
If you’re craving a creative way to slow down and actually make something together, family art ideas are my favorite kind of studio time. These projects are meant to be easy, a little messy, and deeply personal—so you end up with real family keepsakes, not just cute clutter.
Family Handprint Heart Keepsake
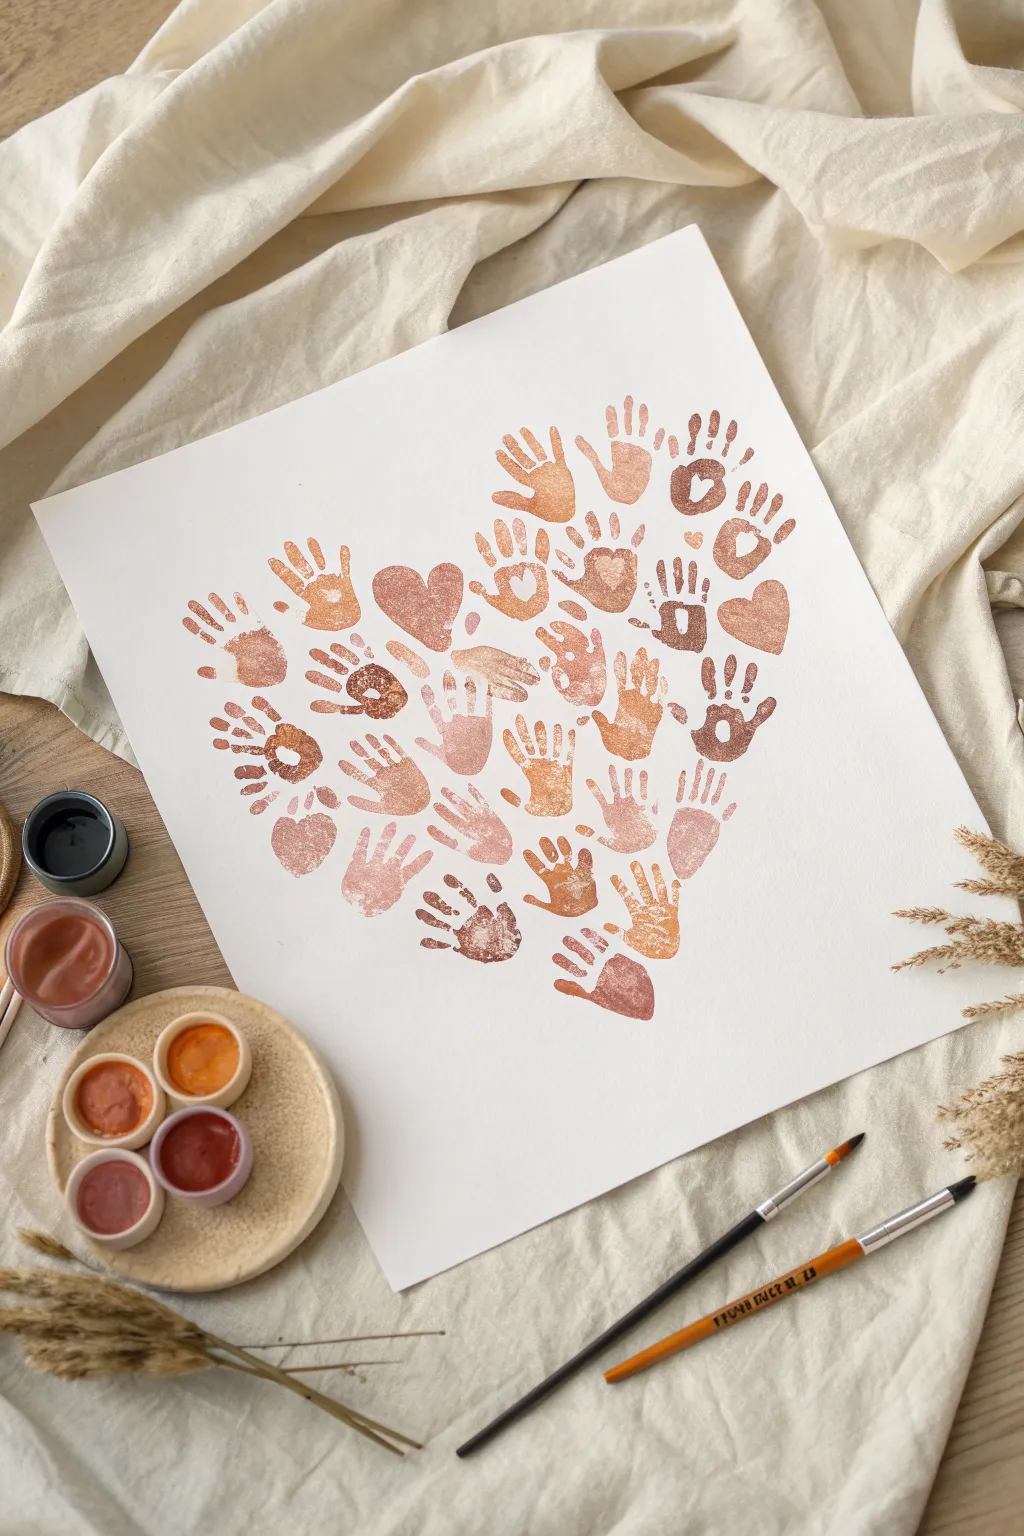
Capture the unique touch of every family member with this heartwarming collective artwork. By arranging handprints in various warm, earthy tones into a heart shape, you’ll create a sophisticated and meaningful piece of wall decor.
Step-by-Step Guide
Materials
- Heavyweight textured art paper (watercolor or mixed media paper, at least 140lb)
- Acrylic paints in earthy tones (burnt sienna, raw umber, terracotta, beige, ochre)
- Foam brushes or wide flat paintbrushes
- Pencil
- Paper palette or disposable plates for mixing
- Paper towels and wet wipes
- Scissors (optional for stencil creation)
Step 1: Preparation and Palette
-
Map out the shape:
Begin by very lightly sketching a large heart shape on your paper using a pencil. This guide line will help you keep the handprints contained within the correct silhouette, but you want it faint enough to erase later if needed. -
Mix your colors:
Prepare your palette by squeezing out your base colors: burnt sienna, deep brown, and ochre. I like to mix a little white into each base color on separate parts of the palette to create various tints, giving you a spectrum from deep chocolate to pale beige. -
Test opacity:
Before applying paint to hands, do a quick swatch test on a scrap piece of paper. You want the paint to be opaque enough to show the print clearly but not so thick that it becomes gloopy and loses the fingerprint details.
Step 2: Creating the Prints
-
Start at the top right:
Begin with the darker brown tones. Using a foam brush, paint the palm and fingers of one hand. Press it firmly onto the upper right curve of your pencil heart guide. -
Vary the sizes:
To make the heart look organically formed, alternate between adult hands and smaller children’s hands if possible. If working solo, vary the angle of your own hand slightly for each impression. -
Fill the upper left:
Apply a lighter terracotta or peach shade to a clean hand and press it onto the upper left curve. Orient the fingers so they point outward, following the natural curve of a heart shape. -
Define the center:
Place a few prints specifically in the ‘V’ dip of the heart’s top center. Use slightly overlapping prints here to ensure the shape doesn’t look broken in the middle. -
Work downwards:
Continue adding prints, moving down the sides of the heart. Switch colors frequently—try a burnt orange next to a beige—to create that lovely mottled, mosaic effect seen in the example.
Clean Print Secret
Apply paint to the hand with a sponge brush rather than dipping the hand in paint. This prevents globs and ensures you can see individual fingerprints.
Step 3: Refining the Shape
-
Create the point:
As you reach the bottom, angle the handprints inward more drastically. The bottommost prints should effectively overlap at the palms to form the sharp point of the heart. -
Add ‘hidden’ hearts within prints:
For a special detail, leave a small heart-shaped negative space in the center of a few palm prints. You can do this by wiping a tiny heart shape off the painted palm with a wet wipe before pressing it down. -
Incorporate solid heart shapes:
Notice the example includes a few painted solid hearts mixed in with the hands. Use a small brush to paint 2-3 simple heart shapes in gaps where a full handprint wouldn’t fit, helping to balance the composition. -
Fill the gaps:
Step back and assess your shape. If there are large white spaces inside the heart boundary, add partial prints (just fingers or a side of a palm) or another small painted heart to fill the void.
Metallic Pop
Mix a small amount of gold or bronze shimmer medium into your tan paint colors. It adds a subtle, elegant glow to the finished keepsake when the light hits it.
Step 4: Finishing Touches
-
Dry completely:
Let the artwork sit undisturbed for at least an hour. The thicker areas of acrylic paint on the palm sections may take longer to dry than the fingers. -
Erase guides:
Once the paint is absolutely bone dry, gently erase any visible pencil marks from your initial sketch outline. -
Flatten the paper:
If the moisture from the paint has buckled the paper slightly, place the artwork under a heavy stack of books overnight (protecting the surface with a sheet of parchment paper) to flatten it out.
Hang your collective masterpiece in a prominent spot to remind everyone of the love you share
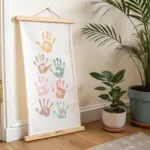


Fingerprint Family Portrait Page
Capture the unique bond of your family with this minimalist yet deeply personal art project featuring a stunning oversized fingerprint heart. The combination of precise line work and simple, affectionate doodles creates a modern keepsake that feels both artistic and heartwarming.
Step-by-Step Tutorial
Materials
- A5 or A4 Spiral-bound sketchbook with thick, white paper
- Fine-point black drawing pen (0.5mm or 0.8mm)
- Reddish-brown or terracotta ink pad (pigment ink works best)
- Pencil (HB)
- Soft eraser
- Printed template of a heart shape (optional but helpful)
Step 1: Drawing the Fingerprint Heart
-
Lightly sketch the outline:
Begin by using your HB pencil to draw a faint, symmetrical heart shape in the upper center of your page. This will serve as the boundary for your fingerprint pattern, so keep the lines extremely light and easy to erase later. -
Define the center whorl:
With your fine-point pen (I prefer reddish-brown to mimic the original look, but black works too if you don’t have colored pens), draw a small, tight oval spiral near the bottom center of the heart shape. This mimics the core of a real fingerprint. -
Expand the rings:
Continue drawing concentric oval rings around that center spiral. Keep your lines close together but distinct, mimicking the friction ridges of a finger. Let the lines be slightly jagged or imperfect for realism. -
Curve towards the edges:
As your rings get larger, start curving the upper lines to follow the top arches of your heart shape. The lines should flow upwards and outwards, creating the two lobes of the heart. -
Fill the bottom point:
For the bottom section of the heart, allow the lines to curve downwards into a V-shape, following the taper of your penciled guideline. -
Add ridge details:
To make it look authentic, occasionally break a line or merge two lines together. These ‘minutiae’ are what make actual fingerprints unique and add texture to your drawing. -
Erase guidelines:
Once the ink is completely dry—give it a good five minutes to avoid smearing—gently erase the original pencil heart outline so only the ink texture remains.
Fixing Wobbly Lines
If your fingerprint lines touch or smudge, don’t restart. Turn that smudge into a ‘ridge ending’ or ‘bifurcation’ (a split line). Real fingerprints have these flaws naturally.
Step 2: Sketching the Family Figures
-
Position the figures:
Below the heart, use your pencil to mark the head positions for your family members. Place the child in the center, slightly lower than the parents to show scale. -
Draw the faces:
Using a black fine-point pen, draw simple oval or circle shapes for the heads. Keep the style consistent with quirky, hand-drawn vibes by not making them perfect circles. -
Add facial features:
Draw wide U-shaped smiles and small dots for eyes. Add tiny pink circles for cheeks using a diluted red marker or a light touch with a colored pencil. -
Create the hair:
Give each character distinct hair. For the mother, long straight lines frame the face; for the father, use small scribbles or loops for texture; use simple swoops for the child. Keep the strokes loose. -
Draw the bodies:
Draw simple triangular or rectangular shapes for the torsos. The mother gets a dress shape, while the father and child get rectangular shirts. -
Add limbs:
Use single, clean lines for arms and legs. Draw the arms extending toward each other so the hands join in a V-shape, symbolizing connection. -
Detail the hands and feet:
Keep hands simple—tiny loops or just intersecting lines work perfectly for this stick-figure aesthetic. Add short horizontal lines for feet.
Step 3: Final Touches
-
Add the connecting heart:
Draw a small heart floating between the child and one parent (or in the center). Use the same reddish-brown tone as the large fingerprint heart to tie the color palette together. -
Fill color:
If you used an outline for the small heart, gently color it in with a textured look, perhaps using stippling or cross-hatching to match the rustic feel. -
Clean up:
Do a final pass with your eraser to remove any remaining graphite marks around the figures. Brush away the eraser dust carefully to ensure the page looks crisp.
Use Real Prints
Make it literal by pressing your actual family members’ inked thumbs onto the paper to form the leaves of a tree or petals of a flower surrounding the central drawing.
Now you have a charming, minimalist piece of family art that looks professional yet deeply personal


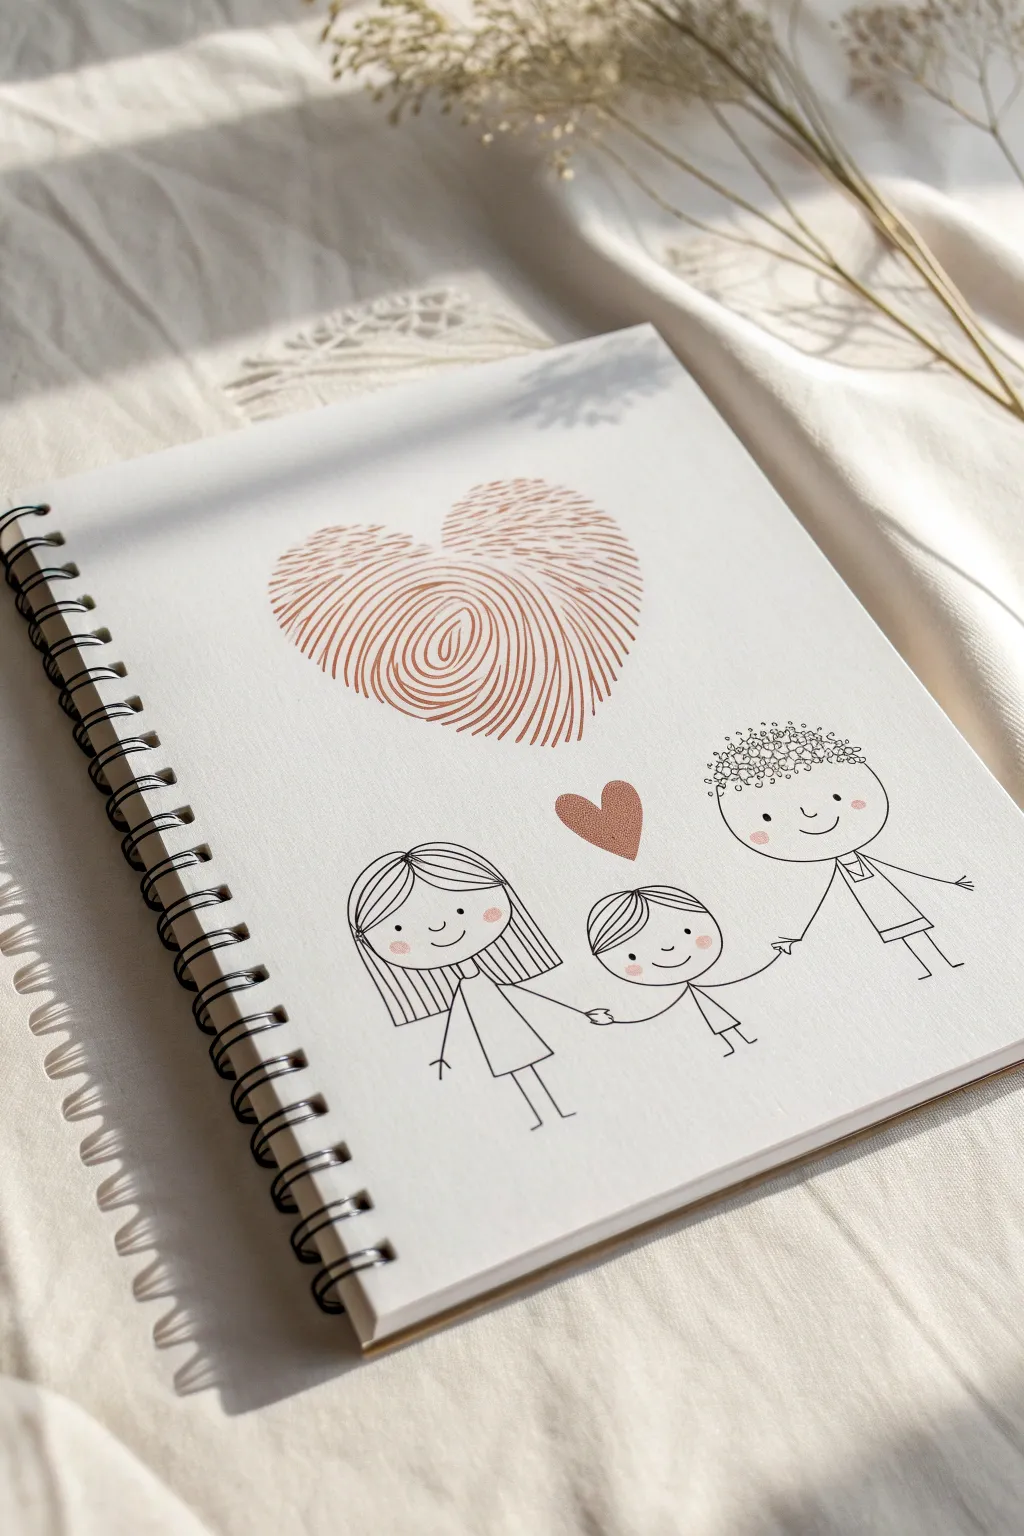
Family Self-Portrait Swap Night
Capture your family’s unique personalities with this minimalist four-panel panorama. By combining simple ink outlines with subtle pattern details, you’ll create a cohesive and modern gallery piece that looks professional but is surprisingly easy to execute.
Step-by-Step Guide
Materials
- Light wood multi-opening picture frame (4 openings)
- Heavyweight drawing paper or cardstock (cut to frame size)
- Fine-point black permanent marker or drawing pen (0.5mm)
- Slightly thicker black marker (0.8mm or 1.0mm)
- Gold or yellow paint pen/marker
- Pink colored pencil
- Pencil and eraser
- Reference photos of family members
Step 1: Preparation & Sketching
-
Size your paper:
Measure the openings of your frame or use the backing board as a template. Cut four pieces of heavyweight drawing paper to fit perfectly within each window, ensuring edges are straight. -
Choose your references:
Select a clear, front-facing photo for each family member. You aren’t looking for photorealism, but rather distinct features like hair shape, glasses, or a favorite shirt neckline. -
Draft the outlines:
Using a pencil with a very light touch, sketch the basic oval shape of the first face in the center of your first paper sheet. Keep the sizing consistent across all four sheets so the heads align when framed. -
Add facial features:
Sketch in the eyes, nose, and mouth. Simplify complex features into clean lines; for example, use simple curved lines for eyelids and small dots or circles for pupils to maintain the illustrative style. -
Define the hair:
Outline the general hair shape rather than drawing every strand. I like to focus on the silhouette and one or two defining cowlicks or partings to make the person recognizable. -
Sketch the clothing:
Draw the neck and shoulders, extending them to the bottom edge of the visible area. Add specific collar details, like a crew neck or a V-neck, which adds character to each portrait.
Keep it Loose
Don’t stress about perfect anatomy. If a line goes slightly askew, embrace it! These are meant to be character illustrations, so slight quirks actually add charm.
Step 2: Inking & Detailing
-
Ink the main contours:
Take your thicker black marker (0.8mm) and trace over the main silhouette lines—the jaw, hair outline, and shoulders. Use confident, smooth strokes rather than short, scratchy ones. -
Refine facial details:
Switch to the fine-point pen (0.5mm) for delicate features like eyes, eyebrows, and lips. This line weight variation keeps the face from looking heavy or cluttered. -
Add hair texture:
Using the fine point pen, add sparse internal lines within the hair shape to suggest flow and direction. Don’t overdo it; a few sweeping curves are enough to suggest texture. -
Incorporate clothing patterns:
Choose one or two portraits to have patterned shirts for visual interest. For one, draw horizontal stripes using the fine pen; for another, you might sketch a subtle floral or scattered geometric pattern. -
Erase pencil marks:
Wait at least ten minutes to ensure the ink is bone-dry to avoid smearing. Gently erase all visible pencil guidelines until the paper is clean.
Mix Up the Height
Instead of aligning every head perfectly, place the drawings of children slightly lower on the paper than the adults to represent their actual height difference in the frame.
Step 3: Accenting & Assembly
-
Apply gold accents:
Using a gold or yellow paint pen, carefully fill in the stripes or patterns on the clothing of the first portrait. The texture of the paint pen adds a nice contrast to the flat ink lines. -
Add subtle color:
Take a pink colored pencil and very lightly shade the lips and cheeks. Keep the pressure minimal—you just want a whisper of color to bring warmth to the faces. -
Repeat for all panels:
Continue this process for the remaining three portraits, alternating the pattern density or clothing styles to keep the series dynamic. -
Final check:
Place all four drawings side-by-side on a table. Check that the eye lines are relatively level across the group and make any final ink touch-ups if a line looks too thin. -
Frame the artwork:
Clean the glass of your multi-opening frame. Place each drawing into its respective slot, secure the backing, and check the front to ensure no dust is trapped inside.
Hang your new personalized panorama in a hallway or living room for a conversation piece that celebrates your family beautifully


Family Shadow Silhouette Painting
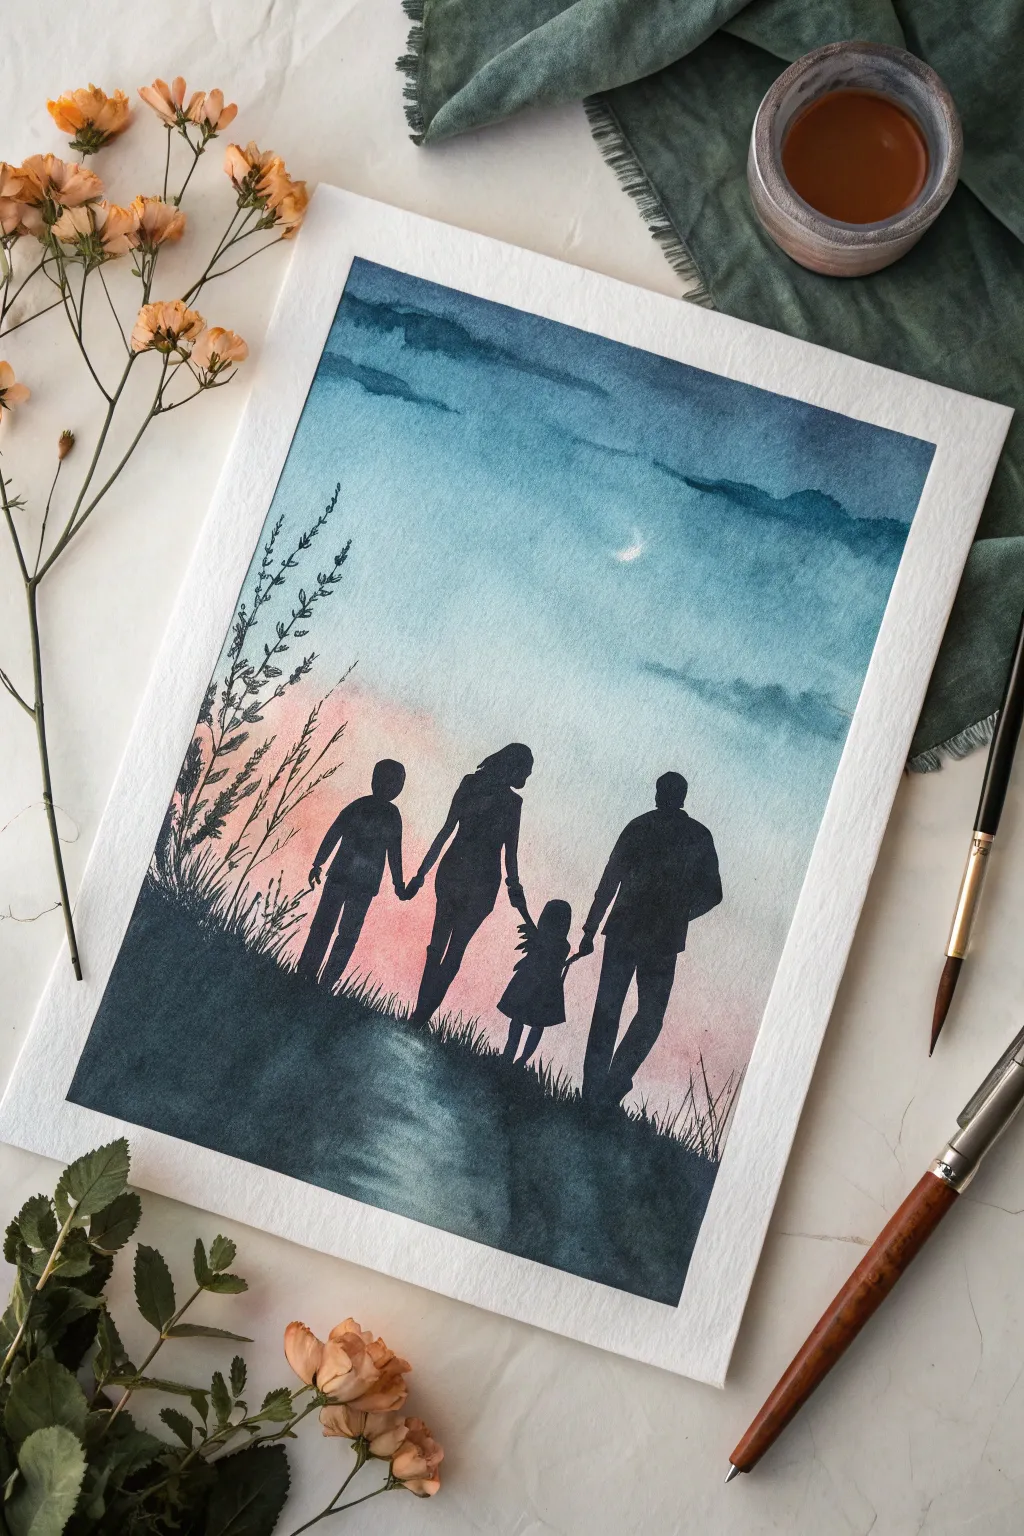
Capture the magic of family connection with this stunning watercolor silhouette painting. Using a dramatic wet-on-wet technique for the sky and bold blacks for the figures, you will create an evocative piece that feels both nostalgic and timeless.
How-To Guide
Materials
- Cold press watercolor paper (300 gsm)
- Watercolor paints (Indigo, Payne’s Grey, Cerulean Blue, Peach or Light Red)
- Masking tape
- Flat wash brush (1 inch)
- Round brushes (sizes 2 and 6)
- Pencil and eraser
- Clean water jar
- Paper towels or rag
- White gouache or white gel pen (optional for moon)
Step 1: Preparation & Sketching
-
Secure the Paper:
Begin by taping down all four edges of your watercolor paper to a drawing board or table. This prevents buckling when we add water and creates that clean white border you see in the final piece. -
Establish the Horizon:
Lightly draw a sloped horizon line about one-third of the way up the paper. You want this line to feel natural, like a grassy hill, not perfectly straight. -
Outline the Family:
Sketch the silhouettes of the family members walking along the path. Draw a taller father figure, a mother figure, and two children holding hands. Focus only on the outer shapes; don’t worry about facial features or clothing details since these will be filled in black.
Silhouette Clarity
If your black isn’t opaque enough after one layer, let it dry and apply a second coat. Solid, deep black silhouettes provide the best contrast against the soft sky.
Step 2: Painting the Sky
-
Wet the Sky Area:
Using your large flat brush, apply clean water to the entire sky area above your horizon line. You want the paper to be glistening but not forming puddles. -
Apply the Sunset Glow:
While the paper is still wet, load a clean brush with a watery peach or diluted light red. Sweep this color horizontally just above the horizon line behind where the figures will stand to create a soft sunset glow. -
The Mid-Sky Transition:
Immediately introduce a light wash of Cerulean Blue above the peach tone. Allow the colors to touch and bleed slightly, but try to keep the mixing minimal to avoid muddiness. -
Deepen the Upper Sky:
Mix a darker Indigo or Payne’s Grey. Apply this to the very top of the paper, pulling it downwards into the lighter blue. This creates the twilight effect. -
Add Cloud Textures:
While the blue wash is still damp, dab in horizontal streaks of darker concentrated Indigo to suggest drifting clouds. The paint will spread softly on its own. -
Create the Crescent Moon:
While the sky is drying, you can gently lift a tiny crescent shape out of the damp blue paint using a thirsty, clean brush to create a moon, or wait until it’s dry to add it later. -
Drying Time:
Let the sky layer dry completely. It must be bone dry before you start painting the silhouettes, or the black paint will bleed into the sky.
Customize the Family
Personalize the silhouettes to match your own family! Add a pet on a leash, change the number of children, or adjust heights to reflect your real life loved ones.
Step 3: Creating the Foreground
-
Paint the Hillside Base:
Mix a very dark, saturated wash using Indigo and Payne’s Grey—almost black. Paint the ground area below the horizon line, making the edges darker than the center path. -
Suggest a Path:
While the ground is wet, lift a little pigment from the center path area or use a slightly lighter, watered-down grey to suggest a walkway where the light hits the ground. -
Add Grass Details:
Switch to your size 2 round brush. Along the horizon line and edge of the path, flick quick, upward strokes to simulate tall wild grass blades.
Step 4: Painting the Silhouettes
-
Fill in the Figures:
Using your size 6 round brush and your darkest black mixture (or pure black watercolor), carefully fill in the family pencil sketches. -
Refine the Edges:
Work slowly around the heads and hands. The silhouette effect relies on crisp, clean edges, so steady your hand against the table. -
Connect the Figures:
Ensure the hands are clearly joined. If the connection point looks too thin, thicken the wrists slightly to emphasize the bond. -
Ground the Shadows:
Extend the dark paint from the feet slightly into the grassy foreground so the figures don’t look like they are floating.
Step 5: Final Touches
-
Add Tall Weeds:
On the left side of the painting, use the fine liner brush to paint tall, spindly weeds reaching up into the sky area. This adds depth and frames the scene. -
Enhance the Moon:
If your lifted moon isn’t bright enough, add a tiny stroke of white gouache or a gel pen to make the crescent pop against the blue sky. -
Remove the Tape:
Once the entire painting is completely dry to the touch, slowly peel away the masking tape at a 45-degree angle to reveal your crisp border.
Frame your new masterpiece in a simple white mat to let the colors truly shine


Have a question or want to share your own experience? I'd love to hear from you in the comments below!