A fan is such a fun canvas because it’s both art and an object you actually use, so your painting gets to live in motion. Here are my favorite fan painting ideas for everything from a delicate folding fan to bold ceiling fan blades and playful oscillating fan makeovers.
Classic Floral Spray on a Folding Fan
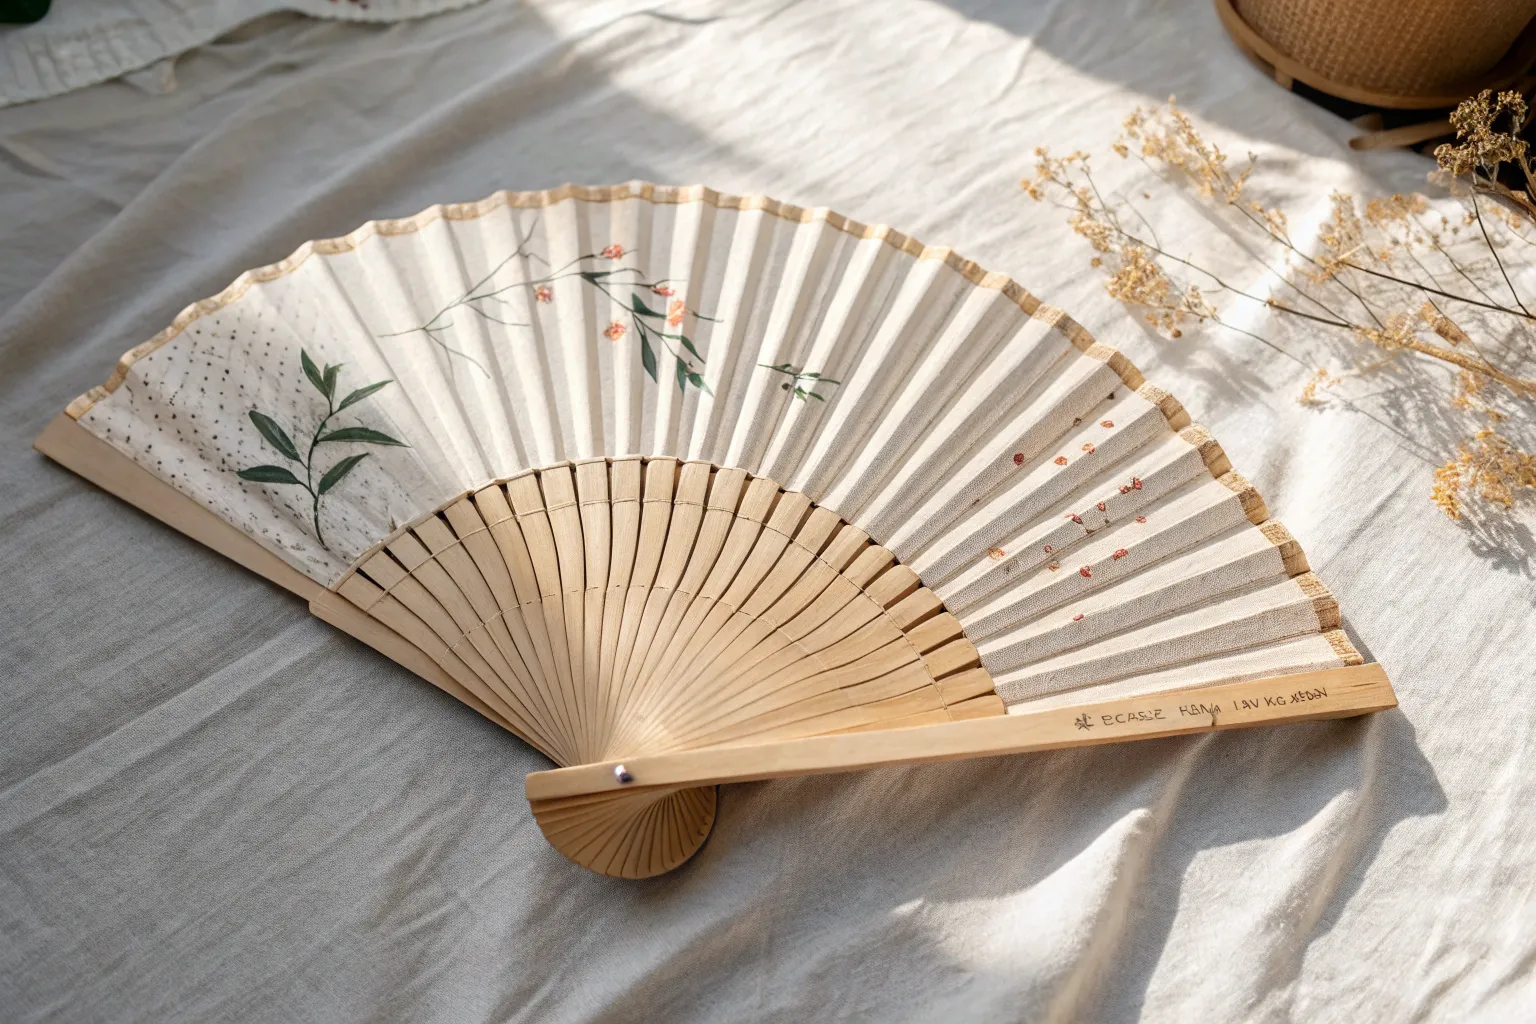
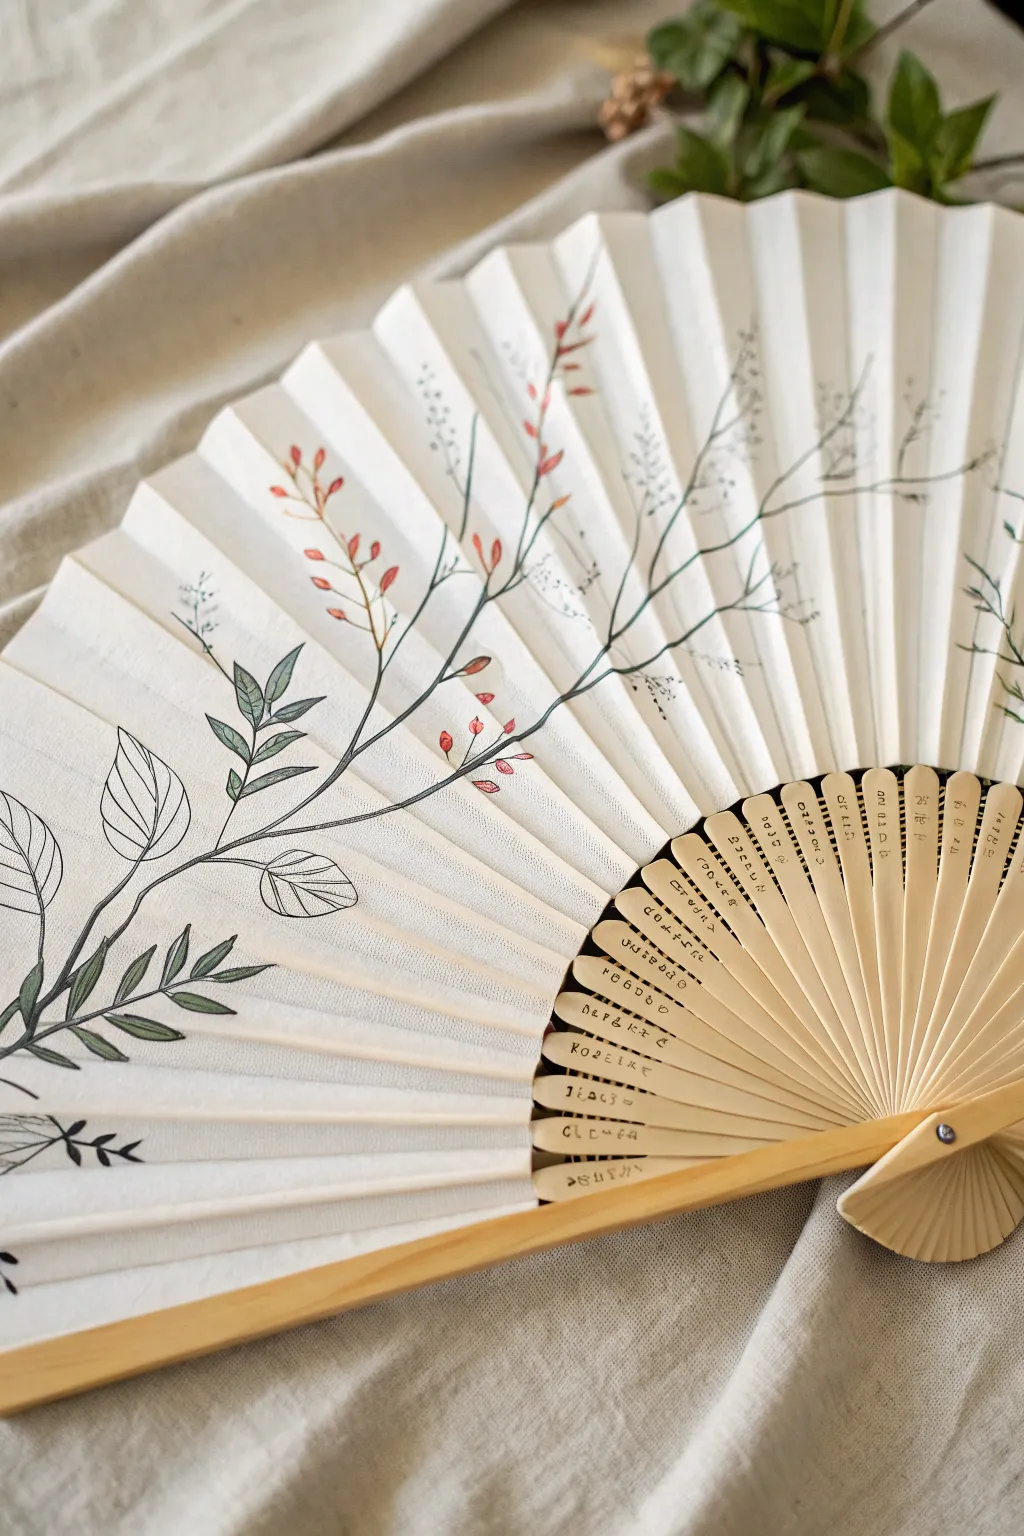
Transform a plain paper fan into an elegant accessory with this classic floral spray design. The sweeping branch composition works perfectly with the fan’s unique shape, creating a gentle gradient of pink blossoms against the crisp white ridges.
Step-by-Step Tutorial
Materials
- Blank paper folding fan (cream or white)
- Watercolor paints or fluid acrylics
- Round watercolor brushes (sizes 2 and 4)
- Fine liner brush (size 0 or 00)
- Palette
- Water container and paper towels
- Pencil (HB or lighter)
- Fine-tip black ink pen (optional, for calligraphy)
Step 1: Planning and Preparation
-
Prepare the workspace:
Clear a flat surface and lay out your materials. Fully open the fan and secure the handles if necessary using a small weight or tape to keep it flat, as the folds will want to spring shut. -
Lightly sketch the branch:
Using a very light touch with your pencil, map out the main branch. Start from the left side, about one-third up from the bottom, and sweep it upwards diagonally toward the top right edge. The branch should feel organic, so add a slight curve or zigzag. -
Mark minor stems:
Add smaller offshoot lines branching from the main limb. These will hold your flower clusters and buds. Keep the composition balanced but asymmetrical.
Paint Bleeding?
Paper fans are absorbent. If paint spreads too fast, use less water and a ‘drier’ brush load. Test your paint consistency on a scrap paper towel first.
Step 2: Painting the Structure
-
Mix your stem color:
Create a dark, natural green-brown by mixing sap green with a touch of burnt umber. You want a color that looks like aged wood but still has life in it. -
Paint the main branch:
Using your size 2 round brush, follow your pencil line. Paint with a somewhat dry brush technique; let the texture of the folded paper break up the line slightly to mimic rough bark. -
Taper the ends:
As you reach the thinner tips of the branches, switch to the fine liner brush. Lift your pressure gradually to let the lines fade out delicately. -
Add the leaves:
Mix a fresh, medium olive green. Using the size 4 brush, press down and lift up to create teardrop-shaped leaves along the stems. Cluster them in pairs or threes for a natural look. -
Add vein details:
Once the green leaves are fully dry, use your thinnest liner brush and a darker green mix to paint a single central vein down the middle of the larger leaves.
Pro Tip: Handling Ridges
Don’t fight the varied surface! When crossing a ridge, dab the brush gently into the valley of the fold to ensure the line connects visually.
Step 3: Adding the Blossoms
-
Mix pink hues:
Prepare two puddles of pink paint: a very watery, pale pink wash and a more saturated, vibrant deep pink. -
Paint base petals:
Dip your size 4 brush into the pale wash. Paint varying sizes of five-petal flower shapes. Place larger, open blooms near the center of the branch and smaller buds near the tips. -
Add depth to petals:
While the base pink is still slightly damp (wet-on-wet), drop a tiny amount of the saturated deep pink into the center of the flowers. Let it bleed outward naturally to create a gradient. -
Define the buds:
For the unopened buds at the branch tips, use the saturated pink directly. Paint small oval shapes that connect to the thin stem ends. -
Paint flower centers:
Once the petals are dry, mix a tiny amount of yellow ochre or deep red. Use the tip of your smallest brush to dot the very centers of the open flowers. -
Add stamens:
With the fine liner brush and dark red or brown paint, draw incredibly thin filaments radiating from the flower centers, capped with tiny dots for pollen.
Step 4: Finishing Touches
-
Falling petals:
To suggest movement, paint two or three single petals ‘floating’ in the empty white space below the main branch. -
Optional calligraphy:
If you wish to replicate the text on the ribs shown in the image, use a fine-tip black ink pen. Carefully write vertical rows of small script on the bamboo slats near the handle. -
Dry and refold:
Let the fan dry completely flat for at least an hour. Afterward, carefully refold the fan along its original creases to ensure the paint doesn’t crack or stick.
Now you have a functional piece of art perfect for warm days or display.


Cherry Blossom Branch Across the Ribs
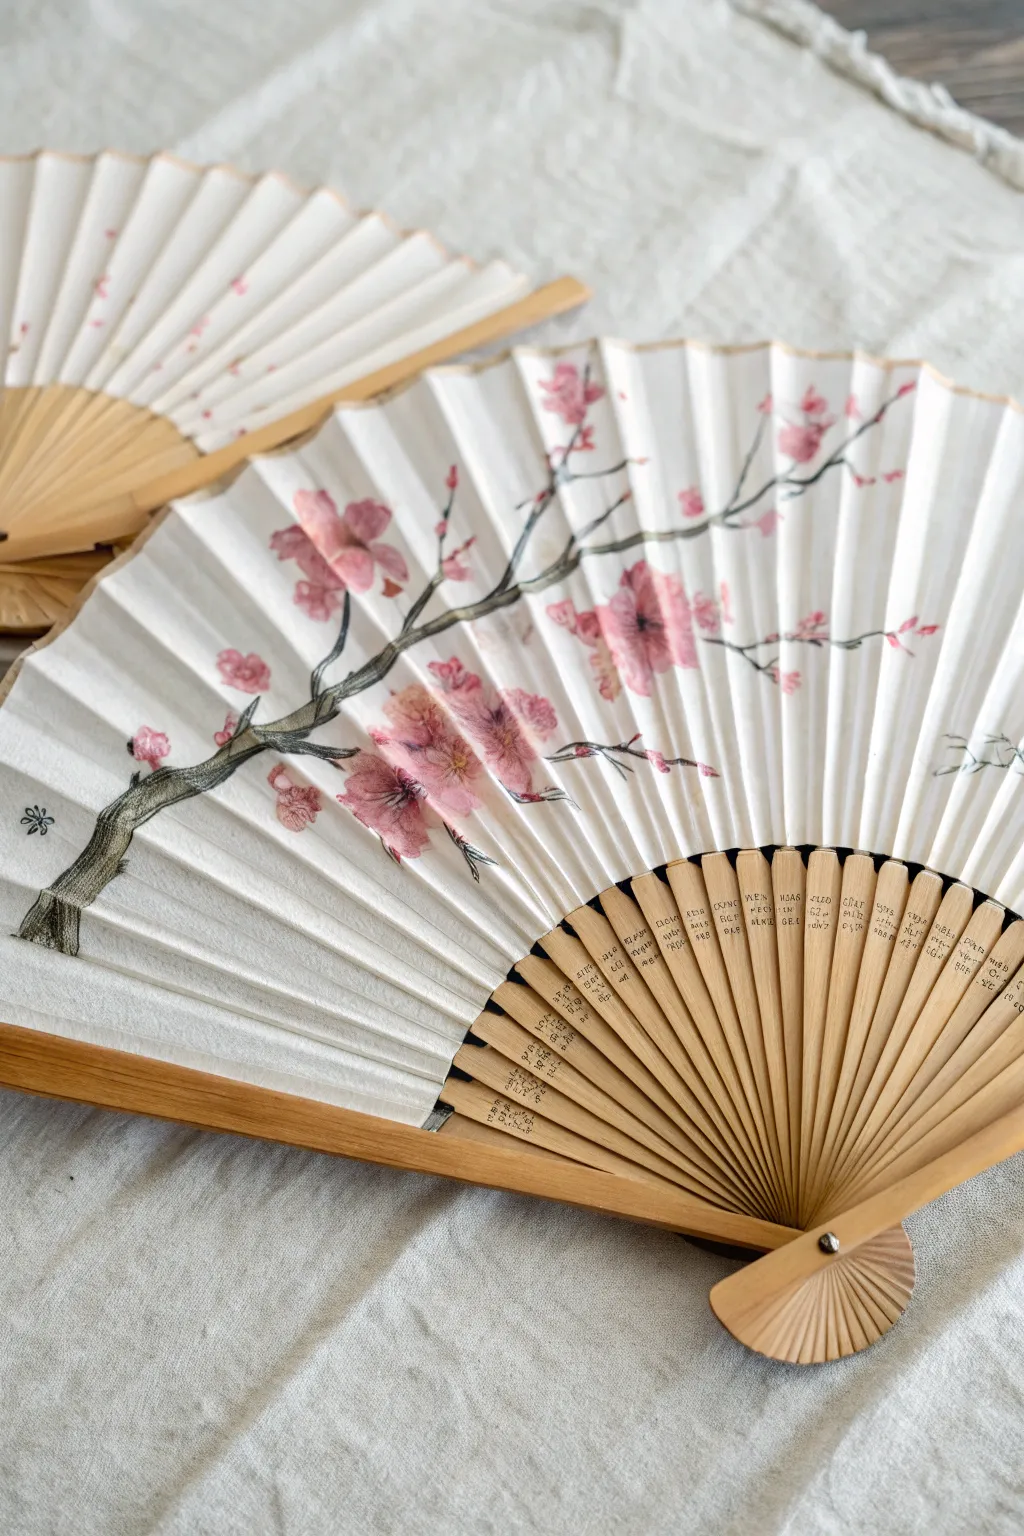
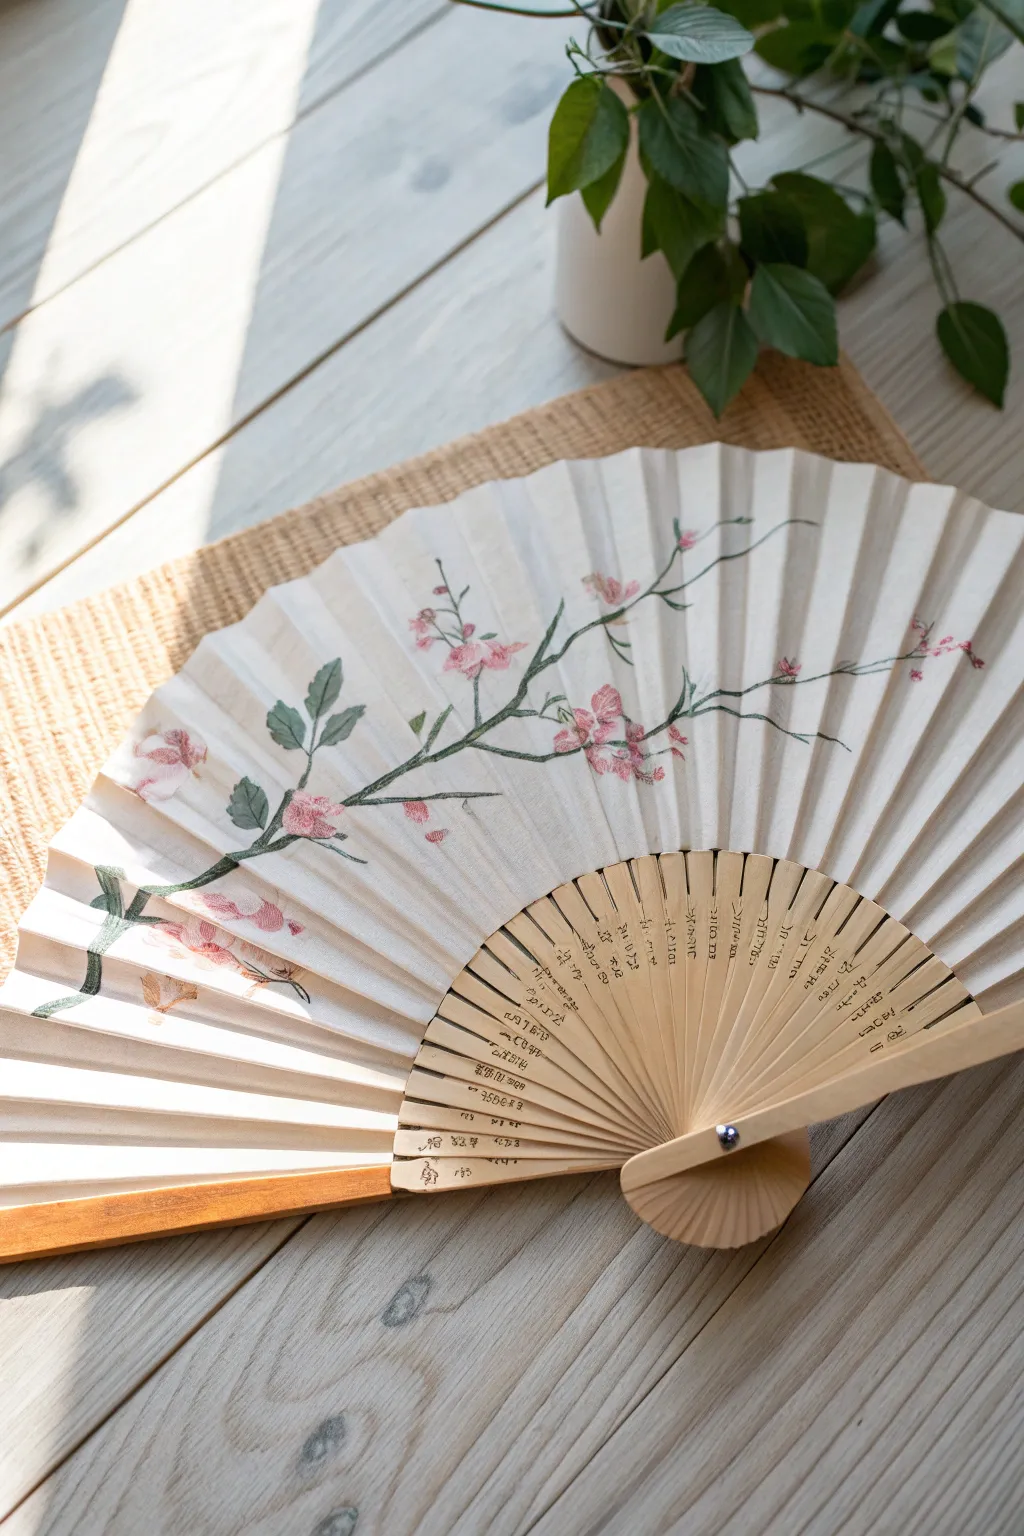
Capture the delicate beauty of spring with this elegant fan painting project featuring a sprawling cherry blossom branch. The design utilizes the fan’s natural texture to create depth, contrasting soft pink blooms against stark, twiggy branches.
Step-by-Step Guide
Materials
- White paper folding fan with wooden ribs
- Watercolor paints (Pink, Red, Black, possibly a touch of Burnt Umber)
- Small round brushes (Size 0 and Size 2)
- Fine liner brush
- Pencil for light sketching
- cup of water
- Paper towels
- Palette for mixing
Step 1: Planning and Sketching
-
Prepare the Surface:
Fully open your fan and lay it flat on a clean surface. Identify the wider end of the fan ribs on the left side; this will be the ‘root’ of your tree branch. -
Sketch the Main Branch:
Using a very light touch with your pencil, draw the main thick branch starting from the bottom left edge and curving upwards towards the center. Let the natural folds of the fan guide your line, but don’t force it to follow them perfectly. -
Add Secondary Branches:
Sketch smaller offshoot branches reaching towards the top right. Keeping these lines jagged and angular mimics the natural growth pattern of cherry trees.
Dry Brush Technique
For realistic bark, wipe most paint off your brush before painting the trunk. The bristles will skip over the paper’s texture, creating natural gaps.
Step 2: Painting the Wood
-
Mix Dark Branch Color:
Mix black watercolor with a tiny amount of water to keep it pigmented but fluid. You can add a speck of brown if you want a warmer tone, but traditional styles stick to black ink tones. -
Paint the Trunk Base:
Start painting at the thickest part of the branch on the far left. Use a #2 round brush and apply the paint heavily at the base, letting the texture of the brush serve as bark. -
Extend the Branches:
As you move up the branch, lighten your pressure. Switch to a liner brush for the thinner twigs extending to the right. A slightly shaky hand actually helps create realistic organic lines here. -
Add Texture Details:
Once the main lines are down, go back with a nearly dry brush with dark black paint. Add small dots or scratchy lines along the main trunk to suggest rough bark texture.
Step 3: Adding the Blossoms
-
Mix Blossom Shades:
Prepare a watery pale pink puddle on your palette and a smaller, more concentrated reddish-pink puddle. -
Paint Base Petals:
Dip your #2 brush in the pale pink. Press the belly of the brush down gently to form petal shapes clustered around the branches. Don’t worry about perfect outlines; soft edges look better. -
Create Depth:
While the pale pink is still slightly damp, touch the center of some flowers with the concentrated red paint. The color will bleed slightly, creating a natural gradient. -
Add Buds:
Use the tip of your brush to dot small, darker pink buds on the very tips of the thin twig branches. -
Detail the Centers:
Wait for the flowers to dry completely. Then, using your finest liner brush and black paint, draw tiny stamens in the center of the open blossoms.
Scented Breeze
Once the paint is fully dry, lightly mist the paper with a floral perfume or essential oil spray for a fan that smells as sweet as it looks.
Step 4: Finishing Touches
-
Add Falling Petals:
Paint a few lone petals floating away from the branch in the open white space to create a sense of movement and breeze. -
Inscribe Small Text (Optional):
If you wish to mimic the example image, use a waterproof fine-liner pen to write small text on the wooden ribs. Keep the text between the paper leaf and the rivet. -
Final Inspection:
Check for any areas that need more definition. I like to add a few very dark, sharp lines to the crooks of the branches to heighten the contrast. -
Dry Completely:
Leave the fan open to dry for at least an hour. Closing it too soon can cause the paint to transfer to other folds.
Now you have a functional piece of art to keep you cool with style


Loose Peonies in Watercolor Style
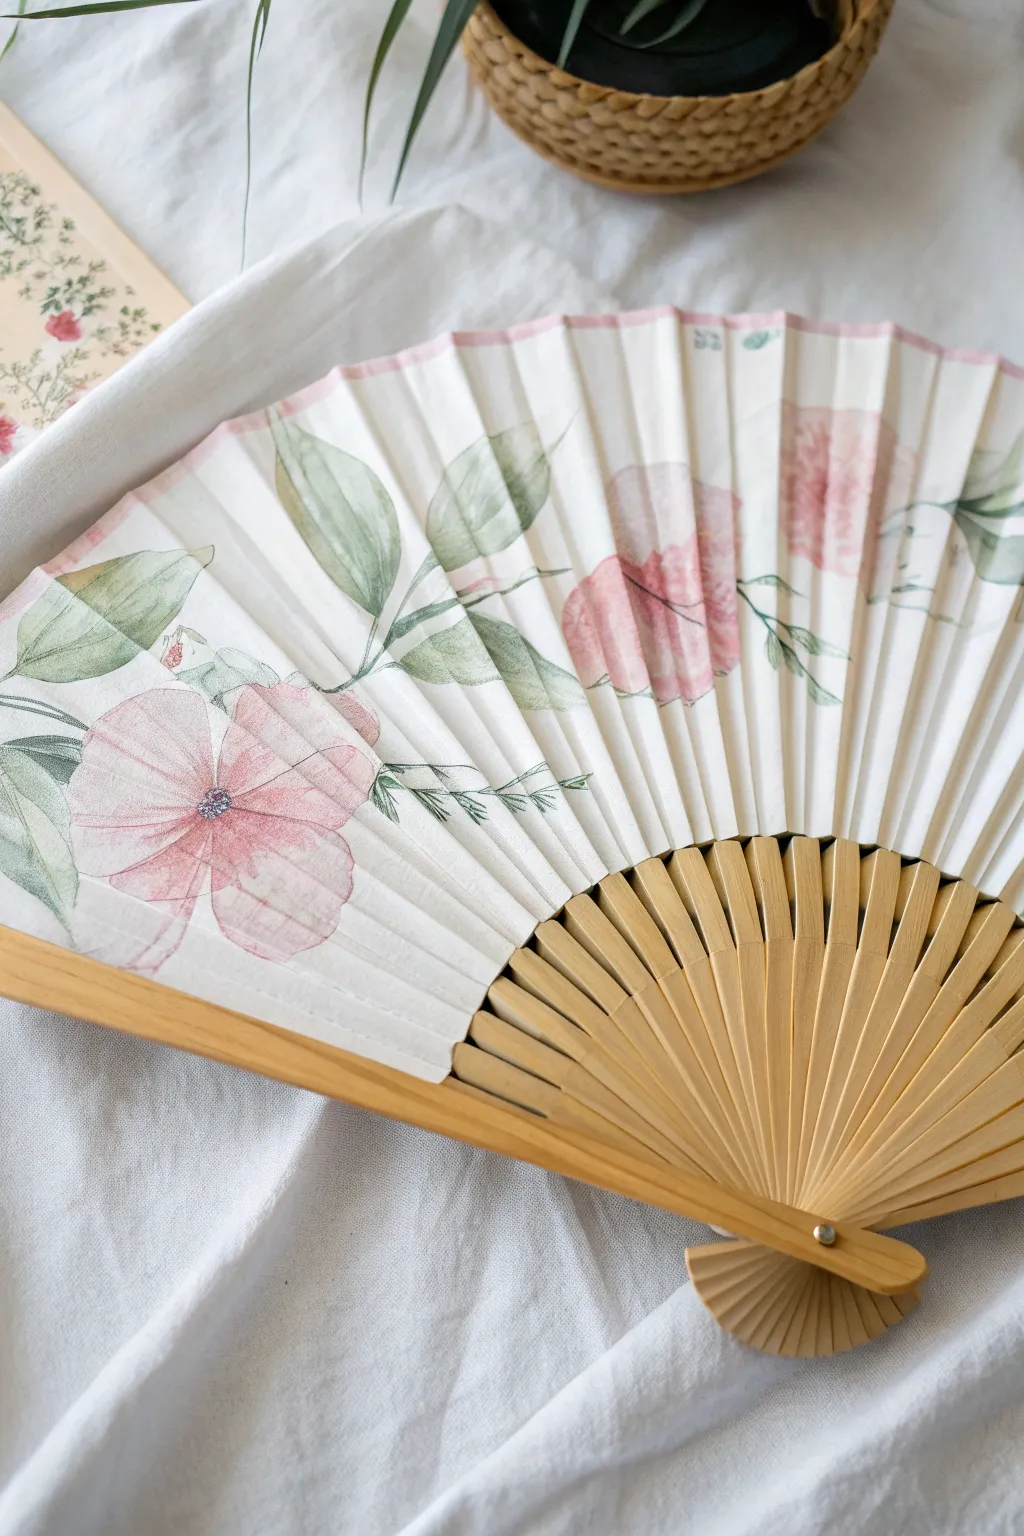
Capture the ethereal beauty of a summer garden with this delicate hand fan project. Using loose watercolor techniques, you’ll create soft, blooming peonies and trailing leaves that seem to dance across the folds.
Step-by-Step Tutorial
Materials
- Blank paper folding fan (xuan paper or absorbent rice paper preferred)
- Watercolor paints (Alizarin Crimson, Sap Green, Yellow Ochre, Ultramarine)
- Round watercolor brushes (Size 4 and 8)
- Mixing palette
- Water jar
- Paper towels
- Masking tape or weighted clips
- Optional: Fine linear brush for details
Step 1: Preparation & Planning
-
Secure the fan:
Gently open your blank fan fully. Because the folds make the surface springy, secure the handles with a heavy object or use masking tape on the outer guard ribs to hold it flat against your work surface. -
Mix your base pink:
Prepare a watery mix of Alizarin Crimson with a tiny touch of Yellow Ochre to warm it up. The consistency should be very tea-like to achieve that translucent look. -
Plan the composition:
Visualize three main floral clusters. Place one large bloom on the left, a medium one slightly higher on the right, and a few buds or partial blooms near the edges to create movement.
Bleeding Lines?
If paint spreads too fast, your brush is too wet. Blot it on a paper towel before touching the paper. Folded fan paper is very absorbent.
Step 2: Painting the Blooms
-
First wash:
Using the size 8 brush, paint the general shape of the first peony petals. Use a ‘wet-on-wet’ feel by laying down clean water first in a rough circular shape, then dropping in your pink mixture. -
Soften edges:
I like to let the pigment bleed naturally into the damp paper. If hard edges form, gently tickle them with a clean, damp brush to soften the look. -
Add depth:
While the first layer is still damp (but not swimming), mix a slightly more concentrated red-pink. Dab this into the center of the flower and the base of the petals to create a 3D effect. -
Paint secondary blooms:
Repeat this process for the other flowers on the fan, varying the saturation. Make some paler than others to suggest they are further away or catching the light differently.
Step 3: Leaves & Foliage
-
Mix leaf greens:
Mix Sap Green with a touch of Ultramarine for a cool shadow green, and Sap Green with Yellow Ochre for a sunny highlight green. Keep these mixes quite fluid. -
Paint main leaves:
Tuck large leaves under the pink blooms. Press the belly of the brush down to create the wide part of the leaf, then lift as you pull away to create a tapered point. -
Navigate the folds:
Don’t fight the ridges of the fan. Let your brush skip slightly over the valleys; this broken line quality adds character and mimics traditional Asian brush painting. -
Add connecting stems:
Using the tip of your brush, draw thin, wandering stems connecting the leaves and flowers. Keep your wrist loose and avoid straight lines. -
Layering green tones:
While the green leaves are damp, drop in touches of the darker blue-green mix at the base of the leaves and stems for contrast.
Add Metallic Accents
For a touch of luxury, outline a few petals or add dots to the flower centers using metallic gold watercolor or a gold paint pen.
Step 4: Details & Finishing
-
Detail the center:
Once the flower centers are dry, mix a dark purple-grey. Use a small, nearly dry brush (size 4) to stipple tiny dots in the center for the stamens. -
Add leaf veins:
With the same small brush and a dark green mix, paint very fine central veins on the largest leaves. Keep the touch incredibly light. -
Final assessment:
Step back and look at the overall balance. If a spot looks too empty, add a small floating petal or a faint ghost leaf using very watered-down paint. -
Dry thoroughly:
Let the fan dry completely while laid flat. If you close it too soon, the damp paper might stick together or mold. -
Re-crease:
Once bone dry, carefully fold the fan shut along the original creases to ‘set’ the painting and ensure it closes smoothly.
Now you have a functional piece of art to keep you cool.


Minimal Ink Botanicals on a Hand Fan
Transform a plain paper fan into a functional piece of art with this subtle botanical design. The combination of fine ink lines and sparing touches of watercolor creates an elegant, minimalist aesthetic perfect for warm summer days.
Step-by-Step
Materials
- Blank paper folding fan (wood or bamboo ribs)
- Fine liner pen (0.1mm or 0.3mm, waterproof, black)
- Watercolor paints (Olive Green, Sap Green, Burnt Sienna, Alizarin Crimson)
- Small round watercolor brush (size 0 or 1)
- Pencil (HB or lighter)
- Kneaded eraser
- Paper towel
- Water jar
- Masking tape (optional)
Step 1: Preparation & Sketching
-
Secure the fan:
Fully open your fan and lay it on your work surface. Since fans naturally want to close, use small weights or pieces of masking tape on the outer guard ribs to keep it stretched flat. -
Plan the main stem:
Using a very light touch with your pencil, draw a curved main stem starting from the lower left (near the pivot point) and sweeping upwards toward the top right edge. Let the line interact with the folds naturally. -
Sketch secondary branches:
Branch off from the main stem. Draw one branch heading toward the top left for the leaves, and several thinner, wispy branches extending toward the right side for the buds. -
Outline the leaves:
On the left branch, sketch large, ovate leaves. Don’t worry about drawing over the fan’s pleats; treat the surface as a continuous canvas, but be gentle so you don’t puncture the paper. -
Place the buds:
On the right-side branches, lightly mark small clusters of oval shapes where the reddish buds will go. Keep them scattered and airy.
Ink Bleeding Help
Fan paper is thirsty! Test your pen on the very edge first. If it bleeds, switch to a pigment liner or very dry brush technique instead of liquid ink.
Step 2: Inking the Design
-
Ink the stems:
Take your waterproof fine liner and trace over your pencil stem lines. Use a confident, sweeping motion. I find it helps to pause at the ‘hills’ of the pleats to ensure the pen doesn’t skip. -
Detail the leaves:
Ink the outlines of the large leaves. Add a central vein down the middle of each. For the veins branching off the center, keep your lines extremely thin and delicate. -
Add texture:
On just one or two leaves, you can leave them as pure outlines. For others, add closely spaced hatching lines or more detailed venation to create contrast. -
Ink the bud stems:
Draw the very fine stems connecting the bud clusters. Keep these lines breaking slightly to suggest a delicate, organic texture. -
Erase guidelines:
Wait at least 10 minutes for the ink to fully cure. Gently roll a kneaded eraser over the surface to lift the pencil marks without damaging the paper fibers.
Step 3: Watercolor Application
-
Mix your greens:
Prepare a watery wash of Olive Green and a separate mix of Sap Green. You want the paint to be translucent so the ink lines show through. -
Paint selected leaves:
Using the size 0 brush, carefully fill in the leaves on the lower left. Leave some leaves unpainted or white for a sketch-like aesthetic. -
Mix the bud color:
Combine Burnt Sienna with a touch of Alizarin Crimson to get a rusty red-orange hue. Dilute it enough that it isn’t opaque. -
Paint the buds:
Dab the red mixture onto the small bud shapes on the right. Don’t frame them perfectly in lines; loose color application looks more artistic here. -
Add subtle variation:
While the red buds are still slightly damp, touch the very tips with a slightly more concentrated red mix to create depth. -
Add background details:
If the design feels too empty, mix a very faint grey wash and add tiny shadow specks or faint sprigs in the background, almost disappearing into the paper.
Painting Over Pleats
Don’t force your brush into the deep V of the fold. Paint the ‘hills’ first, then gently dab color into the ‘valleys’ to connect the image seamlessly.
Step 4: Finishing
-
Dry completely:
Let the fan sit open until the paint is bone dry. If you close it too soon, the paint might act like glue in the folds. -
Refold gently:
Carefully close the fan, re-creasing the pleats with your fingers where the paint might have stiffened the paper slightly.
Your elegant hand fan is now ready to keep you cool with a touch of handmade style
BRUSH GUIDE
The Right Brush for Every Stroke
From clean lines to bold texture — master brush choice, stroke control, and essential techniques.
Explore the Full Guide
Elegant Monogram and Border Details
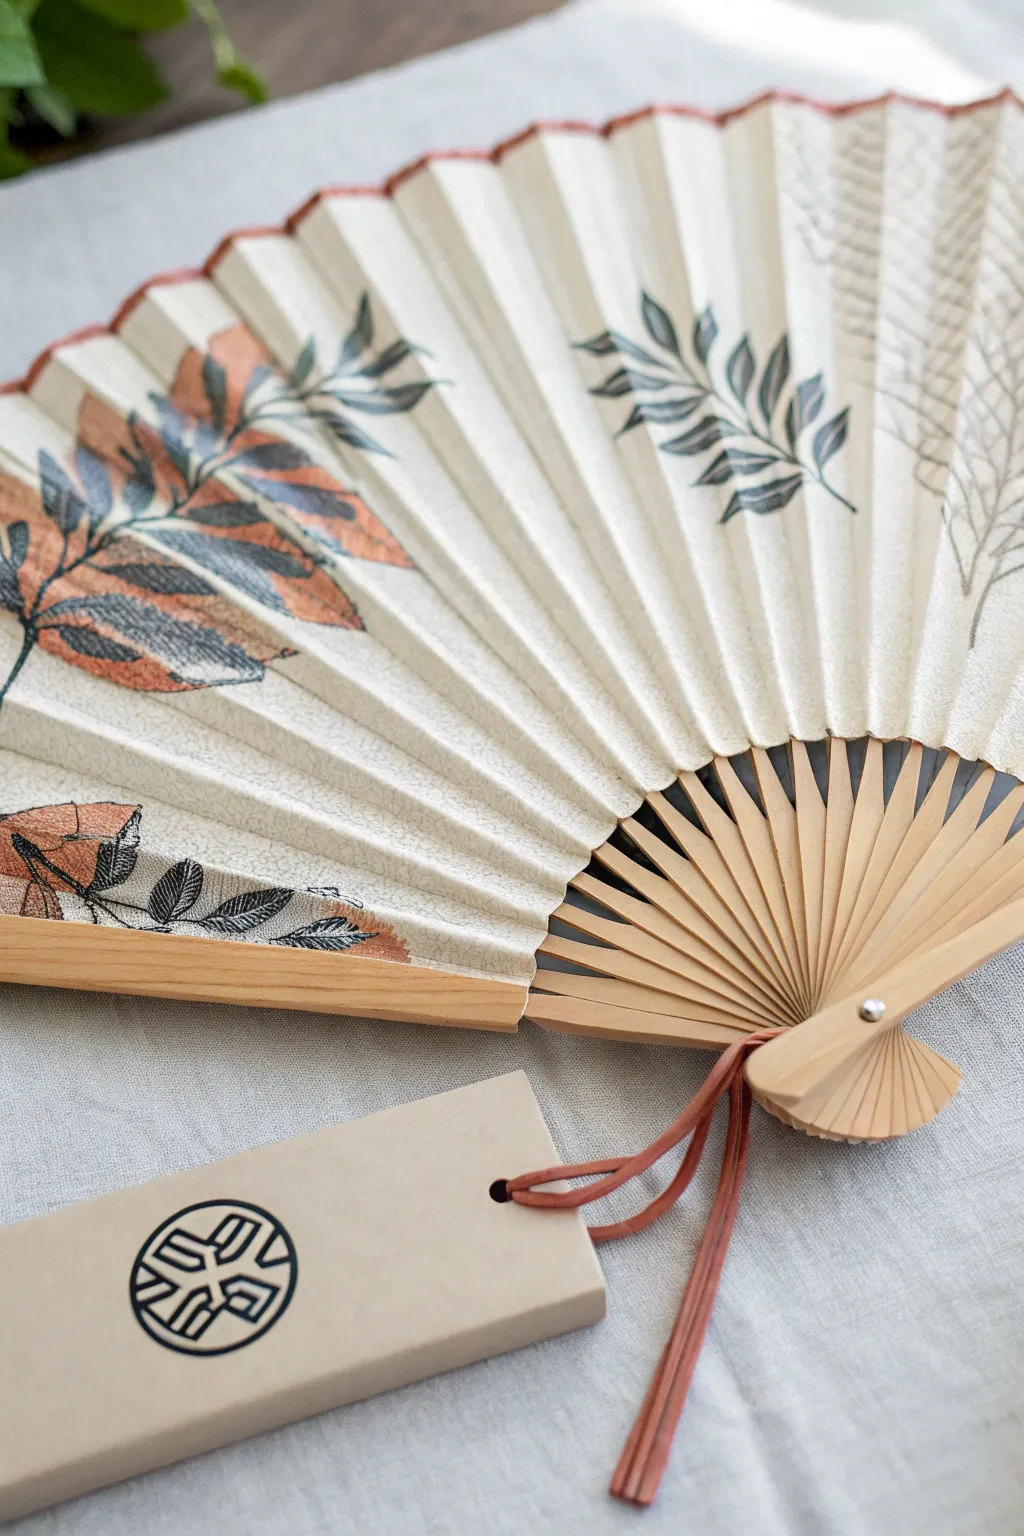
Capture the delicate beauty of autumn foliage with this elegant folding fan project. Using a combination of fine lines and metallic accents, you’ll transform a plain paper fan into a functional piece of botanical art.
Step-by-Step Guide
Materials
- Blank paper folding fan (bamboo ribs)
- Black archival ink fine liner (0.3mm or 0.5mm)
- Metallic bronze or copper watercolor paint
- Fine round watercolor brush (size 1 or 2)
- Pencil (HB or lighter)
- Kneaded eraser
- Reference images of fern leaves
- Paper towel
- Water cup
Step 1: Preparation & Sketching
-
Secure the fan:
Gently open your blank fan fully. It can be helpful to use small weights or low-tack tape on the very edges of the outer guards to keep it flat on your work surface, as the pleats will naturally try to close. -
Plan the composition:
Decide where you want your main focal points. In this design, we are aiming for a balanced asymmetry: a large, dense cluster of leaves on the left side and a sparser, more delicate sprig on the right. -
Draft the stems:
Using a very light touch with your pencil, draw the central veins (rachis) of your fern leaves. Let the lines flow naturally across the pleats; don’t try to draw into the valleys of the folds, just skip over them lightly. -
Outline leaf shapes:
Sketch the general triangle shapes of the fronds along the stems. Keep these outlines faint, as rubbing eraser crumbs out of fan pleats can be tricky later.
Pleat Perfection
Don’t fight the folds! When drawing, hold your pen perpendicular to the paper. If the tip catches on the texture, switch to a brush pen for smoother lines over the ridges.
Step 2: Inking the Outlines
-
Start the ink work:
Take your fine liner pen and begin tracing your pencil lines. Start with the central stems to establish the structure. -
Detail the fronds:
Draw the individual leaflets. Ensure you lift your pen as you cross the ‘valley’ of a pleat and restart on the ‘mountain’ (the ridge). Drawing directly into the deep crevice will often cause the ink to bleed or the line to look distorted when folded. -
Add texture lines:
For the leaves that will remain unpainted (like the one on the far right), add fine hatching lines to suggest texture and shadow. This creates a nice contrast with the solid painted leaves we will do later. -
Erase guidelines:
Once the ink is completely dry—give it a few extra minutes just to be safe—gently dab your kneaded eraser over the sketch to lift the graphite without damaging the delicate paper surface.
Step 3: Adding Bronze Accents
-
Prepare the paint:
Activate your metallic bronze watercolor with a few drops of water. You want a creamy consistency that is opaque enough to cover the paper but fluid enough to flow off the brush. -
filling the leaves:
Carefully paint inside the inked outlines of the main leaf cluster on the left. The beauty of this style is the contrast, so leave some tiny gaps near the veins to let the paper show through. -
Navigate the texture:
I prefer to use the tip of the brush to push the paint gently toward the edges of the pleats. The paper on fans is often absorbent, so work methodically to avoid accidental spreading. -
Layering for depth:
If your first layer of bronze looks too transparent after drying, apply a second coat to the centers of the leaves to heighten the metallic shine. -
Painting the details:
Use the very tip of your brush to add small bronze dots or buds to the unpainted fern on the right side, tying the two elements together visually.
Bleeding Lines?
Fan paper is thirsty. If ink bleeds, switch to a ‘pigment liner’ rather than liquid ink, or prep the paper with a thin layer of clear matte medium before drawing.
Step 4: Final Touches
-
Drying time:
Allow the fan to remain open and flat until the metallic paint is thoroughly dry. Metallic pigments often take a bit longer to set than standard watercolors. -
Re-inking borders:
Check your black outlines. If the paint has obscured any definition, carefully go back over those specific lines with your pen to make them pop again. -
Rim detail:
For a polished look, run a very thin line of bronze paint along the very top edge of the paper arc. This frames the artwork beautifully when the fan is open. -
Close carefully:
Gently close the fan, smoothing the pleats with your fingers to ensure they
Now you have a sophisticated accessory that keeps you cool while displaying your artistic touch
Soft Ombre Gradient on Fan Blades
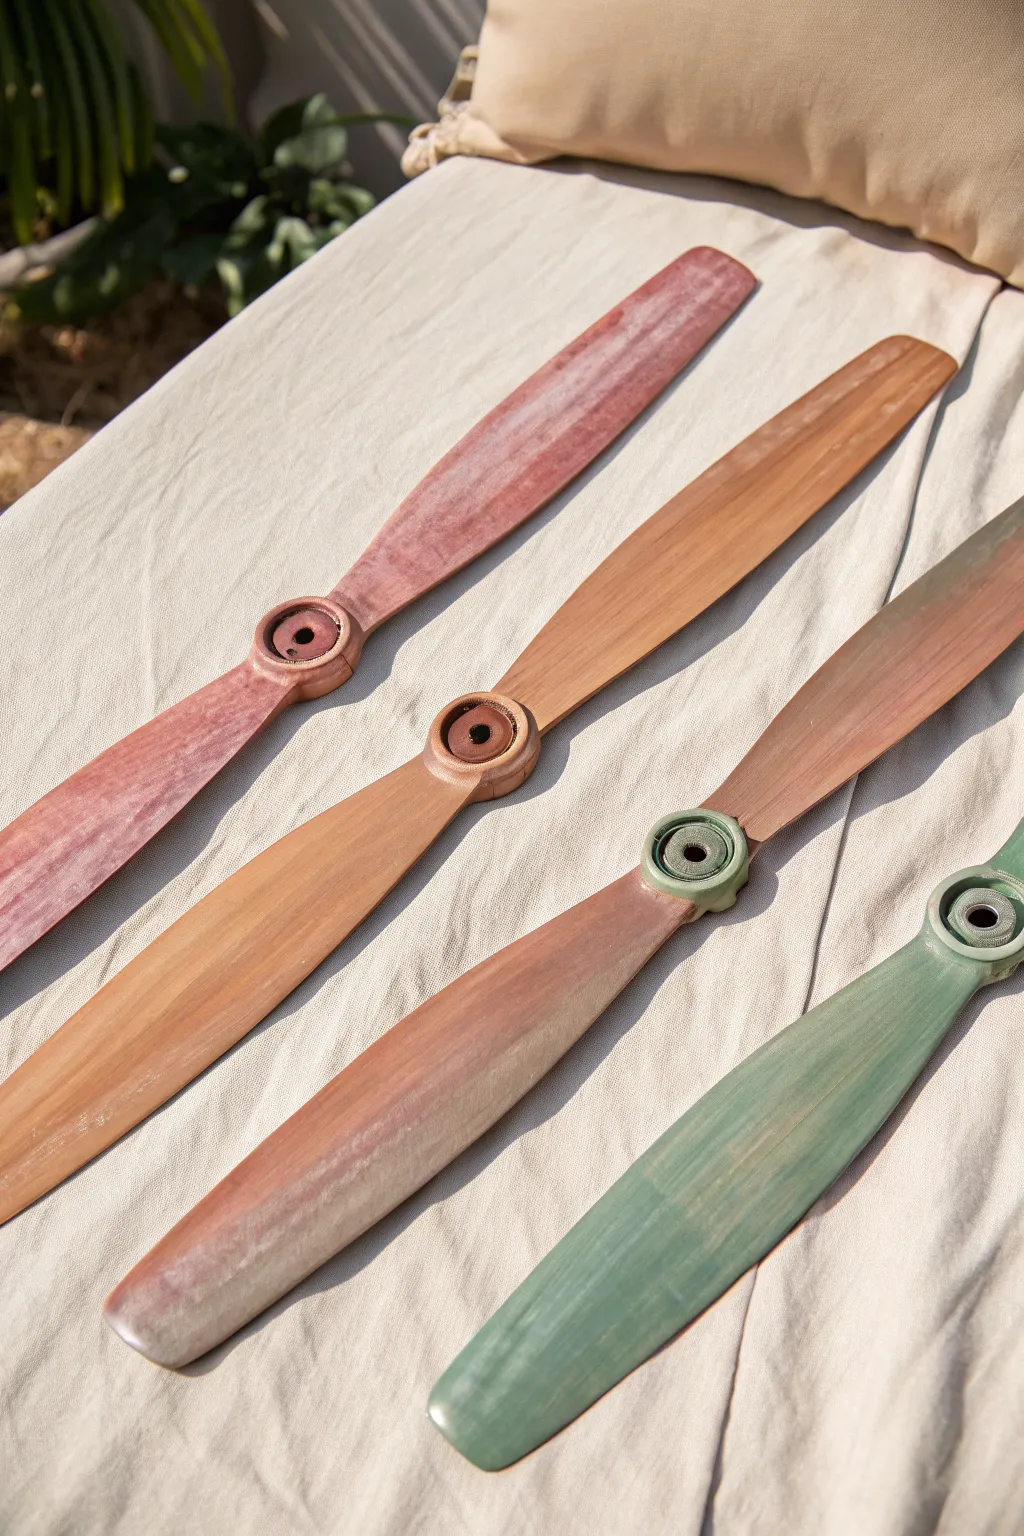
Give your old ceiling fan a gentle, earthy makeover with this soft ombre technique that mimics the look of dusty, sun-faded wood. By layering chalk paints and gently sanding them back, you’ll achieve a textured, vintage finish that feels organic rather than manufactured.
Detailed Instructions
Materials
- Wooden fan blades (detached)
- Medium-grit sandpaper (120-150 grit)
- Fine-grit sandpaper (220 grit)
- Chalk finish paint (Brick Red, Burnt Orange, Sage Green)
- White or cream chalk paint (for lightening)
- Clean rags or lint-free cloths
- Paintbrushes (natural bristle preferred)
- Water spray bottle
- Clear matte wax (optional)
Step 1: Preparation and Base
-
Clean the surface:
Begin by thoroughly wiping down your fan blades with a damp rag to remove years of dust or grease. Let them dry completely. -
Sand for adhesion:
Use your medium-grit sandpaper to scuff the original finish. You don’t need to strip it to bare wood, just remove the sheen so the chalk paint grips well. -
Wipe away dust:
Clean off all the sanding residue with a dry cloth or tack cloth. A clean surface ensures a smooth gradient later. -
Mix your base colors:
Pour your main colors (Red, Orange, Green) into separate containers. To achieve that ‘dusty’ look seen in the photo, mix a small dime-sized amount of white paint into each color to desaturate them slightly.
Pro Tip: Mist It
Keep a spray bottle of water handy. If the chalk paint dries too fast while applying, a light mist helps reactivate it for smoother blending and wiping.
Step 2: Applying the Wash
-
Create a paint wash:
Dilute your paint mixtures with a little water (about a 10% water to 90% paint ratio) to create a thicker wash rather than a heavy coat. -
Apply the first color:
Brush the brick red wash onto the first blade, working in long strokes from the center mounting hole out to the tip. -
Wipe back excess:
I like to immediately take a clean, dry rag and gently wipe over the wet paint in the direction of the wood grain. This pushes pigment into the texture while revealing some wood below. -
Repeat for other colors:
Move to the next blade with the burnt orange wash, and the final blade with the sage green wash. Apply and wipe back in the same manner. -
Address the hardware:
Don’t forget the circular mounting area. Dab paint into the crevices and wipe the raised ring to highlight the detail. -
Let dry:
Allow these base layers to dry for at least 30-45 minutes until they are chalky to the touch.
Step 3: Creating the Ombre & Texture
-
Dry brush highlights:
Dip a dry brush barely into your white or cream paint, then offload almost all of it onto a paper towel. -
Feather the edges:
Lightly flick the brush over the edges and tips of the blades. This creates the ‘sun-bleached’ effect where the sun would naturally hit the hardest. -
Distress with fine sandpaper:
Once fully dry, take your fine-grit sandpaper (220) and gently sand over the painted surface. Focus on the center raised rings and the long edges. -
Softening the color:
Continue sanding lightly over the flat surfaces until the color looks worn and soft, exposing tiny peeks of the wood grain beneath. -
Final dust off:
Wipe away the chalk dust with a dry cloth. The finish should feel velvety smooth. -
Seal (Optional):
If these will be in a humid area, apply a thin layer of clear matte wax with a rag to seal the paint without adding shine.
Troubleshooting: Too Opaque?
If the color looks too solid and heavy, dampen a sanding sponge really well and wet-sand the blade. This removes more paint than dry sanding for a translucent look.
Reassemble your fan to enjoy a breeze that feels both refreshing and stylishly rustic

PENCIL GUIDE
Understanding Pencil Grades from H to B
From first sketch to finished drawing — learn pencil grades, line control, and shading techniques.
Explore the Full Guide
Crisp Stripes With Masking Tape on Ceiling Blades
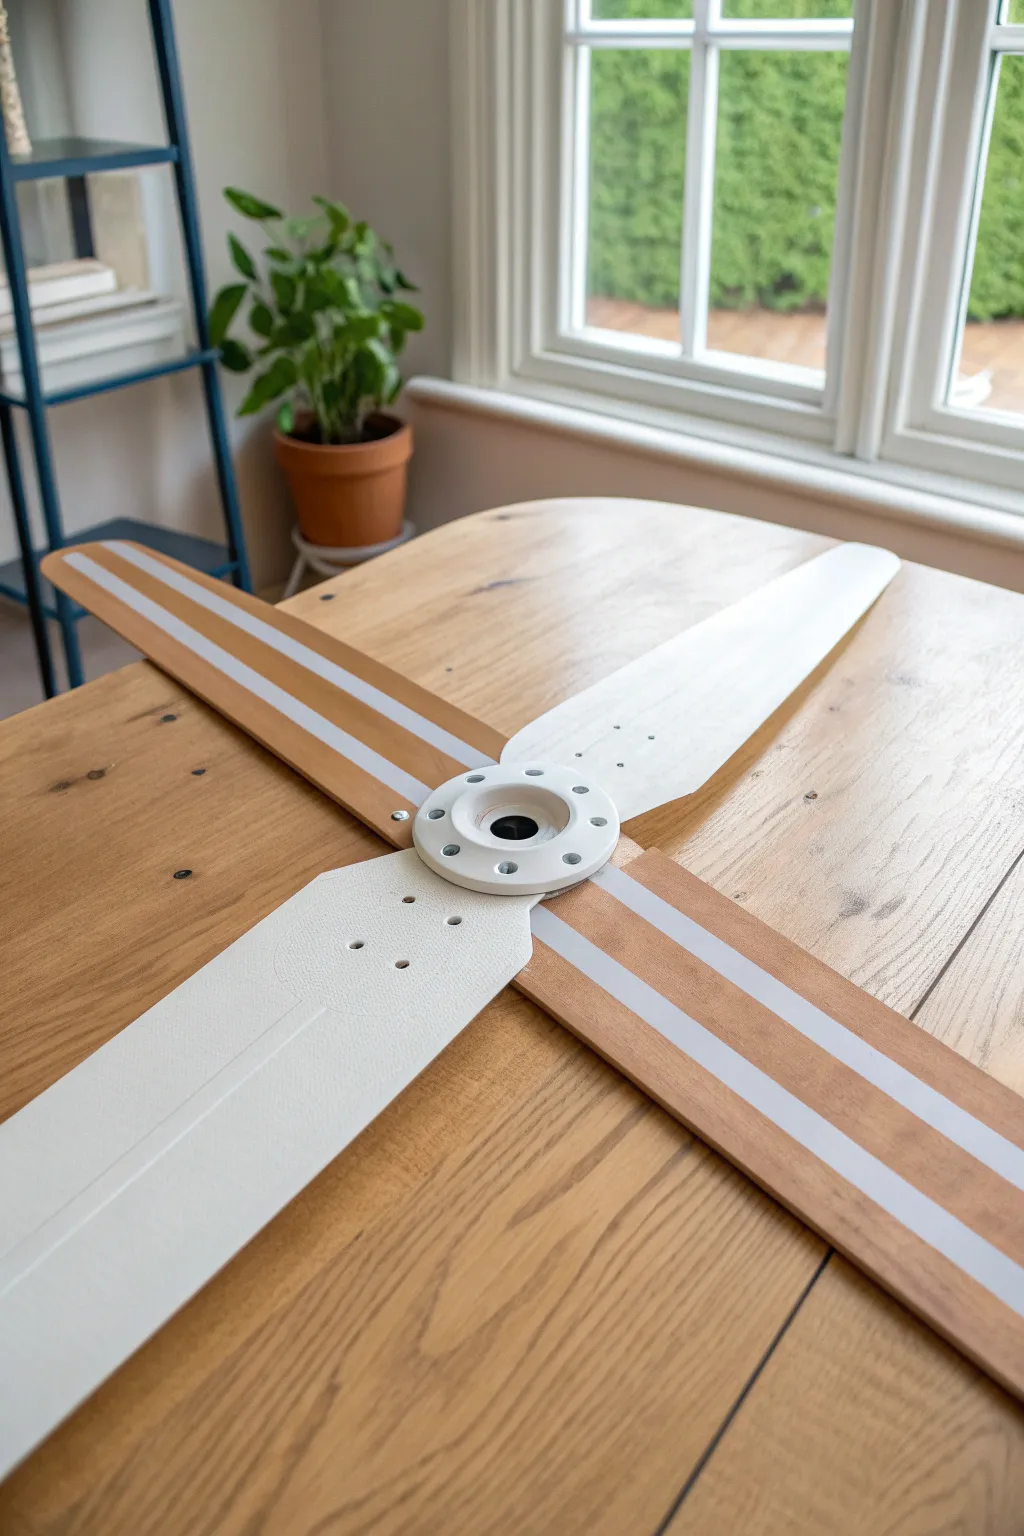
Transform a standard ceiling fan into a modern statement piece with this clean, geometric update. By combining solid white blades with exposed wood grain and crisp racing stripes, you achieve a fresh, Scandinavian-inspired look that instantly brightens a room.
How-To Guide
Materials
- Ceiling fan blades (removed from unit)
- Sandpaper (120 and 220 grit)
- Painter’s tape (high quality, 1-inch width)
- White spray paint (satin or matte finish)
- Clear polyurethane topcoat (spray can)
- Degreaser or mild soap solution
- Microfiber tack cloth
- Drop cloth or cardboard
- Ruler or measuring tape
- Pencil
Step 1: Preparation
-
Clean the surfaces:
Before doing anything else, wipe down all the fan blades thoroughly with a degreaser or soapy water. Ceiling fans accumulate a surprising amount of dust and oils that will ruin your paint adhesion if left behind. -
Sand for adhesion:
Using 120-grit sandpaper, sand all surfaces of the blades to remove the existing finish. You want to get down to the bare wood on the sides you intend to leave natural, and scuff up the sides you plan to paint solid. -
Smooth the grain:
Switch to 220-grit sandpaper for a final pass. This ensures the wood grain is buttery smooth and ready for paint. Wipe away all sanding dust with a microfiber tack cloth. -
Sort your blades:
Decide which blades will be solid color and which will be striped. In this design, two opposing blades are solid white, and the other two opposing blades are wood with white stripes.
Step 2: Painting the Solid Blades
-
Prime the solid blades:
Take the two blades designated for solid color and apply a light coat of primer if your spray paint isn’t a paint-and-primer-in-one. Let this dry completely. -
Apply the first white coat:
Spray the solid blades with your white satin paint. Keep the can moving in steady sweeps about 8-10 inches away to avoid drips. -
Finish the solid color:
Apply a second or third coat as needed for full opacity, allowing proper drying time between each layer as specified on your paint can.
Bleeding Lines?
If paint bled under the tape, don’t panic. Wrap a small piece of fine-grit sandpaper around a pencil eraser and gently sand just the spot where the bleed occurred to remove the paint from the wood.
Step 3: Creating the Striped Blades
-
Measure the center:
On the two remaining bare wood blades, find the vertical center line. Measure equal distances outward from the center to determine where your stripes will sit. -
Mark the stripe path:
Lightly mark your placement with a pencil. For the look in the photo, you want two stripes running parallel down the length of the blade, leaving a strip of natural wood in the very center. -
Apply the tape:
Run long strips of painter’s tape down the blade to mask off the areas you want to remain wood. Press the edges of the tape down firmly with your fingernail or a credit card to prevent paint bleed. -
Seal the tape edges:
I like to spray a very light layer of clear coat over the tape edges first. This seals the gap; if anything bleeds under, it will be clear clear finish rather than white paint. -
Paint the stripes:
Spray the exposed striped areas with your white paint. Use light, easy coats. Two thin coats are much better than one heavy one to keep lines crisp. -
Remove tape promptly:
Don’t wait for the paint to fully cure. Carefully peel off the masking tape while the paint is still slightly tacky to ensure a sharp, clean line without chipping.
Level Up: Hardware pop
For a more industrial look, instead of painting the central hub white, spray paint the screws or bolts a matte black or brass color before reassembling to add contrast.
Step 4: Finishing Touches
-
Inspect and touch up:
Once everything is dry, check your work. If there are any tiny bleeds on the wood section, you can often gently scrape them away with an X-Acto knife or a bit of sandpaper. -
Seal the deal:
Spray all four blades—both the solid white ones and the striped wood ones—with a clear polyurethane topcoat. This protects the finish from dust and humidity. -
Paint the hardware (detailed):
While the blades dry, clean the central metal hub or blade irons. Spray them white to match the blades for that seamless, integrated look shown in the image. -
Reassembly:
Once the clear coat has cured for at least 24 hours, reattach the blades to the central hub, alternating the solid and striped patterns.
Reinstall your newly updated fan and enjoy the instant modern upgrade to your ceiling space
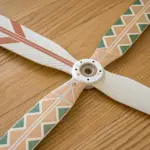
Rainbow Spin Effect on an Oscillating Fan
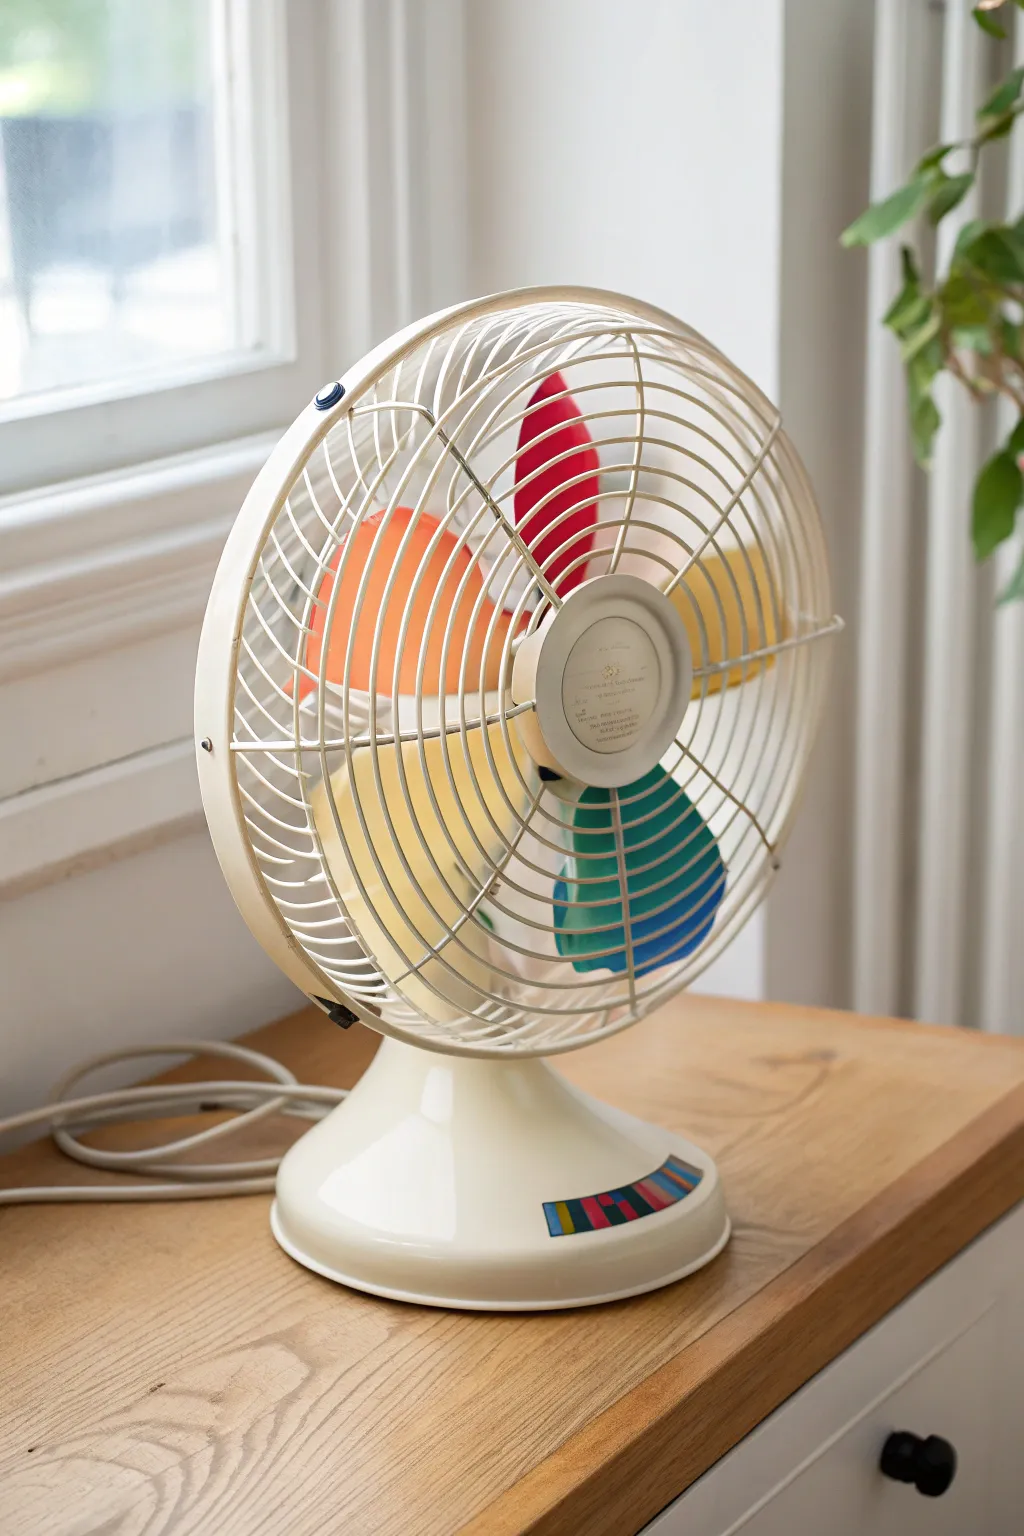
Transform a plain oscillating fan into a kinetic sculpture that bursts with color every time you turn it on. This project takes inspiration from vintage aesthetics, applying bold, solid hues to each blade to create a mesmerizing rainbow blur when in motion.
Detailed Instructions
Materials
- Oscillating desk fan (with accessible blades)
- Screwdriver set (Phillips and flathead)
- Mild dish soap and sponge
- Fine-grit sandpaper (220-grit)
- Painter’s tape or masking tape
- Plastic primer spray (white or clear)
- Acrylic craft paints (Red, Orange, Yellow, Teal, Blue)
- High-gloss spray sealant
- Flat, wide paintbrush (synthetic bristles)
- Drop cloth or old newspaper
- Small colorful vinyl strips (optional, for base decal)
Step 1: Disassembly and Prep
-
Safety First:
Standard practice dictates unplugging the fan completely before beginning any work. Ensure the cord is wrapped up and out of your way. -
Remove the Cage:
Locate the clips or screws holding the front wire cage in place. Carefully unfasten them and lift the front cage off to expose the blade assembly. -
Detach the Blade:
Most fan blades are held by a central cap or nut. Unscrew this cap (remember, some fan nuts are reverse-threaded, so try turning clockwise if counter-clockwise doesn’t work) and slide the blade unit off the motor shaft. -
Deep Clean:
Wash the removable plastic blades thoroughly with warm soapy water to remove dust and grease. I find that skipping this step often leads to peeling paint later, so scrub it well. -
Light Sanding:
Once dry, gently scuff the surface of each blade with 220-grit sandpaper. You don’t need to remove old color, just create a matte surface for the primer to grip. -
Prime the Surface:
Place the blades on a drop cloth in a well-ventilated area. Apply a thin coat of plastic primer to ensure your bright colors pop and stick durability.
Step 2: Painting the Rainbow
-
Select Your Palette:
Line up your acrylic paints. The goal is a spectrum effect: Red, Orange, Yellow, Teal, and Blue. Arrange them in the order intended for the blades. -
First Coat Application:
Using a wide, flat synthetic brush, paint the first blade red. Apply the paint in smooth strokes from the center hub outward toward the tip to minimize brush marks. -
Continue the Spectrum:
Move clockwise to the next blade and paint it orange. Repeat this process for yellow, teal, and blue on the remaining blades. If your fan has fewer blades, just skip a color or blend two. -
Let it Dry:
Allow the first coat to dry completely to the touch. This usually takes about 20-30 minutes depending on your humidity levels. -
Second Coat for Opacity:
Apply a second coat to each blade. This is crucial for that solid, vintage look shown in the photo. Watch for drips along the edges of the blades. -
Detailing the Center:
If the center hub got messy, use a small brush to touch it up with white paint or keep it clean to match the fan’s body.
Paint Balance Tip
Apply paint evenly! Thick globs on just one blade can throw off the fan’s balance, causing it to wobble or rattle when spinning.
Step 3: Reassembly and Finishing
-
Seal the Deal:
Once the color coats are fully cured (give it a few hours), spray the entire blade assembly with a high-gloss sealant. This protects the paint from the friction and dust of spinning. -
De-masking:
If you used any tape to protect the central hole or rear mechanism, remove it now while the sealant is tacky to avoid peeling. -
Base Decoration (Optional):
To mimic the image’s cute detail, cut small strips of colored vinyl or use leftover paint to create a small rectangular rainbow spectrum on the front of the fan base. -
Reinstall Blades:
Slide the painted blade assembly back onto the motor shaft. Secure it tightly with the locking nut or cap you removed earlier. -
Secure the Cage:
Reattach the front wire cage, ensuring all clips stick firmly and the safety screw is tightened. -
Test Spin:
Plug the fan in and turn it on to the lowest setting first to watch your static colors blend into a beautiful, spinning blur.
Neon Upgrade
Swap standard acrylics for fluorescent or UV-reactive paints. Point a blacklight at the fan while it spins for an incredible glowing light show.
Now enjoy the cool breeze and the mesmerizing color wheel you’ve created for your space


Bold Color Blocks for a Modern Fan Look
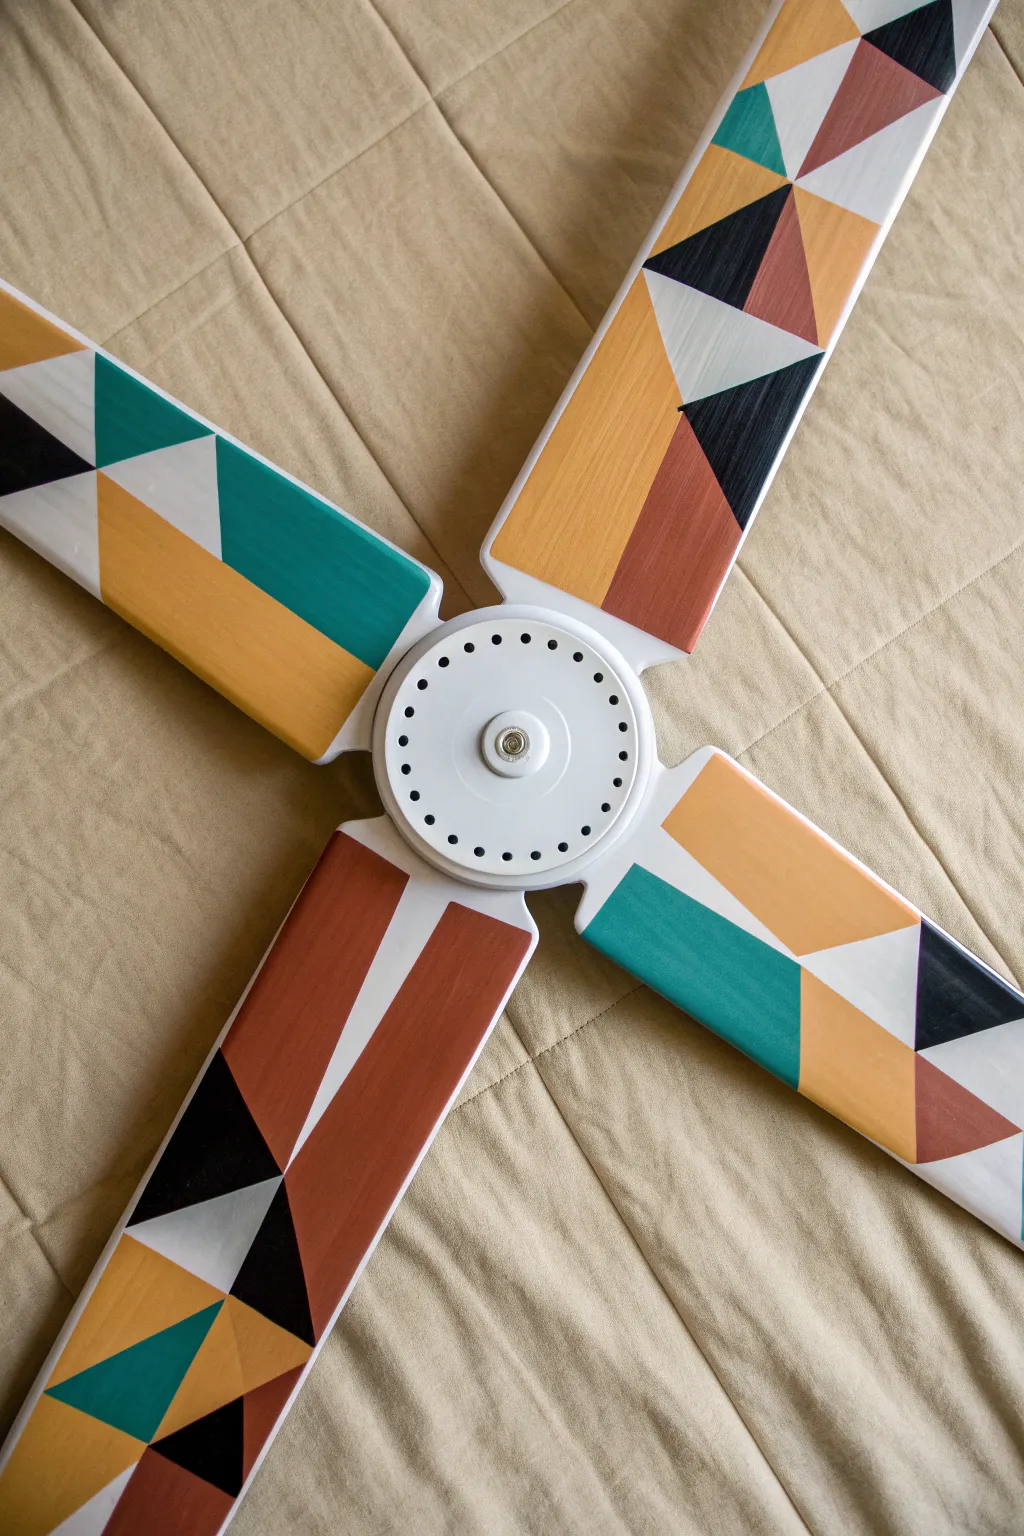
Transform a plain ceiling fan into a striking modern art piece with this bold, geometric makeover. By using sharp triangles and a cohesive palette of mustard, teal, and terracotta, you’ll create a dynamic focal point for any room.
Step-by-Step
Materials
- Ceiling fan blades (removed from unit)
- Sandpaper (medium grit, around 120-150)
- Painter’s tape (high quality for sharp lines)
- White primer spray paint
- Acrylic craft paints (mustard yellow, teal, terracotta/rust, black)
- Assorted paintbrushes (flat and angled shaders)
- Clear protective sealer (polycrylic or spray lacquer)
- Clean cloth
- Ruler or straight edge
- Pencil
Step 1: Preparation and Base Coat
-
Remove hardware:
Begin by taking the fan blades off the motor housing. Remove any metal brackets or screws attached to the blades so you have a flat, unobstructed surface to work on. -
Clean the surface:
Wipe down each blade thoroughly with a damp cloth and mild soap to remove dust, grease, and grime. This is crucial for paint adhesion. -
Sand the finish:
Lightly scuff the existing finish on the blades using medium-grit sandpaper. You don’t need to strip it bare, just create enough ‘tooth’ for the primer to grip. -
Dust off:
Wipe the blades down again with a tack cloth or slightly damp rag to ensure absolutely no sanding dust remains. -
Apply primer:
Spray the blades with a coat of white primer. I prefer doing two light coats rather than one heavy one to avoid drips. Let the primer dry completely according to the can’s instructions.
Step 2: Mapping the Design
-
Sketch the pattern:
Unlike uniform patterns, this design relies on asymmetry. Use a pencil and ruler to lightly draw large triangles and trapezoids directly onto the primed white blades. -
Vary the angles:
Draw intersecting diagonal lines across the width of the blade. Aim for variety—make some triangles large and some small to keep the visual interest high. -
Plan your palette:
Before painting, lightly mark each section with a letter (e.g., ‘Y’ for Yellow, ‘B’ for Black) to map out your colors. Ensure no two adjacent shapes share the same color.
Clean Lines Only
If paint bleeds under the tape, wait for it to dry completely. Then, lay a piece of tape over the ‘good’ side and gently scrape the bleed away with a craft knife or paint over it.
Step 3: Painting the Sections
-
Tape the first sections:
Apply painter’s tape along the pencil lines for your first set of non-touching shapes. Press the edges of the tape down firmly with your fingernail to prevent bleed-under. -
Apply first colors:
Paint the exposed shapes with your chosen acrylic colors. Use a flat brush for smooth coverage. You may need two to three coats particularly for the yellow and white sections to get fully opaque coverage. -
Remove tape while damp:
Carefully peel back the tape while the last coat of paint is still slightly wet. This helps ensure a crisp, clean edge. -
Let it cure:
Allow these first painted sections to dry completely before moving on. Patience is key here to avoid smudging your work. -
Tape remaining sections:
Once dry, tape off the next set of shapes. You will likely serve tap over parts of your freshly painted (and fully dried) sections to get straight lines for the adjacent shapes. -
Finish painting:
Fill in the remaining geometric shapes with your teal, rust, and black paints. Don’t forget the white sections—even though the primer is white, a topcoat of white acrylic looks more finished. -
Touch up edges:
After removing all tape, inspect your lines. Use a very fine detail brush to carefully fix any small bleeds or uneven spots.
Color Coordination
For a truly custom look, mix a tiny bit of your wall color into the white paint sections. This ties the fan into the room’s decor seamlessly without being too matchy-matchy.
Step 4: Sealing and Reassembly
-
Apply topcoat:
Once the designs are fully cured (give it 24 hours if possible), seal the blades. A spray-on polycrylic is ideal because it doesn’t yellow and protects the paint from dust and centrifugal force. -
Dry and reattach:
Let the sealer dry until it is no longer tacky. Reattach the metal brackets to the blades. -
Mount the blades:
Secure the blades back onto the fan motor, step back, and enjoy your new custom spinning art.
Once spinning, your distinct geometric shapes will blend into a beautiful warm blur of color
Mandala Radiating From the Fan Pivot
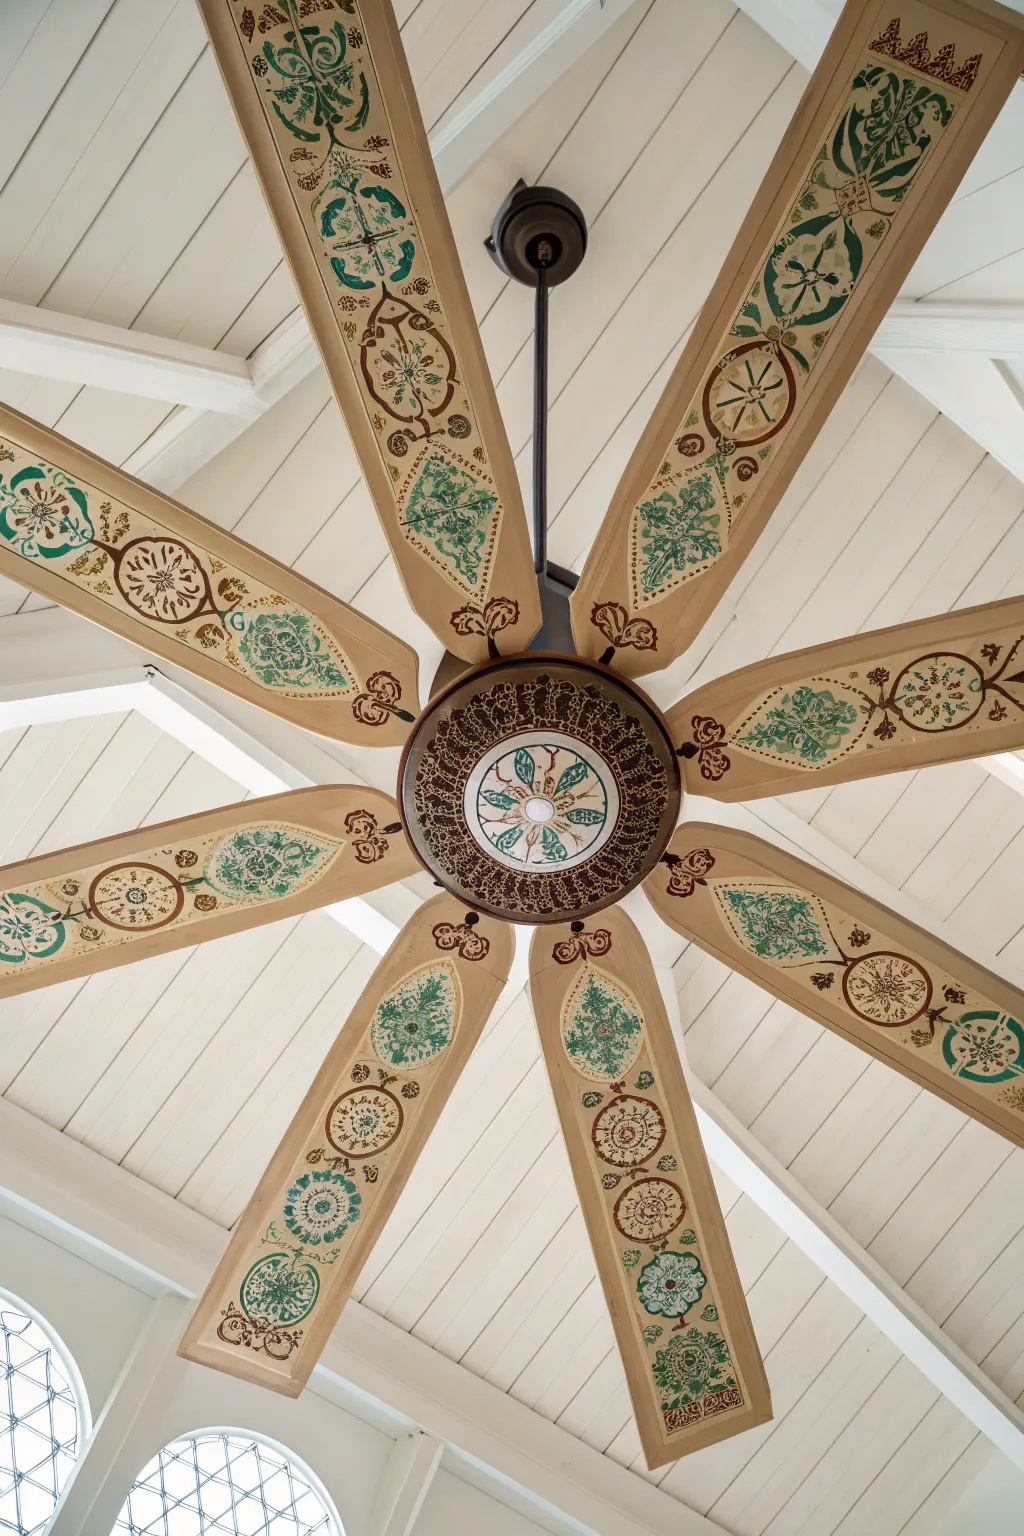
Transform a standard ceiling fan into a stunning centerpiece with this detailed painting project that radiates intricate patterns outward from the center. By combining hand-painted details with stenciled motifs on wooden blades, you’ll create a mesmerizing, kaleidoscope-like effect on your ceiling.
Step-by-Step Guide
Materials
- Ceiling fan blades (removed from unit)
- Sandpaper (fine grit, 220)
- Primer spray paint (white or light beige)
- Base coat acrylic paint (cream or light tan)
- Acrylic craft paints (teal, forest green, burnt umber, dark brown, cream)
- Assorted stencils (mandala fragments, floral motifs, geometric circles)
- Small stencil brushes or sponge pouncers
- Fine liner brushes (size 0 and 1)
- Large flat brush or foam roller
- Painter’s tape
- Clear matte or satin varnish spray
Step 1: Preparation
-
Clean and Disassemble:
Begin by removing the fan blades from the motor housing. Wipe them down thoroughly with a damp cloth to remove any accumulated dust or grease. -
Sand for Adhesion:
Lightly scuff the surface of each blade using 220-grit sandpaper. This creates a ‘tooth’ for the primer to grab onto without damaging the blade’s structure. -
Prime the Surface:
Apply a thin, even coat of spray primer to one side of the blades. Let it dry completely according to the can’s instructions, then flip and prime the other side if you plan to paint both. -
Apply Base Color:
Using a foam roller or large flat brush, apply your cream or light tan base coat. I usually do two thin coats for opaque coverage, letting each dry fully in between.
Uneven Stencils?
If paint bleeds under your stencil, wait for it to dry completely. Then, use a small brush and your base color to touch up the edges for a crisp finish.
Step 2: Creating the Central Hub
-
Paint the Center Housing:
If possible, remove the central light kit or motor cover. Paint a distinct circular zone in the center with a contrasting white circle, surrounded by a dark brown ring. -
Add Radial Details:
Within the white center circle, hand-paint small teal leaf motifs radiating from the very center point. Use a fine liner brush for crisp edges. -
Texture the Outer Ring:
On the dark brown ring surrounding the white center, use a small stencil or freehand small geometric shapes in cream to create a textured, lace-like appearance.
Symmetry Hack
Make a paper template of your blade shape. Cut holes where you want stencils to go, then overlay this on each blade to pencil in perfect placement guides.
Step 3: Decorating the Blades
-
Mark Placement Lines:
To ensure symmetry, lightly mark the center line of each blade with a pencil. Measure equal distances from the connection point downwards to place your motifs consistently. -
Stencil the Primary Motifs:
Select a large floral or geometric stencil for the widest part of the blade. Secure it with painter’s tape and stipple teal and green paint gently to create the main focal points. -
Add Secondary Patterns:
Choose a smaller, circular medallion stencil. Place these near the tip and near the base of the blade, applying a mix of brown and gold-toned paints for contrast. -
Connect with Borders:
Using a long, straight edge or masking tape, paint thin borders along the long edges of the blades in a soft brown to frame your artwork. -
Hand-Paint Filling Details:
This is where the magic happens. Use your size 0 liner brush to paint delicate vines, dots, or scrolls in the empty spaces between your stenciled areas, connecting the disparate shapes. -
Add Dark Accents:
Dip your fine brush into dark burnt umber paint. Outline key parts of your stencils—like the edges of leaves or the perimeter of circles—to make the designs pop against the light background. -
Distress (Optional):
For an aged, vintage look resembling the photo, lightly sand over the dried painted designs in random spots, focusing on the edges where wear would naturally occur.
Step 4: Finishing Up
-
Seal the Artwork:
Once all paint is cured (wait at least 24 hours), spray the blades with a clear matte or satin varnish. This protects your work from dust and makes future cleaning easier. -
Reassemble:
Carefully reattach the blades to the fan motor, ensuring you don’t scratch the fresh paint. Tighten all screws securely.
Enjoy the gentle, spinning kaleidoscope of art you have created whenever you cool down the room
Ocean Waves Flowing Across a Folding Fan
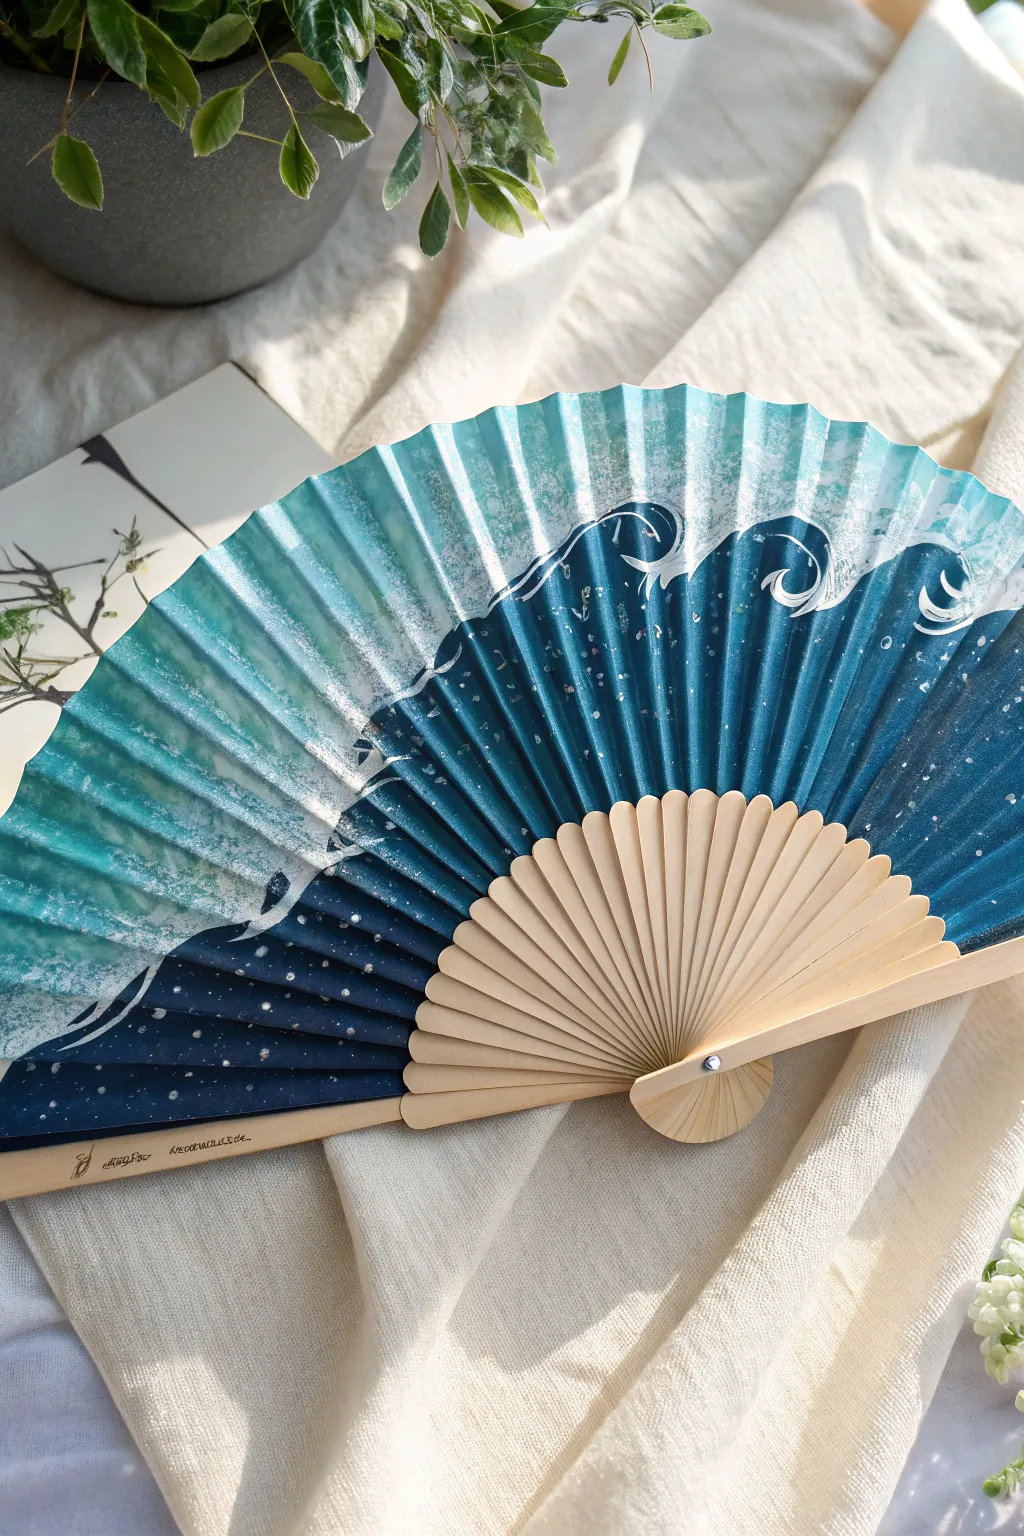
Transform a plain folding fan into a mesmerizing seascape featuring crashing waves in rich indigo and teal hues. This project captures the dynamic energy of the ocean with stylized foam and sea spray, creating a functional piece of art perfect for warm days.
Step-by-Step Tutorial
Materials
- Blank paper or fabric folding fan (bamboo ribs)
- Acrylic paints (Indigo/Navy Blue, Phthalo Blue, Turquoise, White, Teal)
- Fabric medium (if using a fabric fan)
- Masking tape or painter’s tape
- Flat synthetic brushes (medium and large)
- Fine detail liner brush
- Old toothbrush (for splattering)
- Palette and water cup
- Paper towels
Step 1: Preparation and Base Gradient
-
Prepare the fan:
Fully open your blank fan and secure it flat on your work surface using small pieces of masking tape on the outer guard ribs. If you are painting on a fabric fan, mix your acrylics with a bit of fabric medium according to the bottle instructions to prevent cracking later. -
Map the horizon:
Visualize a diagonal line focusing the heaviest visual weight on the right side of the fan. This design relies on asymmetry, so plan for the dark ocean water to occupy the bottom right and sweep upwards toward the left. -
Apply the deepest blue:
Load a medium flat brush with your darkest Indigo or Navy Blue. Paint the bottom right section, filling in the deep ocean area. Use confident strokes that follow the pleats of the fan, ensuring the paint gets into the folds without gumming them up. -
Blend the mid-tones:
While the dark blue is still slightly wet, mix in some Phthalo Blue. Paint the middle section of the wave, blending it downwards into the indigo to create a seamless transition from deep abyss to lighter water. -
Create the upper wave body:
Switch to a clean brush and pick up your Turquoise or Teal paint. Apply this to the upper crest of the wave shape, blending it softly into the mid-tone blue below. The goal involves creating a gradient that gets lighter as the wave rises. -
Define the wave edge:
Using the Teal paint mixed with a tiny touch of White, paint a distinct, scalloped edge along the top of your wave form. This establishes the silhouette where the water meets the spray.
Step 2: Stylized Foam and Details
-
Draft the whitecaps:
Using a fine liner brush and pure Titanium White, outline the very top edge of your wave. Create curved, hook-like shapes that mimic traditional Japanese woodblock wave patterns. -
Fill the foam:
Thicken these white outlines on the crests. You don’t want a solid block of white; instead, leave small gaps and streaks of the underlying teal showing through to give the foam dimension and movement. -
Add inner wave details:
Mix a very pale blue (mostly white with a dot of blue). Use your fine brush to paint thin, curved lines inside the dark blue body of the wave. These lines should follow the curve of the water, showing the current’s direction. -
Create the misty spray:
On the left side of the fan where the wave breaks into mist, use a dry brush technique with white paint. Lightly drag the brush over the paper texture to create a fuzzy, indistinct cloud of sea spray. -
Splatter texture:
Dilute a small amount of white paint with water until it’s inky. Load an old toothbrush with this mixture, aim it at the dark blue sections, and run your thumb over the bristles to fleck tiny droplets onto the ‘water’ for a sparkling effect. -
Add floating bubbles:
With your smallest detail brush, dot random larger circles of white near the wave crests to represent larger foam bubbles caught in the air.
Clean Pleat Tip
Don’t paint too thickly in the ‘valleys’ of the fan folds. Thick paint there cracks easily; apply thin washes in the deep folds and save impasto for the ridges.
Step 3: Finishing and Sealing
-
Clean the ribs:
While the paint is drying, check the wooden ribs. If any acrylic strayed onto the wood, gently scrape it off with a fingernail or damp cloth before it cures completely. -
Dry thoroughly:
Let the fan sit open until completely dry. This is crucial—closing it too soon will cause the painted pleats to stick together and ruin your hard work. -
Re-fold gently:
Once dry, carefully close the fan. The paint adds thickness, so the first time you close it, you may need to manually guide the pleats back into their crisp folds. -
Press to set:
Keep the fan closed and wrapped with a rubber band for a few hours. This helps ‘train’ the painted paper or fabric to hold the folded shape again.
Level Up: Metallic Glint
Mix a small amount of silver or pearlescent medium into your white paint for the wave crests. It will catch the light beautifully when you fan yourself.
Enjoy the cool breeze from your custom ocean artwork on your next sunny outing
Koi Fish That “Swim” When the Fan Opens

Capture the dynamic energy of a koi fish breaking the water’s surface with this elegant folding fan design. The composition uses the fan’s natural ribs to create ripples of movement, balancing the vibrant fish against delicate floral sprays.
How-To Guide
Materials
- Blank folding fan (paper or silk leaf with bamboo ribs)
- Watercolor paints or fluid acrylics (red, orange, black, blue, green)
- Small round brushes (sizes 0, 2, and 4)
- Pencil for sketching
- Palette for mixing
- Cup of water
- Paper towels
Step 1: Planning the Composition
-
Prepare the workspace:
Lay your fan open on a flat surface. Secure the ends gently with small weights or heavy coins if the fan tries to close itself, ensuring the surface is taut. -
Map out the design:
Lightly sketch the position of the main elements with a pencil. Place the koi fish jumping in the upper center right section, curving its body to follow the fan’s arc. Mark a small area on the left for the dragonfly and the bottom corners for the foliage.
Dry Brush for Ripples
For the water splash, load your brush with blue paint, then wipe most of it off on a towel. The scratchy texture perfectly mimics spraying water droplets.
Step 2: Painting the Foliage
-
Left-side plants:
Using a size 2 brush and a mix of black and dark green, paint thin, spindly stems rising from the bottom left corner. Keep your strokes quick and vertical. -
Add gentle blooms:
Dip the tip of a small brush into diluted red paint. Dab tiny dots along the left-side stems to represent small red buds. Keep these minimal and airy. -
Right-side shrubbery:
On the bottom right, create a denser patch of foliage using green washes. Paint a few upward-reaching branches similar to the left side but slightly fuller. -
Anchor with a flower:
Paint a small, indistinct red flower shape near the base of the right-side foliage to visually balance the red buds on the opposite side. -
Ground the scene:
Add a very light wash of grey-green at the base of both plant clusters to simulate the ground or waterline, fading it out as it moves toward the center.
Step 3: Creating the Koi
-
Base shape:
Mix a vibrant orange-red color. Paint the curved silhouette of the fish jumping. The body should be thickest in the middle and taper toward the tail. -
Adding the fins:
While the body is still slightly damp, add the dorsal fin on top and the side fins using a slightly darker red. Let the colors bleed slightly for a softer look. -
Detailing scales:
Once the base layer is dry, use a size 0 brush with dark grey or black ink. Paint a cross-hatch pattern over the orange body to create the suggestion of scales. -
Tail definition:
Paint the tail fin with a solid rust-red color, splitting it slightly at the end to show movement. -
The splash:
Beneath the fish, paint a few curved strokes of light blue and white. Use a dry-brush technique here to mimic the spray of water as the fish leaps.
Gold Leaf Accent
Add tiny flecks of gold leaf to the koi’s scales or the center of the flowers. It catches the light beautifully when the fan is waved.
Step 4: Final Flourishes
-
The dragonfly:
To the left of the fish, paint a small black dragonfly silhouette. Use four tiny teardrop shapes for wings and a thin line for the body. -
Adding text (optional):
If you wish to mimic the traditional style, add a few vertical rows of faux calligraphy or small red stamp marks near the dragonfly using a fine-point brush. -
Bamboo rib detail:
If your paint has covered the decorative holes in the bamboo ribs, carefully clean them out with a dry brush before the paint hardens. -
Sealing the work:
Allow the entire fan to dry completely in the open position. I find leaving it overnight ensures the paint doesn’t stick when you finally fold it. -
The first fold:
Gently close the fan, pressing along the original creases to define the folds again, as the water in the paint may have relaxed the paper slightly.
Your finished fan is now ready to provide a cool breeze and a splash of artistic flair
Night Sky Constellations on Ceiling Fan Blades
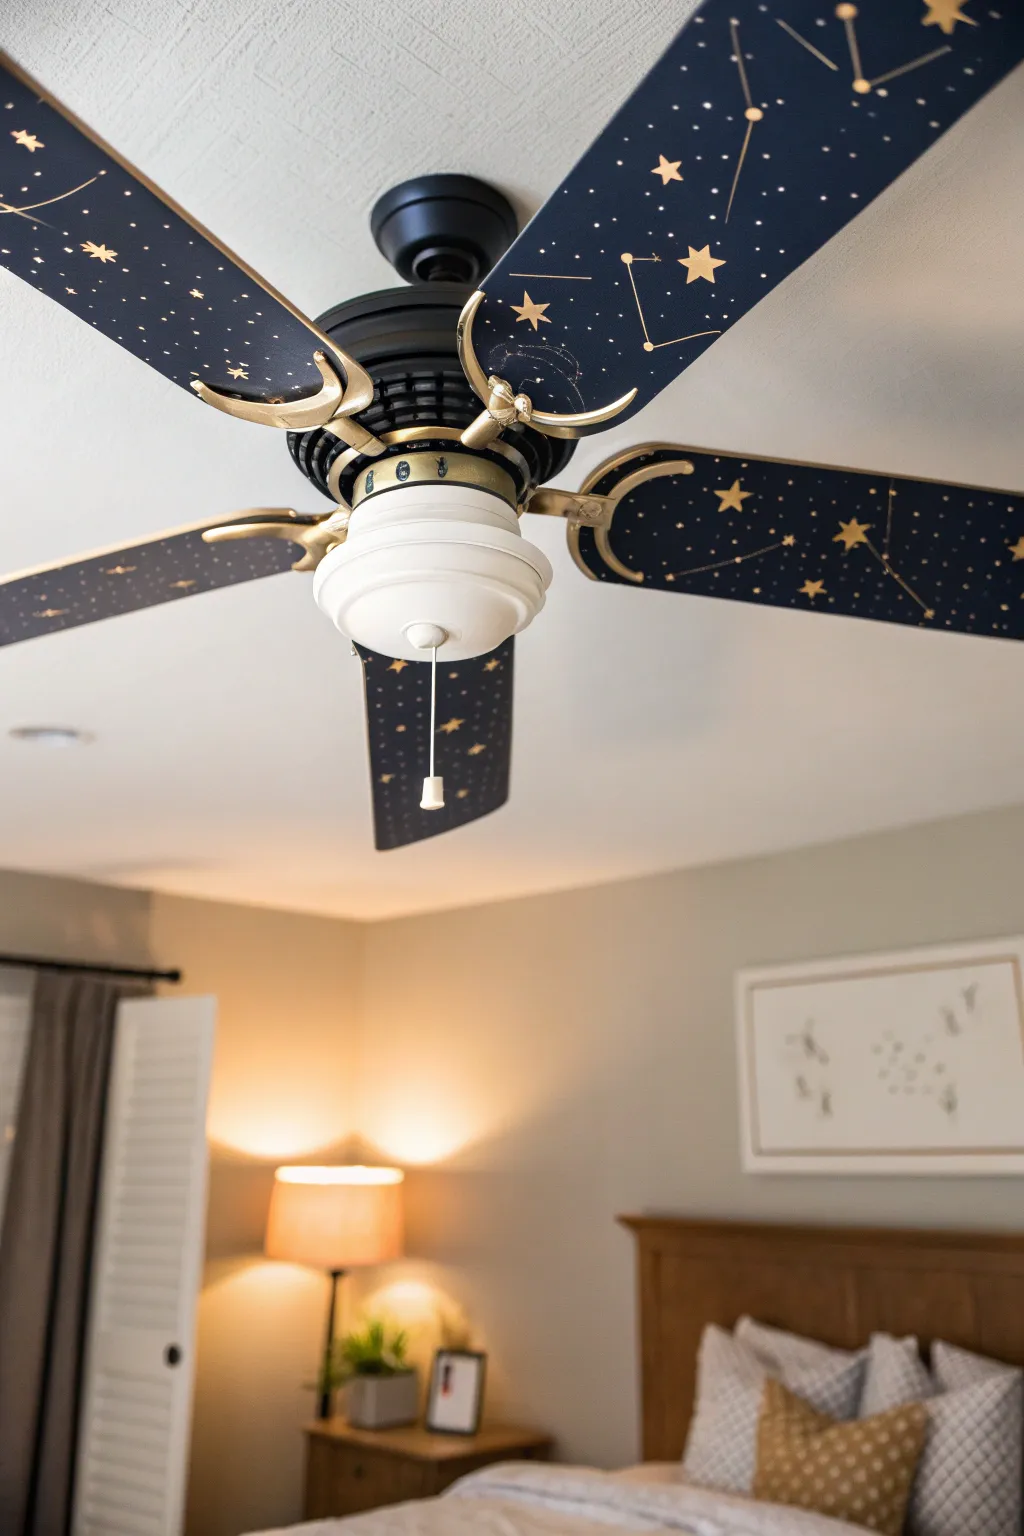
Transform a boring ceiling fan into a starry night masterpiece that sparks imagination. This project uses deep navy paint and metallic gold accents to turn ordinary blades into a stunning constellation display perfect for a bedroom.
Step-by-Step Tutorial
Materials
- Screwdriver
- Sandpaper (fine-grit, 220)
- Clean cloth or rag
- Painter’s tape
- Deep navy blue chalk paint or matte acrylic
- Metallic gold acrylic paint
- Wide flat paintbrush (2-inch)
- Small round detail brush (size 0 or 1)
- Small flat detail brush
- Gold spray paint (optional for hardware)
- Clear matte polycrylic sealer
- White or yellow chalk pencil (for mapping)
Step 1: Preparation & Base Coat
-
Remove the blades:
Turn off the power to the fan at the breaker. Carefully unscrew the blade arms from the motor housing using your screwdriver, and then detach the blades from the metal arms. -
Clean thoroughly:
Wipe down each blade with a damp cloth and mild soap to remove the thick layer of dust and grease that fans tend to collect. Let them dry completely. -
Sand the surface:
Lightly scuff the surface of the blades with 220-grit sandpaper. You don’t need to strip the original finish entirely; just create a bit of ‘tooth’ so the paint adheres better. -
Wipe away dust:
Use a tack cloth or a clean damp rag to remove every speck of sanding dust, as any debris will show up under your dark paint. -
Paint the first coat:
Apply a thin, even layer of deep navy blue paint using a wide flat brush. Paint in the direction of the wood grain or length of the blade to minimize brush strokes. -
Let it dry:
Allow the first coat to dry fully according to the paint can’s instructions, usually about 1-2 hours. -
Apply the second coat:
Add a second coat of navy paint to ensure rich, opaque coverage. If the original blade color is still peeking through, a third thin coat might be necessary.
Star Shape Trick
Struggling with hand-painting stars? Buy a small star-shaped stencil or stamp. It ensures uniformity for the main constellations while keeping the process quick.
Step 2: Creating the Galaxy
-
Map out constellations:
Once the base is bone-dry, use a chalk pencil to lightly sketch your star patterns. You can look up real constellations like the Big Dipper or Orion, or just create freehand geometric shapes. -
Paint the major stars:
Dip your small flat detail brush into metallic gold paint. Create the larger, five-point stars first by painting a simple ‘V’ shape and crossing it, filling in the center. -
Connect the dots:
Using the size 0 round brush, paint thin gold lines connecting your main stars to form the constellation outlines. Keep these lines delicate. -
Add detail stars:
Surround the main constellations with smaller four-point stars or simple dots. Vary the size of your dots to create depth in your galaxy. -
Create the splatter effect:
For the distant background stars, dilute a tiny bit of white or light gold paint with water. Dip an old toothbrush or stiff brush in it and flick the bristles with your thumb to mist tiny specks across the blade. -
Dry the details:
Let all your gold artwork dry completely. Metallic paints can sometimes take a little longer to set than standard acrylics.
Glow Up
Mix a tiny amount of glow-in-the-dark medium into your white paint for the background splatter. The fan will look elegant by day and magically glowing by night.
Step 3: Finishing Touches
-
Paint the hardware (Optional):
While the blades dry, take the metal blade arms outside. Apply two light coats of gold spray paint to match your stars, giving the fan a cohesive, high-end look. -
Seal the artwork:
Apply a coat of clear matte polycrylic sealer over the entire blade. This protects your artwork from dust and makes future cleaning much easier without rubbing off the gold. -
Reassemble:
Once everything is cured (give it at least 24 hours to be safe), screw the blades back onto the metal arms, and then reattach the arms to the motor housing.
Now you have a custom statement piece that turns looking up at the ceiling into a stargazing experience
Tropical Leaves on a Handheld Folding Fan
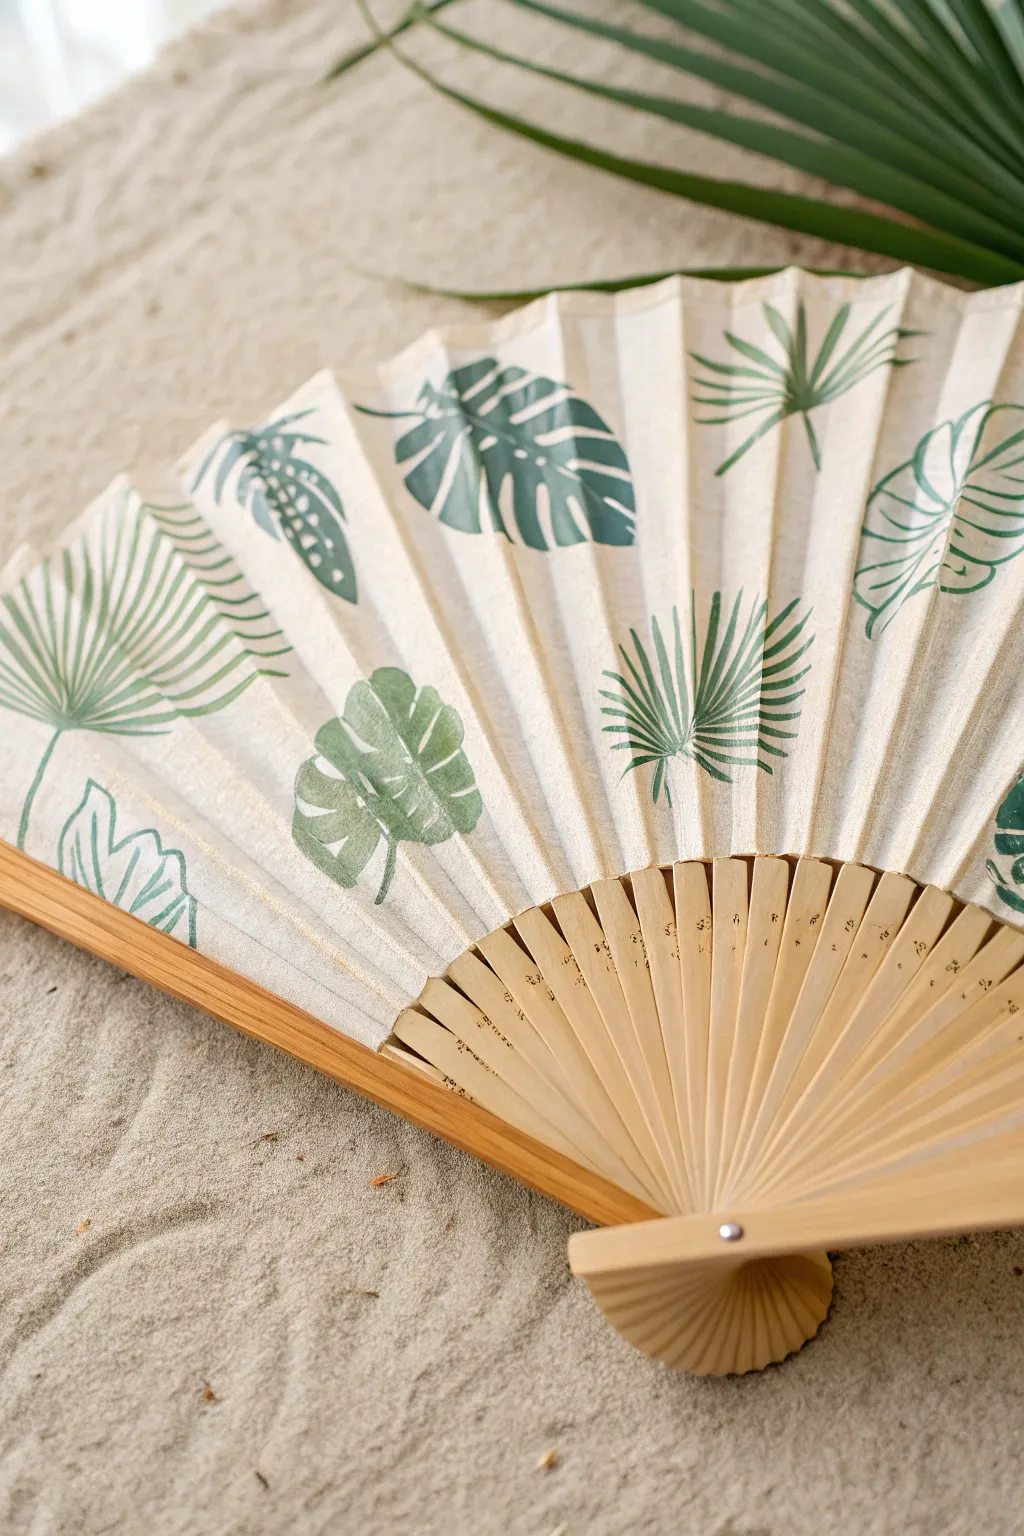
Transform a plain folding fan into a tropical accessory with this simple yet striking leaf painting project. The design uses muted green tones and varied leaf shapes to create a relaxed, natural aesthetic perfect for summer days.
Step-by-Step Guide
Materials
- Blank fabric folding fan (cotton or linen blend)
- Fabric paint or soft-body acrylics (olive green, forest green, white)
- Pencil
- Small round brush (size 2 or 3)
- Fine liner brush (size 0 or 00)
- Palette or mixing tray
- Paper towels
- Masking tape or painter’s tape
- Reference images of tropical leaves (Monstera, Palm, Banana leaf)
Step 1: Preparation & Sketching
-
Prepare your workspace:
Lay down a protective covering on your table. Fully open the fan and secure the handle to the table with a small piece of masking tape to keep it from snapping shut while you work. -
Flatten the folds:
Since painting on the accordion folds can be tricky, gently press the fabric flat with your non-dominant hand as you work. You can also tape down the outer ribs if needed. -
Sketch the Monstera leaves:
Using a pencil very lightly, sketch the outline of two or three Monstera leaves. Focus on positioning them across the pleats, not worrying about the distortion yet. -
Add palm fronds:
Sketch a few fan-palm shapes. Draw a central point and radiate simple lines outward to act as guides for the fronds later. -
Draw varied foliage:
Fill in the empty spaces with simple oval leaf shapes or elongated banana-leaf styles to create variety in the composition.
Pleat Perfection
When sketching, don’t try to fight the folds. Draw your image as if the surface is flat; the distortion when the fan folds is part of the charm.
Step 2: Painting the Base Layers
-
Mix your greens:
Create two shades of green on your palette. For the deep forest green, use the paint straight from the tube. For a softer olive tone, mix a little yellow or white into your olive green paint. -
Paint the Monstera silhouettes:
Load your round brush with the darker green. Fill in the Monstera shapes carefully. I find it easiest to paint the outer edges first and fill inward. -
Create the split-leaf detail:
Remember to leave negative space (unpainted fabric) for the characteristic splits and holes in the Monstera leaves. If you accidentally paint them shut, you can add them back later with white paint, but leaving them blank looks cleaner. -
Paint the Palm fronds:
Switch to the lighter olive green for the palm leaves. Using the round brush, paint thin, tapered strokes outward from the center point you sketched earlier. -
Fill the remaining leaves:
Use alternating shades of green for the smaller filler leaves to create depth and visual interest across the fan surface.
Step 3: Adding Details & Finishing
-
Let the base dry:
Allow the first layer of paint to dry for about 10–15 minutes. It doesn’t need to be fully cured, but it shouldn’t be wet to the touch. -
Switch to the fine details:
Pick up your fine liner brush. This tool is essential for getting those crisp stems and veins that make the leaves look realistic. -
Add veining:
On the solid oval leaves, paint a thin central vein and delicate branching veins using a slightly darker version of the base color. -
Detail the Palm leaves:
Go back over the palm fronds with the fine liner brush to sharpen the tips and add a very thin stem connecting them to the bottom of the leaf shape. -
Refine the edges:
Check the edges of your Monstera leaves. If the paint bled slightly into the fabric weave, use the liner brush to crisp up the outline. -
Dry thoroughly:
Keep the fan fully open and flat until the paint is completely dry. This is crucial because if you close it too soon, the painted fabric surfaces will stick together and ruin the design. -
Set the fabric paint:
Once dry, check your paint manufacturer’s instructions. Some require heat setting with an iron (use a pressing cloth!) or a hairdryer to make the design permanent.
Gold Leaf Glamour
Once the green paint is dry, delicate touches of gold leaf or metallic gold paint on the veins add a luxurious shimmer when the fan catches the light.
Now you have a functional piece of art to keep you cool in style
Faux Stained Glass Lines on a Folding Fan
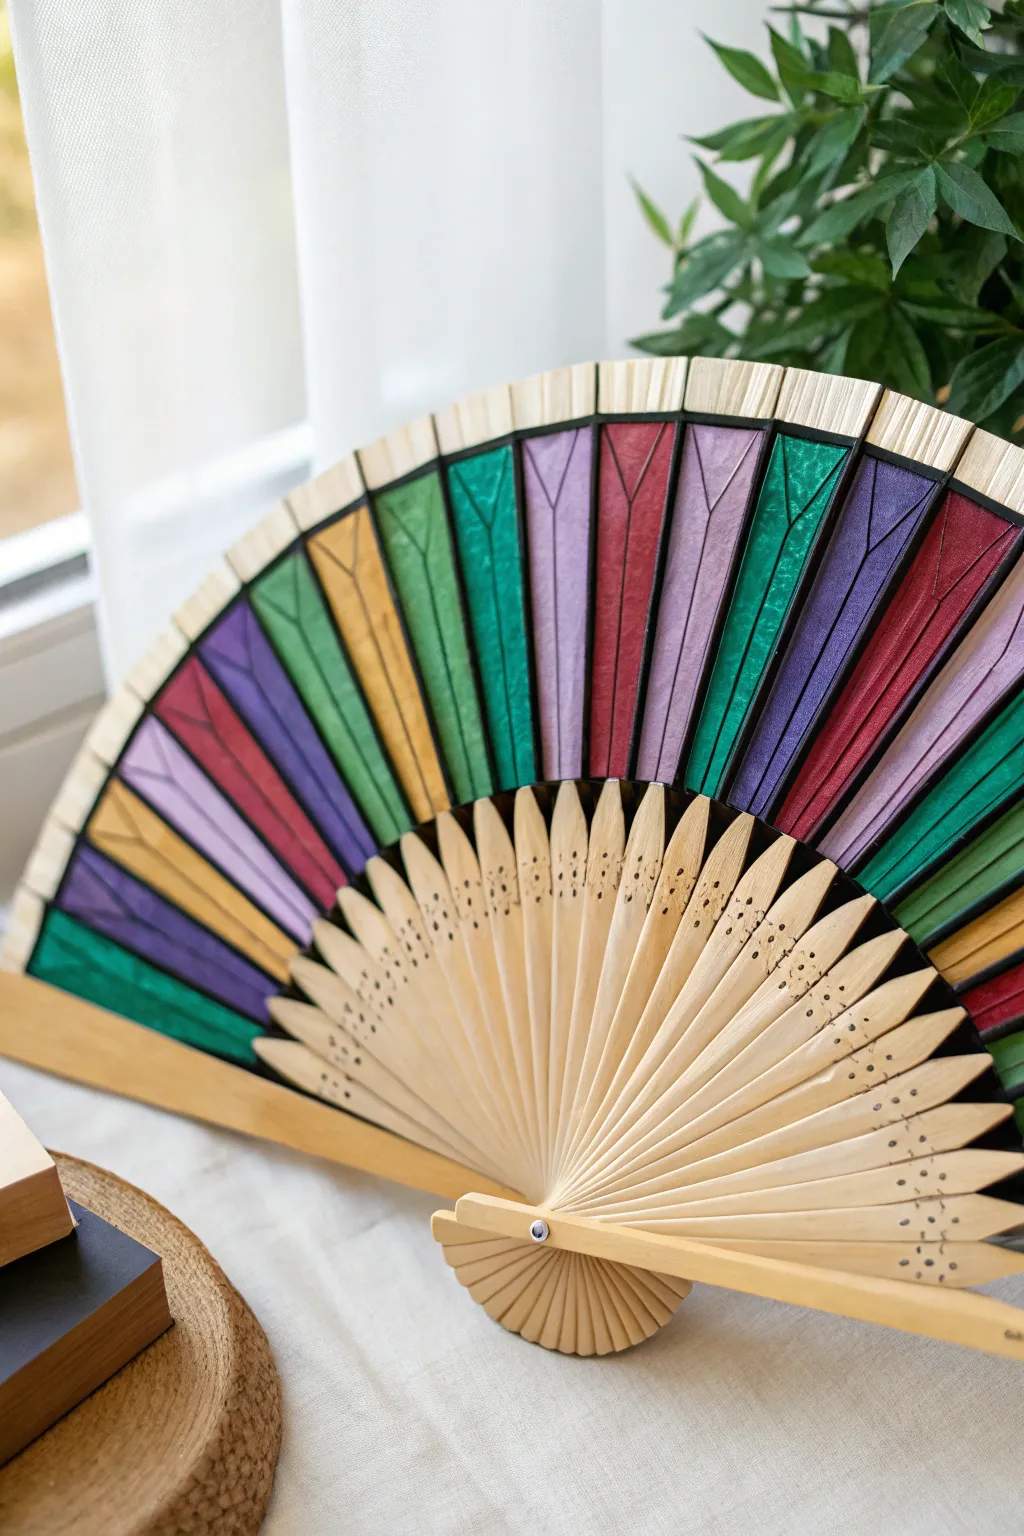
Transform a plain folding fan into a vibrant accessory that mimics the look of leaded stained glass. This project uses bold black lines and rich, saturated colors to create a stunning geometric gradient that catches the light beautifully.
Step-by-Step
Materials
- Plain bamboo folding fan (with silk or fabric leaf)
- Fabric markers or acrylic craft paints in rainbow colors (purple, red, orange, yellow, green, blue)
- Black dimensional fabric paint (puffy paint) or a fine-tip permanent fabric marker
- Small paintbrush (if using acrylics)
- Ruler
- Masking tape
- Water cup and paper towels
Step 1: Preparation and Base Colors
-
Secure the fan:
Fully open your fan and tape the outer wooden guards down to your work surface. This keeps the fabric taut and prevents it from shifting while you work, which is crucial for clean lines. -
Plan your palette:
Arrange your colors in a spectrum order. Looking at the reference, the pattern flows from dark green to blue, purple, magenta, red, orange, yellow, and back to green. Decide which color will start on the far left panel. -
Apply the first color block:
Using your fabric marker or brush with watered-down acrylic, fill in the first fabric panel completely. Whether you use paint or markers, ensure the color is saturated but not so wet that it bleeds comfortably into the next panel. -
Work through the spectrum:
Move to the next panel and apply your next color. Continue painting each fabric section between the bamboo spines one by one. I like to keep a scrap piece of paper nearby to test my color transitions before applying them to the fan. -
Repeat the pattern:
If your fan has many folds, you might cycle through the rainbow twice. Simply restart your color order once you reach the end of your first spectrum set. -
Dry completely:
Let the base colors dry fully. If you used acrylics, wait at least 30 minutes; markers will dry almost instantly. The fabric needs to be bone-dry before dragging a liner pen over it.
Bleed Control
If using liquid paint, dampen the fabric very slightly with plain water first. This helps color spread evenly, but keep a dry brush handy to stop paint from rushing under the wooden ribs.
Step 2: Creating the Stained Glass Effect
-
Outline the spines:
Take your black liner (marker or dimensional paint) and carefully trace along the vertical wooden spines where they meet the fabric. This creates heavy, substantial borders for your ‘glass’ panels. -
Mark the center points:
On each colored panel, find the approximate horizontal center. Make a very tiny dot with your black marker to guide your geometric design. -
Draw the ‘V’ shape:
Starting from the top corners of a single colored panel, draw straight diagonal lines down to your center mark. This creates a long ‘V’ shape. Using a ruler here can be helpful, but freehand lines often add organic charm. -
Add the vertical drop:
From the bottom point of that ‘V’, draw a single straight line down to the base of the fabric section. This completes the classic ‘Y’ geometric shape seen in the reference. -
Repeat across the fan:
Continue this geometric pattern on every single colored panel. Try to keep the vertex of your ‘V’ at roughly the same height across the fan for a cohesive look. -
Thicken the lines:
Go back over your black lines to thicken them. The goal is to imitate the look of lead came used in stained glass windows, so a slightly bolder line works best here. -
Detail the ribs (optional):
If your bamboo spines are plain, you can use a fine-tip black pen to add small faux-drill holes or dots in groups of three near the base of the fabric, mimicking the intricate woodwork shown in the example.
Step 3: Finishing Touches
-
Clean up edges:
Check the top edge of the fan. If the fabric edge looks frayed or uneven, run your black marker along the very rim to create a crisp, finished border. -
Seal the color:
If you are worried about color transfer, you can lightly mist the fabric with a clear matte sealant spray. Ensure you do this from a distance so you don’t soak the detailed paper or fabric. -
Final drying:
Leave the fan open to dry completely, especially if you used dimensional paint which can take several hours to cure. Closing it too early could glue the folds together.
Stiff Movement?
If paint makes the fabric stiff and hard to close, gently fold the fan one pleat at a time to ‘retrain’ the fabric creases before snapping it fully shut.
Now you have a functional piece of art that looks just as beautiful on display as it does cooling you down on a warm day
Monochrome Value Study on Fan Blades
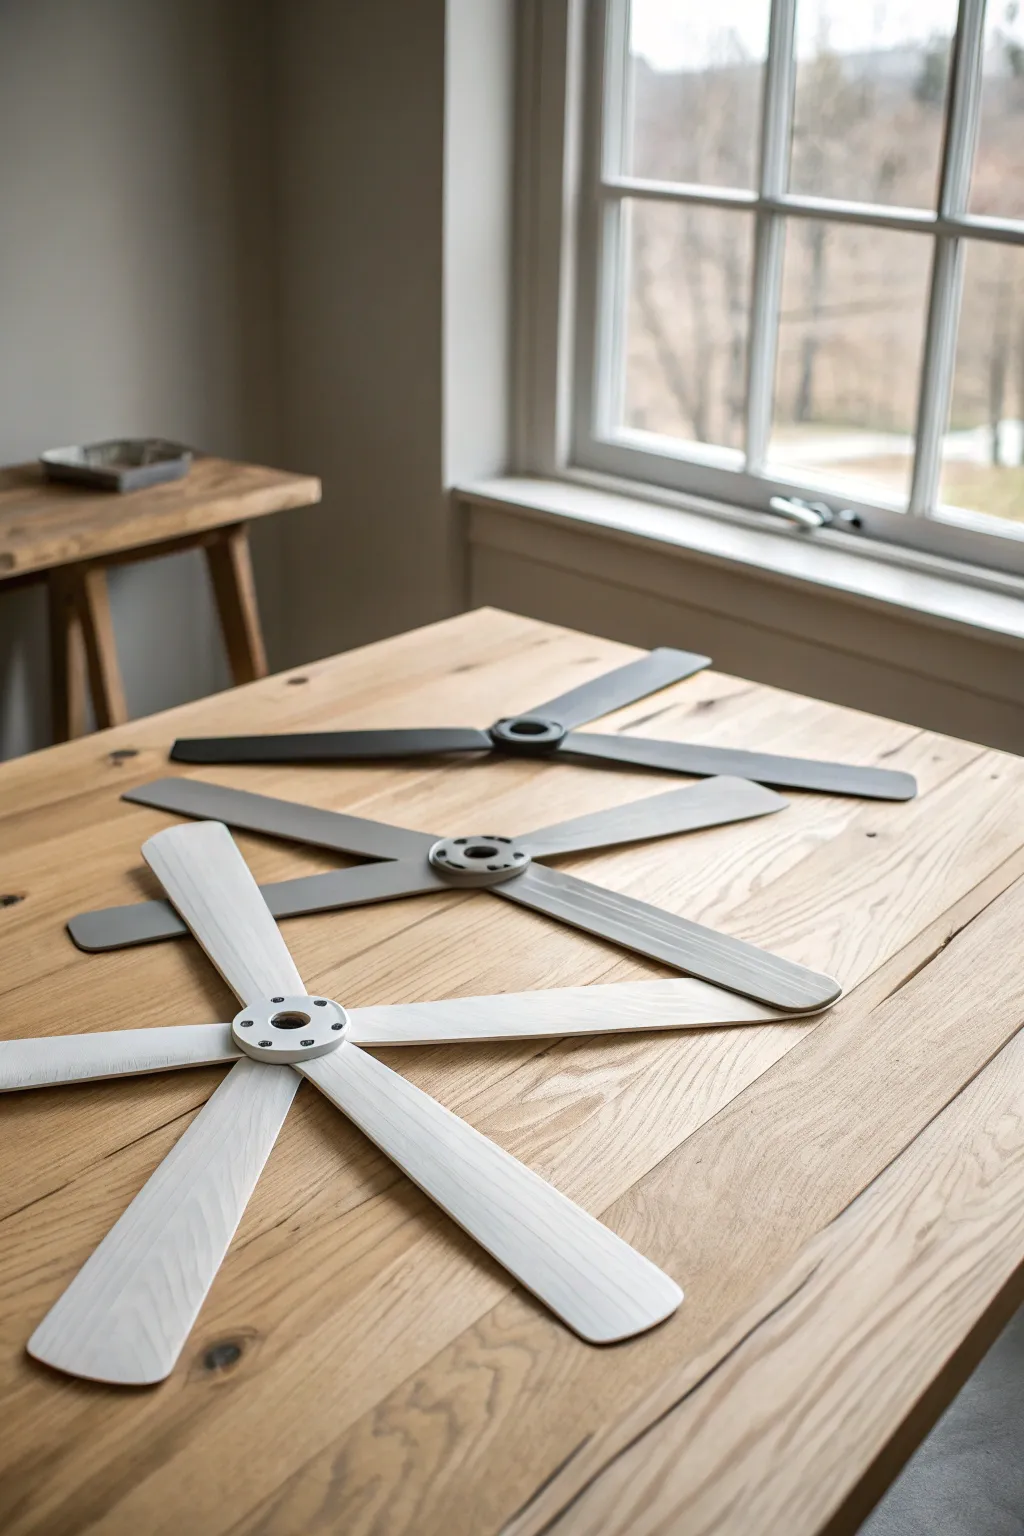
Transform ordinary ceiling fan blades into a sleek, modern statement by exploring value and tone. This project creates a gradient effect across three sets of blades, moving from a charcoal dark to a soft, airy white, perfect for testing color values in your space.
Detailed Instructions
Materials
- Three sets of wooden ceiling fan blades (or similar wooden craft shapes)
- Sandpaper (120 and 220 grit)
- Primer (spray or brush-on)
- Chalk-style paint or matte acrylic paint (Black)
- Chalk-style paint or matte acrylic paint (White)
- Synthetic bristle flat brush (2-inch)
- Small round brush for detailing
- Painter’s tape
- Matte spray sealer or clear wax
- Clean lint-free cloths
- Drop cloth or cardboard
- Screwdriver (to remove hardware)
Step 1: Preparation
-
Disassemble the fans:
Begin by removing the fan blades from their motor housing if you haven’t already. Use a screwdriver to detach the metal brackets from the wooden blades so you are working with just the wood. -
Clean surface:
Wipe down each blade thoroughly with a damp cloth to remove decades of dust, grease, or grime. Allow them to dry completely. -
Draft the order:
Arrange your three sets on your workspace. Decide which set will be the darkest, which will be the mid-tone grey, and which will be the lightest white. -
Sand for adhesion:
Scuff sand all the blades using 120-grit sandpaper. You don’t need to strip them to bare wood, but you need to break the shiny factory seal so the paint sticks. -
Wipe clean again:
Use a tack cloth or slightly damp rag to remove all sanding dust. Every speck of dust will show up in the final finish, so be thorough. -
Prime the wood:
Apply a thin, even coat of primer to all sides of the blades. This ensures your color values remain true and aren’t affected by the underlying wood tone.
Step 2: Mixing and Painting
-
Mix the charcoal shade:
For the darkest set (the 2-blade or simple shape), mix your black paint with a tiny drop of white. You want a soft charcoal, not a harsh jet black. -
Paint the dark set:
Apply the charcoal paint in long, smooth strokes following the length of the blade. Watch for drips on the edges and smooth them out immediately. -
Create the mid-tone grey:
For the middle set (the 4-blade piece), mix equal parts black and white paint. Adjust until you have a perfect neutral grey that bridges the gap between your dark and light sets. -
Paint the grey set:
Paint this second set, ensuring you get into any central grooves or attachment points. I like to let this dry briefly and do a second thin coat for opacity. -
Mix the off-white:
For the foreground set (the 6-blade piece), use your white paint with just a pin-prick of black added to soften it. This purely white look can be stark, so warming it slightly helps. -
Paint the light set:
paint the final large set. Light colors often require three thin coats rather than two thick ones to cover wood grain effectively. -
Detail the hubs:
If your blades have central connecting hubs or decorative centers like in the image, paint these to match their respective blades for a seamless, dipped look.
Smooth Operator
To minimize brush strokes, dampen your synthetic brush slightly before dipping it into the acrylic paint. This helps the paint self-level as it dries.
Step 3: Finishing Touches
-
Sand for texture:
Once fully dry, lightly run 220-grit sandpaper over the flat surfaces. This smooths out brush strokes and gives that professional, matte furniture feel. -
Clean the hardware:
If you are reattaching metal brackets, clean them or spray paint them a matte black before reassembly to keep the modern aesthetic. -
Seal the work:
Apply a matte clear spray sealer or a clear furniture wax. This protects the finish from dust buildup and makes them easier to clean later. -
Buff the wax:
If you used wax, let it cure for about 15 minutes, then buff it gently with a lint-free cloth to a soft sheen. -
Reassemble:
Screw the hardware back onto the blades. Be careful not to overtighten and crack your fresh paint job.
Grain Game
Want a rustic look? Skip the primer and dilute your paint with 20% water. This creates a semi-transparent stain that lets the natural wood grain show through.
Enjoy the calm, cohesive look these tonal blades bring to your room ceiling fan update
Texture Play With Sponging and Splatter on Fans
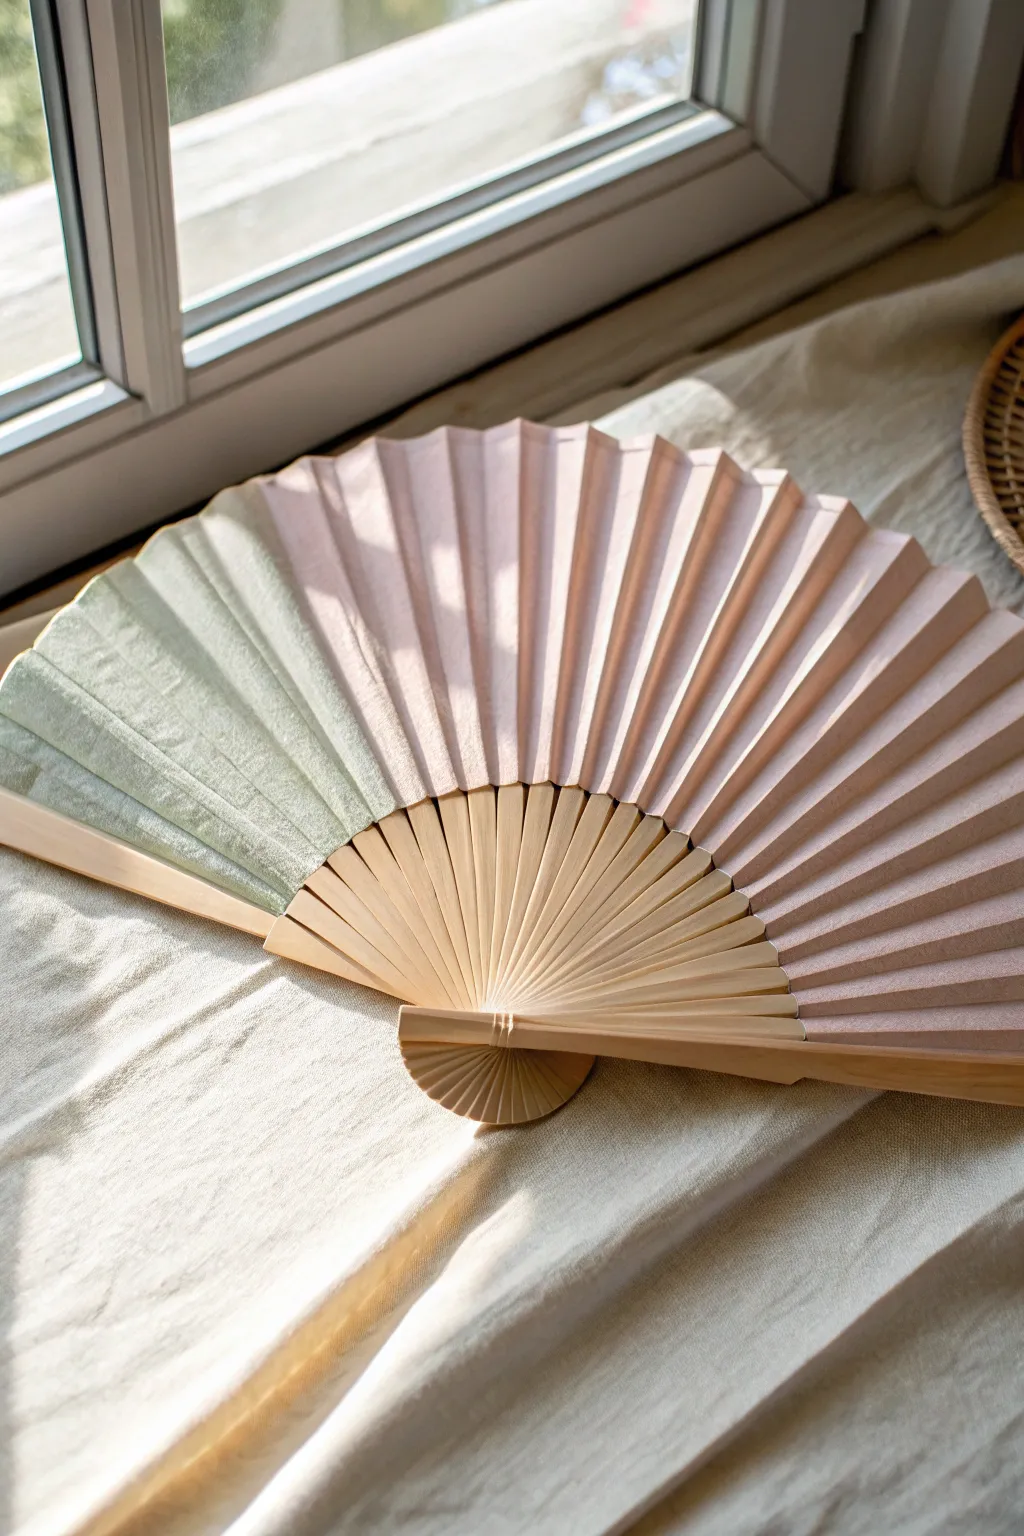
Transform a plain folding fan into a modern, minimalist accessory with this subtle two-tone design. By combining soft sage and dusty pink acrylics with a delicate splatter technique, you’ll create a textured, artisanal look that feels both classic and contemporary.
How-To Guide
Materials
- Blank wooden folding fan with fabric or heavy paper leaf
- Acrylic paints (Sage Green, Dusty Pink/Blush, White)
- Fabric medium (if your fan is fabric)
- Painter’s tape or low-tack masking tape
- Small flat synthetic brush (size 6 or 8)
- Old toothbrush or stiff bristle brush
- Palette or mixing plate
- Water cup and paper towels
- Cardboard or scrap paper for masking
Step 1: Preparation and Base Colors
-
Prepare the fan:
Fully open your blank fan and lay it flat on a protected work surface. If the fan tends to snap shut, use small weights or tape the outer bamboo guards down to the table to keep it taut. -
Mix the colors:
Squeeze out your sage green and dusty pink paints. If you are painting on a fabric fan, mix the acrylics with fabric medium according to the bottle’s instructions to keep the material flexible after drying. -
Decide on sections:
Determine where your color split will be. For the look in the image, aim for an asymmetrical design where the green section covers about one-quarter of the fan on the left side. -
Mask the boundary:
Apply a strip of painter’s tape vertically along one of the pleat folds to create a sharp line between your two future color zones. Press the tape down firmly to prevent bleed-under. -
Paint the green section:
Using your flat brush, apply the sage green mixture to the smaller section. Paint in the direction of the pleats, working from the wooden rib outwards to the edge. -
Paint the pink section:
Apply the dusty pink paint to the larger remaining section. Ensure you get paint into the creases of the folds, but avoid globbing it on too thick, as this prevents the fan from closing properly. -
Remove tape:
Carefully peel back the painter’s tape while the paint is still slightly tacky to reveal your crisp dividing line. Let the base coat dry completely for about 20-30 minutes.
Pro Tip: Flexible Folds
Mix fabric medium into your acrylics (1:1 ratio). It prevents the paint from cracking when the fan folds and keeps the fabric from becoming too stiff.
Step 2: Creating Texture
-
Prepare the splatter mix:
Dilute a small amount of white acrylic paint with water until it reaches the consistency of heavy cream or ink. You want it fluid enough to fly off bristles but thick enough to be opaque. -
Protect the woodwork:
Lay a piece of cardstock or scrap paper over the wooden ribs (the skeleton of the fan) to ensure the splatter only lands on the painted fabric leaf. -
Test your splatter:
I always test on a scrap piece of paper first. Dip an old toothbrush into the white wash, aim it at the paper, and run your thumb across the bristles to flick the paint. -
Apply splatter to green:
Hold the toothbrush about 6-8 inches above the green section. Flick the bristles to create a fine mist of white droplets. Keep the density light for a subtle texture. -
Switch colors for depth (Optional):
For extra depth, you can splatter a slightly darker shade of pink onto the pink section, or keep it consistent with the white splatter across the whole fan. -
Sponging technique:
If you prefer a softer texture over splatter, dampen a small piece of natural sponge. Dip it lightly into a lighter shade of your base color and dab off the excess on a paper towel. -
Apply sponge texture:
Gently press the sponge onto the raised ridges of the fan folds. This highlights the structure and adds a vintage, worn-in feel to the fabric. -
Clean the ribs:
If any paint accidentally got onto the wooden ribs, use a damp Q-tip or a toothpick to gently scrape it away before it cures fully. -
Table dry:
Let the fan sit open and flat until it is bone dry. This is crucial; closing it while damp will glue the pleats together. -
First fold:
Once dry, gently close the fan. The paint may add stiffness, so move slowly to help the fabric ‘remember’ its creases without cracking the paint.
Level Up: Metallic Edge
After the splatter dries, use a gold leaf pen or fine brush with metallic gold paint to line the very top edge of the paper for a touch of elegance.
Now you have a beautifully textured, custom fan ready to keep you cool in style


Have a question or want to share your own experience? I'd love to hear from you in the comments below!