When I’m craving that calm, roomy kind of composition, I reach for farm painting themes—barns, fences, fields, and all that cozy country texture. Here are some farm painting ideas you can keep super simple or level up with extra detail, depending on your mood.
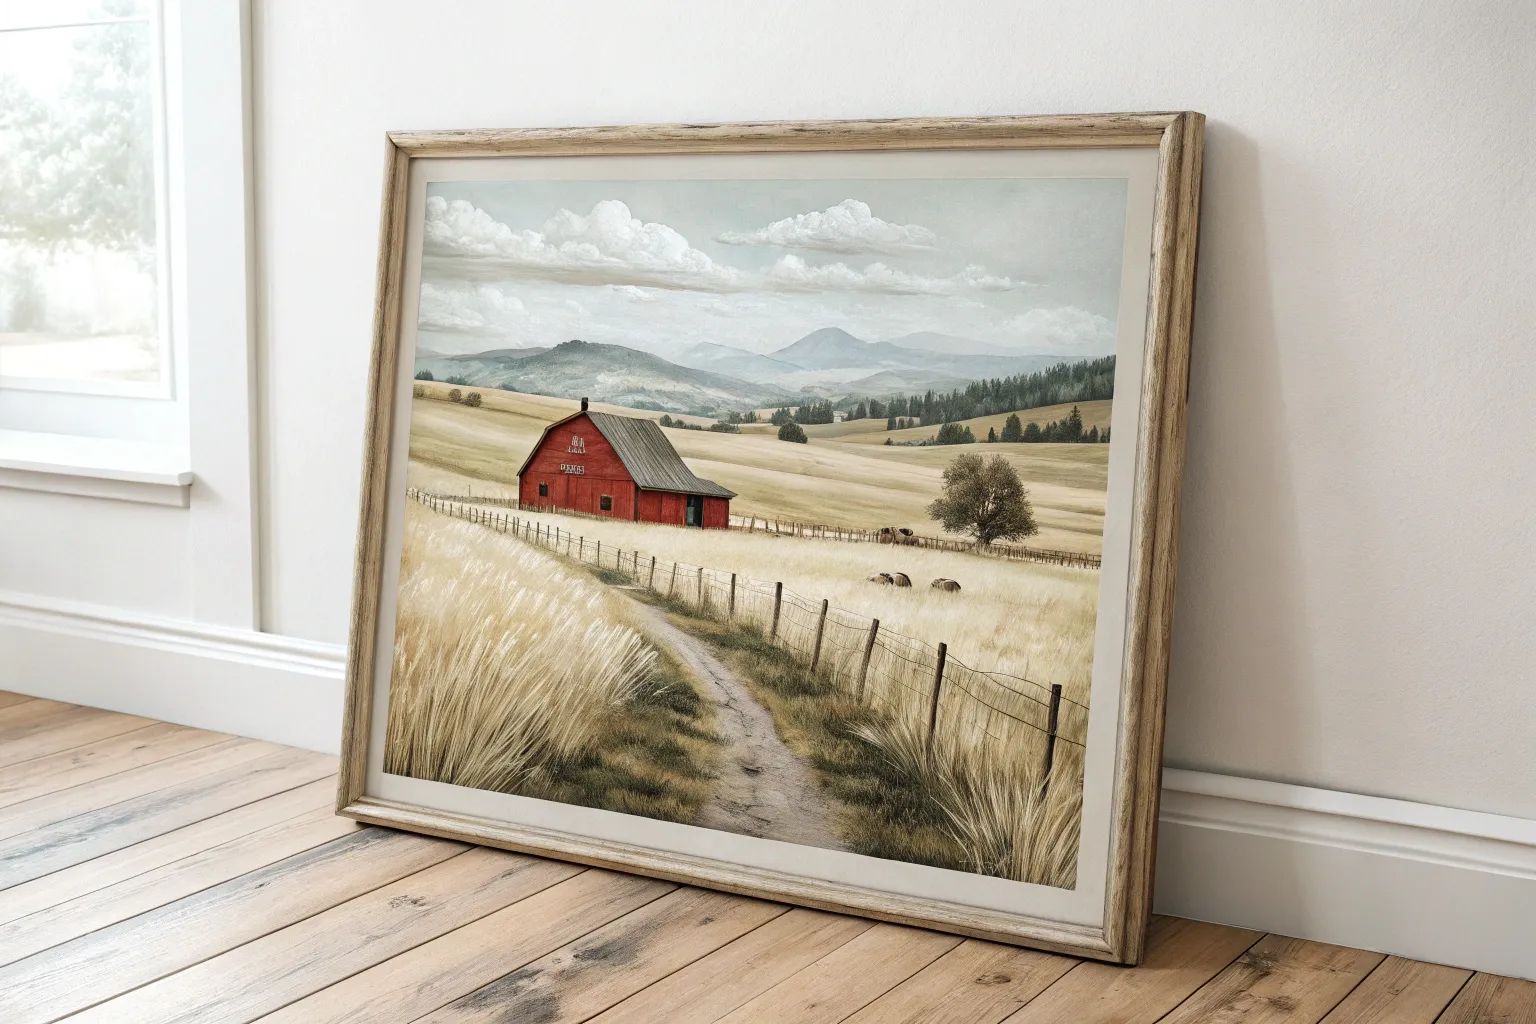
Classic Red Barn in Open Pasture
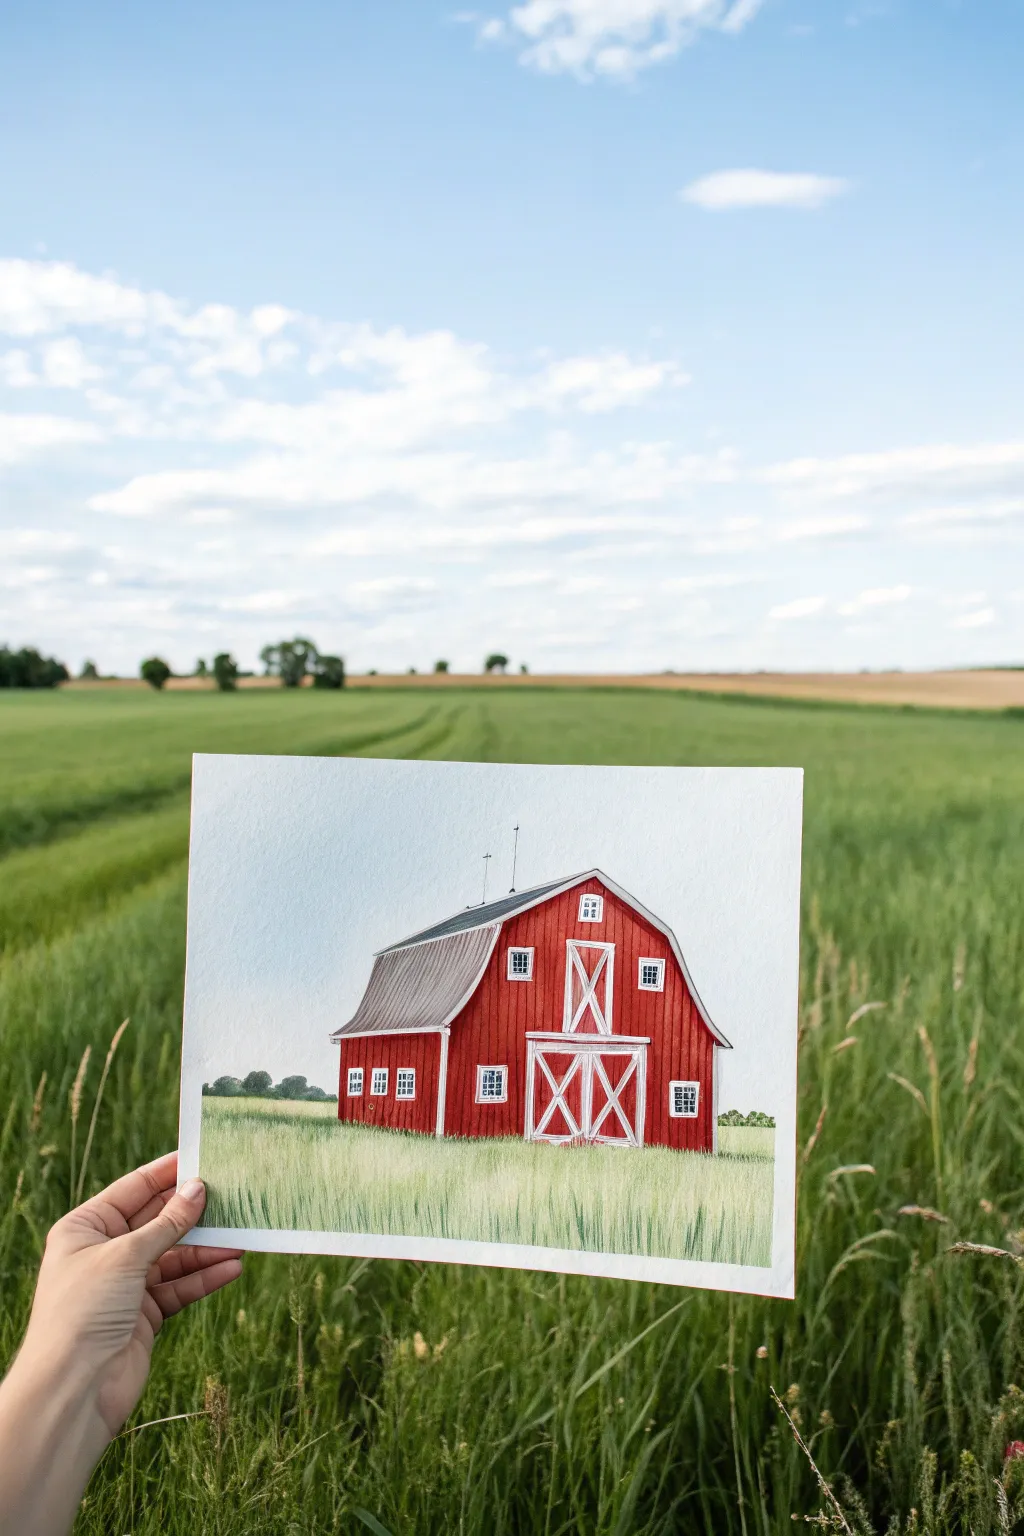
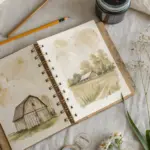
Capture the nostalgic heart of rural scenery with this crisp, realistic watercolor painting of a classic red barn. Through careful layering and precise detailing, you’ll create a piece with vibrant reds and clean white trim that pops against a soft summer sky.
Step-by-Step Guide
Materials
- Cold press watercolor paper (140 lb/300 gsm)
- Watercolor paints (Alizarin Crimson, Cadmium Red, Burnt Umber, Payne’s Grey, Sap Green, Yellow Ochre, Ultramarine Blue)
- White gouache or white gel pen
- Round brushes (size 2, 6, and 10)
- Flat brush (1/2 inch)
- Masking fluid
- Pencil (HB or 2H)
- Ruler
- Painter’s tape
- 2 jars of water
Step 1: Preparation and Sketching
-
Secure the paper:
Begin by taping down all four edges of your watercolor paper to a board. This prevents warping and creates that satisfying crisp border when you’re finished. -
Draft the outline:
Using your ruler and a light pencil, sketch the basic structure of the barn. Focus on the gambrel roof shape (the classic two-slope barn roof) and the large rectangular base. -
Add architectural details:
Sketch in the windows, the large double doors, and the ‘X’ bracing on the doors and loft. Keep your lines light so they don’t show through the final paint. -
Preserve the whites:
Apply masking fluid carefully to the window frames, the door frames, the ‘X’ trim, and the roofline trim. This step is crucial for achieving those bright, crisp white details later.
Straight Lines Made Easy
Don’t stress about perfect freehand lines. Use a strip of painter’s tape or a credit card as a straight-edge guide for your brush when painting the long rooflines and siding edges.
Step 2: Painting the Sky and Field
-
Wash the sky:
Wet the sky area with clean water first. Mix a very dilute wash of Ultramarine Blue and apply it from the top down, fading it out to almost clear water near the horizon line for a realistic atmospheric gradient. -
Paint the distant trees:
While the sky is dry, mix Sap Green with a touch of Payne’s Grey. Paint the tiny silhouette of the tree line along the horizon, keeping the shapes simple and slightly soft. -
Base the foreground:
For the grassy field, apply a loose wash of Sap Green mixed with Yellow Ochre. Use vertical, upward brush strokes near the bottom to suggest blades of grass, letting the color fade slightly as it recedes toward the barn.
Uneven Watermark Fix
If your sky wash dried with hard edges or ‘blooms,’ wet a clean, damp brush and gently scrub the edge to soften it, then blot with a paper towel. Re-glaze if needed.
Step 3: Building the Barn
-
Mix the barn red:
Create a rich barn red by mixing Cadmium Red with a small amount of Alizarin Crimson and a tiny touch of Burnt Umber to tone it down. It shouldn’t be too bright or fire-engine red. -
Apply the first red layer:
Using a size 6 round brush, paint the siding of the barn. Paint right over the masked areas; the fluid will protect the white paper underneath. Keep the wash relatively even. -
Paint the roof:
Mix a dark grey using Payne’s Grey and a touch of Burnt Umber. Paint the roof, ensuring the top section is slightly lighter than the steeper side section to indicate lighting. -
Deepen the shadows:
Once the first red layer is bone dry, mix a slightly darker version of your red (add more Crimson or a tiny bit of blue). Paint vertical striations to mimic wood siding, and darken the area under the eaves for shadow. -
Add roof texture:
Dry brush a little of the darker grey vertically down the roof slope to simulate shingles or metal ribbing texture.
Step 4: Details and Finishing Touches
-
Remove the masking:
Wait until the painting is completely dry—if the paper feels cool to the touch, it’s not ready. Gently rub away the masking fluid to reveal the stark white paper. -
Clean up edges:
If any red paint bled into the white trim, use white gouache to touch it up. Paint the insides of the windows with a dark grey-blue to show depth. -
Paint the foundation:
Use a light grey wash to paint any visible concrete foundation at the very bottom of the barn so it doesn’t look like it’s floating. -
Enhance the grass:
I like to take a size 2 brush with darker green paint and add distinct blades of grass in the immediate foreground, overlapping the bottom of the barn slightly to ground it in the scene. -
Final antennas:
Using your finest brush or a fine-liner pen, create the very thin lines of the lightning rods or weather vanes on the roof peak.
Peel off your border tape and admire your charming countryside scene

Winding Dirt Road to the Farm

This serene watercolor painting captures the quiet beauty of a winding country lane leading toward a distant farmhouse. The composition relies on gentle gradients and the leading lines of the dirt path to draw the viewer’s eye into the peaceful landscape.
Detailed Instructions
Materials
- Cold press watercolor paper (300 gsm)
- Watercolor paints (Sap Green, Olive Green, Burnt Sienna, Yellow Ochre, Ultramarine Blue, Alizarin Crimson, Burnt Umber)
- Round brushes (sizes 4, 8, and 12)
- Flat wash brush (1 inch)
- Masking fluid (optional)
- Pencil (HB or 2B) and kneaded eraser
- Two jars of water
- Paper towels
- Palette
Step 1: Preparation and Sketching
-
Rough sketch:
Begin by lightly sketching the horizon line just above the middle of the paper. Keep your pencil pressure very light so the graphite doesn’t show through the transparent paint later. -
Map the road:
Draw the winding dirt road starting wide at the bottom right and curving toward the center left, getting narrower as it recedes toward the house. -
Place the house & trees:
Sketch the small farmhouse on the distant hill and outline the clusters of trees on the horizon.
Creating Distance
Make colors paler and cooler (more blue) as they recede into the distance. This atmospheric perspective gives the illusion of depth.
Step 2: Sky and Background
-
Wet the sky:
Using your flat wash brush, wet the paper area above the horizon line with clean water. -
First sky wash:
While the paper is wet, drop in a very diluted mix of Ultramarine Blue and a touch of Burnt Sienna for a soft, cloudy grey-blue sky, leaving some white paper showing for clouds. -
Horizon warmth:
While the sky is still damp, add a faint wash of Yellow Ochre near the horizon line to suggest the warm light of sunrise or sunset. -
Distant trees:
Once the sky is dry, mix a cool green using Sap Green and a little Blue. Paint the distant tree line along the horizon with a size 8 round brush, keeping the edges relatively soft.
Step 3: The Rolling Hills
-
Base green wash:
Apply a pale wash of Sap Green and Yellow Ochre to the grass areas on either side of the road. Use broad, horizontal strokes to follow the contour of the land. -
Mid-ground depth:
While the first layer is still slightly damp, drop in deeper greens (Olive Green mixed with a touch of Burnt Umber) into the shadow areas of the rolling hills to create volume. -
Painting the house:
Using the size 4 brush, carefully paint the roof of the farmhouse with a mix of burnt sienna and alizarin crimson. Leave the walls white or tint them very slightly with a diluted grey.
Level Up: Texture
Splatter tiny drops of watered-down brown paint or clean water onto the foreground road area while it’s damp to create a gritty, pebbled texture.
Step 4: The Dirt Road
-
Road base color:
Paint the dirt road with a watery mix of Yellow Ochre and Burnt Sienna. Keep this layer very light and uneven to represent sunlight hitting dust. -
Shadows and tracks:
Once dry, use a mix of Burnt Umber and Ultramarine to paint the tire tracks and shadows within the road ruts. I like to use a dry-brush technique here to mimic the texture of rough dirt. -
Central grassy strip:
Paint the grassy strip down the center of the road using a mix of Olive Green and Sap Green. Use short, upward flicks with the tip of your brush to suggest individual blades of grass.
Step 5: Foreground Details and Refining
-
Foreground grass texture:
Deepen the green in the immediate foreground (bottom corners) with a richer green mix. Add defined grass blades using quick, upward strokes with your smallest brush. -
Dry grass accents:
On the right side of the road, add some dried, golden grasses using Yellow Ochre and a thin rigger or detail brush to add variety to the foliage. -
Road edge definition:
Darken the edges where the road meets the grass with a shadow color to help the road look sunken into the landscape. -
Tree details:
Add the standalone tree on the right side of the horizon and the bush near the house using a stippling motion for leafy texture. -
Final touches:
Evaluate the painting for contrast. Add final dark accents in the deepest tire ruts and under the trees to make the scene pop.
Once dried, frame your landscape in a simple wooden frame to complete the rustic farmhouse aesthetic

Sheep Meadow With Soft Edges
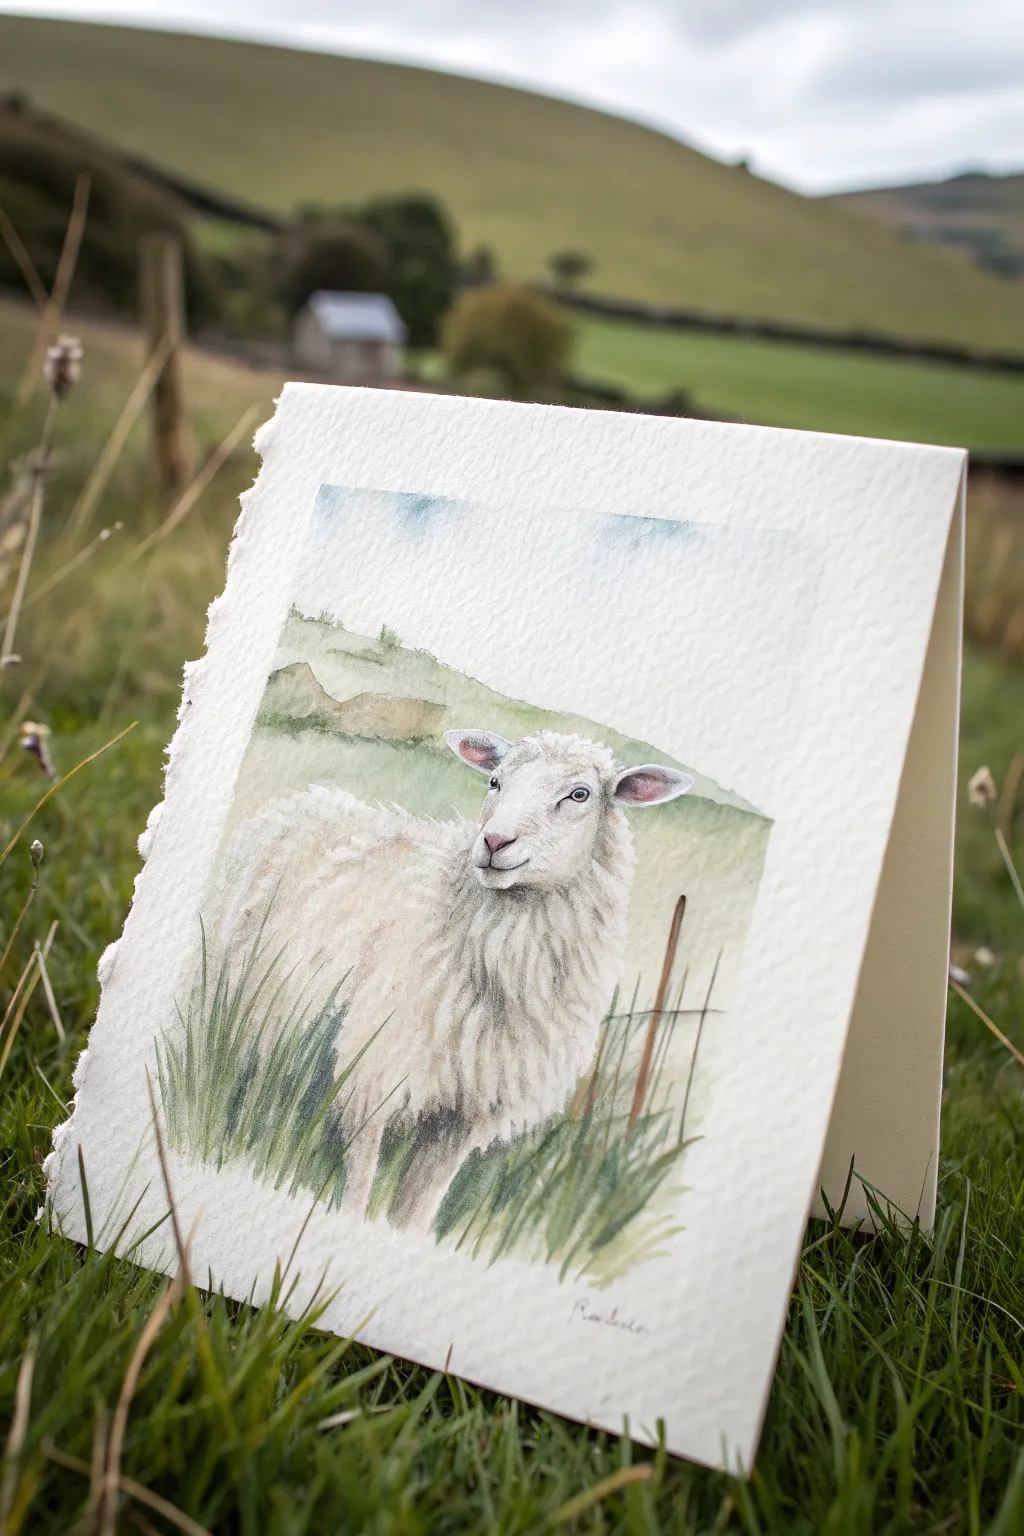
Capture the serene spirit of the countryside with this soft, realistic watercolor painting of a sheep. The focus is on building up layers of texture for the wool and keeping the background dreamy and atmospheric.
Step-by-Step Tutorial
Materials
- Cold press watercolor paper (300gsm/140lb)
- Watercolor paints (Ultramarine Blue, Burnt Sienna, Yellow Ochre, Sap Green, Alizarin Crimson)
- Small round brush (size 2 or 3)
- Medium round brush (size 6 or 8)
- Pencil (HB or 2H)
- Kneaded eraser
- Two jars of water
- Paper towels
- Ruler (optional to tear edges)
Step 1: Sketch and Preparation
-
Prepare the paper edge:
To mimic the card in the photo, create a deckled edge. Wet a ruler or straight edge, place it on your paper, and run a damp brush along the line. Gently tear the paper against the ruler to create a rough, fibrous border. -
Lightly sketch the outline:
Using your HB pencil, lightly draw the main shape of the sheep. Focus on the oval shape of the body and the triangular structure of the head. Don’t press too hard, as graphite can smear when wet. -
Place the horizon and details:
Sketch a soft, sloping horizon line behind the sheep. Add two vertical lines to the right to indicate fence posts. Mark the eye, nose, and ear placement lightly.
Step 2: First Washes
-
Paint the sky:
Mix a very dilute wash of Ultramarine Blue. Wet the sky area with clean water first, then drop in the blue, letting it fade to white as it nears the horizon for a soft, cloudy look. -
Lay in the background hills:
Once the sky is dry, mix Sap Green with a touch of Yellow Ochre. Paint the rolling hills behind the sheep. Keep this layer fairly light and loose; we want the background to recede. -
Underpainting the sheep:
The sheep isn’t pure white. Mix a very watery shadow color using Ultramarine Blue and a tiny amount of Burnt Sienna (to make a soft grey). Paint the shadowed areas of the wool—under the neck, the belly, and the rear legs. -
Warm up the face:
While the body dries, mix a pale skin tone using watered-down Alizarin Crimson and a dot of Yellow Ochre. Wash this over the nose and ears, leaving the top of the nose slightly lighter.
Muddiness warning
If your wool shadows look muddy, you likely overmixed the grey on the paper or didn’t let layers dry. Let the paper dry completely between washes.
Step 3: Building Texture
-
Creating wool texture:
Using your smaller brush and a slightly darker grey mix, start painting small, C-shaped squiggles and clumps of fur. I like to work wet-on-dry here to keep the texture distinct but soft. -
Deepen the shadows:
Identify the darkest shadow areas, usually under the chin and between the front legs. Add another layer of the grey-brown mix here to build volume and form. -
Detailing the face:
With a fine point and a mix of Ultramarine Blue and Burnt Sienna (more pigment, less water), paint the eye. Leave a tiny speck of white paper for the highlight to bring the sheep to life. -
Refining the nose and mouth:
Use the dark grey mix to carefully outline the nostrils and the gentle curve of the mouth. Keep the lines broken and delicate rather than solid outlines.
Add depth
Sprinkle a tiny pinch of salt onto the wet background hill wash while it’s still damp. This creates a mottled, natural texture that looks like distant foliage.
Step 4: Foreground and Finishing
-
Paint the fence posts:
Mix Burnt Sienna with a little blue for a wood tone. Paint the two fence posts on the right side. Don’t worry if they are crooked; it adds rustic charm. -
Start the grass:
Load your medium brush with Sap Green and a bit of Ultramarine. Starting from the bottom of the page, use quick, upward flicking motions to create blades of grass overlapping the sheep’s legs. -
Add grass variation:
Vary your greens by adding more yellow or more blue. Add darker, shorter grass clumps right at the base of the sheep to ground it so it doesn’t look like it’s floating. -
Add background definition:
Return to the background hills. Add slightly darker green blotches to suggest distant bushes or rocks, but keep edges soft so they stay in the distance. -
Final texture check:
Look at the wool again. If it feels too flat, add a few crisp, dark marks in the deepest shadows to increasing contrast. Soften any edges that look too harsh with a damp brush. -
Sign and mount:
Once fully dry, sign your work at the bottom. The piece is now ready to be folded into a greeting card or framed.
Now you have a charming pastoral scene ready to share or display


Farmhouse With Laundry Line
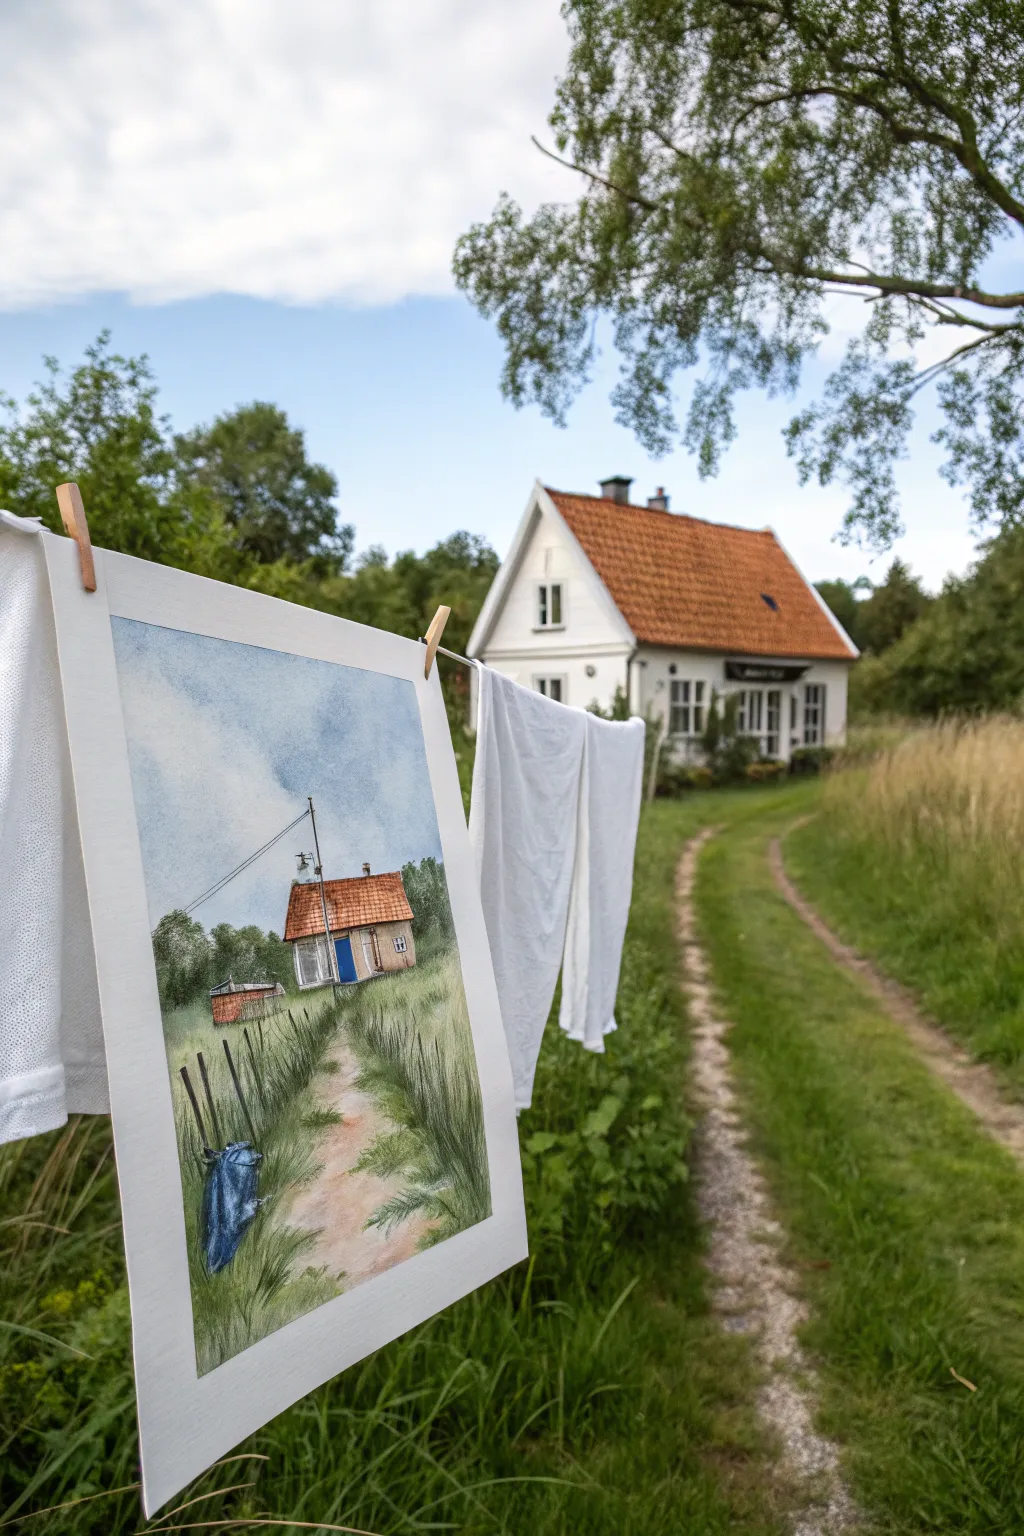
Capture the charm of a rustic white cottage with a vibrant red roof nestled at the end of a grassy path in this breezy watercolor project. The composition focuses on the inviting journey towards the home, using loose washes for the sky and detailed strokes for the tall grasses.
Step-by-Step Guide
Materials
- Cold-press watercolor paper (300gsm)
- Watercolor paints (Ultramarine Blue, Burnt Sienna, Sap Green, Yellow Ochre, Alizarin Crimson)
- Round brushes (sizes 4, 8, and 12)
- Rigger or liner brush for fine details
- Masking fluid (optional)
- Pencil (HB or 2H)
- Kneaded eraser
- Two jars of water
- Paper towels
- Washi tape or masking tape
Step 1: Sketching and Preparation
-
Tape the Edges:
Secure your paper to a board using washi tape or painter’s tape to create a clean white border and prevent buckling while you work. -
Sketch the Composition:
Lightly sketch the horizon line about one-third of the way up the paper. Draw the basic shape of the house, placing it slightly off-center to the left. -
Outline the Path:
Draw the converging lines of the dirt path leading from the bottom foreground toward the house, ensuring the path narrows as it recedes to create perspective. -
Add Details:
Mark the position of the blue door, windows, and the small lean-to shed on the left. Lightly indicate the utility pole and power lines, though you’ll paint these last.
Muddy Greens?
If your grass looks dull, avoid mixing too many colors. Instead, let yellow and blue mix directly on the paper for vibrant, natural variation.
Step 2: Painting the Sky and Background
-
Wet-in-Wet Sky:
Wet the entire sky area with clean water using your largest brush. While damp, drop in a light wash of Ultramarine Blue, leaving white space for fluffy clouds. -
Paint the Background Trees:
While the sky is still slightly damp near the horizon, dab in a mix of Sap Green and a touch of Ultramarine to suggest distant trees behind the house. Let the edges remain soft to push them back in space. -
Let it Dry:
Allow the sky and background layer to dry completely before touching the house to prevent colors from bleeding.
Level Up: Salt Technique
While the path or grass wash is still wet, sprinkle a pinch of table salt on it. As it dries, the salt pushes pigment away, creating amazing texture.
Step 3: The House and Structures
-
Roof Texture:
Mix Burnt Sienna with a hint of Alizarin Crimson for the roof tiles. Apply a wash over the roof area, leaving tiny speckles of white paper showing to suggest texture and light reflection. -
Walls and Shadows:
Keep the house walls mostly paper-white, but use a very dilute mix of Ultramarine and Burnt Sienna to paint shadows under the eaves and along the side of the house. -
The Blue Door:
Paint the door with a saturated Ultramarine Blue. This pop of color draws the eye immediately to the focal point. -
Shed details:
Fill in the small shed structure on the left with a darker reddish-brown mix, ensuring it looks separate from the main house.
Step 4: Grass and Foreground
-
Path Base Layer:
Apply a watery wash of Yellow Ochre and Burnt Sienna to the path area. I like to drop in little splotches of darker brown while it’s wet to mimic dirt texture. -
Base Greenery:
Paint the grassy areas on either side of the path with a light wash of Sap Green and Yellow Ochre. Keep this layer loose. -
Adding Grass Blades:
Once the base green is dry, use your size 4 round brush and varying mixes of Sap Green and Ultramarine to flick upward strokes, creating individual blades of tall grass. -
Foreground Depth:
Make the grass in the immediate foreground (bottom of the paper) darker and taller than the grass near the house to emphasize depth. -
Utility Pole and Lines:
Using a rigger brush and a dark grey mix, paint the thin utility pole and the fine lines connecting to the house roof. Keep your hand steady but fluid. -
Final Touches:
Add the dark blue object (perhaps a covered planter or bin) in the left foreground to anchor the composition. Remove the tape carefully once the paper is bone dry.
Step back and admire your peaceful countryside scene before finding the perfect spot to display it
BRUSH GUIDE
The Right Brush for Every Stroke
From clean lines to bold texture — master brush choice, stroke control, and essential techniques.
Explore the Full Guide
Windmill Silhouette on the Horizon
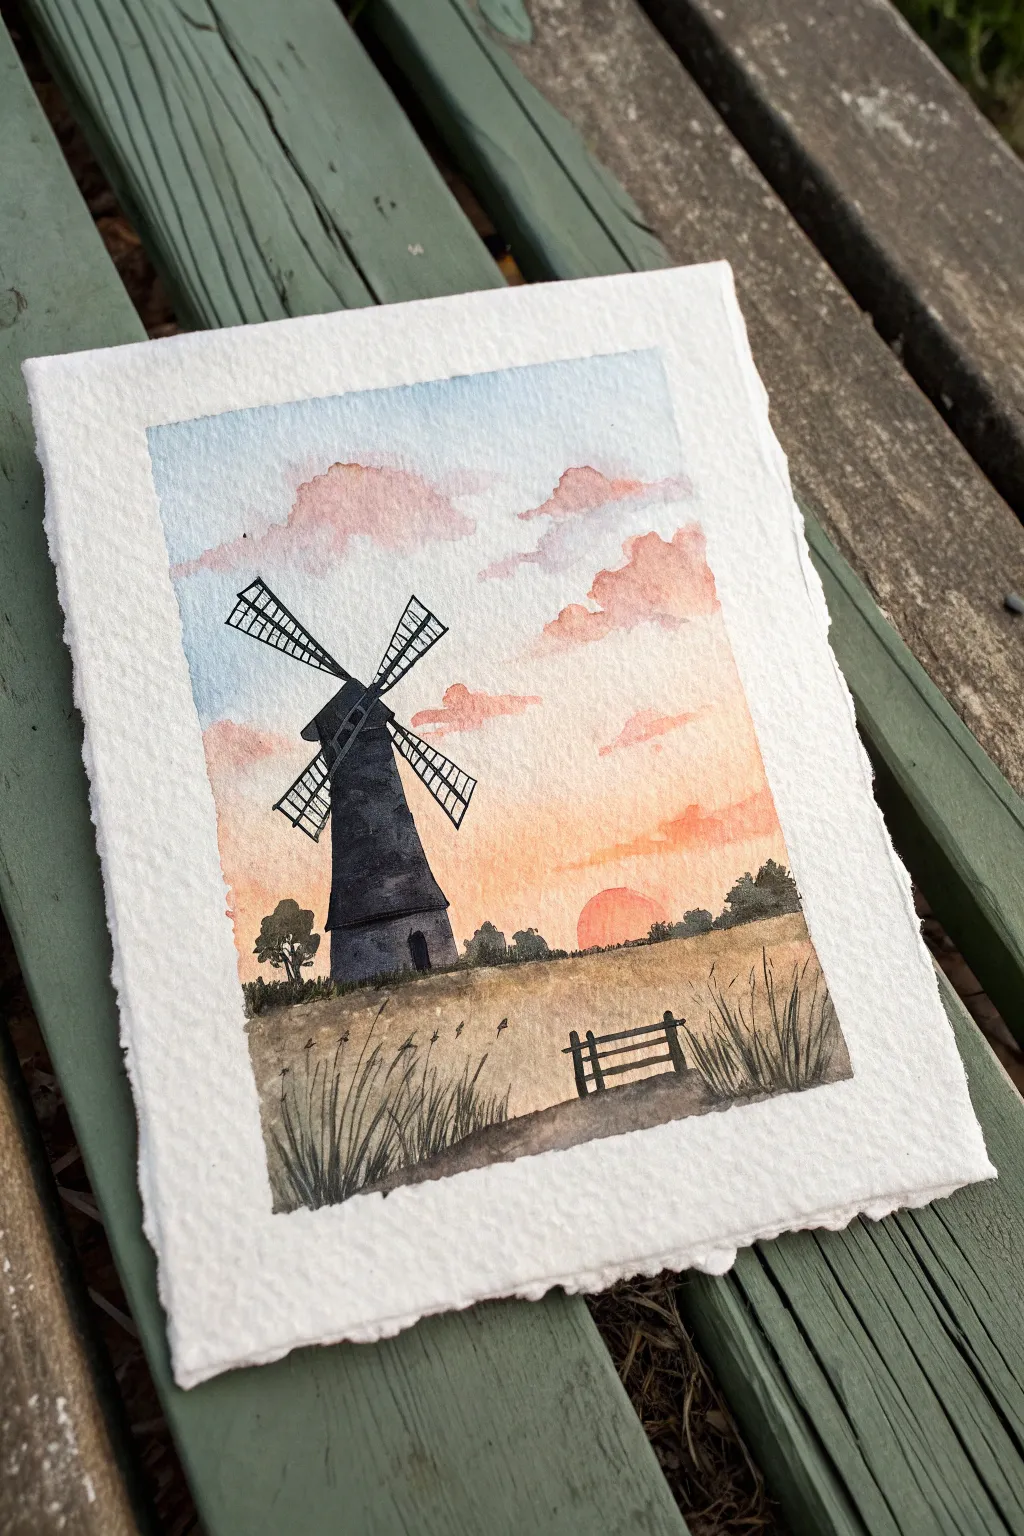
Capture the serene beauty of a rural evening with this evocative watercolor painting, featuring a striking windmill silhouette against a soft, glowing sky. This project combines wet-on-wet sky techniques with crisp architectural details for a balanced and textured composition.
How-To Guide
Materials
- Cold press watercolor paper (deckle edge preferred)
- Watercolor paints (Cerulean Blue, Peach or Naples Yellow, Alizarin Crimson, Burnt Sienna, Payne’s Gray, Lamp Black)
- Masking tape
- Round watercolor brushes (Size 8 and Size 2)
- Fine liner brush or black waterproof fineliner pen
- Pencil and eraser
- Jar of clean water
- Paper towels
Step 1: Preparation and Sketching
-
Prepare the paper:
Begin by taping down your watercolor paper to a hard board if you aren’t using a block. This prevents buckling when we add the wet wash later. If you want that lovely rough edge shown in the image, you can leave the edges untaped or tear the paper beforehand. -
sketch the horizon:
Using a light hand and a hard pencil (like an HB), draw a straight horizon line about one-third of the way up from the bottom of the page. -
Draft the windmill:
Lightly sketch the main body of the windmill on the left side. It looks like a tapered tower, slightly wider at the base. -
Add structure details:
Draw the “X” shape for the sails attached to the cap of the windmill. Keep the lines very faint; you just need a guide for where the black paint will go later. -
Outline the fence:
Sketch a small, rustic fence in the lower right foreground to create depth and lead the eye into the scene.
Step 2: Painting the Sky
-
Pre-wet the sky area:
Using your larger size 8 brush, apply clean water to the entire sky area, stopping right at the horizon line. Avoid the windmill shape if you can, but don’t worry too much since the windmill will be dark. -
Apply the upper blue:
Drop in a wash of diluted Cerulean Blue at the very top of the sky. Let it naturally bleed downward, fading into the clear water. -
Add sunset warmth:
While the paper is still damp, mix a soft Peach or diluted Naples Yellow and apply it near the horizon. Let it meet the fading blue, but try not to overwork the meeting point to avoid making green. -
Create soft clouds:
Mix a watery Alizarin Crimson with a touch of the Peach tone. Dab this gently into the wet sky to create fluffy, soft-edged clouds. The wet paper will do the work of softening the edges for you. -
Paint the sun:
Using a more concentrated orange or red mix, paint a semi-circle right on the horizon line for the setting sun. Soften the top edge slightly so it glows. -
Let it dry:
Allow the sky layer to dry completely. If the paper feels cool to the touch, it’s still wet.
Cloud Control
To keep clouds looking fluffy, lift out pigment with a clean, thirsty brush or a corner of a paper towel while the sky wash is still damp.
Step 3: The Foreground and Windmill
-
Paint the field base:
Mix a wash of Burnt Sienna and Yellow Ochre. Apply this to the ground below the horizon line. I like to keep the brush strokes horizontal near the horizon and more varied near the bottom. -
Add distant trees:
Mix a muted green using Payne’s Gray and your yellow. Paint small, irregular bumps along the horizon line for distant trees and bushes. Make sure these overlap slightly with the sun. -
Paint the windmill body:
Using a strong mixture of Payne’s Gray and a touch of Lamp Black, fill in the tower of the windmill. Paint carefully around the edges to give it a sharp silhouette. -
Detail the sails:
Switch to your size 2 brush or a fine liner brush. With the same dark mixture, paint the thin lines of the windmill sails. Keep your hand steady and use the tip of the brush. -
Add the door and roof:
Paint the cap of the windmill and the small arched door at the base using pure Lamp Black for maximum contrast. -
Create texture in the field:
Once the base field layer is dry, use a dry-brush technique with dark brown paint to flick vertical lines in the foreground. This simulates tall, dry stalks of wheat or grass. -
Paint the fence:
Using the dark brown or Payne’s Gray mix, paint the fence posts and rails. Keep them slightly uneven to suggest old wood. -
Refine the foreground:
Add darker, taller grass blades in the immediate foreground (bottom edge) using quick, upward strokes. This frames the bottom of the painting. -
Final touches:
Add a few tiny ‘v’ shapes in the distance to represent birds flying home for the evening.
Level Up: Texture
Sprinkle a tiny pinch of table salt onto the wet paint of the foreground field. Once dry, brush it off to reveal a speckled, earthy texture.
Step back and enjoy the peaceful countryside scene you have created
Storm Clouds Over the Fields
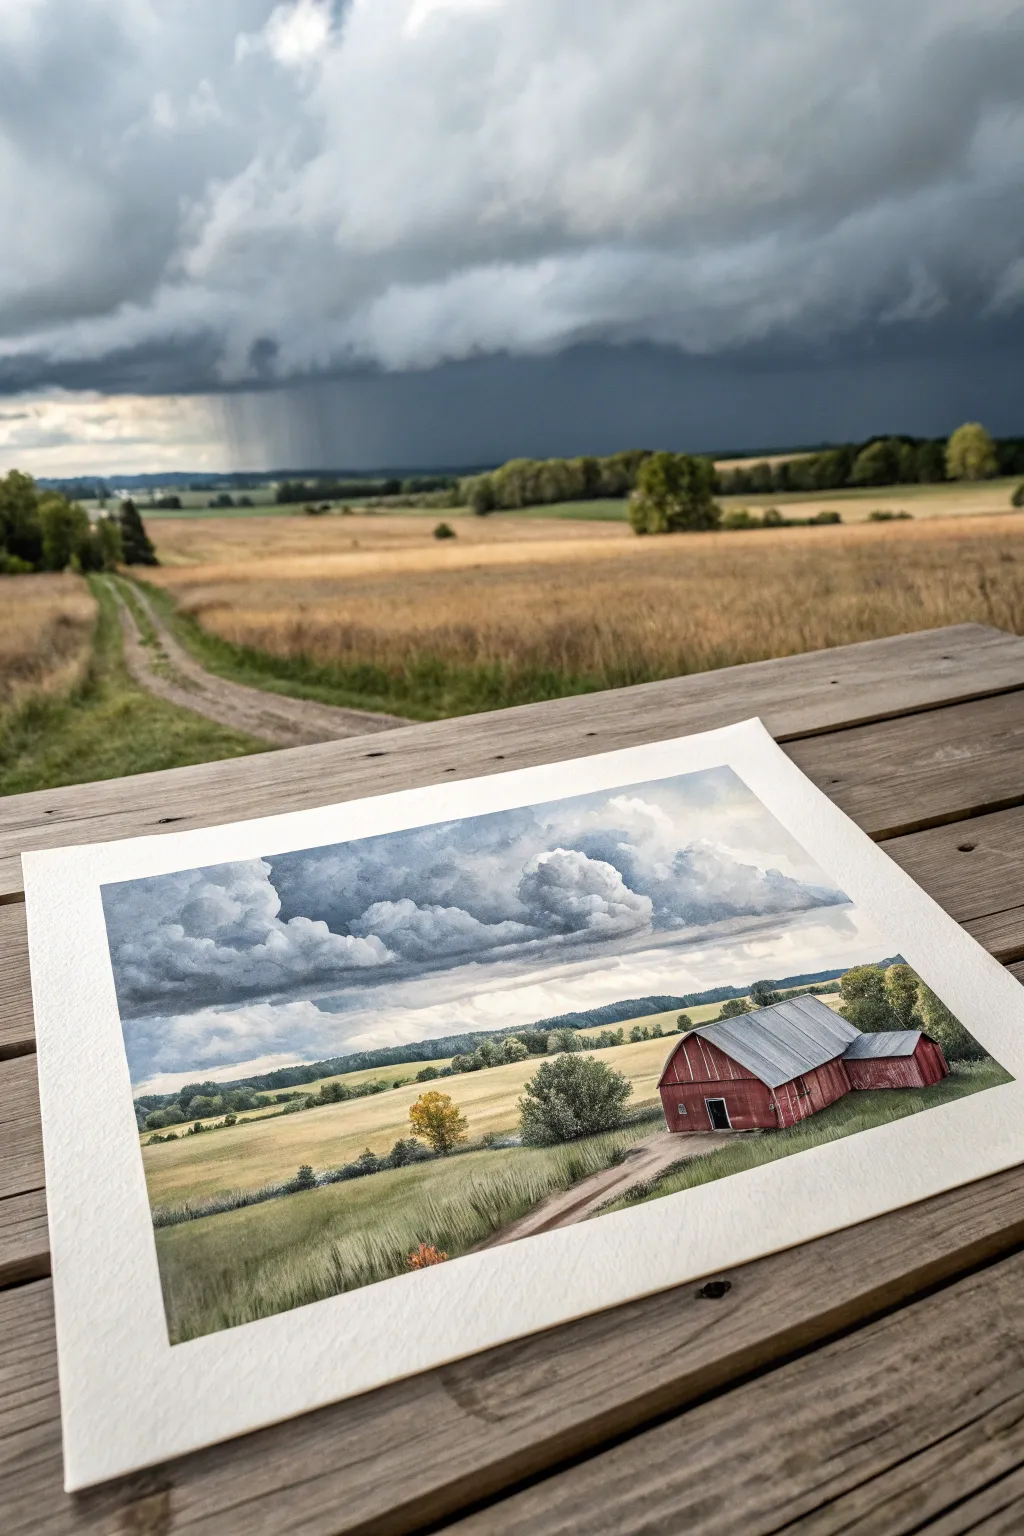
Capture the moody atmosphere of a passing storm over rolling farm fields in this detailed watercolor project. You’ll layer soft washes to build lush golden fields and use wet-on-wet techniques to sculpt billowing, rain-heavy clouds.
Step-by-Step Guide
Materials
- High-quality watercolor paper (cold press, at least 140lb)
- Watercolor paints (Payne’s Grey, Indigo, Burnt Sienna, Yellow Ochre, Sap Green, Alizarin Crimson)
- White Gouache (for highlights)
- Large flat wash brush
- Medium round brush
- Small liner or detail brush
- Masking tape
- Board for mounting
- Two jars of water
- Paper towels
Step 1: Preparation and Sketching
-
Secure the paper:
Tape your watercolor paper down firmly to a board on all four sides. This prevents buckling when we apply heavy washes for the sky later. -
Establish the horizon line:
Lightly draw your horizon line about one-third of the way up from the bottom of the paper. Keep it relatively straight but slightly organic to mimic rolling land. -
Outline the barn:
Sketch the basic perspective of the red barn on the right side. Include the main structure and the smaller lean-to extension. Don’t worry about tiny details like window frames just yet. -
Map the landscape:
Lightly sketch the path winding from the bottom center toward the barn. Indicate the tree lines in the background and the placement of the large bush in the mid-ground.
Cloud Control
If your clouds look too hard-edged, mist the paper lightly with a spray bottle or use a damp natural sponge to soften the boundaries between the grey storm and the white paper.
Step 2: Painting the Stormy Sky
-
Wet the sky area:
Using your large wash brush, wet the entire sky area with clean water until it glistens but doesn’t pool. -
Base cloud shadows:
While the paper is wet, drop in a mix of Indigo and a touch of Payne’s Grey near the horizon and the upper corners. Let the color bleed to create soft edges. -
Refining cloud forms:
As the paper begins to dry slightly (the satin stage), use a thicker mixture of grey-blue to define the bottoms of the cumulus clouds. Use a lifting technique with a thirsty, clean brush to pull back paint for the bright white cloud tops. -
Adding rain curtains:
With a very dilute grey wash, paint vertical, slightly angled strokes descending from the darkest clouds to the horizon to simulate distant rain. Soften the bottom edge so it blends into the distant hills.
Atmospheric Depth
Make the distant trees cooler (more blue) and paler than the foreground trees. This ‘atmospheric perspective’ pushes them back, making the field look vast.
Step 3: Fields and Landscape
-
Distant tree line:
Once the sky is completely dry, mix a cool, muted green using Sap Green and a touch of blue. Paint the distant line of trees along the horizon, keeping the edges soft to suggest atmospheric depth. -
Golden fields base:
Apply a wash of Yellow Ochre and watered-down Burnt Sienna to the large field areas. Leave the dirt path unpainted or extremely pale for now. -
Foreground greens:
While the ochre is damp, charge the bottom corners with a darker Sap Green mix to create a gradient that draws the eye into the painting. -
Mid-ground vegetation:
Paint the small line of bushes and the larger central tree using a stippling motion with your round brush. Vary the greens, adding yellow for sunlit tops and blue-green for shadowed undersides.
Step 4: The Barn and Details
-
Barn base coat:
Mix Alizarin Crimson with a tiny bit of brown to get that weathered barn red. Paint the walls of the barn, carefully avoiding the roof. -
Shadows and siding:
Once the red is dry, mix a darker version of the red (add a dot of green or grey) and paint thin vertical lines for the wood siding. Add a darker shadow under the eaves and clearly define the open doorway. -
Roof texture:
Paint the roof with a diluted grey wash. When dry, add thin lines to suggest corrugated metal. -
Path definition:
Use a watery brown-grey to add texture to the dirt road. Use dry brush strokes here to mimic the rough texture of gravel and dirt. -
Final highlights:
I like to use a tiny bit of white gouache mixed with yellow to highlight the small autumnal tree in the foreground and add sparkle to the tall grasses along the path.
Peel off the tape carefully to reveal those crisp white borders which instantly frame your stormy landscape masterpiece

PENCIL GUIDE
Understanding Pencil Grades from H to B
From first sketch to finished drawing — learn pencil grades, line control, and shading techniques.
Explore the Full Guide
Night Barn Under a Starry Sky
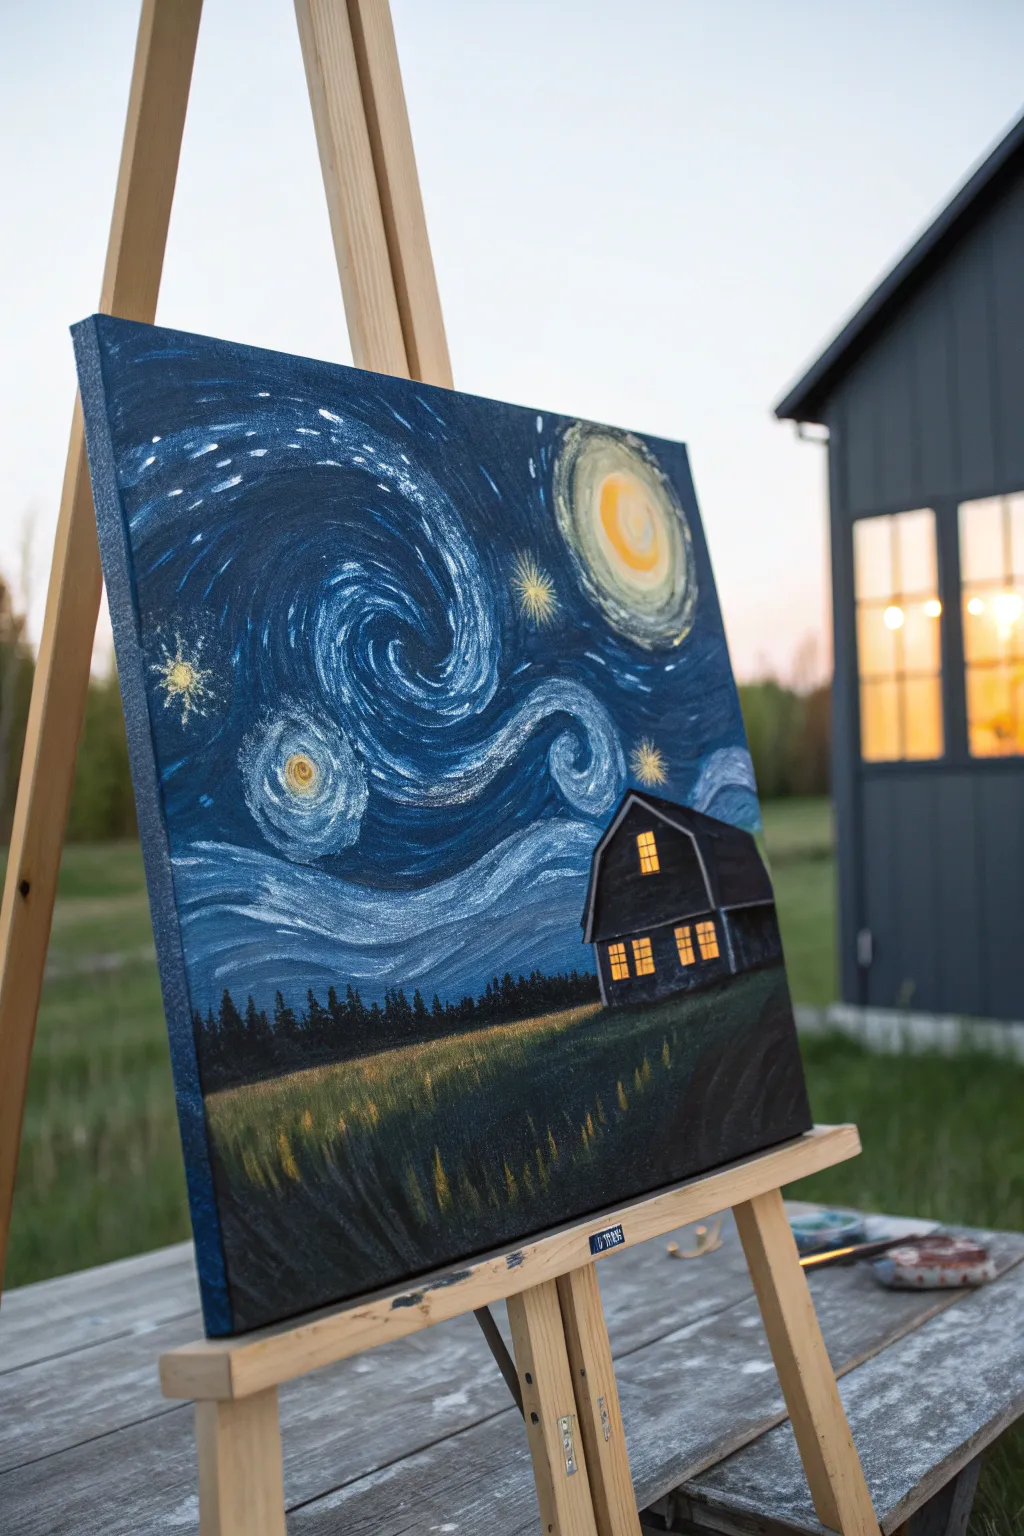
Capture the magic of a rural evening with this celestial barn painting, which blends the whimsical swirls of Van Gogh’s ‘Starry Night’ with a cozy farmhouse scene. Using heavy body acrylics and bold brushstrokes, you’ll create a textured, glowing night sky that watches over a quiet, illuminated barn.
Step-by-Step
Materials
- Canvas (square or rectangular, e.g., 16×20)
- Acrylic paints (various blues: ultramarine, phthalo, cobalt)
- Acrylic paints (white, black, bright yellow, orange, ochre, sap green)
- Large flat brush for background
- Medium filbert brush for swirls
- Small round brush for details
- Palette knife (optional for texture)
- Water cup and paper towels
- Table easel or standing easel
- Chalk or pencil for sketching
Step 1: Setting the Scene
-
Prime the canvas:
Start by painting the entire canvas with a dark blue base coat. Mixing ultramarine blue with a touch of black helps create a deep night sky foundation. Let this dry completely before moving on. -
Sketch the layout:
Using a piece of chalk or a light pencil, gently sketch the horizon line about one-third up from the bottom. Draw the basic outline of the barn on the right side, making sure to include the roof angles and window placement. -
Block in the ground:
Paint the area below the horizon line with a very dark mix of sap green and black. This establishes the shadowy field where the barn sits, providing a strong contrast for the light we’ll add later.
Starry Swirl Tip
Don’t blend your sky colors wet-on-wet too much. Let the individual dashed strokes sit side-by-side to maintain that classic impressionist texture.
Step 2: Painting the Sky
-
Map out the swirls:
With a medium round brush and a lighter blue (like cobalt mixed with a little white), draw the main swirling motion in the center of the sky. Think of a large ‘S’ shape or a spiral to guide your flow. -
Layering sky colors:
Begin adding short, dashed brushstrokes following your spiral guide. Use various shades of blue—some pure, some mixed with white—to build depth. Leave spaces between strokes to let the dark background show through. -
Creating the moon:
In the upper right corner, paint a solid circle of white mixed with a tiny bit of yellow. Around this core, add concentric rings of dashed strokes using pale yellow and soft white to create a glowing halo effect. -
Adding the stars:
Scatter 3-4 smaller yellow circles throughout the sky. Paint radiating dashes of yellow and white around them to make them twinkle, similar to the technique used for the moon. -
Integrating the wind:
Using a lighter blue or white, add a swooping, horizontal band of strokes near the horizon line, just above where the trees will be. This mimics the rolling wind effect seen in impressionist styles.
Step 3: The Barn and Foreground
-
Paint the barn structure:
Fill in the barn sketch with a dark slate blue or charcoal gray. It should be darker than the sky but lighter than the pure black treeline you will add later. -
Add the roof:
Paint the roof using a slightly lighter gray to catch the ‘moonlight.’ Add a thin line of white along the roof’s edge and the eaves to define the shape against the dark sky. -
Light the windows:
Mix a bright orange-yellow. Paint small rectangles for the windows. I like to add a tiny dot of pure white in the center of each window to make the light look intense and welcoming. -
Create the treeline:
Using black paint and a small round brush or fan brush, dab in a silhouette of distant pine trees along the horizon line, behind the barn. Keep these jagged and uneven for a natural look. -
Detail the grass:
回到 the dark foreground. Use a small brush to flick upward strokes of olive green and muted yellow. Focus these lighter grass strokes near the bottom edges and where the light from the barn would hit the ground. -
Final glows:
Add a few faint yellow reflections on the grass directly under the windows to show the light spilling out onto the field.
Muddied Colors?
If your yellow stars look green when painted over the blue sky, let the blue layer dry completely first, or paint a layer of white before adding the yellow.
Step back and admire how the glowing windows warm up the cool, swirling night sky you have created

Have a question or want to share your own experience? I'd love to hear from you in the comments below!