
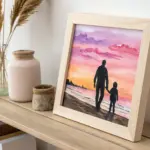
There’s something really special about making art that celebrates the father-daughter bond—it’s tender, playful, and full of little moments worth saving. These father daughter painting ideas are designed to feel doable, meaningful, and fun, whether you’re painting side-by-side or gifting the finished piece.
Sunset Silhouette Hand-Holding
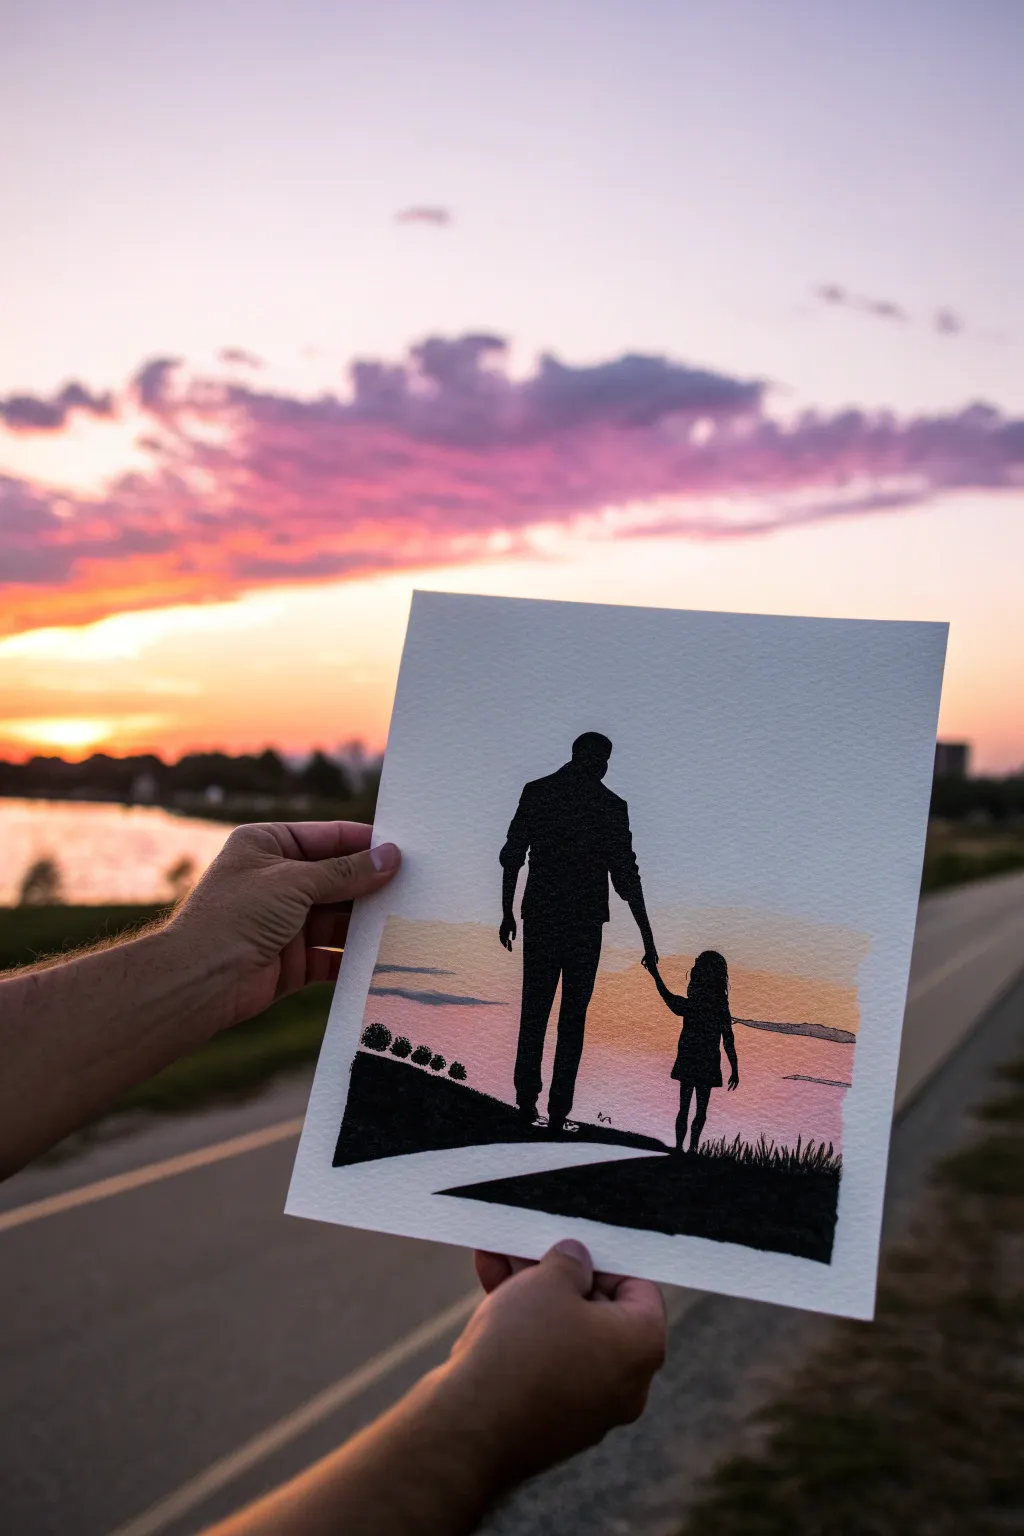
Capture the tender bond between father and daughter with this mixed-media silhouette painting that perfectly mimics the warm glow of a setting sun. Through a blend of soft watercolor washes and bold acrylic blacks, you’ll create a striking contrast that is both simple to execute and emotionally resonant.
Step-by-Step Guide
Materials
- Heavyweight watercolor paper (300gsm cold press recommended)
- Painter’s tape
- Watercolors (Pink, Purple, Orange, Yellow)
- Large flat brush or wash brush
- Black acrylic paint
- Small round detail brush (size 0 or 1)
- Medium round brush (size 4 or 6)
- Pencil and eraser
- Palette or mixing tray
- Cup of water and paper towels
Step 1: Setting the Sky
-
Prepare the canvas:
Begin by taping down all four edges of your watercolor paper to a hard board or table. This creates a clean white border later and prevents the paper from buckling when wet. -
Wet-on-wet technique:
Using your large flat brush and clean water, lightly wet the upper two-thirds of the paper. You want it damp and glistening, but not soaking wet with puddles. -
First wash of color:
Load your brush with a diluted soft pink. Sweep it horizontally across the damp area, starting from the middle and working slightly upward. -
Adding warmth:
While the paper is still damp, introduce a light orange tone near the horizon line (just below the middle), blending it gently into the pink above. -
Hints of dusk:
Mix a very light purple or violet. Dab this sporadically into the upper pink areas to suggest clouds catching the fading light. Let the colors bleed naturally. -
Horizon line clouds:
Paint a few horizontal streaks of slightly darker purple-grey near the horizon line to mimic low-lying clouds, keeping edges soft. -
Let it dry completely:
This is crucial. Walk away for a bit or use a hairdryer on a low setting. The paper must be bone-dry before you add the silhouette, or the black paint will bleed.
Bleeding Lines?
If your black paint bleeds into the sky, the paper wasn’t dry enough. Let it dry fully, then carefully paint over the bleed with white acrylic, wait, and retouch the sky color on top.
Step 2: Defining the Ground
-
Sketch the layout:
Lightly sketch a sloping hill starting from the bottom left and curving slightly upward. Draw a path leading into the scene if desired. -
Paint the terrain:
Using black acrylic paint and a medium round brush, fill in the ground area. Using acrylic here instead of watercolor ensures a solid, opaque black coverage. -
Adding texture:
Along the top edge of the hill, use the tip of your brush to flick tiny upward strokes. This creates the illusion of grass blades silhouetted against the sky. -
Distant trees:
On the far left horizon line, dab small, rounded shapes to represent distant bushes or trees. Keep them small to maintain scale.
Step 3: The Figures
-
Outline the father:
With a pencil, lightly outline the father’s figure. Focus on the stance—legs mid-stride and arm reaching down. Don’t worry about facial features; only the shape matters. -
Outline the daughter:
Sketch the little girl reaching up to hold his hand. Ensure her height is proportional to the father’s legs. -
Fill the father silhouette:
Switch to your small detail brush and black acrylic. Carefully fill in the father’s shape. I like to start with the edges and work inward to keep the lines crisp. -
Fill the daughter silhouette:
Paint the girl’s dress and legs. Pay close attention to her hair; leave the edges slightly rough to suggest movement or loose strands. -
The connection point:
Use the very tip of your smallest brush to paint their joined hands. This is the focal point, so take your time to ensure they look firmly connected. -
Refine edges:
Look over the silhouettes. Smooth out any shaky lines on the clothing or limbs to make the figures look solid. -
Final reveal:
Once the black acrylic is fully dry, slowly peel off the painter’s tape at a 45-degree angle to reveal your crisp white border.
Make it Personal
Customize the silhouettes to match your family! Add a ponytail, a baseball cap, or even a family dog walking alongside to make the memory truly yours.
Now you have a timeless keepsake that freezes a beautiful moment against a forever-setting sun


Walking Along a Beach at Dusk
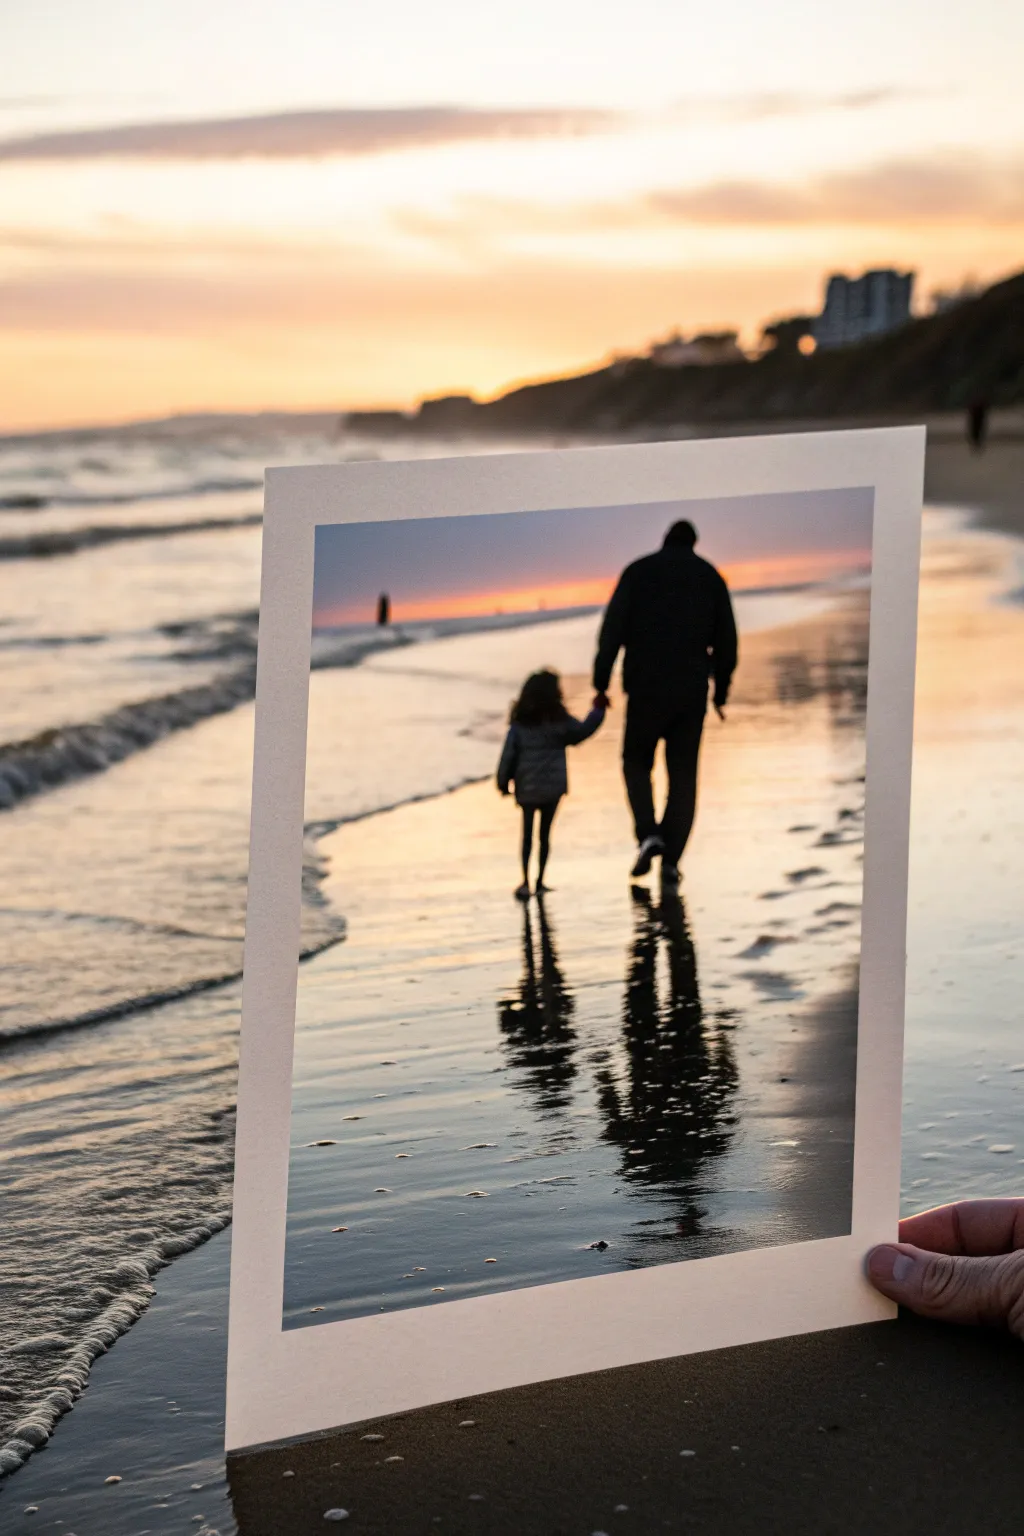
Capture the tender bond between father and daughter with this atmospheric acrylic painting that mimics a snapshot of a beach at dusk. You’ll learn to blend a soft, glowing sunset sky and paint striking silhouettes against wet sand reflections.
How-To Guide
Materials
- Heavyweight watercolor paper or canvas board
- Acrylic paints (primary colors plus black and white)
- Masking tape
- Flat brush (large) for backgrounds
- Round brush (small) for details
- Palette or mixing plate
- Cup of water
- Paper towels
Step 1: Setting the Scene
-
Tape the Edges:
Before you begin, secure your paper to a flat surface with masking tape along all four edges. This creates that crisp, clean white border reminiscent of a classic photograph once peeled away. -
Establish the Horizon:
Lightly sketch a straight horizontal line about one-third of the way down from the top of your canvas. This separates your sky from the expansive wet sand. -
Mix the Sky Gradient:
Prepare a gradient palette: deep slate blue for the top, transitioning into a soft lavender, and finally a warm, pale orange for the horizon line. -
Paint the Sky:
Using your large flat brush, paint horizontal strokes starting from the top with the blue. While the paint is still wet, blend in the lavender and orange as you move downward to create a seamless sunset effect.
Clean Lines Pro-Tip
To prevent paint bleeding under your tape, paint a thin layer of white (or your paper color) over the tape edge first to seal it completely.
Step 2: Creating the Beach
-
Base Sand Color:
Mix a muted beige-grey using white, a touch of black, and a tiny bit of orange or brown. Cover the entire beach area below the horizon line with this base coat. -
Add Wet Reflections:
To make the sand look wet, lightly glaze horizontal streaks of your sky colors (orange and pale blue) onto the sand area. Keep these strokes very thin and watery. -
Paint the Shoreline:
On the left side, paint a gentle, curving white line representing the foam of the ocean waves. Soften the edge facing the water to make it look like receding foam. -
Darken the Foreground:
Gradually add darker grey glazing to the bottom foreground of the sand to create depth and draw the eye toward the center.
Step 3: Painting the Figures
-
Sketch the Silhouettes:
Once the background is completely dry, use a pencil to lightly outline the shapes of a tall figure and a small child holding hands. Keep the shapes simple; focus on the overall posture rather than details. -
Fill with Black:
Using your smallest round brush and pure black paint, carefully fill in the silhouettes. Ensure the edges are sharp, especially around the heads and shoulders. -
Ground the Figures:
I always make sure to paint the feet slightly submerged or flat against the sand, rather than floating, to give them weight.
Add Texture
Mix a pinch of real fine sand or salt into your beige beach paint before applying it to the canvas for a tactile, realistic gritty texture.
Step 4: Reflections & Details
-
Create Shadow Reflections:
Mix a watery, translucent black. Paint a mirror image of the figures extending downwards from their feet into the wet sand. -
Distort the Reflection:
While the reflection paint is wet, use a clean, dry brush to zig-zag horizontally across it. This breaks up the image, mimicking ripples on the water’s surface. -
Final Highlights:
Use a tiny dot of white paint to add glimmers on the wet sand near the figures’ feet or on the crest of a nearby wave. -
Reveal the Border:
Wait for the entire painting to be bone dry. Slowly and carefully peel away the masking tape at a 45-degree angle to reveal your crisp white photo border.
Now you have a timeless keepsake of a sunset stroll that looks just like a treasured photograph


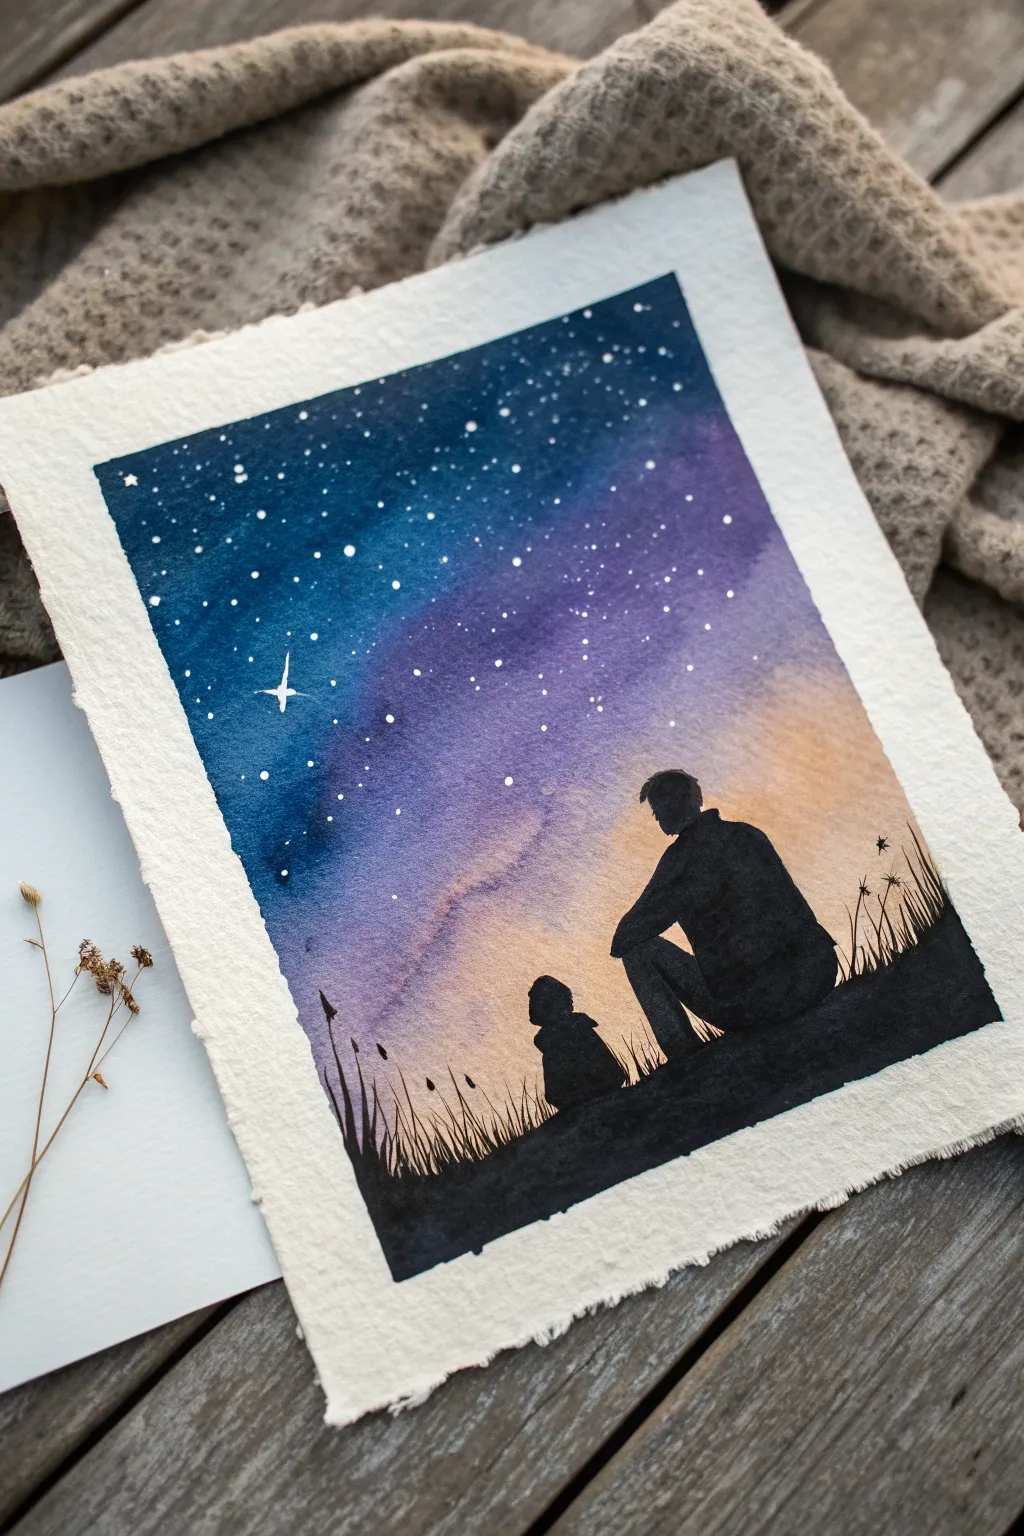
Moonlit Night “To the Moon” Scene
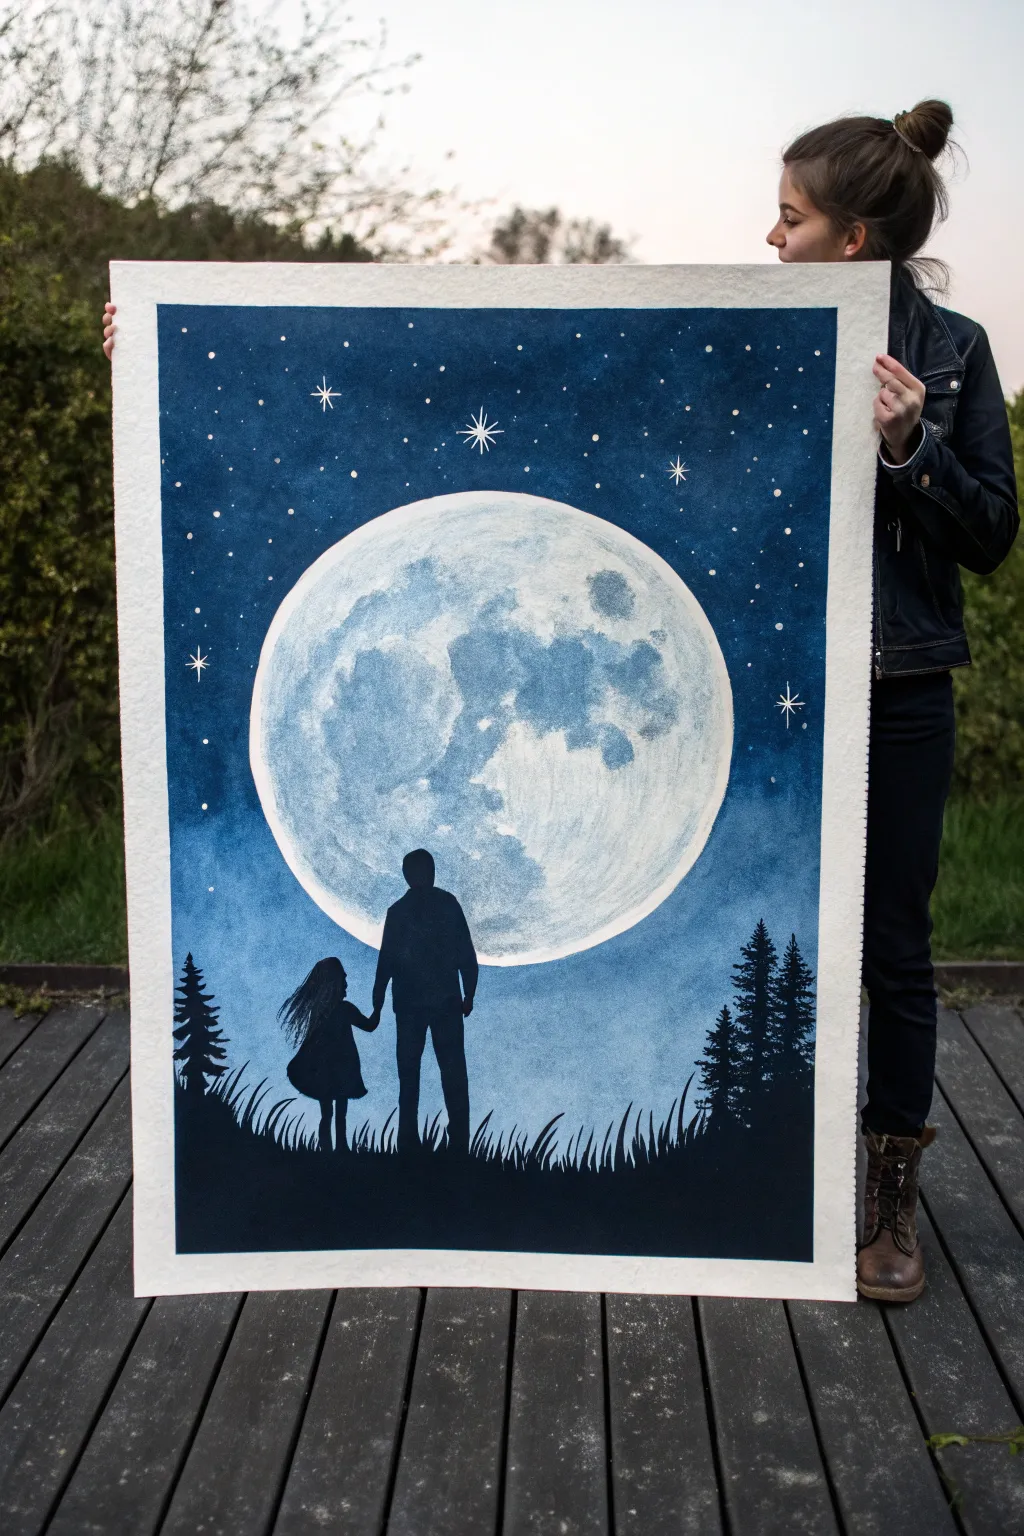
Create a breathtaking tribute to figure bonds with this large-scale watercolor nightscape. The piece features a dramatic, oversized moon set against a deep indigo sky, grounding a tender silhouette of father and daughter.
Detailed Instructions
Materials
- Large sheet of high-quality watercolor paper (cold press recommended, e.g., A2 size or larger)
- Watercolor paints (Indigo, Prussian Blue, Payne’s Gray, Black)
- White opacity medium (e.g., White Gouache or Acrylic ink)
- Masking fluid
- Large round plate or compass (for tracing the moon)
- Wide wash brush (1-2 inch)
- Medium round brush (size 6-8)
- Small liner brush (size 0-1)
- Graphite pencil (HB or lighter)
- Paper towels
- Blue painter’s tape
Step 1: Preparing the Canvas
-
Tape the Edges:
Begin by securing your large watercolor paper to a flat, hard board using painter’s tape. Create a crisp white border by pressing the tape edges down firmly to prevent paint bleed. -
Outline the Moon:
Place a large circular object, like a dinner plate or a pre-cut cardboard circle, in the center of the paper. Lightly trace the circle with your pencil. This will become the focal point of your composition. -
Sketch the Figures:
Lightly sketch the outlines of the father and daughter figures near the bottom of the moon circle. Don’t worry about details; you just need the perimeter shape since they will be filled in as solid black silhouettes later. -
Apply Masking Fluid:
Using an old brush or a masking fluid applicator, carefully fill in the moon shape. Protect the exact circle edge. Allow this to dry completely until it’s rubbery to the touch; this preserves the white paper while you paint the dark sky.
Pro Tip: Masking Fluid
Coat your brush bristles in regular bar soap before dipping into masking fluid. This creates a barrier that makes cleaning the sticky fluid out of the brush much easier later.
Step 2: Painting the Night Sky
-
Mix the Dark Blues:
Prepare a large puddle of deep night-sky color. I usually mix Indigo with a touch of Payne’s Gray to get that really velvety darkness. You want enough paint mixed to cover the whole sky area without stopping. -
The First Wash:
With your wide wash brush, wet the sky area slightly with clean water (wet-on-wet technique). Then, apply the dark blue wash starting from the top, working your way down around the masked moon. -
Wait and Repeat:
Let the first layer dry. Depending on your paint’s quality, you may need a second or even third layer to achieve the deep, opaque blue seen in the reference photo. Make the top edges darker than the area near the horizon line. -
Create Stars:
Once the blue background is completely dry, load a stiff brush or toothbrush with slightly diluted white gouache. Flick the bristles to spatter tiny stars across the sky. Use a fine liner brush to manually paint larger, twinkling stars with cross shapes.
Step 3: The Moon Details
-
Remove Masking:
Gently rub away the masking fluid from the moon using your finger or a rubber cement pickup tool, revealing the stark white circle underneath. -
Moon Textures:
Dilute a small amount of Prussian Blue or grayish-blue with lots of water. Using a crumpled paper towel or a dry brush, dab very light cloud-like shapes onto the moon to create craters and maria features. -
Soften the Edges:
While the moon texture is still damp, soften some edges with a clean, wet brush so the craters don’t look too harsh. Keep large portions of the moon white to ensure it glows against the dark background.
Level Up: Metallic Glow
Mix a tiny amount of silver iridescent medium or silver watercolor into the grey paint used for the moon craters. It adds a magical shimmer when the light hits it.
Step 4: Silhouettes and Foreground
-
Paint the Figures:
Using concentrated watercolor black or black gouache, carefully paint inside your sketched figure outlines. Ensure the paint is opaque enough that the moon doesn’t show through their bodies. -
Ground the Scene:
Paint a solid black uneven line under the figures’ feet to represent the ground. Extend this black area all the way to the bottom tape edge. -
Add Grass Details:
Switch to your small liner brush. Using quick, upward flicking motions, pull blades of grass up from the black ground line. Vary the height and direction of the blades for a natural look. -
Paint Pine Trees:
On the left and right edges, paint silhouette pine trees. Draw a vertical line for the trunk, then dab horizontal, jagged branches that get wider towards the bottom. The trees should frame the scene without blocking the moon. -
Final Touches:
Check for any uneven patches in the silhouettes and fill them. Let the entire painting dry fully, preferably overnight, before carefully peeling off the tape at a 45-degree angle.
Hang this striking piece in a prominent spot as a reminder of an enduring bond


Father and Daughter Under a Tree
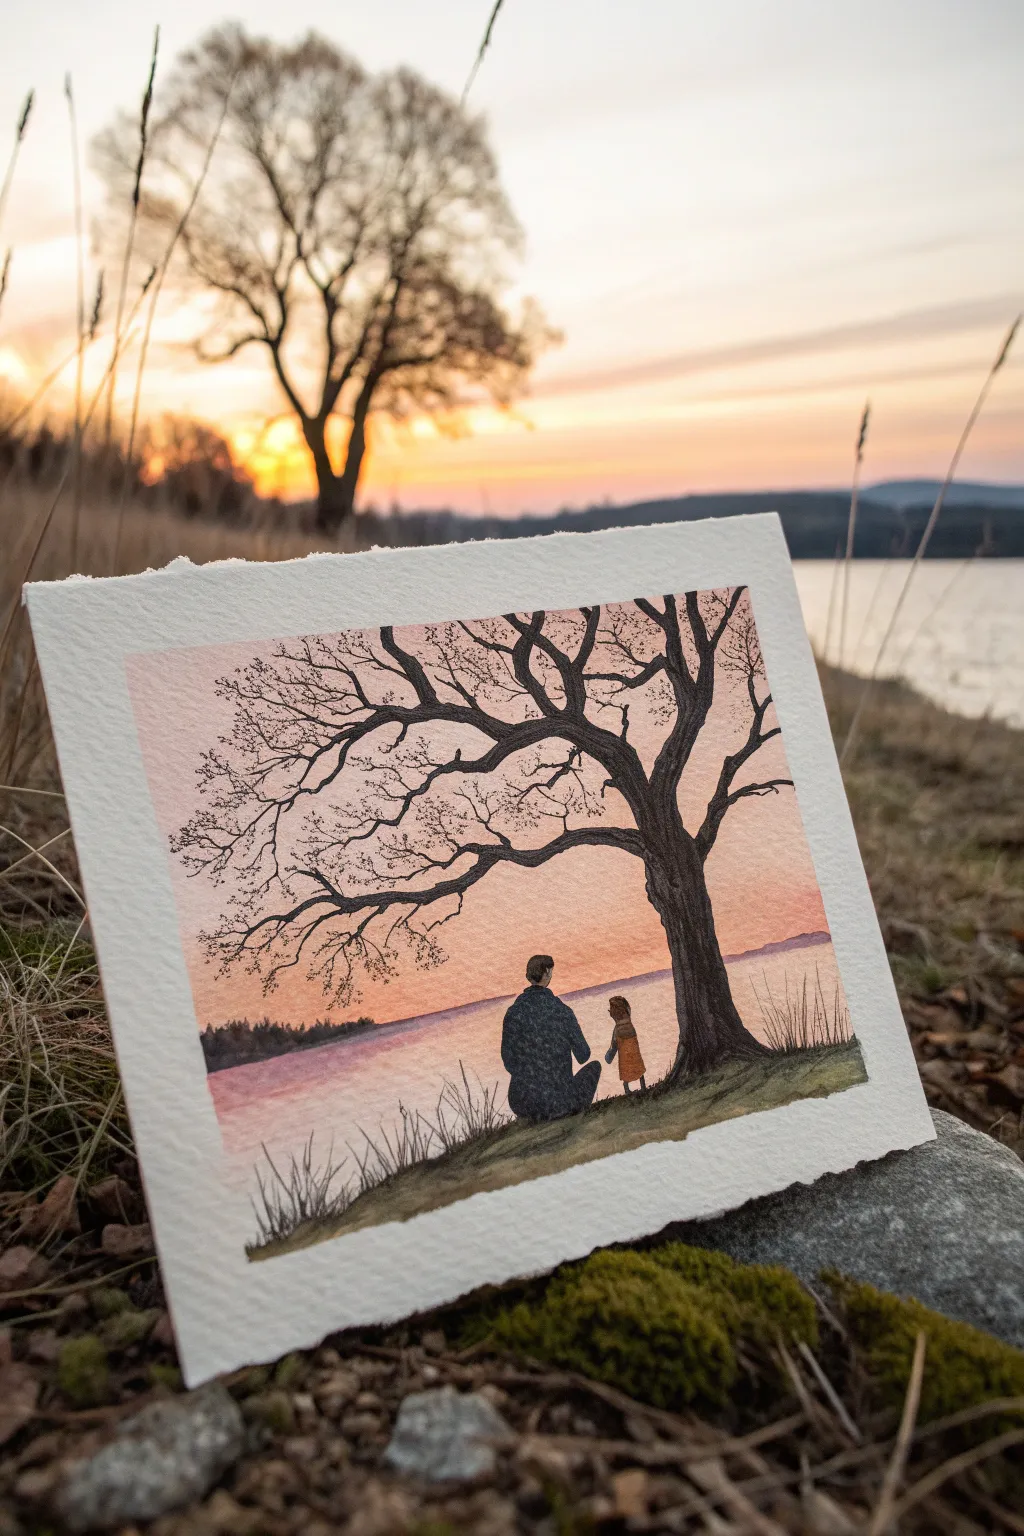
Capture a quiet, heartwarming moment with this watercolor study of a father and daughter gazing at a serene lake sunset. The painting relies on building soft, warm gradients for the sky and water, contrasted against the crisp, dark silhouette of a winter tree.
Step-by-Step Guide
Materials
- Cold press watercolor paper (300 gsm)
- Watercolor paints: Peach, Light Pink, Purple, Indigo or Payne’s Grey, Burnt Umber, Warm Yellow
- Painter’s tape
- Drawing board
- Round brushes: size 8 (for washes), size 4 (for shapes), size 00 or 0 (for fine branches)
- Pencil (HB or H for light sketching)
- Cup of water and paper towels
Step 1: Preparation & Sketching
-
Secure the paper:
Tape down all four edges of your watercolor paper to a board. This prevents buckling when we add the wet washes later and creates that clean white border shown in the final piece. -
Sketch the horizon:
Using a light hand, draw a horizontal line roughly one-third of the way up from the bottom of the paper to establish the lake’s far shore. -
Outline the figures:
Lightly pencil in the shape of the father sitting on the left and the small child standing to his right. Focus on their overall shapes rather than details, as they will be mostly silhouetted. -
Map the tree:
Sketch the main trunk of the large tree on the right side, curving its branches up and over the figures. Don’t worry about drawing every twig yet; just get the main structure in place.
Step 2: Painting the Sky and Water
-
Wet the sky area:
With your large round brush and clean water, gently wet the entire sky area above the horizon line. Avoid the tree trunk if you can, but it’s okay if you overlap slightly since the tree will be dark. -
Apply the first gradient:
Load your brush with a watery mix of peach and warm yellow. Start near the horizon line where the sun would be setting, letting the color bleed softly upwards. -
Blend in cool tones:
While the paper is still damp, introduce a soft light pink moving into a pale purple near the top edge. Tilt the board slightly to help the colors blend seamlessly without harsh lines. -
Paint the water:
Repeat a similar gradient for the lake water below the horizon. Keep the color slightly more muted than the sky. Use horizontal strokes to mimic the calmness of the water surface. -
Dry completely:
Let this background layer dry fully. The paper must be bone-dry before you paint the crisp foreground elements, or the ink will bleed.
Muddy colors?
If your sky turns brown, you likely mixed the purple and yellow while they were too wet. Let the yellow layer dry slightly before adding purple, or keep them separated by a band of pink.
Step 3: Adding the Silhouette Details
-
Paint the distant shore:
Mix a dark purple-grey. Paint a thin, uneven strip along the horizon line to represent the distant trees or hills on the far side of the lake. -
Base layer for the tree:
Mix a strong dark color using Burnt Umber and Indigo (or Payne’s Grey). Using a size 4 brush, fill in the main trunk of the tree, following the texture of the bark with uneven strokes. -
Extend main branches:
Continue using the dark mix to paint the thick primary branches reaching across the sky. Think of them as arms reaching out; let them twist and turn naturally. -
Fine twig details:
Switch to your smallest liner brush (size 0 or 00). With a very inky consistency of paint, add delicate twigs branching off the main limbs. A shaky hand actually helps here to create natural-looking wood textures. -
Ground the scene:
Paint the grassy foreground bank using a mix of dull greens and the dark tree color. Use short, upward flicking strokes to suggest blades of dry grass along the ridge.
Seasonal Shift
Change the season by adding tiny dots of green to the branches for spring buds, or use burnt orange dabs for autumn leaves. You can even add white gouache snowflakes for a winter scene.
Step 4: The Figures & Finishing Touches
-
Paint the father:
Fill in the father’s silhouette with a dark blue-grey. Keep the edges relatively crisp. I find it helpful to leave tiny highlights on the shoulders if you want to suggest light hitting fabric, but a full silhouette works beautifully too. -
Paint the daughter:
For the child, you can use a slightly warmer tone (like a dull orange or ochre) for her coat to make her pop, or keep her silhouetted like the father. Carefully paint her small form standing close to him. -
Connect to the ground:
Ensure both figures are firmly ‘seated’ on the painted ground by darkening the grass directly underneath them to create a shadow. -
Final highlights:
If you want to add texture to the tree bark, you can use a slightly dry brush with pure black or dark brown to drag over the dried trunk. -
Remove tape:
Once everything is completely dry, slowly peel off the painter’s tape at a 45-degree angle to reveal your crisp white border.
Now you have a timeless keepsake that celebrates a quiet bond between parent and child
BRUSH GUIDE
The Right Brush for Every Stroke
From clean lines to bold texture — master brush choice, stroke control, and essential techniques.
Explore the Full Guide
Piggyback Ride in a Field
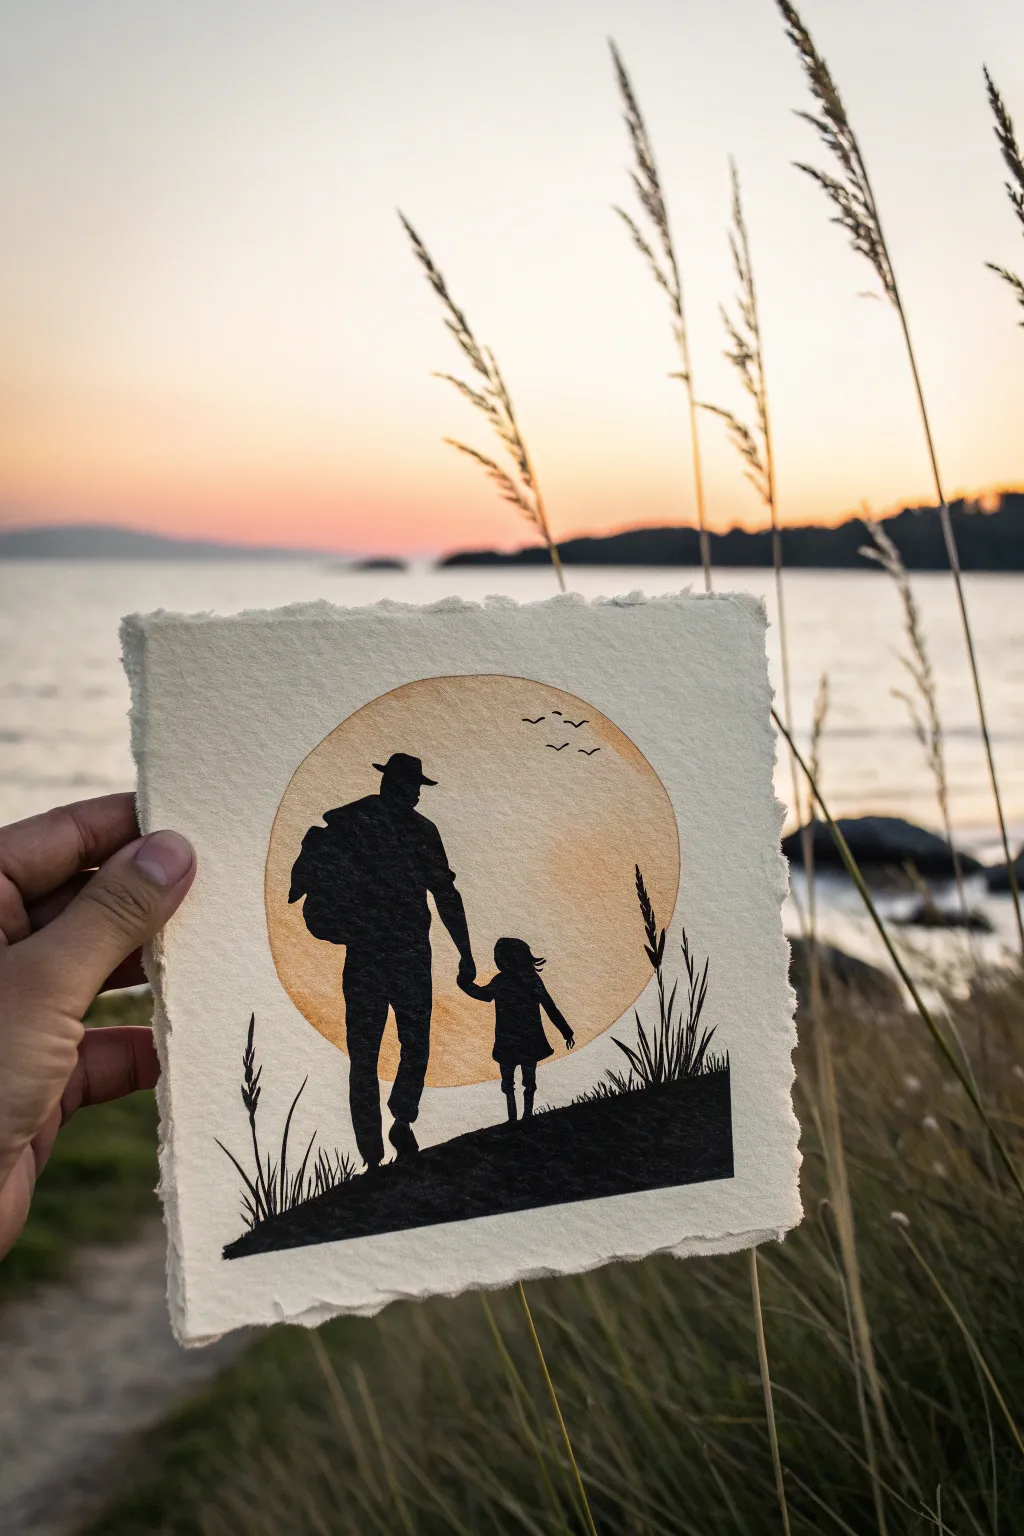
Capture the warmth of a shared evening stroll with this striking silhouette painting. By combining a soft watercolor wash with crisp black ink, you’ll create a heartwarming scene of a father and daughter walking hand-in-hand.
Step-by-Step
Materials
- Heavyweight watercolor paper (300gsm/140lb) with deckled edges
- Watercolor paints (yellow ochre, burnt sienna, or light orange)
- Black waterproof ink or acrylic paint
- Round watercolor brush (size 6 or 8)
- Fine liner brush or black micron pens (various sizes)
- Compass or a round object to trace (approx. 4-5 inches)
- Pencil and eraser
- Painter’s tape or masking fluid (optional)
- Water cups and paper towels
Step 1: Setting the Scene
-
Prepare the paper:
Start with a square piece of heavy watercolor paper. If your paper doesn’t have deckled edges, you can carefully tear the edges against a ruler to create that rustic, handmade texture. -
Trace the sun:
Using a compass or a round household object like a bowl or lid, lightly trace a large circle in the center of your paper. This circle will frame your entire scene, so ensure it is centered. -
Wet the circle:
With a clean brush and clear water, carefully wet the inside of the circle you just drew. Try to stay exactly within the pencil lines to keep the edge crisp. -
Apply the sunset wash:
Load your brush with a diluted yellow ochre or light orange watercolor. Touch the wet paper and let the color spread naturally. I like to make the top slightly lighter and the bottom a bit warmer by adding a touch of burnt sienna while it’s still wet. -
Dry completely:
Let the sun layer dry completely. This is crucial—if the paper is damp, your black silhouette layer will bleed into the orange sun.
Clean Edges Trick
To get a perfect circle edge without masking fluid, paint freely into the circle, then immediately clean up any wobbly edges with a damp, flat brush or Q-tip while the paint is wet.
Step 2: Drawing the Figures
-
The ground line:
Lightly sketch a sloping hill line near the bottom of the circle. This line should rise slightly from left to right to create dynamic movement. -
Sketch the father:
Pencil in the father’s silhouette on the left side. Focus on the outline: a wide-brimmed hat, a backpack or hunched jacket shape, and long trousers. His legs should look like he is mid-stride. -
Sketch the daughter:
Draw the smaller figure to his right. She should have a simple dress shape and perhaps long hair blowing slightly back. Ensure their hands meet in the middle. -
Refine the connection:
Double-check the hand-holding area. The connection should look natural, with arms extended slightly downward. -
Add nature elements:
Sketch a few tall blades of grass on the far left and right edges of the hill. They should extend up into the orange circle area.
Step 3: Inking the Silhouette
-
Outline the ground:
Switch to your black ink or black acrylic paint. Carefully paint along the top edge of your hill line first to establish the ground. -
Fill the hill:
Fill in the entire ground area below the line with solid black. Ensure the coverage is opaque; you may need a second coat if using watercolor. -
Outline the figures:
Using a fine liner brush or a thick pen, carefully trace the outline of the father and daughter over your pencil marks. -
Fill the figures:
Fill in the bodies with solid black. Be careful around details like the hat brim and the daughter’s hair strands, using a smaller brush for precision. -
Detailing grass:
With your finest brush or pen, flick upward from the black ground to create the grass blades. Vary the pressure: press harder at the base and lift off quickly at the tip for a tapered look. -
Adding wheat accents:
Add small, seed-like textures to the tips of the tallest grass blades to mimic wheat or wildflowers. -
Flying birds:
In the upper right portion of the sun, draw three or four tiny ‘v’ shapes to represent distant birds. Keep them small so they don’t distract from the main figures. -
Final touches:
Once the ink is fully dry, gently erase any visible pencil lines around the sun’s edge or within the silhouette.
Personal Touch
Customize the silhouettes to match the real subjects! Add a baseball cap instead of a fedora, or change the child’s hair to pigtails or short curls to make it specific to your family.
Frame your beautiful silhouette in a floating frame to show off those lovely deckled edges
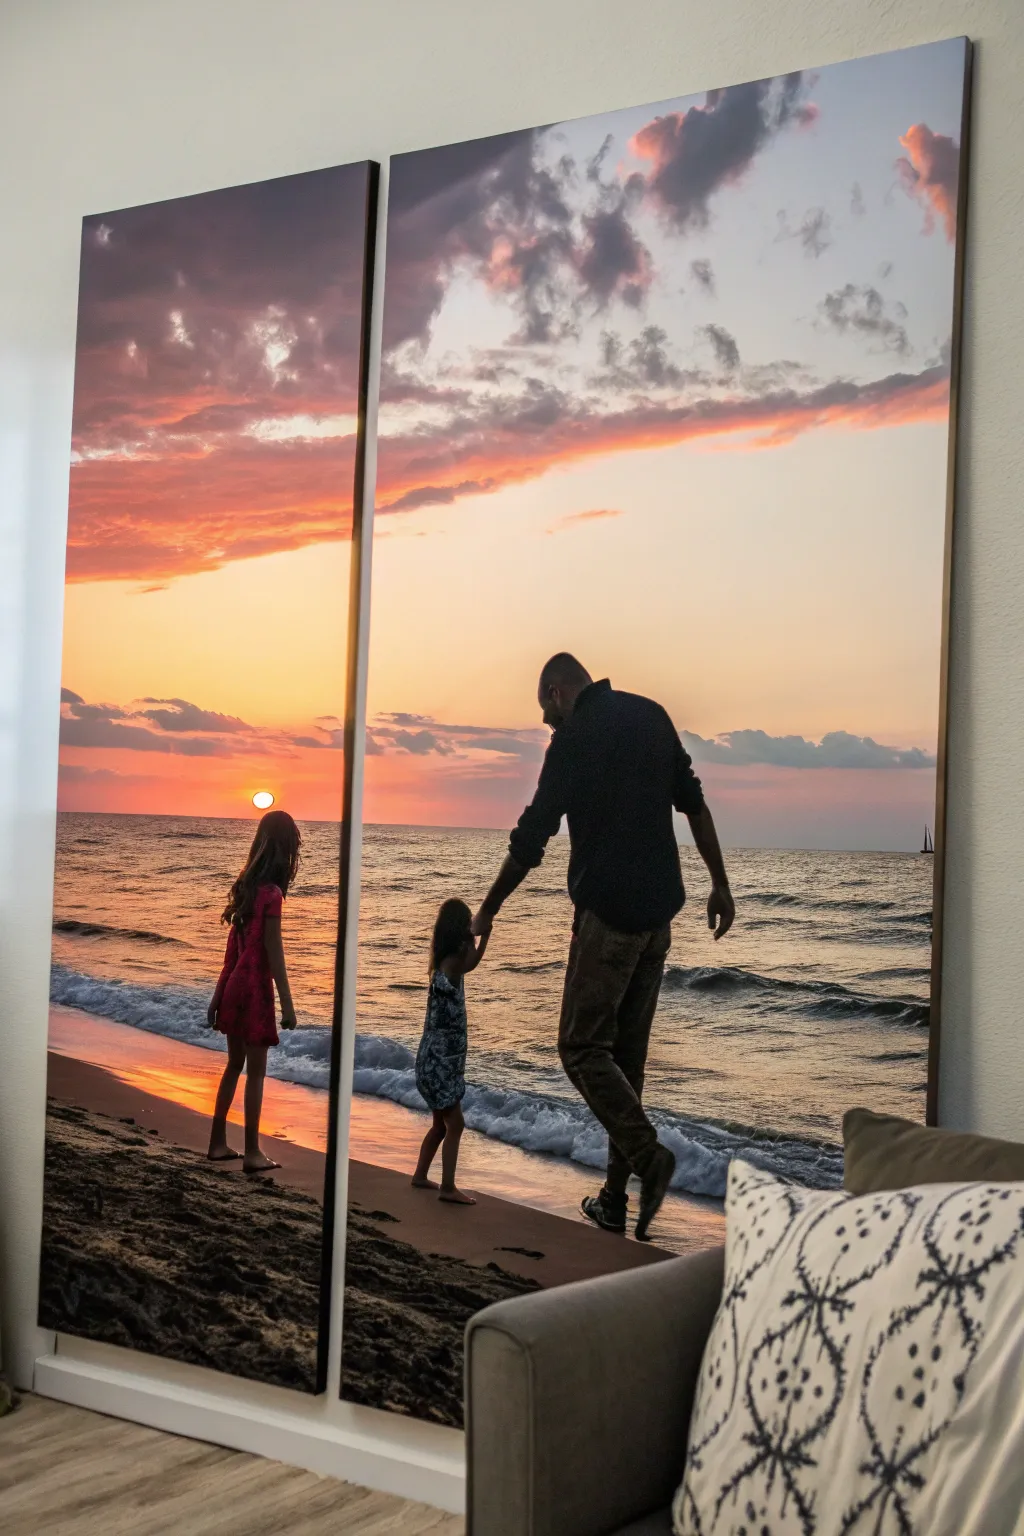
Split Canvas One Shared Scene
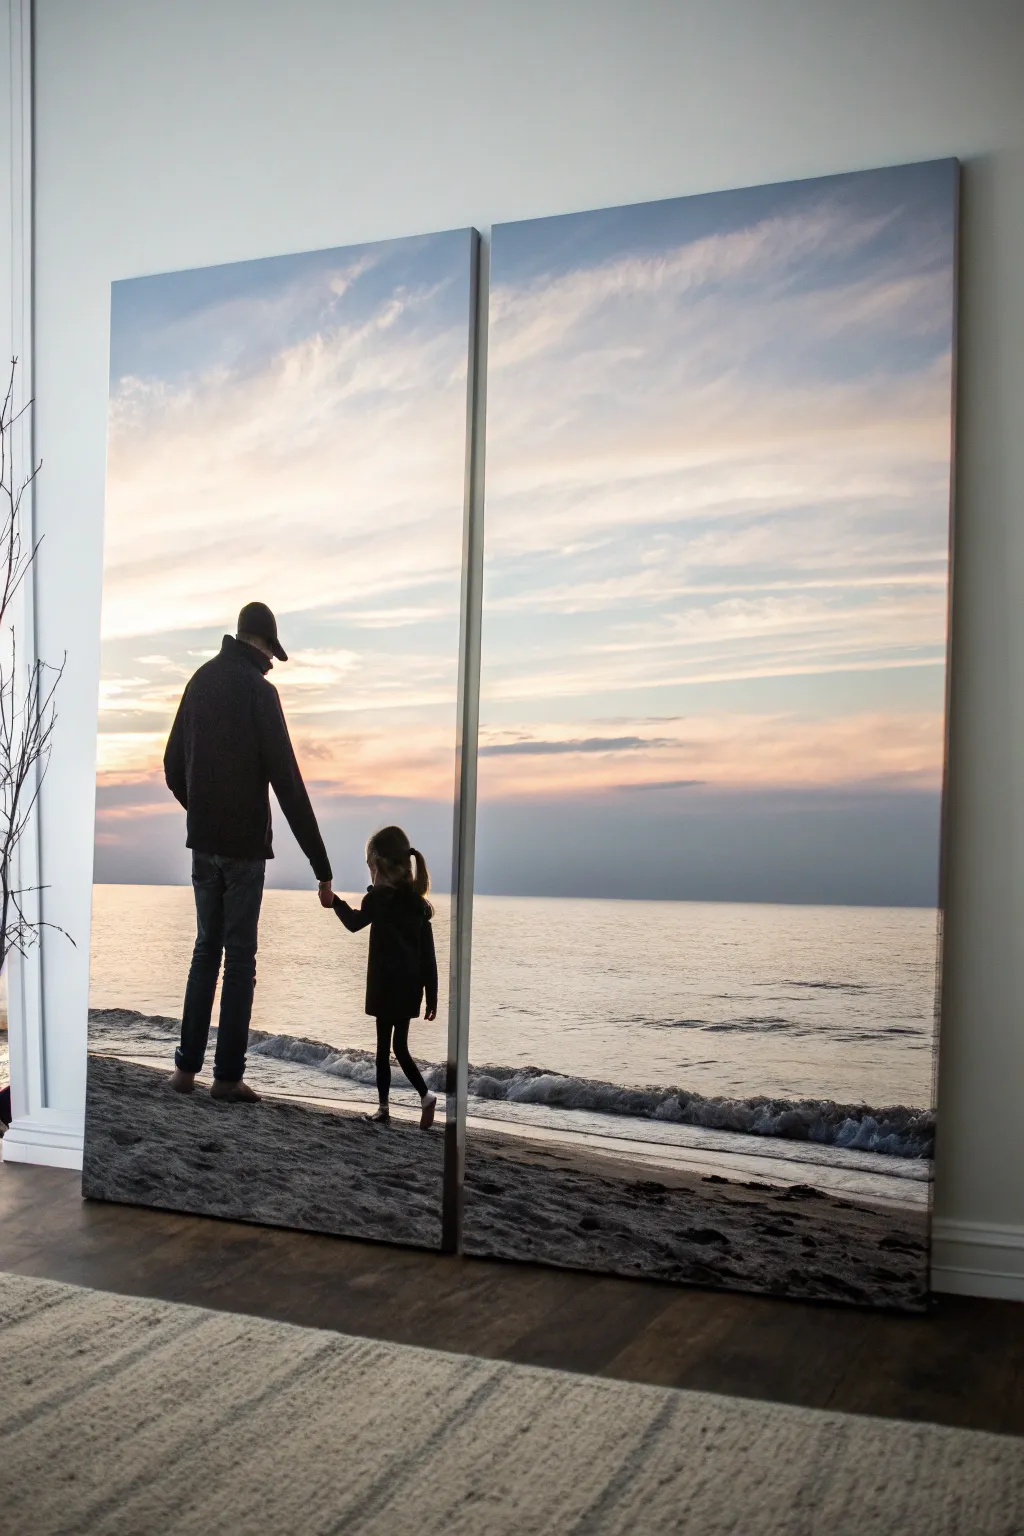
Transform a cherished memory into a stunning statement piece with this large-scale split canvas project. By dividing a single serene image of a father and daughter across two tall panels, you create a modern, gallery-worthy display that dramatically opens up any room.
Step-by-Step Tutorial
Materials
- High-resolution digital photo (father/daughter silhouette)
- Two large gallery-wrapped canvases (e.g., 24×48 inches each)
- Photo editing software (Photoshop, GIMP, or online tool)
- Spray adhesive (heavy duty)
- Fine-grit sandpaper
- Matte or satin varnish spray
- Large format printer service or ordered prints
- Craft knife or rotary cutter
- Metal ruler
- Cutting mat
Step 1: Preparing the Image
-
Select the right photo:
Choose a high-resolution image with the subject matter slightly off-center. A silhouette against a sunset works beautifully because the high contrast reads well from a distance. -
Measure your canvases:
Place your two bare canvases side-by-side on the floor, leaving a small gap (about 1-2 inches) between them to account for the wall spacing. -
Digital cropping:
In your editing software, create a new document matching the total width and height of both canvases combined, plus 2 inches of bleed on all sides for wrapping. -
Split the file:
Divide your digital image into two separate files—one for the left panel and one for the right. Ensure you account for the canvas depth (usually 1.5 inches) so the image wraps around the edges naturally. -
Order the prints:
While you can paint this, the example shown is a photo transfer or print. Order your two split images as large posters on high-quality matte paper or canvas material from a professional print shop.
Alignment Tip
When editing, duplicate a small sliver of the image (0.25 inch) where the split happens. This compensates for the visual gap on the wall, making the horizon line look continuous to the eye.
Step 2: Mounting the Artwork
-
Prep the canvas surface:
Lightly sand the face and edges of your blank canvases. This roughens the gesso slightly and helps the adhesive form a permanent bond with your print. -
Trim the prints:
Once your prints arrive, lay them on a cutting mat. Use a metal ruler and fresh craft knife to trim any white borders, leaving exactly enough operational margin to wrap around the frame. -
Apply adhesive to the face:
Working in a well-ventilated area, spray a generous, even coat of heavy-duty spray adhesive onto the front surface of the first canvas. -
Position the print:
Carefully align the print over the canvas. I find it easiest to anchor the top corners first, then slowly smooth the paper down toward the bottom to prevent air bubbles. -
Smooth it out:
Use a brayer roller or a clean, soft cloth to press the print firmly onto the canvas, working from the center outward to ensure total adhesion. -
Wrap the edges:
Spray the sides of the canvas frame with adhesive. Fold the excess paper print over the edges tightly, treating it like a present. -
Create hospital corners:
For a professional finish, fold the corners neatly (hospital style) and secure them with a dab of extra glue or a staple gun on the back if the paper is thick enough. -
Repeat process:
Repeat the entire mounting process for the second canvas panel, ensuring the horizon lines will match up perfectly when hung.
Make It Mixed Media
After mounting the photo, add texture by painting over the water or clouds with clear acrylic gel medium. Follow the brushstrokes of the waves for a localized, hand-painted 3D effect.
Step 3: Finishing and Hanging
-
Seal the surface:
To protect the print from UV light and moisture, spray a thin, even coat of matte or satin varnish over both panels. -
Let it cure:
Allow the varnish to dry completely for at least 24 hours in a dust-free environment before handling. -
Install hanging hardware:
Attach heavy-duty D-rings or wire to the back of the wooden frames, measuring precisely so both hang at the exact same height. -
Hang with a gap:
Mount the panels on the wall, leaving a 1.5 to 2-inch gap between them. This negative space is crucial for the ‘split’ effect to look intentional.
Step back and admire how this divided composition brings a massive, heartwarming memory to life in your living space

PENCIL GUIDE
Understanding Pencil Grades from H to B
From first sketch to finished drawing — learn pencil grades, line control, and shading techniques.
Explore the Full Guide
Balloon String Connecting Dad and Daughter
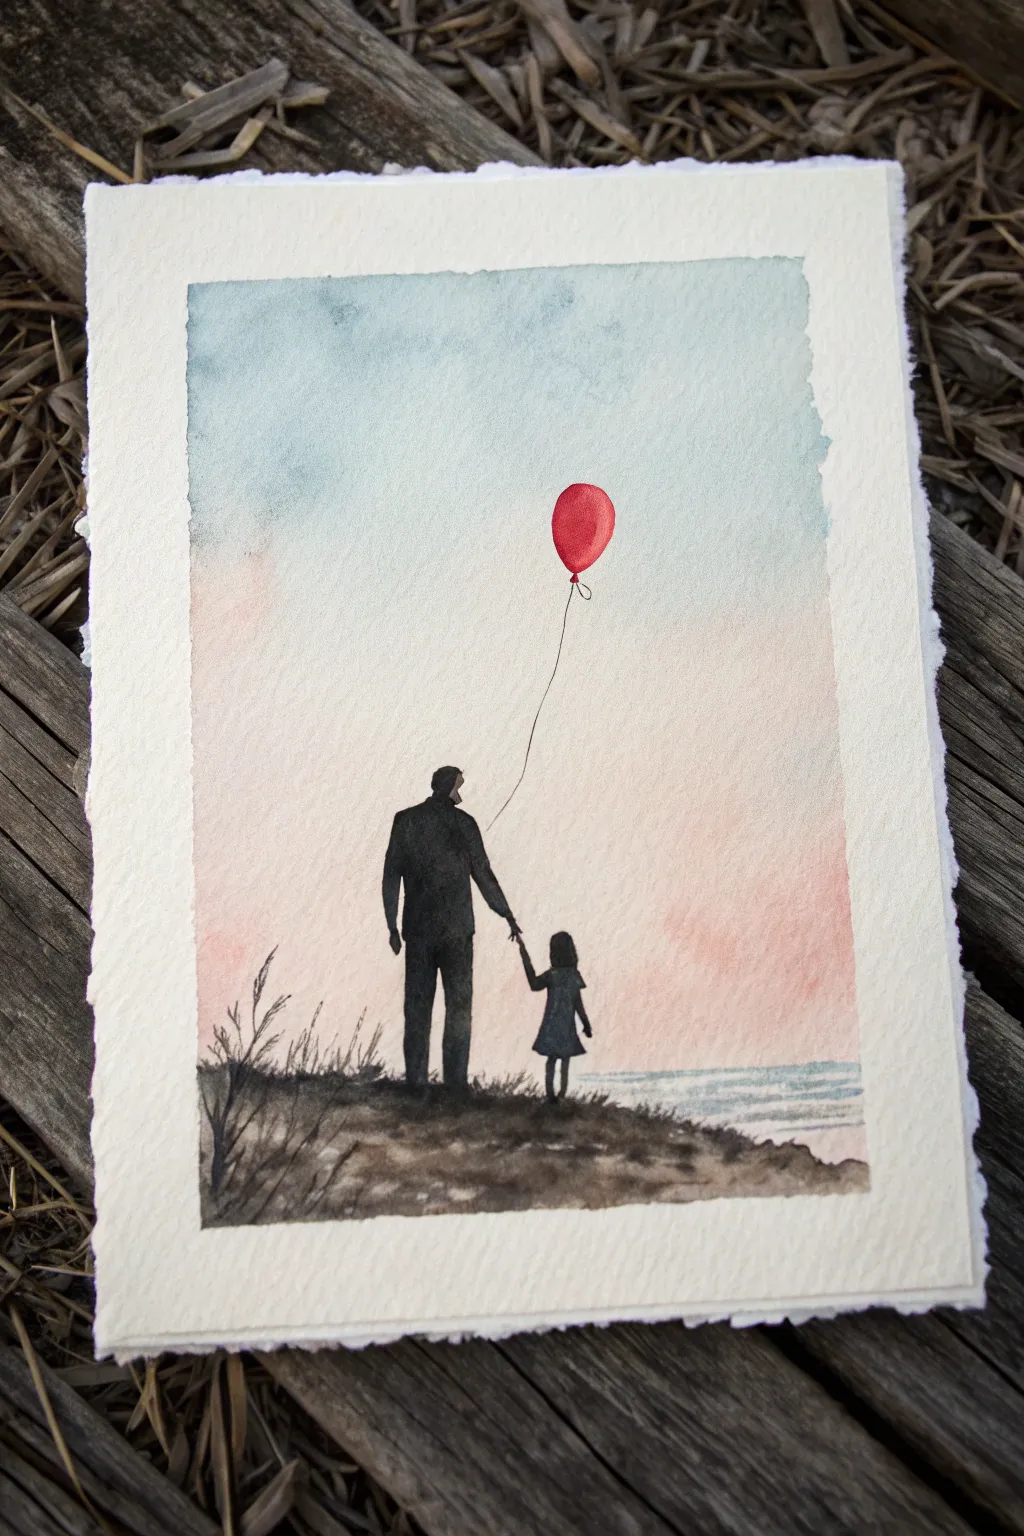
Capture the tender bond of fatherhood with this evocative watercolor silhouette painting. This project combines a dreamy, soft-washed background with crisp, dark figures to create a timeless keepsake perfect for Father’s Day or a nursery.
Step-by-Step Guide
Materials
- Cold press watercolor paper (deckle edge preferred)
- Watercolor paints (Payne’s Grey, Alizarin Crimson, Cerulean Blue, Naples Yellow or light orange)
- Round watercolor brushes (size 4, size 8, and a fine liner brush)
- Pencil and eraser
- Masking fluid (optional)
- Palette for mixing
- Water jar and paper towels
Step 1: Setting the Scene
-
Sketch the horizon:
Begin by lightly sketching a low horizon line about a quarter of the way up the paper. Add a slight mound for the grassy hill where the figures will stand. -
Outline the figures:
Very faintly draw the outline of a tall man holding the hand of a small girl. Keep the details minimal since these will be filled in as solid silhouettes later. -
Position the balloon:
Draw a small oval for the balloon floating high above their heads, slightly to the right of the center.
Silhouette Bleeding?
If your black paint starts spreading into the sky, the background wasn’t dry enough. Stop immediately, let it dry, and then tidy the edge with thick, opaque paint.
Step 2: Creating the Background Wash
-
Prepare the sky wash:
Mix a watery wash of Cerulean Blue for the upper sky. On your palette, also prepare a very diluted Naples Yellow or light orange for the sunset glow. -
Wet the paper:
Using your largest clean brush, apply clean water to the entire sky area, working around the balloon shape carefully to keep it dry. -
Paint the upper sky:
While the paper is still wet, drop in your blue wash at the top, letting it naturally diffuse downward. -
Add the sunset glow:
Quickly rinse your brush and pick up the yellow-orange tint. Apply this near the horizon line, gently blending it upwards into the fading blue. -
Suggest the water:
For the water line just below the sky, use a slightly more concentrated horizontal stroke of blue to suggest the ocean surface meeting the horizon. -
Let it dry completely:
Wait until the background is bone dry. This is crucial so your sharp silhouette lines don’t bleed into the soft sky.
Make it Personal
Customize the silhouettes to match your family! Add a baseball cap to the dad, pigtails to the daughter, or even a family dog sitting nearby in the grass.
Step 3: Painting the Foreground
-
Mix your darks:
Create a rich, dark mixture for the silhouettes. I like to use Payne’s Grey with a touch of brown rather than straight black, as it feels softer and more atmospheric. -
Paint the father:
Using a size 4 brush, carefully fill in the father’s shape. Focus on the posture—a slight lean towards the child adds emotional weight. -
Paint the daughter:
Switch to a smaller brush if needed to fill in the girl’s silhouette, ensuring her dress shape and small legs are distinct. -
Connect the hands:
Use the very tip of your brush to paint their clasped hands, ensuring there is a continuous connection between the two figures. -
Ground the figures:
Paint the grassy hill beneath their feet using rough, texture-creating strokes. Dab the brush to create the look of uneven earth and soil. -
Add grassy texture:
While the hill paint is damp, pull small, quick strokes upward with a fine brush to create wild blades of grass. -
Deepen the shadows:
Drop more concentrated dark pigment into the bottom of the hill and grass clumps to add weight and depth to the foreground.
Step 4: Final Details
-
Paint the balloon:
Using a vibrant Alizarin Crimson (or any bright red), carefully paint the balloon oval. Leave a tiny speck of white paper on the top left side to represent a highlight. -
Draw the string:
This requires a steady hand. Using your finest liner brush and a very inky consistency of black paint, draw a thin, wavy line connecting the balloon to the father’s hand. -
Erase guidelines:
Once the painting is 100% dry, gently erase any visible pencil marks, being careful not to scrub the watercolor paper surface.
Frame this delicate piece in a simple wood frame to let the emotion of the artwork shine
Shadow Portrait From a Real Photo
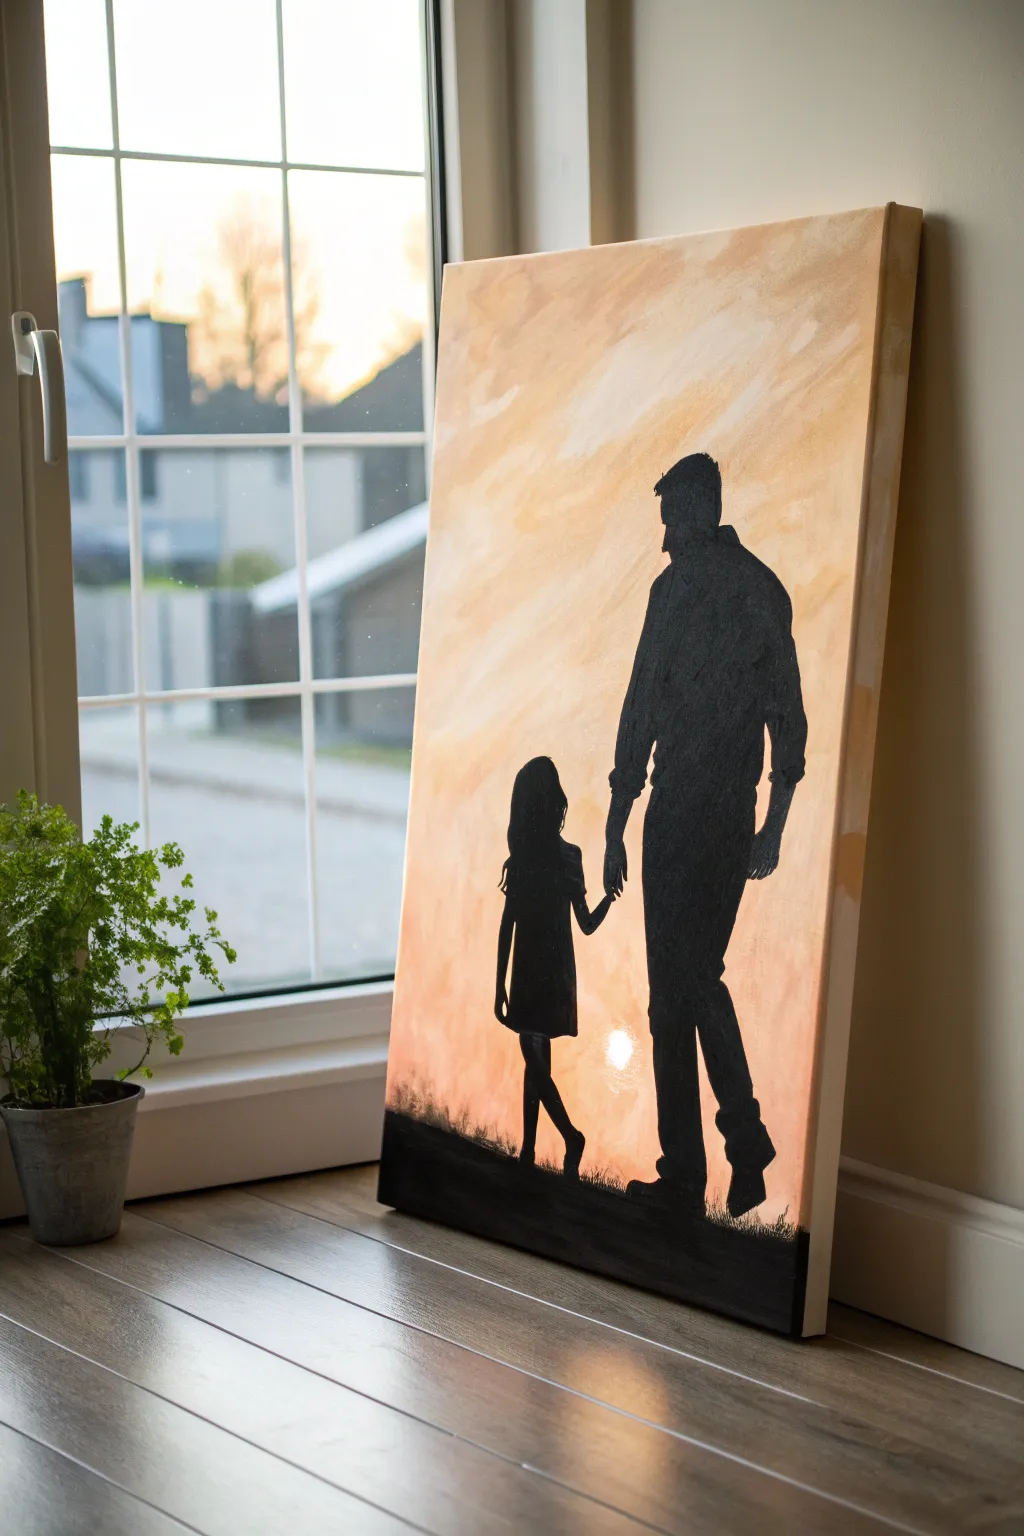
Capture a tender moment forever with this striking silhouette painting that plays with high contrast and warm tones. By using a simple sunset gradient as your backdrop, the focus remains entirely on the bond shown between the father and daughter figures.
Step-by-Step
Materials
- Stretched canvas (rectangular, e.g., 18×24 inches)
- Acrylic paints (Titanium White, Yellow Ochre, Burnt Sienna, Mars Black)
- Large flat brush (2-inch)
- Medium round brush
- Fine detail liner brush
- Pencil
- Reference photo of father and daughter walking
- Carbon paper (optional)
- Palette or paper plate
- Cup of water and paper towels
Step 1: Painting the Sunset Backdrop
-
Prepare your palette:
Squeeze out generous amounts of Titanium White, Yellow Ochre, and a smaller amount of Burnt Sienna onto your palette. -
Start with the brightest light:
Using your large flat brush, mix a lot of white with a tiny dot of yellow. Paint the area slightly below the center of the canvas where the sun would naturally hit the horizon; keep this area very pale. -
Add warmth upwards:
Without cleaning your brush, pick up more Yellow Ochre. Begin painting above your pale center spot, moving upwards in horizontal, sweeping strokes to blend the color. -
create a gradient effect:
As you move toward the top of the canvas, gradually mix in small touches of Burnt Sienna to deepen the color. Keep your strokes loose and slightly uneven to mimic clouds and atmospheric texture. -
Paint the bottom section:
Return to the lower third of the canvas. Use a mix of white and a faint touch of Burnt Sienna to create a soft, hazy ground level that is slightly darker than the sun spot but lighter than the top sky. -
Blend the transitions:
While the paint is still wet, use long, gentle horizontal strokes to smooth out any harsh lines between your color zones. The goal is a soft, dreamlike background. -
Let it dry completely:
Allow the background to dry fully. This is crucial because painting a black silhouette over wet paint will result in a muddy gray mess.
Step 2: Creating the Silhouette
-
Establish the horizon line:
Once the canvas is dry, use a pencil to lightly sketch a low, uneven line near the bottom representing the ground. -
Draft the figures:
Lightly sketch the outlines of the father and daughter. If you aren’t confident drawing freehand, print your reference photo to size, place carbon paper underneath, and trace the outline directly onto the canvas. -
Outline in black:
Switch to your medium round brush and load it with Mars Black paint. Carefully paint over your pencil lines to establish the sharp edges of the figures. -
Fill in the large areas:
Continue using the medium brush to fill in the bodies of the father and daughter with solid black paint. Ensure the coat is opaque; you may need two coats if the sunset background shows through. -
Refine the hands:
I usually switch to the fine liner brush here to handle the delicate connection of their holding hands. Take your time to get the fingers distinct rather than a single blob. -
Detail the profiles:
With the liner brush, carefully refine the profiles of the faces and the edges of the hair. Small details like the daughter’s flowing hair or the father’s collar add realism. -
Identify light gaps:
Look at the negative space between the legs and arms. Ensure these gaps remain the color of the background to clearly define the walking motion.
Uneven Edges?
If your silhouette edges look shaky, use a black permanent marker to carefully smooth out the outline before filling the inside with paint.
Step 3: Grounding and Finishing
-
Paint the ground:
Fill in the ground area below the figures with solid black. Make the top edge of the ground slightly uneven to look natural. -
Add grass texture:
Using a dry, bristly brush or just the tip of your liner brush, flick small, quick upward strokes along the ground line to simulate grass blades sticking up. -
Verify opacity:
Hold the painting up to the light to check for thin spots in the black paint. touching up any areas that look patchy. -
Seal the work (optional):
Once the black paint is bone dry, you can apply a layer of clear varnish to protect the surface and even out the sheen.
Pro Tip: Lighting
Make the background lightest directly behind the figures’ heads or hands. This high contrast draws the viewer’s eye straight to the emotional connection.
Hang this heartwarming piece in a family room or hallway where the warm colors can brighten up the space


Silhouette Inside a Heart Shape
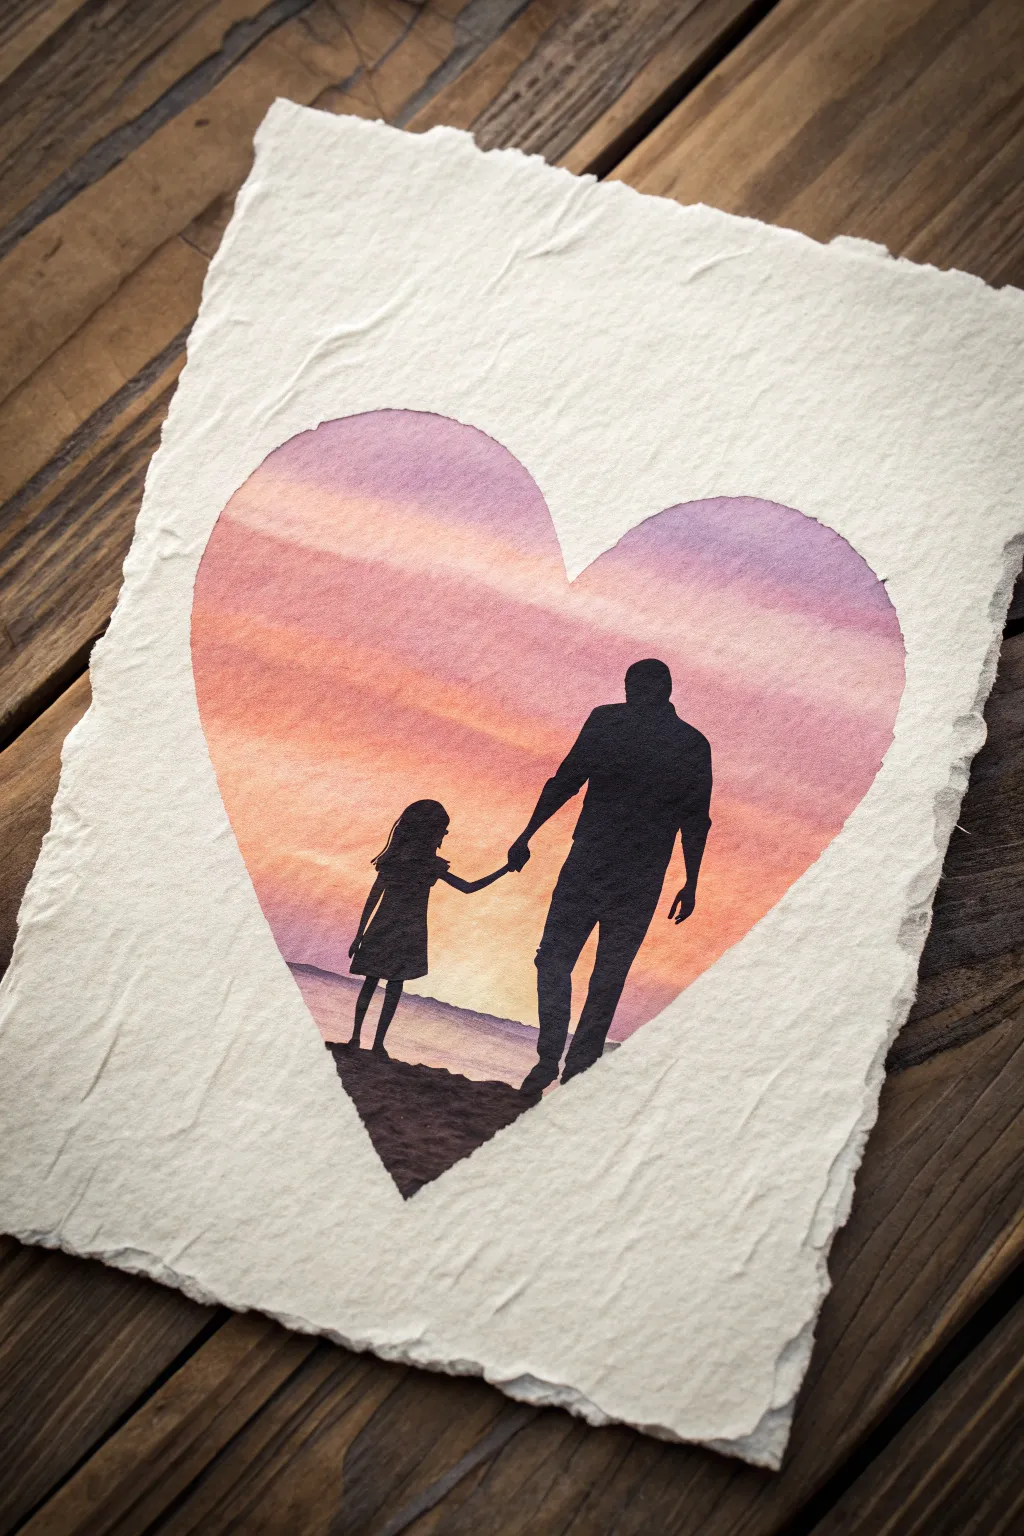
This tender piece captures a special father-daughter bond within the timeless shape of a heart, utilizing warm watercolor washes and stark black silhouettes. The textured deckle-edge paper adds a rustic, artisanal feel that elevates the simple imagery into a heartfelt keepsake.
Detailed Instructions
Materials
- Heavyweight handmade cotton paper (deckle edge, roughly 5×7 or A5)
- Watercolor paints (Purple, Pink, Orange, Yellow)
- Black acrylic paint or black gouache (for opacity)
- Pencil (HB or H)
- Heart-shaped stencil or cardstock cutout
- Painter’s tape or masking fluid (optional but helpful)
- Flat shader brush (size 6 or 8)
- Fine liner brush (size 0 or 00)
- Cup of water and paper towels
- Carbon transfer paper (optional for tracing silhouettes)
Step 1: Preparing the Heart
-
Paper Selection:
Begin by selecting a piece of heavy, handmade cotton rag paper. The rough texture and deckled edges are crucial for achieving the specific look in the reference image, so avoid standard smooth cardstock. -
Outline the Heart:
Place your heart stencil or cutout in the center of the paper. Lightly trace the outline with your pencil. Keep your lines very faint, as you want the paint to define the shape later, not the graphite. -
Masking (Optional):
For a crisp edge like the example, you can carefully apply masking fluid just outside the pencil line to protect the white paper. Alternatively, trust a steady hand to paint up to the edge later.
Step 2: Painting the Sunset Background
-
Pre-wet the Area:
Using a clean brush and clear water, lightly dampen the inside of the heart shape. The paper should be moist but not pooling with water. This ‘wet-on-wet’ technique helps the colors blend seamlessly. -
Start with Purple:
Load your flat brush with a diluted purple or violet watercolor. Apply this to the top curve of the heart, allowing the pigment to spread naturally into the wet paper. -
Transition to Pink:
Rinse your brush slightly and pick up a soft pink. Paint a horizontal band just below the purple, letting the two touches boundaries mingle to create a soft gradient. -
Add Warmth:
Move down the heart with an orange hue. Use horizontal strokes to mimic the feeling of a sky. The colors should get lighter and warmer as you move toward the bottom. -
The Horizon:
Near the bottom point of the heart, use a very pale yellow or diluted orange for the water/reflection area. Leave the bottom-most tip fairly dark (purple-grey) to suggest the shoreline texture. -
Dry Completely:
This is the most critical waiting period. Let the background dry 100% completely before moving on. If the paper is cool to the touch, it’s still damp. I usually give it at least 20 minutes.
Fuzzy Edges?
If your black silhouette “bleeds” into the sunset, the background wasn’t dry enough. Wait longer next time, or use a hair dryer on low heat to ensure the paper is bone dry before adding the figures.
Step 3: Creating the Silhouette
-
Drafting the Figures:
Once dry, lightly sketch the father and daughter figures. Focus on the outline shape rather than internal details. If you aren’t confident in freehand drawing, print a silhouette photo and use carbon paper to transfer it lightly onto the sunset background. -
Mixing the Black:
For the silhouette, you need total opacity. Watercolor black can sometimes dry grey, so I prefer using black acrylic paint or gouache thinned just enough to flow off the brush. -
Painting the Ground:
Start at the very bottom of the heart. Use your black paint to fill in the jagged, rocky ground area. This establishes a base for your figures to stand on. -
Filling the Largest Shapes:
Switch to a medium round brush to fill in the father’s torso and legs. Work carefully up to your pencil lines, ensuring the edges are sharp against the colorful background. -
Detailing the Figures:
Change to your fine liner brush (size 0). Carefully paint the daughter’s dress and legs. The contrast is key here, so ensure your black paint is solid and not streaky. -
Connecting Hands:
With the fine liner, paint the arms and the joined hands. This is the emotional focal point, so take a breath and use a steady, slow stroke to connect them. -
Final Touches:
Check the edges of your heart shape. If you used masking fluid, rub it away gently. If you painted freehand, check if any edges need a tiny touch-up of paint to create a clean curve.
Make It Personal
Take a photo of the actual father and daughter holding hands, print it on plain paper, cut it out, and trace THAT silhouette onto the art for a truly custom likeness.
Once the black paint is fully set, frame this textured piece in a floating frame to show off the beautiful paper edges
Galaxy Sky With Dad and Daughter Stargazing
Capture a tender moment of wonder with this beautiful watercolor painting depicting a father and child looking up at a vast, starry galaxy. Using gentle washes and sharp silhouettes, you’ll create a glowing night sky that transitions from deep indigo to warm twilight hues.
Step-by-Step Guide
Materials
- Cold press watercolor paper (300 gsm)
- Watercolor paints: Indigo, Prussian Blue, Purple/Violet, Quinacridone Magenta, Yellow Ochre
- Black gouache or opaque black watercolor
- White gouache or white gel pen
- Large flat wash brush
- Medium round brush (size 6-8)
- Fine detail brush (size 0-2)
- Masking tape
- Jar of clean water
- Paper towels
- Pencil and eraser
Step 1: Preparing and Sketching
-
Tape the edges:
Secure your watercolor paper to a board or table using masking tape along all four edges. This creates a clean white border and prevents the paper from buckling when wet. -
Sketch the horizon:
Using a pencil, lightly draw a low, slightly uneven hill shape near the bottom quarter of the paper. -
Outline the figures:
Lightly sketch the outlines of a seated man and a smaller child sitting next to him on the hill. Focus just on the outer shapes since these will be filled in with solid black later.
Step 2: Painting the Galaxy Sky
-
Wet the paper:
Using your large flat brush, apply clean water to the entire sky area above your pencil line. The paper should be glisten but not have puddles. -
Apply the horizon glow:
While the paper is wet, drop in a light wash of Yellow Ochre mixed with a touch of Magenta just above the hill line to create a warm sunset glow. -
Add the mid-tones:
Moving upward, blend a band of Purple or Violet into the top edge of the yellow wash. Let the colors bleed naturally where they meet. -
Deepen the night sky:
At the very top of the paper, apply a rich mixture of Indigo and Prussian Blue. Paint downwards, blending it into the purple section to create a seamless gradient. -
Intensify corners:
I like to add extra Indigo to the top left and right corners while the paint is still wet to create a vignetted, deep space effect. -
Let it dry mostly:
Allow the background wash to dry until the shine has disappeared but the paper is cool to the touch.
Star Splatter Trick
Cover the bottom ‘sunset’ area with a scrap piece of paper while flicking white paint. This keeps stars only in the dark upper atmosphere for realism.
Step 3: Creating the Stars
-
Prepare the stars:
Load a medium brush with slightly watered-down white gouache. -
Splatter texture:
Tap the handle of your loaded brush against another brush handle over the dark blue section of the sky to create a spray of tiny stars. -
Add distinct stars:
Use a fine detail brush or a white gel pen to dot a few larger, brighter stars in the blue and purple areas. -
Paint the North Star:
Choose one spot in the deep blue area and paint a four-pointed star with a slightly longer vertical tail for emphasis. -
Dry completely:
Wait for the entire sky and star field to be bone dry before moving on to the silhouettes.
Fixing Blooms
If cauliflower-like ‘blooms’ appear in your sky, disguise them by painting your galaxy stars or constellation clusters right over those textured spots.
Step 4: Painting the Silhouettes
-
Fill the ground:
Load your medium round brush with black gouache (or very concentrated black watercolor). Fill in the entire hill area below your pencil line solid black. -
Paint the figures:
Carefully carefully fill in the outlines of the father and child with the black paint. Ensure the edges are crisp against the colorful sky. -
Add grass details:
Using your finest detail brush, paint thin, upward flicks along the top edge of the hill and around the figures to simulate tall grass blades. -
Make it organic:
Vary the height and direction of the grass blades so the ground looks natural rather than uniform. -
Define wildflowers:
Add tiny cross shapes or small dots at the tips of a few grass blades to suggest wildflower silhouettes. -
The final reveal:
Once everything is completely dry to the touch, slowly peel away the masking tape at a 45-degree angle to reveal the crisp white border.
Now you have a timeless keepsake that perfectly captures the magic of sharing the universe with someone you love
Triptych: Growing Up With Dad
Transform a cherished family memory into a stunning, large-scale statement piece by creating a floor-to-ceiling split photo display. This diptych captures the warmth of a sunset silhouette, breaking a single powerful image across two tall panels for a modern, gallery-style aesthetic.
Step-by-Step Tutorial
Materials
- High-resolution digital photo (sunset silhouette theme)
- Two large canvases (custom size, e.g., 24″ x 72″) or foam core boards
- Photo editing software (Photoshop, GIMP, or similar)
- Spray adhesive (heavy duty)
- Craft knife or rotary cutter
- Metal straight edge ruler
- Self-healing cutting mat
- Large format print (split into two sections)
- Black acrylic paint (optional, for edges)
- Foam paint brush
- Wall mounting hardware (Z-clips or French cleats recommended)
Step 1: Image Preparation
-
Select the perfect photo:
Choose a high-resolution image where the subjects are clearly silhouetted against a bright background like a sunset. Ensure the subjects aren’t dead-center, as the split will occur right down the middle. -
Measure your wall space:
Determine the total height and width available. I like to leave about 2-3 inches of gap between the two panels, so account for this negative space in your total width calculation. -
Crop and split digitally:
Open your image in editing software. Crop it to the final aspect ratio of your two combined panels. Use the slice tool or marquee tool to divide the image into two equal vertical strips. -
Add bleed room:
If you are wrapping the image around the sides of a canvas, add 1.5 to 2 inches of ‘bleed’ (extended image area) to all sides of each strip. If mounting flat on foam core, you can skip the bleed. -
Order large format prints:
Send your files to a professional printer. Request prints on high-quality photo paper or canvas material. Ensure they are shipped rolled to avoid creases.
Bubbles Be Gone
If you spot an air bubble after mounting, use a tiny needle to prick a hole in the center of the bubble, then gently press the air out with a soft cloth.
Step 2: Mounting the Prints
-
Prepare the workspace:
Clear a large, flat surface—the floor often works best for prints this size. Lay down a protective sheet or drop cloth to catch any stray adhesive overspray. -
Paint the edges (optional):
If you are mounting on foam core or wood panels and not wrapping the image, paint the side edges black with acrylic paint. This creates a sharp, finished frame effect. -
Align the first print:
Lay your first substrate panel flat. Position the corresponding print on top without glue first to verify the sizing. Weight down one end with clean heavy books. -
Apply adhesive in sections:
Lift the unweighted half of the print and spray a generous, even coat of adhesive onto the board. I prefer doing this in 12-inch sections to manage the drying time effectively. -
Smooth the print:
Carefully roll the print down onto the sticky surface. Use a soft cloth or rubber brayer, working from the center outward to push out any air bubbles. -
Finish the second half:
Remove the weights, lift the other half of the print, spray the adhesive, and smooth it down just like the first section. Repeat the entire process for the second panel.
Level Up: Texture
Brush a clear acrylic gel medium over the finished print surface. Use varied brushstrokes to mimic the texture of an oil painting and protect the photo.
Step 3: Finishing and Installation
-
Trim excess material:
Flip the mounted panel face down on a cutting mat. Using a sharp craft knife and a metal ruler, trim any overhanging paper flush with the board edges. -
Wrap corners (for canvas):
If using a canvas wrap method, fold the corners tightly—think ‘hospital corners’ on a bed—and staple or glue them securely to the back frame. -
Install mounting hardware:
Attach heavy-duty hangers to the back. For tall, narrow panels like these, French cleats or Z-clips are superior because they keep the artwork perfectly flush against the wall and prevent tilting. -
Mark the wall:
Measure carefully to ensure the gap between panels is consistent from top to bottom. Use a level to mark the top edge of where the panels will sit. -
Hang and align:
Mount the cleats to the wall and slide your panels into place. Step back and check that the horizon line in your sunset image flows seamlessly across the gap.
Now you have a breathtaking, monumental tribute to family moments that totally transforms your room
Negative Space Dad and Daughter Reveal
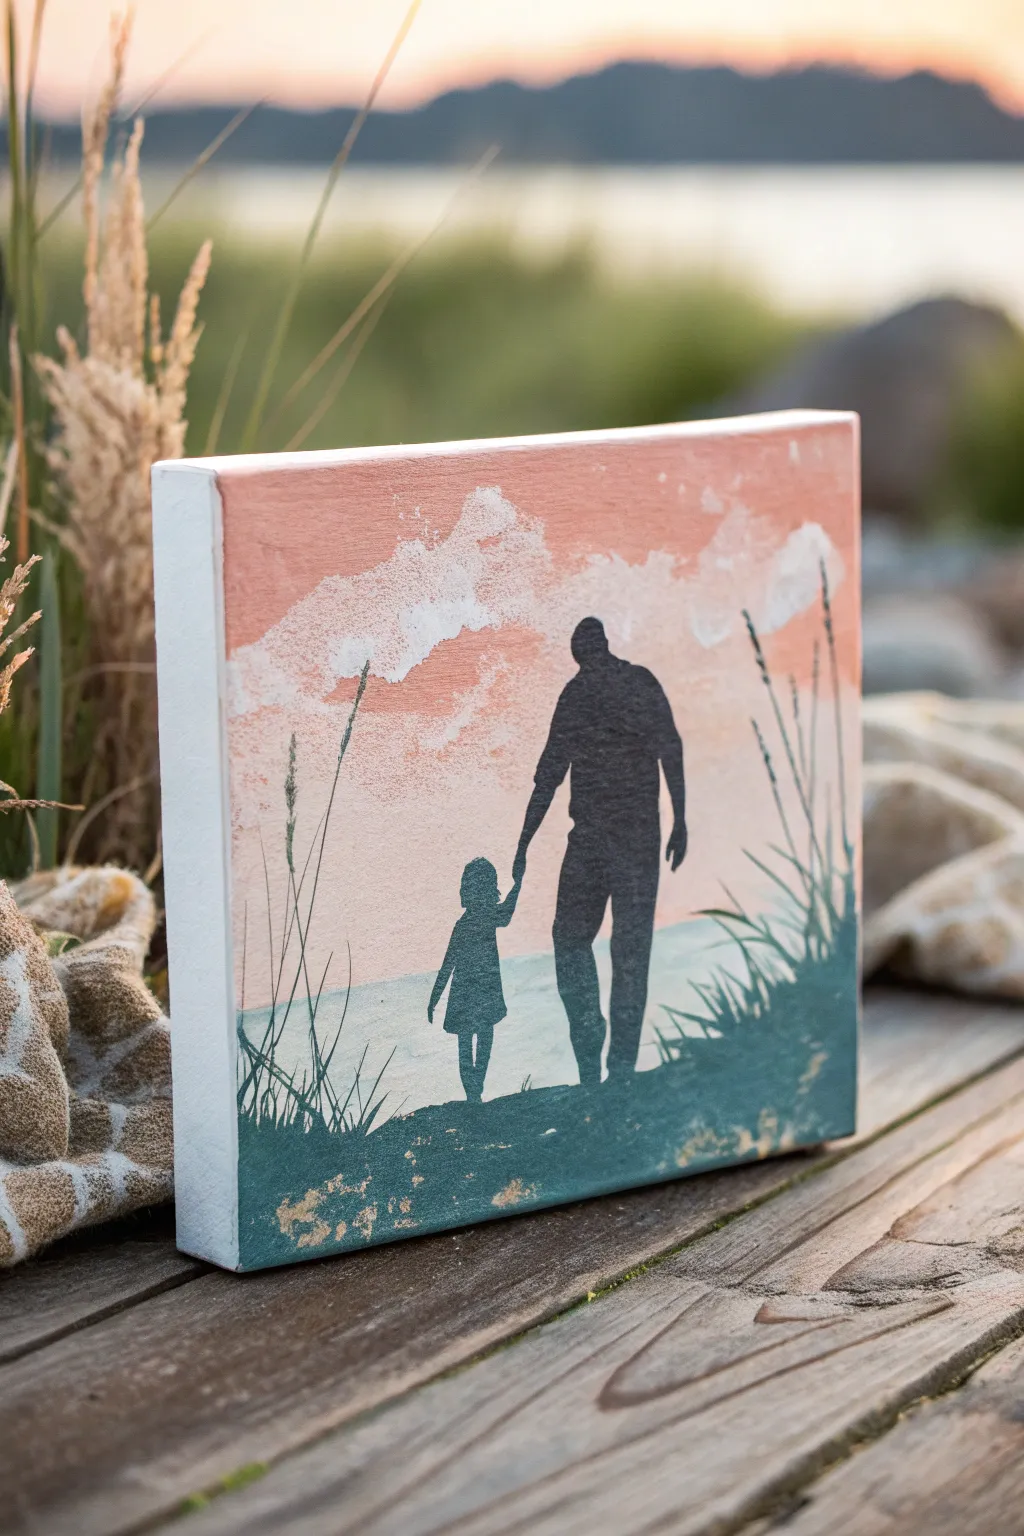
Capture a tender moment frozen in time with this serene canvas painting, featuring distinct silhouettes against a soft, peachy sunset. The interplay of the crisp dark figures against the dreamy, clouded sky creates a heartwarming piece of decor perfect for a desk or shelf.
Detailed Instructions
Materials
- Small box canvas (approx. 6×6 or 8×8 inches)
- Acrylic paints: Peach, Titanium White, Dark Teal, Black
- Silhouette stencil (vinyl or paper) or contact paper
- Flat shader brush (medium)
- Small round detail brush
- Sea sponge or crumpled paper towel
- Painter’s tape
- Pencil
- Craft knife (if cutting your own stencil)
Step 1: Setting the Scene
-
Prepare the canvas:
Start with a clean, dry box canvas. If the surface feels rough, you can give it a light sanding, but the texture here adds to the rustic charm. -
Paint the base sky:
Mix a soft peach color using your peach acrylic and a generous amount of titanium white. Using the flat shader brush, paint the upper two-thirds of the canvas with horizontal strokes. -
Create a gradient:
While the paint is still wet, blend in slightly darker peach tones towards the top and almost pure white towards the middle horizon line to create a natural sunset fade. -
Paint the water:
For the lower third (below the horizon line), mix white with just a tiny drop of dark teal to create a very pale, grayish-blue water color. Paint this horizontally, blending slightly where it meets the sky. -
Add cloud texture:
Take a small piece of sea sponge or a crumpled paper towel. Dip it lightly into white paint, dab off the excess, and gently sponge cloud shapes across the upper sky area. -
Add color to clouds:
Before the white clouds dry completely, sponge a tiny bit of the peach color onto their undersides to give them volume and shadow. -
Let it cure:
Allow the entire background to dry completely. This is crucial before moving to the stencil phase so the adhesive doesn’t lift your paint.
Clean Stencil Lines
Before painting black, paint a thin layer of the background peach color over the stencil edges first. This seals the seal, so any bleed is invisible.
Step 2: Creating the Silhouettes
-
Prepare the stencil:
If you are handy with drawing, sketch the father and daughter outline onto contact paper or adhesive vinyl and cut it out with a craft knife. Alternatively, use a pre-cut vinyl decal. -
Apply the figures:
Position your stencil in the center of the canvas. The feet should land where the ‘land’ mass will eventually be painted. Press the edges down firmly to prevent paint bleed. -
Fill the silhouette:
Using a small brush or a stencil sponge, dab black or very dark charcoal paint into the stencil area. I prefer dabbing over brushing to keep the edges crisp. -
Peel and reveal:
Carefully peel away the vinyl stencil while the paint is still slightly tacky, but not wet. This usually results in the cleanest lines. -
Touch up edges:
Use your smallest detail brush to fix any ragged edges or fill in spots where the paint might have been too thin.
Step 3: Foreground Details
-
Paint the ground:
Load your flat brush with the dark teal paint. Paint a rugged, uneven strip across the bottom of the canvas, covering the feet of the figures to ground them. -
Texture the grass:
While the teal is wet, dab the brush straight up and down along the top edge of the ground strip to simulate short, tufted grass. -
Paint tall stalks:
Switch to your fine detail liner brush. Mix the dark teal with a touch of water to make it flow smoothly. -
Add nature lines:
Paint long, thin sweeping lines upward from the ground on the left and right sides, framing the central figures. -
Detail the reeds:
Add tiny dashed strokes along the tops of the tall grass blades to resemble seed heads or wheat. -
Wrap the edges:
Don’t forget to paint the sides of the canvas! Extend the sky color, the water line, and the dark ground color around the edges for a finished, professional look. -
Seal the work:
Once fully dry (give it a few hours), apply a coat of matte varnish to protect the painting and unify the sheen of the different paint layers.
Add Gold Accents
For a magical touch, use a metallic gold pen or fine brush to add tiny highlights to the edges of the grass blades or the rim of the clouds.
Place your finished canvas on a small easel or hang it on a gallery wall to enjoy this peaceful scene every day
Splatter Silhouette Energy Portrait
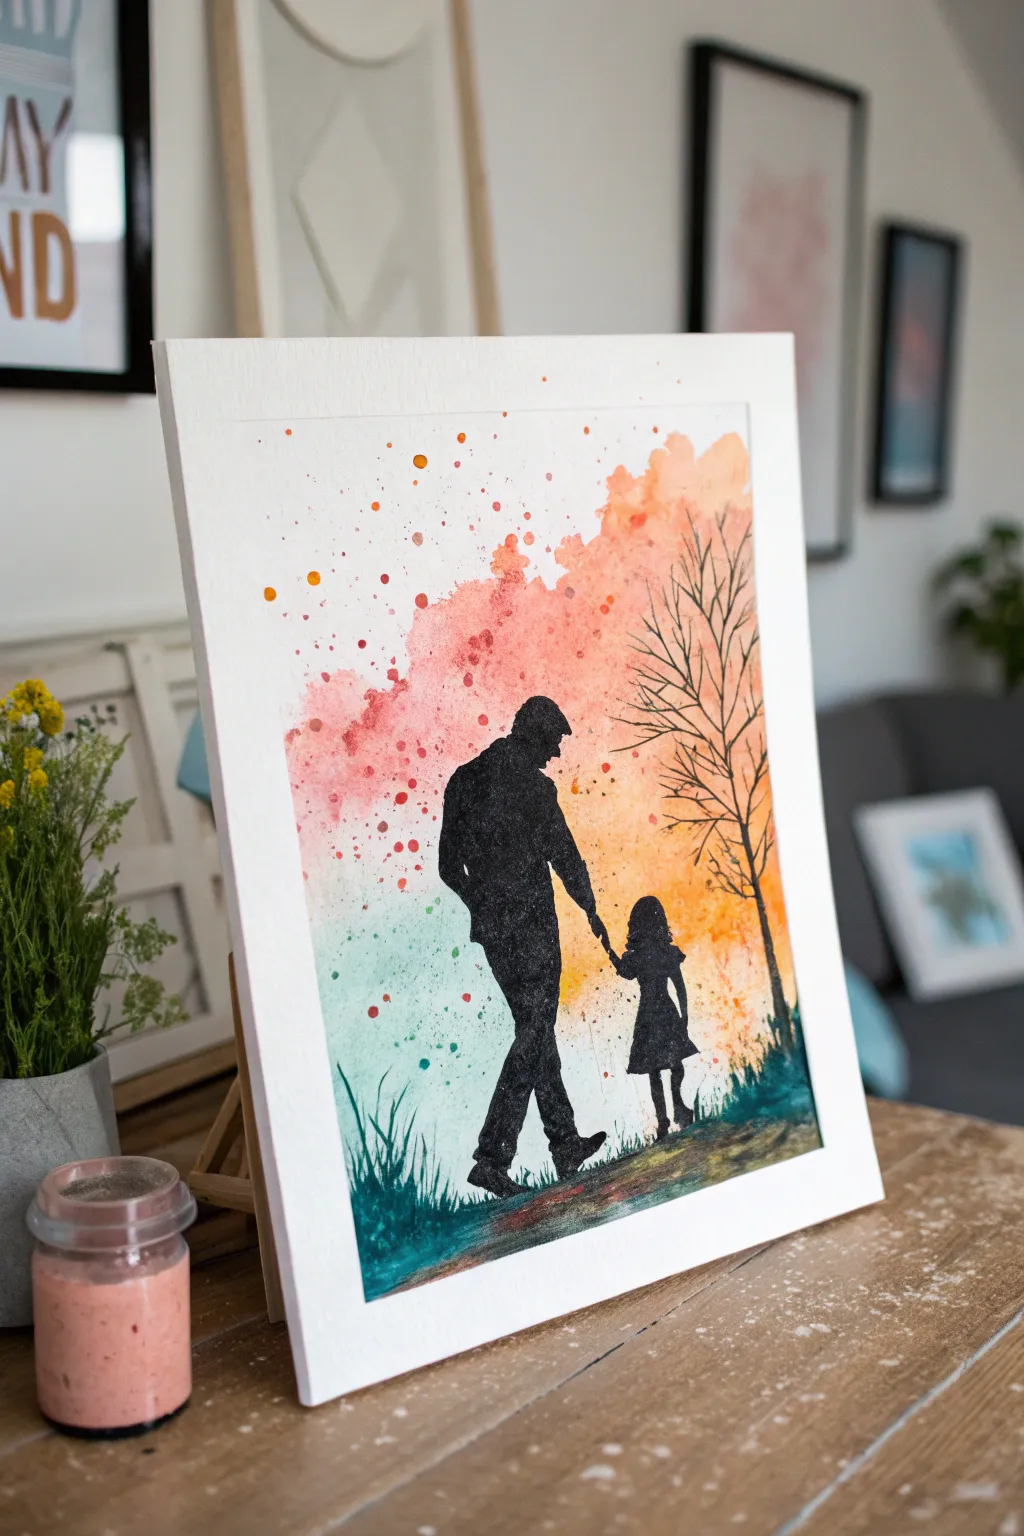
Capture the bond between father and daughter with this expressive mixed-media piece that combines crisp black silhouettes against a vibrant, dreamy watercolor backdrop. The abstract splashes of color create a sense of movement and energy, making a modern keepsake that feels both artistic and personal.
Step-by-Step Tutorial
Materials
- High-quality cold press watercolor paper (A3 or similar size)
- Black acrylic paint or India ink
- Watercolor paints (coral/pink, orange, turquoise/teal)
- Flat shader brush (size 10-12)
- Round pointed brush (size 4-6)
- Fine liner brush (size 0 or 00)
- Pencil and eraser
- Masking tape
- Silhouette reference photo or stencil
- Stiff bristle brush (e.g., an old toothbrush) for splattering
- Water cups and paper towels
Step 1: Setting the Scene
-
Prep your surface:
Begin by taping down the edges of your watercolor paper to a hard board or table. This creates that clean white border shown in the finished piece and prevents the paper from buckling heavily when wet. -
Lightly sketch the figures:
Using a reference photo, lightly sketch the outline of the father and daughter holding hands. Focus only on the outer shape; don’t worry about internal details like buttons or facial features, as these will be filled in completely black later. -
Sketch the environment:
Add a very loose, scribbly line for the ground they are walking on. Then, sketch the skeleton of a bare tree on the right side, ensuring the branches reach up into the negative space above the child.
Step 2: Creating the Colorful Atmosphere
-
Mix your washes:
Prepare three puddles of watercolor: a vibrant coral-pink, a warm orange, and a deep turquoise or teal. Ensure they are juicy and fluid but still pigmented. -
Apply the warm tones:
Start with the sky area behind the figures. Using a wet round brush, dab the pink and orange paints loosely in the upper center and right side. Let the colors bleed into each other naturally, but avoid painting inside your pencil silhouette lines. -
Add the cool tones:
While the warm colors act as the sky, use the turquoise mix near the bottom left and around the feet area to suggest a hazy, abstract background or grass. Let this blend slightly with the pinks if they touch. -
Splatter texture:
This is where the energy comes in. Load a stiff brush with orange paint and flick the bristles with your thumb to send specks flying over the wet wash and onto the white paper above. Repeat with pink and tiny distinct drops of teal near the bottom. -
Dry completely:
I usually force yourself to walk away for at least 30 minutes here. The paper must be bone dry before adding the black ink, or the silhouette edges will bleed into a fuzzy mess.
Clean Edges Trick
If you struggle with steady hands, use liquid masking fluid to paint the silhouette first. Paint the background freely over it, then simple rub the mask away to reveal the white shape to fill with black.
Step 3: Defining the Silhouettes
-
Outline the figures:
Switch to your fine liner brush and black acrylic paint (or ink). carefully trace the pencil outline of the father and daughter. Keep your hand steady to capture details like the shoes and the girl’s dress hem. -
Fill in the bodies:
Using a larger flat brush, fill inside the outlines with solid black. Apply a second coat if the first looks streaky; you want a dense, matte black finish. -
Paint the tree structure:
Return to your fine liner brush to paint the tree on the right. Start at the trunk and pull the brush upward and outward, lifting pressure as you reach the tips of the branches to make them taper to fine points. -
Ground the scene:
Paint the ground beneath their feet. Instead of a solid black line, use short, upward strokes to mimic the texture of grass blades, mixing some of the black with a tiny bit of teal for depth. -
Shadow integration:
Lightly dry-brush some dark pigment horizontally under their feet to create a subtle shadow on the path, anchoring them to the ground.
Custom Integration
Incorporate real elements by pressing a dried leaf into the wet paint near the tree, or use a white gel pen to write a tiny date or name hidden within the grass texture at the bottom.
Step 4: Final Touches
-
Review edges:
Check the edges of your silhouette against the watercolor background. If any white gaps look awkward, carefully touch them up with the black liner. -
Add floating leaves:
Add a few tiny, free-floating dots of orange or black near the tree branches to suggest falling leaves or birds in the distance. -
Final splatter layer:
Once everything is dry, add one last very controlled round of splatters. Aim for faint orange speckles over the black silhouette to make the figures feel like they are truly inside the atmosphere, not just pasted on top. -
The reveal:
Wait until every layer is completely dry to the touch, then slowly peel away the masking tape at a 45-degree angle to reveal your crisp white border.
Now you have a dynamic and heartwarming piece of art ready to be framed and displayed


Have a question or want to share your own experience? I'd love to hear from you in the comments below!