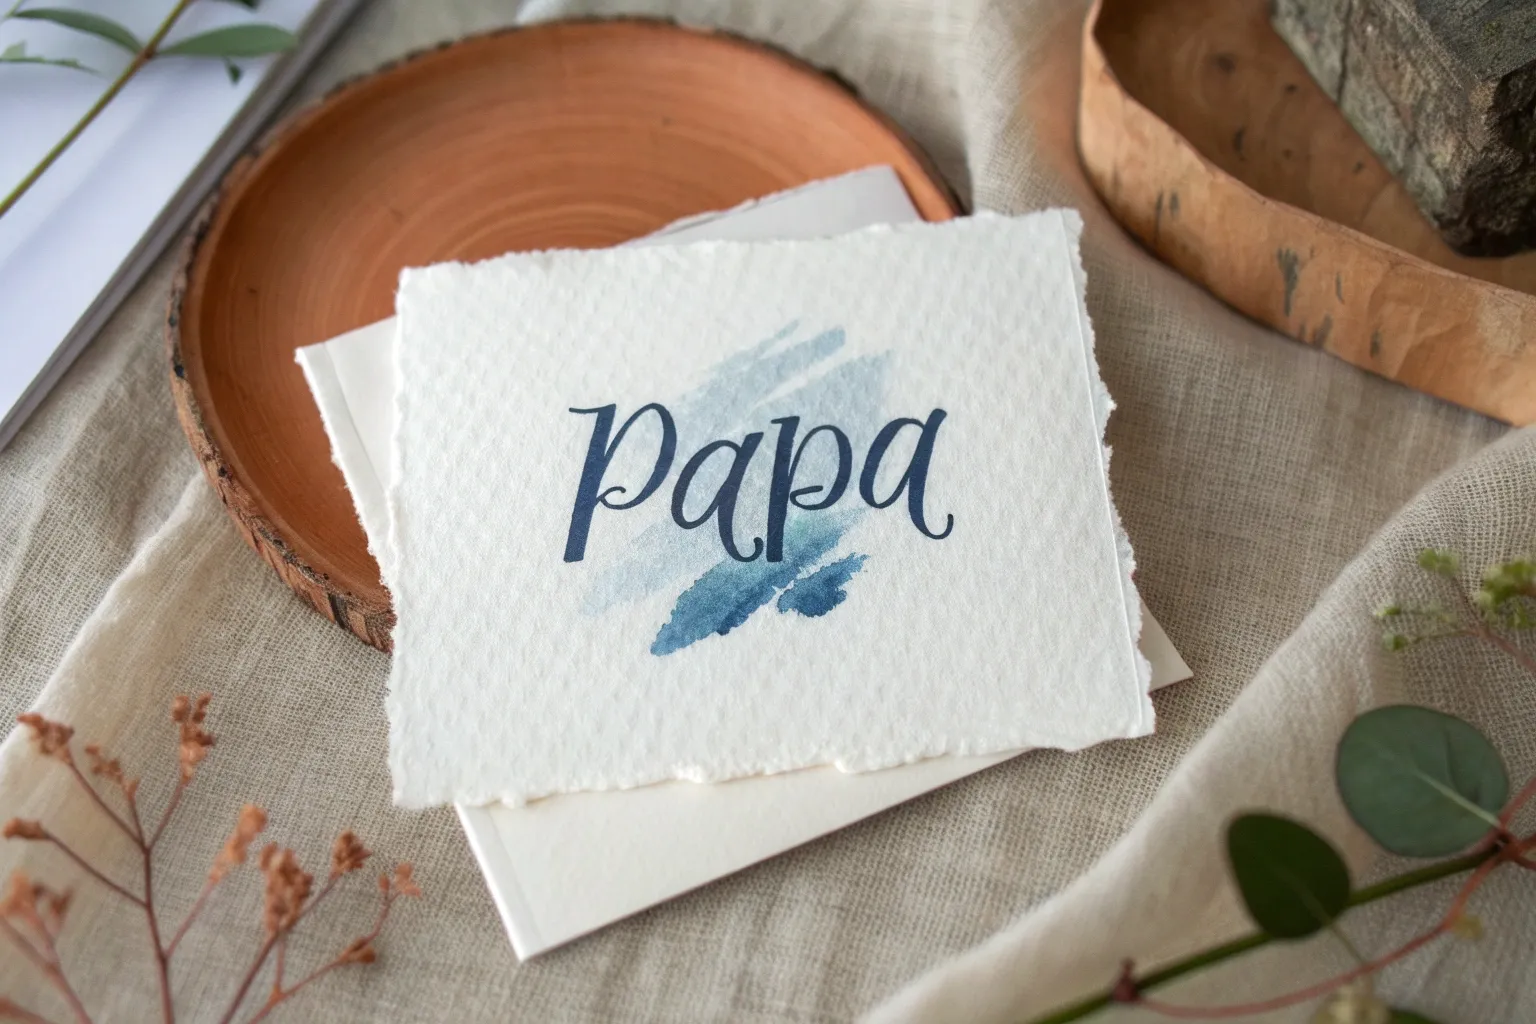
Handmade gifts carry a specific kind of magic that store-bought items simply can’t replicate, especially when they celebrate the unique bond between a father and child. Here is a collection of heartfelt painting projects designed to make him feel like the superhero he truly is, ranging from easy techniques for toddlers to sentimental keepsakes for the home.
Tape Resist “Best Dad” Canvas
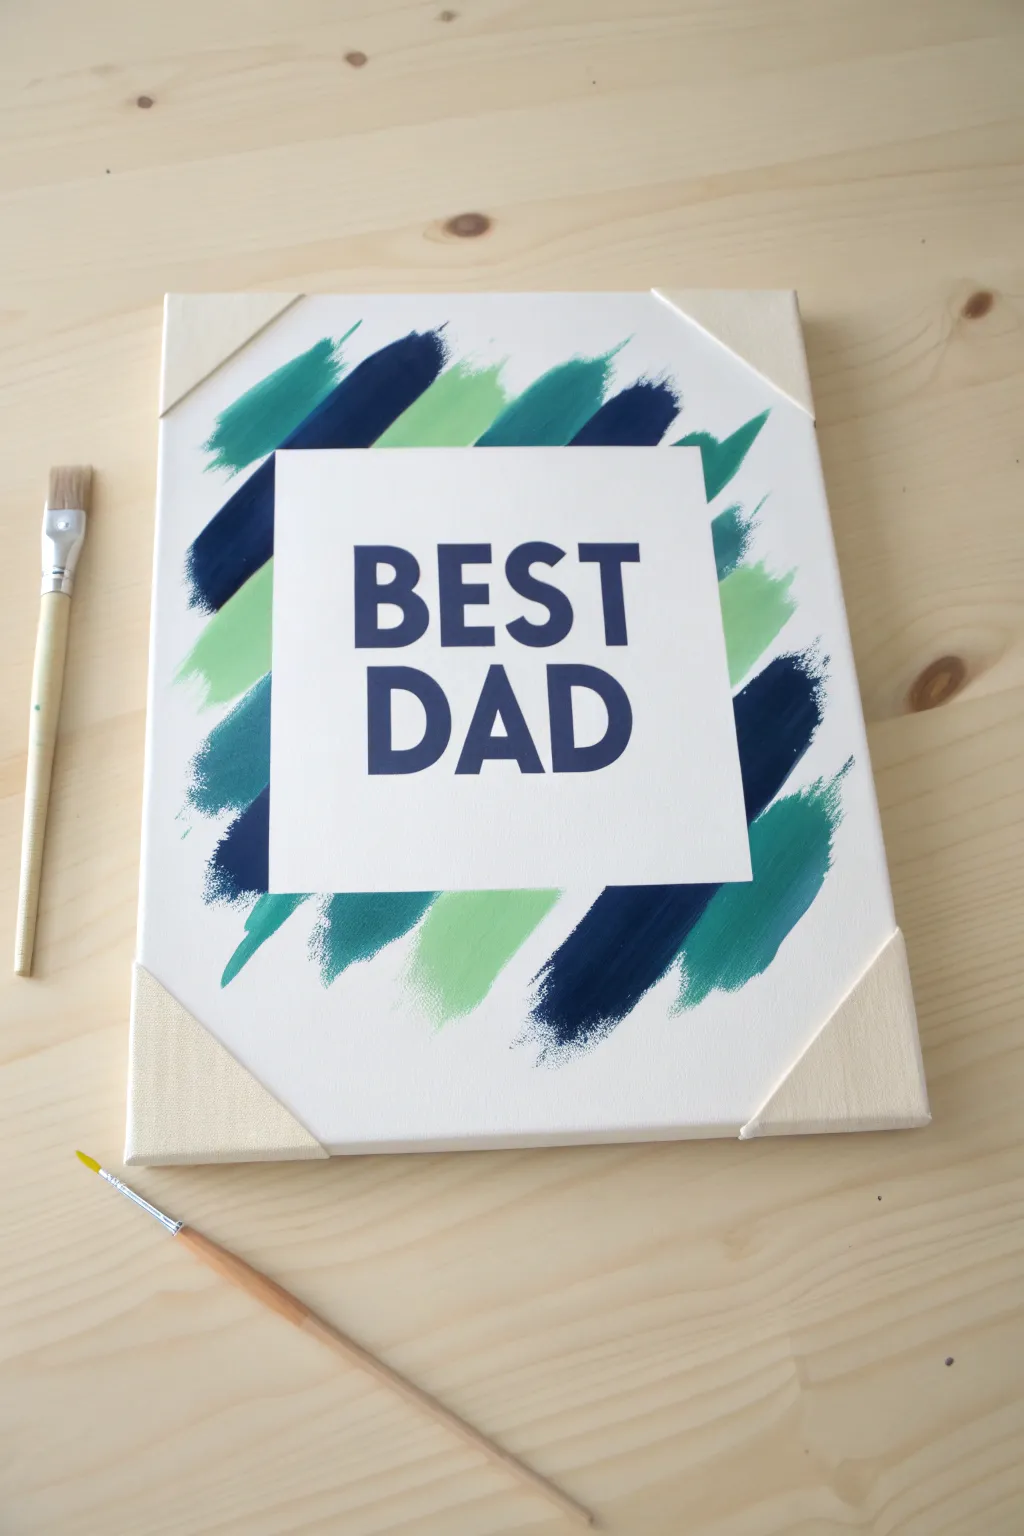
Create a gallery-worthy gift for Dad using this clever masking technique that pairs energetic, colorful brushstrokes with clean, modern typography. This project is wonderfully forgiving for beginners, as the abstract style embraces imperfection while the taped-off center ensures a crisp, professional finish.
Detailed Instructions
Materials
- Stretched white canvas (8×10 or similar)
- Painter’s tape or wide masking tape
- Acrylic paints (Navy blue, Teal, Mint/Lime green)
- White acrylic paint (optional, for sealing)
- Wide flat paintbrush (approx. 1 inch)
- Letter stencils or navy paint marker
- Ruler
- Pencil
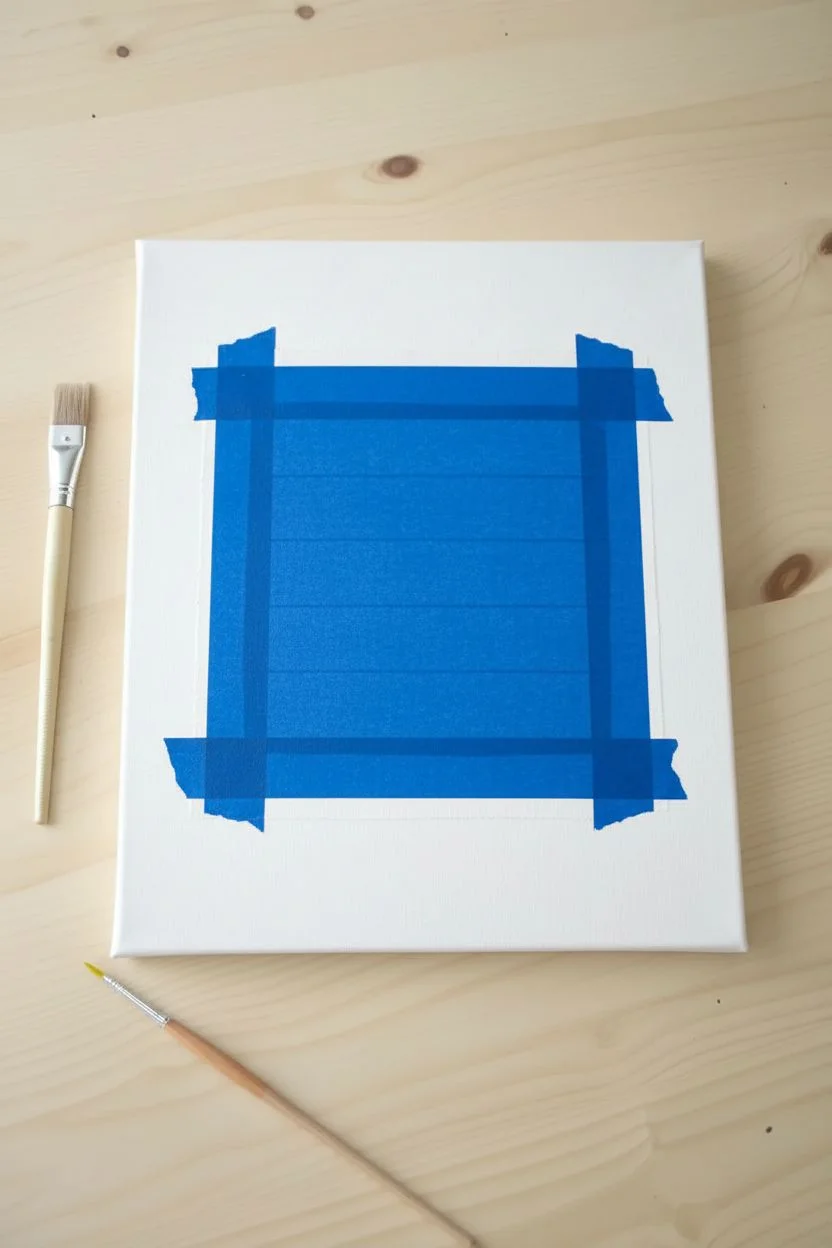
Step 1: Masking the Design
-
Measure the center:
Lay your plain canvas on a flat surface and use a ruler to lightly mark a square in the exact center (about 5×5 or 6×6 inches). -
Apply the mask:
Cover the marked square area completely with strips of painter’s tape. You can overlap multiple strips to fill the shape. -
Seal the edges:
Press down firmly along the outer edges of your tape square with a credit card or your fingernail to prevent paint bleeding. -
Pro sealing Step:
I like to brush a very thin layer of white paint over the tape edges first; this seals any tiny gaps so the colored paint stops in a perfect line.
Crisp Line DIY Hack
Painting a layer of the BASE color (white) over your tape first is the secret weapon for razor-sharp lines. It fills the voids under the tape so your colorful topcoat sits perfectly on top.
Step 2: Creating the Strokes
-
Prepare your palette:
Squeeze dime-sized amounts of navy blue, teal, and mint green paint onto a paper plate or palette. -
Start with stripes:
Load your flat brush with the darkest color (navy) and paint diagonal strokes starting on the tape and sweeping outward. -
Vary the lengths:
Make some strokes long and others distinctively shorter to create a dynamic, jagged edge effect. -
Switch colors:
Rinse your brush thoroughly, then repeat the diagonal stroke process with the teal paint, filling in spaces between the navy. -
Add highlights:
Finish by adding the mint green strokes, layering them slightly over the dry edges of other colors for depth. -
Check coverage:
Ensure you have painted thickly right over the edge of the tape so the square shape will be clearly defined when peeled. -
Dry time:
Allow the paint to dry until it is dry to the touch, usually about 20 to 30 minutes.
Step 3: The Reveal & Text
-
Peel the tape:
Slowly peel back the painter’s tape at a 45-degree angle to reveal the stark white square underneath. -
Clean up edges:
If any tiny bits of paint bled through, simply touch them up with a small brush and white paint. -
Position lettering:
Center your letter stencils inside the white square. -
Apply the text:
Using a sponge dabber or small brush with navy paint, gently fill in the letters “BEST DAD.” Alternatively, use a thick paint marker for control. -
Final cure:
Remove the stencils while the paint is still wet (carefully!) and let the entire piece cure overnight.
Level Up: Texture
Mix a little bit of texture medium or baking soda into your paint for raised, impasto-style brushstrokes that add a tactile, high-end feel to the artwork.
Wrap up this modern masterpiece and watch Dad’s face light up when he sees his new custom office décor.


The Golden Hour Walking Silhouette
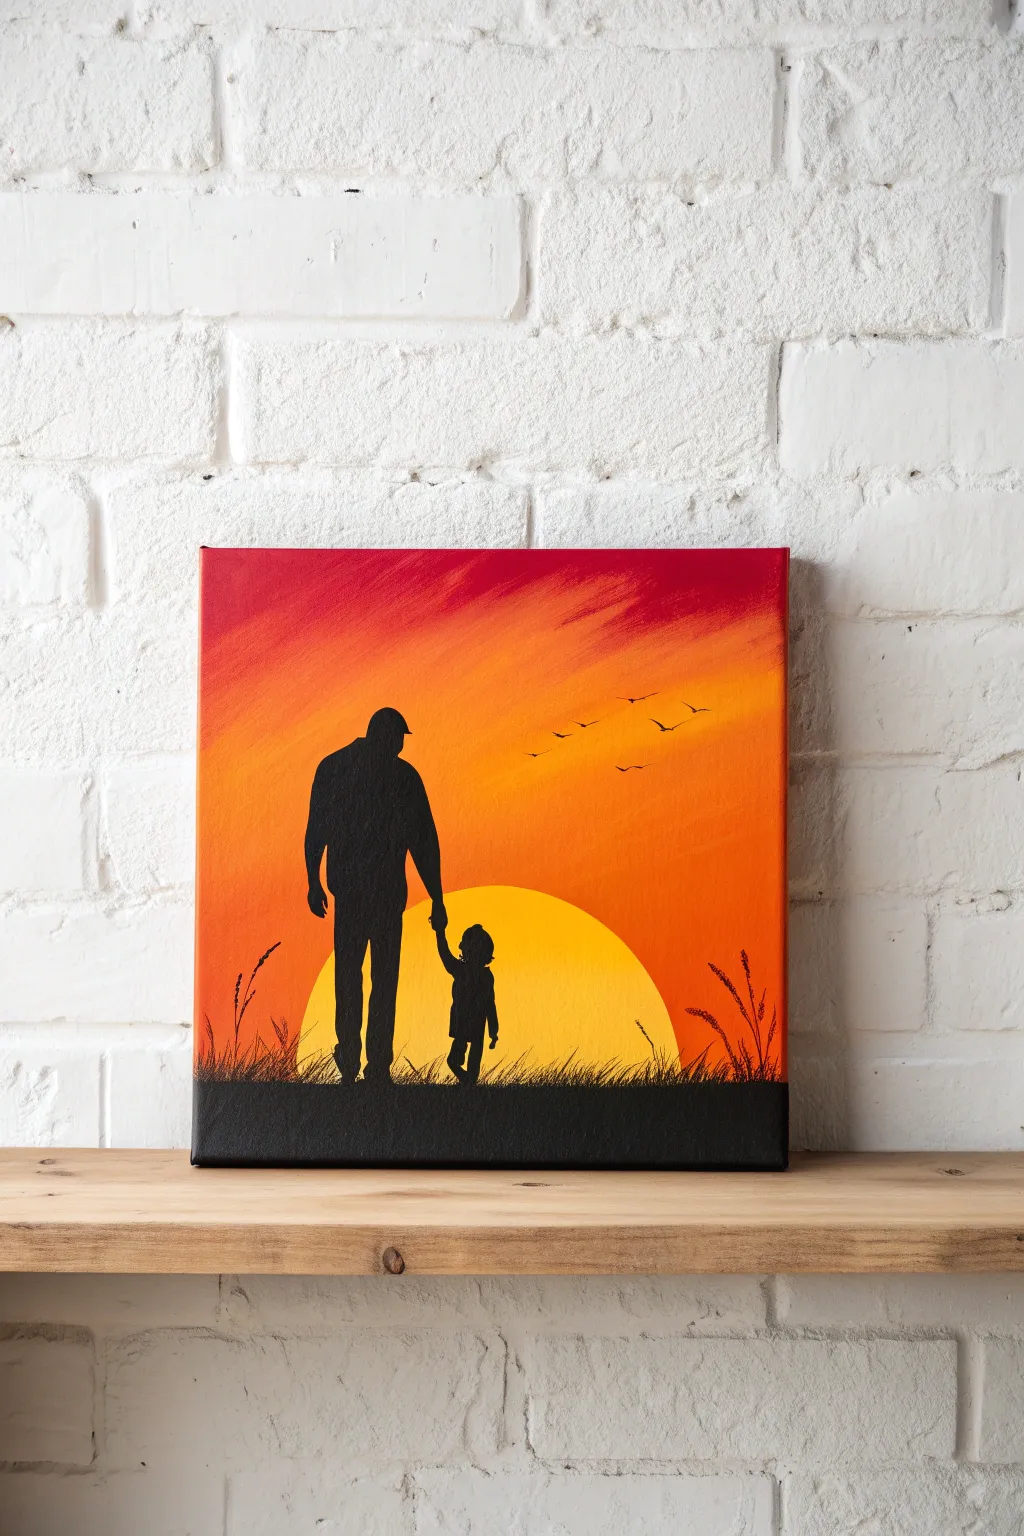
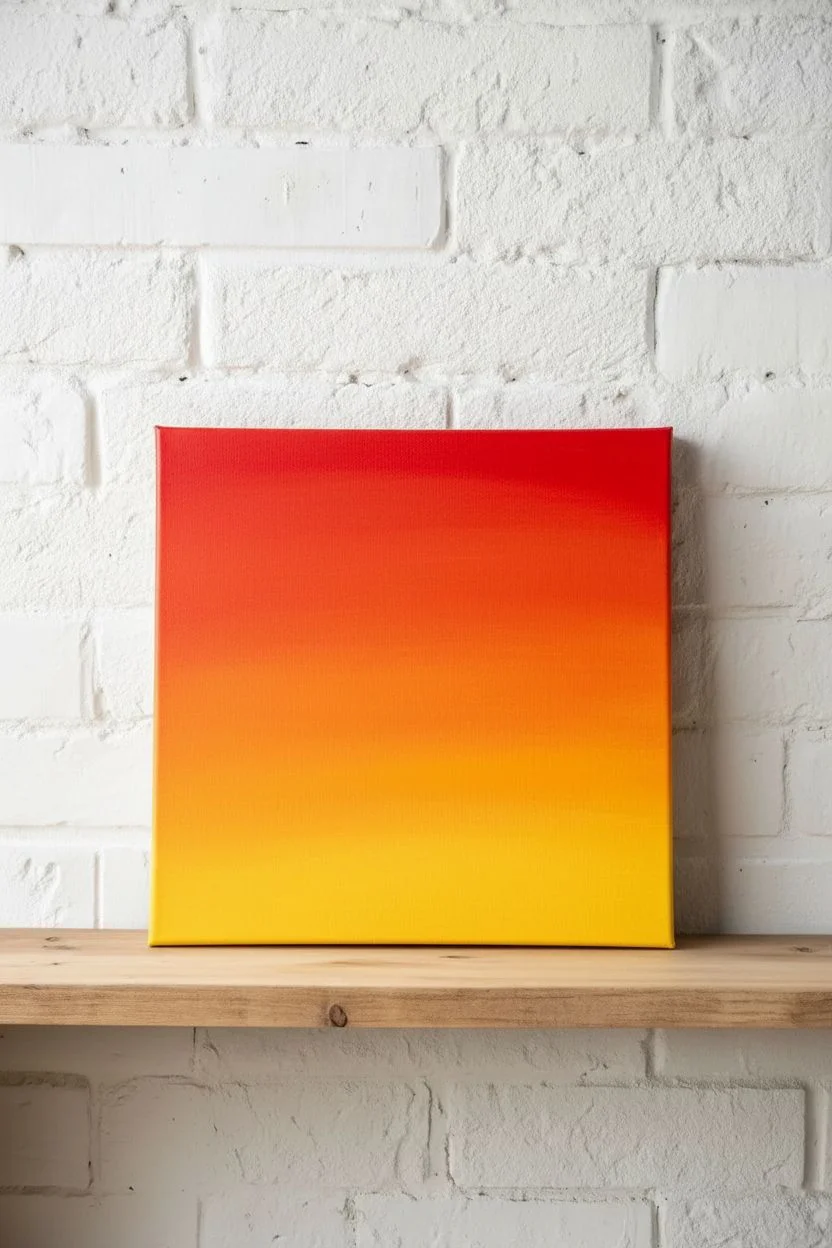
Capture the timeless bond between father and child with this warm, glowing landscape painting. The vibrant gradient sky provides a stunning backdrop for sharp, high-contrast silhouettes, making it a perfect sentimental gift.
How-To Guide
Materials
- Square stretched canvas (approx. 12×12 inches)
- Acrylic paints: Cadmium Red, Orange, Cadmium Yellow, Titanium White, Mars Black
- Large flat brush (1 inch)
- Medium flat brush
- Fine detail liner brush (size 0 or 00)
- Pencil and eraser
- Palette and water cup
- Masking tape (optional)
Step 1: Painting the Gradient Sky
-
Prepare the canvas:
Place your canvas on a covered surface. Squeeze out your red, orange, and yellow paints onto the palette, keeping them separate for now. -
Apply the red:
Using the large flat brush, paint a bold strip of red across the top quarter of the canvas. Use smooth, horizontal strokes from edge to edge. -
Add the orange layer:
Without washing the brush fully, pick up the orange paint. Apply this directly below the red, blending the two colors where they meet to create a soft transition. -
Finish with yellow:
Clean your brush thoroughly. Paint the remaining sky area with yellow, starting from the bottom and working upward to blend into the orange section. -
Smooth the gradient:
While the paint is still wet, run your clean, slightly damp brush horizontally across the entire sky to smooth out any brushstrokes and perfect the blends. -
Let it dry:
Allow the background to dry completely. This is crucial so your sharp silhouettes don’t muddy into the sky colors.
Step 2: Adding the Sun & Ground
-
Draft the sun:
Once dry, use a pencil to lightly trace a large semi-circle rising from the bottom third of the canvas. This creates your setting sun. -
Prime the sun:
Paint inside your sun shape with a thin layer of Titanium White. This blocks out the background color so your yellow will be bright and opaque. -
Color the sun:
Once the white base is dry, paint over it with a bright yellow. I like to mix a tiny dot of white into the yellow here to make it really glow. -
Establish the ground:
Load a medium flat brush with black paint. Paint a solid horizontal strip across the bottom edge of the canvas, covering the bottom of your sun shape slightly to anchor it.
Blending Trouble?
Acrylics dry fast! If your sky gradient is getting sticky or rough while blending, lightly mist the canvas with water to keep the paint workable for longer.
Step 3: Creating the Silhouettes
-
Sketch the figures:
Using a pencil, lightly outline the shape of the father and child. Focus on the distinct shapes: the curve of the cap, the shoulders, and the joined hands. -
Outline in black:
Switch to your fine detail brush and slightly thinned black paint. Carefully trace over your pencil lines to define the edges of the figures. -
Fill the shapes:
Use a slightly larger brush to fill in the bodies with solid black paint. Apply a second coat if needed to ensure no light shines through the figures. -
Refine the edges:
Go back with your detail brush to sharpen small features, such as the messy hair of the child or the brim of the father’s hat.
Make It Yours
Customize the silhouettes to match the real family. Add specific details like a baseball cap, pigtails, a dog on a leash, or a third family member.
Step 4: Final Details
-
Paint grass blades:
Using the liner brush, flick quick, upward strokes of black rising from the ground. Vary the height and angle to make the grass look natural. -
Add seed heads:
On the taller pieces of grass, add tiny dots or dashes to mimic seed heads or wheat textures. -
Add the birds:
Paint small ‘V’ shapes in the orange section of the sky to represent birds flying in the distance. Make some smaller than others to create depth. -
Final check:
Erase any visible pencil marks once the black paint is fully cured and sign your masterpiece in the corner.
Now you have a heartwarming keepsake ready to be gifted or displayed with pride


Mountain Peak Role Model Scene

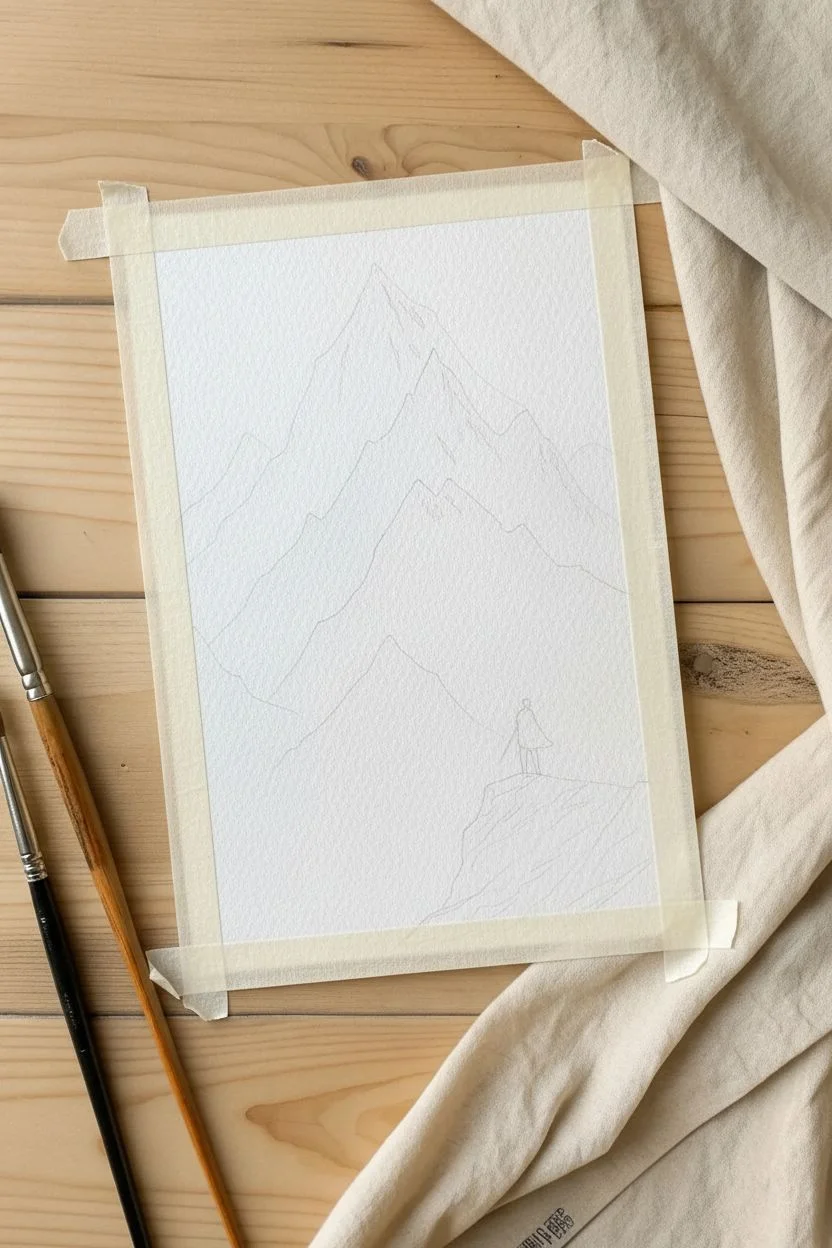
Capture the spirit of adventure and guidance with this atmospheric mountain watercolor painting. Using monochromatic blues with a striking pop of red, this piece creates a serene yet powerful tribute to a father figure overlooking his journey.
Detailed Instructions
Materials
- Cold press watercolor paper (300 gsm)
- Watercolor paints (Indigo, Payne’s Grey, Black, Cadmium Red)
- Round brush size 6 or 8 (synthetic preferred)
- Detail brush size 0 or 1
- Masking tape
- Jar of clean water
- Paper towels
- HB Pencil
Step 1: Preparation and Sketching
-
Secure the paper:
Tape down all four edges of your watercolor paper to a board or table to prevent buckling and create a crisp border. -
Map the landscape:
Using an HB pencil, very lightly sketch the jagged outlines of roughly four layers of mountains, the foreground cliff on the right, and the tiny figure standing on top.
Muddy Mountains?
If your mountain layers are blending together into one blob, you aren’t waiting long enough between steps. Ensure each layer is cool and dry to the touch before starting the next one.
Step 2: The Distant Peaks
-
Mix the lightest wash:
On your palette, dilute a small amount of Indigo or Payne’s Grey with plenty of water to create a very pale, transparent blue-grey. -
Paint the furthest mountain:
Fill in the shape of the topmost, furthest mountain peak with this pale wash, keeping the top edge crisp. -
Create the mist:
Immediately rinse your brush and leave it slightly damp. Run this clean brush along the bottom edge of the wet paint to diffuse the color downward into white paper, creating a misty effect. -
Dry completely:
Wait for this layer to be bone-dry before touching the paper again, or the next layer will bleed into it.
Mastering the Mist
To get that perfect foggy fade, keep a ‘thirsty’ brush ready. This is a clean brush that has been blotted on a towel so it’s damp, not dripping, perfect for dragging pigment.
Step 3: The Middle Range
-
Darken the mixture:
Add a bit more pigment to your grey-blue mix so it is slightly darker than the first layer. -
Second mountain layer:
Paint the second tier of mountains below the first. Carefully cut in along the pencil line to overlap the bottom of the previous pale mountain. -
Add snow texture:
While painting the main body of the mountain, leave tiny slivers of white paper unpainted near the peaks to represent snow or light hitting the rock face. -
Fade out again:
Just like before, use a clean, damp brush to soften the bottom edge of this layer, dragging the pigment down until it fades into nothing. -
Third mountain layer:
Once dry, mix an even darker shade of Indigo. Paint the third layer of mountains, focusing on sharper, more jagged peak shapes. -
Create valley depth:
For this darker layer, drop a tiny bit of concentrated pigment into the wet paint near the ‘valleys’ and crevices to add volume before fading out the bottom edge.
Step 4: Foreground Elements
-
Paint the treeline:
Mix a dark grey-blue. Using the tip of your brush, paint tiny vertical lines along the bottom left horizon to suggest a distant pine forest. -
Soften the trees:
While the tree tops are wet, run a damp brush along their base so they melt into the misty fog below them. -
The cliff face:
Mix your darkest color using Indigo and Black with very little water. Paint the large cliff formation in the foreground on the right. -
Rock texture:
Use the side of your brush or a ‘dry brush’ technique to drag the dark paint across the paper texture, creating the rough look of stone.
Step 5: The Figure
-
Switch brushes:
Pick up your size 0 or 1 detail brush for the final precision work. -
Paint the figure:
Using pure Black, paint the tiny silhouette of the person’s legs and head, and a thin line for the walking staff. -
The red cape:
I like to use a creamy, opaque consistency of Cadmium Red here. Carefully paint the cape billowing slightly in the wind to contrast against the blue mountains. -
Final touches:
Add any final dark cracks to the foreground rocks if needed, then let the entire piece dry completely before peeling off the tape.
Frame this serene landscape to give a meaningful gift that symbolizes strength and perspective


Mixed Media Portrait Collage
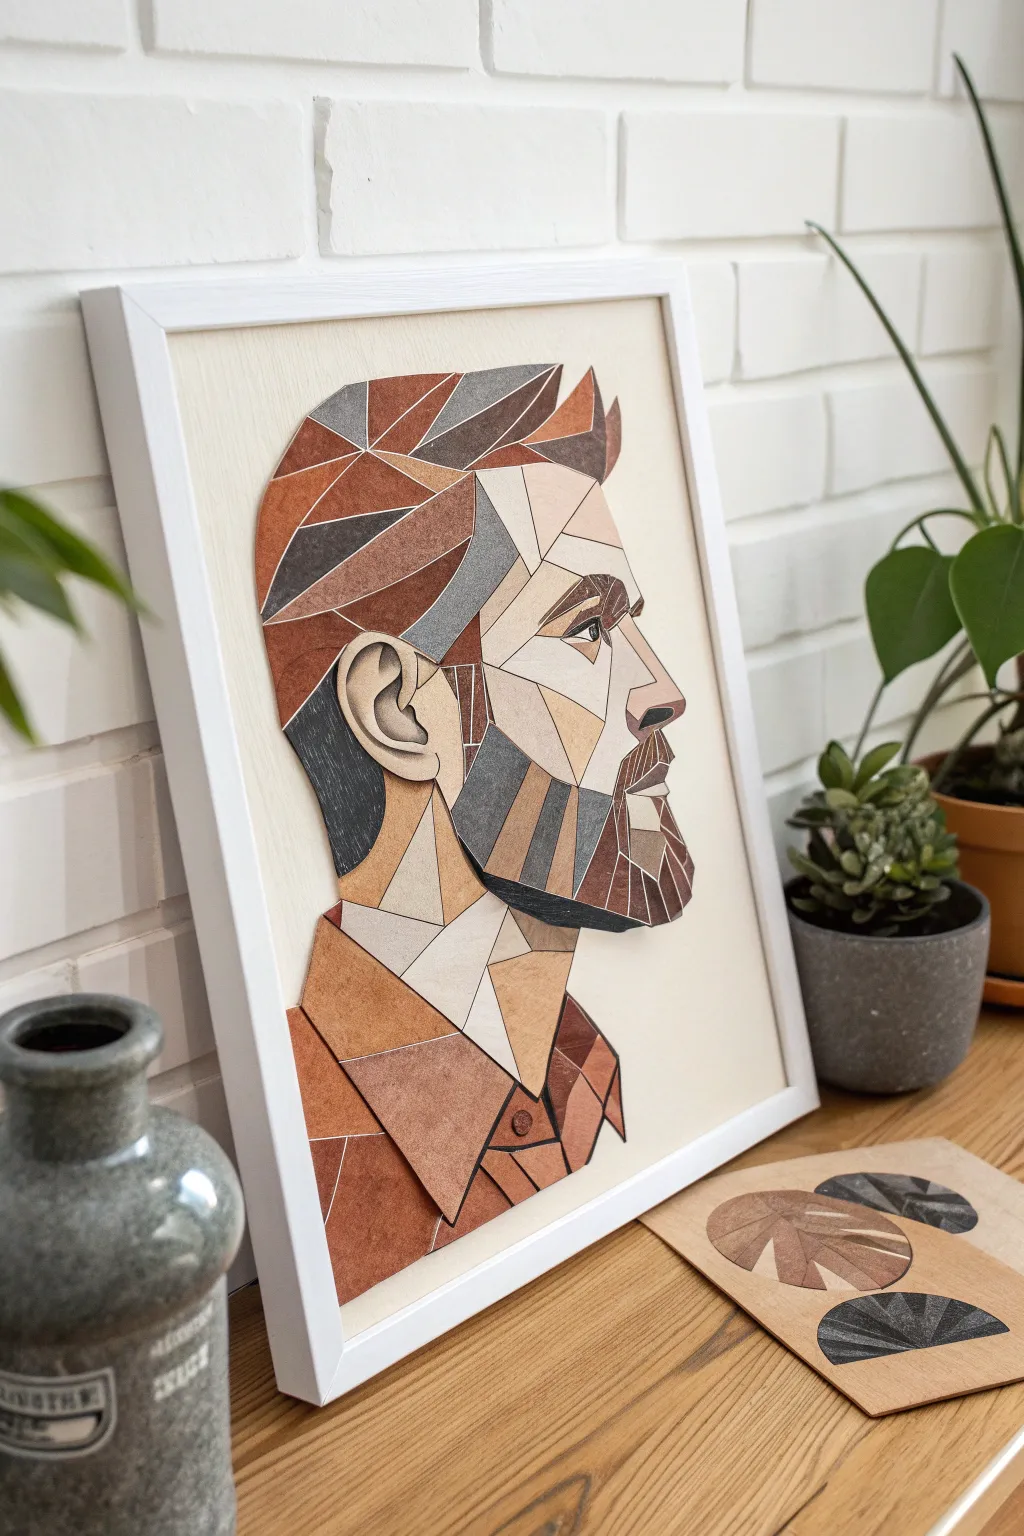
Transform a standard profile photo into a sophisticated, modern art piece using a geometric ‘low poly’ aesthetic. This collage uses varied textures of paper and faux leather to create depth, shadows, and a warm, masculine palette.
Step-by-Step Guide
Materials
- High-quality cardstock (ivory, rust, charcoal, varying browns)
- Faux leather scraps or textured scrapbook paper
- Heavyweight backing board (cream or off-white)
- Precision craft knife (X-Acto)
- Self-healing cutting mat
- Tracing paper
- Pencil and eraser
- Fine-tip glue pen or archival craft glue
- White shadow box frame
- Reference photo of subject in profile
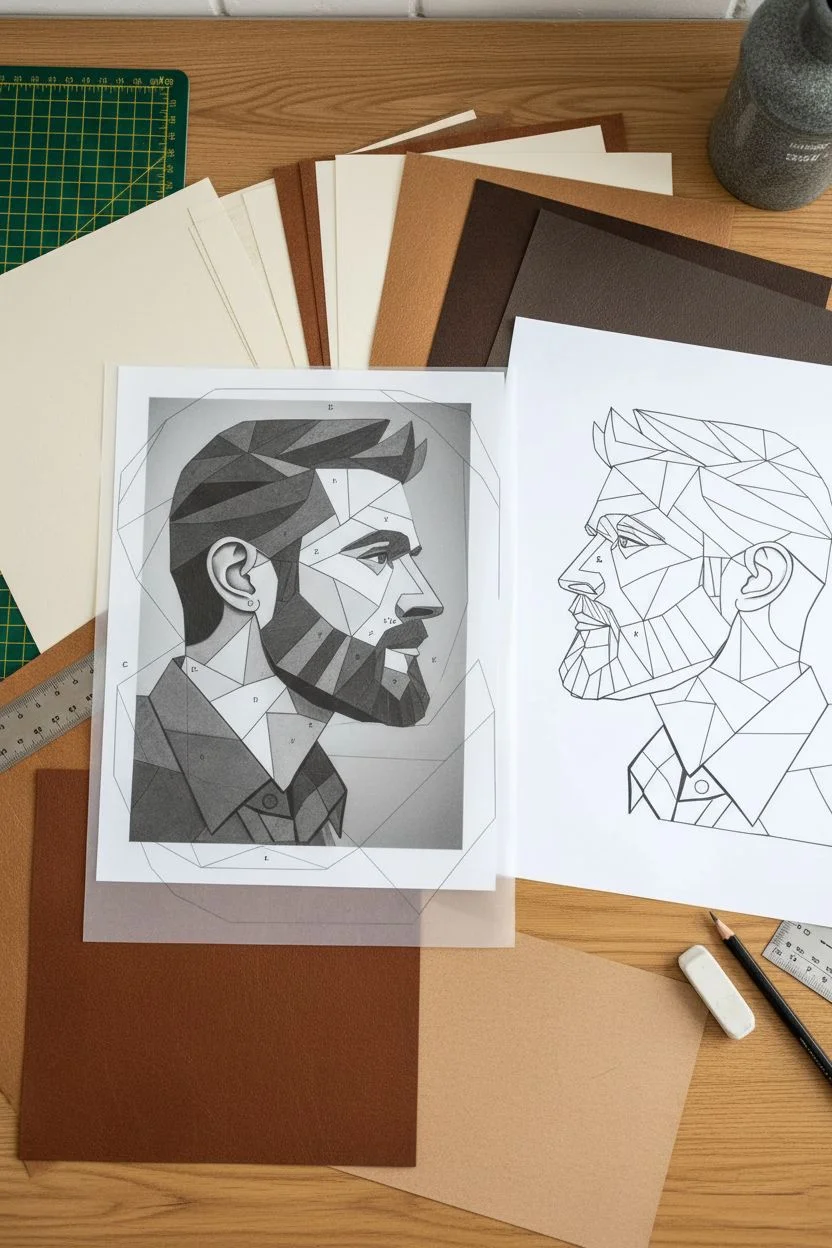
Step 1: Designing the Map
-
Choose your subject:
Select a high-contrast side profile photo of a father figure. The distinct outline of the nose, beard, and jawline works best for this geometric style. -
Outline the geometry:
Place tracing paper over your photo. Instead of drawing curves, use a clear ruler to draw straight lines that connect key points, breaking the face into triangles and polygons. -
Refine the shapes:
Simplify the features. The beard should be a collection of angled shards, and the hair should act as a darker, blocky crown. Aim for 30-50 distinct shapes total. -
Code your map:
Label each shape on your sketch by color tone (e.g., ‘D’ for dark brown, ‘L’ for light skin tone, ‘R’ for rust accent). This creates your assembly guide. -
Create the master template:
Make two photocopies of your geometric line drawing. Keep one as your ‘map’ and set the other aside to be cut up for templates.
Closing the Gaps
If you end up with unsightly white gaps between shapes, use a colored pencil closely matching the paper tone to verify color the backing board in the creases.
Step 2: Cutting Components
-
Organize materials:
Sort your cardstock and textured papers into gradients. I find it saves time to arrange them from lightest (skin highlights) to darkest (deep shadows/hair) before cutting. -
Cut the paper templates:
Take your second photocopy and cut out one individual shape using your craft knife. -
Trace onto media:
Place that paper template onto the corresponding colored cardstock or faux leather. Trace lightly around it with a pencil. -
Cut the final piece:
Using a fresh blade in your craft knife, cut the shape out of the colored material. A sharp blade is vital here to get crisp, pointed corners without tearing. -
Group and store:
Place the cut piece into a small bowl or envelope labeled for that section (e.g., ‘Beard’, ‘Forehead’). Repeat until all shapes are cut.
Level Up: Depth Boost
Use thin foam adhesive squares instead of glue for specific sections, like the collar or parts of the hair, to literally lift them off the page for a 3D effect.
Step 3: Assembly and Framing
-
Prepare the backing:
Cut your cream backing board to fit exactly inside your frame. Mark the visual center lightly with a pencil. -
Dry fit the puzzle:
Before gluing anything, assemble the portrait loosely on the backing board to ensure the pieces fit together snugly like a mosaic. -
Begin gluing:
Start with the central features, such as the eye or ear area. Apply a thin layer of glue to the back of each piece using a glue pen. -
Mind the gap:
Press the pieces down firmly, aiming for very tight seams. Slight gaps can look artistic, but try to keep them consistent. -
Build outward:
Work your way out toward the hairline and collar. Ensure the darker textures of the beard interact cleanly with the lighter skin tones. -
Add texture contrast:
When assembling the hair or collar, mix in your faux leather or heavily textured paper pieces. This mixed-media element creates the tactile quality seen in the example. -
detail the eye:
The eye is the most critical part. Use a tiny triangle of white and a small polygon of dark charcoal to suggest the pupil and iris without needing photorealism. -
Final press:
Once assembled, place a sheet of clean wax paper over the art and weigh it down with a heavy book for an hour to ensure everything lies perfectly flat. -
Frame the work:
Clean the glass of your shadow box, insert the artwork, and secure the back. The shadow box depth protects the textured layers.
This striking geometric portrait captures personality through shape and shadow, making for a truly memorable gift to display.


Have a question or want to share your own experience? I'd love to hear from you in the comments below!