Feathers are basically nature’s perfect painting subject—soft edges, crisp shafts, and endless chances to play with color. Here are my favorite feather painting ideas that range from classic and calming to totally experimental, so you can pick what fits your mood (and your skill level) today.
Peacock-Inspired Eye Feather
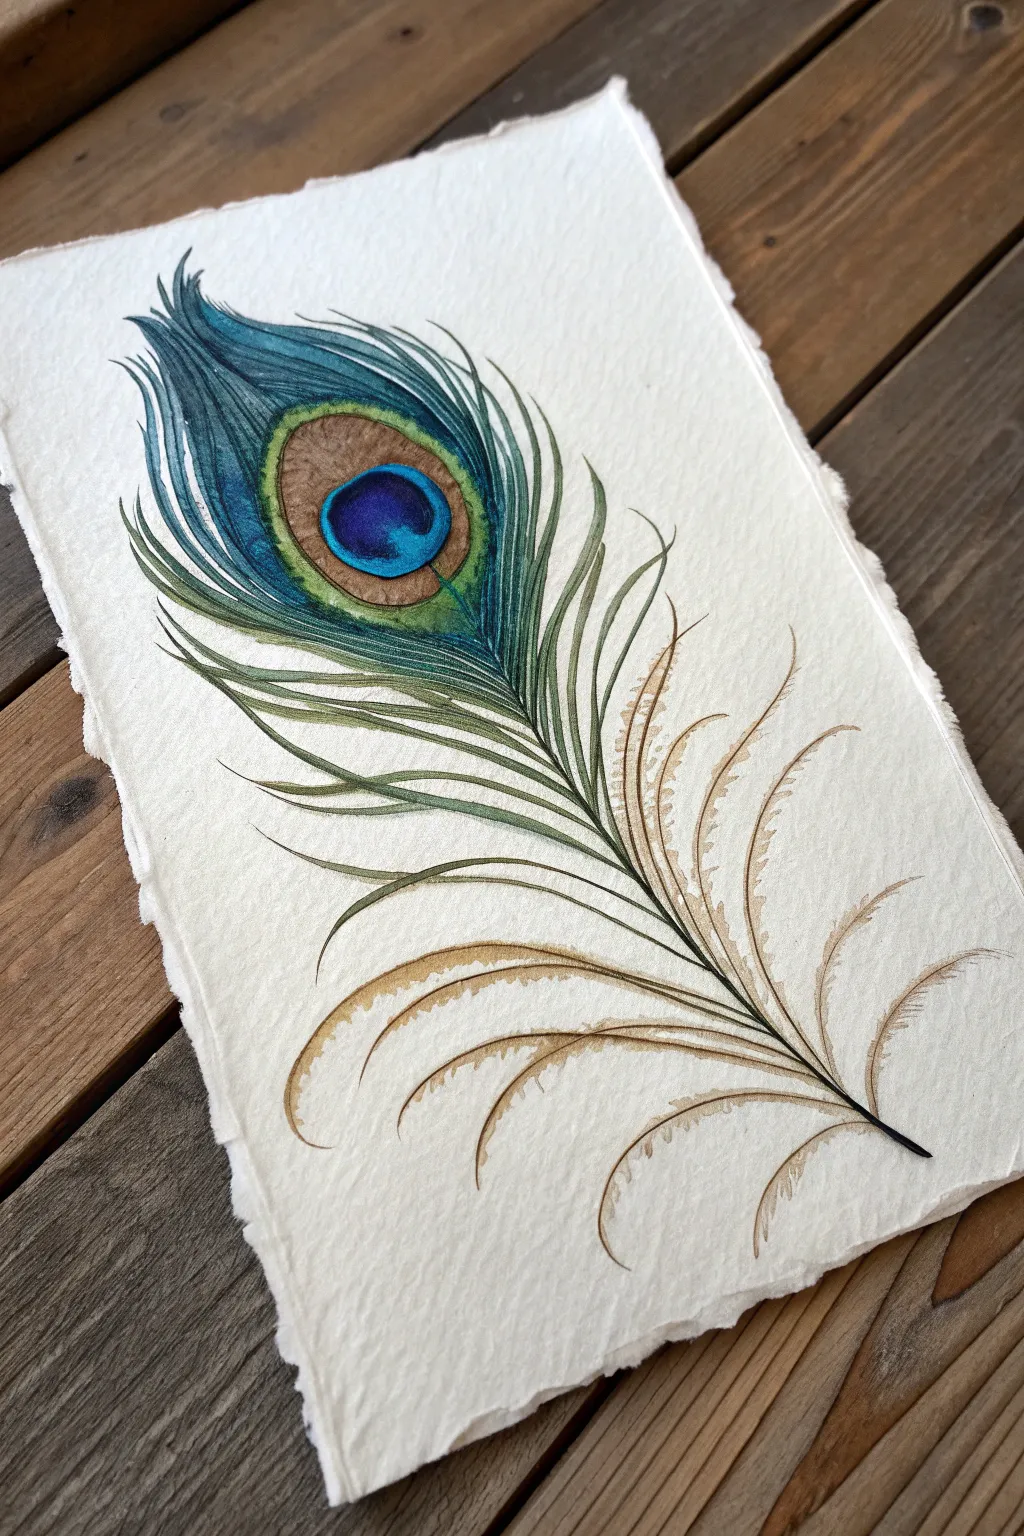
Capture the iridescent beauty of nature with this detailed watercolor painting of a peacock feather. Using deckle-edged paper adds a rustic, organic charm that perfectly complements the delicate barbs and shimmering ‘eye’ of the feather.
Step-by-Step Tutorial
Materials
- Heavyweight watercolor paper (300gsm, cold press/rough) with deckle edges
- Watercolor paints: Prussian Blue, Viridian Green, Burnt Umber, Yellow Ochre, Turquoise
- Synthetic round brushes: Size 4, Size 2, and Size 00 (liner)
- Pencil (HB or 2H)
- Kneadable eraser
- Clean water jar
- Paper towels
- Palette for mixing
Step 1: Sketching the Structure
-
Draw the quill:
Begin by lightly sketching the central shaft (rachis) of the feather. Start from the bottom right and curve it gently upward toward the top left corner, tapering it to a fine point at the top. -
Outline the eye:
Near the top third of the quill, draw the distinctive ‘eye’ shape. Sketch an oval for the outer brown ring, and a kidney-bean shape inside for the brilliant blue center. -
Map the barbs:
Lightly indicate the direction of the feather barbs. Around the eye, they should hug the oval shape tight; lower down, they become loose, flowing strands that curve away from the quill.
Wet-on-Dry Texture
For the crispest hair-like lines on the barbs, ensure your paper is completely bone-dry before painting them. Wet paper will cause the fine lines to fuzz out.
Step 2: Painting the Eye
-
Base layer for the center:
Mix a vibrant Turquoise with a touch of Prussian Blue. Paint the kidney-bean center of the eye using your Size 2 brush, leaving a small sliver of white paper for a highlight if you can. -
Deepen the blue:
While the blue is still damp, drop in concentrated Prussian Blue at the bottom edge of the kidney shape to create depth and a rounded 3D effect. -
Add the copper ring:
Mix Burnt Umber with a little Yellow Ochre to create a bronzed brown. Paint the oval ring surrounding the blue center. I like to keep this wash uneven to mimic the texture of the tiny fibers. -
Connect with green:
Use a Viridian Green wash to paint the area immediately surrounding the brown ring, letting it bleed slightly into the outer edges of the brown if it’s still damp for a soft transition.
Metallic Magic
After the paint dries, glaze the blue center and the green halo with iridescent watercolor medium or metallic gold paint for a true shimmering peacock effect.
Step 3: Creating the Plumes
-
Top plumes foundation:
Switch to your Size 00 liner brush or a very sharp Size 2. Load it with a mix of Prussian Blue and Viridian Green. Start painting individual hair-like strokes radiating from the top of the eye. -
Layering the greens:
As you move down the sides of the eye, transition your color mix to be more green-heavy. Keep your strokes fine and close together to create the dense look of the upper feather. -
Mid-section barbs:
Moving down the shaft, paint longer, sweeping strokes that separate from each other. Use a mix of Viridian and a touch of Burnt Umber to dull the green slightly as it moves away from the iridescent center. -
Lower fluff base:
The bottom half of the feather consists of the ‘downy’ barbs which are looser and browner. Mix a watery wash of Yellow Ochre and Burnt Umber. -
Painting the loose strands:
With the liner brush, paint long, wandering curves for the bottom barbs. These should not be straight; give them wobbly, organic shapes that curl at the ends. -
Adding texture to the down:
While these brown strokes are wet, touch the very tips with a slightly darker Burnt Umber mix to add weight and dimension.
Step 4: Defining Details
-
Darken the quill:
Paint the central quill using a dark mix of Burnt Umber and Prussian Blue. Keep the line thin at the top and gradually thicken it towards the base. -
Refine the eye:
Once the initial eye layers are totally dry, use your smallest brush to add tiny, radiating lines inside the brown ring using a darker brown mix to suggest texture. -
Layering for density:
Go back into the green section at the top. Add a second layer of darker blue-green strokes in between your first set to make the foliage look thick and lush. -
Defining the barbs:
Add tiny ticking marks or ‘hairs’ coming off the main lower brown strands. These secondary barbs make the feather look fluffy rather than spiky. -
Final highlights:
If you lost your white highlight in the blue eye, use a tiny dot of white gouache or opaque white watercolor to reclaim that spark of life.
Step back and admire the vibrant colors of your finished feather study


Minimal Line-and-Wash Feather
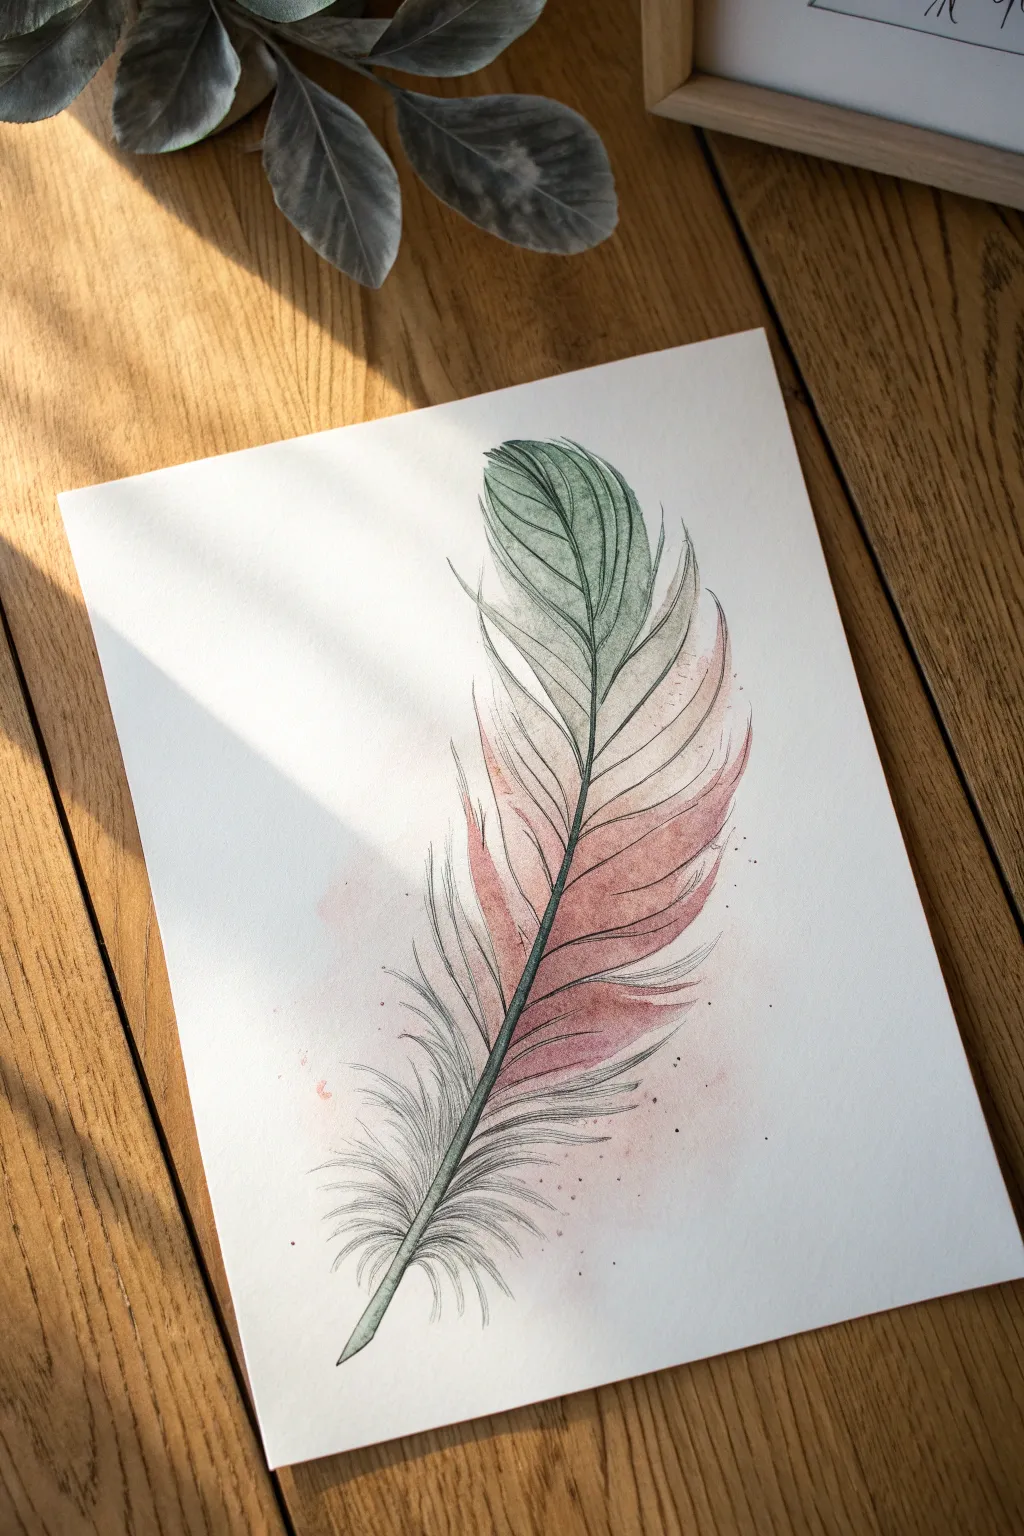
This elegant project combines soft, diffuse watercolor washes with crisp ink detailing to capture the ethereal beauty of a feather. The result is a delicate balance of fluidity and structure, perfect for a minimalist wall hanging or a personalized greeting card.
Step-by-Step
Materials
- Cold-pressed watercolor paper (300 gsm recommended)
- Pencil (HB or lighter) and kneadable eraser
- Watercolor paints (Sap Green/Payne’s Grey mix, Potter’s Pink or Light Red)
- Round watercolor brushes (Size 4 and Size 8)
- Fine liner pen (0.1mm or 0.3mm, waterproof archival ink)
- Jar of clean water
- Paper towels
Step 1: Basic Sketching
-
Define the spine:
Begin by lightly sketching a curved line to represent the rachis, or spine. Give it a gentle ‘S’ curve or simple arc to suggest movement rather than a stiff, straight line. -
Outline the shape:
Draw the general oval shape of the feather around the spine. The top should be rounded, tapering down slightly narrower towards the quill, but keep the lines very faint as guides only. -
Indicate breaks:
Mark a few V-shaped notches along the edges where the feather naturally splits. This breaks up the perfect oval and adds realism instantly.
Fixing heavy lines
If your ink lines look too heavy or uniform, break them up by drawing shorter, unconnected dashes near the feather’s edge. This mimics light hitting the finer tips of the barbs.
Step 2: Watercolor Washes
-
Prepare your colors:
Mix two main puddles of paint. For the top and bottom, create a desaturated green by mixing sap green with a touch of Payne’s grey or a slate blue. For the middle section, prepare a watery mix of Potter’s pink or a diluted earthy red. -
Wet-on-dry application:
Using your larger brush, load up the green-grey mix and apply it to the top third of the feather shape. Let the strokes follow the direction of the barbs—outward and upward from the spine. -
Introduce the pink:
Rinse your brush quickly and pick up the pink tone. Apply this to the middle section while the bottom of your green stroke is still slightly damp, allowing them to bleed softly into each other. -
Finish the wash:
Switch back to the green-grey mix for the bottom third of the feather. I find that leaving small gaps of white paper near the spine in this section creates a nice highlight effect. -
Add a splatter:
While the paint is wet, tap your brush handle lightly to create very subtle splatters around the bottom right edge. Keep these minimal to maintain the clean look. -
Allow to dry:
Let the paper dry completely. If the paper is cool to the touch, it’s still damp. Do not start inking until it is bone dry to prevent the ink from bleeding.
Step 3: Ink Detailing
-
Draw the spine:
Using your waterproof fine liner, draw the central spine. Start thinner at the top and thicken the line slightly as you move down towards the quill. -
Add the main barbs:
Start drawing long, sweeping lines outwards from the spine. Do not trace the watercolor exactly; treat the paint as a background shadow and let your ink lines wander slightly outside or inside the color patches. -
Create texture:
Vary your line pressure. Use confident, quick strokes that taper off at the ends to mimic the softness of hair-like barbs. -
Detail the splits:
Where you sketched the notches earlier, draw barbs that curve away from each other, leaving gaps. This negative space is crucial for a realistic look. -
Add fine fluff:
At the very base of the feather (the aftermath), use short, scribbly, and chaotic lines to represent the downy, fluffy part near the quill. -
Enhance shading with ink:
Add extra ink lines closer to the spine in the shadowed areas to deepen the contrast, particularly where the color is darkest. -
Final dots:
Add a few tiny ink dots (stippling) around the watercolor splatters to integrate the loose paint with the structured drawing.
Metallic magic
Once the black ink is dry, add thin highlights along the central spine or the tips of the feather using a gold or silver gel pen for a touch of shimmering elegance.
Frame your delicate feather artwork with a wide mat to emphasize the minimalist aesthetic you have created


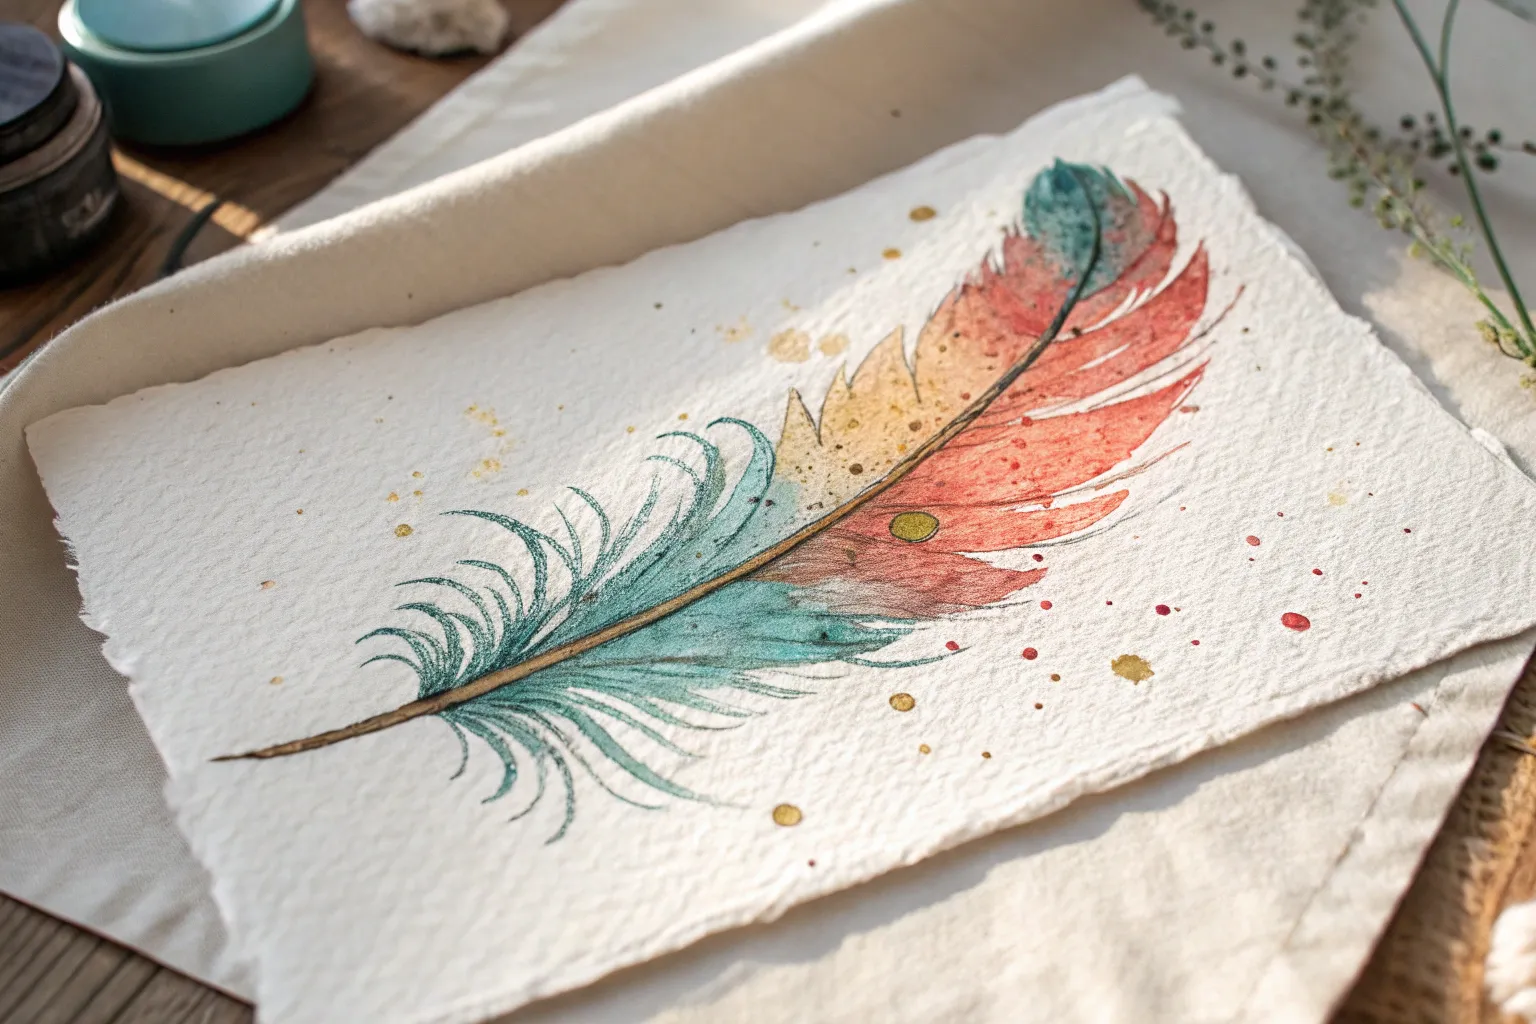
Loose Watercolor Feather Blooms
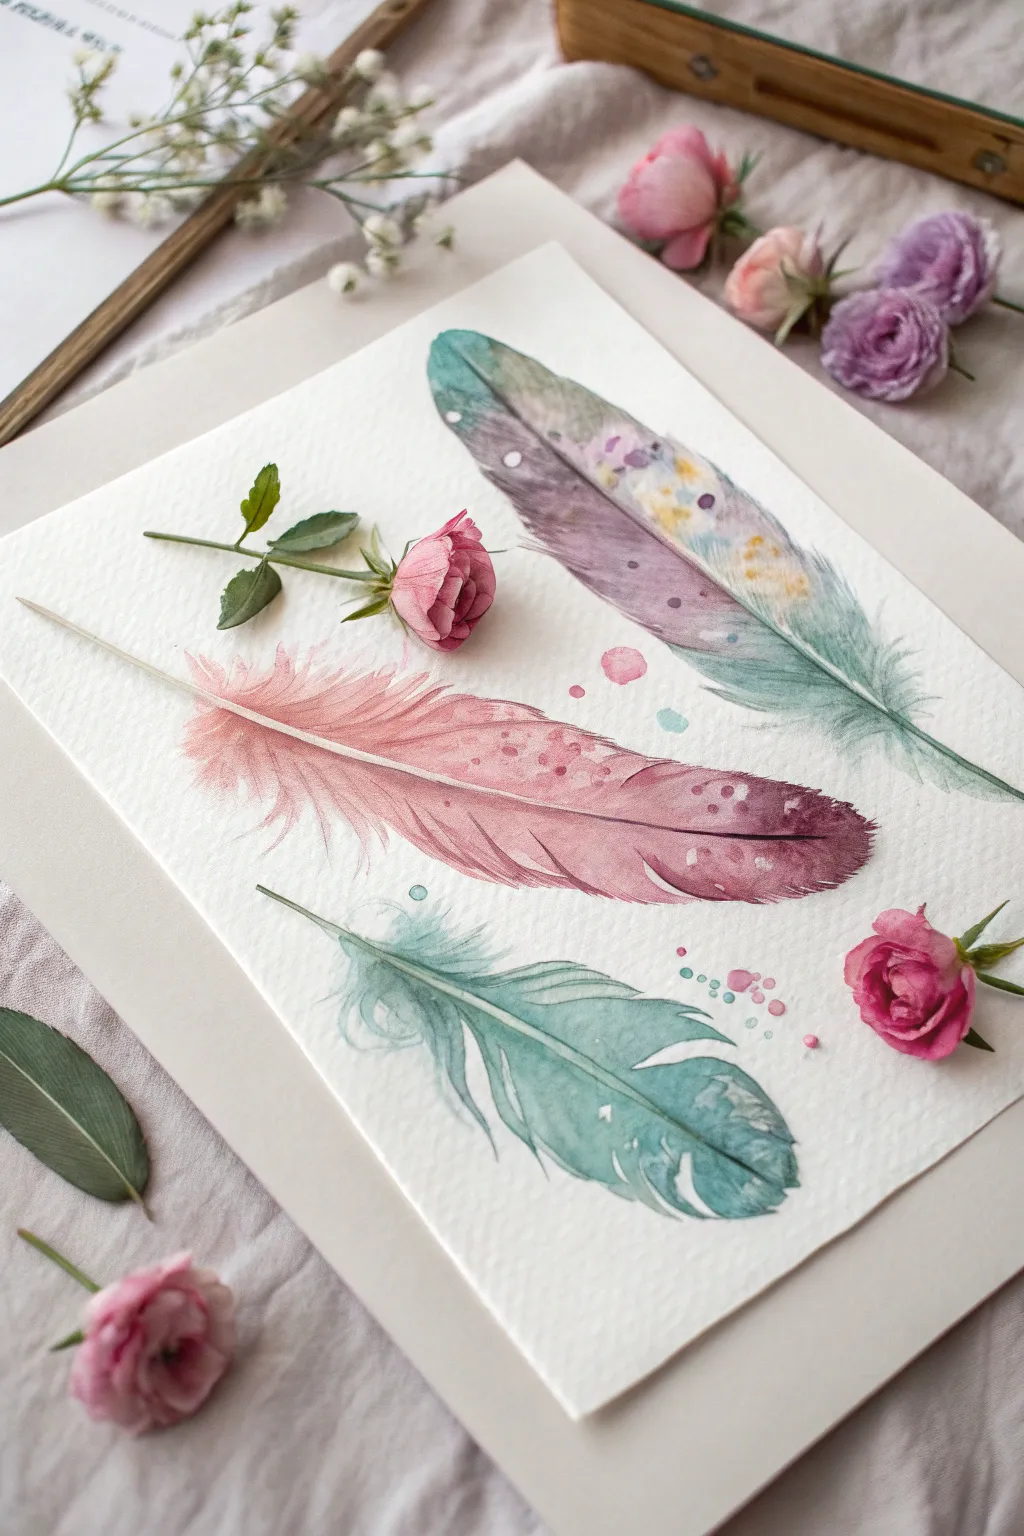
Capture the airy delicateness of feathers using wet-on-wet watercolor techniques in this dreamy composition. You will create three distinct feathers, each with its own soft gradient and speckled details, resulting in an ethereal piece perfect for framing.
Step-by-Step Guide
Materials
- Cold press watercolor paper (300 gsm)
- Watercolor paints (Teal, Dusty Rose/Pink, Violet, Payne’s Grey, Yellow Ochre)
- Round brushes (Size 2, 4, and 6)
- H pencil for light sketching
- Clean water jar and paper towels
- White gouache or white gel pen (optional for highlights)
- Masking fluid (optional)
Step 1: Sketching the Layout
-
Map the curves:
Begin by lightly drawing three curved lines on your paper to act as the central shafts (rachis) for your feathers. Place the largest one diagonally at the top right, a medium one horizontally in the center, and a smaller curved one at the bottom. -
Define the shapes:
Lightly sketch the outer silhouette of each feather around the central shafts. Keep the lines wavy and irregular to mimic the natural separation of barbs, leaving some gaps near the base. -
Erase excess graphite:
Use a kneaded eraser to lift most of the graphite, leaving only the faintest guide lines so the pencil won’t show through the translucent watercolor.
Water Control Fix
If you get ‘hard lines’ inside your feather, your paper dried too fast. Soften lines with a damp brush immediately, or embrace them as natural texture.
Step 2: Painting the Top Galaxy Feather
-
Initial wash:
Using a size 6 brush, wet the top feather shape with clean water until it glistens but isn’t pooling. -
Drop in color:
While the paper is wet, drop violet paint near the base and teal at the tip. Allow them to bleed naturally toward the center. -
Add warmth:
While the paint is still damp, dot in small amounts of yellow ochre in the middle section to create a soft, glowing light effect. -
Define the edge:
Use a smaller damp brush to pull pigment out from the wet edge to create wispy barbs that fade into the white of the paper. -
Texture details:
Once damp but not swimming, splatter clear water droplets onto the paint to create ‘cauliflower’ blooms that look like texture.
Step 3: Painting the Center Pink Feather
-
Base gradient:
For the large central feather, start with a watery mix of dusty rose at the left tip. As you move toward the right (the base), mix in a tiny touch of violet or grey to darken the hue. -
Creating the shaft:
I like to leave a very thin, unpainted white line down the center to represent the shaft. If you struggle with this, you can lift the color later with a stiff damp brush. -
Wispy edges:
Switch to a size 2 brush. With fairly dry paint, flick quick, curving strokes outward from the main body of the feather to create fine, separated hairs. -
Speckling:
Load your brush with a saturated, darker mix of the pink connection. Tap the brush handle against your finger to splatter fine dots over the feather body for a patterned look.
Add Metallic Magic
Mix gold watercolor or ink into your splatter step. The metallic flecks will catch the light and give the feathers a magical, celestial quality.
Step 4: Painting the Bottom Teal Feather
-
Curved strokes:
For the bottom feather, apply a pale teal wash. Unlike the others, paint this one in sections, leaving purposeful white gaps between the barbs to show splitting. -
Deepening contrast:
Drop concentrated teal or turquoise into the wet wash near the central shaft to create depth and volume. -
Softening:
Rinse your brush and soften the outer edges with clean water so the feather looks fluffy rather than cut-out.
Step 5: Final Details
-
Defining the shafts:
Mix a diluted Payne’s Grey or a darker version of each feather’s color. Using your smallest brush (size 0 or 2), paint a very thin line for the central rachis, mainly visible at the base and tapering off toward the tip. -
Negative painting:
If any edges look too solid, wet a clean brush and gently scrub the edge, then blot with a tissue to lift color and create soft breaks. -
Bloom accents:
Paint a few loose, abstract dots of pink and teal floating around the feathers to act as decorative ‘pollen’ or confetti.
Let your painting dry completely before framing to ensure those delicate watercolor textures stay crisp.

Floating Feather Pair Composition
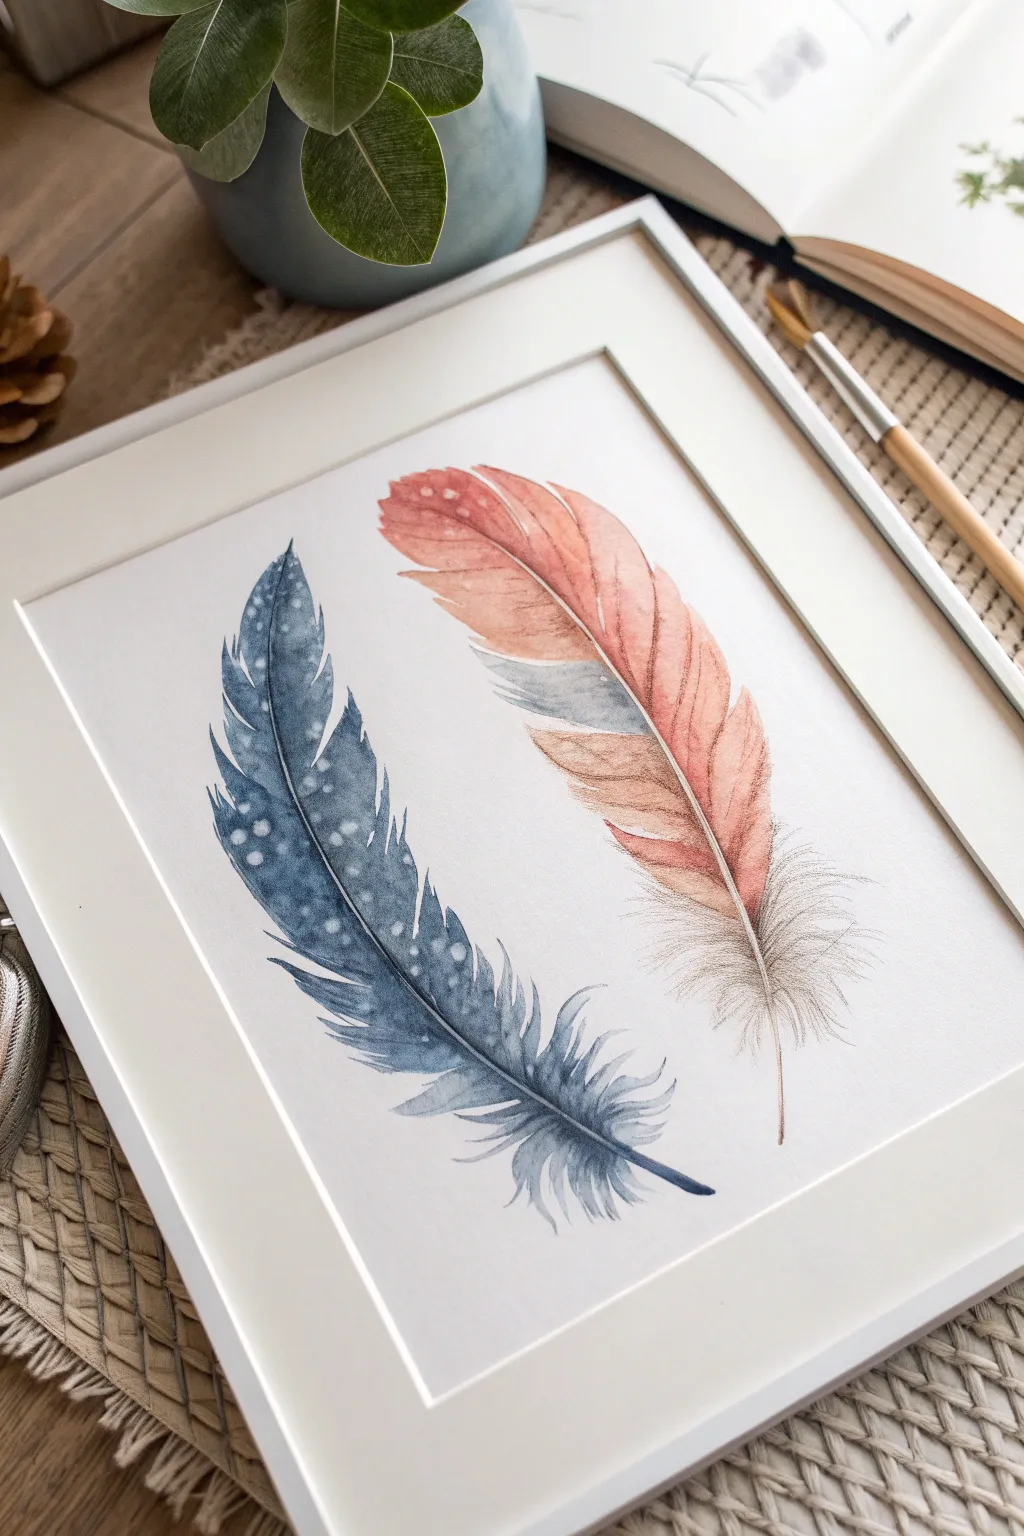
Capture the delicate beauty of nature with this serene watercolor study featuring two distinct feathers in complementary tones. The composition balances a speckled blue-grey feather with a warm, peachy-hued companion, creating a soft, airy feel perfect for modern decor.
Step-by-Step Guide
Materials
- Cold press watercolor paper (minimum 140lb)
- Watercolor paints: Indigo, Paynes Grey, Burnt Sienna, Peach, and possibly a touch of Turquoise
- White gouache or white gel pen
- Round watercolor brushes: Size 6 (for washes) and Size 0 or 00 (for details)
- Pencil (HB or 2H)
- Kneaded eraser
- Clean water jars
- Paper towels
- White mat board and frame (optional)
Step 1: Sketching the Composition
-
Establish the curve:
Begin by lightly drawing two curved lines that will serve as the central shafts (rachis) of your feathers. Place one on the left curving slightly upward, and one on the right curving downward to create a gentle, enclosed oval shape. -
Outline the silhouette:
Lightly sketch the outer shape of the feather vanes around the shafts. Keep the edges organic and slightly jagged, rather than perfectly smooth, to mimic the texture of flight barbs. -
Refine the edges:
Add small notches or splits in the feather vanes where the barbs have separated. This irregularity gives the feathers a natural, realistic appearance. -
Lighten the guides:
Roll your kneaded eraser gently over the entire sketch. You want the pencil lines to be barely visible so they don’t show through the transparent watercolor layers.
Control The Flow
Work on one feather at a time. If you paint them simultaneously, you risk smudging one while reaching for the other. Let the first one dry completely before starting the second.
Step 2: Painting the Blue Feather
-
Base wash:
Mix a watery wash of Indigo and a touch of Turquoise. Using your Size 6 brush, apply this color to the left feather’s shape, leaving the central shaft unpainted or very pale. -
Build depth:
While the first layer is still slightly damp but not soaking, drop in a more concentrated mix of Indigo and Paynes Grey along the central shaft and the tips. This wet-on-wet technique creates soft, shadowy gradients. -
Define the barbs:
Once dry, switch to your fine detail brush (Size 0). Mix a darker Paynes Grey and paint thin, directional hair-lines extending from the shaft outward to the edges to suggest individual barbs. -
Add the fluff:
At the very base of the feather, use very watered-down grey to paint loose, wispy strokes. These represent the soft downy feathers found at the quill. -
Create speckles:
This is the signature detail for the blue feather. Using white gouache or a white gel pen, add small, irregular dots primarily along the darker left side of the feather. Vary the size of the dots for a natural look.
Metallic Accent
Mix a tiny amount of gold watercolor or metallic ink into the central shaft of the peach feather. The subtle shimmer adds an elegant, high-end finish when the light hits it.
Step 3: Painting the Peach Feather
-
Gradient wash:
For the right feather, prepare a mix of Peach and diluted Burnt Sienna. Paint the upper half of the feather with the warmer peach tone, letting it fade into a very pale grey-blue near the center for contrast. -
Layering warmth:
Add a second glaze of Burnt Sienna to the tip and the lower edges to enrich the color. Keep the application loose and uneven to mimic varying pigmentation. -
Quill details:
Paint the central shaft with a thin line of reddish-brown. I prefer to break the line slightly in places so it doesn’t look too rigid. -
Fine texture work:
Using the Size 0 brush and a mix of brown-grey, add fine directional lines to indicate the texture of the vanes, following the curve of the feather. -
Softening the down:
Paint the extensive downy section at the bottom of this feather using very pale warm grey. Use flicking motions with the tip of your brush to create long, fine, hair-like strokes that look soft to the touch.
Step 4: Final Touches
-
Deepen shadows:
Review both feathers. If they look too flat, add a tiny amount of your darkest mix (Paynes Grey) right next to the central shaft on the shadowed side to lift the rachis form. -
Clean up:
Check for any unwanted pencil marks that are still visible and gently erase them, being careful not to rub the painted areas. -
Mounting:
Once fully dry, place a white mat over your painting to see how it frames the composition before securing it in your frame.
Hang your new artwork in a well-lit spot to admire the delicate transparency of your watercolors
BRUSH GUIDE
The Right Brush for Every Stroke
From clean lines to bold texture — master brush choice, stroke control, and essential techniques.
Explore the Full Guide
Glowing Fantasy Neon Feather
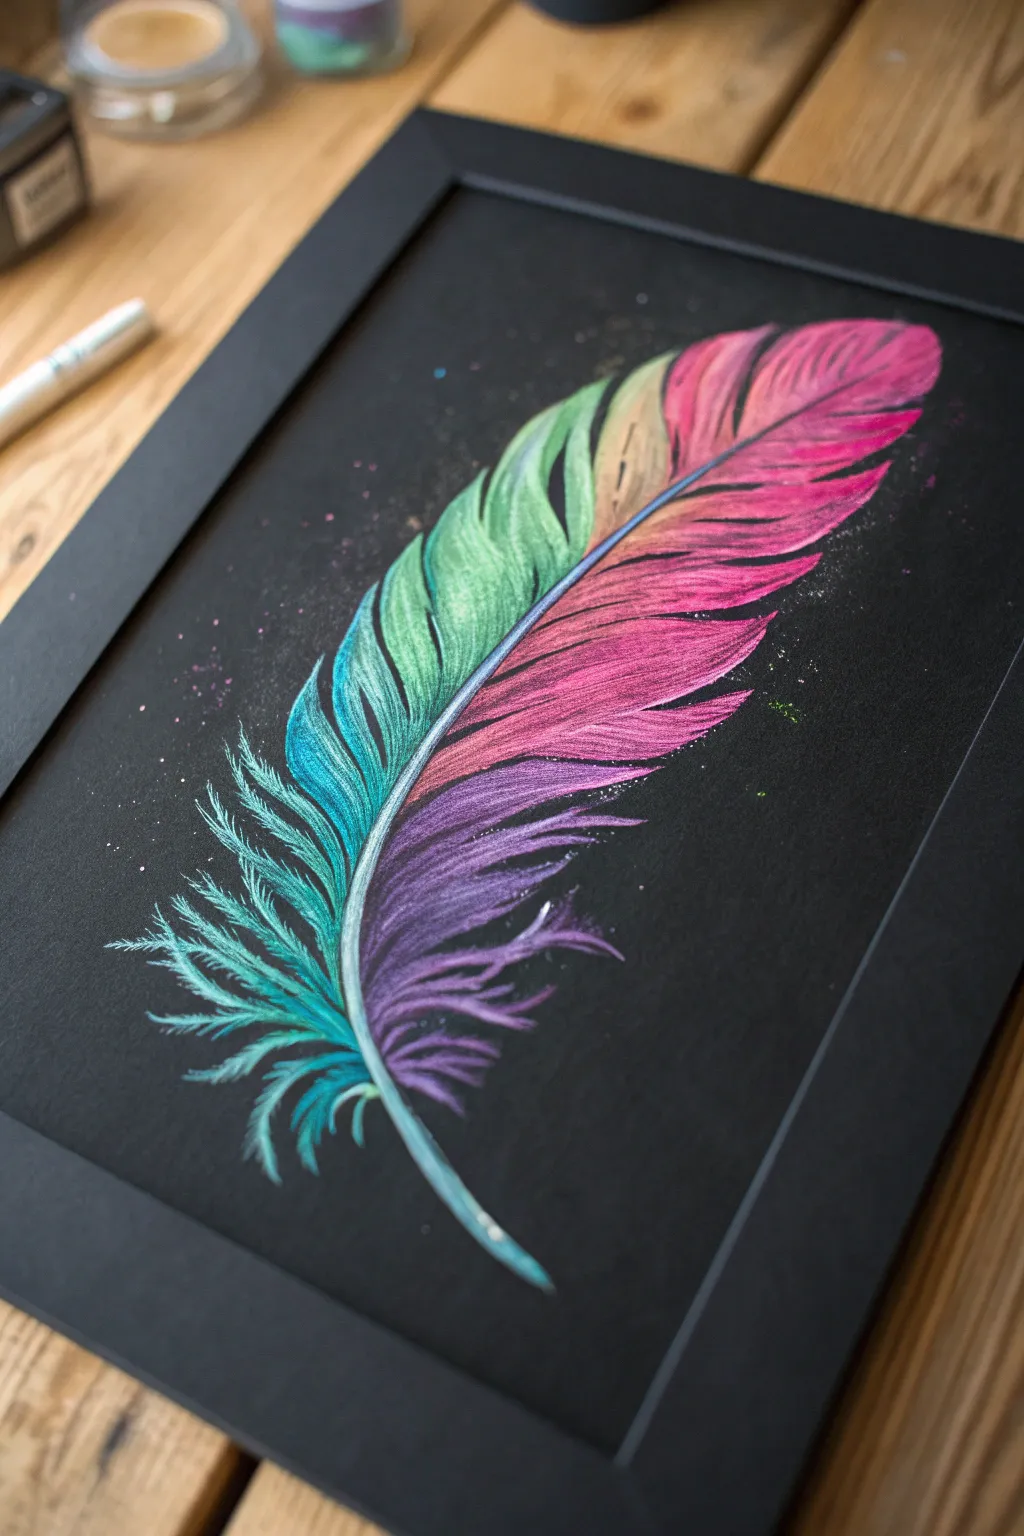
Create a mesmerizing, glowing effect by drawing a vibrant, multi-colored feather on deep black paper. The high contrast makes the neon hues pop, giving the artwork an almost magical, backlit appearance.
How-To Guide
Materials
- Heavyweight black mixed-media paper or cardstock
- Prismacolor Premier or similar soft-core colored pencils (White, Neon Pink, Purple, Teal, Lime Green)
- White gel pen (optional, for highlights)
- Pencil sharpener
- Blending stump or cotton swab
- Soft brush (for sweeping away dust)
Step 1: Outlining and Spine
-
Map the shape:
Begin by lightly sketching the central spine (rachis) of the feather using a white colored pencil. Curve it gently to give the feather a natural, flowing movement. -
Thicken the spine:
Go over your initial spine line, making the bottom base thicker and tapering it to a very fine point at the top. I like to keep the pressure light initially so mistakes are easy to gentle erase or cover. -
Draft the barbs:
Lightly sketch the outer silhouette of the feather using very faint white strokes. This doesn’t need to be perfect; it’s just a boundary guide for where your colors will stop.
Keep it Sharp
The key to realistic feather texture is a sharp point. Rotate your pencil every few strokes to maintain a fine tip, or use a sandpaper block to sharpen quickly.
Step 2: Applying the Base Colors
-
Start with teal:
At the bottom left section of the feather, start filling in the barbs with a bright teal or aqua blue. Use outward strokes that start at the spine and flick outward toward the edge. -
Transition to purple:
Moving up the left side and starting on the bottom right, introduce a rich violet or purple. Where the teal meets the purple, overlap the strokes slightly to create a blended gradient. -
Add the vibrant pink:
On the middle-to-top right section, switch to a hot neon pink. Apply this color heavily; this is the ‘hottest’ part of the glow. Let the strokes follow the upward curve of the feather structure. -
Finish with lime green:
Fill the remaining upper left section with a bright lime or spring green, blending it softly into the teal below it and the pink tip above it.
Step 3: Building Texture and Detail
-
Create individual barbs:
Sharpen your pencils to a fine point. Go back over each color section, pressing harder to create distinct, fast lines that mimic individual hair-like barbs. Ensure these lines flick outward and curve naturally. -
Adding the ‘fluff’:
At the very base of the feather, use the teal and white pencils to create messy, downy fluff. These strokes should be erratic and multidirectional, unlike the organized barbs above. -
Deepen the shadows:
Leave tiny slivers of the black paper visible between some of the barb clusters. This negative space is crucial for defining the separation between the feather segments. -
Intensify the spine:
Re-draw the central spine using a solid white pencil. Press firmly to make it opaque. Then, lightly run your colored pencils along the edges of the white spine to make it look reflective of the surrounding colors.
Colors Not Popping?
If the black paper absorbs the color too much, lay down a base layer of white pencil first, then color over it with your neon brights to maximize opacity.
Step 4: Highlights and Magical Effects
-
White highlights:
Using a very sharp white pencil or a white gel pen, add thin, crisp highlights to the tips of the most prominent barbs. This mimics light catching the texture. -
Create the glow:
Lightly buff a small amount of pigment onto the black paper just outside the feather’s edge using a cotton swab or your finger. This creates a soft halo effect. -
Add sparkles:
Dot tiny specks of white and neon pink around the feather to look like floating dust motes or magical sparks. Vary the pressure to make some dots bright and others faint. -
Final assessment:
Step back and look at the gradient. If any transition looks too harsh, lightly layer the two neighboring colors over each other until the shift is seamless.
Frame your glowing masterpiece in a simple black frame to let the vibrant colors truly shine
Geometric Feather Shapes
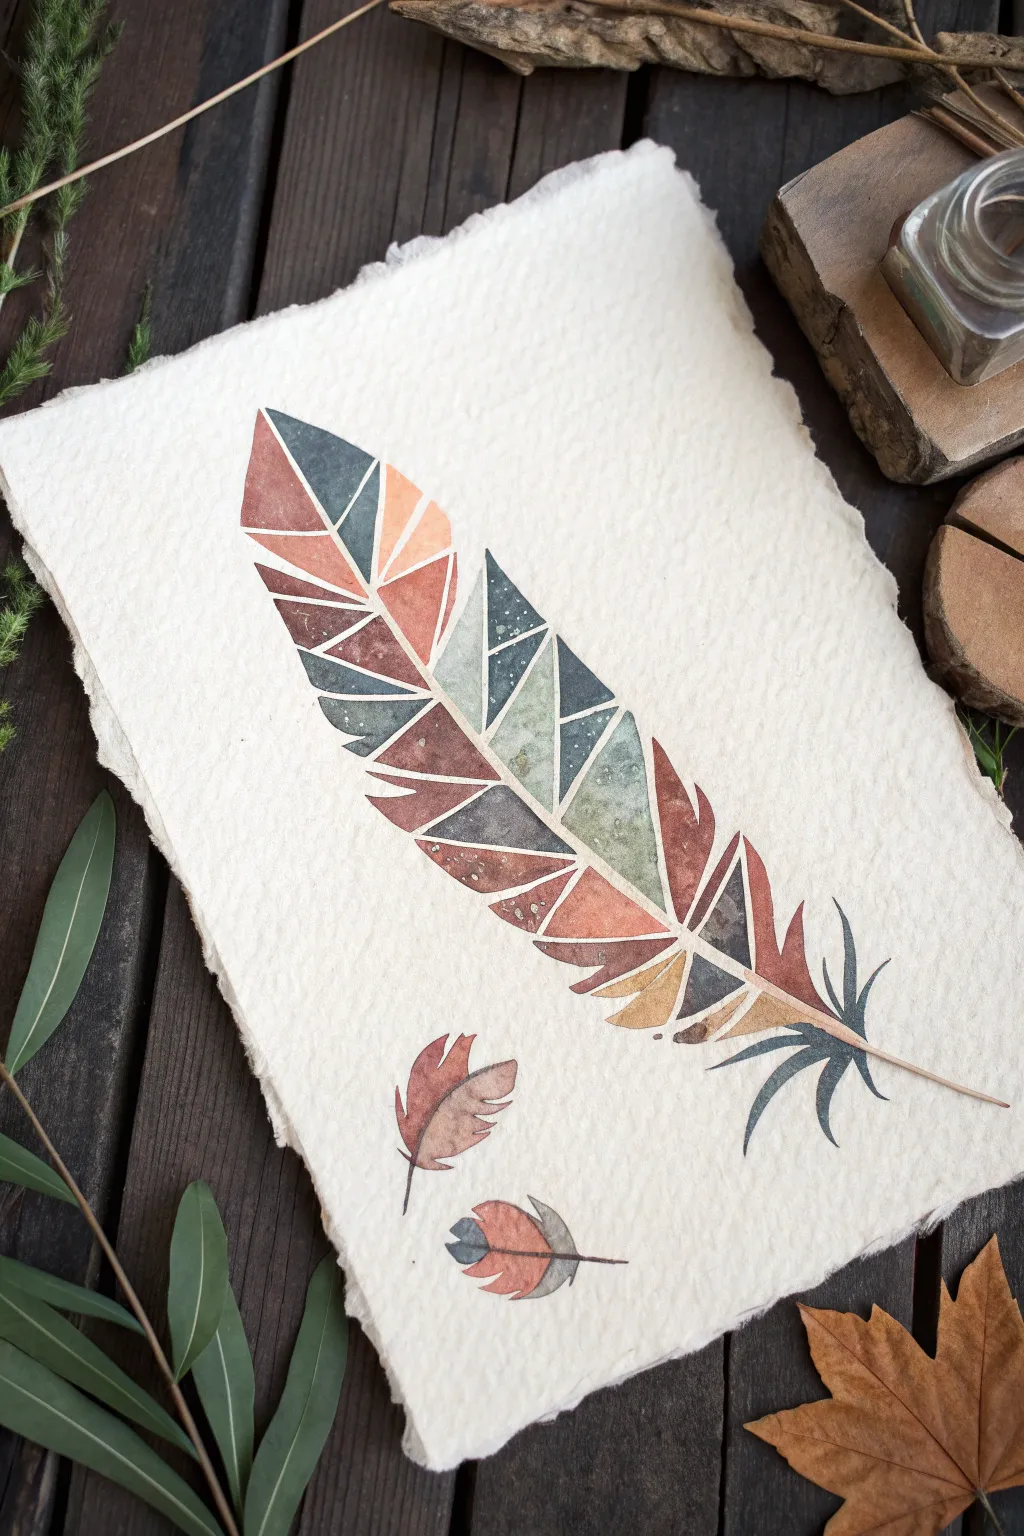
Capture the delicate beauty of a feather through a modern, geometric lens with this striking watercolor project. By breaking the natural form into angular shards of earthy color, you’ll create a piece that feels both organic and structured.
Step-by-Step
Materials
- Heavyweight cold press watercolor paper (handmade or deckle-edge preferred)
- Watercolor paints (terracotta, burnt sienna, indigo, teal, ochre)
- Pencil (HB or H)
- Fine liner brush (size 0 or 1)
- Round brush (size 4 or 6)
- Ruler
- Clean water and paper towels
- White gel pen (optional for detailing)
Step 1: Planning the Structure
-
Lightly sketch the outline:
Start by drawing the central spine (rachis) of the feather with a gentle curve. Then, lightly sketch the overall outer shape of the feather vane, making it wider at the bottom and tapering to a point at the top. -
Break it down:
Using your ruler, draw diagonal and vertical lines across the feather shape to fracture it into geometric shards. Aim for a mix of triangles and irregular quadrilaterals. -
Create separation:
To achieve the mosaic look, you need gaps between the shapes. Go back over your geometric lines and double them up slightly to create narrow channels of negative space between each segment. -
Add floating elements:
Sketch two tiny, simplified feather shapes near the bottom left of the main feather to balance the composition.
Bleeding colors?
If paint bleeds across the white gaps, your brush is likely too wet. Dab it on a paper towel before painting, or wait longer for adjacent sections to dry.
Step 2: Painting the Shards
-
Prepare your palette:
Mix puddles of your earthy tones. You’ll want a rust red, a deep teal or petroleum blue, a muted ochre, and a greyish-blue. Keep the mixtures watery for transparency. -
Start with the top section:
Begin filling in the geometric shapes at the tip of the feather. Alternate colors so that no two adjacent shapes are the same hue. For example, place a terracotta triangle next to a teal one. -
Mind the gap:
As you paint, be very careful to leave the narrow channels between shapes unpainted. This white space is crucial for the stained-glass effect. -
Vary the saturation:
I like to vary the water-to-paint ratio here. Make some segments deep and saturated, while keeping others pale and watery to add depth and interest. -
Work your way down:
Continue filling in the shapes moving down the feather. Introduce the ochre and lighter browns towards the bottom to give the feather a sense of lightness at its base. -
Create texture:
While some segments represent solid color, try dropping a tiny amount of clean water into a few drying segments to create ‘blooms’ or texture. -
Paint the spine:
Using a very fine liner brush and a diluted brown, paint the central spine. Keep this line extremely thin and let it extend elegantly past the bottom of the vanes. -
Detail the base:
At the very bottom of the feather, switch to loose, wispy strokes for the downy barbs. Use a dark grey or indigo here to anchor the design.
Go metallic
Swap the white negative space for gold! Paint the gaps with metallic gold ink or paint after the colors dry for a luxurious cloisonné effect.
Step 3: Finishing Touches
-
Paint the mini feathers:
Fill in the two small feathers at the bottom using the same technique but with simpler shapes—perhaps just two or three color blocks per feather. -
Let it dry completely:
Wait until the paint is bone dry before proceeding. If the paper feels cool to the touch, it is still damp. -
Add speckles (optional):
For a bit of organic texture, load a brush with watered-down white gouache or dark paint and tap it against a pencil to splatter tiny dots over a few specific color blocks. -
Erase guidelines:
Once you are 100% sure the paint is dry, gently erase any visible pencil lines in the white gaps to crisp up the final look.
Step back and admire how simple geometric forms have come together to create something organic and beautiful

PENCIL GUIDE
Understanding Pencil Grades from H to B
From first sketch to finished drawing — learn pencil grades, line control, and shading techniques.
Explore the Full Guide
Negative Space Feather Cutout
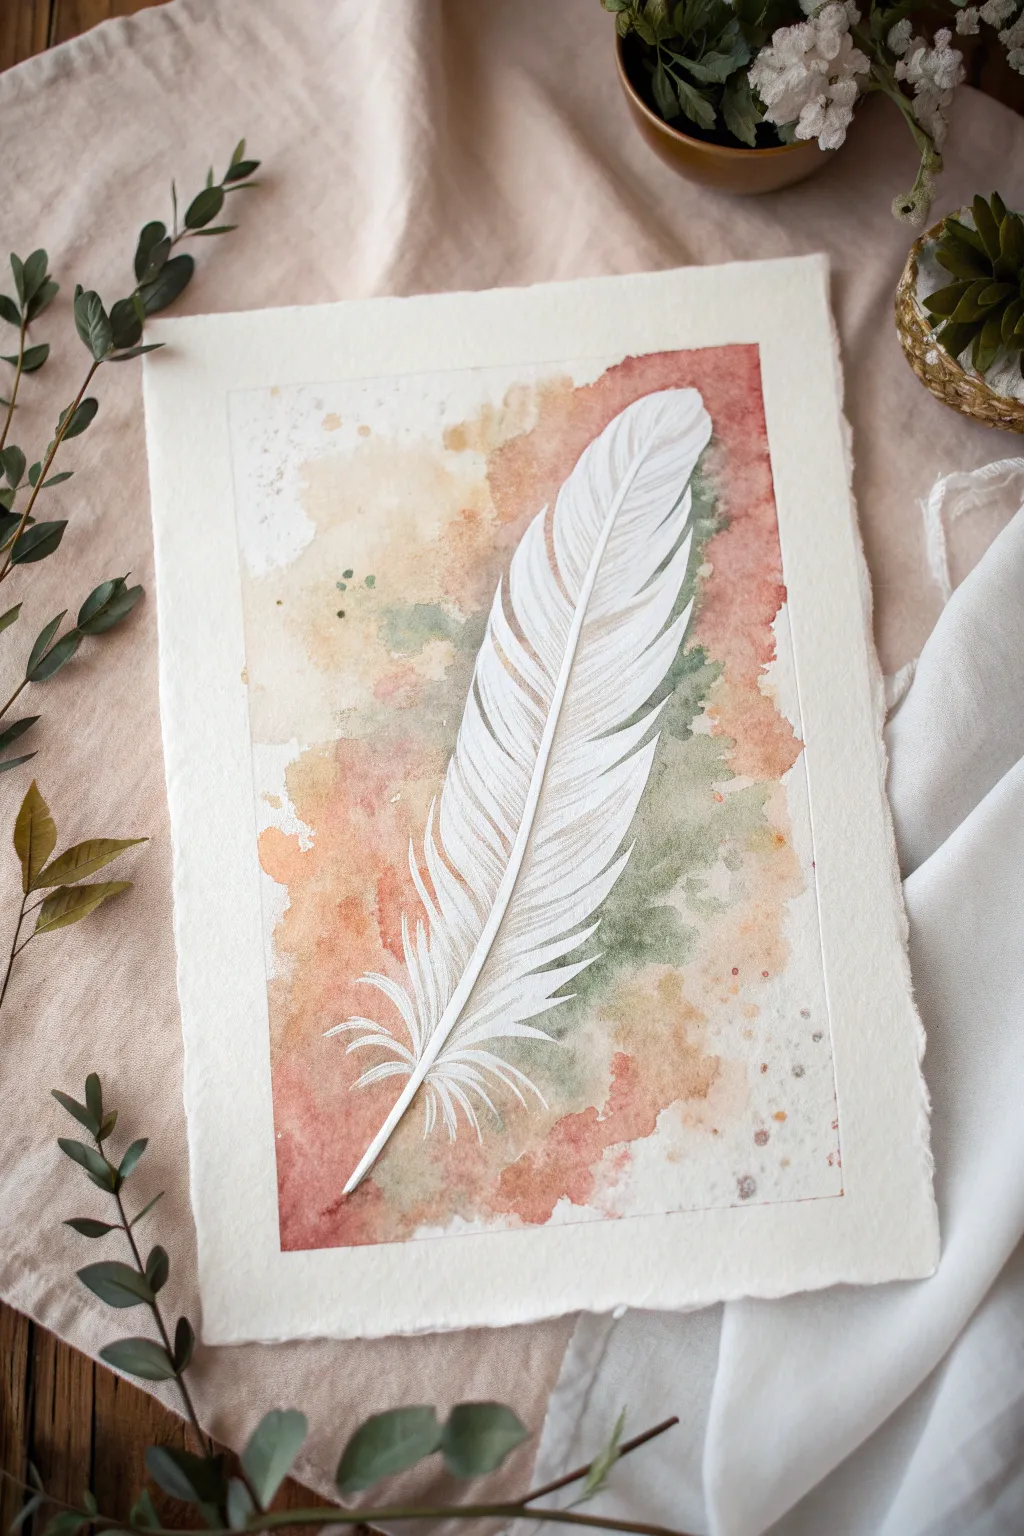
Create a stunning illusion of a floating white feather by painting the negative space around it rather than the subject itself. This approachable watercolor project captures the delicate textures of a quill using masking fluid and loose, organic washes of earthy pigment.
How-To Guide
Materials
- Cold press watercolor paper (300 gsm)
- Masking fluid (drawing gum)
- Fine liner brush (size 0 or 00) or a dipping pen
- Watercolor paints (Rust Red, Burnt Sienna, Ochre, Sage Green)
- Medium round brush (size 6 or 8)
- Pencil (HB or H)
- Kneaded eraser
- Rubber cement pickup tool (optional)
Step 1: Drafting and Masking
-
Feather outline:
Begin by lightly sketching the outline of a feather in the center of your watercolor paper. Keep the lines incredibly faint so they disappear later. -
Refining details:
Add the central quill shaft (rachis) curving gently. Draw the barbs branching out, making sure to show splits and separations for a natural, imperfect look. -
Applying masking fluid:
Shake your masking fluid well. Using a dedicated old brush, dipping pen, or a silicone applicator, carefully fill in the entire feather shape. -
Fine details:
Switch to a very fine tool to pull tiny strands of masking fluid out from the main shape, mimicking the wispy down feathers at the base. -
Drying time:
Allow the masking fluid to dry completely. It must be firm to the touch and usually turns a slightly yellow or greyish tint when ready.
Soap Your Brush
Before dipping into masking fluid, coat your brush bristles in dish soap. This creates a barrier that makes cleaning the sticky rubber out much easier later.
Step 2: The Watercolor Wash
-
Pre-wetting:
Using clean water and a larger brush, wet the area surrounding the masked feather. Don’t soak the whole page, just an inch or two around the shape to encourage flow. -
Dropping in color:
Load your brush with a watery mix of rust red or burnt sienna. Touch the wet paper near the feather’s edge and watch the color bloom outward. -
Adding contrast:
While the red is still wet, drop in patches of sage green and ochre. I find placing the green near the darker red creates a lovely, moody muddying effect. -
Defining the edge:
Carefully paint right up against the dried masking fluid. You want the pigment to be strongest near the white feather to make it pop. -
Splatter texture:
Load a brush with diluted paint and tap it against another brush handle over the paper to create subtle speckles and splatters. -
Softening edges:
Use a damp, clean brush to soften the outer edges of your paint wash so the color fades naturally into the white of the paper rather than stopping abruptly. -
Let it cure:
Wait for the paint to dry completely. If the paper is cold to the touch, it is still damp deep down.
Step 3: The Reveal
-
Removing the mask:
Gently rub your finger or a rubber cement pickup tool over the masking fluid to peel it away, revealing the pristine white paper underneath. -
Adding volume:
Mix a very watery, pale grey (lots of water, tiny dot of black). Paint a thin line down the shadow side of the quill shaft to give it dimension. -
Textural strokes:
With the same pale grey and a dry-brush technique, add incredibly faint, sweeping lines within the white feather to suggest direction and softness. -
Final touches:
If any pencil lines are visible, gently lift them with a kneaded eraser, being careful not to smudge the surrounding paint.
Metallic Accent
Once dry, trace the central quill shaft with gold ink or metallic watercolor. It adds a luxurious shimmer that catches the light against the matte wash.
Step back and admire the stark contrast between your crisp white feather and the surrounding organic wash
Fan Brush Feather Stroke Practice
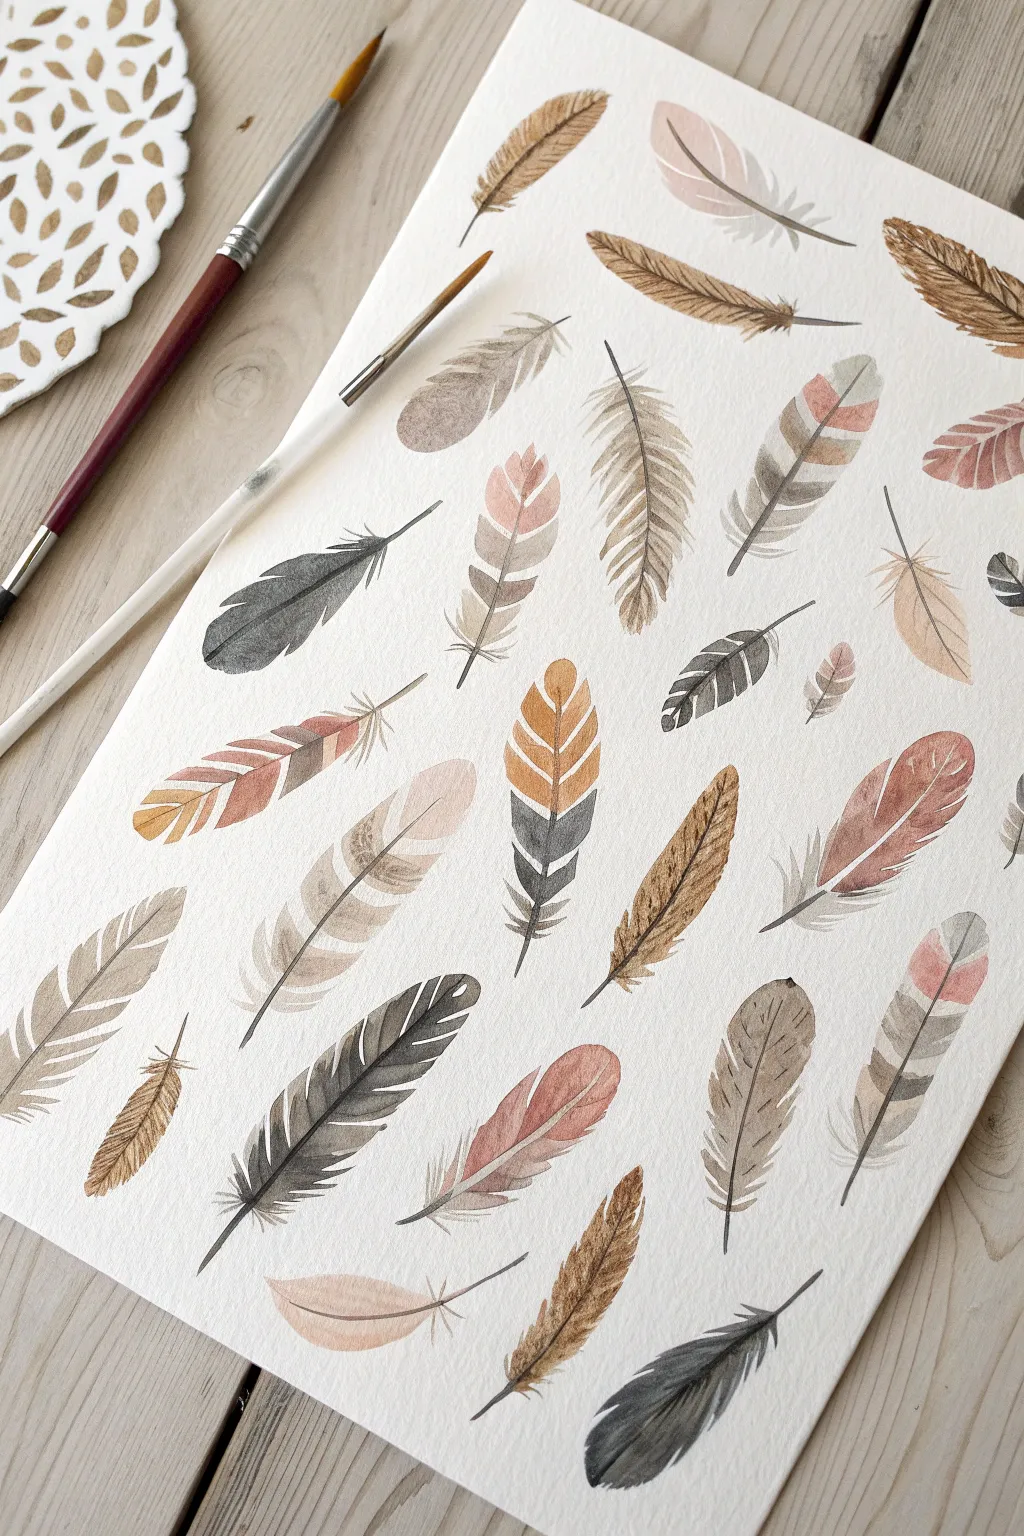
Master the delicate art of painting feathers with this comprehensive study sheet featuring effortless, natural textures. You will create a beautiful grid of unique feathers using a warm, earthy palette of browns, ochres, and dusky pinks.
Step-by-Step
Materials
- Cold press watercolor paper (140lb/300gsm)
- Round watercolor brushes (sizes 2, 4, and 6)
- Small detail brush or liner brush (size 0 or 00)
- Watercolor paints (Burnt Umber, Yellow Ochre, Payne’s Grey, Potter’s Pink, Sepia)
- Two jars of water
- Paper towels
- Pencil (HB or H) for light sketching
Step 1: Preparation & Layout
-
Plan the composition:
Visualize an invisible grid on your paper to keep the feathers organized but organic. Lightly pencil in a central spine (rachis) for about 15-20 feathers, curving them gently in different directions to create movement. -
Sketch the outlines:
Very faintly sketch the outer shape of each feather around the spines. Keep the pencil lines incredibly light so they disappear under the paint later. Vary the shapes—some long and slender, others teardrop-shaped or fluffy.
Muddy colors?
If your colors are blending into brown mush, let layers dry completely before adding patterns. Also, clean your water jar frequently to keep delicate pinks and ochres bright.
Step 2: Basic Wash Techniques
-
Mix your palette:
Prepare puddles of your earthy tones. Mix a watery wash of Potter’s Pink, a soft grey using Payne’s Grey diluted heavily, and a warm golden brown with Yellow Ochre and Burnt Umber. -
Paint the solid shapes:
Starting with a simple oval feather, load a size 4 brush with the pink wash. Paint one side of the feather’s vane, leaving a tiny sliver of white paper unpainted where the center spine is. Repeat for the other side. -
Create a gradient feather:
For the next feather, paint the top half with clean water first. Drop in a touch of grey at the top and let it bleed down. While still wet, touch the bottom of the wet area with pink, allowing the colors to merge softly in the middle. -
Try Wet-on-Dry striping:
Select a long, slender feather shape. Using your brown mix, paint horizontal stripes across the feather width, leaving small white gaps between them. This mimics the natural barring found on hawk or owl feathers.
Step 3: Adding Texture & Detail
-
Simulate splitting:
As you paint the outer edges of the feathers, don’t make them perfectly smooth. Use the tip of your brush to flick tiny strokes outward, or leave small triangular gaps in the paint to show where the feather barbs have separated. -
Darken the tips:
On a few feathers, like the orange-tipped ones, paint the main body color first. While the very tip is still damp, drop in a concentrated dark grey or sepia color to create a dramatic, dipped look. -
Dry brush texture:
For a fluffy, downy look, blot most of the paint off your brush until it is almost dry. Lightly drag the bristles across the paper for the base of the feathers. I find this works best for the soft, fuzzy area near the quill. -
Layering patterns:
Once your initial base washes are completely bone dry, mix a slightly darker value of the same color. Paint subtle chevron shapes or dots over the dry base to create intricate patterning without blurring.
Pro Tip: The Quill Trick
Instead of painting the central quill with dark paint, try leaving it white! Use masking fluid to draw the spine first, paint over it, and peel it off at the end for a crisp white line.
Step 4: Defining the Quill
-
Paint the rachis:
Switch to your smallest liner brush (size 0). Mix a dark, opaque Sepia or Payne’s Grey. Carefully paint a thin line down the center of each feather, following the curve you sketched earlier. -
Taper the line:
Ensure the central line is thickest at the bottom (the quill) and becomes razor-thin as it reaches the tip of the feather. You can lift your brush pressure gradually as you move up. -
Connect the barbs:
From the central spine, paint ultra-fine, hair-like lines extending outward into the feather body. You don’t need to fill the whole feather; just a few lines near the spine suggest the structure effectively.
Step 5: Final Touches
-
Refine the edges:
Look for feathers that look too solid or heavy. Use a damp, clean brush to gently lift a little color from the edges or the center to create highlights and dimension. -
Add stray fibers:
For realism, paint a few tiny, stray hair-lines breaking away from the main shape of the feather, especially near the base where feathers tend to be downier. -
Clean up:
Once the paint is 100% dry, gently erase any visible pencil marks, being careful not to scrub over the painted areas which could smudge the pigment.
Now you have a stunning reference sheet of nature-inspired textures to frame or use in future compositions


Fold-Press Feather Print Surprise

Capture the delicate beauty of nature with this sketchbook study featuring two distinct feather styles. Using ink and watercolor or colored pencils, you will create textured, realistic illustrations that pop against creamy, handmade paper.
Step-by-Step
Materials
- Handmade cotton rag sketchbook or watercolor paper
- Fine liner pens (0.1mm and 0.3mm, black or sepia)
- Colored pencils or watercolors (Prussian blue, teal, ochre, rust brown)
- Small round paintbrush (size 2 or 4) if using paint
- Gold ink or pen (optional for highlights)
- Reference feather images or real feathers
- Pencil for sketching
- Kneadable eraser
Step 1: Planning and Sketching
-
Mark position:
Begin by lightly marking the central spine (rachis) of each feather with a pencil. Curve them gently to give the feathers a natural, resting posture rather than a stiff, straight line. -
Outline the shape:
Sketch the outer boundary of the feathers around the spine. Keep the shapes organic; for the left feather, aim for a wider, fluffier base, while the right feather can be slightly more slender and streamlined. -
Refine the edges:
Go back over your outline and add gentle notches and splits in the vane. Real feathers often have separations where the barbs have come apart, adding character to your drawing.
Step 2: Drawing the Blue-Rust Feather (Left)
-
Base layer coloring:
Start with the upper portion of the feather. Apply a soft layer of dark blue-grey, feathering your strokes downward from the spine toward the edge. -
Transitioning colors:
As you move past the middle of the feather, switch to a warm rust or brown tone. Blend the two colors where they meet by overlapping your strokes gently. -
Adding texture:
Using a fine liner or a sharp colored pencil, draw individual barbs. I find it helpful to start at the spine and flick the wrist outward to create tapering lines that mimic hair-like texture. -
Deepening shadows:
Add darker strokes near the spine and under the overlaps where the quill splits. This contrast makes the feather look three-dimensional rather than flat. -
Fluffy down:
At the very base of the quill, use loose, scribbly strokes to create the soft, chaotic downy feathers. Keep this area lighter and less structured than the main vane.
Natural Imperfections
Don’t fix every mistake! A jagged edge or a slightly uneven color blend actually makes the feather look more organic and realistic.
Step 3: Drawing the Striped Feather (Right)
-
Blocking stripes:
Lightly mark out horizontal bands across the second feather. Alternate between a teal-green section and an ochre-gold section. -
Filling color:
Fill in the bands with your chosen medium. If using watercolor, let each stripe dry slightly before painting the neighbor to prevent muddy bleeding. -
Defining the spine:
Draw the central shaft clearly with a dark brown or black liner. Make it thicker at the base and taper it off to a vanishing point at the tip. -
Detail strokes:
Overlay fine, diagonal lines across the colored sections to represent the barbs. Ensure these lines follow the angle of growth, slanting upwards toward the feather’s tip. -
Highlighting:
If you have a white gel pen or gouache, add tiny ticks of light along the spine or on the edges of the curved sections to suggest a slight sheen.
Metallic Accent
Use gold watercolor or metallic ink for the ochre sections on the right feather. It catches the light beautifully when the page turns.
Step 4: Finishing Touches
-
Review and refine:
Step back and look at the composition. If any edges look too solid, break them up with a few loose ink strokes to suggest softness. -
Shadowing the paper:
To ground the feathers, add a very faint, watery grey shadow underneath one side of each quill. This creates the illusion that they are resting on top of the paper.
Close your sketchbook knowing you’ve preserved a fleeting piece of nature on the page
String-Pull Feather Texture Effect
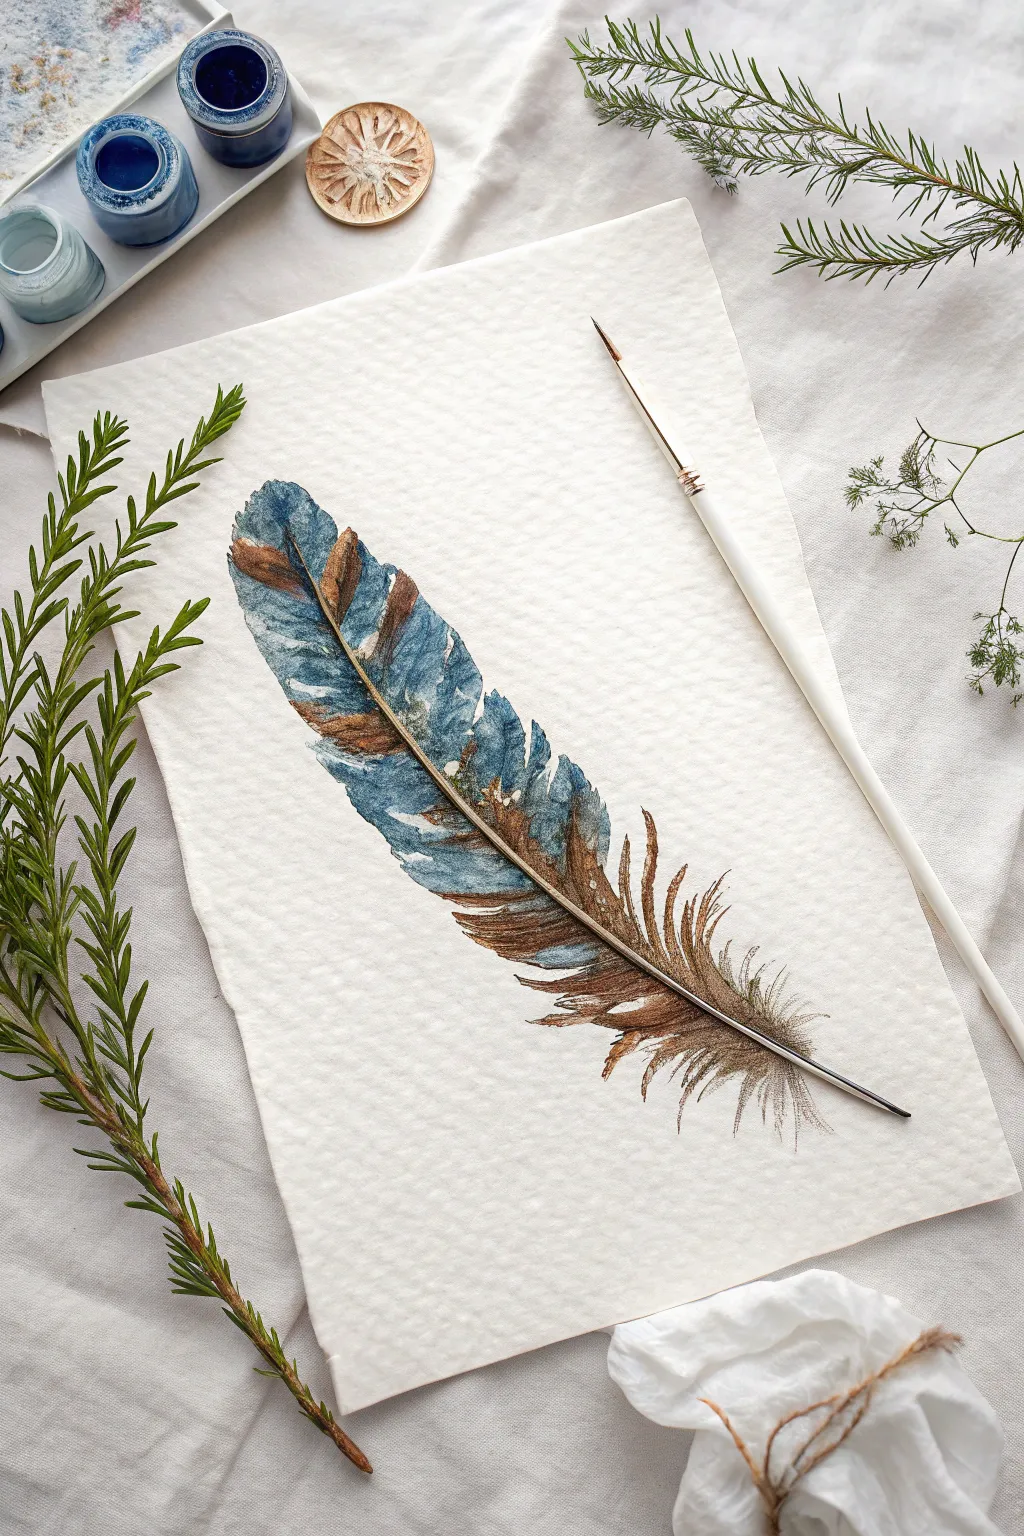
Create this strikingly realistic feather painting using an innovative string-pulling technique that mimics natural barbs and texture. The interplay of deep blues and earthy browns gives this piece a rustic yet refined elegance perfect for framing.
Detailed Instructions
Materials
- Cold press watercolor paper (300 gsm)
- Cotton crochet thread or medium-weight string
- Watercolor paints (Indigo, Burnt Umber or Sepia)
- Fine detail paintbrush (size 0 or 00)
- Medium round paintbrush (size 4 or 6)
- Small mixing palette
- Jar of clean water
- Paper towels
- Masking tape
Step 1: Preparation & String Loading
-
Secure the paper:
Tape down your watercolor paper to a flat surface or board. This prevents buckling and keeps your workspace stable while you manipulate the string. -
Cut the string:
Cut a piece of cotton string about 12-14 inches long. You need enough length to lay it on the paper and have a tail to pull. -
Mix the base colors:
In your palette, mix a rich, dark Indigo with a little water. You want a fluid consistency—not too watery, but thin enough to soak into the string. In a separate well, mix a concentrated Burnt Umber. -
Soak the string:
Submerge the bottom two-thirds of your string into the indigo paint mixture. Use the handle of a brush to push it down so the fibers are fully saturated. -
Add secondary color:
Carefully lift the string and dip sections of it into the Burnt Umber mixture. This will create the variegated brown and blue pattern seen in the reference.
Twist for Texture
For more intricate patterns, try twisting two thin strings together before dipping them. The twisted texture creates even finer, more complex gaps in the paint pull.
Step 2: Creating the Feather Shape
-
Lay the string:
Gently place the saturated string onto the paper in a slight ‘J’ or ‘S’ curve to mimic the central quill of a feather. -
Arrange the loop:
Curve the upper part of the string back on itself slightly so it forms a loop shape, roughly outlining the top half of the feather’s vane. -
The pull technique:
Hold the dry tail end of the string firmly. Place your hand or a clean heavy book gently over the loop area to keep the string flat against the paper. -
Pull downward:
Slowly and steadily pull the string tail downward and slightly outward. The movement of the string dragging across the paper creates the natural, organic striations of the feather barbs. -
Assess the shape:
Lift the string away. You should see a rough, textured feathery shape. If one side is sparse, repeat the process on the other side of the ‘quill’ line using a freshly dipped string.
Step 3: Refining & Detailing
-
Let it settle:
Review the initial texture. The string pull does the heavy lifting, creating those fine parallel lines that look like individual feather hairs. -
Paint the quill:
Using your fine detail brush and a mix of brown and white (or just concentrated brown), paint a thin, solid line down the center where the main stem (rachis) should be. -
Enhance the pattern:
Mix a watery blue glaze. Lightly touch your brush to the blue sections of the feather to deepen the color, being careful not to obliterate the string texture. -
Define the edges:
Take a slightly damp, clean brush and gently soften any harsh outer edges to make the feather look fluffy. -
Add brown tips:
Load your small brush with Burnt Umber. With quick, flicking motions, add sharper, darker barbs near the bottom of the feather where the down is usually fluffier. -
Deepen contrast:
I like to add tiny dots of concentrated Indigo near the quill line to suggest depth and shadow within the feather structure. -
Dry and finish:
Allow the painting to dry completely. Once dry, erase any stray pencil marks if you made guidelines, and remove the tape carefully.
Smudged Pulls?
If your pull looks like a blob, your paint was likely too watery or you pressed down too hard. Use thicker paint and a lighter touch when guiding the string.
Now you have a stunning, organic feather painting that captures the delicate beauty of nature
Collaged Painted Feathers on Canvas
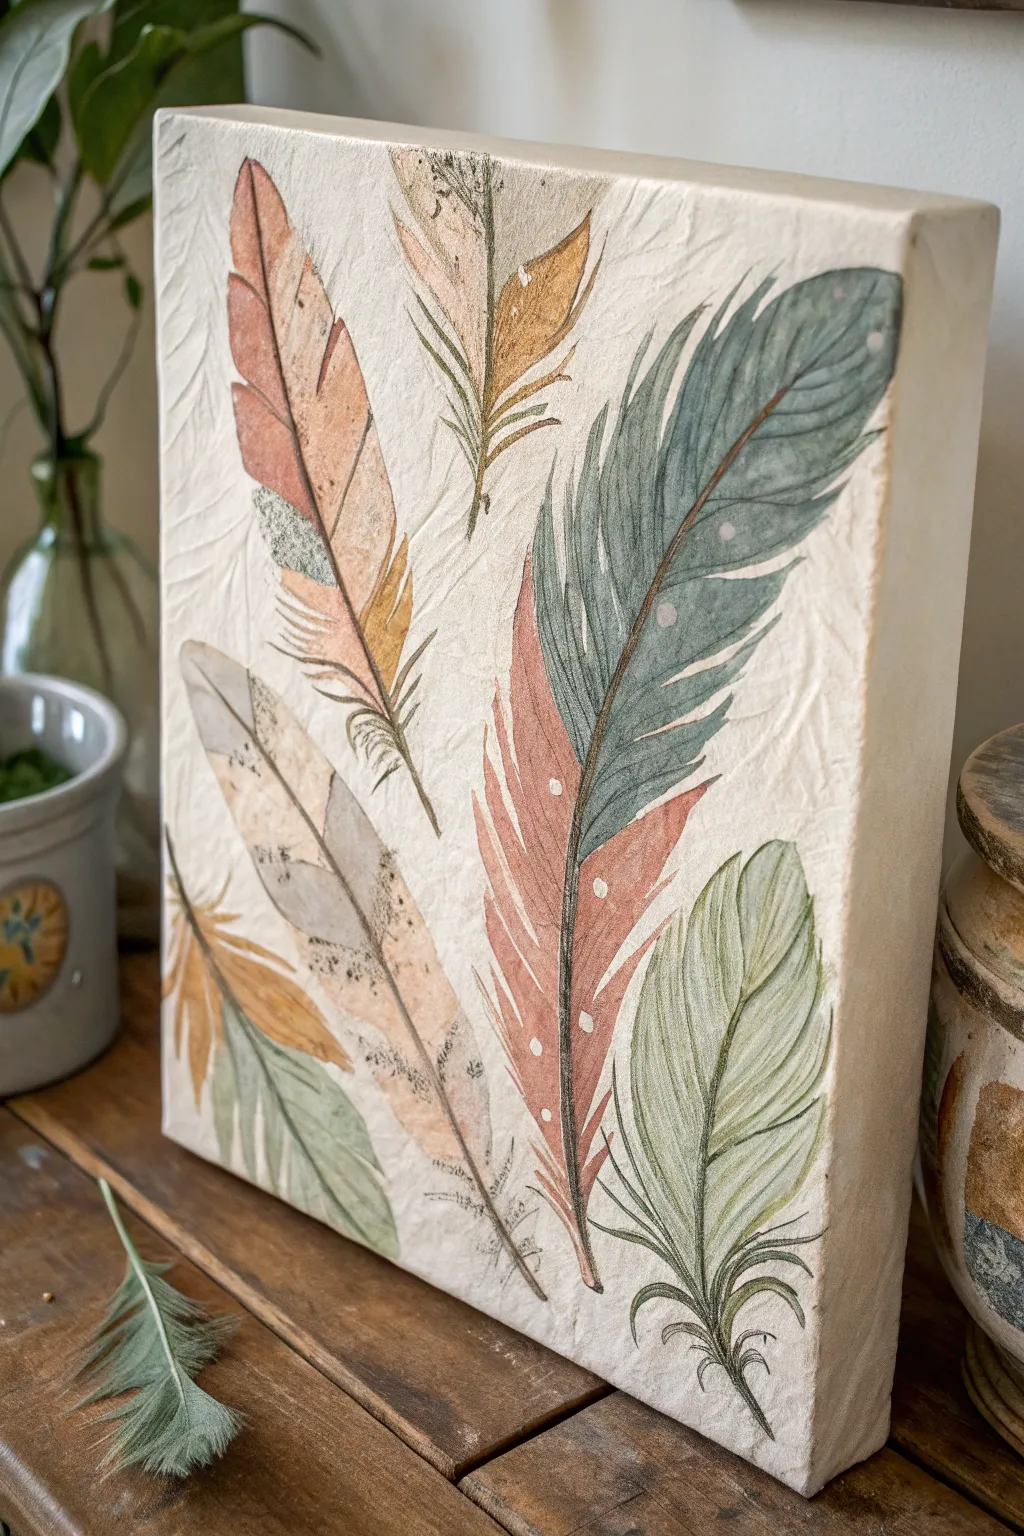
This project combines subtle decoupage textures with soft washes of acrylic paint to create a rustic, earth-toned gallery piece. The finished canvas mimics the look of delicate handmade paper while showcasing a beautiful array of floating feathers.
How-To Guide
Materials
- Pre-stretched canvas (approx. 11×14 inches)
- White tissue paper (the kind used for gift wrapping)
- Matte Mod Podge or decoupage medium
- Soft synthetic flat brush (1 inch)
- White Gesso
- Acrylic paints (Soft Pink, Sage Green, Deep Teal, Burnt Sienna, Ochre, Black)
- Fine liner brush (size 0 or 00)
- Round watercolor brush (size 4 or 6)
- Pencil for light sketching
- Cup of water and paper towels
Step 1: Texturizing the Surface
-
Prepare the Tissue:
Begin by taking a sheet of plain white tissue paper and gently crumpling it into a loose ball, then smoothing it back out. This creates the creases needed for that lovely underlying texture. -
Apply Base Glue:
Coat the entire surface of your canvas with an even layer of matte Mod Podge. Work quickly so it doesn’t dry before the next step. -
Decoupage the Canvas:
Ideally, you want to lay the crumpled tissue paper over the wet glue. Gently press it down with your fingers or a dry brush, deliberately encouraging small wrinkles and folds to remain. Wrap the excess tissue around the edges of the canvas for a clean finish. -
Seal the Texture:
Once the tissue is positioned, brush another coat of Mod Podge or watered-down glue over the top to seal it. Let this dry completely until it’s hard to the touch. -
Prime with Gesso:
Apply a thin layer of white Gesso over the dry tissue. This provides a ‘toothy’ surface for your paint and ensures the tissue texture is unified and white.
Step 2: Sketching and Blocking
-
Plan the Composition:
Using a very light pencil touch, sketch the basic spine (quill) lines for 6-7 feathers. Arrange them at varied angles to create a sense of movement, as if they are falling. -
Outline Shapes:
Lightly draw the contour shapes of the feathers around the spines. Keep the edges ragged or tapered rather than perfectly smooth to make them look realistic. -
Select Color Palette:
Prepare your palette with watered-down acrylics. You want the consistency of heavy cream or watercolor to allow the texture to show through. -
Apply Base Colors:
Block in the main color for each feather using the round brush. Alternate between sage greens, muted pinks, and ochre yellows. Don’t worry about details yet; just get the color shapes down.
Wrinkles tearing?
If the wet tissue paper tears while you are smoothing it, don’t panic. Simply patch it with a small scrap of fresh tissue and extra Mod Podge. The texture is meant to be rugged, so patches blend right in.
Step 3: Detailing and Depth
-
Creating Gradients:
While the base paint is still slightly tacky or just dry, mix a slightly darker version of each color. Apply this darker shade near the center spine and fade it outward to give the feathers dimension. -
Adding the Teal Feathers:
For the prominent teal feathers, mix Deep Teal with a touch of Sage Green. Paint these carefully, using the tip of your brush to flick distinct ‘barbs’ at the edges. -
Splatter Texture (Optional):
Mix a tiny amount of brown paint with extra water. Tap your brush over the canvas to create very subtle speckles on a few feathers, mimicking natural patterns. -
Painting the Quills:
Switch to your fine liner brush. Using a mix of Burnt Sienna and Black, paint the thin center spine (rachis) of each feather. I like to start from the bottom stem and pull the brush upward for a tapering line. -
Defining the Barbs:
With the liner brush and slightly thinned dark paint (grey or dark brown), add very fine, hair-like strokes extending from the spine outward. These don’t need to cover the whole feather, just enough to suggest texture. -
Adding Highlights:
Mix a tiny bit of white into your base colors. Add a few strokes of this lighter shade on the curved parts of the feathers to suggest light hitting them. -
Refining Edges:
Go back with the liner brush and clean up any edges or add tiny ‘splits’ in the feathers where the barbs have separated. -
Final White Accents:
Using pure white paint and a dotting tool or the back of a brush, add a few tiny decorative dots to the red/pink feathers for extra visual interest.
Pro Tip: Vintage Wash
To age the canvas, mix 1 part brown paint with 10 parts water. Lightly glaze the empty background spaces (avoiding the feathers) and wipe it back with a rag. It settles into creases beautifully.
Hang your textured masterpiece in a well-lit spot to let the shadows play across the unique surface.


Have a question or want to share your own experience? I'd love to hear from you in the comments below!