When kids can dive straight in with their hands, finger painting turns into instant confidence and joyful chaos in the very best way. These ideas keep things simple, recognizable, and totally doable—so those tiny handprints and fingerprints become cute little masterpieces you’ll actually want to save.
Fingerprint Flower Garden Patch
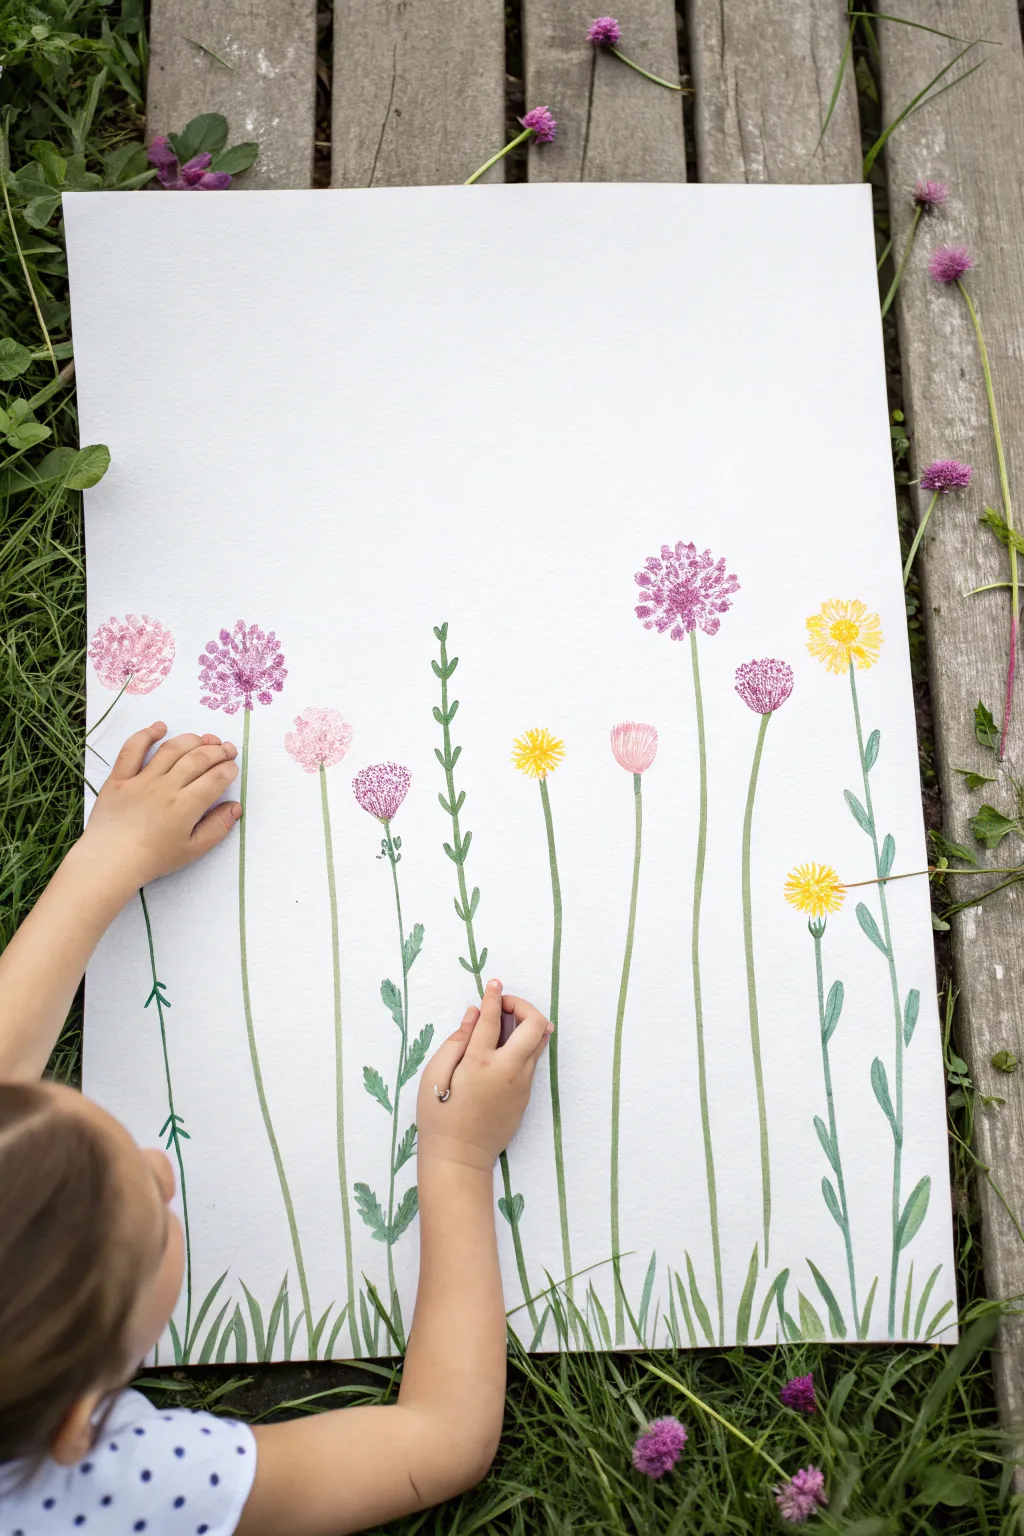
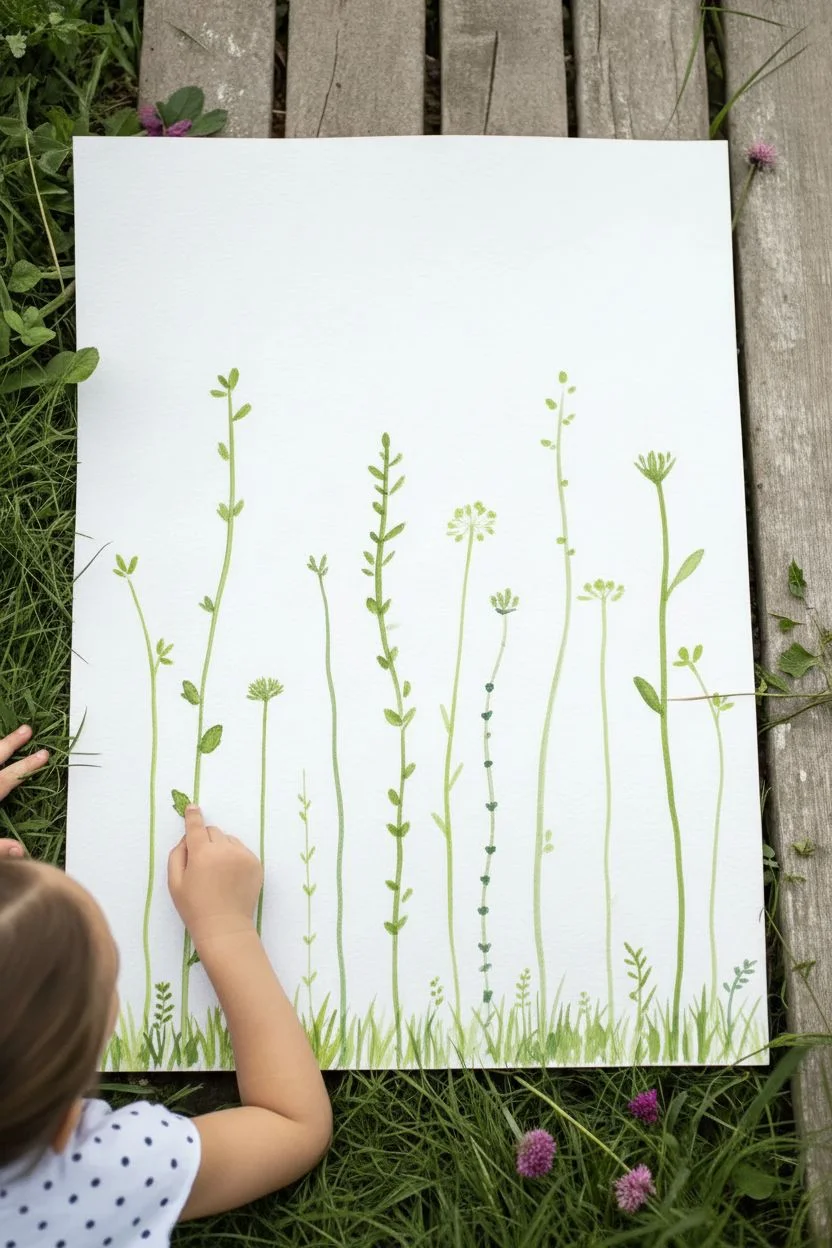
Transform little fingertips into a blooming garden with this delicate mixed-media project. By combining precise brushwork for stems with textured finger-stamped blooms, you’ll create a whimsical field of wildflowers that looks lovely enough to frame.
Detailed Instructions
Materials
- Large sheet of thick white paper (watercolor or mixed media paper recommended)
- Acrylic or tempera paints (shades of pink, purple, yellow, orange, and green)
- Small round paintbrush (size 2 or 4)
- Fine liner brush (optional, for details)
- Paper plate or palette
- Paper towels
- Cup of water
Step 1: Painting the Greenery
-
Prepare your greens:
Squeeze out two shades of green paint onto your palette—a yellowish spring green and a deeper forest green. Keeping these slightly separate allows you to dip into both for natural color variation. -
Start with tall stems:
Using your small round brush, paint long, slender vertical lines starting from the very bottom edge of the paper. Vary the heights, with some reaching almost to the top third of the page and others staying lower. -
Vary the line weight:
Try to make your stems naturally imperfect. Press slightly harder at the base and lift off gently as you reach the top to create a tapering effect that looks like real grass. -
Add leafy details:
On some stems, paint small, alternating leaves up the stalk. For others, just add tiny branching offshoots near the bottom. I like to leave a few stems completely bare to support the larger flower heads later. -
Create the grassy base:
Fill in the bottom edge of the paper with short, quick upward strokes to create a bed of grass. This grounds your stems so they don’t look like they are floating in space. -
Let the stems dry:
Wait 5-10 minutes for your green paint to dry completely. This is crucial because you don’t want the flower colors to smudge into the green stems.
Smudged Prints?
If a fingerprint smudges or looks messy, turn it into a wind-blown flower! Use a fine brush to pull small lines of paint outward in the direction of the smudge to simulate movement.
Step 2: Blooming the Flowers
-
Prepare flower colors:
Squeeze dime-sized amounts of your flower colors (pinks, purples, yellows) onto the palette. Spread the paint out thinly so it’s easy to pick up texture. -
Stamp the large alliums:
Dip your thumb or index finger into a purple or pink shade. Press it firmly at the top of a tall stem to create a large round bold bloom. Lift straight up to avoid smearing. -
Create textured dandelions:
For the yellow flowers, use your pinky finger. Instead of one flat print, try tapping your fingertip lightly in a circle to create a fluffy, textured look. -
Layering colors:
If you want a two-tone flower, dip your finger in pink, dab off the excess, and then lightly touch one side into a darker purple before stamping. -
Add floating buds:
Stamp a few smaller flowers at different heights. Remember, not every flower needs to be attached perfectly to the very top of a stem; you can connect them later if there’s a gap. -
Detailing the blooms:
Once the fingerprints are dry, take your finest brush or the very tip of your round brush. Dip it in a slightly darker shade of the flower color. -
Adding texture lines:
Paint tiny radiating lines or dots inside the fingerprint shapes. For dandelions, paint small spikes coming out from the center to mimic petals. -
Connect the gaps:
If any of your stamped flowers are floating too high above their stems, use your green paint to extend the stem delicately until it meets the base of the flower. -
Final touches:
Add tiny sepals (the little green cup at the base of the flower) under some of the blooms using the very tip of your green brush to make them look realistic.
Make it Sparkle
Mix a tiny pinch of ultra-fine biodegradable glitter into your flower paint colors before stamping. It adds a magical morning dew effect to your garden.
Step back and admire your beautiful, hand-printed garden that captures the wild spirit of nature


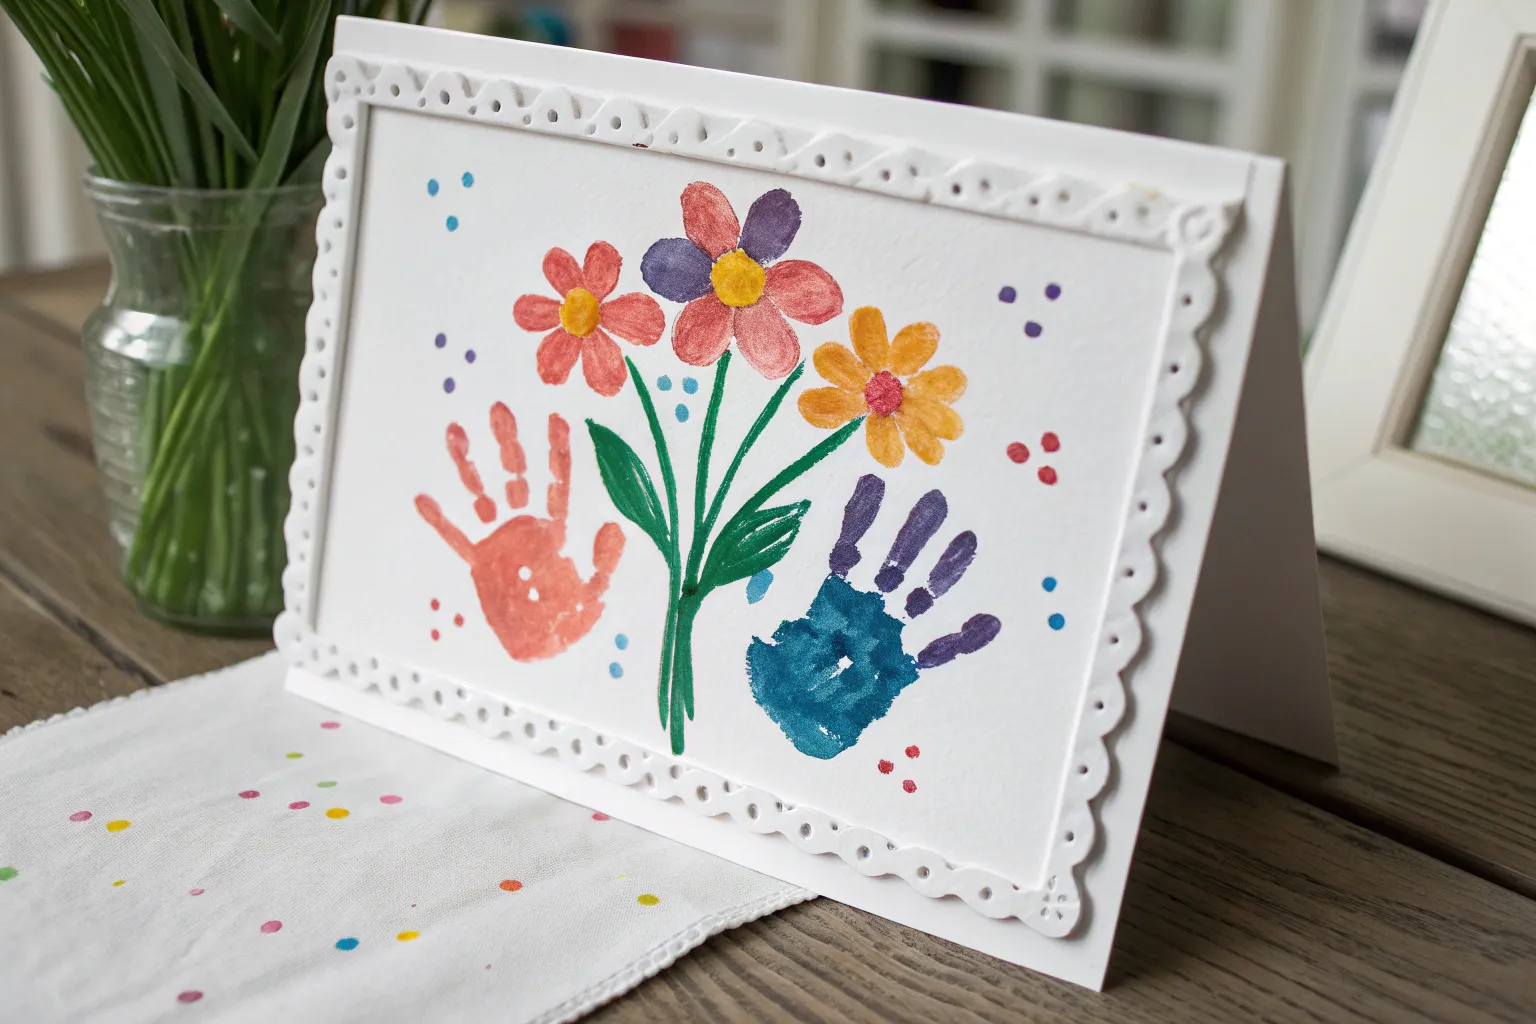
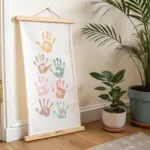
Handprint Butterflies and Fingerprint Ladybugs
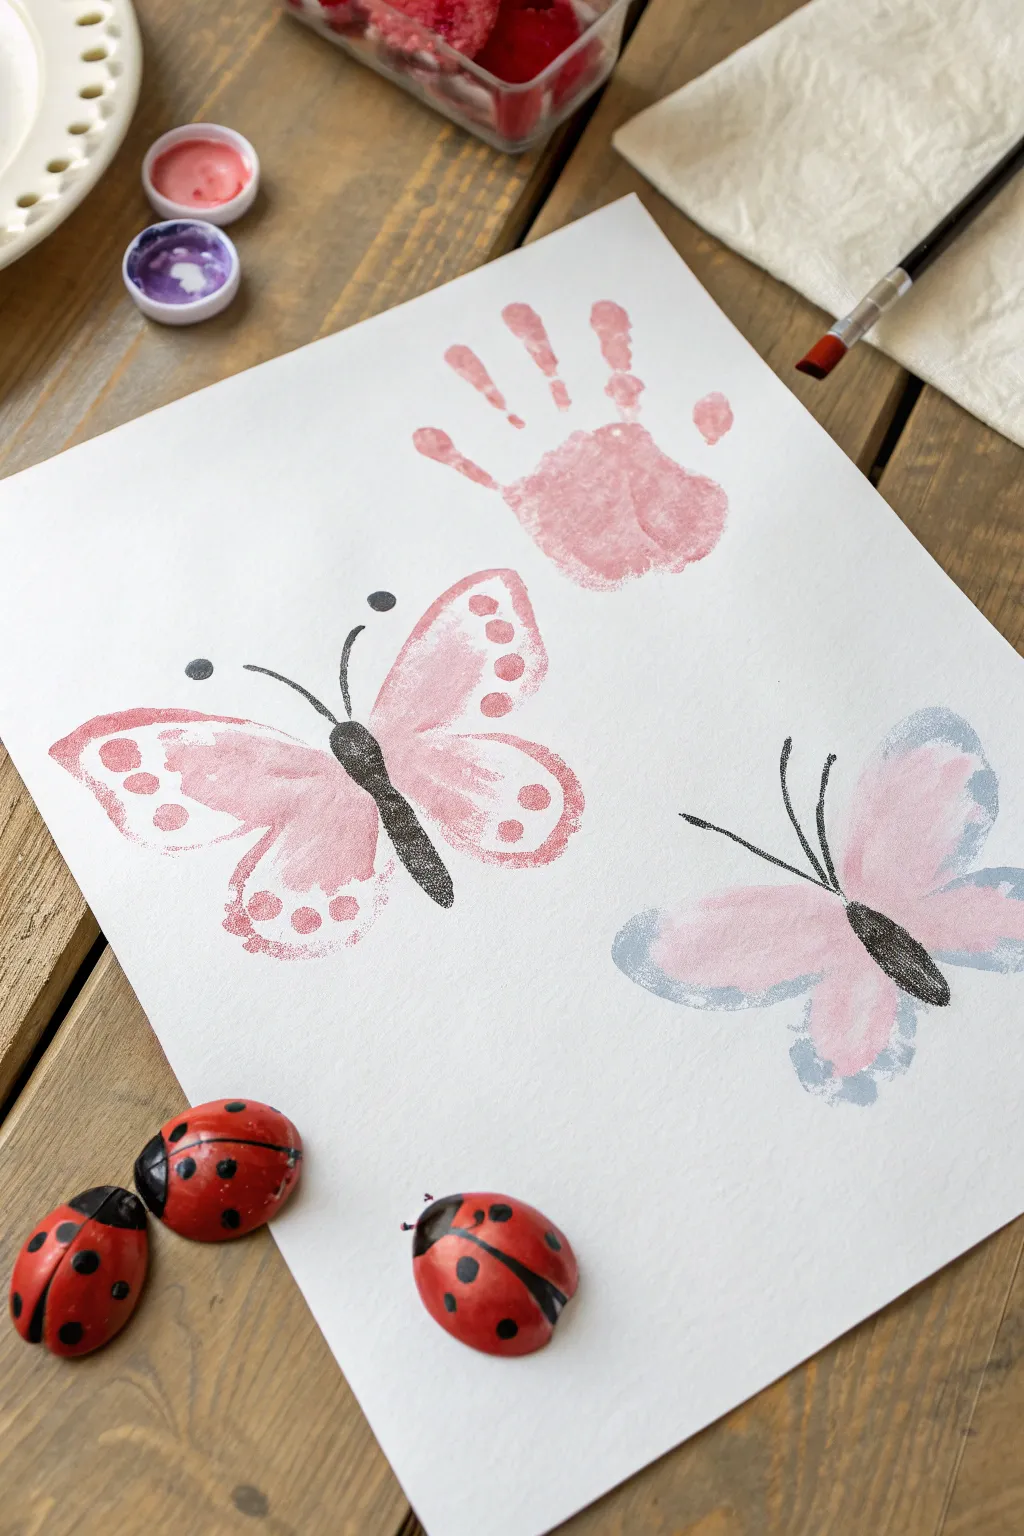
Transform little hands and fingerprints into a whimsical garden scene featuring fluttering butterflies and crawling ladybugs. This project combines soft watercolors with bold black details for a lovely, keepsake-worthy art piece.
Step-by-Step
Materials
- White cardstock or heavy watercolor paper
- Pink or Red washable tempera or acrylic paint
- Light blue washable tempera or acrylic paint
- Black fine-point marker or black paint with a fine brush
- Small paintbrush
- Paint palette or disposable plate
- Small ladybug figurines (optional, for inspiration or display)
- Water cup and paper towels
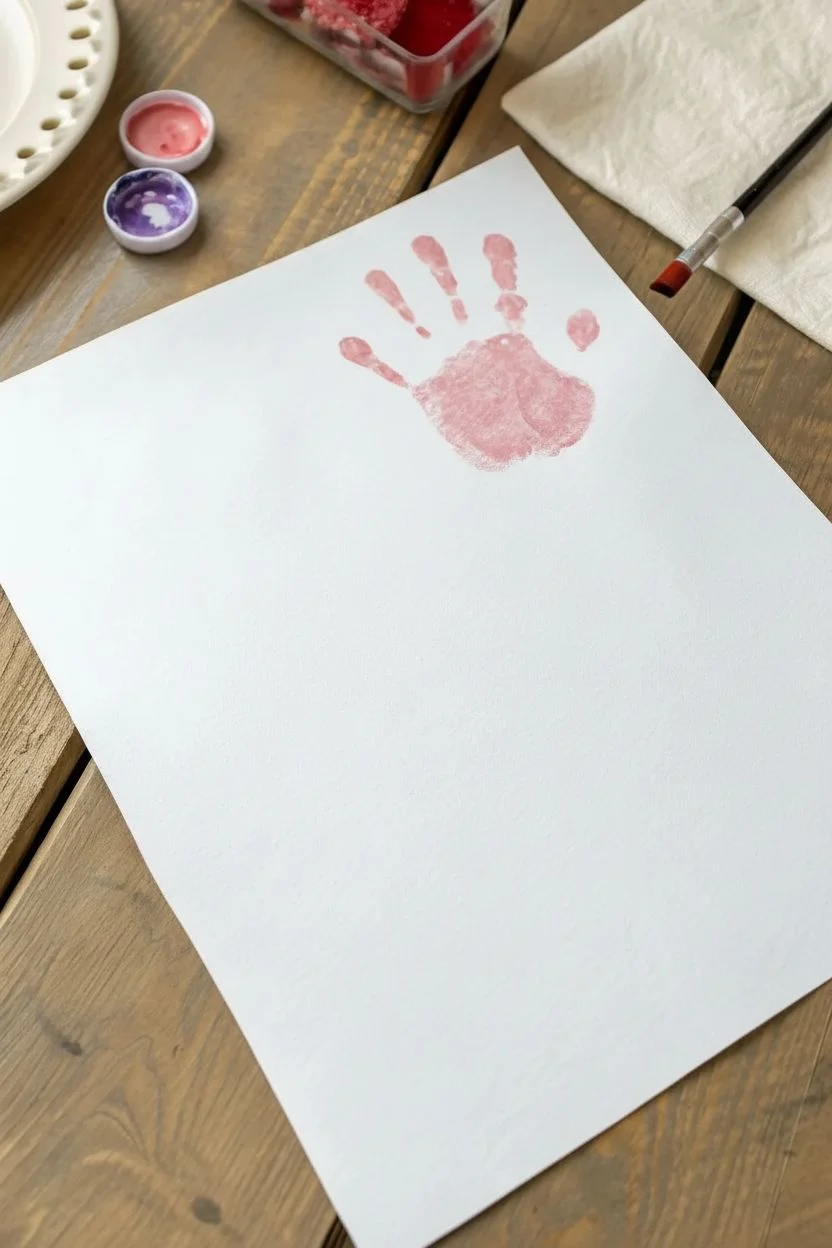
Step 1: Creating the Handprint Base
-
Prepare the workspace:
Lay down newspaper or a craft mat to protect your table, as finger painting can get a little messy. -
Mix the pink shade:
On your palette, mix a soft pink hue if you don’t have one pre-mixed. You want a color that is visible but soft enough for details to show on top later. -
Paint the hand:
Use a brush to coat the child’s palm and fingers evenly with the pink paint. Ensure the paint isn’t dripping wet, but also not too dry. -
Stamp the first impression:
Press the painted hand firmly onto the top right section of the paper to create a standalone handprint element. Lift straight up to avoid smearing. -
Clean up:
Wipe the hand clean with paper towels or wash with soap and water before moving to the butterflies.
Smudge Alert
If a handprint smears, turn it into a ‘flying’ butterfly by painting over the smudge to create motion lines or extended wings.
Step 2: Painting the Butterflies
-
Outline the first butterfly:
For the pink butterfly on the left, use a brush to paint two large, tear-drop shaped wings on either side of an imaginary center line. -
Fill in the wings:
Fill the outlines with a light wash of pink paint. You can leave some areas slightly lighter to create a watercolor effect. -
Add wing details:
While the paint is still wet (or after drying for sharper lines), dap darker pink spots along the edges of the wings using your fingertip or a small brush. -
Paint the second butterfly:
For the right-side butterfly, paint similar wing shapes but use a mix of pink in the center and light blue on the outer edges. -
Blend the colors:
Gently blend where the pink and blue meet on the wings to create a soft, purple-ish transition. -
Let it dry completely:
Pausing here is crucial; wait until all paint is completely dry to the touch so the black marker doesn’t bleed.
Make It 3D
Glue small googly eyes onto the ladybugs or butterflies for a fun, tactile element that brings the characters to life.
Step 3: Adding the Details
-
Draw the butterfly bodies:
Using black paint and a fine brush (or a black marker), draw a long, thin oval in the center of the pink butterfly wings. -
Add the antennae:
Extend two curved lines from the top of the body, adding tiny dots at the ends for a whimsical touch. -
Detail the second butterfly:
Repeat the process for the blue-and-pink butterfly, drawing a slender black body and curved antennae. -
Create ladybugs:
Although the image shows painted figurines, you can paint red ovals near the bottom of your paper to mimic them. -
Add ladybug spots:
Once the red ovals dry, use the black marker or paint to add the classic black head and polka dots to your painted ladybugs. -
Final touches:
Check for any uneven spots and touch them up if necessary.
Display your beautiful garden scene on the fridge or frame it for a lovely gift


Fingerprint Hot Air Balloons
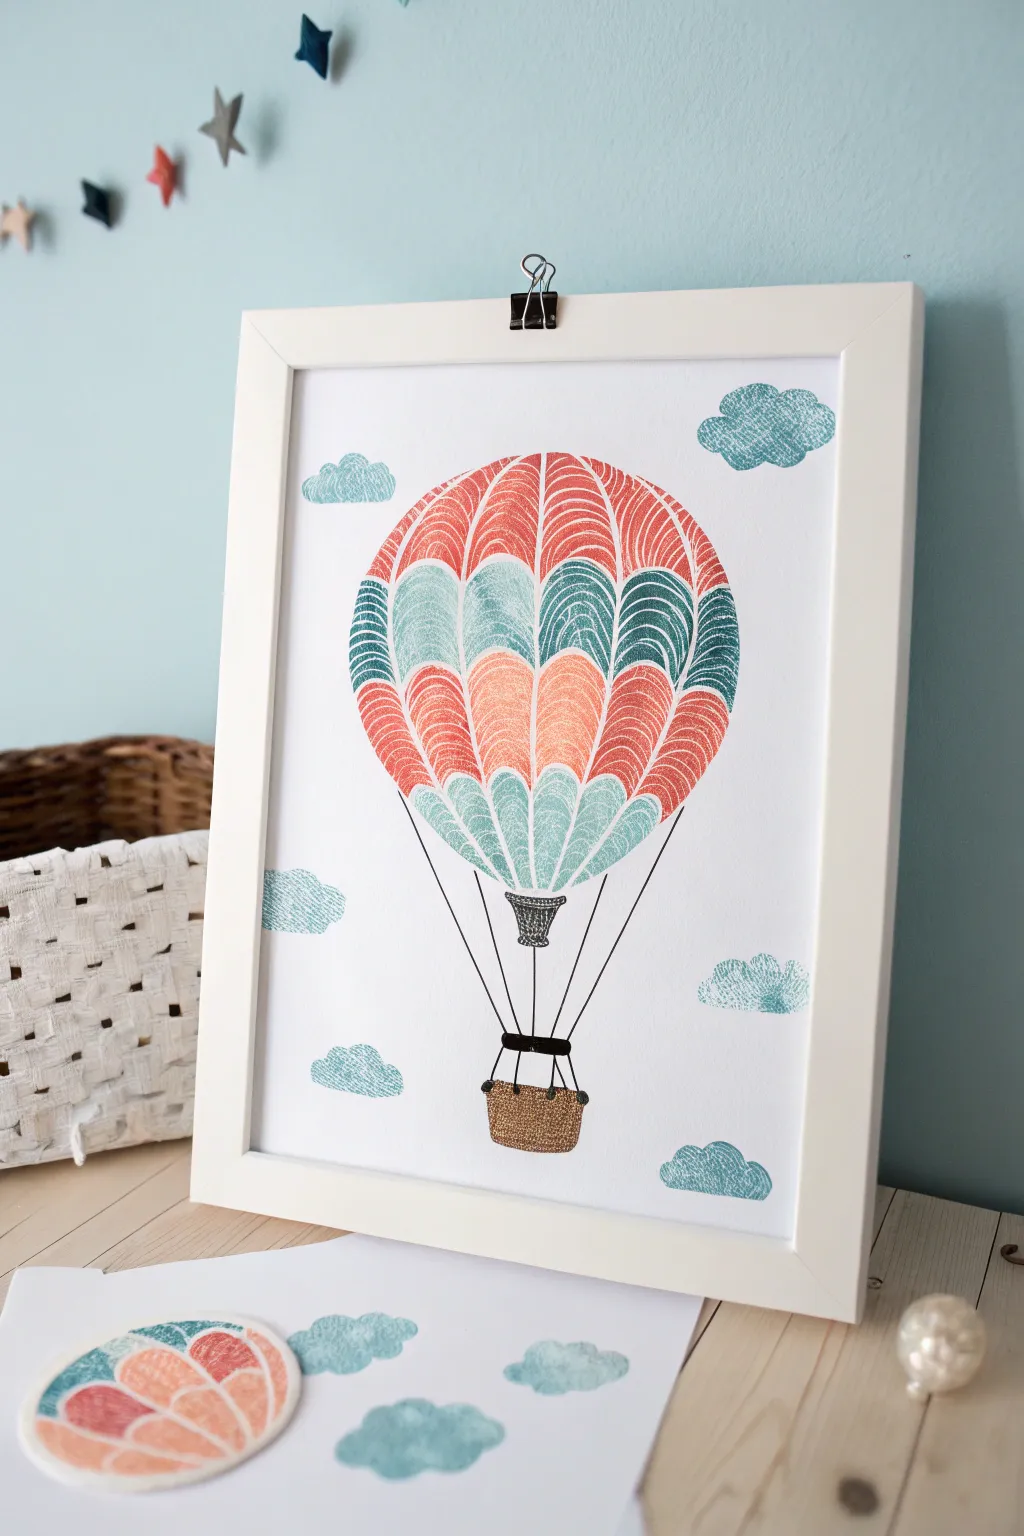
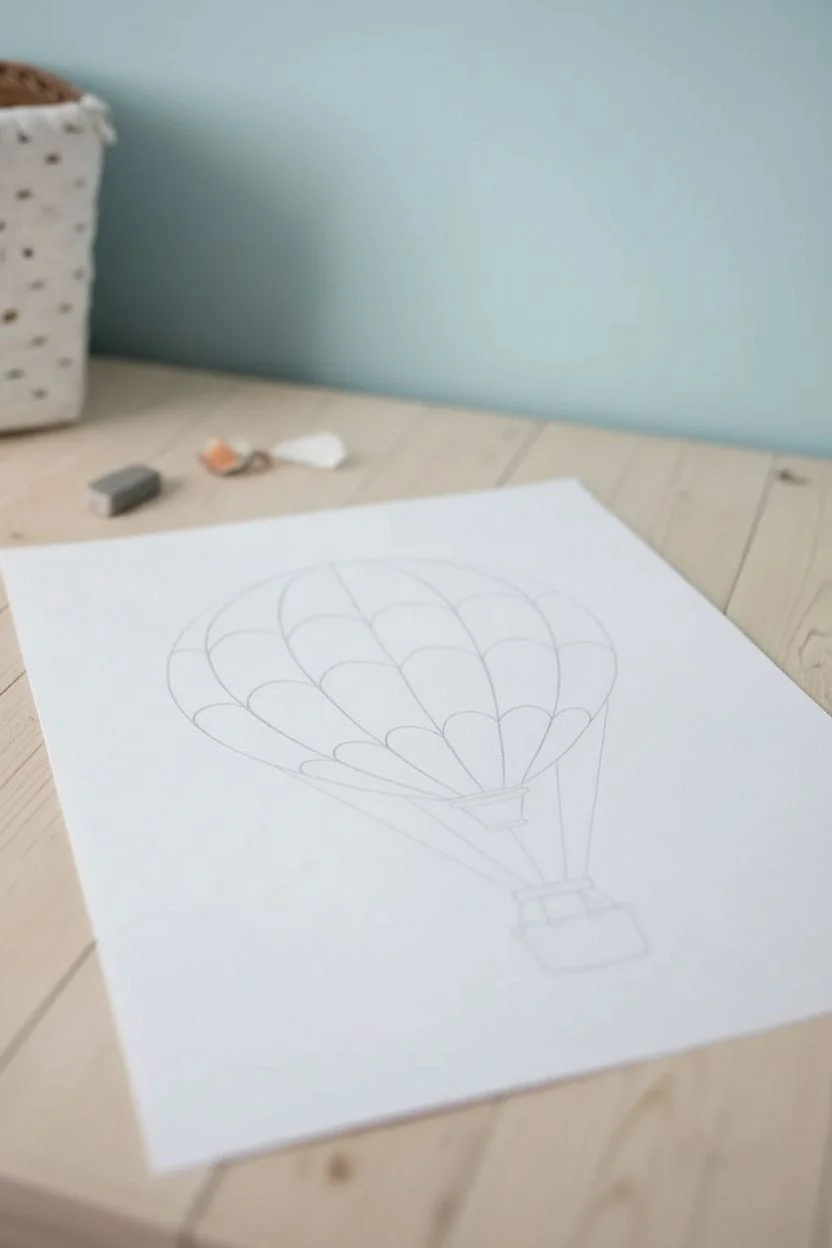
Create a dreamy piece of wall art using nothing but your fingertips and a fine-liner pen to bring a vintage-style hot air balloon to life. The textured whirls of fingerprints add a lovely, personal touch that makes the balloon look almost like fabric.
Detailed Instructions
Materials
- Heavyweight white cardstock or watercolor paper
- Ink pads in coral/orange, teal/blue, and grey
- Fine-tip black fel-tip pen or archival ink pen
- Pencil and eraser
- Ruler
- A clean damp cloth or baby wipes
Step 1: Drafting the Shape
-
Lightly sketch the outline:
Start by using a pencil to draw a large, light circle in the center of your paper to serve as the main body of the balloon. -
Refine the balloon shape:
Slightly taper the bottom of your circle so it looks like an upside-down tear drop, but keep the top very round. -
Divide into sections:
Draw curved vertical lines from the top center point down to the bottom tip to create the segments of the balloon, similar to peeling an orange. -
Add horizontal bands:
Lightly sketch two or three curved horizontal lines across the balloon to create checkered zones for your different colors.
Step 2: Creating the Fingerprints
-
Start with the top red section:
Press your index finger firmly into the coral or orange ink pad. Stamp it into the top central segment of the balloon. -
Fill the segments:
Continue stamping the coral color to fill the top row of segments. Don’t worry if the prints overlap slightly; that texture is what we want. -
Switch colors:
Wipe your finger clean. Ink up with the teal or blue color and stamp the middle row of segments, following the curve of your pencil lines. -
Complete the bottom row:
Clean your finger again and switch back to coral (or a lighter blue if you prefer) to fill the bottom tapered section of the balloon. -
Add floating clouds:
Using the blue ink, stamp clusters of 2-3 fingerprints around the balloon to create fluffy clouds. I usually place one overlapping the frame edge for a dynamic look. -
Let the ink dry:
Wait about 10-15 minutes for the ink to fully set so your pen won’t smudge in the next phase.
Smudge Alert
If your ink pads are very juicy, the prints might be slippery. Blot your inked finger on scratch paper once before stamping the final art.
Step 3: Adding the Details
-
Outline the balloon segments:
Using your fine-tip black pen, trace over your original pencil lines to separate the colored sections. -
Add white space texture:
This is the secret trick: very gently draw fine white lines (or scratch through the ink if wet, but better to draw ‘grain’ lines with a white gel pen if the ink is dry) to mimic the fingerprint ridges if your prints were too solid. -
Draw the basket:
Below the balloon, draw a small rectangle with rounded corners for the basket. Fill it with a cross-hatch pattern to look like wicker. -
Connect with ropes:
Use a ruler to draw straight lines connecting the sides of the basket up to the widest part of the balloon. -
Add the burner detail:
Draw a small triangular shape or nozzle right at the bottom tip of the balloon where the ropes meet. -
Erase pencil marks:
Once the black ink is completely dry, gently erase any visible pencil sketch lines. -
Frame your work:
Place your finished artwork in a simple white frame or use a bulldog clip to hang it for a casual studio vibe.
Pro Tip: Texture Magic
To get those visible white ridges, press your finger very lightly. Hard pressure creates a solid blob; light pressure reveals the unique print.
Hang this charming print in a nursery or playroom to inspire dreams of adventure and flight


Fingerprint Pineapple and Fruit Slices
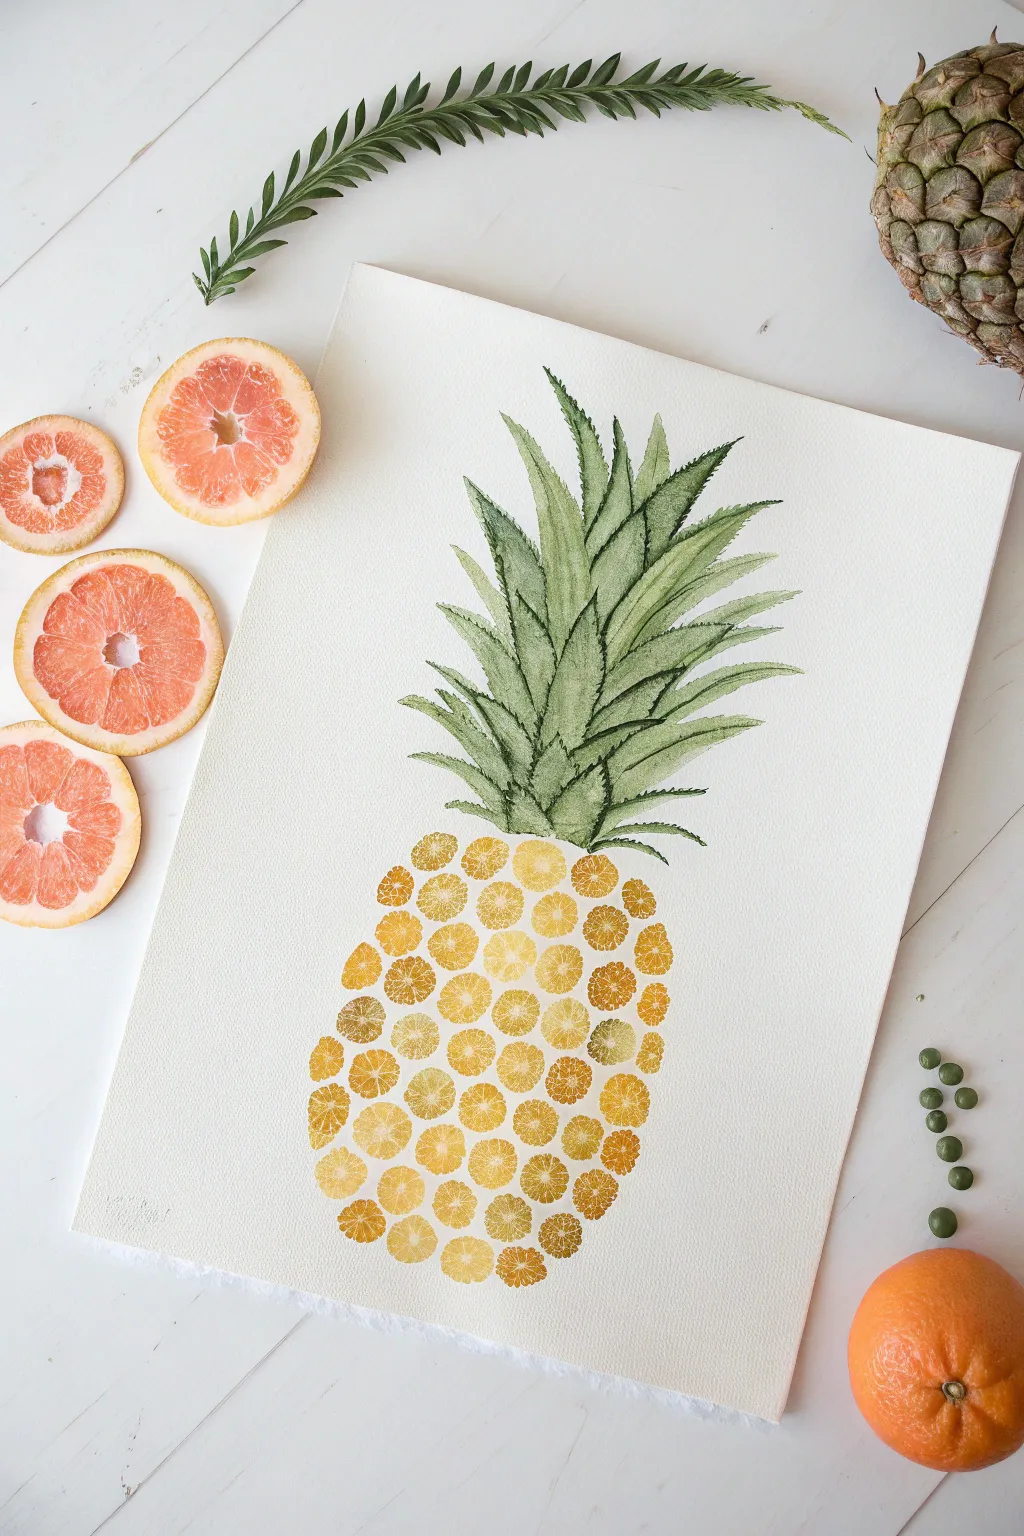
Transform simple citrus slices into a stunning pineapple masterpiece with this clever mixed-media project. By using mini lemon or lime slices as natural stamps, you create a textured, golden fruit body that looks remarkably sophisticated yet is easy enough for kids to manage.
Step-by-Step Tutorial
Materials
- Heavyweight watercolor paper (9×12 inches or larger)
- Small lemons, limes, or kumquats (for stamping)
- Yellow and orange acrylic or craft paint
- Green watercolor paint (or acrylics diluted with water)
- Medium round paintbrush (size 6-8)
- Small liner brush (size 1-2)
- Paper plate or palette
- Paper towels
- Knife and cutting board (for adult use)
Step 1: Preparation & Stamping
-
Prepare your fruit stamps:
Cut your small citrus fruits in half width-wise to reveal the classic wheel pattern. Small lemons work best for the center, while smaller kumquats or limes are great for the edges. Pat the cut side firmly onto a paper towel to remove excess juice, which is crucial for a crisp print. -
Mix your palette:
Squeeze out generous amounts of yellow paint onto your paper plate. Add a smaller dollop of orange next to it. You don’t need to fully mix them; having streaks of orange in your yellow stamp will give the pineapple depth. -
Test your print:
Dip the cut face of your fruit into the paint, ensuring the surface is covered but not gloopy. Press it firmly onto a scrap piece of paper first to see how much pressure you need to see the segments clearly. -
Start the pineapple base:
Begin stamping on your watercolor paper near the bottom center. Start by creating a rounded U-shape to define the bottom of the pineapple. -
Build the body upward:
Continue stamping upwards, filling in the middle. As you stamp, naturally rotate your wrist slightly so the citrus segments don’t all look identical. Re-dip in paint every 2-3 stamps for varying opacity. -
Create the shoulder:
As you reach the top of the fruit shape (the ‘shoulders’ of the pineapple), start tapering your stamping pattern inward slightly to prepare for the crown. -
Layering colors:
For added realism, dip a few stamps into just the orange paint and stamp them sporadically around the edges and bottom of the pineapple shape to create shadows.
Step 2: Painting the Crown
-
Prepare the green paint:
While the yellow body dries, prepare your green paint. If using watercolor, wet your pigments to get a vibrant sap green. If using acrylics, thin them slightly with water so the strokes flow smoothly. -
Paint the central leaves:
Using your medium round brush, start from the top center of your fruit stamps. Paint a few tall, spiky leaves reaching straight up. Press down at the base and lift the brush as you go up to create a pointed tip. -
Add flanking leaves:
Paint more leaves curving outward to the left and right of the center ones. These should be slightly shorter and wider at the base. -
Create the lower crown:
Add the bottom-most leaves that connect directly to the fruit stamps. These should curl outwards more sharply, almost horizontally. Don’t worry if they overlap the yellow stamps slightly; it looks more organic. -
Add texture and shadow:
Switch to your small liner brush and a darker shade of green (mix a little blue or black into your green). Paint thin lines down the center of the leaves to imply veins. -
Detailing edges:
I like to use the very tip of the liner brush to add tiny serrated edges or spikes along the sides of the larger leaves for that prickly pineapple texture. -
Final drying:
Let the entire piece dry completely flat. The thick acrylic from the stamps may take longer to dry than the watercolor leaves. -
Optional clean-up:
If any pencil guidelines were used, gently erase them once everything is bone dry.
Juicy Prints?
If stamps look like blobs, the fruit is too wet. Blot the fruit on paper towels again, or wait 5 minutes for the juice to dry out before dipping in paint.
Level Up: Tropical Detail
Once the yellow paint is dry, use a fine-tip brown marker or paint pen to add tiny ‘eyes’ or cross-hatching details inside the citrus segments for texture.
Hang your tropical creation in a sunny spot to enjoy those summer vibes all year round


Have a question or want to share your own experience? I'd love to hear from you in the comments below!