I never get tired of drawing fireworks—they’re basically pure light and movement, which makes them ridiculously fun to sketch. Below are my favorite fireworks drawing ideas, starting with the classic go-tos and drifting into some playful, unexpected twists.
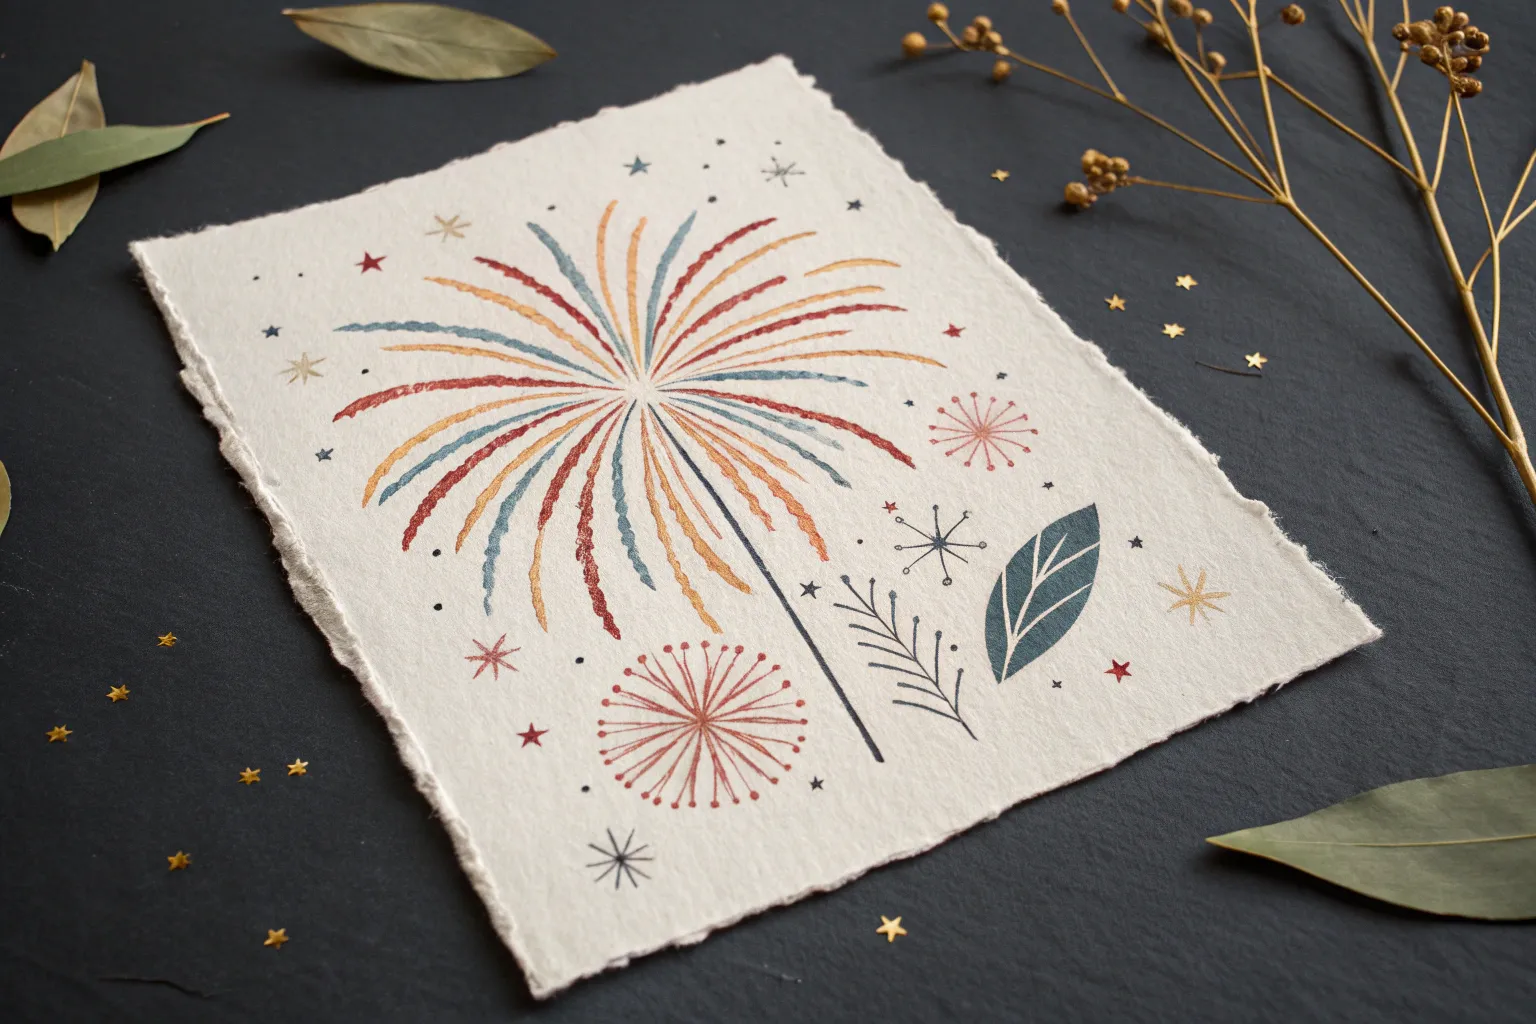
Classic Radial Starburst Fireworks
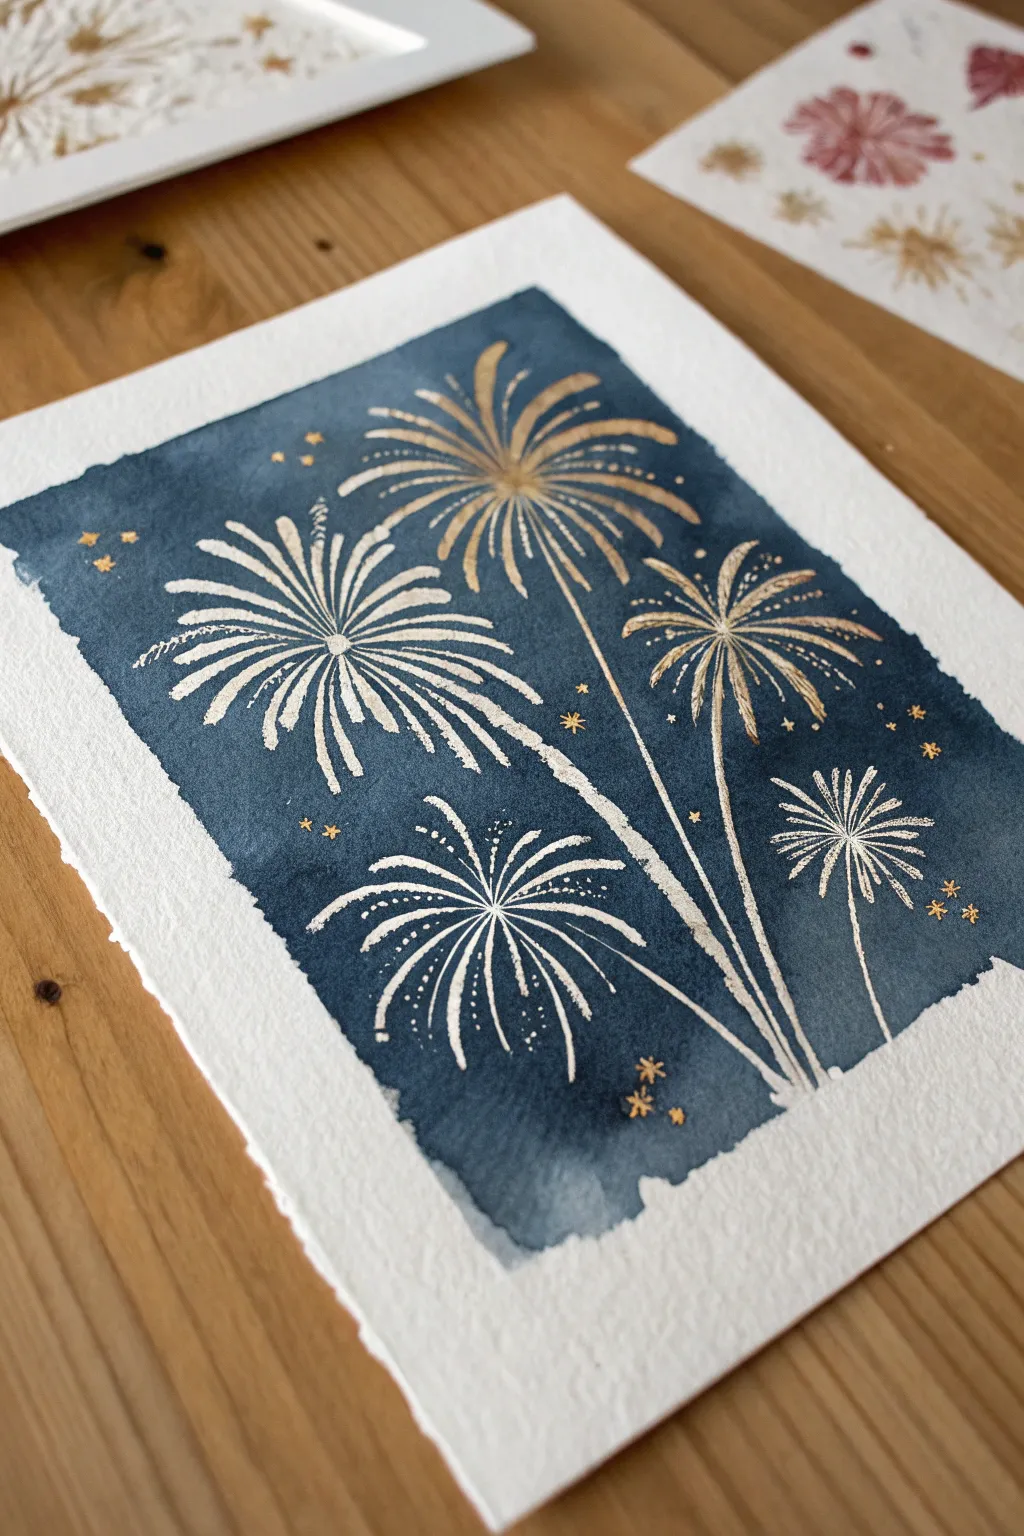
Capture the magic of a midnight celebration with this elegant mixed-media piece. By combining deep navy gouache with crisp white ink and striking gold accents, you’ll create a stylized firework that feels both festive and timeless.
Step-by-Step
Materials
- Heavyweight watercolor paper or mixed media paper (cold press)
- Masking tape or painter’s tape
- Navy blue gouache or acrylic paint
- Wide flat brush
- White gel pen (size 08 or 10) or white ink with a dip pen
- Metallic gold paint pen or gold ink
- Ruler
- Pencil and eraser
Step 1: Preparing the Night Sky
-
Tape the border:
Begin by taping down your paper to a hard surface. Create a clean rectangular border by placing masking tape around the edges where you want the white frame to be. -
Lightly sketch boundaries:
Inside your taped area, lightly sketch a rectangle with a pencil to mark the exact area you intend to paint blue. The reference image shows a slightly organic, hand-painted edge rather than a ruler-straight line, so don’t worry about perfection. -
Mix your navy:
Squeeze out your navy blue gouache. If the color feels too bright, mix in a tiny dot of black or burnt umber to deepen it into a true midnight shade. -
Paint the background:
Using a wide flat brush, fill in the rectangle with your navy paint. Work in smooth horizontal strokes to minimize texture. Gouache dries quickly and matte, which is perfect for this look. -
Let it dry completely:
Allow the paint to fully dry before touching it with pens. If the paper feels cool to the touch, it’s still wet.
Step 2: Drafting the Structure
-
Mark the center:
Once the paint is bone dry, use a pencil to lightly mark a dot slightly above the vertical center of the page. This will be the explosion point of your firework. -
Draw the lower stem:
Sketch a diagonal line extending downward and to the left from your center dot to represent the rocket’s tail or launch path. -
Map the spokes:
Lightly sketch radial lines bursting outward from the center dot. Think of a clock face or a dandelion puff, spacing them relatively evenly around the circle.
Uneven Ink Flow?
If your white gel pen skips on top of the dried paint, the surface might be too rough. scribble on scrap paper to restart flow, or switch to opaque white ink with a fine brush.
Step 3: Inking the Firework
-
Ink the primary rays:
Switch to your white gel pen. Trace over your pencil spokes, starting from the center and flicking outward to get a tapered end. -
Add arrow details:
At the tip of each white ray, draw small V-shapes pointing backward toward the center, giving them a fletched arrow or feather appearance. -
Stipple the tail:
For the long diagonal tail at the bottom, don’t draw a solid line. Instead, use a stippling technique (lots of tiny dots) to create a dissolving, smoky trail effect. -
Layer secondary rays:
Draw shorter, thinner white lines between the main ‘arrow’ spokes to fill out the volume of the sphere. -
Add the gold core:
Using your gold paint pen, draw fine lines radiating from the very center outward, overlapping the white ink slightly. This adds a glowing, hot core to the explosion. -
Intersperse gold accents:
Add a few gold dots or short dashes amongst the white rays to help the metallic shimmer travel through the design.
Pro Tip: Glowing Center
For extra dimension, lightly smudge the central gold lines with your fingertip immediately after drawing them to create a soft, defused halo of light at the burst’s core.
Step 4: Finishing Touches
-
Scatter the stars:
Surround the main firework with small gold stars. Vary them between simple dots and five-pointed star shapes. -
Add white particles:
Place tiny white dots randomly around the outer edges of the burst to look like drifting sparks or embers. -
Remove the tape:
Peel your masking tape away slowly at a 45-degree angle to reveal the crisp white paper border. -
Erase guidelines:
Check for any visible pencil graphite on the blue paint and gently erase it, being careful not to smudge your white ink.
Step back and admire how the metallic gold catches the light against that deep navy background


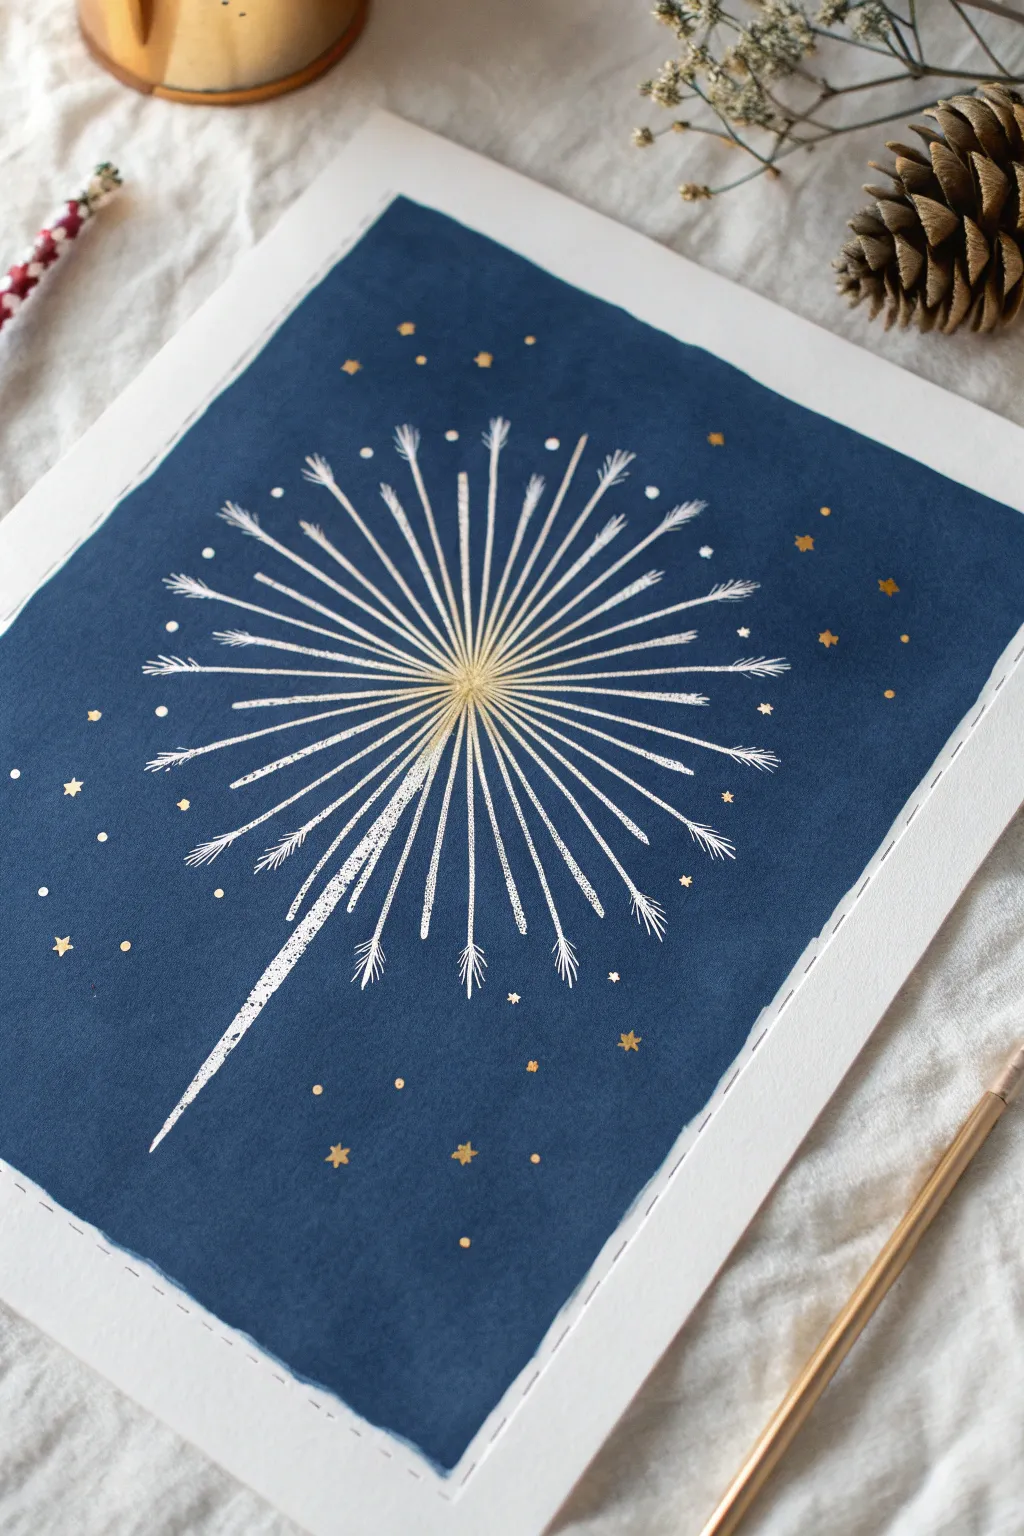
Willow Fireworks With Dripping Trails
Capture the elegance of a New Year’s Eve celebration with this stunning willow firework illustration. The contrast of shimmering copper ink against deep midnight blue paper creates a sophisticated, festive piece perfect for greeting cards or wall art.
Step-by-Step Guide
Materials
- Deep navy blue or midnight blue cotton paper (deckle edge preferred)
- Metallic copper or rose gold gel pen (fine tip)
- Metallic copper or rose gold paint marker (fine to medium tip)
- Pencil (hard lead like 2H)
- Ruler
- Kneaded eraser
Step 1: Planning and Base Structure
-
Establish the Center:
Begin by finding the visual center for your main firework, placing it slightly above the true middle of the paper to allow room for the tail. Lightly mark this central explosion point with your pencil. -
Draft the Primary Arc:
Sketch a very faint circle or oval around your center point to guide the outer limit of the willow trails. This won’t be inked, but will help you keep the burst symmetrical. -
Sketch the Trunk:
Draw a faint, slightly curved vertical line extending from the bottom of the paper up to your center dot. This represents the smoke trail rising before the explosion.
Ink Flow Pro Tip
Metallic pens often clog on textured paper. Keep a scrap piece of paper nearby to scribble on periodically to get the ink flowing smoothly again before touching your main artwork.
Step 2: Inking the Willow Burst
-
Start the Core:
Using your metallic gel pen, draw short, quick strokes radiating outward from the center dot. Keep these lines dense and close together to create a bright, glowing nucleus. -
Extend the Upper Rays:
Draw longer, curved lines shooting upward from the center. Apply more pressure at the start of the stroke (near the center) and flick your wrist outward to taper the line as it reaches the top. -
Create the Drooping Effect:
For the side and lower rays, curve the lines more dramatically. Mimic the shape of a palm tree or weeping willow, where gravity pulls the light trails downward. -
Thicken Key Lines:
Switch to your metallic paint marker for selected trails. Trace over a few of the main structural lines to make them bolder and more reflective. -
Add Texture:
Return to the fine gel pen and add tiny hatching or stippling dots near the ends of the drooping lines to simulate fading sparks. -
Enhance the Density:
Fill in gaps with varying lengths of lines. The drawing should be densest in the middle and airy at the edges.
Step 3: The Main Tail and Details
-
Draw the Rising Tail:
Using the paint marker, trace your vertical pencil line from the bottom. Instead of a solid straight line, use a jagged, woven motion to create a thick, textured ‘braid’ look. -
Add Lower Bursts:
Sketch three smaller, simpler dandelion-style fireworks near the bottom using the fine gel pen. Keep the lines thin and delicate to push them into the background. -
Connect the Small Bursts:
Draw very thin, curved stems for these smaller flowers, ensuring they angle naturally towards the bottom center of the page.
Level Up: Mixed Metals
Use a silver gel pen for the distant background stars and the smaller bottom fireworks. This dual-tone approach creates atmospheric depth.
Step 4: Final Touches
-
Sprinkle Stardust:
Dot the background sky with the fine gel pen. Vary the pressure to create different sized stars. -
Add Distant Stars:
Draw tiny four-point stars or crosses in the negative space around the main firework to add depth to the night sky. -
Clean Up:
Wait at least 15 minutes for the metallic ink to fully cure. Gently roll your kneaded eraser over the paper to lift any remaining pencil guides without smudging the sheen. -
Brighten the Core:
If the center of the main burst looks too dark, add a final concentrated cluster of metallic dots right in the middle for a ‘hot white’ ignition point look.
Once the ink catches the light, you will have a dazzling display that sparkles on the page just like the real thing


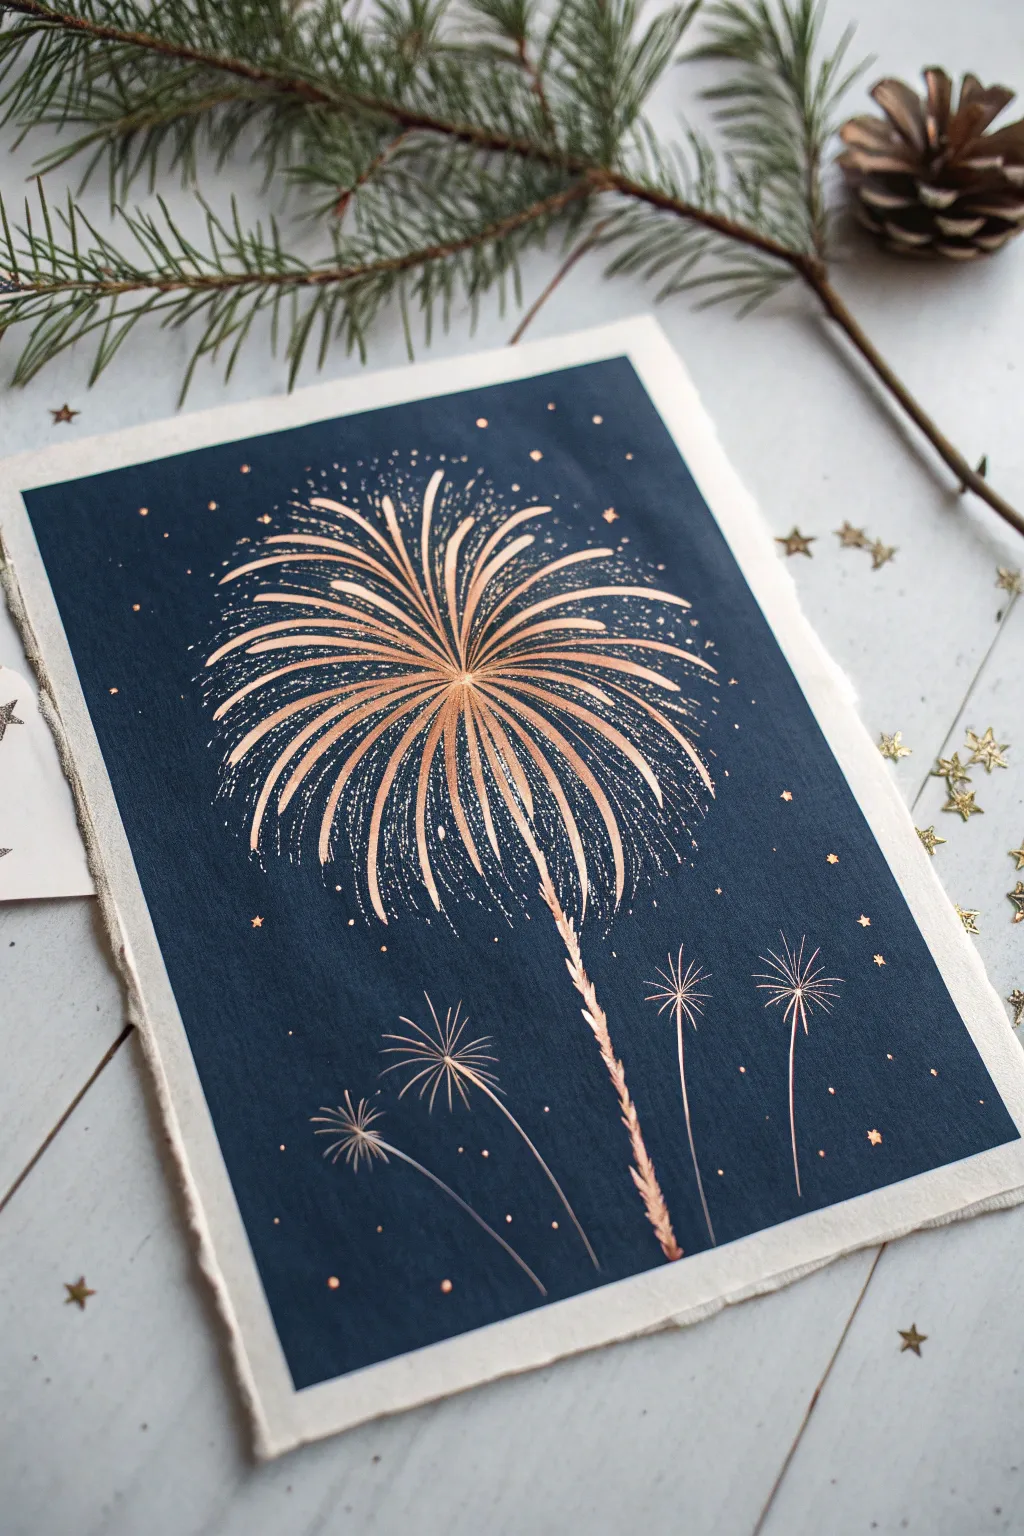
Palm Burst Fireworks With Curved Fronds
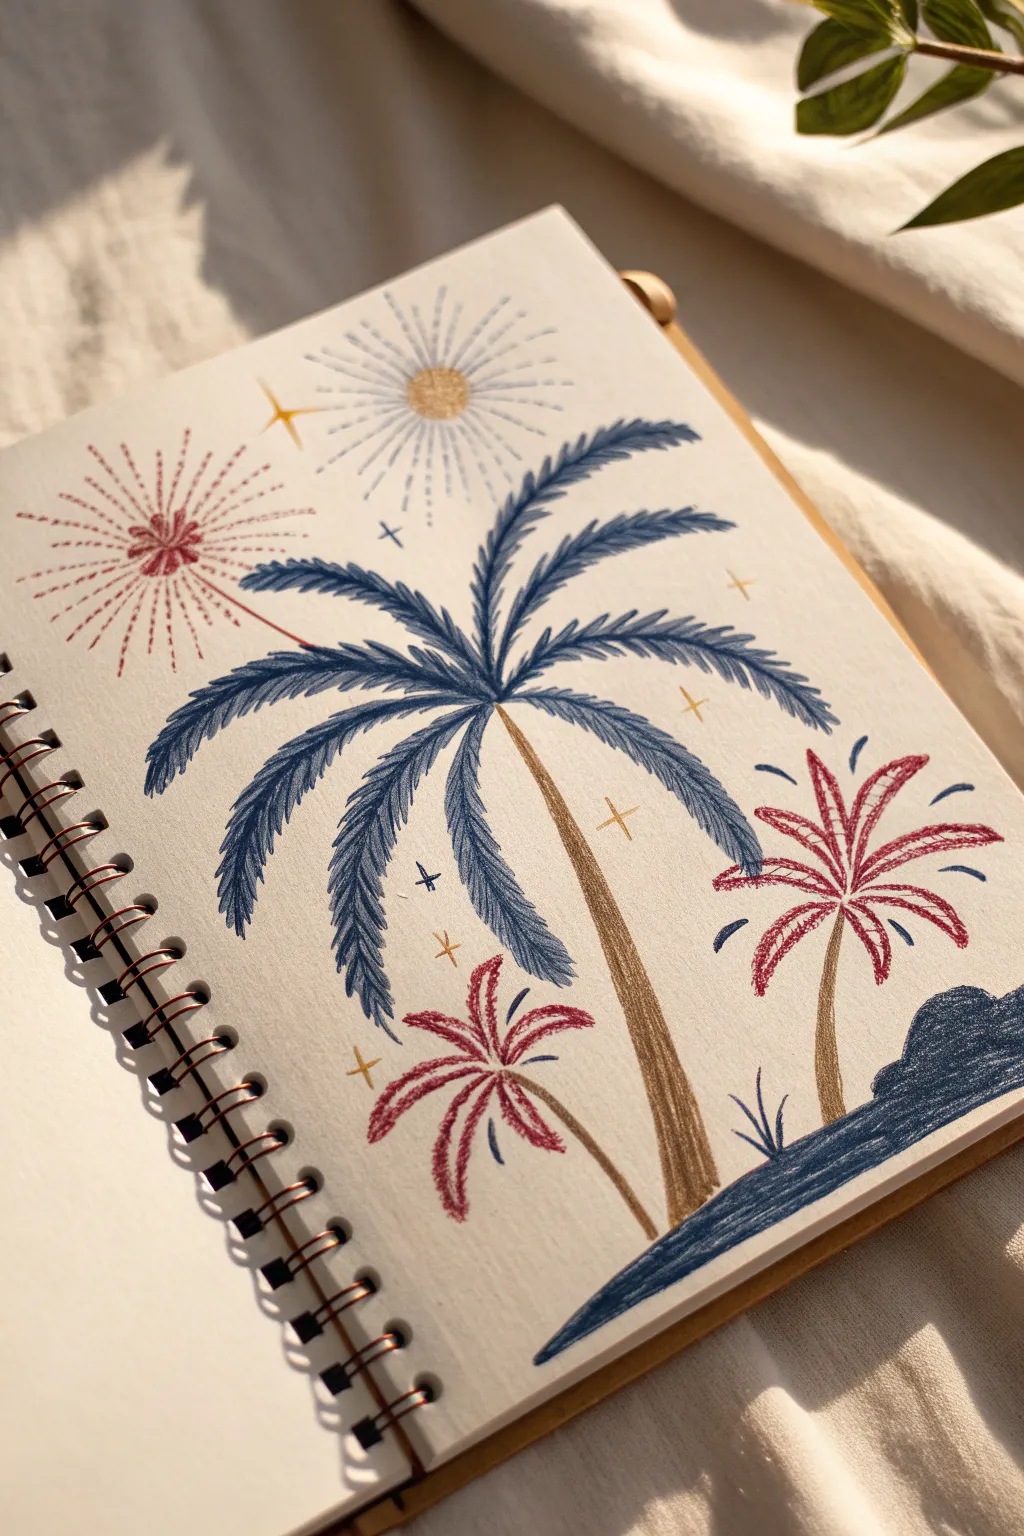
Blend the festive energy of fireworks with tropical vibes in this unique sketchbook illustration. Using textured colored pencils, you’ll create stylized palm trees that mimic exploding starbursts against a clean page.
Step-by-Step Tutorial
Materials
- Spiral-bound sketchbook (cream or white paper)
- Colored pencils (Navy Blue, Deep Red/Maroon, Gold/Ochre)
- Fine-point colored pens or markers (Gold/Yellow, Navy)
- Pencil sharpener
- Eraser (kneaded preferred)
Step 1: Setting the Scene
-
Sketch the ground line:
Start by drawing a soft, slanted line near the bottom right corner using your navy blue colored pencil. Ensure it has a slight curve to mimic a sandy dune or shoreline. -
Fill the ground:
Color in the area below your line with the navy blue pencil using dense, horizontal strokes to build up a rich texture. -
Add a silhouette detail:
On the far right edge of the ground, draw a bumpy, cloud-like shape to represent distant bushes or rocks, filling it in solidly with the same navy blue.
Uneven Fronds?
If your palm leaves look messy, don’t worry. The ‘dashed’ texture is forgiving. Just add a few darker, confident strokes over the top to redefine the curve of the branch.
Step 2: The Central Palm
-
Draw the main trunk:
Using a gold or ochre colored pencil, draw a long, slightly curved line rising from the center of your ground line. Thicken the line gradually towards the base. -
Texture the trunk:
Go over the trunk with vertical strokes to create a fibrous, woody texture, pressing harder on the right side for a subtle shadow effect. -
Draft the frond spines:
Switch to your navy blue pencil. From the very top of the trunk, draw about 7-8 curved lines radiating outward like a fountain. See how they arch gracefully downward at the ends. -
Add the leaflets:
Along each blue spine, draw short, quick dashes angled backward towards the trunk. Keep these strokes close together to create the feathery look of palm leaves without coloring them in solid.
Add Some sparkle
Use a white gel pen or metallic gold marker to add tiny dots in the center of the fireworks and along the palm spines for a magical, glittering finish.
Step 3: The Side Palms
-
Position the smaller palms:
Using the gold pencil again, draw two smaller curved trunks flanking the main tree—one leaning left near the bottom, and one standing taller on the right. -
Create the red palm crown:
Take your deep red pencil to the right-hand tree. Draw the radiating spines first, then add the feathery dash strokes, making this tree look like an exploding red firework. -
Create the lower red palm:
Repeat the process for the small tree on the left using the red pencil. Keep the fronds shorter and more compact here. -
Add accent lines:
Use the navy blue pencil to add a few simple curved lines around the red palm fronds to simulate movement or sparks flying off.
Step 4: Sky Elements
-
Draw the red starburst:
In the upper left corner, use the red pencil to draw a small flower shape. Then, draw dashed lines radiating outward from it in a circle to create a classic firework shape. -
Create the sunburst:
Near the top center, use the gold pencil to color a small, dense circle. Switch to a fine blue pen or sharp pencil to draw thin dashed lines radiating from it. -
Add twinkle stars:
Scatter small four-pointed stars across the empty white space using the gold and navy pencils. I find that varying the size of these stars adds a nice sense of depth. -
Final grass details:
At the base of the trees along your ground line, draw a few sharp, upward strokes in navy blue to suggest tufts of grass poking up.
Close your sketchbook knowing you’ve captured a perfect summer celebration moment
Fireworks Above a Simple Skyline
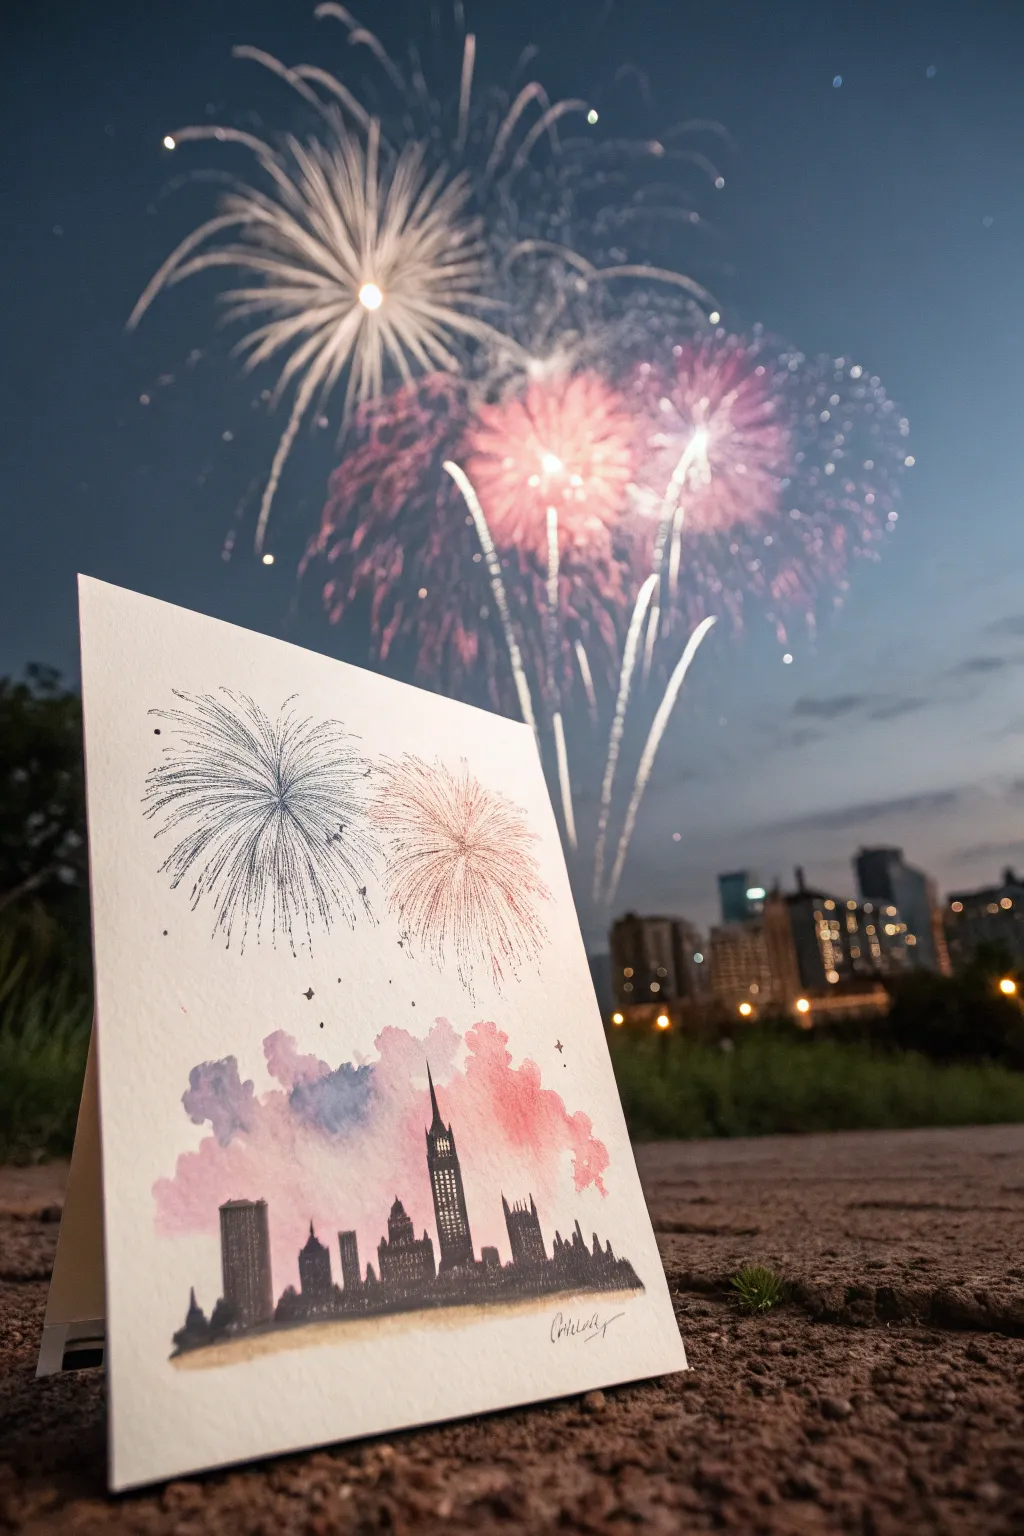
Capture the magic of an urban celebration with this mixed-media piece that combines the looseness of watercolour with the precision of fineliner pens. This project creates a striking contrast between a dreamy, colorful sky and a sharp, silhouetted skyline.
Step-by-Step
Materials
- Cold press watercolour paper (A5 or 5×7 inch)
- Watercolour paints (Pink, Purple, Blue)
- Round watercolour brush (size 6 or 8)
- Black fineliner pens (0.1mm and 0.5mm)
- Pencil (HB)
- Ruler
- Colored pencils or gel pens (Silver/Blue/Red) for fireworks detailing
Step 1: Painting the Sky
-
Prepare your paper:
Tape down the edges of your watercolour paper to a board to prevent buckling. Lightly mark the horizon line where your buildings will sit, keeping it in the bottom third of the page. -
Mix your washes:
Prepare three puddles of diluted watercolour paint: a soft magenta or rose, a dusty purple, and a muted cerulean blue. You want these to be fairly watery for a cloud-like effect. -
Apply the cloud layer:
Using your round brush, dab the pink paint onto the paper just above your horizon line. Don’t paint a solid block; leave the edges ragged and uneven to mimic billowing smoke. -
Blend the colors:
While the pink is still wet, drop in the purple and blue sections next to and slightly overlapping the pink. Let the colors bleed into each other naturally on the paper to create soft transitions. -
Create the smoke shape:
Extend the color upwards in irregular patches, leaving plenty of white space at the very top of the paper for your fireworks. The color should look like the illuminated smoke left behind by explosions. -
Let it dry completely:
This is crucial. The paper must be bone dry before you add the ink skyline, otherwise the black ink will bleed into the clouds.
Wet-on-Wet Magic
For the softest clouds, wet the paper with clean water first before touching it with paint. The pigment will bloom outward effortlessly.
Step 2: Drawing the Skyline
-
Sketch the silhouette:
Using a pencil, lightly outline the shapes of various buildings along the bottom. Vary the heights and roof shapes—include spires, flat tops, and stepped skyscrapers for visual interest. -
Outline with ink:
Take your 0.5mm black fineliner and carefully trace over your pencil lines to define the outer edges of the buildings. -
Fill the silhouette:
Fill in the building shapes with solid black ink. For a textured look like the example, use vertical hatching lines or markers, leaving tiny flecks of white to suggest lit windows. -
Add architectural details:
Use the finer 0.1mm pen to add antennas, spires, and small architectural details to the tops of the buildings to make them look realistic. -
Ground the city:
Paint a very faint, thin wash of grey or brown underneath the buildings to ground the city, so it doesn’t look like it’s floating in mid-air.
Metallic Pop
Use a metallic silver or gold gel pen for the fireworks lines. When the light hits the drawing, the explosions will actually shimmer.
Step 3: Creating the Fireworks
-
Plan the explosion points:
Identify two main spots in the white sky above your watercolour clouds where the fireworks will center. Mark these centers with a tiny dot. -
Draw the main starbursts:
Using a silver or dark blue gel pen (or colored pencil), draw curved lines radiating outward from the center point. Vary the length of the lines to create a spherical shape. -
Layer the second firework:
For the second firework, use a reddish-pink colored pencil or fine marker. Draw similar radiating lines, making this burst slightly smaller or larger than the first for variety. -
Add the trails:
At the end of some radiating lines, add tiny dots or flicks to simulate the glittering sparks fading out. -
Enhance with black accents:
Take your finest black pen and draw very delicate, broken lines interspersed with the colored lines. This adds contrast and definition to the explosion. -
Add final sparkles:
Scatter a few tiny dots and small star shapes around the main fireworks and floating above the clouds to represent distant stars or stray embers.
Now you have a festive cityscape that captures the excitement of a night out
BRUSH GUIDE
The Right Brush for Every Stroke
From clean lines to bold texture — master brush choice, stroke control, and essential techniques.
Explore the Full Guide
Wax-Resist Fireworks Under a Dark Wash
Capture the explosive beauty of fireworks using a simple wax-resist technique that lets the white paper shine through deep indigo washes. This project combines the precision of drawing with the loose, watery flow of watercolor for a striking contrast that feels both festive and elegant.
Step-by-Step Tutorial
Materials
- Cold press watercolor paper (deckle edge optional)
- White oil pastel or white wax crayon
- Gold gel pen or metallic gold paint marker
- Indigo or Payne’s Gray watercolor paint
- Large round watercolor wash brush (size 10 or 12)
- Clean water jar
- Paper towels
- Painter’s tape (optional, for securing paper)
Step 1: Drawing the Fireworks
-
Plan your composition:
Visualize where your main firework bursts will go. The reference image features four distinct bursts: a large central one, two medium ones at the top and bottom, and a smaller one to the right. -
Draw the centers:
Using your white oil pastel or wax crayon, press firmly to draw a small dot for the center of your first firework. The wax needs to be thick enough to repel water later. -
Create the main rays:
From that center dot, draw long, curved lines radiating outward. Mimic the shape of a palm tree or a fountain, letting the lines curve slightly downward at the ends for a natural look. -
Add secondary details:
Between your longer rays, add shorter strokes and little dashes. These create the illusion of density and glittering sparks falling from the main explosion. -
Draw the stems:
Extend a long, slightly curved line downwards from the center of each explosion. Bring these lines together toward the bottom right corner of the composition, grouping them as if they launched from the same area. -
Repeat for all bursts:
Complete the remaining firework shapes, varying their sizes. It’s perfectly fine if you can barely see your drawing at this stage; transparent white-on-white outlines are part of the magic reveal. -
Add starry accents:
Scatter small star shapes or tiny dots in the empty spaces around the fireworks using the same white pastel. This adds depth to your night sky.
Invisible Ink Hack
Work under a harsh side-light (like a desk lamp angled low) while drawing with the white pastel. The shadows will help you see your waxed lines on the white paper.
Step 2: Creating the Sky
-
Prepare your wash:
Mix a generous puddle of watercolor paint. You want a deep, saturated color like Indigo or Payne’s Gray. Ensure you have enough mixed to cover the entire background without stopping. -
Wet the paper slightly:
Brush a very light layer of clean water over the area where you intend to paint the sky. Don’t soak it; just make it slightly damp to help the pigment flow. -
Apply the dark wash:
Load your large brush with the dark paint and touch it to the paper. Watch as the paint glides over the wax lines, instantly revealing your drawing. -
Work around the edges:
Paint loosely around the fireworks, leaving a rough, uneven border rather than painting edge-to-edge. This creates the artistic ‘vignette’ look seen in the example. -
Deepen the contrast:
While the wash is still wet, drop in more concentrated pigment into the areas between the firework rays. I find this creates a richer contrast that makes the white really pop. -
Let it dry completely:
Wait for the paint to dry fully. The paper must be bone-dry before you add the final metallic touches, or the ink will bleed.
Step 3: Gilded Details
-
Trace select rays:
Take your gold gel pen or metallic marker and carefully trace over some of the white wax lines. You don’t need to trace every single one; highlighting just a few rays gives a shimmering effect. -
Add gold centers:
Dot the center of each firework burst with gold to simulate the intense heat of the initial explosion. -
Embellish the sky:
Draw tiny gold stars or crosses in the dark blue areas, focusing on the spaces between the bursts to balance the composition. -
Final highlights:
Add a few stray gold dots at the ends of the firework trails to look like fading embers drifting in the wind.
Level Up: Salt Texture
While the indigo wash is still wet, sprinkle a pinch of table salt into the wettest areas. When dry, brush it off to create starry, crystallized textures in the sky.
Step back and admire how a simple wax crayon can preserve such brilliant bursts of light against your midnight blue sky
Soft Pastel Glow on Black Paper
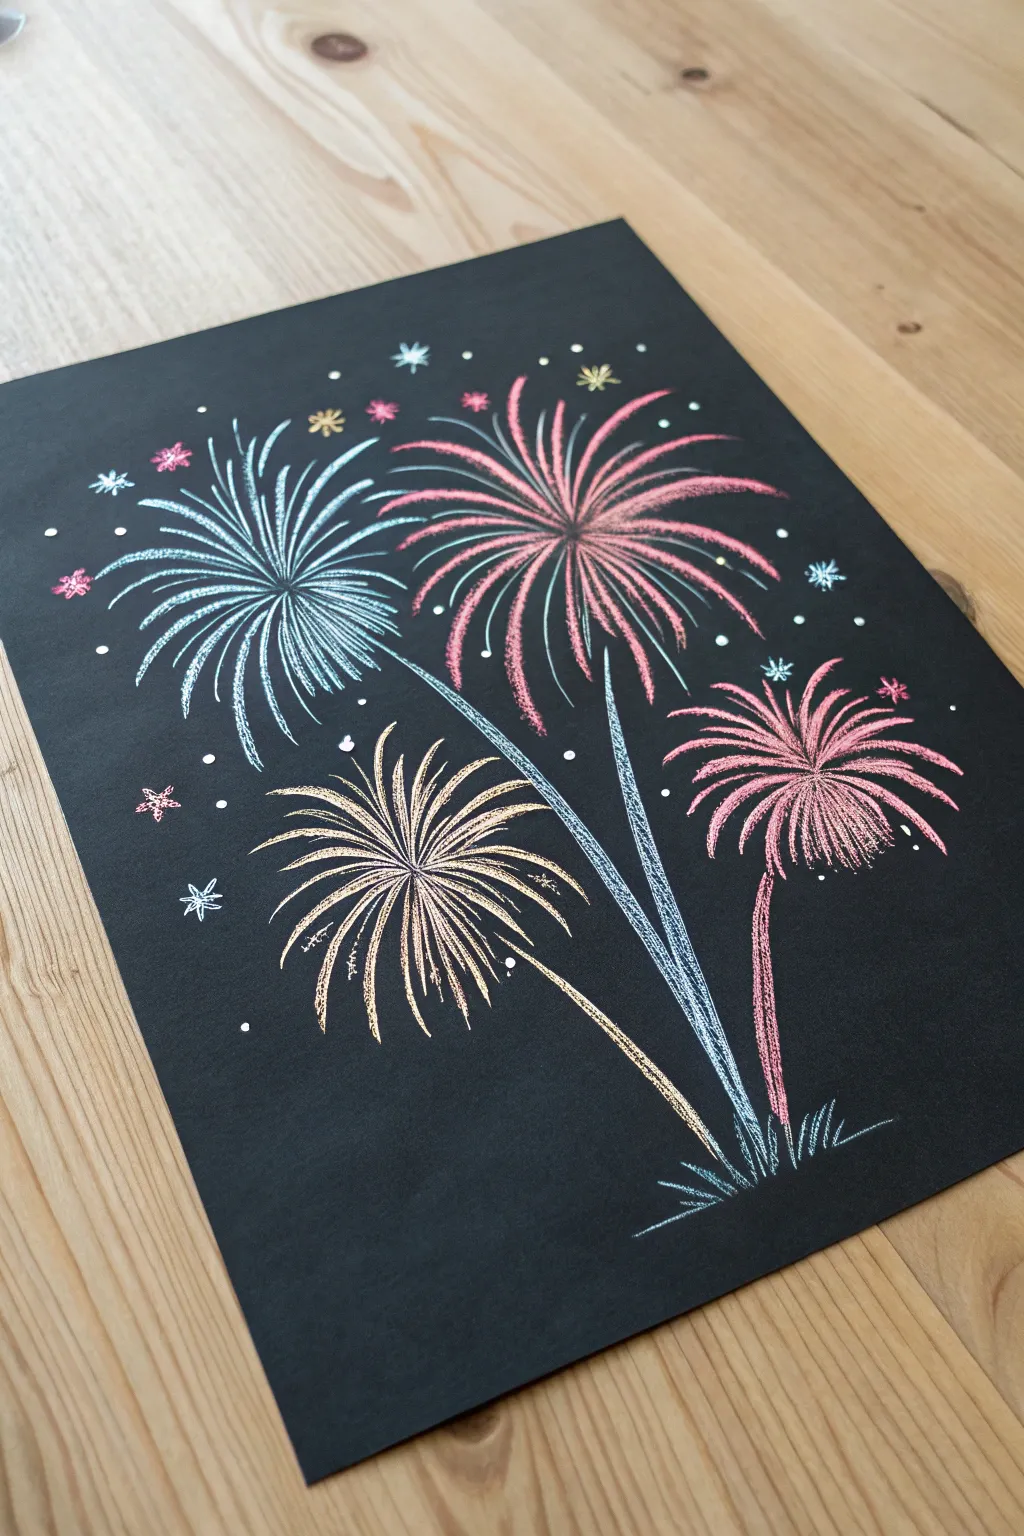
Capture the magic of a festive evening with this vibrant soft pastel drawing on black paper. The dark background makes the neon-like colors pop, creating a dazzling display of exploding fireworks that seem to glow right off the page.
How-To Guide
Materials
- Black construction paper or pastel paper
- Soft pastels or chalk pastels (light blue, pink, yellow/gold, white)
- White gel pen (optional for small stars)
- Workable fixative (optional)
- Paper towel or blending stump
Step 1: Setting the Scene
-
Prepare your workspace:
Lay down your black paper on a flat surface. Since soft pastels can be dusty, it’s a good idea to have a paper towel underneath or nearby to catch any fallout. -
Plan the composition:
Visualize where your four main fireworks will go. You’ll want a large pink one in the upper right, a blue one in the upper left, a gold one lower down in the center-left, and a smaller pink one on the lower right.
Sharper Lines
For crisp, thin lines like the star detailing, don’t use a dull pastel stick. Break a stick in half and use the sharp, fresh edge of the fracture to draw.
Step 2: Drawing the Base Stalks
-
Draw the main stem:
Start with the light blue pastel. Draw a long, slightly curved line rising from the bottom right-center area, reaching up towards the top left third of the paper. This is the trail for the blue firework. -
Add the supporting stems:
Using a golden-yellow pastel, draw a shorter stem branching out to the left for the gold firework. Then, switch to pink and draw a stem for the lower right firework. -
Detail the grass:
Where the stems originate at the bottom, sketch a few jagged, zig-zag lines using light blue or white to represent grass or ground cover catching the light.
Smudge Alert
Black paper shows every fingerprint. Keep a spare sheet of paper under your drawing hand to act as a bridge, preventing your palm from ghosting oils onto the dark background.
Step 3: Creating the Explosions
-
Start the center point:
For the large top-right pink firework, place a small dot where the center of the explosion will be. This helps guide your strokes. -
Radiate outward:
Using firm, quick strokes, draw curved lines exploding outward from that center dot. Vary the length of your strokes to make it look organic. -
Layering colors:
I find that adding a few strokes of white or a lighter pink in the very center adds intensity. Layer these over your initial pink lines to create a glowing core. -
The blue burst:
Move to the top left stem. Using your light blue pastel, create a similar burst pattern. Make these lines curve slightly downward at the ends, like a willow tree, to suggest gravity taking hold. -
The golden distinct shape:
For the lower left gold firework, create a slightly smaller, more contained burst. Keep the lines dense and sharp. -
The lower pink palm:
For the final firework on the bottom right, draw the lines arching heavily downward, resembling a palm tree shape.
Step 4: Adding Texture and Details
-
Enhance the tips:
Go back over some of the firework tips with a heavier hand to make the ends appear brighter than the trails. -
Create secondary sparks:
Between the main lines of the bursts, add shorter, fainter lines or small dashes using secondary colors. For example, add a few white dashes inside the blue burst. -
Draw distant stars:
Using a white pastel or a white gel pen, scatter small dots around the background to represent distant stars. -
Add decorative sparkles:
Draw small asterisks (*) or tiny star shapes in various colors (pink, yellow, blue) floating around the main fireworks to fill the empty black space. -
Highlight the stems:
Refine the stems you drew earlier. If the colored dust has smudged, re-draw the line cleanly to ensure it connects visually to the bursts. -
Final dust off:
Carefully blow away any loose pastel dust. Don’t wipe it with your hand or you will smear the black paper. -
Seal the work:
If you want to preserve the drawing, lightly spray a fixative over the paper in a well-ventilated area to prevent smudging.
Now you have a dazzling night sky display that captures the excitement of a celebration

PENCIL GUIDE
Understanding Pencil Grades from H to B
From first sketch to finished drawing — learn pencil grades, line control, and shading techniques.
Explore the Full Guide
Salt-Textured Firework Trails
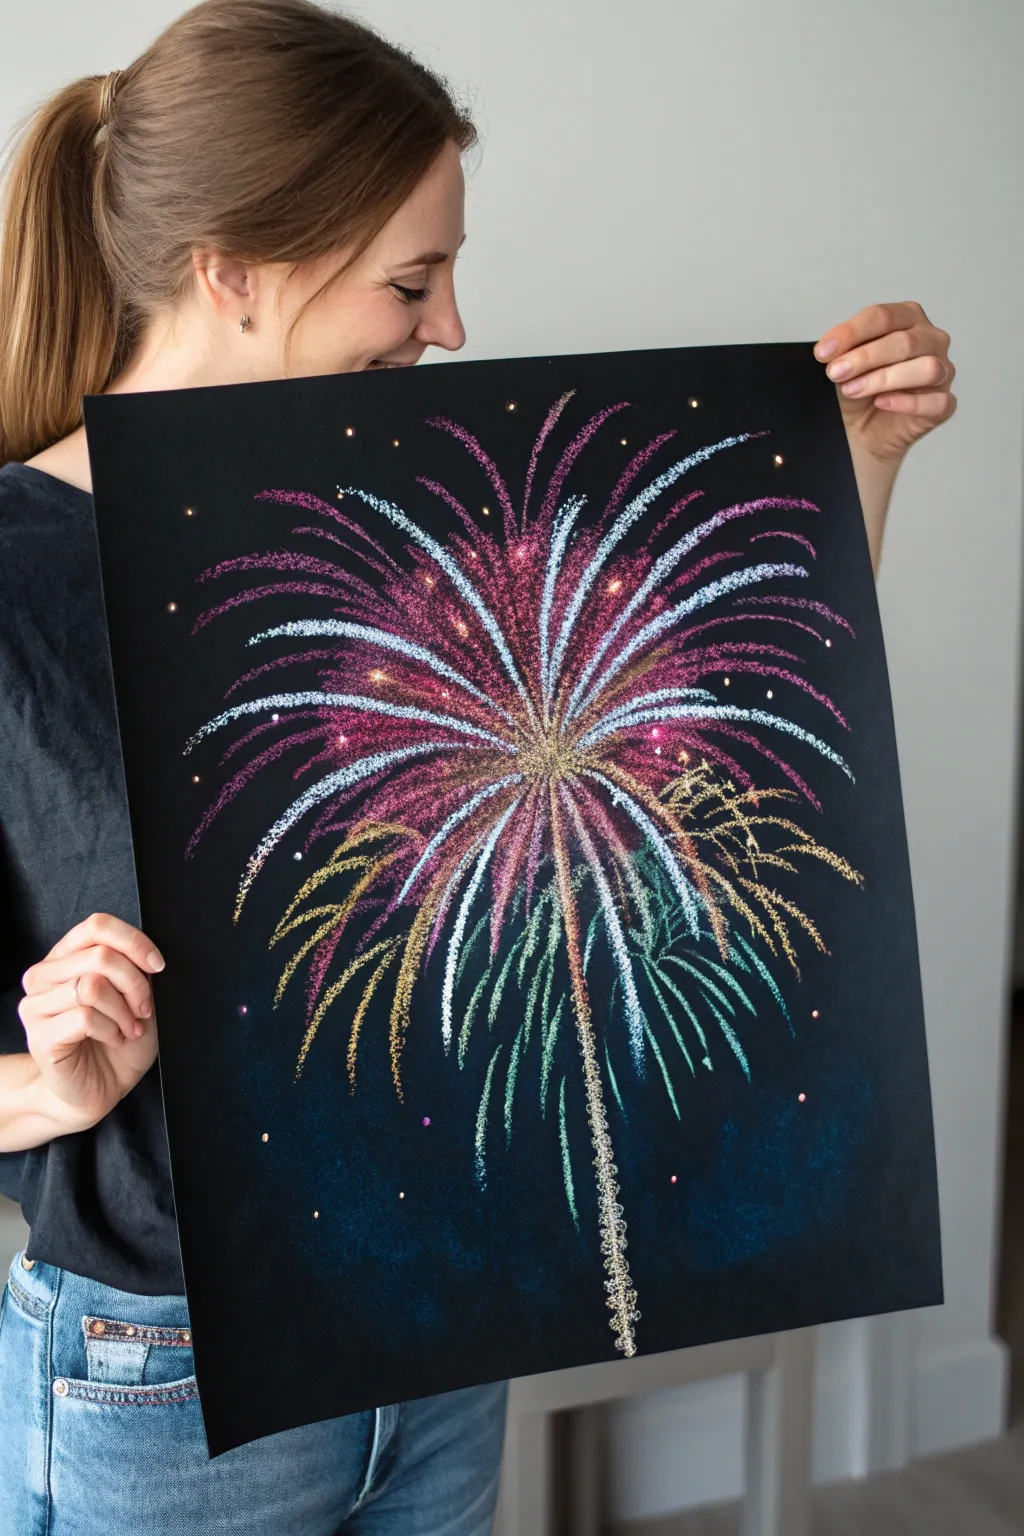
Capture the explosive magic of a fireworks display using common household salt to add an incredible, crystalline texture to your artwork. The dark background makes the vibrant colors pop while the raised texture gives the burst a 3D effect that catches the light.
Step-by-Step Guide
Materials
- Large sheet of black cardstock or heavy poster board
- PVA glue or clear craft glue in a fine-tip squeeze bottle
- Table salt or fine sea salt
- Watercolor paints or liquid food coloring
- Small round paintbrushes (sizes 2-4)
- Water cup and paper towels
- Tray or large baking sheet (to catch excess salt)
- Gold or silver metallic paint (optional for highlights)
Step 1: Planning and Drawing the Glue Lines
-
Prepare your workspace:
Place your black cardstock inside a large tray or baking sheet. This simple step will save you a massive cleanup headache later when we start pouring salt. -
Visualize the center point:
Identify a spot roughly in the middle-bottom third of your paper. This will be the radiant center where your main firework explosion originates. -
Draw the central burst:
Using your fine-tip glue bottle, draw clear lines radiating outward from your center point. Like spokes on a wheel, make these lines curve slightly downwards at the ends to mimic gravity. -
Add secondary layers:
Draw shorter, secondary lines in between the longer spokes. Layering different lengths creates depth and makes the explosion look more voluminous. -
Create the trailing tail:
From the center point, draw a wobbly, vertical line extending straight down toward the bottom of the paper. This represents the smoke trail of the launched rocket. -
Add distant sparkles:
Dot tiny spots of glue randomly around the main burst and near the edges of the paper. These will become distant glowing embers or stars in the night sky. -
Incorporate low-level bursts:
Off to one side created smaller, distinct clusters of curved lines. This suggests secondary fireworks going off at a lower altitude or in the distance.
Keep it Salty
If salt falls off during painting, your glue may have been too dry. Touch up bare spots with fresh glue and re-salt immediately.
Step 2: Applying the Salt Texture
-
Pour the salt:
While the glue is still very wet (don’t wait!), pour a generous amount of salt over every single glue line. Don’t be shy; completely bury the glue. -
Let it sit:
I always encourage patience here—let the salt sit on the wet glue for at least 60 seconds to ensure it really adheres to the adhesive. -
Shake off excess:
Lift the paper vertically and gently tap it against the tray to knock off the loose salt. You should be left with a crisp, crystalline white drawing. -
Dry completely:
This is crucial: allow the salt and glue mixture to dry completely before adding color. If you paint too soon, the salt might dissolve or slide off.
Go Glo-in-the-Dark
Mix glow-in-the-dark acrylic paint with a little water instead of regular watercolors for fireworks that actually light up at night.
Step 3: Painting the Colors
-
Prepare your paints:
Dilute your watercolors or food coloring with just a little water. You want vibrant, saturated liquid that will flow easily. -
Touch the salt:
Dip your brush into the paint and gently touch the tip to the salt lines. You don’t need to ‘brush’ it; watch as the salt wicks the color and pulls it along the line like magic. -
Create gradients:
Start with bright pinks or reds near the center of the burst. While the pink is still wet on the salt, touch the outer ends of the lines with teal or blue to create a beautiful blend. -
Color the secondary bursts:
Use contrasting colors like gold or yellow for the smaller, lower bursts to distinguish them from the main purple-pink explosion. -
Paint the trail:
For the vertical tail line, use a metallic gold or silver paint if you have it, or a pale yellow. This differentiates the smoke trail from the colorful explosion. -
Detail the stars:
Dab a tiny bit of yellow or white onto the isolated salt dots you created earlier to make them twinkle. -
Final drying time:
Let the painting dry flat overnight. As the water evaporates, the salt will recrystallize slightly, leaving a sparkling, hardened texture.
Hang your sparkling night sky masterpiece where the light can catch the texture for the full effect
Stamped Firework Bursts With Drawn Details
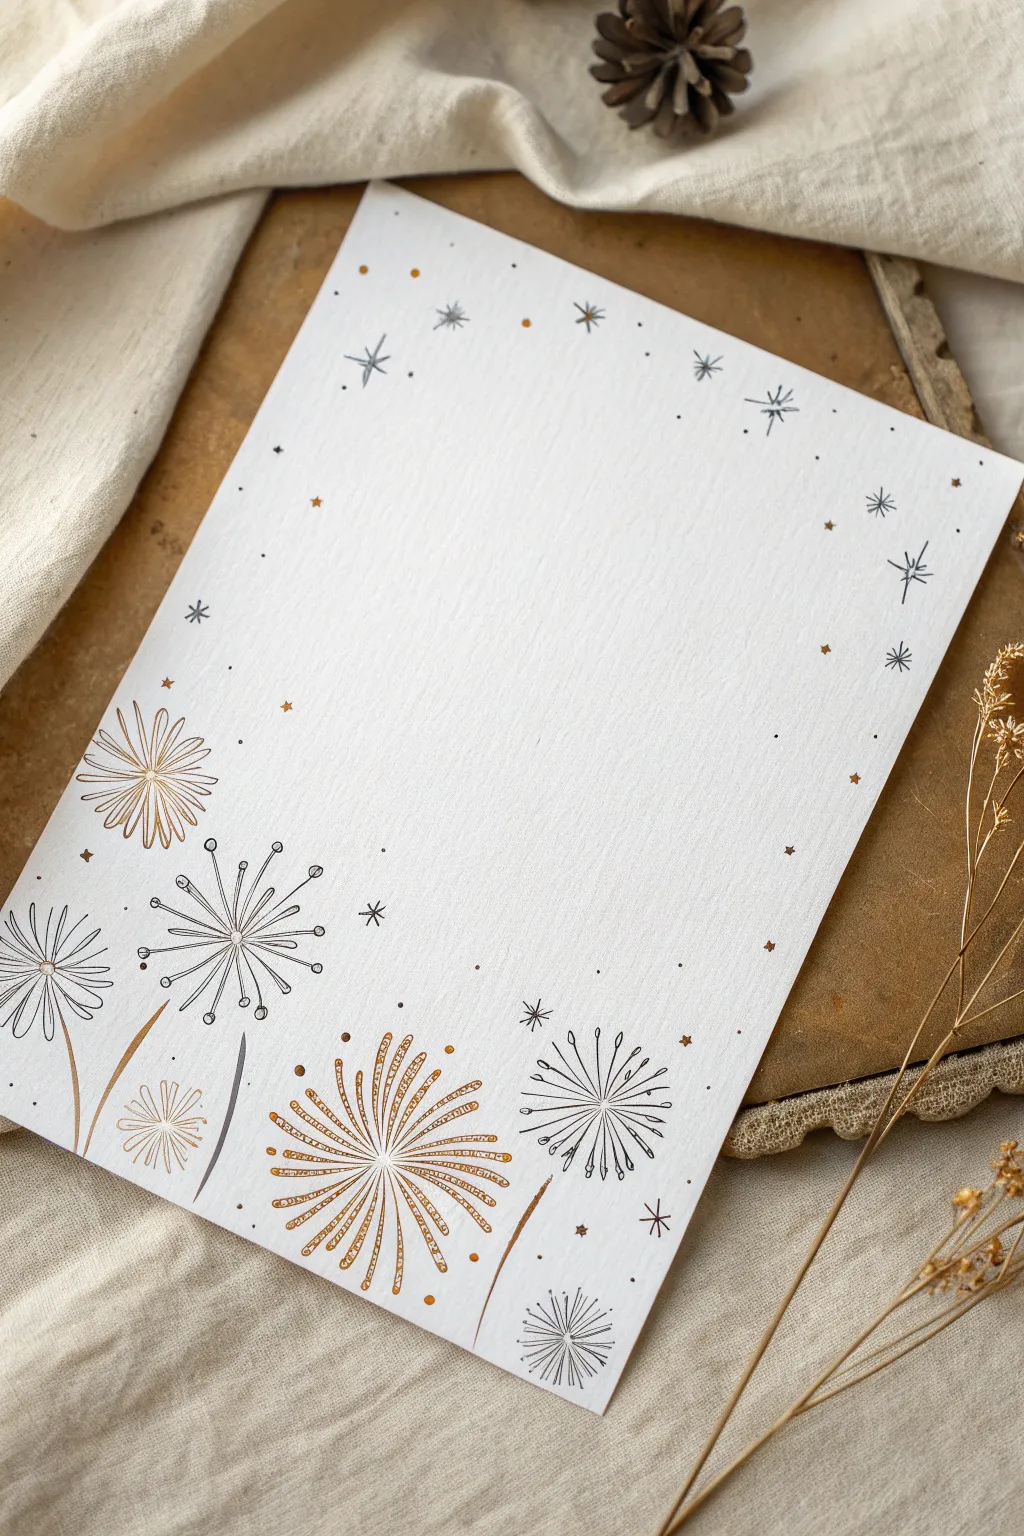
Capture the magic of a starry night with this delicate blend of stamping and hand-drawn details. By combining metallic gold ink with crisp black fine-liners, you’ll create a festive border that sparkles with celebration while leaving plenty of space for handwritten notes.
Step-by-Step
Materials
- White cardstock or heavy drawing paper (A5 or 5×7 size)
- Rubber stamps with radial/starburst patterns (e.g., dandelion or simple flower shapes)
- Metallic gold ink pad
- Metallic copper or bronze gel pen
- Fine-liner pen (black, 0.3mm or 0.5mm tip)
- Metallic gold marker or paint pen (fine tip)
- Scrap paper for testing stamps
Step 1: Setting the Composition
-
Plan your layout:
Visualize an ‘L’ shape or a reversed ‘L’ shape for your design. The fireworks should be dense at the bottom corners and gradually fade as they move up the sides, leaving the center open for text. -
Test your stamps:
Before touching your final paper, stamp onto a scrap sheet to check the ink coverage. You want a crisp impression, but a slightly faded look adds vintage charm.
Step 2: Stamping the Gold Bursts
-
Stamp the main flower bursts:
Ink your larger radial stamp with metallic gold. Press it firmly into the bottom left corner. -
Create variation:
Without re-inking, stamp a second time slightly higher up or to the side. This ‘second-generation’ stamping creates a softer, more distant look. -
Add secondary bursts:
Using a slightly different radial stamp (or the same one cleaned off), switch to a copper or bronze ink if available, or just stick to gold. Place these near the bottom right to balance the design. -
Wait for ink to dry:
Metallic inks often stay wet longer than standard dyes. Give your paper a good 10–15 minutes to ensure you don’t smudge the gold when drawing later.
Stamp Smearing?
If your metallic ink smudges easily, try heat-setting it with a hairdryer on a low, warm setting or lightly dust it with translucent setting powder.
Step 3: Hand-Drawing the Details
-
Draw the stems:
Take your black fine-liner. Draw thin, slightly curved lines extending from the bottom edge of the paper up toward the stamped bursts. Vary the lengths to make them look organic. -
Sketch the black bursts:
In the empty spaces between your gold stamps, draw your own firework shapes. Start with a small dot and draw straight lines radiating outward in a circle. -
Add the tips:
At the end of each black radiating line, draw a tiny circle or a small ‘v’ shape to mimic the exploding sparks of a firework. -
Detail the gold stamps:
I like to add definition to the stamped images here. Use the fine-liner to trace just a few of the stamped petals or add a center dot to the gold bursts, marrying the print with the drawing. -
Add metallic accents:
Using a gold gel pen or marker, draw thin lines over or next to your black sketches. This layering makes the fireworks look like they are shimmering.
Pro Tip: Depth
Use a white gel pen to add tiny highlights on top of the darkest black lines or in the center of the gold bursts to make the fireworks pop off the page.
Step 4: Adding the Celestial Atmosphere
-
Draw large stars:
Using the black pen, draw eight-pointed stars (a cross with an ‘X’ over it) scattered loosely up the sides of the paper. -
Draw medium stars:
Fill in gaps with simpler six-pointed stars (three intersecting lines). -
Add tiny stars:
Using your gold pen, draw tiny five-pointed stars or simple crosses in the upper corners to frame the empty space. -
Sprinkle dots:
To connect the elements, add clusters of small stippled dots in both black and gold throughout the design. -
Final check:
Look at the overall balance. If a spot looks too empty, a single gold sequin-style dot or a tiny black asterisk is usually the perfect fix.
Once the ink is fully cured, your dazzling stationery is ready to carry your warmest wishes


Silhouettes Watching Fireworks
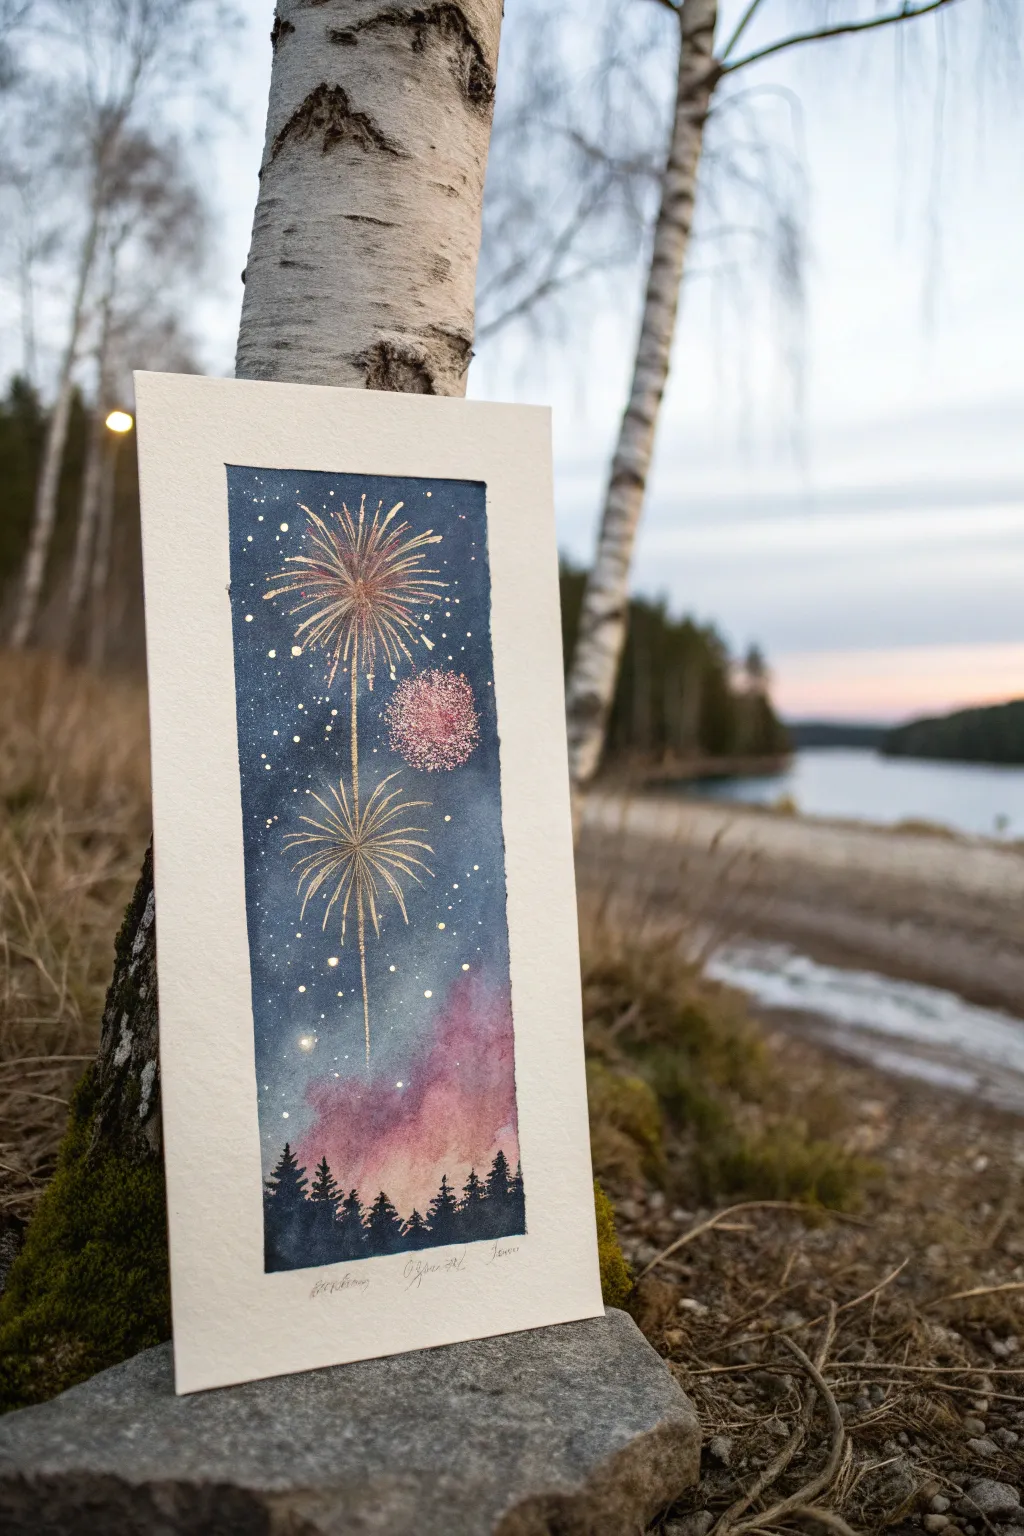
Capture the magic of a festive night sky with this atmospheric watercolor piece. Featuring shimmering golden bursts over a twilight forest silhouette, this vertical format design is perfect for handmade cards or wall art.
Detailed Instructions
Materials
- Cold-press watercolor paper (300 gsm)
- Masking tape or painter’s tape
- Watercolors (Indigo, Prussian Blue, Violet, Magenta)
- Metallic gold watercolor or gold ink
- Black ink or black gouache
- White gouache or white gel pen
- Round watercolor brushes (size 6 and size 2)
- Rigger brush or fine liner brush
- Pencil and eraser
- Mixing palette
- Jar of water
Step 1: Setting the Scene
-
Prepare your paper:
Cut your watercolor paper into a tall, narrow rectangle. Tape down all four edges to a flat board using masking tape to create a crisp white border and prevent buckling. -
Sketch placement:
Lightly sketch a very faint horizon line near the bottom third of the paper. Mark two center points where you want your main firework bursts to explode. -
Wet the sky:
Using a clean, wet brush (size 6), wet the entire sky area above your horizon line. The paper should be glisteny but not swimming in puddles.
Step 2: Creating the Night Sky
-
Apply the darks:
While the paper is still wet, drop in concentrated Indigo and Prussian Blue at the very top. Let the paint flow naturally downwards, keeping the color deepest at the top corners. -
Blend the mid-tones:
As you move down the paper, mix a little Violet into your blue. Allow this transition to happen wet-on-wet so there are no hard lines. -
Add the twilight glow:
Near the bottom, just above the horizon area, drop in Magenta or a soft pink. Let it bleed slightly upwards into the violet to create a hazy, smoky effect. -
Lift clouds:
If the pink area looks too flat, use a thirsty, damp brush to gently lift out some pigment, creating soft cloud-like shapes in the mist. -
Let it dry completely:
Wait for the entire background wash to become bone dry. This is crucial before moving to crisp details.
Fixing Blooms
If you get ‘cauliflower’ blooms in the sky, don’t panic. Gently wet the area again and dab with a tissue to turn it into a soft cloud, or cover it later with extra stars.
Step 3: Painting the Silhouette
-
Mix your black:
For the trees, you want an opaque, deep black. I prefer using black gouache or ink for maximum coverage, but concentrated watercolor works too. -
Paint the tree tops:
Using a smaller round brush (size 2), dab irregular, jagged shapes along the bottom horizon to form the tops of pine trees. -
detail branches:
Use the very tip of the brush to flick tiny lines outward from the tree centers to suggest distinctive evergreen branches. -
Fill the bottom:
Once the tree line is established, fill in the rest of the bottom area with solid black to anchor the composition.
Sparkle Upgrade
For extra dimension, apply a tiny dab of glitter glue or loose glitter to the center of the fireworks while the gold paint makes it sticky.
Step 4: Adding the Fireworks
-
Paint the first burst:
Load a fine liner or rigger brush with metallic gold paint. Starting from the central point you marked earlier, paint thin, curving lines radiating outward like spokes on a wheel. -
Vary the lengths:
Make some lines longer and some shorter to give the firework depth and realism. Avoid making a perfect circle; randomness looks more organic. -
Add the second burst:
Repeat the process for the second firework, perhaps making this one slightly smaller or lower down to create visual interest. -
Create the rocket trails:
Draw a thin, slightly wavy vertical line extending downward from the center of each burst, fading out as it goes down. -
Stipple the sparkle:
Add a third, different style of firework by stippling a cluster of dots in a round shape using pink or rose-gold metallic paint. This mimics a glittery, crackling burst.
Step 5: Final Touches
-
Add stars:
Dip a toothbrush or stiff brush into white gouache or metallic gold. Flick the bristles to splatter tiny stars across the dark blue sky area. -
Enhance the magic:
Use a white gel pen or fine brush with white gouache to add a few larger, brighter stars or highlights to the tips of the gold firework lines. -
Peel and sign:
Once everything is completely dry, carefully peel away the masking tape at a 45-degree angle to reveal your clean edges, then sign your masterpiece at the bottom.
Frame your sparkling night scene and enjoy the glow it brings to your space
Fireworks Inside a Cutout Shape
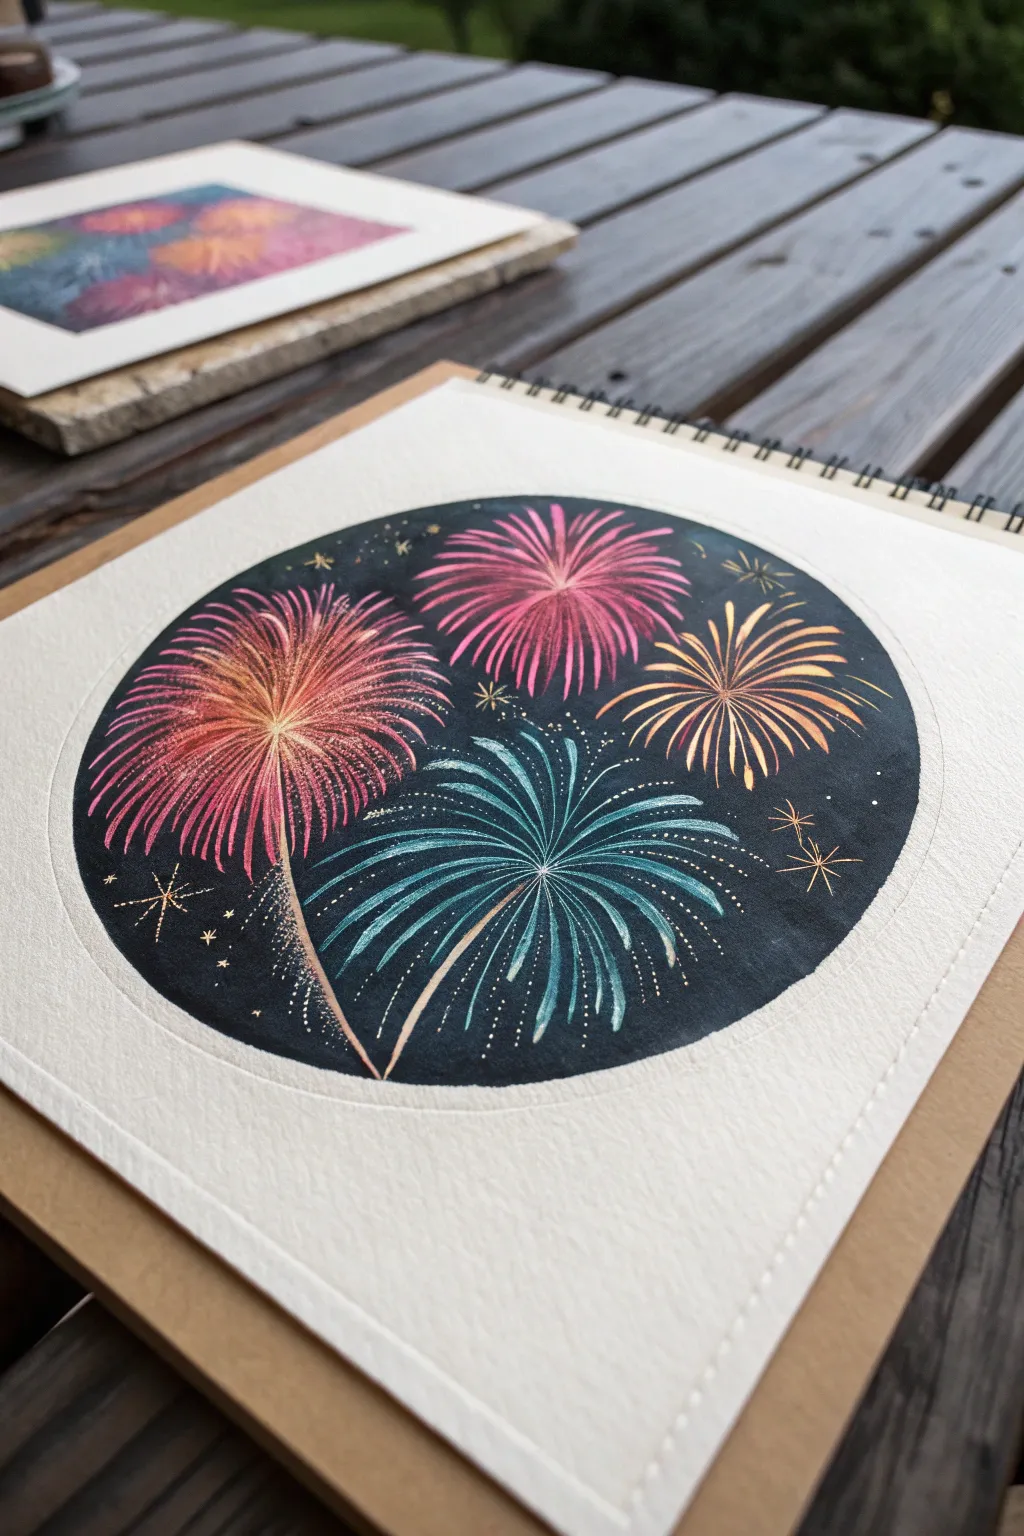
Capture the explosive magic of a fireworks display contained within a perfect circle. This project uses a clever masking technique to create a crisp, defined boundary for your night sky scene, vibrant against the white paper.
How-To Guide
Materials
- Heavyweight watercolor paper or mixed media sketchbook
- Compass or round object to trace
- Pencil (HB)
- Black gouache or acrylic paint
- Paintbrushes (flat and fine round)
- Metallic gel pens (gold, silver)
- Colored pencils or oil pastels (pink, teal, gold, purple)
- White gel pen or acrylic marker
- Ruler (optional)
Step 1: Setting the Stage
-
Draw the boundary:
Begin by finding the center of your sketchbook page. Use a compass or trace around a medium-sized bowl to draw a perfect circle lightly in pencil. Press gently so you don’t groove the paper. -
Fill the night sky:
Using black gouache or acrylic paint, carefully fill in the entire circle. Use a flat brush for the center and switch to a smaller round brush to get a crisp, clean edge along your pencil line. I like to rotate the sketchbook as I paint the edges to keep my hand steady. -
Let it cure:
Allow the black background to dry completely. It needs to be bone-dry before you add the fireworks, or the colors will muddy. This is a good time to wash your brushes.
Clean Edges?
Painting a perfect circle freehand is tough. For razor-sharp edges, apply masking fluid over your pencil circle line before painting. Rub it away once the black paint is 100% dry.
Step 2: Creating the Fireworks
-
Map the explosions:
Visualizing where your fireworks will burst, lightly mark the center point of three or four main fireworks using a white charcoal pencil or a light application of your colored pencil so you can see it against the black. -
Layer the base color:
Starting with the large pink firework on the left, use a pink colored pencil or oil pastel. detailed strokes radiating outward from your center point. Press firmly to make the color opaque against the dark background. -
Add dimension:
Layer a slightly lighter shade of pink or peach over the center area of the bursts. This creates a glowing core effect, making the firework look hot and bright. -
Draw the teal burst:
Move to the bottom center area. Using a teal or seafoam green pencil, draw long, curved strokes creating a ‘palm tree’ style firework. These lines should droop slightly as they extend outward, mimicking gravity. -
Create the golden sparkler:
To the right, draw a smaller, spiky firework using yellow ochre or gold pencil. Short, sharp strokes work best here to distinguish it from the flowing teal lines. -
Cluster the top burst:
Fill the top gap with a magenta or purple firework, keeping the strokes tighter and more uniform to create a dense sphere of light.
Make it Pop
For an extra festive touch, brush a tiny amount of clear glitter glue or iridescent medium over the very center of the fireworks. It catches the ambient light beautifully.
Step 3: Metallic Details & Magic
-
Add the spines:
Switch to your metallic gold gel pen. Draw thin, fine lines following the path of your colored pencil strokes. You don’t need to outline everything; just add highlights to about half the strands to catch the light. -
Highlight the centers:
Add a concentrated cluster of gold or silver dots at the very center of each firework explosion. This acts as the ignition point. -
Draw the trails:
For the large pink and teal fireworks, use the gold pen to draw a faint, dotted trail line leading from the bottom of the circle up to the center of the burst, showing the path the rocket took. -
Create distant sparks:
Using a white or silver gel pen, add tiny single dots scattered in the empty black spaces. Vary the pressure to create different sized ‘stars’. -
Add starbursts:
Draw a few small, four-pointed or eight-pointed stars in gold around the edges of the main fireworks to fill the composition. -
Refine the circle edge:
Check the perimeter of your circle. If any firework lines went over the edge, you can touch up the outside with white gouache, or conversely, clean up jagged black edges with a black pen. -
Final shimmer:
Add a few final dashes of white gel pen on top of the brightest colored pencil areas to enhance the sense of brilliance and luminosity.
Now you have a stunning, contained celebration that draws the eye straight to the center of the page
Minimalist Doodle Fireworks
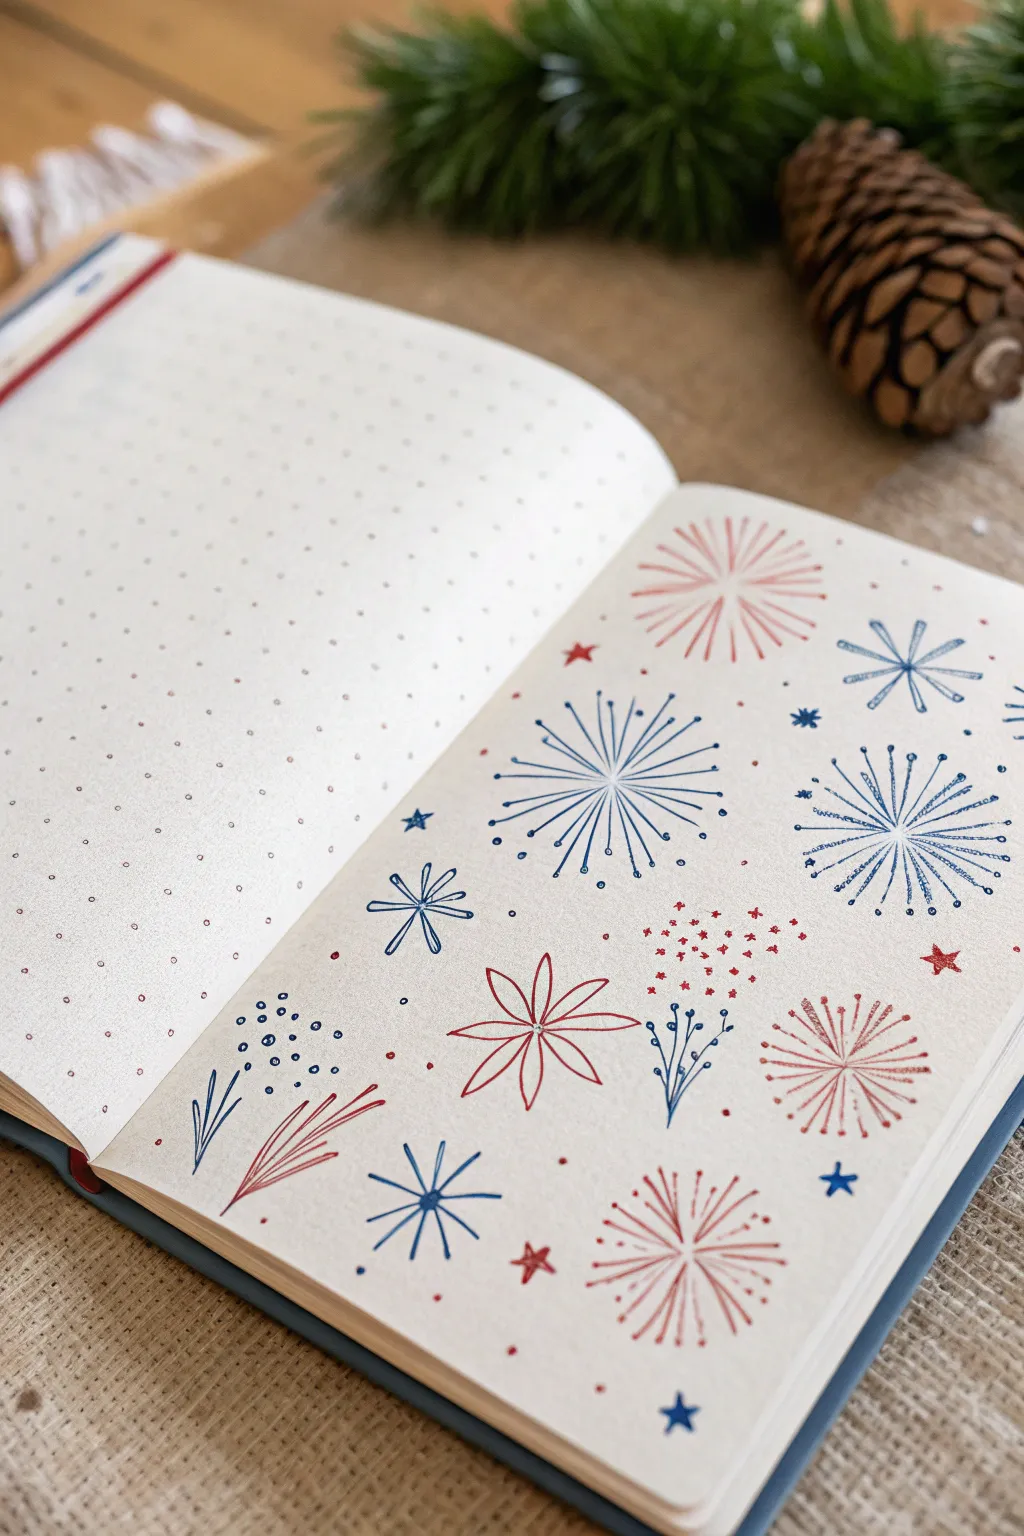
Transform a plain dotted page into a festive celebration with these charmingly simple firework doodles. Using a limited palette of just red and blue, this minimalist spread captures the excitement of a night sky display without needing complex artistic skills.
Step-by-Step
Materials
- Dotted notebook or bullet journal
- Fine liner pen (Red, 0.3mm or 0.5mm)
- Fine liner pen (Blue, 0.3mm or 0.5mm)
- Pencil (optional for sketching)
- Eraser
Step 1: Planning the Layout
-
Visualize the spacing:
Before putting pen to paper, look at your blank dotted page. You want to create a scattered, random pattern rather than a grid. Imagine where your largest fireworks will go first—usually three or four big ones anchor the composition. -
Pencil placement (optional):
If you’re nervous about spacing, lightly mark the center point of each intended firework with a pencil dot. This helps ensure you don’t cluster everything in one corner.
Uneven Lines?
Don’t stress if your lines aren’t perfectly straight. Wobbly lines actually make fireworks look more dynamic and like they are shimmering in the sky.
Step 2: Drawing the ‘Burst’ Style Fireworks
-
Create the center point:
Start with a large blue firework in the upper middle area. Place your pen tip on a dot and draw straight lines radiating outward like the spokes of a wheel. -
Vary line length:
Make these radiating lines uneven in length. Some should be long and dramatic, while others are shorter to fill the gaps, creating a circular but organic explosion shape. -
Add the tips:
At the end of each line, add a tiny solid dot. This small detail mimics the glowing embers of a real firework fading out. -
Repeat with red:
Switch to your red pen and create a similar ‘burst’ style firework elsewhere on the page, perhaps closer to the bottom right. This balances the colors across the spread.
Step 3: Drawing ‘Flower’ and ‘Star’ Variations
-
Draw the flower burst:
For the lower middle section, use the red pen to draw a flower-like firework. Instead of straight lines, draw 5-6 long, thin loops or petals meeting at a center point. -
Add internal details:
Draw a single straight line through the center of each ‘petal’ to give it structure and movement. -
Create simple stars:
Using the blue pen, draw a few asterisk-style stars (*). Draw a vertical line, a horizontal line, and two diagonal lines interacting at a center point. These are great for filling medium-sized gaps.
Add Sparkle
Go over the center of your biggest fireworks with a silver or gold gel pen to add a subtle metallic shimmer that catches the light.
Step 4: Adding Unique Shapes
-
The dual-tone burst:
Try a two-step firework. Draw a small, tight circle of blue dots. Then, surround that circle with longer outward-shooting lines. -
The fountain style:
Near the bottom edge, draw curved lines shooting upward from a single point, resembling grass or a fountain. I like to add tiny floating dots above the tips to show the sparks falling. -
The speckled explosion:
For a different texture, create a firework shape solely out of dots. Cluster them tightly in the center and spread them out as you move away, creating a gradient effect.
Step 5: Filling the Gaps
-
Scattered stars:
Look for empty white spaces between your larger drawings. Draw tiny solid 5-point stars in both red and blue. -
Micro-dots:
Add singular dots or groups of three tiny dots around the larger fireworks. This mimics the smoke and smaller debris of a pyrotechnic show. -
Final balance check:
Step back and look at the spread. If one area looks too blue, add a small red star. If a spot looks empty, add a small blue cross. The goal is an even distribution of color and shape. -
Erase guidelines:
If you used any pencil marks for planning, wait a few minutes to ensure the ink is completely dry, then gently erase them.
Now you have a vibrant, celebratory page ready to welcome the new year or mark a special occasion is ready to go


Have a question or want to share your own experience? I'd love to hear from you in the comments below!