If you’ve got a pile of smooth stones and the urge to paint something cheerful, fish rock painting ideas are the sweetest little dive into color and pattern. I love how the natural rock shape practically tells you what kind of fish it wants to become—simple, bold, or surprisingly detailed.
Classic Cute Fish With a Big Eye
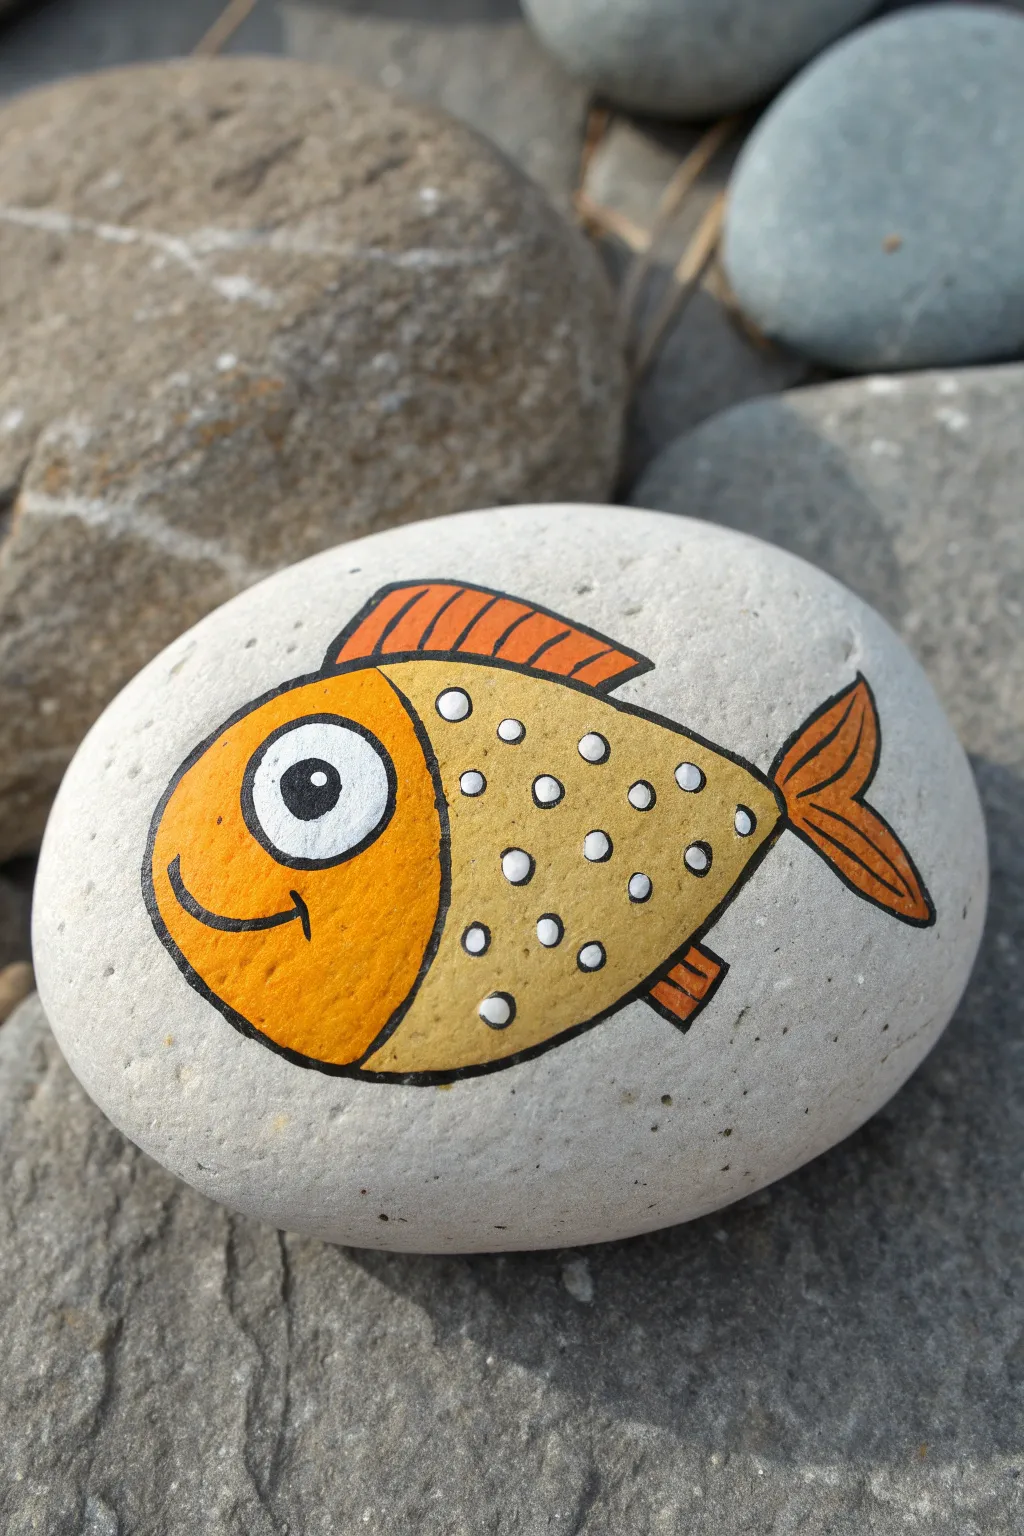
This charming project features a stylized, friendly fish with a vibrant orange face and a dotted yellow body painted onto a smooth white stone. The bold black outlines give it a cartoon-like quality that is both simple to execute and incredibly eye-catching.
Step-by-Step
Materials
- Smooth, flat river rock (rounded oval shape)
- White acrylic paint or gesso (for base)
- Bright orange acrylic paint
- Mustard yellow or light gold acrylic paint
- Black acrylic paint or fine-tip black paint pen (0.7mm recommended)
- White paint pen or small dotting tool
- Flat brush (small)
- Round detail brush (size 0 or 1)
- Clean water and paper towel
- Clear matte or gloss spray sealer
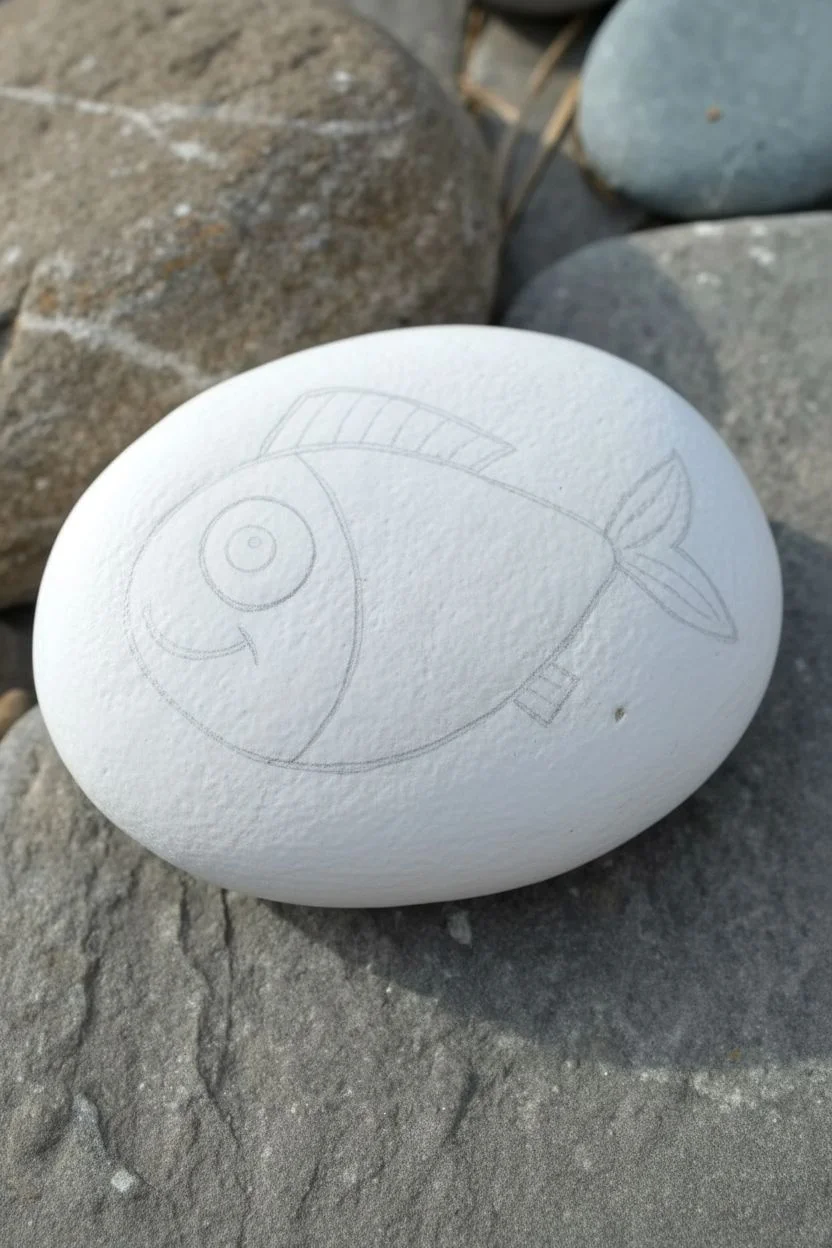
Step 1: Preparing and Sketching
-
Clean the Stone:
Begin by washing your stone with warm soapy water to remove any dirt or oils. Let it dry completely before starting, as moisture can ruin the paint adhesion. -
Apply the Base Coat:
Since the design relies on a clean background, paint the entire top surface of the stone with white acrylic paint. You might need two layers to ensure it’s opaque and smooth. -
Outline the Shape:
Once the white base is bone-dry, lightly sketch the fish shape using a pencil. Draw a large oval for the body and divide it vertically with a curved line near the front to separate the head from the body. -
Add the Fins:
Sketch a triangular top fin (dorsal fin) and a forked tail fin at the back. Don’t forget the small rectangular fin on the bottom. -
Draw the Eye and Mouth:
Inside the head section, simple draw a large circle for the eye. Add a small ‘u’ shape near the bottom front for a smiling mouth.
Smudged Ink?
Paint pens can smear if sealed too soon. Let the black lines dry for at least an hour before varnishing, or brush a layer of Mod Podge over it first as a barrier.
Step 2: Blocking in Color
-
Paint the Head:
Load your small flat brush with bright orange paint. Carefully fill in the front head section, painting around the large circle you sketched for the eye. -
Fill the Fins:
Use the same orange color to fill in the dorsal fin, the tail fin, and the small bottom fin. If the orange looks streaky, let it dry and add a second coat for richness. -
Paint the Body:
Switch to your mustard yellow or light gold paint. Fill in the main body section behind the head. Be careful where the yellow meets the orange to keep a crisp edge, though we will outline it later. -
Whitening the Eye:
Even though your base coat is white, add a fresh dollop of bright white paint inside the eye circle to make it pop against the orange face. -
Dry Time:
Allow all the colored sections to dry completely. I usually give this about 15-20 minutes, or speed it up with a hairdryer on a cool setting, because wet paint will clog your outlining pen.
Step 3: Adding Details and Outlines
-
Outline the Body:
Using a fine-tip black paint pen or a very thin brush with black paint, trace the outer perimeter of the entire fish. -
Define the Division:
Draw the curved black line separating the orange head from the yellow body. This ‘gill line’ gives the fish its character. -
Finish the Eye:
Outline the white eye circle with your black pen. Inside, draw a smaller black circle for the pupil, leaving a tiny white speck for a highlight if you want extra cuteness. -
Create the Smile:
Trace over your pencil smile line in black. Add a tiny perpendicular dash at the end of the smile for a ‘cheek’ crease. -
Texture the Fins:
Add thin black lines inside the top, bottom, and tail fins to mimic striations or bones in the fins.
Smoother Dots
If using a brush handle for dots, reload with fresh paint after every single dot. This ensures they stay round, raised, and consistent in size like the photo.
Step 4: Polka Dots and Sealant
-
Start the Dots:
Using a white paint pen or the handle end of a paintbrush dipped in white paint, gently press dots onto the yellow body section. -
Vary Placement:
Space the white dots randomly but somewhat evenly apart. Avoid making them too perfect; a little variation adds to the organic, hand-painted look. -
Final Check:
Look over the rock for any pencil marks that might still be visible. If the paint is fully cured, you can gently erase them. -
Seal the Deal:
Once you are absolutely certain the black ink is 100% dry (give it extra time!), spray the rock with a clear sealer to protect your fish from the elements.
Place your little aquatic friend in a garden pot or on a desk for a splash of color


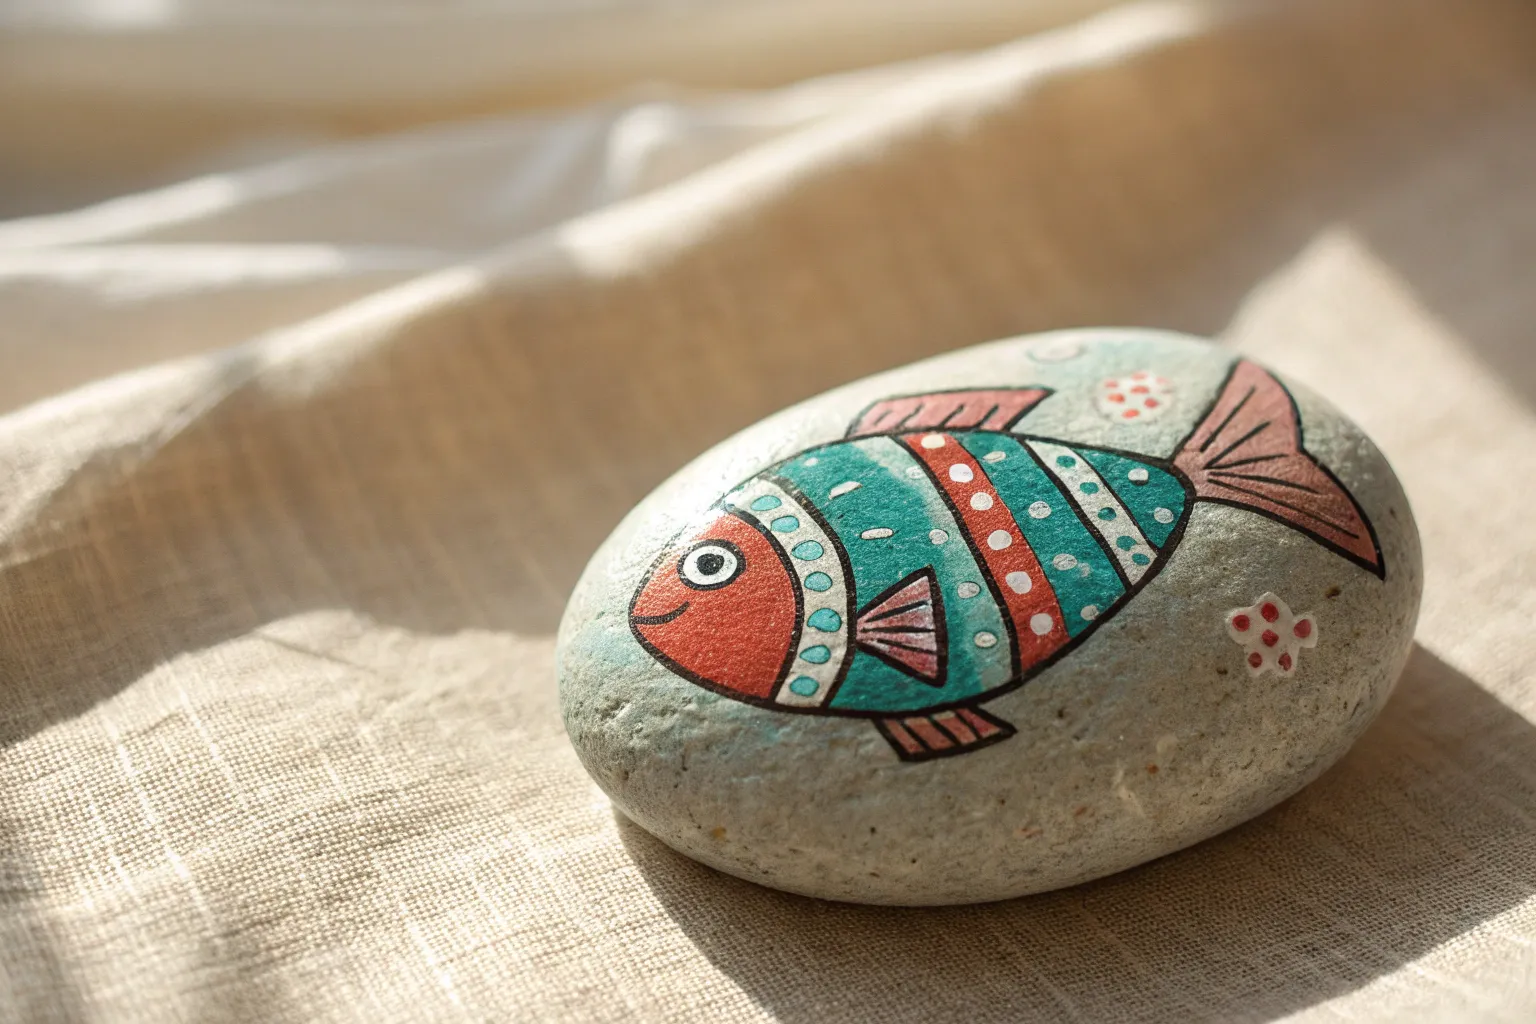
Easy Striped Tropical Fish

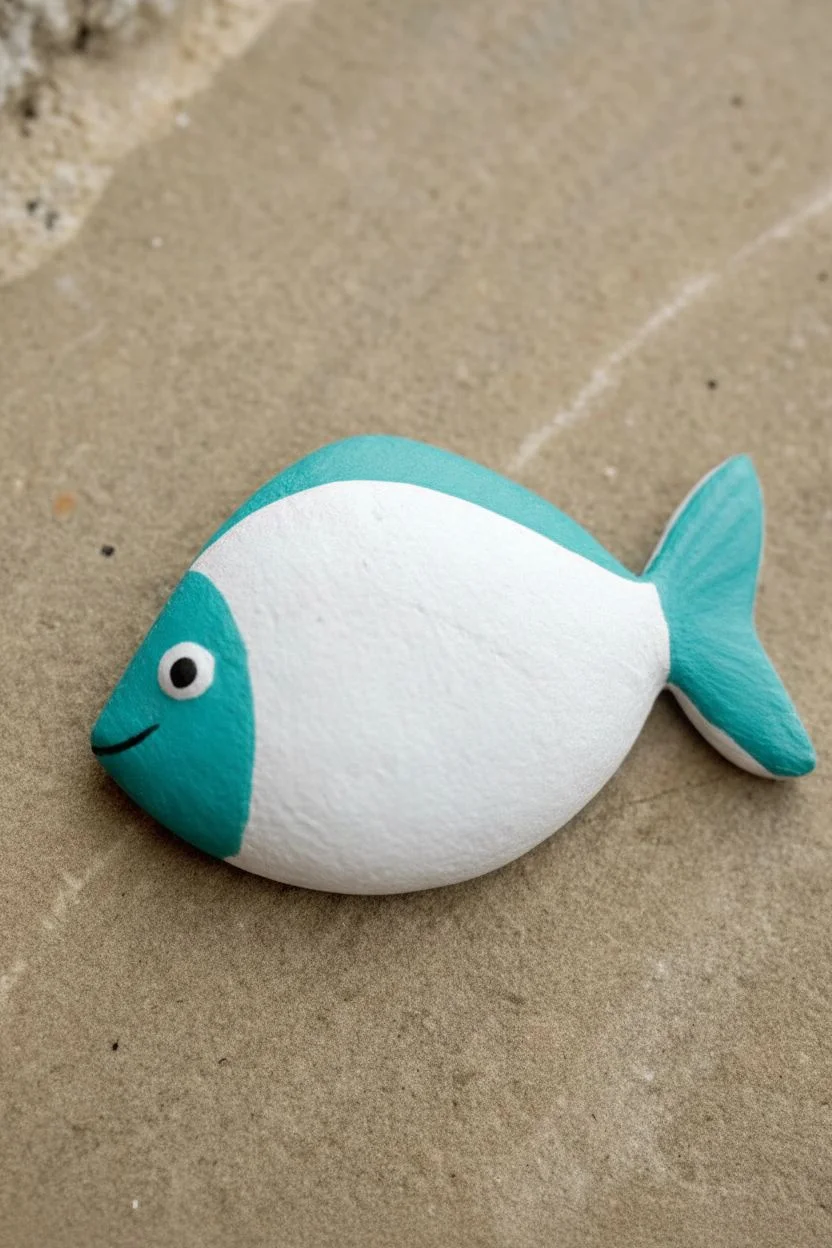
Transform a smooth garden stone into a vibrant tropical character with this simple striped fish design. Its bold vertical bands and cheerful teal face make it a standout piece that’s surprisingly easy to achieve.
Detailed Instructions
Materials
- Smooth, oval-shaped river rock (flat is best)
- Acrylic paints: White, Teal/Turquoise, Bright Orange, Burnt Sienna/Red-Brown, Black
- Flat paintbrush (medium)
- Small round detail brush
- Pencil (optional)
- Clear spray sealer or varnish
Step 1: Base and Shape
-
Priming the stone:
Clean and dry your rock thoroughly. Paint the entire surface with a solid coat of white acrylic paint to create a bright canvas. You might need a second coat for full opacity. -
Outlining the fins:
Use a pencil to lightly sketch the dorsal fin bump on top and the tail fin shape at the back. If your rock isn’t perfectly fish-shaped, you can ‘cheat’ the shape by painting these fins extending slightly onto the sides or just drawing them within the rock’s natural boundary. -
Blocking in the teal:
Dip your flat brush into the teal paint. Create a curved section at the front (left) of the rock for the face. Paint this area solid teal. -
Painting the upper fin:
Using the same teal color, paint the dorsal fin area along the top edge of the rock. Extend this color slightly down the back. -
Painting the tail:
Fill in the tail section at the back with teal paint. Depending on your rock’s shape, this might cover just the tip.
Stone Selection Tip
Look for a stone that is naturally narrower at one end (the tail) and rounder at the other. Smooth river rocks work best as rough textures make straight lines harder.
Step 2: Adding the Stripes
-
Planning the bands:
Visualize vertical stripes running down the white body of the fish. You can sketch these lightly with a pencil first to ensure even spacing. -
Applying orange stripes:
With a clean flat brush or the edge of your medium brush, paint two vertical stripes using bright orange. Leave white space between them. -
Adding depth with darker stripes:
Mix a little brown into your orange or use burnt sienna to paint two darker, reddish-brown stripes. Place these alternating with the orange ones to create variety in the pattern. -
Let it dry:
Pause here to let the colored stripes dry completely so the colors don’t bleed into the next steps. -
The black divider:
Using a thin brush and black paint, carefully draw a vertical line separating the teal face from the first white stripe. This defines the gills/head area.
Step 3: Details and Fins
-
Side fin placement:
Paint a small, triangular side fin (pectoral fin) in teal, overlapping the first orange and white stripe area. -
Detailing the side fin:
Once the teal triangle is dry, use your finest brush with black paint to add three or four thin lines inside the fin for texture. -
Detailing top and tail:
Add thin black lines to the top dorsal fin and white lines to the tail fin to suggest ribbing. This really brings the anatomy to life. -
Creating the eye:
Paint a solid white circle on the teal face. Once dry, add a smaller black pupil in the center. -
The highlight:
I always add a tiny white dot in the black pupil to give the fish a spark of life. -
The smile:
Paint a small, curved black line near the front edge of the teal section for the mouth. -
Sealing:
Once the paint is fully cured (give it a few hours), spray the rock with a clear varnish to protect it from the elements and make the colors pop.
Make a School
Vary the stripe colors on your next rocks! Try lime green and yellow stripes, or purple and pink bands to create a whole colorful school of tropical fish.
Place your colorful swimmer in a potted plant or near a garden pond for a fun aquatic surprise


Bold Banded Clownfish Look

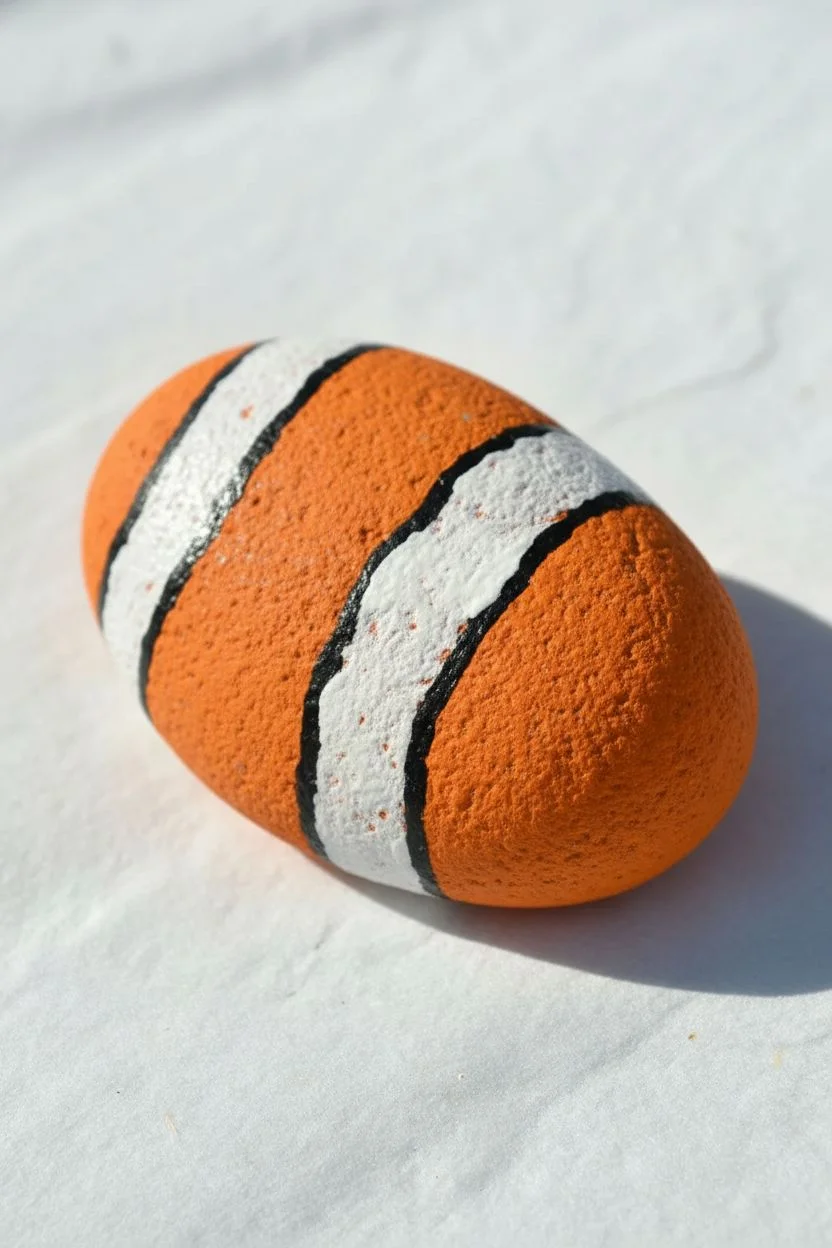
Turn a simple oval stone into a vibrant, friendly clownfish with distinct bands and a charming smile. This specific design uses bold black outlines to make the white stripes pop against the bright orange body, creating a cartoon-like effect that looks great in any garden.
How-To Guide
Materials
- Smooth, oval river rock
- Acrylic paint (Bright Orange, White, Black)
- Flat paintbrushes (medium and small)
- Fine liner brush or black paint marker (0.7mm)
- Pencil
- Acrylic sealer (spray or brush-on)
- Palette or paper plate
- Water cup and paper towels
Step 1: Base and Blocking
-
Clean Your Canvas:
Start by scrubbing your river rock with soap and water to remove any dirt or oils. Let it dry completely in the sun or use a hairdryer to speed things up. -
Sketch the Bands:
Using a pencil, lightly draw two broad vertical bands curving around the rock. Imagine the rock is the fish’s body; place one band near the ‘head’ (about a third of the way in) and another towards the ‘tail’ end. -
Paint the White Stripes:
Fill in the sketched band areas with white acrylic paint. You will likely need two coats to ensure the white is opaque and none of the rock’s natural color shows through. -
Fill the Orange Sections:
Paint the remaining front, middle, and back sections of the rock with bright orange acrylic paint. Carefully work up to the edges of your white bands, but don’t worry about being perfect yet—the outline will hide minor messy edges.
Smooth Stripes Tip
For perfectly crisp edges on your white bands, apply narrow painter’s tape or a rubber band around the rock before painting the orange sections.
Step 2: Adding Fins and Details
-
Outline the Fins:
In the middle orange section, just behind the first white band, lightly sketch a rounded dorsal fin shape near the top and a smaller side fin shape below it. -
Color the Fins:
Paint the inside of these fin shapes with a slightly lighter shade of orange (mix a tiny dot of white into your orange) to help them stand out against the body, or just use the same orange if you prefer a simpler look. -
Create the Black Borders:
Using a fine liner brush or a black paint pen, carefully trace the borders where the white bands meet the orange paint. Make these lines relatively thick and bold. -
Define the Fins:
Outline your painted fins with the same thick black line. This separation is crucial for the cartoon style. -
Add Tail Details:
Sketch and paint a few curved lines near the back orange section to suggest the tail fin, outlining them in black as well.
Glow Up
Mix glow-in-the-dark medium into your white paint for the stripes. Your clownfish will be visible during the day and magically light up your garden path at night.
Step 3: Face and Finishing
-
Paint the Eye Whites:
On the front orange section (the face), paint two circles for eyes. Place one slightly higher than the other to give it a quirky perspective. -
Add Pupils:
Once the white circles are dry, paint a solid black circle in the center of each. Leave a tiny speck of white unpainted, or add a white dot later, to create a highlight. -
Outline the Eyes:
Use your liner brush or paint pen to draw a black rim around the white part of the eyes. -
Draw the Smile:
Paint a simple, long curved line underneath the eyes for a happy mouth. Adding a tiny vertical tick mark at the end of the smile adds a nice bit of character. -
Add Small Dots:
Place two tiny black dots between the eyes and the mouth to represent little nose holes. -
Highlight the Skin:
I like to add very subtle texture by dabbing a dry brush with lighter orange on the top of the head, giving the skin a slightly bumpy, realistic texture. -
Seal the Rock:
Allow the paint to cure fully for 24 hours. Then, apply a clear acrylic sealer to protect your fish from weather and chipping.
Place your little swimming stone near a pond or in a flower pot to add a splash of color to your greenery


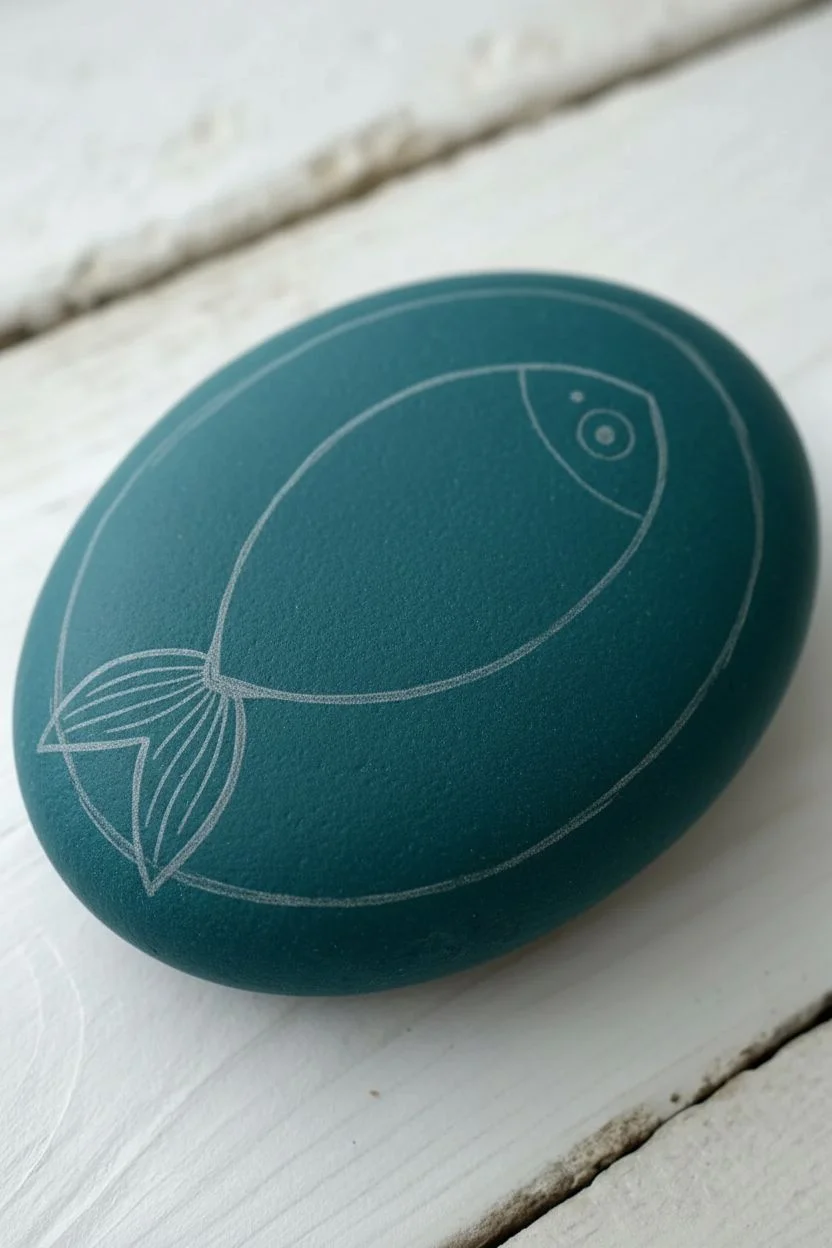
Simple Angelfish With Triangular Fins
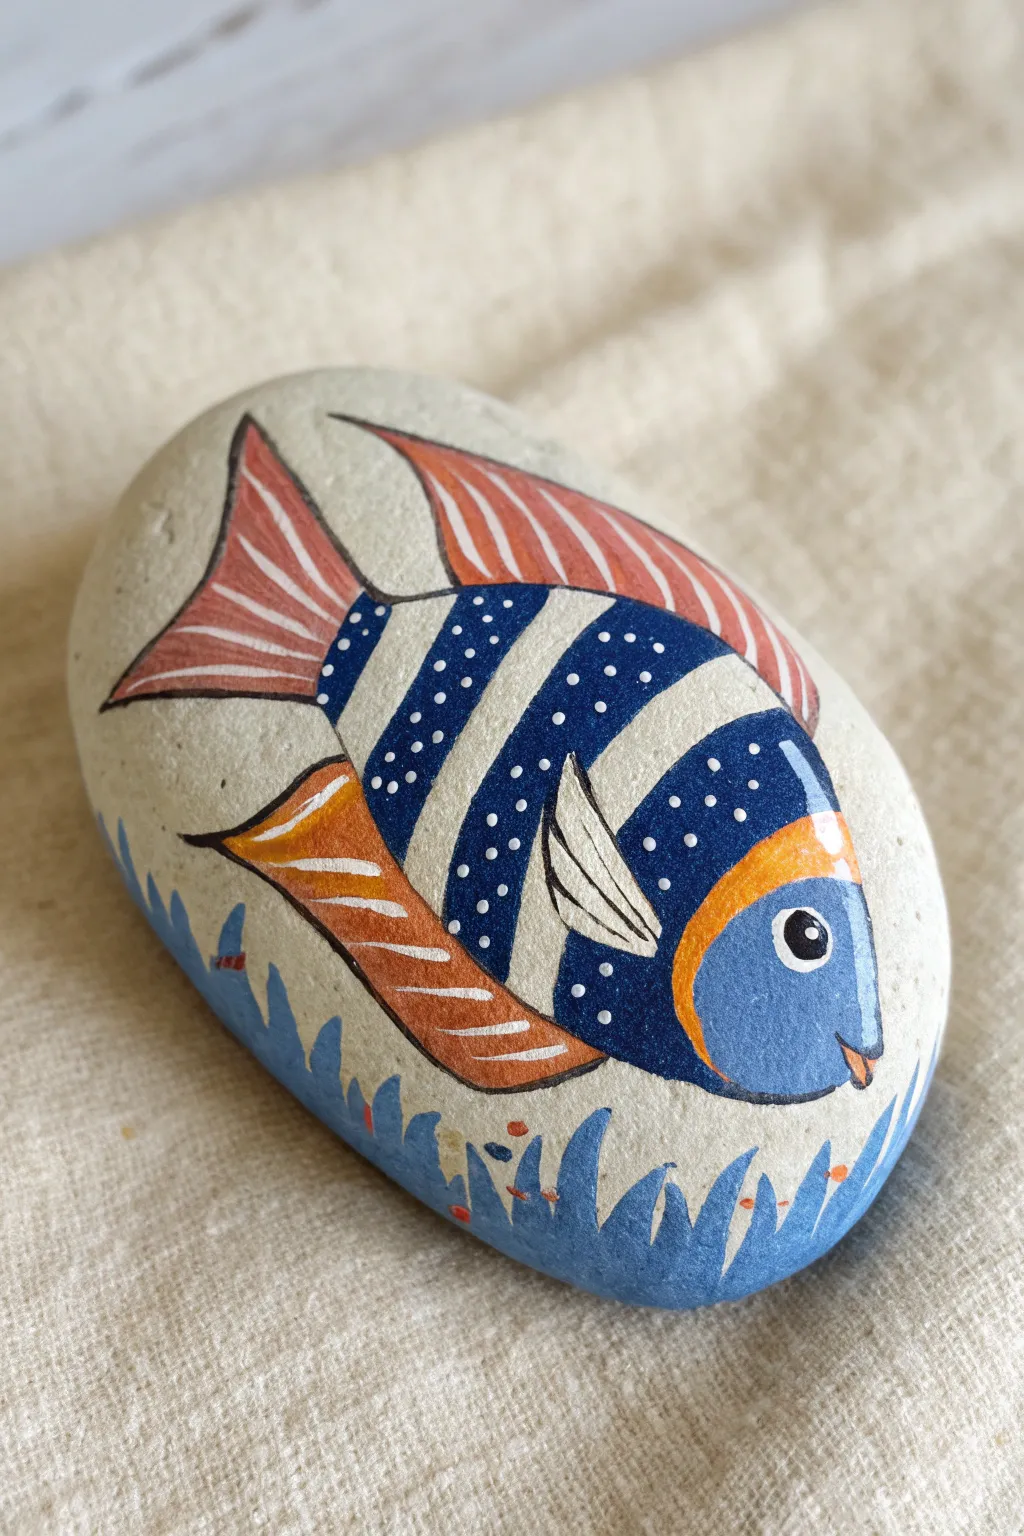
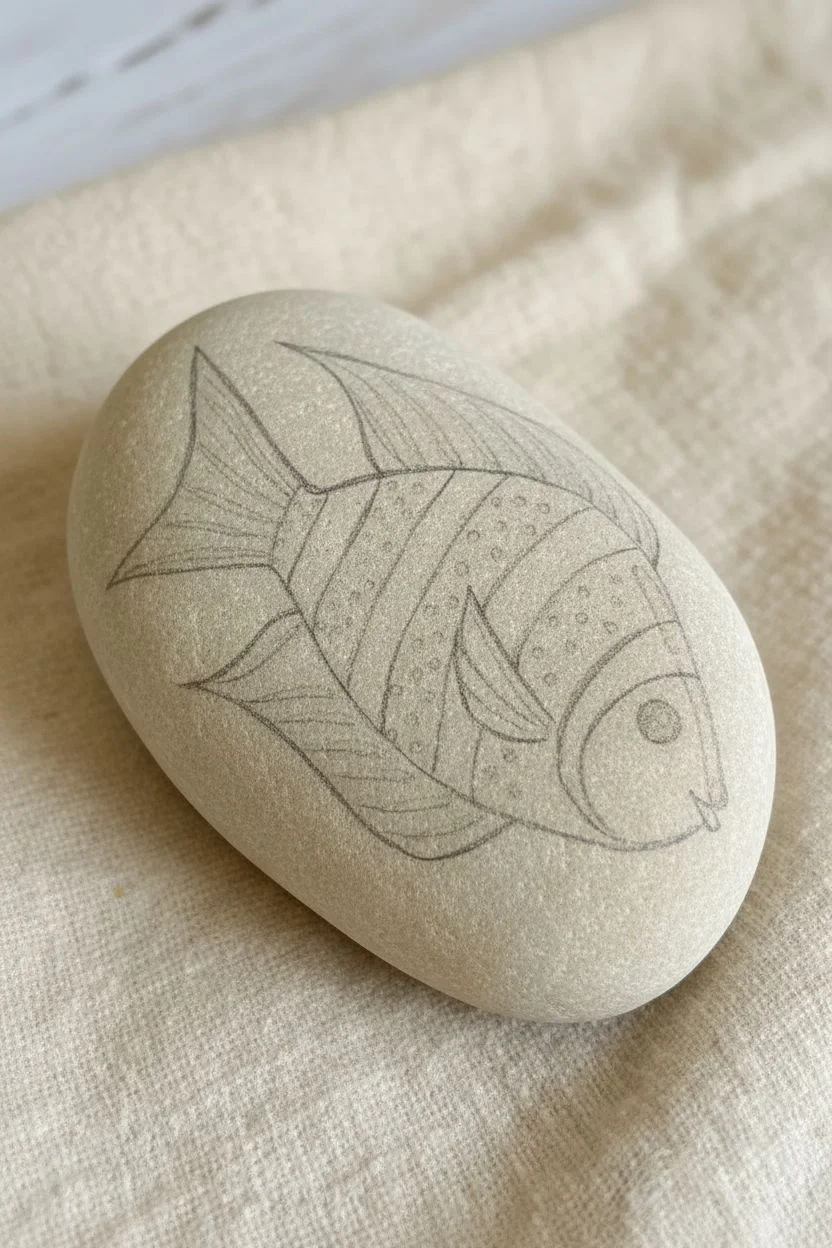
This project transforms a simple oval rock into a vibrant, stylized angelfish swimming through blue seagrass. The design features bold navy stripes accented with delicate white dots and contrasting rusty-orange fins, making for a sophisticated yet playful piece of garden decor.
Step-by-Step Guide
Materials
- Smooth, oval river rock (palm-sized)
- Acrylic paints: White, Navy Blue, Rusty Orange/Red-Orange, Light Blue, Black
- Pencil for sketching
- Fine-point black paint pen or liner brush
- Various paintbrushes: small flat brush, medium round brush, fine liner brush
- Dotting tool or toothpick
- Matte or glossy clear sealant spray
Step 1: Base and Sketch
-
Clean surface:
Begin by washing your stone with warm water and soap to remove any dirt or oils. Let it dry completely before starting. -
Sketch the outline:
Using a pencil, lightly draw the basic oval shape of the fish body in the center of the rock. Add a triangular tail fin at the back and a sweeping dorsal fin on top. -
Detail the sketch:
Draw the lower ventral fin and the small side fin. Mark out the curved vertical stripes on the fish’s body and create a separation line for the head area.
Step 2: Blocking Colors
-
Paint the stripes:
Using a small flat brush and navy blue paint, carefully fill in the wide vertical stripes on the body. Leave the alternating stripes unpainted (showing the natural rock color) or paint them white if your rock is dark. -
Fill the fins:
Mix a rusty orange shade and paint the tail fin, top dorsal fin, and bottom ventral fin. You may need two coats here to get a solid, opaque color. -
Paint the face:
Use a light blue shade to fill in the rounded face area at the front. While you have this color, you can also paint the small side fin white or very pale blue. -
Add the gill line:
Paint a thin, curved line of bright orange separating the blue face from the body stripes to add a pop of contrast.
Fix Spilt Lines
If your black outline is wobbly or too thick, wait for it to dry completely. Then, use the original fill color (like the orange or navy) to paint over just the mistake and tidy up the edge.
Step 3: Fine Details
-
Outline everything:
Once the base colors are dry, use a fine-point black paint pen or a dedicated liner brush to outline the entire fish, including the fins and stripes. Keep your hand steady for crisp lines. -
Add fin texture:
Using a very fine brush and white paint, add thin stripes inside the orange fins to mimic texture. Add similar black lines to the small side fin. -
Create the eye and mouth:
Paint a small white circle for the eye, then add a smaller black circle inside it, leaving a tiny white dot for reflection. Draw a small, simple smile at the front. -
Dot the stripes:
Dip a dotting tool or toothpick into white paint. Add rows of small dots along the navy blue stripes to give the fish pattern and dimension.
Make It 3D
Use ‘puffy paint’ or dimensional fabric paint for the white dots on the body stripes. This raised texture adds a fantastic tactile element that feels great when holding the stone.
Step 4: Environment and Finish
-
Paint the seagrass base:
Along the bottom edge of the rock, paint wavy, grass-like shapes using a medium blue shade. This grounds the fish in a scene. -
Highlight the grass:
Add lighter blue highlights to the tips of the grass blades and create a few small orange dots among the grass to represent pebbles or coral. -
Clean up:
Check your outlines and touch up any smudges with the background stone color or paint. -
Seal the rock:
I like to wait at least 24 hours for the paint to cure fully, then spray with a clear sealant to protect your artwork from chipping and fading.
Enjoy displaying your colorful underwater friend on a shelf or tucking it into a potted plant
BRUSH GUIDE
The Right Brush for Every Stroke
From clean lines to bold texture — master brush choice, stroke control, and essential techniques.
Explore the Full Guide
Rainbow Scales in Neat Rows
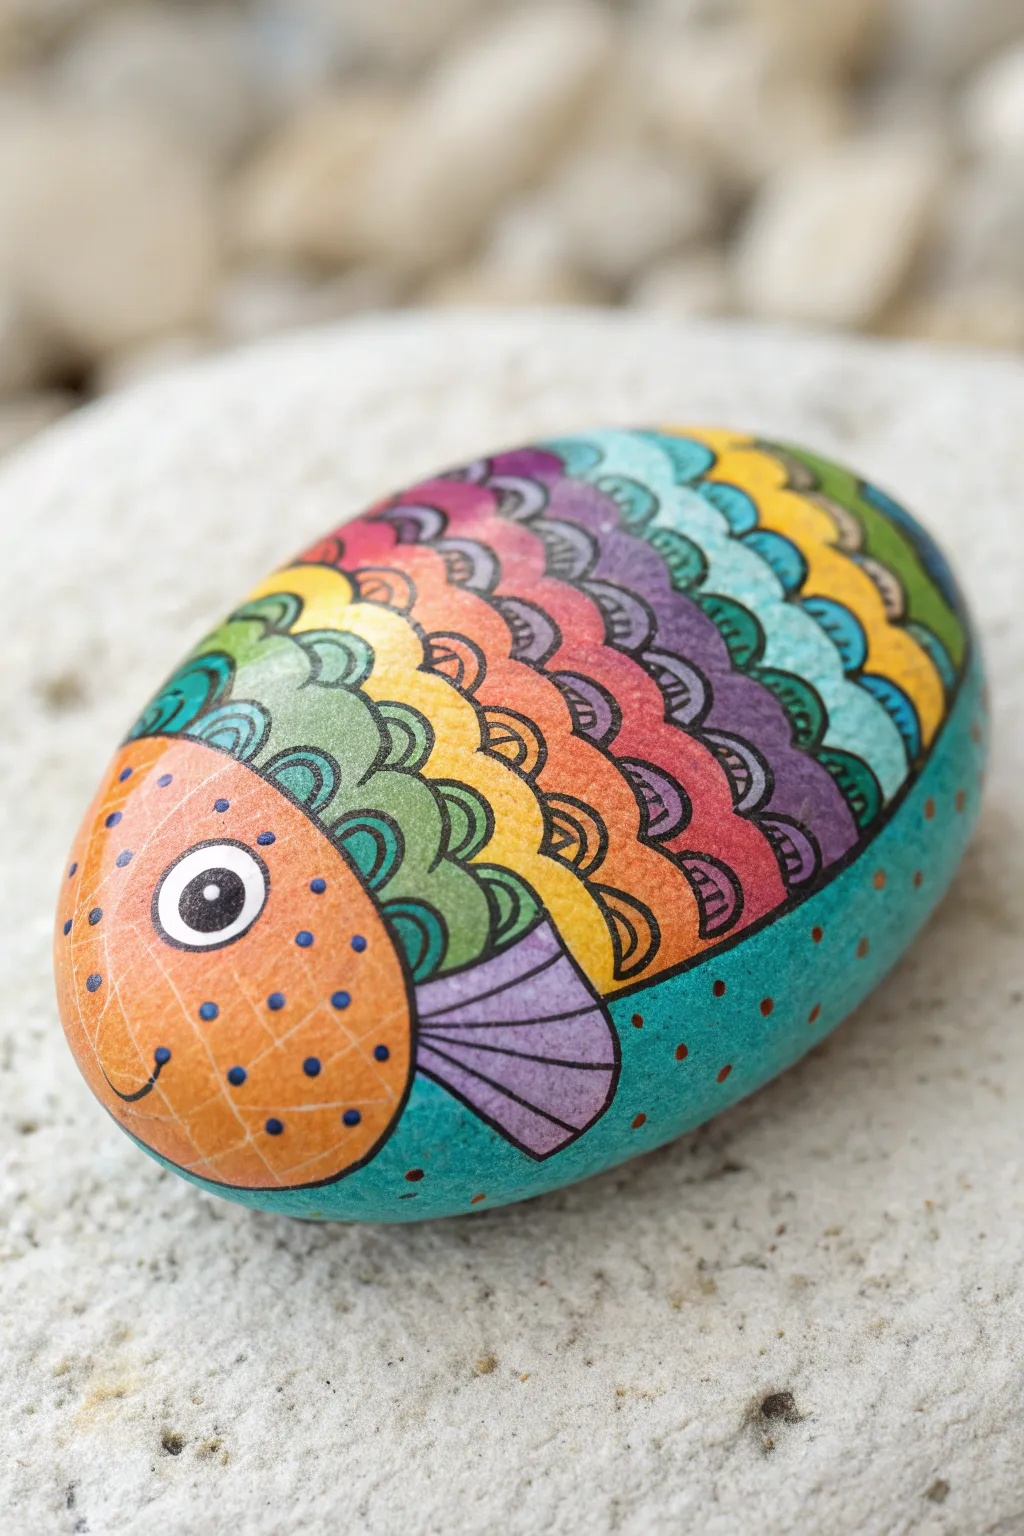

Transform a simple smooth stone into a vibrant swimming companion with rows of meticulously painted rainbow scales. This colorful fish features bright, distinct sections and fine linework that make the design pop beautifully against the rock’s surface.
How-To Guide
Materials
- Smooth, oval-shaped river rock
- Acrylic paints (orange, yellow, green, light blue, purple, pink, teal)
- White acrylic paint or paint pen
- Black fine-liner paint pen (extra fine point)
- Pencil and eraser
- Small flat paintbrushes
- Detail paintbrush (00 size)
- Spray varnish or sealant (glossy finish)
Step 1: Planning and Base Colors
-
Clean the surface:
Begin by scrubbing your rock with warm soapy water to remove any dirt or oils, then let it dry specially well so the paint adheres properly. -
Sketch the outline:
Using a pencil, lightly sketch the curve of the fish’s head on the left side (about one-thrd of the rock). Then, draw faint curved vertical guidelines down the length of the body where your scale rows will go. -
Draw the fin:
Sketch a small trapezoid shape near the bottom middle of the body for the pectoral fin. -
Paint the face:
Fill in the face section with bright orange acrylic paint. You may need two coats for opaque coverage, allowing the first to specific dry completely before adding the second. -
Paint the scales – Row 1:
Starting right next to the orange face, paint a curvy, scalloped row of green. Think of painting a line of connected stylized clouds. -
Paint the scales – Row 2:
Moving right, paint the next scalloped row in bright yellow, ensuring the ‘bumps’ of the scallops alternate with the green row for a scale effect. -
Paint the scales – Row 3:
Continue with a row of orange scales. I find it helpful to turn the rock as I paint to keep the angle comfortable. -
Paint the scales – Row 4:
Add a row of deep pink or magenta scales following the same alternating pattern. -
Paint the scales – Row 5:
Finish the top body patterns with rows of purple and light blue until you reach the tail end or run out of space. -
Paint the underbelly:
Paint the remaining bottom curve of the rock and the area surrounding the fin in a solid teal or turquoise color. -
Color the fin:
Fill in the small fin shape with purple paint.
Wobbly Lines?
If your black outlines aren’t smooth, try drawing them quickly rather than slowly. You can also clean up edges by painting over mistakes with the original base color once the black ink is dry.
Step 2: Details and Outlines
-
Outline the main shapes:
Once all base colors are bone-dry, use your black extra-fine paint pen to draw a solid line separating the head from the body, and outline the fin. -
Outline the scales:
Carefully trace over the scalloped edges of each color row with the black pen. Keep your hand steady and rest your wrist on the table for support. -
Add scale details:
Inside each individual colored scale, draw two or three small curved lines (rainbow arches) to add texture and depth. -
Paint the eye:
On the orange face, use a white paint pen or small brush to distinct make a large white circle. Let it dry, then paint a smaller black circle inside, leaving a tiny white dot for a highlight. -
Add face details:
Draw a small curved smile under the eye with the black pen. Then, use a blue paint pen or small brush to add decorative dots all over the orange face. -
Decorate the fin and belly:
Draw straight lines radiating outward on the purple fin. Add small terracotta or orange dots along the teal underbelly for extra pattern. -
Seal the rock:
Finish by applying a clear spray varnish to protect your artwork and give the fish a wet, shiny look appropriate for an aquatic creature.
Make It Shimmer
Mix a tiny amount of metallic gold or silver paint into your scale colors, or use a metallic marker for the inner scale arches to give your fish a glittering, sun-kissed effect.
Now you have a cheerful rainbow fish that will never need a tank or food
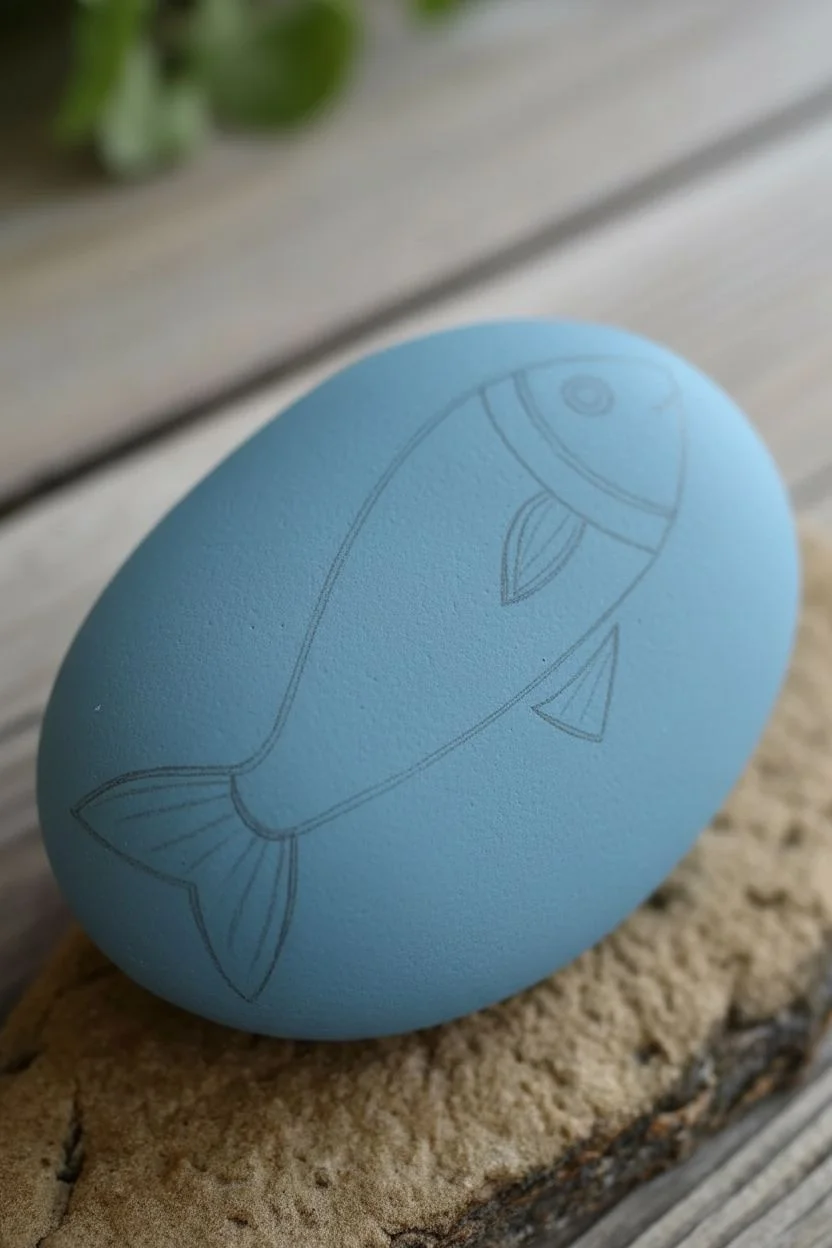
Metallic Highlights for Shimmery Scales
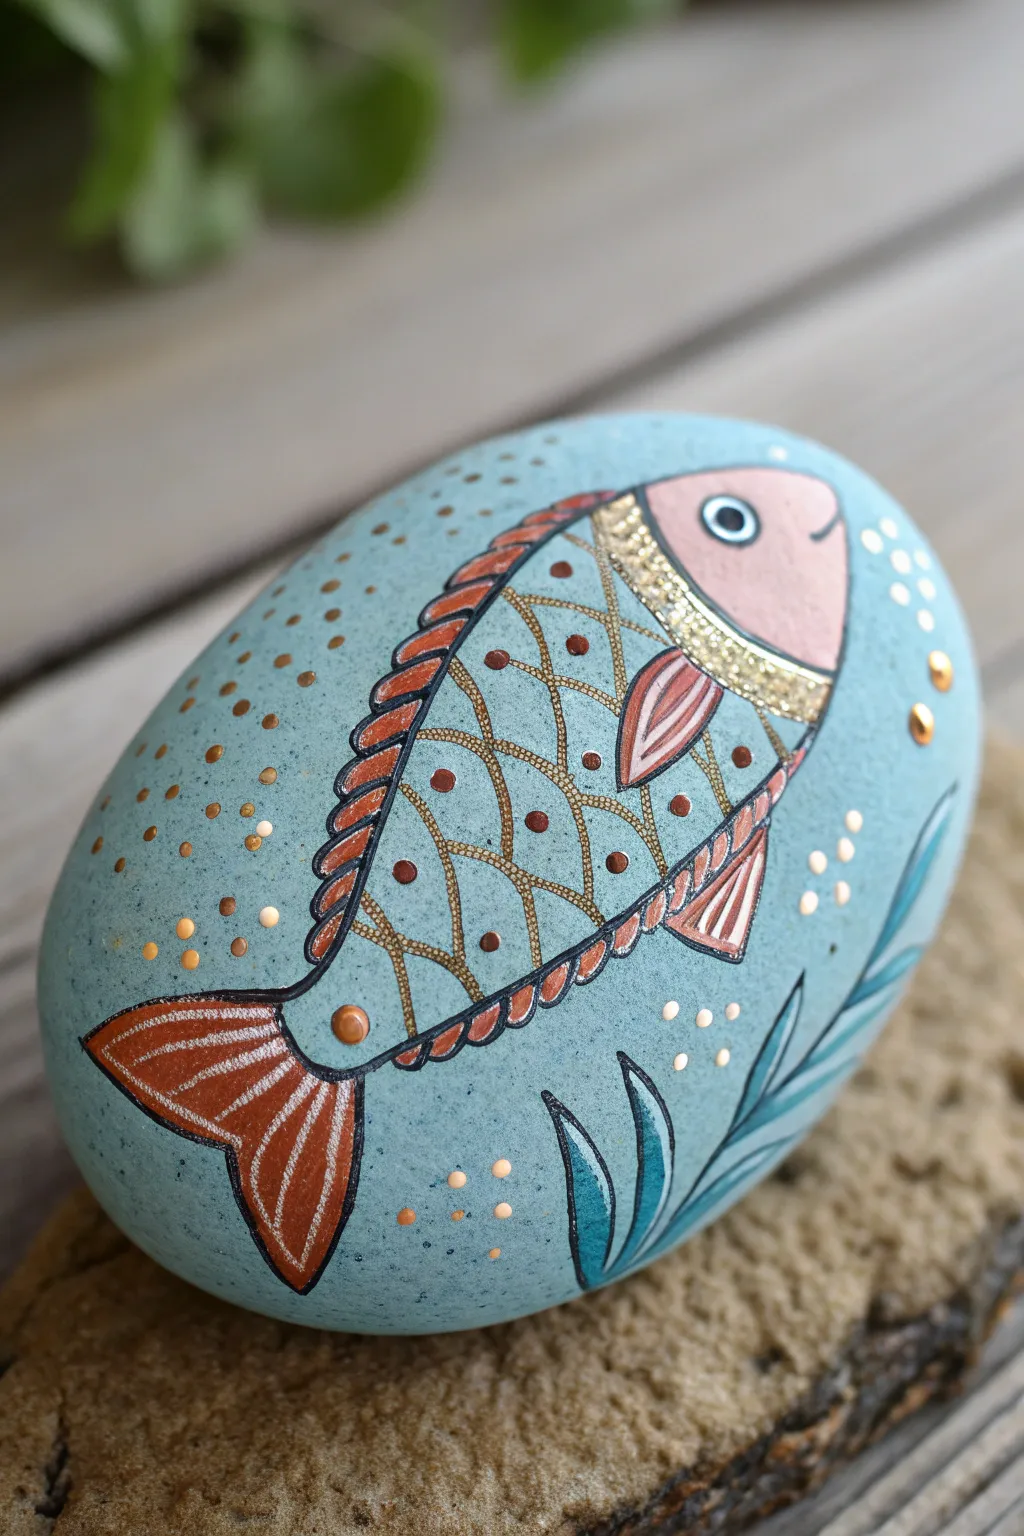
This elegant rock painting project features a stylized fish with metallic accents that catch the light beautifully against a matte dusty blue background. The precise lines and dot details give it a charming folk-art feel perfect for garden decor or paperweights.
Step-by-Step Tutorial
Materials
- Smooth oval river rock (medium size, approx. 4-6 inches)
- Acrylograph or fine-tip paint pens (black, gold, white, copper)
- Acrylic paint (dusty blue, warm pink, terracotta orange, teal)
- Small flat brush and detail liner brush
- Pencil and eraser
- Gloss varnish or clear sealant
Step 1: Base and Background
-
Clean Your Canvas:
Begin by scrubbing your rock with warm soapy water to remove any dirt or oils. Let it dry completely in the sun or use a hairdryer to speed things up. -
Apply the Blue Base:
Coat the entire top surface of the rock with the dusty blue acrylic paint. Use a flat brush for even coverage. You will likely need two coats to ensure the natural stone color doesn’t show through. -
Sketch the Outline:
Once the blue base is bone dry, lightly sketch the fish shape with a pencil. Draw a simple pointed oval for the body, a curved line separating the head, and triangular shapes for the tail and fins.
Clean Lines Pro Tip
If your hand is shaky for the grid lines, use a flexible piece of cardstock as a curved ruler to guide your pen over the rounded rock surface.
Step 2: Painting the Fish
-
Block in the Head:
Fill the head section of the fish with a soft, warm pink acrylic paint. Keep your edges tidy, but don’t worry about perfection as we will outline later. -
Color the Body:
Paint the main body section with a slightly lighter blue or teal mixture than the background, or leave it the background color if you prefer a subtle look. This creates the base for the scale pattern. -
Add Fins and Tail:
Using the terracotta or burnt orange paint, fill in the dorsal fin (top), bottom fins, and the fan-shaped tail. These areas add a nice warmth to cool tones of the rock. -
Create the Collar:
Paint a thick curved band right behind the head using gold paint. This metallic ‘collar’ acts as a visual break between the pink face and the patterned body.
Level Up: 3D Texture
Instead of flat paint for the dots on the scales, use 3D fabric puff paint or ‘liquid pearls’ to give the fish actual tactile texture you can feel.
Step 3: Detailed Line Work
-
Outline in Black:
Using a fine-tip black paint pen or a liner brush with black paint, carefully outline the entire fish, the head separation, and the individual fins. Keep your hand steady and rested on a surface for support. -
Draw the Scale Grid:
On the body of the fish, use a gold pen to draw a cross-hatch or diamond grid pattern. These intersecting lines create the stylized ‘scales’ of the fish. -
Detail the Fins:
Add white stripes inside the orange fins and tail. Once those dry, add thin black lines between the white stripes to give them definition and texture. -
Add the Eye and Mouth:
Paint a white circle for the eye with a smaller black dot inside, and a tiny white highlight. Draw a simple curved line for the smiling mouth.
Step 4: Metallic Accents and Finishing
-
Dotted Scale Details:
Place a single brown or copper dot in the center of each diamond scale on the fish’s body. I like to use the back end of a paintbrush to get perfectly round dots. -
Outline the Dorsal Fin:
Add copper or orange scalloped detailing along the spine of the fish, just above the gold grid pattern, to suggest rough scales along the back. -
Paint Sea Grass:
In the bottom corner, paint simple, curved blades of grass using teal paint. Once dry, outline them thinly in black to make them pop against the background. -
Atmospheric Dots:
Scatter groups of small dots around the fish using gold, white, and copper tones. Vary the sizes to look like rising bubbles or floating particles in the water. -
Seal the Work:
Allow the paint to cure for at least 24 hours. Finish with a coat of gloss varnish to protect the artwork and make the metallic paints shimmer brilliantly.
Now you have a shimmering piece of aquatic art ready to brighten up your desk or garden path

PENCIL GUIDE
Understanding Pencil Grades from H to B
From first sketch to finished drawing — learn pencil grades, line control, and shading techniques.
Explore the Full Guide
Crisp Black Outline for a Graphic Pop
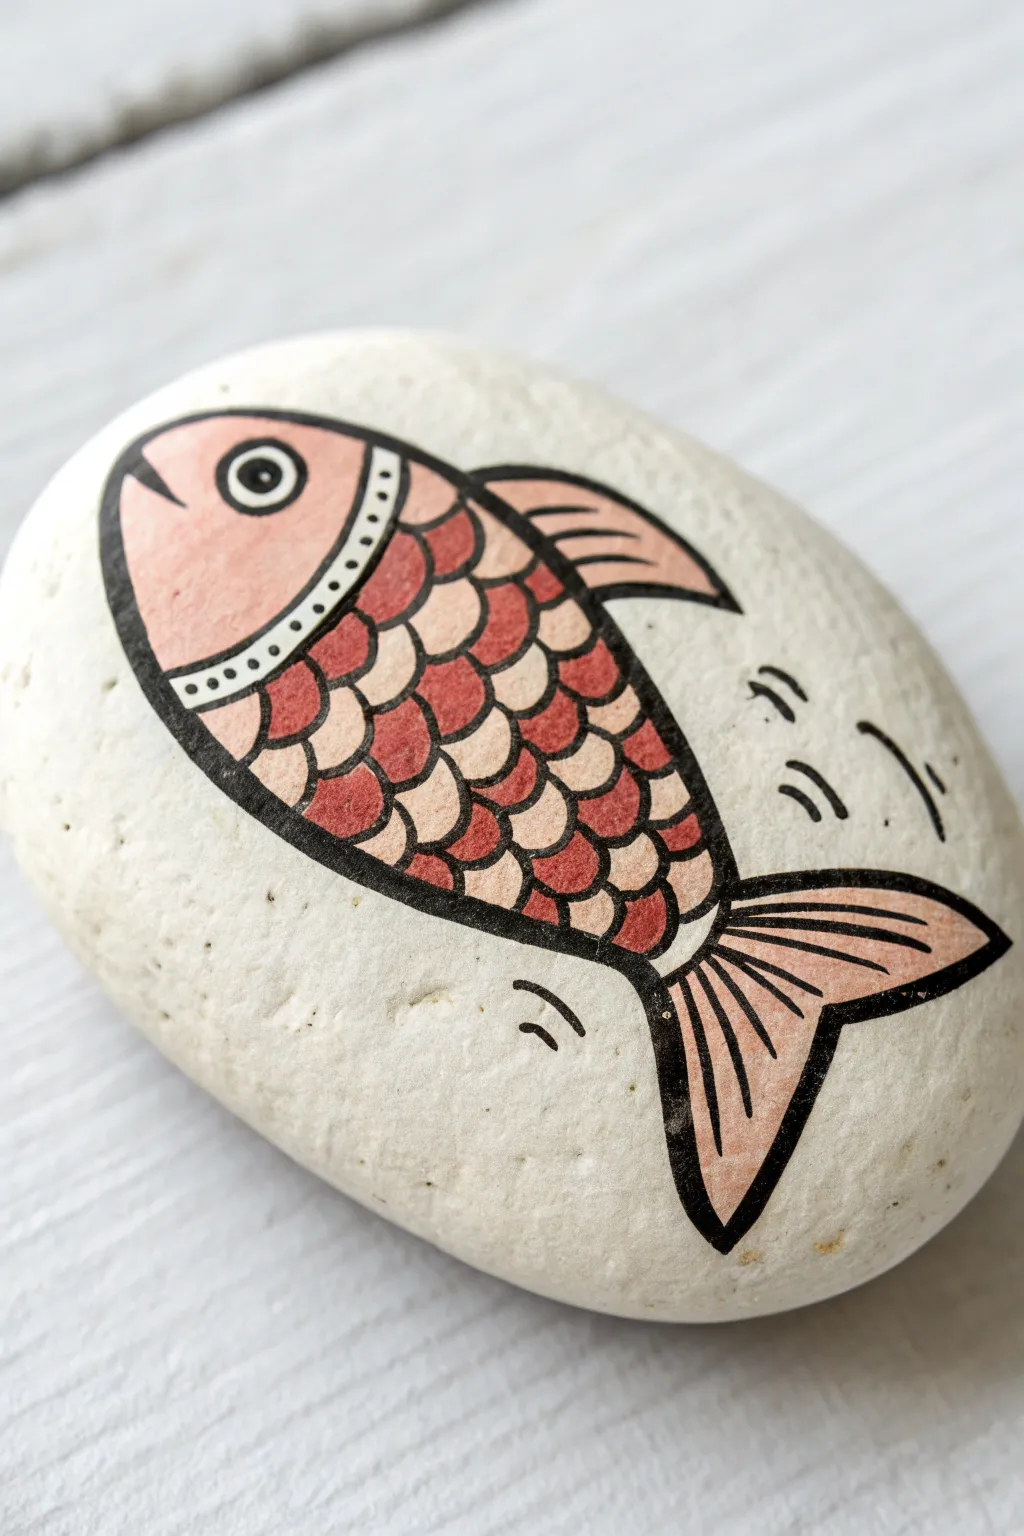
Achieve a bold, illustrative look with this folk-art inspired fish design that uses crisp black outlines to make soft coral pinks pop. The smooth white background of the stone acts as the perfect canvas for a clean, graphic finish that feels both modern and handmade.
How-To Guide
Materials
- Smooth, flat oval rock (river rock preferred)
- White acrylic paint or gesso
- Coral pink acrylic paint
- Deep reddish-brown or burgundy acrylic paint
- Light peach or pale pink acrylic paint
- Fine grit sandpaper (optional)
- Wide flat paintbrush
- Fine detail paintbrush (size 0 or 1)
- Black paint pen (fine and medium tip) or liner brush with black paint
- Spray varnish or sealant (matte or satin finish)
Step 1: Preparing the Canvas
-
Select the perfect stone:
Look for a stone that is naturally smooth and has a nice oval shape, mimicking the body of a fish. If your rock has rough spots, give it a quick rub with fine-grit sandpaper to smooth it out. -
Clean the surface:
Wash the rock thoroughly with soap and water to remove any dirt or oils, then let it dry completely. Paint adheres much better to a clean surface. -
Prime the background:
Using a wide flat brush, apply a coat of white acrylic paint or gesso over the entire top surface. Let it dry, then apply a second coat to ensure an opaque, solid white base.
Steady Hand Trick
Rest your pinky finger on the dry part of the rock while drawing outlines. This anchors your hand, giving you much better control for smooth curves.
Step 2: Sketching and Outlining
-
Draft the fish shape:
Lightly sketch the outline of the fish using a pencil. Start with a large oval for the body that tapers slightly at the tail end. -
Add simple fins:
Draw a curved triangle on the top for the dorsal fin and a forked shape at the back for the tail. Keep the lines simple and stylized rather than realistic. -
Draw the main black outline:
Using a medium-tip black paint pen (or a liner brush with black paint), trace over your pencil sketch. I like to make this outer line slightly thicker to really frame the design. -
Define the head:
Draw a curved line inside the body, about one-third of the way from the front, to separate the head from the body. This creates the ‘collar’ area.
Step 3: Adding Color and Scales
-
Paint the head:
Fill in the head section with your light peach or pale pink paint. Use a small detail brush to stay neatly within the black lines. -
Base coat the fins:
Paint the dorsal fin and tail with the same light peach color used for the head. -
Create the scale grid:
Once the paint is dry, use a pencil to lightly sketch a grid of curved scales across the main body section. -
Paint the dark scales:
Using the deep reddish-brown or burgundy paint, fill in alternating scales to create a checkerboard effect. -
Paint the light scales:
Fill the remaining empty scales with the coral pink paint. The contrast between the two pink tones gives the fish nice dimension. -
Outline the scales:
This is the crucial step for that graphic pop. Carefully trace around each individual colored scale with your fine-tip black pen.
Metallic Accent
Swap the pale pink paint for a metallic rose gold or copper. It adds a beautiful shimmer to the fins and head that catches the light.
Step 4: Final Details
-
Detail the collar:
Add a thin white strip or leave a gap along the curved line separating the head and body. Use your black pen to add small dots inside this strip for extra decoration. -
Add the eye and mouth:
Paint a white circle for the eye, outline it in black, and add a center black dot. Draw a simple slanted line at the front for the mouth. -
Texture the fins:
Draw three or four curved lines inside the top fin and tail fin to suggest ribbing or texture. -
Add movement lines:
Draw a few small, curved motion lines in the white space around the fish’s tail and belly to make it look like it’s swimming. -
Seal the artwork:
Allow the rock to dry for at least 24 hours. Finish with a spray varnish to protect the paint and give it a professional sheen.
Now you have a striking piece of stone art that looks great on a desk or hidden in the garden for someone to find
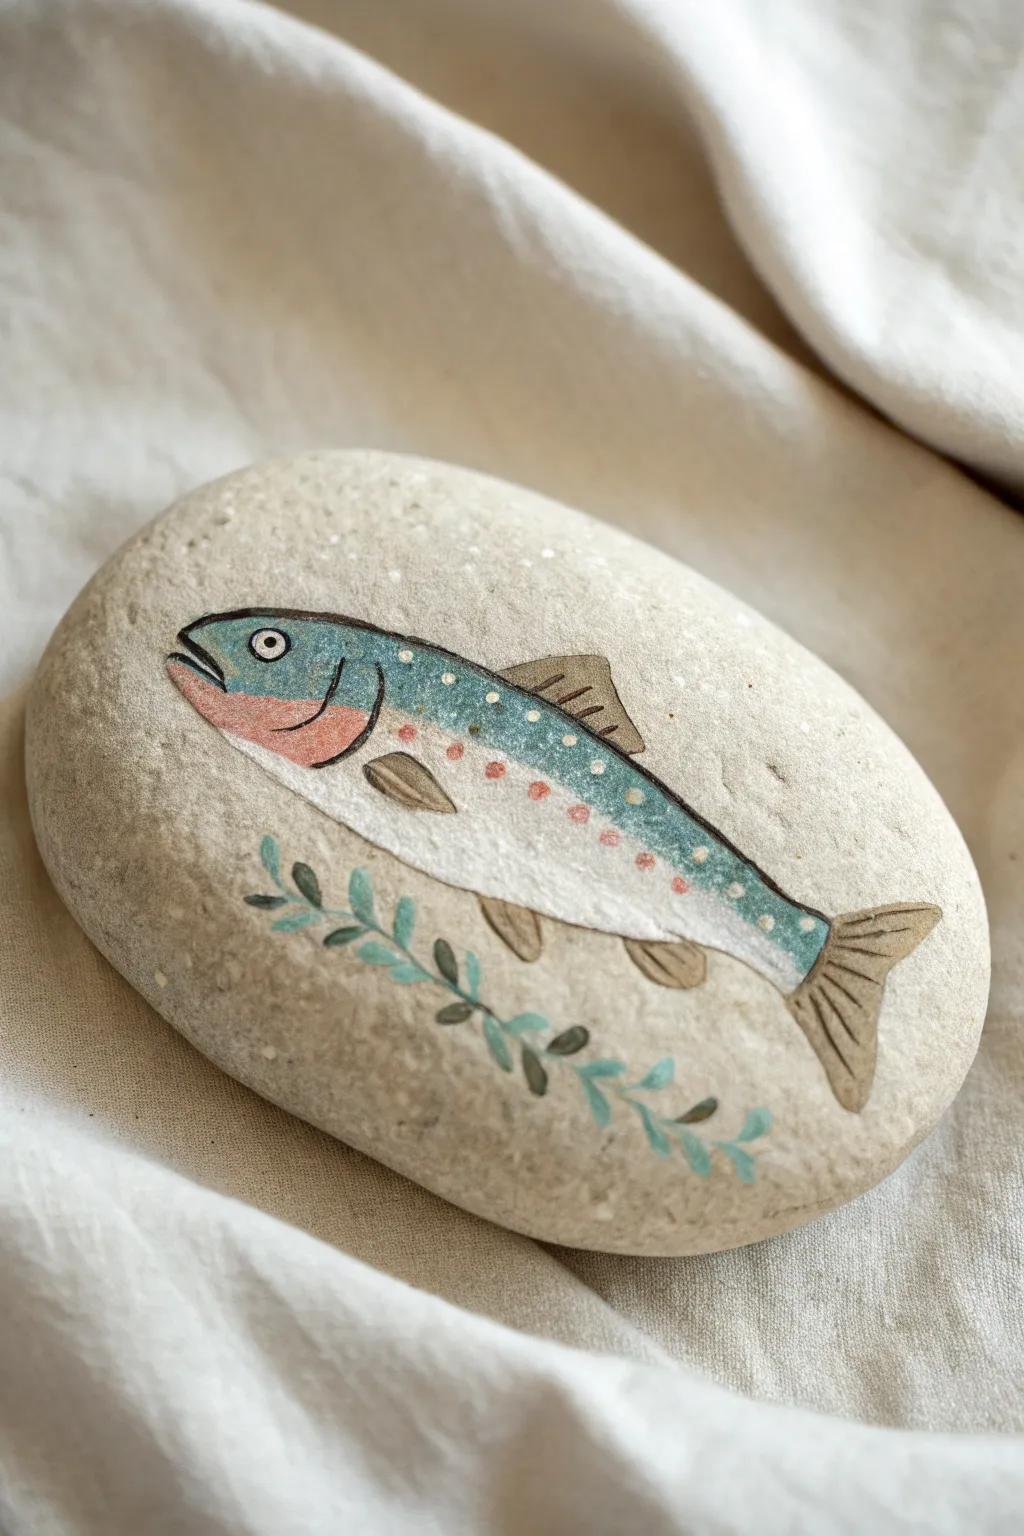
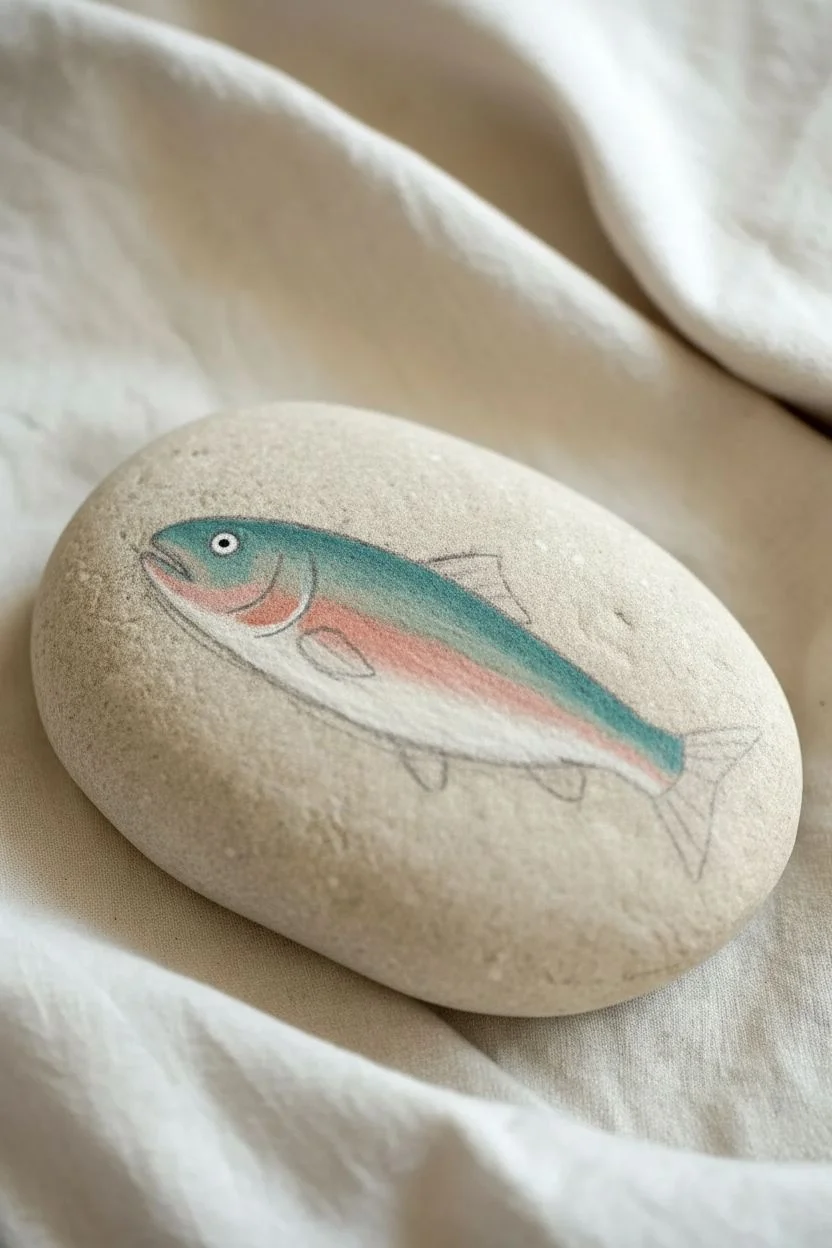
Ombre Fish Body With a Soft Gradient
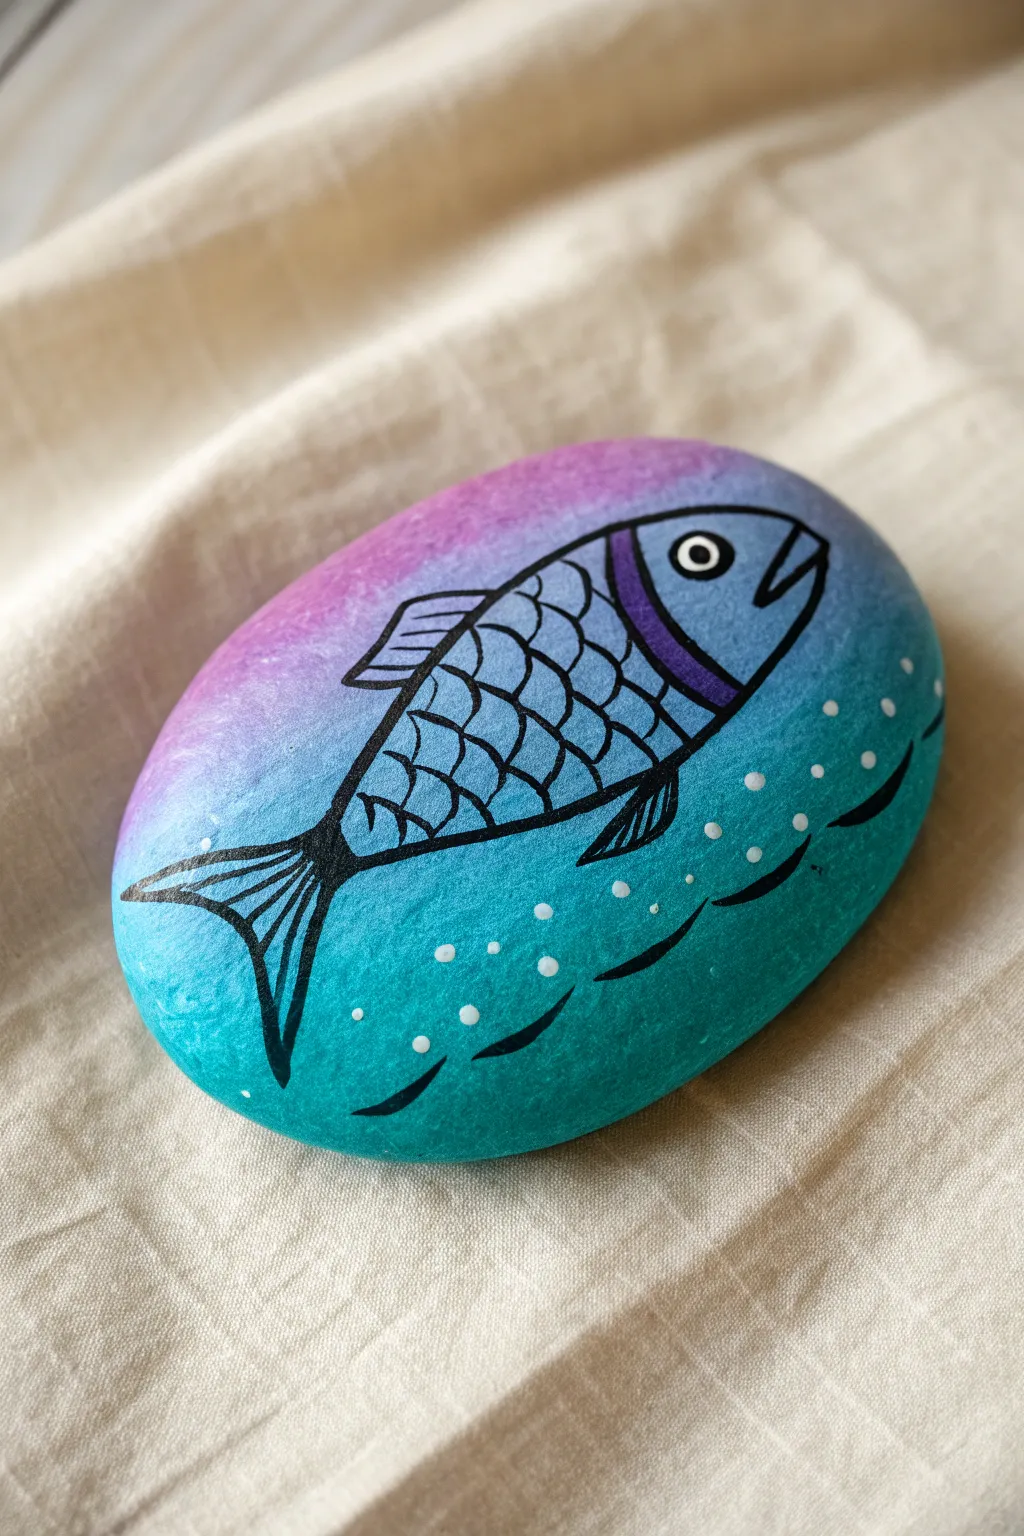
This serene rock painting project captures the calm of the ocean with a stunning three-color gradient background. The bold black line work of the fish contrasts beautifully against the soft blend of purple, blue, and teal.
Step-by-Step Guide
Materials
- Smooth, oval river rock (cleaned and dried)
- Acrylic paints: Purple, Royal Blue, Teal, White, and Black
- Flat shader brush (medium size)
- Fine liner brush or black paint pen (0.5mm or 0.7mm)
- Dotting tool or toothpick
- Cup of water and paper towels
- Spray varnish or sealant
Step 1: Creating the Ombre Background
-
Base coat:
Start by painting the entire top surface of your rock with a coat of white acrylic paint. This primer layer ensures your gradient colors will pop and look true to tone. Let it dry completely. -
Top section:
Load your flat brush with purple paint. Apply this color to the top third of the rock, brushing horizontally to cover the curve. -
Middle section:
Without washing the brush fully—just wipe off the excess purple—load it with royal blue. Paint the middle third of the rock, slightly overlapping the bottom edge of the purple section. -
Bottom section:
Clean your brush and pick up the teal paint. Apply this to the bottom third of the rock, bringing it up to meet the blue section. -
Blending the seams:
While the paint is still slightly wet, use a clean, slightly damp flat brush to gently stroke back and forth horizontally over the lines where colors meet. This softens the transition for that dreamy ombre effect. -
Drying time:
Allow the gradient background to dry thoroughly. This step is crucial; if the base is wet, your black lines will bleed.
Fixing Wobbly Lines
If your black outline gets shaky, wait for it to dry completely. Then, use a tiny brush with the background color to carefully paint over the mistake.
Step 2: Designing the Fish
-
Outline the body:
Using a fine liner brush with thinned black paint or a black paint pen, draw the main oval shape of the fish body. It should angle slightly upward, resembling a football shape. -
Add the tail:
Draw the tail fin at the back. Create two sweeping curves that flare outward, then connect them with a slightly varying line. Add internal lines to give the fin texture. -
Define the head:
Draw a curved vertical line to separate the head from the body. Add a small stripe of purple paint just behind this line for a pop of color, then outline that stripe in black. -
Facial features:
Draw a small white circle for the eye with a black dot in the center. Add a simple V-shape for the mouth at the front of the face.
Scale Up
Make the scales shimmer by mixing a tiny bit of silver metallic paint into the blue or purple you paint over the body before adding the black outlines.
Step 3: Adding Details and Finishing Touches
-
Draw the scales:
Fill the body section with a pattern of U-shaped scales. Start from the head line and work your way back toward the tail. I find it easiest to stagger these like bricks for a natural look. -
Fins:
Add a dorsal fin on top and a pectoral fin on the bottom using simple geometric shapes filled with straight lines. -
Ocean current:
Paint a few black, wavy lines underneath the fish to suggest movement and water currents. -
Bubbles:
Dip a dotting tool or the tip of a toothpick into white paint. Add small dots of varying sizes around the fish, concentrating them near the tail and the water lines. -
Final texture:
If needed, go back and thicken the outer outline of the fish slightly to verify it stands out against the colorful background. -
Seal:
Once your artwork is completely dry—give it at least an hour—apply a spray varnish to protect the paint and give the rock a polished sheen.
Place this peaceful rock on your desk or hide it in a garden for someone to discover


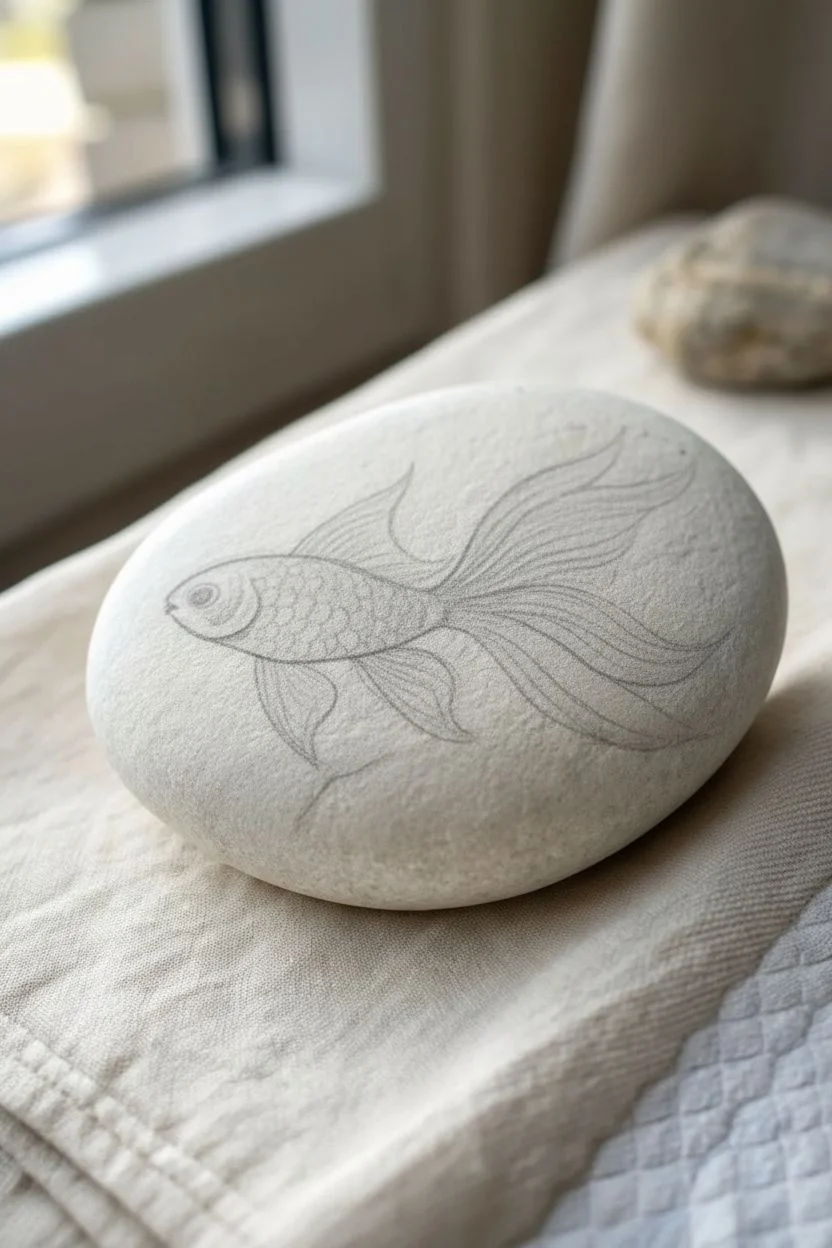
Realistic Goldfish With Gentle Shading
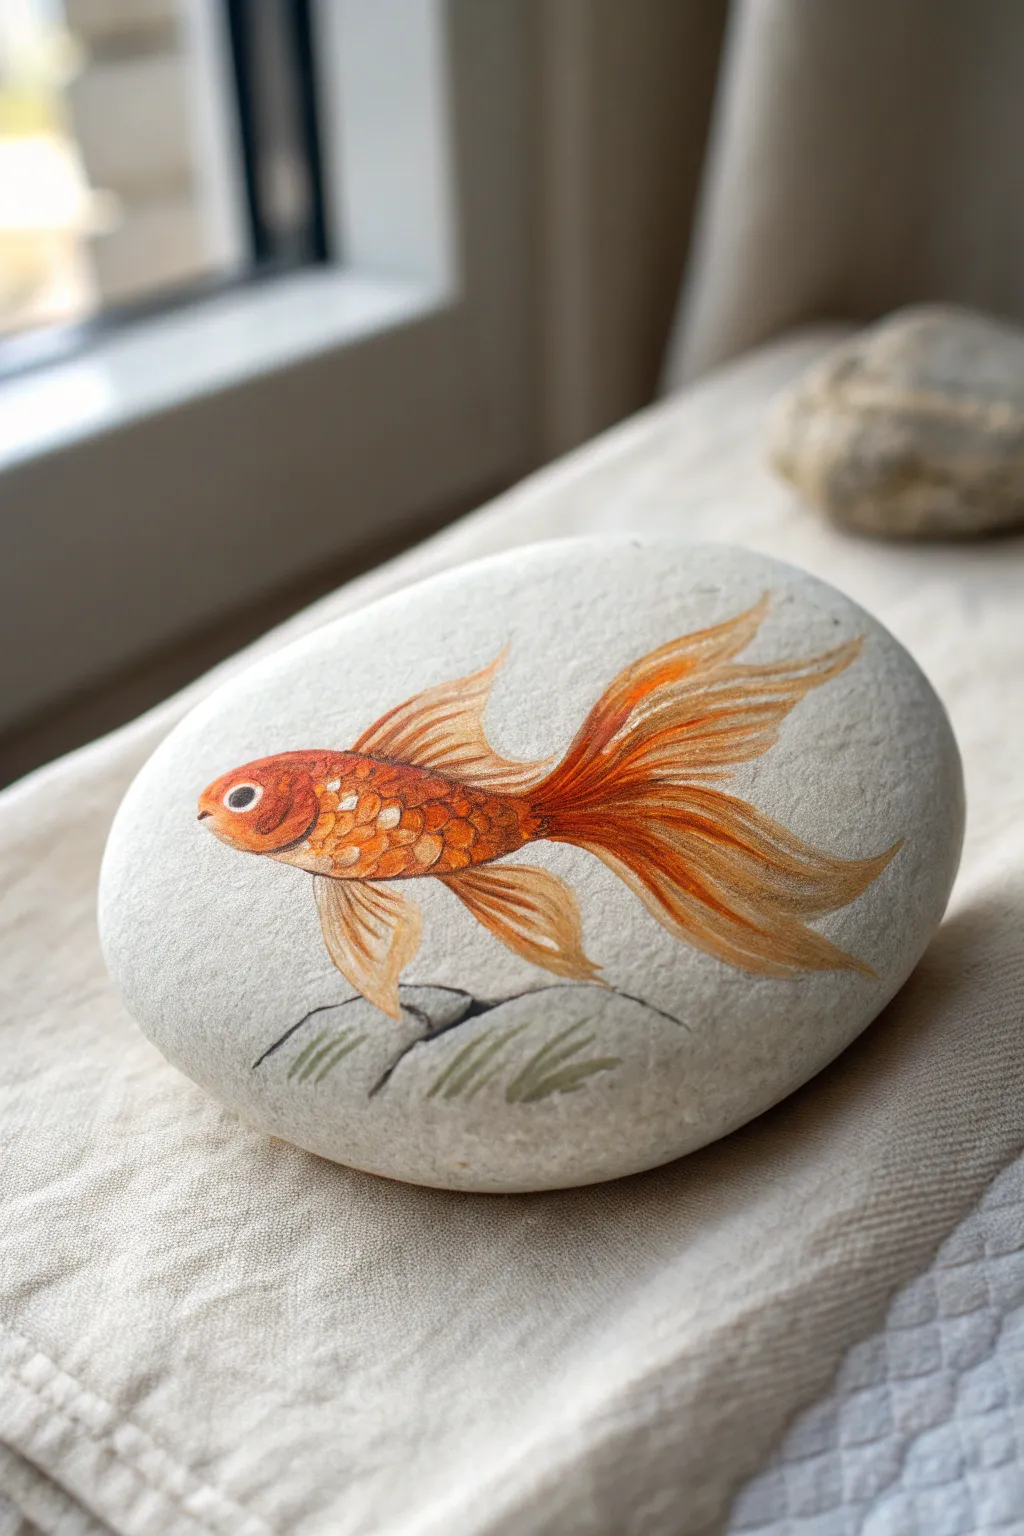
Capture the fluid elegance of aquatic life with this beautifully detailed goldfish painted on a smooth river stone. The soft shading and semi-transparent fin technique create a lifelike illusion, making it seem as though the fish is gliding right across the rock’s surface.
Detailed Instructions
Materials
- Smooth, oval-shaped river rock (cleaned and dried)
- Acrylic paints (Titanium White, Cadmium Orange, Burnt Sienna, Yellow Ochre, Black, Olive Green)
- White Gesso (optional, for priming)
- Fine detail brushes (sizes 0, 00, and 1)
- Small flat shader brush (size 2)
- Palette or small plate
- Water cup and paper towels
- Pencil (HB or lighter)
- Matte or satin varnish/sealer
Step 1: Preparation & Sketching
-
Select the perfect canvas:
Choose a rock that is relatively flat and very smooth. Wash it thoroughly with soap and water to remove any dirt or oils, then let it dry completely. -
Prime the surface:
If your rock is dark or porous, apply a thin coat of white gesso or white acrylic paint to the area where you plan to paint the fish. This helps the bright orange colors pop later. -
Outline the form:
Lightly sketch the goldfish shape using a pencil. Start with an oval for the body, then add the sweeping, flowing lines for the dorsal (top) and caudal (tail) fins. Keep your pressure light to avoid engraving the stone.
Step 2: Base Colors
-
Block in the body:
Mix a vibrant orange using Cadmium Orange and a touch of Yellow Ochre. Paint the main body of the fish, leaving the eye area white. Apply two thin coats rather than one thick one for smoothness. -
First pass on fins:
Dilute your orange paint with a tiny bit of water to make a glaze. Gently paint the base of the fins, fading the color out as you move toward the tips to create a translucent effect. -
Define the belly:
While the orange is still slightly tacky, blend in a small amount of white along the bottom edge of the belly to give the fish a rounded, three-dimensional look.
Brush Control Pro-Tip
For the ultra-fine fin lines, mix a drop of water or flow medium into your paint. Inky consistency paint flows better off the brush than thick paint, giving you longer, uninterrupted strokes.
Step 3: Detailed Rendering
-
Create the scales:
Using your smallest detail brush and a mix of White and Yellow Ochre, carefully dab small, U-shaped overlapping scales on the middle and lower part of the body. I find it easiest to start near the tail and work forward. -
Deepen the shading:
Mix Burnt Sienna with a dot of Orange. Apply this darker shade along the top ridge of the fish’s back and at the base of the fins where they connect to the body to add volume. -
Refine the fins:
Use the size 0 brush to paint fine, flowing lines of Burnt Sienna radiating from the body through the fins. These lines simulate the fin rays. Keep your hand relaxed to get natural curves. -
Highlighting the fins:
Once the fin rays are dry, add delicate strokes of white or very pale yellow in between the darker rays, especially near the edges, to emphasize their gauzy texture. -
Paint the eye:
Paint a solid black circle for the pupil inside the reserved white eye space. Add an outer ring of Burnt Sienna or Orange. Once dry, place a tiny white dot in the black pupil for the ‘life spark’ reflection.
Level Up: Metallic Glint
Mix a tiny amount of metallic gold paint into your scale highlights. It won’t look metallic overall, but it will catch the light just like real fish scales when the rock is turned.
Step 4: Environment & Finish
-
Ground the subject:
Mix a light grey using White and a speck of Black. Paint a subtle, uneven rock shape directly underneath the fish so it isn’t floating in space. -
Add aquatic greenery:
Thicken slightly some Olive Green paint. With quick, upward flicking motions, paint a few wisps of seagrass growing out of the grey rock base. -
Cast a shadow:
Using a very watered-down grey or black (a wash), paint a faint shadow under the fish on the rock base to anchor the weight of the creature. -
Final highlights:
Check the fish for any dull areas. Add a final crisp white highlight on the top of the gill cover and the upper lip to make it look wet and shiny. -
Protect your work:
Allow the rock to dry for at least 24 hours. Apply a coat of matte or satin varnish to seal the paint and protect it from scratches or moisture.
Place your finished stone near a sunny window or in a garden nook to let your little fish swim in the light
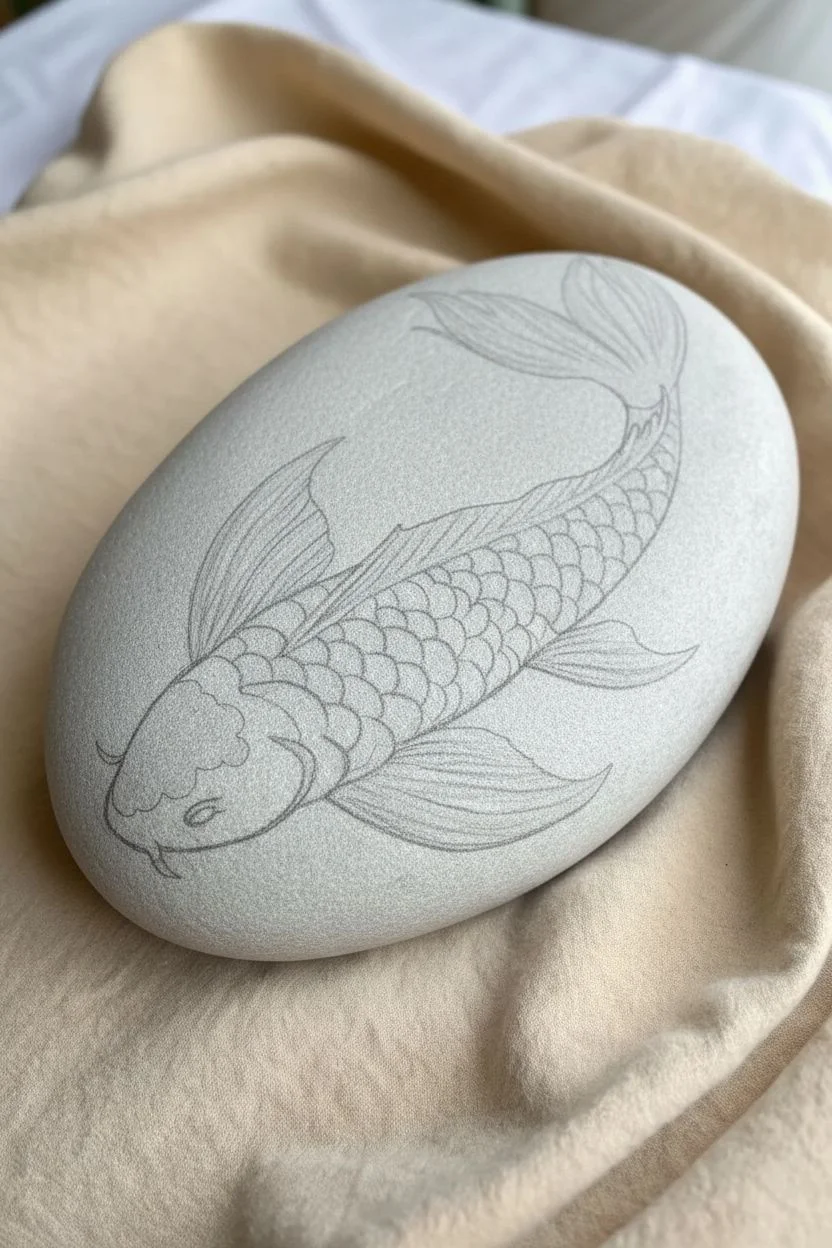
Koi Fish With Wraparound Fins
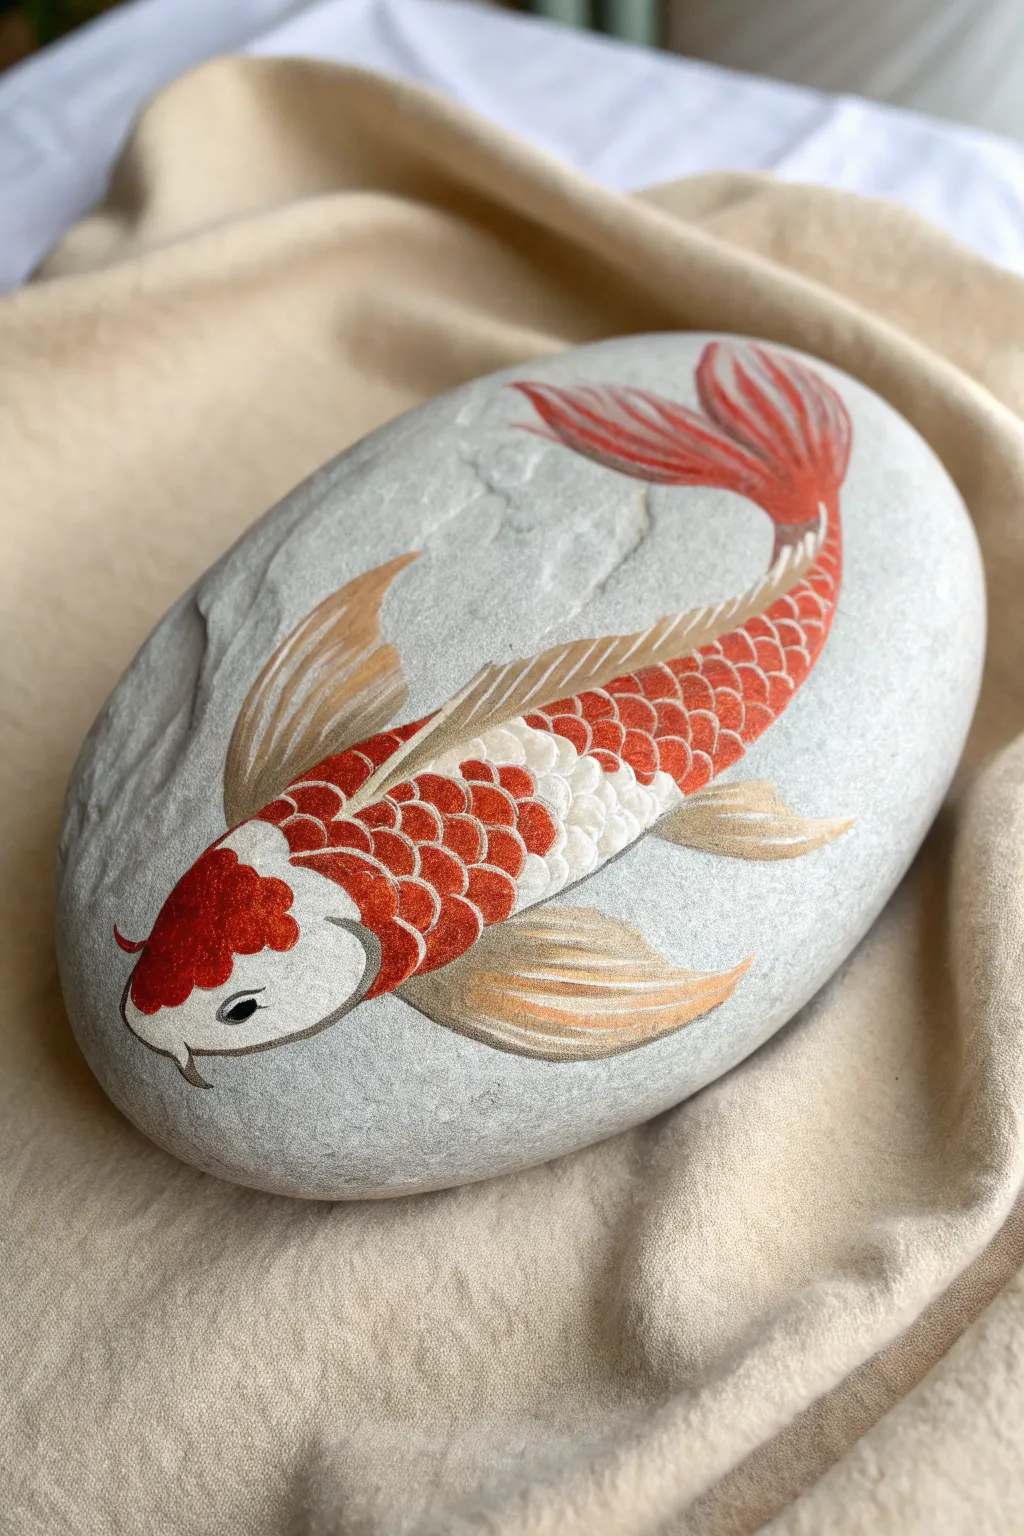
Transform a simple river rock into a serene pond scene with this elegant koi fish design. By following the natural curvature of the stone, the fish appears to be swimming effortlessly across the surface, complete with shimmering gold-tinged fins.
Step-by-Step Guide
Materials
- Smooth, oval river rock (light grey preferred)
- Acrylic paints (Titanium White, Cadmium Red, Metallic Gold/Bronze, Black)
- Fine liner brushes (size 00 or 000)
- Small flat brush or filbert brush
- Pencil and eraser
- Spray varnish or gloss sealant
- Palette
- Water cup and paper towel
Step 1: Sketching the Shape
-
Select the perfect stone:
Choose a smooth, pale grey stone with a slightly elongated oval shape. Wash it thoroughly with soap and water, then let it dry completely before starting. -
Map out the curve:
Using a pencil, lightly draw a curved ‘S’ shape that flows from one end of the rock to the other. This guide line will be the spine of your fish, helping it look like it’s turning in the water. -
Outline the body:
Sketch the teardrop-shaped head at the wider end of your curve. Continue drawing the body, tapering it down towards the tail, following your spine line. -
Add fin placement:
Sketch large, flowing pectoral fins on either side of the body. Draw a long dorsal fin along the back and a bifurcated tail fin that fans out at the end.
Step 2: Base Coating
-
Paint the white base:
Load a small flat brush with Titanium White. Fill in the entire shape of the fish’s body, avoiding the fins for now. You may need two thin coats to get a solid, opaque white against the grey rock. -
Block in the red patches:
Once the white is dry, identify where the red markings will go. Paint a large patch on the head and a distinct, elongated patch along the upper back using Cadmium Red. -
Base the fins:
Mix a very translucent wash of Metallic Gold or Bronze with a touch of white. Paint the tail and side fins with this mixture, keeping it semi-transparent so the rock texture peeks through slightly.
Scale Perfection
Paint your scales starting from the tail and moving toward the head. This layering technique mimics how real fish scales overlap naturally.
Step 3: Detailed Scale Work
-
Start the scale outlines:
Switch to your finest liner brush. Using a thinned white paint, carefully paint small ‘U’ shapes over the red patches to create scales. The white overlap makes the red look embedded. -
Define the white scales:
For the white sections of the body, use a very light grey (mix white with a tiny dot of black) to paint subtle ‘U’ shaped shadows, defining the scales without making them too dark. -
Deepen the red scales:
Go back into your red patches. I like to add a tiny dab of darker red or orange at the base of each scale to give the body dimension and a textured appearance.
Shadow Play
Paint a very faint, watery grey shadow on the rock directly underneath the fish’s belly. It lifts the fish off the surface for a 3D effect.
Step 4: Fins and Facial Features
-
Texturize the fins:
Using thin white lines, paint delicate streaks flowing from the body outward to the tips of the fins. Add a few streaks of pure Metallic Gold for shimmer. -
Add the eye:
On the side of the head, paint a small black almond shape for the eye. Leave a tiny white dot in the upper corner for a reflection highlight. -
Define the face:
Use a very thin line of diluted black or dark grey to outline the gill cover (operculum) and the mouth area. Add two small barbels (askew whiskers) near the mouth. -
Highlight the red:
Mix a soft pink or light orange. Add tiny highlights to the top curves of the red scales on the head and back to suggest wetness and light hitting the fish.
Step 5: Finishing Touches
-
Clean up edges:
If any paint went outside the lines, use a damp brush to gently scrub it away or paint over it with a grey mix that matches your rock. -
Seal the artwork:
Allow the rock to cure for 24 hours. Finish with a spray varnish. A gloss finish looks best here as it makes the fish appear wet, like it’s actually underwater.
Now you have a tranquil piece of stone art perfect for a garden path or desk paperweight
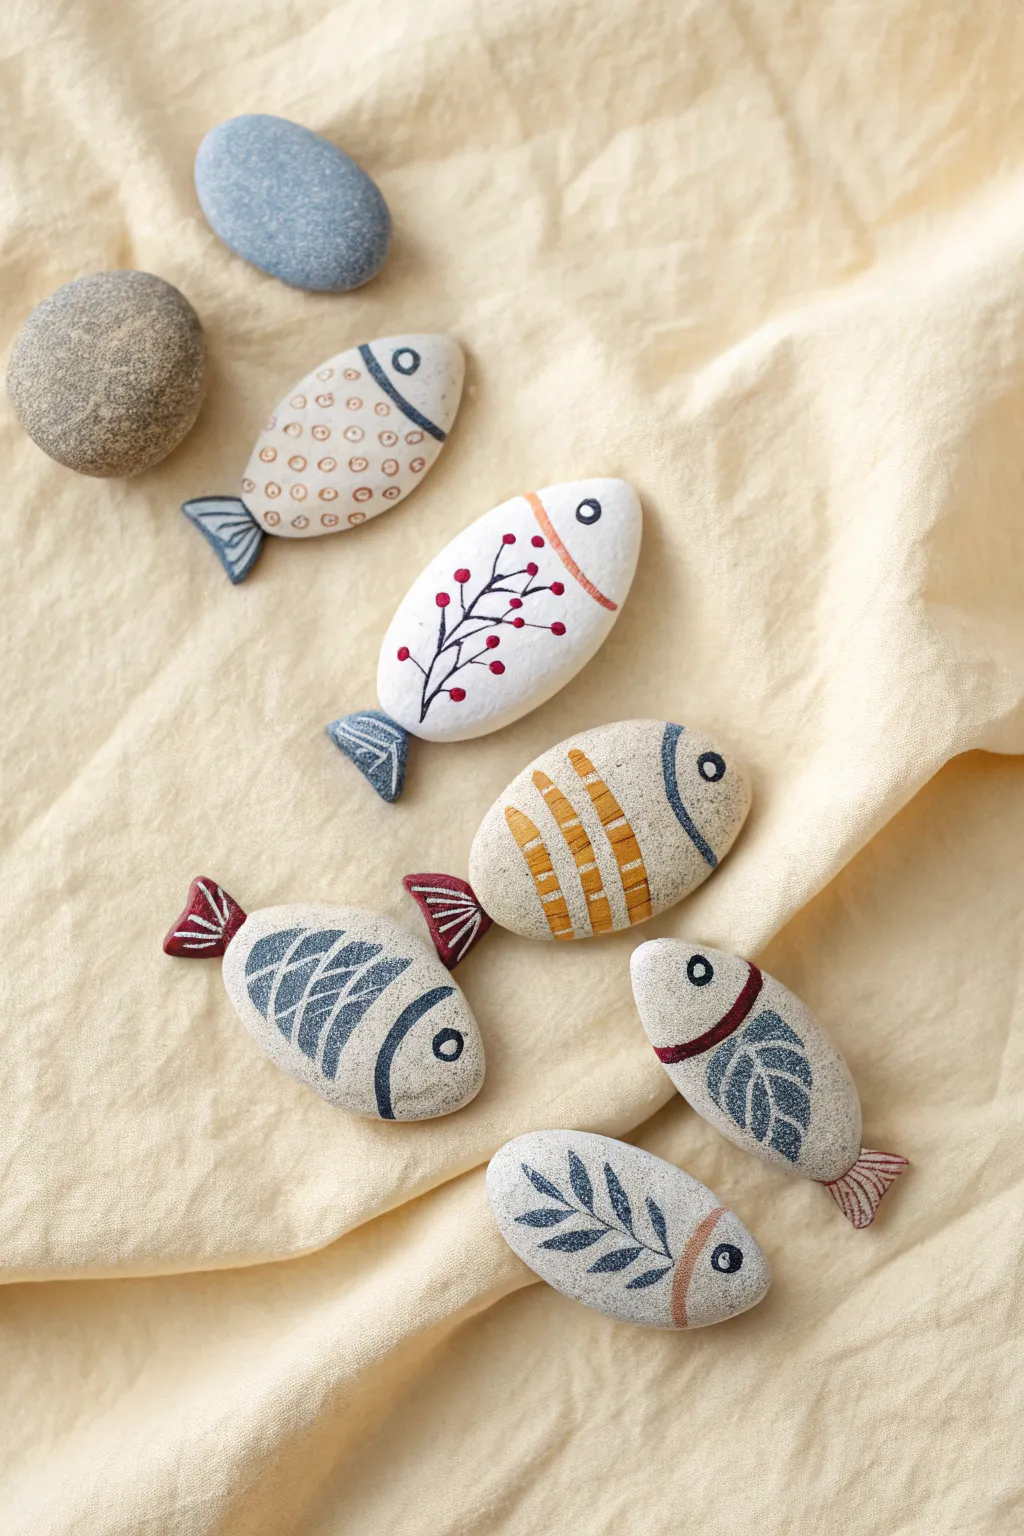
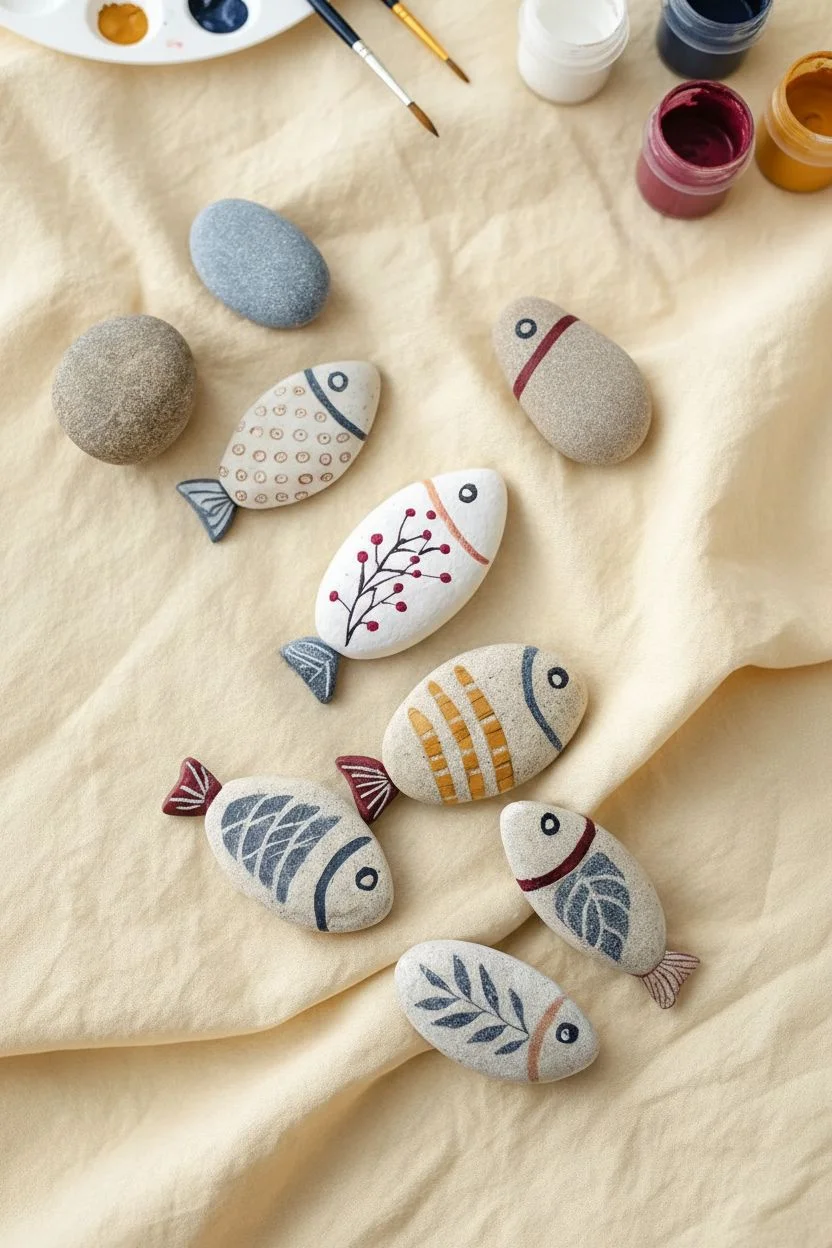
Mini School of Fish Using Small Pebbles
Transform smooth river stones into a charming school of decorative fish with delicate patterns and earthy tones. This simple project relies on the natural shape of the pebbles to suggest the fish bodies, using minimal lines and shapes to bring them to life.
How-To Guide
Materials
- Smooth, oval-shaped river rocks (various sizes)
- Acrylic paints (White, Navy Blue, Red/Burgundy, Mustard Yellow)
- Fine detail paintbrushes (Size 00 or 0)
- Stiff cardstock or foam sheet (for tails)
- Scissors
- Strong craft glue or E6000
- Matte varnish or sealant spray
- Palette for mixing
- Water cup and paper towels
Step 1: Preparing the Canvas
-
Stone selection:
Begin by sorting through your collection of stones. Look for smooth, elongated ovals that naturally mimic the profile of a fish. You will need six stones for this specific set, plus two regular round stones if you want to include the ‘bubbles’ seen in the inspiration photo. -
Clean surface:
Wash the stones thoroughly with warm soapy water to remove any dirt or grit, then let them dry completely. A clean surface is crucial for the acrylic paint to adhere properly. -
Base coat (Optional):
Most of these designs use the natural stone color as the background. However, for the bright white fish with the berry branch, paint the entire top surface of one oval stone with white acrylic paint. Apply two thin coats for opacity, letting the first dry before adding the second.
Step 2: Designing the Bodies
-
Pattern grouping:
Plan your designs before painting. Notice how the set includes different styles: scales, stripes, botanical motifs, and simple lines. It helps to lightly sketch your main dividing lines with a pencil first. -
Defining the heads:
On five of the stones, paint a curved line near one end to define the fish’s head area. Use colors like navy blue, red, or mustard yellow depending on the specific fish you are replicating. -
The striped fish:
For the yellow-striped fish, paint thick, slightly curved bands of mustard yellow across the body. Leave gaps of natural stone showing between the stripes to create texture. -
The berry branch fish:
On your white-painted stone, use a very fine brush and black or dark blue paint to draw a thin branch structure. Once dry, use the tip of a toothpick dipped in red paint to dot small berries along the branch tips. -
Simple scales:
For the top-left fish, use a fine brown or copper color to paint small circles or ‘u’ shapes across the body to mimic scales. Keep them loose and organic rather than perfectly gridded. -
Leaf pattern:
On the bottom-most fish, paint a central dark blue spine and add leaf-like veins branching out. This botanical style mimics a fish skeleton in an artistic way. -
Cross-hatch texture:
For the blue fish on the left, outline a leaf shape on the body in navy blue, then fill it with a diagonal cross-hatch pattern to suggest scales.
Paint Slipping?
If acrylic paint beads up or slips off the smooth stone surface, wipe the rock with rubbing alcohol first to remove natural oils, or scuff it very gently with fine sandpaper.
Step 3: Adding Details
-
Painting eyes:
Using white paint, add a small circle within the ‘head’ section of each fish. Once the white is dry, add a tiny black or navy dot in the center for the pupil. -
Refining lines:
Go back over your separating lines (between head and body) with a distinct color if needed. For example, the bottom fish has a mustard yellow band separating the head from the leaf-patterned body. -
Drying time:
Allow all paint to dry completely. Acrylics dry fast, but giving them an extra 15 minutes ensures you won’t smudge your fine lines during the assembly phase.
Add Dimension
Use a specialized ‘puff paint’ or 3D fabric paint for the eyes and the berry dots. This adds a tactile, raised texture that makes the details pop.
Step 4: Creating the Tails
-
Cut the shapes:
Cut small trapezoid or fan shapes out of stiff cardstock or foam. These should be proportionate to your stones—about 1/2 inch to 1 inch long depending on the fish size. -
Paint the tails:
Paint these tail pieces to match their corresponding fish. I find it easiest to paint a base color (like blue or red) and then add detail lines in white to mimic the fin’s rays. -
Attaching fins:
Apply a dab of strong craft glue to the narrow end of the tail cutout. Tuck it slightly under the back end of the stone and press firmly. Let the glue set according to the package instructions.
Step 5: Finishing Touches
-
Sealing:
To protect your artwork, apply a coat of matte varnish. A spray varnish works best here to avoid smearing the paint, especially if you used water-based markers for any details. -
Final arrangement:
Once fully dry, arrange your school of fish on a surface or glue them into a shadow box for display.
Arrange your completed school of fish on a windowsill or table runner to bring a touch of coastal calm to your home
Bubbles and Seaweed to Frame Your Fish
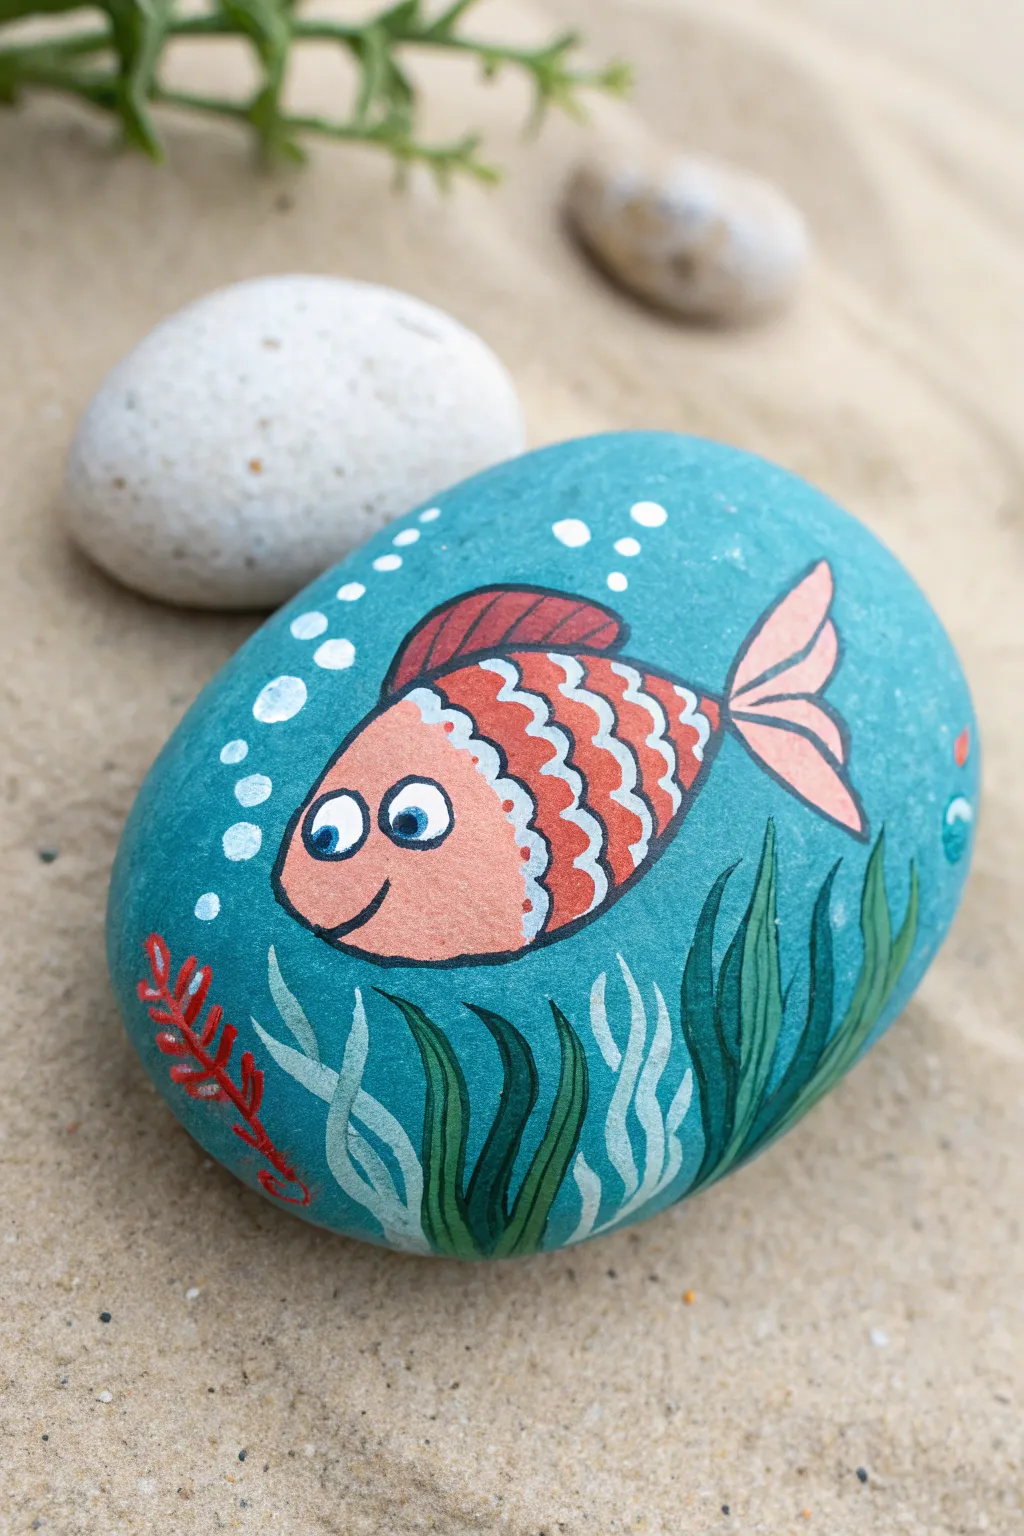
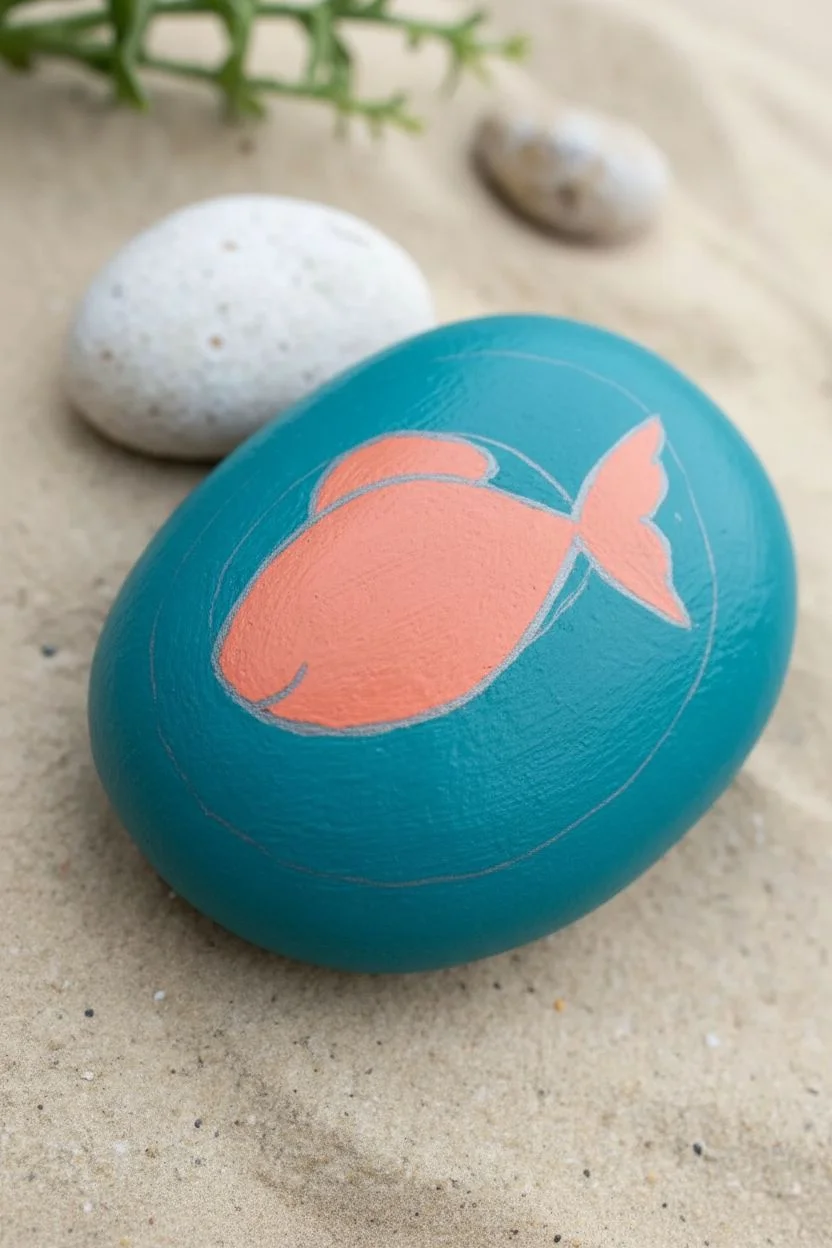
Transform a simple smooth stone into a vibrant underwater scene featuring a cute, wide-eyed fish swimming among swaying plants. The bright teal background makes the coral and white accents pop, creating a cheerful little pocket of the ocean.
Step-by-Step Guide
Materials
- Smooth, oval-shaped river rock
- Acrylic paints: Teal/Turquoise, White, Coral/Orange, Red, Dark Green, Light Green, Black
- Flat paint brush (medium size)
- Fine liner detail brush (size 0 or 00)
- Dotting tool or toothpick
- Pencil for sketching
- Gloss varnish or sealer
Step 1: Base and Sketch
-
Clean the canvas:
Begin by scrubbing your rock with soap and water to remove any dirt or oils. Let it dry completely in the sun or with a hairdryer before starting. -
Apply the background:
Using a flat brush, coat the entire top surface of the rock with a rich teal or turquoise acrylic paint. You might need two coats to get a solid, opaque finish. Allow the first coat to dry fully before applying the second. -
Outline the fish:
Once the background is bone-dry, lightly sketch the shape of your fish with a pencil. Draw a large oval for the body in the center, tilting it slightly upward. -
Block in color:
Fill in the main body of the fish using a coral or soft orange paint. Don’t worry about the details yet; just get a solid base color down for the fish shape.
Uneven Lines?
If your black outlines look shaky, thin your black paint slightly with a drop of water. Ink-like consistency flows smoother off the liner brush.
Step 2: Painting the Fish Details
-
Add fins and tail:
Paint a dorsal fin on top using a darker red shade. Then, paint a split tail fin at the back and a small pectoral fin on the side using a lighter pinkish-orange or by mixing white into your coral paint. -
Create the scales:
Using your fine liner brush and white paint, carefully draw scalloped lines across the fish’s body to create rows of scales. Start from the head area and work your way back toward the tail. -
Define the head:
Draw a curved white line to separate the fish’s face from its scaly body. This defines the gill area and giving the face a smooth look. -
Paint the eyes:
Paint two circles for the eyes using white paint. The circle closer to the front should be slightly overlapping the one behind it. Let the white dry completely. -
Add pupils and smile:
Using a very fine brush or a dotting tool, place blue dots inside the white eyes for irises, followed by tiny black pupils. Use the black liner paint to draw a simple curved smile and verify the outline of the eye. -
Outline the body:
With a steady hand and thin black paint, outline the entire fish, the fins, and the separation line between the head and body to make the character pop against the blue background.
Step 3: Adding the Environment
-
Paint dark seaweed:
Mix a dark green shade. With your liner brush, paint long, wavy blades of seaweed starting from the bottom right and curving upward. Vary the lengths to make it look natural. -
Add visual depth:
Using a lighter, minty green or white mixed with a touch of green, paint wispy seaweed strands in the background area behind the dark green plants. This layering creates depth. -
Create red coral:
On the bottom left side, paint a small, branching coral structure using bright red paint. Use short, deliberate strokes to mimic the organic growth of coral. -
Dot the bubbles:
Dip a dotting tool or the back end of your paintbrush into white paint. Stamp a series of bubbles rising from the fish’s mouth to the top of the rock. Make the lower bubbles slightly larger and the upper ones tiny dots. -
Highlight the bubbles:
For a realistic touch, once the large bubbles are dry, you can add a tiny speck of grey or blue in the center of the largest white circles to make them look transparent. -
Final touches:
Check your seaweed for any transparent spots and add a second coat if needed. I like to add tiny white highlight lines on the darkest seaweed blades to show light reflection. -
Seal the artwork:
Allow the entire rock to cure for at least 24 hours. Finish by applying a coat of clear gloss varnish to protect the paint and give the water background a wet, shiny look.
Add Sparkle
Mix a tiny amount of iridescent glitter medium into your white paint for the bubbles. They will shimmer like real air pockets under the light.
Place your finished rock in a garden planter or on a desk to bring a splash of seaside joy to your day
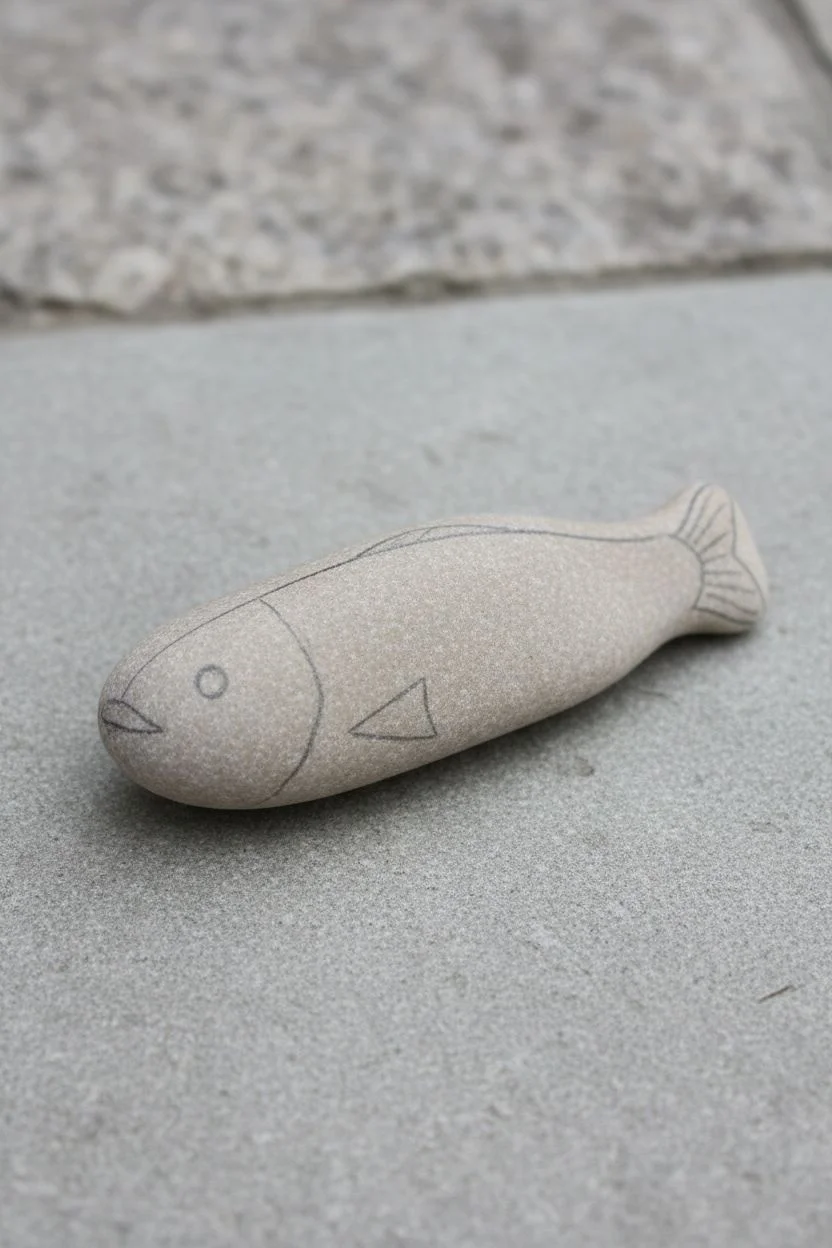
Dot-Painted Fish Scales
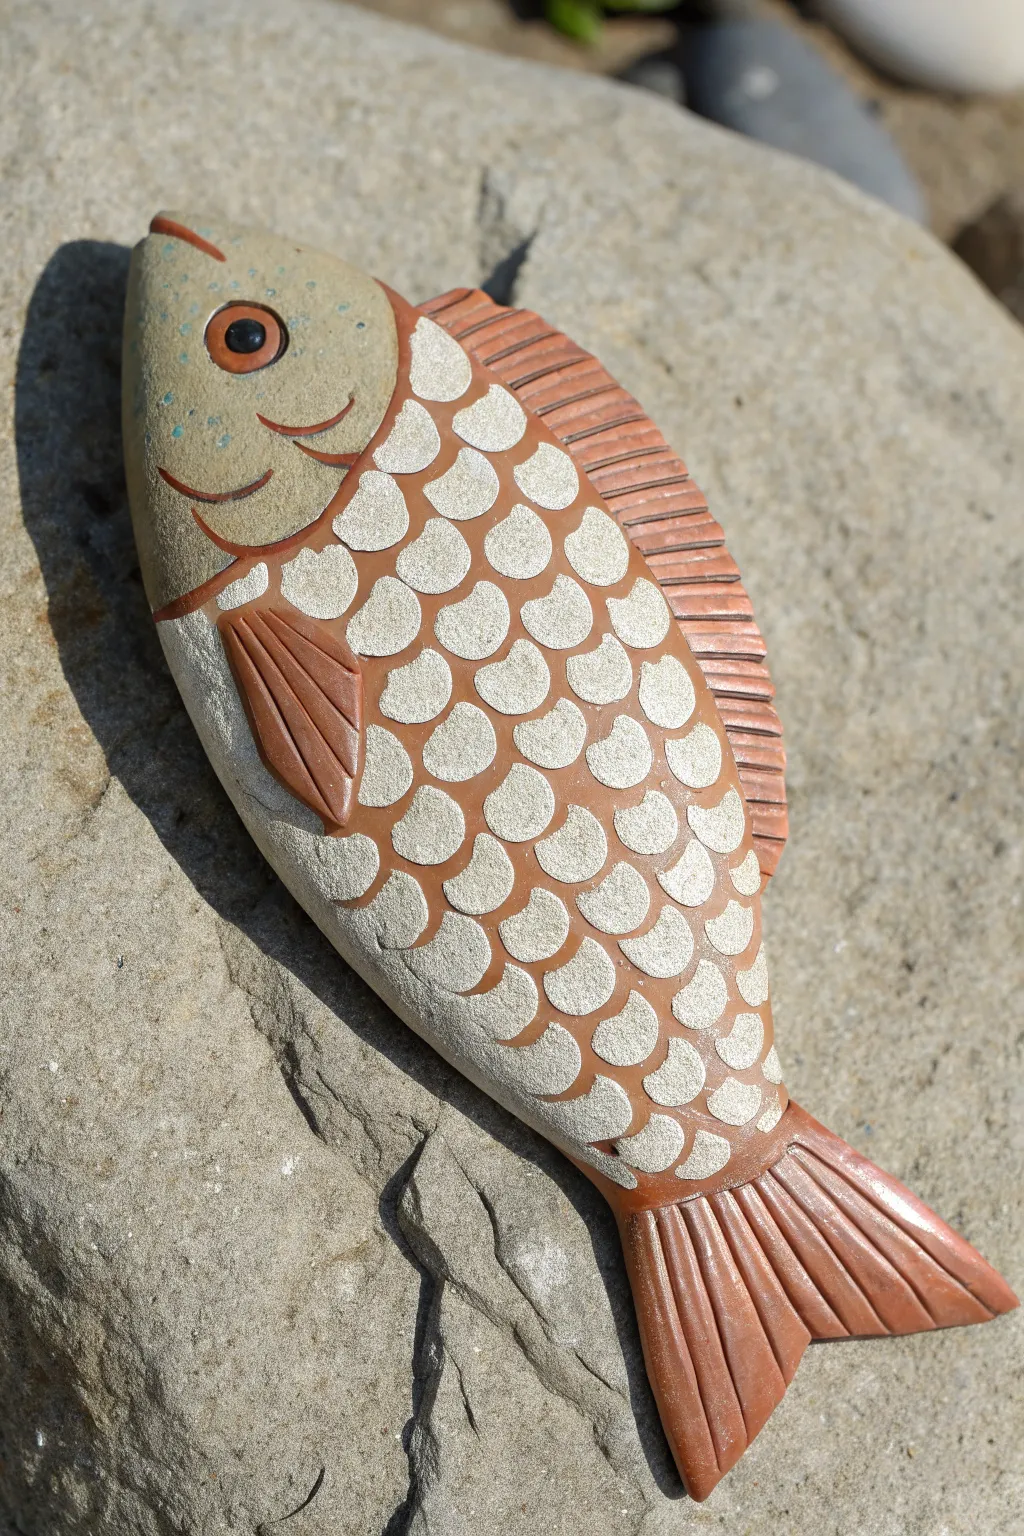
Transform a simple river rock into a textured, semi-relief fish sculpture by combining natural stone with polymer clay accents. This project mixes the raw beauty of the rock’s surface with carefully sculpted clay scales and fins for a striking 3D effect.
Step-by-Step
Materials
- Smooth, elongated river rock (approx. 4-6 inches)
- Terracotta or rust-colored polymer clay
- Sculpting tools (needle tool, small ball stylus)
- Liquid polymer clay (Bake and Bond)
- Acrylic paints (black, white, light teal/blue)
- Small detail paintbrushes
- Matte varnish or sealant
- Oven for baking
- Rubbing alcohol
Step 1: Preparation and Planning
-
Clean surface:
Scrub your chosen rock thoroughly with soap and water to remove any dirt or oils that might prevent clay adhesion. Wipe it down with a little rubbing alcohol and let it dry completely. -
Plan the anatomy:
Visualize where the fish head and tail will sit. The naturally rounded end of the stone works best for the head, while the tapering end is perfect for attaching the clay tail.
Step 2: Sculpting the Clay Elements
-
Apply adhesive:
Identify the areas where you will add clay—the tail, dorsal fin, pectoral fin, and the outline of the head. Dab a thin layer of liquid polymer clay onto these specific spots to act as a strong glue. -
Form the tail:
Roll a piece of terracotta clay into a cone, flatten it, and shape it into a fan. Press it firmly onto the tapered end of the rock, smoothing the clay onto the stone for a seamless join. -
Detail the tail:
Use a needle tool or knife to carve deep, radiating lines into the tail fin to simulate the ribbed texture of fish fins. -
Add the dorsal fin:
Create a long, thin strip of clay for the top fin. Press it along the upper ridge of the stone, tapering it towards the tail, and carve vertical lines to match the tail texture. -
Create the head outline:
Roll a very thin snake of clay. Lay this curve on the front third of the rock to define the gill line, separating the head from the body. Flatten it slightly so it isn’t too bulky. -
Sculpt the side fin:
Shape a small triangle of clay for the pectoral fin. Attach it just behind the gill line, adding similar grooved textures as the other fins. -
Define the eye:
Roll a small ring of clay and press it onto the head area to form the eye socket. Smooth the edges so it feels integrated into the stone.
Adhesion Trick
If the clay isn’t sticking to the smooth rock, rough up the contact points slightly with sandpaper before applying the liquid clay.
Step 3: Creating the Scale Mesh
-
Lay the grid:
Instead of individual scales, roll very thin threads of clay. Create a mesh or net pattern over the body of the fish, leaving the natural stone visible inside each ‘scale’ shape. -
Refine the shape:
Press the intersection points of your clay lattice gently to flatten them. The goal is to make the stone look like it is peeking through a terracotta net. -
Add facial details:
Add tiny clay snakes for facial details, such as a curved mouth line and a small eyebrow ridge above the eye socket.
Make it Sparkle
Mix a tiny amount of gold mica powder into your varnish for the fins only. This gives them a sun-kissed, wet shimmer.
Step 4: Baking and Painting
-
Bake the project:
Place your rock on a baking sheet. Follow the specific temperature and timing instructions on your package of polymer clay. Be careful removing it, as the stone will retain heat for a long time. -
Cool down:
Let the stone cool completely before starting any painting. This ensures the clay is fully set and the paint won’t dry too instantly on a hot rock. -
Paint the eye:
Using a fine brush, paint the inside of the eye ring black. Add a tiny white dot toward the top right of the black circle to create a lifelike reflection. -
Add head spots:
Dip a toothpick or small dotting tool into light teal or blue paint. Add tiny, subtle freckles to the top of the stone head area for added texture. -
Highlight the scales:
Dry brush a tiny amount of off-white or light beige paint onto the exposed stone sections inside your clay grid. I encourage you to be very light-handed here; you want to highlight the rock’s texture, not cover it opaque. -
Seal:
Protect your work with a coat of matte varnish, which preserves the natural look of the stone while protecting the clay and paint.
Display your swimmingly good creation in a garden bed or use it as a charming paperweight
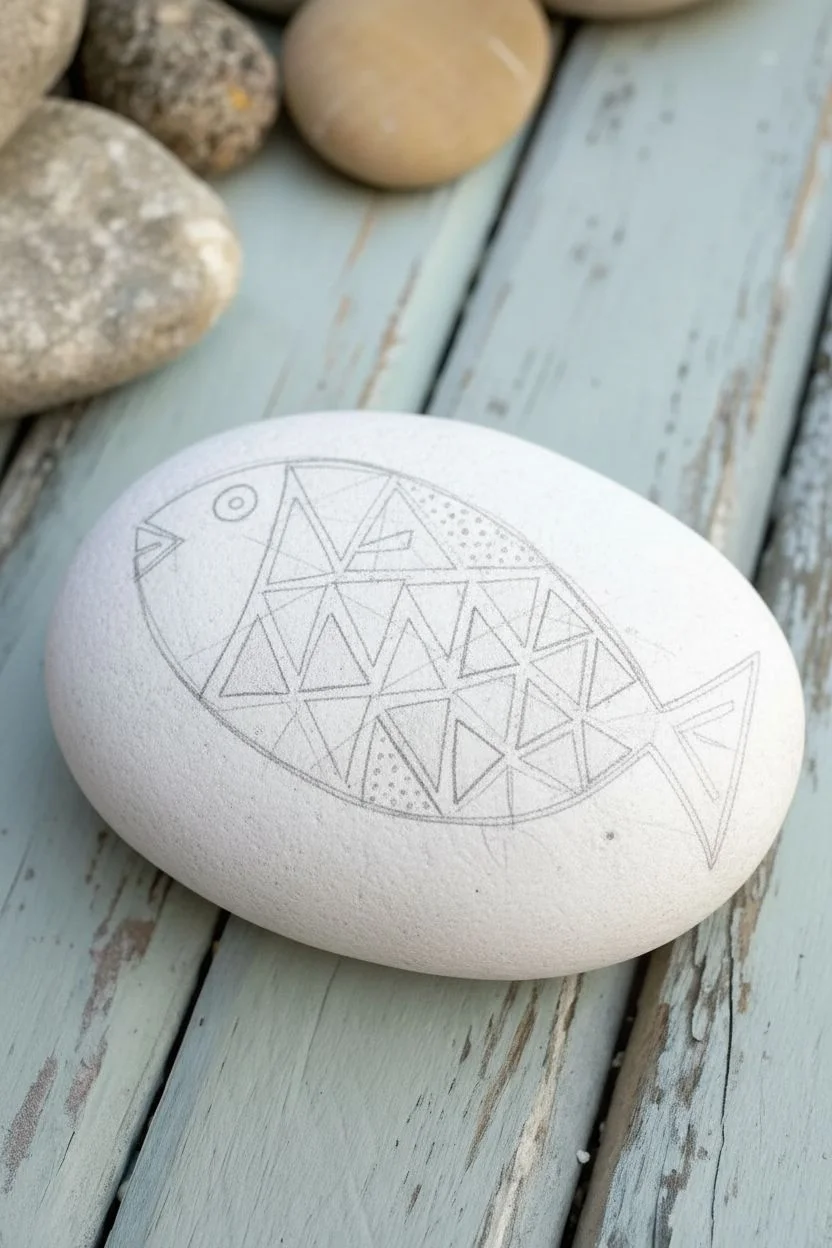
Geometric Mosaic Fish
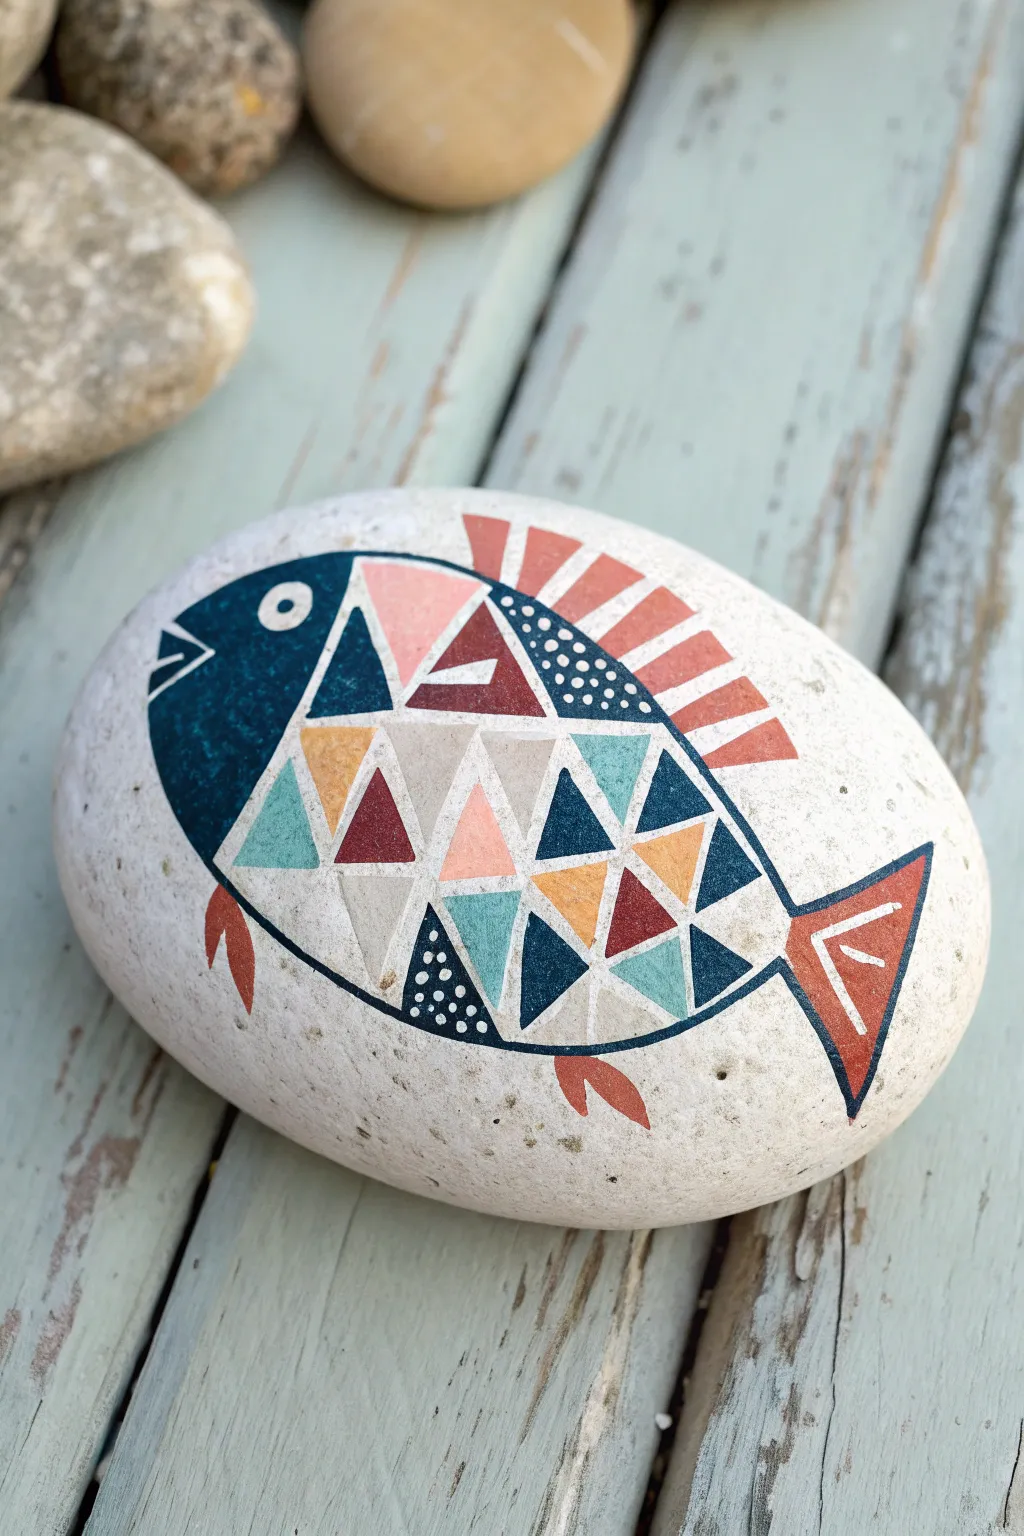
Transform a smooth garden stone into a modern piece of art with this vibrant geometric fish design. Using a clever combination of triangle patterns and bold colors, you’ll create a stylized aquatic friend that looks like a tiny mosaic tile.
Detailed Instructions
Materials
- Smooth, oval river rock (medium to large size)
- White acrylic paint or gesso (for base)
- Acrylic paints: Navy blue, terracotta red, mustard yellow, teal, blush pink, maroon
- Fine tip black paint pen or liner brush
- Pencil and eraser
- Ruler or straight edge (optional)
- Small round detail brushes (sizes 0 and 1)
- Clear acrylic sealer (matte or satin finish)
Step 1: Preparation & Base Outline
-
Prep the canvas:
Begin by washing your stone with soapy water and drying it completely. Apply two thin coats of white acrylic paint or gesso over the entire surface to create a bright, clean background. Let the base dry fully between coats. -
Sketch the fish shape:
Using a light pencil, draw a large oval shape for the fish’s body in the center of the rock. At the tail end, sketch a trapezoid shape that flares out. -
Define the head:
Draw a curved vertical line about one-third of the way from the front to separate the head from the body. Add a small ‘V’ shape at the very front for the open mouth. -
Grid the body:
This is the crucial step for the mosaic look. Lightly sketch a grid of triangles inside the body area. I find it easier to draw diagonal lines in one direction, then cross them in the other, creating a naturally interlocking pattern of triangles.
Step 2: Blocking in Color
-
Paint the head:
Fill in the head section (excluding the eye area) with navy blue paint. Use a steady hand near the edges for a crisp line. -
Add the fins:
Paint the dorsal (top) fin as a series of small, slanted rectangles detached slightly from the body. Paint the two bottom fins and the tail in terracotta red. -
Start the mosaic colors:
Begin filling in your triangles. Choose 3-4 random triangles to paint with the maroon shade. Space them out so they aren’t touching. -
Apply the teals:
Select another set of 3-4 triangles and paint them with your teal color. Keep the color distribution random for that authentic mosaic feel. -
Continued coloring:
Repeat the process with mustard yellow and blush pink. Leave some triangles unpainted (white) or paint them a very soft beige to create ‘negative space’ within the design. -
Paint distinct navy triangles:
Fill in a few remaining specific triangles with the navy blue. It helps to tie the body color back to the head color.
Uneven Triangles?
Don’t stress about perfect geometry. Irregular triangles actually make the stone look more organic and hand-crafted. Just ensure your black outline lines are fairly consistent in thickness.
Step 3: Details & Outlining
-
Eye details:
Paint a white circle for the eye on the navy head. Once dry, add a tiny black dot in the center. -
Add patterns:
To add texture, use a toothpick or very fine brush to add tiny white polka dots to one or two of the navy blue triangles on the body. -
Outline the skeleton:
Using a fine-tip black paint pen or a liner brush with thinned black paint, carefully outline the entire fish body, the head curve, and every individual triangle. This ‘grouting’ line is what really makes the mosaic pop. -
Fin details:
Add simple V-shaped lines inside the tail fin and simple lines inside the dorsal fin to suggest webbing. -
Clean up:
If your black outlines got a little shaky, use a small flat brush with white paint to tidy up the exterior edges of the fish. -
Seal the work:
Allow the paint to cure for at least 24 hours. Finish by applying a clear matte or satin sealer to protect your design from chipping or fading.
Pro Tip: Masking Tape
For super sharp lines on the larger sections, cut tiny strips of washi tape or painter’s tape to mask off the triangles before painting. Peel them off while the paint is still slightly wet.
Place your colorful geometric fish in a planter or on a desk to bring a splash of artistic seascaping to your day
Mandala Fish on an Oval Rock

This project transforms a smooth, oval stone into a piece of decorative art featuring a stylized fish surrounded by intricate borders. The deep teal background makes the gold, maroon, and white details pop, creating a sophisticated slightly folk-art aesthetic.
Step-by-Step Guide
Materials
- Smooth oval river rock (medium to large size)
- Acrylic paints: Deep teal, maroon/burgundy, gold metallic, white, black, burnt orange, light blue
- Fine detail brushes (size 000, 0, and 1)
- Flat brush (for base coat)
- Dotting tools (various sizes)
- Pencil and eraser
- Spray varnish or sealant (matte or satin finish)
Step 1: Preparation & Base Coat
-
Clean the Stone:
Begin by scrubbing your rock with warm soapy water to remove any dirt or grease. Dry it thoroughly before starting. -
Apply Base Color:
Using a flat brush, paint the entire surface of the rock with the deep teal acrylic paint. You will likely need 2-3 coats for full, opaque coverage. Let each layer dry completely before adding the next. -
Sketch the Outline:
Once the base is bone-dry, use a pencil to lightly sketch the oval outline of the fish body in the center. Add the triangular tail fin at one end and mark the curved border surrounding the fish.
Pattern Precision Tip
Drawing guide lines with a white charcoal pencil instead of graphite makes them easier to see on dark paint and they wipe off effortlessly with water.
Step 2: Painting the Fish Body
-
Block in the Head:
Paint the head section of the fish using a mix of gold and a tiny drop of white to create a creamy metallic beige. Fill in the shape smoothly. -
Create the Scales:
For the main body, paint a large section in solid maroon. Once dry, use a fine liner brush with gold paint to draw overlapping scalloped ‘U’ shapes to create the scale texture. -
Detail the Tail:
Fill the tail fin with gold paint. After it dries, use your finest brush and maroon or dark brown paint to add sweeping lines that mimic the tailored texture of a fin. -
Decorate the Mid-Section:
Between the head and the maroon scales, paint a curved section in teal (slightly lighter than the background if possible) or leave the background showing. Add a burnt orange circle surrounded by a blue ring in the center of this band. -
Add White Details:
Paint the rear section of the fish body white. Once dry, use a small dotting tool or black fine-liner to add tiny speckles or dots for texture. -
Paint the Eye:
On the head, paint a crisp white circle. Add a smaller black pupil in the center and outline the entire eye with a thin black line.
Make It 3D
Use puffy fabric paint or 3D liner paints for the gold outlines and dots. This adds tactile texture that makes the scales really stand out.
Step 3: Borders & Final Touches
-
Outline the Fish:
Using your gold paint and a steady hand, outline the entire shape of the fish to separate it cleanly from the background. -
Draft the Outer Border:
Paint a series of scalloped semi-circles in maroon along the upper and lower edges of the rock, framing the fish. Leave a small gap between these scallops and the fish body. -
Add Gold Accents:
Above each maroon scallop, paint a gold triangle pointing inward. Inside these gold triangles, use a very fine brush to paint vertical lines or hatching. -
Detail the Scallops:
Use a small dotting tool dipped in a lighter red or pink to add tiny dots inside the maroon scallop shapes for extra depth. -
Create the Dotted Halo:
With white paint and a fine dotting tool, place a series of small dots around the fish’s tail and along the bottom edge of the design to balance the negative space. -
Enhance with Micro-Dots:
I like to add very tiny gold dots on the blue section of the fish body to mimic a mandala pattern. This adds a nice shimmer. -
Clean Up:
Check for any stray pencil marks and erase them gently if visible. Touch up the teal background paint if you accidentally went over any lines. -
Seal the Artwork:
Once the paint has cured for at least 24 hours, apply two light coats of spray varnish to protect the design from scratches and fading.
Now you have a stunning, intricate fish stone perfect for a paperweight or garden decoration
Galaxy Fish With Star Speckles
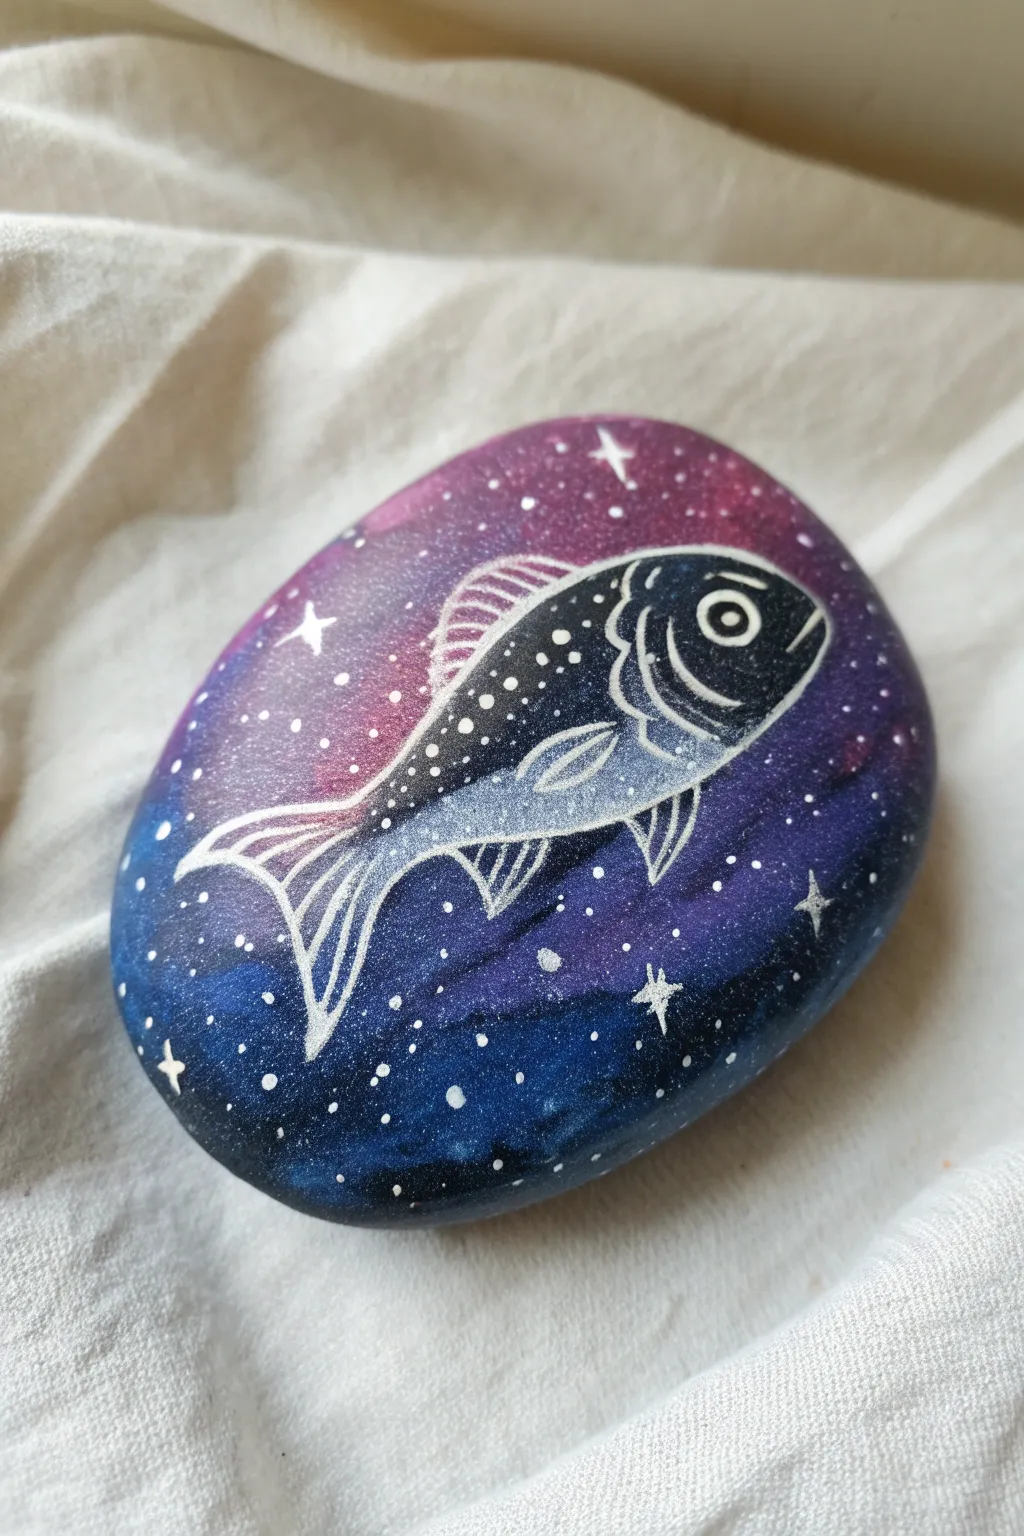
Transform an ordinary stone into a window to the cosmos with this enchanting galaxy fish design. The deep purples and blues create a stunning backdrop for the crisp, stylized fish silhouette that seems to float among the stars.
Step-by-Step Tutorial
Materials
- Smooth, oval-shaped river rock
- Acrylic paints (black, phthalo blue, purple/violet, magenta, titanium white)
- Small blending sponge or makeup sponge
- Fine liner brush (size 00 or 000)
- Flat shader brush
- White Posca paint marker (extra fine tip) – optional but recommended
- Water cup and palette
- Spray sealer or varnish (gloss finish)
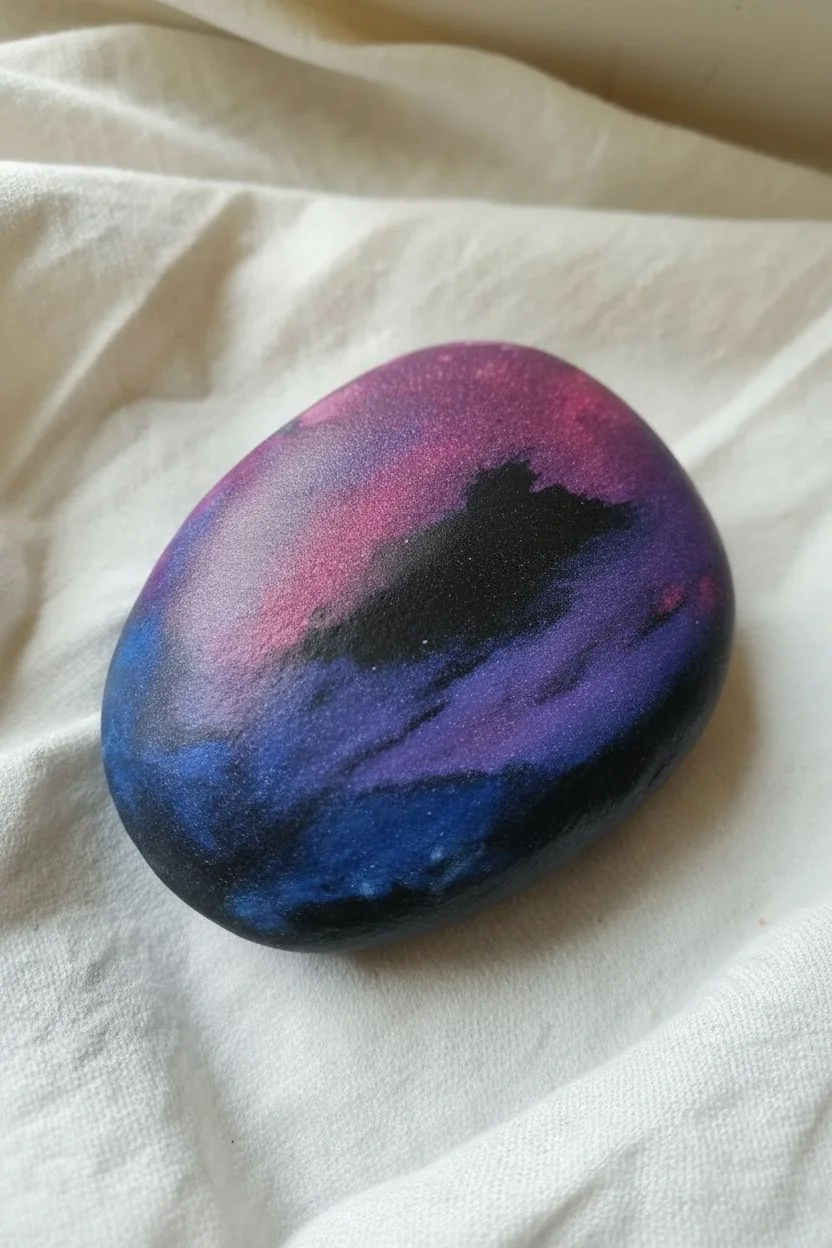
Step 1: Creating the Galaxy Base
-
Base Coat:
Start by scrubbing your rock clean and drying it thoroughly. Apply a solid coat of black acrylic paint over the entire top surface. Let this dry completely to ensure opaque coverage for the next layers. -
Sponge Dabbing:
Cut a small piece of sponge. Dip it lightly into dark blue paint and dab off the excess on your palette until it’s almost dry. Gently sponge cloudy patches onto the bottom left and top right areas of the rock. -
Layering Colors:
Using a clean section of the sponge, repeat the process with purple paint. Dab this color near the blue areas but let them overlap slightly to create a seamless transition. Keep the center area a bit darker. -
Adding Highlights:
Mix a tiny bit of white with magenta to create a bright pink. Sponge this sparingly into the lightest parts of the purple clouds to add depth and a glowing nebula effect. -
Blending the Void:
If the colors look too harsh against the black background, take a barely damp sponge with a tiny amount of black paint and gently soften the edges where the color meets the dark void.
Starry Splatter Tip
cover the main body of your fish with a scrap of paper while flicking white paint. This prevents the fish silhouette from getting lost in the background noise of the star splatter.
Step 2: Painting the Fish
-
Sketch the Outline:
Once the background is 100% dry, lightly sketch the oval shape of the fish body in the center using a white charcoal pencil or very thin chalk line. This makes mistakes easy to wipe away. -
Body Fill:
Using your fine brush and a mix of white and a tiny drop of blue (to make a pale, icy blue-grey), paint the silhouette of the fish. It doesn’t need to be solid white yet; a translucent ghostly look is actually perfect here. -
Detailing the Head:
Using a fine liner brush with pure white paint (or a paint pen), outline the gill curve and the eye. Paint a distinct white circle for the eye with a small black dot in the center for the pupil. -
Fins and Scales:
Draw the dorsal fin on top and the pectoral fin on the side using thin white lines. Add small, curved distinct strokes for the tail fin to suggest movement. -
Defining the Shape:
Go over the main outline of the fish again with opaque white to make it pop against the dark galaxy. Leave the interior of the fish slightly darker or speckled to show it belongs to the starry background.
Step 3: Stars and Finishing Touches
-
Splattering Stars:
Water down a small amount of white acrylic paint until it’s the consistency of ink. Load a stiff brush or toothbrush, and flick the bristles to spray tiny specks of ‘stars’ across the galaxy background. -
Hand-painting Stars:
Use your finest brush tip to create a few larger, distinct four-point stars (cross shapes) in the open black spaces. Add a few single dots of white inside the fish’s body to make it look semi-transparent. -
Highlighting Edges:
Add a final crisp white line on the top curve of the fish’s head and back to simulate light hitting it. -
Sealing:
Allow the rock to dry overnight. Apply a glossy spray sealer to protect the paint and make the galaxy colors look wet and vibrant.
Level Up: Metallic Magic
Mix a tiny amount of iridescent mixing medium or silver metallic paint into your blue and purple sponge layers. The galaxy will shimmer and shift colors as you turn the rock in the light.
Now you have a captured piece of the universe ready to display on your desk or hiding in the garden
X-Ray Style Fish With a Skeleton Pattern
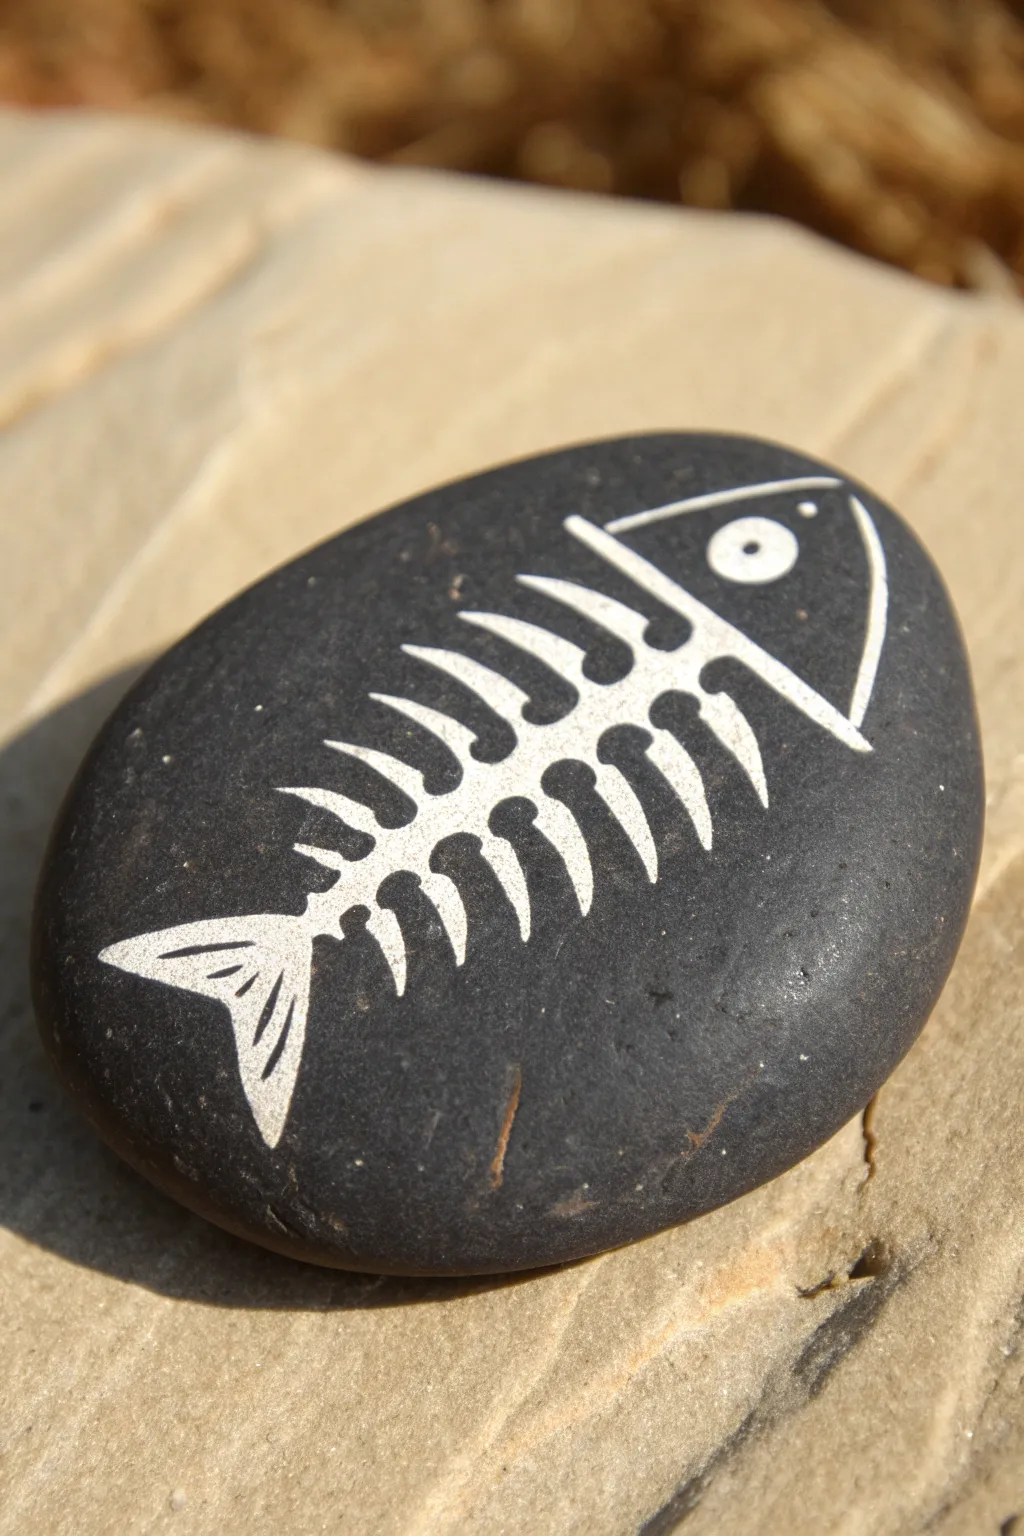
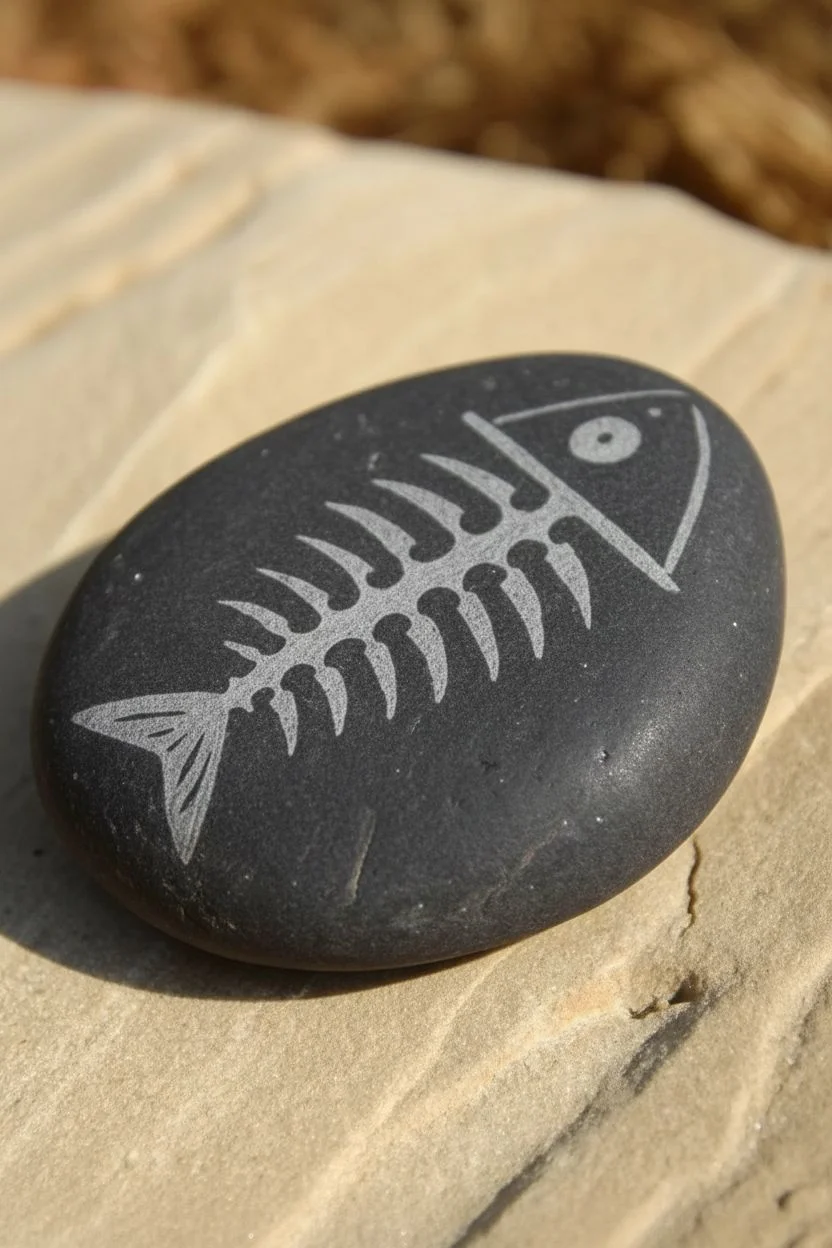
This striking project turns a simple dark stone into a fossil-like artifact using a clever X-ray design. The high contrast of white on black creates a bold, modern look that is surprisingly simple to achieve with a steady hand.
Step-by-Step
Materials
- Smooth, dark river rock (oval shape is best)
- White paint pen (fine tip) or 00 detail brush with white acrylic paint
- Pencil (white charcoal pencil works best on dark rocks)
- Eraser
- Matte or satin spray sealant
- Paper towel
- Soap and water
Step 1: Preparation and Sketching
-
Clean the canvas:
Begin by thoroughly washing your rock with soap and water to remove any dirt or oils. Let it dry completely in the sun or use a hairdryer to speed things up. -
Find the center line:
Visualize the spine of the fish running lengthwise across the rock. Using your pencil, lightly draw a curved line that starts near the right edge and sweeps down towards the left edge to guide the body’s flow. -
Outline the head:
On the right side of your spine line, sketch a simple triangular shape for the fish head. The point of the triangle should face right, and the back should affect a vertical curve where the spine begins. -
Draft the tail:
At the opposite end of the spine, sketch a widening fishtail. Draw two flaring lines outward and connect them with a notched ‘V’ shape at the very end. -
Draw the ribcage:
Sketch the ribs along the spine. Draw pairs of curved lines extending outward from the center line. Start with longer curves near the head and make them progressively shorter as you move toward the tail.
Step 2: Painting the Design
-
Base the head:
Starting with your white paint pen or fine brush, carefully outline the triangular head shape you sketched earlier. -
Add head details:
Inside the head triangle, paint a straight line separating the upper and lower jaw area if desired, or keep it simple. Add a small circle for the eye socket, leaving a tiny black dot in the center for the pupil. -
Define the spine:
Draw the main spine line connecting the head to the tail. I like to make this line slightly thicker than the ribs to anchor the visual weight of the skeleton. -
Paint the top ribs:
Work on the upper set of ribs first. Paint curved strokes pulling up and back from the spine. Add a small ‘bone’ shape or rounded knob at the end of each rib for a cartoony, skeletal effect. -
Paint the bottom ribs:
Mirror the process on the bottom side. Pull curved strokes downward, ensuring they line up roughly with the top ribs. Finish these with the same rounded bone ends. -
Fill the tail:
Outline your tail sketch with the white paint. Inside the tail shape, add a few internal lines to suggest the bony rays of the fin. -
Let it set:
Allow the white paint to dry completely. Since the dark rock shows through easily, you don’t want to smudge the stark white lines. -
Second coat:
For a truly opaque X-ray look, retrace your lines with a second layer of white paint. This makes the design pop against the dark background.
Steady Hands
Anchor your pinky finger against the rock surface while painting. This creates a pivot point and stabilizes your hand for drawing those smooth, curved rib lines.
Step 3: Finishing Touches
-
Cleanup:
Once the paint is bone-dry (wait at least an hour), use a damp q-tip or eraser to gently remove any visible pencil guidelines. -
Seal the deal:
Take the rock to a well-ventilated area and apply a light coat of spray sealant. A matte finish looks most natural for this fossil style, preventing glare from ruining the graphic effect.
Glow Up
Swap standard white paint for glow-in-the-dark acrylic paint. By day it looks like a normal skeleton, but turn off the lights and your ghostly fish will float in the dark.
Place your finished fossil rock in a garden path or planter for a quirky surprise discovery
3D Illusion Fish With a Painted Shadow
Transform a simple smooth stone into a charming piece of nature-inspired decor with this stylized trout painting. The design features soft, earthy tones, delicate speckling, and a decorative branch motif that frames the fish perfectly.
Step-by-Step Guide
Materials
- Smooth, oval river rock (light grey or beige)
- Acrylic paints (teal blue, white, soft pink, light brown, dark brown, sage green)
- Fine liner brush (size 0 or 00)
- Round brush (size 2)
- Black fine-point paint marker or micron pen
- Matte varnish or sealant
- Palette for mixing
- Water cup and paper towels
Step 1: Painting the Fish Base
-
Outline delicate shapes:
Start by sketching the basic outline of the trout lightly with a pencil. Draw an elongated oval body that tapers toward the tail, adding the triangular tail fin and small dorsal and ventral fins. -
Apply the belly color:
Using your size 2 round brush, paint the bottom half of the fish body with creamy white paint. Apply two thin coats if necessary to get a solid, opaque coverage against the stone. -
Add that distinctive stripe:
Mix a soft, dusty pink color. Paint a horizontal band right along the middle of the fish, following the curve of the body from the gill area to the tail. Blend the bottom edge slightly into the white while it’s still wet for a softer transition. -
Paint the upper body:
Fill in the top portion of the fish with a teal or greenish-blue paint. Carefully meet the pink stripe line. For the head area, bring this color down to the eye level. -
Detail the head and gills:
Paint the gill cover (operculum) with a slightly deeper pink or salmon tone to distinguish it from the body stripe. I like to add a tiny white circle for the eye base now so it has plenty of time to dry.
Steady Hand Trick
For the tiny fish spots, use the non-brush end of a paintbrush handle or a toothpick dipped in paint. It makes perfectly round, consistent dots every time.
Step 2: Refining Details
-
Define the fins:
Using a light brown or tan shade, paint the dorsal fin (top), pectoral fin (side), pelvic fin (bottom), and caudal fin (tail). Keep the shapes simple and stylized. -
Add fin texture:
Once the brown base is dry, use a liner brush with dark brown paint to draw thin, straight lines radiating from the base of each fin to the tip to mimic the fin rays. -
Create the signature spots:
This is the fun part—adding the trout’s pattern. Use the tip of your smallest brush or a dotting tool. Dip into white, light yellow, and dark teal paints to create tiny, varying dots across the teal upper back. -
Add side speckles:
Continue adding smaller dots along the pink stripe. Use a darker maroon or brown for these spots to ensure they stand out against the pink background. -
Outline the fish:
With a black fine-point paint pen or a very steady hand and a liner brush, outline the entire fish. Keep the line thin and crisp. Add the mouth line and outline the gill cover. -
Finish the eye:
Draw a small black dot in the center of your white eye circle. Add a tiny outline around the white circle to make it pop.
Natural Texture
Instead of a solid background, try lightly sponging a very watered-down white wash over the rock before painting. It creates a ‘calcified’ look typical of river stones.
Step 3: Decorative Flourishes
-
Paint the vine stem:
underneath the fish, use a liner brush with dark brown or dark green paint to create a curving, wavy line representing a plant stem. Let it flow naturally with the shape of the rock. -
Add the leaves:
Along the stem, paint small, teardrop-shaped leaves using a sage green or muted teal. Alternate the direction of the leaves for a natural look. -
Highlight the fins:
Go back to the fins and add extremely subtle white highlights on the top edges to give them a bit of dimension and separation. -
Final touches:
Check for any patchy areas. If the white belly needs brightening, add one final thin layer of white, being careful not to paint over your outlines. -
Seal the artwork:
Allow the rock to dry completely—ideally overnight. Apply a matte varnish spray to protect the paint without making the stone unnaturally glossy, preserving that river-rock feel.
Now you have a serene little river scene that fits right in the palm of your hand
Textured Reef Fish With Sandy Paint Effects
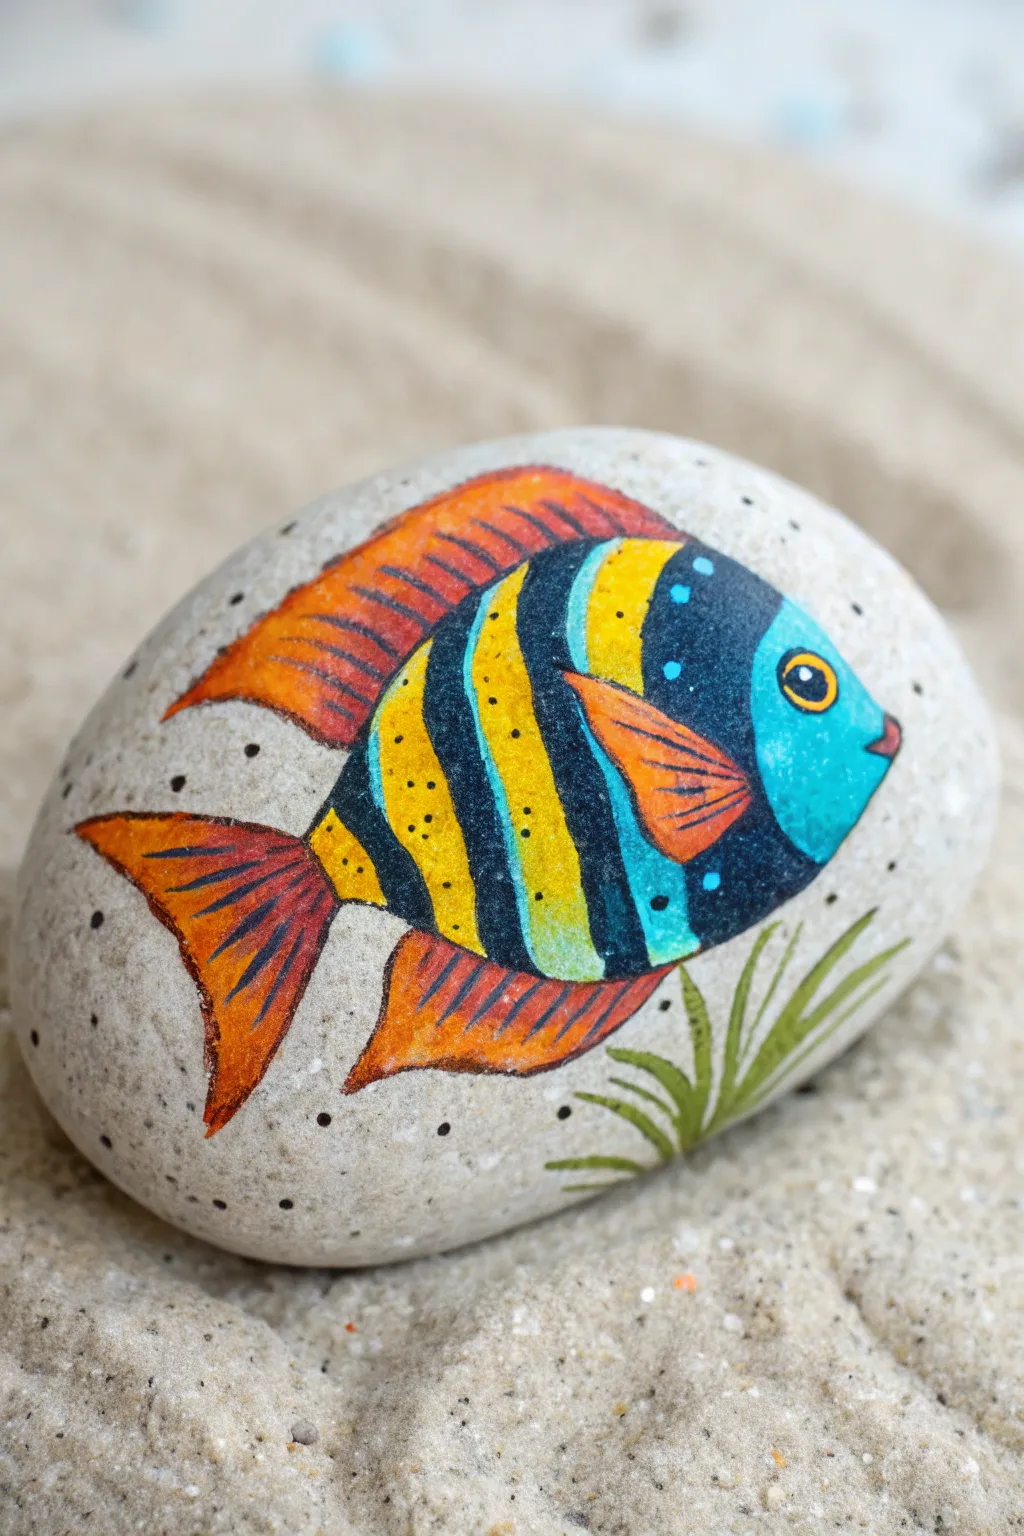
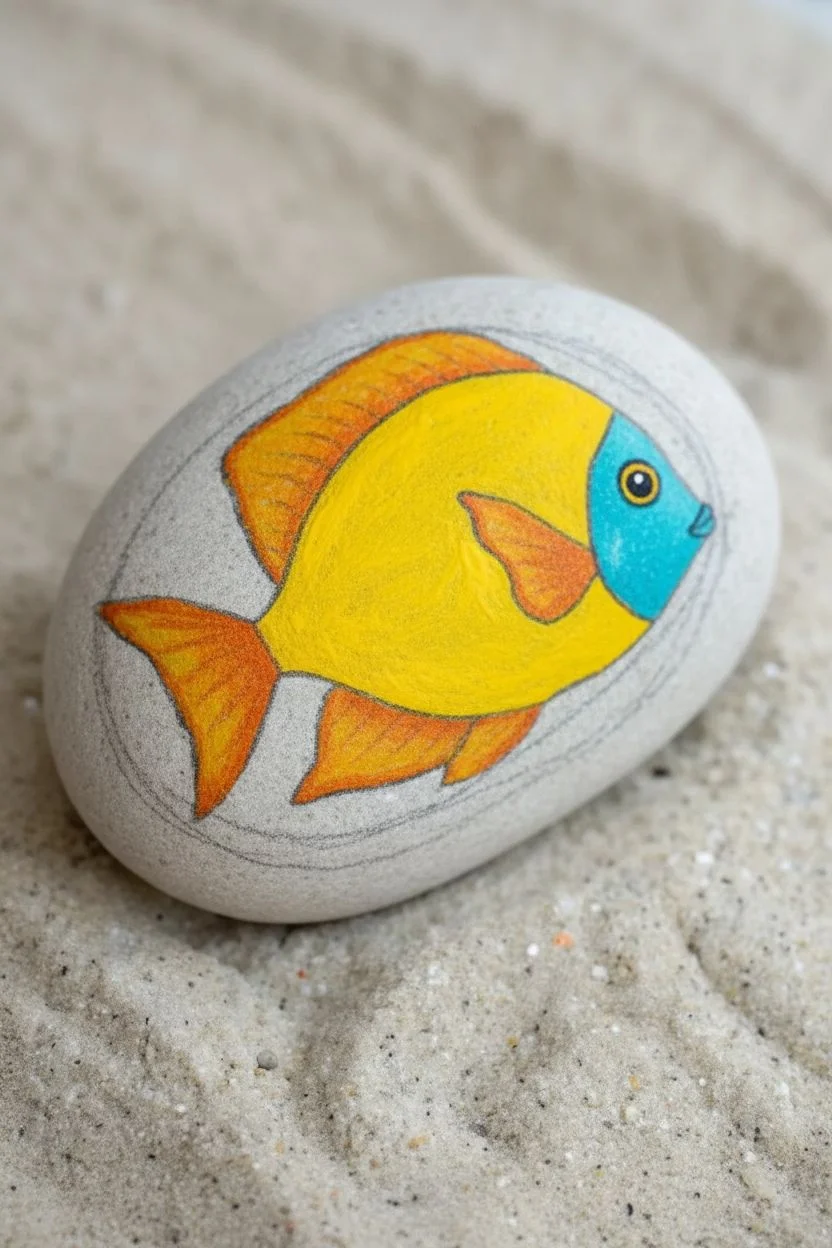
Bring the coral reef to your garden with this vibrant fish painted on a natural stone canvas. The combination of bright yellow, deep blue, and fiery orange creates a striking contrast against the pale pebble background.
Step-by-Step Tutorial
Materials
- Smooth, rounded river rock (light grey or white)
- Acrylic paints: Bright yellow, deep blue, turquoise/light blue, orange, black, white, lime green, olive green
- Fine detail paintbrush (size 0 or 00)
- Medium flat paintbrush (size 4 or 6)
- Pencil for sketching
- Spray varnish or clear sealer (gloss or matte)
- Palette for mixing paint
- Water cup and paper towels
Step 1: Sketching and Base Layers
-
Prepare the Stone:
Begin by washing your stone with warm water and soap to remove any dirt or oils. Let it dry completely. If the stone is dark, you may want to prime the painting area with a thin layer of white paint, but for light stones, the natural background works perfectly. -
Outline the Shape:
Using a pencil, lightly sketch the outline of the fish. Start with an oval shape for the body, then add the triangular fins on top and bottom, the forked tail at the back, and the curved line separating the face from the body. -
Paint the Body Yellow:
Fill in the main body section with bright yellow paint. Use your medium brush for this. You might need two coats to get a solid, opaque color that hides the stone’s texture underneath. -
Block in the Blue Face:
Paint the face area (the front section of the fish) with a turquoise or light blue color. Carefully follow the curved line you sketched earlier so it meets the yellow section cleanly. -
Add Orange Fins:
Paint the top dorsal fin, the bottom anal fin, the tail fin, and the small side pectoral fin with a vibrant orange. Let all these base colors dry completely before moving to the next step to prevent smudging.
Step 2: stripes and Details
-
Paint the Black Stripes:
Using your fine detail brush and black paint, create vertical stripes across the yellow body. These should be somewhat thick and slightly curved to follow the contour of the fish’s body. -
Outline the Fins:
Switch back to the orange paint if needed to tidy up, then take a very small amount of thinned black paint or a dark grey to add subtle lines within the orange fins, simulating the spines. Add a black outline to the leading edge of the fins for definition. -
Detail the Face:
Paint a darker blue patch on the top of the head and near the gill line to add dimension. Paint a small white circle for the eye, let it dry, then add a black pupil and a tiny white highlight dot. Add a small pink or red triangle for the mouth. -
Add Texture Dots:
Dip the very tip of your brush or a toothpick into black paint and add tiny stippling dots along the yellow stripes and on the fins. This gives the fish a textured, scale-like appearance. -
Create Water Bubbles:
scattered around the outside of the fish, add small black dots of varying sizes directly onto the bare stone. These mimic bubbles or debris in the water.
Pro Tip: Smooth Lines
Add a tiny drop of water to your black paint to make it inky. It will flow much smoother from your liner brush, giving you crisp, confident outlines.
Step 3: Finishing Touches
-
Paint a Seaweed Tuft:
At the bottom right of the stone, just under the fish, paint a few simple blades of grass or seaweed using lime green. Add a stroke of olive green to the base of each blade for shadow. -
Final Outlining:
I prefer to do a final pass with my finest brush and black paint to crisply outline the entire fish. This ‘cartoon’ style outline makes the colors pop against the grey rock. -
Clean Up:
If you made any mistakes or smudges on the bare rock, use a wet Q-tip to wipe them away before the paint sets, or paint over them with a color that matches your stone. -
Seal the Artwork:
Once your painting is 100% dry (give it a few hours or overnight to be safe), take it outside and spray it with a clear acrylic sealer. This protects the paint from chipping and makes the colors look wet and vibrant.
Level Up: Glitter Scales
Once the paint is dry but before varnishing, dab a little clear glitter glue onto the yellow stripes or the tail to make your tropical fish shimmer in the sunlight.
Place your finished reef fish in a potted plant or on a windowsill to enjoy a splash of ocean color every day
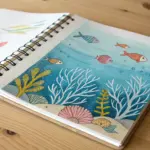


Have a question or want to share your own experience? I'd love to hear from you in the comments below!