Flamingos are one of my favorite subjects to paint because you get that instantly recognizable S-curve plus a whole playground of pink hues to mix. Here are a bunch of flamingo painting ideas—from super simple and beginner-friendly to artsy, unexpected twists—so you can pick what fits your mood today.
Classic Flamingo Side Profile
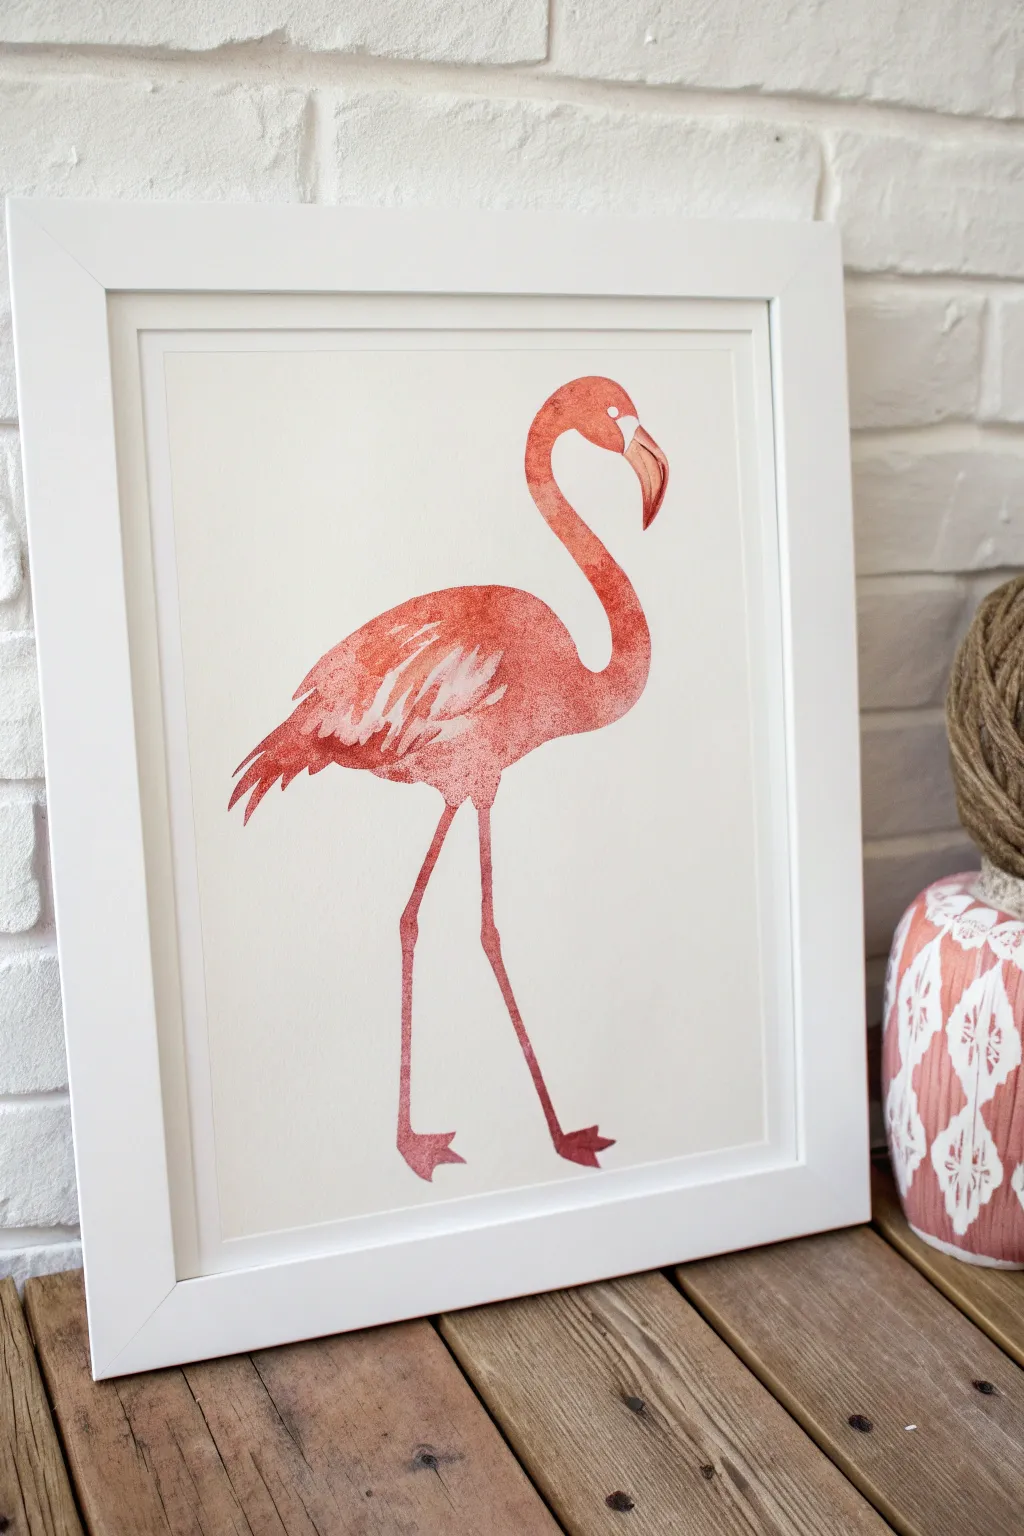
Capture the graceful silhouette of a flamingo with this beautiful watercolor project that balances vibrant coral tones with soft, watery textures. The result is a clean, classic profile that looks stunning in a simple white frame.
Step-by-Step
Materials
- High-quality watercolor paper (cold press, 300gsm)
- Watercolor paints (Coral, Alizarin Crimson, Cadmium Red, White gouache)
- Round brushes (sizes 6 and 2)
- HB pencil
- Kneaded eraser
- Palette for mixing
- Clean water jar
- Paper towels
- Painter’s tape or masking tape
Step 1: Drawing the Silhouette
-
Establish the curve:
Begin by lightly sketching the main ‘S’ curve that defines the flamingo’s neck and body. Start near the top right for the head, swooping down and left for the neck, then rounding out the oval body shape. -
Head and beak details:
Refine the head shape into a small oval. Sketch the distinctive downward-curved beak, marking the separation line between the upper and lower beak, and add a tiny circle for the eye. -
Leg placement:
Draw two long, thin lines extending from the bottom of the body. Angle the left leg slightly backward and the right leg forward to create a balanced stride. Add the knobby knee joints about halfway down. -
Refining the sketch:
Add the webbed feet at the bottom and define the jagged feather edges at the tail feathers. Once happy with the outline, use a kneaded eraser to lift the graphite until the lines are barely visible.
Step 2: Painting the Body
-
Mix your base color:
Create a watery mix of Coral and a touch of Cadmium Red on your palette. You want a soft, transparent pinkish-orange to start. -
First wash:
Using the size 6 round brush, apply a clean water glaze inside the body and neck area, avoiding the beak and eye. While wet, drop in your coral mix, letting it bloom naturally. -
Deepening the hue:
While the paper is still damp, mix a slightly stronger concentration of Alizarin Crimson. Touch this pigment to the bottom edge of the neck and the shadowed underside of the body to create volume. -
Creating texture:
I like to use a crumpled paper towel to gently blot parts of the wet body, particularly near the top of the wing area. This lifts pigment and creates a mottled, feathery texture instantly. -
Painting the legs:
Switch to your size 2 brush. Mix a semi-transparent reddish-pink and carefully paint the legs. Keep the lines steady but allow slight variations in color intensity, making the knees and feet slightly darker.
Bloom Control
To get that specific mottled texture on the neck and body, drop plain water into semi-dry paint. This pushes the pigment away, creating ‘cauliflower’ blooms that look like soft feathers.
Step 3: Adding Detail and Definition
-
Allow to dry:
Let the initial layers dry completely. The paper should feel room temperature to the touch, not cool. -
Wing feather definition:
Mix a concentrated red-orange. Using the tip of your small brush, paint short, curved strokes to suggest the layers of wing feathers, leaving negative space between them to show the lighter under-layer. -
The beak coloring:
Paint the tip of the beak with a dark mix of Alizarin Crimson and a tiny bit of blue or black. Wash your brush and paint the upper beak with a very pale, watery pink, blending it slightly into the dark tip. -
Face details:
Carefully paint around the eye, leaving the white paper showing for the pupil highlight. Add a small stroke of darker pink around the eye area for definition. -
Creating white feathers:
Using white gouache or opaque white watercolor, paint thin, dry-brush streaks over the main wing body. This mimics the bright highlights of the feathers catching the light. -
Final touches:
Assess the balance. If the tail feathers need more definition, add a few sharp strokes of dark coral to the tips. -
Framing preparation:
Once absolutely dry, erase any remaining stray pencil marks. Place a clean mat board over the image to check the composition before final framing.
Digital Hybrid Idea
Make your painting a hybrid! Scan your dry watercolor painting at high resolution, then use editing software to erase the background completely for a crisp, print-ready look like the example.
Hang your finished flamingo piece in a bright room to add a splash of tropical warmth to your decor


Sunset Flamingo Silhouette
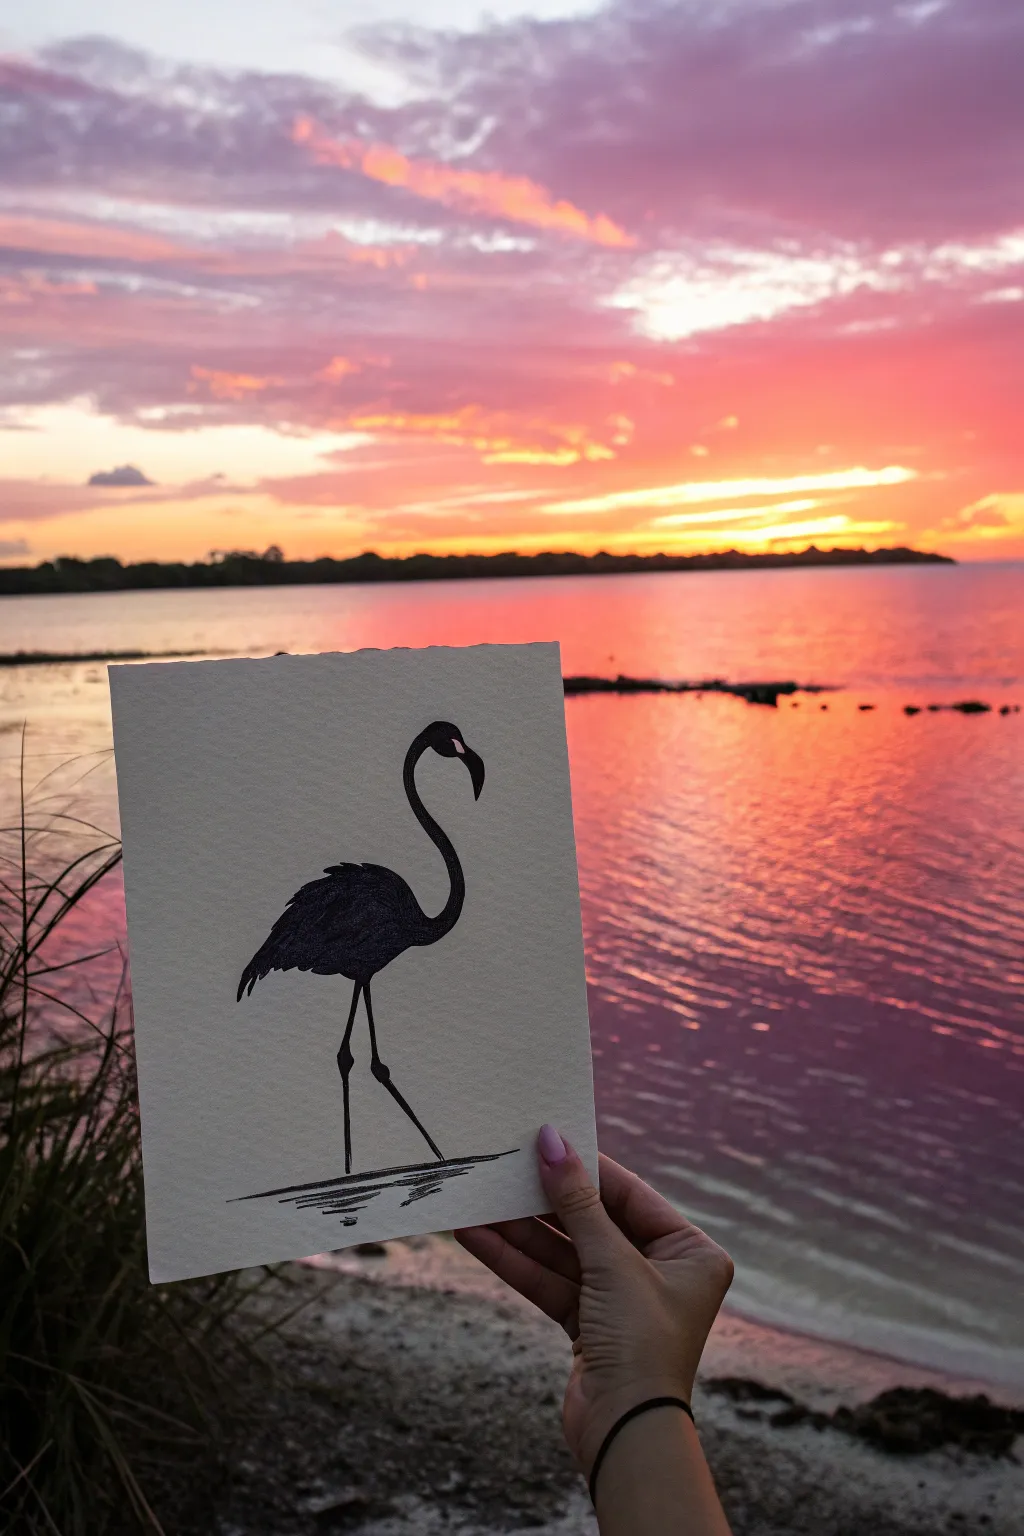
Capture the elegance of tropical life with this striking high-contrast silhouette. Using simple black ink or marker on textured paper creates a bold, minimalist look that stands out beautifully against any backdrop.
Detailed Instructions
Materials
- Heavyweight watercolor paper or mixed media paper (cold press recommended)
- Black waterproof fine liner pen (0.5mm or 0.8mm)
- Black brush pen or India ink with a small round brush
- Pencil (HB or 2B)
- Eraser
- Reference photo of a flamingo profile
Step 1: Sketching the Outline
-
Paper preparation:
Begin with a rectangular sheet of cold press watercolor paper. The textured surface adds a lovely organic feel to the final piece, even though we aren’t using watercolors. -
Mark specific points:
Lightly mark the top curve of the head, the curve of the neck, and where you want the body relative to the bottom of the page. This helps keep your proportions correct before committing to details. -
Draft the S-curve:
Draw a faint, flowing ‘S’ shape to serve as the spine of the flamingo. This connects the head, down through the neck, and into the round body. -
Define the beak:
Sketch the distinctive hooked beak. Ensure the tip points downward, creating that classic flamingo profile. -
Outline the body:
Flesh out the body using an oval shape that tapers slightly downward. Don’t worry about feathers yet; just get the main mass of the bird correct. -
Leg placement:
Draw two long, thin lines for the legs. Position one leg straight down and the other bent slightly forward as if taking a step.
Step 2: Inking the Silhouette
-
Trace the outline:
Using your fine liner pen, carefully trace over your pencil lines. I prefer starting at the beak to ensure the sharpest point is accurate. -
Add feathery texture:
When outlining the wing area on the back, switch from a smooth line to jagged, varying strokes. This mimics the texture of folded feathers. -
Fill large areas:
Switch to a black brush pen or a brush dipped in India ink to fill in the main body. This covers the large surface area evenly without leaving streak marks. -
Refine the neck:
Carefully fill in the neck. The neck should vary in thickness slightly—thinner near the head and thickening as it joins the body. -
Detail the eye:
Leave a tiny sliver of white paper unpainted near the beak for the eye. If you accidentally color it in, you can add a dot of white gel pen later. -
Thicken the legs:
Go back over the legs with your fine liner. Include the knobby ‘knee’ joints (which are actually ankles) slightly thicker than the rest of the leg.
Uneven Ink Coverage?
If your black fill looks patchy or greyish, wait for the first layer to dry completely, then apply a second coat. Going over wet ink can pill the paper.
Step 3: Grounding and Finishing
-
Create the water line:
Draw horizontal, slightly wavy lines at the base of the legs. These shouldn’t be solid; break them up to suggest ripples in shallow water. -
Add reflection hints:
Under the water line, add a few zigzag scribbles directly below the legs to suggest a shadow or reflection in the water. -
Dry thoroughly:
Let the ink dry completely. Ink on textured paper can pool in the crevices, so give it an extra minute. -
Erase guidelines:
Gently erase any remaining pencil marks. Be sure to hold the paper taut so you don’t wrinkle it.
Sharper Edges
Use the 0.5mm pen for the outermost edges and the brush pen only for the center fill. This keeps the silhouette crisp and prevents ink bleeding.
Hold your finished piece up against a bright light or a real sunset to see the silhouette pop.


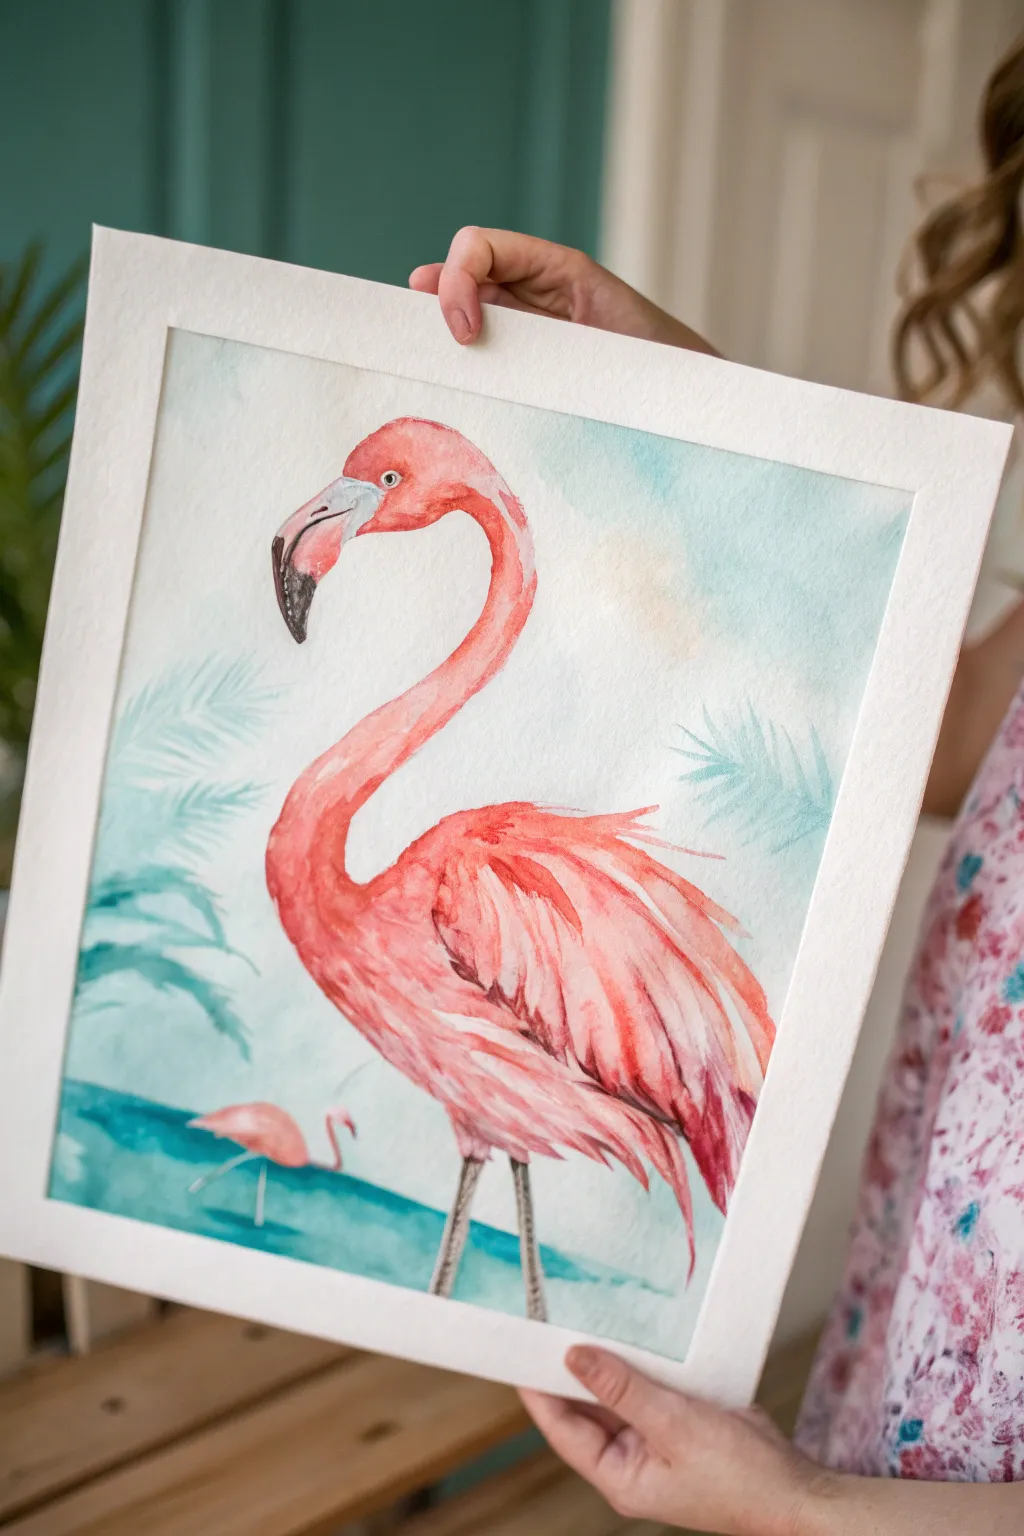
Tropical Beach Flamingo Scene
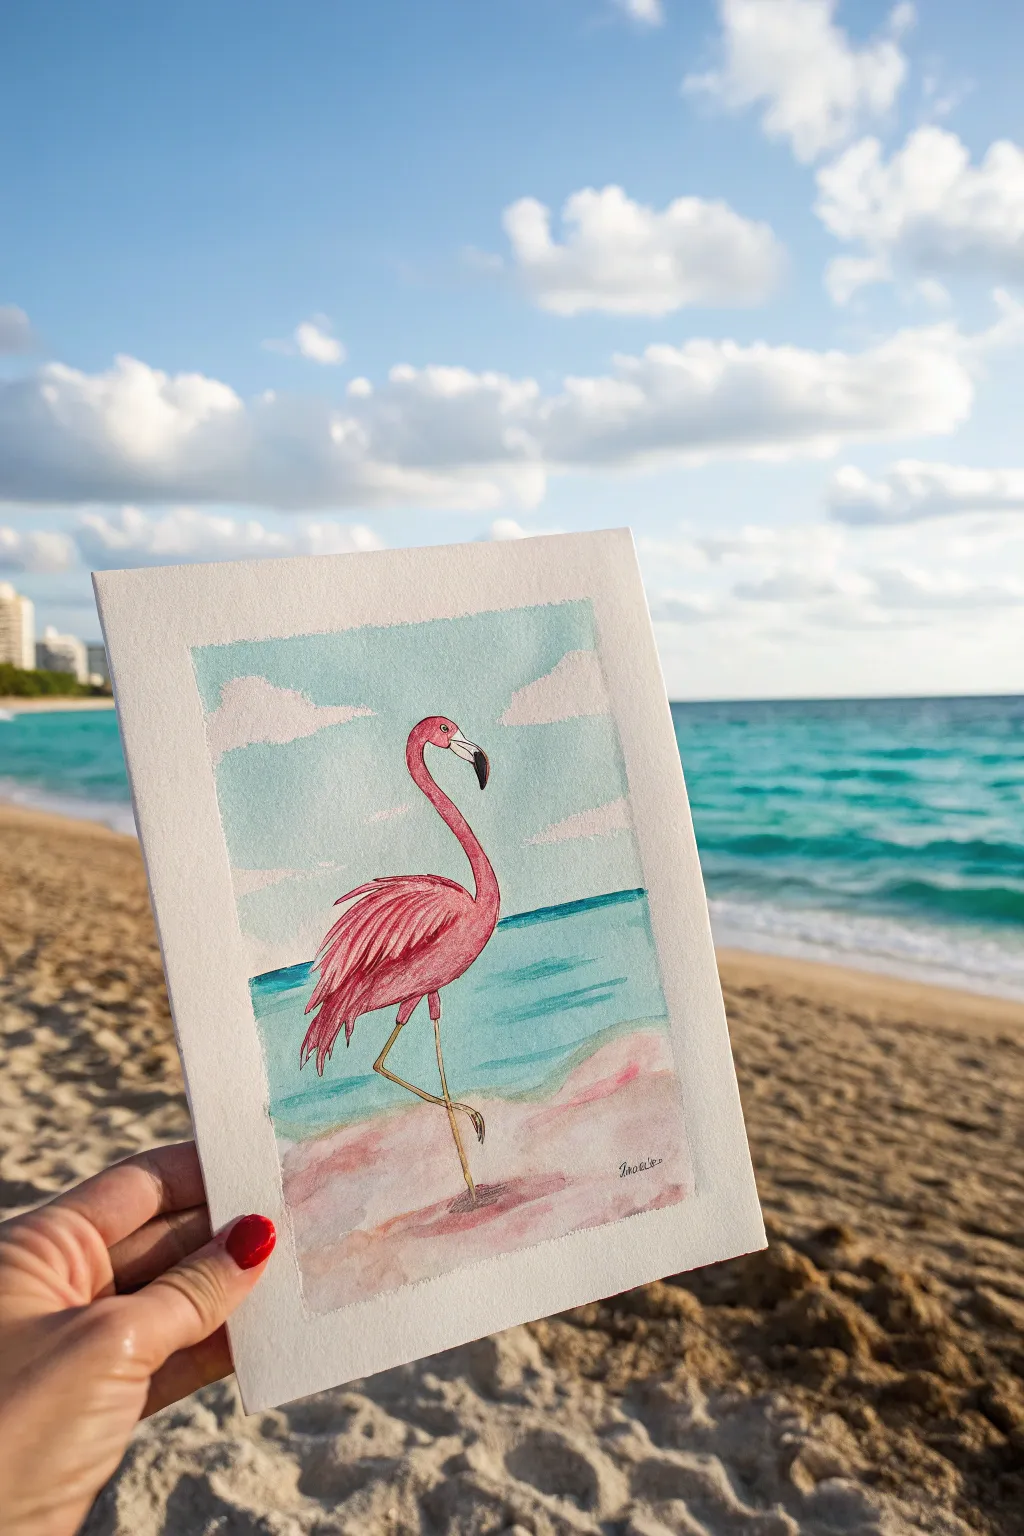
Capture the serenity of a day at the beach with this lovely watercolor scene featuring a bright pink flamingo standing in shallow surf. The soft pastel sky and turquoise water create a perfect backdrop for the bird’s detailed feathers.
How-To Guide
Materials
- Cold press watercolor paper (block or taped sheet)
- Watercolor paints (pans or tubes)
- White gouache (optional, for highlights)
- Round watercolor brushes (sizes 2, 6, and 8)
- Pencil (HB) and eraser
- Masking tape (for clean borders)
- Cup of water and paper towels
- Mixing palette
Step 1: Preparation and Sketching
-
Define the borders:
Start by taping down the edges of your watercolor paper with masking tape. This creates that crisp, professional white border shown in the final piece and prevents the paper from buckling while wet. -
Establish the horizon:
Lightly draw a straight horizontal line about one-third of the way up from the bottom of your taped area to mark where the ocean meets the sky. -
Outline the flamingo:
Sketch the flamingo’s shape in the center. Start with a small oval for the head and a larger, tilted oval for the body. Connect them with a long, S-shaped neck. Draw the legs, with one standing straight and the other bent at the knee joint. -
Mark cloud shapes:
Very faintly sketch irregular, fluffy shapes in the sky area. These won’t be outlined in ink later, so keep the pencil pressure extremely light—just enough to know where to avoid painting blue.
Bleeding Lines?
If your pink flamingo bleeds into the blue ocean, the background wasn’t dry enough. Let layers dry completely (or use a hair dryer) before painting touching sections.
Step 2: Painting the Background
-
Paint the sky:
Mix a diluted cerulean or sky blue. Using your largest brush, paint the sky area, carefully painting around your pencil cloud shapes to leave the paper white. Keep the wash even and light. -
Add cloud shadows:
While the blue is drying, mix a very faint violet-grey. Add just a touch of this shadow color to the bottom edges of your white cloud shapes to give them volume and softness. -
Paint the ocean water:
Mix a vibrant turquoise or teal color. Paint the water section below the horizon line. I like to make the color slightly darker right at the horizon line and lighter as it approaches the beach. -
Create the shoreline:
For the sand, wet the bottom area of the paper. Drop in soft pinks, diluted browns, and sandy beige tones. Let these colors bleed together naturally, creating a wet-sand look where the bird is standing.
Add Some sparkle
Use a white gel pen or a tiny dot of white gouache to add a highlight to the flamingo’s eye and a few sparkles on the ocean waves for extra dimension.
Step 3: Painting the Flamingo
-
Base layer for the bird:
Once the background is completely dry, mix a light, watery pink. Fill in the entire body, neck, and head of the flamingo with this pale wash. Avoid the beak area for now. -
Deepen the body color:
While the base layer is still slightly damp, drop in a more saturated, darker pink or coral color onto the lower part of the body and the back to create a sense of roundness and shadow. -
Detail the feathers:
Switch to your smallest brush (size 2). Using a concentrated deep pink or red, paint individual stroke marks on the wing to simulate layered feathers. Curve your strokes downward to follow the wing’s shape. -
Define the neck and head:
Add a thin line of darker pink along the underside of the neck to create a shadow, making it look cylindrical rather than flat. carefully paint the eye with a tiny dot of black or dark grey. -
Paint the beak:
Paint the tip of the beak black and the upper part a pale pink or creamy white. Ensure the black hook shape is sharp and distinct.
Step 4: Final Details
-
Paint the legs:
Mix a yellowish-beige color for the legs. Paint the thin legs carefully. Use a slightly darker brown to outline the joints and the feet to give them definition against the sand. -
Add the shadow:
Mix a diluted purple-brown color. Paint a soft, blurry shadow on the sand directly beneath the flamingo’s feet, stretching slightly to the right, to ground the bird in the scene. -
Enhance ocean horizons:
If the ocean wash looks too flat, add a thin, straight line of darker teal exactly on the horizon line to sharpen the separation between sea and sky. -
Reveal the border:
Wait until the painting is 100% dry—touch it to be sure. Slowly peel away the masking tape at a 45-degree angle to reveal your crisp white edges.
Frame your tropical masterpiece or gift it to a friend who loves the ocean


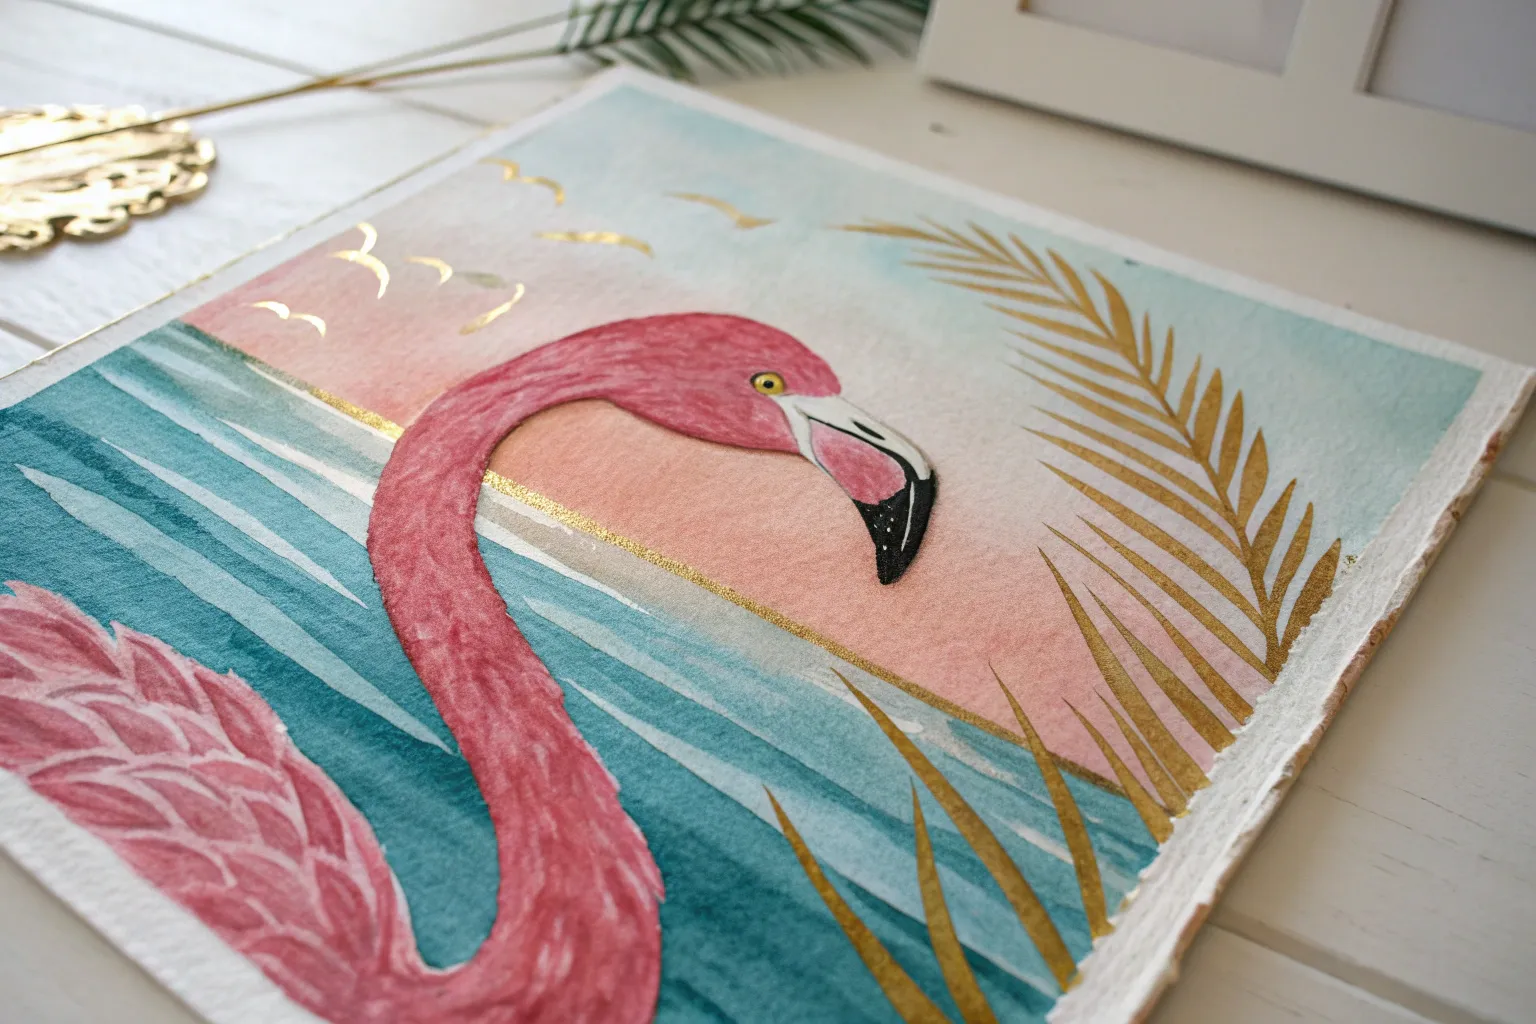
Palm Fronds Framing a Flamingo

Bring a splash of the tropics into your home with this delicate watercolor painting featuring a graceful flamingo framed by vibrant palm leaves. The soft pinks and deep greens create a balanced, nature-inspired composition that looks stunning in a bold white frame.
Step-by-Step Guide
Materials
- Cold-pressed watercolor paper (140 lb/300 gsm)
- Watercolor paints (Alizarin Crimson, Cadmium Red, Sap Green, Viridian, Burnt Umber, Lamp Black)
- Round watercolor brushes (Size 4, 8, and a fine liner size 0)
- Pencil (HB or H) and kneaded eraser
- Two jars of water
- Paper towels
- Painter’s tape or masking tape
- White wooden frame (square format recommended)
Step 1: Preparation and Sketching
-
Secure the paper:
Tape your watercolor paper down to a hard board or table surface using painter’s tape to prevent buckling when the paper gets wet. -
Sketch the silhouette:
Lightly draw the flamingo’s outline in the center. Start with an oval for the body and a curved ‘S’ shape for the neck. Keep your pencil lines very faint so they won’t show through the translucent paint. -
Add palm placements:
Sketch the spines of the palm leaves first—one drooping from the top left, one rising from the bottom left, and one from the bottom right—before lightly adding the leaflet shapes.
Muddy Wings?
If your feather layers are bleeding into blobs, you aren’t waiting long enough between coats. Ensure the bottom layer is bone dry before adding darker feather details on top.
Step 2: Painting the Flamingo
-
Base wash for the body:
Mix a very dilute wash of Alizarin Crimson and water. Using the size 8 brush, wet the flamingo’s body area (wet-on-dry) and drop in the pale pink color, leaving the paper white for highlights on the upper back. -
Define the neck:
While the body dries slightly, paint the neck with a slightly stronger mix of pink. Use the tip of your brush to carefully navigate the curve, fading the color out as it joins the body. -
Layering feathers:
Once the base layer is dry to the touch, mix a more saturated pink using Cadmium Red and Alizarin Crimson. With the size 4 brush, paint decisive, flicking strokes on the wing area to mimic layered feathers. -
Adding shadow and depth:
Mix a tiny touch of purple or brown into your pink to create a shadow tone. Apply this under the wing and along the bottom curve of the belly to give the bird volume. -
The beak and face:
Use the size 0 liner brush for the beak. Paint the tip black, fading into a pale grey-white near the face. Add a tiny dot for the eye and a subtle pink wash around the face. -
Legs and feet:
Mix Burnt Umber with a touch of pink for a distinctive grey-brown leg color. Use the liner brush to paint the long, thin legs, capturing the knobby knee joint on the standing leg.
Step 3: Painting the Palm Fronds
-
Mixing greens:
Prepare two puddles of green: a bright, yellowish green (Sap Green) and a darker, cool green (Viridian mixed with a touch of blue or Payne’s Grey). -
Painting the spine:
I like to start by painting the central spine of the leaf with the lighter green using the size 4 brush to establish the flow of the frond. -
Adding leaflets:
Using the size 4 brush, pull strokes outward from the spine to create individual leaflets. Press down at the start of the stroke and lift up at the end to create a tapered point. -
Creating texture:
While the leaflets are still damp, drop touches of the darker green mixture into the base of the leaves where they meet the spine. This wet-on-wet technique adds natural depth. -
Top left frond:
Paint the top-left frond so it appears to hang downward into the frame. Ensure the leaves curve naturally with gravity. -
Bottom framing:
Paint the bottom two frond clusters. Vary the angle of your brush strokes so the leaves don’t look too uniform or stiff.
Pro Tip: Loose Leaves
Don’t paint every single palm leaflet perfectly. Leave small slivers of white space between some leaves to keep the painting airy and prevent it from becoming a heavy green block.
Step 4: Final Details
-
Review and refine:
Step back and look at the composition. If the flamingo looks too pale, add a glaze of pink over the darker feather areas. -
Sharpen edges:
Use the liner brush with concentrated dark green to sharpen the tips of any palm leaves that lost their definition. -
Frame the artwork:
Once the painting is completely dry (give it at least an hour), remove the tape carefully. Place the artwork into a sturdy white wooden frame to complete the modern tropical look.
Hang your tropical masterpiece in a well-lit spot to enjoy those summer vibes all year round
BRUSH GUIDE
The Right Brush for Every Stroke
From clean lines to bold texture — master brush choice, stroke control, and essential techniques.
Explore the Full Guide
Easy Flamingo With Simple Shapes
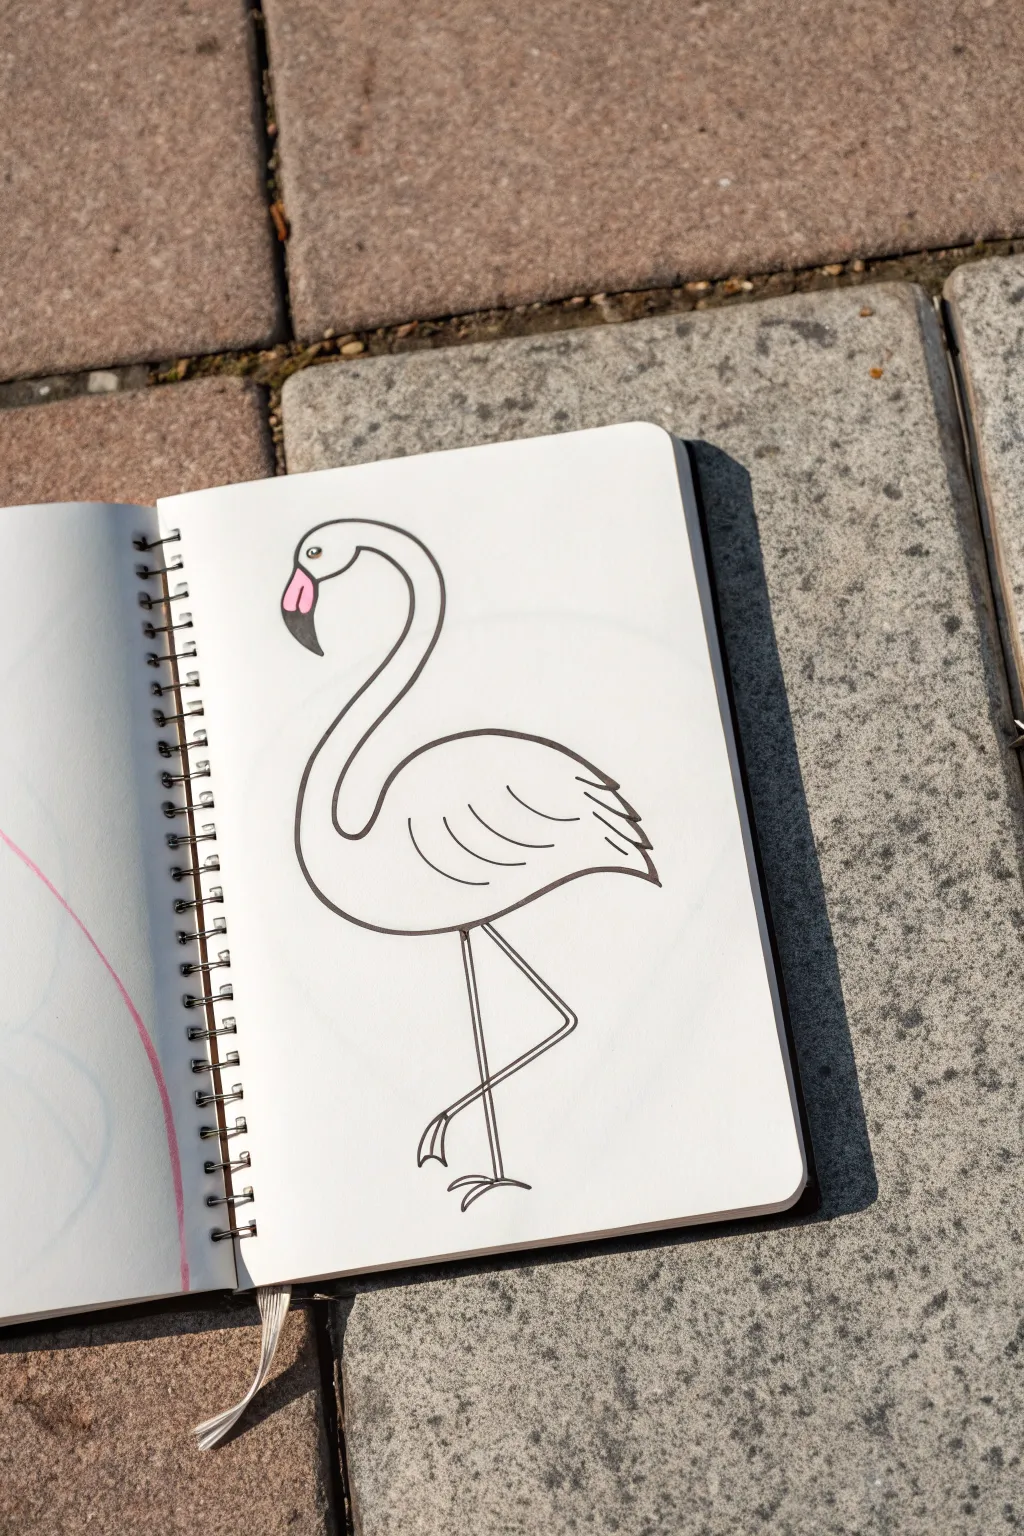
This elegant flamingo sketch reduces the bird to its most essential, graceful curves, making it perfect for beginners. The clean black lines against white paper create a striking minimalist look with just a tiny pop of pink for character.
Step-by-Step
Materials
- Sketchbook with smooth white paper
- HB Pencil (for initial sketch)
- Eraser
- Fine liner pen (black, archival ink)
- Pink marker or colored pencil
Step 1: Planning the Shapes
-
Start with the head:
Begin near the upper middle left of your page. Lightly sketch a small, rounded shape for the head. Think of a slightly flattened circle. -
Draft the neck curve:
From the back of the head, draw a long, sweeping ‘S’ curve downwards. This is the spine of the neck. Flamingos are known for this elegant shape, so take your time getting the flow right. -
Add the neck thickness:
Draw a parallel line inside the first curve to give the neck width. It should be slender but widen slightly as it joins the body. -
Outline the body:
At the base of the neck, sketch a large oval shape for the body. The top of the oval should connect smoothly to the neck lines you just drew. -
Refine the beak:
Back at the head, add the distinctive curved beak. Imagine a hook shape that points downward. Split it into two sections: the lighter upper part and the black tip.
Step 2: Inking the Outline
-
Switch to ink:
Once you are happy with your pencil guide, pick up your black fine liner. Start by tracing the top of the head. -
Draw the back line:
create one continuous, smooth line that runs from the back of the head, down the neck, and over the top curve of the body. -
Complete the neck:
Draw the front line of the neck. Pay attention to the ‘throat’ area where the neck curves; keep the width consistent until it flares into the chest. -
Form the underbelly:
Draw a deep, rounded curve for the bottom of the flamingo’s body. Connect this line to the tail end of the back line. -
Add tail feathers:
At the rear of the body oval, add three or four pointed, slightly curved jagged lines to suggest tail feathers. -
Ink the beak:
Trace the beak outline carefully. Draw the separation line between the upper beak and the black tip. -
Add the eye:
Place a small circle near the beak for the eye. Leave a tiny white dot in the center as a highlight, then fill the rest of the pupil.
Smooth Operator
When drawing the long neck curve, lock your wrist and move your entire arm from the shoulder. This prevents shaky lines and creates a smoother arc.
Step 3: Adding Details and Legs
-
Draw wing details:
Inside the main body shape, draw a smaller curved line that mimics the top of the back. This suggests the wing resting against the body. -
Feather texture:
Add three or four simple curved strokes inside the wing area to imply layers of feathers without getting too complicated. -
Draw the straight leg:
Find the center point of the belly curve. Draw a long, thin straight line extending downwards for the standing leg. -
Add the bent leg:
Start the second leg slightly behind the first. Draw a diagonal line going back, then a sharp angle (the ‘knee’), and a another diagonal line coming forward to cross the first leg. -
Outline the feet:
At the bottom of each leg line, draw simple webbed feet. Think of a small triangle shape with curved toes. -
Double the leg lines:
Go back over your leg lines to give them a tiny bit of thickness. They should look delicate, like sticks. -
Add color:
Using your pink marker or pencil, gently color in just the upper section of the beak. Leave the rest of the bird white for that clean, modern look. -
Final touches:
Fill in the tip of the beak with your black pen solid black. Wait a moment for the ink to fully dry, then erase your pencil guidelines.
Splash of Watercolor
Instead for leaving the body white, use a very watery pink watercolor wash over the body area, letting it bleed slightly outside the lines.
You now have a chic piece of art that looks great in a sketchbook or framed on a wall
Bold Pink Acrylic Flamingo Layers
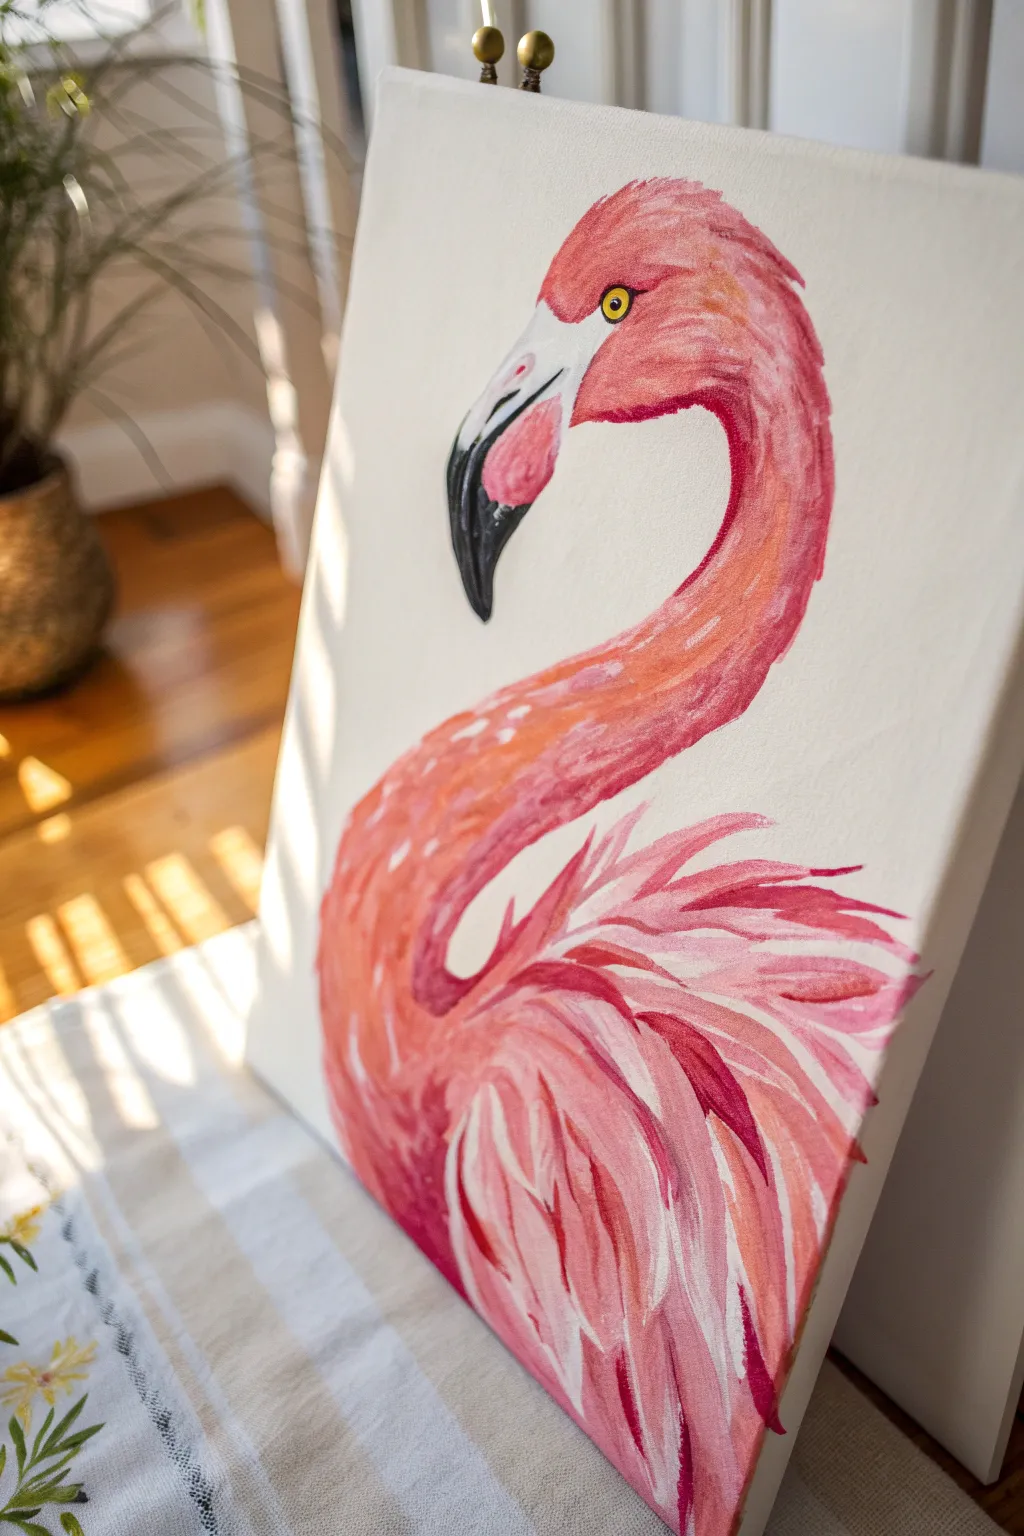
Capture the elegance of a flamingo with this vibrant acrylic painting that plays with light and texture. By building up layers of varying pinks and corals, you will create a sense of feathery depth against a crisp white background.
How-To Guide
Materials
- Rectangular stretched canvas (approx. 12×16 or similar)
- Acrylic paints: Titanium White, Primary Red, Magenta, Cadmium Orange, Carbon Black, Primary Yellow
- Flat shader brushes (sizes 8 and 4)
- Round detail brush (size 1)
- Pencil and eraser
- Palette for mixing
- Cup of water and paper towels
Step 1: Sketching the Form
-
Outline the head:
Start near the top center of your canvas. Gently sketch an oval shape for the bird’s head, leaving space on the left for the beak. -
Extending the neck:
Draw the iconic ‘S’ curve of the neck. Start from the back of the head, curving it down and to the left, then swooping back toward the right to form the body. -
Define the body shape:
Create the large oval mass for the body at the bottom. The neck should flow seamlessly into this shape, suggesting a solid connection. -
Detail the beak and eye:
Sketch the large, downward-curved beak attached to the face. Add a small circle for the eye, placed relatively high on the head, and mark off the area where the black tip of the beak meets the lighter section.
Fixing Flat Feathers
If the feathers look too flat, your colors might be too similar. Wait for the paint to dry, then add a glaze of dark magenta in the shadows for instant contrast.
Step 2: Painting the Base Layers
-
Mix your base pink:
Create a mid-tone pink on your palette by mixing Magenta with a touch of Titanium White and a tiny dot of Orange to warm it up. -
Fill the neck and head:
Using the size 8 flat brush, block in the head and neck. Don’t worry about texture yet; just aim for solid coverage, but leave the eye and beak areas unpainted. -
Block in the body:
Continue using your base pink to fill in the main body area. While the paint is wet, you can streak in a little unmixed Magenta near the bottom edge to suggest shadow depth. -
Paint the beak base:
Mix a very pale grey-pink (mostly white with a speck of red and black). Paint the upper part of the beak, closest to the face, ensuring a clean edge against the pink feathers.
Step 3: Building Feathery Texture
-
Mix a highlight coral:
Combine Primary Red, Orange, and lots of White to make a bright creamy coral color. This will be your main highlight tone. -
Layering neck feathers:
Switch to the size 4 brush. Apply small, curved strokes going down the neck, following the curve of the ‘S’. Let the darker base show through between strokes to create volume. -
Creating wing feathers:
On the body, use longer, sweeping strokes that curve downward and backward. Imagine how long wing feathers lay against the body and mimic that direction. -
Deepen the shadows:
Mix Magenta with a tiny bit of Red (no white). Add darker strokes underneath the main wing feathers and along the inside curve of the neck to enhance the 3D effect. -
Add high-contrast highlights:
Clean your brush and use nearly pure White with just a whisper of pink. Add sharp, distinct visual highlights on the top of the head and the topmost wing feathers.
Golden Hour Glow
Mix a metallic gold paint with a drop of orange glaze. Lightly dry-brush this over the highest points of the wings to give the bird a sun-kissed, shimmering finish.
Step 4: Facial Details
-
Paint the eye:
Use the round detail brush and Primary Yellow to fill the eye circle. Once dry, add a tiny black pupil in the center and a microscopic white reflection dot. -
Finish the beak:
Fill the tip of the beak with Carbon Black. Where the black meets the lighter area, use a slightly jagged line to make it look organic rather than perfectly straight. -
Refining the face:
I like to use a very watered-down grey to outline the white patch of the face lightly, giving it distinct separation from the pink feathers. -
Final feathery wisps:
Take your smallest brush with watered-down light pink paint and flick a few loose ‘hairs’ or feather tips extending off the back of the head and wings for realism.
Step back and admire the vibrant layers of your tropical masterpiece

PENCIL GUIDE
Understanding Pencil Grades from H to B
From first sketch to finished drawing — learn pencil grades, line control, and shading techniques.
Explore the Full Guide
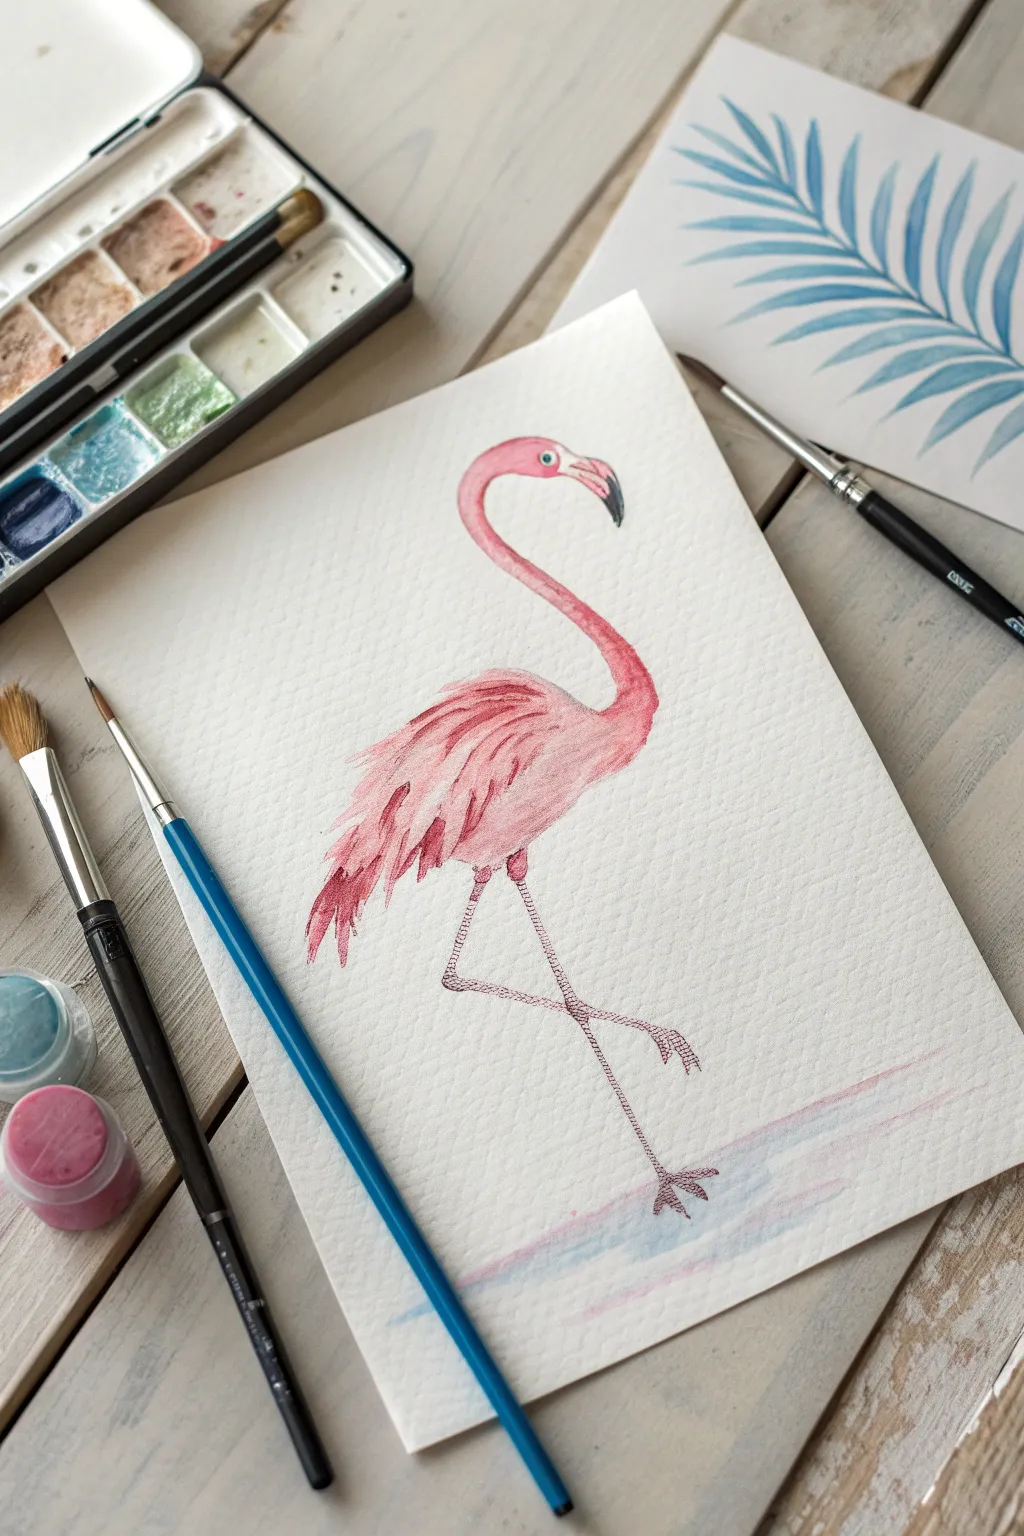
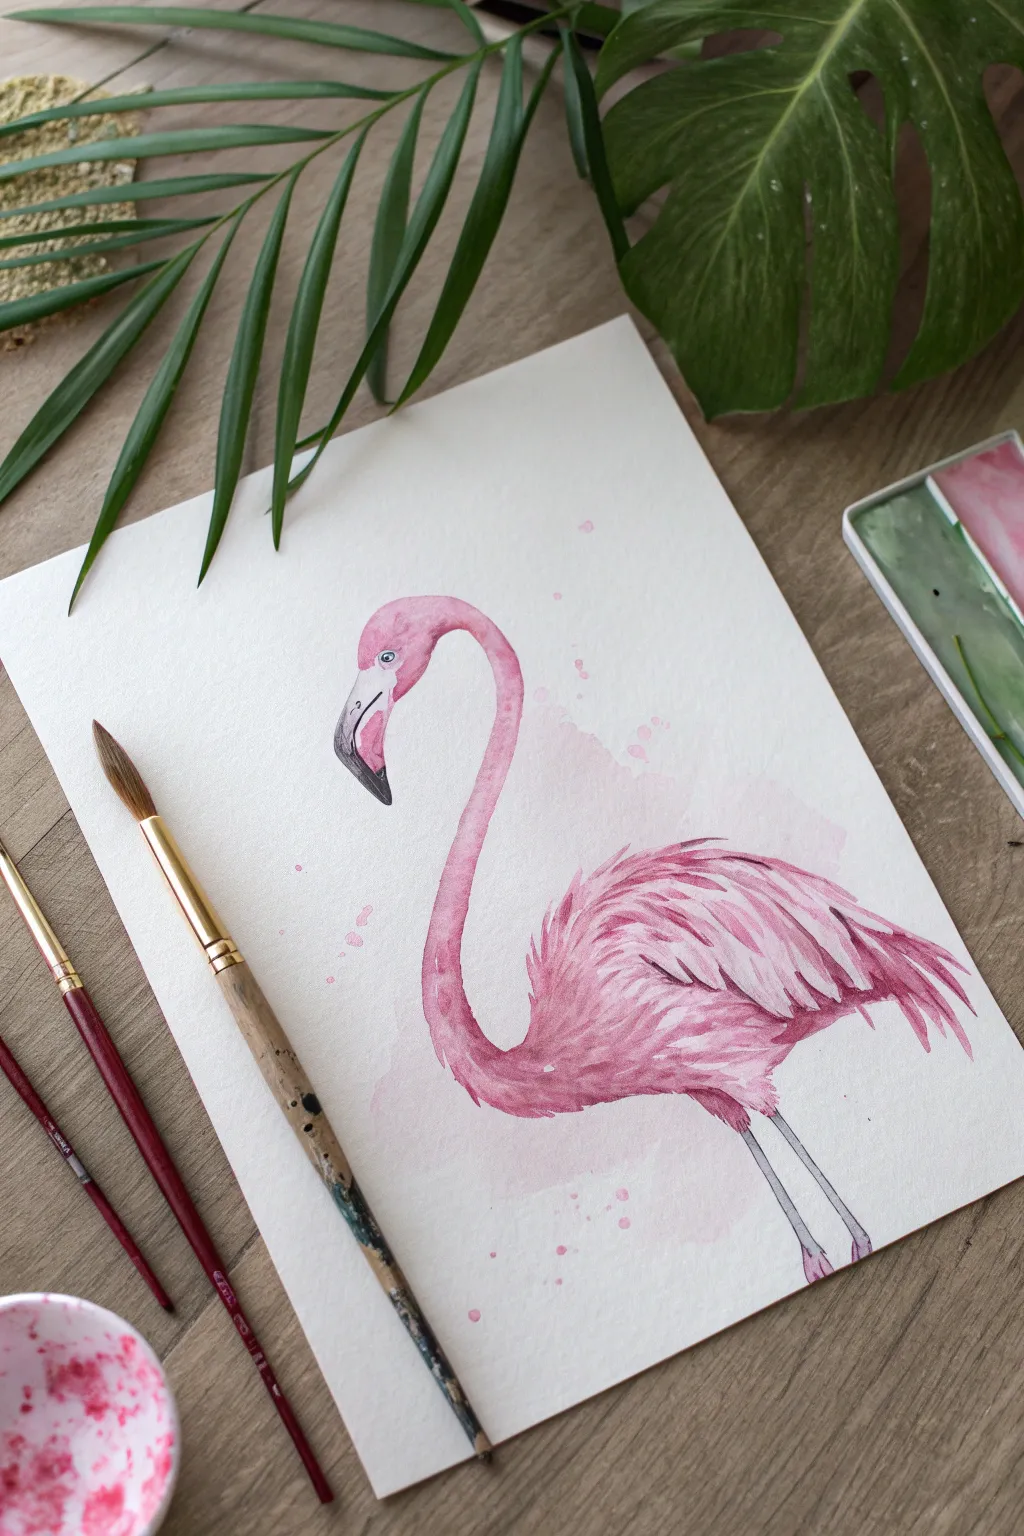
Watercolor Flamingo With Loose Washes
Capture the graceful curve and vibrant pinks of a flamingo using soft watercolor techniques that balance detail with dreamy backgrounds. This project focuses on building layers of coral and rose hues while keeping the surrounding palm fronds delicate and airy.
Detailed Instructions
Materials
- Cold press watercolor paper (140lb/300gsm), preferably taped to a board
- Watercolor paints: Rose Madder, Cadmium Red, Alizarin Crimson, Turquoise, Indigo, Lamp Black, Yellow Ochre
- Round watercolor brushes: Size 10 (for washes), Size 6 (for body), Size 2 (for details)
- Masking fluid (optional)
- Pencil (HB or H) and kneaded eraser
- Two jars of water
- Paper towels
- Painter’s tape
Step 1: Preparation and Sketching
-
Secure the paper:
Begin by taping down all four edges of your watercolor paper to a hard board using painter’s tape. This creates a clean white border and prevents the paper from buckling during wet washes. -
Outline the flamingo:
Lightly sketch the main flamingo shape in the center, focusing on the distinct ‘S’ curve of the neck. Ensure the beak points downward and the body has a rounded, teardrop shape. -
Add background elements:
Sketch a horizon line near the bottom third of the paper for the water. Briefly outline a smaller, distant flamingo to the left and faint indications of palm leaves on the sides. -
Refine the beak:
Draw the specific curve of the beak clearly, marking the division between the black tip and the lighter upper section. Keep your pencil lines very faint so they don’t show through the paint later.
Step 2: Painting the Background
-
Wet the sky area:
Using your largest brush, apply clean water to the sky area around the bird, being careful not to paint inside the flamingo’s outline. -
Apply the sky wash:
Drop in a very watery mix of Turquoise and a touch of Yellow Ochre for a warm, sunny glow. Let the colors bleed softly on the wet paper, keeping the wash uneven for an atmospheric look. -
Paint the distant palms:
While the paper is still damp but not soaking, mix a faint teal using Turquoise and plenty of water. Paint loose, feathery palm fronds on the left and right sides so they blur slightly into the background. -
Create the water:
Switch to a slightly stronger mix of Turquoise and Indigo. Paint the water area below the horizon line with horizontal strokes, leaving a few white gaps for sparkle. -
Paint the distant bird:
Using a size 6 brush, paint the small background flamingo with a simple silhouette of diluted Rose Madder. It doesn’t need detail, just the suggestion of shape.
Clean Edges Pro-Tip
When painting the sky around the flamingo, get close to the outline but leave a microscopic hair-width of white paper dry between the pink bird and the blue sky to prevent colors from muddying.
Step 3: The Main Flamingo
-
Base layer for the body:
Wet the entire body of the main flamingo with clean water. Drop in a light wash of Rose Madder, letting it flow naturally. Keep the top of the head and parts of the back lighter to suggest highlights. -
Deepen the neck:
While the base layer is still damp, mix a stronger concentration of Cadmium Red and Rose Madder. Paint along the underside of the neck to create roundness and shadow. -
Define the wing feathers:
Switch to a size 6 brush. Using Alizarin Crimson mixed with a touch of Cadmium Red, paint the long, draping feathers on the wing. Use quick, sweeping strokes that follow the curve of the body. -
Layering texture:
Once the first feather layer is dry, add a second layer of darker reds and pinks between the feathers to create depth and separation. Paint negative shapes to make the lighter feathers pop. -
Detail the head:
Use your smallest brush to carefully paint around the eye, leaving a tiny white highlight. Add darker pink accents around the beak and eye socket to give the face structure.
Level Up: Salt Texture
While the background sky wash is still wet, sprinkle a tiny pinch of table salt onto the paper. When it dries and you brush it off, you’ll get a beautiful, crystallized texture.
Step 4: Final Details
-
Paint the beak:
Paint the upper part of the beak usually a pale pink or whitish-grey. For the tip, use a mix of Lamp Black and Indigo, painting carefully to keep the edge sharp. -
Add the legs:
Mix a greyish-brown using your palette leftovers. Paint the legs with thin, confident lines using the size 2 brush. Remember that flamingo knees are essentially ankles, so the joint is quite high up. -
Enhance contrast:
Look at the darkest areas under the wing and belly. Glaze a final layer of Alizarin Crimson mixed with a tiny drop of Indigo here to ground the bird and add volume. -
Final touches:
If the water wash dried too light, add a few more horizontal strokes of teal near the legs to anchor the bird in the scene. -
Reveal the border:
Wait until the painting is completely bone dry. Slowly peel away the painter’s tape at a 45-degree angle to reveal your crisp, clean edges.
Frame your tropical masterpiece in a simple white frame or mat to let those vibrant pinks truly shine
Flamingo Line-and-Wash Sketch
Capture the elegance of a flamingo with this soft and textured watercolor project. By combining loose washes for the feathers with precise lining for the legs and beak, you will create a piece that feels both airy and grounded.
Step-by-Step Guide
Materials
- Cold press watercolor paper (300 gsm)
- Watercolor paints (Alizarin Crimson, Cadmium Red, Opera Rose, Sap Green, Paynes Grey, Cerulean Blue)
- Round brush (size 6 or 8) for washes
- Fine detail brush (size 0 or 00) or a fine liner brush
- Pencil (HB) for sketching
- Kneadable eraser
- Mixing palette
- Two jars of water
- Paper towels
Step 1: Sketching the Form
-
Outline the head and neck:
Start near the top center of your paper. Lightly sketch the curved ‘S’ shape of the flamingo’s neck, leading into a small oval for the head. Keep your pencil pressure extremely light so the graphite doesn’t show through the transparent paint later. -
Define the body:
Draw an oval shape for the body connecting to the neck. The back should be slightly hunched, tapering down towards the tail feathers. Don’t worry about individual feathers yet; focus on the main mass of the bird. -
Sketch the legs:
Draw the long, slender legs. Position one leg straight down to support the weight and the other bent at the ‘knee’ (which is actually the ankle) tucked up towards the body. Add the webbed feet at the bottom. -
Refine the beak and eye:
Add the distinct curved beak shape, noting the downward hook. Place a small circle for the eye. Once satisfied, gently roll a kneadable eraser over the whole sketch to lift excess graphite, leaving only faint guidelines.
Fixing Blooms
If water pushes pigment into ugly ‘cauliflower’ blooms, wait for it to dry completely. Then, gently scrub the edge with a damp stiff brush to soften it.
Step 2: Applying Color Washes
-
Mix your pinks:
Create a watery mix of Opera Rose and a touch of Cadmium Red on your palette. You want a soft, shell-pink color. Prepare a second, slightly more saturated mix of Alizarin Crimson for the darker areas. -
Paint the first body wash:
Using your medium round brush, apply clean water to the body area first (wet-on-wet technique). Drop in your pale pink mix, letting it bloom softly across the body shape. -
Add neck color:
While the body is settling, paint the neck with the pale pink mix. Be careful to stay inside your lines here as the neck is slender. Leave the head area very pale, almost white. -
Layering the feathers:
While the body is still damp but not soaking wet, use the tip of your brush to stroke in the darker Alizarin Crimson mix. Follow the direction of feather growth—curving down and back towards the tail. This creates soft, undefined texture. -
Allow to dry:
Let this initial layer dry completely. The paper must be cool to the touch and flat before you add the fine details.
Step 3: Adding Details and Texture
-
Define the feathers:
Switch to your fine detail brush. Mix a more concentrated red-pink. Paint specific feather shapes on the wing, using jagged, lifting strokes to mimic the ruffled edges of plumage. Leave gaps to let the lighter wash underneath show through. -
Paint the beak:
Paint the tip of the beak with Paynes Grey (almost black), blending it upwards into a pale pink near the face. Use the very tip of your brush to ensure a sharp, clean edge. -
Detail the eye:
Carefully paint the pupil black and ring it with a tiny touch of yellow or pale green. Leave a microscopic dot of white paper for the highlight to bring the bird to life. -
Texture the neck:
Using a relatively dry brush with the darker pink mix, add tiny stippling or very short dash marks along the underside of the neck to suggest shadow and texture without painting a solid line.
Level Up: Splatter
For a looser, artistic vibe, tap your loaded brush handle against a finger to flick tiny droplets of pink and blue paint around the feet and tail feathers.
Step 4: Legs and Grounding
-
Outline the legs:
The legs require a steady hand. Using your finest brush and a mix of Alizarin Crimson and a speck of brown or grey, paint the thin outlines of the legs. I find it helpful to exhale slowly while pulling these long lines to keep them steady. -
Add skin texture:
Instead of filling the legs solidly, use a cross-hatching or stippling pattern with the fine brush. This mimics the scaly texture of bird skin. Darken the joints (knees) slightly to show volume. -
Paint the water reflection:
Mix a very watery wash of Cerulean Blue and a touch of your pink mix. Paint horizontal, loose strokes under the feet to suggest water. Let the colors bleed slightly into one another. -
Soften the reflection edges:
Before the water wash dries, take a clean, damp brush and run it along the outer edges of the blue strokes to fade them out into the white paper, creating a dreamy, watery effect.
Step back and admire the contrast between the soft watercolor washes and your precise fine lines.


Two Flamingos Making a Heart Pose
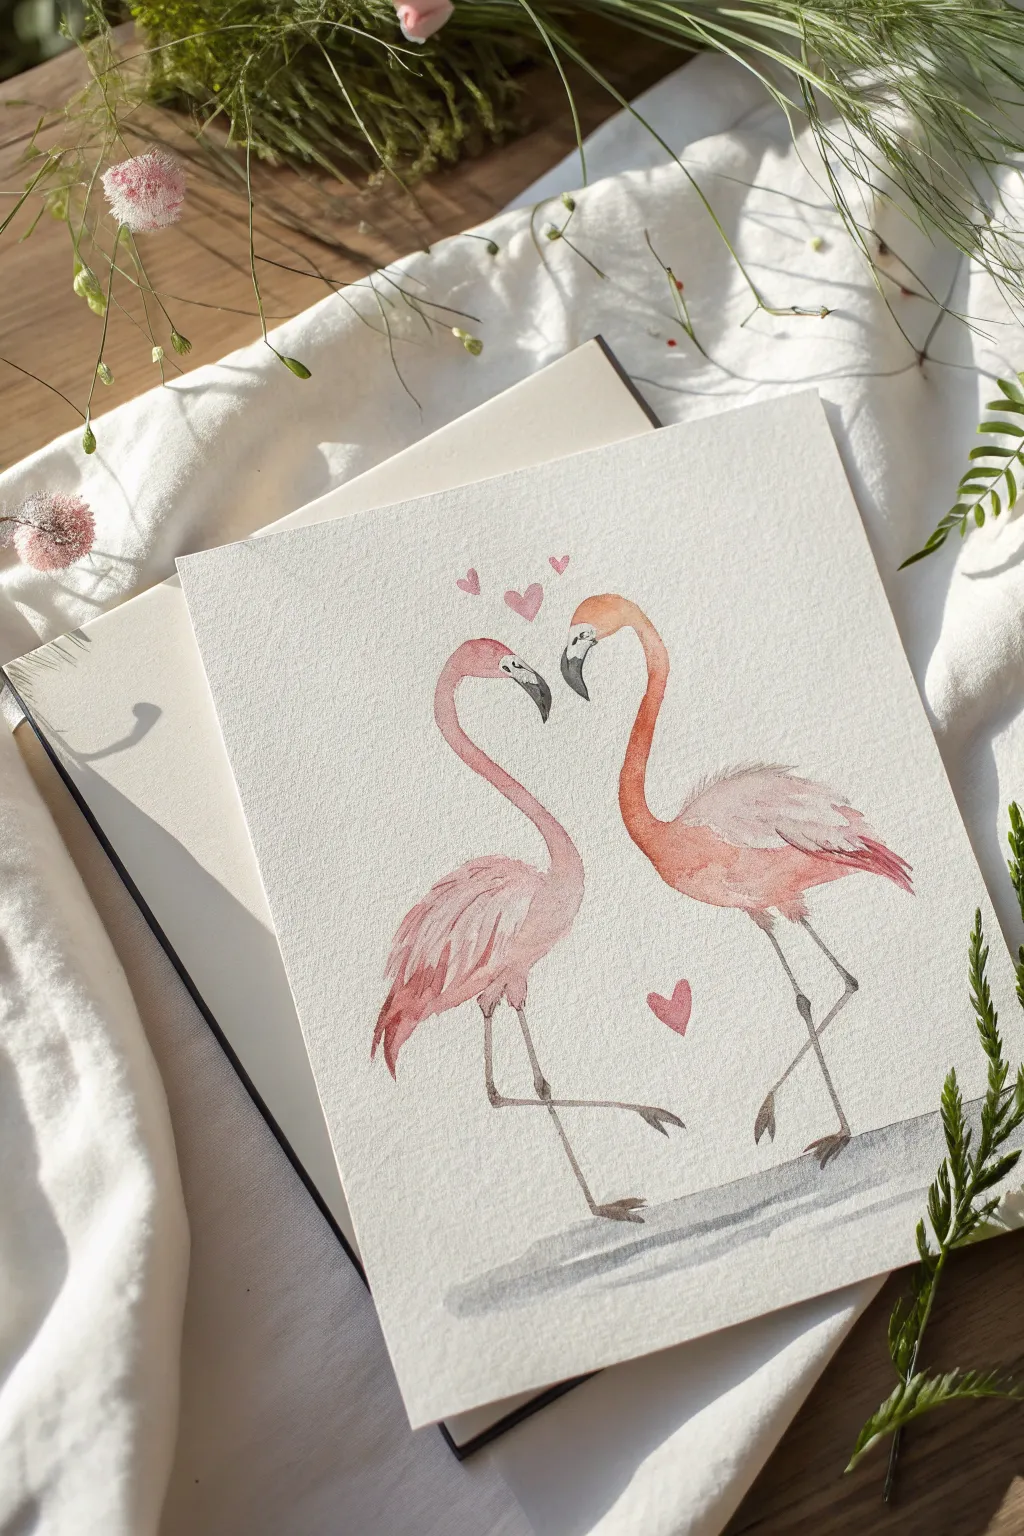
Capture the romance of nature with this sweet watercolor illustration featuring two flamingos whose curved necks form a perfect heart shape. The soft pink washes and delicate details make this piece an ideal greeting card or a charming addition to a nursery wall.
Detailed Instructions
Materials
- Cold press watercolor paper (300 gsm)
- Watercolor paints (Alizarin Crimson, Cadmium Orange, Payne’s Grey, Burnt Umber)
- Round brushes (sizes 2, 4, and 6)
- Pencil (HB or H)
- Kneaded eraser
- Two jars of water
- Paper towel or rag
- Mixing palette
Step 1: Sketching the Composition
-
Establish the heart shape:
Begin by lightly sketching a large, invisible heart in the center of your paper to serve as a guide. This ensures the negative space between the birds remains symmetrical. -
Draft the left flamingo:
Sketch the left flamingo’s head starting at the top left curve of your invisible heart. Draw a graceful ‘S’ curve down for the neck, leading into an oval body shape angled towards the bottom left. -
Draft the right flamingo:
Mirror the previous step for the right bird. Ensure their beaks are close but not touching, and check that the curve of their necks creates that essential open heart space. -
Add leg structures:
Draw thin lines for the legs. Have the left flamingo standing on its left leg with the right leg bent up. The right flamingo should stand on its right leg with the left leg slightly angled back. Add the suggestion of a ground line beneath them. -
Refine and lighten:
Detail the beaks and the wing feathers on the bodies. Once happy with the forms, roll your kneaded eraser over the entire page to lift the graphite until the lines are barely visible.
Keep it Clean
Wait for the pink head areas to be bone-dry before painting the grey beaks. If the pink is damp, the grey will bleed into the face and ruin the crisp contrast.
Step 2: Painting the Birds
-
Mix your base pinks:
Create two puddles of color on your palette: a soft, watery pink using Alizarin Crimson and plenty of water, and a warmer, slightly peachy tone by adding a touch of Cadmium Orange. -
First wash – Left bird:
Using a size 6 brush, wet the body of the left flamingo with clean water. Drop in the cool pink mixture, letting it bloom softly. Keep the head very pale, almost white near the eye. -
First wash – Right bird:
Repeat the wet-on-wet process for the right flamingo, but use more of the peachy-orange mix on the neck and upper wing to distinguish it from its partner. -
Deepen the wings:
While the bodies are still damp but not soaking, drop slightly more saturated pigment (less water) onto the wing areas to create a soft, feathery gradient. -
Paint the beaks:
Switch to a size 2 brush. Paint the tip of the beaks with a dark mix of Payne’s Grey. Leave a sharp, unpainted white highlight on the upper curve of the beak for shine. -
Add facial details:
Carefully paint the facial skin connecting the beak to the eye using a very pale grey wash. Dot the eye with dark grey, leaving a tiny speck of white paper for the catchlight.
Make it Personal
Instead of painted hearts, use metallic gold watercolor for the floating hearts, or replace them with tiny, realistic flower blossoms for a botanical twist.
Step 3: Defining Texture and Background
-
Feather texture:
Once the base layer is completely dry, use the size 4 brush with a slightly darker pink mix to paint loose, curved strokes on the wings and tail feathers. This mimics individual plumage. -
Legs and feet:
Mix a diluted grey-brown using Payne’s Grey and a tiny bit of Burnt Umber. Using the size 2 brush, paint the thin legs. Thicken the joints slightly to make them look realistic. -
Ground shadow:
Turn your brush sideways or use a flat wash to create a horizontal, watery grey strip beneath their feet. Let this fade out at the edges so they aren’t floating in space. -
Floating hearts:
Mix a sweet, vibrant pink. Paint three small hearts floating above their heads and one solitary heart drifting between the birds near their legs. -
Final touches:
Evaluate the contrast. If the wing feathers need more definition, add a few dry-brush strokes of concentrated pink to the tips of the wings.
Now you have a lovely, balanced composition that celebrates connection and grace
Flamingo Flock in the Distance
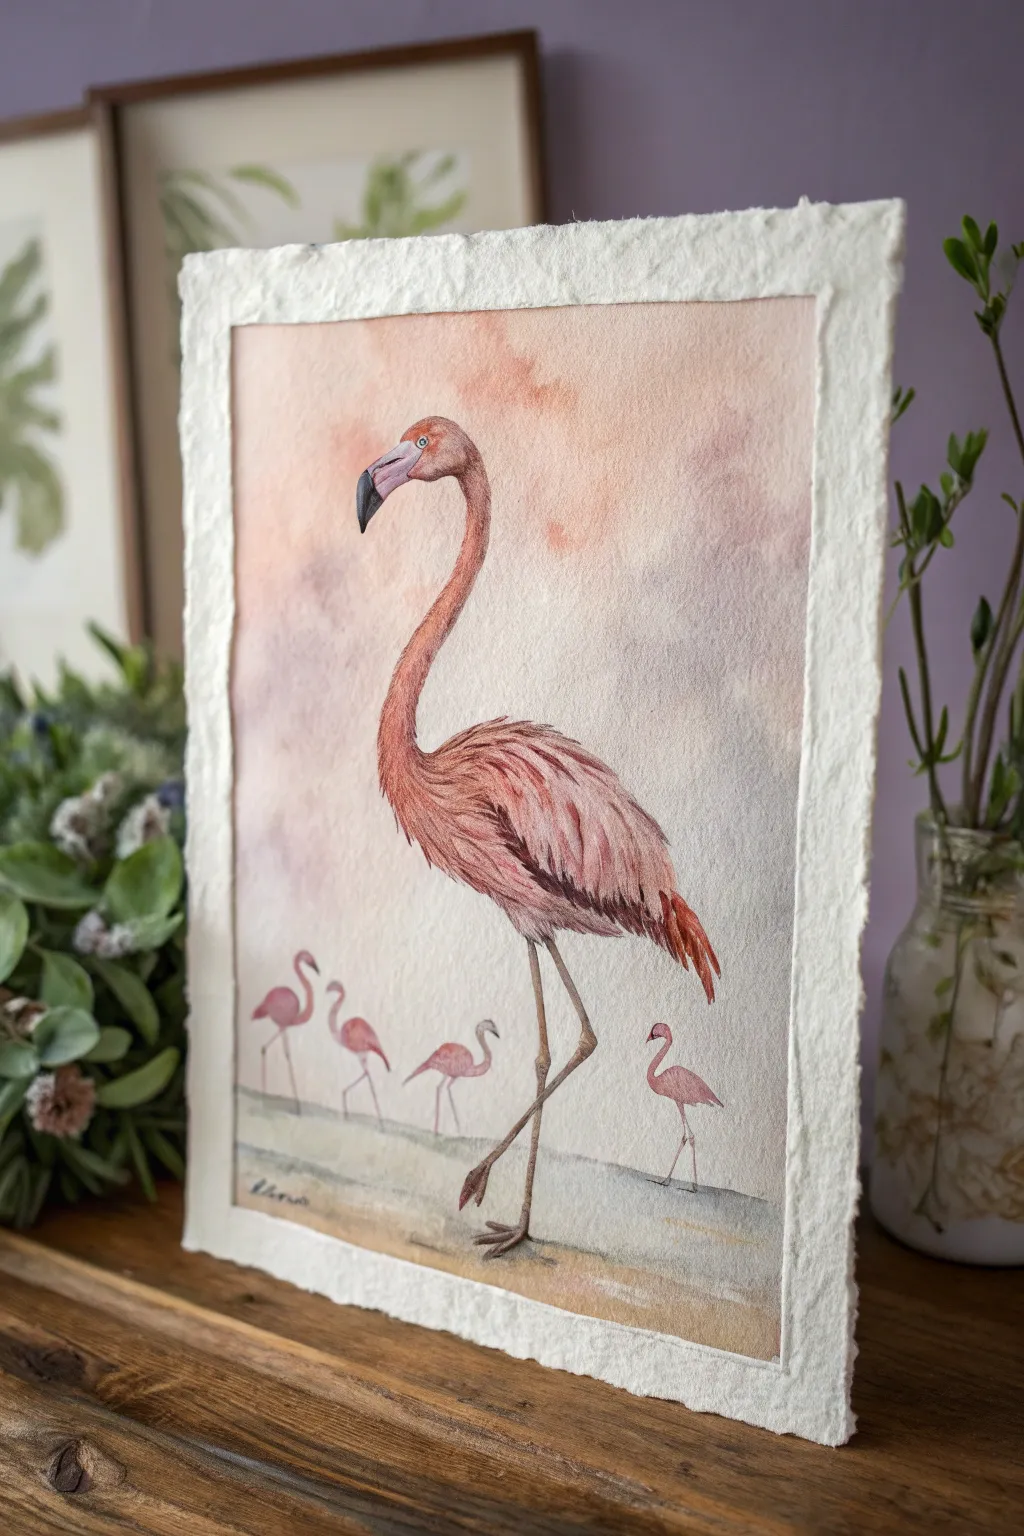
This elegant watercolor project captures a majestic flamingo in the foreground watching over a distant, faded flock. The soft palette of dusty pinks and grays creates a serene atmosphere, while the textured paper edge adds a handmade, rustic charm.
Step-by-Step
Materials
- High-quality watercolor paper (rough or cold press, 140lb/300gsm or heavier)
- Watercolor paints (Alizarin Crimson, Cadmium Red, Burnt Sienna, Payne’s Grey, Yellow Ochre, Ultramarine Blue, White Gouache)
- Round watercolor brushes (Size 8 for washes, Size 4 for details, Size 0 for fine lines)
- Masking fluid (optional)
- Drawing pencil (HB or 2B) and kneaded eraser
- Two jars of water
- Paper towels
- Deckle edge ruler or straight edge for tearing paper
Step 1: Preparation and Sketching
-
Prepare the paper edge:
Before you begin painting, give your paper that distinctive torn look. Wet the edges of your heavy watercolor paper with a brush or sponge, wait a moment for the fibers to soften, and gently tear away the margins to create a soft, deckle edge. -
Sketch the main subject:
Lightly sketch the large, central flamingo. Focus on the graceful ‘S’ curve of the neck. Ensure the body is positioned slightly off-center to the right, balancing on one leg with the other tucked up. -
Add the background flock:
Draw four smaller flamingos in the background, making them significantly smaller to create a sense of depth and distance. Keep their shapes simple and gestural compared to the main subject. -
Draft the horizon line:
Sketch a faint horizon line about a quarter of the way up from the bottom. Do not make this a perfectly straight line; a slight unevenness suggests a natural shoreline.
Muddy Colors?
If your pinks look dull, clean your water! Red pigments are sensitive to dirty water. Rinse your brush thoroughly between mixing the sky tones and the bird to keep the flamingo vibrant.
Step 2: The Atmospheric Background
-
Wet-in-wet sky wash:
Brush clean water over the entire sky area, working around the main flamingo if possible. While wet, drop in very diluted washes of Alizarin Crimson mixed with a touch of Burnt Sienna for a warm, dusty pink glow. -
Add clear sky tones:
While the paper is still damp, introduce a very watery grey-violet mix (Ultramarine Blue + Alizarin Crimson + touch of Grey) into the corners and upper sections to suggest soft clouds and atmosphere. -
Paint the distant flock:
Once the background is damp but not soaking (lustre stage), paint the background flamingos. Use a single, flat wash of watery pink. Let the wet paper soften their edges slightly to push them into the distance. -
Define the ground:
Paint the sandy ground using a mix of Yellow Ochre and a tiny bit of Burnt Sienna. Keep the wash horizontal and streaky. Allow the paint to pool slightly at the bottom edge for texture.
Step 3: Painting the Main Flamingo
-
Base layer for the body:
Start with a pale wash of Cadmium Red and Alizarin Crimson on the main flamingo’s head, neck, and body. I find it helpful to leave tiny slivers of white paper dry to suggest highlights on the curves. -
Layering feather texture:
Once the base is dry, use your Size 4 brush to paint individual feather groupings on the wing. Use a slightly darker mix of red and Sienna. Use short, curved strokes that follow the rounded shape of the wing. -
Deepen the shadows:
Mix a darker shadow color using Alizarin Crimson and Payne’s Grey. Apply this to the underside of the neck, the belly, and the shadowed crevices between the wing feathers to create volume. -
The legs and feet:
Paint the legs using a neutral beige-grey. Note the knobby joints. Use a darker grey mix for the undersides of the legs to make them look cylindrical rather than flat. -
Facial details:
Paint the beak. Start with a light pinkish-grey near the face, transitioning to black at the hook. Leave a tiny white highlight on the black tip to make it look shiny. -
The eye:
With your smallest brush (Size 0), paint the eye using a pale yellow/white circle with a tiny black pupil. Outline it very delicately for clarity.
Add Texture
Sprinkle a few grains of coarse salt onto the wet sand wash at the bottom. Once fully dry, brush the salt away creates beautiful, sandy speckles that add realism to the beach.
Step 4: Final Details and Refining
-
Tail feathers:
Add bright, saturated strokes of Cadmium Red or orange to the tail feathers at the very back of the flamingo to indicate those brighter flight feathers. -
Cast shadows:
Mix a transparent grey-blue and paint horizontal shadows under the flamingos’ feet on the sand. This anchors them to the ground so they don’t look like they are floating. -
Atmospheric touch-ups:
If the background flamingos dried too sharp, gently scrub them with a damp, clean brush to blur them again. This reinforces the focal point on the main bird. -
White highlights:
Use a tiny dot of white gouache for the strongest highlight in the eye and perhaps a thin line on top of the beak if the paper white was lost.
Step back and admire your peaceful flock, perfectly captured in gentle watercolor.
Flamingo in Lush Jungle Leaves
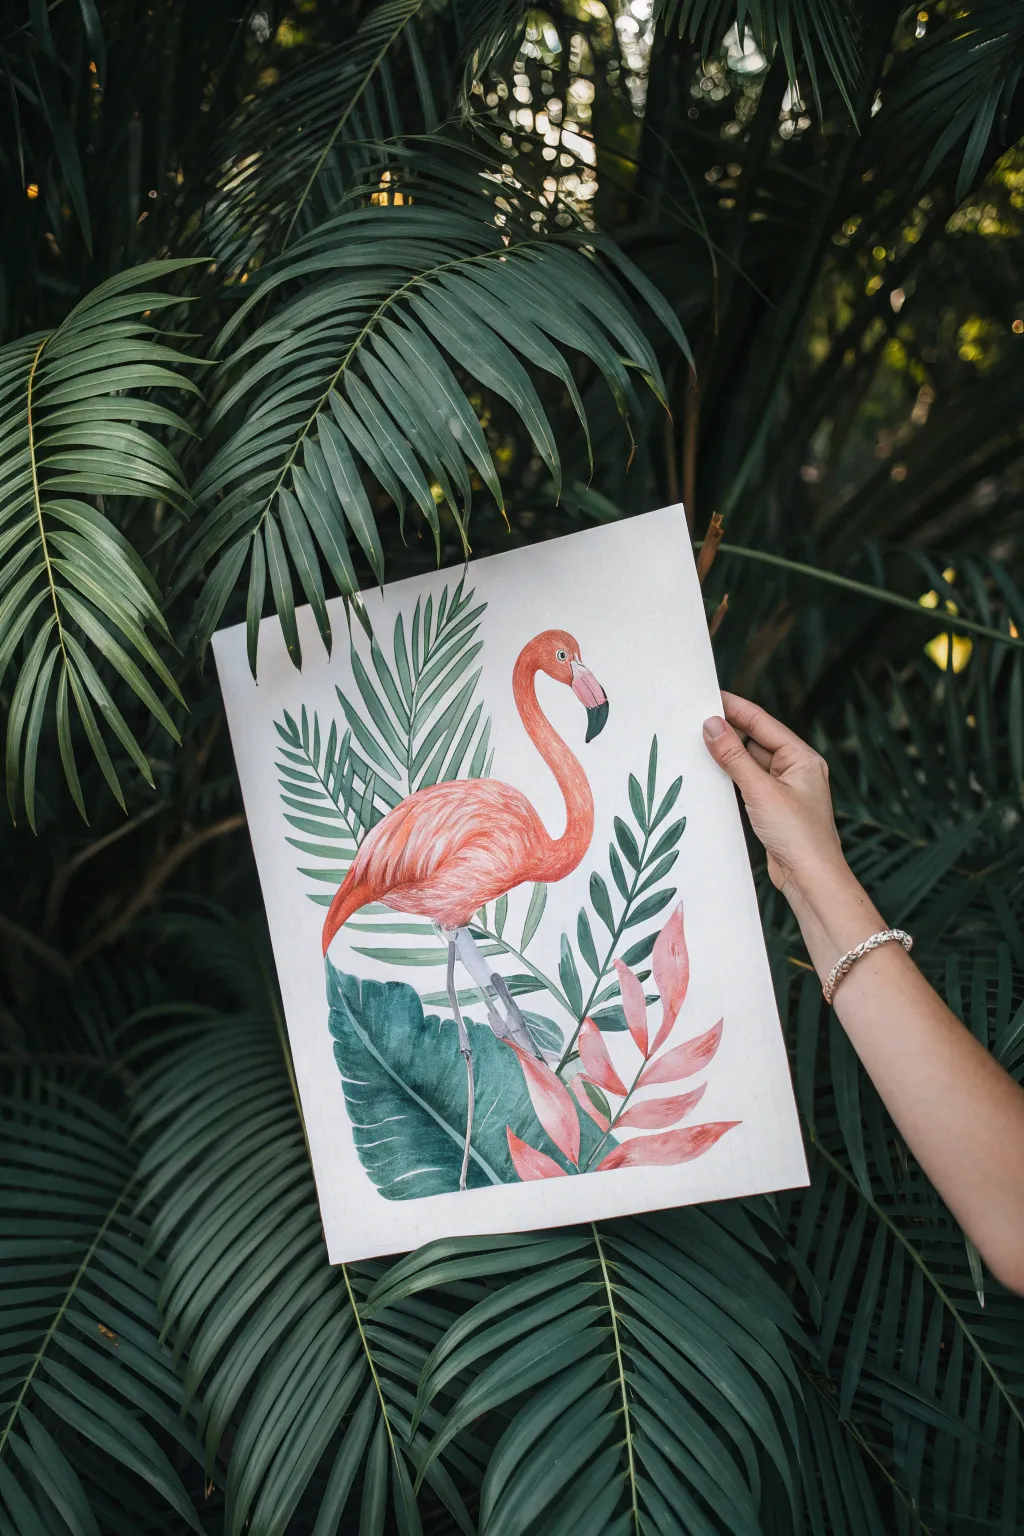
Capture the delicate beauty of a pink flamingo nestled among vibrant tropical foliage with this watercolor and colored pencil project. The composition balances lush greens against soft pinks, creating an artwork that feels both tranquil and alive with jungle energy.
Step-by-Step Tutorial
Materials
- Hot press watercolor paper (smooth finish)
- Watercolor paints (pans or tubes)
- Colored pencils (wax or oil-based)
- Round watercolor brushes (size 2, 6, and 10)
- Pencil (HB) and soft eraser
- Mixing palette
- Jars of water
- Paper towels
Step 1: Sketching the Composition
-
Outline the flamingo:
Begin by lightly sketching the flamingo’s S-shaped neck and oval body in the center of your paper. Keep your lines faint so they won’t show through the paint later. -
Add the legs:
Draw the long, slender legs. Note how the standing leg is straight while the other is bent at the ‘knee’ joint, creating a relaxed pose. -
Sketch the foliage:
Surround the bird with large tropical leaves. Draw broad monstera-style leaves at the bottom and fan-like palm fronds reaching in from the sides behind the flamingo. -
Detail the bill and eye:
Refine the shape of the bill, marking the distinct downward curve and the separation for the black tip, and place the small circular eye.
Keep it vibrant
Don’t overmix your greens on the palette. Let the blue and yellow pigments separate slightly on the paper for a natural, organic leaf look.
Step 2: Watercolor Base Layers
-
Paint the flamingo body:
Mix a watery, pale coral pink. Wash this over the flamingo’s body and neck, keeping it light to preserve luminosity. -
Layer the feathers:
While the first layer is still slightly damp, drop in a slightly more saturated pink/orange mix on the wing area to suggest depth and feathery texture. -
Base coat for greenery:
Mix a cool, medium green. Paint the palm fronds in the background, using the tip of your brush to create sharp, leafy ends. -
Paint the large leaves:
For the lower broad leaves, use a darker, blue-green hue to anchor the composition. Apply the paint smoothly, lifting a little color along the central vein for a highlight. -
Add pink foliage:
Paint the bottom-right tropical leaves using a soft dusty rose color, distinguishing them from the bright coral of the bird.
Step 3: Building Depth and Texture
-
Define the face:
Using a small brush, carefully paint the bill. Use a pale pink for the top and black for the tip, leaving a tiny white gap or highlight to show sheen. -
Shade the neck:
Mix a slightly darker red-orange. Apply this shadow color along the underside of the neck and belly to give the bird a round, three-dimensional form. -
Enhance the wings:
Use short, curved strokes with a stronger coral paint to mimic the layering of individual feathers on the wing. -
Deepen leaf shadows:
Go back over your green leaves with a darker emerald shade, painting one side of the leaf veins to create contrast and realistic folding.
Go metallic
Add gold leaf or metallic gold paint to the central veins of the pink leaves for a chic, modern tropical twist.
Step 4: Colored Pencil Details
-
Feather texture:
Once the paint is bone dry, use a sharp dark orange or red colored pencil to draw fine lines on the wing and neck, simulating soft plumage. -
Sharpen leaf edges:
I like to use a dark green pencil here to crisply outline the palm fronds and add fine veins to the large leaves, cleaning up any messy paint edges. -
Leg definition:
Use a grey or taupe pencil to outline the legs and add the knobby texture of the joints. -
Final eye finish:
Add a tiny dot of yellow to the eye with paint or pencil, and ensure the pupil is a crisp, dark black.
Step back and admire your colorful jungle creation as it brightens up your space
Flamingo With Playful Cartoon Style
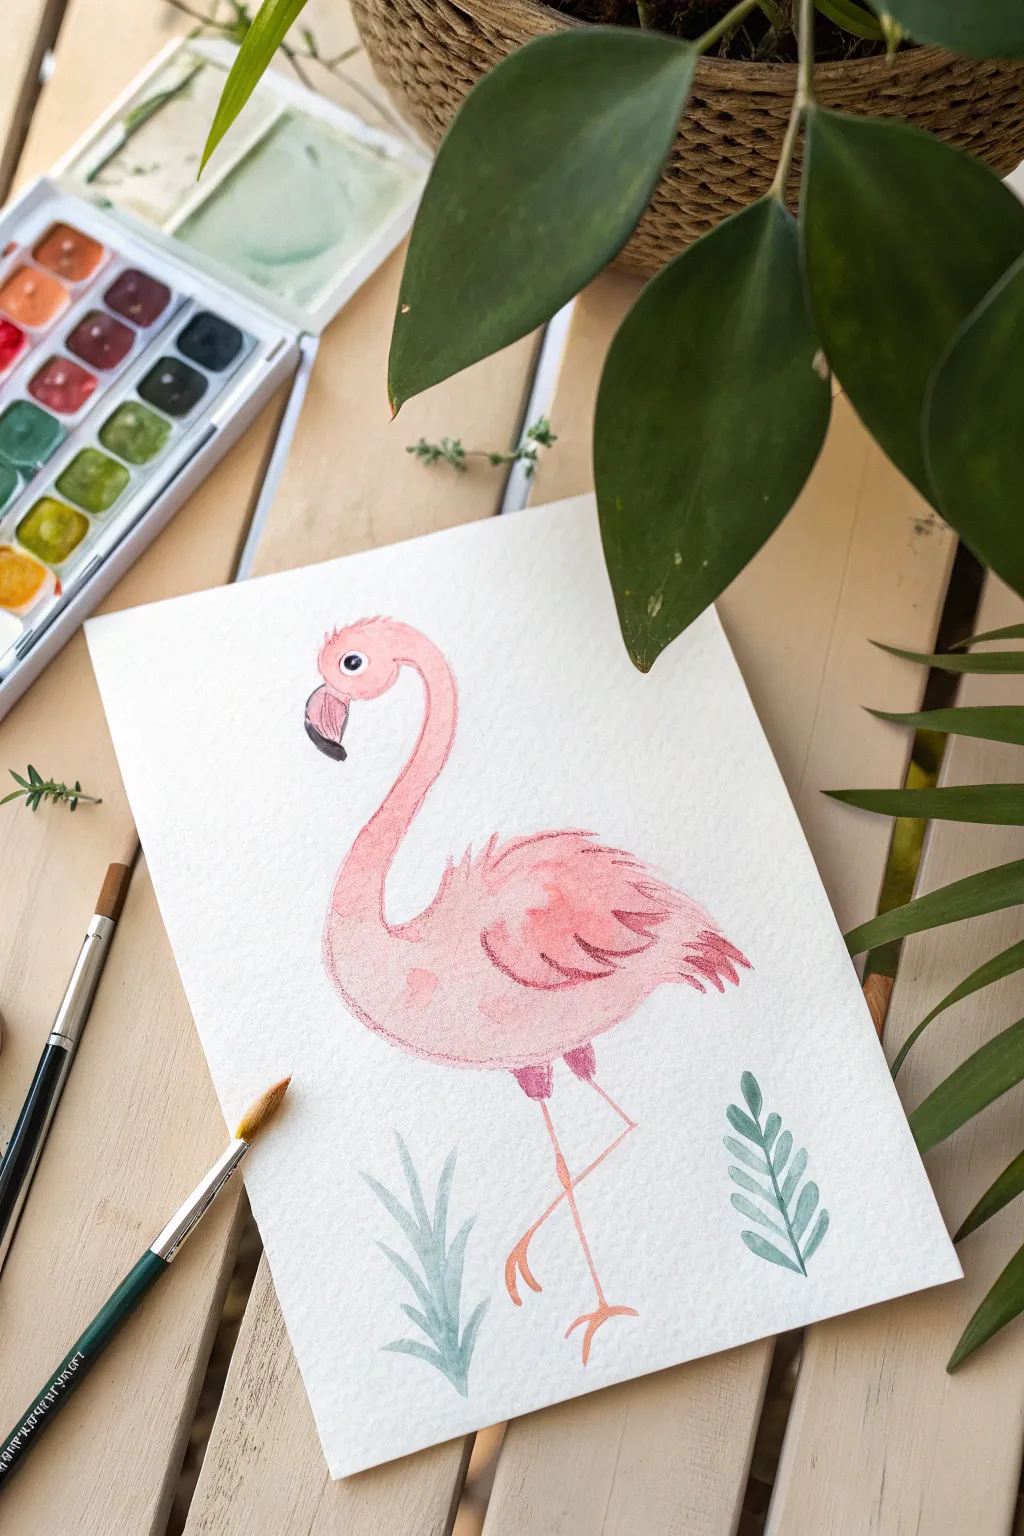
This project embraces a playful, cartoon-like style to create a charming pink flamingo surrounded by simple botanical elements. The soft watercolor textures combined with crisp lines give the bird a sweet and approachable personality.
Detailed Instructions
Materials
- Cold press watercolor paper (A5 size recommended)
- Watercolor paint set (shades of pink, red, green, black, white)
- Round brushes (sizes 2 and 6)
- Pencil (HB or 2H)
- Kneaded eraser
- Clean water jar
- Paper towel
Step 1: Sketching the Character
-
Map out the head and neck:
Start near the upper-left quadrant of your paper. Lightly sketch a small circle for the head and a long, curved ‘S’ shape extending downwards to form the graceful neck flamingoes are famous for. -
Create the body:
At the base of the neck curve, draw a large, horizontal oval shape. Connect this smoothly to the neck, tapering the back end slightly where the tail feathers will be. -
Adding features:
Sketch a large, curved beak pointing downward. Place a small circle for the eye high on the head. Draw two stick-thin legs—one standing straight and one bent at a sharp angle mid-leg. -
Refining the outline:
Go over your sketch to add definition. Give the neck a thicker width and add jagged, feathery tufts at the base of the neck and on the wing area. Erase any unnecessary guidelines so only a faint outline remains.
Preserve the Highlight
Don’t worry if you accidentally paint over the white eye highlight. You can bring it back easily at the end using a tiny dot of opaque white gouache or a gel pen.
Step 2: Painting the Flamingo
-
First wash of pink:
Mix a watery, pale pink using a size 6 brush. Apply this wash over the entire head, neck, and body, but leave the beak and eye white for now. Keep the paint wet enough to flow smoothly. -
Adding gradients:
While the first layer is still damp, drop slightly more saturated pink pigment onto the belly and the curve of the wing. Let the colors bleed naturally for that soft watercolor look. -
Defining the legs:
Switch to a smaller brush (size 2). Mix a coral-pink shade and paint the thin legs. Add small darker pink ovals at the ‘knees’ (the joints) to give them volume. -
Painting the beak:
Paint the top half of the beak in a soft pink, similar to the body color. For the tip of the beak, use a dilute black or dark grey, carefully blending it slightly where it meets the pink section. -
Let it dry completely:
Allow the paper to dry fully before moving to the next steps. I sometimes use a hairdryer on a low setting if I’m impatient, but air drying is safest.
Step 3: Details & Feathers
-
Painting the wing:
Mix a medium-strength pink, slightly darker than your base layer. Paint a wing shape on the side of the body, using short, curved strokes to mimic layered feathers. -
Darkening the shadows:
Add a touch of red to your pink mix to create a shadow tone. Paint small, jagged strokes under the neck where it meets the body and under the wing to add dimension. -
Tail feathers:
Using the tip of your round brush, paint loose, flicking strokes at the tail end using the darker pink mix. This gives the flamingo a fluffy, playful appearance. -
The eye detail:
With your smallest brush and concentrated black paint, fill in the pupil of the eye, leaving a tiny speck of white paper for a highlight. -
Refining the beak:
Go back to the beak tip with a stronger black if the first layer dried too light. Ensure the curve is sharp and clean.
Add Some Sparkle
For a magical touch, mix a tiny bit of gold watercolor or metallic ink into the pink paint used for the wing feathers to make the bird shimmer in the light.
Step 4: Foliage & Final Touches
-
Mixing green tones:
Prepare a muted sage green color. The key to the cartoon style is keeping the colors soft, so water the green down significantly. -
Painting grass sprigs:
Below the flamingo, paint a few simple, upward-curving grass blades. Keep them loose and not too detailed; they are just there to ground the character. -
Adding leafy accents:
To the right side, paint a simple fern-like frond. Use a central stem and press the belly of the brush down to create almond-shaped leaves on either side. -
Texturing the body:
Once the pink body is dry, take a slightly darker pink pencil or a very dry brush with pigment and add tiny scribbles or dots on the chest for texture. -
Final assessment:
Step back and check your contrast. If the legs look too faint, carefully glaze over them with another layer of coral paint to make them stand out.
Now you have a cheerful, simplified flamingo that captures the fun of summer without needing photorealism
Abstract Color-Blocked Flamingo
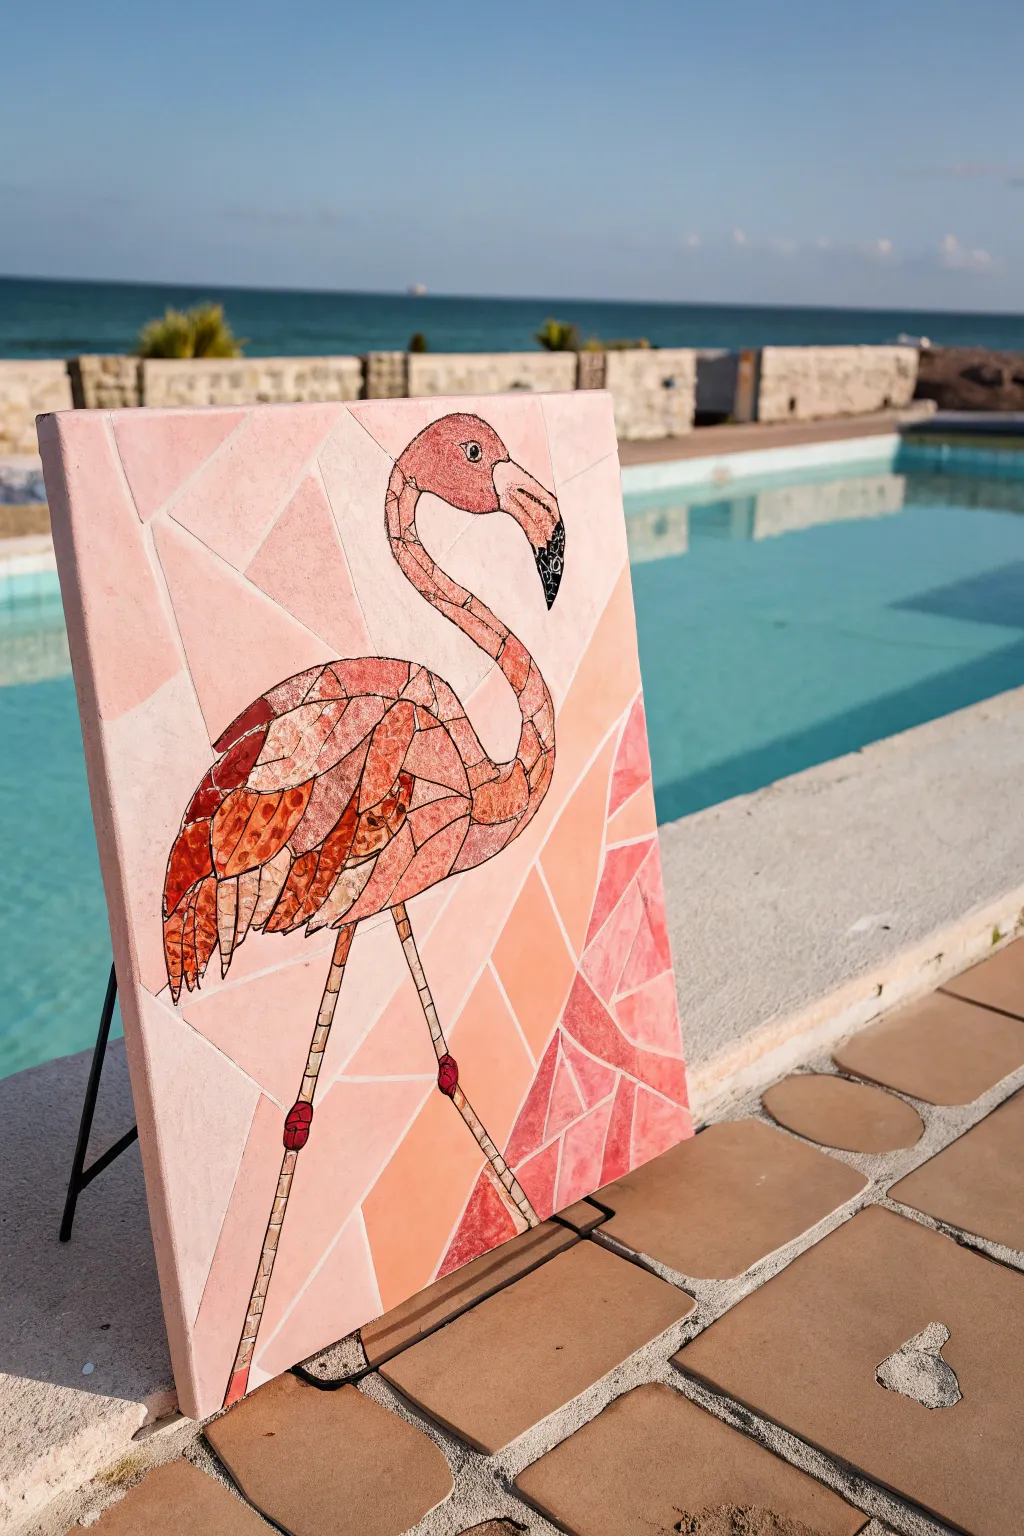
Capture the elegance of a flamingo with this stunning faux-mosaic project that combines abstract geometric backgrounds with detailed animal art. This technique uses segmented shapes and heavy outlines to mimic the look of stained glass or ceramic tiles on a canvas.
Step-by-Step
Materials
- Rectangular stretched canvas (16×20 or similar)
- Acrylic paints (various pinks, peaches, coral, red, black, white)
- Black paint marker or thin liner brush
- Pencil and eraser
- Ruler or straight edge
- Flat shader brushes (medium and small)
- Detail round brush
- Gloss varnish (optional)
Step 1: Planning and Sketching
-
Draft the background grid:
Begin by lightly drawing the geometric background structure on your canvas using a ruler and pencil. Create a shattered glass effect by drawing lines that crisscross at angles, forming irregular polygons. Leave the central area somewhat open for the bird. -
Outline the flamingo:
Sketch the main shape of the flamingo in the center. Start with the S-curve of the neck, followed by the oval body and the long, thin legs extending downward. -
Segment the flamingo:
Inside the flamingo’s body, draw lines to break the form into smaller segments. Make the wing shapes resemble feathers by using elongated, curved shards, while the neck and body can be more irregular, stone-like shapes. -
Refine the beak and eye:
detail the face by drawing the curved beak and the small eye area. Segment the beak into a few distinct zones to separate the black tip from the pink upper section later.
Fixing Wobbly Lines
If your black outlines get shaky, wait for the black to dry completely. Then, simply paint the geometric color over the mistake to straighten the edge.
Step 2: Painting the Background
-
Mix your palette:
Prepare several shades of light pink, peach, and coral. You want a gradient feel, so mix white with your reds and oranges to get soft, pastel tones. -
Block in background colors:
Paint the geometric background shapes. I like to alternate shades so that no two adjacent shapes are the exact same color. Use lighter blush tones near the top left and transition to slightly deeper corals towards the bottom right to create depth. -
Clean edges:
As you fill the shapes, keep your edges crisp, but don’t worry about perfection, as the black outlines will cover small gaps later. -
Let it dry:
Allow the background layer to dry completely before moving on to the main subject to avoid accidental smudging.
Add Real Texture
Mix modeling paste or sand into your acrylic paint before filling the bird segments. This creates actual physical relief that mimics grout and stone.
Step 3: Painting the Flamingo
-
Paint the body segments:
Fill in the segments of the flamingo’s body using more vibrant, saturated colors than the background. Use textured strokes or dab the paint slightly to mimic the rough texture of stone tiles. -
Add variance to the wings:
For the wing ‘feathers,’ use darker reds and rusty oranges. This contrast separates the wing from the lighter pink body. -
Detail the head and neck:
Paint the neck segments in soft pinks. For the beak, use a creamy pink on the top half and solid black for the hooked tip. Paint the eye black with a tiny white dot for a highlight. -
Paint the legs:
Carefully fill in the long legs with a pale peach or beige tone. Add the darker red ‘knees’ (technically ankles) to give the legs structure.
Step 4: Outlining and Finishing
-
Start the outlining process:
Once all paint is bone dry, begin outlining every single segment with black. A black paint marker is easiest for control, but a liner brush with black acrylic works too. -
Vary line weight:
Make the outline around the entire flamingo slightly thicker than the internal lines. This helps pop the subject out from the geometric background. -
Connect the background shapes:
Trace over your pencil lines in the background with the black marker. Ensure the lines intersect cleanly at the corners. -
Add texture marks:
If you want a more rustic mosaic look, add tiny tick marks or small dots within the color blocks to suggest pitting or texture. -
Seal the surface:
Apply a coat of gloss varnish over the entire painting. This unifies the sheen and makes the ’tiles’ look like polished ceramic or glass.
Display your vibrant mosaic flamingo near a sunny window to let those colors truly shine
Monochrome Pink Flamingo Value Study
This elegant value study captures the grace of a flamingo using a monochromatic palette of various pink tones. By varying the saturation and water ratio, you’ll create a lively piece that balances soft washes with crisp, detailed feather textures.
Detailed Instructions
Materials
- Cold press watercolour paper (A4 or similar)
- Watercolour paint (Alizarin Crimson, Quinacridone Rose or similar cool pinks)
- Round brushes (sizes 2, 6, and 10)
- Pencil (HB) and kneaded eraser
- Clean water jar
- Paper towels or cloth
- Palette for mixing
Step 1: Sketch and Base Washes
-
Outline the form:
Lightly sketch the S-curve of the flamingo’s neck and the oval shape of the body. Keep your pencil lines faint so they won’t show through the transparent paint later. -
Detail the head:
Refine the beak shape, ensuring it has that distinctive downward curve. Add the small circular eye and mark the separation between the pink plumage and the black beak tip. -
Pre-wet the paper:
Using your largest clean brush, wet the area inside your sketch for the body and neck with plain water. You want a sheen, not a puddle. -
Apply the first wash:
Mix a very dilute, pale pink wash. Drop this colour onto the wet paper, letting it bloom naturally to create a soft base layer for the feathers. -
Background splash:
While the body is still damp, take a slightly stronger pink mix and loosely paint a faint, abstract shape behind the bird’s back. This creates that dreamy background atmosphere seen in the reference. -
Let it dry completely:
Patience is key here. Before moving to details, the paper must be bone dry to prevent your crisp lines from bleeding into fuzzy blobs.
Step 2: Building Form and Value
-
Darken the neck:
Mix a medium-value pink. Paint the underside of the neck curve, gradually fading the colour into the lighter top edge with a damp brush to show roundness. -
Define the beak:
Paint the upper part of the beak with a very pale pink wash, leaving a tiny white highlight near the top. Paint the tip of the beak with a dark grey or black mix. -
Paint the eye:
Using your smallest brush, carefully establish the eye. Leave a tiny speck of white paper for the highlight to bring the bird to life. -
Layering the body feathers:
Switch to a size 6 brush. With a medium-pink mix, start painting curved, leafy shapes on the main body to suggest groups of feathers. -
Add wing definition:
Towards the back of the wing, extend these strokes into longer, pointed shapes to represent the flight feathers.
Muddy Pinks?
If your pinks look dull, ensure your water jar is clean. Red pigments are sensitive to dirty water. Make sure to let layers dry fully before glazing over them to keep colours crisp.
Step 3: Refining Details
-
Deepen the shadows:
I like to mix a concentrated pink (less water) for the deepest shadows. Apply this under the wing layers and at the base of the neck where it meets the body. -
Create texture:
Use a ‘dry brush’ technique—wipe most paint off your brush—to whisk light, feathery strokes over the pink areas. This mimics the soft fluff of the plumage. -
Detail the flight feathers:
Use your smallest brush to outline and define individual feathers on the wing tips, ensuring the separation between them is clear. -
Paint the legs:
Draw two thin lines for legs using a pale grey-pink mix. Remember that flamingo knees are actually ankles and bend backward. -
Add splatter:
Load a brush with watery pink paint and tap it against your finger over the paper to create the energetic splashes around the neck and background. -
Final assessment:
Step back and look at your contrast. If the bird looks too flat, add one final layer of your darkest pink to the deepest crevices between feather groups.
Add Some Tropical Flair
Once the painting is dry, use a metallic gold watercolour or ink to outline a few key feathers or add gold splatters. This adds a luxurious, modern touch to the monochrome study.
Once dry, frame your vibrant pink study to add a splash of tropical elegance to your wall
Negative Space Flamingo in a Washy Background
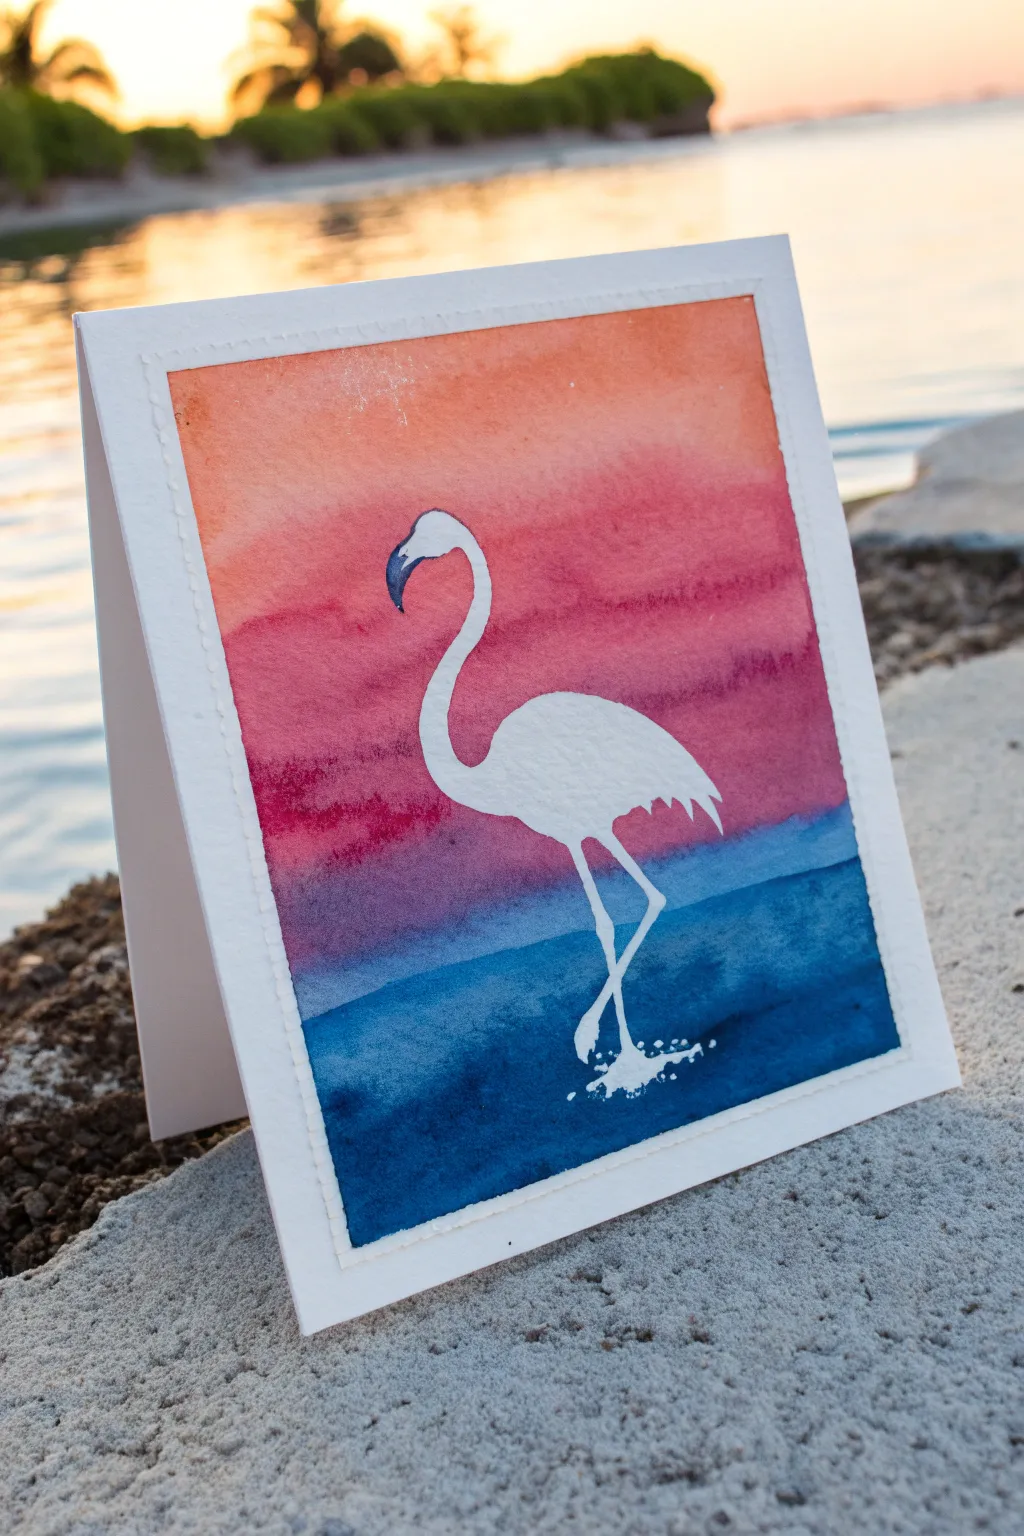
Capture the serene beauty of a tropical dusk with this striking negative space watercolor card. By masking off the flamingo shape, you create a crisp, white silhouette that stands out beautifully against a vibrant, blended wash of sunset hues.
Step-by-Step
Materials
- Cold press watercolor paper (cut to card front size)
- Folded cardstock base
- masking fluid or liquid frisket
- Old paintbrush or dedicated masking fluid applicator
- Watercolor paints (orange, warm red/magenta, purple, indigo blue)
- Large round watercolor brush (size 10 or 12)
- Painter’s tape or washi tape
- Pencil and eraser
- Flamingo reference image or stencil
- Clean water and paper towels
- Rubber cement pickup tool (optional)
Step 1: Preparation and Masking
-
Sketch the outline:
Begin by lightly sketching the outline of a flamingo in the center of your watercolor paper using a pencil. Keep your lines faint so they can be easily erased later. -
Refine the legs:
Pay careful attention to the legs, ensuring one is straight and the other is bent in the classic flamingo pose. Add little details like the triangular webbed feet at the bottom. -
Apply masking fluid:
Using an old brush or a silicone applicator, carefully fill in the entire flamingo shape with masking fluid. Be generous enough to cover the paper fully but keep the edges crisp. -
Protect the water splash:
Don’t forget to dab a few small dots and irregular shapes of masking fluid around the feet to simulate splashing water. -
Let it dry completely:
Allow the masking fluid to dry fully. It should feel transparent and tacky but not wet to the touch before you proceed with any paint. -
Tape the edges:
Secure your paper to a board with painter’s tape or washi tape along all four edges properly create a clean white border around your painting.
Clean Edges Tip
Coat your brush in dish soap before dipping it into masking fluid. This creates a barrier that makes cleaning the sticky fluid off your bristles much easier later.
Step 2: Painting the Gradient
-
Prepare your palette:
Mix plenty of watery paint for your four main colors: a sunny orange, a warm magenta, a deep purple, and a dark indigo blue. -
Start with the sky:
Load your large round brush with the orange paint and apply a broad wash across the top third of the paper, painting right over the masked flamingo head. -
Blend in the middle tones:
While the orange is still wet, pick up the magenta and paint the middle section. Allow the red to bleed slightly upward into the orange for a soft transition. -
Transition to water:
As you move lower, introduce the purple tones, blending them into the bottom edge of the magenta area. This creates the horizon line feeling. -
Paint the deep ocean:
Finally, saturate the bottom third with the dark indigo blue. Paint right over the masked legs and splash marks, ensuring the color is rich and dark to provide strong contrast. -
Refine the blend:
If the transitions look too harsh, clean your brush, dampen it slightly, and gently run it horizontally between color bands to smooth them out. -
Dry thoroughy:
Let the entire wash dry completely. The paper must be bone dry before the next step to prevent tearing.
Step 3: Reveal and Finish
-
Remove the mask:
Gently rub away the masking fluid using your finger or a rubber cement pickup tool. I find rolling it off slowly ensures the paper surface stays intact. -
Erase pencil lines:
Once the mask is gone, use a soft eraser to remove any visible pencil sketches that might be showing on the white paper. -
Define the beak:
Using a very small detail brush and a touch of indigo or black paint, carefully paint the curved tip of the flamingo’s beak to give it character. -
Add defined horizon (optional):
If you want a clearer water line, you can add a subtle, straight stroke of slightly darker blue across the horizon line behind the bird’s legs. -
Mount the card:
Remove the border tape carefully, peeling away from the painting. Glue your finished watercolor panel onto your folded cardstock base.
Level It Up
Sprinkle coarse salt onto the wet indigo paint at the bottom while it dries. This adds a mottled texture that looks exactly like sea foam or bubbles in the water.
Now you have a stunning, professional-looking card ready to brighten someone’s day
Mixed Media Flamingo Collage Texture
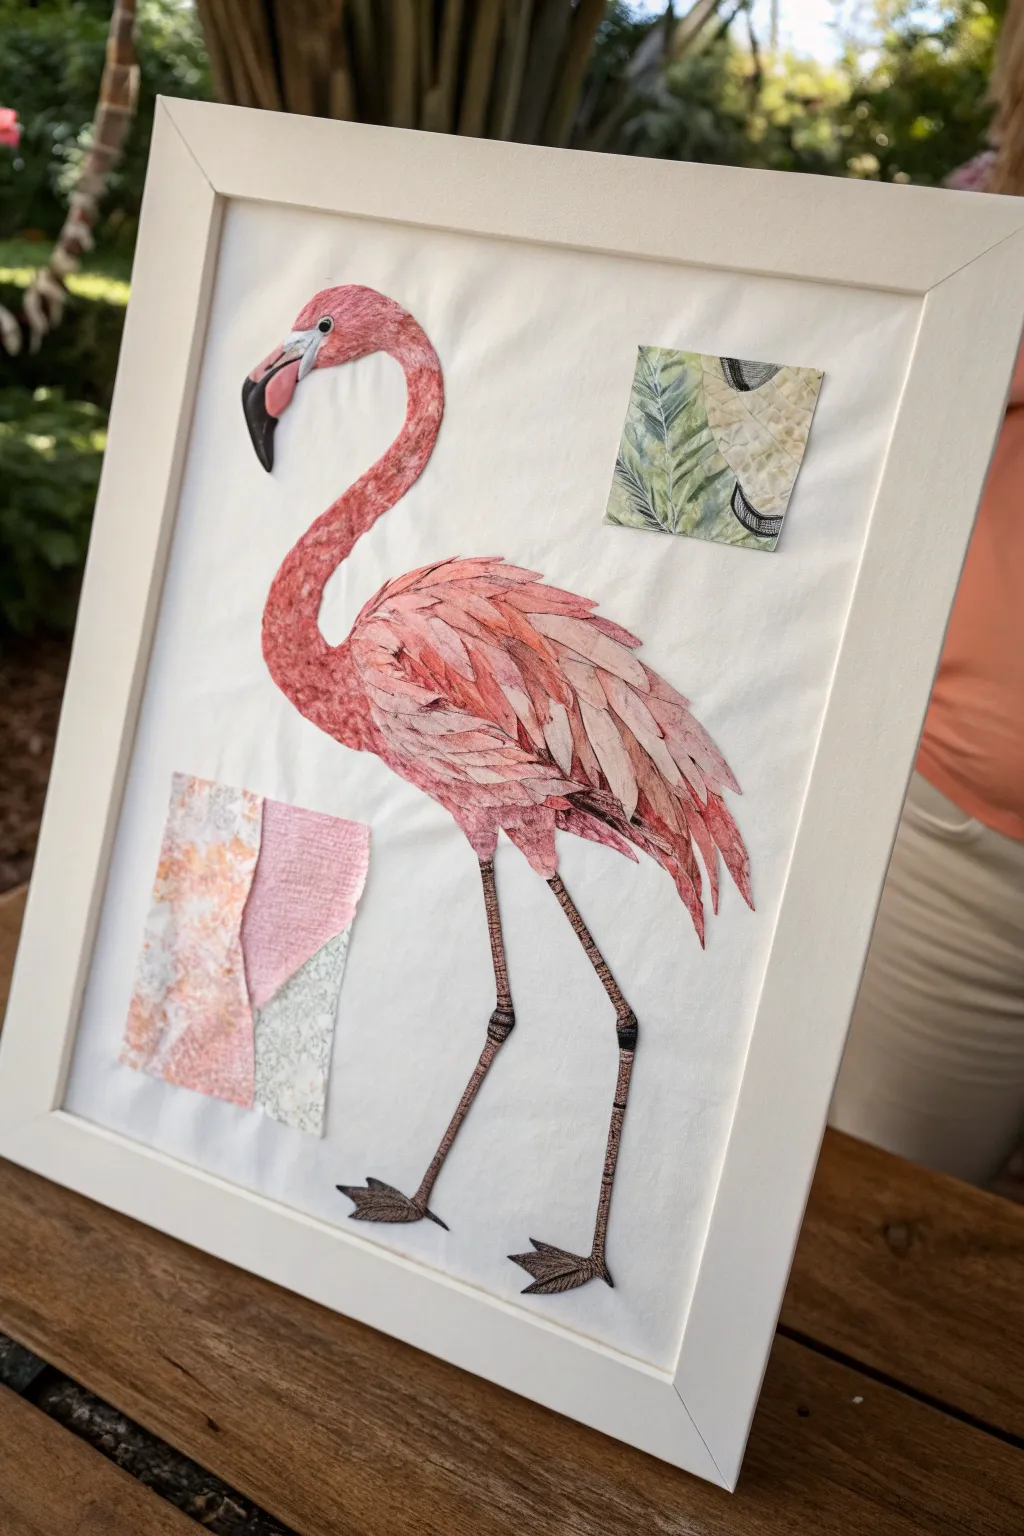
This elegant mixed media piece combines painted elements with layered paper textures to create a sophisticated flamingo portrait. By mimicking the look of feathers with individually cut ‘plumes’ and adding patterned accents, you’ll achieve a unique dimensional effect that pops right out of the frame.
Detailed Instructions
Materials
- White cardstock or watercolor paper (A3 or 11×14 size)
- Pink watercolor paints (rose madder, magenta)
- Black fine-liner pen or thin marker
- Patterned scrapbook paper (pink tones and green botanical prints)
- Textured handmade paper (blush pink tones)
- Craft glue or mod podge
- Small sharp scissors
- Pencil and eraser
- White or light wood frame
- Small round paintbrush (size 2 or 4)
Step 1: Sketching and Foundation
-
Draft the outline:
Begin by lightly sketching the flamingo’s profile onto your main white background paper. Focus on getting the curve of the neck just right—it should look like a graceful ‘S’ shape. -
Define the beak:
Draw the distinct hooked beak shape. Sketch a line separating the black tip from the pink upper section and mark the eye position. -
Paint the neck base:
Using a watercolor wash, fill in the sketched neck area with a textured, mottled pink. Don’t worry about being perfectly smooth; blotchy texture actually adds realism here. -
Detail the head:
Paint the upper beak a soft salmon pink and the tip a deep black. Use your fine-liner to draw the eye, leaving a tiny white highlight for life.
Collage Pro Tip
Gently curl the edges of your paper ‘feathers’ outward with a pencil or scissor blade before gluing. This lifts the paper off the page for incredible 3D texture.
Step 2: Creating the Plumage
-
Prepare your papers:
Gather your pink textured papers and patterned scrapbook sheets. If you have any paper with a fibrous or petal-like quality, that works beautifully for the body. -
Cut feather shapes:
Cut dozens of small, elongated tear-drop shapes from your various pink papers. I find varying the sizes slightly (between 1-2 inches) creates a more natural look. -
Layering the body:
Start gluing your paper ‘feathers’ at the tail end of the bird, working your way forward toward the neck. -
Create volume:
Overlap the feather shapes significantly as you glue them down. Use darker pinks near the bottom for shadow and lighter pinks near the top for highlights. -
Blend the transition:
When you reach the painted neck, use very small, finely cut paper pieces to create a smooth transition from the 3D body to the 2D painted neck.
Step 3: Legs and Accents
-
Draw the legs:
Using a pencil, lightly sketch the long, spindly legs. Remember the ‘knees’ (actually ankles) are knobby and thicker. -
Paint leg texture:
Go over your leg sketch with a mix of brown and grey watercolor or diluted black ink. Use short, horizontal dash strokes to mimic the scaly texture of bird skin. -
Define the feet:
Paint the webbed feet at the bottom, using a darker grey-black shade to ground the bird. -
Prepare geometric accents:
Cut two square or rectangular blocks from your patterned scrapbook paper. One should be a botanical print (greenery), and one a mix of pink abstract patterns. -
Place the top accent:
Glue the green botanical square in the upper right quadrant of the composition to balance the flamingo’s head. -
Place the bottom accent:
Arrange the pink patterned block near the lower left, perhaps overlapping a few pieces slightly for a collage feel.
Level Up: Real Petals
Swap the paper feathers for dried rose petals or bougainvillea bracts. Press them flat first, then glue them in layers for an authentic organic texture.
Step 4: Finishing Touches
-
Final ink details:
Once the paint is fully dry, use your black fine-liner to define the joints on the legs and sharpen the edge of the beak. -
Check for gaps:
Inspect the feather collage area. If you see white paper showing through the plumage, tuck a small sliver of pink paper into the gap. -
Frame the artwork:
Place your finished collage into a clean white or light wood frame to complement the airy, tropical aesthetic.
Hang your new textural masterpiece in a sunny spot where the light can catch the layers of the plumage
Mini Flamingo Rock Painting Idea
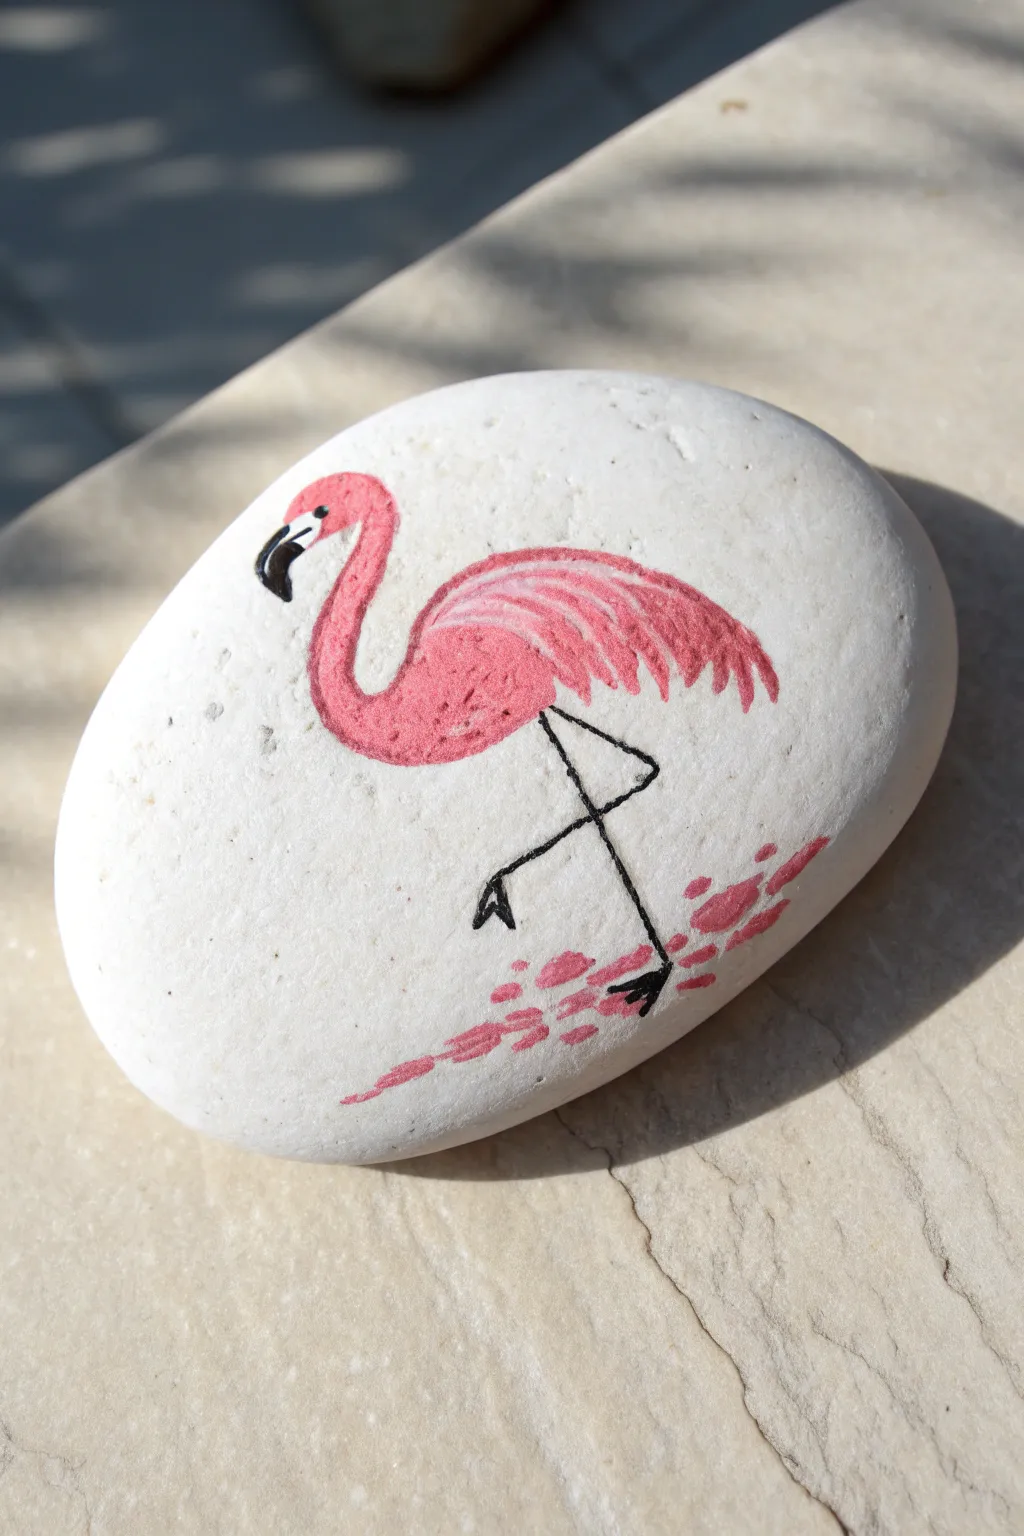
Transform a simple stone into a tropical treasure with this minimalist flamingo design. The stark contrast between the smooth white rock and the vibrant pink paint creates a charming little art piece perfect for hiding in gardens or displaying on a shelf.
Step-by-Step
Materials
- Smooth, oval river rock (preferably white)
- White acrylic paint (priming)
- Vibrant pink acrylic paint
- Light pink acrylic paint (or mix white + pink)
- Black acrylic paint or fine-tip paint pen
- White paint pen or small detail brush
- Small flat paintbrush
- Fine liner brush
- Clear sealant (spray or brush-on)
- Pencil (optional)
Step 1: Preparing the Canvas
-
Clean the surface:
Begin by washing your stone with warm soapy water and scrubbing away any dirt or grit with an old toothbrush. Let it dry completely in the sun. -
Prime the rock:
Even if your rock is naturally light, apply a coat or two of white acrylic paint. This creates a bright, consistent background that makes the pink pigment truly pop. -
Lightly sketch:
Using a pencil with a very light touch, outline the basic shape of the flamingo. Start with a curved ‘S’ shape for the neck and an oval for the main body.
Step 2: Painting the Body
-
Fill the silhouette:
Load your small flat brush with vibrant pink paint. Fill in the body oval and the curved neck, ensuring smooth, opaque coverage. You may need two coats here. -
Create feather texture:
Once the base pink is tacky but not fully dry, take a slightly lighter shade of pink on a smaller brush. Add sweeping, curved strokes along the top of the bird’s back to mimic folded wings. -
Define the tail:
Extend the paint at the rear of the bird into small, jagged points. Think of these flicked brushstrokes as the feathery tail feathers trailing behind the body. -
Add detail to the chest:
Dab a few tiny dots or short dashes of the darker pink on the chest area to give the plumage some texture and depth, rather than leaving it flat.
Smooth Operator
If your rock is porous or bumpy, mix a little white school glue into your white base coat. It acts as a filler, creating a smoother surface for detailed line work.
Step 3: Facial Features
-
Paint the head shape:
Ensure the top of the neck curves into a small, rounded head shape. Let this pink layer dry completely before moving to the beak. -
Construct the beak:
Using a fine liner brush or a black paint pen, draw a curved, downward-pointing triangle for the beak. Fill the tip with black. -
Add beak details:
Carefully paint a small white stripe near the base of the beak (where it meets the pink feathers). This characteristic stripe separates the black tip from the face. -
Dot the eye:
Place a tiny black dot on the pink face area for the eye. I find using the non-brush end of a paintbrush dipped in paint makes perfect dots.
Tropical glitter
Mix a tiny pinch of iridescent fine glitter into your clear sealant coat. It will make the white background sparkle like wet sand in the sun.
Step 4: Legs and Environment
-
Draw the main leg:
Switch to your black paint pen or finest liner brush. Draw a thin, straight line extending down from the center of the body for the standing leg. -
Add the bent leg:
Draw the second leg bent at a sharp angle, creating a triangle shape that tucks up near the body. This is the classic flamingo pose. -
Feet details:
Add small, webbed feet at the bottom of the standing leg and the tip of the bent leg using tiny triangular strokes. -
Create the splash:
Beneath the feet, paint loose, abstract dashes and blobs of pink. This suggests the bird is wading in water or standing on pink sand. -
Seal the artwork:
Once the paint is bone dry (wait at least an hour), apply a clear sealant to protect your design from weather and chipping.
Now you have a piece of tropical paradise that fits right in the palm of your hand
Surreal Galaxy Flamingo Night Scene
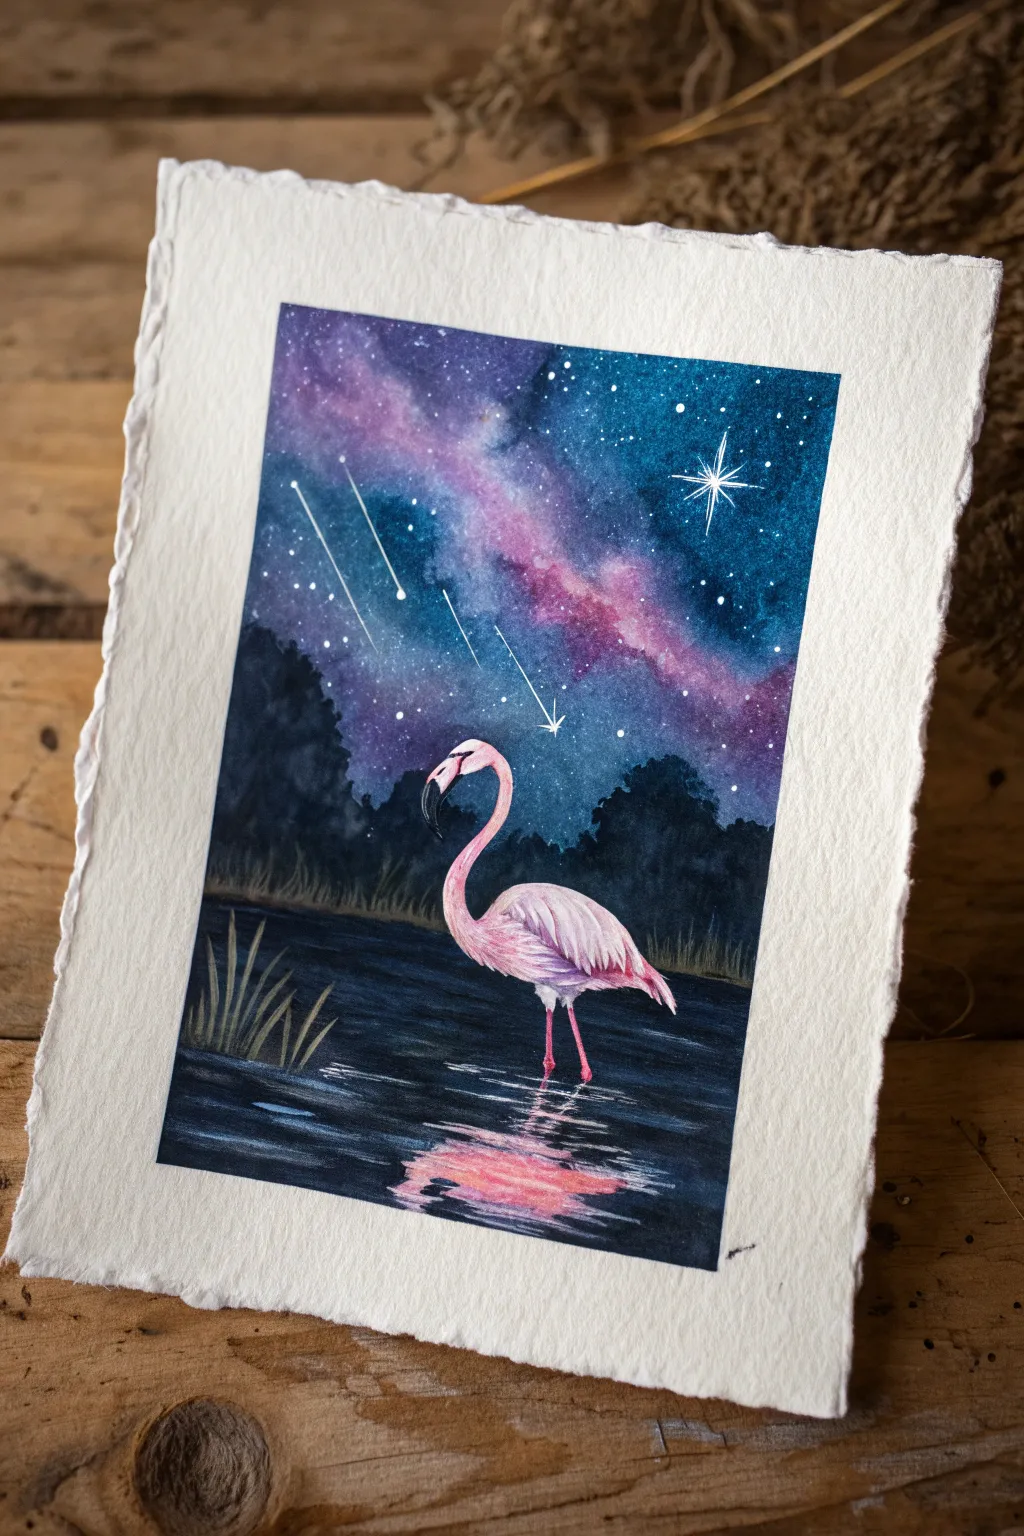
Blend the elegance of nature with the mystery of the cosmos in this striking watercolor piece. You will create a vibrant galaxy sky that transitions seamlessly into a dark, reflective lagoon, with a graceful flamingo as the focal point.
Detailed Instructions
Materials
- Cold press watercolor paper (300 gsm, deckled edge preferred)
- Watercolor paints (Indigo, Prussian Blue, Magenta/Rose, Violet, Black, Sap Green)
- White gouache or white gel pen
- Masking fluid
- Round brushes (sizes 2, 6, and 10)
- Pencil and eraser
- Palette for mixing
- Two jars of water
- Paper towels
Step 1: Sketching and Preparation
-
Scale your subject:
Lightly sketch the flamingo in the lower center third of your paper. Keep the neck curved into an ‘S’ shape and ensure the legs extend down into where the water line will be. -
Refine the outline:
Add details like the beak shape and the wing feathers, but keep pencil lines faint so they don’t show through the pink paint later. -
Mark the horizon:
Draw a very faint horizontal line significantly below the halfway point of the paper to separate the sky/treeline from the water. -
Protect the bird:
Apply masking fluid carefully over the entire flamingo sketch. This preserves the white paper, ensuring your pinks stay bright against the dark background later.
Nebula Nuance
For a ‘glow’ effect in the galaxy, lift a little paint with a damp brush or paper towel from the center of your pink spirals while they are still wet.
Step 2: Painting the Galaxy Sky
-
Wet-on-wet base:
Once the masking fluid is bone dry, wet the entire sky area with clean water using your largest brush until it glistens. -
Lay in the galaxy colors:
While wet, drop in swirls of Magenta and Violet diagonally across the sky. Let them bloom organically. -
Deepen the cosmos:
Fill the rest of the wet sky with Prussian Blue and Indigo. Allow these dark blues to touch the edges of the pink/violet swirls, letting them blend softly to create a nebula effect. -
Add true darkness:
Drop concentrated Indigo or a touch of Black into the corners and the area just above the horizon line to create depth. -
Create main stars:
While the sky is still damp (but not soaking), splatter clean water droplets or white gouache to create diffused, distant stars.
Step 3: The Water and Treeline
-
Establish the horizon:
Mix a very dark, creating a silhouette color using Indigo and Sap Green. Paint the distant treeline with a jagged top edge right along your horizon mark. -
Paint the water base:
Using a dark blue-black mix (Indigo + Black), paint the water area. Use horizontal strokes to mimic the surface of a lake. -
Add reflection depth:
While the water layer is wet, drop slightly darker pigment just below the flamingo’s legs to start building the shadow. -
Suggest reeds:
On the left side, paint thin, upward flicking strokes using the dark green mix to create silhouette grasses emerging from the water.
Muddy Galaxy?
If your sky colors turn brown, you’re overworking the blend. Let the wet paint touch and mix on its own without scrubbing the brush back and forth.
Step 4: Bringing the Flamingo to Life
-
Reveal the paper:
Rub off the masking fluid gently once the entire background is completely dry. -
First pink wash:
Paint a watery, pale pink wash over the flamingo’s body, leaving the top of the back and head very light for highlights. -
Feather texture:
Load your size 2 brush with a darker Magenta mix. Paint short, curved strokes on the wings to suggest layered feathers. -
Define the face:
Paint the tip of the beak black and middle section light grey or white. Add a tiny dot for the eye. -
Leg details:
Paint the legs with a deep pink-red, adding knobby knees. Remember, flamingo legs are quite thin.
Step 5: Final Cosmic Details
-
Create the reflection:
Using a watered-down pink, paint horizontal, wiggly lines directly under the flamingo in the dark water. Mirror the bird’s shape loosely. -
Bright stars:
Use white gouache or a gel pen to add bright, sharp stars to the dry sky. Add a few ‘cross’ shapes for twinkling stars. -
Shooting stars:
Draw three or four straight white lines diagonally, lifting the pressure at the end to create a fading tail. -
Water ripples:
Add very thin horizontal lines of white gouache in the water area to suggest light reflecting on ripples.
Step back and admire how the vibrant pink pops against that deep, celestial background you have created


Have a question or want to share your own experience? I'd love to hear from you in the comments below!