I never get tired of painting a fleur de lis—it’s one of those classic shapes that can look regal, modern, playful, or moody just by shifting color and texture. Here are some of my favorite fleur de lis painting ideas to help you find a style that feels totally you.
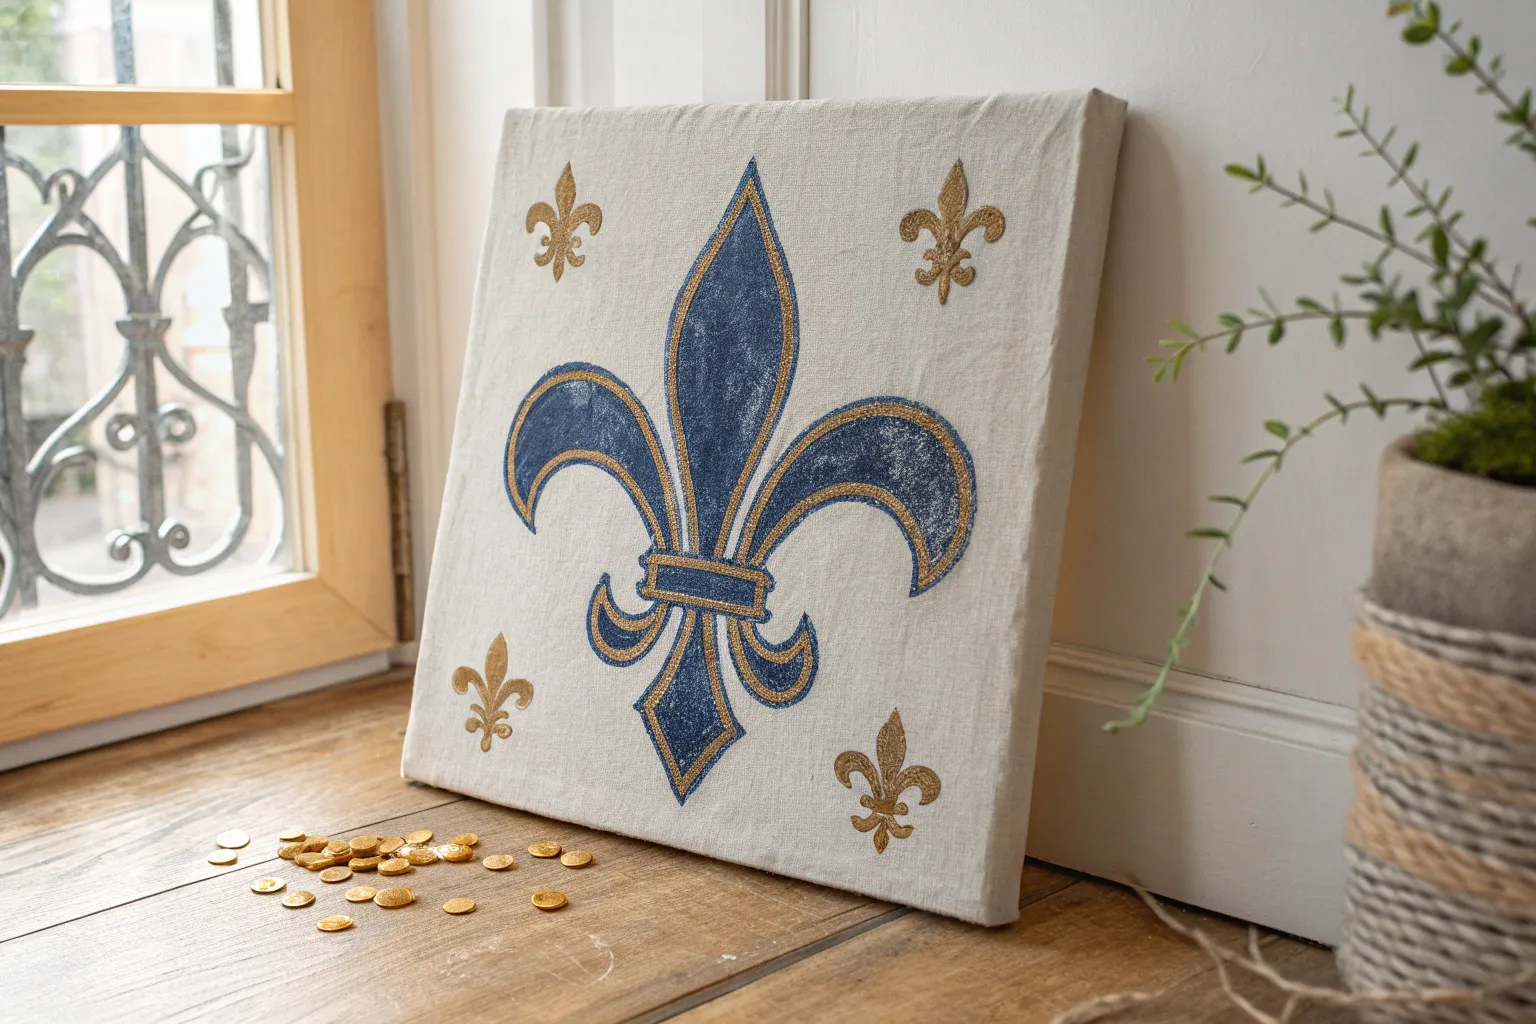
Classic Heraldic Fleur de Lis
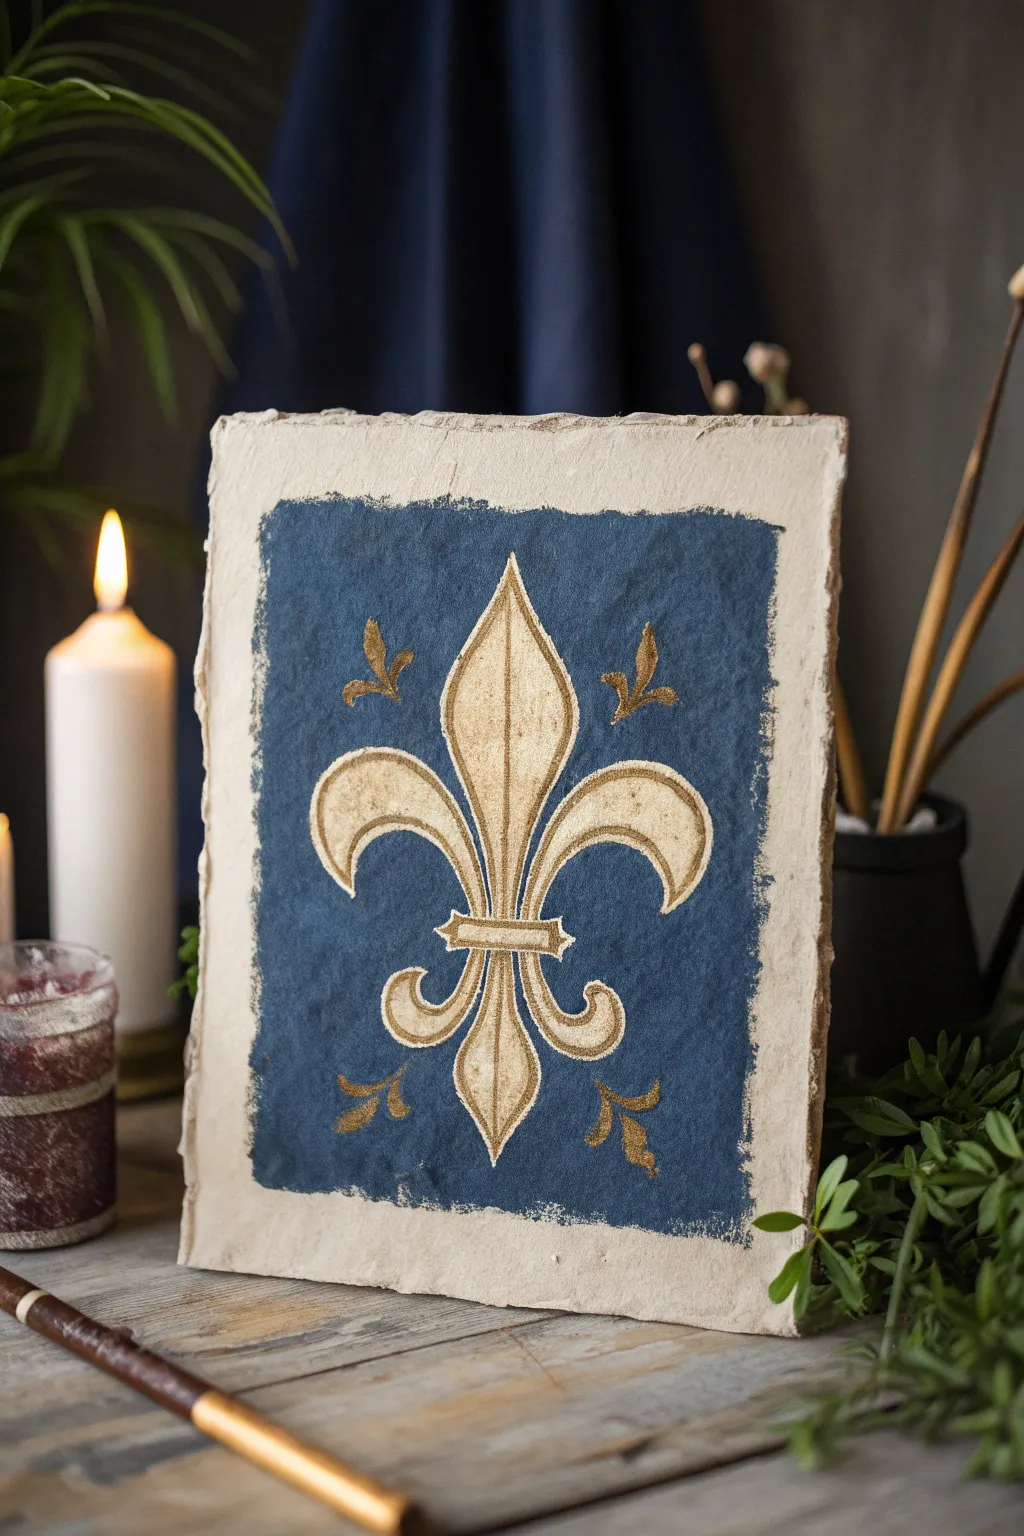
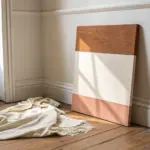
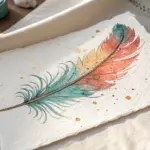
Capture the elegance of medieval art with this stunning project that pairs heavy handmade paper with regal gold tones. The result is a piece that feels centuries old, featuring a classic Fleur de Lis set against a deep, textured indigo field.
Step-by-Step Tutorial
Materials
- Heavyweight rag paper or cold-press watercolor paper with deckled edges
- Deep indigo or navy blue gouache paint
- Gold metallic paint or gouache
- Gold leaf adhesive size (optional)
- Imitation gold leaf sheets (optional)
- Round synthetic brushes (sizes 2 and 6)
- Flat shader brush (size 10 or 12)
- Pencil and eraser
- Ruler
- Fine-grit sandpaper (optional)
- Tracing paper (optional)
Step 1: Preparing the Parchment
-
Paper selection:
Choose a thick, textured paper to mimic ancient parchment. If your paper has straight machine-cut edges, carefully tear them against a ruler or wet the edge and pull to create a soft, deckled look. -
Surface texture:
If your paper is too smooth, you can lightly scuff the surface with fine-grit sandpaper to give it a weathered, fibrous feel that will grip the paint beautifully. -
Mapping the field:
Lightly measure a rectangle in the center of your paper, leaving a generous border of about 1.5 to 2 inches on all sides. This marks where your blue background will go.
Uneven Edges?
If your dry-brush border looks too messy, dampen a clean brush with water and gently soften the outer edges to blend the abrupt strokes.
Step 2: Painting the Heraldic Field
-
Mixing the indigo:
Dilute your deep indigo gouache slightly with water. You want a creamy consistency that is opaque but flows smoothly. -
Painting the base:
Using the flat shader brush, fill in the rectangular area. Don’t worry about perfect coverage; a little mottling adds to the antique charm. -
Creating the rough edge:
To achieve that specific aged border, do not paint a straight line at the edges. Instead, use a ‘dry brush’ technique: wipe most of the paint off your brush and drag it outward from the blue center, letting the paper texture break up the stroke. -
Adding depth:
While the first layer is barely damp, dab a slightly darker concentration of blue into random spots within the field to create subtle variations in value. -
Drying time:
Allow the blue background to dry completely. Gouache dries matte and quickly, but ensure it is bone dry before sketching over it.
Step 3: Designing the Fleur de Lis
-
Sketch the centerline:
Use a ruler to lightly draw a vertical centerline down the middle of your blue field with a pencil. -
Drafting the shape:
Sketch the central petal first, which looks like a spearhead. Then, draw the two curving side petals that hook downward. Keep the curves symmetrical around your centerline. -
Refining details:
Add the horizontal band gathering the petals together and the smaller bottom section of the florid shape. If drawing freehand is tricky, sketch it on tracing paper first and transfer it. -
Corner accents:
Lightly sketch small, stylized floral sprigs or abstract leaves in the four corners of the blue field to balance the composition.
Use Real Gold Leaf
Apply gold leaf size instead of paint for the main shape. Wait for tackiness, press a gold leaf sheet on top, and brush away excess for a true metallic shine.
Step 4: Gilding and Detailing
-
Applying base gold:
Using your size 6 round brush and metallic gold paint, fill in the main body of the Fleur de Lis. Use smooth, confident strokes to follow the curves. -
Painting the accents:
Switch to a smaller size 2 brush to paint the delicate corner sprigs. Keep the paint fluid so the tips of the leaves remain sharp. -
Adding texture (Optional):
I prefer to dab the gold paint slightly in the center of the petals rather than painting it flat, which mimics the look of worn embroidery or hammered metal. -
Creating the Outline:
Once the main gold shape is dry, mix a lighter cream or pale gold shade. Use your finest brush to paint a thin border around the entire Fleur de Lis to make it pop against the blue. -
Inner details:
Paint a thin vertical line down the center of the main petal and add small definition lines inside the curved side petals to give the emblem dimension. -
Final weathering:
If the gold looks too new, very lightly dry-brush a tiny amount of the indigo paint over the textured parts of the gold to simulate age and tarnish.
Display this regal artwork on a mantle or in a floating frame to showcase the beautiful paper edges


French Blue and White Porcelain Style

Bring a touch of timeless elegance to your table setting with these faux-embroidered linen napkins featuring a classic fleur-de-lis motif. The soft blue hues against textured cream fabric mimic the look of vintage French porcelain, making a sophisticated yet surprisingly simple DIY project.
Detailed Instructions
Materials
- Square linen or cotton napkins (cream or off-white)
- Fabric medium
- Acrylic paints (French Ultramarine, Cobalt Blue, Titanium White, Sap Green)
- Small flat brush (size 4)
- Fine liner brush (size 0 or 00)
- Pencil for sketching
- Fleur-de-lis stencil (optional)
- Iron and pressing cloth
- Cardboard insert
Step 1: Preparation and Sketching
-
Prep your surface:
Wash, dry, and iron your napkin to remove any sizing or wrinkles. Place a piece of cardboard underneath the fabric layer you intend to paint to prevent bleed-through to the other side. -
Mark center point:
Lightly fold the napkin in half vertically and horizontally to find the exact center point. Mark this tiny spot with your pencil. -
Sketch the central motif:
Using a pencil, lightly sketch the large fleur-de-lis in the center. If you aren’t confident in your freehand skills, you can lightly trace a stencil or printed template. -
Outline the border:
Use a ruler to lightly draw a square border about one inch inward from the napkin’s edge. This will serve as the guide for your repetitive pattern. -
Placement of corner florals:
Sketch small floral clusters in the corners between the central motif and the border. Aim for a diagonal arrangement, perhaps putting them in two opposite corners for balance, or all four if you prefer.
Step 2: Painting the Centerpiece
-
Mix your base blue:
Mix French Ultramarine with a generous amount of fabric medium. The medium helps the paint penetrate the fibers for a softer, ‘dyed’ look rather than sitting on top like plastic. -
Block in the fleur-de-lis:
Using the size 4 flat brush, fill in the main shapes of the fleur-de-lis. Use smooth strokes following the curve of the petals. -
Add dimension:
While the blue is still slightly wet, mix a little Titanium White into your blue. Paint highlights on the upper curves of the petals to create a rounded, 3D effect. -
Deepen the shadows:
Mix a tiny touch of black or dark grey into your blue. Apply this darker shade to the crevices where the petals meet the central band, adding depth. -
Outline for clarity:
Switch to your fine liner brush. Using a slightly thinned dark blue mixture, carefully outline the entire fleur-de-lis to crisp up the edges.
Bleeding Lines?
If your paint bleeds into the linen fibers, your mix is too watery. Add a tiny bit more raw paint to thicken it up, or dampen the fabric slightly with a spray bottle before painting for control.
Step 3: Details and Border
-
Paint the border pattern:
For the border, use the liner brush and your main blue shade. Create a simple repeating pattern of small ‘x’ shapes or loops along the pencil line you drew earlier. -
Start the floral elements:
Mix a soft Sap Green with fabric medium. Paint delicate, sweeping leaves for the corner floral clusters using the tip of your liner brush. -
Add floral blooms:
Dip a small round brush into the blue paint. Dab small clusters of dots to form hydrangeas or simple country flowers amongst the green leaves. -
Refine the flowers:
Add tiny white highlights to the center of your blue flowers to make them pop against the cream fabric. -
Tie it together:
Check the balance of your design. If the border looks too thin, re-trace it with a slightly heavier hand or add small dots between the pattern repeats. -
Heat set the design:
Allow the paint to dry completely (at least 24 hours). Once dry, place a pressing cloth over the design and iron on a high, dry setting for 3-5 minutes to heat set the fabric paint.
Antique Finish
Tea-stain the entire napkin after the paint is fully heat-set. Dip the fabric in strong black tea for 10 minutes to give the white linen a darker, aged parchment look that matches old porcelain.
Now your table is ready for a charming provincial lunch.


Mardi Gras Color Palette Fleur de Lis
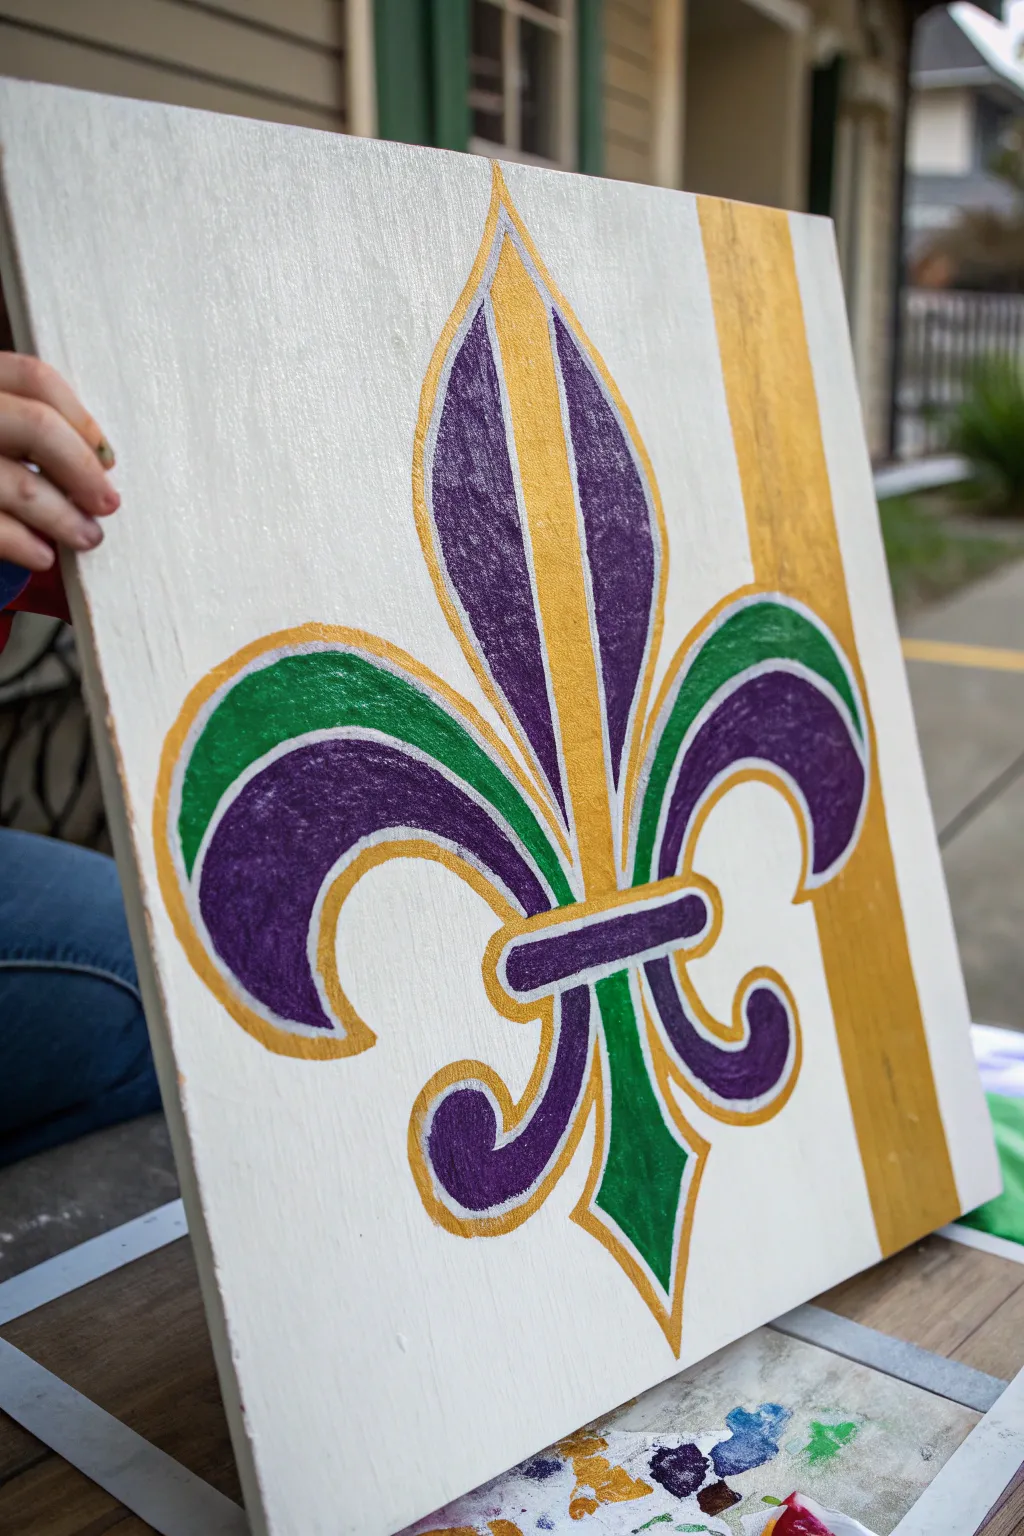
Celebrate Fat Tuesday in style with this bold and festive wood panel painting featuring the classic fleur-de-lis. Using the traditional colors of purple, green, and gold, this project creates a striking piece of decor perfect for carnival season.
How-To Guide
Materials
- Rectangular wood panel or plywood sheet (approx. 16×20 inches recommended)
- White acrylic paint or gesso (for base coat)
- Purple acrylic paint (rich, deep violet)
- Green acrylic paint (kelly or emerald green)
- Metallic gold acrylic paint
- Pencil and eraser
- Ruler or painter’s tape
- Fleur-de-lis stencil or template (printed from internet)
- Flat paintbrushes (1-inch and 1/2-inch sizes)
- Small round detail brush (size 2 or 4)
- Carbon transfer paper (optional)
Step 1: Preparation and Base Coat
-
Prime the surface:
Begin by cleaning your wood panel to remove any sawdust or dirt. Apply two coats of white acrylic paint or gesso to the entire front surface, allowing the first coat to dry completely before adding the second. -
Sand for smoothness (optional):
If the wood grain raises after priming, give it a quick, light sanding with fine-grit sandpaper to ensure a smooth painting surface, then wipe away any dust. -
Mark the side stripe:
Using a ruler, measure a vertical stripe about 2-3 inches wide along the right edge of the board. Lightly mark this line with a pencil.
Step 2: Drawing the Layout
-
Position your template:
Print out a large fleur-de-lis outline that fits nicely within the white space to the left of your stripe area. Center it vertically and tape it down lightly so it doesn’t shift. -
Transfer the design:
Slide carbon paper under the template and trace the outline firmly. Alternatively, use the pencil-rub method on the back of your printout to transfer the shape onto the painted wood. -
Refine the lines:
Lift the paper checks to ensure the lines are visible. If they are faint, go over them lightly with a pencil to make the painting process easier. -
Sketch interior sections:
Draw the internal separation lines within the fleur-de-lis petals. This design features specific color zones, so mark where the purple ends and the green or gold begins inside the larger shapes.
Clean Lines Hack
If you have trouble painting straight lines for the side stripe, apply painter’s tape firmly. Peel it off while the paint is still slightly wet to prevent chipping.
Step 3: Applying the Colors
-
Paint the gold stripe:
Fill in the vertical stripe on the right side using metallic gold paint and a wide flat brush. You might need two layers to get a solid, opaque shimmer. -
Fill the center gold spike:
Using a medium flat brush, paint the very center vertical spike of the fleur-de-lis with the same metallic gold paint. -
Paint the purple sections:
Switch to your purple paint. Fill in the top outer curves of the petals and the large bottom curves. Use a smaller flast brush here to stay neat near the edges. -
Add the green accents:
Using the kelly green paint, fill in the lower sliver of the top petals and the central spike of the bottom section. This creates that classic Mardi Gras tri-color look. -
Detail the center band:
Paint the horizontal band that ties the fleur-de-lis together in purple. -
Let colors set:
Allow all the colored sections to dry completely. Acrylics dry fast, but thick metallic paint may take a little longer.
Add Some sparkle
While the paint is wet, sprinkle ultra-fine glitter over specific color sections (like purple or gold) to mimic the glittering look of Mardi Gras beads.
Step 4: Outlining and Refining
-
Outline with gold:
Load a small round detail brush with metallic gold paint. Carefully outline the outer edges of the entire fleur-de-lis shape to give it a crisp border. -
Add white separation lines:
Clean your detail brush thoroughly. Using white paint, carefully go over the gaps between the colors inside the petals. This white space, or ‘negative space,’ makes the colors pop. -
Refine the edges:
If any gold or purple spilled over, use your white background paint to touch up the main background area for a clean finish. -
Final gold outline:
For extra dimension, I like to add a second, thin coat of gold to the outer border once the first one is dry, ensuring it catches the light.
Display your vibrant artwork on a porch or mantle to let the good times roll

Weathered Rustic Background

Achieve a charming salvaged wood look with this distressed fleur-de-lis sign project. By combining layering techniques and heavy sanding, you’ll create a piece that feels like a vintage architectural treasure.
Step-by-Step Tutorial
Materials
- 5-6 Wood slats (furring strips or pallet wood)
- 2 Backing strips (for assembly)
- Wood glue and nails/screws
- Chalk paint (White)
- Chalk paint (Sage Green or Teal)
- Acyrlic paint (Dark Brown/Umber)
- Large fleur-de-lis stencil (or printed template)
- Stencil brush or sponge
- Sandpaper (coarse grit, 60 or 80)
- Antique wax or dark glaze
- Rusty decorative nails or upholstery tacks
- Hammer
- Paintbrushes
- Small artist brush
Step 1: Building the Canvas
-
Prepare the wood:
Cut your wood slats to equal lengths, roughly 18-24 inches depending on your desired size. If using pallet wood, remove any old nails and sand down rough splinters, but leave some texture for character. -
Assemble the board:
Lay the slats side-by-side on a flat surface. Place two backing strips across the back (perpendicular to the slats) and secure them with wood glue and short screws or nails, ensuring the front surface is relatively flush. -
Base layer:
Stain the entire front surface with a dark wood stain or a watered-down brown paint wash. This dark base is crucial because when you distress the top layers later, this dark wood tone will peek through.
Paint Bleeding?
If paint bleeds under your stencil, don’t panic. Since this is a rustic project, use coarse sandpaper to distress the messy edges. It will look like natural wear and tear.
Step 2: Applying the Background Colors
-
Tape off the border:
Measure about 2-3 inches from the top and bottom edges. Use painter’s tape to mask off the central area, leaving the top and bottom bands exposed for the green color. Depending on the look, you can also paint the outermost left and right slats entirely green. -
Paint the borders:
Apply your Sage Green chalk paint to the exposed top and bottom borders and the outer side slats. Don’t worry about perfect coverage; a slightly patchy application adds to the rustic feel. -
Paint the center:
Once the green is dry, remove the tape. Now, paint the large central rectangle with White chalk paint. Carefully cut in next to the green areas or let them overlap slightly for a casual look. -
Dry completely:
Allow the paint layers to dry fully. Chalk paint dries quickly, but give it at least an hour to harden so the sanding step works effectively.
Step 3: Stenciling the Design
-
Position the design:
Center your fleur-de-lis stencil over the white section. Secure it firmly with painter’s tape so it doesn’t shift while you work. -
Apply the motif:
Load a stencil brush with Dark Brown paint and offload most of it onto a paper towel until the brush is almost dry. Use a pouncing motion to apply the paint through the stencil. This prevents bleed-under. -
Add detail:
Remove the stencil carefully. If you used a paper template and traced the outline instead, use a small artist brush to fill in the shape with the brown paint now. -
Highlight the shape:
I like to take a tiny bit of lighter tan or gold paint and dry-brush visible strokes onto the brown fleur-de-lis to give it depth and fake the look of worn gilding.
Instant Aging
To make new nails look old and rusty for the final step, soak them in a small cup of white vinegar and hydrogen peroxide with a pinch of salt for an hour before using.
Step 4: Distressing and Finishing
-
Heavy sanding:
Take your coarse sandpaper (60 or 80 grit) and sand the entire piece aggressively. Focus on the edges of the slats, corners, and high spots. Sand until you reveal the dark stained wood underneath the paint. -
Clean up:
Wipe away all the sanding dust with a tacky cloth or a slightly damp rag to prepare for the final seal. -
Apply antique wax:
Rub a dark antique wax over the entire piece with a lint-free cloth. Work it into the grain and the sanded areas. This instantly ages the bright white paint and deepens the wood tones. -
Buff the surface:
After the wax has sat for about 10-15 minutes, buff the surface vigorously with a clean cloth to create a soft sheen and remove excess wax. -
Add hardware accents:
Hammer rusty decorative nails or upholstery tacks into the top and bottom borders. Place them aligned with the center of each slat to mimic old construction methods.
Hang your new rustic masterpiece in an entryway or living room to add instant farmhouse elegance.
BRUSH GUIDE
The Right Brush for Every Stroke
From clean lines to bold texture — master brush choice, stroke control, and essential techniques.
Explore the Full Guide
Wrought-Iron Outline Fleur de Lis
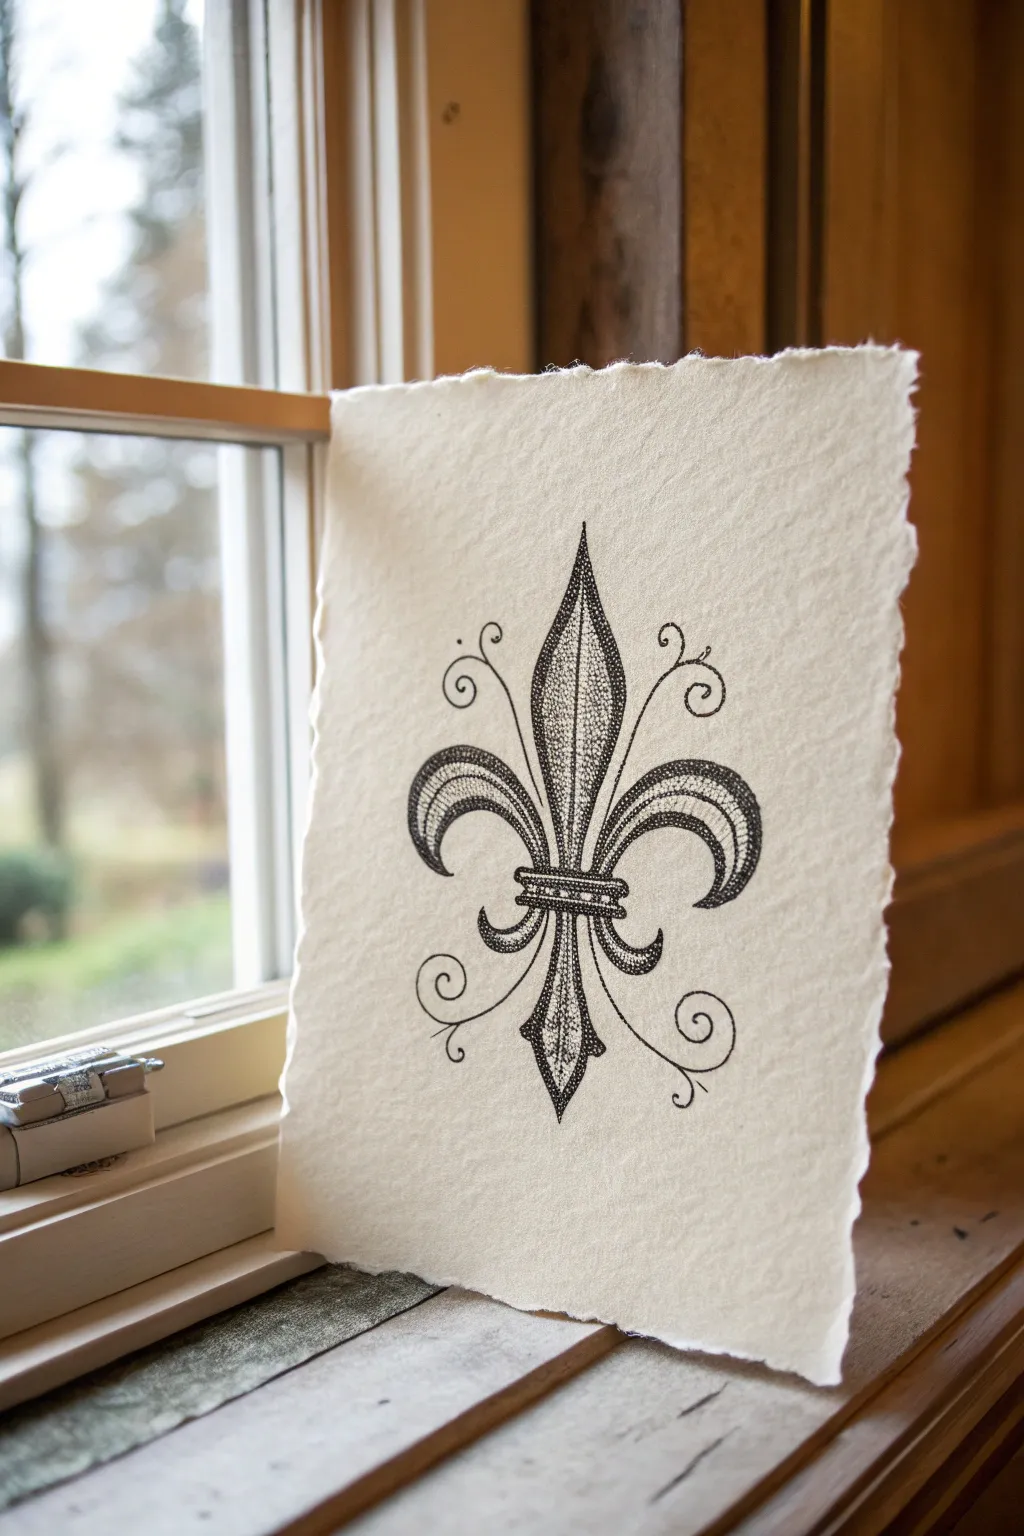
This elegant project captures the timeless beauty of a fleur-de-lis with the intricate look of wrought iron, all rendered on luxurious paper. Using fine liner pens and stippling techniques creates depth and texture that mimics antique engraving.
Step-by-Step
Materials
- Heavyweight cold-press watercolor paper or handmade deckle-edge paper (300gsm+)
- Pencil (HB or H)
- Kneadable eraser
- Ruler
- Fine liner pigment pens (sizes 0.05, 0.1, 0.3, and 0.5)
- Black ink brush pen (optional for filling bold areas)
- Masking tape
Step 1: Preparation and Sketching
-
Prepare the paper:
Since this project relies heavily on the paper’s texture, secure your deckle-edge sheet to your work surface with masking tape. This prevents the heavy paper from shifting while you sketch. -
Mark the center axis:
Using a ruler and a light pencil, find the horizontal and vertical center of your paper. Draw a faint vertical line down the middle; this axis is crucial because the fleur-de-lis is a perfectly symmetrical symbol. -
Sketch the central petal:
Start by drawing the central, spear-like petal. It should be widest near the middle and taper into a sharp point at the top. Keep your pencil pressure extremely light so lines can be erased later without damaging the paper tooth. -
Outline the side petals:
Sketch the two side petals curving outward and downward. Imagine them like drooping leaves that curl back up at the tips. Ensure the curves on the left mirror the curves on the right as closely as possible. -
Add the binding band:
Draw the horizontal band that ties the three petals together near the bottom third of the design. This should look like a small rectangular ringcinching the petals. -
Sketch the decorative curls:
Add the delicate, thin curlicues that act as embellishments. Place two springing from the top sides of the main petals and two at the bottom, curling outward. -
Refine the double stroke:
To achieve the ‘wrought iron’ look, go back over your main petal shapes and draw an inner line parallel to the outer edge. This creates a border or channel that we will later fill with texture.
Step 2: Inking the Outline
-
Start the main ink lines:
Switch to a 0.5 fine liner pen. Carefully trace the outermost and innermost contours of your main petal shapes. Use confident, smooth strokes rather than short, scratchy ones to emulate smooth metalwork. -
Ink the decorative band:
Outline the horizontal band. I find it helps to add two small horizontal lines inside the band itself to suggest ridges or dimension. -
Trace the flourishes:
Use a slightly thinner 0.3 pen for the delicate wire-like flourishes and curls surrounding the main motif. Finish the ends of these lines with tiny solid loops or dots. -
Let the ink settle:
Wait at least 15 minutes for the ink to dry completely. Since textured paper can hold ink longer, waiting prevents smudging. Gently lift the graphite sketch with a kneadable eraser, dabbing rather than rubbing.
Bleeding Lines?
Textured handmade paper is absorbent. If ink feathers, switch to pigment liners (like Micron) over dye-based pens, and work faster with lighter pressure.
Step 3: Adding Texture and Shading
-
Stipple the central spine:
Using your finest 0.05 pen, begin adding texture to the very center sections of the petals (inside the double border). Use stippling—tiny dots—densely packed near the bottom and edges, fading to fewer dots in the middle to create a rounded, cylindrical effect. -
Texturize the borders:
Within the ‘channel’ or double border you created on the petals, draw tiny, evenly spaced perpendicular lines (hatching). This makes the border look like a textured metal rim. -
Deepen the shadows:
Return to the areas where the petals meet the binding band. Use the 0.1 pen to add heavier cross-hatching or denser stippling here. This shadow makes the band appear to be physically wrapping around the petals. -
Ornament the band:
Add a row of tiny dots or small circles inside the horizontal band to give it a studded or jeweled appearance. -
Final contrast check:
Step back and look at the image. If the drawing feels too flat, go over the outermost limit of the design (the silhouette) with the 0.5 pen one last time to thicken the outline and make it pop against the cream paper.
Antique Wash
Before drawing, lightly brush the paper with diluted tea or coffee and let it dry. This adds an aged parchment look that complements the vintage iron style perfectly.
Place your finished illustration near a natural light source to let the paper’s texture truly shine
Filigree and Jewel-Dot Details
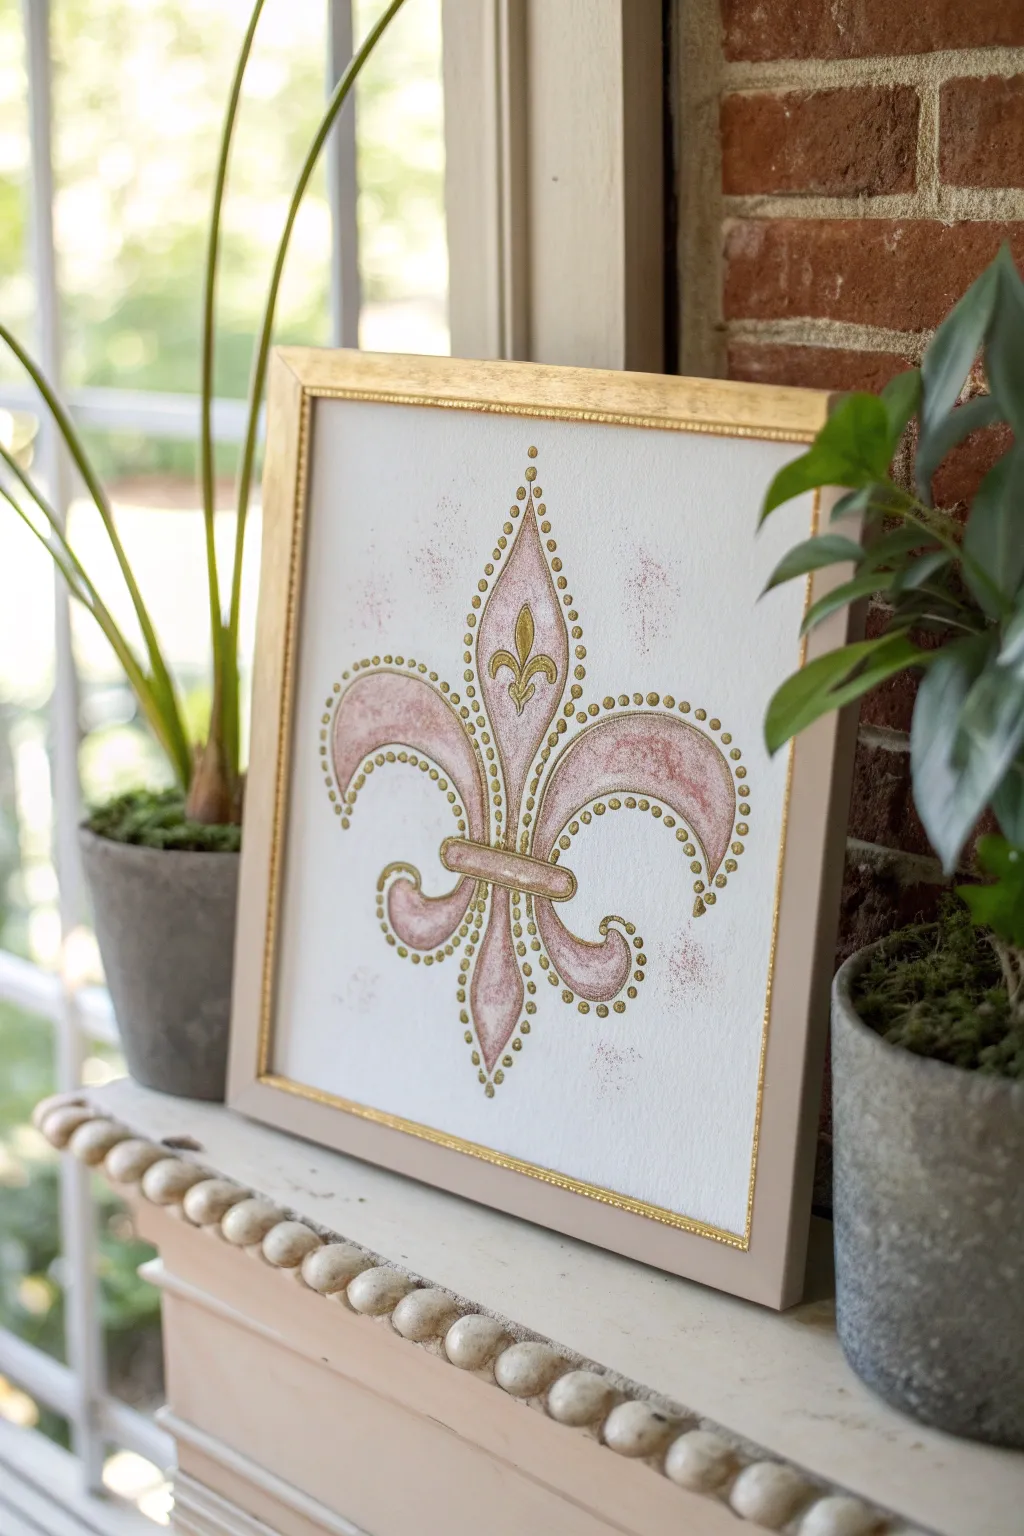
Capture regal elegance with this textured fleur-de-lis painting, featuring soft mauve washes and intricate raised gold detailing. This project combines simple watercolor techniques with dimensional fabric paint to create a piece that feels both vintage and luxurious.
Detailed Instructions
Materials
- Square wood painting panel or stretched canvas (approx. 10×10 inches)
- Acrylic paints (Soft Pink, Mauve, White)
- Gold dimensional fabric paint (puffy paint) or relief liner
- Gold acrylic paint
- Small flat brush and fine liner brush
- Fleur-de-lis stencil or printed template
- Graphite transfer paper
- Pencil
- Palette
- Gold leaf paint pen (optional for frame)
Step 1: Preparation and Base Coat
-
Prime the Surface:
Begin by painting your entire panel or canvas with a coat of white acrylic paint. This ensures your background is crisp and creates a smooth surface for the detail work. Let it dry completely. -
Tint the Background (Optional):
If you prefer a softer, aged look rather than stark white, mix a tiny drop of mauve into your white paint and apply a second, very sheer coat. Allow this to dry. -
Transfer the Design:
Position your fleur-de-lis stencil or template in the center of the canvas. If using a paper template, slide a sheet of graphite transfer paper underneath. Trace the outline of the shape lightly with a pencil. Don’t worry about the dots yet; just get the main silhouette.
Pro Tip: Steady Hands
Rest your wrist on a bridge (like a ruler raised on books) while piping the dimensional paint. This prevents smudging wet areas and steadies your line work.
Step 2: Painting the Silhouette
-
Mix the Fill Color:
Create a watery wash using soft pink and a touch of mauve acrylic paint. You want a semi-transparent glaze rather than opaque coverage to mimic the textured look in the reference. -
Apply the Color Wash:
Using a small flat brush, fill in the fleur-de-lis shape. Use dabbing motions rather than long strokes to create a slightly mottled, stone-like texture. It’s okay if the coverage isn’t perfectly even; that unevenness adds charm. -
Add Subtle Spatter:
While the paint is still on your palette, dilute a little mauve paint with water. Dip your brush, hold it over the canvas, and tap the handle to create very faint, tiny speckles around the fleur-de-lis for an antique effect. -
Paint the Central Band:
Locate the horizontal band that cinches the fleur-de-lis. Paint this area with opaque gold acrylic paint using a fine brush. Let all paint layers dry completely before moving on.
Step 3: Adding Filigree and Gold Details
-
Outline the Shape:
Take your gold dimensional paint (or relief liner) and carefully trace the pencil outline of the entire fleur-de-lis. Keep your pressure consistent to create a smooth, raised line. -
Create the Inner Border:
Just inside the outer painted edge, pipe a second line of gold, leaving a small gap between it and the outer edge. This double-line effect gives the piece a professional finish. -
Add the Central Motif:
In the upper petal of the fleur-de-lis, use the gold dimensional paint to draw a small, simplified mini fleur-de-lis or spade shape in the center. -
Begin the Dot Work:
Starting at the top point of the design, gently squeeze small dots of gold dimensional paint along the outer perimeter of your painted shape. Try to space them evenly, about an eighth of an inch apart. -
Complete the Dotted Border:
Continue the dotting technique all the way around the curving arms and the bottom of the fleur-de-lis. I find it helps to rotate the canvas as I work to keep my hand steady. -
Detail the Crossbar:
Pipe two straight lines of gold across the horizontal band—one top and one bottom—and fill the space between them with a row of tiny gold dots. -
Inner Embellishments:
Add a vertical row of graduating dots descending from the top tip through the center of the design to guide the eye downward.
Level Up: Antique Glaze
Once the gold dots are fully dry, lightly brush a watered-down brown glaze over the entire piece and wipe it back immediately for an aged, vintage parchment look.
Step 4: Finishing Touches
-
Frame the Piece:
If you are working on a flat wood panel, paint a border around the very edge of the panel using gold metallic paint or a gold leaf pen to mimic a frame. -
Clean Up Edges:
Use a small brush with white paint to tidy up any areas outside the design where the pink wash might have strayed too far. -
Final Drying Time:
Dimensional point takes significantly longer to dry than standard acrylic. Set the painting in a safe, dust-free area and let it cure for at least 6 to 12 hours before displaying.
Place your finished artwork on a mantel or easel to bring a touch of French sophistication to your room

PENCIL GUIDE
Understanding Pencil Grades from H to B
From first sketch to finished drawing — learn pencil grades, line control, and shading techniques.
Explore the Full Guide
Abstract Color Splash Backdrop
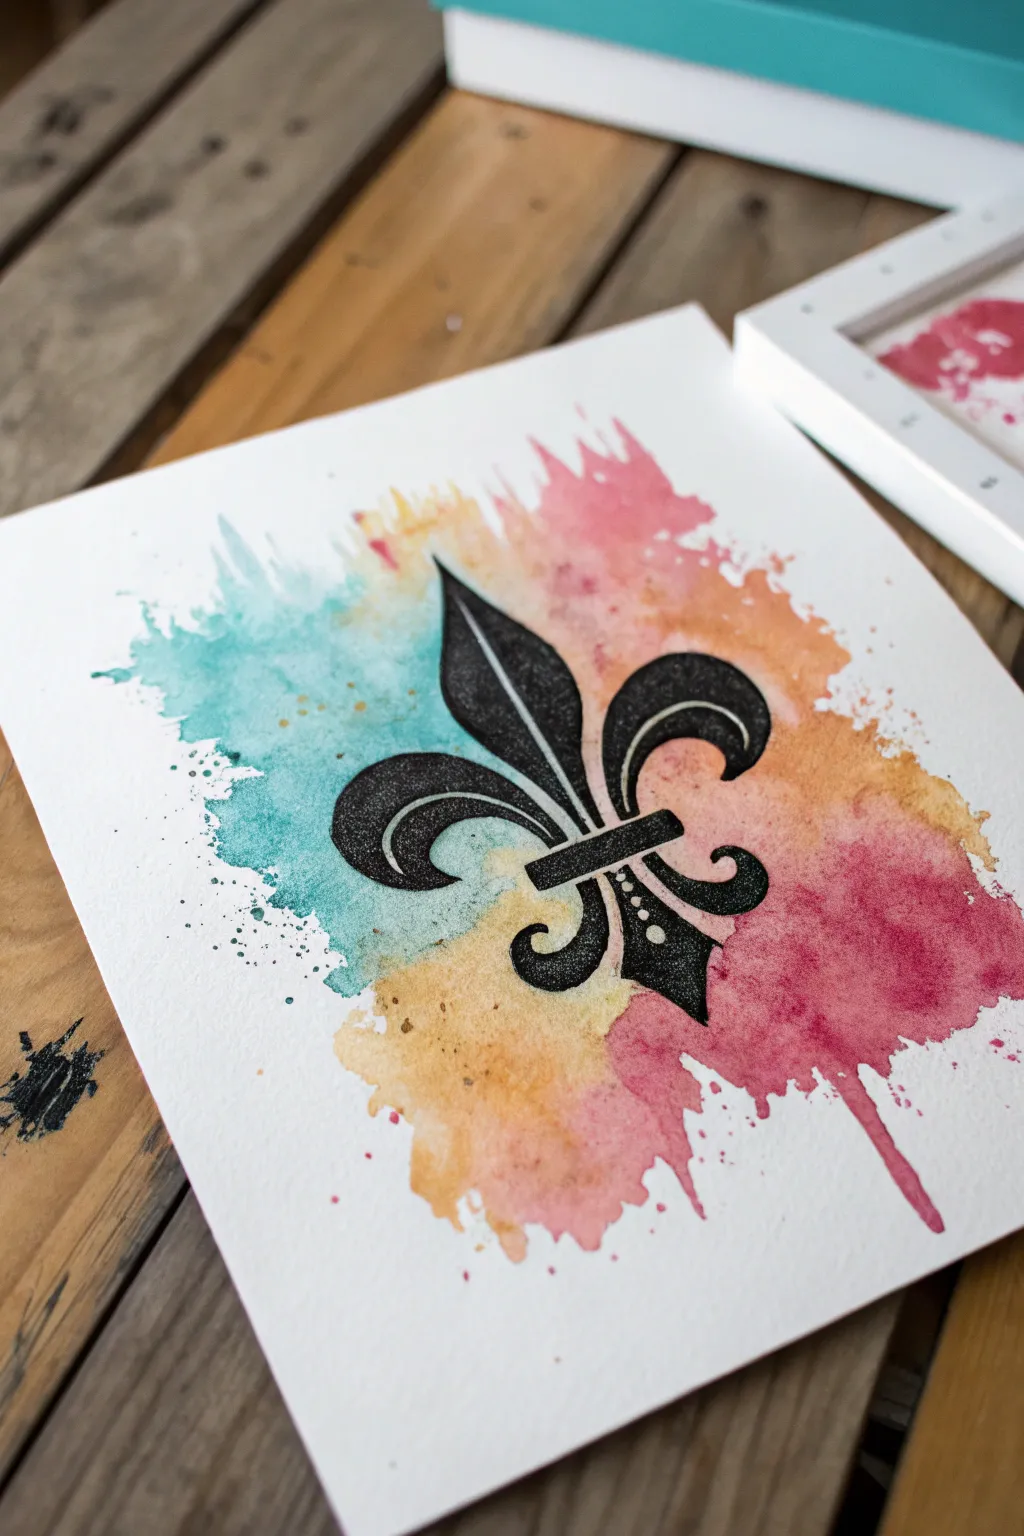
Blend the elegance of a classic symbol with the free-spirited nature of abstract watercolors in this stunning art project. A vibrant splash of teal, gold, and berry hues creates a dynamic backdrop for a bold, textured black fleur-de-lis centerpiece.
Step-by-Step Guide
Materials
- Cold press watercolor paper (140lb/300gsm)
- Watercolor paints (teal, yellow ochre/gold, berry pink/magenta)
- Round watercolor brushes (size 8 and 12)
- Black glitter paint or embossing powder with ink
- Fleur-de-lis stencil (approx. 4-5 inches tall)
- Palette or white plate for mixing
- Painter’s tape
- Paper towels
- Jar of clean water
- Stencil brush or sponge dauber
Step 1: Creating the Abstract Background
-
Prepare your surface:
Begin by taping the edges of your watercolor paper down to a hard surface. This prevents the paper from buckling when it gets wet and ensures you have a nice flat canvas to work on. -
Activate the teal:
Load a size 12 round brush with clean water and mix up a juicy puddle of teal paint. You want a good balance of pigment and water so the color flows easily. -
Apply the first splash:
On the left side of the paper, dab the teal paint onto the dry surface. Don’t try to paint a specific shape; instead, let the brush dance a bit to create jagged, organic edges. -
Softening the edges:
Rinse your brush slightly and use just water to pull the edges of the teal splash outward, creating a splatter effect. You can even tap the brush handle against your finger to flick tiny droplets around the main color patch. -
Introduce the gold:
While the teal is still damp but not soaking wet, mix up a yellow ochre or gold hue. Apply this to the center and bottom area, allowing it to slightly touch the teal. -
Encourage blending:
Where the gold meets the teal, let the colors bleed into each other naturally. If I feel the line is too harsh, I gently tap the boundary with a clean, damp brush. -
Add the berry tones:
Mix a vibrant berry pink or magenta. Apply this generously to the right side of the composition, completing the tri-color background. -
Create movement:
To mimic the drip effect seen in the bottom right corner, load your brush with watery pink paint, press it to the paper, and tilt your board upright so gravity pulls a drip downward. -
Dry thoroughly:
This is crucial: allow the background to dry completely. If the paper is cold to the touch, it’s still wet. You can use a hair dryer on a low setting to speed this up.
Bleeding edges?
If paint bled under your stencil, wait for it to dry fully. Then, take a fine-tip black marker or pen and trace the outline to neaten up the crisp edges.
Step 2: Adding the Fleur-de-Lis
-
Position the stencil:
Once the watercolor is bone dry, place your fleur-de-lis stencil purely in the center of the color splashes. Secure it lightly with painter’s tape. -
Prepare the black medium:
Pour out a small amount of black glitter paint. If you don’t have glitter paint, standard black acrylic mixed with fine loose glitter works perfectly. -
Load the sponge:
Dip your stencil sponge or dauber into the black paint, then dab the excess off onto a paper towel. You want the sponge to be almost ‘dry’ to prevent paint bleeding under the stencil. -
Apply the stencil:
Using an up-and-down pouncing motion, apply the black paint through the stencil. Build up the coverage in thin layers rather than one thick glob. -
Detail work:
Pay special attention to the decorative dots and curves within the fleur-de-lis design, ensuring the bristles get into those small crevices. -
Remove stencil:
Carefully lift the stencil straight up to avoid smearing the wet edges. Wash the stencil immediately. -
Final drying time:
Let the black focal point dry completely. The glitter effect will become more apparent as the medium dries. -
Remove tape:
Slowly peel away the painter’s tape from the edges of your paper, pulling away from the artwork at a 45-degree angle to keep the paper intact.
Make it Pop
For extra dimension, use clear embossing ink and black embossing powder for the fleur-de-lis. Melt it with a heat gun for a glossy, raised, professional finish.
Display your new artwork in a simple white frame to let those vibrant colors really shine
Bold Contrast Silhouette
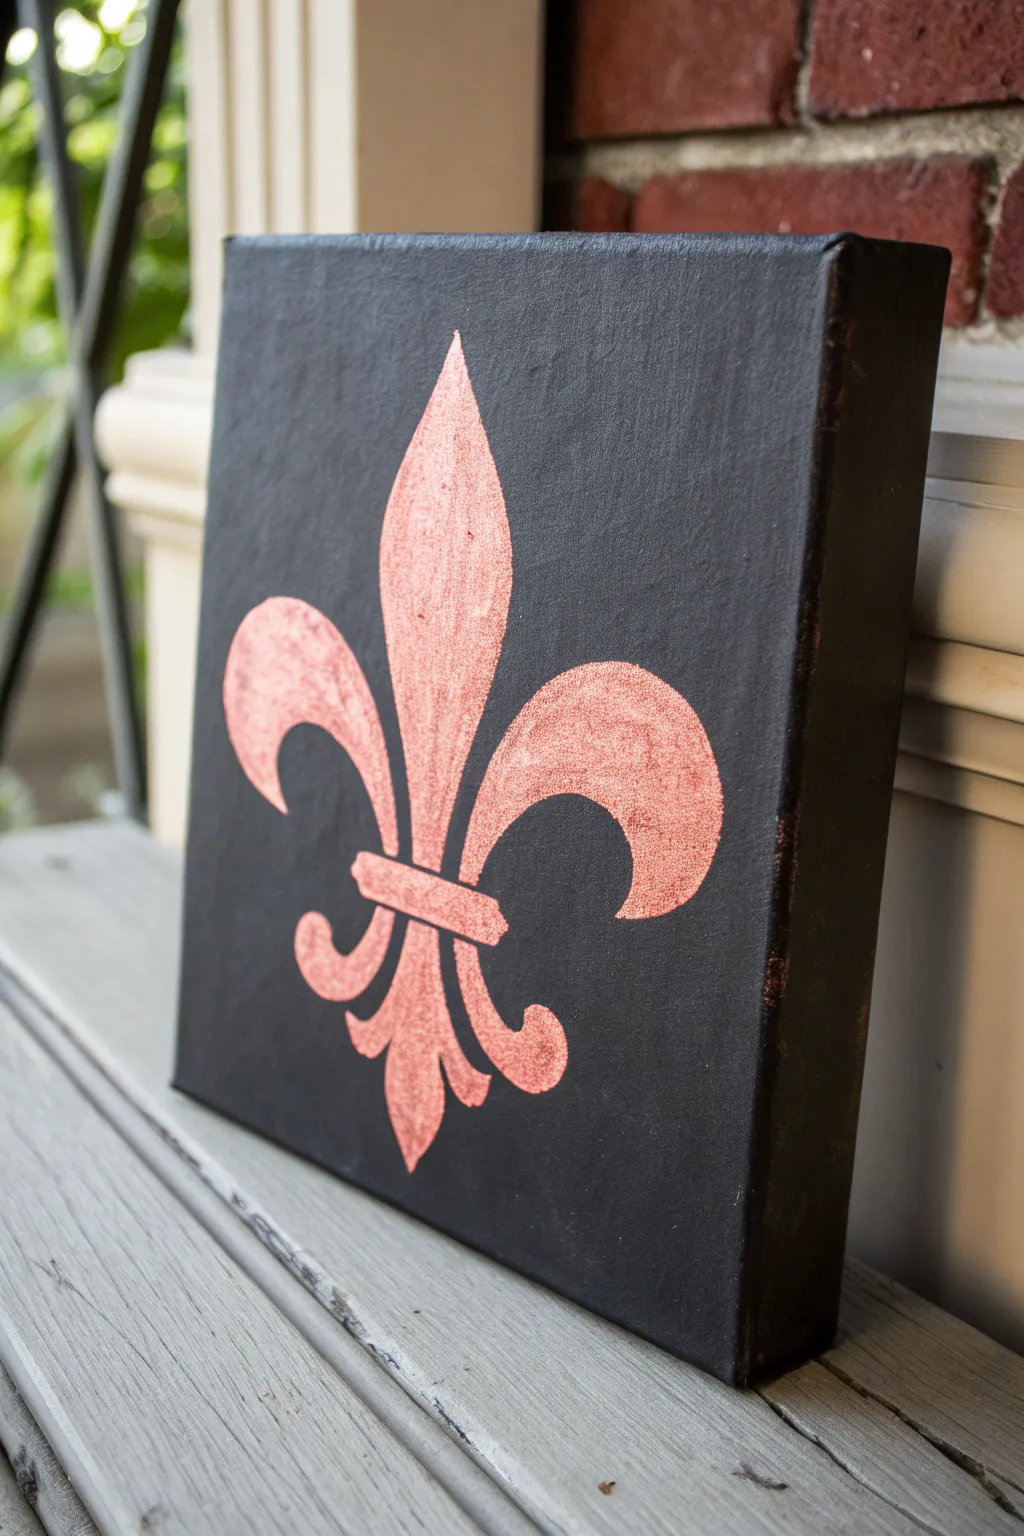
Achieve a striking and elegant look with this high-contrast painting project that pairs a deep, matte black background with a shimmering metallic fleur de lis. The visual impact comes from the sharp silhouette and the warm copper tones popping against the darkness.
Step-by-Step
Materials
- Square stretched canvas (approx. 8×8 or 10×10 inches)
- Matte black acrylic paint
- Metallic copper or rose gold acrylic paint
- Flat paintbrush (1-inch width)
- Small round detail brush
- Medium flat shader brush
- Pencil or white chalk pencil
- Fleur de lis stencil or printed template
- Painter’s tape or stencil adhesive (optional)
- Palette or paper plate
- Graphite transfer paper (if using a printed template)
Step 1: Preparing the Dark Canvas
-
Base coat application:
Begin by squeezing a generous amount of matte black acrylic paint onto your palette. Using the large flat brush, cover the entire front surface of the canvas with smooth, even strokes. -
Painting the edges:
Don’t forget the sides. Extend the black paint around the edges of the canvas to ensure a finished, gallery-wrapped look that doesn’t require a frame. -
Drying and second coat:
Allow the first layer to dry completely to the touch. Apply a second coat of black paint to ensure full opacity so no white canvas texture peeks through. -
Ensuring a matte finish:
Inspect the canvas under good light. If your black paint has too much sheen, you might want to wait for it to cure and then brush on a layer of fluid matte medium to flatten the finish.
Clean Lines Pro-Tip
For ultra-crisp edges, verify your black base is 100% dry, then paint the outline of the shape in black first to seal the stencil edge before adding copper.
Step 2: Creating the Silhouette
-
Positioning the design:
Once the black background is bone dry, determine the center of your canvas. Place your stencil or printed template directly in the middle. -
Transferring the shape:
If using a stencil, secure it with tape and lightly trace the outline with a white chalk pencil. If using a printout, slide graphite transfer paper underneath and trace the design firmly with a pencil. -
Creating the metallic mix:
Pour out your metallic copper or rose gold paint. I find that mixing a tiny drop of orange or brown into the metallic paint can deepen the richness without losing the shimmer. -
Outlining the shape:
Load your small round detail brush with the metallic paint. Carefully paint along the traced lines first to establish crisp, sharp edges for the fleur de lis. -
Filling the large sections:
Switch to the medium flat shader brush. Fill in the larger interior sections of the three main petals, keeping your brushstrokes vertical to mimic the natural flow of the shape.
Level Up: Aged Patina
Mix a tiny amount of turquoise paint with glaze medium and dab it sparingly onto the edges of the dry copper paint to create a realistic oxidized verdigris effect.
Step 3: Refining and Layering
-
Building opacity:
Metallic paints often require multiple coats. Let the first layer dry for about 15 minutes, then apply a second coat to make the copper vibrantly opaque. -
Detailing the binding band:
Use your smallest brush to carefully paint the horizontal band that ties the petals together. Ensure the corners where the band meets the petals are sharp. -
Enhancing the texture:
For the final top coat on the copper, use a slightly drier brush and use a stippling motion. This adds a subtle hammered metal texture that catches the light beautifully. -
Touching up the background:
If any copper paint strayed over the lines, take a clean small brush with black paint and carefully cut back in to clean up the silhouette edges. -
Sealing the work:
Because you want to maintain the contrast between matte and metallic, do not varnish the whole piece. Instead, carefully brush a gloss varnish only over the copper shape if you want extra shine.
Display strictly on a shelf or mantel where natural light can hit the metallic texture


Negative Space Fleur de Lis
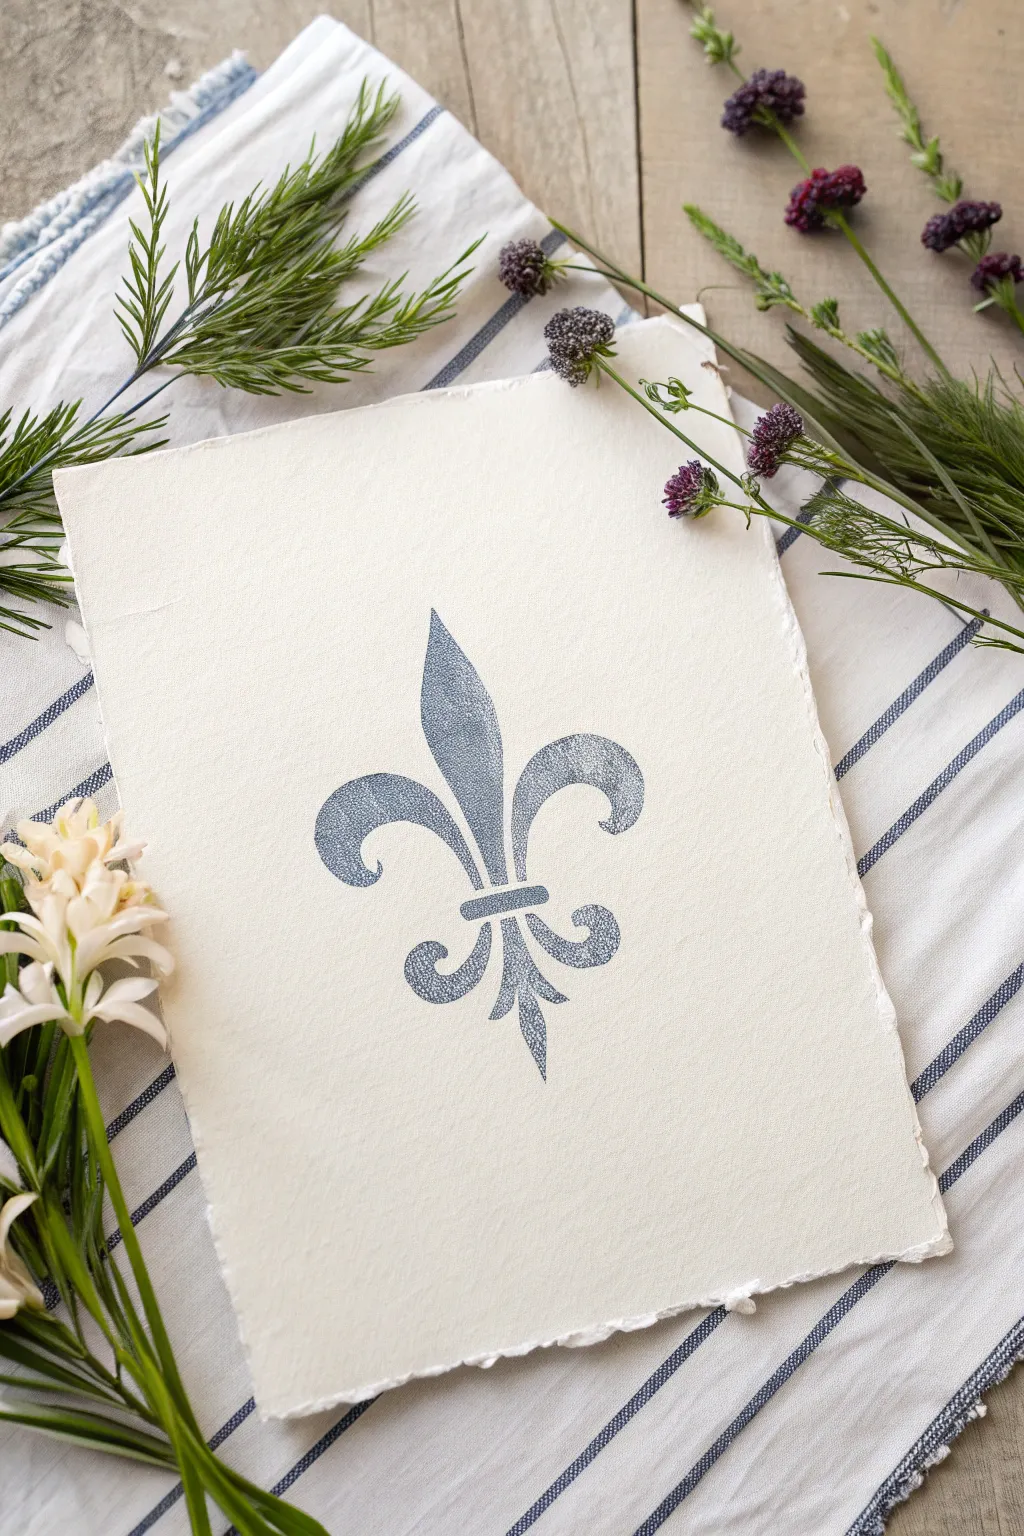
Create a sophisticated piece of decor featuring a classic fleur de lis motif on beautiful handmade paper. The textured, deckle-edged paper combined with the muted blue-grey symbol creates an elegant, timeless aesthetic perfect for framing or gifting.
Step-by-Step Guide
Materials
- Heavyweight cold press watercolor paper or handmade cotton rag paper (deckle edge preferred)
- Fleur de lis stencil
- Removable painter’s tape or stencil adhesive spray
- Grey-blue acrylic craft paint (satin finish)
- Small stencil brush or cosmetic sponge wedge
- Paper plate or palette
- Paper towels
- Pencil (optional)
- Ruler
Step 1: Preparation & Setup
-
Paper selection:
Choose a high-quality paper with visible texture. If your paper doesn’t have a deckle edge and you want that look, you can carefully tear the edges against a ruler rather than cutting them. -
Find the center:
Using a ruler, lightly measure to find the exact center of your paper sheet. You can make a tiny pencil tick mark that will eventually be covered by the paint. -
Secure the paper:
Tape down the corners of your paper to your work surface using small loops of painter’s tape on the back to prevent it from sliding around while you work. -
Prepare the stencil:
Align the center of your fleur de lis stencil over your center mark. Ensure the vertical axis is perfectly straight. -
Adhere the stencil:
Secure the stencil firmly. If using spray adhesive, apply a light mist to the back of the stencil and let it get tacky before placing. Alternatively, tape the edges down securely with painter’s tape.
Dry Brush Success
The secret to crisp lines on textured paper is an extremely dry brush. If your brush leaves a wet smudge, you have too much paint. It should feel like stippling with dry powder.
Step 2: Applying the Design
-
Load the brush:
Pour a small amount of grey-blue acrylic paint onto your palette. Dip the flat end of your stencil brush or sponge into the paint. -
Offload excess paint:
This is crucial: dab the brush firmly onto a paper towel until it feels almost dry. Too much paint will bleed under the stencil edges. -
Start stenciling:
Begin applying the paint using a straight up-and-down pouncing or dabbing motion. Do not brush side-to-side, as this pushes paint under the plastic. -
Build the color:
Apply a very thin, translucent first layer. It might look splotchy at first, but that’s normal. I find patience is key here rather than rushing perfectly opaque coverage immediately. -
Second pass:
Once the first layer is touch-dry (which takes just a minute or two with thin acrylics), go over the design again to deepen the blue tone. -
Create texture:
For the slightly weathered look seen in the photo, vary your pressure slightly. Let some of the paper texture show through in the broader areas of the design. -
Check the edges:
Pay special attention to the intricate curves and points of the fleur de lis, ensuring these small areas get enough pigment to define the shape clearly.
Metallic Accent
For a regal twist, mix a tiny drop of gold paint into your blue-grey, or tap gold leaf adhesive randomly over the dry blue paint and apply gold foil flecks.
Step 3: Finishing Touches
-
Remove the stencil:
While the paint is still slightly tacky (do not wait for it to fully cure), carefully lift the stencil straight up. Lifting at an angle might smudge the wet edge. -
Touch ups:
Inspect the edges. If there was minor bleeding, wait for the paint to dry completely, then carefully scrape away the excess with a craft knife or cover it with a tiny dot of white gouache mixed to match your paper. -
Flattening:
If the moisture from the paint caused the paper to buckle slightly, place the dry artwork under a heavy book overnight to flatten it out. -
Final cure:
Allow the piece to sit undisturbed for a few hours to ensure the acrylic paint hardens completely before framing or displaying.
Now you have a piece of handmade art that combines historical symbolism with modern simplicity
Pop Art Pattern-Fill Fleur de Lis
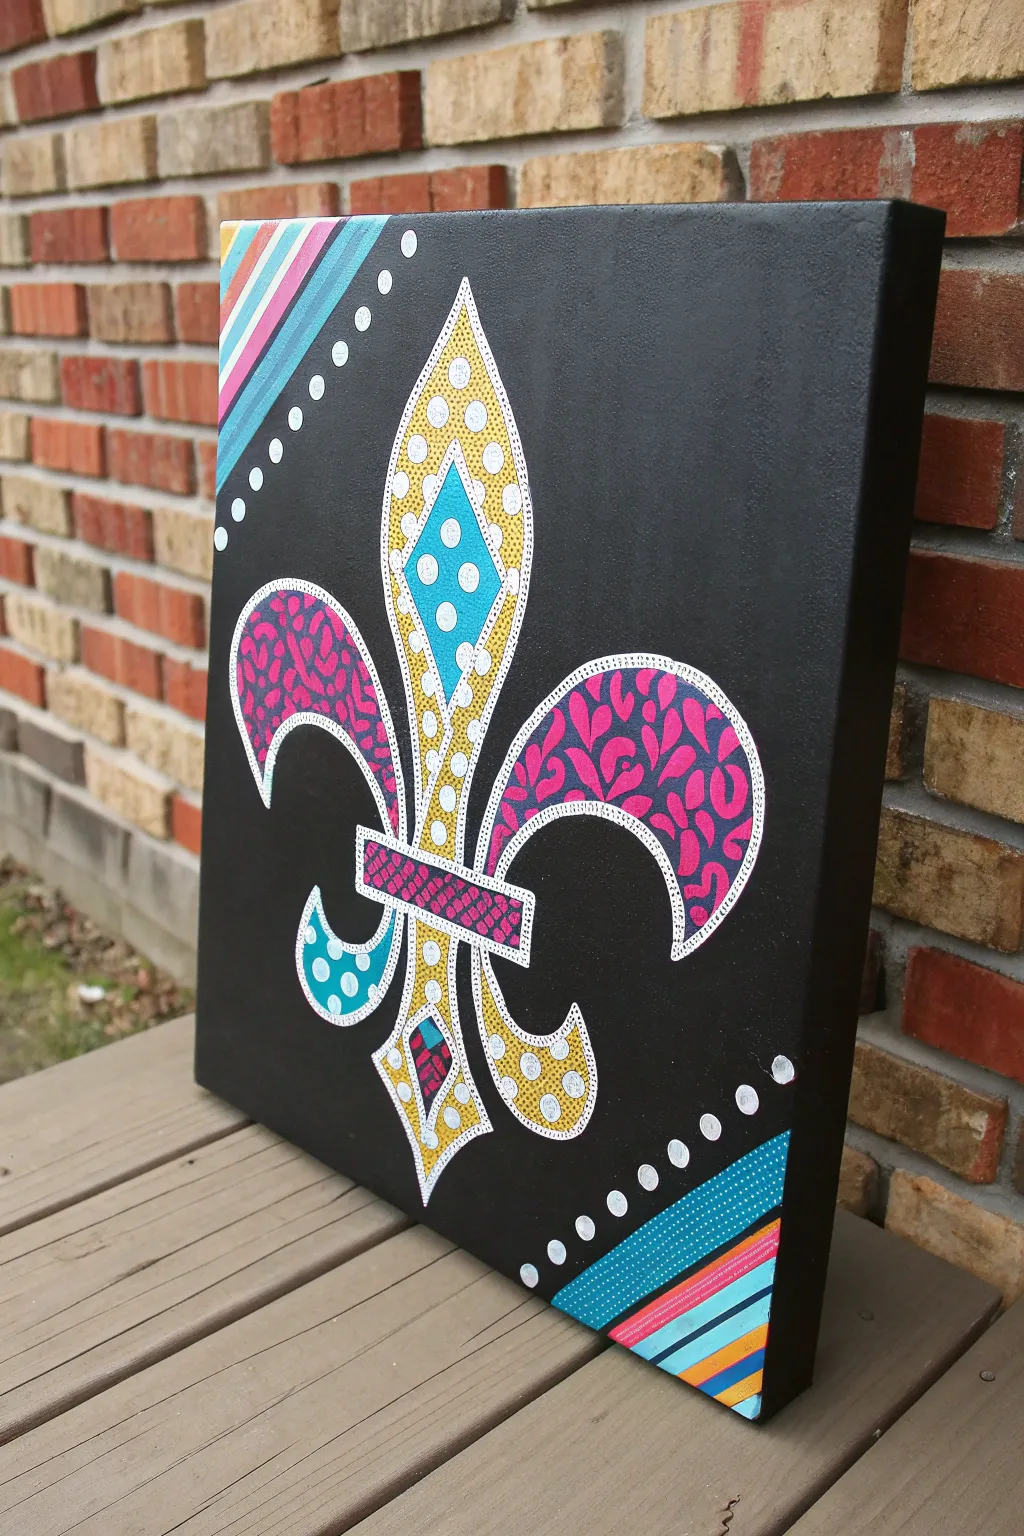
Give the classic French symbol a vibrant, modern makeover with this bold pop-art inspired painting. Featuring electric colors, playful patterns like leopard print and polka dots, and clean lines against a stark black background, this piece really pops off the canvas.
Step-by-Step
Materials
- Square stretched canvas (e.g., 12×12 or 16×16 inches)
- Black acrylic paint (heavy body preferred)
- Acrylic paints: Bright pink, teal, yellow/gold, white, light blue
- Pencil and eraser
- Fleur de lis stencil or printed template
- Ruler or straight edge
- Painter’s tape (optional)
- Small round brushes (for details)
- Fine liner brush (for outlining)
- White paint pen (fine tip) or metallic silver marker
Step 1: Setting the Stage
-
Base coat application:
Begin by painting your entire canvas black. Use a wide flat brush to ensure smooth, even coverage, and don’t forget to paint the sides of the canvas for a finished look. Let this dry completely; you might need a second coat if the canvas texture is still showing through. -
Drafting the design:
Once the black background is bone dry, lightly sketch a large fleur de lis in the center of the canvas using a pencil. If you aren’t confident in your freehand sketch, cut out a paper template, center it, and trace around it with a white chalk pencil or a regular pencil (pressing hard enough to see the graphite sheen). -
Adding corner details:
Using a ruler, draw diagonal lines across the top-left and bottom-right corners. You’ll want a wide band closest to the corner and a series of thinner bands moving inward. Leave space between the corner design and the central fleur de lis for a row of decorative dots.
Oops! Uneven Dots?
If your painted dots look lumpy or uneven, let them dry, lightly sand the high spots, paint over with the background color, and try again using the handle end of a brush.
Step 2: Blocking in Color
-
Central column first:
Start painting the central vertical petal of the fleur de lis. Fill the main shape with a yellow-gold tone, but leave a diamond shape in the very center unpainted for now. This gold section will later hold the white polka dots. -
Teal diamond details:
Paint the diamond inside the top center petal with a bright teal. Do the same for the smaller teardrop shapes at the very bottom of the design using the same teal color. -
Curved side petals:
Move to the large, curved side petals (the arms). Paint these a solid deep pink or magenta. This will serve as the background for the leopard print pattern later. -
Lower swirls and band:
Paint the small bottom swirls in teal. For the horizontal band (the “tie”) across the middle, use the magenta paint again. Let all these base coats dry thoroughly before starting the pattern work.
Make It Sparkle
To add glamour, swap the plain white outline for a metallic silver or gold paint pen. You can also glue small rhinestones onto the polka dot sections for 3D texture.
Step 3: Pattern and Detail Work
-
Leopard print touches:
On the pink side petals, use a darker purple or dark blue to paint small, irregular ‘C’ shapes and spots to create a stylized leopard print. Fill the centers of the larger spots with a lighter pink if you want extra dimension. -
Polka dot frenzy:
Using a small round brush or the back end of a paintbrush handle, dip into white paint to create the polka dots on the yellow-gold sections. Try to keep the spacing consistent. -
Striping the corners:
Head back to the corners. Paint the diagonal stripes using your palette of teal, pink, orange, and yellow. Using painter’s tape here ensures your lines stay crisp and straight against the black background. -
Geometric diamonds:
In the teal diamond on the top petal, add four crisp white dots arranged in a diamond pattern. I find a dotting tool works best here for perfect circles. -
Cross-hatching the tie:
On the magenta horizontal band, use a dark color (black or dark purple) to paint a grid or cross-hatch pattern for texture.
Step 4: Final Outlines and Accents
-
High-contrast outlining:
This is the most crucial step for the ‘pop’ effect. Using a fine-tip white paint pen or a liner brush with thinned white paint, carefully outline every section of the fleur de lis. The white line creates a barrier between the colored sections and the black background. -
Inner dividing lines:
Continue using the white pen to outline the internal shapes, like the teal diamond and the cross-hatched band. This separation makes the design look clean and almost like a sticker. -
Floating dots:
Create the line of floating white dots that runs parallel to the corner stripes. Start with smaller dots near the bloom and make them gradually larger as they move toward the canvas edge. -
Cleanup:
Check for any smudges or uneven black areas. Use your black paint to touch up the background, cutting in close to your new white outlines to sharpen any wobbly edges.
Hang your vibrant masterpiece on a wall that needs a serious splash of color and bold design
India Ink Free-Flow Fleur de Lis
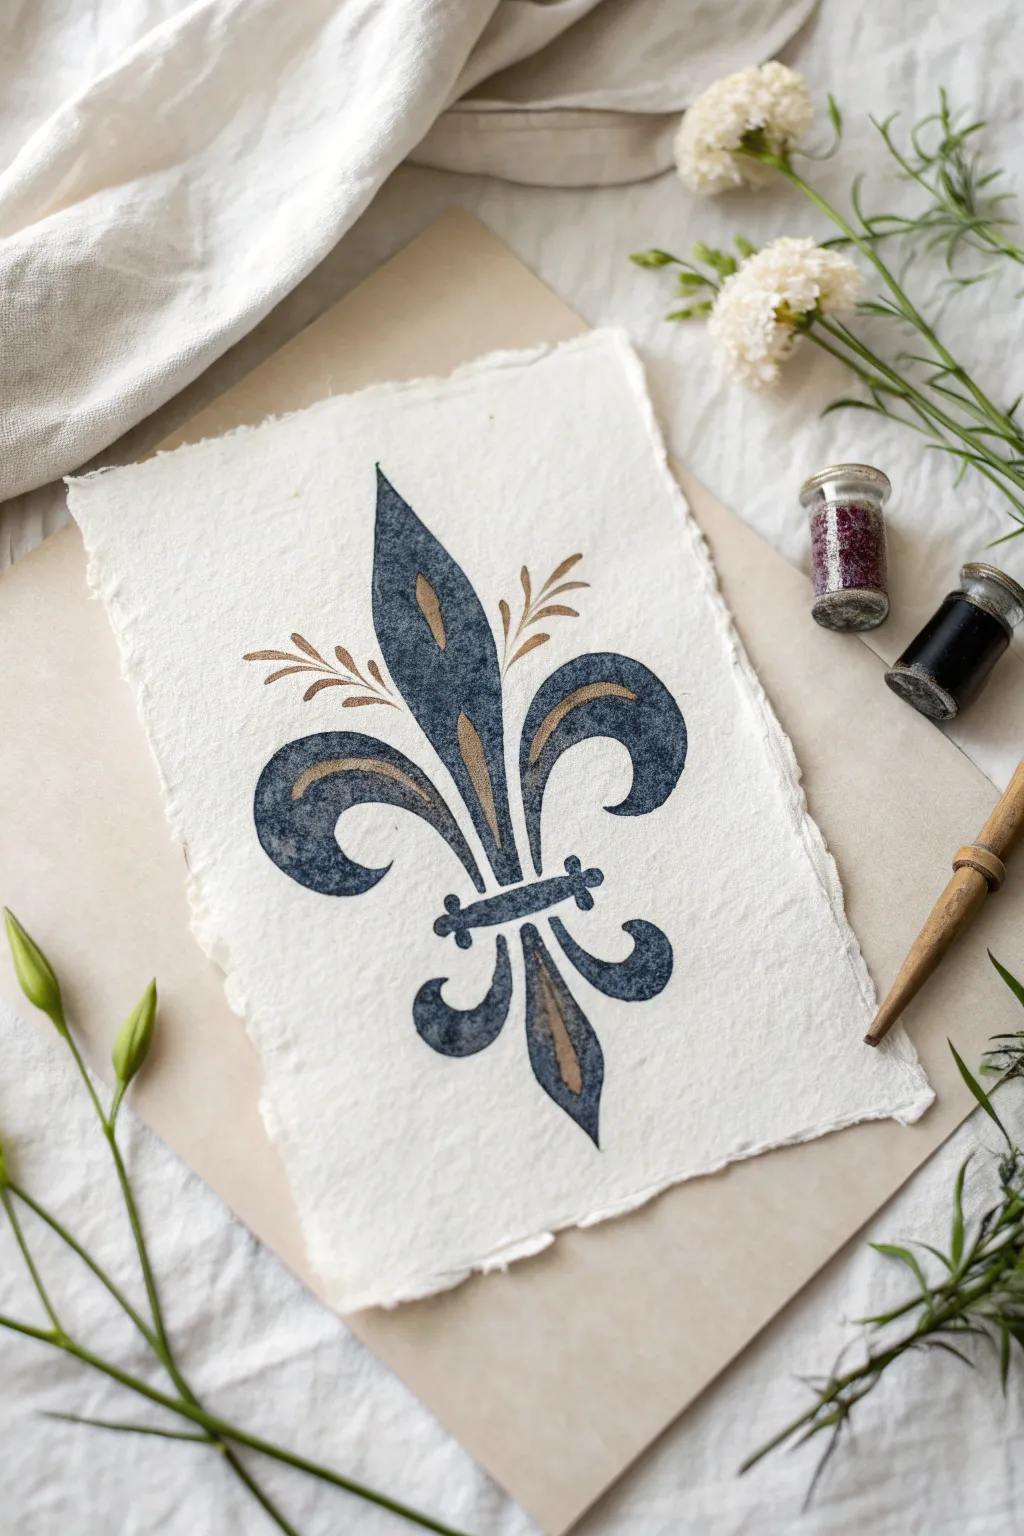
Embrace the fluid beauty of India ink with this striking yet simple artwork, where deep navy tones meet subtle gold accents. The textured, handmade paper base adds an authentic, old-world charm to this classic symbol.
Step-by-Step Tutorial
Materials
- Heavyweight textured paper (ideally handmade cotton rag paper with deckled edges)
- Deep blue or navy India ink
- Metallic gold ink or gold gouache
- Round watercolor brushes (sizes 4 and 6)
- Fine liner brush (size 0 or 00)
- Pencil (HB or H)
- Kneaded eraser
- Paper towel
- Ruler
- Water jar
Step 1: Preparation & Sketching
-
Center the design:
Begin by finding the vertical center of your textured paper. Use a ruler to lightly draw a straight vertical line down the middle; this axis is crucial for the symmetry of the fleur de lis. -
Establish the height:
Mark the top and bottom points of your central petal on this axis line. Leave plenty of breathing room at the borders to let those beautiful deckled edges show. -
Sketch the central petal:
Draw the elongated teardrop shape of the central petal. It should be pointed at the top and taper gently at the bottom where it meets the horizontal tie/band. -
Draft the side petals:
Sketch the two curling side petals. They should curve outward from the center and hook downwards, resembling stylized waves. Keep checking the left side against the right to maintain symmetry. -
Add the base:
Draw the lower section, which mirrors the top but is shorter and more flared, consisting of a central downward point and two smaller outward curves. -
Refine the sketch:
Add the horizontal bar that ties the petals together. Once happy with the shape, lightly roll a kneaded eraser over the pencil lines to make them very faint so the graphite won’t dirty your ink.
Step 2: Inking the Base
-
Prepare the blue ink:
Shake your navy India ink well. I like to dilute a small drop with a touch of water on a palette if the ink is too thick, aiming for a consistent, fluid texture. -
Outline the main shapes:
Using the size 4 brush, carefully trace the outline of your fleur de lis. Don’t worry if the line isn’t perfectly smooth; the texture of the paper creates character. -
Fill the silhouette:
Switch to the size 6 brush to fill in the main bodies of the petals. Work relatively quickly so the ink settles evenly into the paper fibers. -
Create texture:
While the ink is still slightly wet, you can dab a clean, slightly damp brush into the center of the petals to lift a tiny bit of pigment, giving it that weathered, vintage look. -
Define the tie:
Paint the horizontal band across the middle. Leave a hair-thin gap of white space between the band and the petals above and below it to clearly define the separate sections. -
Add decorative flourishes:
Using the fine liner brush, add the small ornamental details, such as the tiny crossbars on the horizontal band and the little curled ‘feet’ at the very bottom.
Bleeding Blue?
If ink feathers too much on the handmade paper, lightly brush a layer of clear matte medium or gum arabic over the sketch area first to seal the fibers.
Step 3: Gilding & Details
-
Dry completely:
Allow the blue ink to dry thoroughly. India ink is permanent once dry, but if you paint over it too soon, it might bleed. -
Mix the gold:
Prepare your metallic gold ink or gouache. It should be opaque enough to sit on top of the dark blue but fluid enough to flow off a liner brush. -
Add internal highlights:
Paint a thin, sweeping gold line inside the center of the main top petal. Repeat this curve inside the two side petals, following the natural curve of the shape. -
Highlight the base:
Add a vertical gold stroke to the bottom-center petal section. This balances the metallic shine from top to bottom. -
Paint external sprigs:
To soften the heraldic look, use the fine liner brush dipped in gold (or a mix of gold and brown) to paint delicate, leafy sprigs floating in the white space between the central petal and the side petals. -
Final touches:
Check your edges. If any areas look too rough, clean them up with the liner brush and a tiny bit of blue ink, but remember that the hand-painted feel is part of the charm.
Level Up: Aged Effect
before painting, soak the paper in strong tea or coffee and let it dry. This creates an antique parchment background that contrasts beautifully with the navy ink.
Once dry, frame this elegant piece in a floating frame to show off the distinctive paper edges
Botanical Lily-to-Fleur Hybrid
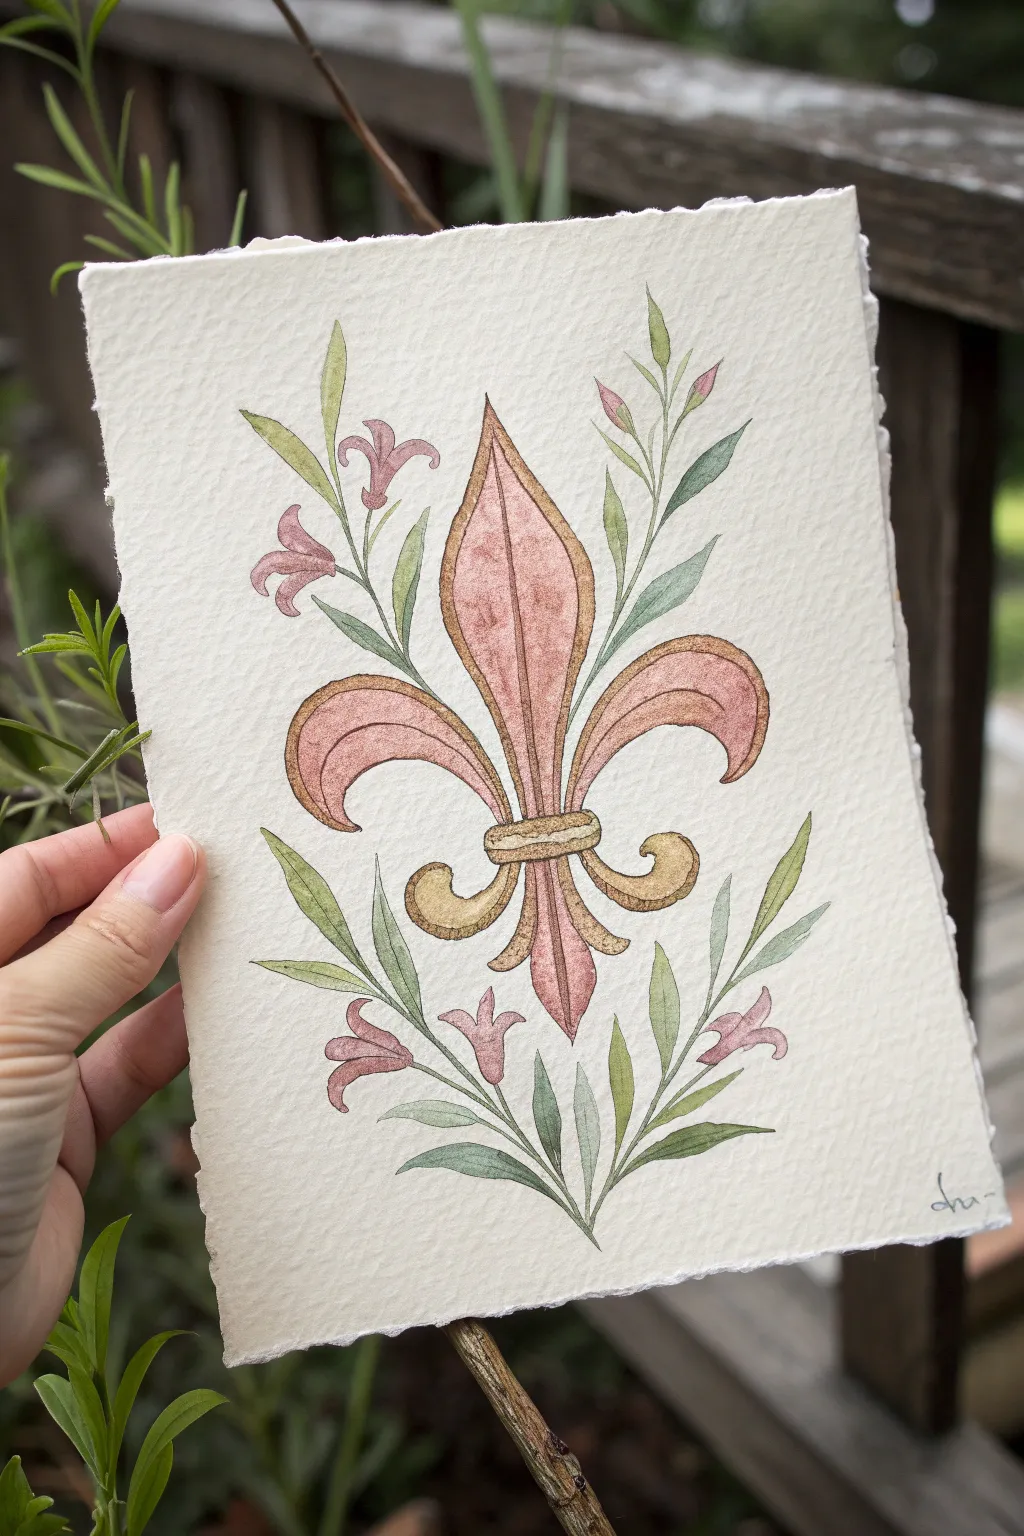
This elegant project reimagines the classic fleur-de-lis symbol by sprouting it directly from living botanical elements. Using delicate watercolor washes and precise outlining on deckle-edged paper, you’ll create a piece that feels both heraldic and organic.
How-To Guide
Materials
- Cold press watercolor paper (deckle edge recommended)
- Pencil (HB or H)
- Kneaded eraser
- Watercolor paints (Sap Green, Alizarin Crimson, Yellow Ochre, Burnt Sienna)
- Round watercolor brushes (Size 2 and 4)
- Fine liner pen (Sepia or Dark Brown, waterproof)
- Gold metallic watercolor or pigment
- Jar of water
- Paper towels
Step 1: Drawing the Structure
-
Establish the centerline:
Begin by lightly sketching a vertical line down the center of your paper. This invisible guide is crucial for keeping your fleur-de-lis symmetrical. -
Sketch the central petal:
Draw the tall, central teardrop shape of the fleur-de-lis first, ensuring the point aligns with your center line. -
Add side petals:
Curve two large C-shapes outward from the base of the central petal, swooping down and hooking back up. They should mirror each other as closely as possible. -
Draw the band and base:
Create the horizontal band that cinches the petals together, then add the three smaller, flared bottom sections of the symbol below it. -
Sprout the vines:
From the base of the design, sketch thin, curving stems that grow upwards and outwards, framing the main symbol. Let them intertwine slightly with the lower petals.
Step 2: Adding Detail & Paint
-
Sketch leaves and buds:
Along your vine stems, add slender, lance-shaped leaves. At the tips of the upper stems, draw small, closed lily buds. Add a couple of open lily flowers near the bottom for balance. -
Lighten the lines:
Gently roll a kneaded eraser over your entire sketch. You want the graphite to be barely visible—just enough to guide your brush without showing through the translucent paint. -
Paint the main petals:
Mix a watery wash of Alizarin Crimson with a touch of Burnt Sienna to get a dusty rose color. Paint the main three petals of the fleur-de-lis, keeping the wash sheer and even. -
Base coat the greenery:
Using a dilute Sap Green, fill in all the leaves and stems. Paint loosely; it’s okay if the color varies slightly in intensity. -
Paint the floral accents:
Use the same dusty rose mix to paint the small lily buds and open flowers on the vines, creating a cohesive color palette. -
Add the gold accents:
Mix Yellow Ochre with a tiny bit of brown (or use gold metallic paint). Fill in the horizontal band and the curling bottom tips of the fleur-de-lis.
Uneven Wash?
If your pink wash dries with hard edges or ‘blooms,’ wet the area slightly with clean water and lift the excess pigment with a thirsty (dry) brush to smooth it out.
Step 3: Outlining & Refining
-
Apply texture to the main petals:
Once the base pink is dry, mix a slightly stronger version of that color. Add faint vertical veins or stippling to the main fleur-de-lis petals to suggest an organic texture to the ‘metal’ shape. -
Deepen the gold areas:
Add a second layer of your gold/ochre mix to the bottom curves and band, concentrating the pigment at the edges to create a 3D rounded effect. -
Outline the fleur-de-lis:
Using your sepia fine liner, carefully trace the outer edge of the main fleur-de-lis. I like to break the line occasionally rather than making it solid, which keeps it looking delicate. -
Outline the botanicals:
Trace the stems and leaves with the pen. Add a central vein line down the middle of each green leaf. -
Intensify shadows:
Go back in with your smallest brush and a darker green mix. Add tiny shadows where the leaves meet the stem and where the vines tuck behind the fleur-de-lis.
Level Up
Use actual gold leaf for the band and bottom curls instead of yellow ochre paint. The metallic shine will contrast beautifully with the matte watercolor.
Frame this delicate piece in a floating frame to show off the beautiful deckle edges
Mixed-Media Collage Fleur de Lis With Script
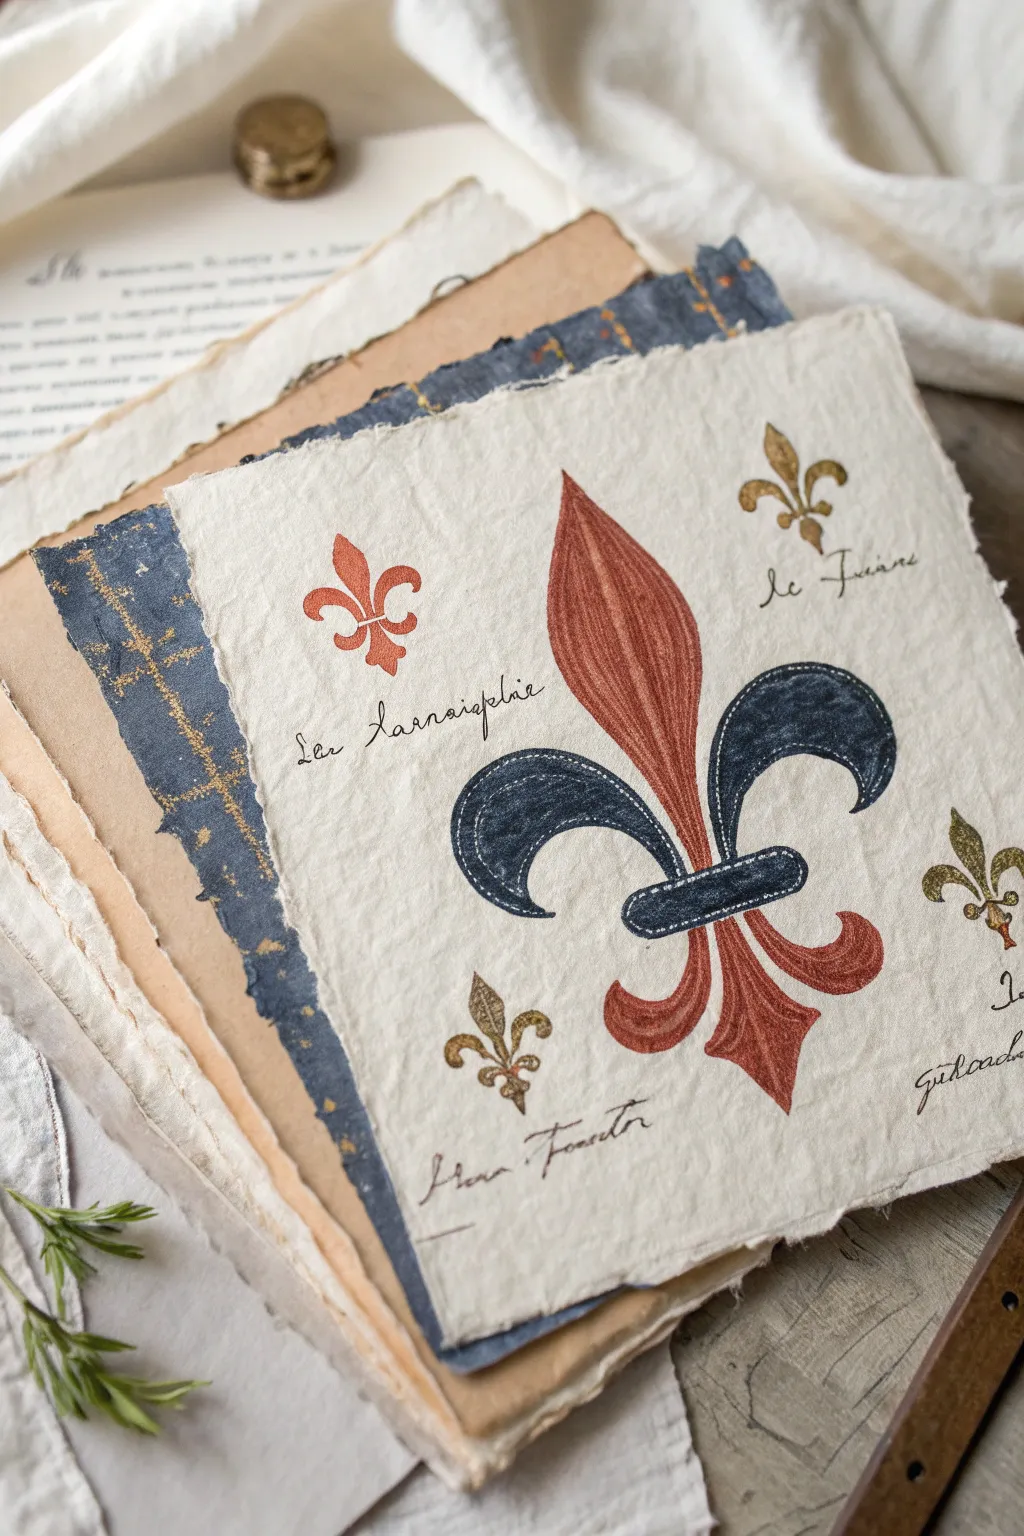
Transport yourself to an ancient scriptorium with this beautiful mixed-media project, featuring a classic fleur de lis motif on handmade paper. The combination of watercolor rendering, elegant calligraphy, and layered textured papers creates a sophisticated, Old World aesthetic perfect for framing or as a journal centerpiece.
Detailed Instructions
Materials
- Heavyweight handmade cotton rag paper (deckled edge)
- Blue handmade paper or textured colored cardstock
- Watercolor paints (burnt sienna, rust red, navy blue/indigo)
- Metallic gold watercolor or gouache
- Fine-point black illustration pen (0.1 or 0.3mm)
- Pencil and eraser
- Round watercolor brushes (size 4 and 0)
- Walnut ink or diluted brown watercolor (for aging)
- Ruler (optional)
Step 1: Preparation & Layering
-
Select your canvas:
Begin with a square sheet of heavy, handmade cotton rag paper. The uneven, deckled edges are crucial for the antique look, so avoid trimming them straight. If your paper is too white, lightly wash it with diluted tea or walnut ink and let it dry completely to achieve a creamy bone color. -
Prepare the backing layer:
Cut a sheet of deep blue textured paper slightly larger than your main painting surface. This acts as a mounting layer to frame the artwork later. For extra flair, you can lightly speckle this blue paper with gold paint using a toothbrush to mimic a night sky or aged textile. -
Sketch the layout:
On your dry rag paper, lightly sketch a large, central fleur de lis. The design should be symmetrical, with a tall central petal and two curving side petals held together by a horizontal band. Leave ample negative space around the edges for four smaller motifs. -
Draft the smaller elements:
Sketch four miniature fleur de lis symbols in the corners surrounding the main design. Keep these looser and slightly less detailed than the centerpiece.
Aged Edges Trick
To make the paper look centuries old, gently scrape the deckled edges with a distress ink pad in light brown or burnt orange before painting.
Step 2: Painting the Central Motif
-
Base coat the red petals:
Mix a rust-red hue using burnt sienna and a touch of red. Paint the central upright petal and the lower tail petals. Use a ‘dry brush’ technique slightly near the edges to let the paper texture show through, giving it a weathered appearance. -
Add petal details:
While the red is drying, darken your mix slightly. With a size 0 brush, paint fine vertical lines following the curve of the central petal to mimic veins or wood grain. -
Paint the blue curves:
Switch to a deep navy or indigo watercolor. Paint the two curved side arms of the fleur de lis. Allow the color to be slightly uneven, pooling in some areas for natural variation. -
Define the band:
Paint the horizontal band binding the petals in the same navy blue. Leave a tiny sliver of unpainted white paper between the band and the petals to act as a highlight and separate the shapes. -
Add stitching details:
Once the blue paint is dry to the touch, use a white gel pen or very dry white gouache on a fine brush to add small dashed lines along the center of the blue curves and the band. This simulates embroidery stitching.
Historical Twist
Instead of watercolor, use real gold leaf for the smaller icons. Apply a size adhesive, wait for tackiness, and press the leaf for a genuine illuminated manuscript look.
Step 3: Accents & Script
-
Paint the corner motifs:
For the smaller fleur de lis sketches, use varied colors. I like to paint the top right and bottom left in gold for balance, and the others in the rust-red mix. Ensure they look slightly faded compared to the main image. -
Add gold highlights:
Using your metallic gold paint, add tiny touches of sheen to the edges of the main red petals or the tips of the smaller motifs. Subtle shimmering adds elegance without overpowering the rustic vibe. -
Outline the main shape:
Use a very fine point brush with diluted dark brown paint to loosely outline the main fleur de lis. The line shouldn’t be solid; let it break and vary in thickness to look like hand-drawn ink. -
Pencil guidelines for text:
Very lightly draw horizontal guidelines near each of the four smaller motifs where you want to add text. -
Write the calligraphy:
Using a fine-point black pen or a dip pen with walnut ink, write French script names or phrases like ‘Les Tournières’ or ‘Le Franc’ next to the small icons. A loose, cursive handwriting style works best here. -
Final assembly:
Once the painting is fully dry, place it atop your prepared blue backing paper. You can adhere it with a small dab of glue in the center to let the corners lift slightly, emphasizing the paper’s texture and layers.
Display your finished manuscript page on a wooden desk or floating frame to admire the timeless charm of your handiwork

Have a question or want to share your own experience? I'd love to hear from you in the comments below!