If you’ve got a plain plate and the urge to paint flowers on something that actually gets used, you’re in for a treat. These floral plate painting ideas are the kind I teach in my studio—easy to start, super customizable, and endlessly pretty once they’re on the table.
Classic Floral Wreath on the Rim
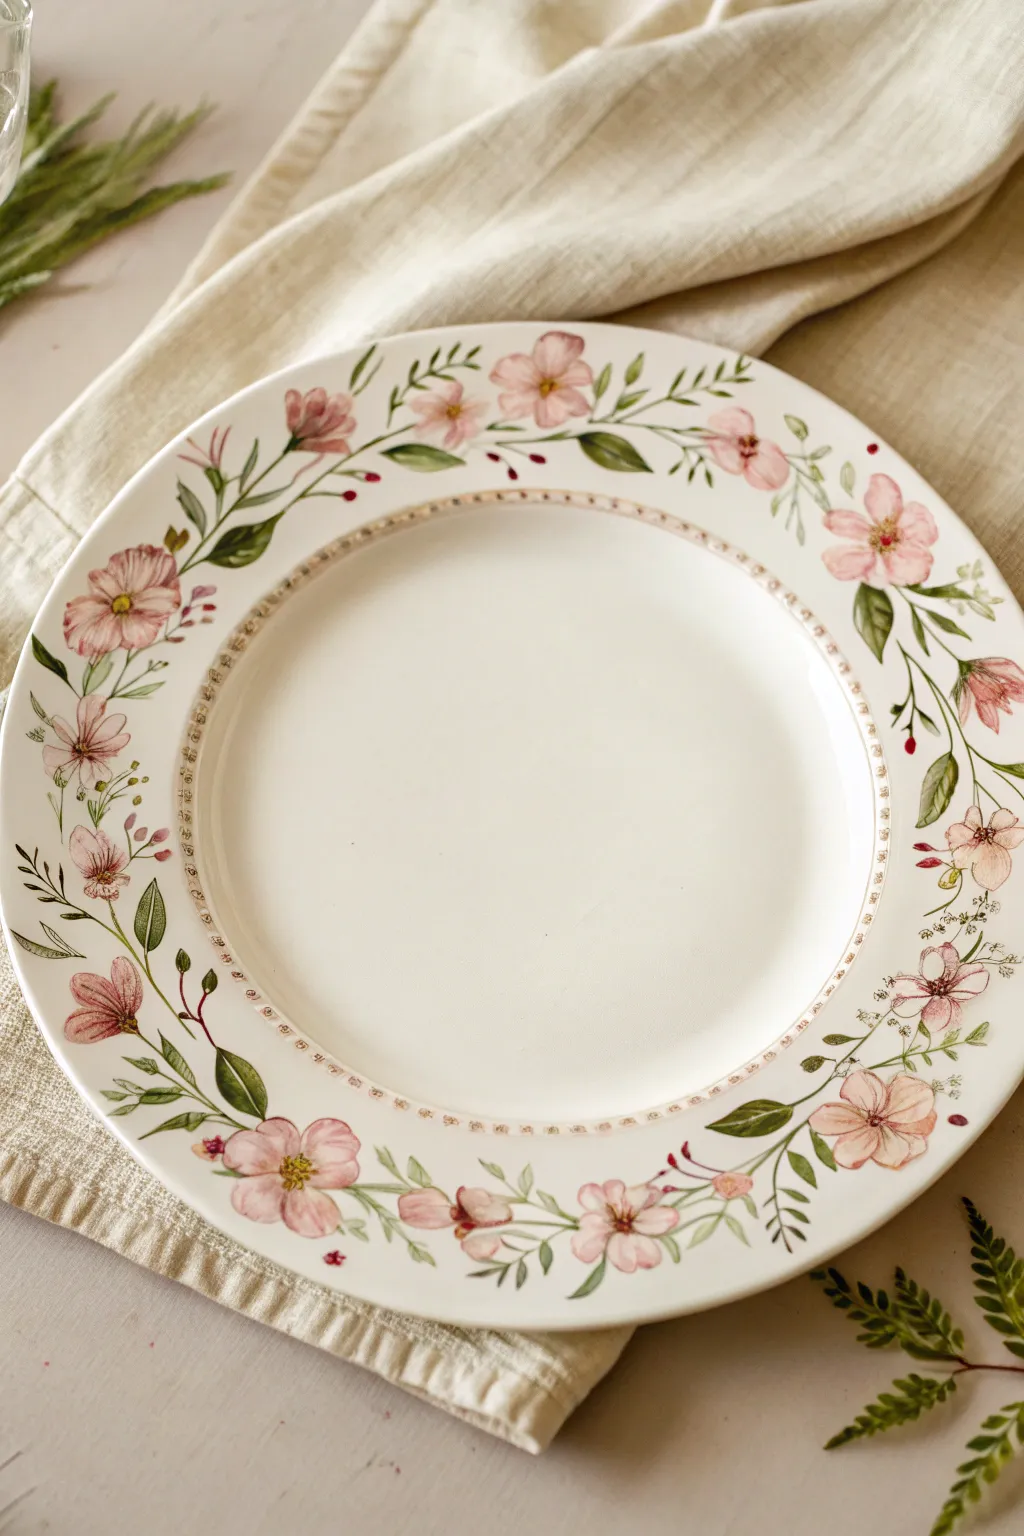
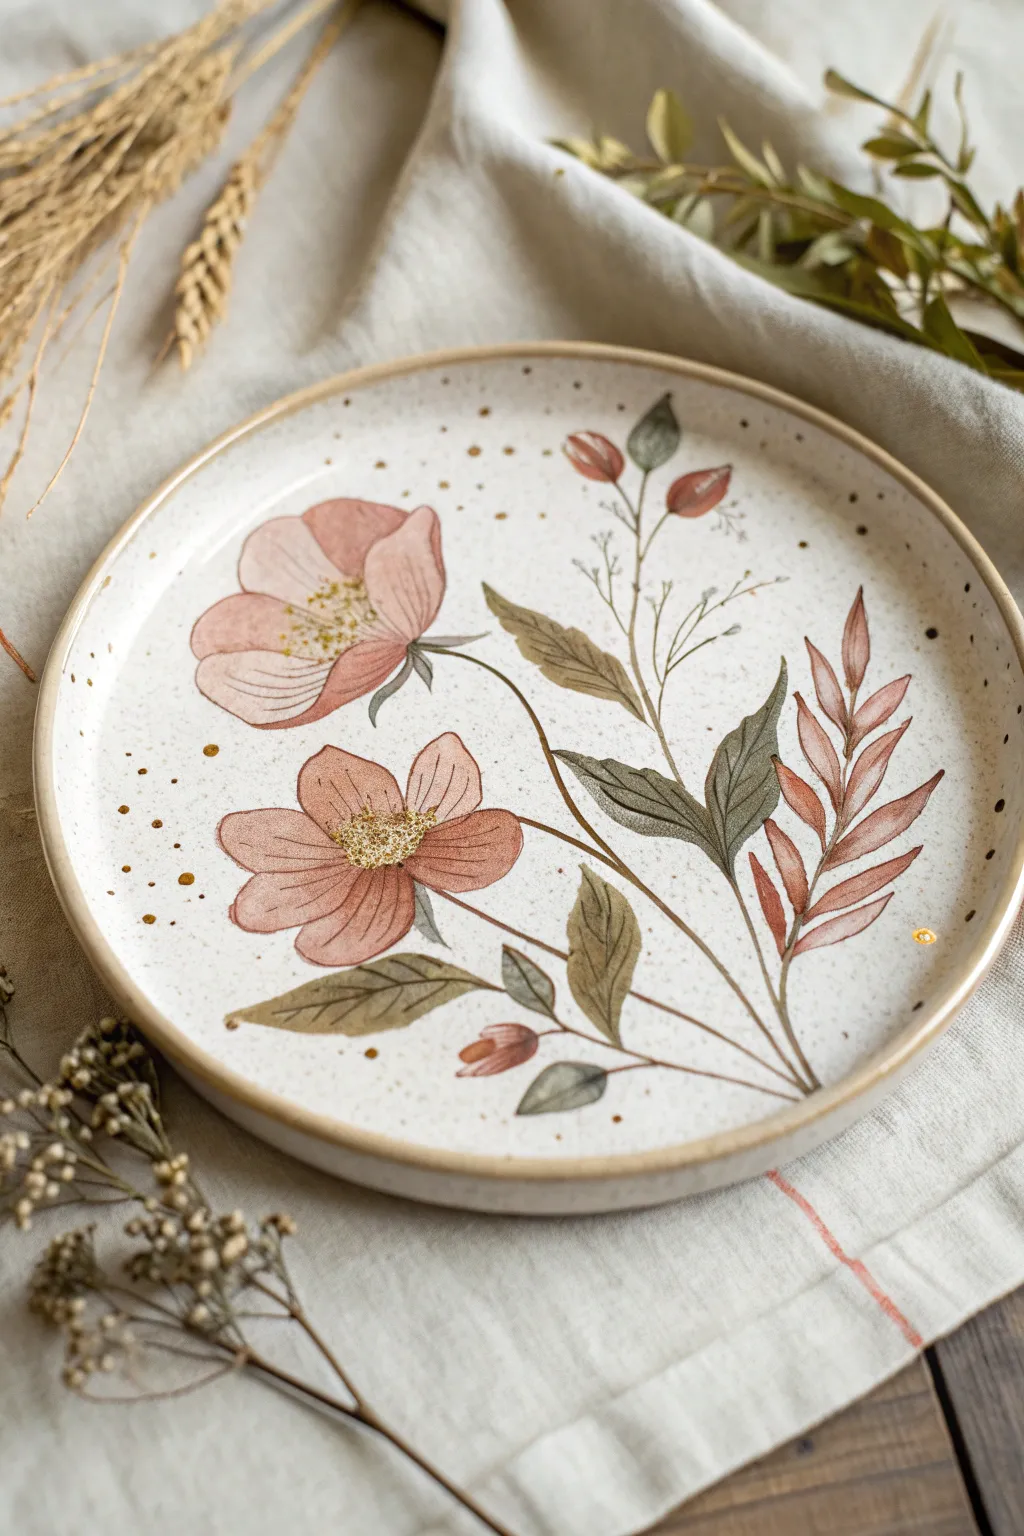
Transform a plain white dinner plate into a romantic, vintage-inspired piece with this watercolor-style floral rim design. The soft pink blossoms and trailing greenery create an elegant frame perfect for spring dining or display.
How-To Guide
Materials
- White ceramic plate (glazed dinner plate)
- Pebeo Porcelaine 150 paints (or similar oven-bake ceramic paints)
- Colors: Ivory, Rose Pink, Deep Red (for details), Olive Green, Leaf Green, Yellow Ochre
- Fine detail brushes (size 0 and 00)
- Small round brush (size 2)
- Rubbing alcohol and paper towel
- Ceramic paint medium (thinner)
- Pencil for sketching (optional)
Step 1: Preparation and Mapping
-
Clean the surface:
Begin by thoroughly wiping down your plate with rubbing alcohol and a paper towel. This removes any invisible oils or fingerprints that could prevent the paint from adhering properly. -
Plan the layout:
Visualize the wreath as a continuous circle. You can lightly mark four equidistant points (12, 3, 6, and 9 o’clock) on the rim with a very faint pencil mark to help space out your main flower clusters evenly.
Paint Consistency Tip
Ceramic paints dry fast. Keep your brush wet with medium, not water, to maintain that transparent watercolor look without breaking down the binder.
Step 2: Painting the Base Flowers
-
Mix a sheer pink:
Mix your Rose Pink with a generous amount of Porcelaine thinner or medium. We want a translucent, watercolor effect rather than opaque coverage. -
Lay down petal shapes:
Using your size 2 round brush, paint loose, five-petal flower shapes at irregular intervals around the rim. Vary their angles—some facing up, some sideways—to create movement. Keep the edges soft and slightly uneven. -
Add smaller buds:
In the spaces between the larger blooms, dab small, teardrop shapes to represent unbloomed buds. These should be slightly darker pink than the open flowers. -
Let the base layer dry:
Allow these base pink shapes to dry for about 10-15 minutes before adding details. This prevents the colors from muddying.
Step 3: Adding Greenery and Stems
-
Mix green shades:
Create two green mixtures: a lighter Olive Green for new leaves and a darker Leaf Green for contrast. -
Connect the blooms:
With your fine liner brush (size 0), paint thin, winding stems connecting your main flowers. Let the lines be organic and slightly wavy, not geometric. -
Paint leaves:
Add almond-shaped leaves along the stems. Cluster them in pairs or threes near the flowers. I like to use a ‘press and lift’ motion with the brush to naturally form the tapered leaf tip. -
Vary leaf tones:
While the green paint is still wet, drop a tiny bit of darker green into the base of some leaves to add depth and dimension. -
Add wispy details:
Using the very tip of your finest brush (size 00), flick out tiny, hair-like stems and very small leaves that break the main line of the wreath, giving it a wild, overgrown feel.
Vintage Patina
Before baking, you can gently sponge a very diluted tea-colored paint along the extreme outer edge of the plate for an aged, antiqued ceramic look.
Step 4: Refining Details
-
Define the petals:
Return to your pink flowers. Mix a slightly deeper pink-red shade. Use your finest brush to paint delicate lines radiating from the center of each flower outwards, defining the separation between petals. -
Paint flower centers:
Dip the tip of a detail brush into Yellow Ochre and dot the very center of the open flowers. Add tiny specks of brown or deep red around the yellow pollen for realistic contrast. -
Highlight the leaves:
If desired, paint a very thin central vein on the larger leaves using a darker green mixture.
Step 5: Borders and Finishing
-
Create the inner border:
Look at where the rim slopes into the center of the plate. Along this ridge, paint a very subtle, dotted or dashed line using a diluted brownish-pink tone. This acts as a frame for the white center. -
Final inspection:
Check for any gaps that feel too empty. Fill them with tiny floating petals or small green sprigs to balance the wreath composition. -
Cure the paint:
Allow the plate to air dry for 24 hours. After that, bake it in a domestic oven according to the paint manufacturer’s instructions (usually around 300°F/150°C for 35 minutes) to make it dishwasher resistant.
Once baked, your custom floral plate is ready to bring a touch of garden charm to your next meal


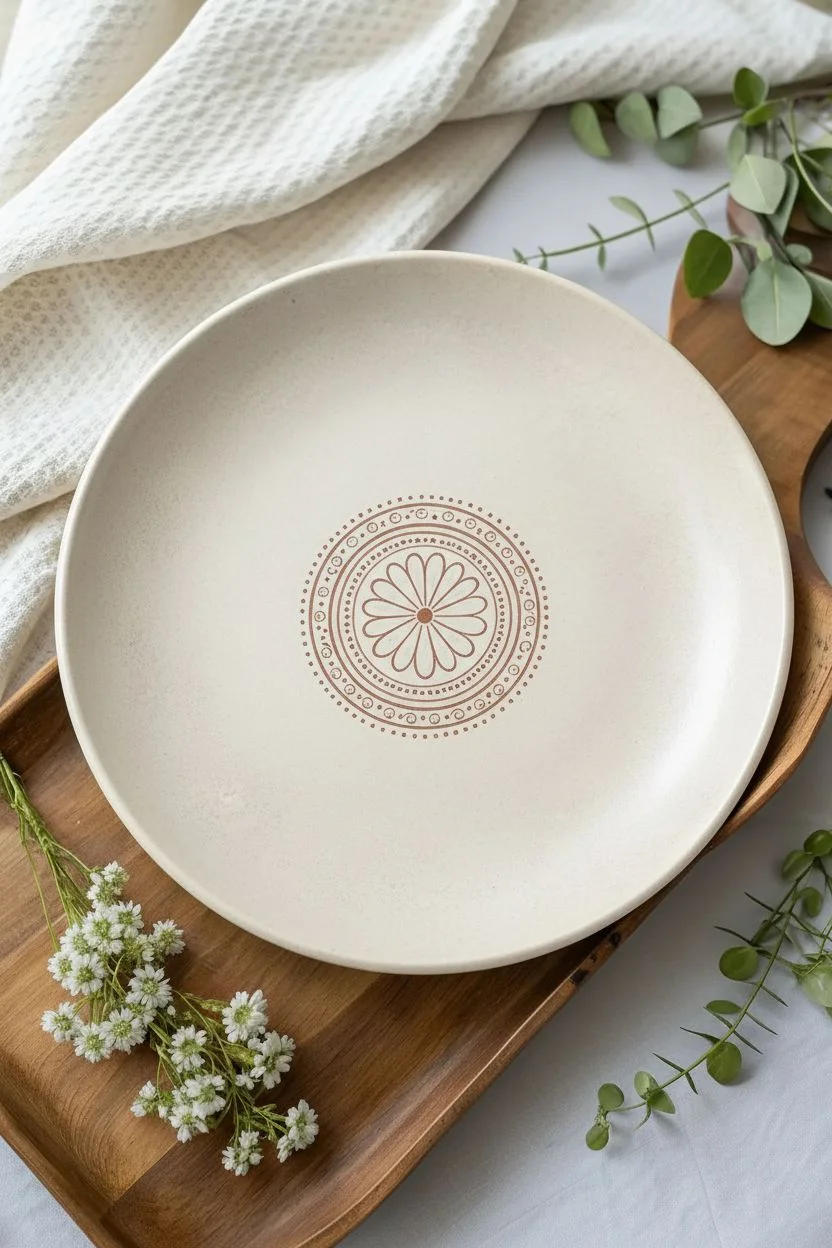
Simple Daisy Border

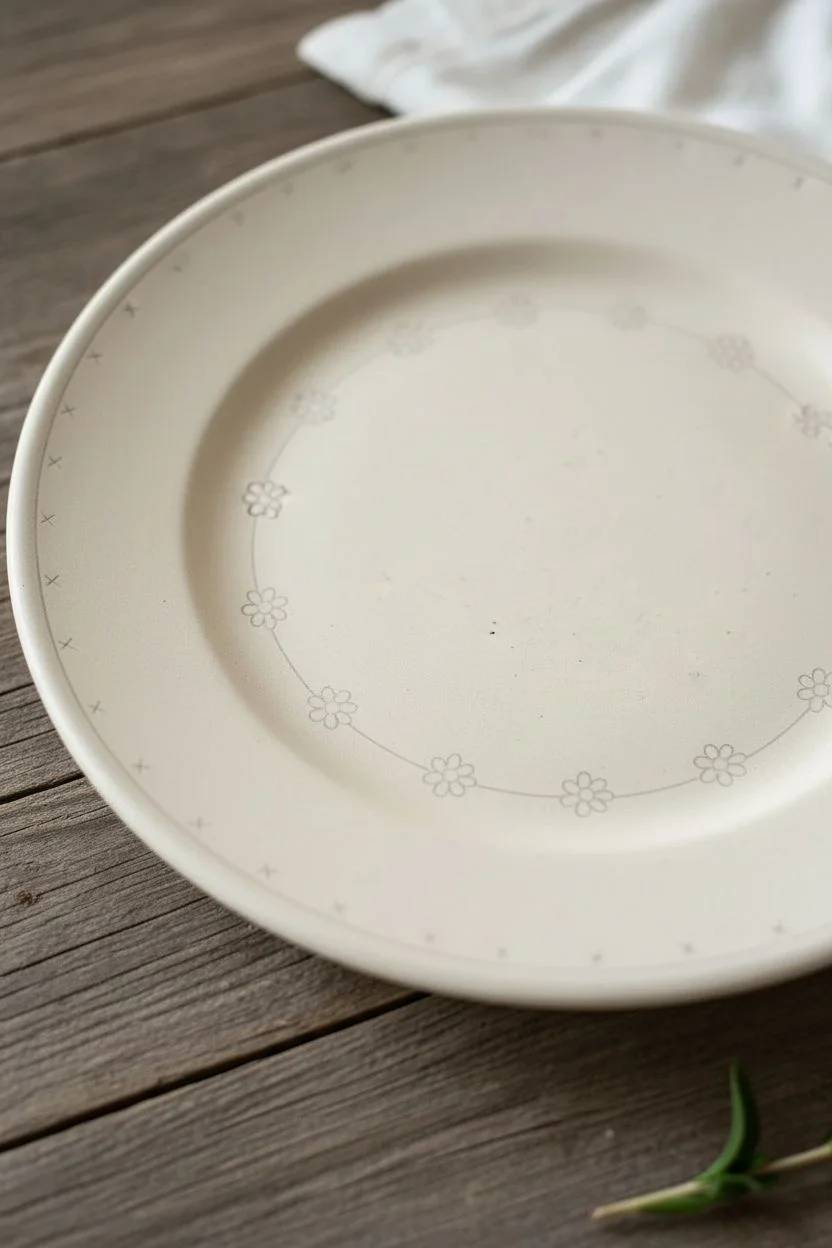
Transform a plain ceramic plate into a piece of cottagecore art with this double-wreath design featuring cheerful daisies. The combination of a bold, painted outer rim and a delicate inner vine creates a lovely sense of depth and rustic elegance.
Step-by-Step Tutorial
Materials
- Plain ceramic plate (bisque ware or a plain glazed plate suitable for overglaze)
- Ceramic paints or porcelain paints (Ochre Yellow, Bright White, Leaf Green, Dark Green, Golden Yellow)
- Round brushes (sizes 2, 4, and 6)
- Detail liner brush (size 0 or 00)
- Sponge or stippling brush
- Pencil (for sketching on bisque) or washable marker (for glazed surfaces)
- Paper towels
- Water cup
- Palette
Step 1: Planning the Layout
-
Mark your zones:
Begin by lightly marking two concentric circles on your plate. One circle should be about 1.5 inches in from the rim to define the outer colored band. The second circle should be another inch inward to guide the delicate vine wreath. -
Space the flowers:
Using a pencil or washable marker, lightly mark small ‘X’s evenly spaced around the outer rim where the large daisy centers will go. Do the same for the smaller daisies on the inner circle, but space them further apart.
Uneven Petal Spacing?
Don’t panic if your last flower doesn’t fit perfectly. Make the last two flowers slightly wider or overlap a leaf to hide the gap. Nature isn’t perfect, and neither should your art be.
Step 2: Painting the Outer Border
-
Create the background texture:
Mix your Ochre Yellow paint with a tiny drop of water to thin it slightly. Using a sponge or stippling brush, dab the color onto the outer rim area. Don’t worry about perfect coverage; a slightly mottled, uneven texture adds to the rustic antique look. -
Refine the background edge:
While the ochre paint is wet, use a clean, damp brush to wipe the inner edge into a neat circle if your sponging went over the line. Let this background layer dry completely before proceeding. -
Paint the large petals:
Load a size 4 or 6 round brush with Bright White. Starting from your ‘X’ marks on the rim, paint long, tear-drop shaped petals radiating outward. It helps to press the brush down for the belly of the petal and lift up as you move toward the center. -
Add a second coat:
White paint on a colored background can sometimes look translucent. I like to let the first coat dry briefly and then add a second layer to make those petals pop. -
Add the centers:
With a size 4 brush, paint a round Golden Yellow circle in the center of each large daisy. While wet, dab a tiny dot of slightly darker orange or ochre on the bottom edge of the yellow center for a 3D shadow effect. -
Paint the rim leaves:
Using a size 2 brush and Leaf Green, paint simple almond-shaped leaves filling the gaps between the large flowers. Add a touch of Dark Green near the base of each leaf for depth. -
Add the white rim dots:
Dip the handle end of a paintbrush into your Bright White paint. Dot it evenly along the very outer edge of the ochre border to create the delicate beaded effect seen in the photo.
Step 3: Creating the Inner Vine
-
Draw the vine structure:
Switch to your fine liner brush and the Leaf Green paint. Paint a continuous, thin, waving line following your inner circle guide. Let the line break occasionally where flowers will sit. -
Paint tiny stems:
Add small, short curved lines branching off the main vine where you want your small flowers to -
Add vine leaves:
Using the size 2 brush, paint small, single-stroke leaves attached to the vine. Keep these much smaller than the rim leaves to maintain visual hierarchy. -
Paint small daisies:
Using the size 2 brush and Bright White, paint small 5-6 petal flowers on the stems you prepared. These petals should be short and rounded, almost like small ovals. -
Small daisy centers:
Use the tip of a small brush to place a tiny Golden Yellow dot in the center of these smaller blooms.
Pro Tip: Vintage Craquelure
To get that aged pottery look, mix a tiny amount of crackle medium into your background ochre paint. It creates subtle fissures as it dries, mimicking antique glazing.
Step 4: Final Touches and Curing
-
Detailing the petals:
Once the white petals on the large rim daisies are dry, mix a very faint grey or beige. Use your liner brush to paint extremely thin lines separating the petals if they merged too much, giving them definition. -
Clean up:
Check for any stray paint splatters on the creamy white center of the plate and carefully scrape them away or wipe them with a damp Q-tip. -
Cure the paint:
Follow the specific instructions on your ceramic paint bottle. This usually involves letting the piece air dry for 24 hours, then baking it in a home oven at a low temperature to set the design permanently.
Now you have a charming, hand-painted piece that brings a touch of spring to your table setting


Wildflower Meadow Rim Scatter
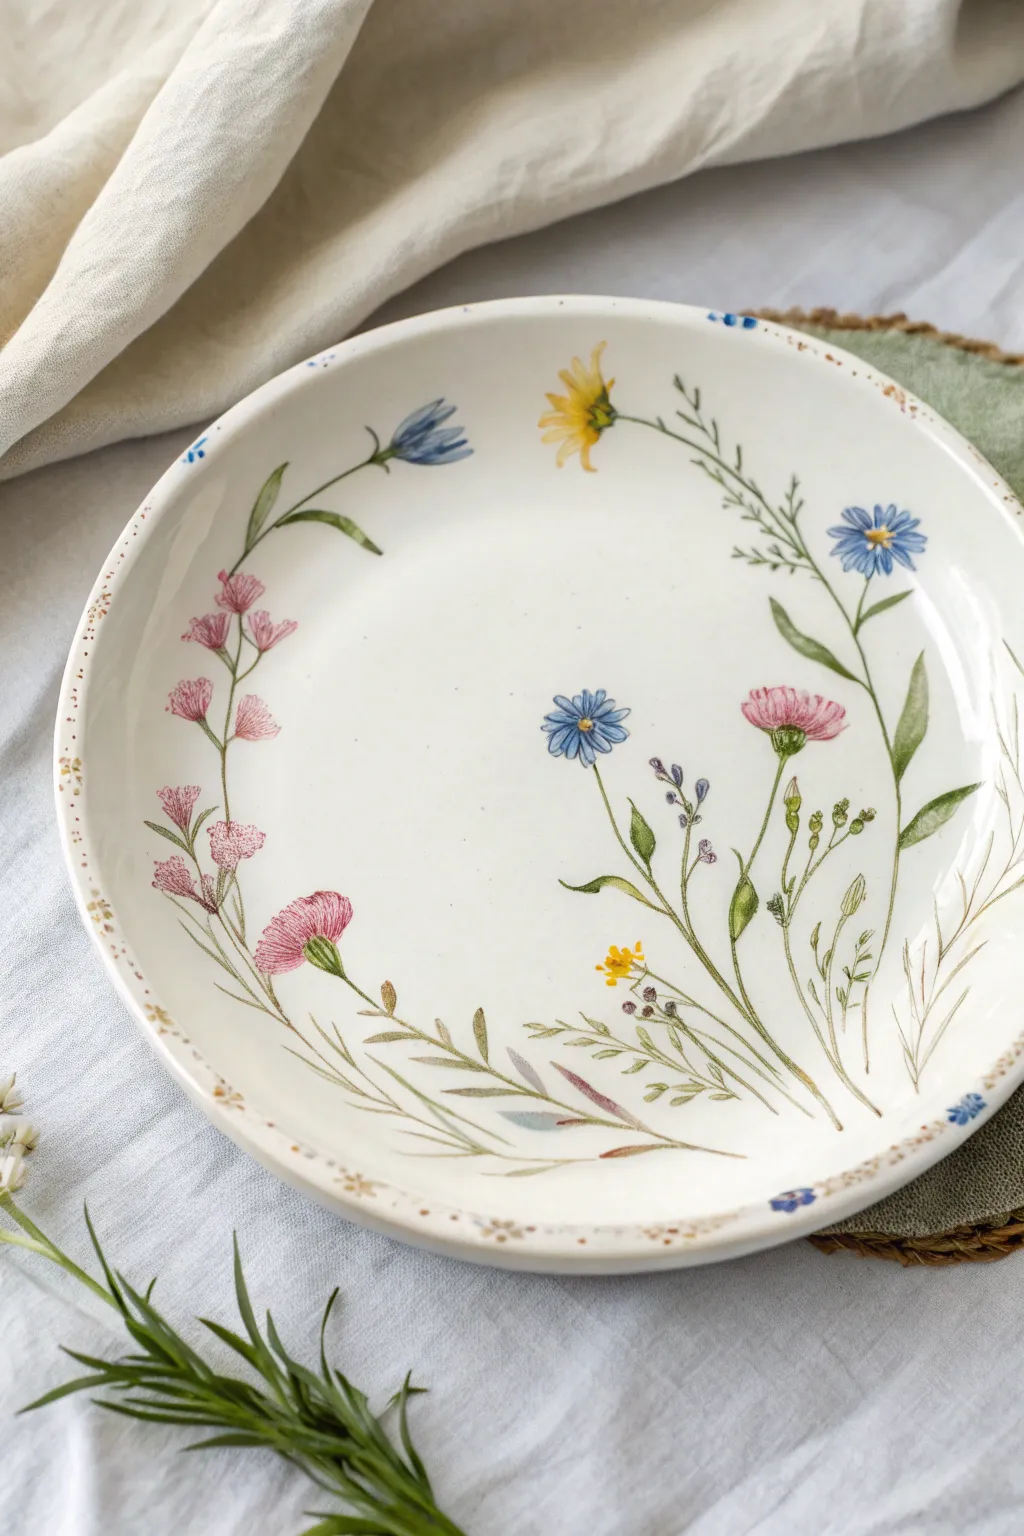
This project transforms a simple ceramic blank into a delicate garden snapshot using soft, scattered botanicals. The design focuses on a light, airy composition where wildflowers dance around the rim, leaving the center refreshingly open.
Detailed Instructions
Materials
- Bisque-fired white ceramic shallow bowl or plate
- Underglaze paints (cornflower blue, sunflower yellow, sage green, forest green, blush pink, rose red, lavender)
- Small round detail brushes (sizes 00, 0, and 1)
- Fine liner brush
- Small palette or ceramic tile
- Cup of water
- Pencil (HB or lighter)
- Clear dipping glaze (for post-painting)
- Damp sponge
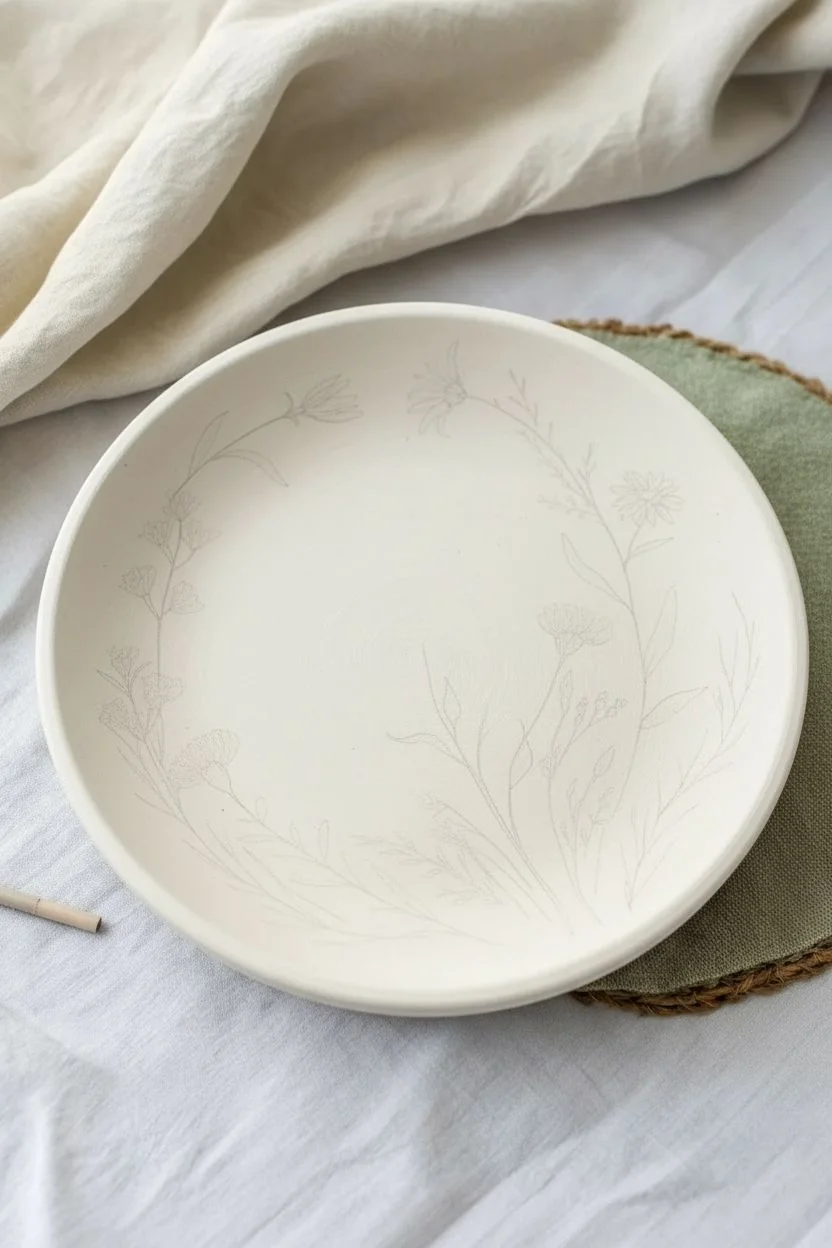
Step 1: Planning and Sketching
-
Surface Preparation:
Begin by wiping down your bisque-ware with a slightly damp sponge. This removes any dust that could prevent the glaze from adhering properly and creates a clean canvas for your delicate work. -
Marking the Rim:
Visualize a circle roughly two inches in from the edge of the plate. This will define your painting zone. You want the flowers to occupy the rim and curving sides, leaving the flat bottom mostly white. -
Sketching Stems:
Lightly sketch the main stems using a pencil. Since the graphite will burn off in the kiln, don’t worry about being perfect. Draw long, sweeping curves that originate near the bottom edge and reach upwards toward the rim. -
Varying Heights:
Ensure your sketched stems are different lengths. Some should reach all the way to the rim edge, while others should be shorter peeking out from below, creating a natural, meadow-like rhythm.
Fixing Heavy Bloom
If a paint blotch gets too heavy, don’t wipe it! Let it dry completely, then gently scratch the excess off with a needle tool or craft knife to refined the edges.
Step 2: Painting the Greenery
-
Mixing Greens:
On your palette, mix a touch of sage green with water to create a watercolor consistency. I find this transparency is key to achieving that delicate botanical illustration look. -
Paining Main Stems:
Using your liner brush, trace over your pencil stem lines. Keep the pressure very light to ensure the lines remain thin and elegant. -
Adding Leaves:
Switch to a size 0 round brush. Load it with sage green and press gently against the stems to create leaves. vary the pressure—press down for the belly of the leaf and lift up for the tip. -
Layering Depth:
While the first layer is still slightly damp, take a tiny amount of forest green and touch it to the base of the larger leaves. This adds a subtle shadow and visual weight to the foliage. -
Grassy Fillers:
Use the liner brush with a very pale green to flick in thin, grass-like strokes between the main flowers. These should look like faint sketches to fill the negative space.
Step 3: Blooming the Flowers
-
Pink Cosmos:
Mix blush pink with a tiny bit of water. Paint small, scalloped shapes for the cosmos petals on the mid-length stems. Leave the centers empty for now. -
Blue Cornflowers:
Using cornflower blue, paint the distinct star-shaped flowers. Uses short, dashed strokes radiating from a center point to mimic the jagged edges of cornflower petals. -
Yellow Accents:
Add small clusters of yellow dots or tiny five-petal flowers near the base of the arrangement. This pop of yellow balances the cool blues and pinks. -
Detailed shading:
Once the base pink is dry, use a size 00 brush with rose red to add fine lines on the pink petals. This texture gives the flowers a realistic, hand-drawn quality. -
Flower Centers:
Dot the centers of the blue flowers with a dark blue or black. For the pink flowers, add small yellow and green dots to the centers to create the pollen area. -
Lavender Sprigs:
Dip a small brush in lavender glaze and dab small, ascending dots along the top of the thinnest stems to create lavender or salvia sprigs.
Pro Tip: Watercolor Effect
To get that translucent look, dilute your underglazes slightly more than usual. Three thin, wash-like coats offer more depth than one thick, opaque layer.
Step 4: Refining the Rim
-
Speckled Edge:
To frame the piece, dilute a brown or bronze underglaze. Dip a toothbrush or stiff brush into it, and running your thumb over the bristles, gently flick specks onto just the very edge of the rim. -
Rim Accents:
Add tiny, deliberate dabs of blue and gold along the very lip of the plate at random intervals. This creates a rustic, imperfect finish that feels vintage. -
Final Inspection:
Check for any stray smudges and clean them with a damp brush. Once fully dry, the piece is ready for clear glazing and firing.
Once fired, these delicate meadow details will be permanently sealed, ready to bring a touch of eternal spring to your table setting


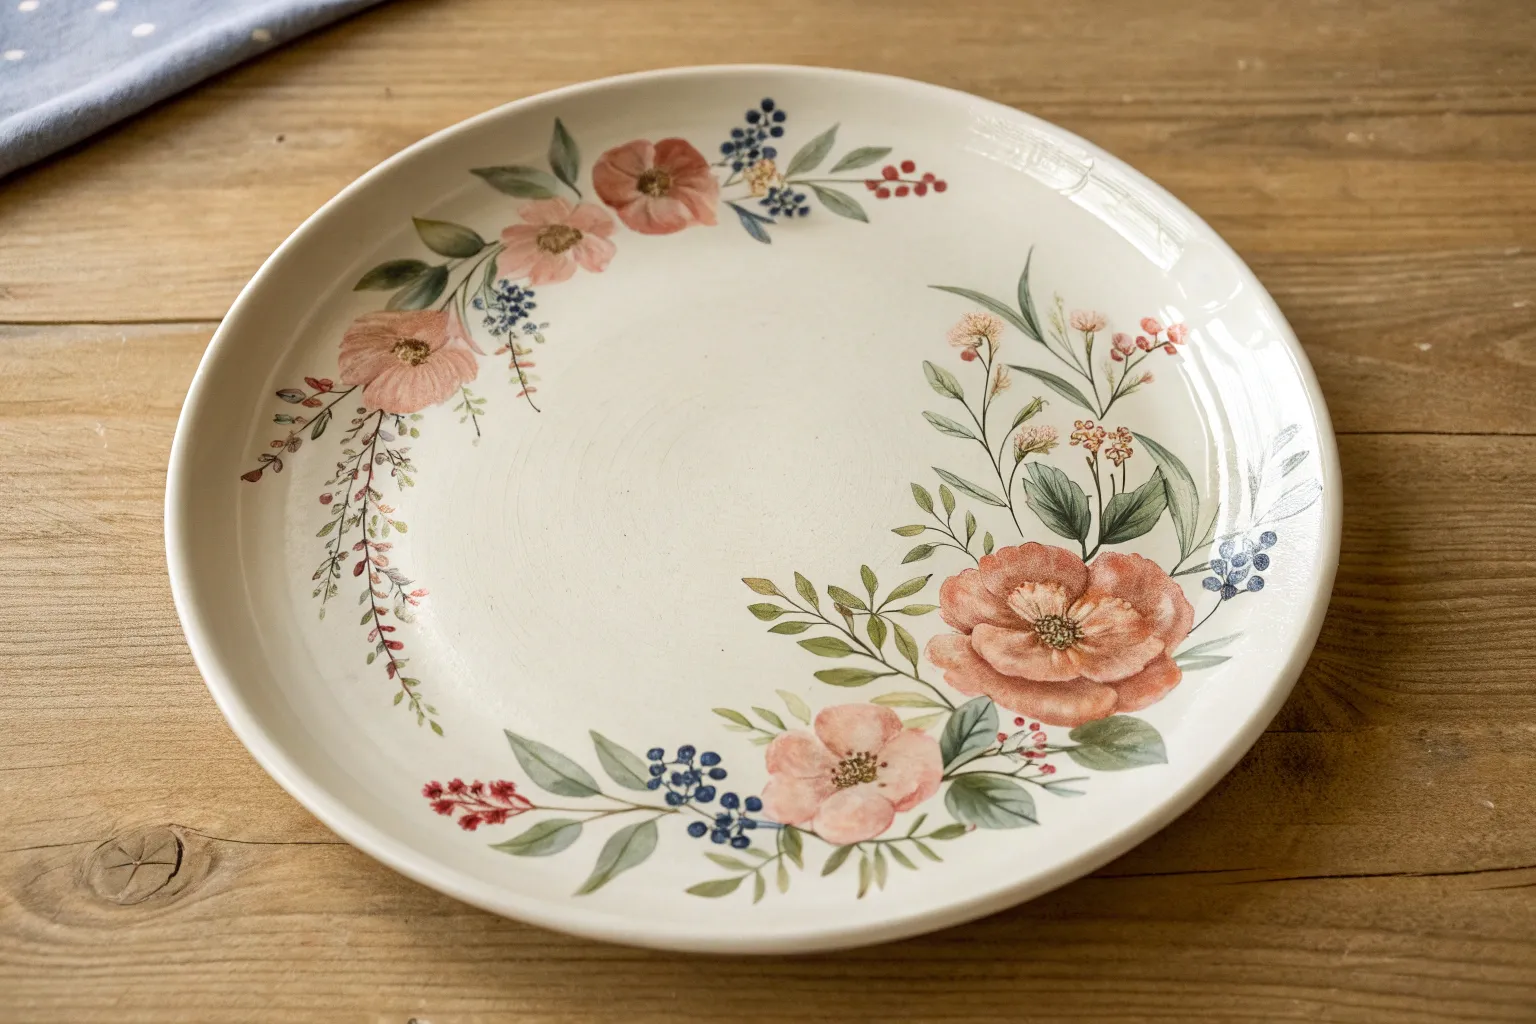
Single Statement Bloom in the Center
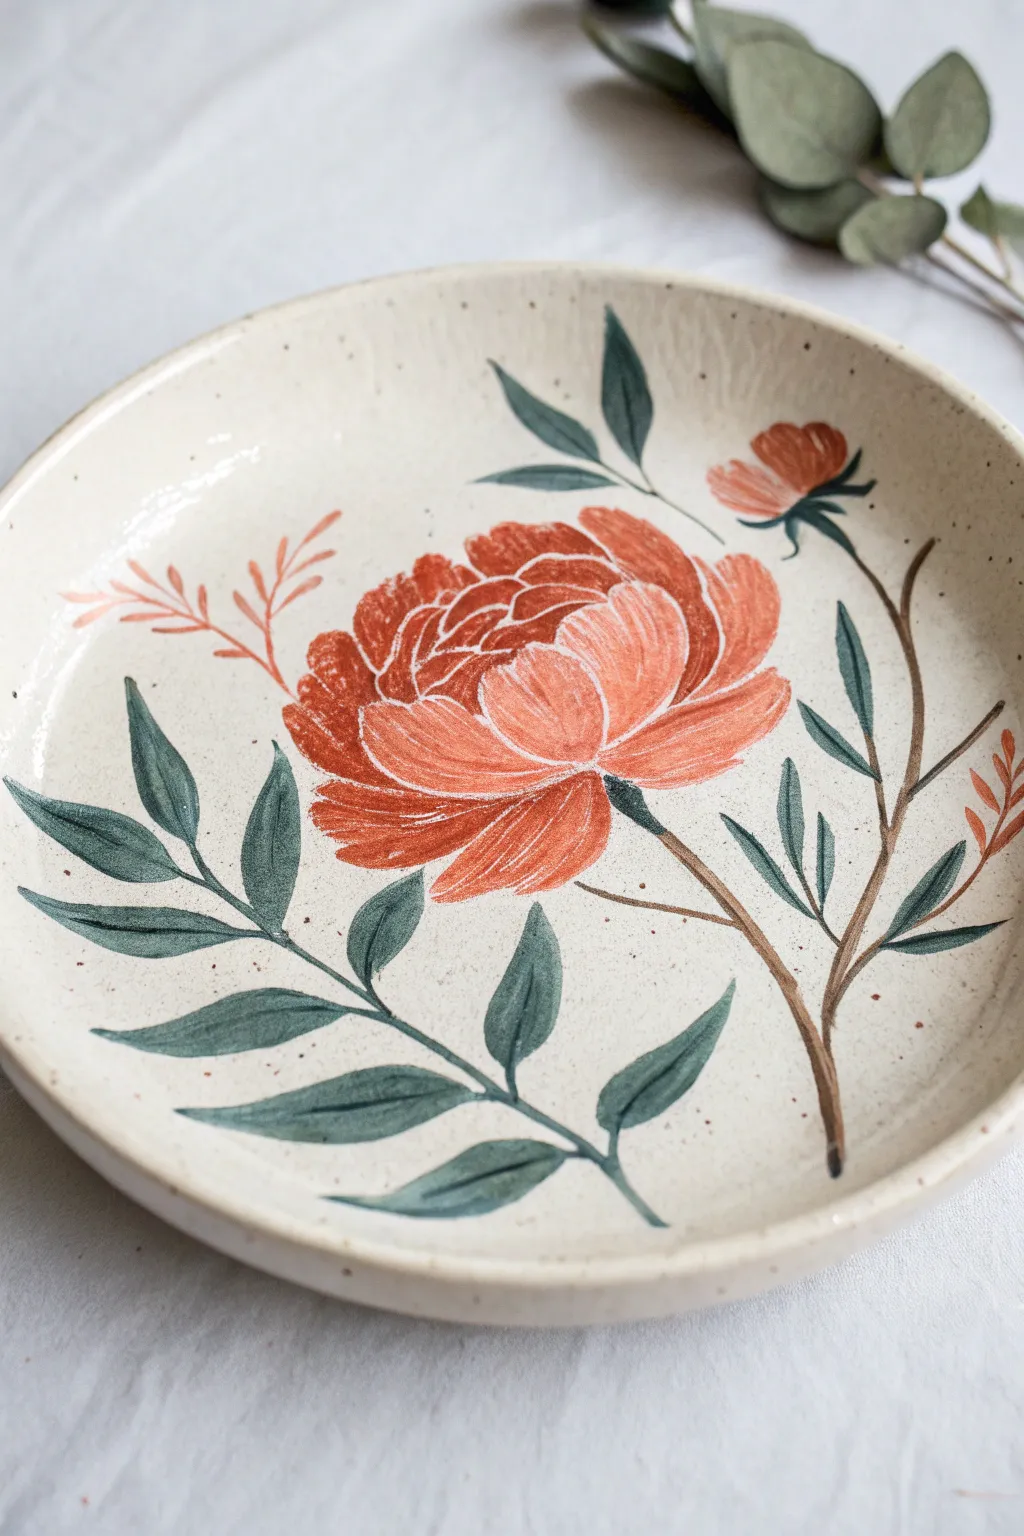
Transform a plain ceramic dish into an heirloom-quality piece with this bold, centering floral design. The focal point is a lush, terra-cotta colored bloom surrounded by sweeping deep green foliage, all set against a speckled cream background for a rustic, handmade feel.
How-To Guide
Materials
- Bisque-fired ceramic plate (cream or oat speckled clay)
- Underglazes: Terra Cotta, Dark Forest Green, Espresso Brown, White
- Clear dipping glaze
- Round watercolor brushes (Size 2, 4, 6)
- Fine liner brush (Size 00)
- Pencil for sketching
- Clean water jar
- Paint palette
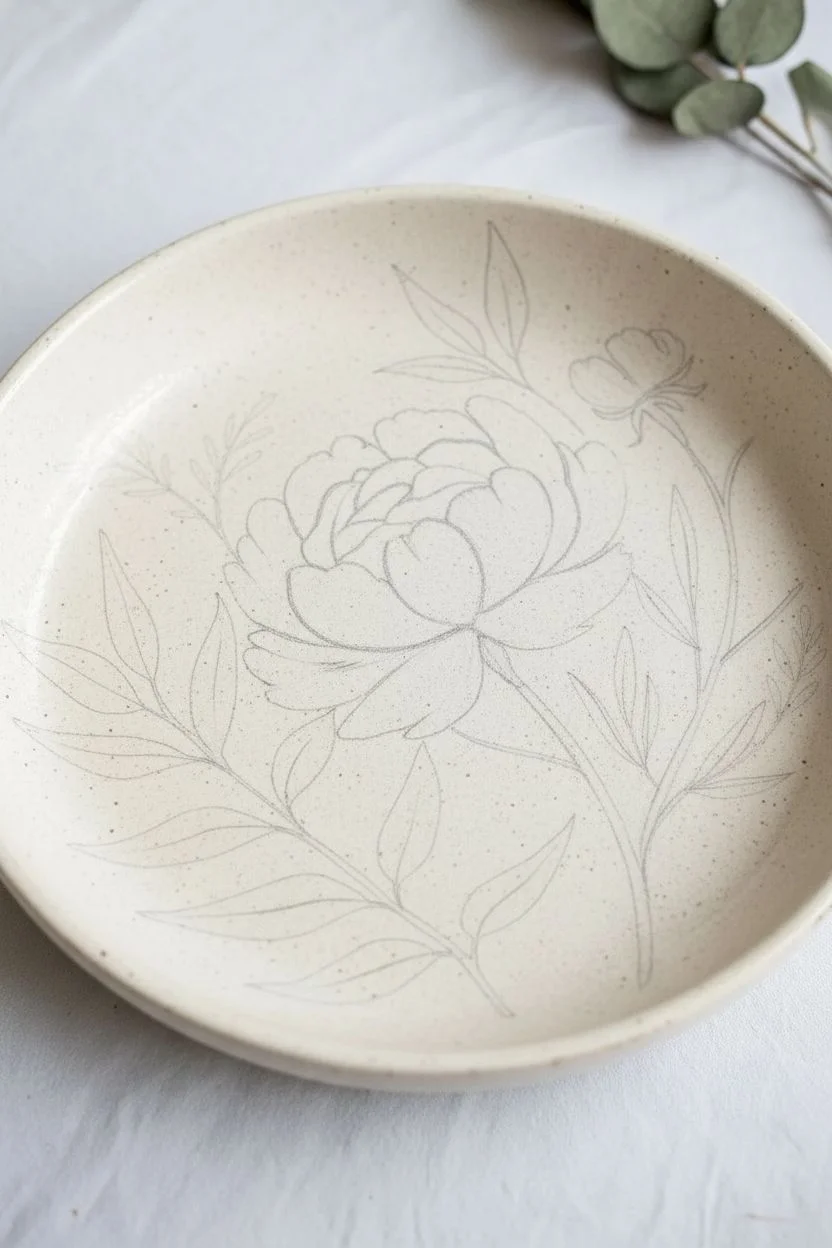
Step 1: Planning and Base Work
-
Prepare surface:
Begin with a clean bisque plate. Wipe it down with a slightly damp sponge to remove any kiln dust, which ensures your underglaze adheres properly. -
Position the focal point:
Visualize the plate as a clock face. Using a pencil, lightly sketch a large oval shape slightly off-center, leaning towards the 2 o’clock position. This will be your main flower head. -
Sketch the stems:
Draw a main stem curving gently from the flower base down towards the 5 o’clock edge. Add a secondary, thinner branch sweeping up towards the 10 o’clock position for balance. -
Outline the skeleton:
Lightly sketch the general shapes of the leaves. Don’t worry about details yet; just place the leafy branches so they extend outwards, filling the negative space on the 7 o’clock and 4 o’clock sides.
Fixing Smears
Did green paint smudge onto the cream background? Don’t wipe it while wet! Let it dry completely, then gently scratch the mistake off with a needle tool or craft knife.
Step 2: Painting the Bloom
-
Block in the flower:
Load a size 6 brush with Terra Cotta underglaze. Paint the overall rounded shape of the flower, using curved strokes that mimic petals wrapping around a center. -
Add the bud:
Near the top right (around 1 o’clock), paint a smaller, half-opened bud shape in the same Terra Cotta hue. -
Define the petals:
Once the base color is dry to the touch, mix a tiny amount of Espresso Brown into your Terra Cotta. Use a size 2 brush to paint the shadows between the petals, creating a ‘cupped’ appearance. -
Highlight the form:
Take your fine liner brush and pure White underglaze. Carefully outline the top edges of the petals. I find using quick, confident strokes helps these white lines look like natural light hitting the flower. -
Add texture lines:
Using the same fine liner and white glaze, add very thin, striated lines inside the petals to suggest texture and direction.
Add Dimension
Use a squeeze bottle with a fine tip to apply white slip for the petal highlights instead of a brush. This creates a raised, tactile texture you can feel after firing.
Step 3: Adding Foliage and Stems
-
Paint the main stems:
Using the size 2 brush and Espresso Brown, trace over your pencil lines for the stems. Let the main stem be slightly thicker at the bottom, tapering as it reaches the flower. -
Create the leaves:
Switch to your Forest Green underglaze and a size 4 brush. Paint the leaves using a ‘press and lift’ motion: press down to create the wide belly of the leaf, then lift while dragging to create a sharp point. -
Add color variation:
While the green is still slightly damp, drop a tiny bit of darker green or brown at the base of the leaves where they meet the stem to create depth. -
Detail the leaves:
Once the green is dry, use your liner brush with a dark grey or black wash to draw a thin central vein down the middle of each leaf. -
Include accent sprigs:
Mix a lighter, watered-down version of your Terra Cotta. Paint delicate, feathery sprigs on the left side (around 9 o’clock) and far right edge to soften the heavy green areas.
Step 4: Finishing Touches
-
Clean up:
Check for any smudges on the cream background and gently scrape them away with a clean, damp crafting knife or stiff brush. -
Speckling (Optional):
If your clay body isn’t naturally speckled, dip a stiff toothbrush in iron oxide or brown underglaze and flick it lightly over the plate for a vintage look. -
Glaze and fire:
Once the underglaze is bone dry, dip the entire plate into a clear glaze. Fire according to your clay and glaze manufacturer’s cone instructions.
Once fired, this plate will be ready to serve as a stunning centerpiece for your next gathering
BRUSH GUIDE
The Right Brush for Every Stroke
From clean lines to bold texture — master brush choice, stroke control, and essential techniques.
Explore the Full Guide
Rose Garland With Twisting Vines
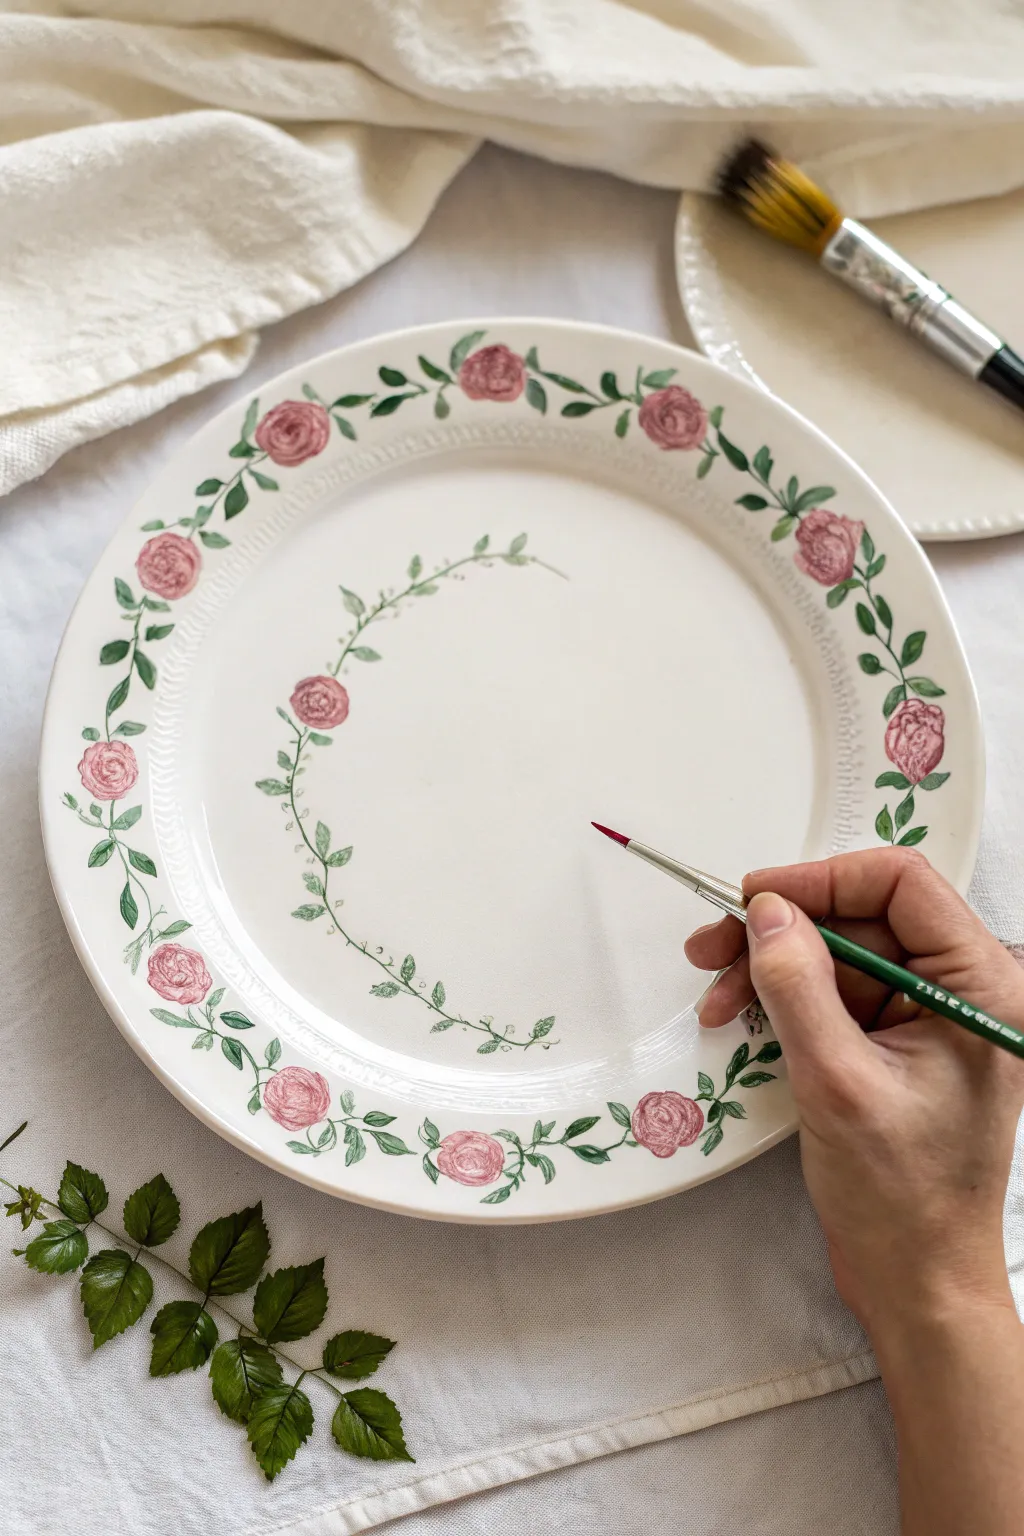
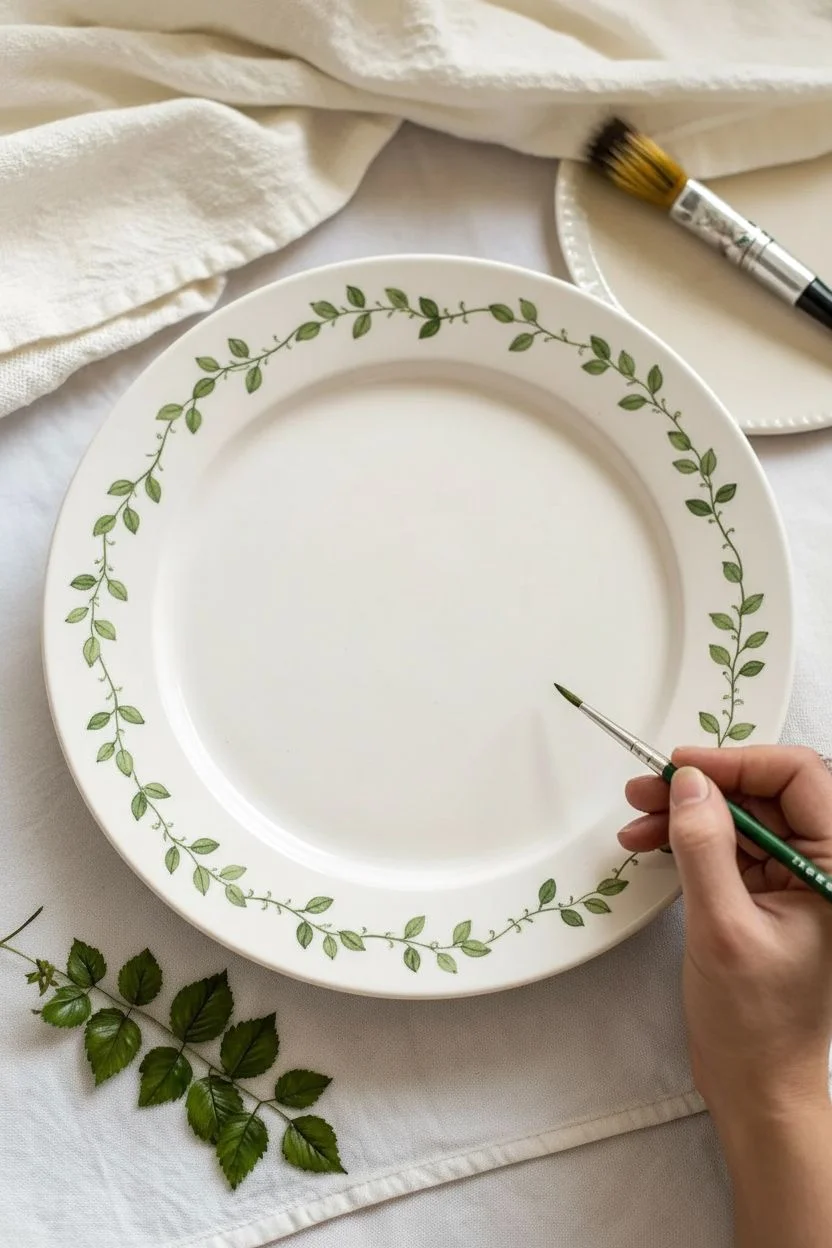
Transform a plain white ceramic plate into a romantic, vintage-inspired piece with this delicate rose garland design. The combination of blooming pink roses on the rim and fine, twisting ivy vines in the center creates a perfectly balanced botanical composition.
Step-by-Step
Materials
- White ceramic plate (glazed)
- Pebeo Porcelaine 150 paints (or similar high-quality ceramic paint)
- Colors: Deep Pink, Olive Green, Moss Green, White (for mixing)
- Fine liner brush (size 0 or 00)
- Small round brush (size 2)
- Rubbing alcohol and paper towel
- Palette or small dish for mixing
- Paper and pencil for sketching (optional)
Step 1: Preparation & Rim Foliage
-
Clean surface:
Begin by thoroughly wiping down your plate with rubbing alcohol and a paper towel. This removes any oils or fingerprints that could prevent the paint from adhering properly. -
Visualize the spacing:
Mentally divide the rim of the plate into even sections for your roses. You can make tiny, faint dots with a washable marker if you need guide points to keep the spacing consistent. -
Paint the main vine:
Load your fine liner brush with Olive Green paint. Paint a thin, undulating vine that travels all the way around the rim of the plate. Keep the line fluid and organic rather than perfectly straight. -
Add first leaves:
Switch to Moss Green. Along the vine you just painted, add small, teardrop-shaped leaves in pairs or alternating patterns. Leave clear gaps where you plan to place your rose blooms. -
Layer darker accents:
Dip just the tip of your brush into a slightly darker green mix. Add tiny veins or stems to your existing leaves to give them depth and dimension.
Step 2: Painting the Roses
-
Create the rose base:
Using the size 2 round brush and Deep Pink, paint a rough circle for the first rose. Don’t make it a solid blob; instead, dab the paint in a circular motion to suggest petals. -
Add petal definition:
While the base is still slightly wet, pick up a tiny amount of a darker pink or red mixture. Paint small C-shaped curves inside the circle, starting tight in the center and getting larger toward the edges. -
Soften the edges:
Clean your brush and leave it barely damp. Gently sweep over the outer edges of the rose to soften the look, giving it that vintage, hand-painted porcelain feel. -
Repeat the process:
Continue around the rim, painting a rose in each gap you left between the leaves. Try to vary the angle of the blooms slightly so they don’t look like identical stamps. -
Connect blooms to vines:
Once the roses are dry to the touch, use your liner brush and green paint to add tiny stems connecting the back of each rose to the main vine line.
Clean Edges Instantly
Keep a damp cotton swab or a toothpick handy while painting. If a vine line goes astray, you can wipe it away immediately for a crisp edge.
Step 3: Center Wreath & Finishing
-
Start the inner wreath:
Move to the center well of the plate. With your liner brush and watered-down green paint, create a much thinner, more delicate arc starting from the left side. -
Twist the vines:
Paint a second thin line intertwining with the first arc. This twisting effect mimics wild ivy or honeysuckle vines. -
Add miniature buds:
Dip the very tip of your brush in pink. Dot tiny, unripe rosebuds along this inner vine wreath. These should be significantly smaller than the rim roses to maintain visual hierarchy. -
Detail the center leaves:
Using short, quick strokes, add feathery small leaves to the center styling. I like to keep these quite sparse so the white of the plate shows through. -
Review and refine:
Step back and look at the plate as a whole. Fill in any uneven gaps on the rim with extra leaves or tiny curled tendrils. -
Curing process:
Allow the paint to air dry for 24 hours. Afterward, bake the plate in a home oven according to your paint manufacturer’s instructions (usually around 300°F/150°C for 35 minutes) to make it dishwasher safe.
Add Gold Accents
Once the primary colors are dry, add tiny dots of metallic gold ceramic paint to the center of the roses for an elegant, royal finish.
Enjoy using your lovely new custom plate for serving treats or displaying as wall art
Tulip Trio With Clean Stems
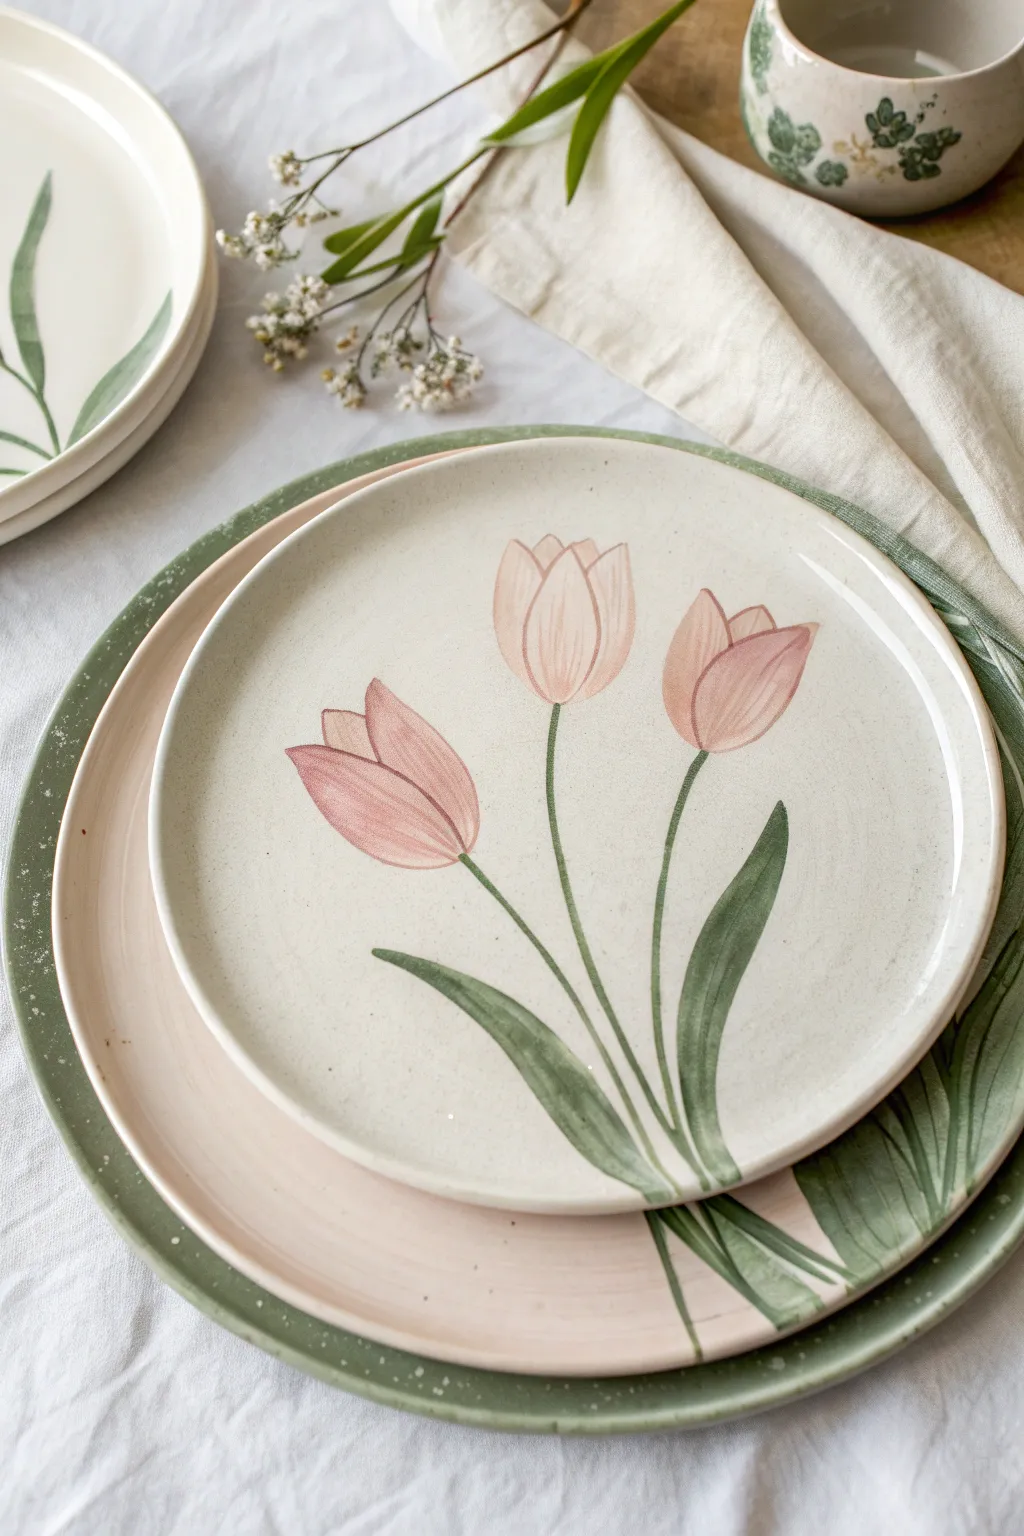

Capture the delicate elegance of spring with this soft, hand-painted ceramic design featuring three swaying tulips. The motif uses a gentle palette of blush pink and sage green to create a timeless, airy look perfect for creating a cohesive dining set.
Step-by-Step Tutorial
Materials
- Ceramic bisque plate (dinner or salad size)
- Underglaze paints (blush pink, dusty rose, sage green, forest green)
- Round soft bristle brushes (sizes 2 and 6)
- Fine liner brush (size 0 or 00)
- Pencil for sketching
- Palette or small dish for mixing
- Water cup
- Damp sponge
- Clear dipping glaze
- Kiln access (or ceramic studio service)
Step 1: Preparation & Sketching
-
Clean surface:
Wipe down your bisque plate with a damp sponge to remove any dust or oils from handling. This ensures the underglaze adheres properly to the ceramic surface. -
Map the composition:
Using a pencil, lightly sketch the layout of your three tulips. Position the center flower slightly higher than the two flanking it to create a balanced, organic trio. -
Outline the stems:
Draw three long, slender stems originating from the bottom center of the plate, curving them gently outward as they rise. Don’t worry about pencil marks; they will burn off in the kiln. -
Define the blooms:
Sketch the tulip heads as simple egg shapes initially, then add the defining petal lines—usually a central oval with two side petals wrapping around it.
Step 2: Painting the Blooms
-
Base coat mixture:
Mix a small amount of your blush pink underglaze with a drop of water to create a semi-translucent wash. -
First petal layer:
Using the size 6 round brush, fill in the tulip heads with this light pink wash. Keep your strokes loose and following the curve of the petals. -
Adding depth:
While the first layer is still slightly damp, dip your brush into the un-thinned dusty rose color. -
Shading petals:
Apply the darker pink to the bottom of each flower head and along the lines where the petals overlap. This creates a soft gradient. -
Defining edges:
Switch to your fine liner brush and the dusty rose shade to crisp up the very tips of the petals and the separation lines between them.
Brushwork Pro-Tip
For the most graceful tulip leaves, load your brush fully with green paint. Start with light pressure, press down firmly for the middle, then lift completely for the tip.
Step 3: Stems & Leaves
-
Stem foundation:
With your size 2 brush and sage green underglaze, paint the thin stems. Use a steady hand and pull the brush toward you for the smoothest line. -
Leaf structure:
Paint two large leaves near the base, sweeping upward. Press down on the brush belly to widen the leaf, then lift as you reach the tip to create a point. -
Leaf details:
Mix a touch of forest green into your sage green. I like to add this darker shade to the ‘underside’ or shadow side of the leaves for dimension. -
Connecting points:
Ensure the stems connect cleanly to the bottom of the flower heads. A tiny dot of green at the base of the pink bloom helps anchor it.
Troubleshooting Color
If your pinks look too faint after sketching, remember underglazes often fire darker than they appear when wet. Check your test tile before adding too many heavy layers.
Step 4: Final Touches & Firing
-
Clean up:
If any paint strayed outside the lines, use a clean, stiff brush dipped in water to gently ‘erase’ the mistake by scrubbing it off the bisque. -
Speckling (Optional):
To match the rustic look in the photo, you can flick a tiny amount of diluted brown or grey iron oxide onto the plate using a toothbrush. -
Glazing:
Allow the underglaze to dry completely (usually 24 hours). Dip the entire plate into a clear glaze to seal the design. -
Firing:
Fire the plate in the kiln according to the clay and glaze specifications (typically Cone 5 or 6 for stoneware).
Once fired, you’ll have a durable, food-safe piece of art ready for your next spring brunch

PENCIL GUIDE
Understanding Pencil Grades from H to B
From first sketch to finished drawing — learn pencil grades, line control, and shading techniques.
Explore the Full Guide
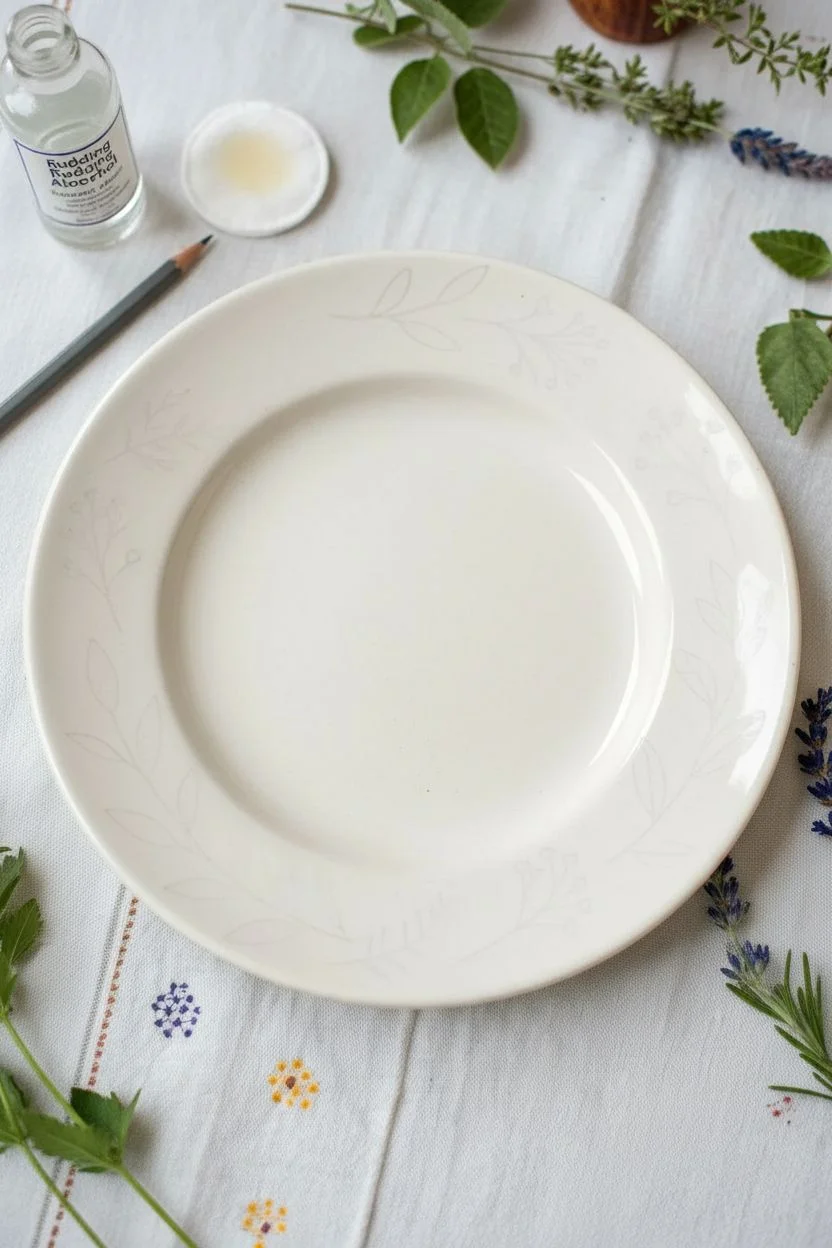
Minimal Lavender Sprigs
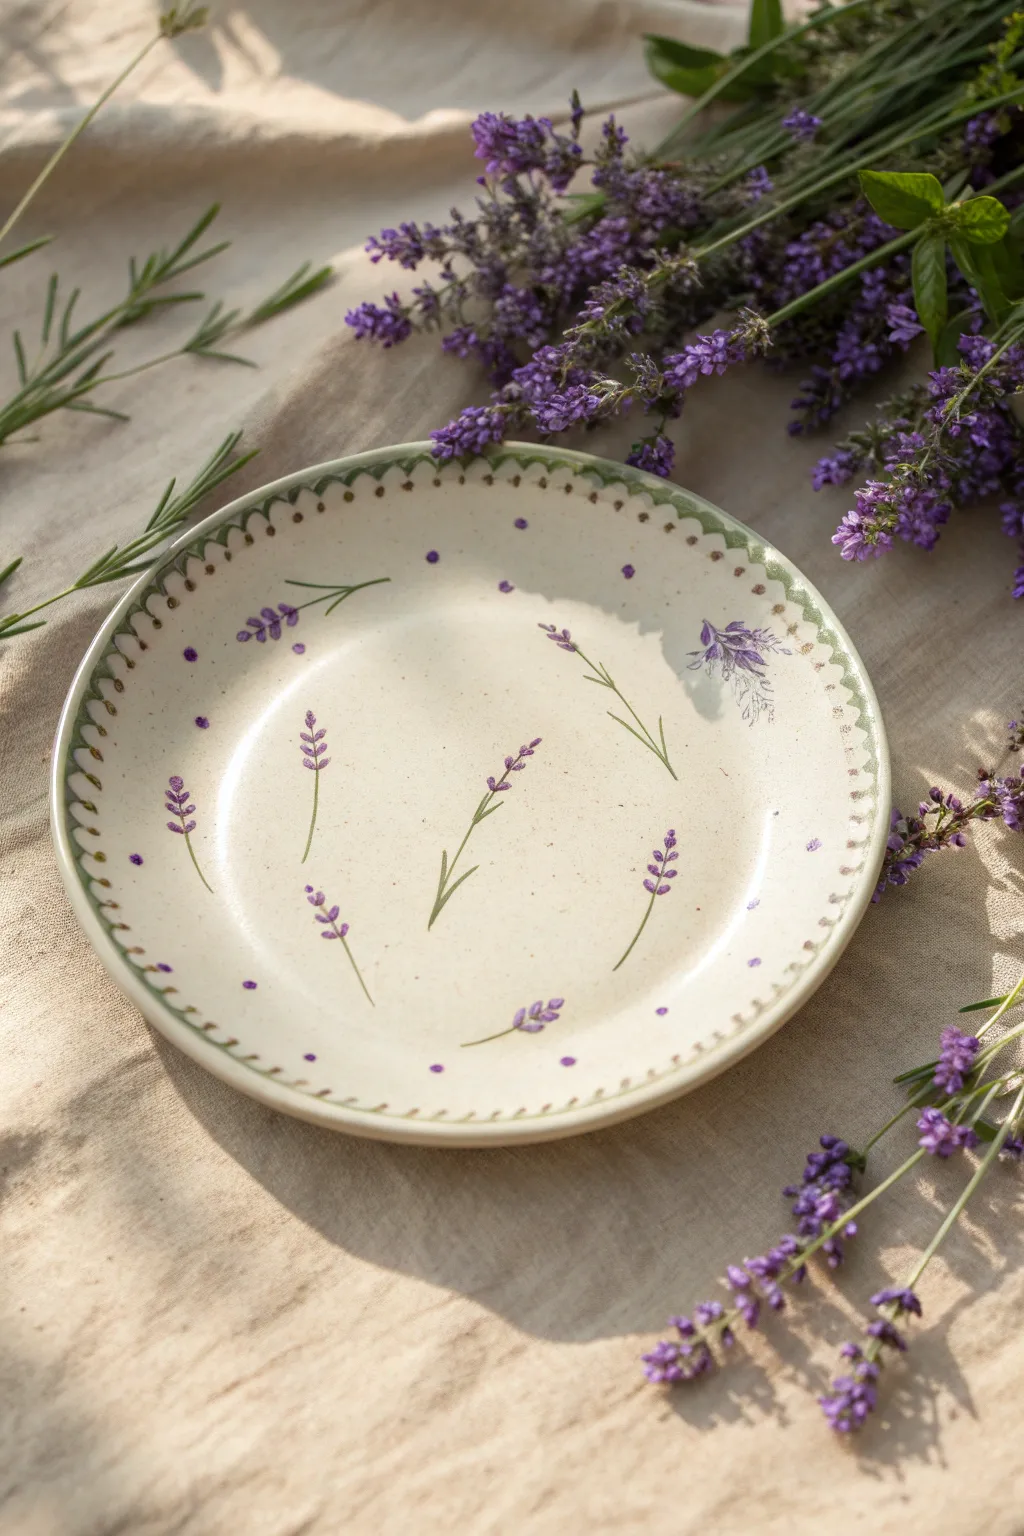
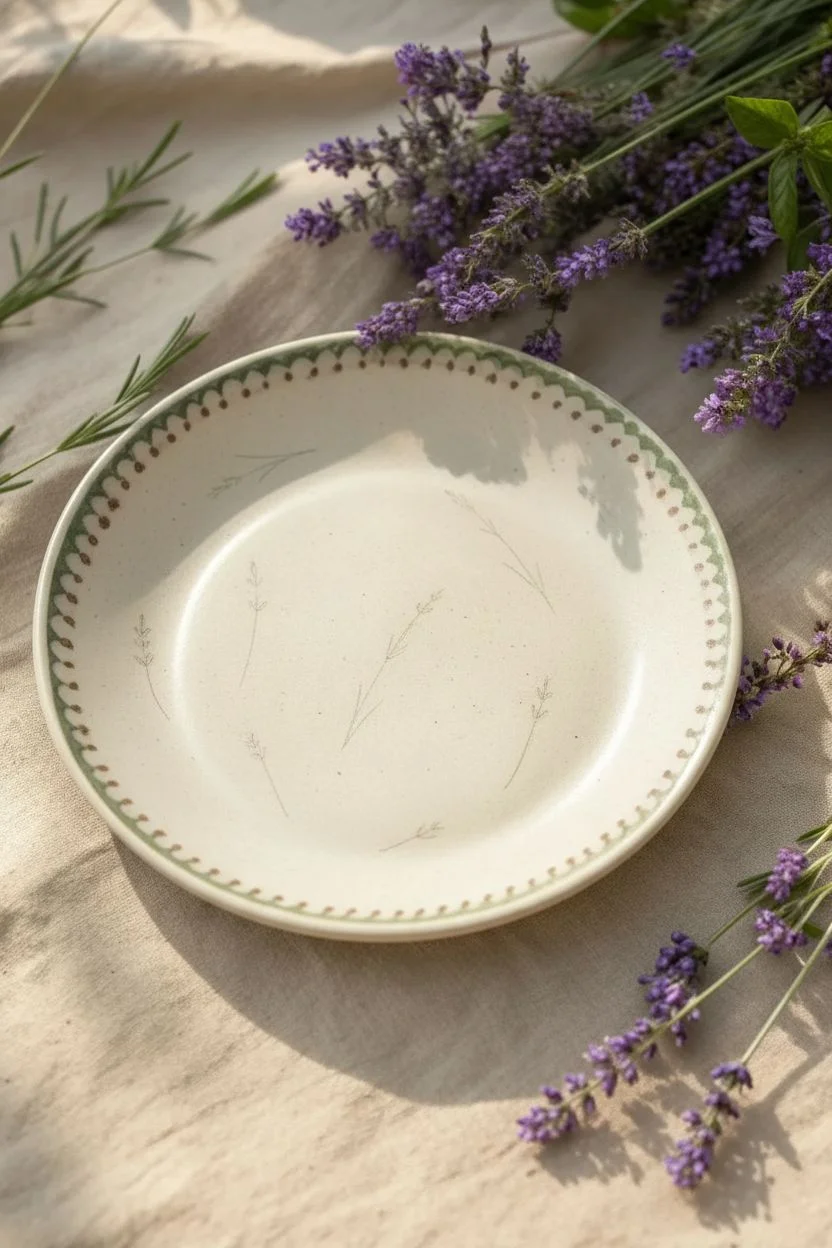
Capture the rustic elegance of a French country kitchen with this delicate plate design featuring scattered sprigs of lavender. The soft cream background and hand-painted purple blooms create a serene, botanical aesthetic perfect for display or everyday dining.
Step-by-Step Guide
Materials
- Bisque ceramic plate (cream or off-white clay body preferred)
- Underglaze paints: Muted purple, Deep violet, Sage green, Olive green, Chocolate brown
- Clear transparent glaze
- Fine liner brush (size 0 or 00)
- Small round brush (size 2)
- Pencil for sketching
- Palette or small dishes for mixing
- Water cup and paper towels
- Optional: Lavender essential oil for inspiration
Step 1: Preparation & Border Design
-
Clean the surface:
Begin by wiping down your bisque plate with a slightly damp sponge to remove any dust or oils from your hands. Let it dry completely for a moment. -
Plan the placement:
Lightly sketch the scattered positions of your lavender sprigs using a pencil. Remember that the pencil marks will burn off in the kiln, so don’t worry about being too messy. Aim for a random, organic scattering rather of rigid rows. -
Mix the green hues:
Prepare your greens on the palette. I like to mix a little brown into the sage green to create an earthier, dried-stem look for the border. -
Paint the scalloped rim:
Using your small round brush loaded with the olive green mix, create a scalloped or dashed pattern along the very edge of the rim. Use short, curved strokes that follow the curvature of the plate. -
Add detail dots:
Dip the very tip of a fine liner brush or a toothpick into the chocolate brown underglaze. Place small dots in the dips of your green scalloped border pattern to add definition.
Step 2: Painting the Flora
-
Draft the stems:
Switch to your fine liner brush and the sage green underglaze. Paint thin, delicate arched lines for the main stems of the lavender. Vary the lengths and directions so they look natural. -
Add leaves:
Along the lower parts of the stems, add small, narrow leaves using a single stroke method: press down slightly to widen the stroke and lift up to taper the end. -
Start the flower buds:
Mix a soft, muted purple. Using the tip of your liner brush, dab small, teardrop-shaped spots along the top third of the stems. These should be spaced out slightly, mimicking the segmented growth of lavender. -
Layer darker accents:
While the first purple layer is still slightly damp, take your deep violet color and add tiny dots at the base of each flower cluster. This adds depth and makes the blooms look three-dimensional. -
Create scattered buds:
Paint single, tiny purple dots floating in the empty spaces between sprigs. These represent loose buds falling from the stems and help fill visual voids. -
Refine the stems:
Go back with your finest brush and olive green to connect the flower clusters to the main stem with almost invisible, thread-like lines.
Pro Tip
Vary your purple intensity by watering down the underglaze for some buds. This creates a watercolor effect that looks soft and ethereal.
Step 3: Finishing Touches
-
Check for balance:
Step back and look at the composition. If a large area feels too empty, add a very small, single stem or a few stray purple dots to balance it out. -
Clear glaze application:
Once the underglaze design is completely dry to the touch, apply a coat of clear transparent glaze over the entire plate. Ensure the application is even to prevent clouding. -
Fire the piece:
Load the plate into the kiln and fire according to the glaze manufacturer’s instructions and the clay body’s requirements.
Level Up
Add a tiny buzzing bee near one of the flowers using yellow and black fine-point glaze pens for a lively garden detail.
Now you have a lovely piece of functional art ready to bring a touch of the countryside to your table
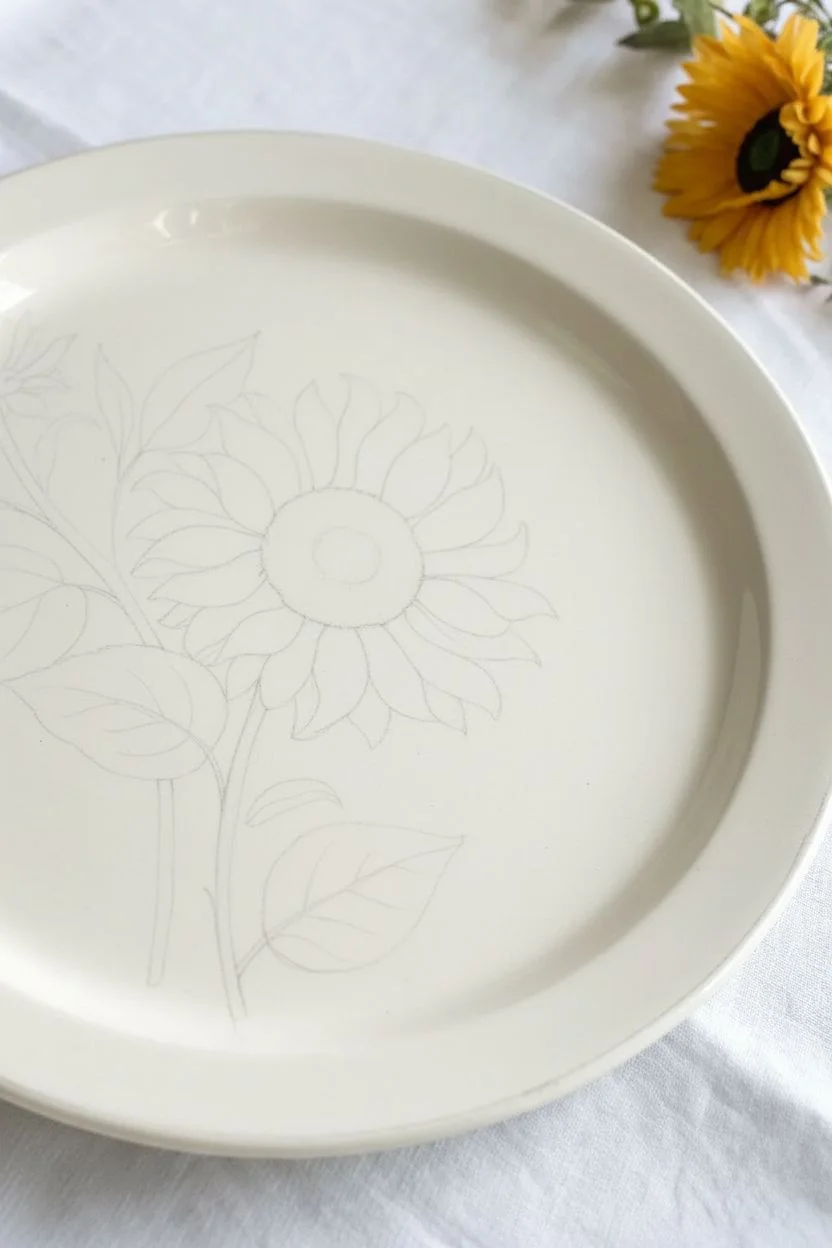
Sunflower Corner Cluster
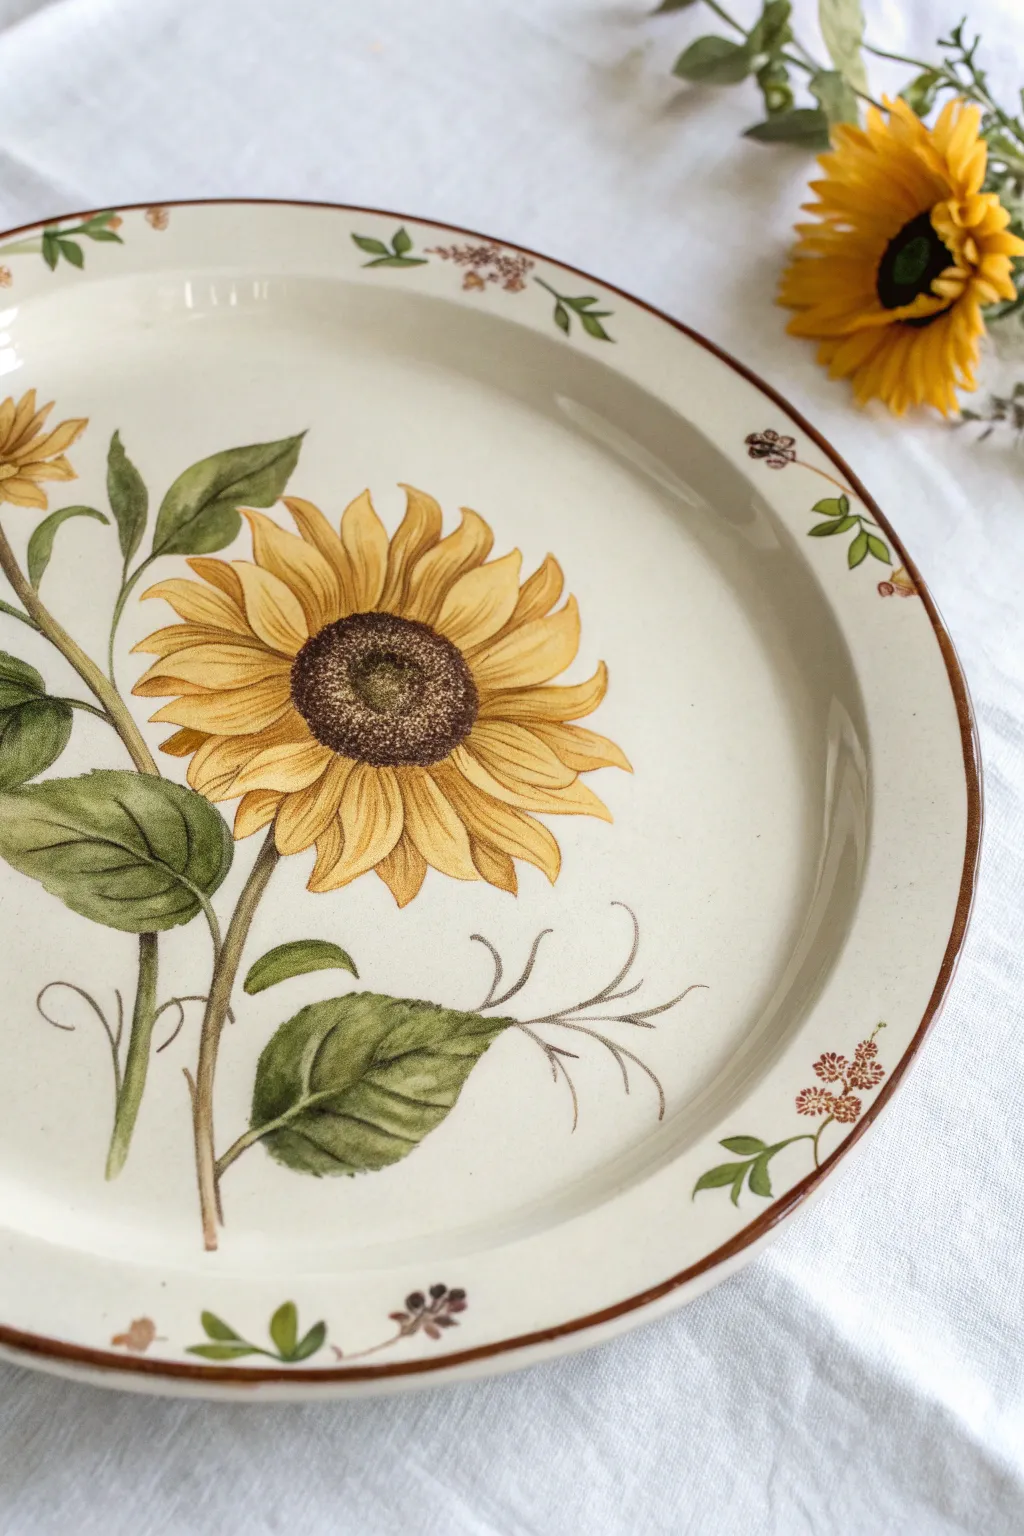
Transform a plain ceramic dish into a piece of country-chic decor with this detailed sunflower painting guide. The design features a large, radiant blossom offset to one side, complemented by a delicate rim of miniature floral motifs for a cohesive, vintage look.
Detailed Instructions
Materials
- Plain white or cream ceramic plate (oven-safe if using bake-on paints)
- Ceramic paints or enamel paints (Yellow Ochre, Burnt Sienna, Antique White, Sap Green, Olive Green, Dark Brown)
- Paintbrushes: Round #2, #4, Liner hue #00 or #0
- Pencil or transfer paper
- Paper palette or mixing plate
- Paper towels
- Q-tips (for cleanup)
- Rubbing alcohol
- Oven (if curing is required by your paint brand)
Step 1: Preparation & Sketching
-
Surface Prep:
Begin by thoroughly cleaning your plate with soap and water. Once dry, wipe the entire surface with a paper towel dampened with rubbing alcohol. This removes invisible oils and ensures your paint adheres perfectly. -
Placement Planning:
Visualize the layout before you start. The main sunflower should sit off-center on the left side, taking up about a third of the plate’s interior space. The stem will curve naturally downwards. -
Rough Sketching:
Lightly sketch the flower’s center as an oval and draw the main stem line using a pencil. Ceramic surfaces can be slippery, so keep your lines faint; they will guide your painting but don’t need to be perfect.
Step 2: Painting the Main Sunflower
-
Base Petals:
Mix Yellow Ochre with a touch of Antique White to get a warm, muted yellow. Using the #4 round brush, paint the first layer of petals radiating from the center. Keep them fairly broad at the base and pointed at the tips. -
Petal Layers:
While the first layer is still slightly wet, add a second layer of petals behind the first ones using pure Yellow Ochre. This creates immediate depth. Don’t worry about perfect coverage; translucency adds character. -
Flower Center Base:
Fill the oval center with a solid coat of Burnt Sienna. I usually gently stipple this area rather than stroking it to start building a seed-like texture. -
Petal Details:
Switch to a smaller #2 brush. Mix a little Burnt Sienna into your yellow paint and add thin lines radiating from the flower center up the middle of each petal. This mimics the natural veining of a sunflower. -
Center Texture:
Once the brown center is dry to the touch, stipple Dark Brown around the outer ring of the center oval. Then, take a tiny bit of Yellow Ochre on a dry brush and tap it into the very middle for a highlighted, pollen-dusted look. -
Deepening Shadows:
Use a liner brush with watered-down Burnt Sienna to outline the individual petals very faintly, especially where they overlap near the center. This separates them visually.
Paint Consistency Tip
If your ceramic paint feels too thick or drags, don’t use water to thin it, which can weaken the bond. Use a specific flow medium or a tiny drop of rubbing alcohol instead.
Step 3: Leaves and Greenery
-
Main Stem:
Load your #4 brush with Olive Mixed with a tiny bit of brown. Paint the main stem in one confident, curving stroke from the flower head down to the bottom rim. -
Leaf Blocking:
Paint large, heart-shaped leaves extending from the stem. Use Sap Green for the base color. Make the leaves fairly large to balance the heavy flower head. -
Leaf Texture:
While the green is still workable, streak in some Olive Green along the edges for shadow. Let this dry completely before moving to the veins. -
Veining:
Using your liner brush and the Dark Brown paint, draw a central vein down each leaf and smaller veins branching out. Keep these lines extremely thin. -
Wispy Tendrils:
Mix a very watery grey-brown. Using your finest liner brush, paint delicate, curly tendrils coming off the lower stem. These should be loose and free-flowing to soften the design.
Make a Set
Create a matching salad plate by painting just the rim border design and a single, large leaf in the center, skipping the full sunflower for a lighter look.
Step 4: The Decorative Border
-
Rim Line:
Using a steady hand and the #2 brush loaded with Burnt Sienna, paint a thin, consistent line along the very edge of the plate’s rim. You can rest your pinky finger on the table to stabilize your hand. -
Miniature Motifs:
Space out small floral clusters along the rim. Paint tiny three-leaf springs using your Sap Green. Leave roughly 2 inches of space between each cluster. -
Tiny Blossoms:
Add tiny clusters of reddish-brown dots (using the back end of your paintbrush handle works great here) near the green sprigs to represent small berries or buds. -
Final Cleanup:
Inspect your plate for any stray paint marks. A damp Q-tip is perfect for wiping away mistakes before the paint sets. Check that the rim line is clean. -
Curing:
Follow the specific instructions on your paint bottle for curing. Most ceramic paints require air drying for 24 hours, followed by baking in a home oven to make the design permanent and dishwasher safe.
Once baked and cooled, your custom plate is ready to bring a touch of eternal sunshine to your table setting


Half-Wreath Asymmetrical Bouquet
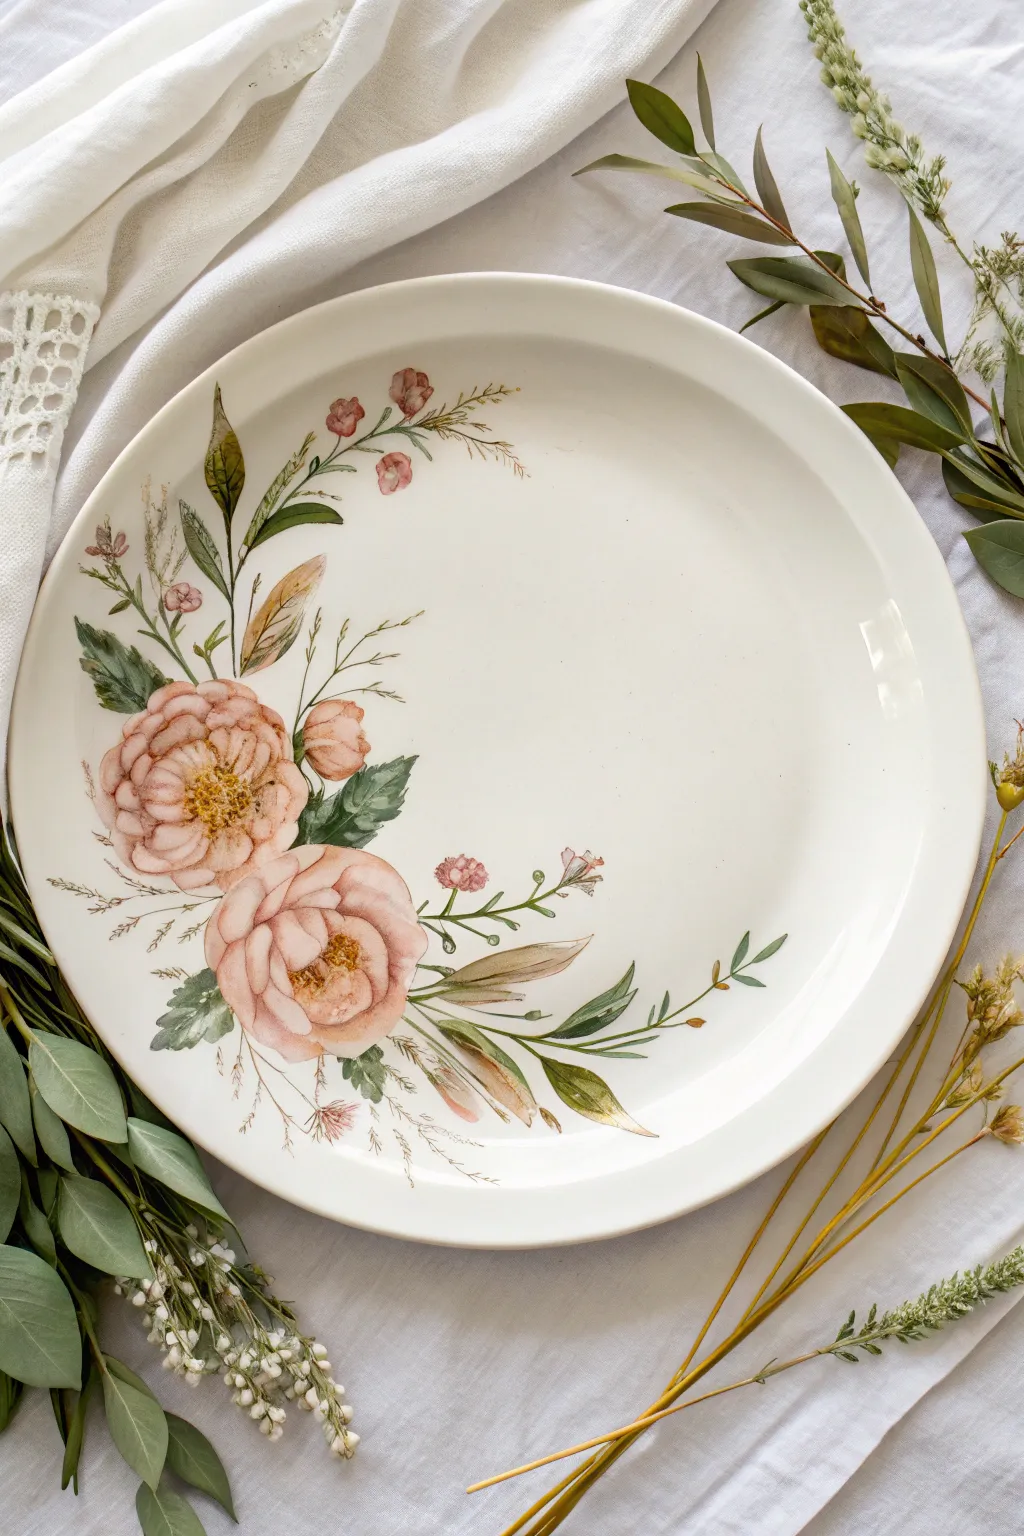
Transform a plain ceramic plate into a delicate masterpiece featuring an asymmetrical half-wreath of soft peach peonies and gentle greenery. This design mimics the translucent, airy feel of watercolor painting using specialized ceramic paints for a lasting finish.
Step-by-Step Guide
Materials
- White ceramic plate (glazed, oven-safe)
- Pebeo Porcelaine 150 paints (or similar ceramic paints)
- Colors: Pale Pink, Coral, Moss Green, Olive Green, Brown, Gold
- Rubbing alcohol and paper towels
- Fine liner brush (size 0 or 00)
- Round watercolor brush (size 2 or 4)
- Palette for mixing
- Water cup
- Pencil (optional)
Step 1: Preparation & Sketch
-
Clean surface:
Before you begin, wipe the entire surface of the plate with rubbing alcohol on a paper towel. This removes any oils or fingerprints that could prevent the paint from adhering properly. -
Plan the composition:
Visualize a ‘C’ curve specifically on the left side of the plate. The design should be heaviest in the bottom-left quadrant and taper off as it reaches the top and bottom center. -
Light sketch:
If you’re nervous about freehanding, use a regular pencil to very faintly sketch the position of the two main flower heads and the general flow of the main stems. The pencil graphite will burn off when baked.
Transparency Trick
To get that true watercolor look with acrylic-based ceramic paints, mix a drop of painting medium or thinner rather than just water, which can weaken the bond.
Step 2: Painting the Blooms
-
Base petals:
Start with the main peony flowers. Mix a very watery wash of Pale Pink. Using your round brush, paint loose, cupped shapes for the outer petals. Keep the paint thin to achieve that watercolor transparency. -
Deepening the color:
While the base layer is still slightly tacky but mostly dry, mix a slightly stronger Coral color. Add strokes to the centers of the blooms and the bases of the petals where shadows would naturally fall. -
Adding the secondary bud:
Tuck a smaller, tighter bud shape just above the main flower using the same Coral mix. Keep this shape round and compact compared to the open blooms. -
Flower centers:
Once the petal layers are dry, take your fine liner brush and dab tiny dots of Gold and Brown into the very center of the open peonies to create the stamens and pollen.
Layered Luxury
Once the main design is baked and cooled, add a second layer of metallic gold liner over the leaf veins for a 3D gilded effect that catches the light.
Step 3: Adding Greenery & Details
-
Main stems:
Using the fine liner brush and Olive Green, paint thin, flowing lines extending from the flowers. Create a long, curving stem reaching upward and another sweeping downward to form the wreath shape. -
Broad leaves:
Switch back to the round brush. Load it with Moss Green and press the belly of the brush down near the flowers to create the wider, darker leaves shown in the reference. Lift the brush at the end of the stroke to create a sharp point. -
Wispy foliage:
Mix a watery Brown-Green shade. Paint very delicate, fern-like sprigs extending outward from the main bouquet. These should look airy and light. -
Accent florals:
Add tiny clusters of small pink buds on thin stems at the top and bottom extremities of the design. These help fade the design into the white space. -
Adding texture:
For a bit of rustic charm, I like to use a mostly dry brush with a tiny bit of brown paint to add faint, scratchy lines on some leaves and petals, mimicking botanical illustration details. -
Final leaf accents:
Mix a touch of Gold into your Green. Add a few highlights to the tips of the largest leaves to give them dimension and a slight shimmer.
Step 4: Finishing
-
Dry time:
Allow the paint to air dry for at least 24 hours. Do not rush this step, as deep moisture can cause bubbling during baking. -
Baking:
Place the plate in a cool oven. Set the temperature to 300°F (150°C) or the temperature specified by your paint manufacturer. turn the oven on. -
Curing:
Once the oven reaches temperature, bake for 35 minutes. Turn the oven off and let the plate cool down completely inside the oven before removing it to prevent thermal shock.
Now you have a stunning, food-safe piece of art ready for your next dinner party
Herb Garden Florals With Name Labels
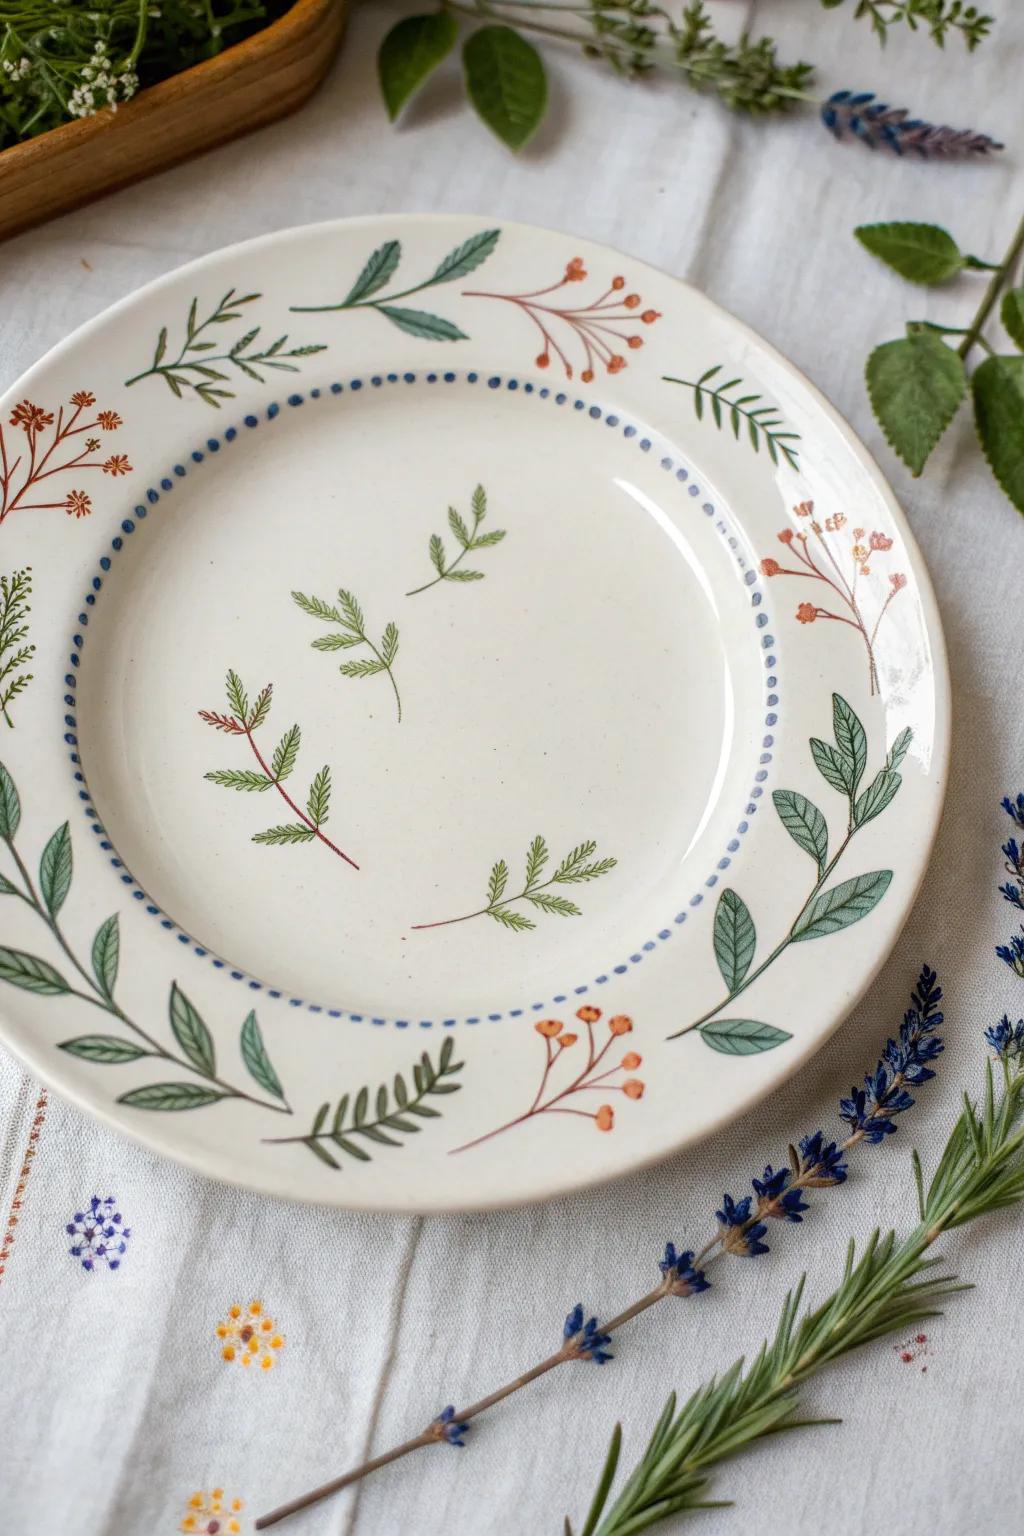
Capture the charm of a rustic kitchen garden with this delicately painted ceramic plate featuring scattered herbs and wildflowers. The design combines fine line work with soft earthy greens and terracottas for a timeless, hand-foraged look.
Detailed Instructions
Materials
- White or cream ceramic plate (oven-safe if baking)
- Ceramic paints (porcelain paint) in: Sage Green, Deep Forest Green, Terracotta/Burnt Orange, Brown
- Fine liner paintbrush (size 0 or 00)
- Small round paintbrush (size 1)
- Rubbing alcohol and cotton pads
- Paper palette or small dish
- Pencil (optional for sketching)
- Oven (for curing, check paint instructions)
Step 1: Preparation & Planning
-
Clean the surface:
Before making a single mark, wipe the entire plate down thoroughly with rubbing alcohol on a cotton pad. This removes invisible oils and fingerprints that could prevent the paint from adhering properly. -
Map the rim layout:
Visualize the outer rim as a clock face. You want to space your larger botanical elements evenly around this circle, leaving breathing room between each sprig.
Brush Pressure Pro-Tip
For the tapered leaves, practice on paper first: press down hard for the leaf base, then lift the brush gradually while pulling back to create a sharp, fine tip.
Step 2: Painting the Rim Border
-
Start with the main stems:
Using your fine liner brush and brown paint mixed with a touch of green, paint thin, curving lines along the rim. Vary the direction so some curve clockwise and others counter-clockwise. -
Add sage leaves:
Dip your size 1 round brush into the Sage Green. Press the belly of the brush down and lift up to create teardrop-shaped leaves along some of the stems. These should look like broad, flat sage leaves. -
Paint delicate fern-like fronds:
Switch back to the fine liner and Deep Forest Green. Paint a central vein, then add tiny, quick dashes outward on both sides to mimic dill or fern leaves. -
Create berry sprigs:
Using the Terracotta paint, create small clusters of dots at the ends of thin brown stems. Keep these loose and airy rather than perfectly spherical. -
Incorporate rosemary sprigs:
With Deep Forest Green, paint stiff, needle-like strokes branching off a main stem to resemble fresh rosemary. -
Detail the leaves:
Once the broader sage leaves are dry to the touch, use your finest brush and diluted dark green paint to add a central vein line down the middle of each leaf for definition.
Step 3: The Dotted Inner Ring
-
Mix the perfect blue-grey:
Mix a tiny amount of blue into your green or grey paint to get a slate color. You want a distinct color to frame the center. -
Paint the dot border:
Carefully paint a circle of small, evenly spaced dots on the inner ridge of the plate where the rim meets the center depression. I find rotating the plate as I work helps keep the spacing consistent.
Level Up: Name Labels
Use a superfine black pen or liner brush to write the Latin or common names (like ‘Salvia’ or ‘Thyme’) next to the corresponding herbs in script font.
Step 4: Center Field Motifs
-
Place the central herbs:
In the center ‘well’ of the plate, paint three or four small, isolated sprigs. Keep these smaller than the rim designs to maintain a delicate balance. -
Vary the center foliage:
Paint one sprig as a fern type, one with small broad leaves, and perhaps a small reddish stem. Arrange them randomly as if they were tossed onto a table.
Step 5: Finishing & Curing
-
Clean up errors:
If you have any smudges or wobble lines, use a damp cotton swab or a toothpick to gently scrape away the wet paint before it sets. -
Dry time:
Allow the plate to air dry completely for at least 24 hours. The paint must be fully dry before baking. -
Bake to set:
Place the plate in a cool oven, then set the temperature according to your paint manufacturer’s instructions (usually around 300°F/150°C). After the time is up, turn the oven off and let the plate cool inside completely to prevent cracking.
Your custom herbarium plate is now ready to be displayed on a wall or used for a charming afternoon tea
Blue-and-White Floral Vintage Look
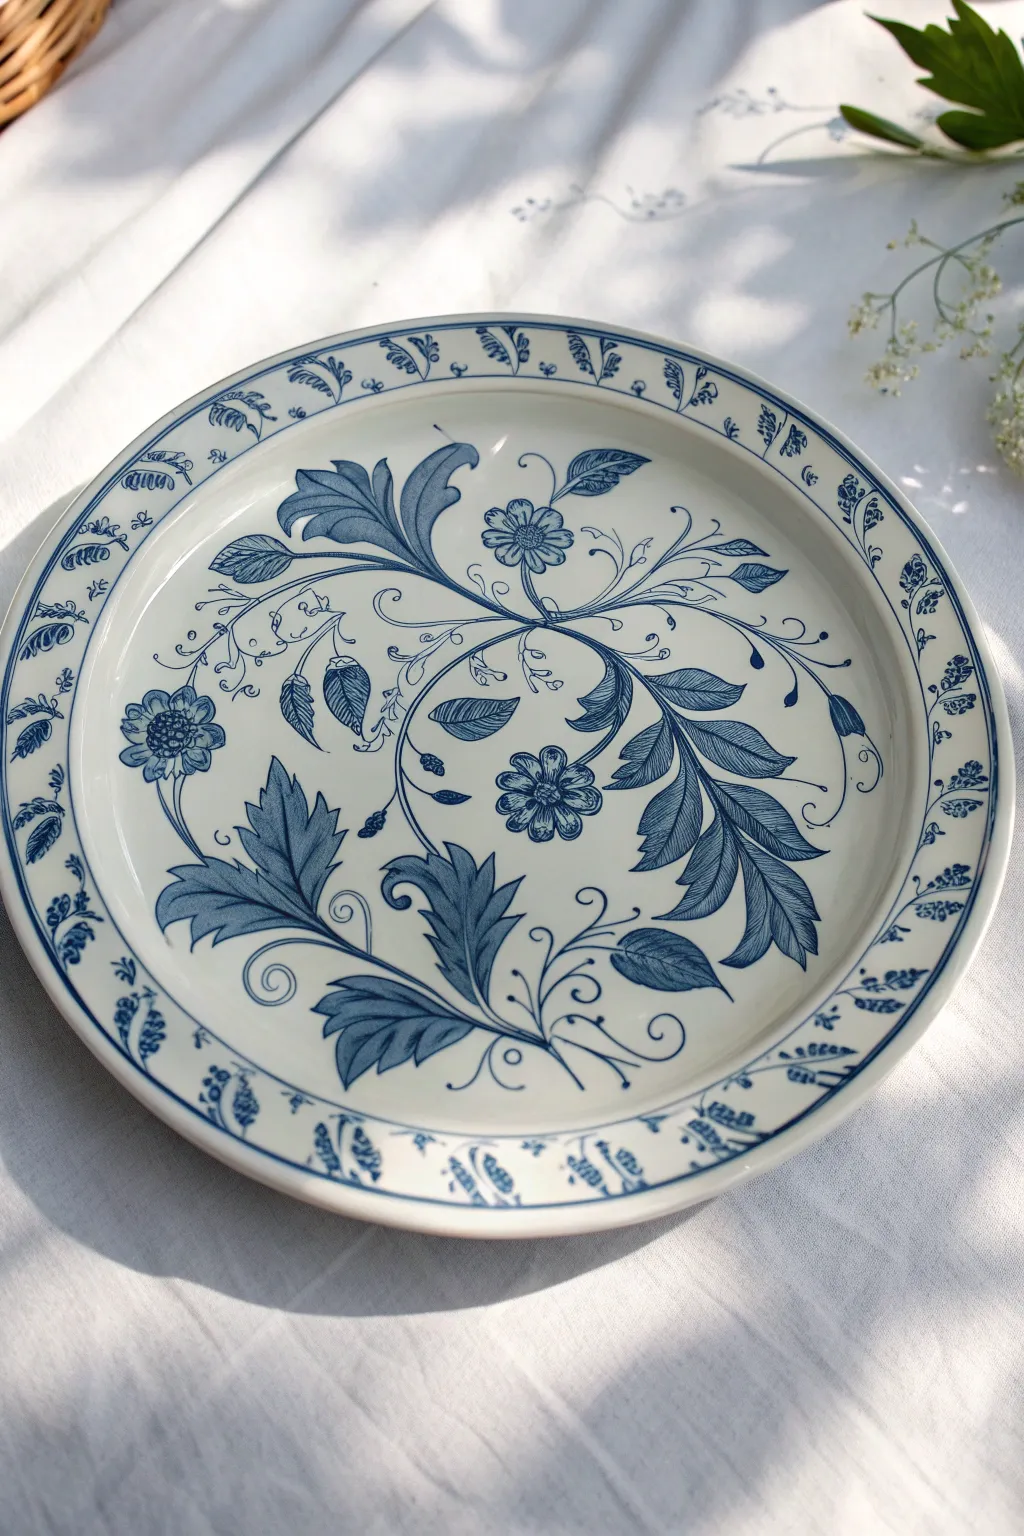
This project mimics the elegance of classic Delftware or Blue Willow china, transforming a plain white plate into a stunning faux-antique piece. Using deep indigo tones and flowing botanical lines, you’ll create a sophisticated, hand-painted treasure perfect for display.
Step-by-Step
Materials
- Plain white ceramic plate (dinner size)
- Porcelain paint (Deep Navy Blue or Indigo)
- Porcelain paint outliner (fine tip, matching blue or slightly darker)
- Fine round paintbrush (size 0 or 00)
- Small flat shader brush (size 2)
- Isopropyl alcohol and paper towels
- Carbon paper and pencil (for tracing)
- Printed floral pattern template (optional)
- Palette or small dish for mixing
- Water cup
Step 1: Preparation & Sketching
-
Clean surface:
Begin by thoroughly wiping down your ceramic plate with isopropyl alcohol and a paper towel. This removes any oils or fingerprints that could prevent the paint from properly adhering to the glaze. -
Plan the composition:
Visualize the central motif. The design features a swirling, organic cross-shape composed of leaves and stems meeting in the center, with curling vines extending outward. -
Transfer or sketch:
If you aren’t confident freehanding, tape carbon paper and your printed design to the plate. Gently trace the main stems and large leaf shapes with a pencil to create faint guidelines on the ceramic.
Brush Loading Secret
For those long, smooth stems, thin your paint slightly with a drop of water or medium. Twirling the brush tip into a point allows you to drag the line further without lifting.
Step 2: Painting the Central Motif
-
Establish the main stems:
Load your fine liner brush (size 0) with thinned indigo porcelain paint. With a steady hand, paint the long, thin S-curve stems that crisscross in the center of the plate, acting as the spine for the foliage. -
Outline the large leaves:
Using the same fine brush, carefully outline the distinct shapes of the large, acanthus-style leaves. Notice how some have jagged edges while others are smoother; vary your line weight slightly for a hand-painted feel. -
Fill the leaves:
Switch to your small flat brush. For the solid blue leaves, fill them in completely. For the detailed leaves, apply thin, parallel hatching lines to mimic the texture of engravings often found on vintage pottery. -
Paint the flowers:
Locate the positions for the two main blossoms. Paint five or six rounded petals for each, leaving a tiny circle of white space in the center for the stamen detail later. -
Add intricate veining:
Once the filled leaves are touch-dry, go back in with your finest brush and add darker blue veins or cross-hatching to create depth and shadow within the foliage.
Age It Up
Want an antique look? Before baking, lightly sponge a very diluted, warm grey paint around the very edges of the rim to mimic the patina found on centuries-old earthenware.
Step 3: Adding Delicate Details
-
Create fine vines:
Extend very thin, wispy tendrils curling off the main stems. These should look like loose spirals or ‘pigtails’ that fill the negative space around the central cross shape. -
Paint buds and berries:
Along the thinner vines, dab small dots or teardrop shapes to represent unopened flower buds or berries, anchoring the airy design. -
Detail the flower centers:
Add a small cluster of dots or a tiny star shape in the center of your open flowers to give them a finished, botanical appearance. -
Check balance:
Take a step back and look at the plate. If one side feels empty, add another small swirling vine or a few extra leaves to balance the visual weight.
Step 4: The Rim Border
-
Start the border pattern:
The rim features a repeating botanical garland. Start by painting a continuous thin vine line that undulates gently around the circumference of the rim. -
Add border leaves:
Paint small, simple leaf shapes alternating on either side of the border vine. Keep these much simpler than the center leaves to avoid overcrowding the design. -
Insert mini florals:
Intersperse tiny three-dot flowers or miniature buds between the border leaves to mimic the complexity of the central design without copying it exactly. -
Clean up edges:
Use a cotton swab dipped in rubbing alcohol or water (depending on your paint type) to sharpen any smeared edges or lift stray paint marks.
Step 5: Curing
-
Dry time:
Allow the plate to dry completely for at least 24 hours. The thickest parts of the paint need this time to settle before baking. -
Bake to set:
Place the plate in a cold oven. Set the temperature according to your paint manufacturer’s instructions (usually around 300°F/150°C). Bake for the required time, then turn the oven off and let the plate cool completely inside.
Once baked and cooled, your plate will have a durable, classic finish akin to heirloom china, ready to be mounted on a wall or used for light styling
Soft Pastel Cottage Garden Mix
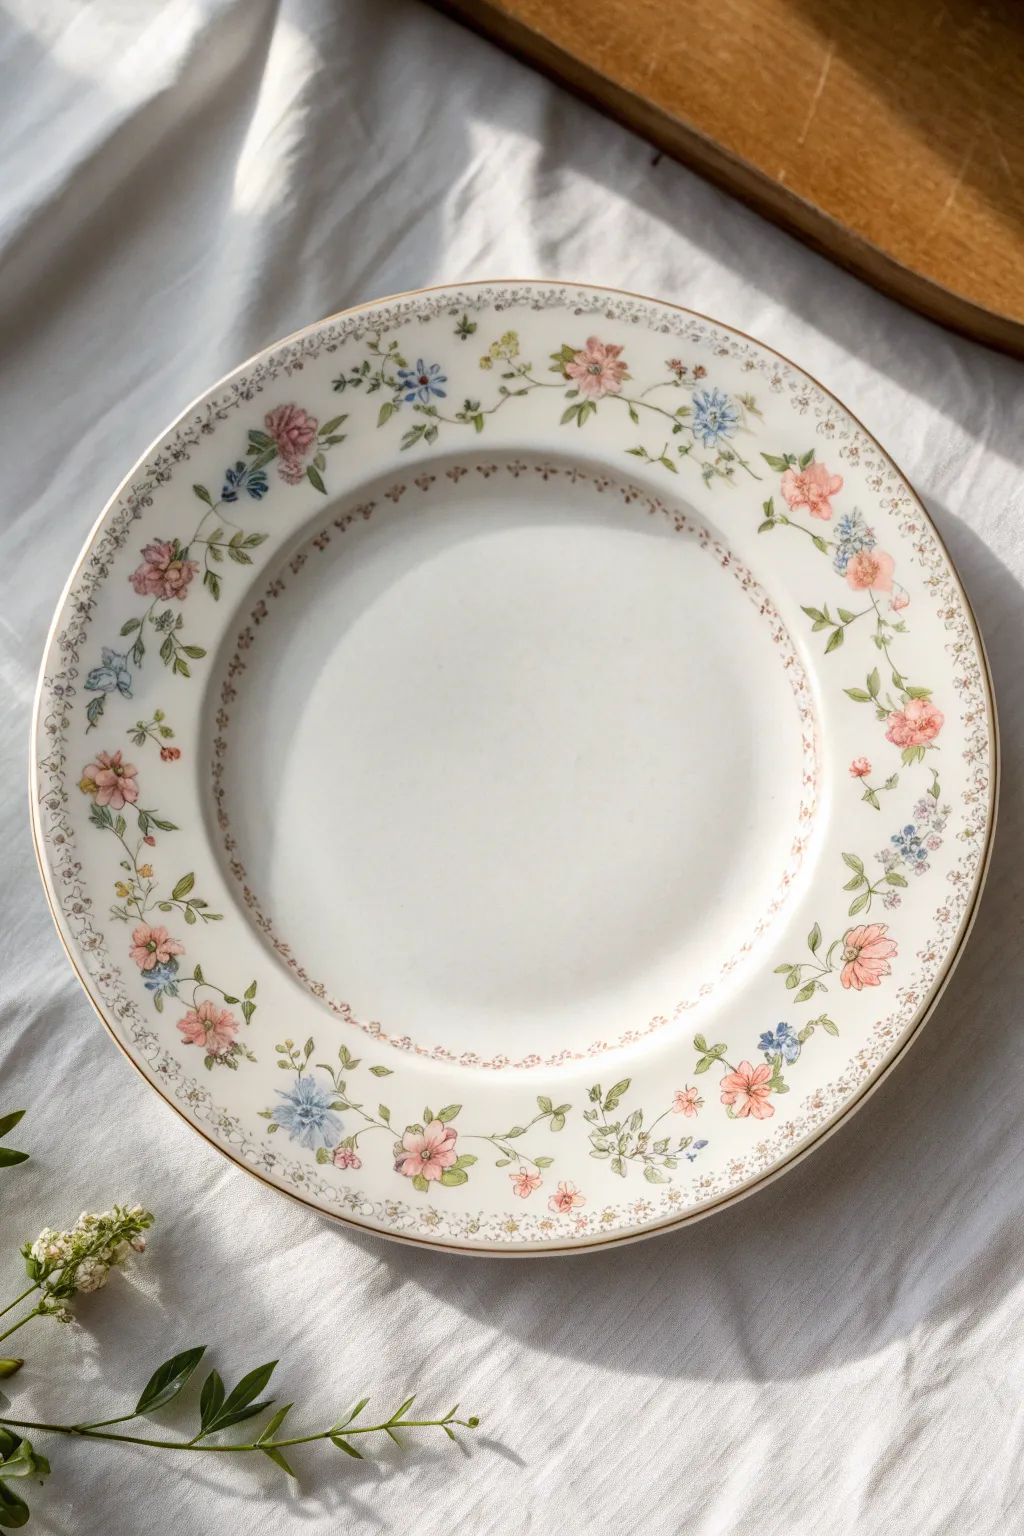
Transform a plain white ceramic plate into a piece of heirloom-style china with this delicate floral painting project. The design features a wreath of soft pink roses and blue wildflowers, evoking the charm of a sun-dappled English garden.
Step-by-Step Guide
Materials
- Plain white ceramic dinner plate (oven-safe)
- Pebeo Porcelaine 150 paints (or similar bake-to-set glass/ceramic paint)
- Colors: Pastel Pink, Light Blue, Sage Green, Olive Green, Ivory, and Gold
- Fine detail brushes (sizes 00, 0, and 2)
- Rubbing alcohol
- Cotton pads
- Palette or small ceramic tile for mixing
- Paper towels
- Soft pencil or china marker (optional)
- Domestic oven
Step 1: Preparation & Planning
-
Clean surface:
Begin by thoroughly wiping down your plate with rubbing alcohol and a cotton pad. This removes invisible oils and ensuring the paint adheres perfectly. -
Map the rim:
Visualize the plate rim divided into four equal quadrants. You can lightly mark these with a soft pencil if you need guide points, though a freehand approach adds to the organic, vintage feel. -
Mix base colors:
Prepare your palette. Mix a touch of Ivory into your Pink and Blue to soften them into true pastels. Create two shades of green: a pale Sage for stems and a deeper Olive for leaf details.
Pro Tip: Sheer Petals
Mix a tiny drop of painting medium or gloss thinner into your petal colors. This creates a watercolor-like transparency that looks incredibly delicate on white china.
Step 2: Painting the Floral Wreath
-
Anchor flowers first:
Using a size 2 brush and your soft pink mix, paint small, loose rose shapes spaced unevenly around the outer rim. Think of them as soft blobs with irregular edges rather than perfect circles. -
Add secondary blooms:
Switch to your pastel blue. Paint small clusters of five-petal wildflowers or simple scatterings of blue dots near the roses to represent forget-me-nots. -
Connect with greenery:
With the size 0 brush and Sage Green, paint thin, winding vines connecting your floral clusters. Let the lines meander naturally along the curve of the rim. -
Leaf placement:
Add small leaves along the vines using a single press-and-lift motion with your brush. Vary the direction of the leaves to create a sense of movement. -
Deepen the contrast:
Once the base green is tacky-dry, use your 00 brush and the Olive Green to add tiny veins or stems to the leaves for depth. -
Define the roses:
Return to your pink roses. Mix a slightly darker pink and paint tiny ‘C’ curved strokes inside the original pink shapes to suggest unfolding petals. -
Add floral centers:
Dot the centers of the blue flowers with a tiny speck of yellow or gold paint to make them pop.
Level Up: Gold Guilding
Once baked and cooled, use a gold porcelain outliner to add minuscule metallic highlights to the flower centers or the very edge of the rim.
Step 3: Border Details & Finishing
-
Inner ring details:
Move to the inner verge of the plate (where the rim meets the center). Using the 00 brush and a mix of brown or dull pink, paint a very fine, repetitive pattern of tiny dots or ‘x’ shapes to create a delicate lace-like border. -
Outer rim texture:
For the very edge of the plate, mix a diluted grey-brown or gold. Stipple tiny dots tightly together along the absolute outer edge to mimic an antique texture. -
Clean up edges:
If any paint went astray, use a damp cotton swab or a toothpick to gently scrape away the error before it hardens. -
Dry thoroughly:
Allow the plate to dry for at least 24 hours. This is crucial—if moisture is trapped underneath, the paint may bubble during baking. -
Baking process:
Place the plate in a cool oven. Set the temperature to 300°F (150°C) or per your paint manufacturer’s instructions. Once the temp is reached, bake for 35 minutes. -
Cool down:
Turn off the oven and leave the plate inside to cool down gradually with the oven door closed. This prevents thermal shock and cracking.
Now you have a stunning, food-safe decorative plate that brings a touch of spring to your table setting
Bold Tropical Hibiscus Pop
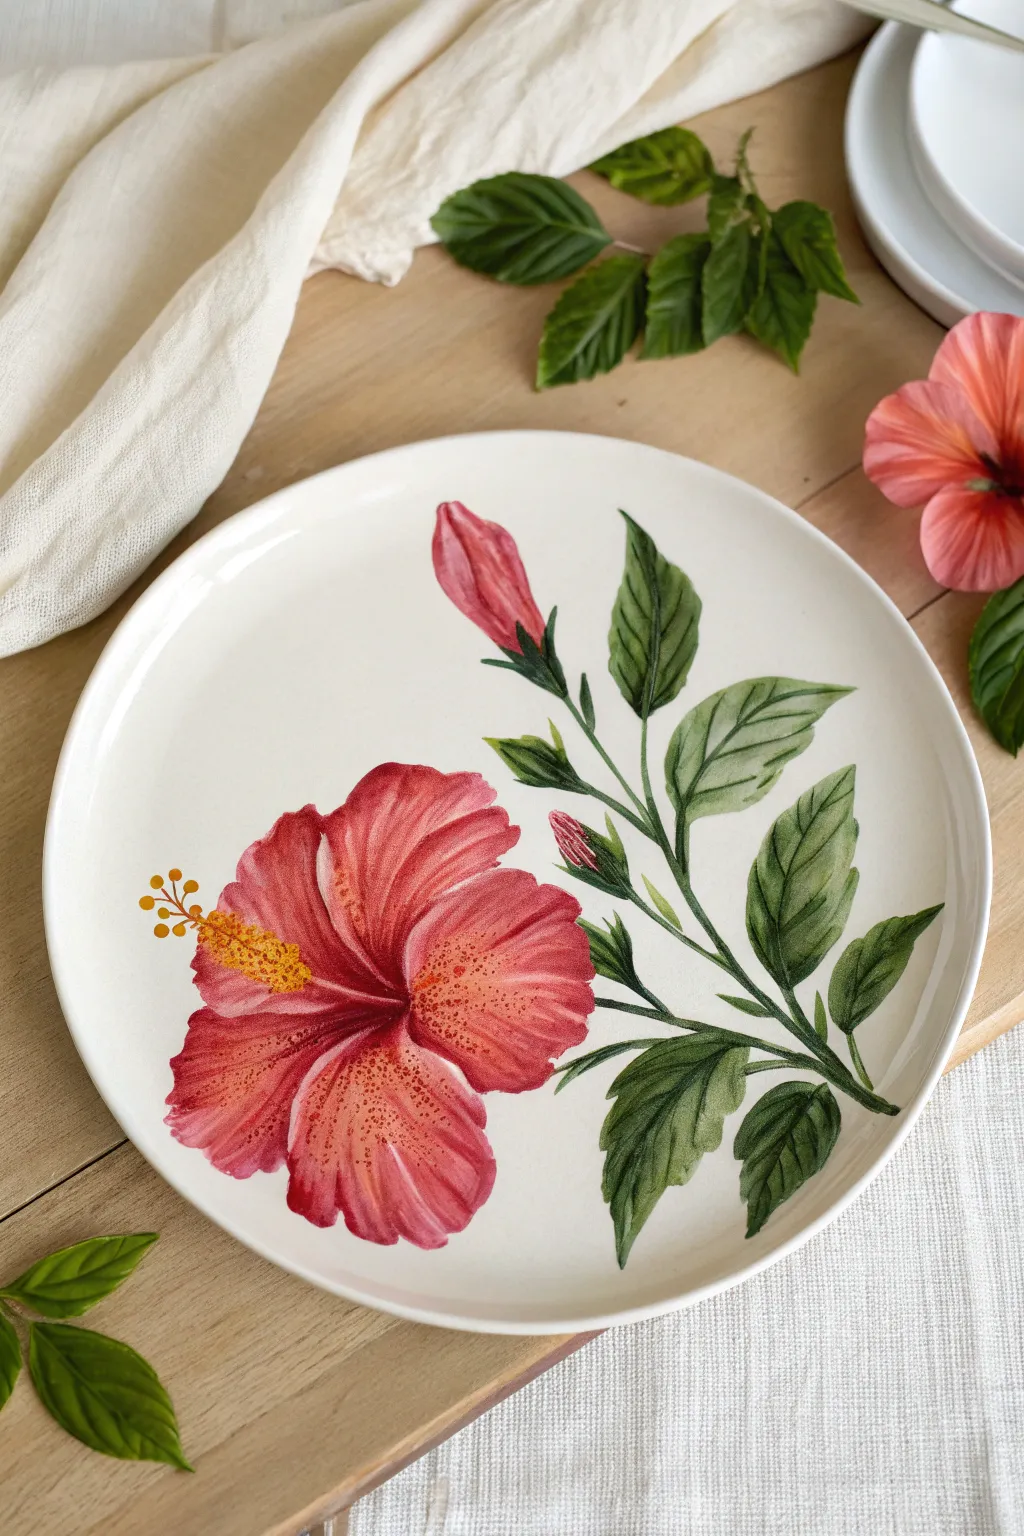
Transform a plain white ceramic plate into a lush tropical display with this vibrant hibiscus design. The brilliant coral-red petals and rich greenery create a striking contrast that feels like a permanent vacation for your table setting.
How-To Guide
Materials
- White ceramic plate (dinner or salad size)
- Ceramic paints or enamel paints (Coral Red, Deep Red, Yellow, White, Sap Green, Dark Green, Black)
- Rubbing alcohol and cotton pads
- Round brushes (sizes 2, 4, and 8)
- Fine liner brush (size 00)
- Palette or small plate for mixing
- Pencil (HB) or transfer paper
- Water container and paper towels
- Oven (if baking is required for your paint brand)
Step 1: Preparation & Sketching
-
Clean surface:
Before you begin, wipe the entire surface of the plate with rubbing alcohol on a cotton pad. This removes any invisible oils or fingerprints that could prevent the paint from adhering properly. -
Plan composition:
Visualize your layout. The main flower sits off-center near the bottom left, with stems reaching diagonally upward toward the top right. This asymmetrical balance is key to the design’s elegance. -
Sketch the outline:
Lightly sketch the flower and leaves directly onto the plate using a soft pencil. Don’t press hard. Start with the five large, ruffled petals of the hibiscus, then add the central stamen line and the surrounding leaves and bud stems.
Smooth Gradients
For softer transitions on the petals, create a ‘glazing medium’ by mixing a drop of water or clear extender with your paint. This makes blending the deep reds into the lighter pinks much smoother.
Step 2: Painting the Hibiscus Bloom
-
Base coat petals:
Load your size 8 brush with Coral Red. Fill in the petal shapes, leaving the paint slightly thinner towards the edges to create a delicate, translucent look. It’s okay if it looks a bit streaky; hibiscus petals naturally have texture. -
Add depth:
While the base is still slightly tacky, mix a little Deep Red with your Coral. Use the size 4 brush to paint strokes radiating from the flower’s center outward. This creates the deep throat of the bloom. -
Create highlights:
Mix a tiny drop of White into your Coral Red. Apply this lighter shade to the ruffled outer edges of the petals to make them look like they are catching the light. -
Paint the bud:
For the upper bud, use the same Coral Red base. Add a streak of the lighter pink mix on the left side to give it roundness and form. -
Detail the center:
Using Deep Red, paint faint veins running through the petals. I find it helps to flick the brush quickly from the center outward to keep lines organic and tapering.
Step 3: Painting the Greenery
-
Stems and veins:
Mix Sap Green with a touch of Dark Green. Using your size 2 brush, paint the main stem connecting the flower, the bud, and the leaf clusters. Keep your hand steady but allow for slight curves. -
Leaf base layers:
Fill in the leaf shapes with Sap Green. The leaves should have serrated edges, so use the tip of your brush to pull paint outward into little points along the perimeter. -
Shading leaves:
While the green is wet, add Dark Green to one half of each leaf (divided by the center vein) to create a shadowed effect. This adds instant dimension. -
Leaf details:
Once the green is dry to the touch, use the fine liner brush and Dark Green (or a mix of Green and Black) to paint thin, crisp veins on every leaf. -
Encasing the bud:
Paint the small green sepals hugging the base of the pink bud. Ensure the green overlaps the pink slightly to look realistic.
Mistake Eraser
Smudged a leaf? Don’t panic. If the paint is wet, wipe it with a damp Q-tip. If it’s dry, you can often gently scratch it off ceramic with a wooden toothpick without damaging the glaze.
Step 4: Final Details & Curing
-
Stamen base:
Using your fine liner brush and Deep Red, draw the long pistil extending from the center of the flower. -
Anther placement:
Dip the tip of the liner brush or a toothpick into bright Yellow paint. Dot tiny clusters at the end of the pistil to create the pollen-covered anthers. -
Stippling texture:
To give the flower realistic texture, use a nearly dry brush with Deep Red to gently stipple (dot) the area near the throat of the flower. -
Cleanup:
Use a damp cotton swab to clean up any stray paint marks or sharpen the edges of your petals if they spread too much. -
Curing process:
Allow the plate to dry for at least 24 hours. If your paint requires baking (common for dishware), place the plate in a cold oven, heat to the manufacturer’s specified temperature, bake, and let it cool completely inside the oven.
Once baked and cooled, your stunning botanical plate is ready to bring a touch of the tropics to your next meal
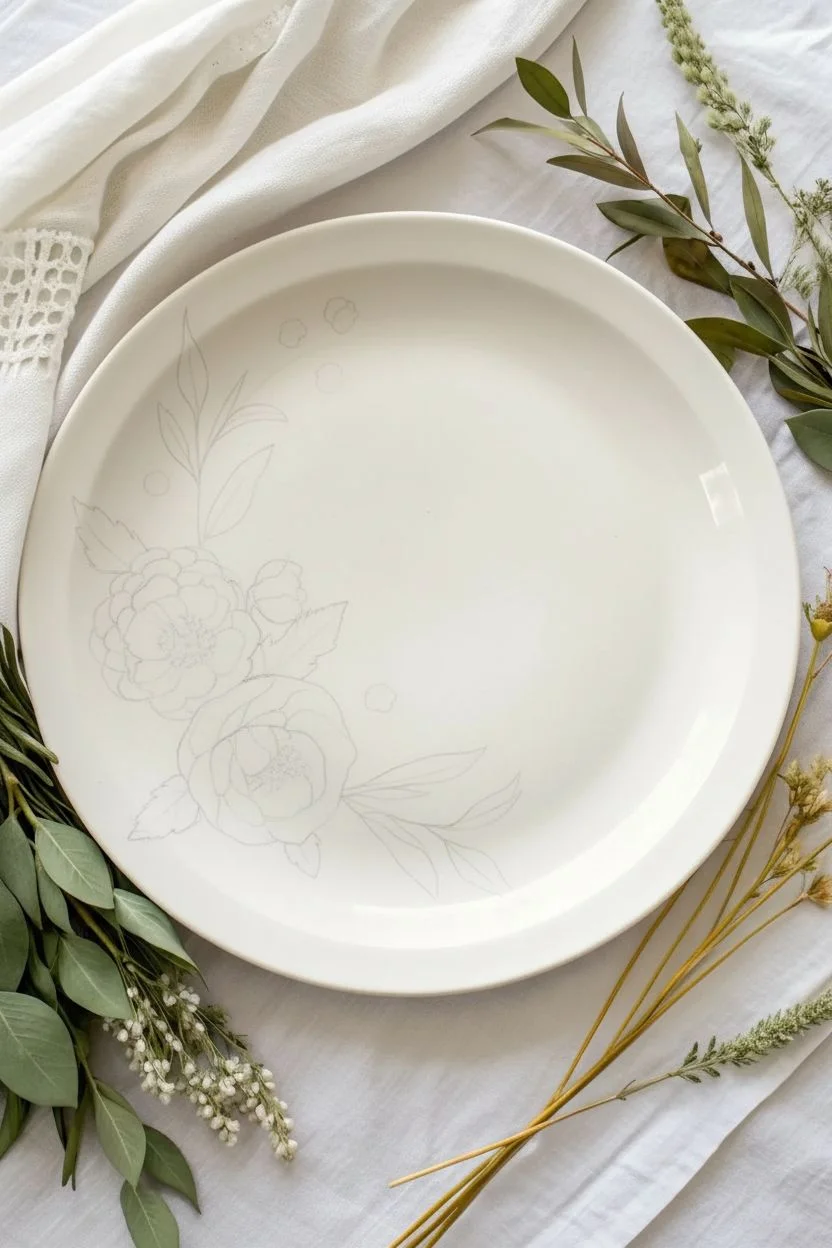
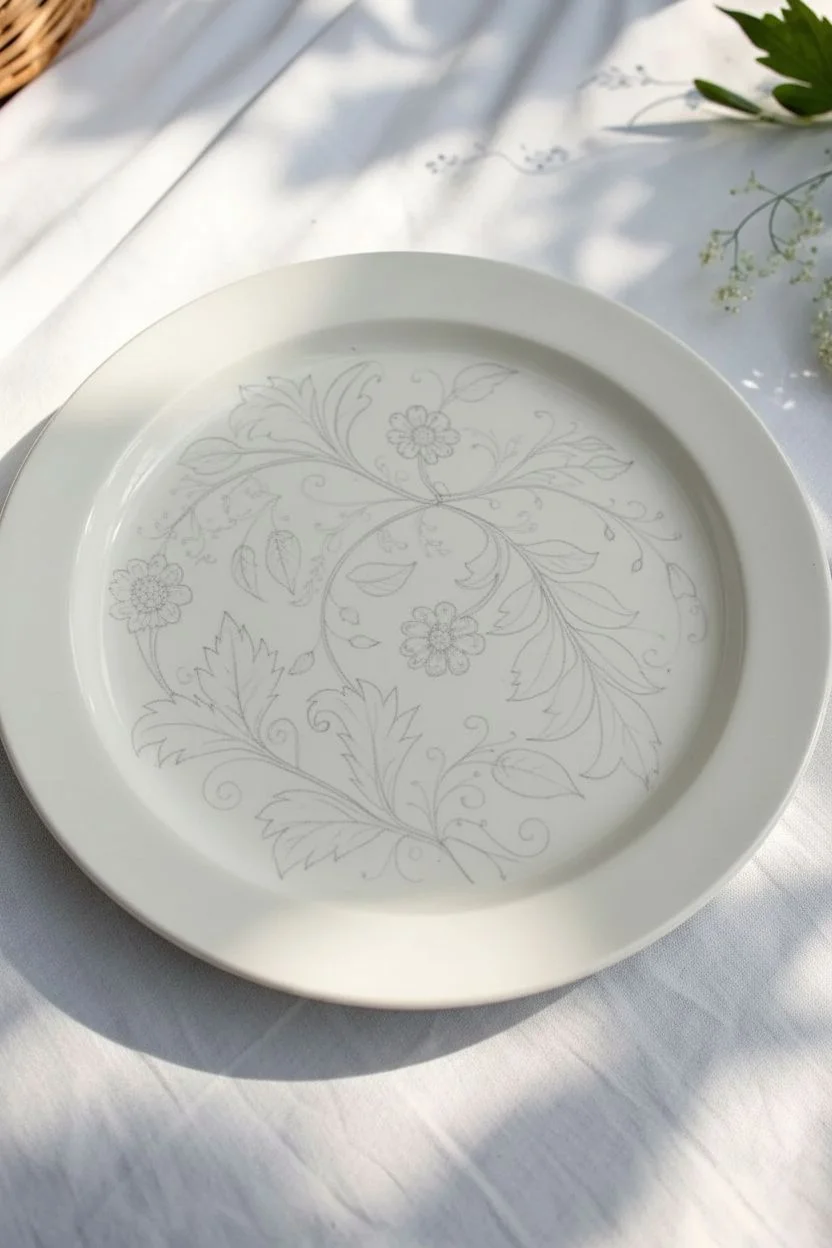
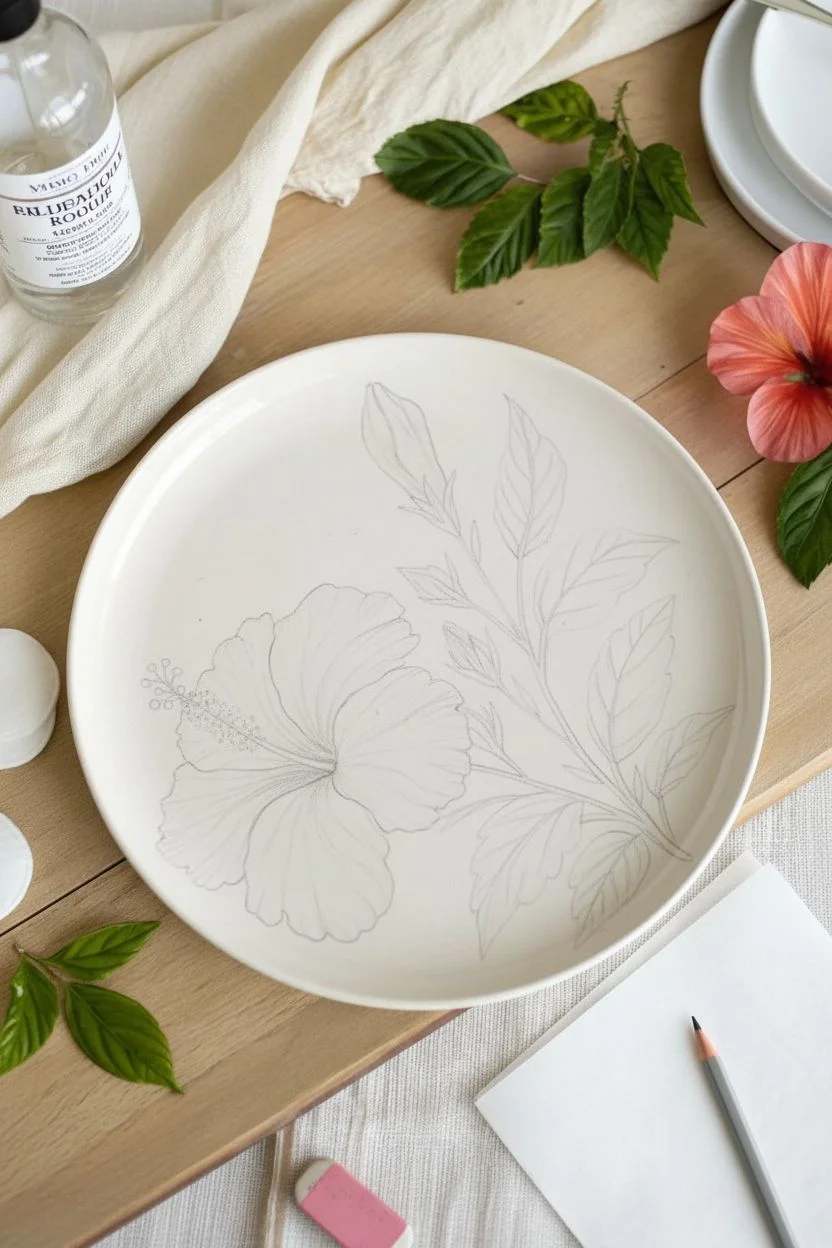
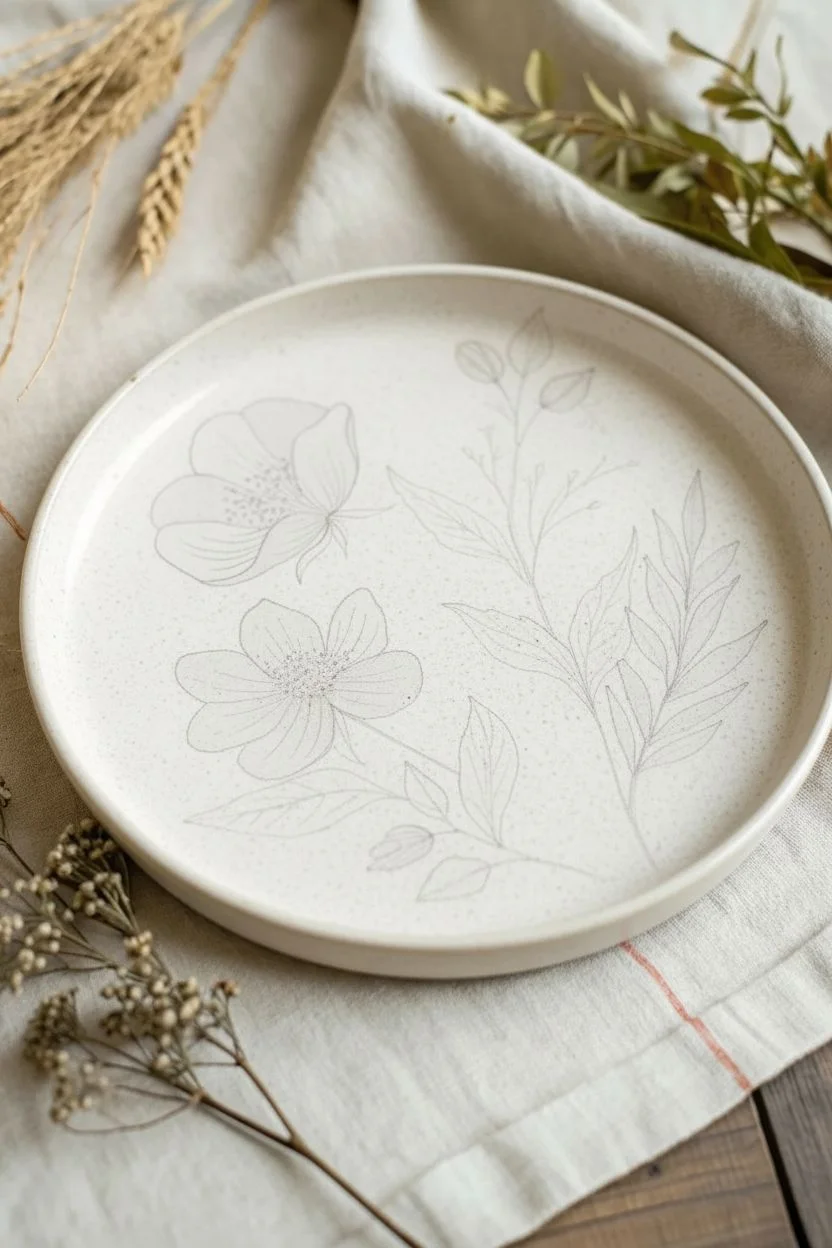
Floral Line Art With Soft Color Wash
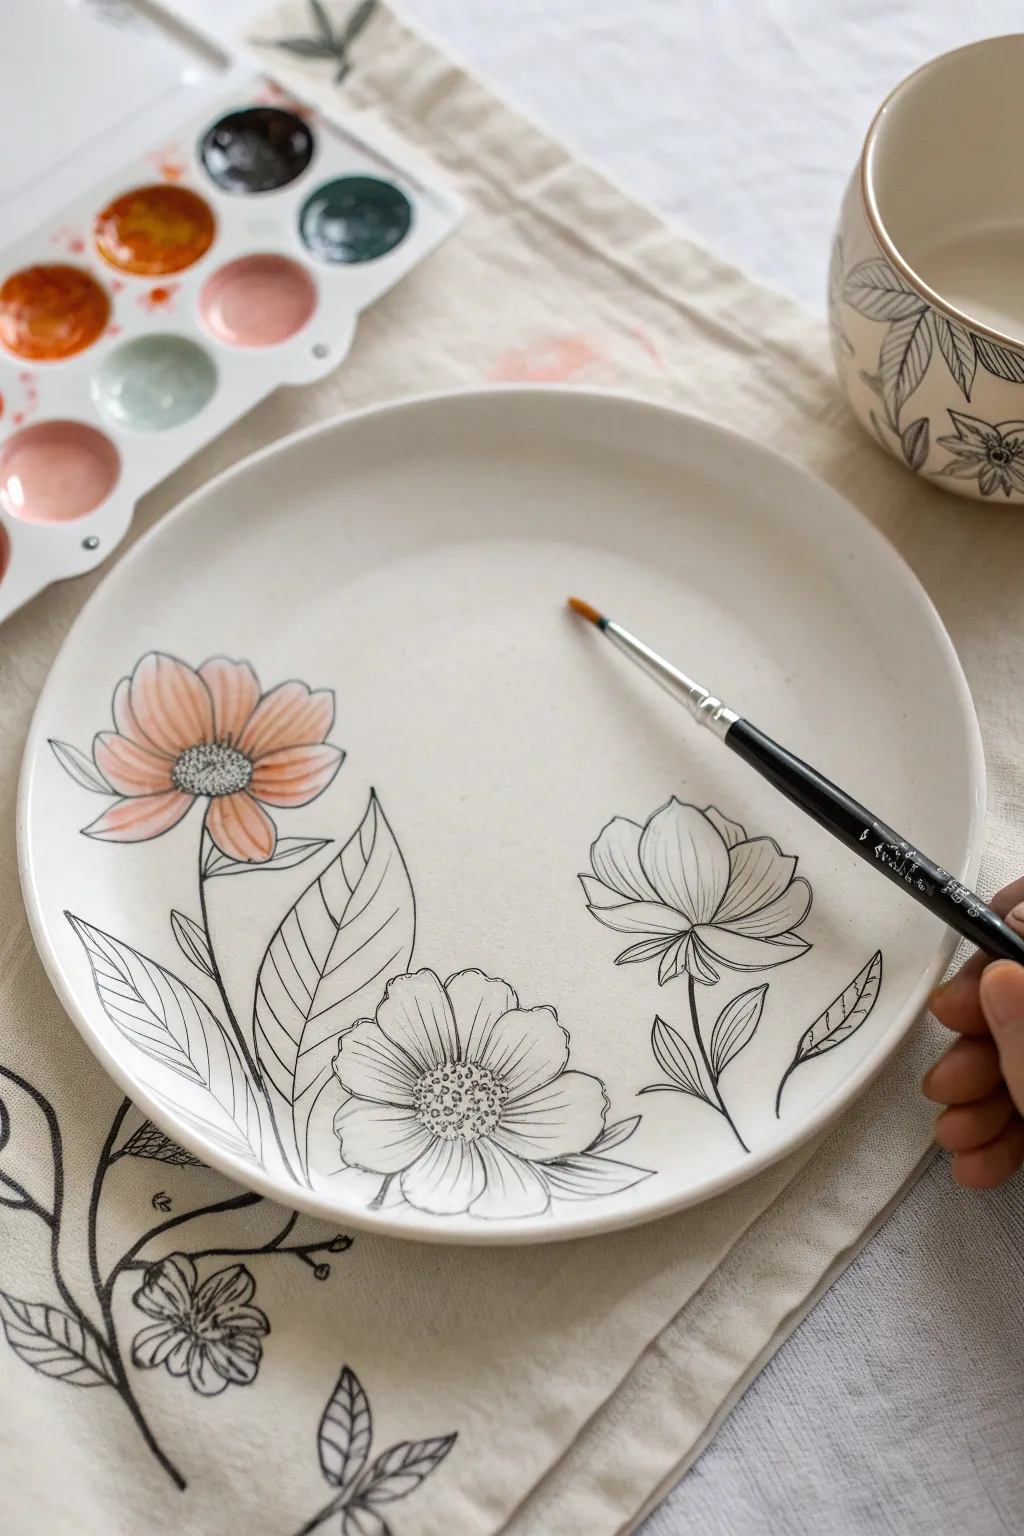
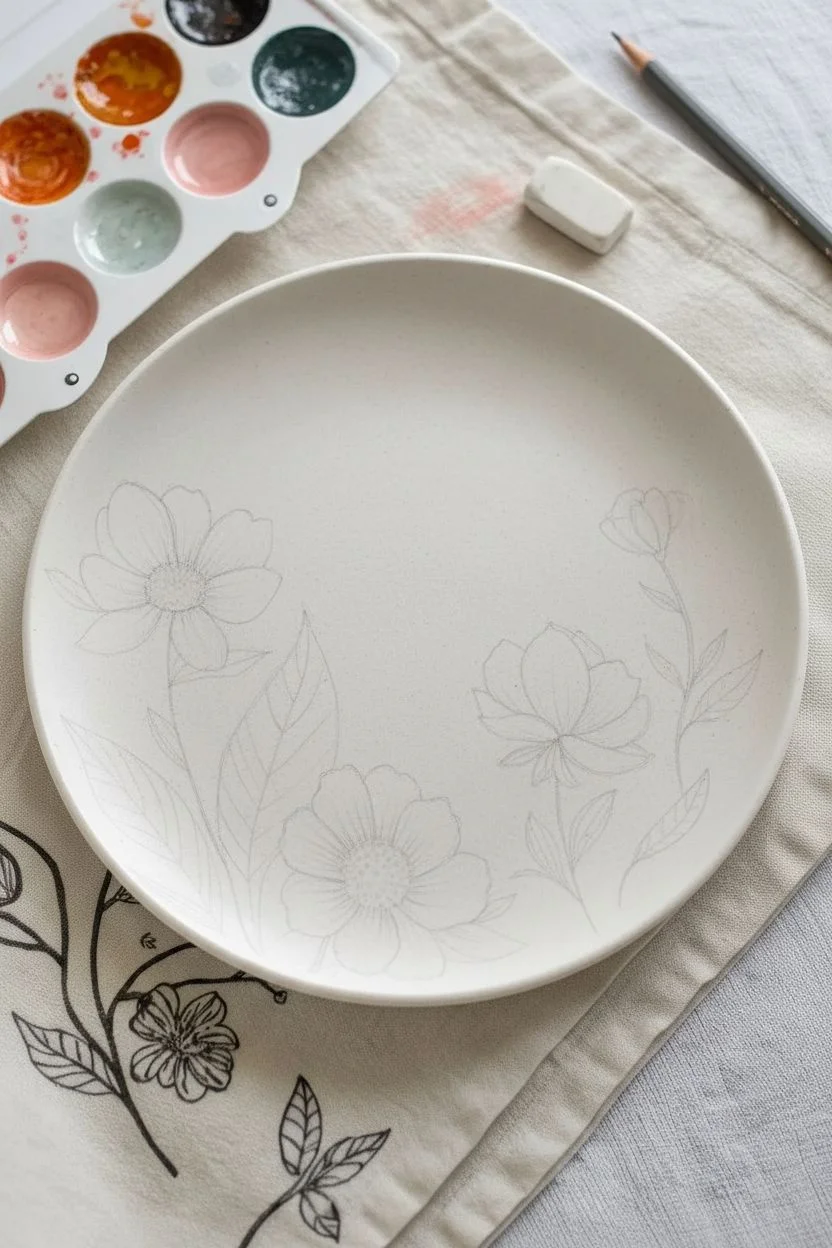
Marrying the precision of botanical line art with the loose, airy feel of watercolor, this project transforms a simple ceramic plate into a piece of functional art. The contrast between crisp black ink and soft, blooming washes creates a sophisticated, modern aesthetic perfect for display or light use.
Step-by-Step Guide
Materials
- White ceramic plate (matte or bisque finish works best)
- Pebeo Porcelaine 150 paint (Anthracite Black for lines)
- Pebeo Porcelaine 150 paint (Coral, Peach, or transparent medium)
- Fine liner brush (size 0 or 00)
- Small round brush (size 2 or 4)
- Pencil and eraser (for sketching)
- Rubbing alcohol and cotton pads
- Paper towel
- Oven (for baking instructions)
Step 1: Preparation & Sketching
-
Clean the surface:
Before laying down any design, wipe the entire plate surface with rubbing alcohol on a cotton pad. This removes invisible oils or fingerprints that could prevent the paint from adhering properly. -
Plan your composition:
Visualize a balanced arrangement of three main blooms. Place a large focal flower on the left side, slightly lower than center, and two smaller buds or open blooms trailing toward the right. -
Lightly sketch outlines:
Using a soft pencil, VERY lightly sketch the basic oval shapes of your flower heads and the curves of the stems. Don’t press hard; you just want a faint guide that won’t scratch the ceramic glaze. -
Refine the petals:
Flesh out your sketch, adding definition to the petals. For the main flower on the left, aim for a daisy-like shape with distinct, separate petals radiating from a central disk.
Step 2: Inking the Line Work
-
Load the liner brush:
Dip your fine liner brush (size 00) into the black ceramic paint. The consistency should be fluid but opaque; if it’s too thick, mix in a tiny drop of painting medium, not water. -
Outline the main bloom:
Starting with the flower on the left, carefully trace your pencil lines. Focus on the petal edges, ensuring the lines are thin and continuous. -
Detail the center:
Stipple small dots in the center of the flower to create texture resembling pollen or seeds. Keep the dots dense in the middle and slightly looser at the edges. -
Draw the leaves:
Extend a stem downwards and add two large, lance-shaped leaves. Draw a central vein down each leaf, then add angled veins branching off to the sides. -
Outline the secondary flowers:
Move to the bottom center and right side to outline the remaining flowers. I find that varying the line weight slightly—pressing harder on shadow sides—adds nice dimension to these simpler shapes. -
Add floating leaves:
Fill the gaps between blooms with small, singular leaves or buds to connect the composition visual flow. -
Let the lines dry:
Allow the black outline to dry completely. This is crucial before adding color so the black doesn’t bleed into the wash. Give it at least 30-45 minutes.
Steady Hand Trick
Rest your pinky finger on the dry surface of the plate while painting fine lines. This anchors your hand and prevents the brush from shaking during delicate line work.
Step 3: Adding the Color Wash
-
Prepare the wash:
Mix a small amount of coral or peach ceramic paint with a transparent thinning medium (specific to the paint brand). You want a very sheer, watercolor-like consistency. -
Apply the first wash:
Dip your round brush into the thinned color. Gently touch the brush to the base of the petals on the main left flower, letting the color pool slightly. -
Pull the color:
Rinse your brush and leave it damp. Drag the wet paint from the base of the petal upwards towards the tip, creating a gradient that fades to white. -
Repeat for all petals:
Work petal by petal on the main flower. Don’t worry about staying perfectly inside the lines; a little overlap adds to the artistic, hand-painted charm. -
Tint the center:
Add a tiny dab of slightly darker peach or light brown to the stippled center of the flower for depth. -
Evaluate the balance:
Process the other flowers if desired, or leave them black and white for a striking contrast, exactly as shown in the inspiration photo. -
Clean up:
If there are any visible pencil marks left, wait until the paint is perfectly dry (24 hours is best) before gently erasing them. -
Bake to set:
Follow the manufacturer’s instructions for baking the plate (usually placing it in a cold oven, heating to 300°F/150°C, and baking for 35 minutes) to make the design dishwasher resistant.
Level Up: Gold Accents
After the initial baking process, add tiny dots of gold luster or ceramic gold paint to the flower centers or leaf tips, then re-bake for a touch of luxury.
Enjoy your beautiful, hand-painted ceramic piece as a decorative accent or a special serving dish.
Dot-Petal Mandala Flowers
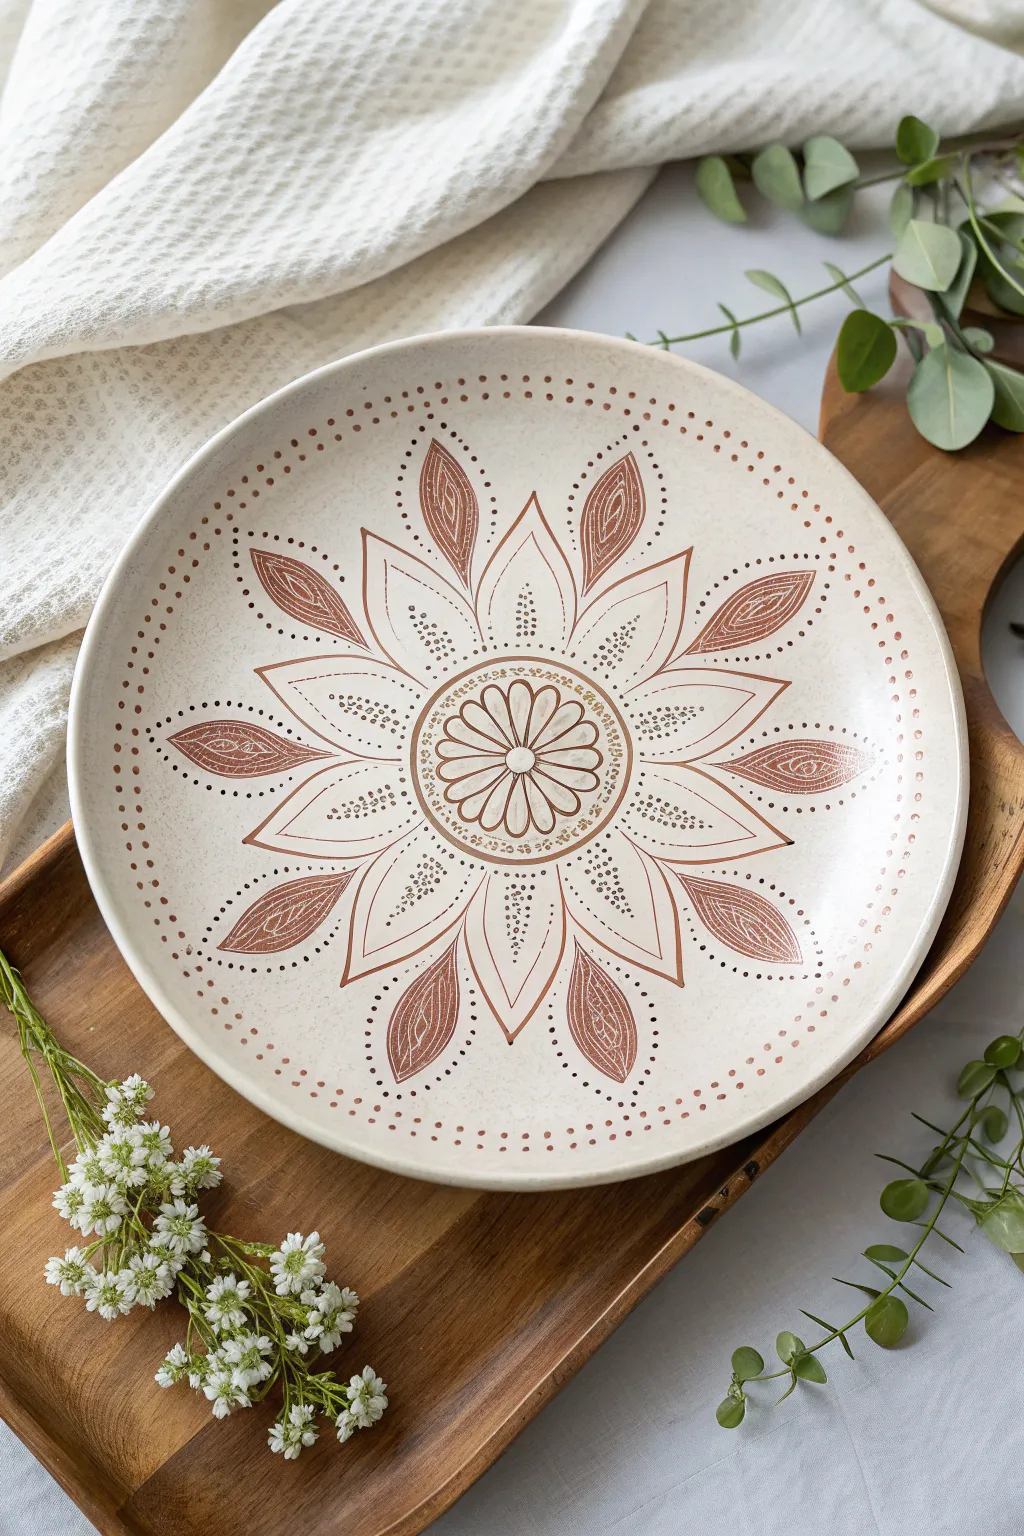
Transform a simple cream ceramic plate into a bohemian centerpiece with this warm, dotwork-inspired mandala design. Using a limited palette of terracotta and cream, you’ll build up intricate layers of petals and dots for a calming, symmetrical motif.
Step-by-Step
Materials
- Cream-colored ceramic plate (glazed or unglazed bisque)
- Porcelain paint (terracotta/rust brown)
- Porcelain paint (off-white or light beige)
- Fine detail paintbrush (size 0 or 00)
- Dotting tools (variety of sizes)
- Clean sponge or cloth
- Pencil (optional, for light guidelines)
- Paper plate or palette
- Cotton swabs (for cleanup)
- Oven (for curing, if paint requires)
Step 1: Preparation and Center
-
Clean surface:
Begin by thoroughly cleaning your plate with soap and water, then wiping it down with rubbing alcohol to remove any oils. This ensures your paint adheres perfectly. -
Find the center:
Locate the exact center of your plate. You can lightly mark this with a pencil if you need a guide, or trust your eye. -
Paint the central flower:
Using your fine detail brush and terracotta paint, draw a small circle in the very center about the size of a coin. Inside this circle, paint eight to ten simple, elongated loop petals radiating from a tiny central dot, like a daisy. -
Outer ring boundary:
Draw two concentric circles around your central flower. These lines create a narrow band that frames the center. Leave the inside of this band unpainted for now. -
Detailing the band:
Fill the narrow band with tiny loops or small dashes using the very tip of your brush, creating texture within the ring.
Step 2: Building the Petal Layers
-
Outline main petals:
Paint large, pointed leaf shapes radiating outward from the central ring. Aim for about eight to ten large petals evenly spaced around the circle. These are just outlines for now. -
Second petal tier:
In the gaps between your main petals, paint smaller, slightly shorter pointed petals peaking out from behind. This adds depth to the flower. -
Inner petal lines:
Inside each large main petal, paint a second, smaller outline that mimics the shape of the petal but stays inside the boundary. -
Central veins:
Draw a thin line straight down the center of each main petal, connecting the tip to the base. -
Textured filling:
Now for the texture. Inside the smaller, secondary petals (the ones between the main ones), fill the tips with solid terracotta paint, but leave a small gap or line work near the base to keep it airy. -
Leaf details:
For the main large petals, use your smallest dotting tool or the brush tip to add rows of tiny dots (stippling) inside the inner shape, focusing on the wider parts of the petal.
Uneven Spacing?
Don’t panic! If your petals aren’t perfectly symmetrical, add extra dots in the wider gaps. The eye is drawn to the texture, not the spacing.
Step 3: Outer Details and Dots
-
External leaves:
At the tip of every large main petal, paint a solid, detached leaf shape floating just above the point. Use thin, white scratched lines or negative space inside these solid shapes to mimic veins. -
Dot framing:
Outline each of these floating solid leaves with a series of tiny dots using your smallest dotting tool. Follow the curve of the leaf shape closely. -
Rim border preparation:
Move your attention to the outer rim of the plate. Visualize a circle about an inch inward from the edge. -
Dotted rim:
Create a border using dots. Start with a ring of larger dots, then add a ring of smaller dots just inside it. I find rotating the plate on a lazy susan helps keep these circles even. -
Connecting details:
Add small clusters of three or four dots near the tips of the main petals to visually bridge the gap between the central flower and the outer rim border. -
Clean up:
Check for any smudges or uneven lines. Use a damp cotton swab to gently wipe away mistakes while the paint is still tacky. -
Curing:
Allow the paint to dry for at least 24 hours. If your specific paint requires heat setting, bake the plate according to the manufacturer’s instructions (usually placing it in a cold oven, heating to 300°F/150°C, and baking for 30 minutes).
Layered Texture
Use a toothpick to scratch tiny lines into the wet solid-painted leaves. This ‘sgraffito’ technique reveals the cream plate underneath for delicate veins.
Once baked and cooled, your custom mandala plate is ready to bring a touch of handcrafted warmth to your table setting
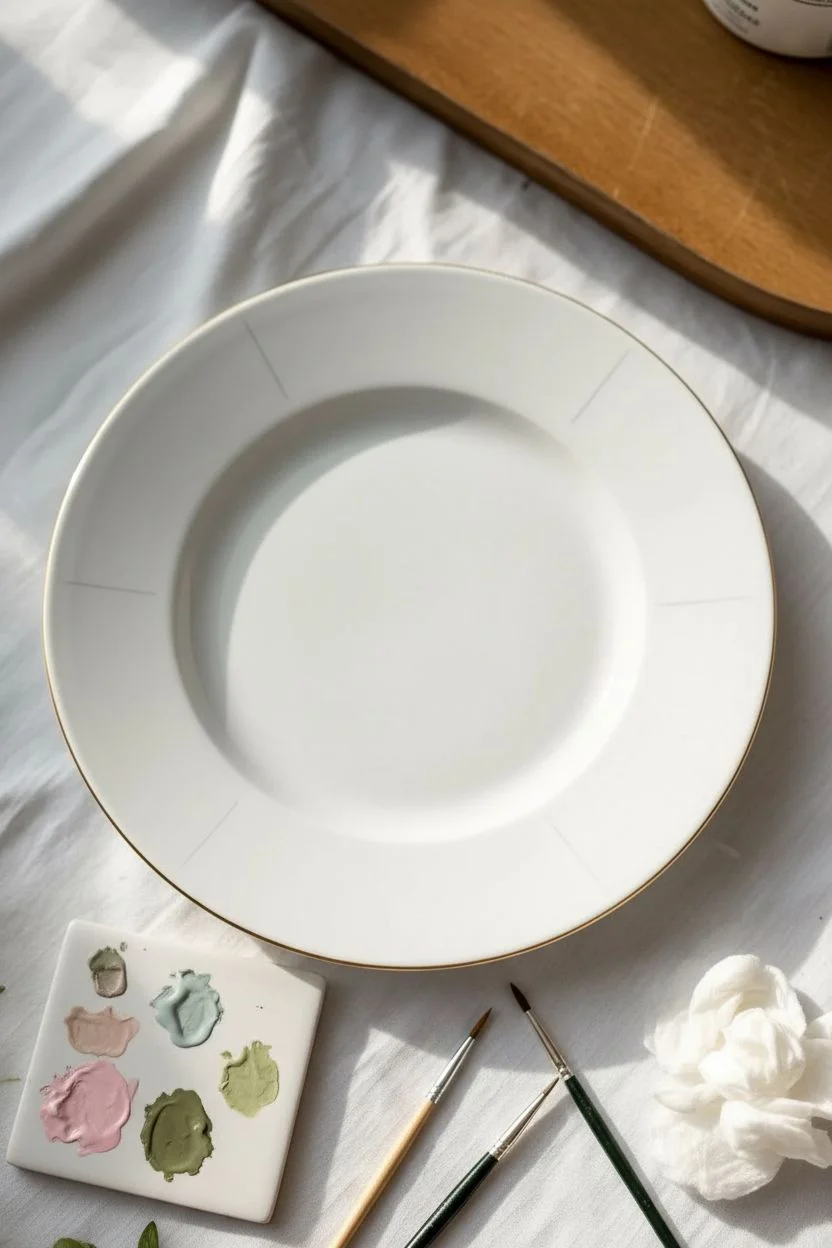
Drybrush Petal Texture for Layered Blooms
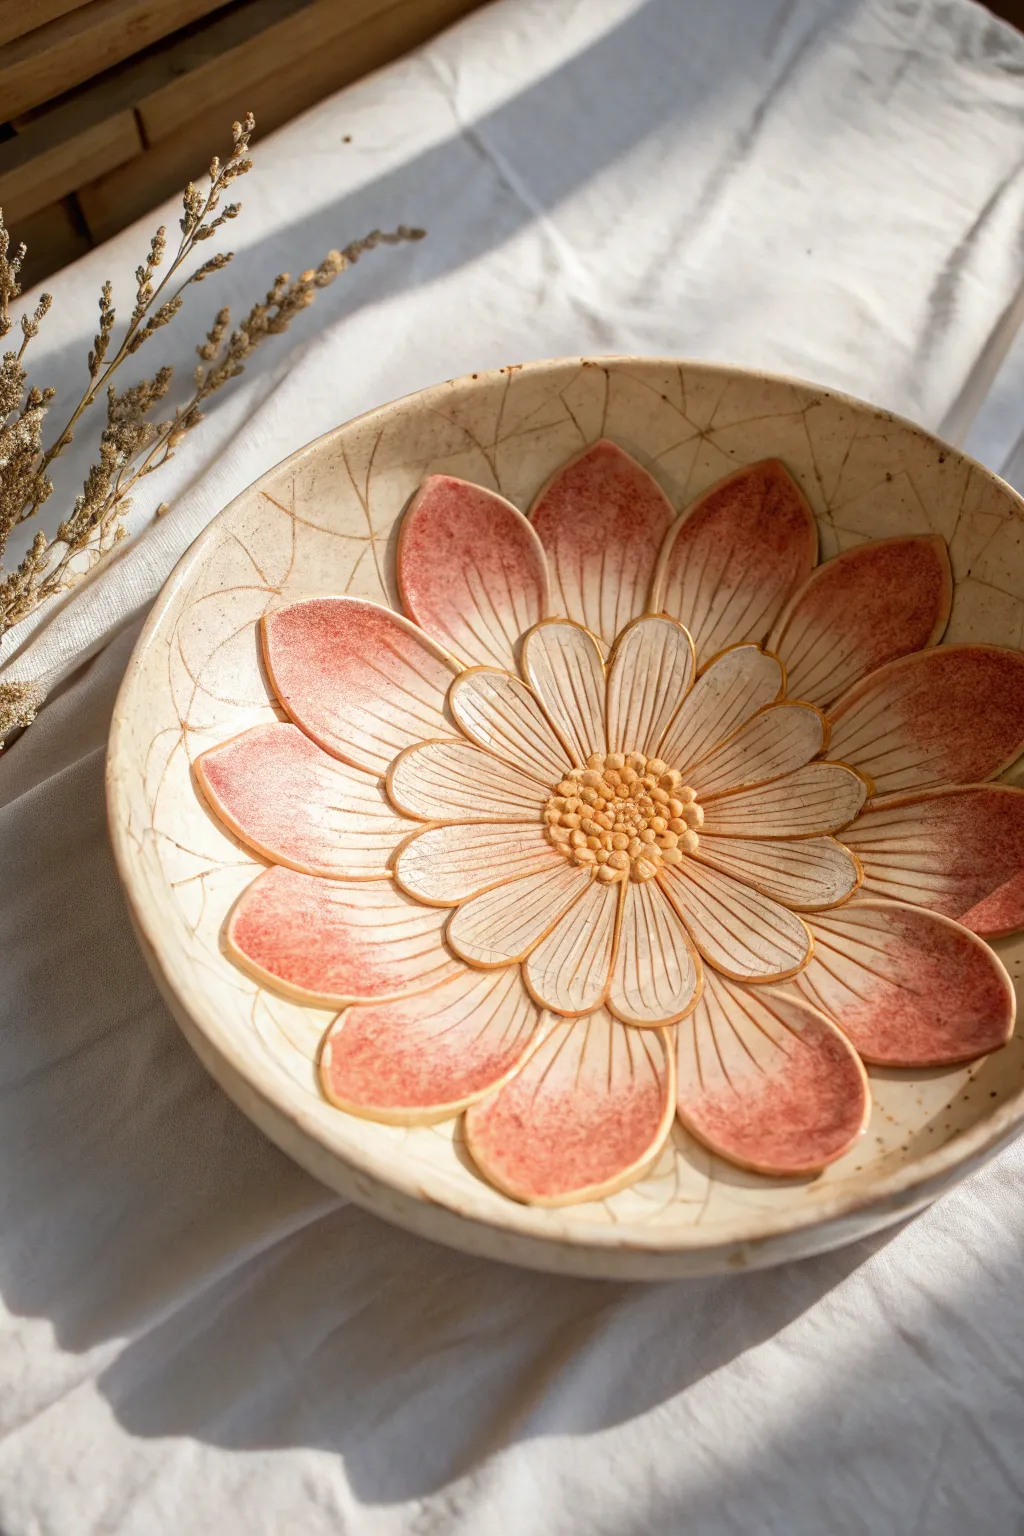
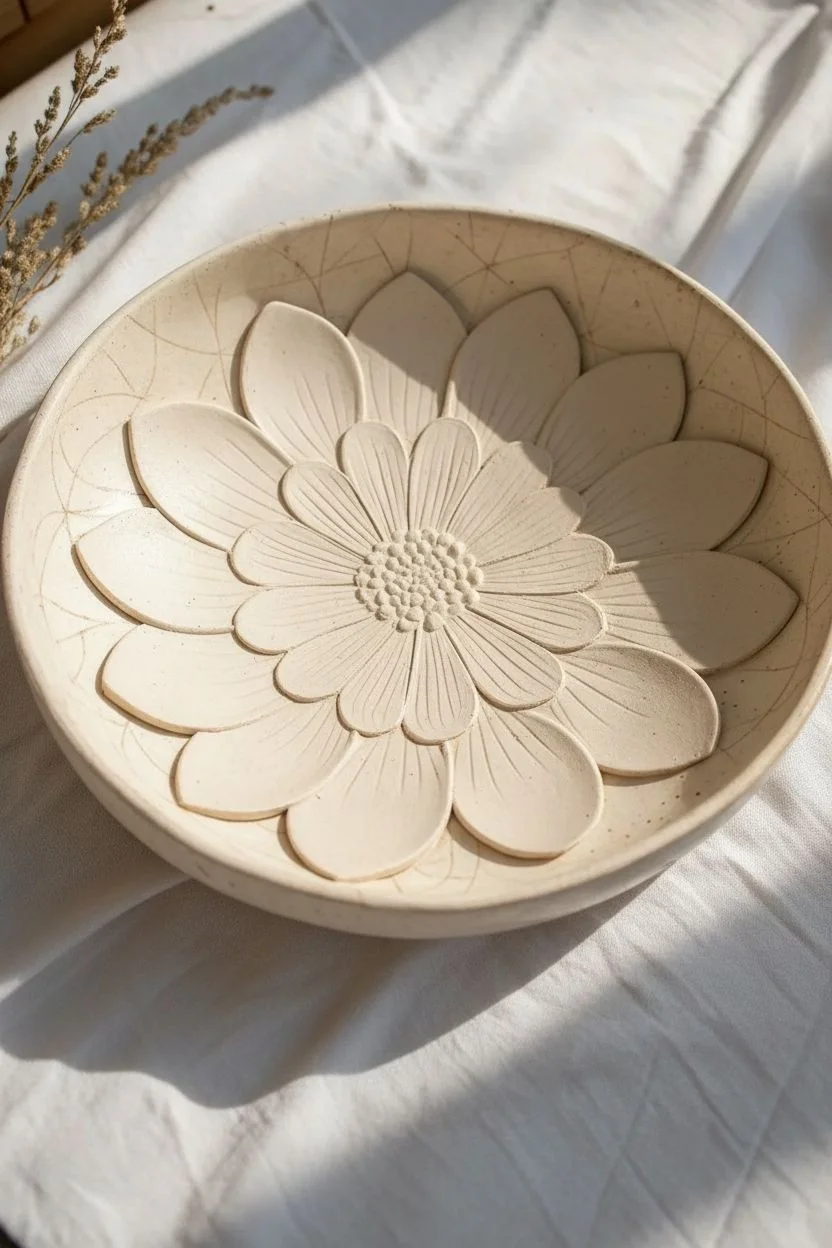
Transform a simple ceramic or clay dish into a dimensional masterpiece by sculpting raised petals directly onto the surface. This project combines relief techniques with a delicate dry-brush painting method to achieve a soft, vintage stoneware effect.
Detailed Instructions
Materials
- Bisque-fired ceramic plate or air-dry clay plate base
- Air-dry clay or ceramic clay (matching your base)
- Slip (clay slurry) and scoring tool
- Modeling tools (or a butter knife and toothpick)
- Acrylic paints (Cream/Off-White, Terra Cotta, Dusty Rose, Gold/Yellow Ochre)
- Glazing medium or matte varnish
- Small flat stiff-bristled brushes
- Fine detail brush
- Sponge
Step 1: Sculpting the Relief
-
Prepare the base:
Clean your plate surface with a slightly damp sponge to remove any dust. If using air-dry clay, ensure your base plate is fully dry and rigid before adding new clay. -
Map the center:
Lightly mark the exact center of the plate with a pencil. This will determine where your flower radiates from. -
Create the outer petals:
Roll small balls of clay and flatten them into teardrop shapes about 2 inches long. You will need roughly 10-12 for the outer ring. -
Attach the first layer:
Score the back of each petal and the plate surface where they will sit. Apply a dab of slip, press the petal down firmly, and smooth the edges slightly so they adhere well but retain their raised shape. -
sculpt the inner petals:
Repeat the process for a second, inner ring of petals. Make these slightly smaller and narrower, positioning them in the gaps between the outer petals to create depth. -
Form the center texture:
Roll tiny balls of clay (varying sizes, like peppercorns) and cluster them tightly in the center. Use a toothpick or small tool to poke texture into some of them for a pollen-like effect. -
Add petal veins:
With a needle tool or knife edge, gently carve 3-4 parallel lines running lengthwise down each petal. Keep these lines shallow to mimic natural veins. -
Create the crackle effect:
On the exposed rim of the plate around the flower, use a sharp tool to scratch very fine, random intersecting lines. This simulates a vintage crackle glaze texture. -
Dry completely:
Allow the clay to dry fully. Depending on the thickness and type of clay, this could take 24-48 hours. Sand any rough burrs gently if necessary.
Glazing Tip
Mix a drop of glazing medium into your acrylics. It increases transparency, making the gradients smoother and creating a more realistic ‘fired glaze’ look.
Step 2: Painting the Drybrush Gradient
-
Base coat application:
Paint the entire plate, including the relief flower, with an off-white or cream acrylic paint. I like to apply two thin coats to ensure solid coverage. -
Antique the cracks:
Mix a very watery wash of brown paint. Brush it over the scratched crackle lines on the rim, then immediately wipe the surface with a damp sponge, leaving the dark paint only inside the scratches. -
Start the gradient:
Load a stiff, dry brush with a small amount of Terra Cotta or Dusty Rose paint. Dab most of it off on a paper towel until the brush is almost clean. -
Apply tip color:
Starting at the very outer tips of the petals, lightly sweep the dry brush inward. The color should be strongest at the tip and fade into the cream base halfway down the petal. -
Detail the veins:
Using the same dry-brush technique, lightly drag the brush over the carved vein lines. The raised parts will catch the pigment while the grooves stay cream, emphasizing the texture. -
Paint the center:
Mix a Yellow Ochre or soft Gold color. Carefully paint the clustered center ‘seeds’, allowing the paint to settle into the crevices. -
Highlight the center:
Once the center is dry, dry-brush a tiny bit of cream highlight over the very tops of the seeds to make them pop. -
Seal the piece:
Finish with a coat of matte varnish or clear sealant to protect the paint and unify the sheen, giving it that ceramic look.
Fixing Cracks
If the clay shrinks and cracks away from the plate while drying, fill the gaps with a paste made of clay and white glue. Smooth it out and repaint once dry.
Display your dimensional plate on a stand or use it as a stunning catch-all dish for jewelry and trinkets
Metallic Accents on Flower Details
Transform a plain speckled ceramic plate into an heirloom-quality piece with soft, watercolor-style florals and subtle metallic touches. This project highlights the delicate interplay between matte floral tones and shimmering gold accents, perfect for decorative display.
Step-by-Step Guide
Materials
- Matte ceramic plate (speckled cream or off-white)
- Ceramic paints (dusty rose, terracotta, olive green, sage green, dark brown)
- Metallic gold porcelain paint or gold leaf pen
- Fine liner brush (size 0 or 00)
- Round brush (size 2-4)
- Rubbing alcohol
- Palette
- Pencil for sketching
- Oven (for curing, if paint requires)
Step 1: Preparation & Sketching
-
Clean the Surface:
Before you begin, wipe the entire plate surface with rubbing alcohol on a soft cloth. This removes any oils or fingerprints that might prevent the paint from adhering properly. -
Plan the Composition:
Visualize an L-shaped composition. The design should flow from the bottom left, swooping up toward the right side of the rim. Lightly sketch two main open blooms on the left and trailing stems moving right. -
Outline the Stems:
With a very light pencil touch, draw the main stem structure. Include a central stem that branches out, ensuring curves feel organic rather than stiff.
Brush Loading Tip
For the finest lines on stems and veins, dilute the paint slightly with a flow medium. Load only the tip of your liner brush and pull it through the puddle while rotating.
Step 2: Painting the Base Layer
-
Mix the Floral Tones:
On your palette, mix a dusty rose with a tiny drop of water to create a semi-translucent wash. It should mimic the look of watercolor. I like to keep this mixture thin so the plate’s speckles show through. -
Fill the Petals:
Using the round brush, paint the two large blooms. Use swift, curved strokes that follow the shape of the petals, leaving the centers empty for now. Don’t worry about perfect coverage; variation adds to the hand-painted charm. -
Add Leaf Foundations:
Switch to your sage green. Paint the larger, broader leaves attached to the main stem. Use a ‘press and lift’ motion with your brush to create the tapered leaf shape. -
Paint the Fern Sprig:
Mix a terracotta shade. On the right side of the composition, paint the fern-like sprig with small, almond-shaped leaves extending from a central vein.
Paint Blobbing?
If you accidentally drop a blob of paint, don’t wipe it immediately as it will smear. Use a damp cotton swab to lift the mistake purely vertically off the ceramic.
Step 3: Adding Definition
-
Deepen the Shadows:
Once the base pink is dry, mix a slightly darker version of the rose color. Add thin lines inside the petals to suggest veins and separation between overlapping petals. -
Define the Leaves:
Using the fine liner brush and dark brown paint, carefully outline the sage green leaves and add central veins. Keep the lines incredibly thin for a delicate botanical illustration look. -
Paint the Buds:
Add small, teardrop-shaped buds near the top right and bottom using the terracotta and rose mix. Connect them to the main stems with thin brown lines. -
Create Depth:
Add a darker olive green to the ‘undersides’ of the leaves or where leaves overlap to create a sense of dimension and shadow.
Step 4: Metallic Details & Finishing
-
Stipple the Centers:
Load the tip of a dry brush or a toothpick with gold metallic paint. Gently stipple (dot) the center of the two main flowers to create the pollen-filled stamen area. -
Add Atmospheric Dots:
Dip a toothpick into the gold paint and place random, tiny dots around the floral design. Focus these ‘spores’ near the flower centers and trailing off toward the rim. -
Gild the Details:
Use the gold paint one last time to add tiny highlights on the tips of the fern leaves or a single thin line along a stem for a subtle catch of light. -
Paint the Rim:
Finish the piece by painting a thin, consistent band of muted ochre or gold along the very edge of the plate rim to frame the artwork. -
Cure the Paint:
Follow the manufacturer’s instructions for your specific ceramic paint. This often involves letting the piece air dry for 24 hours and then baking it in a home oven to set the design permanently.
Once baked and cooled, your plate is ready to be displayed on a stand or used as a stunning jewelry catchall
Negative-Space Floral Silhouettes With Masking
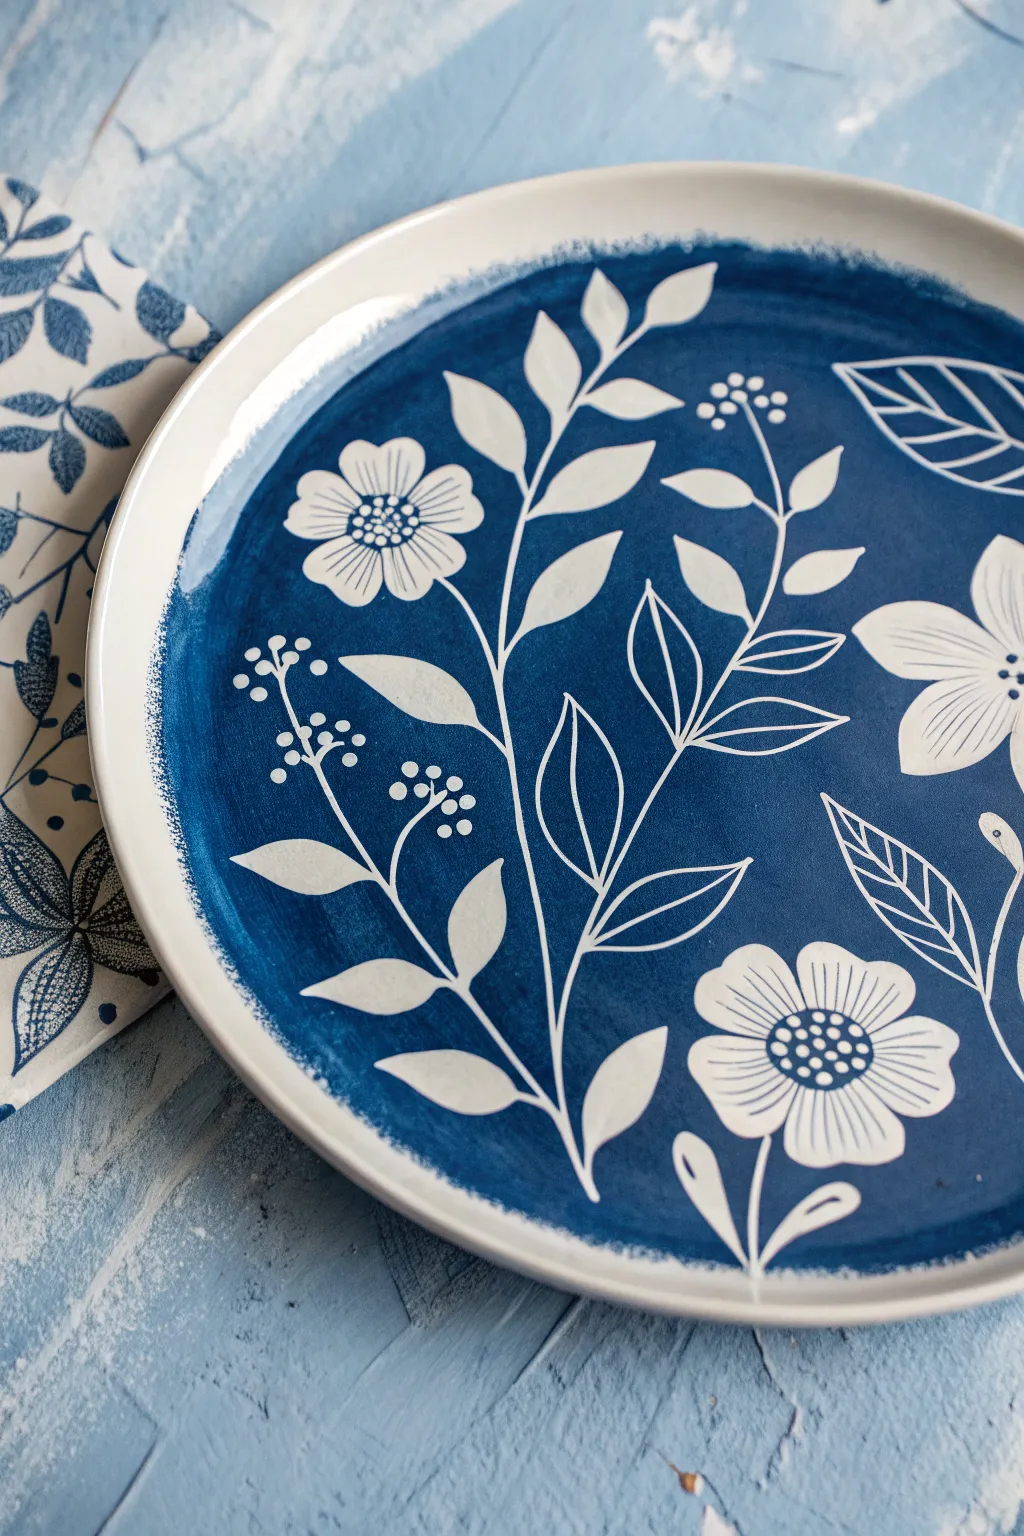
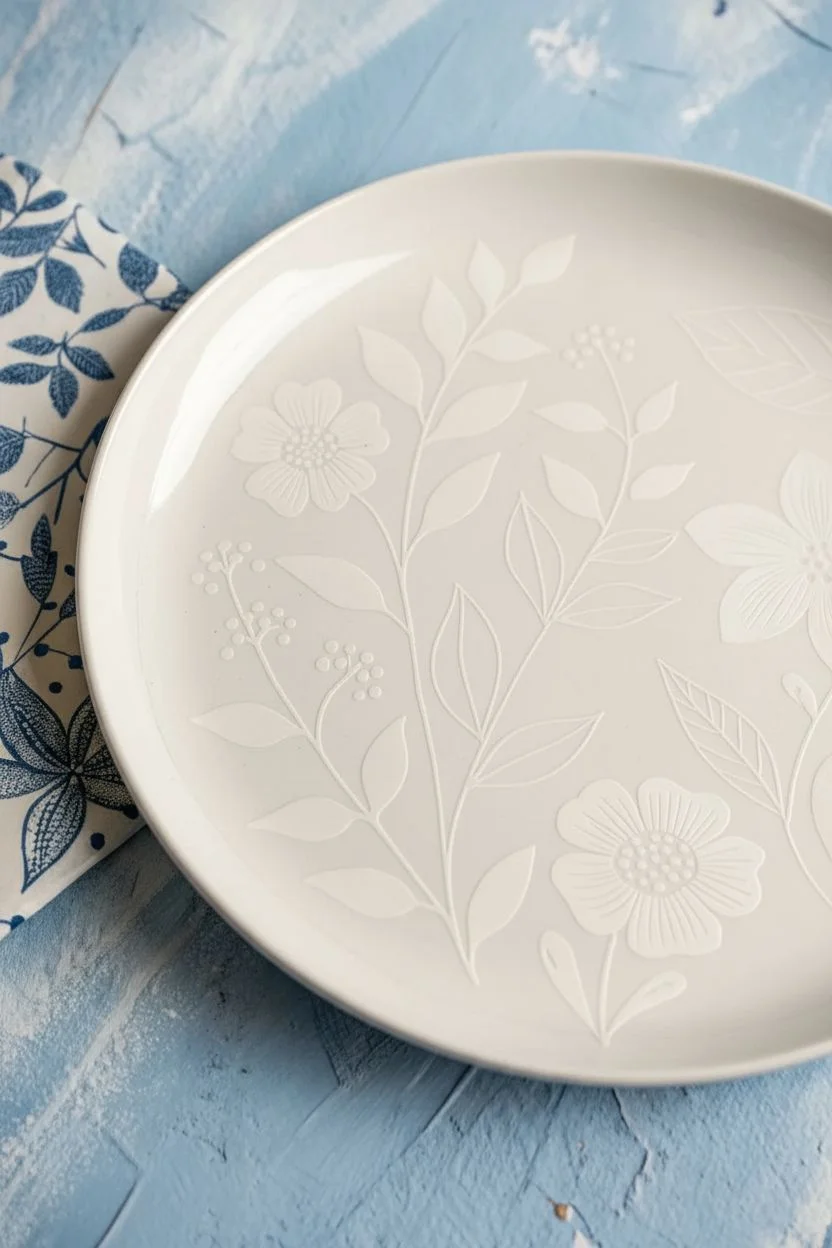
Create a striking piece of functional art using a clever masking technique that reveals crisp white florals against a moody, textured indigo background. This project mimics the look of cyanotype prints or classic pottery glazing by painting around your design rather than painting the design itself.
Step-by-Step
Materials
- White ceramic plate (porcelain or stoneware)
- Peel-and-stick vinyl or contact paper
- Craft knife or precision scissors
- Cutting mat
- Navy blue ceramic paint or porcelain paint marker (specifically for glass/ceramic)
- Wide flat brush (for background)
- Fine liner brush (for details)
- Rubbing alcohol
- Lint-free cloth
- Pencil
- Carbon transfer paper (optional)
Step 1: Preparation and Design
-
Clean surface:
Begin by thoroughly wiping down your ceramic plate with rubbing alcohol and a lint-free cloth. This removes any invisible oils or fingerprints that could prevent the masking material from adhering properly. -
Draft the layout:
Sketch your floral design on a piece of paper first to ensure the composition flows well with the curve of the plate. Focus on three main floral clusters and connecting stems. -
Transfer to masking material:
Draw your floral shapes directly onto the backing of your adhesive vinyl or contact paper. Alternatively, use carbon paper to transfer your paper sketch onto the vinyl. -
Cut the silhouettes:
Using precision scissors or a sharp craft knife on a cutting mat, carefully cut out the flower heads, individual leaves, and thicker stem segments. Keep the shapes simple; we will add the fine lines later with tools.
Bleeding Edges?
If paint bleeds under your sticker, don’t panic. Wait for it to dry completely, then gently scratch the excess paint away with the flat edge of a craft knife.
Step 2: Applying the Mask
-
Place main elements:
Peel the backing off your largest flower cutouts first. Position them on the plate, pressing down firmly from the center outward to eliminate air bubbles. -
Add foliage:
Arrange the leaf stickers around the flowers. I like to let a few leaves drift toward the edges of the central recessed area for a natural, growing look. -
Connect with stems:
Apply the thin strips of vinyl for the main stems. Ensure every edge is sealed tight against the ceramic surface, as loose edges will allow paint to seep under.
Sgraffito Styling
Instead of painting the flower centers blue, try scratching cross-hatching patterns into the blue background immediately surrounding the petals for texture.
Step 3: Painting the Background
-
Apply base color:
Load a wide flat brush with navy blue ceramic paint. Apply the paint over the entire central well of the plate, brushing right over your vinyl stickers. -
Create texture:
While the paint is wet, use the brush to create slightly uneven, swept strokes. The goal isn’t a factory-perfect flat color, but a hand-painted look with visible brush texture. -
Define the rim:
Carefully paint up to the rim’s edge, creating a slightly jagged, organic border where the blue meets the white rim, rather than a perfect circle. -
Dry to tackiness:
Allow the paint to dry until it is tacky but not fully hardened. If it’s too dry, the paint might chip when you remove the stickers; too wet, and it might smear.
Step 4: The Reveal and Detailing
-
Remove masking:
Use the tip of your craft knife to gently lift the edge of a vinyl sticker. Slowly peel it away at a sharp angle to reveal the pristine white ceramic beneath. -
Clean up edges:
If any paint seeped under the mask, quickly scrape it away with a damp toothpick or a cotton swab dipped in alcohol while the paint is still relatively fresh. -
Scratch in details:
This is the secret to the intricate look: while the blue paint is still semi-soft, use a toothpick or a specialized sgraffito tool to scratch fine lines *through* the blue paint. Add veins to the leaves and thin stems connecting the buds. -
Paint interior details:
Using a very fine liner brush and the blue paint, carefully draw the stamens, pistils, and center details inside the white flower silhouettes. -
Add delicate stems:
For the tiniest berry sprigs that were too small to mask, simply paint the thin stems in blue directly onto the white space within the composition.
Step 5: Finishing
-
Final dry:
Let the plate sit undisturbed for at least 24 hours to allow the paint to fully cure and bond with the ceramic surface. -
Bake to set:
Follow the specific instructions on your ceramic paint bottle for baking. Usually, this involves placing the plate in a cool oven, heating to 300-350°F, and baking for 30 minutes before cooling down inside the oven.
Once baked and cooled, your plate is ready to be displayed as a stunning example of negative space artistry


Have a question or want to share your own experience? I'd love to hear from you in the comments below!