
A floral wall mural can turn a plain wall into a whole mood—soft and dreamy, bold and dramatic, or anywhere in between. Here are my favorite floral wall mural ideas to help you pick a style that feels like you and fits your space.
Oversized Peony Accent Wall
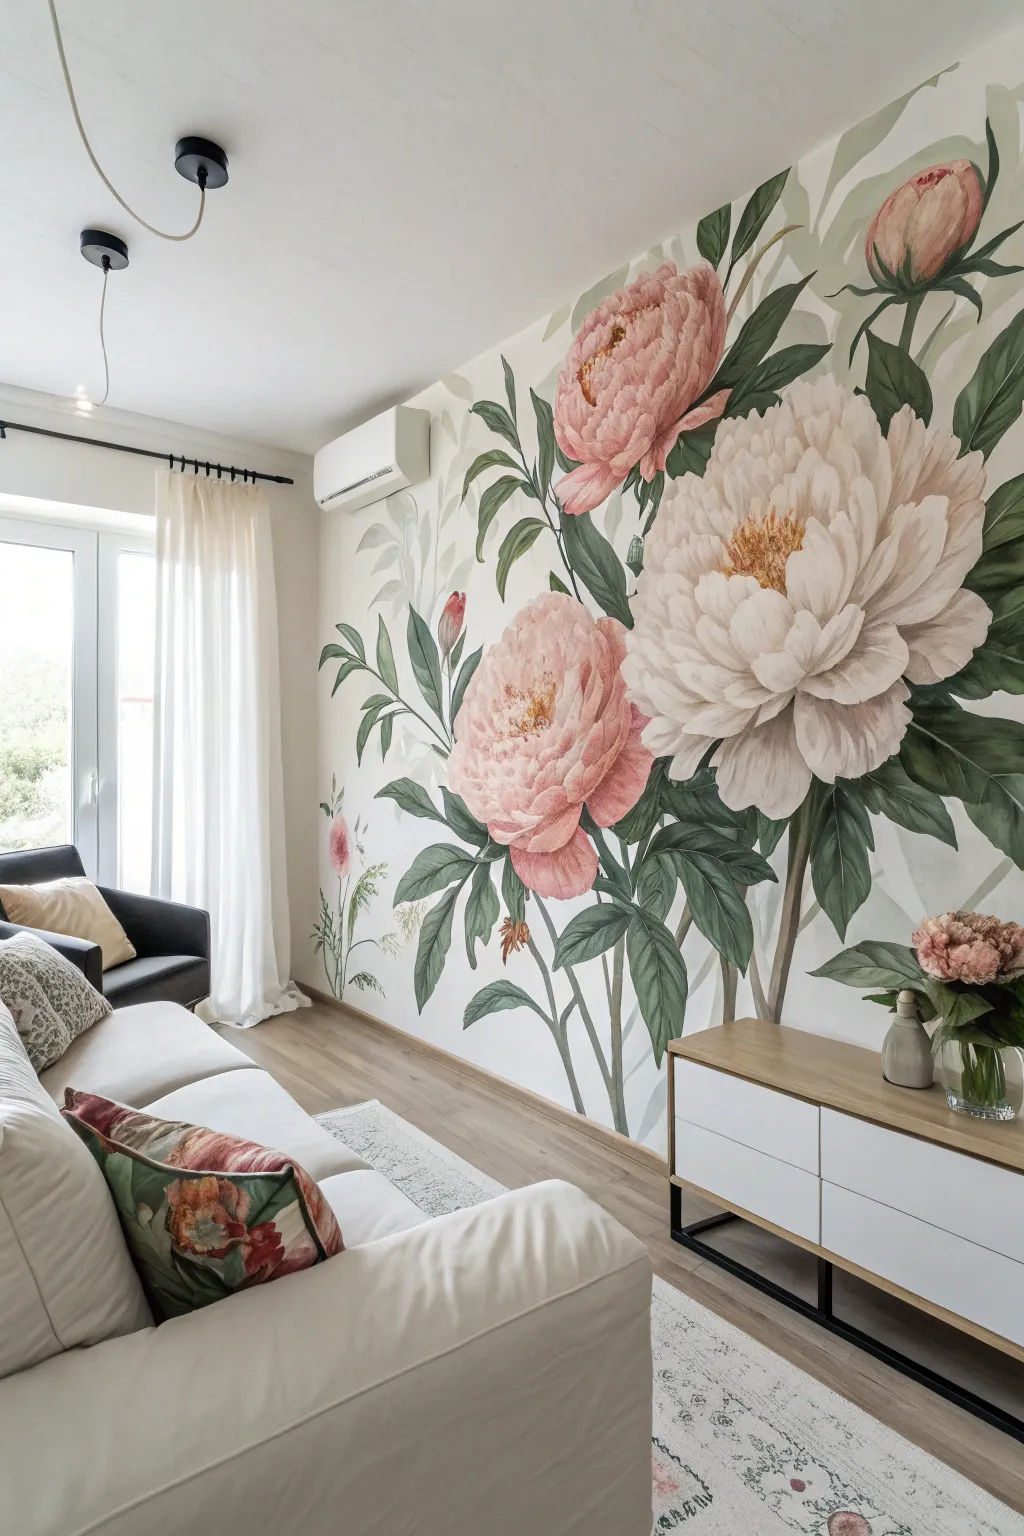
Transform a plain wall into a romantic garden centerpiece with this breathtaking hand-painted peony mural. Featuring soft pastel pinks, creamy whites, and lush greenery on a monumental scale, this project brings an air of vintage elegance and drama to any living space.
Step-by-Step Tutorial
Materials
- Interior acrylic latex paint (eggshell or satin finish): White, Sage Green, forest green, Deep Rose, Pale Pink, Butter Yellow, Burnt Sienna
- Pencil and large eraser
- Digital projector (optional but recommended)
- Painter’s tape
- Drop cloths
- Assorted synthetic brushes: 2-inch angular sash brush, 1-inch flat brush, various round detail brushes (#4, #8)
- Mixing buckets or trays
- Ladder or step stool
- Water container and rags
Step 1: Preparation and Sketching
-
Prep the canvas:
Clear the wall of all artwork and furniture. Clean the surface thoroughly with mild soapy water to remove dust and grease, then tape off the baseboards, ceiling line, and adjacent walls. Lay down drop cloths to protect your flooring. -
Base coat application:
If your wall isn’t already a neutral off-white or cream, apply a fresh coat of base paint. This ensures your floral colors will pop and provides a consistent texture for the mural work. Let this dry completely, preferably overnight. -
Project or sketch layout:
For the most accurate recreation, set up a digital projector to cast the peony reference image onto the wall. Adjust the distance until the flowers are oversized—reaching nearly floor to ceiling. Lightly trace the main outlines of the petals, stems, and leaves with a pencil. -
Freehand adjustment:
Turn off the projector and step back. Look for areas where the composition feels unbalanced. If you didn’t use a projector, sketch large, loose circles to denote where the flower heads will go, then refine the petal shapes within those circles.
Step 2: Blocking in Colors
-
Greenery foundation:
Mix a mid-tone sage green. Using your 2-inch angular brush, fill in the large leaf shapes and thick stems. Don’t worry about perfect edges yet; just get the color on the wall to establish the composition’s skeleton. -
Darker foliage depths:
While the sage is still tacky, mix a darker forest green and blend it into the base of the leaves and the shadowed sides of the stems. This wet-on-wet technique creates a soft, natural gradient. -
First flower layer: Pink:
For the pink peonies, mix your deep rose with a touch of white to create a mid-tone pink. Block in the general shape of the pink flowers, leaving the edges somewhat loose and organic. -
First flower layer: White:
For the large white peony, use a warm white or very pale cream. Fill in the main shape, but be careful not to lose your pencil lines that define individual petals.
Fixing Flat Flowers
If a flower looks too flat, your contrast is likely too low. daringly darken the deepest creases between petals with a translucent glaze of dark purple or crimson to force the lighter petals to pop forward.
Step 3: Defining the Petals
-
Shadowing the pink blooms:
Switch to a 1-inch flat brush. Mix a darker version of your pink using a tiny dot of burnt sienna. Paint the shadows between the petals and at the base of the flower head to create depth and separate the layers. -
Highlighting pink petals:
Mix a very pale, almost white pink. Using the edge of your brush, sweep highlights onto the top curves of the pink petals, mimicking the way light hits the rounded edges. -
Sculpting the white flower:
The white peony needs subtle contrast. Mix a very light grey-beige glaze by watering down a mix of white and a tiny bit of raw umber. Use this to paint the shadows where petals overlap, defining the ruffles. -
Adding warmth:
I like to glaze a very watery pale yellow near the center of the white peony. This gives it a glowing, lifelike heart before we add the pollen details.
Level Up: Texture
Mix a texture medium or modeling paste into your acrylics for the center stamens and the edges of the foreground petals. This physical relief adds a tactile, 3D quality when viewed up close.
Step 4: Refining Details
-
Leaf detailing:
Return to the leaves with a smaller round brush. Use a mix of white and sage green to paint thin veins. Add crisp edges to the leaves where they overlap the background, cleaning up any messy lines from the blocking phase. -
Buds and stems:
Paint the tight buds using the same pinks and greens. Ensure the stems connecting them to the main plant flow naturally; avoid stiff, straight lines. -
Center stamens:
Using a small number 4 detail brush and a mixture of butter yellow and burnt sienna, stipple (dot) the centers of the open peonies. Vary the size of the dots to create a realistic, pollen-heavy texture. -
Final highlights:
Add pure white highlights to the very tips of the stamens and the sun-facing edges of the topmost petals. This sharpest contrast brings the whole mural into focus. -
Clean up:
Step back and inspect the mural from a distance. If any background wall color was accidentally smudged, touch it up with your wall paint. Carefully remove the painter’s tape once everything is dry.
Step back and admire your personal indoor garden, bloom by massive bloom.


Romantic Rose Garden Wall
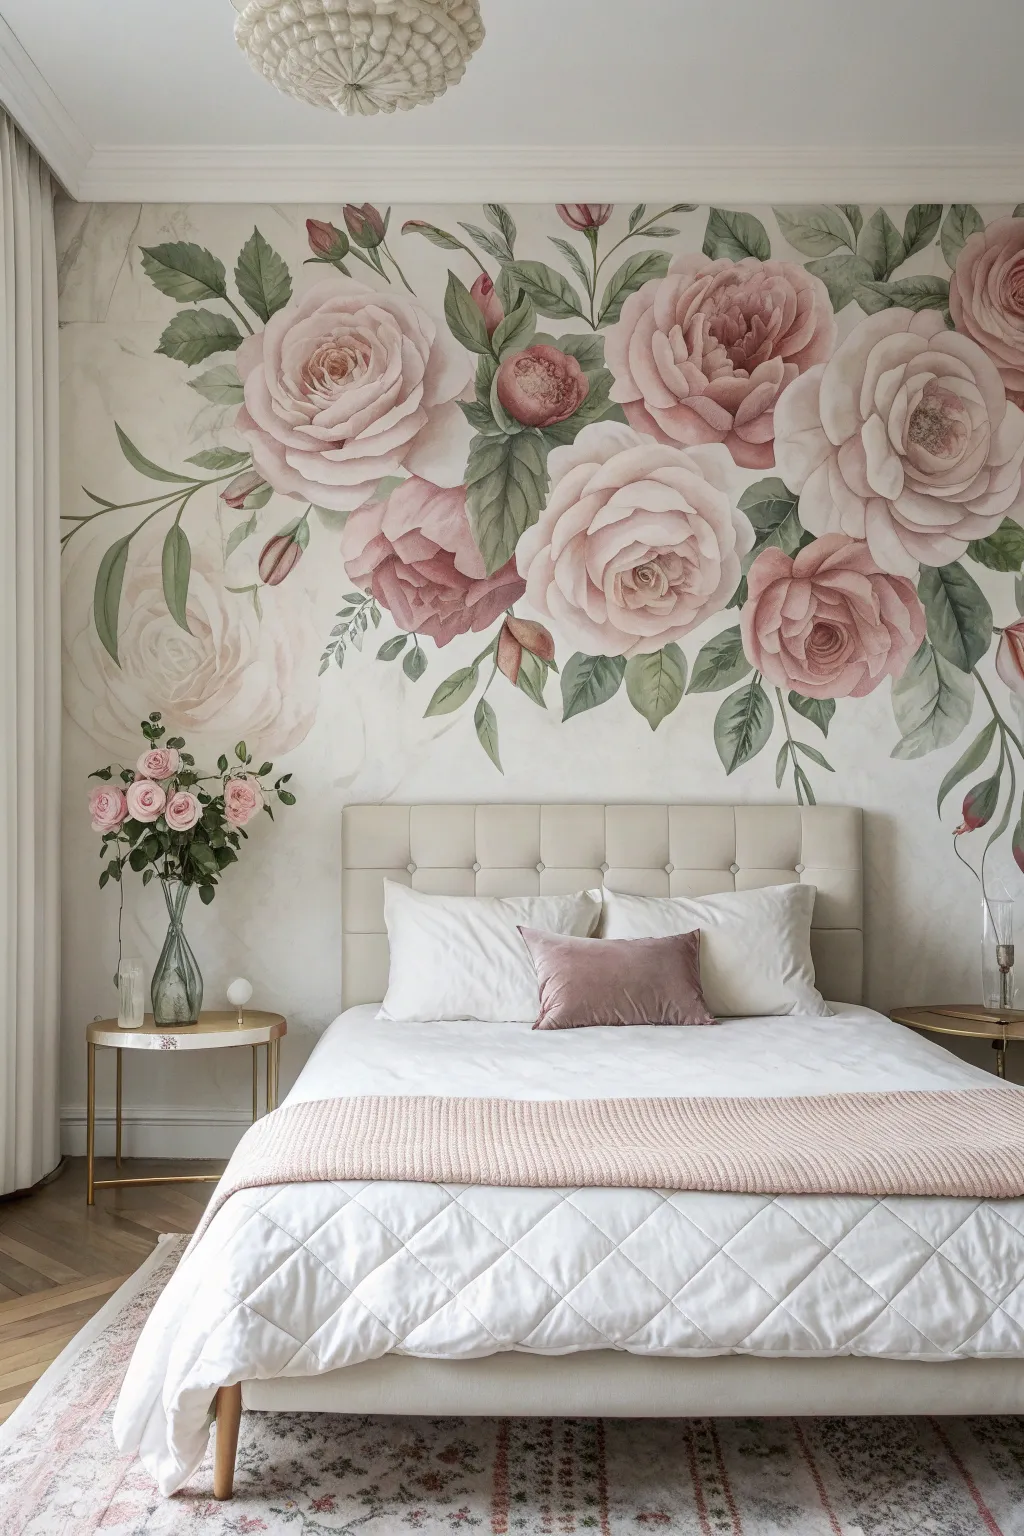
Transform a plain bedroom wall into a romantic sanctuary with this oversized floral mural. By layering soft washes of acrylics and glazes, you will create the illusion of giant watercolor roses blooming right above your headboard.
Step-by-Step
Materials
- Interior acrylic paint (matte white for base)
- High-quality artist acrylics (Titanium White, Alizarin Crimson, Sap Green, Burnt Umber, Yellow Ochre)
- Acrylic glazing medium (matte or satin)
- Large synthetic flat brushes (2-3 inch)
- Assorted round brushes (sizes 8, 12, and a liner brush)
- Sea sponge or clean cotton rags
- Chalk or watercolor pencils (light pink or grey)
- Painter’s tape and drop cloths
- Mixing buckets and palette trays
- Ladder
Step 1: Preparation & Background
-
Clean and mask:
Start by thoroughly cleaning the wall surface to remove dust or grease. Apply painter’s tape to the ceiling line, baseboards, and adjoining walls, then lay down drop cloths to protect the flooring. -
Create the base:
Roll on a fresh coat of matte white interior paint if your wall isn’t already pristine. Let this dry completely overnight to ensure a non-absorbent canvas for your detail work. -
Simulate a marble texture:
To mimic the subtle background texture seen in the photo, mix a large volume of glazing medium with a tiny drop of grey paint. Use a damp sea sponge to dab this very faintly across random sections of the wall, softening the edges with a dry rag so it looks like faint smoke or weathered paper.
Step 2: Sketching Composition
-
Plan the placement:
Stand back and visualize where the blooms should sit. The focal point should be slightly off-center above the bed. Use a light pink chalk or watercolor pencil to faintly sketch the large circles where the main rose heads will go. -
Outline the shapes:
Refine your circles into rough rose shapes, marking the center spirals and the large outer petals. I like to keep these lines very loose and faint since they are just guides. -
Add foliage flow:
Sketch sweeping, curved lines for the stems and leaves, ensuring they drape downwards on the sides to frame the bed area naturally.
Fixing Heavy Lines
If a shadow or outline looks too harsh, don’t paint over it. Instead, apply a thin layer of pure white glaze over just that section to push the dark color back and make it look misty.
Step 3: Painting the Blooms
-
Mix the rose wash:
Combine Alizarin Crimson with plenty of glazing medium and a touch of Titanium White to create a translucent, tea-rose pink. It should be the consistency of heavy cream but see-through. -
Block in base colors:
Using a large flat brush, fill in the sketched rose shapes with your pink glaze. Don’t worry about even coverage; variations in opacity actually help create the watercolor effect. -
Deepen the centers:
While the base is tacky, mix a slightly darker, more opaque version of the pink (less glaze, more paint). Dab this into the center of the flowers to establish the heart of the rose. -
Define the petals:
Switch to a size 12 round brush. Mix a ‘shadow pink’ by adding a speck of Burnt Umber to your pink mix. Paint c-shaped strokes specifically where petals overlap to create depth and separation. -
Add white highlights:
Mix Titanium White with a little glaze. Using a clean brush, paint the upper edges of the outer petals to make them look like they are catching light. Soften the bottom edge of these white strokes with a damp brush to blend them into the pink.
Pro Tip: ‘The Watercolor Look’
The secret to the watercolor effect with acrylics is water management. Keep a spray bottle handy to mist the wall lightly as you blend, which prevents the acrylic from drying too fast.
Step 4: Leaves & Details
-
Mix foliage greens:
Create two green shades using Sap Green: one mixed with Yellow Ochre for fresh leaves, and one with a touch of Burnt Umber and White for a muted, dusty sage look. -
Paint the leaves:
Use the round brush to paint the leaves, pressing down at the base and lifting as you reach the tip to create a point. Vary between the two green shades for realism. -
Connect stems:
Use a liner brush and the darker green mix to draw thin, elegant stems connecting the leaves to the main floral cluster. -
Add final contrast:
Mix a very dark, reddish-brown color. Sparingly add tiny accents to the deepest parts of the rose centers and the very tips of the buds to bring the image into focus. -
Soften edges:
Step back to view the whole wall. If any edges look too hard or ‘cut out,’ use a brush dipped in clear glazing medium to gently lightly scrub the edge, blurring it slightly into the background.
Remove the tape once dry and enjoy sleeping beneath your tranquil garden masterpiece


Wildflower Meadow From Floor Up
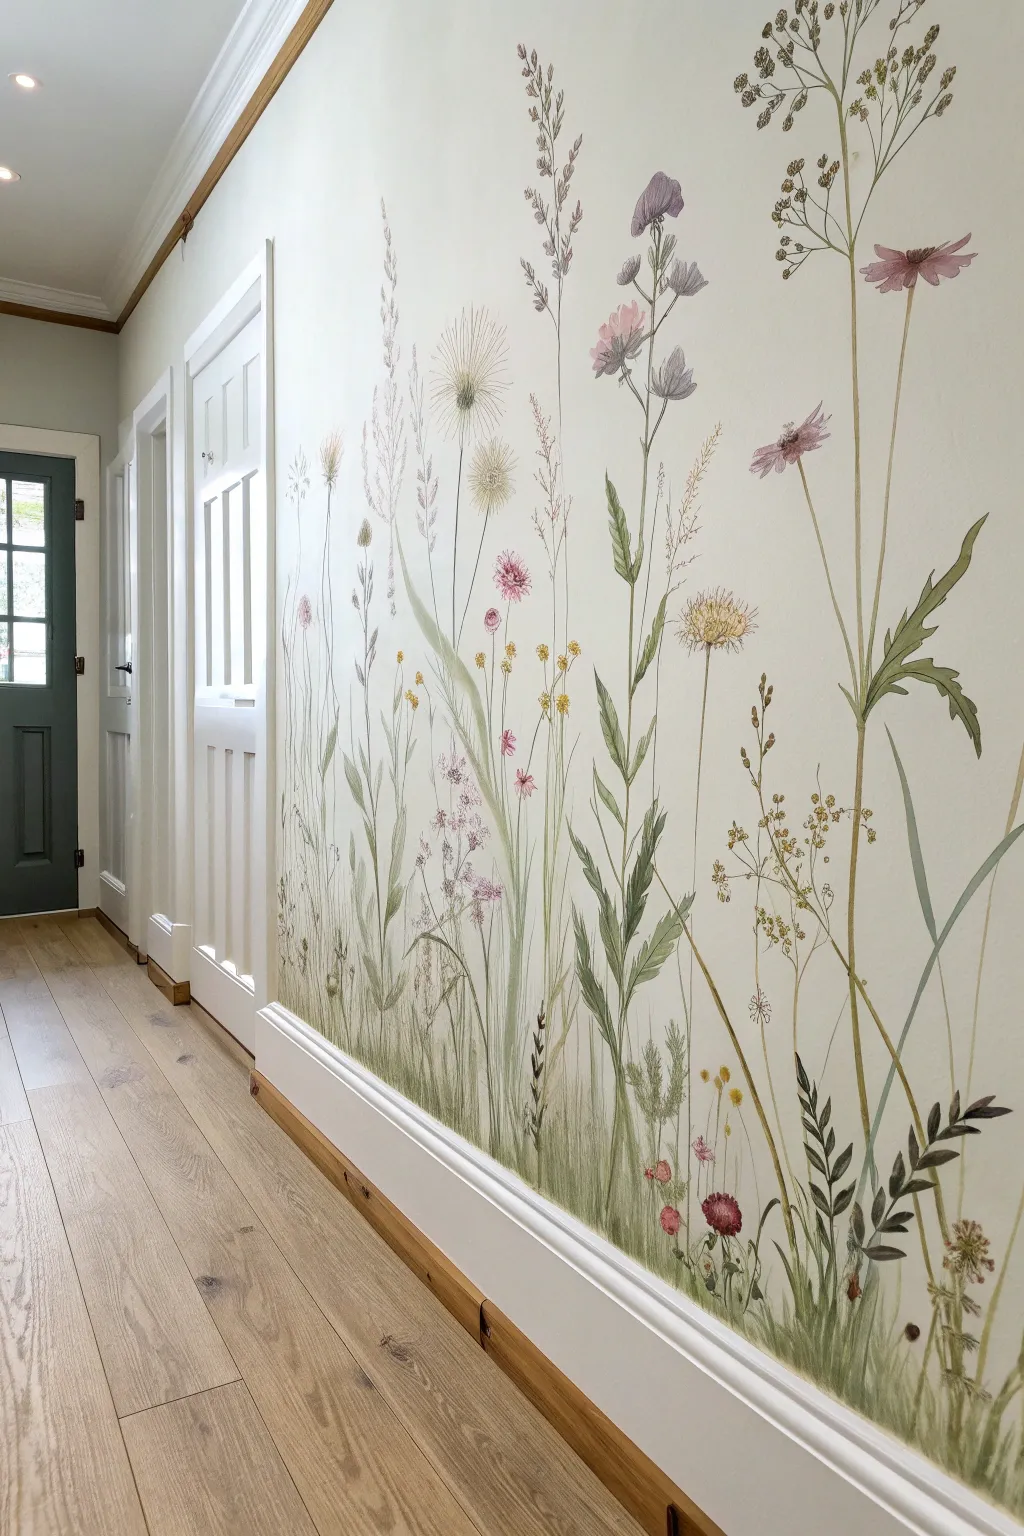
Transform a plain hallway into a serene garden path with this delicate, floor-up botanical mural. The design creates an airy, organic feel by anchoring the heavier foliage at the baseboard and letting slender stems reach loosely upward towards the ceiling.
Step-by-Step Tutorial
Materials
- Interior acrylic latex paint (eggshell or satin finish) in a creamy off-white for the base
- High-quality acrylic craft paints or mural paints (olive green, sap green, muted pink, lavender, pale yellow, ochre, burnt umber)
- Glazing medium or water for thinning paint
- Assorted synthetic brushes: 1″ angle brush, #6 and #8 round brushes, #0 or #1 liner brush
- Painter’s tape
- Drop cloth
- Chalk or a watercolor pencil (light gray or pale green)
- Paper plates or palettes for mixing
- Water cups and rags
- Reference images of botanical illustrations
- Optional: Clear matte acrylic varnish
Step 1: Preparation and Background
-
Prepare the workspace:
Begin by clearing the hallway area and laying down a drop cloth to protect your flooring. Tape off the top edge of the baseboards carefully with painter’s tape to ensure a crisp horizon line where the stems begin. -
Refresh the base coat:
If your wall isn’t already a clean, warm off-white, apply a fresh coat of eggshell interior latex paint. This provides a uniform canvas and helps the semi-transparent floral layers glide on smoothly. Let this cure for at least 24 hours. -
Sketch the composition:
Using a piece of chalk or a very light watercolor pencil, lightly sketch the main vertical lines of your tallest plant stems. Vary the heights significantly—some reaching waist-high, others nearly to the ceiling—to create a natural rhythm. Keep the lines faint; you just need a guide for placement.
Step 2: Painting the Foundations
-
Mix your greens:
On your palette, create three shades of green: a pale, watery willow green; a medium olive; and a darker forest green mixed with a touch of brown. Mix a generous amount of glazing medium (or water) into the lighter shades to achieve a watercolor effect. -
Paint the background grasses:
Using the 1-inch angle brush and your palest, thinnest green mixture, paint loose, vertical strokes starting from the baseboard and flicking upward. These should be low and grassy, creating a dense ‘haze’ of green at the bottom that fades as it rises. -
Establish main stems:
Switch to a #6 or #8 round brush. Load it with the medium olive green and trace over your chalk guidelines for the primary flower stalks. Vary the pressure on the brush: press down for thicker bases and lift off for tapering tips. -
Add secondary branches:
While the main stems are drying, use the same brush to add smaller offshoot branches. Keep the angles sharp and upward-reaching, mimicking the growth patterns of wildflowers like cow parsley and cornflowers.
Transparency Tip
Acrylics dry fast and opaque. To keep that soft botanical look, use glazing liquid rather than just water. It keeps the paint translucent without breaking down the binder.
Step 3: Adding Foliage and Detail
-
Paint broad leaves:
Identify where you want heavier foliage, mostly in the lower third of the mural. Use the darkest green mixture and a round brush to paint broad, lance-shaped leaves. Twist the brush slightly as you pull to create organic curves. -
Create feathery textures:
For plants resembling ferns or dill, use a liner brush with a slightly drier paint consistency. Use short, quick ticks outward from a central vein to build up a feathery texture. I find looking at a real dried flower helps visualize this step. -
Layer depth:
Once your first layer of greens is dry, go back in with a slightly more opaque, darker green. Paint slender blades of grass in front of the faded background wash to create an illusion of depth.
Add Some Life
Hide a few tiny creatures in the tall grass! Paint a small ladybug on a leaf, a bumblebee near a bloom, or a butterfly resting on a stem for a charming surprise.
Step 4: Blooming and Refining
-
Paint the structural blooms:
Mix a muted pink and lavender. Using a small round brush, dab the basic shapes of the flower heads. For the thistle-like flowers, use an upward fanning motion. For the flatter blooms, use small, circular dabs. -
Add delicate seed heads:
Mix a pale ochre or beige. Use your finest liner brush to create ‘dandelion’ style puffs or umbels (umbrella-shaped flowers). Instead of painting solid circles, use tiny dots or dashes to keep them looking airy. -
Detail the petals:
Return to your pink and purple blooms. Add deeper color near the center of the flowers and use a clean, slightly damp brush to pull the color outward, softening the edges to look like watercolor petals. -
Highlight and define:
Mix a watery burnt umber. Use the liner brush to add very fine details: tiny joints on the stems, veins on the larger leaves, and darker centers in the flowers. This contrast brings the soft wash into focus. -
Clean up:
Once the paint is fully dry, gently wipe away any remaining visible chalk lines with a damp cloth. Remove the painter’s tape from the baseboard slowly at a 45-degree angle. -
Seal the work (Optional):
In a high-traffic hallway, you may want to protect your work. Apply a coat of clear matte acrylic varnish using a soft foam roller, ensuring you don’t overwork it to prevent smearing the delicate details.
Step back and enjoy the peaceful atmosphere your handcrafted meadow brings to the home.


Soft Watercolor Bloom Wash
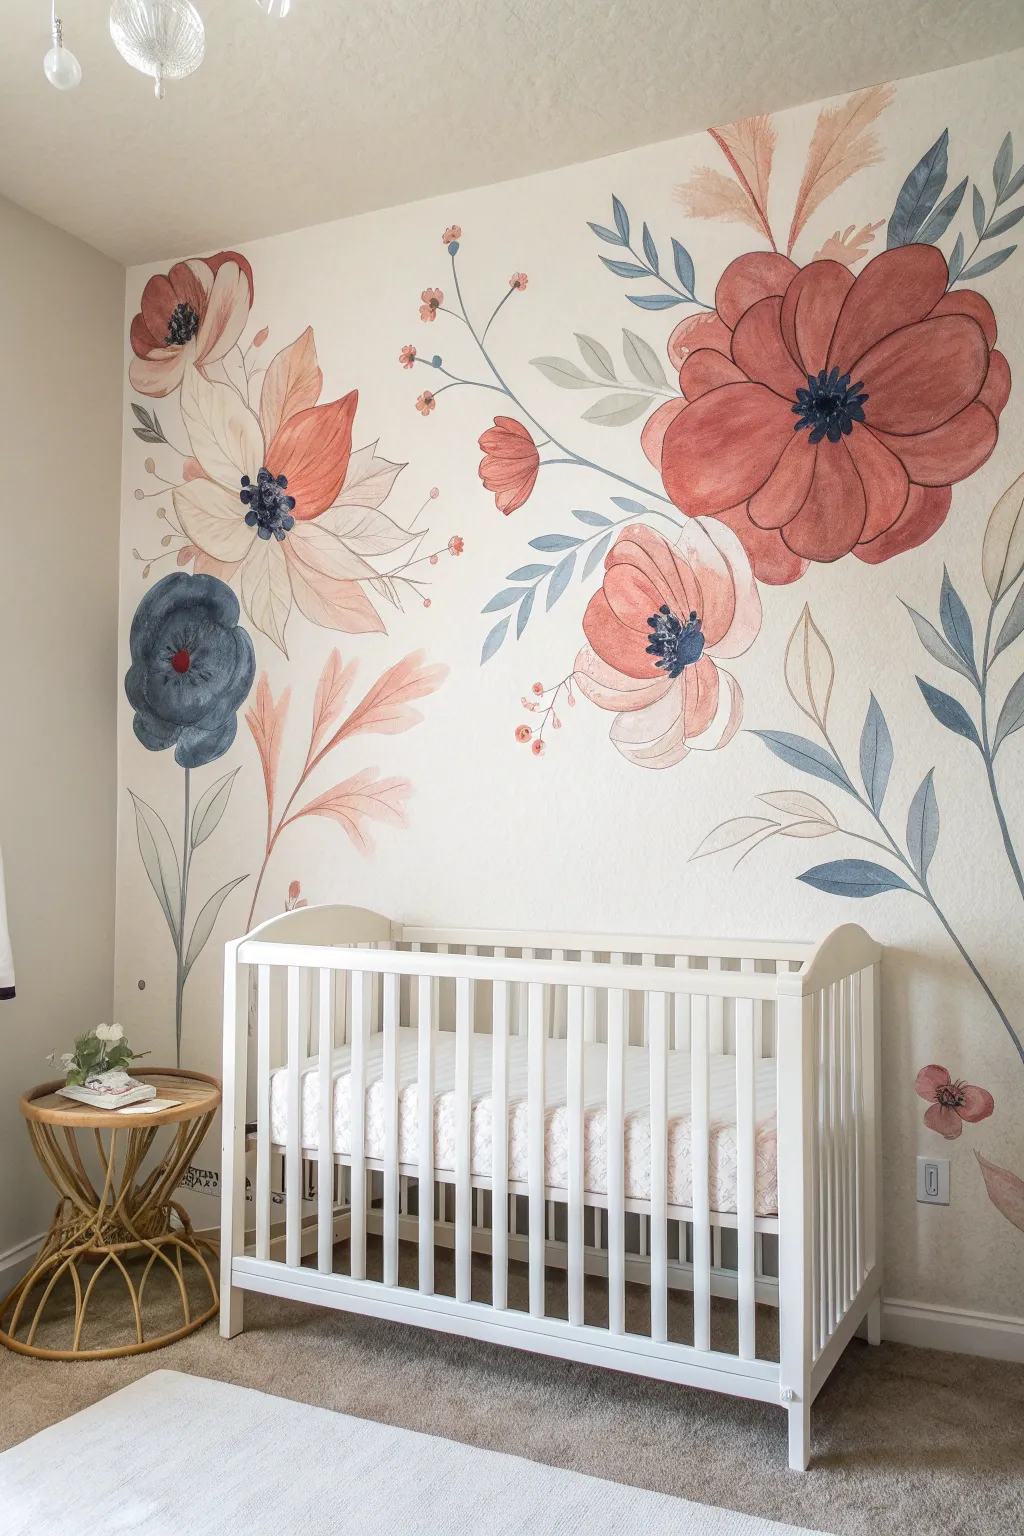
Transform a nursery or bedroom wall into a blooming garden with this soft, oversized floral mural. Using a faux watercolor technique, you’ll layer translucent acrylic washes to create dreamy, ethereal flowers that feel organic and hand-painted.
Step-by-Step
Materials
- Matte interior latex paint (white for base)
- Acrylic craft paints (burnt orange, dusty rose, navy blue, sage green, pale pink)
- Glazing medium or water (for thinning)
- Assorted synthetic brushes (2-inch flat brush, 1-inch angle brush, round detail brushes)
- Pencil and large eraser
- Paper towels or rags
- Painter’s tape and drop cloth
- Mixing cups or palette
- Ladder or step stool
Step 1: Preparation and Sketching
-
Prepare the canvas:
Ensure your wall is clean and painted with a fresh coat of flat or eggshell white paint. A matte surface is crucial for grabbing the watery pigment effectively without dripping too much. -
Draft the composition:
Lightly sketch the general placement of your large blooms using a pencil. Focus on three main focal points—like the large rust-colored flower on the right, the peach bloom on the left, and the smaller accents—to balance the visual weight. -
Add stem guidelines:
Draw loose, sweeping lines for the stems and branches. Keep them curved and organic rather than stiff and straight, letting them flow naturally from the bottom corners upward towards the blooms. -
Refine the shapes:
Flesh out the petal shapes on your sketch. They don’t need to be perfect; irregular, wavy edges mimic the watercolor look better than perfect circles.
Drip Doctor
If your watery paint runs down the wall, don’t panic. Quickly dab it with a dry paper towel to lift the run, or embrace it for an artistic ‘splatter’ effect common in watercolors.
Step 2: Painting the Blooms
-
Mix your glazes:
In mixing cups, dilute your acrylic paints with water or glazing medium. You want a consistency similar to heavy cream or skim milk—thin enough to be translucent, but pigmented enough to show color. I usually aim for a 1:1 ratio to start. -
Base layer for the large rust flower:
Using a 2-inch flat brush, fill in the large petals of the main flower on the right with a diluted burnt orange. Work quickly to keep a wet edge, allowing the color to pool slightly at the edges for that characteristic watercolor outline. -
Paint the secondary blooms:
Move to the left side and fill in the large flower with a pale peach wash. For the darker blue flower on the lower left, use a navy wash, applying it slightly heavier to achieve depth while keeping it transparent. -
Layering for intensity:
Once the first layers are dry to the touch, go back over the centers of the flowers with a slightly less diluted version of the same color. This creates an ombre effect, radiating darkness from the middle outward. -
Add the pink accents:
Paint the smaller rose-colored buds and medium-sized pink blooms. Use a round brush here to control the smaller shapes while maintaining a loose, watery feel.
Metallic Magic
Once the mural is dry, outline just a few key petals or add tiny dots to the flower centers using a gold leaf pen or metallic gold paint for a touch of elegance.
Step 3: Stems and Foliage
-
Draft the leaves:
Using a sage green wash, paint the larger leaves. Experiment with pressure on your angled brush: press down for the wide part of the leaf and lift up as you taper to the point. -
Introduce blue foliage:
To add visual interest, paint some of the sprigs and smaller leaves in a muted blue-grey tone. This contrasts beautifully with the warm floral colors and connects the design to the navy flower. -
Connect the stems:
Using a long liner brush or a steady hand with a small round brush, trace over your pencil stem lines with a mixture of green and brown. Keep the lines thin and elegant. -
Blend the intersections:
Where a leaf meets a stem, soften the connection with a damp, clean brush so it looks like the colors are bleeding into one another slightly.
Step 4: Detailing and Defining
-
Create the flower centers:
Mix a dark navy or charcoal color. Using a small detail brush, stipple jagged, star-like shapes in the very center of the large rust and peach flowers. -
Add stamina details:
Paint tiny dots or ‘anthers’ around the dark centers using white or pale yellow to bring the flowers to life. -
Define the petals:
Mix a slightly darker version of each flower’s color. With a very fine brush, outline a few select petals loosely to give them definition without outlining the entire flower like a cartoon. -
Incorporate delicate sprigs:
Paint wispy, hair-thin branches with tiny buds extending from the main floral clusters to fill empty negative space and add movement. -
Erase guidelines:
Once the paint is completely cured (wait at least 4-6 hours), gently erase any visible pencil marks that weren’t covered by paint.
Step back and admire your new, serene garden sanctuary.
BRUSH GUIDE
The Right Brush for Every Stroke
From clean lines to bold texture — master brush choice, stroke control, and essential techniques.
Explore the Full Guide
Cherry Blossom Branch Sweep
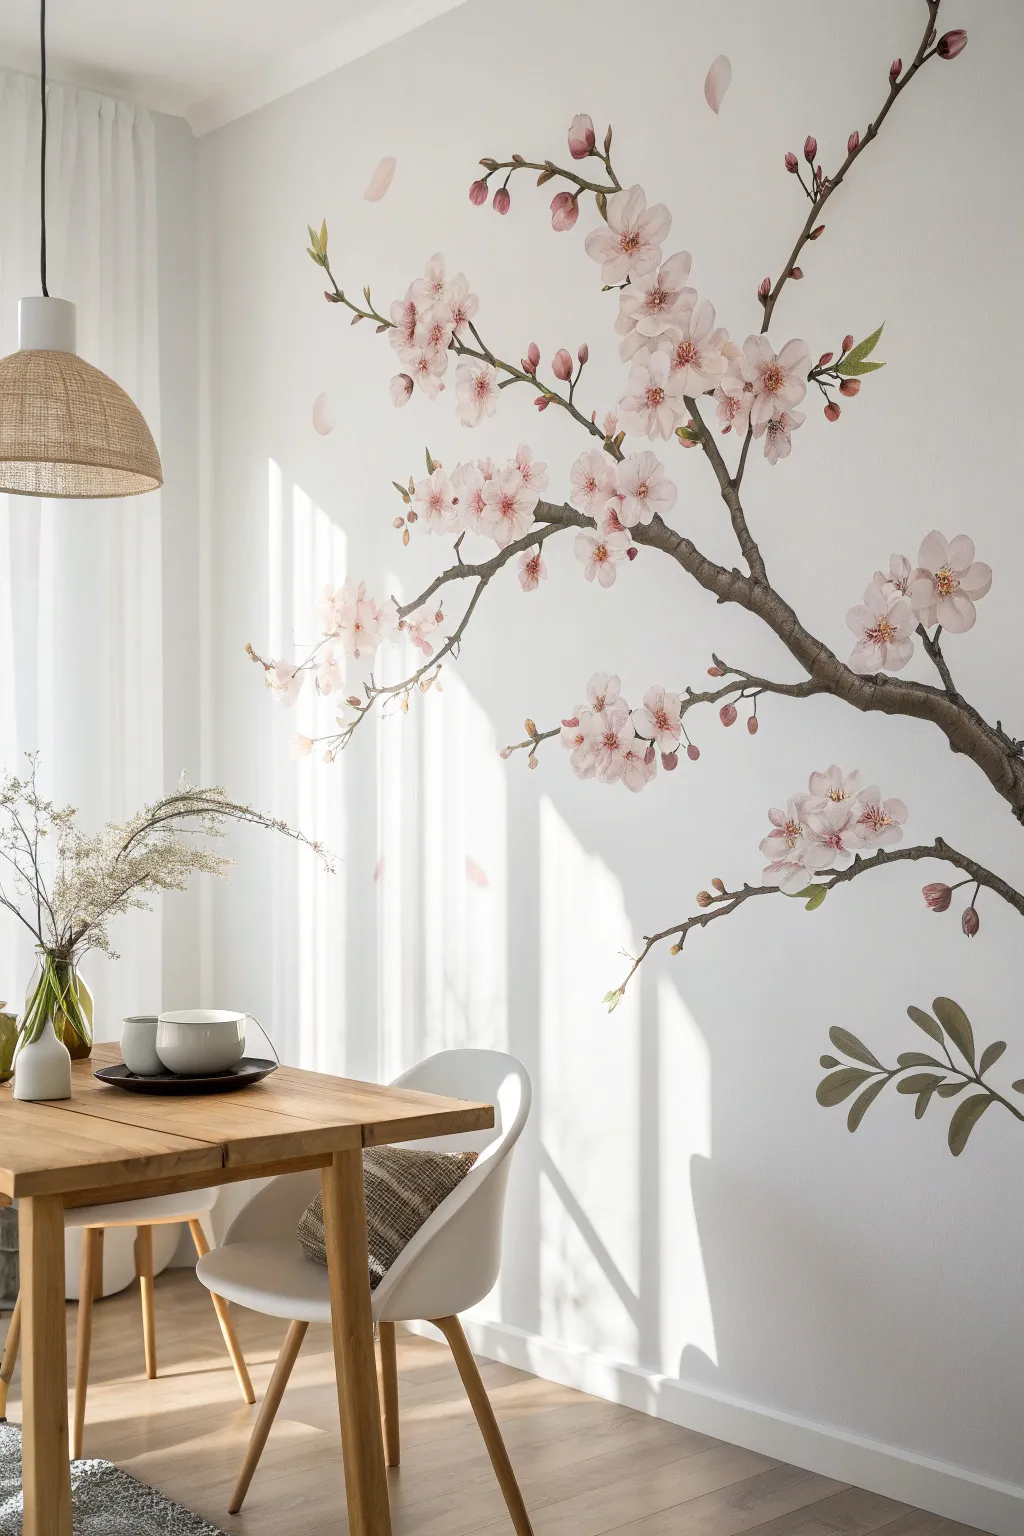
Transform a plain white wall into an ethereal garden with this delicate cherry blossom mural. The design features a sweeping, realistic branch laden with soft pink blooms, creating a serene focal point that feels both organic and artistic.
Step-by-Step Guide
Materials
- Matte finish interior wall paint (dark brown/taupe for branches)
- Acrylic paints (various shades of pink, white, soft green, yellow)
- Wall painting brushes (1-inch flat, #4 round, #2 liner)
- Pencil and large eraser
- Reference photo of cherry blossom branches
- painter’s tape
- Drop cloth
- Stepladder
- Paper plate or palette for mixing
- Rags or paper towels
Step 1: Preparation and Sketching
-
Prepare the space:
Clear furniture away from the wall you intend to paint. Lay down a drop cloth to protect your flooring and tape off any baseboards or adjacent walls if the branch will get close to corners. -
Map the composition:
Using a light pencil, lightly sketch the main artery of the branch. Start from the right edge of the wall, about two-thirds up from the floor, and create a sweeping, organic curve that reaches toward the center of the wall. -
Add secondary branches:
Draw thinner offshoot branches extending from the main limb. Keep lines jagged and natural rather than perfectly straight, as real cherry wood is knobby and textured. -
Position the blooms:
Roughly circle areas where clusters of flowers will sit. Group them in bunches of three to five, leaving some open space on the branches for balance.
Softness Secret
Mix a clear glazing medium into your acrylic paints. This makes the paint semi-transparent, allowing you to build up layers that look like watercolor.
Step 2: Painting the Woodwork
-
Base coat the branch:
Mix a dark brown with a touch of gray/taupe to get an aged wood color. Using a 1-inch flat brush or a large round brush, fill in the main branch shape. -
Create texture and dimension:
While the brown is still wet, blend in a slightly darker shade on the bottom of the branches for shadow. I like to add a touch of lighter taupe on the top edges to suggest sunlight hitting the bark. -
Extend the thin twigs:
Switch to a smaller round brush to paint the delicate, spindly tips of the branches. Ensure these taper off naturally into thin points.
3D Embellishment
For a stunning mixed-media effect, hot glue high-quality silk cherry blossom flowers over some of the painted ones for real texture and shadow.
Step 3: Blooming the Flowers
-
Mix your pinks:
Prepare three shades of pink on your palette: a very pale, nearly white pink for highlights; a medium blush pink for the main petals; and a deeper mauve for shadows. -
Paint petal base layers:
Using a round brush, paint five-petal shapes in the medium pink. Don’t worry about perfection; keeping edges slightly soft mimics the watercolor style shown in the image. -
Layering highlights:
Once the base pink is tacky but not fully dry, dab the pale pink onto the outer edges of the petals to create luminosity and volume. -
Adding depth:
Apply the darker mauve color near the center of each flower to give the bloom a cup-like shape and depth. -
Paint the buds:
Scattered along the thinner twigs, paint small oval shapes in darker pink to represent unopened buds. Paint the base of these buds with a tiny dab of green.
Step 4: Detailing and Refining
-
Flower centers:
Using a liner brush and yellow ochre or gold paint, create tiny stippled dots in the very center of the open blooms. -
Stamens:
With the finest liner brush and a diluted deep red or brown paint, draw very fine lines radiating from the yellow center. Top these lines with tiny dots. -
Adding leaves:
Mix a soft, sage green. Paint small, pointed oval leaves emerging near the flower clusters. Keep the green muted so it doesn’t overpower the soft pinks. -
Floating petals:
Paint single petal shapes distinctly separated from the branch, appearing to float in the air. This enhances the sense of movement and breeze. -
Final check:
Step back across the room to view the mural as a whole. Use a small brush with your wall color (white) to clean up any messy edges or refine the shape of petals that feel too heavy.
Allow the mural to cure for at least 24 hours before moving furniture back, ensuring your beautiful new branch is fully set
Sunflower Field Horizon Mural
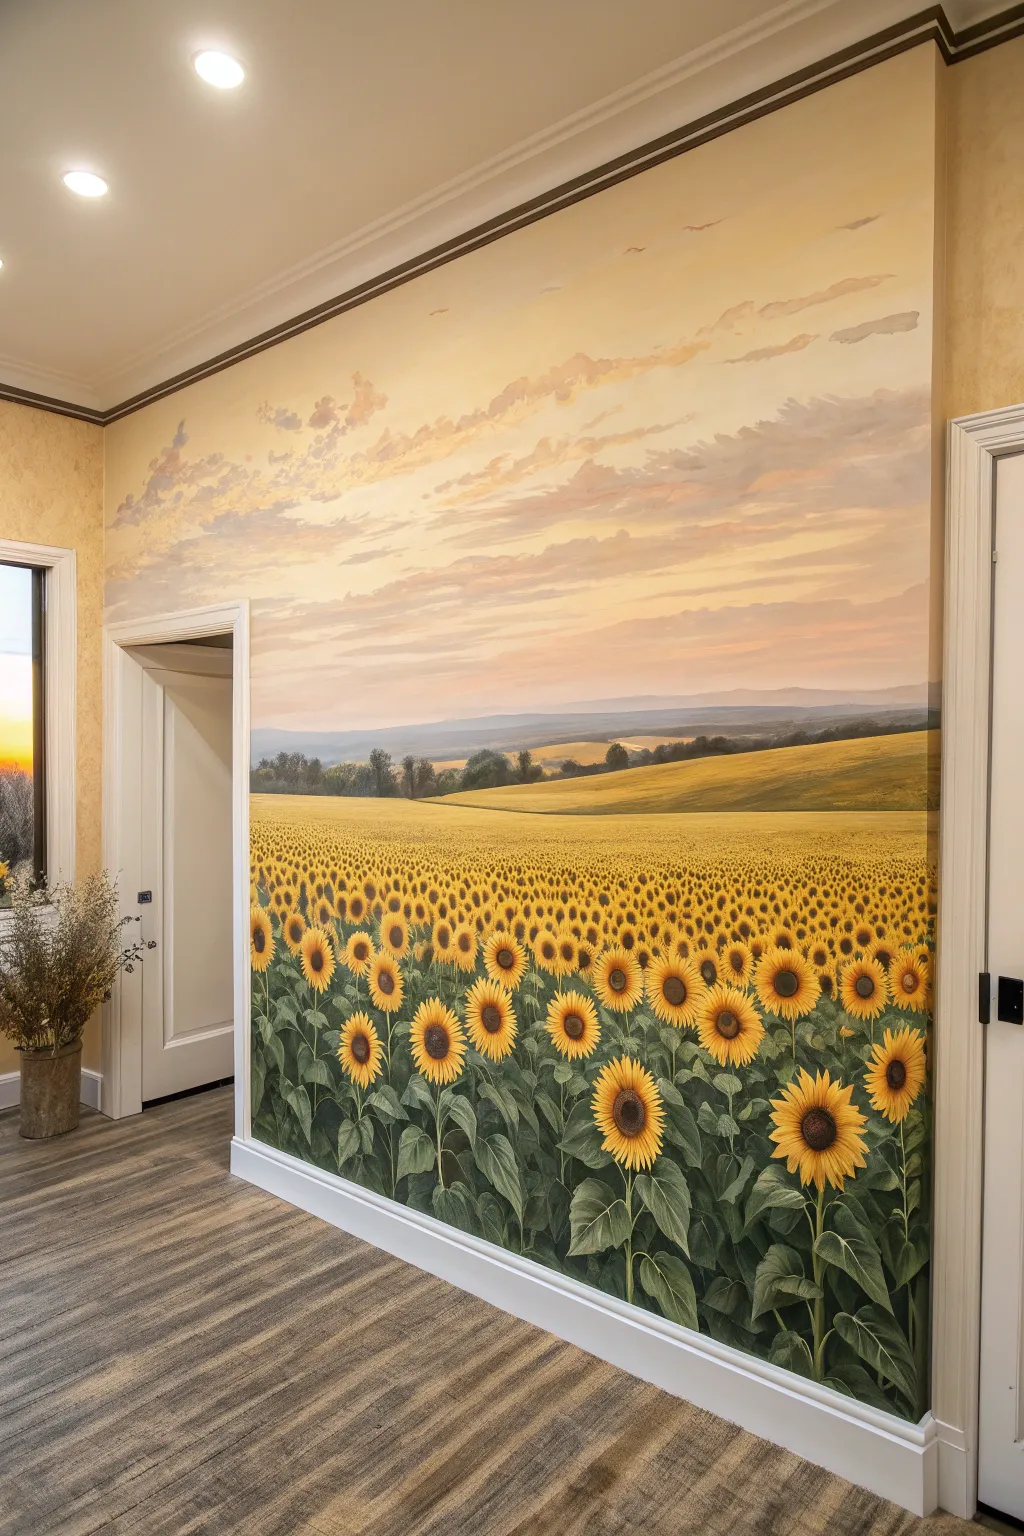
Transform a blank wall into an endless summer afternoon with this immersive mural featuring rolling sunflower fields beneath a soft, cloud-streaked sky. This large-scale painting uses atmospheric perspective to create incredible depth, making any room feel instantly more expansive.
How-To Guide
Materials
- Interior acrylic wall paints (eggshell or satin finish)
- Colors: White, sky blue, pale yellow, ochre, burnt sienna, deep green, brown, black
- Large rollers and extension pole
- Assorted paintbrushes (wide flat brushes, round detail brushes, fan brush)
- Painter’s tape
- Drop cloths
- Mixing buckets and trays
- Chalk or pencil for sketching
- Glazing medium (optional)
- Step ladder
Step 1: Preparation and Sky Layer
-
Prep the workspace:
Clear the area and lay down drop cloths to protect your flooring. Tape off the ceiling, baseboards, and door frames with painter’s tape to ensure crisp edges. -
Base coat the wall:
Roll a primer or a fresh coat of white paint over the entire wall. This provides a clean, luminous surface that will help the sky colors glow. -
Mix sky gradients:
Prepare three large pools of color: a pale, dusty blue for the top, a peach-orange tone for the middle horizon, and a very pale yellow-white for the transition zone. -
Paint the sky gradient:
Working while the paint is wet, blend the blue down from the ceiling into the peach tones. Use a large, damp brush or a dry roller to soften the transition so there are no hard lines. -
Add wispy clouds:
Mix a soft lavender-grey and a pale cream. Using a rag or a dry brush, scumble horizontal, elongated cloud shapes across the upper third of the wall. Keep the strokes loose and feathery to mimic distinct cloud layers.
Cloud Control
If your clouds look too heavy or solid, lightly drag a dry, clean brush horizontally across them while wet. This feathers the edges instantly.
Step 2: Creating the Landscape
-
Establish the horizon line:
About one-third of the way up from the floor, use chalk to lightly mark the horizon line. Add gentle, rolling curves above it to represent distant hills. -
Paint the distant hills:
Mix a muted, desaturated purple-green color. Paint the furthest hills with this tone; atmospheric perspective dictates that distant objects are lighter and cooler in tone. -
Paint the mid-ground fields:
As you move closer (moving down the wall), switch to a warmer olive green mixed with ochre. Paint the rolling hills just below the distant ones, using horizontal strokes to suggest the lay of the land. -
Block in the foreground color:
For the bottom half of the mural—the immediate field—paint a solid base coat of deep, dark green. This will serve as the shadowy foliage beneath the bright flowers.
Step 3: Planting the Sunflowers
-
Create the distant flower field:
Near the horizon line, stipple tiny dots of yellow ochre. These shouldn’t look like distinct flowers yet, just a texture suggesting thousands of blooms further away. -
Paint mid-ground flower shapes:
Moving down the wall, begin painting small, rough circles of yellow. I find it helpful to vary the heights slightly to keep the field looking organic rather than regimented. -
Detail the foreground stems and leaves:
At the bottom third of the wall, switch to a medium round brush. Paint thick, vertical green stems and large, heart-shaped leaves over your dark base coat, adding lighter green highlights to the leaf tips. -
Add foreground flower centers:
Paint large, dark brown circles for the centers of the prominent foreground flowers. Make the centers slightly oval-shaped to account for the perspective. -
Paint the main petals:
Using a bright, sunny yellow, paint long, teardrop-shaped petals radiating from the brown centers. Overlap them slightly for a full look. -
Add highlights and depth:
Mix a lighter lemon yellow and add highlights to the top edges of the petals where the ‘sun’ would catch them. Use a little burnt sienna mixed with yellow for the shadowed petals underneath. -
Refine the centers:
Dab a bit of black and lighter brown inside the flower centers to create a seed texture. This small detail brings the closest blooms into sharp focus. -
Final touches:
Step back to review the mural. Add a few stray leaves or petals to fill any awkward gaps, and ensure the transition from the detailed foreground to the blurry background feels gradual.
Pro Tip: Depth Perception
Remember the rule of scale: Keep details sharp and colors warm at the bottom, but make everything blurrier, cooler, and smaller as you move up toward the horizon.
Now step back and enjoy the warmth of your permanent summer view

PENCIL GUIDE
Understanding Pencil Grades from H to B
From first sketch to finished drawing — learn pencil grades, line control, and shading techniques.
Explore the Full Guide
Elegant Lily-and-Leaves Composition
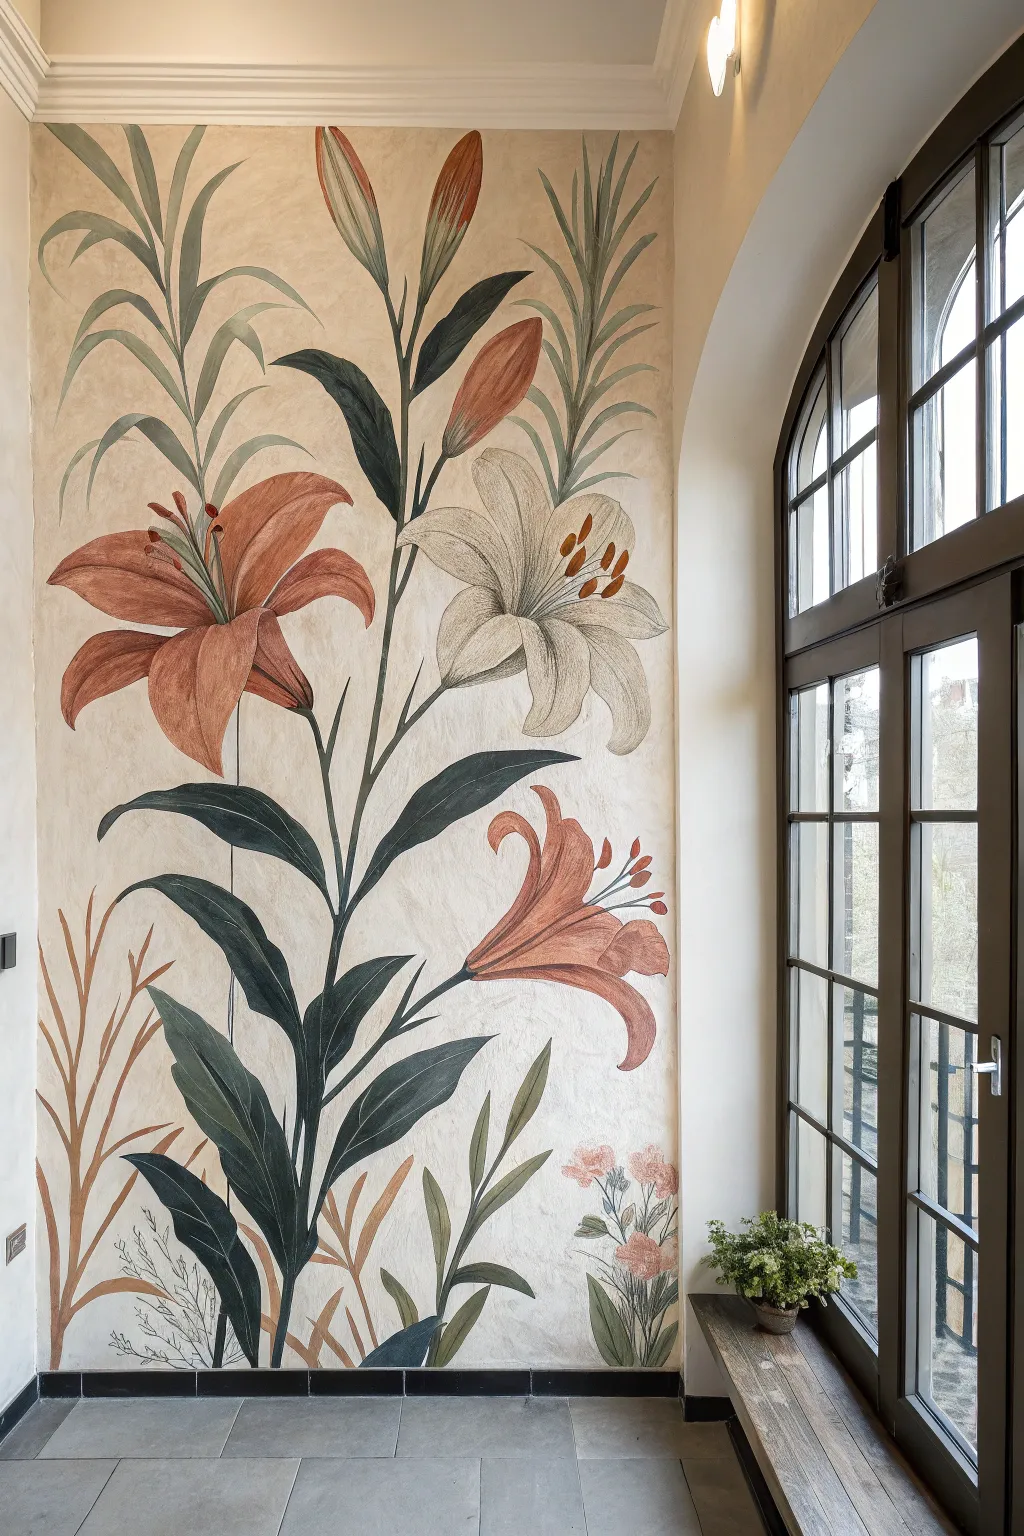
Bring the elegance of a vintage conservatory into your home with this stunning, large-scale lily mural. Featuring muted terracotta blooms and deep green foliage against a textured cream background, this project mimics the look of an aged fresco.
Step-by-Step Tutorial
Materials
- Interior latex paint (eggshell or matte finish): cream/off-white (base)
- Acrylic paints: burnt sienna, terracotta, deep forest green, olive green, sage green, raw umber, titanium white, yellow ochre
- Glaze medium
- Large synthetic brushes (2-3 inch) for background
- Assorted artist brushes: rounds (sizes 4, 8, 12), filberts (sizes 10, 16), and a liner brush
- Chalk or watercolor pencils (light brown or grey)
- Sea sponge or rag (optional for texture)
- Painter’s tape
- Drop cloths
- Step ladder
Step 1: Preparation and Background
-
Prepare the workspace:
Clear the area near the wall and lay down drop cloths to protect your flooring. Tape off baseboards, ceiling molding, and any window frames like the dramatic arched window shown here to ensure clean edges. -
Create the base texture:
Roll on your cream or off-white base coat. While it is still slightly wet, I like to use a dry brush or a scrunched rag to subtly manipulate the paint in random, cross-hatch motions. This breaks up the flat uniformity and mimics the look of old plaster or parchment. -
Age the background (optional):
Mix a tiny amount of raw umber with glaze medium and water. Lightly wash this over random areas of the wall, concentrating on edges and corners, to create a subtle, antique patina. Let the wall dry completely, preferably overnight.
Pro Tip: Translucency
Mix a glazing medium into your paints for the petals. This transparency allows layers to interact, mimicking the delicate, papery quality of real flower petals.
Step 2: Sketching the Composition
-
Map out the stems:
Using a light brown chalk or watercolor pencil, lightly sketch the main vertical lines of the plant stems. Establish a tall, central stalk that reaches nearly to the ceiling and gently curves, anchoring the composition. -
Placement of blooms:
Roughly circle where the three main lily heads will go: one large open bloom on the left, one facing right near the center, and a bud or side-facing bloom lower down. Keep the scale large; the lilies should feel grand and impactful. -
Refine the sketch:
Flesh out the petal shapes, adding the characteristic recurved tips of the lily petals. Sketch in the long, lance-shaped leaves growing upward from the stem base, and add the secondary filler plants at the bottom.
Level Up: Faux Framing
Paint a simple, thin border around the entire mural in a contrasting dark grey or bronze to create the illusion of a framed botanical hanging.
Step 3: Painting the Foliage
-
Block in base greens:
Mix a deep forest green with a touch of raw umber. Using a large filbert brush, paint the main stems and the darkest shadow areas of the long, sweeping leaves. Don’t worry about perfect blending yet; focus on establishing the sweeping direction of growth. -
Add mid-tones:
Lighten your green mix with a bit of olive and white. Paint the main body of the leaves, blending wet-on-wet into the darker shadow areas you just applied. Use long, confident strokes that follow the leaf’s length. -
Highlight the leaves:
Mix a pale sage green. Apply this to the top edges of the leaves and where the light would naturally hit the curving surfaces. This creates dimension and prevents the foliage from looking flat against the wall. -
Paint secondary foliage:
For the taller, grassier elements in the background (top right and top left), use a very watered-down sage or grey-green. Paint these with thinner, more translucent strokes so they visually recede behind the main lily plant.
Step 4: Painting the Blooms
-
Base coat for orange lilies:
Mix a muted terracotta color using burnt sienna, a touch of red, and white. Paint the petals of the left and bottom lilies. Keep the paint slightly thin so the wall texture shows through, enhancing the fresco feel. -
Base coat for white lily:
For the central right lily, use an off-white mixed with a tiny drop of yellow ochre. Paint the petals, leaving the center slightly untouched for later detailing. -
Add petal shading:
On the orange lilies, use raw umber mixed with the terracotta to deepen the color near the center of the flower and along the mid-rib of each petal. For the white lily, use a diluted grey-brown to shadow the overlapping petals. -
Detailing the petals:
Using a smaller round brush, add fine linear strokes along the length of the orange petals to simulate veins. On the white lily, add very subtle, faint grey lines to define the petal curves. -
Paint the stamens:
With a liner brush and a mix of light green and white, paint the filament stalks emerging from the flower centers. Top them with anthers painted in a thick, dark burnt sienna or rust color for contrast.
Step 5: Finishing Touches
-
Add the bottom filler plants:
At the very bottom right, paint the smaller cluster of flowers using soft pinks and dull greens. Treat these loosely, almost like a sketch, to keep the focus on the main lilies. -
Incorporate dried grasses:
On the bottom left, paint the wheat-like grasses using yellow ochre and raw sienna. Use quick, flicking motions with a thin brush to capture their wispy nature. -
Clean up edges:
Step back and view the mural from a distance. If any edges feel too sharp against the cream background, lightly dry brush the background color over them to soften the transition. -
Final texture assessment:
If the artwork looks too ‘new,’ I sometimes lightly sand specific painted areas with fine-grit sandpaper to distress the paint and reveal the wall texture beneath.
Enjoy the peaceful, organic atmosphere this grand floral mural adds to your space
Minimal Line-Art Florals on White
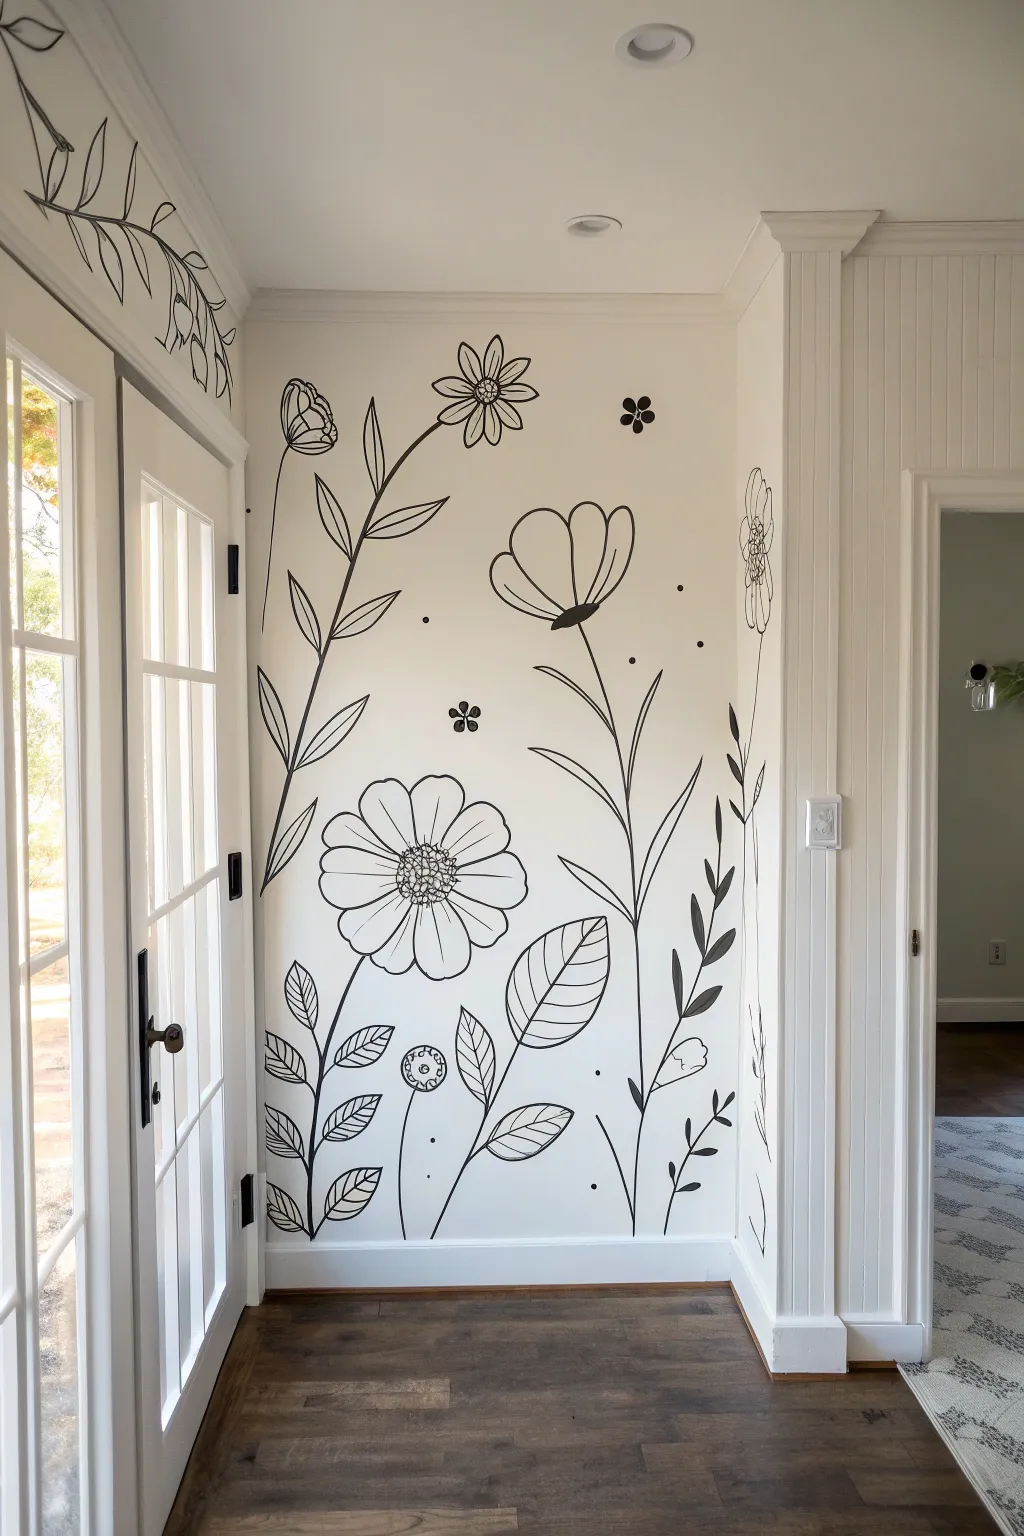
Transform a blank corner into an artistic statement with this elegant line-art floral mural. Featuring sweeping black botanical forms against a crisp white background, this project brings a sophisticated, hand-drawn aesthetic to your space without overwhelming the room.
Step-by-Step Guide
Materials
- White or cream interior latex paint (for base coat)
- Black semi-gloss or satin interior latex paint (quart)
- Pencil and eraser
- Projector (optional but recommended)
- Artist paint brushes: Round #4, Round #8, and a small liner brush
- Paint tray or small cup
- Painter’s tape
- Drop cloth
- Damp rag for mistakes
- Ladder or step stool
Step 1: Preparation & Base
-
Prepare the workspace:
Clear the area around the wall you intend to paint. Lay down a drop cloth to protect your flooring, ensuring it’s tucked tightly against the baseboard. -
Clean and prep the wall:
Wipe down the wall surface with a damp cloth to remove dust and oils. If there are any holes or uneven textures, patch and sand them smooth now. -
Apply the base coat:
Paint the entire wall section with your chosen white or cream base color. I prefer using a fresh coat of eggshell finish, which offers a slight sheen that makes the black line work pop. -
Let it dry completely:
Allow the base coat to dry for at least 6-8 hours, or ideally overnight, to ensure the pencil sketching step doesn’t dent the fresh paint.
Step 2: Sketching the Design
-
Plan your composition:
Look at your reference image or sketch your own floral layout on paper first. You want a mix of tall, reaching stems and lower, fuller blooms to create balance. -
Project or freehand outline:
If you aren’t confident freehanding, set up a projector to cast your design onto the wall. Lightly trace the main stems and larger flower heads with a pencil. -
Add detail elements:
Once the main structures are in place, pencil in smaller details like leaves, petals, and tiny buds. Keep your pencil pressure very light so lines are easy to erase or cover. -
Review the flow:
Step back about five feet to check the overall flow. Ensure the stems curve naturally upwards and that the negative space feels balanced, not cluttered.
Wobbly Lines?
Don’t panic! Minor wobbles add to the hand-drawn charm. If a line is truly crooked, let it dry, paint over it with the wall color, and try again once dry.
Step 3: Painting the Line Work
-
Prepare your black paint:
Pour a small amount of black satin or semi-gloss paint into a cup. Add a tiny drop of water if the paint feels too thick; you want an inky consistency that flows smoothly off the brush. -
Paint the main stems:
Using your #8 round brush, start from the bottom baseboard and pull the brush upward to create the long stems. Apply steady pressure for consistent line width. -
Outline the large blooms:
Switch to a #4 round brush for better control on curves. Carefully trace the petals of your large focal flowers, like the daisy and poppy shapes shown in the example. -
Fill in dark accents:
Some leaves and flower centers in this style are solid black. Carefully fill these shapes in now, using the brush to push paint to the edges for a crisp silhouette. -
Add delicate leaves:
For the finer leaves branching off the main stems, use the #4 brush. Press down at the base of the leaf and lift up as you reach the tip to create a tapered point. -
Create texture and stamens:
Use your smallest liner brush to add the tiny dots inside the flower centers and the delicate stamens. These fine details bring the flat shapes to life. -
Add whimsical dots:
Dip the back end of a small brush into the black paint and dab it onto the wall to create perfect little floating dots around the flowers for a pollen-like effect.
Smooth Flow Tip
Use a mahl stick or simply rest your pinky finger against the wall to stabilize your hand while painting long, vertical stem lines for better control.
Step 4: Finishing Touches
-
Check for consistency:
Scan your lines for any spots where the black paint looks thin or streaky. Go over these areas gently to ensure a solid, opaque black color. -
Clean up edges:
If you slipped or made a line too thick, wait for it to dry completely, then use a small brush with your white base wall paint to ‘erase’ and reshape the line. -
Erase visible pencil marks:
Once the black paint is fully dry (give it a few hours), gently erase any remaining visible pencil lines with a white eraser. -
Remove tape and clean up:
Peel off any painter’s tape along the trim or ceiling line and fold up your drop cloth.
Step back and admire how this striking yet simple artwork completely refreshes the energy of your room


Monochrome Poppy Statement Mural
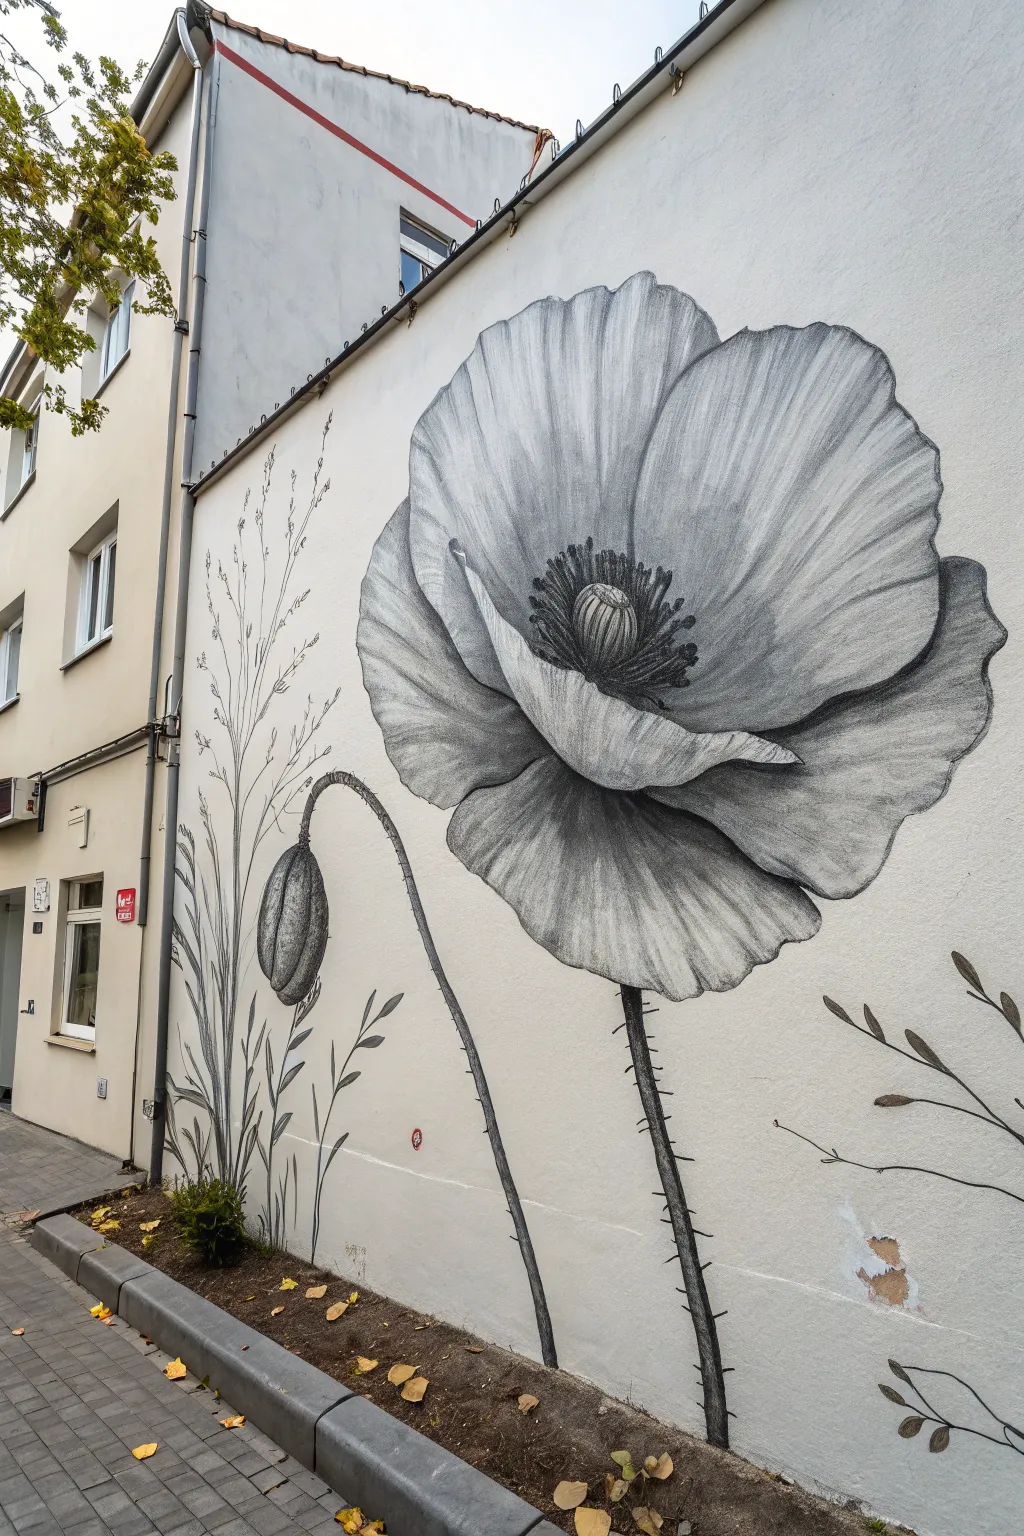
Transform a plain exterior wall into a stunning artistic statement with this massive monochrome poppy. Emulating the delicate texture of a charcoal sketch on a grand scale, this project uses weather-resistant paints to capture the drama of nature in striking black and white.
Detailed Instructions
Materials
- Exterior masonry primer (white or off-white)
- Black exterior latex or acrylic masonry paint
- Gray exterior paint (medium tone)
- Assorted paintbrushes (wide rollers, large filberts, fine liners)
- Projector (optional but recommended for scale)
- Chalk or charcoal stick for gridding/sketching
- Ladder or scaffolding
- Painter’s tape
- Drop cloths
- Plastic mixing containers
- Water for thinning paint
Step 1: Preparation and Outline
-
Prep the surface:
Begin by thoroughly cleaning the wall surface to remove dust, moss, or peeling paint. Once dry, apply a solid base coat of white or off-white exterior masonry primer to ensure your background is uniform and your artwork will adhere properly. -
Project or grid the design:
Because the scale is so large, use a digital projector at night to cast your poppy reference image onto the wall. Trace the major shapes—the large open petals, the central pod, the drooping bud stem, and the lower leaves—lightly with a piece of chalk. -
Refine the sketch:
Step back to check proportions. The main bloom should dominate the upper right, while the bud arches gracefully from the left. Hand-draw any missing details or adjust the composition to fit architectural features like windows or ground clearance. -
Establish the main stems:
Using a medium round brush and diluted black paint (about a 70/30 paint-to-water ratio), paint the long, vertical stems. Keep your hand loose to create slightly organic, imperfect lines rather than rigid straight ones.
Step 2: Blocking and Shading
-
Block in the dark center:
Mix a deep charcoal gray using your black and white paints. Fill in the center of the poppy around the pistil, creating a dark, dense core that will ground the petals. Don’t worry about the fine stamen details yet. -
Create the tonal wash:
Prepare a very thin, watery wash of gray paint. Apply this broad wash to the shadowed areas of the petals, specifically where they overlap. This creates the ‘paper’ texture look before you add the line work. -
Paint the bud structure:
Move to the drooping bud on the left. Paint the outer casing with a mix of gray and black, leaving the vertical highlight strips unpainted or very pale. This gives the bud its rounded, 3D volume. -
Add petal definition:
Switch to a smaller filbert brush and undiluted black paint. Begin defining the edges of the petals. I find it helpful to make these lines slightly broken or varying in thickness to mimic the look of a natural pencil stroke.
Drip Disaster?
Painting vertical walls often causes drips. Keep a damp rag handy to catch them instantly. If one dries, turn it into a stem texture or leaf vein rather than trying to over-paint.
Step 3: Detailing and Texture
-
Hatching technique:
This is the most crucial step for the ‘sketch’ style. Using a fine liner brush, paint hundreds of fine, parallel lines (hatching) curving along the form of the petals. Follow the natural contour of the flower to suggest curvature and depth. -
Deepen the shadows:
Go back into the deepest creases between petals with pure black. Layer more cross-hatching marks here to darken the value without losing the texture of the wall underneath. -
Detail the center:
Paint the central pod with vertical stripes of highlight and shadow. Use a fine brush to flick black paint outward from the center to create the delicate, frizzy stamens that surround the pod. -
Stem texture:
Return to the main stems. Add small, sharp thorns or hair-like details along the sides using quick, short brushstrokes. This gives the poppy its characteristic rough stem texture. -
Add background foliage:
To the left of the poppy, sketch in faint, tall grasses or wheat stalks. Keep these much lighter and simpler—using gray tones rather than black—so they recede into the background and don’t compete with the focal flower.
Level Up: Color Pop
Add a single element of color, like a tiny red ladybug on a leaf or a soft watercolor-style wash of red in just one petal, to create a stunning focal point against the monochrome.
Step 4: Final Touches
-
Highlight recovery:
If any areas became too dark, take a small amount of your wall background color and dry-brush highlights back onto the tops of the petals or the curve of the stem to bring back contrast. -
Soften harsh edges:
Inspect your work from a distance. If any lines look too ‘cartoonish’ or solid, lightly feather them with a damp brush or a gray wash to integrate them better with the masonry texture. -
Seal the base:
Ensure the bottom edge of the mural meets the ground or planter bed neatly. You may want to paint the stems fading out slightly at the very bottom for a dreamy, floating effect.
Step back and admire how this graphic botanical illustration brings sophisticated drama to your outdoor space
Maximalist Bloom Wall With No Gaps
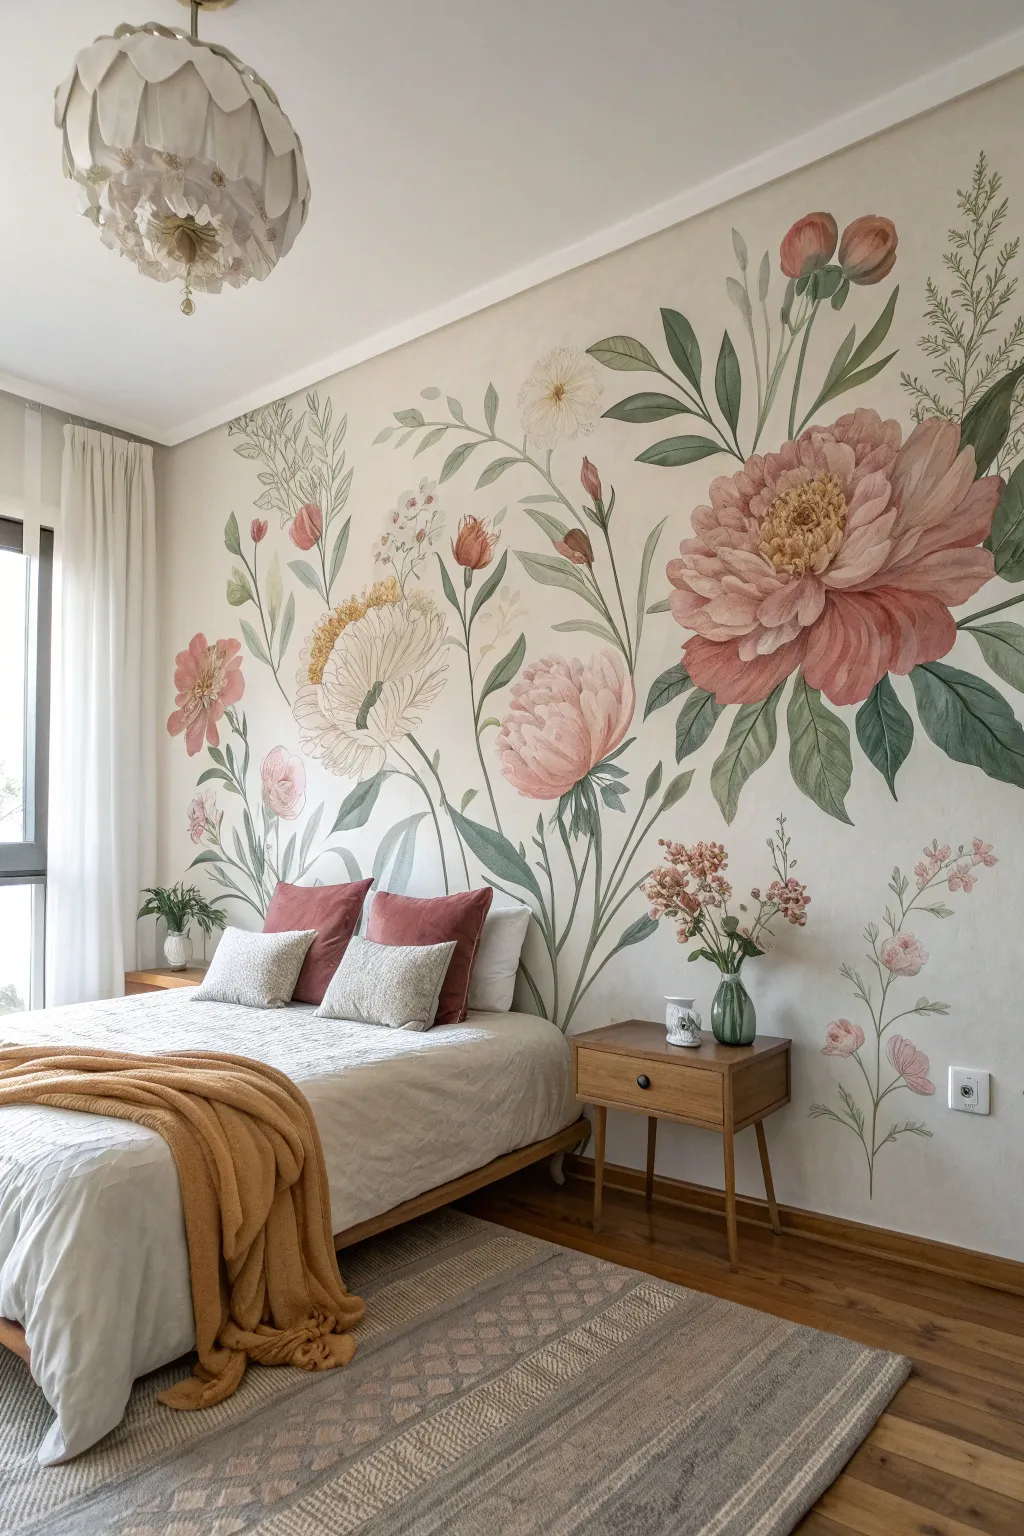
Transform a plain white wall into a breathtaking botanical garden with this soft, painterly mural project. Featuring oversized blooms and trailing vines in vintage pinks and greens, this statement wall brings the romance of an English garden directly into your bedroom.
Step-by-Step Tutorial
Materials
- Interior flat wall paint (white base)
- Acrylic paints (Vintage Pink, Burnt Sienna, Sage Green, Forest Green, Cream, Yellow Ochre)
- Glazing medium or water (to thin paints)
- Pencil and large eraser
- Assorted synthetic brushes (2-inch flat, 1-inch angled, rounded filbert, fine liner)
- Drop cloth
- Painter’s tape
- Paper plates or palette
- Ladder or step stool
- Rags or paper towels
Step 1: Preparation and Sketching
-
Prepare the Canvas:
Begin by clearing the wall completely and laying down your drop cloth. If your base wall color isn’t already a creamy off-white, apply a fresh coat of flat interior paint to create a clean, non-glossy surface that mimics watercolor paper. -
Map the Composition:
Step back and visualize where your largest blooms will go. Based on the image, place the massive pink peony on the right side as your anchor, and a smaller cluster on the left. Lightly sketch large circles to mark these main flower heads. -
Draw the Flow:
Using your pencil, draw sweeping, curved lines extending from the bottom corners upward. These will be your main stems. Vary the heights—some should reach almost to the ceiling, while others stay lower to frame the bed. -
Add Leaf Details:
Along your stem lines, sketch in the basic leaf shapes. Keep them loose and varied; mix large pointed leaves with softer, rounded fern-like fronds to create texture. -
Refine the Flowers:
Return to your flower circles and sketch the petals. For the peonies, start with a tight center and draw ruffled, overlapping layers radiating outward. Don’t worry about perfection; organic wobbly lines look more natural.
Pro Tip: Watercolor Hack
To get that distinctive watercolor ‘bloom’ effect on petals, spray a tiny mist of water onto the wet acrylic paint on the wall. It will separate slightly as it dries.
Step 2: Painting the Blooms
-
Mix the Base Pink:
On your palette, mix Vintage Pink with a touch of Cream and a generous amount of glazing medium. You want a translucent, milky consistency that allows the white wall to shine through slightly. -
Block in Petals:
Using a filbert brush, wash the diluted pink over the main petal shapes. Work one petal at a time, keeping the edges slightly wet to blend. Leave some white space near the tips for highlights. -
Deepen the Shadows:
While the base layer is tacky, mix a slightly darker version of the pink using a tiny dot of Burnt Sienna. paint this into the crevices where petals overlap and near the center of the bloom to create depth. -
Create the Centers:
Mix Yellow Ochre with a bit of Cream for the flower centers. Dab this on with a small round brush using a stippling motion to mimic pollen texture. -
Add Smaller Wildflowers:
For the smaller floral sprays (like the one near the outlet), use a lighter touch. Mix a pale mauve or coral and paint simple five-petal shapes, keeping them airy and delicate.
Troubleshooting: Drips
Since you’re working with watery paint, drips happen. Keep a damp rag in your pocket. If paint runs, dab (don’t wipe) it immediately to lift the unwanted pigment.
Step 3: Greenery and Finishing
-
Paint the Stems:
Mix Sage Green with glazing medium. Using your angled brush, paint the long, sweeping stems with confident, continuous strokes. It helps to move your whole arm, not just your wrist, for smooth curves. -
Fill in Leaves:
Switch between Sage Green and Forest Green for the leaves. Paint the larger leaves with two tones—one half light, one half dark—to suggest light hitting them. Keep the paint thin/watery for that watercolor effect. -
Add Fern Details:
For the feathery foliage at the top right, dilute Forest Green heavily. Use the fine liner brush to flick quick, upward strokes, suggestive of delicate grasses or ferns. -
Refine Edges:
Step back to look at the whole wall. If any edges look too harsh, take a clean, damp brush and gently soften the paint lines before they fully cure. -
Detail Work:
Using your fine liner and undiluted paint, add tiny details like veins on the leaves or individual stamens in the flower centers. This crisp detail contrasts beautifully with the soft washes. -
Final Erasure:
Once the paint is completely bone-dry (wait at least 24 hours), gently erase any visible pencil lines that weren’t covered by paint.
Step back and admire the serene, blooming sanctuary you have painted into existence
Giant Petal Close-Up Crop
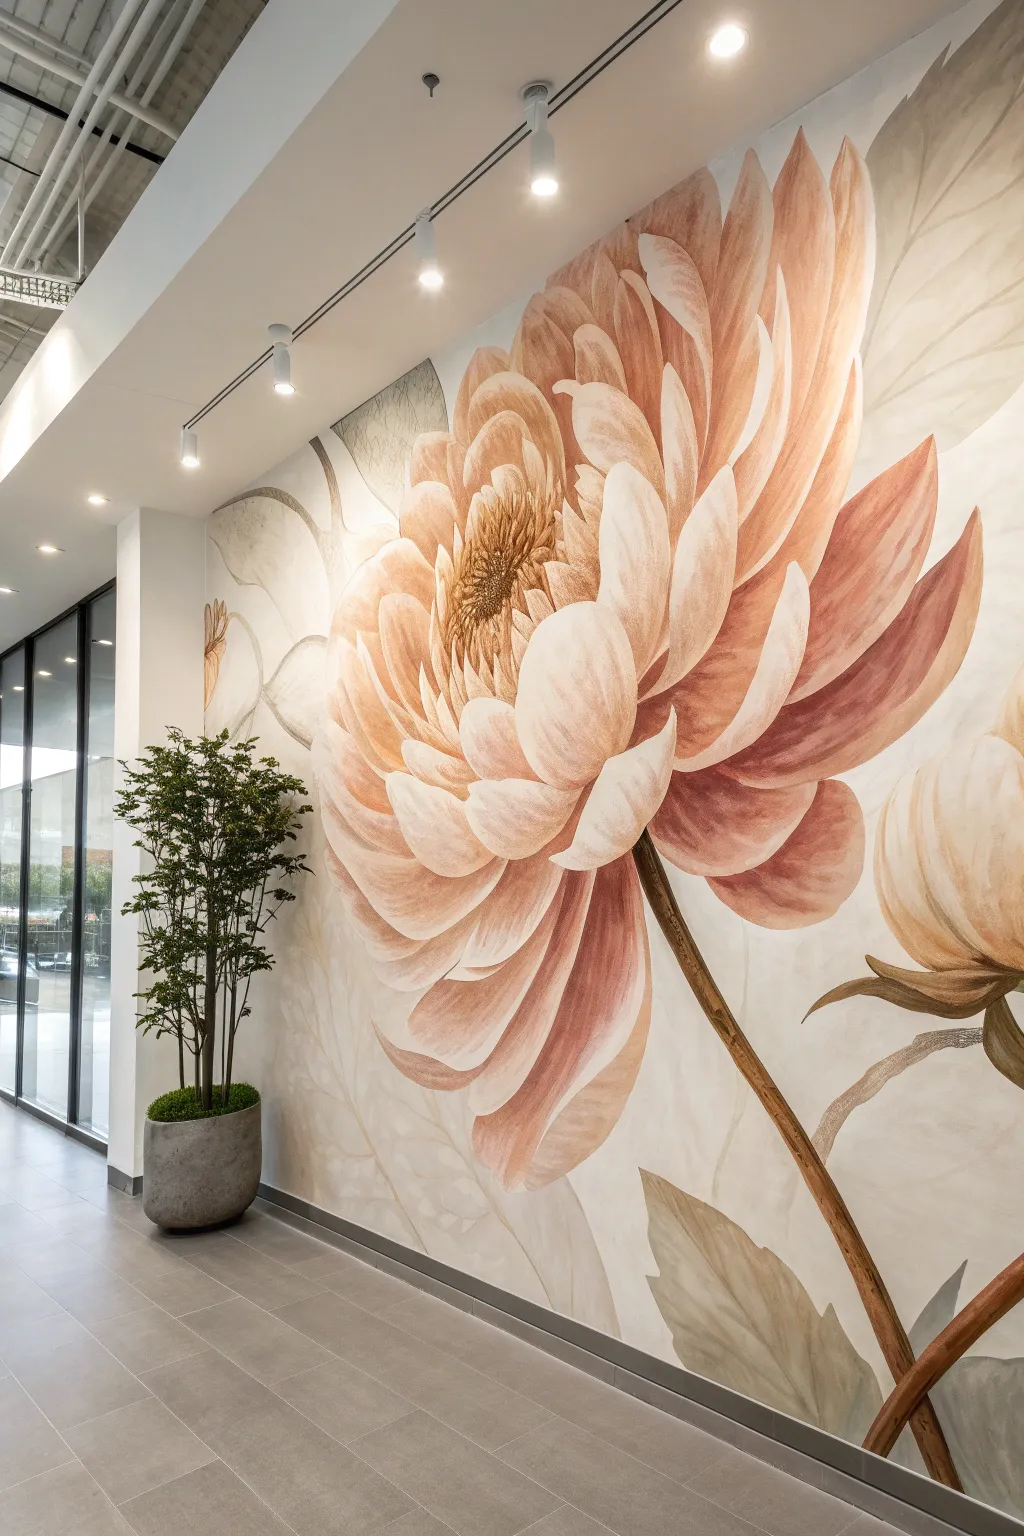
Transform a blank hallway or feature wall into an immersive botanical experience with this colossal floral mural. Featuring soft, sweeping petals in warm terracotta and cream tones, this large-scale painting creates a dramatic yet calming focal point.
Step-by-Step
Materials
- Interior latex paint (Eggshell finish: Cream/Off-White base)
- Acrylic mural paints or sample pots (Terracotta, Peach, Burnt Sienna, Sage Green, Olive Green, Deep Brown)
- Glazing liquid (acrylic medium)
- Large synthetic brushes (2-inch and 4-inch flats)
- Assorted smaller rounds and filberts for detail
- Chalk or watercolor pencil (light grey)
- Projector (optional but recommended for scale)
- Painter’s tape and drop cloths
- Ladder or step stool
- Bucket and sponges for blending
Step 1: Preparation and Sketching
-
Prepare the workspace:
Begin by clearing the wall area and laying down drop cloths to protect the flooring. Tape off the baseboards and any adjoining walls or ceiling edges with painter’s tape to ensure crisp borders. -
Prime the surface:
If the wall isn’t already a neutral off-white or cream, apply a base coat of your background color. A warm, stony off-white works best to make the petal colors pop without the harshness of bright white. -
Draft the outline:
Project your reference image onto the wall to get the proportions of the giant petals correct. If you don’t have a projector, grid out the wall lightly with chalk. Trace the major shapes of the main bloom, the bud, and the stem. -
Refine the sketch:
Step back and check the flow of the composition. Since this is a ‘crop’ view, ensure the petals extend naturally off the edges of the wall. Lighten your chalk lines with a rag so get don’t muddy the paint later.
Fixing Muddy Blends
If your colors turn brown or muddy while blending, stop! Let the layer dry completely (about 30 mins) before adding fresh glaze. Wet-on-dry layering keeps colors cleaner.
Step 2: Blocking and Layering
-
Mix your base glaze:
Mix your peach and terracotta paints with a generous amount of glazing liquid. You want the paint to be semi-transparent, acting like a watercolor wash rather than opaque latex. -
Wash in the shadows:
Focusing on the center of the flower and the base of the petals, apply the darkest terracotta mix. Use a large brush and loose, sweeping strokes that follow the curve of each petal. -
Block in the mid-tones:
While the shadow layer is still slightly tacky, apply a lighter peach glaze to the middle sections of the petals. Use a damp sponge to blur the line between the shadow and the mid-tone for a soft, gradient effect. -
Define the petal tips:
Use your cream or white paint mixed with a tiny bit of glaze to highlight the outer tips of the petals. I like to dry-brush this part slightly to give it a textured, organic feel. -
Paint the foliage base:
Mix olive green with a touch of brown for the stems and lower leaves. Apply this in thin washes, keeping the edges soft. Don’t worry about details yet; just establish the direction and weight of the stems.
Metallic Magic
Mix a tiny amount of pearl or gold mica powder into your final clear glaze. Apply it only to the lightest petal tips for a subtle shimmer that catches the light.
Step 3: Detailing and Depth
-
Deepen the core:
Combine Burnt Sienna and a touch of Deep Brown to create the dark center of the flower. Stipple this color in the very center to mimic the texture of the stamens and tightly packed inner petals. -
Enhance petal separation:
With a smaller filbert brush and your dark terracotta mix, paint thin, tapered lines where petals overlap. This casts a shadow and visually separates the layers of the bloom. -
Add veining texture:
Dilute your paint significantly until it’s almost watery. Use a liner brush to drag very faint vein lines from the base of the petals outward. Keep these lines broken and subtle. -
Refine the stems:
Go back to the green stems. Add a darker line on one side of the stem to indicate a cylindrical shape and a highlight on the opposite side. This gives the stem roundness and volume. -
Detail the side bud:
Treat the smaller bud similarly to the main flower, but keep the colors slightly more muted to push it visually into the background. Ensure the sepals (the green parts cupping the bud) wrap convincingly around it. -
Add ghost leaves:
To create depth, paint a few large leaves in the background using a very pale, watery grey-green wash. These should look like shadows or ‘ghosts’ behind the main flower.
Step 4: Final Touches
-
Clean up edges:
Use a small angled brush with your wall background color to tidy up any petal edges that got too messy. This ‘cutting in’ creates the crisp silhouette typical of botanical illustrations. -
Highlight check:
Step back to the other side of the room. If the flower looks too flat, add pure white highlights to the very tips of the petals that would catch the most light. -
Seal the mural:
Once the paint has cured for at least 24 hours, apply a clear, matte, water-based polycrylic sealer over the entire wall to protect your artwork from scuffs and fading.
Step back and admire how this larger-than-life bloom brings a permanent garden elegance to your space.
Negative-Space Florals Around Furniture
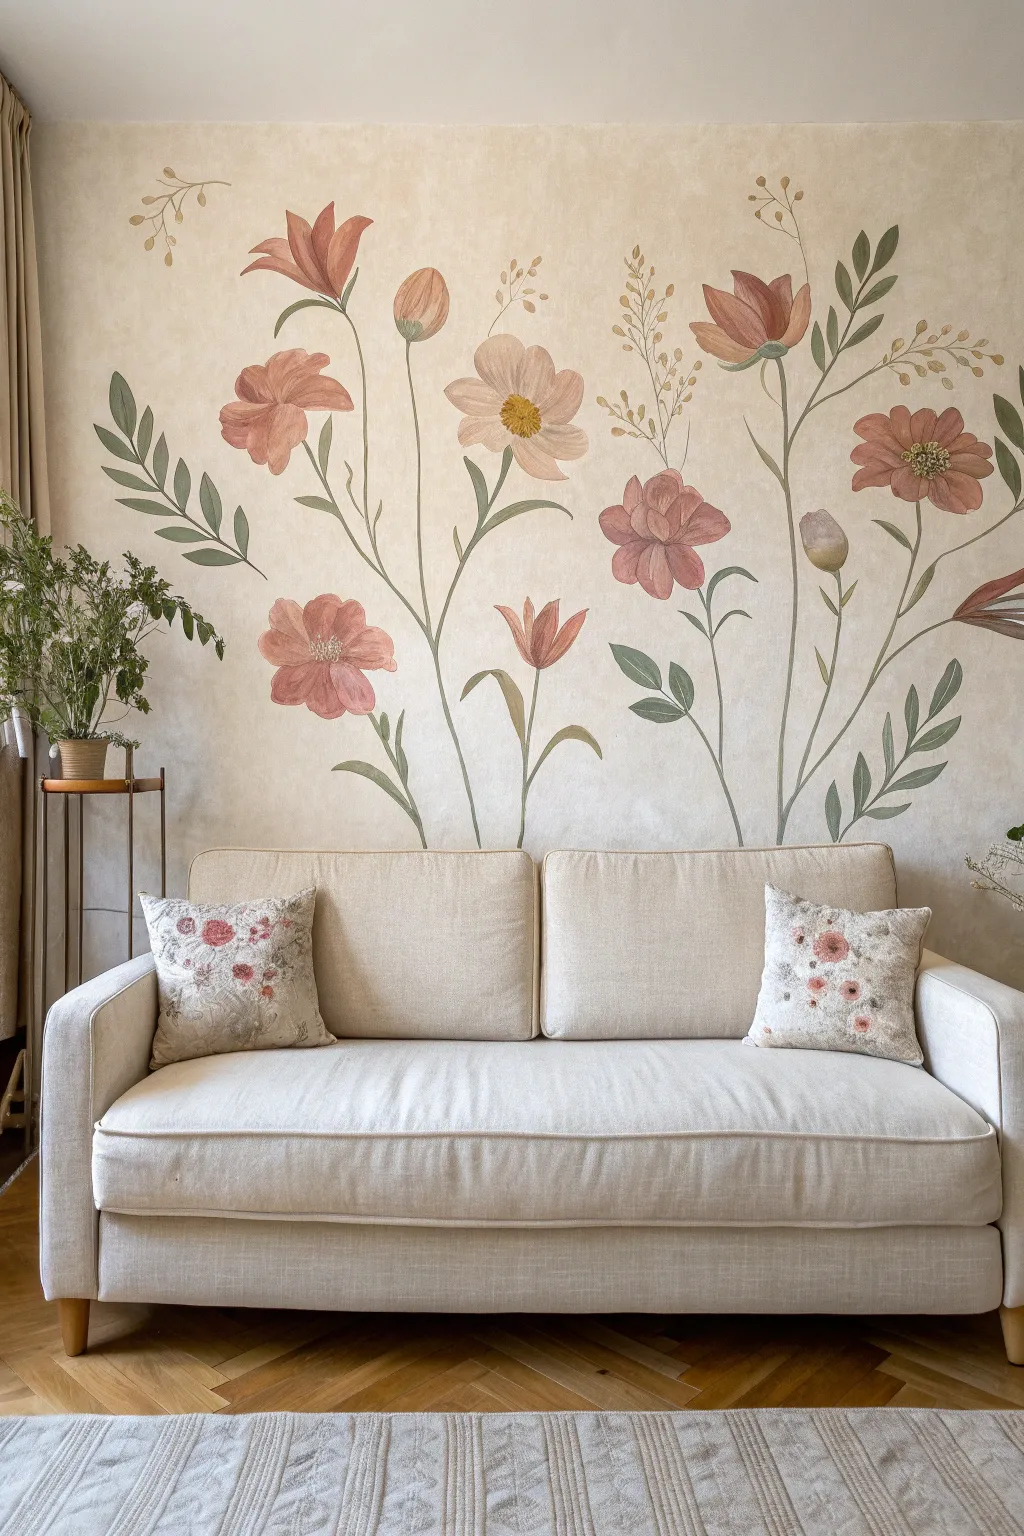
Transform a plain wall into a blooming meadow with this soft, painterly mural that embraces negative space. The design features airy wildflowers rising from behind your furniture, creating a gentle, organic frame for your living space without overwhelming the room.
Step-by-Step Guide
Materials
- Interior latex paint (base wall color, eggshell finish)
- Acrylic paints (various shades: terracotta, blush pink, sage green, olive green, ochre yellow, deep brown)
- Acrylic glazing medium or textile medium (to create transparency)
- Chalk (white or light grey) for sketching
- Assorted paintbrushes (large round brush, medium filbert, fine liner brush)
- Painter’s tape and drop cloth
- Paper plates or palette
- Wipes or damp rag for corrections
- Water cups
Step 1: Preparation & Layout
-
Prepare the canvas:
Start with a clean wall and protect your floor with a drop cloth. If your current wall color isn’t a warm, neutral beige like the photo, apply a fresh coat of eggshell interior paint in a sandy or oatmeal shade. This warm background is crucial for the ‘vintage paper’ look. -
Mark furniture placement:
Before moving your sofa, use light chalk marks or painter’s tape to indicate exactly where the back of the sofa sits against the wall. This ensures your floral stems will appear to grow naturally from behind it, rather than floating awkwardly in mid-air. -
Sketch the primary stems:
Using a stick of white chalk, lightly sketch four to five main vertical curving lines. Vary their heights significantly so the eye travels up and down the wall. Keep the lines loose and organic—nature rarely grows in straight lines. -
Draft the major blooms:
Add rough circles or ovals at the tops of your tallest stems and a few lower down to balance the composition. Don’t draw details yet; just map out where the biggest splashes of color will go to ensure the layout feels balanced.
Step 2: Painting the Foliage
-
Mix your greens:
Create three shades of green on your palette: a muted sage, a deeper olive, and a brownish-green. Mix each with a significant amount of glazing medium (about 1 part paint to 1 part medium) to achieve that sheer, watercolor effect. -
Paint the main stems:
Using a medium round brush loaded with the brownish-green mix, trace over your chalk stem lines. I like to vary the pressure as I pull the brush up—pressing harder at the bottom and lifting off at the top creates a natural taper. -
Add large leaves:
Switch to a filbert brush for the larger leaves. Load it with sage green and press the flat side of the brush against the wall, dragging and twisting slightly to create the leaf shape. The glazing medium allows the texture of the wall to show through, mimicking watercolor paper. -
Layer in accent foliage:
Using the olive green, add smaller, fern-like fronds and slender leaves branching off the main stems. Keep your wrist loose and swift to capture movement. -
Fill the gaps with sprigs:
Look for empty negative spaces and add delicate, thin sprigs using a liner brush. Paint tiny dots or teardrops at the ends of these sprigs to represent buds or seeds.
Uneven Coverage?
If your watery paint drips, don’t panic! Embrace it. Use a dry brush to feather the drip downwards into the stem. This enhances the hand-painted, watercolor aesthetic.
Step 3: Blooming Details
-
Block in flower shapes:
Mix terracotta, blush pink, and a touch of ochre with your glazing medium. Using a large round brush, wash in the base petals of the main flowers. Keep the paint very thin and watery so the edges feel soft and diffused. -
Add petal definition:
Once the base wash is tacky but not fully dry, come back with slightly more opaque paint in a deeper pink or rust tone. Define the separation between petals, concentrating darker color near the center of the flower. -
Paint the centers:
For the open blooms (like the cosmos-style lowers), dab a mix of ochre and brown into the center. Don’t make a solid circle; stipple the paint to create the texture of pollen and seeds. -
Create buds and closed flowers:
Paint tulip-shaped buds on some of the shorter stems. Use a darker pink at the base of the bud and fade to a lighter cream or blush at the tip. -
Refine with highlights:
Mix a very pale pink or cream color. Add thin, wispy highlights to the edges of the petals where the light would naturally hit. This adds dimension without making the flowers look like cartoons. -
Connect flowers to stems:
Use your liner brush and the green mixture to paint the calyx (the little green cup) at the base of each flower head, ensuring they firmly attach to their stems.
Gilded Garden
Add a touch of magic by painting the very tips of the flower stamens or seed pods with a metallic gold leaf paint. It catches the afternoon light beautifully.
Step 4: Final Touches
-
Clean up the sketch:
Once the paint is completely dry to the touch, use a clean, slightly damp cloth to gently wipe away any visible chalk lines. -
Assess from a distance:
Step back to the other side of the room. If any area looks too sparse, add a ‘floating’ leaf or a few extra seed pods to fill the void without overcrowding. -
Position the furniture:
Move your sofa back into place against the wall. The mural should now peek out perfectly, framing your seating area.
Enjoy the serenity of your new indoor garden, perfectly tailored to hug your furniture with organic charm.
Stencil-Layered Floral Pattern Mural
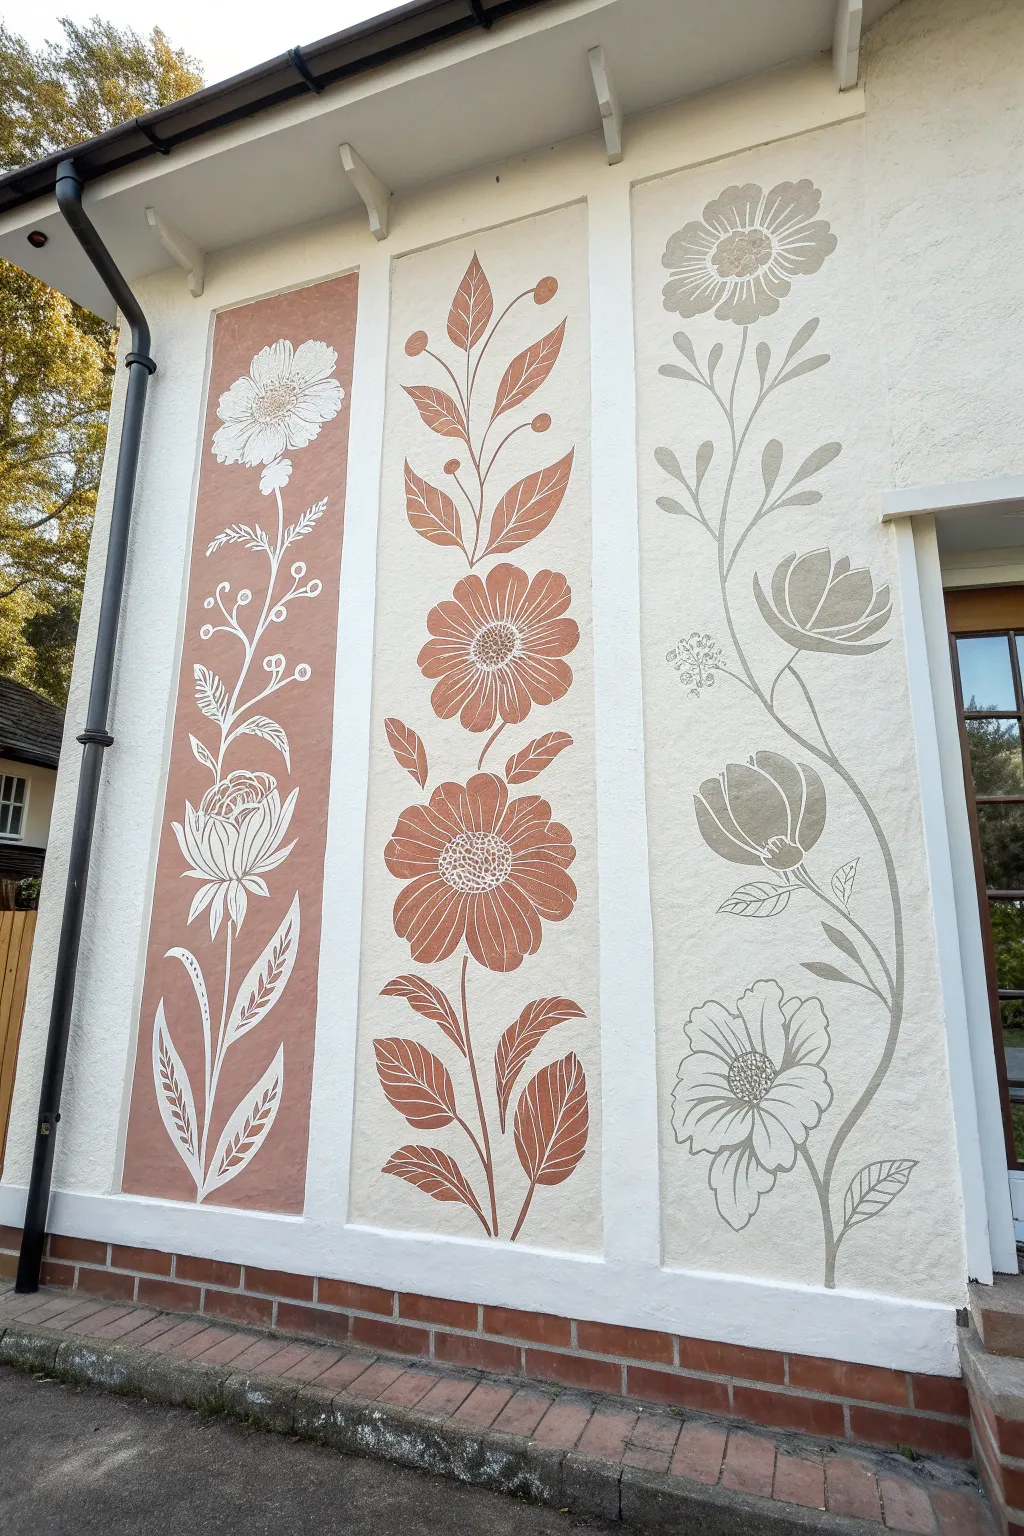
Transform a plain exterior or interior wall into a work of art with this elegant three-panel mural. Featuring stylized wildflowers in earthy terracotta and taupe tones against cream backgrounds, this design mimics the look of vintage stenciling or sgraffito plasterwork.
Step-by-Step Tutorial
Materials
- Exterior masonry paint (Cream/Off-White base)
- Exterior masonry paint (Terracotta/Burnt Orange)
- Exterior masonry paint (Warm Taupe/Grey)
- Painter’s tape (various widths)
- Large flower stencils (custom cut or purchased) OR projector
- Pencil and eraser
- Small angled sash brush
- Fine liner brush (for details)
- Medium roller and tray
- Drop cloth
- Ladder (if necessary)
- Clear matte exterior sealer (optional)
Step 1: Preparation and Base Layer
-
Clean the surface:
Begin by thoroughly cleaning the wall surface to remove any dirt, moss, or loose paint. If working on exterior stucco, use a stiff brush to get into the texture. Let the wall dry completely before proceeding. -
Apply base coat:
Roll on two coats of your cream or off-white masonry paint across the entire working area. Allow sufficient drying time between coats according to the manufacturer’s instructions to ensure a solid, neutral foundation. -
Measure and tape panels:
Once the base is cured, measure out three vertical rectangular panels. Use a long level and painter’s tape to mark the boundaries. The design features a colored background on the far left panel, while the middle and right panels rely on the cream base coat.
Use Cardboard Templates
Cut separate flower head shapes from cereal boxes. Trace around them to keep sizes consistent, then hand-paint the stems connecting them for a fluid look.
Step 2: Painting the Panel Backgrounds
-
Paint the left panel:
For the leftmost panel, paint the interior of the taped rectangle with the terracotta masonry paint. Use a brush for the edges to ensure a crisp line against the tape, then roll the center. I like to do two thin coats here for an even, saturated color. -
Define the remaining borders:
The middle and right panels keep the cream background, but you may want to re-tape or ensure your original spacing tape is secure to keep the panel separation distinct. -
Remove tape:
carefully peel away the painter’s tape while the paint is still slightly tacky to prevent chipping. Let all background layers dry fully, preferably overnight.
Step 3: Drafting the Floral Designs
-
Plan the composition:
If you are confident freehanding, sketch the tall, climbing floral stems lightly with a pencil. Notice how the stems curve gently rather than growing straight up. -
Use a projection method:
For precision, project your floral designs onto the wall at night and trace the outlines. Alternatively, use large Mylar stencils for the main flower heads if you want uniformity. -
Outline the left panel:
On the terracotta panel, sketch the flowers that will be filled in with white. This panel uses negative space style, so you are drawing the light shapes on the dark ground. -
Outline the middle panel:
On the middle cream panel, sketch the leaf patterns and flower heads that will be painted in the terracotta color. -
Outline the right panel:
On the right cream panel, sketch a different floral variety that will be painted in the warm taupe color.
Add Subtle Texture
Mix a small amount of fine sand into your flower paint colors. This mimics old-world plaster relief techniques and adds tactile depth to the petals.
Step 4: Painting the Florals
-
Fill the left panel flowers:
Using a small angled brush and your cream base paint, carefully fill in the sketched flower shapes on the terracotta background. This creates a bold, high-contrast look. -
Paint the middle panel:
Switch to the terracotta paint. Fill in the stems, leaves, and large flower petals on the middle panel. Keep your edges smooth, even over textured stucco. -
Paint the right panel:
Using the taupe paint, fill in the large floral shapes on the right panel. Take your time with the long, curving stems to ensure they look organic. -
Add definition to middle flowers:
Once the terracotta shapes in the middle panel are dry, take a fine liner brush and the cream paint. Add delicate centers to the flowers and fine veins to specific leaves. -
Add definition to right flowers:
Similarly, use the cream paint and a liner brush to add details to the taupe flowers on the right. Add lines to the petals and centers to give them dimension. -
Refine the left panel details:
Go back to the left panel. If needed, use the terracotta paint and a tiny brush to ‘cut back’ into the white flowers to create separation between petals or add interior details. -
Final touch-ups:
Step back and view the mural from a distance. Use a small brush to fix any wobbly lines or drips. Erase any visible pencil marks. -
Seal (Optional):
If the wall is exposed to harsh weather, apply a clear matte exterior sealer over the painted panels to protect your work.
Step back and enjoy the bespoke, architectural charm this botanical trio brings to your space
Painted Floral Arch or Niche Frame
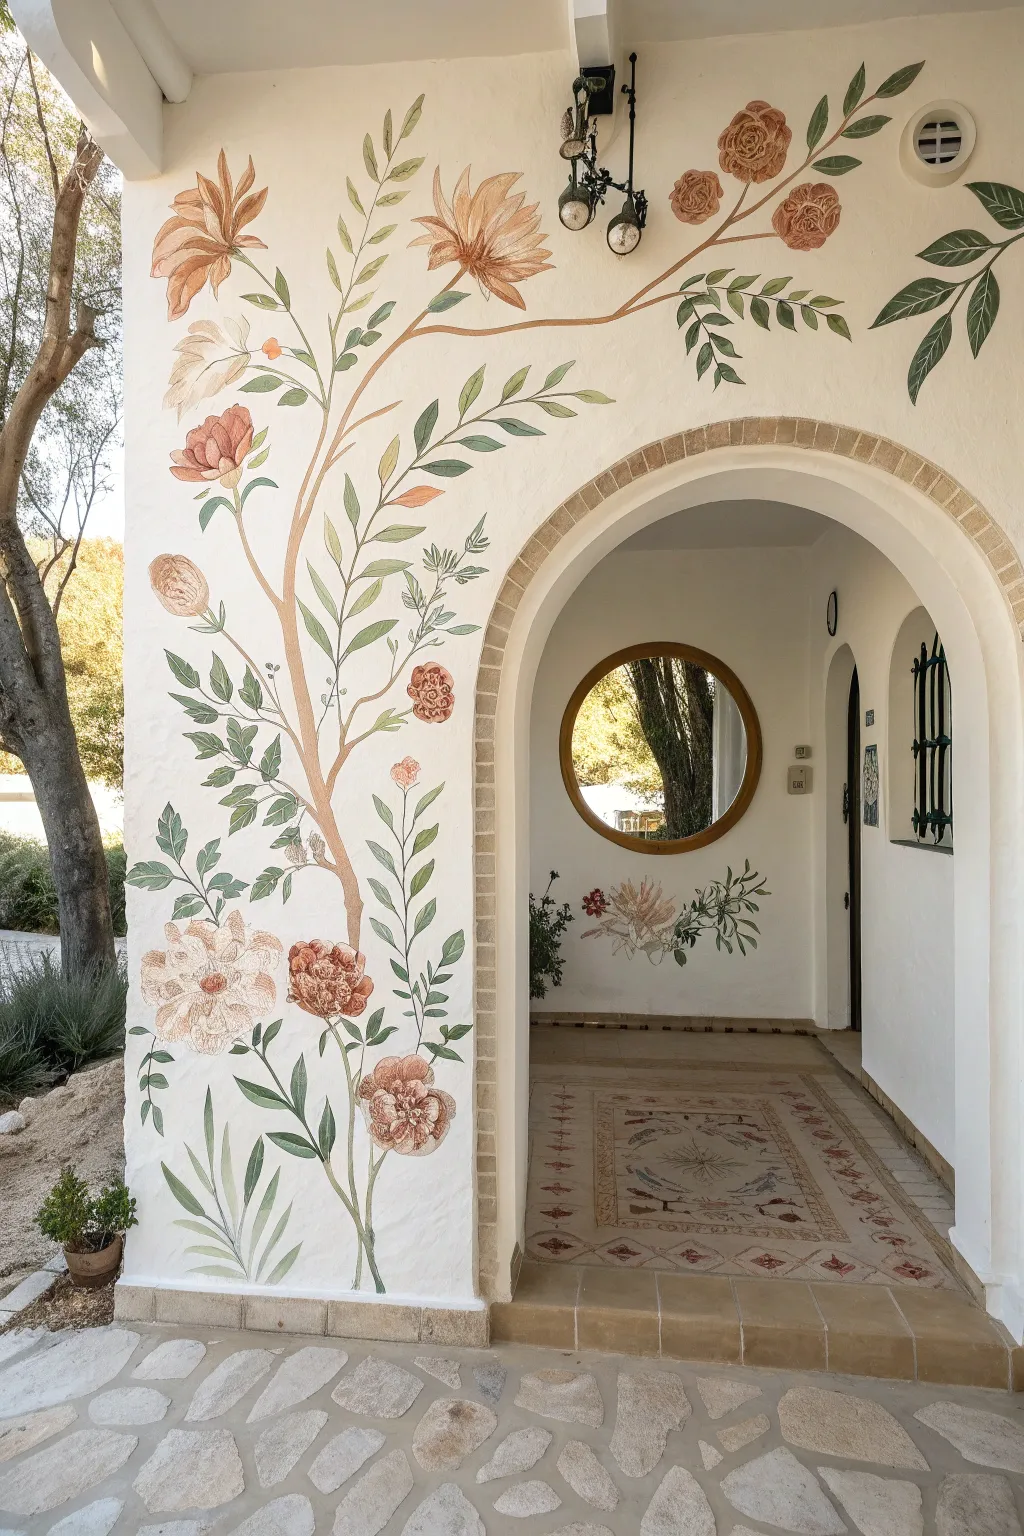
Transform a plain archway or niche into an enchanting garden entrance with this muted, vintage-style floral mural. The design features climbing botanical elements that frame architectural features, using a soft, earthy palette to create a seamless, organic look.
Detailed Instructions
Materials
- Interior acrylic latex paint (matte or eggshell finish)
- Colors: Creamy white (base), Terracotta, Sage Green, Olive Green, Pale Peach, Burnt Sienna, Warm Brown
- Assorted synthetic brushes: 1″ angle sash brush, round brushes (#4, #8, #12), liner brush
- Pencil and eraser
- Painter’s tape
- Drop cloth
- Extender medium or glaze (optional, for blending)
- Reference photo of botanical illustrations
Step 1: Preparation & Mapping
-
Prepare the surface:
Begin by ensuring your wall surface is clean and dry. If you are painting over a dark color, prime the wall first. Apply a base coat of a warm, creamy white paint to the entire wall section to provide a soft, neutral canvas that matches the vintage aesthetic. -
Sketch the main vine structure:
Using a light pencil, loosely sketch the primary climbing vine. Start from the bottom left corner and draw a sweeping, organic S-curve that travels upward and arches over the doorway. Keep the line fluid and slightly shaky to mimic natural growth rather than a rigid pipe. -
Place the blooms:
Mark the positions of the large flowers with simple circles or ovals. Position the largest blooms near the bottom and mid-height to anchor the design, placing smaller buds and sweeping leaves towards the top arch to create visual movement.
Fixing Translucency
If your lighter flower colors look streaky or see-through over the wall paint, don’t overwork wet paint. Let the first layer dry completely, then apply a second coat for true opacity.
Step 2: Painting the Foliage
-
Block in the main stems:
Mix a warm brown with a touch of olive green to create a woody stem color. Using a #8 round brush or a small angle brush, paint the main vine structure, varying the pressure to create thick and thin sections that look like natural wood. -
Paint base leaves:
Load a #12 or 1″ brush with sage green. Paint the larger leaves using a ‘press and lift’ motion: press the brush down at the base of the leaf to widen it, then lift while dragging to create a tapered point. -
Add secondary leaves:
Switch to a darker olive green. Add clusters of smaller leaves behind or intertwined with the sage leaves. This variation in green tones adds depth and prevents the mural from looking flat. -
Create leaf veins and details:
Once the green leaves are touch-dry, use a liner brush with a diluted darker green or brownish mixture to paint delicate central veins. Keep these lines very thin and broken in places for a more painterly effect.
Step 3: Creating the Blooms
-
Base coat the large flowers:
For the large, peony-style flowers, mix pale peach and creamy white. Paint the overall scallop shape of the flower head, keeping the edges soft. Don’t worry about petals yet; just establish the silhouette. -
Define the petals:
Using a terracotta or burnt sienna shade, paint C-shaped strokes inside the flower silhouette to define individual petals. I like to start from the center and work outward, letting the strokes get looser near the edges. -
Add depth and shading:
Mix a darker rust color. Apply this to the bottom of the flower centers and between the petal layers to create shadow and volume. This gives the blooms that lush, three-dimensional look. -
Paint the smaller buds:
Using the same terracotta palette, paint small, tight buds near the upper branches. Use simple teardrop shapes, adding a small green sepal at the base where it connects to the stem. -
Highlight the petals:
Mix a very light cream or white. Add tiny highlights to the upper tips of the petals where the light would naturally hit, giving the flowers a sun-drenched appearance.
Creating Flow
To make leaves look natural, hold your brush near the end of the handle. This loose grip creates more fluid, organic curves compared to the rigid lines drawn when holding it like a pencil.
Step 4: Finer Details & Finishing
-
Connect elements:
Using the #4 round brush and your stem color, paint thin, connecting stems that attach all the floating leaves and flowers back to the main vine system. -
Enhance the arch connection:
Extend a few delicate tendrils or leaves so they visually ‘reach’ over the curve of the archway, ensuring the mural feels integrated with the architecture rather than just sitting next to it. -
Add airy filler stems:
Mix a very pale gray-green. Paint feathery, fern-like sprigs or tiny seed pods in the empty spaces to add texture without visual weight. -
Final assessment:
Step back about ten feet to view the composition as a whole. If any area looks too sparse, add a small floating leaf or a curling tendril to balance the visual weight. -
Clean up:
Gently erase any visible pencil sketch lines once the paint is fully cured. If you smudged the wall color, touch it up with your base creamy white paint for a crisp edge.
Enjoy the timeless, romantic atmosphere your new hand-painted garden feature brings to your space
Glow-in-the-Dark Night Garden Florals
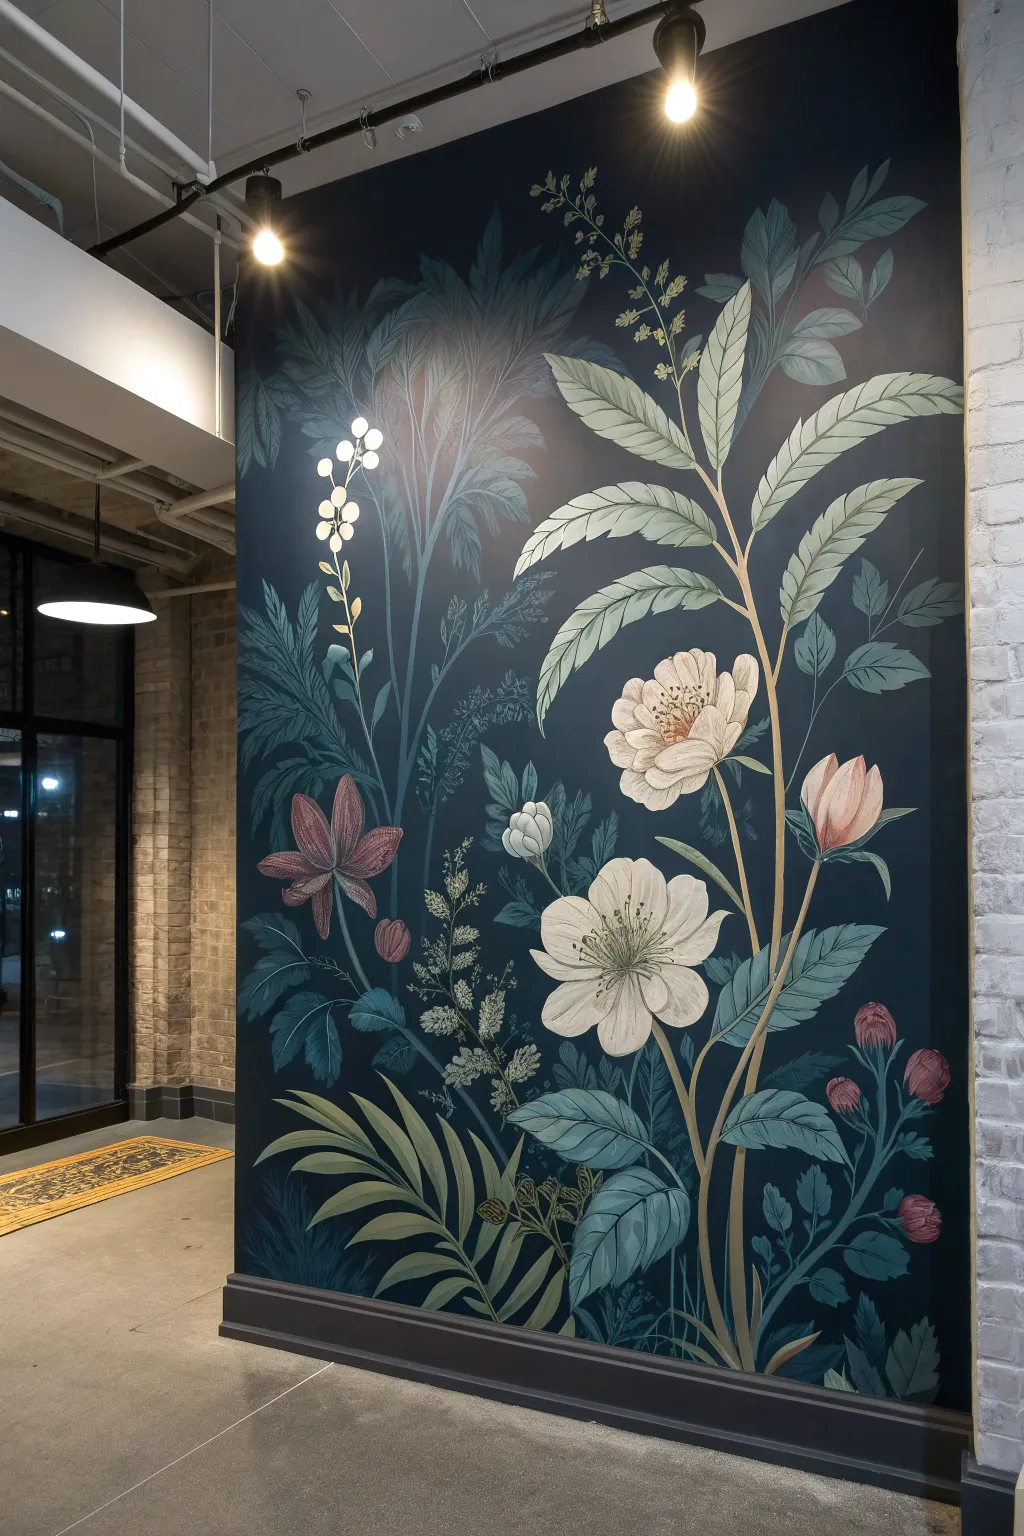
Transform a blank wall into a moody, vintage-inspired garden with this dramatic mural project. By layering pale botanical illustrations over a deep navy background, you create an eerie yet elegant scene that seemingly glows in low light.
Step-by-Step Tutorial
Materials
- Deep navy blue interior latex paint (matte or satin finish)
- White or cream acrylic paint
- Assorted acrylic craft paints (sage green, dusty pink, maroon, pale yellow)
- Glow-in-the-dark medium or paint (optional for the ‘night’ effect)
- Chalk or a white pastel pencil
- Projector (optional but recommended)
- Assorted paintbrushes (large flat brush, round brushes in sizes 2-8, fine liner brush)
- Painter’s tape
- Drop cloths
- Mixing palette or paper plates
- Clean rag and water cup
Step 1: Preparation & Base Coat
-
Prepare the space:
Begin by clearing the area in front of your wall. Lay down drop cloths to protect the flooring and apply painter’s tape to the trim, ceiling line, and adjacent walls to ensure crisp edges. -
Apply the dark background:
Rule number one for a ‘night garden’ is a dark canvas. Paint the entire wall with your deep navy blue latex paint. Use a roller for the main areas and a brush for cutting in edges. -
Allow to cure:
Let this base coat dry completely, preferably overnight. A fully cured surface prevents the background color from muddying the lighter floral details later on.
Step 2: Drafting the Design
-
Plan your composition:
Decide on your layout. For this look, larger-than-life stems rising from the bottom work best. You can sketch this on paper first or project a vintage botanical print directly onto the wall. -
Sketch the outline:
Using a white pastel pencil or chalk, lightly trace the main stems and flower heads onto the navy wall. Keep the lines faint; you just need a roadmap, not a permanent border. -
Map out leaf clusters:
Don’t forget the background foliage. Sketch in large, sweeping fern fronds and smaller leaf clusters to fill the negative space between the main floral elements.
Chalk Marks Won’t Budge?
If your chalk sketch lines are stubborn, don’t scrub hard or you might burnish the matte wall paint. Instead, dab them gently with a microfiber cloth dipped in a tiny bit of soapy water.
Step 3: Blocking and Layering Colors
-
Block in the stems:
Mix a pale, muddy green using your sage, a touch of brown, and white. Use a medium round brush to paint the main stems, ensuring they taper gracefully as they reach upward. -
Base coat the large blooms:
For the large white flowers, mix a warm off-white. Apply a thin, slightly translucent layer to block in the petals. I find keeping this layer sheer helps integrate the flower with the dark background. -
Add secondary flowers:
Paint the smaller buds and secondary flowers with muted tones—dusty pinks and soft maroons. Avoid bright, primary colors; keep everything slightly desaturated to maintain the vintage vibe. -
Paint the foliage:
Use various shades of green for the leaves. Create depth by painting ‘background’ leaves in a darker, bluer green (closer to the wall color) and ‘foreground’ leaves in a lighter, silvery green.
Pro Tip: Depth Perception
To make the mural feel vast, mix a little of your navy wall paint into the green used for the leaves at the very bottom. This pushes them visually into the shadows.
Step 4: Detailing and Highlights
-
Add petal definition:
Once the base flower coats are dry, use a smaller brush to add definition. Mix a slightly darker cream or beige to paint the shadows between overlapping petals. -
Create the flower centers:
Using a fine liner brush, detail the centers of the blooms. Stipple small dots of yellow and brown to create the pollen and stamens. -
Veining the leaves:
Mix a light tint of your leaf color. With your finest brush, carefully paint the central veins and branching veins on the larger leaves to give them realistic structure. -
Refine the edges:
Go back over your outlines. If the background paint shows through too much in areas meant to be solid, apply a second coat of your lighter colors to increase opacity.
Step 5: The ‘Night Garden’ Glow
-
Highlighting:
Mix your white paint with a tiny bit of water to make it fluid. Add crisp white highlights to the tips of the petals and the tops of the leaves where ‘moonlight’ would hit. -
Apply glow medium (Optional):
For the true ‘Glow-in-the-Dark’ effect mentioned in the section title, mix clear glow-in-the-dark medium with your white highlighting paint, or glaze it over the lightest parts of the flowers. -
Cleanup:
Once the mural is fully dry, gently wipe away any remaining chalk lines with a damp cloth and remove the painter’s tape.
Step back and enjoy the serene atmosphere of your new moonlit garden


Have a question or want to share your own experience? I'd love to hear from you in the comments below!