A plain flower box is basically a blank canvas that gets to live outside, soak up the light, and show off your style every single day. Here are my favorite flower box painting ideas—starting with the classics you’ll actually use, then drifting into the fun, artsy “I can’t believe I made that” territory.
Rose Garland Along the Rim
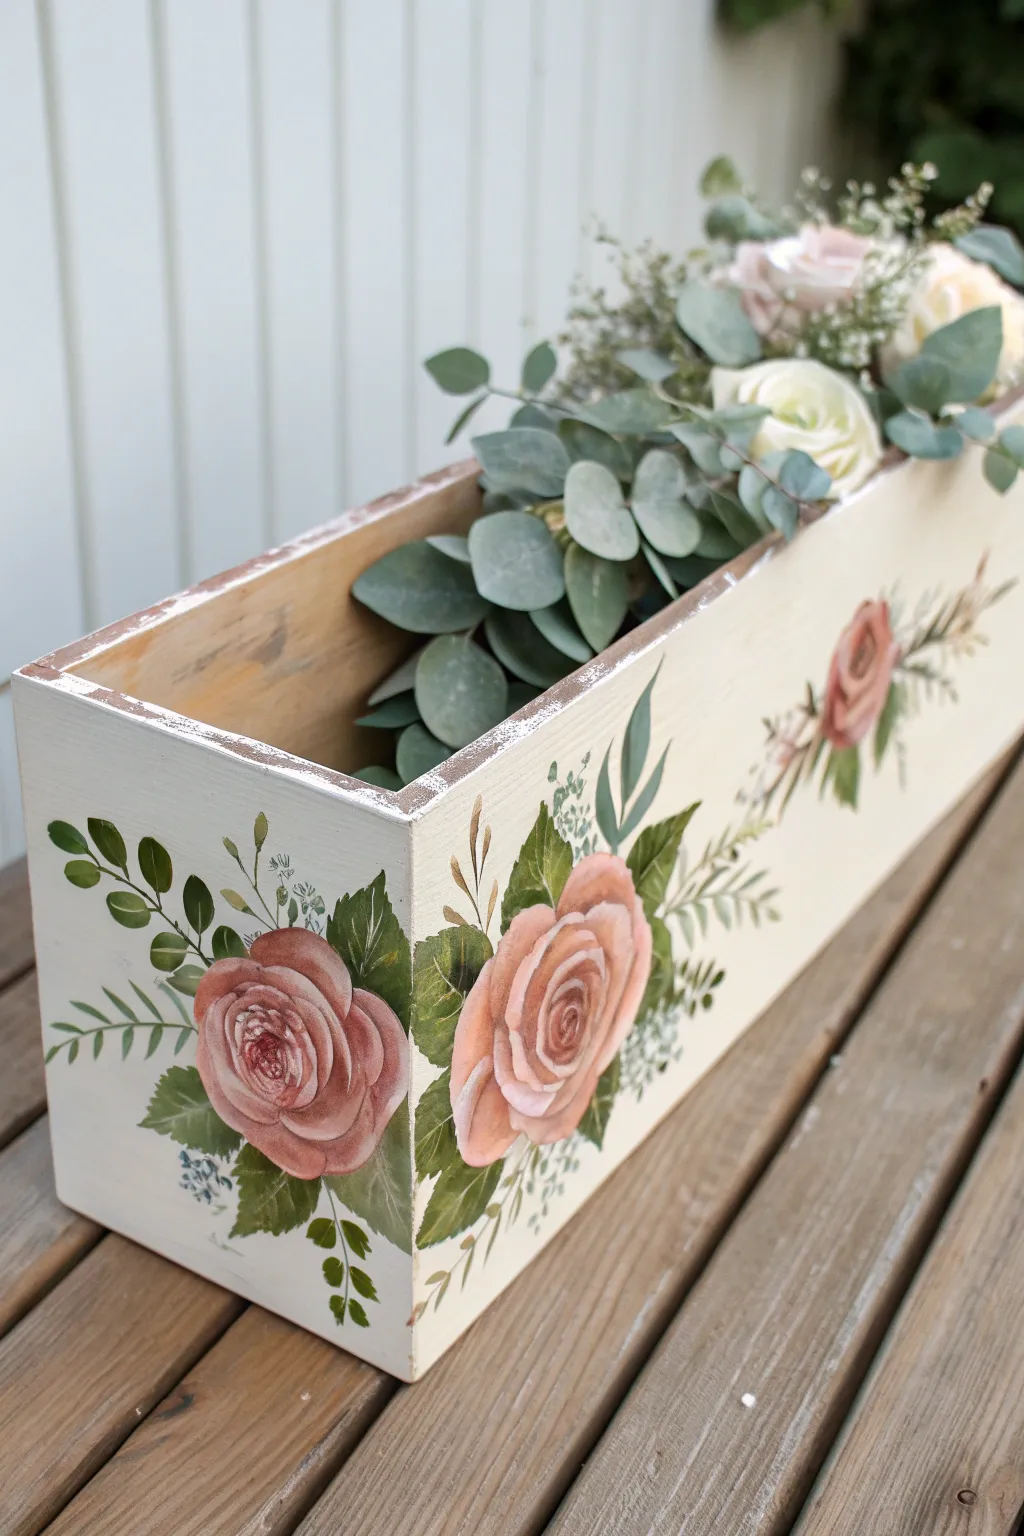
Transform a plain wooden trough into a vintage-inspired centerpiece with this charming rose garland design. By combining soft, creamy backgrounds with distressed edges and organic floral motifs, distinct character is added to any tabletop or windowsill.
How-To Guide
Materials
- Rectangular wooden planter box
- Sandpaper (medium and fine grit)
- Creamy white chalk paint or acrylic paint
- Acrylic paints (Dusty Rose, Salmon Pink, White, Deep Red, Olive Green, Sage Green, Dark Brown)
- Flat paintbrushes (1-inch and 1/2-inch)
- Round paintbrushes (size 4 and 6)
- Linear or detail brush (size 1)
- Palette or paper plate
- Matte clear sealer spray or varnish
- Paper towels
- Water cup
Step 1: Preparing the Base
-
Sand the Box:
Begin by sanding the entire wooden planter box to ensure a smooth surface. Pay attention to any rough splinters or uneven patches, but don’t worry about perfection as this project thrives on a rustic look. -
Apply Base Coat:
Paint the entire exterior using a 1-inch flat brush and creamy white chalk paint. Apply long, even strokes with the grain of the wood. Let the first coat dry completely. -
Add a Second Coat:
Apply a second coat of the creamy white paint to ensure solid coverage, hiding the raw wood grain underneath. Allow this to dry for at least an hour. -
Distress the Edges:
Once the paint is fully dry, take a piece of medium-grit sandpaper and gently rub along the rim, corners, and sharp edges of the box. Sand until the raw wood peeks through, creating a weathered, time-worn effect.
Uneven Petals?
If your rose petals look too like rigid stripes, blend the wet paint gently with a clean, slightly damp brush to soften the edges.
Step 2: Painting the Foliage
-
Map Out the Composition:
Visualize where your roses will sit. For this design, place a cluster at the corner and trail smaller elements down the long side. You can lightly sketch the main shapes with a pencil if you need a guide. -
Base Leaves:
Using a size 6 round brush and Olive Green, paint roughly shaped, broad leaves where the main rose clusters will be. Keep the edges slightly organic rather than perfectly sharp. -
Add Greenery Variation:
Mix a little Sage Green with White to create a softer tone. Paint smaller, filler leaves tucked behind and around the darker olive leaves to create depth. -
Paint Fern Sprigs:
Switch to a liner brush or the tip of a smaller round brush. Using the dark Olive Green, paint thin stems extending outward from the leaf clusters, adding tiny, quick dashes along the stems to mimic fern fronds or eucalyptus. -
Add Berry Stems:
Using a dark brown or deep green, paint delicate, branching twigs sticking out from the foliage. These serve as anchors for small buds or filler flowers later.
Add Dimension
Mix a tiny drop of brown into your green leaf paint and add a single vein line down the center of the largest leaves for instant realism.
Step 3: Creating the Roses
-
Block in Rose Shapes:
Mix a base color using Dusty Rose and a touch of Salmon Pink. Paint large, rough circles on top of your foliage clusters where the main flowers should be. -
Define the Center:
While the base is still slightly tacky, load a smaller round brush with a darker mix of Deep Red and Dusty Rose. Paint a tight ‘C’ shape or spiral in the center of the flower circle. -
Layer the Petals:
Surround the center spiral with overlapping curved strokes ‘hugging’ the middle. As you move outward toward the edges of the rose, make these strokes larger and loser. -
Add Highlights:
Clean your brush and pick up some White paint mixed with a tiny bit of pink. Add highlights to the top edges of the outer petals using quick, curved strokes. I find this really makes the flower pop against the green leaves. -
Paint Buds:
Along the trailing vine on the long side of the box, paint smaller oval shapes in pink. Add a small green joyful ‘V’ shape at the base of each oval to connect it to a stem.
Step 4: Inking and Finishing
-
Add Filler Details:
Dip the liner brush into White or pale blue-grey paint. Stipple tiny dots in clusters near the leaves to represent baby’s breath or wildflowers. -
Deepen Shadows:
Check your rose centers. If they look flat, add a tiny touch of dark crimson or brown into the deepest crevices of the spiral to increase contrast. -
Refine the Distressing:
If painting covered up some of your distressed edges, gently sand over those specific areas again to bring the rustic wood texture back to the forefront. -
Seal the Project:
Once all paint is bone dry (give it a few hours), spray the entire box with a matte clear sealer. This protects your artwork from water damage when you water your plants.
Now your planter is ready to be filled with fresh blooms or greenery for a stunning rustic display


One Color Base Coat That Pops
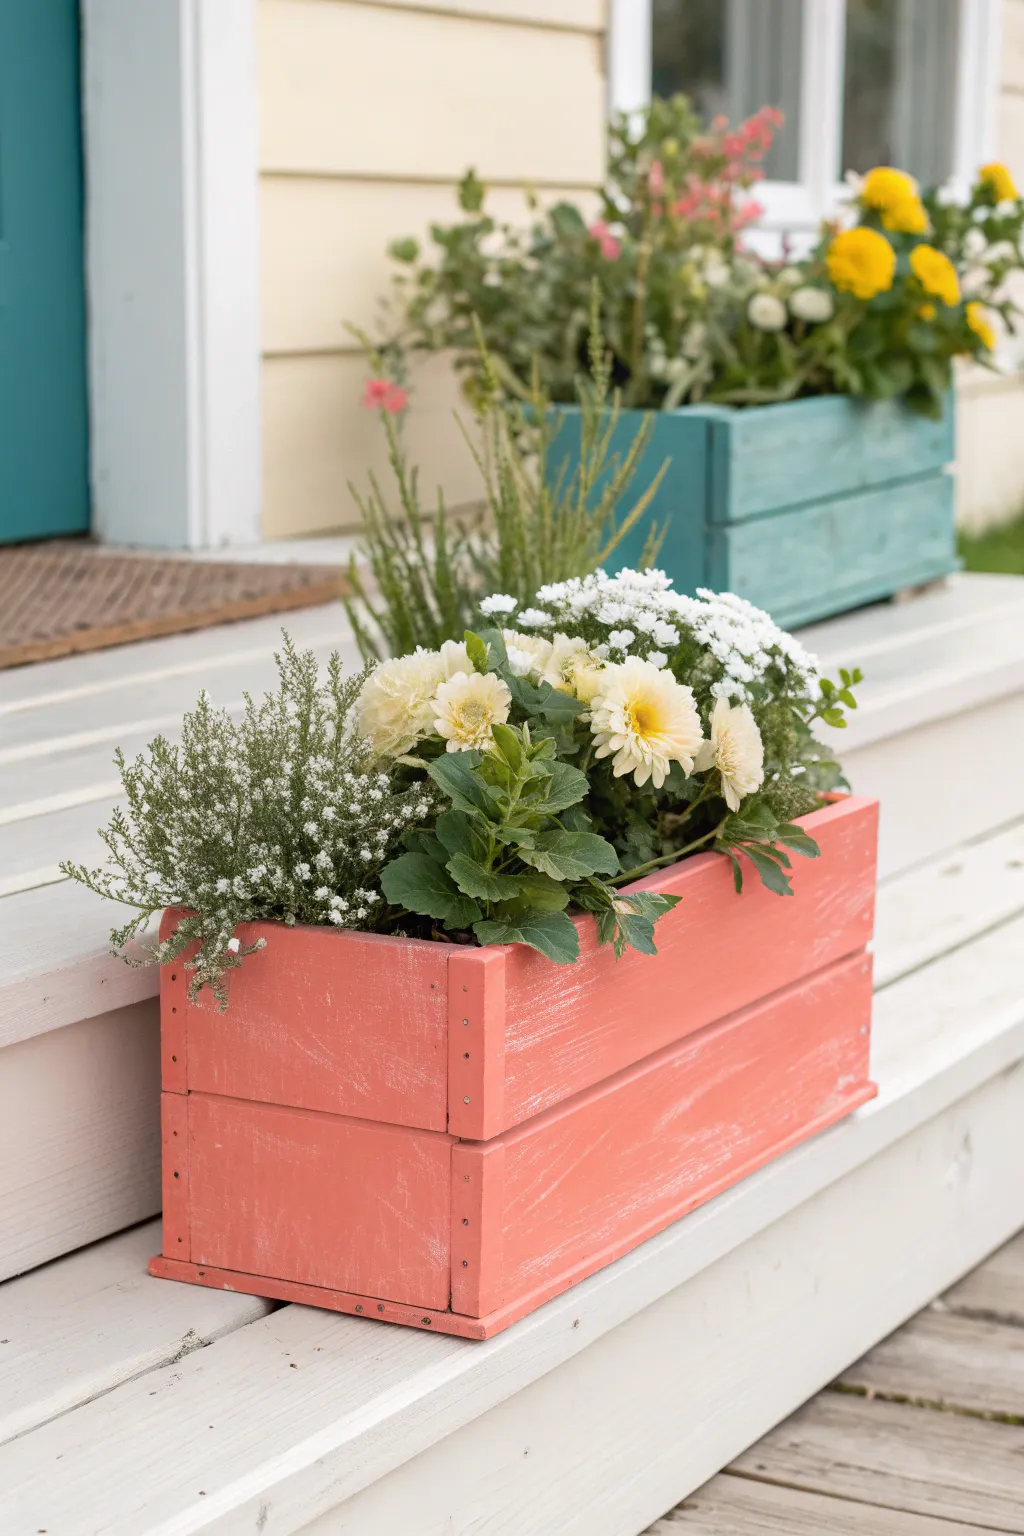
Bring a warm, welcoming pop of color to your front porch with this simple yet striking coral flower box project. The vibrant finish beautifully contrasts against white steps and green foliage, creating an effortless focal point for your entryway.
Step-by-Step Guide
Materials
- Unfinished wooden crate or slatted planter box
- Sandpaper (120 and 220 grit)
- Tack cloth or microfiber rag
- Exterior primer (white)
- Exterior acrylic latex paint (coral/salmon shade)
- 2-inch synthetic bristle brush
- Small foam roller (optional for flat sides)
- Matte or satin clear outdoor sealant
- Plastic drop cloth
- Paint stirrer
- Painter’s tape (optional)
Step 1: Preparation
-
Inspect the Wood:
Begin by checking your wooden crate for any rough splinters, loose staples, or protruding nails. If you find any nails sticking out, gently tap them flush with a hammer so your painting surface is safe and smooth. -
Sand the Interior:
Using the 120-grit sandpaper, give the interior rim and the top edges a good sanding. You don’t need to make the inside perfect since it will be filled with dirt, but the top edges should be smooth to the touch. -
Sand the Exterior:
Switch to the 220-grit sandpaper for the exterior slats. Sand with the grain of the wood to remove any mill glaze and create a surface the paint can grab onto. -
Clean the Dust:
Vacuum away the heavy sawdust, then wipe the entire box down firmly with a tack cloth or a slightly damp microfiber rag to capture every last particle of dust.
Step 2: Priming and Base Coat
-
Apply Primer:
Brush a coat of high-quality exterior white primer onto the outside of the box. The white base is crucial because it ensures your coral topcoat will look bright and true to color rather than muddy. -
Work into Crevices:
Don’t forget the gaps between the slats. Use the tip of your brush to dab primer into these recessed areas so no raw wood shows through later. -
Let it Dry:
Allow the primer to dry completely according to the can’s instructions, usually about one to two hours. If the wood grain has raised significantly, lightly scuff it with the 220-grit paper again. -
Stir the Coral Paint:
Open your coral paint and stir it thoroughly to ensure the pigments are evenly distributed, pulling the color up from the bottom of the can. -
Paint the Slats:
Beginning at the top slat, apply the coral paint in long, smooth strokes following the wood grain. I generally avoid overloading the brush here to prevent drips from forming in the gap between the slats.
Pro Tip: Elevate It
Place small wooden blocks or feet under the crate before planting. This improves drainage and prevents water from pooling underneath, which can rot the wood bottom over time.
Step 3: Finishing Touches
-
Check Coverage:
Once the first coat is dry to the touch, inspect the box in natural light. If you see inconsistent streaks or the primer showing through, get ready for a second round. -
Apply Second Coat:
Apply a second thin coat of the coral paint. This layer builds up the richness of the color and provides a more durable barrier against the elements. -
Distress (Optional):
If you want the subtle weathered look seen in the photo, wait until the paint is tacky but not fully cured. Gently run a dry, coarse sanding sponge over the edges and corners to reveal tiny hints of the wood or primer beneath. -
Seal to Protect:
After the paint has cured for 24 hours, apply a coat of clear matte or satin exterior sealant. This step is vital to prevent peeling and fading from sun and rain exposure. -
Final Cure:
Let the sealant cure fully before introducing any soil or moisture. This patience ensures your beautiful new finish won’t bubble or lift when you water your plants.
Level Up: Liner Logic
Staple heavy-duty landscape fabric inside the crate before adding soil. It keeps the dirt contained while allowing water to drain, protecting your paint job from internal moisture.
Once dry, fill your vibrant new box with seasonal blooms and enjoy the cheerful welcome it adds to your home

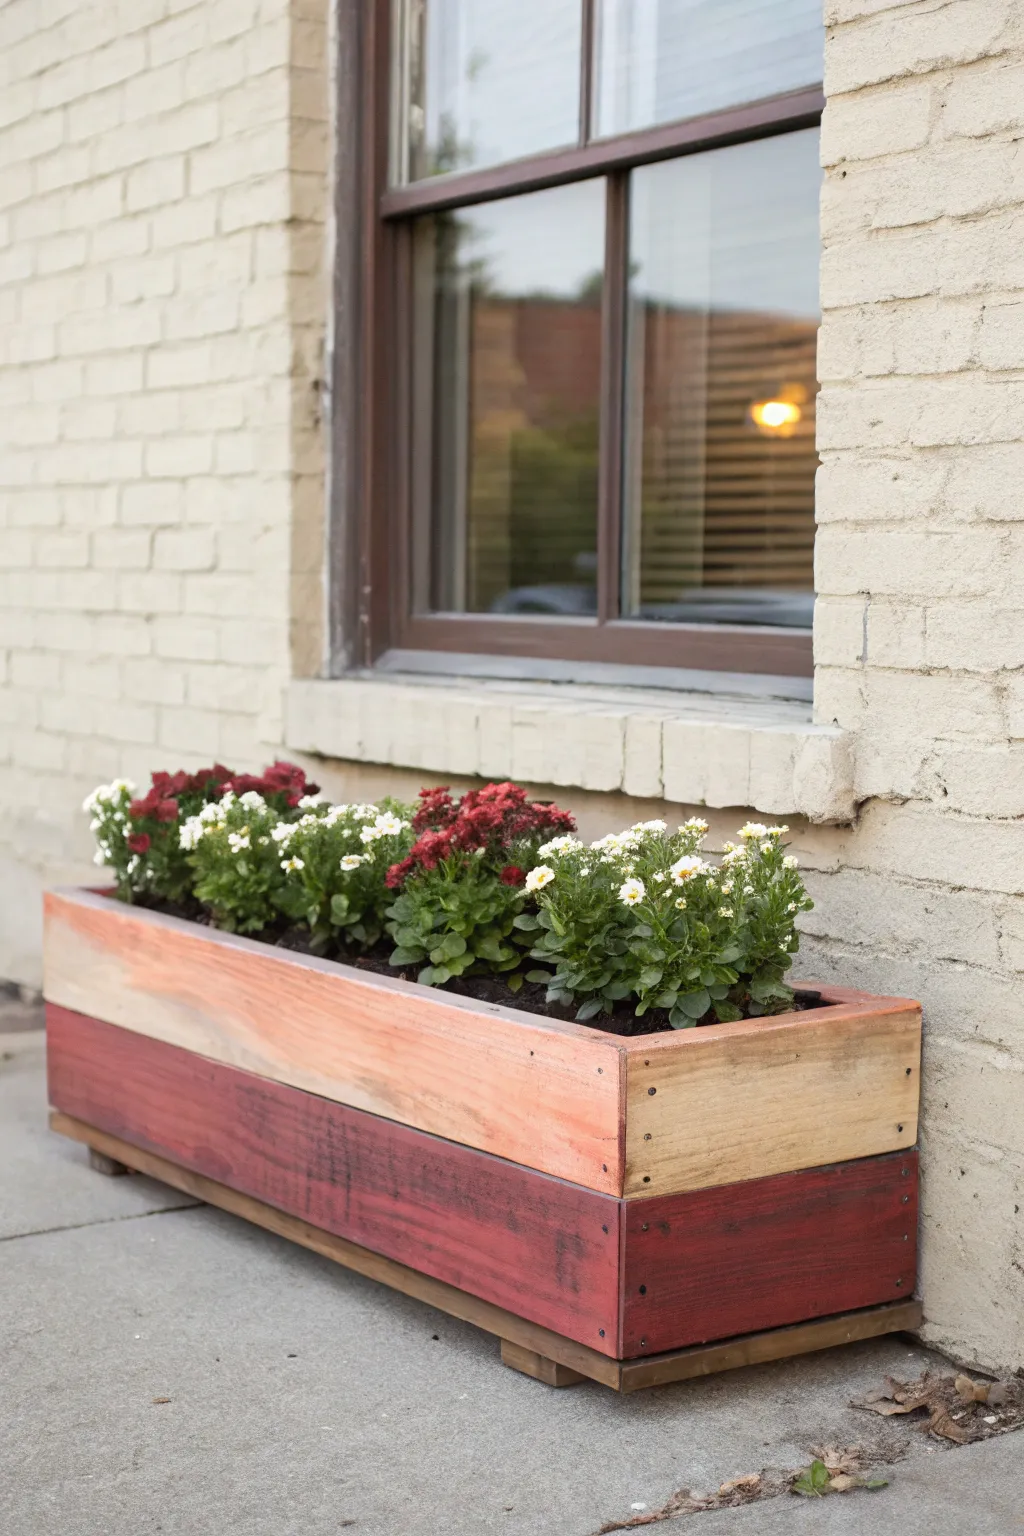
Two-Tone Dip-Dye Effect
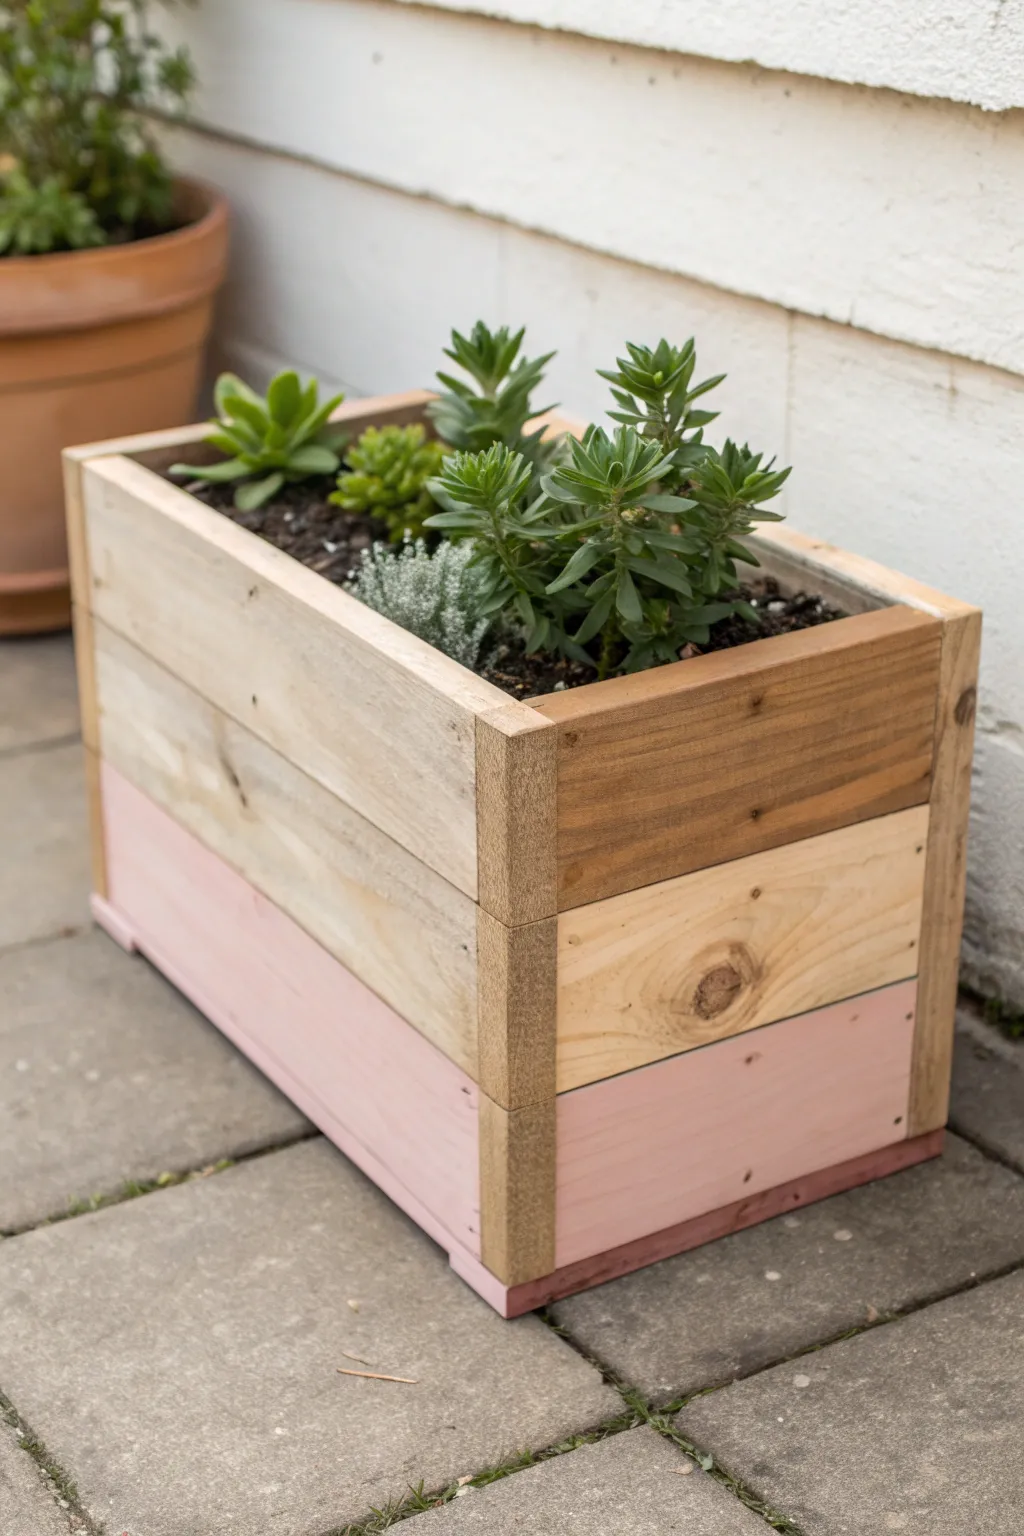
Transform a simple wooden crate into a chic garden accessory with this easy two-tone painting technique. The crisp line between the natural wood grain and the soft pink base creates a modern dipped effect that highlights the planter’s rustic texture.
Detailed Instructions
Materials
- Unfinished wooden planter box (or crate)
- Sandpaper (120 and 220 grit)
- Painter’s tape (high quality)
- Soft pink chalk paint or acrylic outdoor paint
- Medium-sized flat paintbrush
- Measuring tape
- Pencil
- Clear outdoor sealant (polyurethane or spar varnish)
- Drop cloth or newspapers
- Tack cloth or clean rag
Step 1: Prep Work
-
Assess the wood surface:
Begin by inspecting your wooden planter for any major rough patches or splinters. Since this project highlights natural wood, you want the unpainted section to look clean and intentional. -
Initial sanding:
Use 120-grit sandpaper to smooth out the entire exterior surface. Pay special attention to the corners and the top rim where the wood is most visible. -
Refining the finish:
Switch to 220-grit sandpaper for a finishing pass. This ensures the wood feels smooth to the touch and provides a better surface for the tape to adhere to later. -
Clean the surface:
Wipe down the entire box thoroughly with a tack cloth or a slightly damp rag to remove all sawdust. Dust is the enemy of a crisp paint line, so be thorough here.
Bleed-Proof Trick
Before painting pink, paint a thin layer of clear matte medium or clear sealer over the tape edge first. This seals the gap, so if anything bleeds under, it’s invisible clear coat.
Step 2: Creating the Design
-
Determine the paint line:
Decide how high you want your ‘dipped’ color to go. A rule of thirds often looks best composed, so measure about one-third of the way up from the bottom edge. -
Mark the height:
Using your measuring tape and pencil, make small, light tick marks at that height on all four sides of the planter box. -
Apply painter’s tape:
Run a continuous strip of painter’s tape around the box, aligning the bottom edge of the tape with your pencil marks. Ensure the tape is straight and level all the way around. -
Seal the tape edge:
Press down firmly on the bottom edge of the tape with your fingernail or a credit card. This is cruel step to prevent paint from bleeding under the tape and ruining that sharp line.
Peeling Paint?
If the paint peels up with the tape, you likely waited too long. Score the edge gently with a craft knife before pulling to separate the dried paint from the tape.
Step 3: Painting & sealing
-
Apply the first coat:
Dip your flat brush into the pink paint and apply the first coat to the bottom section. Brush in the direction of the wood grain for the smoothest finish. -
Mind the tape line:
When painting near the tape, brush slightly away from the tape edge rather than forcing paint under it. I like to be a bit lighter with the paint application right at the seam. -
Paint the bottom edge:
Don’t forget to paint the very bottom rim or feet of the planter so the color looks consistent even from low angles. -
Let it dry:
Allow the first coat to dry completely according to the manufacturer’s instructions. This usually takes about an hour depending on humidity. -
Add a second coat:
Apply a second coat of pink paint for full opacity. If you are using a lighter color like this blush pink, a second coat ensures the wood grain doesn’t darker the final hue too much. -
Remove the tape:
While the second coat is still slightly tacky (not fully dry), carefully peel back the painter’s tape at a 45-degree angle. Pulling it while wet helps ensure a razor-sharp line without chipping. -
Allow full cure:
Let the paint cure completely for at least 24 hours before moving on to sealing. -
Apply protective sealant:
Brush a clear outdoor sealant over the entire box—both the painted section and the raw wood. This protects the wood from rot and keeps the pink color from fading in the sunlight. -
Final dry:
Let the sealant dry fully before adding soil and plants. This ensures no chemicals leach into your potting mix.
Once sealed and dry, fill your stylish new planter with greenery and enjoy the modern pop of color on your patio


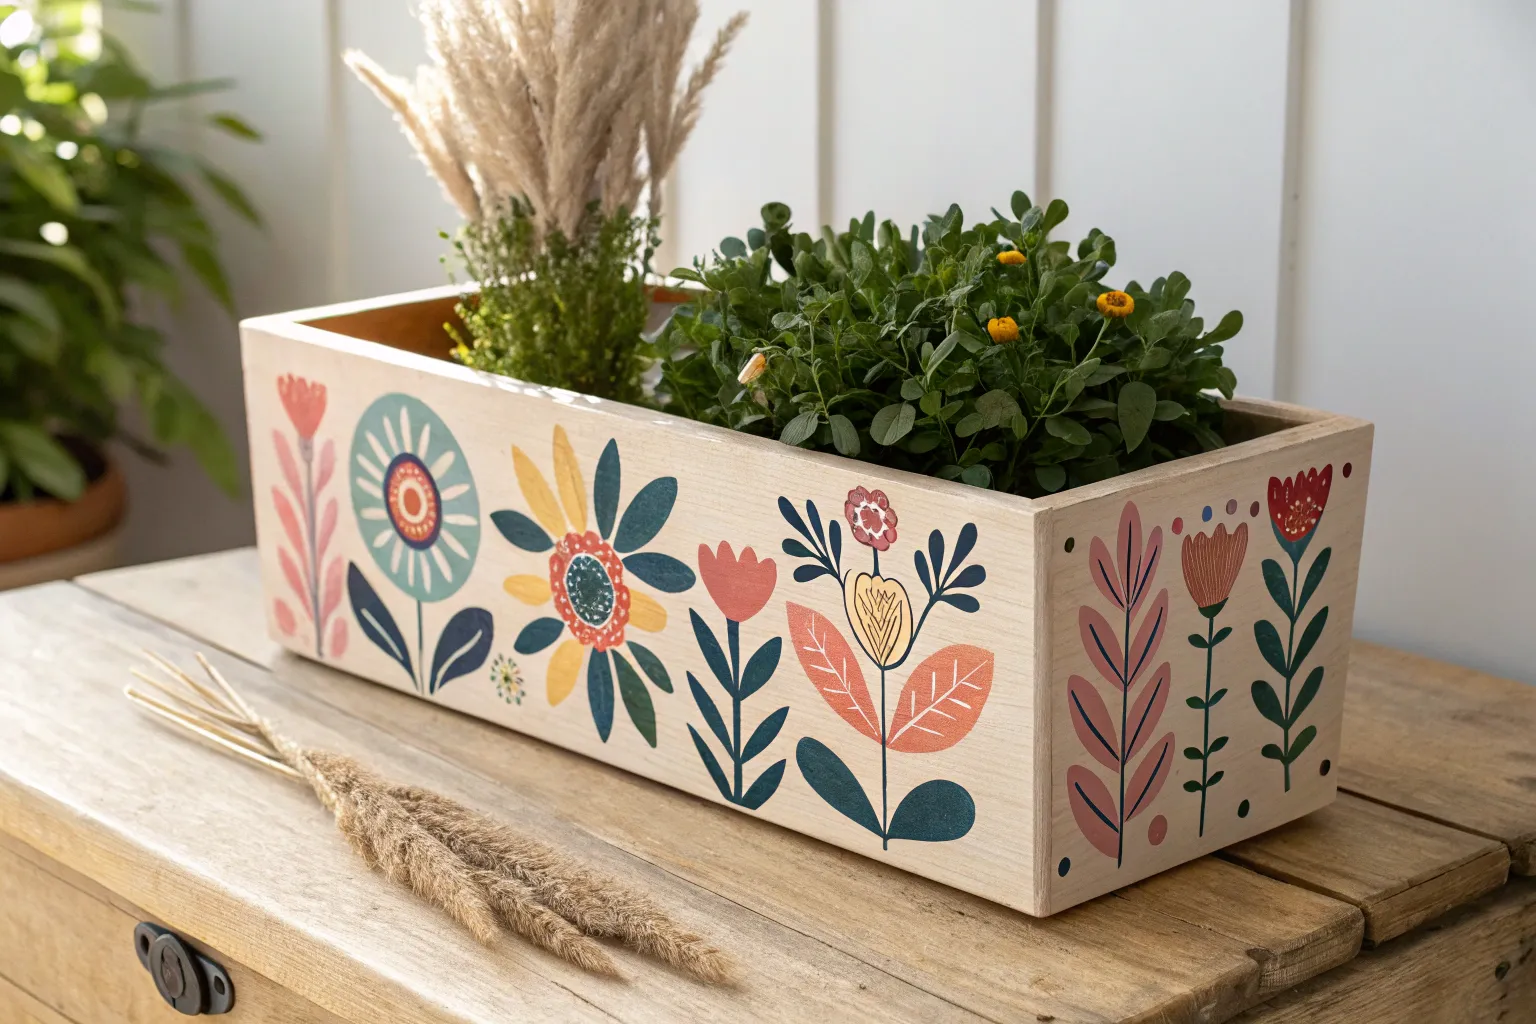
Daisy Dot Pattern for Beginners

Bring a burst of cheer to your porch with this delightful patterned flower box, featuring a golden yellow background dotted with playful white polka dots and bold, hand-painted daisies. The distinct whitewashed trim frames the artwork beautifully, giving it a charming rustic cottage feel.
Step-by-Step Tutorial
Materials
- Rectangular wooden planter box
- Sandpaper (120 and 220 grit)
- Painter’s tape (1-inch width)
- White acrylic craft paint or chalk paint
- Mustard yellow or goldenrod acrylic paint
- Sage green acrylic paint (two shades: light and medium)
- Small round foam pouncer or circle stencil
- Flat shader brushes (medium and small)
- Round detail brush (size 2 or 3)
- Matte clear sealant spray
Step 1: Preparation & Base Coat
-
Prep the Surface:
Begin by lightly sanding the entire planter box with 120-grit sandpaper to remove any rough splinters or old finish. Wipe away the dust with a damp cloth or tack cloth. -
Whitewash the Trim:
Dip a brush into white paint and blot most of it off on a paper towel. Dry-brush the corner posts and the top and bottom horizontal trim pieces. You want the wood grain to peek through for that rustic look. -
Masking Off:
Once the trim is completely dry, use painter’s tape to carefully mask off the inside edges of the vertical corner posts and the horizontal trim. This protects your whitewashed frame while you paint the panels. -
Apply the Yellow Base:
Paint the main recessed panels of the box with your mustard yellow or goldenrod paint. Use a medium flat brush for even coverage. -
Second Yellow Coat:
Let the first coat dry for about 20 minutes. Apply a second coat of yellow to ensure a rich, opaque background color without streaks.
Pro Tip: Perfect Circles
If you don’t have a pouncer, use the flat end of a pencil eraser or a drill bit dipped in paint to stamp perfectly round, consistent polka dots.
Step 2: Creating the Polka Dot Pattern
-
Start the Dots:
Dip your round foam pouncer lightly into white paint. Dab it on a palette first to ensure not too much paint is loaded, which prevents bleeding. -
Apply the Grid:
Press the pouncer onto the yellow background to create rows of polka dots. Keep the spacing consistent, roughly an inch apart, creating a simple grid pattern across the entire yellow panel. -
Touch Ups:
If any dots look too faint, carefully dab them a second time once the first layer is tacky. Let the polka dots dry completely before moving to the flowers.
Step 3: Painting the Daisies
-
Blocking the Flower Shapes:
Using a small flat brush and white paint, sketch the rough outline of large daisy petals in the corners and center. Don’t worry about perfection; we want a stylized, folk-art look. -
Filling the Petals:
Fill in the daisy petals with white paint. I like to apply two thin coats here, letting the yellow show slightly through the first coat to give the petals depth. -
Adding Leaves:
With the lighter sage green paint, paint sweeping, curved leaf shapes tucked behind and around the flower heads. Add a swirling vine or two for movement. -
Leaf Accents:
Use the darker green shade to add contour lines inside the leaves or to paint a secondary layer of smaller leaves for contrast. -
Painting the Centers:
Mix a tiny bit of brown or green into your yellow base color to darken it slightly. Paint a large circle in the center of each daisy. -
Detailing the Centers:
Using your smallest round detail brush and white paint, add tiny dashed lines or dots around the outer ring of the flower center to mimic texture. -
Outline Work (Optional):
If you want the design to pop more, outline the flower petals and leaves very loosely with a watered-down grey or light brown paint.
Level Up: 3D Texture
Mix a little baking soda into the yellow paint for the flower centers. This creates a raised, fuzzy texture that mimics real pollen when dried.
Step 4: Finishing Touches
-
Remove Tape:
Carefully peel off the painter’s tape at a 45-degree angle. If any yellow bled onto the white trim, quickly wipe it or sand it off lightly. -
Distressing the Edges:
Take your 220-grit sandpaper and gently scuff the edges of the painted panels and the trim. This unifies the design and enhances the vintage character. -
Sealing:
Protect your hard work by spraying the entire box with a matte clear sealant. This step is crucial if the planter will be kept outdoors.
Fill your new masterpiece with fresh daisies to mirror the painted design and enjoy the double dose of blooms
BRUSH GUIDE
The Right Brush for Every Stroke
From clean lines to bold texture — master brush choice, stroke control, and essential techniques.
Explore the Full Guide
Striped Flower Box in Coastal Blues
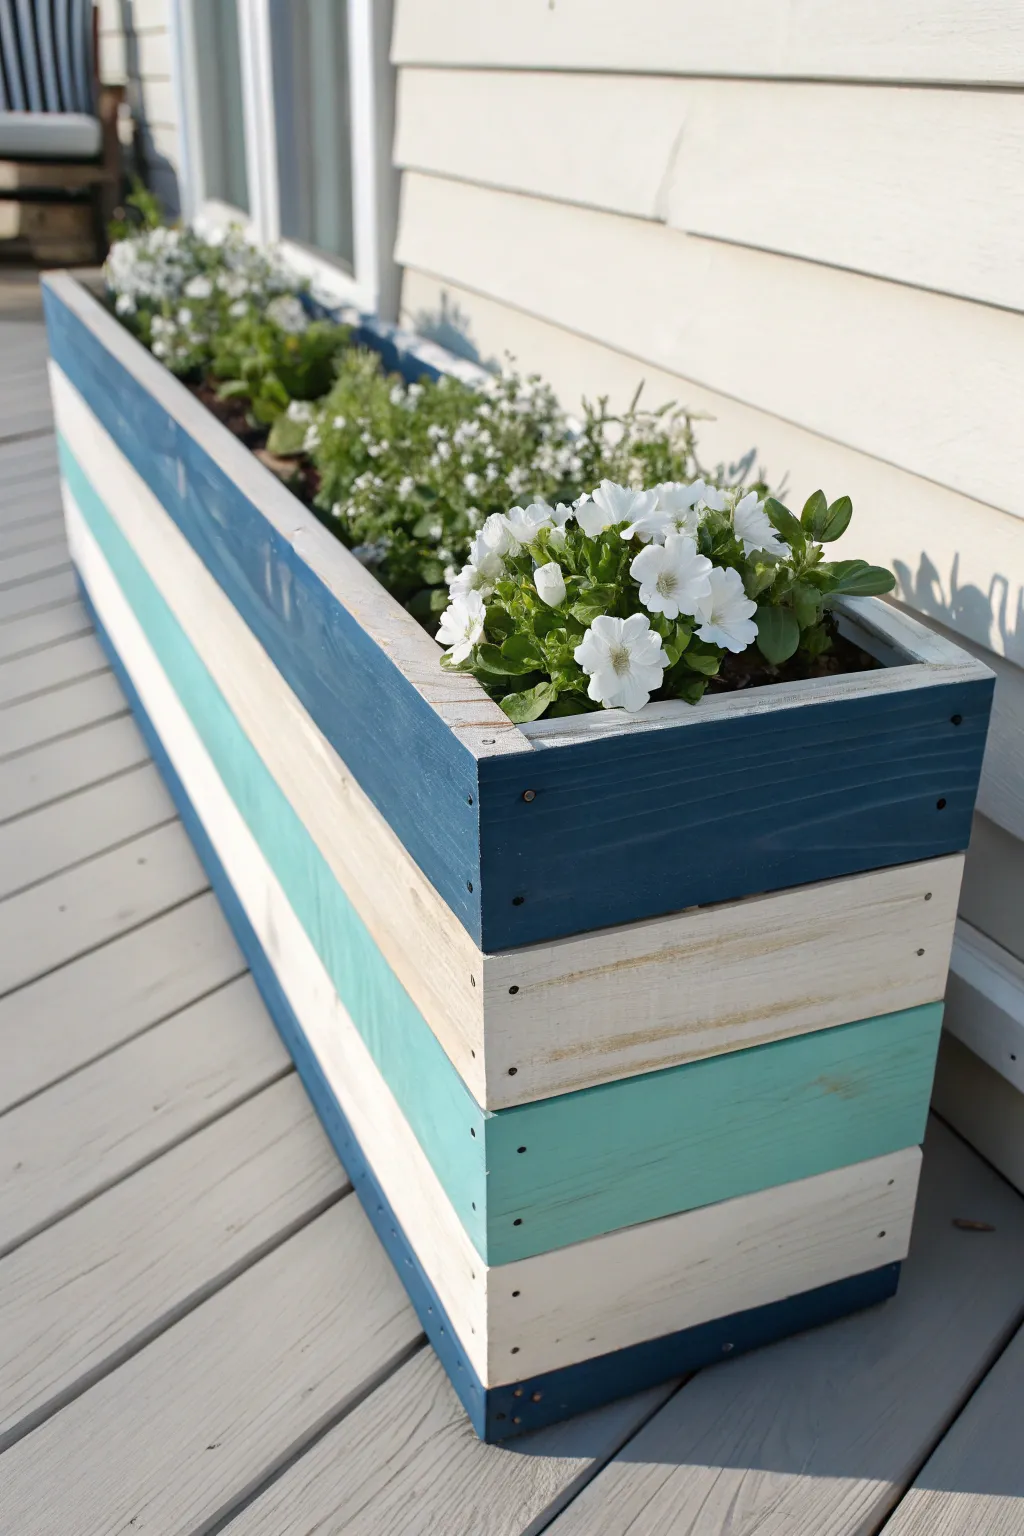
Bring the breezy charm of a seaside cottage to your deck with this simple yet striking striped planter. The crisp lines and soothing palette of navy, white, and teal create a fresh, modern look that beautifully highlights bright white blooms.
Step-by-Step
Materials
- Unfinished wooden planter box (rectangular with horizontal slats)
- Sandpaper (120 and 220 grit)
- Painter’s tape (1-inch width)
- Exterior acrylic latex paint (Navy Blue)
- Exterior acrylic latex paint (Bright White)
- Exterior acrylic latex paint (Ocean Teal)
- Satin or semi-gloss exterior clear coat (polyurethane)
- 2-inch synthetic bristle paint brushes
- Small foam roller (optional for smoother finish)
- Tack cloth or clean rags
- Drop cloth
Step 1: Preparation
-
Clean and prep the surface:
Begin by inspecting your wooden planter box for any rough spots or splinters. If you’re building it from scratch, ensure all slats are securely fastened. Wipe the entire surface down with a damp cloth to remove any sawdust or loose debris. -
Sand for smoothness:
Using 120-grit sandpaper, give the wood a good sanding to open up the pores, which helps the paint adhere better. Follow up with 220-grit sandpaper for a smoother finish, especially on the top edges where hands might touch. -
Remove dust:
Once sanding is complete, it’s crucial to remove all sanding dust. Use a tack cloth or a slightly damp rag to wipe every crevice clean. Any leftover dust will create bumps in your paint finish.
Bleeding Lines?
If paint bleeds into the grooves, wait for it to fully dry. Then, use a small artist’s brush with the correct color to neatly cut back over the mistake.
Step 2: Painting the Stripes
-
Plan your pattern:
Visualize the pattern before you start. For this look, we are using a specific rotation: Dark Blue (top), White, Teal, White, Dark Blue (bottom). This symmetry grounds the design. -
Paint the top slat:
Start with your Navy Blue paint. Using a 2-inch brush, carefully paint the top horizontal slat. Be sure to paint the top lip of the box as well for a cohesive look. Don’t worry too much about the gap between slats yet, but try to keep the paint from dripping onto the second board. -
Paint the bottom slat:
While you have the Navy Blue paint out, apply it to the very bottom slat as well. This creates a frame for the lighter colors in the middle. Let the navy paint dry to the touch before moving on. -
Apply the white stripes:
Next, tackle the two white sections. These are the second slat from the top and the second slat from the bottom. Use the Bright White exterior paint. Applying two thin coats is usually better than one thick coat here to ensure solid coverage over the wood grain. -
Fill the center:
Now for the pop of color. Paint the middle slat with the Ocean Teal. I find that using a small foam roller here can help get a very smooth, modern finish on these flat surfaces, but a brush works perfectly fine too. -
Detail the gaps:
This step requires a steady hand or a small artist’s brush. If there are visible gaps or grooves between the slats, decide which color they should be. Usually, painting the inside of the groove the same color as the slat above it creates the cleanest visual line.
Add Rope Detail
For extra nautical flair, hot glue or tack thick manila rope handles to the short ends of the planter box after the sealer has dried completely.
Step 3: Finishing Touches
-
Touch up edges:
Inspect where the colors meet. If any paint dripped or crossed over onto a neighboring slat, use a small detail brush to touch up the lines. You want distinct, crisp separation between the contrasting colors. -
Allow to cure:
Let the paint dry completely according to the manufacturer’s instructions. This usually takes at least 4-6 hours, but leaving it overnight is safest to prevent tackiness. -
Distress (Optional):
If you prefer a more weathered, beach-cottage look rather than a crisp modern one, lightly sand the edges of the painted slats with 220-grit paper to reveal a tiny bit of wood underneath. -
Seal the wood:
Apply a coat of exterior-grade clear polyurethane. This creates a barrier against sun and water. Pay special attention to the bottom edges where water might pool on the deck. -
Second coat of sealer:
For maximum durability, lightly sand the first coat of sealer once dry, wipe clean, and apply a second coat. This ensures your coastal masterpiece withstands the elements for seasons to come. -
Add drainage:
Before planting, ensure the bottom of the box has adequate drainage holes. If not, drill 3-4 holes along the center bottom to prevent root rot.
Once filled with soil and your favorite white petunias, your new planter will become the focal point of your outdoor space
Soft Distressed Farmhouse Finish
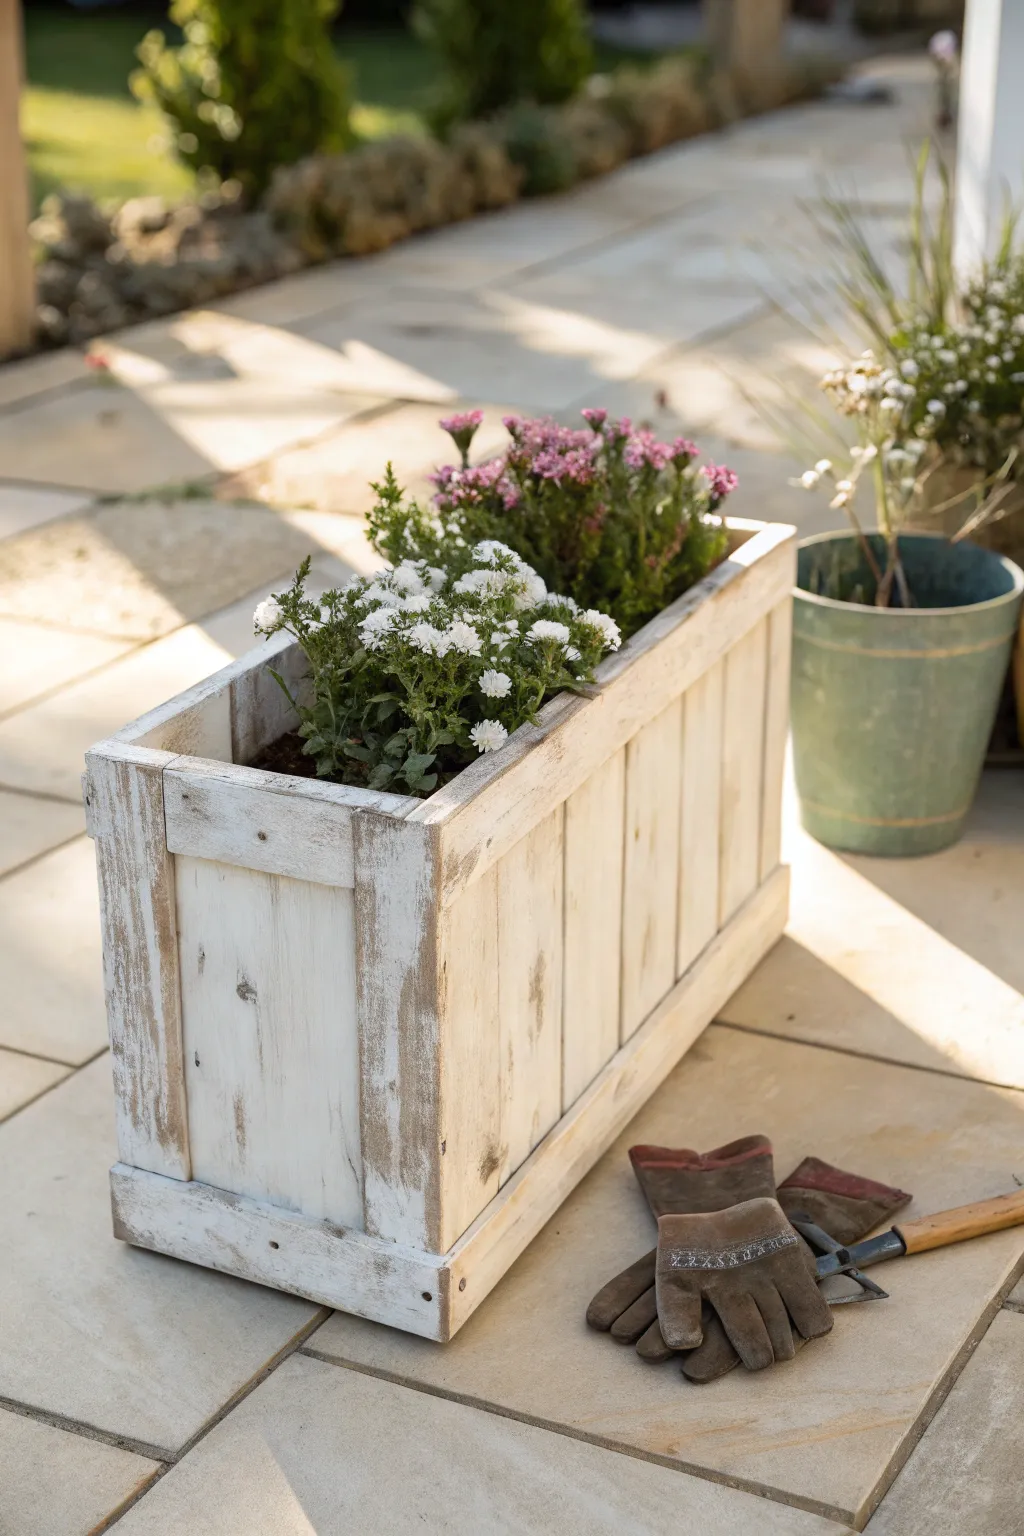
Achieve a soft, naturally aged look with this gentle distressing technique that lets the warm wood grain peek through a creamy white finish. This project transforms a basic wooden planter into a rustic farmhouse centerpiece that feels like it has weathered years of sunshine.
Step-by-Step Guide
Materials
- Unfinished wooden planter box (pine or cedar works well)
- White extra-matte chalk paint or milk paint
- Dark walnut or espresso wood stain
- Lint-free rags
- Medium-grit sandpaper (120-grit)
- Coarse-grit sandpaper (80-grit)
- 2-inch synthetic bristle brush
- Clear matte polyurethane or exterior sealer
- Tack cloth
- Drop cloth
Step 1: Preparation and Base Coat
-
Clean surface:
Begin by wiping down your wooden planter box with a tack cloth to ensure it is completely free of sawdust and debris, which could mar your finish. -
Apply stain:
Dip a lint-free rag into your dark walnut wood stain and rub it generously into the wood. Coverage doesn’t need to be perfect, but ensure the corners and edges are well-saturated, as these are the areas that will show through later. -
Wipe excess:
immediately wipe away any pooling stain with a clean rag to ensure the layer remains thin and dries evenly. -
Dry time:
Allow the stain to dry completely according to the manufacturer’s instructions, usually about 4-6 hours, so it doesn’t bleed into your white paint.
Step 2: Painting Technique
-
Load the brush:
Dip just the tips of your synthetic brush into the white chalk paint. You want a moderate amount of paint—not a dry brush, but not dripping wet. -
Apply first strokes:
Brush the paint onto the flat panels with long, confident strokes going with the grain. The goal is full coverage, but don’t worry if the darkness of the stain shadows through slightly. -
Paint the trim:
Carefully paint the vertical frames and top trim. I find that painting these areas a bit thicker helps create a nice contrast once we start sanding. -
Inspect coverage:
Look for any areas that seem too translucent. If you prefer a more solid white look before distressing, apply a second thin coat after the first is touch-dry. -
Full cure:
Let the paint dry completely. Chalk paint dries fast, but give it at least 2 hours to harden sufficiently for sanding.
Paint Peeling Off?
If the white paint peels off in sheets rather than sanding away dusty, the underlying stain wasn’t dry enough. Let it cure longer, then try sanding again.
Step 3: Distressing and Sealing
-
Initial distressing:
Take your medium-grit (120) sandpaper and gently sand the flat surfaces. Use circular motions to create random wear patterns, exposing just hints of the dark wood beneath. -
Focus on edges:
Switch to the coarse-grit (80) sandpaper for the corners and raised trim edges. Apply more pressure here to simulate natural wear and tear where the box would be handled most. -
Soften the paint:
Go back over the entire piece lightly with the 120-grit paper to smooth out brush strokes and feather the edges where you’ve sanded through to the wood. -
Clean up dust:
Thoroughly remove all sanding dust using a vacuum brush attachment followed by a clean tack cloth. Any remaining dust will get trapped in the sealer. -
Seal the finish:
Apply a coat of clear matte exterior sealer to protect the wood from moisture. Brush it on in thin, even layers to avoid milky buildup. -
Final cure:
Allow the sealer to cure for 24 hours before filling the box with soil or placing it outdoors.
Add Vintage Character
Before sealing, lightly dry-brush some gray or taupe paint near the bottom corners to mimic dirt accumulation and weathering for extra realism.
Now you have a beautifully weathered planter ready to showcase your favorite seasonal blooms

PENCIL GUIDE
Understanding Pencil Grades from H to B
From first sketch to finished drawing — learn pencil grades, line control, and shading techniques.
Explore the Full Guide
Modern Geometric Tape Blocks
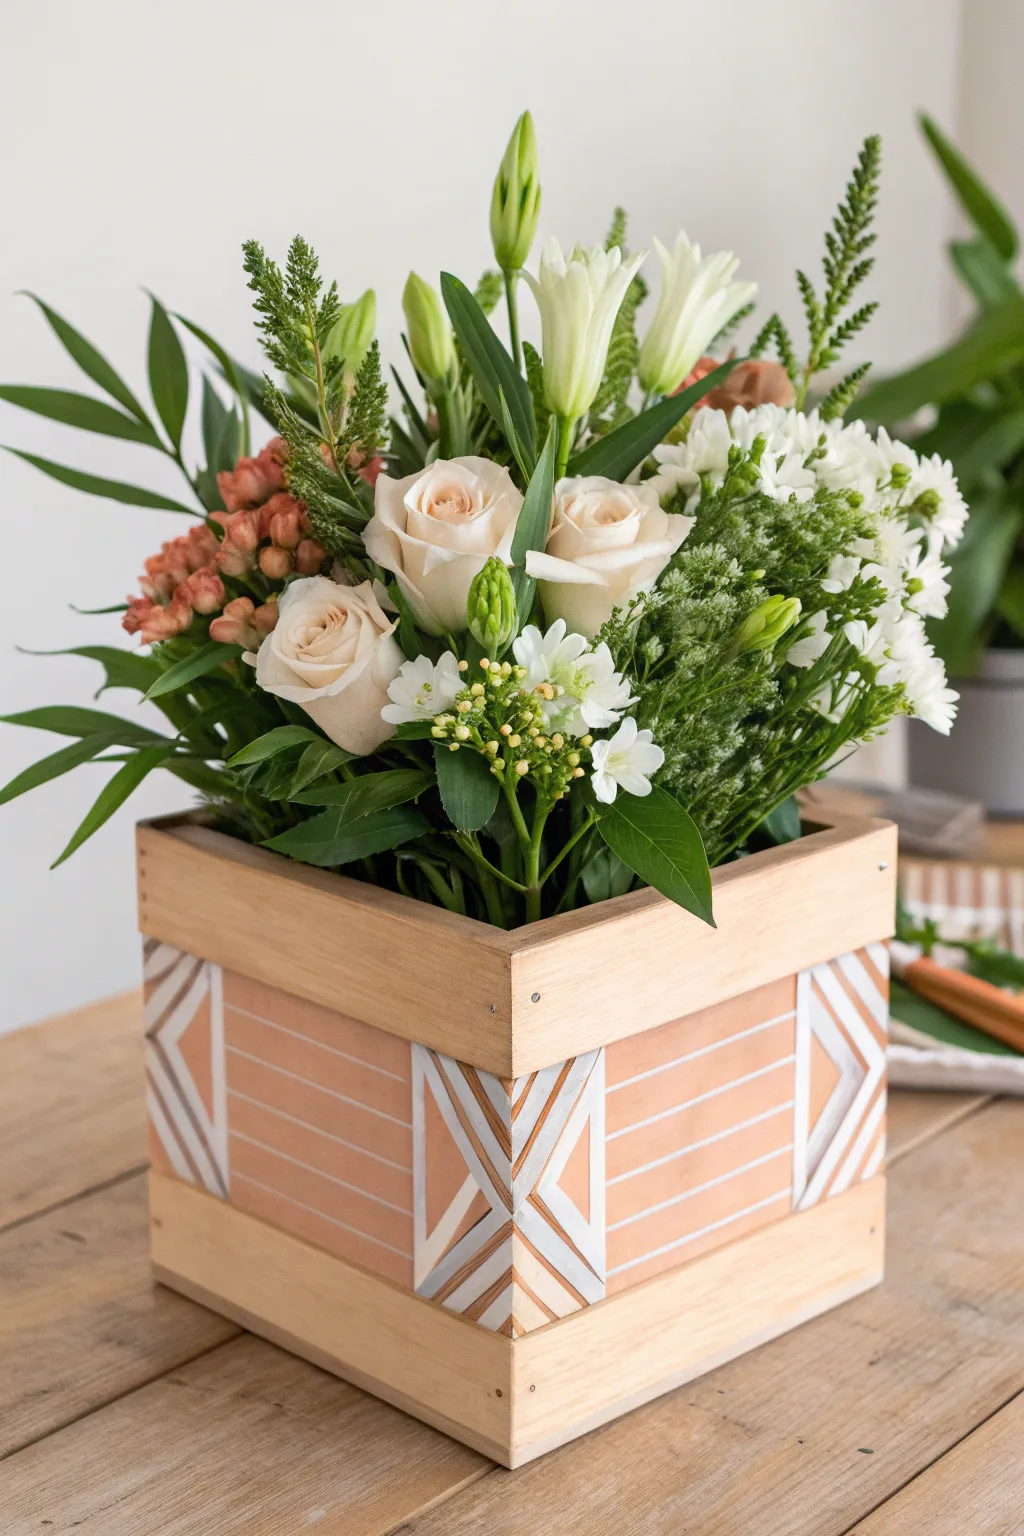
Transform a plain wooden crate into a chic centerpiece with this modern geometric design featuring soft peach tones and crisp white angles. Using tape blocking techniques, you’ll achieve sharp lines and a sophisticated pattern that perfectly complements fresh blooms.
Step-by-Step Guide
Materials
- Unfinished wooden square planter box
- Painter’s tape (various widths, including 1/4 inch fine line tape)
- Acrylic craft paint (Peach/Terracotta shade)
- Acrylic craft paint (White)
- Foam brushes
- Small flat detail brush
- Sandpaper (medium grit)
- Clear matte sealer spray
- Ruler and pencil
- Craft knife
Step 1: Preparation & Mapping
-
Surface prep:
Begin by removing any stickers or rough patches from your wooden box. Give the entire surface a light sanding to ensure the wood is smooth and ready to accept paint, then wipe away the dust with a damp cloth. -
Establish the frame:
Decide on the width of your natural wood borders. Apply standard painter’s tape horizontally around the very top and very bottom rims of the box to protect the wood you want to leave unpainted. -
Mark the centers:
Use a ruler to find the exact vertical center of each side panel. Make a light pencil mark at the top and bottom of the central painting area to guide your geometric pattern. -
Create the central diamond:
Using your pencil marks as a guide, apply tape to create the large ‘X’ shape or diamond borders in the center. Refer to the image where the white lines intersect; you are taping off the areas that will eventually be the natural wood or white painted lines.
Step 2: Painting the Base
-
Apply the peach tone:
Pour out your peach or terracotta acrylic paint. Using a foam brush, paint the large rectangular sections on either side of your central geometric shape. Do not paint over the taped areas. -
Second coat coverage:
Let the first coat dry for about 15-20 minutes. If the wood grain is still showing through too much for your liking, apply a second coat of peach paint for a completely opaque finish. -
Dry thoroughly:
Allow the peach paint to dry completely. This is crucial because we will be applying more tape over this painted surface for the pinstripe details.
Clean Lines Hack
Before painting your main color, brush a thin layer of clear matte medium or sealer over the tape edges to seal them. This blocks paint bleed completely.
Step 3: Adding Geometric Details
-
Tape the pinstripes:
Once the peach paint is bone dry, run thin strips of 1/4 inch tape horizontally across the painted peach sections. Press the edges down firmly to prevent bleed. -
Mask the white angles:
Now, focus on the central geometric focal point. You need to mask off the shapes so you can paint the specific white triangles and chevrons seen in the design. I find using a craft knife helps trim the tape at sharp corners. -
Paint the white accents:
Using white acrylic paint and a smaller flat brush, paint the exposed pinstripes (where the peach was) and the geometric angular sections in the center joint. -
Layering check:
The white paint might need two or three thin layers to look bright and crisp against the wood or peach background. Be patient and let layers dry in between.
Rustic Texture
For a ‘distressed’ farmhouse look, lightly sand the painted areas after they are dry, focusing on the corners and edges to reveal a bit of wood.
Step 4: The Reveal & Finish
-
Remove tape carefully:
While the final coat of paint is still slightly tacky (not fully cured), slowly peel back your tape at a 45-degree angle. This helps keep the lines crisp and prevents peeling up dried paint chips. -
Touch ups:
Inspect your lines. If any paint bled under the tape, use a tiny detailed brush and the background color (or a specialized distinct wood eraser) to clean up the edges. -
Clean the raw wood:
If any paint got onto the top or bottom natural wood rims, gently sand it away with a small piece of sandpaper for a clean border. -
Seal the project:
Take the box to a well-ventilated area and spray it with a clear matte sealer. This will protect the paint from water drips when you water your flowers. -
Insert liner:
Since wood can rot with constant moisture, place a plastic liner or a glass jar inside the box before adding your floral arrangement.
Start arranging your favorite seasonal blooms in your new custom planter for a fresh look
Ombre Gradient Across the Length
Transform a basic two-slat wooden planter box into a piece of modern art with this sideways ombre technique. The design features a two-tone gradient that shifts from deep burgundy to light natural wood, mimicking the warm hues of a setting sun.
Detailed Instructions
Materials
- Rectangular wooden planter box (two horizontal slats high)
- Sandpaper (80-grit and 120-grit)
- Clean rags or tack cloth
- Painter’s tape
- Acrylic craft paint (Deep Burgundy)
- Acrylic craft paint (Warm Peach or Light Coral)
- Acrylic craft paint (Cream or Off-White)
- Acrylic glazing medium or water
- 2-inch synthetic bristle brush
- Small mixing cups
- Clear matte outdoor sealer spray
Step 1: Preparation & Sanding
-
Initial Sanding:
Begin by sanding the entire exterior of your wooden planter. Use 80-grit sandpaper first to remove any rough splinters or previous finishes. -
Smoothing the Grain:
Follow up with 120-grit sandpaper to create a smooth surface that will accept the paint wash evenly. Pay special attention to the corners where the boards meet. -
Cleaning:
Wipe down the entire box with a tack cloth or a slightly damp rag to remove every speck of sawdust. Dust left behind can ruin the smooth gradient effect. -
Taping the Intersection:
Since this design treats the top and bottom boards differently, run a strip of painter’s tape along the bottom edge of the top slat to protect it while you work on the lower section.
Wet Rag Trick
Keep a soaking wet rag nearby. If your gradient gets too harsh, a wet wipe can ‘erase’ the acrylic wash while it’s fresh, letting you try the blend again.
Step 2: Creating the Paint Washes
-
Mixing the Dark Wash:
In a mixing cup, combine your Deep Burgundy paint with water or glazing medium. I prefer a ratio of about 1 part paint to 2 parts water to ensure the wood grain still peeks through slightly. -
Mixing the Light Wash:
In a separate cup, mix the Warm Peach and Cream colors to create a soft, pale sunset hue. Dilute this mixture similarly to the burgundy so it acts as a stain rather than an opaque coat.
Spotty Coverage?
If the wood absorbs the wash unevenly, apply a clear water coat to the wood first. This ‘pre-conditioner’ helps the pigment soak in consistently.
Step 3: Painting the Gradient
-
Base Coat – Bottom Slat:
Dip your 2-inch brush into the diluted Deep Burgundy wash. Apply it generously to the bottom slat, brushing horizontally from one end to the other. -
Wiping Back:
Before the paint dries, take a clean rag and gently wipe across the grain. This removes excess pigment and highlights the wood texture, giving it a rustic ‘stained’ look rather than a flat painted one. -
Creating the Side Gradient:
To achieve the ombre look seen on the left side of the bottom slat, dampen a clean corner of your rag. Gently rub the far left edge of the painted wood to lift some color, making it lighter than the right side. -
Transitioning:
Once the bottom slat is dry to the touch, remove the tape. Apply a new strip of tape along the top edge of the *bottom* slat to protect your fresh work. -
Base Coat – Top Slat:
Using a clean brush, apply your Light Wash (Peach/Cream mix) to the top slat. Work quickly to cover the length of the board. -
Blending the Top Gradient:
Just like the bottom, wipe away excess paint with a rag. To match the image, dip a small brush into a tiny bit of the Burgundy wash and feather it into the very far left edge of the top slat, blending it quickly into the peach color. -
Creating the Fade:
On the far right side of the top slat, use a wet rag to wipe almost all the paint away, leaving the wood nearly natural. This creates the ‘fading out’ effect. -
Corner Details:
Inspect the corners specifically. The image shows the darker red tones wrapping around the front-left corner. Ensure your paint application wraps slightly around the sides for continuity.
Step 4: Finishing Up
-
Drying Time:
Allow the planter to dry completely for at least 2-4 hours. The wood needs to be bone dry before sealing. -
Sealing:
Spray the entire exterior with a clear matte outdoor sealer. This will protect your ombre work from rain and sun damage without adding an artificial gloss. -
Final Buff:
Once the sealer is cured, give it a very light buff with a brown paper bag to knock down any raised grain from the sealing process.
Now you have a stunning, modern planter ready to showcase your favorite blooms


Bees and Butterflies Among Painted Blooms
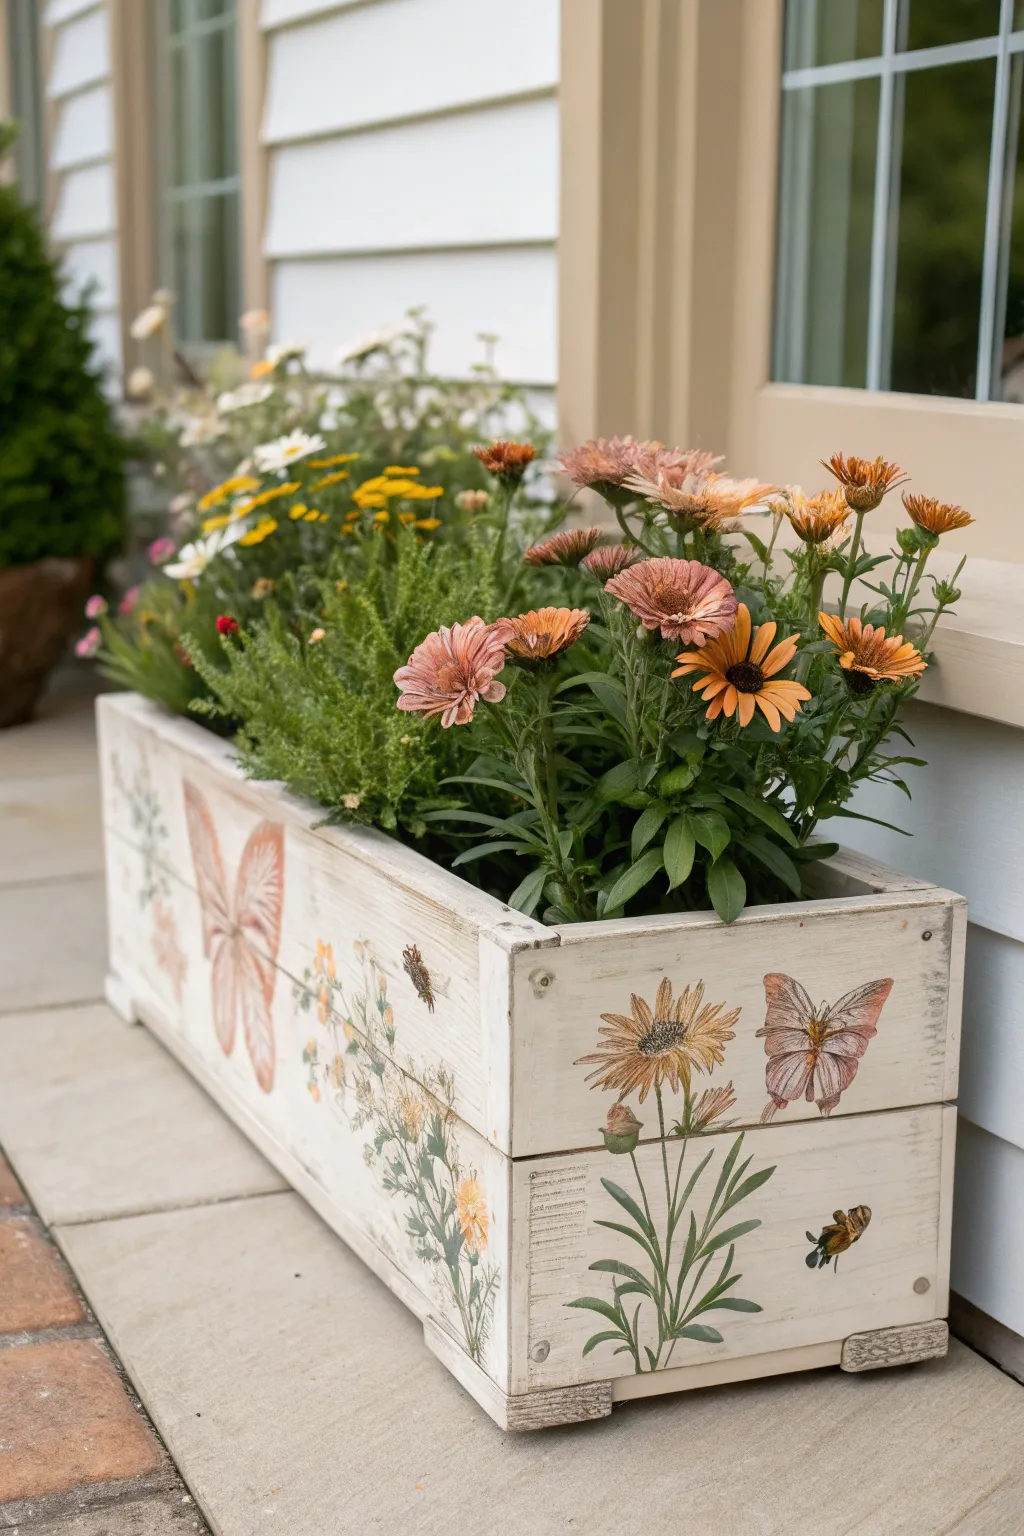
Bring the charm of a flower meadow directly to your container garden with this whitewashed wooden planter featuring delicate botanical illustrations. The soft, rustic finish combined with decoupage-style imagery of bees, butterflies, and wildflowers creates a vintage-inspired piece perfect for a front porch.
Step-by-Step
Materials
- Unfinished rectangular wooden planter box (or crate)
- White or cream chalk paint
- Medium-grit sandpaper
- Botanical transfer stickers or decoupage paper (butterflies, bees, wildflowers)
- Mod Podge or decoupage medium (matte finish)
- Wide foam brush
- Small detailing brushes
- Clear outdoor sealant spray (matte)
- Soft cloth or rag
- Water
- Scissors
Step 1: Preparing the Base
-
Clean the surface:
Start with a clean, dry wooden planter. If you are repurposing an old crate, use a stiff brush to remove any dirt or cobwebs from the corners. -
Sand the wood:
Lightly sand the exterior surfaces with medium-grit sandpaper to remove rough splinters and create a smooth base for your paint. -
Create a whitewash mixture:
Mix your white chalk paint with water in a 1:1 ratio. You want a milky consistency that allows the wood grain to show through slightly. -
Apply the first wash:
Using a wide foam brush, apply the whitewash mixture generously over the entire exterior face of the planter. -
Wipe back excess:
Before the paint dries completely, use a soft cloth to gently wipe away excess moisture. This highlights the natural texture and imperfections of the wood. -
Dry thoroughly:
Allow the planter to dry completely, which usually takes about an hour depending on humidity.
Seamless Blending
If the edges of your decoupage paper are visible, dip a finger in water and gently rub the paper edges to thin them out before glueing, making them disappear.
Step 2: Applying the Imagery
-
Plan your composition:
Lay out your botanical transfers or decoupage cutouts on a table. I usually arrange the large butterfly and flower elements first to ensure the spacing feels balanced before committing them to the wood. -
Cut out elements:
If using decoupage paper, carefully cut around the butterflies, bees, and flower stems with sharp scissors, getting as close to the design edge as possible. -
Apply the main floral stems:
Apply a thin layer of decoupage medium to the back of the tall flower stem cutouts. Place them vertically on the front/end panels, making sure the ‘ground’ of the stem aligns near the bottom slat. -
Smooth the paper:
Gently smooth the paper down with your fingers or a clean brayer, working from the center outward to push out any air bubbles. -
Add the butterflies:
Position your large butterfly motifs. Place them slightly higher up the box to simulate flight, perhaps angling one toward a flower. -
Place the bees:
Add the smaller bee details last. These act as perfect filler for empty negative spaces near the corners or lower sections. -
Using transfers instead:
If you are using rub-on transfers instead of paper, place the sheet design-side down and rub firmly with the included stick tool until the image releases onto the wood. -
Seal the images:
Brush a thin coat of decoupage medium directly over the top of your applied paper images to seal them. If using transfers, this step is optional but recommended for durability.
3D Effect
Use a fine liner brush and diluted brown or gray paint to add tiny drop shadows under the butterflies’ wings to make them look like they are hovering.
Step 3: Finishing Touches
-
Distress the edges:
Once the images are fully dry, take your sandpaper and very lightly scuff the edges of the box and even parts of the images for a worn, vintage look. -
Waterproof the planter:
Since this will hold plants and likely sit outside, spray the entire exterior with two or three light coats of clear outdoor matte sealant. -
Let it cure:
Allow the sealant to cure for at least 24 hours before filling the box with soil and your favorite pollinator-friendly flowers.
Your pollinator paradise is now ready to welcome real bees and butterflies alongside your painted ones
Mini Meadow Mural on the Front Panel
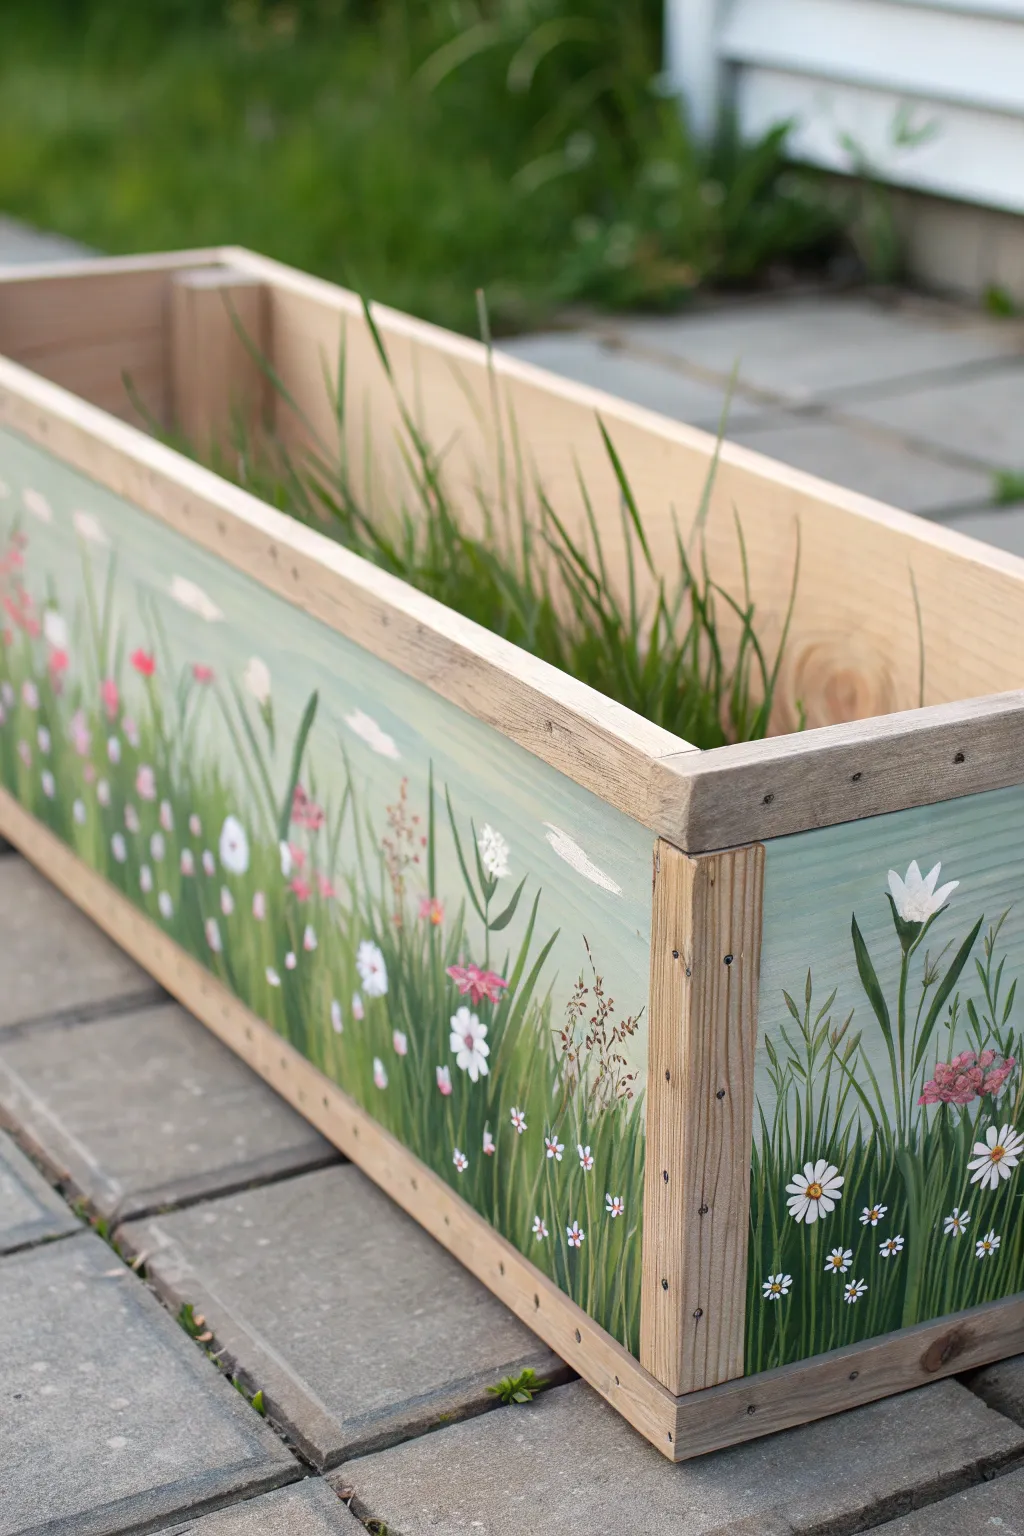
Transform a plain wooden planter into a charming slice of the countryside with this detailed painting tutorial. This project captures the airy, delicate feel of a meadow with layered grasses and scattered blooms, perfect for adding artistic flair to your patio or garden.
Step-by-Step Tutorial
Materials
- Unfinished wooden planter box
- Sandpaper (120 and 220 grit)
- Painter’s tape
- Exterior acrylic craft paints (light blue, white, sage green, dark forest green, pink, bright red, yellow)
- Flat brush (1-inch width)
- Small round brush (size 2 or 4)
- Fine liner brush (size 0 or 00)
- Water basin and paper towels
- Clear outdoor sealer (polyurethane or acrylic spray)
Step 1: Preparation & Sky
-
Prep the surface:
Start by lightly sanding the exterior panels of your wooden planter box with 120-grit sandpaper to remove any rough splinters, then follow up with 220-grit for a smooth painting surface. Wipe away all dust with a damp cloth. -
Mask the edges:
Apply painter’s tape carefully along the outer wooden trim, top rim, and vertical corner posts. This ensures the natural wood frame remains clean while you paint the recessed panels. -
Mix the sky gradient:
On your palette, mix a soft, pale blue using light blue and a generous amount of white. You want a color that suggests a hazy, bright summer morning rather than a deep midday blue. -
Paint the background:
Using the 1-inch flat brush, cover the entire recessed panel with your pale blue mix. Paint with horizontal strokes to mimic the horizon. -
Add subtle clouds:
While the blue is still slightly wet, pick up a tiny bit of pure white on the corner of your brush. Sweep in a few very faint, horizontal streaks to suggest distant, wispy clouds. Let the background dry completely.
Oops! Blobs happen
If a grass blade looks too thick or blobby, wait for it to dry. Then, use the background sky color to paint over the edge, ‘erasing’ the mistake and thinning the blade back down.
Step 2: Layering the Grass
-
Create the base grass:
Mix a medium sage green tone. Using the small round brush, start painting grass blades from the bottom edge upwards. Use quick, flicking motions—press down at the start and lift off quickly to create a tapered tip. -
Vary the heights:
Ensure your grass blades vary significantly in height. Some shyer blades should stay low, while others should stretch nearly halfway up the panel. -
Add depth with shadows:
Switch to the dark forest green. Paint a second layer of grass interspersed with the first, focusing more on the bottom third of the panel to create density and shadow near the ‘ground’. -
Highlight the greenery:
Mix a tiny bit of yellow into your sage green to make a bright lime color. Add a few sparse highlights on the tips of the tallest grasses where the sun would hit. -
Paint thicker stalks:
I like to paint a few thicker, straighter stems using the forest green. These will serve as the strong stalks that support the larger flowers later.
Step 3: Blooming Details
-
Start the daisies:
Using pure white paint and a small round brush, paint simple petals radiating from a center point. Don’t worry about perfect symmetry; natural wildflowers are often a bit irregular. -
Add daisy centers:
Once the white petals are dry, use the tip of your brush handle or a liner brush to dot a bright yellow center into each daisy. -
Paint pink clusters:
Mix a soft pink and use a stippling motion (tapping the brush tip repeatedly) to create clusters of small blooms that resemble yarrow or clover. Place these at different heights among the grass. -
Add small filler flowers:
With the fine liner brush, add tiny dots of white and pale blue floating on fine stems high above the main grass line. These represent delicate ‘filler’ weeds like baby’s breath. -
Detail the leaves:
Return to your dark green and add small, specific leaves to the flower stems—jagged leaves for the daisies and small oval leaves for the pink clusters. -
The final flourishes:
Step back and look for empty spots. Add a few distinct, tall blades of grass that overlap the flowers slightly to push them back into the scene and create depth. -
Seal the artwork:
Allow the paint to cure for at least 24 hours. Remove the tape, then apply two coats of clear outdoor sealer over the entire box (painted areas and natural wood) to protect it from moisture and UV rays.
Level Up: 3D Texture
Mix a texture medium or sand into the paint for the flower centers to make them physically bumpy, adding a tactile element to your floral scene.
Once filled with soil and real plants, your painted meadow will seamlessly blend with the living greenery for a delightful garden feature
Marbled Swirls for an Artsy Statement
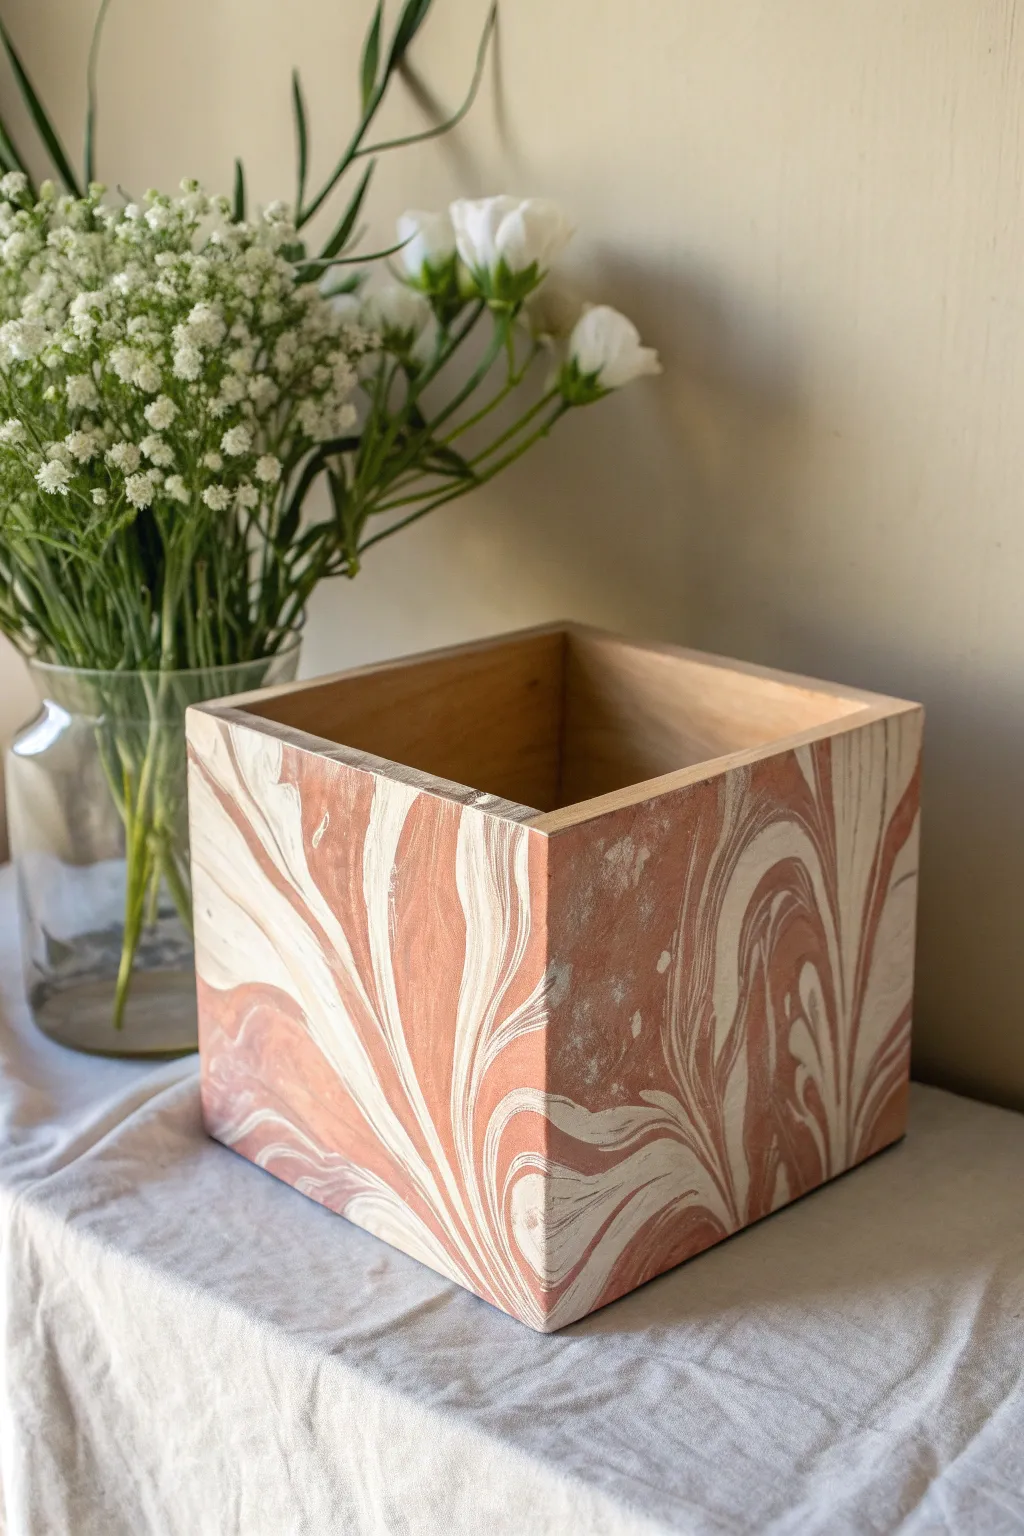
Bring an organic, flowing aesthetic to your home decor with this marbled wood planter tutorial. By utilizing a simple water transfer technique, you’ll achieve gorgeous swirls of terracotta and cream that look like high-end ceramic.
Step-by-Step
Materials
- Unfinished square wood planter box
- Sandpaper (220-grit)
- White spray paint primer (matte)
- Terracotta or warm rust spray paint (enamel or acrylic)
- Cream or off-white spray paint (match the sheen of the terracotta)
- Large plastic tub (deep enough to submerge the box)
- Painter’s tape
- Water (room temperature)
- Disposable gloves
- Stir stick or skewer
- Clear matte sealer spray
Step 1: Prep & Base Coat
-
Sand the surface:
Begin by lightly sanding the exterior of your wooden box with 220-grit sandpaper to remove any rough patches or splinters. -
Clean the wood:
Wipe the entire box down with a tack cloth or slightly damp rag to remove all dusting debris. -
Tape the interior:
Since we want to keep that beautiful natural wood look inside, carefully use painter’s tape to mask off the entire interior rim and inner walls. -
Apply primer:
Spray the exterior with a thin, even coat of white primer. This ensures the wood grain doesn’t soak up your colors later. -
Let it cure:
Allow the primer to dry completely according to the can’s instructions. A smooth white base will make your marble colors pop.
Paint Clumping Up?
Work quickly! Spray paint dries fast on water films. If it clumps, your water might be too cold or you waited too long to dip. Skim the water and restart.
Step 2: The Hydro-Dip Process
-
Prepare the water bath:
Fill your large plastic tub with room temperature water. It needs to be deep enough to dip the box sides fully. -
Create the first color layer:
Shake your terracotta spray paint vigorously, then spray it directly onto the water’s surface from about 8-10 inches away. Aim for the center. -
Add the contrast color:
Immediately spray the cream paint into the center of the floating terracotta paint. You’ll see rings starting to form. -
Repeat the spray pattern:
Alternate spraying the two colors a few more times to build up a nice film of paint on the water surface. -
Swirl the pattern:
Gently drag a skewer or stir stick through the floating paint to create the marbled swirls. Don’t overmix, or it will become muddy. -
Position the box:
Hold the taped box upside down, with the opening facing away from the water. -
The dip:
Slowly and steadily lower the box into the water at a slight angle. The paint film will wrap around the sides of the wood. -
Clear surface and remove:
While the box is submerged, blow away or use a stick to clear the remaining surface paint so it doesn’t double-coat when you pull the box out. -
Drain and dry:
Lift the box out, shake off excess water gently, and set it on a drop cloth to dry. Avoid touching the wet paint pattern.
Step 3: Finishing Touches
-
Remove moisture:
Look for any water droplets trapped on the surface. Gently dab them with a paper towel corner or let them air evaporate completely. -
Peel the tape:
Once the exterior is dry to the touch, carefully peel away the painter’s tape from the interior to reveal the crisp line. -
Seal the deal:
Protect your art by applying two light coats of clear matte sealer spray. This prevents the paint from scratching or peeling over time. -
Final cure:
Let the planter cure for at least 24 hours before adding soil or a potted plant to ensure the finish is hard and durable.
Add Metallic Flair
For a luxe touch, spray a tiny burst of metallic gold paint into the water swirl just before dipping to add shimmering veins to the marble.
Now you have a stunning, one-of-a-kind planter ready to showcase your favorite greenery
Night Sky and Constellations Above Florals
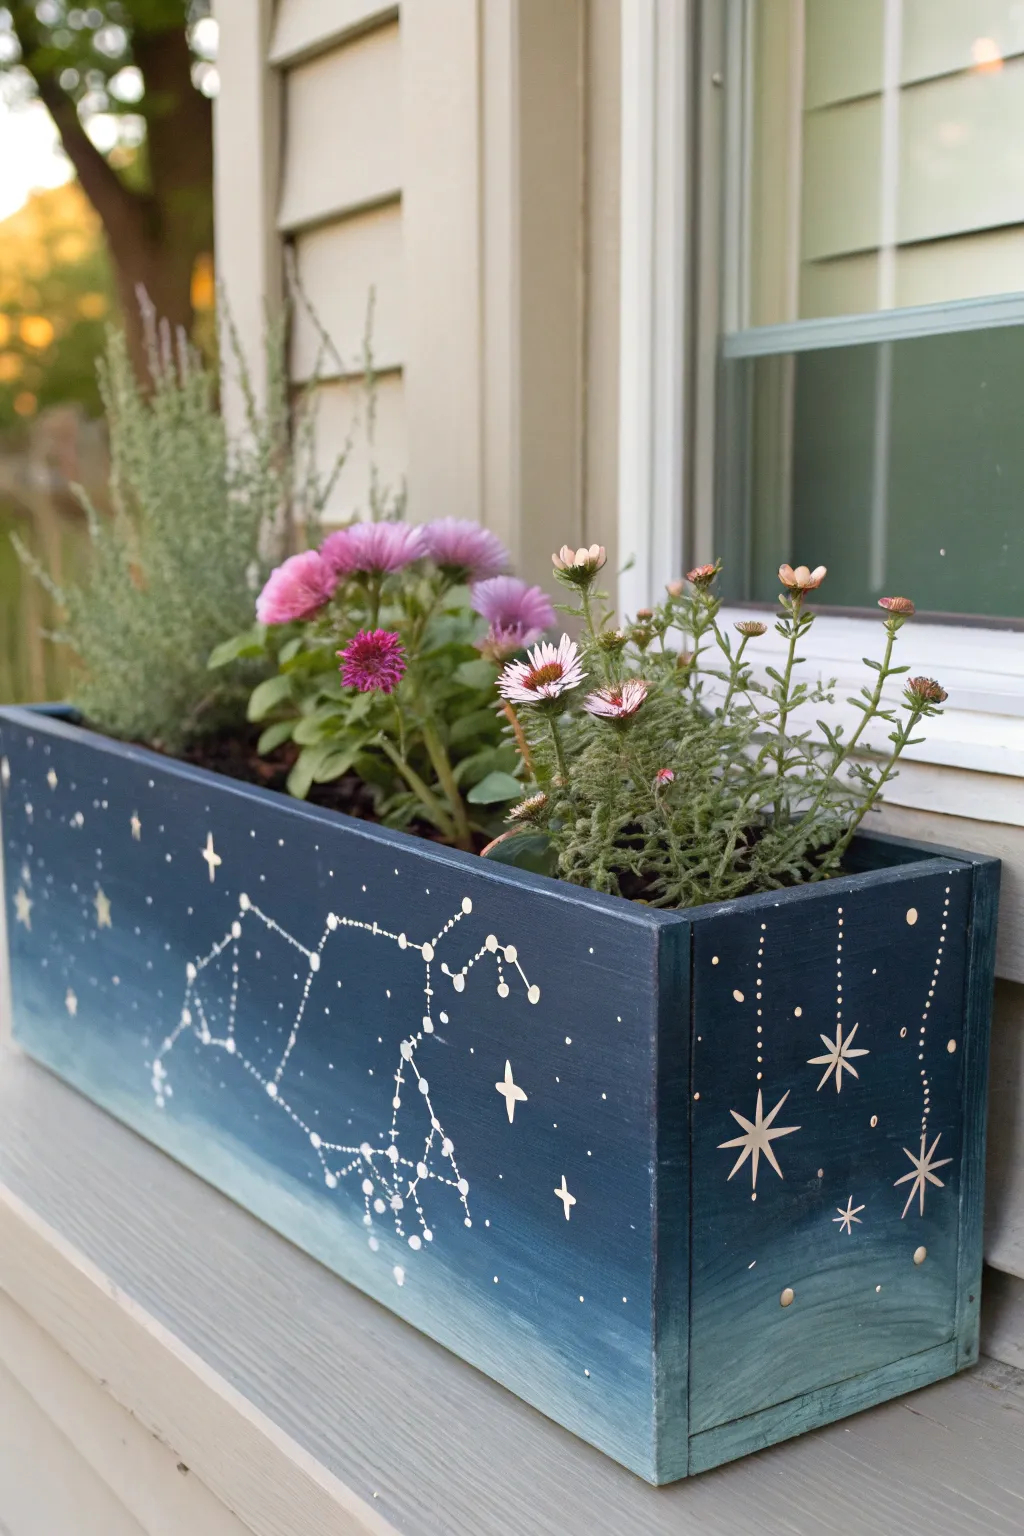
Transform a plain wooden planter into a dreamy window to the galaxy with this celestial-themed painting project. By blending deep navy hues into soft teals and adding delicate white constellations, you create a magical backdrop for your favorite blooms.
How-To Guide
Materials
- Wooden window box planter (unfinished or primed)
- Sandpaper (medium grit)
- Acrylic craft paint: Dark Navy Blue, Phthalo Blue, Teal/Aqua, White
- Large flat paintbrush (2-inch)
- Medium flat paintbrush
- Fine liner brush (size 0 or 00)
- Old toothbrush (optional for stars)
- Ruler or straight edge
- Pencil for sketching
- Reference image of constellations (e.g., Scorpius)
- Clear outdoor sealant spray (matte or satin)
- Paper plate or palette
- Water cup and paper towels
Step 1: Preparation and Base Coat
-
Prepare the surface:
Begin by lightly sanding your wooden planter to remove any rough splinters or existing finish. Wipe away the dust with a damp cloth to ensure the paint adheres smoothly. -
Set up the palette:
Squeeze out generous amounts of Dark Navy Blue, Phthalo Blue, and Teal on your palette. Keep the White separate for now. -
Apply the darkest layer:
Using the large flat brush, paint the top two-thirds of the box with the Dark Navy Blue. Don’t worry about a perfect bottom edge yet; we want it to be workable for blending. -
Begin the gradient:
While the navy is still wet, introduce the Phthalo Blue just below it. Brush back and forth where the colors meet to create a seamless transition. -
Add the horizon line:
Paint the bottom inch or two with the Teal/Aqua shade. Blend this upward into the mid-tone blue using long, horizontal strokes until the gradient looks soft and misty. -
Refine the ombre:
I like to go back over the transition areas with a slightly damp, clean brush to smooth out any harsh lines. Let this base layer dry completely before moving on.
Starry Precision Pro-Tip
For perfectly straight dotted lines connecting your stars, lay a ruler flat against the wood and lightly tap your brush along the edge rather than free-handing it.
Step 2: Painting the Constellations
-
Plan your design:
Use a pencil to lightly mark where your constellations will go. For this look, sketch the main constellation (like Scorpius shown here) on the front face and dangling stars on the side panels. -
Dot the major stars:
Dip the handle end of a small paintbrush or a dedicated dotting tool into white paint. firmly press dots onto the key points of your constellation sketch to represent the brightest stars. -
Connect the stars:
Switch to your fine liner brush. Thin your white paint slightly with a drop of water so it flows like ink. Carefully paint dashed or dotted lines connecting the major star points. -
Add distant stars:
Using the very tip of the liner brush, add tiny, random specks of white throughout the dark navy section to create depth in the galaxy. -
Create the hanging stars:
On the side panel, paint vertical dotted lines dropping down from the top edge. At the end of each line, paint a larger star shape.
Gradient Troubleshooting
If acrylic paint dries too fast while blending the ombre background, mix a little ‘slow drying medium’ or ‘retarder’ into your paint to keep it workable longer.
Step 3: Details and Finishing
-
Paint starbursts:
To make the larger stars pop, paint an eight-pointed starburst shape (a large plus sign with a smaller ‘x’ over it) over several of the main constellation dots and the hanging stars. -
Add a galaxy mist (optional):
If you want extra texture, load an old toothbrush with watered-down white paint and gently flick the bristles to spray a fine mist of stars near the bottom lighter section. -
Review and touch up:
Step back and look at the composition. If any white lines look too faint, carefully retrace them to ensure they stand out against the dark background. -
Let it cure:
Allow the artwork to dry for at least 24 hours. This ensures the moisture has fully evaporated from the wood before sealing. -
Protect your work:
Spray the entire exterior with two to three thin coats of clear outdoor sealant. This creates a barrier against rain and sun so your galaxy doesn’t fade.
Once dry and potted with vibrant pinks or whites, your new planter will bring a touch of the cosmos to your windowsill
Raised Texture Petals With Metallic Highlights
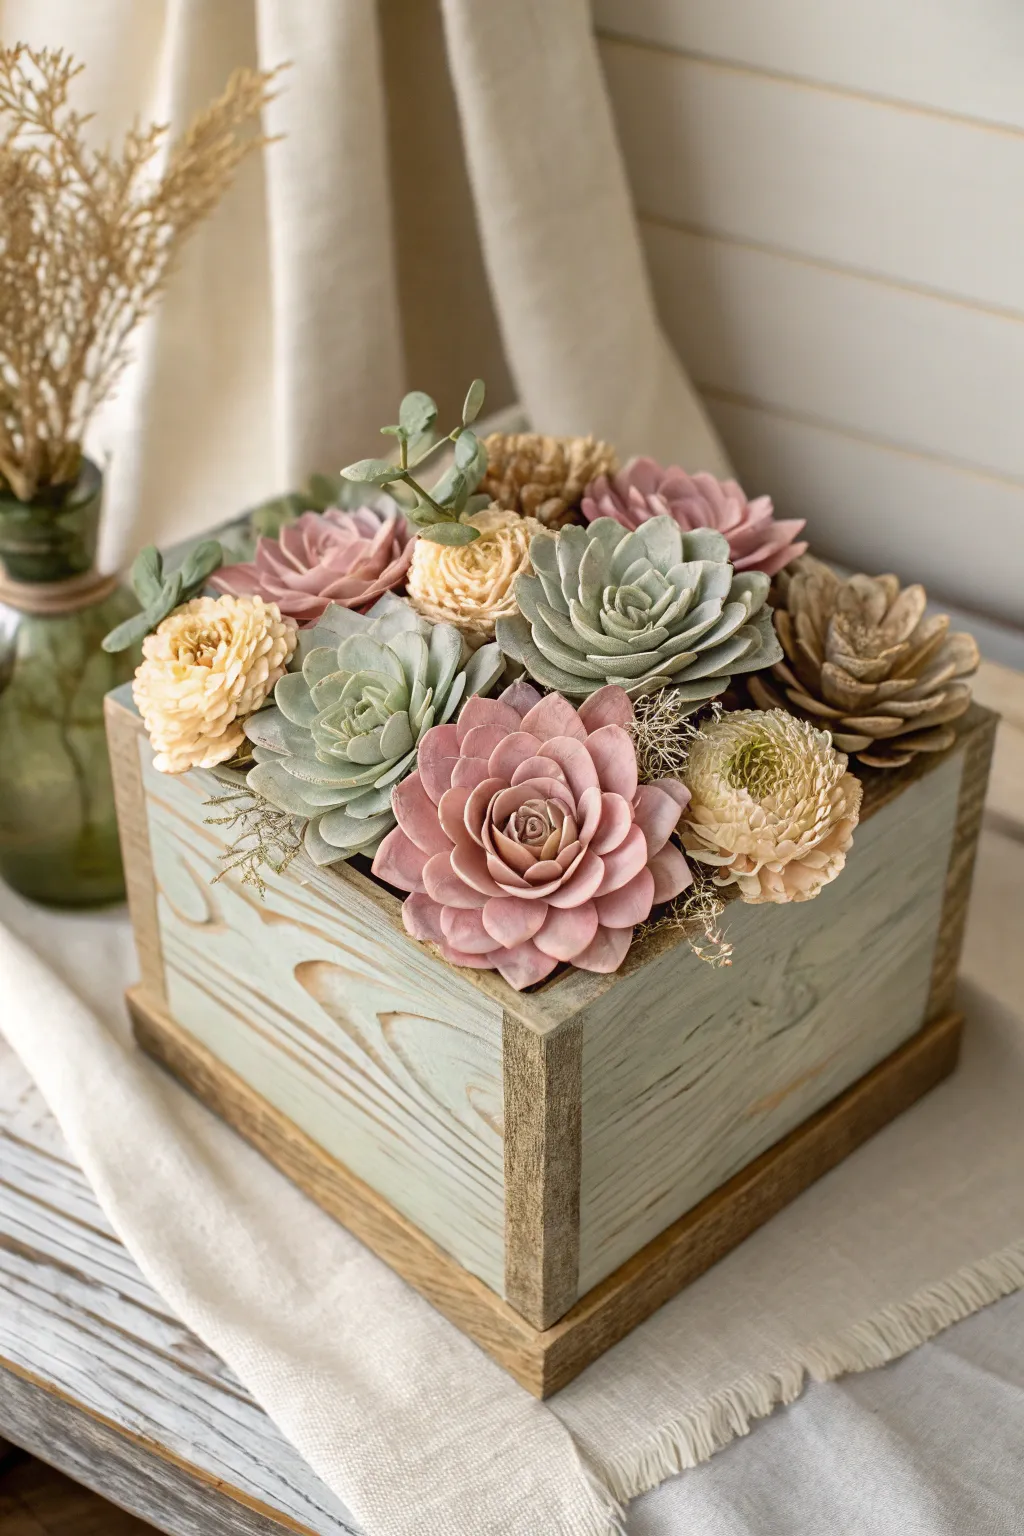
Create a stunning, everlasting centerpiece that combines the rustic charm of distressed wood with the delicate beauty of painted flora. This project focuses on transforming a simple wooden box and creating realistic, textural faux succulents using sola wood flowers and layered paint techniques.
Step-by-Step Tutorial
Materials
- Square wooden planter box (unfinished)
- Sola wood flowers (assorted succulent and zinnia shapes)
- Acrylic paints (Mint Green, Sage Green, Dusty Rose, Cream, Raw Umber, Metallic Gold)
- Floral foam block
- Hot glue gun and glue sticks
- Floral wire or bamboo skewers
- Paintbrushes (flat wide brush, small detail brush)
- Water spray bottle
- Small mixing bowls for paint dip
- Dry moss (reindeer or sheet moss)
- Paper towels
- Dried filler greens (optional)
Step 1: Preparing the Distressed Planter
-
Base Coat Application:
Begin by painting the main body of the wooden box with a light Mint Green acrylic paint. Brush it on somewhat unevenly; you don’t need perfect coverage as the distressing comes next. -
Adding Wood Grain Texture:
While the green paint is dry to the touch, mix a watery wash of Raw Umber. Using a fine detail brush, hand-paint faux wood grain lines—simple elongated ovals and wavy lines—over the green base to mimic the knots and grain seen in the photo. -
Distressing the Edges:
Use a dry brush capable of holding stiff bristles, dip it lightly into a darker brown or grey, and scrub the corners and vertical structure beams of the box to make it look weathered and aged. -
Defining the Frame:
Paint the bottom trim and the corner posts of the box with a solid coat of medium-brown stain or paint to frame the mint green panels, adding structural contrast.
Step 2: Coloring the Sola Wood Flowers
-
Mixing the Dips:
Prepare three separate bowls with acrylic paint mixed with water (about a 1:2 ratio of paint to water) to create a dye consistency. Mix one bowl of Dusty Rose, one of Sage Green, and one of Cream/Light Yellow. -
Dipping the Succulents:
Dip the pointed, succulent-shaped sola flowers into the Sage Green or Dusty Rose mixtures. Use a quick dunk to avoid oversaturating the wood, then shake off excess liquid. -
Dipping the Blooms:
Dip the rounder, zinnia-style flowers into the Cream/Light Yellow wash. This will give them that soft, buttery tone seen on the left side of the arrangement. -
Drying Phase:
Set all the dyed flowers on a protected surface or paper towel to dry completely, which usually takes about 24 hours depending on humidity. -
Adding Depth:
Once dry, use a dry brush with slightly darker paint to dust the very centers of the pink and green succulents. This mimics the natural shadow and growth patterns of real plants.
Keep Them Soft
Add a teaspoon of vegetable glycerin to your water/paint mix when dyeing the flowers. This keeps sola wood soft and pliable preventing brittle petals.
Step 3: Creating the Metallic Highlights
-
Highlighting Edges:
This is the crucial step for the ‘Raised Texture’ effect. Take a small flat brush with undiluted Metallic Gold or a pearlescent white paint. Very lightly brush just the tips of the petals on the central pink succulent and the sage green ones. -
Adding Texture to Centers:
For the cream flowers, dab a little texture paste or thick paint into the center florets to give them a pollen-heavy look.
Scented Decor
Add a few drops of essential oil directly onto the raw wood centers of the flowers to turn your arrangement into a passive room diffuser.
Step 4: Assembly and Arrangement
-
Prepping the Base:
Cut your floral foam to fit snugly inside the wooden box. If it’s loose, secure it to the bottom with a daub of hot glue. -
Stemming the Flowers:
Insert a floral wire or bamboo skewer into the bottom of each dried sola flower. Use a drop of hot glue at the connection point to ensure the head stays on the stem. -
Establishing the Focal Point:
Insert the largest pink succulent slightly off-center in the front. This anchors the arrangement. I like to angle this one slightly forward so it ‘greets’ the viewer. -
Building the Cluster:
Place the large sage green succulent next to the pink one, and the cream flowers on the opposite side. Keep the height relatively low and tight to the box edge. -
Filling the Gaps:
tuck the smaller remaining flowers and pinecone-style buds into the gaps behind the main blooms. Vary the heights slightly to create a domed shape. -
Adding Greenery:
Insert sprigs of dried eucalyptus or artificial dusty miller between the wooden flowers to break up the textures and add softness. -
Final Moss Layer:
Use hot glue to tuck small tufts of reindeer moss or sheet moss into any visible gaps between the flowers and the edge of the box to hide the floral foam completely.
Place your completed box in a well-lit spot to watch the subtle metallic highlights catch the afternoon sun


Have a question or want to share your own experience? I'd love to hear from you in the comments below!