A flower mural can totally change the vibe of a space—suddenly your wall feels like it’s breathing. Here are my favorite flower mural ideas, starting with the classics and drifting into the fun, unexpected stuff I love trying in the studio.
Oversized Peonies on an Accent Wall
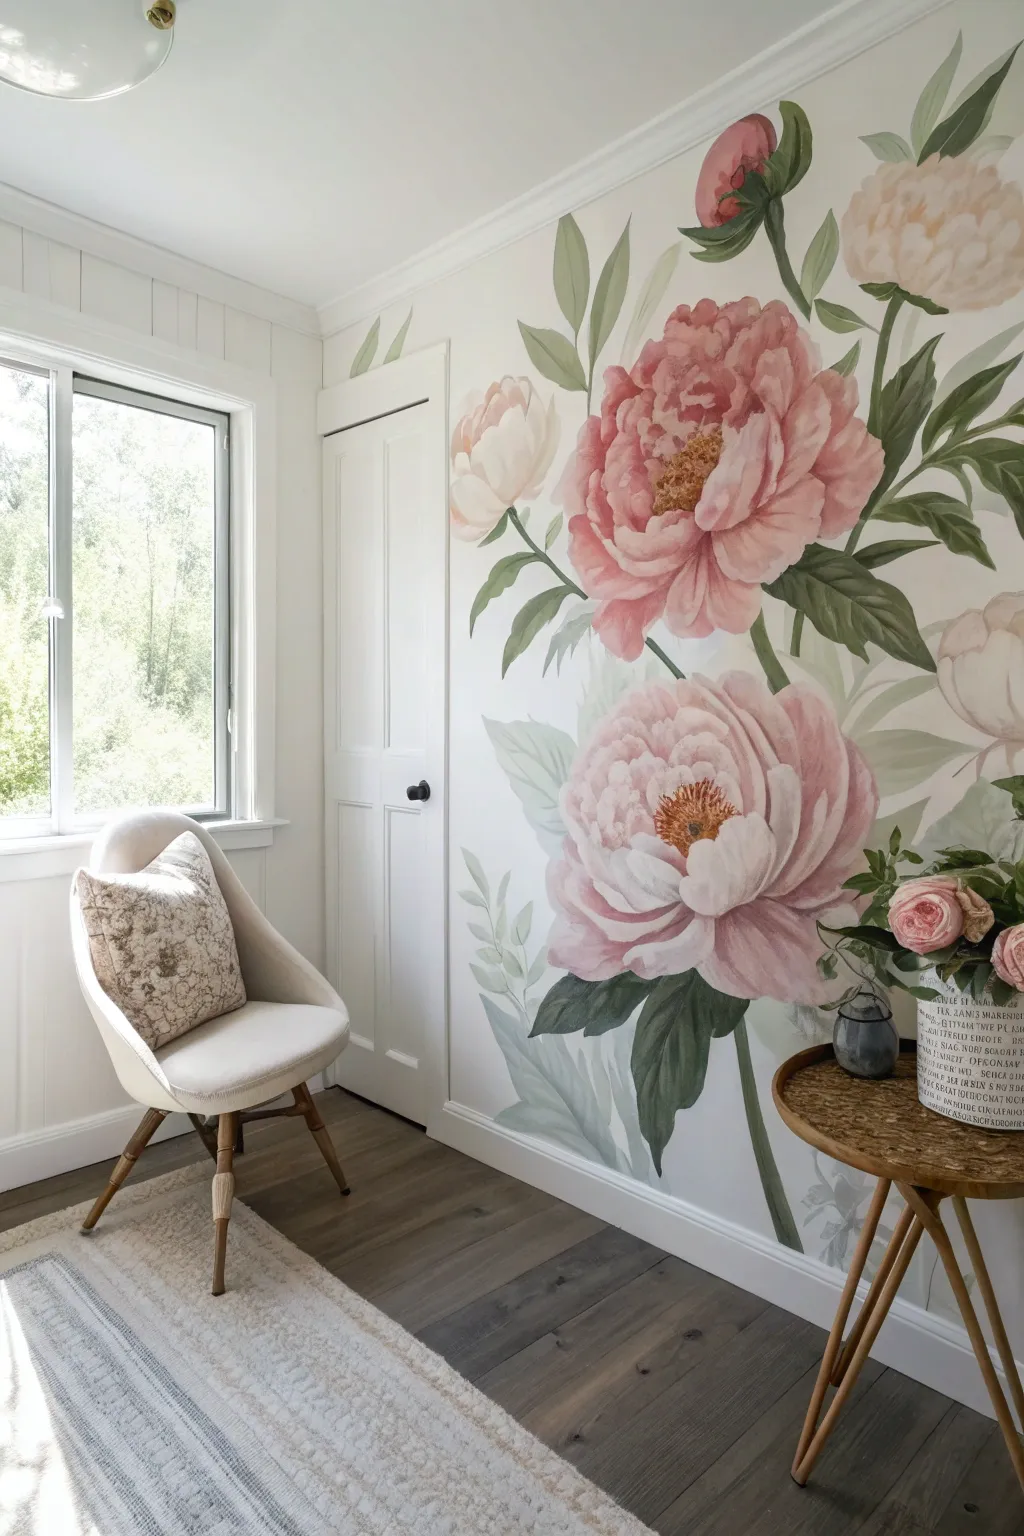
Transform a blank accent wall into a garden oasis with these dramatic, oversized peonies that feel both vintage and fresh. The soft pink petals and sweeping green leaves create a striking focal point that adds romance and depth to any room.
Step-by-Step
Materials
- Interior latex paint (Eggshell finish): White or light cream (base coat)
- Acrylic paint or latex samples: Deep rose, soft blush pink, pale peach, white, olive green, sage green, and dark forest green
- Assorted paintbrushes: 2-inch angular sash brush, medium filbert brush, and fine liner brush
- Pencil and large eraser
- Projector (optional but recommended)
- Painter’s tape
- Drop cloths
- Paper plates or palette for mixing
- Step ladder
Step 1: Preparation & Sketching
-
Prepare the canvas:
Before artistry begins, ensure your wall is pristine. Clean the surface thoroughly to remove dust and grease, patch any holes, and apply a fresh coat of your white or light cream base color. Let this dry completely overnight for the best adhesion. -
Plan the composition:
Visualize three main focal points: two large, full blooms stacked vertically on the dominant side, and smaller buds or leaves trailing off to the sides. The goal is an organic, asymmetrical flow. -
Draft the outline:
Using a projector makes this step effortless; simply cast a peony clip art image onto the wall and trace the major shapes with a light pencil. If sketching freehand, draw large, rough circles for the flower heads first, then refine the jagged, ruffled edges of the petals. -
Map the foliage:
Sketch long, sweeping stems that connect the blooms. Add large, serrated leaves extending outward to fill the negative space, ensuring they curve naturally to mimic movement.
Fixing “Heavy” Flowers
If a flower looks like a solid blob, don’t panic. Wait for it to dry, then paint pure white ‘cuts’ or v-shapes into the petals to separate them and restore airiness.
Step 2: Painting the Blooms
-
Block in base colors:
Start with the large flower heads. Mix a mid-tone pink shade and loosely fill in the petal shapes, leaving some white space near the edges for highlights later. Don’t worry about perfect coverage yet; a slightly streaky texture adds dimension. -
Add deep shadows:
While the base is still tacky, take your deep rose color and paint the inner recesses of the petals, specifically where they overlap near the center of the bloom. This creates the ‘cup’ shape of the peony. -
Layering lighter petals:
Mix your blush pink with a bit of white. Using a filbert brush, stroke from the outer edge of each petal inward, feathering the paint into the darker shadow areas. This transition is key to that soft, lush look. -
Highlighting edges:
Dip your brush into nearly pure white paint. Carefully define the ruffled, jagged tips of the outer petals. I find that quick, confident dabs work better here than slow, straight lines to capture the ruffled texture. -
Painting the stamen:
For the center of the open blooms, use a mix of yellow-ochre or gold. Use a small round brush to dab growing clusters of dots in the very center, adding a few tiny dark brown specks for contrast.
Step 3: Foliage & Details
-
Base the greenery:
Mix a muted sage green and fill in the leaf shapes. Keep the paint relatively thin so it doesn’t look like a sticker; a little transparency helps it recede visually. -
Add leaf structure:
Using the dark forest green and a liner brush, paint a central vein down each leaf. From there, feather darker green outward to create ribs and shadows, especially where leaves tuck behind flowers. -
Soften the stems:
Paint the stems connecting the flowers using olive green. If a stem feels too stark, dry-brush a little of your white wall color over it to make it look like it’s fading into the background, similar to a watercolor effect. -
Unify the palette:
Step back and look at the mural as a whole. If some pinks feel too bright, glaze over them with a very watered-down white. If leaves feel flat, add a touch of the pink mix to the green for harmony. -
Final touches:
Erase any visible pencil lines carefully. Use a small brush to touch up the white wall background anywhere you may have slipped outside the lines, sharpening the edges of the petals.
Watercolor Effect
Mix a clear glazing medium into your acrylics. This increases transparency, allowing layers to glow through each other for a true hand-painted watercolor look.
Step back and admire how these blooming giants bring a permanent spring to your living space


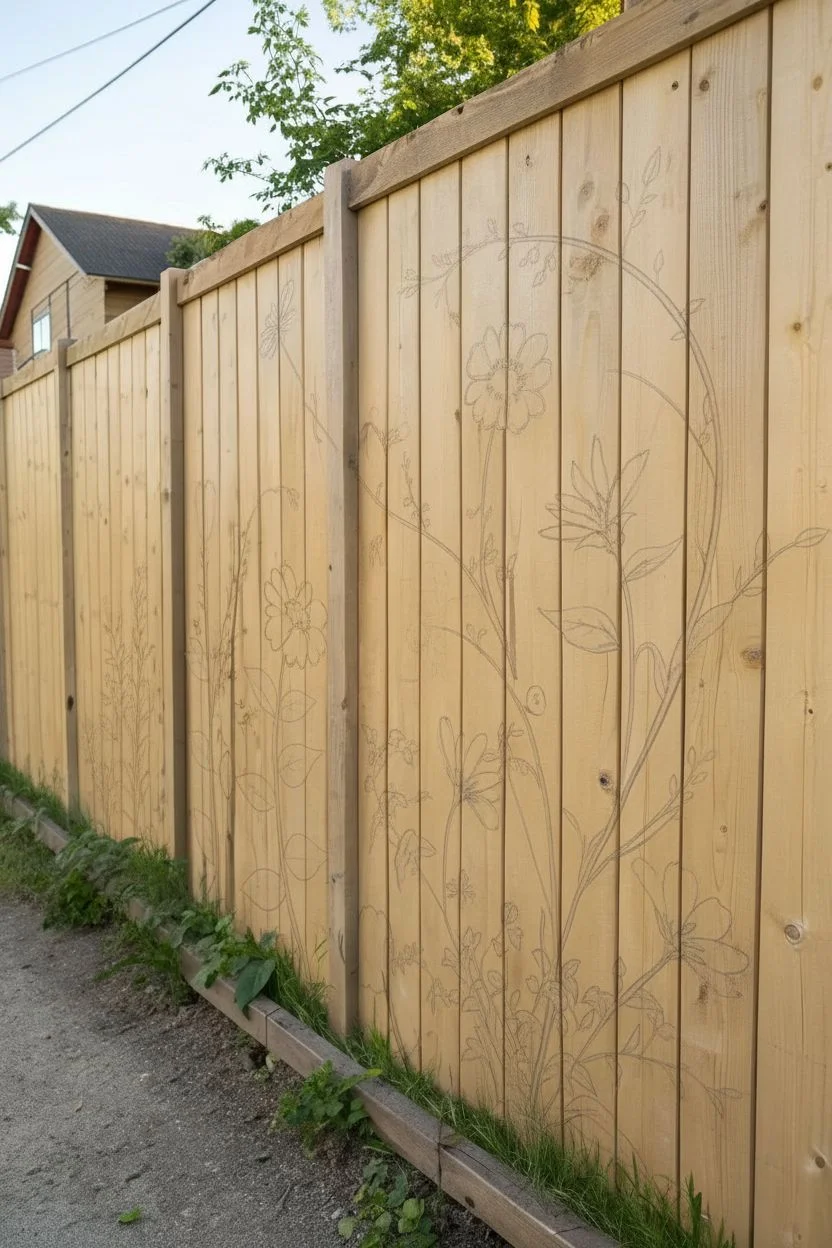
Wildflower Meadow Growing Up From the Baseboard
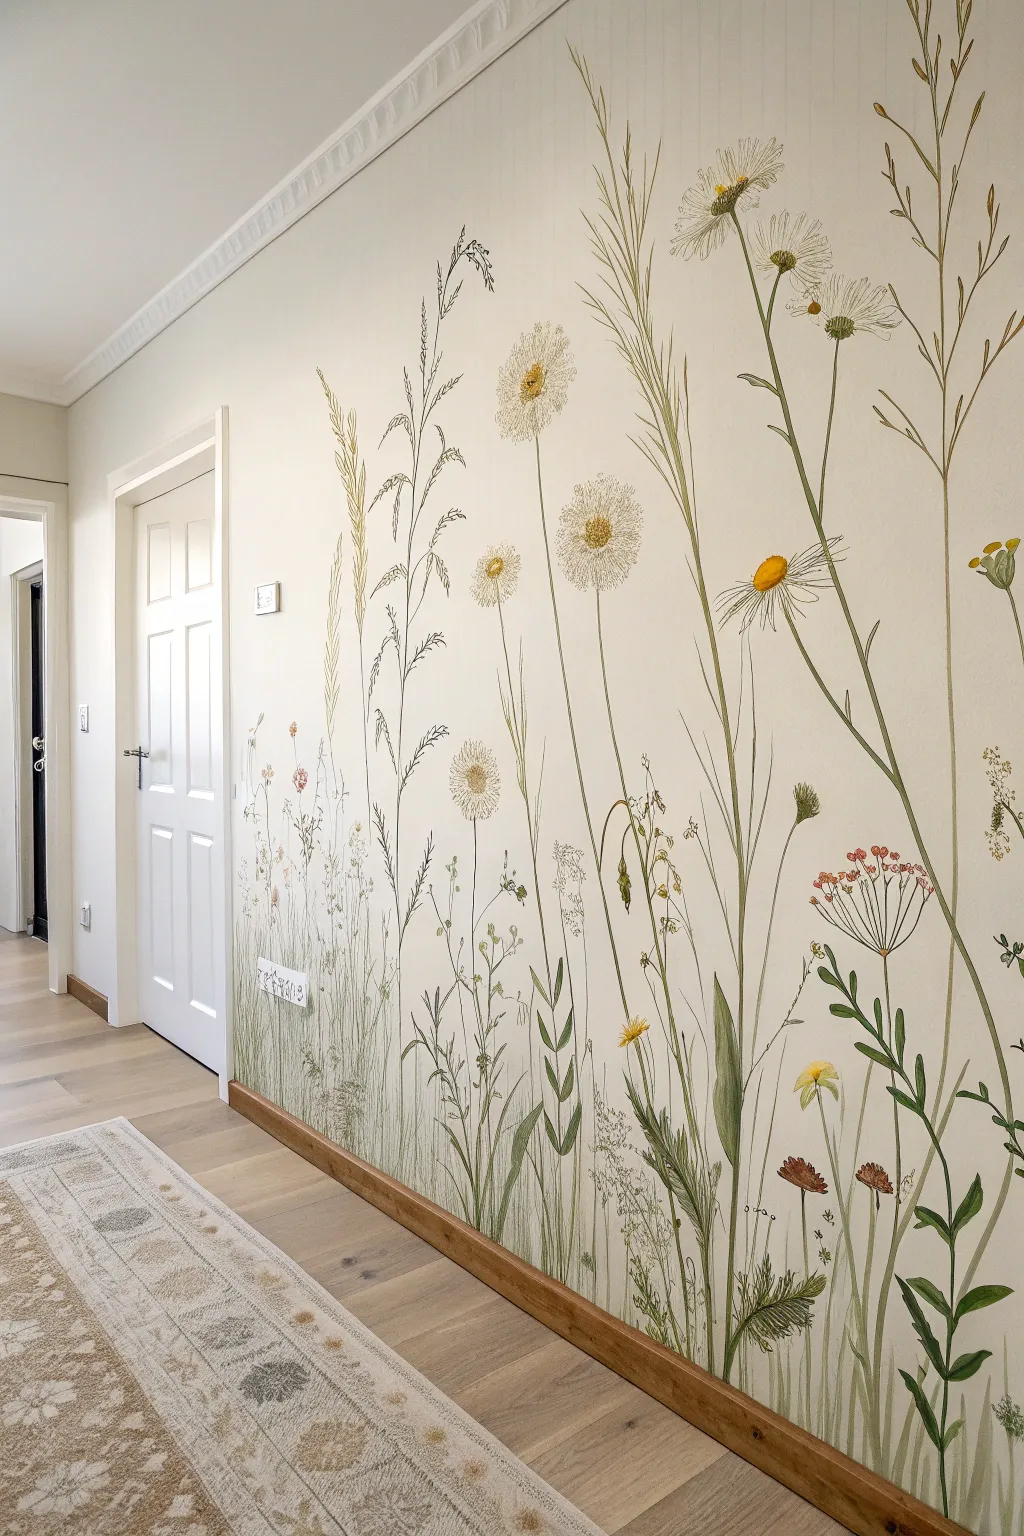
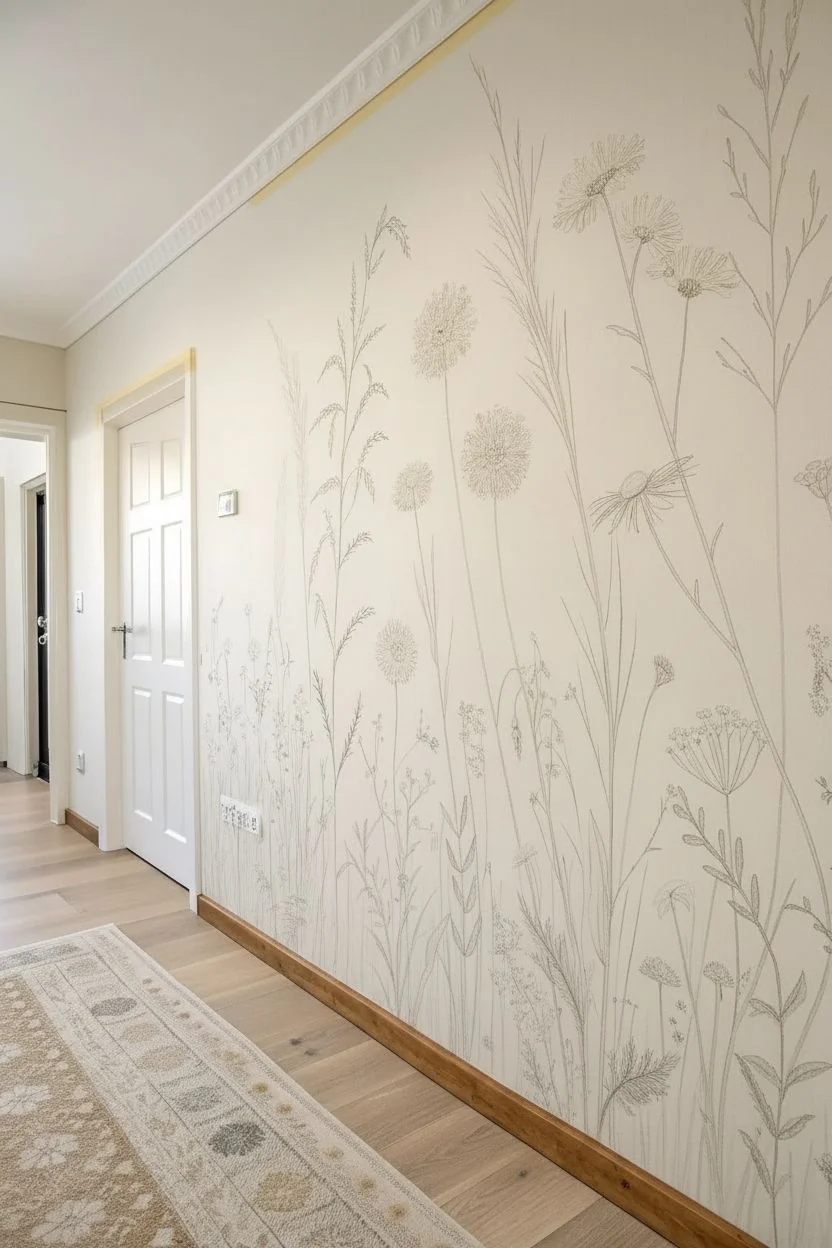
Transform a blank hallway or bedroom wall into a serene botanical garden with this delicate floor-to-ceiling mural. Featuring towering daisies, airy grasses, and subtle blooms rising from the baseboard, this project mimics the look of vintage scientific illustrations brought to life on a grand scale.
Step-by-Step Tutorial
Materials
- Interior latex wall paint (Cream or off-white for base coat)
- Acrylic paints (Olive green, sap green, burnt umber, yellow ochre, titanium white, cream)
- Glazing medium
- Pencils (HB and 2B)
- Kneaded eraser
- Projector (optional)
- Botanical reference images
- Round synthetic brushes (Sizes 2, 4, and 8)
- Fine liner brushes (Size 0 or 00)
- Painter’s tape
- Drop cloth
- Water container and palette
Step 1: Preparation and Sketching
-
Prep the surface:
Begin by cleaning your wall thoroughly to remove dust and grease. If you are changing the wall color, apply two coats of a warm cream or off-white interior latex paint to create a soft, vintage paper background effect. Let it cure for at least 24 hours. -
Protect the area:
Apply painter’s tape along the top edge of the baseboard, door frames, and ceiling molding. Lay down a drop cloth to protect your flooring from accidental drips. -
Plan your composition:
Gather your botanical references. You want a mix of tall, structural plants (like the large daisies) and airy filler grasses. Sketch a rough layout on paper first, deciding where your tallest elements will reach to create a balanced, organic rhythm. -
Sketch on the wall:
Using a projector or sketching freehand, lightly draw the main stems on the wall with an HB pencil. Start from the baseboard and draw upward, varying the heights. I find it helpful to stand back frequently to ensure the spacing feels natural and not too uniform. -
Detail the flowers:
Sketch the flower heads at the top of your stems. Draw circles for the daisy centers and lightly outline the petal shapes. Add rough shapes for the seed heads and leafy clusters lower down.
Natural Variety Tip
Avoid ‘soldier lines’ where all plants stand straight up. Intentionally curve some stems, crisscross them, and vary the heights drastically to mimic wild growth.
Step 2: Painting the Greens
-
Mix your greens:
On your palette, create several shades of green. Mix sap green with a touch of burnt umber for a natural, earthy stem color. Mix olive green with white for a softer, hazy grass color. Adding glazing medium will make the paint translucent, like watercolor. -
Paint main stems:
Using a size 4 round brush, paint the primary stems. Use long, confident strokes starting from the bottom and lifting pressure as you reach the top to taper the line. Don’t worry if the lines aren’t perfectly straight; nature is imperfect. -
Layer foliage:
Switch to different green mixtures for variety. Paint the leaves attached to the main stems. For the long, grass-like blades, use a size 8 brush, turning it on its side to create varying widths. -
Add intricate leaves:
For the fern-like or feathery leaves, switch to a size 2 brush. Use short, quick dabs or flicks to replicate the texture of intricate foliage. Keep the paint thin to maintain that delicate illustration style.
Level Up: 3D Insects
Add tiny painted bees, dragonflies, or butterflies interacting with the flowers. Use a tiny drop of gloss varnish on their wings to make them catch the light.
Step 3: Blooming Details
-
Paint flower centers:
Mix yellow ochre with a tiny bit of burnt umber. Paint the centers of the daisies and other blooms. Stipple the paint (dabbing up and down) to create a textured, pollen-like appearance. -
Create the petals:
Mix titanium white with a drop of cream and glazing medium. Using a size 4 brush, paint the petals of the large daisies. Start at the flower center and pull the brush outward. If the paint is translucent, apply a second layer to the tips for highlights. -
Add secondary blooms:
For the smaller, cluster flowers (like yarrow or cow parsley), use the tip of a size 2 brush to dot small clusters of white or pale pink. Connect these dots with very fine green stems. -
Detail fine grasses:
Load a fine liner brush (size 0) with thinned, dark brownish-green paint. Add the very fine ‘hairs’ on stems, the veins on leaves, and the tiny branching structures at the tops of the grasses. -
Ground the bottom:
Use a dry brush technique near the baseboard with a pale, hazy green to simulate a density of grass stems. This grounds the mural so the plants don’t look like they are floating.
Step 4: Finishing Touches
-
Erase guidelines:
Once the paint is completely dry (give it a few hours just to be safe), gently erase any visible pencil marks with a kneaded eraser. Be careful not to rub off delicate paint layers. -
Add highlights:
Mix a tiny amount of pure white or pale yellow. Add tiny highlights to the tops of the flower centers and the edges of the most prominent leaves to make them pop. -
Final review:
Step back to the other side of the room. Look for any empty spots that need a stray blade of grass or a small bud to balance the composition. -
Cleanup:
Remove the painter’s tape slowly at a 45-degree angle to ensure clean edges along the baseboard.
Enjoy the peaceful atmosphere of your new indoor garden meadow


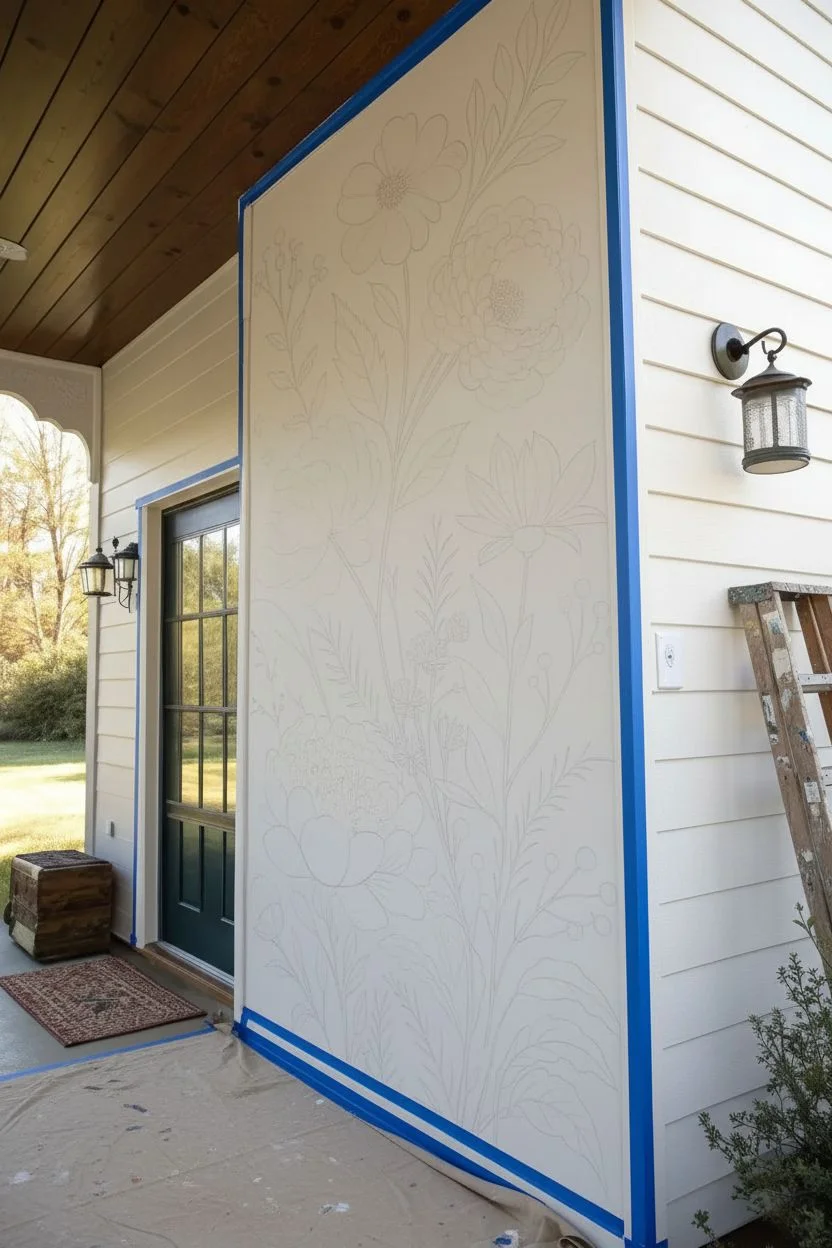
Soft Watercolor Florals for a Calm Bedroom
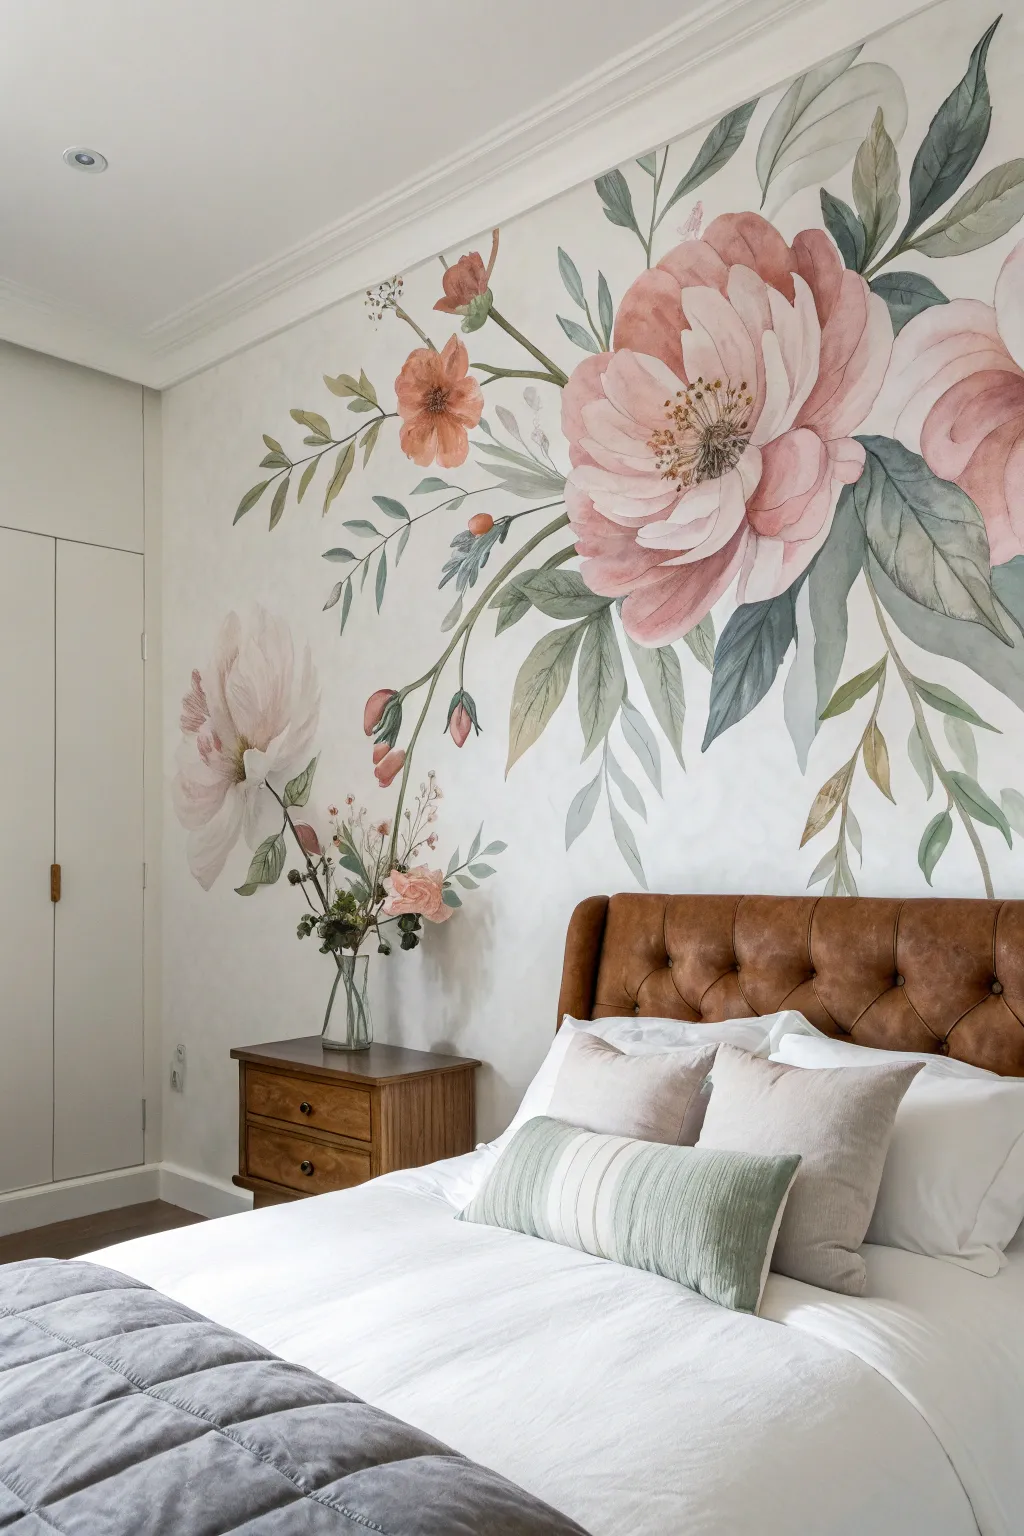
Transform a blank bedroom wall into a serene garden sanctuary with this oversized floral mural. Using a faux-watercolor technique with acrylics and glaze, you will achieve the soft translucency of petals and the organic flow of botanical illustrations on a grand scale.
Step-by-Step
Materials
- Matte latex wall paint (white base)
- Acrylic paints (Soft Pink, Blush, Dusty Rose, Sage Green, Olive, Deep Green, Burnt Sienna, Yellow Ochre)
- Clear acrylic glazing medium (slow drying)
- Assorted synthetic brushes (2-inch flat, 3-inch angle sash, round sizes 8 and 12)
- Sea sponge or clean cotton rags
- Large plastic plates or palette trays
- Spray bottle with water
- Pencil and eraser
- Drop cloths and painter’s tape
- Step ladder
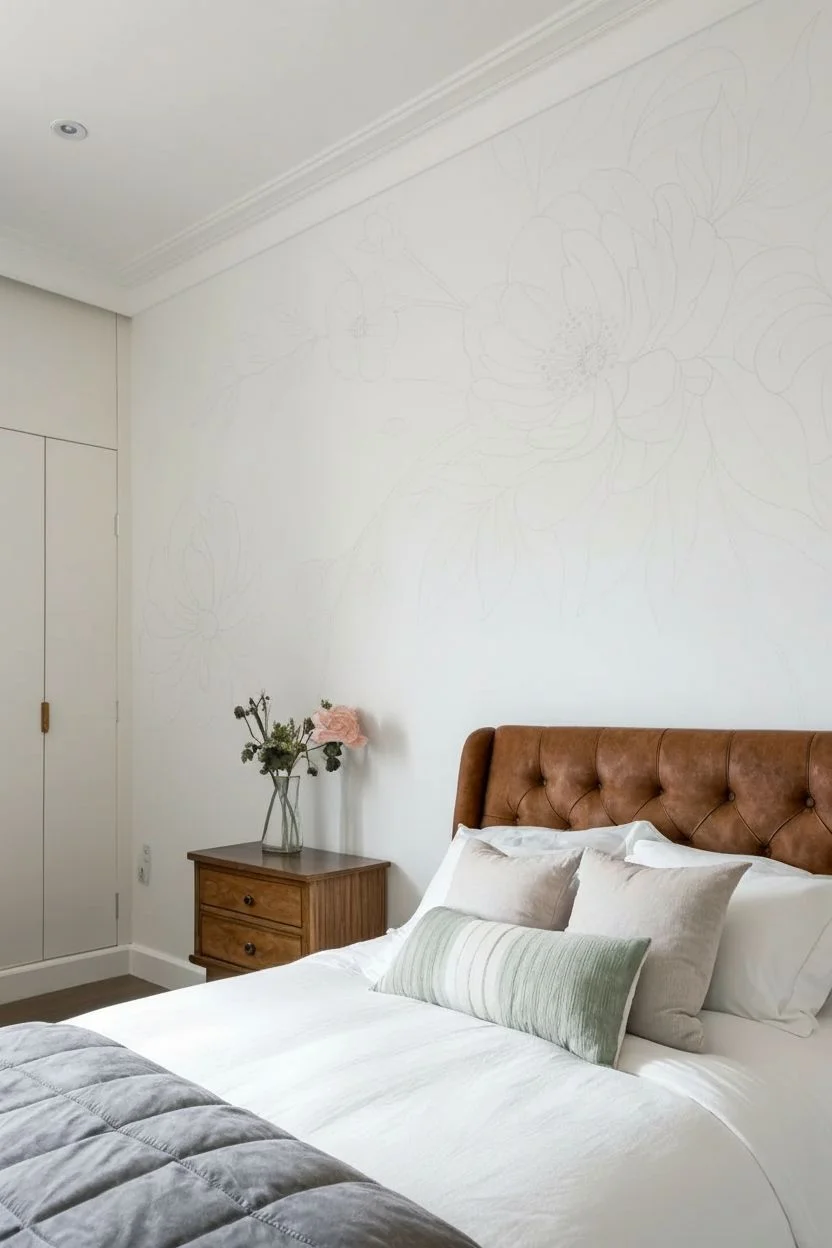
Step 1: Preparation and Sketching
-
Prep the surface:
Clear furniture away from the wall and lay down drop cloths. If the current wall color isn’t white or cream, apply a fresh coat of matte white latex paint to serve as your ‘paper’. The watercolor technique relies on this bright base showing through translucent layers. -
Map the composition:
Lightly sketch the largest blooms first using a pencil. Place the main focal flower—a giant peony—slightly off-center to the right, roughly where headboard height would be. Keep the sketching loose and faint; you just need general shapes, not details. -
Add supporting elements:
Draw the stems radiating outward from the main blooms. Sketch large, sweeping leaves and smaller buds, ensuring some elements ‘fall’ downwards while others reach up towards the ceiling molding to create movement.
Pro Tip: The Water Trick
Keep a spray bottle of water set to ‘mist.’ Spritz the wall lightly before applying paint to make the acrylics bleed and bloom exactly like real watercolor on paper.
Step 2: Painting the Blooms
-
Mix the base glaze:
On your palette, mix a generous amount of Soft Pink with the glazing medium in a 1:4 ratio. The more glaze you use, the more translucent the paint will be. I like to keep a spray bottle handy to keep the mix wet and workable. -
Lay the first wash:
Using a large round brush, fill in the petal shapes with the watery pink glaze. Work quickly and don’t worry about perfect coverage; let the brushstrokes follow the curve of the petals. -
Create wet-on-wet depth:
While the first layer is still tacky, mix a slightly darker Dusty Rose glaze. Dab this into the center of the flower and the base of the petals, using a damp sponge to blur the edges outward. -
Define the petals:
Once the base is semi-dry, use a smaller round brush with less glaze and more pigment to outline individual petals. Keep the lines broken and varied in thickness to mimic the organic feel of watercolor. -
Add the centers:
Mix Yellow Ochre with a touch of Burnt Sienna. Stipple (dot) this mixture into the center of the open blooms. Create a dense cluster of dots in the very middle and scatter them loosely as you move outward.
Level Up: Texture Pop
For the flower centers (stamens), mix a little baking soda into your yellow paint. This adds actual gritty texture, making the pollen area pop off the wall visually.
Step 3: Painting the Foliage
-
Mix greens:
Prepare three shades of green glaze: a light Sage, a medium Olive, and a Deep Green. Ensure all are mixed generously with the glazing medium for that transparent effect. -
Paint large leaves:
Use a 2-inch flat or angle brush to sweep in the large leaves. Start with the lightest Sage green on one half of the leaf. While wet, blend the medium Olive into the other half or the shadow areas. -
Add veining:
Wait for the leaves to dry to the touch. With a thin round brush and the Deep Green mix, paint delicate central veins and side veins. If a line looks too harsh, immediately dab it with a damp rag to soften it. -
Create stems:
Using the medium green mix and a long liner brush or the edge of your flat brush, pull long, confident strokes for the stems. Vary the pressure: press down for thick sections and lift up for thin, delicate ends.
Step 4: Fading and Finishing
-
Add ‘ghost’ leaves:
Mix a very watery, pale gray-blue glaze. Paint simplified leaf shapes in the background, behind the main flowers. These should look faint, creating atmospheric depth. -
Paint small filler flowers:
Using a small brush and touches of Blush or Coral, add the tiny buds and sprigs of smaller wildflowers that act as filler. Keep these simple—just little dashes and dots of color. -
Final blending check:
Step back about six feet to view the whole wall. If any edges look too ‘cut out’ or sharp, take a slightly damp sea sponge and very gently rub the outer edges of the paint to feather them into the white wall. -
Seal (Optional):
Because this is a low-traffic area behind a bed, sealing isn’t strictly necessary. However, if you want extra protection, apply a coat of clear matte polycrylic using a roller once the mural has cured for at least 48 hours.
Enjoy the peaceful atmosphere your new botanical masterpiece brings to the room


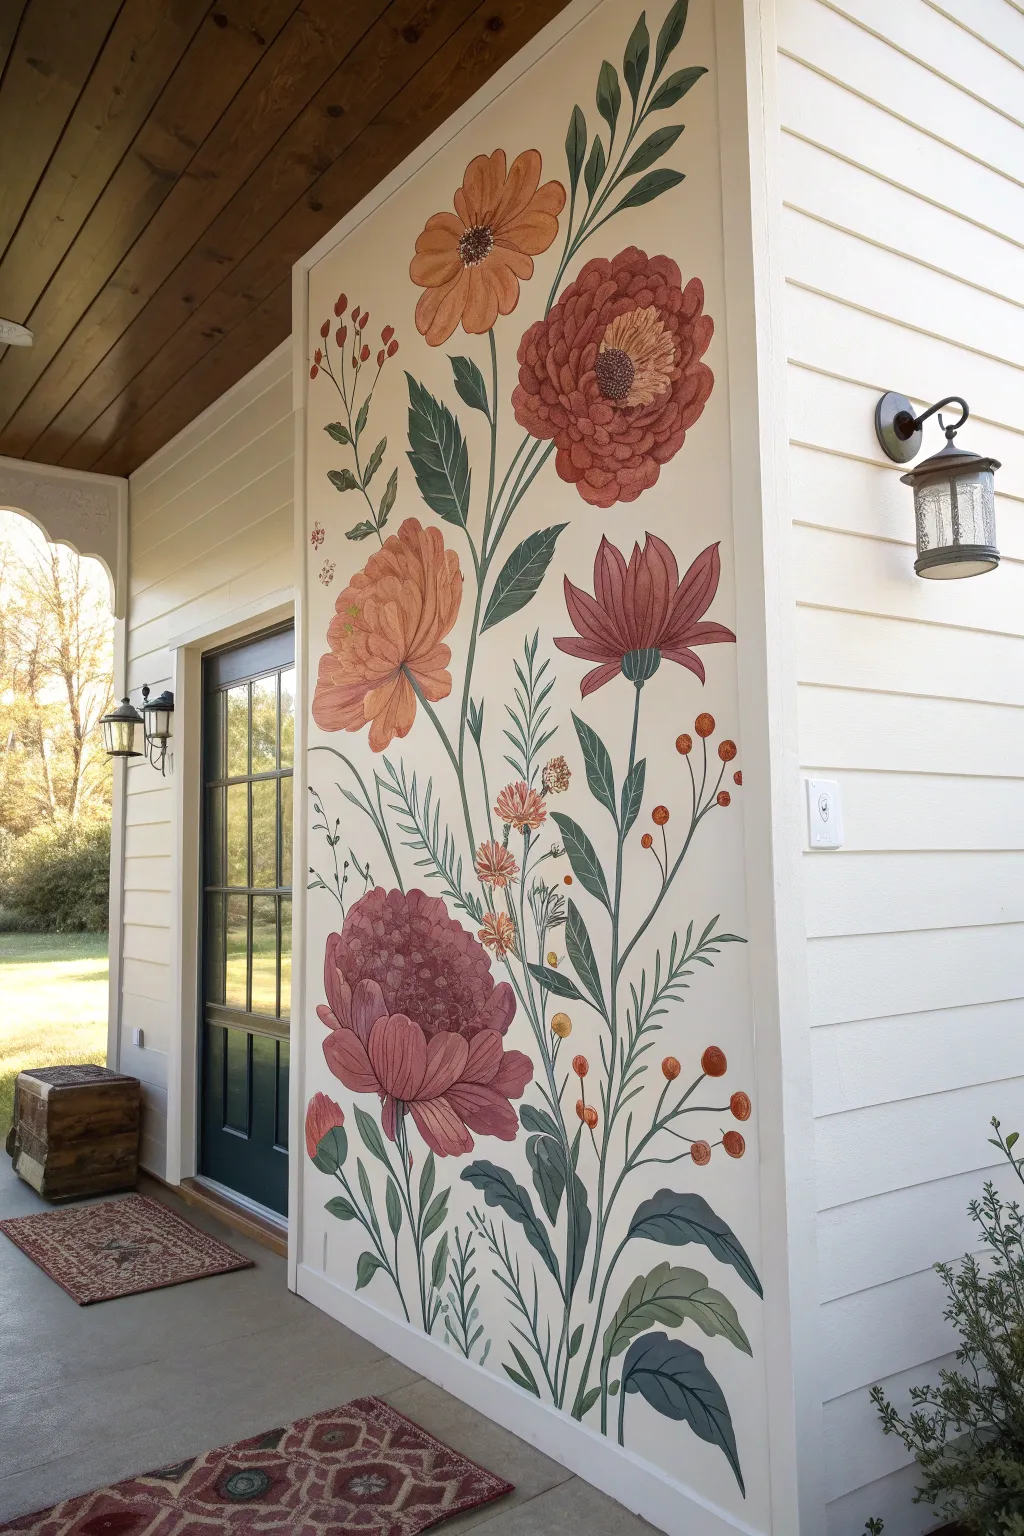
Black Line Art Blooms With a Few Color Pops
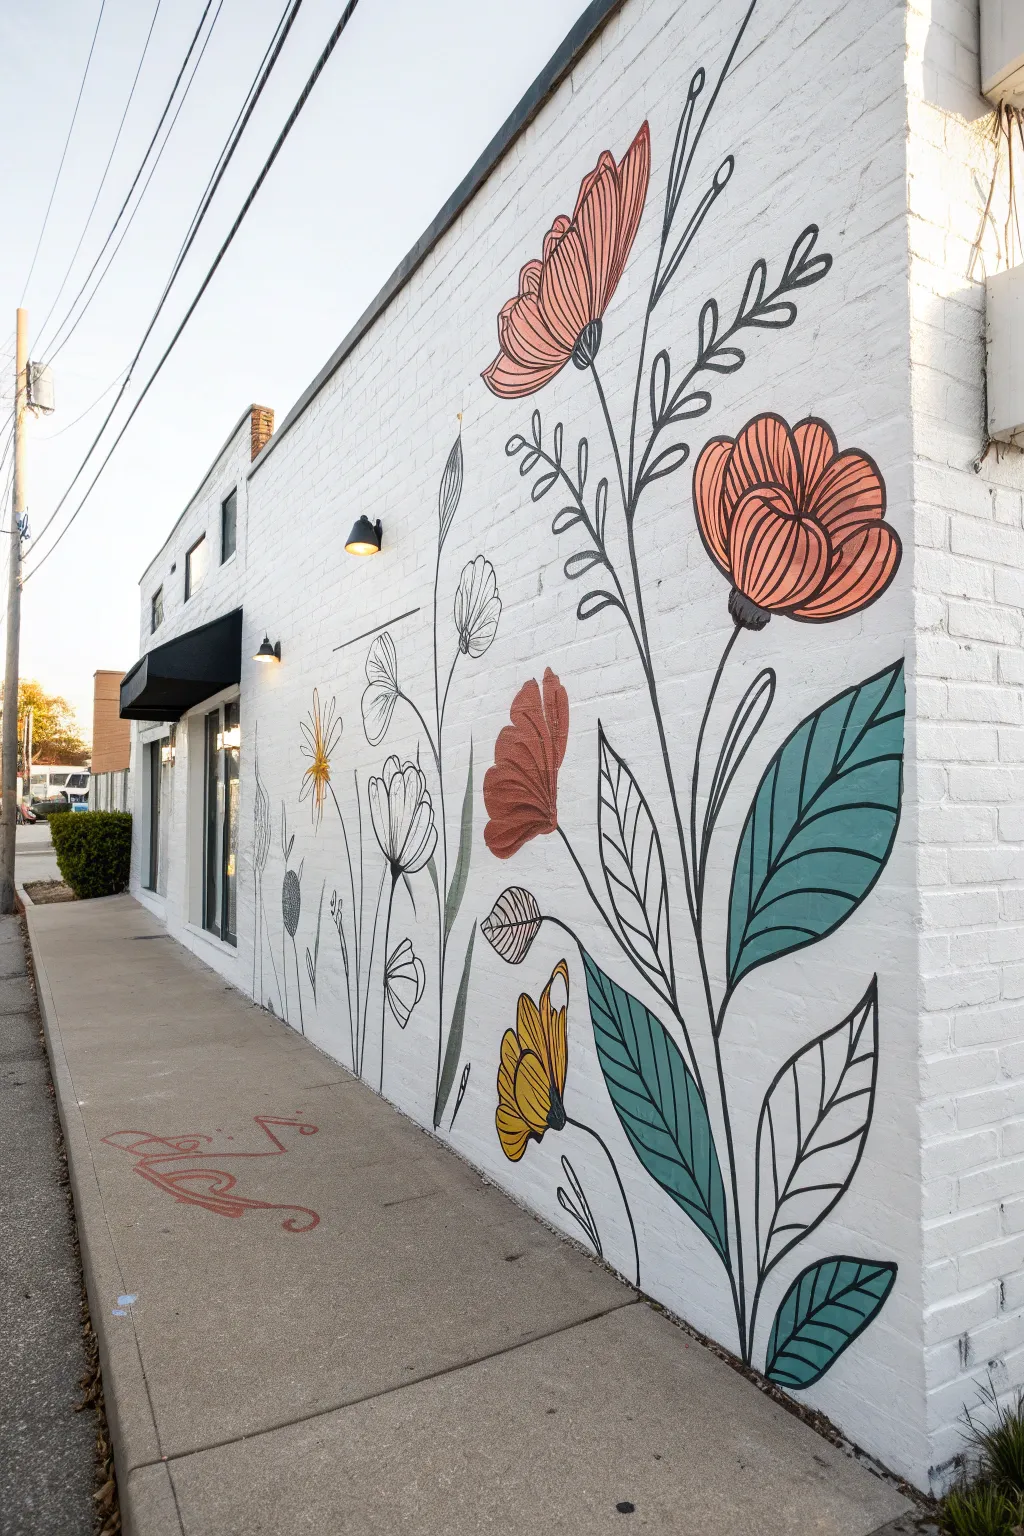

Transform a plain exterior wall into a garden of delight with this illustrative mural style that balances bold black linework with strategic pops of color. The design features oversized wildflowers in coral, mustard, and teal, giving the space a modern, sketchbook-inspired aesthetic.
How-To Guide
Materials
- Exterior masonry primer (white)
- Exterior latex paint (White, semi-gloss or satin)
- Exterior mural paint (Black, Coral/Salmon, Mustard Yellow, Teal Green)
- Assorted paint brushes (2-inch angled sash, various round detail brushes)
- Paint rollers and tray (medium nap for brick)
- Chalk or pastel pencil (light gray)
- Ladder or step stool
- Painter’s tape and drop cloths
- Projector (optional but recommended for scale)
- Clear exterior masonry sealer (matte or satin)
Step 1: Preparation and Base Coat
-
Clean the surface:
Begin by thoroughly cleaning the brick wall. Use a pressure washer on a low setting or a stiff bristle brush with soapy water to remove dirt, moss, and loose debris. Allow the wall to dry completely for at least 24 hours. -
Protect the area:
Lay down heavy-duty drop cloths along the sidewalk or ground to catch drips. Use painter’s tape to mask off any window frames, light fixtures, or adjacent trim you want to keep clean. -
Apply primer:
Roll on a coat of high-quality masonry primer. Brick is porous and thirsty, so this step ensures your topcoat adheres properly and looks uniform. -
Paint the background:
Once the primer is dry, apply two coats of your white exterior latex paint. Use a medium nap roller (3/8″ to 1/2″) to get into the mortar joints. I like to let this dry overnight to ensure a solid canvas for the detailed work.
Step 2: Sketching the Design
-
Create a layout plan:
Before touching the wall, sketch your design on paper. This mural features tall, vertical stems. Plan for a mix of large focal flowers (like the coral tulips) and smaller filler flowers (like the yellow daisies). -
Transfer the design:
If you have a projector, set it up at dusk to cast your design onto the wall. This is the easiest way to get the scale right. If drawing freehand, start by sketching the long, sweeping stems first to establish the flow. -
Refine the sketch:
Use a light gray chalk or pastel pencil to trace the projected lines or draw your flowers. Avoid standard graphite pencils as they can smear and are hard to cover with light paint colors. -
Vary the heights:
Ensure your flowers reach different heights to create a natural, organic rhythm. Some should loom tall, while others fill the lower space near the sidewalk.
Master the Line Weight
For smooth, long stems, mix a tiny amount of water into your black paint to increase flow. This prevents the brush from dragging on the rough brick texture.
Step 3: Adding Color
-
Paint the coral blooms:
Start with your accent colors. Use a round brush to fill in the large, tulip-shaped flowers with coral or salmon paint. You don’t need to be perfectly neat at the edges since the black outline will clean it up later. -
Add the yellow accents:
Move on to the lower flowers, painting the petals a deep mustard yellow. Apply two coats if the white background shows through too much. -
Paint the foliage:
Select specific large leaves to fill with teal green. Leave roughly half of the leaves and flowers uncolored (white) to maintain that open, airy ‘line art’ feel designated in the pro-tip.
Add Metallic Flair
Use outdoor metallic gold paint for the centers of the flowers or specific leaves. It will catch the sunlight beautifully and add a surprising shimmer.
Step 4: Defining the Lines
-
Outline the colored shapes:
Using a high-quality round brush and black exterior paint, carefully outline the colored flowers and leaves. Keep your hand steady and use your pinky finger against the wall for balance. -
Add petal details:
Paint the internal details on the colored blooms. For the coral flowers, add vertical striation lines to give the petals texture and dimension. -
Draw the stems:
Paint the long, sweeping stems in black. Vary the line weight slightly—thicker at the bottom, thinning out as you reach the buds—to make the plant look alive. -
Create the white flowers:
For the uncolored sections, simply paint the black outlines directly onto the white background. Add delicate stamens and internal petal lines to these ‘ghost’ flowers. -
Detail the leaves:
On the teal leaves, paint a central vein and branching veins in black. For the uncolored leaves, replicate this same vein pattern using just the black outline. -
Review and touch up:
Step back across the street to view the mural as a whole. Walk back up and fix any shaky lines or thin patches of color. A small angled brush is great for sharpening corners. -
Seal the work:
Once the paint has cured (usually 24-48 hours), apply a clear masonry sealer to protect your artwork from UV rays and weather damage.
Step back and admire how this elegant botanical artwork breathes new life and personality into the building.
BRUSH GUIDE
The Right Brush for Every Stroke
From clean lines to bold texture — master brush choice, stroke control, and essential techniques.
Explore the Full Guide
Romantic Rose Wall With Layered Petals
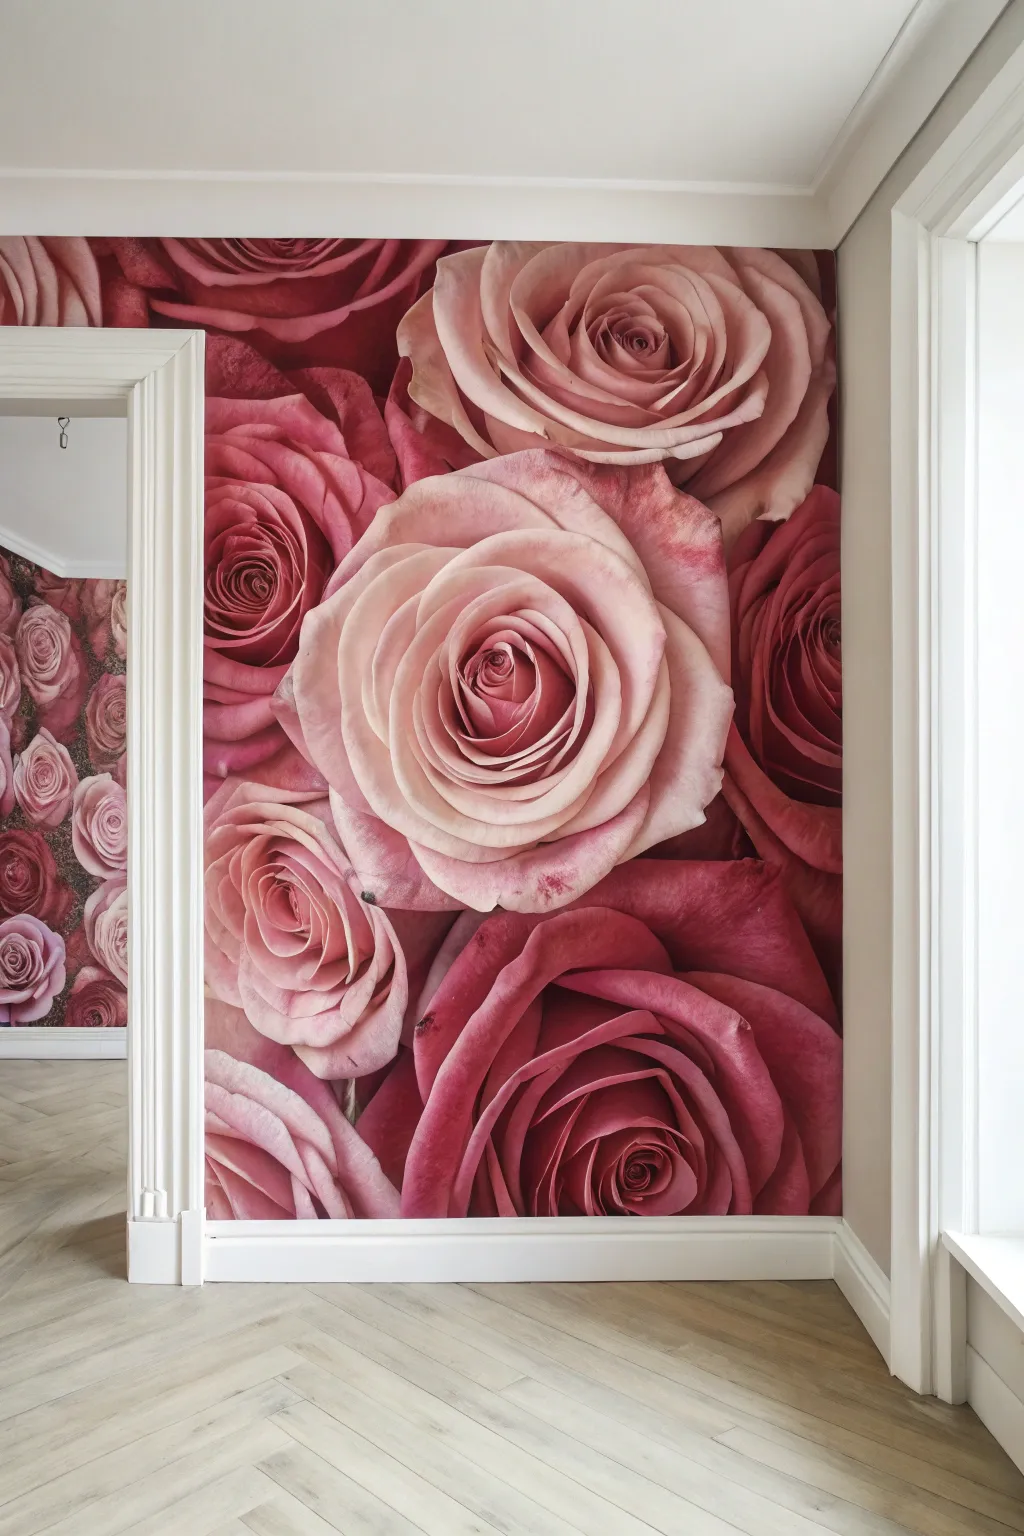
Transform a plain wall into a romantic sanctuary with this large-scale rose mural, featuring deep red and soft blush blooms that appear to have endless layers of petals. This project uses high-quality wallpaper panels to create a seamless, photorealistic floral feature that adds instant drama and elegance to any room.
Step-by-Step Tutorial
Materials
- Custom photo mural wallpaper (pre-pasted or paste-the-wall)
- Wallpaper paste (if not pre-pasted)
- Wallpaper smoothing tool
- Sharp utility knife with snap-off blades
- Tape measure
- Pencil
- Level or plumb line
- Ladder or step stool
- Bucket of clean warm water
- Large sponge
- Drop cloth
- Seam roller
Step 1: Preparation & Planning
-
Measure the wall:
Begin by carefully measuring the height and width of your target wall. Add about 2-3 inches of buffer to both dimensions when ordering your mural to account for any uneven floors or ceilings. -
Prepare the surface:
Remove any outlet covers or switch plates. Patch holes, sand down bumps, and wash the wall with a mild detergent to ensure a completely smooth, clean surface for adhesion. -
Prime the wall:
Apply a coat of wallpaper primer or sizing. This crucial step helps the wallpaper slide into position more easily and prevents the paste from soaking too quickly into the drywall. -
Draw a plumb line:
Using your level, draw a perfectly vertical pencil line about 20 inches from the left corner (or the width of your first panel minus 1 inch). This guide is essential because corners often aren’t perfectly straight.
Wrinkle Rescue
If you see stubborn air bubbles after smoothing, don’t force them. Prick them with a tiny needle to release the trapped air, then smooth gently toward the hole.
Step 2: Paste Application
-
Layout panels:
Unroll your mural panels on the floor in the correct order to visualize the full rose pattern. Check for any printing defects before you start pasting. -
Apply paste (Method A):
If using paste-the-wall paper, use a roller to apply a generous, even layer of paste to the wall section where your first panel will go, extending slightly past your plumb line. -
Prepare panel (Method B):
For traditional paper, apply paste to the back of the panel on a pasting table. Book the paper by folding the pasted sides together (wet on wet) and letting it rest for 3-5 minutes so the fibers expand.
Step 3: Hanging the Mural
-
Hang the first panel:
Align the right edge of your first panel with your vertical pencil line. Allow about 2 inches of excess paper to overlap the ceiling and the floor. -
Smooth it out:
Use your smoothing tool to gently press the paper against the wall, working from the center outwards to push out any air bubbles. -
Align the pattern:
Hang the second panel, carefully matching the intricate rose petal details at eye level first. Slide the paper into place so the pattern aligns perfectly seamlessly. -
Check the seams:
I usually run a seam roller gently over the join to ensure the edges lay completely flat and don’t lift later. -
Continue across the wall:
Repeat the process for remaining panels. Wipe away any excess paste from the front of the mural immediately with a damp sponge.
Framed Illusion
Install decorative picture frame molding directly over the mural in large squares or rectangles to create the look of giant framed art pieces.
Step 4: Trimming & Finishing
-
Cut around obstacles:
When you reach the door frame, let the paper overhang the opening. Make a diagonal relief cut towards the corner of the frame to allow the paper to fold flat against the wall around the trim. -
Trim the excess:
Use a fresh, sharp blade and your smoothing tool as a guide to trim the excess paper along the ceiling, baseboards, and door trim. Change blades frequently to avoid tearing damp paper. -
Wait for drying:
Allow the wallpaper to dry slowly at room temperature. Avoid using heaters or opening windows wide, as rapid drying can cause seams to shrink and open.
Step back and admire the depth and color of your new featured floral wall
Sunflowers and Warm Sky for Instant Cheer
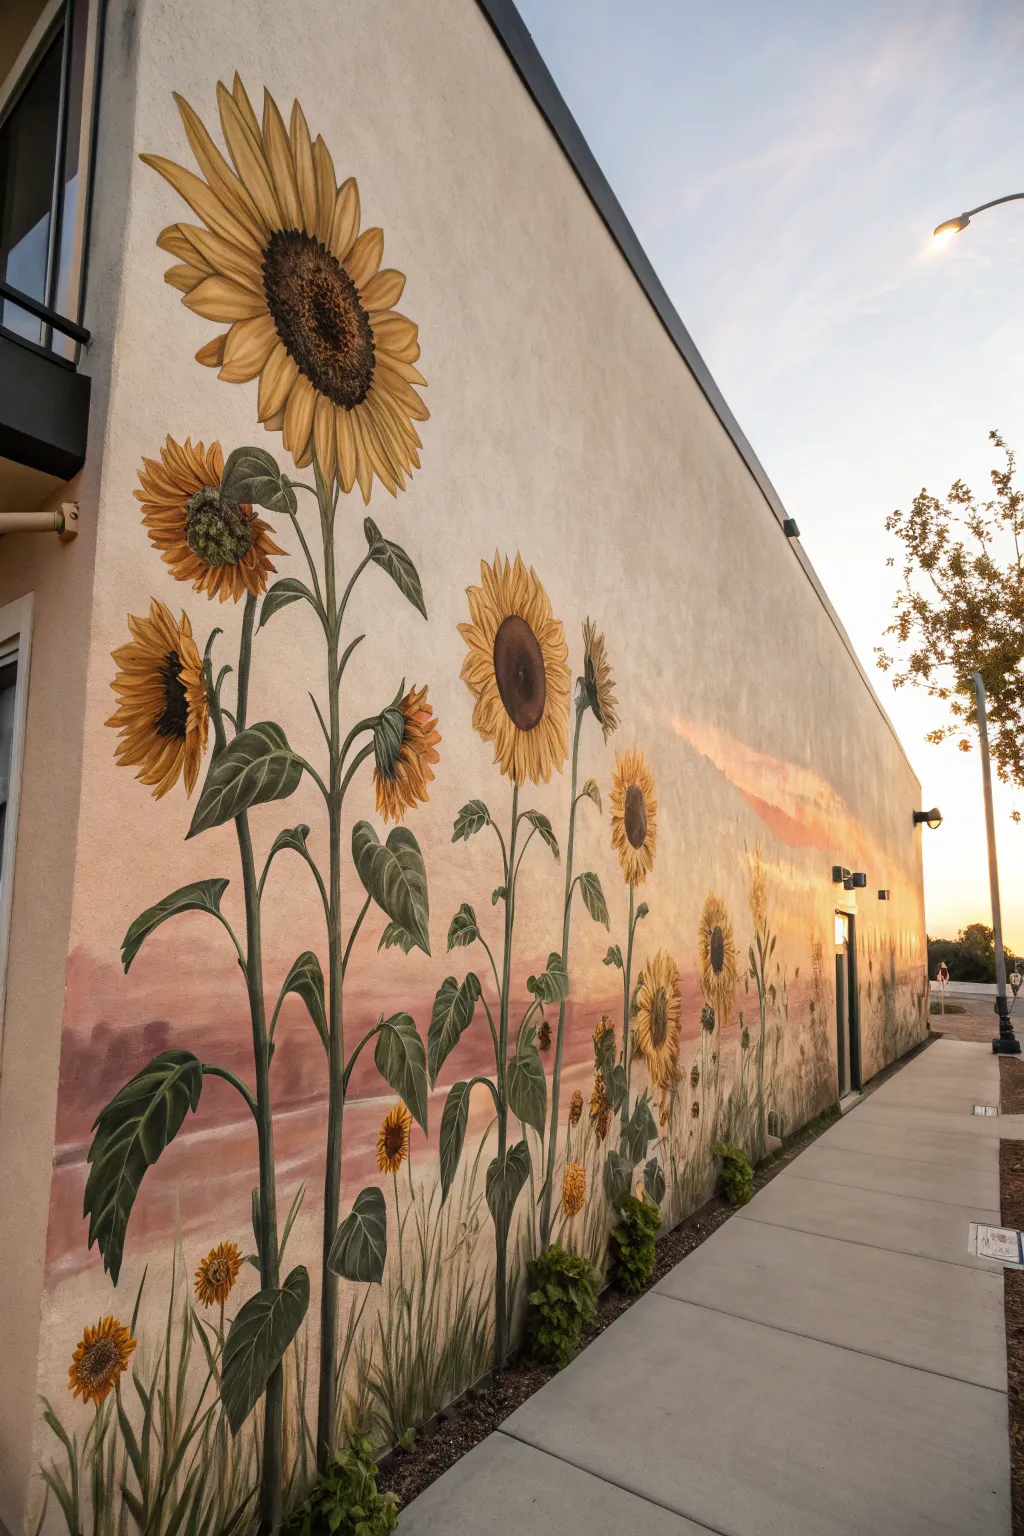
Transform a plain exterior wall into a stunning field of giant sunflowers bathed in the warm glow of a sunset. This mural project combines soft, blended gradients for the sky with crisp, detailed botanical illustrations for a striking, cheerful statement.
Step-by-Step Guide
Materials
- Exterior masonry primer
- Exterior acrylic latex paint (white, yellow, ochre, brown, green, dark green, orange, pink, light purple)
- Variety of paint rollers (large nap for stucco)
- Extension pole for rollers
- Assorted paintbrushes (2-inch sash, 1-inch flat, various detail liners)
- Chalk or charcoal specifically for sketching
- Painter’s tape
- Drop cloths
- Ladder or scaffolding
- Mixing buckets and trays
Step 1: Preparation and Sky Gradient
-
Prepare the surface:
Begin by thoroughly cleaning the wall surface to remove dust and dirt. Once dry, apply a generous coat of exterior masonry primer to ensure your colors pop and the paint adheres properly to the texture. -
Establish the horizon line:
Decide where your flowers will meet the ground. Use painter’s tape or a chalk line to mark a low horizon line; notice in the reference photo how the ‘ground’ area is actually quite low, allowing the flowers to tower. -
Paint the upper sky Base:
Start at the very top of the wall with a very pale, whitish-blue or cream color. Use a roller on an extension pole to cover the upper third of the wall, keeping the application somewhat loose at the bottom edge. -
Create the sunset transition:
Mix a soft, warm pinkish-orange. While the upper layer is still slightly tacky, roll this color across the middle section of the wall. Use a dry brush or a semi-dry roller to feather the top edge into the cream color above for a soft blend. -
paint the horizon glow:
For the area just above your ground line, apply a deeper, dusky purple-pink. This anchors the sunset. Blend this upward into the orange section to create that classic twilight gradient effect. -
Fill the ground layer:
Paint the bottom strip below your horizon line in a neutral, sandy beige or light tan color to represent the soil or field base. This doesn’t need much detail yet.
Stucco Struggles?
If painting on rough stucco, dab or stipple the brush rather than dragging it to get paint into crevices. A thick nap roller is essential for the background layers.
Step 2: Sketching and Stems
-
Rough out the composition:
Once the background is fully dry, use chalk or charcoal to sketch the sunflowers. Draw the largest flower head near the top left to act as a focal point, then stagger the heights of the others as you move right. -
Draft the stems:
Draw long, slightly curving vertical lines for the stems. Aim for variety—some should stand straight, while others lean naturally. Don’t make them perfect ‘poles’; add slight bends at the leaf joints. -
Paint the main stems:
Using a dark olive green and a 2-inch brush, paint the main stems following your chalk guides. I find it helps to use long, continuous strokes to keep the stems looking organic rather than choppy. -
Add the large leaves:
Block in the large, heart-shaped leaves extending from the stems. Paint them in a mid-tone green first. Notice how the leaves droop slightly under their own weight; capture this curve. -
Detail the leaf veins:
Mix a lighter mint green and a very dark forest green. Use a smaller brush to add highlights on the leaf edges and deep shadows along the central veins to give them dimension and a ribbed texture.
Level Up: 3D Pollen
Mix a small amount of fine sand or texture additive into the brown paint for the flower centers. This adds a tactile, seeded quality that catches the light beautifully.
Step 3: Flower Heads and Details
-
Block in the centers:
Paint large, rough circles for the flower centers using a dark chocolate brown. Make sure the centers are proportionate to the petals; sunflower centers are famously large. -
Paint the first layer of petals:
Using a golden yellow ochre, paint the back layer of petals. These should be slightly darker and can be less detailed. Let the tips of the petals point outward in a radial pattern. -
Add the foreground petals:
Mix a bright, sunny yellow. distinct overlapping petals on top of the ochre layer. Make these petals slightly shorter and more defined. Vary the direction—some petals should curl or twist slightly. -
Texture the centers:
Take a small round brush and stipple (dot) a lighter tan color around the outer ring of the brown centers to mimic the tiny individual florets. Keep the very center dark for depth. -
Add smaller blooms:
Don’t forget the ‘baby’ sunflowers lower down near the ground. Paint these smaller heads with the same technique, perhaps showing some from the side or as buds that haven’t fully opened. -
Paint the grass details:
At the very bottom, use a liner brush with varied greens and browns to flick vertical strokes upward, creating tall grasses and weeds that obscure the base of the thick sunflower stems. -
Final highlights:
Step back and look at the whole piece. Add touches of pure white or pale yellow to the tips of the highest petals and the top edges of the leaves to suggest sunlight hitting them.
Step back across the street to admire how your giant blooms bring warmth and summer energy to the entire building.

PENCIL GUIDE
Understanding Pencil Grades from H to B
From first sketch to finished drawing — learn pencil grades, line control, and shading techniques.
Explore the Full Guide
Tall Cosmos and Poppies to Add Height
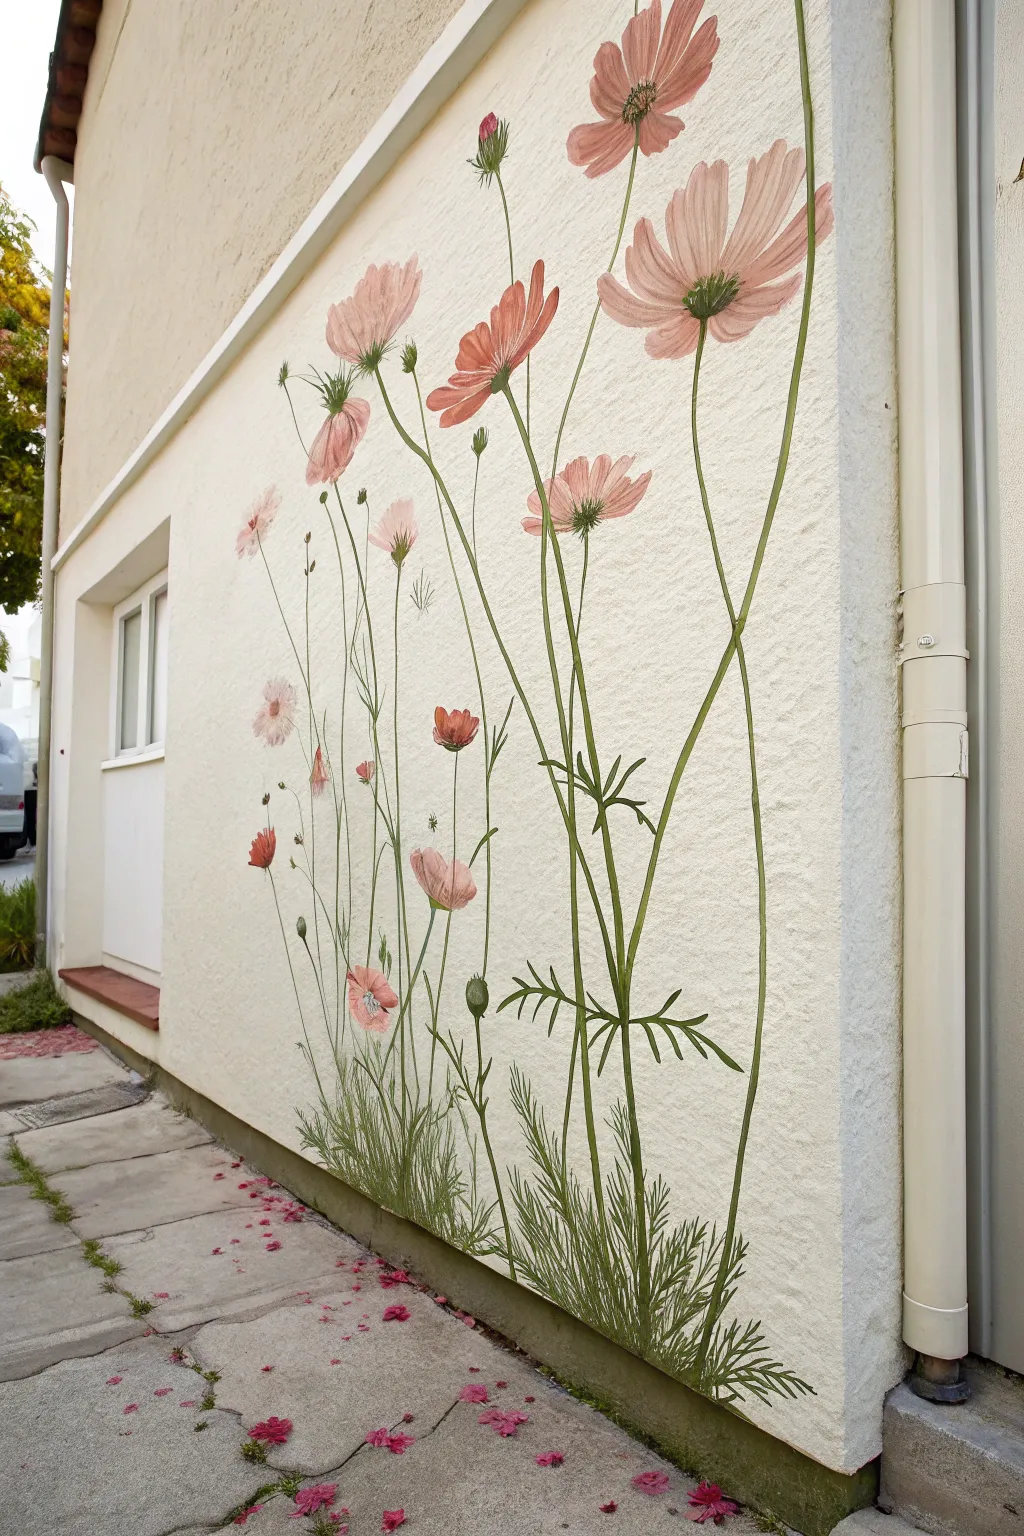
Transform a plain exterior or interior wall into a blooming garden with these towering, painted cosmos flowers. The design emphasizes verticality and delicate lines, working beautifully to add movement and color to a tall, narrow space.
Step-by-Step
Materials
- Exterior acrylic latex paint (white or cream for base, if needed)
- Acrylic paints (Soft Pink, Dusty Rose, Deep Red, Coral, Sage Green, Forest Green)
- Set of angled brushes (1/2 inch and 1 inch)
- Round detail brushes (sizes 2, 4, and 6)
- Chalk or a light pencil for sketching
- Painter’s tape
- Paper towels or rags
- Water container
- Clear matte exterior sealer (optional)
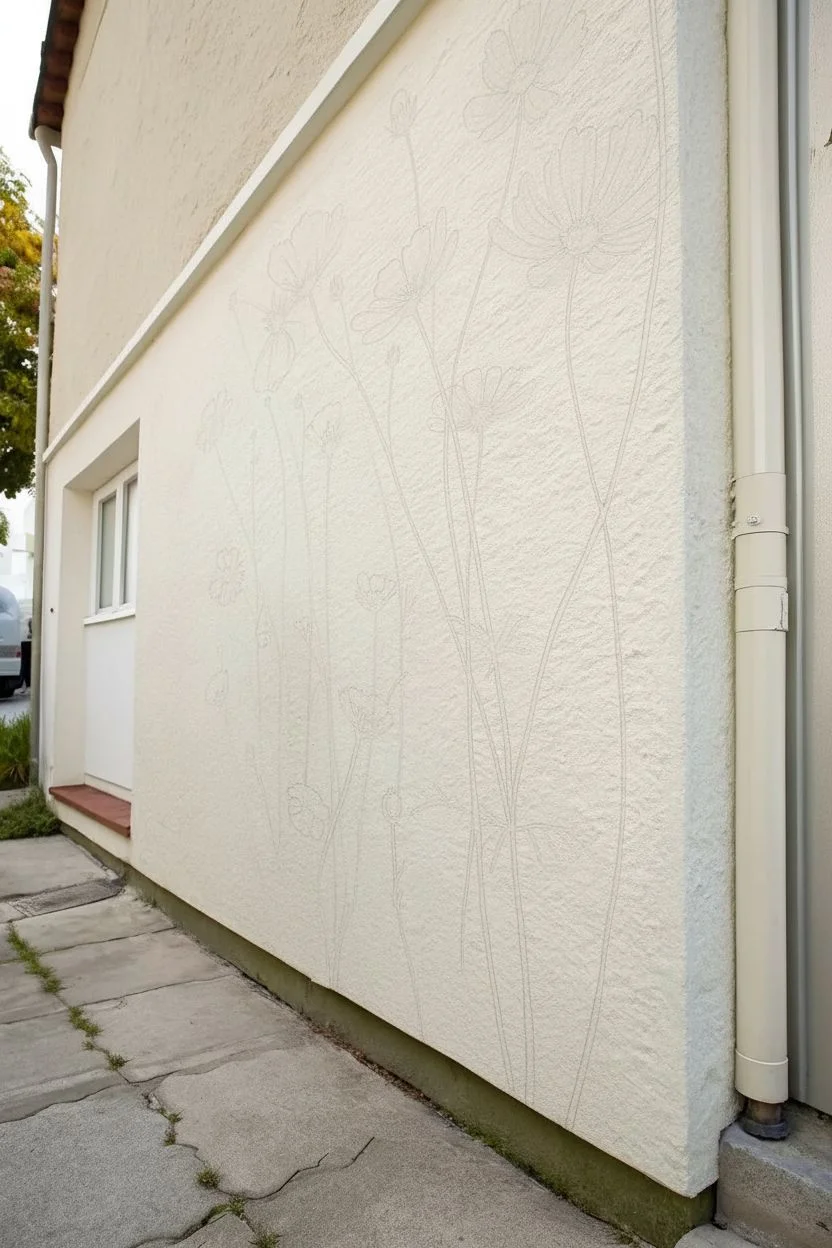
Step 1: Preparation and Sketching
-
Prepare the surface:
Begin by ensuring the wall is clean and dry. If the existing stucco or plaster is dirty, scrub it down with a mild detergent and let it dry completely. If you want a fresh background, roll on a coat of white or cream exterior paint to make the flowers pop. -
Map out the stems:
Using a piece of chalk, lightly sketch long, sweeping vertical lines to represent the main stems. Vary the heights significantly, with the tallest reaching near the top of your space and shorter ones filling the bottom third. -
Position the blooms:
Roughly circle where the flower heads will go. Place the largest blooms at the top of the taller stems and smaller buds or half-open flowers lower down to create a natural hierarchy.
Uneven Texture?
If the wall is very rough stucco, use a ‘stippling’ motion (dabbing vertically) rather than long brush strokes to get paint into the deep crevices.
Step 2: Painting the Foliage
-
Mix your greens:
On your palette, mix Sage Green with a touch of Forest Green. You want a natural, mid-tone green that isn’t too neon. I like to keep a little unmixed dark green on the side for shadows. -
Paint the main stems:
Use a round size 6 brush to paint over your chalk stem lines. Keep the pressure light to maintain thin, elegant lines. Don’t worry if the line breaks slightly over the textured wall; it adds character. -
Add feathery leaves:
Cosmos leaves are thin and fern-like. Using the size 2 or 4 brush, paint short, wispy strokes branching off the main stems, particularly near the base. Keep these strokes rapid and loose. -
Thicken the base:
At the very bottom of the mural, layer more grassy strokes in varying shades of green to ground the plants, making it look like a dense patch of growth. -
Add the sepals:
Where your flower heads will go, paint the small green sepals (the cup-like base of the flower) using the darker Forest Green mix.
Step 3: Creating the Blooms
-
Base coat the petals:
Start with the petals using a 1/2 inch angled brush. Mix a wash of Soft Pink and water to lay down a translucent base shape for each flower head. This doesn’t need to be opaque yet. -
Define the petal shapes:
Once the wash is tacky, switch to Dusty Rose and Coral. Paint distinct petal shapes—cosmos typically have 8 petals that are slightly squared off at the tips with jagged edges. -
Create variety:
Paint some flowers facing forward (full circles) and others in profile (fan shapes curving upward). Use darker reds for flowers that are ‘behind’ others or lower down. -
Add petal details:
Take a fine round brush with Deep Red or a darker pink mix. Paint thin striations starting from the center of the flower and flicking outward towards the petal tips to simulate texture. -
Highlighting:
Mix a little white into your Soft Pink. Add highlights to the tips of the upper petals where the sunlight would naturally hit the flower.
Level Up: Depth
Mix a heavily watered-down grey-brown paint. Paint very faint, transparent flower shadows slightly offset from the main blooms for a 3D illusion.
Step 4: Finishing Touches
-
Paint the centers:
For open flowers, dab a mix of yellow (or light green) and brown in the center to create the pollen-filled disk. Keep the edges of this center soft. -
Connect stems to blooms:
Double-check that all your flower heads are firmly connected to a green stem. If there is a gap, extend the stem carefully to meet the bloom. -
Clean up edges:
Step back and look at the composition. If any petals look messy, use your background wall color to ‘cut in’ and refine the shapes. -
Add falling petals:
For a whimsical touch, paint a few loose petals on the ground level or ‘falling’ through the air using your pink mixes. -
Seal the work:
If this mural is exposed to direct rain or harsh sun, apply a clear matte exterior sealer once the paint has cured for at least 24 hours.
Enjoy the view of your permanent garden that stays in bloom regardless of the season
Cherry Blossom Branches Sweeping Across the Wall
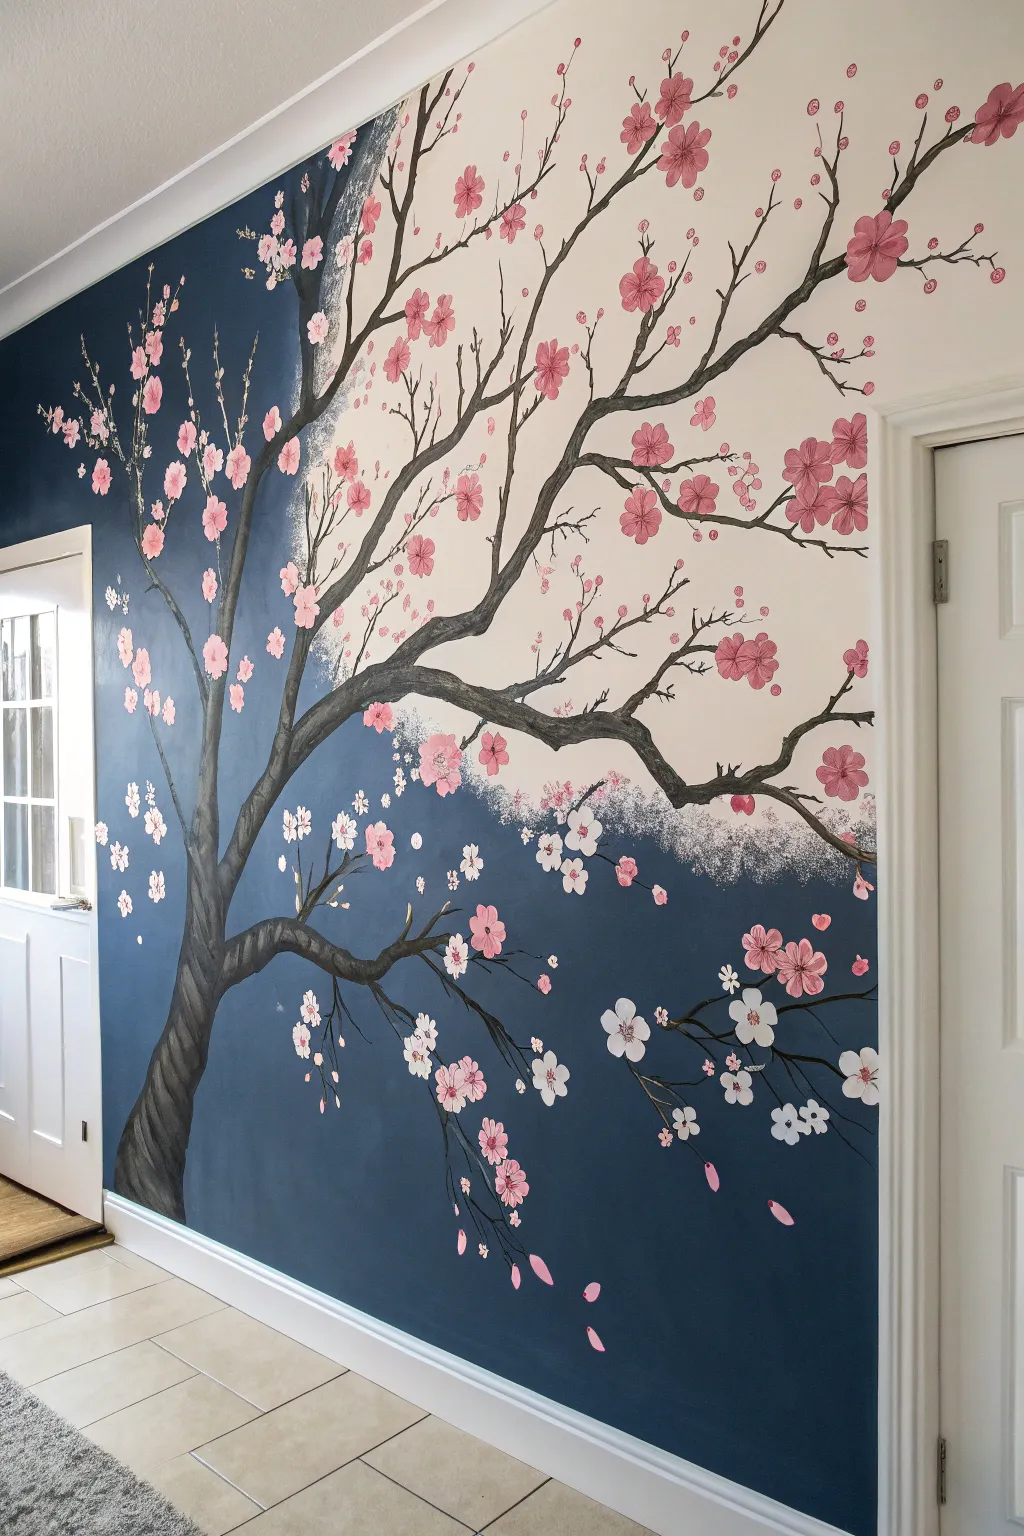
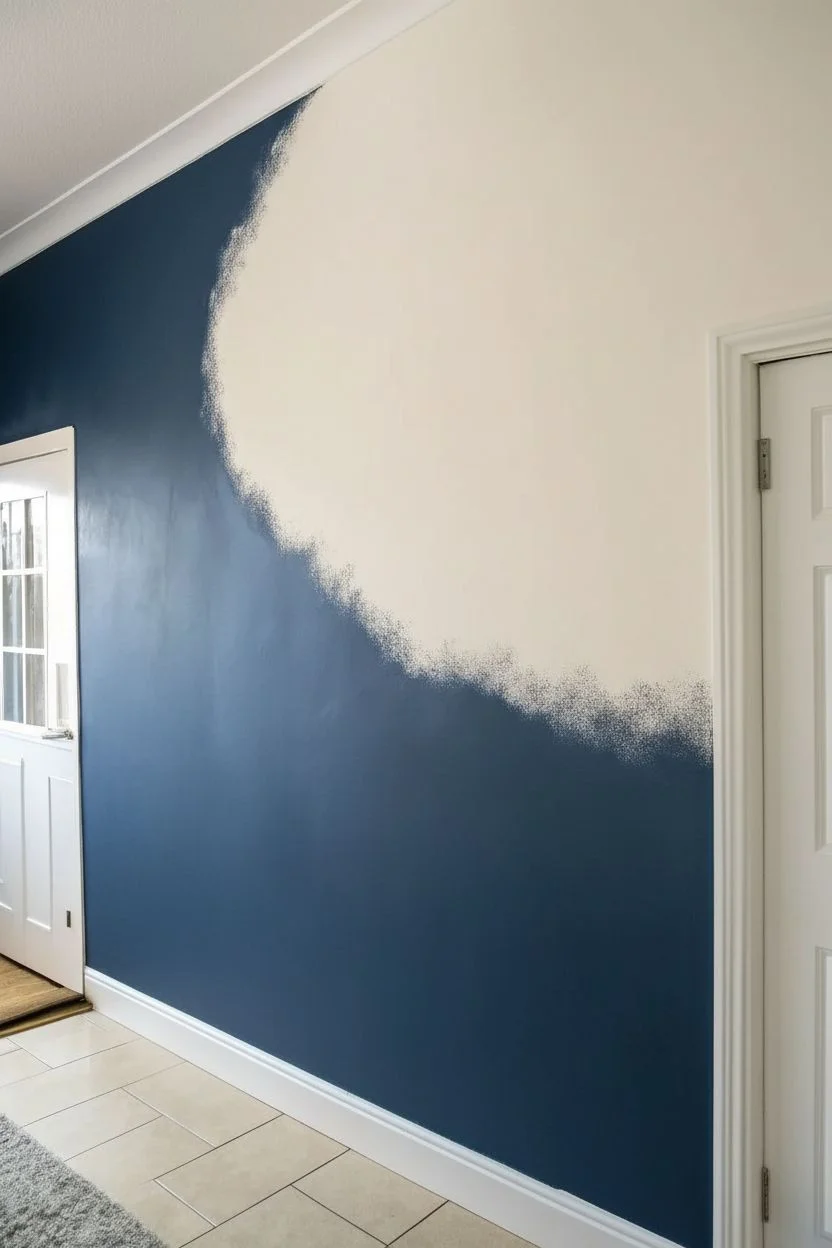
Transform a plain wall with this dramatic mural featuring a sturdy cherry blossom tree reaching across a dual-toned sky. The unique diagonal split between navy and cream creates a modern backdrop for the delicate pink blooms and intricate branches.
Step-by-Step Tutorial
Materials
- Deep navy blue interior wall paint (matte or eggshell)
- Cream or off-white interior wall paint
- Painter’s tape or masking tape
- Chalk or a light pencil
- Acrylic paints (dark brown, black, mid-pink, light pink, white)
- Small sea sponge or stippling brush
- Various paintbrushes (1-inch flat, filbert, and liner brushes)
- Paper plates or palettes
- Drop cloths
- Ladder or step stool
Step 1: Creating the Background
-
Prep the space:
Clear the area against the wall you intend to paint. Lay down drop cloths to protect your flooring and tape off the baseboards, door frames, and ceiling edges to ensure crisp lines. -
Paint the light section:
Start by painting the upper right portion of the wall with your cream or off-white paint. Don’t worry about a perfect edge where the colors will meet yet; just ensure good coverage in the top right corner and extend it past where you want the diagonal line to fall. -
Apply the dark section:
Once the cream paint is dry, paint the lower left section with the deep navy blue. Use a roller for the large areas but switch to a brush near the diagonal transition zone. -
Blend the transition:
While the navy edge is still slightly wet, use a sea sponge or a dry stippling brush to tap the navy paint over the edge of the cream paint. Create a rough, organic diagonal line rather than a straight taped edge to give the impression of a cloud break or textured atmosphere.
Uneven Blending?
If the diagonal blend looks too messy, wait for it to dry. Dry-brush a layer of the lighter cream color back over the messy navy edge to soften the transition instantly.
Step 2: Constructing the Tree
-
Sketch the skeleton:
Using chalk, lightly sketch the main trunk starting from the bottom left corner. Draw the primary branches reaching upward and outward toward the right side of the wall. Keep the lines loose and flowing. -
Block in the trunk:
Mix dark brown acrylic paint with a touch of black to get a deep, rich bark color. Using a 1-inch flat brush or larger filbert brush, fill in the main trunk shape, following your chalk guidelines. -
Add texture to the bark:
While the trunk paint is wet, streak in slightly lighter brown or grey tones along the curve of the trunk. This highlights the rounded shape and creates a twisted, organic bark texture. -
Extend the branches:
Switch to a thinner round brush. Extend the main branches out further, tapering them as they get closer to the ends. Ensure the branches fork naturally, getting thinner with each split. -
Paint fine twigs:
Use a liner brush (a very thin, long-bristled brush) to add the smallest twigs at the ends of the branches. I prefer to use a slightly more diluted paint here so the ink flows smoothly for these delicate lines.
Add Metallic Life
Mix a tiny amount of metallic gold or silver paint into your white blossom centers. It catches the light beautifully when walking past the mural.
Step 3: Adding the Blossoms
-
Prepare bloom colors:
poured outs pink, light pink, and white acrylic paints onto your palette. You will need a range of tints to create depth in the flowers. -
Paint the base petals:
Start with the mid-tone pink. using a small filbert brush or just the tip of a round brush, dob five small petals in a circular arrangement to form the basic flower shape. Place these randomly along the branches, clustering some together. -
Add variance:
Paint some flowers using the lighter pink shade, especially on the branches that sit against the navy background, so they pop visually. -
Create white blossoms:
In the lower right section against the dark blue, paint several clusters of pure white flowers. This adds a beautiful stark contrast against the deep background. -
Detail the centers:
Once the pink and white petals are dry, use a tiny dot of dark pink or red in the center of the pink flowers, and a small yellow or grey dot in the white flowers. -
Add falling petals:
To create a sense of movement, paint single petals ‘falling’ through the air in the navy section. Use a simple teardrop stroke for these drifting petals. -
Final touches:
Step back and assess the density. If a branch looks too bare, add a few buds (small single dots of pink) to fill the space without overcrowding it.
Step back and enjoy the serene atmosphere your new cherry blossom mural brings to the room


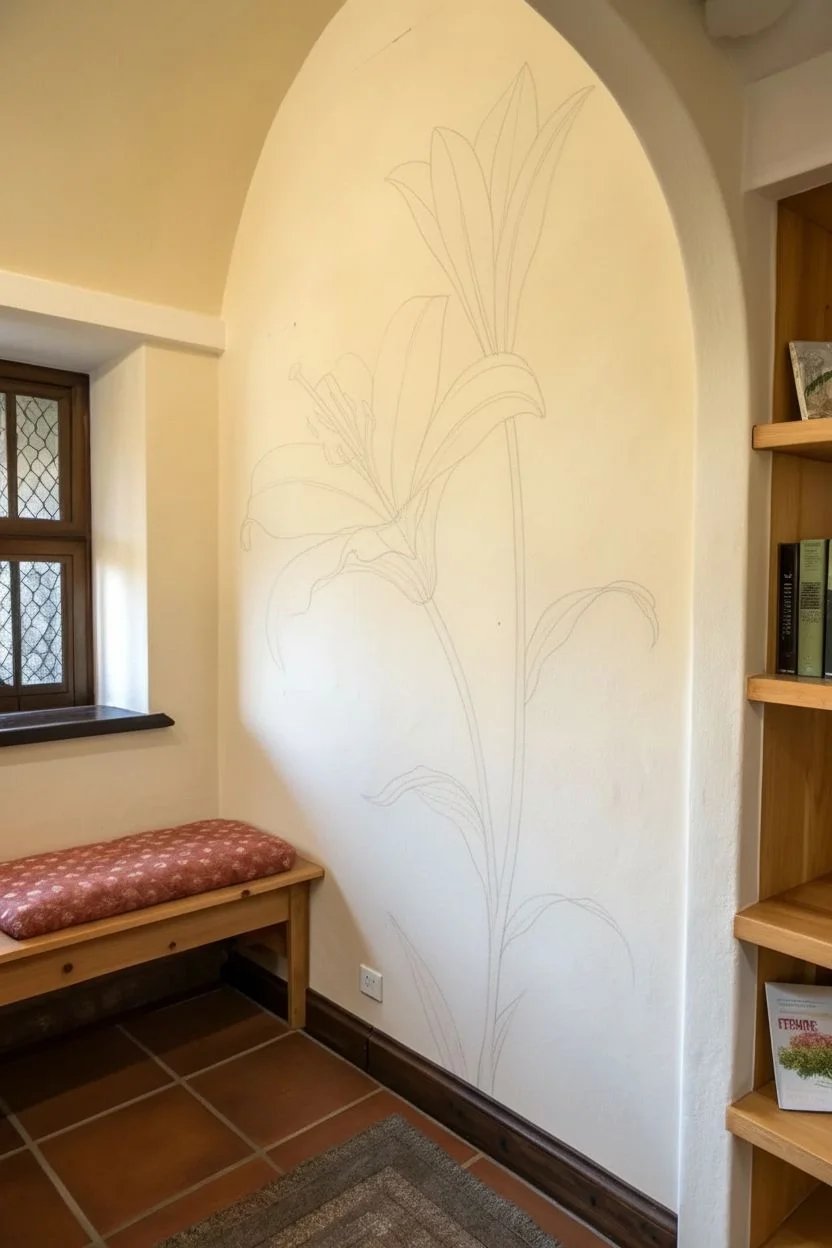
Minimal Single Stem Bloom in a Quiet Corner
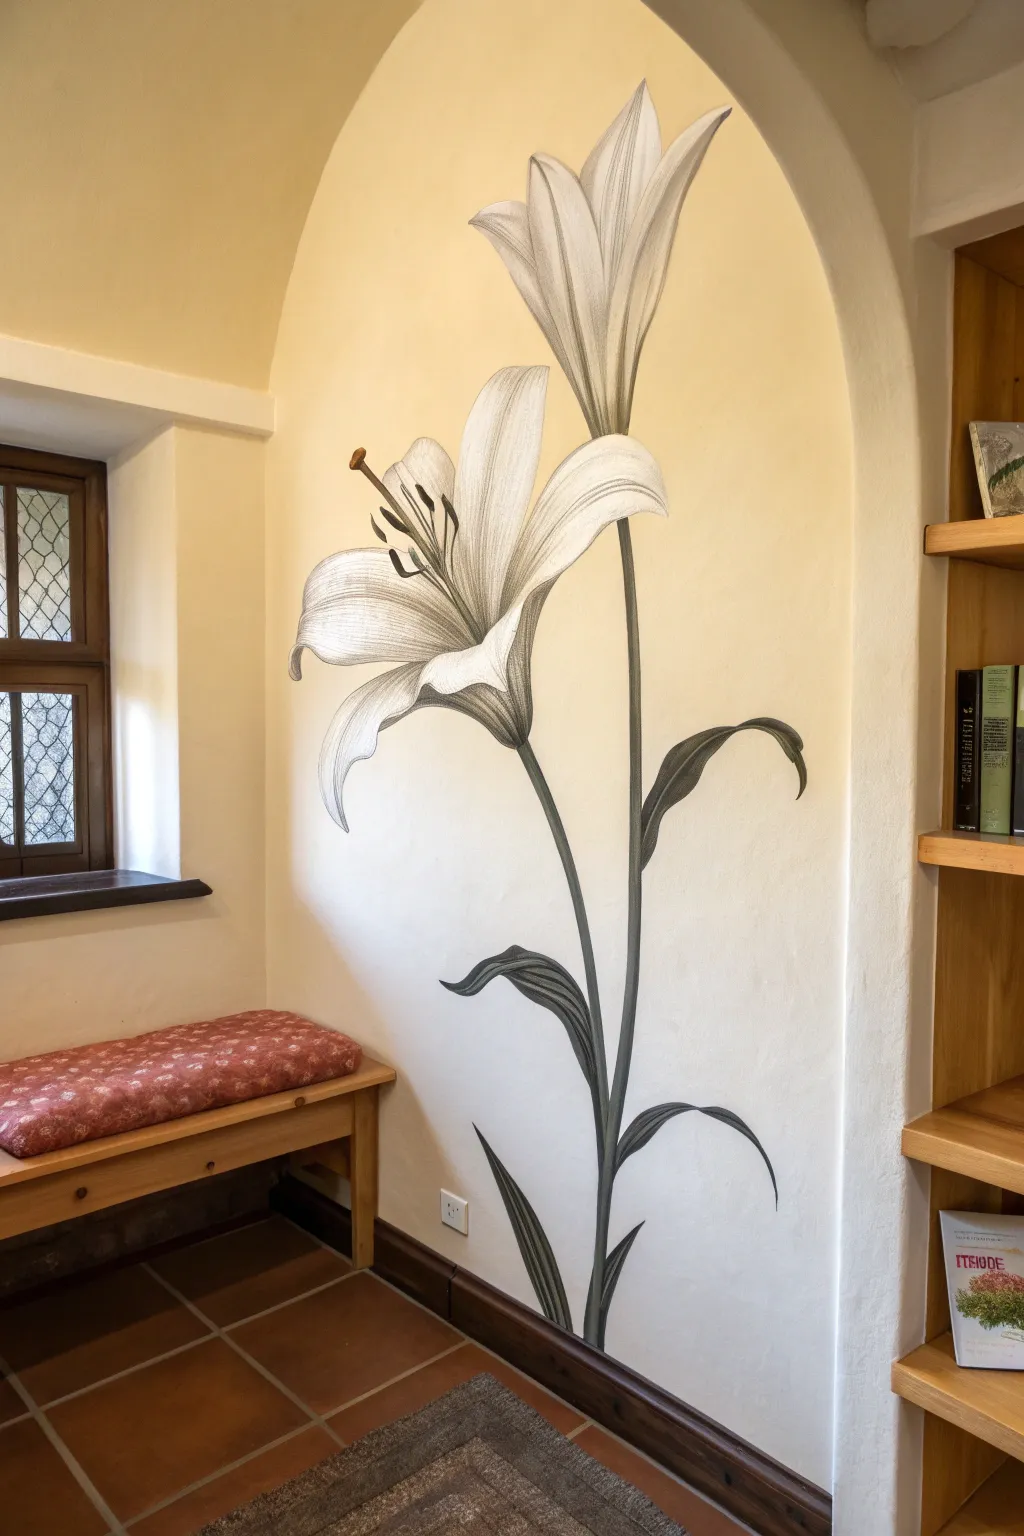
Transform an arched alcove or quiet corner into a stunning focal point with this large-scale botanical mural. Replicating the delicate shading of a graphite pencil sketch, this monochrome lily adds vertical drama without overwhelming a neutral space.
How-To Guide
Materials
- Interior latex wall paint (Cream/Off-white base coat)
- Graphite grey acrylic paint or heavy-body drawing ink
- Soft charcoal pencil (for initial sketch)
- Wide angle brush (1-inch shader)
- Medium round brush (size 6-8)
- Fine liner brush (size 0-2)
- Measuring tape
- Reference image of an Asiatic lily
- Water container and mixing palette
- Painter’s tape and drop cloth
- Matte clear acrylic sealer (optional)
Step 1: Preparing the Canvas
-
Prime the wall:
Ensure your alcove or wall section is clean and smooth. Apply two coats of a warm cream or soft yellow latex paint to serve as the background, creating that vintage paper look. -
Map out proportions:
Using a measuring tape, lightly mark the top, bottom, and center points of where your flower stem will sit. This lily is very tall, so ensure the stem starts near the baseboard and the highest petal reaches well into the arch. -
Sketch the primary stem:
Take your charcoal pencil and draw a long, slightly curved line for the main stem. It should have a gentle ‘S’ curve to feel organic, leaning slightly right before correcting back to the left. -
Outline the main bloom:
Sketch the large open bloom about two-thirds up the wall. Start with a central oval for the flower’s heart, then extend six long, trumpet-like petals outward. Keep lines faint so they can be easily erased or painted over. -
Add the bud and leaves:
Draw the secondary closed bud branching off the top right of the main bloom. Then, add long, slender lance-shaped leaves along the stem, varying their direction for a natural flow.
Fixing Heavy Lines
Painted a line too thick? Don’t wipe it! Let it dry completely, then use your cream base/wall paint to carefully paint over the excess width.
Step 2: Painting the Structure
-
Mix your grey wash:
dilute your graphite grey acrylic paint with a small amount of water. You want a consistency that flows like ink but is opaque enough to mimic a dark pencil line. -
Define the stem:
Using the medium round brush, paint over your stem sketch. Apply slightly more pressure at the bottom of the stem and lift off as you move up to taper the stroke. -
Block in leaf shapes:
Fill in the base color of the leaves and stem with a dark, solid grey. Unlike the petals, the green parts of the plant are rendered as dark silhouettes to ground the composition. -
Outline the petals:
Switch to your fine liner brush. Carefully trace the perimeter of your flower petals. Keep your hand loose; a slightly jittery line actually helps mimic the texture of paper sketching.
Level Up: Watercolors
Instead of acrylics, try using watercolor pencils directly on the wall. Dampen them with a brush afterwards for a genuine, soft botanical illustration effect.
Step 3: Shading and Detail
-
Create the striated texture:
This step defines the ‘pencil drawing’ look. Using a semi-dry brush technique with the fine liner, paint thin, parallel lines running from the center of the petals outward toward the tips. -
Deepen the shadows:
I prefer to mix a slightly darker, un-diluted grey here. Apply this into the deep creases where petals overlap and at the very base of the flower throat to create depth. -
Detail the stamens:
Paint the long filaments extending from the center using the fine liner. Add the anthers (the pollen pads) at the tips using a tiny touch of brown or burnt sienna paint for a singular pop of warmth. -
Enhance the bud:
Use vertical hatching lines on the closed upper bud. Leave plenty of the cream wall color showing through between your grey lines to suggest the roundness of the petals. -
Refine leaf veins:
Go back to your dark leaves. Mix a lighter grey and paint a thin central vein down the middle of each leaf, or simply outline the leaf edge with a finer, darker line to sharpen the silhouette. -
Add cross-hatching:
Look for areas that feel too flat. Add tiny, diagonal cross-hatching marks in the darkest shadow areas, just like a sketch artist would shade with a pencil.
Step 4: Finishing Touches
-
Check balance:
Step back about six feet. If the stem feels too thin compared to the heavy flower head, thicken the lower portion of the painted stem slightly. -
Clean up edges:
Use a small brush with your original cream wall paint to ‘erase’ any charcoal smudges or correct any wobbly paint lines that disrupt the flow. -
Erase guidelines:
Once the paint is fully dry (give it at least an hour), use a kneaded eraser to gently lift any visible charcoal sketch marks that weren’t covered by paint. -
Seal the artwork:
For high-traffic areas, protect your work by brushing on a layer of matte clear acrylic sealer over the painted areas only.
Step back and admire how a simple monochrome design brings elegant life to your corner
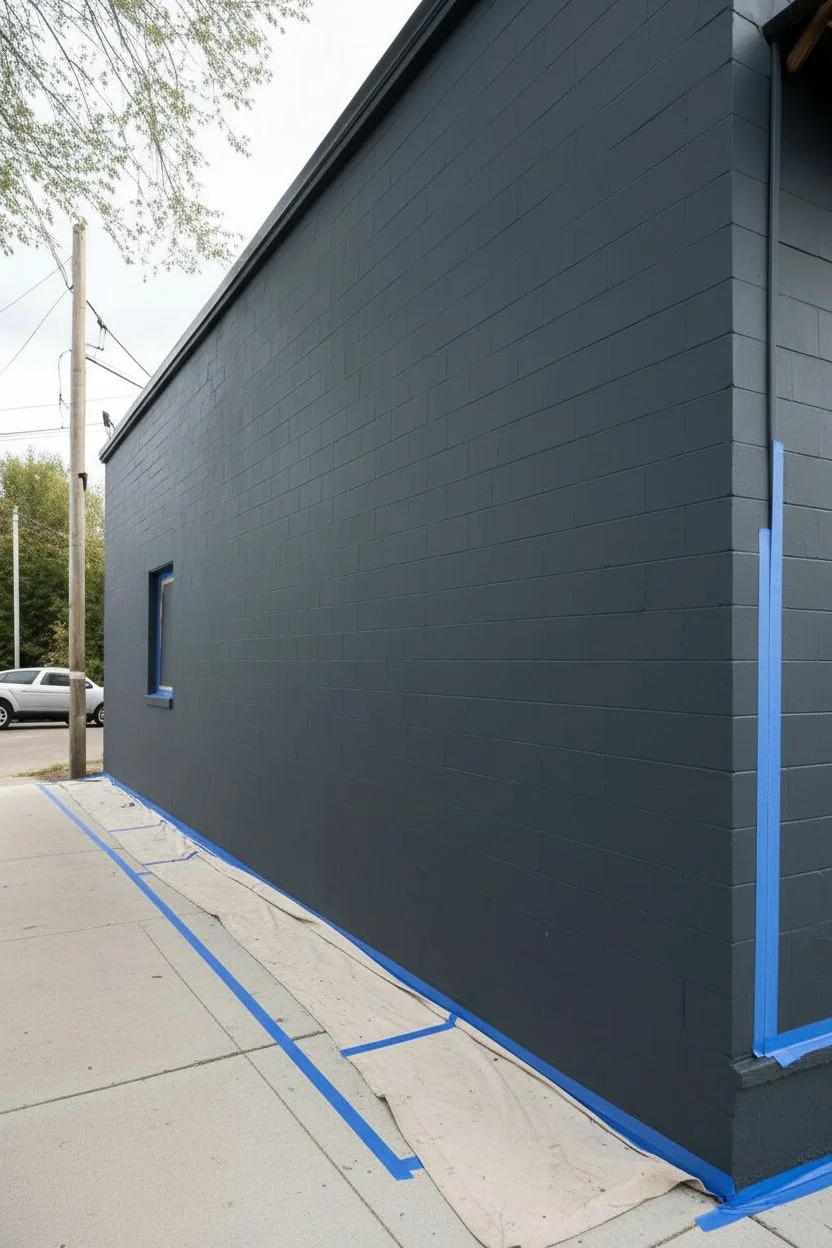
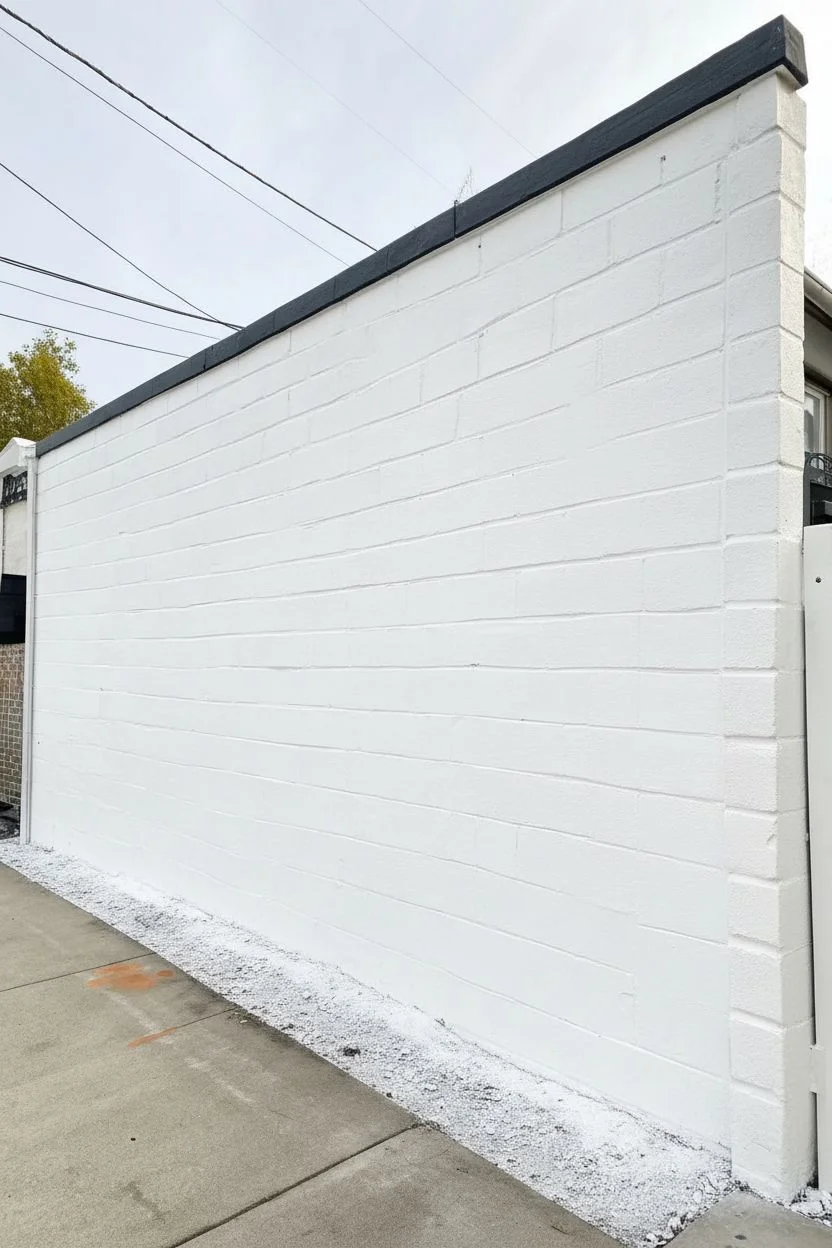
Dark Background Florals for High Contrast Drama
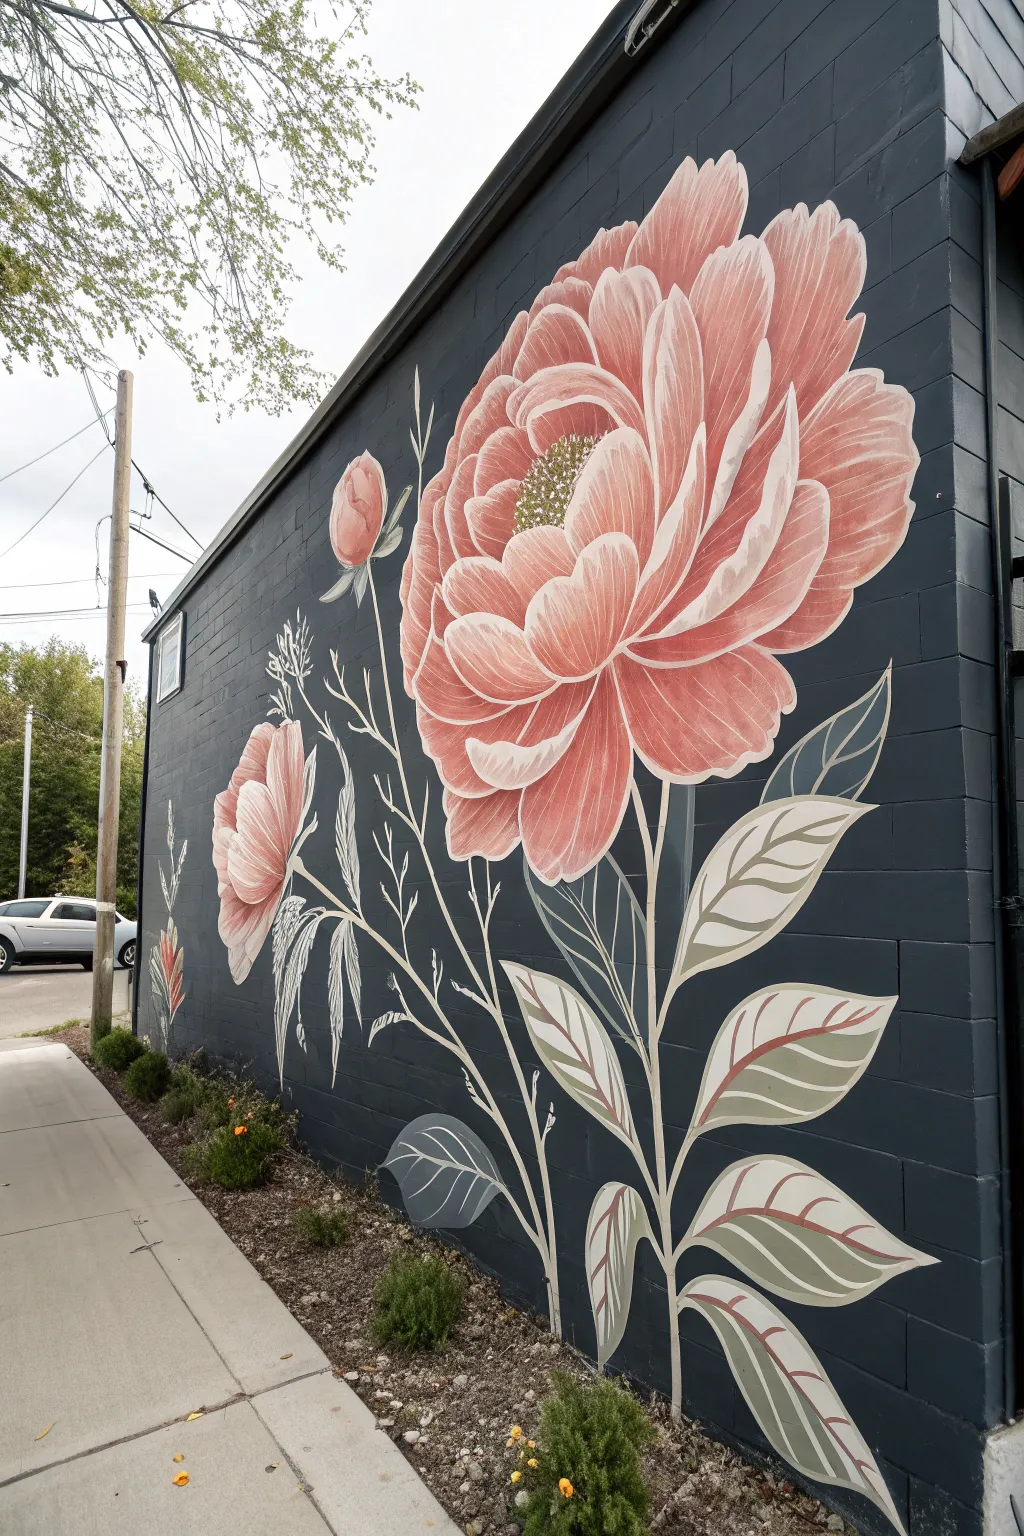
Transform a plain exterior wall into a stunning focal point with this large-scale floral mural, featuring vintage-style peonies against a moody charcoal backdrop. The high contrast between the soft pink petals and the dark masonry creates a striking, sophisticated look perfect for urban spaces or garden walls.
Step-by-Step Guide
Materials
- Exterior masonry primer (tinted dark grey)
- Exterior acrylic latex paint (Charcoal/Dark Slate)
- Exterior acrylic latex paint (Warm Pink, Peach, Cream, Sage Green, Dark Green)
- Large nap roller (3/4 inch) and extension pole
- Paint tray and liners
- Assorted synthetic bristle brushes (2-inch sash, 1-inch flat, round detail brushes)
- Chalk or pastel crayons (white or light grey)
- Drop cloths
- Ladder
- Painter’s tape
- Clear exterior masonry sealer (optional)
Step 1: Preparation and Base Coat
-
Clean the Surface:
Begin by thoroughly cleaning the brick or block wall. Use a pressure washer or a stiff scrub brush with a TSP substitute to remove dirt, moss, and loose debris. Let the wall dry completely for at least 24 hours. -
Protect the Area:
Lay down drop cloths along the base of the wall to protect the sidewalk and landscaping. Mask off any adjacent trim, windows, or gutters with painter’s tape. -
Apply the Base Color:
Roll on your dark charcoal masonry paint using a thick nap roller designated for textured surfaces. The goal is to get into the grout lines and pores. -
Cut In Edges:
Use a 2-inch brush to cut in around edges, windows, and corners where the roller couldn’t reach. Ensure full coverage. -
Second Coat:
Once dry to the touch, apply a second coat of the dark background color to ensure a solid, opaque finish without patchiness.
Brushwork Tip
For smooth curves on rough brick, wiggle your brush slightly as you pull the stroke. This helps bristles reach into deep crevices without pressing too hard.
Step 2: Sketching the Design
-
Map Out Placement:
Stand back and decide where your main blooms will sit. It helps to mark the center of the largest flower with a piece of chalk first. -
Sketch the Outline:
Using white chalk or a light pastel crayon, sketch the rough outline of the large peony, the smaller side bloom, and the bud. Don’t worry about perfect details yet; focus on scale and composition. -
Add Stem Lines:
Draw the sweeping, curved lines for the main stems and branches. Keep the lines fluid to mimic organic growth.
Level Up: Metallic Pop
Add gold leaf or metallic gold paint to the very center stamens of the peony. It catches the sunlight and adds a hidden layer of luxury.
Step 3: Painting the Blooms
-
Block In Base Petals:
Mix a mid-tone warm pink. Use a 2-inch brush to fill in the main shapes of the petals, leaving the chalk lines visible as a guide. -
Add Highlights:
Mix cream into your pink to create a light highlight shade. Paint the outer edges and tips of the petals where the light would naturally hit, using broad, sweeping strokes. -
Create Depth:
Use a deeper peach or terracotta shade to paint the base of the petals near the flower center. This shadow creates the cupped shape of the peony. -
Define Petal Edges:
Using a smaller flat brush and nearly white cream paint, carefully outline the upper edges of the petals to crisp up the shapes and separate overlapping layers. -
Paint the Center:
For the pollen center, dab small dots of pale yellow and greenish-grey using a round brush to create a textured, stippled effect.
Step 4: Leaves and Details
-
Base the Stems:
Paint the long stems using a mix of cream and light sage green. A long liner brush or a steady hand with a flat brush works best here. -
Fill Leaf Shapes:
Block in the leaf shapes with a muted sage green. Follow the natural curve of your sketch lines. -
Detail Veins:
I like to use a creamy white paint to draw the veins and outline the leaves. This gives them that illustrative, botanical print style. -
Shadowing Leaves:
Add subtle strokes of darker green or even a touch of the background charcoal color to the underside of the leaves for dimension. -
Clean Up:
Step back and check your work. If any chalk lines are still visible, wipe them away with a damp cloth or touch up with the charcoal background paint.
Now you have a breathtaking piece of public art that turns a standard brick wall into a garden oasis
Nursery Florals With Gentle Pastels and Simple Shapes
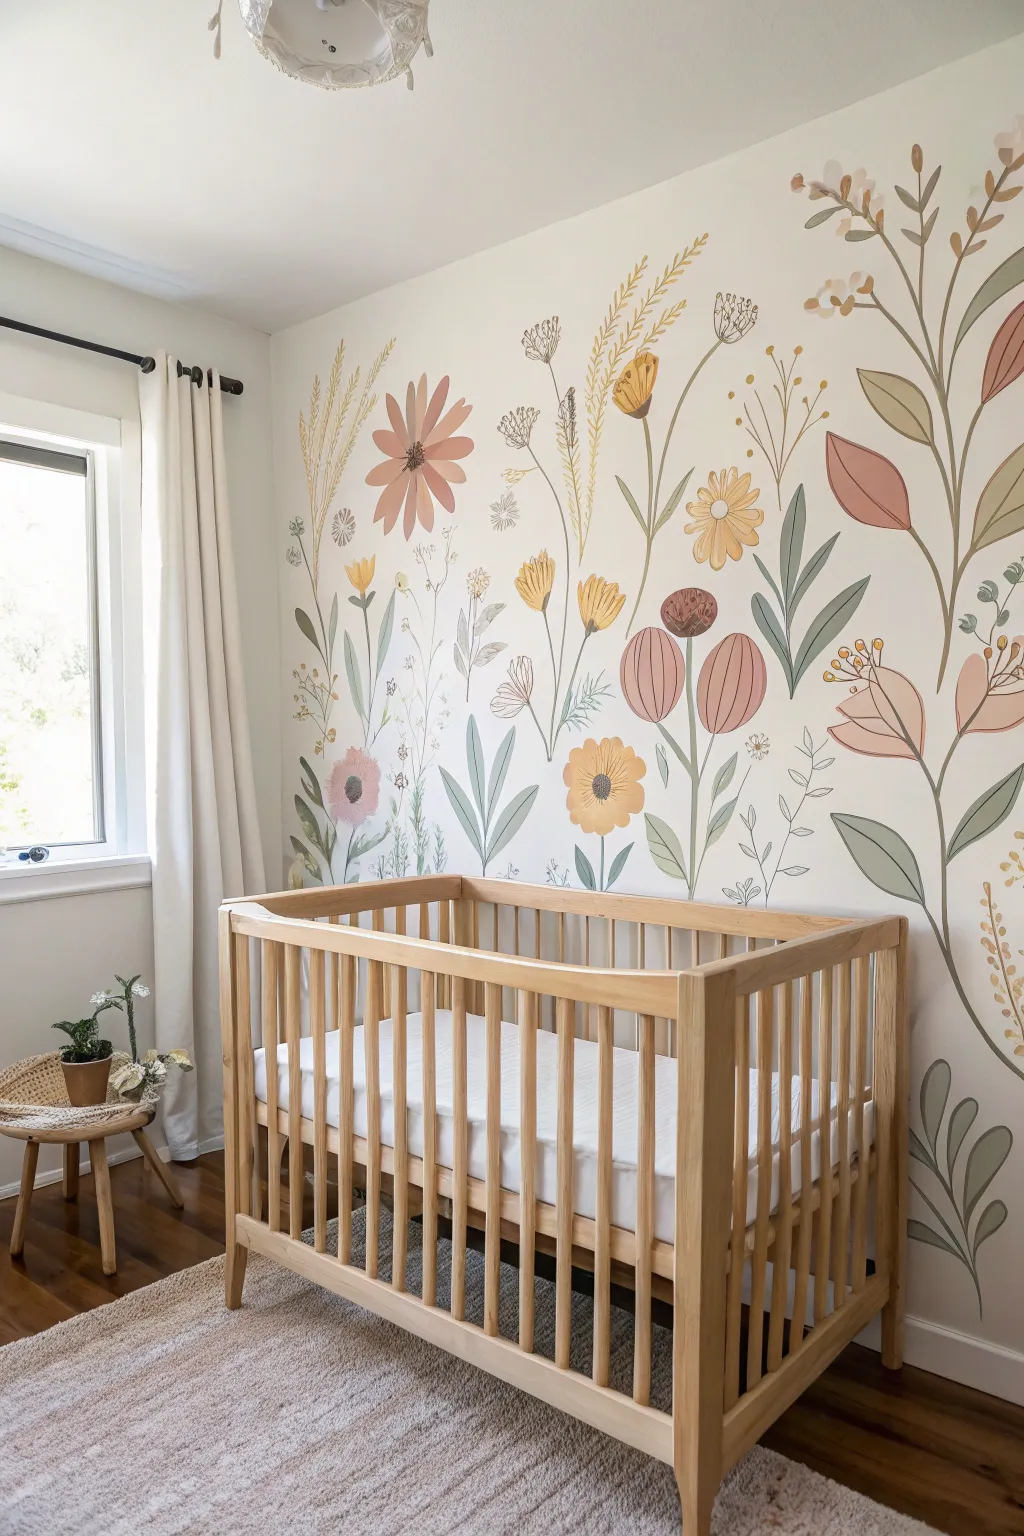
Transform a blank nursery wall into a calming meadow scene featuring oversized wildflowers in soft pastels and earthy tones. This large-scale mural uses simple organic shapes and muted colors to create a whimsical yet serene backdrop perfect for a little one’s room.
Step-by-Step Tutorial
Materials
- Interior latex wall paint (Eggshell finish) in: Cream/Off-White (base), Dusty Rose, Muted Gold, Sage Green, Deep Terracotta, Beige
- Various angled paintbrushes (1-inch, 2-inch)
- Small round detail brushes (sizes 4 and 6)
- Pencil and eraser
- Painter’s tape
- Step ladder
- Drop cloths
- Projector (optional but recommended for layout)
- Paper plates or palette
- Damp rags for cleanup
Step 1: Preparation and Base
-
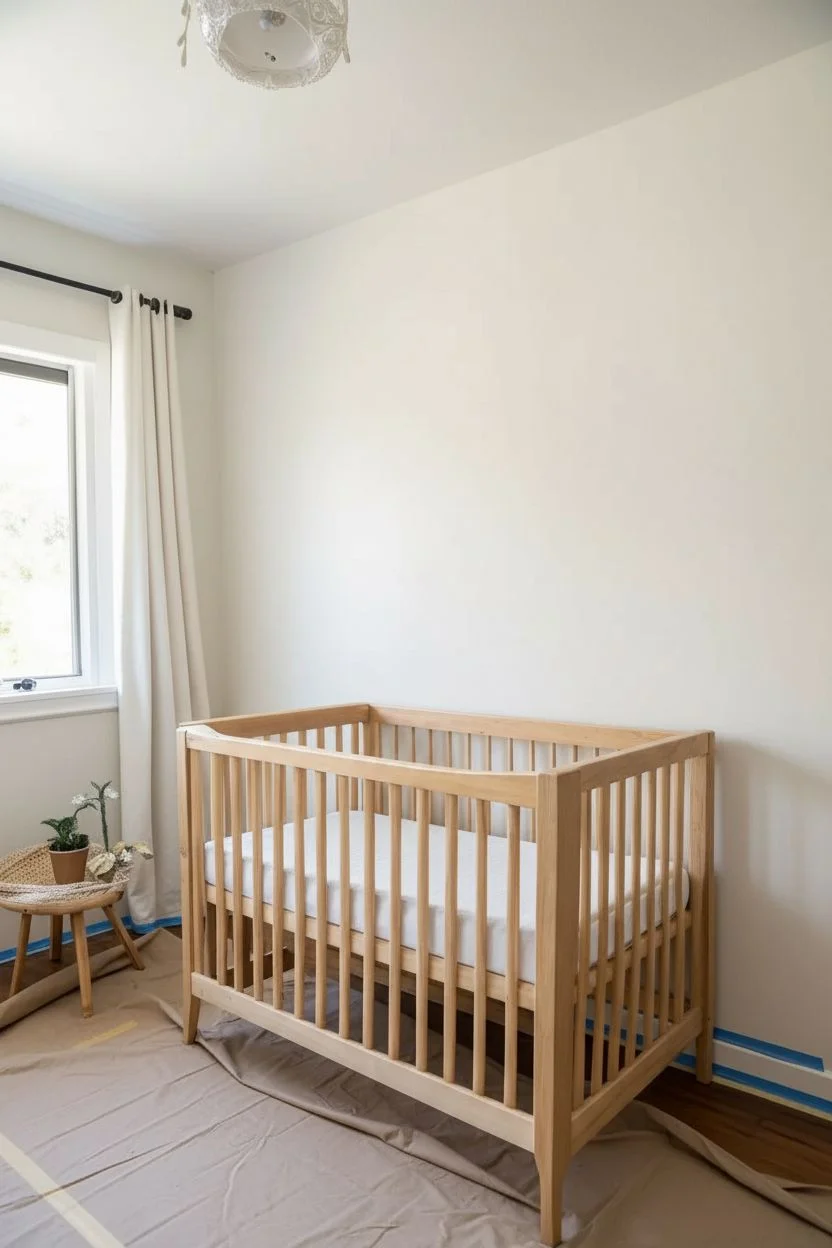
Prepare the room:
Clear the area against the wall, removing any furniture like the crib. Lay down drop cloths to protect the flooring and tape off the baseboards and adjoining walls with painter’s tape. -
Prime the canvas:
If the wall isn’t already a neutral tone, apply two coats of your cream or off-white base color. Let this cure completely, preferably overnight, to ensure your floral colors sit truly on top without picking up underlying hues.
Step 2: Sketching the Layout
-
Plan your composition:
Look at the wall as a whole. The key to this mural is verticality. Plan for tall stems reaching from the floor up toward the ceiling, creating an sense of height and growth. -
Sketch the main stems:
Using a light pencil, draw long, flowing S-curves and straight lines to represent the main stems. Vary the heights—some should tower near the ceiling, while others fill the mid-wall space. -
Outline major blooms:
At the top of your stems, sketch the largest flower heads first. Focus on simple ‘U’ shapes for tulips, circles for daises, and ovals for seed pods to keep the style consistent with the ‘simple shapes’ theme. -
Fill in leaves and details:
Add leaves attached to the stems. Draw large, teardrop-shaped leaves near the bottom and smaller, thinner leaves as you move upward. Add smaller sprigs of filler flowers or wheat-like stalks in the empty spaces.
Wobbly Lines?
If your stems look shaky, don’t stress. Nature isn’t perfect. Simply thicken the line slightly in the wobbly area to smooth it out, or turn a mistake into a new leaf node.
Step 3: Painting the Greenery
-
Mix your greens:
Pour out your Sage Green paint. I like to keep a little of the base wall color nearby to mix into the green if certain leaves need to look more faded or distant. -
Paint the stems:
Using a 1-inch angled brush, carefully paint over your pencil lines for the stems. Use a long, continuous stroke where possible to keep the lines smooth and natural. -
Fill in the leaves:
Switch to a smaller brush if needed for tighter corners. Fill in the leaf shapes with the Sage Green. For visual interest, consider mixing a darker olive tone for some stems and a lighter sage for others. -
Add grassy textures:
For the wheat-like elements or tall grasses, use a thin round brush. Use quick, upward flicking motions to create the feathery texture of dried grass heads.
Add Depth
Mix a tiny drop of grey into your flower colors and paint a thin line along the bottom of each petal or leaf. This subtle shadow adds dimension without overpowering the flat style.
Step 4: Adding the Blooms
-
Paint the warm tones:
Start with the Deep Terracotta and Dusty Rose colors. Fill in the large, flat shapes of the main flower petals. Don’t worry about shading yet; simply block in the flat color. -
Add yellow accents:
Use your Muted Gold paint for the daisy centers, dandelion-style flowers, and small pollen accents. This color pops beautifully against the cream background. -
Paint the seed pods:
For the round, bulbous shapes (like poppy pods), use a mix of the beige and rose paints. Paint vertical stripes on these shapes to mimic the ribbed texture of a seed pod. -
Create fine details:
Once the main flower shapes are dry to the touch, use your smallest round brush (size 4) to add stamen, pistils, and tiny dots around the flower centers using a contrasting dark color, like a dark brown or deep grey. -
Layering transparency:
If you want a watercolor effect, slightly water down your paint for the petals. This allows the wall color to peek through slightly, making the flowers feel airy and light.
Step 5: Finishing Touches
-
Check for gaps:
Step back to the other side of the room. Look for any awkward empty spaces. Add small floating petals, tiny dots, or extra sprigs of greenery to balance the composition. -
Clean up lines:
Use a small brush and your original wall base color to ‘erase’ any paint that went outside the lines or to sharpen the tips of leaves that became too rounded. -
Erase pencil marks:
Once the paint is completely dry (wait at least 4-6 hours), gently erase any visible pencil sketch lines that weren’t covered by paint.
Step back and enjoy the peaceful garden you have brought indoors, ready to inspire sweet dreams
Flower Garland Frame Around a Door or Window
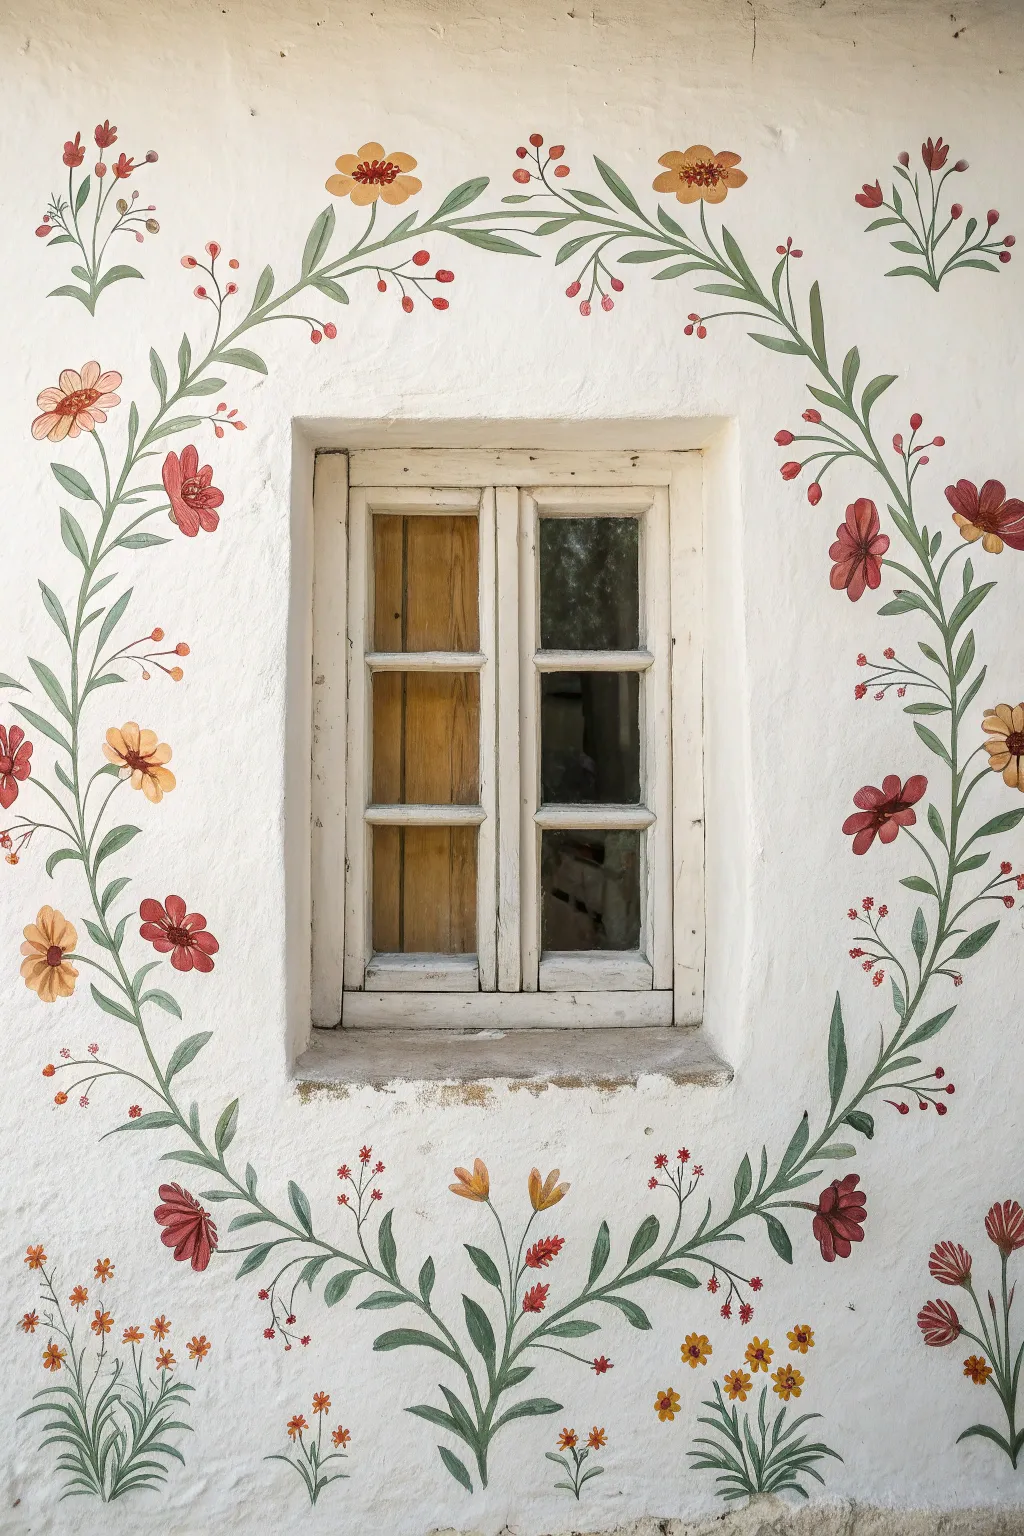

Transform a plain window into a storybook feature with this hand-painted floral garland. Using simple folk-art strokes and a warm, inviting palette, this mural creates a charming frame that feels both timeless and whimsical.
Detailed Instructions
Materials
- Exterior or interior latex paint (white for base if needed)
- Acrylic craft paints (muted red, coral, mustard yellow, sage green, forest green)
- Assorted paintbrushes (round tips #4, #8, and a fine liner brush)
- Chalk or pencil for sketching
- Paper plates for mixing
- Water cup and paper towels
- Clear matte sealer (optional, for exterior longevity)
Step 1: Preparation and Layout
-
Clean the surface:
Begin by thoroughly cleaning the wall area around your window. Remove any dust, cobwebs, or grime with a damp cloth and mild detergent. Let it dry completely. -
Sketch the main vine:
Using a piece of chalk or a faint pencil, lightly draw the main curved stems. Start from the bottom center, sweep up the left side, slightly arch over the top, and repeat on the right side. The lines don’t need to meet perfectly; a slight gap at the top and bottom adds to the organic look. -
Mark flower placements:
Lightly sketch circles where your larger blooms will go to ensure balanced spacing. Place a few major focal points on the sides and corners, leaving room for smaller filler flowers and leaves.
Step 2: Painting the Greenery
-
Paint the main stems:
Load your #8 round brush with forest green paint mixed with a tiny drop of water for flow. Paint the main vine lines you sketched, varying the pressure on your brush to make lines that taper naturally. -
Add large leaves:
Using the same forest green, add the larger, structural leaves attached to the main vine. Use a ‘press and lift’ stroke: press the belly of the brush down near the stem and lift as you pull away to create a pointed tip. -
Layer lighter leaves:
Mix a little sage green into your forest green. Paint secondary, smaller stems branching off the main vine and add smaller, lighter leaves. This creates depth and prevents the vine from looking flat. -
Add grassy details:
At the very bottom of the mural, below the window sill, paint small clumps of grass or distinct vertically-growing plant stems. These ground the design so it doesn’t feel like it’s floating.
Wobbly Lines?
If your vine stems look shaky, don’t re-paint the whole line. Instead, thicken the line slightly at the wobbly point or paint a new leaf over the mistake to hide it.
Step 3: Adding the Blooms
-
Paint the red flowers:
With a clean brush, mix your deep red. Find the spots you marked for the large 5-petal flowers. Paint simple, rounded petals radiating from a center point. Don’t worry about perfection; rustic brushstrokes are part of the charm. -
Create the yellow blooms:
Using mustard yellow, paint the secondary flowers. These can be similar 5-petal shapes or side-profile cup shapes. I like to add a touch of white to the yellow for highlights on the upper edges of the petals. -
Add coral and pink accents:
Use the coral paint for smaller filler flowers or buds. For the tiny berry-like clusters at the top, daub small circles on fine stems branching off the main vine. -
Paint the flower centers:
Once the red and yellow petals are dry, use a contrasting color for the centers. A dark brown or deep red dot in the middle of the yellow flowers, and a yellow or black center for the red flowers, works beautifully.
Add Dimension
Mix a tiny bit of white into your petal colors and add a small comma-stroke highlight to the tip of each petal. It makes the flowers pop instantly.
Step 4: Fine Details and Finishing
-
Add fine stems:
Switch to your fine liner brush. With a thinned dark green or brown, paint the delicate stems connecting the floating berries and small buds to the main vine. -
Detail the petals:
Using the liner brush and a slightly darker shade of red (or red mixed with a dot of black), add tiny lines radiating from the center of the red flowers to show texture. -
Include tiny filler dots:
Sprinkle the design with tiny dots of red or orange near the ends of the leafy branches. These mimic small buds or wild berries and fill in any awkward empty spaces. -
Clean up sketch lines:
Once the paint is thoroughly dry to the touch, gently wipe away any visible chalk marks with a damp cloth or erase pencil lines. -
Seal the work:
If this is on an exterior wall or a high-traffic area, apply a coat of clear matte sealer over the painted areas to protect your artwork from the elements.
Step back and enjoy the cheerful, hand-crafted warmth your new floral frame brings to the room
Geometric Florals With Flat Color Blocks
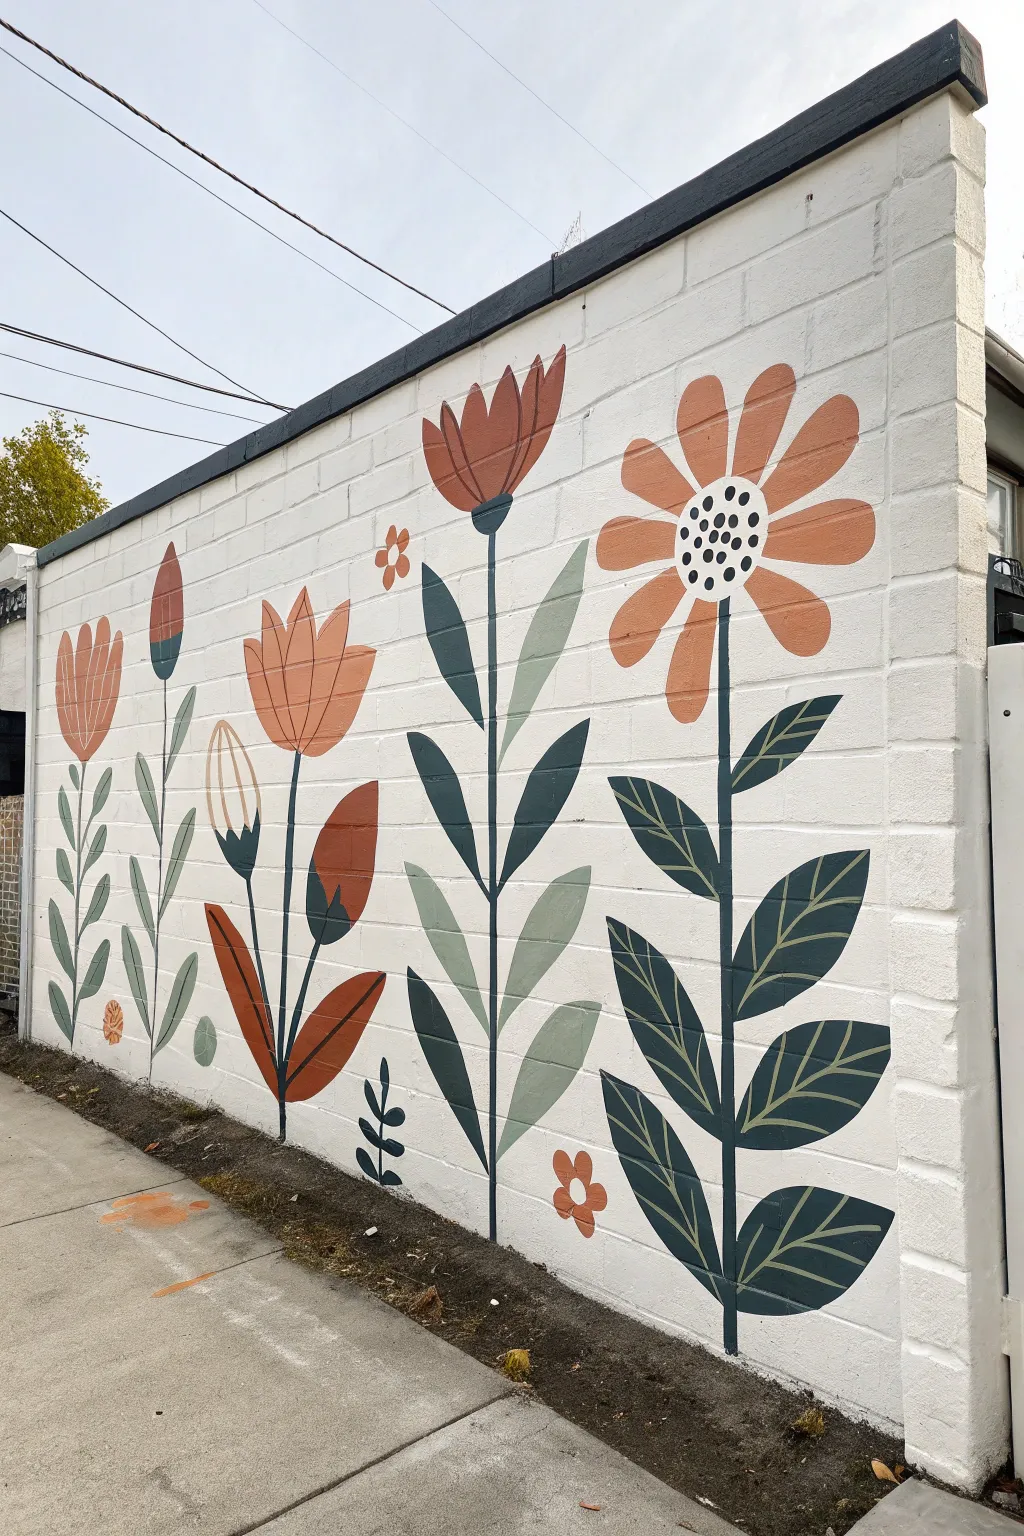
Transform a plain cinder block wall into a vibrant garden with this oversized, geometric floral mural. Using a limited palette of earth tones and clean lines, you’ll create a striking piece of street art that balances modern design with folk art charm.
Step-by-Step Guide
Materials
- Exterior masonry primer (white)
- Exterior latex paints (white, terracotta, deep sage green, light sage green, navy blue/black)
- Assorted paintbrushes (2-inch sash brush, various sizes of flat artist brushes)
- Roller and tray for base coat
- Chalk or pencil for sketching
- Painter’s tape
- Drop cloths
- Ladder or step stool
- Cleaning supplies (TSP or soapy water, scrub brush)
Step 1: Preparation
-
Clean the Surface:
Begin by thoroughly cleaning the cinder block wall. Use TSP or warm soapy water and a stiff scrub brush to remove dirt, moss, and loose debris. Rinse with a hose and let the wall dry completely for at least 24 hours. -
Prime and Base Coat:
Apply a coat of high-quality masonry primer to seal the porous blocks. Once dry, roll on two coats of white exterior latex paint to create a fresh, bright canvas. Ensure full coverage is achieved, getting into the grout lines.
Smooth Moves
Cinder blocks are rough! Use a high-nap roller for the base coat to get into crevices, but switch to stiff-bristled brushes for the detailed flower work to force paint into the texture.
Step 2: Sketching the Design
-
Plan the Layout:
Visualize five main vertical stems spaced evenly across your wall. The heights should vary to create interest, with the central and rightmost flowers being the tallest. -
Draft the Stems:
Using chalk, draw five vertical lines for the stems. Don’t worry about perfect straightness; a slightly organic line feels more natural. Mark the ground level clearly above your actual dirt line. -
Outline Main Blooms:
Sketch the flower heads at the top of each stem. From left to right: a simple tulip shape, a tall bud, a layered tulip, a large fan-shaped bloom, and a big daisy-like flower with radiating petals. -
Add Leaf Details:
Draw the leaves attached to the stems. Vary the shapes: simple oval leaves for the first two, larger pointed leaves for the middle two, and complex, double-tone leaves for the large daisy on the right.
Pollinator Park
Plant actual flowers in the dirt bed at the base of the wall that match the colors in your mural. Marigolds or black-eyed Susans would visually extend the art into the ground.
Step 3: Painting the Greens
-
Paint Dark Stems:
Using a thin brush and your darkest color (navy or black), paint the main vertical stems and the central spines of the leaves. I find a steady hand is easier if you brace your pinky against the wall. -
Fill Dark Leaves:
Use the deep sage green for the leaves on the far right plant and the lower sections of the middle two plants. Follow your chalk lines carefully to keep edges sharp. -
Add Light Green Accents:
Fill in the lighter sage green leaves. This color is used for the second plant from the left and the upper leaves of the central plant. This two-tone green approach adds depth without shading.
Step 4: Painting the Blooms
-
Block in Terracotta:
Using the terracotta or rust-orange paint, fill in the petals of the daisy on the far right and the tulip shapes on the left. Apply two coats if necessary to get a solid, opaque look. -
Detail the Daisy Center:
Paint the center circle of the large right-hand flower white initially. Once dry, add small black dots in a ring pattern to mimic seeds. -
Paint Unique Buds:
For the second plant from the left (the tall bud), outline the bulb shape in terracotta but leave the inside white or pale cream. Add vertical stripes in terracotta to suggest the form of a closed flower. -
Add Small Florals:
Don’t forget the tiny filler flowers near the ground and floating between the main stems. Paint these simple five-petal shapes in terracotta to tie the composition together.
Step 5: Finishing Touches
-
Refine Edges:
Step back and inspect your lines. Use a small angled brush and your white background paint to clean up any smudges or wobbly edges where the colors meet the white block. -
Add Veining:
On the large leaves of the rightmost flower, use a thin liner brush with a lighter green or white to paint delicate veins over the dark green base. This adds a nice graphic detail. -
Clear Coat (Optional):
If your mural is in a high-traffic or harsh weather area, apply a clear, non-yellowing masonry sealer over the finished painting to protect your work from UV fading and moisture.
Enjoy the view of your everlasting garden that blooms brightly in every season
Stencil-Layered Floral Pattern for a Crisp Repeat
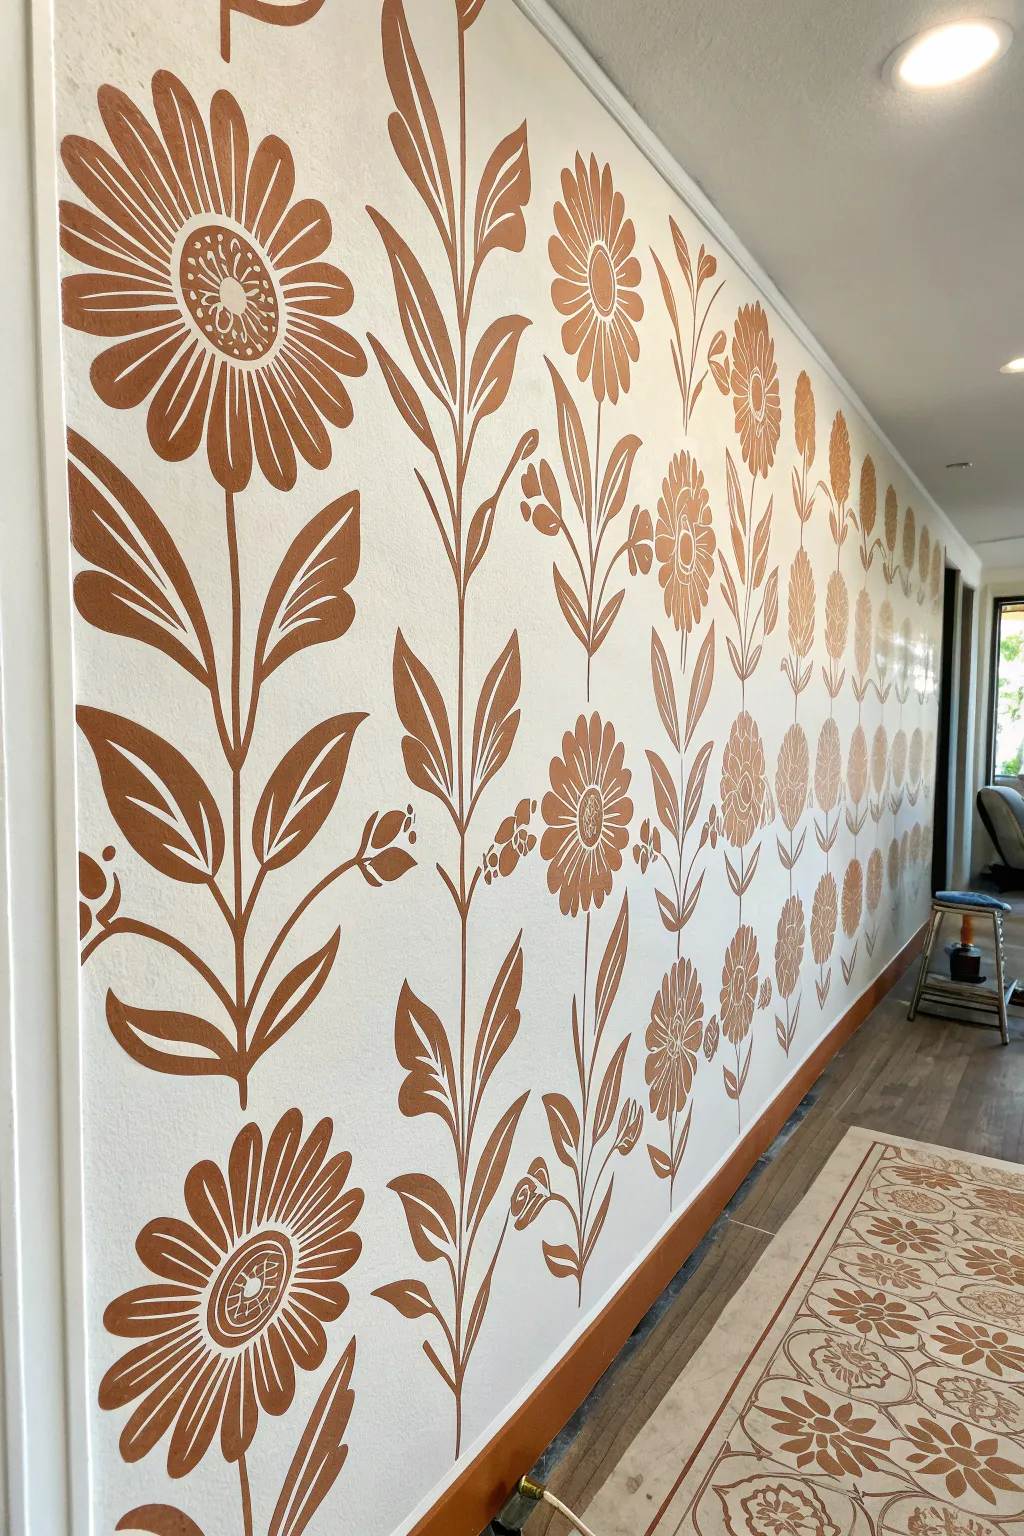
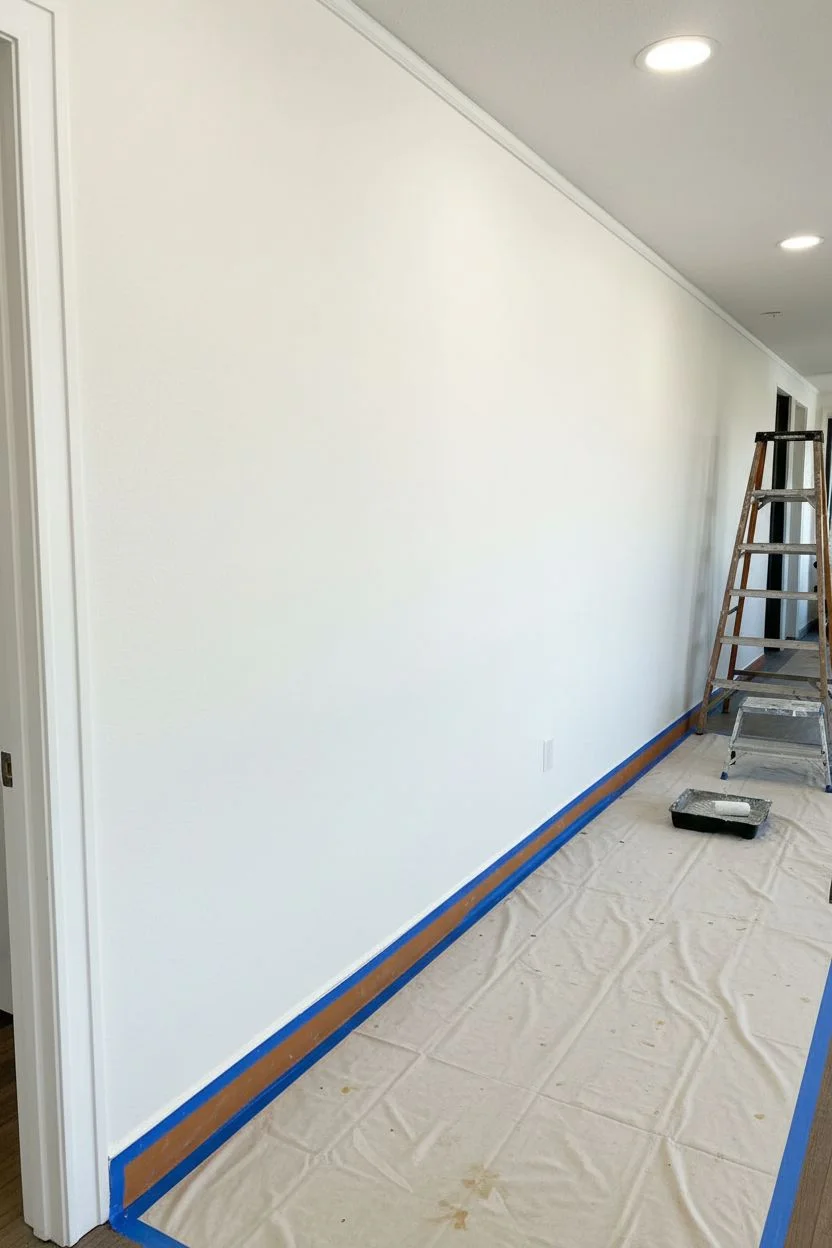
Transform a plain white wall into a warm, inviting garden with this crisp, large-scale floral pattern. Using repeating stencils allows you to achieve clean lines and a professional wallpaper look without the hassle of actual wallpaper application.
How-To Guide
Materials
- Satin interior latex paint (White for base, Terracotta/Rust color for pattern)
- Large-scale floral motif wall stencil (approx. 24×36 inches containing full flower and stem)
- Small foam roller
- Painter’s tape or stencil spray adhesive
- Paint tray
- Paper towels
- Small fine-tipped artist brush
- Level or laser level
- Ladder (if the wall is tall)
- Drop cloth
Step 1: Preparation and Base Coat
-
Prep the workspace:
Clear the area against the wall and lay down a drop cloth to protect your flooring. If you are matching the look in the photo, ensure your baseboards are taped off cleanly. -
Clean the wall surface:
Wipe down the wall with a damp cloth to remove dust or grease. A clean surface ensures the stencil lays flat and the paint adheres properly. -
Apply the base coat:
Paint the entire wall with a crisp white satin latex paint. Allow this to dry completely, preferably overnight, so the tape used in the next steps won’t peel up the fresh paint.
Dry Roller Technique
The #1 rule of stenciling: Less paint is more! Your roller should feel almost dry to the touch before it hits the wall. Multiple thin, misty coats are better than one thick, bleeding coat.
Step 2: Stenciling the First Column
-
Position the first stencil:
Start at the top left corner of the wall. Position your floral stencil so the top of the flower begins near the ceiling line. Use a level to ensure the stem of the flower is perfectly vertical. -
Secure the stencil:
Use minimal painter’s tape or a light mist of stencil adhesive on the back of the stencil to hold it firmly in place against the wall. -
Load the foam roller:
Dip your foam roller into the terracotta paint, then roll it off onto a paper towel until it feels almost dry. This ‘off-loading’ technique is crucial to prevent paint from bleeding under the stencil edges. -
Roll the first flower:
Gently roll over the stencil using light pressure. I find it helpful to roll in multiple directions to catch all the tiny corners of the petals without forcing paint underneath. -
Move down the wall:
Carefully peel back the stencil. Align the registration marks (usually built into pattern stencils) on the bottom of the first painted flower with the top of the stencil for the next recurrence. Secure and repeat the rolling process. -
Complete the first column:
Continue moving down until you reach the floor. If the stencil needs to separate at the baseboard, tape off the trim and paint only down to the tape line.
Step 3: Repeating the Pattern
-
Align the second column:
Move horizontally to start the next column. Depending on your stencil design, you may just place it side-by-side, or drop it down halfway to create a staggered, organic look like the photo shows. -
Verify alignment:
Use your level again before painting. Even a slight tilt can become very noticeable as you work your way across a large wall. -
Paint subsequent columns:
Repeat the stenciling process across the entire wall width. Remember to wipe off the back of your stencil occasionally if paint starts to build up, as this can smudge your crisp white background. -
Handle corners and edges:
When you reach the far right wall or doorways, bend the flexible stencil into the corner and use your fingers to press it tight while dabbing paint carefully into the crease.
Sticky Situation?
If adhesive residue sticks to the wall after moving the stencil, let it dry and rub it gently with a clean finger or eraser. Don’t scrub while the paint is fresh or it will smear.
Step 4: Finishing Touches
-
Touch up imperfections:
Once the main pattern is dry, inspect the wall closely. Use a small artist brush and white paint to erase any small bleeds or smudges. -
Connect gaps:
If bridges (the small plastic connectors in stencils) left awkward gaps in lines that should be solid, use the artist brush and terracotta paint to manually fill those in for a hand-painted look. -
Remove tape:
Peel up the painter’s tape from the baseboards and ceiling line slowly at a 45-degree angle to ensure a clean edge.
Step back and admire how a simple repeated pattern has turned a blank space into a sophisticated botanical feature wall.
Outdoor Fence Florals That Look Like a Garden Escaping
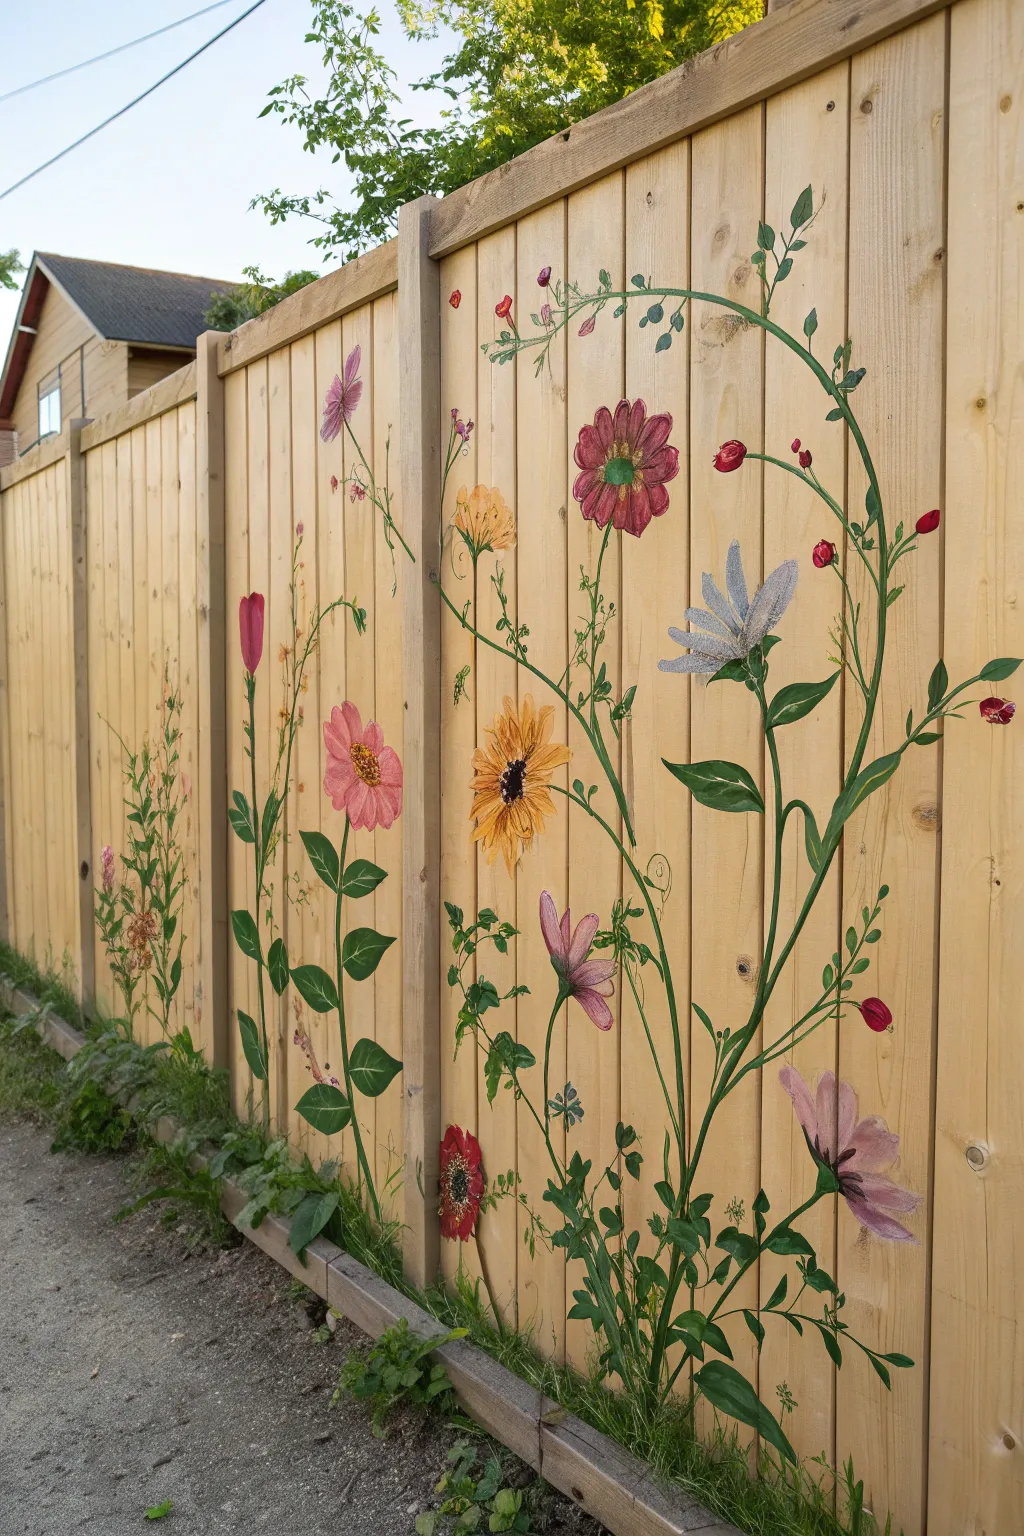
Bring your garden vertical with this charming painted fence mural that mimics the look of wildflowers growing freely. Painting directly onto the natural wood grain gives the artwork a rustic, organic feel perfect for brightening up a plain boundary.
Detailed Instructions
Materials
- Outdoor acrylic paints (red, yellow, white, deep green, light green, pink, purple)
- Wide flat brush (1-2 inch)
- Assorted round brushes (sizes 4, 8, and 12)
- Small liner brush (size 1)
- Chalk or pastel pencil (white or light grey)
- Palette or paper plates
- Water container and rags
- Outdoor clear spray sealer (matte or satin)
Step 1: Planning and Sketching
-
Clean surface:
Ensure your fence boards are clean and dry. Use a stiff brush to sweep away any dirt, cobwebs, or loose wood splinters to create a painting-ready surface. -
Visualize composition:
Decide where your main ‘stems’ will flow. The beauty of this design lies in the meandering, S-curve shapes that span across multiple vertical boards. -
Sketch the stems:
Using chalk or a pastel pencil, lightly sketch the main winding stem lines starting from the bottom corner and reaching diagonally upward across the fence. -
Place the blooms:
Sketch rough circles to mark where your flower heads will go. vary the heights and spacing so it doesn’t look too uniform.
Paint Absorption
Raw wood fences soak up paint quickly. If your first layer looks transparent or dull, let it dry and apply a second coat for opacity, or prime just the painting areas white first.
Step 2: Painting the Greenery
-
Mix your greens:
Prepare two shades of green on your palette: a deep forest green for shadows and older leaves, and a vibrant lime green for new growth and highlights. -
Paint main stems:
Using a round size 8 brush and the darker green, trace over your chalk lines. Let the brush pressure vary to make the stems look organic—thinner at the top, slightly thicker at the base. -
Add secondary branches:
Paint smaller offshoot vines curving away from the main stems. These will hold the leaves and flower buds. -
Paint base leaves:
Switch to a larger round brush to create the leaves. Press down firmly to widen the stroke and lift up as you drag to create a pointed tip. Alternate between dark and light green for depth. -
Add delicate tendrils:
With your liner brush and the lighter green, add tiny, curly tendrils wrapping around the main stems to emphasize the ‘climbing’ effect.
Step 3: Painting the Blooms
-
Start with sunflowers:
For the yellow sun-like flowers, use a flat brush to pull strokes outward from a central point. I like to layer a bit of orange near the center of the petals for warmth. -
Create the cosmos:
For the pink and red flowers, paint broad, loose petals. Don’t worry about perfect symmetry; wavy edges look more natural. -
Add the silvery bloom:
For the greyish-blue flower, mix white with a tiny dot of blue or black. Use long, slender strokes that all meet in the center. -
Paint flower centers:
Once the petals are tacky or dry, dab dark brown or black in the centers. Use a stippling motion (dabbing straight up and down) to create a fuzzy texture. -
Add small red buds:
Scatter small red teardrop shapes along the upper vines to represent unopened poppy or rose buds. -
Highlighting petals:
Mix a little white into your petal colors and add streaks of highlight on the tips of the flowers where the sun would hit them.
Flow & Movement
Avoid straight lines. Nature is curvy and chaotic. Cross your painted stems over the gaps between fence boards to integrate the mural with the structure.
Step 4: Finishing Touches
-
Connect flowers to stems:
Use your green liner brush to ensure every flower head has a small green stem or ‘calyx’ (the green cup at the base) connecting it to the main vine. -
Clean up chalk:
Once the paint is completely dry to the touch, use a damp cloth to gently wipe away any visible chalk guidelines. -
Seal the refined areas:
Spray the painted areas with an outdoor clear sealer to protect your artwork from rain and UV fading.
Step back and enjoy your maintenance-free garden that blooms all year round
Glow-in-the-Dark Floral Accents for a Nighttime Surprise

Transform a plain exterior wall into a stunning vertical garden that charms by day and surprises by night. This large-scale floral mural features warm, autumnal botanicals that hide a secret: selective glow-in-the-dark highlights that come alive after sunset.
Step-by-Step Tutorial
Materials
- Exterior primer (white)
- Exterior latex paints (Rust orange, terracotta, mauve, sage green, forest green, deep teal)
- Glow-in-the-dark exterior paint or medium (phosphorescent)
- Assorted paintbrushes (2-inch angled sash, round sizes 4-10, liner brush)
- Chalk or watercolor pencils for sketching
- Painter’s tape
- Drop cloth
- Ladder or step stool
- Sealant (optional, exterior grade clear coat)
Step 1: Preparation and Sketching
-
Clean the surface:
Begin by thoroughly washing the siding to remove dirt, mildew, and dust. A mild detergent and water mix works well; let it dry completely for at least 24 hours to ensure proper paint adhesion. -
Protect the area:
Lay down a drop cloth over the porch floor and use painter’s tape to mask off the door frame, light fixtures, and adjacent trim. This wall has a framed edge, so tape along the inside of that border for a crisp line. -
Prime the background:
Even if the siding is already white, apply a fresh coat of high-quality exterior white primer to the mural area. This creates a uniform canvas and helps your colors pop. -
Sketch the composition:
Using a light-colored watercolor pencil or chalk, lightly sketch the main stems first. Start from the bottom center and fan them out upwards, creating a V-shape or tall bouquet structure. Keep the lines loose and flowing. -
Map out the blooms:
Draw large circles or ovals where the main flower heads will go. Place the largest blooms near the top and middle, varying their heights to keep the eye moving. Add smaller bud shapes and berry clusters in the gaps.
Step 2: Blocking in Color
-
Paint the stems:
Mix a muted sage green and use a medium round brush to paint the main stems. Follow your sketch lines, varying the pressure to make the stems slightly thicker at the bottom and tapering off at the top. -
Base coat the large flowers:
Fill in the large flower outlines with your base colors. Use rust orange for the poppy-like shapes and a deep mauve for the peonies. Apply two thin coats rather than one thick one for better durability. -
Add the foliage:
Using a forest green, paint the large leaves. Create elongated, pointed shapes that curve away from the stems. For variety, mix a little teal into your green for some of the lower, darker leaves. -
Create berry accents:
Dip a small round brush into terracotta or burnt orange paint. Dot clusters of small circles at the ends of the thinner, wiry stems to create berries or buds.
Uneven Glow?
If the glow looks patchy at night, you likely need more layers. Apply 2-3 additional thin coats, letting each dry fully. The pigment particles need to stack up to hold a charge.
Step 3: Detailing and Depth
-
Layer petals:
Once the base coats are dry, mix a lighter version of your flower colors (add a touch of white). Paint individual petal shapes on top of the base blobs, leaving some of the dark background showing to create shadows. -
Define the centers:
For the open flowers, paint the centers with a dark contrasting color like deep brown or maroon. Then, using a small liner brush, add tiny dots or stamen lines in yellow or cream. -
add leaf veins:
Mix a lighter green shade. I find using a liner brush here allows for delicate vein work on the larger leaves, giving them more dimension and realism. -
Refine the edges:
Step back and look at the overall shape. Use your white background paint to cut back into any flowers or leaves that got too bulky, cleaning up the silhouettes.
Pro Tip: Charge Check
Test your glow paint’s invisibility on a scrap surface first. Some brands dry with a slight yellow tint, so you may want to only apply it over similarly colored petals.
Step 4: The Nighttime Glow
-
Prepare the glow medium:
Stir your exterior glow-in-the-dark paint thoroughly. If it’s too thick, you can thin it slightly, but remember that multiple thin layers glow brighter than one thick gloop. -
Highlight the petals:
Paint over the lighter parts of the flower petals with the glow medium. It will dry clear or slightly milky, so it won’t ruin the daytime look. Focus on the tips of the petals. -
Accentuate the stems:
Run a very thin line of glow paint along the sun-facing side of the main stems and the edges of the leaves. This creates a ghostly, beautiful outline at night. -
Create firefly dots:
Add tiny random dots of glow paint in the negative white space around the flowers. At night, these will look like fireflies dancing around your garden. -
Seal (Optional):
If your mural is fully exposed to harsh weather, apply a clear exterior sealer over the entire artwork once everything has cured for at least 48 hours.
Step back and admire your vertical garden that never needs watering and lights up your evenings.


Have a question or want to share your own experience? I'd love to hear from you in the comments below!