If you’re craving fresh flower pottery design ideas, you’re in the right headspace—florals are basically the happiest motif to wrap around a mug, vase, or planter. In my studio, I love how a few simple botanical shapes can go from sweet and classic to artsy and unexpected just by changing the layout or texture.
Classic Daisy Scatter on a Mug
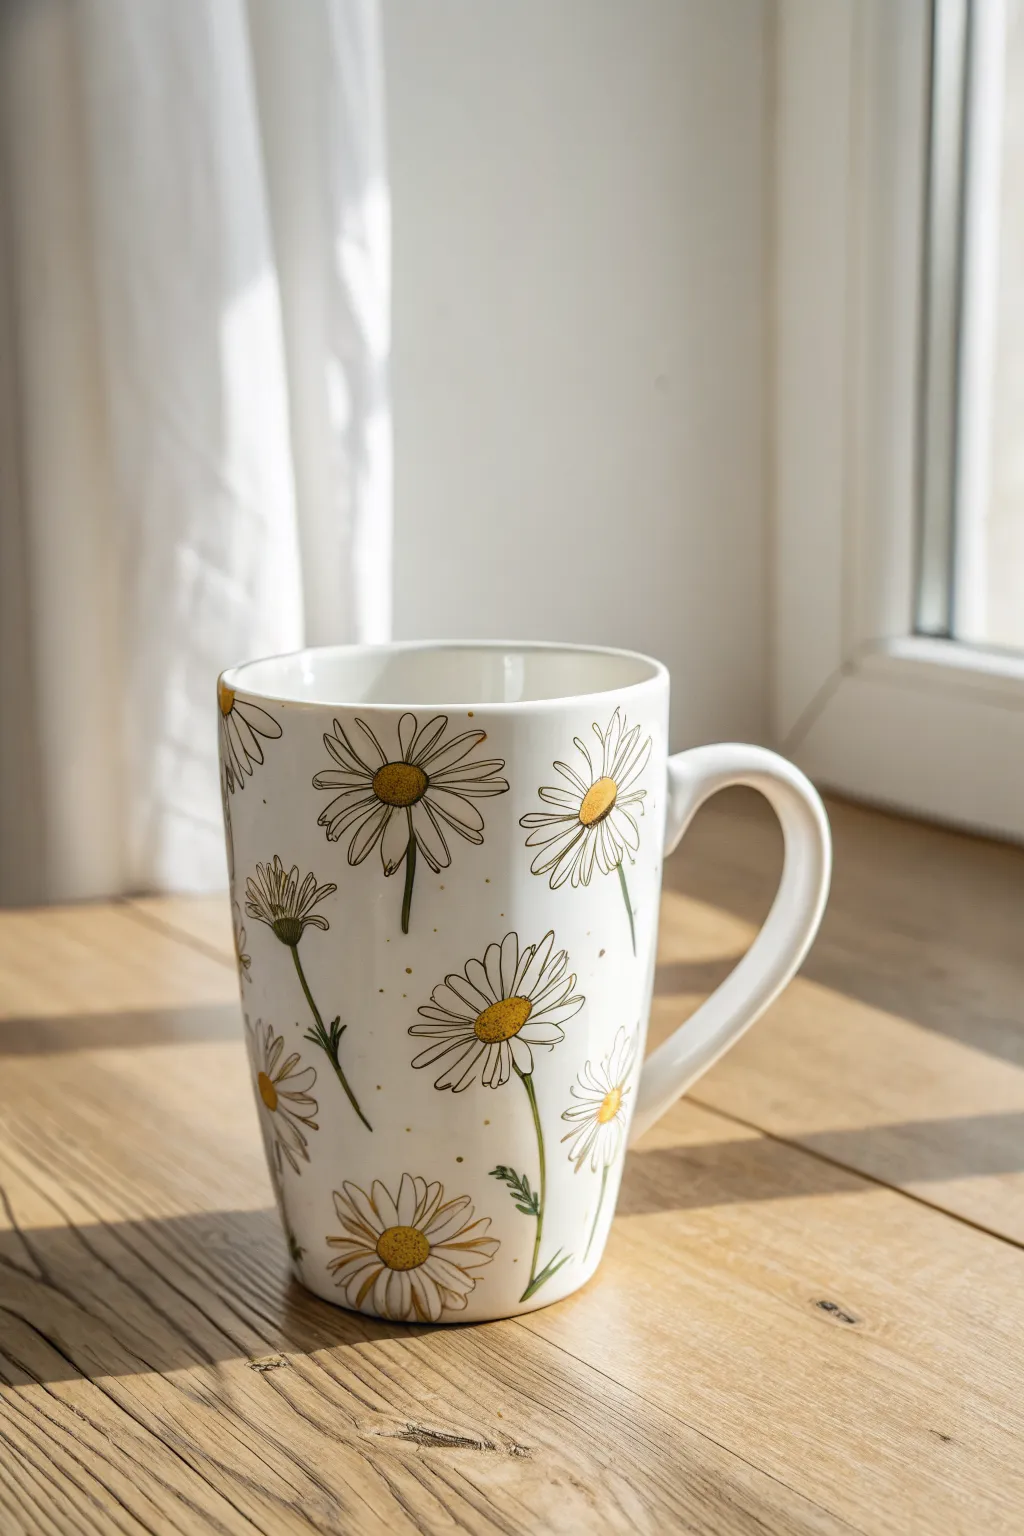
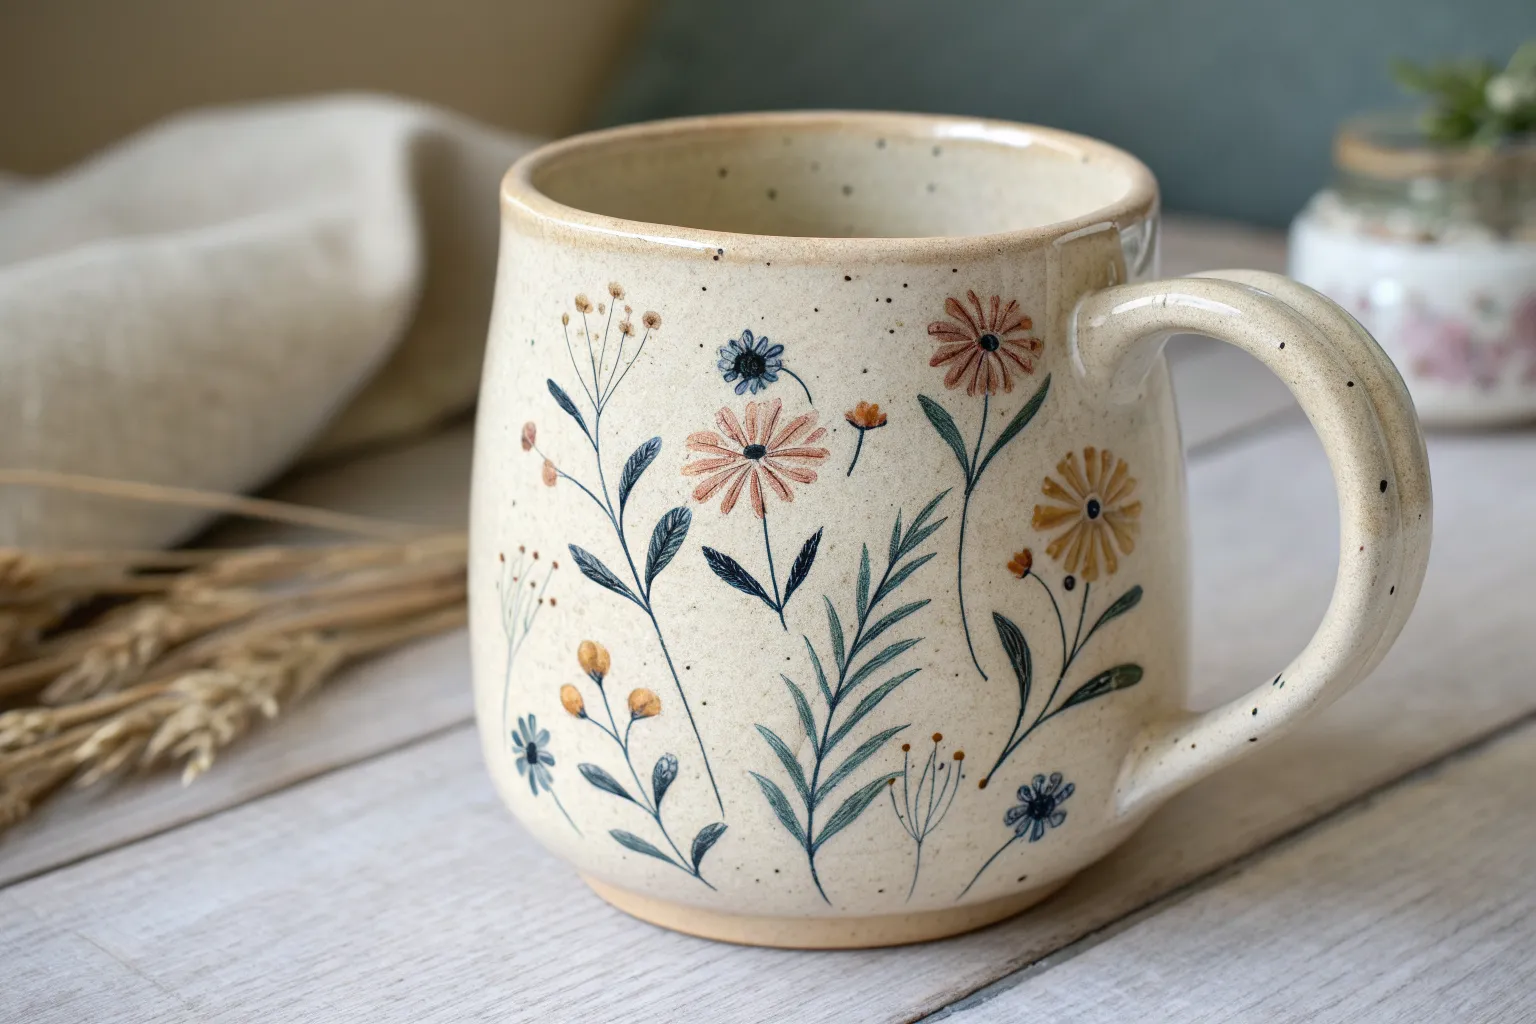
Bring the warmth of a summer meadow to your morning coffee with this cheerful daisy-patterned mug. The design features scattered blooms in various stages of opening, creating a lively and organic rhythm across the smooth white ceramic.
How-To Guide
Materials
- A bisqueware ceramic mug
- Underglazes: Lemon Yellow, Golden Ochre, Dark Green, Olive Green
- Clear dipping or brushing glaze
- Pencil (for light sketching)
- Small round brush (size 2 or 3)
- Fine liner brush (Script or Rigger)
- Detail brush (size 0)
- Spatter brush or an old toothbrush
- Ceramic palette or tile
- Water container
Step 1: Planning the Layout
-
Surface Preparation:
Ensure your bisqueware mug is clean and free of dust by wiping it down with a slightly damp sponge. This helps the underglaze adhere properly. -
Sketching the Anchors:
Using a regular pencil, lightly sketch small circles where you want the centers of your main daisies to be. Remember, the pencil marks will burn away in the kiln, so don’t worry about erasing mistakes. -
Varied Positioning:
Scatter the flowers randomly. Place some near the rim, some near the base, and allow a few to ‘wrap’ around the curvature of the mug to keep the pattern dynamic.
Clean Lines
If you struggle with steady lines for petal outlines, try using a specific underglaze applicator bottle with a fine metal needle tip for precision.
Step 2: Painting the Blooms
-
Painting the Centers:
Load your small round brush with Lemon Yellow underglaze. Dab it into the sketched circles to create the flower centers. -
Adding Depth to Centers:
While the yellow is still slightly damp, take a tiny amount of Golden Ochre on the tip of the same brush. Tap it gently onto the bottom edge of the yellow centers to create a shadow and speckled texture. -
Defining the Petals:
For the petals, you will use the negative space technique if your mug body is white. Instead of painting white petals, use a very thin wash of grey or diluted brown with a liner brush to outline where the petals *would* be. Alternatively, if you want crisp lines, use a black underglaze pencil or a very fine liner brush with black underglaze to draw the petal outlines directly. -
Petal Shape Variety:
Draw long, thin elliptical shapes radiating from the centers. Make them slightly irregular—some overlapping, some shorter—to mimic natural growth. -
Side-View Blooms:
For flowers that aren’t facing forward, draw a semi-circle center and sweep the petals backward in a cone shape. These add great dimension to the overall composition.
Step 3: Stems and Details
-
Drawing the Stems:
Switch to your fine liner brush and mix the Dark Green and Olive Green underglazes. Draw thin, delicate lines extending from the base of some flowers, letting them curve naturally. -
Adding Leaves:
Along the stems, add small, serrated leaves or tiny bracts. Keep the strokes quick and light so they taper off at the ends. -
Adding Sepals:
For the side-view flowers and buds, paint a small green cup (the sepal) at the base of the petals where they meet the stem. -
Creating the Speckle Effect:
load an old toothbrush or a stiff bristle brush with diluted Golden Ochre underglaze. Hold the brush near the mug and run your thumb across the bristles to flick tiny specks onto the surface. -
Controlling the Splatter:
I like to test the splatter on a piece of paper first to gauge the density. Aim for a light dusting of spots to fill the empty white spaces without overwhelming the flowers.
Textured Centers
For a 3D effect, mix a tiny bit of slip into your yellow underglaze. Dab this thickened mix onto the flower centers for raised pollen bumps.
Step 4: Glazing and Firing
-
Drying Time:
Allow the underglaze design to dry completely, preferably overnight, to ensure the pigments are set. -
Application:
Apply a coat of clear glaze over the entire mug. If dipping, do it in one smooth motion. If brushing, use a wide, soft fan brush to apply 2-3 even coats, letting each dry in between. -
Firing:
Fire the mug in the kiln according to the clay and glaze manufacturer’s instructions, typically to Cone 5 or 6 for stoneware durability. -
Checking the Foot:
Before firing, double-check that the bottom (foot) of the mug is wiped clean of any glaze to prevent it from sticking to the kiln shelf.
Once fired, you will have a durable, custom piece of pottery perfect for brightening up your tea time

Wildflower Meadow Wraparound Vase
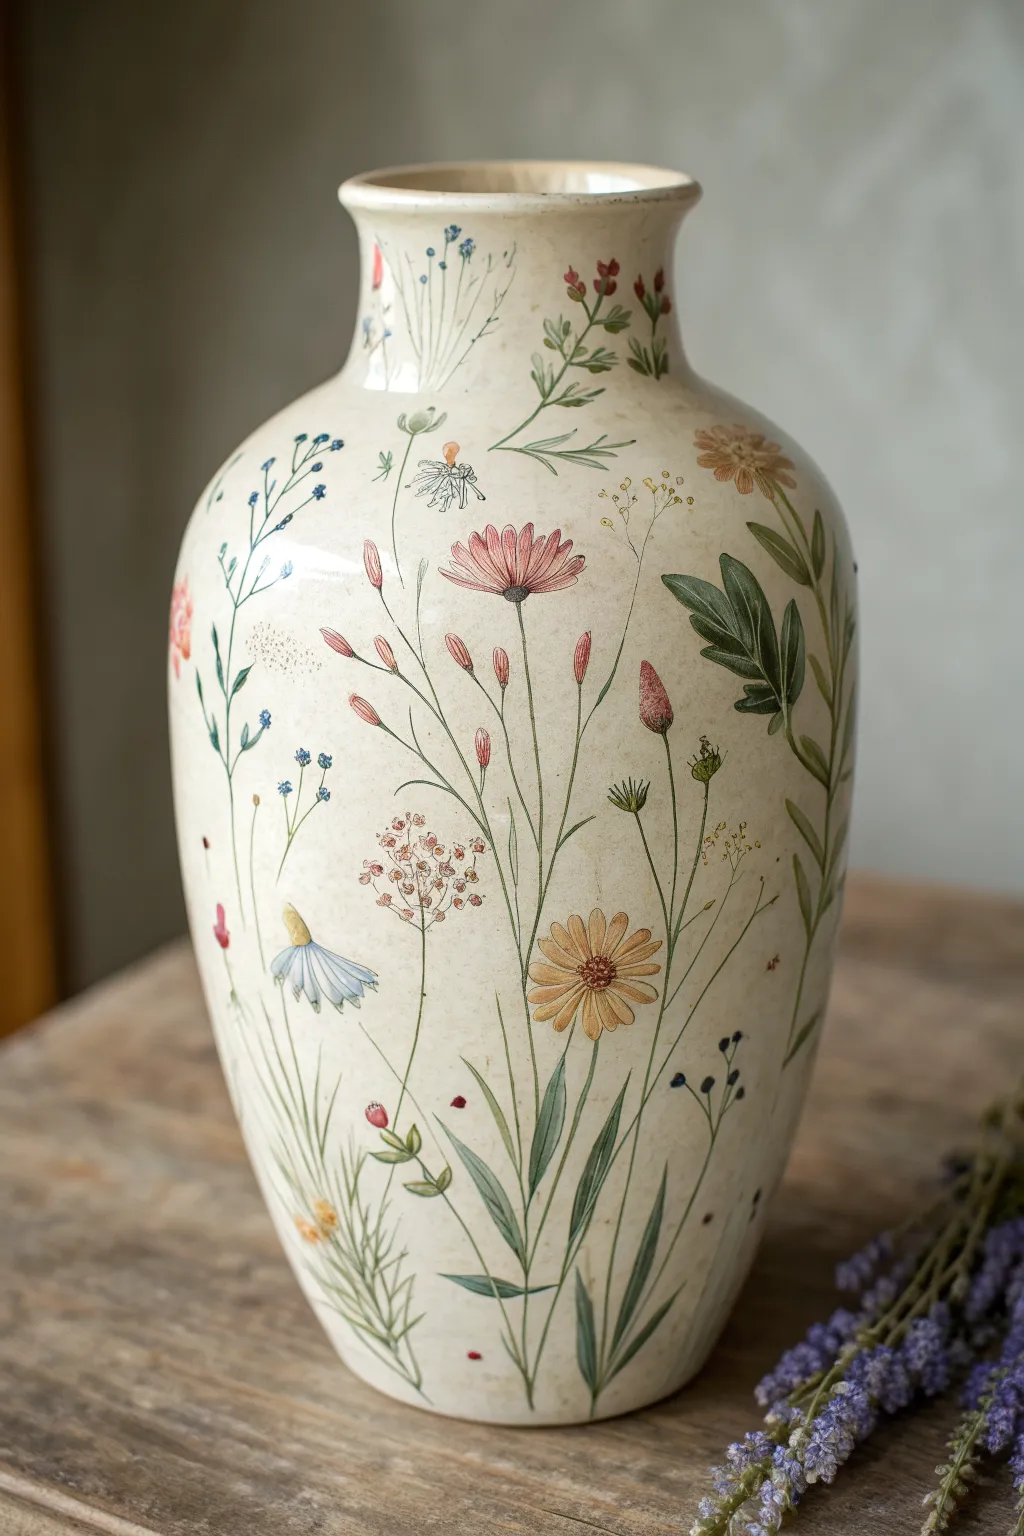
Bring the gentle serenity of an English garden indoors with this delicate painted pottery project. By layering fine stems and soft blooms onto a creamy ceramic base, you’ll create a timeless piece that captures the effortless beauty of wild botanicals.
Step-by-Step Tutorial
Materials
- Tall bisque ceramic vase (smooth surface)
- Acrylic paints (ceramic-specific or standard craft acrylics)
- Colors: Cream/Off-white (base), Sage Green, Forest Green, Dusty Pink, Cornflower Blue, Mustard Yellow, Burnt Orange
- Clear spray sealant (matte or satin finish) or glazing medium
- Fine liner brushes (sizes 000, 00, and 1)
- Small round brush (size 2)
- Palette or small dishes for mixing
- Pencil for light sketching
- Water cup and paper towels
Step 1: Base Preparation
-
Clean the surface:
Begin by wiping down your bisque ware with a slightly damp sponge to remove any kiln dust or oils from your hands. Let it dry completely. -
Apply the base coat:
Mix a warm cream or off-white shade. Using a larger soft brush, apply an even coat over the entire exterior of the vase. You want an opaque, smooth finish that looks like natural stoneware. -
Second layer application:
Once the first coat is dry to the touch, apply a second coat to ensure solid coverage. Brush vertically to map the direction the stems will eventually grow. Allow this base to cure fully, preferably overnight.
Flowing Brushwork
Add a drop of flow medium or water to your green paint. It helps the liner brush glide long distances without lifting, creating unbroken, elegant stems.
Step 2: Drafting the Design
-
Plan the composition:
Visualize the spacing. The idea is ‘wraparound,’ so avoid creating a distinct front or back. Imagine tall grasses swaying gently from the bottom up. -
Light sketching:
Use a pencil to very faintly mark the main directional lines of the tallest stems. Keep these lines fluid and slightly curved—nothing in nature is perfectly straight. -
Map the focal flowers:
Mark the positions of the larger blooms (like the orange cosmos and pink daisies) first to ensure they are evenly distributed and not clumped together.
Step 3: Painting the Greenery
-
Mix green tones:
Prepare two shades of green: a pale Sage for background stems and a deeper Forest Green for foreground foliage. Thin the paint slightly with a drop of water for smoother flow. -
Paint main stems:
Using your size 1 liner brush, paint the primary stems starting from the base and flicking the brush upward to create a tapered, natural end. -
Add grassy details:
Switch to the 00 brush and add very fine, hair-like grass blades between the main stems using the lighter Sage Green. I find that varying the height of these blades adds depth. -
Leaf structure:
Add leaves to the thicker stems. For the fern-like foliage seen on the right, use the tip of the brush to create small, alternating teardrop shapes along the stem.
Vintage Patina
Before sealing, lightly assist sponge a very watered-down brown paint over the cream background to give it an aged, antique parchment look.
Step 4: Adding the Blooms
-
Paint the daises:
For the pink daisy-like flowers, use the Dusty Pink. Paint individual petals radiating from a center point, keeping the paint semi-translucent for a watercolor effect. -
Create the cosmos:
Use Mustard Yellow mixed with a touch of Burnt Orange for the larger, multi-petaled flowers. Apply these strokes confidently, allowing the brush to widen at the petal edge and taper toward the center. -
Add blue accents:
Dip a size 0 brush into Cornflower Blue. Paint tiny clusters of dots or small trumpet shapes on the finer, branching stems to mimic forget-me-nots. -
Detailing the centers:
Once the flower petals are dry, use a dark brown or deep red to dot the centers of the daisies and cosmos. This immediately grounds the flowers and makes them look realistic. -
Adding texture:
For the textured brownish clusters (like dried seed heads), stipple tiny dots tightly together using the tip of your smallest brush.
Step 5: Finishing Touches
-
Review and refine:
Spin the vase slowly. If you see large empty gaps, add a floating seed fluff or a tiny isolated bud to balance the negative space. -
Clean up stray marks:
If any pencil lines are still visible and distracting, gently erase them, but be careful not to smudge the paint. -
Seal the artwork:
If you used acrylics, spray the entire vase with a matte clear sealant to protect the design. If using ceramic glazes, now is the time to apply a clear dipping glaze before firing.
Place your finished vase near a window where natural light can highlight the delicate brushstrokes of your meadow scene


Bold Sunflower Statement Planter

Transform a plain terracotta pot into a vibrant focal point with this bold sunflower design. The striking contrast between the sunny yellow petals and the rich teal background creates a cheerful, rustic statement piece perfect for displaying your favorite succulents.
How-To Guide
Materials
- Terracotta pot (6-inch standard size)
- Acrylic craft paints (Deep Teal, Bright Yellow, Golden Ochre, Burnt Sienna, Dark Brown, Black)
- White primer or gesso
- Paintbrushes (1-inch flat brush, #4 round brush, #0 detail liner brush)
- Pencil for sketching
- Clear acrylic sealer (gloss or satin finish)
- Palette for mixing
- Water cup and paper towels
Step 1: Preparation and Base Coat
-
Prime the surface:
Begin with a clean, dry terracotta pot. Apply a generous coat of white primer or gesso to the entire exterior surface below the rim. This step is crucial for making the yellow and teal colors pop later on. -
Establish the borders:
Once the primer is dry, use your pencil to mark a line about 1 inch from the bottom and 1/2 inch from the top rim. These will define your upper and lower terracotta-colored bands. -
Apply the background color:
Using a flat brush, paint the central area between your pencil lines with the Deep Teal acrylic. You may need two coats to get that solid, opaque turquoise look shown in the photo. -
Paint the rims:
Mix Burnt Sienna with a touch of water to create a terracotta glaze. Paint the top rim and the bottom 1-inch band with this color to give it a finished, cohesive look that mimics natural clay.
Uneven Coverage?
Yellow paint can be notoriously sheer. If the teal shows through the petals, paint the petal shape in white first, let it dry, and then apply the yellow on top.
Step 2: Drafting the Sunflower
-
Position the center:
Lightly sketch a circle in the very center of the teal band. It should be large enough to be the focal point but leave room for long petals. -
Sketch the petals:
Draw long, slightly pointed oval petals radiating outward from the center circle. Start with four petals at the cardinal points (top, bottom, left, right) to ensure even spacing, then fill in the gaps with the remaining petals. -
Block in the petals:
Using a round brush, fill in all the petal shapes with Bright Yellow. Don’t worry about shading yet; just get a solid base layer down. I prefer to let this dry fully before adding the second coat for maximum brightness. -
Paint the flower center:
Fill the central circle with Dark Brown paint. While the brown is still wet, you can dab just a tiny bit of Burnt Sienna in the middle to create subtle dimension.
Raise the Texture
Mix a pinch of baking soda into your brown paint for the center. Stipple it on with an old brush to create actual 3D texture that feels like real seeds.
Step 3: Details and Definition
-
Add petal depth:
Mix a little Golden Ochre with your Bright Yellow. Paint broad strokes near the base of each petal (closest to the center) to create a shadow effect where the petals emerge. -
Outline the design:
Switch to your #0 detail liner brush and thin your black paint slightly with water so it flows like ink. Carefully outline each yellow petal. -
Detail the center:
Using the same liner brush and black paint (or a very dark brown), paint concentric circles or a spiral inside the brown center to mimic seeds. -
Add petal veins:
Paint a single, thin black line down the center of each petal, starting from the brown center and stopping about two-thirds of the way up. -
Create the bottom border:
In the bottom terracotta band, use your liner brush to paint a zigzag pattern, creating a series of connect triangles along the base. -
Define the triangle details:
Outline the top edge of your bottom band with a thin black line to separate it from the teal background.
Step 4: Finishing Touches
-
Clean up edges:
Check the teal background for any stray yellow marks. Touch up with your Deep Teal paint if necessary to keep the edges crisp. -
Paint the inner lip:
Paint the inside of the pot limit just down to the soil line with the Burnt Sienna color so the finished look is professional. -
Seal the artwork:
Once all paint is completely dry (wait at least 4-6 hours), apply a clear acrylic sealer. A gloss finish will give it that ceramic-glaze shine seen in the photo.
Place your favorite succulent inside and enjoy the burst of color this planter brings to your space


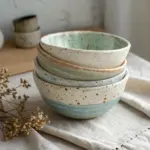
Blue Floral Linework on a Bowl
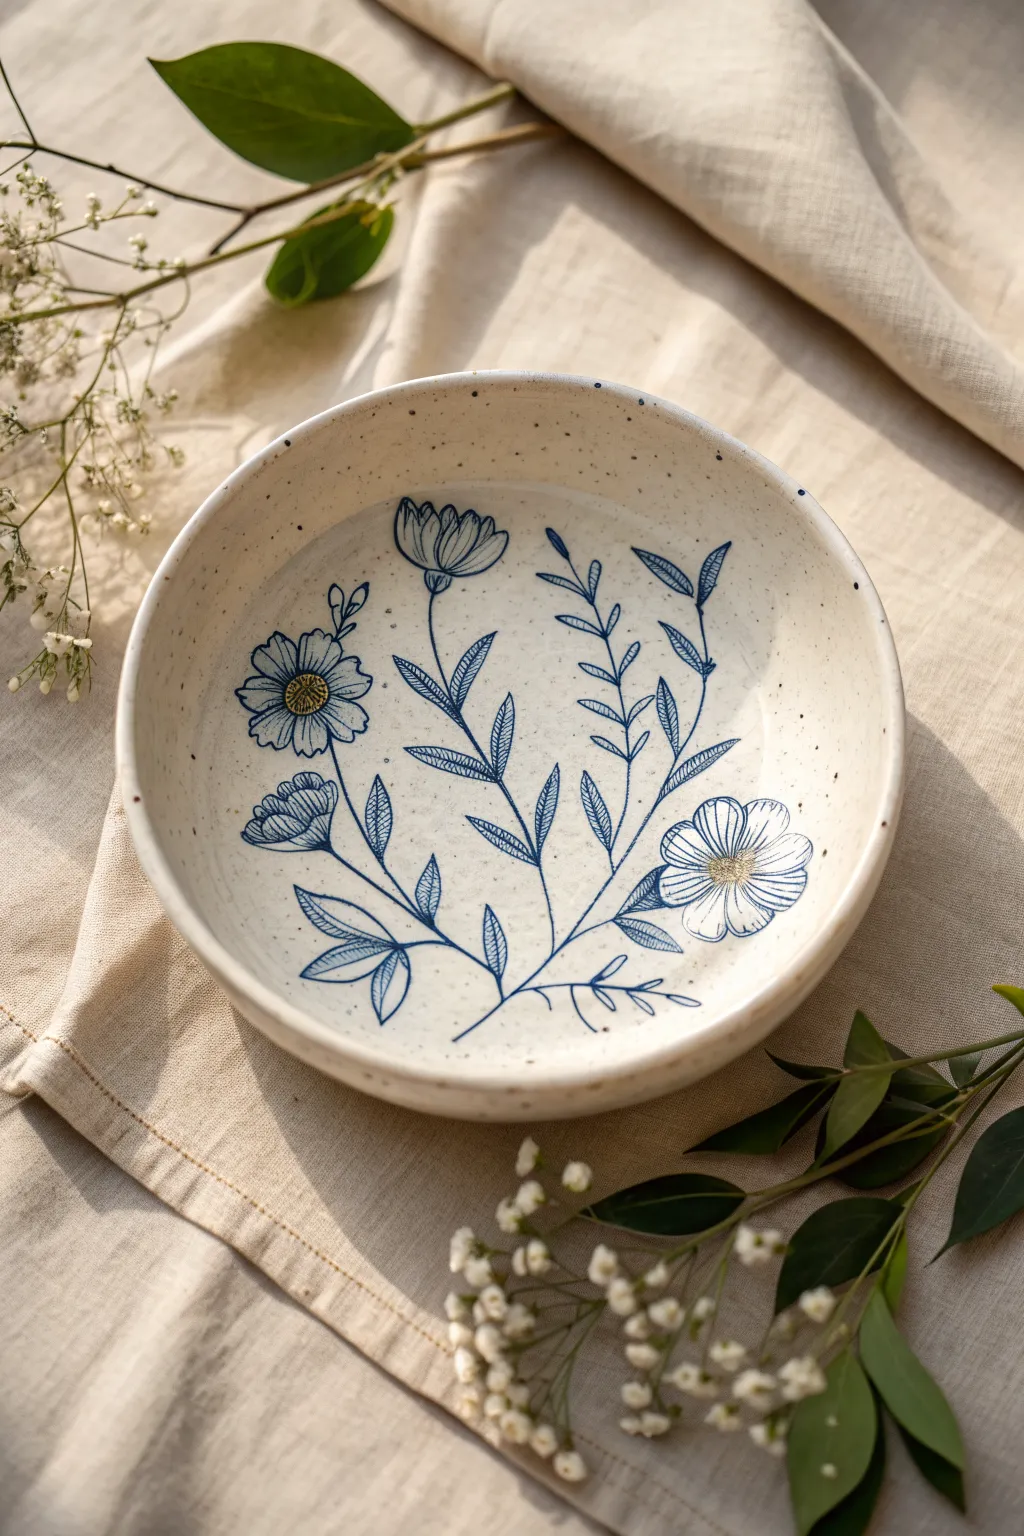
This project transforms a simple ceramic form into a delicate botanical masterpiece using fine brushwork and underglaze. The result is a creamy, speckled bowl featuring a whimsical wildflower design in deep cobalt blue, perfect for both display and daily use.
Step-by-Step
Materials
- Bisque-fired white stoneware bowl (speckled clay body)
- Dark blue underglaze (Cobalt)
- Small amount of yellow underglaze
- Clear dipping glaze (food safe)
- Fine liner brush (size 0 or 00)
- Small round brush (size 2)
- Pencil (HB or lighter)
- Clean water and sponge
- Wax resist (optional)
Step 1: Planning and Preparation
-
Surface Prep:
Begin by gently wiping your bisque-fired bowl with a damp sponge to remove any dust or debris, which ensures the underglaze adheres properly. -
Sketching the Layout:
Using a light touch with a regular pencil, lightly sketch the main stems of your floral design directly onto the bisque. Don’t worry about erasing mistakes; graphite burns off in the kiln. -
Center Stem Placement:
Start your sketch with the central stem rising from the bottom, curving slightly to the left to create dynamic movement, then add the two side branches extending outward.
Pro Tip: Steady Hand
Rest your pinky finger against the bowl’s surface as a stabilizer while painting fine lines. This anchors your hand and prevents shakiness on curved surfaces.
Step 2: Painting the Linework
-
Mixing Underglaze:
Pour a small amount of dark blue underglaze onto a palette. I usually add a drop or two of water to thin it slightly to an ink-like consistency, which helps the liner brush glide smoothly. -
Main Stems:
Load your fine liner brush and trace over your pencil lines for the main stems, keeping the pressure consistent to maintain an even line thinness. -
Adding Leaves:
Paint small, pointed oval outlines for the leaves along the stems. Leave the interiors of the leaves unpainted to let the clay body show through. -
Leaf Vein Details:
Once the leaf outlines are dry to the touch, carefully draw a single line down the center of each leaf, adding tiny diagonal veins for realistic texture. -
Lower Blooms:
On the left branch, paint the outlines of the smaller, cup-shaped flowers. Uses short, curved strokes to create the layered petals. -
Top Bud:
Paint the tulip-shaped bud at the very top of the central stem, using vertical lines to define the closed petals. -
Main Flower Outline:
For the large open flower on the right, draw five large, rounded petals radiating from a center point. -
Petal Texturing:
Fill the large petals with very fine, closely spaced lines radiating from the center outward to create shading and dimension without solid color. -
Daisy Detail:
Repeat the petal outlining and texturing process for the daisy-like flower on the upper left branch.
Step 3: Adding Accents and Glazing
-
Yellow Centers:
Rinse your small round brush thoroughly and dip it into the yellow underglaze. Dab a small circle into the center of the daisy and the large open flower. -
Center Texturing:
After the yellow dots dry, go back with your blue liner brush and add tiny stippled dots over the yellow to create depth. -
Drying:
Allow the underglaze design to dry completely, ideally for a few hours, to prevent smudging during glazing. -
Glazing:
Dip the entire bowl into a clear, food-safe glaze. Ensure the glaze coat is even and not too thick, so the fine blue lines remain crisp. -
Firing:
Fire the bowl in the kiln according to the clay and glaze manufacturer’s instructions (typically Cone 5 or 6 for stoneware).
Common Issue: Smudging
If you accidentally smudge a blue line, don’t wipe it! Let it dry, then gently scratch the mistake off with a needle tool or an X-Acto knife.
Once fired, fill your beautiful new bowl with fruit or simply display it to admire your delicate handiwork
BRUSH GUIDE
The Right Brush for Every Stroke
From clean lines to bold texture — master brush choice, stroke control, and essential techniques.
Explore the Full Guide
Rose Bouquet Cluster on a Pitcher
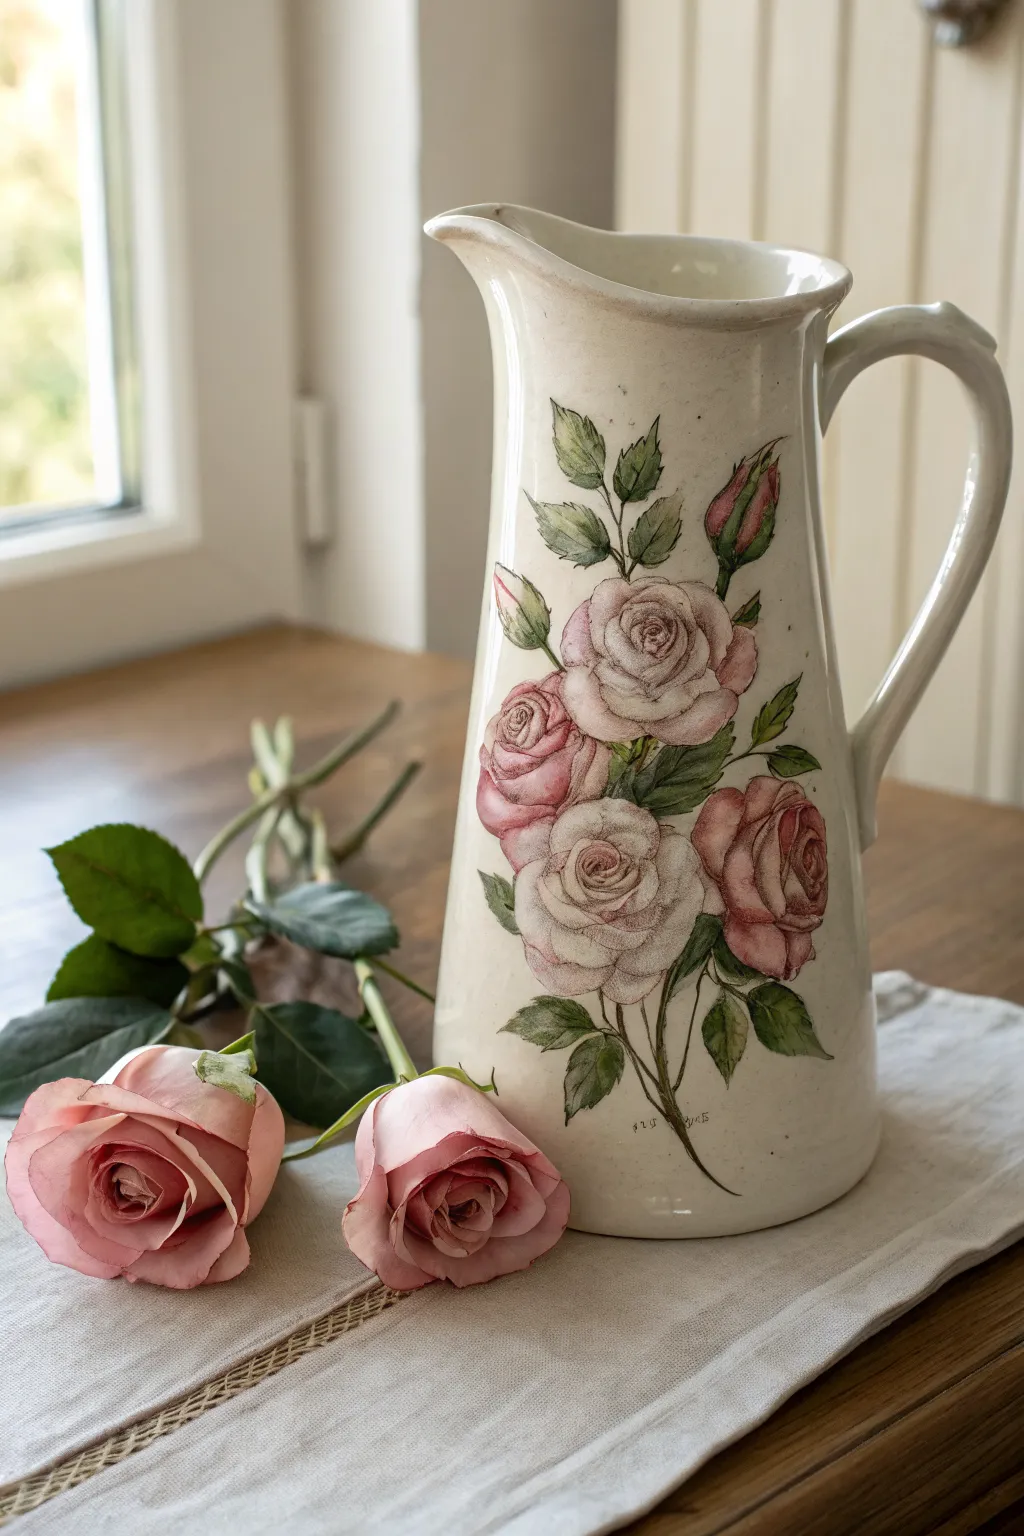
Transform a plain ceramic pitcher into a romantic farmhouse centerpiece with this delicate rose design. Whether you choose hand-painting or a decoupage method, the result is a timeless floral cluster that brings soft pinks and lush greens to your table setting.
How-To Guide
Materials
- White or cream ceramic pitcher (clean and dry)
- Ceramic paints (matte or satin finish): Soft Pink, Dusty Rose, Burgundy, Olive Green, Forest Green, White, and Brown
- Fine liner brushes (size 0 and 00)
- Small round brushes (size 2 and 4)
- Reference image of vintage roses
- Pencil or transfer paper
- Rubbing alcohol
- Clear ceramic glaze or sealant (optional)
- Palette for mixing
Step 1: Preparation and Layout
-
Clean the Surface:
Begin by wiping down your ceramic pitcher with rubbing alcohol. This removes any oils or dust that might prevent the paint from adhering properly. -
Sketch the Composition:
Using a soft pencil, lightly sketch the oval shape of the main flower cluster on the front curve of the pitcher. Mark the center points for the two large roses and the surrounding smaller blooms. -
Outline the Forms:
Sketch the basic outlines of the roses and leaves. Don’t worry about petals yet; just establish where the shapes sit relative to the handle and spout to ensure balance.
Fixing Wobbly Lines
If your fine outlines get too thick or shaky, wait for them to dry completely, then use a clean, damp brush or toothpick to gently erode the excess width back to a thin line.
Step 2: Painting the Roses
-
Base Color Application:
Mix a very pale pink using White and a touch of Soft Pink. With a round brush, fill in the main rose shapes. Keep the paint relatively thin for a watercolor effect. -
Defining the Centers:
While the base is still slightly tacky, use Dusty Rose to assert the darker spiral centers of the main flowers. This establishes the depth right away. -
Layering Petals:
Switch to a smaller brush. Create C-shaped strokes radiating outward from the center using the Dusty Rose. Stagger these strokes to mimic unfurling petals. -
Adding Highlights:
Dip your brush into pure White paint and add highlights to the top edges of the petals. This separation is crucial for making the flower look three-dimensional. -
Deepening Shadows:
Mix a tiny amount of Burgundy into your Dusty Rose. Apply this shadow color sparingly deep inside the flower center and under the lower petals for dramatic contrast. -
Painting Buds:
For the upper rosebuds, use a teardrop shape in Dusty Rose, highlighting the side that catches the light with Soft Pink.
Step 3: Foliage and Stems
-
Base Greenery:
Using Olive Green, paint the jagged shapes of the rose leaves. I find it helpful to pull the brush stroke from the stem outward to the leaf tip for a natural taper. -
Adding Veins:
Once the green is dry, use your finest liner brush and the Forest Green paint to draw delicate central veins and stems connecting the buds to the main cluster. -
Stem Detail:
Extend the main stem downward using a mix of Brown and Olive Green. Let it curve naturally toward the base of the pitcher.
Add Vintage Patina
For an aged look, mix glazing medium with a drop of burnt umber paint. Lightly brush over the dry design and wipe it back immediately with a cloth, leaving color only in crevices.
Step 4: Fine Details and Finishing
-
Black Linear Work:
To achieve that specific botanical illustration look, use a size 00 brush with very watered-down black or dark brown paint. Outline select petals and leaves loosely—don’t close every shape. -
Texture Stippling:
Add tiny dots (stippling) near the base of the petals and on the sepals of the buds using the dark detailed color to add texture. -
Clean Up:
If you made any stray marks, gently scratch them off with a toothpick or wipe with a damp cotton swab before the paint fully cures. -
Curing:
Allow the pitcher to dry for at least 24 hours. If your specific ceramic paint requires baking to set, follow the manufacturer’s instructions for oven time and temperature. -
Sealing:
For extra durability, especially if you plan to use water in the pitcher, apply a clear gloss ceramic sealer over the design once fully cured.
Now you have a stunning, hand-painted piece that brings the elegance of an English garden right into your kitchen
Lavender Stems in Gentle Rows
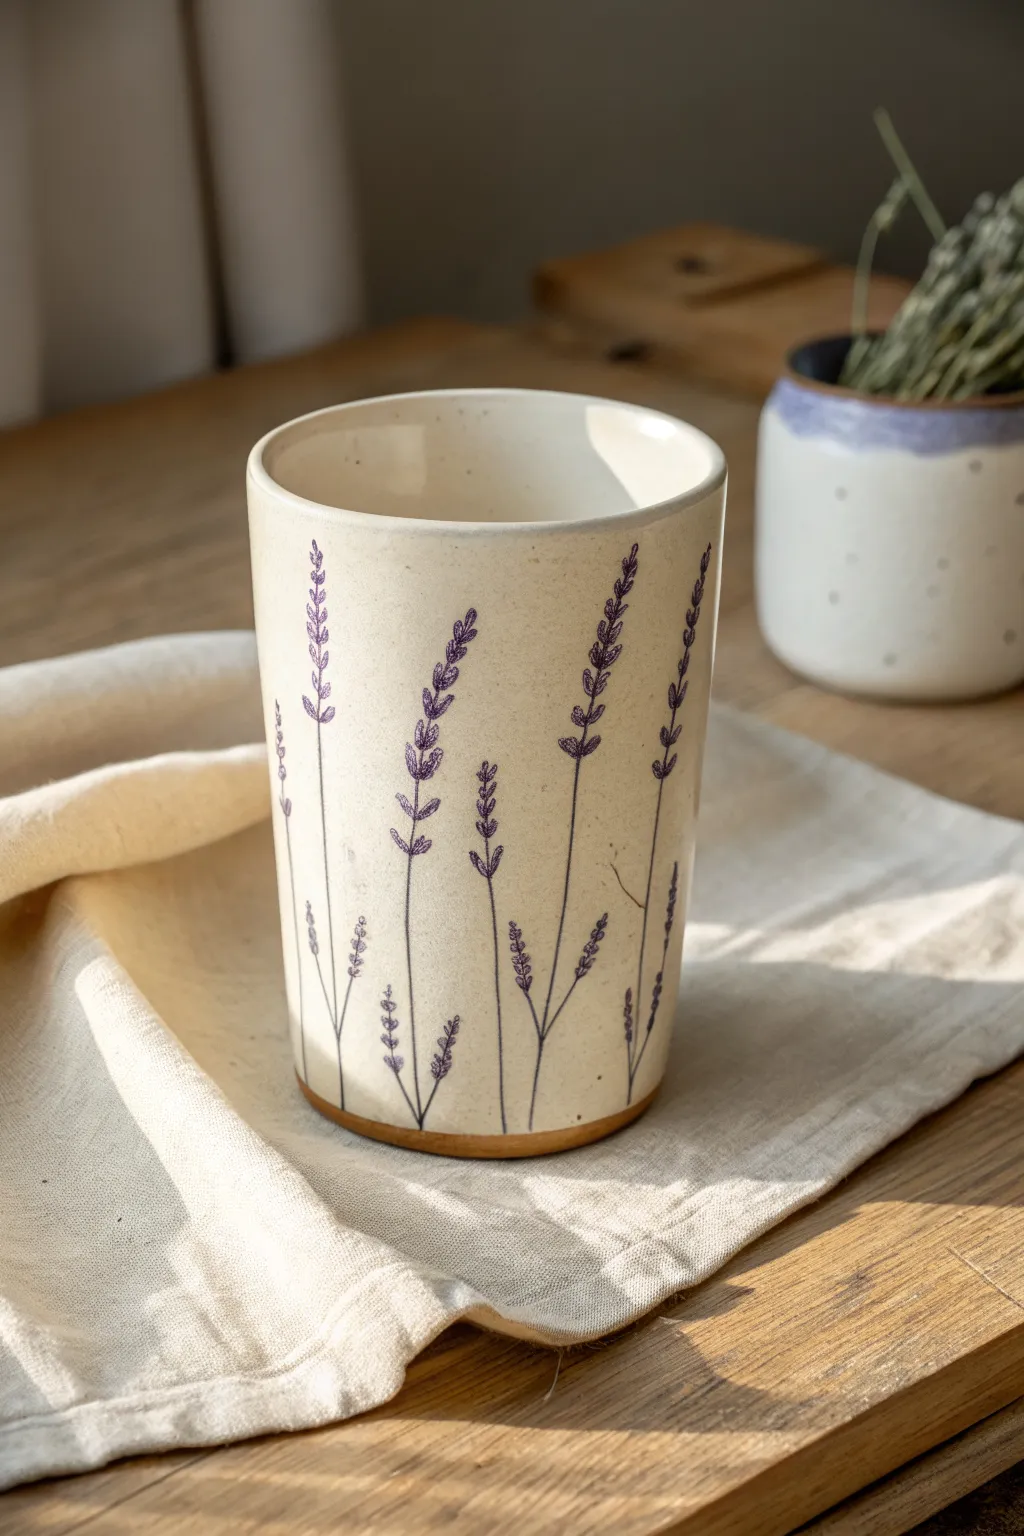
Capture the calming essence of a summer garden with this hand-painted ceramic tumbler featuring slender lavender stems. The creamy glaze provides a perfect canvas for the fine purple botanical details, creating a piece that feels both rustic and refined.
Step-by-Step Tutorial
Materials
- Bisque-fired ceramic tumbler (straight-sided)
- Underglaze pencil (dark purple or violet)
- Underglaze (lavender purple)
- Underglaze (darker violet/plum for depth)
- Fine liner brush (size 0 or 00)
- Clear variation-free dipping glaze or brush-on clear glaze
- Creamy white dipping glaze or brush-on glaze (opaque)
- Wax resist emulsion
- Sponge and water
- Kiln access
Step 1: Preparation & Base Glazing
-
Clean the bisque:
Start with your bisque-fired tumbler. Take a slightly damp sponge and wipe down the entire surface to remove any kiln dust or oils from your hands, ensuring a clean surface for glazing. -
Wax the foot:
Apply a coat of wax resist to the bottom foot of the tumbler and roughly 1/8 inch up the side. This creates that charming raw clay accent at the base seen in the finished cup. -
Apply base color:
Dip the entire tumbler into a creamy white opaque glaze. Alternatively, brush on three even coats, allowing drying time between each. The goal is a smooth, milky canvas. -
Clean the rim:
Check the rim for any drips. Smooth them gently with a finger while the glaze is still powdery but not fully set to ensure a comfortable drinking edge.
Step 2: Sketching the Lavender
-
Plan the composition:
Visualize vertical lines rising from the bottom third of the cup. Lavender grows straight but naturally, so plan for varied heights—some tall reaching near the rim, others shorter to fill gaps. -
Draw the main stems:
Using a dark purple underglaze pencil or a very fine brush with diluted violet underglaze, sketch thin, vertical lines. I keep my hand loose here to mimic natural growth rather than ruling straight lines. -
Add side branches:
From the lower sections of your main stems, draw smaller offshoot stems angling upward. These should be thinner than the main stalk.
Loose Lines
Don’t overthink the stems. A slightly shaky or varying line weight looks more organic and botanical than a perfectly straight ruler line.
Step 3: Painting the Blooms
-
Mix your colors:
Prepare a small amount of lavender underglaze. If it feels too thick, thin it slightly with water until it has an ink-like consistency. -
Start the flower spikes:
Using the tip of your fine liner brush, begin adding the blooms at the top of a stem. create small, stacked ‘V’ shapes or tiny dashes that get slightly wider towards the bottom of the flower head. -
Build the texture:
Continue down the stem, leaving small gaps between clusters of blooms. Lavender flowers grow in whorls, so dab small dots on alternating sides of the stem line. -
Vary the density:
Make some flower heads dense and lush, while keeping others sparse. This variation adds depth and realism to the design. -
Add darker accents:
Dip just the very tip of your brush into the darker violet underglaze. Add tiny dots or dashes within the existing lavender clusters to create shadow and dimension. -
Anchor the stems:
Ensure the stems fade out naturally near the bottom wax line. They shouldn’t look like they are floating; extend them low enough so they appear rooted in the base.
Smudged Glaze?
If you make a mistake while painting on top of the unfired base glaze, gently scrape the error off with an X-Acto knife rather than wiping, which blurs it.
Step 4: Finishing & Firing
-
Dry completely:
Let the painted decoration dry fully. The underglaze should feel chalky and room temperature to the touch. -
Clear coating (Optional):
Since you are painting over an unfired glaze, you typically fire directly. However, if your base glaze is matte and you want a glossy finish, apply a very thin coat of clear glaze over the design, being careful not to smear the purple. -
Clean the foot again:
Double-check the waxed foot. If any purple drips or smudges landed on the wax, wipe them away cleanly with a damp sponge. -
Final fire:
Load the piece into the kiln for the final glaze firing (typically Cone 5 or 6 depending on your clay and glaze choice).
Once fired, you will have a serene, botanical vessel perfect for morning tea

PENCIL GUIDE
Understanding Pencil Grades from H to B
From first sketch to finished drawing — learn pencil grades, line control, and shading techniques.
Explore the Full Guide
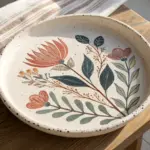
Poppy Petal Watercolor Wash
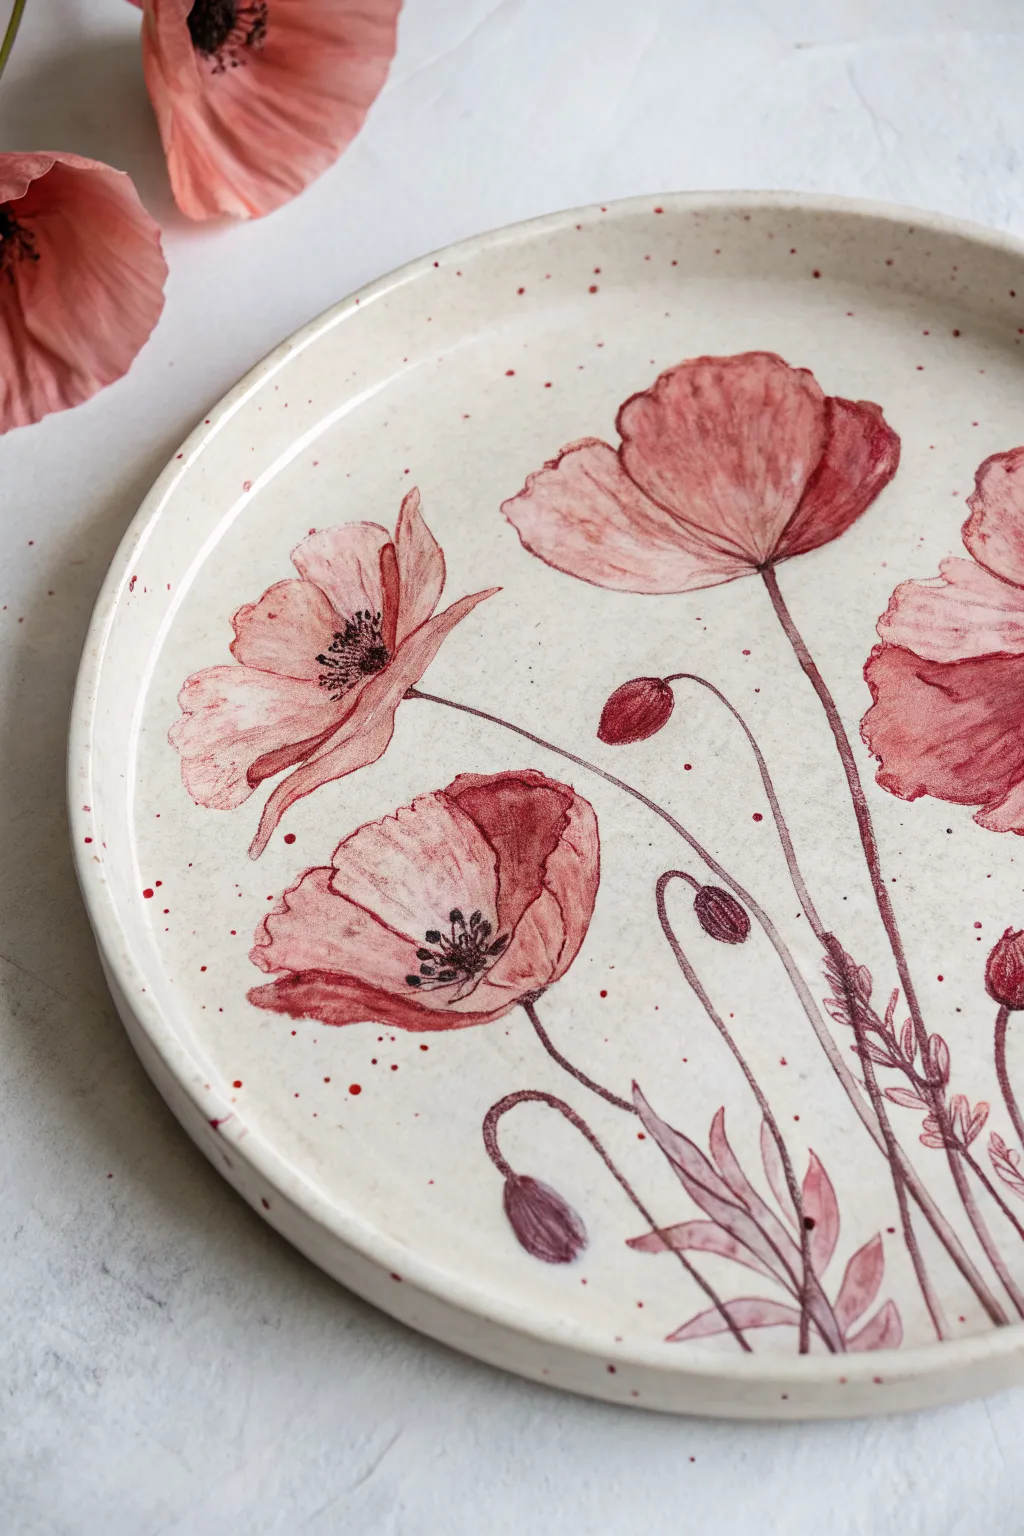
Capture the ephemeral beauty of summer with this delicate poppy design painted directly onto a bisque plate. This technique replicates the soft, bleeding edges of watercolor painting using ceramic underglazes for a permanent yet airy floral motif.
Step-by-Step
Materials
- Bisque-fired ceramic plate
- Underglazes: Pale pink, magenta/crimson, deep burgundy, black
- Watercolor-style brushes (round #4, #6, and liner #0)
- Palette or small tray
- Water jar
- Sponge
- Clear transparent glaze
- Pencil (optional)
Step 1: Preparation & Base shapes
-
Surface Prep:
Wipe your bisque plate thoroughly with a damp sponge. This removes any dust that could prevent the underglaze from adhering and slightly hydrates the thirsty clay. -
Sketch Layout:
Lightly sketch the general placement of your poppy heads and stems using a pencil. Remember, the graphite burns off in the kiln, so don’t worry about erasing mistakes. -
Water Down Underglaze:
On your palette, mix a small amount of pale pink underglaze with water until it reaches a very thin, watery consistency—like skim milk. -
Initial Wash:
Using a larger round brush, lay down wet, loose blobs for the flower heads. I like to keep the edges irregular to mimic organic petals.
Control the Flow
Bisque is very absorbent. Wet the localized area with clean water right before painting to extend working time and help colors bleed softer.
Step 2: Defining the Petals
-
Second Layer:
While the first layer is still damp (but not swimming), drop in localized areas of the slightly stronger magenta color. Let it bloom naturally into the pale pink areas to create soft gradients. -
Outline Work:
Switch to a smaller brush loaded with unthinned magenta or crimson underglaze. Gently trace the scalloped edges of the petals to give them definition. -
Internal Veins:
With the same unthinned color, pull very faint, thin lines from the center of the flower outwards to suggest petal texture and veins. -
Deepening Shadows:
Add touches of deep burgundy to the base of the petals and where petals overlap. This creates depth and prevents the flower from looking flat.
Fixing Smudges
If you drip underglaze where you don’t want it, let it dry completely, then gently scrape it off with a sharp tool or exacto knife rather than wiping.
Step 3: Stems & Details
-
Stem Structure:
Dilute your maroon or brownish-red underglaze slightly. Using a liner brush, paint long, slender stems flowing from the flower heads down to the plate rim. -
Adding Leaves:
Paint the serrated leaves near the bottom using the same diluted mix. Keep the strokes quick and wispy to maintain the watercolor aesthetic. -
Buds:
Include a few drooping poppy buds on curved stems. Use a darker saturation of color for the bud casing to make them pop against the pale plate. -
Stamen Centers:
Once the flower centers are dry to the touch, use a fine liner brush and black underglaze to stipple tiny dots for the poppy seeds. -
Filaments:
Connect these black dots to the center with hair-thin lines, creating the delicate stamens.
Step 4: Finishing Touches
-
Splatter Effect:
Load a stiff brush with watered-down red underglaze. Tap the handle against your finger over the plate to create tiny, randomized speckles for artistic flair. -
Dry Time:
Allow the underglaze design to dry completely, preferably overnight, to ensure no moisture is trapped. -
Clear Glaze Application:
Carefully dip or brush on a clear transparent glaze. If brushing, dab gently over the design first to avoid smearing the underglaze details. -
Final Fire:
Fire the plate in the kiln according to the specific temperature instructions for your clear glaze.
Once fired, you will have a stunning, food-safe piece of art ready for your table display
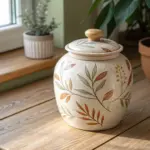
Botanical Imprint Flower Fossils
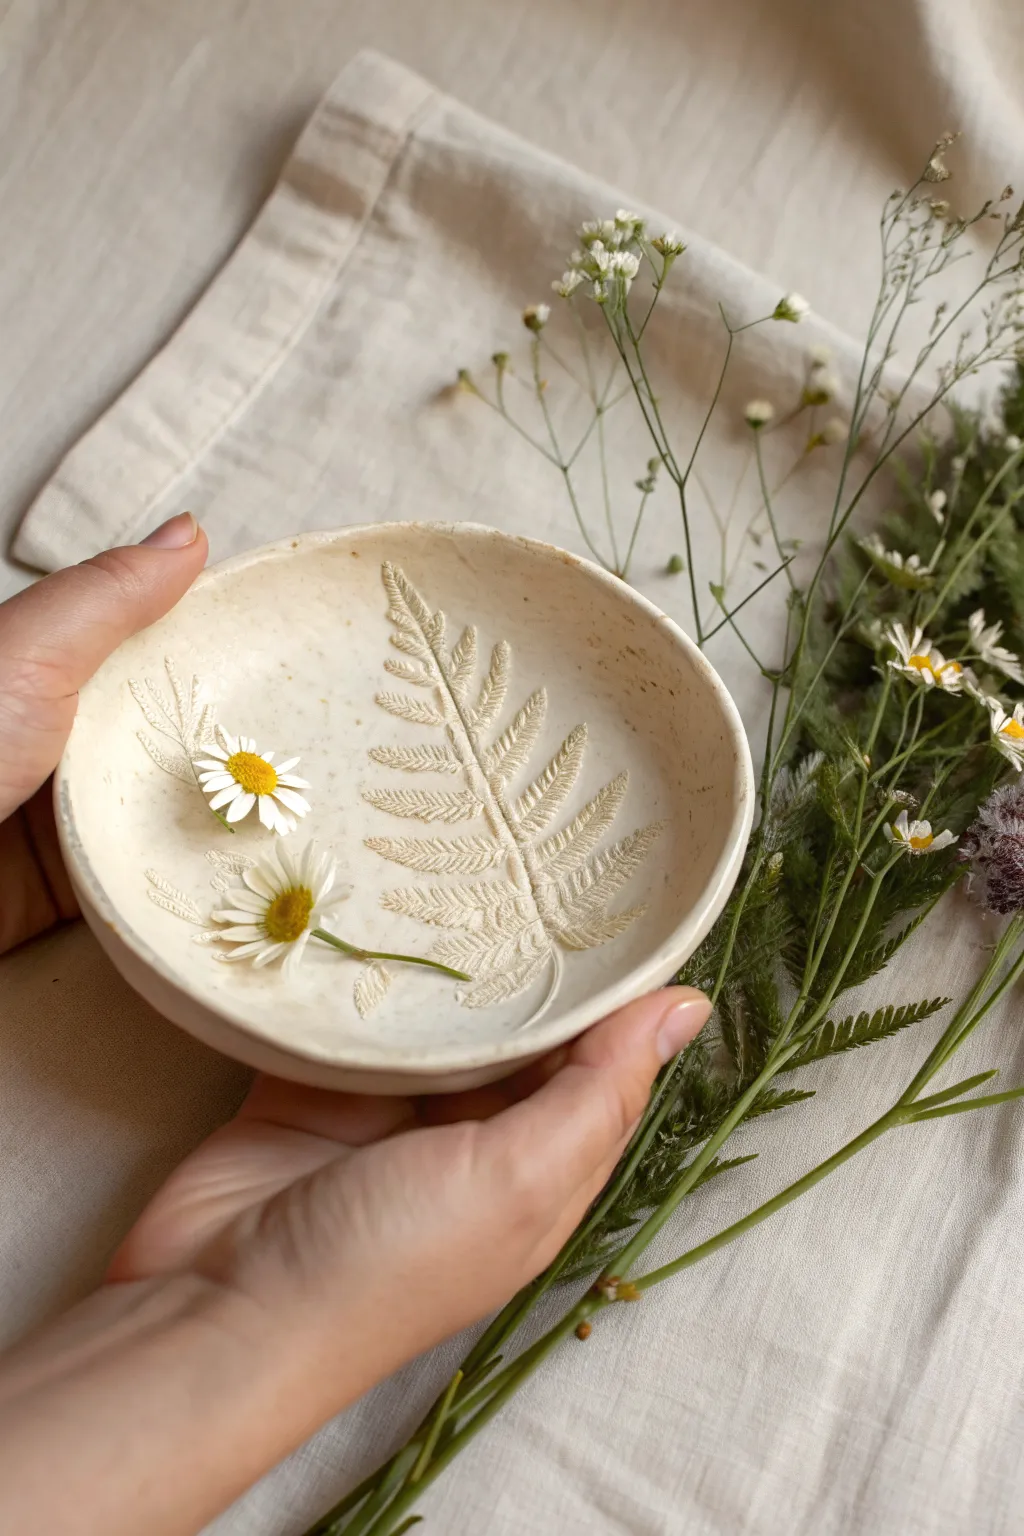
Immortalize the fleeting beauty of nature with this elegant clay bowl featuring a deep botanical relief. The result is a soft, organic vessel that captures the intricate vein details of a fern frond, perfect for holding trinkets or simply displaying as an art piece.
How-To Guide
Materials
- Air-dry clay or white earthenware pottery clay
- Fresh fern frond (sturdy, with clear veins)
- Rolling pin
- Canvas mat or cloth (to prevent sticking)
- Small bowl (to use as a slump mold)
- Potter’s knife or butter knife
- Sponge
- Water
- Fine-grit sandpaper
- Clear matte varnish or food-safe sealant
Step 1: Prepping the Clay Canvas
-
Prepare your workspace:
Lay down a canvas mat or a piece of heavy cloth on a flat surface. This texture prevents the clay from sticking and adds a nice subtle texture to the bottom of your bowl. -
Wedge the clay:
Take a grapefruit-sized ball of clay and wedge perfectly it to remove air bubbles, ensuring a smooth consistency throughout. -
Roll the slab:
Using your rolling pin, roll the clay out into a concise, even slab about 1/4 inch thick. Rotate the clay periodically to ensure an even circle. -
Smooth the surface:
Take a slightly damp sponge and gently wipe the surface of the clay slab to remove any canvas marks or imperfections, creating a pristine canvas for your print.
Uneven Impressions
If the leaf didn’t press in deeply enough, don’t try to re-align and re-roll. It’s better to flip the slab, smooth it out, and try again on the fresh side to avoid ghost images.
Step 2: Creating the Botanical Impression
-
Position the fern:
Place your fresh fern frond vein-side down onto the center of the clay slab. I usually like to curve the stem slightly to follow the future shape of the bowl. -
Secure the leaf:
Gently press the leaf with your fingers first to tack it in place so it doesn’t slide during the next step. -
Roll the imprint:
Use the rolling pin to firmly roll over the leaf once. Apply steady, even pressure to push the plant material deep into the clay, capturing the finest details. -
Remove the botanical:
Carefully lift the stem with a tweezer or fingernails and peel the fern away to reveal the clean, raised impression left behind.
Step 3: Shaping and Refining
-
Cut the circle:
Using a potter’s knife or a sharp tool, cut a clean circle around the imprint. You can use a paper template or a pot lid as a guide if you struggle with free-hand circles. -
Smooth the rim:
Dip your finger in water and run it along the cut edge to soften the sharp angle, rounding it off for a more finished look. -
Form the bowl shape:
Lift the clay circle carefully and place it inside your slump mold bowl to give it a curved shape. Gently press it against the mold’s sides. -
Dry slowly:
Allow the clay to dry in the mold until leather hard. If using ceramic clay, wrap it loosely in plastic first to slow drying; for air-dry clay, keep it out of direct sunlight. -
Remove from mold:
Once the clay is firm enough to hold its own shape but not bone dry, remove it from the mold to allow airflow to the bottom.
Petal Accents
Before sealing, lightly brush dry powdered pigments or blush onto the deepest parts of the fern imprint to give the fossil a soft, lifelike shade without using heavy paints.
Step 4: Finishing Touches
-
Sand the edges:
After the bowl is bone dry, use fine-grit sandpaper to smooth any roughness on the rim or the underside. -
Clean dust:
Wipe the piece with a barely damp sponge or cloth to remove all sanding dust before sealing. -
Seal the piece:
Apply a coat of clear matte varnish to protect the surface. If you want the fern imprint to pop, you can apply an extremely diluted brown wash into the crevices before sealing, wiping the high points clean. -
Final drying:
Let the final sealant cure according to the manufacturer’s instructions before placing any items inside.
Your finished bowl now holds a permanent memory of the garden, ready to hold treasures or stand alone as art


Sgraffito Floral Silhouettes
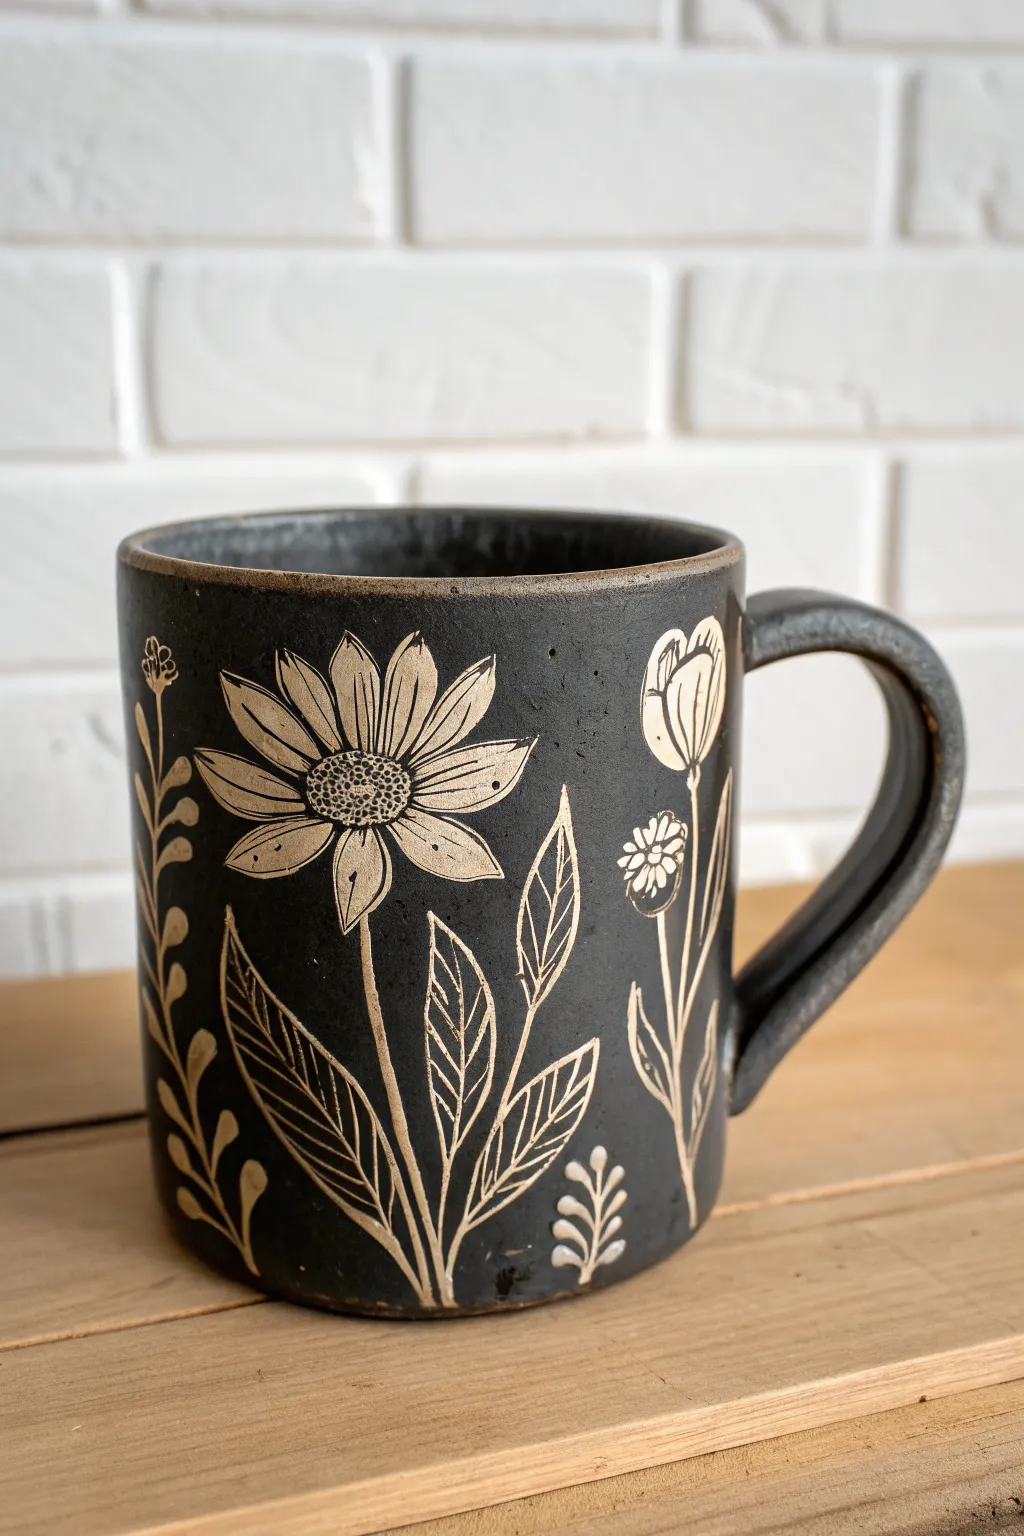
Embrace high contrast with this striking black sgraffito mug, where intricate floral silhouettes are carved away to reveal the warm clay body beneath. This project combines wheel-throwing (or hand-building) with the satisfyingly tactile art of surface carving for a piece that feels as good as it looks.
Step-by-Step Guide
Materials
- Stone-colored stoneware clay (smooth body)
- Black underglaze (satin or matte finish)
- Pottery wheel (or slab roller for hand-building)
- Rib tool (metal and rubber)
- Sponge
- Soft fan brush
- Needle tool
- Loop tool (small sharp for carving)
- Sgraffito tool or dental pick
- Clear glaze (optional, for inside only)
Step 1: Forming the Canvas
-
Prepare your clay:
Begin by wedging your stoneware clay thoroughly to remove air bubbles. You’ll need about 1-1.5 lbs of clay for a standard mug size. -
Throw the cylinder:
Center your clay on the wheel and open it up. Pull the walls up to create a straight-sided cylinder, aiming for an even thickness of about 1/4 inch. Keep the walls vertical rather than tapered for this specific modern look. -
Refine the surface:
While the wheel is spinning slowly, use a metal rib to compress the outside wall. This removes throwing lines and creates the perfectly smooth ‘canvas’ needed for the carving step later. -
Shape the rim:
Use a chamois or a small strip of plastic to compress and round the rim. A comfortable drinking edge is crucial for a functional mug. -
Pull a handle:
Pull a strap handle from a separate piece of clay. Let both the cylinder and the handle stiffen slightly until they reach a soft leather-hard state.
Clean Lines Tip
Work while the clay is leather hard—like a block of cheddar cheese. If it’s too soft, lines look muddy; too dry, and the edges will chip.
Step 2: Assembly and Underglazing
-
Trim the foot:
Once leather hard, trim the bottom of your cylinder to define the foot ring. Clean up any rough edges with a damp sponge. -
Attach the handle:
Score and slip the attachment points on both the mug body and handle. Press the handle firmly into place, checking for alignment, and smooth the join with a modeling tool or your finger. -
Apply the background:
Using a soft fan brush, apply 2-3 even coats of black underglaze to the exterior of the mug. I prefer to rotate the mug on a banding wheel to ensure seamless coverage without streak marks. -
Let it set:
Allow the underglaze to dry until it is no longer tacky to the touch, but ensure the clay underneath remains leather hard. If it gets bone dry, carving becomes chipped and difficult.
Add Dimension
Vary your carving depth slightly. Deeper gouges catch shadows differently than shallow scratches, adding subtle 3D texture to the petals.
Step 3: Carving the Blooms
-
Outline the main flower:
Start by lightly scratching the outline of the large daisy-like focal flower using a needle tool. Don’t dig deep yet; just map out the spacing. -
Carve the petals:
Using a sharp sgraffito tool or small loop tool, carve away the black underglaze inside the petal shapes. Use directional strokes that follow the length of the petal to mimic natural texture. -
Detail the center:
For the flower center, gently stipple the surface with the point of your tool to create a seeded texture, carefully confusing the black and clay colors. -
Add secondary blooms:
Sketch and carve the tulip shapes and smaller buds around the main flower. Vary the height of the stems to create visual movement around the curve of the mug. -
Create foliage:
Carve the leaves using long, confident strokes. For the veins inside the leaves, switch to a finer point tool and etch thin lines, leaving thin strips of black underglaze to define the segments. -
Refine the edges:
Go back over the outlines of your etched shapes. A crisp clean line between the black background and the raw clay motif makes the design pop. -
Brush away crumbs:
Throughout the process, use a large, soft dry brush to gently sweep away the clay ‘crumbs’ produced by carving. Never rub them with your finger, or you might smear the black underglaze into your fresh white lines.
Step 4: Final Firing
-
Bisque fire:
Once fully bone dry, load the mug into the kiln for a bisque firing (typically cone 04). -
Glaze the interior:
Pour a clear glaze into the inside of the mug, swirl to coat, and pour out. Wipe the rim clean. -
Fettle the exterior:
Leave the exterior unglazed to maintain the matte, tactile finish of the raw clay and underglaze, or apply a very thin matte clear coat if you prefer a sealed surface. -
Glaze fire:
Fire the piece to the maturity temperature of your clay body (likely cone 5 or 6). This final firing will vitrify the clay and make the mug durable and watertight.
Enjoy your morning coffee knowing you’re holding a completely unique piece of handcrafted art
Wax-Resist Blooms With Speckled Texture
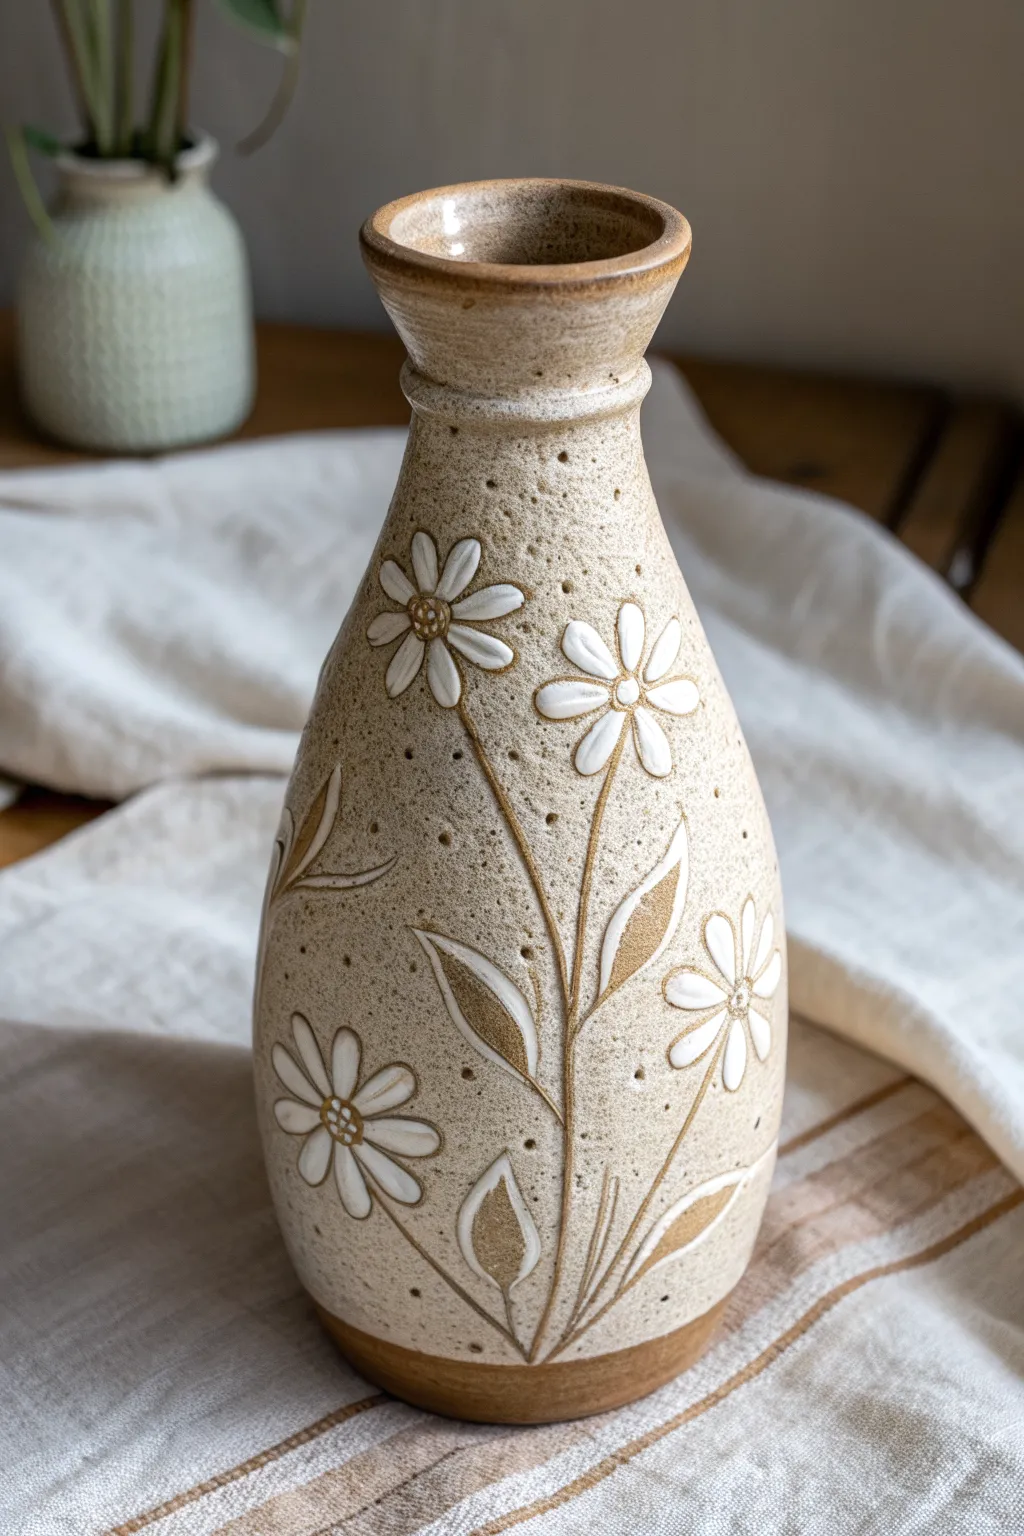
Embrace the natural beauty of exposed clay with this tactile vase project featuring delicate white daisies created using a classic wax-resist technique. The result is a charming interplay between smooth, creamy petals and the raw, speckled texture of the stoneware.
How-To Guide
Materials
- Speckled stoneware clay (pyrite or iron-flecked)
- Potter’s wheel and throwing tools
- Trimming tools
- Wax resist emulsion
- Fine-point paintbrush for wax application
- Needle tool or sgraffito tool
- White or cream underglaze
- Clear transparent glaze (cone 5/6 or suitable for your clay)
- Sponge
Step 1: Throwing and Shaping
-
Prepare the clay:
Begin by thoroughly wedging your speckled stoneware clay to ensure there are no air bubbles and the speckles are evenly distributed. -
Center and open:
Center a medium-sized ball of clay on the wheel head. Open the clay, keeping a slightly narrower base to support the eventual bottle shape. -
Pull the walls:
Pull the walls up into a tall cylinder first, maintaining even thickness. Don’t worry about the curves just yet; height is your priority here. -
Shape the belly:
Gently push the clay outward from the inside to form a bulbous belly at the bottom, tapering gradually as you move upward. -
Collar the neck:
Using both hands, carefully varying pressure, collar (compress) the top third of the pot inward to create a narrow, elegant neck. -
Refine the rim:
Flare the very top out slightly to create a defined lip, smoothing it with a chamois for a professional finish. -
Trim the foot:
Once the piece is leather-hard, return it to the wheel to trim the excess clay from the bottom, creating a clean foot ring.
Clean Lines Only
If your wax lines look ragged, let them dry fully, then gently scrape the edges clean with a sharp fettling knife or razor blade before glazing.
Step 2: Designing the Blooms
-
Sketch the layout:
Lightly trace your floral design directly onto the greenware using a needle tool. Keep the lines very faint; these are just guides for your wax application. -
Apply wax resist:
Dip a fine paintbrush into your wax resist emulsion. Carefully paint the long stems and pointed leaves first, following your traced lines. -
Paint the petals:
Paint the daisy petals with the wax. Ensure the wax coating is thick enough to fully repel glaze later, but keep your edges crisp for a clean look. -
Allow to dry:
Let the wax resist dry completely. It should feel firm to the touch and no longer tacky before you proceed to the next step. -
Apply underglaze (Optional Step):
If you want the flowers to be bright white rather than just raw clay color, you can carefully dab white underglaze *inside* the waxed areas. The wax will actually repel the *overglaze*, but painting underglaze first gives a solid color base. Alternatively, rely on the raw clay body as the ‘color’ and skip this if you prefer the sandy look shown in the image.
Pro Tip: Tinted Wax
Add a drop of food coloring to your liquid wax resist. This makes it visible on the pale clay, so you can see exactly where you’ve painted.
Step 3: Glazing and Finishing
-
Bisque fire:
Fire the vase to bisque temperature (usually Cone 04). The wax will burn off during this firing, leaving the design as bare bisque. -
Clean the surface:
Wipe the bisqueware down with a damp sponge to remove any dust that settled during firing. -
Wax the design again:
This is crucial for the resisted look: Re-apply wax carefully *only* over the flower petals, stems, and leaves that you want to remain unglazed or matte. I find it helpful to work slowly here, as this defines the final texture. -
Carve details:
Once the second wax layer is dry, use a needle tool to gently scratch through the wax in the center of the flowers to create the pollen texture, and draw a vein line down the center of the leaves. -
Apply the wash:
Brush a very thinned-out white underglaze or slip over the entire vase body (except the waxed areas) if you want the background to be lighter, or skip to clear glazing if you want the natural speckle to dominate. -
Wipe back excess:
Using a slightly damp sponge, gently wipe the surface. The wax will protect the flowers, while the sponge removes glaze/slip from the high points of the wax, ensuring the petals stay defined. -
Clear glaze:
Dip or brush a matte or satin clear glaze over the entire piece. The waxed floral areas will resist the glaze, remaining raw and textured. -
Final wipe:
Check the waxed areas one last time. If any droplets of clear glaze are sitting on top of the wax, dab them off with a clean sponge. -
Glaze fire:
Fire the vase to the maturity temperature of your clay body (likely Cone 5 or 6). The unglazed clay flowers will create a beautiful textural contrast against the smooth background.
Once cooled, your vase is ready to hold fresh stems or simply stand as a piece of sculptural art on your shelf
Two-Color Graphic Floral Blocks

Transform a plain ceramic planter into a striking piece of decor with this stylized block-print inspired design. The graphic combination of deep navy and terracotta orange creates a look that is both modern and pleasantly nostalgic.
Step-by-Step
Materials
- Unfinished bisque ceramic pot or plain glazed cream pot
- Ceramic underglazes (Deep Navy Blue, Terracotta Orange, Brick Red)
- Pencil for sketching
- Soft measuring tape
- Medium round paintbrush (size 4-6)
- Fine liner paintbrush (size 0-1)
- Small flower sponge stamp or stencil template (optional)
- Clear glazing medium (if using bisque)
- Matte or satin clear sealant (if painting on finished ceramic)
- Palette for mixing
Step 1: Planning and Layout
-
Clean surface:
Begin with a clean, dry pot. If working with bisque, wipe it down with a damp sponge to remove dust. If upcycling a glazed pot, clean it with rubbing alcohol. -
Measure the circumference:
Use a soft measuring tape to measure the circumference of your pot. Divide this number by 4 or 5 to determine how many large flower motifs will fit evenly around the perimeter. -
Mark spacing:
Lightly mark the center point for each flower with a pencil. Make sure they are horizontally aligned so your pattern doesn’t wander up or down. -
Sketch the main flower:
Draw the central axes of your main flower first—an ‘X’ shape. Then, sketch the four inner petals (which will be orange) and the four outer sets of leaves (which will be blue). The shape is geometric and pointed, almost like a starburst.
Uneven Spacing?
If your flowers don’t meet perfectly at the end, fill the gap with an extra column of the small red accent flowers to hide the spacing error.
Step 2: Applying the Colors
-
Paint the orange center:
Load your medium round brush with Terracotta Orange underglaze. Carefully fill in the four inner petals of your main flower sketch. Painting from the center outward helps keep the points sharp. -
Add secondary orange details:
If your pattern includes side-profile flowers (half-flowers) between the main motifs, paint their orange centers now as well. -
Paint the small spacer flowers:
Using a smaller brush or a tiny bit of Bridge Red mixed with Terracotta, paint the small five-petal accent flowers in the negative space between the large motifs. Simple dots arranged in a circle work perfectly here. -
Outline the blue leaves:
Switch to Deep Navy Blue. Using your fine liner brush, outline the large leaf shapes that surround the orange center. This creates a crisp boundary before filling them in. -
Fill the blue sections:
Use the medium round brush to fill in the blue leaf sections. Apply the paint evenly, but don’t worry if it has a slight texture; that adds to the hand-painted charm. -
Wait for the first coat to dry:
Allow the paint to dry until it is chalky and matte to the touch. This usually takes 10-20 minutes depending on humidity. -
Apply second coat:
For a solid, opaque look, I always apply a second coat to both the blue and orange sections. This prevents streaking after firing or sealing.
Texture Play
Before painting, gently carve the outline of the flowers into the leather-hard clay. The glaze will pool in the grooves, adding depth and tactility.
Step 3: Adding Details and Finishing
-
Add the veins:
Normally, you paint dark on light, but here we are carving back or using negative space. If using underglaze on bisque, use a ‘sgraffito’ tool to gently scratch a center line through the dry paint to reveal the white clay beneath. If using acrylics on a finished pot, use a white paint pen to draw the center vein lines. -
Detail the center dot:
Place a tiny dot of yellow or raw ceramic color in the exact center where the four orange petals meet. -
Clean up edges:
Use a damp stiff brush or a q-tip to tidy up any paint that went outside your sketch lines. Crisp edges make the geometric design pop. -
Dry completely:
Let the pot dry overnight to ensure all moisture has evaporated from the clay body. -
Dip in clear glaze:
If you are firing the pottery, dip the entire pot into a clear glaze bucket. Ensure an even coat and wipe the foot of the pot clean so it doesn’t stick to the kiln shelf. -
Fire the kiln:
Fire the piece according to your clay and glaze specifications (usually Cone 5 or 6 for stoneware). If not using a kiln, apply two coats of clear acrylic sealer instead.
Once fired or sealed, pot your favorite succulent and enjoy the bold pop of color on your shelf
Ombre Background With Floating Blossoms
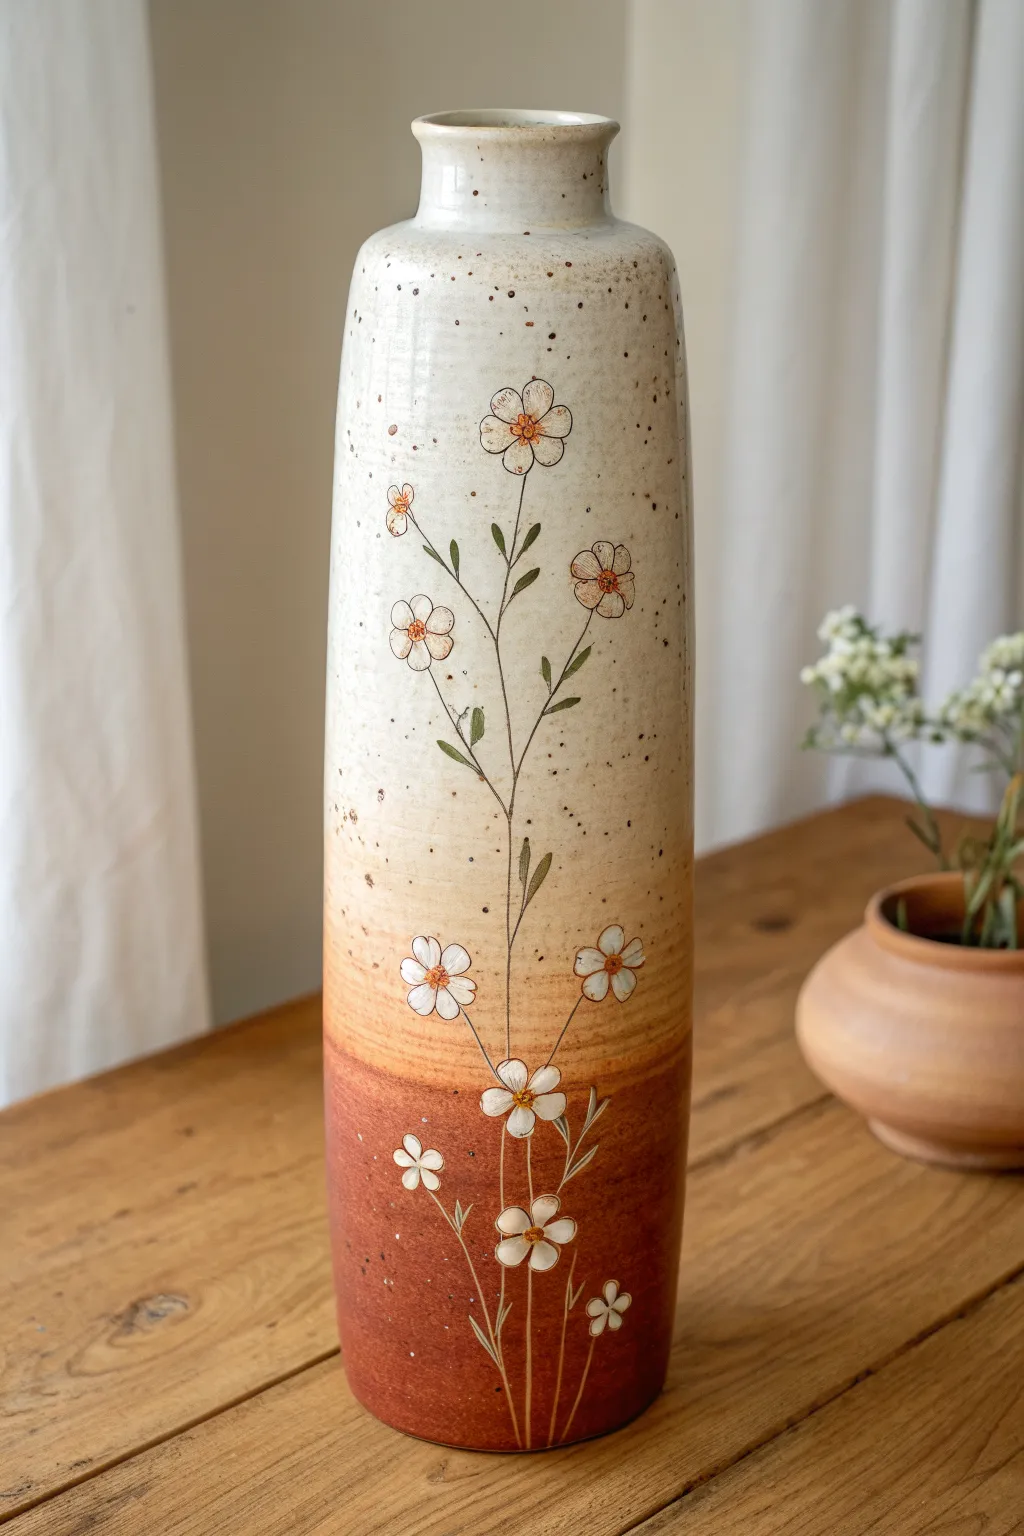
This project transforms a simple tall ceramic form into a stunning piece of rustic décor featuring a warm, sunset-inspired gradient. The delicate, hand-painted wildflowers appear to float effortlessly over the shifting colors, creating a piece that feels both grounded and ethereal.
Detailed Instructions
Materials
- Tall bisque-fired ceramic vase (cylindrical or bottle shape)
- Underglaze (Cream or Speckled White)
- Underglaze (Light Ochre/Sand)
- Underglaze (Terracotta or Rust Red)
- Fine liner brush (size 00 or 000)
- Small round brush (size 2 or 4)
- Fan brush or wide soft glazing brush
- Sponge
- Pencil
- Black underglaze pencil or fine liner for outlines
- Clear transparent glaze
- Kiln access (for firing)
Step 1: Creating the Ombre Base
-
Clean the bisque:
Start by wiping down your bisque-fired vase with a damp sponge. This removes any kiln dust or oils from handling and ensures the underglaze adheres perfectly to the surface. -
Apply the top layer:
Using a wide soft brush, apply the Cream or Speckled White underglaze to the top third of the vase. Use horizontal strokes and feathered edges at the bottom of this section to prepare for blending. -
Add the middle tone:
Apply the Light Ochre or Sand underglaze to the middle section. While the paint is still wet, gently work it into the bottom edge of the white section above to create a soft transition. -
Paint the base:
Cover the bottom third of the vase with the Rust Red underglaze. Bring this color up to meet the ochre section, overlapping slightly. -
Blend the gradients:
Refine the ombre effect by using a slightly damp sponge or a dry brush. Tap or lightly drag horizontally across the transition lines where colors meet to blur them together seamlessly. -
Add speckles (optional):
If your white underglaze isn’t pre-speckled, I like to create a splatter effect now. Dip a stiff toothbrush in watered-down brown underglaze and flick it lightly over the top light section for that rustic clay look. -
Let it dry:
Allow the base coats to dry completely until they are chalky to the touch before starting the floral details.
Natural Texture
Use iron-rich clay or a speckled buff stoneware body instead of painting speckles manually. The natural iron spots will bleed through the white slip during firing.
Step 2: Painting the Wildflowers
-
Sketch the stems:
Lightly sketch the main vertical lines of your stems using a graphite pencil. Don’t worry about erasing; the graphite will burn off in the kiln. -
Paint main stems:
Mix a dark olive green underglaze. Using your fine liner brush, trace over your pencil lines with long, confident strokes, starting from the bottom and thinning out as you reach the top. -
Add leaves:
Paint small, lance-shaped leaves branching off the main stems. Vary the green shades slightly by mixing in a touch of the ochre or brown for a more natural, dried-flower appearance. -
Outline the blossoms:
Switch to a dark brown or black underglaze (or underglaze pencil). Draw the delicate five-petal outlines of the flowers. Place larger blooms near the top and smaller buds lower down against the darker background. -
Fill the petals:
Using a small round brush, fill the flower petals with white underglaze. For the flowers on the light top section, manipulate the white to be slightly translucent so the speckles show through, or tint it slightly pink. -
Detail the centers:
Add a dot of diluted orange or rust in the center of each flower. Once dry, add tiny radiating lines from the center using your finest brush to give the blooms depth. -
Highlight the lower flowers:
For the flowers sitting on the dark red base, apply a second coat of white to the petals to ensure they pop against the deep background.
Step 3: Finishing Touches
-
Clear glaze application:
Once the flower details are bone dry, carefully dip or brush on a clear transparent glaze over the entire piece. Ensure an even coat without smudging the intricate line work. -
Check the foot:
Wipe the foot (bottom rim) of the vase clean with a sponge to prevent it from sticking to the kiln shelf during firing. -
Final firing:
Fire the piece in the kiln according to the specific temperature instructions for your clear glaze and clay body.
Sgraffito Twist
Instead of painting the outlines, paint the flowers solid first, then use a sharp needle tool to scratch delicate outlines through the underglaze for a textured edge.
Place your finished vase near a window where natural light can highlight the gentle color transition and delicate floral work
Raised Slip-Trailed 3D Petals
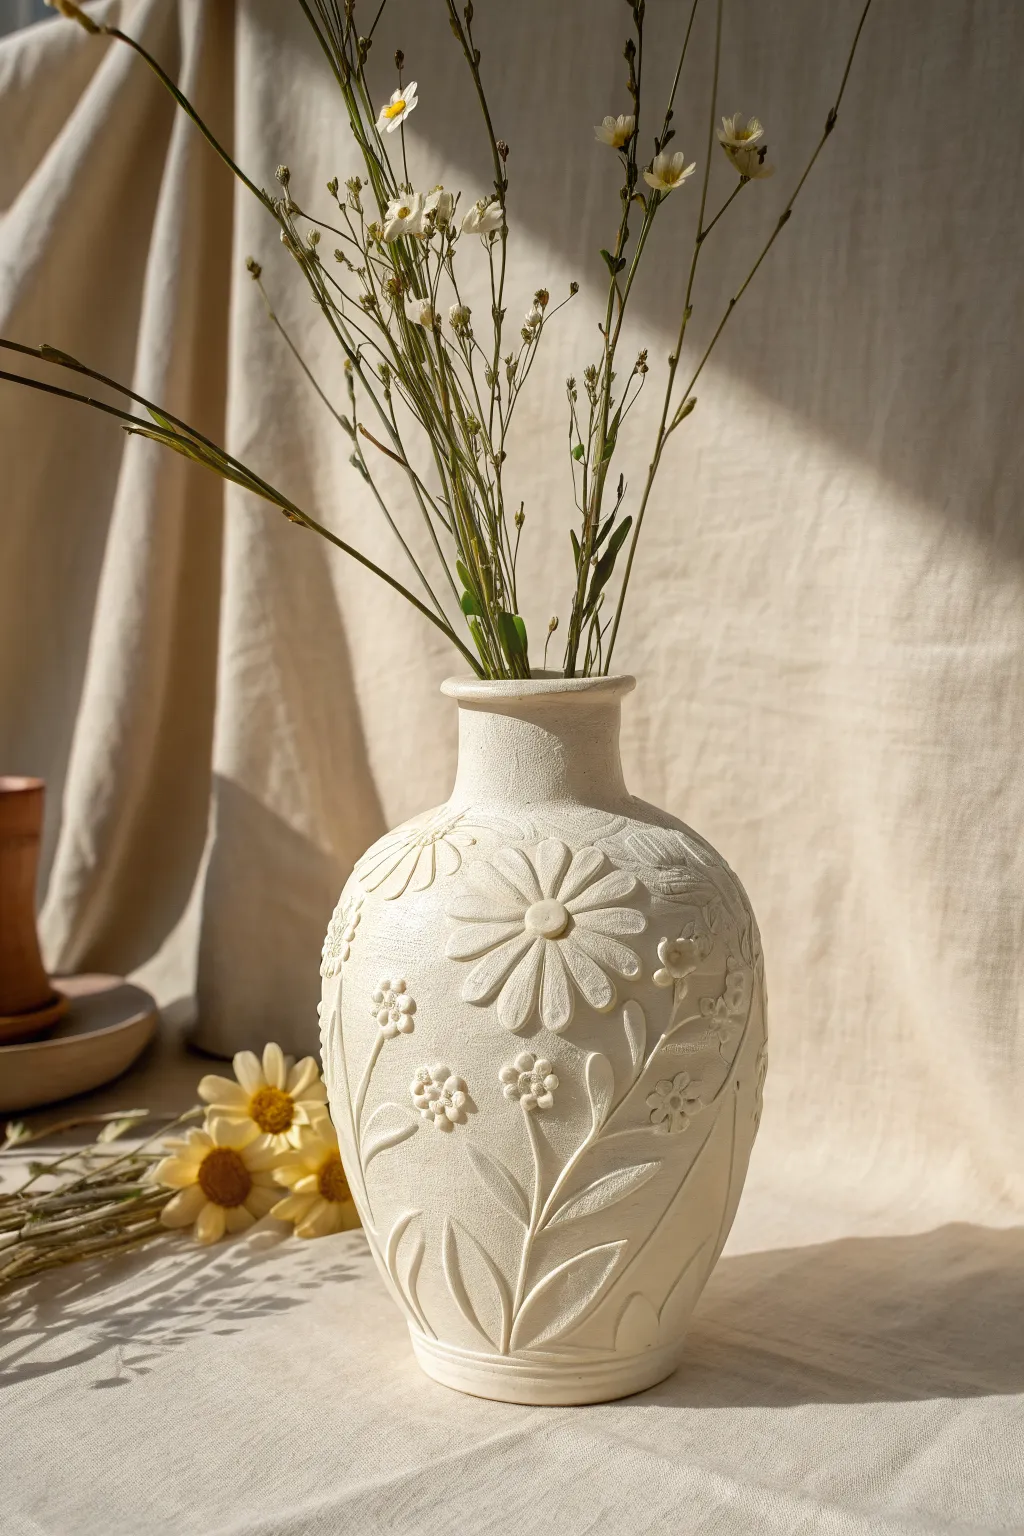
Capture the delicate beauty of a wildflower meadow with this monochrome textured vase featuring raised petals and stems. The subtle interplay of light and shadow on the white-on-white design creates an elegant, tactile finish perfect for displaying dried stems.
Step-by-Step Guide
Materials
- White stoneware clay body
- Pottery wheel (or coil/slab building tools)
- Rib tool (kidney)
- Needle tool
- Small loop carving tools
- Modeling tool with a rounded tip
- Slip (made from the same clay body)
- Small paintbrush
- Sponge
- Matte white glaze
Step 1: Forming the Vessel
-
Throw the base form:
Begin by centering your clay on the wheel and throwing a tall cylinder. Gently bell the bottom out to create a bulbous body and narrow the neck to form an elegant vase shape. -
Refine the curve:
Use a rib on the exterior while pushing gently from the inside to smooth the walls and perfect the silhouette. Aim for a distinct shoulder that transitions into a flaring rim. -
Dry to leather hard:
Allow the piece to dry slowly until it reaches a sturdy leather-hard stage. This is crucial; if it’s too wet, the carving will be messy, but too dry and adding clay will be difficult. -
Trim the foot:
Turn the vase over and trim a defined foot ring. This lifts the form visually and gives you a stopping point for your future glaze.
Cracks Appearing?
If cracks form around the added flowers during drying, compress the clay with a rounded tool and apply a tiny amount of vinegar slip to heal the separation.
Step 2: Sketching and Building
-
Plan the composition:
Lightly sketch your floral design directly onto the leather-hard clay using a needle tool. Keep the lines faint so they can be smoothed away later. -
Mix thick slip:
Prepare a thick joining slip or a soft joining clay. It should be the consistency of heavy cream or soft butter to adhere well. -
Apply clay pads:
For the largest daisy centers and main petals, score the surface lightly and press small, flattened pellets of soft clay onto your sketch marks to build up volume. -
Blend the additions:
Use a modeling tool to firmly blend the edges of these added clay pieces into the vase body, ensuring no air is trapped underneath.
Step 3: Sculpting the Details
-
Define the petals:
Using a small loop tool, carve into the added clay pads to separate individual petals. Remove material between them to create depth and distinct shadows. -
Shape the centers:
Press a small, round tool into the center of the flower additions. You can texture this center with stippling from a needle tool to mimic pollen. -
Carve the stems:
Instead of adding clay for stems, try carving the background away around the stem lines (relief carving) or trailing thick slip for a raised effect. The image suggests a mix of relief carving and added volume. -
Add leaves:
Apply small coils of clay for leaves, flatten them onto the surface, and use a knife tool to carve the central vein, creating a V-shape depression. -
Refine the edges:
Go back over every petal and leaf with a damp paintbrush. Smooth out any sharp burrs or rough carving marks to give the flowers a soft, organic look. -
Textural contrast:
I like to gently press a textured sponge against the background areas (avoiding the raised flowers) to give the ’empty’ space richness and a matte appearance.
Pro Tip: Soften the Look
After carving but before firing, lightly buff the raised floral elements with a piece of nylon stocking. This creates an ultra-smooth, stone-like finish.
Step 4: Finishing and Firing
-
Slow drying:
Cover the vase loosely with plastic to dry very slowly. Uneven drying between the thick sculpted areas and thin walls can cause cracking. -
Bisque fire:
Once bone dry, fire the piece to bisque temperature (usually cone 04 or 06) to prepare it for glazing. -
Glaze application:
Pour a matte white glaze into the interior and swirl to coat. For the exterior, spray the glaze lightly. -
Wipe back (optional):
If your glaze is thick, gently wipe the highest points of the relief with a damp sponge. This thins the glaze on the raised details, enhancing the 3D effect. -
Final firing:
Fire to your clay body’s maturity temperature (e.g., cone 6 or 10). Ensure the kiln isn’t too crowded to allow heat to circulate evenly around the relief work.
Fill your finished bas-relief vase with dried wildflowers or fresh stems to complete the natural aesthetic.
Carved Floral Border Around the Rim
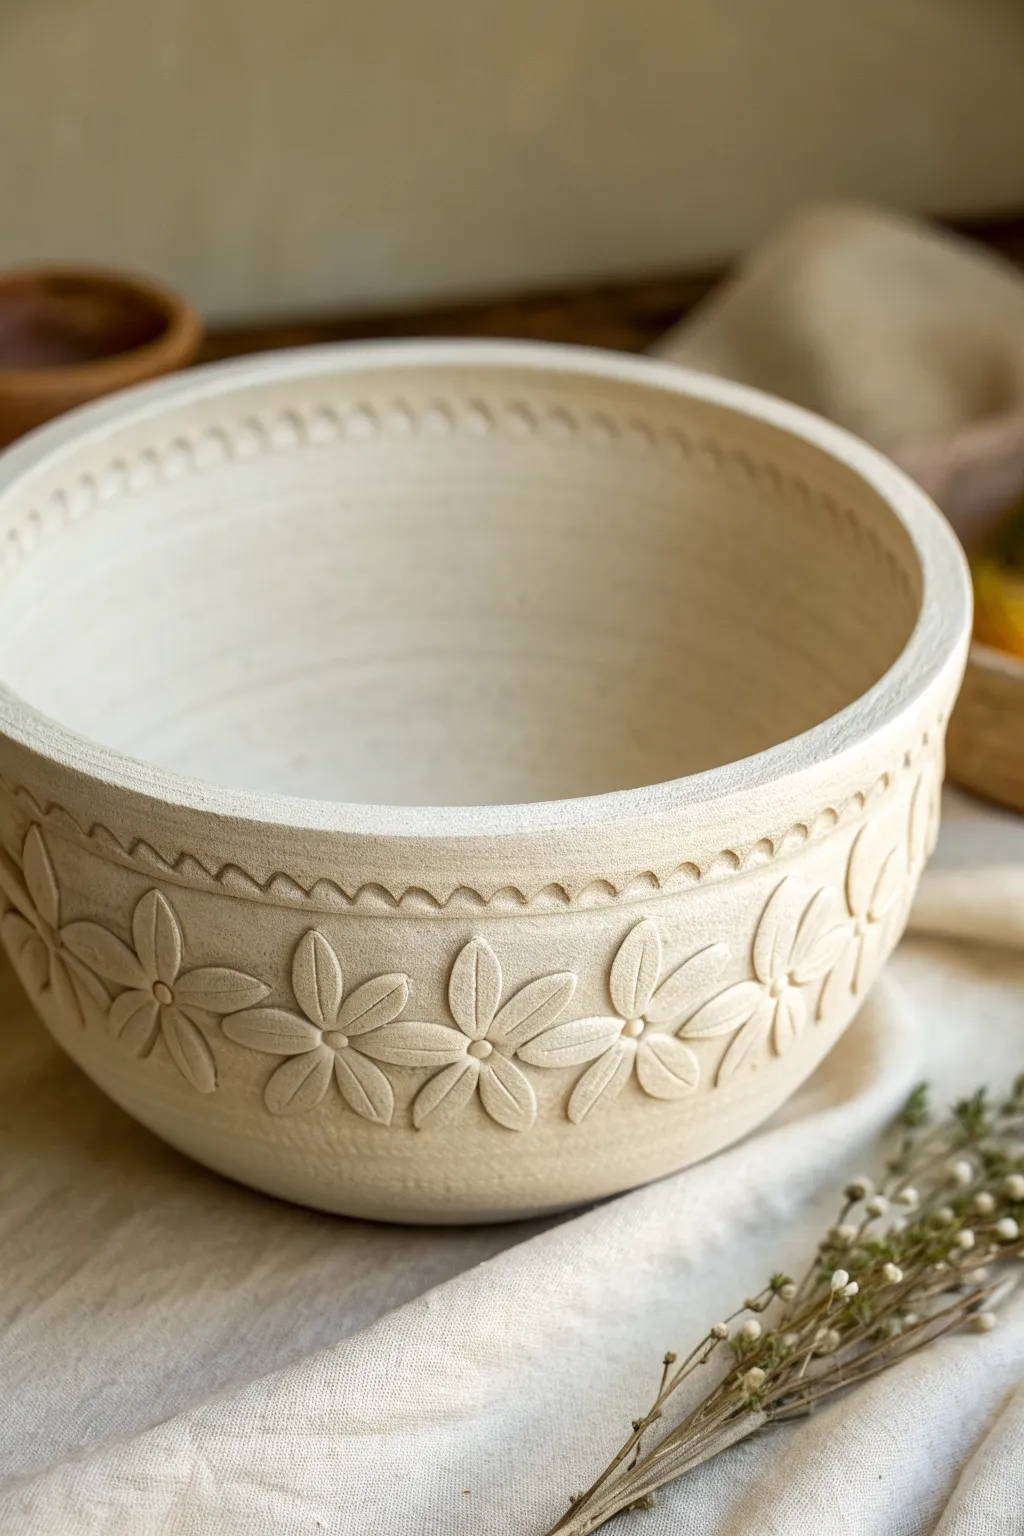
This elegant stoneware bowl features a tactile garden of carved five-petal flowers marching around its circumference. The design relies on clean relief carving techniques to create shadows and highlights, letting the natural clay texture shine without the need for complex glazing.
Detailed Instructions
Materials
- Stoneware clay body (smooth, light-toned)
- Pottery wheel (or slab roller/coil supplies if handbuilding)
- Ribs (metal and wood)
- Pattern transfer paper or soft pencil
- Loop tool (small, rounded profile)
- Needle tool
- Carving tool (pointed or V-gouge)
- Sponge
- Soft brush
- Modeling tool (rounded tip)
Step 1: Shaping the Vessel
-
Throw the basic form:
Center your clay on the wheel and open it up to create a medium-sized bowl with a wide, open rim. Aim for a slightly thicker wall than usual, specifically around the mid-section where the carving will happen—you need depth to dig into. -
Refine the curve:
Use a metal rib to smooth the exterior and create a classic hemispherical curve. Ensure the rim is flat and distinct, with a slight vertical rise before it flares out. -
Leather hard drying:
Allow the piece to dry slowly to a leather-hard stage. The clay should be firm enough to handle without warping but soft enough to carve easily like cheese. -
Trim the foot:
Flip the bowl and trim a neat foot ring. This helps define the bottom boundary for your floral pattern.
Clean Cuts Only
Carve when the clay is a firm leather-hard. If it’s too soft, the tools will drag and tear the clay rather than slicing it cleanly.
Step 2: Marking the Design
-
Establish the band:
While the pot is centered on a banding wheel, lightly drag a needle tool to scribe two parallel lines: one just below the rim and one about two inches lower, creating the ‘lane’ where your flowers will live. -
Divide the circumference:
Divide the circumference into equal sections to ensure your flowers are evenly spaced. You can make faint tick marks on the rim to guide you. -
Sketch the flowers:
Using a soft pencil or a dull tool, sketch the basic five-petal flower shapes within your marked band. They don’t need to be perfect yet, just placeholders for placement.
Step 3: Carving the floral Relief
-
Outline the petals:
Use a fine needle tool or a small V-gouge to incise the outline of each petal and the central button. Cut confidently but not too deeply. -
Excavate the background:
Switch to a small U-shaped loop tool. Carefully carve away the clay *between* the flower shapes. I prefer to remove about 2-3mm of clay here, leaving the flowers raised above the new background surface. -
Refine the petal shapes:
Smooth the edges of the raised petals with a damp sponge or a soft brush to remove sharp burrs. Use a rounded modeling tool to gently press the center of each petal, giving it a slight concave curve for realism. -
Add petal details:
Carve a single, definitive line down the center of each petal using a sharp styling tool. This vein adds direction and creates the visual separation between the petals. -
Shape the centers:
Enhance the central button of each flower by pressing a small circle tool or the back of a drill bit into the center, creating a crisp dot.
Uneven Spacing?
If your flowers aren’t spacing out perfectly at the end, overlap the last two petals slightly or turn one flower sideways to make it look intentionally organic.
Step 4: Detailing the Rim
-
Create the scalloped border:
Directly under the lip of the bowl, carve a series of small, connected semi-circles or arches. This acts as a decorative ‘lace’ edge above the floral band. -
Add texture marks:
Inside each small scallop arch, press a small divot or vertical line to provide rhythm and match the texture of the floral section. -
Create the interior rim texture:
For the inside of the bowl near the rim, use a patterned roller or a tool to impress a subtle repeating texture. In the example, this looks like small bead impressions.
Step 5: Finishing Touches
-
Smooth the background:
Go back to the negative space you carved away around the flowers. Depending on your preference, smooth it completely with a finger or add a subtle texture to contrast with the smooth petals. -
Final clean up:
Use a soft brush to sweep away all clay crumbs. Check for any sharp edges that might be uncomfortable to hold and soften them. -
Slow drying:
Cover the bowl loosely with plastic to let the varying thicknesses of clay dry at the same rate before bisque firing.
Once fired, the depth of the carving will catch glaze beautifully or stand strong on its own as a textural piece
Hidden Flower Surprise Inside the Bowl
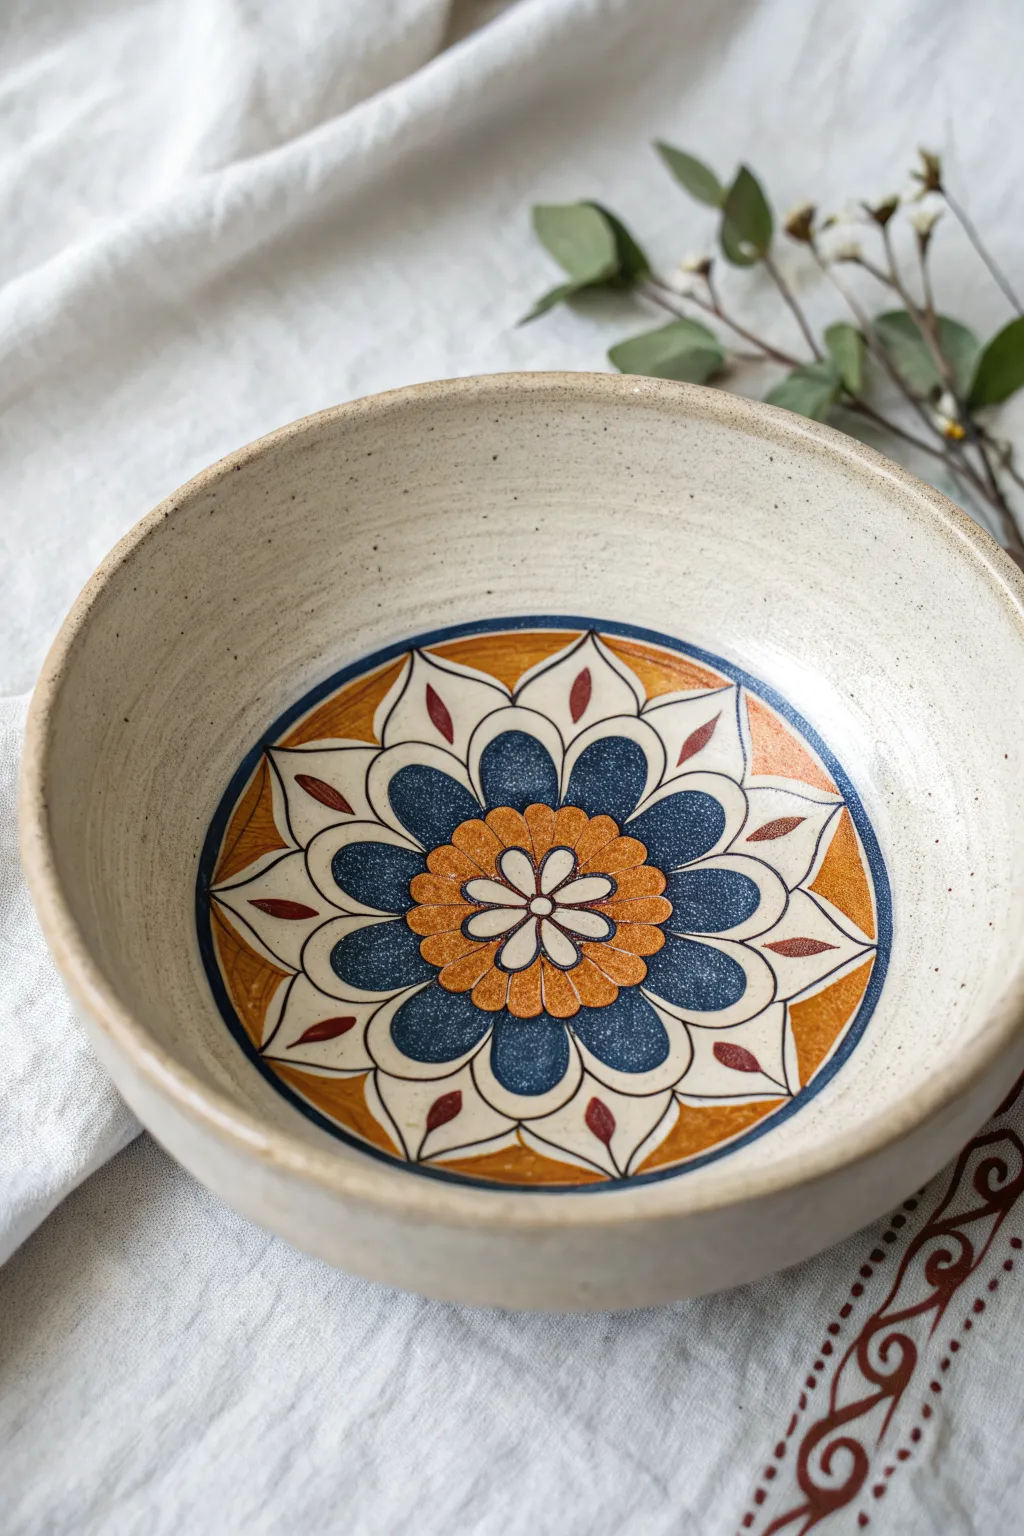
This project transforms a simple stoneware bowl into a delightful discovery with a vibrant, intricate mandala painted directly on the interior base. The design mimics folk art styles with deep blues, warm ochres, and crisp lines, creating a centering focal point that is revealed as you finish your meal.
Step-by-Step
Materials
- Bisque-fired ceramic bowl (speckled stoneware clay recommended)
- Underglazes: Navy Blue, Burnt Orange/Ochre, Red-Brown, White
- Clear transparent glaze (cone 5/6 or suitable for your clay)
- Pencil (graphite keeps lines light)
- Compass or circle template
- Fine liner brush (size 0 or 00)
- Round watercolor brush (size 4 or 6)
- Sponge and water
- Banding wheel (optional but helpful)
Step 1: Planning the Layout
-
Prep the surface:
Begin by wiping your bisque-fired bowl with a damp sponge to remove any dust or oils from handling. This ensures the underglaze adheres properly. -
Mark the center:
Find the absolute center of the bowl’s interior. A simple trick is to look straight down and make a tiny dot with your pencil. -
Draw guide rings:
Using a compass or by carefully tracing circular objects, lightly draw three concentric circles expanding from the center. These will define the layers of your mandala: the central flower, the blue petal ring, and the outer border. -
Sketch the primary petals:
Lightly sketch eight large, rounded petal shapes within the middle ring. I find it helps to draw north, south, east, and west petals first to keep the spacing even. -
Add secondary details:
Sketch the smaller inner flower petals at the very center and the pointed leaves between the large petals. Sketching lightly is key because graphite will burn off in the kiln.
Steady Hand Trick
Rest your pinky finger against the bowl’s rim or side while painting the center. This anchors your hand and acts as a pivot point for smoother curves.
Step 2: Painting the Design
-
Outline the blue petals:
Load your fine liner brush with Navy Blue underglaze. carefully outline the eight main petals you sketched. Keep your hand steady and the brush perpendicular to the surface. -
Fill the blue zones:
Switch to your larger round brush and fill in the large petals with the Navy Blue. Apply 2-3 coats, letting each dry briefly in between, to ensure an opaque, rich color. -
Paint the center bloom:
Using Burnt Orange or Ochre, paint the central flower shape. Just like the blue areas, you want multiple thin layers for solid coverage. -
Detail the outer ring:
Paint the triangular sections between the outer tips of the blue petals with your Ochre underglaze. This creates a warm, jagged border that frames the cool blue tones. -
Add red accents:
Using your Red-Brown underglaze and the fine liner brush, add the small leaf-shaped accents floating in the white space of the outer petals. -
Create definition:
Once the color blocks are dry, use a very fine brush with dark underglaze (or a black underglaze pencil) to outline the orange center and add the decorative dots and veins inside the petals. -
Refine the perimeter:
Paint a solid thin band of Navy Blue around the entire design to enclose the mandala. A banding wheel makes this step much easier—just spin and hold your brush still.
Fixing Smears
If you smudge a dark color onto a white area, don’t wipe it while wet! Let it dry completely, then gently scrape the mistake away with an X-acto knife.
Step 3: Glazing and Firing
-
Clean up:
Check for any stray smudges while the underglaze is dry. You can gently scratch them off with a needle tool or wipe them with a barely damp brush. -
Bisque touch-up (optional):
If you are painting on greenware, fire to bisque now. If you painted on bisque (as recommended), proceed to glazing. -
Apply clear glaze:
Pour a clear, food-safe glaze into the bowl, roll it around to cover the entire interior, and pour out the excess. Ensure the coating is even so the design doesn’t get cloudy. -
Wipe the rim:
If you want the raw clay texture on the rim as shown in the photo, wipe the very edge clean with a wet sponge. -
Fire the piece:
Load the bowl into the kiln and fire to the temperature appropriate for your clay and glaze combination (usually Cone 5 or 6 for stoneware).
Once cooled, your bowl is ready to hold soup or cereal, revealing a burst of art with every spoonful
Abstract Floral Gestures With Big Brush Marks
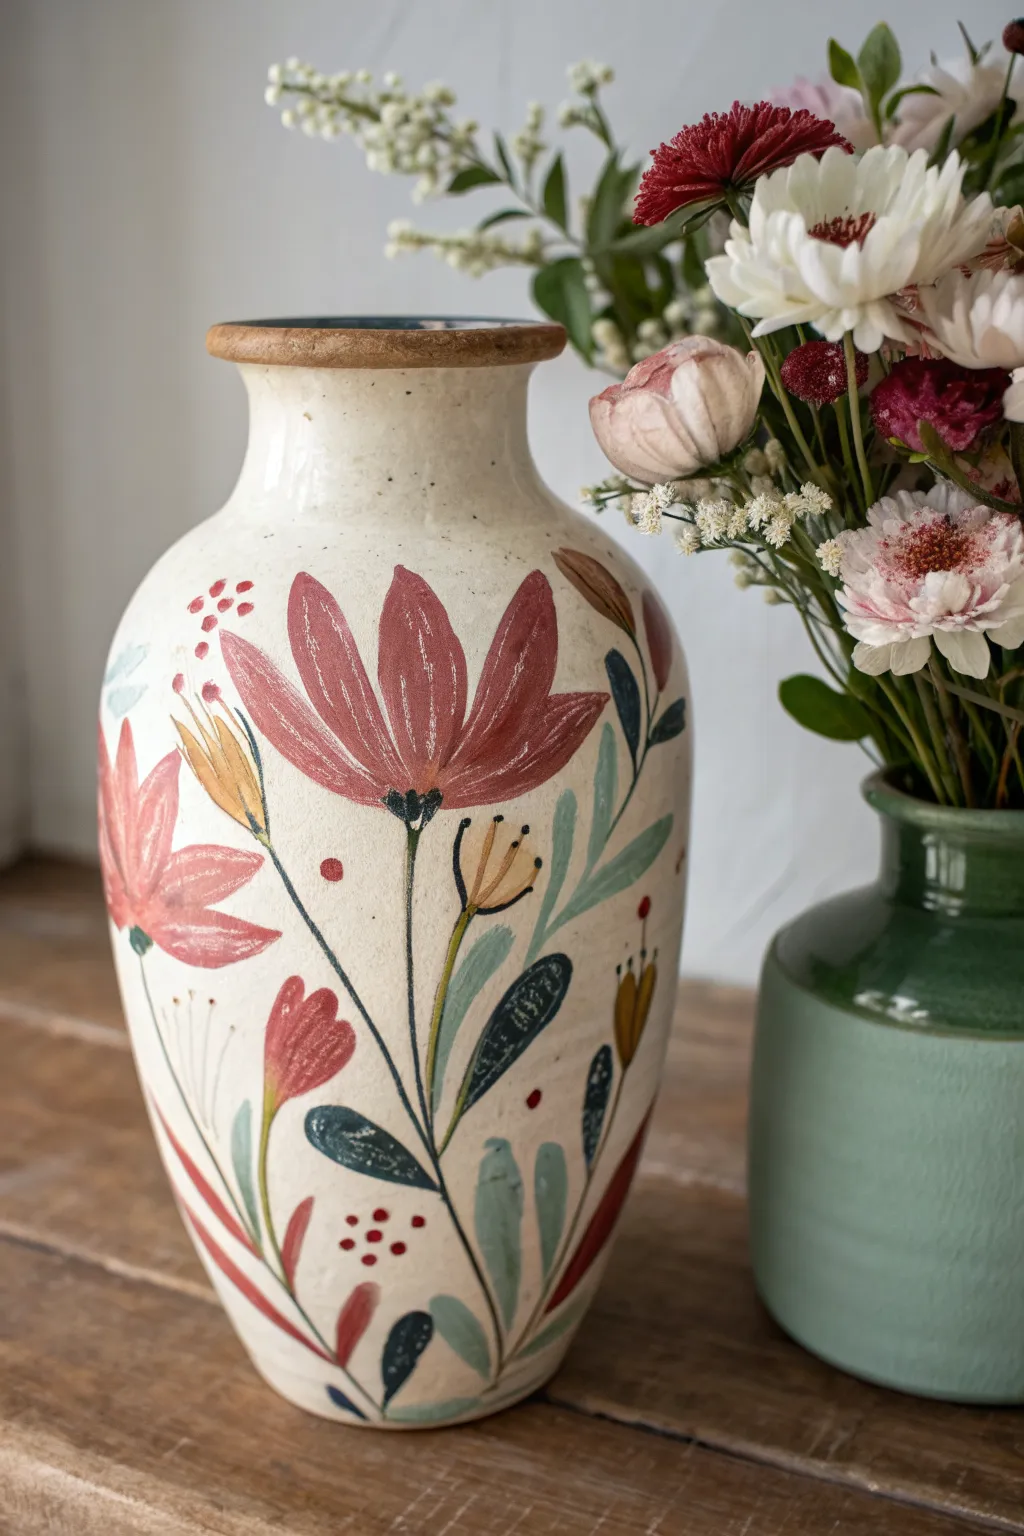
Embrace the imperfect beauty of folk art with this hand-painted ceramic vase design. Featuring sweeping floral shapes in rusty reds and muted teals against a creamy, speckled background, this project celebrates loose brushwork and natural color palettes.
Detailed Instructions
Materials
- Bisque-fired ceramic vase (tall, curvy shape)
- Creamy white underglaze (for base)
- Underglazes: Rust red, dusty pink, mustard yellow, sage green, teal blue, dark forest green
- Clear dipping glaze
- Wide flat brush (1 inch)
- Round watercolor-style brushes (sizes 4, 6, and 8)
- Fine liner brush (size 1)
- Clean water and sponge
- Palette for mixing
Step 1: Base Preparation
-
Clean the bisque:
Wipe down your entire bisque-fired vase with a damp sponge to remove any kiln dust or oils from your hands. This ensures the underglaze adheres properly. -
Apply the background:
Using a wide flat brush, apply three thin, even coats of creamy white underglaze to the entire exterior of the vase. Allow each coat to dry until it’s chalky to the touch before adding the next. -
Add texture (optional):
If you want that speckled stoneware look but have smooth clay, dip an old toothbrush into watered-down brown underglaze and gently flick tiny specks onto the dried white base. -
Define the rim:
Paint the top rim with a solid band of dark brown or bronze underglaze to frame the piece. I find a steady hand and a size 6 round brush works best here, or you can use a banding wheel if you have one.
Uneven Coverage?
If your base white looks streaky, sponge it lightly before adding flowers. This smooths ridges without removing paint, creating a better canvas for the details.
Step 2: Painting the Florals
-
Rough out positioning:
Visualize a large triangle composition for the main flower. You want the central bloom to sit slightly above the center line of the vase. -
Paint the main petals:
Load a size 8 round brush with rust red underglaze. Using a single, confident stroke for each petal, press down to create the wide belly and lift up to create the point. Paint a fan shape of about five to seven petals. -
Create secondary blooms:
To the left of the main flower, paint a smaller, tulip-like shape using dusty pink. Use simpler, shorter strokes here to imply a flower that is just opening. -
Add accent buds:
Using mustard yellow, add small, teardrop-shaped buds floating near the main stems. Keep these loose and imperfect. -
Anchor with stems:
Switch to a size 4 brush and dark forest green or charcoal. Draw long, sweeping lines starting from the base of the vase and connecting up to your flowers. Let the lines cross each other naturally; they don’t need to be straight.
Step 3: Adding Details & Foliage
-
Paint large leaves:
Using a sage green or muted teal, add large, leaf-shaped strokes along the bottom of the bouquet. Press the brush flat against the pot to get that broad, organic shape. -
Add dark contrast leaves:
In the negative spaces between the teal leaves, paint smaller, darker leaves using deep forest green. This variety in value adds depth to the design. -
Highlight the petals:
Once the red petals are dry, take a slightly lighter dry brush and feather in some white or pale pink streaks near the tips for texture. -
Center detailing:
Use the fine liner brush and black or dark brown underglaze to add the center of the main flower. A small semi-circle at the base of the petals works well. -
Stamen and pistils:
From the flower centers, pull out tiny, thin lines for stamens. Top them with small dots. -
Decorative berries:
Scatter groups of three or four small red dots around the empty white spaces of the vase to balance the composition. -
Final dry:
Let the underglaze dry completely, ideally overnight. It should feel room temperature and dry to the touch. -
Glazing and Firing:
Dip the entire vase into a clear glaze. Fire the piece according to your clay and glaze specifications (usually cone 5 or 6 for stoneware).
Brushwork Tip
Don’t overwork the petals. The charm comes from the visible brush texture. Lay the stroke down once and leave it alone for that painterly, folk-art feel.
Once fired, fill your new vase with fresh wildflowers to complement the painted ones


Have a question or want to share your own experience? I'd love to hear from you in the comments below!