If you’ve got a stack of foam board lying around, you’re sitting on a goldmine of lightweight, budget-friendly surfaces that can look seriously polished. Here are my favorite foam board painting ideas—from classic wall art looks to playful, big-impact projects you can knock out in a weekend.
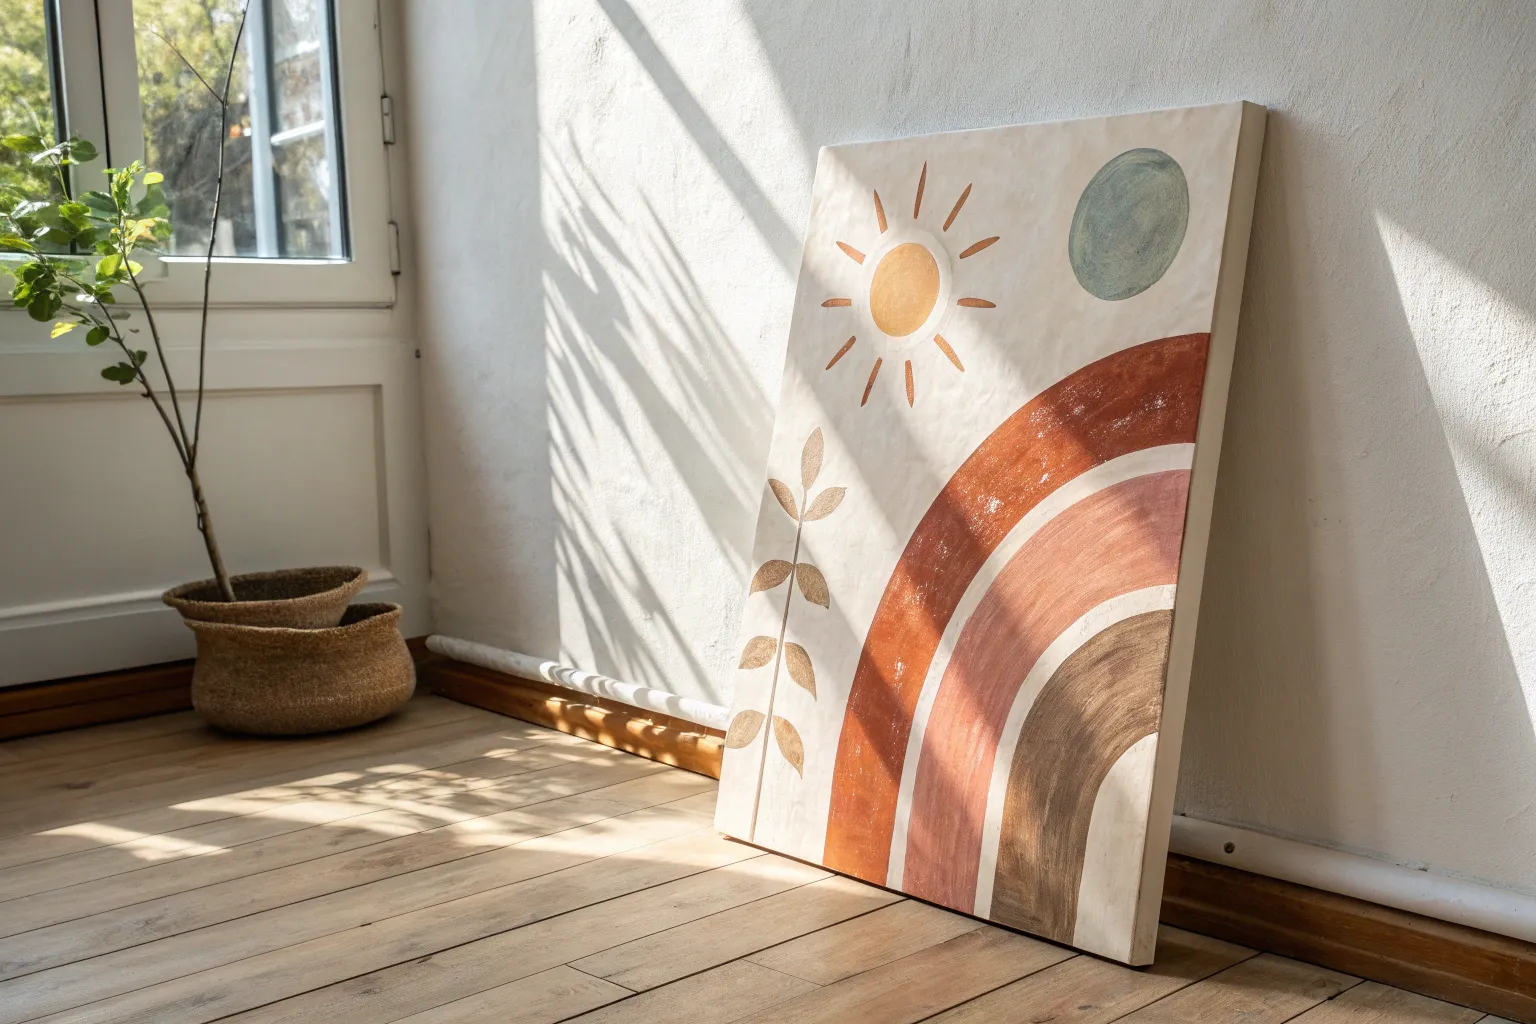
Color-Block Abstract on Foam Board

Transform a plain sheet of foam board into a striking piece of modern art with this geometric color-block design. The crisp white lines intersect with deep teals, terracotta, and sage greens to create a sophisticated visual rhythm that looks far more expensive than it actually is.
How-To Guide
Materials
- Thick white foam board (1/2 inch or thicker preferred)
- Acrylic paints (Deep Teal, Terracotta/Rust Orange, Sage Green, Beige/Cream)
- High-quality painter’s tape (frog tape works best for crisp lines)
- Flat synthetic paintbrushes (1-inch and 2-inch)
- Ruler or straight edge
- Pencil
- Palette or paper plate
- Gesso (optional but recommended for priming)
- Utility knife (if cutting board to size)
- Matte spray varnish
Step 1: Preparation & Layout
-
Prepare the surface:
Begin by wiping down your foam board to ensure it is free of dust. If you want a textured, canvas-like finish similar to the inspiration image, apply a coat of white gesso with a roller or brush and let it dry completely. This also helps the paint adhere better. -
Plan your composition:
Lightly sketch your design with a pencil. Start by drawing a few large diagonal lines that intersect across the board. The goal is to create a series of irregular triangles and quadrilaterals. Don’t worry about perfection; asymmetry makes this style interesting. -
Apply the tape:
Place your painter’s tape directly over your pencil lines. These taped areas will remain white, acting as the negative space between your color blocks. Press the edges of the tape down firmly with your fingertip or a credit card to prevent paint bleed. -
Seal the tape edges:
For razor-sharp lines, I like to brush a very thin layer of white acrylic paint (or clear matte medium) over the edges of the tape. This seals any tiny gaps so that if there is bleed, it’s white-on-white and won’t show.
Seal Prior to Peeling
Painting a thin layer of the base white color over your tape edges BEFORE adding color locks the tape down. It guarantees those super crisp, professional lines every time.
Step 2: Painting the Color Blocks
-
Mix your palette:
Squeeze out your acrylics. You are aiming for a muted, earthy palette: a deep teal blue-green, a warm rusty terracotta, a soft sage green, and a creamy beige. Adjust shades with a drop of white or black if they feel too vibrant straight from the tube. -
Start with the darkest color:
Identify the sections you want to be Deep Teal. Using your flat brush, fill in these shapes. Paint with smooth strokes parallel to the tape lines where possible to minimize ridge buildup. -
Apply the terracotta:
Clean your brush thoroughly and move on to the Rust Orange sections. Ensure these warm tones balance the cool teal by placing them in non-adjacent sections or on opposite sides of the composition. -
Fill in the neutrals:
Paint the remaining larger sections with your Beige/Cream color. This light neutral helps ground the darker colors and keeps the piece feeling airy. -
Add the sage accents:
Finally, paint the smaller accent shapes in Sage Green. This acts as a bridge between the deep blue and the warm orange. -
Coat the edges:
Don’t forget the sides of your foam board! Paint the thick edges to match the adjacent color block on the front. This ‘gallery wrap’ effect gives the lightweight board a substantial, professional canvas look. -
Check for opacity:
Let the first coat dry for about 20 minutes. If you can see streaks or the white board showing through, apply a second coat to ensure solid, opaque color blocks.
Warped Board?
Foam board can sometimes bow if wet paint shrinks as it dries. To fix this, paint a large ‘X’ or coat the entire back of the board with gesso to create equal tension.
Step 3: Finishing Touches
-
Remove the tape:
This is the satisfying part. Before the final coat is 100% rock-hard dry (aim for slightly tacky or just dry to the touch), slowly peel back the painter’s tape at a 45-degree angle. Pulling while slightly damp prevents the paint skin from ripping. -
Touch up edges:
Inspect your white lines. If any paint bled led under the tape, use a small detail brush and white paint to tidy up the lines. If the foam board texture is rough, a tiny scrape with a craft knife can sometimes remove a stray paint blob. -
Erase pencil marks:
Check the white gutter spaces for any visible pencil lines from your initial sketch and gently erase them with a white plastic eraser. -
Seal the artwork:
Once the entire piece has cured for 24 hours, take it outside and spray it with a clear matte varnish. This unifies the sheen of the different paints and protects the foam board from moisture and dust.
Hang your new geometric masterpiece and enjoy the modern gallery vibe it brings to your space


Simple Landscape on Foam Board
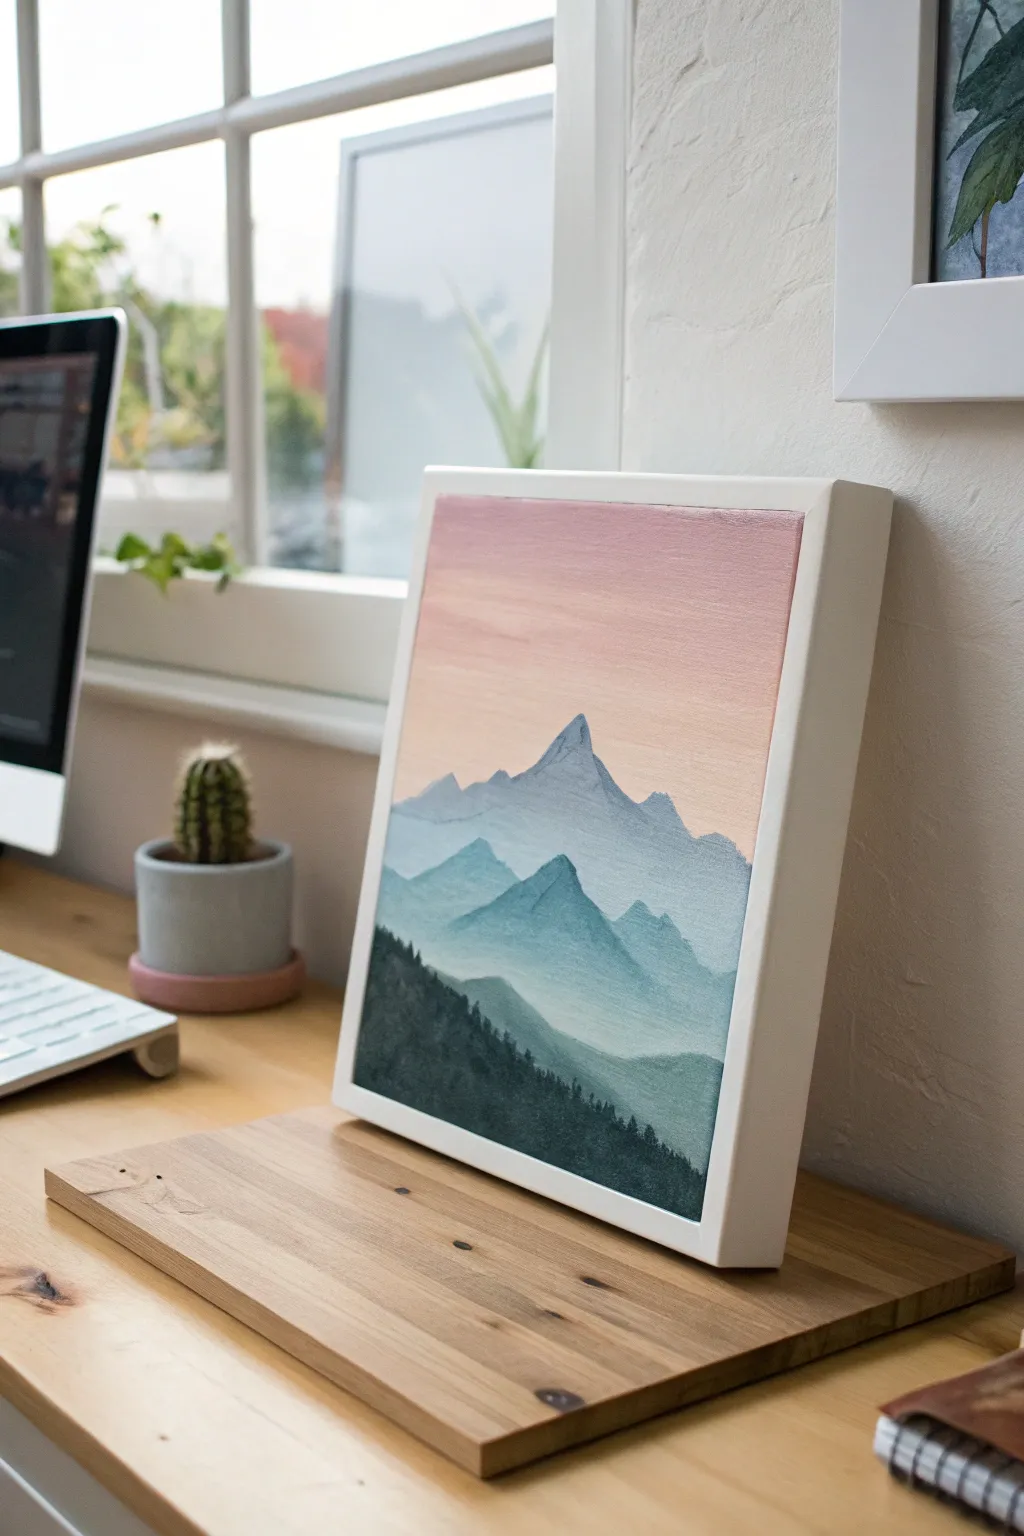
Capture the peaceful essence of fading daylight with this layered mountain landscape. Using acrylics on sturdy foam board creates a clean, modern look perfect for desk or shelf display.
Step-by-Step
Materials
- Thick white foam board (cut to square size, e.g., 8×8 or 10×10 inches)
- Acrylic paints: Titanium White, Payne’s Grey, Phthalo Blue (or Teal), Hooker’s Green, Peach/Salmon Pink
- Flat shader brushes (medium and large)
- Small round detail brush
- Palette or mixing plate
- Jar of water and paper towels
- Painter’s tape (optional for edges)
- Craft knife and metal ruler (if cutting board to size)
Step 1: Preparing the Sky
-
Cut and prep the base:
If your foam board isn’t pre-cut, measure a perfect square and slice it cleanly with a sharp craft knife. Ensure the surface is free of dust before starting. -
Mix the sunset hues:
On your palette, prepare two main colors for the sky: a soft, dusty pink and a pale peach. Mix white into both to ensure they are opaque and pastel. -
Paint the upper sky:
Using your largest flat brush, apply the dusty pink mixture to the top third of the foam board. Use horizontal strokes for a smooth finish. -
Paint the lower sky:
Without cleaning your brush thoroughly, pick up the peach color and paint the middle section of the board, stopping just below the halfway point. -
Blend the gradient:
Where the pink and peach meet, use a slightly damp brush to gently blend the two wet edges together. Back-and-forth horizontal motions work best to create a seamless transition.
Foam Board Fix
Foam board can warp if it gets too wet. Paint the back side with a simple ‘X’ or a solid coat of gesso to create tension that keeps the board perfectly flat as it dries.
Step 2: Creating the Distant Range
-
Mix the lightest blue:
Create the color for the farthest mountains by mixing a large amount of white with a tiny dot of blue and a speck of grey. It should be barely darker than the sky. -
Outline the peak:
With a smaller flat brush or round brush, paint the silhouette of the tallest central mountain peak. Keep the lines somewhat jagged to look natural. -
Fill the shape:
Fill in the mountain shape with your light blue mix. Don’t worry about the bottom edge being perfect, as it will be covered by the next layer. -
Add subtle highlights:
While the paint is still tacky, mix a slightly lighter version of your blue and brush it onto the right side of the peak to suggest a light source.
Step 3: Layering the Mid-Ground
-
Darken the mixture:
Add a bit more blue and a touch of teal or green to your previous mixture. This layer needs to be visibly darker and more saturated than the distant peak. -
Paint the middle range:
Paint a second range of mountains below the first. Make the peaks lower and wider than the central peak to create depth. Overlap the bottom of the first layer. -
Add texture:
I like to use a dry brush technique here—wipe most paint off your brush and lightly drag it down the mountain slopes to simulate rocky texture. -
Create the lower hills:
Mix an even darker teal-green shade. Paint rolling hills below the middle range. These shapes should be softer and less jagged than the peaks above. -
Mist the valleys:
To create a foggy effect, use a very watery white wash at the absolute base of these hills before they dry completely.
Fixing Muddy Colors
If your mountain layers are blending together and looking messy, stop and let each layer dry completely (about 10 mins) before painting the next row down.
Step 4: The Foreground Forest
-
Mix the darkest shade:
Combine your green with a little black or Payne’s Grey. The foreground needs to provide strong contrast to the pastel sky. -
Establish the treeline slope:
Paint a solid, dark slope rising from the bottom left corner across the bottom of the board. This anchors the composition. -
Stipple tree texture:
Using the tip of a small round brush or an old, splayed brush, tap tiny dots along the top edge of this dark slope to mimic the tops of pine trees. -
Detail individual trees:
For the largest trees closest to the viewer, use your smallest detail brush to paint thin vertical lines with tiny downward-sloping branches. -
Final touches:
Check your edges. If you want a framed look without a frame, paint the thickness (sides) of the foam board white or a solid color to finish it off.
Place your finished piece near a window to let natural light enhance those soft gradient transitions


Geometric Pattern on Foam Board
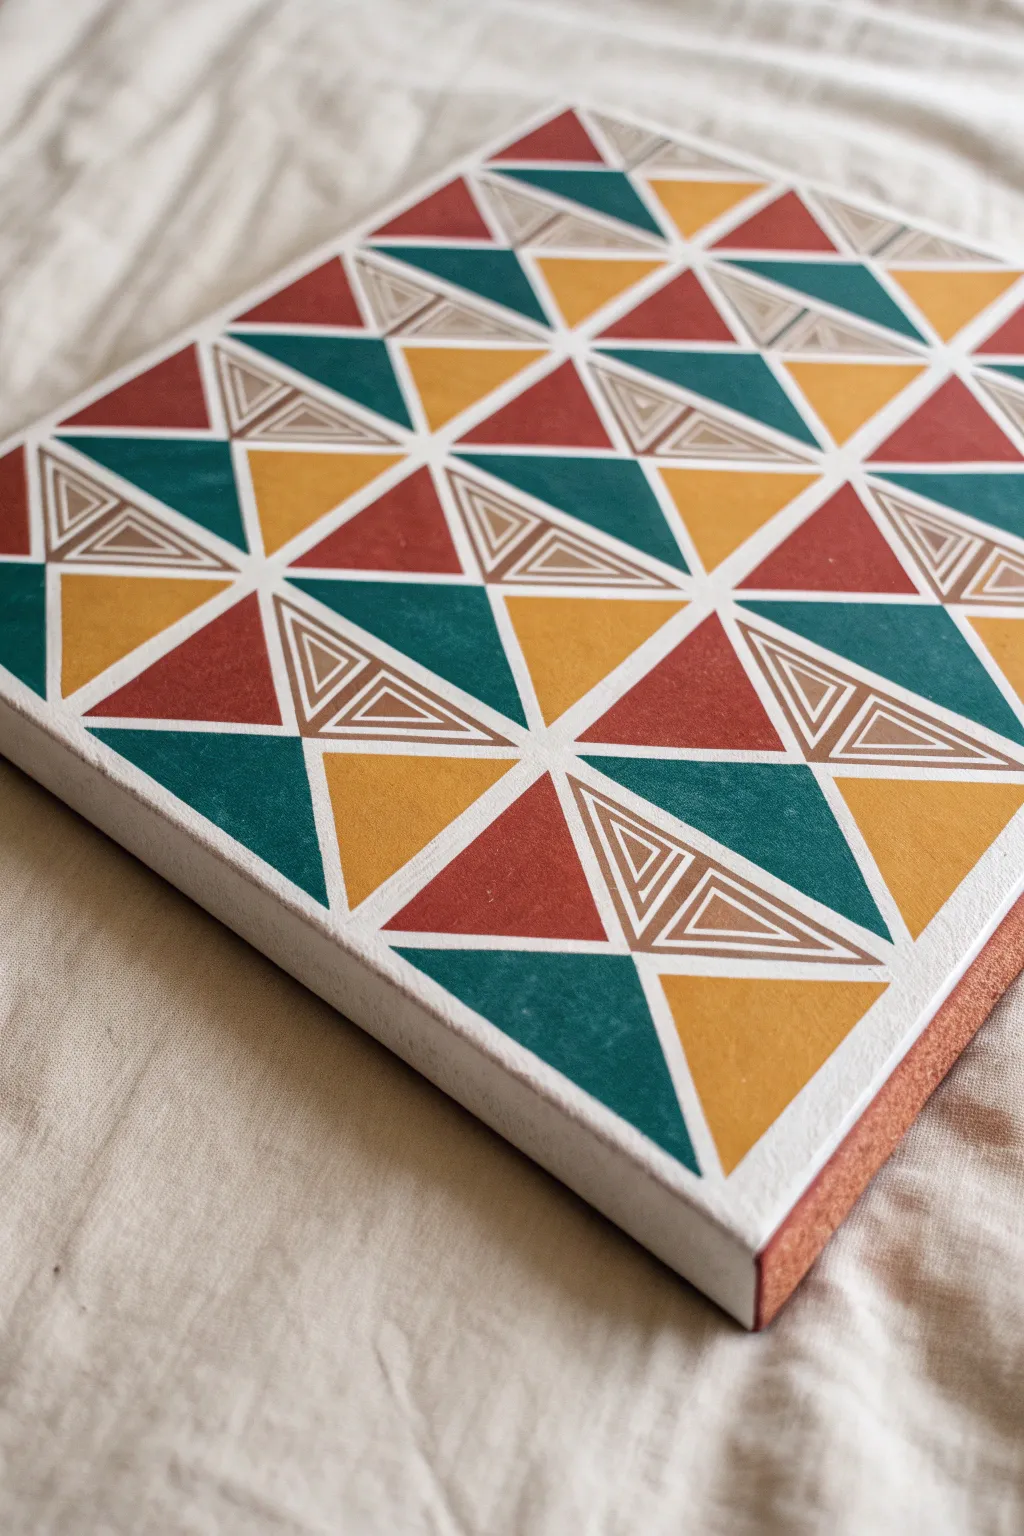
Transform a simple foam board into a striking piece of wall art using warm, earthy tones and crisp geometric lines. This project combines deep teals, burnt siennas, and mustard yellows in a structured repeating pattern that looks deceptively complex but relies on simple masking techniques.
Detailed Instructions
Materials
- Thick foam board (1/2 inch or thicker) or foam-core canvas
- Acrylic paints (Teal/Deep Green, Burnt Sienna/Rust, Mustard Yellow, White)
- Painter’s tape or masking tape (1/4 inch width is ideal)
- Ruler or quilting rule
- Pencil
- Flat paintbrushes (medium and fine liners)
- White paint pen or fine brush
- Matte mod podge or clear sealant (optional)
Step 1: Preparation & Grid
-
Prepare your base:
Start with a clean, thick piece of foam board. If the surface is too glossy, give it a very light scuff with fine sandpaper to help the paint adhere better, then wipe away any dust. -
Base coat:
Paint the entire surface of the board with a solid white acrylic paint. This acts as your primer and will also serve as the white lines between your colored shapes later. Let this dry completely. -
Mark the grid:
Using a ruler and pencil, lightly mark out a grid of squares on your board. For the scale shown in the image, 3-inch or 4-inch squares work well. -
Draw diagonals:
Within each square, draw an ‘X’ from corner to corner. This will divide each square into four equal triangles meeting at the center. Do this for every square on the board.
Crisp Line Secret
Burnish down your painter’s tape edges with an old credit card or bone folder before sealing with base paint. This ensures zero gaps for color to sneak through.
Step 2: Taping the Pattern
-
Tape the main grid lines:
Apply your thin painter’s tape (1/4 inch or narrower) directly over the pencil grid lines you drew. Press the edges down firmly to prevent paint bleed. -
Tape the diagonals:
Now apply tape over your diagonal ‘X’ lines. You may need to cut the tape ends at angles with a craft knife where they intersect to keep the joints clean and flat. -
Seal the tape:
I usually brush a very thin layer of the white base paint over the tape edges. This bleeds white paint under the tape first, effectively sealing it so your colored paints will have crisp, sharp lines later.
Step 3: Painting the Colors
-
Plan your palette:
Mix your acrylics to get earthy tones: a deep teal green, a warm burnt sienna (rust red), and a muted mustard yellow. -
Paint the first color group:
Start with the Deep Teal. Look at the reference image: notice how the teal triangles often sit opposite each other in a ‘bowtie’ shape. Fill in specific triangles to start establishing the alternating pattern. -
Add the Rust Red:
Switch to your Burnt Sienna paint. Fill in the next set of triangles, being careful to distribute them evenly across the board according to the pattern shown. -
Fill with Mustard:
Paint the Mustard Yellow sections. By now, your pattern should be emerging clearly. -
Create the ‘Line’ triangles:
Leave specific triangles white (unpainted) for now. These will become the special detailed sections with the nested lines later. -
Apply second coats:
Most acrylics will need a second coat for opacity, especially the yellow. Let the first coat dry to the touch before adding the second.
Add Texture
Mix a small amount of baking soda into your acrylic paint before applying. This gives the colored triangles a subtle, grainy terracotta texture.
Step 4: Detailing & Reveal
-
Remove the tape:
Once the paint is tacky (not fully cured, but dry to touch), carefully peel off the tape at a 45-degree angle. This reveals your crisp white grid. -
Detail the white triangles:
For the triangles you left white, use a fine liner brush mixed with Burnt Sienna paint (thinned slightly with water) or a fine paint pen. Draw nested, smaller triangles inside the white space, usually three to four concentric lines. -
Touch ups:
Use a small brush and white paint to tidy up any spots where the color might have bled under the tape. -
Paint the edges:
Don’t forget the sides of your foam board. Painting the thick edges white gives it a finished, gallery-wrapped look. -
Final seal:
Once everything is fully dry (wait at least overnight), apply a coat of matte spray varnish or clear acrylic sealer to protect the surface and even out the sheen.
Hang your new geometric masterpiece and enjoy the modern, structural vibe it brings to your space


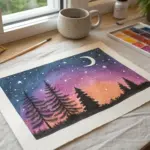
Night Sky Splatter on Foam Board
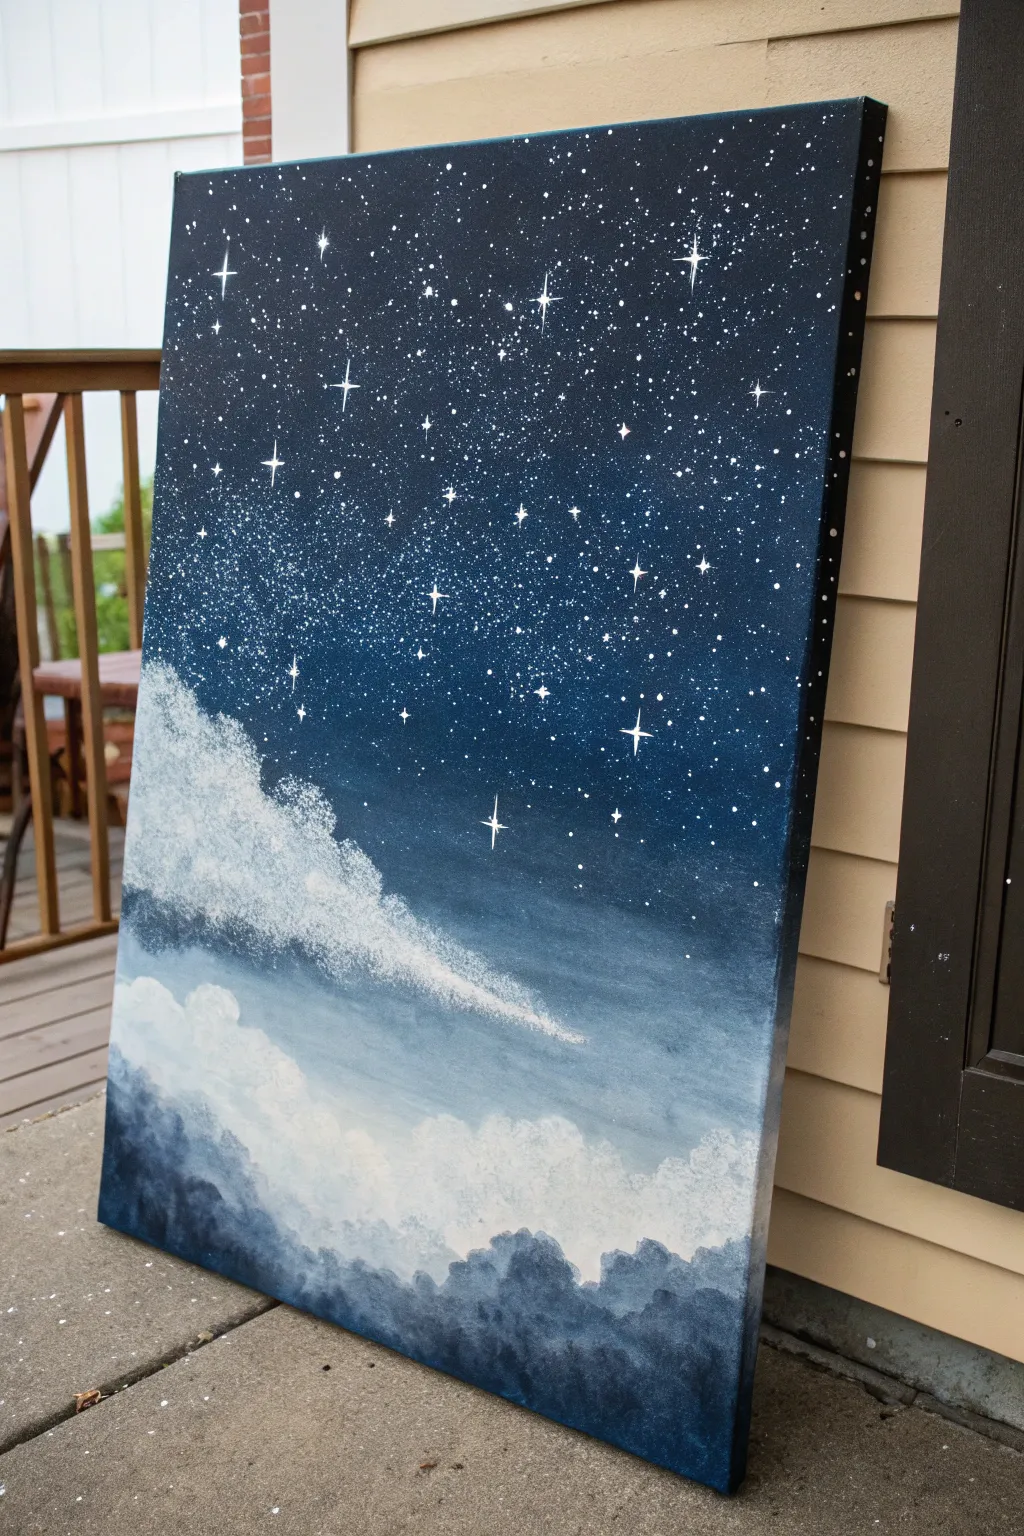
Transform a simple foam board into a breathtaking window onto the cosmos with this layered night sky painting. Using simple splatter techniques and sponge blocking, you’ll create a seamless gradient from deep space to rolling cloud cover.
Step-by-Step
Materials
- Large foam board (white or black)
- Acrylic paints: Indigo, Phthalo Blue, Black, Titanium White, Grey
- Large flat brush (1-2 inch)
- Medium round brush
- Small detail liner brush
- Old toothbrush (for splattering)
- Natural sea sponge or synthetic sponge
- Palette or paper plate
- Water cup
- Paper towels
- Drop cloth or old newspaper
Step 1: Setting the Atmosphere
-
Prepare the workspace:
Since this project involves splattering paint, lay down a generous amount of newspaper or a drop cloth to protect your surrounding surfaces. -
Base coat the sky:
Start at the very top of your foam board. Mix indigo and black acrylic paint to create a deep, midnight color. Apply this across the top third of the board using your large flat brush. -
Create the gradient:
As you move down the canvas, gradually mix in more Phthalo Blue and a tiny touch of white to your dark mixture. Blend the colors while they are wet to create a smooth transition from black-blue to a lighter midnight blue. -
Fade to the horizon:
Stop painting the blue gradient about two-thirds of the way down the board. The bottom third will be reserved for clouds and mountains, but let the blue fade out casually rather than creating a hard line. -
Dry the background:
Allow this base layer to dry completely. If the foam board warps slightly from moisture, you can press it flat under heavy books once dry, or paint the back side to even out the tension.
Oops! Blobs happen
If you splatter a giant unintentional blob, turn it into a shooting star! While wet, drag a damp brush through the blob in one direction to create a tail fading into the background.
Step 2: Creating the Galaxy
-
prepare the splatter mix:
Dilute a small amount of Titanium White paint with water until it reaches the consistency of heavy cream or liquid ink. It needs to be thin enough to fly off bristles but thick enough to be opaque. -
Splatter the stars:
Dip an old toothbrush into your thinned white paint. hold it over the dark upper section of the painting and run your thumb across the bristles to spray a fine mist of stars. Concentrate more stars at the top and fewer as you go down. -
Detail larger stars:
Using your smallest liner brush, dip into pure white paint to hand-paint the ‘hero’ stars. Paint a small cross shape first, then extend the vertical and horizontal lines to create a twinkle effect. -
Add variance:
Dot a few random larger circles with the tip of a round brush to represent closer planets or brighter stars among the mist.
Glow Up
Mix glow-in-the-dark medium into your white star paint. The painting will look normal during the day but reveal a secret glowing galaxy when the lights go out.
Step 3: Painting the Cloudscape
-
Sponge the base shapes:
Dampen your sponge and squeeze out excess water. Dip it into a mix of grey and white paint. Dab gently along the bottom edge of the blue sky to establish the vague shapes of the clouds. -
Build the white peaks:
Load the sponge with pure Titanium White. Stipple (tap repeatedly) over the tops of your grey shapes to create bright, fluffy highlights where the moonlight would hit the clouds. -
Create the diagonal drift:
Notice the large diagonal cloud element in the reference? Use the sponge to drag a trail of white paint from the left side down toward the center-right to create movement. -
Soften the edges:
If your sponge marks look too textured, use a dry, clean soft brush to very lightly sweep over the wet paint to blur the edges.
Step 4: The Mountain Silhouette
-
Mix the mountain color:
Create a dark blue-grey color by mixing your Phthalo Blue with black and a tiny bit of white. It should be lighter than the top sky but darker than the clouds. -
Block in the shapes:
At the very bottom of the board, use a round brush to paint rolling, bumpy shapes representing distant tree-covered hills or mountains. -
Layer the foreground:
I find it adds depth to make the very bottom edge slightly darker than the tops of the hills. Add more black to your mix and paint the bottom-most inch of the board. -
Blend into the clouds:
Where the mountains meet the white clouds, use a slightly watered-down brush to feather the bottom of the clouds over the mountain tops, making it look like the peaks are poking through mist. -
Final touches:
Step back and assess your galaxy. If you lost any stars behind the clouds, you can carefully add a few back in on top of the wispy cloud edges for a magical layered look.
Now you have a stunning piece of atmospheric art that captures the silent beauty of a mountain night.
BRUSH GUIDE
The Right Brush for Every Stroke
From clean lines to bold texture — master brush choice, stroke control, and essential techniques.
Explore the Full Guide
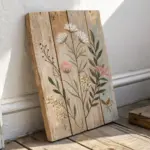
Loose Florals on Foam Board
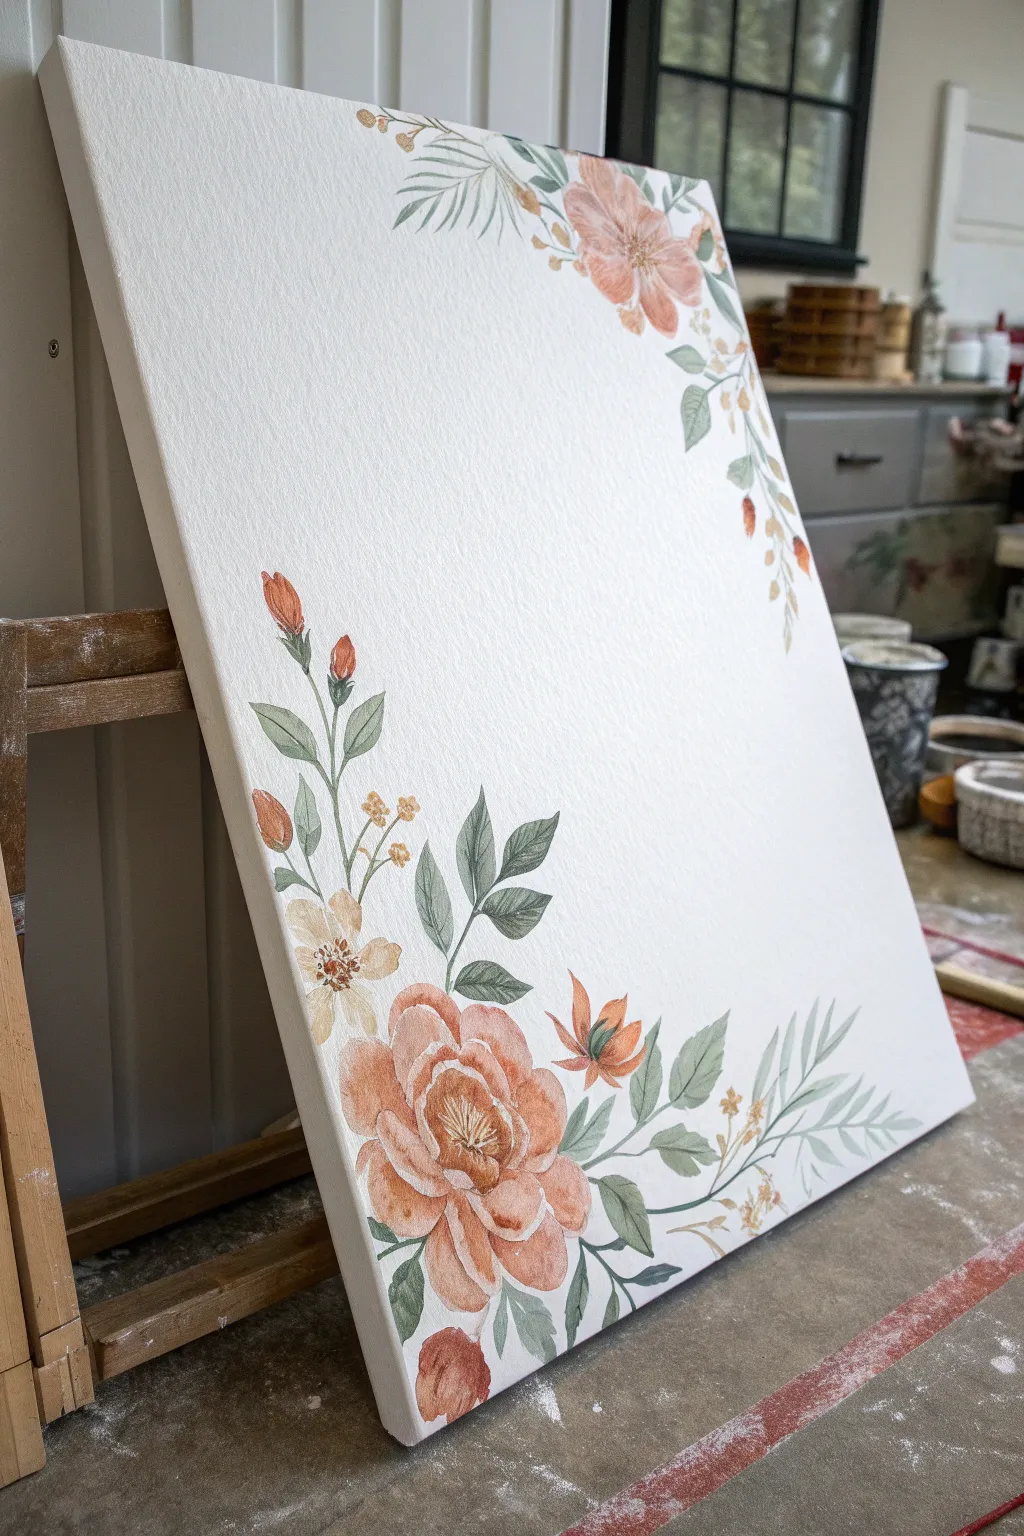
Transform a plain foam board into a piece of airy, sophisticated art with these loose floral motifs. This technique mimics the delicate transparency of watercolor while using accessible acrylics to create a framing effect that feels fresh and organic.
Step-by-Step Guide
Materials
- Large white foam board (approx. 24×36 inches)
- White gesso (optional, for priming)
- Acrylic paints (peach, coral, sage green, olive green, ochre/yellow)
- Glazing medium or water for thinning
- Round synthetic brushes (sizes 4, 8, and 12)
- Small liner brush for details
- Palette for mixing
- Paper towels
- Pencil for light sketching
Step 1: Preparing the Surface
-
Prime the board:
If your foam board has a very shiny or slick surface, start by applying a thin layer of white gesso. This gives the paint some ‘tooth’ to grab onto and helps prevent it from beading up. -
Map out the composition:
Using a pencil, very lightly sketch the placement of your main floral clusters. You want the heaviest weight in the bottom left corner and a lighter, trailing cluster in the top right to create a balanced frame.
Transparency Trick
To get that watercolor look with acrylics, don’t use white paint to lighten colors. Use water or medium to thin the pigment so the white foam board shines through.
Step 2: Painting the Main Blooms
-
Mix a wash:
On your palette, mix a coral-peach tone with a generous amount of glazing medium or water. You want the consistency to be very fluid, almost like ink, to achieve that watercolor look. -
Base layer of the large peony:
Start with the large flower in the bottom left. Using your size 12 brush, paint loose, curved petal shapes. Keep the center open for now and let the outer edges fade slightly. -
Build petal depth:
While the first layer is still slightly damp, mix a slightly stronger, darker version of your peach color. Dab this into the base of the petals near the flower center to create depth and shadow. -
Upper corner blossom:
Repeat this process for the main flower in the top right corner. Keep this one slightly smaller and airier than the bottom anchor flower. -
Add secondary buds:
Mix a soft terracotta or deeper orange. Using the size 8 brush, paint the tight rosebud shapes rising up the left side. These are simple teardrop shapes with just a hint of overlapping petals. -
Smaller filler flowers:
With a diluted yellow-ochre mix, add the small, five-petaled wildflowers near the main peony. Keep these very simple and flat.
Texture Twist
Before painting, lightly glue tissue paper onto the foam board surface with Mod Podge. This wrinkled texture mimics cold-press watercolor paper instantly.
Step 3: Adding Foliage and Stems
-
Mix your greens:
Prepare two shades of green: a muted sage for the background leaves and a deeper olive for definition. Ensure these are also thinned down for transparency. -
Paint main stems:
Use your size 4 brush to draw thin, curving lines connecting your buds to the main cluster. Let the lines break naturally; they don’t need to be perfectly continuous. -
Add broad leaves:
Switch back to the size 8 brush for the leaves. Press the belly of the brush down and lift as you pull away to create a tapered leaf shape. Vary the direction of the leaves to make the movement feel natural. -
Fern-like details:
For the feathery leaves on the far right and top, use the tip of the brush to create long, slender strokes extending from a central vein. -
Layering leaves:
Paint some lighter sage leaves appearing ‘behind’ the darker olive ones. I find this simple step adds immediate dimension without needing complex shading.
Step 4: Final Details
-
Define the centers:
Once the main peach flowers are dry, use a small liner brush and undiluted ochre or brown paint to add tiny dots and stamen lines in the center. -
Highlight edges:
Mix a tiny bit of white into your peach color. Add very sparing highlights to the tops of the curled petals on the main peony to make it pop. -
Add connecting sprigs:
Use the liner brush to add very fine, whispy stems and tiny berries (dots of orange) bridging the gaps between your main elements. -
Review and balance:
Step back and look at the overall flow. If the white space in the middle feels too stark, extend a few leaf tips slightly further inward.
Allow the board to dry completely flat before displaying your beautiful new floral border
Multi-Panel Foam Board Wall Set
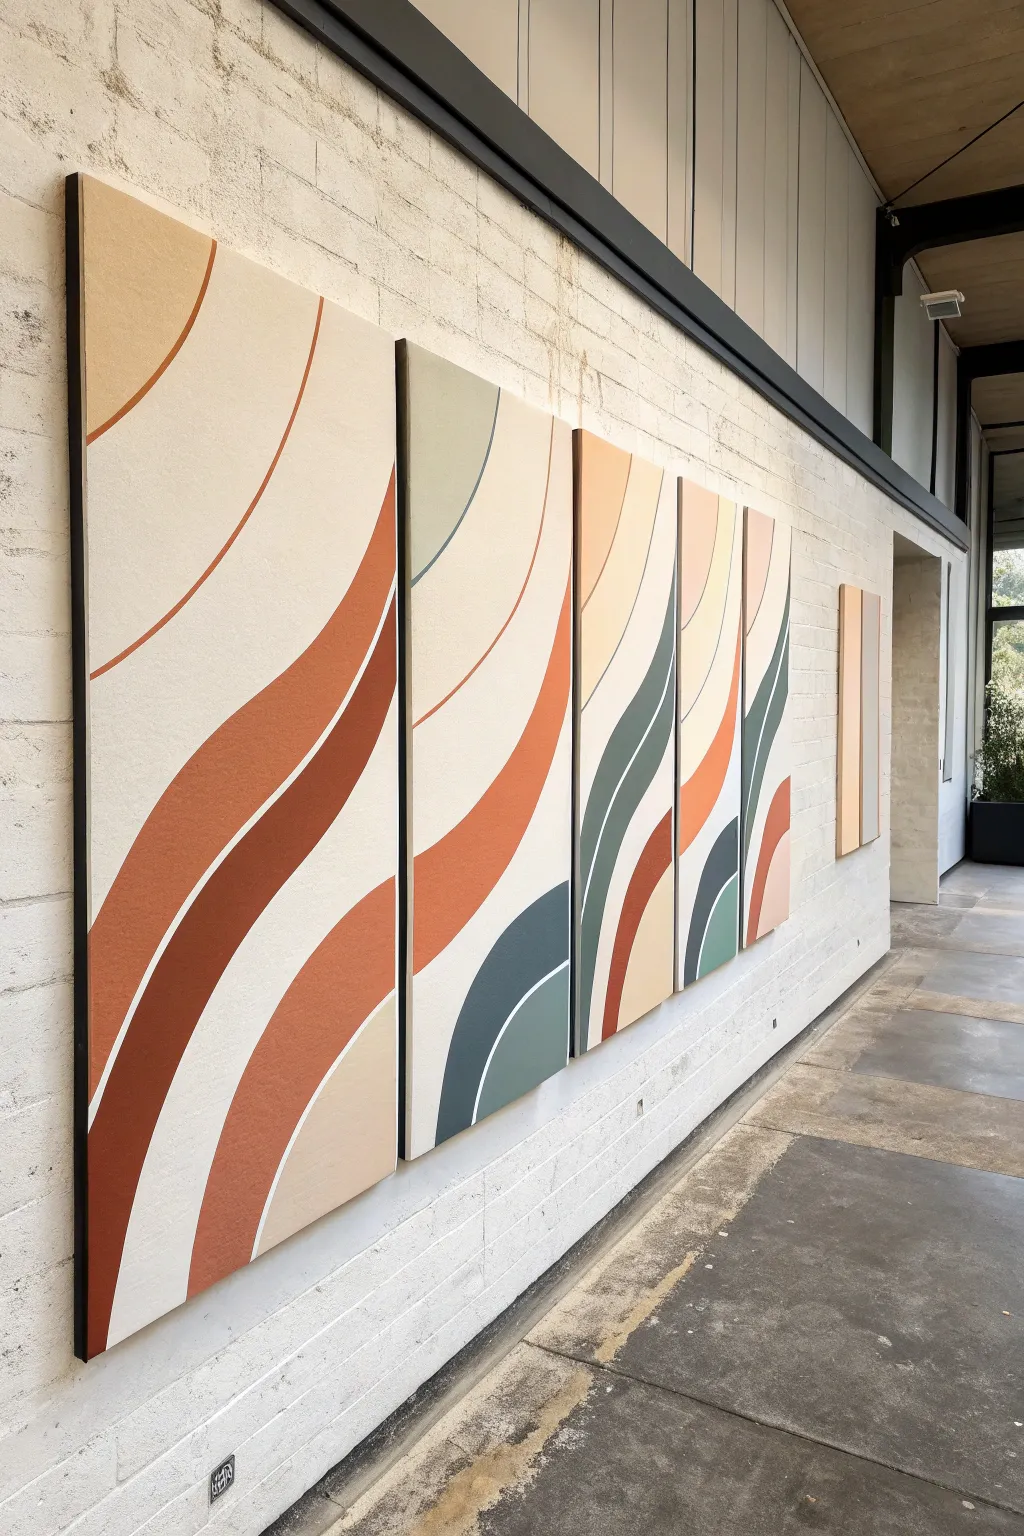
Transform a blank wall with this impressive multi-panel installation that features sweeping organic curves and a warm, earth-toned palette. This project uses lightweight foam board as a canvas, making it easy to hang and perfect for adding large-scale modern art to any space without the weight of wood or framed canvas.
Step-by-Step Tutorial
Materials
- 4 large foam core boards (white, 1/2 inch thick recommended for stability)
- Acrylic paints (terracotta, rust orange, peach/beige, sage green, and teal)
- Gesso primer
- Pencil and large eraser
- Long flexible ruler or a string
- Painter’s tape or spacing shims
- Assorted flat paintbrushes (1-inch to 3-inch sizes)
- Small round brush for edges
- Measuring tape
- Command strips or double-sided mounting tape for installation
Step 1: Preparation and Layout
-
Prime the surface:
Begin by applying a coat of gesso to the front and sides of your foam boards. Foam board can be slick, so this primer layer is crucial for giving the acrylic paint something to grip onto, ensuring smooth coverage later. -
Arrange the canvas:
Lay all four panels flat on the floor side-by-side. To ensure your design flows correctly, place spacers (like scrap cardboard or thick coins) between them to mimic the gap you will have when they hang on the wall. -
Sketch the flow:
Using a pencil, lightly sketch your sweeping curves across the entire assembly as if it were one giant canvas. Start from the bottom left with a large, swooping curve that peaks on the second panel and descends. -
Add secondary curves:
Draw parallel flowing lines to create thick bands of color. Add contrasting curves coming from the opposite direction (top right) to create visual balance. Don’t worry about perfection; organic shapes look best here. -
Refine the lines:
Step back and look at the composition from a standing height. If a curve looks jagged, smooth it out with your pencil now. Once happy, I like to lightly label each section with the intended color code (e.g., ‘R’ for rust, ‘T’ for teal) so I don’t get lost later.
Warping Worries?
If acrylic paint causes the foam board to bow as it dries, paint a large ‘X’ on the back side with gesso. This counter-tension helps pull the board back to flat as it dries.
Step 2: Painting the Design
-
Paint the background:
Start with your lightest color, likely the cream or beige tone. Fill in the large negative space areas first. Use a large flat brush and long, smooth strokes to minimize brush marks. -
Apply the first accent color:
Mix your terracotta or rust shade. Carefully paint along the pencil lines of your main swooping curve. A steady hand is key here; you can use a smaller angle brush to cut in the crisp edge before filling the rest with a larger brush. -
Paint the contrasting waves:
Moving to the cooler tones, apply the sage green or teal to the secondary curves. These cooler colors often require two coats to achieve full opacity. -
Refine the edges:
Use a small, high-quality round brush to sharpen the lines where two colors meet. If the paint bled slightly, touch it up with the base color once the accent color is fully dry. -
Paint the sides:
Since these panels have thickness, paint the exposed foam edges to match the adjacent color on the face. This makes the artwork look professional and finished from side angles. -
Seal the work:
Once all paint is completely dry (give it a few hours), apply a clear matte or satin varnish. This protects the foam board from dust and moisture and unifies the sheen of the different paint colors.
Step 3: Installation
-
Mark the wall:
Measure the total width of your arrangement, including the gaps. Use a level and painter’s tape to mark the top line or bottom line on your wall where the panels will sit. -
Attach mounting strips:
Apply heavy-duty mounting strips (like Command strips) to the back corners of each panel. Clean the wall surface with rubbing alcohol first to ensure the best adhesion. -
Hang the first panel:
Start with the leftmost panel. Align it with your guide marks and press firmly for 30 seconds. -
Space and hang the rest:
Use a spacer block (a small piece of wood or cardboard cut to your desired gap width, usually 1-2 inches) to position the second panel perfectly next to the first. Repeat for the remaining panels.
Level Up: Texture
Mix baking soda or texture medium into your paint for the rust-colored sections. This adds a grainy, stone-like relief that makes the foam board look like high-end ceramic.
Step back and admire how the continuous lines create a sophisticated, cohesive mural across your wall


Have a question or want to share your own experience? I'd love to hear from you in the comments below!