When my brain feels scattered, I love turning focus into something I can literally see on the page. These focus drawing ideas are like little visual anchors—simple, satisfying prompts that help you practice clarity while you draw.
Draw a Focused Eye Study
This project guides you through creating a highly detailed and realistic graphite study of a single human eye. Master the balance between delicate shading and sharp details to bring depth and emotion to the sketchbook page.
How-To Guide
Materials
- High-quality sketchbook paper (medium tooth)
- Graphite pencils (HB, 2B, 4B, and 6B)
- Mechanical pencil (0.5mm HB for fine details)
- Kneaded eraser
- Paper blending stump or tortillon
- Precision eraser (or eraser stick)
Step 1: Basic Structure & Outline
-
Establish the shape:
Begin with your HB pencil, pressing very lightly. Sketch the basic almond shape of the eye, paying attention to the tear duct curve on the inner corner. The upper lid should cut across the top of the iris slightly, while the lower lid just touches the bottom edge. -
Place the iris and pupil:
Draw a perfect circle for the iris. Inside this circle, place the pupil in the very center. Leave a small, irregular organic shape blank within the pupil or overlapping the iris right now—this will be your main highlight or ‘catchlight’ later. -
Mark the eyelids:
Sketch the crease of the upper eyelid, mirroring the curve of the eye’s top edge but spaced a few millimeters above it. Add a faint line for the lower lid thickness (the waterline). -
Map the eyebrow:
Lightly outline the general shape of the eyebrow above the eye. Don’t draw individual hairs yet; focus on the arch and how it relates to the eye’s position.
Step 2: Shading the Iris & Pupil
-
Darken the pupil:
Switch to a 4B or 6B pencil. Fill in the pupil area completely, making it as dark as possible, but strictly preserve that white highlight area you marked earlier. -
Create the iris rim:
Using a 2B pencil, darken the outer ring of the iris. This outline shouldn’t be a uniform hard line; soft variations make it look more organic. -
Build iris texture:
With a sharp mechanical pencil or HB, draw fine lines radiating from the pupil outward toward the rim, like bicycle spokes. Vary the length and pressure to mimic the fibrous muscle structure of the eye. -
Deepen the shadows:
Add shading to the top third of the iris, simulating the shadow cast by the upper eyelid. This creates immediate depth. Use a blending stump to soften the radiating lines slightly, then layer sharper lines on top.
Vital Highlight Tip
Never shade over the highlight in the pupil! Keeping the purity of the paper white is far brighter than using a white gel pen or paint later.
Step 3: Form & Lashes
-
Shade the sclera:
The ‘white’ of the eye isn’t purely white. Use a dirty blending stump or very light HB shading to add gray tones to the corners of the eyeball, leaving the center area brightest to make the spherical shape pop. -
Define the tear duct:
Detail the inner corner (tear duct) with soft, fleshy tones. It needs subtle highlighting to look wet, so use your kneaded eraser to lift tiny spots of graphite here. -
Draw upper eyelashes:
Using a 4B pencil, draw the upper lashes. Start inside the eyelid line and flick the pencil upward and outward in a quick, curved motion. The lashes should clump together slightly rather than sticking straight up like a picket fence. -
Add lower eyelashes:
Sketch the lower lashes with a 2B pencil. These are shorter, thinner, and more sparse than the upper lashes. Ensure they originate from the outer edge of the waterline, not the eyeball itself. -
Refine the waterline:
Darken the edge below the waterline to separate it from the lashes. Use a precision eraser to clean up the waterline itself, keeping it crisp and light to suggest moisture.
Smudge Prevention
If you’re right-handed, place a scrap piece of paper under your hand to prevent smearing the graphite as you work from left to right.
Step 4: Eyebrow & Final Touches
-
Layer eyebrow hairs:
Return to the eyebrow outline. Use a sharp 2B pencil to draw individual hairs, following the natural direction of growth—upward at the nose, then turning outward and downward toward the temple. -
Thicken the brow:
I like to go back in with a 4B pencil to add darker hairs in the center of the brow mass, creating density. Keep the edges softer and wispier. -
Skin texture shading:
Lightly shade the skin around the eye, particularly the socket crease and the side of the nose bridge. Use the blending stump to smooth this shading into a seamless gradient. -
Intensify contrasts:
Do a final pass with your 6B pencil. Re-darken the pupil if it faded, strengthen the upper lash line, and deepen the darkest creases to maximize contrast.
Now step back and admire the intense gaze you have captured on the page


Sketch a Bullseye and Arrow
This crisp, graphic illustration combines the precision of a compass rose with the satisfaction of a bullseye. Using clean lines and a pop of red, you’ll create a striking focal point that looks great in any sketchbook journal.
Detailed Instructions
Materials
- Blank sketchbook or mixed media paper
- Black felt-tip pen (0.5mm)
- Thick black marker or brush pen
- Red marker or felt-tip pen
- Compass (drawing tool)
- Ruler
- Pencil
- Eraser
Step 1: Setting the Structure
-
Find the Center:
Begin by lightly marking a small dot in the center of your page with a pencil. This will serve as the anchor point for your entire drawing. -
Draw the Axis Lines:
Using a ruler and pencil, draw a vertical line and a horizontal line through your center dot to create a crosshair. Extend these lines about 3 inches from the center in each direction. -
Draft the Circles:
Place the point of your compass on the center dot. Create your smallest circle first, about the size of a dime. -
Expand the Rings:
Continue using the compass to draw four more concentric circles, spacing them evenly apart. Aim for about a half-inch gap between each ring.
Clean Circles Tip
If you don’t have a compass, trace round objects like coins, bottle caps, or cups to effectively get perfect concentric circles.
Step 2: Inking the Target
-
Outline the Rings:
Switch to your thick black marker or brush pen. Carefully trace over your penciled circles. Keep your hand steady to ensure a smooth, uniform line thickness for a bold graphic look. -
Add the Crosshairs:
Using a ruler and a finer 0.5mm black pen, trace the vertical and horizontal axis lines. Note that these lines should cut through the rings but stop just outside the outermost circle. -
Draw the Diagonal Axes:
With the ruler, draw two diagonal lines that form an ‘X’ through the center. These should be shorter, only extending slightly past the third ring from the center. -
Cap the Diagonals:
At the ends of these shorter diagonal lines, draw small perpendicular ticks or arrowheads to give it a technical, schematic feel. -
Color the Bullseye:
Take your red marker and fill in the very center circle completely. This pop of color draws the eye immediately to the middle.
Step 3: Adding the Arrow
-
Sketch the Arrow Shaft:
Pencil in a diagonal line coming from the top right, aiming directly at the red bullseye. Stop the line just as it enters the red center. -
Draw the Arrowhead:
At the tip of the shaft near the center, draw a simplified triangular arrowhead. It should look embedded in the target. -
Construct the Fletching:
At the tail end of the shaft, draw a rectangle tilted to match the shaft’s angle. Divide it with the shaft line running through the middle. -
Ink the Arrow Outline:
Go over the arrow sketch with your 0.5mm black pen. Make the outline crisp. -
Stripe the Feathers:
Using the red marker, draw diagonal stripes inside the fletching rectangle. Leave fine white gaps between red stripes if possible, or outline stripes in black first.
Smudge Control
Work from the center outwards if you are left-handed (or right to left) to prevent your hand from dragging across wet ink.
Step 4: Final Details
-
Letter the Directions:
At the top of the vertical line, neatly print a capital ‘N’. At the bottom, print an ‘S’. Add numbers or other letters like ‘M’ at the other cardinal points for an abstract map effect. -
Add Decorative Stars:
In the empty space between the main directional markers, draw small six-pointed asterisks using three intersecting lines. -
Erase Guidelines:
Wait until the ink is completely dry to avoid smudging. Then, gently erase all remaining visible pencil marks to clean up the drawing.
Now you have a striking geometric design that keeps your artistic focus sharp


Illustrate a Lightbulb Moment

Capture the classic symbol of inspiration with this cleanly drawn lightbulb sketch on textured paper. Using fine liners and a touch of gold marker, this project creates a warm, vintage-style illustration perfect for journals or idea logs.
How-To Guide
Materials
- Cream or off-white sketchbook paper (textured)
- Pencil (HB or 2B)
- Eraser
- Fine liner pen (Black, 0.3mm or 0.5mm)
- Yellow-orange or gold marker/highlighter
- Ruler (optional)
Step 1: Drafting the Bulb Shape
-
Sketch the main circle:
Start by lightly sketching a large circle in the center of your page with a pencil. This will be the main body of the glass bulb, so try to keep it fairly symmetrical, but don’t worry about perfection. -
Add the neck:
From the bottom of the circle, draw two lines sloping slightly inward. These should curve gently into the circle, forming the neck of the bulb where it connects to the metal base. -
Draw the base structure:
At the bottom of the neck, sketch a rectangular shape with rounded edges for the screw base. Add a smaller, pointed oval shape at the very bottom tip for the electrical contact point. -
Outline the filament support:
Inside the bulb, draw a thin central stem rising from the base. I like to split the top into two branching wires that reach outward, creating a ‘Y’ shape that will hold the filament. -
Add the filament coil:
Connect the two tips of your ‘Y’ shape with a loose, curly line. Make three or four small loops to represent the coiled tungsten filament that actually lights up.
Ink Smearing?
If your fine liner smears when erasing pencil lines, wait longer for it to dry or switch to a pigment-based liner like a Micron, which dries waterproof and fast.
Step 2: Inking the Details
-
Trace the outer contour:
Switch to your black fine liner. Carefully trace over your pencil lines for the main glass bulb shape. Use a smooth, continuous stroke if possible, but a slightly shaky line adds character here. -
Define the screw threads:
On the rectangular base, draw three or four curved, horizontal lines to create the look of screw threads. Give the sides of the base a slightly ribbed edge to match these curves. -
Ink the bottom tip:
Fill in the very bottom contact point with solid black ink, or close hatching lines, to give it weight and contrast against the glass portion. -
Detail the inner stem:
Ink the internal stem structure carefully. Draw the glass mount as a small rectangle near the base of the stem, adding tiny vertical lines inside it for texture. -
Finalize the filament:
Go over your curly filament line with the pen. You can make this line slightly thicker than the stem wires to emphasize that this is the glowing part. -
Erase pencil guides:
Once the ink is completely dry—give it a full minute—use your eraser to gently remove all the underlying pencil sketches, leaving a clean black outline.
Step 3: Adding the Spark
-
Add outer rays:
Using your gold or yellow-orange marker, draw swift, short strokes radiating outward from the top half of the bulb. Vary their lengths slightly to make the light look organic. -
Highlight the glass:
Take the same marker and add a curved highlight just inside the top left or right edge of the glass bulb. This suggests reflection and roundness. -
Color inside the bulb:
Add very faint touches of the yellow color near the filament loops. Don’t fill the whole bulb; you want it to look transparent with just a hint of internal glow. -
Draw decorative stars:
Switch back to your black pen. Draw two or three small four-pointed stars or diamonds floating around the bulb to enhance the magical ‘idea’ feeling. -
Add final sparkles:
Draw tiny five-pointed star outlines further out in the background. Keep these minimal so they don’t distract from the main subject.
Pro Tip: Line Variation
Thicken the outline on just one side of the glass bulb (the side away from your light source) to instantly give the drawing more visual weight and 3D volume.
Now you have a charming symbol of creativity ready for your next big idea


Draw a Meditation Center Point
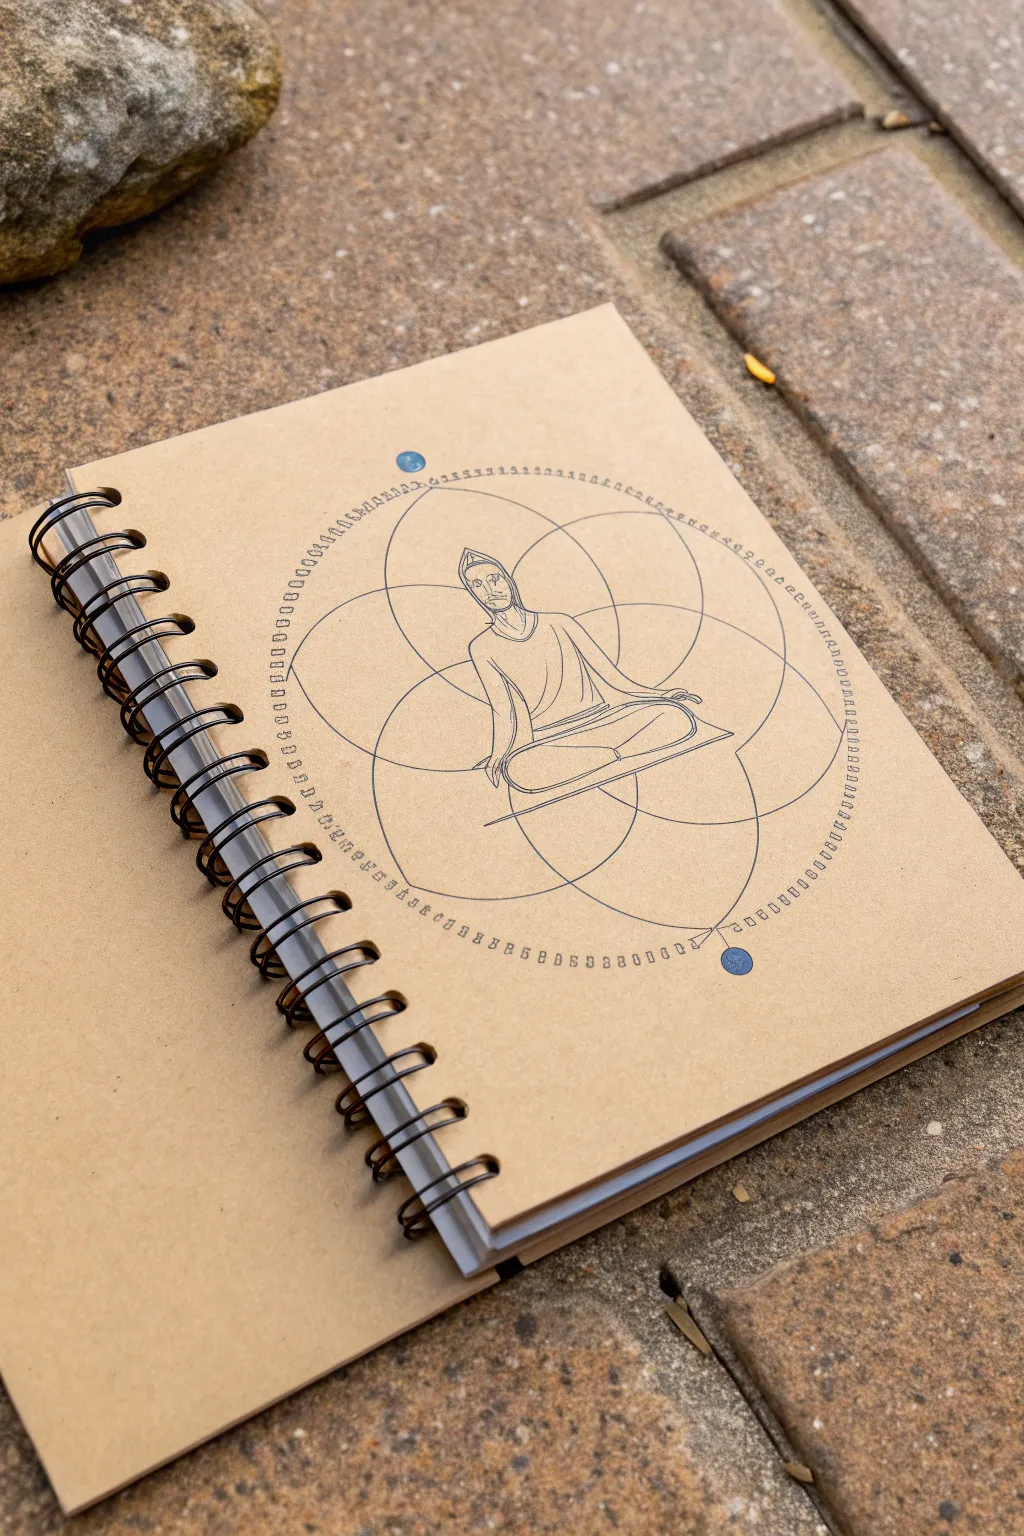
Transform a plain kraft cover notebook into a centered space for your thoughts with this geometric meditation drawing. The design features a serene figure seated within intersecting circles, framed by a delicate ring of runes or symbols for a truly grounded aesthetic.
Step-by-Step Guide
Materials
- Spiral-bound kraft paper sketchbook or journal
- Fine-point black drawing pen (0.3mm or 0.5mm)
- Ultra-fine black drawing pen (0.05mm or 0.1mm)
- Ruler
- Compass for drawing circles
- Pencil (HB or lighter)
- Eraser
- Blue market or colored pencil
Step 1: Setting the Geometric Foundation
-
Find the center:
Begin by placing your ruler diagonally from corner to corner on the notebook cover to lightly mark the exact center point with your pencil. -
Draw the main circle:
Set your compass to a radius of about 2 inches (adjust based on your notebook size). Place the needle on the center point and draw your primary circle lightly in pencil. -
Create the six-petal structure:
Without changing the compass radius, place the needle on the edge of the circle you just drew (start at the very top). Draw an arc that passes through the center point. -
Continue the pattern:
Move the compass needle to where your first arc intersects the circle’s edge. Draw another arc through the center. Repeat this step four more times around the circle until you have a six-petaled flower shape inside. -
Draw the outer boundary:
Widen your compass by about 1 inch beyond the original circle. Draw a larger concentric circle that will serve as the guide for your symbol ring.
Uneven Circles?
If your compass slips, stick a piece of masking tape over the center point. It gives the needle better traction and protects the paper from getting a hole.
Step 2: Sketching the Figure
-
Outline the posture:
In the center of the geometric flower, sketch a simple seated figure. Use the vertical centerline to keep the head and torso straight. The knees should extend into the lower left and right ‘petals’ of the geometry. -
Refine the draping:
Draw the robes flowing over one shoulder. Use sweeping, curved lines to suggest fabric folds across the chest and legs, giving the figure a relaxed, grounded weight. -
Detail the head:
Sketch the head with a slight downward tilt. You can add a simple headdress or hair outline, keeping facial features minimal or abstract to maintain a sense of universal calm. -
Add the base:
Draw a thin, floating platform or mat underneath the crossed legs. This anchors the figure within the lower half of the central circle.
Step 3: Inking and Details
-
Ink the geometry:
Switch to your 0.3mm fine-point pen. Carefully trace over the pencil lines of the intersecting circles. I find rotating the notebook as I draw helps keep my hand steady for these curves. -
Ink the figure:
Trace the seated figure with the same pen. Ensure the lines for the robes are smooth and continuous to emphasize flow. -
Create the symbol ring:
Along the large outer circle you drew earlier, start adding small marks. These can be tiny rectangles, runes, or simple tick marks. Keep them evenly spaced, working your way around the entire circumference. -
Add the dot details:
Locate the absolute top and bottom points of your outer ring. Draw a small solid circle at each pole. -
Color the accents:
Use a blue marker or colored pencil to fill in the top and bottom circles. The blue adds a nice pop of color against the warm kraft paper. -
Erase pencil marks:
Wait until the ink is completely dry—give it a few minutes to be safe. Gently erase all visible graphite construction lines to reveal the clean design.
Level Up: Metallic Touch
Trace over just the intersecting geometric circles with a gold or silver gel pen. The metallic shine looks incredible against the matte kraft paper.
Now you have a perfectly centered piece of art to inspire your daily journaling practice

PENCIL GUIDE
Understanding Pencil Grades from H to B
From first sketch to finished drawing — learn pencil grades, line control, and shading techniques.
Explore the Full Guide
Headphones as a Quiet Bubble
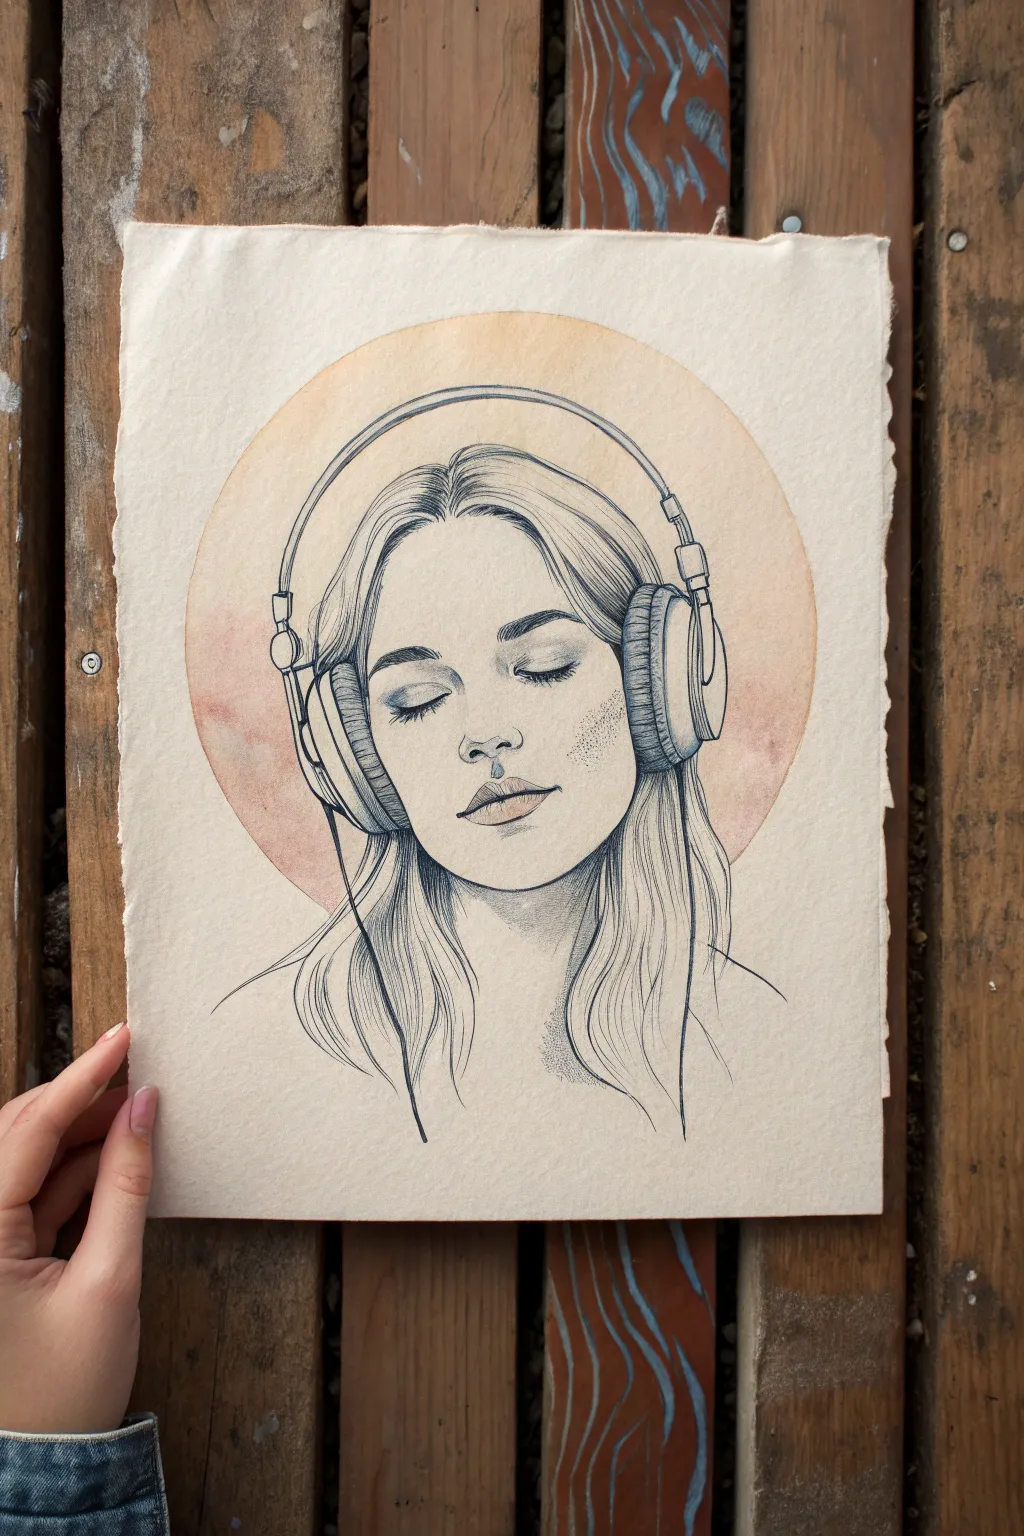
This project captures the peaceful isolation of listening to music through a delicate portrait combining fine line work with a soft, glowing background. The contrast between the precise blue-black ink details and the warm, diffuse circular wash creates a feeling of a personal bubble or sanctuary.
Detailed Instructions
Materials
- Heavyweight textured paper (cold press watercolor paper or mixed media paper)
- Fine liner pens (sizes 005, 01, and 03) in dark blue or black
- Pencil (HB or 2H) for sketching
- Kneaded eraser
- Watercolor paints (Peach, Burnt Sienna, and a touch of Pink)
- Round watercolor brush (size 6 or 8)
- Compass or a circular object to trace (about 6-7 inches diameter)
- White gel pen (optional for highlights)
Step 1: Planning and Sketching
-
Establish the background circle:
Begin by lightly tracing a large circle in the upper center of your paper using a compass or a bowl. This circle acts as a halo or a ‘bubble’ of sound and will frame the portrait. -
Map out facial proportions:
Sketch a vertical center line through the circle to help with symmetry. Lightly draw an oval mainly in the lower half of the circle for the head, positioning the chin just outside the circle’s boundary. -
Sketch the headphones:
Draw the ear cups on either side of the head first. They should be large and over-ear style. Connect them with a wide headband arc that follows the curve of the skull but sits slightly above the hair. -
Define features and hair:
Add the facial features: closed eyes for a serene look, a small nose, and relaxed lips. Sketch the hair parting in the middle and flowing down around the headphones and shoulders in loose waves.
Step 2: Applying the Watercolor Base
-
Wet-on-wet technique:
Before inking, we’ll paint the background circle. Lightly wet the inside of the circle area with clean water, being careful to paint around the sketched head and headphones if you want them to remain stark white. -
Drop in color:
Mix a watery wash of peach and a hint of pink. Gently tap this color into the wet circle, allowing it to bloom. I like to concentrate slightly darker pigment (burnt sienna) near the edges of the circle for a glowing effect. -
Let it dry completely:
Wait for the paint to be bone dry before touching it with a pen. If the paper is damp, the ink will bleed and ruin crisp lines.
Ink Confidence
Jitters ruining your lines? exhale as you draw long strokes. Pull the pen toward you rather than pushing it away for smoother curves.
Step 3: Inking the Portrait
-
Outline the face:
Using your 01 fine liner, carefully trace the jawline and neck. Keep your hand steady but allow the line weight to vary slightly for a natural feel. -
Detail the eyes and lashes:
Switch to a 005 pen for the delicate features. Draw the curve of the eyelids and add individual eyelashes with quick, flicking strokes. -
Ink the nose and lips:
Use broken lines for the nose to keep it soft—don’t outline the whole thing, just the nostrils and tip. Outline the lips gently, perhaps leaving a small gap in the line for a highlight. -
Structure the headphones:
Go back to the 01 or 03 pen for the headphones. Draw the mechanical parts with precision. Add small circles or texture to the ear cushions to suggest padding.
Golden Hour Glow
Paint the background circle with metallic gold watercolor instead of peach. It creates a stunning halo effect that catches the light.
Step 4: Hair and Shading
-
Flowing hair strands:
For the hair, use long, sweeping strokes that follow the direction of the wave. Do not outline every single hair; instead, group them into locks. -
Deepen the shadows:
Add darker shading where the hair tucks behind the ears and under the headphones. Use hatching (parallel lines) to create depth in the darker areas of the hair. -
Stippling for softness:
To create soft shading on the face (cheeks, under the chin), use a stippling technique. Dot the pen gently to build up a shadow without harsh lines. This works beautifully for the ‘blush’ area on the cheeks. -
Add the cord:
Draw the headphone cord draping down naturally from the ear cup, intertwining slightly with the hair strands. -
Final Cleanup:
Once the ink is fully dry, gently erase any visible pencil sketch lines, being careful not to rub off any watercolor pigment.
Step back and admire the quiet moment you’ve captured on paper.
One Object, Zero Clutter Still Life

Master the art of observation by drawing a single ceramic mug from direct sight, capturing its volume and texture through careful pencil work. This exercise focuses on translating the subtle curves and shadows of a real-life object onto paper without the distraction of a complex background.
Step-by-Step
Materials
- Helix-bound sketchbook or drawing paper
- Graphite pencil (HB or 2B recommended)
- Eraser
- A simple ceramic mug (preferably speckled or textured)
Step 1: Setting the Composition
-
Position your subject:
Place your mug on the table in front of you at a comfortable angle. Ideally, position the handle so it’s visible on the right side, creating an interesting silhouette to capture. -
Establish the central axis:
Lightly sketch a vertical line down the center of your page. This invisible spine will help ensure your mug stands straight and distinct rather than leaning to one side. -
Mark the height:
Make two small horizontal dashes on your axis line to determine the total height of the mug. Keep these marks light so they can be easily erased later. -
Determine the width:
Estimate how wide the mug is compared to its height. Mark the width at the top and bottom, ensuring the distance from the center axis is equal on both the left and right sides.
Wobbly Ellipses?
If your ovals look pointy like almonds, focus on rounding the corners more than you think is necessary. Practicing rows of continuous loops on scrap paper warms up your arm.
Step 2: Drafting the Ellipses
-
Sketch the rim ellipse:
At the top width marks, draw a flattened oval (ellipse) to represent the opening of the mug. Remember, because you are viewing it from an angle, it won’t be a perfect circle. -
Sketch the base ellipse:
Draw a similar, slightly rounder curve at the bottom width marks. The bottom of a cylinder often appears slightly more curved than the top due to perspective. -
Connect the sides:
Draw vertical lines connecting the outer edges of your top ellipse to the bottom curve. If your mug tapers slightly like the one in the photo, angle these lines inward just a bit as they go down. -
Add the handle shape:
Block in the general C-shape of the handle on the right side. Pay attention to exactly where it attaches to the main body on your reference mug. -
Refine the rim thickness:
Draw a second, smaller ellipse inside the top one to indicate the thickness of the ceramic rim. This gives the object a sense of solidity. -
Refine the base:
Add a small ‘foot’ or extra ring at the very bottom if your mug has one, creating a stable foundation for the drawing.
Level Up: Texture Play
Try capturing the specific surface of your mug. Use stippling (dots) for a matte stone finish, or sharp, high-contrast highlights for a glossy glaze.
Step 3: Shading and Texture
-
Clean up the outline:
Go over your structural lines with a slightly firmer stroke to define the final shape. Gently erase the clean central axis line and any messy construction marks. -
Identify the light source:
Look at where the light hits your real mug. In our example, the light comes from the left, meaning the right side and the interior will be darker. -
Apply initial hatching:
Start shading the exterior curve of the mug using diagonal hatch marks. Keep your lines loose and follow the curvature of the form to suggest roundness. -
Deepen the shadows:
Add cross-hatching (lines going in the opposite direction) on the shadowed side of the mug to build contrast. I find that gradually building up these layers prevents the drawing from getting too dark too quickly. -
Shade the interior:
Darken the inside of the mug, particularly on the side closest to the light source, as the rim casts a shadow inward. Leave the opposite inner edge lighter. -
Detail the handle:
Add shading to the underside and inner curve of the handle, treating it as a distinct three-dimensional ring attached to the main body. -
Ground the object:
Sketch a cast shadow on the table surface extending from the base of the mug. Use horizontal strokes here to differentiate the flat table from the vertical mug. -
Final touches:
If your mug has speckles or texture, add a few random dots or swift marks now to give it character, then strengthen the darkest lines for a crisp finish.
Now you have a solid, dimensional study of a simple object that captures the quiet beauty of everyday life
BRUSH GUIDE
The Right Brush for Every Stroke
From clean lines to bold texture — master brush choice, stroke control, and essential techniques.
Explore the Full Guide
Continuous Line Focus Drawing
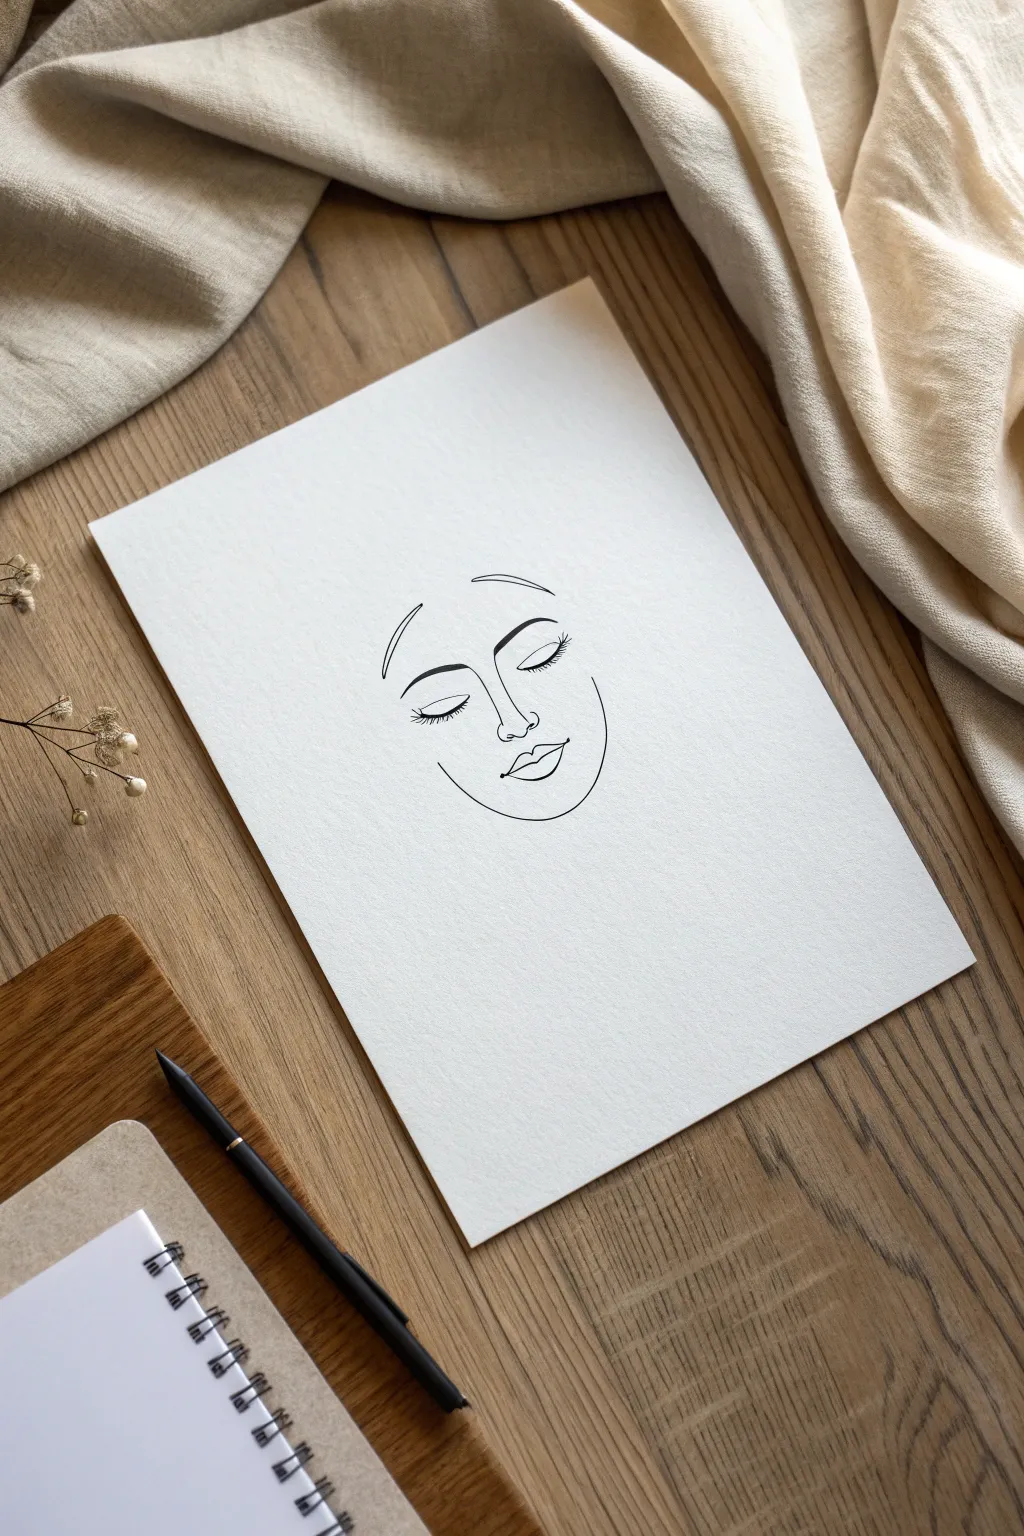
This project explores the meditative art of continuous line drawing, resulting in a minimalist face that captures emotion with just a few strokes. The textured paper adds a lovely organic feel to the crisp black lines, creating a piece that feels both modern and timeless.
Step-by-Step Tutorial
Materials
- Heavyweight textured drawing paper (cold press watercolor paper works well)
- Fine liner pen (0.5mm tip size, black ink)
- Pencil (HB or H for light sketching)
- Kneaded eraser
- Ruler (optional, for placement)
Step 1: Planning and Sketching
-
Paper preparation:
Begin by selecting a high-quality sheet of paper. I prefer using paper with a bit of tooth or texture, like cold press watercolor paper, as it adds depth to the simple lines. -
Finding the center:
Locate the approximate center of your page. You don’t need to measure perfectly, but aim to keep the face centered initially to leave plenty of negative space around it. -
Sketch the eyebrow arches:
Using your pencil very lightly, draw two soft arches for the eyebrows. The left one should be slightly higher to create a relaxed expression. -
Mark the eyes:
Below the brows, sketch two closed eyelid curves. Ensure they curve downward like crescents to signify sleep or peacefulness. The lashes will be added later. -
Define the nose bridge:
Draw a faint vertical line connecting from under the right eyebrow down towards where the nose tip will be to guide your spacing. -
Outline the nose shape:
Sketch the bottom curve of the nose and the nostril area. Keep this small and delicate; it sits just below the eye line. -
Position the mouth:
Mark the center line of the lips. The mouth should be slightly parted or full, centered below the nose with a defined cupid’s bow. -
Draft the jawline:
Lightly sketch the curve of the jaw on the right side only. In this style, we only suggest the face shape rather than closing the entire circle.
Step 2: Inking the Lines
-
Test your pen:
On a scrap piece of paper, test your fine liner to ensure the ink flows smoothly without skipping. -
Ink the left eyebrow:
Start with the left eyebrow. Draw two parallel curved lines that taper at the ends, leaving the inside empty for a clean look. -
Ink the right eyebrow:
Repeat this for the right eyebrow, keeping the stroke fluid and confident. -
Draw the left eye:
Trace over your pencil sketch for the left eyelid. At the outer corner and center, flick your pen upward in tiny, quick strokes to create delicate eyelashes. -
Create the nose bridge:
Starting just under the right eyebrow, draw a single, unbroken line down to form the bridge of the nose. -
Detail the nose tip:
Continue that line to curve around the tip of the nose and the small nostril mark. Keep the pressure even. -
Connect to the right eye:
Lift your pen and draw the right eyelid curve separately. Add the lashes with the same flicking motion used on the left eye. -
Ink the lips:
Draw the upper lip line with a distinct dip for the cupid’s bow. Then, draw the lower lip curve, slightly fuller than the top. Add a tiny dot or short line on the left side of the mouth for a beauty mark or dimple. -
finalize the contour:
Starting near the right cheekbone area, draw a long, smooth curve down to form the jaw and chin, stopping before you reach the left side of the face. This open shape keeps the drawing airy. -
Erase guidelines:
Wait at least 15 minutes for the ink to fully dry. Then, gently roll your kneaded eraser over the pencil marks to lift them away without smudging the ink.
Shaky Lines?
If your hand shakes, try drawing from your shoulder rather than your wrist. Moving your whole arm creates smoother, more confident curves than small finger movements.
Vary Line Weight
Use a thicker 0.8mm pen for the jawline and eyebrows, and a delicate 0.3mm for eyelashes. This subtle contrast adds professional depth to the simplicity.
Enjoy the calm feeling this minimal piece brings to your space
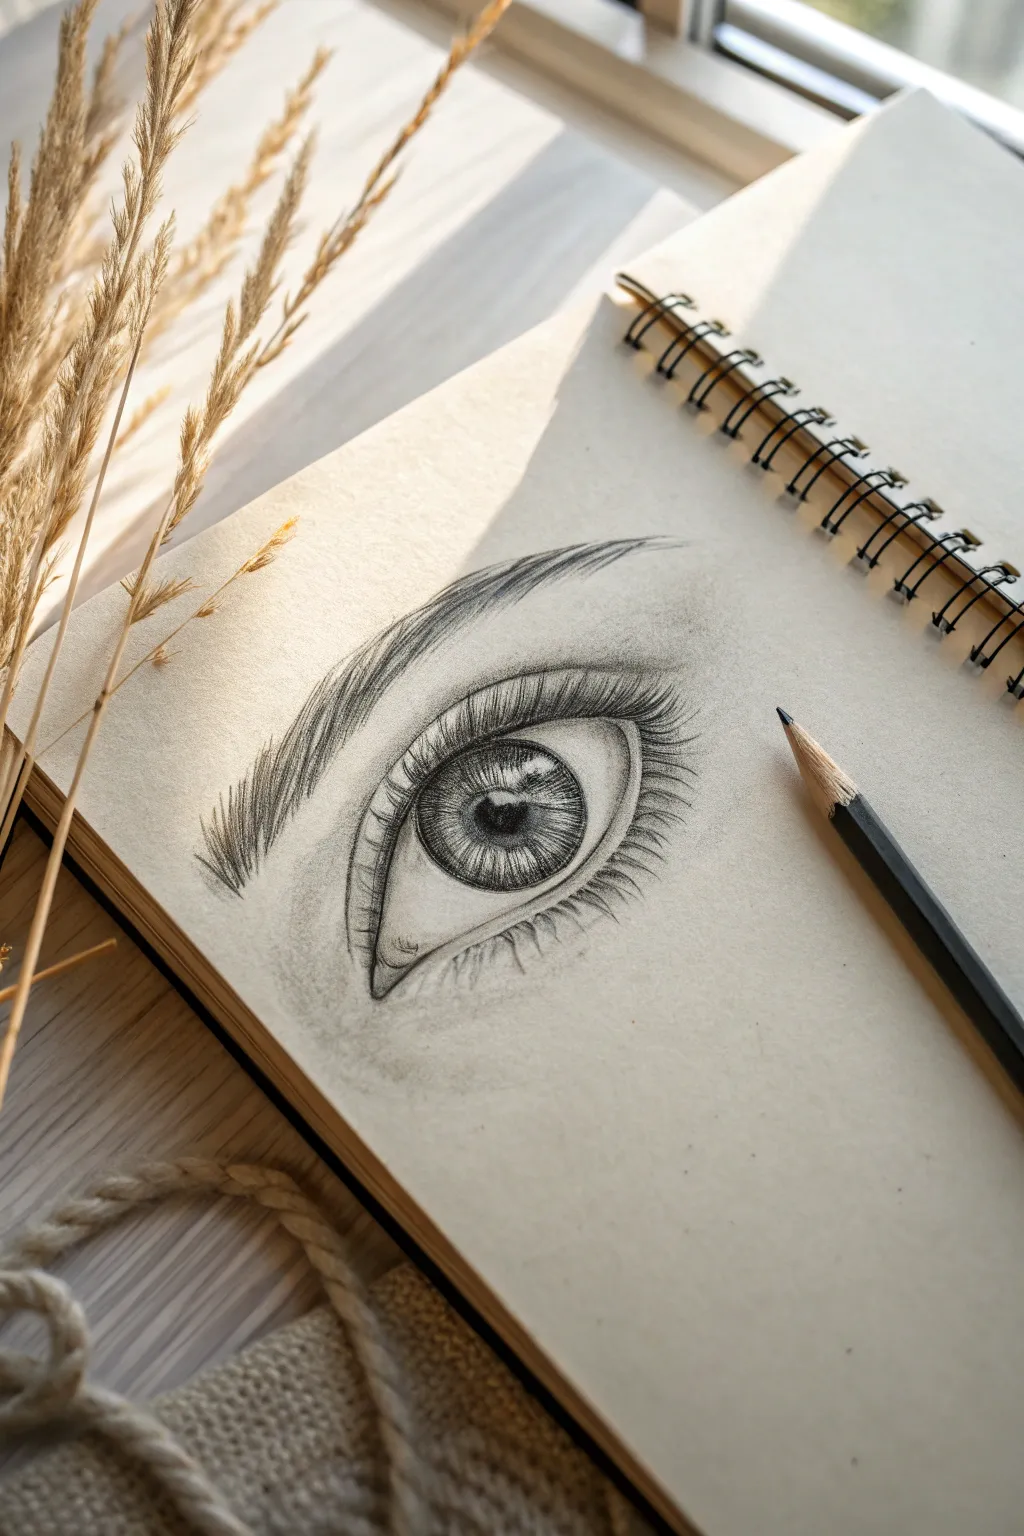
Circle of Attention Composition
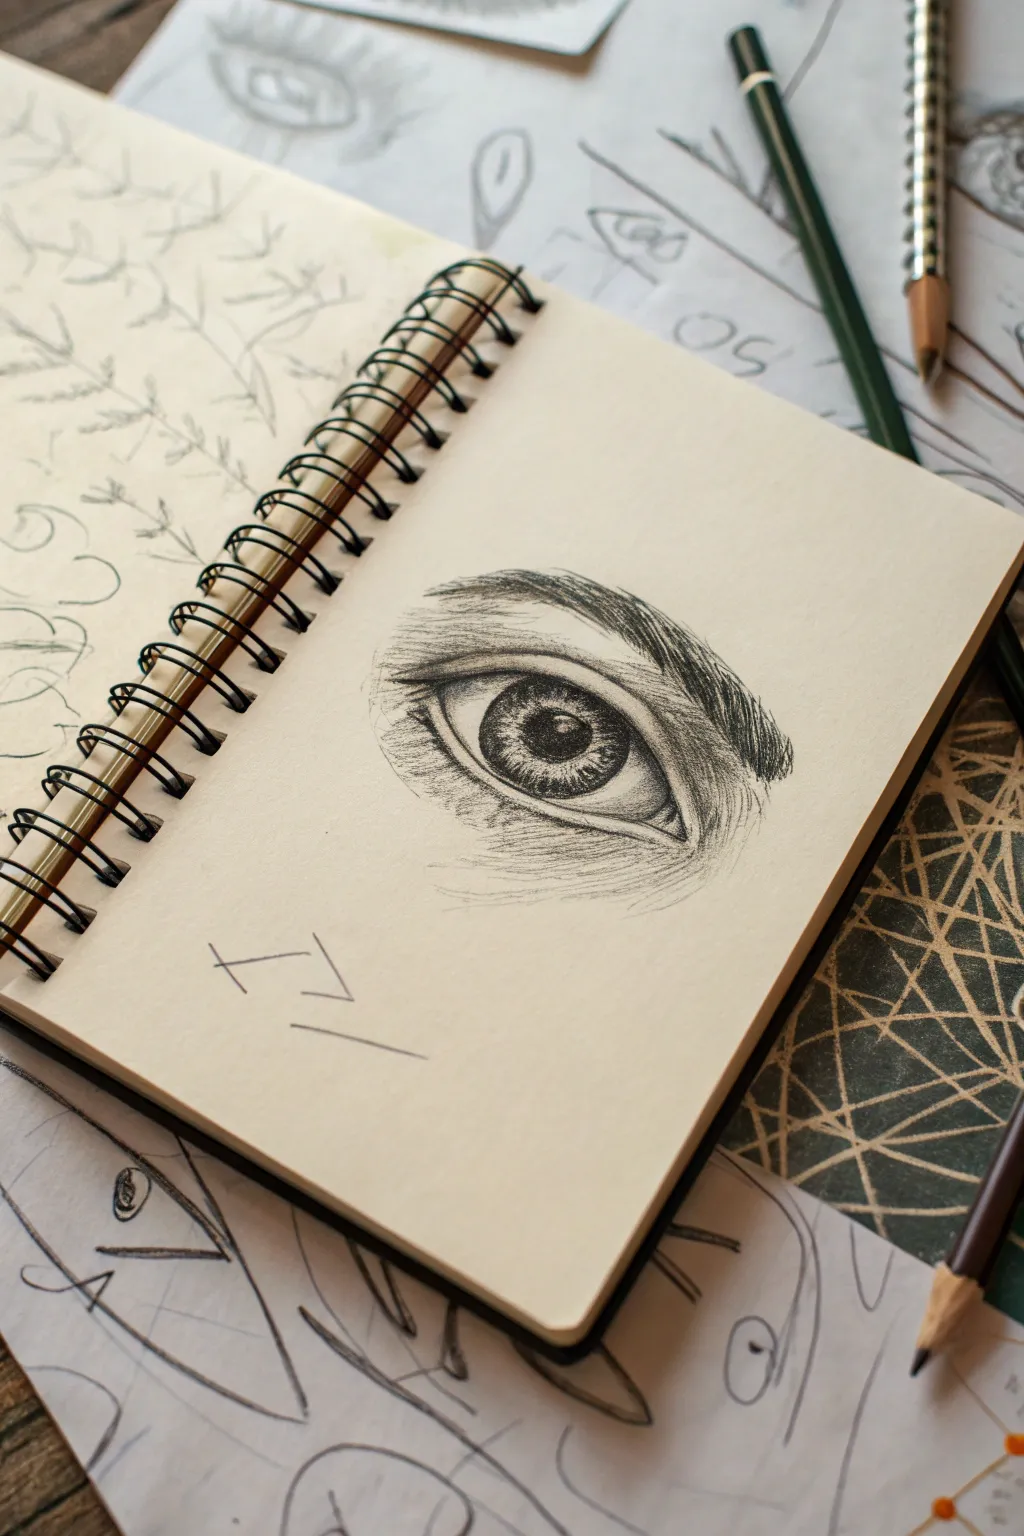
Master the art of realistic graphite drawing by focusing on one of the most expressive human features: the eye. This study captures intricate details from the iris texture to the delicate eyelashes, creating a captivating focal point on your sketchbook page.
How-To Guide
Materials
- Spiral-bound sketchbook (cream or off-white paper)
- Graphite pencils (HB, 2B, 4B, and 6B)
- Mechanical pencil (0.5mm HB for fine details)
- Kneaded eraser
- Blending stump or tortillon
- Pencil sharpener
Step 1: Planning and Outline
-
Position the eye:
Begin on the right-hand page of your open sketchbook. Locate the center of the page but shift slightly to the right to leave negative space on the left, which creates that ‘circle of attention’ feel. -
Lightly block in:
Using an HB pencil with very light pressure, sketch the basic almond shape of the eye. Don’t worry about perfect symmetry yet; just capture the main curve of the upper and lower lids. -
Add the iris and pupil:
Draw a perfect circle within the eyelids for the iris. The upper lid usually covers the very top of the iris, so don’t draw the full circle if the eye is relaxed. Place a smaller, dark circle in the dead center for the pupil. -
Mark the highlights:
Before you start shading, draw a small, irregular shape overlapping the pupil and iris to reserve the white of the paper for a reflection. This ‘catchlight’ brings the eye to life. -
Indicate the tear duct and crease:
Sketch the small, fleshy tear duct on the inner corner. Then, draw a distinctive line above the eye to mark the upper eyelid crease, following the curve of the eye itself.
Clean Highlights
Keep your hand off the paper by placing a scrap sheet under your palm while working. This prevents smudging graphite into the white of the eye.
Step 2: Shading and Depth
-
Darken the pupil:
Switch to a 4B or 6B pencil to fill in the pupil. Make this the darkest value on your page, but be careful not to color over your reserved highlight area. -
Texture the iris:
Using a sharp 2B pencil or mechanical pencil, draw lines radiating outward from the pupil like bicycle spokes. Vary the length and pressure to create the intricate muscle fibers of the iris. -
Shade the iris rim:
Darken the outer ring of the iris (the limbal ring). Softly shade the top third of the iris underneath the eyelid, as the lid casts a shadow here. -
Shade the eyeball:
The ‘white’ of the eye (sclera) isn’t truly white. Use an HB pencil to lightly shade the corners, making the eyeball look spherical rather than flat. Leave the center near the iris brightest. -
Detail the tear duct:
Add subtle shading to the tear duct area using an HB pencil. It should look moist and slightly fleshy, not starkly outlined.
Wet Look Effect
Use a white gel pen for key highlights on the pupil and tear duct. The sharp, opaque white creates a convincing wet, glossy texture.
Step 3: Refining and Texture
-
Define the eyelids:
Darken the crease line above the eye with a 2B pencil. Shade the area between the crease and the eye to show the volume of the skin fold. -
Draw the eyelashes:
Using a sharp mechanical pencil or 4B, draw the lashes with quick, flicking motions. Start at the root on the eyelid rim and flick outward and upward. Remember, lashes overlap and clump together; they aren’t picket fences. -
Add lower lashes:
Repeat the flicking motion for the lower lashes, but make them shorter, thinner, and more sparse than the upper set. -
Construct the eyebrow:
Start sketching the eyebrow hairs using short strokes that follow the natural growth direction. The hairs near the nose usually grow upward, then angle sideways as they move toward the temple. -
Thicken the brow:
Layer more hair strokes over your base to build density. I usually go back in with a 4B here to add depth to the darkest parts of the brow arch. -
Add skin texture:
Lightly cross-hatch or shade around the eye socket, bridge of the nose, and under-eye area. This context helps the eye sit naturally in a face rather than floating. -
Final contrast check:
Deepen your darkest darks (pupil, lash roots, crease shadow) one last time. Use a kneaded eraser to lift pigment from the highlight if it got smudged.
Now you have a striking, soulful eye study drawing attention right from the sketchbook page


Timed Micro-Sketch for Concentration
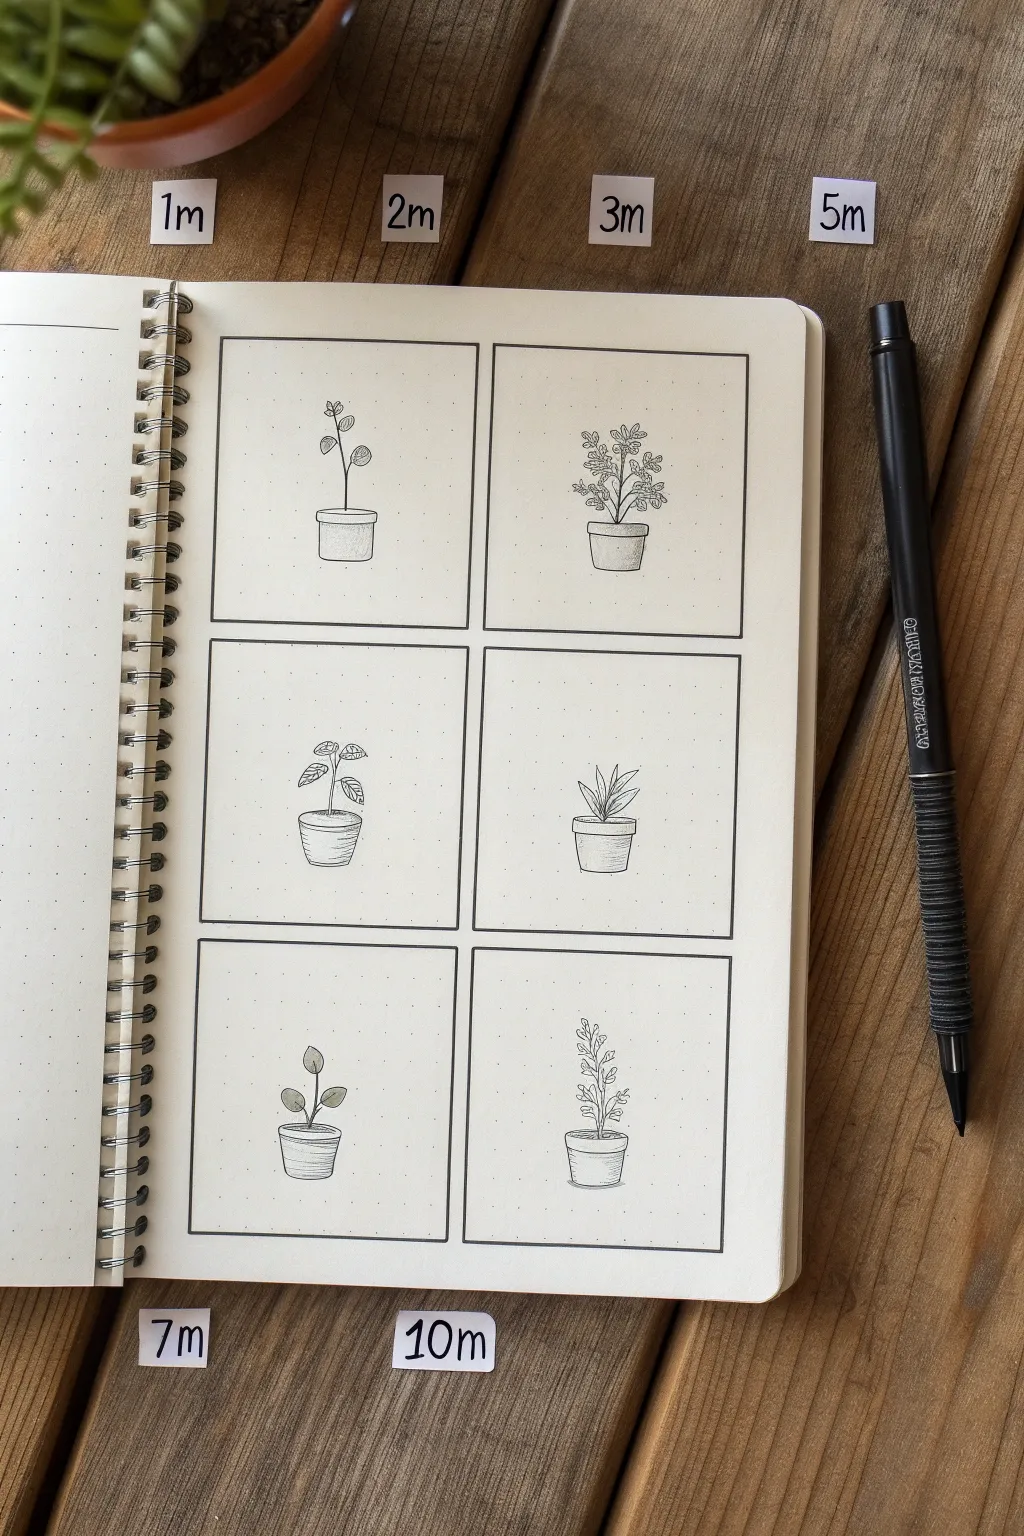
This rigorous yet rewarding exercise helps you build drawing speed and confidence by creating a series of quick, simple plant doodles within a strict grid layout. The final result is a clean, organized spread of six distinct potted plants, ranging from minimalist stems to fuller foliage, all drawn with precise fine lines.
How-To Guide
Materials
- Dotted grid journal (A5 size recommended)
- Black fine liner pen (0.3mm or 0.5mm)
- Ruler
- Pencil (for initial layout)
- Eraser
Step 1: Setting the Grid
-
Measure the layout:
Begin by determining the spacing for your six boxes. On a standard A5 dotted journal, you will want two columns and three rows. Count the dots to ensure equal spacing; typically, leaving a 2-3 dot margin between boxes works well. -
Draft the borders:
Using your pencil and ruler, lightly sketch six identical squares. Aim for squares that are roughly 2 inches by 2 inches (5cm x 5cm) to give yourself enough room for detail without being overwhelming. -
Ink the frames:
Go over your pencil squares with the black fine liner. Use the ruler to keep lines crisp and sharp. I like to stop just short of the corners to give it a slightly hand-drawn feel, or connect them perfectly for a graphic look. -
Erase guidelines:
Wait a moment for the ink to dry completely to avoid smudging, then gently erase all pencil marks to reveal clean, empty frames.
Step 2: Plant Variations 1-3
-
Sketch the first pot (Top Left):
In the first box, draw a simple cylindrical pot slightly below the center. Add a thin rim at the top. Draw a single, thin stem rising up with three small, sparse leaves branching off near the top. -
Detail the first plant:
Give the leaves a bit of vein detail with tiny flicks of your pen. Shade the right side of the pot with horizontal hatching lines to suggest roundness. -
Create the second plant (Top Right):
Draw a slightly tapered pot for this one. Create a bushier plant by drawing multiple branching stems. Add clusters of small, rounded leaves to fill the upper half of the box. -
Refine the foliage:
Stipple or add tiny circles within the leaf clusters to create texture. Add a drop shadow to the pot’s rim and curve the bottom line of the pot to emphasize perspective. -
Draft the third plant (Middle Left):
For this box, draw a rounded, bowl-shaped pot with a textured rim. Draw a central stem that splits into two, featuring larger, drooping leaves with visible veins. -
Add texture:
Use horizontal curved lines across the body of the pot to give it a ceramic texture. Darken the soil area at the base of the stem.
Pro Tip: Line Weight
Use a slightly thicker pen (0.5mm) for the outlines of the pots and frames, and a thinner nib (0.1mm or 0.3mm) for the delicate leaf veins to create instant visual depth.
Step 3: Plant Variations 4-6
-
Draw the succulent (Middle Right):
Draw a standard terra-cotta style pot with a thick rim. Instead of a stem, draw spiky, aloe-like leaves emerging directly from the pot, overlapping each other. -
Shade the succulent:
Add vertical lines on the succulent leaves to show their fleshy volume. Shade under the rim of the pot with tight cross-hatching. -
Create the stiff plant (Bottom Left):
Draw a pot with horizontal ridges. Sketch a stiff, upright stem with opposite pairs of oval leaves. Keep the leaves simple and uniform. -
Draw the vine (Bottom Right):
For the final box, draw a simple pot. Create a tall, winding vertical vine that snakes upward, with small leaves sprouting in alternating directions all the way to the top. -
Final touches:
Review all six drawings. Strengthen any outer lines on the pots that look too thin. Add a tiny bit of stippling (dots) on the leaves of any plant that looks too flat to add depth. -
Clean up:
Do a final pass with your eraser to remove any lingering pencil sketches from inside the frames.
Level Up: Color Accents
Use a single green watercolor pencil or marker to add a splash of color. Don’t fill the leaves perfectly; scribble loosely outside the lines for an artistic, modern look.
You now have a beautifully organized botanical study that serves as both practice and art
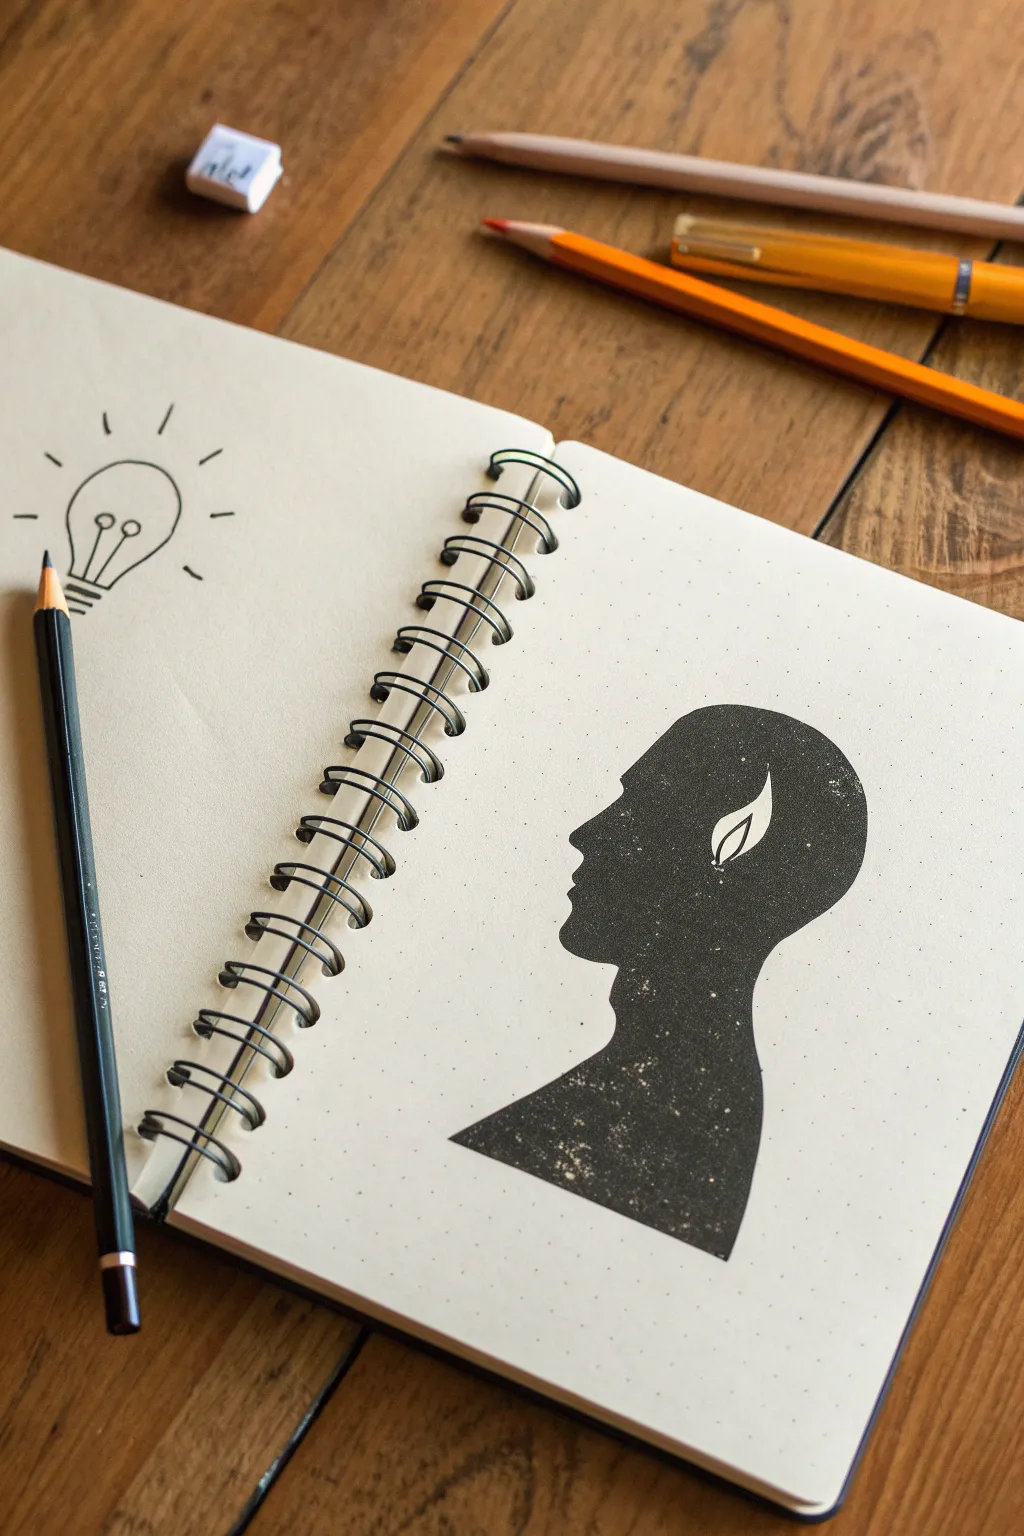
Negative Space Focus Silhouette

This striking project combines the simplicity of line art with visual weight of a silhouette, creating a clever visual metaphor for focus and inspiration. The contrast between the sparse lightbulb sketch and the dense, textured profile makes for a captivating page in your sketchbook.
Step-by-Step Tutorial
Materials
- Spiral-bound sketchbook (dot grid or blank paper)
- Black ink fineliner pen (0.3mm or 0.5mm)
- Graphite pencil (HB or 2B)
- Black permanent marker or brush pen
- Ruler (optional)
- Eraser
- Scrap paper (for testing ink density)
Step 1: Planning and Sketching
-
Outline the lightbulb:
On the left-hand page, start by lightly sketching a standard lightbulb shape in the center using your pencil. Draw a circle for the glass bulb, tapering down into a threaded base. -
Add filament details:
Inside the bulb, sketch a simple looped wire for the filament. Add two small circles at the bottom of the loop where it connects to the base structure. -
Draw the ‘rays’:
Pencil in short, radiating lines around the top part of the bulb to represent light shining. Keep them evenly spaced but varied in length for a hand-drawn feel. -
Draft the profile silhouette check:
On the right-hand page, lightly sketch the outline of a human head in profile looking toward the left binding. Start with the forehead, nose, lips, chin, and neck, sloping down into a shoulder line. -
Create the negative space flame:
This is the crucial step. In the center of the head, roughly where the mind’s eye or ear would be, erase a small, flame-shaped area. Draw a clean outline of a candle flame here; everything inside this flame will remain white.
Step 2: Inking the Lightbulb
-
Trace the bulb shape:
Switch to your black fineliner. Carefully trace over your pencil lines for the glass bulb. Use a steady hand to create a smooth, continuous curve. -
Detail the base:
Ink the threaded base by drawing stacked, slightly curved rectangles. Add the bottom contact point. I like to shade in one or two of the thread lines to give it dimension. -
Define filament and rays:
Go over the internal filament wire and the two small circles. Finally, ink the radiating lines around the outside of the bulb with quick, confident strokes. -
Erase guide lines:
Wait a moment for the ink to dry completely, then gently erase the pencil sketch underneath the lightbulb so only the crisp black lines remain.
Ink Bleeding Control
If your marker bleeds through the paper, place a protective sheet behind the page while working. You can also glue a second sheet to the back later to hide any bleed-through.
Step 3: Filling the Silhouette
-
Outline the profile:
Using your fineliner, trace the exterior boundary of the human head profile. Do not ink the bottom edge yet if you want it to fade out naturally, or draw a hard line if you prefer a contained shape. -
Preserve the flame:
Carefully trace the outline of the internal flame shape with your fineliner. This boundary is critical because it protects the white space. -
Start the fill:
Switch to a thicker marker or brush pen to speed up the process. Begin filling in the head shape with solid black ink, working carefully around the edges of the flame and the profile face. -
Apply texture:
Instead of a perfectly solid flat black, try a stippling or ‘distressed’ fill technique. Dab your marker repeatedly or use a slightly dried-out marker to leave tiny specks of white paper showing through, creating a galaxy-like or stone texture. -
Refine the flame edge:
Switch back to the fine point pen to neaten the black ink right up to the edge of the flame cutout. The sharper this contrast, the better the effect. -
Final clean up:
Once the heavy ink area is fully dry, erase any remaining pencil marks around the profile.
Galactic Interpretation
Enhance the silhouette by using a white gel pen over the black fill. Add tiny stars or constellations to turn the ‘mind’ into a universe, keeping the flame as the central focus.
Now you have a thoughtful spread that perfectly balances minimalism with bold contrast, ready to inspire your next idea


Have a question or want to share your own experience? I'd love to hear from you in the comments below!