If you’ve ever painted a fox, you know the combo of fiery fur, sharp ears, and that clever little expression is just irresistible. I pulled together my favorite fox painting ideas—from classic poses you can finish in an afternoon to more stylized concepts that feel like a full-on creative adventure.
The Classic Sleeping Curl Fox
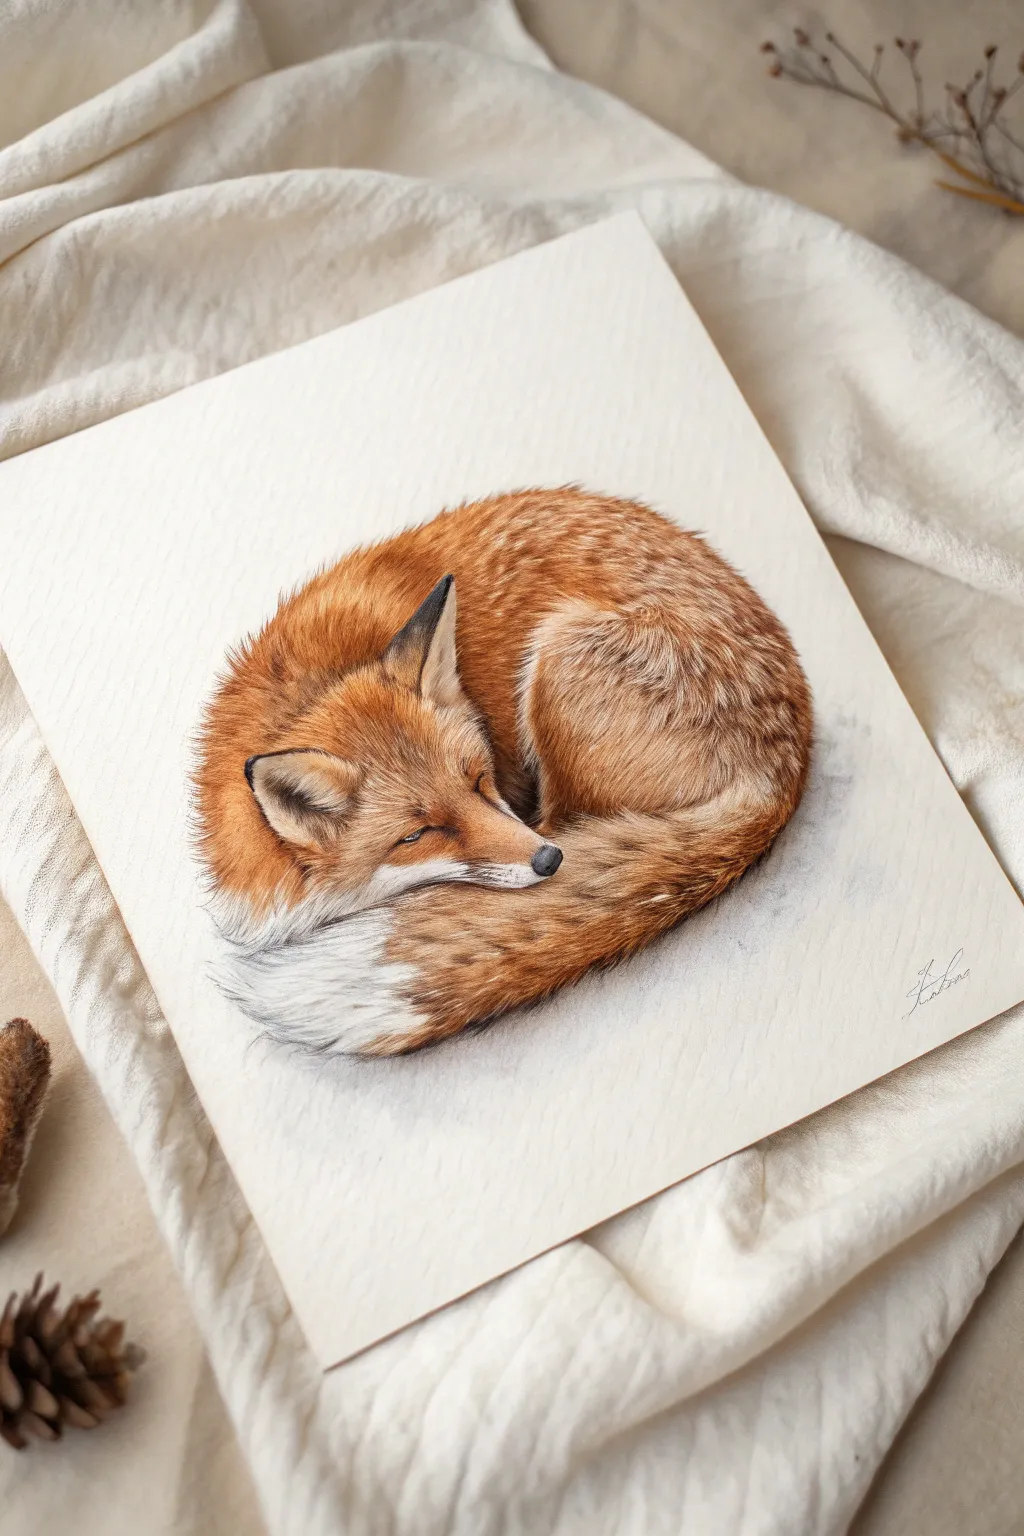
Capture the serenity of a sleeping fox with this detailed study in texture and warmth. You’ll layer soft oranges, burnt siennas, and creams to build up realistic fur that looks soft enough to touch.
Step-by-Step Tutorial
Materials
- Heavyweight hot-press watercolor paper (smooth finish)
- Watercolor paints (burnt sienna, yellow ochre, cadmium orange, burnt umber, ultramarine blue, lamp black)
- White gouache
- Synthetic round brushes (sizes 0, 2, and 4)
- HB graphite pencil
- Kneaded eraser
- Mixing palette
- Paper towels
- Two jars of water
Step 1: Sketching the Shape
-
Establish the oval:
Visualize the sleeping fox as a simple oval shape. Lightly sketch this form on your paper to center the composition, leaving plenty of negative space around the edges. -
Define the anatomy:
Within your oval, lightly draw the curve of the spine and the placement of the head. The chin should be tucked deeply into where the tail begins, creating a continuous loop. -
Add key features:
Sketch the triangular ears, the closed eye slit, and the black nose tip. Outline the distinctive white patch on the tail tip and the chest area. -
Refine and lighten:
Go over your sketch to add jagged guidelines for fur direction. Once satisfied, roll a kneaded eraser over the entire drawing to lift most of the graphite, leaving only the faintest ghost lines.
Step 2: Base Washes
-
First wet-on-wet layer:
Mix a very dilute wash of yellow ochre. Wet the main body area (avoiding the white tail tip) with clean water, then drop this pale yellow in to establish a warm undertone. -
Adding the orange glow:
While the paper is still slightly damp, introduce a mix of cadmium orange and burnt sienna to the mid-back and head areas, letting it bloom softly. -
Cool shadows:
Mix a tiny amount of ultramarine blue with burnt umber to create a watery grey. Apply this very faintly to the white tail tip and under the chin to suggest shadow without making it look dirty. -
Let it dry completely:
Wait until the paper is bone dry before proceeding. If you rush this step, the detail work to follow will bleed and blur.
Master the Fur Flow
Always rotate your paper while painting fur flicks. This keeps your hand at a natural angle and ensures the strokes curve organically around the fox’s body shape.
Step 3: Building Fur Texture
-
Start the mid-tones:
Switch to your size 2 brush. Using a burnt sienna mix with less water, start painting short, directional strokes that follow the curve of the body. -
Directional mapping:
Pay close attention to how fur flows. On the nose, strokes are tiny and smooth; on the back, they are longer; on the tail, they should be long and sweeping. -
Deepening the reds:
Mix burnt sienna with a touch of burnt umber. Reinforce the areas where the body curls—specifically the ‘crease’ between the thigh and the tail, and behind the ears. -
Ear details:
Use a dark mix of lamp black and brown for the ear tips and rims. Paint the outer edges solidly, but feather the inner edges to show the fluffiness of the ear interior. -
Facial definition:
With a size 0 brush and a dark grey mix, carefully paint the nose and the line of the closed eye. Add small dots for whisker follicles on the muzzle.
Watercolor Blooming?
If your fur details are blurring into blobs, your brush is too wet. Blot the bristles on a paper towel before touching the paper to get crisp, dry-brush lines.
Step 4: Refining and Highlighting
-
Darkest shadows:
Mix a concentrated dark brown-black. Carefully glaze this into the deepest crevices where the limbs tuck underneath, grounding the fox on the paper. -
White gouache highlights:
Take your white gouache and dilute it slightly. Using the size 0 brush, paint fine, individual white hairs overlapping the darker orange fur, particularly on the muzzle, inner ears, and scattered along the back. -
Whiskers:
Load your smallest brush with white gouache. With a confident, quick flick of the wrist, add long whiskers protruding from the muzzle. -
Ground shadow:
Mix a watery, cool grey. very gently paint a soft shadow underneath the curve of the fox’s body on the paper itself to give the subject weight and dimension. -
Final assessment:
Step back. Identify any areas that look too flat and add a few more crisp, dark hairs to increase contrast. I usually find the tail needs a bit more fluffing at this stage.
Now you have a peaceful woodland creature resting permanently in your sketchbook


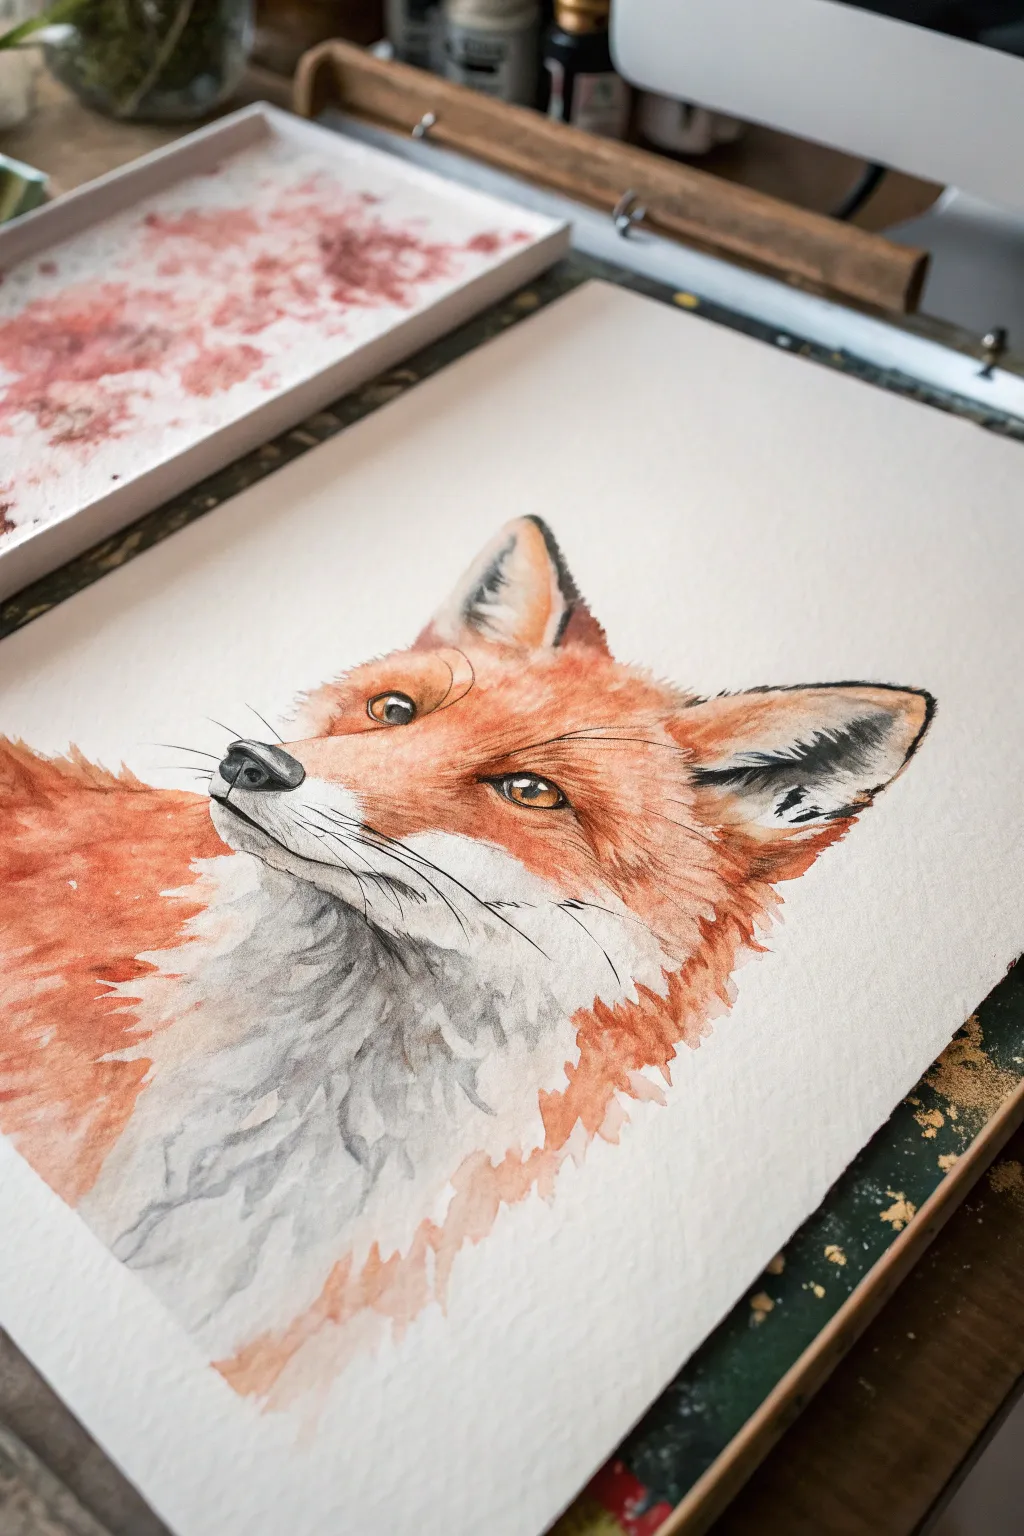
Side-Profile Fox Portrait
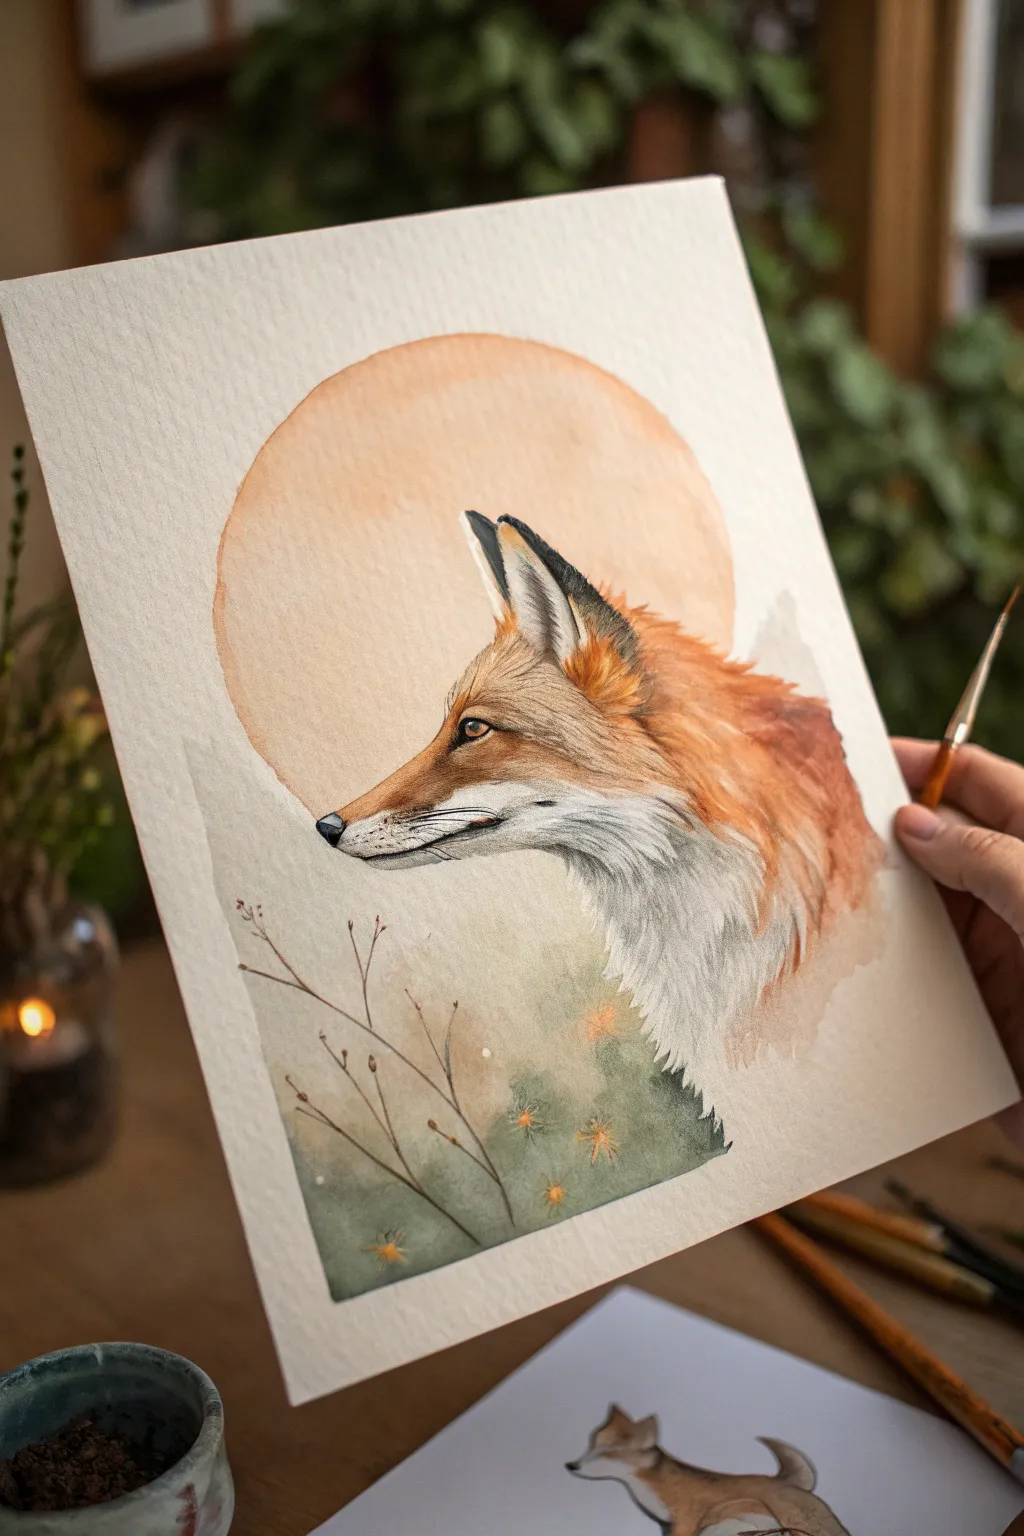
Capture the quiet elegance of a red fox with this mixed-media watercolor portrait. Featuring a soft, glowing backdrop and detailed fur textures, this piece balances realistic animal portraiture with a whimsical, illustrative style.
Detailed Instructions
Materials
- Cold-pressed watercolor paper (300 gsm)
- Watercolor paints (Burnt Sienna, Yellow Ochre, Paynes Grey, Sap Green, Burnt Umber)
- White gouache or white acrylic ink for highlights
- Round watercolor brushes (sizes 6, 2, and 00 for details)
- HB pencil for sketching
- Kneaded eraser
- Masking tape
- Compass or circular object (for tracing)
- Jar of clean water
- Paper towels
Step 1: Sketching the Foundations
-
Draw the circular background:
Begin by lightly tracing a large circle in the upper center of your paper using a compass or by tracing a bowl. This will serve as the glowing sun or moon behind the fox. -
Map the fox’s profile:
Sketch the outline of the fox’s head in profile, positioning it so the nose points to the left and the ears overlap the top right of the circle. Keep your pencil pressure very light so graphite doesn’t muddy the watercolor later. -
Refine facial features:
Add the details of the eye, the black tip of the nose, and the inner ear structure. I find it helpful to sketch flow lines indicating the direction of the fur, especially around the neck and cheek. -
Add foreground elements:
Lightly sketch a few organic, spindly branches rising from the bottom left corner, overlapping the fox’s chest slightly to create depth.
Step 2: Washing in the Background
-
Paint the sun circle:
Mix a very dilute wash of Yellow Ochre and a touch of Burnt Sienna. Wet the inside of the circle area (avoiding the fox) and drop in the color, keeping it uneven for a textured, atmospheric look. Let this dry completely. -
Establish the lower background:
beneath the fox’s neck, wet the paper and apply a soft wash of Sap Green mixed with a little Grey. Allow the paint to bleed upwards slightly into the white fur area of the neck for a soft transition, but keep the pigment faint.
Fixing Muddy Fur
If fur texture looks muddy, your paint was too wet. Let the area dry completely, then go back in with a fine brush and highly pigmented (creamy consistency) paint for crisp details.
Step 3: Painting the Fox
-
Base layer for the fur:
Start with a wet-on-dry technique using a mix of Burnt Sienna and Yellow Ochre. Paint the main orange sections of the face and upper neck, leaving white space around the muzzle, cheek, and inner ear. -
Deepen the coat colors:
While the first layer is barely damp, drop in pure Burnt Sienna and a hint of Burnt Umber into the shadowy areas like the back of the neck and behind the ears to build form. -
Define the eye and nose:
Switch to your smallest brush. Use a concentrated mix of Burnt Umber and Paynes Grey (almost black) to paint the nose and the pupil. Leave a tiny speck of white paper in the eye for a lifelike glint. -
Paint the amber iris:
Fill the rest of the iris with a golden brown mix. Once dry, outline the eye carefully with the dark grey mix to make it pop. -
Detailing the ears:
Use the dark grey mix to paint the distinct black markings on the back of the ears. Use short, flicking strokes to mimic the texture of stiff fur.
Pro Tip: Soft Edges
To keep the portrait dreamy, soften the fur edges on the back of the neck. Simply run a clean, damp brush along the edge of the wet paint to blur it into the background
Step 4: Adding Texture and Foreground
-
Create fur texture:
Once the base layers are totally dry, use a size 0 or 00 brush with slightly drier paint to create individual fur distinct strokes. Layer darker orange strokes over the lighter base, following the direction of hair growth. -
Shadowing white fur:
For the white chest and muzzle, don’t use pure white paint. Instead, use a very watery grey-blue wash to paint only the shadows between clumps of fur, simulating volume. -
Paint the foreground branches:
Using a thin rigger or detail brush, paint the branches with Burnt Umber. Keep lines shaky and organic rather than perfectly straight. -
Add highlights:
With white gouache or acrylic ink, add tiny, sharp whiskers to the muzzle. You can also add fine white hairs inside the ears and on the muzzle’s edge. -
Final glow effects:
Add small touches of yellow gouache or opaque watercolor to creating glowing ‘sparks’ or flowers in the green foreground foliage to tie the color palette together.
Step back and admire the gentle gaze of your woodland creation


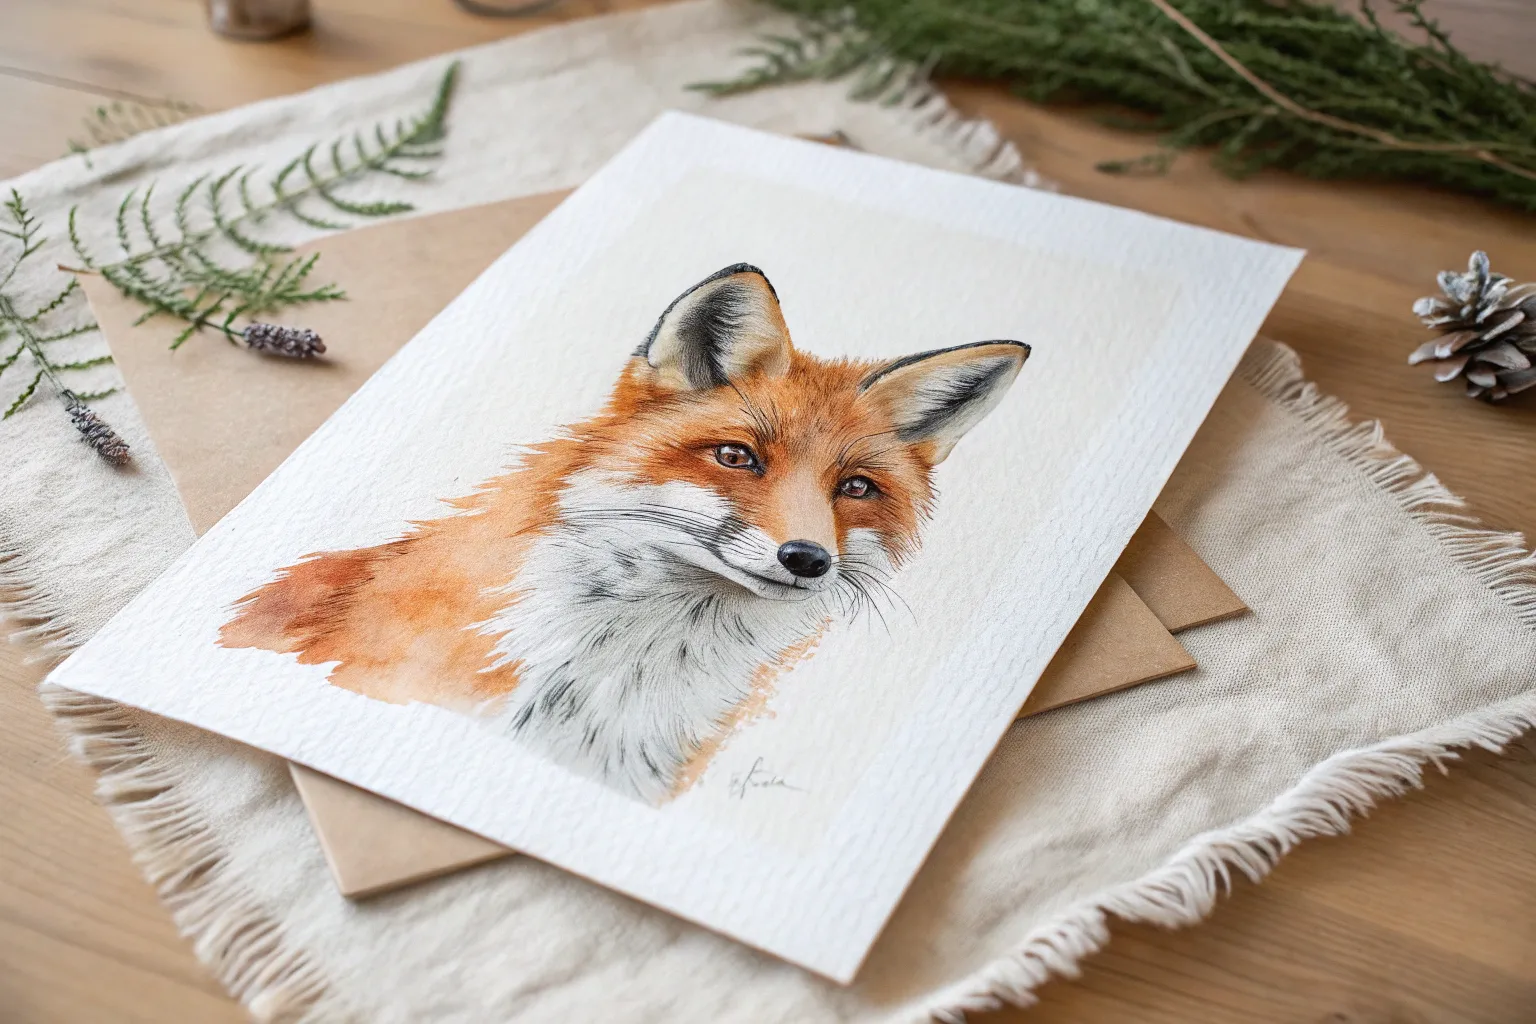
Front-Facing Fox With a Direct Gaze
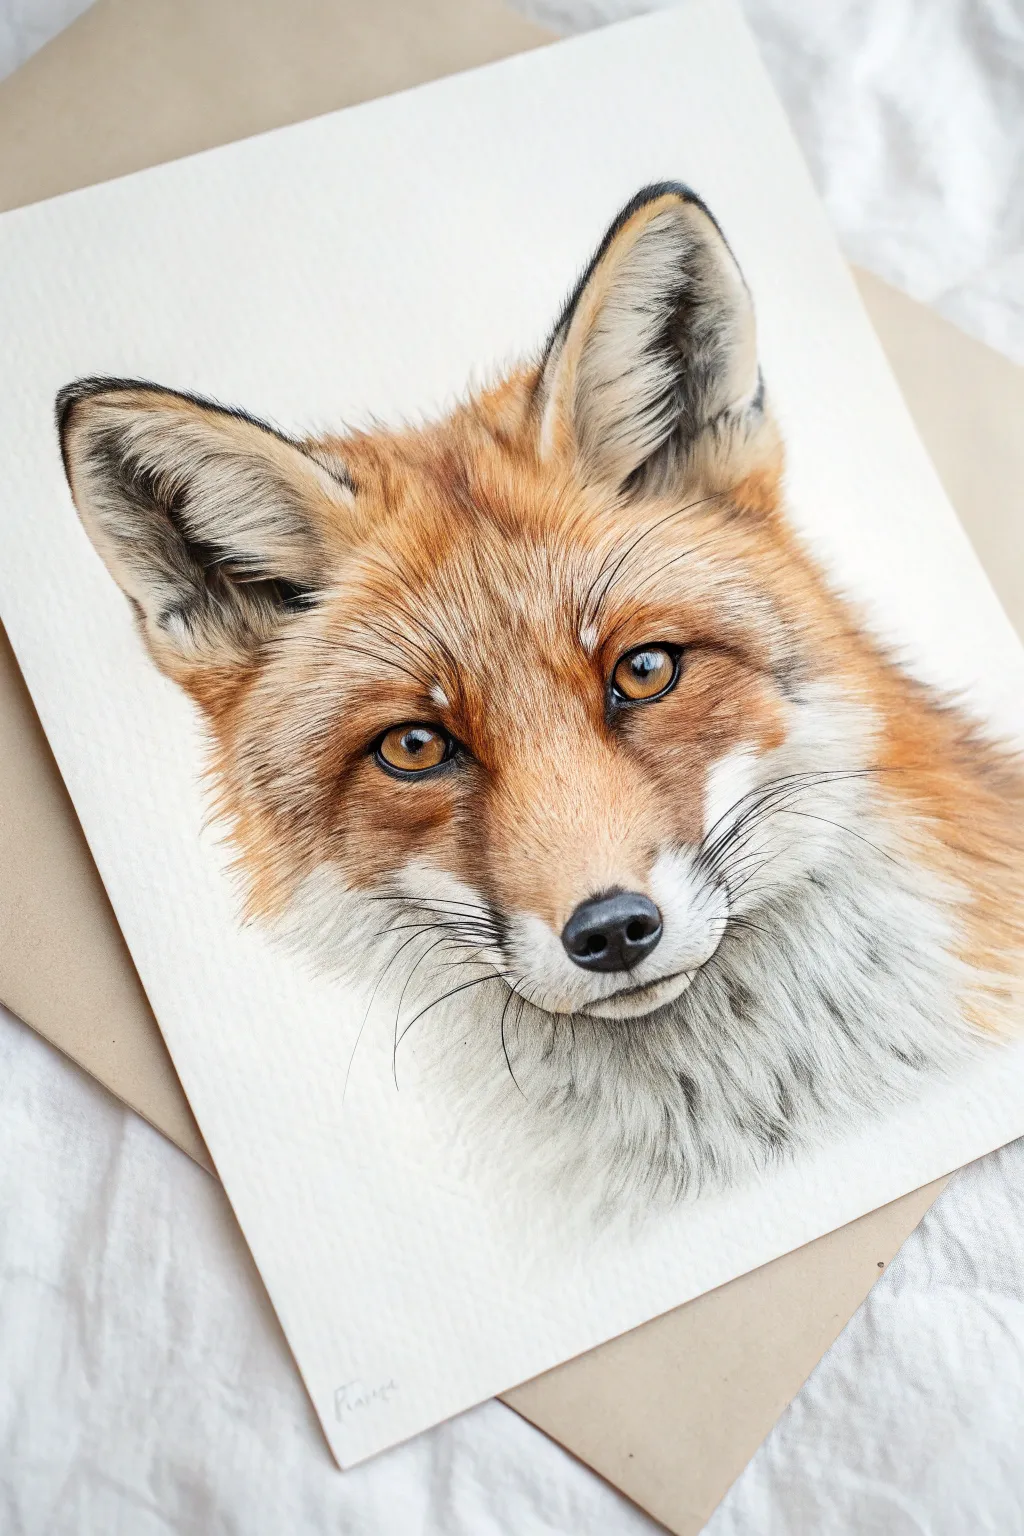
Capture the clever personality of a red fox with this detailed, realistic watercolor portrait. By layering warm oranges and cool greys, you will build up lifelike fur texture and piercing amber eyes that seem to look right through you.
Step-by-Step
Materials
- Hot press watercolor paper (smooth finish)
- Watercolor paints (Burnt Sienna, Yellow Ochre, Burnt Umber, Payne’s Grey, Ultra Marine Blue, Lamp Black)
- White lush gouache
- Synthetic sable brushes (Sizes 0, 2, and 4)
- Pencil (HB) and kneaded eraser
- Masking fluid (optional)
- Two water jars
- Paper towels
Step 1: Sketching and Initial Washes
-
Outline the subject:
Begin with a light pencil sketch of the fox’s head. Focus on symmetry, ensuring the eyes are level and the ears are equal in size. Keep your lines faint so they won’t show through the transparent watercolor later. -
Preserve the highlights:
Identify the brightest white areas, specifically the little reflections in the eyes and the purest white whiskers. You can either carefully paint around these or apply a tiny dot of masking fluid to save them. -
Base layer for the eyes:
Mix a diluted wash of Yellow Ochre and a touch of Burnt Sienna. Apply this to the irises, keeping the color transparent and glowing. Let this dry completely before adding darker details. -
First fur wash:
With a size 4 brush, lay down a very pale, wet wash of Yellow Ochre over the main face area, avoiding the white muzzle and the insides of the ears. This provides a warm undertone for the fur.
Fur Direction Tip
Constantly check your reference photo for fur direction. The hair grows outward from the nose and sweeps back on the cheeks. Following this flow is key to realism.
Step 2: Building Color and Form
-
Deepen the orange tones:
While the paper is dry, mix Burnt Sienna with a hint of red. Using a size 2 brush, start placing the darker orange patches on the forehead, cheeks, and the bridge of the nose. Use short, directional strokes to mimic the growth direction of the fur. -
Shadows on the white fur:
The white fur isn’t purely white; it needs shadows to have volume. Mix a very watery grey using Ultramarine Blue and a tiny bit of Burnt Sienna. Glaze this gently under the chin and on the shadowed side of the white muzzle. -
Working on the ears:
The ears require high contrast. Paint the outer rims with a mix of Burnt Sienna and Burnt Umber. For the dark inner ear fluff, use a strong mix of Payne’s Grey and Burnt Umber, but leave wispy negative spaces to represent light hairs popping against the dark background. -
Refining the eyes:
Go back to the eyes with a smaller brush. Outline the iris with dark brown. Add the pupil using a mix of Lamp Black and Burnt Umber, softening the edges slightly so they look organic, not harsh.
Step 3: Detailing the Texture
-
Mid-tone fur texture:
Switch to your size 0 brush. I find it helpful to vary the consistency of the paint here—less water, more pigment. Create fine, hair-like strokes over the orange areas, layering darker browns over the lighter base. -
The nose bridge:
The fur on the nose bridge is very short and dense. Use tiny stippling motions or extremely short dashes to create this velvety texture, darkening the color as you move toward the tear ducts. -
Painting the nose:
Fill in the nose pad with a dark grey-black mix. Leave a small, soft area lighter on the top curve to suggest moistness and light reflection. Once dry, deepen the nostrils with almost pure black. -
Chest and neck fur:
The fur on the neck helps frame the face. Use your diluted grey mix again, but this time use longer, sweeping strokes to suggest the longer guard hairs on the chest ruff.
Level Up: Soft Background
Add a very pale, out-of-focus wash of green and brown behind the fox before painting the fur. This suggests a forest setting without distracting from the detailed portrait.
Step 4: Final Touches
-
Deepest darks:
Mix your darkest black-brown. Reinforce the eyeliner markings around the eyes and top of the muzzle. This high contrast is crucial for that intense, realistic gaze. -
White gouache highlights:
If you didn’t use masking fluid (or if you want sharper details), use a size 0 brush with opaque white gouache to add wispy white hairs overlapping the dark colors in the ears and on the muzzle. -
Adding whiskers:
Using a rigger brush or your finest point, paint the long whiskers. Use dark grey for whiskers against light fur, and white gouache for whiskers that cross over dark fur patches. -
Final eye sparkle:
Ensure the highlight in the eye is crisp white. If you masked it, rub the gum away now. If it got painted over, add a tiny dot of thick white gouache to bring the fox to life.
Step back and admire the intense, wild expression you have captured in your painting


Full-Body Fox Sitting in the Woods
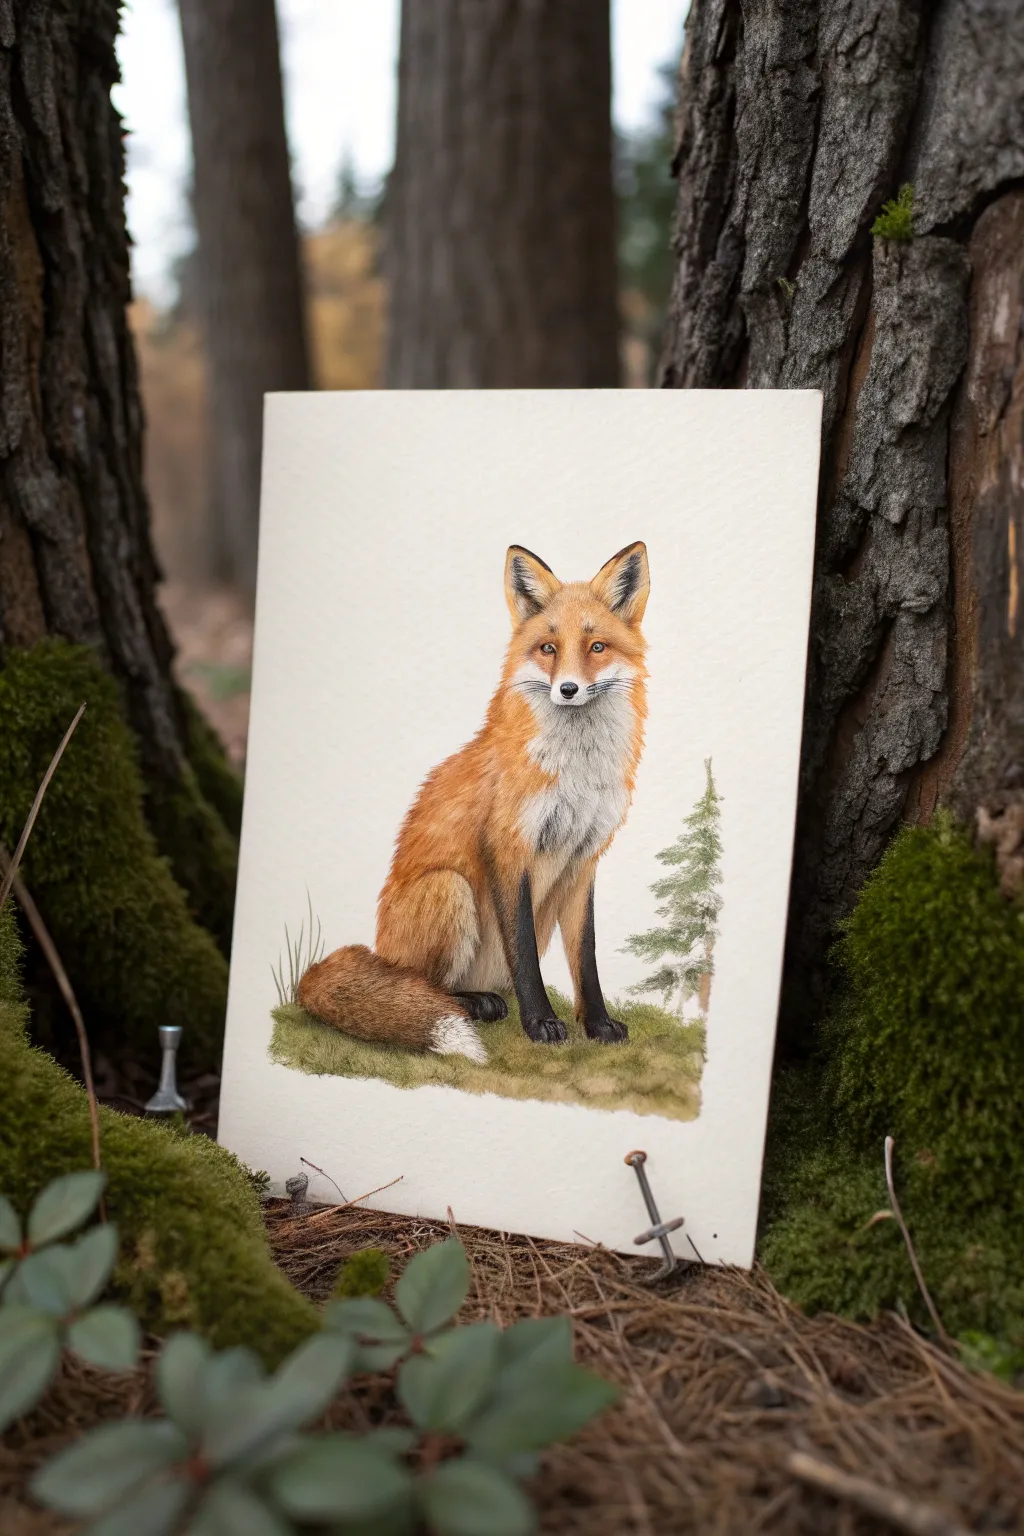
This serene painting captures a red fox in a moment of stillness, set against a minimal woodland backdrop. Using watercolors layered with fine detail work creates a realistic texture on the fur that contrasts beautifully with the soft, white paper background.
How-To Guide
Materials
- Hot press watercolor paper (smooth texture)
- Watercolor paints (Burnt Sienna, Yellow Ochre, Paynes Grey, Burnt Umber, Sap Green)
- White Gouache or white gel pen
- Round brushes (sizes 2, 4, and 00 for details)
- HB pencil and kneaded eraser
- Masking tape
- Two jars of water
- Paper towels
Step 1: Sketching and Base Layers
-
Draft the outline:
Begin with a light HB pencil sketch. Draw a simple oval for the chest and a circle for the head to get the proportions right. Refine the shape of the ears, the slender legs, and the bushy tail wrapped around the side. Keep your lines faint so they don’t show through the paint. -
Outline the environment:
Lightly sketch a small patch of ground beneath the fox and add a simple, singular pine tree to the right side to balance the composition. Suggest a few blades of grass on the left, but keep the background minimal. -
First wash of color:
Mix a watery wash of Yellow Ochre and a touch of Burnt Sienna. Apply this broadly to the fox’s body, avoiding the chest, the tip of the tail, and the inside of the ears, which should remain the white of the paper. -
Deepen the orange tones:
While the first layer is damp but not soaking, drop in a more saturated Burnt Sienna on the fox’s back and top of the head. This wet-on-wet technique creates a soft, fuzzy transition for the undercoat. -
Paint the legs:
For the characteristic black socks, start with a diluted Paynes Grey on the lower legs. Let it fade gently into the orange of the upper leg. Don’t go pitch black yet; we build darkness in layers.
Don’t Rush the Fur
Work in the direction the hair grows. Start from the nose outwardly on the face, and down the back towards the tail. Following anatomy creates believable volume.
Step 2: Building Fur Texture
-
Dry brush texture:
Once the base layers are completely dry, switch to a size 2 brush with very little water. Use short, flickering strokes of Burnt Sienna mixed with Burnt Umber to simulate fur direction on the back and flanks. -
Detail the face:
Switch to your 00 brush. Carefully paint the eyes using a honey-brown tone, leaving a tiny speck of white paper for the highlight. Outline the eyes and nose with a strong Paynes Grey. -
Add chest Definition:
The chest is white, but it needs shadows to show form. Use a very watery, pale violet-grey mix to paint subtle shadows under the chin and between tufts of white fur. -
Enhance the legs:
Go back to the legs with a concentrated Paynes Grey. Apply it solidly near the paws and blend upward. Use the tip of the brush to pull tiny dark hairs up into the orange sections for a seamless transition. -
Refine the ears:
Paint the backs of the ears black (Paynes Grey), leaving the inner edges light. I like to add tiny, wispy strokes inside the ear with a pale grey to suggest fluff. -
Tail texture:
The tail should look voluminous. Use broader, sweeping strokes of Burnt Sienna and Umber. Darken the area where the tail tucks behind the leg to create depth. -
The white tip:
Ensure the very tip of the tail remains white. If you accidentally painted over it, use white gouache later to reclaim it. Add some jagged shadow lines at the transition point to make the fur look bristly.
Step 3: Environment and Final Touches
-
Paint the ground:
Mix Sap Green with a little Burnt Umber for a muted, earthy moss color. Stipple this beneath the fox to anchor it to the page. -
Tree details:
Paint the small pine tree on the right using the tip of your brush to tap in loose, needle-like textures. Keep the edges soft so it doesn’t distract from the main subject. -
Final highlights:
Use white gouache or a gel pen to add the whiskers on the muzzle. Make them long, curved, and confident. Add a few bright white hairs in the ears and on the chest for extra crispness. -
Evaluate contrast:
Step back and check your values. If the fox looks flat, glaze a transparent layer of Burnt Umber over the shadowed side of the body (usually the side away from the light source) to round out the form.
Winter Coat Twist
To make this a winter scene, dilute your background paints significantly and splatter opaque white gouache over the finished piece for falling snow.
Once the paint is fully dry, careful remove any tape to reveal your woodland portrait ready for display
BRUSH GUIDE
The Right Brush for Every Stroke
From clean lines to bold texture — master brush choice, stroke control, and essential techniques.
Explore the Full Guide
Autumn Fox in Warm Foliage
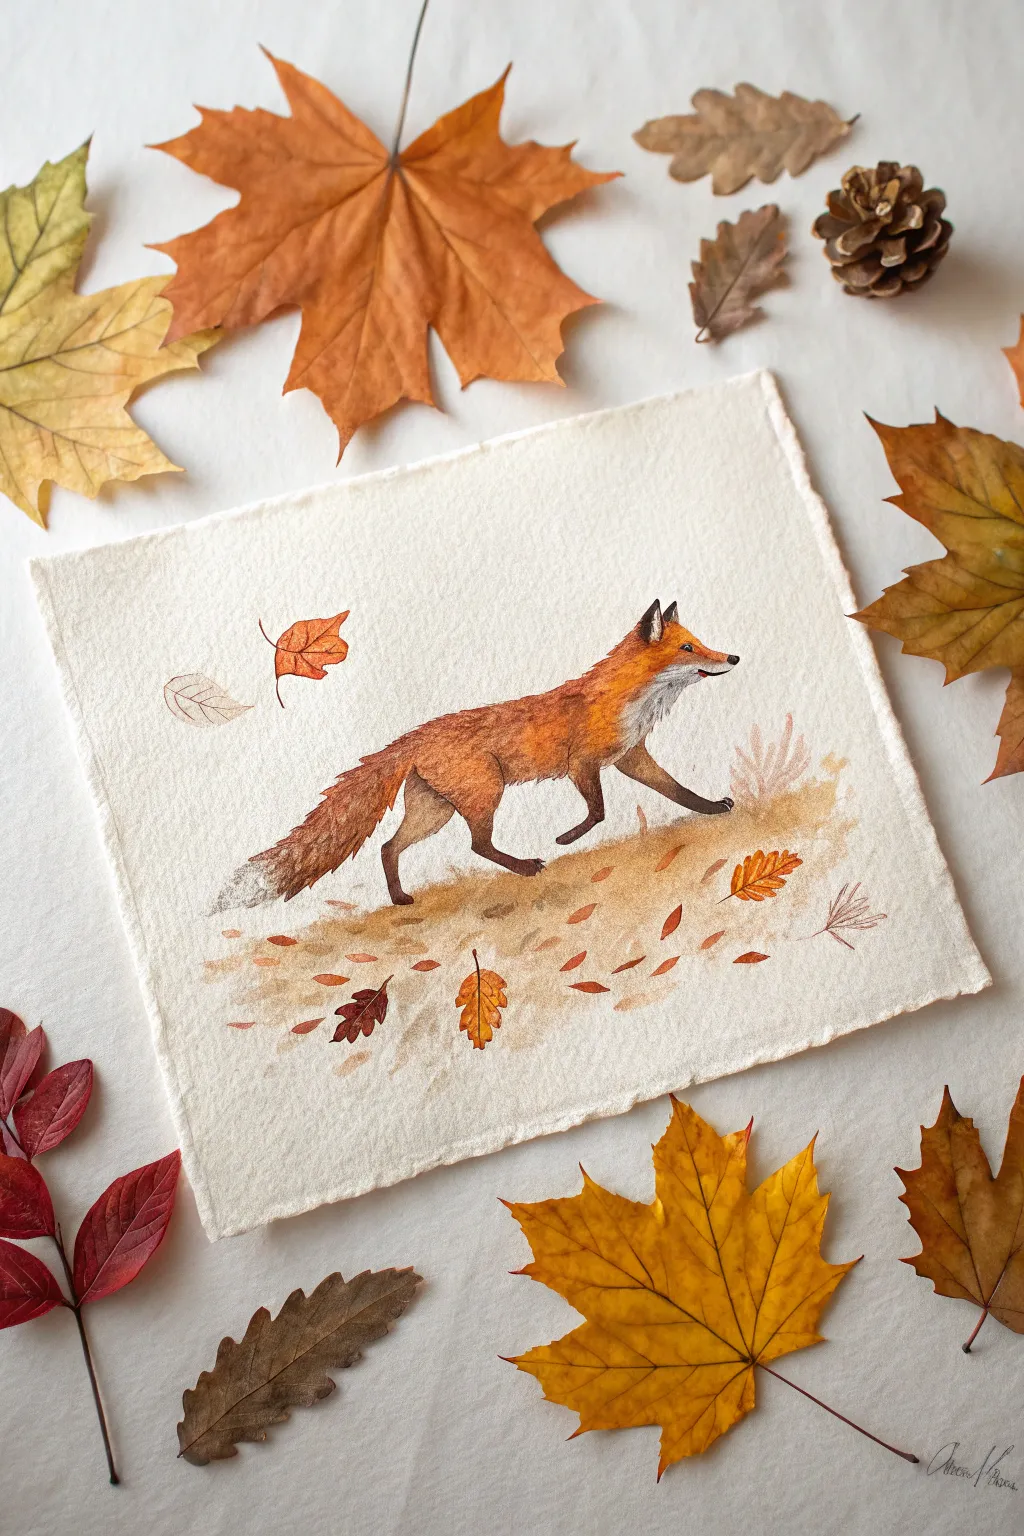
Capture the crisp essence of fall with this charming watercolor illustration of a red fox trotting through fallen leaves. Using warm russet tones and a textured deckle-edge paper, you’ll create a piece that feels both organic and delightfully whimsical.
Step-by-Step
Materials
- Heavyweight watercolor paper (300gsm/140lb) with deckle edges
- Watercolor paints (Burnt Sienna, Yellow Ochre, Burnt Umber, Lamp Black, Scarlet Lake)
- Round brushes (sizes 2, 4, and 0 for details)
- HB pencil for sketching
- Kneaded eraser
- Jar of clean water
- Paper towel
- Masking fluid (optional, for whiskers/highlights)
Step 1: Sketching and Preparation
-
Outline the fox:
Begin with a very light pencil sketch of the fox’s body. Start with a simple oval for the torso and a smaller circle for the head, connecting them with a curved neck line. -
Refine the pose:
Add the legs, positioning the front right leg raised mid-step to convey movement. Sketch the long, bushy tail extending downwards and slightly back. -
Add facial details:
Draw the triangular ears, the pointed snout, and the small eye. Keep the pencil pressure extremely light so graphite doesn’t smudge into your paint later. -
Sketch the ground elements:
Mark out the horizon line of the ground beneath the fox’s paws and lightly sketch a few falling leaves around the fox, including one large maple leaf directly in its path.
Deckle Edge Trick
If you don’t have deckle-edge paper, you can tear the edges of regular watercolor paper against a ruler. Simply wet the fold line first, then tear slowly towards yourself.
Step 2: Painting the Fox
-
First wash of orange:
Mix a vibrant orange using Scarlet Lake and Yellow Ochre. Apply a diluted wash to the head and upper back, leaving the chest, belly, and muzzle white for now. -
Deepen the fur tones:
While the first layer is slightly damp but not soaking, drop in stronger Burnt Sienna along the spine and the top of the tail to create a sense of volume and shadow. -
Paint the legs:
As you move down the legs, transition from the orange-brown to a darker Burnt Umber/Black mix. Fox legs typically get very dark near the paws (‘boots’). -
Define the face:
Use a size 0 brush to carefully paint the eye black, leaving a tiny speck of white paper for the highlight. Add the black nose tip and the dark outlines of the ears. -
Texture the fur:
Once the base layers are dry, mix a thicker consistency of Burnt Sienna. Use a dry-brush technique (wipe most paint off the brush) to flick tiny fur strokes along the neck and tail for a fluffy texture. -
Shadows and white fur:
Use a very watery grey-blue mix to add subtle shading to the white fur on the chest and underbelly, giving the form dimension without coloring it.
Metallic Magic
Mix a tiny amount of gold watercolor or metallic ink into your Yellow Ochre for the falling leaves. It adds a magical shimmer when the light hits your painting.
Step 3: Creating the Autumn Scene
-
Exhaust the brush for the ground:
Mix Yellow Ochre with a touch of Burnt Sienna. Using the side of a larger brush, sweep across the ground area with a dry-brush motion to create a rough, textured earthy look. -
Add ground clutter:
While the ground wash is wet, drop in tiny specks of darker brown to suggest pebbles or dirt clods. I like to let this bloom naturally. -
Paint falling leaves:
Paint the floating leaves around the fox. Use varying shades like straight Yellow Ochre for some and rusty red for others to create variety. -
Detail the foliage:
Once the leaves are dry, use your finest brush (size 0) and a dark brown mix to paint the delicate veins and stems on the falling leaves. -
Add background grasses:
Behind the fox’s rear legs, paint soft, pale pink-brown strokes suggesting dried autumn grasses. Keep these loose and slightly blurred to push them into the background. -
Final touches:
Review the painting for contrast. Darken the eye or nose if needed, and add a few final stray darker leaves on the ground for balance.
Step back and admire the warm, cozy atmosphere you have captured in your autumn fox scene
Loose Watercolor Wash Fox
Capture the clever gaze of a red fox using a blend of wet-on-wet softness and sharp, dry-brush details. This project balances the fluid, unpredictable nature of watercolor with precise pen work to create a piece that feels both spirited and grounded.
Step-by-Step
Materials
- Cold press watercolor paper (300 gsm)
- Watercolor paints (Burnt Sienna, Yellow Ochre, Paynes Grey, Lamp Black)
- Round brushes (flats for washes, fine liners for details)
- Drawing pencil (HB or 2B)
- Kneadable eraser
- Masking fluid (optional)
- White opacity ink or gouache
- Jars of clean water
Step 1: Sketching & Preparation
-
Light Outline:
Begin with a very faint pencil sketch of the fox’s head. Focus on the triangular shape of the ears and the elongated snout, ensuring the eyes are placed symmetrically. -
Preserve Highlights:
Identify the bright white areas on the muzzle, the inner ears, and the catchlights in the eyes. You can leave these as bare paper or apply a tiny dot of masking fluid to the eye highlights for later safety.
Step 2: Applying the Base Washes
-
Warm Undertones:
Mix a watery wash of Yellow Ochre and lightly brush it onto the upper head and neck areas where the fur will be lightest. -
Building the Red:
While the paper is still slightly damp, introduce Burnt Sienna. Drop this saturated color onto the forehead and cheeks, letting it bleed naturally into the ocher to create gentle gradients. -
Chest Fur Texture:
For the white chest area, use a very dilute mix of Paynes Grey. Apply it using loose, jagged strokes that mimic the direction of fur growth, leaving plenty of white paper showing through for brightness. -
Soft Edges:
Soften the outer edges of the fox’s coat with a clean, damp brush. I like to let the paint fade vaguely into the white background to enhance that dreamy, loose aesthetic.
Wet-on-Wet Control
Work in small sections. Wet only the forehead first, apply color, then move to the cheek. This prevents the paper from drying out unevenly while you work.
Step 3: Deepening Values & Texture
-
Layering Shades:
Once the initial wash is dry, mix a stronger concentration of Burnt Sienna with a touch of red. Use cooler, shorter strokes to suggest the layering of fur around the ears and forehead. -
Ear Details:
Paint the outer rims of the ears with a dark mix of Burnt Sienna and Lamp Black. Use quick, flicking motions to create the tufted look at the tips. -
Shadowing the Chest:
Deepen the shadows in the chest fur using a darker grey wash. Concentrate these shadows under the chin to push the head forward visually.
Metallic Magic
Mix a tiny amount of gold watercolor or metallic powder into the yellow ochre eye layer. It catches the light beautifully and gives the fox a lively spark.
Step 4: Facial Features
-
Golden Eyes:
Paint the iris with a clear Yellow Ochre or Gold tone. Let this dry completely before moving to the pupil to avoid muddying the colors. -
Pupil Definition:
Use a fine liner brush and Lamp Black to paint the pupils and outline the eye shape. Ensure the highlight remains contrasting and crisp. -
Nose Structure:
Paint the nose with a solid black, but leave a tiny sliver of lighter grey or white on the upper ridge to suggest moisture and dimension. -
Muzzle Contrast:
Carefully paint the dark patch behind the whiskers on the cheek. Use a very fine brush to create the jagged separation between the white muzzle fur and the red cheek fur.
Step 5: Final Details
-
Whisker Lines:
Using your thinnest brush or a fine liner pen, draw sweeping, confident lines for the whiskers. Some should stem from the muzzle pads and others from above the eyes. -
Fur Highlights:
If you lost some whites during painting, use white gouache on a dry brush to flick tiny hairs back onto the ears or the bridge of the nose. -
Final Assessment:
Step back and check your values. Add a final glaze of Burnt Sienna if the orange fur needs more vibrancy.
Allow your woodland friend to dry completely before framing it to showcase those delicate textures

PENCIL GUIDE
Understanding Pencil Grades from H to B
From first sketch to finished drawing — learn pencil grades, line control, and shading techniques.
Explore the Full Guide
Acrylic Fox With Bold Brushstrokes
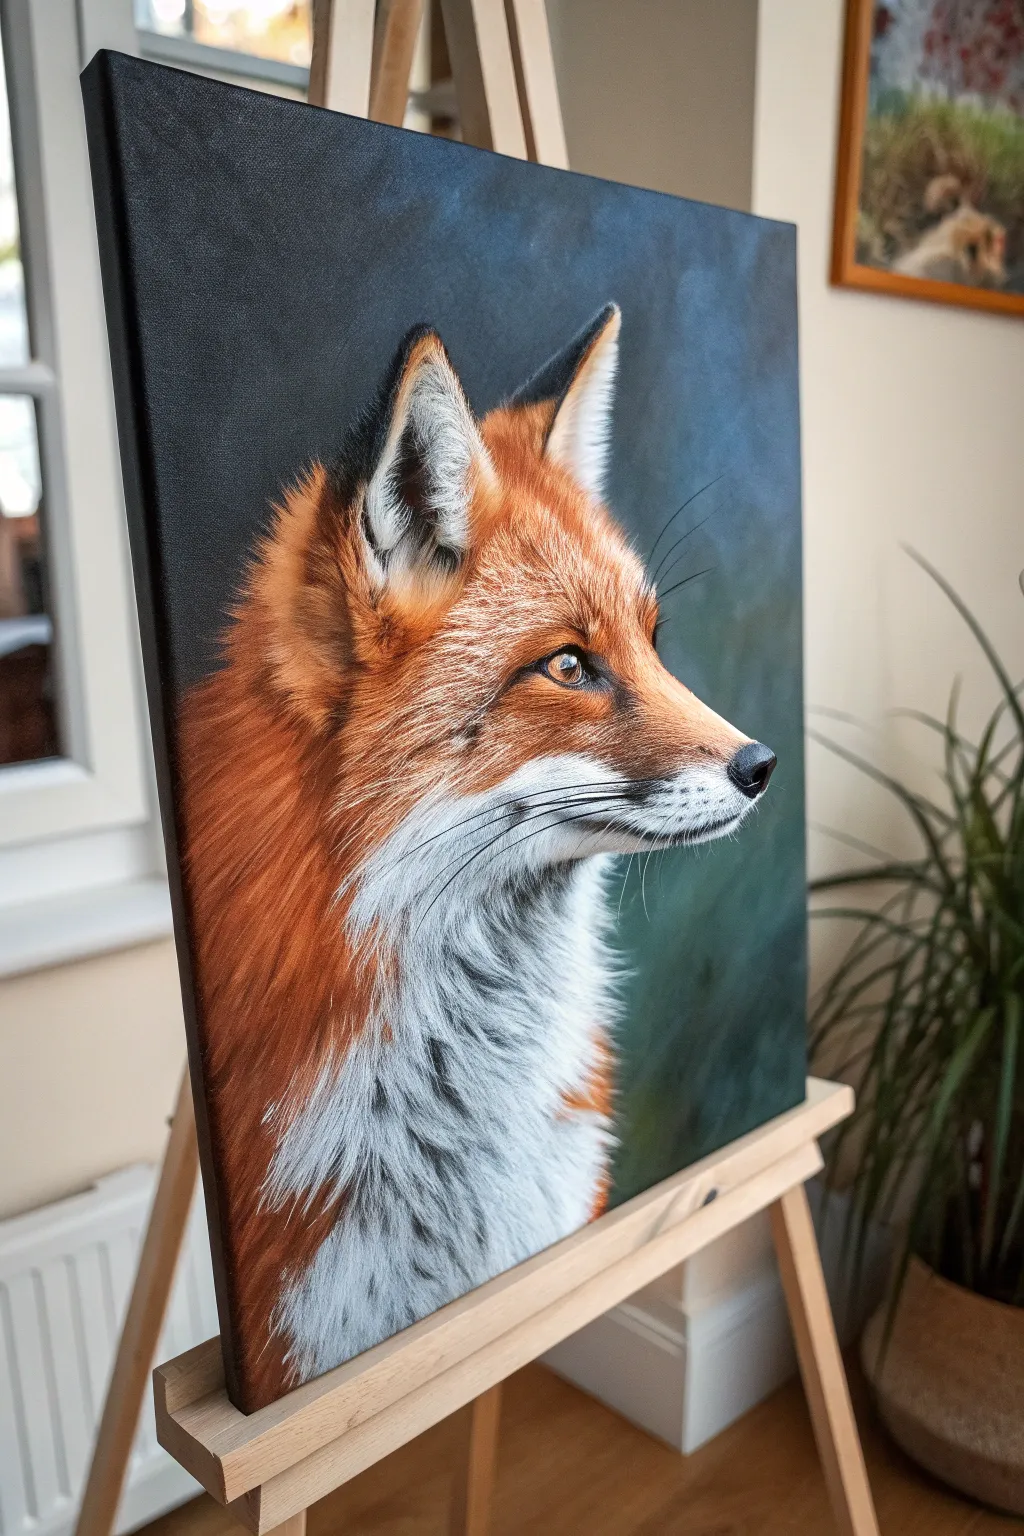
Capture the quiet elegance of a red fox in this detailed profile study, set against a moody, dark background that makes the warm fur tones pop. Using acrylics to build up layers of texture, you’ll create a lifelike rendering that balances realistic detail with expressive brushwork.
Detailed Instructions
Materials
- Stretched canvas (16×20 inches recommended)
- Acrylic paints: Burnt Sienna, Yellow Ochre, Cadmium Red, Titanium White, Mars Black, Burnt Umber, Phthalo Blue
- Flat brushes (1 inch, 1/2 inch) for background and blocking
- Filbert brushes (size 4, size 8) for fur texture
- Detail liner brush (size 0 or 00) for whiskers and eyes
- Palette knife (optional, for mixing)
- Water container and paper towels
- Pencil for sketching
- Slow-drying medium (optional)
Step 1: The Dark Atmosphere
-
Prepare the background mix:
Mix a deep, cool charcoal tone for the background. Combine Mars Black with a touch of Phthalo Blue and white to create a slate-like darkness rather than a flat black. The blue adds atmospheric depth. -
Apply the background base:
Cover the entire canvas with your dark mix using a large flat brush. Keep your strokes loose and multidirectional to create a subtle, smoky texture. While the paint is still wet, blend in slightly lighter touches of grey near where the fox’s face will be to create a faint glow. -
Sketch the silhouette:
Once the background is thoroughly dry, lightly sketch the fox’s profile with a white charcoal pencil or chalk. Focus on the triangular shape of the ear, the slope of the nose, and the fluffy curve of the chest.
Stiff Fur?
If fur looks like solid blocks, you likely have too much paint on your brush. Wipe excess off on a towel before touching the canvas to get individual distinct hairs.
Step 2: Blocking the Base Colors
-
Underpaint the russet tones:
Mix Burnt Sienna with a little Cadmium Red. Block in the main areas of the head, neck, and back. Don’t worry about individual hairs yet; just establish the warm mid-tones where the fur is densest. -
Establish the white zones:
Use a light grey mixture (Titanium White with a tiny dot of Black) to block in the muzzle, cheek, and chest. Using grey first instead of pure white provides a shadow base that adds dimension later. -
Dark accents:
Fill in the ears and the nose tip with Mars Black. Add the dark separation line of the mouth and the almond shape of the eye area.
Glow Up
Glaze a very thin layer of transparent orange over the finished fur once dry. It unifies the strokes and makes the coat look incredibly vibrant and sunlit.
Step 3: Building Fur Texture
-
Layering the orange fur:
Mix a lighter orange using Yellow Ochre and Cadmium Red. Switch to a size 8 filbert brush. Using flicking motions following the direction of hair growth, layer this over your dried base coat on the head and neck. -
Deepening shadows:
Mix Burnt Umber into your red-orange mix. Glaze this into the areas behind the ear and under the jawline to create volume. The contrast between these darks and the bright oranges is crucial for realism. -
Texturing the white chest:
Reload your brush with Titanium White. Over the grey base on the chest, apply long, sweeping strokes. Let some of the grey show through between the white hairs to simulate depth and shadow within the fur. -
Refining the muzzle:
Switch to a smaller filbert brush. Create the transition from red to white on the face using short, careful strokes where the colors meet, blending them slightly wet-on-wet for a soft edge.
Step 4: The Eye and Details
-
Painting the iris:
Paint the iris with a golden-brown mix (Yellow Ochre + Burnt Sienna). Darken the edges near the eyelids. -
Adding life to the eye:
Paint the pupil black. crucially, add a tiny, sharp dot of pure Titanium White near the top of the pupil for the catchlight. This single dot wakes up the entire painting. -
Ear details:
Paint the inner ear hairs using creamy white strokes. These should look soft and fluffy, contrasting with the sleek fur on the nose. Darken the tips of the outer ear with black glazes. -
Final highlights:
Mix a very pale peach color (White + tiny bit of Orange). Gently dry-brush this over the bridge of the nose and the top of the head where the light hits most strongly.
Step 5: Finishing Touches
-
Whiskers:
Thin down your black paint with water until it’s fluid like ink. Using your finest liner brush, paint long, confident whiskers sprouting from the muzzle. The key is to move the brush quickly to get a tapered line. -
White muzzle hairs:
Similarly, use thinned white paint for the smaller tactile hairs on the chin and eyebrows. These should be delicate and barely visible. -
Review contrast:
Step back from the easel. If the fox looks too flat, glaze a tiny bit more black into the background immediately surrounding the lit side of the face to increase the drama.
Hang your finished piece where natural light can catch the subtle textures of the fur.
Textured Impasto Fox Fur
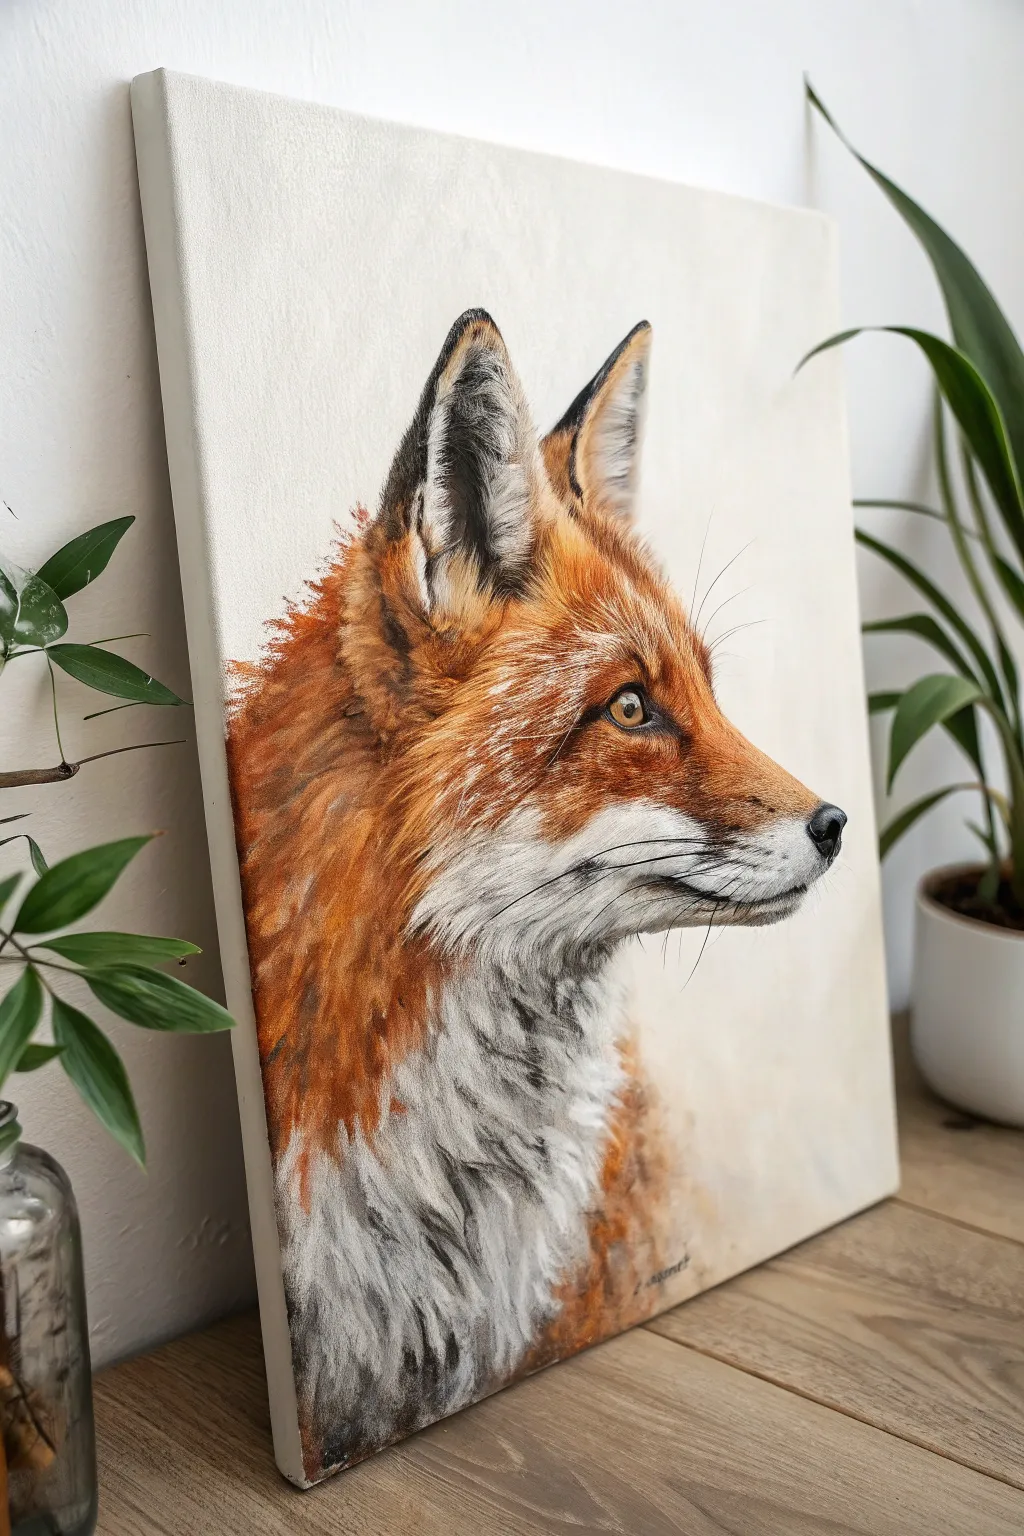
Capture the wild elegance of a red fox with this textured acrylic painting project. By layering thick, visible brushstrokes, you’ll build up a realistic fur effect that practically lifts off the canvas, focusing on the beautiful contrast between fiery orange and snowy white.
Step-by-Step
Materials
- Rectangular stretched canvas (approx. 16×20 inches)
- Heavy body acrylic paints (burnt sienna, yellow ochre, cadmium orange, titanium white, mars black, burnt umber)
- Impasto medium or textural gel
- Assorted brushes: Flat shaders (large and medium), Filbert brushes, Rigger or liner brush
- Palette knife
- Pencil for sketching
- Palette and water cup
- Paper towels
Step 1: Planning and Underpainting
-
Establish the composition:
Begin by observing the reference. The fox is in strict profile, looking to the right. Gently sketch the outline of the head, large triangular ears, and the chest area using a light pencil. Ensure the snout is elongated and the eye is positioned correctly relative to the ear. -
Map the color zones:
Lightly mark where the major color shifts happen: the deep orange of the upper head, the white patches on the cheek and throat, and the dark tips of the ears. This acts as your roadmap. -
Base layer application:
Mix a thin wash of burnt sienna and water. Cover the fox’s body with this transparent layer to kill the white of the canvas. It doesn’t need to be perfect; it just provides a warm undertone. -
Background wash:
For the background, mix titanium white with a tiny touch of yellow ochre or unbleached titanium. Apply this loosely around the fox outline, keeping it simple and slightly off-white to let the subject stand out.
Paint Looking Flat?
If the fur lacks depth, let it dry and apply a thin glaze of burnt umber mixed with glazing liquid over the shadow areas. This deepens the recesses without losing the texture underneath.
Step 2: Building the Fur Texture
-
Prepare the texture mix:
Mix your acrylic paints with an impasto medium or gel. You want a consistency similar to soft butter. This structure is crucial for holding the brushstrokes that simulate fur. -
Dark ear accents:
Using a small filbert brush, apply mars black mixed with a little burnt umber to the insides and tips of the ears. flick the brush upward to mimic the tufted shape. -
Mid-tone oranges:
Combine cadmium orange, burnt sienna, and yellow ochre. Apply this mix to the top of the head and down the back of the neck. Use short, confident dashes that follow the direction of hair growth—generally sweeping backward and down. -
Deepening the shadows:
While the orange is still tacky, mix in a bit of burnt umber to your orange blend. Add this to the ‘valley’ behind the ear and along the nape of the neck to create depth within the thick fur. -
The white chest:
Clean your brush thoroughly. Mix titanium white with a tiny drop of grey or blue to create a shadow white. Apply this to the lower neck and chest area, using longer, downward strokes to suggest heavier winter coat fur.
Step 3: Refining Details
-
Cheek gradients:
The transition from the orange snout to the white cheek is critical. Gently blend wet-on-wet where these colors meet, using a clean, dry brush to feather the edges so it looks soft, not like a hard line. -
Painting the eye:
Use a small round brush for the eye. Paint the iris with a golden-yellow mix, then outline it in black. Add the pupil and, most importantly, a tiny dot of pure white for the reflection highlight to bring the fox to life. -
Snout definition:
Use a rigger or liner brush with thinned black paint to define the mouth line and the nose. The nose should be a soft, matte black, perhaps with a touch of blue for a cool highlight on top. -
Whiskers and fine hairs:
With the liner brush and fluid white paint (add a drop of water), pull out long, delicate whiskers from the muzzle. Flick them quickly so they taper naturally at the ends. -
Layering highlights:
Go back over the orange fur with a lighter mix (add more yellow ochre and white). lightly dry-brush the tips of the fur on the forehead and bridge of the nose to simulate sunlight hitting the coat. -
Chest texture boost:
I like to take a palette knife with pure white impasto paint and drag it gently over the chest area. This catches on the canvas weave and previous paint layers to create rugged, realistic texture. -
Final ear details:
Add the soft, inner ear fluff using a scruffy old brush and off-white paint. Use a stippling motion to make it look fuzzy compared to the sleek outer guard hairs. -
Edge check:
Review the outer edges of the fox. If they look too cut-out, use a small brush to flick wispy hairs out into the background color, integrating the subject with the space.
Level Up: Color Pop
Introduce unexpected color by mixing a tiny amount of violet into your shadow areas or teal into the background near the fox’s face. These complements make the orange fur vibrate with intensity.
Step back and admire the intense gaze and tactile quality of your woodland portrait.


Minimal Line Art Fox Silhouette
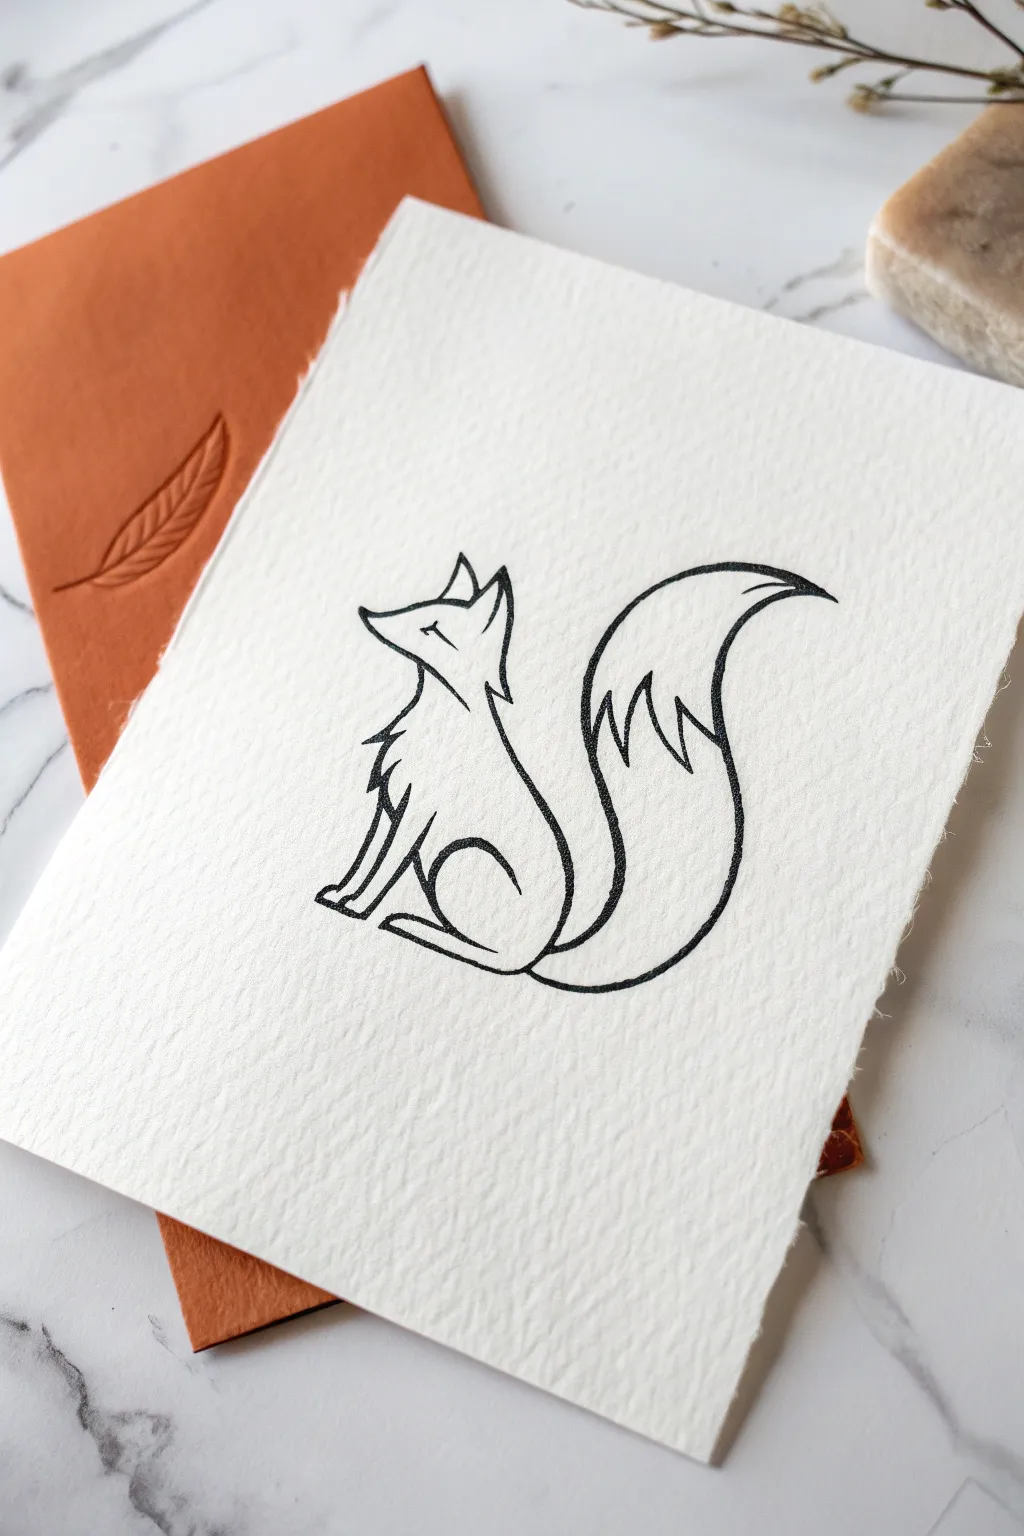
This project captures the essence of a fox with just a few confident, flowing lines. The beauty lies in the contrast between the crisp black ink and the raw texture of handmade paper, creating a piece that feels both modern and timeless.
Step-by-Step
Materials
- High-quality textured watercolor paper or handmade cotton paper (roughly A5 size)
- Black graphical fineliner (0.5mm or 0.8mm) or a dip pen with India ink
- Pencil (HB or H)
- Kneaded eraser
- Ruler (optional, to find center)
- Smooth work surface
Step 1: Setting the Foundation
-
Prepare your canvas:
Start by selecting a piece of paper with a nice tooth or texture. If you are using a large sheet, tear the edges against a ruler rather than cutting them to achieve that soft, deckled edge look visible in the photo. -
Establish the posture:
Lightly sketch a vertical curve for the fox’s back. This line should be gentle, like a very subtle ‘S’ shape, curving out for the back and in for the waist. -
Draft the head shape:
At the top of your back line, sketch a simple triangle for the head, pointing slightly upward to the left. Add two smaller triangles on top for the ears. -
Sketch the tail:
From the base of the back line, draw a large, sweeping curve upward to the right. This should be the biggest shape in the drawing, resembling a large paisley or teardrop shape that curls back towards the head. -
Define the legs:
Sketch the front legs as slender, straight lines angling slightly forward. For the hind leg, draw a rounded curve at the base of the body to represent the haunch of a sitting fox.
Step 2: Inking the Outline
-
Test your pen:
Before touching the final paper, scribble on a scrap piece of the same texture. Textured paper can snag fine nibs, so ensure your ink flows smoothly without bleeding. -
Ink the ears and forehead:
Start at the top. Draw the sharp peaks of the ears and the smooth slope of the forehead. Keep your hand steady but allow the line to vary slightly in thickness if using a dip pen. -
Define the chest fur:
Moving down from the neck, use jagged, zig-zag motions to create the tuft of fur on the chest. This breaks up the smooth lines and adds character. -
Draw the back:
Connect the back of the head to the tail base with one long, confident stroke. I find it helps to lock my wrist and move my entire arm for these longer curves. -
Complete the tail:
Outline the large tail shape. Inside the tail, about halfway down, add a zig-zag line to separate the white tip from the rest of the tail, mimicking the chest fur style. -
Detail the face:
Add a very simple, closed eye—just a short, slightly curved horizontal line. Place a small dot or triangle for the nose at the very tip of the snout.
Use your wrist
For the smoothest curves on the tail and back, lock your wrist and draw by moving your elbow. This prevents shaky, hesitant lines.
Step 3: Finishing Touches
-
Finalize the legs:
Ink over your leg sketches. Ensure the front paws feel grounded. The hind leg is defined by a ‘C’ curve for the hip/thigh area. -
Check line weight:
Review your drawing. If some lines look too thin against the texture of the paper, go over them carefully to thicken them just a hair, especially around the base of the fox where a shadow would naturally fall. -
Let the ink cure:
Wait at least 15 to 20 minutes for the ink to dry completely. Textured paper absorbs ink deeply, so it might feel dry to the touch while still being wet underneath. -
Erase pencil marks:
Gently roll a kneaded eraser over the drawing to lift the graphite sketches. Avoid rubbing hard with a standard eraser, as this can damage the paper’s delicate surface fibers. -
Flatten (if needed):
If the ink caused any buckling, place the drawing under a heavy book overnight once it is 100% dry.
Add a splash
Once the black ink is waterproof-dry, paint pure watercolor orange inside the body shape, deliberately leaving the tail tip and chest white.
Display your charming minimalist fox on a desk easel or gift it in a contrasting envelope to make the white paper pop
Geometric Low-Poly Fox Face
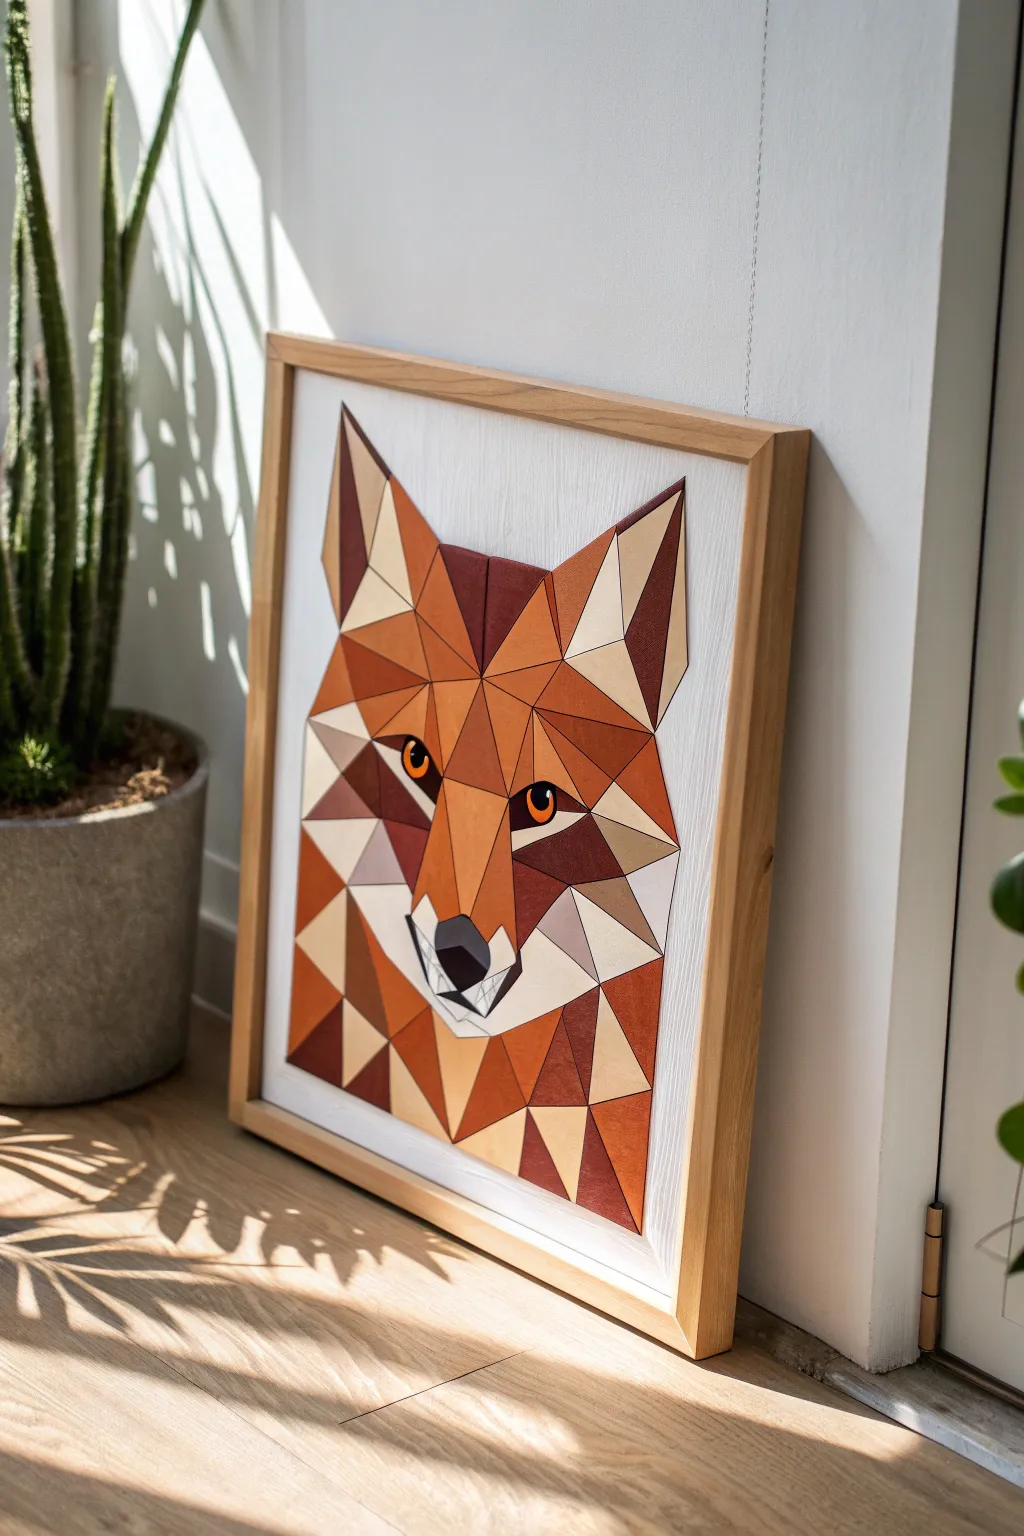
Bring the sleek, modern aesthetic of low-poly art into your home with this stunning geometric fox portrait. By assembling individual triangles of warm, wood-toned paper or veneer, you’ll build a dimensional face that looks professionally crafted and beautifully intricate.
How-To Guide
Materials
- Heavy cardstock or thin wood veneer sheets (various shades of brown, orange, cream, and dark chestnut)
- White art board or canvas panel (approx. 16×20 inches)
- Craft knife (X-Acto)
- Metal ruler
- Self-healing cutting mat
- Spray adhesive or strong craft glue stick
- Pencil and eraser
- Printed low-poly fox template (or tracing paper)
- Black fine-liner or dark brown cardstock (for eyes/nose detail)
- Light wood frame
Step 1: Preparation and Mapping
-
Source your template:
Find a low-poly fox vector design online or sketch your own. You need a line-drawing version (the map) and a color reference image. -
Print the guide:
Print two copies of your outlines at full size (the size of your final frame). One will be your base guide, and the other will be used to cut your pattern pieces. -
Prepare the backing:
Mount one of the outline prints directly onto your white art board using spray adhesive. Ensure it is perfectly centered and smooth, as these lines will tell you exactly where to place each shape. -
Sort your palette:
Gather your materials—whether you chose wood veneer for an authentic look or textured cardstock. Organize them from lightest cream (for the cheeks/ears) to darkest brown (for shadows and ears) and mid-tone oranges.
Grain Direction
If using wood veneer, rotate the grain direction for adjacent pieces. This makes the light catch each facet differently.
Step 2: Cutting the Geometry
-
Cut the template shapes:
Take your second printed copy and begin cutting out a small section of triangles with your craft knife. It is best to work in clusters—like just the left ear or the right cheek—so you don’t lose track of the tiny pieces. -
Trace onto material:
Place a paper template piece onto your chosen colored material. Pay attention to the grain direction if using wood veneer; having the grain run in different angles for adjacent pieces adds amazing visual depth. -
Cut the final pieces:
Using a metal ruler for precision, cut around your template on the colored material. A sharp blade is crucial here to get crisp, sharp corners that will fit together tightly. -
Dry fit the section:
Before gluing, place your cut colored pieces onto the mounted base map to ensure they fit snugly against their neighbors without gaps.
Step 3: Assembly and Detailing
-
Begin gluing:
Apply a thin, even layer of glue to the back of each shape. I find it easier to start from the center (the nose bridge) and work outward to keep symmetry aligned. -
Build the darker tones:
Focus on the deep shadow areas, such as the inside of the ears and the neck shadows. Use the darkest chocolate brown material here to create contrast. -
Create the highlights:
Cut and glue the cream or white shapes for the inner ears, lower cheeks, and muzzle. These high-contrast areas define the fox’s expression. -
Fill the mid-tones:
Complete the face with your various shades of orange and tan. Slight variations in these shades help the faceted low-poly effect pop. -
Construct the eyes:
The eyes are crucial. Cut tiny triangles of amber or bright orange for the iris, and use a dark brown or black for the pupil. Place these carefully, as their alignment dictates the gaze. -
Add the nose:
Cut the final black geometric shape for the nose tip and adhere it securely at the central focal point. -
Clean up edges:
If any white backing shows through the gaps, you can very gently touch it up with a colored pencil that matches the adjacent paper.
Varnish Effect
For a glossy ‘oil painting’ look, seal the finished piece with a coat of Mod Podge or clear acrylic spray sealant.
Step 4: Finishing
-
Press flat:
Once all pieces are glued, place a sheet of clean wax paper over the art, followed by a heavy book. Leave it for an hour to ensure all corners are adhered flat. -
Frame it up:
Remove the glass from your light wood frame if the artwork has too much texture, or use a shadow box frame. Secure the board into the frame.
Hang your geometric masterpiece in a sunny spot where natural light can play across the different angles and textures
Fox With a Galaxy Background
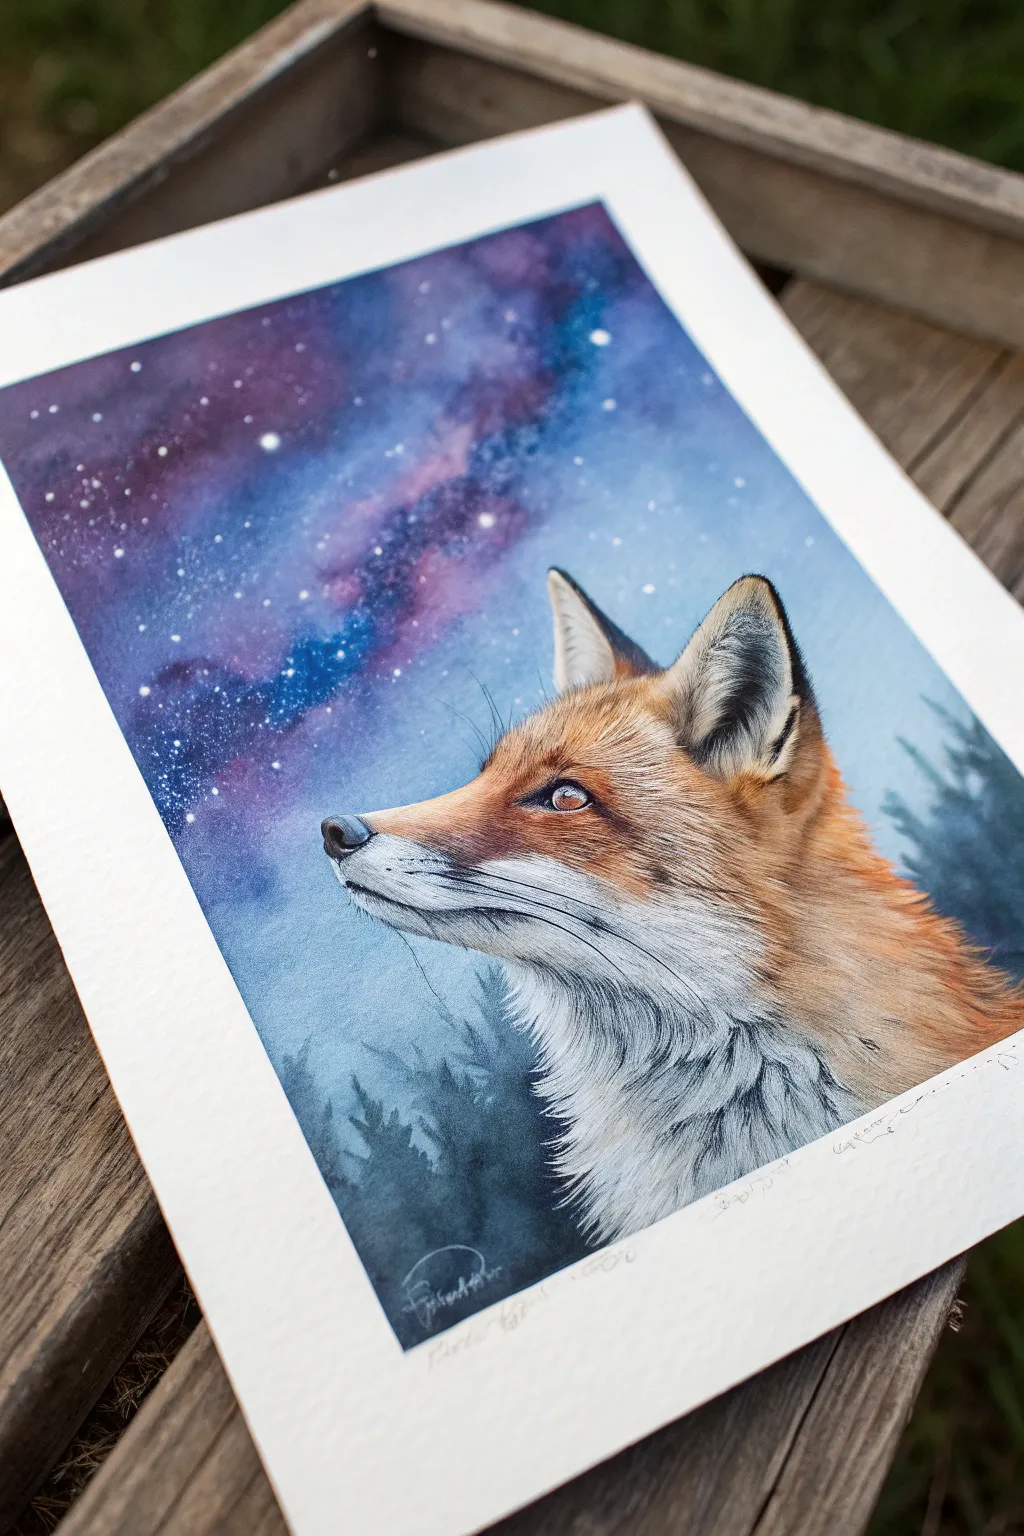
Capture the quiet wonder of nature with this striking watercolor portrait of a red fox gazing up at a celestial sky. By combining wet-on-wet techniques for the galaxy background with detailed dry-brushing for the fur, you’ll create a piece that feels both expansive and intimate.
Step-by-Step
Materials
- High-quality watercolor paper (cold press recommended, at least 300gsm)
- Artist masking tape
- Watercolor paints (Indigo, Purple/Violet, Phthalo Blue, Burnt Sienna, Yellow Ochre, Burnt Umber, Lamp Black)
- White gouache or white ink
- Pencil and eraser
- Small round brushes (size 0, 2) for details
- Medium round or flat brush (size 6-8) for washes
- Tissue or paper towel
- Two jars of water
Step 1: Preparation and Sketching
-
Tape the edges:
Secure your watercolor paper to a board using masking tape. Press the edges down firmly to ensure a crisp clean border once you finish painting. -
Sketch the outline:
Lightly sketch the profile of the fox looking upward. Focus on the triangular shape of the ear, the long snout, and the fluff of the chest. Keep your lines faint so they don’t show through the final paint. -
Mask the fox:
If you are worried about accidentally painting over the fox, you can apply masking fluid to the sketched area. Otherwise, just paint carefully around the outline in the next phase.
Step 2: Painting the Galaxy Sky
-
Prepare the sky wash:
Pre-wet the sky area with clean water, being careful not to get water inside the fox outline. The paper should be glistening but not forming puddles. -
Add deep blues:
Drop in Indigo and Phthalo Blue into the wet paper, concentrating the darkest values at the top left corner and fading slightly as you move down. -
Create the nebula:
While the blue is still wet, drop in patches of Purple or Violet. Allow these colors to bleed naturally into the blue to create a soft, nebulous effect. -
Suggest the treeline:
At the very bottom left, mix a misty grey-blue. While the paper is still damp, paint soft, indistinct shapes to suggest distant pine trees fading into the fog. Let the background dry completely. -
Splatter the stars:
Load a toothbrush or stiff brush with white gouache (or watered-down white acrylic). Flick the bristles to spray tiny stars across the dry sky. Add one or two larger stars manually with a fine brush.
Bleeding Colors?
If sky colors bleed into the fox area, dab gently with a clean tissue immediately. For crisp edges, always wait for adjacent sections to be bone-dry before painting next to them.
Step 3: Painting the Fox
-
Base layer for fur:
Start with a very watery wash of Yellow Ochre on the fox’s face and upper neck. Leave the muzzle, cheek, and chest white for now. -
Build the orange tones:
Once the base is dry, mix Burnt Sienna with a touch of red. Using a size 2 brush, start painting fur texture using short, directional strokes that follow the curve of the animal’s head. -
Add shadows to the white fur:
The white fur on the chest and muzzle isn’t truly white. Mix a very pale, watery blue-grey and paint distinct clumps of fur on the chest to give it volume. -
Deepen the contrast:
Mix Burnt Umber and a tiny bit of Black. Paint the dark fur inside the ear, the nose, and the shadows under the jawline. This high contrast makes the fox pop against the sky. -
Refine the eye:
Paint the iris with a golden-brown hue, leaving a tiny spot of white paper for the highlight. Outline the eye with black, extending the dark tear duct line toward the nose. -
Detail the whiskers:
Using your smallest brush (size 0) and a dark grey mix, paint long, sweeping whiskers. Keep your hand loose to ensure the lines look natural and not stiff. -
Final fur texture:
I like to use a nearly dry brush with white gouache to add a few highlights on the tips of the ear fur and the top of the head to simulate moonlight hitting the animal.
Add Magic
Mix a tiny amount of iridescent or pearl watercolor medium into your white star spatter. This gives the galaxy a subtle shimmer that changes when viewed from different angles.
Peel off the tape slowly to reveal those crisp white borders and enjoy your celestial woodland scene
Fox Portrait With Wildflowers
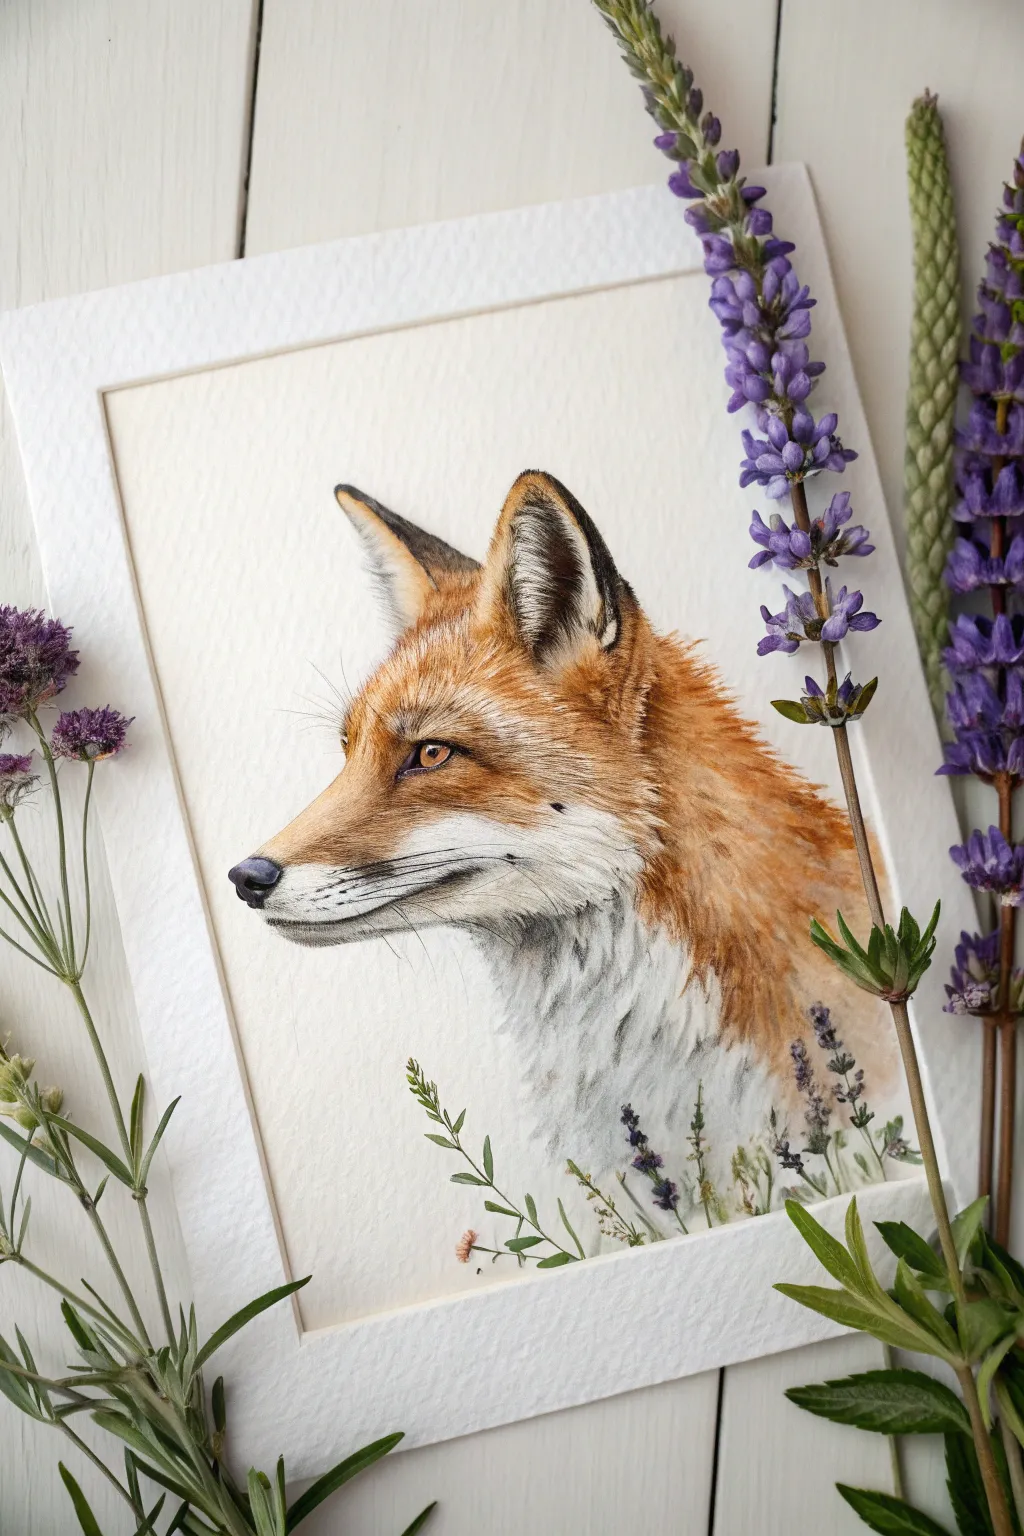
Capture the quiet dignity of a red fox with this detailed profile portrait, blending realistic fur textures with delicate botanical elements. The result is a soft, naturalistic piece that balances intricate brushwork with the organic spontaneity of wildflowers.
Step-by-Step
Materials
- Cold press watercolor paper (300 gsm)
- H or HB pencil for sketching
- Kneaded eraser
- Watercolor paints (Burnt Sienna, Yellow Ochre, Burnt Umber, Lamp Black, Ultramarine Blue, Sap Green)
- White classic gouache or acrylic ink
- Round watercolor brushes (Size 4, 2, and 00 for details)
- Masking fluid (optional, for whiskers)
- Paper towels and two water jars
Step 1: Sketching the Foundation
-
Establish the proportions:
Begin with a light pencil sketch. Draw a sloping triangle shape for the head and a gentle curve extending down for the chest. Position the ear high on the skull, ensuring the angle matches the alert posture of the reference. -
Refine the features:
Detailed sketching is crucial here. Carefully outline the teardrop shape of the eye, the black tear duct line, and the subtle curve of the muzzle mouth. Mark the transition zones where red fur meets white fur on the cheek and neck. -
Lighten the lines:
Before painting, roll a kneaded eraser over your entire sketch to lift excess graphite. You want the lines barely visible so they don’t muddy your yellow and orange washes later.
Step 2: Applying Base Layers
-
The golden underpainting:
Mix a very watery wash of Yellow Ochre. Apply this to the top of the head, the ear back, and the upper neck. Keep the edges soft by using clean water to fade the color out toward the white areas. -
Building the red coat:
While the first layer is damp (but not soaking), introduce Burnt Sienna. Drop this richer color into the areas where the fur is thickest—the crown of the head and the main neck ruff. Allow the pigments to bloom slightly for a natural transition. -
Shadowing the white fur:
The white chest isn’t pure white. Mix a very faint grey using Ultramarine Blue and a touch of Burnt Umber. Apply varied, directional strokes to the chest area to suggest the shadow of fur clumps without painting them solid grey.
Brushwork Tip
Always paint fur in the direction it grows on the animal. Use the very tip of your brush and flick your wrist upward at the end of each stroke for a tapered, hair-like effect.
Step 3: Detailing the Texture
-
Creating fur texture:
Switch to your size 2 brush. Using a mix of Burnt Sienna and Burnt Umber, start painting short, directional strokes that follow the growth pattern of the fox’s coat. Keep strokes short on the snout and longer on the neck. -
Darkening the ears and nose:
Mix a dark grey-black using Burnt Umber and Lamp Black. Carefully paint the back edge of the ears and the nose tip. I prefer to leave a tiny sliver of white paper unpainted on the nose to represent a highlight. -
Painting the eye:
Use a heavy concentration of Yellow Ochre and Burnt Sienna for the iris. Once dry, add the pupil with thick black paint. Leave a crisp white highlight, or add it back later with gouache. -
Refined layering:
Continue building up layers of ‘fur’ strokes with the red-brown mix. Increase the density of strokes near the ear base and the cheekbone to create depth and form.
Level Up: Real Botany
Instead of painting the final flowers, use pressed dried flowers glued to the paper’s surface at the fox’s neckline for a stunning mixed-media 3D effect.
Step 4: Finishing Touches
-
Adding botanical accents:
At the base of the fox’s chest, sketch a few simple wildflowers. Paint the stems with Sap Green and use small dabs of purple or blue for the gentle blossoms, letting them fade into the white fur. -
Whisker details:
Using a size 00 brush and black paint, pull long, confident strokes for the whiskers originating from the muzzle. Keep your wrist loose to ensure the lines taper naturally. -
White highlights:
Use white gouache or acrylic ink on your smallest brush to add final sharp hairs inside the ears and on the muzzle. This brings the texture forward and adds crisp realism.
Step back and admire how the layers of simple strokes have transformed into a lifelike gaze on the paper
Double-Exposure Fox With Forest Inside

Capture the quiet solitude of the forest with this atmospheric watercolor piece featuring a rusty-red fox overlooking a misty evergreen landscape. By combining crisp silhouettes with soft, wet-on-wet washes, you’ll create a painting that feels both grounded and dreamlike.
How-To Guide
Materials
- Cold press watercolor paper (300 gsm)
- Watercolor paints (Burnt Sienna, Alizarin Crimson, Payne’s Grey, Indigo, Sap Green)
- Round watercolor brushes (Size 2, 6, and 10)
- Pencil (HB or lighter)
- Kneaded eraser
- Masking fluid (optional)
- Two jars of water
- Paper towels
- Painter’s tape
Step 1: Preparation and Sketching
-
Secure the paper:
Tape down all four edges of your watercolor paper to a board using painter’s tape. This prevents buckling when we add water later and creates a clean white border. -
Outline the fox:
Lightly sketch the contour of the seated fox in the center of the page. Focus on the sharp ears, the sloping back, and the large, bushy tail wrapping around the base. -
Define the landscape:
Draw the gentle curve of the snowy mound the fox is sitting on. Then, sketch rough vertical lines to indicate where your background and foreground pine trees will stand, but keep detail minimal here.
Step 2: Painting the Sky and Background
-
Wet the sky area:
Using your largest round brush, apply clean water to the sky area, carefully painting around the fox’s outline so the background doesn’t bleed into the subject. -
Add a soft glow:
Drop a very diluted wash of warm pink or orange near the horizon line behind the fox to mimic a soft sunrise or sunset glow. -
Paint distant trees:
Mix a pale, watery wash of Indigo and Sap Green. While the paper is still slightly damp (but not soaking), paint the faint silhouettes of distant pine trees. The damp paper will fuzz the edges, creating a misty effect. -
Let it dry complete:
Allow this background layer to dry completely before moving forward. This is crucial to keep your foreground crisp.
Keep the White
For the fox’s white chest and jaw, outline the area with clean water first. If you struggle to keep it white, use masking fluid before you start painting.
Step 3: Painting the Fox
-
First wash of fur:
Mix Burnt Sienna with a touch of Alizarin Crimson. Wet the body of the fox with clean water first, then drop this pigment in, letting it bloom naturally. -
Deepen the shadows:
While the fox is still wet, drop concentrated Burnt Sienna or a bit of burnt umber near the bottom of the tail and the shadowed side of the legs to create volume. -
Detail the face:
Switch to your size 2 brush. With a drier mix, carefully paint the ears and the snout. Leave negative space (white paper) for the cheek and chest to define the jawline. -
Texture the fur:
As the paint starts to dry but isn’t quite set, use a semi-dry brush to pull tiny flicks of paint outward on the tail and neck to suggest fur texture. -
Final fox details:
Add the nose tip and eye with a dark mix of Payne’s Grey and Burnt Umber. Keep these precise for a focal point.
Salt Texture Trick
While the background wash or the fox’s tail is still wet, sprinkle a few grains of table salt. As it dries, it creates a unique, crystalline texture.
Step 4: Foreground Elements
-
Mix dark greens:
Create a saturated, dark mix using Indigo, Payne’s Grey, and Sap Green. We want a deep, cool forest tone for the foreground. -
Paint the rock mound:
Wash a light grey-blue over the shadowed side of the rock/snow mound the fox sits on, keeping the top edge white to suggest snow. -
Add foreground trees:
Using the dark green mix, paint the sharp pine trees in the foreground. Start with a thin vertical line for the trunk, then use jagged, downward strokes for the branches. -
Overlap carefully:
Place some tree branches so they slightly overlap the rock or frame the fox, creating depth. Ensure these are darker and sharper than your background trees. -
Finishing touches:
Once everything is dry, remove the tape slowly at an angle to reveal your crisp white border.
This serene scene captures the quiet beauty of nature and looks perfect framed on a wall
Vixen and Kits Family Scene

This tender illustration captures a watchful mother fox and her two curious kits nestled within a striking triangular frame. By combining precise geometry with soft, textured fur techniques, you’ll create a modern yet heartwarming piece perfect for a gallery wall.
Detailed Instructions
Materials
- Heavyweight watercolor paper (cold press with texture, 300gsm)
- H or HB pencil for sketching
- Ruler
- Fine liner pens (sepia or dark brown, 0.1mm and 0.3mm)
- Watercolor paints (burnt sienna, yellow ochre, raw umber, ivory black)
- White gouache or white gel pen
- Round watercolor brushes (sizes 2, 4, and 0 for details)
- Colored pencils for texture (optional)
- Masking tape
Step 1: Geometric Framework & Sketch
-
Set the boundaries:
Begin by lightly tracing a large, equilateral(ish) triangle in the center of your paper using a ruler and an HB pencil. This shape will act as the container for your composition, so ensure it is centered. -
Sketch the mother fox:
Roughly block in the mother fox’s head on the right side of the triangle. Her snout should point left, extending just slightly beyond the triangle’s edge to break the frame dynamically. -
Position the kits:
Sketch the two kits below the mother. Place the left kit curled slightly, looking inward, and the right kit nestled directly under the mother’s chest, creating a cozy cluster. -
Refine the features:
Detail the faces, focusing on the triangular ears and almond-shaped eyes. Keep your pencil lines light, especially for the fur areas where you want the texture to look soft later.
Breaking the Frame
Letting the mother’s snout and ear tips extend slightly past the drawn triangle line creates depth and makes the composition feel alive and unconstrained.
Step 2: Base Washes & Underpainting
-
First layer of color:
Mix a diluted wash of yellow ochre and burnt sienna. Apply this wet-on-dry to the main body areas of the foxes, avoiding the white chests, muzzles, and inner ears. -
Defining the shadows:
While the first layer is still slightly damp, drop in a small amount of raw umber where the kits’ bodies touch the ground and where heads turn away from the light source. -
Background wash:
Very lightly wash the interior of the triangle behind the foxes with a faint, cool gray or diluted blue to separate the subjects from the raw paper, keeping the wash strictly inside the pencil lines.
Muddy Colors?
If fur tones look muddy, let the paper dry completely between layers. Foxes need vibrant oranges, so keep your water clean and avoid over-mixing on the palette.
Step 3: Fur Texture & Details
-
Building the orange coat:
Using a size 2 brush and a stronger mix of burnt sienna, start painting short, directional strokes to mimic fur. Follow the natural curve of the animal’s body, particularly around the mother’s neck ruffle. -
Detailed facial features:
Switch to your size 0 brush. Use a dark mix of umber and black to carefully paint the eyes, nose tips, and the dark rims of the ears. Leave tiny specks of white paper in the eyes for the catchlights. -
Softening the kits:
The kits should look fluffier than the adult. I like to use a slightly dryer brush here, dabbing color rather than stroking, to create that fuzzy, downy texture on their backs. -
Adding the shadows:
Deepen the contrast between the foxes. Use raw umber to paint the shadows cast by the mother’s head onto her chest, and the crevices between the kits’ paws.
Step 4: Refinement & Final Touches
-
Reinforcing the geometry:
Take a fine liner pen or a very sharp pencil and re-trace the main triangle border. Make sure the line stops cleanly where the foxes’ bodies overlap and break the shape. -
Whisker details:
Using a white gel pen or thin white gouache, add the long, delicate whiskers to the muzzles. You can also add fine white hairs inside the ears for depth. -
Grounding shadows:
Add a soft, hazy shadow underneath the kits using a diluted cool gray. This grounds them so they don’t look like they are floating in the triangle. -
Final pencil texture:
Once the paint is bone dry, you can use colored pencils to add crisp definition to individual hairs, especially on the paws and around the eyes.
Now step back and admire how the geometric structure perfectly balances the organic softness of your foxes
Mixed-Media Collage Fox With Metallic Accents
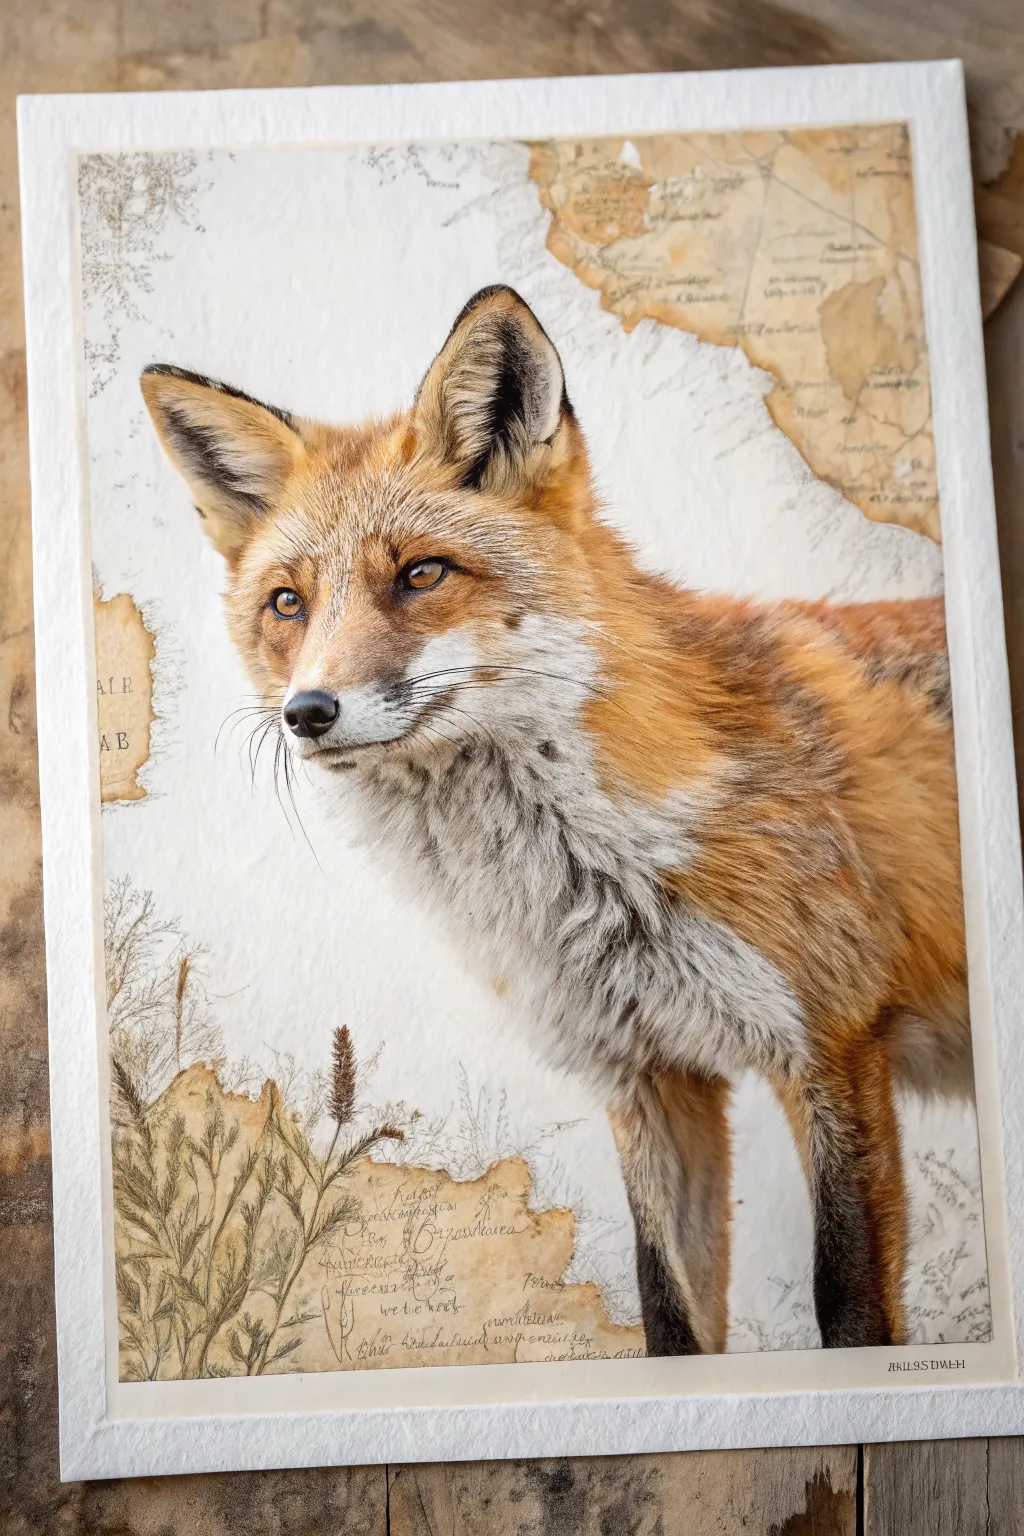
This striking mixed-media piece blends the hyper-realism of a red fox with the vintage charm of antique cartography. By combining decoupage techniques with precise painting or high-quality printing, you’ll create a textured artwork that feels like a discovery from an old explorer’s journal.
How-To Guide
Materials
- Heavyweight watercolor paper or mixed-media board (A3 size)
- Vintage map prints or old atlas pages (specifically with creamy/sepia tones)
- Matte gel medium or decoupage glue
- Soft synthetic brushes (flat shader and rigger lines)
- High-resolution fox reference photo
- Acrylic paints (Burnt Sienna, Yellow Ochre, Titanium White, Lamp Black, Burnt Umber)
- Fine-liner archival ink pens (Sepia or Black, 0.1mm and 0.3mm)
- Scissors and precision craft knife
- Small natural sponge
- Tea bag or heavily diluted brown ink (for aging)
- Pencil (HB) and eraser
Step 1: Preparing the Cartographic Background
-
Source your maps:
Begin by tearing roughly shaped fragments from your vintage map prints. Focus on pieces that have interesting topographical lines or old script. Don’t use scissors here; the torn edges are essential for the organic look. -
Arrange the composition:
Lay your torn map pieces onto the white watercolor paper. Aim for an asymmetrical layout—perhaps clustering them in the top right and bottom left corners to frame where the fox will stand. Leave the center largely empty white space. -
Adhere the maps:
Apply a thin, even layer of matte gel medium to the back of each map fragment. Press them firmly onto the paper, smoothing out any air bubbles with an old credit card or brayer. -
Age the edges:
Once the glue is dry, dip a small sponge into strong brewed tea or very diluted brown ink. Gently dab the torn edges of the maps and sporadically on the white paper to create a weathered, unified parchment effect. -
Add nature sketches:
In the bottom left corner, overlapping the map fragment, use your 0.1mm sepia ink pen to sketch delicate botanical elements like tall grasses or wheat. Keep the lines loose and sketchy to mimic a field journal style.
Uneven Glue?
If the map paper wrinkles when glued, you used too much adhesive. Let it dry completely, then place a sheet of parchment paper over it and iron on low heat to flatten it out.
Step 2: Painting the Fox
-
Transfer the outline:
Lightly sketch the outline of the fox onto the center of your paper. If you aren’t confident in freehand drawing, you can use a projector or transfer paper to get the proportions of the ears and snout exactly right. -
Base coat blocking:
Start by blocking in the main colors with acrylics diluted slightly with water. Use Burnt Sienna mixed with Yellow Ochre for the main fur, Titanium White for the chest and muzzle, and a dark grey (Black + White) for the legs. -
Building fur texture:
Using a small flat brush, use a dry-brush technique to start layering the orange fur. Use short, flicking strokes that follow the direction of hair growth. I find it helps to work from the tail forward towards the head. -
The white chest:
For the chest and neck, switch to a clean brush. Layer Titanium White with tiny touches of grey to create shadow and depth within the white fur, ensuring it doesn’t look flat. -
Detailing the face:
This is the most critical part. Use a rigger brush or very fine round brush. Paint the eyes with amber and black, adding a tiny white reflection dot to bring them to life. Use short, precise strokes to create the velvet texture on the ears. -
Legs and paws:
Darken the legs with a mix of Burnt Umber and Lamp Black. Instead of solid black, keep the application slightly translucent in areas to suggest the coarseness of the fur on the limbs. -
Whiskers and fine hairs:
Dilute a small amount of black paint to an ink-like consistency. Using your finest liner brush, pull long, confident strokes for the whiskers. Do this quickly to keep the lines smooth.
Level Up: Metallic
Add subtle gold leaf flakes along the torn edges of the map fragments. The metallic shine simulates the illuminated manuscripts of old and catches the light beautifully.
Step 3: Unifying the Elements
-
Shadow integration:
Mix a transparent glaze of Burnt Umber and water. Lightly paint a soft shadow underneath the fox’s paws and tail where they meet the background, grounding the animal so it doesn’t look like it’s floating. -
Script additions:
Using your fine liner pen, add segments of handwritten cursive text over the map areas or near the botanical sketches. This mimics the look of scientific notes; the words don’t need to be legible, just rhythmic. -
Final blending:
Take a nearly dry brush with a tiny amount of the background tea stain color and lightly feather it over the edges of the fox’s tail or back legs. This pushes them slightly back visually, making the sharp focus of the face pop even more.
Step back and admire how your modern brushwork blends seamlessly with the history of the background for a truly timeless piece.


Have a question or want to share your own experience? I'd love to hear from you in the comments below!