
If you’ve been craving a bold freehand wall painting moment, you don’t need perfect lines or fancy tools—just a little courage and a brush you’re willing to wiggle. These DIY mural ideas are all about organic shapes, happy accidents, and big impact you can create one stroke at a time.
Abstract Color-Block Accent Wall
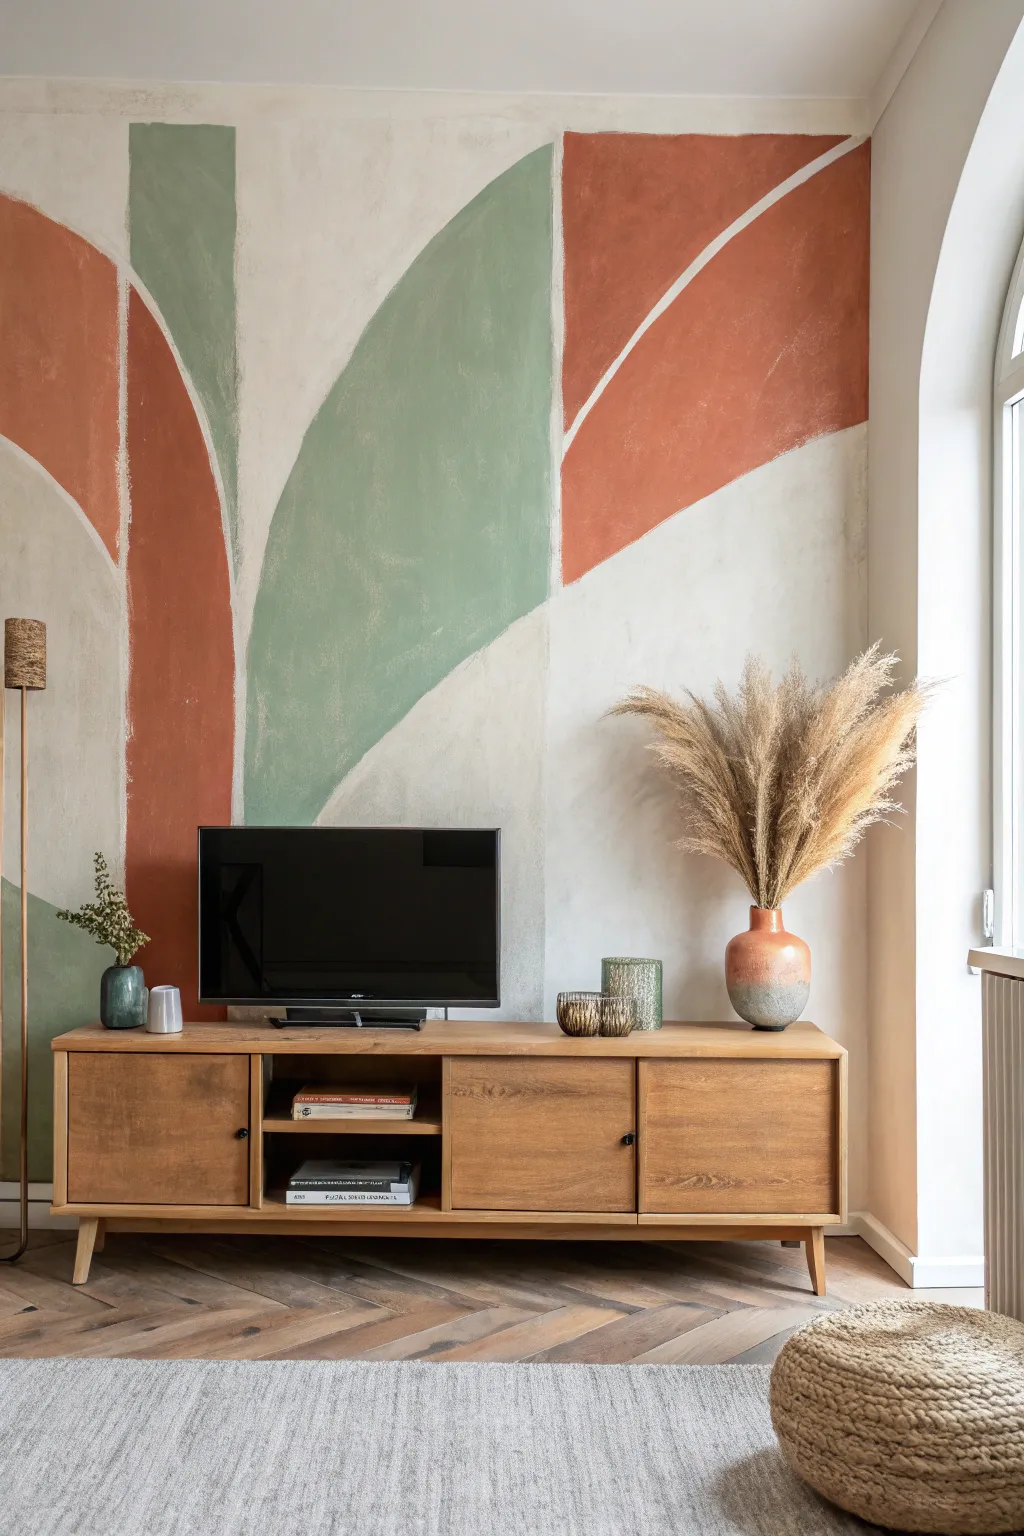
Transform a plain wall with this soothing, large-scale abstract design featuring soft organic curves in terracotta and sage green. The hand-painted, slightly imperfect edges give the mural a wonderful textured, plaster-like quality that adds warmth without overwhelming the room.
Step-by-Step Tutorial
Materials
- Interior latex paint (Terracotta/Rust)
- Interior latex paint (Sage Green)
- Interior latex paint (Cream/Off-White for background)
- 2-inch angled paintbrush (high quality)
- Small artist brush or 1-inch flat brush (for edges)
- Chalk or a light pencil
- Drop cloth
- Painter’s tape (for baseboards)
- Ladder or step stool
- Mixing stick
- Paint tray and liner
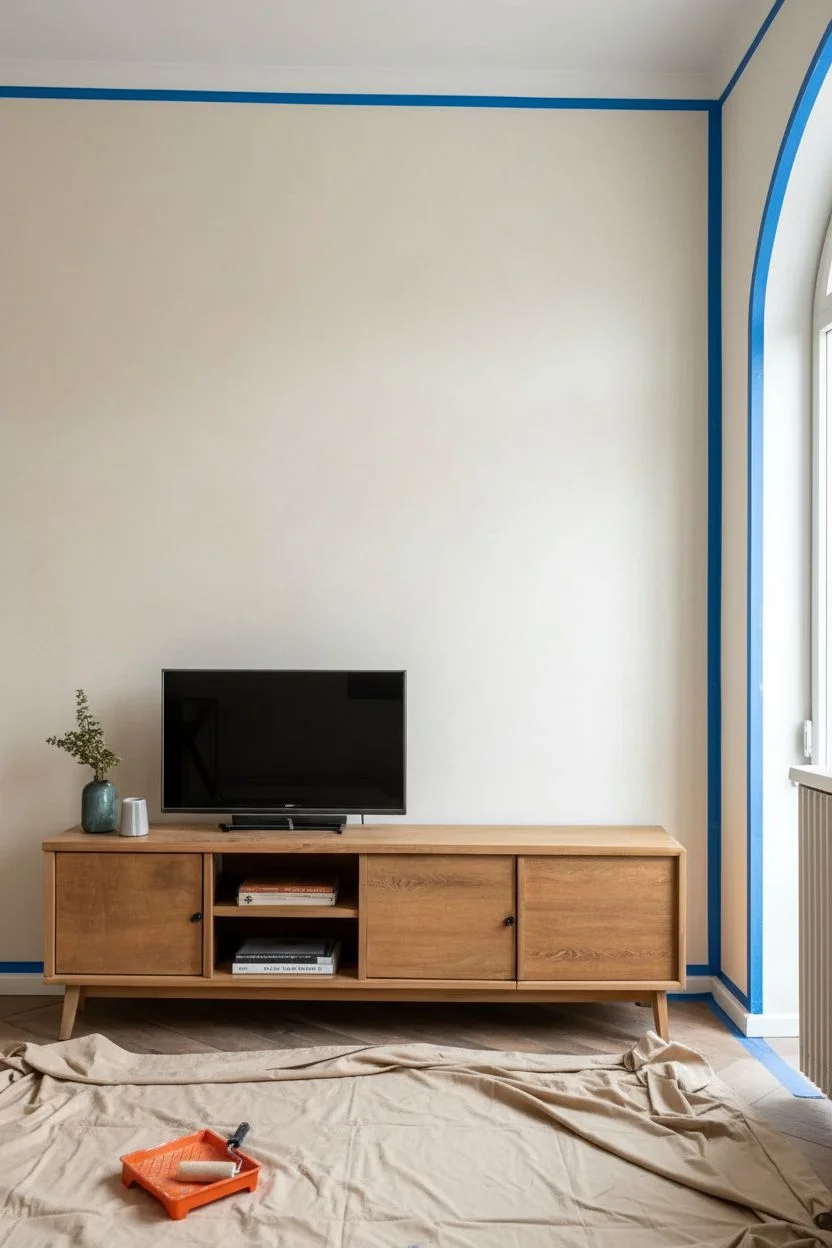
Step 1: Preparation & Base Coat
-
Prepare the workspace:
Clear furniture away from the wall to give yourself plenty of room to move. Lay down a drop cloth to protect your flooring, particularly since freehand painting can sometimes lead to minor drips. -
Protect the edges:
Apply painter’s tape along the baseboards, ceiling line, and adjacent walls. Press the edges of the tape down firmly with a credit card or your thumb to prevent bleed-through. -
Apply the background color:
If your wall isn’t already the desired cream or off-white shade, roll on two coats of your background color. Let this dry completely—I usually wait overnight to ensure the surface is perfectly cured for the detail work.
Step 2: Sketching the Design
-
Analyze the shapes:
Look closely at the reference. Notice how the shapes feel like giant, simplified leaves or petals rising from the floor. There are essentially three vertical zones: a rust and green cluster on the left, a large central green curve, and a rust shape on the upper right. -
Sketch the main vertical lines:
Using chalk or a very light pencil, loosely mark the vertical boundaries. Don’t use a level; the charm of this mural lies in its organic flow, so a slightly wavering hand is actually an advantage here. -
Map out the curves:
Draw the large, sweeping arches. Start with the bottom left rust shape, then the green shape above it. Move to the center green petal shape, and finally the top right rust section. Step back frequently to check proportions. -
add negative space lines:
Mark the thin white lines that separate the color blocks. These ‘channels’ of negative space are crucial—they act like veins in a leaf or grout lines in a mosaic, separating the colors so they don’t touch.
Pro Tip: Texture Talk
To mimic the limewash look seen here without buying expensive specialty paint, mix a small amount of baking soda or plaster of Paris into your latex paint for a gritty, matte texture.
Step 3: Painting the Rust Sections
-
Load your brush:
Dip your 2-inch angled brush into the terracotta paint. Don’t overload it; control is key. -
Cut in the edges first:
Paint the outline of your first rust shape, following your chalk guide but keeping a ‘live’ edge. The goal isn’t a razor-sharp vector line, but a soft, hand-painted border. -
Fill the interior:
Fill in the rest of the shape. Use random, crisscrossing brushstrokes rather than rolling it on. This creates that subtle texture visible in the photo. -
Repeat for upper sections:
Move to the upper right rust section. Use the ladder to reach the top, carefully cutting in against the ceiling tape line.
Level Up: Metallic Veins
Instead of leaving the negative space lines as plain wall color, use a thin gold leaf strip or metallic gold paint in the gaps to turn the mural into a modern Kintsugi-inspired masterpiece.
Step 4: Painting the Sage Green Sections
-
Switch colors:
Wash your brush thoroughly or switch to a fresh one for the sage green paint. -
Paint the central curve:
Start with the large central green shape. Be very mindful of the negative space gap between this green section and the neighboring rust section; keep that white line consistent in width, about 1-2 inches wide. -
Feather the edges:
As you paint the outer curve, use a slightly dryer brush. This technique allows a tiny bit of the wall texture to show through at the very edge, enhancing the organic feel. -
Add the smaller accents:
Fill in the smaller green shapes on the far left. Check your composition from across the room to ensure the color balance feels right.
Step 5: Finishing Touches
-
Assess opacity:
Once the first coat is dry to the touch, check for patchiness. This style looks great with some texture, but if the wall color shows through too much, apply a second coat using the same cross-hatch brush motion. -
Refine the negative space:
If any paint lines got too close or messy, use a small artist brush and your background cream paint to tough up the negative space channels, crisping them up just enough. -
Clear chalk marks:
Use a barely damp cloth to gently wipe away any visible chalk lines that weren’t covered by paint. -
Remove tape:
Slowly peel off the painter’s tape at a 45-degree angle while the paint is still slightly tacky to ensure clean edges.
Step back and admire your new focal point, enjoying the calm atmosphere these organic shapes bring to your living space


Ombre Arches Painted Freehand

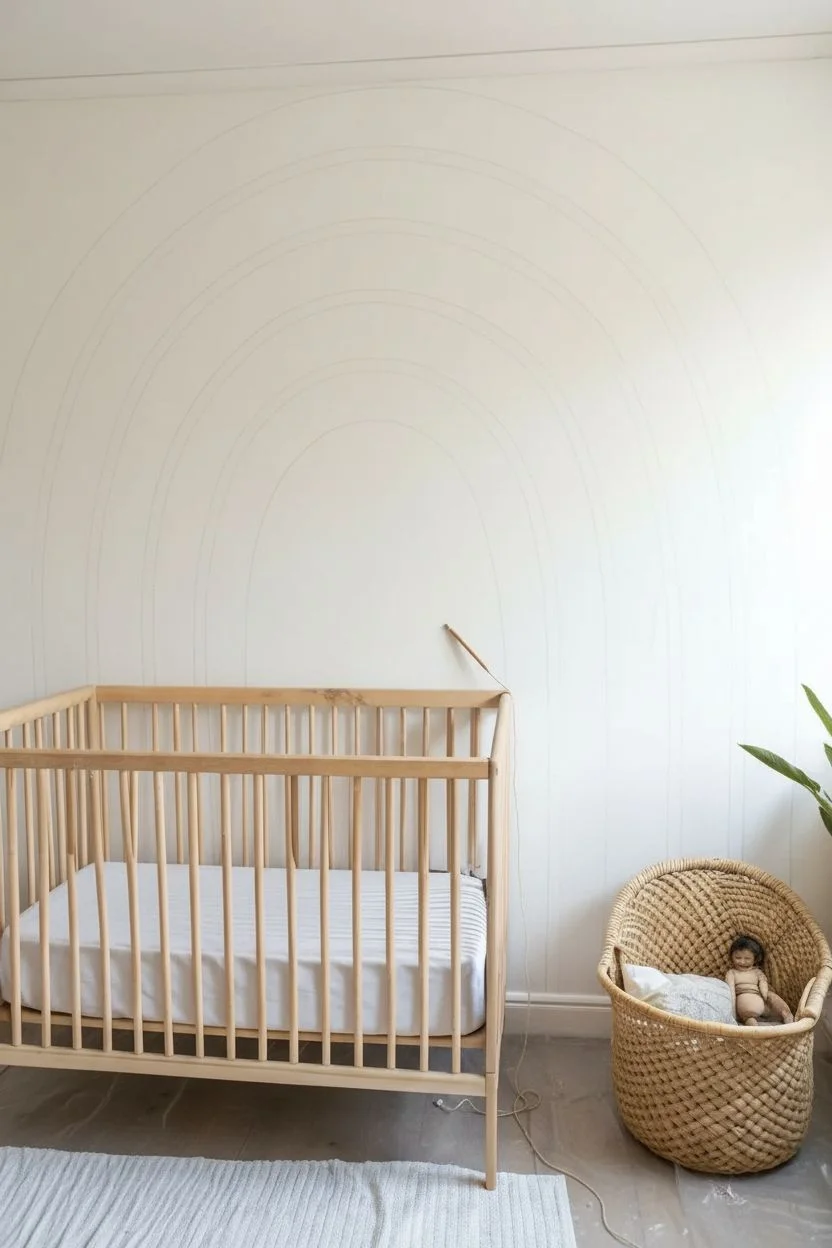
Transform a plain wall into a warm, bohemian focal point with this large-scale earthy rainbow mural. The beauty of this piece lies in its imperfect, freehand brushstrokes and soft, muted color palette that mimics the look of textured plaster.
Step-by-Step
Materials
- Interior latex paint (terracotta/rust)
- Interior latex paint (dusty rose/pink)
- Interior latex paint (mustard/ochre)
- White wall paint (for mixing and touch-ups)
- Pencil
- String/twine (approx. 4-5 feet)
- Painter’s tape or thumb tack
- 2-inch angled sash brush
- 3-inch flat brush (for texture)
- Mixing cups or small buckets
- Rags or paper towels
- Drop cloth
Step 1: Planning and Sketching
-
Clear and prep the area:
Move furniture like cribs or chairs away from the wall to give yourself plenty of working space. Lay down a drop cloth to protect your flooring from any accidental drips. -
Find your center point:
Measure the width of the wall or the specific area where you want the rainbow to live. Mark a small dot near the floor (or right above the baseboard) to serve as your central anchor point. -
Create a makeshift compass:
Tie a piece of string to a pencil. Tape or tack the other end of the string to your center mark at the bottom of the wall. This simple tool will help you draw accurate arches. -
Sketch the outermost arch:
Extend the string to your desired maximum height for the rainbow. Keeping the string taut, lightly draw a large semi-circle arch on the wall with your pencil. I like to keep the line faint so it doesn’t show through the lighter paint later. -
Sketch the inner arches:
Shorten the string by about 6 to 8 inches (depending on how thick you want your stripes) and draw another arch inside the first one. Repeat this process until you have four distinct arch outlines, creating three bands for color and a central open space.
Dry Brushing Is Key
For that cloudy texture, dip just the tip of your brush in paint, wipe most of it off on cardboard, and apply lightly.
Step 2: Painting the Texture
-
Mix your colors:
Pour your terracotta, dusty rose, and mustard paints into separate containers. To achieve that chalky, textured look seen in the photo, mix a small amount of white paint into each color if they are too saturated, or dilute slightly with a tiny bit of water for a wash effect. -
Paint the outer band:
Start with the largest, outermost band using the terracotta color. Use the 2-inch angled brush to carefully cut in along the top pencil line. Don’t worry about being laser-perfect; a wiggle here and there adds character. -
Add texture to the stroke:
Fill in the rest of the outer band. Instead of rolling it smooth, use cross-hatch brush strokes or a dry-brushing technique with a larger flat brush. This creates the varying opacity that gives the mural its vintage, plaster-like vibe. -
Outline the second band:
Move inwards to the next band, using the dusty rose color. Leave a gap of about one inch of white wall space between the terracotta band and this new pink band. This negative space separates the colors beautifully. -
Fill and distress:
Fill in the pink band, maintaining that same uneven, textured application. If the paint looks too solid, blot it slightly with a dry rag while it’s still tacky to lift some pigment. -
Paint the inner band:
Switch to your mustard or ochre paint for the third, innermost colored arch. Again, leave a consistent white gap between this band and the pink one above it. -
Feather the edges:
As you paint the bottom parts of the arches (th vertical straight sections), gently feather your brush strokes downward so they don’t end in a hard, abrupt line, though usually, they will run straight into the baseboard. -
Refine the white gaps:
Once the colors are dry to the touch, assess the white gaps between the arches. If you accidentally painted too far into a gap, use a small brush with your original white wall paint to tidy up the lines and restore the spacing. -
Check for balance:
Step back and look at the overall composition. If one section looks too heavy or solid compared to the rest, you can lightly dry-brush a bit of white paint over it to soften the color and enhance the distressed look. -
Final clean up:
Erase any visible pencil marks that weren’t covered by paint. Remove the tape or tack from the center point and move your furniture back into place to enjoy the view.
Wobbly Lines?
Don’t stress over wobbly edges! If a curve looks wonky, simply widen the adjacent band slightly to correct the visual flow.
Step back and admire the warm, organic atmosphere your new hand-painted mural brings to the room


Terrazzo Confetti Chips Across the Wall

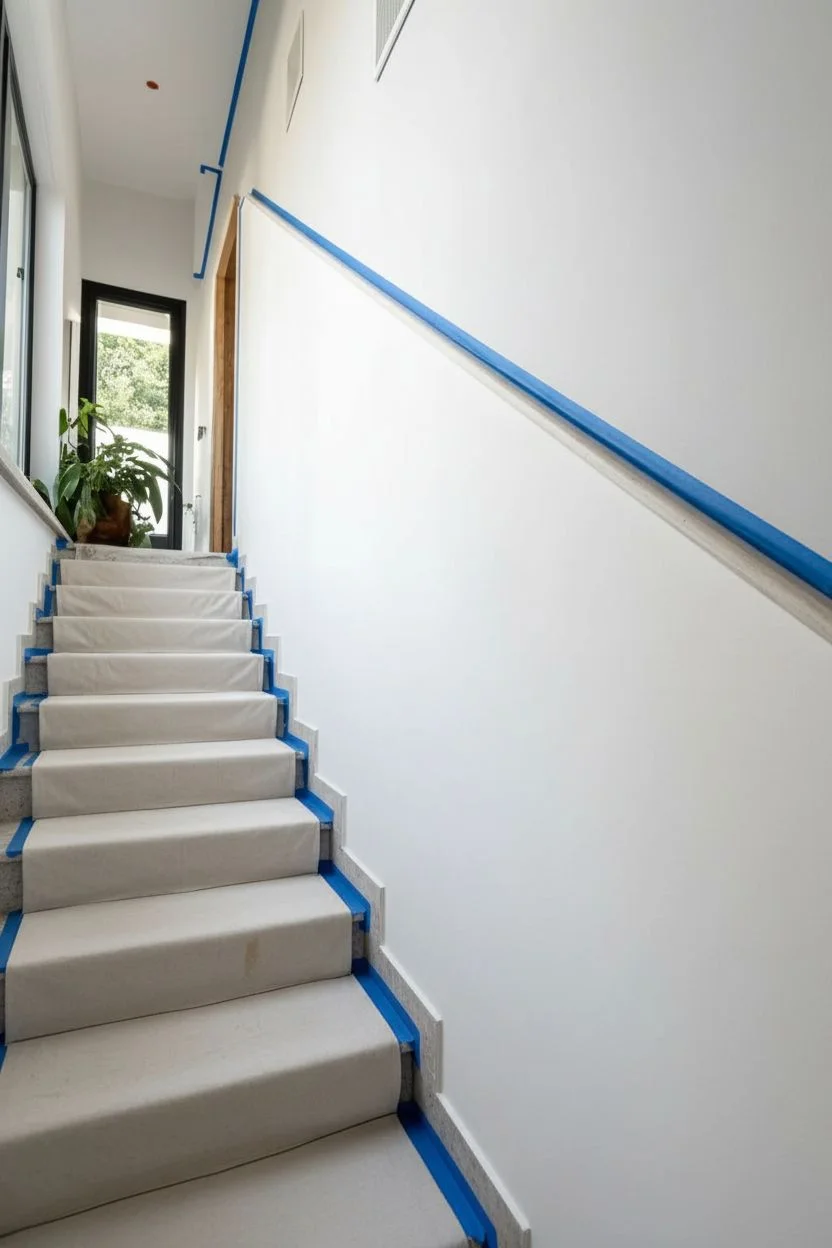
Transform a plain staircase or accent wall into a vibrant, oversized terrazzo masterpiece with this freehand painting technique. The look mimics the playful scattering of stone chips and confetti, bringing color and energy to your space without the commitment of real tile.
How-To Guide
Materials
- Latex interior wall paint (white or off-white base)
- Small sample pots of acrylic or latex paint (terracotta, sage green, forest green, black, mustard yellow, blush pink)
- Assorted small flat artist brushes (1/2 inch to 1 inch)
- Round tip brush (size 6 or 8) for smaller dots
- Painter’s tape
- Drop cloths
- Pencil
- Paper plate or palette
- Step ladder
- Damp rag for mistakes
Step 1: Preparation & Base Coat
-
Clear and clean:
Remove any artwork or hardware from the wall. Wipe down the surface with a damp cloth to remove dust, especially along the baseboards and trim, ensuring a clean canvas for your paint. -
Tape and protect:
Apply painter’s tape carefully along the skirting board, the handrail (if attached to the wall), and the ceiling line. Lay down drop cloths on the stairs to protect the stone or carpet from stray drips. -
Refresh the background:
If your wall isn’t already a fresh, crisp white, apply a coat of your base wall color. A matte or eggshell finish works best to make the colorful ‘chips’ pop. Let this dry completely—I usually wait overnight to be safe before starting the detail work.
Fixing Odd Shapes
If a shape looks too round or awkward, don’t wipe it while wet. Let it dry, then paint over just a corner with your white base color to ‘chisel’ it back into an angular shard.
Step 2: Planning the Pattern
-
Analyze the shapes:
Study the terrazzo style. Notice how the shapes are irregular polygons—some are jagged shards, some are softer pebbles, and others are tiny speckles. Avoid making perfect circles or squares. -
Practice sketching:
Before touching the wall, grab a piece of scrap paper and practice drawing these random shapes. Try grouping a large shard near a tiny dot to create a natural, organic feel. -
Mark loose zones:
Using a pencil very lightly, mark out visual ‘zones’ on the wall if you’re worried about spacing. You don’t need to draw every shape, just faint marks to ensure you don’t cluster too many colors in one spot.
Step 3: Painting the Chips
-
Start with the dominant color:
Choose your boldest color first, likely the terracotta or forest green. Pour a small amount onto your palette. -
Paint the large shapes:
Using a flat 1-inch brush, paint random, angular shapes across the entire wall area. Space them out widely, leaving plenty of room for the other five or six colors. -
Vary the rotation:
Make sure you rotate your wrist as you paint so the ‘chips’ don’t all point in the same direction. Terrazzo is random, so directional uniformity will kill the effect. -
Add the second color:
Switch to your next color, perhaps the sage green. Fill in the gaps between your first set of shapes, painting slightly different sizes—some larger chunks and some medium ones. -
Introduce contrast:
Now for the black or dark grey paint. These shapes act as anchors for the eye. Use a slightly smaller brush here to create sharp, jagged slivers that look like broken slate. -
Use a round brush for details:
Switch to a round tip brush for your smaller accent colors like mustard yellow and blush pink. Paint smaller, pebble-like shapes and tiny confetti dots to fill in empty negative spaces. -
Step back frequently:
Every 15 minutes, climb down the ladder and view the wall from a distance. This is crucial for spotting bald spots or areas that look too heavy with one color. -
Layering check:
Avoid having shapes touch each other. The beauty of terrazzo is the ‘grout’ (your white wall) separating each stone chip. -
Fill the tiny gaps:
Go back in with your smallest brush and the black or dark grey paint. Add tiny specks—almost just dots—in the large open white areas to mimic the grit found in real terrazzo.
Add Metallic Flair
For a luxe twist, mix in a metallic gold or copper paint as one of your ‘chip’ colors. It catches the light beautifully on a stairway.
Step 4: Finishing Touches
-
Review edges:
Check the edges near the tape. Paint partial shapes leading off the ‘edge’ of the wall so the pattern looks continuous rather than contained. -
Touch up:
If any shape looks messy or has a drip, wait for it to dry, then cut in with your white base wall paint to reshape it. -
Remove tape:
While the paint is dry to the touch but not fully cured, carefully peel away your painter’s tape at a 45-degree angle to reveal crisp lines.
Enjoy the playful movement this custom pattern adds to your home as you walk up and down the stairs each day


Loose Brushstroke Stripes for Instant Energy
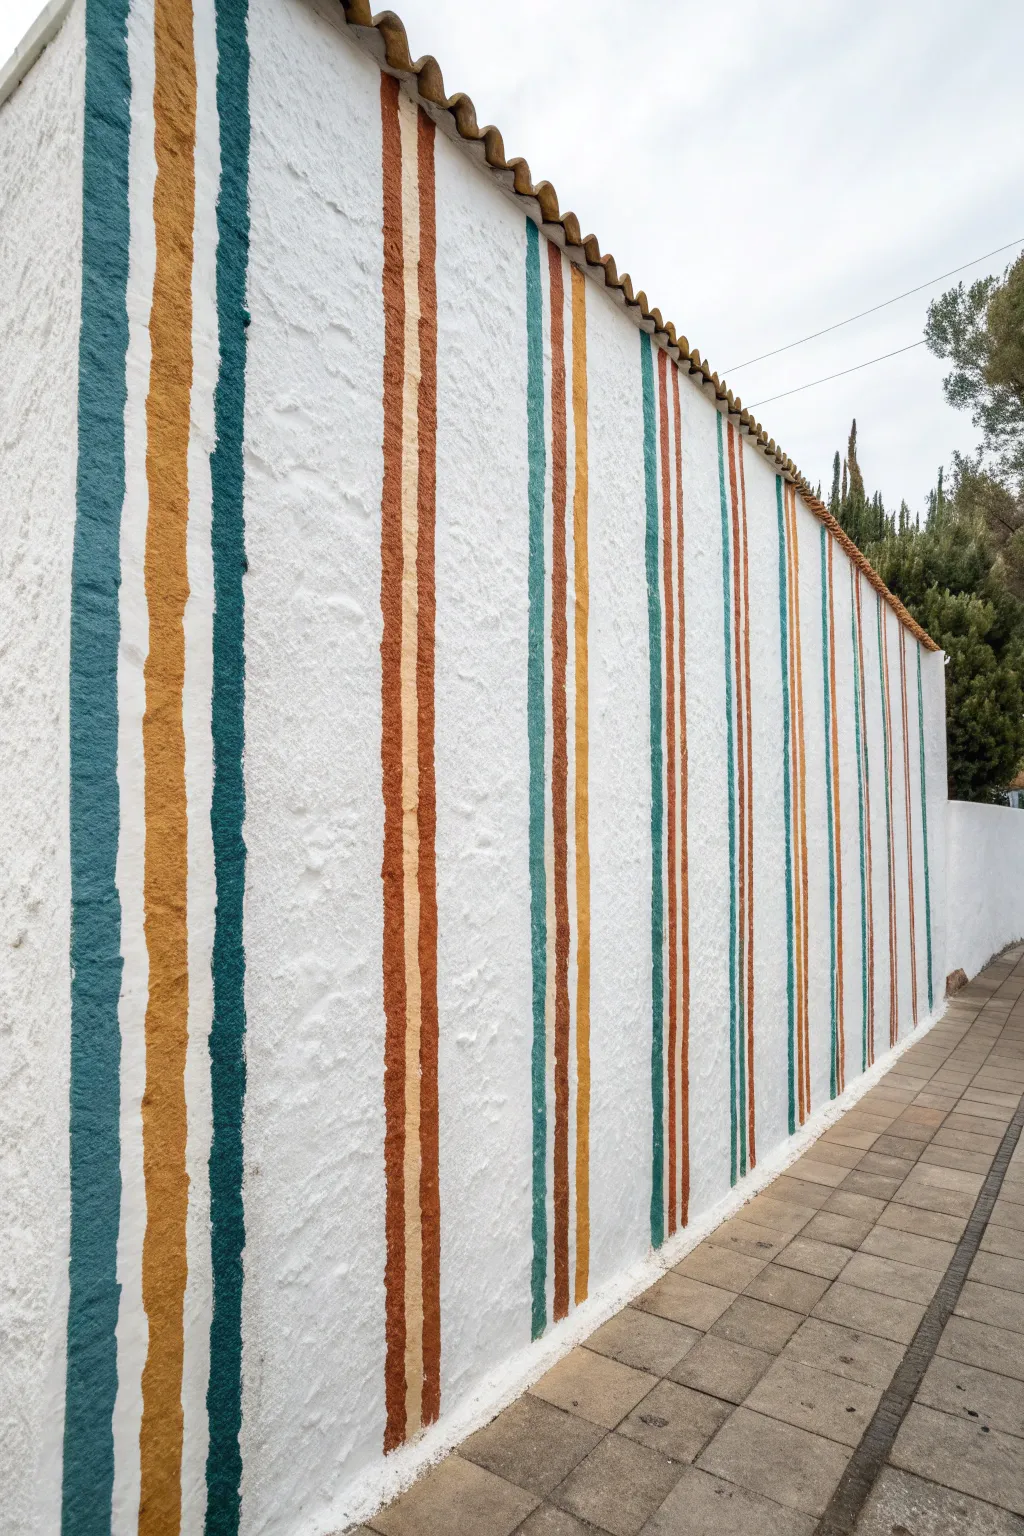
Embrace the imperfection of hand-painted lines to add rhythm and height to any outdoor or indoor space. This technique uses rough stucco texture to its advantage, creating vibrant, swaying stripes that feel lively rather than rigid.
Detailed Instructions
Materials
- Exterior masonry paint (white base)
- Exterior masonry paint (teal, mustard yellow, russet brown)
- Wide, flat paintbrush (3-4 inch)
- Extension pole (optional for height)
- Drop cloth or plastic sheeting
- Painter’s tape (for protecting adjacent surfaces only)
- Stir sticks
- Ladder
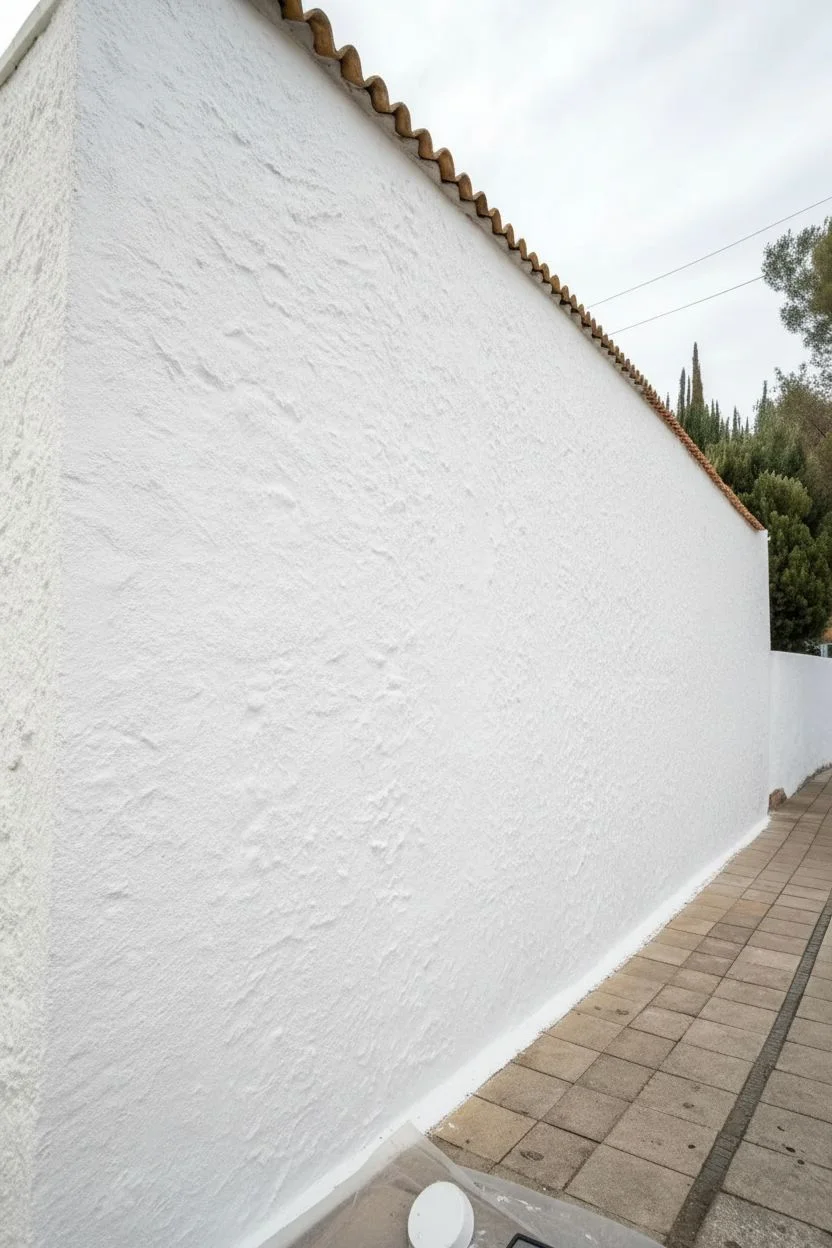
Step 1: Preparation and Base Coat
-
Clean the Surface:
Begin by removing any dirt, moss, or loose debris from your wall using a stiff bristle brush. If the wall is particularly dirty, extensive washing may be required, but ensure it is completely dry before proceeding. -
Protect the Area:
Lay down your drop cloth along the base of the wall to catch any drips. Use painter’s tape to mask off any areas you don’t want painted, such as door frames or adjacent walls. -
Apply the White Base:
Roll on a fresh coat of white masonry paint to create a clean, high-contrast canvas. The textured surface will require a thick nap roller to ensure full coverage in the crevices. -
Check Coverage:
Inspect the wall for any missed spots. Stucco can be tricky, so you might need a second coat or some touch-ups with a brush to get a solid, bright white background. -
Dry Completely:
Allow the base coat to cure fully according to the manufacturer’s instructions. A dry surface is crucial to prevent the colored stripes from muddying or bleeding into the white.
Wobbly Lines?
If a line drifts too far off course, don’t wipe it. Instead, paint a thin ‘correction’ stripe of the same color right next to it to visually straighten the overall path.
Step 2: Planning the Pattern
-
Visualize the Spacing:
Stand back and visualize where your stripes will go. The beauty of this design is irregularity, so you don’t need to measure exact distances, but aim for a balanced distribution of color groups. -
Mark Guide Points:
Lightly mark the top and bottom of the wall with a pencil or chalk where you want each stripe to start and end. This gives you a vertical target without restricting your hand movement. -
Group the Colors:
Plan to cluster your stripes. Notice how the example uses pairs or trios of colors (like a thick teal next to a thin mustard) rather than perfectly even spacing.
Step 3: Painting the Stripes
-
Load the Brush:
Dip your wide flat brush into your first color (e.g., teal). Do not overload it; you want enough paint to flow, but not so much that it drips uncontrollably down the textured wall. -
Execute the First Pull:
Starting from the very top, pull the brush straight down in one continuous motion if possible. If you need to stop to reload or move the ladder, try to blend the seam by feathering the wet edge. -
Embrace the Wobble:
Don’t try to correct natural wavers in the line. The charm of this look comes from the brush interacting with the rough stucco, creating those jagged, organic edges. -
Vary Widths:
For some stripes, use the full width of the brush. For others, turn the brush on its side or use a smaller brush to create thinner accent lines, like the russet brown stripes. -
Allow Overlap:
I like to let the stripes breathe, but if two colors accidentally touch or overlap slightly, leave it. It adds to the hand-painted, energetic feel. -
Rotate Colors:
Move across the wall, alternating between your teal, mustard, and brown paints. Wash your brush thoroughly between color changes or use separate brushes for each hue to keep the colors crisp. -
Maintain Verticality:
Step back frequently to ensure your overall direction remains vertical. While the edges should be loose, the overall stripe shouldn’t lean too heavily to the left or right. -
Touch Up Edges:
Once the stripes are painted, check the very top (near the roofline) and very bottom. Use a smaller brush to ensure the color extends clearly to the termination points. -
Final Inspection:
Look for any unintentional drips or spatters on the white sections. If found, let them dry and then carefully dab a little white paint over them to conceal the mistake.
Add Dimension
Mix a slightly lighter shade of your teal or brown and dry-brush it over the center of the matching dried stripes to create a sun-faded, dimensional highlight.
Step back and enjoy the vibrant rhythm your new wall brings to the environment
BRUSH GUIDE
The Right Brush for Every Stroke
From clean lines to bold texture — master brush choice, stroke control, and essential techniques.
Explore the Full Guide
Big Organic Blobs That Overlap and Float
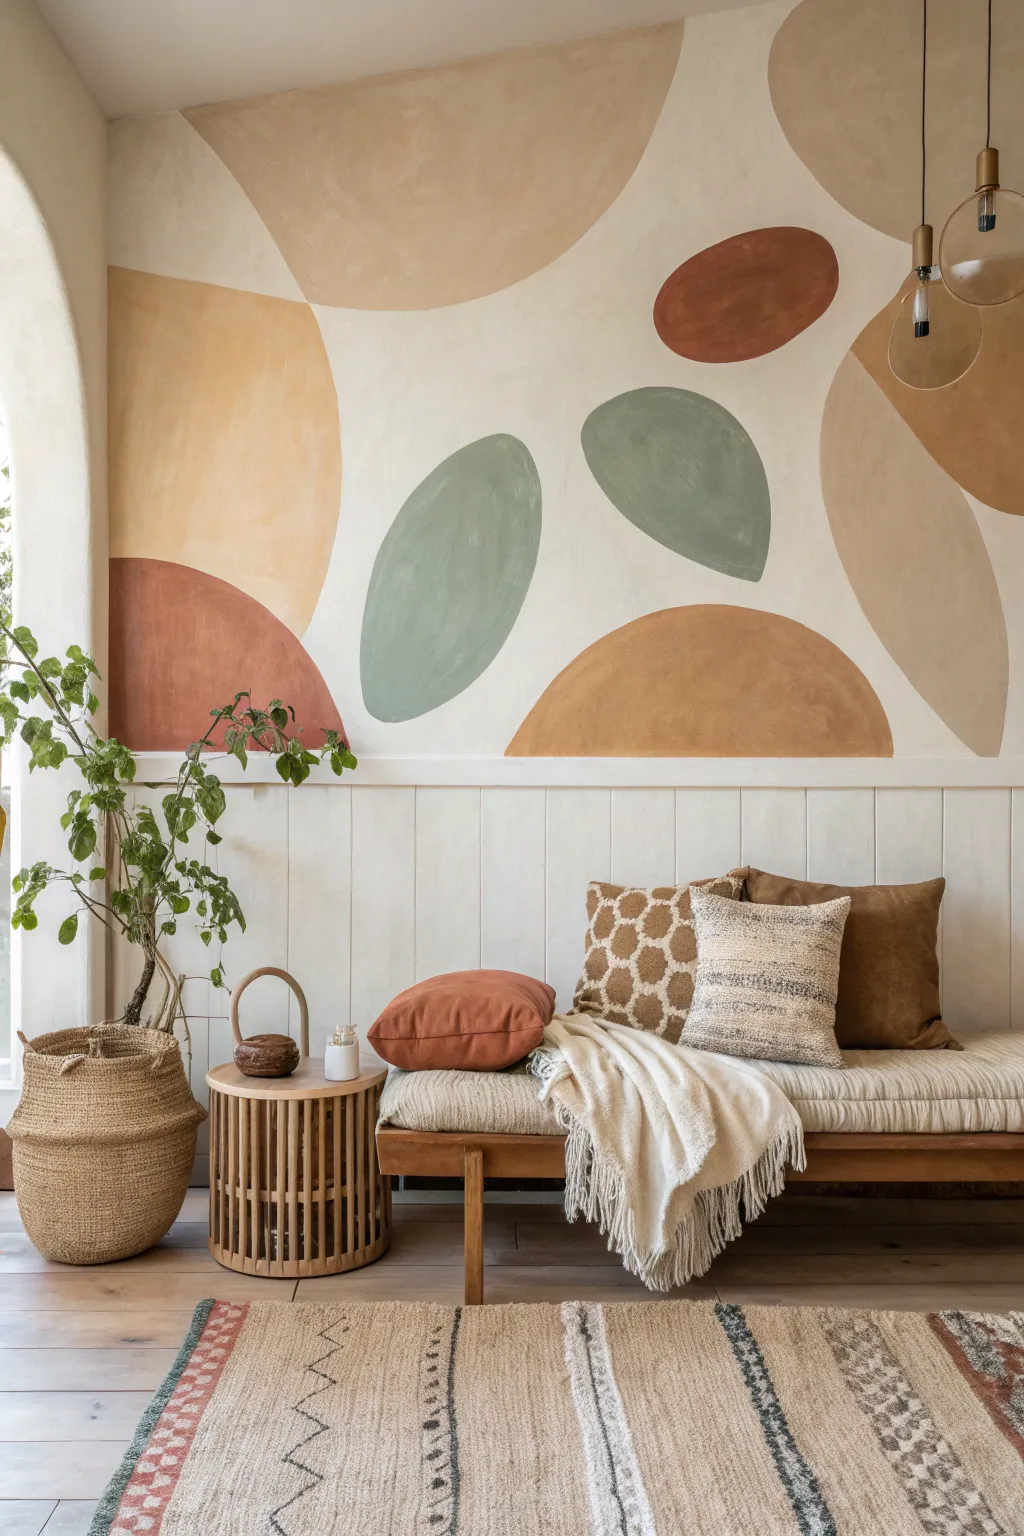

Transform a plain wall into a piece of modern art with this freeform mural featuring large, floating organic shapes. The earthy palette and overlapping composition create a calm, grounded atmosphere perfect for a living room or bedroom.
Step-by-Step
Materials
- Interior latex paint (flat or matte finish) in 5 colors: rust red, sage green, mustard yellow, sand beige, deep brown
- Base wall paint (warm off-white or cream)
- Pencil for sketching
- Medium angled sash brush (1.5 – 2 inch)
- Small round artist brush (for touch-ups)
- Drop cloth
- Painter’s tape (for baseboards)
- Small paint rollers (4-inch) and tray
- Paper towels or rag
Step 1: Preparation & Planning
-
Prepare the workspace:
Clear furniture away from the wall you intend to paint. Lay down a drop cloth to protect your flooring and apply painter’s tape along the baseboards or wainscoting to ensure a clean bottom edge. -
Base coat application:
If your wall isn’t already a warm, neutral shade, apply a fresh coat of warm off-white or cream paint. Let this dry completely—usually 4 to 6 hours—before starting your mural design. -
Sketch the composition:
Using a light pencil, gently sketch your large organic blobs directly onto the wall. Don’t worry about being perfect; these shapes should look hand-drawn. Draw a mix of kidney shapes, ovals, and half-circles, ensuring some float freely while others interact with the edges of the wall. -
Review the layout:
Step back about ten feet to look at your pencil lines. Check the balance between empty space and filled shapes. Adjust any blob sizes now while it’s just pencil marks, erasing lightly if needed.
Wobbly Edges?
If your freehand curves look shaky, use a small artist’s brush to smooth out the perimeter. A slightly thicker, more deliberate line often corrects nervous hand jitters.
Step 2: Painting the Shapes
-
Start with the mustard yellow:
Pour a small amount of your mustard yellow paint into a tray. I like to start with the lighter, larger shapes to set the tone. Use an angled sash brush to carefully cut in the edges of your first sketched shape. -
Fill in the yellow shapes:
Once the outline is defined, use a small roller to fill in the center of the shape for a smooth texture, or stick with the brush for a more hand-painted, textured look. Let this color dry to the touch. -
Apply the sage green:
Move on to your sage green paint. Identify where your green blobs will go. These often look great as floating ovals in the middle of the wall. -
Paint green outlines:
Outline the green shapes with your brush. If a shape is meant to look like it’s behind another color, paint right up to the pencil line but don’t worry about perfect overlap yet. -
Fill and texture green:
Fill in the green sections. To mimic the soft texture in the photo, apply the paint in cross-hatch strokes rather than straight lines. -
Add the rust accents:
Select your rust or terracotta color. This strong color works well anchoring the bottom corners or as smaller accent blobs higher up. Paint these outlines carefully. -
Fill the rust shapes:
Fill in the rust shapes thoroughly. Since red pigments can sometimes be translucent, you might need to plan for a second coat here later. -
Paint the sand beige blobs:
Use the sand beige color for large, sweeping shapes that bridge the gaps between more vibrant colors. These neutral blobs help balance the composition. -
Add deep brown details:
Finally, paint the deep brown shapes. These are usually smaller, darker accents that add depth. Paint these last to ensure they sit visually ‘on top’ or act as a stark contrast.
Add Visual Texture
Mix a small amount of baking soda or plaster of paris into your paint cups. This thickens the paint for a subtle 3D limestone texture.
Step 3: Refining & Finishing
-
Create the illusion of overlap:
Where two shapes visually overlap, decide which one is ‘in front.’ If the front shape is dry, carefully repaint its edge where it meets the background shape to create a crisp, clean line that implies layering. -
Second coats:
Assess the opacity of your shapes. The rust and green paint may need a second coat to look solid and rich. Apply this passing lightly to build up color without creating thick ridges. -
Touch up edges:
Use a small artist brush and your background wall color to touch up any areas where the paint might have strayed outside your desired blob lines. -
Erase visible pencil:
Check for any pencil marks that are still visible around the edges of the paint. Often you can gently rub these away with a damp cloth or a clean eraser once the paint is 100% bone dry. -
Remove tape:
Peel off the painter’s tape from the baseboards slowly at a 45-degree angle to reveal a crisp bottom edge. -
Final cure:
Allow the entire mural to cure for at least 24 hours before pushing furniture back against the wall to prevent scuffing the fresh latex surface.
Enjoy the relaxed, artistic vibe your new feature wall brings to the room
Botanical Line Drawing in Bold Outline
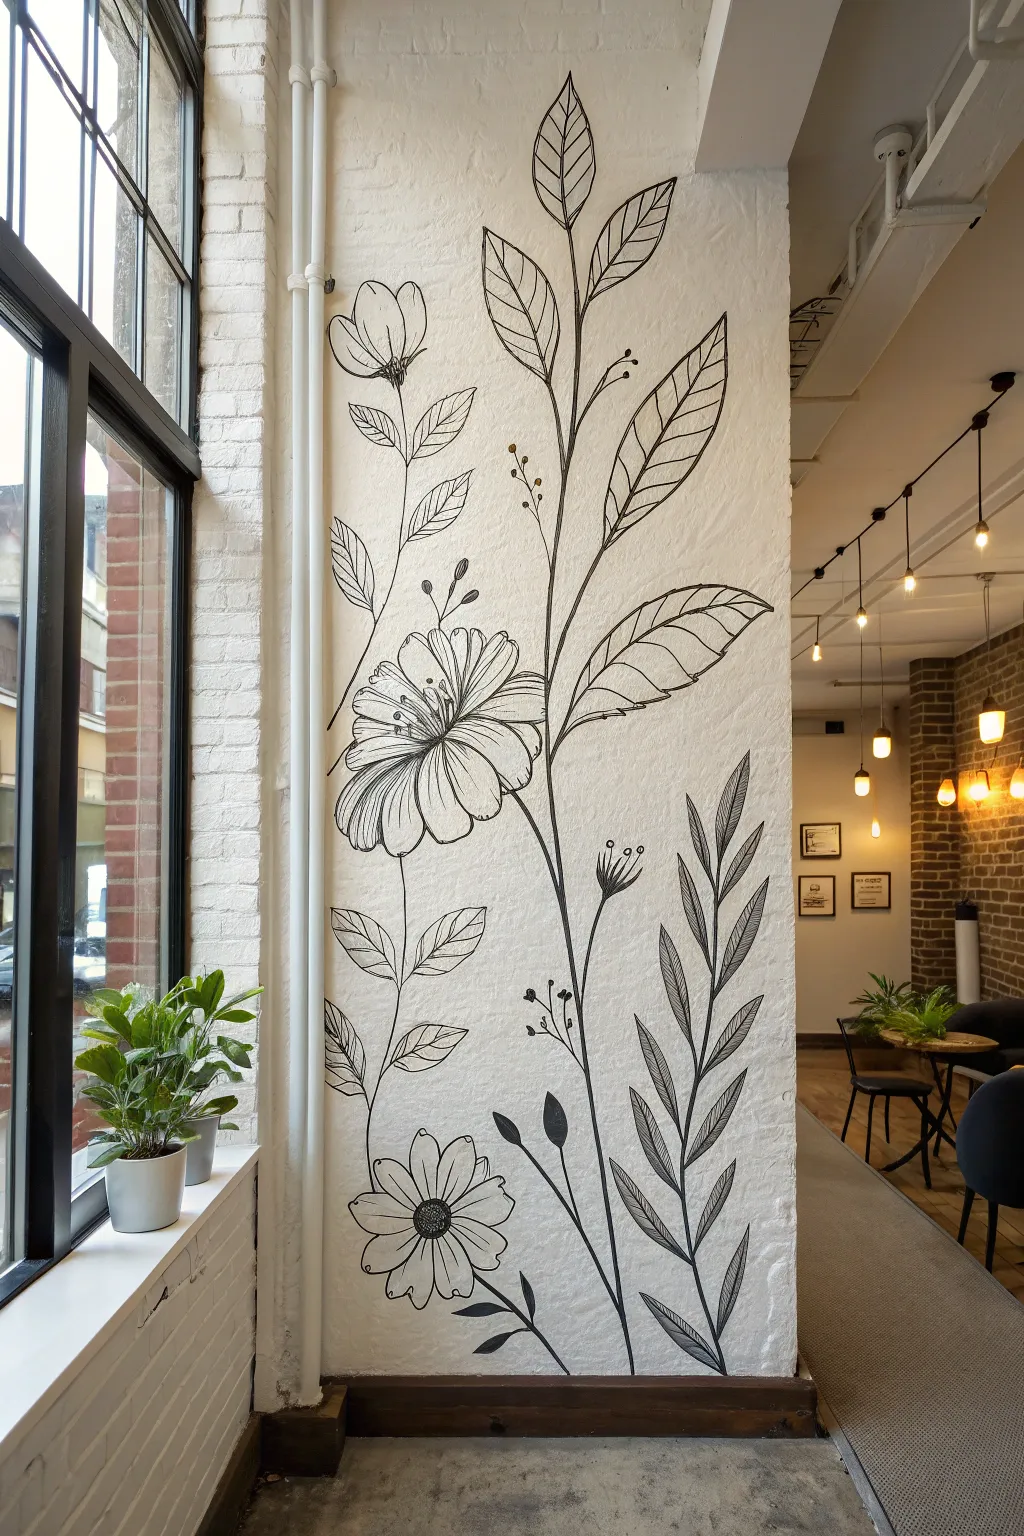
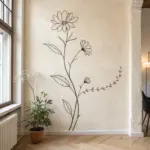
Transform a plain white wall into vertical garden art with this striking freehand botanical mural. The design features oversized floral blooms and intricate leaf structures rendered in bold, contrasting black lines for a modern illustrative look.
How-To Guide
Materials
- White interior wall paint (matte finish)
- Black oil-based paint marker (chisel tip)
- Black oil-based paint marker (fine tip)
- Graphite pencil (HB or B)
- Large eraser
- Bubble level or laser level
- Painter’s tape
- Graph paper (optional)
- Ladder or step stool
- Damp cloth
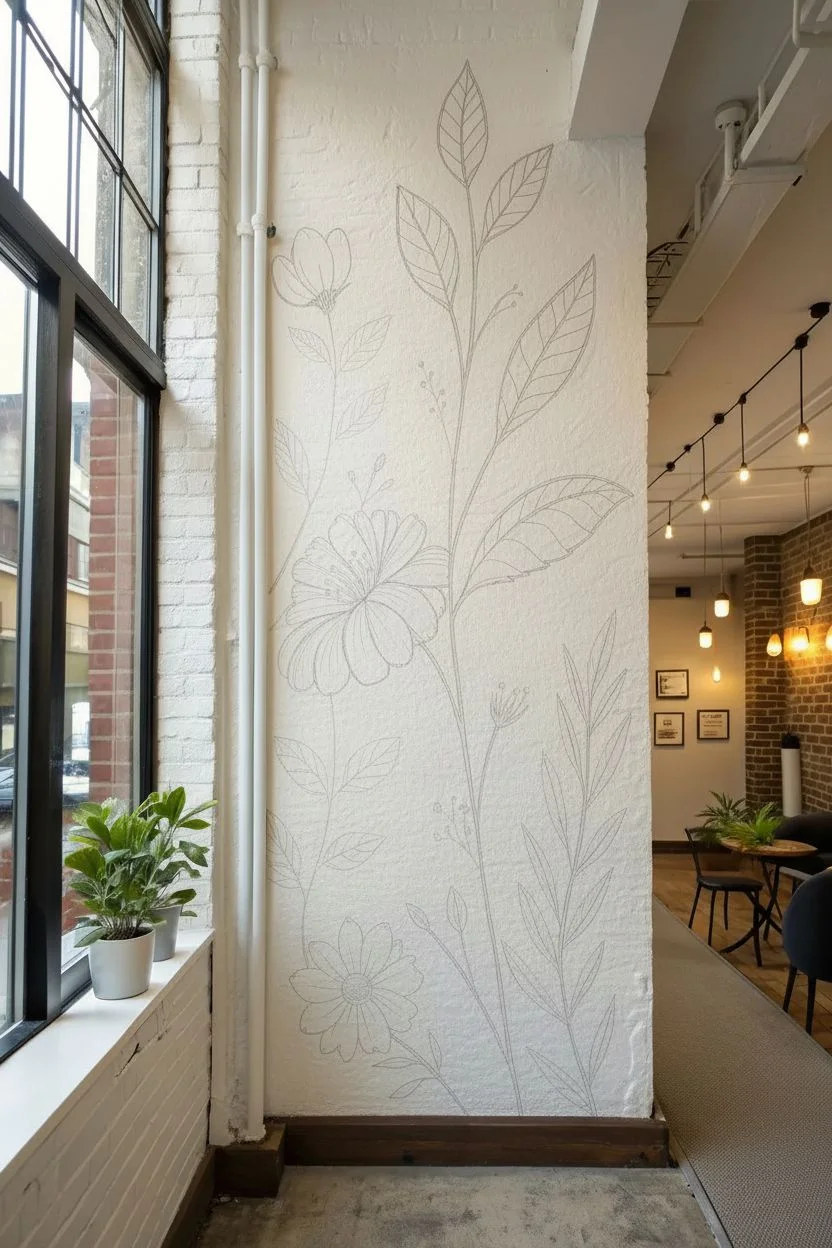
Step 1: Preparation and Layout
-
Prepare the surface:
Ensure your wall is clean, dry, and painted with a fresh coat of white matte paint. The matte finish provides a better tooth for the markers than eggshell or gloss. -
Sketch on paper:
Before touching the wall, roughly sketch your botanical composition on a piece of paper. Look at the reference image: the design flows vertically, with three main stems rising upwards and intersecting slightly. -
Mark vertical guides:
Using a laser level or a long straightedge, lightly pencil in a faint vertical line where the central stem will travel. This acts as a subtle anchor so your drawing doesn’t lean unintentionally. -
Block in main stems:
Swapping to your graphite pencil, lightly draw the main sweeping curves of the three primary stems directly on the wall. Keep these lines fluid and organic rather than perfectly straight. -
Position the blooms:
Sketch circles or ovals to represent where the two main flower heads will sit. Place the lower flower towards the left and the upper bud cluster near the top left corner. -
Add leaf placements:
Pencil in the general direction and size of the large leaves. Notice how the leaves on the right curve dramatically downwards, while the lower left leaves reach upward.
Master the Texture
On rough brick, don’t drag the marker quickly. Use a slow, dabbing motion to ensure the ink gets into the crevices without ruining the nib.
Step 2: Drafting the Details
-
Define the main flower:
Refine the large central flower. Draw the center cluster of stamens first, then add the petals radiating outward. Make the petals slightly irregular and overlapping for a natural look. -
Draft the bottom flower:
Sketch the smaller, daisy-like flower at the very bottom. This one has a simpler structure with a textured center and shorter, rounder petals. -
Detail the foliage:
Go back to your leaf outlines and add the central veins. For the fern-like plant on the bottom right, draw the individual leaflets attached to the stem. -
Refine the top section:
Sketch the upper leaves and the small bud clusters. This is a good time to step back and check the balance of the composition.
Uneven Lines?
If a line looks too shaky, don’t panic. Simply go over it again to thicken it intentionally. Varying line weights adds artistic character.
Step 3: Inking the Mural
-
Test your marker:
Shake your black oil-based paint marker well and test the flow on a scrap piece of cardboard. You want a consistent, opaque black line. -
Outline main stems:
Begin tracing over your pencil lines with the chisel-tip marker. Start with the main stems to establish the structure. Use a confident, steady motion to avoid shaky lines. -
Outline the leaves:
Trace the outer perimeter of the leaves. I find it helpful to vary the pressure slightly—pressing harder on the shadowed underside of curves to create line weight variation. -
Detail the leaf veins:
Switch to your fine-tip marker for the interior veins of the leaves. These lines should be thinner than the outer contours to create depth. -
Ink the flowers:
Carefully ink the flower petals. Use the fine tip for the delicate stamens in the center of the large flower, and the chisel tip for the petal outlines. -
Fill in solid areas:
Identify the solid black elements, like the solid leaves near the bottom right and the small buds. Fill these in completely with the chisel tip marker. -
Add texture marks:
Add the final illustrative details: small dots around the flower centers and tiny shading lines on the petals to suggest curve and volume.
Step 4: Finishing Touches
-
Let ink cure:
Allow the paint marker to dry completely. Oil-based markers can take a few hours to fully set, especially on textured walls. -
Erase guidelines:
Gently erase any visible pencil lines. Be careful not to rub too hard over the inked areas to avoid smudging the black paint. -
Touch up:
Check for any gaps or uneven lines. Use your fine-tip marker to sharpen any corners or fill in small white spots on the textured surface.
Step back and admire how this elegant black-and-white botanical instantly adds sophistication and height to your space.

PENCIL GUIDE
Understanding Pencil Grades from H to B
From first sketch to finished drawing — learn pencil grades, line control, and shading techniques.
Explore the Full Guide
Wildflower Meadow Border Along the Baseboard
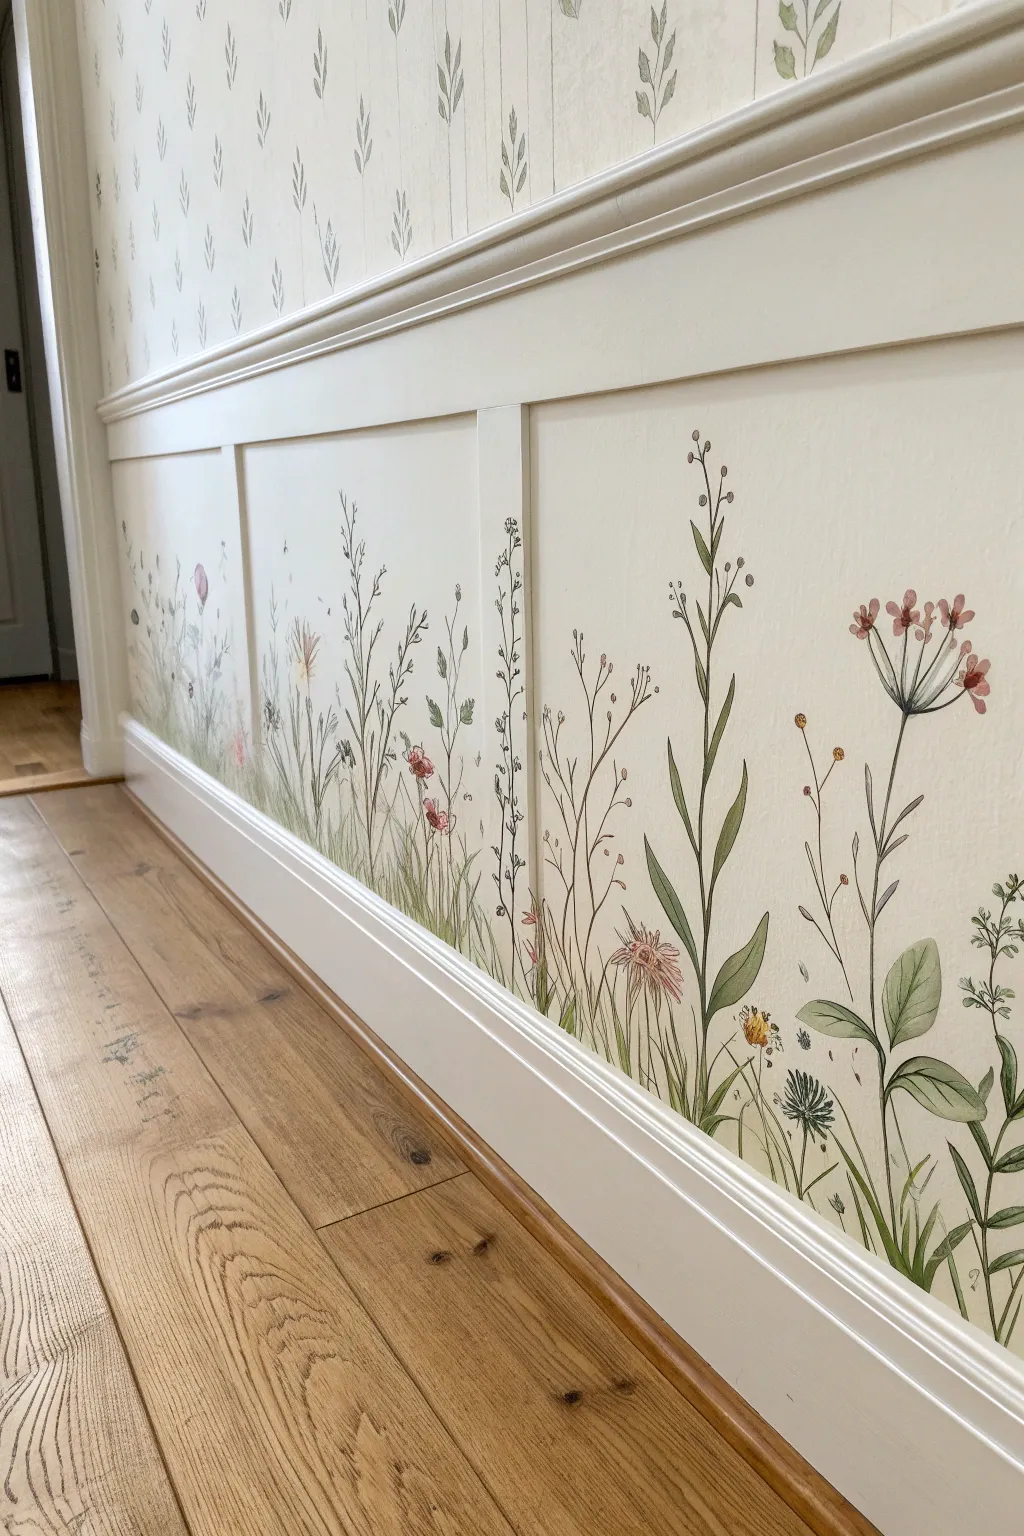
Transform a simple paneled wall into a perpetual spring garden with this delicate, hand-painted mural. The airy stems and soft blooms rising from the baseboard create a grounding, organic border that feels both sophisticated and storybook-sweet.
Step-by-Step Tutorial
Materials
- High-quality acrylic craft paints (sage green, forest green, deep olive, dusty pink, muted yellow, lavender, white)
- Glazing medium or water (for thinning)
- Set of round synthetic brushes (sizes 0, 2, and 4)
- Flat shader brush (size 6)
- Pencil (HB or lighter)
- Kneaded eraser
- Palette or disposable plate
- Paper towels
- Optional: Clear matte varnish
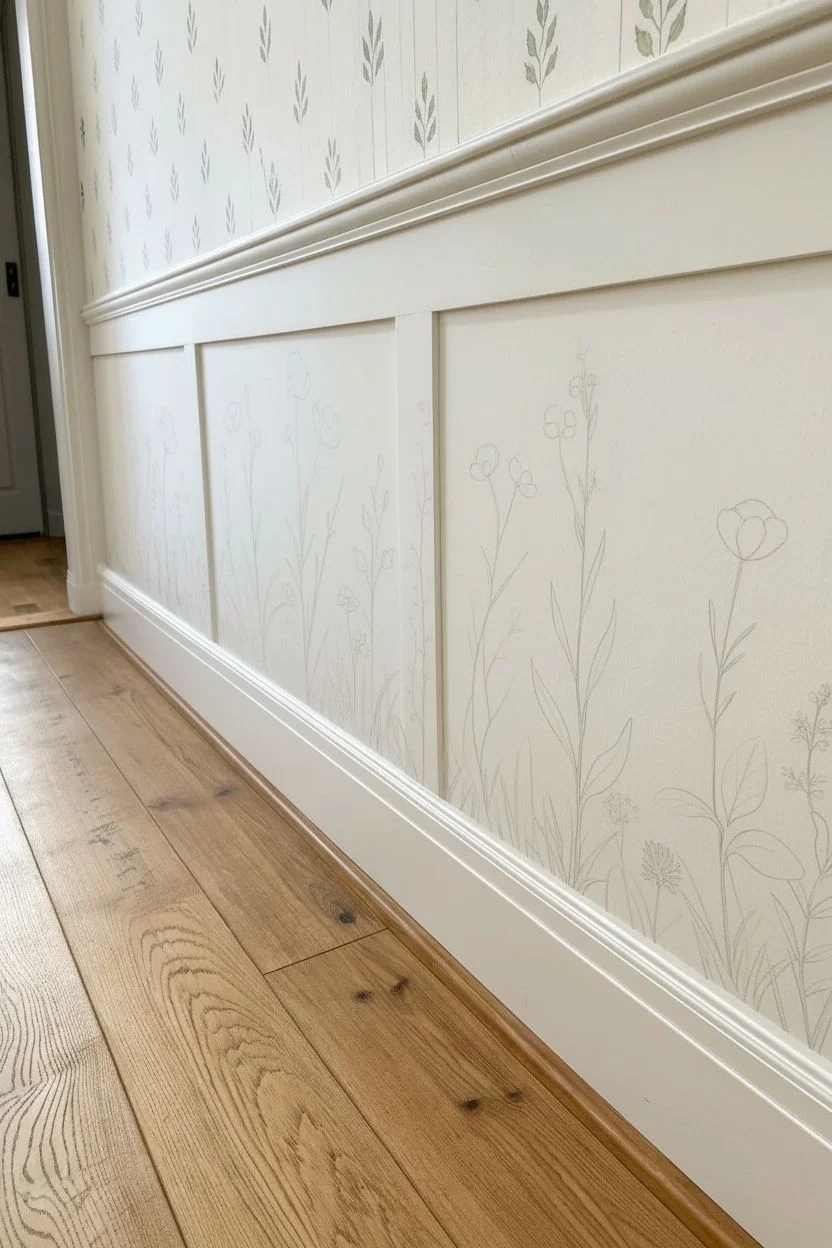
Step 1: Preparation & Sketching
-
Clean the surface:
Begin by wiping down your baseboards and wall panels with a damp cloth to remove any dust or oils that might repel the paint. Ensure the base wall color is fully dry and cured if recently painted. -
Plan your composition:
Stand back and look at your wall panels. You want the tallest flowers to reach about two-thirds up the panel height, with variety in elevation. Lightly mark a few high points to guide you. -
Sketch the main stems:
Using a light pencil touch, draw flowing, slightly curved vertical lines rising from the baseboard. Vary the angles—some should lean left, some right, just like real grass in a breeze. -
Add variety:
Intersperse different types of plant structures. Sketch some single stalks for tall grasses, branched Y-shapes for leafy stems, and multi-branched spreading shapes for clustered flowers. -
Placement of blooms:
Roughly circle where your main flower heads will go. Don’t worry about detailing petals yet; just establish the spacing so the garden feels balanced but not perfectly symmetrical.
Step 2: Painting the Greenery
-
Mix your greens:
Create three shades of green on your palette: a light sage, a medium grass green, and a dark olive. I like to mix a tiny drop of red into green to de-saturate it for a more natural, vintage look. -
Paint foundational stems:
Load a size 2 round brush with your medium green. Paint the main stems using long, fluid strokes. Start at the baseboard with a bit more pressure and lift off as you go up to create a tapered tip. -
Layer in grasses:
Switch to your size 0 or liner brush. Using the light sage and dark olive, paint very fine, hair-like grass blades in between the main stems. These should crisscross slightly to create density at the bottom. -
Add leaves:
Return to the main stems. Use the size 4 brush to press and lift, creating leaf shapes. Alternating the direction of leaves on the stem adds realism. Vary your greens here so some leaves look younger and lighter.
Natural Flow Tip
Avoid straight lines. Hold your brush near the end of the handle, not the ferrule. This reduces control slightly, creating more organic, wobblier lines that mimic real nature.
Step 3: Blooming Details
-
Base coat the flowers:
Mix a watery wash of your floral colors (dusty pinks, lavenders). Paint the general shape of the flower heads lightly. This watercolor-style underlayer gives the flowers a soft, ethereal glow. -
Define the petals:
Once the wash is dry, use creamy, un-thinned paint to add defined petal strokes. For the pink cosmos-style flowers, use the flat brush to make small, specific dabs radiating from a center point. -
Detail the buds:
For the tall, thin stalks, add tiny dots or teardrop shapes along the upper stems to represent closed buds or seed pods. A mix of brownish-purple works beautifully here. -
Add flower centers:
Dip the tip of a size 0 brush into yellow or dark brown. Add tiny stippled dots to the centers of your open flowers to give them texture and depth. -
Anchor the bottom:
Look at the very bottom where the stems meet the trim. It can look sparse, so add a few more short, dark green strokes right at the baseboard line to “root” the plants. -
Final highlights:
Mix a tiny bit of white into your lightest green. Add very thin highlight lines to the sun-facing side of the larger leaves and stems for dimension. -
Review and refine:
Step back about five feet. Look for any bald spots in your meadow. Fill these gaps with faint, wispy stems in a pale color to push them into the background. -
Erase and seal:
Once the paint is curing (give it at least 24 hours), gently erase any visible pencil lines with a kneaded eraser. If this is a high-traffic hallway, apply a clear matte varnish over the painted areas for protection.
Level Up: 3D Effect
Mix a tiny amount of glazing medium into your petal colors. Paint translucent layers over dried opaque petals to create a delicate, sun-dappled watercolor effect.
Enjoy your serene indoor garden that requires absolutely no watering
Simple Mountain Range Silhouette for Calm Vibes
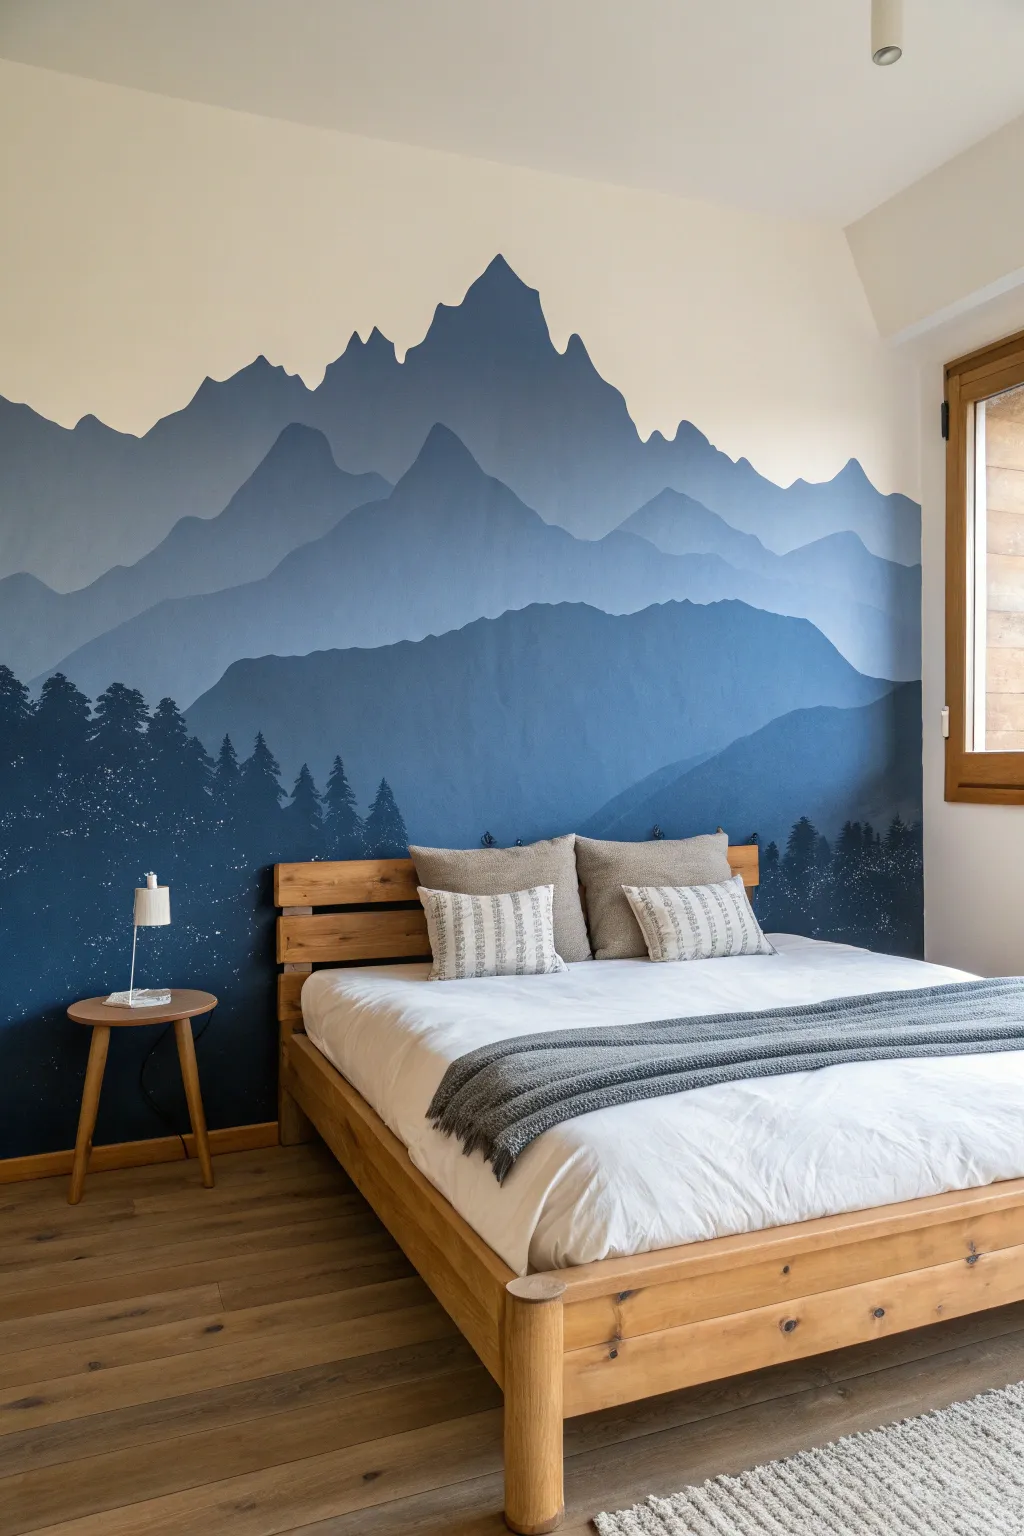
Bring the tranquility of the outdoors into your bedroom with this stunning multi-layered mountain mural. Using a monochromatic palette of blues, you will create depth and perspective, transforming a plain wall into a serene alpine vista.
How-To Guide
Materials
- Interior latex paint (white base)
- Interior latex paint (deep navy blue)
- 3-4 plastic mixing containers with lids
- Paint rollers (medium nap)
- Paint tray and liners
- Angled sash brush (2 inch)
- Small artist brush or toothbrush (for stars)
- Pencil
- Painter’s tape
- Drop cloths
- Measuring tape (optional)
Step 1: Planning and Mixing
-
Prepare the workspace:
Clear furniture away from the wall you intend to paint. If the bed cannot be moved completely, cover it and the floor with thick drop cloths to protect surfaces from accidental drips. -
Establish your base color:
The lightest part of this mural is the existing wall color or the top ‘sky’ layer. Ensure your wall is clean and prepainted a creamy off-white or very pale beige to serve as the background sky. -
Create a gradient palette:
Pour your deep navy blue paint into the first container—this is your darkest shade. For the next shade, mix roughly 75% navy with 25% white in a second container. Continue this process for two more shades, creating a 50/50 mix and a 25% navy/75% white mix. You need four distinct shades of blue ranging from light to dark.
Edge Perfection
Work from the top of the wall down. This prevents wet drips from ruining completed lower sections and allows you to easily cover the messy bottom edge of each layer with the next darker color.
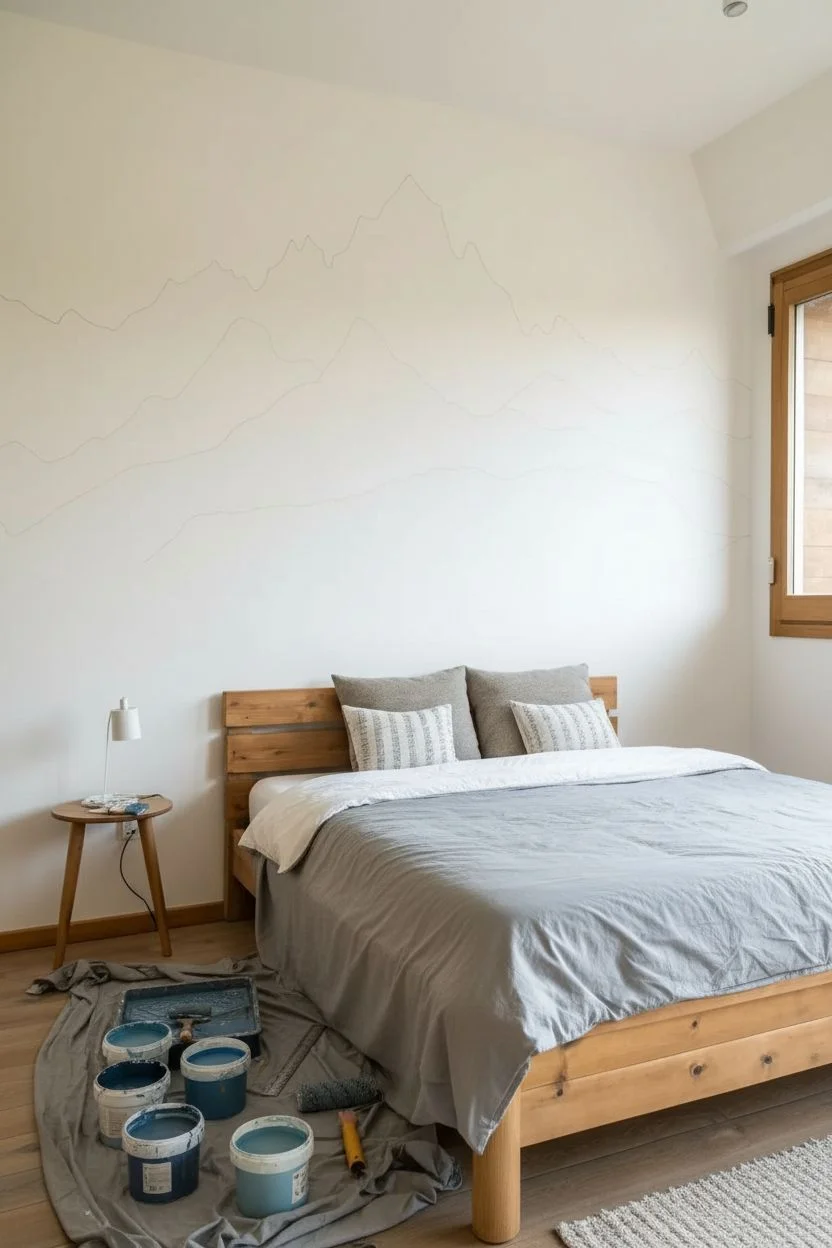
Step 2: Drafting the Design
-
Sketch the furthest range:
Using a pencil, lightly draw the outline of the highest mountain peak. This should be the tallest shape on the wall but positioned slightly off-center. Keep the lines jagged and organic, rather than perfect triangles. -
Outline the middle layers:
Draw the next two layers of mountains below the first. Overlap the peaks slightly to create interest. These ranges shouldn’t reach as high as the first one, simulating distance. -
Define the foreground:
Sketch the final, lowest layer. This line should be relatively flat compared to the peaks above but can have some rolling hills. This section will hold the tree details later.
Step 3: Painting the Layers
-
Cut in the top layer:
Dip your angled sash brush into the lightest mixed blue shade (the 25% navy). Carefully paint along the pencil line of your highest mountain range. -
Fill the first range:
Once the edge is defined, use a roller to fill in the body of this mountain shape down to where the next pencil line begins. Don’t worry about being perfect at the bottom edge, as it will be covered by the next layer. -
Apply the middle tones:
Switch to your medium blue tone (the 50/50 mix). Cut in the top edge of the second mountain range, overlapping the bottom of the first light blue layer. Roll out the rest of this section. -
Paint the darker range:
Repeat the process with the 75% navy mix for the third layer of mountains. As the colors get darker, the visual weight of the wall will settle towards the bottom. -
Apply the foreground:
Finally, paint the bottom-most section with your pure, unmixed deep navy blue. This anchors the entire mural. Let all layers dry completely, ideally overnight, before adding details.
Level It Up
Mix a small amount of metallic silver or pearlescent medium into the ‘mist’ splatter paint. It will catch the light from lamps in the evening, making the starry texture genuinely twinkle.
Step 4: Adding Details
-
Paint the tree silhouettes:
Using a smaller brush and the darkest navy paint, hand-paint pine tree shapes along the top ridge of the bottom-most layer. Keep brushstrokes vertical and jagged to mimic branches. Vary the height of the trees for a natural look; group some together and leave gaps elsewhere. -
Create the starry mist:
Dip an old toothbrush or stiff bristle brush into watered-down white paint. Run your thumb over the bristles to flick tiny specks of paint onto the darkest blue layer, focusing around the tree line. -
Soften the effect:
I like to concentrate the splatter near and behind the trees to look like mist or distant fireflies, fading it out as you move up the mountain. Be sparing; it’s easier to add more than to remove it. -
Final touches:
Inspect your edges. If any underlying pencil marks are still visible along the ridges, use a small artist brush and the corresponding paint color to carefully touch them up.
Step back and admire your new peaceful retreat, where the mountains are always calling


Dreamy Cloudscape Painted With Soft Edges
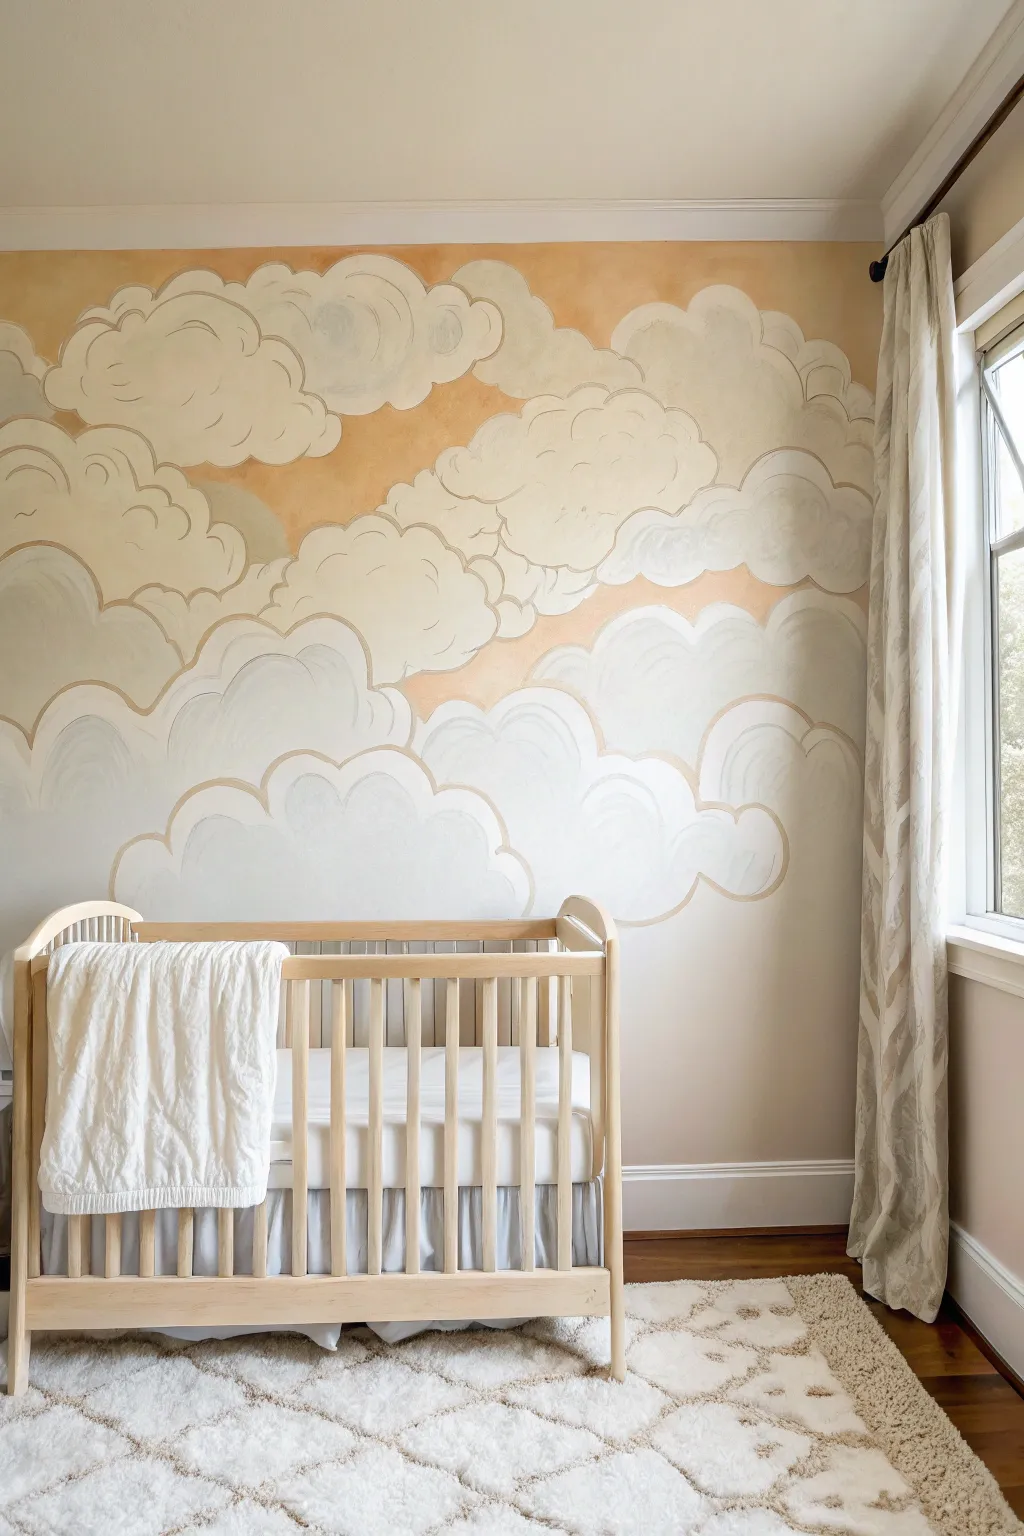
Transform a blank nursery wall into a serene skyscape with this large-scale cloud mural. Using a palette of warm beiges, soft whites, and a touch of sunset peach, you’ll create billowy formations that feel both modern and timelessly comforting alongside natural wood furniture.
Step-by-Step Guide
Materials
- Interior latex paint (eggshell or satin finish): White, Warm Beige, Peach/Terracotta
- Glaze medium (acrylic or latex compatible)
- Pencil
- Large eraser
- Assorted paintbrushes (2-inch sash brush for cutting in, rounded artist brushes for details)
- Small foam roller and tray
- Painters tape
- Drop cloth
- Ladder or step stool
- Mixing cups or small buckets
- Rags or paper towels
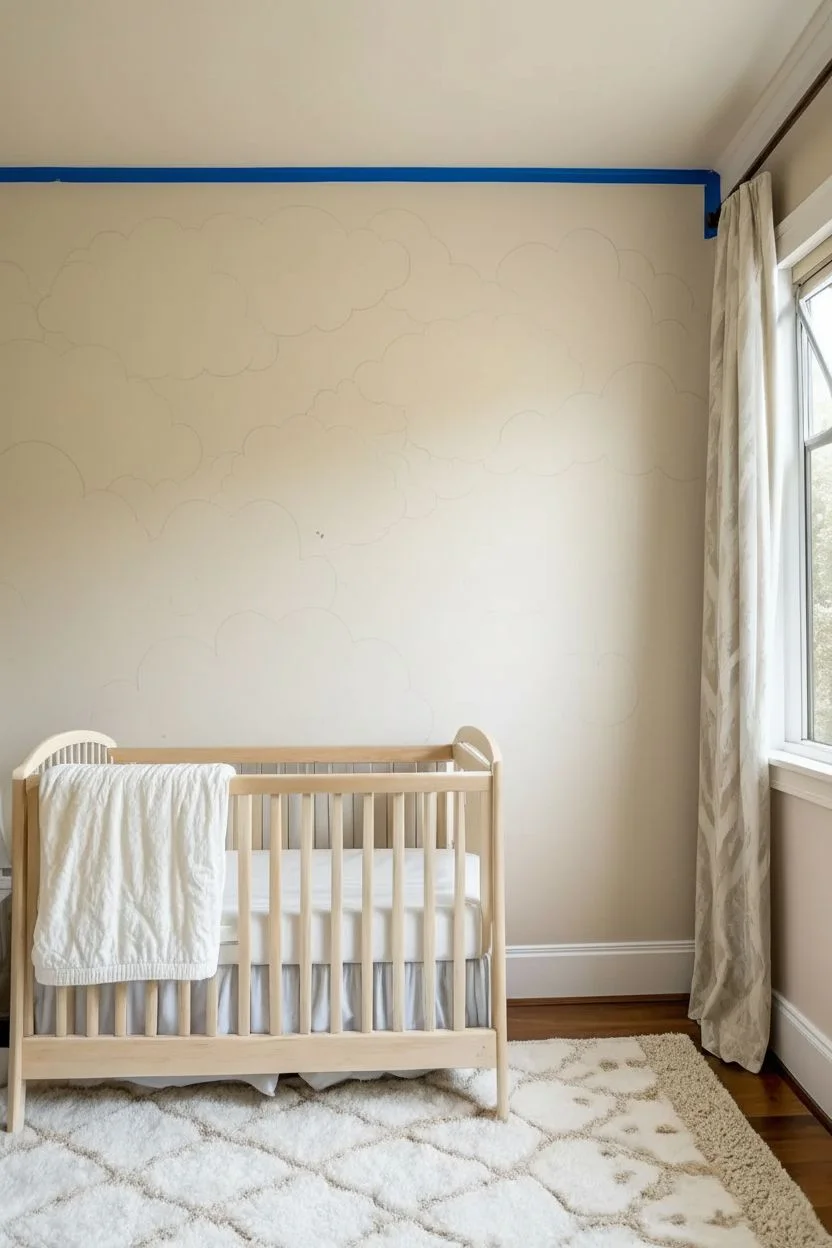
Step 1: Preparation & Sketching
-
Prepare the workspace:
Clear the room of furniture, or move the crib and rug to the center. Lay down your drop cloth to protect the floor and tape off the baseboards and ceiling line. -
Establish the background:
If your wall isn’t already a neutral base, roll on a fresh coat of warm off-white or light beige paint. This will serve as the ‘sky’ behind your clouds and needs to be completely dry before proceeding. -
Draft the layout:
Using a pencil, lightly sketch large, bubbling cloud shapes starting from the bottom left and rising toward the top right. Focus on creating varied sizes of ‘bubbles’—some large and dominant, others smaller and clustering around the edges. -
Refine the composition:
Step back frequently to view the wall as a whole. Ensure the clouds drift naturally across the space, leaving some negative space at the bottom right for balance. Erase and redraw until the flow feels organic.
Oops! Harsh Lines?
If your cloud outlines look too stiff or cartoonish, dip your brush in clear glaze or water and run it over the dry line to re-wet and smudge it slightly for a dreamy, diffused look.
Step 2: Color Blocking
-
Mix the peach tone:
In a mixing cup, combine your peach or terracotta paint with a generous amount of glaze medium (about a 1:1 or 1:2 ratio depending on desired transparency). This helps the paint glide and stay workable longer. -
Apply the background wash:
Paint the upper sections of the wall around the cloud outlines with your peach glaze mixture. I like to use a large brush here to create a wash effect that looks like a sunset glowing from behind the clouds. -
Soften the wash:
While the peach glaze is still wet, use a clean, slightly damp rag to blur the edges where the sky meets the cloud lines, ensuring there are no harsh stops and starts. -
Fill the primary clouds:
Using your warm beige paint (mixed with a little white if needed for variety), block in the main bodies of the clouds. Don’t worry about perfect opacity yet; a little streakiness adds texture. -
Add dimension with white:
While the beige is tacky, brush pure white paint onto the top curves of each cloud bubble. This acts as a highlight where the ‘sun’ would catch the fluff.
Step 3: Detailing & Outlining
-
Mix the outline color:
Create a slightly darker beige tone by mixing your original beige with a tiny drop of brown or grey. This will be used to define the cloud edges. -
Define the shapes:
Using a medium round artist brush, paint the outlines of your cloud bubbles. Keep your hand loose; the line should vary slightly in thickness to look like a sketch. -
Blend the inner lines:
Immediately after painting a segment of outline, use a dry brush to feather the inner edge of the line downward into the cloud body. This creates that soft, illustrative shadowing effect seen in the photo. -
Layer interior shapes:
Paint smaller semi-circles inside the larger cloud forms using a lighter beige or white. These internal swirls suggest volume and fluffiness. -
Enhance the background contrast:
Go back to the peach sections. If the contrast between the cloud tops and the sky feels too weak, add a second thin layer of peach glaze right along the top edge of the cloud line. -
Add subtle shadows:
Mix a very watered-down grey-beige glaze. Apply this sparingly to the bottom curves of the cloud bubbles to give them weight and roundness.
Level Up With Texture
For a magical touch, use a sea sponge to dab metallic gold or pearlescent paint very lightly along the absolute highest peaks of the clouds to catch the light.
Step 4: Final Touches
-
Review edges:
Check the perimeter where the mural meets the ceiling and baseboards. Touch up any tape bleed with your wall color or a small brush. -
Clean up sketch lines:
Once the paint is thoroughly dry (give it at least 24 hours to be safe), use a clean eraser to gently remove any visible pencil marks that weren’t covered by paint. -
Step back and assess:
Look at the mural from the doorway. If any area looks too flat, scrub a little extra white onto the centers of the clouds to make them pop forward.
Enjoy the peaceful atmosphere your new hand-painted sky brings to the room
Imperfect Polka Dots and Hand-Painted Rings
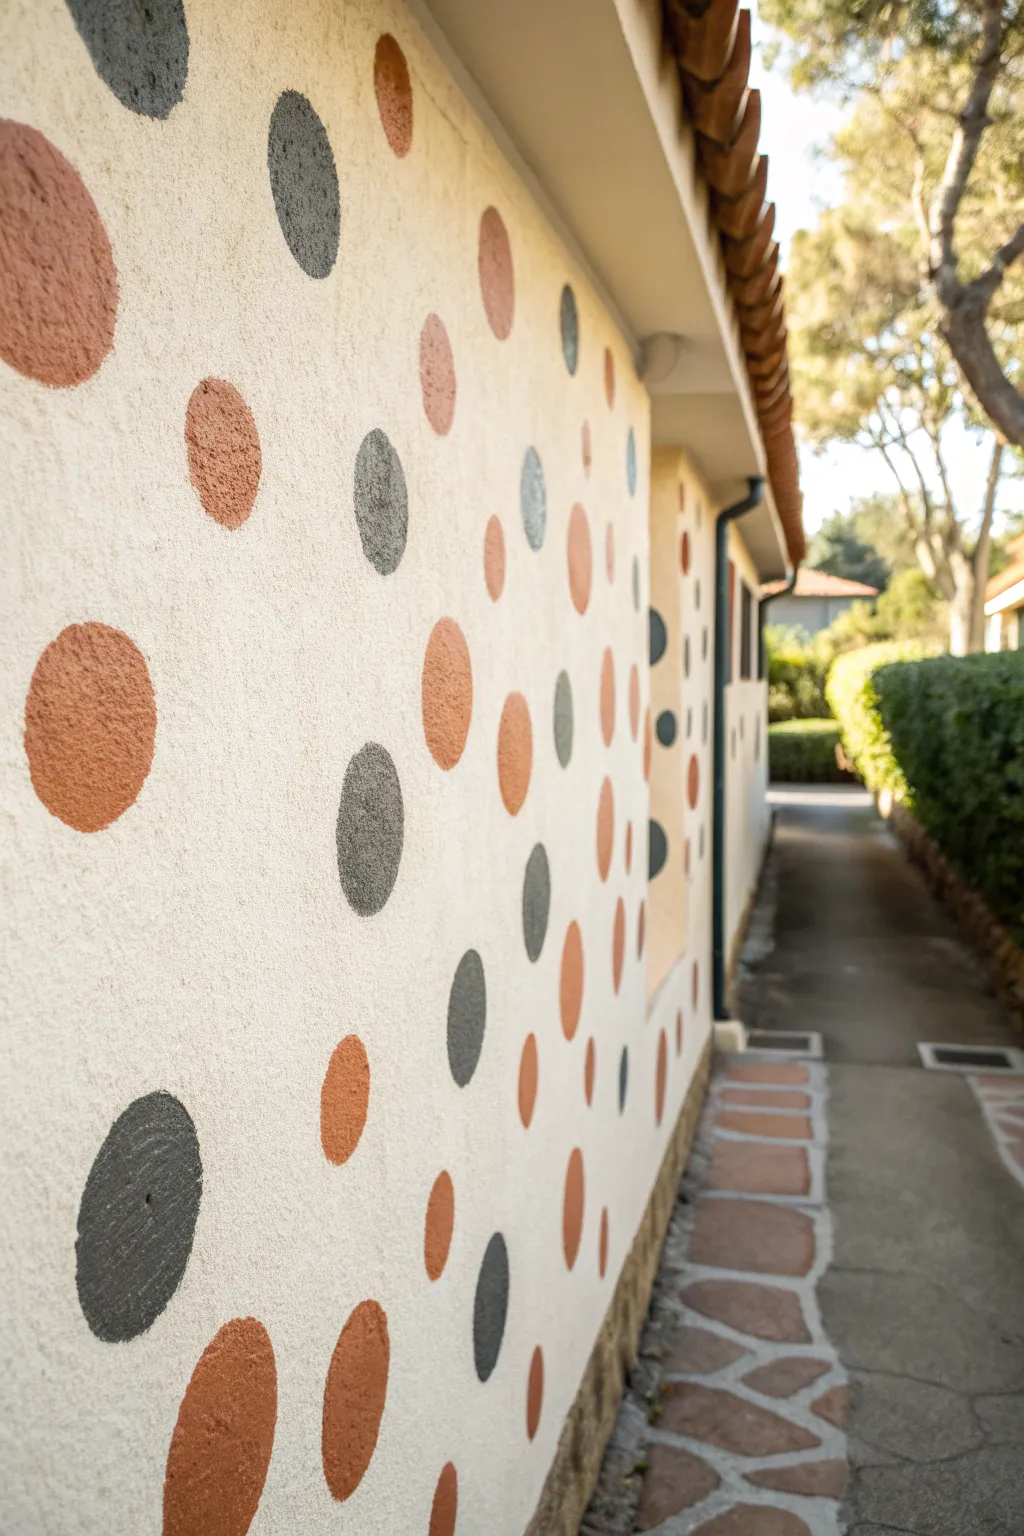
Embrace the beauty of imperfection with this whimsical exterior wall treatment that turns a plain stucco surface into a playful canvas. Using natural earth tones and loose, hand-painted circles creates a soft, welcoming vibe that mimics the charm of old-world frescoes.
Detailed Instructions
Materials
- Exterior masonry paint (cream/off-white base)
- Exterior masonry paint (terracotta/rust orange)
- Exterior masonry paint (charcoal grey)
- Large round paintbrush (2-3 inch)
- Medium round paintbrush (1-1.5 inch)
- Chalk or pencil (optional)
- Drop cloth
- Painter’s tape
- Ladder or step stool
- Mixing containers
- Water for cleaning
- Rags
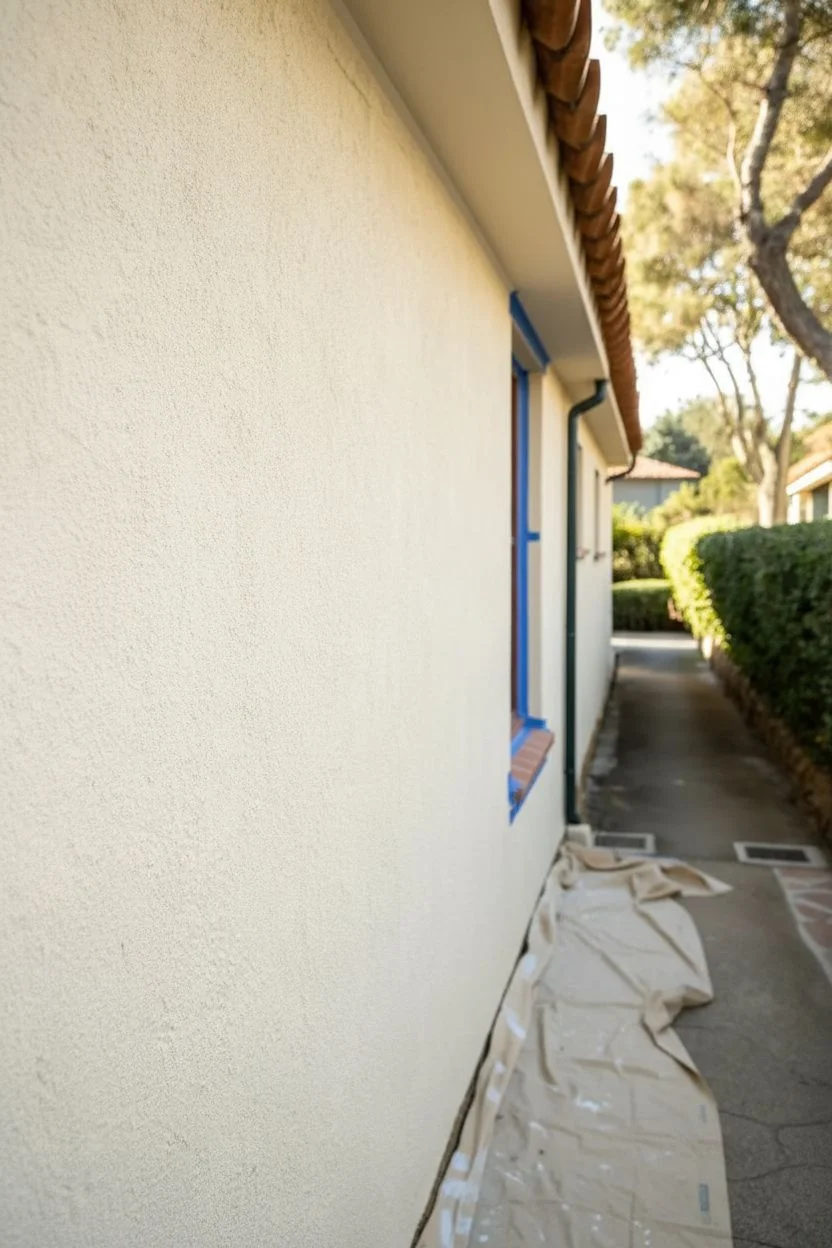
Step 1: Preparation & Base Coat
-
Prepare the area:
Begin by thoroughly cleaning the exterior wall surface to remove dust, dirt, or loose stucco pieces. Lay down a drop cloth along the base of the wall to protect the paving or ground from drips. -
Protect trim work:
Use painter’s tape to carefully mask off any window frames, door frames, gutters, or architectural trim that you want to keep clean. Press the edges down firmly to prevent bleed-through. -
Apply the base color:
Roll on your cream or off-white exterior masonry paint. Since stucco is textured, you may need a thick-nap roller to get into the crevices. Apply two coats if necessary to ensure a solid, uniform background. -
Let it cure:
Allow the base coat to dry completely according to the paint manufacturer’s instructions before starting the dot pattern. A dry surface ensures your colored dots won’t smear or blend unintentionally.
Stamp It Instead
Cut large circles out of clean sponges. Dip them in paint and press directly onto the stucco for an even faster, more uniform texture with soft edges.
Step 2: Painting the Polka Dots
-
Plan your spacing:
Stand back and visualize the placement. You aren’t aiming for a perfect grid; the charm lies in the random scatter. You can lightly mark center points with chalk if you’re nervous, but freehanding is often best for this organic look. -
Load the brush for terracotta:
Pour some terracotta paint into a small container. Dip your large round brush, ensuring the bristles are well-coated but not dripping. I find it helpful to dab the excess on the container rim. -
Paint the first large dot:
Choose a spot and press the brush against the wall. Instead of drawing a circle outline and filling it in, start from the center and spiral outward or swirl the brush to expand the shape naturally. -
Create texture:
Don’t overwork the edges; let the brush texture and the roughness of the wall dictate the perimeter. The goal is a rough, ‘stamped’ look rather than a perfect geometric circle. -
Add more terracotta dots:
Continue adding orange dots across the wall. Vary the sizes slightly—some large, some medium—to keep the eye moving. Leave ample negative space between them for the grey dots. -
Switch to charcoal grey:
Once you’re happy with the distribution of the warm tones, clean your brush or switch to a fresh one for the charcoal grey paint. -
Fill the gaps:
Paint grey dots in the empty spaces between the terracotta ones. Aim for a balanced distribution, but avoid perfect symmetry. If two dots end up close together, that’s just part of the charm. -
Adjust opacity:
Masonry paint can be thick. If the stucco texture is showing through too much for your liking, dab a second layer of paint onto the center of the dots while they are still tacky to build opacity. -
Step back and assess:
Walk away from the wall periodically to view the entire composition. This helps you spot any large empty patches that might need a small filler dot. -
Tidy up:
Remove the painter’s tape while the paint is still slightly damp to avoid peeling. Clean your brushes immediately, as exterior paint dries hard and fast.
Add Metallic Flair
For a surprising twist, add a few tiny dots in metallic gold or copper paint. They will catch the sunlight beautifully against the matte finish.
Now you have a lively, Mediterranean-inspired feature wall that brings character to your outdoor space
Wobbly Checkerboard for a Retro Statement
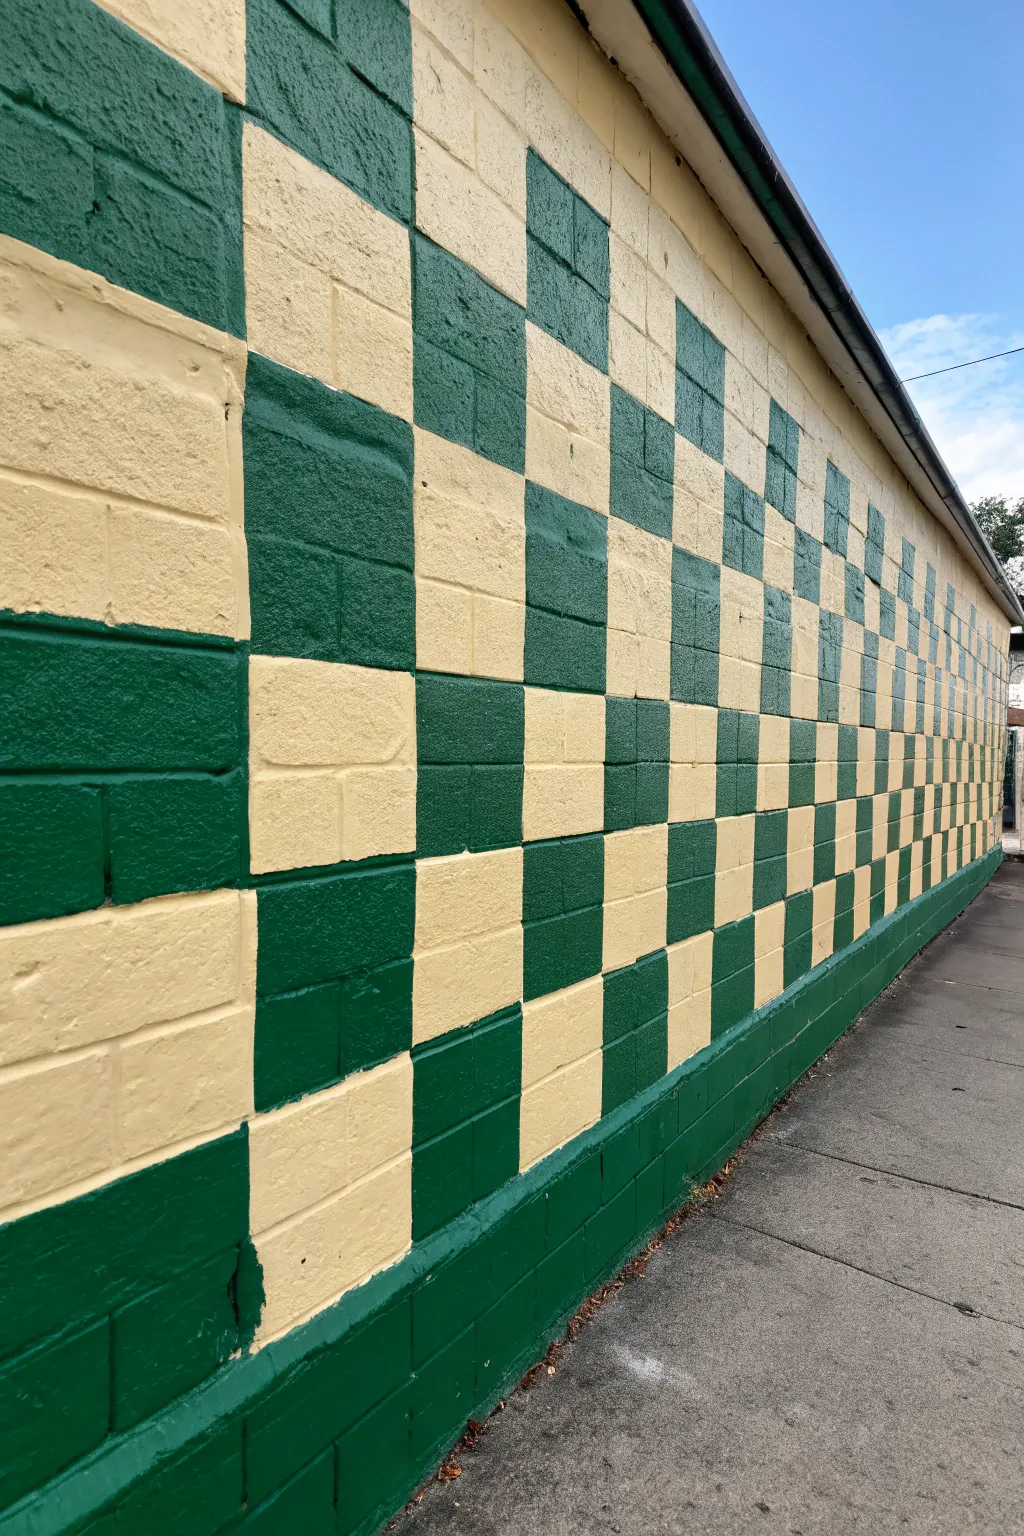

Embrace the imperfections of your canvas with this playful take on a classic pattern. By using the natural lines of a concrete block wall to guide your brush, you can achieve a wonderfully textured, retro-style checkerboard that feels both structured and handmade.
Step-by-Step
Materials
- Exterior masonry paint (cream/yellow)
- Exterior masonry paint (forest green)
- Heavy-duty painter’s tape (1.5 – 2 inch width)
- Wire brush or stiff scrub brush
- Pressure washer (optional but recommended)
- TSP substitute cleaner
- Bucket and sponge
- Medium-nap roller (3/8 inch or 1/2 inch) with extension pole
- Roller tray and liners
- 2-inch angled sash brush
- Pencil or chalk
- Drop cloths
Step 1: Prep and Prime
-
Inspect the surface:
Before painting, carefully examine the block wall for any loose mortar or major cracks. Patch any significant damage with masonry filler and let it cure fully. -
Clean thoroughly:
Scrub the entire wall with a wire brush or stiff bristle brush to remove loose paint, dirt, and moss. If the wall is particularly grimy, a pressure washer is your best friend here. -
Wash with TSP:
Mix a TSP substitute cleaner with water in a bucket. Use a large sponge to wash the surface, ensuring all grease and oils are removed, then rinse with clean water and let the wall dry completely for at least 24 hours. -
Protect the area:
Lay down drop cloths along the base of the wall. Since you’ll be using a roller, cover a generous area of the ground to catch any splatter. -
Apply the base coat:
Roll on the cream/yellow masonry paint over the entire wall. This will serve as the lighter color in your checkerboard. Masonry blocks are thirsty, so don’t be shy with the paint load. -
Cut in the edges:
While the roller work dries, use your angled sash brush to ensure the cream paint gets into the deep mortar grooves and corners where the roller might have missed. -
Apply a second coat:
Once the first coat is dry to the touch (check your paint can for specific times), apply a second coat of the cream color to ensure solid, opaque coverage.
Tape Sealing Trick
On rough bricks or blocks, tape often fails. After taping, run a line of paintable caulk over the tape edge or dab the base color heavily to create a dam against bleeds.
Step 2: Map the Grid
-
Define your squares:
Instead of measuring perfectly, use the existing block layout. For this look, a ‘square’ consists of two standard cinder blocks stacked vertically. This creates a slightly rectangular, elongated check. -
Mark the grid:
Using a pencil or chalk, lightly mark an ‘X’ in every other 2-block section. Start from the top corner and work your way across and down to visualize the pattern before you apply any tape. -
Tape the vertical lines first:
Apply vertical strips of painter’s tape along the mortar joints that separate your columns. Press the tape firmly into the mortar grooves using a dry rag or flexible putty knife to prevent bleed. -
Tape the horizontal lines:
Apply horizontal tape lines every two blocks down. You should now have a grid of tape covering the wall. -
Seal the edges:
This is a crucial step for rough surfaces like cinder block. Brush a light layer of the base cream color over the edges of the tape. This seals the tape line and ensures any paint that bleeds underneath matches the base color.
Fixing Bleeds
If green paint seeps under the tape into a cream square, wait for it to dry completely. Then, use a small, stiff flat brush and the cream paint to carefully stamp over the error.
Step 3: Paint the Checks
-
Start the dark color:
Open your forest green exterior paint. Using a brush, carefully outline the inside of your first taped ‘square’ (the ones you marked with an X earlier). -
Fill in the squares:
Once outlined, you can use a small roller or continue with the brush to fill in the green squares. I like to use a brush for the whole square on textured blocks to really work the paint into the pits. -
Check for holidays:
Because cinder blocks are porous, inspect each green square from different angles to make sure you didn’t miss any tiny pinholes or crevices. -
Create the bottom border:
Observe how the reference image has a solid green band at the bottom. Tape off a horizontal line about two blocks high from the ground and fill this entire bottom section with green paint to ‘ground’ the design. -
Remove tape carefully:
Don’t wait for the paint to fully cure. Carefully peel off the tape while the green paint is still slightly tacky to avoid pulling up dried flakes. Pull the tape at a 45-degree angle away from the painted edge. -
Touch up freehand:
Masonry surfaces are rarely perfect. Use a small artist’s brush to fix any ragged edges or spots where the tape didn’t seal perfectly against the deep mortar lines.
Step back and admire how this bold geometric pattern transforms a simple textured wall into a standout feature
Continuous One-Line Squiggle Mural
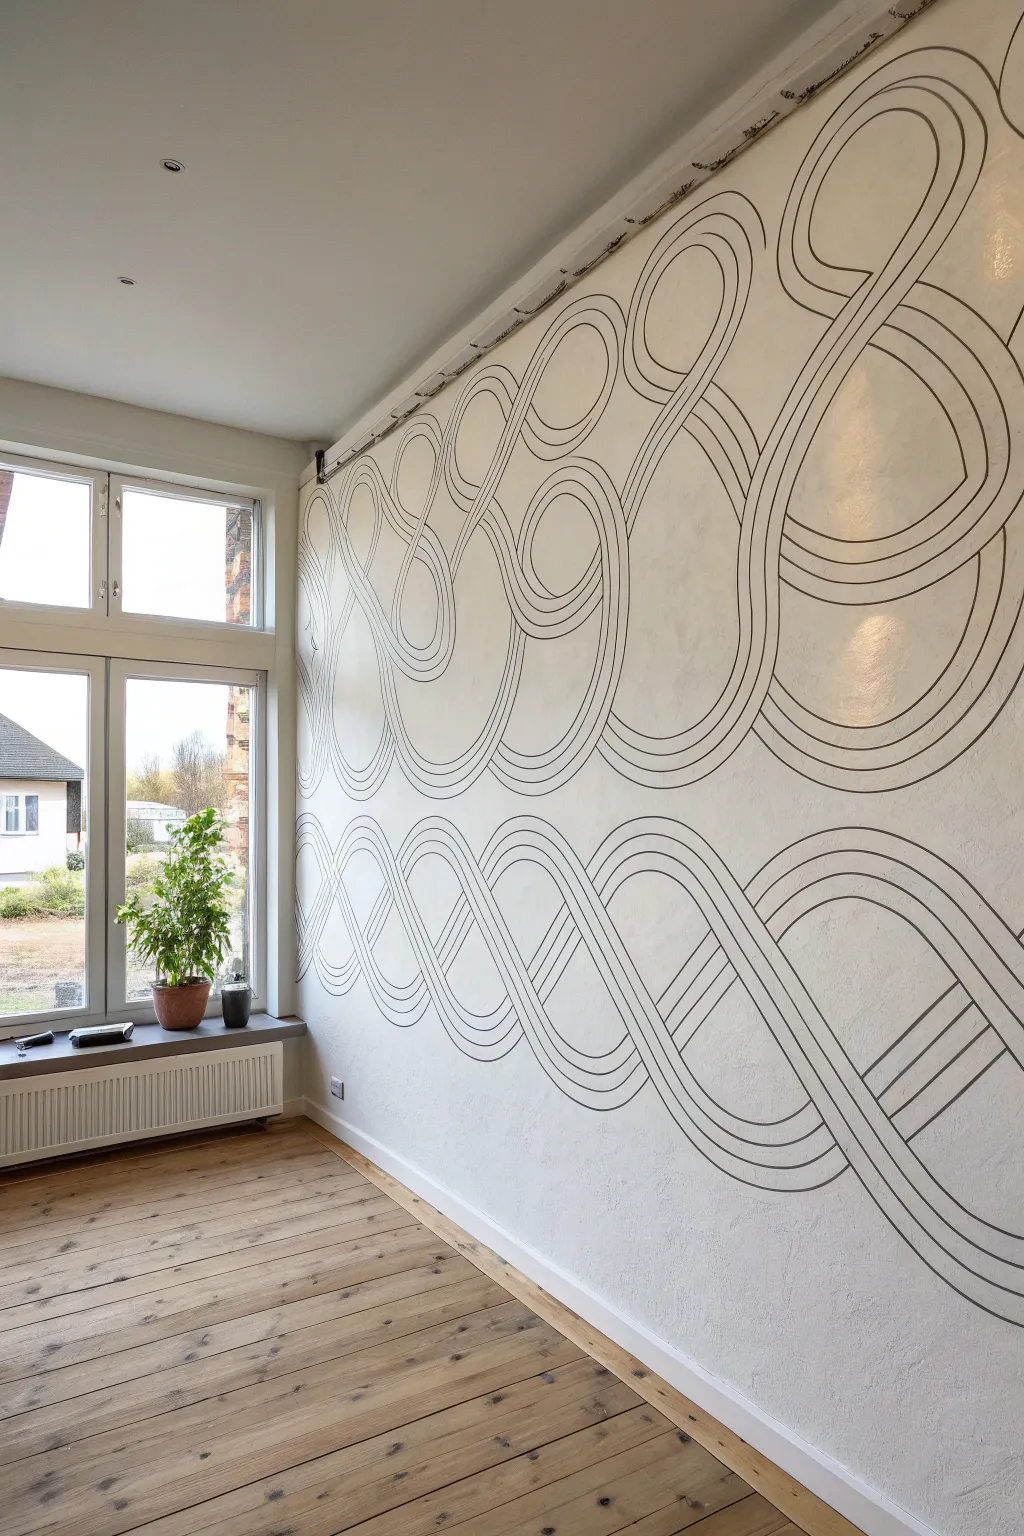
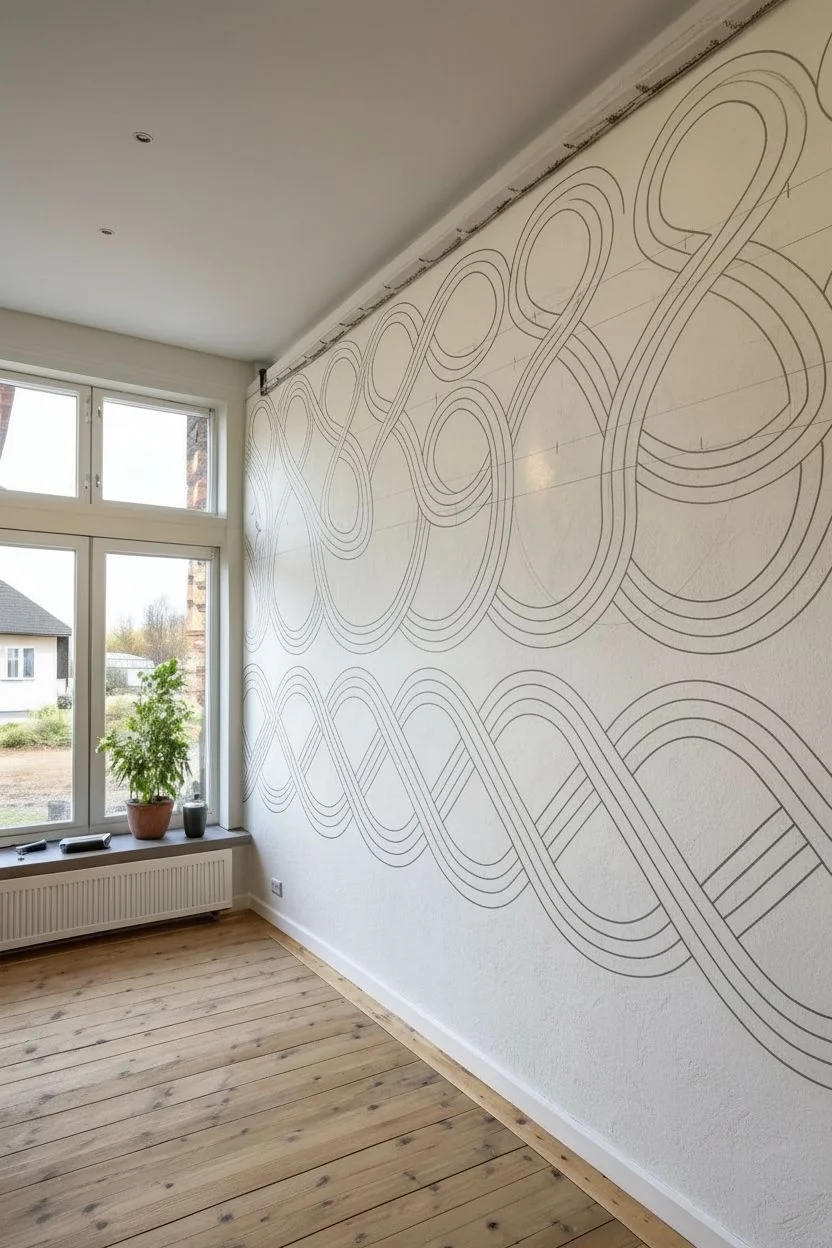
Transform a plain wall into a mesmerizing sculptural element with this bold, continuous-line mural. By creating a rhythmic series of interlocking loops, you’ll add dynamic movement and modern sophistication to your space without needing complex stencils.
Step-by-Step Guide
Materials
- High-quality interior wall paint (white for base, dark grey or black for lines)
- Pencil and eraser
- Large compass or string and a thumbtack
- Long ruler or straight edge (at least 1 meter)
- Painter’s tape
- Small round artist brush (size 4-6)
- Flat angled sash brush (1-2 inch)
- Chalk line (optional)
- Step ladder
Step 1: Planning and Grid Layout
-
Prepare the Surface:
Ensure your wall is clean and the base coat is fully dry. If your wall has a heavy texture like the plaster shown, accept that your lines will have a bit of organic character, which adds to the charm. -
Mark the Horizontal Guidelines:
Measure the height of your wall and decide where your three main rows of loops will sit. Using a pencil and a long straight edge, lightly mark horizontal baselines across the entire width of the wall to keep your pattern height consistent. -
Establish Vertical Spacing:
Decide on the width of each loop element. Mark vertical tick marks along your horizontal guidelines at regular intervals (e.g., every 60cm) to act as center points for your loops. -
Draft the Primary Loops:
Using a large compass (or a string tied to a pencil and pinned at the center point), lightly sketch the outer circles of your loops. Focus only on the main shape first, not the interlocking details. -
Create the Interlocking Path:
Connect the circles with sweeping, curved lines to create the ‘S’ curves that join the top row to the bottom row. Sketch lightly, as you will likely need to adjust these curves to make the flow look natural. -
Define the Line Thickness:
Once the single-line path is drawn, go back and add the secondary parallel lines to create the ‘ribbon’ effect. Keep the spacing consistent—roughly 1-2 inches wide—so the ribbon feels substantial.
Steadier Hands
Rest your pinky finger against the wall as you paint to stabilize your hand. This acts as an anchor and allows you to pull smoother, longer curves without the brush shaking.
Step 2: Refining the Pattern
-
Check the Flow:
Step back to the other side of the room. Look for any areas where the curves feel jagged or the loops look lopsided. Correct these now with your pencil while it’s easy to erase. -
Draw the Over/Under Effect:
To make the knot look 3D, you need to decide which lines go ‘over’ and which go ‘under’. Erase the pencil lines where a ribbon passes underneath another, creating a visual break. -
Add Inner Detail Lines:
As seen in the photo, each ribbon consists of three parallel lines. Sketch a central line running exactly through the middle of your ribbon path. This adds complexity and precision to the design.
Metallic Accent
For a glamorous twist, paint the center line of the ribbon using gold or copper metallic paint. It catches the light from nearby windows beautifully.
Step 3: Painting the Mural
-
Load Your Brush:
Dip your small round brush into the dark grey or black paint. You want the paint to be fluid but not drippy, so I usually mix a tiny drop of water in if the paint feels too thick. -
Start with the Outlines:
Begin painting the outer edges of the ribbons first. Use a steady hand and pull the brush towards you. Don’t worry about perfect straightness; the slight wobble gives it a hand-drawn, illustrative feel. -
Paint the Center Lines:
Carefully paint the middle line inside the ribbon. This requires the most focus, as it needs to stay centered between your two outer lines. -
Manage the Intersections:
Pay close attention to your ‘over/under’ gaps. Stop your paint line crisply before it hits a crossing ribbon, leaving a tiny gap if necessary to emphasize the depth. -
Work in Sections:
Move from left to right (or right to left if you are left-handed) to avoid smudging your fresh paint. Complete a 3-foot section fully before moving horizontally. -
Touch Up Edges:
Once the dark lines are dry, take your white base paint and a small clean brush. clean up any rogue splatters or lines that became too thick or uneven. -
Final Erasure:
Wait at least 24 hours for the paint to cure completely. Gently use a kneaded eraser to lift any visible pencil guidelines remaining on the wall.
Step back and admire the rhythmic flow of your new statement wall as the light plays across the curves
Sunburst Halo Painted Behind a Headboard or Sofa
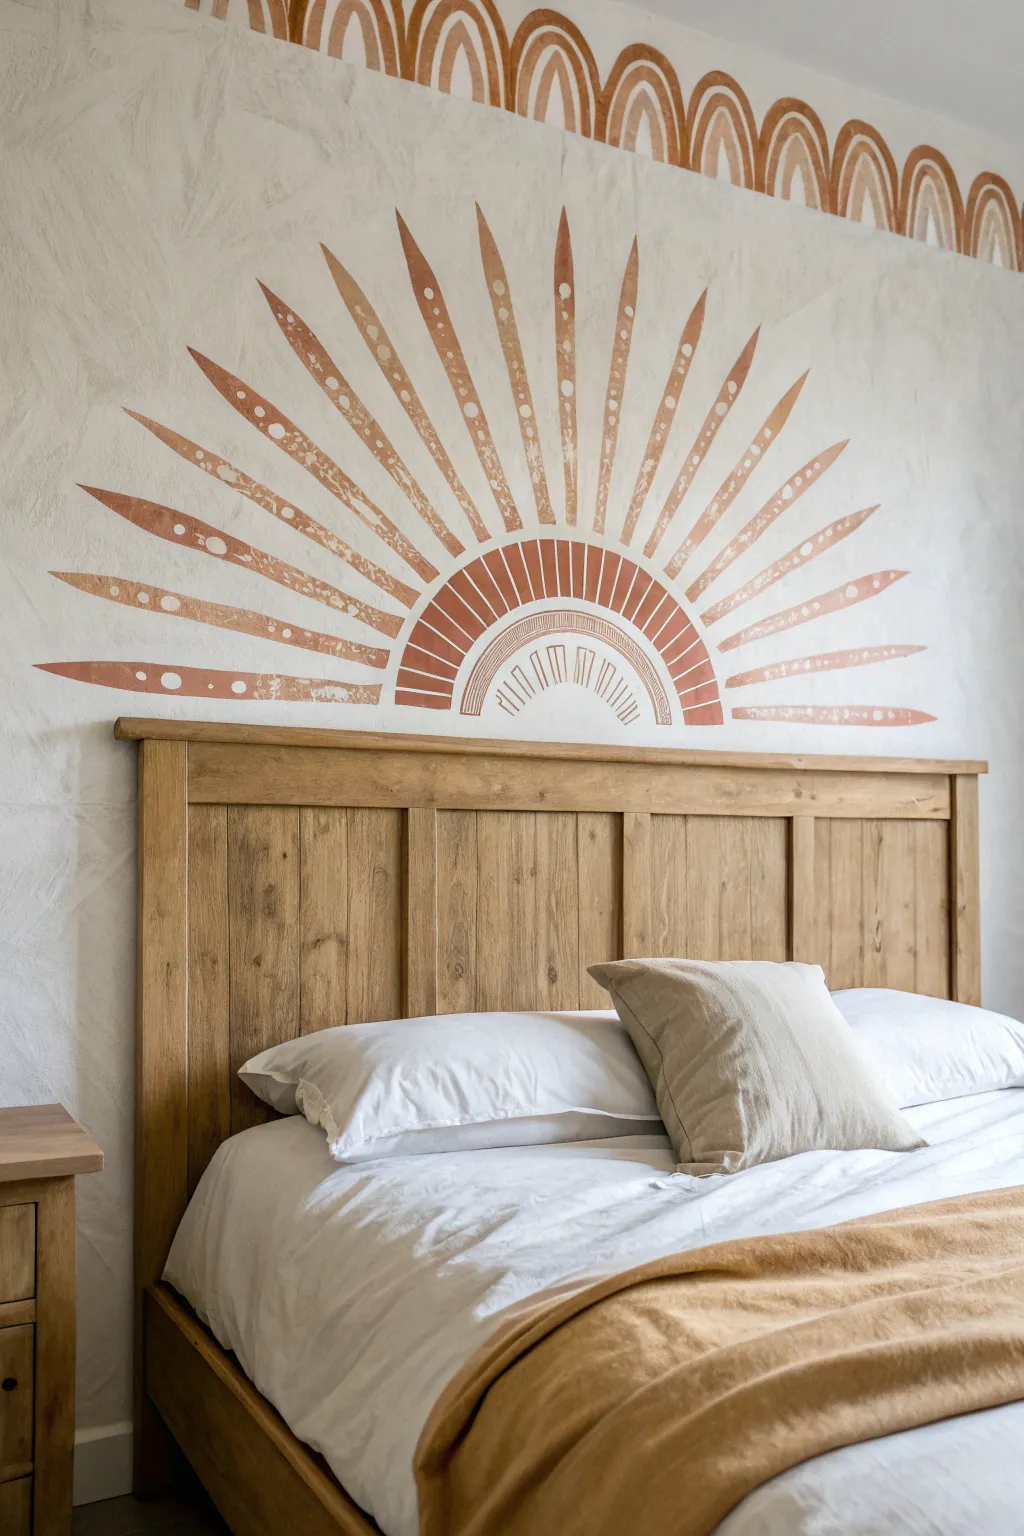

Transform your bedroom with this earthy, bohemian sunburst mural that radiates warmth from behind your bed. The textured, distressed finish gives it a perfectly imperfect, hand-painted charm that feels cozy and organic.
Detailed Instructions
Materials
- Matte interior wall paint (terracotta or rust orange)
- Small roller and tray
- 1-inch angled artist brush
- Pencil
- String and pushpin (for drawing circles)
- Level
- Painter’s tape
- Dry sponge or rag
- Measuring tape
- Drop cloth
Step 1: Planning and Layout
-
Clear and prep:
Move your bed away from the wall to give yourself plenty of working room. Lay down a drop cloth to protect your flooring from any accidental drips. -
Establish the center:
Measure the width of your bed frame and mark the exact center point on the wall just above where the headboard sits. This ensures your sunburst rises perfectly symmetrically from behind the furniture. -
Draw the base arches:
Using a pushpin attached to a string at your center point, draw two semi-circles. The first should be small (about 12 inches radius) for the inner detailed arch, and the second slightly larger (about 18 inches radius) to define the thick solid band. -
Mark the rays:
Tie a longer string to your center pin. Extend it outward to the length you want your longest sun rays to be. Use a level to lightly mark a horizontal line ensuring the horizon of the sun is straight, then sketch faint guidelines for where each major ray will extend.
Step 2: Painting the Core
-
Outline the main arch:
Using your 1-inch angled brush, carefully paint the outline of the larger semi-circle arch created in the previous phase. -
Fill the band:
Fill in the thick band of the sun’s core. You don’t need solid, opaque coverage here; a slightly streaky application adds to the textured, rustic look visible in the photo. -
Create the negative space details:
For the inner arch design, use a very dry brush to paint small, vertical lines that mimic a rising sun or fan shape. Leave plenty of the white wall showing through to keep it airy. -
Add the rainbow crown:
If you are replicating the top border seen in the image, use a stencil or a small bowl to trace interlocking arches near the ceiling line and fill them freehand.
Paint Too Perfect?
If your paint looks too flat and solid, dilute a small amount of paint with water (50/50 mix) and dab it over dry areas with a crumpled rag for instant texture.
Step 3: Creating the Rays
-
Draft the ray shapes:
Lightly sketch the tapering lance-like shapes of the sun rays. Notice how they vary slightly in length and don’t touch the central arch directly—leave about an inch of negative space between the arch and the start of the rays. -
Paint the ray outlines:
Dip your artist brush and outline each ray. Keep your hand loose; wobbly lines are actually desirable here to achieve that hand-painted folk art aesthetic. -
Fill with texture:
Fill in the rays, but avoid making them solid blocks of color. I like to dry-brush the paint in the center of the rays or dab it with a dry sponge while wet to create a distressed, vintage texture. -
Add the circular details:
While the paint inside the rays is still tacky, use a clean, damp rag or a cotton swab to lift small circles of paint out, creating the ‘beaded’ look running down the center of each ray. -
Refine edges:
Step back and look at the overall balance. If any ray feels too thin, gently widen it with your brush, feathering the edges slightly.
Pro Tip: Cardboard Trick
Cut a single ‘ray’ shape out of cardboard to use as a tracing template. This keeps your sizes consistent while still allowing for hand-painted variances.
Step 4: Finishing Touches
-
Erase guidelines:
Once the paint is completely dry to the touch, gently erase any visible pencil marks, being careful not to smudge the graphite into the wall texture. -
Distress purposefully:
If parts of the mural look too ‘new’ or perfect, lightly sand specific spots with fine-grit sandpaper to enhance the worn, plaster-like effect shown in the inspiration image. -
Reset the room:
Move your headboard back into place, pushing it right up against the wall to frame your new artwork.
Step back and admire how this simple addition completely anchors your room with warm, inviting energy
Stairwell Confetti Drift for Awkward Angles
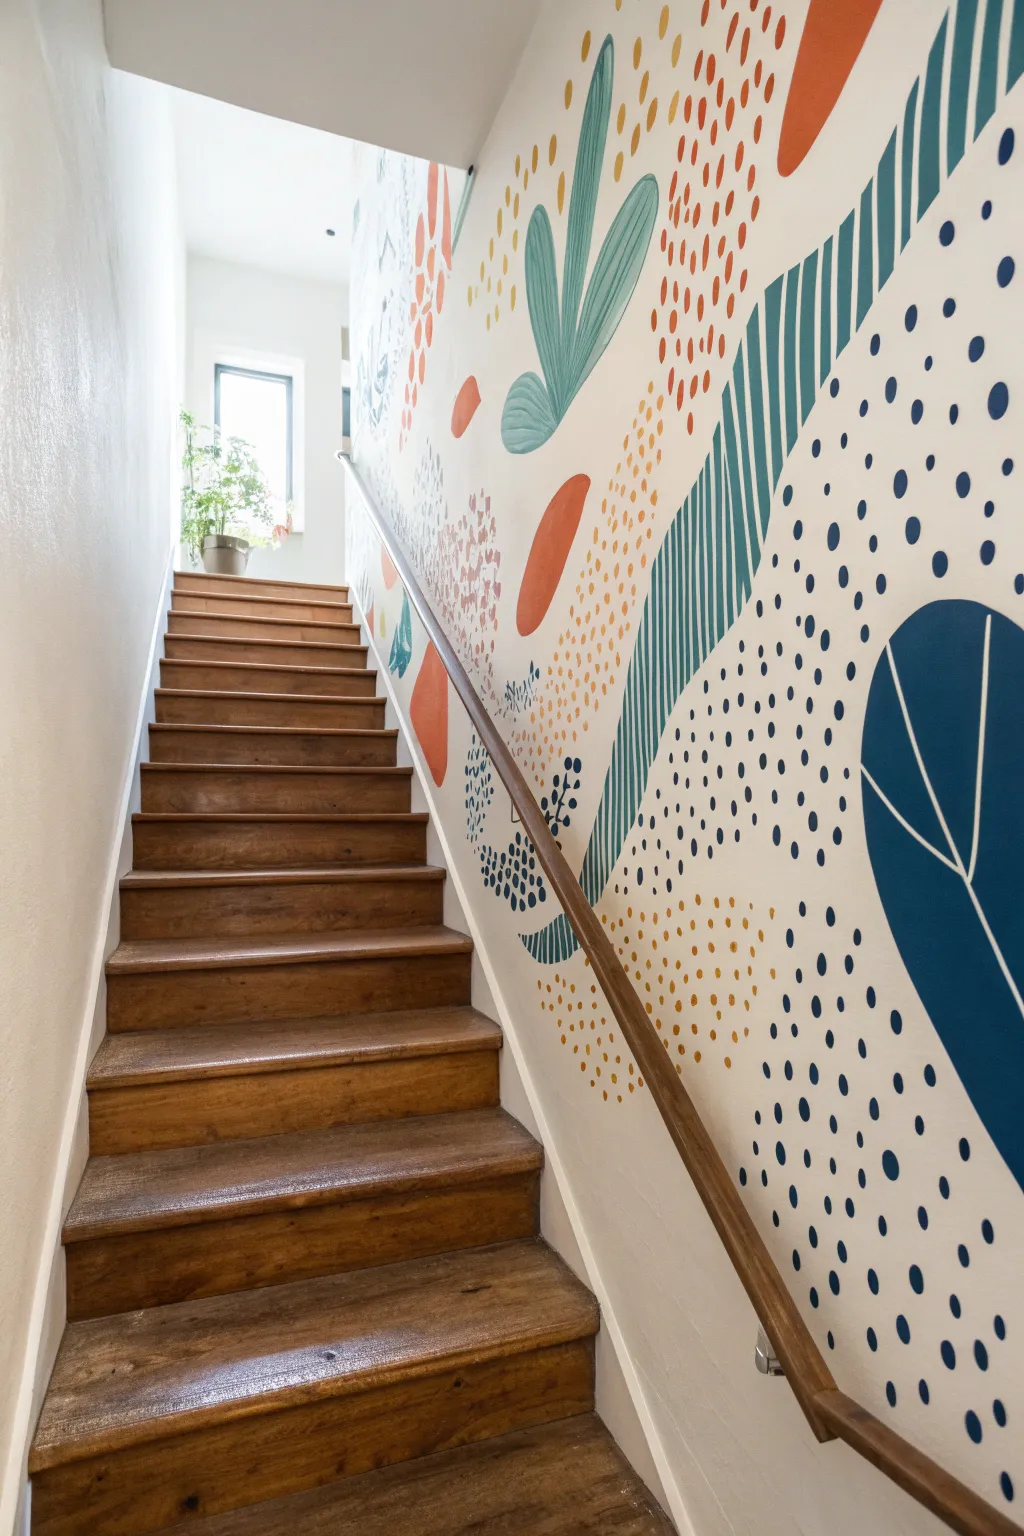
Transform a blank, awkward stairwell wall into a vibrant journey upward with this abstract, organic mural. Featuring sweeping leaf forms, playful dots, and bold color blocks, this freehand design adds movement and joy to a transitional space.
Detailed Instructions
Materials
- Interior latex paint (white base for wall)
- Sample pots of interior satin paint: Deep Teal, burnt orange, mustard yellow, navy blue, light blue-green
- Assorted round brushes (sizes 4, 8, and 12)
- 1-inch flat angle brush
- Painter’s tape
- drop cloths
- Pencil
- Eraser
- Ladder or step stool (safe for stairs)
- Paper plates or small cups for paint
Step 1: Preparation & Planning
-
Clear and clean:
Remove any existing artwork or hardware from the stairwell wall. Wipe the surface down with a damp cloth to remove dust and let it dry completely. -
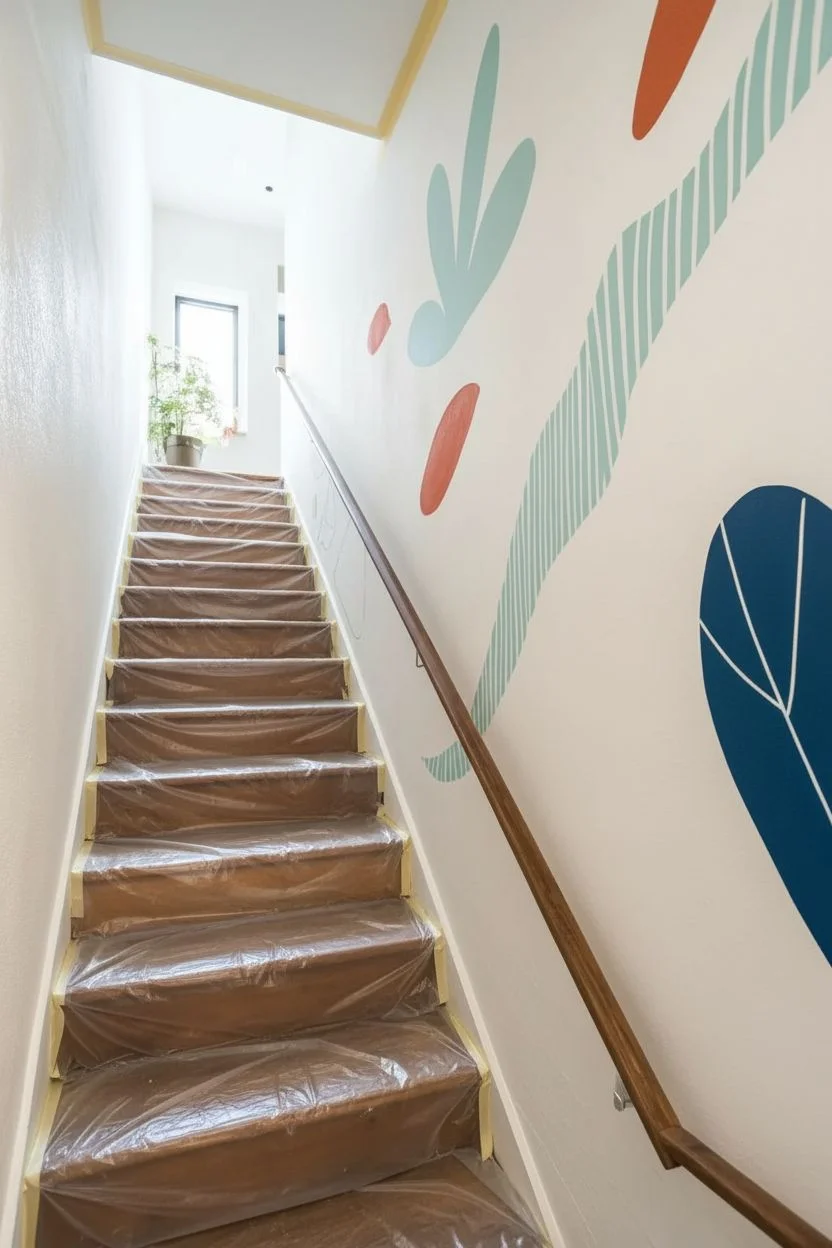
Protect the area:
Lay drop cloths on the stairs, taping them down securely so they don’t slip while you are working on the incline. Tape off the handrail, baseboards, and the ceiling line to ensure crisp edges. -
Base coat application:
If your wall isn’t already a fresh, crisp white, roll on a coat of white interior latex paint to provide a high-contrast background for your colors. -
Sketch the flow:
Using a pencil, very lightly sketch the largest shapes first to establish the composition’s ‘drift’. I find it helpful to start with the large teal swooshes and the biggest leaves to create the main upward diagonal movement.
Step 2: Painting Large Forms
-
The Great Teal Swoosh:
Load your 1-inch flat angle brush with the light blue-green paint. Paint the large, striated shapes that look like long grass blades, using a confident, sweeping motion to mimic the natural curve sketched earlier. -
Add texture to the teal:
Instead of filling these teal shapes solidly, use the edge of the brush to create parallel lines or stripes inside the shape, leaving small gaps of white wall showing through for texture. -
Anchor with Navy:
Switch to navy blue and a medium round brush. Outline and fill the large, half-oval leaf shapes at the bottom right. Leave the vein lines unpainted (white) for a crisp, negative-space effect. -
Pop in the Orange:
Using the burnt orange paint, fill in the solid, rounded abstract blobs scattered throughout the design. These act as visual weights to balance the lighter colors. -
Secondary leaves:
Paint the smaller, multi-lobed plant shapes using the same light blue-green or a slightly darker teal mix. Keep the strokes fluid and loose rather than rigid.
Brush Stamp Hack
For perfectly uniform dots, use the back end of a paintbrush handle or a round foam pouncer dipped in paint. Press straight onto the wall.
Step 3: Adding the ‘Confetti’ Details
-
Mustard dots:
Dip a size 8 round brush into the mustard yellow paint. Create clusters of small dots in open areas, varying the pressure slightly so some are larger than others. Think of them as pollen drifting in the wind. -
Orange dashes:
With a smaller brush and the orange paint, add sections of short, vertical dashes. These should feel like rain or seeds falling, adding a different rhythm to the composition. -
Navy stippling:
Use the navy blue to add high-contrast dots around the larger forms. I like to concentrate these denser at the bottom of the wall and have them space out as they move upward, mimicking lightness. -
Layering shapes:
Look for empty pockets that feel unbalanced. Add small, solid circles or tiny leaf shapes in alternating colors to link the large zones together. -
Step back and assess:
Walk down the stairs to view the mural from a distance. Fill in any sparse areas with additional dots or small organic shapes to ensure the drift feels continuous from bottom to top. -
Clean up borders:
Check the edges where shapes meet the stairs or ceiling. If needed, use a small brush and white paint to tidy up any stray marks or wobbly outlines.
Go Metallic
Swap the mustard yellow for gold leaf or metallic gold paint. It catches the light from the stairwell window beautifully.
Now every trip up the stairs feels like a walk through a whimsical, floating garden


Have a question or want to share your own experience? I'd love to hear from you in the comments below!