
Friendship rocks are my favorite little “tiny canvases” because you can pack a whole lot of love into something that fits in your palm. If you’re making them with a friend (or for a friend), these ideas will help you paint designs that feel personal, sweet, and totally keep-worthy.
Matching Heart Bestie Rocks
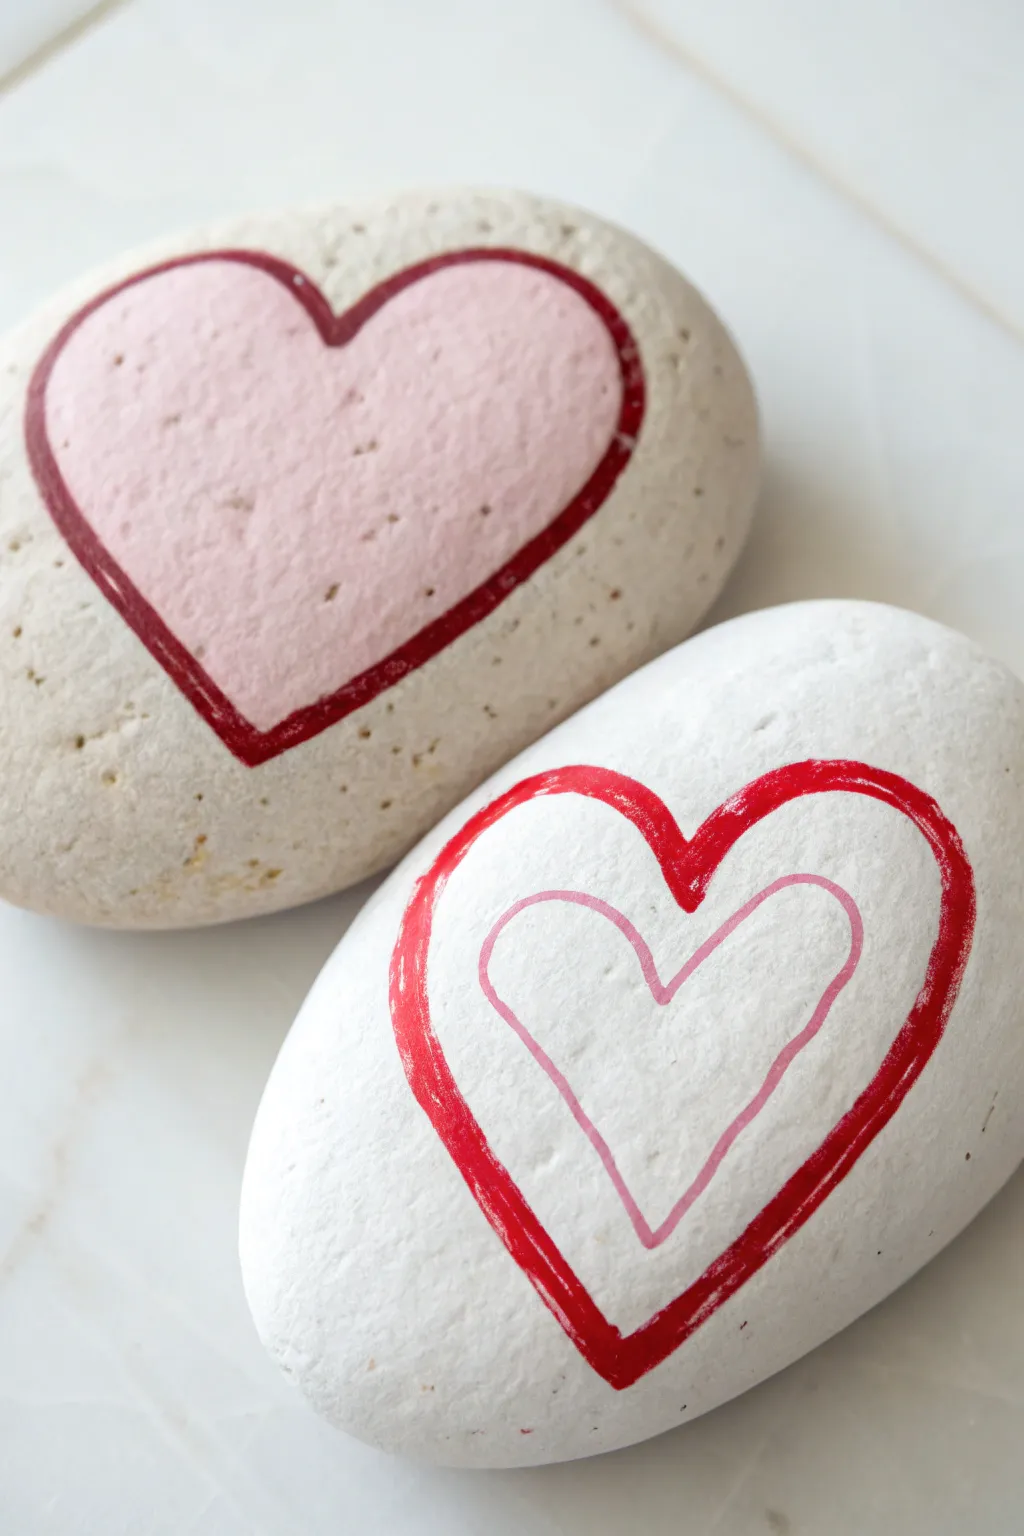
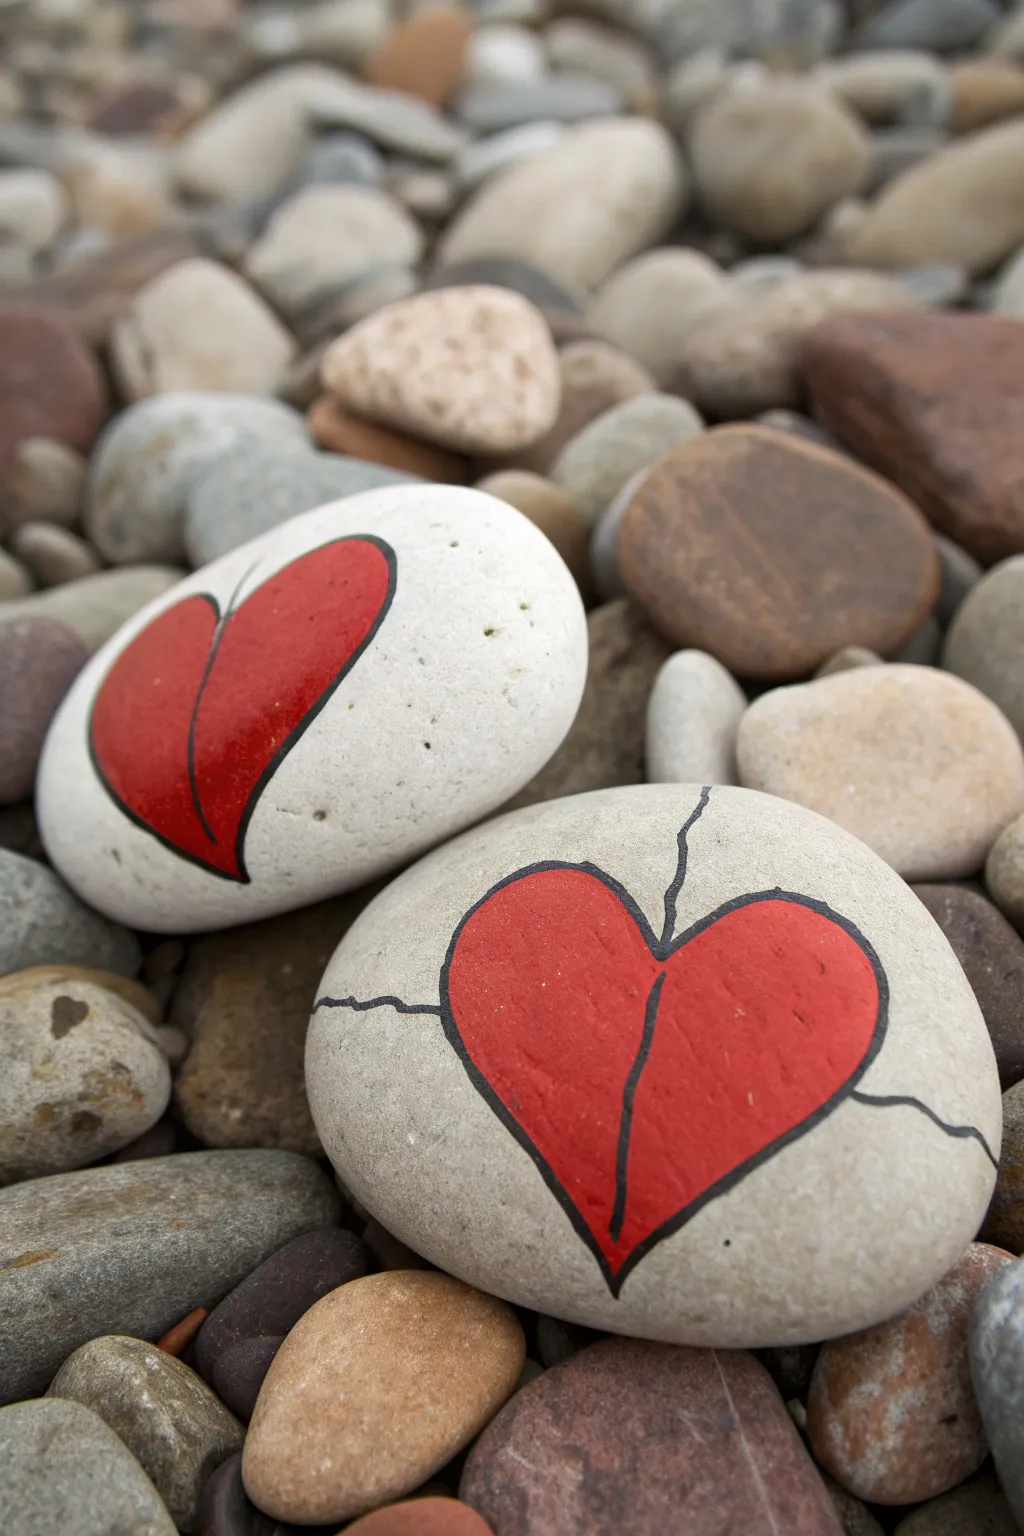
Celebrate a unique bond with these interlocking heart designs painted on smooth river stones. This beginner-friendly project uses inverse color schemes to create a matching pair that looks adorable together but stands strong apart.
Detailed Instructions
Materials
- Two smooth, oval river rocks (medium size)
- White acrylic paint or gesso (for priming)
- Light pink acrylic paint
- Bright red acrylic paint or paint pen
- Fine liner brush (size 0 or 1)
- Flat brush (small)
- Pencil
- Eraser
- Matte or glossy sealant spray
Step 1: Preparation & Priming
-
Clean the canvas:
Begin by scrubbing your rocks with warm soapy water to remove any dirt or oil. Let them dry completely, ideally in the sun, to ensure the paint adheres properly. -
Base coat decision:
For the bottom rock, apply a solid coat of white acrylic paint to create a bright, clean background. I like to apply two thin coats rather than one thick one for smoothness. -
Natural look:
Leave the second rock (top left) unpainted if it has a nice natural creamy color, or dry-brush a very light beige over it if you need to even out the tone.
Step 2: Painting the Solid Heart Rock
-
Sketch the outline:
On the natural-colored rock, lightly sketch a large heart shape in the center using a pencil. Keep the lines faint so they don’t show through the light paint later. -
Fill the heart:
Using a small flat brush, fill the inside of your sketched heart with light pink acrylic paint. -
Build opacity:
Let the first pink layer dry completely. Apply a second or third layer until the natural rock color no longer peeks through and the pink looks creamy and solid. -
Outline in red:
Once the pink heart is fully dry, switch to a fine liner brush loaded with bright red paint. -
Steady borders:
Carefully trace the outer edge of the pink heart with a medium-thickness red line. A paint pen works wonders here if you struggle with brush control.
Fixing Shaky Lines
If your outline wobbles, wait for it to dry perfectly. Then, use a toothpick to gently scrape away the excess paint for a crisp edge.
Step 3: Painting the Open Heart Rock
-
Outer heart design:
On the white-painted rock, sketch a large heart similar in size to the one on your first rock. This will be the outer frame. -
Paint the red frame:
Using your fine liner brush and red paint, trace over this pencil line. Make the line slightly thick to create a bold, open heart shape. -
Inner heart sketch:
Inside the red heart, lightly pencil in a smaller, floating heart. Try to center it so there is equal white space usage. -
Pink detail line:
Trace this inner heart with a very thin line of light pink paint. This creates a delicate visual echo of the solid heart on the other rock. -
Clean up:
If any lines look shaky, wait for the paint to dry and use a tiny bit of white paint to sharpen the edges of your lines.
Pro Tip: Hand Bracing
Rest your pinky finger on the rock surface while painting the outlines. This anchors your hand and gives you much steadier control.
Step 4: Finishing Touches
-
Wait and dry:
Allow both rocks to sit undisturbed for at least an hour until the paint is cured and dry to the touch. -
Erase marks:
Gently erase any visible pencil sketch marks that weren’t covered by paint. -
Seal the deal:
Spray both rocks with a clear acrylic sealer. This protects the paint from chipping and gives the rocks a finished, professional sheen.
Give one rock to your best friend and keep the other so you’re always connected by art


Best Friends Quote Rock

Celebrate an unbreakable bond with this elegant and minimalist painted rock featuring beautiful script lettering. The natural stone background allows the bold black text and simple heart motifs to really pop, creating a sophisticated keepsake.
Step-by-Step Tutorial
Materials
- Smooth, oval river rock (light grey or beige)
- Black acrylic paint pen (fine tip)
- Black acrylic paint pen (medium tip or brush tip)
- Pencil (HB or lighter)
- White eraser
- Soap and water
- Clear matte spray sealer
Step 1: Preparation
-
Clean the canvas:
Begin by thoroughly washing your stone with warm water and a little soap. Scrub away any dirt or grit that might interfere with your pen tip later, then let it dry completely in the sun. -
Assess the surface:
Run your thumb over the rock’s surface to find the smoothest side. This will be your front face, as bumps can make smooth lettering difficult.
Steady Hand Trick
Rest your wrist on a stable surface while drawing. If the rock is small, place your pinky finger on the table to anchor your hand for cleaner curves.
Step 2: Drafting the Design
-
Plan the layout:
visualize where the two words will sit. ‘Best’ should arch slightly over the top center, and ‘Friends’ will sit directly below, slightly larger and centered. -
Lightly sketch the text:
Using your pencil, very lightly sketch the words ‘Best Friends’ onto the stone. Don’t press hard; you just want a faint guide that can be easily erased later. -
Draft the hearts:
Sketch a small heart shape to the right of ‘Best’ and a slightly larger, open heart outline below the word ‘Friends’ to balance the composition. -
Refine the script:
Go back over your pencil letters to thicken the downstrokes. This faux-calligraphy technique helps you visualize where to add weight with the paint pen.
Step 3: Inking the Lettering
-
Outline the word ‘Best’:
Shake your fine-tip black paint pen well to mix the pigment. Carefully trace the outline of your pencil sketch for the word ‘Best’. -
Thicken the strokes:
Switch to your medium or brush-tip pen. Fill in the downstrokes (the parts of the letters where your pen moves downward) to give them that classic calligraphy weight. -
Ink the word ‘Friends’:
Move on to the second word. Trace the ‘F’ with a decorative flourish, ensuring the crossbar is distinct. Trace the rest of the letters carefully. -
Add weight to ‘Friends’:
Just as before, thicken the downstrokes of ‘Friends’. I find that adding slightly more weight to the bottom word anchors the design visually. -
Connect the letters:
Ensure the cursive connections between letters like ‘r’, ‘i’, ‘e’, ‘n’, ‘d’, and ‘s’ are smooth and flow naturally into one another.
Date It
Use a fine-tip white pen on the back of the rock to write the year or the initials of you and your best friend for a personalized touch.
Step 4: Adding Details
-
Fill the top heart:
Using the fine-tip pen, outline the small heart next to ‘Best’. Then, fill it in completely with solid black ink for a bold accent. -
Draw the bottom heart:
For the heart below ‘Friends’, use the fine tip to draw a swift, fluid outline. Keep the line thickness varied—slightly thicker on one side—to mimic a hand-drawn sketch look. -
Check for consistency:
Look over your lettering. Are any edges jagged? Use the fine-tip pen to carefully smooth out any bumps or uneven lines. -
Let the ink cure:
Allow the paint pens to dry completely. This usually takes about 15 to 20 minutes, but give it extra time to ensure no smudging occurs in the next step.
Step 5: Finishing Touches
-
Erase guidelines:
Once you are absolutely certain the ink is dry, gently use the white eraser to remove any visible pencil marks remaining around your letters. -
Dust off debris:
Brush away the eraser crumbs with a soft, clean brush or cloth so the surface is perfectly clean. -
Seal the artwork:
Take the rock to a well-ventilated area. Apply a light coat of matte spray sealer. This protects the paint from chipping without adding an unnatural shine to the stone.
Now you have a durable and heartfelt token ready to gift to your closest companion


Friends Holding Hands Silhouettes

Capture the simple beauty of connection with this elegant silhouette project. Using just a smooth grey stone and black ink, you can create a striking contrast that celebrates friendship against any backdrop.
Step-by-Step
Materials
- Smooth, rounded grey river rock (palm-sized)
- Black acrylic paint pen (0.7mm fine tip) OR fine liner brush and black acrylic paint
- Pencil (HB or H for light lines)
- Eraser
- Matte or satin spray varnish
- Soap and water
- Paper towel
Step 1: Preparation & Sketching
-
Clean the Surface:
Begin by washing your stone thoroughly with warm soapy water to remove any dirt or oils. Pat it completely dry with a paper towel and let it sit for a few minutes to ensure no moisture remains in the pores. -
Positioning:
Hold the rock to find its most stable resting position. You want the painting surface to be relatively flat and facing the viewer. -
Drafting the Figures:
Using your pencil very lightly, sketch the outline of two standing figures in the center of the rock. Start with two small ovals for heads, spaced slightly apart but close enough for their arms to meet. -
Adding Bodies:
Draw simple stick-figure guidelines first to get the proportions right. The figure on the left should be slightly taller with straight legs, while the figure on the right should be a bit shorter. -
Refining the Shapes:
Thicken the stick figures lightly. Give the left figure rectangular legs for pants and a broader torso. Give the right figure a triangular skirt shape starting from the waist. -
The Handhold:
Sketch their inner arms extending downward and meeting in a ‘V’ shape between them, indicating they are holding hands.
Bleeding Ink?
If paint bleeds into the rock’s porous surface, dab a clear matte medium or white glue over the sketch area first. Let it dry clear, then paint the black silhouette on top.
Step 2: Painting the Silhouette
-
Outline the Male Figure:
Take your fine-tip black paint pen or liner brush. Carefully trace the outer edge of the left figure’s head, shoulders, and torso. -
Leg Definition:
Continue strictly outlining down the legs. Leave a tiny vertical gap between the legs to show they are standing apart, rather than one solid block. -
Outline the Female Figure:
Move to the figure on the right. Outline the head and shoulders, curving down into the flared shape of the dress or skirt. -
Leg Details:
Draw two thin lines extending from the bottom of the skirt for legs, adding small oval shapes for feet. This detail helps distinguish the silhouette. -
Connecting the Hands:
Carefully draw the arms reaching toward each other. The point where the hands meet doesn’t need detailed fingers; a simple overlapping shape works perfectly for a silhouette. -
Filling In:
Once your outline is dry to the touch (usually just a minute for pens), begin filling in the shapes with solid black. I find that working in small circular motions helps get an even, opaque coverage without streaks. -
Second Coat:
Let the first layer dry completely. If the stone’s grey color is showing through the black ink, apply a second coat to make the silhouette crisp and deep.
Sunset Gradient
Before painting the black figures, sponge a gradient of yellow, orange, and purple acrylics onto the rock face to mimic a real sunset background behind the silhouette.
Step 3: Finishing Touches
-
Cleanup:
Once the black paint is 100% dry, gently erase any visible pencil sketch marks around the edges of your figures. -
Sealing:
In a well-ventilated area, hold a spray varnish about 10-12 inches away from the rock. -
Apply Protection:
Apply a light mist over the surface. Do not soak it; a light mist prevents the ink from running. Let it dry, then apply a second slightly heavier coat to seal your artwork against the elements.
Place your finished stone in a garden or gift it to a best friend as a permanent reminder of your bond

Split Heart Across Two Rocks
Celebrate your connection with a best friend using this simple yet symbolic design where two individual rocks come together to form a complete heart. The stark contrast of the bright red paint against the natural white stone creates a modern, graphic look that is both striking and sentimental.
Step-by-Step Tutorial
Materials
- Two smooth, flat river rocks or beach pebbles (similar size and shape)
- White or cream acrylic paint (optional, for base)
- Bright red acrylic paint
- Black acrylic paint or extra-fine Posca paint pen (black)
- Pencil
- Small flat paintbrush
- Fine detail paintbrush or liner brush
- Eraseable carbon paper (optional)
- Matte or satin spray sealant
Step 1: Preparing the Canvas
-
Selecting the stones:
Find two stones that nestle together naturally. Look for rocks with a relatively flat surface and a similar light color, or paint darker rocks with a coat of cream acrylic to match the photo’s aesthetic. -
Cleaning the surface:
Wash your rocks with warm soapy water and scrub away any grit. Let them dry completely, as moisture inside the stone can cause paint to peel later. -
Positioning:
Place the two rocks on your work surface exactly how you want them to sit when finished. The top rock should slightly overlap or touch the bottom one to ensure the design flows continuously.
Smooth Operator
To get super clean lines on uneven rock surfaces, brace your pinky finger against the table or the rock itself to stabilize your hand while outlining.
Step 2: Drafting the Design
-
Sketching the outline:
With the rocks positioned together, use a pencil to lightly sketch a large heart shape that spans both surfaces. Focus on getting a nice, plump curve for the lobes. -
Creating the break line:
Draw a jagged, zig-zagging line where the two rocks meet. This crack line simulates a puzzle piece connection and adds character to the design. -
Extending the crack:
On the bottom rock, extend the horizontal crack line outward from the heart to the edges of the stone, making it look like the rock itself creates the division. -
Separating the rocks:
Once you are happy with the unified sketch, separate the rocks. You should now have two distinct partial shapes ready for painting.
Step 3: Painting the Heart
-
First coat of red:
Using a small flat brush, fill in the heart sections with bright red acrylic paint. Start from the center and work toward the pencil lines. -
Refining the edges:
Switch to a smaller detail brush to carefully paint up to your pencil outline, keeping the curves smooth and the points sharp. -
Drying and recoating:
Allow the first layer to dry for about 15 minutes. Red pigment is often translucent, so apply a second coat to achieve that solid, opaque look seen in the photo. -
Checking the match:
Carefully push the rocks back together while dry to ensure the red sections still align visually. make minor adjustments if needed.
Level Up: Hidden Messages
Paint initials or a secret date on the back of each stone so the recipient has a hidden surprise when they turn their puzzle piece over.
Step 4: The Outline and Details
-
Outlining the heart:
Using a very fine liner brush with black paint, or a black paint pen, slowly trace the outer edge of the red heart. Keep the pressure consistent for an even line width. -
Adding the center vertical crack:
Draw the vertical squiggly line that runs down the center of the heart. In the top rock, this is just a partial line; on the bottom rock, it splits the heart vertically. -
Connecting the crack lines:
Ensure the vertical crack line on the bottom rock meets neatly with the ‘broken’ separation line at the top edge of the bottom stone. -
Horizontal extensions:
Trace the horizontal jagged lines extending from the heart to the sides of the stone on the bottom rock. This integrates the design with the stone’s shape.
Step 5: Finishing Touches
-
Cleanup:
If you have any visible pencil marks remaining outside the paint, use a kneaded eraser to gently lift them off the stone surface. -
Sealing the artwork:
Take the rocks to a well-ventilated area and apply a light coat of matte spray sealant. This protects the paint from chipping without making the natural stone look unnaturally glossy.
Give one half to your friend and keep the other to symbolize your bond even when apart
BRUSH GUIDE
The Right Brush for Every Stroke
From clean lines to bold texture — master brush choice, stroke control, and essential techniques.
Explore the Full Guide
Thumbprint Heart Keepsake Rocks
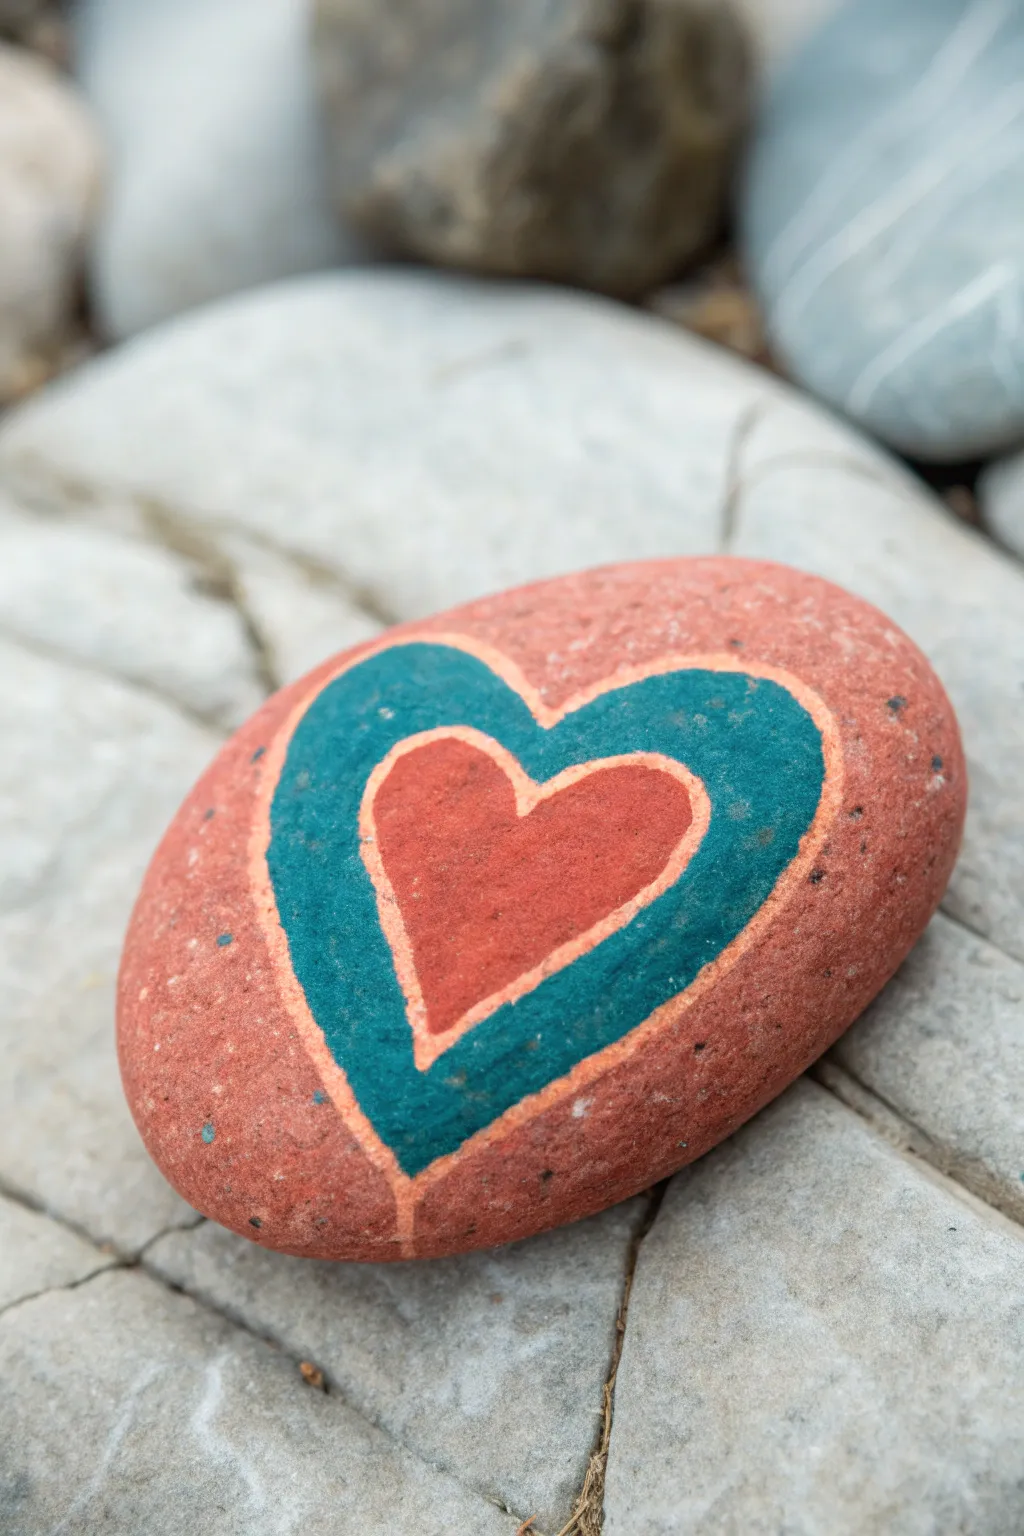
This simple yet striking design uses bold color blocking to create a radiating heart effect on a smooth stone. It is a wonderful friendship token that relies on clean lines and contrasting warm and cool tones to make a statement.
How-To Guide
Materials
- Smooth, oval-shaped river rock
- Red acrylic paint (warm brick red)
- Teal or turquoise acrylic paint
- Light peach or pale orange acrylic paint (for outlining)
- Medium flat paintbrush
- Fine detail liner brush (size 0 or 00)
- Pencil for sketching
- Matte or satin varnish spray
Step 1: Base Preparation
-
Clean the surface:
Begin by washing your stone thoroughly with soap and water to remove any dirt or oils. Let it dry completely before starting any painting. -
Apply the base color:
Using a medium flat brush, coat the entire top surface of the rock with a warm, brick-red acrylic paint. This creates a uniform background color. -
Check coverage:
If the first coat looks streaky or the natural rock color shows through, apply a second coat after the first one is dry to the touch. -
Allow to cure:
Set the rock aside and let the red base coat dry completely. This step is crucial so your pencil sketch doesn’t dig into wet paint.
Fixing Shaky Lines
If your outlines are uneven, use a damp cotton swab or toothpick to gently nudge wet paint back into place, or paint over dried mistakes with the base color.
Step 2: Sketching the Design
-
Draft the outer heart:
Lightly sketch a large heart shape on the center of the rock with a pencil. Leave a comfortable margin of red space around the edges. -
Draft the inner heart:
Inside the first heart, sketch a smaller heart. Try to keep the spacing between the inner and outer lines relatively even to create a consistent border width.
Step 3: Painting the Layers
-
Fill the middle band:
Load a small round brush with teal or turquoise paint. Carefully fill in the space between your two pencil heart lines. -
Refine the edges:
Work slowly near the pencil lines to keep the teal shape crisp. I find steadying my hand on the table helps with these curves. -
Second teal coat:
The teal paint might be slightly translucent over the red base. Apply a second layer once the first is dry for a solid, opaque look. -
Paint the center heart:
Using the same red paint as your base (or a slightly brighter shade for contrast), fill in the smallest central heart. -
Double check opacity:
Ensure the center red heart is solid and smooth, adding another layer if needed to match the texture of the teal paint.
Add Dimension
For a 3D effect, add tiny white dots inside the teal band or a small white reflection highlight on the upper curve of the red center heart.
Step 4: Outlining and Finishing
-
Prepare the liner brush:
Switch to your fine detail liner brush and load it with light peach or pale orange paint. You want the paint fluid but not runny. -
Outline the center:
Carefully paint a thin, consistent line separating the central red heart from the teal band. -
Outline the exterior:
Paint a matching peach line around the outer edge of the teal heart, separating it from the red background. -
Connect the points:
Extend a straight vertical line of peach paint from the bottom point of the heart down to the edge of the stone. -
Clean up errors:
If your lines wobble, wait for them to dry, then touch up with the adjacent background color (red or teal) to straighten them out. -
Final drying:
Review your work and let the entire stone dry for at least 24 hours to ensure all layers are hardened. -
Seal the rock:
Spray the finished piece with a clear matte or satin varnish to protect the paint from chipping and weather.
Now you have a beautifully layered heart stone ready to gift to a close friend
Googly-Eyed Heart Buddy Rocks
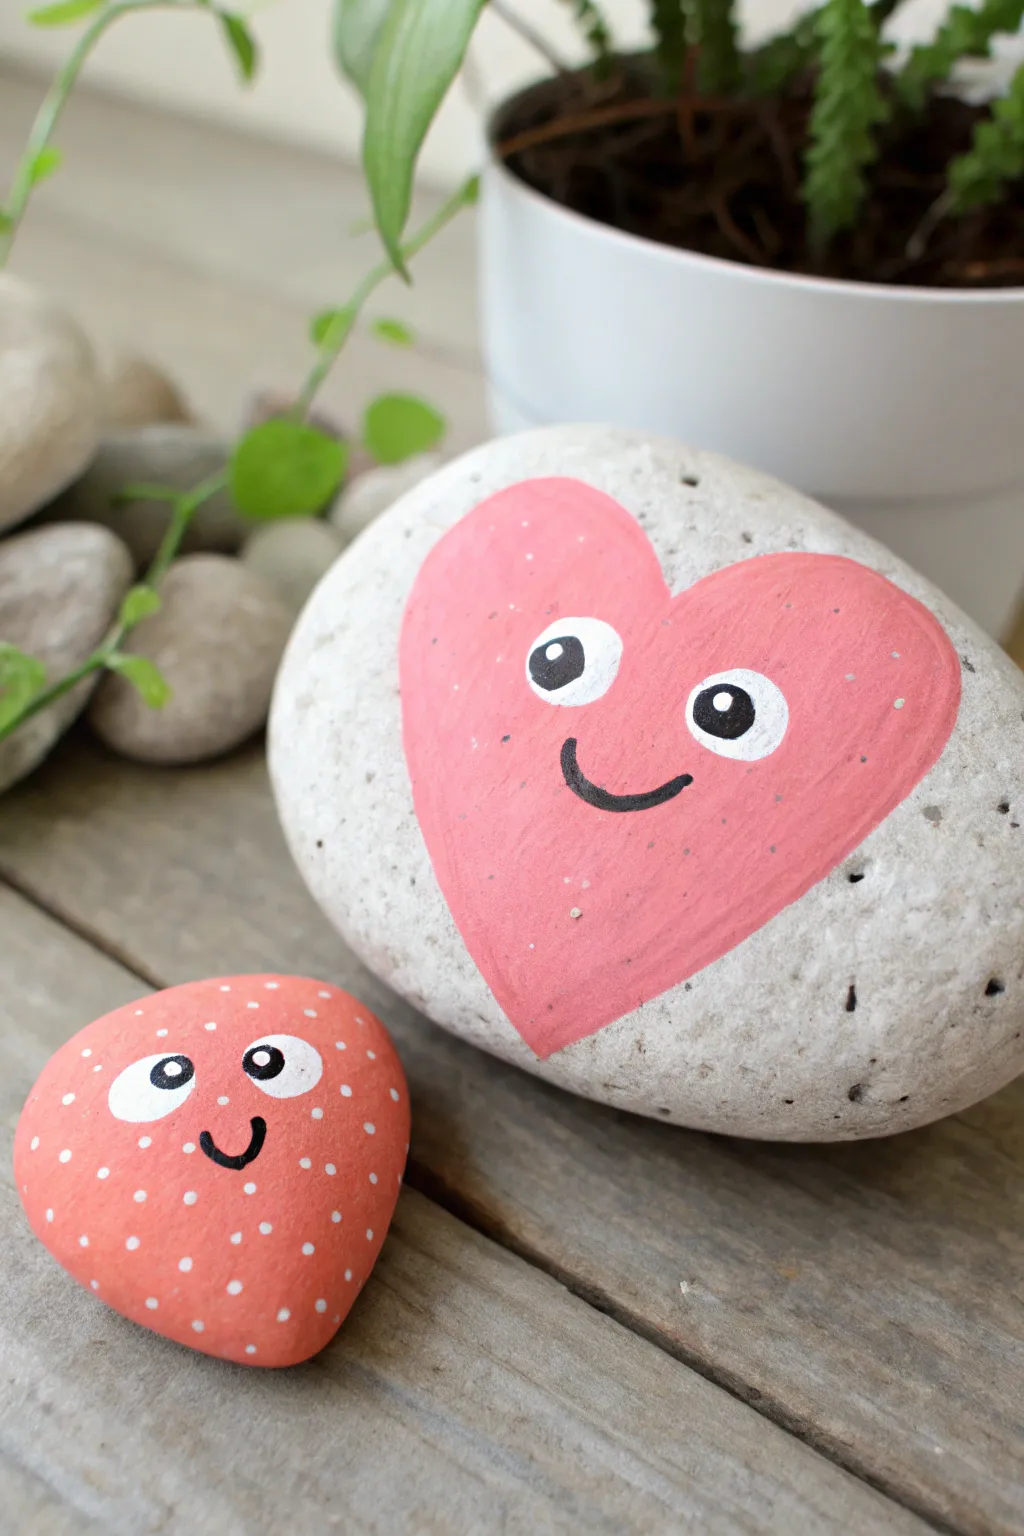
These charming rock friends make the perfect gift to show someone you care. With their bright pink colors and expressive painted faces, this duo adds a cheerful pop of personality to any garden or windowsill.
Step-by-Step Tutorial
Materials
- One large, smooth oval stone (light grey or white)
- One smaller, rounded stone
- Acrylic paint (light pink, coral red, white, black)
- Medium flat paintbrush
- Fine detail paintbrush or liner brush
- Pencil for sketching
- Dotting tool or toothpick
- Matte or satin sealant spray (optional)
Step 1: Painting the Big Heart Buddy
-
Clean the canvas:
Before starting, ensure your large stone is scrubbed clean with soap and water and fully dried. A dusty surface will prevent the paint from sticking properly. -
Sketch the outline:
Using a pencil, lightly sketch a large, wide heart shape directly onto the center of the stone. Make the heart generous in size so it dominates the rock’s face. -
Fill in the heart base:
Load your medium flat brush with light pink acrylic paint. Carefully fill in the heart shape, keeping your brushstrokes smooth to minimize texture. -
Apply a second coat:
Once the first pink layer is dry to the touch, apply a second coat to ensure the color is opaque and solid. -
Paint the eye whites:
Dip a smaller brush into white paint. Create two medium-sized circles near the top center of the heart. These should be close together but not touching. -
Add the pupils:
Using black paint and a fine detail brush or a large dotting tool, place a black circle inside each white eye. Positioning them slightly off-center makes the expression look look playful. -
Create the shine:
To give the eyes life, use the very tip of a brush or a toothpick to place a tiny white dot in the upper corner of each black pupil. -
Paint the smile:
With your finest liner brush and black paint, draw a simple, curved ‘U’ shape below the eyes.
Uneven Paint?
If your pink heart looks streaky, don’t keep brushing wet paint. Let it dry fully, then add another thin layer. Several thin coats always look smoother than one thick, gloopy one.
Step 2: Creating the Little Spotted Friend
-
Base coat the small rock:
Take the smaller stone and paint the entire surface with a coral red or dark pink paint. I find that holding the rock by the edges helps keep fingers clean. -
Let it dry completely:
Allow the base color to dry fully. Since this rock is painted all over, you might need to prop it up on a scrap piece of paper. -
Add white polka dots:
Using a dotting tool or the non-brush end of a paintbrush dipped in white paint, create small, random dots all over the red surface. -
Create the eyes:
Just like the larger rock, paint two white circles for eyes. Place them slightly lower on the rock face to make it look like a little creature. -
Add the pupils and details:
Once the white circles are dry, add the black pupils and the tiny white reflection dots, exactly as you did for the heart rock. -
Draw the tiny smile:
Finish the face with a small black smile using your liner brush. -
Seal the artwork:
After all paint is completely cured (wait at least 24 hours), spray both rocks with a clear matte or satin sealant to protect them from weather and chipping.
Dotting Trick
Don’t have a professional dotting tool? A cotton swab with the fluff removed or the flat head of a straight pin creates perfect, uniform polka dots every time.
Arrange your finished rocks together to create an adorable scene that celebrates friendship

PENCIL GUIDE
Understanding Pencil Grades from H to B
From first sketch to finished drawing — learn pencil grades, line control, and shading techniques.
Explore the Full Guide
Hidden Note Under a Painted Layer
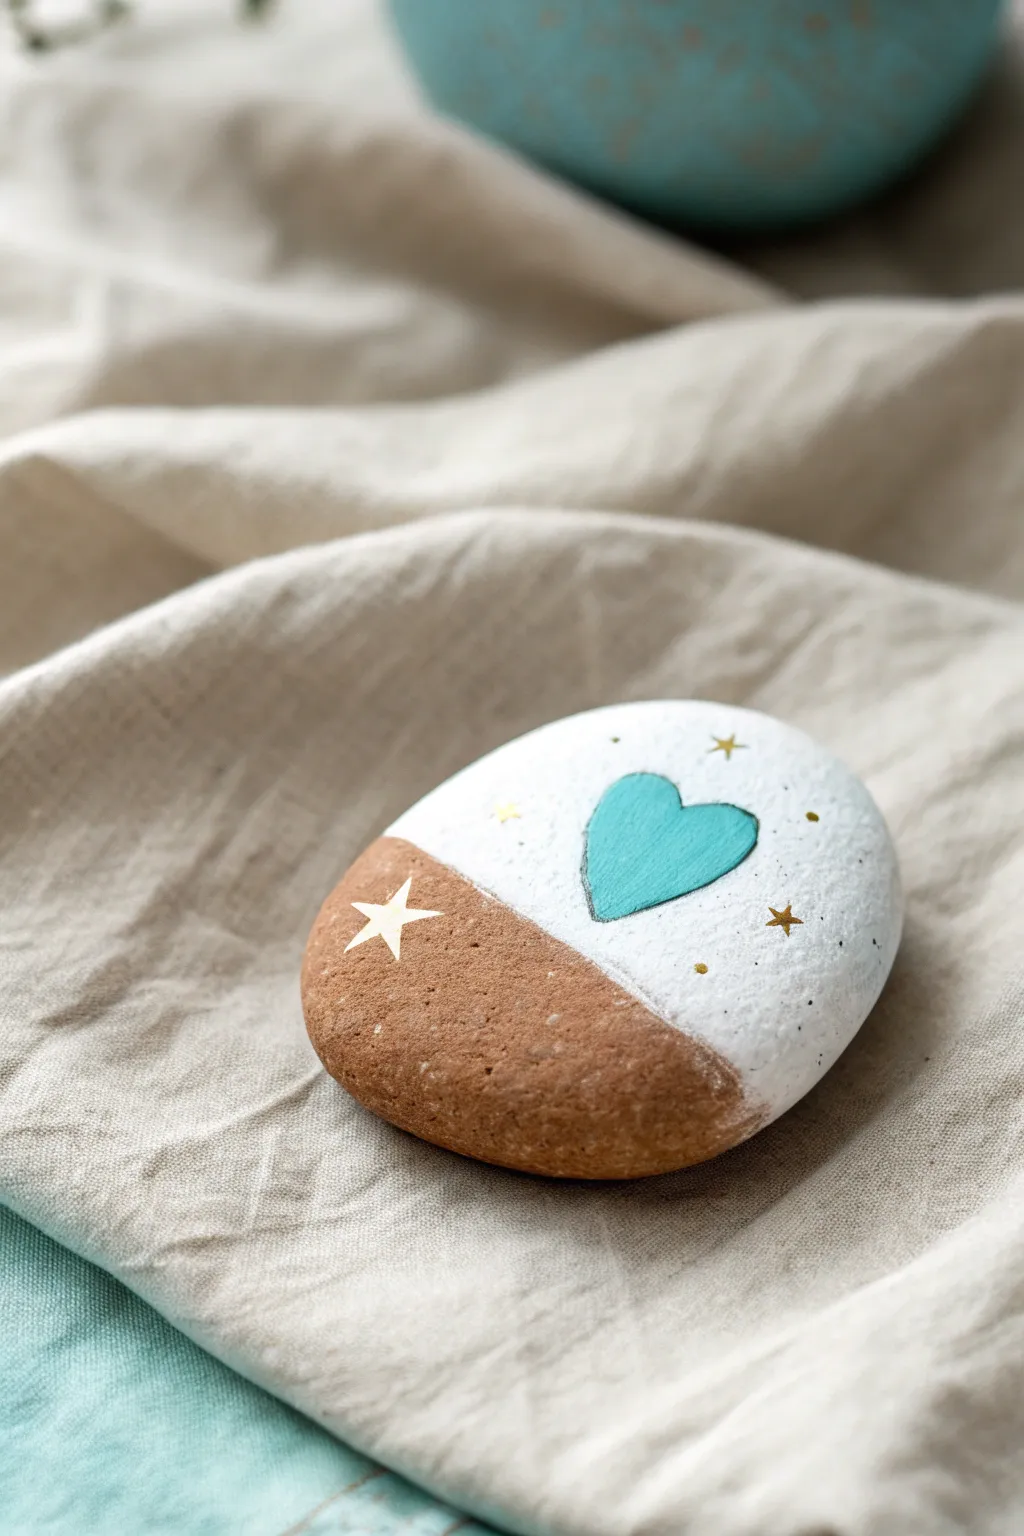
This elegant rock painting project combines the raw beauty of natural stone with a crisp, modern design featuring a teal heart and delicate golden stars. It’s a perfect keepsake for a friend, hinting at a hidden message or simple appreciation.
Detailed Instructions
Materials
- Smooth oval river rock (about palm-sized)
- White acrylic paint (high opacity)
- Teal or turquoise acrylic paint
- Gold paint pen (fine tip) or gold metallic paint
- Painter’s tape or masking tape (optional)
- Small flat paintbrush
- Fine detail paintbrush
- Pencil
- Matte or satin sealant spray
Step 1: Preparation and Base Layer
-
Clean the Stone:
Begin by thoroughly washing your rock with warm soapy water to remove any dirt or oils. Let it dry completely before starting; moisture can prevent the paint from adhering properly. -
Plan the Division:
Visualize a diagonal line across the rock. You want to leave the bottom-left section natural and paint the top-right section white. You can use a piece of painter’s tape to mark this off for a sharp line, or freehand it for a softer, organic look. -
Paint the White Section:
Using a small flat brush, apply white acrylic paint to the top section of the rock. Paint right up to your dividing line. -
Apply Second Coat:
The first layer of white will likely look streaky or translucent against the dark stone. Allow it to dry fully, then apply a second or even third coat until you have a solid, opaque white background. -
Remove Tape:
If you used tape, verify the paint is dry to the touch but not fully cured before gently peeling the tape away to reveal your crisp line. If you freehanded, just ensure your edge looks tidy.
Step 2: Painting the Heart
-
Sketch the Heart:
Once the white base is completely dry, lightly sketch a heart shape in the center of the white area using a pencil. Keep the lines faint so they don’t show through the lighter paint later. -
Fill the Heart:
Load your fine detail brush with teal acrylic paint. Carefully outline the heart shape first to get clean edges, then fill in the center. -
Outline for Definition:
For a slightly sketched look, you can add a very thin outline around the heart. I prefer to use a slightly darker shade of teal or a very fine grey marker, or you can leave it solely as the block of color shown here. -
Let it Dry:
Allow the teal heart to dry completely. If the teal looks patchy, add a second thin coat for vibrancy.
Uneven White Edges?
If paint bleeds under your tape, wait for it to dry, then gently scrape the excess off the raw stone with a toothpick or craft knife to clean the line.
Step 3: Adding the celestial details
-
Prepare Gold Paint:
Shake your gold paint pen well or mix your metallic gold acrylic paint thoroughly. You want a consistent, shiny flow. -
Draw the Main Star:
On the natural, unpainted brown section of the rock, draw a five-pointed star. Position it near the division line so it feels connected to the painted area. -
Add Small Stars:
Now, switch to the white painted section. Draw two or three tiny five-pointed stars scattered around the heart. -
Add Stardust Dots:
To fill the empty space gently, dot the tip of your gold pen or brush onto the white background randomly. These tiny specks act as distant stardust. -
Tiny Cross Stars:
Mix up the shapes by drawing one or two simple ‘cross’ stars (just a vertical line crossed by a horizontal one) for variety in your celestial pattern.
Pro Tip: Smoother Coat
Mix a tiny drop of water into your white acrylic paint. It helps the paint self-level on the stone surface, reducing visible brushstrokes for a porcelain-like finish.
Step 4: The Hidden Element
-
Write the Secret Note:
This step is what makes it a ‘hidden note’ rock. Flip the stone over to the unpainted back side. Here you can write a date, a name, or a secret message using your paint pen. -
Final Seal:
Once all paint is bone dry (give it at least an hour), take the rock outside and spray it with a clear matte or satin sealant. This protects the paint from chipping and keeps the natural stone looking finish.
Now you have a beautiful, hand-painted token ready to brighten a friend’s day


Have a question or want to share your own experience? I'd love to hear from you in the comments below!