A front porch concrete slab can go from tired and blotchy to totally intentional with just a little paint and a plan. I’m sharing my favorite concrete porch paint ideas—from classic, clean refreshes to artsy designs that make your entry feel like a mini outdoor studio moment.
Solid Warm Gray Refresh

Transform your worn concrete porch into a welcoming entryway with this clean, monolithic look. This project focuses on achieving a smooth, durable finish in a versatile warm gray that complements nearly any siding color.
Step-by-Step
Materials
- Concrete cleaner/degreaser
- Stiff bristle scrub brush
- Pressure washer (optional but recommended)
- Concrete patch/filler
- Putty knife
- Painter’s tape (exterior grade)
- Concrete primer (tintable recommended)
- Porch and Floor enamel paint (Warm Gray)
- Paint roller frame and extension pole
- 3/8-inch nap roller covers (for smooth/medium surfaces)
- 2-inch angled sash brush
- Paint tray and liners
- Wire brush or scraper
Step 1: Cleaning & Prep
-
Assess the Surface:
Begin by inspecting the entire concrete area for cracks, loose paint, or oily spots. Use a wire brush or scraper to remove any flaking material or old paint that isn’t adhered well. -
Apply Cleaner:
Mix your concrete cleaner or degreaser according to the manufacturer’s instructions. Pour it generously over the concrete surface, focusing on stained areas. -
Scrub Thoroughly:
Take your stiff bristle brush and scrub the wet surface vigorously. This step creates the essential mechanical bond potential by removing grime and opening the concrete pores slightly. -
Rinse Well:
Rinse the entire porch with a garden hose or pressure washer. Make sure no soapy residue remains, as this will prevent the primer from sticking. Allow the concrete to dry completely, ideally for 24 hours. -
Patch Imperfections:
If you found cracks earlier, fill them now with concrete patch filler using a putty knife. Smooth it out so it’s flush with the surrounding surface. Let the patch material cure fully before moving on.
Step 2: Priming
-
Tape Off Edges:
Apply exterior painter’s tape along the bottom edge of the house siding, door frame, and any columns to protect them from wayward brush strokes. -
Cut In the Perimeter:
Dip your 2-inch angled brush into the primer and ‘cut in’ a 3-inch border around the edges of the porch and any tight corners where a roller won’t reach. -
Roll the Primer:
Pour primer into your tray. Attach the roller to the extension pole and apply an even coat over the main floor and steps. I usually work from the door outwards so I don’t paint myself into a corner. -
Dry Time:
Let the primer dry for the time specified on the can, usually about 4-8 hours. It should feel dry to the touch and not tacky before painting.
Moisture Check
Tape a small square of plastic wrap to the concrete for 24 hours. If it’s wet underneath when removed, the concrete is holding moisture and shouldn’t be painted yet.
Step 3: Painting
-
Stir the Paint:
Open your warm gray porch enamel and stir it thoroughly to ensure the pigments are evenly distributed. -
Cut In Again:
Just like with the primer, use your angled brush to paint the perimeter and corners first. Don’t forget the vertical risers of the steps and the undersides of the lip. -
First Coat Application:
Roll on the first coat of paint using long, smooth strokes. Maintain a wet edge by overlapping each pass slightly to avoid lap marks. -
Details on Steps:
When painting the steps, carefully roll the flat tread first, then use the brush to smooth out any drips on the vertical riser. It’s helpful to do every other step if you need to access the house, but for a full refresh, doing them all at once ensures a seamless finish. -
Wait and Recoat:
Allow the first coat to dry for at least 4-6 hours (or overnight if humidity is high). Apply a second coat following the same process to ensure rich, solid color coverage. -
Remove Tape:
While the second coat is still slightly damp, carefully peel up the painter’s tape at a 45-degree angle. This helps prevent peeling dry paint off with the tape. -
Final Cure:
Let the paint cure for at least 24-48 hours before walking on it, and wait a full week before placing heavy planters or furniture back onto the surface.
Add Texture
Mix a non-slip additive into your final coat of paint. This subtle grit adds significant traction for rainy days without changing the color.
Enjoy the fresh, modern look of your renovated entryway as you welcome guests to your home


Painted Rug Rectangle Under Seating
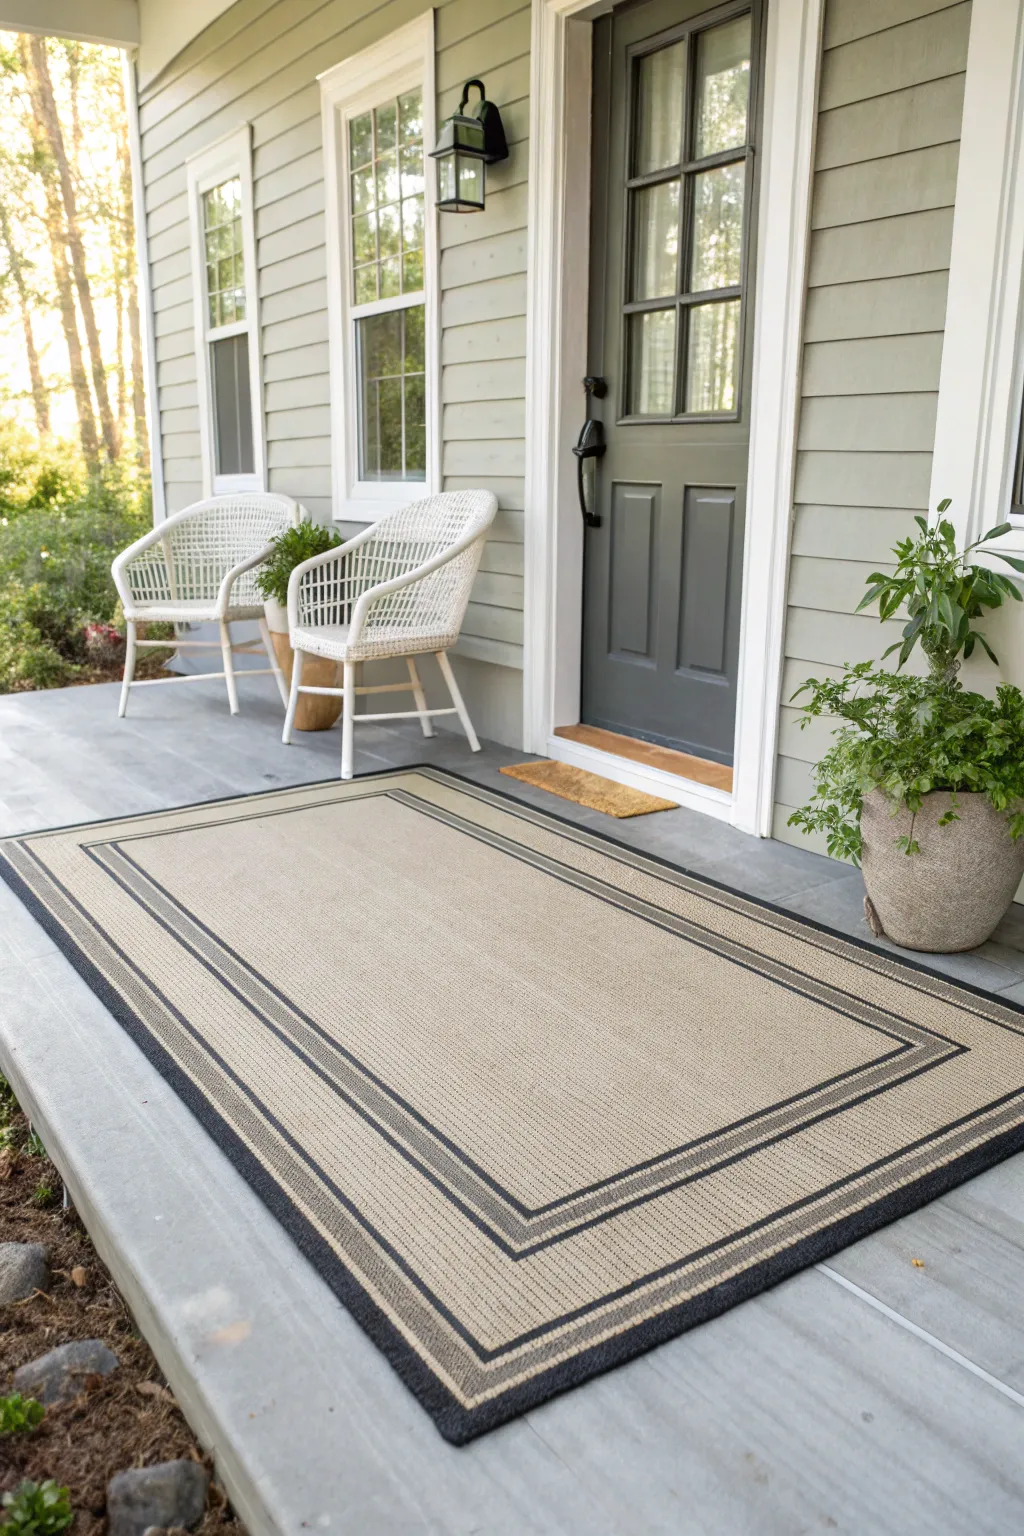
Transform a plain concrete porch into a welcoming entryway with this clever painted rug illusion. Using durable porch paint and careful taping, you can create a sophisticated border design that mimics a high-end sisal or woven rug without the worry of mold or tripping hazards.
Detailed Instructions
Materials
- Concrete porch and floor paint (Tan/Beige base color)
- Concrete porch and floor paint (Black/Charcoal accent color)
- Concrete cleaner/degreaser
- Stiff scrub brush
- Painter’s tape (various widths: 2-inch and 1-inch)
- Measuring tape
- Chalk line or long straight edge
- Pencil
- Paint roller (3/8 inch nap) with extension pole
- Paint tray and liners
- Small angled sash brush (for edging)
- Exterior clear concrete sealer (optional)
Step 1: Cleaning & Prep
-
Clear the area:
Remove all furniture, mats, plants, and debris from the porch surface to give yourself a completely blank canvas. -
Deep clean concrete:
Scrub the concrete vigorously using a stiff brush and concrete degreaser to remove dirt, oils, or loose paint. Rinse thoroughly with a hose and let the concrete dry completely for at least 24 hours. -
Map out dimensions:
Determine the size and placement of your rug. Center it in front of the door or arrange it to anchor your seating area just like a real rug would. -
Mark the perimeter:
Measure and mark the four corners of your rug rectangle with a pencil. Use a chalk line or a long straight edge to connect these points, ensuring your lines are perfectly straight and square.
Bleeding Lines?
If paint bleeds under tape, wait for it to dry completely. Use a small artist brush and the base color to carefully “erase” the mistake. Scraping wet paint often makes a smeary mess.
Step 2: Base Coat Application
-
Tape the outer edge:
Apply painter’s tape along the *outside* of your chalk lines. This masks off the rest of the porch while defining the sharp outer boundary of your painted rug. -
Seal the tape edge:
Press the tape down firmly. I like to run a putty knife or credit card along the edge to ensure a tight seal, which prevents paint bleed. -
Roll the base color:
Using a roller, apply the tan/beige base paint to cover the entire rectangular area inside the tape. Use long, even strokes. -
Edge the corners:
Use a small brush to ensure the paint reaches right into the taped corners where the roller might miss. -
Apply second coat:
Allow the first coat to dry according to the can’s instructions (usually 4-6 hours), then apply a second coat for solid, opaque coverage.
Step 3: Creating the Border Design
-
Let base cure:
Wait for the base coat to dry completely, preferably overnight. Tape applied to tacky paint will ruin your finish. -
Measure the outer band:
Measure about 2 to 3 inches inward from your perimeter tape edge. Mark this distance at intervals around the rectangle to guide your next tape line. -
Tape the first stripe:
Apply a new line of painter’s tape connecting your marks. The gap between this new tape and your original perimeter tape will form the thick outer black border. -
Create the inner stripe:
Measure inward another 1 to 1.5 inches from the tape you just placed. Place a third line of tape here. This creates a narrow gap for the thinner inner stripe. -
Seal tape edges again:
Just like before, burnish down the edges of your new tape lines firmly to stop the accent color from creeping underneath. -
Paint the accent stripes:
Using a small brush or mini-roller, carefully fill in the gaps between the tape lines with your black/charcoal paint. Two light coats are better than one heavy coat to prevent bleeding.
Clean Lines Secret
Before applying your black accent color, paint a thin layer of the BASE color over the tape edge first. This seals the tape, so any bleed is invisible, leaving perfect crisp lines.
Step 4: Finishing Touches
-
Remove tape promptly:
Carefully peel up all the tape while the black accent paint is still slightly wet. Pull at a 45-degree angle away from the wet paint for the crispest line. -
Fix imperfections:
If any paint bled through, let it dry fully, then use a tiny artist’s brush and the base color to touch up the edges. -
Seal the surface:
Optional but recommended: Roll a coat of clear exterior concrete sealer over the entire painted rug area to protect your work from foot traffic and weather. -
Cure time:
Allow the project to cure for 24-48 hours before placing furniture back onto your new painted rug.
Step back and admire how this simple paint technique anchors your porch space with timeless style


Classic Stenciled Tile Look
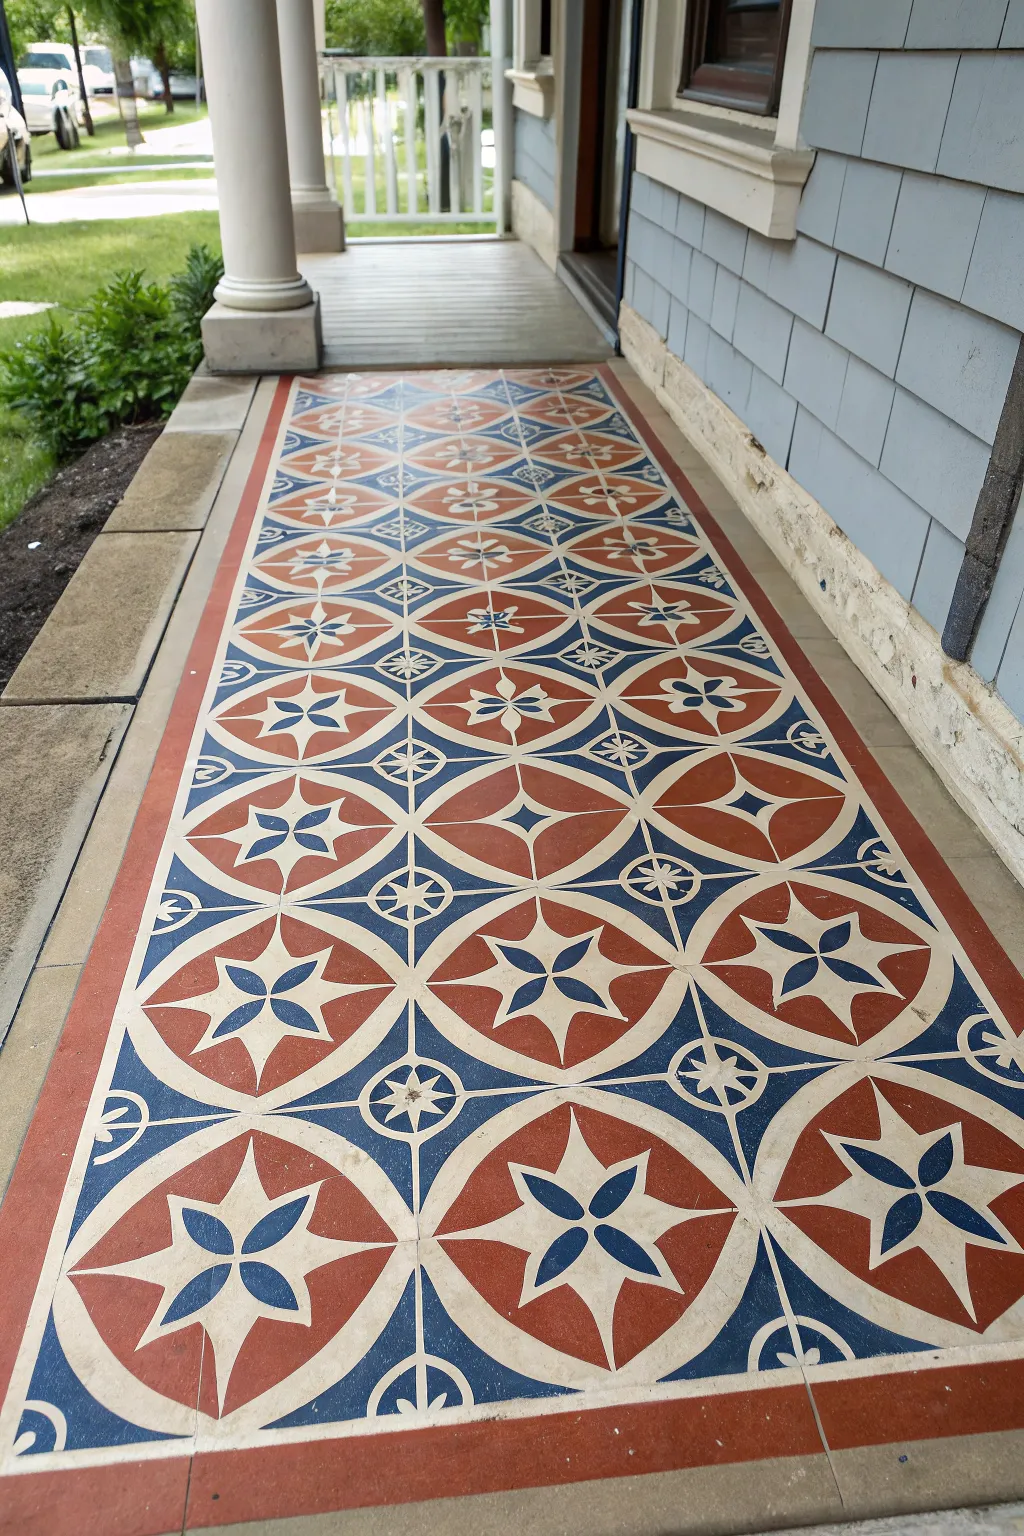
Transform a plain concrete porch into a stunning entryway with this intricate faux tile technique. Using a repeating geometric stencil and a classic palette of terracotta, deep blue, and cream, you can mimic the high-end look of historic encaustic cement tiles without the hefty price tag.
Step-by-Step Tutorial
Materials
- High-quality concrete porch and floor paint (white/cream base)
- Porch and floor paint (terracotta red)
- Porch and floor paint (navy blue)
- Porch and floor paint (slate blue-grey)
- Large geometric tile stencil (approx. 12×12 or 16×16 inches depending on scale)
- Stencil brushes (flat, stiff bristles)
- High-density foam rollers
- Painter’s tape (wide)
- Measuring tape and chalk line
- Concrete cleaner/degreaser
- Clear matte or satin exterior sealer
Step 1: Preparation and Base Coat
-
Clean surface:
Begin by thoroughly sweeping and washing the concrete porch. Use a stiff scrub brush and a concrete degreaser to remove any dirt, oils, or loose paint chips. -
Dry completely:
Allow the concrete to dry fully for at least 24 to 48 hours. Trapped moisture is the enemy of durable floor paint. -
Tape perimeter:
Use painter’s tape to mask off the walls, columns, and the area where the patterned ‘rug’ will end. Tape off a clean rectangle in the center of the porch where the main pattern will go, leaving space for a solid border if desired. -
Apply base color:
Roll on two coats of your white or cream concrete floor paint across the entire area. This acts as the ‘grout’ lines and the lightest parts of the star pattern. Let the base dry overnight.
Step 2: Stenciling the Pattern
-
Find the center:
Measure the width of your taped-off central area to find the exact center point. Snap a chalk line down the middle to ensure your first row of tiles is perfectly straight. -
Anchor the stencil:
Place your stencil at the top center of your chalk line. Secure it firmly with painter’s tape on all four corners to prevent shifting. -
Stipple the red:
Load a stencil brush sparingly with terracotta red paint. Offload most of the paint onto a paper towel until the brush is almost dry. Stipple paint into the large circular outer sections of the design. -
Add the navy details:
Using a smaller, separate brush for the navy blue, carefully fill in the central star shapes and the small corner diamonds. A vertical tapping motion works best to keep crisp lines. -
Fill the accents:
Use the slate blue-grey paint for the intermediate geometric shapes or connecting lines if your specific stencil design calls for a third definition color. Keep your hand steady and brushes dry. -
Lift and repeat:
Carefully peel up the stencil while the paint is still wet to avoid pulling up dried edges. Align the registration marks of the stencil with the painted design you just completed and move to the next spot. -
Complete the grid:
Work your way down the center line first, then branch out to the sides. I prefer completing all full-tile sections before tackling the partial edges. -
Edge work:
For the edges where a full stencil doesn’t fit, tape off the boundary line again. Bend the flexible stencil into the corner or cut a spare stencil to fit the gap, painting only the necessary portion.
Bleed-Through Blues?
If paint bleeds under the stencil, wipe it immediately with a damp Q-tip. For crisp lines, ensure your brush is extremely dry—almost powdery—before touching the stencil.
Step 3: Borders and Sealing
-
Paint the border:
Once the main pattern is fully dry (wait 24 hours), remove the inner tape. Tape a fresh line around the outside of your patterned rectangle. Paint a solid band of terracotta red about 4-6 inches wide to frame the ‘rug’ effect. -
Touch ups:
Inspect the floor for any paint bleed. use a small artist’s brush and your base white color to correct any smudges or jagged edges. -
Seal the floor:
Finish by rolling on two to three thin coats of a clear, non-yellowing exterior sealer. This protects your hard work from foot traffic and UV fading. -
Final cure:
Let the sealer cure for the manufacturer’s recommended time (usually 3-5 days) before placing heavy furniture back on the porch.
Antique Finish
For a truly aged look, lightly sand the dried stencil pattern in high-traffic areas before sealing. This simulates decades of wear on authentic cement tiles.
Step back and admire how a simple stencil design has completely elevated the character of your porch entrance.


Big Checkerboard Squares
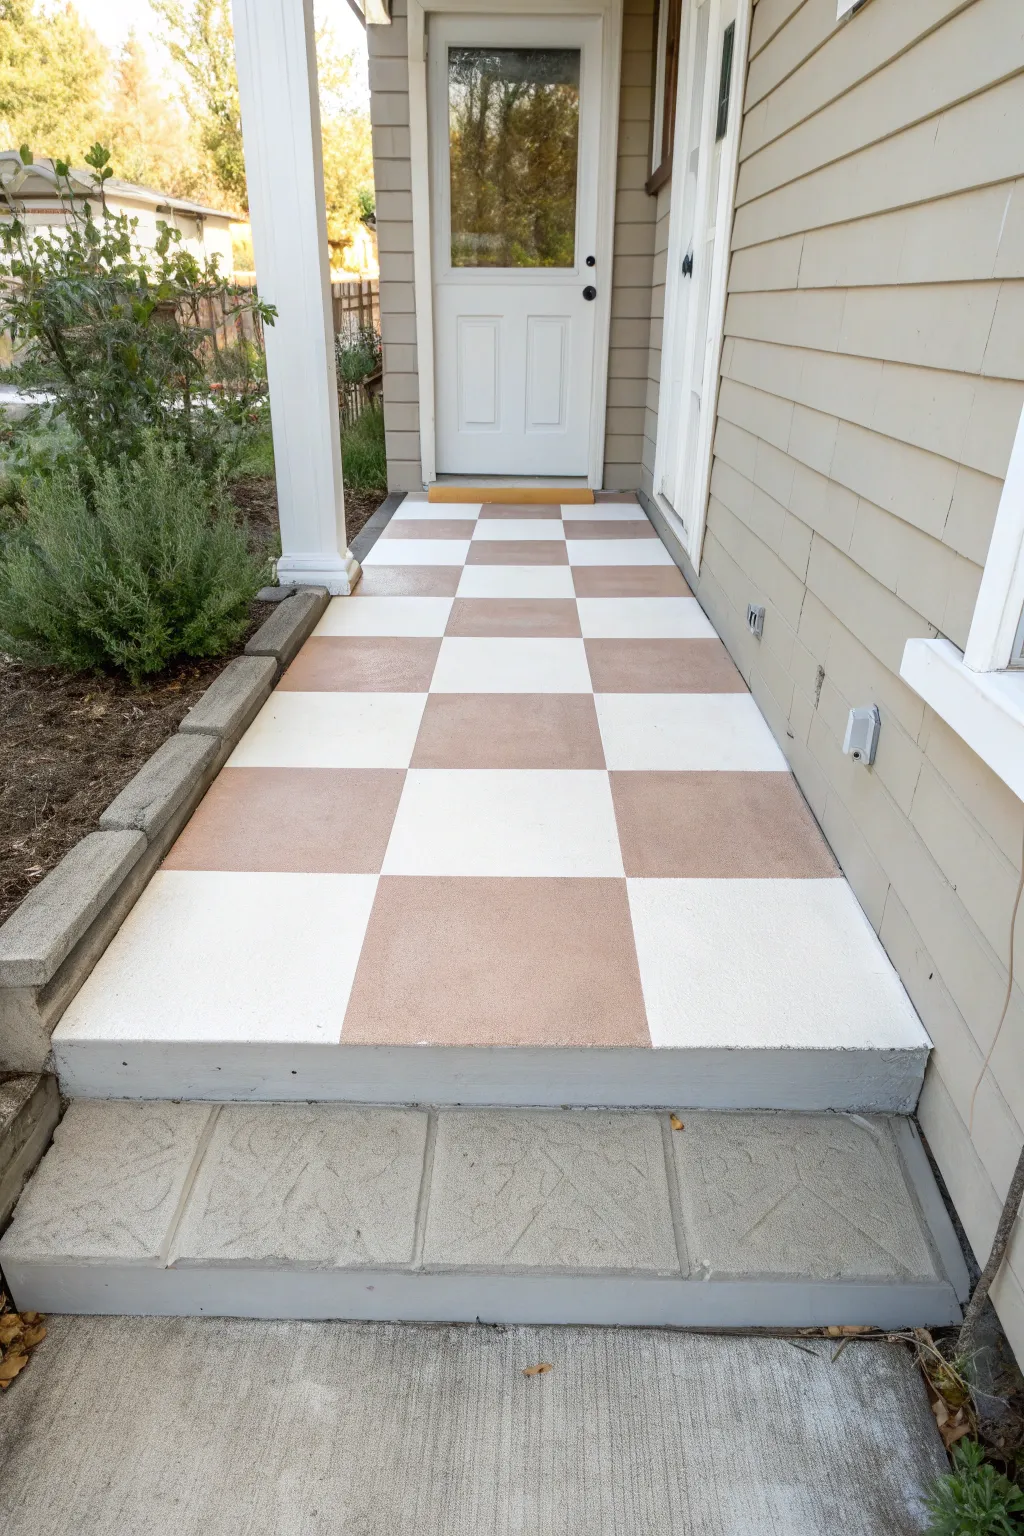
Transform a plain concrete porch into a classic, eye-catching entrance with this oversized checkerboard pattern. By using a warm beige and crisp white palette, you can achieve a look that feels both vintage and refreshingly modern without needing expensive tiles.
Step-by-Step
Materials
- Concrete cleaner/degreaser
- Pressure washer or stiff bristle broom
- Exterior concrete primer (masonry primer)
- Porch and Floor Enamel (White)
- Porch and Floor Enamel (Beige/Tan)
- Painter’s tape (high-quality, preferably green or yellow for crisp lines)
- Tape measure
- Chalk line tool
- Long level or straight edge
- Paint rollers (standard nap appropriate for concrete texture)
- Extension pole
- Paint tray and liners
- Small angled brush for edging
- Pencil
Step 1: Preparation
-
Clear and clean:
Remove all furniture, mats, and plants from the porch completely. Sweep away loose debris and dirt. -
Deep clean the concrete:
Apply a concrete degreaser or cleaner according to the manufacturer’s instructions. Scrub vigorously with a stiff broom or use a pressure washer to ensure the surface is free of oil, dirt, and old flaky paint. Let the concrete dry completely—usually at least 24 hours. -
Prime the surface:
Roll on a coat of high-quality exterior masonry primer. This creates a bonding layer so your paint won’t peel up later. Cut in the edges near the walls and steps with your brush first, then roll the main area.
Bleed-Through Blues?
If paint bleeds under the tape, don’t panic. Wait for it to dry fully, then use a small artist’s brush and the original base color to carefully touch up the line.
Step 2: Base Coat
-
Apply the base color:
For this project, the white checks act as the base. Roll two coats of white Porch and Floor Enamel over the entire porch surface. -
Let it cure:
Allowing adequate dry time is crucial here; if the base coat is tacky, the tape will pull it up later. I prefer to wait a full 48 hours before putting any tape down.
Step 3: Measuring and Taping
-
Find your center:
Measure the width of your porch to find the exact center point in front of the door. Mark this spot with a pencil. -
Snap the center line:
Use a chalk line to snap a line straight down the middle of the porch, perpendicular to the house. This ensures your pattern is centered on the entryway. -
Determine square size:
Decide on the size of your squares. The project shown uses large squares, likely 18 or 20 inches. Mark these intervals along your center chalk line. -
Create the grid:
Using your marked intervals and a large square or level, snap parallel horizontal and vertical chalk lines across the entire porch to create a full grid. -
Tape the pattern:
Apply painter’s tape along the outside edges of the squares you intend to paint beige. This is the tricky part—you have to visualize the checkerboard. Remember, you are taping *outside* the lines of the boxes that will receive the dark paint so the squares stay the intended size. -
Mark the ‘paint’ squares:
To avoid confusion, place a small piece of tape or a light pencil ‘X’ inside every square that needs to be painted beige. It’s easy to get lost in the grid once you start rolling. -
Seal the tape edges:
Press the tape down firmly. For extra crisp lines, lightly brush a tiny amount of your *base* color (white) over the edge of the tape. This seals the gap so any bleed-through matches the color underneath.
Level Up: Border Patrol
Add a solid painted border around the perimeter of the checkerboard. It frames the pattern like a rug and hides awkward partial squares near the walls.
Step 4: Painting the Checks
-
Cut in the corners:
Using a small brush, carefully paint the corners and edges of your marked beige squares where the roller might miss or make a mess. -
Roll the color:
Roll the beige Porch and Floor Enamel onto the designated squares. Use a smaller roller if the squares are tight, but a standard roller works well for these large sections. -
Apply a second coat:
Once the first coat is dry to the touch, apply a second coat of beige for solid, opaque coverage. -
Remove the tape:
This is the most satisfying part. While the final coat is still slightly damp (not wet, but not fully cured), slowly peel back the tape at a 45-degree angle to reveal your clean lines.
Step 5: Finishing Up
-
Clean the chalk:
Once the paint is fully hard and dry, use a damp cloth to wipe away any visible chalk lines left in the white squares. -
Paint the riser:
Finish the look by painting the vertical face of the concrete slab (the riser) in a solid color—grey is used here to ground the design. -
Final cure:
Wait at least 72 hours before walking on the surface or moving furniture back onto your beautiful new porch.
Now you have a grand entrance that adds instant curb appeal to your home
BRUSH GUIDE
The Right Brush for Every Stroke
From clean lines to bold texture — master brush choice, stroke control, and essential techniques.
Explore the Full Guide
Harlequin Diamond Pattern
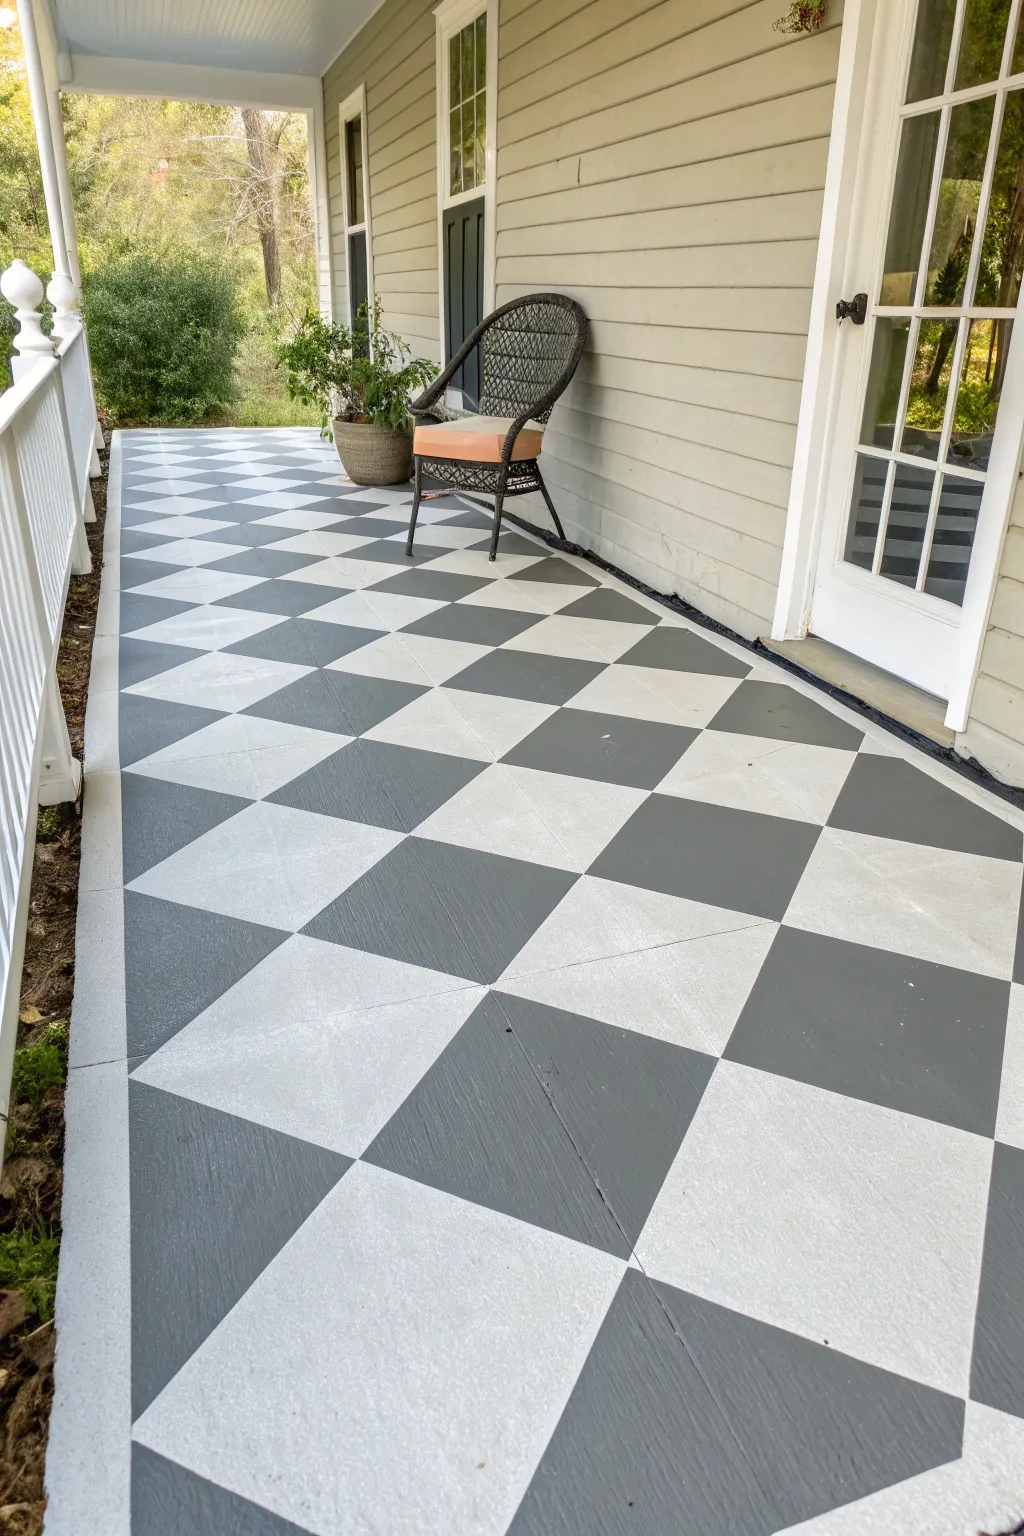
Transform a plain concrete porch into a statement piece with this classic harlequin diamond pattern. The alternating grey and white geometry adds instant curb appeal and a sophisticated touch to your outdoor entryway.
How-To Guide
Materials
- Concrete cleaner/degreaser
- Pressure washer or stiff scrub brush
- Exterior concrete primer
- Exterior porch and floor paint (white base)
- Exterior porch and floor paint (dark grey)
- Painter’s tape (high quality for crisp lines)
- Chalk line reel
- Measuring tape
- Straight edge or long ruler
- Paint rollers (medium nap for concrete)
- Paint tray and liners
- Angled paintbrush for cutting in
- Clear concrete sealer (optional but recommended)
Step 1: Cleaning and Base Coat
-
Clean the surface:
Thoroughly clean the concrete porch using a degreaser and a pressure washer. Remove all dirt, debris, and existing loose paint, as any residue will prevent the new paint from adhering properly. -
Let it dry:
Allow the concrete to dry completely for at least 24 hours. Trapped moisture can cause peeling later on. -
Prime the floor:
Apply a coat of high-quality exterior concrete primer using a roller. Cut in the edges near the house and railings with an angled brush first. -
Apply base color:
Roll on two coats of your lighter color (the white) across the entire porch floor. Let the first coat dry according to the manufacturer’s instructions before applying the second. This will serve as your ‘grout lines’ and half of your diamonds. -
Allow full cure:
Wait at least 24-48 hours for the base coats to cure hard. If the paint is soft, the tape you apply in the next phase might pull it up.
Bleeding Lines?
If you see bleeding after lifting tape, don’t panic. Let it dry fully, then place a straight edge over the line and use a small artist brush to paint a crisp correction line.
Step 2: Measuring and Taping
-
Find the center:
Measure the width of your porch to find the exact center point at the front edge and the back edge (against the house). Snap a chalk line connecting these two points to create a centerline. -
Mark diamond width:
Decide on the width of your diamonds. Starting from your centerline, measure out equal distances to the left and right along the front and back edges, marking every interval (e.g., every 18 or 24 inches). -
Mark diamond length:
Determine the length of the diamonds. Measure along the side edges of the porch and mark equal intervals. I usually like elongated diamonds, so the length might be longer than the width measurement. -
Create the grid:
Connect your marks diagonally using the chalk line to form a grid of diamonds. Snap lines connecting a width mark to a length mark to create the diagonal cross-hatch pattern. -
Tape the pattern:
Apply painter’s tape along the *outside* edges of the diamonds that will remain white. You want to expose the diamonds that will be painted grey. Be very mindful here; it’s easy to get confused, so mark the diamonds to be painted with a small piece of tape or ‘X’ meant for removal. -
Seal the tape edges:
To ensure super crisp lines on rough concrete, brush a very light layer of the *base color* (white) over the edges of the tape. This seals any gaps so the grey paint won’t bleed underneath.
Step 3: Painting and Finishing
-
Paint the diamonds:
Using a roller or brush, paint the exposed diamond shapes with your dark grey color. Two light coats are better than one heavy coat to avoid ridges. -
Remove tape promptly:
Pull up the painter’s tape while the final coat of grey paint is still slightly wet. Pulling at a 45-degree angle helps cut through the paint film cleanly without lifting the finish. -
Touch up:
Inspect your lines once dry. Use a small artist’s brush to fix any little bleeds or missed spots with the appropriate color. -
Seal the surface:
Once the paint has cured for a few days, apply a clear exterior concrete sealer. This protects your hard work from foot traffic and weather.
Level Up: Faux Border
Leave a solid 4-inch border of the darker color around the perimeter of the porch before starting your grid. It frames the pattern like a rug.
Now you have a durable, stylish floor that completely changes the character of your home entrance
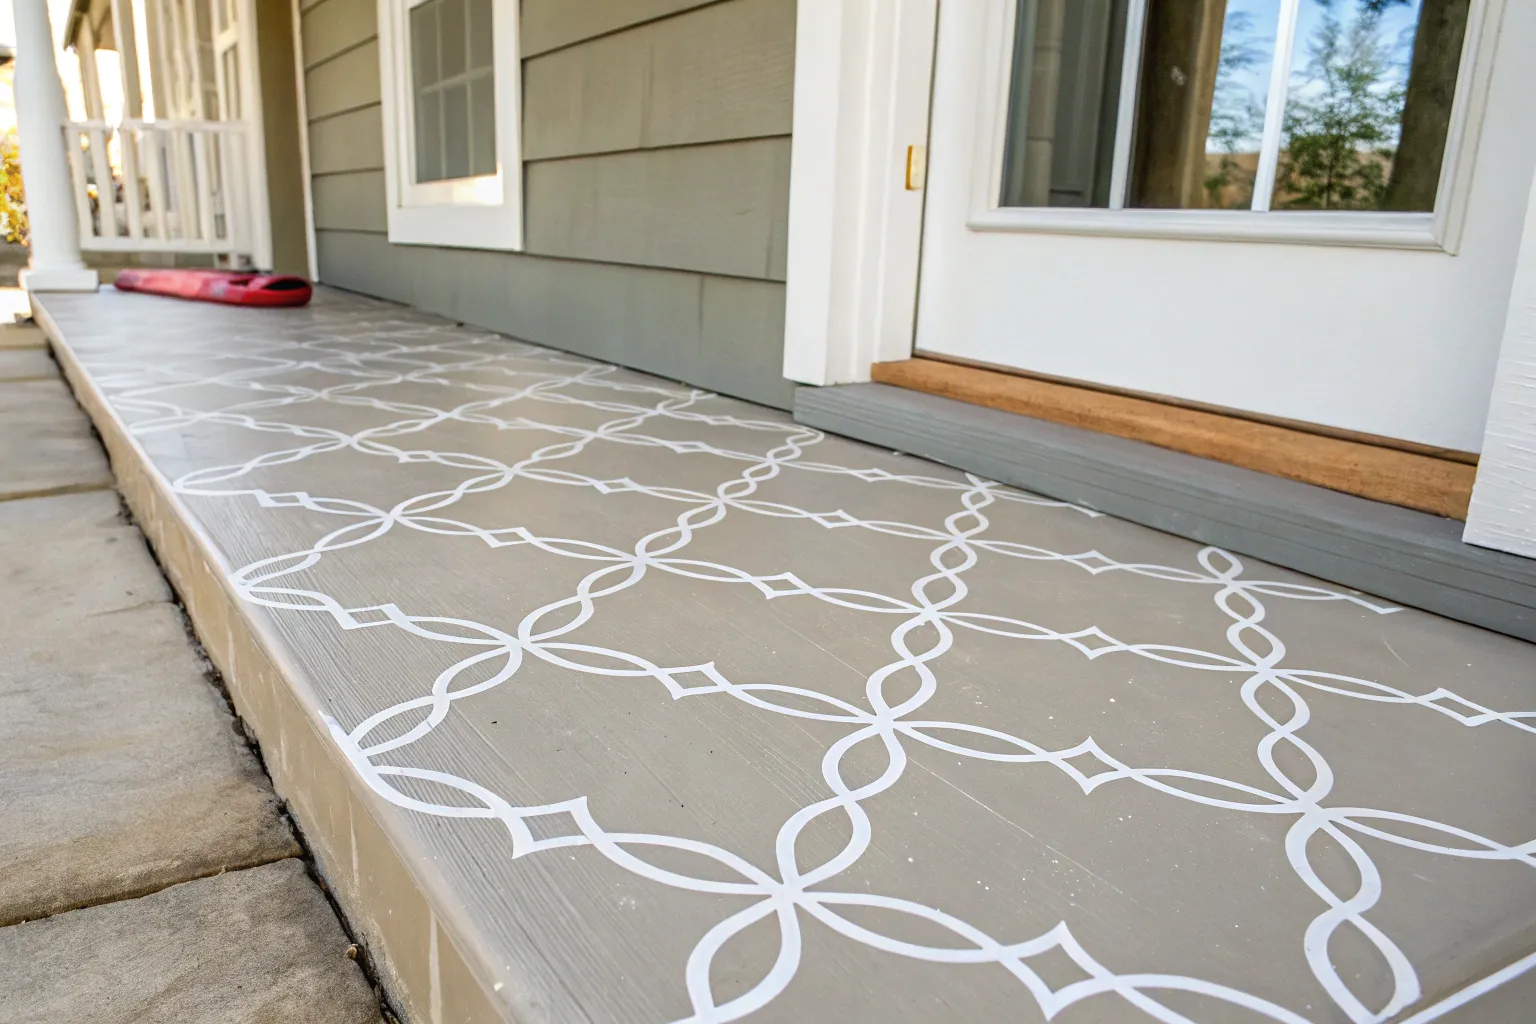
Crisp Tape Stripes for Subtle Texture
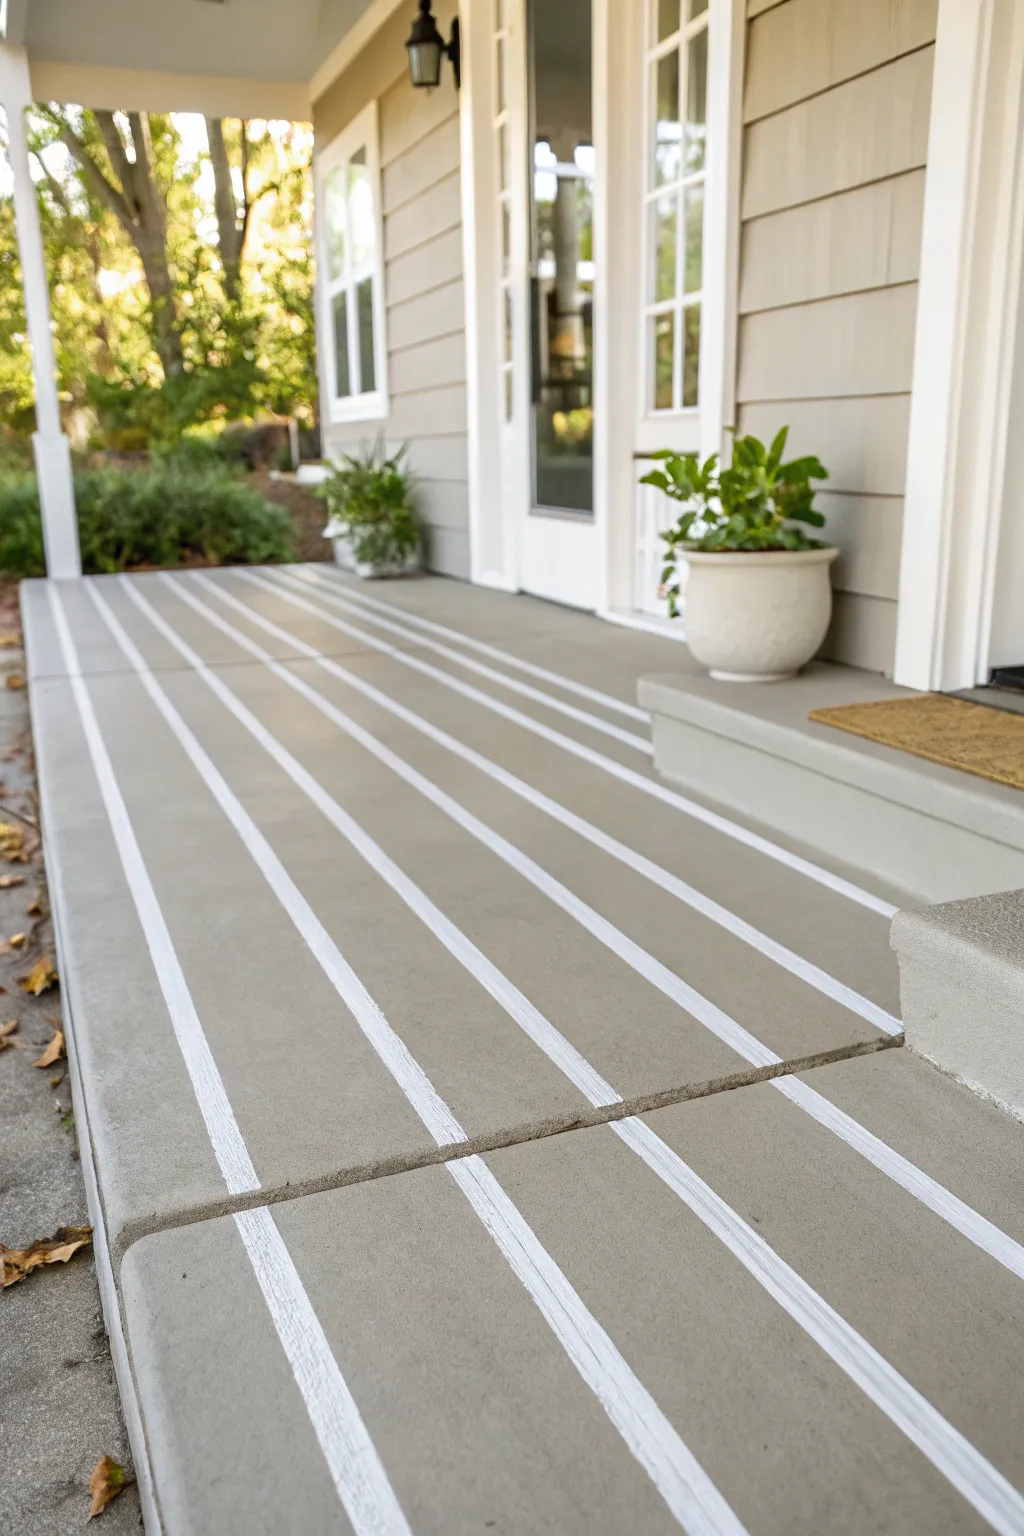
Elevate your plain concrete porch with this sophisticated yet simple striping technique. By combining a solid base coat with crisp white lines, you can create the illusion of texture and depth that mimics custom tile or decking.
Step-by-Step Tutorial
Materials
- Concrete cleaner/degreaser
- Stiff bristle scrub brush
- Pressure washer (optional)
- Exterior concrete porch and floor paint (Base color: Greige/Warm Gray)
- Exterior concrete porch and floor paint (Stripe color: Bright White)
- Paint roller extension pole
- 3/8-inch nap roller covers
- 2-inch angled sash brush
- Painter’s tape (high-quality outdoor measuring between 1/4 inch and 1 inch)
- Measuring tape
- Chalk line
- Carpenter’s pencil
- Sealant (optional, clear matte outdoor sealer)
Step 1: Preparation & Cleaning
-
Clear and Sweep:
Remove all furniture, rugs, and potted plants from the porch completely. Sweep away loose dirt, leaves, and debris, paying special attention to corners and the junction between the porch and the house siding. -
Scrub the Surface:
Apply a concrete cleaner or degreaser according to the manufacturer’s instructions. Use a stiff bristle brush to scrub out any stains, mildew, or oil spots, as paint won’t adhere properly to dirty concrete. -
Rinse Thoroughly:
Wash the cleaner away completely. A pressure washer is ideal for this step to ensure all residue is gone, but a high-pressure hose nozzle works too. Let the concrete dry completely for at least 24 hours before painting.
Tape Sealing Trick
Before painting the white stripes, brush a thin layer of your BASE gray color over the tape edges. This fills voids and ensures the white lines come out perfect.
Step 2: Base Coat Application
-
Cut In the Edges:
Using your greige/warm gray base color and an angled sash brush, carefully paint the perimeter of the porch where the floor meets the wall and columns. Don’t forget the vertical edges of the steps. -
Roll the First Coat:
Attach a 3/8-inch nap roller to an extension pole. Pour your base paint into a tray and roll the main surface of the porch, working from the house outward toward the yard so you don’t paint yourself into a corner. -
Apply Second Coat:
Allow the first coat to dry according to the paint can’s instructions (usually 4-6 hours). Apply a second coat to ensure solid, opaque coverage without streaks. -
Cure Time:
Let the base coat cure for at least 24-48 hours. This is crucial—if the paint is fresh, applying tape in the next phase could peel it right off.
Add Traction
For safety on wet days, mix a non-skid additive (available at paint stores) into your final coat of paint or sealer to give the smooth concrete subtle grip.
Step 3: Measuring & Taping
-
Plan Your Spacing:
Decide on the width of your stripes. For the look in the image, aim for wide gray bands (about 5-6 inches) separated by thin white stripes. Consistency is key here. -
Mark the Measurements:
Using a measuring tape and pencil, make small tick marks along the top (near the house) and bottom (near the steps) of the porch to guide your lines. -
Snap Chalk Lines:
Have a helper hold one end of a chalk line while you hold the other. Snap lines connecting your top and bottom tick marks to create perfectly straight guides across the concrete. -
Apply Tape for Stripes:
Apply painter’s tape along the chalk lines. Remember, you want to paint the *gap* between the gray sections, so place your tape lines to create narrow channels where the white paint will go. -
Seal the Tape Edges:
Run your finger or a plastic putty knife firmly over the edges of the tape to prevent bleed-through. I like to paint a very thin layer of the *base* gray color over the tape edges first; this seals the tape so any bleeding is just the base color, keeping your final white lines razor-sharp.
Step 4: Painting Stripes & Finishing
-
Paint the White Stripes:
Using a small roller or a brush, paint the white color into the taped-off channels. Depending on the opacity of your white paint, you may need two light coats rather than one heavy one. -
Remove Tape While Wet:
Carefully peel up the painter’s tape while the white paint is still slightly tacky (don’t wait for it to fully dry, or it might chip). Pull the tape at a 45-degree angle away from the fresh paint. -
Touch Up:
Inspect your lines once the tape is gone. Use a small artist’s brush to tidy up any spots where the paint might have bled or skipped. -
Final Cure:
Allow the entire porch to cure for a full 72 hours before placing heavy planters or furniture back onto the surface.
Enjoy the fresh, structured look of your newly painted porch as you welcome guests to your home

PENCIL GUIDE
Understanding Pencil Grades from H to B
From first sketch to finished drawing — learn pencil grades, line control, and shading techniques.
Explore the Full Guide
High-Contrast Step Runner Illusion
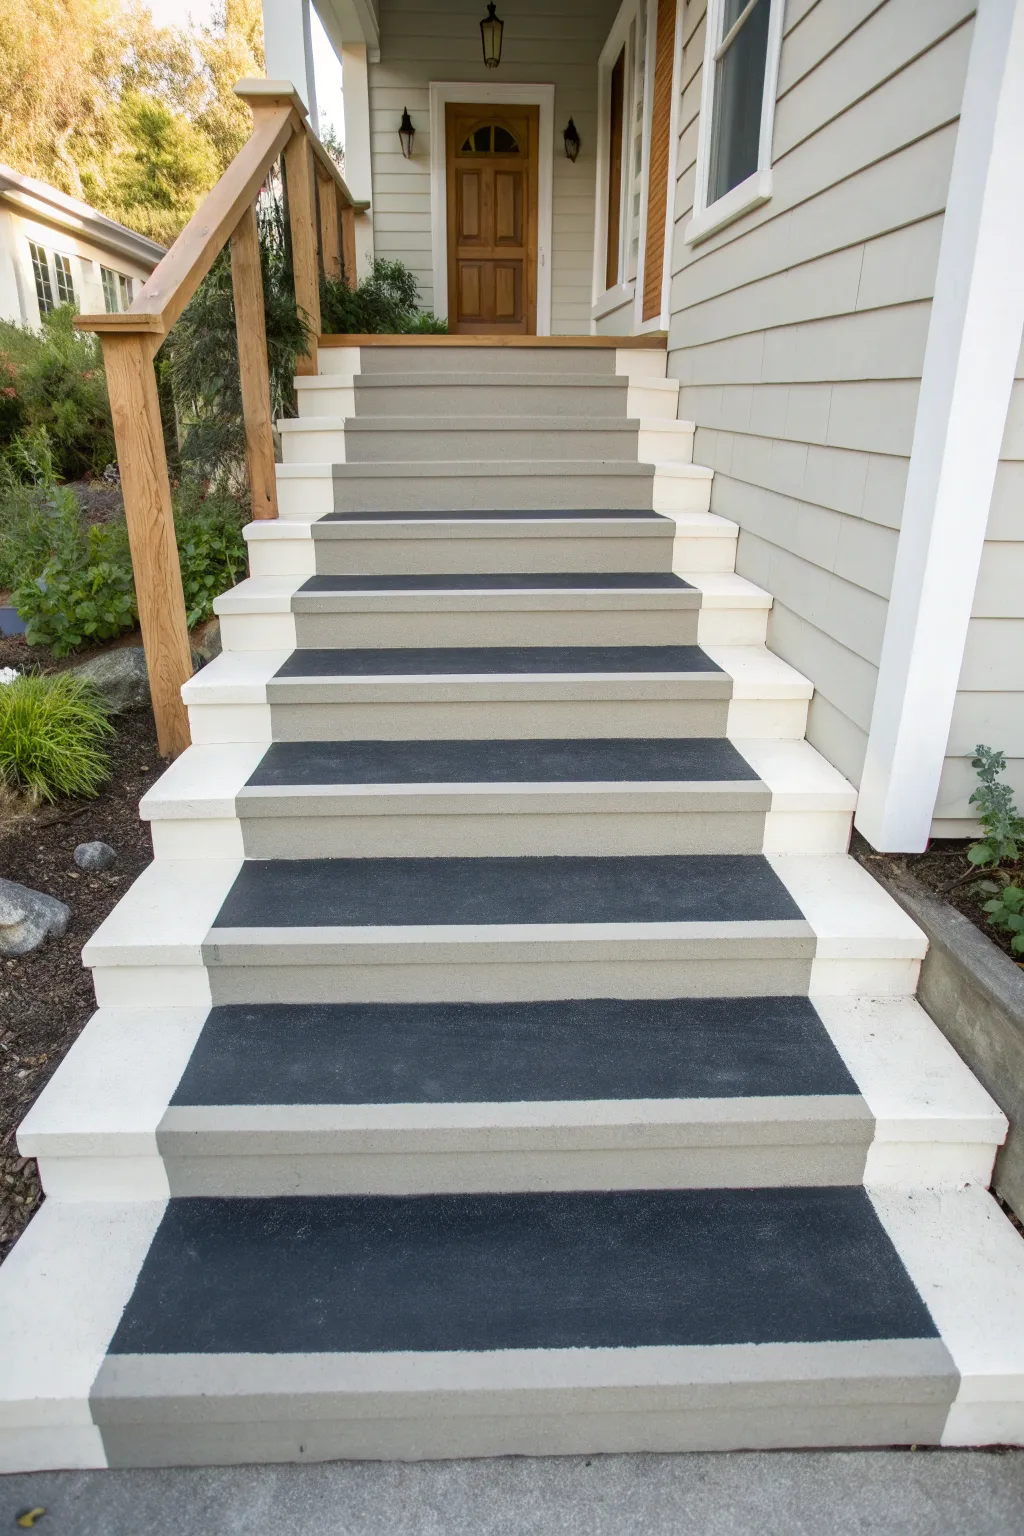
Transform plain concrete stairs into a stylish entrance with this high-contrast paint runner illusion. By using three distinct colors—crisp white, soft grey, and bold charcoal—you can mimic the look of a carpet runner while maintaining the durability of outdoor paint.
Detailed Instructions
Materials
- Concrete cleaner/degreaser
- Stiff-bristle scrub brush
- Pressure washer (optional)
- Concrete filler/patch (if needed)
- Painter’s tape (1-inch and 2-inch widths)
- Exterior porch & floor paint (White)
- Exterior porch & floor paint (Light Grey)
- Exterior porch & floor paint (Charcoal/Black)
- Paint roller with extension pole
- 3/8-inch nap roller covers
- 2-inch angled sash brush
- Measuring tape
- Pencil or chalk line
- Anti-slip additive (optional)
Step 1: Preparation
-
Clean the surface:
Begin by thoroughly sweeping the steps to remove loose dirt and debris. Use a concrete cleaner or degreaser and a stiff-bristle brush to scrub away any stains or mildew, ensuring the paint adheres properly. -
Rinse and dry:
Rinse the steps completely with a garden hose or pressure washer to remove all cleaning residue. Allow the concrete to dry for at least 24 to 48 hours; moisture trapped inside can cause the paint to peel later. -
Repair imperfections:
Inspect the stairs for cracks or chips. Fill any significant damage with concrete patch, smoothing it out with a putty knife. Let the patch cure according to the manufacturer’s instructions before proceeding.
Tape Trouble?
If paint peeled up with your tape, the base coat likely wasn’t fully cured. Sand the area lightly to smooth the edges, wipe away dust, and carefully touch up with a small brush.
Step 2: Base Coat Application
-
Outline closely:
Start with your white exterior paint. Use the angled sash brush to cut in along the edges where the steps meet the house siding and underneath the stair nosing. -
Paint the risers and borders:
Paint the vertical risers (the front face of each step) and the outer edges of the horizontal treads white. You don’t need to be perfectly precise in the center yet, as that will be covered, but ensure the sides effectively create that visible white border. -
Apply second coat:
Once the first coat is dry to the touch, apply a second coat of white to ensure solid, opaque coverage. This bright white frame is key to the high-contrast look.
Step 3: Creating the Grey Tread
-
Measure the borders:
Decide how wide you want your white border to be—usually about 3 to 4 inches on each side looks balanced. Measure in from the left and right edges of each tread and mark with a pencil. -
Tape the white line:
Apply painter’s tape along your pencil marks on the treads. Press the tape edges down firmly to prevent bleed-through. You are masking off the white sides you just painted. -
Apply light grey paint:
Using a roller, paint the entire center section of the treads (between your tape lines) with the light grey paint. Painting the nosing (the rounded front edge) grey helps define the step clearly. -
Let it cure:
Allow this grey layer to dry completely. I like to let this dry overnight just to be safe, especially since we will be putting tape directly onto fresh paint for the next step.
Make It decorative
Add house numbers to the risers using stencils and contrasting black paint for a custom, high-end address display that adds major curb appeal.
Step 4: Painting the Dark Runner
-
Measure for the center strip:
Determine the width of your dark charcoal ‘runner.’ A good rule of thumb is to leave a 2-3 inch border of the light grey visible on either side. Measure and mark these lines on every step. -
Tape the grey borders:
Run long strips of painter’s tape down the length of the stairs along your new marks. This tape will protect the light grey borders while you paint the dark center. -
Seal the tape edge:
For a razor-sharp line, brush a very light amount of the *light grey* paint over the edge of the tape first. This seals any tiny gaps so that if paint bleeds, it matches the base color. -
Mix anti-slip additive:
If you are concerned about slippery steps in wet weather, stir an anti-slip additive into your charcoal paint now. It adds a subtle texture that mimics the grip of a real carpet runner. -
Paint the dark runner:
Roll the charcoal or black paint onto the center section. Use a brush to get into the back corners where the tread meets the riser, ensuring full coverage. -
Remove tape promptly:
Carefully peel off the painter’s tape while the dark paint is still slightly tacky. Pulling slowly at a 45-degree angle helps keep the lines crisp and prevents peeling up dried paint chips. -
Touch up:
Inspect your lines once everything is dry. Use a small artist’s brush to tidy up any spots where the tape might have slipped or paint might have bled.
Now you have a durable, sophisticated entryway that combines safety with classic style
Faux Slate Block Pattern
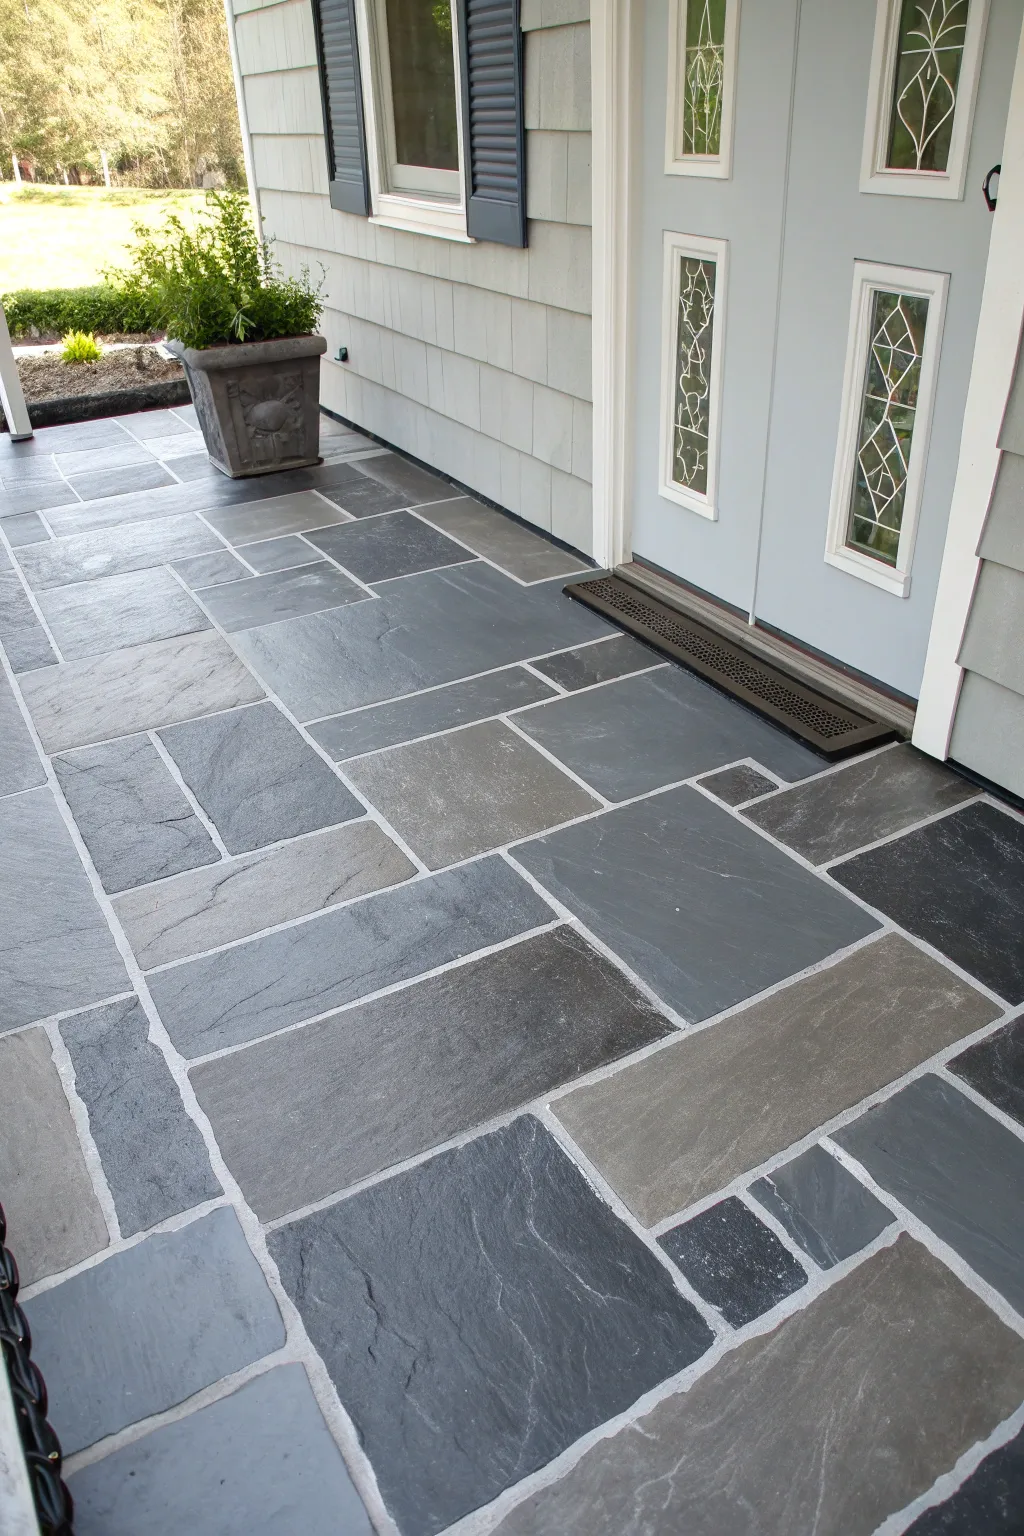
Transform a plain slab into an elegant entryway with this faux slate block pattern technique. By layering blended greys and blues over a taped grid, you can mimic the natural variation and texture of real stone without the heavy lifting.
Detailed Instructions
Materials
- Concrete cleaner/degreaser
- Pressure washer (optional)
- Exterior concrete primer (grey tinted)
- 1/4 inch or 1/2 inch painters tape (for grout lines)
- Base coat paint (dark charcoal or slate grey)
- Accent paints (light grey, bluish-grey, tan/beige)
- Sea sponge or rag roller
- Paint tray and liners
- 2-inch angled sash brush
- Exterior concrete sealer (matte or satin)
- Chalk line
- Measuring tape
- Knee pads
Step 1: Cleaning and Prep
-
Deep Clean Surface:
Begin by thoroughly cleaning the concrete porch. Sweeping isn’t enough; use a stiff bristle brush and a concrete cleaner or degreaser to remove all dirt, oil, and loose debris. -
Rinse and Dry:
Wash away the cleaning solution completely. A pressure washer works best here, but a hose with a high-pressure nozzle is fine. Allow the concrete to dry completely for at least 24 hours. -
Prime the Surface:
Apply a coat of high-quality exterior concrete primer. If you plan for your ‘grout’ lines to be light grey, tinting the primer to that shade now saves a step later. Let this cure according to the can’s instructions.
Step 2: Mapping the Grid
-
Plan Your Pattern:
Sketch out a random block pattern on paper first. The look in the photo relies on ‘Ashlar’ or modular patterns that mix rectangles and squares of varying sizes to avoid a rigid grid look. -
Tape Grout Lines:
Using your 1/4 inch tape, start laying out your ‘grout’ lines directly on the primed floor. I find it easiest to lay down the long main lines first, then subdivide sections into smaller rectangles and squares. -
Press and Seal:
Firmly press down all tape edges. This is crucial to prevent paint bleed. Run a dry rag over the tape lines to ensure a tight bond with the concrete texture.
Bleeding Grout Lines?
If paint seeps under the tape, don’t panic. Wait for it to dry completely, then use a small, stiff angled brush and your original grout color to ‘cut in’ and cover the mistakes.
Step 3: Painting the Stone
-
Prepare Base Colors:
Pour your main slate color (dark charcoal) into a tray. Have your accent colors (lighter grey, blue-grey, and tan) ready in smaller containers or on a paper plate for easy access. -
Apply Base Technique:
Working in patches of 3-4 ‘stones’ at a time, apply the dark base coat. Do not paint it solid; leave some transparency or brush strokes visible to simulate stone texture. -
Add Color Variation:
While the base coat is still wet, immediately dab a sea sponge or crumpled rag into your accent colors. Lightly pounce the light grey into the center of a ‘stone’ or add blue tones to the corners. -
Blend and Soften:
Gently stipple the wet colors together so they swirl slightly without turning into a single muddy color. You want distinctive patches of color that mimic mineral deposits in real slate. -
Vary the Stones:
Ensure no two adjacent blocks look identical. Make one significantly darker, another more beige-heavy, and another with strong blue undertones. This randomness is key to realism. -
Continue Across Porch:
Continue this wet-on-wet blending process across the entire porch. Step back occasionally to check that the color distribution feels balanced and natural. -
Let Dry Completely:
Allow the painted surface to dry undisturbed for at least 4 to 6 hours, or until it is dry to the touch and not tacky.
Natural Texture Hack
Crumple a plastic grocery bag and press it into the wet paint occasionally. This lifts small amounts of pigment, creating realistic veins and negative space just like quarried slate.
Step 4: The Reveal and Seal
-
Remove the Tape:
Carefully peel up the painter’s tape. Pull it slowly at a 45-degree angle to reveal the crisp ‘grout’ lines of the primer underneath. -
Touch Ups:
Inspect the grout lines. If any paint bled under the tape, use a small artist’s brush and your primer color to tidy up the edges. -
Apply Sealer:
Once fully cured (usually 24 hours), apply a clear exterior concrete sealer. A matte or satin finish looks most like natural stone; high gloss tends to look artificial. -
Second Coat Sealer:
Apply a second coat of sealer for durability, especially in high-traffic areas near the door. This protects your artwork from UV rays and rain.
Now you have a durable, distinct entryway that invites guests in with the charm of natural stone


Herringbone Brick Illusion

Transform a plain, gray concrete slab into a charming, classic entryway using only paint and a stencil. This project creates a surprisingly realistic herringbone brick effect that adds instant curb appeal and warmth without the cost of masonry.
How-To Guide
Materials
- High-quality concrete porch & floor paint (terracotta/brick red color)
- White or off-white exterior concrete paint (for the grout lines)
- Herringbone brick stencil (large format)
- Painter’s tape (1-inch width)
- High-density foam roller and tray
- Small touch-up brush
- Stiff bristle brush (optional, for texture)
- Concrete cleaner/degreaser
- Pressure washer or stiff scrub brush
- Clear matte or satin concrete sealer
Step 1: Preparation & Base Coat
-
Clean the Surface:
Begin by thoroughly cleaning the concrete porch. Use a degreaser and a stiff scrub brush or a pressure washer to remove all dirt, oil, and loose debris, ensuring the paint will adhere properly. -
Dry Completely:
Allow the concrete to dry completely for at least 24 hours. If moisture is trapped underneath, the paint will eventually peel. -
Tape Off Edges:
Use painter’s tape to mask off the bottom of the door frame, siding, and any columns you want to protect from roller splatter. -
Apply the Grout Color:
Roll on two coats of your base color, which will serve as the ‘grout’ lines (the white or off-white shade). Let the first coat dry for 4-6 hours before applying the second. -
Final Cure:
Let the base coat cure fully, preferably overnight, so the stencil adhesive or tape won’t peel it up later.
Pro Tip: Distressing
For a naturally aged look, don’t aim for perfect coverage. Let some of the white base show through the red brick paint in random spots to mimic weathering.
Step 2: Creating the Border
-
Measure the Soldier Course:
Decide on the width of your border (the ‘soldier course’ of bricks). A standard brick length is about 8 inches, so measuring out 8-9 inches from the edge is a good standard to follow. -
Tape the Perimeter:
Run a line of painter’s tape parallel to the porch edge to mark the inner line of your border. This separates the main herringbone field from the border bricks. -
Mark Individual Bricks:
Along the border area, place strips of 1/4-inch or 1/2-inch tape perpendicular to the edge every 4 inches to create the separation lines between the individual border bricks.
Step 3: Stenciling the Pattern
-
Position the Stencil:
Start the herringbone pattern in the most visible corner (usually near the door) or the center, depending on your stencil’s alignment guides. Secure the stencil with pieces of painter’s tape. -
Load the Roller Lightly:
Dip your foam roller into the brick-red paint and offload almost all the excess onto the tray or a paper towel. A ‘dry roller’ is crucial to prevent paint from bleeding under the stencil bridges. -
Roll the Pattern:
Roll over the stencil with light to medium pressure. I prefer to do two thin coats rather than one thick one to maintain crisp lines. -
Add Texture (Optional):
While the paint is wet, you can dab it lightly with a stiff bristle brush or a crumpled rag to create a varied, stone-like texture rather than a flat color. -
Lift and Move:
Carefully lift the stencil straight up to avoid smudging. Align the stencil with the registration marks from your previous section and repeat the process across the main field. -
Fill the Edges:
When you reach the taped-off border line, let the stencil overlap the tape. Paint right up to the tape line to ensure the herringbone pattern stops cleanly at the border.
Level Up: Multi-Toned Bricks
Pour a bit of dark grey or brown onto a paper plate. Occasionally dip a corner of your roller into it to add subtle color variations to random bricks.
Step 4: Finishing Touches
-
Paint the Border:
Once the center field is dry, remove the long tape line separating the field and border. Now, carefully fill in the border brick rectangles you marked out earlier with the red paint. -
Remove All Tape:
Peel up all remaining tape strips from the border area while the paint is still slightly tacky to get clean edges. -
Touch Up Imperfections:
Use a small artist’s brush and your base white paint to tidy up any areas where the red paint might have bled under the stencil. -
Seal the Surface:
After the brick paint has cured for at least 24-48 hours, apply two coats of a clear, non-yellowing concrete sealer to protect your handiwork from foot traffic and weather.
Enjoy the timeless elegance of your new faux-brick porch that welcomes guests with classic style
Modern Color-Blocked Steps and Landing
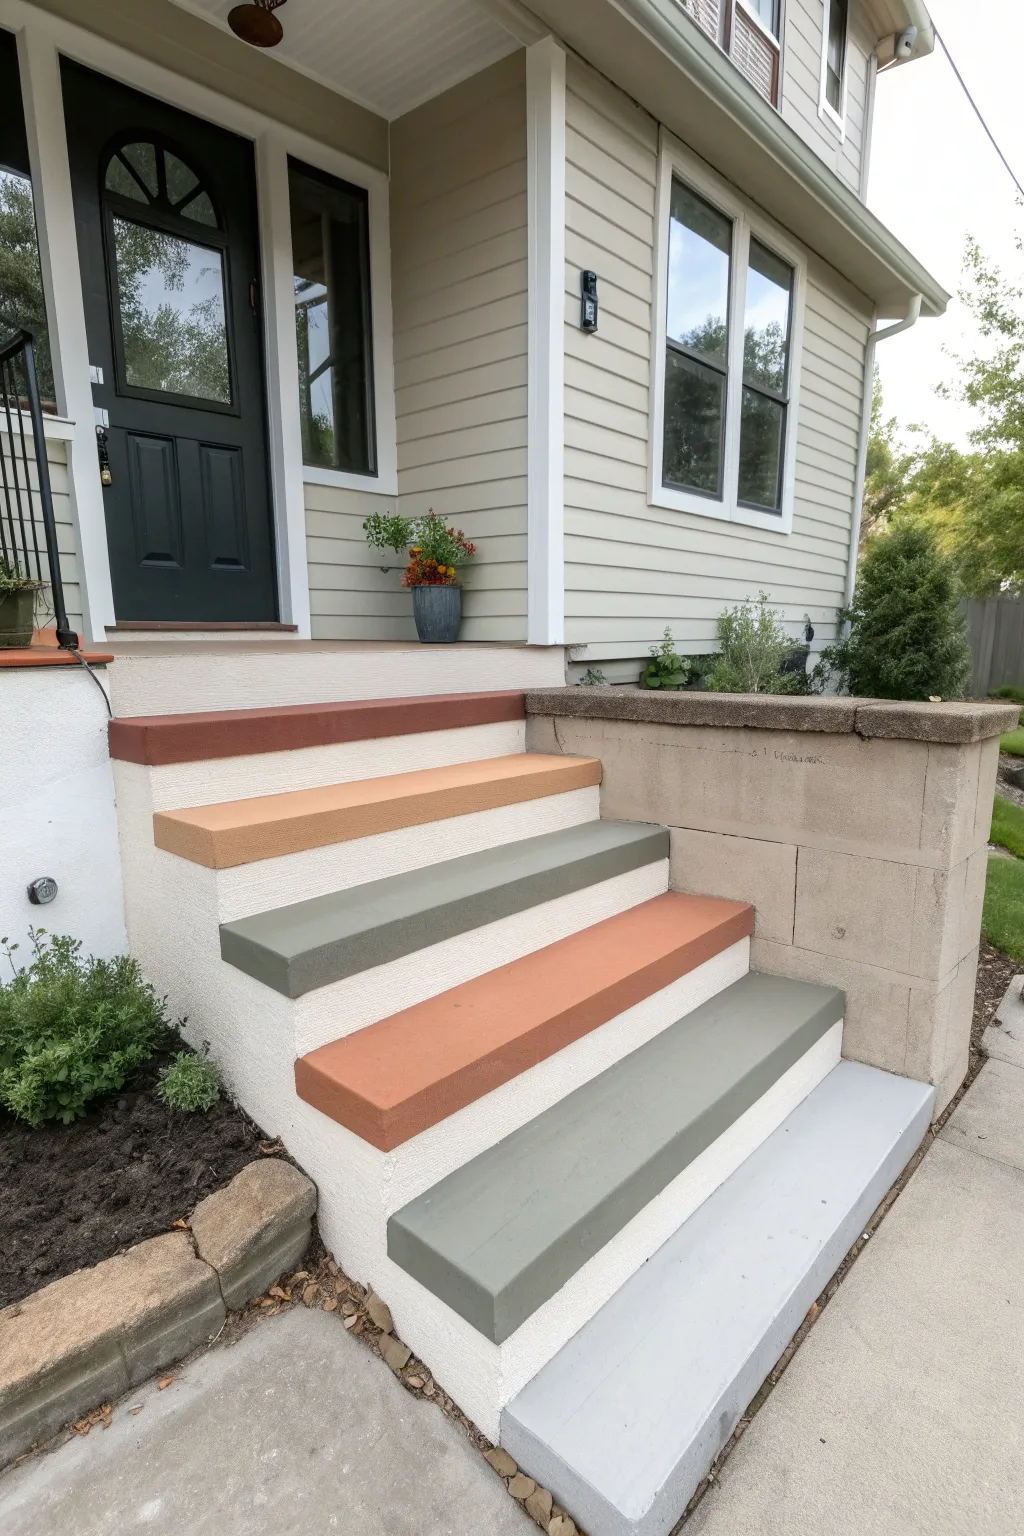
Transform a standard concrete stoop into a welcoming, modern entrance with this cheerful color-blocking project. By alternating warm terracotta tones with cool sages and neutrals, you can create a unique focal point that boosts your curb appeal instantly.
Step-by-Step Guide
Materials
- Exterior concrete porch and floor paint (white base)
- Exterior concrete paint (terracotta/brick red)
- Exterior concrete paint (peach/light terracotta)
- Exterior concrete paint (sage green)
- Exterior concrete paint (light grey)
- Concrete cleaner/degreaser
- Stiff bristle scrub brush
- Pressure washer (optional but recommended)
- Concrete patch or filler (if needed)
- Putty knife
- Painter’s tape (high adhesion for concrete)
- 4-inch paint roller frame and covers (medium nap)
- 2-inch angled sash brush
- Paint tray and liners
- Wire brush
- Drop cloths
Step 1: Cleaning & Preparation
-
Clear the area:
Remove any potted plants, doormats, or furniture from the porch and steps. Sweep away all loose dirt, leaves, and debris. -
Scrub the concrete:
Apply a concrete cleaner or degreaser according to the manufacturer’s instructions. Use a stiff bristle brush to scrub the surfaces vigorously, paying extra attention to any oil spots or deeply ingrained dirt. -
Rinse thoroughly:
Wash away all cleaner residue. I find a pressure washer works best here to get into the pores of the concrete, but a garden hose with a high-pressure nozzle will suffice. -
Remove loose paint:
If there is old, flaking paint, use a wire brush to scrape it away until you have a solid surface. This prevents your new paint from peeling later. -
Repair cracks:
inspect the steps for any cracks or chips. Fill these with concrete patch or filler using a putty knife, smoothing it out to match the surrounding texture. -
Allow to dry:
Let the concrete dry completely. Ideally, wait at least 24 hours of dry weather before painting, as trapped moisture can ruin the finish.
Step 2: Painting the Base & Risers
-
Protect the surroundings:
Lay down drop cloths to protect the sidewalk and garden beds. Apply painter’s tape to the siding or door frame where it meets the concrete. -
Cut in the edges:
Using your 2-inch angled brush and the white exterior concrete paint, cut in the corners and edges of the vertical risers and the side retaining walls. -
Roll the risers:
Use the 4-inch roller to apply the white paint to all the vertical surfaces (risers) and the side walls. work the paint into the texture of the concrete. -
Apply second coat:
Once the first coat is dry to the touch (usually 2-4 hours), apply a second coat of white to ensure full coverage and a crisp, clean look. -
Tape the treads:
After the white risers have cured (preferably overnight), firmly apply painter’s tape along the bottom edge of each riser where it meets the tread to protect your fresh white paint.
Anti-Slip Secret
For safety on rainy days, mix a specific non-slip additive (often sand or silica) into your paint before applying the final coat on the horizontal treads.
Step 3: Color Blocking the Treads
-
Plan your palette:
Assign each step a specific color from your palette. In this design, the order from top to bottom is: Brick Red, Peach, Sage Green, Darker Peach, Grey-Green, and Light Grey for the landing. -
Paint the top tread:
Start at the top so you don’t paint yourself into a corner. Using a clean brush for edges and a roller for the flat surface, apply the Brick Red paint to the top tread edge. -
Paint the second tread:
Moving down, apply the Peach color to the second step. Be careful not to drip onto the white risers below. -
Continue the pattern:
Proceed down the stairs, applying the Sage Green, then the Darker Peach, washing your brush and changing roller covers between colors (or using disposable liners). -
Paint the bottom treads:
Finish with the Grey-Green on the second-to-last step and the light Light Grey on the bottom landing pad. -
Apply second coats:
Wait for the recommended drying time, then apply a second coat to each tread to ensure the colors are rich and opaque. -
Remove tape:
Carefully peel off the painter’s tape while the paint is still slightly tacky to avoid pulling up any dried paint chips. -
Touch up:
Inspect your lines. Use a small artist’s brush to touch up any spots where the color may have bled or the coverage is thin.
Elevate with Stencils
Add personality by stenciling house numbers on the top riser or adding a small geometric pattern to just one specific step in a contrasting color.
Allow the paint to cure fully for a few days before placing heavy pots back on the steps to keep that finish pristine
Sunburst Medallion at the Threshold
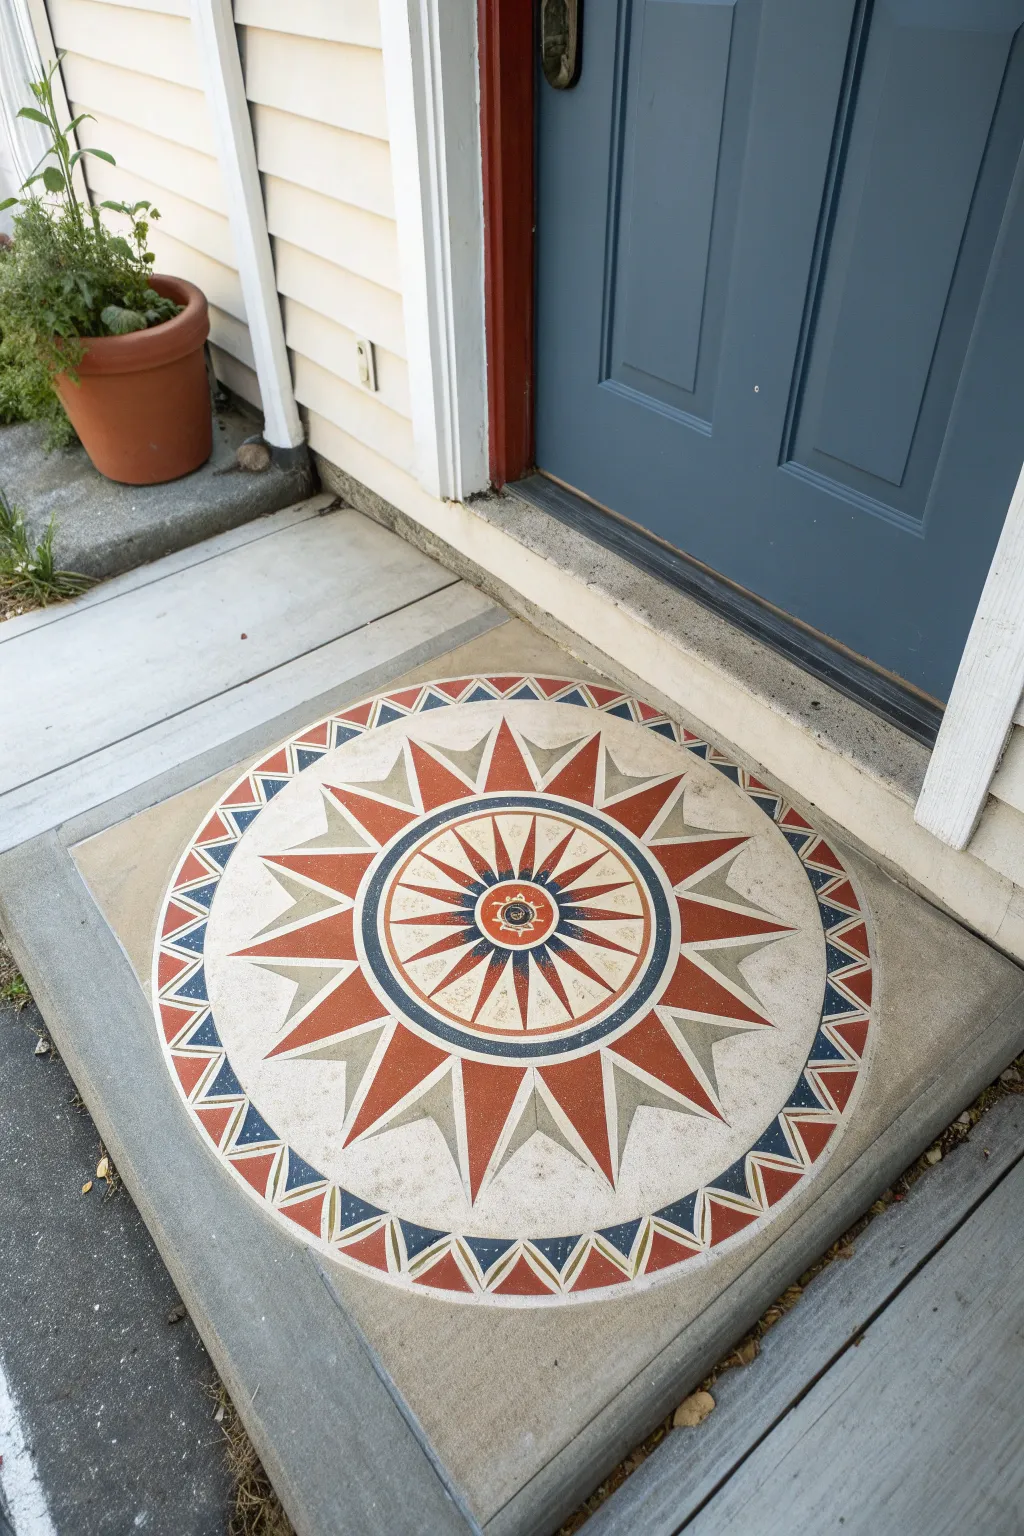
Transform your entryway with a sophisticated painted ‘rug’ that mimics the intricate inlay of a compass rose. This sunburst medallion combines classic geometry with durable porch paint to create a welcoming focal point right at your threshold.
Step-by-Step Tutorial
Materials
- Outdoor concrete porch paint (Terra Cotta, Navy Blue, Cream/White, Light Grey)
- Concrete cleaner/degreaser
- Pressure washer or stiff scrub brush
- Painter’s tape (multi-surface)
- Large circular stencil (Sunburst/Compass design) OR compass tool and chalk
- Stencil brushes (various sizes)
- Small artist brushes for touch-ups
- Paint roller and tray (for base coat)
- Clear concrete sealer (matte finish)
Step 1: Preparation & Base Coat
-
Clean the slab:
Begin by thoroughly cleaning the concrete surface. Use a degreaser and a stiff brush or pressure washer to remove dirt, oils, and old sealers. Allow the concrete to dry completely for at least 24 hours. -
Map your center:
Measure the width of your door frame and the depth of the landing to find the precise center point. Mark this spot with chalk; this will be the anchor for your entire design. -
Establish the background:
If your concrete is stained or uneven, roll on a neutral base coat of concrete paint—a warm beige or light grey works well here—to create a blank canvas. Let this cure according to the can’s instructions.
Dry Brush Technique
The key to crisp stencil lines on rough concrete is ‘dry brushing.’ Wipe 80% of the paint off your brush before touching the stencil to prevent bleeding.
Step 2: Stenciling the Design
-
Position the stencil:
Align the center of your large sunburst stencil with your chalk mark. Secure the stencil firmly around the edges with painter’s tape to prevent shifting. -
Start with the light values:
load a stencil brush with your cream or off-white paint. Off-load most of the paint onto a paper towel until the brush feels almost dry. -
Apply the first layer:
Using a vertical dabbing motion, apply the cream paint to the designated lighter areas of the sunburst rays and the central ring. Work in light layers to prevent bleed-under. -
Add the terra cotta accents:
Switch to a clean brush and the terra cotta paint. Carefully fill in the large primary points of the star and the outer zig-zag border triangles. -
Deepen with navy blue:
Use the navy blue paint for the smaller, darker triangles in the border and the defining rings around the center medallion. This high-contrast color gives the design its sharpness. -
Detail the center:
For the very center compass rose, use a smaller brush to alternate between terra cotta and navy, ensuring the tiny details remain crisp. -
Create the grey shadows:
Fill in the secondary, shorter spikes or ‘shadow’ rays with the light grey paint. This creates a sense of depth and dimension in the starburst pattern.
Step 3: Finishing Touches
-
Remove the stencil:
Once the paint is tacky but not fully dry, carefully lift one edge of the stencil and peel it away slowly. Pulling straight up helps avoid smudging the edges. -
Clean up the lines:
Inspect the design for any paint bleed. Dip a small artist’s brush into the base coat color (or the concrete color) and carefully touch up any fuzzy edges. -
Paint the defining border:
To frame the medallion, use a long strip of painter’s tape to create a square or rectangular border around the circle if desired, or leave it floating as a circle. The example shows a simple circular finish. -
Cure time:
Allow the painted design to cure for at least 24-48 hours before walking on it. Avoid placing mats or furniture on it during this time. -
Seal the deal:
Apply two thin coats of a clear, matte concrete sealer. This step is crucial for protecting your artwork from UV rays, rain, and heavy foot traffic.
Antiquing Finish
For a weathered, vintage look, lightly sand the dried design with fine-grit sandpaper before sealing to reveal bits of the concrete texture below.
Step back and admire how this elegant geometric addition instantly upgrades your home’s curb appeal
Corner Botanical Vine Motifs
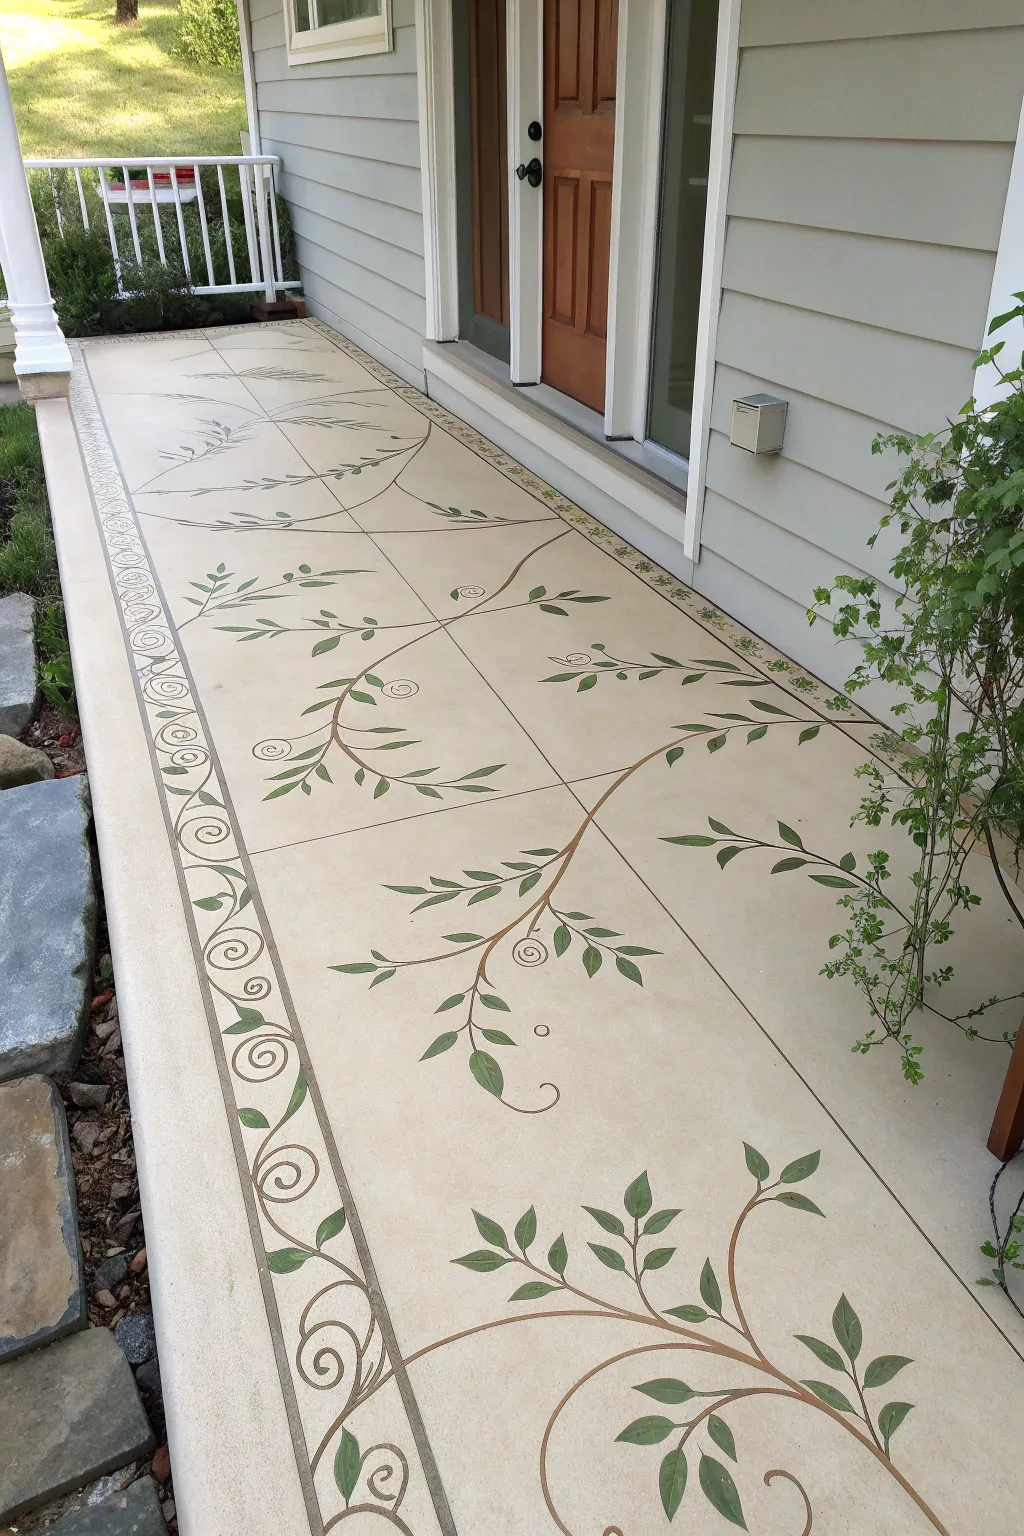
Transform a plain concrete slab into a stunning botanical walkway with this decorative painting technique. The design features graceful trailing vines and distinct leaf motifs that bring an organic, garden-inspired feel right to your doorstep.
Step-by-Step
Materials
- Concrete cleaner and degreaser
- Pressure washer (optional but recommended)
- Concrete primer (exterior grade)
- Exterior porch and floor paint (Base color: Cream/Beige)
- Exterior porch and floor paint (Accent colors: Dark Brown, Sage Green)
- Painter’s tape (1-inch and 2-inch widths)
- Chalk line
- Large angled paint brush
- Detail brushes (round and filbert styles)
- Paint roller and extension pole
- Custom vine stencil (optional, can be hand-painted)
- Pencil or chalk
- Clear concrete sealer (exterior grade matte or satin)
Step 1: Preparation & Base Coat
-
Clean the Surface:
Begin by thoroughly cleaning the concrete porch. Use a stiff broom and a concrete degreaser to remove any dirt, oil, or old paint. A pressure washer works best to ensure the pores of the concrete are open and ready to accept paint. -
Prime the Concrete:
Once the concrete is completely dry (wait at least 24 hours after washing), apply a high-quality exterior concrete primer. Roll it on evenly to ensure good adhesion and prevent peeling later. -
Apply the Base Coat:
Roll on your base color—a warm cream or beige works beautifully to mimic natural stone. Apply two coats for full coverage, allowing the first coat to dry according to the manufacturer’s instructions before adding the second.
Uneven Lines?
If your vine stems look shaky, don’t worry. Thicken the line slightly to correct it, or embrace the organic look—real vines aren’t perfectly straight.
Step 2: Creating the Layout
-
Mark the Grid:
The porch in the image utilizes a grid pattern to mimic large tiles. Use a tape measure and a chalk line to snap straight lines creating large squares or rectangles across the main floor area. -
Tape the Border:
To create the distinct border zone alongside the house and railing, measure about 12-18 inches from the edge. Apply painter’s tape to mark off this runner area where the detailed scrollwork will go. -
Define the Panel Lines:
Using a very fine artist brush and a diluted mixture of your brown paint (or a dark glaze), carefully paint over your chalk lines to create thin, subtle grout lines. I like to keep a damp rag handy to wipe back mistakes immediately.
Step 3: Painting the Vines
-
Sketch the Design:
Using a pencil or light chalk, lightly sketch your vine placement. Focus on large, sweeping curves that originate from the ‘grout’ lines or borders. For the runner border, sketch a repeating scroll or wave pattern. -
Paint the Stems:
Dip a round brush into your dark brown paint. With a steady hand, trace your sketched vine lines. Vary the pressure on your brush—press down for thicker parts of the stem and lift up for the tapering ends to create majestic, flowing lines. -
Add the Border Scrolls:
Fill in the repeating scroll pattern on the side border using the same brown paint. Keep these lines slightly more uniform in thickness to act as a structured frame for the looser central design. -
Paint Base Leaves:
Using a filbert brush (which has a rounded tip perfect for leaves), press and drag with sage green paint to form the leaf shapes along the brown stems. Aim for a mix of single leaves and small clusters. -
Add Leaf Details:
Once the green leaves are dry, go back in with a very fine liner brush and the brown paint or a lighter green to add subtle veins or highlights, giving the foliage dimension. -
Incorporate Spirals:
Paint small, decorative brown spirals at the ends of certain vine branches or within the border pattern. These whimsical fern-fiddlehead shapes add a classical artistic touch.
Level Up: Faux Stone
Sponge a slightly darker beige glaze over the base coat before painting vines. This creates a textured ‘limestone’ effect instead of flat paint.
Step 4: Sealing & Protection
-
Cure the Design:
Allow your detailed painting work to cure fully. This usually takes at least 24 to 48 hours depending on humidity, but check your specific paint brand’s recommendation. -
Apply Sealer:
Finish the project by rolling on two thin coats of exterior-grade clear concrete sealer. A satin or matte finish is best to reduce glare and protect your artwork from foot traffic and weather.
Now you have a durable, custom-designed entrance that adds immense curb appeal to your home
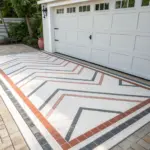
Optical Illusion Cube Grid
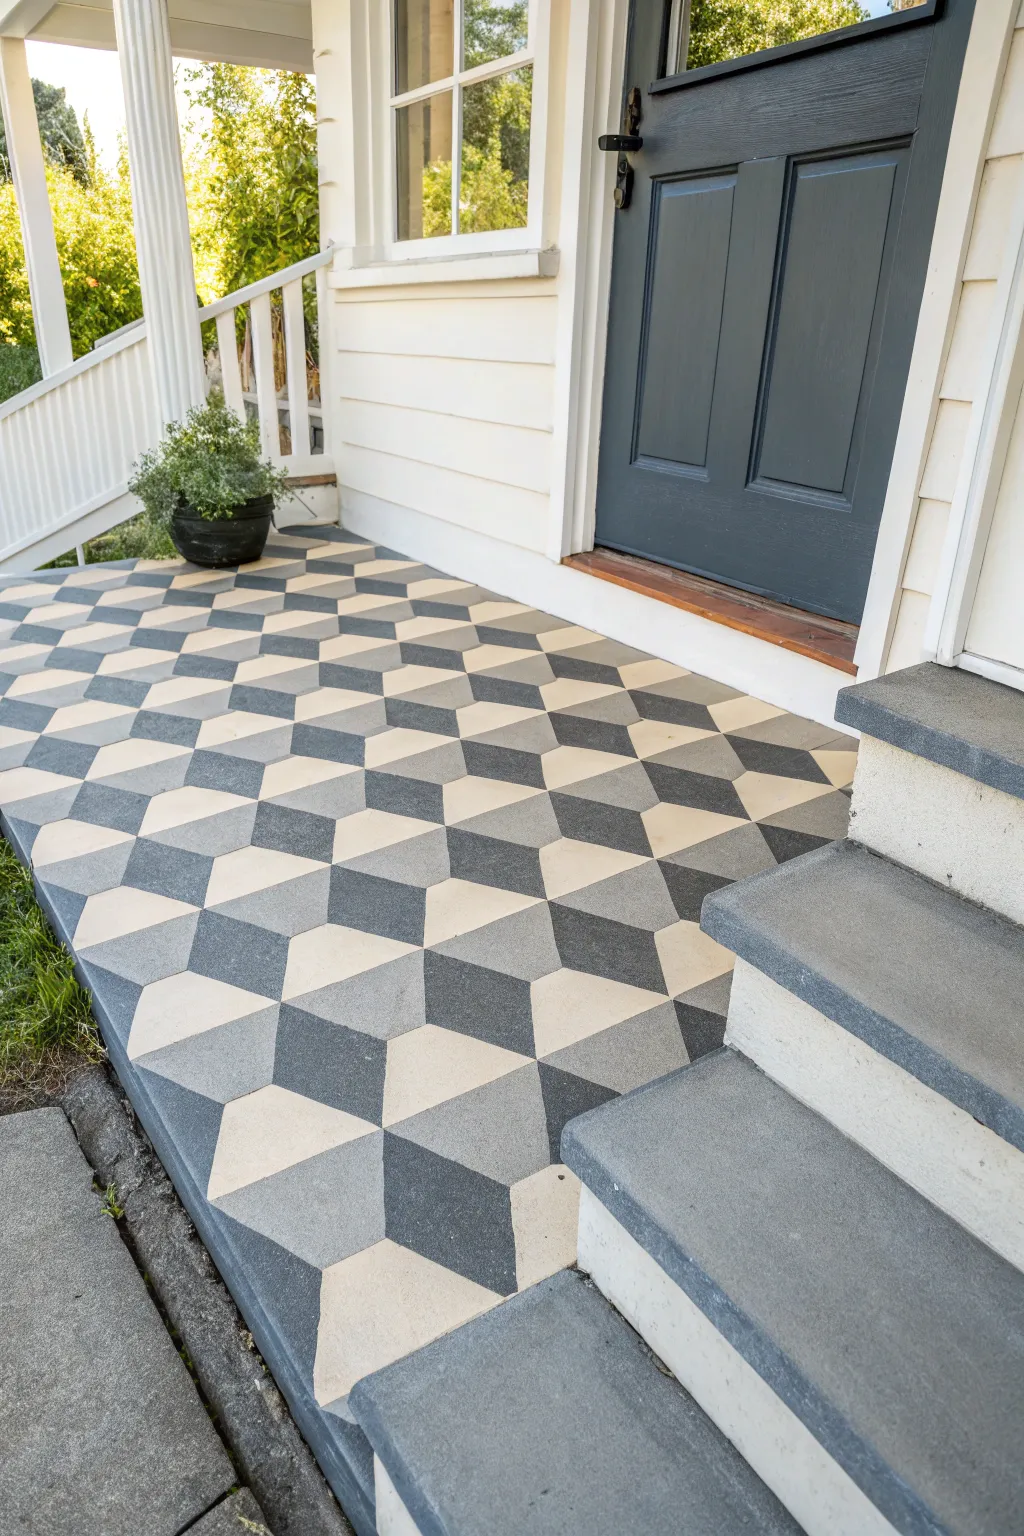
Transform a plain concrete slab into a stunning geometric masterpiece with this high-impact painting project. By carefully arranging light, medium, and dark diamonds, you can create a mesmerizing 3D isometric cube effect that instantly upgrades your home’s curb appeal.
How-To Guide
Materials
- Concrete porch and floor paint (white base)
- Concrete porch and floor paint (medium gray)
- Concrete porch and floor paint (charcoal or black)
- Course-grit sandpaper or concrete etcher
- Pressure washer or stiff bristle broom
- Concrete primer
- High-density foam rollers and extension pole
- 2-inch angled paintbrush
- Chalk snap line (blue chalk recommended)
- Straight edge or long ruler
- Painter’s tape (high-adhesion for concrete)
- Cardstock or cardboard for stencil making
- Pencil
- Scissors
Step 1: Preparation & Base Coat
-
Clean the surface:
Start by thoroughly cleaning the concrete. A pressure washer works best to remove ingrained dirt, moss, or old flaking paint. If you don’t have one, scrub vigorously with a stiff broom and a heavy-duty concrete degreaser. -
Prep the concrete:
If your concrete is smooth, scuff it up with coarse sandpaper to help the paint adhere. Alternatively, use a concrete etching solution according to the manufacturer’s instructions. Rinse thoroughly and let the porch dry completely, ideally for at least 24 hours. -
Prime the surface:
Apply a high-quality bonding primer designed for masonry or concrete. Work the primer into any crevices with a brush first, then roll out the main areas. Let this dry fully before moving on. -
Apply the base color:
Paint the entire porch with your lightest color (the off-white or cream shade). This will serve as the ‘top’ face of your cubes and the background for your grid. It usually takes two coats to get a solid, opaque finish.
Tape Sealing Trick
To get razor-sharp lines on rough concrete, paint a thin layer of the *base* color over your tape edge first. This fills voids effortlessly, so your contrast color won’t bleed under.
Step 2: Mapping the Grid
-
Create a diamond template:
While the base coat cures, cut a diamond shape from sturdy cardstock. A 60-degree/120-degree rhombus is the classic isometric shape. Test the size of your template to ensure the scale feels right for your porch dimensions. -
Establish a centerline:
Find the center of your porch and snap a vertical chalk line from the door to the stairs. This ensures your pattern is centered and symmetrical, which is crucial for the illusion. -
Snap horizontal guides:
Measure the height of your diamond template. Snap parallel horizontal chalk lines across the porch floor, spacing them apart by exactly half the height of your template. These will guide your diamond placement. -
Trace the pattern:
Using your template and pencil, lightly trace the diamond grid across the floor. Since you already painted the base color, you are essentially tracing the outlines where the medium and dark diamonds will go. It can look confusing at first, so step back frequently to check your alignment.
Step 3: Painting the 3D Cubes
-
Tape the first set:
This process requires painting in stages to avoid wet edges touching. Tape off all the diamonds that will be the ‘left’ face of the cubes (your medium gray color). Ensure you press the tape firmly into the texture of the concrete to prevent bleeding. -
Paint the medium gray diamonds:
Using a small roller or brush, fill in the taped areas with your medium gray paint. I like to brush away from the tape edge initially to minimize seepage. Two thin coats are better than one thick one. -
Remove tape and wait:
Peel up the tape while the paint is still slightly tacky to keep lines crisp. Let this set fully dry—usually overnight—before taping over it for the next color. -
Tape the second set:
Once the gray allows, tape off the diamonds that represent the ‘right’ face of the cubes (the dark charcoal color). These diamonds should join with the gray and white shapes to complete the three-part hexagon illusion. -
Paint the charcoal diamonds:
Fill in these taped sections with the dark charcoal paint. Be meticulous here; this high-contrast color is what makes the 3D effect pop. Check for any gaps near the corners where the three colors meet. -
Clean up borders:
Tape and paint your border edges or the strip under the doorway threshold if you want a solid transition frame. A solid dark border often helps contain the busy pattern. -
Touch ups:
After all tape is removed, you might find tiny bleeds or uneven corners. Use a small artist’s brush to hand-paint corrections with the appropriate color. -
Seal the deal:
Once everything has cured for roughly 48 hours, apply a clear concrete sealer. A matte or satin finish is best as high gloss can ruin the optical illusion with glare. This protects your hard work from foot traffic and weather.
Fixing Wobbly Grids
If your pattern drifts, don’t restart. Stop tracing, re-snap a fresh chalk line based on your last ‘good’ row, and adjust your stencil slightly. The eye forgives small shifts.
Enjoy the double-takes from neighbors as they admire your dimension-defying entryway


Have a question or want to share your own experience? I'd love to hear from you in the comments below!