
When you paint the entire face, you’re basically building a wearable character—no costume required. Here are my favorite full-face paint ideas that make the most of your forehead, eyes, cheeks, and lips for a truly transformed look.
Classic Tiger Transformation
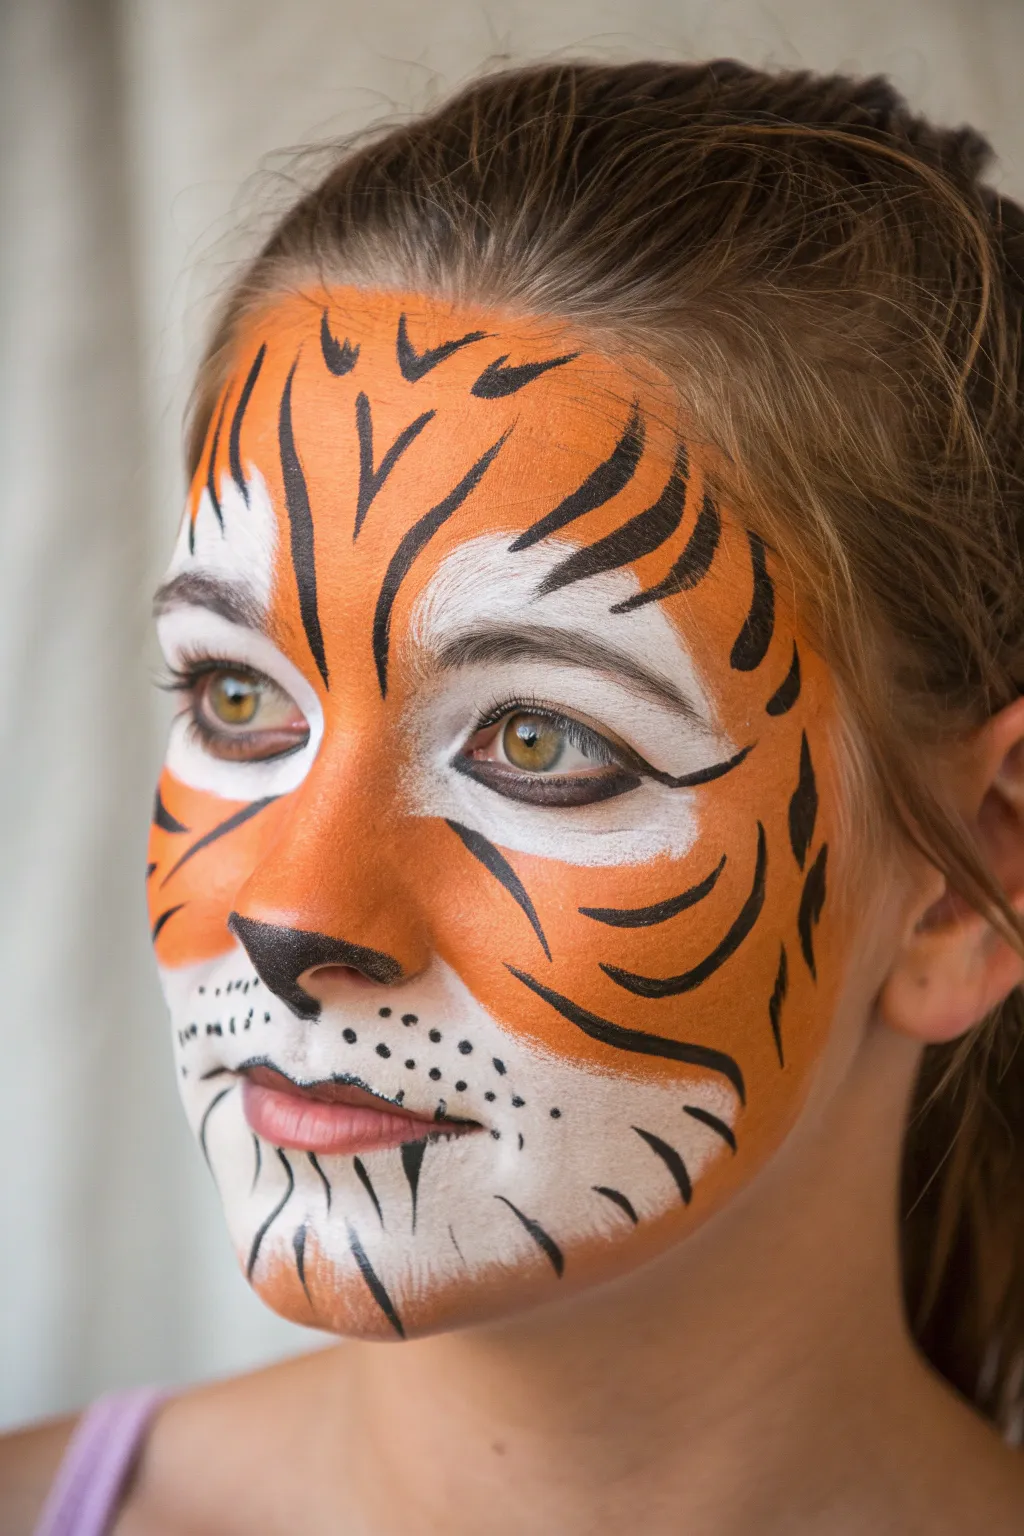
Unleash a roar with this striking yet accessible tiger face paint design that uses classic orange, black, and white tones. By combining sharp, dramatic stripes with soft white highlights around the eyes and muzzle, you can create a wild look that is perfect for costume parties or playtime.
How-To Guide
Materials
- High-quality face paint (Orange, White, Black)
- High-density face painting sponge (petal or half-moon shape)
- Medium flat brush (approx. size 6-8)
- Fine round brush (size 1 or 2)
- Cup of water
- Paper towels
- Cosmetic glitter (optional)
Step 1: Laying the Foundation
-
Create the white highlights:
Start with a clean, dry face. Load a slightly damp sponge with white face paint. Pat the white gently over the eyelids, extending up towards the eyebrows to create bright arches. -
Define the muzzle area:
Using the same sponge or a medium flat brush, paint the entire muzzle area white. Cover the space between the nose and upper lip, extending out past the corners of the mouth and slightly down onto the chin. -
Blend the orange base:
Load a sponge with bright orange paint. Starting at the forehead, sponge the color downwards, covering the nose bridge, cheeks, and chin areas that aren’t white. -
Soften the edges:
While the paint is still slightly tacky, gently blend the orange into the white areas around the eyes and muzzle. You want a soft gradient rather than a harsh line where the colors meet. -
Add texture:
For a fur-like effect, use the edge of your sponge to dab a little extra orange onto the outer cheeks and forehead, building up opacity.
Tapered Tips
To get perfectly sharp stripes, press the brush down to start the line thick, then lift slowly as you drag it to end on a razor-thin point.
Step 2: Sculpting the Features
-
Paint the tiger nose:
Switch to a medium brush loaded with black paint. Color the tip of the nose completely black. -
Connect the nose:
Draw a thin vertical line from the center of the nose down to the center of the upper lip (the philtrum). -
Line the eyes:
Using a fine round brush and black paint, carefully draw a thin line along the upper lash line. Then, create a small flick or wing at the outer corner to elongate the eye shape. -
Add the inner corner detail:
Paint a small, sharp triangular point extending downward from the inner corner of each eye, pointing toward the nose bridge. This gives that intense feline gaze.
Smudge Control
If the black paint is bleeding into the orange, your brush is too wet. Blot it on a paper towel until the consistency is creamy, not watery.
Step 3: Stripes and Details
-
Start the forehead stripes:
Using your fine round brush and black paint, begin painting stripes on the forehead. Start with a central ‘V’ or ‘U’ shape right between the eyebrows. -
Add side forehead stripes:
Paint 2-3 curved stripes radiating outward from the center of the forehead above the eyebrows. Press down firmly at the start of the stroke and lift up at the end to create a tapered, sharp point. -
Stripe the cheeks:
Move to the cheeks. Paint 3-4 thick stripes on each side, curving inward from the hairline towards the nose and mouth. Vary the thickness—thick at the outside, thin on the inside. -
Define the chin:
Add smaller, shorter stripes along the jawline and chin area to frame the bottom of the face. -
Detail the muzzle:
Paint small black dots on the white muzzle area where whiskers would grow. I like to vary the size of these dots for a more natural look. -
Add chin whiskers:
Using very light pressure, flick a few thin lines downward from the bottom lip onto the chin to mimic stray hairs. -
Final touches:
Check for symmetry. If you want a bit of sparkle, dab a tiny amount of cosmetic glitter onto the orange areas while the paint is drying.
Now step back and admire the fierce jungle cat you’ve created


Butterfly Wing Mask
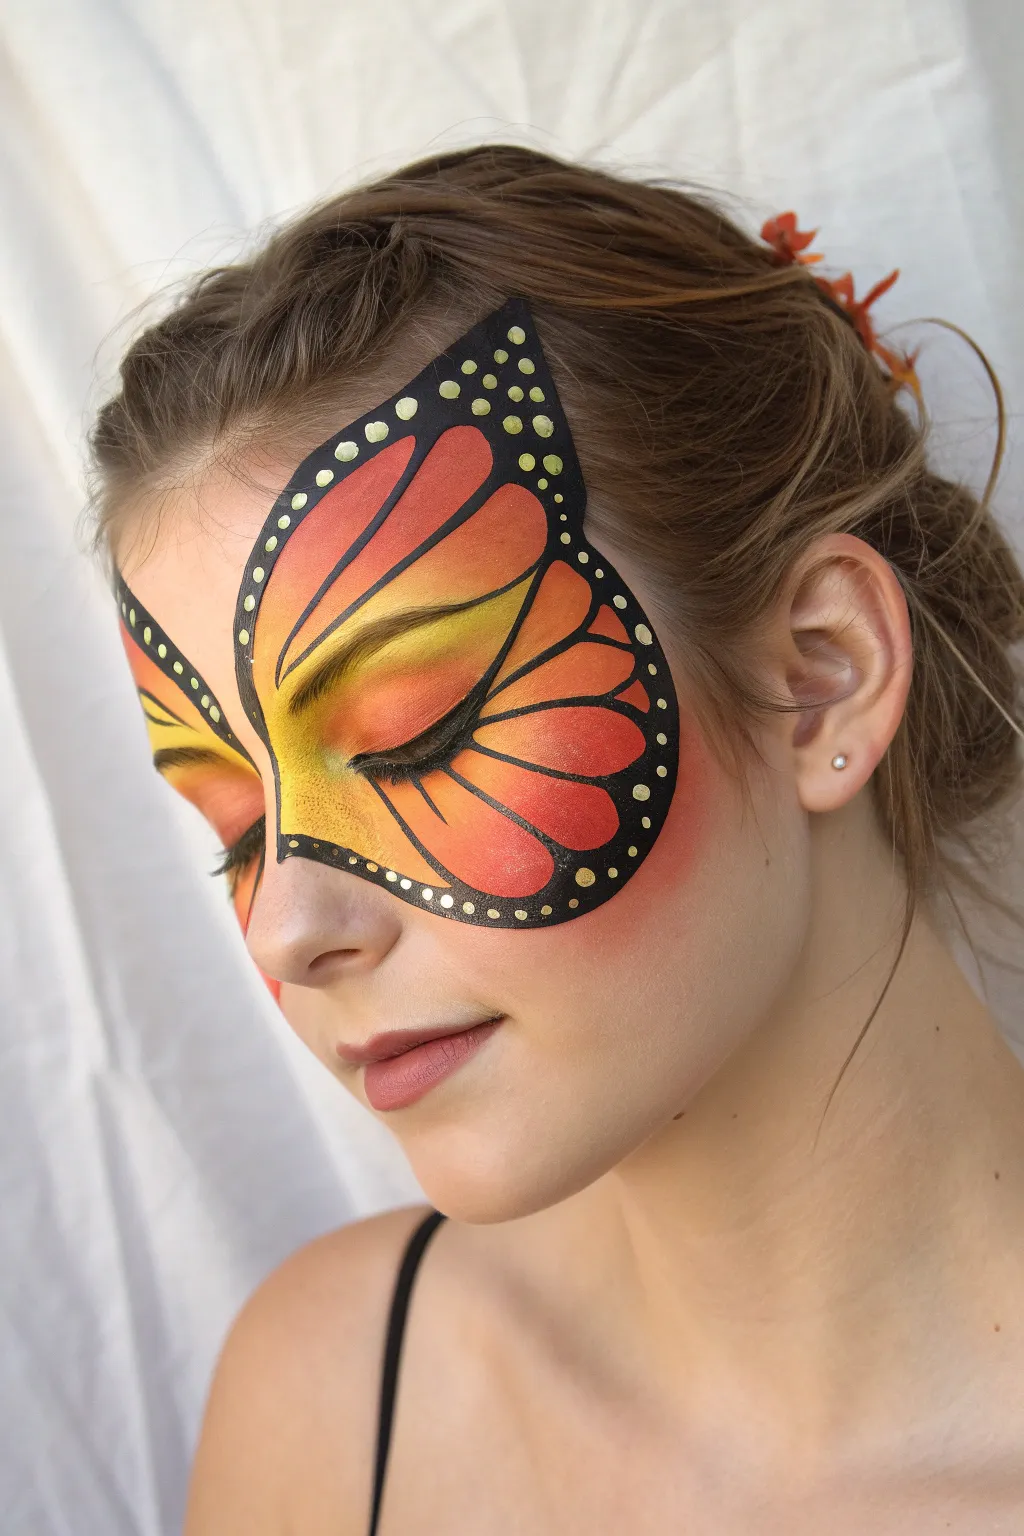
Capture the graceful beauty of a monarch butterfly with this vivid mask design that transforms the eye area into delicate wings. The warm gradient of yellow to deep orange creates a stunning, glowing effect that looks intricate but is surprisingly achievable.
Step-by-Step Guide
Materials
- High-density face paint sponges (at least 2, cut in half)
- Water-activated face paints: bright yellow, orange, deep red, black, and white
- Round brush (size 2-4) for outlines
- Fine liner brush (size 0-1) for details
- Small flat brush or filbert brush
- Cup of water
- Setting spray (optional)
Step 1: Base Gradient
-
Load the sponge:
Start by misting your face paint cakes lightly. Take a half-moon sponge and load the rounded edge with bright yellow, the middle with orange, and the outer edge with deep red. -
Apply the first wing:
Position the sponge over the left eye so the yellow is near the inner corner and the nose bridge. Press and pivot the sponge upwards towards the hairline to create the top wing shape. -
Create the lower wing:
Reload the sponge if necessary. Using the same pivoting motion, stamp the color downwards onto the cheekbone to form the bottom section of the wing, keeping the yellow focused near the eye and nose. -
Blend the transition:
I like to gently dab the area where the top and bottom wing sections meet at the temple to ensure a seamless color transition without hard lines. -
Mirror the design:
Repeat the sponge loading and stamping process on the right eye. Aim for symmetry, ensuring the yellow centers meet comfortably across the bridge of the nose.
Sponge Savvy
Keep your sponge slightly dry. Too much water will make the colors bleed together into a muddy brown rather than a nice gradient. The sponge should feel tacky.
Step 2: Structural Outlines
-
Outline the upper wing:
Using a medium round brush loaded with inky black paint, draw a smooth, curving line from the inner corner of the eye, sweeping up past the eyebrow and flicking out towards the temple. -
Define the outer edge:
Continue the black line from the temple tip, curving it downwards to frame the red outer edge of your gradient base. Make this line slightly thicker than the interior lines. -
Close the lower wing:
Sweep a line from the outer cheekbone back underneath the eye, connecting it near the inner corner of the nose. This creates the primary butterfly mask shape. -
Create the center divider:
Draw a thick black line extending from the outer corner of the eyelid outwards towards the temple, separating the upper and lower wing sections. -
Add wing veins:
With a lighter touch, paint 3-4 curved lines radiating from the eye area outwards to the black border. These lines should taper, starting thicker near the eye and becoming thin as they reach the edge.
Step 3: Refining Details
-
Deepen the border:
Go back over the main outer perimeter of the butterfly wings with your black paint. Thicken the line significantly, creating a bold, graphic frame that varies in width for visual interest. -
Fill the eyelid:
Carefully paint a black eyeliner wing on the upper eyelid that connects seamlessly into the central divider line painted earlier. -
Sharpen the points:
Use the very tip of your brush to sharpen the tips of the ‘veins’ where they meet the thick black border, creating small triangular connection points.
Glitter Upgrade
While the paint is still slightly damp, poof some cosmetic-grade gold or iridescent glitter onto the yellow sections for a magical, shimmering finish.
Step 4: Highlights & Finishing
-
Prepare the dots:
Load a fine liner brush or the handle end of a brush with creamy white or pale yellow paint. Ensure the consistency is thick enough to sit opaquely on top of the black. -
Dot the perimeter:
Apply a series of dots along the thick black outer border. Vary the size patterns—try one large dot followed by two smaller ones—to mimic real wing patterns. -
Highlight the veins:
Add extremely thin, broken lines of white or pale yellow alongside the black veins on the inner part of the wing to give the design dimension and lift. -
Clean up edges:
Use a damp cotton swab or a clean, damp flat brush to wipe away any paint fallout under the eyes or smeary edges for a crisp finish.
Now you have a striking butterfly mask that is ready for any festival or costume party


Puppy Face With Floppy Ears
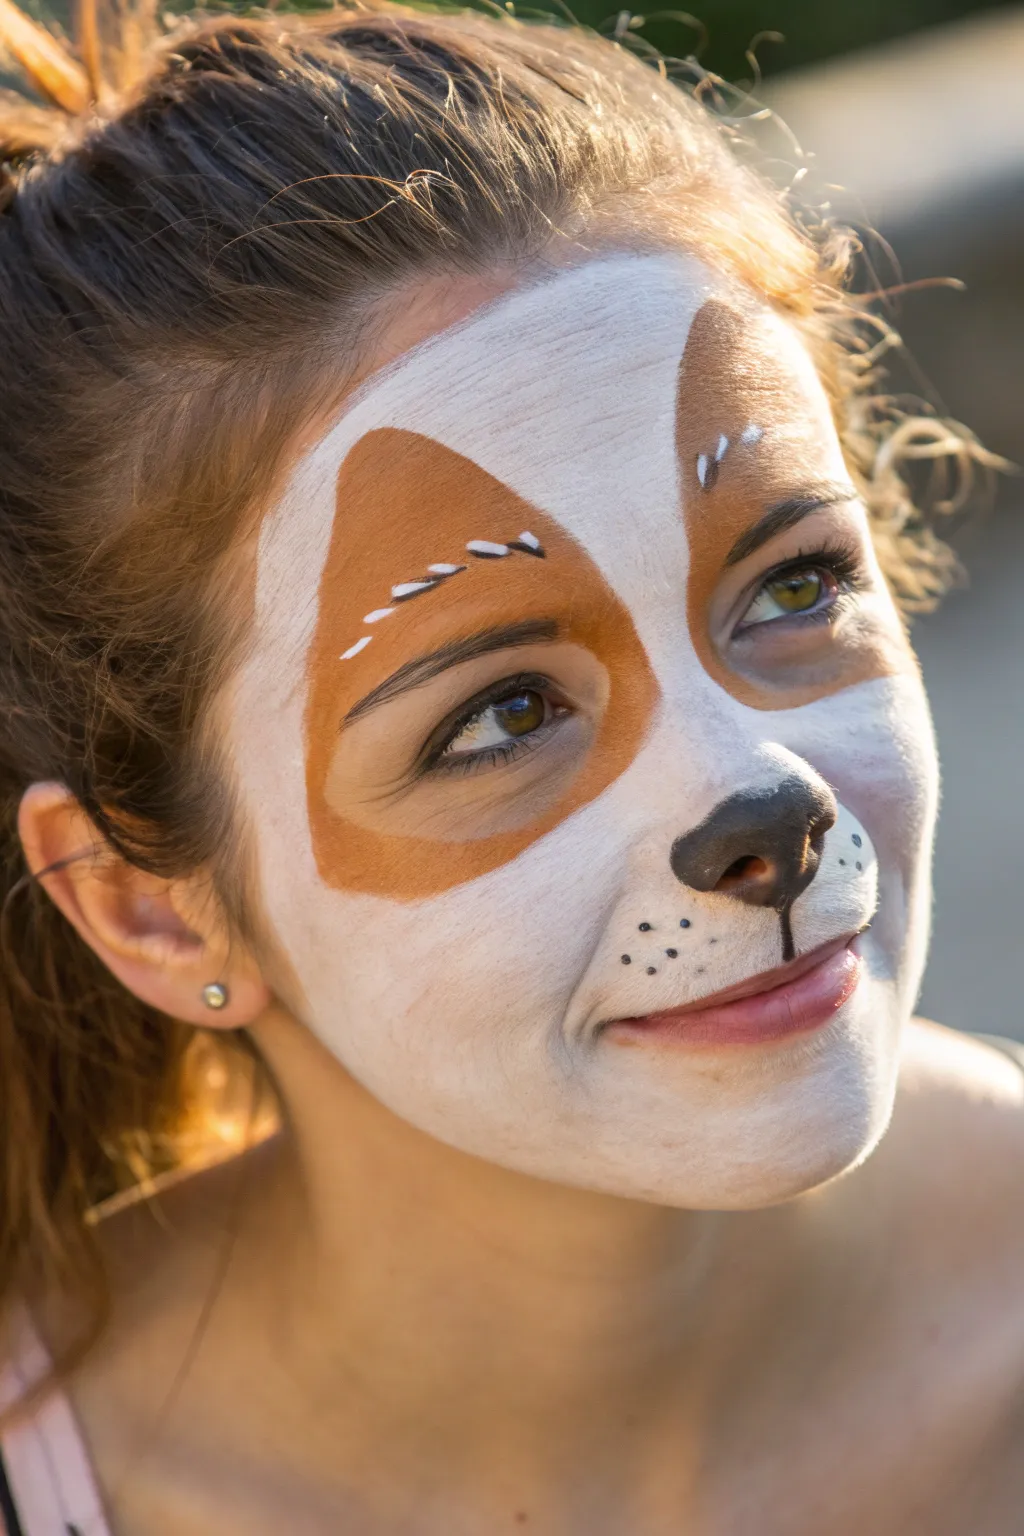
Transform into an adorable pup with this classic face painting design featuring soft patches and cute details. The look combines a clean white base with warm brown accents to create a floppy-eared dog character that works perfectly for parties or costumes.
How-To Guide
Materials
- High-quality water-activated face paint (White)
- High-quality water-activated face paint (Warm Brown/Rust)
- High-quality water-activated face paint (Black)
- Face painting sponge (high density)
- Medium round brush (size 4 or 6)
- Fine liner brush (size 1 or 2)
- Cup of clean water
- Paper towels or wet wipes
Step 1: Creating the Base
-
Load the sponge:
Begin by dampening your high-density sponge and loading it generously with white face paint. You want a creamy consistency that isn’t too drippy but provides opaque coverage. -
Map the white area:
Pat the white paint over the center of the face. Start from the forehead, cover the nose and muzzle area, and extend outwards onto the cheeks. Leave the eye area somewhat clear for now but bring the white close to the eyebrows. -
Define the shape:
Shape the white base so it resembles a mask. It should dip down the bridge of the nose and fan out across the forehead, reaching toward the temples but stopping before the hairline. -
Cover the muzzle:
Ensure the upper lip and the area between the nose and mouth (philtrum) are completely covered in white. Pat gently to build up opacity without streaking. -
Smooth the edges:
Use the clean edge of your sponge or a slightly damp finger to feather the outer edges of the white paint, making the transition soft rather than a harsh line.
Step 2: Adding the Puppy Ears
-
Load the brown paint:
Rinse your sponge or grab a fresh edge, and load it with a warm brown or rust-colored paint. Alternatively, you can use a medium round brush for more precision here. -
Left ear patch:
Create a large, triangular patch over the left eye. The shape should start above the eyebrow on the forehead and sweep down to the outer corner of the eye. Curve the bottom edge so it hugs the cheekbone. -
Right ear accent:
On the right side, painting a smaller patch near the temple or upper forehead adds asymmetry which looks quite cute. Keep the shape rounded and organic. -
Fill in the color:
Fill these shapes completely with the brown paint. If using a brush, smooth out any brushstrokes so the color looks solid and uniform. -
Let it set:
Give the brown patches a moment to dry completely before adding any details on top of them to prevent colors from muddying.
Sponge Savvy
For the smoothest white base, use a patting or stippling motion rather than dragging the sponge. This builds coverage without lifting the layer underneath.
Step 3: Defining Features
-
Paint the nose:
Load a medium round brush with black face paint. Paint the tip of the nose black, following the natural shape but extending slightly up the nostrils for a classic dog nose look. -
Add the philtrum line:
using the very tip of your round brush or switching to a liner brush, draw a thin, vertical black line from the bottom center of the nose straight down to the center of the upper lip. -
Create the muzzle dots:
On the white muzzle area, specifically where whiskers would grow, dot three or four small black freckles on each side using the tip of your fine brush. -
Stitching detail:
Reload your fine liner brush with white paint. Paint small dashed lines along the upper edge of the brown eye patch to mimic stitching or fur texture. This adds a whimsical, stuffed-animal quality. -
Highlight the eyes:
Add two small white teardrop shapes or dashes near the inner corner of the brown patch to brighten the expression.
Glitter Upgrade
While the paint is still slightly damp, puff a tiny bit of cosmetic-grade iridescent glitter onto the white muzzle area for a magical, sparkly finish.
Now you have a sweet, long-lasting puppy look perfect for hours of play


Jack-o’-Lantern Face

Transform into the ultimate Halloween icon with this classic pumpkin face paint design. The look combines a vibrant, full-coverage orange base with bold, geometric black details for a spooky yet playful expression.
Step-by-Step
Materials
- High-quality orange face paint (water-activated or cream)
- Black face paint (water-activated or cream)
- Make-up sponge or high-density foam applicator
- Medium flat brush
- Small round detail brush
- Cup of water
- Paper towels
Step 1: The Pumpkin Base
-
Prep the canvas:
Begin with a clean, dry face. Pull hair back tightly using a headband or clips to keep the forehead area completely accessible and free of stray hairs. -
Load the sponge:
Dampen your makeup sponge and swirl it well into the orange face paint. You want a creamy consistency that isn’t too drippy, ensuring solid opacity. -
Apply the first layer:
Stipple the orange paint over the entire face, starting from the center and working outward. Use a dabbing motion rather than dragging to avoid streaks. -
Refine the edges:
Carefully trace the hairline and jawline with the sponge. Don’t worry about perfect lines near the hair, as getting paint in the hair can be messy to clean later. -
Build coverage:
Once the first layer is touch-dry, lightly dab on a second layer if you see any skin showing through. Aim for a bright, uniform pumpkin orange.
Pro Tip
For the blackest black around the eyes, let the first layer dry for 60 seconds before applying a second coat. This prevents the paint from looking grey or patchy.
Step 2: Geometric Features
-
Draft the nose:
Switch to a medium flat brush loaded with black paint. Paint a triangle directly on the nose tip, with the top point reaching the bridge and the base covering the nostrils. -
Outline the eyes:
Using a small round brush, outline a large, curved shape over each eye socket. For this design, I prefer a softer, bean-like shape rather than a harsh triangle, covering the eyelid and extending up to the eyebrow. -
Fill the eye sockets:
Fill in these outlines with the flat brush and black paint. Instruct the model to close their eyes gently to ensure you cover the entire lid without gaps. -
Add under-eye triangles:
Paint a sharp, inverted triangle directly beneath each eye patch. While the eye patch is curved, these should have straight, geometric edges pointing down toward the cheekbones. -
Create forehead triangles:
Paint three distinct triangles across the forehead. Space them evenly, with the two outer triangles slightly larger or angled inward to frame the face.
Step 3: The Wicked Smile
-
Draw the main smile line:
Using the small detail brush, draw a long, sweeping black line from one cheek, across the lips, to the other cheek. Curve the ends upward toward the ears for a menacing grin. -
Identify stitch points:
Instead of coloring the lips completely black, keep the main line thin. Prepare to add the vertical ‘stitches’ or teeth marks along this horizontal line. -
Add upper teeth:
Paint small, sharp triangles pointing upward along the top edge of the smile line. Vary their sizes slightly to make the mouth look jagged and carved. -
Add lower teeth:
Mirror the process on the bottom edge of the line, painting downward-pointing triangles. Offset them slightly from the top ones so they look like interlocking teeth. -
Extend the grin:
Continue these triangular ‘stitches’ all the way to the curled ends of the smile line on the cheeks, making them smaller as you reach the tips. -
Final touch-ups:
Step back and check for symmetry. Use the small brush to sharpen the points of the triangles on the forehead and eyes for a crisp, freshly-carved look.
Troubleshooting
If the orange base looks streaky, your sponge might be too wet. Squeeze out excess water, reload with pigment, and use a stippling (dabbing) motion to fix it.
Now you are ready to haunt the neighborhood with a perfectly carved pumpkin face
BRUSH GUIDE
The Right Brush for Every Stroke
From clean lines to bold texture — master brush choice, stroke control, and essential techniques.
Explore the Full Guide
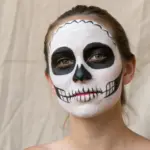
Skull Overlay With Contour Shading
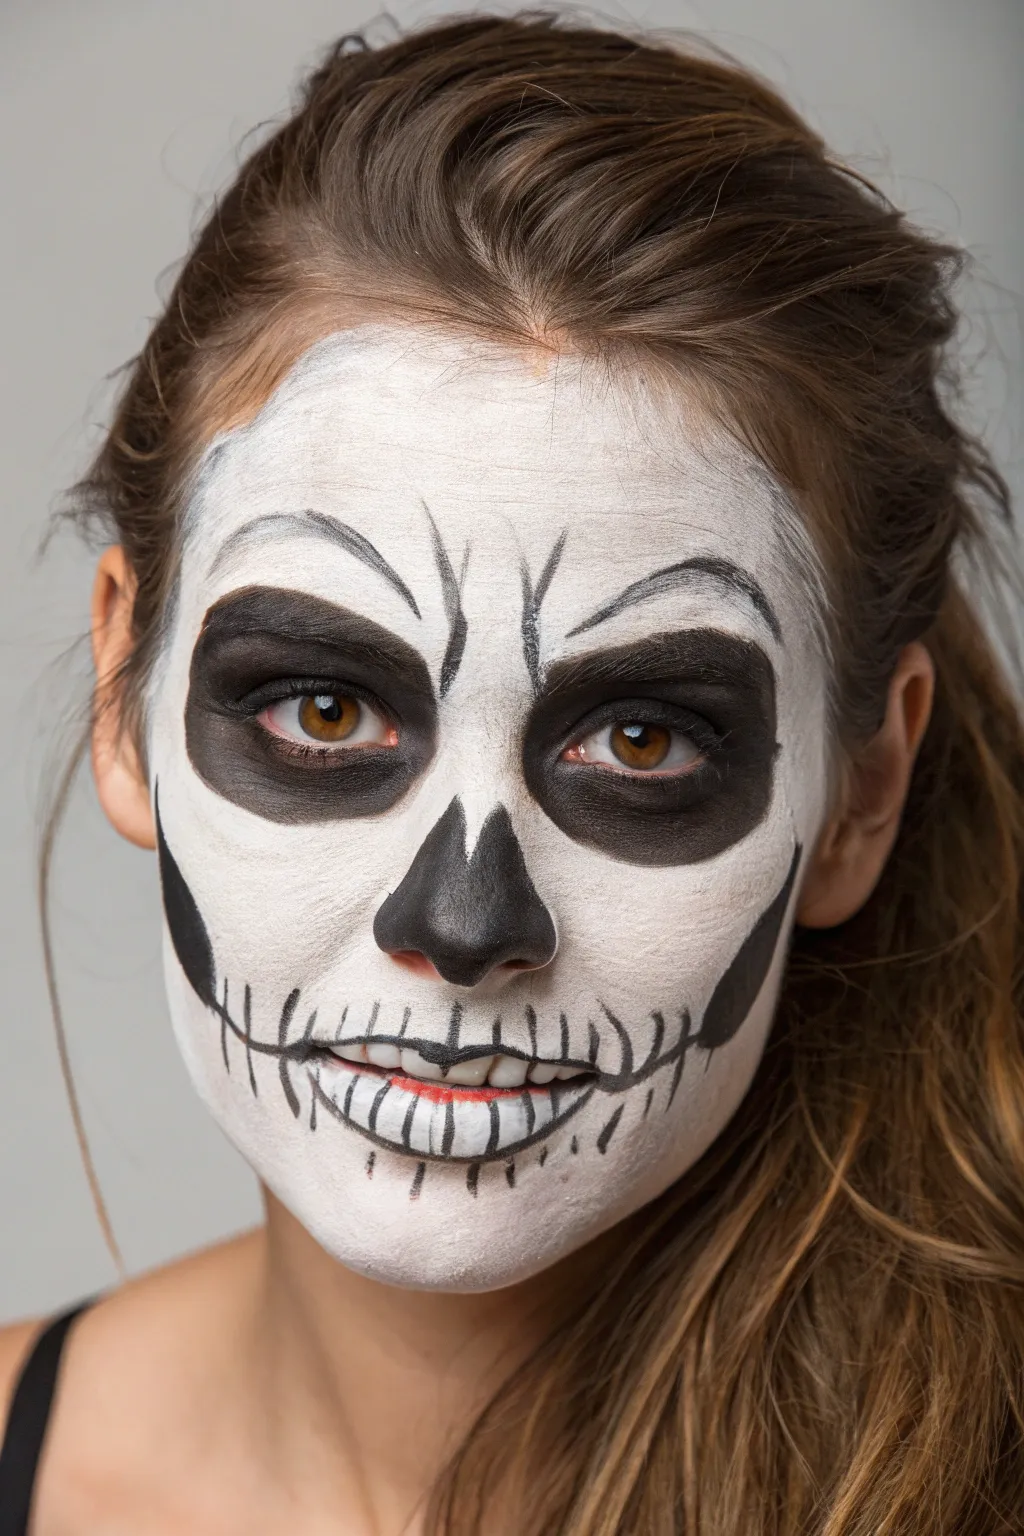
Transform your face into a spooky yet realistic skull using this high-contrast makeup design. By focusing on deep contouring and precise line work, you’ll create a bone-chilling illusion that brings skeletal features to the surface.
Step-by-Step
Materials
- White cream face paint or grease paint
- Black cream face paint or grease paint
- Translucent setting powder
- Makeup sponge triangles
- Medium round brush
- Fine detail brush (liner brush)
- Fluffy blending brush
Step 1: Base and Structure
-
Prep the canvas:
Start with a clean, dry face. If you have sensitive skin, a light layer of barrier cream or moisturizer can help protect it before applying heavy face paint. -
Apply the white base:
Load a makeup sponge with white cream paint. Stipple the paint over your entire face, covering the forehead, cheeks, chin, and nose. Don’t worry about perfect opacity; a slightly patchy texture actually makes the bone look more realistic. -
Leave negative space:
Avoid painting heavily around the immediate eye area and the tip of the nose, as these spots will be filled with black later. This keeps the black paint from mixing with the white and turning gray. -
Set the base:
Lightly dust the white paint with translucent setting powder using a fluffy brush. This crucial step prevents the base from smearing while you add the darker details.
Paint Looking Gray?
If your black looks gray, your white base was likely too wet. Let the white dry fully or set it well with powder before applying black on top.
Step 2: Dark Features and Contours
-
Outline the eye sockets:
Using a medium round brush loaded with black paint, draw large circles around your eyes. Follow the natural bone structure of your orbital bone, extending slightly above the eyebrow and below the under-eye area. -
Fill the eyes:
Fill in these circles completely with black paint. I like to use a clean sponge for this to get a solid, opaque coverage quickly. Ensure the inner corners and lash lines are fully blackened. -
Create the nose cavity:
Paint the tip of your nose black. Instead of a simple triangle, paint two upside-down teardrop shapes on the nostrils, leaving a tiny sliver of skin or white paint in the middle center for a specialized septum look. -
Define the hollows:
Switch to a smaller brush to outline the hollows of the cheekbones. Start from the ear and curve downwards towards the corner of the mouth, creating a swoop that mimics the jaw hinge. -
Shade the cheekbones:
Fill in the back portion of this cheek outline with black. Use a brush or sponge to fade the black paint forward, creating a gradient that looks like a deep shadow rather than a solid block.
Make It 3D
Use a grey eyeshadow to shade around the edges of the teeth and skull cracks. This slight shadow adds incredible depth and realism.
Step 3: Teeth and Fine Details
-
Draft the mouth line:
Using a fine detail brush and black paint, draw a thin horizontal line extending from the corners of your mouth outwards across your cheeks, stopping just before the cheek hollow shading. -
Paint the center teeth:
Start painting the teeth directly over your lips. Draw vertical lines to separate the teeth, making the ones in the center slightly wider. -
Extend the jaw:
Continue drawing vertical tooth dividers along the extended mouth line on your cheeks. As you move further back, make these ‘teeth’ shorter to simulate perspective. -
Shape the roots:
For each tooth, round off the top and bottom edges where the root would be. Don’t just leave them as square blocks; use the fine brush to taper the lines upward and downward into the white base. -
Add gum detail:
Draw tiny, faint fissures or cracks extending from the roots of the teeth into the jaw area to age the skull. -
Create forehead worry lines:
Using the fine brush, paint two vertical lines ascending from the inner brows. Then, add arched lines above the eyebrows to mimic the skull’s brow ridge structure. -
Detail the brows:
Feather the paint on these forehead lines slightly with a dry brush so they look etched into the bone rather than just painted on top. -
Adjust the chin:
Add subtle black shading under the bottom lip and along the very bottom of the chin to give the jaw more dimension and projection. -
Final touches:
Review your work. If any black lines look too harsh, you can soften them with a mostly clean brush to blend them into the white base for a weathered effect.
Now you are ready to haunt the night with your detailed skull transformation
Vampire Pallor and Bite Detail
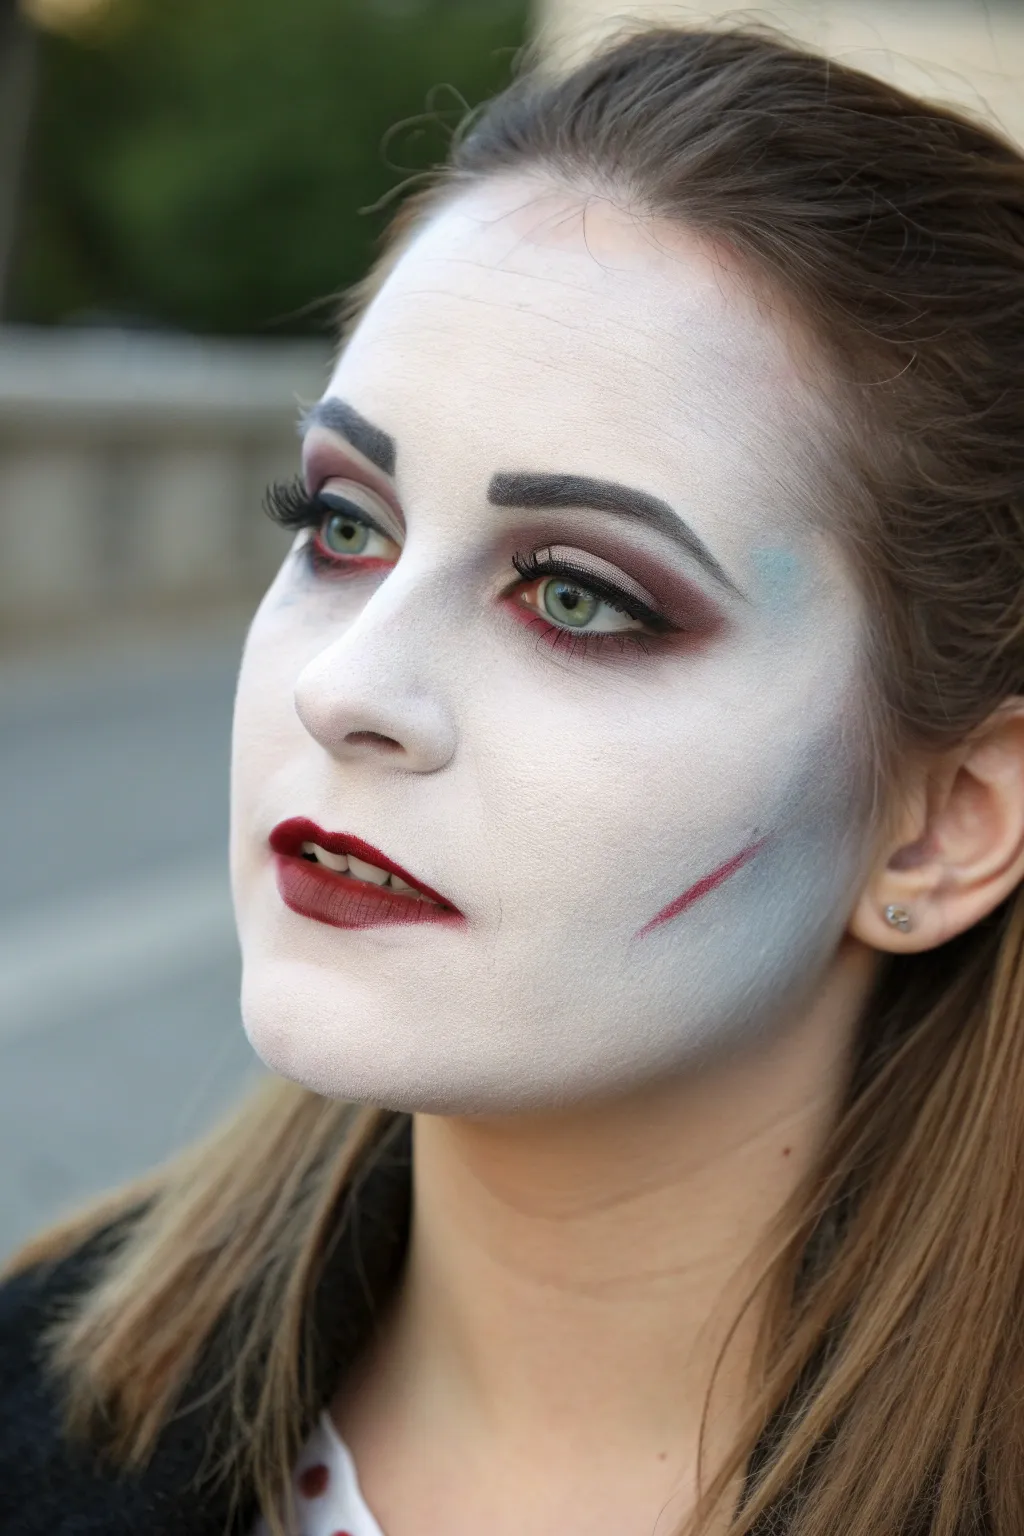
Achieve a hauntingly beautiful undead look with this tutorial that balances stark, supernatural skin with striking, deep-set eyes. This makeup design focuses on a smooth, full-coverage pale base accented by cool-toned contouring and a subtle suggestion of injury.
Step-by-Step Tutorial
Materials
- Full-coverage white cream foundation or face paint
- Translucent setting powder (white or colorless)
- Contour powder or cream (cool grey or slate blue)
- Matte eyeshadow palette (burgundy, deep red, black, charcoal)
- Black liquid or gel eyeliner
- Deep blood-red lipstick (matte)
- Red lip liner
- Red body paint or creamy lip liner (for the scratch)
- Makeup sponges or beauty blender
- Various makeup brushes (fluffy blending, angled, detail)
Step 1: Creating the Undead Base
-
Prep and prime:
Start with a clean, moisturized face. Apply a primer to ensure the heavy white makeup sits smoothly without sinking into pores. -
Apply the white foundation:
Using a damp sponge, stipple the full-coverage white cream foundation all over your face, neck, and ears. Build this up in thin layers rather than one thick coat to avoid cakiness. -
Blend the edges:
Work the foundation gently into the hairline and down the neck so there are no harsh skin-tone lines visible. -
Set the base:
Generously apply translucent or white setting powder with a fluffy brush to lock the cream in place and create a matte, velvet finish.
Patchy White Base?
If the white paint looks streaky, switch to a stippling motion (dabbing) rather than dragging the sponge. Let the first layer dry completely before adding a second.
Step 2: Haunting Eyes and Brows
-
Define the brows:
Fill in your eyebrows using a black or dark charcoal powder/pencil. Create a strong, arched shape that looks slightly unnaturally perfect. -
Apply transition shade:
Sweep a dusty mauve or light burgundy eyeshadow through the crease of your eyelid as a transition color. -
Deepen the crease:
Use a focused brush to pack a deep maroon or blood-red shadow into the outer corner and drag it inward along the socket line. -
Add lower lash definition:
Smudge the same deep red shadow along the lower lash line, blending it out slightly to give a tired, hungry look. -
Brighten the lid:
Pat a lighter matte beige or white shadow onto the center of the eyelid to create contrast. -
Line the eyes:
Apply a thin line of black liquid liner close to the upper lashes. I find a small wing helps elongate the eye shape without overpowering the shadow. -
Finish the lashes:
Apply black mascara or a pair of natural-looking false lashes to define the eyes.
Step 3: Contouring and Details
-
Sculpt the hollows:
Using an angled brush and a cool grey or slate-blue shadow, contour specifically under the cheekbones. -
Blend the contour:
Buff the grey contour backward toward the ear and hairline. This cool tone against the white skin creates a corpse-like effect. -
Add temple shading:
Lightly dust a tiny bit of the grey shadow into the temples to narrow the face. -
Create the cheek detail:
Using a fine detail brush and red body paint (or a sharp red lip liner), draw a single, diagonal thin line across the cheekbone contour. Keep the ends tapered.
Vein Detail
Use a very fine brush with diluted blue paint to draw faint, wiggly veins under the eyes or near the temples for an older, more translucent vampire skin effect.
Step 4: The Blood Red Lip
-
Line the lips:
Outline your lips with a dark red liner, emphasizing the cupid’s bow. -
Fill with color:
Apply the deep blood-red matte lipstick to the entire lip area. -
Darken the corners:
Tap a tiny amount of black eyeshadow or liner into the very outer corners of the mouth to add dimension and depth. -
Final check:
Assess the pallor. If any natural skin tone is peeking through, gently pat a bit more white powder over those areas.
Now step out into the night with your perfectly pale and mysterious vampire visage

PENCIL GUIDE
Understanding Pencil Grades from H to B
From first sketch to finished drawing — learn pencil grades, line control, and shading techniques.
Explore the Full Guide
Creepy Clown Contrast Mask
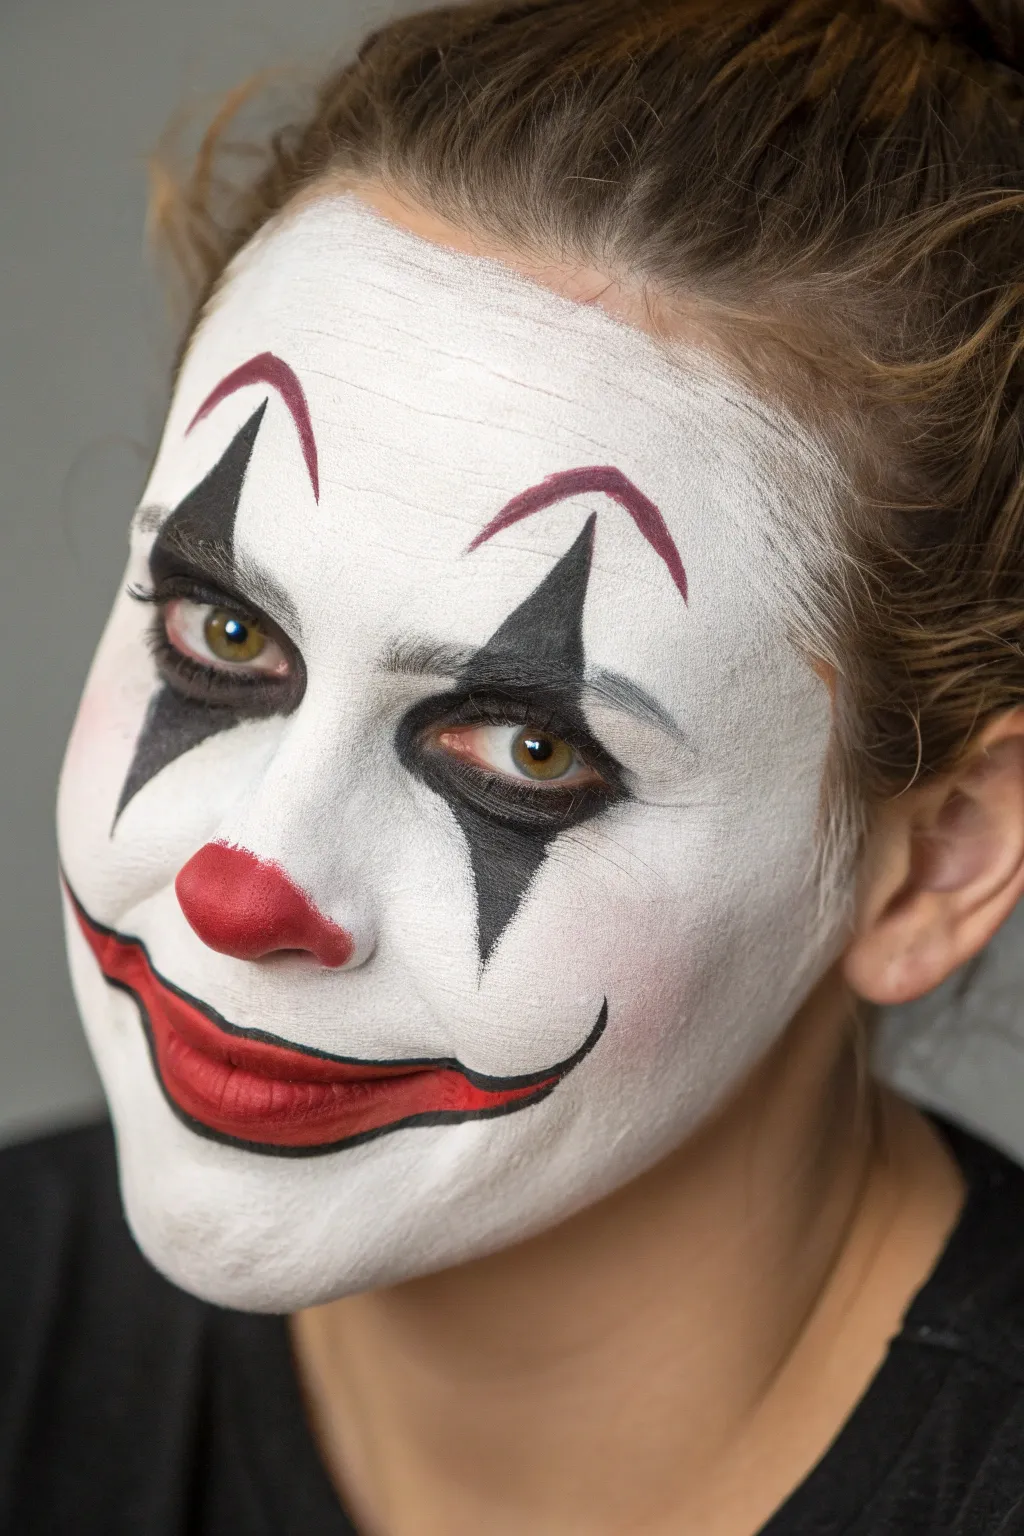
Step right up for a sinister twist on the classic harlequin look featuring sharp black diamonds and a boldly exaggerated smile. This high-contrast design captures a perfect balance between playful performance and eerie mystery.
Detailed Instructions
Materials
- White face paint (water-activated or cream)
- Black face paint or gel liner
- Red face paint
- High-density triangular sponge
- Medium round brush
- Fine liner brush
- Setting powder
- Powder puff or large fluffy brush
Step 1: Setting the Stage
-
Clean Slate:
Begin with a clean, dry face. Tie back any hair securely to ensure you have a clear canvas all the way to the hairline. -
Loading the White:
Dampen your high-density sponge and activate your white face paint. You want a creamy, opaque consistency, not a watery wash. -
Base Layer Application:
Stipple the white paint across the entire face, patting gently rather than dragging to avoid streaks. Cover the eyelids, lips, and go slightly past the jawline. -
Smoothing It Out:
Go back over the base with the purely clean side of your sponge to lift excess moisture and even out the texture for a porcelain effect. -
Set the Base:
Dust a generous amount of transparent setting powder over the white base. This prevents the colors we add later from smudging into the white.
Patchy White Base?
If the white looks streaky, let the first layer dry completely, then pat on a second thin layer. Don’t drag the sponge, or you’ll lift the paint underneath.
Step 2: The Harlequin Eyes
-
Drafting the Upper Diamonds:
Load a medium round brush with black paint. Starting from the center of the eyebrow, paint a sharp triangle extending upward toward the middle of the forehead. -
Lower Points:
Mirror that triangle on the bottom, drawing a long, sharp point descending from the lower lash line down toward the cheekbone. -
Filling the Shape:
Fill in the diamond shapes completely with black, carefully working around the delicate eye area. Keep the edges extremely crisp. -
Arced Brows:
Switch to a red paint on a smaller brush. Paint a thin, highly arched eyebrow floating just above the black upper diamond points for an expressive look. -
Refining the Brows:
Use a liner brush with a tiny bit of maroon or darker red to trace the top edge of these new eyebrows, giving them dimension.
Glam It Up
Add false eyelashes to the top and bottom lids, or glue small red rhinestones to the tips of the diamond points for sparkle.
Step 3: The Sinister Smile
-
Nose Accent:
Paint a simple red circle on the very tip of the nose using your round brush, keeping the edges soft but distinct. -
Painting the Lips:
Fill the natural lips with bright red paint. At the corners, extend the color outward and slightly upward toward the cheeks. -
Creating the Grin:
Using a fine liner brush and black paint, outline the red lips. Extending from the outer corners, draw a thin black line that curves sharply upward into a hook shape. -
Adding Depth:
Thicken the black outline slightly in the center of the lower lip and at the corners to add weight to the expression. -
Final Touches:
Check for symmetry. If one diamond point is sharper than the other, use a clean angled brush with a tiny bit of white paint to clean up the edges.
Now you are ready with a hauntingly sharp look that is sure to turn heads at your next event
Mermaid Scale Gradient Face

Transform yourself into a sea siren with this elegant mermaid face paint design featuring a stunning teal ombre effect. The look combines soft blending with crisp white linework to create the illusion of shimmering scales across the forehead and temple.
Step-by-Step Guide
Materials
- Teal face paint (water-activated)
- Light blue face paint
- White face paint (highly pigmented)
- Small flat brush (1/2 inch)
- Medium round brush
- Fine liner brush (size 0 or 1)
- Cosmetic glitter gel or chunky glitter
- Small rhinestones (blue or teal)
- Eyelash glue (skin safe)
- Face painting sponge (high density)
- Cup of water
- Spray bottle
- Paper towels
Step 1: Creating the Base Gradient
-
Load the sponge:
Begin by dampening your high-density sponge. Load the top half with the deep teal paint and the bottom half with the lighter blue shade. You want these two colors to sit next to each other on the sponge face. -
Apply the forehead base:
Tap the sponge gently across the forehead, keeping the darker teal near the hairline and the lighter blue lower down. Extend this color patch from the center of the forehead down to the left temple and onto the the cheekbone. -
Blend the transition:
Using a clean, slightly damp section of the sponge, tap over the edges of the paint to soften them into the skin. This creates that seamless, airy transition rather than a hard line. -
Enhance the eyes:
Take a flat brush loaded with the teal paint and sweep it across the eyelid. Extend the color slightly past the outer corner of the eye to connect it visually with the temple shading. -
Deepen the contrast:
If the teal near the hairline looks too faint after drying, re-load your sponge with just the darkest color and tap it gently along the very top edge to add depth.
Pro Tip: Line Consistency
To get perfectly smooth scale outlines, focus on keeping equal pressure on your brush. Try rotating the brush slightly in your fingers as you curve the ‘U’ shape.
Step 2: Drafting the Scales
-
Prepare the white paint:
Activate your white face paint with water until it reaches an inky consistency. You need the paint fluid enough to flow off a liner brush smoothly but opaque enough to show up over the teal. -
Start the center scale:
Using a fine liner brush, paint the first ‘U’ shape right in the center of the forehead, just above the eyebrows. This central scale anchors the entire pattern. -
Build the first row:
Paint connecting ‘U’ shapes extending outward from that first center scale to the left and right. Keep them relatively consistent in size. -
Layer the second row:
Start the next row of scales above the first. Position the bottom curve of each new scale so it meets the intersection of the two scales below it, creating a brick-laying pattern. -
Continue the pattern:
Repeat this pattern upward toward the hairline and outward toward the temple. As you move towards the temple, angle the scales slightly downwards to follow the natural curve of the face. -
Fade the edges:
As you reach the outer edges of the teal background on the cheek, let the scale outlines become slightly thinner or even incomplete, suggesting they are fading into the skin.
Step 3: Details & Embellishment
-
Add scale highlights:
Rinse your brush and load it with a very faint, watery white. Add a tiny swipe inside the top curve of a few larger scales to give them a bit of dimension. -
Paint decorative dots:
Dip the handle end of a paintbrush into the thick white paint. Dot a cluster of various sizes—large to small—sweeping from the outer corner of the eye down onto the cheekbone. -
Apply forehead gems:
Using a tiny dab of skin-safe adhesive or eyelash glue, place three or four small blue rhinestones between the eyebrows, following the bottom curve of the lowest central scales. -
Add temple sparkle:
Place a few small adhesive sequins or chunky glitter pieces within the white dot trail on the cheek for extra catch-light. -
Define the lashes:
Finish the eye area by applying a coat of mascara or painting a thin black line along the upper lash line to frame the eye against the teal shadow. -
Final check:
Step back and check for symmetry. If any white lines look too transparent, carefully go over them one last time with fresh white paint.
Level Up: Fishnet Trick
Instead of hand-painting scales, stretch a fishnet stocking over the skin and sponge the teal paint through it. Lift carefully to reveal instant negative-space scales.
This shimmering scale design is perfect for festivals or costume parties and looks amazing when it catches the light


Surreal Multi-Eye Illusion
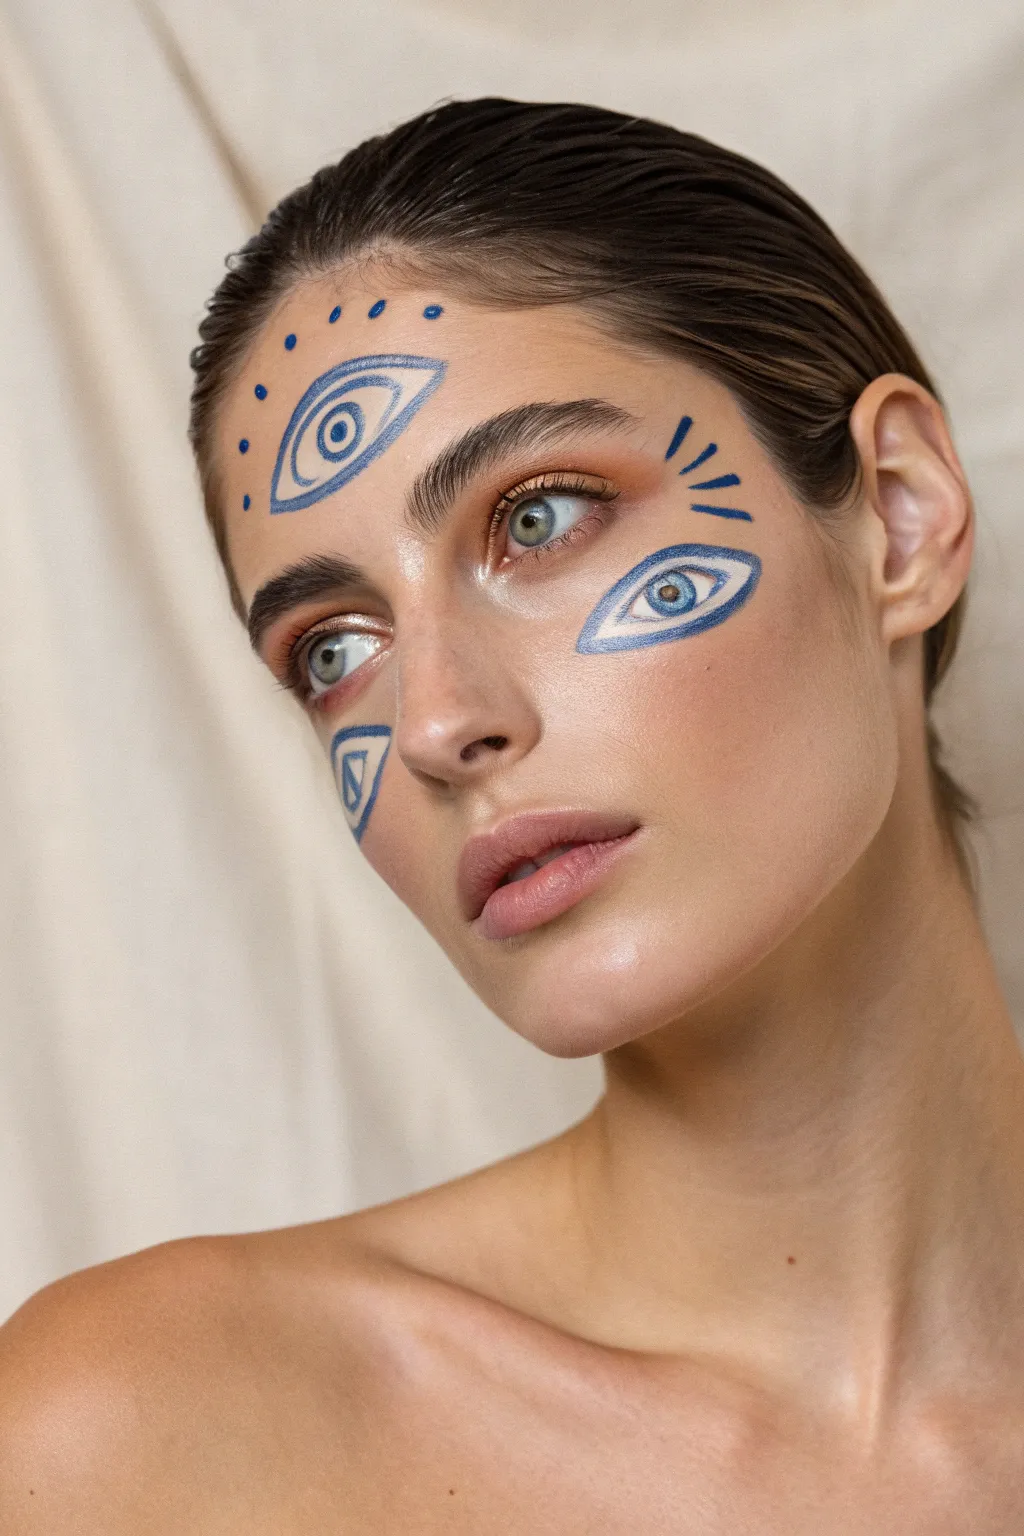
Channel an avant-garde artistic vision with this ethereal, multi-eye face paint design. This look combines soft, glowing skin with striking, graphic blue eye illustrations that create a mesmerizing surrealist effect.
Step-by-Step Tutorial
Materials
- Dewy finish foundation
- Liquid luminizer or highlighter
- Warm coral/bronze cream blush and eyeshadow
- Water-activated face paint (Royal Blue)
- Water-activated face paint (White)
- Finely pointed round brush (size 0 or 1)
- Small flat brush
- Setting spray
- Mascara
- Spoolie brush
- Clear brow gel
Step 1: Base and Glow
-
Prep the canvas:
Begin with clean, moisturized skin. Apply a sheer, dewy foundation to even out the complexion without masking natural skin texture. The goal is a ‘glass skin’ effect. -
Add warmth:
Blend a warm coral or bronze cream blush onto the tops of the cheekbones, extending slightly toward the temples. This creates a natural flush that contrasts beautifully with the cool blue paint. -
Create a soft eye:
Wash a sheer layer of metallic bronze or champagne eyeshadow over the eyelids. Keep the actual eye makeup minimal to let the painted elements take center stage. -
Groom the brows:
Brush eyebrows upward using a spoolie and clear brow gel for a feathery, laminated look. This adds to the editorial feel of the final piece. -
Highlight high points:
Tap a liquid luminizer onto the tip of the nose, the bridge of the nose, and the highest points of the cheekbones for an ethereal glow.
Shaky hands?
If you struggle with clean lines, rest your pinky finger against the model’s face (or your own cheek) while painting. This anchors your hand for much smoother strokes.
Step 2: Drafting the Eyes
-
Load the white paint:
Activate your white face paint with a little water until it reaches a creamy consistency. Load a small flat brush. -
Paint the sclera shapes:
Paint elongated almond shapes where the surreal eyes will go: one large one in the center of the forehead, one on the left cheekbone (angled upward), and half of one peeking out from the right jawline. -
Feather the edges:
Before the white dries completely, use a clean, slightly damp brush to soften the edges of the white shapes so they blend slightly into the skin rather than having a hard border. -
Create the iris base:
Using a smaller brush, paint a circle inside each almond shape with the white paint to act as a base for the iris color, ensuring the blue will pop later.
Pro Tip: Line Variation
To make the illustrations look more dynamic, vary your pressure. Press down for thick lines in the center of the curves, and lift up for thin, tapered edges.
Step 3: Graphic Blue Detailing
-
Prepare the blue liner:
Activate the royal blue face paint. You want an inky, fluid texture that flows easily off a fine liner brush (size 0 or 1). -
Outline the forehead eye:
Carefully trace the almond shape on the forehead with the blue paint. Vary the line thickness slightly—thicker in the middle, thinner at the corners—for a stylized feel. -
Draw the forehead iris and pupil:
Draw a circle in the center of the forehead eye. Add a smaller dot in the very center for the pupil, and draw a second ring around it for the iris detail. -
Add upper crease line:
Paint a hovering, arched blue line above the forehead eye to represent the eyelid crease. Make this line slightly thicker than the outline. -
Detail the cheek eye:
Repeat the outlining process on the cheekbone eye. For this one, draw the iris looking slightly sideways or centered, depending on the gaze you want to emulate. -
Detail the jawline fragment:
Outline the partial eye shape on the jawline. Since this is a fragment, ensure the lines are crisp but cut off cleanly where the design ends. -
Add floating accents:
Using the very tip of your brush, add five small blue dots in an arch above the forehead eye. Add three small lash-like dashes floating near the temple area.
Step 4: Finishing Touches
-
Enhance the real eyes:
Apply a coat of mascara to your natural lashes to define them without overpowering the painted artwork. -
Refine lines:
Check your blue lines for opacity. If any look streaky, carefully go over them one last time with a freshly loaded brush. -
Set the look:
Mist the face lightly with a setting spray to lock in the makeup and add a final touch of hydration to the skin.
Now you have a stunning, surreal visage ready for an art shoot or editorial event


Have a question or want to share your own experience? I'd love to hear from you in the comments below!