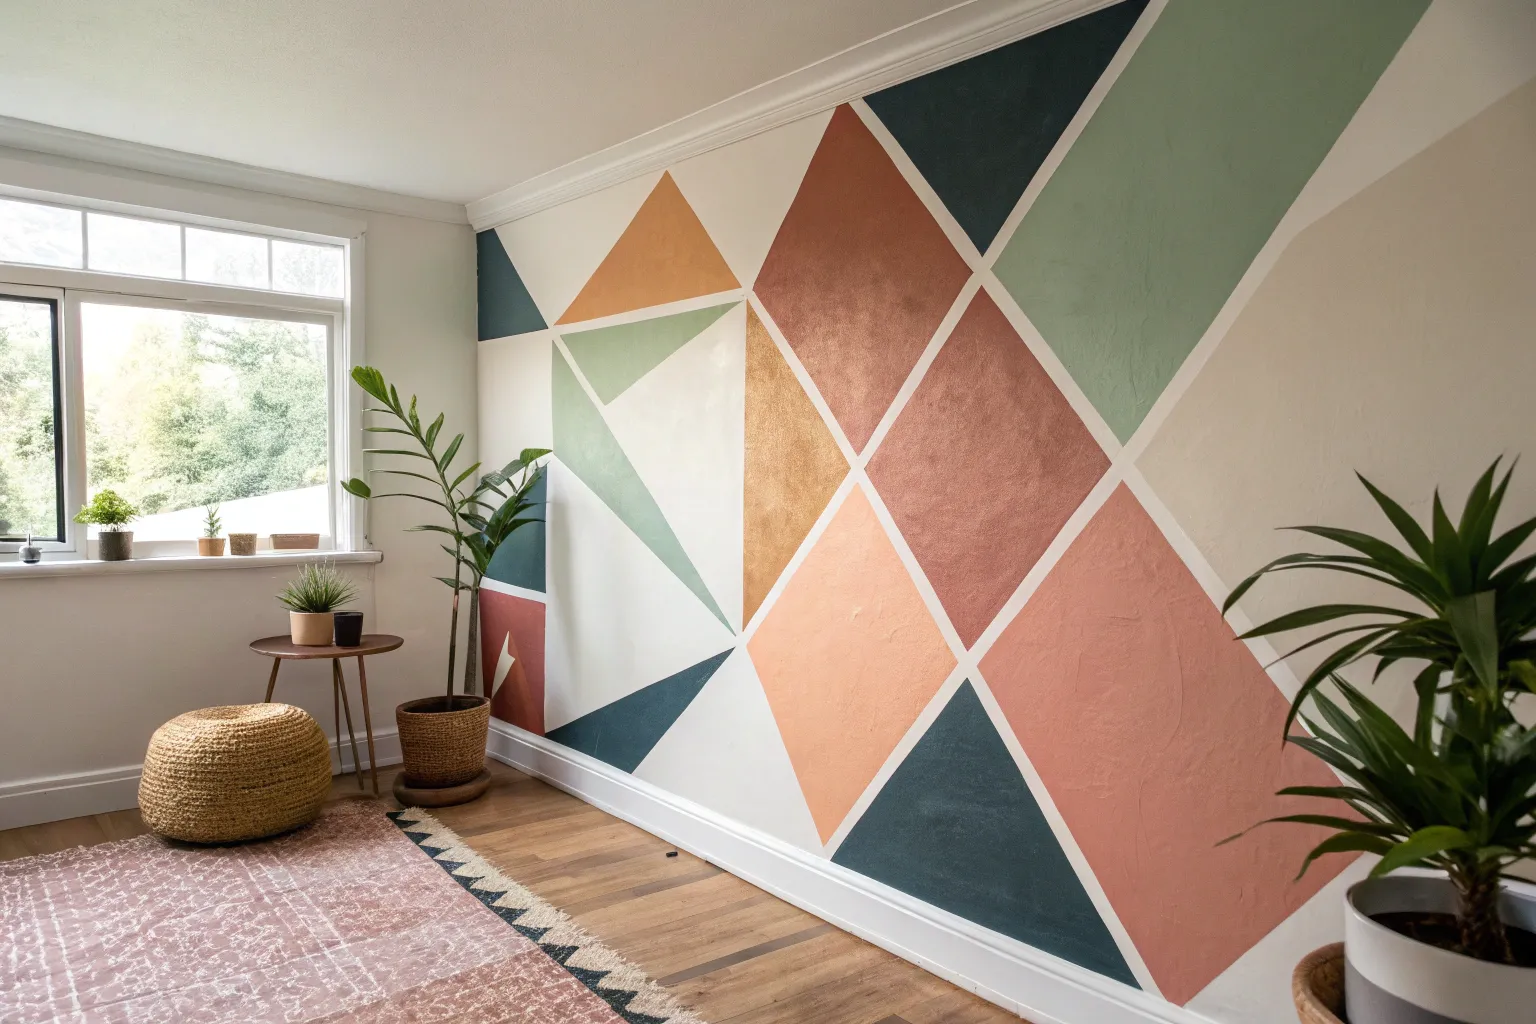
If your walls are feeling a little too “blank canvas,” a playful paint idea can change the whole mood in a single afternoon. I love wall paint projects because they’re equal parts design move and personal art piece—messy, brave, and totally you.
Playful Vertical Stripes
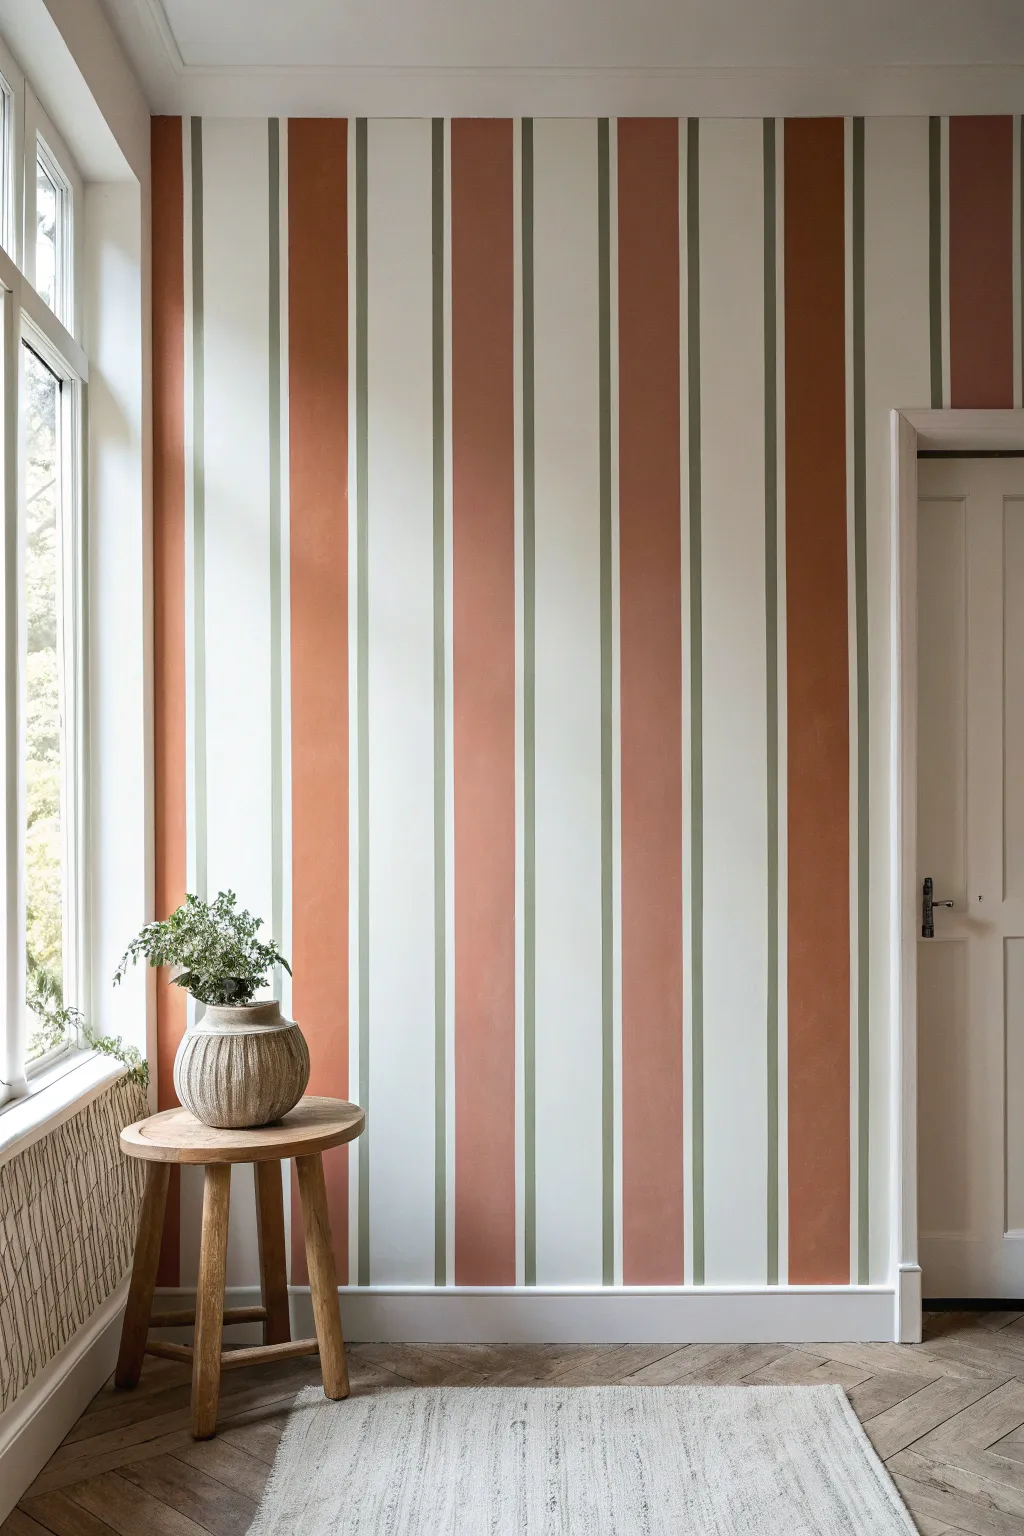
Transform a plain wall into an architectural statement using a sophisticated pattern of wide rust bands and delicate sage dividers. This alternating stripe design adds perceived height to your room while bringing in a warm, earthy color palette.
Step-by-Step
Materials
- Interior latex paint (Eggshell finish): Cream/Off-white (Base)
- Interior latex paint (Eggshell or Matte): Terracotta/Rust
- Interior latex paint (Eggshell or Matte): Sage Green
- Painter’s tape (1-inch width)
- Painter’s tape (delicate surface/low tack)
- Laser level or bubble level
- Measuring tape
- Pencil
- 9-inch paint roller and tray
- 4-inch foam roller or mini roller
- 1-inch angled sash brush
- Plastic drop cloths
- Putty knife (optional, for sealing tape)
Step 1: Preparation & Base Coat
-
Clear and clean:
Remove all furniture, outlet covers, and wall hangings from the working area. Wipe the walls down with a damp cloth and mild soap to remove dust or grease, ensuring a clean slate for the tape to adhere to. -
Prime and base:
Apply your lightest color first, which in this case is the Cream/Off-white shade. Roll two even coats over the entire wall, allowing at least 4 hours of drying time between coats. -
Cure time:
Let the base coat cure for at least 24 to 48 hours. This is crucial; if the paint is too fresh, the tape you apply in the next steps might peel it off.
Bleed-Through Blues?
If paint bled under the tape, wait until it’s 100% dry. Use a small artist’s brush and the base cream color to carefully touch up specifically along the jagged edge to clean it up.
Step 2: Measuring & Taping Pattern
-
Calculate stripe width:
Measure the total width of your wall. To replicate the image, aim for wide stripes (Cream and Terracotta) that are roughly 8-10 inches wide. The thin Sage pinstripes should be about 0.5 to 1 inch wide. -
Establish the layout:
I like to sketch the pattern on a piece of paper first to ensure the stripes end evenly at the corners. Adjust the width slightly if needed so you don’t end up with a tiny sliver of color at the wall’s edge. -
Mark vertical guides:
Using your measuring tape and pencil, make small tick marks along the top of the wall to denote where every stripe transition occurs. -
Draw plumb lines:
Use a laser level (or a long level and straightedge) to lightly draw vertical pencil lines down the wall at your tick marks. These lines represent the edges of your stripes. -
Tape the thin stripes first:
Apply tape along the *outside* edges of where the thin Sage lines will go. Essentially, you are masking off the wide areas to paint the thin lines first. Press the tape edges down firmly. -
Seal the tape:
Paint a thin layer of the *base color* (Cream) over the edge of the tape. This seals the tape and ensures any seep-through matches the base, giving you razor-sharp lines later. -
Paint the pinstripes:
Using a 1-inch brush or small roller, fill in the narrow gaps with the Sage Green paint. Two light coats are better than one heavy one. -
Remove pinstripe tape:
While the Sage paint is still slightly tacky, carefully peel off the tape. Let this dry completely (overnight is best) before taping over it for the next phase.
Level Up: Texture
For a more organic, plaster-like look seen in high-end design, mix a texture additive into the Terracotta paint or apply it with a limewash brush using X-strokes instead of a roller.
Step 3: The Terracotta Bands
-
Mask for wide stripes:
Now you need to tape off the Cream sections and the Sage pinstripes to expose the areas for the Terracotta. Use delicate surface tape here since you act placing it over fresh paint. -
Protect the pinstripe:
Place tape directly over your dried Sage pinstripes or right next to them, depending on if you want a white gap between colors. In the reference image, there is a tiny white gap, so place your tape about 1/4 inch away from the green line into the ‘Terracotta’ zone. -
Double-check placement:
Verify your pattern. You should have exposed vertical columns where the Terracotta paint will go. The Cream and Sage areas should be covered. -
Seal again:
Just like before, seal the tape edges with a quick brush of the Cream base coat to prevent bleeding. -
Roll the accent color:
Use a 4-inch roller to apply the Terracotta/Rust paint into the exposed columns. A smaller roller gives you more control and prevents accidentally rolling onto the ceiling or trim. -
Second coat:
Apply a second coat of Terracotta once the first is dry to the touch to ensure rich, opaque coverage. -
The final reveal:
Slowly peel back the tape at a 45-degree angle while the paint is still slightly damp. This prevents the dried paint film from ripping.
Step back and admire how this structured yet colorful design completely expands the feeling of your space


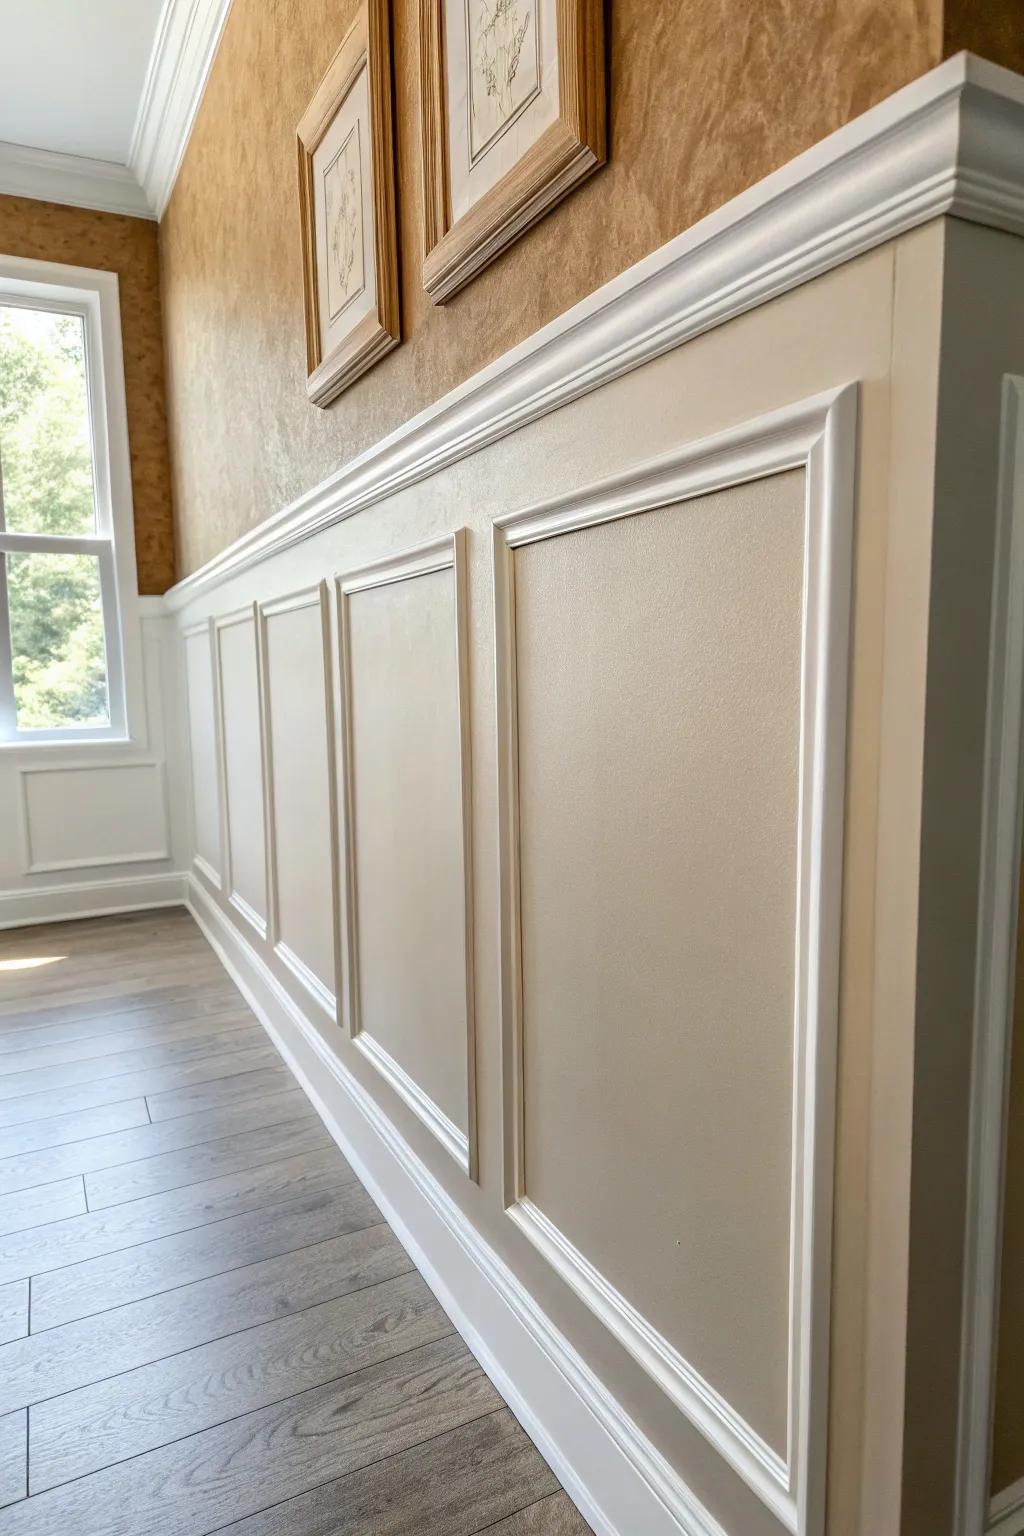
Cheerful Half-Wall Paint Line
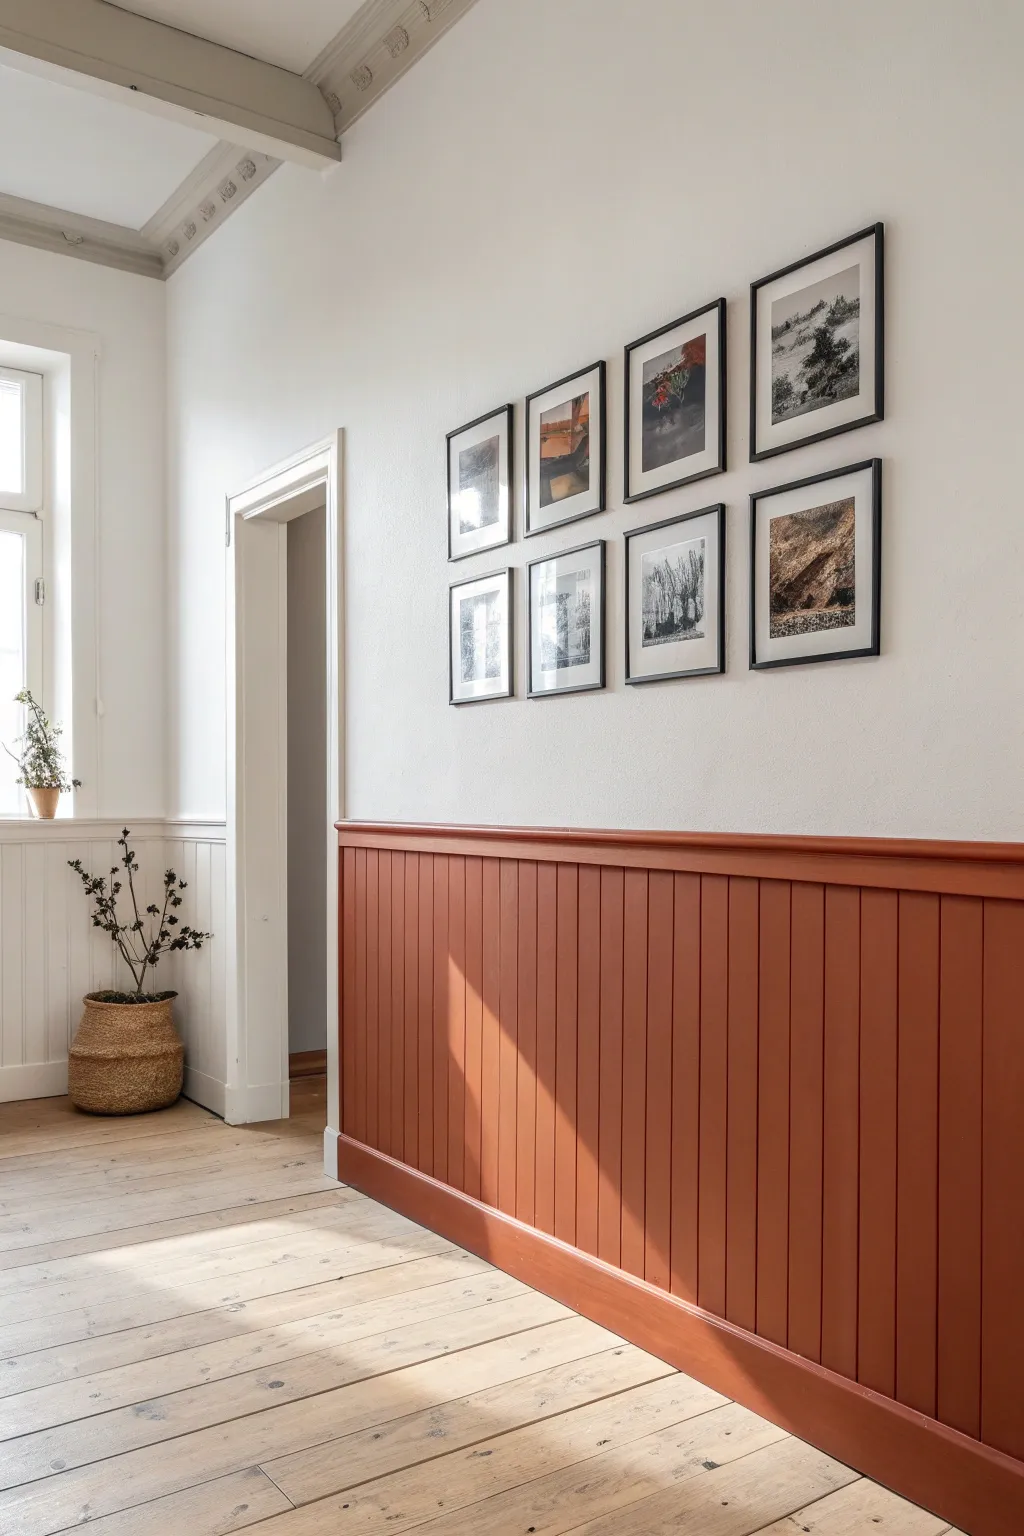
Transform a plain hallway into a warm, architectural feature with this classic beadboard wainscoting project. The earthy terra cotta tone grounds the space while adding vertical texture, creating a sophisticated gallery-like atmosphere for your home.
Step-by-Step Tutorial
Materials
- Beadboard paneling sheets or tongue-and-groove planks
- Top cap molding (chair rail)
- Baseboard molding
- Construction adhesive (e.g., Liquid Nails)
- Finishing nails & nail gun
- Wood filler
- Caulk & caulk gun
- Fine-grit sandpaper (220-grit)
- Primer (for wood)
- Interior semi-gloss or satin paint (Terra Cotta/Burnt Orange color)
- Paintbrush (2-inch angled sash)
- Paint roller & tray
- Painter’s tape
- Level
- Tape measure
- Circular saw or jigsaw
Step 1: Preparation & Wall Layout
-
Measure twice:
Determine the desired height for your half-wall. A standard wainscoting height is around 32 to 36 inches from the floor, but adjusting it to roughly one-third of your total ceiling height usually looks best visually. -
Establish a level line:
Using a long level or a laser level, mark a horizontal reference line around the entire perimeter of the room at your chosen top height. This ensures your paneling stays straight even if the floor dips. -
Remove existing trim:
Carefully pry off the existing baseboards. If you plan to reuse them, pull the nails through the back to avoid damaging the front face; otherwise, discard them to make room for the new paneling. -
Locate studs:
Use a stud finder to mark the location of wall studs. Mark these lightly above your level line so you can see them later when nailing up the boards.
Uneven Gaps?
If your floor is sloped, don’t force the panel down. Install it level at the top guide line and let a gap remain at the bottom; the baseboard molding will cover this gap perfectly.
Step 2: Installing the Wainscoting
-
Cut panels to size:
Measure and cut your beadboard sheets or tongue-and-groove planks to fit snugly between the floor and your marked level line. Remember to account for electrical outlets by measuring and cutting careful notches with a jigsaw. -
Apply adhesive:
Apply a zigzag of construction adhesive to the back of your first panel. This helps prevent the thin board from bowing away from the wall over time. -
Secure the panels:
Press the panel against the wall, checking for plumb with your level. Secure it by shooting finishing nails into the studs and along the top and bottom edges where molding will eventually cover them. -
Continue installation:
Work your way along the wall, butting sheets or locking planks tightly together. I find using a scrap block of wood and a hammer helps tap tongue-and-groove planks together without damaging the edges.
Silky Smooth Finish
Sand lightly between coats of paint with very fine sandpaper (320-grit) or a brown paper bag. It knocks down any dust nibs for a professional, furniture-grade feel.
Step 3: Trim & Finish Work
-
Install baseboards:
Measure, cut, and install the baseboard molding over the bottom edge of the paneling. Nail into the studs for a secure hold. -
Add the chair rail:
Place the top cap molding (chair rail) along the top edge of the wainscoting. This piece is crucial as it hides the raw cut edge of the beadboard and creates a finished shelf-like appearance. -
Fill the holes:
Apply a dab of wood filler to every nail hole. Overfill slightly, as the fill tends to shrink when it dries. -
Sand smooth:
Once the filler is dry, sand the spots flat with fine-grit sandpaper. Vacuum away all dust from the grooves and ledges. -
Caulk the seams:
Run a thin bead of finish caulk along all seams—where the molding meets the wall, where the molding meets the beadboard, and corners. Smooth it with a wet finger for a seamless look.
Step 4: Painting
-
Protect the walls:
Apply painter’s tape along the wall just above the chair rail to ensure a crisp line. Press the tape edge down firmly to prevent bleed-through. -
Apply primer:
Roll or brush a coat of high-quality wood primer over the entire wainscoting surface, including the trim. This is essential for raw wood or MDF to ensure the topcoat adheres evenly. -
Cut in edges:
Dip your angled brush into the terra cotta paint and carefully ‘cut in’ along the edges, corners, and deep inside the beadboard grooves where a roller won’t reach. -
Roll the flat surfaces:
Use a small foam or low-nap roller to apply paint to the flat faces of the paneling. This helps achieve a smooth finish without heavy brush marks. -
Second coat application:
Allow the first coat to dry completely according to the can’s instructions, then apply a second coat for full, rich color saturation. -
Remove tape:
Ideally, peel off the painter’s tape while the final coat is still slightly tacky. Pull the tape away from the paint line at a 45-degree angle.
Step back and enjoy the instant warmth and architectural character this bold half-wall brings to your space


Painted Arch Accent Nook
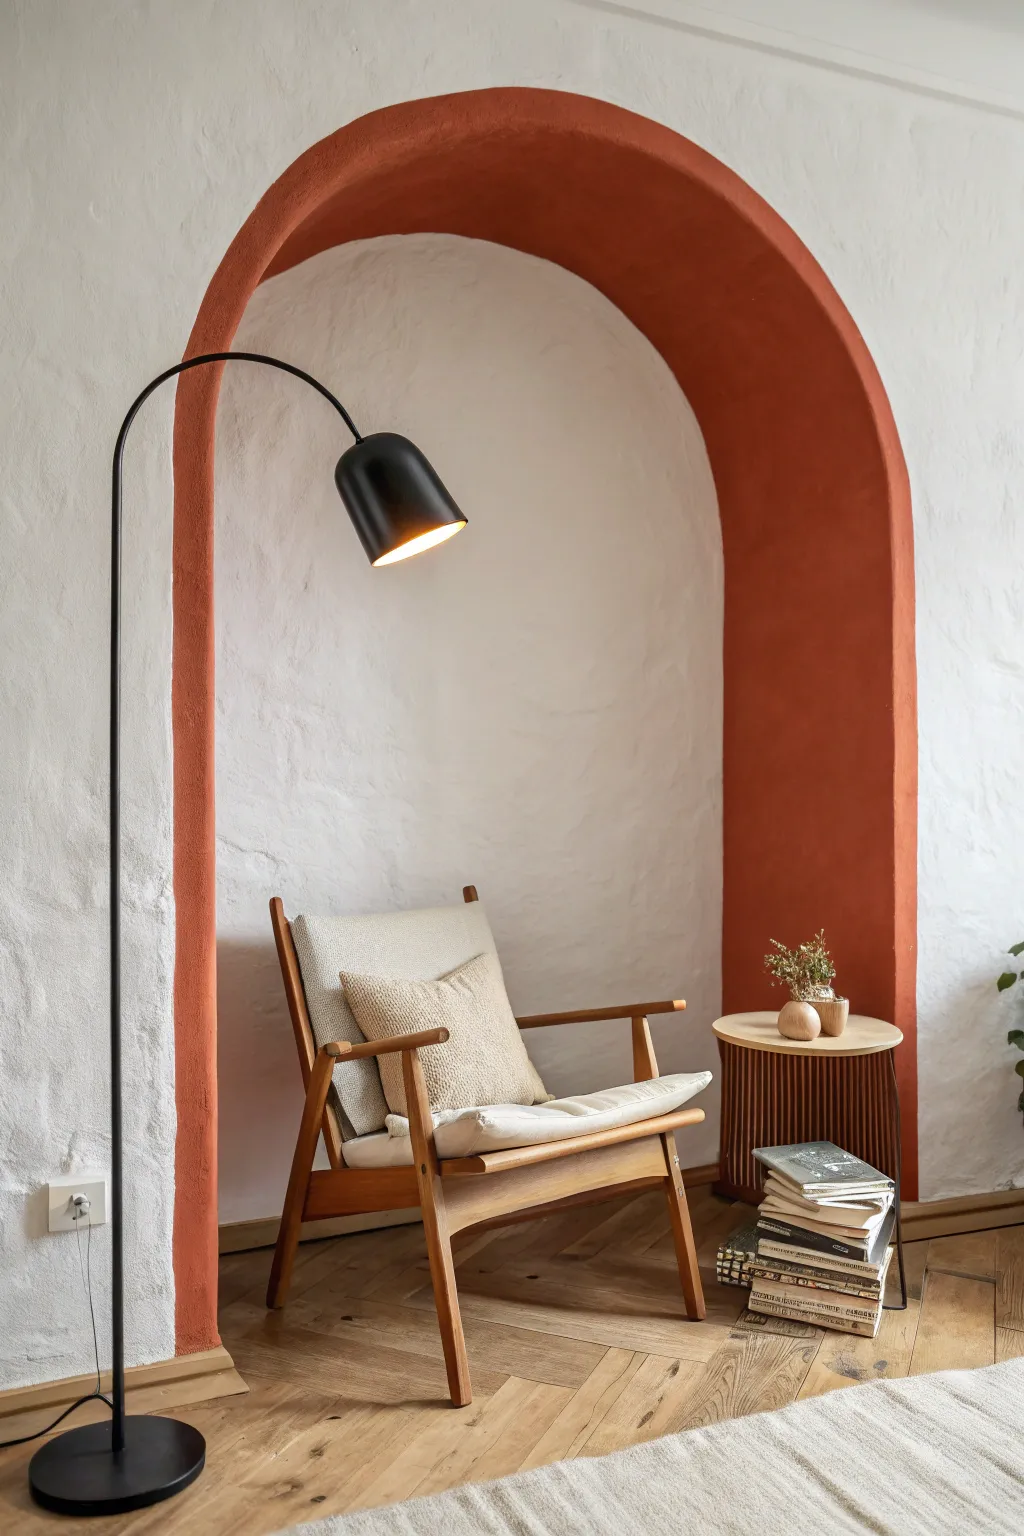
Transform a plain corner into a cozy, Mediterranean-inspired reading nook with this simple painted arch project. The warmth of the terracotta tone against crisp white textured walls creates an instant focal point that feels architectural without any actual construction.
Detailed Instructions
Materials
- Terracotta or burnt orange interior latex paint (matte or eggshell finish)
- Painter’s tape (high quality)
- Pencil
- String or twine (non-stretchy)
- Push pin or tape measure
- Small angled sash brush (1.5 to 2 inch)
- Small foam roller and tray
- Level
- Drop cloth
- Eraser or damp cloth
Step 1: Preparation & Planning
-
Clear the area:
Move furniture away from the wall you intend to paint. This project requires room to swing your makeshift compass, so clear a generous workspace and lay down your drop cloth to protect the floor. -
Determine dimensions:
Decide on the width of your arch. For a reading nook like this, measure your chair first; you’ll want the arch to extend at least 6-10 inches beyond the chair on both sides for visual balance. -
Mark the sides:
Using a tape measure and a level, draw two long vertical lines lightly in pencil to mark the outer edges of the arch’s legs. Ensure they are perfectly plumb so your arch doesn’t look like it’s leaning. -
Determine the thickness:
This specific design features a thick, visible border rather than a filled-in shape. Measure inward about 4 to 6 inches from your outer lines and draw two inner vertical lines parallel to the outer ones. -
Find the center point:
Measure exactly halfway between your two outer vertical lines. Mark this center point at the height where you want the curve of the arch to begin.
Step 2: Drafting the Arch
-
Create a compass:
Tie a piece of string to a pencil. Measure the string so its length matches the distance from your center point to the *outer* vertical line. -
Draw the outer curve:
Pin or hold the loose end of the string firmly at the center point mark. Pull the string taut and sweep the pencil upward to connect the left vertical line to the right vertical line, creating a perfect semi-circle. -
Adjust compass for inner curve:
Shorten your string so its length now matches the distance from the center point to the *inner* vertical line. -
Draw the inner curve:
Keep the anchor point in the exact same spot. Sweep the pencil again to draw the smaller, inner semi-circle, connecting your two inner vertical lines.
String Theory
Use non-stretchy twine or fishing line for your compass. Yarn or elastic string will stretch as you pull, causing a wobbly or egg-shaped oval instead of a clean circle.
Step 3: Painting the Details
-
Clean up guidelines:
Step back and check your shape. If the pencil lines seem too dark or messy, gently lighten them with an eraser so the graphite won’t bleed through the paint. -
Cutting in the edges:
Dip your angled sash brush into the terracotta paint. Carefully paint along the pencil lines. I find it easiest to maintain a steady hand by exhaling slowly as I drag the brush along the curve. -
Handle the texture:
If your wall is highly textured like the one in the example, you may need to dab or stipple the brush slightly to get paint into the deeper crevices of the plaster. -
Fill the outline:
Once the edges are defined, use the brush to fill in the space between your lines. Because this is a band rather than a solid block, a brush is often more precise than a roller here. -
Feather the strokes:
Keep a wet edge as you work your way around the arch to avoid lap marks. Use long, smooth strokes that follow the curvature of the arch. -
Assess coverage:
Let the first coat dry completely according to the can’s instructions. Darker earth tones often look patchy after one coat, so don’t panic. -
Apply second coat:
Apply a second coat to ensure a rich, opaque finish. Pay special attention to the edges to keep them crisp without building up a thick ridge of paint. -
Final touch-ups:
Once fully dry, inspect for any white spots where the wall texture might have been missed. Use a tiny artist’s brush to dab paint into these stubborn areas.
Bleed-Through Blues?
On textured walls, tape rarely seals perfectly. Instead of tape, rely on a high-quality angled brush and a slow hand. If you must tape, seal the edge with clear matte medium first.
Now all that’s left is to slide your favorite chair into place and enjoy the defined, artistic vibe of your new corner


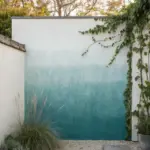
Soft Ombre Wall Fade
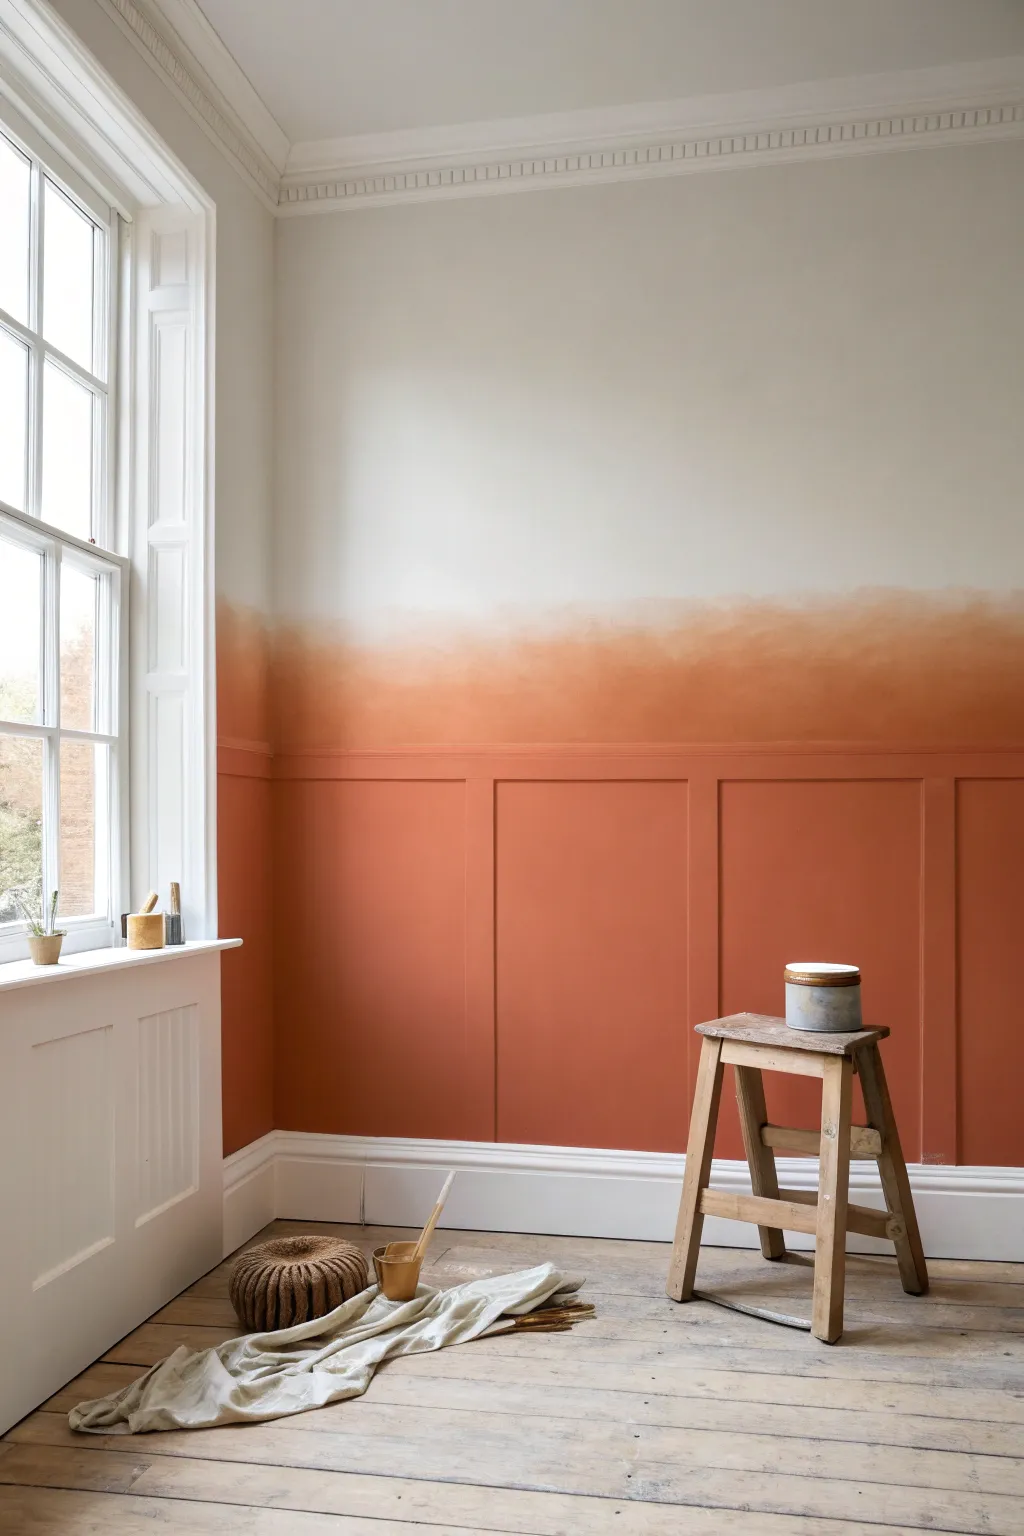
Transform a plain wall into a warm, inviting masterpiece with this soft ombre technique that mimics a hazy sunset. By combining traditional wainscoting with a modern, blended paint effect, you create a sophisticated look that feels both grounded and ethereal.
How-To Guide
Materials
- Terracotta or burnt orange interior wall paint (matte or eggshell)
- White or off-white interior wall paint (color matched to upper wall)
- Painter’s tape
- Drop cloth
- Panel molding strips (optional, for wainscoting look)
- Wood glue and finishing nails (if adding molding)
- Caulk and caulk gun
- Paint roller and tray
- 2-inch angled sash brush
- 4-inch blending brush or large dry brush
- Spray bottle with water
- Clean lint-free rags
- Mixing bucket or pails
Step 1: Preparation and Base
-
Clear and Protect:
Move furniture away from the wall and lay down a drop cloth to protect your floors. If possible, remove baseboards for a cleaner finish, or tape them off meticulously if they are staying in place. -
Install Wainscoting (Optional):
If your wall is flat and you want the paneled look shown, measure and cut panel molding to create large rectangular boxes along the lower half of the wall. Attach them using wood glue and finishing nails. -
Caulk and Fill:
Fill any nail holes and caulk the seams where the molding meets the wall. Smooth the caulk with a wet finger and let it dry completely before proceeding. -
Clean the Surface:
Wipe down the entire wall to remove dust and grease. This ensures the best possible adhesion for your specific paint choice.
Paint drying too fast?
Add a paint conditioner or extender (like Floetrol) to your acrylic latex paint. It slows drying time significantly, giving you extra minutes to perfect that seamless blend.
Step 2: Applying the Solid Color
-
Define the Horizon:
Decide where you want your solid color to fade out. In the image, this is about 6-10 inches above the top wainscoting rail. Mark this line lightly with a pencil. -
Cut In Edges:
Using your sash brush and the terracotta paint, cut in along the baseboards, corners, and around the molding squares. Be thorough getting paint into the crevices of the paneling. -
Roll the Lower Section:
Use a roller to fill in the lower wall and paneling with the terracotta paint. Apply an even coat up to your pencil mark, but don’t worry about a crisp top edge yet. -
Second Coat:
Let the first coat dry according to the can’s instructions. Apply a second coat to ensure a rich, opaque finish on the lower section.
Level Up: Texture Play
Use a lime wash paint for the terracotta section instead of standard latex. The natural variations in lime wash add incredible depth and make the ombre feel even more organic.
Step 3: Creating the Ombre Fade
-
Mix a Mid-Tone:
In a separate container, mix equal parts of your terracotta paint and your white (upper wall) paint. This intermediate shade will help bridge the gap between the two colors. -
Apply the Transition Strip:
Paint a horizontal strip of the mixed mid-tone right above your solid terracotta line, roughly 4-6 inches wide. Work in sections of about 3 feet at a time so the paint stays wet. -
Add Wet White Paint:
Immediately paint a strip of the pure white wall color above the mid-tone strip. -
Blend Upwards:
While all strips are still wet, take a clean, dry blending brush. Use quick, cross-hatch (X-shaped) motions to blend the white paint down into the mid-tone. -
Blend Downwards:
Wipe your brush off on a rag. Now, blend the bottom of the mid-tone strip down into the solid terracotta section using the same cross-hatch motion. The goal is to maximize the blur. -
Create the Haze:
For that cloudy, soft look, I like to lightly mist the wall with water if the paint is drying too fast. Use the dry brush to feather out harsh lines, working horizontally across the wall. -
Assess and Adjust:
Step back frequently to look at the blend from a distance. If an area looks too heavy, dab it with a clean rag or add a touch of the lighter paint to soften it. -
Final Feathering:
once the big blend is done, take a very dry brush and lightly whisk over the entire transition area one last time to soften the texture.
Step 4: Finishing Touches
-
Clean Up:
Remove painter’s tape carefully while the paint is still slightly tacky to prevent peeling. -
Touch Ups:
Inspect the wainscoting for any drips or missed spots and touch them up with a small artist’s brush. -
Dry Time:
Allow the wall to cure fully—usually 24 hours—before moving furniture back or leaning anything against it.
Enjoy the gentle warmth and artistic flair this custom wall brings to your favorite room
BRUSH GUIDE
The Right Brush for Every Stroke
From clean lines to bold texture — master brush choice, stroke control, and essential techniques.
Explore the Full Guide
Hand-Painted Polka Dot Party
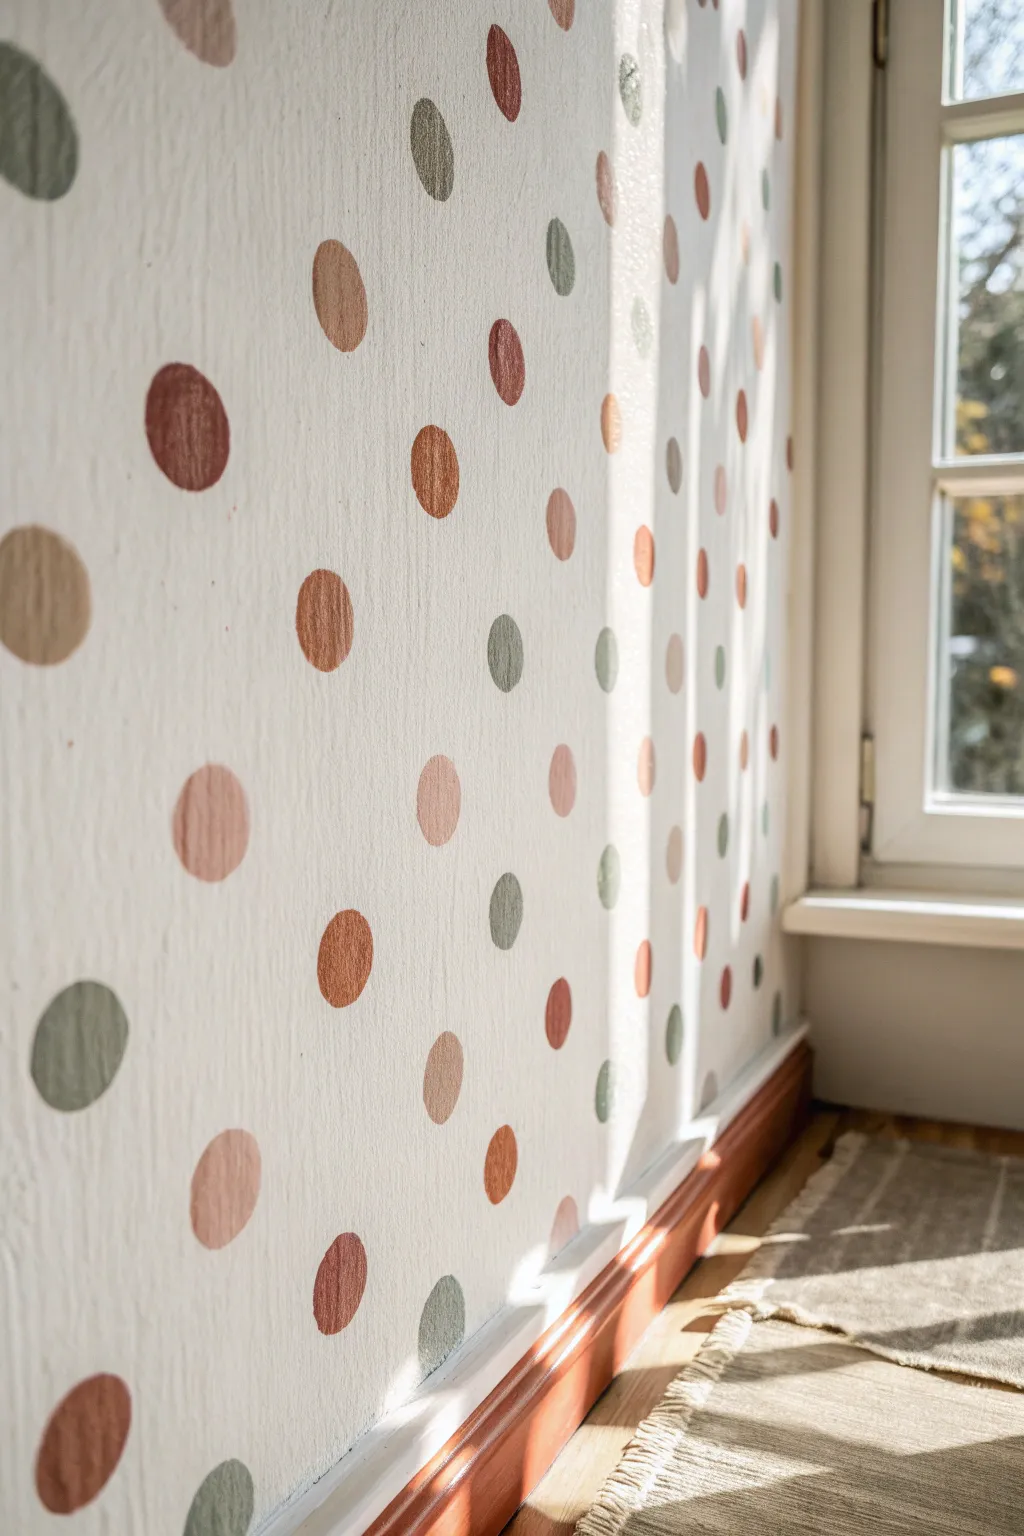
Transform a plain white wall into a playful yet sophisticated feature with these freehand earthy polka dots. This project embraces imperfection, using warm terracotta, sage, and blush tones to create a cozy, organic rhythm.
Step-by-Step Guide
Materials
- Interior wall paint (white base)
- Acrylic sample pots or wall paint testers (Terracotta, Sage Green, Blush Pink, Burnt Umber, Deep Brown)
- Round artist brushes (sizes 8-12)
- Small round sponge pouncer (optional, for guidelines)
- Painter’s tape
- Drop cloth
- Paper plate or painting palette
- Pencil
- Bubble level (optional)
Step 1: Preparation
-
Clean the surface:
Start by wiping down your wall with a damp cloth to remove any dust or grease, ensuring the paint adheres properly. -
Protect the area:
Lay down a drop cloth along the baseboards to catch any stray drips. -
Tape the edges:
Apply painter’s tape to the baseboards, ceiling line, and adjacent walls or door frames to keep your edges crisp. -
Base coat check:
If your wall isn’t already a fresh white or cream, apply a base coat of interior latex paint and let it dry completely before starting the artwork.
Circle Technique
Instead of outlining a circle and filling it in, place your brush in the center and spiral outward. This creates a smoother shape with nice texture.
Step 2: Planning the Pattern
-
Visualize the spacing:
Look at the wall and decide on the general density of your dots. For this look, the dots are spaced roughly 6-10 inches apart in a loose, staggered formation. -
Mark anchor points:
Using a pencil very lightly, mark small ‘x’ spots where you want your main dots to go. Don’t measure perfectly; the charm lies in the organic placement. -
Stagger the rows:
As you move up the wall, offset the next row of marks so they sit in the gaps of the row below, rather than in a stiff grid. -
Review the layout:
Step back across the room to check the balance of your pencil marks, filling in any large empty spaces or erasing marks that look too clustered.
Step 3: Painting the Dots
-
Prepare the palette:
Pour a small amount of each paint color (terracotta, sage, blush, umber) onto your paper plate, keeping them separate. -
Start with the dominant color:
Load a round brush with your first color (e.g., terracotta). I find it easiest to work one color at a time to maintain an even distribution. -
Paint the first set:
Paint circles over roughly 20% of your pencil marks. Don’t worry about perfect circles; a slightly wobbly, hand-painted edge adds to the boho aesthetic. -
Vary the sizes slightly:
While most dots should be about 1.5 to 2 inches in diameter, intentionally make some slightly smaller and others slightly larger for visual interest. -
Switch colors:
Rinse your brush thoroughly (or grab a fresh one) and move to the sage green. Paint another 20% of the spots, aiming to scatter them away from each other. -
Add the blush tones:
Continue the process with your blush pink paint, filling in the next set of available pencil marks. -
Incorporate the dark accents:
Use the burnt umber or deep brown for the remaining spots. These darker dots act as grounding elements, so ensure they are well-distributed. -
Check density:
Stand back again. If you see gaps that feel too empty, simply paint a new dot in a color that isn’t immediately adjacent to it. -
Opacity check:
Some colors, especially the lighter blush tones, might look streaky at first. Once the first layer is dry to the touch, dot a second coat on top if needed.
Texture Twist
Mix baking soda into your acrylic paint before applying the dots. This creates a chalky, plaster-like texture that looks amazing in sunlight.
Step 4: Finishing Touches
-
Clean up edges:
If you painted any half-dots near the baseboards or corners, carefully peel the tape while the paint is still slightly tacky to prevent peeling. -
Erase guidelines:
Once the paint is 100% dry, gently erase any visible pencil marks that peek out from behind the dots.
Enjoy the whimsical, hand-crafted warmth your new polka dot wall brings to the room
Scalloped Border for Whimsy
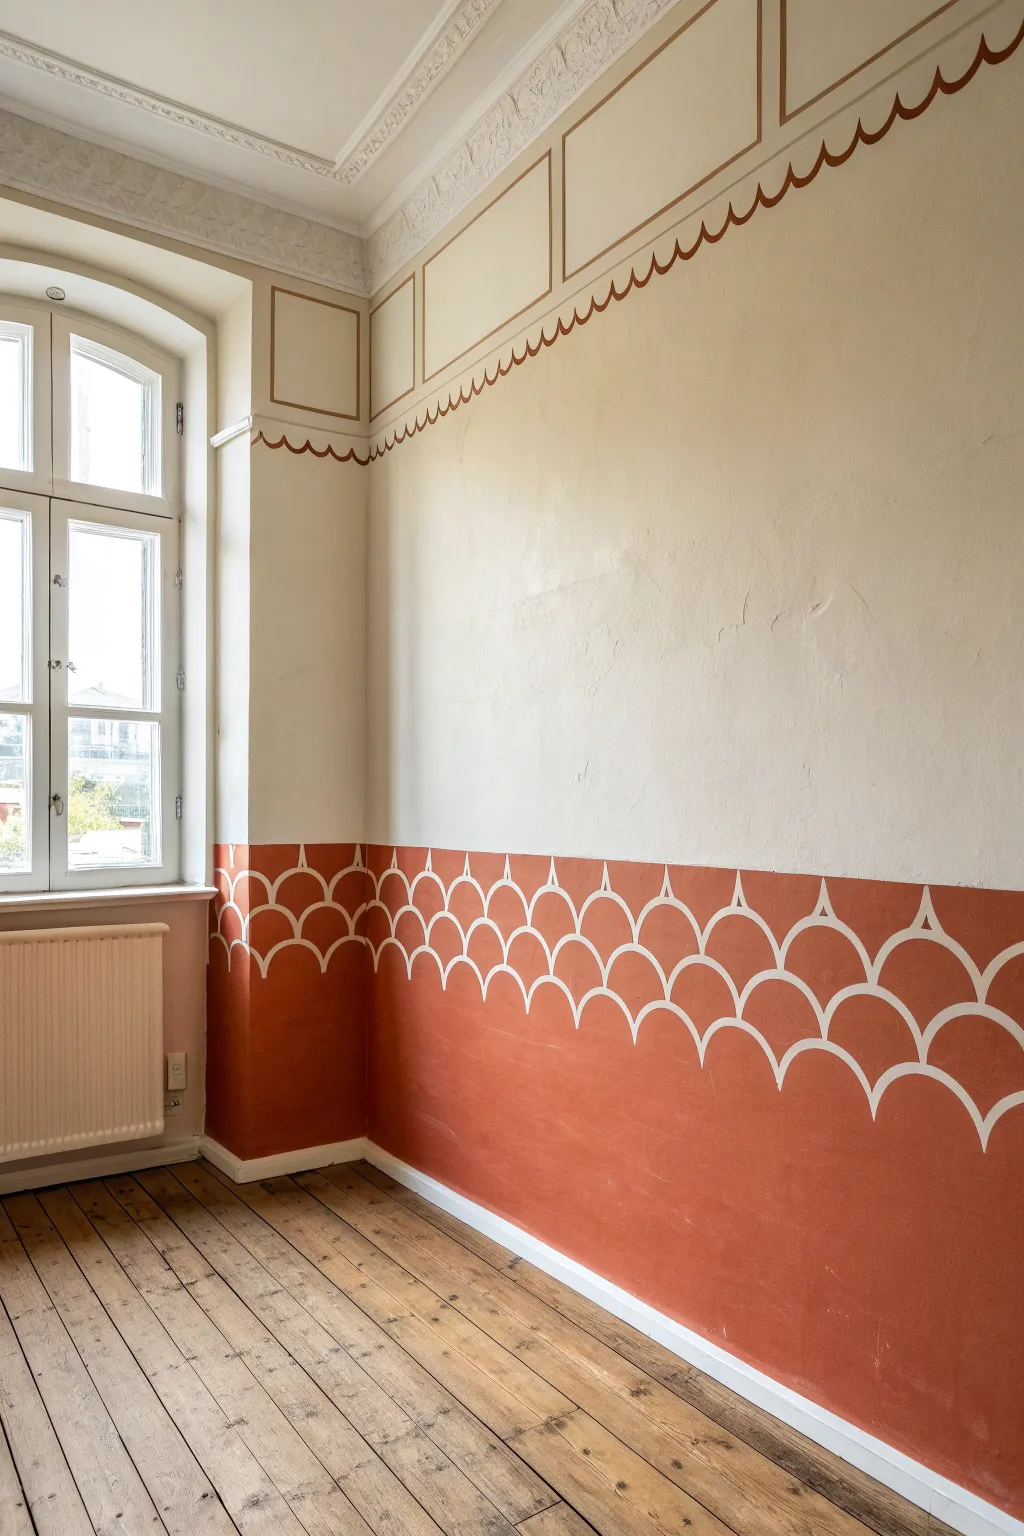
Add a touch of playful character to a room with this dual-tone scalloped wall design. By pairing a grounded terracotta wainscoting with a delicate matching frieze near the ceiling, you create architectural interest without needing any woodwork.
Detailed Instructions
Materials
- Terracotta colored interior latex paint (matte or eggshell)
- Cream/Off-white colored interior latex paint (base color)
- Medium-sized round stencil sponge or paintbrush
- Cardboard or stencil film (for making templates)
- Painter’s tape (low tack)
- Laser level or spirit level
- Pencil
- Scissors or craft knife
- Small artist brush (for touch-ups)
- Paint roller and tray
Step 1: Preparation & Base Coat
-
Prepare the room:
Clear furniture away from the walls and lay down drop cloths to protect that beautiful wooden flooring. Mask off baseboards, window frames, and the ceiling edge with painter’s tape. -
Apply the base color:
Before starting the design, ensure your walls have a fresh, solid coat of the cream/off-white base color. Roll two coats if necessary for full coverage. -
Let it cure:
Allow the base coat to dry completely, preferably overnight. This is crucial so your pencil marks don’t dig into soft paint and tape doesn’t pull it up later.
Curve Control
For the most consistent curves on the bottom section, consider tracing a dinner plate or vinyl record. The rigidity works better than cardboard.
Step 2: Creating the Stencils
-
Measure the template:
Decide on the width of your scallops. A 6-inch diameter is a good standard size. Draw a semi-circle of this size onto your cardboard or stencil film. -
Cut the wainscoting template:
Cut out the positive shape (the semi-circle itself) to use for tracing the lower border. -
Create the delicate frieze template:
For the upper border near the ceiling, create a smaller template, perhaps 3-4 inches wide, cutting a negative stencil (a hole in the card) if you plan to sponge it, or a positive shape if you plan to trace and hand-paint.
Uneven Spacing?
If your wall length doesn’t divide perfectly by your stencil width, slightly adjust the spacing between the last few scallops in the corner so it’s less noticeable.
Step 3: Marking the Guides
-
Establish the horizon line:
Determine how high you want the solid terracotta color to go. Use a laser level to project a straight horizontal line around the room at this height and lightly mark it with a pencil. -
Mark the scallop peaks:
Position your large semi-circle template so the flat bottom aligns with your pencil line. I find it helpful to mark the top of the curve lightly all the way along the wall to ensure even spacing. -
Trace the curves:
Using the template, trace the full scalloped line carefully. If you reach a corner and the pattern doesn’t fit perfectly, gently bend the cardboard template into the corner to continue the line seamlessly.
Step 4: Painting the Wainscoting
-
Cut in the edges:
Using a high-quality angled sash brush, carefully paint the outline of the scallops. Go slowly here—this crisp line defines the look. -
Fill the body:
Once the detailed edge is cut in, use a roller to fill the large solid area below the scallop line with your terracotta paint. -
Add the defining line (optional):
Looking at our inspiration, there is a thin white outline creating a ‘fish scale’ effect above the solid block. To achieve this, use a small artist brush and the base cream color to paint thin arches over the terracotta scallops after the main block is dry. -
Second coat:
Apply a second coat of terracotta to the lower section to ensure a rich, opaque finish.
Step 5: The Ceiling Frieze
-
Mark the upper guide:
Measure a consistent distance down from the ceiling molding (about 12-18 inches) to establish where your thin floating border will sit. -
Trace the upper pattern:
Using your smaller template, trace a single line of scallops. Unlike the bottom, this is just a line, not a filled shape. -
Paint the floating line:
Use a small round brush or a lining brush to paint over your pencil marks with the terracotta color. Keep the pressure even to maintain a consistent line thickness. -
Add the frame box:
To mimic the paneled look in the photo, use a long level to draw and then paint thin straight lines forming rectangular boxes above the scalloped frieze.
Step 6: Clean Up
-
Erase guidelines:
Once the paint is fully hard and dry, gently erase any visible pencil marks with a white vinyl eraser. -
Remove tape:
Peel off the painter’s tape from the baseboards and ceiling while the paint is still slightly tacky to prevent peeling.
Step back and enjoy the bespoke, architectural feel you’ve added to the space with just paint and patience

PENCIL GUIDE
Understanding Pencil Grades from H to B
From first sketch to finished drawing — learn pencil grades, line control, and shading techniques.
Explore the Full Guide
Running Stripe Around the Room
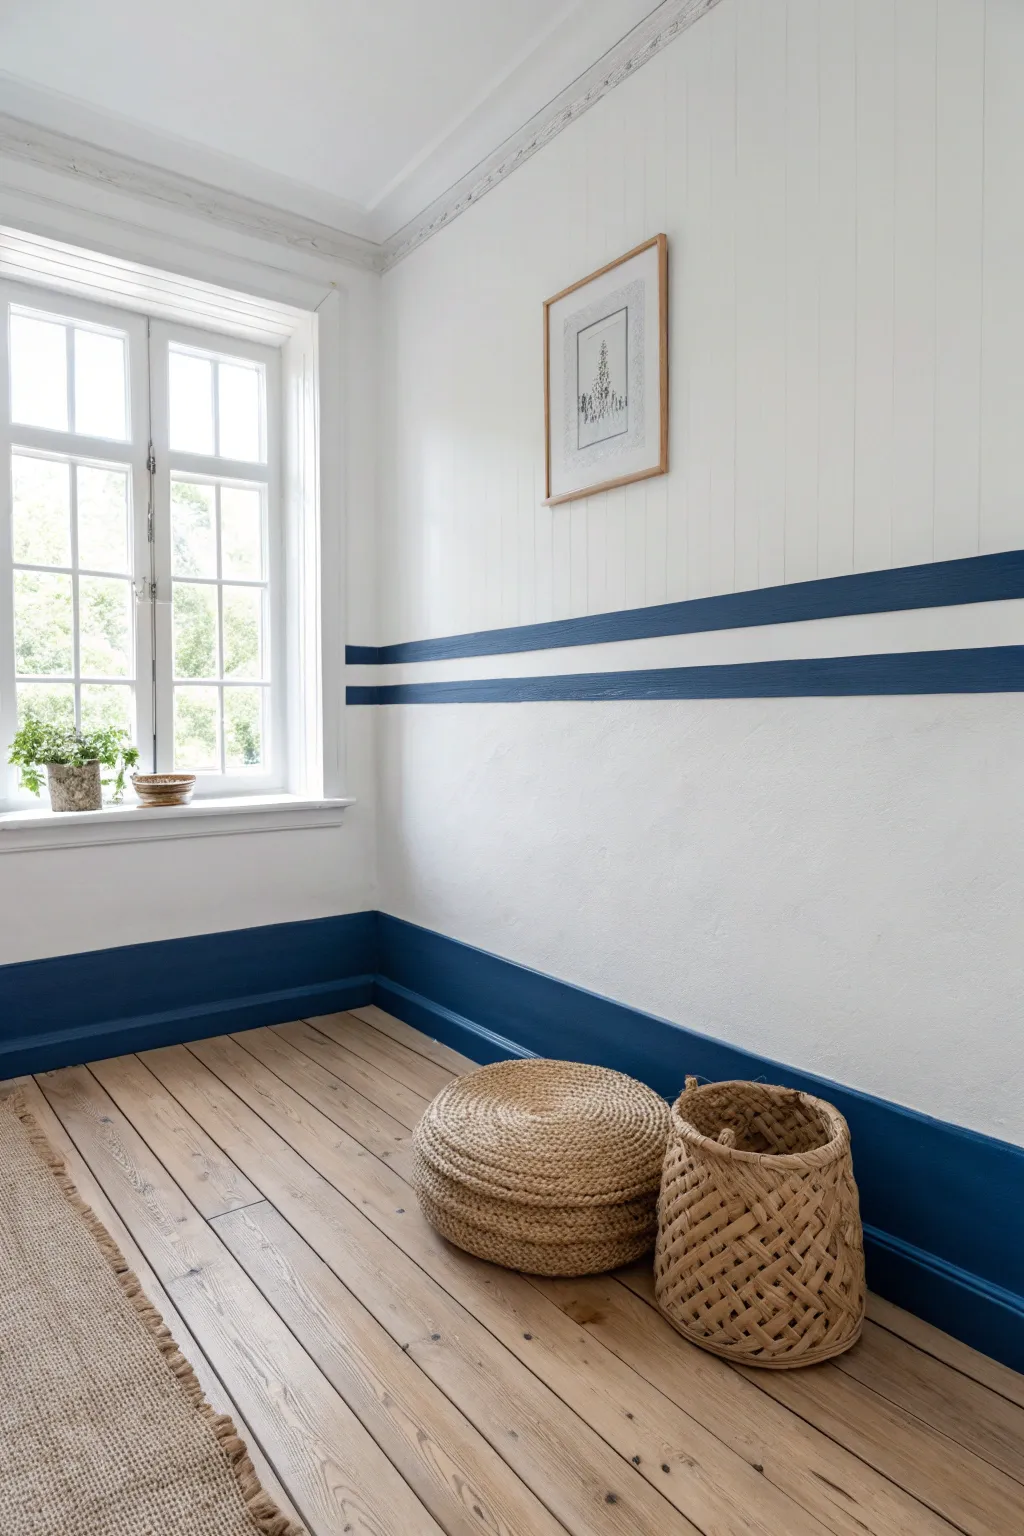
Transform a plain white room into a coastal-inspired haven with these crisp, graphic navy lines. This project combines a bold, extended baseboard with dual floating stripes to add architectural interest and horizontal movement without overwhelming the space.
How-To Guide
Materials
- High-quality painter’s tape (multi-surface)
- White wall paint (matching existing wall color)
- Deep navy blue latex paint (satin or semi-gloss finish)
- Measuring tape
- Laser level (highly recommended) or long spirit level
- Pencil
- Angled sash brush (2-inch)
- Small foam roller and tray
- Drop cloths
- Damp rag for cleanup
- Sanding block (fine grit)
Step 1: Preparation & Baseboard
-
Clean the surfaces:
Start by wiping down your walls and baseboards with a damp rag to remove dust and grime. Paint adheres best to clean, dry surfaces, so don’t skip this quick step. -
Protect the floor:
Lay down drop cloths and carefully apply painter’s tape along the floor edge where it meets the baseboard to catch any drips. -
Mark the baseboard height:
To achieve the extended baseboard look shown in the photo, measure about 2-3 inches above your existing skirting board. Mark this height at intervals along the wall. -
Tape the extended line:
Connect your marks using painter’s tape. Ensure this line is perfectly straight—a laser level is fantastic here, but a spirit level works too. Press the tape edge firmly. -
Seal the tape edge:
Brush a very thin layer of your *white* wall paint over the edge of the tape. This trick seals the tape and prevents the blue paint from bleeding underneath. -
Paint the baseboard zone:
Once the seal is dry, paint the baseboard and the wall strip below the tape with your deep navy blue. Use a brush for grooves and a small roller for flat areas. -
Apply a second coat:
Let the first coat dry according to the can’s instructions, then apply a second coat for a rich, opaque finish.
Bleed-Through Blues?
If paint seeped under the tape, don’t panic. Wait for it to dry completely, then use a small, stiff artist’s brush and your original white wall paint to touch up the edges.
Step 2: Creating the Floating Stripes
-
Determine stripe height:
Measure up from the floor to your desired height for the lower stripe—around 36-40 inches is standard for a chair rail effect. -
Set up the laser level:
Turn on your laser level and align it with your mark. This beam will be your guide for the entire room, ensuring the stripes meet perfectly in the corners. -
Tape the lower stripe:
Apply two rows of painter’s tape to define the first stripe. The space between them should be about 1.5 to 2 inches wide. -
Measure the gap:
Measure exactly 2 inches up from the top of your first tape band. This will be the white negative space between the two blue stripes. -
Tape the upper stripe:
Apply tape for the second, upper stripe. Keep this stripe the same width as the lower one for symmetry. -
Seal the stripe edges:
Just like the baseboard, brush a light coat of white paint over the edges of all four tape lines. I find this extra minute saves so much frustration later. -
Paint the stripes:
Using a small brush or mini foam roller, fill in the space between the tape lines with your navy paint. Use a light hand to avoid ridges. -
Double check coverage:
Apply a second coat once the first is dry to the touch, ensuring the color is solid and consistent. -
Remove tape promptly:
Peel off the tape while the final coat of paint is still slightly tacky. Pull slowly at a 45-degree angle away from the painted area for the crispest line.
Add Dimension
Install a thin wooden molding directly over the painted stripes for a 3D chair rail effect. Paint the wood the same navy blue to blend seamlessly with the wall art.
Enjoy the crisp, nautical rhythm these stripes bring to your room
Oversized Checkerboard Statement

Transform a plain room into a striking optical playground with this oversized checkerboard accent wall. This high-contrast black and white design creates instant drama and architectural interest, making your space feel modern and playful.
Detailed Instructions
Materials
- Interior latex paint (Eggshell or Satin finish – White base)
- Interior latex paint (Eggshell or Satin finish – distinct Black)
- Painter’s tape (high-quality, specifically for delicate surfaces or sharp lines)
- Laser level or long spirit level
- Pencil
- Measuring tape or yardstick
- Calculator
- Paint roller (9-inch) with a smooth-surface nap (3/8 inch)
- Paint tray and liners
- Angled sash brush (2-inch)
- Plastic drop cloths
- Razor blade
Step 1: Preparation & Planning
-
Clear the area:
Begin by removing all furniture, outlet covers, and wall hangings from the target wall. Lay down a drop cloth to protect your flooring. -
Base coat application:
If your wall isn’t already the desired ‘light’ color of your checkerboard (usually white or cream), paint the entire wall with two coats of your base color. Allow this to cure for at least 24-48 hours before applying any tape. -
Measure the wall:
Measure the total width and height of the wall precisely. Since walls are rarely perfectly square, take measurements at the top, middle, and bottom. -
Calculate square size:
Decide on your grid size. For an ‘oversized’ look like the photo, aim for squares between 18 and 24 inches. Divide your wall width by your desired square size to see how many full squares fit across. -
Adjust the math:
It’s best to have partial squares on the outer edges rather than one tiny sliver on one side. Adjust your starting point so the pattern is centered, leaving equal partial squares on the left and right ends.
Step 2: Mapping the Grid
-
Establish the vertical lines:
Using your laser level, mark your vertical lines from ceiling to floor based on your calculated intervals. lightly trace these lines with a pencil. -
Mark horizontal lines:
Measure down from the ceiling to mark your horizontal rows. Use the level to ensure these are perfectly straight across the wall, intersecting your vertical lines to form a grid. -
Identify the ‘Dark’ squares:
This is crucial to avoid mistakes later: take a small piece of painter’s tape and place a visible ‘X’ inside every single square that will be painted black. Step back and check the pattern to ensure it alternates correctly.
Bleed-Through Blues?
If black paint bled under the tape, wait for it to fully harden. Then, place a piece of tape over the black, and re-paint the white edge carefully to cover the smudge.
Step 3: Taping and Sealing
-
Tape the first set:
Apply painter’s tape along the OUTSIDE edges of the squares marked with an ‘X’. This means the tape itself will sit inside the ‘white’ squares. Run your finger firmly over the tape edges to secure them. -
Seal the tape edges:
Here is a trick I love for crisp lines: brush a very light coat of your *base* wall color (white) over the edge of the painter’s tape. This seals any gaps; if paint bleeds, it will be the white paint bleeding onto white. -
Let the seal dry:
Allow this sealing coat to dry completely to the touch, usually about 30 to 60 minutes.
Pro Tip: The Diagonal Pull
When removing tape, always pull slowly and away from the fresh paint area. If the paint feels stuck or gummy, lightly score the edge with a clean razor blade before pulling.
Step 4: Painting the Checks
-
Cut in the corners:
Using your angled sash brush and the black paint, carefully paint the corners and edges inside the taped-off squares where the roller might not reach efficiently. -
Roll the first coat:
Use the roller to fill in the squares marked with an ‘X’. Apply a thin, even coat of black paint. Don’t overload the roller, as thick paint can seep under tape. -
Second coat application:
Once the first coat is dry to the touch, apply a second coat of black to ensure full opacity and deep color saturation. -
Remove tape while damp:
Do not wait for the paint to fully cure. Carefully peel off the painter’s tape slowly at a 45-degree angle while the second coat is still slightly tacky.
Step 5: Finishing Touches
-
Touch up lines:
Inspect your grid closely. If there are any small bleeds or uneven spots, use a tiny artist’s brush to correct them with the appropriate color. -
Address outlet covers:
Paint your outlet covers to match the square they inhabit. If a cover spans two colors, use tape to continue the line across the plastic plate for a seamless look. -
Clean and reset:
Remove the drop cloths and bring your furniture back in. The graphic nature of the wall pairs perfectly with simple wood tones and greenery.
Step back and admire how this simple geometric change has completely redefined the energy of your room


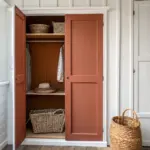
Door and Trim Color Pop Frame
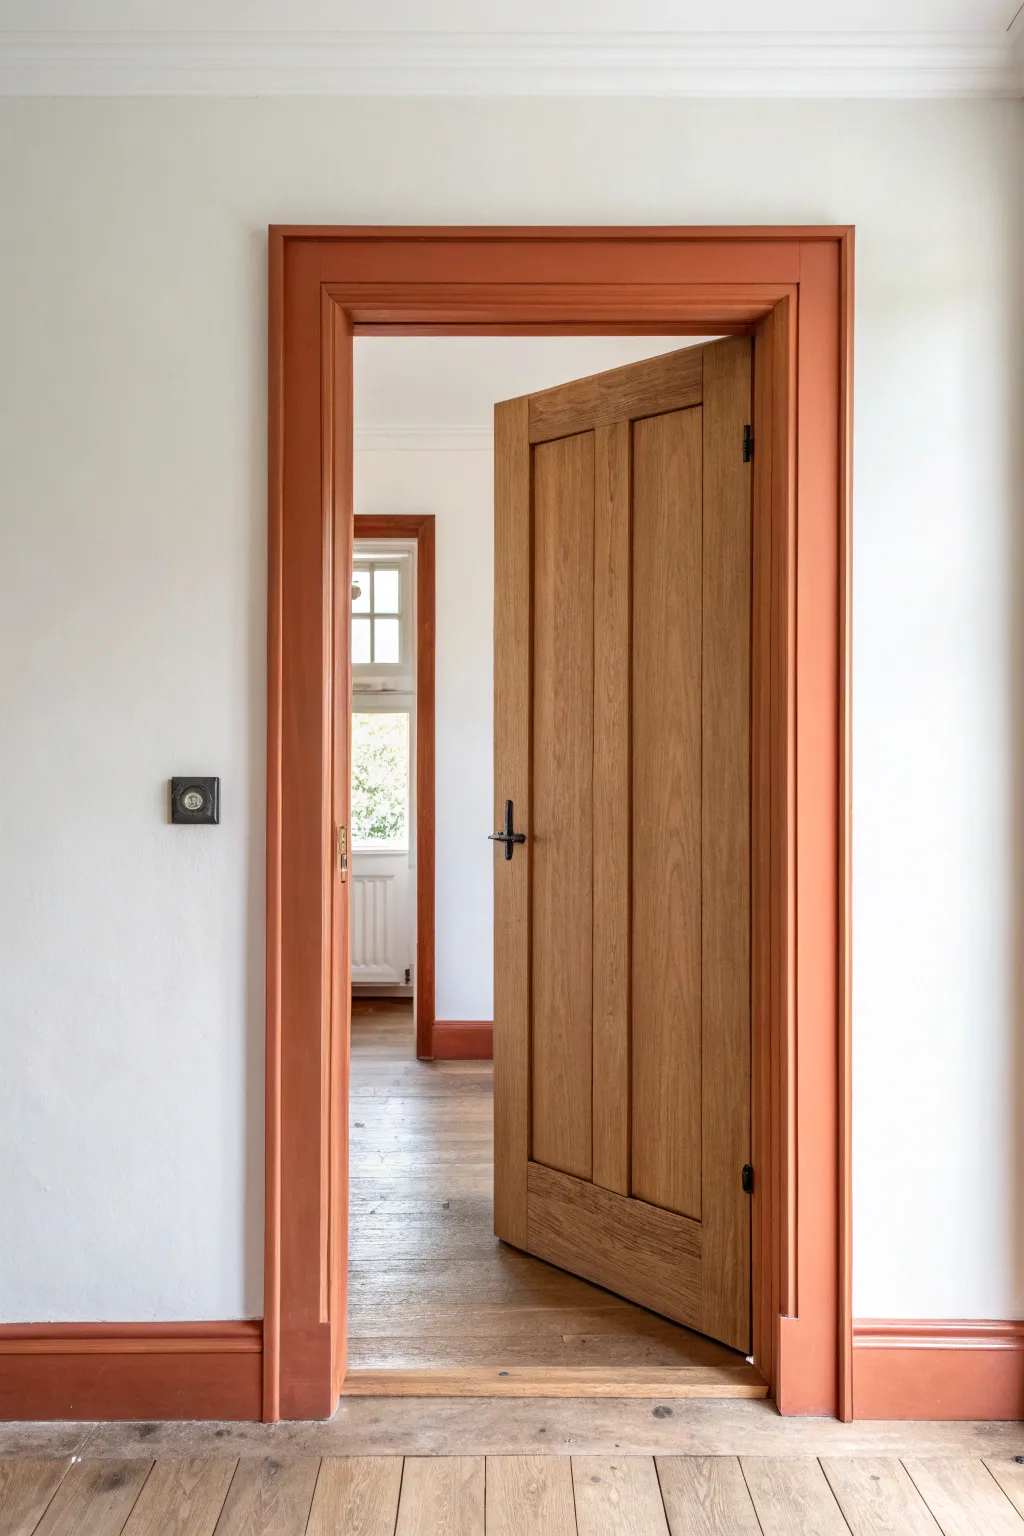
Elevate a simple doorway by framing it with a bold, earthy terracotta hue that adds warmth and architectural interest. This project focuses on painting the door casing, jambs, and baseboards to create a cohesive, contrasting pop of color against neutral walls.
Step-by-Step
Materials
- Interior semi-gloss or satin trim paint (terracotta/burnt orange color)
- High-quality angled sash brush (2-inch)
- Painter’s tape (delicate surface recommended)
- Fine-grit sanding sponge (220 grit)
- Tack cloth
- Drop cloths or masking paper
- Screwdriver (to remove hardware)
- Wood filler (if repairs are needed)
- Primer (if painting over dark colors or bare wood)
- Stir stick
- Step ladder
Step 1: Preparation & Masking
-
Clear the area:
Begin by opening the door completely or removing it from the hinges if you want easier access to the jambs. Place a drop cloth on the floor to catch any drips. -
Remove hardware:
Use a screwdriver to take off the strike plate on the door jamb. It is much cleaner to remove this metal piece than to try painting around it. -
Clean the surface:
Wipe down the door frame, casings, and baseboards with a mild degreaser or soapy water to remove dust and oils. Let it dry completely. -
Sanding:
Lightly scuff sand all the surfaces you intend to paint using the fine-grit sanding sponge. This helps the new paint adhere properly. -
Remove dust:
Wipe away the sanding dust with a tack cloth. I find this step crucial for getting that super smooth finish. -
Apply tape:
Carefully apply painter’s tape to the wall right along the edge of the trim. Also, tape off the floor where the baseboards meet the wood to ensure a crisp line.
Clean Lines
Press the edge of your painter’s tape down firmly with a putty knife or credit card. This prevents paint from bleeding under the tape for a razor-sharp line.
Step 2: Painting the Trim
-
Prime if necessary:
If your current trim is a very dark color or bare wood, apply a coat of primer first. If it’s already white or light-colored, you can likely skip straight to the paint. -
Stir the paint:
Open your terracotta paint and stir it thoroughly to ensure the pigments are evenly distributed. -
Paint the jambs:
Start with the inside of the door frame (the jambs). Use your angled brush to cut in corners and smooth out the paint, working from the top down. -
Paint the header:
Move to the top casing (the header). Apply paint with long, smooth horizontal strokes, feathering the edges to avoid buildup. -
Paint the vertical casings:
Paint the side casings next, starting at the top corner and brushing downwards. Watch for drips that might gather in the decorative grooves of the moulding. -
Paint the baseboards:
Finally, paint the baseboards that connect to the door frame. Keep a wet edge as you move along the floor line to avoid lap marks. -
Let it dry:
Allow the first coat to dry according to the manufacturer’s instructions. This usually takes about 2 to 4 hours.
Step 3: Finishing Touches
-
Apply second coat:
Apply a second coat of paint following the same order: jambs, header, side casings, then baseboards. This ensures full opacity and a rich color depth. -
Inspect for drips:
While the second coat is still wet, do a quick visual check for any runs or drips and smooth them out immediately. -
Remove tape:
Remove the painter’s tape while the paint is still slightly tacky, or wait until it’s fully dry and score the edge with a utility knife to prevent peeling. -
Reinstall hardware:
Once the paint has cured sufficiently (ideally 24 hours to avoid sticking), screw the strike plate back into position.
Color Echo
Use a tiny amount of your trim color to paint just the edge of the door itself, creating a subtle connection between the door and its new colorful frame.
Enjoy the sophisticated warmth your new colorful trim brings to the room
Painted Faux Wainscoting Panels
Transform a plain wall into a sophisticated architectural feature with this faux wainscoting project. By combining simple picture frame molding with a calming two-tone color palette, you can achieve the look of expensive custom woodwork for a fraction of the cost.
Detailed Instructions
Materials
- Baseboard molding
- Chair rail molding
- Picture frame molding (small profile)
- Miter saw (or miter box and hand saw)
- Construction adhesive (Liquid Nails)
- Brad nailer (or hammer and finish nails)
- Wood filler
- Sandpaper (220 grit)
- Caulk and caulk gun
- Painter’s tape
- Primer
- Paint (Creamy beige for panels/trim)
- Paint (Textured brown/tan for upper wall)
- Paint rollers and brushes
- Level and measuring tape
- Pencil
Step 1: Preparation and Planning
-
Measure and calculate:
Begin by measuring the total length of your wall. Decide on the height for your chair rail—typically about one-third up the wall, around 32 to 36 inches high. -
Design the panel layout:
Sketch out your wall on paper to determine the size and spacing of your ‘picture frame’ boxes. Aim for consistent spacing between boxes, usually 3 to 4 inches, ensuring the boxes at the ends of the wall are balanced. -
Mark the wall:
Using a level and pencil, lightly draw the horizontal line where your chair rail will sit. Then, draw the precise rectangles for each box directly onto the wall to visualize the final layout. -
Prime the wall surface:
If your wall is a dark color or unpainted, apply a coat of primer to the entire lower section where the wainscoting will be installed to ensure an even finish later.
Step 2: Painting the Base Layers
-
Paint the upper wall:
Before installing trim, paint the upper portion of the wall. For the textured look in the photo, use a sponge painting technique or specialty textured paint in a warm tan or brown hue. -
Paint the lower wall:
Roll two coats of your creamy beige paint onto the lower section of the wall, extending slightly above your pencil line for the chair rail so no gaps show later. -
Prep the trim:
I find it much easier to prime and paint the first coat on all your molding strips before cutting them. Lay them on a drop cloth and apply your cream paint, letting them dry completely.
Miter Gap Fix
If corners don’t meet perfectly, don’t panic. Use the round shank of a screwdriver to rub the wood fibers together at the joint, then fill remaining gaps with wood filler.
Step 3: Installation
-
Install baseboards:
If replacing baseboards, install the new baseboard molding first along the floor using construction adhesive and a brad nailer. -
Install chair rail:
Cut your chair rail to length. Apply a bead of adhesive to the back, position it on your level line, and nail it into the studs for a secure hold. -
Cut the box molding:
Using a miter saw set to a 45-degree angle, cut the four sides for your first box. Double-check the fit by holding them against your penciled guide on the wall. -
Attach the boxes:
Apply a thin wavy line of adhesive to the back of each molding piece. Press them onto the wall following your pencil lines, then secure with a few brad nails. Repeat for all boxes.
Add Depth
Paint the wall inside the boxes a shade slightly darker or lighter than the molding itself. This subtle contrast makes the trim work pop.
Step 4: Finishing Touches
-
Fill the holes:
Use wood filler to cover all nail holes. Overfill them slightly, as the filler shrinks when it dries. -
Sand smooth:
Once the filler is dry, gently sand the spots flush with the molding using 220-grit sandpaper. -
Caulk the seams:
Apply a thin bead of paintable caulk to all edges where the molding meets the wall and at the mitered corners. Smooth the bead with a damp finger for a seamless, built-in look. -
Final paint coat:
Brush a final coat of the creamy beige paint over the trim and the wall area inside the boxes. This unifies the color and covers any filler or caulk. -
Clean up lines:
If any beige paint got onto your upper textured wall, use a small artist’s brush to touch up the edge for a crisp, professional line.
Step back and admire how this classic architectural detail instantly warms up your hallway or dining room
Wavy Lines and Squiggle Bands

Bring the calming movement of the ocean indoors with this minimalist yet striking wall accent featuring flowing blue ribbons. It’s a surprisingly simple way to add organic shapes and a splash of color to a plain white wall without committing to a full repaint.
Step-by-Step Tutorial
Materials
- Royal blue interior latex paint
- High-quality painter’s tape (1-inch width)
- Pencil
- Eraser
- Small angled sash brush (1.5 inch)
- Small foam roller
- Drop cloth
- Ladder or step stool
- Damp rag
Step 1: Preparation & Planning
-
Clean surface:
Begin by wiping down the wall with a damp rag to remove any dust or oils, ensuring the paint adheres perfectly. -
Clear the area:
Remove any existing shelving, artwork, or mirrors from the wall area you intend to paint. -
Protect the floor:
Lay down your drop cloth along the baseboard to catch any potential drips. -
Sketch the flow:
Using a pencil very lightly, freehand the path of your first wave. -
Create the parallel line:
Sketch the top edge of your first wave about 3-4 inches above your first line, mimicking the curves exactly to create a consistent band width. -
Draft the second wave:
Repeat the sketching process for the second wave below the first one, staggering the peaks and valleys slightly for a more natural, organic look. -
Refine curves:
Step back and look at your pencil lines from a distance to ensure the flow feels balanced, making adjustments with your eraser as needed.
Smoother Curves
For steadier hand-painting, rest your pinky finger against the wall to stabilize your hand while you drag the brush along your pencil guide.
Step 2: Painting the Bands
-
Load the brush:
Dip your angled sash brush into the royal blue paint, loading it moderately but not so much that it drips. -
Cut in the edges:
Carefully paint along your pencil lines first using the angled brush. I find it easiest to work in long, continuous strokes to keep the curve smooth rather than choppy. -
Correct mistakes immediately:
If your hand slips outside the line, wipe it instantly with a damp rag before the paint sets. -
Fill the center:
Once the edges are defined, use either the brush or a small foam roller to fill in the space between the outlines. -
Check for opacity:
Let this first coat dry for about two hours or until it is dry to the touch. -
Apply second coat:
Apply a second coat to ensure the blue is rich, solid, and opaque, covering any streaks from the first pass. -
Clean up sketch lines:
If any pencil marks are still visible outside the paint, gently erase them once the paint is fully cured (usually 24 hours).
Step 3: Styling the Space
-
Re-hang shelves:
Re-install your wooden floating shelf, positioning it so it visually interacts with the lower wave without being obscured by it. -
Add reflection:
Hang a round mirror in the negative space created by the upper wave’s curve; the circular shape complements the wavy lines beautifully. -
Incorporate contrasting lines:
Place a striped vase on the shelf to play off the blue tones while contrasting the organic wall curves with vertical structure.
Add Depth
Mix a tiny amount of white into your blue paint for the top wave, creating a subtle gradient effect that suggests atmospheric perspective.
Your space now has a fresh, fluid energy that feels customized and artistic
Maximalist Mini Pattern Repeat

Transform a plain hallway into a whimsical corridor with this maximalist mini pattern featuring hand-drawn overlapping arches. The imprecise, sketchy quality of the lines adds charm and movement, proving that you don’t need wallpaper to achieve a high-end designer look.
Step-by-Step Guide
Materials
- Cream or off-white latex wall paint (eggshell or satin finish)
- Black acrylic paint or high-quality paint pen meant for walls
- Small round paintbrush (size 2 or 4) if not using a pen
- Pencil
- Eraser
- Painter’s tape
- Level (laser level is best)
- Cardboard or cardstock (for template)
- Scissors
- Chair rail molding (optional, if recreating the wainscoting look)
- Drop cloth
Step 1: Preparation & Base Coat
-
Clear and clean:
Remove all artwork, switch plates, and furniture from the hallway to give yourself a clear canvas. Wipe down the walls with a damp cloth to remove dust. -
Protect the floors:
Lay down your drop cloth to catch any potential drips, running it along the entire length of the wall you intend to paint. -
Tape off trim:
Apply painter’s tape carefully along the baseboards, ceiling line, and door frames to ensure crisp edges. -
Apply the base color:
Roll on two coats of your cream or off-white background color, allowing at least 4 hours of drying time between coats. Let the final coat cure overnight before drawing on it.
Step 2: Creating the Grid
-
Make a sizing guide:
Decide on the width of your rainbows—about 4 to 5 inches wide is standard for this look. Cut a piece of cardboard to this width to use as a quick spacer. -
Mark vertical guides:
Using a pencil and a laser level (or a long straightedge), lightly mark vertical plumb lines spaced apart by the width of your cardboard spacer. These lines will keep your columns straight. -
Establish horizontal rows:
Mark light horizontal lines every 3 to 4 inches down the wall. You want the arches to feel stacked but not perfectly rigid, so these guides are for reference, not strict boundaries. -
Create an arch template:
Draw your ideal arch shape on cardstock and cut it out. It shouldn’t be a perfect semi-circle; a slightly taller, narrower arch mimics the hand-drawn style in the photo.
Oops! Smudged Ink?
If you smudge wet black paint, don’t wipe it! Let it dry completely, seal it with a dab of clear primer, and paint over it with your cream base color. Then redraw the line.
Step 3: Painting the Pattern
-
Trace the primary arches:
Using your cardstock template and a pencil, trace the main outline of the rainbows in a staggered brick-pattern layout across your grid. -
Load your brush or pen:
If using a paint pen, shake it well to start the flow. If painting, thin your black acrylic slightly with water so it flows smoothly off a size 2 round brush. -
Outline the outer arch:
Going over your pencil marks, paint the outermost arch first. Keep your wrist loose; the charm of this pattern comes from the slight wobbles and variations in line thickness. -
Draw the inner arches:
Inside the first arch, freehand two or three smaller nesting arches. Don’t worry about perfect spacing; drawing them freehand creates that organic, sketchy texture. -
Add detail lines:
I like to add the scribble detail now. Between two of the inner arches, draw tight, messy zig-zags or loops depending on your preference. This fills the negative space and adds visual weight. -
Repeat the process:
Move methodically across the wall. Complete one full ‘rainbow’ before moving to the next neighbor to ensure consistency in style. -
Check density:
Step back every few feet to look at the overall density. If a spot looks too empty, slightly adjust the size of the next adjacent arch to fill the gap visually.
Make It Pop
For a textural twist, use a metallic gold paint pen for the squiggly ‘scribble’ layer inside the arches. It catches the light and adds a touch of glamour to the hallway.
Step 4: Finishing Touches
-
Erase guide lines:
Once the black paint is completely bone-dry (wait at least 24 hours to be safe to avoid smudging), gently erase any visible pencil grid lines. -
Touch up gaps:
Inspect your work for any spots where the black paint skipped or looks too faint. Go back in with your brush or pen to solidify those lines. -
Reinstall trim and cleaning:
Remove the painter’s tape carefully. If you removed a chair rail for painting, reinstall it now to separate the pattern sections, then clean up your workspace.
Now you have a hallway full of personality that looks like custom wallpaper but cost a fraction of the price
Ceiling-to-Wall Color Drench Surprise
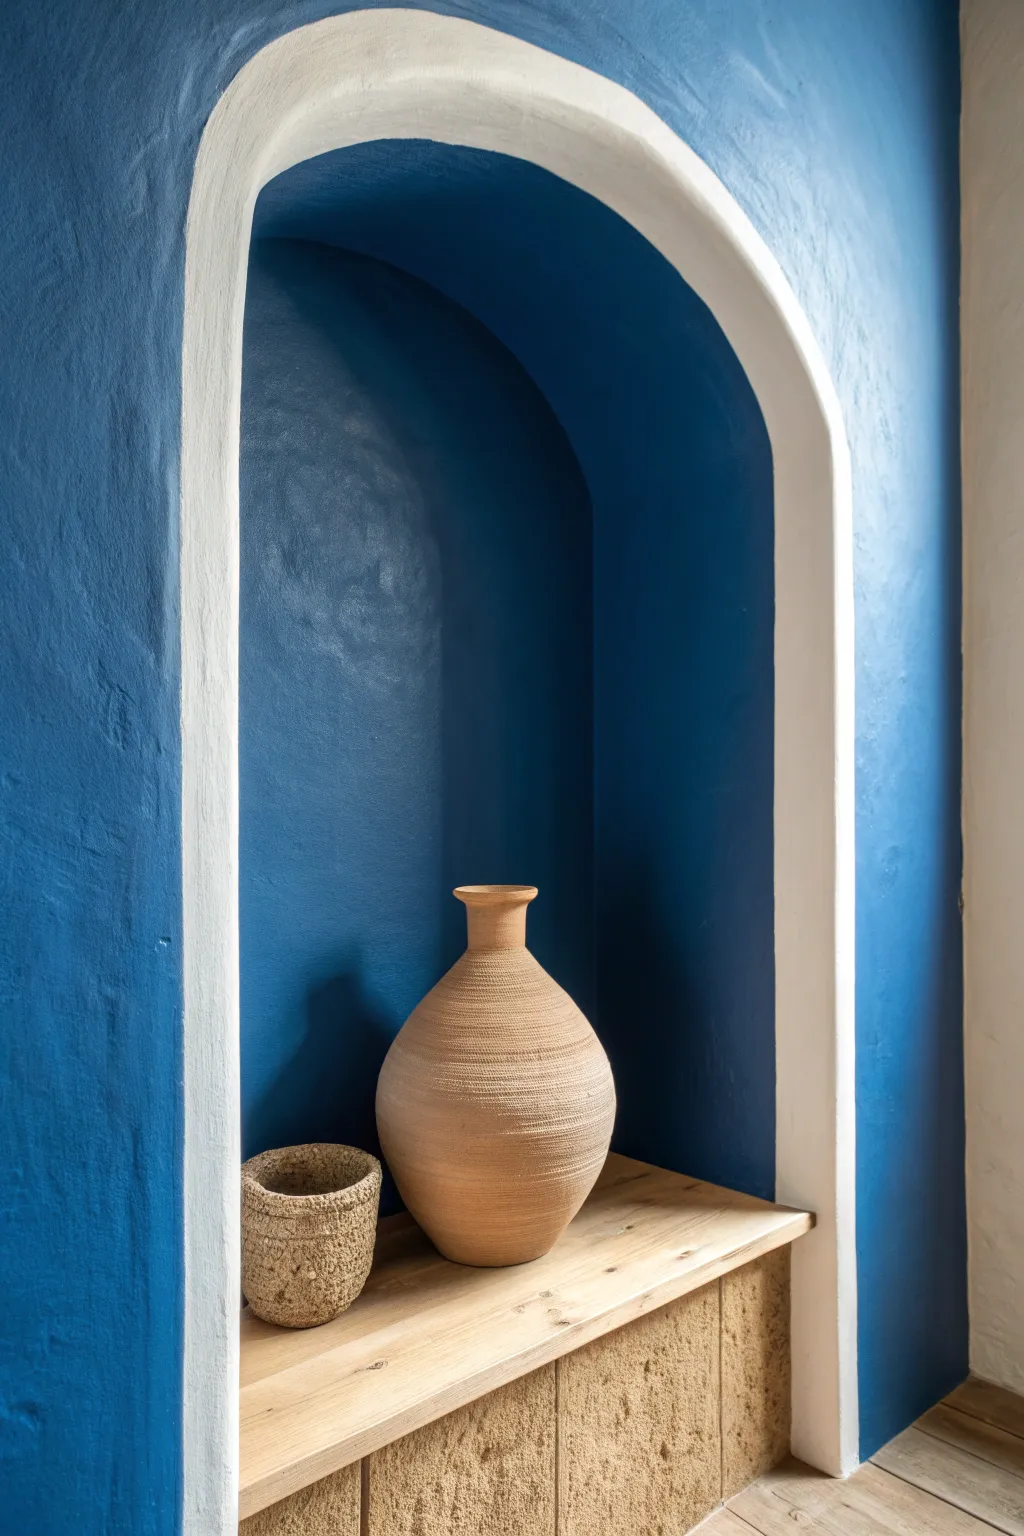
Transform a standard wall alcove into a stunning focal point using the power of color drenching. This project combines deep, saturated blues with crisp white edges and earth tones to evoke a breezy, coastal aesthetic.
Step-by-Step Tutorial
Materials
- High-quality painter’s tape (multi-surface)
- Deep marine blue interior latex paint (matte finish)
- Crisp white interior latex paint (matte or eggshell finish)
- Spackle or joint compound (if texture is needed)
- Wide putty knife
- Medium-grit sandpaper
- Small angled sash brush (1.5-2 inch)
- Small microfiber trim roller (4 inch)
- Drop cloths
- Clean rag
- Wooden shelf board (cut to size)
- Construction adhesive or shelf brackets (optional)
Step 1: Preparation & Texturing
-
Assess the surface:
Begin by removing any existing shelves or hardware from your niche. Clean the walls thoroughly to remove dust and grease. -
Create texture (optional):
If your walls are smooth and you want that authentic plaster look shown in the image, apply a thin, uneven layer of joint compound using a wide putty knife. Let the knife skip slightly to create organic divots. -
Sand high spots:
Once the texture is completely dry, lightly sand down any overly sharp ridges. You want a soft, undulating surface, not a jagged one. Wipe away all dust. -
Protect the area:
Lay down drop cloths to protect your flooring. This blue pigment is strong and can be difficult to clean off carpets.
Step 2: Painting the Deep Blue
-
Cut in the corners:
Using your angled sash brush, paint the deep blue into the back corners and around the interior ceiling curve of the niche. -
Roll the interior:
Switch to a small microfiber roller for the blue. Apply the paint to the back wall and the curved sides of the niche interior. Don’t worry about the front edge yet. -
Apply the second coat:
Blue paint often requires multiple coats for true saturation. Allow the first coat to dry fully, then apply a second (and potentially third) coat until the color is rich and opaque. -
Paint the exterior wall:
Continue the blue paint onto the flat wall surrounding the niche. Use a larger roller here for efficiency, blending seamless lines outward.
Uneven Paint Lines?
On textured walls, tape often fails. Use a high-quality angled artist brush to cut the line between white and blue by hand. A slightly wobbly line adds to the rustic charm.
Step 3: The Crisp White Frame
-
Define the border:
This is the most critical step. Decide how wide you want your white arch border to be. I find that free-handing this on textured walls looks more organic, but you can lightly mark it with a pencil. -
Paint the reveal:
Using a clean angled brush, paint the white strip along the face of the archway. You want to cover the transition point where the wall turns into the niche. -
Soften the edges:
Don’t create a razor-sharp line between the white and blue. Allow the white to follow the natural bumps of your textured wall for that hand-plastered Mediterranean feel. -
Touch up:
Inspect your work. If blue dripped onto the white area, wait for it to dry and dab white over it. The contrast is what makes this pop.
Level Up: Hidden Light
Install a small, battery-operated LED puck light at the very top of the inner arch before painting. It creates a dramatic shadow play on the textured blue walls at night.
Step 4: Styling the Niche
-
Prepare the shelf:
Cut a piece of light-toned wood (like pine or oak) to fit snugly across the base of the niche opening. -
Install the base:
Secure the wood board. If the niche has a flat bottom, you can lay it directly on top, perhaps securing it with a little construction adhesive. -
Add lower texture:
If you have space below the shelf, consider adding a textured facing stone or rough-hewn tile to ground the look, as seen in the inspiration image. -
Final styling:
Place one or two large, simple earthenware vessels on the shelf. The neutral tones will stand out beautifully against the saturated blue backdrop.
Step back and enjoy the coastal warmth this simple color change brings to your room


Have a question or want to share your own experience? I'd love to hear from you in the comments below!