Sometimes the quickest way to fall back in love with painting is to let it be a little ridiculous. These funny painting ideas are designed to make you laugh while you paint—and give you something instantly shareable when you’re done.
Visual Puns You Can Paint Literally
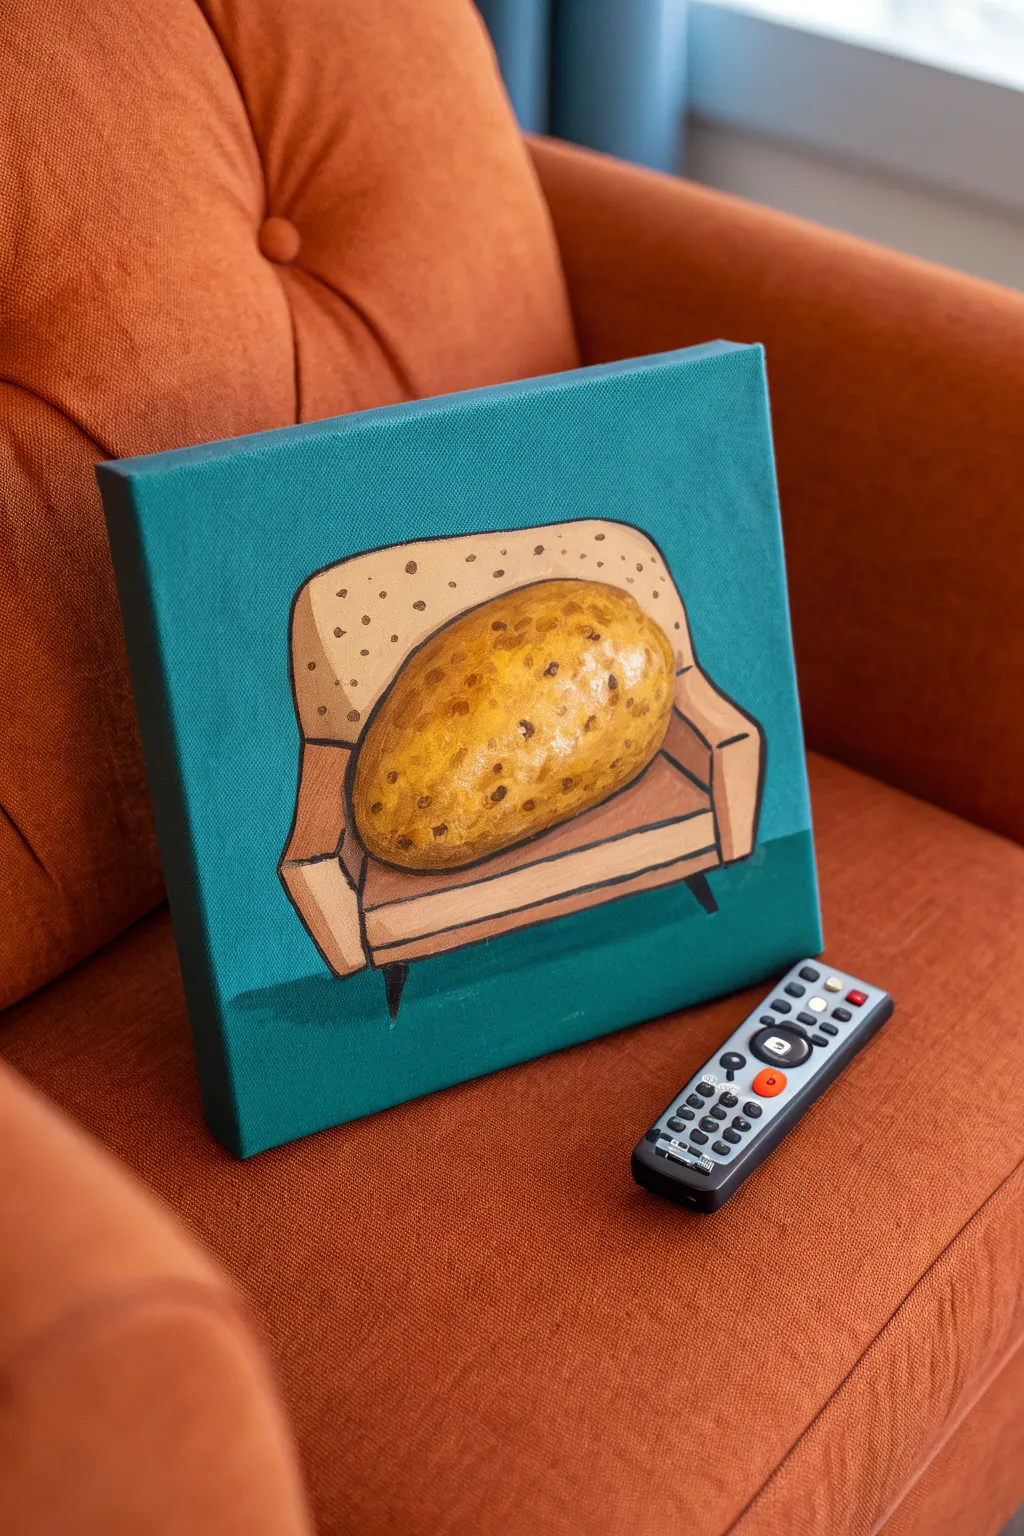
Bring a classic idiom to life with this cheeky acrylic painting of a realistic potato lounging on stylized furniture. The contrast between the detailed spud and the cartoonish armchair makes for a hilarious visual pun that’s perfect for a living room or TV den.
Detailed Instructions
Materials
- Square stretched canvas (approx. 10×10 or 12×12 inches)
- Acrylic paints (Teal, Burnt Sienna, Yellow Ochre, Titanium White, Mars Black, Cream/Unbleached Titanium)
- Flat shader brushes (medium and large)
- Round detail brushes (sizes 0 and 2)
- Pencil for sketching
- Palette or paper plate
- Cup of water and paper towels
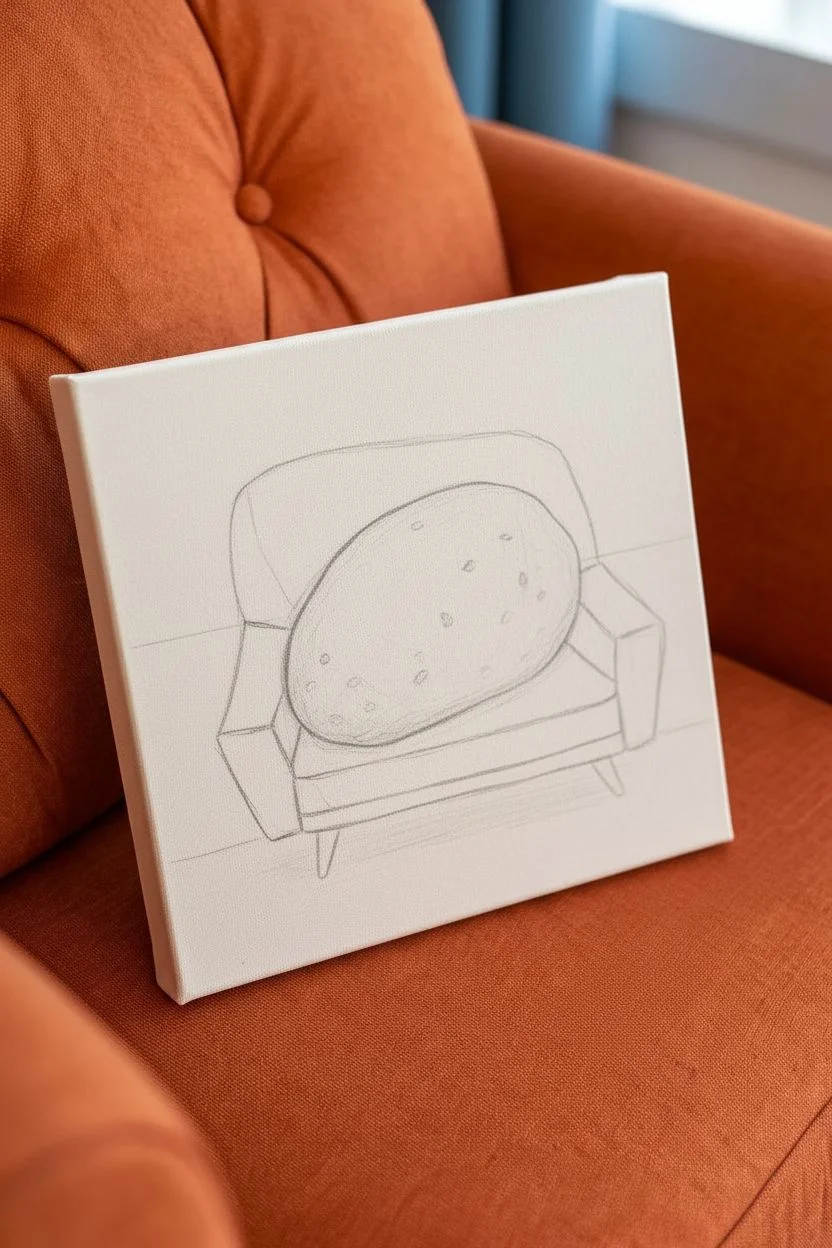
Step 1: Sketching the Scene
-
Establish the horizon:
Begin by lightly drawing a horizontal line across the lower third of your canvas. This will separate the wall from the floor. -
Outline the armchair:
Sketch a simple, retro-style armchair centered on the canvas. Draw a high back, two boxy armrests, and a seat cushion. Keep the lines slightly loose and illustrative rather than perfectly geometric. -
Add the star subject:
Draw a large, oblong oval shape resting diagonally on the seat cushion. This is your potato. Make sure it takes up a significant portion of the chair to look properly ‘seated’. -
Detail the legs:
Add four tapered, mid-century modern style legs to the bottom of the chair. The front two should angle slightly outward.
Uneven Texture?
If your potato looks too smooth, crumple a small piece of paper towel, dip it in brown paint, and lightly stamp the surface for instant organic skin texture.
Step 2: Blocking in Backgrounds
-
Paint the wall:
Using a large flat brush, mix a vibrant teal color. Apply this to the entire upper background area above your horizon line, cutting in carefully around the chair outline. -
Paint the floor:
Darken your teal mixture slightly with a tiny touch of black or deep blue. Paint the floor area below the horizon line to create a subtle separation between the vertical and horizontal planes. -
Base coat the chair:
Mix a cream or unbleached titanium color with a hint of ochre. Paint the main body of the chair—the backrest and the outer arms. Let this layer dry completely. -
Define the seat:
Mix a slightly darker tan using ochre and a touch of burnt sienna. Fill in the seat cushion area where the potato is resting.
Customize It
Make it personal by painting a tiny remote control resting on the arm of the chair or adding a small painting-within-a-painting on the teal wall behind the spud.
Step 3: Painting the Potato
-
Potato base layer:
Fill the oval potato shape with a solid coat of Yellow Ochre mixed with a little Titanium White. This provides a glowing undertone. -
Adding shadow and form:
While the base is still slightly tacky, use Burnt Sienna on the lower edges and the right side of the potato to create a 3D effect. Blend this gently toward the center. -
Stippling texture:
Using an old or dry brush, dab spots of pure Yellow Ochre and mixed browns all over the surface. This creates that specific modeled, uneven skin texture potatoes have. -
Creating the eyes:
With your small round brush and dark brown paint, make small, irregular dots scattered across the potato. Add tiny crescent shadows under these dots to make them look like recessed divots or ‘eyes’. -
Final potato highlights:
Add a few small, soft dabs of white mixed with yellow on the upper left curve of the potato to simulate a glossy, waxy skin reflecting light.
Step 4: Refining the Chair
-
Outlining:
Use a liner brush with thinned black or very dark brown paint to outline the entire chair. This comic-book style outline makes the realistic potato pop against the furniture. -
Chair pattern:
Using a small round brush, add little clusters of dots or speckles to the upper backrest of the chair using a darker beige. It gives the fabric a retro upholstery feel. -
Painting the legs:
Fill in the chair legs with solid black or dark charcoal gray. Ensure the points are sharp. -
Cast shadows:
Mix a dark transparent glaze (black mixed with water). Paint a soft shadow on the floor directly under the chair legs to ground the object. -
Seat shadow:
Add a darker shadow on the seat cushion right underneath the potato so it feels heavy and planted, rather than floating.
Now you have a hilarious piece of literal art ready to hang near your favorite lounging spot


Derpy Animals With Intentionally Awkward Anatomy
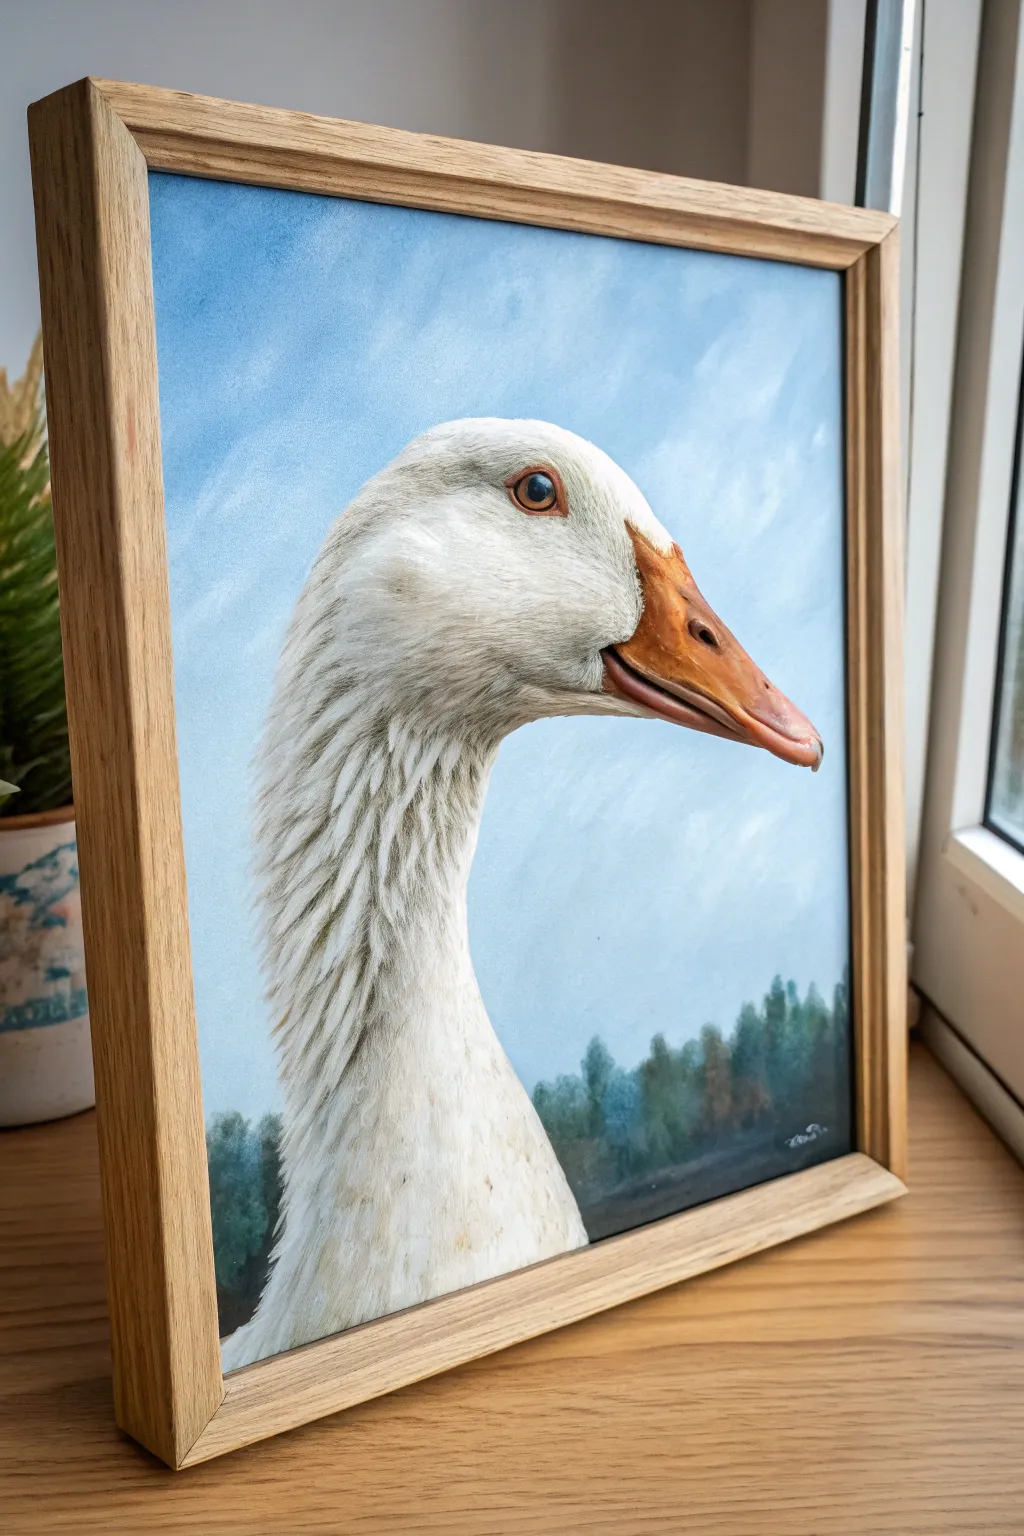
Capture the surprisingly serious and slightly goofy personality of a farmyard goose in this detailed acrylic portrait. With realistic feather textures against a serene blue sky, this piece finds the perfect balance between fine art and awkward animal charm.
Step-by-Step
Materials
- Square canvas board or stretched canvas (approx. 12×12 inches)
- Acrylic paints (Titanium White, Burnt Umber, Yellow Ochre, Cadmium Orange, Phthalo Blue, Ultramarine Blue, Lamp Black, Burnt Sienna)
- Set of synthetic brushes (wide flat brush for background, medium filbert, fine liner brush)
- Acrylic matte medium or retarder
- Palette and water cup
- Charcoal pencil or soft graphite for sketching
- Light wood floating frame (optional, for display)
Step 1: Setting the Scene
-
Background Gradient:
Start by mixing a sky blue using Titanium White and a touch of Cerulean or Phthalo Blue. Using a wide flat brush, paint the upper three-quarters of the canvas, blending it to be lighter near the bottom to suggest an atmospheric horizon. -
Cloud Whispers:
While the sky is still slightly tacky, scumble in very faint streaks of white to create soft, wispy clouds around where the head will be. -
Distant Trees:
Mix Phthalo Blue with a tiny bit of Burnt Umber and Green to create a cool, dark forest green. Paint a blurry, uneven tree line along the bottom quarter of the canvas. Keep the edges soft to ensure the background stays out of focus.
Feather Fluidity
Don’t paint every single feather individually. Focus on ‘clumps’ of feathers and shadow shapes first, then add detail only on the top layers.
Step 2: Sketching and Blocking
-
Goose Outline:
Once the background is completely dry, loosely sketch the goose’s anatomy with a charcoal pencil. Focus on the long, curved neck and the triangular head shape. The key to the ‘derpy’ look is the placement of the eye—sketch it high and alert. -
Base White Layer:
Fill in the entire shape of the goose with a flat layer of Titanium White mixed with a tiny drop of Yellow Ochre to warm it up. This doesn’t need to be perfect; it’s just an underpainting to cover the blue sky. -
Beak Foundation:
Block in the beak using a mix of Cadmium Orange and Burnt Sienna. Keep the color flat for now, ensuring the signature ‘smile’ shape of the mouth line is established.
Add Some Personality
Change the expression by slightly altering the beak opening or the pupil size. A wider eye makes the goose look more startled and intense.
Step 3: Feather Texture & Form
-
Shadow Mapping:
Mix a light grey using White, a touch of Ultramarine Blue, and Burnt Umber. Glaze this shadow color under the chin and along the back of the neck to create 3D volume. -
Neck Feathers:
Switch to a medium filbert brush. Using thick Titanium White, start dabbing overlapping strokes down the neck. Follow the curve of the bird’s form, letting the brush strokes mimic the direction of feathers. -
Creating Fluff:
I like to use an older, slightly frayed brush here to create the ruffled texture on the neck. Drag the paint slightly outward at the edges so the goose looks soft rather than cutout. -
Deepening Shadows:
Go back in with a darker grey-brown mix between the feather clumps on the neck to add depth. This separation makes the white feathers pop forward.
Step 4: The Face and Details
-
Beak Details:
Highlight the top ridge of the beak with a mix of Orange and White. Use pure Burnt Umber to paint the nostrils and the dark line separating the upper and lower beak. -
The Eye:
Paint the eye iris with a rich Burnt Sienna. Once dry, add a black pupil in the center. Give the eye a rim of orange-skin tone around the outside to integrate it into the face. -
Adding Life:
With your finest liner brush, place a tiny, crisp white reflection dot in the upper right of the eye. This single dot brings the whole character to life. -
Fine Hairs:
Using watered-down grey paint and a liner brush, add tiny, individual hair-like feathers around the beak and eye area for realistic detail. -
Final Highlights:
Add the brightest white highlights on the crown of the head and the very tip of the beak to simulate glossiness. -
Varnish and Frame:
Allow the painting to cure for several days. Apply a satin varnish to unify the sheen of the matte forest and glossy eye. Place in a light wood floating frame to match the reference style.
Hang your intense goose portrait in a prominent spot where his watchful eye can greet your guests


Reaction Face Paintings With One Big Mood
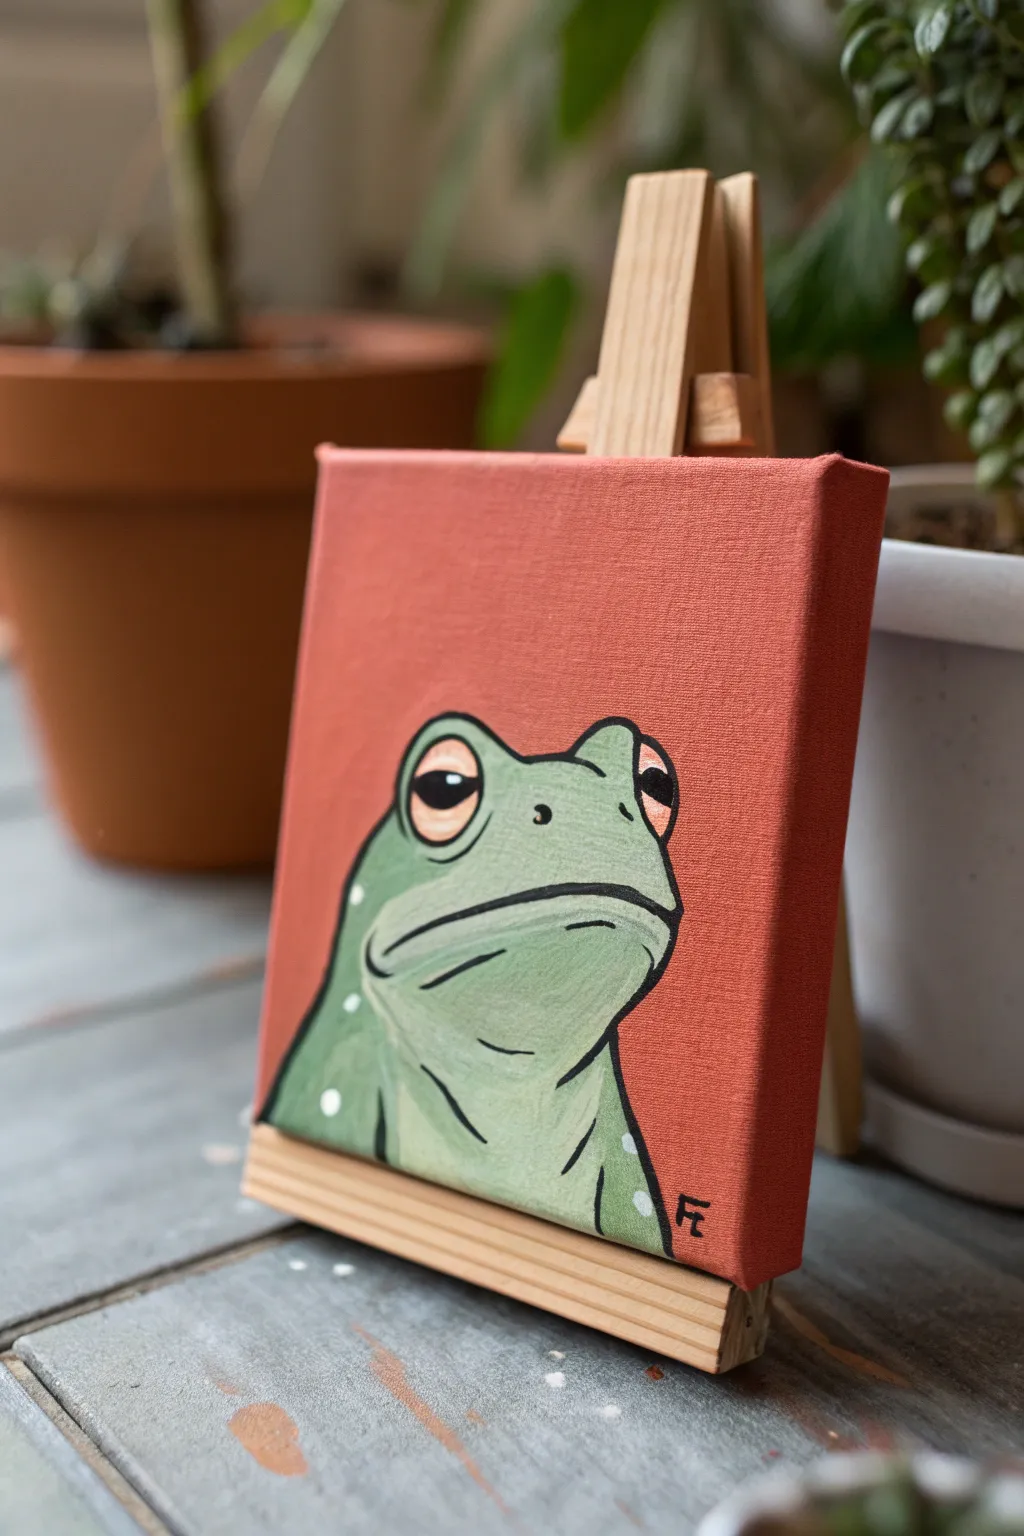
Capture the ultimate look of judgment with this stylized frog portrait set against a striking terracotta background. This small canvas project uses bold outlines and expressive eyes to create a reaction face that speaks volumes without saying a word.
Step-by-Step
Materials
- Small square canvas (e.g., 4×4 or 6×6 inches)
- Acrylic paints: Terracotta/Rust Orange, Sage Green, Dark Olive Green, Titanium White, Carbon Black, Pale Peach
- Flat shader brush (medium)
- Small round detail brush (size 0 or 1)
- Fine liner brush (size 00)
- Pencil and eraser
- Palette
- Water cup and paper towels
- Easel (optional)
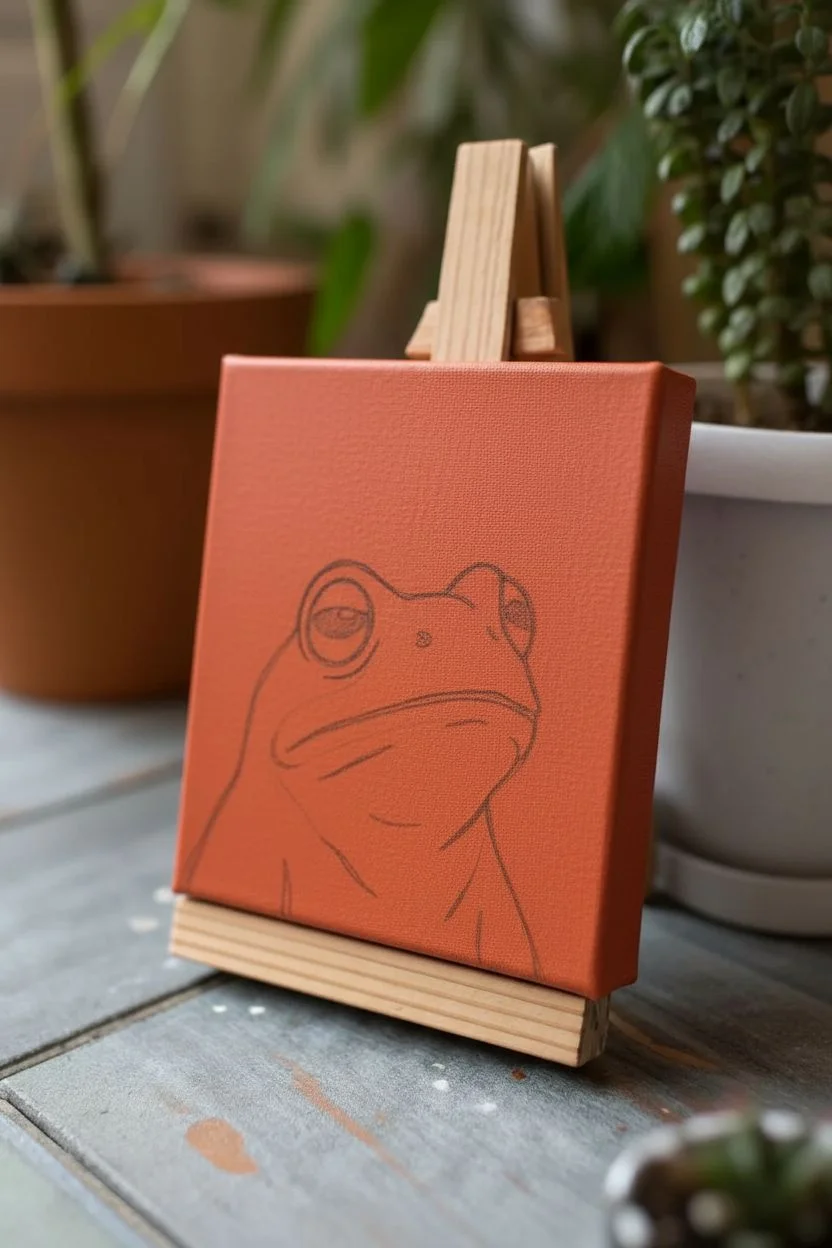
Step 1: Preparation & Background
-
Prime the background:
Begin by covering your entire canvas with a solid coat of terracotta or rust orange acrylic paint. Use your flat shader brush for broad, smooth strokes. -
Paint the edges:
Don’t forget to wrap the color around the sides of the canvas for a polished, finished look, just like in the reference photo. -
Apply a second coat:
Once the first layer is touch-dry, apply a second coat to ensure the background is completely opaque and vibrant. Let this dry fully before sketching. -
Sketch the outline:
Lightly sketch the frog’s shape using a pencil. Focus on the triangular head shape and the distinctive drooping mouth line that gives him his grumpy expression.
Fixing Wobbly Lines
If your black outlines aren’t smooth, your paint might be too thick. Add a single drop of water to the black paint on your palette to make it flow like ink.
Step 2: Painting the Frog
-
Base coat the frog:
Fill in the frog’s body shape with a sage green paint. It’s okay if you cover your pencil lines slightly, as we will redefine them later. -
Add tonal variation:
While the sage green is still slightly wet, blend in a tiny bit of darker olive green near the bottom and sides to create subtle volume, but keep the overall look fairly flat and illustrative. -
Paint the eyelids:
Mix a pale peach color (white with a tiny dot of orange) and paint the heavy, drooping eyelids. They should take up a significant portion of the eye area to sell the sleepy look. -
Fill the eyes:
Paint the small visible slivers of the eyeballs with pure white beneath the peach eyelids. -
Define the pupils:
Using your small round brush and black paint, add the large, dark pupils. Notice how the eyelids cut off the top of the pupil circles.
Make It Glossy
Once fully dry (wait 24 hours), apply a coat of high-gloss varnish. This makes the frog look perpetually wet and slimy, adding to the realism.
Step 3: Details & Outlining
-
Create the main contours:
Using a fine liner brush and slightly watered-down black paint, carefully trace the main outline of the frog’s head and body. -
Emphasize the mouth:
Paint the mouth line with a slightly thicker black stroke. Curve it downward significantly to maximize the unamused expression. -
Add facial creases:
Paint thin black lines under the eyes and around the throat area to suggest wrinkles and skin folds. These lines add character and age to the frog. -
Paint the nose:
Add two small black comma shapes for the nostrils right in the center of the face. -
Add shading lines:
On the throat pouch area, paint a few curved vertical lines to suggest the texture of the frog’s skin. -
Add the spots:
Dip the handle end of a paintbrush into white paint to create perfect dots along the sides of the frog’s body for texture. -
Sign your work:
Using your finest brush, add your initials in the bottom right corner with black paint.
Now you have a perfectly grumpy desk companion to judge your daily tasks silently


Tiny Dramatic Paintings of Inanimate Objects With Feelings
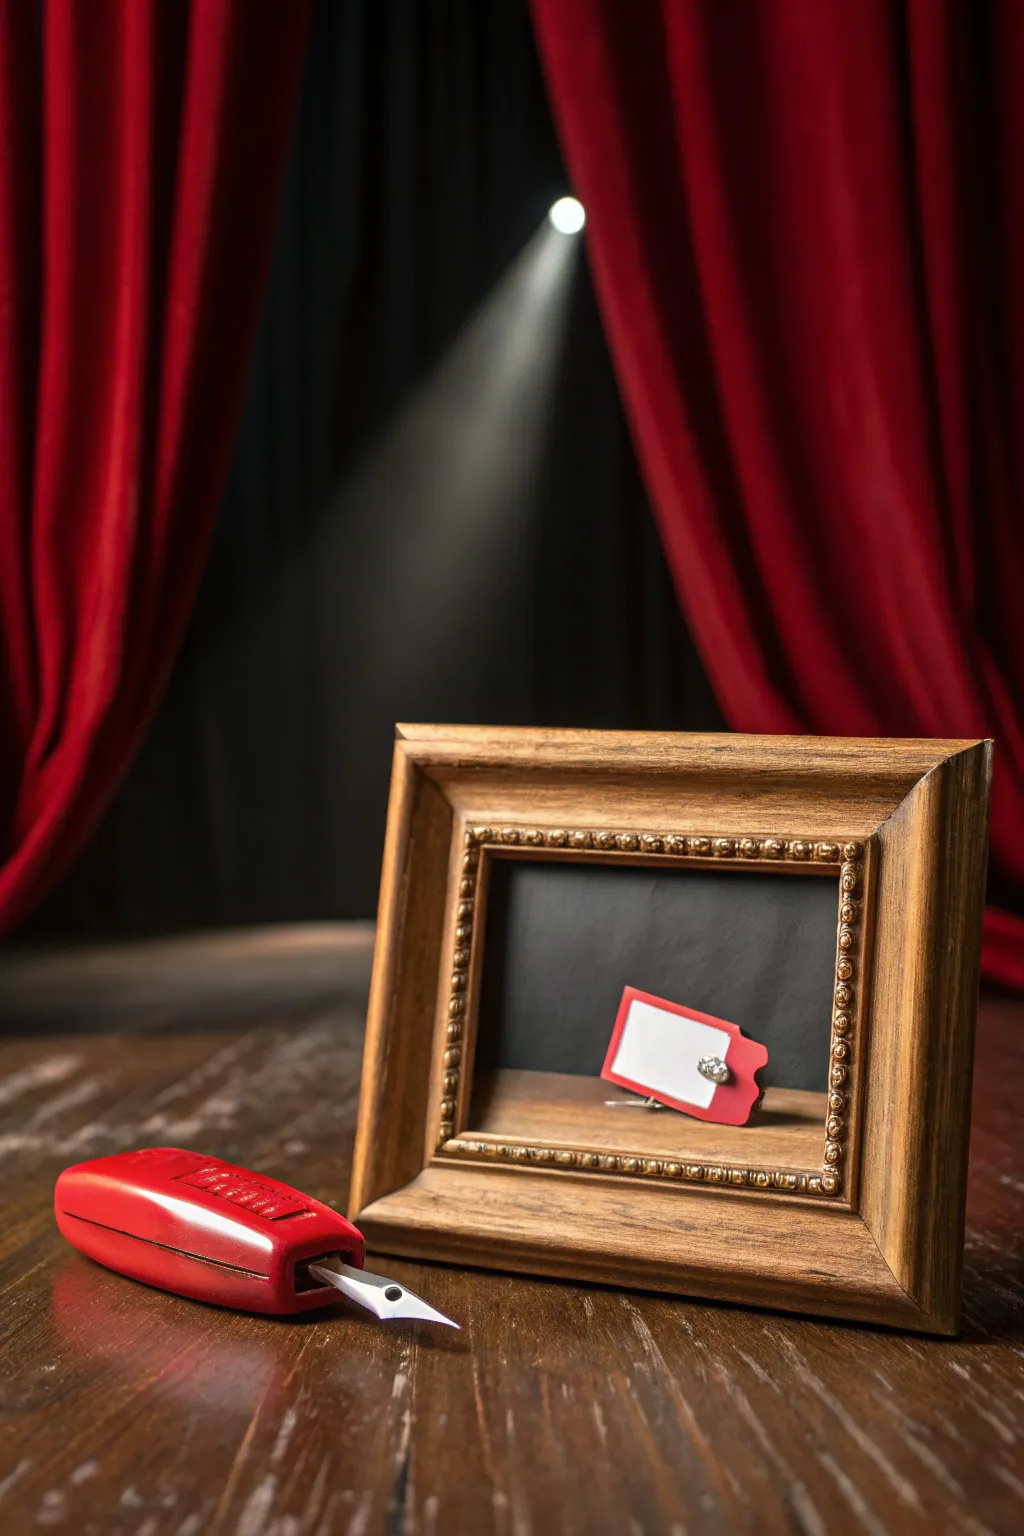
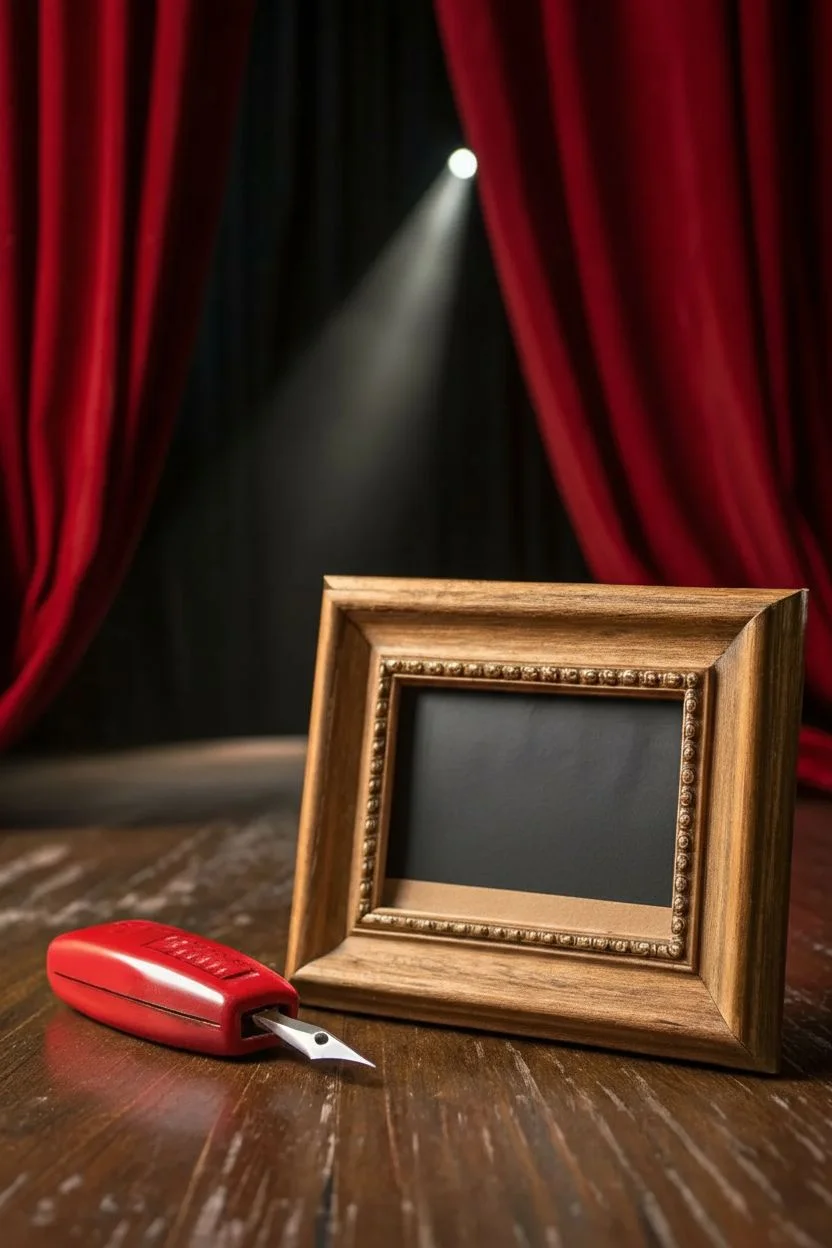
Capture the surprisingly poignant drama of a discarded ticket stub in this miniature framed piece. This tongue-in-cheek project elevates a tiny scrap of paper into a museum-worthy tragedy, perfect for adding a touch of whimsy to your desk or bookshelf.
Step-by-Step
Materials
- Small wooden picture frame (approx 4×4 or 5×7)
- Black cardstock or chalkboard paper
- Red cardstock
- White cardstock
- Tiny silver brad, sequin, or metallic paint marker
- Fine-tip black pen
- Craft glue or double-sided tape
- Scissors or hobby knife
- Tweezers
- Red paint (for the prop, optional)
Step 1: Setting the Stage
-
Prepare the background:
Disassemble your small wooden frame, removing the glass. Cut a piece of black cardstock or chalkboard paper to fit perfectly inside the frame backing. -
Create the depth:
If your frame is shallow, you might want to create a ‘floor’ for your object. Cut a strip of wood veneer or brown cardstock to line the bottom interior edge of the frame, creating a shelf. -
Secure the backing:
Insert the black background into the frame. If you removed the glass (which reduces glare for this shadow-box look), secure the backing board tightly.
Step 2: Crafting the Protagonist
-
Cut the ticket base:
From the red cardstock, cut a very small rectangle, approximately 1 inch by 0.5 inches. Keep the edges sharp. -
Shape the ticket:
Using tiny scissors or a hole punch, snip the corners off diagonally or use a corner rounder to mimic a classic raffle ticket shape. -
Create the white insert:
Cut a slightly smaller rectangle from white cardstock. This will be the center where ticket numbers usually go. -
Assemble the ticket layers:
Glue the white rectangle onto the center of the red base. I find using tweezers helps align these tiny pieces perfectly without getting glue on your fingers. -
Add the ‘hole’:
To make it look like a real tag or ticket, punch a tiny hole on one side, or simply draw a black dot with your fine-tip pen to simulate the perforation.
Glue Woes?
If liquid glue warps the tiny paper ticket, switch to a dry adhesive runner or very thin double-sided tape for a flatter, cleaner finish.
Step 3: The Dramatic Details
-
Make the fastener:
To mimic the silver thumbtack or rivet seen in the image, glue a tiny silver sequin or the head of a small brad onto the ticket. -
Optional metallic touch:
If you don’t have hardware, a dot of thick silver metallic paint or a gel pen works wonders to create that 3D illusion. -
Create the shadow:
For added realism, cut a tiny sliver of grey paper or use a grey marker to create a subtle cast shadow underneath where the ticket will sit. -
Position the actor:
Place a dab of glue on the back of your finished ticket. Position it slightly off-center on the ‘floor’ of your frame or against the black background. -
Angle for emotion:
Tilt the ticket slightly effectively lean it against the back wall; this subtle angle makes the object look discarded and forlorn rather than neatly displayed.
Scale It Down
Use a standard hole punch on the red paper first, then cut the rectangle around that hole. This guarantees a perfectly proportioned hole for the tag.
Step 4: Final Presentation
-
Clean the frame:
Wipe down the wooden frame to ensure no dust distracts from your tiny scene. A little wood polish can make the grain pop. -
Prop styling:
To recreate the full photo aesthetic, place a red object, like a chunky red marker or utility knife, alongside the frame to echo the color of the ticket. -
Lighting check:
Position your frame where a single light source hits it from above. This highlights the textures and deepens the tiny shadows inside the box.
Step back and admire how much emotion a tiny piece of paper can hold when given the proper stage
BRUSH GUIDE
The Right Brush for Every Stroke
From clean lines to bold texture — master brush choice, stroke control, and essential techniques.
Explore the Full Guide
Minimalist Flat-Color Comedy Posters
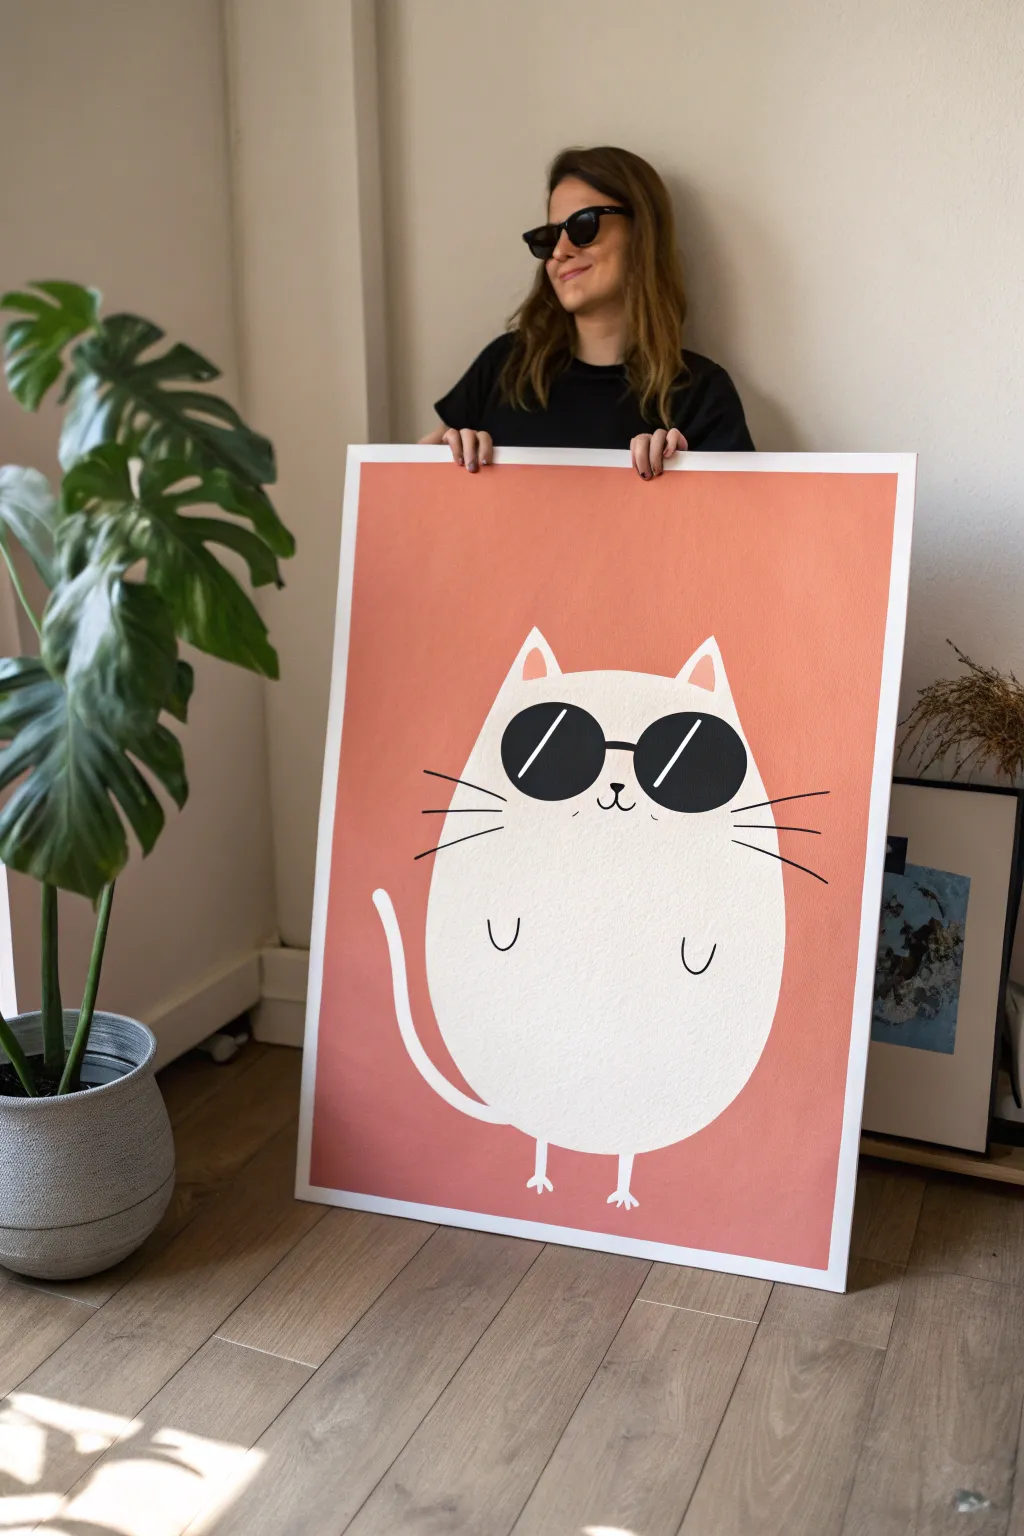
Embrace the humor of minimalism with this striking poster featuring an effortlessly cool, oversized cat wearing sunglasses. The charm lies in the contrast between the bold salmon background and the simple, flat-white shape of a confident feline.
Step-by-Step
Materials
- Large canvas or heavy-weight poster board (approx. A1 size)
- Acrylic paint: Coral/Salmon Pink, Titanium White, Mars Black
- Large flat paintbrush (2-3 inch width)
- Medium round brush
- Small liner brush or black paint marker
- Pencil and eraser
- Painters tape or masking tape (optional)
- Ruler
- Compass or large circular object (like a mixing bowl) for tracing
Step 1: Preparation & Background
-
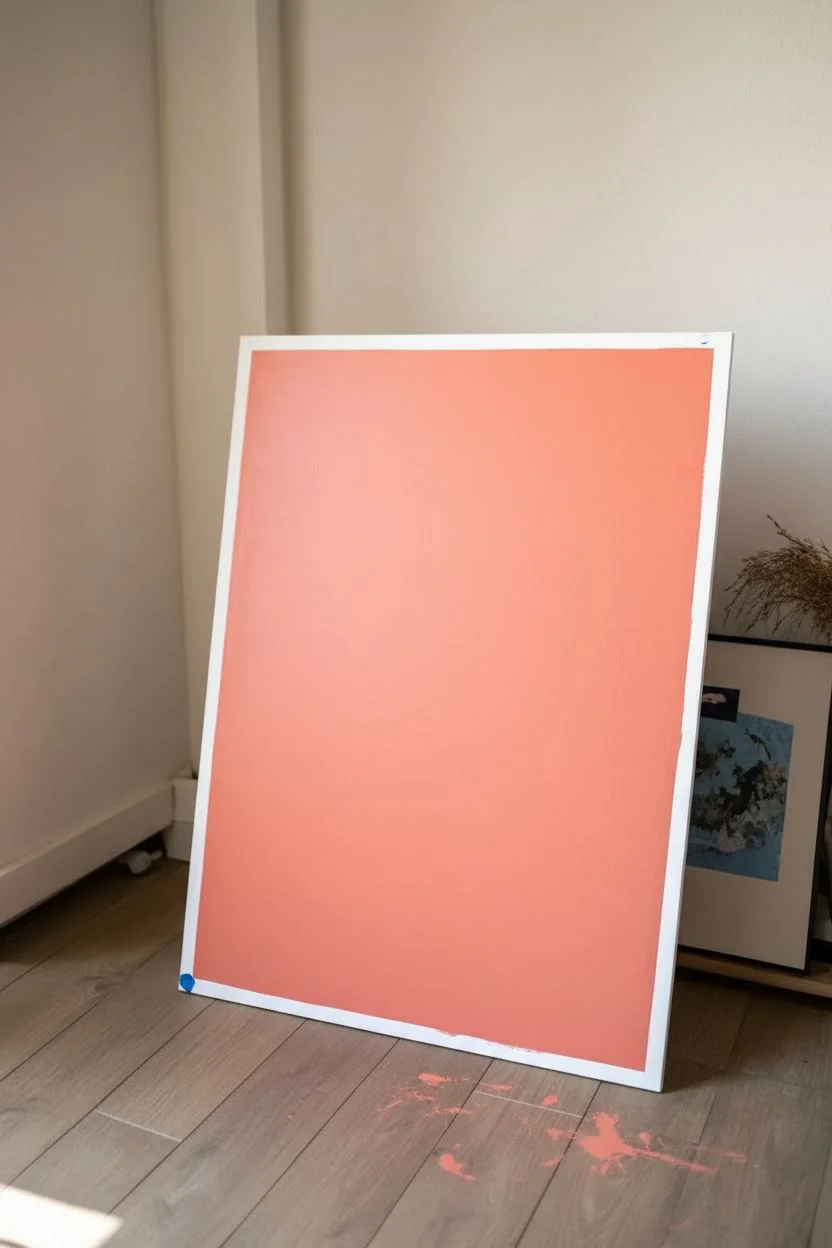
Prepare your surface:
Lay your canvas or poster board flat on a protected surface. If you are using a canvas, ensure it is primed; if using poster board, tape the edges down to prevent warping. -
Mix the background color:
Create the signature background shade by mixing red, yellow, and a generous amount of white acrylic paint. You are aiming for a warm, muted coral or salmon pink. Make a large batch to ensure coverage. -
Apply the base coat:
Using the large flat paintbrush, apply the coral paint across the entire surface. Use long, smooth horizontal strokes to minimize brush marks. -
Let it dry:
Allow the first coat to dry completely. If the coverage looks patchy, apply a second coat for that opaque, professional ‘flat poster’ look. -
Dry completely:
Ensure the background is 100% dry before attempting to draw on top. This usually takes about 1-2 hours depending on humidity.
Sticky White Paint?
White acrylic can be thick. If your brush drags, mix a tiny drop of water or glazing medium into the paint for smoother flow.
Step 2: Drafting the Cat
-
Outline the body shape:
Lightly sketch the cat’s body using a pencil. Start with a large oval shape that dominates the bottom center of the canvas. The shape should be slightly wider at the bottom (like a pear) for maximum cuteness. -
Add the ears:
Draw two small triangles at the top of the oval for ears. Keep them relatively small compared to the massive body to exaggerate the scale. -
Sketch the tail:
Draw a hook-shaped tail emerging from the left side. It should curve upwards and look simple and tube-like. -
Position the sunglasses:
Roughly mark where the sunglasses will go. They should be positioned near the top third of the body shape.
Sharper Lines
For ultra-crisp sunglass edges, use the rim of a small cup or bottle cap to trace the circles before filling them with black.
Step 3: Painting the Cat
-
Paint the body white:
Load a medium round brush or smaller flat brush with Titanium White. Carefully fill in the large oval body shape, the ears, and the tail. -
Keep edges crisp:
Pay special attention to the outlines. You want a distinct separation between the white cat and the coral background. I sometimes use a smaller brush just for the edges to get them sharp. -
Apply a second white coat:
White paint is notoriously transparent. Once the first layer is dry, apply a second layer to ensure the pink background doesn’t show through the cat. -
Paint the inner ears:
Mix a tiny bit of your background coral color with white to create a lighter pink. Paint small triangles inside the ears.
Step 4: Details & Attitude
-
Outline the glasses:
Using a pencil, draw the final shape of the sunglasses. The lenses should be slightly D-shaped or rounded squares, with a bridge connecting them. -
Fill in the lenses:
Use Mars Black paint and a small round brush to adhere the sunglasses. Paint carefully to maintain the symmetry of the black lenses. -
Add the reflection:
Once the black paint is dry, use a liner brush with white paint to add a thin, diagonal line across each lens. This simple reflection makes them look shiny. -
Draw facial features:
Use a liner brush with black paint (or a paint marker) to draw a tiny ‘3’ shape for the mouth and a small inverted triangle for the nose right between the glasses. -
Add the whiskers:
With a steady hand, paint three long, straight whiskers extending from each cheek. Quick, confident strokes work best here. -
Detail the paws:
Draw two small ‘U’ shapes on the belly for the front paws. For the feet, draw tiny stick-legs at the bottom with three little toes each.
Hang your new masterpiece in a bright spot and enjoy the instant cool factor it adds to your room
Surreal Mashups That Make No Sense (In a Good Way)
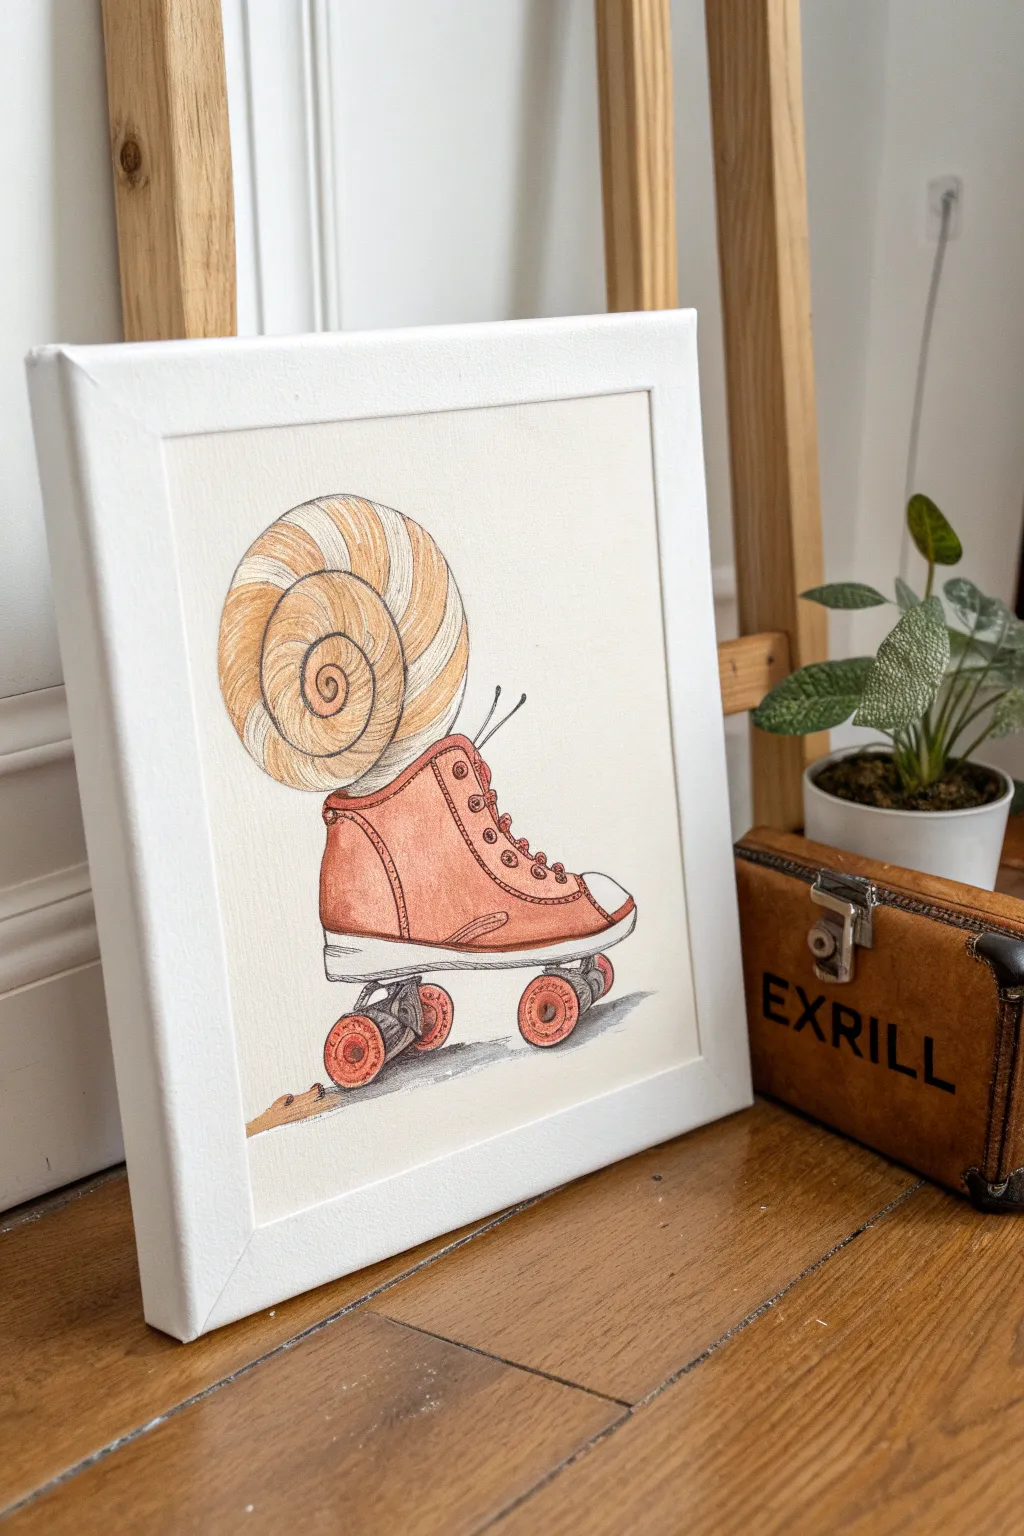
Blend the slow pace of nature with retro speed in this whimsical illustration. This tutorial guides you through creating a charmingly absurd ink and watercolor piece where a snail shell morphs seamlessly into a vintage roller skate.
Step-by-Step Tutorial
Materials
- Fine grain watercolor paper or canvas board (square format)
- Pencil (HB or 2B) and kneadable eraser
- Fine liner pens (Black, 0.1mm and 0.3mm)
- Watercolor paints (Burnt Sienna, Yellow Ochre, Cadmium Red, Payne’s Grey, White)
- Small round watercolor brushes (Size 0 and 2)
- White gel pen (optional for highlights)
- Ruler
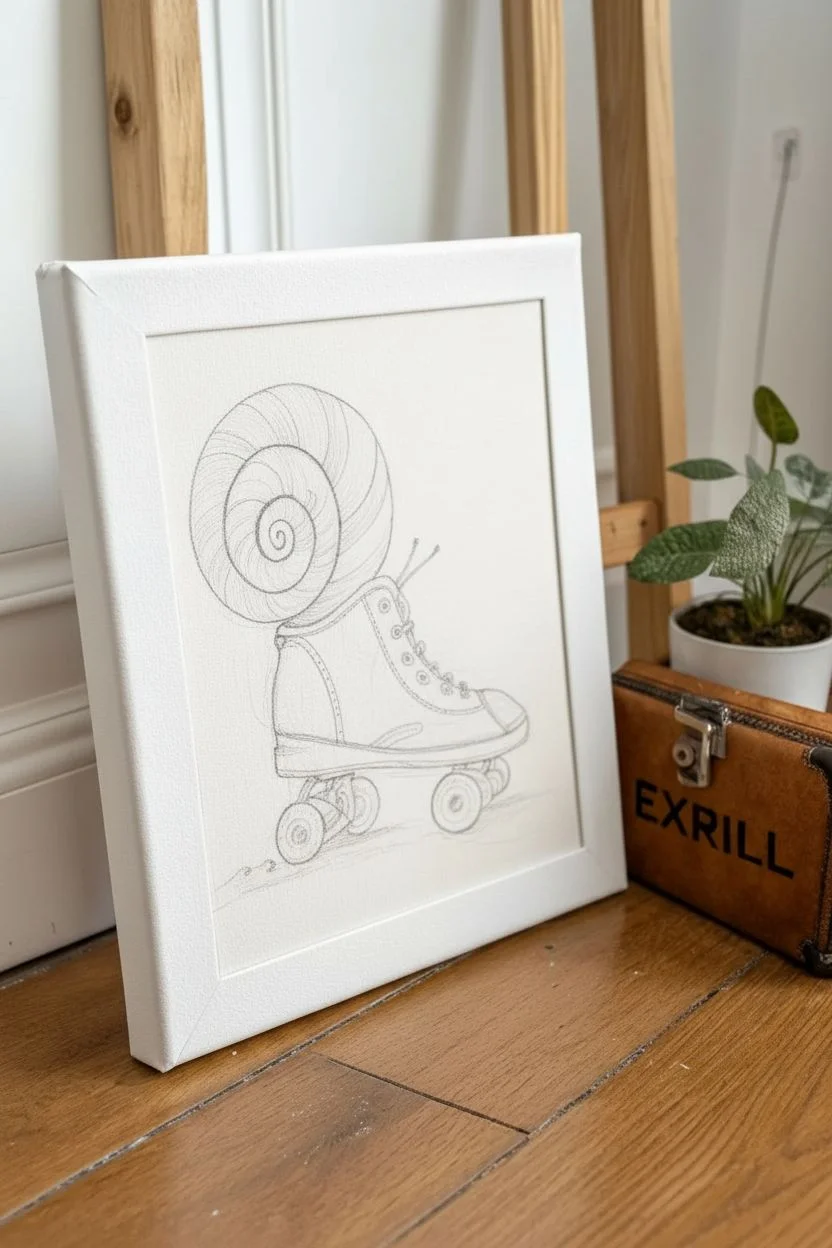
Step 1: Drafting the Hybrid Form
-
Establish the composition:
Begin by lightly sketching a central vertical line to center your subject. Draw a large circle in the upper third for the shell and a rectangular shape below it, angled slightly upwards to the right, to block out the shoe area. -
Sketch the snail shell:
Within your top circle, draw a loose spiral starting from the center and expanding outward. Don’t make it a perfect geometric spiral; let the lines wave slightly to mimic organic shell ridges. -
Connect the boot:
Draw the high-top sneaker emerging from the bottom of the shell. The heel should curve down from the back of the spiral, and the tongue area should align with the front. Add the toe cap as a semi-circle at the front. -
Add sneaker details:
Sketch the laces, eyelets, and the stitching lines that define the shoe’s panels. Don’t forget the two thin antennae poking out from where the shoe tongue meets the shell—this is crucial for the ‘snail’ personality. -
Draft the skate chassis:
Draw the sole of the shoe, making it thick enough to support the hardware. Sketch the truck assembly (the metal parts holding the wheels) and place four wheels—two visible in the front perspective and two in the back.
Ink Smearing?
If your ink bleeds when you apply watercolor, ensure you are using waterproof archival ink pens. If not, do the painting phase first, let it dry completely, and then lend definition with ink on top.
Step 2: Inking the Outline
-
Initial line work:
Using your 0.1mm fine liner, trace over your pencil sketch. Use broken, slightly shaky lines for the shell to suggest texture, but keep the shoe lines smoother and more defined. -
Detail the wheels:
Outline the wheels carefully. Draw concentric circles inside the wheels to represent the bearings and outer edges. Add small, textural dashes to the ground beneath the wheels to imply movement or a shadow. -
Add weight variation:
Switch to a 0.3mm pen to darken the bottom edge of the sole and the shadowed side of the shell spirals. This line weight variation helps ground the object and gives it dimension before painting. -
Erase guidelines:
Wait at least 10 minutes for the ink to fully cure. Gently erase all pencil marks with a kneadable eraser to avoid damaging the paper surface.
Go Retro
For a true vintage biological diagram feel, write the latin name ‘Helix Skaterus’ underneath in a stylized cursive font using your finest pen.
Step 3: Watercolor Wash & Texture
-
Base wash for the shoe:
Mix a watery blend of Burnt Sienna and a touch of Cadmium Red to get a vintage coral/terracotta color. Paint the canvas part of the shoe, carefully avoiding the white toe cap, laces, and sole. -
Shell coloration:
Dilute Yellow Ochre heavily with water. Paint the shell in stripes, alternating between the painted ochre and the bare white paper to create the spiral pattern. Retouch the shoe color if it looks too pale once dry. -
Shadowing the shell:
Once the base wash is dry, use a slightly more concentrated Yellow Ochre or light brown to paint thin lines along the spiral separations. This creates the illusion of deep ridges. -
Painting the wheels:
Use the same terracotta mix from the shoe but slightly more saturated (less water) for the wheels. This ties the color palette together nicely. -
Metal and rubber details:
Mix Payne’s Grey with a lot of water to create a soft grey. Paint the metal trucks under the skate and add a shadow running along the bottom of the white sole depending on your light source. -
Grounding shadows:
Use a darker mix of Payne’s Grey or a dark brown to paint a cast shadow on the ground beneath the wheels. Keep the edges soft by using a damp brush to feather the paint out. -
Final highlights:
If you lost any crisp whites during painting, use a white gel pen or opaque white paint to add highlights to the eyelets, the shine on the toe cap, and the top curve of the shell.
Frame your surreal creation in white or light wood to let the warm colors pop against your wall


Have a question or want to share your own experience? I'd love to hear from you in the comments below!