If you want your fall decor to get real laughs, funny pumpkin painting is the sweetest spot between cute and hilarious. I love how a little color, a goofy expression, and one good visual gag can turn a plain pumpkin into a total character.
Classic Goofy Jack-o’-Lantern Faces
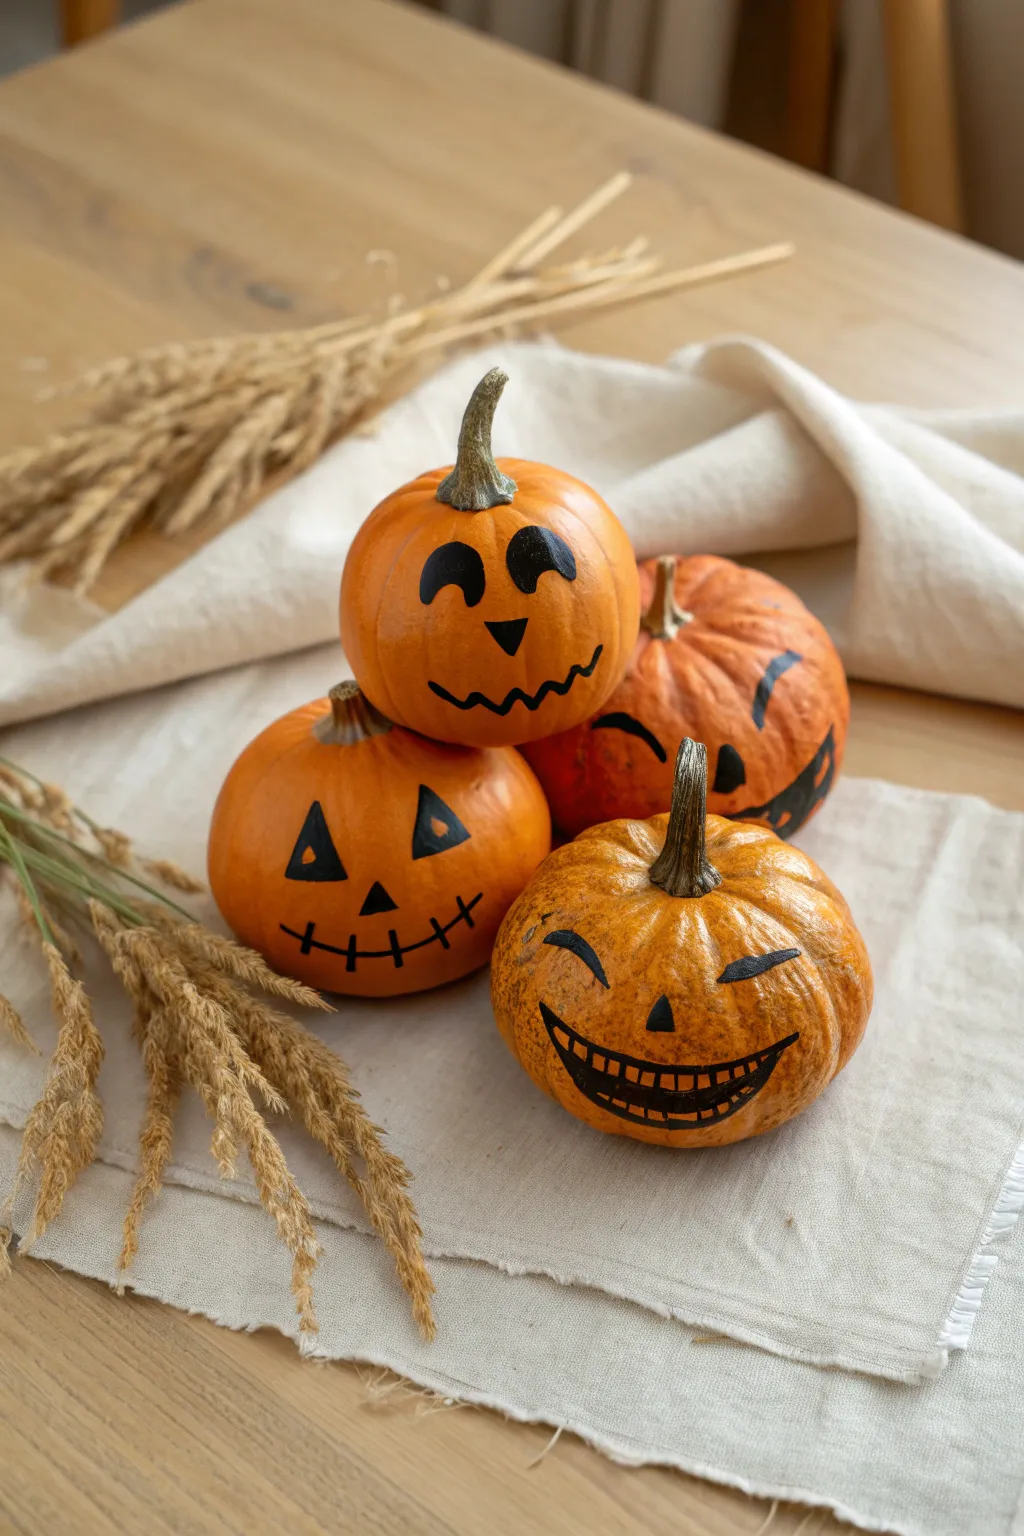
Skip the mess of carving this year with these adorable, expressive painted pumpkins. This project uses bold black lines to create a family of classic, goofy jack-o’-lantern expressions on petite orange gourds.
Step-by-Step Tutorial
Materials
- 4 small round pumpkins (pie pumpkins or mini gourds)
- Black acrylic paint or a black permanent paint marker (oil-based works best)
- Small round paintbrush (if using paint)
- Pencil (optional, for sketching)
- Damp cloth or paper towel
- Clear matte sealer spray (optional)
Step 1: Preparation & Planning
-
Clean the Pumpkins:
Start by thoroughly wiping down your four mini pumpkins with a damp cloth to remove any dirt or waxy residue. This ensures your paint or marker adheres properly. -
Dry Completely:
Let the pumpkins air dry completely. If the surface is even slightly damp, the marker ink might bleed or the paint won’t stick. -
Plan the Faces:
Decide which face goes on which pumpkin. For this look, you need four distinct personalities: The Classic Triangle, The Happy Winker, The Wide Grin, and The Goofy Side-Eye. -
Light Sketching:
If you’re nervous about freehanding, lightly sketch the features onto the pumpkin skin with a pencil. Keep the lines faint so they don’t show through later.
Marker Mastery
Oil-based markers work best on pumpkin skin. If the marker skips, scribble on paper to get the ink flowing before returning to the gourd.
Step 2: Painting the Personalities
-
Face 1: The Classic Triangle:
Choose a round, smooth pumpkin for the bottom left position. Using your black marker or paint, draw two equilateral triangles for eyes. -
Adding the Classic Nose:
Place a smaller triangle in the center, just below the eyes. -
Stitching the Smile:
Draw a wide curved line for the mouth, then cross it with 4-5 short vertical hash marks to create a stitched look. -
Face 2: The Top Pumpkin:
Select your smallest pumpkin for the top of the stack. Draw two oval eyes, but fill inside the left one completely to make a solid shape. -
Making it Wink:
For the right eye, curve the top of the oval down slightly as if the eyelid is lowering, leaving a small white highlight if you’re painting, or just drawing a solid black shape with a small ‘shine’ gap. -
Top Pumpkin Smile:
Give this one a wiggly, wavy line for a mouth rather than a perfect curve. Adding small ticks at the corners emphasizes the goofy smirk. -
Face 3: The Wide Grin:
Pick a textured or slightly darker pumpkin for the bottom right. Start by drawing a wide crescent moon shape for the mouth opening. -
Adding Teeth Details:
Draw a horizontal line through the middle of the crescent, then add vertical lines to create a grid of teeth. Fill in the gaps between teeth if you want a gap-toothed look, or outline them heavily. -
Squinty Eyes:
Give this happy fella two arched lines for eyes—one arching up and one arching down—to make him look like he’s laughing hard. -
Face 4: The Background Fellow:
Take the final pumpkin. Draw two slanted straight lines for eyes to give a slightly mischievous or confused expression. -
Adding the Crooked Grin:
Draw a large, uneven mouth that pulls to one side. I find that making one side significantly higher than the other adds character.
Step 3: Finishing Touches
-
Touch Ups:
Go back over your black lines to increase their opacity. A second coat often makes the black pop against the orange skin. -
Clean Lines:
If any lines look shaky, thicken them slightly to smooth out the edges. -
Let it Dry:
Allow the paint or ink to dry fully for at least 30 minutes. Be careful not to smudge the faces if you start stacking them too soon. -
Stack and Style:
Arrange your pumpkins in a small pyramid or cluster on a neutral cloth, tucking in some dried wheat stalks or fall foliage around the base for a rustic finish.
Stem Styling
Wrap thin jute twine or natural raffia around the base of the stems to add a rustic farmhouse texture to your pumpkin family.
You now have a charming little pumpkin family ready to greet guests from your tabletop


Big Googly-Eye Monster Pumpkins
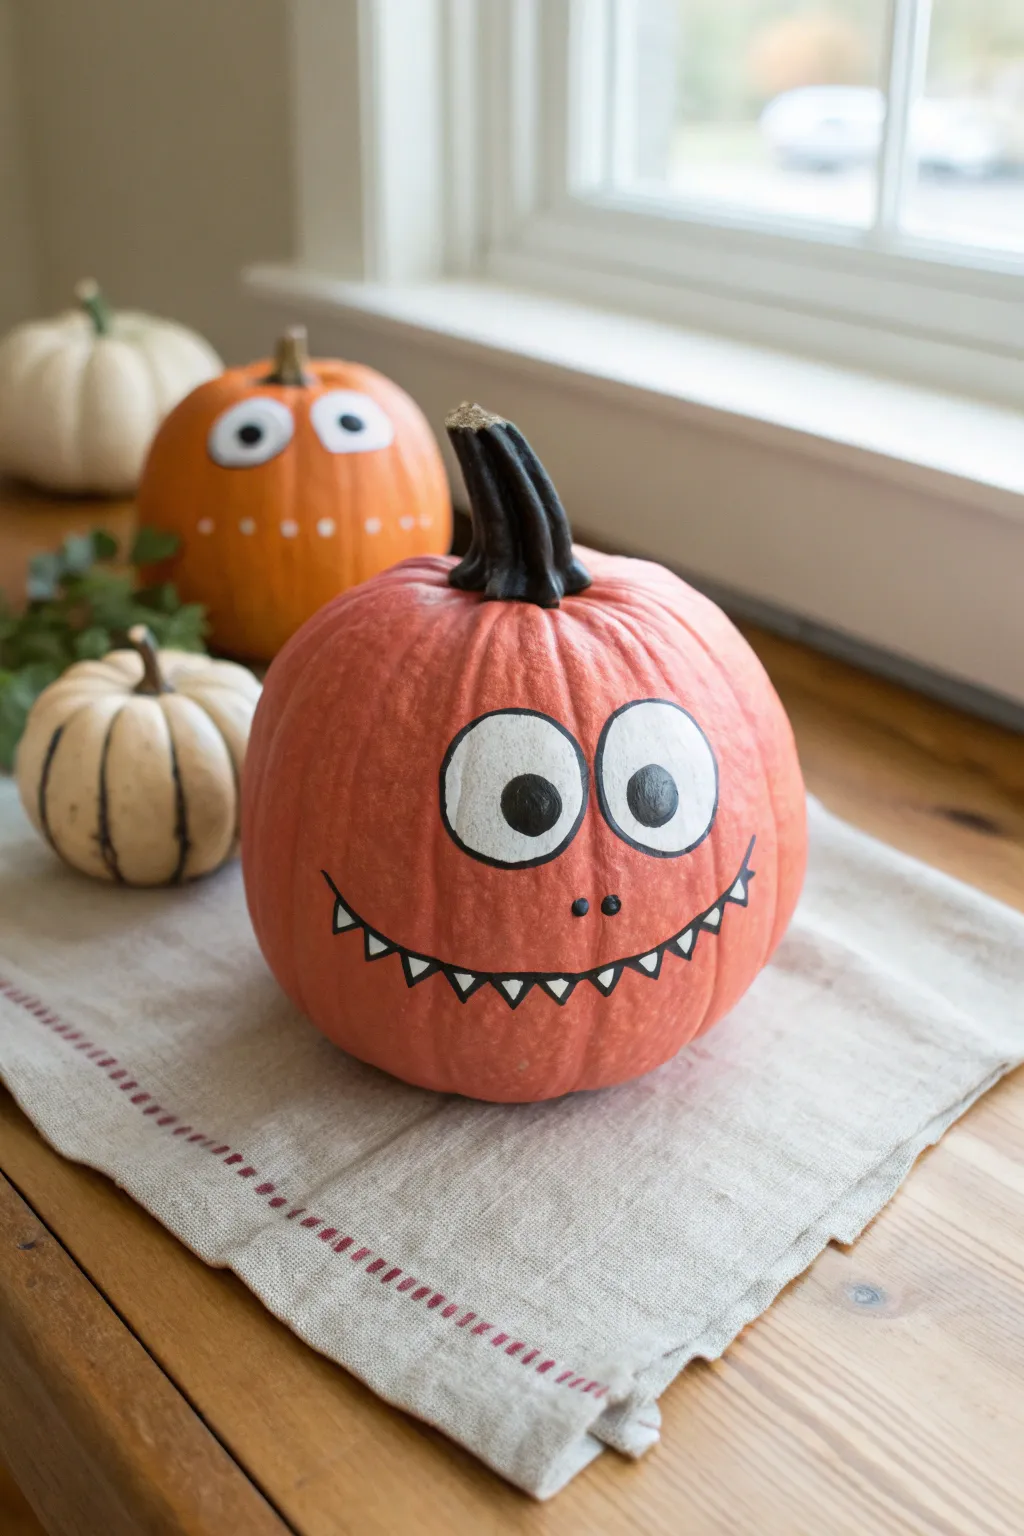
These expressive pumpkins prove that you don’t need a carving knife to create a memorable Halloween character. With wide, startled eyes and a goofy, tooth-filled smile, this design transforms a standard gourd into a friendly monster perfect for welcoming trick-or-treaters.
Step-by-Step Guide
Materials
- Medium-sized round orange or reddish-orange pumpkin
- White acrylic craft paint
- Black acrylic craft paint
- Medium flat paintbrush
- Small round detail brush
- Fine-point black permanent marker (optional but helpful)
- Pencil for sketching
- Paper towel
- Water cup
Step 1: Preparation and Sketching
-
Clean the surface:
Before you start, wipe down your pumpkin with a damp cloth to remove any dirt or field dust. Dry it completely with a paper towel so the paint adheres properly. -
Plan the eyes:
Using a pencil, lightly sketch two large circles side-by-side near the upper middle of the pumpkin. They don’t need to be perfectly round—a slightly wonky shape adds character. -
Draft the mouth:
Sketch a wide, generous curve for the smile below the eyes. The curve should stretch almost the entire width of the face for a goofy look. -
Add the teeth:
Along the bottom edge of your mouth line, draw a series of small V-shapes to represent sharp little teeth.
Smoother Circles
Struggling to paint perfect circles? Trace the bottom of a plastic cup or a spice jar lid with your pencil first to get a crisp, even guide before painting.
Step 2: Painting the Base Features
-
Fill the eyes:
Dip your medium flat brush into white acrylic paint. Carefully fill in the two large eye circles you sketched. -
Build opacity:
Pumpkin skin can be dark, so the first layer of white might look streak, that’s normal. Let it dry for about 10-15 minutes. -
Apply second coat:
Apply a second coat of white paint to the eyes to ensure a bright, opaque finish. Depending on your paint quality, a third coat might be necessary. -
Paint the teeth:
While you have the white paint out, switch to your small detail brush. Carefully fill in the small triangles for the teeth along the smile line.
Glow in the Dark
Swap the standard white paint for glow-in-the-dark acrylic paint for the eyes and teeth. Your monster will look normal by day but spooky after sunset.
Step 3: Adding the Details
-
Outline the eyes:
Once the white paint is totally dry to the touch, use the small round brush and black paint to trace a thin, even line around the perimeter of each eye. A steady hand is key here. -
Create the pupils:
Decide where your monster is looking. Paint two medium-sized black circles inside the white areas. I usually place them slightly cross-eyed or looking in different directions for a sillier expression. -
Draw the mouth line:
Reload your small brush with black paint. Trace over your main smile line, making it bold and visible. -
Connect the teeth:
Outline each small white tooth with a very fine black line so they stand out clearly against the orange skin. -
Add nostrils:
Just between the eyes and the mouth, dab two small dots of black paint to create simple nostrils. -
Clean up edges:
If any lines look shaky or uneven, wait for them to dry completely, then touch them up with the appropriate background color or re-outline them with a marker for sharpness. -
Final dry:
Allow the entire face to dry undisturbed for at least an hour before moving or displaying the pumpkin to prevent smudging.
Set your goofy masterpiece on the porch or windowsill to share a smile with the neighborhood


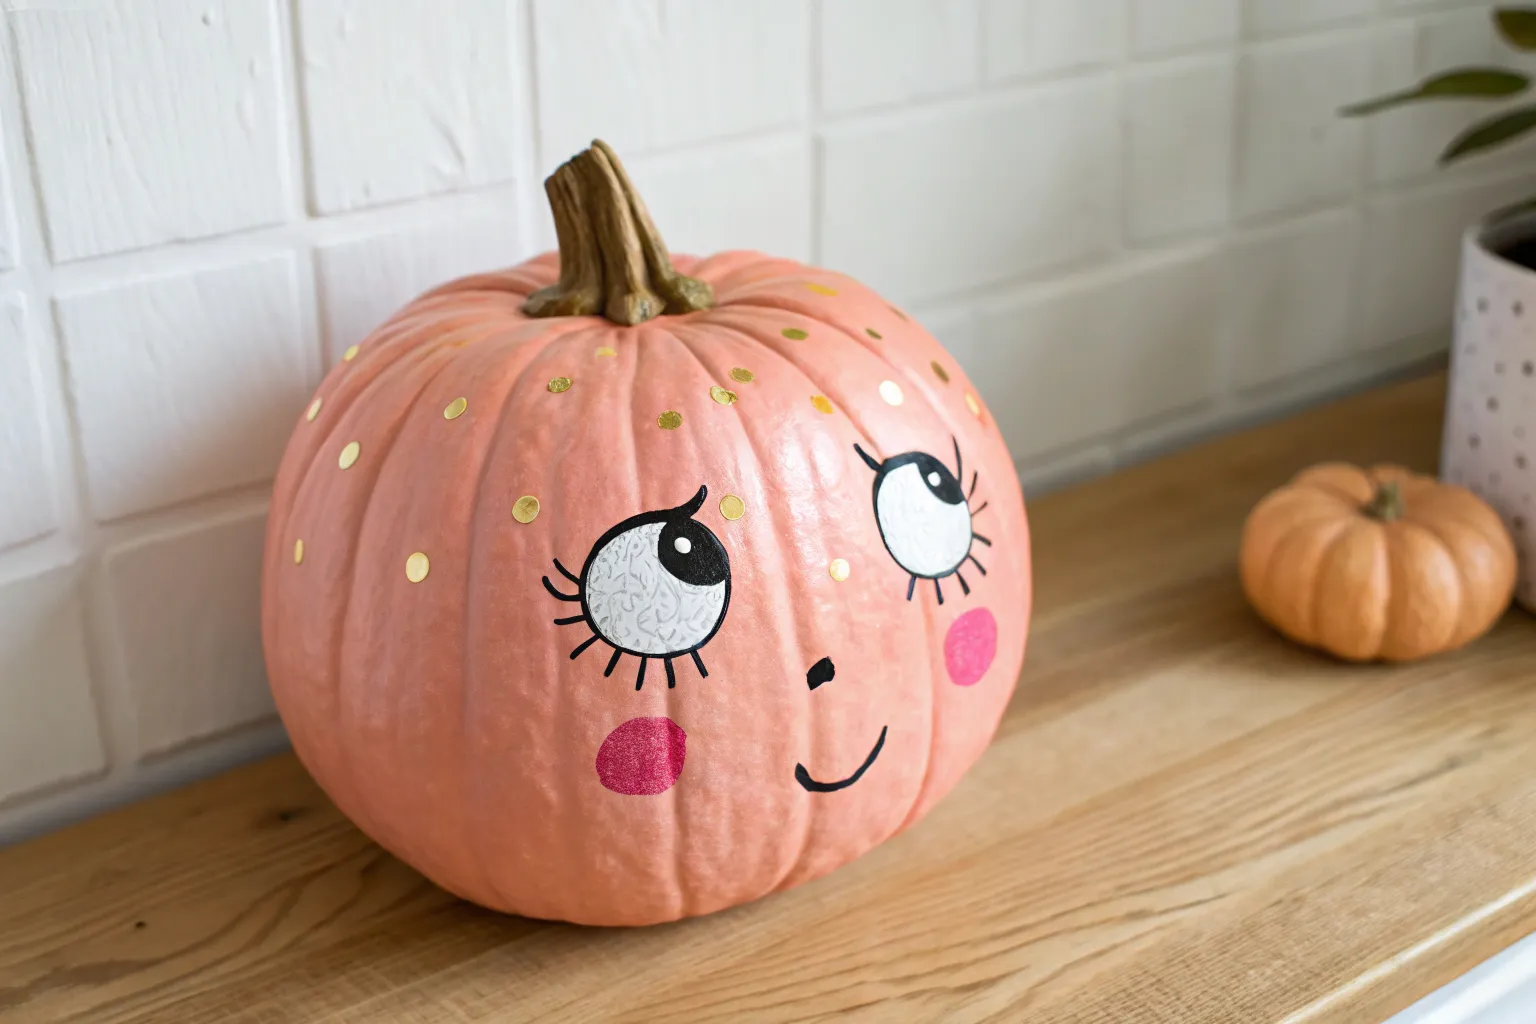
Cross-Eyed “Derp” Expression Pumpkin
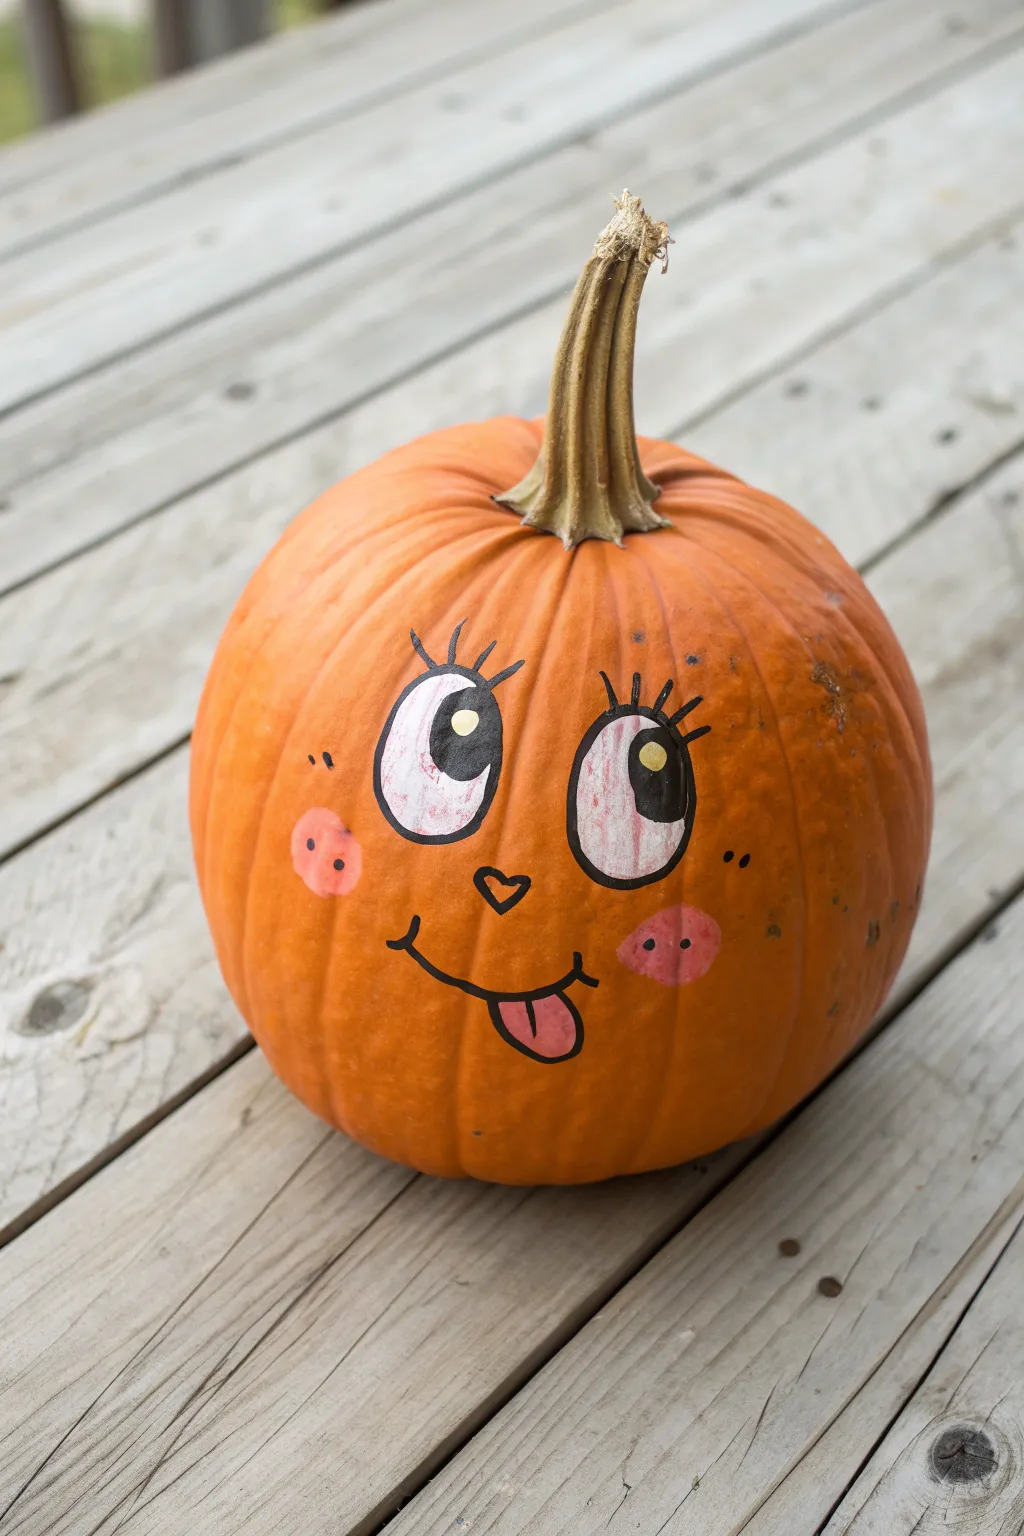
Embrace the silly side of the season with this whimsically goofy pumpkin design. Featuring wide, mismatched eyes and a playful tongue sticking out, this project is all about capturing that lovable ‘derp’ expression without picking up a carving knife.
Step-by-Step Tutorial
Materials
- Medium-sized orange pumpkin (clean and dry)
- White acrylic craft paint
- Black acrylic craft paint or a thick black paint marker
- Pink acrylic craft paint
- Small round paintbrush
- Medium flat paintbrush
- Pencil for sketching
- Paper towel
- Water cup
Step 1: Planning and Base Layers
-
Prep the surface:
Before you start, wipe down your pumpkin with a damp cloth to remove any dirt or field dust. Let it dry completely so the paint adheres properly to the skin. -
Sketch the eyes:
Using a pencil, lightly draw two large oval shapes on the upper half of the pumpkin. Angle them slightly inward toward each other to start building that goofy expression. -
Fill in the whites:
Load your medium flat brush with white acrylic paint. Fill in the oval shapes you just drew. -
Apply a second coat:
Orange pumpkin skin is distinctively bright, so the first layer of white might look translucent. Once the first coat is dry to the touch, add a second layer of white for solid, bright eyeballs.
Fixing Wobbly Lines
If your black outline goes astray, wait for it to dry completely. Gently scrape the error off with a toothpick or paint over it with a dab of orange that matches the pumpkin skin.
Step 2: Adding the Silly Details
-
Paint the pupils:
Switch to black paint and a small round brush. Paint two large circles inside the whites of the eyes. To achieve the cross-eyed look, position both pupils near the inner corners, closest to the nose area. -
Add the eye shine:
Dip the handle end of your paintbrush into white paint. Dot a small speck of white onto the upper right side of each black pupil. This ‘catchlight’ brings the character to life immediately. -
Outline the eyes:
Using black paint or a black paint marker, carefully trace the outer edge of the white ovals. Keep your hand steady, but don’t worry if the line varies in thickness slightly; it adds to the hand-drawn charm. -
Draw the eyelashes:
Add three or four short lashes extending from the top outer corners of each eye. Make them stiff and straight for a cartoonish vibe. -
Create the nose:
Draw the nose as a simple, small heart shape between and slightly below the eyes. Outline it in black first, leaving the center empty or orange.
Level Up: 3D Hair
Glue strands of yellow yarn or fake hay around the stem to give your goofy pumpkin messy hair that matches its chaotic energy.
Step 3: Cheeks and Mouth
-
Paint the rosy cheeks:
Mix a soft pink color or use straight pink acrylic. Paint two circle blobs on either side of the face, just below the eye level. -
Add freckles:
Once the pink circles are dry, take your black paint or marker and add three small dots inside each cheek. Add two or three stray freckles outside the cheek area for extra texture. -
Sketch the smile:
Draw a wide, U-shaped smile starting from one cheek and stretching to the other. At one end, curve the line slightly upward to create a smirk. -
Trace and thicken paint:
Go over your smile line with black paint. I like to thicken the line slightly in the middle to give the mouth more definition. -
Add the tongue:
Draw a U-shape hanging down from the side of the mouth where the smile curves up. Paint the inside of this shape with the same pink used for the cheeks. -
Detail the tongue:
Outline the pink tongue in black. Add a single vertical line down the center of the pink area to show depth. -
Final touches:
Look over your pumpkin. If any black lines look thin, give them a second pass to make the features pop against the orange background.
Set your finished pumpkin on the porch to greet trick-or-treaters with a delightfully silly face


One-Eyed Cyclops Pumpkin
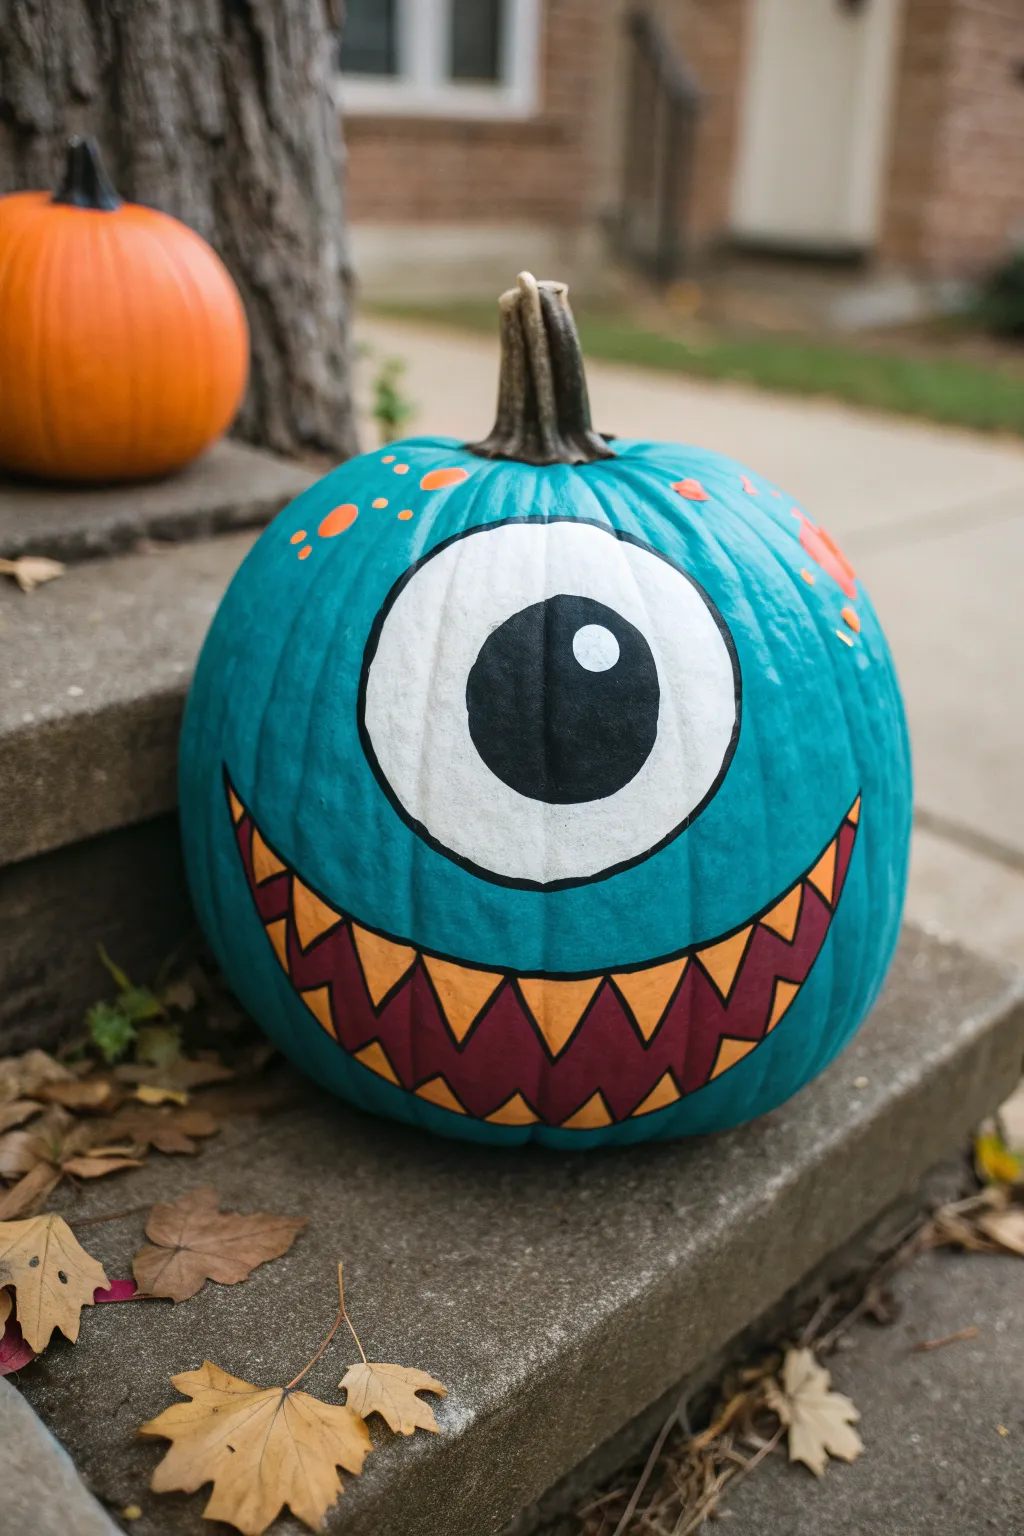
Transform a standard pumpkin into a friendly one-eyed monster with this vibrant teal cyclops design. The bold colors and simple geometric shapes make it a standout decoration that’s equal parts spooky and silly.
How-To Guide
Materials
- Medium to large round pumpkin
- Teal or turquoise acrylic paint
- White acrylic paint
- Black acrylic paint
- Maroon or dark red acrylic paint
- Orange acrylic paint
- Large flat paintbrush (for base coat)
- Medium round brush
- Fine detail brush or liner brush
- Pencil for sketching
- Damp cloth
- Cup of water
- Palette or paper plate
Step 1: Base Prep
-
Clean the canvas:
Before you unscrew a single paint cap, wipe down your pumpkin with a damp cloth to remove any dirt or field debris. Dry it thoroughly so the paint adheres properly. -
Apply the first base coat:
Using your large flat brush, cover the entire pumpkin in teal or turquoise paint. Don’t worry about the stem just yet; focus on the skin. -
Let it dry completely:
Acrylics dry fast, but pumpkin skin can be slick. Wait about 20-30 minutes before touching it to ensure you don’t smudge your work. -
Add a second coat:
To get that opaque, vibrant finish seen in the photo, apply a second layer of teal paint. This ensures the orange pumpkin skin doesn’t peek through.
Uneven Coverage?
If the teal paint streaks, try dabbing it on with a sponge brush instead of dragging a bristle brush. This creates a textured, solid coat.
Step 2: Drafting the Design
-
Sketch the eye:
Once the base is fully dry, grab a pencil. Draw a large circle in the upper center of the pumpkin for the cyclops eye. -
Outline the mouth:
Sketch a wide, U-shaped grin below the eye. It should stretch almost from one side of the pumpkin to the other. -
Add the teeth:
Inside the mouth outline, draw a zigzag line horizontally across the middle to create upper and lower pointed teeth.
Step 3: Painting the Eye
-
Fill the sclera:
Use a medium round brush to fill in the large eye circle with white paint. You may need two coats here to cover the teal perfectly. -
Paint the pupil:
Once the white is dry, paint a large black circle in the center of the eye. It should take up about half of the white space. -
Add the spark of life:
Dip the handle end of a paintbrush into white paint and dot a small highlight near the top right of the black pupil. This reflection makes the eye look wet and alive. -
Outline the eye:
Using a fine detail brush and black paint, carefully trace roughly around the outer edge of the white circle to define it clearly against the teal.
Glow in the Dark
Mix glow-in-the-dark medium into your white paint for the eye. At night, your cyclops will stare back from the porch steps.
Step 4: Creating the Grin
-
Paint the teeth:
Fill in the triangle shapes of the teeth with orange paint. I prefer using a bright pumpkin orange to tie it back to the original vegetable. -
Fill the gums:
Carefully paint the spaces between the teeth—the triangular gaps pointing away from the center line—with maroon or dark red paint. -
Define the mouth:
With your fine detail brush and black paint, outline the entire mouth shape. -
Trace the teeth:
Continue using the black liner brush to trace the zigzag line separating the orange teeth from the maroon gums, giving everything a sharp, comic-book style look.
Step 5: Final Touches
-
Spots and freckles:
Dip a small round brush or Q-tip into the orange paint. Add random spots around the top and sides of the eye for texture. -
Clean up lines:
Review your black outlines. If any teal or white looks uneven, touch up the black borders to make them crisp and bold. -
Protect your art:
Since this will likely sit outside, consider spraying the dried pumpkin with a clear acrylic sealer to prevent the paint from peeling in the rain.
Place your charming monster on the porch step and enjoy the smiles it brings to passersby
BRUSH GUIDE
The Right Brush for Every Stroke
From clean lines to bold texture — master brush choice, stroke control, and essential techniques.
Explore the Full Guide
Silly Vampire With Tiny Fangs
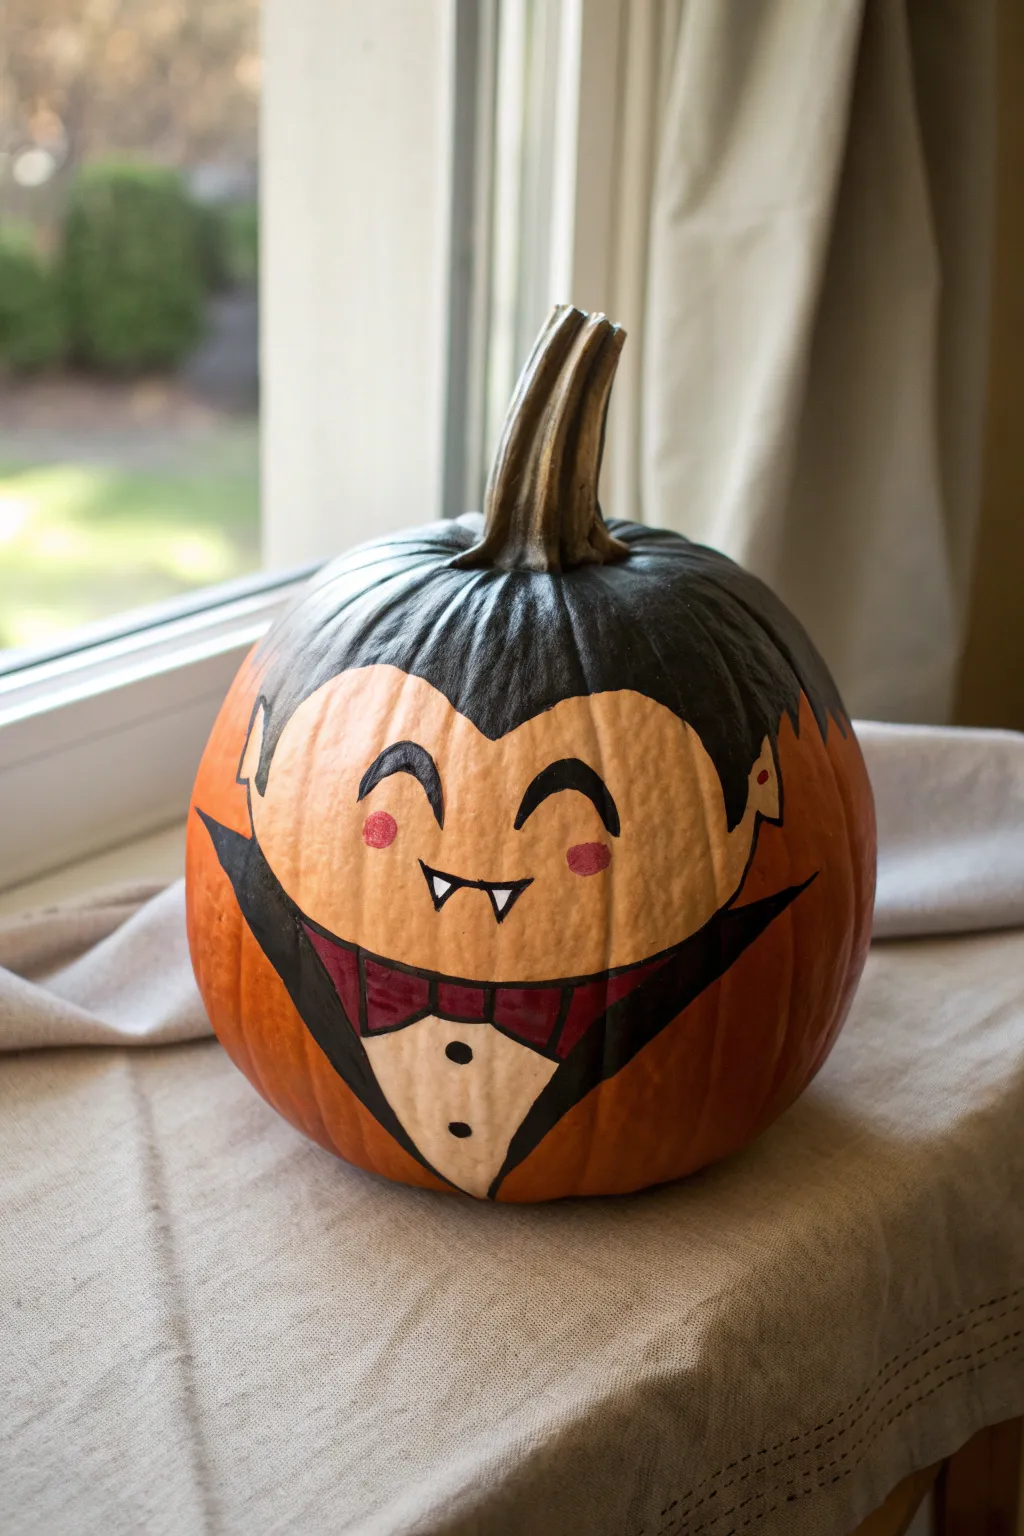
Turn a simple round pumpkin into a charming vampire who looks more ready for a hug than a haunt. This painted design features a classic widow’s peak, a dapper bowtie, and an irresistibly joyous expression that skips the spooky factor entirely.
Step-by-Step Tutorial
Materials
- Medium-sized round pumpkin (orange)
- Acrylic paints: Black, White, Cream/Beige, Red/Burgundy, Pink
- Pencil or chalk (for sketching)
- Wide flat paintbrush (approx. 1 inch)
- Medium round paintbrush
- Fine detail brush (size 0 or similar)
- Cup of water and paper towels
- Sealant spray (optional)
Step 1: Planning and Base Shape
-
Clean the Surface:
Begin by wiping down your pumpkin with a damp cloth to remove any dirt or oily residue, then dry it thoroughly so the paint adheres properly. -
Sketch the Face Outline:
Using a pencil or a piece of chalk, lightly draw a large heart shape for the vampire’s face. The top of the heart (the widow’s peak) should dip down near the upper middle of the pumpkin. -
Define the Suit Area:
Below the point of the heart-shaped chin, sketch a V-shape widening towards the bottom of the pumpkin. This will become the shirt and bowtie area. -
Draw the Collar:
Extend two curved lines upward from the sides of the suit V-shape, flaring them out like bat wings to create the vampire’s high collar.
Chalk It Up
Use chalk instead of pencil for your initial sketch. If you make a mistake on the pumpkin skin, a damp paper towel wipes the chalk away instantly without leaving graphite smudges.
Step 2: Painting the Face and Hair
-
Fill the Face Tone:
Mix a cream or light beige color. Use your medium round brush to paint the entire heart-shaped face area, being careful to keep the edges crisp. You may need two coats for full opacity. -
Paint the Hair Base:
Once the face is dry, take your wide flat brush and black paint. Fill in the top section of the pumpkin above the distraction hairline, covering the top completely up to the stem. -
Add Hair Texture:
While the black paint is still wet, use the tip of your brush to pull small strokes downward slightly into the beige forehead area, creating a jagged, hair-like texture rather than a straight line. -
Define the Sideburns:
Extend the black hair down the sides of the face, ending in small points just beside where the ears would be. -
Paint the Ears:
Using the beige face color, paint two small, pointed ear shapes poking out from the black hair on the sides.
Patchy Beige Paint?
If your cream paint looks streaky over the orange rind, let the first coat dry completely (about 15 mins) before adding a second. Don’t overwork wet paint or it will lift.
Step 3: Dressing the Vampire
-
Fill the Shirt:
Paint the central V-shape at the bottom with the cream/beige color to represent his dress shirt. -
Create the Collar and Cape:
Use the black paint to fill in the flared collar shapes on either side of the shirt. Bring this black paint down around the V-shape to form the tuxedo jacket lapels. -
Paint the Bowtie Base:
With a red or burgundy paint, add a horizontal bowtie shape directly under the vampire’s chin. -
Outline the Bowtie:
Once the red draws, use your fine detail brush and black paint to outline the bowtie segments to make them pop.
Step 4: Adding the Details
-
Outline the Features:
Switch to your finest detail brush and black paint. Carefully outline the entire face, the ears, and the shirt V-shape to give it a clean, cartoon look. -
Add Shirt Buttons:
Dip the back end of a small paintbrush into black paint and dot two perfect circles onto the cream shirt area for buttons. -
Paint the Eyes:
In the center of the face, paint two upward-curved arches for eyes. Thickening the lines slightly in the middle makes him look extra happy. -
Create the Smile:
Below the eyes, paint a small, simple line for the mouth. Add two tiny white triangles pointing downward from the top lip for his non-threatening fangs. -
Add Rosy Cheeks:
Dip a fingertip or a small round brush into pink paint and dab two soft circles onto the cheeks, just outside the smile lines. -
Final Ear Detail:
I like to add a tiny red dot or line inside the pointed ear tracing to give it a little depth.
Place your happy vampire on a windowsill to greet trick-or-treaters with a smile.
Cute Frankenstein “Oops” Face
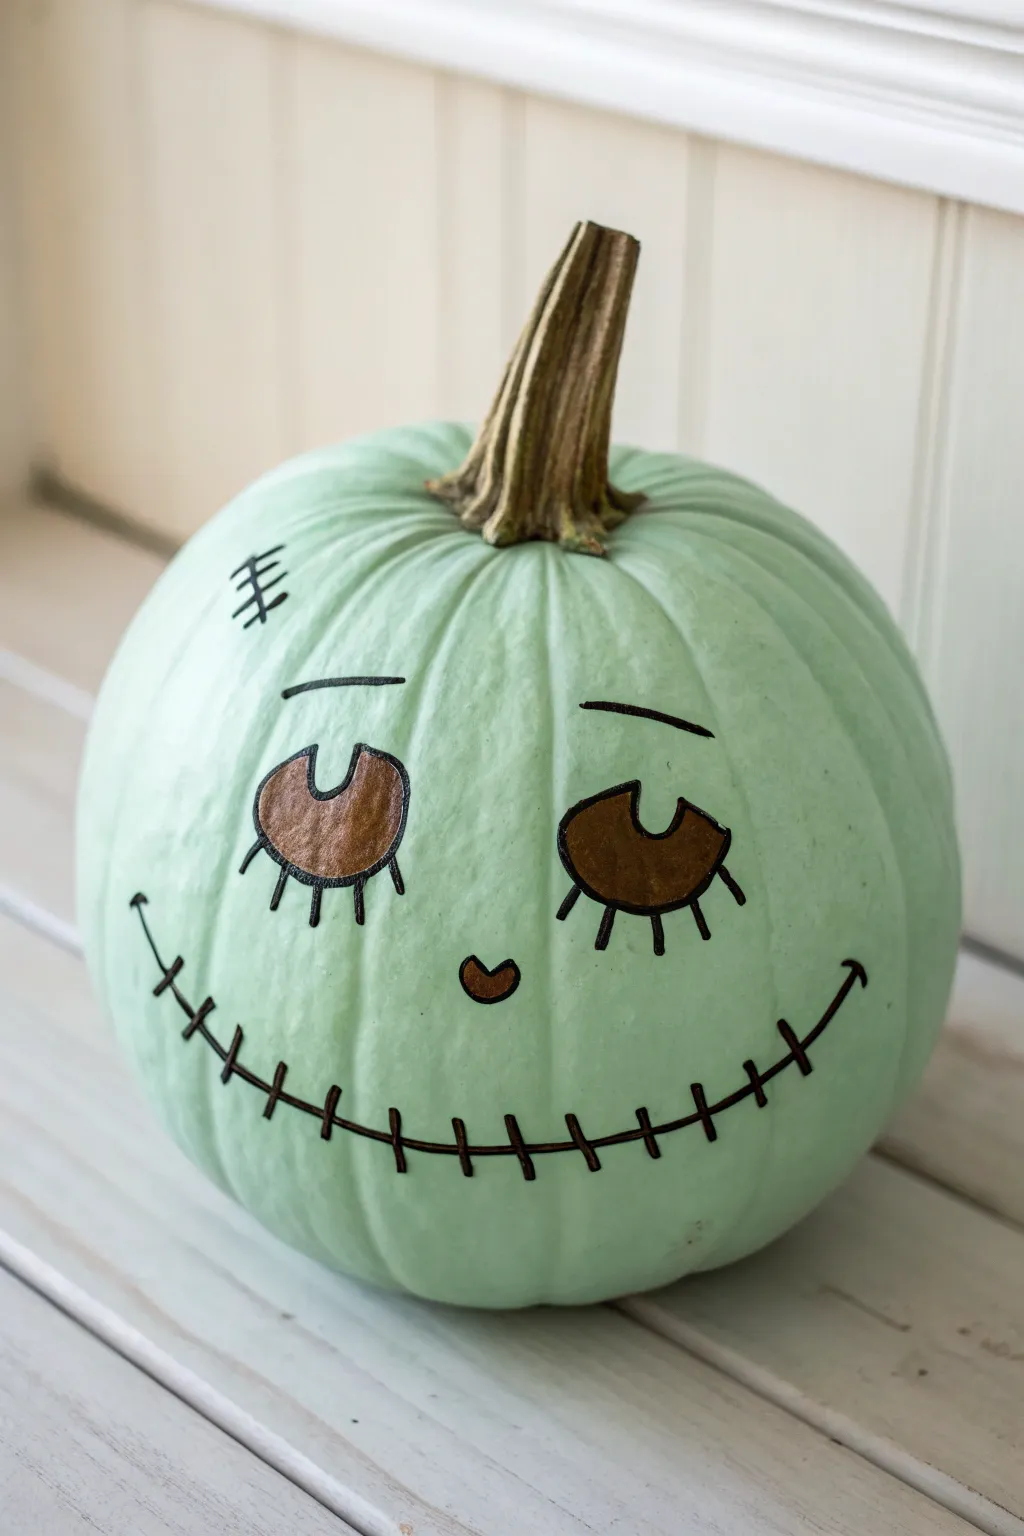
Give your Halloween decor a gentle, whimsical touch with this pastel take on Frankenstein’s monster. This adorable pumpkin swaps scares for sweetness, featuring big glossy eyes and a stitched-up smile on a soft mint green background.
Step-by-Step
Materials
- Medium-sized pumpkin (real or faux)
- Mint green acrylic craft paint or spray paint
- Brown metallic or glossy acrylic paint
- Black fine-tip paint pen or permanent marker
- Medium paintbrush (for base coat)
- Small round paintbrush (for eyes/nose)
- Pencil
- Sealer or clear glossy topcoat (optional)
Step 1: Setting the Stage
-
Clean Your Canvas:
Begin by wiping down your pumpkin with a damp cloth to remove any dirt or oils. If you are using a real pumpkin, ensure it is completely dry before starting to paint. -
Tape the Stem:
To keep that natural look on the stem, wrap painter’s tape around the base of the stem where it meets the pumpkin skin. This protects it from stray paint strokes. -
Apply the Base Layer:
Paint the entire surface of the pumpkin with your mint green acrylic paint. Work in vertical strokes following the pumpkin’s natural ribs for a smooth finish. -
Dry and Repeat:
Let the first coat dry completely, which usually takes about 20-30 minutes. Apply a second coat to ensure opaque coverage so no orange shows through. -
Remove Protection:
Once the final green coat is tacky but nearly dry, carefully peel away the painter’s tape from the stem to reveal the clean edge.
Step 2: Sketching the Personality
-
Light Sketching:
Using a pencil, very lightly draw the outline of the face features. Place the eyes about midway down the pumpkin, spacing them wide apart for a cuter look. -
The Eyes:
Draw two large semicircles or rounded bean shapes for the eyes. The flat side should be at the top, creating a sleepy or shy expression. -
Nose and Mouth:
Sketch a tiny heart right in the center, slightly below the eyes. Then, draw a wide, curved smile line that stretches almost cheek-to-cheek. -
Forehead Details:
Add a small diagonal line on the upper left forehead for the scar, and draw faint eyebrows floating above the eyes.
Clean Lines Tip
Rest your pinky finger on a dry part of the pumpkin while drawing with the marker. This stabilizes your hand for smoother, tremor-free lines.
Step 3: Bringing Frankie to Life
-
Painting the Eyes:
Fill in the large eye shapes with the metallic brown paint. Use your small round brush and take your time to keep the edges crisp. -
Adding the Heart:
Fill in the small heart nose with the same metallic brown paint to match the eyes. -
Let it Set:
Pause here to let the brown paint dry fully. If you rush to the outlining stage, the black marker might snag or bleed into wet paint. -
Outlining the Eyes:
Take your black paint pen and carefully trace the outer edge of the brown eyes to define them clearly. -
Lashes and Brows:
Draw four or five straight lashes extending downward from the bottom curve of each eye. Then, trace your penciled eyebrows with a single clean stroke. -
The Smile:
Trace the main smile line with the black marker. Add small vertical hatch marks all along the smile to create the classic ‘stitched’ look. -
Finishing Touches:
Outline the tiny heart nose in black. Finally, trace the scar line on the forehead and add three or four cross-hatches to match the stitched mouth. -
Optional Highlight:
If you want extra dimension, add a tiny dot of white paint to the upper corner of the brown eyes once everything is dry.
Level Up: 3D Elements
Hot glue two real bolts (spray painted silver) or wine corks to the sides of the pumpkin to give your Frankie monster iconic neck bolts.
Place your adorable creation on a porch step or windowsill to greet visitors with a friendly face

PENCIL GUIDE
Understanding Pencil Grades from H to B
From first sketch to finished drawing — learn pencil grades, line control, and shading techniques.
Explore the Full Guide
Witch Face With Comically Bad Hair
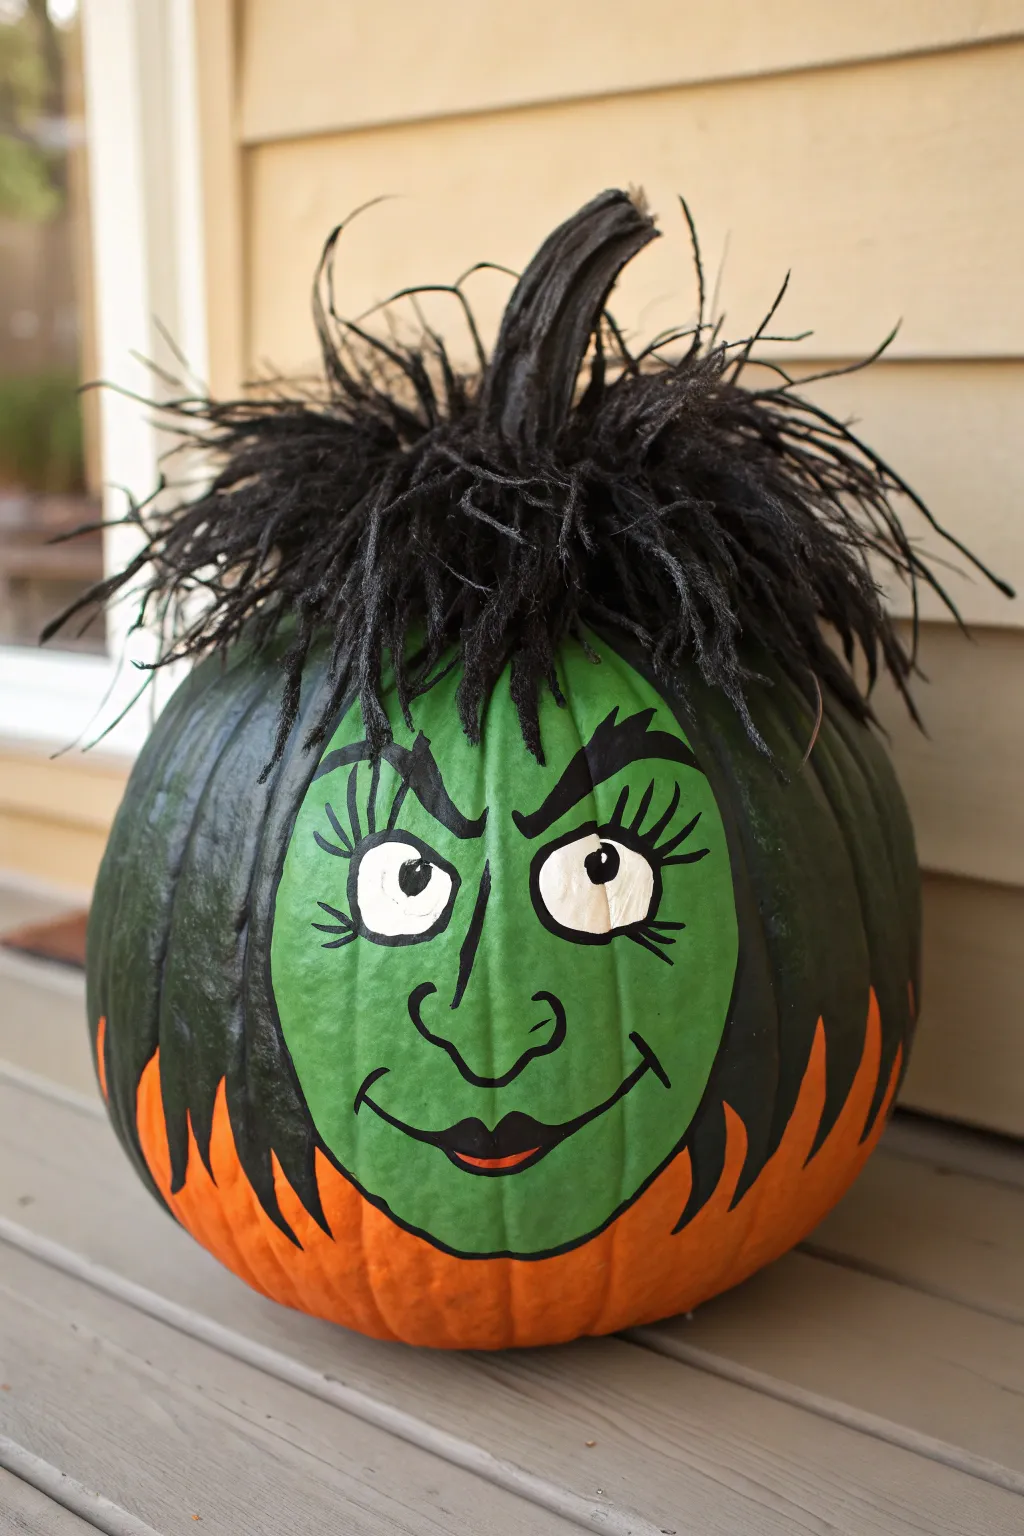
Bring wicked whimsy to your porch with this detailed witch face painted on a classic orange pumpkin. The clever use of negative space for flames and wild, feathery material around the stem gives her a hilarious “bad hair day” personality.
Detailed Instructions
Materials
- Medium to large orange pumpkin (smooth surface preferred)
- Acrylic craft paints: Lime Green, Black, White, Red (for mixing lip color)
- Painter’s tape or masking tape (optional)
- Pencil or chalk for sketching
- Assorted paintbrushes: 1-inch flat brush, #4 round brush, fine liner brush
- Black feather boa piece or faux fur trim (about 12 inches)
- Hot glue gun and glue sticks
- Cup of water and paper towels
Step 1: Planning and Sketching
-
Clean the surface:
Wipe down your pumpkin with a damp cloth to remove any dirt or oily residue. A clean surface ensures the acrylic paint adheres properly without peeling later. -
Map out the face shape:
Using a pencil or a piece of chalk, lightly sketch a large oval shape on the flattest side of the pumpkin. This will be the witch’s green face area. -
Sketch flattened bottom details:
At the bottom of your oval sketch, draw zig-zag flame shapes pointing upward. These jagged edges will create the illusion that her black hood is flared out like fire against the orange pumpkin skin. -
Draw the features:
Inside the oval, sketch two large almond shapes for eyes, a long hooked nose, eyebrows, and a wide smirk.
Paint Transparency?
If your white paint looks translucent over the green face, don’t rush. Let the layer dry completely (touch dry) before adding another coat to avoid lifting the paint.
Step 2: Painting the Base Layers
-
Fill in the face:
Using your 1-inch flat brush, fill in the oval face area with lime green paint. Avoid the eye shapes if you can, but it’s okay if you paint over them since white will cover it later. -
Apply a second coat:
Let the first green layer dry for about 15 minutes. Apply a second coat to ensure the bright orange pumpkin skin doesn’t show through, giving you a solid, vibrant complexion. -
Paint the hair and hood:
Switch to black paint. Outline the green face carefully, then paint the entire rest of the pumpkin’s top and sides black. Extend the black paint down to meet your zig-zag flame sketch marks at the bottom. -
Create the flames:
Carefully paint the negative space around the bottom flames black. The goal is to leave the natural orange pumpkin showing as the ‘fire’ shapes, creating a sharp contrast against the black hood. -
Darken the stem:
Don’t forget the stem! Paint the entire stem black to blend it seamlessly into the witch’s messy hairdo.
Step 3: Detailed Features
-
Paint the eyes white:
Using a round brush, fill in the eye shapes with opaque white paint. You might need two coats here to make them pop against the green skin. -
add the pupils:
Once the white is fully dry, use a smaller brush to paint black circles for pupils. Place them slightly off-center or looking sideways to give her a suspicious or sassy expression. -
Outline the eyes:
With a fine liner brush and black paint, carefully outline the white eyes. Add three dramatic eyelashes to the outer corner of each eye. -
Define the nose and mouth:
Using the liner brush, trace your sketched nose line and the wide smile. Add small ‘cheek’ creases at the ends of the smile to emphasize the expression. -
Paint the eyebrows:
Paint thick, arched black eyebrows. I find that giving them a slightly jagged, bushy edge adds to the haggard witchy character. -
Add the lips:
Mix a tiny bit of red with black to create a dark maroon, or use plain black. Fill in the lip shape, making the top lip thinner and the bottom lip fuller. -
Highlight the lips:
Once the lips are dry, add a tiny sliver of orange or red to the center of the bottom lip for a subtle highlight.
Pro Tip: Eye Shine
Add a tiny white dot in the black pupils of the eyes (at the 2 o’clock position). This ‘catchlight’ instantly brings the character to life.
Step 4: The Finishing Touch
-
Prepare the wig material:
Take your black feather boa or faux fur strip. Measure it around the base of the stem to ensure it’s long enough to create a full circle. -
Glue the hair:
Apply a thick ring of hot glue around the base of the painted stem. Carefully press the feather boa into the glue, fluffing it up so it stands wild and frantic. -
Secure strays:
If any feathers are hanging too low over the eyes, use a tiny dot of glue to tack them back or simply trim them with scissors for the perfect bad haircut look.
Set your witch on the porch and enjoy the cackles she inspires from the neighborhood trick-or-treaters
Emoji-Inspired Laughing Face Pumpkin

Bring the internet’s favorite reaction to life with this cheerful, emoji-inspired pumpkin design. Painted in a bright yellow hue with classic cartoon expressions, this project is guaranteed to spread smiles on your front porch.
Step-by-Step
Materials
- Medium-sized round pumpkin with a good stem
- Yellow acrylic craft paint (primary yellow or sunshine yellow)
- Black acrylic paint
- White acrylic paint
- Bright blue acrylic paint
- Wide flat paintbrush (approx. 1 inch)
- Small round detail brush
- Medium filbert or flat brush
- Pencil or chalk for sketching
- Palette or paper plate
- Cup of water and paper towels
- Clear acrylic sealer spray (optional)
Step 1: Base Coat Preparation
-
Clean the surface:
Start by wiping down your pumpkin with a damp cloth to remove any dirt or field dust. Dry it completely with a paper towel, as moisture will prevent the paint from adhering properly. -
Protect the stem:
If you want to keep the stem natural like in the photo, wrap a piece of painter’s tape around the base of the stem where it meets the pumpkin skin. This makes cutting in with your yellow paint much easier. -
Apply the first yellow coat:
Using your wide flat paintbrush, apply a layer of bright yellow acrylic paint over the entire surface of the pumpkin. Paint with the vertical grooves of the pumpkin for a smoother texture. -
Let it dry:
Allow the first coat to dry for about 20-30 minutes. Acrylics dry quickly, but if you rush, the next layer might lift the previous one. -
Apply subsequent coats:
Apply a second and possibly third coat of yellow until the orange skin of the pumpkin is no longer visible. You want a solid, opaque matte finish.
Pro Tip: Pencil Marks
If you used a pencil to sketch and made a mistake, a standard eraser usually works on dried acrylic paint. Just rub gently to avoid peeling the yellow layer.
Step 2: Sketching the Face
-
Position the features:
Wait until the yellow base is fully dry to the touch. Using a pencil or a piece of white chalk, lightly sketch the location of the eyes and mouth. The eyes should be crescent shapes curving upward. -
Draft the mouth:
Draw a wide, U-shaped smile below the eyes. Make it large enough to accommodate the teeth later. The top line of the mouth should curve slightly upward at the ends. -
Add the tears:
Sketch two large teardrop shapes. Place one near the outer corner of each eye. These should rely on gravity, so the bulbous part of the drop hangs downward. -
Mark the eyebrows:
Draw two arched eyebrows floating above the eyes. They should follow the curve of the closed eyelids to emphasize the laughing expression.
Level Up: 3D Tears
Make the tears pop by using blue puffy paint or hot glue painted blue. This adds a raised texture that catches the light and looks like real water.
Step 3: Painting the Details
-
Fill the eyes:
Switch to your medium brush and black paint. Carefully fill in the crescent shapes of the eyes. Use the small round brush to sharpen the pointed corners. -
Paint the eyebrows:
Using the black paint, fill in the eyebrow arches. Keep the start of the brow slightly thicker and let it taper off toward the temples. -
Outline the mouth:
Paint the entire mouth shape with black acrylic. Don’t worry about the teeth yet; it’s easier to paint white over dried black than to paint black around tiny white squares. -
Create the tears:
While the black dries, dip a clean medium brush into bright blue paint. Fill in the teardrop shapes. You may need two coats of blue to make it pop against the yellow background. -
Outline the tears (optional):
I prefer to add a very thin outline of a darker blue or black around the tears to make them stand out, although the reference image keeps them simple and flat.
Step 4: Finishing Touches
-
Paint the teeth:
Once the black mouth area is 100% dry, load a small flat brush with white paint. Paint two small squares hanging from the top line of the mouth to represent the teeth. -
Refine the edges:
Check your lines. If any yellow shows through the black or if lines are wobbly, use your small detail brush to tidy up the edges. -
Remove tape:
Carefully peel off the painter’s tape from the stem, revealing the clean line between the green stem and the yellow face. -
Seal the work:
If this pumpkin will be sitting outside, spray it with a clear acrylic sealer in a matte or satin finish to protect the paint from moisture.
Place your hilarious creation near a window or entryway to greet guests with a big laugh


Mustache and Eyebrow Comedy Pumpkin

Transform an ordinary pumpkin into a distinguished gentleman with just a few strokes of a marker. This minimalist yet humorous design relies on bold lines and exaggerated facial hair to create a character full of personality and charm, perfect for a quick and mess-free decoration.
How-To Guide
Materials
- Medium-sized orange pumpkin (smooth surface preferred)
- Black permanent marker (chisel tip)
- Black permanent marker (fine tip)
- Pencil
- Eraser
- Damp cloth or paper towel
- Dry cloth
Step 1: Preparation
-
Select your canvas:
Choose a pumpkin that has a relatively smooth, even face. Deep ridges can make drawing straight lines tricky, so look for a flatter side to serve as the front. -
Clean the surface:
Wipe the pumpkin down thoroughly with a damp cloth to remove any dirt or field dust. Markers adhere much better to a clean surface. -
Dry completely:
Ensure the pumpkin is bone dry before you begin. Even a little moisture can ruin markers or cause the ink to bleed immediately.
Step 2: Drafting the Design
-
Sketch the eyebrows:
Using your pencil, lightly sketch two arched shapes for eyebrows about a third of the way down the pumpkin face. Angle the inner corners downward slightly to give him a bit of expression. -
Draft the eyes:
Below the eyebrows, draw two sideways ‘3’ shapes (or ‘m’ shapes turned vertically) to represent squinted, laughing eyes. Space them evenly beneath the eyebrow arches. -
Outline the mustache center:
Start the mustache by drawing a small dip or ‘cupid’s bow’ shape in the center, aligned with the stem of the pumpkin. -
Extend the mustache wings:
From the center, draw two large, sweeping curves outward and slightly upward. Imagine a classic handlebar mustache shape. -
Add the curls:
At the end of each mustache wing, add a tight spiral curl, twisting upwards towards the eyes. This swirl is the signature detail of the look. -
Connect the bottom line:
Draw the bottom curve of the mustache, connecting the spiral tips back to the center point. Make the mustache thickest in the middle and tapering toward the curls.
Ink Running?
If the marker ink beads up or won’t stick, the pumpkin skin might be too waxy. Lightly buff the drawing area with very fine sandpaper or a dry scouring pad to give the marker better grip.
Step 3: Inking and Finishing
-
Trace the outlines:
Take your fine-tip permanent marker and trace over your pencil lines carefully. I find it helps to anchor my pinky finger on the pumpkin for stability while tracing. -
Fill the eyebrows:
Switch to the chisel-tip marker. Color inside the eyebrow outlines. Use short, upward flicking strokes if you want to suggest a bit of hair texture, or fill them solid for a cartoon look. -
Thicken the eyes:
Return to the fine-tip marker to go over the eye lines again. Make them slightly bolder so they stand out against the orange skin, but keep the ends crisp. -
Fill the mustache:
Using the chisel-tip marker, begin filling in the large mustache shape. Work in long, horizontal strokes to minimize streakiness in the ink. -
Refine the curls:
Switch back to the fine tip to carefully fill in the tight spirals at the ends of the mustache. This ensures the curls stay sharp and don’t become blobby. -
Check for coverage:
Look closely at the filled areas. If the orange shows through the black ink too much, apply a second coat of marker after the first layer has dried for a minute. -
Clean up sketches:
Once the ink is completely dry—give it at least 5 minutes—gently erase any visible pencil marks. Be gentle so you don’t scrub off the marker ink.
Pro Tip: Highlight It
To make drawings pop, use a white paint pen to add tiny reflection dots to the mustache or eyebrows. It adds dimension and makes the black ink look darker.
This simple yet expressive face brings a touch of class to your festive decor setup
Spa Day Face Mask Pumpkin
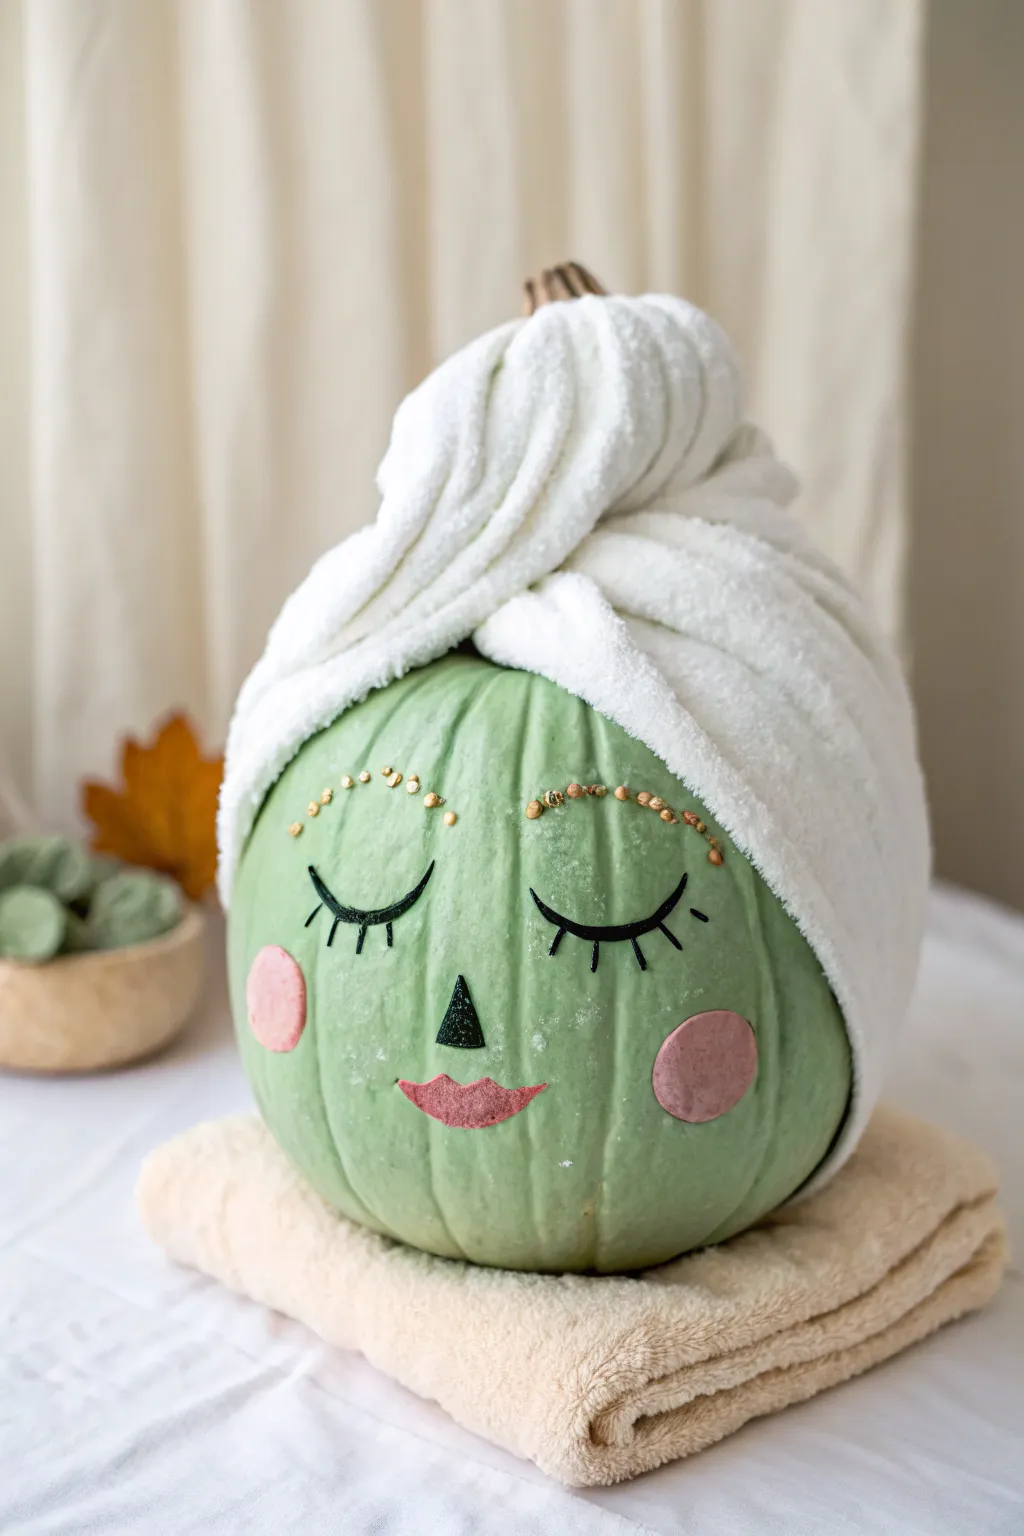
Transform a simple pumpkin into the ultimate relaxation icon with this pale green ‘face mask’ look. Wrapped in a cozy towel turban and adorned with golden glitter eyebrows, this spa-themed pumpkin exudes a calm, self-care vibe perfect for a unique fall display.
Detailed Instructions
Materials
- One medium-sized pumpkin (real or faux)
- Pale sage green or mint chalkboard paint
- White or cream bath towel (hand towel size)
- Black paint pen or fine-tip brush and black acrylic paint
- Pink felt or cardstock
- Dark pink or red felt or cardstock
- Black felt or cardstock
- Gold glitter glue or loose gold glitter with craft glue
- Hot glue gun and glue sticks
- Scissors
Step 1: Setting the Scene
-
Clean the Surface:
Wipe down your pumpkin with a damp cloth to remove any dirt or oils. If using a real pumpkin, ensure it is completely dry before you begin painting. A clean surface ensures the paint adheres smoothly without peeling later. -
Apply the Base Coat:
Paint the entire pumpkin with the pale sage green paint. This specifically mimics the look of a clay face mask. You likely won’t need to paint the very bottom, but cover all the visible sides. -
Add a Second Coat:
Allow the first layer to dry completely, usually about 20-30 minutes. Apply a second coat to get a solid, opaque coverage where no orange shows through. Let this dry fully before handling.
Towel Won’t Stay Put?
If the towel keeps slipping while you try to wrap it, use sewing pins to temporarily hold the fabric layers in place before you commit to hot gluing them down.
Step 2: Creating the Features
-
Draft the Face:
Lightly sketch the placement of the eyes, nose, mouth, and cheeks with a pencil directly onto the dry paint. This helps you get the proportions right before making permanent marks. -
Cut the Cheeks:
Cut two perfectly round circles from the pink felt or cardstock. These should be about 1.5 to 2 inches in diameter to create a rosy, flushed look. -
Cut the Mouth:
Cut a calm, smiling mouth shape from the dark pink material. A simple curved shape works best to convey relaxation. -
Cut the Nose:
Snip a small, simple triangle from the black felt for the nose. Keep it geometric and minimalist. -
Glue the Features:
Using a small dot of hot glue, attach the pink cheeks, the dark pink mouth, and the black nose triangle onto the painted pumpkin surface according to your pencil marks.
Step 3: Detailing the Face
-
Draw the Eyelashes:
Using a black paint pen, carefully draw two closed eyelids. Add three to four long, sweeping eyelashes extending from the outer corners of each eye for a sleepy, serene expression. -
Create Glitter Brows:
Above the eyes, draw an arched eyebrow line using craft glue. While the glue is wet, sprinkle gold glitter over it, or simply use gold glitter glue directly to create shimmering brows. -
Add Brow Accents:
To match the image perfectly, place larger dots of gold glitter or small gold sequins along the brow arch for extra texture and sparkle.
Add Cucumber Slices
For an extra dose of spa realism, glue two circles of green felt or painted wood slices over the eyes to mimic soothing cucumber slices.
Step 4: Wrapping the Turban
-
Prepare the Towel:
Fold your white hand towel lengthwise to create a long, narrower strip. This makes it easier to manipulate around the pumpkin’s shape without being too bulky. -
Position the Wrap:
Place the center of the towel at the back of the pumpkin. Bring the two ends forward, crossing them over the ‘forehead’ area above the painted face. -
Twist and Tuck:
Twist the ends of the towel together tightly at the top, just like you would with a real hair towel. Tuck the loose ends underneath the wrap or behind the pumpkin stem to secure them. -
Secure with Glue:
Once you are happy with the draping, use a few dabs of hot glue under the towel folds to keep the turban permanently in place so it doesn’t slide off. -
Final Adjustments:
Fluff specific parts of the towel to create volume and ensure the stem is mostly hidden, giving the illusion of a high towel wrap. -
Display:
Set your spa pumpkin on a folded matching towel to complete the vignette.
Now you have a serene, pampered pumpkin ready to bring a moment of zen to your autumn decor
Candy-Coated Color Block Pumpkin Lineup
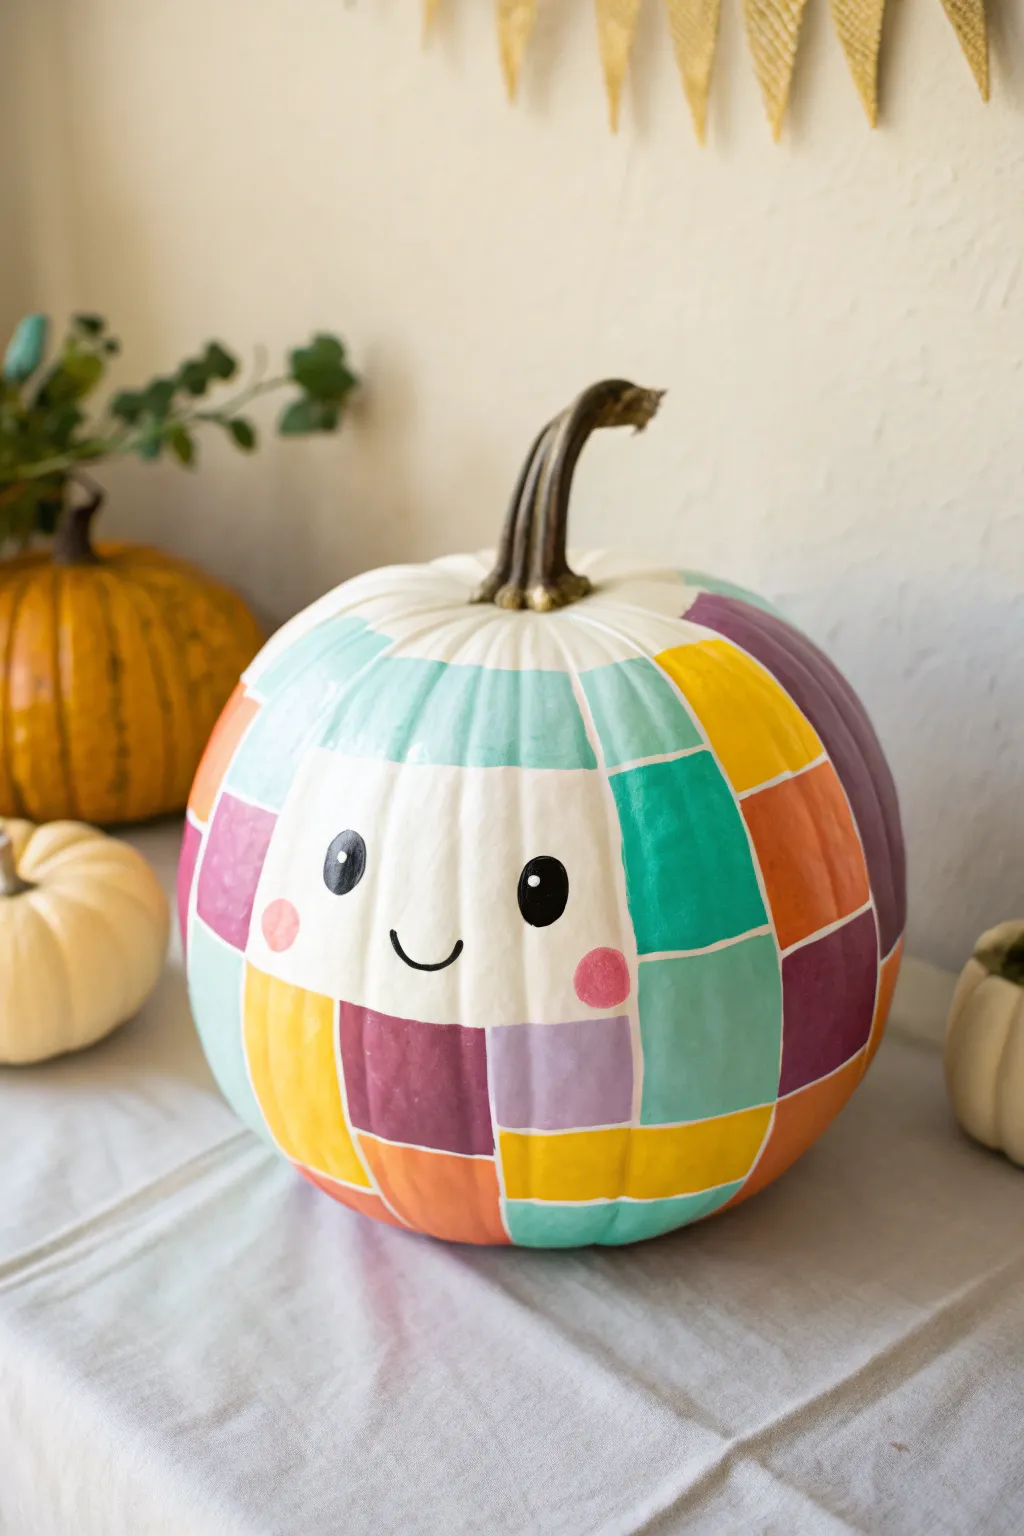
Trade the traditional spooky face for this adorable, candy-colored grid character that brightens up any fall display. This project uses clean geometric lines and a soft, pastel palette to turn a white pumpkin into a cheerful little friend.
Step-by-Step Tutorial
Materials
- White craft pumpkin (or a real white pumpkin)
- Acrylic paints (teal, purple, yellow, orange, coral pink)
- Black acrylic paint
- Pencil
- Flexible measuring tape
- Flat shader paintbrush (medium size)
- Small round paintbrush (size 1 or 2)
- White eraser
- Matte sealer spray (optional)
Step 1: Planning the Grid
-
Clean surface:
Begin by wiping down your pumpkin with a damp cloth to remove any dust or oils, ensuring a perfectly clean surface for the paint to adhere to. -
Vertical guidelines:
Using the pumpkin’s natural ribs as a guide, lightly trace vertical lines with a pencil from the stem down to the base to define your columns. -
Horizontal mapping:
Take a flexible measuring tape and lightly mark horizontal intervals around the pumpkin’s circumference to create the rows for your grid. -
Connecting the grid:
Connect your horizontal marks with a pencil, drawing somewhat loose, organic lines rather than using a rigid ruler; this gives the character a softer, hand-drawn look. -
Designating the face:
Choose a prominent, smooth side of the pumpkin to be the face. -
Reserving the face area:
Lightly mark a large 2×2 or 3×3 block section in the center of your chosen side that will remain unpainted white for the face.
Clean Lines Hack
If painting straight lines by hand is tricky, use thin washi tape or painter’s tape to mask off the grid lines before painting. Peel it off while paint is wet for crisp edges.
Step 2: Painting the Patchwork
-
First color application:
Load your flat shader brush with teal paint and fill in random squares around the grid, making sure not to paint adjacent squares the same color. -
Adding warmth:
Rinse your brush thoroughly and switch to yellow, filling in another set of blocks scattered around the pumpkin. -
Balancing tones:
Introduce purple into the mix, finding empty spots that need a cooler tone to balance the yellow and teal. -
Rounding out the palette:
Fill the remaining empty grid squares with coral pink and orange, leaving only the designated face area white. -
Refining edges:
I like to go back with a small brush and tidy up the edges of the squares, leaving a thin, consistent gap of white space between each colored block to define the grid. -
Opacity check:
Let the first coat dry completely, then apply a second coat to any colors (especially the yellow) that look a bit streaky.
Make It 3D
Glue small buttons or pom-poms onto specific color blocks to add texture, or give your pumpkin a fabric beanie hat to sit on top of the stem.
Step 3: Adding the Personality
-
Drafting features:
Once the color blocks are fully dry, use your pencil to lightly sketch two oval eyes and a small u-shaped smile in the center of the white face area. -
Painting the eyes:
Using the small round brush and black paint, carefully fill in the oval eye shapes. -
Adding eye sparkle:
While the black paint is still wet, you can tap a tiny dot of white paint near the top of each eye, or wait for it to dry and add a clean white dot for a catchlight. -
Creating the smile:
Paint a thin, confident stroke over your pencil line to create the simple, happy smile. -
Rosy cheeks:
Mix a soft pink or use the coral paint to dab two small circles just below and outside the eyes for blushing cheeks. -
Clean up:
Once everything is bone dry, gently erase any visible pencil lines from the white gaps between blocks.
Now you have a charming, colorful pumpkin friend ready to greet your guests
Animal Costume Pumpkin With Add-On Ears
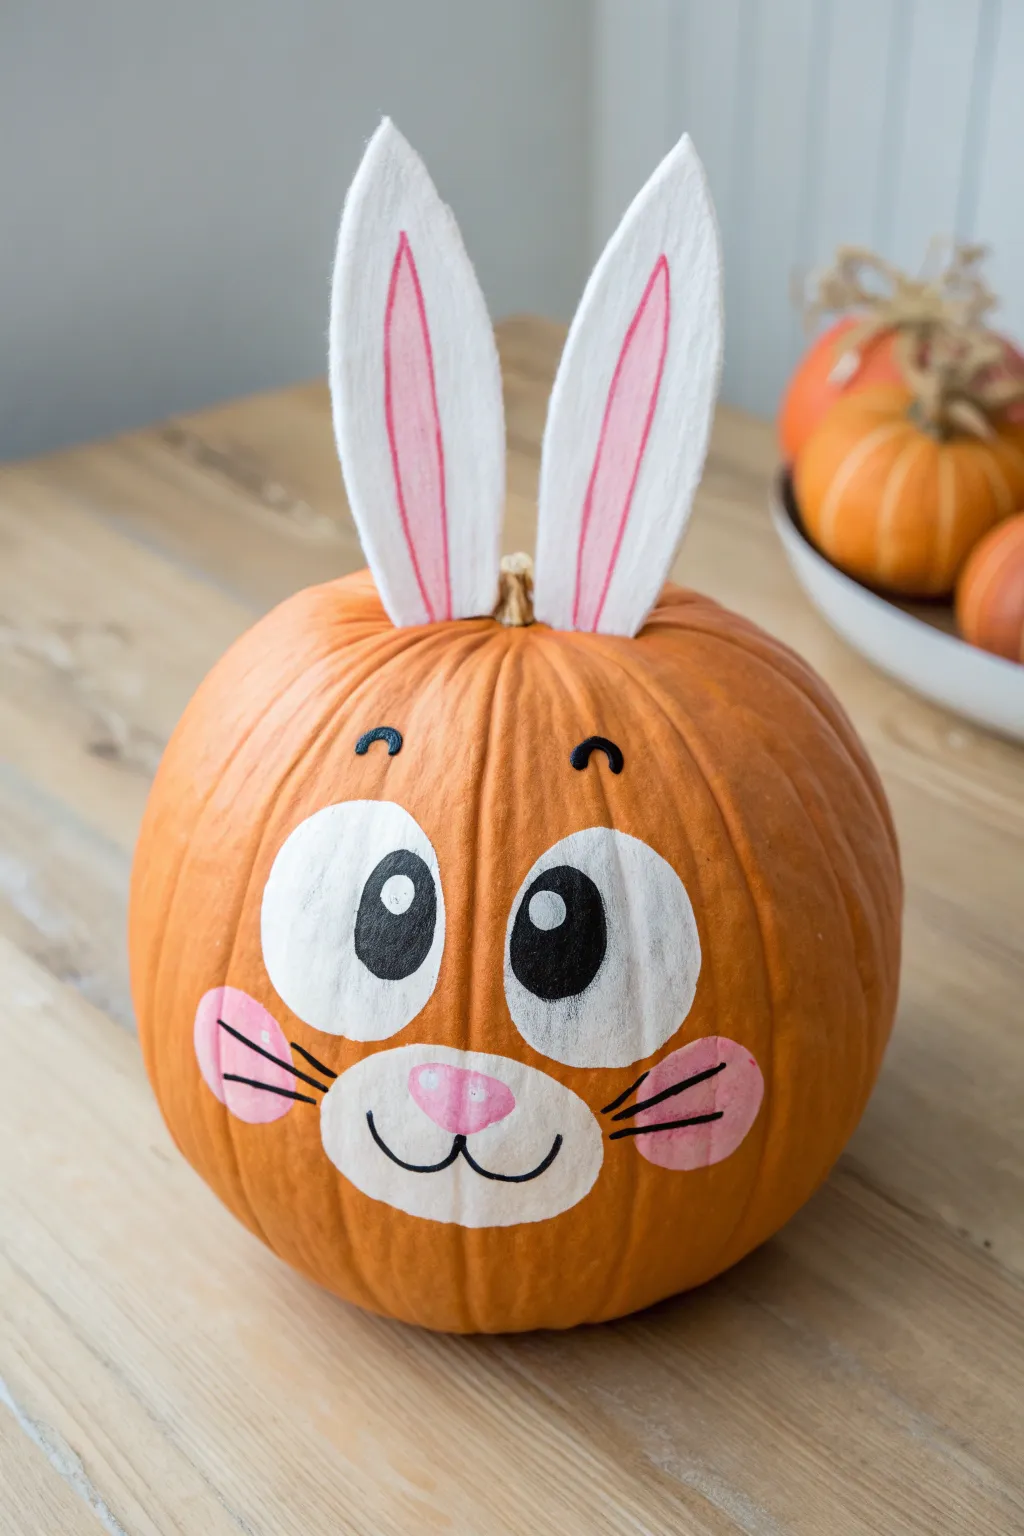
Transform a classic orange gourd into an adorable hopper with this simple yet striking project. The natural ribs of the pumpkin add texture to the bunny’s face, while oversized paper ears complete the charming animal costume effect.
Step-by-Step
Materials
- Medium-sized orange pumpkin
- White acrylic paint
- Black acrylic paint
- Pink acrylic paint
- Stiff white felt or foam sheet
- Pink marker or paint pen
- Hot glue gun and glue sticks
- Scissors
- Medium flat paintbrush
- Small detail paintbrush
- Pencil
Step 1: Planning and Base Coats
-
Clean surface:
Begin by wiping down your pumpkin with a damp cloth to remove any dirt or pumpkin patch residue, ensuring the surface is dry before painting. -
Sketch the face:
Using a pencil, lightly sketch the large oval eyes, the round cheeks, and the muzzle area directly onto the pumpkin skin. -
Outline the features:
Make sure your sketch includes the half-circle shape for the muzzle at the bottom center and two distinct circular blush marks on the sides. -
Paint the eyes white:
Fill in the large eye ovals with white acrylic paint. You will likely need two coats to get a solid, opaque finish over the orange skin. -
Paint the muzzle:
Fill in the central muzzle area with the same white paint, carefully following the curved bottom edge of your sketch.
Paint Slipping?
If the acrylic paint beads up on the shiny pumpkin skin, lightly sand the surface with fine-grit sandpaper first to give the paint some tooth.
Step 2: Adding Details
-
Paint the blush:
Mix a soft pink or use pre-mixed pink acrylic paint to fill in the two cheek circles on either side of the muzzle. -
Create the nose:
Paint a small, inverted soft triangle nose in the center of the white muzzle using a slightly brighter pink shade. -
Add pupils:
Once the white eye paint is completely dry, paint large black circles inside them, positioning them slightly inward so the bunny looks cross-eyed and cute. -
Add eye highlights:
I like to use the back end of a small paintbrush dipped in white paint to dot a tiny highlight onto the black pupils for extra life. -
Outline and define:
Using a thin detail brush and black paint, draw the mouth lines extending from the nose, sketch the whiskers over the pink cheeks, and add small arched eyebrows above the eyes.
Step 3: Crafting the Ears
-
Cut the ear shapes:
Cut two long, almond-shaped ears out of stiff white felt or a craft foam sheet. They should be roughly 6-8 inches tall. -
Draw inner ears:
Use a pink marker or paint pen to draw the inner ear shape. Sketch a long, thin pink loop inside each white ear, leaving a white border. -
Pinch the base:
Create a slight fold or pinch at the very bottom flat edge of each ear to give them a curved, three-dimensional shape. -
Attach the ears:
Apply a generous dab of hot glue to the bottom pinched edge of each ear and press them firmly behind the pumpkin stem. -
Secure upright:
Hold the ears in place for thirty seconds until the glue cools completely so they stand up straight without flopping.
Fuzzy Texture
Make the bunny tactile by gluing a white craft pom-pom onto the back of the pumpkin for a tail, or gluing cotton balls onto the muzzle area.
Place your happy pumpkin bunny on the porch to greet visitors with a smile


Have a question or want to share your own experience? I'd love to hear from you in the comments below!