If you’ve ever picked up a plain little stone and thought, “You could be a joke,” you’re my kind of artist. Funny rock painting is my favorite mix of quick creativity, silly storytelling, and tiny surprises you can tuck into gardens, planters, or gift bags.
Goofy Rock Faces With Big Expressions

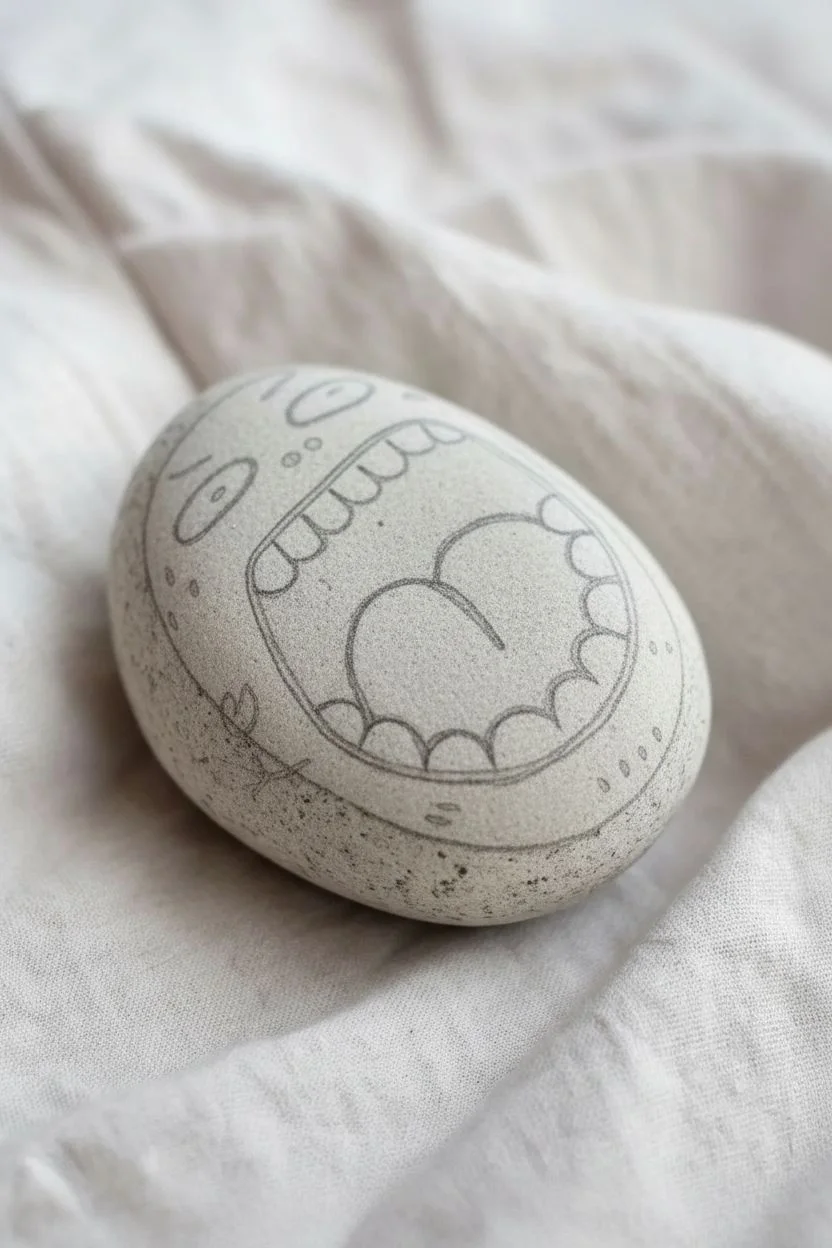
Capture the charm of cartoon characters with this wonderfully simple yet expressive rock face. The exaggerated eyes and wide, friendly smile turn an ordinary grey stone into a desk companion that’s guaranteed to make you chuckle.
Detailed Instructions
Materials
- Smooth, rounded grey river rock (flat work surface ideal)
- White acrylic paint
- Black acrylic paint or black paint pen (fine tip)
- Small round paintbrush
- Fine liner brush
- Pencil and eraser
- Matte or satin sealant spray
Step 1: Preparation & Sketching
-
Clean the canvas:
Begin by scrubbing your rock with soapy water and drying it completely to ensure the paint adheres properly. -
Sketch the eyes:
Using a pencil, lightly draw two large, oval shapes touching each other in the upper center of the rock. Make one slightly larger than the other for a goofy look. -
Add pupils:
Draw circles inside the ovals for pupils. Position them slightly cross-eyed or looking in a specific direction to add personality. -
Sketch the smile:
Create a long, sweeping curve below the eyes that stretches almost from one side of the rock to the other. -
Add details:
Sketch a tiny ‘u’ shape for the nose right between and below the eyes, and add some eyelashes and eyebrows above.
Uneven Lines?
If your hand shakes while outlining, rest your pinky finger on a dry part of the rock for stability. A paint pen is much easier to control than a brush for beginners.
Step 2: Painting the Face
-
Fill the whites:
Use a small round brush and white acrylic paint to fill in the large eye ovals. Be careful to stay inside your pencil lines. -
Apply a second coat:
White paint can be translucent on dark rocks, so once the first layer is dry, I usually add a second coat for solid, bright coverage. -
Paint the pupils:
Once the white is fully dry, take your black paint (or a thick black paint pen) and fill in the pupils carefully. -
Add the sparkle:
Dip the non-brush end of a paintbrush handle into white paint and dot a tiny highlight onto the top corner of each black pupil. This brings the character to life. -
Let it dry:
Ensure all the paint layers are completely dry before moving on to the fine lines to prevent smudging.
Hairdo Upgrade
Give your rock personality by gluing yarn, moss, or colored craft fur to the top for a wild hairstyle that matches the goofy expression.
Step 3: Outlining & Defining
-
Outline the eyes:
Using a fine liner brush with black paint or a fine-tip paint marker, carefully trace the outer edge of the white eye shapes. -
Draw the lashes:
Flick three small curved lines upward from the outer corners of each eye to create expressive eyelashes. -
Add eyebrows:
Paint short, floating curved lines above the eyes. Raising them high on the forehead makes the expression look surprised or happy. -
Define the nose:
Trace the small ‘u’ shape for the nose with a delicate touch. -
Paint the mouth:
Go over your large smile line with the liner brush or marker. Add small ‘cheek lines’ at the ends of the smile to deepen the grin. -
Add freckles:
Dot a few tiny specks on the cheeks using the very tip of your fine brush or marker to add texture to the face. -
Seal the stone:
Once everything is cured, spray the rock with a clear matte or satin sealant to protect your new friend from scratches.
Place your goofy rock buddy somewhere unexpected to brighten up your day


Tongue-Out Derp Rocks
This cheerful pebble project transforms an ordinary grey stone into a beaming, joyful character with just a few strokes of paint. Its wide, open smile and bright eyes are sure to bring a dose of happiness to your day.
Step-by-Step Tutorial
Materials
- Smooth, oval-shaped grey rock (river rock works best)
- White acrylic paint or paint pen
- Black fine-tip acrylic paint pen or very fine brush
- Red acrylic paint
- Orange acrylic paint
- Small flat brush
- Detail brush
- Water cup and paper towels
- Matte spray sealer (optional)
Step 1: Prepping the Canvas
-
Clean the stone:
Before starting, scrub your rock with warm soapy water to remove any dirt or oils. Let it dry completely in the sun or use a hairdryer to speed things up. -
Inspect the surface:
Check your rock for the smoothest side. You want the face to sit on a relatively flat area without deep pits or cracks that could distort the drawing.
Use Paint Pens
For crisp outlines like the eyes and mouth, an extra-fine tip acrylic paint pen offers much better control than a brush, especially on bumpy rock surfaces.
Step 2: Drafting the Eyes
-
Outline the whites:
Using a white paint pen or a small brush with white acrylics, draw two large ovals in the upper center of the rock. They should be touching slightly in the middle. -
Fill them in:
Fill the ovals with solid white paint. Depending on your paint’s opacity, you might need a second coat once the first one is dry to make it bright and crisp. -
Outline the eyes:
Once the white is fully dry, take your black fine-tip paint pen and carefully trace the outer edge of the white ovals to define the eyes. -
Add pupils:
Draw two small black dots inside the white ovals. Placing them slightly cross-eyed or varying their size adds to the goofy, happy expression. -
Create eyebrows:
Draw two short, curved lines floating above the eyes. Give them a slight arch for an inquisitive, friendly look. -
Add lashes:
Sketch three tiny, straight lines sticking out from the outer side of each eye to suggest eyelashes or expression lines.
Uneven Coverage?
If the natural rock color shows through your white or red paint, stop painting. Let the layer dry 100% before adding another; wet-on-wet just moves the paint around.
Step 3: Adding the Happy Grin
-
Draw the mouth shape:
Using your black pen, draw a wide, U-shaped curve below the eyes. Close the top of the U with a slightly curved line to form an open mouth. -
Add cheek lines:
Extend the corners of the mouth slightly upward with tiny tick marks to emphasize the smile. -
Fill the mouth:
Use a small detail brush focused on the center of the mouth shape to paint the interior red. Be careful to stay inside your black outline. -
Retrace if needed:
If the red paint covered any of your black outline, simply go over the black line again once the red is dry for a clean finish.
Step 4: Finishing Touches
-
Paint the cheeks:
Mix a tiny bit of orange paint or use it straight from the tube. paint two small, soft circles on the far left and right sides of the face. -
Soften the edges:
I find that tapping the orange paint with your fingertip while it’s wet helps blend it into the rock’s texture for a more natural blushing look. -
Let it cure:
Allow the entire rock to dry for at least 24 hours to ensure all layers are set. -
Seal the deal:
Spray the rock with a matte sealer to protect your artwork from weathering, especially if you plan to keep this happy little guy outdoors.
Place your new friendly rock on a desk or in a garden nook to share a smile with everyone who passes by


Grumpy Rock vs. Happy Rock Side-by-Side
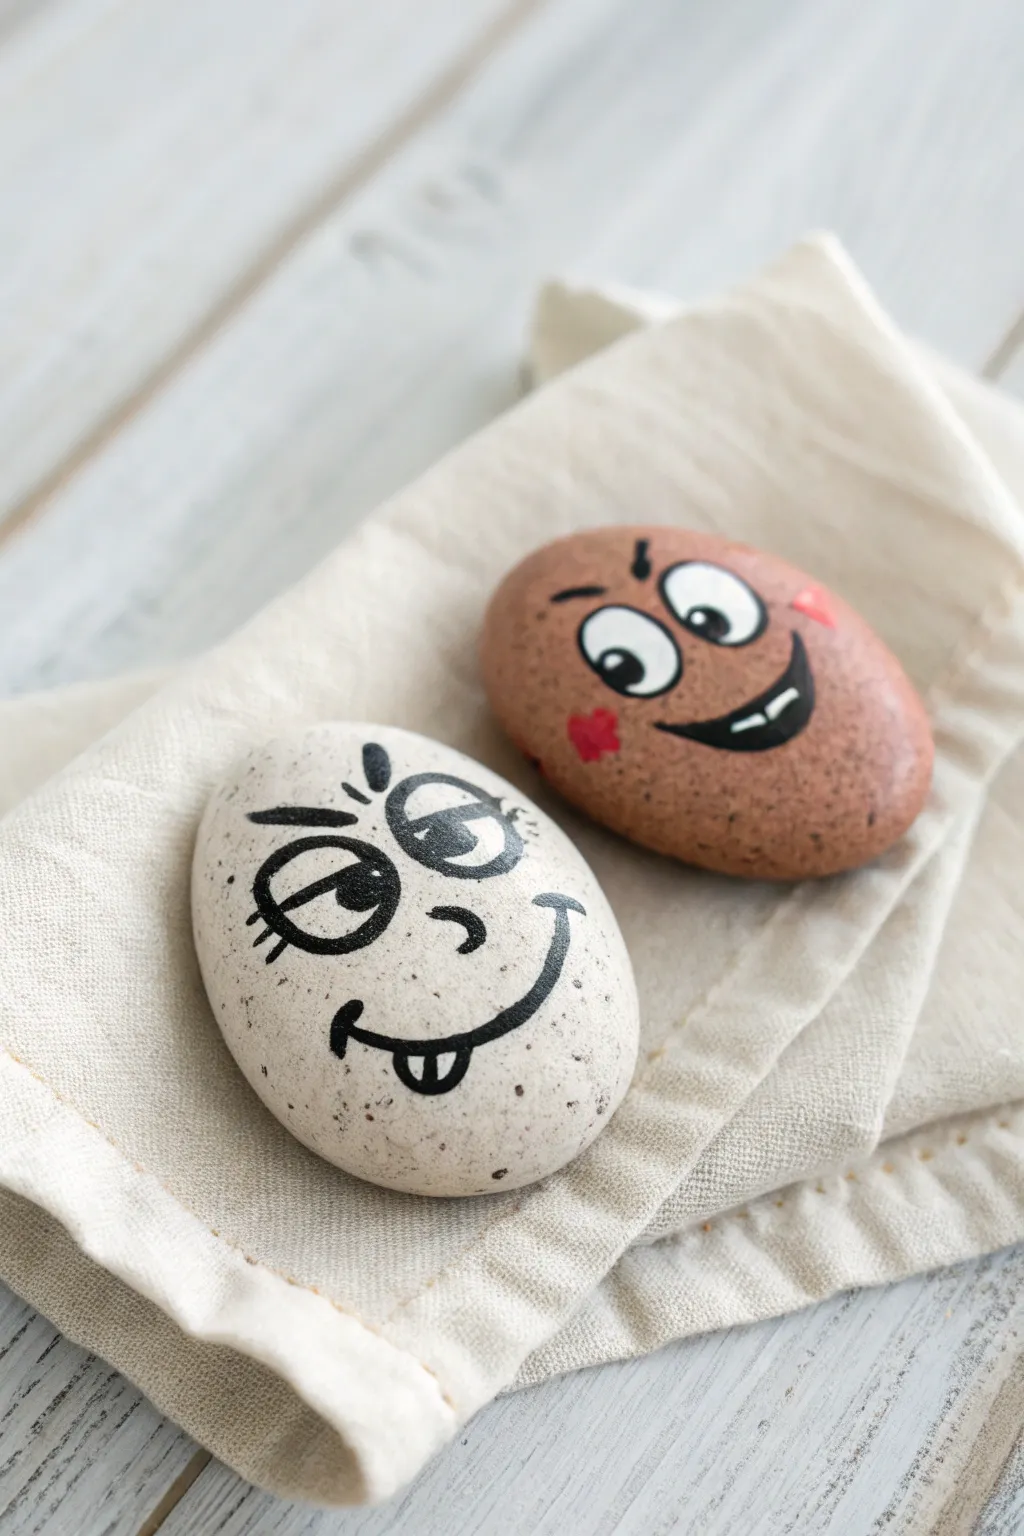
Capture two distinct personalities with this delightful rock painting duo featuring a cheeky, speckled white character and his beaming, reddish-brown friend. These expressive stones use simple lines and natural textures to create a charming desktop conversation piece.
How-To Guide
Materials
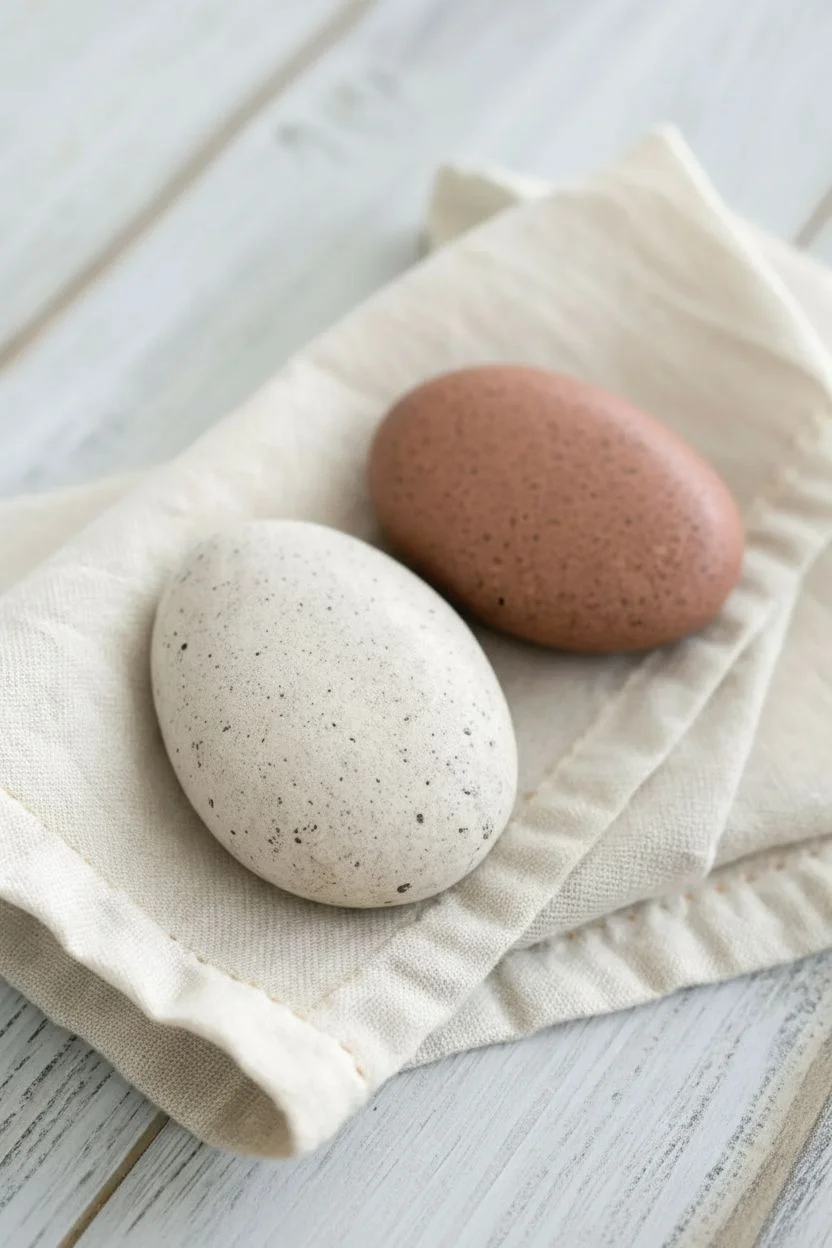
- Two smooth river rocks (one oval/light, one rounded/reddish-brown)
- Acrylic paint (white, black, red/pink)
- Fine-tipped black permanent marker or paint pen (0.5mm or 0.7mm)
- Detail paintbrush (00 or 000 size)
- Spray sealant (matte or satin finish)
- Cup of water
- Paper towels
- Old toothbrush (for speckling)
Step 1: Preparation & Base Coat
-
Clean your canvas:
Start by scrubbing your chosen rocks with warm, soapy water to remove any dirt or oil. Let them dry completely, or speed up the process with a hairdryer, as paint won’t adhere well to damp stone. -
Color correction (optional):
If you couldn’t find naturally colored stones, paint one rock a creamy off-white and the other a warm terracotta or reddish-brown. Let these base coats dry thoroughly before proceeding. -
Add texture:
To mimic the natural speckled look in the photo, dip an old toothbrush into slightly watered-down gray or brown paint. Run your thumb over the bristles to flick tiny specks onto both rocks. Let this faux-texture dry completely.
Step 2: Creating the Cheerful Red Rock
-
Paint the eye whites:
On the reddish-brown rock, paint two large, slightly overlapping white ovals near the top center. The left oval should be slightly higher than the right to give a jaunty expression. -
Refine the shape:
You might need a second coat of white to ensure opacity against the darker rock background. Allow the white paint to dry fully so your black lines don’t bleed later. -
Outline the features:
Using your fine-tipped black paint pen, draw a thick outline around both white eyes. Add small diagonal eyebrows floating above them—make them slant inwards for an excited look. -
Draw the pupils:
Place two medium-sized black dots inside the white ovals. Position both pupils looking toward the left side of the rock to suggest he’s looking at his friend. -
Paint the smile:
Draw a wide distinctive ‘U’ shape for the mouth. Fill the top strip with black, leaving a thin curved white line at the bottom to represent teeth, and add a small tick mark at the corner. -
Add rosy cheeks:
Using a tiny dab of red or pink paint, add a small heart or oval shape on the left cheek and a small triangle or dash on the right cheek for a flushed, happy appearance.
Uneven Surface?
If your rock is too pitted for clean marker lines, apply a coat of clear acrylic medium or Mod Podge first. Let it dry to create a smooth surface for drawing.
Step 3: Creating the Goofy White Rock
-
Outline the eyes:
On the lighter rock, skip the white base paint and go straight to the black marker. Draw two large, joined circles (like heavy glasses frames) roughly in the middle of the stone. -
Create the heavy lids:
Draw a horizontal line across the top third of each eye circle to create eyelids. Fill the pupils in strictly on the left side of the eye, tucking them under the eyelid line for a sleepy, half-lidded gaze. -
Add eyebrows:
Draw two short, thick dashes floating well above the eyes. I find angling them slightly outward adds to the confused or goofy expression. -
Draw the nose:
Just below the spot where the eyes join, draw a small, simple ‘c’ shape or curved hook to indicate a nose. -
Sketch the mouth:
Draw a wide, sweeping smile line that curves up dramatically on the right side. Add a small ‘bracket’ mark at the end of the smile line. -
The tongue detail:
At the bottom center of the smile, draw a small ‘U’ shape dropping down to form a tongue. Draw a vertical line down the center of the tongue to define it. -
Eyelashes (optional):
For extra character, add three tiny, quick lines sticking out from the outer edge of the left eye.
Make Them 3D
Glue small googly eyes over the painted eyes for a fun wobble, or attach a small piece of red felt for the tongue on the light-colored rock.
Step 4: Finishing Touches
-
Check your lines:
Go back over any black lines that look thin or transparent. The contrast is key for these cartoon-style faces. -
Seal the deal:
Once absolutely dry (give it at least an hour), take the rocks outside and spray them with a clear matte sealant. This protects the paint from chipping and keeps the marker from fading over time.
Set your new stone friends on a window sill or desk to bring a little humor to your day


Sassy Speech Bubble Rocks

Sometimes you just need a polite way to decline the day’s drama, and this sassy little rock says it all. Featuring a clean speech bubble design on a faux-speckled background, this project combines simple lettering with charming decorative dots for a finished piece that feels both polished and playful.
Detailed Instructions
Materials
- Smooth, oval river rock (palm-sized)
- White acrylic paint
- Light grey or pale mint acrylic paint (optional for base)
- Dark brown acrylic paint or paint pen
- Orange acrylic paint
- Teal or turquoise acrylic paint
- Fine detail paintbrush (size 0 or 00)
- Small round paintbrush
- Dotting tool or toothpick
- Matte finish sealant spray
Step 1: Preparing the Canvas
-
Clean the surface:
Begin by scrubbing your rock with warm soapy water to remove any dirt or oils. Let it dry completely before starting, as moisture trapped inside can ruin the paint later. -
Create the base texture:
If your rock is naturally grey and smooth, you can leave it bare. However, to get that speckled egg look, I like to sponge on a very light, uneven coat of pale grey or mint paint, letting some natural stone texture peek through. -
Let the base dry:
Allow this base layer to cure fully for about 15-20 minutes. It should be dry to the touch before you begin the main design.
Wobbly Outline?
If your brush hand is shaky, rest your wrist on the table or stabilize it against your other hand while painting the fine gold outline.
Step 2: Painting the Speech Bubble
-
Outline the bubble shape:
Using a pencil, lightly sketch a rounded speech bubble in the center of the rock. Include a small tail at the bottom pointing downwards. -
Fill the bubble with white:
Use your small round brush to fill in the speech bubble shape with white acrylic paint. You may need two to three thin coats to get a solid, opaque white, allowing for drying time between each layer. -
Refine the edges:
Once the white paint is dry, take a fine detail brush loaded with metallic gold or light bronze paint to outline the speech bubble. Keep the line thin and steady. -
Add the text:
With a fine liner brush or a dark brown paint pen, carefully write ‘NOT’ in the upper half and ‘TODAY’ in the lower half of the bubble. Use a loose, casual serif font as shown in the reference image. -
Paint interior accents:
Dip a small dotting tool or the back of a paintbrush into orange paint. Place two medium-sized dots inside the bubble, flanking the word ‘NOT’ to add a pop of color. -
Add tiny interior details:
Using the very tip of a toothpick or a fine paint pen, add two tiny brown dots on the left side of ‘NOT’ and two on the right side of the orange dot for balance.
Step 3: Adding the Border Details
-
Start the dotted border:
Load a dotting tool with teal or turquoise paint. Begin placing dots around the outside perimeter of the speech bubble. -
Space the dots evenly:
Try to keep the distance between the gold outline and your teal dots consistent. Leave about 2-3 millimeters of space between each dot. -
Vary dot sizes (optional):
For a more organic look, you can slightly vary the pressure so some dots are a tiny bit larger than others, but aim for general uniformity. -
Add the second speckle layer:
To enhance the ‘bird egg’ effect on the background, use an old toothbrush or a stiff brush to flick tiny droplets of watered-down teal paint onto the exposed rock surface outside the design. -
Clean up stray marks:
If you accidentally got speckles inside the white bubble, quickly wipe them away with a damp Q-tip before they dry.
Perfect Circles
Don’t have a dotting tool? Use the flat head of a nail or a sewing pin stuck into a pencil eraser for precise, uniform dots.
Step 4: Finishing Touches
-
Check for opacity:
Look closely at your lettering. If the brown looks streaky, carefully go over the letters one more time to make them bold and readable. -
Allow specifically long drying time:
Since there are multiple layers and raised dots, let the rock sit undisturbed for at least an hour to ensure the thickest paint parts are hard. -
Seal the rock:
Move to a well-ventilated area and spray the rock with a clear matte sealant. A matte finish preserves the natural stone look better than a glossy one.
Now you have a perfectly polite painted rock to handle all your refusals for the day
BRUSH GUIDE
The Right Brush for Every Stroke
From clean lines to bold texture — master brush choice, stroke control, and essential techniques.
Explore the Full Guide
Fruit Rocks With Cheesy One-Liners
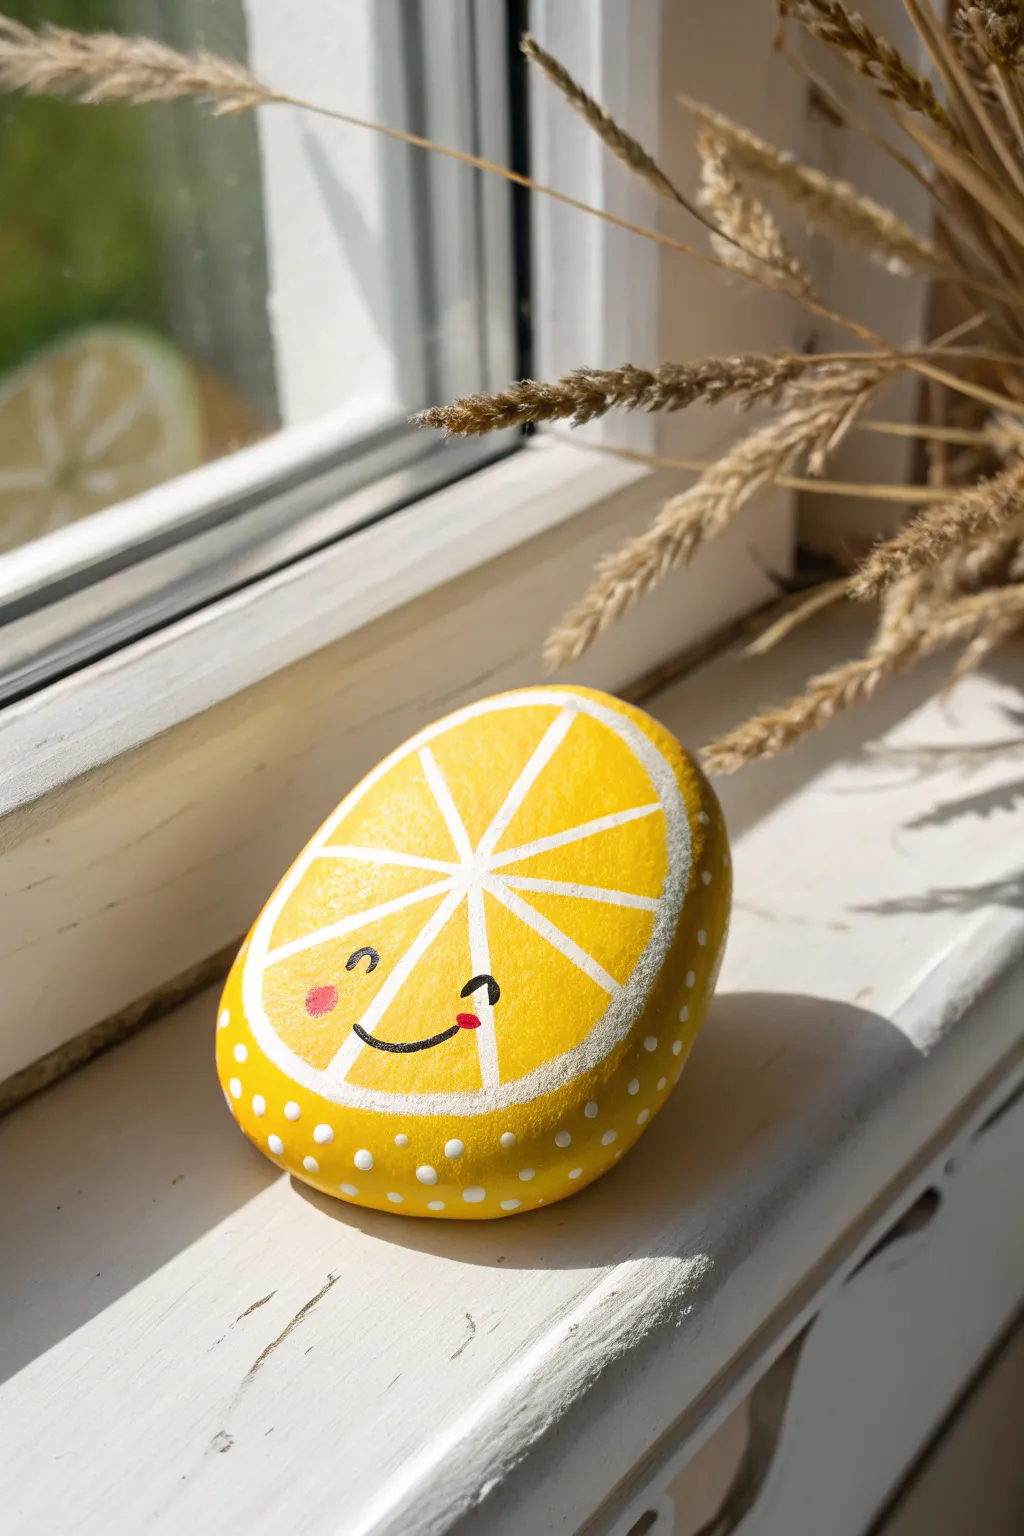
Transform an ordinary stone into a zesty slice of sunshine with this adorable lemon wedge design. The smooth, painted rind dotted with white and a cheerful little face makes for a perfect desk buddy or a bright surprise in the garden.
Step-by-Step Guide
Materials
- Smooth, oval-shaped rock (palm-sized)
- Acrylic paint (bright yellow, white, black, pink)
- Wide flat paintbrush
- Fine detail paintbrush (liner brush)
- Dotting tool or toothpick
- Pencil (optional)
- Clear acrylic sealant (spray or brush-on)
- Palette or paper plate
- Water cup and paper towels
Step 1: Prepping the Canvas
-
Clean the Stone:
Begin by washing your rock with warm, soapy water to remove any dirt or oils. Use an old toothbrush to scrub into any tiny crevices if necessary. -
Dry Completely:
Let the rock dry thoroughly in the sun or use a hair dryer to speed up the process. A bone-dry surface ensures the paint adheres properly. -
Base Coat:
Paint the entire top surface of the rock with a layer of titanium white acrylic paint. This primer layer will make the yellow pop much more vibrantly than painting directly on the grey stone. -
Smooth Finish:
Allow the white base to dry, then inspect it. If you can still see the dark rock underneath, add a second thin coat of white for full opacity.
Sharper Lines Pro Tip
Does your hand shake? Rest your pinky finger on the dry part of the rock while painting the thin white segment lines. It acts as an anchor for steadying your hand.
Step 2: Painting the Lemon Slice
-
Yellow Layer:
Using your wide flat brush, cover the white base completely with bright yellow acrylic paint. You may need two coats here to get a rich, solid lemon color. -
Define the Rind:
Once the yellow is dry, visualize an oval shape in the center of the rock—this will be the juicy fruit part. Leave a border around the edge untouched for now, or imagine where the border starts. -
Outline the Segments:
Switch to your fine liner brush and white paint. Paint a thin white oval outline just inside the edge of your yellow shape to separate the ‘rind’ from the ‘fruit’. -
Create the Wedges:
Paint a small white dot in the absolute center of the oval. From this center point, paint straight white lines radiating outward to the white oval border, creating triangular fruit segments like a bicycle wheel. -
Thicken the Lines:
Go back over your radiating lines to thicken them slightly, making sure they are crisp and opaque. The contrast between the white pith and yellow fruit is key.
Step 3: Adding Personality
-
Face Placement:
Decide which fruit segment will hold the face. I find the bottom center area usually looks cutest. -
Paint the Eyes:
Using the very tip of your finest brush and black paint, create two small, upside-down ‘U’ shapes for the smiling eyes. Keep them relatively close together. -
Add a Smile:
Paint a simple, curved line centered below the eyes for the mouth. Adding tiny tick marks at the ends of the smile gives it a sweeter expression. -
Rosy Cheeks:
Dip a dotting tool or the back end of a paintbrush into pink paint. Gently dab a small dot just below and to the outside of each eye.
Troubleshooting Paint Opacity
If your yellow paint looks streaky or transparent, don’t just heap on thick paint. Instead, paint a thin layer of white first, let it dry, and then paint yellow over it.
Step 4: Final Details
-
Dot the Rind:
Using a small dotting tool or a toothpick dipped in white paint, create a pattern of small polka dots along the darker yellow ‘rind’ area on the side of the rock. -
Spacing the Dots:
Try to offset the rows of dots (like a brick pattern) for a more professional look, or keep them random for a whimsical feel. -
Dry Time:
Set the rock aside and let all the paint layers dry completely. Rushing this stage can smear your crisp lines. -
Seal Protection:
Apply a coat of clear acrylic sealant or varnish. A glossy finish mimics the wet texture of real fruit, while matte looks softer. -
Display:
Once the sealant is cured, your happy lemon rock is ready to brighten up a windowsill or hide in a flower pot.
Now you have a refreshing little artwork that will never go sour.
Veggie Rocks With Silly Wordplay
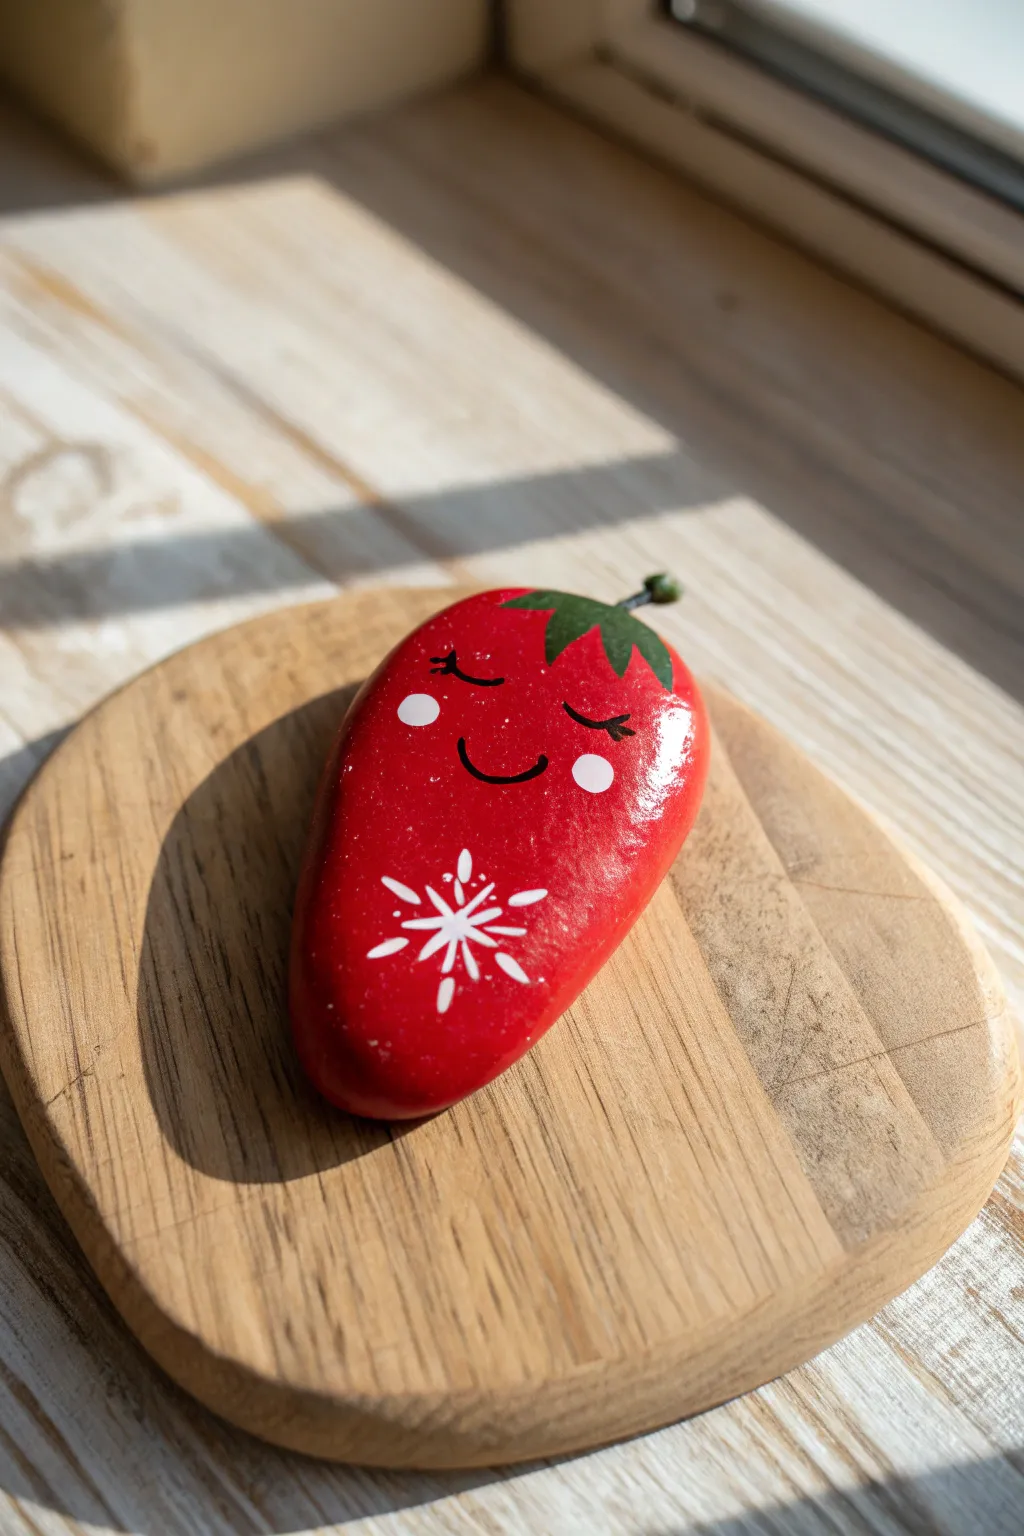
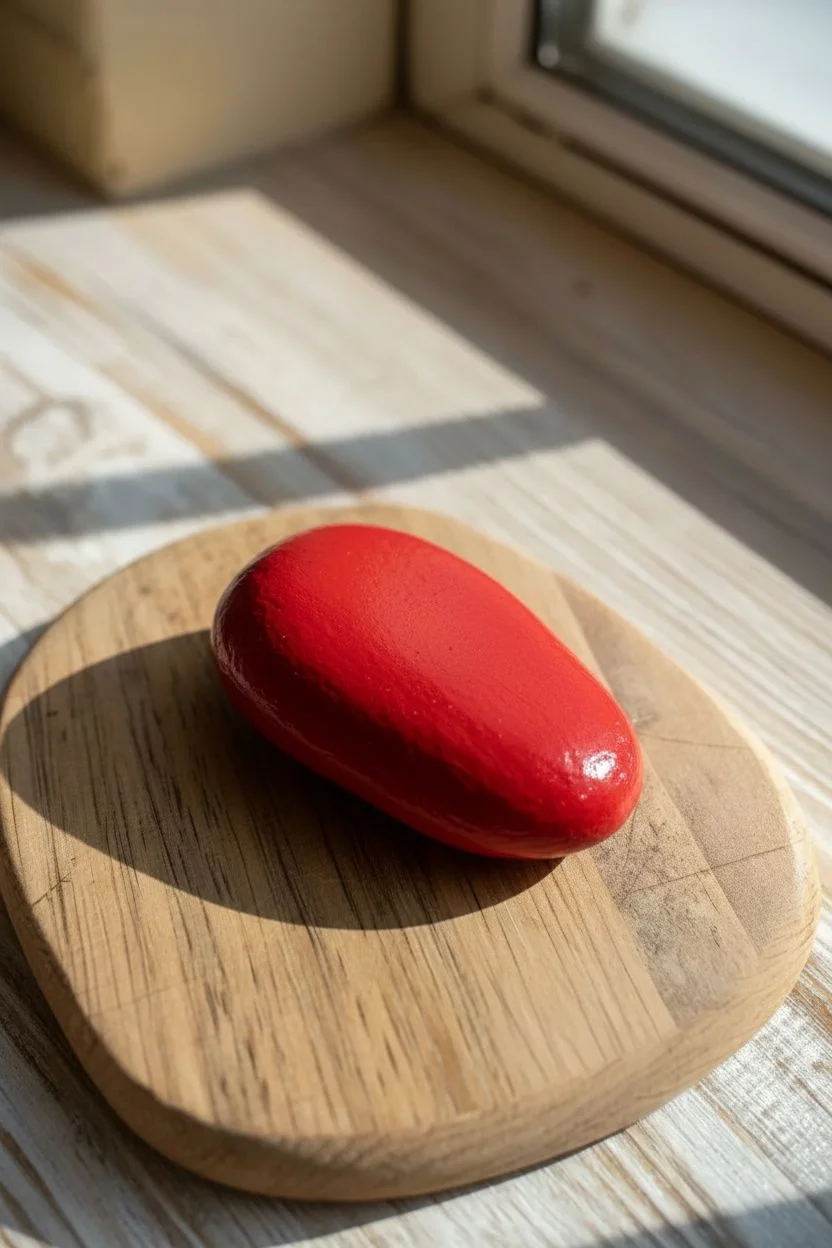
Transform a smooth garden stone into an adorable, grinning strawberry that’s sure to brighten anyone’s day. This glossy, vibrant red rock features a sweet sleeping face and delicate snowflake details, perfect for a cheerful garden accent or a tiny paperweight.
Detailed Instructions
Materials
- Smooth, oval-shaped river rock (palm-sized)
- Red acrylic paint (bright glossy red)
- Green acrylic paint (leaf green)
- White acrylic paint or paint pen
- Black fine-tip paint pen or permanent marker
- Flat paintbrush
- Fine detail paintbrush
- Glossy sealant spray or Mod Podge
- Pencil for sketching
- Small twist tie or bit of wire (optional for stem)
Step 1: Base Coating
-
Clean the canvas:
Begin by scrubbing your rock with warm soapy water and a brush to remove any dirt or oils. Let it dry completely in the sun or with a quick blast from a hair dryer. -
Apply the first red layer:
Using your flat brush, coat the entire top surface of the rock with bright red acrylic paint. Smooth out your brushstrokes as you go. -
Let it dry:
Wait for about 15-20 minutes for the first layer to dry to the touch. Putting it in a sunny windowsill helps speed this up. -
Thicken the color:
Apply a second (and potentially third) coat of red paint to ensure the color is solid, opaque, and vibrant. You shouldn’t see the grey stone underneath.
Step 2: Adding the Crown
-
Sketch the leaves:
Once the red base is fully dry, lightly use a pencil to draw a jagged, leafy crown shape at the wider end of the rock. -
Paint the greenery:
Fill in your pencil sketch using green acrylic paint and a smaller brush. Create pointed leaf shapes that drape slightly down the ‘shoulders’ of the strawberry. -
Add a stem base:
Paint a small green circle or stump right at the very top center of the leaves where a stem would naturally emerge.
Uneven Coverage?
If the red paint looks streaky, don’t rush. Apply thin layers, letting each dry fully. Thick globs peel easily.
Step 3: Painting the Face
-
Draft the features:
Very lightly sketch the face placement with a pencil. You’ll want the eyes closed in a ‘U’ shape and a small smile right in the center. -
Draw the eyelashes:
Using the black fine-tip paint pen, draw two curved lines for the closed eyes. Add three tiny, delicate lashes flicking upward from the outer corner of each eye. -
Create the smile:
Draw a small, simple semi-circle for the mouth directly between and slightly below the eyes. -
Add rosy cheeks:
Dip the back end of a paintbrush into white paint (or use a white paint pen) to dot two perfect circles on either side of the smile for cheeks.
Glitter Glam
Mix a tiny bit of fine red glitter into your final coat of sealant for a strawberry that sparkles in the sun.
Step 4: Details & Finish
-
Paint the decorative snowflake:
Below the face, create a stylized snowflake or starburst pattern using white paint and a very fine brush. Start with an ‘X’ shape. -
Expand the pattern:
Add a vertical line through the center of the ‘X’, then add tiny ‘V’ shapes or dots to the tips of each line to create a crystallized look. -
Add light reflection:
I prefer to add a tiny white dash or dot on the upper forehead area to simulate a shiny highlight on the fruit’s skin. -
Attach the stem (optional):
For a 3D effect, glue a tiny piece of green-painted wire or a twist-tie onto the green stem base you painted earlier. -
Seal the artwork:
Once absolutely everything is dry, apply a coat of glossy varnish or spray sealer. This protects the paint from chipping and gives it that permanent ‘wet’ look.
Place your little fruit friend near a window or in a planter to add a touch of whimsy to your space

PENCIL GUIDE
Understanding Pencil Grades from H to B
From first sketch to finished drawing — learn pencil grades, line control, and shading techniques.
Explore the Full Guide
Mini Mustache and Glasses Disguise Rocks
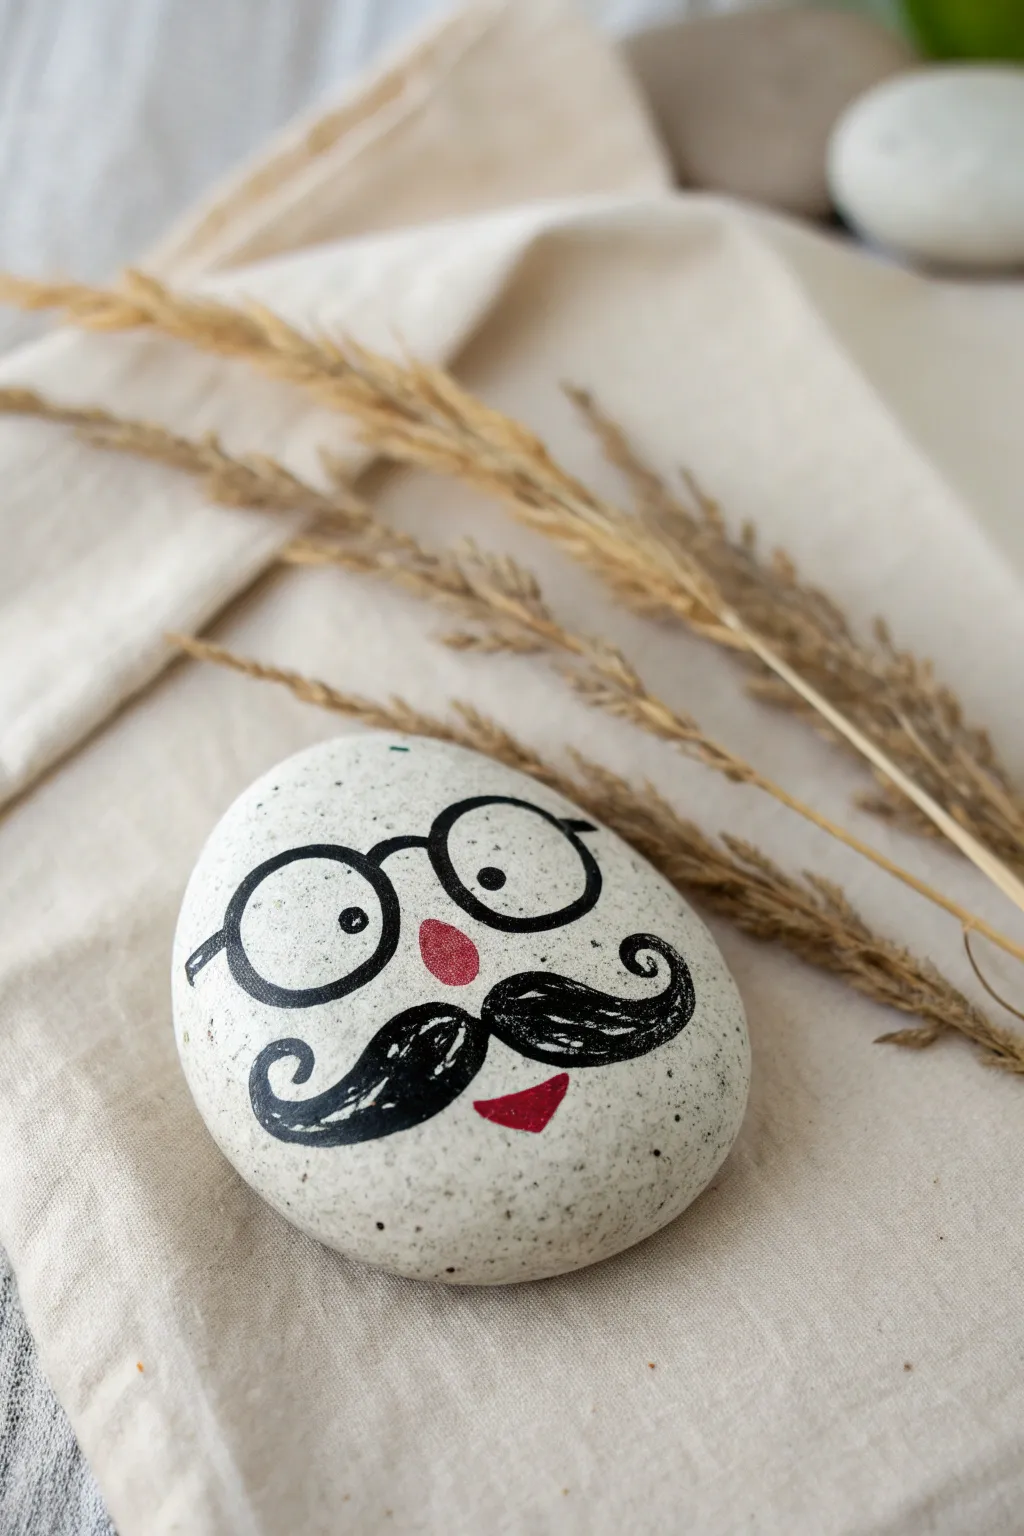
Transform a humble stone into a distinguished gentleman with just a few strokes of paint. This playful design, featuring bold spectacles and a debonair curled mustache, brings instant personality to any smooth river rock.
Step-by-Step Tutorial
Materials
- Smooth, rounded river rock (palm-sized)
- White or cream acrylic paint (matte finish)
- Black fine-tip acrylic paint pen (or 00 brush and black paint)
- Red fine-tip acrylic paint pen (or 00 brush and red paint)
- Small flat paintbrush
- Pencil and eraser
- Paper towel
- Water cup
- Matte spray varnish or Mod Podge for sealing
Step 1: Base Preparation
-
Clean the surface:
Begin by washing your selected rock with warm soapy water to remove any dirt or oils that might repel the paint. Scrub gently with a brush if needed and allow it to dry completely. -
Prime the background:
Using your small flat paintbrush, coat the entire top surface of the rock with a layer of white or cream acrylic paint. For this specific look, aim for a slightly speckled off-white tone if you have it, matching the natural stone aesthetic. -
Create opacity:
Let the first coat dry fully. Apply a second coat if the rock’s natural color is still showing through too strongly, ensuring a solid, neutral canvas for your character’s face. -
Add speckles (optional):
If your base paint is solid white but you want the textured look from the photo, dip an old toothbrush in watered-down black grey paint and run your thumb across the bristles to flick tiny specks onto the dried base.
Step 2: Sketching the Features
-
Outline the glasses:
With a pencil, lightly sketch two large circles side-by-side near the upper middle of the rock. Leave a small gap between them for the bridge of the nose. -
Position the nose:
Draw an inverted tear-drop or small oval shape directly below the gap between the glasses lenses to mark the nose. -
Draft the mustache:
Sketch a large, exaggerated mustache below the nose. Start from the center and swoop out and up on both sides, spiraling the ends into tight curls. -
Add the mouth:
Draw a small, slightly crooked triangular shape just underneath the center of the mustache to represent a quirky little smile.
Smooth Operator
If your rock has a rough texture, apply a layer of thick gesso or a mixture of white glue and white paint first. Sand it lightly once dry to create a perfectly flat surface for drawing fine lines.
Step 3: Painting the Details
-
Outline the frames:
Using your black fine-tip paint pen, carefully trace over your pencil lines for the glasses. Go over the lines a second time to thicken the frames for a bold, cartoonish look. -
Connect the glasses:
Draw a small, curved line connecting the two circles to create the bridge, and add small horizontal dashes on the outer edges to represent the arms of the glasses extending back. -
Fill the eyes:
Inside each lens circle, place a simple black dot for the pupil. I prefer placing them slightly off-center or looking in one direction to give the character a silly expression. -
Color the nose:
Use the red paint pen to fill in the nose shape. Apply the ink gently to avoid scratching up the base coat paint underneath. -
Paint the mustache outline:
Switch back to the black pen and carefully outline the perimeter of your mustache sketch, paying close attention to the smooth curves of the spiral tips. -
Fill the mustache:
Color in the entire mustache solid black. You may need to do this in two passes to ensure the black is deep and opaque without visible marker strokes. -
Add highlights:
Once the black mustache paint is completely dry, use a very fine white paint pen or a tiny brush with white paint to add a few thin, curved scratch lines on the mustache. This mimics hair texture and adds dimension. -
Finish the smile:
Fill in the small mouth shape with your red paint. A slightly asymmetrical shape adds to the charm.
Shaky Hands?
Drawing circles on a curved rock is tricky. If your glasses look uneven, trace around a small coin or bottle cap with your pencil first to get perfect circles before inking.
Step 4: Finishing Touches
-
Clean up sketch lines:
Once you are absolutely certain all paint is dry, gently erase any visible pencil marks that weren’t covered by the paint. -
Seal the artwork:
To protect your rock from chipping or weather (if placed outside), apply a coat of matte spray varnish. Hold the can 12 inches away and spray in light, sweeping motions.
Place your distinguished little rock on a desk or plant pot to add a touch of humor to your day
Cartoon Teeth and Overbite Rocks
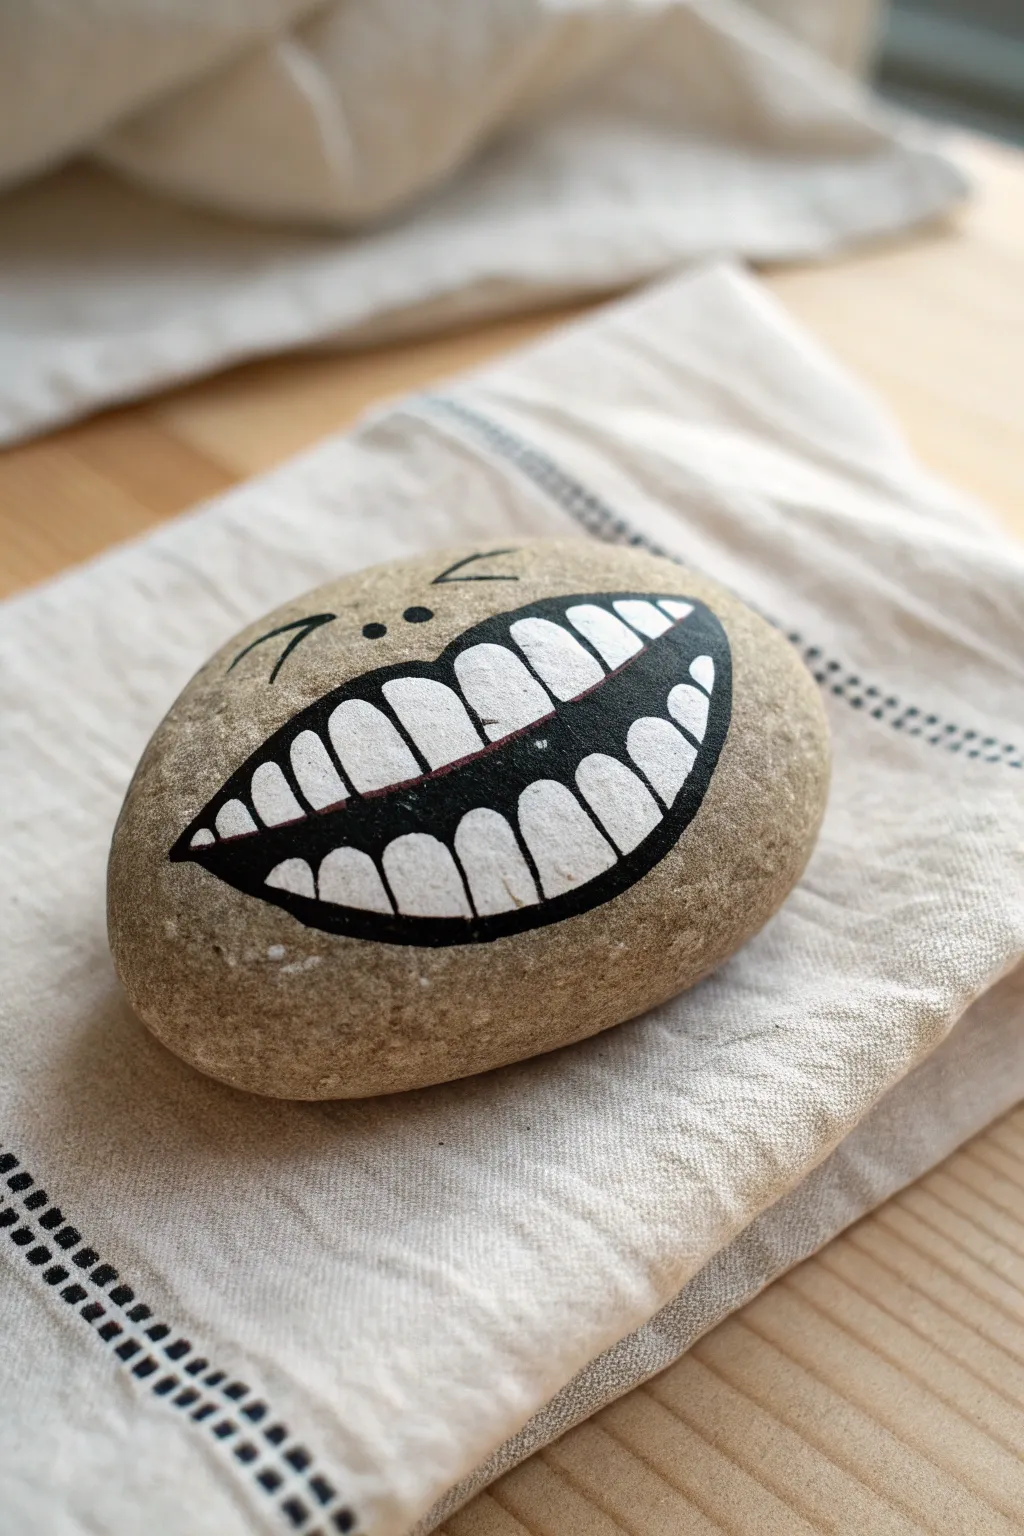
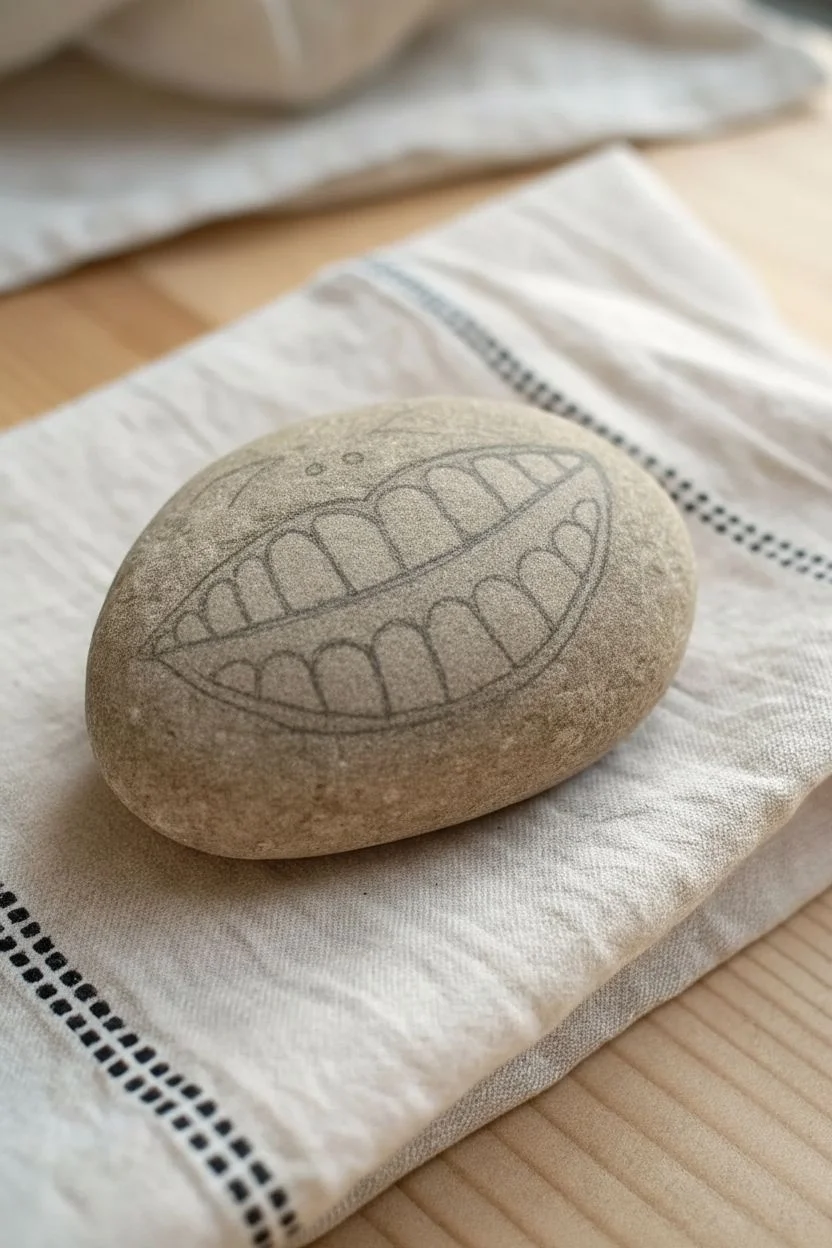
Transform a simple stone into a source of endless giggles with this expressive cartoon face design. Featuring an oversized, toothy smile and happy squinting eyes, this project uses bold contrast to turn an ordinary rock into a cheerful character.
How-To Guide
Materials
- Smooth, oval-shaped river rock (cleaned and dried)
- White acrylic paint or paint pen (opaque)
- Black acrylic paint or fine-point paint pen
- Pencil with a soft eraser
- Fine detail paintbrush (size 0 or 1)
- Medium flat paintbrush
- Clear sealant spray (matte or glossy)
Step 1: Drafting the Design
-
Prepare your surface:
Ensure your rock is completely free of dirt and dust. If the surface is porous, you might want to apply a clear matte medium first to help the paint glide, though raw stone works fine for this rustic look. -
Sketch the mouth outline:
Using a light pencil, draw a wide, elongated oval shape that takes up the bottom two-thirds of the rock’s face. Curve the top line upwards slightly to create a grinning effect. -
Draft the teeth:
Inside your oval, lightly sketch a horizontal line across the middle to separate the top and bottom teeth. Then, draw vertical lines to create individual teeth, making them slightly rounded and uneven for a goofy cartoon style. -
Add facial features:
Above the mouth, sketch two small upside-down ‘U’ shapes for the squinting eyes. Add two tiny dots between the eyes and the mouth for nostrils.
Step 2: Painting the Smile
-
Fill in the teeth:
Using your white paint or a white paint pen, carefully fill in the shapes of the teeth you sketched. You will likely need two coats to get a solid, opaque white against the rock’s natural color. -
Let the white dry:
Allow the white paint to dry completely. If you proceed too quickly, the black outline will bleed into the white, turning your crisp smile grey. -
Outline the mouth:
With black paint and a fine brush (or a black paint marker), trace the heavy outer perimeter of the mouth. Make this line quite thick to define the character’s expression. -
Define the teeth:
Carefully trace the horizontal line between the upper and lower teeth. Then, draw the vertical lines separating each tooth. Keep these lines thinner than the main mouth outline. -
Rounding the edges:
At the corners of the mouth where the black outline meets the white teeth, slightly thicken the black paint to create triangular darker zones, simulating depth inside the mouth.
Crisp Lines Secret
For the sharpest teeth outlines, I prefer using a 0.7mm acrylic paint marker instead of a brush. It offers much better control.
Step 3: Finishing Touches
-
Paint the eyes:
Go over your pencil sketches for the eyes with the black paint or marker. Two simple, curved arches give the rock a happy, laughing expression. -
Add the nose:
Place two small, deliberate dots of black paint for the nostrils. Keep them centered and small so they don’t distract from the giant smile. -
Add eyebrows (optional):
If you want extra expression, add tiny floating floating lines above the squinting eyes to suggest eyebrows, though the original design keeps it minimal. -
Clean up details:
Check the white teeth for any smudges. If needed, touch up the white paint to ensure the teeth look bright and clean against the black outlines. -
Erase pencil marks:
Once the paint is 100% dry, gently erase any visible pencil sketch lines that weren’t covered by paint. -
Seal the artwork:
Take the rock outside or to a well-ventilated area. Spray it with a clear sealant to protect the paint from chipping and weather if you plan to leave it outdoors.
Gold Tooth Upgrade
Paint one single tooth with metallic gold paint instead of white. It adds a hilarious, pirate-like character detail to your rock.
Place this cheerful rock in your garden or on a desk to greet passersby with a permanent, goofy grin


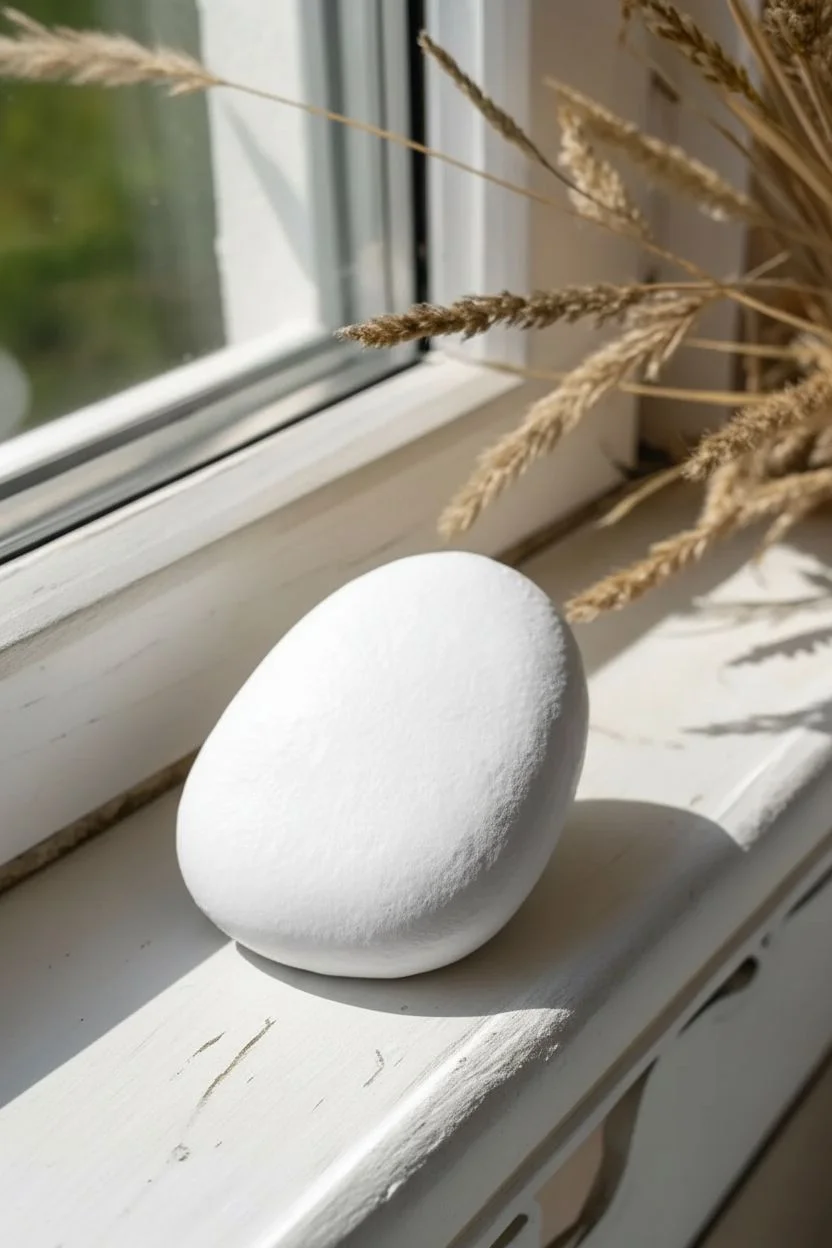
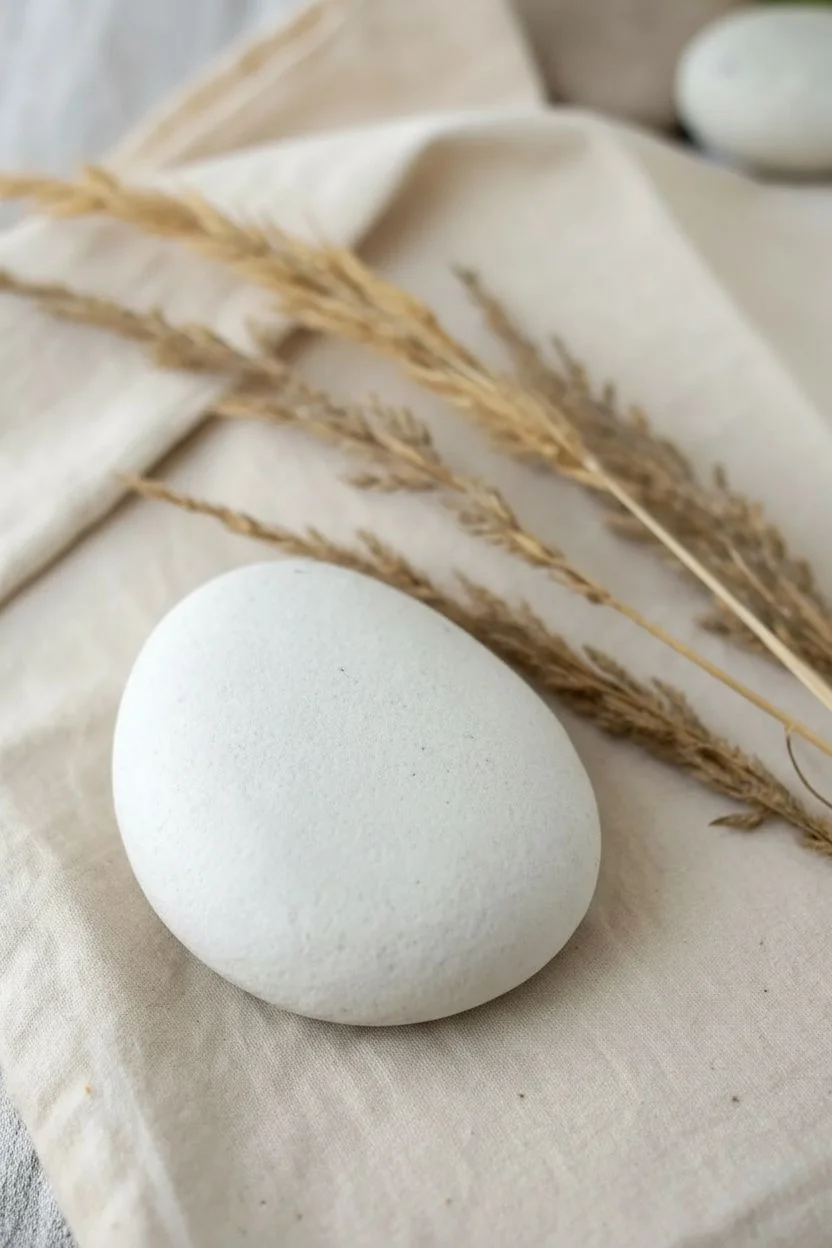
Surprised Garden Peekaboo Face Rocks
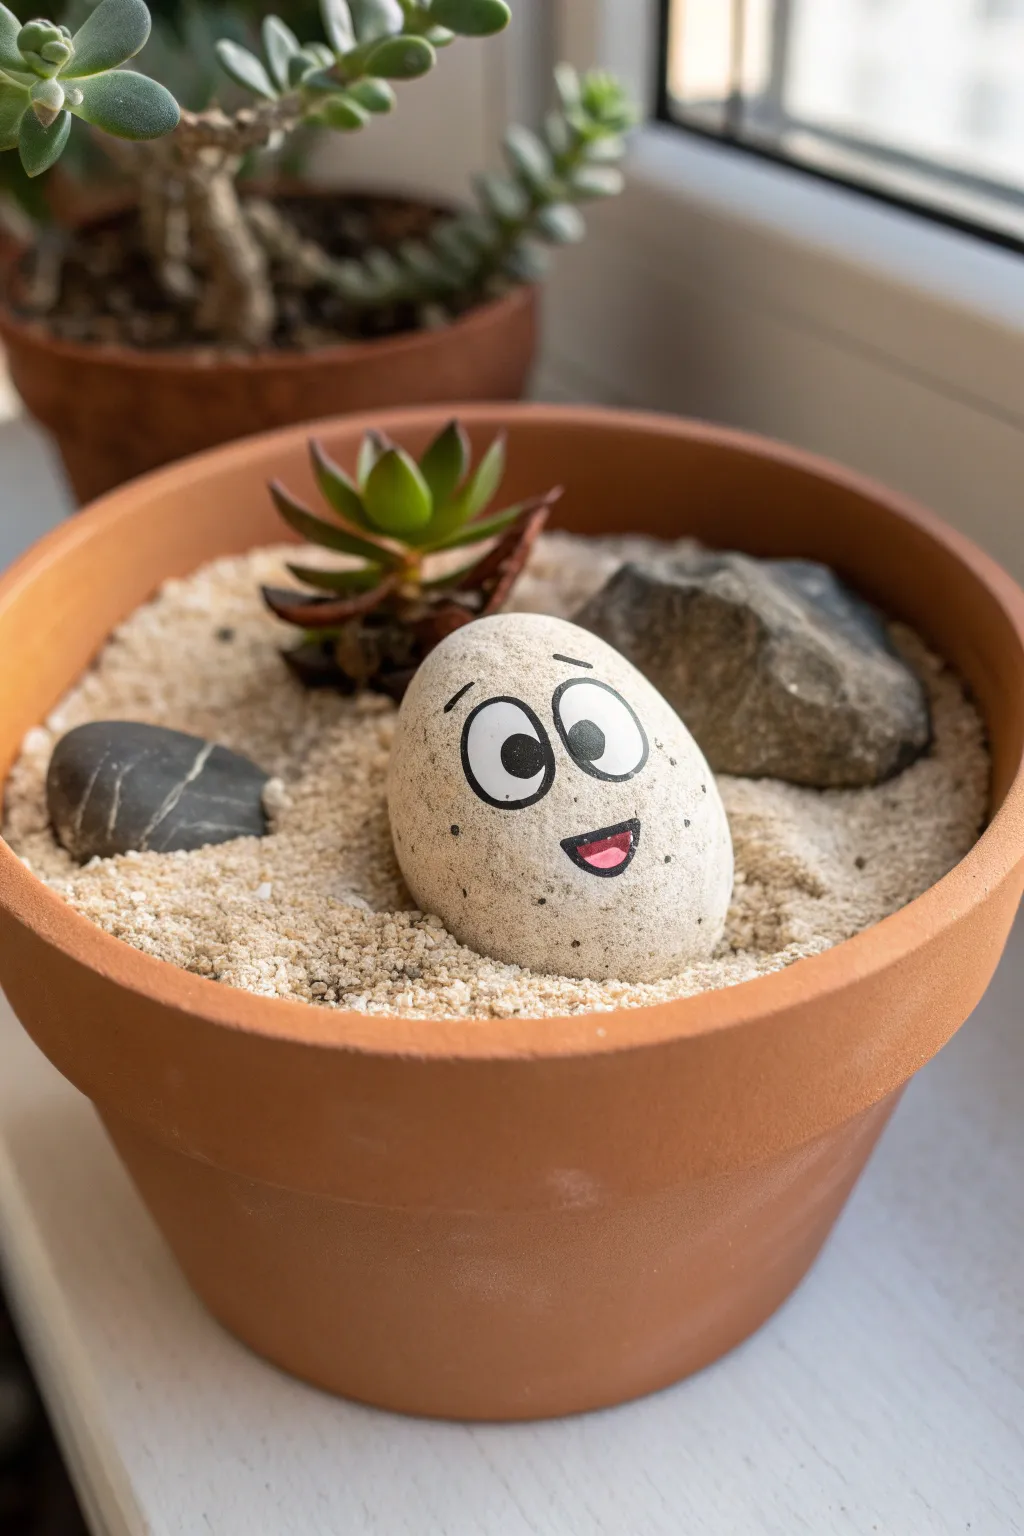
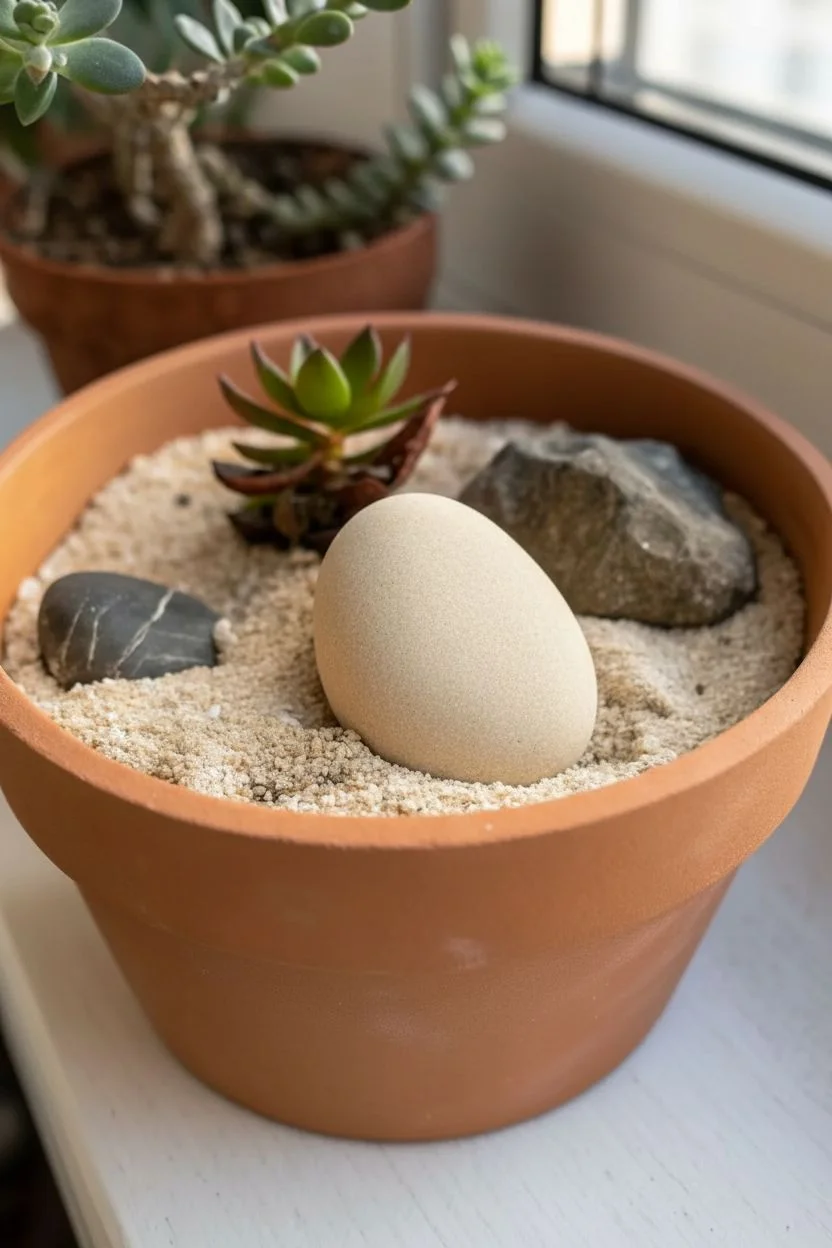
Bring a touch of whimsy to your succulent garden with this delightful peekaboo rock friend. With its wide, expressive eyes and cheerful smile, this simple project turns an ordinary stone into a charming companion for your houseplants.
Step-by-Step Guide
Materials
- Smooth, egg-shaped river rock (white or light beige)
- Black acrylic paint marker (fine and medium tip)
- White acrylic paint marker or paint
- Pink or red acrylic paint marker
- Clear matte sealant spray
- Small terracotta pot
- Succulent soil or sand
- Small succulent plant
- Decorative gravel (optional)
Step 1: Preparing the Stone Canvas
-
Select the perfect rock:
Hunt for a smooth, rounded rock that resembles a bird’s egg in shape. A light-colored background—like cream, white, or light grey—works best so you don’t have to paint a base coat. -
Clean and dry:
Wash your stone thoroughly with warm soapy water to remove any dirt or oils. Use a scrub brush if necessary, and let it dry completely in the sun before starting. -
Optional base coat:
If your rock is dark, you can sponge on a layer of titanium white or cream acrylic paint to create a uniform canvas. I usually skip this if the natural stone has a nice speckled texture.
Step 2: Painting the Expressive Face
-
Outline the eyes:
Using a medium-tip black paint marker, draw two large, tall ovals in the upper center of the rock. Make them touch slightly in the middle for that classic cartoon look. -
Fill the whites:
Carefully fill in the ovals with white paint. You may need two coats here to ensure the stone’s texture doesn’t show through. Let the first coat dry fully before adding the second. -
Add the pupils:
Once the white is bone-dry, use your black marker to draw distinct pupils. Position them looking slightly sideways or upward to enhance the ‘peekaboo’ effect. -
Create the reflection:
Add a tiny dot of white paint inside each black pupil. This ‘catchlight’ brings the character to life instantly. -
Draw the eyebrows:
With a fine-tip black marker, sketch short, slanted eyebrows floating just above the eyes. Angling them slightly outward creates that innocent, surprised expression. -
Outline the mouth:
Draw a joyful, open D-shaped mouth below the eyes. Keep the bottom curve deep to make the smile look big and friendly. -
Color the tongue:
In the bottom curve of the mouth, paint a small crescent shape using your pink or red marker to represent the tongue. -
Fill the mouth void:
Color the remaining space inside the mouth with black, being careful not to paint over the pink tongue area.
Pro Tip: Marker Flow
Store paint markers horizontally. If the ink flows too fast, tap the tip on a scrap paper first to unload excess paint before touching the rock to prevent puddles.
Step 3: Finishing and Planting
-
Seal the artwork:
Take the rock to a well-ventilated area and spray it with a clear matte sealant. This protects the paint from moisture in the plant pot. -
Prepare the pot:
Fill your terracotta pot about three-quarters full with succulent soil or sandy potting mix. -
Plant the greenery:
Place a small succulent off-center in the pot. A rosette-style succulent works beautifully as a little ‘hairdo’ or companion for the rock. -
Top dressing:
Pour a layer of light-colored sand or decorative gravel over the soil surface to create a tidy, clean look. -
Position the stone:
Nestle your painted rock into the sand next to the succulent. Push it down slightly so it looks like it’s emerging from the ground. -
Add accents:
If you have space, add one or two unpainted, darker rocks nearby to create contrast and make your painted friend pop.
Level Up: Family Gathering
Don’t stop at one! Paint rocks of different sizes with varying expressions—winking, laughing, or sleeping—to create a whole family living in a larger planter box.
Now you have a cheerful little garden guardian that will never fail to make you smile when you water your plants
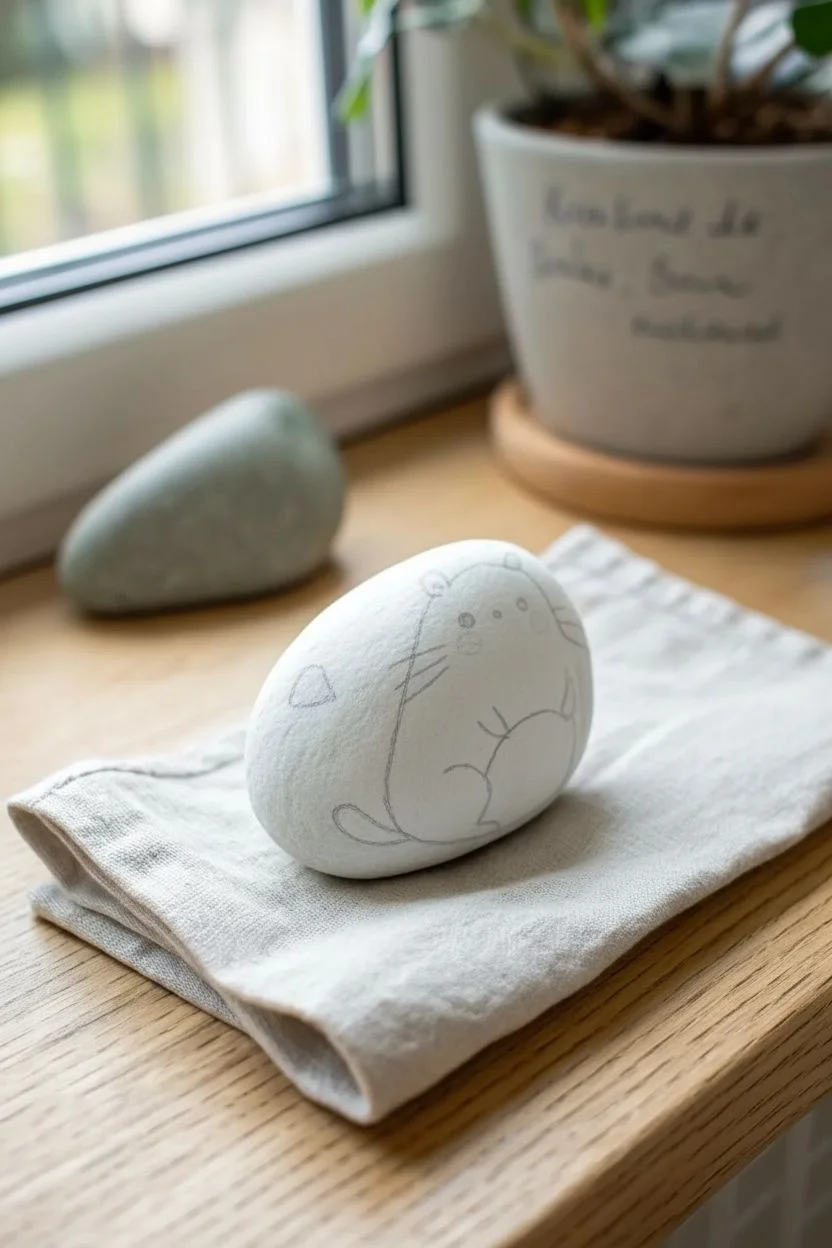
Animal Butt Rocks (Cute From One Side, Funny From the Other)
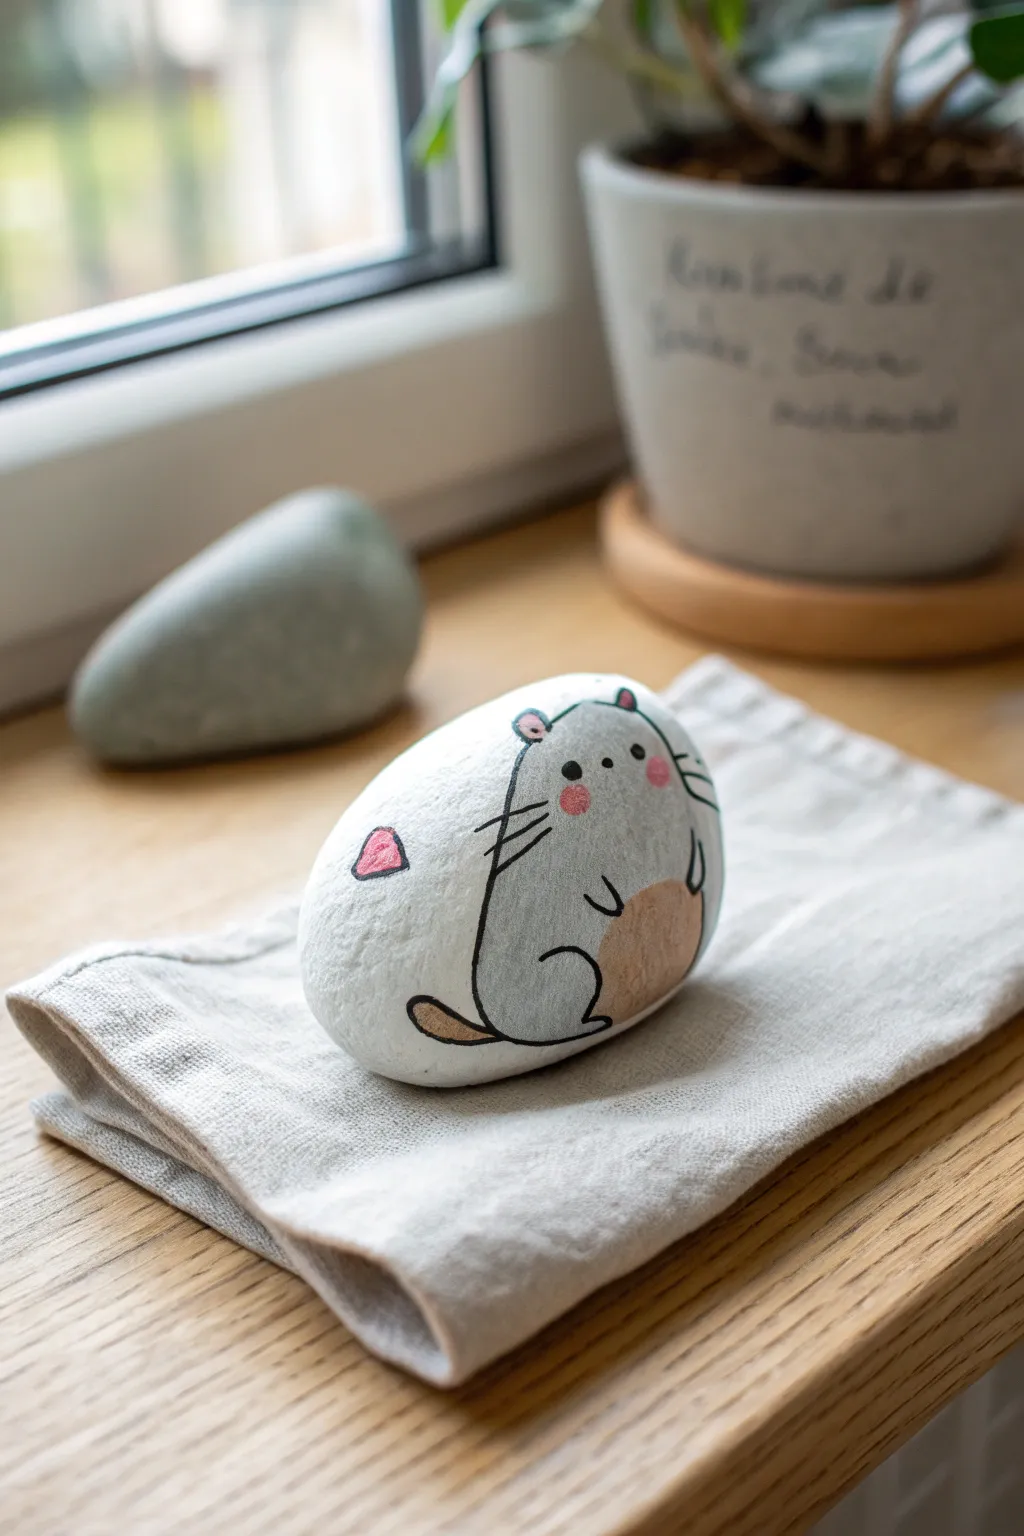
Transform a simple stone into an adorable, rotund hamster friend that’s perfect for brightening up any windowsill. This project features clean lines, soft blush details, and a charming cartoon style that captures a sweet personality in just a few strokes.
Detailed Instructions
Materials
- Smooth, rounded river rock (egg-shaped is ideal)
- White acrylic paint or gesso
- Light grey acrylic paint
- Soft pink acrylic paint
- Light brown or tan acrylic paint
- Black fine-liner aesthetic posca pen or very fine brush
- Medium flat paintbrush
- Small round paintbrush
- Matte spray varnish
Step 1: Preparation & Base Coat
-
Clean the canvas:
Begin by scrubbing your rock with warm, soapy water to remove any dirt or oils that might prevent the paint from sticking. Let it dry completely in the sun. -
Apply the primer:
Paint the entire surface of the rock with a coat of white acrylic paint or gesso. This ensures your colors will pop and gives you a clean slate to work on. -
Second coat:
Once the first layer is dry, apply a second coat of white. You want an opaque, smooth finish where the natural stone color doesn’t peek through. -
Pencil sketch:
Lightly sketch the outline of your hamster using a pencil. Draw a large oval shape for the body, slightly wider at the bottom to give it that ‘squishy’ look.
Ink Smearing?
If your black outline smears when you varnish, switch to a water-based sealant first or ensure your pen is fully waterproof and cured for 24h.
Step 2: Painting the Body
-
Grey body fill:
Mix a very pale grey—mostly white with a tiny drop of black—and fill in the main body shape, leaving space for the belly. -
The belly patch:
While the grey dries, protect your brush and switch to a light brown or tan color. Paint a rounded patch on the lower right side of the body for the hamster’s tummy. -
Blending edges:
I like to gently tap the edge where the grey meets the brown while the paint is still slightly damp to soften the transition, though a sharp line works for a cartoon look too. -
Adding the ears:
Paint two small semi-circles on top of the head using the same grey tone as the body. -
Inner ear detail:
Using your smallest brush, add a dab of soft pink inside the grey ear shapes. -
Cheeky blushing:
Dip a round paintbrush or a cotton swab into the pink paint. Blot it on a paper towel first, then stamp two rosy circles on the hamster’s face cheeks. -
Floating heart:
Paint a small, floating heart shape to the left of the hamster in a slightly darker pink or red.
Step 3: Line Art & Details
-
Outline the body:
Using a black fine-liner pen or a very steady hand with a liner brush, trace over the main body outline. Keep the lines relatively thin but distinct. -
Facial features:
Dot two wide-set black eyes between the ears. Add a tiny nose right between the blush marks. -
Whiskers:
Draw three straight, horizontal lines on each side of the face for whiskers. Quick, confident strokes work best here. -
Arms and feet:
Draw two small ‘U’ shapes on the belly for little paws, and a curved line at the bottom to suggest a foot tucked under the body. -
Finishing the tail:
Outline a small, curved tail shape peaking out from the bottom left, coloring the inside with the brown tan tone used for the belly. -
Heart outline:
Give your floating pink heart a black outline to match the cartoon style of the hamster. -
Sealing:
Allow the ink and paint to cure for at least 24 hours. Finish with a light mist of matte spray varnish to protect your new pet from scratching.
Make it 3D
Glue a tiny felt triangle for ears or a pom-pom for a tail to add tactile texture to your painted pet rock.
Place your little hamster on a desk or shelf for an instant dose of cuteness whenever you look its way
Worm-on-a-Rock “Snack Attack” Gag
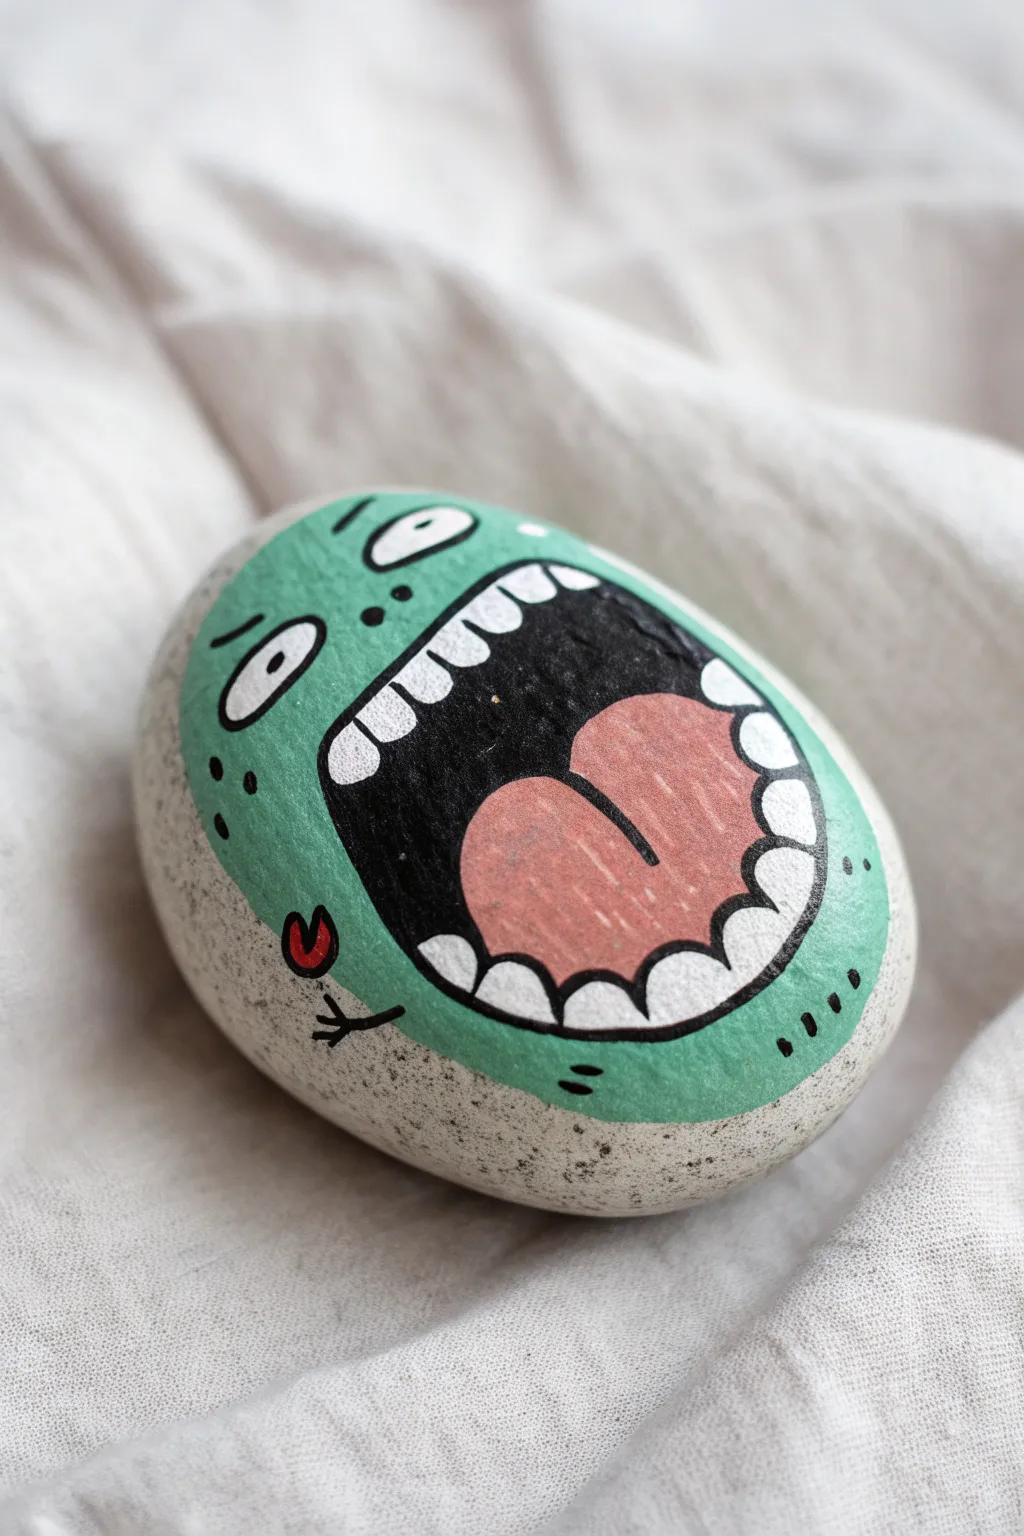
Transform an ordinary garden stone into a hilarious character mid-shout with this expressive rock painting project. The bright teal face contrasting against the natural stone texture creates a fun, pop-art style decoration perfect for hiding or displaying.
Step-by-Step
Materials
- Smooth, oval-shaped river rock (palm-sized)
- Acrylic paint marks (POSCA or similar) in teal/mint green, black, white, pink, and red
- Pencil and eraser
- Clear spray sealant or varnish (matte or satin finish)
- Small detail paintbrush (optional, for filling large areas if not using markers)
- Paper towel or rag
Step 1: Preparation & Sketching
-
Rock Selection:
Find a rock that is nice and smooth with a rounded, egg-like shape. Scrub it clean with soap and water, then let it dry completely before starting. -
Outline the Face Shape:
Using a pencil, lightly sketch a large, rounded shape that covers most of the top surface of the rock, leaving the natural stone exposed around the edges. This will be the green face area. -
Sketch the Big Mouth:
Draw a large, wide ‘U’ shape that dominates the center of the face. This character is all about the mouth, so make it big! Add a curved line at the top for the upper lip area. -
Add Facial Features:
Sketch two oval eyes near the top left of the face area. Add small nostrils and eyebrows. Inside the mouth, draw a curvy tongue shape rising from the bottom. -
Detail the Teeth:
Sketch blocky, rectangular teeth along the top and bottom inside edges of the mouth. They don’t need to be perfect squares; slightly irregular shapes add character.
Step 2: Color Blocking
-
Fill the Face Color:
Using your teal or mint green paint marker, color in the entire face area outside of the mouth and eyes. Be careful effectively cutting in around the pencil lines. -
Second Green Layer:
Acrylic markers can sometimes be streaky. I usually wait for the first layer to fully dry, then add a second coat of green to get that solid, opaque look. -
Fill the Mouth Void:
Take a black paint marker or black acrylic paint and fill in the dark space inside the mouth, carefully avoiding the tongue and teeth areas. -
Color the Tongue:
Use a dusty pink or light red marker to color in the tongue shape. It might need two coats to look bright against the dark mouth background. -
Brighten the Teeth and Eyes:
Fill in the teeth and the eye ovals with white paint. A paint pen is perfect here for precise control on the small teeth shapes.
Uneven Coverage?
If the green paint looks patchy or the stone texture shows through too much, let it dry 100% and apply a layer of white paint first as a primer, then repaint the green on top.
Step 3: Details & Outlining
-
Outline the Mouth:
Once the green and white areas are bone dry, take a fine-tip black marker. Outline the entire mouth opening, the individual teeth, and the tongue. -
Define the Eyes:
Outline the white eye ovals with black. Draw small black pupils (dots) in the center of each eye. -
Add Expression Lines:
Draw small slanted eyebrows above the eyes for an anxious look. Add two small dots for nostrils and a few freckles or texture dots on the cheeks. -
Draw the Tiny Arm:
On the bottom left of the green face area, draw a tiny black stick-figure arm reaching out. Add three small fingers. -
Add the Red Accent:
Just above the stick hand, paint a tiny red ‘C’ shape or heart-like shape to look like a little object (or crab claw!) the character is reacting to. -
Tongue Details:
Use a fine black pen to draw a center line down the tongue for depth. -
Final Face Outline and Highlights:
Outline the entire green face shape where it meets the raw stone. Add a few small dash marks around the chin or cheeks for texture.
Choosing Markers
Acrylic paint pens (like POSCA extra fine 0.7mm) are far easier than brushes for the teeth and outlines. They give you the control of a drawing tool with the opacity of paint.
Step 4: Finishing Touches
-
Clean Up:
Check your edges. If any green paint looks uneven against the stone, you can carefully scratch away excess dry paint with a toothpick. -
Seal the Rock:
In a well-ventilated area, spray the rock with a clear matte sealant. This protects the paint from chipping if you place it outside.
Now you have a hysterical little stone friend ready to startle anyone who walks by
Mini “Office Supplies” Rocks With Attitude

Capture the essence of workplace ennui with this hilariously relatable annoyed lemon-yellow rock. This simple yet expressive character brings a dose of grumpy charm to your desk setup, perfectly mimicking that ‘this could have been an email’ feeling.
How-To Guide
Materials
- Smooth, oval river rock (palm-sized)
- Matte yellow acrylic paint (lemon or sunflower shade)
- Black fine-tip paint pen (0.7mm or similar)
- Black medium-tip paint pen (optional for filling)
- Flat synthetic paintbrush (size 8 or 10)
- Matte spray sealer or varnish
- Pencil and eraser (optional for sketching)
- Water cup and paper towels
Step 1: Base Coat Prep
-
Rock selection:
Choose a rock that is relatively flat and smooth. An oval shape works best to mimic a head or a potato, giving the character a more organic feel. -
Cleaning the surface:
Wash your rock thoroughly with warm soapy water and scrub away any dirt or grit. Let it dry completely before starting to ensure the paint adheres properly. -
First layer application:
Using your flat synthetic brush, apply a layer of matte yellow acrylic paint to the top surface of the rock. Don’t worry about perfect opacity yet; just get the color down. -
Drying time:
Allow the first coat to dry for about 15-20 minutes. It should be dry to the touch before you add more paint to prevent lifting the previous layer. -
Boosting the color:
Apply a second and potentially third coat of yellow. You want a solid, opaque finish where no grey rock shows through. I like to let the final coat cure for a full hour to provide a sturdy canvas for the pen work.
Step 2: Adding the Attitude
-
Planning the face:
Visualize where the features will go. The eyes should sit slightly higher than the center line to leave room for the frown. You can lightly sketch this with a pencil if you’re nervous about freehanding. -
Drawing the eyelids:
With your black fine-tip paint pen, draw two horizontal straight lines for the tops of the eyes. Angle them slightly downward towards the outside edges to create that tired, drooping look. -
Forming the eyes:
Draw semi-circles underneath your straight lines to complete the eye shapes. Keep them looking heavy and half-closed. -
Adding pupils:
Place small black dots or half-circles inside the eyes. Position them looking sideways or slightly up to enhance the expression of annoyance. -
Eyebrows:
Draw two small, floating curves above the eyes. These should be short and subtle, adding a touch of worry or skepticism to the face. -
Nose and mouth:
Place a tiny dot or small ‘c’ shape in the center for a nose. Below that, draw a distinct frown—a curved line turning downwards at the ends. -
Expression lines:
Add two small vertical dash marks on the cheeks (like blush lines or worry lines) and perhaps a small crease under the eye to age the rock slightly.
Ink Smearing?
If your paint pen smears when sealing, the ink wasn’t dry enough or you sprayed too heavily. Apply very thin mist coats, letting them dry in between.
Step 3: Finishing Touches
-
Ink drying:
Let the paint pen ink dry completely for at least 30 minutes. Smearing black ink across yellow paint is a tragedy we want to avoid. -
Sealing the deal:
Take your project to a well-ventilated area. Hold the spray sealer about 10-12 inches away and apply a light, even mist over the rock. -
Matte finish:
Use a matte sealer rather than glossy to keep the rock looking natural and cartoon-like, reducing glare under office lights. -
Final cure:
Allow the sealer to dry according to the manufacturer’s instructions, usually 24 hours for a full cure, before placing it on your desk.
Make a Set
Create a whole ‘mood scale’ of rocks for your desk. Paint different colors for different emotions: Blue for sad, Red for angry, and Green for envy.
Place your grumpy little friend on a stack of papers or a fabric coaster to silently judge your workload
Pun-Labeled “Rock Star” Rocks
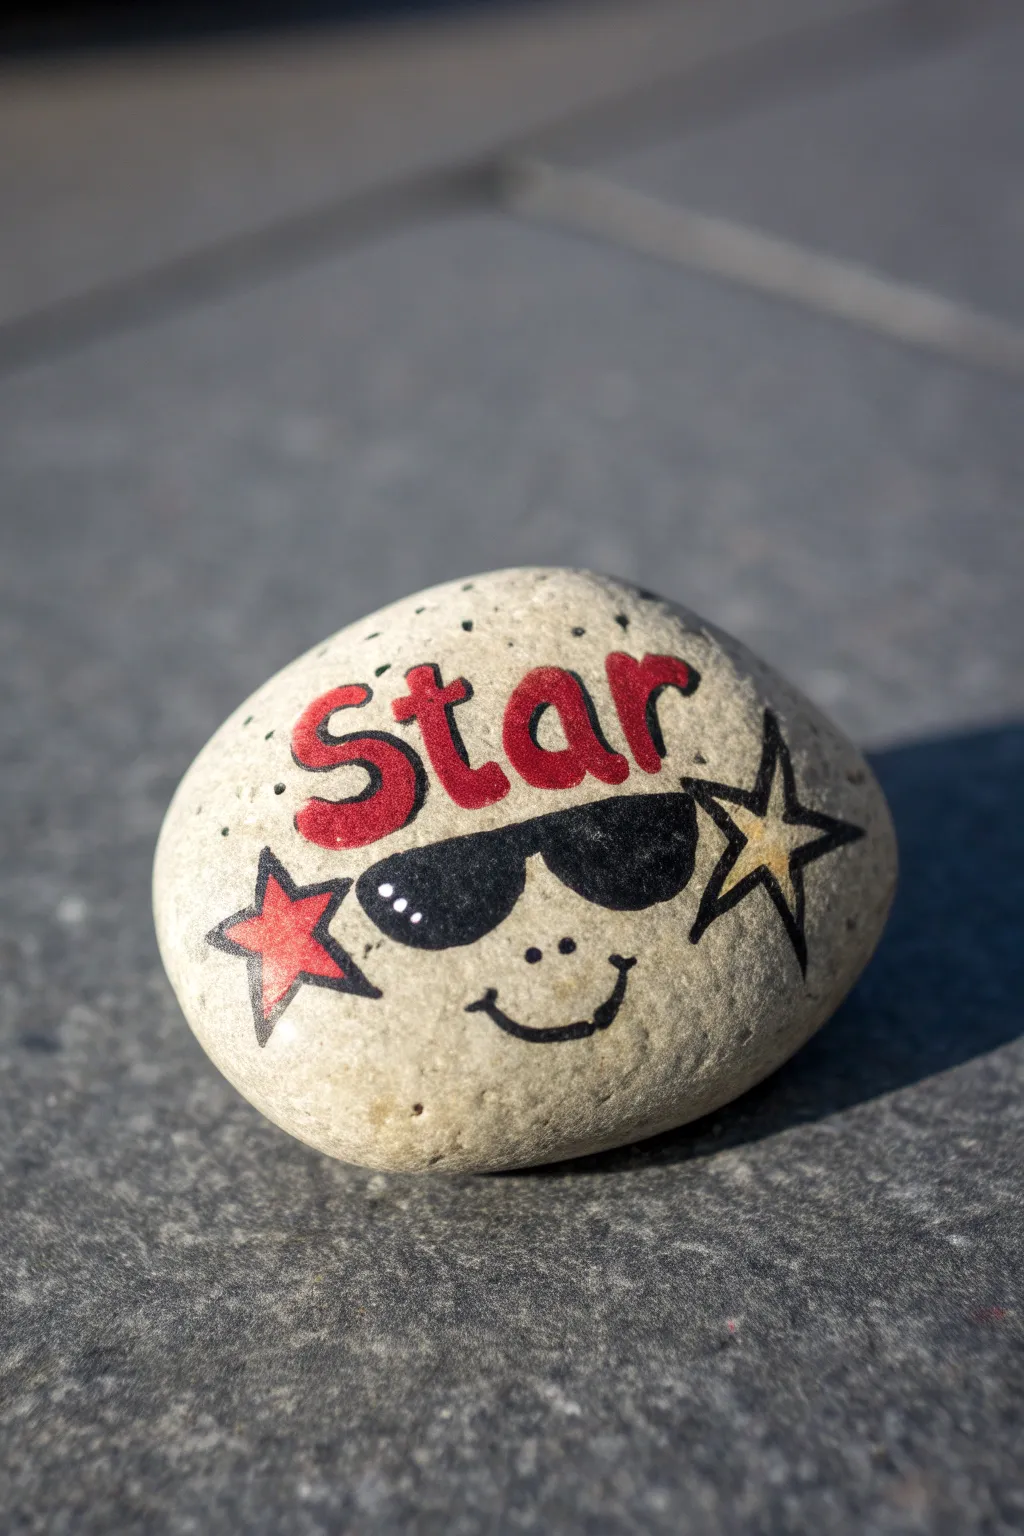
Turn a simple stone into a cool character with this cheeky play on words. This project features a happy rock wearing shades, sporting the word ‘Star’ in bold red letters to complete the ‘Rock Star’ pun.
Detailed Instructions
Materials
- Smooth, rounded rock (roughly fist-sized)
- White or cream acrylic paint (for the base)
- Red acrylic paint or paint pen
- Black acrylic paint or fine-tip paint pen
- Gold or yellow paint pen (optional)
- Wide flat paintbrush
- Fine detail paintbrush
- Clear spray sealer or varnish
Step 1: Base Preparation
-
Clean the canvas:
Scrub your chosen rock with warm, soapy water to remove any dirt or grit. Let it dry completely in the sun or use a hairdryer to speed things up. -
Prime the surface:
Apply a base coat of white or cream acrylic paint. Depending on how dark your rock is, you might need two coats to get an opaque, stone-like finish that makes the colors pop. -
Dry time:
Wait for the base coat to be fully dry to the touch before moving on to the design details.
Uneven Surface?
If your rock is pitted, use a thicker acrylic paint or gesso for the base coat. It fills in small holes, creating a smoother surface for writing text.
Step 2: Text and Features
-
Draft the text:
Lightly sketch the word ‘Star’ across the top third of the rock using a pencil. Aim for a bubbly, informal font style. -
Paint the letters:
Fill in your sketched letters with bright red paint. A paint pen works wonders here for crisp edges, but a small brush creates a nice hand-painted texture. -
Outline the text:
Once the red is dry, careful outline each letter with a very fine black line to separate it from the background. -
Position the shades:
Sketch the outline of oversized sunglasses underneath the text. They should span across the middle of the rock. -
Fill the lenses:
Paint the sunglasses entirely black. I find that doing two thin coats prevents brushstrokes from showing in the black paint. -
Add reflection:
To make the glasses look shiny, add two tiny white dots or dashes in the upper left corner of the left lens.
Pen vs. Paint
For the black outlines and text, use acrylic paint pens instead of brushes. They offer way more control for beginners and create sharper lines.
Step 3: Stars and Smiles
-
Left cheek star:
Draw a traditional five-point star on the left side of the face. Fill this star in with the same red used for the text. -
Right cheek star:
On the right side, draw another star outline in black. Leave the inside unpainted or add a subtle wash of gold or yellow for a different look. -
Outline details:
Use your fine black liner to outline the red star on the left cheek, giving it a cartoon sticker appearance. -
Draw the nose:
Place two small black dots centered right below the bridge of the sunglasses to serve as nostrils. -
Create the smile:
Paint a simple, curved black line for the mouth beneath the nose dots. Add small perpendicular tick marks at the ends of the smile for dimples. -
Add speckles:
For a textured look, add a few random tiny black dots around the ‘Star’ text and the top of the rock.
Step 4: Finishing Touches
-
Final dry:
Allow the entire design to dry completely, ideally overnight to ensure the thickest paint layers have set. -
Protect the art:
Spray the rock with a clear sealer. This protects the paint from chipping and gives the rock a professional sheen.
Place your little rock star in the garden or on a desk to bring a smile to anyone who spots it
Modular Face Rocks You Can Mix and Match
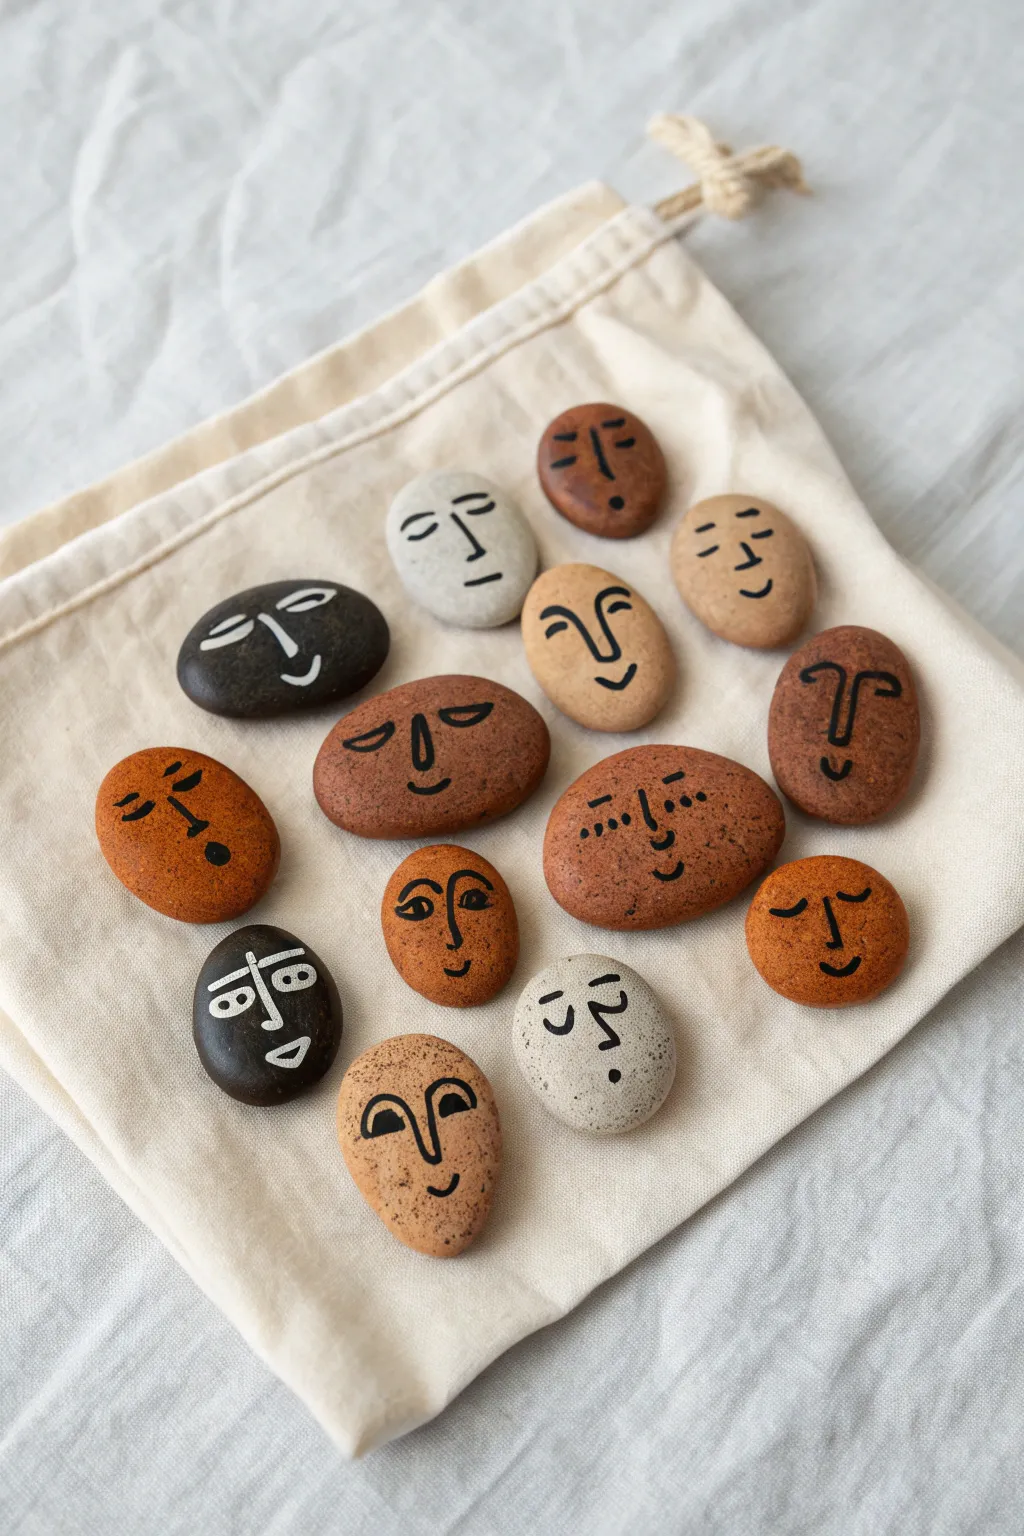
Transform smooth river stones into a cast of quirky characters with just a few expressive lines. These minimalist face rocks use the natural color of the stones as a canvas, celebrating diverse shades and shapes in a playful, mix-and-match collection.
How-To Guide
Materials
- Smooth river stones (assorted colors and sizes)
- Black acrylic paint marker (fine tip)
- White acrylic paint marker (fine tip)
- Mild soap and water
- Old toothbrush
- Matte spray varnish or sealant
- Paper towels
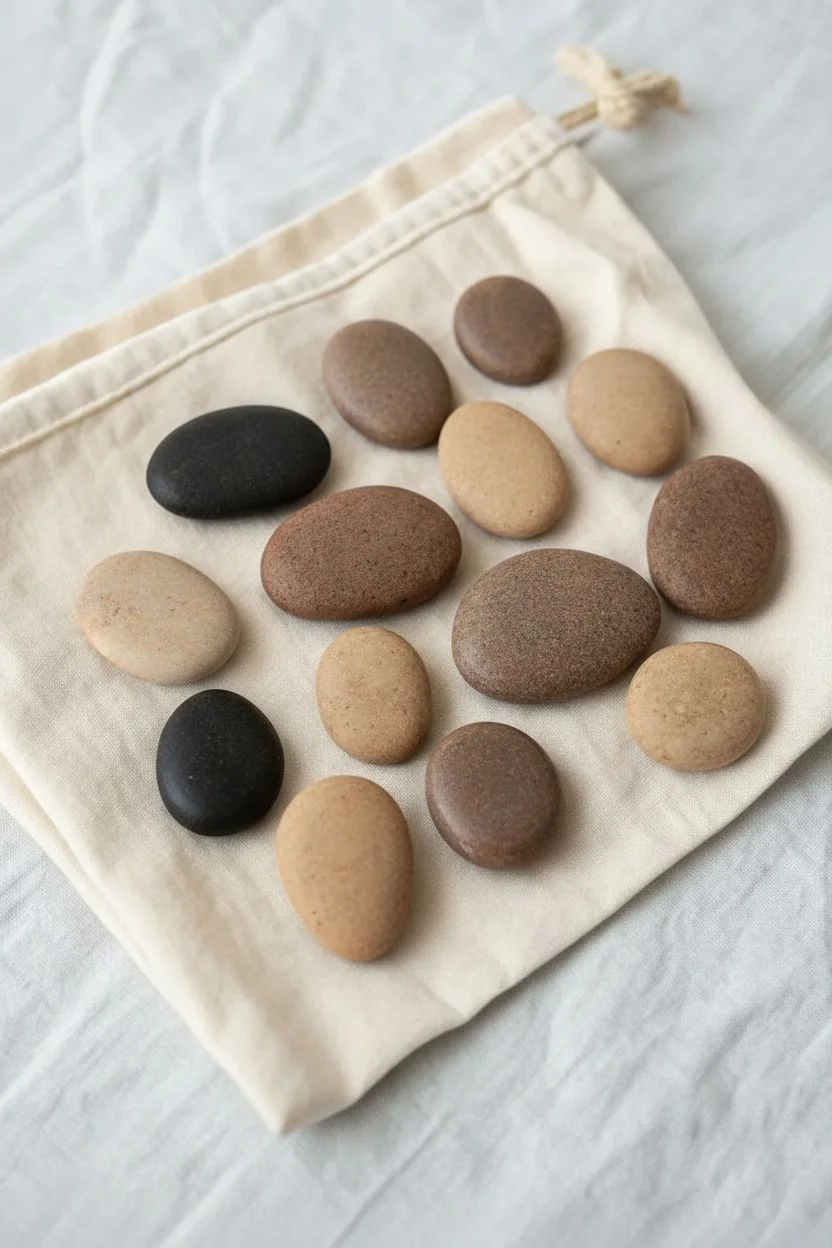
Step 1: Preparing the Base
-
Clean Your Canvases:
Begin by thoroughly washing your river stones with warm water and mild soap to remove any dirt or oily residue. -
Scrub the Surface:
Use an old toothbrush to get into any tiny crevices or pores on the rock’s surface, ensuring a perfectly clean base for the paint to adhere to. -
Dry Completely:
Pat the stones dry with paper towels and let them air dry completely for at least an hour. Any trapped moisture inside the porous rock can ruin your paint later. -
Plan Your Roster:
Arrange the dry stones on a table. Look at their shapes—a long oval might suit a droopy face, while a round pebble works well for a cheerful expression.
Continuous Line Look
Try drawing the nose and eyebrows in one single, unbroken line. This creates a sophisticated, abstract style similar to Picasso or Matisse line drawings.
Step 2: Drawing the Features
-
Select the Right Marker:
For lighter-colored stones (beige, tan, grey), use a black acrylic paint marker. For dark grey or black stones, pick up your white marker for maximum contrast. -
Prime the Noses:
Start centrally on the stone by drawing the nose first. This anchors the face. Try a long ‘L’ shape, a simple vertical line, or a wider ‘U’ shape depending on the character you want to build. -
Add the Eyes:
Place the eyes on either side of the nose bridge. Keep them simple: dots work for a minimalist look, while small almond outlines create a more open expression. -
Make them Sleepy:
To create a calm or sleeping face, simply draw two small downward curves (like crescents) instead of open eyes. -
Establish the Brows:
Draw eyebrows above the eyes. Connecting the eyebrows directly to the bridge of the nose is a great trick for that continuous-line art style. -
Form the Mouths:
Add the mouth below the nose. A small upwards curve makes a gentle smile, a straight line looks neutral, and a small circle can indicate surprise or whistling. -
Experiment with Details:
On a few stones, add extra character details like dotted cheeks (freckles) or dashes under the eyes to suggest tiredness or age lines.
Step 3: Finishing Up
-
Check Consistency:
Evaluate your lines. If the marker stroke looks thin or transparent, wait for it to dry completely and then carefully trace over it a second time for solid opacity. -
Contrast Check:
Ensure your white lines on dark rocks are bright enough. I usually find that white markers need a second coat more often than black ones to really pop against stone. -
Correction Time:
If you make a mistake, don’t panic. Let the paint dry fully, then gently scrape the error away with a toothpick or paint over it if the rock color allows. -
Let the Paint Cure:
Allow the painted faces to dry undisturbed for several hours. Acrylic markers dry to the touch quickly but need time to fully harden. -
Seal the Artwork:
Take the rocks outside or to a well-ventilated area. Apply a light, even coat of matte spray varnish to protect the designs from chipping and abrasion.
Ink Bleeding into Rock?
If the marker ink bleeds into the stone’s pores (looking fuzzy), apply a layer of clear matte varnish or Mod Podge to the raw stone first to seal the surface before drawing.
Group your finished characters together in a bowl or scatter them in the garden for a whimsical touch
Mood Swing Rock Set (Same Face, Different Emotions)
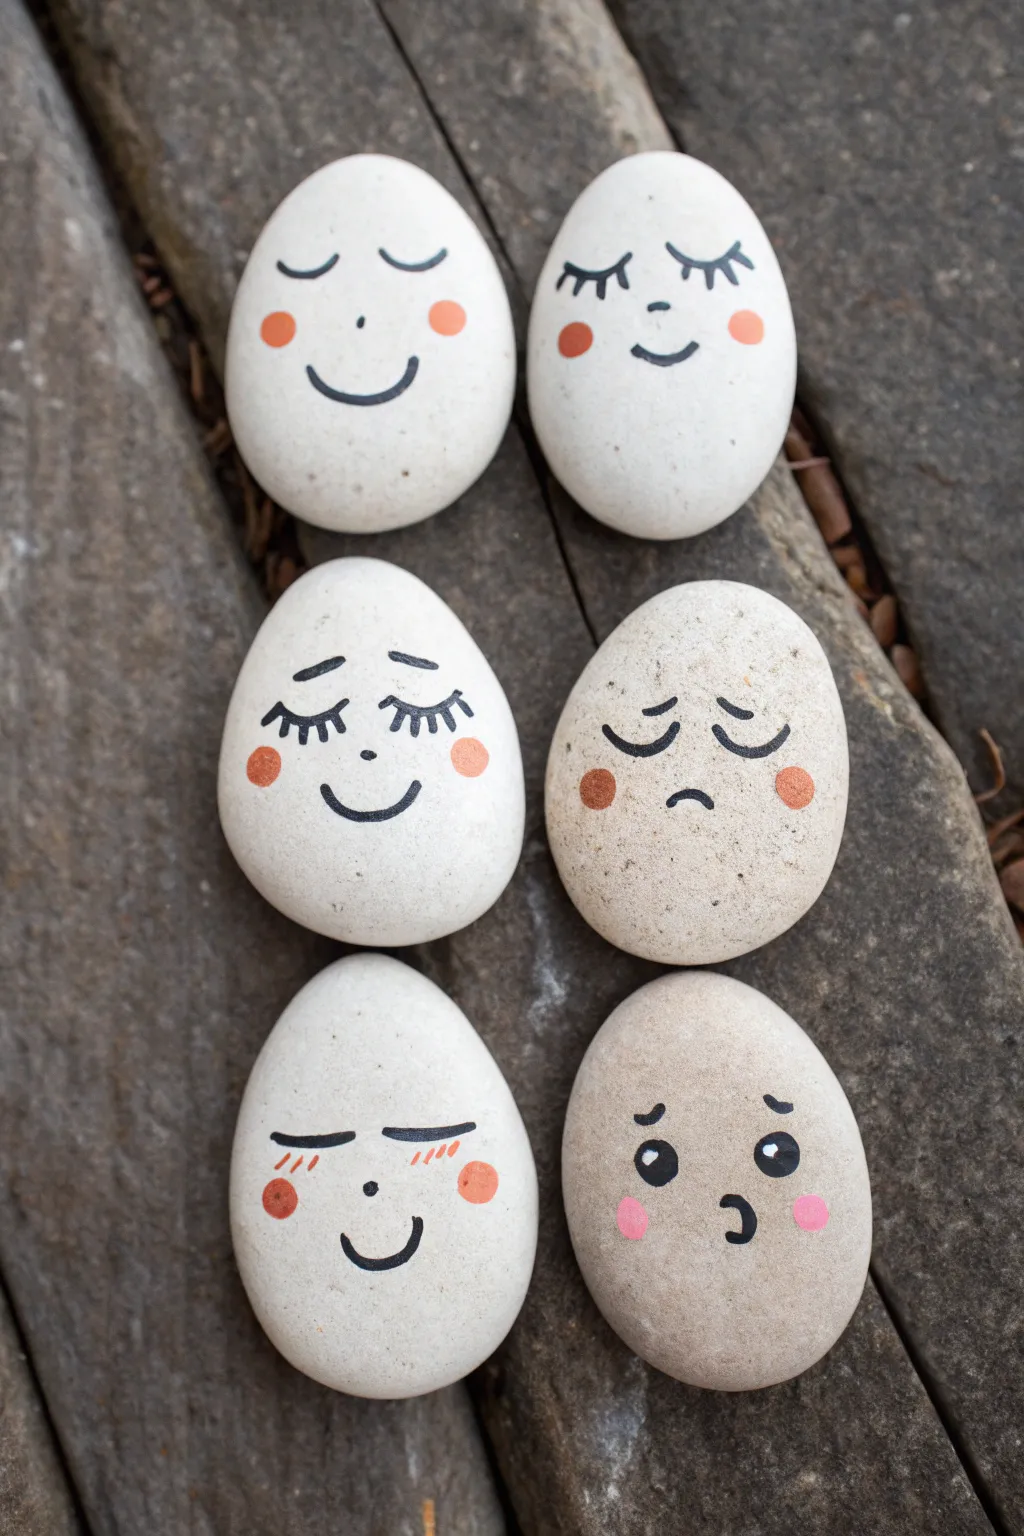
This charming set of rock faces captures a range of feelings, from sleepy contentment to surprise, using simple lines and soft colors. Creating these characters is a delightful exercise in minimalism, turning plain garden stones into a cast of emotional little friends.
Detailed Instructions
Materials
- 6 smooth, oval-shaped river rocks (3 white/light grey, 3 beige/tan)
- Black fine-point permanent marker or acrylic paint pen (0.7mm tip)
- Acrylic paint in peach/coral and bright pink
- Small round paintbrush or dotting tool
- Matte spray sealant (optional)
- Mild soap and water
- Pencil and eraser
Step 1: Preparation
-
Select your canvas:
Choose six stones that are roughly the same size and shape—ideally oval like eggs. Look for smooth surfaces without deep pits or cracks which could distort your drawing. -
Clean the surface:
Wash the stones thoroughly with mild soap and warm water to remove any dirt or oily residue. Let them dry completely, perhaps in the sun, to ensure the marker adheres properly. -
Draft the faces:
Using a pencil very lightly, sketch out the facial features on each stone. Aim for variety: happy eyes, sleepy lashes, sad brows, and surprised mouths. Keep the features centered on the ‘face’ of the stone.
Step 2: Drawing the Happy Trio (White Stones)
-
First happy face:
On the first white stone, draw two arcs curving downward for closed happy eyes. Add a small dot for a nose and a wide U-shape for a smile. -
Second dreamy face:
For the middle white stone, draw slightly heavier eyebrows. Below them, add curved eyelids with distinct vertical eyelashes. Place a small U-smile underneath. -
Third winking face:
On the bottom white stone, draw two straight horizontal lines for closed, relaxed eyes. Add three small diagonal dash marks under each eye to suggest blushing or sleepy wrinkles, and a U-shaped smile.
Fixing Smudges
If your black marker accidentally smudges, let it dry completely, then paint over the error with a tiny bit of acrylic paint that matches the stone’s color.
Step 3: Drawing the Moodier Trio (Tan Stones)
-
Sweet face:
On the top tan stone, draw two arcs for eyes similar to the first white one, but add whimsical eyelashes flicking upward. Give it a tiny nose and a gentle smile. -
Sad face:
For the middle tan stone, draw two small arcs curving upward (like rainbows) for sad eyes. Add tilted eyebrows above them that slope outward. Draw a small, downturned curve for the mouth. -
Surprised or worried face:
On the bottom tan stone, draw small, tilted eyebrows. Below, draw two filled-in black ovals for wide eyes, leaving a tiny white dot in each for a ‘catchlight.’ Finish with a small, open ‘O’ shape for the mouth.
Make it a Game
Turn these into a social-emotional learning tool! Put the stones in a bag and have kids pull one out to act out the emotion shown on the rock.
Step 4: Adding Color & Finish
-
Inking the lines:
Once you are happy with your pencil sketches, trace over them carefully with your black fine-point marker or paint pen. I find that pulling the pen toward me creates smoother lines than pushing it away. -
Let ink set:
Allow the black ink to dry for at least 15 minutes to prevent smearing when you add the cheeks. -
Paint the cheeks:
Dip the back end of a paintbrush or a dotting tool into your peach or pink acrylic paint. Gently stamp a circular cheek onto each side of the face. -
Vary the cheek tones:
Use the lighter peach tone for the happy and sad faces, and switch to the brighter pink for the surprised face to emphasize the emotion. -
Clean up:
If any pencil marks are still visible after the ink is fully dry, gently erase them. -
Seal the artwork:
To protect your expressions from the elements, especially if they will live in a garden, apply a light coat of matte spray sealant. Hold the can 12 inches away and mist lightly.
Now you have a set of adorable stone characters ready to bring personality to your desk or garden path
Self-Referential “Found You” Rocks
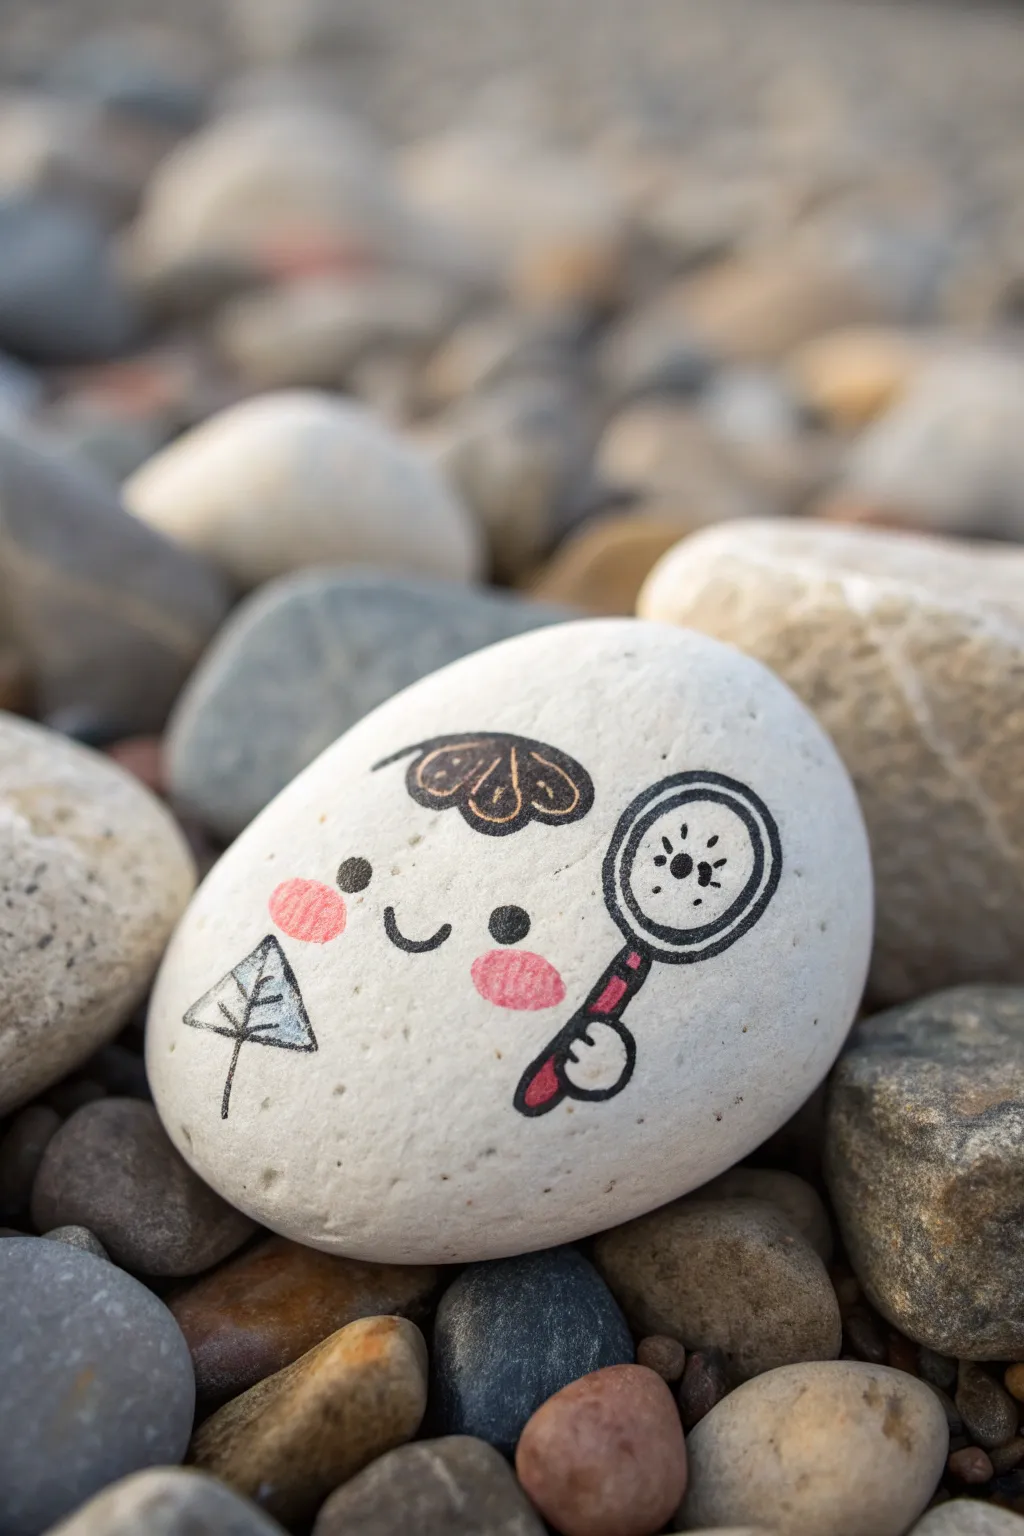
This adorable project transforms a simple river stone into a tiny explorer, complete with a magnifying glass to help you ‘find’ the beauty in nature. With its clean lines and sweet expression, this self-referential rock is perfect for hiding in parks for others to discover.
How-To Guide
Materials
- Smooth, rounded white river rock (approx. 2-3 inches)
- Black ultra-fine point permanent marker or acrylic paint pen (0.7mm)
- Black fine point paint pen or marker (medium tip for filling)
- Pink acrylic paint or paint pen (blush color)
- Red or dark maroon acrylic paint pen (for the handle)
- Light blue or grey watercolor pencil or diluted paint (triangle shading)
- Matte spray sealer or varnish
Step 1: Preparation and Base
-
Rock Selection:
Begin by hunting for the perfect canvas. Look for a naturally white or very light grey stone that is smooth to the touch and mostly flat on one side. A texture-free surface is crucial for getting clean lines with fine-tipped pens. -
Cleaning:
Wash your stone thoroughly with warm soapy water and a stiff brush to remove any river silt or dirt. Let it dry completely in the sun or bake it in a cool oven for 15 minutes to ensure no moisture remains inside. -
Surface Priming (Optional):
If your rock isn’t naturally bright white, you can paint a solid layer of white gesso or acrylic paint over the top face. Let this cure fully before drawing, as markers can clog on wet paint.
Step 2: Drawing the Character
-
Pencil Sketch:
Lightly sketch the character’s layout using a regular pencil. Place the eyes centrally, leaving room above for the hair and to the right for the magnifying glass. Keep your pressure extremely light so you don’t scratch the rock’s surface. -
Inking the Hair:
Using your black fine-point marker, draw the ‘cloud’ or ‘mushroom’ shaped hair cap at the top. Outline the soft curves first, then fill the inside with a loose, scribbled texture or wavy lines to give it visual weight without making it solid black. -
Adding the Face:
Dot two small, solid black circles for the eyes. Just below them, draw a simple, tiny ‘U’ shape for the smile. The spacing here is key—keep the features close together to maximize the cuteness factor. -
Drawing the Magnifying Glass Rim:
To the right of the face, draw a large circle sketch. Go over it with your black marker to create the outer rim. Draw a second, slightly smaller circle inside the first to form the frame thickness. -
Creating the Lens Effect:
Inside the center of the magnifying glass, draw a tiny starburst or ‘shine’ mark using a few short radiating lines. This simple detail instantly communicates that the object is glass. -
Adding the Handle and Hand:
Draw a straight stick extending downwards from the glass rim using the black outline. At the bottom of this stick, draw a small, rounded ‘mitten’ hand shape gripping the handle.
Ink Flow Tip
If using a paint pen for the fine lines, scribble on a scrap paper first to get the ink flowing smooth. Shaking the pen directly over your rock can lead to sudden puddles.
Step 3: Adding Color and Details
-
Adding the Blush:
Dip a small brush into pink paint, or use a pink paint pen. Dab two soft, oval cheeks right under the eyes. If using paint, I find tapping it with a fingertip helps soften the edges to look more natural. -
Coloring the Handle:
Carefully fill in the handle of the magnifying glass with red or dark maroon paint. Be careful not to paint over the black outline of the character’s hand gripping it. -
The Triangle Pattern:
On the left side of the rock, draw a small triangle tree or arrow shape with a vertical line through it. Using a very light blue or grey watercolor pencil (or diluted paint), gently shade just the inside of this shape for a subtle pop of color.
Smearing markers?
If your black outlines bleed when you apply the varnish, you haven’t waited long enough. Permanent marker needs at least 1 hour to fully off-gas before sealing.
Step 4: Finishing Touches
-
Refining Lines:
Once the colored paint is bone dry, go back over any black outlines that might have gotten slightly covered or faded. This crisps up the image and makes the cartoon style pop. -
Sealing:
Take the rock to a well-ventilated area. Apply a light coat of matte spray sealer. Do not brush-on varnish directly, as the friction can smear the marker ink instantly. -
Second Coat:
After the first spray coat dries (about 15-20 minutes), apply a second coat to ensure the rock is weather-resistant and ready for hiding.
Now your little detective is ready to be hidden outdoors and bring a smile to whoever spots it first
Tiny Comic Strip Rocks (Three-Rock Punchline)
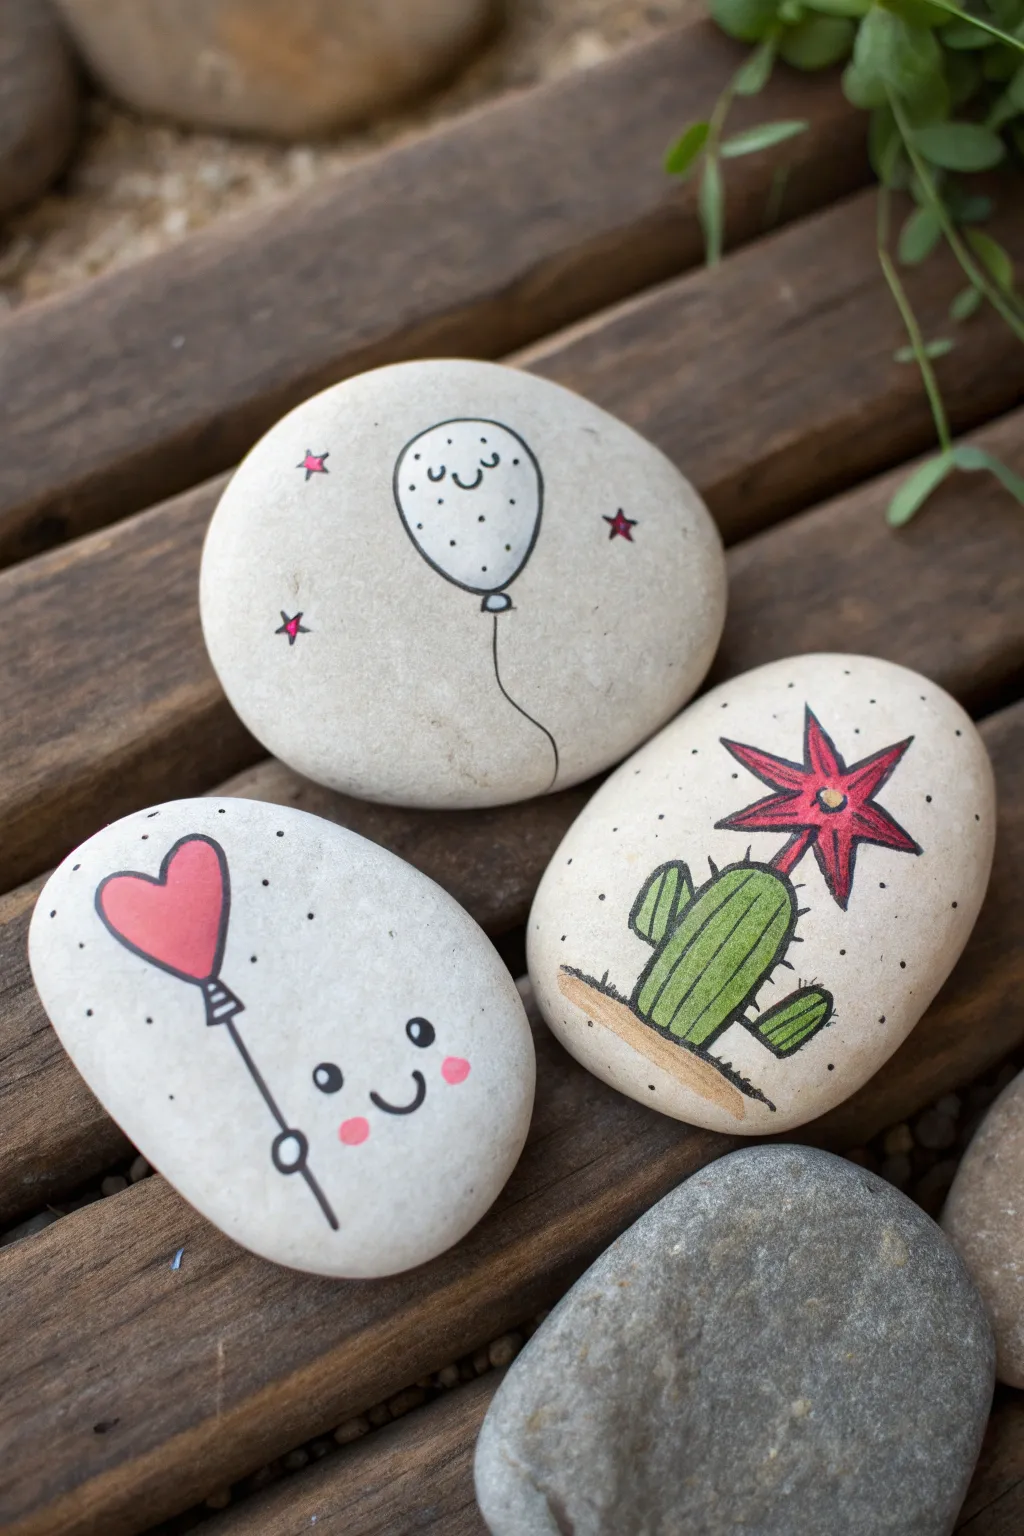
Transform three smooth, white river stones into a charming set of story stones featuring cheerful balloons and a prickly cactus pal. This simple, doodle-style project uses crisp black outlines and pops of vibrant color to create a lighthearted, playful vibe perfect for garden decor or gifts.
Step-by-Step
Materials
- Three smooth, white or light-colored river stones (flat surfaces preferred)
- Mild soap and water for cleaning
- Pencil and eraser
- Black ultra-fine point permanent marker or paint pen (0.5mm or 0.7mm)
- Acrylic paint pens or fine brushes with acrylic paint (Red/Pink, Green, Brown, White)
- Clear matte or satin varnish spray
Step 1: Preparation & Planning
-
Clean Your Canvases:
Before you begin, scrub your stones thoroughly with mild soap and warm water to remove any dirt or grease. Rinse them well and let them dry completely, ideally in the sun, to ensure the paint adheres properly. -
Select the Right Shapes:
Choose three stones that are relatively flat and oval-shaped. For the cactus and balloon designs, a slightly elongated stone works best, while rounder stones are perfect for the character faces.
Step 2: Painting the Happy Balloon Stone
-
Sketch the Balloon:
On your first stone, lightly pencil in a large oval shape near the top center for the balloon. Add a small triangle at the bottom where the string attaches. -
Add the Face:
Inside the top half of the balloon oval, pencil in two small U-shapes for closed, happy eyes and a tiny smile right between them. -
Ink the Outlines:
Using your black ultra-fine paint pen, trace over your pencil lines carefully. Draw the balloon string as a wavy line trailing off the bottom of the rock. -
Detail Work:
Use the same black pen to add tiny dots all over the balloon for texture. Then, draw three small five-pointed stars floating around the balloon. -
Color Pops:
With a fine bright pink or red paint pen, carefully fill in the small stars to give them a lovely burst of color.
Steady Hand Trick
Rest your pinky finger on the stone surface (or the table) while drawing fine lines. This acts as an anchor and significantly reduces hand shakiness.
Step 3: Creating the Heart Balloon Character
-
Draft the Character:
On the second stone, visualize the stone itself as a character. Near the bottom right, sketch a simple smiling face: two round eyes and a U-shaped mouth. -
Draw the Heart Balloon:
To the left of the face, sketch a heart shape that is tilted slightly. Draw a straight line connecting the bottom of the heart to a small circle ‘hand’ below the face. -
Fill with Color:
Use a pink or coral paint pen to fill in the heart shape completely. Add two small pink oval cheeks to the face. -
Define the Lines:
Once the pink paint is dry, outline the heart, the string, and the hand in black. Outline the face features, adding small highlights in the eyes with white paint if they are large enough, or just use black dots. -
Add Atmosphere:
Create a sense of movement by adding tiny black stipple dots around the character and balloon.
Fixing Smudges
If you smudge wet ink, don’t wipe! Let it dry completely, paint over the mistake with white acrylic paint, let that dry, and then redraw your line.
Step 4: Designing the Cactus Flower
-
Sketch the Cactus:
On the final stone, draw a main cactus body (an elongated oval) and one smaller arm branching off to the right. Ground it with a simple horizontal oval for the sand patch. -
Add the Bloom:
At the very top of the main cactus stem, sketch a large, six-pointed star shape for the flower. -
Apply Green and Brown:
Fill the cactus body with a vibrant light green paint. Use a light brown or tan color to fill in the sand patch at the base. -
Paint the Flower:
Color the star-shaped flower with a deep red or magenta paint. Let all the base colors dry completely before moving to the next step. -
Texture and Spines:
With your fine black pen, outline the cactus, flower, and sand. Draw vertical lines down the green cactus body for ribs, and add tiny tick marks along the edges for spines. -
Final Touches:
Add a small yellow dot in the center of the flower and scatter a few black dots in the background to match the style of the other stones.
Step 5: Finishing Up
-
Erase Guide Lines:
Check all stones for any visible pencil marks. Once you are certain the ink is 100% dry, gently erase them. -
Seal the Deal:
Take the stones to a well-ventilated area and apply a light coat of clear matte varnish spray to protect your artwork from chipping and weather.
Arrange your adorable trio in a garden pot or windowsill and enjoy the smiles they bring.
Weird Little Rock Creatures With Unexpected Details
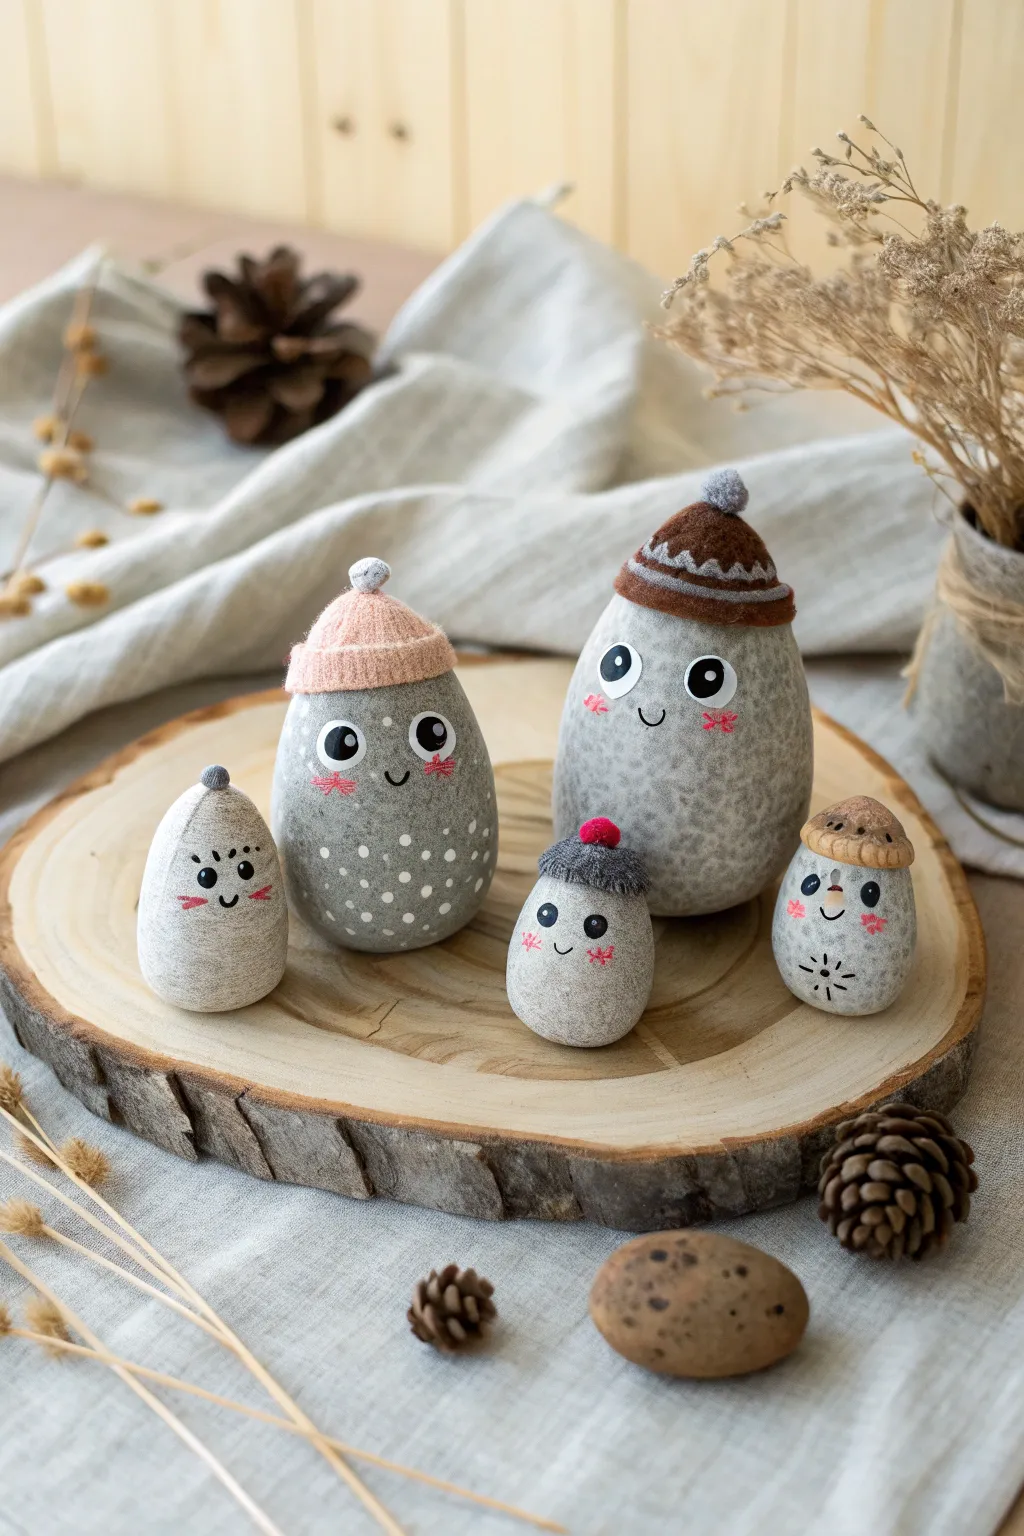
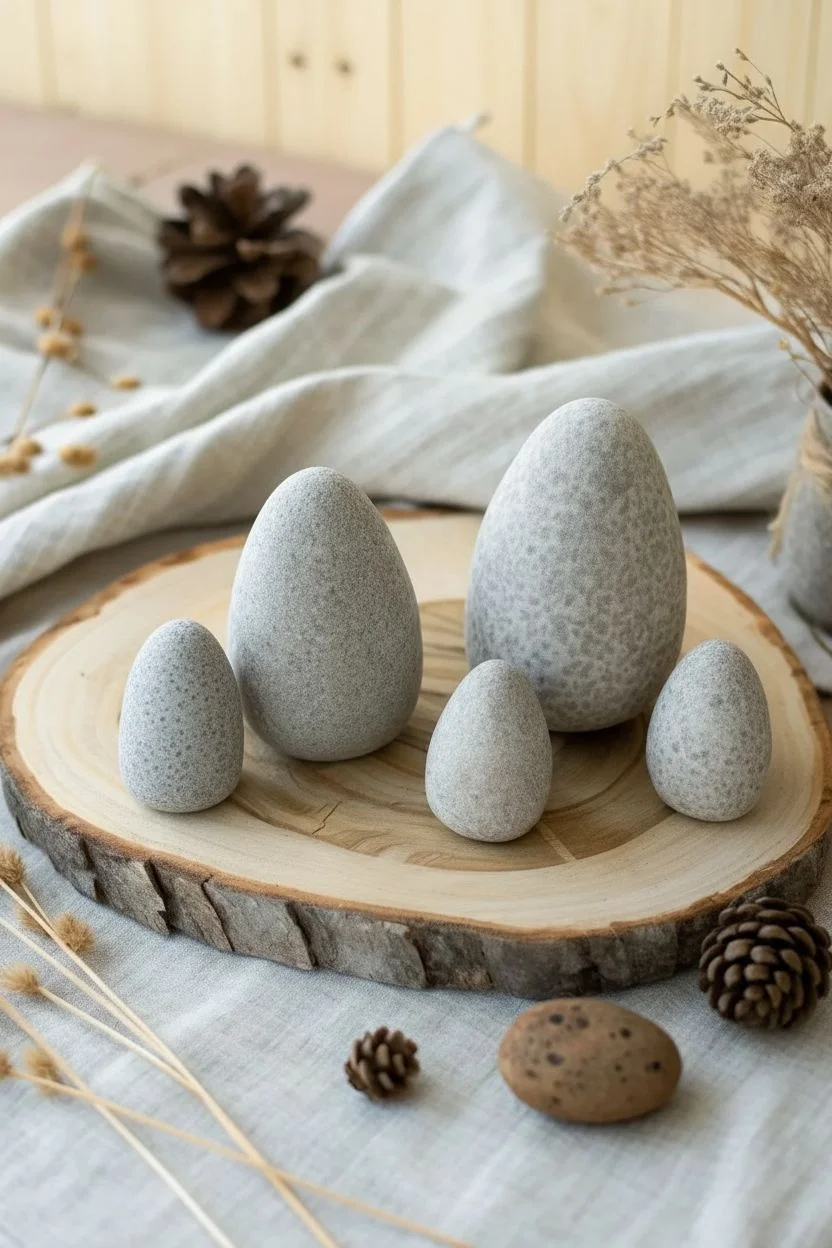
Transform smooth river stones into an adorable family of winter characters complete with tiny, textured details. This project combines simple stone painting with miniature costume-making for a charming woodland vibe.
How-To Guide
Materials
- Smooth, egg-shaped river rocks (various sizes)
- Acrylic paints (light grey, white, black, pink)
- Fine-grit sandpaper
- Detail paintbrushes (fine liner brushes)
- Scraps of knit fabric (old socks, sweaters, or glove fingers)
- Miniature pompoms or wool felt
- Hot glue gun and glue sticks
- Scissors
- Matte mod podge or acrylic sealer
Step 1: Stone Preparation & Base
-
Clean the canvas:
Scrub your river rocks with warm soapy water to remove any dirt or moss. Let them dry completely, preferably in the sun. -
Smooth it out:
If your rocks have rough patches where faces will go, gently sand them with fine-grit sandpaper for a better painting surface. -
Create a texture base:
Mix a tiny amount of dark grey or black into white paint to create a stony grey. Sponge this lightly over the rocks to give them a uniform, speckled granite look, letting some original stone color peek through. -
Add Polka Dots (Optional):
For the larger character on the left, use the back of a paintbrush handle dipped in white paint to stamp small, random dots on the lower half of the stone.
Step 2: Painting the Faces
-
Outline the eyes:
Using a very fine liner brush and black acrylic, paint two large circles for eyes. Placement is key—keep them somewhat wide-set for a cute, innocent look. -
Fill the eyes:
Fill the circles with black paint. For the larger characters, you might want to leave a tiny sliver of white, or paint white circles first and add large black pupils inside. -
Add that sparkle:
Once the black is dry, dip a toothpick or a dotting tool into white paint and add a small ‘catchlight’ reflection dot in the upper corner of each eye. This brings them to life. -
Draw the mouths:
With your finest brush, paint a tiny, simple curved line for a smile between the eyes. Keep it subtle and small. -
Cheeky details:
Dip a dry, stiff brush into a tiny bit of pink paint and wipe most of it off. Gently stipple rosy cheeks under the eyes. For some characters, paint tiny pink asterisk shapes for a flushed effect. -
Seal the paint:
Once all paint is thoroughly dry, apply a coat of matte sealer to protect the faces without making them too shiny.
Fabric Scrap Hack
Use the ribbed cuffs of baby socks for the perfect scale knit texture. The elasticity is usually just right for medium-sized river stones.
Step 3: Fashioning the Tiny Hats
-
Source your fabric:
Cut the fingertips off old knit gloves or cut small tubes from the cuffs of old socks. The natural ribbed texture looks exactly like a miniature beanie. -
Size the hats:
Stretch the fabric piece over the top of a rock to test the fit. Trim the bottom edge so it rolls slightly, creating a brim. -
Close the top:
Flip the fabric tube inside out. Use a dab of hot glue or a quick stitch with needle and thread to cinch the top closed, then flip it right-side out again. -
Secure the cap:
Apply a thin ring of hot glue around the top crown of the rock, being careful not to obscure the painted face. Press the knit cap firmly onto the glue. -
Top it off:
Glue a miniature pompom to the very top of the hat. For a different look, as seen on the far right rock, use a small acorn cap instead of fabric. -
Final adjustments:
Roll the brim of the hats up slightly to ensure the eyes are fully visible and the hat sits jauntily on the head.
Acorn Alternative
Instead of fabric, try gluing real acorn caps or small pinecone scales on top for a ‘forest spirit’ variation of the family.
Arranging your new stone family on a wood slice or windowsill creates an instant conversation piece full of personality


Have a question or want to share your own experience? I'd love to hear from you in the comments below!