
If you’ve been craving a wall that feels like you could fall straight into outer space, a galaxy paint mural is such a fun way to do it. I’m sharing my favorite galaxy wall paint ideas—from classic nebulas to bold, artsy twists—so you can pick a vibe and run with it.
Classic Nebula Accent Wall
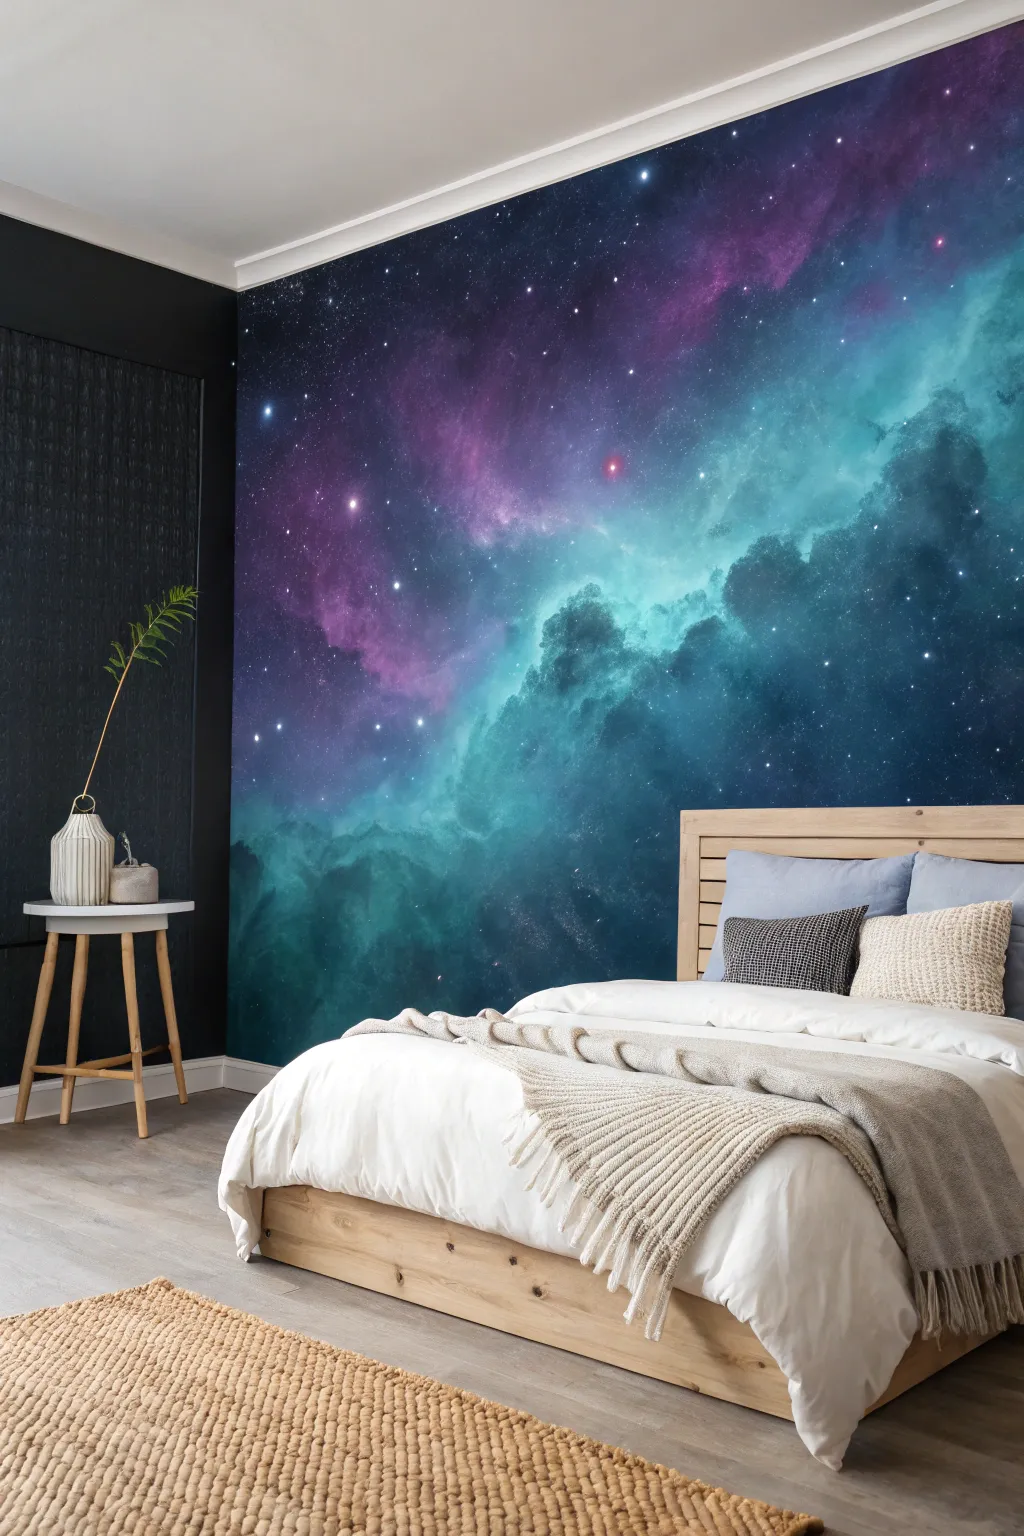
Transform a plain wall into a breathtaking window to the cosmos with this detailed mural tutorial. Featuring deep indigos, ethereal teals, and glowing starlight, this project uses blending techniques to create a soft, cloud-like nebula effect right in your bedroom.
Step-by-Step Guide
Materials
- Interior latex paint (Deep Black or Navy Blue for base)
- Acrylic paints (Dark Purple, Magenta, Teal, Cyan, White)
- Glazing medium or water for thinning
- Large roller and tray
- Selection of sea sponges (natural)
- Dry blending brushes (soft bristle)
- Painter’s tape and drop cloths
- Small round brush for stars
- Old toothbrush
- Ladder
Step 1: Setting the Stage
-
Prep the space:
Clear the area against the wall, remove outlet covers, and use painter’s tape to mask off the ceiling line, baseboards, and adjoining walls. Lay down drop cloths to protect your flooring. -
Apply the base coat:
Roll on a deep, dark base color over the entire wall. A true black or a very dark midnight blue works best to make the colors pop later. -
Second coat coverage:
Once the first coat is dry, apply a second coat to ensure absolutely opaque coverage. You don’t want the original wall color peeking through the void of space.
Don’t Over-sponge
Keep your sponge fairly dry. Too much paint creates flat blobs instead of airy clouds. It’s always better to build up many thin, translucent layers than one thick opaque one.
Step 2: Building the Nebula
-
Map out the clouds:
Mix your teal and cyan paints with a little glazing medium. Dip a dampened sea sponge into the mix and dab excess paint onto a paper towel until it’s almost dry. -
Sponging the teal sections:
Start sponging large, irregular cloud shapes on the right and lower sections of the wall. Use a light pouncing motion to keep the edges soft and misty rather than hard. -
Adding the purples:
While the teal is drying, switch to a fresh sponge with dark purple paint. Apply this to the upper left section, letting it drift diagonally across the black background. -
Creating transitions:
Where the purple and teal areas meet, lightly sponge a blend of the two colors. Don’t overmix; just let them overlap slightly to create a moody, transitional violet hue. -
Softening with a dry brush:
Take a large, clean, dry paintbrush and very gently sweep over the wet sponge marks. This ‘knocks down’ the texture and makes the clouds look gaseous and ethereal.
Glow in the Dark
Mix transparent glow-in-the-dark medium with your white star paint. The wall will look normal during the day, but the stars will secretly illuminate when the lights go out.
Step 3: Deepening and Highlighting
-
Intensifying the core:
Go back into the center of your teal clouds with a brighter Cyan paint. Sponge this only in the middle of the cloud shapes to create depth and a glow effect. -
Pop of magenta:
Add touches of magenta into the purple sections. I find that concentrating this brighter color near the center of the dark purple mass makes it look like the nebula is lit from within. -
Blending the black:
Dip a sponge lightly into your black wall paint. Gently dab around the outer edges of your colored clouds to feather them back into the dark background, erasing any harsh lines. -
Bright white highlights:
Mix white paint with a tiny drop of cyan. Sponge this sparingly into the absolute brightest parts of the teal clouds for high contrast. -
Final dry brush blend:
Do one last pass with a dry brush over the highlight layers to ensure everything feels smoky and connected.
Step 4: The Starfield
-
Flicking the stars:
Dilute white acrylic paint with water until it’s the consistency of ink. Dip an old toothbrush into it. -
Creating distance:
Stand back and run your thumb across the bristles to flick a fine mist of tiny stars across the entire wall. Focus more density on the teal ‘milky way’ areas. -
Painting larger stars:
Use a small round brush to manually paint larger, individual stars. Place a few in the dark space areas and some glowing ones within the nebula clouds. -
Adding the cross-stars:
Select 3-5 spots for ‘hero’ stars. Paint a small cross shape with a bright center to mimic the lens flare of a bright distant star. -
Cleanup:
Once the paint is fully dry, carefully peel away the painter’s tape and remove the drop cloths to reveal your finished galaxy.
Step back and admire your personal view of the universe, ready for dreaming under the stars


Star Splatter Stardust Layer
Bring the magic of the deep cosmos into your room with this stunning night sky mural technique. By combining a dark, velvety base with strategic splatters and hand-painted stars, you’ll create a mesmerizing illusion of infinite space.
Step-by-Step Tutorial
Materials
- Matte black interior wall paint
- Titanium White acrylic paint
- Paint roller and tray
- Stiff-bristled paintbrush (hog bristle or similar)
- Small fine-point synthetic brush
- Water container
- Drop cloths and painter’s tape
- Deep blue and purple acrylic paints (optional heavily diluted for nebula effect)
Step 1: Setting the Void
-
Prep the surface:
Begin by masking off your trim, ceiling line, and adjacent walls with painter’s tape. Lay down drop cloths extensively, as the later steps can get messy. -
Roll the base:
Apply a coat of matte black wall paint using your roller. A matte finish is crucial here because it absorbs light, giving the illusion of depth rather than a shiny surface reflection. -
Apply a second coat:
Once the first layer is dry to the touch, apply a second coat to ensure complete, opaque coverage. Any patches of the old wall color will ruin the immersion. -
Full dry:
Allow the black base coat to dry completely, preferably overnight. A bone-dry surface ensures your star layers sit crisply on top without muddying.
Star smears?
If a splatter lands wet and drips, wait for it to dry completely. Then, dab a tiny bit of your black base paint over the error to erase it before re-splattering that spot.
Step 2: Creating the Nebula Haze
-
Mix the wash:
On a palette or plate, mix a small amount of deep blue or purple acrylic paint with a generous amount of water. You want a translucent, watery consistency, almost like watercolor. -
Sponge application:
Dip a sea sponge or a crumpled rag into your watery mix. Dab off most of the excess paint onto a paper towel until it’s nearly dry. -
Cloud formation:
Gently pat the sponge in irregular, cloud-like clusters near the bottom or corners of your wall section to suggest distant nebula gases. Keep this subtle; it should barely tint the black.
Step 3: The Splatter Technique
-
Prepare the star paint:
Mix Titanium White acrylic paint with a little water. The consistency should be creamy, like melted ice cream—runny enough to fly off the brush but thick enough to stay opaque. -
Test the consistency:
Dip your stiff-bristled brush into the mixture. Test the splatter on a piece of cardboard first: run your finger across the bristles to flick paint spots. If they are too big, add a tiny bit more paint; too faint, add a drop of water. -
The flicking motion:
Hold the brush perpendicular to the wall, about 1-2 feet away. Use your thumb to firmly pull back the bristles and release them, flicking a spray of fine dots onto the wall. -
Vary density:
Create a natural look by clustering the stars more densely in some diagonal bands (representing the Milky Way) and leaving other areas sparser. -
Distance control:
I find that stepping closer creates intense clusters of tiny stars, while stepping back creates larger, more isolated specs. Vary your distance for realism.
Glow in the Dark
Mix phosphorescent medium into your white paint for the final layer of hand-painted stars. The wall will look normal by day but reveal a hidden galaxy when lights go out.
Step 4: Major Stars & Details
-
Identify hero stars:
Look at your splatter field and identify spots where you want brighter, more prominent stars to anchor the composition. -
Hand-paint larger stars:
Using your fine-point synthetic brush and undiluted white paint, carefully dot in larger circles over some of the existing splatters to make them pop. -
Add the five-point stars:
For a stylized majestic look, paint a few traditional five-pointed or four-pointed star shapes. Keep the points long and thin for a twinkling effect. -
Create flare:
On the largest hand-painted stars, drag a very dry brush outward from the center to create a subtle glowing halo or cross-flare. -
Final assessment:
Step back to the far side of the room. Look for any ‘bald spots’ in your galaxy and fill them in with a quick extra flick of the splatter brush. -
Clean up:
While the paint dries, immediately wash your brushes, as acrylic dries fast and hard. Carefully remove the painter’s tape.
Enjoy drifting off to sleep under your own personal slice of the universe


Milky Way Diagonal Band
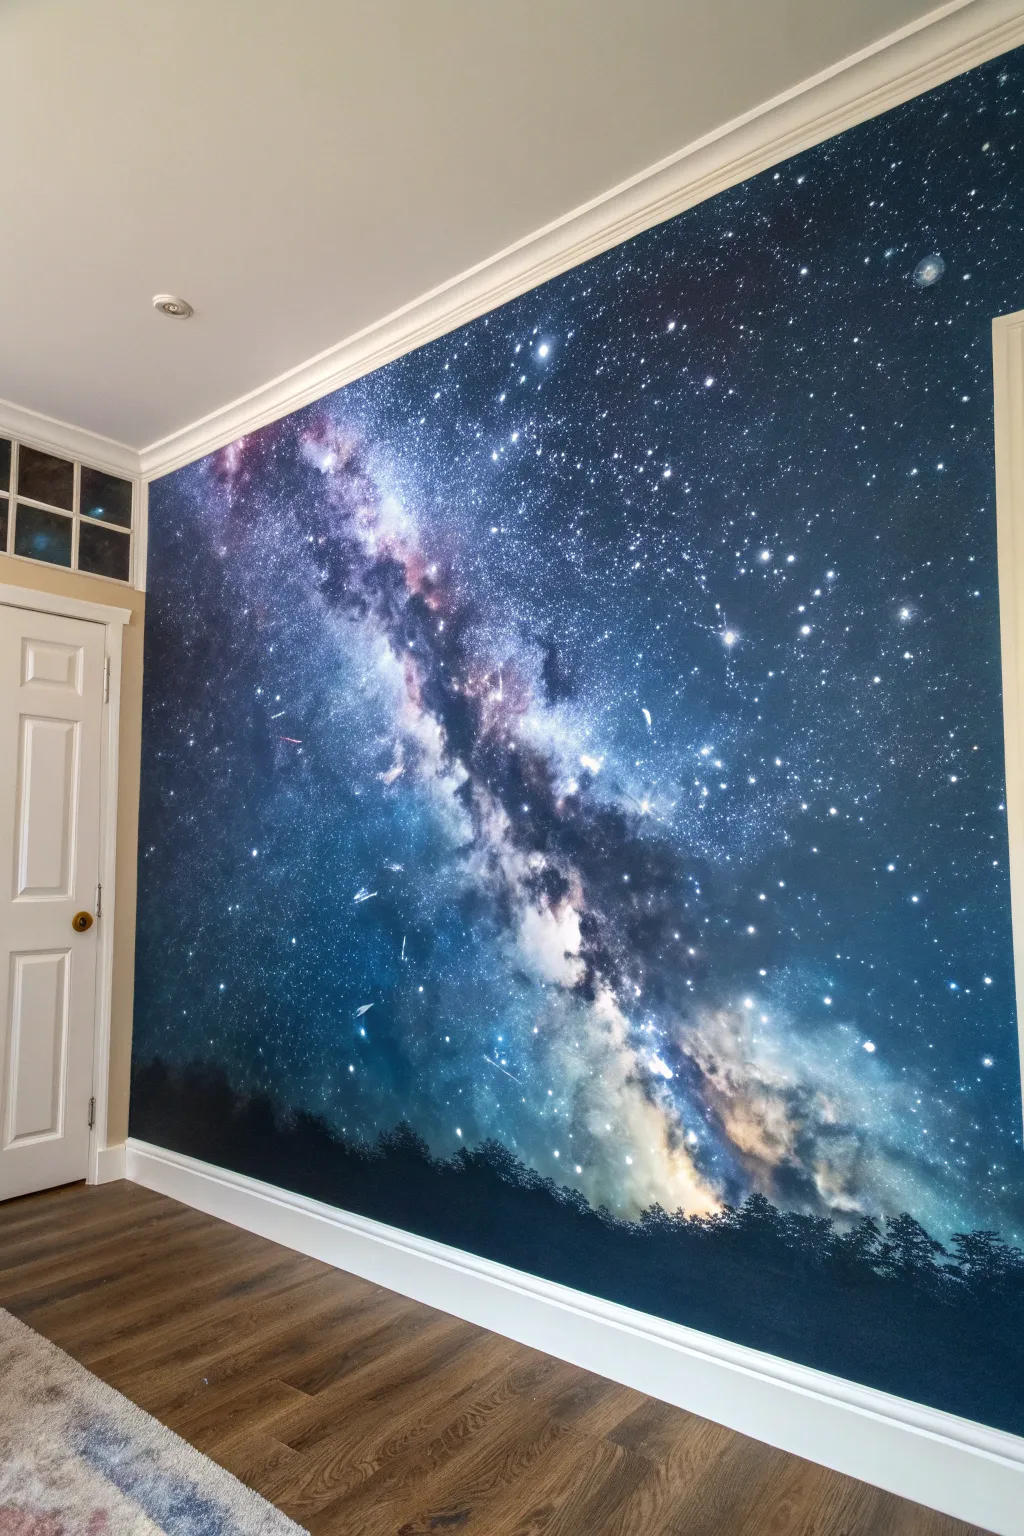
Transform an ordinary room into a window to the cosmos with this stunning Milky Way mural. By layering deep blues and blacks with vibrant nebulas and a grounding tree line silhouette, you’ll create a breathtaking diagonal composition that feels both vast and intimate.
Detailed Instructions
Materials
- Interior latex paint (Deep Navy, Black, Violet)
- Acrylic craft paints (White, Teal, Magenta, Yellow, Light Blue)
- Glazing medium
- Large painter’s drop cloth
- Painter’s tape
- Assorted brushes (large rollers, 2-inch angled sash, various round detail brushes)
- Natural sea sponges
- Old toothbrush or stiff bristle brush
- Mixing trays and cups
- Chalk or pastel pencil (light color)
- Ladder
Step 1: Preparation and Base Coat
-
Prepare the workspace:
Clear the area completely and lay down your drop cloth to cover the flooring. Tape off the ceiling molding, baseboards, door frames, and adjacent walls meticulously to ensure crisp lines. -
Apply the dark foundation:
Roll on a base coat of your deepest navy blue interior latex paint. This doesn’t need to be perfectly opaque, as some variation adds depth, but ensure the white breakdown of the original wall is mostly covered. Let this dry completely. -
Sketch the composition:
Using a light-colored chalk or pastel pencil, lightly sketch the diagonal flow of the Milky Way band. Mark the horizon line near the bottom where the trees will eventually go, keeping about 1/5th of the wall for the forest silhouette.
Galaxy Glow Tip
Mix glow-in-the-dark medium into your white star paint. The wall will look great by day, but when the lights go out, a hidden second layer of stars will emerge.
Step 2: Creating the Galaxy Core
-
Block in the nebula shape:
Mix a lighter blue and violet with glazing medium to create transparency. Using a large brush or sponge, dab these colors along your chalk diagonal line to establish the ‘cloud’ of the galaxy. -
Deepen the contrast:
While the glaze is still tacky, introduce pure black paint into the corners and edges of the galaxy band. Use a damp sea sponge to blend the black into the navy base, softening the transition so there are no hard lines. -
Add nebula highlights:
Mix white with magenta and teal separately. Sponge these lighter colors into the center of your diagonal band. Keep the texture irregular; natural nebulas are cloud-like and random, not geometric. -
Blend the mid-tones:
Use a clean, dry brush to gently feather the edges where your light nebula colors meet the dark space background. This creates that glowing, ethereal effect essential for a realistic galaxy.
Upgrade the Realism
Use a projector to trace real constellation patterns onto the wall before painting your major stars so the sky map is astronomically correct.
Step 3: The Starfield
-
Prepare splatter paint:
Water down white acrylic paint until it has the consistency of heavy cream. It needs to flow easily off a brush but still be opaque. -
Create distant stars:
Dip an old toothbrush into the thinned white paint. Point the bristles toward the wall and run your thumb across them to flick a fine mist of tiny stars. Cover the entire wall, concentrating heavily on the diagonal band. -
Create medium stars:
For slightly larger stars, load a round brush with thinned paint and tap the handle against a stick or your other hand to shake droplets onto the wall. Practice on cardboard first to control the splatter size. -
Hand-paint major stars:
I like to take a fine detail brush and manually paint the brightest stars. Place a few larger dots randomly, and add tiny cross-hatches to a couple of them to create a twinkling ‘lens flare’ effect. -
Add color variation:
Not all stars are white. Mix very pale yellow and light blue tints and carefully dot a few of these colored stars into the field for astronomical realism.
Step 4: Adding the Silhouette
-
Paint the horizon:
Using solid black paint and a standard brush, fill in the bottom section of the wall below your chalk line. Ensure this is completely opaque. -
Stipple the tree tops:
Switch to an old, splayed bristle brush or a rough sponge dipped in black paint. Tap along the top edge of your black horizon to create the irregular texture of leaves and branches. -
Detail individual trees:
Use a small liner brush to pull a few distinct pine tree tips upward from the mass of the forest. Vary their heights to keep the landscape looking organic. -
Final touches:
Step back and assess your work. If the starfield looks too uniform, sponge a thin layer of deep blue glaze over the outer edges to push those stars back into the distance, creating a sense of 3D volume.
Peel back the tape to reveal clean edges and enjoy sleeping under your own private universe.


Deep Space Ombre Fade
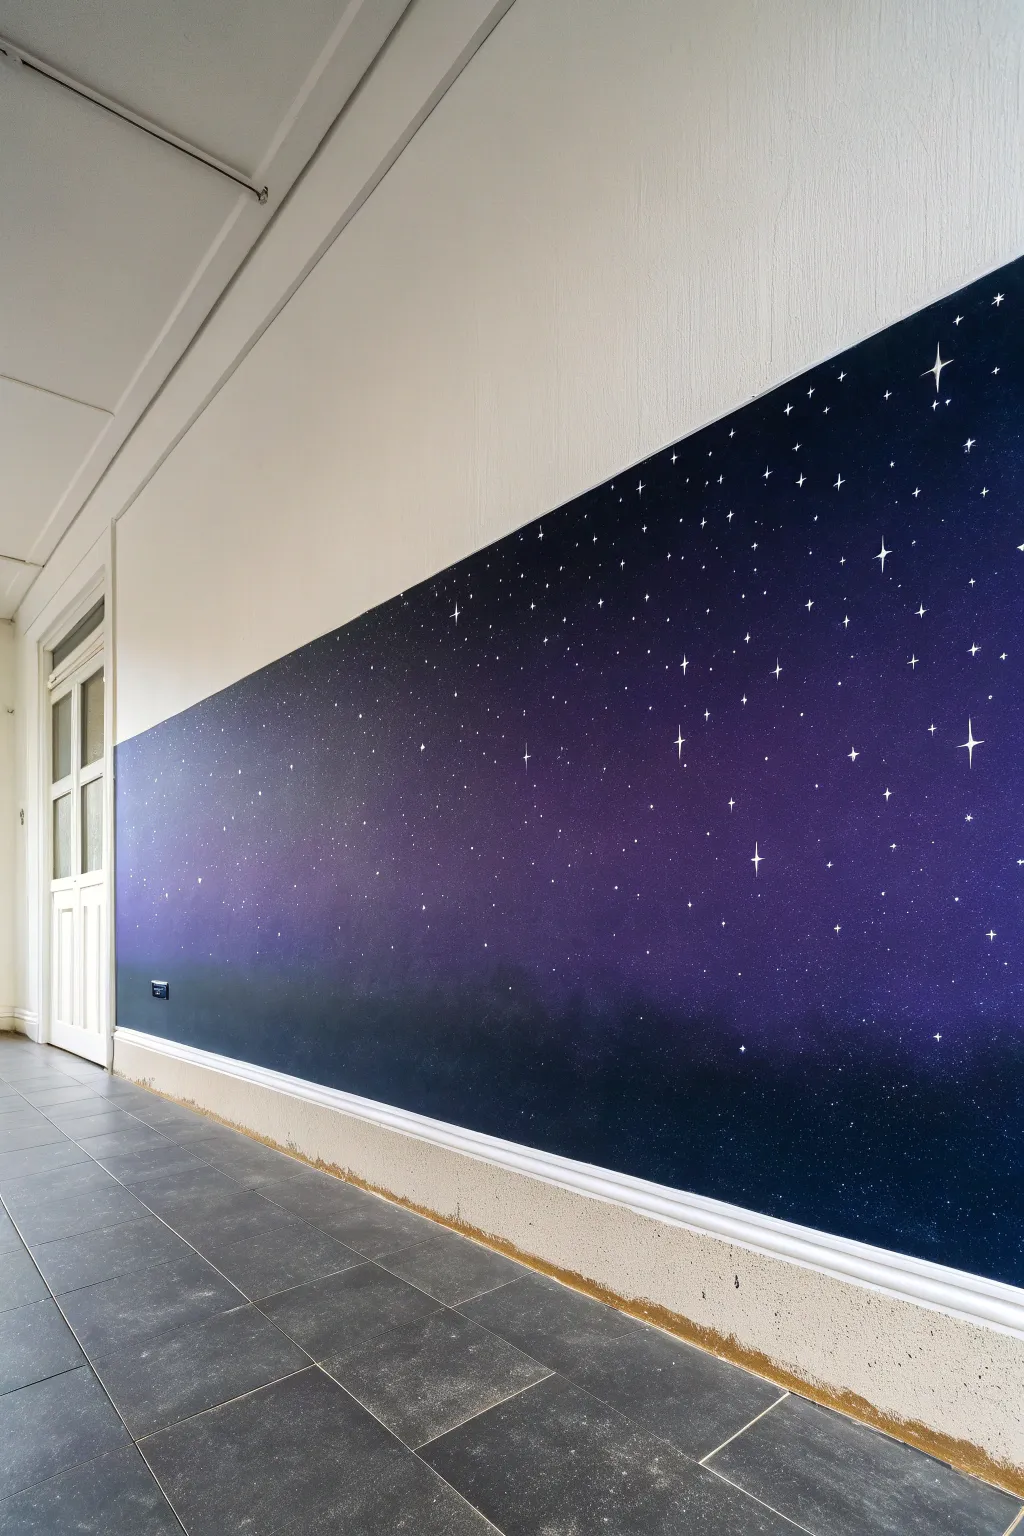
Transform a plain hallway into an infinite cosmos with this dramatic ombre mural that transitions from deep twilight purple to the darkest void of space. This immersive backdrop uses simple blending techniques to create a sophisticated, seamless gradient before sprinkling it with starlight.
How-To Guide
Materials
- Interior wall paint (Deep indigo/purple)
- Interior wall paint (Black or Midnight Blue)
- Interior wall paint (White for stars)
- Painter’s tape
- Drop cloths
- Large paint rollers and trays
- Wide blending brush or dry sponge
- Detail brushes (fine point and liner)
- Old toothbrush (for speckling)
- Mixing bucket
- Ladder or step stool
Step 1: Setting the Stage
-
Prep the area:
Before opening any paint cans, completely protect the floor with drop cloths, taping them down at the edges to prevent shifting. -
Tape the borders:
Apply painter’s tape along the ceiling line, adjacent walls, door frames, and especially the baseboards. Press the tape edge down firmly with a putty knife or credit card to ensure a crisp line. -
Clean the surface:
Wipe down the wall with a damp cloth to remove dust and cobwebs, as these can snag in the paint and ruin the smooth gradient effect.
Step 2: Creating the Ombre Gradient
-
Apply the top color:
Start by rolling your deep indigo or purple paint along the top two-thirds of the wall. Don’t worry about the bottom edge being perfect yet. -
Apply the bottom color:
While the top section is still wet, roll the black or midnight blue paint along the bottom third of the wall, bringing it up to meet the purple. -
Mix a transition shade:
I find it helpful to pour a small amount of both colors into a separate container and mix them 50/50 to create a perfect mid-tone for the blending zone. -
Blend the seam:
Apply this mixed shade right where the two main colors meet. Using a wide, dry brush or a sponge, work in horizontal sweeping motions to blur the lines. -
Feather the edges:
Continue working the brush up into the purple and down into the black until the transition looks soft and smoky rather than like a stripe. -
Let it cure completely:
Allow the base coat to dry for at least 4-6 hours. The surface needs to be completely dry before you start adding stars to avoid smudging.
Starry Scatter Tip
Test your toothbrush flicking technique on a piece of cardboard first. The consistency of the paint matters—too thick and it won’t spray; too thin and it will drip.
Step 3: Painting the Galaxy
-
Create the star splatter:
Dip an old toothbrush into slightly watered-down white paint. Run your thumb across the bristles to flick tiny droplets across the entire wall. -
Vary density:
Aim for a random distribution. I like to focus denser clusters of ‘stars’ near the darker bottom section to create depth, and leave the top slightly airier. -
Paint medium stars:
Using a small round brush, dot individual stars randomly throughout the galaxy. Vary the pressure to make some dots slightly larger than the splatters. -
Draft the major stars:
Select a few spots for focal points—large, shining stars. Use a very fine liner brush to paint a small white dot as the center. -
Add vertical rays:
From the center dot, pull a long, thin line straight up and straight down. Taper the line so it is thickest at the center and vanishes at the tips. -
Add horizontal rays:
Paint a shorter horizontal line crossing through the center. This creates the classic ‘cross’ star shape seen in the reference image. -
Highlight the centers:
Once the cross shape is dry, place a tiny second dot of pure white right in the middle to make the star look like it’s glowing intensely. -
Clean up:
Slowly peel away the painter’s tape while pulling it away from the fresh paint at a 45-degree angle to keep your edges razor sharp.
Level Up: Glow Effect
Mix glow-in-the-dark additive into your white star paint. Use it for the final layer of speckles so the galaxy reveals a hidden layer when the lights go out.
Enjoy the peaceful atmosphere of your personal slice of the universe every time you walk down the hall
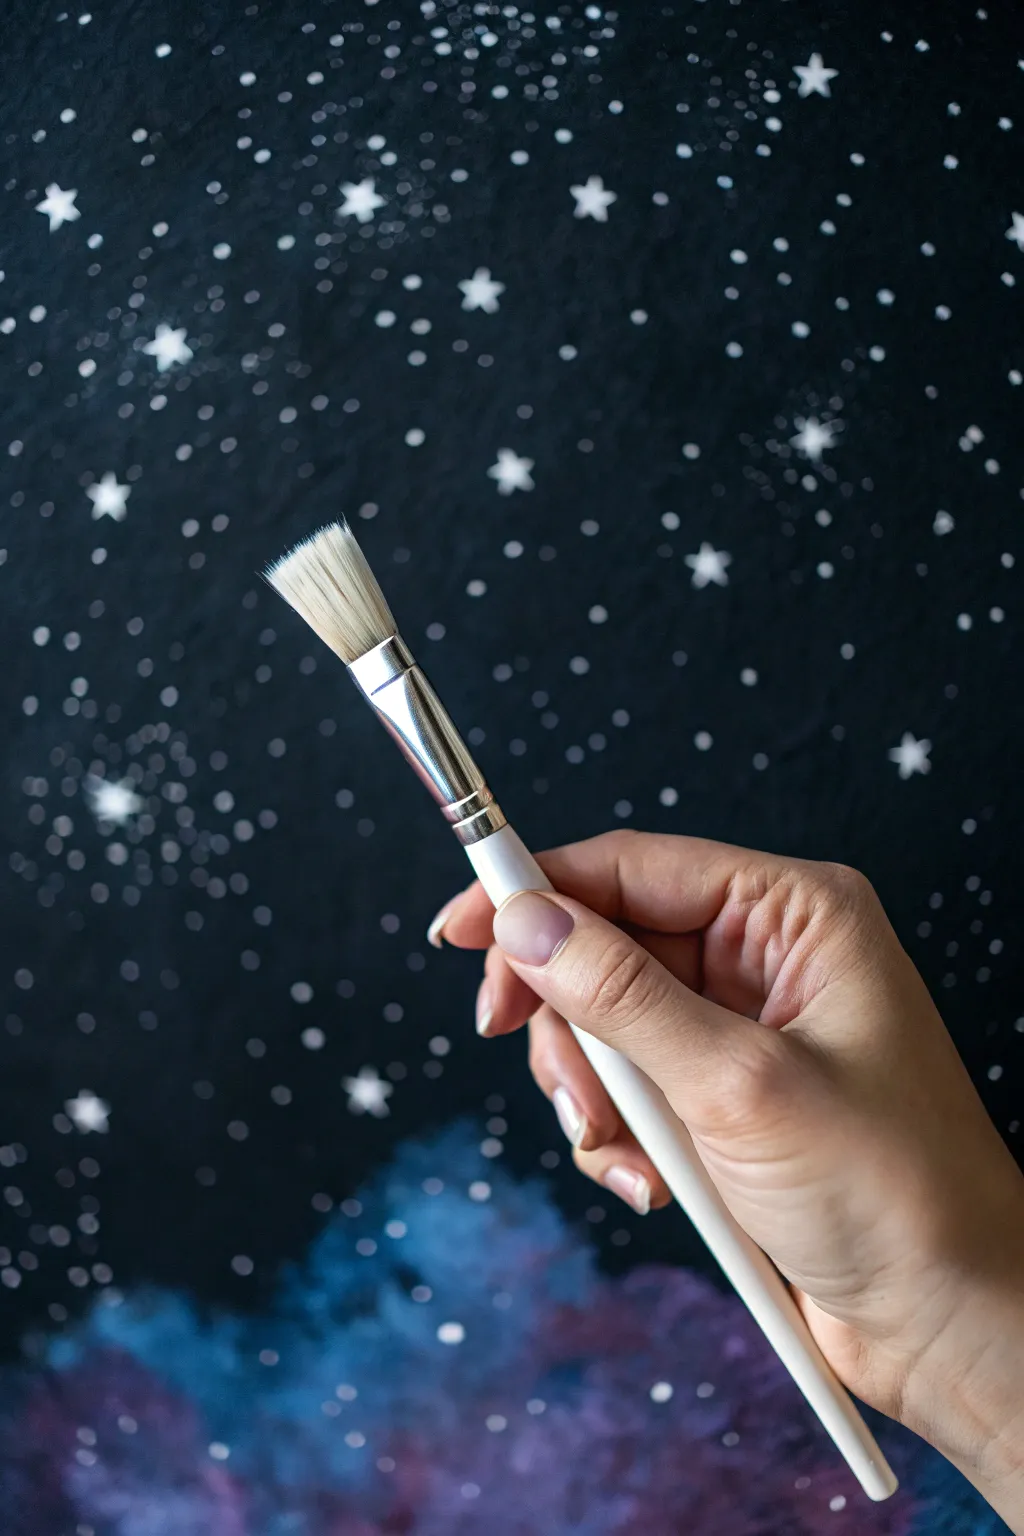
BRUSH GUIDE
The Right Brush for Every Stroke
From clean lines to bold texture — master brush choice, stroke control, and essential techniques.
Explore the Full Guide
Big Planet Focal Circle
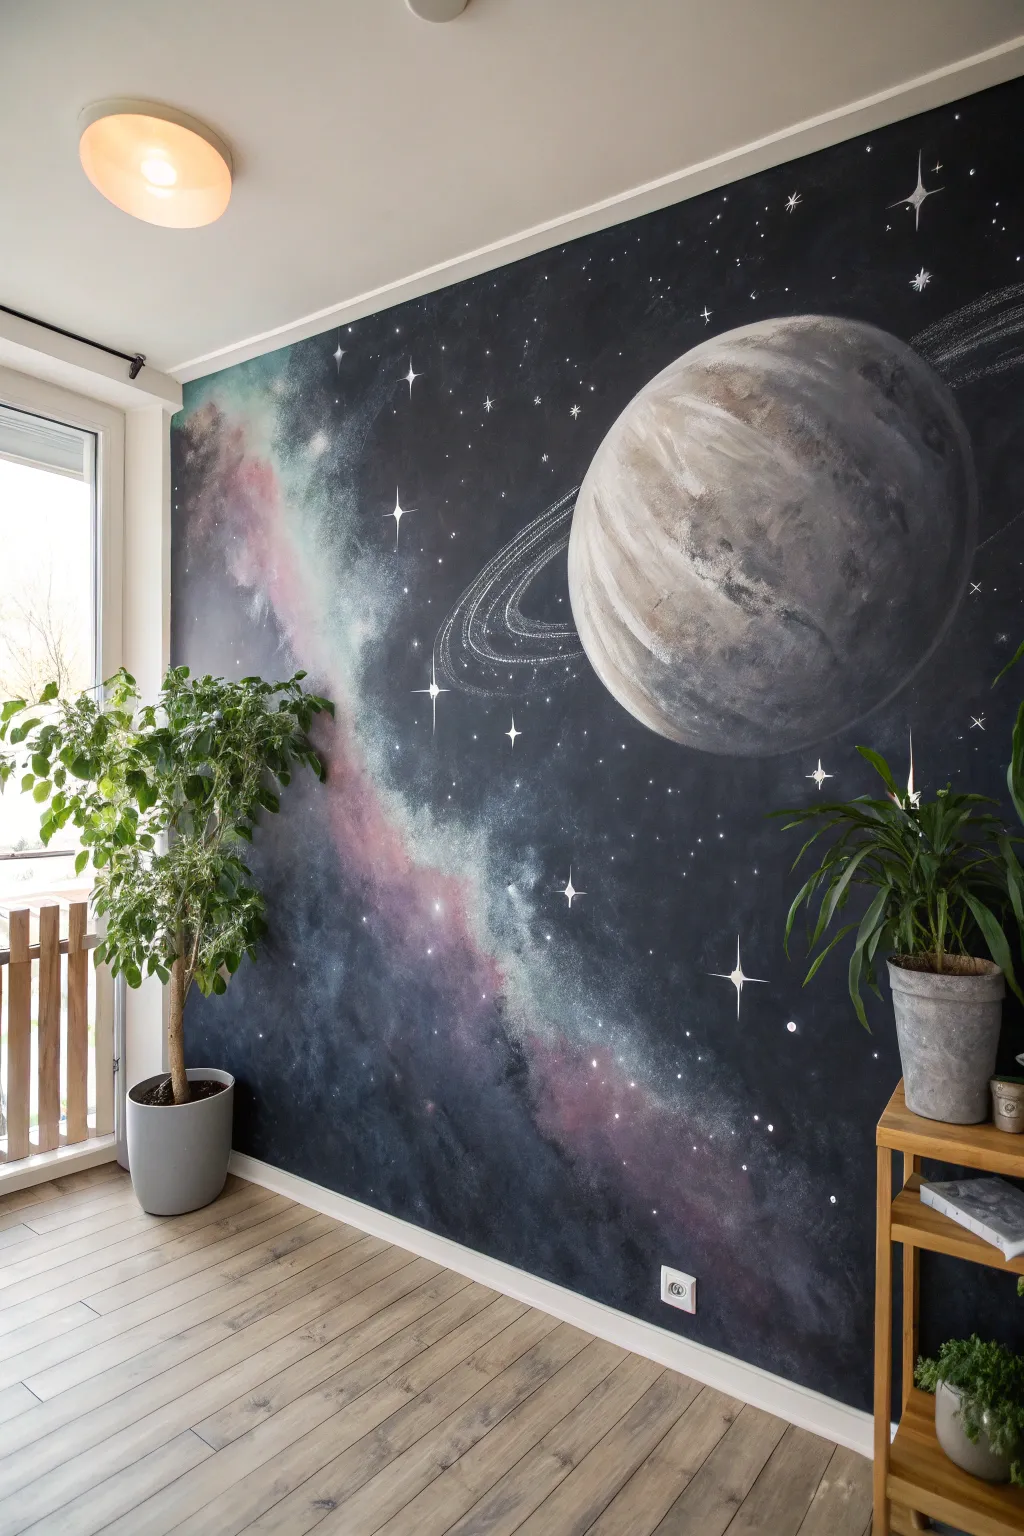
Transform a standard room into a window onto the cosmos with this stunning, large-scale mural featuring a textured gas giant and a sweeping nebula. The deep, moody background contrasted with the bright celestial details creates an immersive focal point perfect for bedrooms or creative spaces.
Step-by-Step
Materials
- Dark charcoal or midnight blue interior latex paint (matte finish)
- White latex paint or primer
- Acrylic paints (Titanium White, Phthalo Blue, Dioxazine Purple, Magenta, Burnt Umber, Beige)
- Large paint roller and tray
- Sea sponges (various sizes)
- Dry blending brushes (large, soft bristles)
- Fine liner brush
- Chalk (white)
- Painter’s tape
- Drop cloths
- Mixing plates or palette
- String and push pin (for circle guide)
Step 1: Setting the Stage
-
Prep the surface:
Begin by clearing the wall area and taping off baseboards, adjacent walls, and ceiling edges with painter’s tape. Lay down drop cloths to protect your flooring. -
Apply the base coat:
Roll on the dark charcoal or midnight blue base color. This project works best with a matte finish to absorb light and mimic the depth of space. Apply two coats for solid, opaque coverage. -
Map out the design:
Once the wall is fully dry, use a piece of white chalk to lightly sketch your composition. Create a large circle in the upper right for the planet—you can make a compass using a string tied to a pencil and anchored with a push-pin for a perfect arc. -
Sketch the nebula path:
Use the chalk to loosely outline the flowing, S-curved path of the nebula cloud running diagonally from the top left down to the bottom right.
Too much texture?
If your sponge marks look too blotchy, wait for them to dry, then apply a thin wash (glaze) of the dark background color over those spots to push them back into the shadows.
Step 2: Painting the Nebula
-
Sponge the cloudy base:
Dampen a sea sponge and dip it into a mix of white and a tiny drop of blue acrylic. Dab off excess paint onto a paper towel until the sponge is almost dry. -
Build nebula density:
Lightly pounce the sponge along your chalked nebula path. Concentrate the pigment in the center of the ‘cloud’ and let it fade out to nothing at the edges to create a smoky effect. -
Add cosmic colors:
Load a clean sponge with magenta and purple tones mixed with a little white. Overlap these colors onto the white nebula base you just created, blending them while the paint is still slightly tacky. -
Soften the transitions:
Take a large, dry blending brush and gently sweep over the sponge work in a circular motion. This ‘smokes out’ the harsh sponge marks and makes the gas clouds look ethereal. -
Highlight the core:
Go back in with pure white on a small sponge to hit the brightest centers of the nebula clouds, adding depth and contrast against the darker colors.
Pro Tip: 3D Depth
For the planet, make the edge facing the light source distinctive and sharp, while slightly blurring the shadowed edge into the background. This makes the sphere look rounder.
Step 3: Creating the Planet
-
Block in the planet:
Using a wide brush, fill in your large circle with a base coat of beige or light grey. It doesn’t need to be perfectly solid; some texture is good here. -
Establish the shadow side:
Determine your light source (usually coming from the nebula). Mix dark grey or burnt umber and paint a crescent shape on the side of the planet facing away from the light, blending it inward. -
Create surface bands:
Mix shades of brown, tan, and white. Using a wide, dry brush, paint curved, parallel strokes across the planet’s surface to mimic atmospheric bands. -
Add textural details:
I like to crumple a plastic bag or a rag, dip it in white paint, and gently press it onto the lit side of the planet to create crater-like textures and highlight reflections. -
Paint the rings:
Use a thin brush and watered-down white paint to draw elliptical rings around the planet. Keep the lines faint and slightly broken to represent orbiting debris.
Step 4: Stars and Details
-
Flick the stars:
Dilute some white acrylic paint with water until it’s the consistency of ink. Dip an old toothbrush or stiff brush into it, and flick the bristles to spray tiny stars across the dark background areas. -
Paint major stars:
Use your fine liner brush to hand-paint larger, individual stars. Create cross-shapes (four points) for the brightest stars to mimic a lens flare effect. -
Add final highlights:
Place tiny white dots in the center of your largest painted stars to make them glow. Add a few deliberate sparkles within the nebula clouds as well. -
Clean up:
Once everything is fully dry, gently wipe away any remaining visible chalk lines with a damp cloth and remove the painter’s tape.
Step back and admire your new window into the galaxy, ready to inspire dreams of space travel
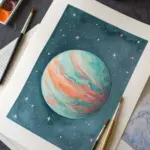
Ringed Planet Statement Moment
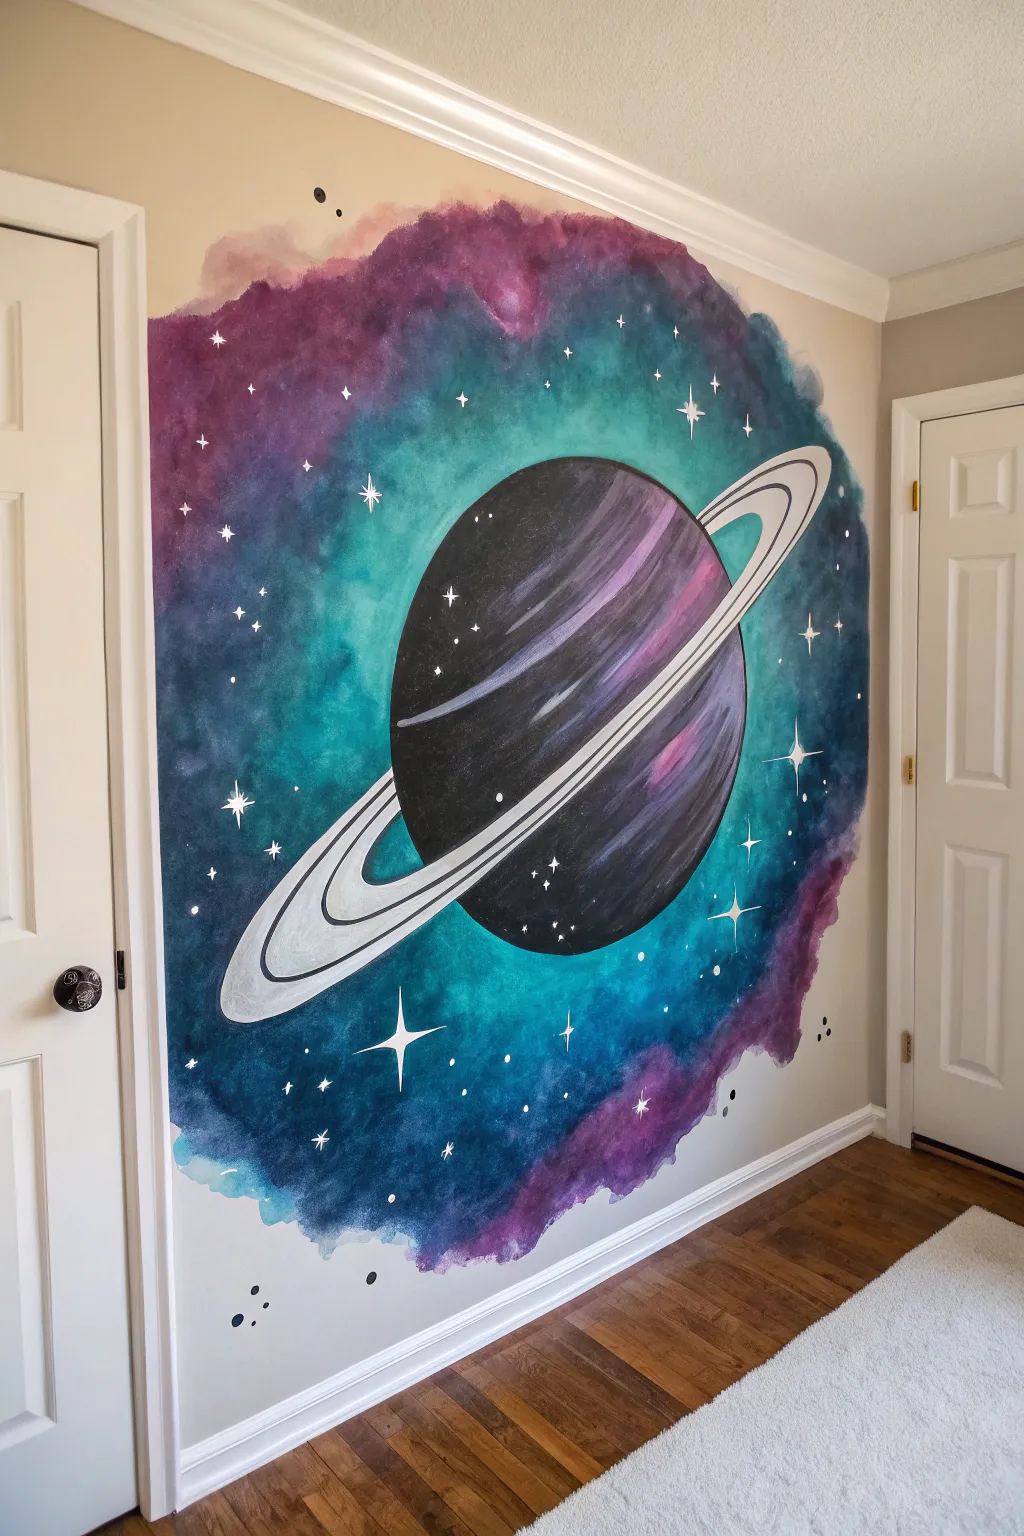
Transform a blank stretch of wall into a window to the cosmos with this stunning watercolor-style mural. Featuring a bold ringed planet surrounded by a soft nebula of teals and purples, this project brings a dreamy, interstellar atmosphere to any bedroom or creative space.
How-To Guide
Materials
- Acrylic wall paints (black, purple, teal/turquoise, dark blue, white, magenta)
- Pencil and eraser
- Measuring tape or large ruler
- Medium and large paintbrushes (synthetic bristle recommended)
- Small liner brush (for stars)
- Sea sponge or large blending brush
- Painter’s tape (to protect baseboards)
- String and thumbtack (for drawing the circle)
- Paper plate or palette for mixing
- Water cups and paper towels
Step 1: Planning and Sketching
-
Prepare the space:
Clear the area and tape off any baseboards or door frames adjacent to your mural spot to protect them from stray splatters. -
Create a compass:
Find the center point for your main planet. Tie a string to a pencil, hold the string’s end at the center point (or use a thumbtack), and pull the string taut to sketch a perfect circle lightly on the wall. -
Sketch the rings:
Freehand the elliptical rings around the planet. Start with the outer curve sweeping behind and in front of the sphere, keeping your lines light so they can be easily painted over later. -
Outline the nebula:
Lightly pencil a rough, jagged organic shape around the entire planet composition. This doesn’t need to be perfect; it just marks where your colored background will fade into the existing wall color.
Sponge Technique
For the softest nebula clouds, use a damp natural sea sponge rather than a synthetic kitchen sponge. The irregular holes create a much more realistic texture.
Step 2: Painting the Galaxy Background
-
Start with darks:
Using a sponge or large brush, dab dark blue and purple paint near the edges of your planet sketch, working outward. Don’t paint inside the planet circle. -
Blend the mid-tones:
While the dark paint is still tacky, introduce your teal and magenta shades. Blend them into the dark blue using a dabbing motion to create a clouded, nebula-like texture. -
Feather the edges:
Dip your sponge in a tiny bit of water to thin the paint at the very outer edges of the nebula. Dab gently so the color fades organically into the beige wall rather than ending in a hard line. -
Fill the gaps:
Continue filling in the background area, alternating colors to create depth. I find that layering the teal over the purple while wet creates beautiful deep blue transitions. -
Dry time:
Let the background dry completely before starting on the planet to avoid muddying your sharp lines.
Hard Paint Lines?
If your nebula edges look too harsh, mix a “glaze” of 80% water and 20% wall base color. Lightly brush this over the edge to push the nebula back.
Step 3: Creating the Planet
-
Base coat the planet:
Paint the main sphere black. Use a steady hand or a smaller flat brush to get a crisp edge along your original pencil circle. -
Add atmospheric bands:
Mix a small amount of purple and white. While the black base is dry, paint curved stripes across the planet’s surface to mimic gas giant bands. -
Blend the planet texture:
Use a dry brush to soften the edges of your purple bands, dragging them slightly to create a spherical, dimensional look. -
Paint the rings:
Use light grey (white with a drop of black) to fill in the rings. Paint confident, sweeping strokes to follow the curve of the ellipse. -
Detail the rings:
Once the grey is dry, add thin lines of pure white and dark charcoal within the rings to separate them and add definition.
Step 4: Stars and Highlights
-
Paint major stars:
Using your smallest liner brush and pure white paint, create several four-pointed stars. Draw a cross shape with elongated vertical lines and shorter horizontal ones. -
Add distinct dots:
Dip the handle end of a paintbrush into white paint and dot it onto the wall to create perfect circular stars of varying sizes. -
Create distant shimmer:
Dilute a little white paint with water. Dip an old toothbrush or stiff brush into it and flick the bristles with your thumb to spray a fine mist of tiny stars across the darker nebula areas. -
Final wanderers:
Paint a few stray black dots or tiny clusters near the outer edges of the galaxy cloud to add contrast and movement. -
Touch ups:
Step back and check your work. If any background color accidentally crossed into the planet rings, use your white or grey to tidy up those edges for a crisp finish.
Enjoy the view of your personal solar system every time you walk into the room

PENCIL GUIDE
Understanding Pencil Grades from H to B
From first sketch to finished drawing — learn pencil grades, line control, and shading techniques.
Explore the Full Guide
Moon Phases Galaxy Border
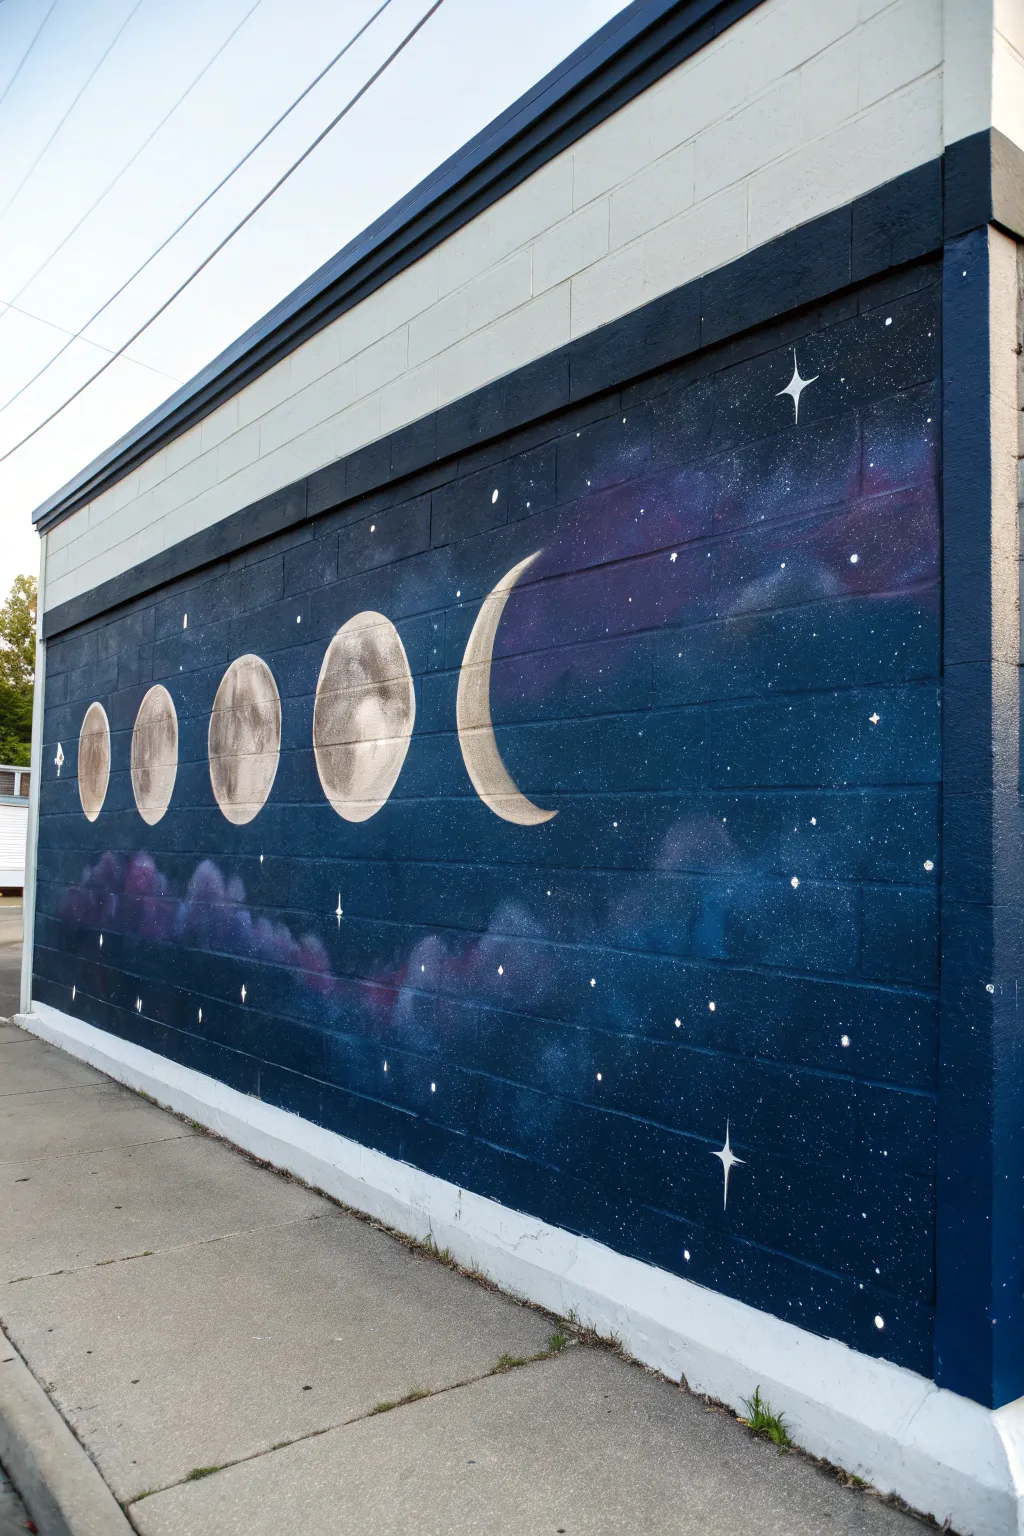
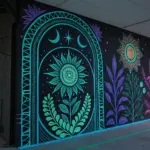
Transform a plain exterior or interior brick wall into a window to the cosmos with this stunning galaxy mural. Featuring a sequence of moon phases set against a deep blue, star-studded backdrop, this project combines bold geometric shapes with soft, blended nebula effects.
Detailed Instructions
Materials
- Exterior masonry primer (white or grey)
- Exterior latex paint (Midnight Blue, Navy Blue, Violet, Magenta, Black)
- White exterior paint (for moons and stars)
- Assorted paint rollers and trays
- Painter’s tape
- Large round stencils or makeshift compass (string and chalk)
- Chalk for sketching
- Sea sponges or rag bundle
- Detail brushes (various sizes)
- Drop cloths
Step 1: Preparation & Base Coat
-
Clean surface:
Begin by thoroughly cleaning the brick wall with a stiff brush and water to remove dirt and spiderwebs. Let it dry completely. -
Tape boundaries:
Use high-quality painter’s tape to mark off the rectangular border of your mural. Press the tape firmly into the mortar lines to prevent bleeding. -
Prime the area:
Roll on a coat of masonry primer within your taped area. This ensures your dark colors will be rich and opaque. -
Background roll:
Apply the darkest midnight blue paint over the entire primed area as your base canvas. Two coats are usually best for solid coverage.
Step 2: Creating the Galaxy
-
Map the nebula:
While the blue base is dry, lightly sketch flowing, cloud-like shapes with chalk where you want your purple and magenta nebula clouds to appear. -
Apply deep purple:
Using a sea sponge, dab deep violet paint into the center of your chalked areas. Don’t cover the midnight blue entirely; keep it irregular. -
Layer lighter tones:
While the purple is still slightly tacky, sponge magenta and lighter blue tones near the edges of the purple clouds to create depth and a glowing effect. -
Soften edges:
Take a clean, slightly damp sponge and gently tap the edges where the colors meet the midnight blue background to create a seamless, smoky transition. -
Dry brush blending:
For extra softness, I sometimes use a dry bristle brush to lightly whisk over the sponge work, further blurring the harsh texture of the brick.
Sponge Technique Tip
Rotate your sponge or rag every time you dab the wall. This prevents a repetitive ‘stamp’ pattern and makes the nebula clouds look much more organic and gaseous.
Step 3: Painting the Moons
-
Outline the phases:
Use a round stencil or a string-and-chalk compass to outline five circles in a horizontal line. Sketch the crescent and gibbous shapes within these circles. -
Base fill:
Fill the moon shapes with flat white paint. This will need to be thick enough to cover the dark background, so apply two coats if necessary. -
Add craters:
Mix a tiny drop of black into your white paint to make a light grey. Use a small sponge to dab texture onto the moons, mimicking craters and lunar maria. -
Shadowing:
Paint a thin crescent of darker grey along the shadowed side of each moon phase to give them spherical dimension. -
Highlighting:
Add pure white highlights to the brightest edge of the crescent moon and the rims of the larger phases to make them pop.
Rough Texture Fix
Painting straight lines on rough brick is hard. Use a small artist’s angle brush to push paint into the deep mortar crevices for crisp moon edges.
Step 4: Stars & Finishing Touches
-
Flick stars:
Dip a stiff toothbrush or bristle brush into watered-down white paint. Flick the bristles with your thumb to spray tiny stars across the galaxy. -
Paint major stars:
Use a fine detail brush to hand-paint larger, diamond-shaped stars (four points) in empty areas for visual balance. -
Add constellations:
Connect a few of your flicked stars with very thin white lines if you want to feature specific constellations. -
Clean up:
Once the paint is fully dry, carefully peel away the painter’s tape. Touch up any bleed-through on the edges with the original wall color.
Step back and admire your new cosmic view, which brings a sense of wonder to an ordinary wall
Galaxy Ceiling Night Sky
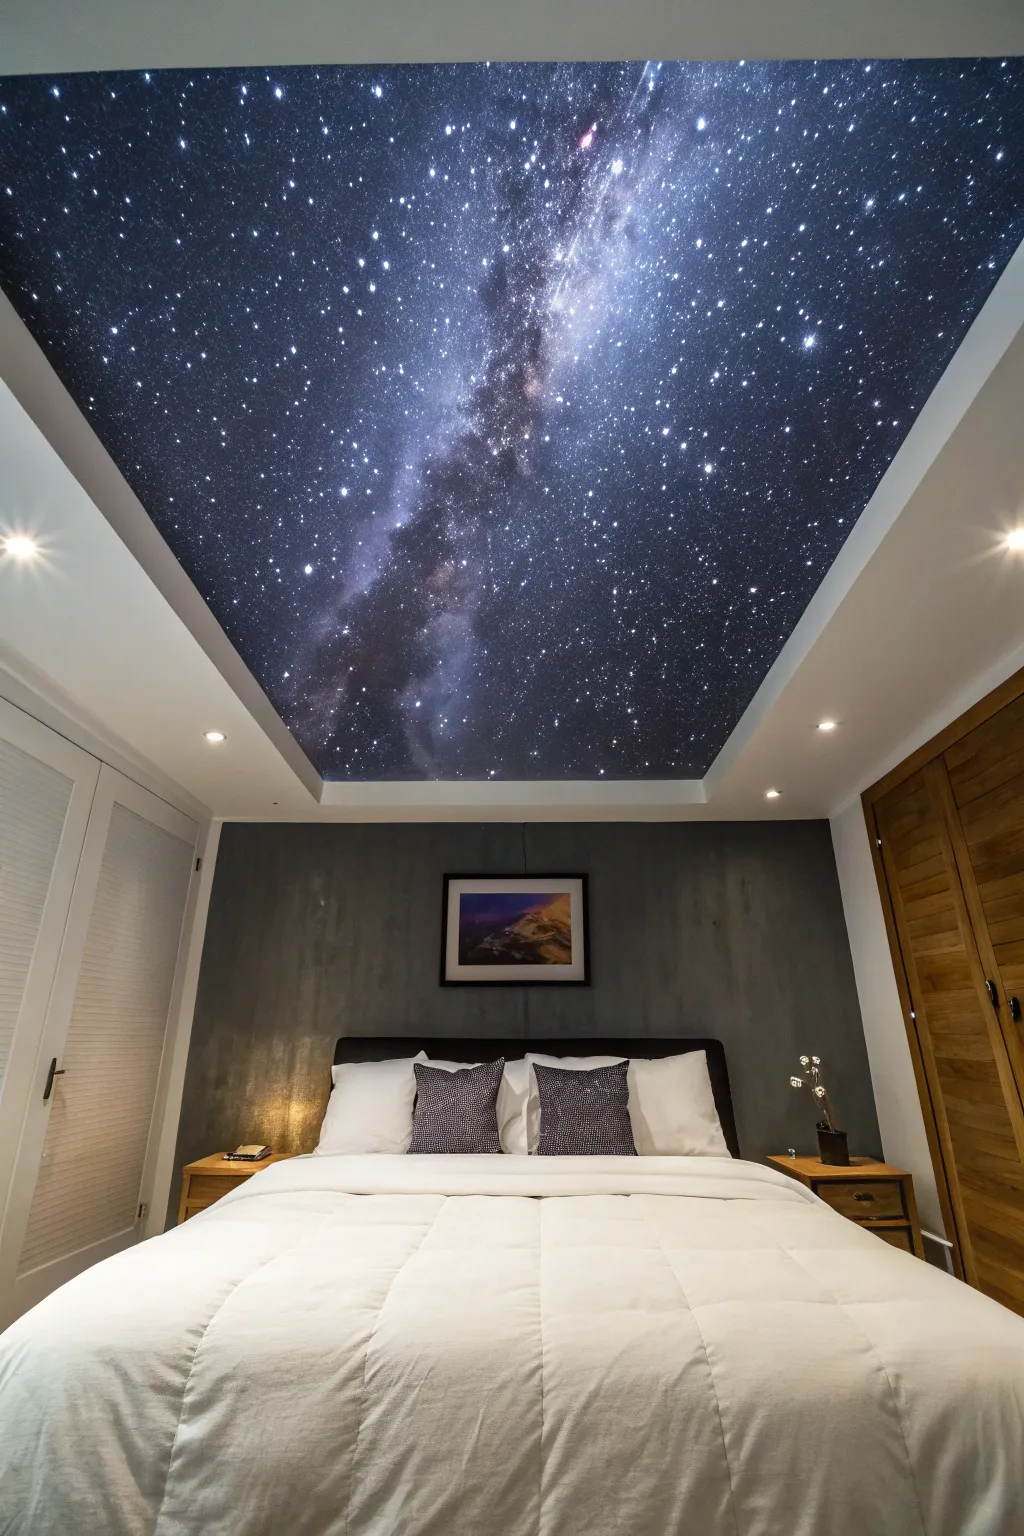
Transform your bedroom into an observatory with this breathtaking recessed ceiling mural that captures the depth and mystery of the Milky Way. By layering deep cosmic blues and blacks with splattered starlight, you will create a portal to the universe right above your bed.
Step-by-Step
Materials
- Deep matte black latex paint (base)
- Navy blue acrylic paint
- Phthalo blue acrylic paint
- Purple and violet acrylic paints
- Titanium white acrylic paint
- Glow-in-the-dark paint (optional)
- Large foam rollers
- Sea sponges (natural texture)
- Stiff bristle toothbrushes
- Small detail brushes (rounds)
- Misting spray bottle with water
- Painter’s tape and drop cloths
- Glaze medium
Step 1: Setting the Stage
-
Prep the heavens:
Clear the room of furniture or cover everything thoroughly with drop cloths. This project involves painting overhead, so drips are inevitable. -
Define the boundaries:
Use high-quality painter’s tape to mask off the surrounding white soffit or molding. Press the edges down firmly to ensure crisp lines where the universe meets your architecture. -
Clean the surface:
Wipe down the ceiling area with a damp cloth to remove dust or cobwebs. A clean surface ensures your dark base coat adheres perfectly without texture bumps.
Star-Splatter Troubles recovery
Did a splatter turn into a drip? Don’t wipe it! Wait for it to dry completely, then paint over the mistake with your base black paint. It’s much cleaner than smearing wet white paint.
Step 2: Creating the Void
-
Apply the dark base:
Roll on two coats of deep matte black latex paint over the entire recessed ceiling area. Let the first coat dry completely before applying the second to achieve a solid, light-absorbing void. -
Inspect coverage:
Check for any light patches from various angles in the room. You want a perfectly uniform darkness as your canvas.
Step 3: Forming the Nebulas
-
Mix your galaxy clouds:
Mix navy blue and purple acrylics with a generous amount of glaze medium. You want these colors to be translucent, not opaque, so they float over the black background. -
Sponge on the first layer:
Dampen a sea sponge and dip it into your navy glaze mixture. Lightly dab irregular cloud shapes diagonally across the ceiling, mimicking the band of the Milky Way seen in the photo. -
Soften the edges:
While the paint is still wet, use a clean, dry chipping brush or soft rag to gently pat the edges of your sponged areas, fading them out into the black background. -
Add depth with purple:
Once the navy layer is tacky but not fully dry, sponge small amounts of the purple glaze into the center of the navy clouds. This creates the rich, multi-tonal depth characteristic of deep space. -
Highlighting with brighter blue:
Mix a small amount of Phthalo blue with white and glaze. Sponge this sparingly into the brightest parts of your nebula band to create ‘hot spots’ of gas and light.
Level Up: Fiber Optics
Drill tiny holes through the drywall in the black areas and thread fiber optic cables through before painting. Connect to a twinkling light source in the attic for a truly dynamic ceiling.
Step 4: Birthing the Stars
-
Prepare the star paint:
Thin down titanium white acrylic paint with water until it reaches an ink-like consistency. It needs to be fluid enough to splatter easily but not so watery that it drips excessively. -
The flicking technique:
Dip a stiff toothbrush into the thinned white paint. Test on a piece of cardboard first: hold the brush near the surface and run your thumb across the bristles to spray a fine mist of dots. -
Create background stars:
Spray this fine mist over the entire ceiling, concentrating heavily within the painted nebula band and fading out as you move into the pure black areas. -
Cluster formation:
I like to go back into the brightest cloud areas and add a second, denser layer of splatter. This simulates the dense star clusters found in the galactic core.
Step 5: Detailing and Finishing
-
Hand-paint major stars:
Using your smallest detail brush, carefully paint individual, larger stars. Place these randomly, but add a few near the nebula band to draw the eye. -
Add the star flares:
For the brightest 3-5 stars, paint a tiny cross or ‘lens flare’ shape to mimic the look of bright light captured by a camera lens. -
Glow accents (Optional):
If you want the mural to work with the lights off, re-dot the larger stars with glow-in-the-dark paint. It dries clear, so it won’t affect the daytime look. -
The reveal:
Wait for the paint to be completely dry to the touch, then slowly peel away the painter’s tape at a 45-degree angle to reveal your crisp edges.
Lie back and enjoy sleeping under the stars every single night without ever leaving your warm bed


Wraparound Galaxy Corner Mural
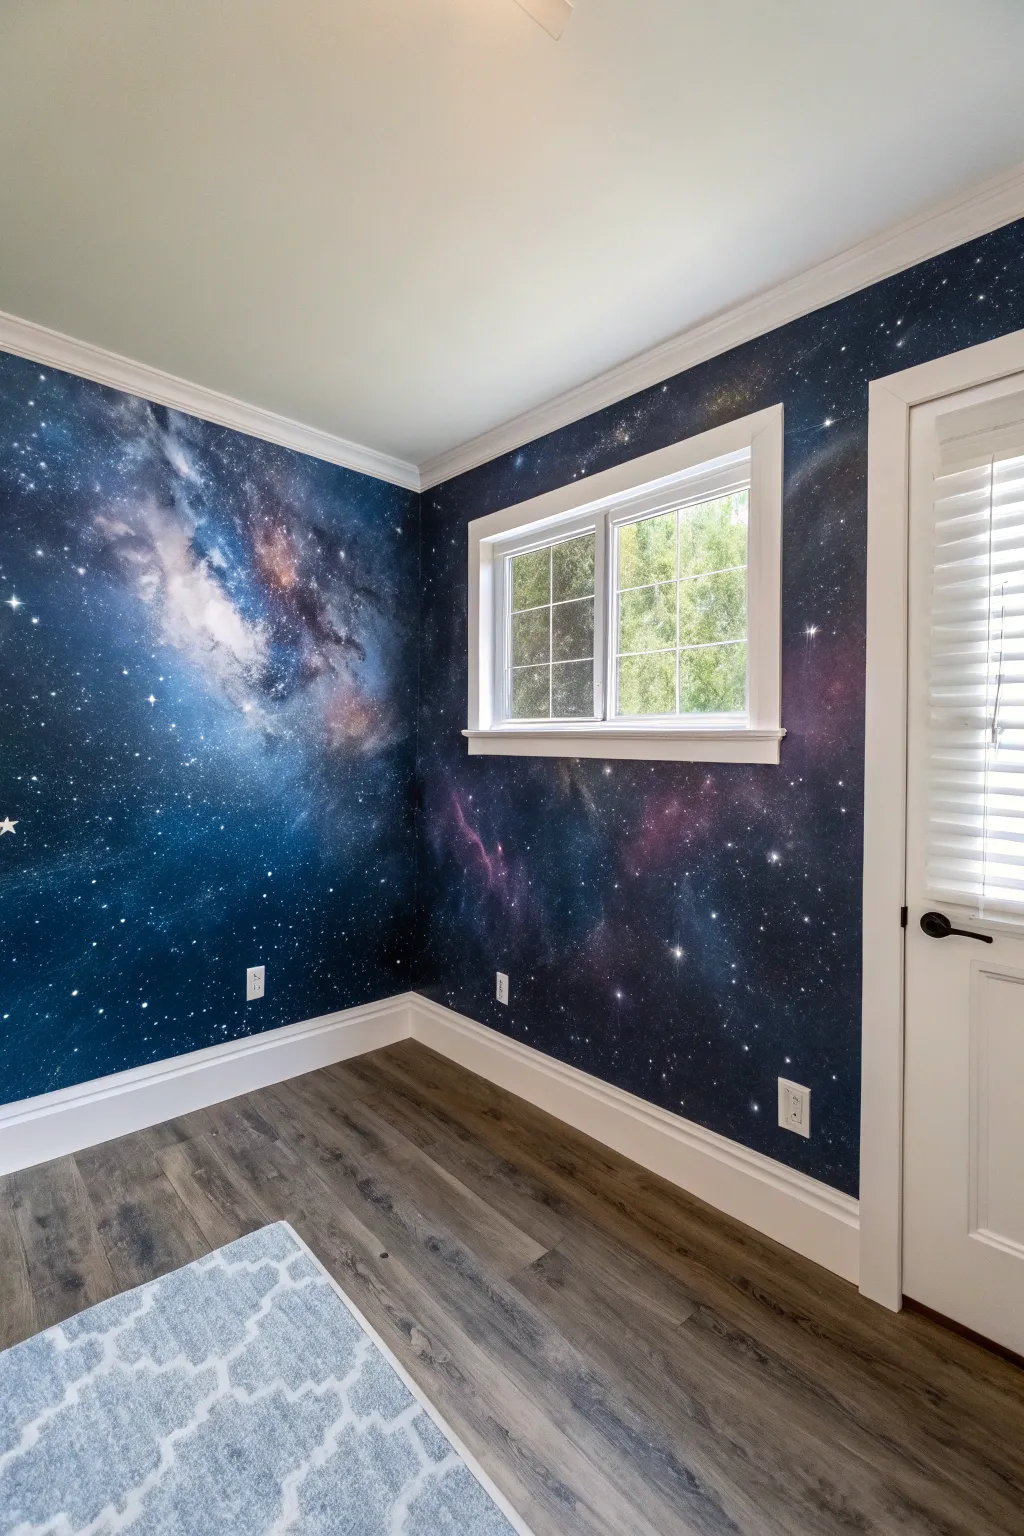
Transform a blank room corner into a portal to deep space with this immersive galaxy mural. By wrapping the design across two adjacent walls, you create a captivating 3D depth that feels like stepping into a nebula.
Detailed Instructions
Materials
- High-quality interior wall paint (Black, Dark Navy Blue)
- Acrylic paints (Titanium White, Magenta, Violet, Teal, Cobalt Blue)
- Large paint roller and tray
- Assorted sea sponges (natural texture is best)
- Wide blending brushes (2-3 inch)
- Small round detail brushes
- Old toothbrush
- Painter’s tape and drop cloths
- Mixing plates or plastic containers
- Glaze medium (optional, for smoother blending)
- Water spray bottle
Step 1: Preparation and Base Coat
-
Prep the workspace:
Clear the corner of the room completely. Remove any outlet covers and tape off the trim, ceiling line, window frames, and the adjacent edges where the mural will end. Lay down drop cloths to protect the flooring. -
Roll the base color:
Mix a small amount of your dark navy blue into the black wall paint to give it depth, rather than a flat, dead black. Roll this mixture over both walls as your base coat. It usually requires two coats to get full, opaque coverage. -
Let it cure:
Allow the black base coat to dry completely, preferably overnight. A fully dry surface is crucial because you will be scrubbing layers of wet paint on top of it, and you don’t want to lift the base layer.
Step 2: Building the Nebula Clouds
-
Map the nebula flow:
Visualize the diagonal flow of the Milky Way. Use a dry piece of chalk to very lightly sketch where your major cloud formations will go, ensuring the design wraps fluidly across the corner seam. -
Sponge on dark blues:
Dampen a sea sponge and dip it into dark navy and cobalt blue acrylics. Dab this loosely onto the black wall, focusing on the outer edges of your mapped nebula areas to create a transitional shadow. -
Layer in bright colors:
While the blue is still slightly tacky, use a fresh sponge to dab in violets and magentas. Concentrate these colors toward the center of your nebula shapes. Don’t cover the black entirely; negative space creates depth. -
Blend with a dry brush:
Take a clean, dry blending brush and gently feather the edges where the sponge marks meet the black background. Work in circular motions to soften the harsh sponge textures into smoke-like clouds. -
Add dimension with teal:
Introduce small pockets of teal or lighter blue near the brightest parts of the nebula. Use a lighter touch here, as these cool tones pop aggressively against the warm purples. -
Create the bright core:
Mix titanium white with a tiny drop of pink or blue. Sponge this into the absolute center of your largest nebula clusters to simulate the glowing core of gas clouds.
Natural Sponging
Don’t press the sponge flat every time. Rotate your wrist and use different sides of the sea sponge to avoid a repetitive ‘stamp’ pattern on the wall.
Step 3: Refining and Stars
-
Soften the corner seam:
Pay special attention to the actual corner of the wall. Dab your sponge directly into the crease to ensure the paint bridges the gap, making the corner disappear visually. -
Misty white overlay:
Dilute some white paint with water or glaze medium until it is very milky. Lightly glaze this over sections of the nebula to create a sense of glowing gas that sits in front of the darker colors. -
Create distant stars:
Thin down white paint with water until it is the consistency of ink. Load an old toothbrush, aim it at the wall, and run your thumb over the bristles to spray a fine mist of tiny stars. Test on cardboard first to control the splatter size. -
Add medium stars:
Use a small round brush to manually dot in slightly larger stars. Cluster them more densely around the nebula clouds and sparser in the black void areas. -
Paint ‘hero’ stars:
Select 5 to 7 spots for major stars. Paint a solid white dot, then use a fine liner brush to pull four long, thin rays outward to create a twinkling cross shape. -
Final dry blending:
Step back and look at the composition from across the room. If any star clusters look too uniform, mist a very thin layer of black or dark blue over them to push them back into the distance. -
Cleanup:
Once everything is fully dry, carefully peel away the painter’s tape. If any paint bled onto the trim or ceiling, touch it up with a small brush and the original trim color.
Muddy colors?
If your colors turn gray or muddy, stop blending immediately. Let that layer dry fully, then apply fresh color on top. Overworking wet paint kills the vibrancy.
Now you have a stunning, window-like view into the cosmos that expands the feel of the room
Headboard Halo Nebula Glow
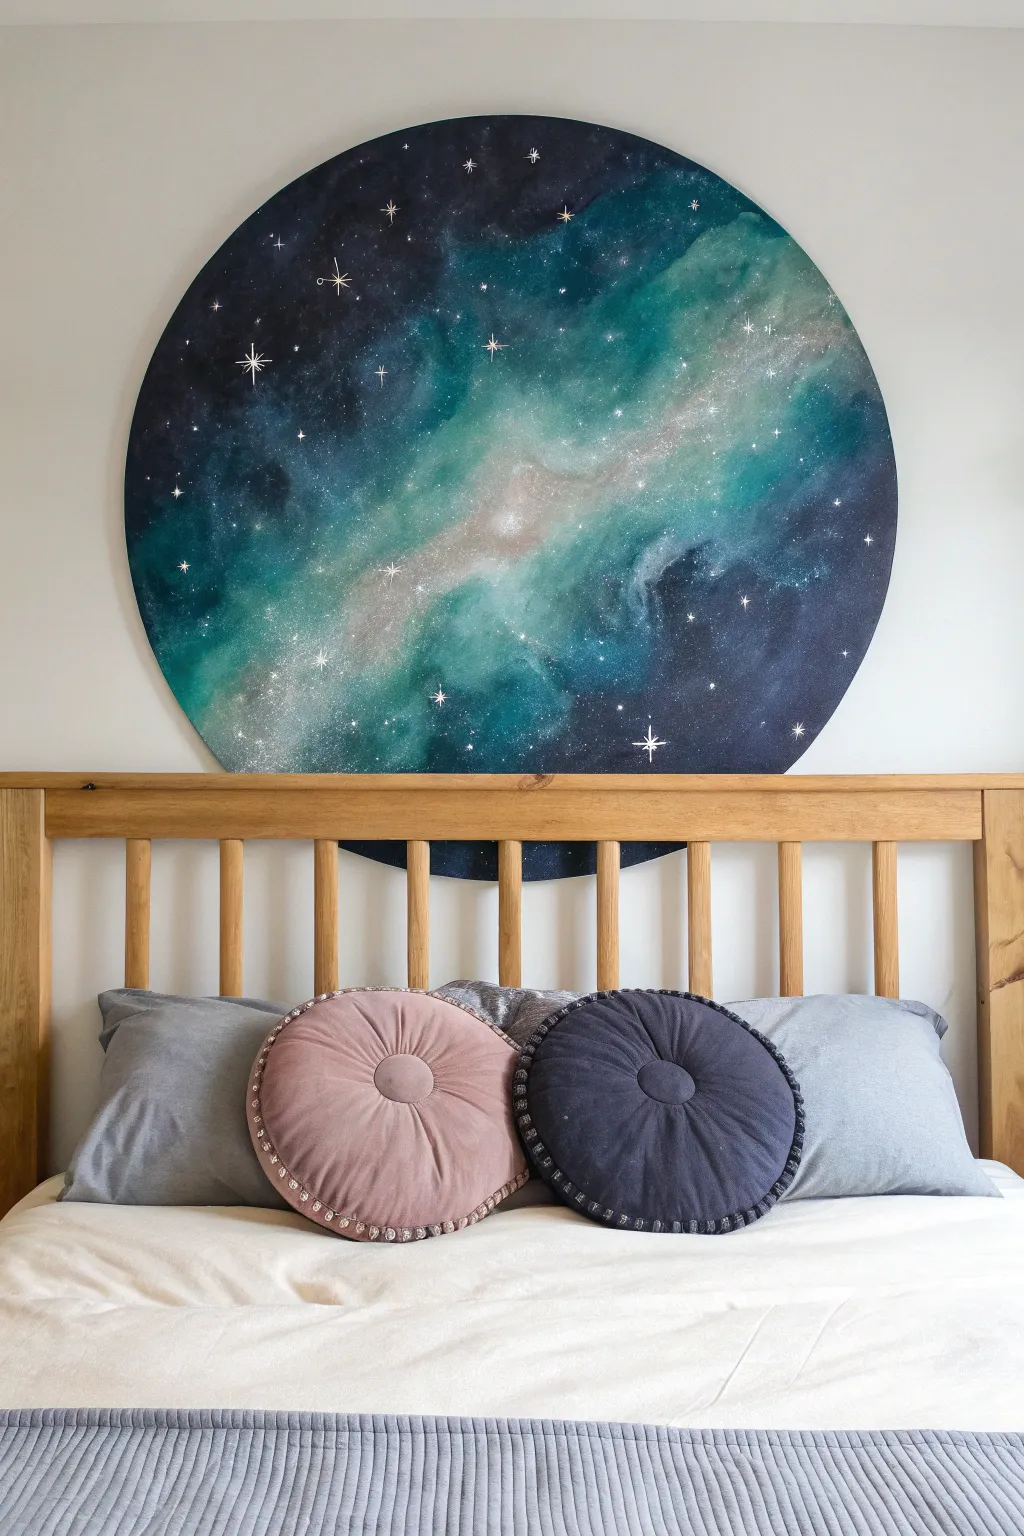
Transform your bedroom into a cosmic observatory with this stunning circular galaxy painting. Featuring deep space blues, ethereal teal nebulas, and twinkling stars, this statement piece acts as a dreamy, oversized halo above your headboard.
Step-by-Step
Materials
- Large round canvas or wooden circle panel (36-48 inches diameter)
- Gesso primer (if using wood)
- Acrylic paints: Carbon Black, Prussian Blue, Phthalo Turquoise, Titanium White, and Silver
- Large flat paintbrush (2-3 inch)
- Medium round brush
- Fine detail liner brush
- Natural sea sponge or synthetic art sponge
- Mixing palette or paper plates
- Cup of water and paper towels
- Old toothbrush (for splatter stars)
- Clear matte or satin varnish
- Wall mounting hardware
Step 1: Preparing the Void
-
Prime the surface:
If you are using a raw wooden circle, apply a coat of gesso to seal the wood and create a smooth painting surface. Let it dry completely. -
Base coat application:
Mix Carbon Black with a touch of Prussian Blue to create a deep, midnight shade. Cover the entire canvas using your large flat brush, ensuring you paint the edges for a finished look. -
Establish the shadows:
While the base is still slightly tacky, apply pure Carbon Black to the outer edges and corners, blending inwards just a little to create a vignette effect. -
Initial drying:
Allow this dark base layer to dry fully before moving on to the nebula clouds. This prevents your lighter colors from turning muddy too quickly.
Nebula Depth Trick
Work in thin, translucent layers. Let each sponge layer dry for 10 minutes before adding the next lighter color to build true 3D depth.
Step 2: Creating the Nebula
-
Sponge technique setup:
Dampen your sea sponge and squeeze out excess water. Load it with a mix of Prussian Blue and a tiny bit of Phthalo Turquoise. -
First nebula layer:
Gently dab the sponge in a diagonal band across the circle. Keep the pressure light and the edges irregular to mimic organic gas clouds. -
Deepening the teal:
Load a clean section of the sponge with pure Phthalo Turquoise. Dab this over the previous blue layer, concentrating on the center of the diagonal band but leaving some dark blue visible at the edges. -
Adding luminosity:
Mix Titanium White with Phthalo Turquoise to make a bright aqua. Sponge this sparingly into the center of your turquoise clouds to create a glowing core. -
Blending the drift:
Use a dry, soft brush to very gently sweep over the sponged areas while they are wet. This softens the texture and makes the ‘gas’ look wispy and ethereal. -
The milky way core:
Mix a very pale grey-blue using White and a dot of Prussian Blue. Sponge a thin, concentrated line through the absolute center of the nebula for the brightest part of the galaxy.
Fixing Heavy Blobs
If you sponge on too much paint, quickly dab the area with a clean, dry paper towel to lift the excess pigment before it dries.
Step 3: Star-Studded Details
-
The flicking method:
Dilute Titanium White paint with a few drops of water until it has an ink-like consistency. -
Creating distance stars:
Dip an old toothbrush into the thinned white paint. Holding it over the canvas, run your thumb across the bristles to spray a fine mist of stars across the nebula and dark background. -
Adding distinct stars:
Use your fine liner brush and pure Titanium White to paint random individual dots. Make some slightly larger than others to create depth. -
Painting the hero stars:
Select 5-7 spots for major stars. Paint a small plus sign (+) and then an ‘X’ over it with thin, tapered strokes to create a twinkling 8-point starburst effect. -
Adding shimmer:
I like to take a little metallic silver paint and lightly dry-brush it over the brightest white parts of the nebula for a subtle, magical glimmer. -
Final protection:
Once the painting is cured (usually 24 hours), apply a coat of clear varnish to protect the paint and unify the sheen.
Mount your cosmic masterpiece behind your bed and drift off into the stars.
Glow-in-the-Dark Star Layer
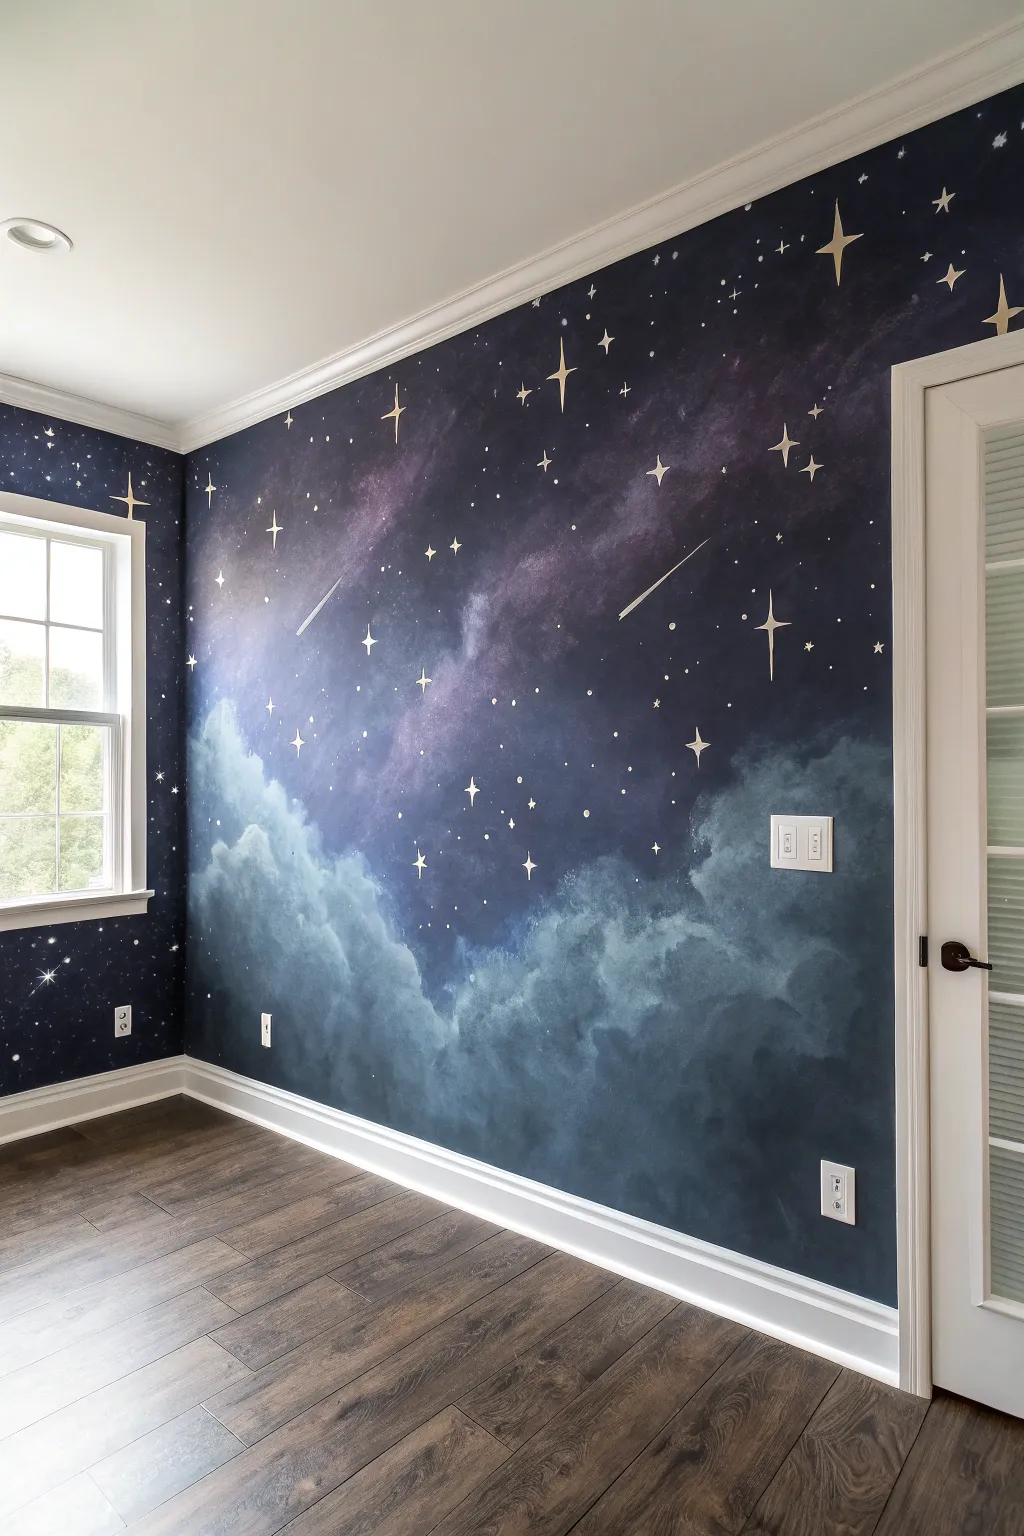
Transform a plain room into a cosmic escape with this stunning galaxy wall mural featuring dreamy nebula clouds and twinkling stars. The deep blue backdrop and soft, blending colors create an immersive atmosphere perfect for stargazing from bed.
Step-by-Step
Materials
- Dark navy or midnight blue latex wall paint (base coat)
- Black acrylic paint
- Purple acrylic paint (plum or deep violet)
- Teal and light blue acrylic paint
- White acrylic paint
- Gold or light yellow acrylic paint
- Glow-in-the-dark paint (optional)
- Large paint rollers and trays
- Variety of sponges (sea sponges work best)
- Assorted paintbrushes (fine liner brushes and small angled brushes)
- Painter’s tape
- Drop cloths
- Spray bottle with water
- Paper plates for mixing
Step 1: Setting the Stage
-
Prep the room:
Clear the area and lay down drop cloths to protect your floor. Use painter’s tape to mask off baseboards, ceiling molding, window frames, and any outlets or switches. Clean the walls to ensure the paint adheres properly. -
Apply the base coat:
Roll on the dark navy or midnight blue wall paint. This serves as the deep canvas of space. Two coats are usually necessary to get a rich, opaque finish. Let this dry completely, ideally overnight.
Sponge Technique Tip
Don’t rub the sponge on the wall; dab it straight on and off. Rotate your wrist slightly with each dab so you never repeat the exact same sponge texture twice.
Step 2: Creating the Nebula
-
Mix your cloud colors:
On paper plates, pour out your teal, light blue, purple, and black paints. Create a few transitional shades by mixing teal with white or purple with black to have a gradient ready. -
Sponge on the dark clouds:
Dampen a sea sponge slightly and dip it into the black and dark purple paint. Dab this irregularly across the wall where you want the densest parts of the galaxy to be. Keep the edges soft by using a light hand. -
Add the main nebula body:
Using a fresh sponge, pick up the teal and light blue paints. Start dabbing these ‘clouds’ near the bottom of the wall, building them up like cumulonimbus formations. Blending while the paint is still wet helps create that misty, ethereal look. -
Soften the transitions:
While the paint is tacky, use a dry brush or a clean, damp sponge to blur the harsh lines between the blue nebula clouds and the dark background. A light mist of water from your spray bottle can help the acrylics blend more smoothly. -
Overlay purple accents:
Identify areas in the upper dark space where you want cosmic dust. Lightly sponge on thin layers of purple, allowing the dark blue base to show through for depth. This creates the illusion of distant gas clouds. -
Highlight the cloud tops:
Add white to your light blue mix to create a highlight color. Sponge this onto the top edges of your teal clouds to simulate light hitting the celestial gas, giving the forms volume and dimension.
Step 3: Painting the Stars
-
Splatter the background stars:
The easiest way to create distant stars is the splatter technique. Dilute white paint with a little water until it’s inky. Dip a stiff-bristled brush or toothbrush into it. -
Flick the paint:
Hold the brush near the wall and run your thumb across the bristles to spray fine specks. Test on cardboard first to control the spray density. Focus heavily on the dark upper areas and lightly over the nebula clouds. -
Hand-paint medium stars:
Using a small round brush, paint distinct dots of varying sizes. I like to group some together to form constellations or clusters, placing them randomly to avoid patterns that look too uniform. -
Draft the large glimmer stars:
Select spots for your ‘hero’ stars. Use a very fine liner brush with white or pale gold paint to draw a vertical line, then a horizontal line crossing it, creating a simple cross shape. -
Refine the star shapes:
Curvet the inner corners of your cross shapes inward slightly to give them that classic four-point twinkle look. Extend the vertical tails to make them look like distant shimmering lights. -
Add falling stars:
For a shooting star, paint a small white dot (the head) and quickly drag your brush away to create a fading tail. Make the tail thinner and more transparent as it moves away from the head. -
Apply glow-in-the-dark accents:
For the secret layer mentioned in the prompt, take your glow-in-the-dark paint and go over specific stars or highlight the edges of the nebula. This layer will be invisible in daylight but magical at night.
Paint Dried Too Fast?
If acrylics dry before you can blend, lightly mist the wall with water. This reactivates the paint slightly and allows you to smudge edges for that smoky nebula effect.
Peel off the tape and enjoy your personal view of the cosmos every night
Tape-Resist Geometric Galaxy Shapes
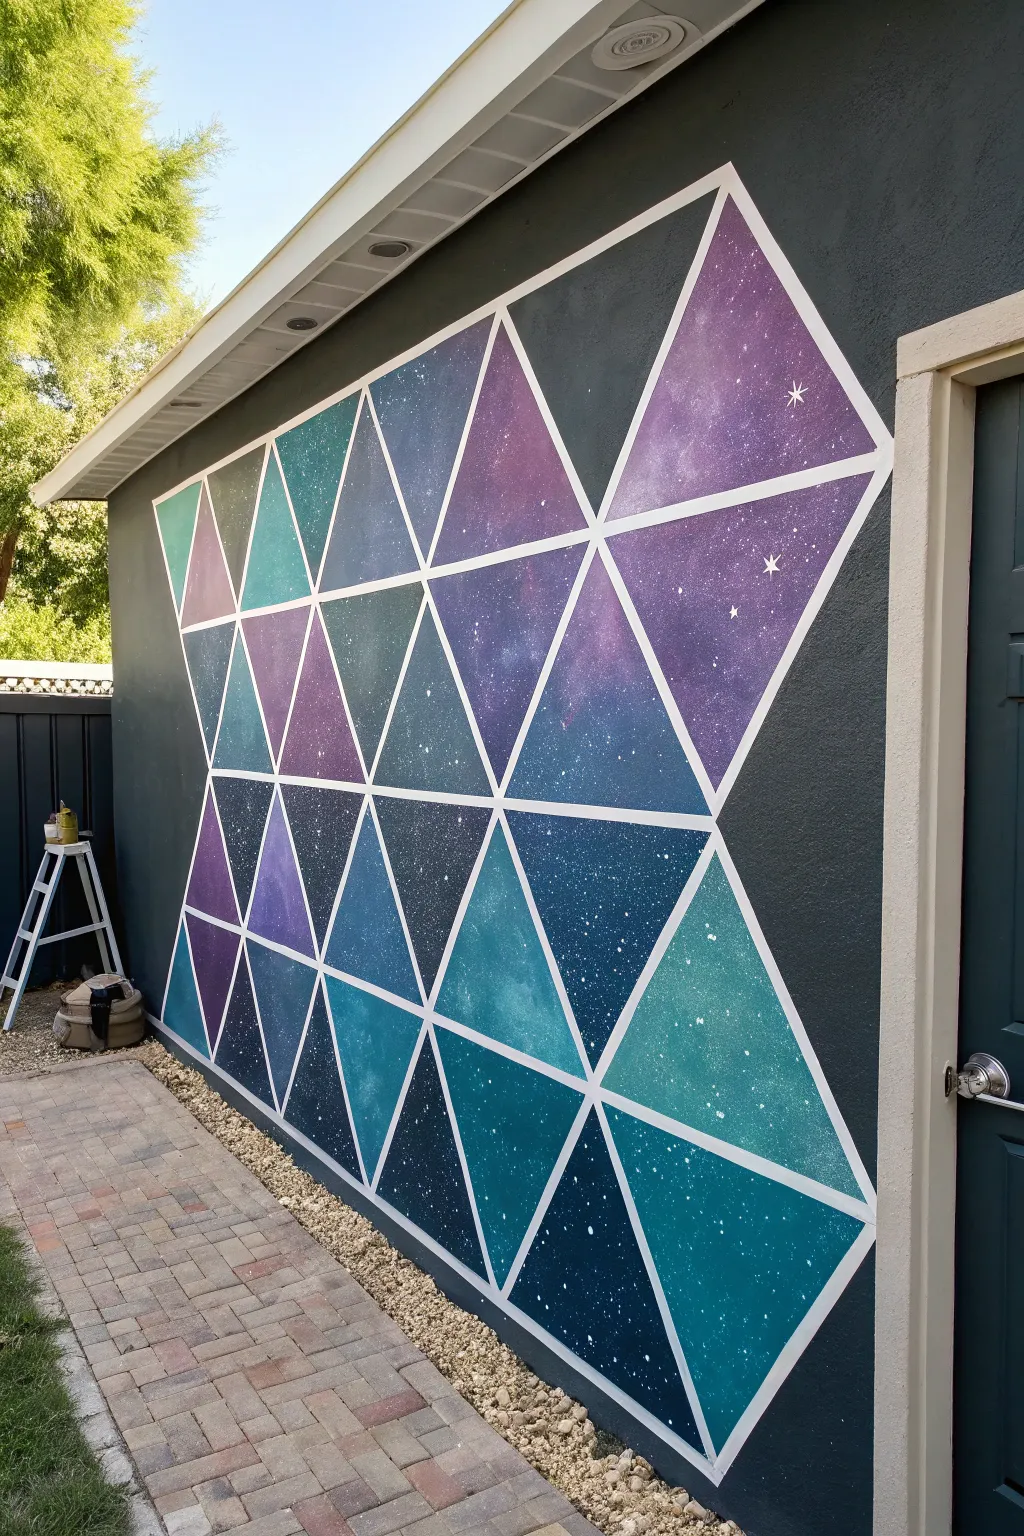
Transform a plain exterior wall into a window to the cosmos with this stunning geometric mural. By combining sharp, tape-defined lines with soft, blended galaxy painting techniques, you’ll create a modern statement piece that feels both structured and infinite.
Step-by-Step Tutorial
Materials
- Exterior latex paint (dark gray or black base)
- Acrylic or exterior latex paints (teal, navy blue, purple, magenta, white)
- High-quality painter’s tape (1-inch width)
- Paint rollers and tray
- Assorted paintbrushes (large flat brushes and stiff bristle brushes)
- Sponges (sea sponge or synthetic)
- Old toothbrush
- Ladder
- Drop cloth
- Measuring tape
- Chalk line or long level
Step 1: grid and layout
-
Prepare the surface:
Begin by cleaning the wall thoroughly to remove dust and debris. If the current wall color isn’t suitable for your lines (white is used in the example), paint the entire area with a base coat of white exterior paint and let it cure completely for at least 24 hours. -
Plan the geometry:
Using a measuring tape and a level, mark out a large grid of diamonds or triangles. While you can freehand for a more organic look, measuring ensures your geometric pattern feels balanced. -
Apply the tape:
Firmly press painter’s tape along your plotted lines to create the geometric skeleton. Run your finger or a plastic card along the edges of the tape to seal them tight against the wall, preventing paint bleed. -
Seal the edges:
For razor-sharp lines, I like to brush a very light layer of the base wall color (white) over the tape edges. This fills any tiny gaps with the base color so the colored paint sits perfectly on top.
Step 2: base colors
-
Create a color map:
Before painting, visualize or sketch which triangles will be which dominant color. Alternate between teals, dark blues, and purples so no two adjacent shapes look too similar. -
Paint the dark backgrounds:
Working one triangle at a time, apply a base layer of dark paint—navy blue or black—to the corners or edges of the shape. This creates depth and simulates deep space. -
Apply main colors:
While the dark paint is still wet, brush your main vibrant color (purple or teal) into the center of the triangle. Don’t worry about perfect blending yet; just get the pigment on the wall. -
Blend the gradients:
Use a damp sponge to blend the harsh line between the dark edges and the bright center. Dab repeatedly to create a cloudy, nebula-like transition rather than smooth brushstrokes.
Bleeding Lines?
If color bleeds under the tape, wait for it to fully dry. Then, place a straight edge or ruler over the line and paint your base color over the mistake to tidy it up.
Step 3: galaxy details
-
Add lighter highlights:
Dip a sponge lightly into white or very pale pink/blue paint. Dab this sparingly into the lightest parts of your ‘nebula’ clouds to make them glow. -
Splatter stars:
Dilute a small amount of white paint with water until it has an inky consistency. Dip an old toothbrush into the mixture, aim it at a specific triangle, and run your thumb over the bristles to spray fine mist stars. -
Paint feature stars:
Using a fine-tip brush and pure white paint, hand-paint a few larger, four-pointed ‘twinkle’ stars in select triangles. Place these strategically rather than randomly to draw the eye. -
Refine the edges:
Check the edges of each triangle near the tape. Ensure you have solid coverage right up to the tape line so the final reveal is crisp. -
Repeat for all shapes:
Continue this process—base, blend, highlight, stars—until every triangle is filled. Vary the intensity and color bias of each one to keep the mural dynamic.
Cosmic Depth
Don’t use just one shade of black! Mix in tiny drops of deep purple or midnight blue into your black paint. It makes the ‘void’ of space feel richer and less flat.
Step 4: the reveal
-
Let paint set:
Allow the paint to dry until it is tacky but not fully cured—usually about an hour, depending on humidity. Removing tape from fully dry paint can sometimes peel up the film. -
Remove the tape:
Slowly peel the tape away at a 45-degree angle. Pull gently and steadily to reveal the crisp white grid underneath. -
Touch up:
Inspect the lines for any small bleeds. Use a small angled brush and your original base wall color to clean up any messy intersections.
Step back and admire how simple geometry can frame the infinite beauty of space right in your own backyard
Doorway Portal Into a Galaxy
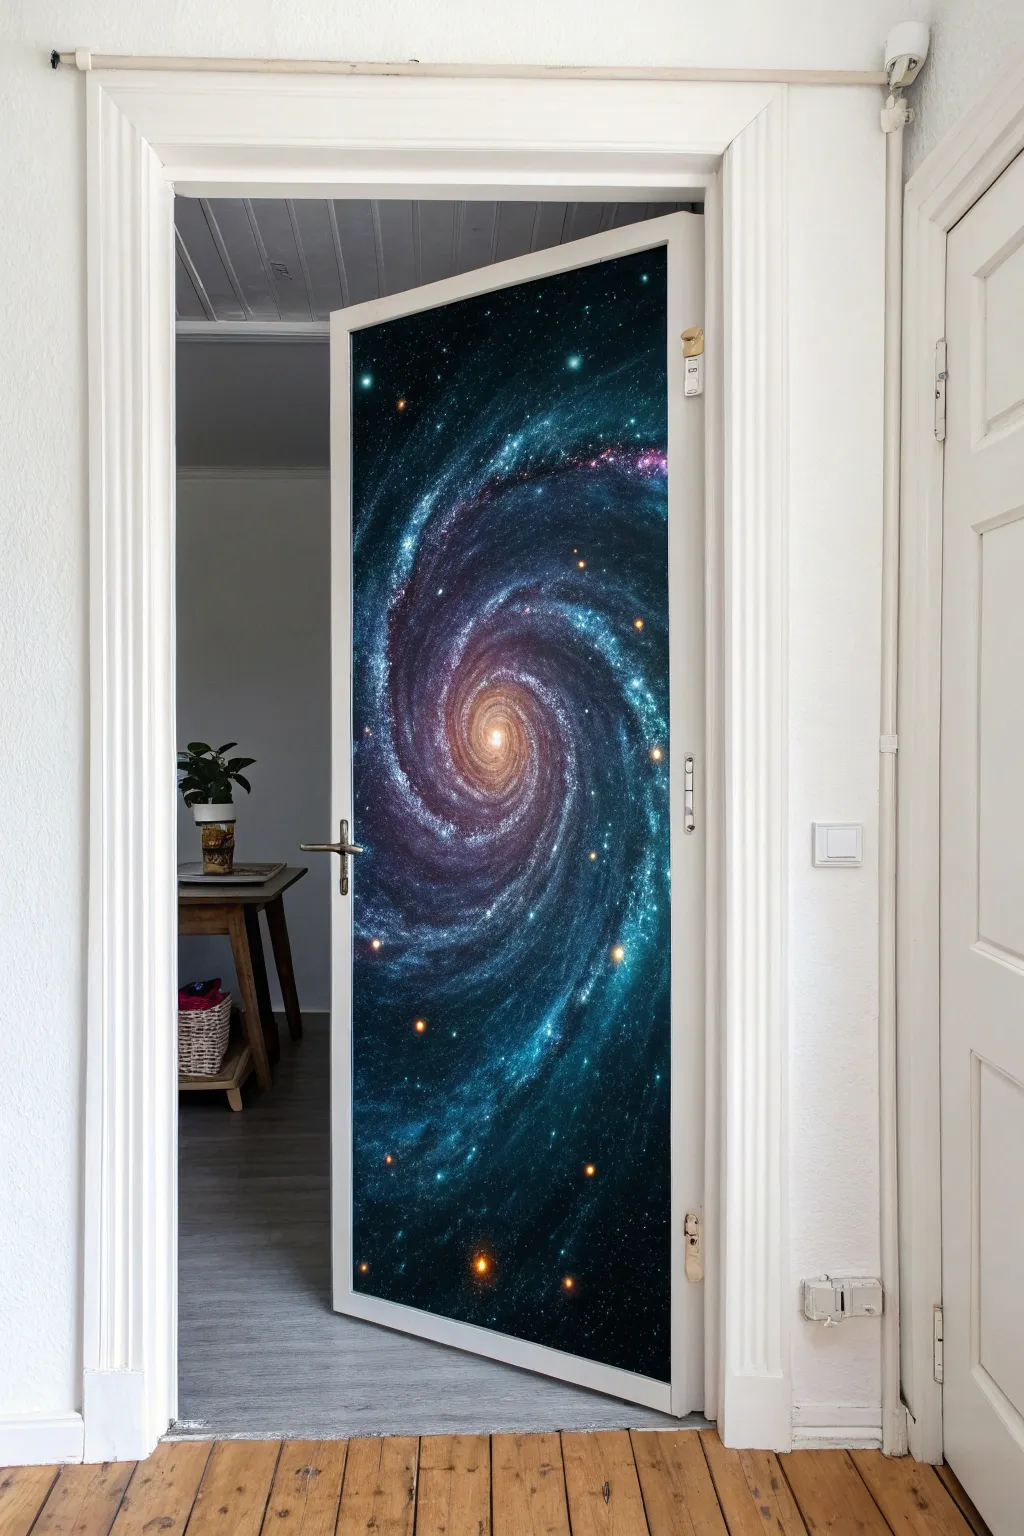
Transform a plain interior door into a breathtaking gateway to the cosmos with this detailed painting project. The result creates a stunning optical illusion of infinite space, featuring a vibrant spiral galaxy that appears to swirl right in your hallway.
How-To Guide
Materials
- Interior door (primed white)
- Painter’s tape
- Drop cloth
- Sanding sponge (fine grit)
- Acrylic latex interior paint (Black, Deep Navy Blue)
- Acrylic craft paints (Vibrant Purple, Teal, Cyan, Magenta, White, Gold)
- Assorted synthetic brushes (large flat, medium round, fine liner)
- Natural sea sponge
- Old toothbrush
- Glazing medium
- Clear acrylic sealer (satin or gloss)
Step 1: Preparation and Base Coat
-
Prepare the surface:
Remove the door hardware or tape over the handle, hinges, and lock mechanism precisely with painter’s tape to keep them crucial metal parts clean. -
Sand for adhesion:
Lightly scuff the entire surface of the door with a fine-grit sanding sponge. This helps the paint grip better and ensures a durable finish. -
Clean the surface:
Wipe away all sanding dust with a damp cloth and let the door dry completely. -
Apply the darkness:
Paint the entire face of the door with a coat of deep black acrylic latex paint. Use a roller or large brush for even coverage. -
Add depth:
While the black is still slightly tacky, I like to blend in patches of deep navy blue around the edges and corners to create a subtle, rich background rather than a flat black void.
Nebula Nuance
Keep your sponge fairly dry when dabbing clouds. Too much water will make paint run; a dry sponge creates that perfect airy texture.
Step 2: Building the Spiral Galaxy
-
Draft the shape:
Once the background is dry, lightly sketch the spiral galaxy shape using a piece of white chalk. Start from a central point and spiral outward to guide your painting. -
Create the core:
Mix white with a touch of gold and orange. Paint a bright, glowing center where your chalk spiral began, feathering the edges outward so it glows rather than looks like a solid dot. -
Sponge the main arms:
Dampen a sea sponge and dip it into a mix of violet and deep blue. Dab along your chalk lines to create the fluffy, gaseous texture of the galaxy’s arms. -
Layering colors:
Using a clean section of the sponge, layer lighter colors like teal and cyan over the purple areas, focusing on the center of the spiral arms to make them look dimensional. -
Intensify the contrast:
Mix a small amount of glazing medium with black paint. Gently glaze the spaces *between* the spiral arms to push them back into the distance and make the colors pop. -
Highlighting the gas clouds:
Mix a very light cyan or near-white blue. Lightly dry-brush this color onto the highest points of the spiral arms to simulate illuminated cosmic dust.
Glow Up
Mix glow-in-the-dark pigment into your white paint for the stars. The galaxy will recharge in daylight and shine at night!
Step 3: Stars and Details
-
Create background stars:
Dilute white paint with a little water until it’s inky. Dip an old toothbrush into the mixture and run your thumb across the bristles to flick a fine mist of stars across the whole galaxy. -
Paint major stars:
Using a fine liner brush, paint individual larger stars. Dot random spots with white, then add tiny cross shapes to a few of them to create a twinkling diffraction effect. -
Add colored stars:
Dot a few larger stars in gold and soft orange, particularly near the galaxy’s edge, to add warmth and variety to the starfield. -
Refine the center:
Return to the galactic core and add a tiny joyful dot of pure white right in the middle to represent the intense brightness of the galaxy’s heart. -
Protect your work:
Allow the painting to cure for at least 24 hours. Apply two coats of clear acrylic sealer (satin works best to reduce glare but keep colors rich) to protect the artwork from daily use. -
Reveal:
Carefully peel away the painter’s tape from the hardware and edges to reveal your finished portal.
Step back and enjoy the feeling of infinite space every time you walk through your new portal.

Have a question or want to share your own experience? I'd love to hear from you in the comments below!