
If your garage floor is still raw concrete, you’re sitting on the easiest makeover in the whole house. I love how the right garage floor paint or epoxy coating can take a dusty space and turn it into something that feels polished, bright, and totally intentional.
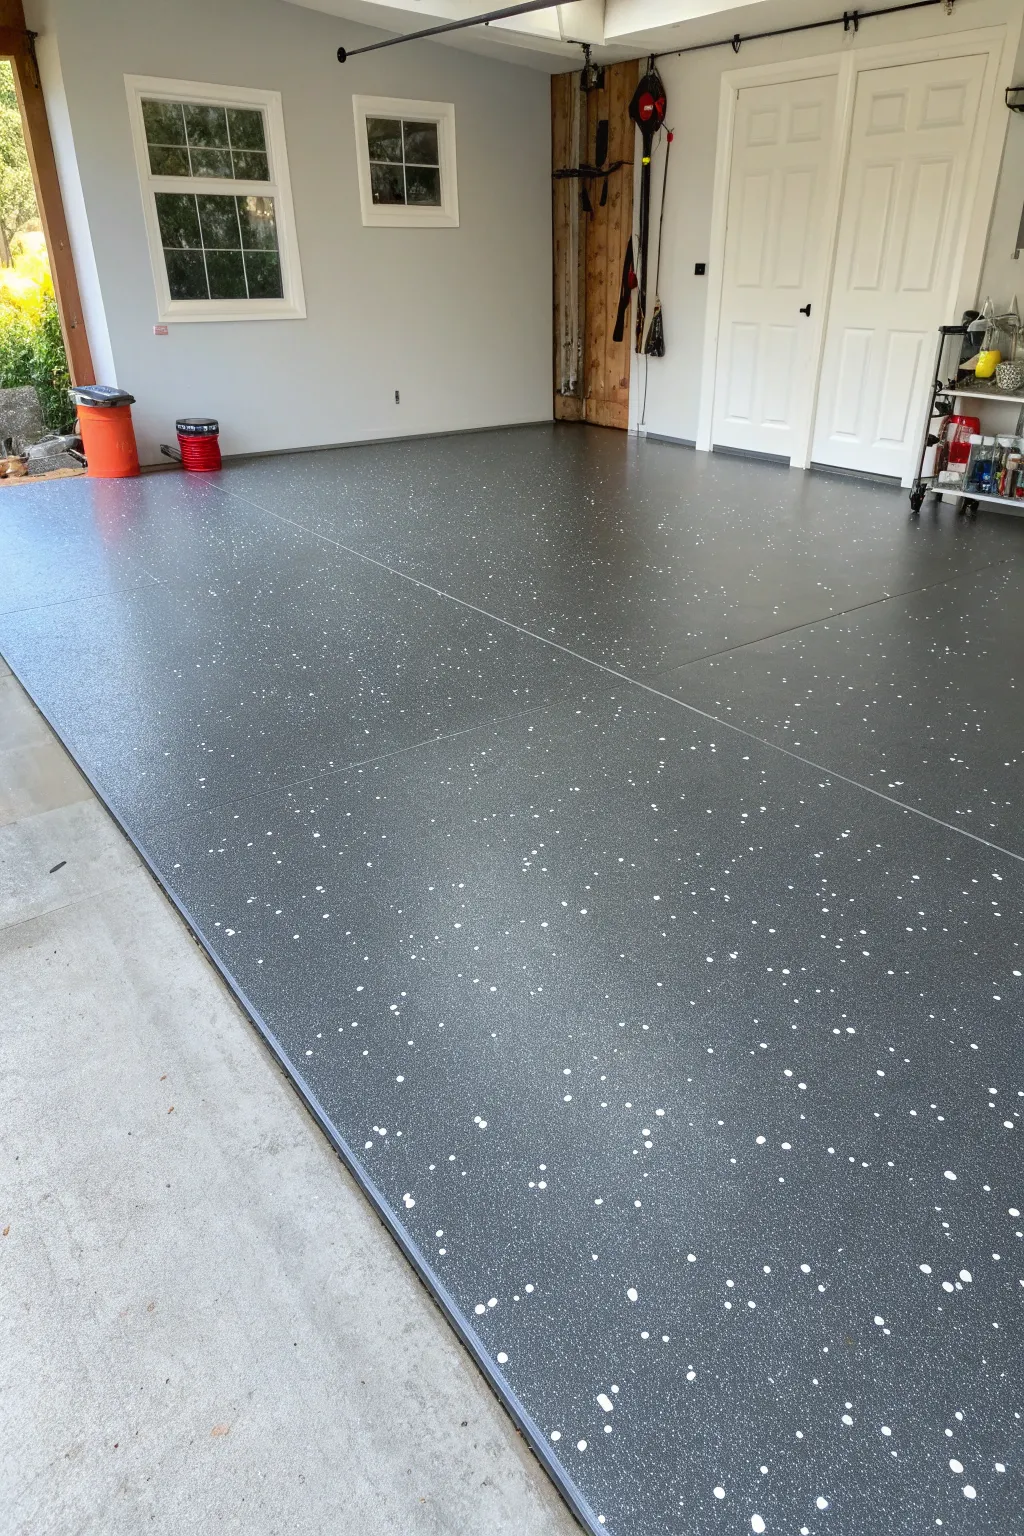
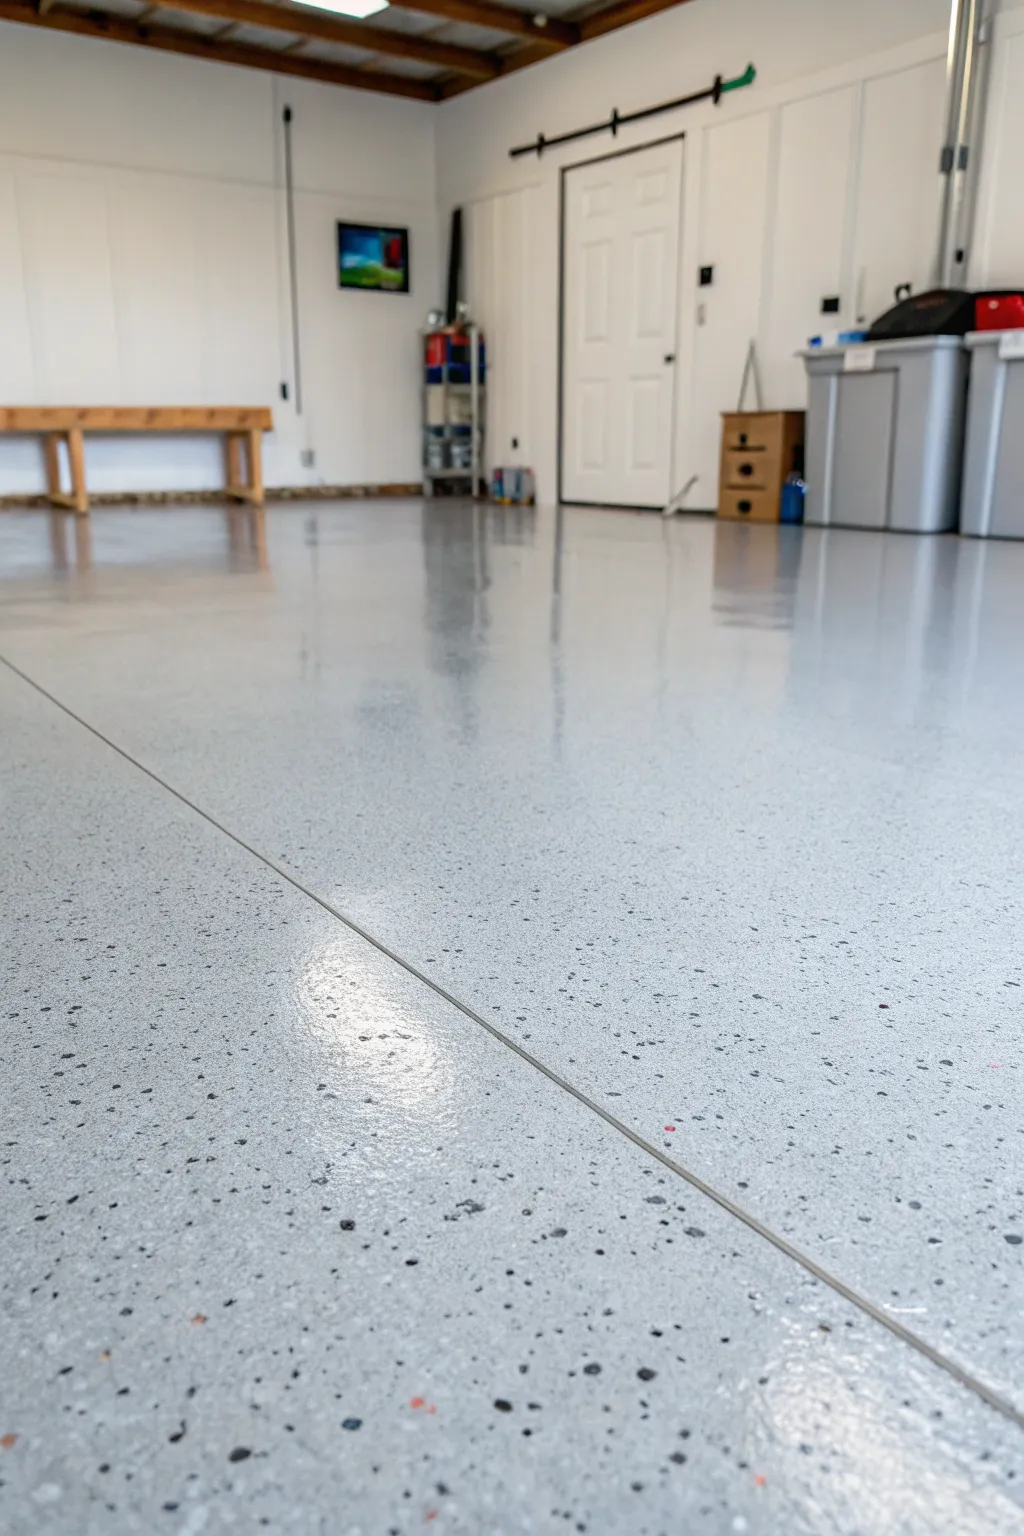
Classic High-Gloss Gray Epoxy
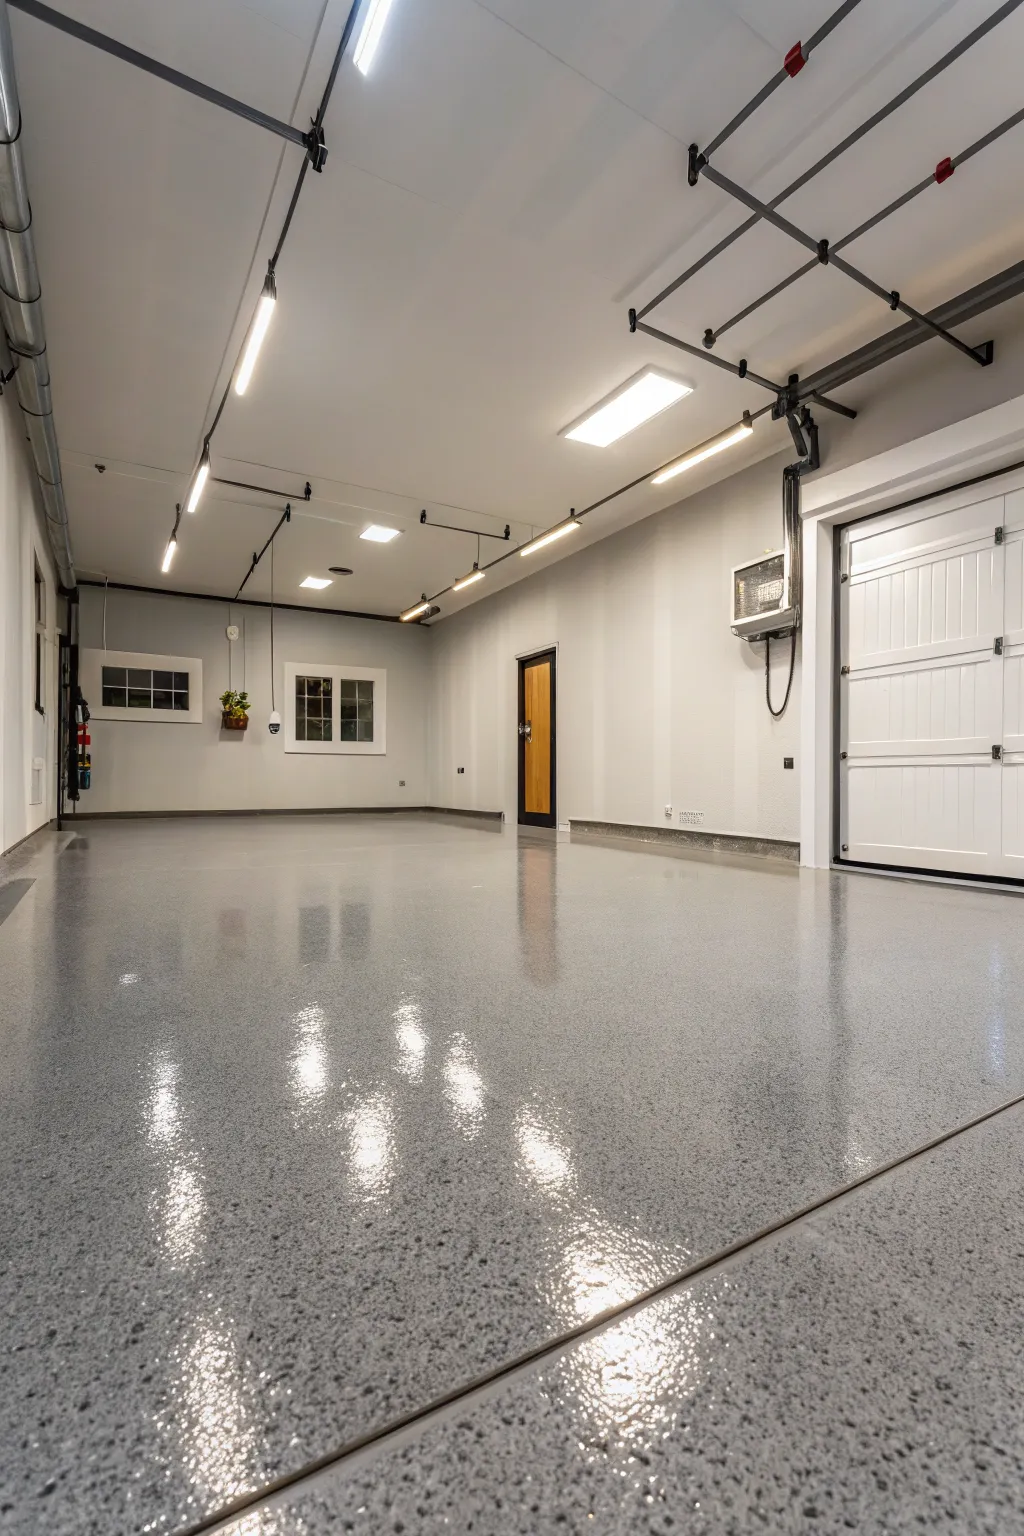
Transform a dull concrete slab into a showroom-quality surface that gleams under the lights with this classic high-gloss gray epoxy system. This heavy-duty finish not only looks incredibly sleek but provides a durable, easy-to-clean shield against spills and tire marks.
Detailed Instructions
Materials
- Concrete degreaser and cleaner
- Concrete etching solution (muriatic acid based)
- Concrete crack filler (if needed)
- Epoxy primer (gray tinted)
- High-solids epoxy base coat (gray)
- Decorative vinyl color flakes (gray/black/white mix)
- Clear epoxy or polyaspartic topcoat
- Stiff-bristle push broom
- Power washer or hose
- Painter’s tape
- 9-inch roller frame and extension pole
- 3/8-inch nap epoxy-safe roller covers
- 2-inch chip brushes for cutting in
- Squeegee (optional but recommended for base coat)
- Spiked shoes (for walking on wet epoxy)
- Protective gear (gloves, goggles, respirator)
Step 1: Preparation & Cleaning
-
Clear and sweep:
Remove absolutely everything from the garage floor. Sweep the surface thoroughly to remove loose dirt, dust, and debris, paying special attention to corners where cobwebs gather. -
Degrease oil spots:
Inspect the concrete for oil or grease stains. Apply a heavy-duty degreaser to these spots, scrub vigorously with a stiff brush, and rinse. Epoxy won’t bond to oil, so this step is critical. -
Etch the concrete:
Mix your etching solution with water according to the manufacturer’s ratio. Pour it onto the floor—it should fizz like soda. Scrub the floor with a stiff broom to open up the concrete pores, creating a rough texture like sandpaper. -
Rinse thoroughly:
Power wash or hose down the floor to remove all traces of the acid and cleaning residue. You may need to rinse two or three times to ensure the pH is neutral. -
Patch cracks:
Once the floor is dry (this can take 24-48 hours), fill any cracks or divots with a concrete patch or epoxy filler. Smooth it out with a putty knife so it is flush with the floor surface.
Moisture Test Tip
Tape a 2×2 sheet of plastic to the concrete for 24 hours. If moisture droplets form underneath, your floor is too damp for epoxy and needs a moisture barrier first.
Step 2: Applying the Base Coat
-
Tape the perimeter:
Apply painter’s tape along the bottom edge of your baseboards or walls to prevent accidental splashing. I find that using a wide blue tape gives unmatched peace of mind here. -
Mix the epoxy:
Combine Part A (resin) and Part B (hardener) of your gray epoxy. Mix thoroughly with a drill mixer for the exact time specified on the can—usually 2 to 3 minutes—to ensure it cures properly. -
Cut in the edges:
Using a chip brush, paint a 3-inch wide strip of epoxy along the perimeter of the room where the roller won’t reach. -
Roll the base coat:
Pour a ribbon of mixed epoxy onto the floor. Use your notched squeegee or roller to spread it evenly in a 4×4 foot section. Work quickly to maintain a ‘wet edge’. -
Back-roll:
Go back over the section you just applied with the roller, moving perpendicular to your first pass. This levels the epoxy and removes squeegee lines.
Bubbles Appearing?
Tiny bubbles often mean the concrete is ‘outgassing’ due to heat. Apply your epoxy when the temperature is falling (late afternoon) to prevent air from escaping the slab.
Step 3: Broadcasting Color Flakes
-
Toss the flakes:
While the base coat is still wet, grab a handful of vinyl flakes. Throw them high into the air—like you are feeding chickens—so they rain down evenly onto the wet surface rather than clumping in one spot. -
Check coverage density:
Aim for a medium broadcast (about 50% coverage) to mimic the look in the image. You should see plenty of the gray base coat peeking through the speckles. -
Let it cure:
Allow the base coat to dry completely according to the manufacturer’s instructions, usually 12 to 24 hours. Keep the garage door closed to prevent bugs or leaves from landing in the sticky resin. -
Scrape and vacuum:
Once dry, walk over the floor with a flat floor scraper or stiff broom to knock down any flakes that are sticking up vertically. Vacuum the entire floor thoroughly to remove loose chips.
Step 4: The High-Gloss Finish
-
Mix the topcoat:
Prepare your clear polyaspartic or epoxy topcoat. This layer provides the deep, wet look seen in the photo and protects the flakes. -
Apply clear coat:
Pour the clear coat onto the floor and roll it out using the same technique as the base coat. Ensure you cover every inch to seal the flakes in completely. -
Texture check:
If you want extra slip resistance, you can mix a small amount of anti-slip aggregate into this topcoat layer before rolling. It reduces the gloss slightly but adds safety. -
Final cure:
Let the final coat cure for at least 72 hours before driving a vehicle onto the surface. Foot traffic is usually okay after 24 hours.
Enjoy the sleek, industrial look of your new floor that brings a professional finish to your garage workspace.


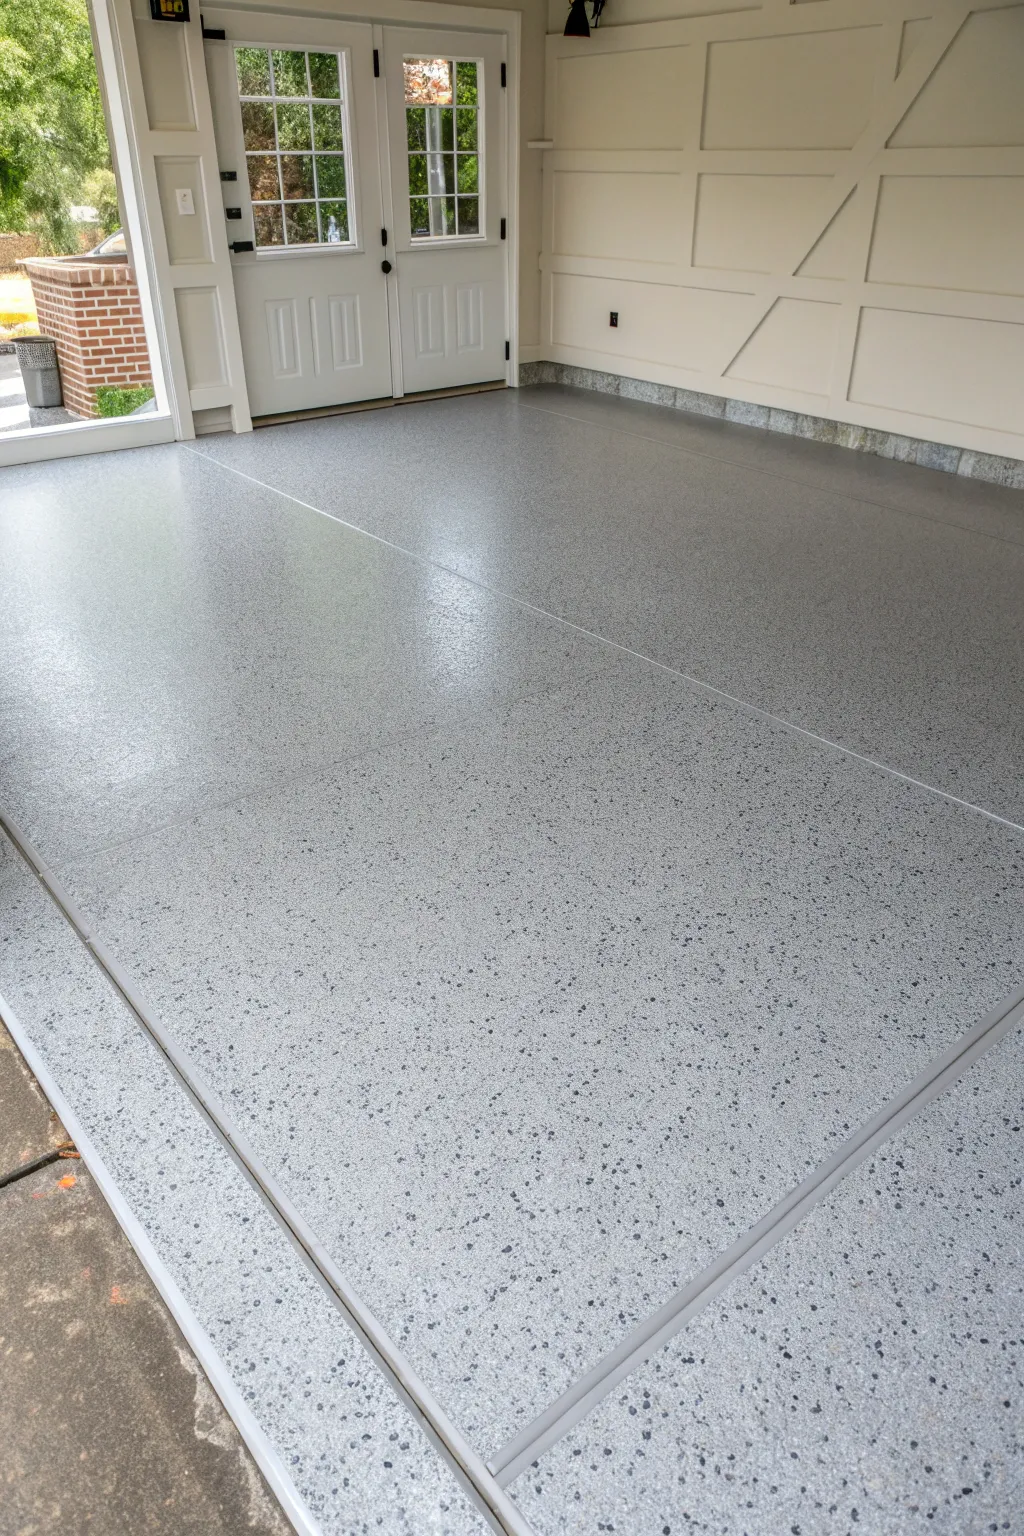
Salt-and-Pepper Flake Finish
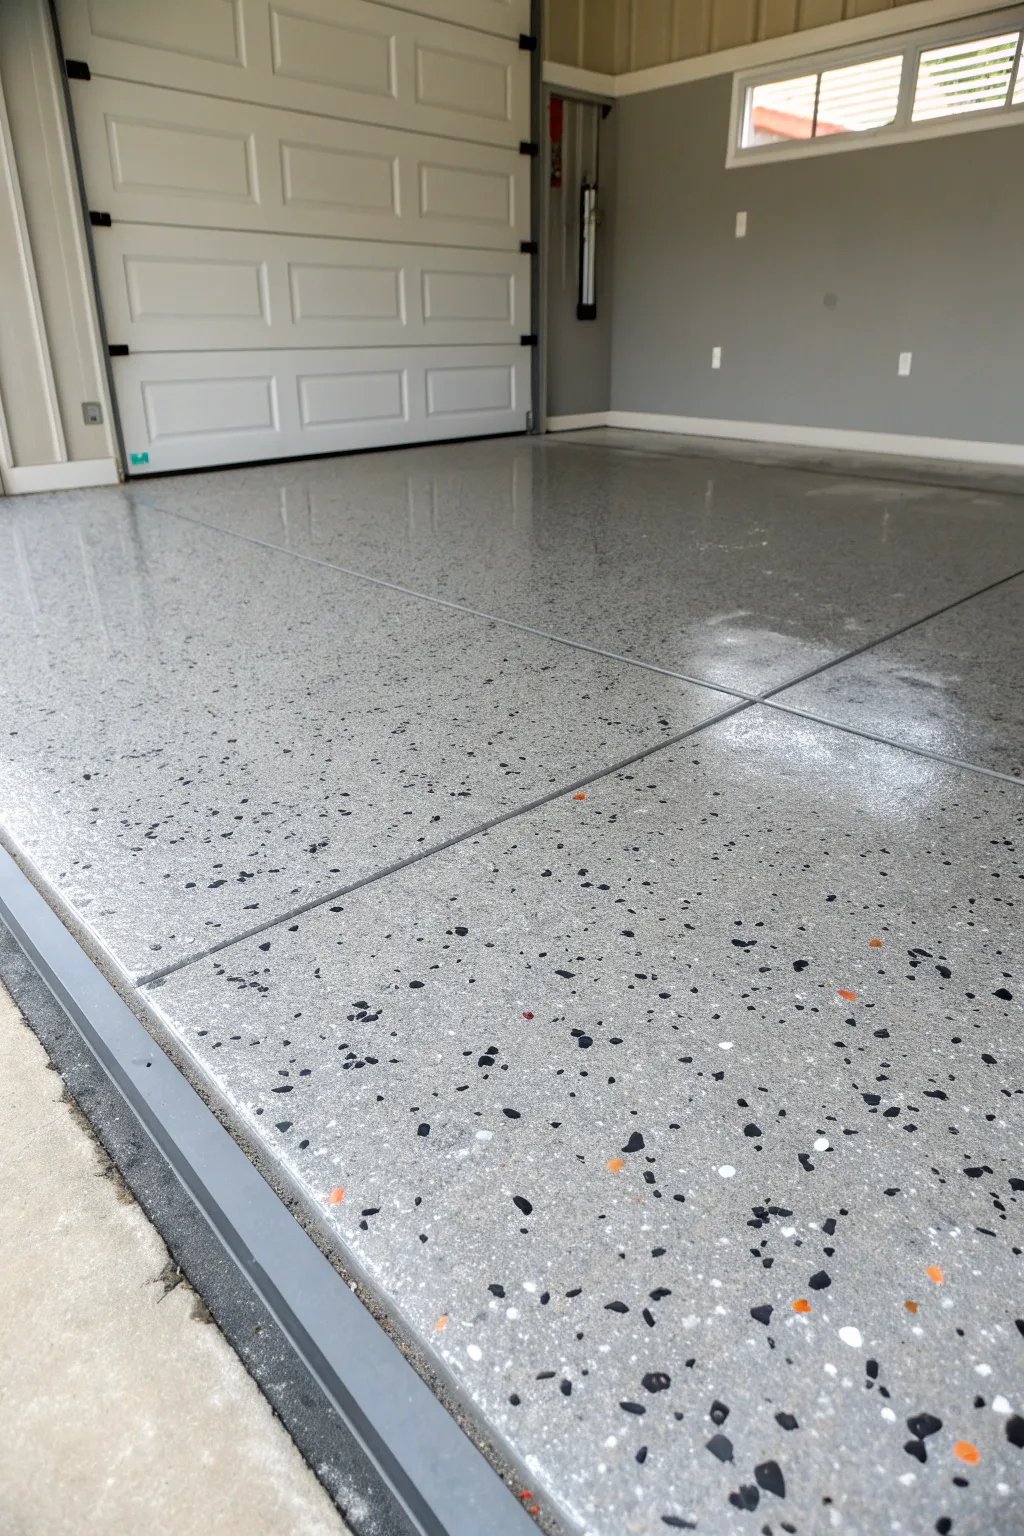
Achieve a sleek, showroom-quality finish for your garage with this durable epoxy coating system. The “salt and pepper” look offers a modern industrial vibe using a light grey base sprinkled with black, white, and subtle orange flakes for depth and interest.
Step-by-Step Tutorial
Materials
- Concrete pressure washer
- Stiff-bristle broom
- Concrete degreaser/etching solution
- Epoxy crack filler (if needed)
- Painter’s tape
- 2-part Epoxy Kit (Light Grey base)
- Decorative vinyl chips (Black, White, and Orange mix)
- Clear polyaspartic or epoxy topcoat
- 9-inch paint roller frame
- Epoxy-grade 3/8-inch nap roller covers
- Paintbrush (nylon/polyester blend)
- Spiked shoes (for walking on wet epoxy)
- Mixing drill with paddle attachment
- Bucket for mixing
Step 1: Preparation & Cleaning
-
Clear and sweep:
Remove absolutely everything from the garage floor. Sweep away all loose dust, dirt, and cobwebs with a stiff-bristle broom. -
Degrease stains:
Identify any oil or grease spots. Apply a concrete degreaser directly to these areas, scrub vigorously with a stiff brush, and rinse thoroughly. -
Etch the concrete:
Mix your etching solution according to the package instructions. Apply it to the damp floor to open up the concrete pores; it should fizz slightly. -
Rinse and dry:
Pressure wash or hose down the entire floor to remove all etching residue. Allow the concrete to dry completely for at least 24-48 hours—moisture is the enemy of epoxy adhesion. -
Repair imperfections:
Fill any cracks or pits with an epoxy crack filler. Smooth it out with a putty knife so it is flush with the floor surface.
Moisture Test Trick
Before painting, tape a 2×2 plastic sheet to the concrete for 24 hours. If the concrete is darker underneath or there’s condensation on the plastic, wait longer for the floor to dry.
Step 2: Applying the Base Coat
-
Mask the perimeter:
Apply painter’s tape along the bottom edge of the wall trim or baseboards to protect them from wandering rollers. -
Preparation for mixing:
Set up a mixing station on a tarp outside or on a protected surface. Have your spiked shoes ready to strap on. -
Mix the epoxy:
Combine Part A and Part B of your light grey epoxy kit. Use a drill with a mixing paddle on low speed to blend them thoroughly for the time specified by the manufacturer (usually 2-3 minutes). -
Cut in the edges:
Using your paintbrush, paint a 3-4 inch border of the mixed epoxy along the walls and corners of the garage. -
Roll out the epoxy:
Pour the mixed epoxy into a roller tray or directly onto the floor in ribbons. Use the 3/8-inch nap roller to spread it evenly in 4×4 foot sections. I find working in these smaller grids helps maintain a wet edge.
Step 3: Broadcasting the Flakes
-
Prepare the flake mix:
Before the epoxy dries, mix your black, white, and orange chips in a bucket if they aren’t pre-blended. You want an even distribution of colors. -
The toss technique:
Take a handful of flakes and toss them upward (like feeding chickens) rather than throwing them down at the floor. This allows them to rain down evenly into the wet epoxy. -
Apply to wet sections:
As you finish rolling a section, immediately broadcast the flakes while the epoxy is still wet. Aim for a medium coverage density to mimic the salt-and-pepper look shown in the photo. -
Repeat until finished:
Continue rolling a section of grey epoxy and then broadcasting flakes until the entire floor is covered. -
Initial cure:
Allow the base coat and flakes to cure for at least 12–24 hours, depending on humidity and temperature.
Don’t Skimp on Flakes
Always buy 20% more chips than you think you need. Running out of flakes halfway through leaves a visible seam where the texture density changes.
Step 4: Finishing Touches
-
Scrape the surface:
Once hard, walk over the floor with a floor scraper or a pole sander to knock down any sharp, vertical-standing flakes. -
Vacuum debris:
Thoroughly vacuum the entire floor to remove the loose flake debris you just scraped off. You want a clean surface for the topcoat. -
Apply clear topcoat:
Mix and apply your clear polyaspartic or epoxy topcoat using a clean roller. cover the entire floor to seal in the flakes and provide that high-gloss protective shine. -
Final cure:
Let the floor cure for at least 72 hours before driving vehicles onto it, though you can usually walk on it after 24 hours.
Enjoy your brand new, resilient floor that wipes clean effortlessly


Charcoal Base With Light Flakes
Transform a dull concrete slab into a showroom-ready surface with this modern charcoal epoxy application. The deep gray base coat provides a sophisticated background, while scattered white flakes add visual texture and hide dirt.
Detailed Instructions
Materials
- Concrete cleaner/degreaser
- Concrete acid etch or diamond grinder
- Charcoal gray epoxy kit (base and activator)
- Decorative paint chips (white and light gray blend)
- Clear epoxy topcoat (optional but recommended)
- 3-inch paintbrush (for cutting in edges)
- 9-inch paint roller with extended handle
- 3/8-inch nap roller cover (shed-resistant)
- Stir sticks
- Spiked shoes (optional)
- Painter’s tape
- Plastic sheeting
- Stiff-bristle broom
Step 1: Preparation & Cleaning
-
Clear the area:
Remove absolutely everything from the garage floor. Sweep away all loose debris, dirt, and dust with a stiff-bristle broom to ensure you’re starting with a naked surface. -
Degrease spots:
Inspect the concrete carefully for oil or grease stains. Apply a heavy-duty degreaser to these spots, scrub vigorously, and rinse thoroughly. Oil prevents adhesion, so don’t skip this. -
Etch the concrete:
Mix your acid etching solution according to the package instructions. Pour it onto the floor and scrub it in with a stiff broom; it should fizz like soda. This opens the concrete’s pores. -
Rinse and dry:
Rinse the entire floor multiple times until the water runs clear. Allow the concrete to dry completely—usually at least 24 to 48 hours depending on humidity. I like to tape a small square of plastic to the floor; if moisture appears underneath after a few hours, it’s not dry enough. -
Mask the perimeter:
Apply painter’s tape along the baseboards or walls where they meet the floor. You can also tape plastic sheeting up the walls to protect them from accidental roller splatters.
Step 2: Application
-
Mix the epoxy:
Combine the two parts of your charcoal gray epoxy (resin and hardener) in a bucket. Stir steadily for the amount of time specified on the can—usually about 3 minutes—to ensure chemically proper bonding. -
Cut in the edges:
Using your 3-inch paintbrush, paint a 3-to-4-inch strip of epoxy along the perimeter walls and corners. Do this quickly so you can maintain a ‘wet edge’ when you start rolling. -
Roll the first section:
Dip your roller into the epoxy tray and apply it to a 4×4 foot section of the floor. work in a ‘W’ pattern to distribute the paint, then roll back over it to smooth it out. -
Broadcast the flakes:
While the section is still wet, grab a handful of the white and light gray flakes. Toss them high into the air (like feeding chickens) so they float down randomly rather than throwing them directly at the floor. -
Continue section by section:
Move to the adjacent 4×4 foot area. Roll the epoxy, blending the edge with the previous section, and immediately broadcast your flakes. Repeat this until the entire floor is covered. -
Let it cure:
Allow the base coat to dry according to the manufacturer’s timeframe. Usually, this is about 12 to 24 hours for light foot traffic.
Toss it High
When applying flakes, throw them upward near the ceiling. This allows them to flutter down evenly, avoiding unsightly clumps associated with throwing them like a baseball at the ground.
Step 3: Finishing Touches
-
Remove loose flakes:
Once the floor is hard enough to walk on, sweep or vacuum up any loose flakes that didn’t adhere to the epoxy. -
Apply clear topcoat (Optional):
For extra durability and that high-gloss shine seen in the photo, mix and apply a clear coat sealer. Roll it on just like the epoxy, covering the entire surface. -
Remove tape:
Carefully peel up the painter’s tape along the walls while the topcoat is still slightly tacky to prevent peeling the coating later. -
Final cure:
Let the final surface cure completely. This typically takes 72 hours before you can drive a vehicle onto it.
Bubbling Up?
If you see bubbles forming in the wet epoxy, it’s often ‘outgassing’ from concrete that wasn’t sealed or cooled properly. Apply coatings when temps are falling (late afternoon) to reduce this.
Enjoy your durable, showroom-quality new floor that is now much easier to keep clean


Crisp Perimeter Border Lines
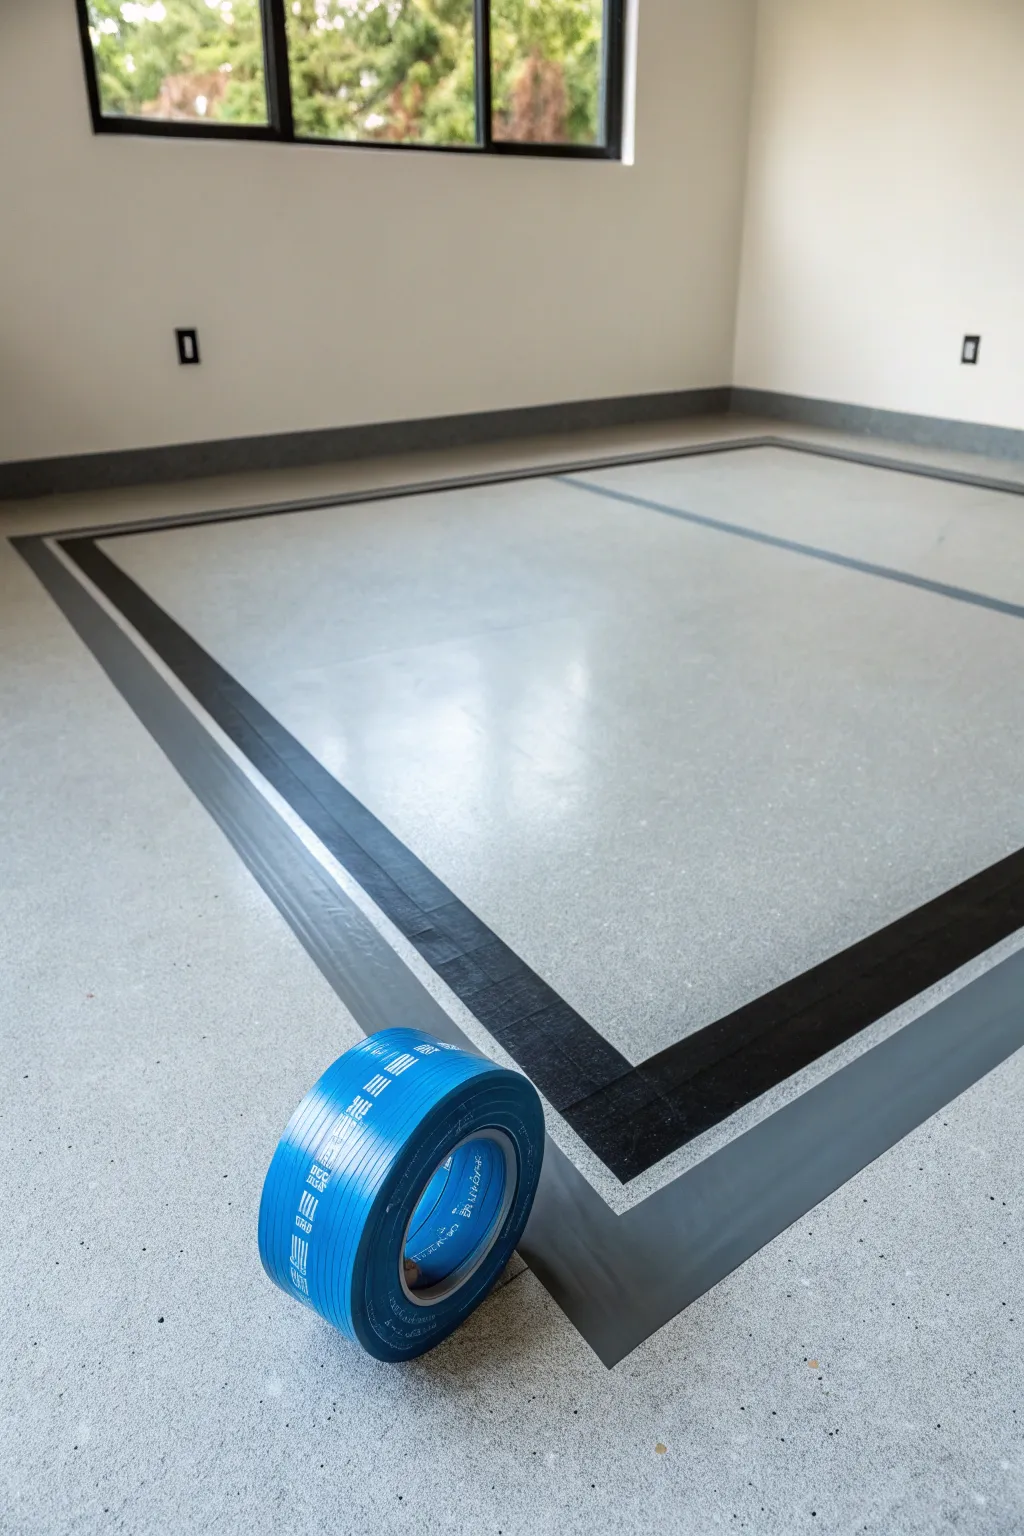
Achieve a high-end, custom look for your garage by adding precise border lines that frame parking spots or designated zones. This technique uses careful taping to create sharp geometric contrasts between the raw concrete and specialized floor paint.
Detailed Instructions
Materials
- High-adhesion painter’s tape (blue or green)
- Concrete floor paint (epoxy or latex acrylic)
- Paint roller with extension pole
- Small angled sash brush
- Measuring tape
- Chalk line or laser level
- Degreaser/concrete cleaner
- Stiff-bristle broom
- Clear concrete sealer (optional)
Step 1: Surface Preparation
-
Clean the slab:
Begin by thoroughly sweeping the entire floor area to remove loose dust and debris. A leaf blower works wonders for getting dust out of corners. -
Degrease and wash:
Scrub the concrete with a degreaser solution using a stiff-bristle broom. This removes oil stains that could repel the paint. Rinse thoroughly and let it dry completely—usually 24 to 48 hours. -
Check for moisture:
Before applying any tape, ensure there is absolutely no moisture rising from the concrete. Tape a small square of plastic down; if condensation forms underneath after a day, the floor is too damp to paint.
Bleeding Lines?
If paint seeps under the tape, wait for it to fully dry. Then, gently scrape the excess off with a razor blade or touch up closely with the original floor color.
Step 2: Mapping the Design
-
Measure the perimeter:
Determine where you want your border to sit. A common spacing is 12 to 18 inches away from the wall to create a floating effect. -
Mark the corners:
Using a pencil or chalk, mark the exact corner points for your interior rectangle. -
Snap the lines:
With a partner, stretch a chalk line between your corner marks and snap it to create a perfectly straight guide on the floor. -
Establish the border width:
Decide on the thickiness of your separation line. Measure inwards (or outwards) from your first chalk line—usually 2 to 4 inches—and snap a second parallel set of lines.
Step 3: Taping and Sealing
-
Apply the first tape run:
Lay down your painter’s tape along the *outside* of your chalk lines. Press it down firmly as you go. -
Seal the tape edge:
This is the most critical step for crisp lines. Run a putty knife or the edge of a credit card firmly over the tape edge to ensure a tight seal against the concrete texture. -
Create the inner box:
Tape off the interior rectangle, again placing the tape so the area you intend to paint is exposed. -
The bleed-block trick:
I like to brush a tiny amount of the *base* floor color (or clear matte medium) along the tape edge first. This fills any microscopic gaps so the contrast color doesn’t bleed under.
Pro Tip: Radius Corners
For a softer look, use a dinner plate as a template to draw curved corners. Use flexible vinyl tape instead of standard paper tape to follow the curve smoothly.
Step 4: Painting the Border
-
Cut in the edges:
Use your angled sash brush to carefully paint along the taped lines. Don’t overload the brush; thin coats are better to prevent pooling. -
Roll the fill:
Use a mini-roller or standard roller to fill in the space between the tape lines. Apply a consistent coat. -
Second coat application:
Allow the first coat to dry according to the manufacturer’s instructions (usually 4-6 hours), then apply a second coat for full opacity.
Step 5: The Reveal
-
Time the removal:
Don’t wait for the paint to fully cure. Carefully peel off the tape while the final coat is still slightly tacky to the touch. -
Peel at an angle:
Pull the tape back slowly at a 45-degree angle away from the painted edge. This slices through the paint film cleanly. -
Final cure:
Let the floor cure undisturbed for at least 72 hours before driving any vehicles onto the new surface.
With these sharp lines in place, your garage will feel less like a storage unit and more like a showroom for your vehicle
BRUSH GUIDE
The Right Brush for Every Stroke
From clean lines to bold texture — master brush choice, stroke control, and essential techniques.
Explore the Full Guide
Subtle Speckled Stone Look
Transform a plain concrete slab into a high-end, showroom-quality surface that mimics the appearance of speckled granite. This epoxy flake system not only looks sophisticated but creates a durable, slip-resistant finish that hides dirt and imperfections beautifully.
Step-by-Step Tutorial
Materials
- Concrete degreaser and cleaner
- Hydrochloric acid or concrete etching solution
- Stiff-bristle broom or floor scrubber
- Pressure washer (optional but recommended)
- Epoxy floor kit (light gray base)
- Decorative vinyl color chips (black, white, gray mix)
- Clear topcoat (polyaspartic or epoxy)
- 9-inch paint roller frame and extension pole
- 3/8-inch nap roller covers (lint-free)
- 2-inch synthetic paintbrush
- Plastic watering can or spiked shoes (optional)
- Painter’s tape
- Protective gloves and eyewear
Step 1: Preparation & Cleaning
-
Clear and sweep:
Remove everything from the garage floor. Sweep away all loose dust, debris, and cobwebs, paying special attention to corners where dirt tends to accumulate. -
Degrease stain spots:
Identify any oil or grease spots on the concrete. Pour a generous amount of concrete degreaser on these areas and scrub vigorously with a stiff-bristle brush until the oil is lifted. -
Etch the concrete:
Mix your etching solution according to the manufacturer’s instructions. Pour it onto the concrete; you should hear a sizzling sound as it reacts, which opens the pores of the concrete for better adhesion. -
Scrub and rinse:
Work the etching solution into the floor with a stiff broom in a circular motion. Once etched, rinse the entire garage floor thoroughly with water—I usually rinse it three times to ensure the pH is neutralized and no residue remains. -
Dry completely:
Allow the floor to dry for at least 24 to 48 hours. The concrete must be visibly dry and moisture-free before applying any epoxy, or the coating will peel.
Step 2: Applying the Base Coat
-
Tape edges:
Apply painter’s tape along the bottom edge of the baseboards or walls to protect them from accidental roller marks. -
Mix the epoxy:
Combine Part A and Part B of your epoxy kit in a large bucket. Stir slowly and consistently for the exact time specified on the can (usually 2-3 minutes) to ensure the chemical reaction starts properly. -
Cut in the perimeter:
Using a 2-inch brush, paint a 3 to 4-inch strip of mixed epoxy along the walls and corners of the garage where a roller can’t reach easily. -
Roll out the epoxy:
Pour the epoxy into a roller tray or directly onto the floor in ribbons. Use the extension pole and roller to spread the epoxy in 4×4 foot sections, ensuring a smooth, even gray base. -
Maintain a wet edge:
Work efficiently from the back of the garage toward the exit. Always roll back into the previously painted section to blend the lines and avoid roller marks.
Throw High, Not Hard
When tossing flakes, throw them up toward the ceiling like confetti. Throwing them down creates clumps; letting them float down creates an even distribution.
Step 3: Broadcasting Flakes & Sealing
-
Prepare the chips:
Pour your decorative color chips into a clean bucket or bag so they are easy to grab by the handful. -
Broadcast the flakes:
While the base coat is still wet, toss handfuls of chips into the air—aiming upward rather than down—to let them rain down naturally onto the wet epoxy. Work in the same sections you just rolled. -
Ensure even coverage:
For the look in this photo, aim for a medium-heavy broadcast so the gray base is visible but heavily speckled. Be consistent with your throwing density to avoid patchy areas. -
Let the base cure:
Allow the base coat and chips to dry for at least 12 to 24 hours, depending on humidity and product specifications. -
Scrape and sweep:
Once hard, use a floor scraper or a stiff broom to knock down any chips that are sticking up vertically. Sweep or vacuum up all loose, unadhered chips thoroughly. -
Apply the clear topcoat:
Mix and apply the clear topcoat using a fresh roller. This seals the chips in, provides the glossy sheen seen in the image, and adds a layer of protection against tire marks. -
Final cure time:
Avoid walking on the surface for 24 hours and keep cars off the driveway for at least 3 to 7 days to allow the epoxy to reach full hardness.
Bubbles in the Finish?
If you see bubbles forming in the wet epoxy, it’s likely ‘outgassing’ from warm concrete. Apply epoxy in the evening when temperatures are dropping to prevent this.
Enjoy your durable, showroom-ready garage floor that brings new life to the space
Satin-Matte Industrial Finish
Transform a dusty, boring concrete slab into a showroom-quality surface with this durable epoxy flake system. This finish mimics the look of polished granite while providing an incredibly tough, chemical-resistant barrier that hides dirt and imperfections effortlessly.
How-To Guide
Materials
- Concrete degreaser and cleaner
- Concrete etching solution (muriatic acid or citric acid based)
- Epoxy floor kit (solvent-based or high-solids preferred for durability)
- Decorative vinyl color chips (black, white, gray blend)
- Clear topcoat (polyaspartic or polyurethane)
- 3/8-inch nap paint roller covers
- Extension pole
- Stiff-bristle scrub brush
- Pressure washer or hose with high-pressure nozzle
- Painter’s tape
- Plastic sheeting
- Spiked shoes (for walking on wet epoxy)
- Shop vac
- Concrete patch compound (optional)
Step 1: Preparation & Cleaning
-
Clear and sweep:
Remove absolutely everything from the garage floor. Sweep the surface thoroughly to remove loose dust, dirt, and debris. -
Degrease spots:
Identify any oil or grease stains. Apply your heavy-duty concrete degreaser to these spots, scrub vigorously with a stiff-bristle brush, and rinse. If the water beads up, scrub it again until the water soaks in. -
Repair cracks:
Inspect the floor for pitting or cracks. Fill these imperfections with a concrete patch compound and use a putty knife to smooth it flush with the surface. Let this cure completely according to the package instructions. -
Etch the concrete:
Mix your etching solution with water in a plastic watering can. Sprinkle it evenly over the floor; it should fizz and foam upon contact. Scrub the wet acid into the concrete with your stiff brush to open up the pores. -
Deep rinse:
Rinse the entire floor thoroughly with a hose or pressure washer. You need to flush out all the acid residue. I usually rinse it three times just to be safe, scrubbing while rinsing to lift fine dust. -
Dry completely:
Allow the floor to dry for at least 24 to 48 hours. The concrete must be bone dry before applying epoxy. Tape plastic sheeting to the floor for an hour; if moisture appears underneath, it needs more drying time.
Step 2: Base Coat Application
-
Tape edges:
Apply painter’s tape along the bottom edge of the baseboards or walls to protect them from accidental splashes. -
Mix the epoxy:
Combine Part A and Part B of your epoxy kit. Stir thoroughly for exactly the amount of time specified in the instructions (usually 2-3 minutes). Do not whip air into the mixture. -
Induction time:
Let the mixed epoxy sit in the bucket for the required induction time if your specific product calls for it. This chemical reaction is crucial for proper hardening. -
Cut in the edges:
Use a cheap chip brush to paint the epoxy along the perimeter walls and corners where a roller can’t reach. -
Roll the first section:
Pour a ribbon of epoxy onto the floor in the back corner. Use your roller on an extension pole to spread it into a thin, even layer, working in a 4×4 foot section.
Sticky Situation?
If your roller cover starts shedding lint into the epoxy, wrap the new roller in painter’s tape and rip it off quickly before starting. This removes loose fibers before they ruin your smooth finish.
Step 3: Flaking & Topcoat
-
Broadcast flakes:
While the 4×4 section is still wet, grab a handful of vinyl chips. Throw them high into the air—like you are feeding chickens—so they rain down evenly onto the wet epoxy. Aim for consistent coverage. -
Continue and blend:
Roll out the next 4×4 section of epoxy, overlapping the wet edge of the previous section. Broadcast your chips again. Repeat this process until you reach the garage exit. -
Scrape the floor:
Once the base coat is hard enough to walk on (usually roughly 12-24 hours), take a wide floor scraper or a pole sander and run it aggressively over the surface. This knocks down sharp vertical flakes. -
Vacuum debris:
Use a shop vac to remove all the loose flakes and dust created by the scraping process. The floor should feel relatively smooth to the touch now. -
Mix topcoat:
Prepare your clear coat sealant. This layer locks in the flakes and provides that glossy, industrial sheen. -
Apply clear coat:
Roll the clear topcoat over the entire floor using the same technique as the base coat. Work systematically from the back corner to the exit. -
Final cure:
Keep the garage door closed and avoid foot traffic for at least 24 hours to prevent bugs or dust from settling in the finish. Wait 72 hours before parking a car on it.
Safety Stripe Upgrade
Before the clear coat, use tape to mark a border or parking box. Paint a contrasting color, remove tape, then clear coat over everything for a custom parking zone.
Enjoy your sleek, showroom-ready garage floor that is now tough enough to handle dropped tools and muddy tires

PENCIL GUIDE
Understanding Pencil Grades from H to B
From first sketch to finished drawing — learn pencil grades, line control, and shading techniques.
Explore the Full Guide
Slip-Resistant Textured Topcoat
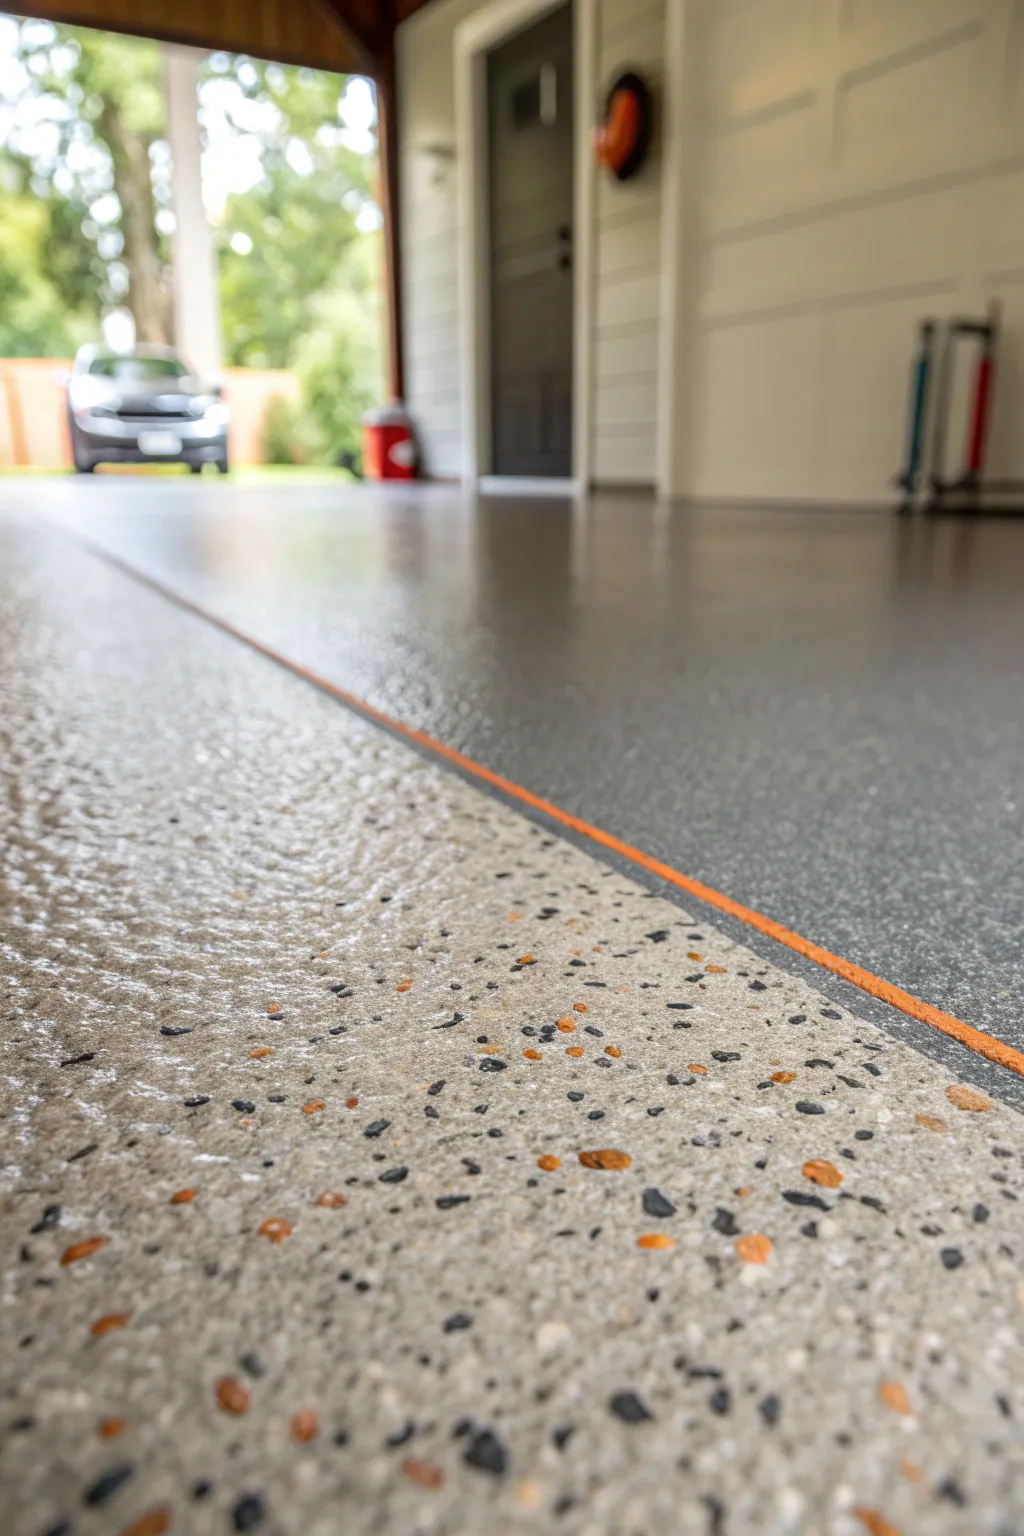
Transform your garage into a showroom with this sophisticated dual-zone floor design featuring a slip-resistant textured foreground. By combining a classic flake finish with a sleek solid gray and a bold orange separator, you create a custom look that defines functional spaces while adding safety and style.
Step-by-Step Tutorial
Materials
- High-quality concrete cleaner/degreaser
- Concrete etching solution or diamond grinder
- Painter’s tape (high adhesion for concrete)
- Epoxy primer (gray)
- Epoxy base coat (gray)
- Decorative vinyl color chips (black, white, gray, orange blend)
- Clear polyaspartic or epoxy topcoat
- Anti-slip aggregate additive (fine grit)
- Orange floor marking tape or orange epoxy paint
- Paint rollers (3/8 inch nap)
- Paint brushes (2-inch angled)
- Stiff-bristle broom
- Shop vacuum
- Spiked shoes for walking on wet epoxy
Step 1: Preparation and Cleaning
-
Clear and sweep:
Begin by removing everything from the garage floor. Sweep the entire surface thoroughly to remove loose dirt, dust, and debris. -
Degrease stains:
Identify any oil or grease spots on the concrete. Apply your heavy-duty degreaser to these areas, scrub vigorously with a stiff brush, and rinse well. -
Etch the surface:
Mix your etching solution according to the manufacturer’s instructions. Apply it to the damp floor to open the concrete pores, which is crucial for adhesion. You should hear a fizzing sound. -
Rinse and dry:
Rinse the floor thoroughly, scrubbing while you rinse to remove the etching residue. Allow the floor to dry completely, which usually takes at least 24-48 hours depending on humidity. -
Test moisture levels:
Tape a small square of plastic sheeting to the floor for 24 hours. If no condensation forms underneath, the concrete is dry enough to proceed.
Clean Edges Pro Tip
When applying the accent strip, remove the tape while the epoxy on either side is still slightly tacky. This prevents the dried paint from peeling up with the tape.
Step 2: Designing the Zones
-
Measure the transition line:
Decide where you want the visual break between the textured front area and the solid back area. Measure from the garage door threshold and mark your line across the width of the room. -
Apply the divider tape:
Lay down your orange floor marking tape along your marked line. Alternatively, tape off a thin 1/2-inch strip, paint it with orange epoxy, let it dry, and then cover it with protective tape. -
Mask the perimeter:
Run painter’s tape along the baseboards or walls to protect them from roller marks and splashes.
Step 3: Application: The Solid Zone
-
Mix the epoxy:
Mix your two-part gray epoxy base coat. Stir carefully for the recommended time to ensure the chemical reaction starts properly. -
Cut in edges:
Using a brush, paint the edges and corners of the back ‘solid gray’ zone first, working carefully near your dividing line. -
Roll the main area:
Use a roller to apply the gray epoxy to the rest of the back zone. Maintain a wet edge to ensure a seamless finish.
Level Up: Custom Logos
Use a vinyl decal of a car logo or sports team in the solid gray zone. Seal over it with your clear coat for a permanently embedded custom graphic.
Step 4: Application: The Textured Flake Zone
-
Apply base coat to foreground:
Repeat the cutting-in and rolling process for the front section of the garage using the same gray epoxy base. -
Broadcast the flakes:
While the base coat is still wet, take handfuls of your decorative chip blend (black, gray, orange) and toss them upward into the air so they rain down evenly onto the wet epoxy. -
Check for density:
I prefer to do this section in small 4×4 foot patches so the epoxy doesn’t dry before I can chip it. Aim for full rejection (completely covering the floor) or a medium broadcast depending on your preference. -
Let it cure:
Allow the base coat to cure for the manufacturer’s recommended time, usually overnight. -
Scrape and vacuum:
Once dry, scrape the flaked area firmly with a flat metal scraper to knock down any sharp, vertical-standing chips. Vacuum up all loose debris thoroughly.
Step 5: Sealing the Deal
-
Prepare the clear coat:
Mix your clear topcoat. This layer will lock in the chips and provide the final glossy sheen. -
Add slip resistance:
Pour your anti-slip aggregate into the clear coat bucket and mix frequently. This is essential for the front area where rain or snow might make smooth epoxy slippery. -
Expose the accent line:
Carefully peel up the tape protecting your orange divider line. -
Apply final clear coat:
Roll the clear coat with the anti-slip additive over the entire floor—both the solid zone and the flaked zone—sealing over the orange line for a seamless, protected finish. -
Final cure:
Stay off the floor completely for 24-48 hours before walking on it, and wait at least 3-7 days before parking a vehicle on the new surface.
Enjoy the professional look and enhanced safety of your new custom garage floor
Black-and-White Checkerboard Blocks
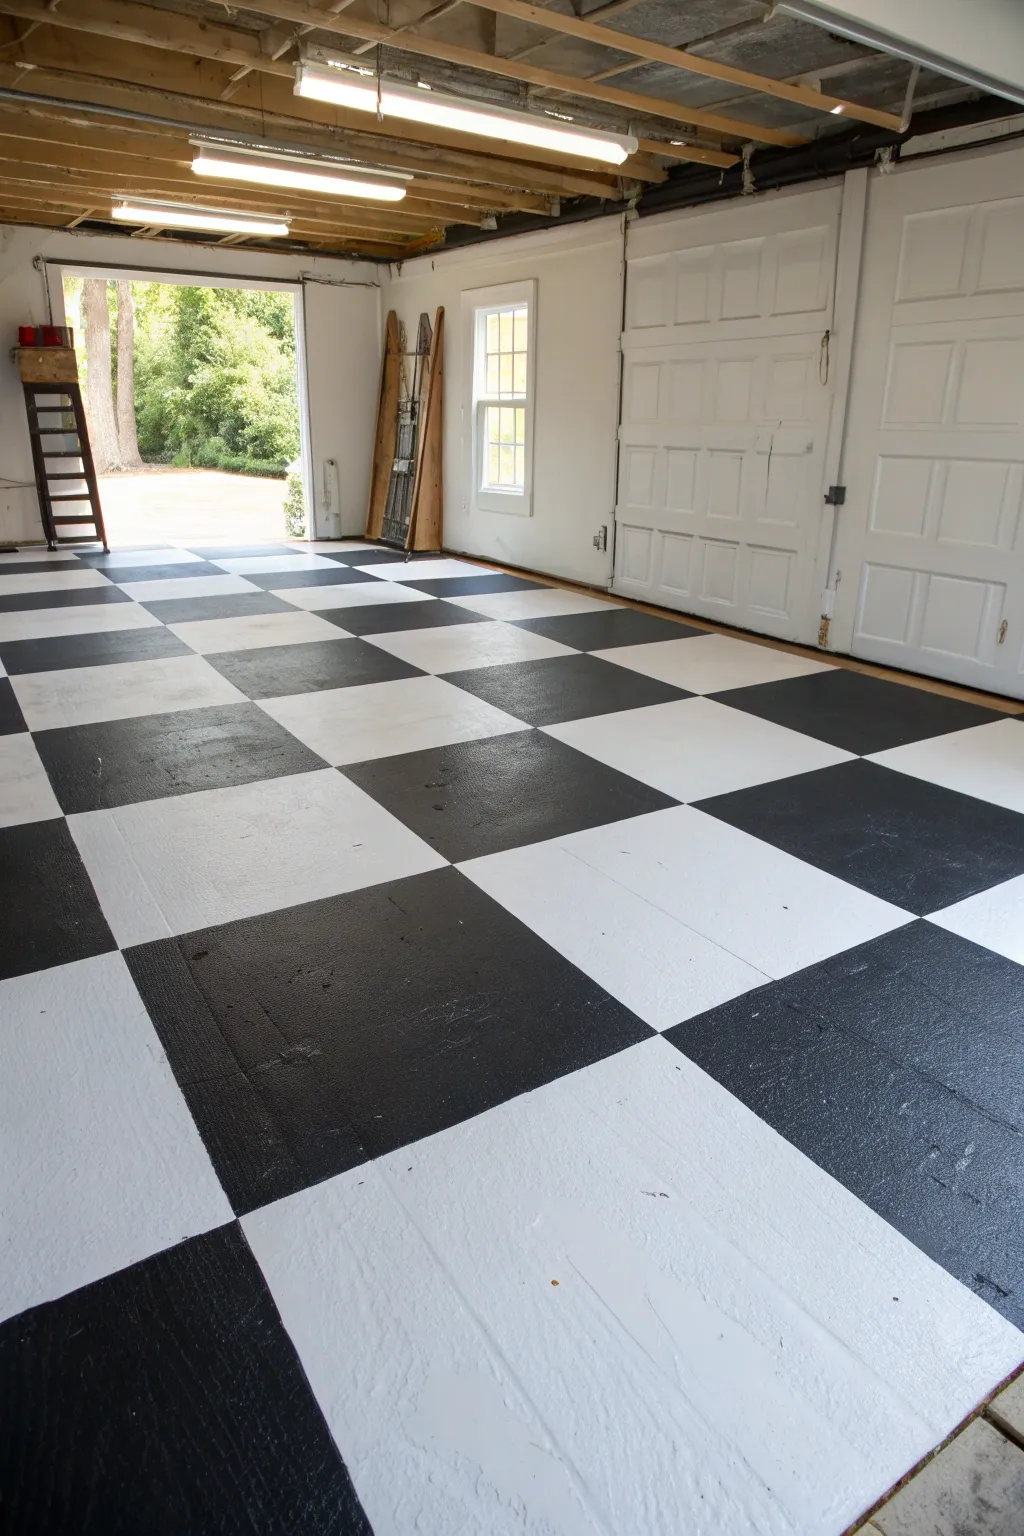
Transform a dull concrete slab into a retro-inspired showroom with this bold, high-contrast black and white checkerboard pattern. This finish is durable, visually striking, and surprisingly straightforward to achieve with patience and precise taping.
Step-by-Step Guide
Materials
- Concrete cleaner/degreaser
- Pressure washer (optional but recommended)
- Concrete etching solution (muriatic acid based)
- Concrete patch/filler
- White epoxy or aliphatic urethane floor paint (base coat)
- Black epoxy floor paint
- Clear coat concrete sealer (satin or gloss finish)
- Roller frames and extension pole
- 3/8-inch nap roller covers (lint-free)
- Stiff-bristle scrump brush
- Painter’s tape (high quality)
- Chalk line reel
- Tape measure
- Framing square
Step 1: Preparation and Cleaning
-
Assess the surface:
Begin by inspecting the concrete for cracks or pitting. Fill any significant imperfections with a concrete patch filler and smooth it down so your painted squares will look flat and professional. -
Degrease the floor:
Scrub the entire floor vigorously using a degreaser and a stiff-bristle brush to remove oil spots, tire marks, and dirt. A pressure washer serves as a great tool here to blast away stubborn grime. -
Etch the concrete:
Apply a concrete etching solution according to the manufacturer’s instructions. This opens the pores of the concrete, ensuring the paint adheres properly rather than peeling later. -
Rinse and dry:
Rinse the floor thoroughly—at least twice—to neutralize the acid. Allow the floor to dry completely, which usually takes at least 24 to 48 hours depending on humidity.
Bleed-Proof Lines
Before painting the black squares, lightly brush a thin layer of the *white* base paint over the tape edges. This seals any tiny gaps with white paint, ensuring your black lines remain perfect.
Step 2: Base Coat Application
-
Cut in the edges:
Using a brush, paint the perimeter of the garage floor with your white epoxy paint. This creates a clean border where the roller can’t reach. -
Roll the first coat:
Apply the white epoxy to the entire floor using a 3/8-inch nap roller. Work in sections, maintaining a wet edge to avoid lap marks. -
Apply a second coat:
Once the first coat is dry to the touch (check your paint can for specific recoat times), apply a second layer of white to ensure opaque, solid coverage. -
Wait for full cure:
Allow the white base coat to cure for at least 24 to 48 hours. The paint needs to be hard enough to withstand tape removal without lifting.
Add a Border
Instead of running the checkerboard wall-to-wall, leave a 6-to-12-inch solid color border around the perimeter. It frames the pattern beautifully and solves awkward partial square cuts at the walls.
Step 3: Mapping the Grid
-
Find the center:
Measure the width of the garage door opening to find the center point. Measure the back wall to find its center, then snap a chalk line connecting these two points to establish your vertical centerline. -
Determine square size:
Decide on your square size; 18-inch or 24-inch squares are standard for garages. Smaller squares can make a room look busy, while larger ones feel more expansive. -
Snap the grid:
Working out from your centerline, measure and mark your grid intervals. Snap chalk lines horizontally and vertically across the entire floor to create your checkerboard guide. -
Tape the pattern:
Here is where precision matters. Tape along the outside edges of what will become the *white* squares. You want to paint the exposed concrete inside the squares that need to be black. -
Seal the tape edges:
I like to run a putty knife or credit card firmly over all tape edges to ensure a tight seal. This prevents the black paint from bleeding under the tape and ruining your crisp lines.
Step 4: Painting and Finishing
-
Paint the black squares:
Using a smaller roller or brush, fill in the exposed squares with the black epoxy paint. Be careful not to overload the roller, as thick puddles can peel later. -
Remove tape promptly:
Once the black paint is tacky but not fully dry, carefully peel up the painter’s tape. Pulling it at a 45-degree angle away from the painted edge helps create a razor-sharp line. -
Let the pattern cure:
Allow the black squares to dry completely according to the manufacturer’s timeframe. -
Apply clear coat:
Identify a clear coat compatible with your paint system. Roll a layer over the entire floor to seal the design, protect against hot tire pickup, and add a uniform sheen. -
Final cure:
Keep the garage door closed and avoid walking on the surface for at least 24 hours, and wait at least 72 hours before parking a car inside.
Step back and admire how this timeless geometric pattern completely redefines the energy of your workspace


Wide Center Racing Stripe
Elevate your garage from a simple storage space to a showroom-worthy floor with this clean, automotive-inspired racing stripe design. The combination of a high-gloss grey base with a crisp white and tan center line adds visual length and a touch of vintage racing flair to the room.
Step-by-Step Tutorial
Materials
- Concrete cleaner and degreaser
- Concrete patch compound (if needed)
- Epoxy floor coating kit (Grey)
- Epoxy floor paint (White)
- Epoxy floor paint (Tan/Beige)
- Painter’s tape (automotive grade or high-adhesion)
- Paint rollers (3/8 inch nap) and extension pole
- Paint brushes (2-inch synthetic)
- Measuring tape
- Chalk line
- Clear coat epoxy sealant (optional but recommended)
- Protective gloves and mask
- Floor buffer or stiff push broom
Step 1: Prep & Base Coat
-
Clear and clean:
Remove absolutely everything from the garage floor. Sweep thoroughly to remove loose dust and debris. -
Degrease and etch:
Apply the concrete cleaner and degreaser according to the manufacturer’s instructions. Scrub vigorously with a stiff brush or use a pressure washer to remove oil stains and old sealers. -
Repair imperfections:
Inspect the concrete for cracks or pitting. Fill these areas with concrete patch compound and smooth them out so your final stripe won’t look wavy. -
Apply the base grey:
Mix your grey epoxy floor coating. Start by cutting in the edges of the room with a brush, then use a roller on an extension pole to cover the main floor area. -
Second coat application:
Allow the first coat to dry as per the can’s instructions (usually 12-24 hours). Apply a second coat of grey to ensure a deep, opaque finish that hides the concrete completely. -
Full cure time:
Let the base grey coat cure completely before walking on it to tape. This usually takes at least 24-48 hours; rushing this step can cause the tape to peel up your fresh paint.
Seal the Tape Edge
Before painting the white or tan stripes, paint a thin layer of the BASE GREY over the tape edge first. This seals the gap, meaning any bleed-through matches the floor.
Step 2: Designing the Stripe
-
Find the center:
Measure the width of the garage at the front limit and the back wall. Mark the exact center point at both ends. -
Snap the guide:
Have a helper hold one end of a chalk line at your front mark while you hold the other at the back. Snap a line to create your central guide. -
Mark outer boundaries:
Decide on your total stripe width. For the look in the image, measure 6 inches out from the center line on both sides (12 inches total width) and mark these spots every few feet. -
Tape the main channel:
Connect your measurement marks with painter’s tape to create the two outer boundaries of your racing stripe. Press the tape edges down firmly to prevent bleed-under. -
Create the inner separation:
Inside your 12-inch channel, you need to separate the white borders from the tan center. I like to tape off two 2-inch strips on the outer edges for the white, leaving an 8-inch section in the middle for the tan.
Step 3: Painting the Detail
-
Paint the white borders:
Using a smaller roller or a brush, carefully fill in the two outer 2-inch strips with white epoxy paint. Apply thin, even layers. -
Paint the tan center:
Fill the central channel with the tan/beige epoxy. You may need two coats for the tan to stand out vibrantly against the grey base. -
Remove tape carefully:
While the paint is still slightly tacky (not fully dry), slowly pull the tape up at a 45-degree angle. Pulling while wet helps ensure a crisp, sharp edge. -
Correct errors:
Once dry, check for any bleed-through. You can touch these up with a small artist’s brush and a bit of the base grey paint. -
Clear coat integration:
To make the stripes look like they are part of the floor rather than painted on top, apply a full clear coat epoxy over the entire garage floor. -
Final cure:
Allow the entire floor to cure for at least 72 hours before driving a vehicle onto it to prevent hot tire pickup.
Add Decorative Flakes
For a showroom texture, lightly sprinkle metallic or color-matched vinyl flakes into the wet clear coat. It hides dirt and adds serious visual depth.
Enjoy the satisfying view of your customized parking space every time you pull in
Painted “Tile” Grid With Faux Grout
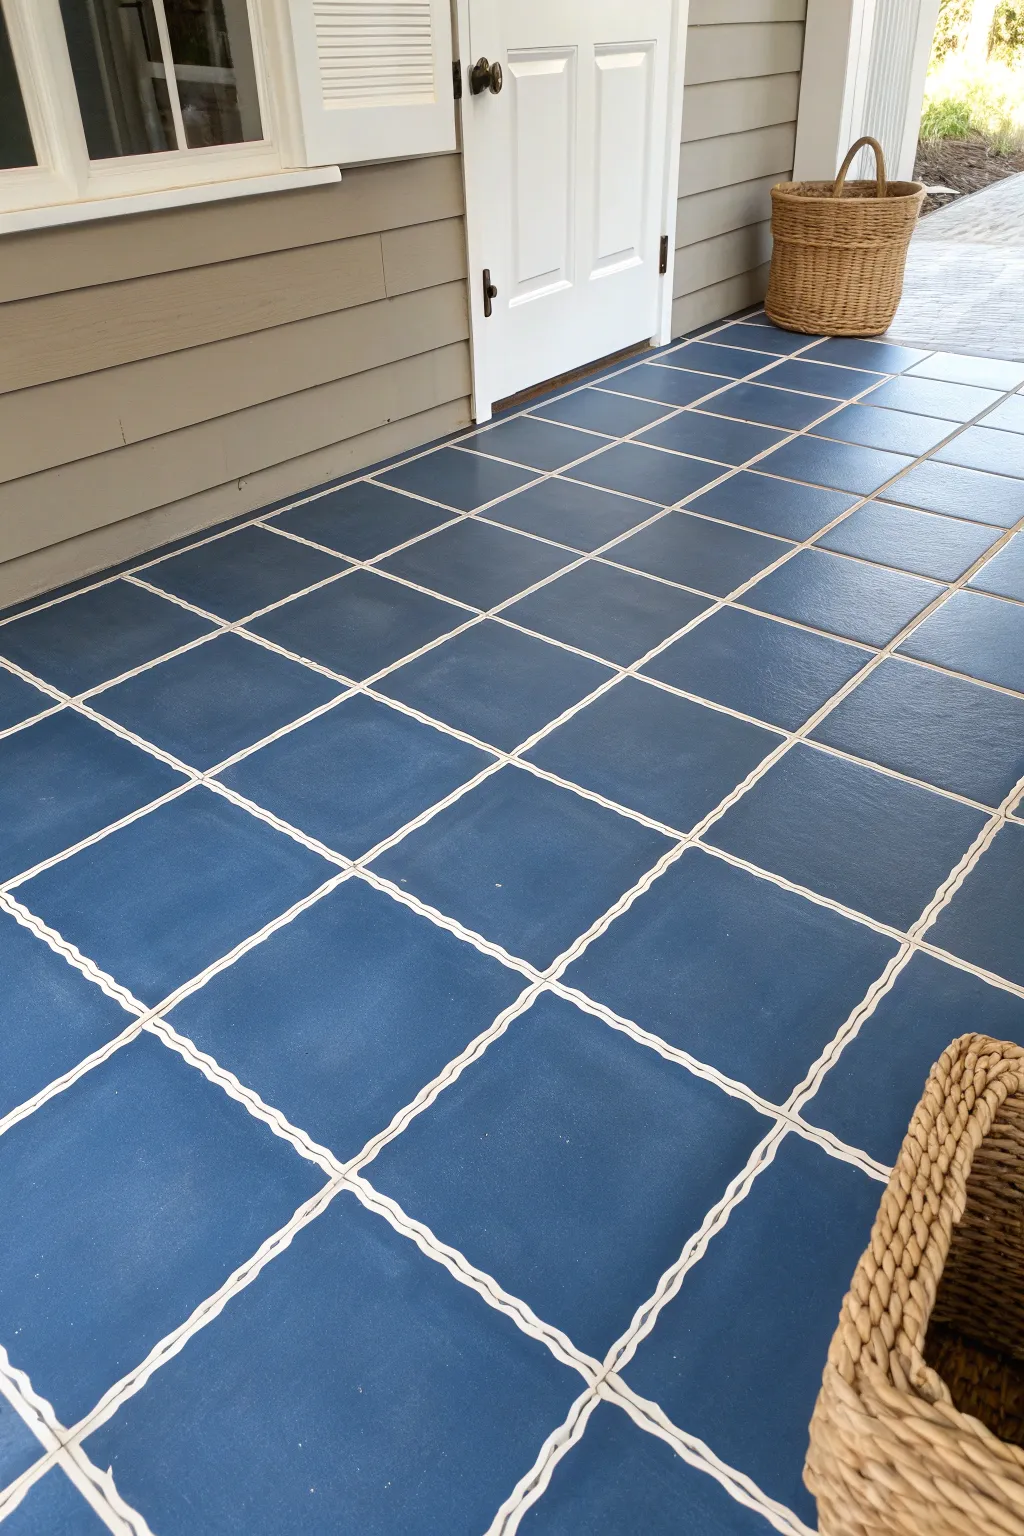
Transform a plain concrete slab into a stunning faux-tiled surface featuring deep slate-blue squares and distinctively textured, wavy grout lines. This technique avoids the rigid perfection of standard stenciling for a softer, more organic, and handcrafted aesthetic that instantly warms up a garage or porch.
How-To Guide
Materials
- Concrete cleaner and degreaser
- Concrete primer (tinted grey optional)
- White porch and floor enamel (for the grout coat)
- Deep slate blue porch and floor enamel (for the tiles)
- Painter’s tape (1/4 inch or 1/2 inch width)
- Wavy-edge painter’s tape (optional) or standard tape
- Paint rollers (standard and trim size)
- Extension pole
- Measuring tape
- Chalk line
- Pencil
- Small artist brush
- Clear concrete sealer (matte or satin)
Step 1: Preparation and Base Coat
-
Clean the slab:
Begin by thoroughly sweeping and vacuuming the entire floor. Scrub the concrete with a dedicated cleaner and degreaser to remove any oil spots or dirt; finding a clean surface is crucial for paint adhesion. -
Rinse and dry:
Rinse the floor with clean water until no soap residue remains. Allow the concrete to dry completely for at least 24 hours to prevent moisture from getting trapped under the paint. -
Fill cracks:
Inspect the floor for any significant cracks or pits. Fill these with a concrete patch compound and sand them smooth once dry so your faux tiles look uniform. -
Prime the surface:
Roll on a coat of high-quality concrete primer. This creates a bonding layer and ensures your topcoats will be durable enough for foot traffic and vehicle tires. -
Apply the grout color:
Roll two coats of white porch and floor enamel over the entire floor. This will serve as your ‘grout’ lines later, so ensure solid, opaque coverage. -
Let it cure:
Allow this white base coat to dry for roughly 48 hours. Hard drying is essential here because you will be crawling on it and applying tape that needs to come off cleanly later.
Tape Peeling Problems
If paint peels up with the tape, score the edge gently with a utility knife before pulling. Pull the tape back at a 45-degree angle, low to the ground.
Step 2: Taping the Grid
-
Measure the grid:
Decide on your tile size; large squares (like 18×18 inches) work well for garage spaces. Mark your intervals along the perimeter walls using a tape measure and pencil. -
Snap chalk lines:
With a partner, snap chalk lines across the floor connecting your pencil marks to create a grid. Use a light colored chalk that won’t bleed through the paint. -
Apply the tape:
Now, lay your tape over the chalk lines. For the specific look in the image, you have a choice: use specialized wavy-edge craft tape (if sturdy enough for floors) or simply lay standard 1/4 inch tape down in a slightly loose, hand-guided wiggle rather than pulling it perfectly taut. -
Seal the tape edges:
To prevent the blue paint from bleeding under the tape, brush a very thin layer of your *white* base paint over the tape edges. This locks the tape to the floor.
Level Up: Faux Texture
Before the blue paint dries, lightly dab it with a bunched-up plastic bag or sea sponge. This adds subtle texture, making the ’tiles’ look like real stone.
Step 3: Painting the Tiles
-
Cut in the edges:
Use a brush to carefully paint the deep slate blue color around the perimeter of the room where the roller can’t reach. -
Roll the blue coat:
Using a roller on an extension pole, apply the deep slate blue paint over the entire floor, rolling right over the tape grid. Work in sections to maintain a wet edge. -
Apply second coat:
Once the first coat is dry to the touch, apply a second coat of blue to ensure deep, rich color saturation without streakiness.
Step 4: The Big Reveal
-
Remove tape carefully:
I always find this part the most satisfying—slowly peel up the tape while the second coat is still slightly tacky (not fully cured) to avoid chipping the paint edges. -
Touch up:
Inspect your ‘grout’ lines. If any blue bled through or the white lines look too stark, use a small artist brush to tidy them up or soften edges for that hand-painted ceramic look. -
Seal the floor:
After the paint has cured for roughly 3-5 days, roll on two thin coats of clear concrete sealer. A satin finish works best to mimic the sheen of ceramic tile without being dangerously slippery.
Enjoy the durable beauty of your new custom floor that looks like expensive tiling but costs a fraction of the price
Geometric Tape-Resist Color Blocks
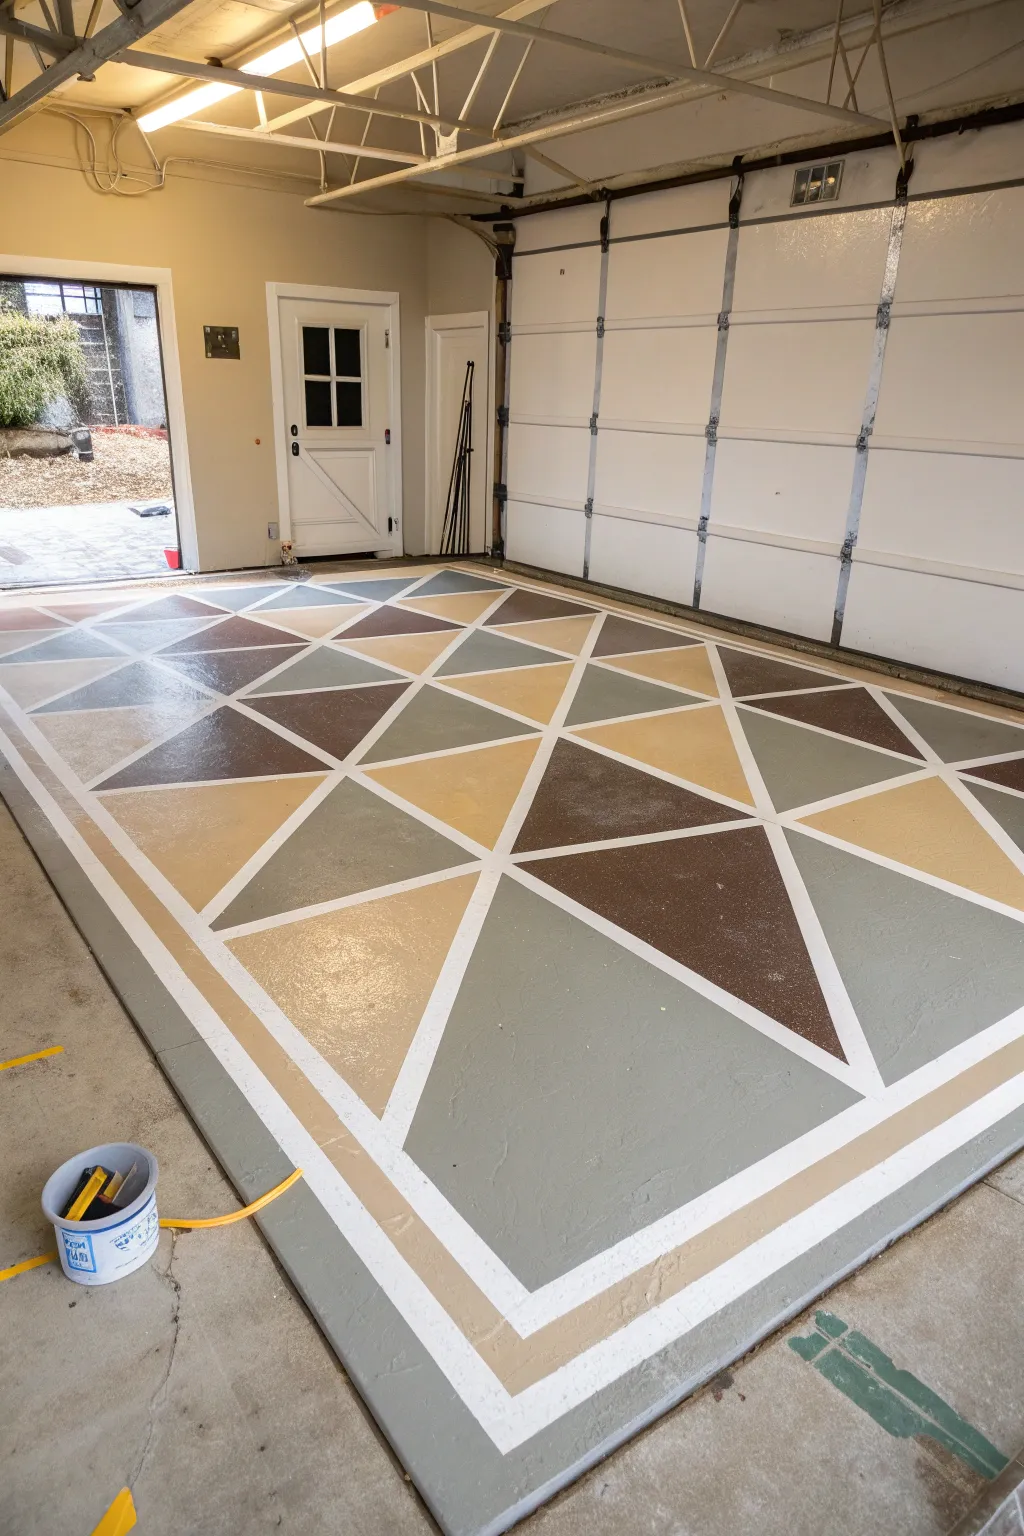
Transform a plain concrete slab into a stunning showpiece with this large-scale geometric tape-resist design. Using a palette of earth tones like chocolate brown, slate gray, and sandy beige, this project creates a sophisticated, durable rug-like effect right on your garage floor.
Step-by-Step
Materials
- Concrete cleaner/degreaser
- Concrete etcher (if floor is unsealed)
- Epoxy or acrylic garage floor paint (Base color: White)
- Epoxy or acrylic garage floor paint (Accent colors: Dark Brown, Slate Gray, Tan/Beige)
- Painter’s tape (1-inch and 2-inch widths)
- Paint rollers (standard 9-inch and smaller 4-inch for detail work)
- Extension pole
- Measuring tape
- Chalk line
- Stiff bristle brush
- Clear concrete sealer (optional topcoat)
Step 1: Preparation & Base Coat
-
Clean the surface:
Before any paint touches the ground, give the garage floor a thorough scrubbing. Use a stiff bristle brush and a concrete degreaser to remove any oil spots or dirt, then rinse completely and let it dry for at least 24 hours. -
Etch the concrete:
If your concrete is smooth or previously unpainted, use a concrete etcher according to the package directions. This opens the pores of the concrete, ensuring the paint adheres properly. -
Apply the base color:
Roll out your base color—in this case, white—across the entire intended design area. This white layer will eventually become the ‘grout lines’ between your geometric shapes. Two coats are usually best for solid coverage. -
Allow for curing:
Patience is key here. Let the white base coat cure fully, typically for 24 to 48 hours, so the tape won’t peel it up in the next phase.
Sticky Situation Tip
Use high-quality tape rated for multiple surfaces. Press edges down firmly with a putty knife to stop bleed-under on textured concrete.
Step 2: Drafting the Design
-
Establish the border:
Define the outer edge of your ‘rug’ area using painter’s tape. Create a double border by placing two strips of tape about 4 to 6 inches apart, leaving a gap that will later be painted tan. -
Mark the grid:
Measure the interior space and mark a grid of squares using a chalk line. For this large-scale look, 2-foot or 3-foot squares work well. -
Create the diagonals:
Snap diagonal chalk lines through your grid squares to create the triangle foundation. You want intersecting diagonals that form ‘X’ shapes across the grid. -
Tape the pattern:
Apply 1-inch painter’s tape firmly over all your chalk lines. Run your finger or a dry rag over the tape edges to ensure a tight seal against the concrete.
Add Decorative Flakes
While the colored paint is wet, sprinkle color-coordinating vinyl chips sparsely into the triangles for texture and a pro-finish granite look.
Step 3: Painting the Colors
-
Seal the tape edges:
I always take a minute to lightly brush a tiny bit of the white base paint over the tape edges. This seals the tape and prevents the color from bleeding underneath. -
Plan your palette:
Before painting, map out where your colors (Dark Brown, Slate Gray, Tan) will go. You can stick small pieces of colored tape in each triangle to keep track of the pattern and ensure random distribution. -
Paint the first color:
Start with the Tan/Beige paint. Use a small roller to fill in the designated triangles and the outer border strip. Do not cross the tape lines. -
Apply the gray tones:
Next, fill in the Slate Gray sections. Be careful near the wet tan edges; relying on the tape as a barrier is fine, but work cleanly. -
Fill the dark accents:
Finally, paint the remaining triangles with the Dark Brown epoxy. This provides the high contrast that anchors the design. -
Check for coverage:
Once the first coat of colors is touch-dry, inspect for thin spots. Apply a second coat to the colored triangles if the white base is showing through.
Step 4: Reveal & Finish
-
The peel reveal:
While the final coat is still slightly tacky (usually about an hour after painting), slowly pull up the painter’s tape. Pull at a 45-degree angle away from the fresh paint for the crispest lines. -
Clean up chalk lines:
If any chalk residue remains in your white lines, gently wipe it away with a damp cloth once the paint is fully hard to the touch. -
Add a topcoat:
To protect your handywork from hot tires and oil spills, roll a clear concrete sealer over the entire floor. This also adds a nice sheen and makes cleaning easier.
Allow the floor to cure according to your paint manufacturer’s instructions before driving your car onto your new masterpiece
Stenciled Medallion Focal Point

Transform a plain concrete driveway or garage floor into a grand entrance with this striking compass rose medallion. Using a large-scale stencil and warm terracotta tones creates a sophisticated focal point that mimics the look of custom tile inlay.
Step-by-Step Tutorial
Materials
- High-quality concrete driveway paint or stain (terracotta or reddish-brown)
- Base coat concrete paint (cream or light beige, if recoloring the background)
- Large compass rose stencil (sing-piece or multi-part overlay)
- Painter’s tape (heavy-duty)
- Stencil brush (large, stiff-bristled)
- Dense foam roller
- Concrete cleaner/degreaser
- Pressure washer
- Measuring tape and chalk line
- Spray adhesive (repositionable)
- UV-resistant concrete sealer (matte or satin)
- Paint tray
- Paper towels
Step 1: Preparation
-
Clean the Surface:
Thoroughly sweep the area to remove loose dirt and debris. Scour the concrete with a degreaser to remove any oil stains, then pressure wash the entire surface to ensure the best possible paint adhesion. -
Dry Completely:
Allow the concrete to dry completely for at least 24 hours. Any trapped moisture underneath the paint can cause peeling later on. -
Find the Center:
Measure the width of your driveway or parking pad to locate the exact center point. Mark this spot with chalk. Snap a vertical and horizontal chalk line through this center point to create a crosshair guide for aligning your stencil.
Clean Edges Guarantee
Always off-load your roller on a paper towel until barely any paint comes off before touching the stencil. Less paint equals cleaner lines.
Step 2: Stenciling the Design
-
Position the Stencil:
Lay your stencil over the center mark, aligning the north/south and east/west points with your chalk lines. If your stencil comes in quadrants, place the first quadrant carefully. -
Secure the Stencil:
Apply a light mist of repositionable spray adhesive to the back of the stencil before placing it down. Press it firmly onto the concrete, then tape down all outer edges with heavy-duty painter’s tape to prevent shifting. -
Load the Roller:
Pour a small amount of terracotta paint into your tray. Load a dense foam roller, then roll it off onto paper towels until it is almost dry. I find that a ‘dry roller’ is the single most important trick to prevent paint from bleeding under the stencil edges. -
Apply the First Layer:
Roll over the stencil with light to medium pressure. The first pass might look patchy or translucent; don’t try to get solid coverage immediately, as this forces too much paint into the gaps. -
Build Color Intensity:
Once the first dusting of paint is dry to the touch (usually just a few minutes on porous concrete), apply a second and possibly third coat until the terracotta color is rich and opaque. -
Detail Work:
For the intricate braided border or the central star details, use a large stencil brush. Dip the tip in paint, offload the excess on a paper towel, and use a vertical dabbing or swirling motion to get paint into sharper corners the roller might miss. -
Repeat for Mult-Part Designs:
If using a quadrant system, carefully lift the stencil once dry and rotate it to the next section. Align the registration marks from the stencil with the previously painted section to ensure the pattern connects seamlessly.
Add Dimension
Use a darker brown paint on just one side of the compass points to create a shadow execute. This simple step makes the star look 3D.
Step 3: Finishing Touches
-
Remove Stencils:
Peel up the tape and lift the stencil straight up to avoid smudging any wet edges. If you notice any small bleed-under spots, you can touch them up with a small artist’s brush and your base concrete color. -
Add Distressing (Optional):
To mimic the weathered look in the photo, you can lightly sand parts of the design once fully dry with fine-grit sandpaper. This gives it an established, old-world stone appearance. -
Clean Up Lines:
Inspect the chalk lines you made earlier. Once the paint is fully cured, wash away the remaining chalk marks with water and a soft brush. -
Apply Sealer:
Roll a high-quality, UV-resistant concrete sealer over the entire area (including the surrounding plain concrete) to lock in the color and protect the design from tire marks and sun fading. -
Cure Time:
Follow your sealer’s specific instructions for cure time before driving any vehicles onto the surface, which usually takes 3 to 5 days depending on the weather.
Once sealed, this durable compass rose will guide guests to your door with elegant style for years to come
Smoky Cloud Blend Effect

Transform your garage from a utilitarian space to a showroom with this stunning smoky cloud blend effect. This project uses metallic pigments and careful blending to create a durable, high-gloss surface that looks like swirling marble or storm clouds caught in glass.
How-To Guide
Materials
- High-performance 2-part epoxy floor kit (base coat)
- Metallic pigment additive (Pearlescent Silver)
- Metallic pigment additive (Charcoal or Gunmetal)
- Clear epoxy topcoat kit
- Concrete etching solution or diamond grinder
- Concrete patch filler (if needed)
- 18-inch roller frame and lint-free epoxy roller covers
- 3-inch paintbrush for edging
- Squeegee (optional, for spreading)
- Drill with mixing paddle attachment
- Spiked shoes for walking on wet epoxy
- Painter’s tape
- Isopropyl alcohol (optional, for dispersal effects)
Step 1: Preparation
-
Clear and clean:
Completely empty the garage floor. Sweep away every bit of dust and debris, paying special attention to corners where dirt likes to hide. -
Repair imperfections:
Inspect the concrete for cracks or pitting. Fill any significant cracks with a concrete patch filler and smooth it down so it’s flush with the floor surface. -
Profile the concrete:
This is crucial for adhesion. Use a diamond grinder (rentable at most hardware stores) to open up the concrete pores. Alternatively, use an acid etching solution if the concrete is relatively new and clean. Rinse thoroughly and let dry completely—I like to wait at least 24 hours to ensure zero moisture remains. -
Tape the perimeter:
Apply painter’s tape along the bottom edge of the baseboards or walls to protect them from accidental splashes.
Don’t Rush the Mix
Epoxy sets quickly, but under-mixing is a disaster. Mix for the FULL time stated on the box to avoid sticky, uncured soft spots in your final floor.
Step 2: Base Coat Application
-
Mix the primer/base:
Mix your solid color epoxy base coat (usually a dark gray or black works best for this metallic look) according to the manufacturer’s instructions using your drill and mixing paddle. -
Cut in the edges:
Using a 3-inch brush, paint a border around the perimeter of the room where the roller won’t reach. -
Roll the base:
Pour the mixed base coat onto the floor in ribbons. Use the squeegee to spread it out initially, then back-roll with the 18-inch roller to ensure even coverage. Let this cure according to the specific product timeline.
Add a Border
For a truly custom look, tape off a 6-inch border and paint it a solid contrasting color (like solid black) before doing the metallic pour in the center.
Step 3: Creating the Smoky Effect
-
Prepare metallic batches:
For the metallic coat, you’ll likely need to mix a large clear epoxy batch, then split it. Tint the larger portion with your lighter silver pigment and a smaller portion with the darker charcoal pigment. -
Pour the primary color:
Wearing your spiked shoes, pour the silver metallic epoxy onto the floor in a random, serpentine pattern. -
Add the accent color:
Immediately pour the darker charcoal epoxy in veins or puddles within and around the silver pours. Don’t worry about neatness here; organic shapes are better. -
Blend with the roller:
Using a fresh roller, gently push and pull the colors into each other. Don’t over-roll, or the colors will mix into a single muddy grey. You want distinct swirls and clouds. -
Create movement:
To enhance the ‘cloud’ look, use the roller in circular or figure-eight motions rather than straight lines. This disrupts the uniform pattern and creates that smoky aesthetic. -
Optional dispersal:
If you want cells or separation effects, lightly mist isopropyl alcohol over the wet epoxy in a few spots. This disperses the pigment slightly for a unique texture. -
Let it settle:
Metallic epoxy is self-leveling. Allow it to flow and settle on its own for about 15-20 minutes. The patterns will soften and shift slightly as it levels out.
Step 4: Protection
-
Apply clear topcoat:
Once the metallic layer is cured (usually 24 hours), apply a high-gloss clear protective topcoat. This adds depth and protects that beautiful metallic finish from scratches. -
Add anti-slip grip:
Epoxy can be slippery when wet. Sprinkle a clear anti-slip aggregate into the wet topcoat if you live in a rainy area, though keep in mind it may slightly reduce the glass-like shine. -
Final cure:
Keep the garage door closed and minimize airflow to prevent dust from landing in the wet finish. Allow the floor to cure for at least 72 hours before parking a vehicle on it.
Enjoy the incredible depth and shine of your new showroom-quality garage floor
“Epoxy River” Flow Through the Floor
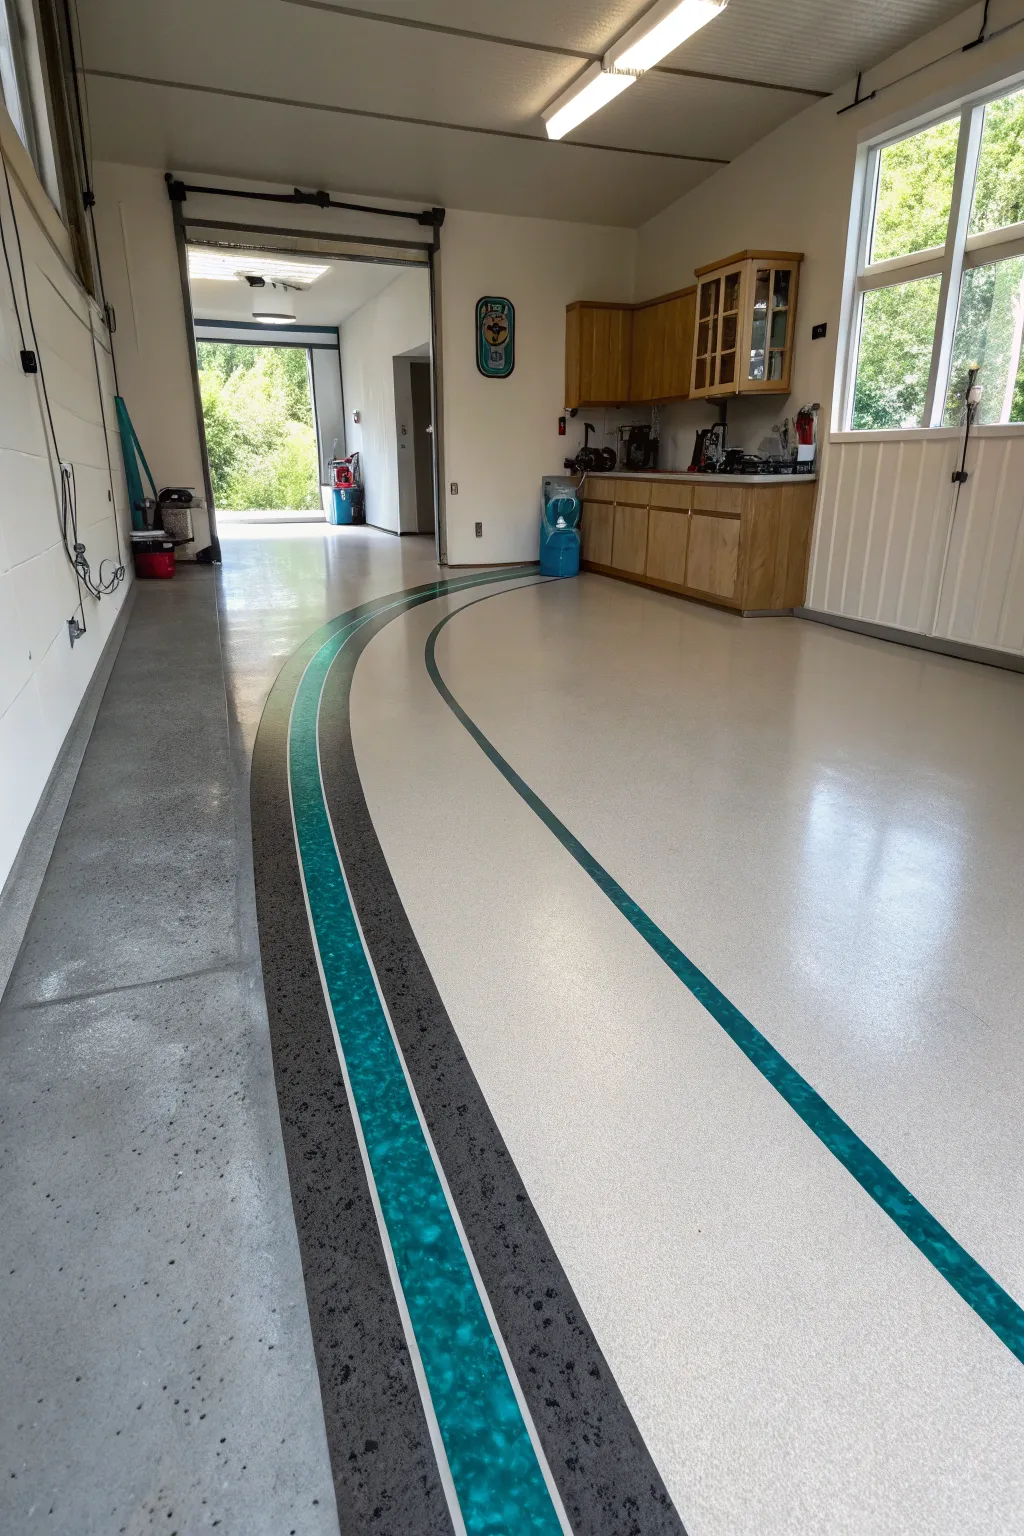
Transform a standard garage floor into a modern showroom with this striking, high-gloss ‘river’ effect. Using a combination of opaque base coats, metallic pigments, and vinyl flakes, you’ll create a durable surface that guides the eye with elegant, sweeping curves.
Detailed Instructions
Materials
- Concrete grinder or shot blaster
- Concrete patch/filler
- Moisture vapor barrier primer
- Base coat epoxy (light gray or off-white)
- Metallic epoxy pigment (Teal/Turquoise)
- Black epoxy pigment
- Vinyl chips/flakes (black/gray mix)
- Clear epoxy topcoat (UV stable)
- Painter’s tape (high-quality automotive grade works best for curves)
- 18-inch roller frame and lint-free nap rollers
- Squeegee
- Spiked shoes
- Mixing drill and paddle
- Exacto knife
Step 1: Preparation & Primer
-
Surface Grind:
Begin by mechanially grinding the entire concrete floor to open up the pores. This step is non-negotiable for proper adhesion; you want a surface texture similar to 100-grit sandpaper. -
Repair Cracks:
Inspect the floor for any divots, cracks, or pitting. Fill these with a concrete patch compound and grind them flush once cured to ensure your glossy river won’t show imperfections later. -
Clean Thoroughly:
Vacuum the floor meticulously to remove all dust. A quick wipe with a microfiber mop dampened with denatured alcohol ensures the surface is perfectly pristine. -
Apply Vapor Barrier:
Roll out your moisture vapor barrier primer across the entire floor. This prevents groundwater moisture from bubbling your beautiful epoxy later on.
Bleeding Lines?
If epoxy bleeds under the tape, let it cure, then gently scrape the excess with a razor blade or sharp chisel before pouring the adjacent color.
Step 2: Laying the River Design
-
Map the Curve:
Once the primer is dry, use a pencil on a long stick or chalk line to sketch your sweeping curve. Ensure the arc flows naturally from the entrance toward the back wall. -
Tape the Outer Border:
Apply tape along your pencil lines to define the main river channel and the separation between the teal, black, and main floor sections. Press the tape edges down firmly to prevent bleed. -
Mix Teal Metallic Epoxy:
Mix a small batch of clear epoxy with your teal metallic pigment. Mix slowly to minimize air bubbles, aiming for a rich, shimmering consistency. -
Pour the River:
Pour the teal metallic epoxy into the center channel of your taped design. Use a small squeegee or trowel to manipulate the metallic pigment, creating swirls that mimic flowing water. -
Create the Black Border:
Mix a batch of black pigmented epoxy. Carefully pour and roll this into the designated border stripe alongside the teal river. -
Broadcast Flakes (Black Section):
While the black epoxy is wet, broadcast your black/gray vinyl chips into it until rejection (full coverage) if you want the texture shown in the border. -
Remove Tape:
Carefully pull up the tape while the epoxy is still slightly tacky but has stopped flowing. This leaves a crisp edge. Allow these accent strips to cure overnight.
Step 3: Main Floor & Topcoat
-
Prep the Edges:
Lightly sand the edges of your cured river and border stripes to ensure the next coat bonds well and to knock down any high ridge lines. -
Tape Phase Two:
Re-tape exactly over the top of your cured teal and black stripes to protect them from the main floor color application. -
Apply Main Base Coat:
Mix and pour your light gray or off-white base epoxy for the rest of the garage. Squeegee it out and back-roll it to get a consistent thickness. -
Remove Protection:
Pull the protective tape off the river design before the main floor epoxy fully hardens so the edges settle and self-level slightly together. -
Clear Coat Application:
After the base coat has cured, apply a high-quality UV-stable clear topcoat over the entire floor. This unifies the sheen and protects the metallic pigments. -
Final Cure:
Keep all traffic off the floor for at least 24-48 hours, and wait a full week before parking heavy vehicles on your new surface.
Add Depth
For a 3D water effect, use a heat gun or isopropyl alcohol mist on the wet metallic teal epoxy to disperse the pigments and create unique cells.
Park your car on this masterpiece and enjoy the durability of a professional-grade custom floor
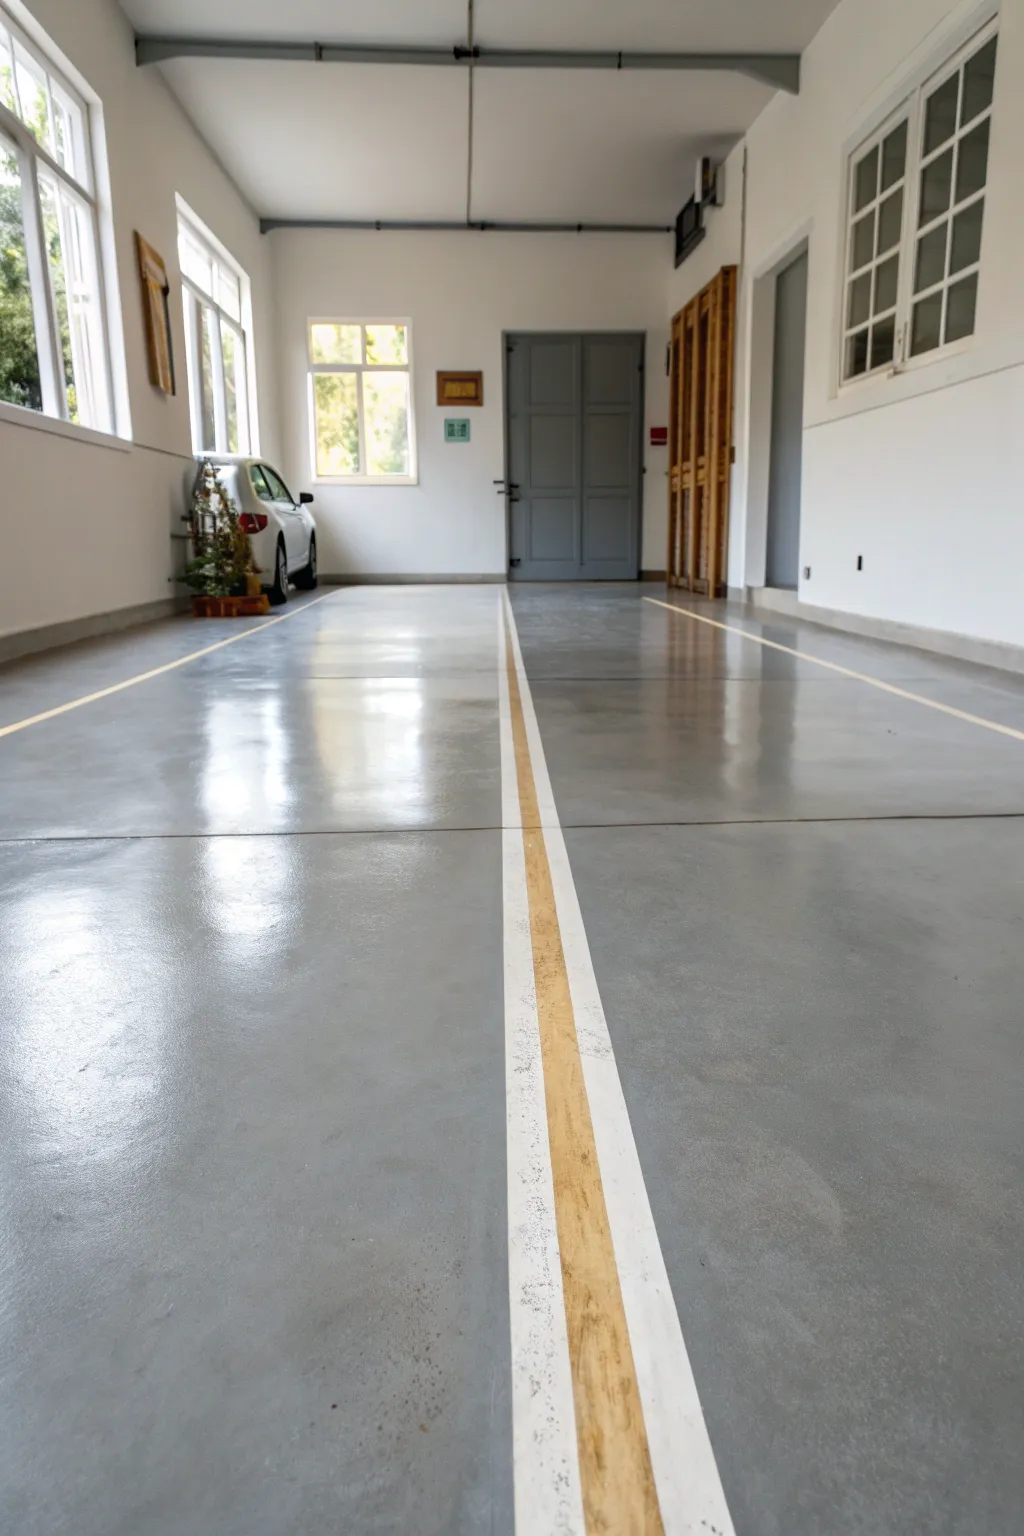
Transparent Tint Over Existing Concrete
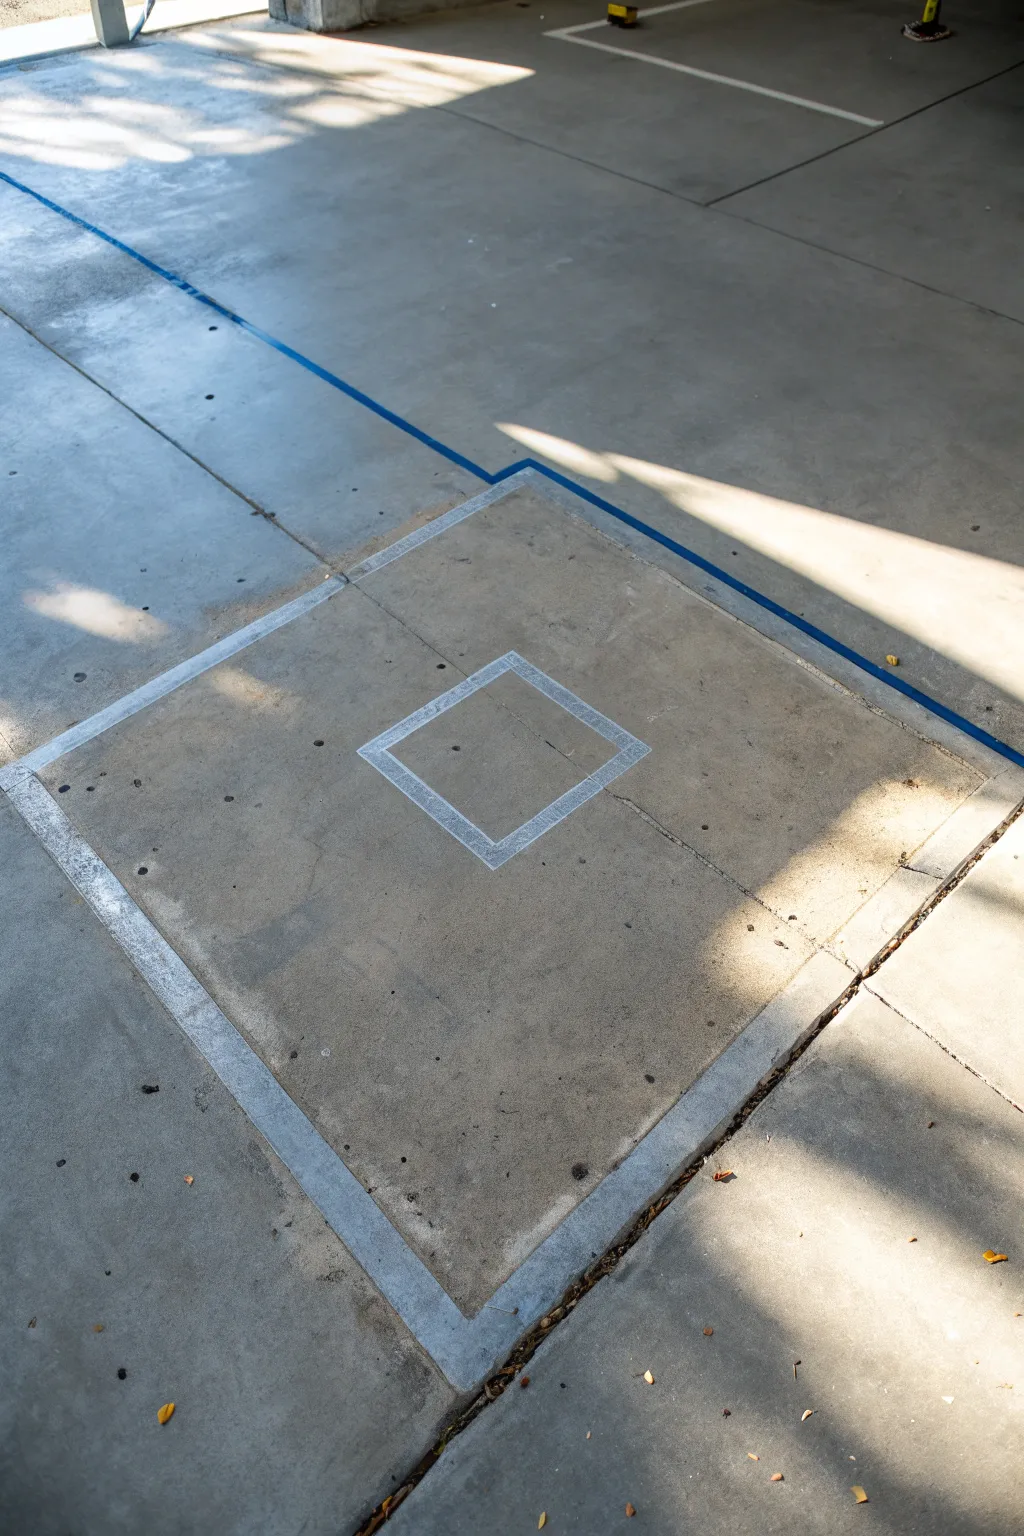
This project adds a minimalist architectural touch to your garage floor using transparent tints rather than heavy opaque paints. Ideally suited for creating a durable four-square court or simply defining a space, the result is a clean, modern look that lets the concrete’s natural character shine through.
How-To Guide
Materials
- Concrete cleaner/degreaser
- Stiff bristle scrub brush
- Pressure washer (optional but recommended)
- Painter’s tape (1-inch width)
- Painter’s tape (2-inch width, optional for wider borders)
- Measuring tape
- Chalk line or straight edge
- Pencil
- Concrete tint or semi-transparent concrete stain (white or light gray)
- Small foam roller or high-quality paint brush
- Concrete sealer (clear matte or satin)
- Paint try and liner
Step 1: Preparation
-
Clear and Sweep:
Begin by removing all items from the garage floor area you intend to work on. Sweep the entire surface thoroughly to remove loose dust, dirt, and debris that could interfere with adhesion. -
Deep Clean the Surface:
Apply a concrete cleaner or degreaser according to the manufacturer’s instructions. Scrub vigorous with a stiff bristle brush to lift oil spots and grime. -
Rinse Thoroughly:
Rinse the floor completely. A pressure washer works best here to ensure all cleaning residue is gone, but a garden hose with a high-pressure nozzle will suffice. Allow the concrete to dry completely—usually at least 24 hours.
Bleed Prevention Trick
Before applying your tint, brush a tiny amount of clear sealer along the tape edge first. This fills any concrete pores, so if anything bleeds under, it’s invisible clear sealer, not white paint.
Step 2: Layout and Taping
-
Measure the Outer Square:
Decide on the dimensions of your large square. Using a measuring tape, mark the four corners of the square with a pencil. Double-check your measurements by measuring diagonally from corner to corner; if the numbers match, your square is perfectly true. -
Mark the Center:
Find the exact center point of your large square by measuring the halfway point of each side and connecting them, or by finding where the diagonal lines intersect. -
Measure the Inner Square:
From the center point, measure outwards to mark the corners of the smaller inner square. Ensure this smaller box is perfectly centered within the larger one. -
Snap Lines:
Use a chalk line to connect your pencil marks. This gives you a clear, straight visual guide for applying your tape without having to guess. -
Apply Tape for Outer Border:
Apply painter’s tape along the *outside* edge of your chalk lines for the large square. Press the tape down firmly to prevent bleed-under. -
Create the Paint Gap:
Place a second strip of tape parallel to the first, leaving a gap of about 1 to 2 inches (depending on your desired line width). This gap is where you will apply the tint. -
Tape the Inner Square:
Repeat the taping process for the small inner square. Remember to tape both sides of the line to create a contained channel for the tint. -
Seal the Tape Edges:
I always run a putty knife or the back of my fingernail firmly along the edges of the tape to ensure a tight seal against the concrete texture.
Level Up: Ghost Lines
For an even subtler look, dilute your white paint with water (1:1 ratio) to create a ‘whitewash’ effect. This makes the geometric shape look like it’s faded naturally into the floor over time.
Step 3: Application
-
Prepare the Tint:
Stir your semi-transparent concrete stain or tint thoroughly. Since we want a washed look rather than a solid paint layer, ensure the product is mixed well so the pigment is suspended evenly. -
Apply the First Light Coat:
Using a small foam roller or brush, apply the tint within the taped lines. Use a light hand; you want to stain the concrete, not coat it thickly like wall paint. -
Feather the Edges:
As you apply, ensure you don’t let the liquid pool against the tape edge, which can cause bleeding. Work from the center of the tape gap outward. -
Assess and Recoat:
Allow the first coat to dry according to the can’s instructions (usually 1-2 hours). If you want a more distinct white line, apply a second thin coat. -
Remove Tape:
Carefully peel up the painter’s tape while the final coat is still slightly tacky. Pull the tape at a 45-degree angle away from the fresh line to keep the edge crisp. -
Clean Up Chalk:
Once the tint is fully dry (wait at least 4-6 hours), gently wipe away any remaining chalk marks with a damp cloth.
Step 4: Sealing
-
Apply Sealer:
To protect your design and the concrete, roll a clear concrete sealer over the entire area. A matte or satin finish looks best to maintain the industrial aesthetic. -
Final Cure:
Let the sealer cure for the full recommended time before walking or parking heavily on the surface.
Now you have a sleek, custom-designed floor that is ready for heavy use.
Hand-Painted Mural Sealed for Vehicles
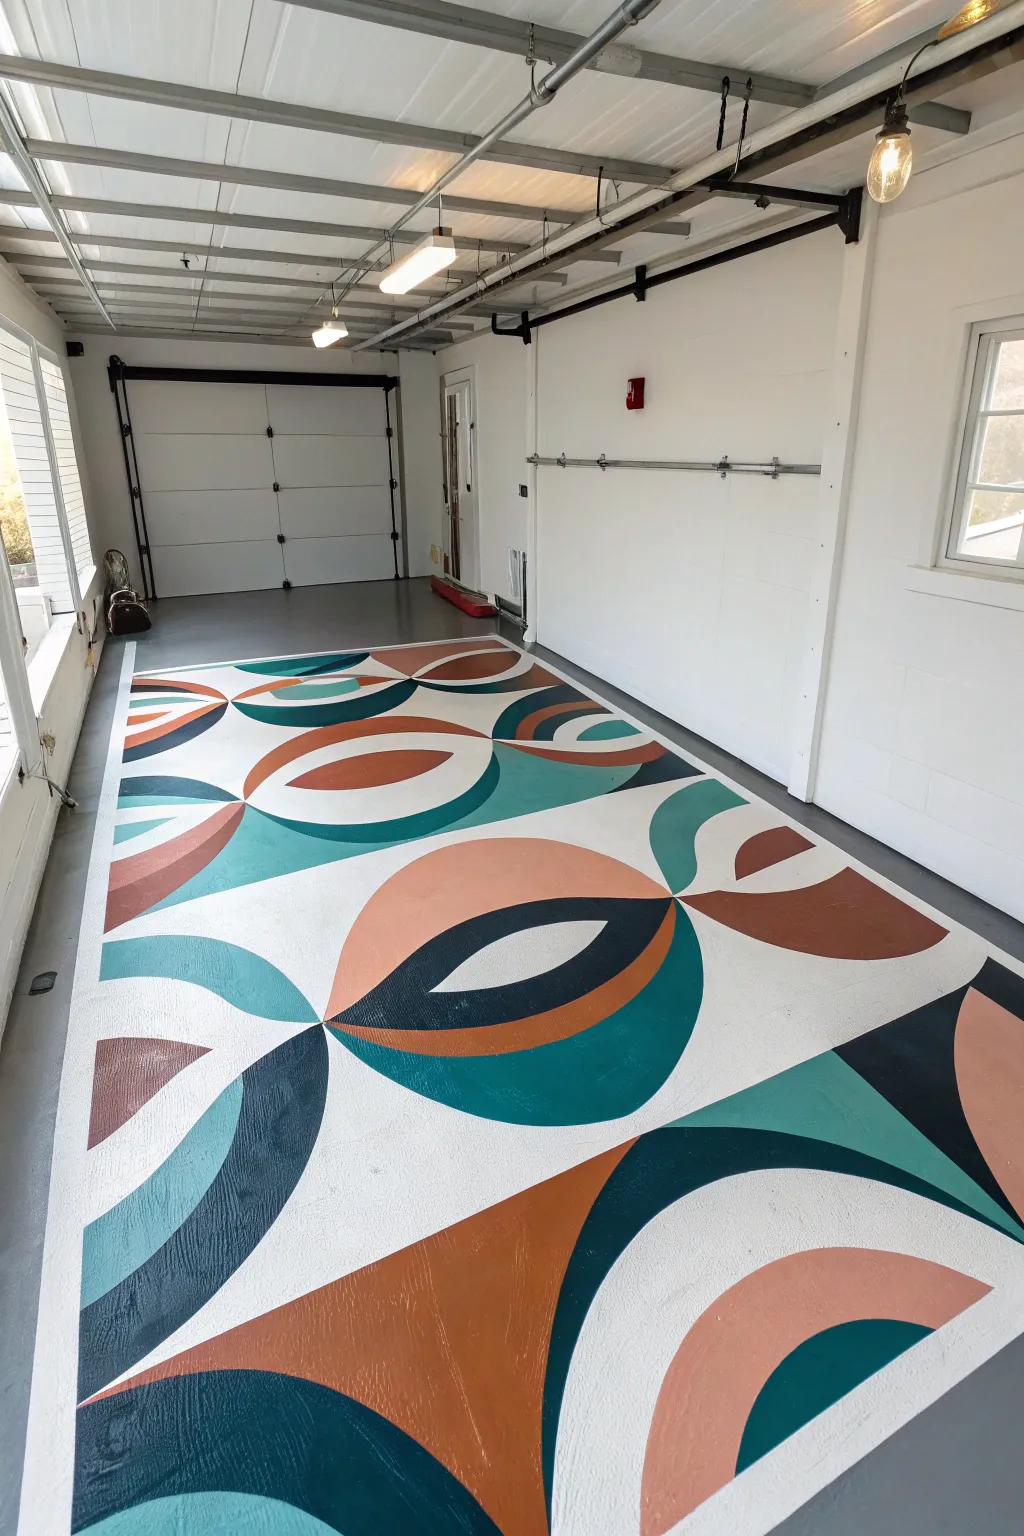
Transform a plain concrete slab into a stunning, gallery-worthy statement with this bold geometric floor mural. Featuring a striking mid-century modern palette of teal, terracotta, navy, and cream, this project uses heavy-duty products to ensure the art stands up to vehicle traffic.
Step-by-Step Guide
Materials
- Concrete cleaner and degreaser
- Concrete etch solution
- Pressure washer or stiff scrub brush
- High-quality painters tape (1-inch and 2-inch widths)
- Chalk snap line
- Pencil and large compass (or string on a pivot point)
- Concrete floor primer (white tint)
- Epoxy or polyurethane porch & floor paint (White, Teal, Terracotta/Rust, Navy Blue)
- Anti-slip additive (optional)
- Foam rollers (4-inch and 9-inch)
- Synthetic angled sash brushes (2-inch)
- Clear concrete sealer (polyaspartic or high-gloss epoxy topcoat)
- Paint try and liners
Step 1: Preparation & Priming
-
Clean the surface:
Begin by removing everything from the garage floor. Sweep thoroughly, then scrub the concrete with a degreaser to remove any oil stains that could prevent adhesion. -
Etch the concrete:
Apply a concrete etching solution according to the manufacturer’s instructions. This opens up the ‘pores’ of the concrete, creating a rougher texture that helps the paint grip tightly. -
Rinse and dry:
Rinse the floor thoroughly with a pressure washer or hose to remove all etching residue. Allow the floor to dry completely—this usually takes at least 24 to 48 hours depending on humidity. -
Apply the base coat:
Roll on a coat of white concrete primer. This serves two purposes: it ensures the topcoat adheres well and acts as the ‘white’ background color for your design, saving you from painting those sections later. -
Let the base cure:
Wait for the recommended drying time for your specific primer. I always like to give it an extra couple of hours just to be safe before walking on it to layout the design.
Clean Lines Pro-Tip
For perfectly smooth curves without buying expensive flexible tape, heat standard painter’s tape with a hair dryer as you lay it down. It makes the paper pliable enough to bend.
Step 2: Drafting the Pattern
-
Establish a grid:
Using a chalk snap line, create a large grid across the floor. This doesn’t have to be the final lines of the art, but rather reference guides to help you center the large circular elements. -
Draw the circles:
Create a makeshift compass using a string tied to a pencil, anchored at the center of your grid squares. Draw large, intersecting circles and semi-circles to form the overlapping geometric shapes. -
Refine the shapes:
Use a straightedge to connect specific points of your circles, creating the sharp angles and ‘eye’ shapes seen in the design. Sketch the final bold curves lightly in pencil. -
Tape the boundaries:
Carefully apply painter’s tape along your pencil lines. For the curved sections, you can use specialized flexible tape or tear small pieces of standard tape to navigate the overlapping arcs.
Step 3: Painting & Sealing
-
Seal the tape edges:
Brush a very thin layer of your white base color over the edges of the tape. This prevents your colored paints from bleeding underneath, ensuring razor-sharp lines. -
Paint the teal sections:
Identify all areas designated for the teal color. Use a 4-inch roller for larger fills and an angled brush for neat edges near the tape lines. -
Add the navy depth:
Move on to the deep navy blue sections. These darker shapes act as anchors for the design, providing high contrast against the white base. -
Inject warmth with terracotta:
Fill in the remaining geometric shapes with the terracotta or rust-colored paint. This warm tone balances the cool blues and gives the floor that distinct retro vibe. -
Remove tape:
Pull the tape up slowly at a 45-degree angle while the paint is still slightly tacky. If the paint fully dries, it might chip, so timing is key here. -
Touch up details:
Inspect the floor for any minor bleeds or uneven edges. Use a small artist’s brush to tidy up lines where the colors meet the white background. -
Apply the clear coat:
Once the color layer has cured for 72 hours, mix and apply a clear, high-traffic concrete sealer. Roll it on systematically to avoid missed spots. -
Final cure:
Allow the final topcoat to cure completely before driving a vehicle onto it. This often takes 5 to 7 days for full hardness, even if it feels dry to the touch sooner.
Level Up: Texture
Mix a clear anti-slip aggregate into your final sealer coat. It adds invisible texture that prevents the glossy surface from becoming dangerous when wet from rain or snow.
Your garage is now a functional art piece that greets you every time you come home


Have a question or want to share your own experience? I'd love to hear from you in the comments below!