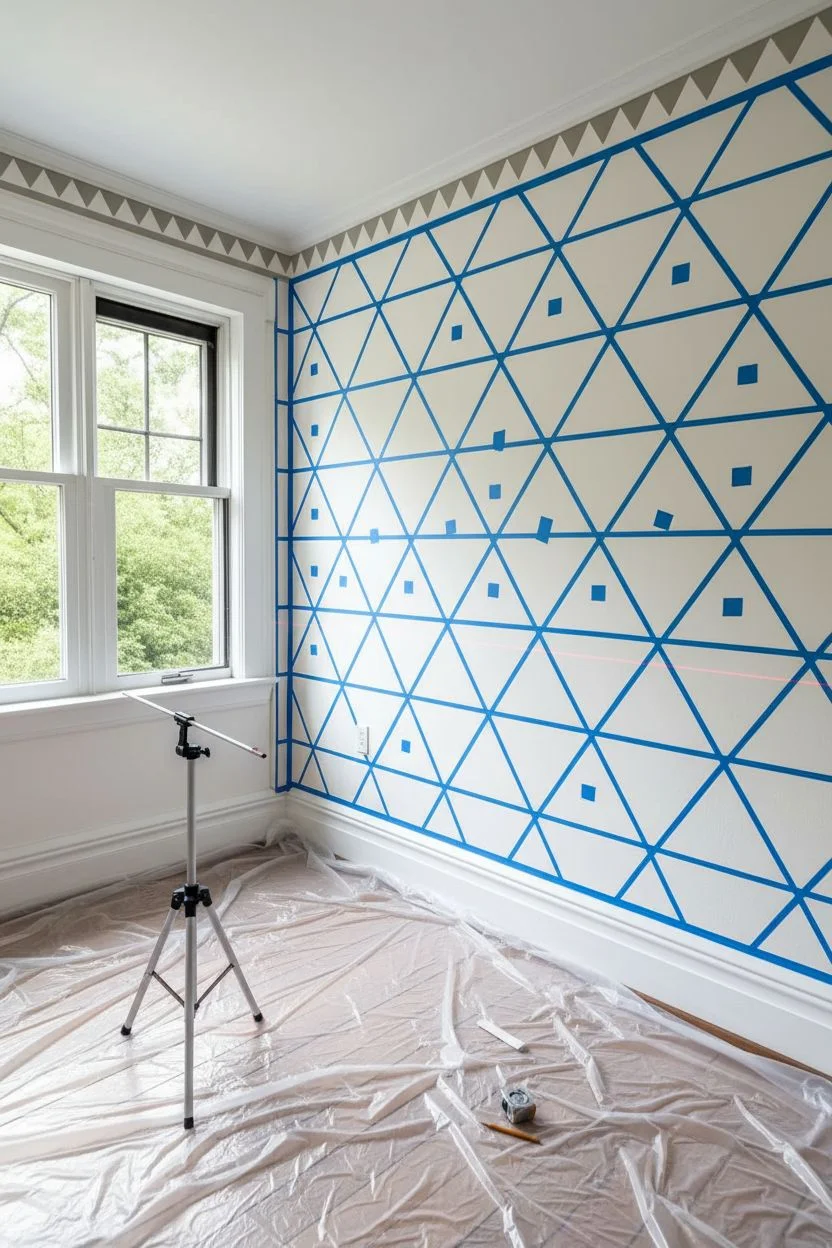
If you’ve got a plain wall staring back at you, geometric paint is my favorite way to turn it into instant art. With a little planning and some crisp tape lines, you can get a bold, modern look that feels totally custom—without a mural budget.
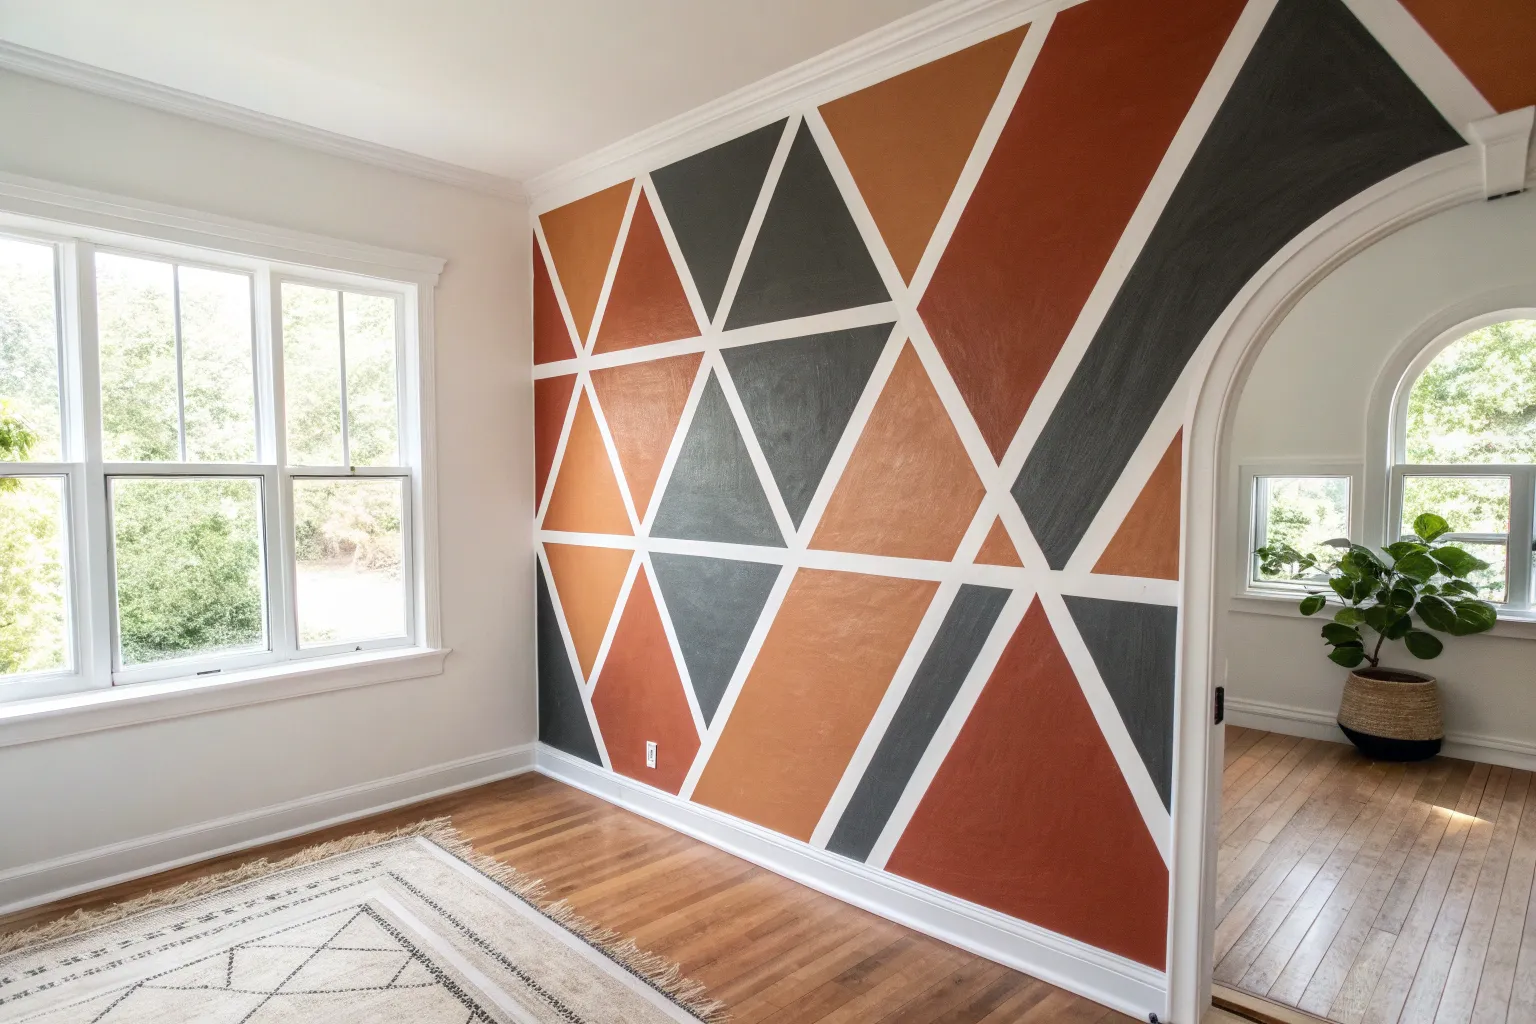
Crisp Triangle Color-Block Wall
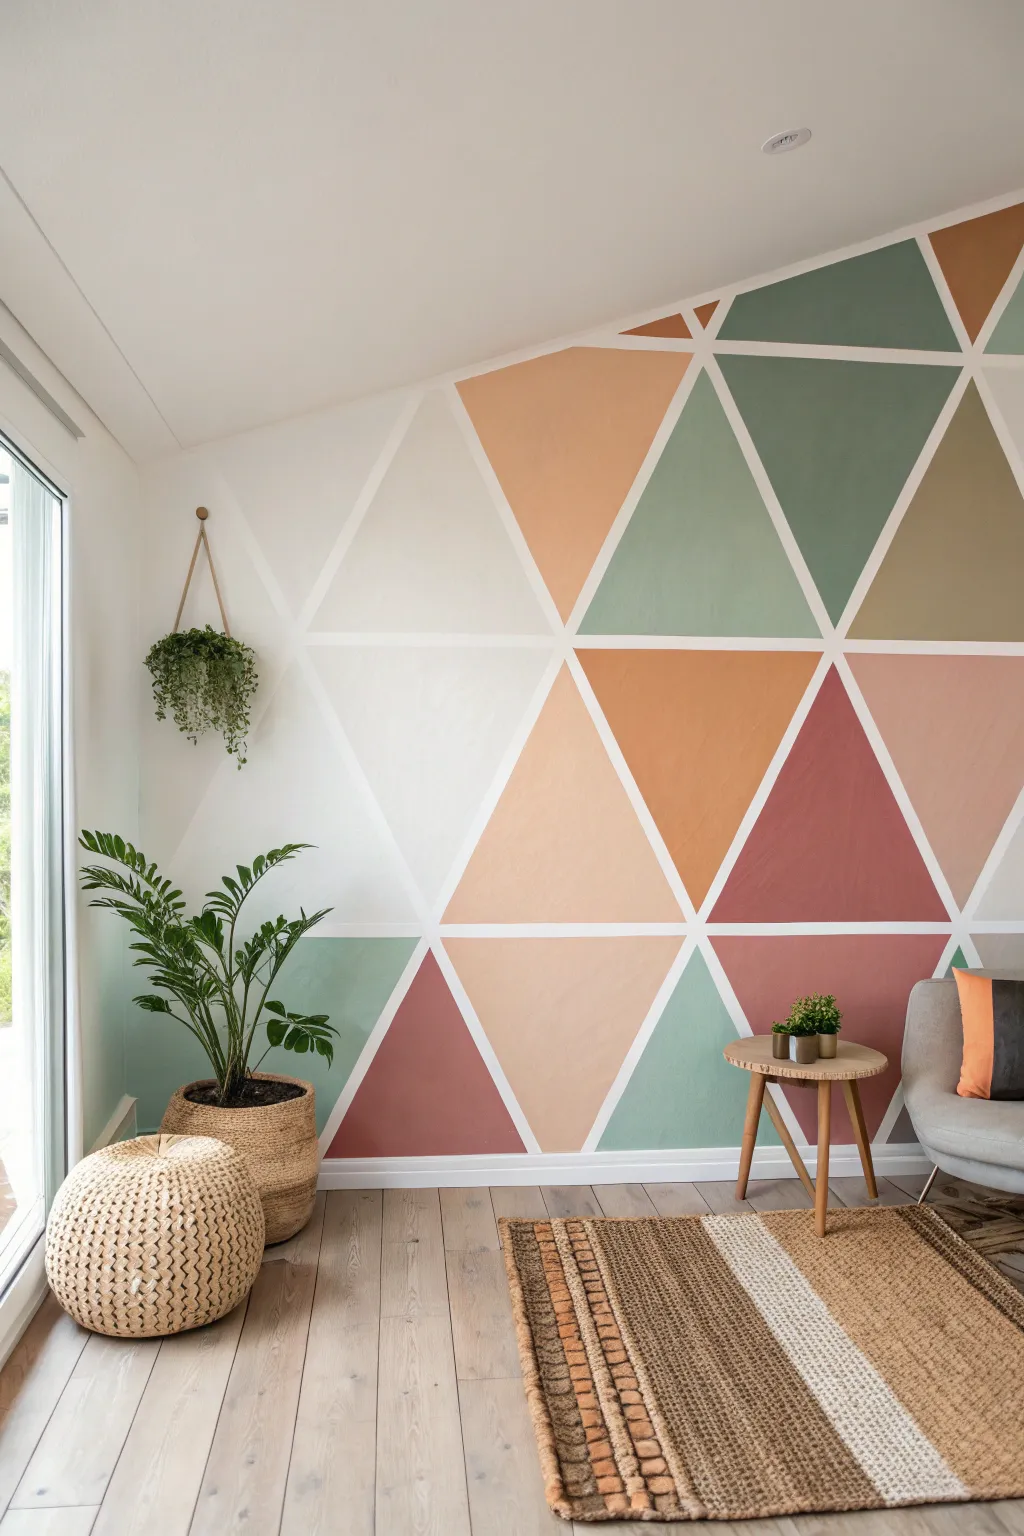
Transform a plain wall into a stunning focal point with this large-scale geometric triangle design. Featuring a warm palette of dusty pinks, terracotta, and sage greens separated by crisp white lines, this project adds immediate architectural interest and a modern touch to any space.
Step-by-Step
Materials
- Painter’s tape (1-inch width high-quality brand)
- Interior latex wall paint (White for base/lines)
- Interior latex wall paint (4-5 accent colors: Dusty Pink, Terracotta, Sage Green, Beige, Gray-Green)
- Small foam roller set
- Medium-sized paint roller and tray
- Angled sash brush (2-inch)
- Level (laser or spirit)
- Pencil
- Measuring tape
- Drop cloth
- Stepladder
Step 1: Preparation and Base Coat
-
Clear and clean:
Begin by removing all furniture, wall hangings, and outlet covers from the wall you intend to paint. Wipe the surface down with a damp cloth to remove dust and grease, ensuring the tape will stick properly later. -
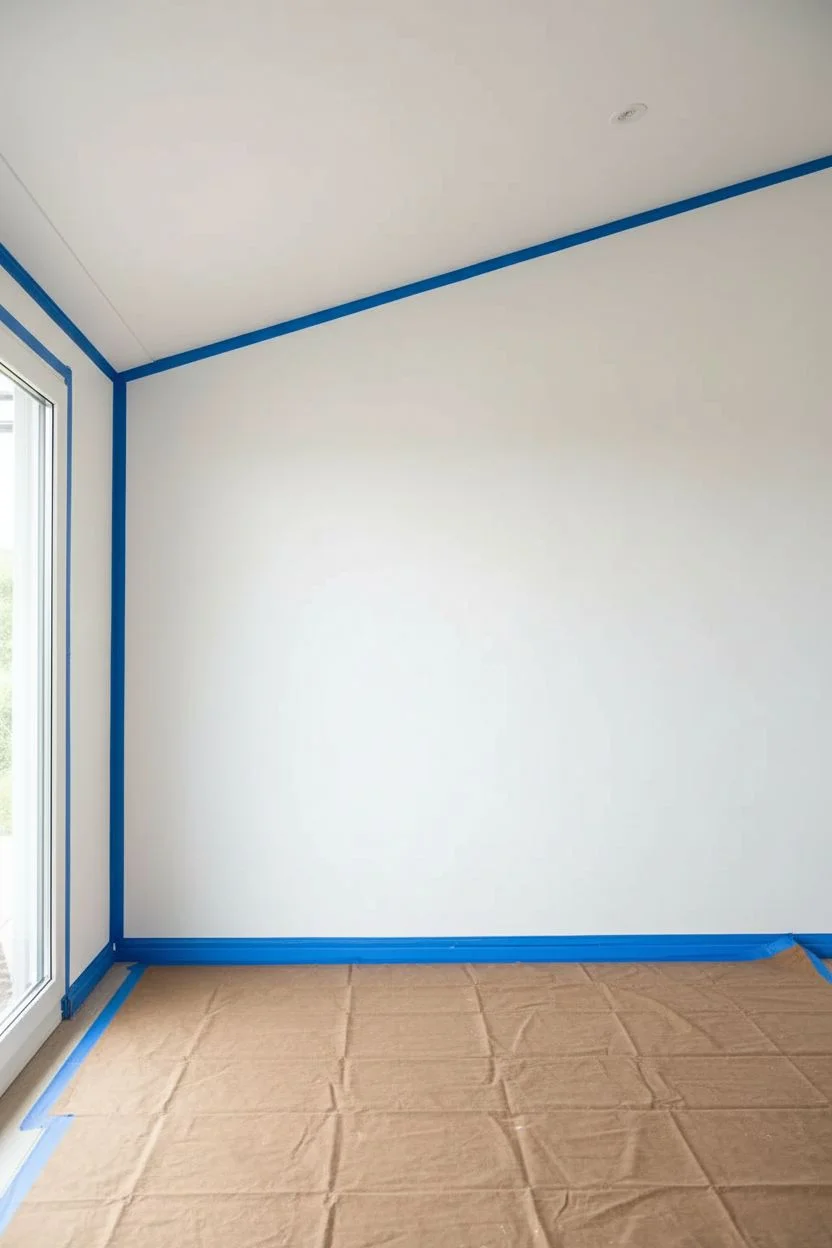
Protect the area:
Lay down a drop cloth to protect your flooring. Apply painter’s tape to the adjacent walls, ceiling line, and baseboards to keep your edges clean. -
Apply the base color:
Paint the entire wall with your chosen line color—in this case, a bright, crisp white. This will become the grid lines between the colored triangles. -
Let it cure:
Allow the white base coat to dry completely. I strongly recommend waiting at least 24 hours just to be safe; if the paint is even slightly tacky, the tape might peel it off during the next phase.
Seal the Deal
For jagged lines on textured walls, seal tape edges with a thin layer of clear matte medium or caulk before painting the colors. This guarantees a razor-sharp edge.
Step 2: Creating the Geometric Design
-
Map out the grid:
Visualize your design first. The pattern consists of large equilateral triangles. You can lightly sketch lines with a pencil, but using a laser level is the easiest way to ensure your diagonals stay straight. -
Tape the first set of diagonals:
Apply long strips of painter’s tape diagonally across the wall, all slanting in one direction (e.g., bottom-left to top-right). Space them evenly to determine the size of your triangles. -
Tape the opposing diagonals:
Apply a second set of tape strips slanting the opposite direction (top-left to bottom-right), creating a lattice of diamonds. -
Create the horizontal lines:
To finish turning the diamonds into triangles, tape horizontal lines intersecting the ‘X’ points of your diamonds. Step back frequently to check that the pattern looks balanced. -
Seal the tape edges:
This is the most critical step for crisp lines: Paint a thin layer of your base white paint *over* the edges of the tape. This seals any gaps; if paint bleeds, it will be white-on-white, invisible to the eye.
Metallic Accent
Make the design pop by painting one or two random triangles in a metallic gold or copper finish. It catches the light beautifuly and adds a luxe feel.
Step 3: Painting the Triangles
-
Plan your palette:
Mark each triangle with a small dot of the color you intend to paint it. Distribute your rusts, pinks, and greens randomly so that identical colors don’t touch each other. -
Cut in the edges:
Starting with your first color (e.g., the terracotta), use the angled sash brush to carefully paint along the inside edges of the tape triangles marked for that shade. -
Fill the centers:
Use a small foam roller to fill in the center of the triangles. The foam roller provides a smooth finish without heavy texture marks. -
Repeat for other colors:
Wash your brush and change roller heads (or use separate ones) to repeat the process for the sage green, dusty pink, and beige triangles. Work one color at a time to stay organized. -
Apply a second coat:
Once the first coat is dry to the touch, apply a second coat to ensure rich, opaque color coverage, especially for the darker charcoal or green tones.
Step 4: The Reveal
-
Remove tape carefully:
Remove the painter’s tape while the final coat is still slightly damp. Pull the tape slowly at a 45-degree angle away from the fresh paint to slice through the film rather than ripping it. -
Touch up imperfections:
Inspect the white lines. If faint bleed-through occurred, use a small artist’s brush and your white base paint to tidy up the straight edges. -
Re-stage the room:
Once fully cured, replace your outlet covers and move your furniture back in. Decorate with natural textures like woven baskets and green plants to complement the earthy tones of the wall.
Enjoy the dramatic and refreshing atmosphere your new geometric feature wall brings to the room


Bold Chevron Stripe Geometry
Transform a plain wall into a striking focal point with these massive, high-contrast chevron stripes. Pairing a deep navy blue with a warm camel tone creates a sophisticated, modern geometry that instantly elevates the room’s character.
Detailed Instructions
Materials
- Interior latex paint (Navy Blue, Satin or Eggshell)
- Interior latex paint (Camel/Tan, Satin or Eggshell)
- Base wall paint (White or Off-White)
- Painter’s tape (invest in high-quality sharp-line tape)
- Laser level or long spirit level
- Measuring tape
- Pencil and eraser
- Paint rollers (9-inch for large areas, 4-inch for edges)
- Angled sash brush (2-inch)
- Drop cloths
- Ladder
- Clear matte medium or wall base color paint (for sealing tape)
Step 1: Planning and Preparation
-
Assess the wall:
Begin by measuring the total width and height of your target wall. This scale of chevron works best on a large, uninterrupted surface, so clear away any furniture and remove outlet covers or switch plates. -
Determine the peak:
Locate the exact horizontal center of your wall. This is where the ‘V’ shape of the chevrons will peak. Mark a vertical line lightly with a pencil from floor to ceiling at this center point using your level to ensure it is perfectly plumb. -
Plan the stripe width:
Decide on the width of your stripes based on your wall height. For the look in the photo, the stripes are substantial—roughly 10 to 12 inches wide. Calculate how many repeats you can fit comfortably. -
Base coat application:
If your wall isn’t already the desired background color (white or cream), apply two coats of your base paint now. Allow this to cure for at least 24 hours before applying any tape to avoid peeling.
Step 2: Mapping the Geometry
-
Mark the intervals:
Along your center vertical line, measure and mark the points where each chevron stripe will peak. Make sure the spacing between marks accounts for both the colored stripe width and the blank space width. -
Establish the angle:
Decide on the steepness of your angle. A 45-degree angle is standard, but you can go steeper for more drama. Use a large drafting triangle or create a cardboard template to ensure every angled line remains consistent. -
Connect the dots:
Using your level or a laser guide, draw light pencil lines connecting your center marks down to the side edges of the wall. Double-check that the left slope and right slope are symmetrical. -
Tape the ‘outside’ lines:
Begin taping along your pencil lines. Remember: apply the tape on the *outside* of the area you intend to paint. If you tape on the inside, your stripe will end up narrower than planned. -
Press and seal:
Firmly press down the edges of the tape with a credit card or putty knife. I like to seal the tape edge by brushing a very thin layer of the *base wall color* (white) over the tape edge first. This creates a barrier so the colored paint won’t bleed underneath.
Tape Sealing Trick
For razor-sharp lines on textured walls, seal the tape edge with a clear matte medium instead of base paint. It fills the texture gaps perfectly without altering color opacity.
Step 3: Painting the Design
-
Organize your colors:
Mark the specific stripes lightly with ‘Blue’ or ‘Tan’ on the masking tape itself so you don’t accidentally paint the wrong section once you get into the rhythm. -
Cut in the edges:
Use your angled sash brush to carefully paint along the taped edges and corners. Work on one color group at a time—do all the navy stripes first to minimize brush washing. -
Roll the first color:
Use a small roller to fill in the navy blue stripes. Ensure you aren’t overloading the roller, as thick paint tends to seep under tape. Two thin coats are always better than one thick coat. -
Switch to the accent color:
Once the navy sections are complete, clean your tools or switch to fresh ones for the camel/tan color. Repeat the cutting-in and rolling process for these stripes. -
Partial drying time:
Let the final coat of paint set for about an hour. You want the paint to be dry to the touch but not fully cured/hardened when you remove the tape.
Switch Up The Rythm
Make the design unique by varying the stripe widths. Try alternating a thick 12-inch navy stripe with a thinner 4-inch camel stripe for a custom bar-code effect.
Step 4: The Reveal
-
Remove tape carefully:
Slowly peel the painter’s tape away at a 45-degree angle. Pulling slowly helps ensure a crisp line and prevents pulling up chunks of the dried paint. -
Touch up:
Inspect your lines closely. If there are minor bleeds, use a tiny artist’s brush and your base white paint to correct them. Allow the full wall to cure for 48 hours before leaning furniture against it.
Enjoy the dramatic energy this bold graphic pattern brings to your living space


Minimalist Painted Arch Nook
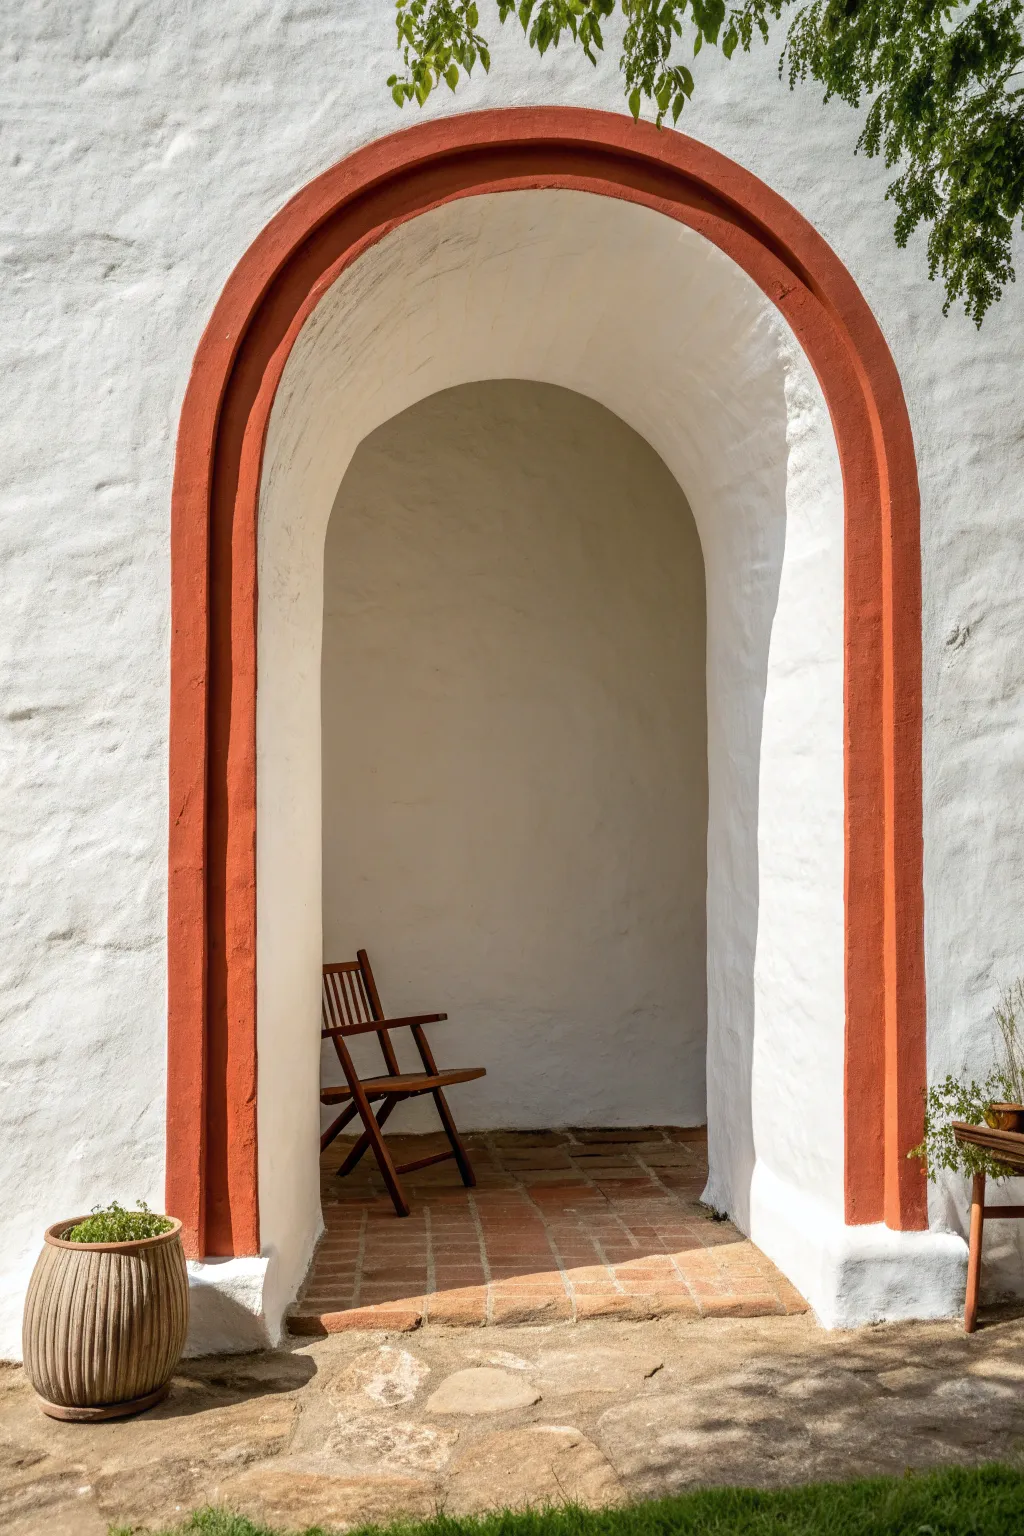
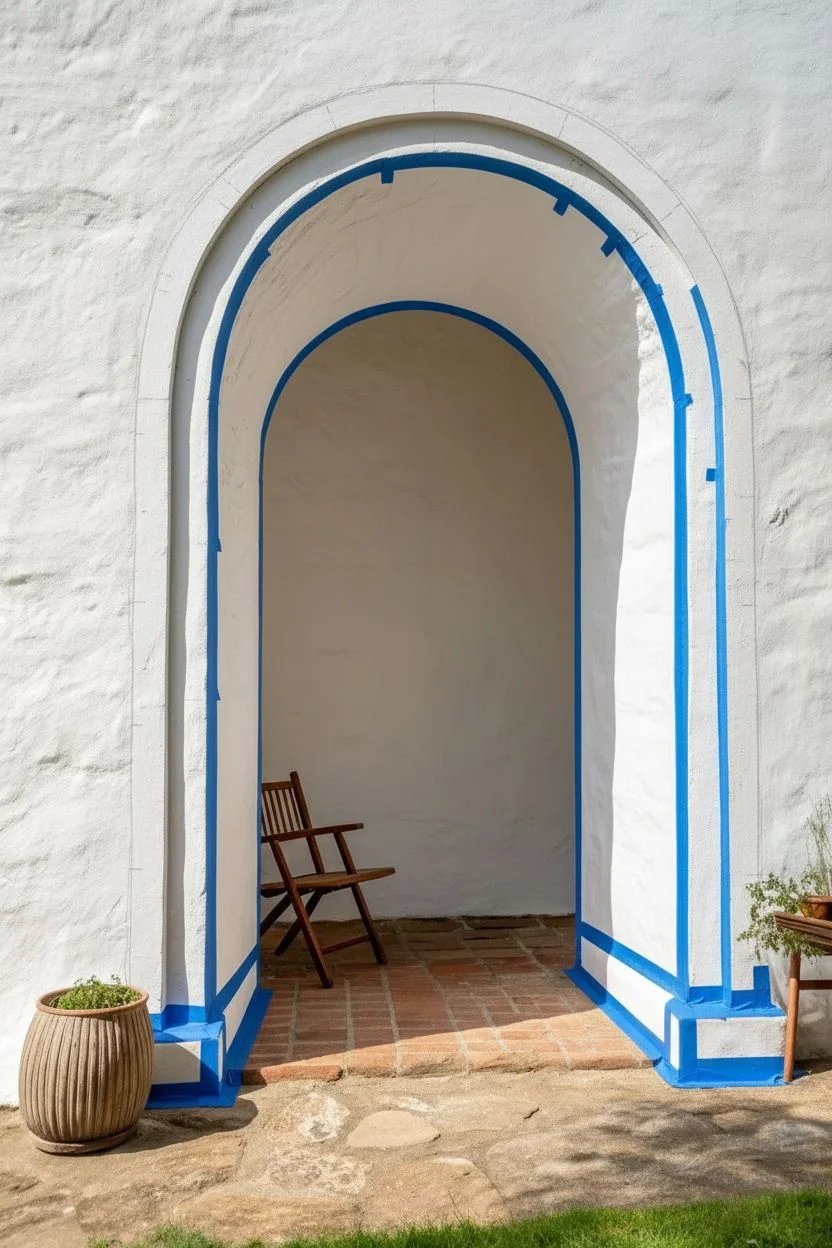
Embrace the warmth of Mediterranean design with this simple yet striking painted arch project. By outlining an existing alcove or creating a faux arch on a plain wall with rich terracotta paint, you add instant architectural depth and character to any minimalist space.
Step-by-Step
Materials
- Terracotta or burnt orange interior latex paint (matte or eggshell finish)
- High-quality 1.5-inch to 2-inch angled sash brush
- Painter’s tape (blue or green)
- Small foam roller and tray
- Pencil
- String and push pin (if creating a faux arch)
- Damp cloth
- Drop cloth
- Measuring tape
- Level
Step 1: Preparation and Mapping
-
Clean the surface:
Begin by wiping down the wall surface around the archway or the area where you plan to paint. Dust and grime prevent crisp lines, so ensure the stucco or drywall is clean and dry. -
Measure the width:
Decide on the thickness of your painted border. The example shows a bold line, approximately 4 to 6 inches wide. Use your measuring tape to determine a consistent width around the entire opening. -
Mark the outer edge:
Using a pencil, make small, light tic marks at regular intervals around the exterior of the archway, measuring out from the opening’s edge to your desired width. -
Connect the marks:
Lightly sketch a connecting line through your measurements. If you are working on a curved ceiling or irregular stucco surface like the photo, rely on your eye to smooth out the curve rather than forcing a perfect geometric arc.
Textured Wall Tip
On heavy stucco, skip the tape for the outer curve. Use a steady hand and a high-quality angled brush to ‘cut in’ freehand following the texture’s natural bumps for a more organic, authentic look.
Step 2: Taping the Borders
-
Tape the inner edge:
Apply painter’s tape along the very inside edge of the archway reveal. Press the edge of the tape firmly with your fingernail or a credit card to prevent paint bleed. -
Tape the outer curve:
For the curved top section, use small, overlapping pieces of tape to navigate the arc smoothly. Keep the tape line fluid so the painted edge doesn’t look jagged. -
Tape the vertical sides:
Run long, continuous strips of tape down the straight vertical sides of your outer pencil line, using a level to ensure they are perfectly plumb. -
Seal the tape:
I like to run a very thin layer of the *existing* wall color (white) over the edge of the tape first. This seals the tape and ensures that any bleed-through matches the wall, keeping your terracotta line crisp.
Step 3: Painting the Arch
-
Cut in the edges:
Dip your angled sash brush into the terracotta paint. Carefully paint along the taped edges first, ensuring you don’t overload the brush to avoid drips. -
Fill the center:
Once the edges are cut in, use a small foam roller or continue with your brush to fill in the space between the tape lines. A brush is often better for textured stucco to work the paint into the crevices. -
Let the first coat dry:
Allow the paint to dry according to the manufacturer’s instructions, usually about 2-4 hours. Do not rush this step. -
Apply the second coat:
Apply a second coat to ensure rich, opaque coverage. The high contrast between white and terracotta usually demands two or even three coats for true vibrancy. -
Inspect coverage:
Check for any pinholes or missed spots, especially if painting on rough stucco. Dab paint into these areas with the tip of your brush.
Bleeding Lines?
If paint bleeds under the tape on a textured wall, don’t panic. Wait for it to fully dry, then use a tiny artist brush and the base wall color to re-paint and ‘erase’ the blurry spots.
Step 4: Finishing Touches
-
Remove tape while damp:
Carefully peel off the painter’s tape while the final coat is still slightly tacky. Pull the tape away from the wet paint at a 45-degree angle to slice through the film cleanly. -
Touch up irregularities:
If the stucco texture caused any jagged lines, use a small artist’s brush and your original white wall paint to tidy up the outer edges. -
Clean the area:
Wipe away any stray pencil marks that might still be visible near the paint line.
Step back and admire how a single band of color completely transforms the depth of your space


Half-Wall Block With a Clean Horizontal Line
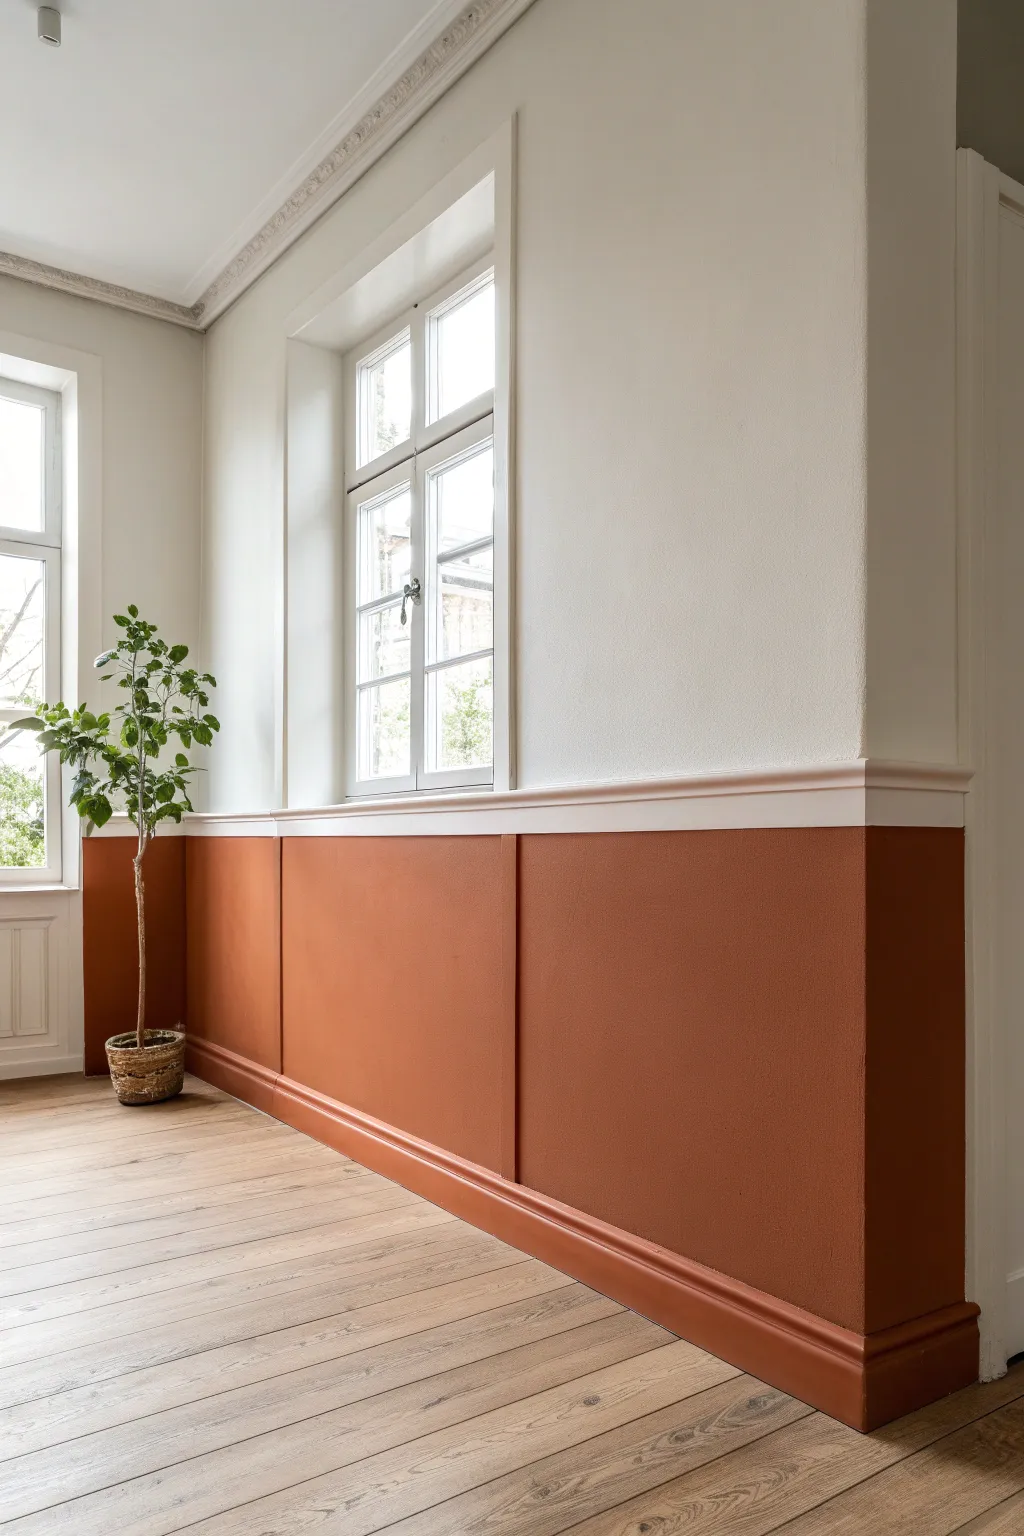
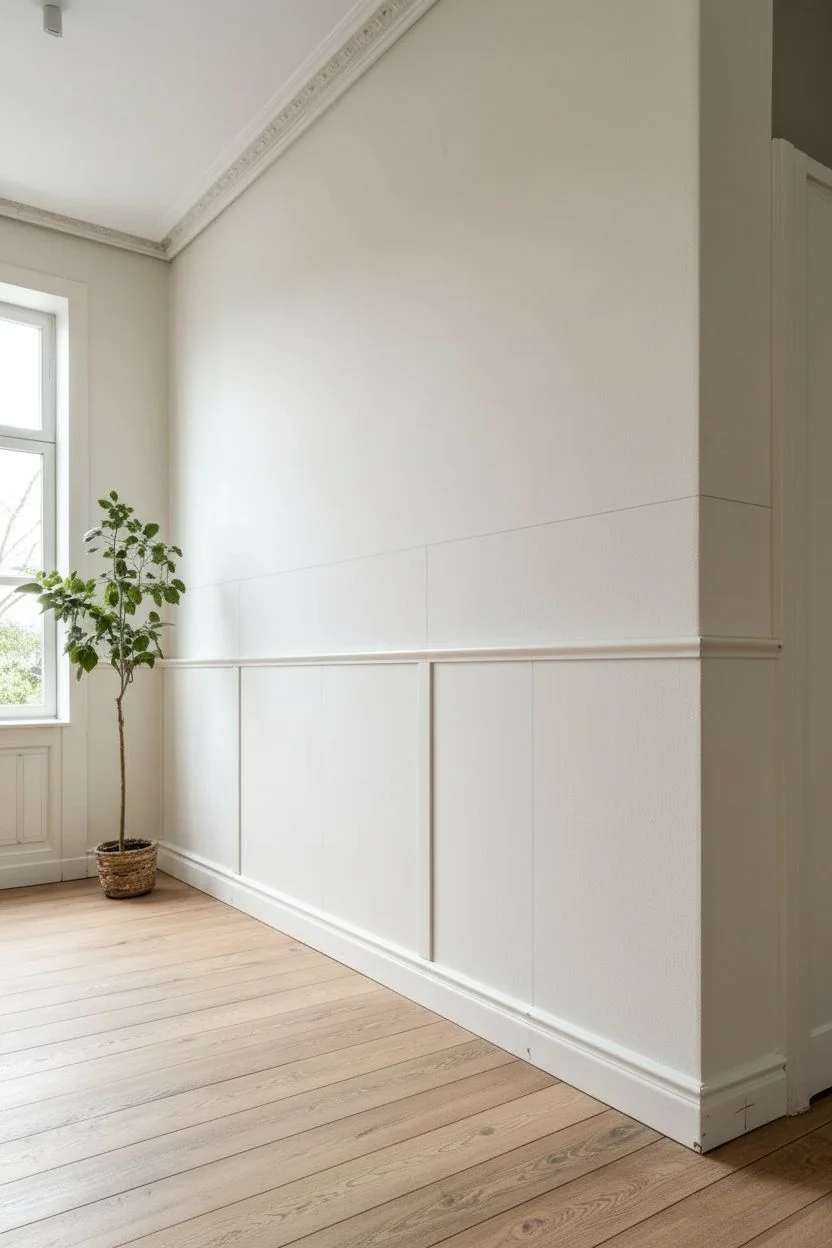
Bring warmth and structure to your room with this classic color-blocked half-wall design. The deep rust tone grounds the space, while the added vertical battens create a sophisticated paneled effect that mimics traditional wainscoting without the heavy construction.
Detailed Instructions
Materials
- Terracotta or rust-colored interior wall paint (matte or eggshell finish)
- White interior wall paint (for upper wall and trim if needed)
- Wooden chair rail molding
- Flat wood trim strips (battens), about 1-2 inches wide
- Paint roller with microfiber sleeve
- Angled sash brush (2 inch)
- Painter’s tape (delicate surface)
- Laser level or spirit level
- Measuring tape and pencil
- Construction adhesive (or finishing nails and hammer)
- Wood filler
- Fine-grit sandpaper (220 grit)
- Caulk and caulk gun
- Drop cloths
Step 1: Preparation and Layout
-
Clear and Clean:
Begin by removing any existing baseboards if you plan to replace them, or tape them off securely if they are staying. Wipe down the walls with a damp cloth to remove dust and grease, ensuring a clean surface for adhesion. -
Establish the Height:
Decide on the height of your half-wall. A classic rule of thumb is about one-third of the wall height, roughly 32 to 36 inches from the floor. Mark this height at several points along the wall. -
Draw the Level Line:
Using a laser level or a long spirit level, connect your marks to draw a faint, perfectly horizontal pencil line across the entire length of the room. This will guide your chair rail installation. -
Plan Vertical Spacing:
Measure the total length of the wall to determine the spacing for your vertical battens. Spacing them 24 to 30 inches apart usually creates a balanced look. Mark these vertical positions lightly on the wall.
Uneven Walls?
If your walls are wavy, the wood battens might not sit flush. Don’t force them flat. Instead, secure them where possible and use a high-quality acrylic caulk to fill the gaps behind the wood before painting.
Step 2: Installing the Woodwork
-
Attach the Chair Rail:
Cut your chair rail molding to fit the length of the wall. Apply a bead of construction adhesive to the back and press it firmly against the wall, aligning the bottom edge with your horizontal pencil line. Use finishing nails for extra hold if necessary. -
Cut Vertical Battens:
Measure the distance from the top of your baseboard to the bottom of the chair rail. Cut your flat wood trim strips to this exact length. -
Install Vertical Battens:
Apply adhesive to the back of each batten and place them over your vertical guide marks. Use your level to ensure each piece is perfectly plumb before the glue sets. -
Fill and Sand:
Once the adhesive is dry, fill any nail holes or gaps in the wood with wood filler. Let it dry completely, then sand the filler smooth with 220-grit sandpaper so it blends seamlessly with the wood. -
Caulk the Seams:
Run a thin bead of paintable caulk along the edges where the wood meets the wall—both on the chair rail and the vertical battens. This step is crucial for that built-in, professional look. Smooth the bead with a damp finger and let it cure.
Seamless Color
For a truly monolithic look, use a matte finish paint for the drywall sections and a satin finish in the exact same color mix for the wood trim. It adds subtle texture while keeping the color perfectly matched.
Step 3: Painting the Block
-
Tape Off the Upper Wall:
Apply painter’s tape along the top edge of the chair rail to protect the upper white wall. Press the edges of the tape down firmly to prevent bleed-through. -
Cut In the Edges:
Dip your angled sash brush into the terracotta paint. Carefully paint along the corners, the baseboards, and around the intricate edges of the chair rail and battens where a roller won’t reach. -
Roll the Flat Areas:
Pour your paint into a tray. I like to load the roller evenly but not too heavily to avoid drips. Roll the paint onto the wall sections between the battens, using a ‘W’ motion to distribute it evenly. -
Paint the Trim:
While the wall paint is wet, use your brush or a small foam roller to paint the faces of the vertical battens and the chair rail itself. Painting the trim the same color as the wall creates the cohesive, modern block effect. -
Apply Second Coat:
Allow the first coat to dry for at least 4 hours. Apply a second coat to both the wall sections and the woodwork to ensure a rich, opaque color depth. -
Remove Tape:
While the second coat is still slightly tacky (not fully dry), carefully peel away the painter’s tape at a 45-degree angle to ensure a crisp, sharp line.
Step back and admire how this simple structural addition completely transforms the architectural character of your space
BRUSH GUIDE
The Right Brush for Every Stroke
From clean lines to bold texture — master brush choice, stroke control, and essential techniques.
Explore the Full Guide
Painted Circle “Headboard” Moment
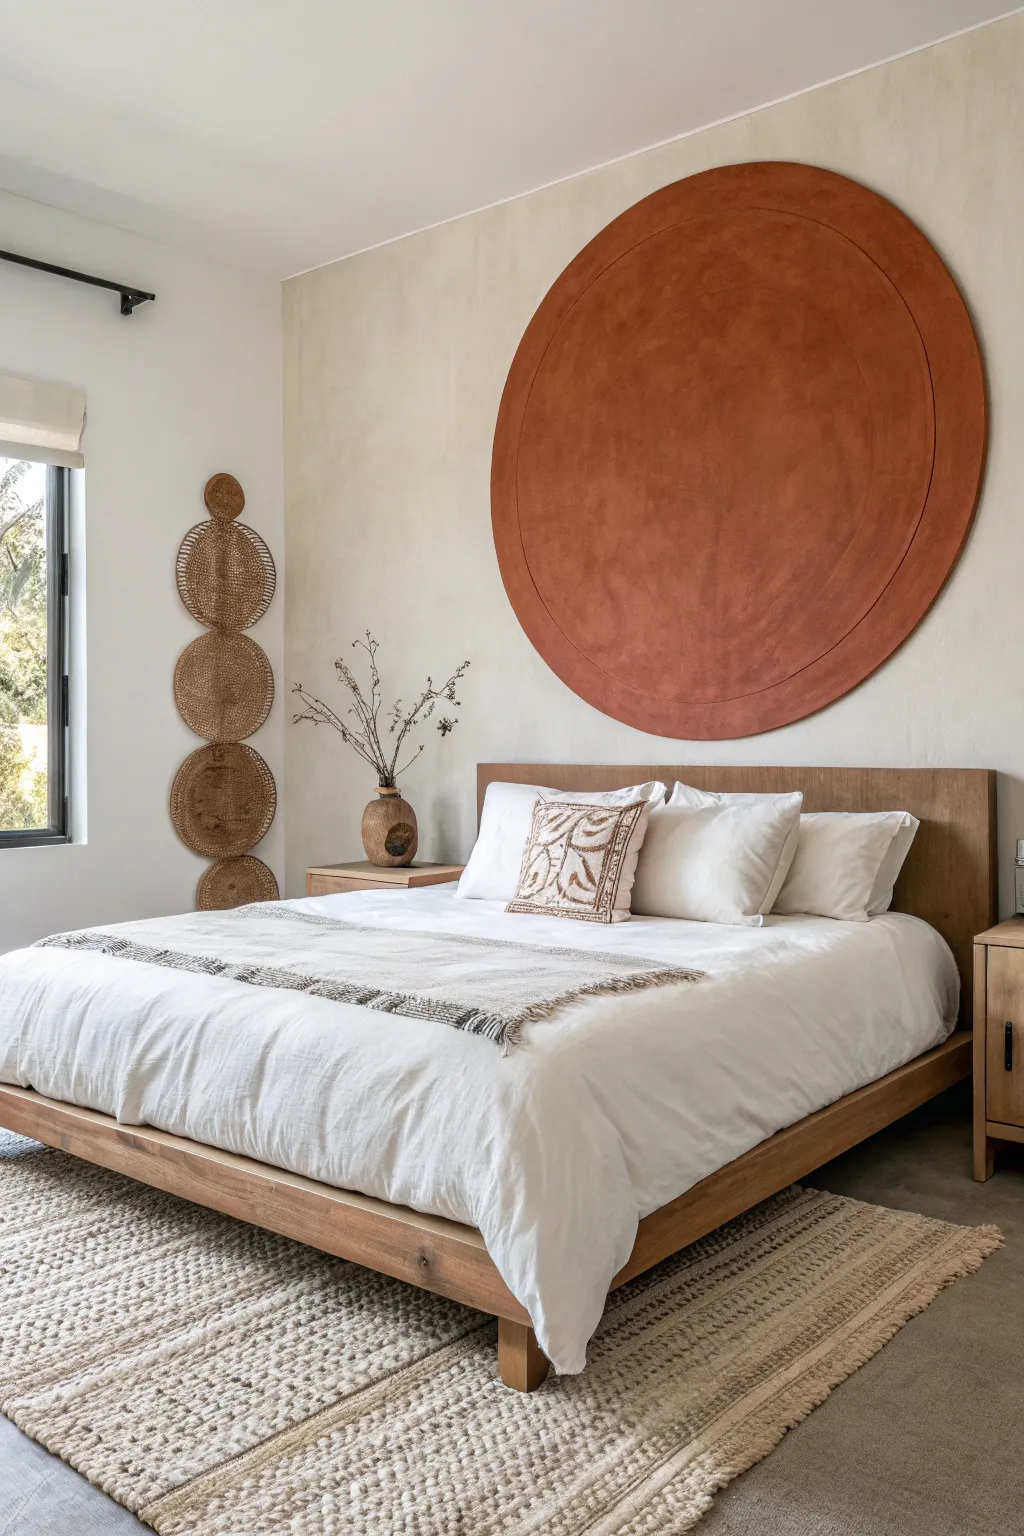
Transform a blank bedroom wall into a warm, grounding sanctuary with this oversized geometric statement piece. This textured, terracotta-hued circle acts as a visual headboard, bringing an earthy and bohemian elegance to your sleeping space.
Step-by-Step
Materials
- Terracotta or rust-colored interior latex paint (matte finish)
- Pencil
- String or twine (non-stretchy)
- Push pin or tack
- Measuring tape
- Painter’s tape
- Small angled brush (1.5 – 2 inch)
- Small roller (4 inch) with a smooth nap
- Painting tray
- Plumb bob or level (optional)
- Sea sponge or rag (for texture)
Step 1: Planning and Mapping
-
Determine the center point:
Start by finding the visual center for your circle. Measure the width of your bed or headboard and mark the midpoint on the wall. Decide how high you want the circle to sit; usually, centering it vertically between the ceiling and the top of the bed frame creates the most balanced look. -
Create a string compass:
Cut a piece of non-stretchy string slightly longer than the desired radius of your circle. Tie one end firmly around a pencil and make a loop at the other end. The distance between the loop and the pencil tip will be your radius. -
Test the dimensions:
Hold the loop at your marked center point and extend the pencil to see where the circle’s edge will fall. Ensure it clears the ceiling and furniture comfortably. -
Draw the outer circle:
Secure the string’s loop to the wall at your center mark using a push pin. Keeping the string taut but not stretching it, lightly draw the full circle circumference with your pencil. -
Draw the inner ring:
To create the distinct border effect seen in the inspiration image, shorten your string by about 2-3 inches. Using the same center pin, draw a slightly smaller circle inside the first one.
Step 2: Painting the Outline
-
Prepare your paint:
Pour your terracotta paint into the tray. I find that stirring it thoroughly right before pouring ensures the pigments are rich and even. -
Cut in the edges:
Using your small angled brush, carefully paint along the inside of your outer pencil line. A steady hand is key here; act as if you are outlining a drawing. -
Detail the inner ring:
Use the angled brush to trace the inner pencil line as well. This definition is crucial because the center of the circle often has a slightly more textured fill than the crisp outer ring. -
Fill the border gap:
With the angled brush, fill in the space between the two pencil lines you just traced. Keep your brushstrokes following the curve of the circle to maintain a smooth flow.
Clean Curves Pro Tip
For a razor-sharp edge without shaky hands, rest your pinky finger against the wall as a stabilizer while gliding the angled brush along your pencil line.
Step 3: Filling and Texturing
-
Roll the center:
Switch to your small roller. Start filling in the large central area of the circle. Work in small sections to maintain a wet edge. -
Apply the first coat:
Cover the entire inner circle (inside the ring you painted). Don’t worry about perfect opacity yet; the goal is coverage. -
Add subtle texture:
While the paint is still tacky, lightly dab a clean, dry sea sponge or a crumpled rag over the wet paint in the center area. This mimics the lime-wash or plaster effect seen in the photo. -
Let it dry completely:
Allow the first coat to dry for at least 2-4 hours. It needs to be fully set before you add depth. -
Apply the second coat:
Roll on a second coat of paint. For the outer ring, use the brush again to deepen the color without adding the sponge texture, keeping that border crisp and defined. -
Enhance the texture:
Repeat the sponge dabbing technique on the second coat in the center area if you want more visual movement. If you prefer a smoother look, simply roll it out evenly.
Wobbly Circle Fix
If your circle looks egg-shaped, your string likely stretched or slipped. Re-measure the radius at 12, 3, 6, and 9 o’clock positions to find the bulge, then correct with a pencil.
Step 4: Finishing Touches
-
Check the edges:
Inspect the outer perimeter. If the line looks shaky, use a tiny artist’s brush and a bit of wall color (the background color) to touch up mistakes, or refine the curve with the terracotta paint. -
Remove the pin:
Gently pull the push pin from the center. Fill the tiny hole with a dab of spackle. Once dry, dab a tiny bit of paint over it to conceal the mark. -
Style the space:
Wait 24 hours for the paint to fully cure before pushing furniture back against the wall.
Now you have a stunning, warm focal point that anchors your room with minimal effort and maximum impact
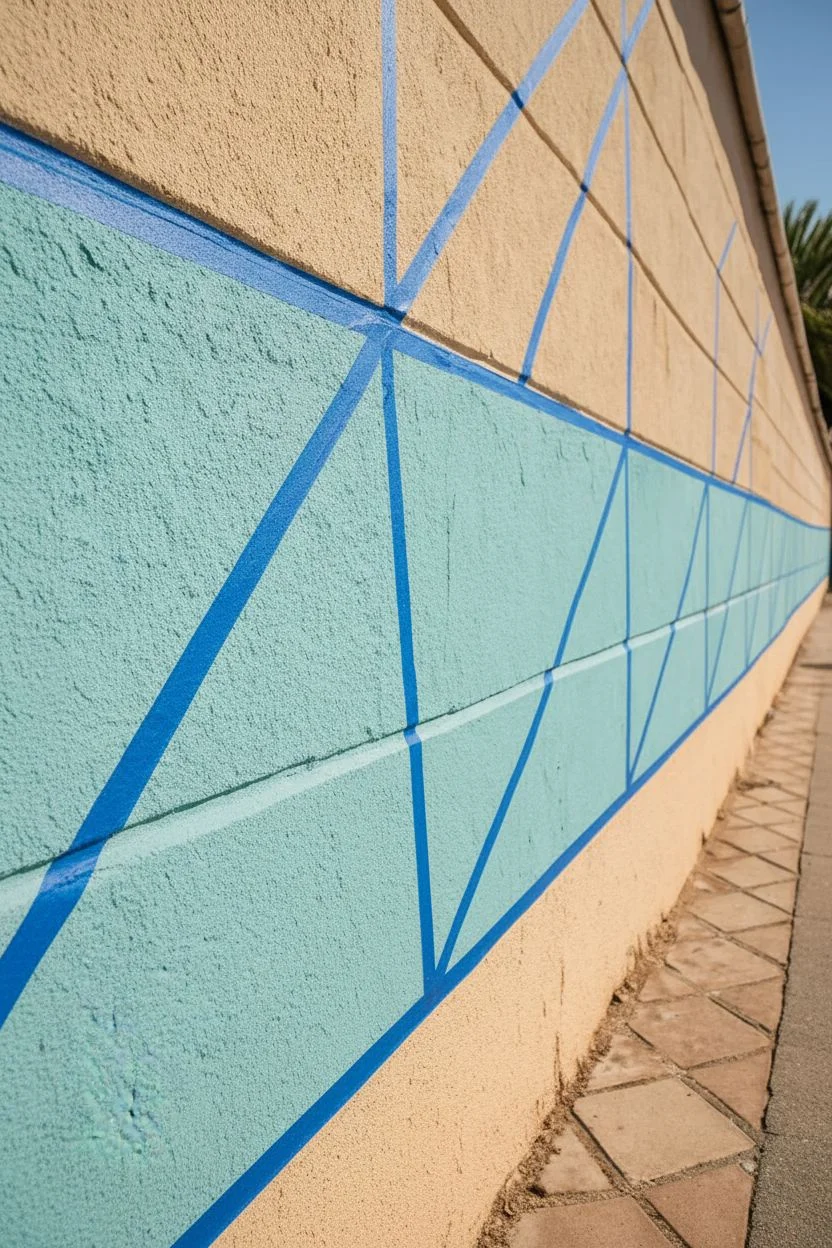
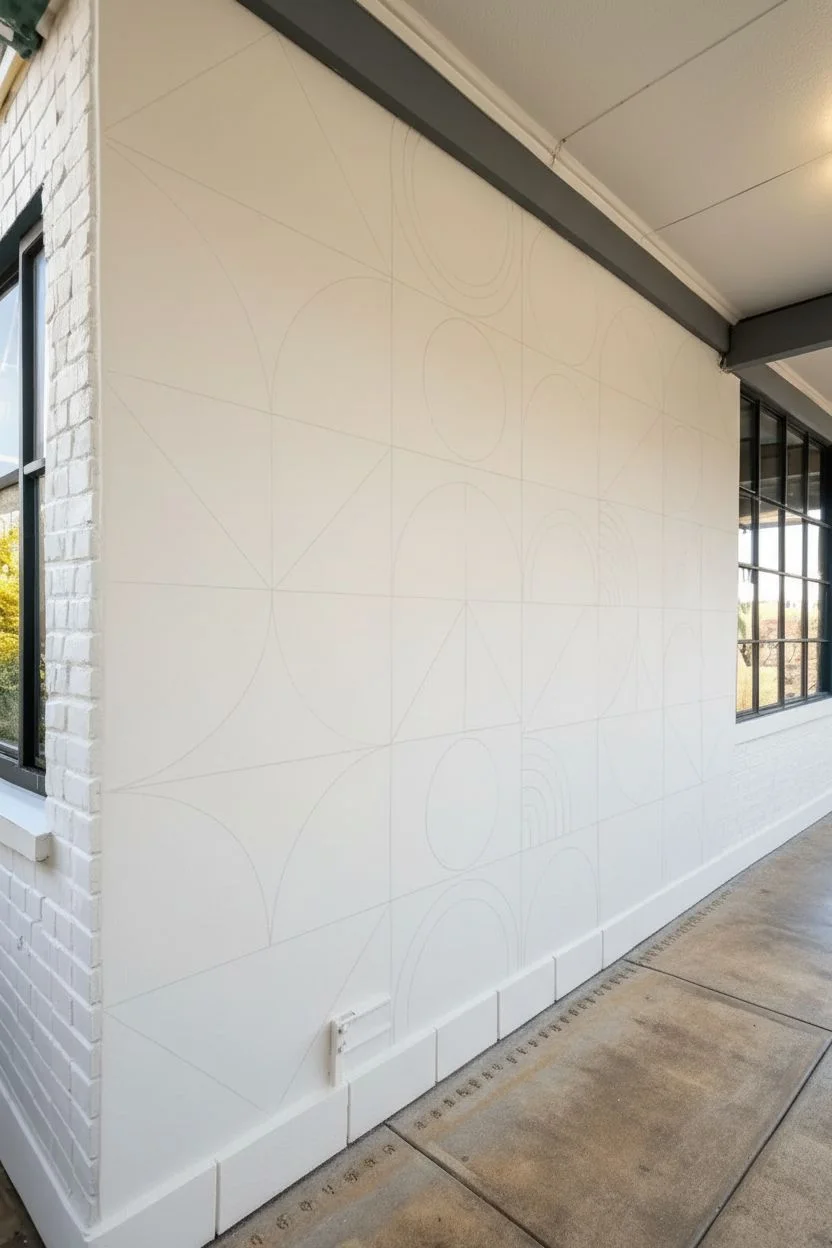
Tape-Line Grid With Color Pops
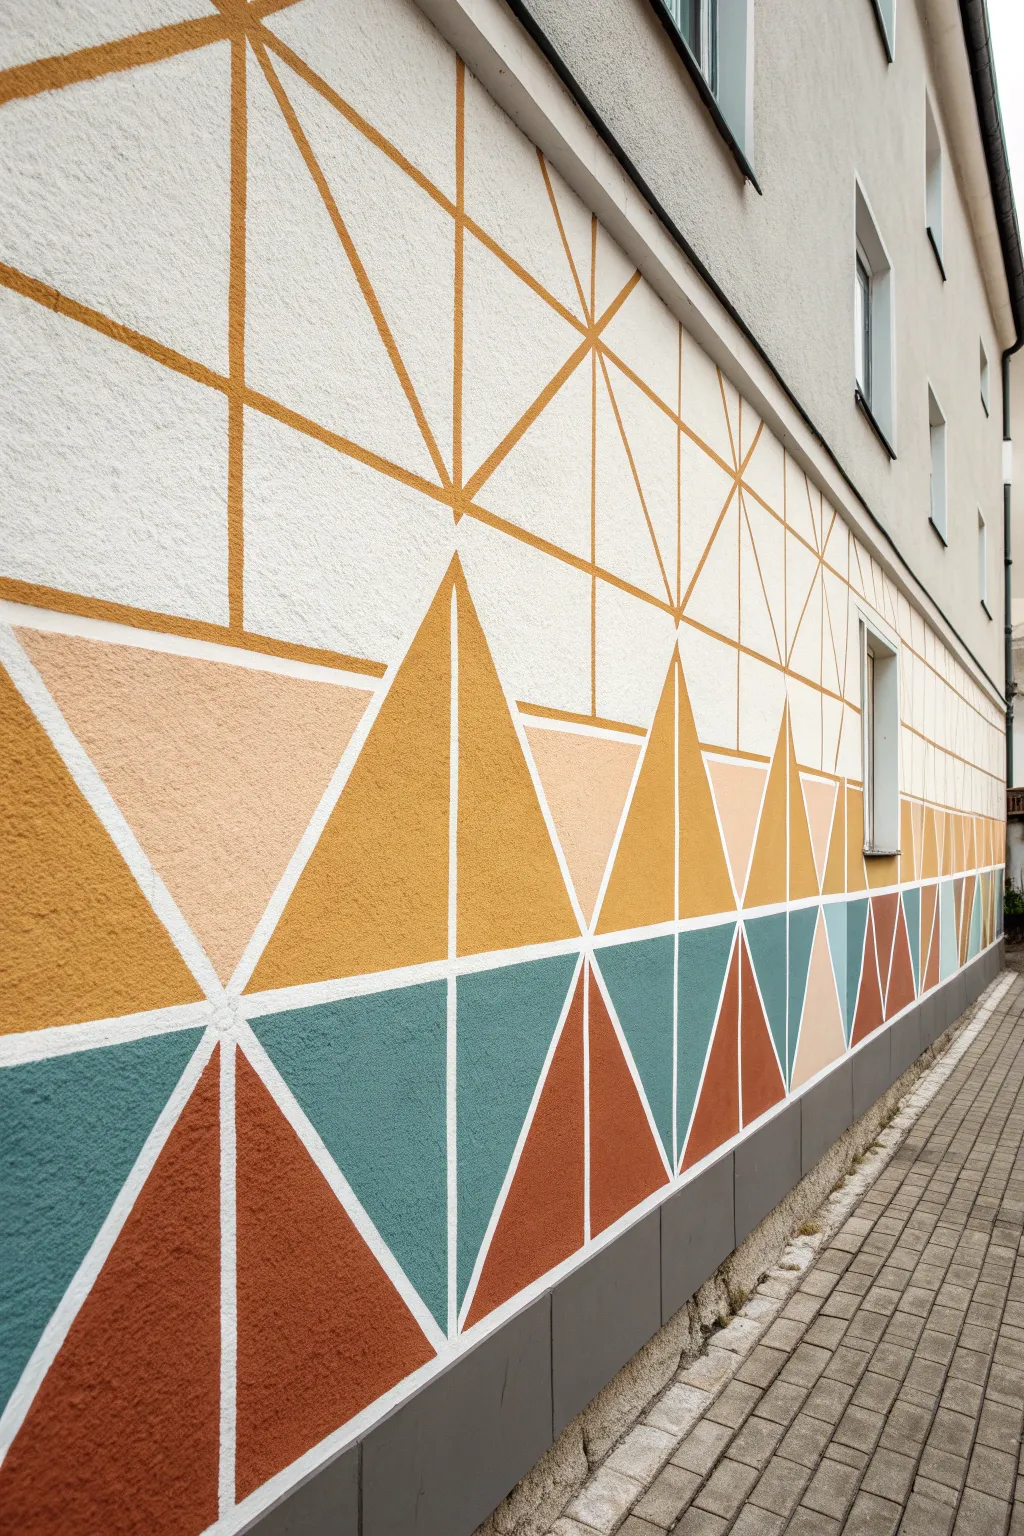
Transform a plain exterior wall into a striking architectural feature with this large-scale geometric mural. By combining bold blocks of earthy color at the base with airy, linear gridwork above, you create a sophisticated visual balance that draws the eye upward.
How-To Guide
Materials
- Exterior masonry paint (White/Off-white base)
- Exterior masonry paint (Terra cotta/Rust)
- Exterior masonry paint (Teal/Muted blue-green)
- Exterior masonry paint (Mustard yellow/Ochre)
- Quality painter’s tape (various widths, 1-inch and 2-inch)
- Laser level or chalk line
- Long straight edge or level
- Paint rollers (medium nap for textured walls)
- Small angled sash brushes
- Ladder or scaffolding
- Measuring tape
- Pencil for masonry
Step 1: Preparation and Base Coat
-
Clean the surface:
Begin by thoroughly cleaning the exterior wall. Use a pressure washer to remove dirt, moss, or loose paint, ensuring the surface is completely dry before proceeding. -
Apply base color:
Roll on the base coat of off-white masonry paint across the entire wall section. This will serve as the background for the upper grid and the grout lines between the lower triangles. -
Add a second coat:
Apply a second coat of the base white to ensure full coverage and a crisp, clean brightness, as this will peek through your design later. -
Dry completely:
Allow the base coat to cure according to the manufacturer’s instructions—usually 24 hours—so your tape won’t peel up any fresh paint.
Seal the Deal
On rough stucco, press tape down firmly with a rag, then seal edges with clear matte medium before painting color. This stops bleed-under completely.
Step 2: Mapping the Design
-
Establish the horizon line:
Decide on the height where the solid colors will transition to the line art. Use a laser level or chalk line to snap a perfectly horizontal guide across the entire wall width. -
Mark vertical guides:
Mark regular intervals along the bottom skirt of the wall and your horizon line to determine the width of your triangles. -
Create the main triangles:
Using a long straight edge, draw diagonal lines connecting your bottom marks to your horizon line marks to form a continuous zigzag pattern of large triangles. -
Bisect the shapes:
Draw a vertical line down the center of each large triangle, splitting them into right-angled triangles. This creates the ‘folded’ look seen in the reference. -
Draft the upper grid:
Above the horizon line, extend vertical lines upward from the triangle peaks. Connect these with diagonals to mirror the geometry below, but creating open shapes instead of solid ones.
Step 3: Taping and Sealing
-
Tape the white lines:
Apply painter’s tape *over* the lines you want to remain white. This includes the gaps between the solid colored triangles and the borders. -
Box out the upper grid:
For the upper section which uses colored lines, the taping process is reversed. You need to tape off the large empty triangles, leaving only thin channels exposed where the golden-yellow lines will be painted. -
Seal the tape edges:
I always take a moment to brush a tiny amount of the white base paint over the edges of the tape. This seals the tape and prevents the colored paint from bleeding underneath on textured stucco.
Go Metallic
For the upper line-work section, swap the mustard yellow paint for a metallic gold exterior paint. It will catch the sunlight beautifully.
Step 4: Applying Color
-
Paint the bottom triangles:
Fill in the lower geometric shapes with your solid colors (teal, terracotta, and mustard). Use a sash brush for edges and a small roller for the centers. -
Work in sections:
Alternate colors randomly or in a repeating pattern, ensuring no two adjacent shapes share the same color unless intended. -
Apply the upper lines:
Carefully paint the exposed channels in the top section with the mustard yellow paint to create the grid effect. -
Double check coverage:
Stucco can be thirsty; inspect your work from different angles and dab extra paint into deep textures if missed. -
Remove tape:
Peel off the tape slowly at a 45-degree angle while the paint is still slightly tacky to achieve the sharpest lines. -
Touch up:
Use a small artist’s brush and the appropriate paint color to fix any bleeds or rough edges once the tape is removed.
Step back and admire how your new geometric facade adds modern energy to the entire building

PENCIL GUIDE
Understanding Pencil Grades from H to B
From first sketch to finished drawing — learn pencil grades, line control, and shading techniques.
Explore the Full Guide
Honeycomb Hexagon Accent Strip
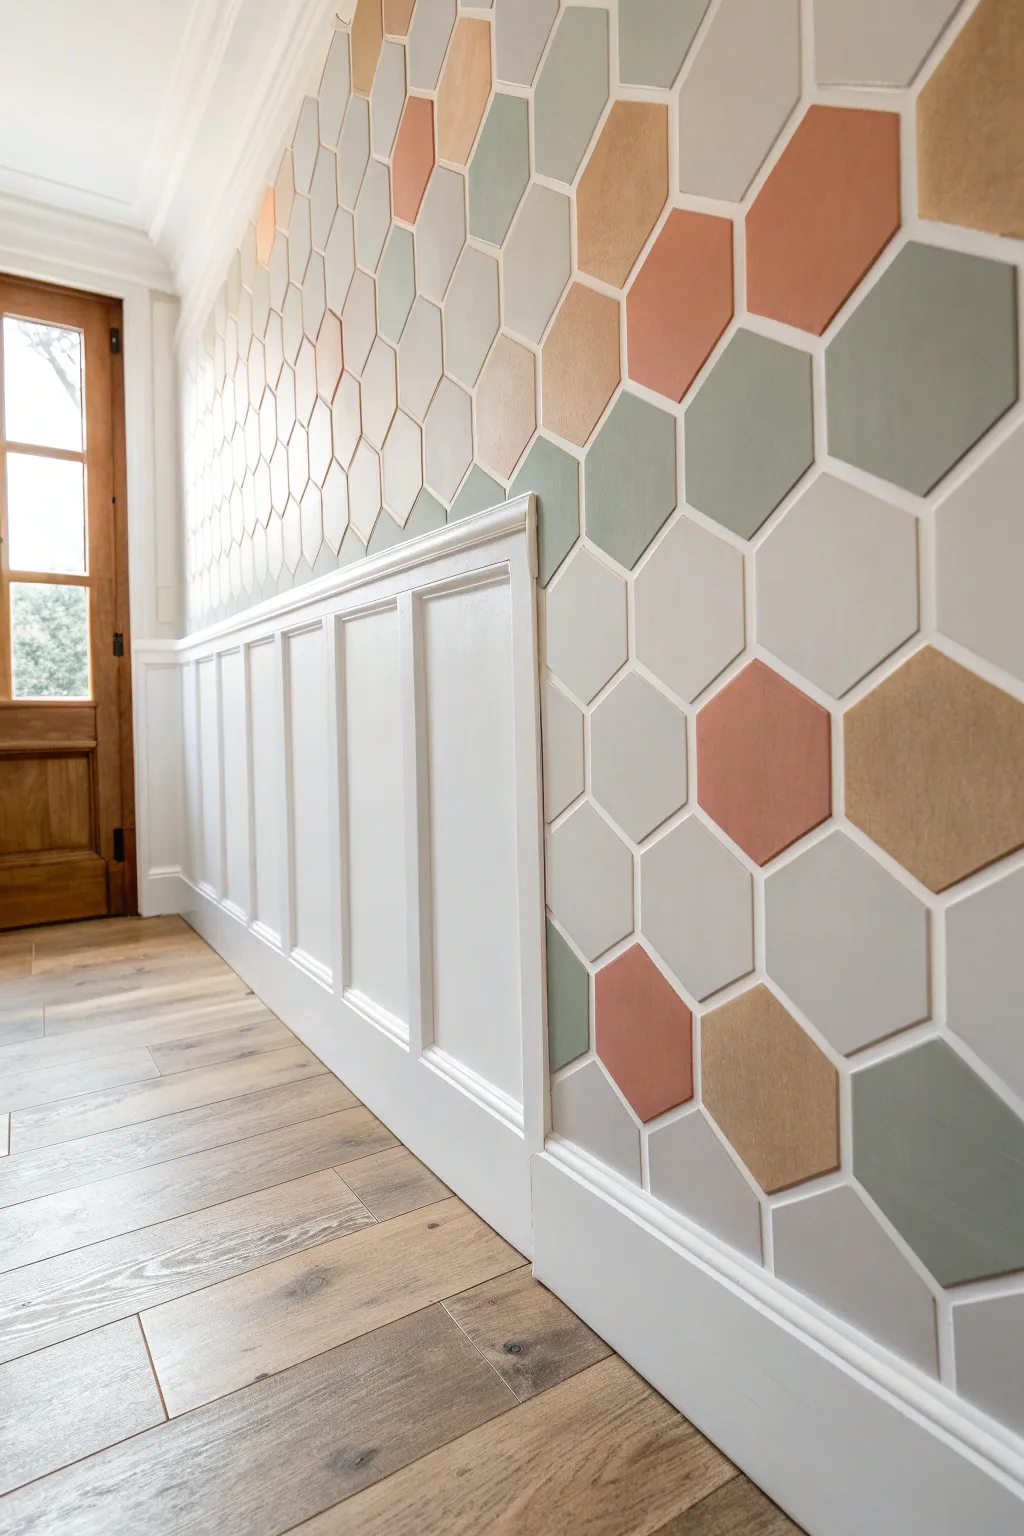
Transform a plain hallway into a geometric masterpiece with this honeycomb accent wall that pairs beautifully with classic wainscoting. The soft, muted palette of sage, terra cotta, and grey creates a sophisticated yet playful focal point.
Step-by-Step
Materials
- Pre-primed wooden hexagon tiles (approx. 4-6 inches wide)
- Construction adhesive or liquid nails
- Caulk gun
- Painter’s tape
- Laser level
- Spacers (1/4 inch tile spacers)
- Sandpaper (220-grit)
- Interior latex paint (Eggshell finish)
- Colors: Sage Green, Dusty Rose, Tan, Light Grey
- Small foam rollers and tray
- Small angled sash brush
- Wood filler
- White semi-gloss paint (for wainscoting)
Step 1: Preparation and Layout
-
Prepare the Surface:
Ensure your wall is clean, dry, and free of dust. If you haven’t installed the wainscoting yet, mark the top line where the rail will sit using a level and pencil. -
Plan the Pattern:
Lay out your wooden hexagon tiles on the floor first. This allows you to experiment with the color distribution—try to avoid clustering the same colors together. -
Paint the Base Color:
Paint the upper wall section in a crisp white or the light grey color that will serve as your ‘grout’ lines between the tiles. Two coats are usually best for full coverage. -
Set the Starting Line:
Use a laser level to project a perfectly straight vertical line. This is crucial because hexagons can drift significantly if the first column isn’t plumb.
Drifting Tiles?
If your pattern starts skewing, don’t panic. Use slightly larger or smaller spacers for one row to imperceptibly correct the alignment.
Step 2: Painting the Tiles
-
Categorize and Sand:
Group your raw wooden tiles by the color they will be painted. Give the edges a quick sanding with 220-grit paper to remove any splinters. -
Prime the Wood:
Even if pre-primed, I like to apply a quick coat of primer to the edges to ensure the final color goes on smoothly without soaking into the wood grain. -
Apply First Coat:
Using small foam rollers, apply the first coat of paint to the face of the tiles. Use the angled brush to carefully catch the sides. -
Sand and Finish:
Once dry, lightly sand the face of the tiles for a professional-smooth finish, wipe away dust, and apply the second and final topcoat.
Step 3: Installation
-
Install the First Tile:
Apply dabs of construction adhesive to the back of your first tile. Place it against your laser line, just above the wainscoting rail. -
Create the Grid:
Place tile spacers (1/4 inch often looks best) on the angled sides of the first tile before placing the neighbors. This ensures uniform ‘grout’ lines. -
Build Upwards and Outwards:
Continue attaching tiles, checking frequently with your level. It helps to work in diagonal rows to keep the honeycomb pattern interlocking correctly. -
Cutting Edge Pieces:
When you reach the ceiling or corners, measure the gap and mark your tile. A miter saw set to the correct angle or a jigsaw makes quick work of these partial pieces.
Add Dimension
For a 3D effect, execute the project using tiles of varying thicknesses (e.g., 1/4″ and 1/2″ mix) to create a subtle topographical texture.
Step 4: Finishing Touches
-
Fill and Caulk:
If flush installation is desired, use wood filler on any nail holes (if you used a brad nailer) and paint over them. Otherwise, check for any adhesive that squeezed out and clean it up. -
Wainscoting Integration:
Ensure the wainscoting cap rail sits flush against the bottom row of hexagons. If there are gaps, run a bead of paintable caulk along the seam where the wood meets the rail. -
Touch Up Paint:
Use a small artist brush to touch up any scuffs on the tile edges or any spots where the wall color needs to be perfected between the gaps.
Step back and admire how the clean geometry breathes new life and color into your hallway space
Geometric “Mountain” Triangle Landscape
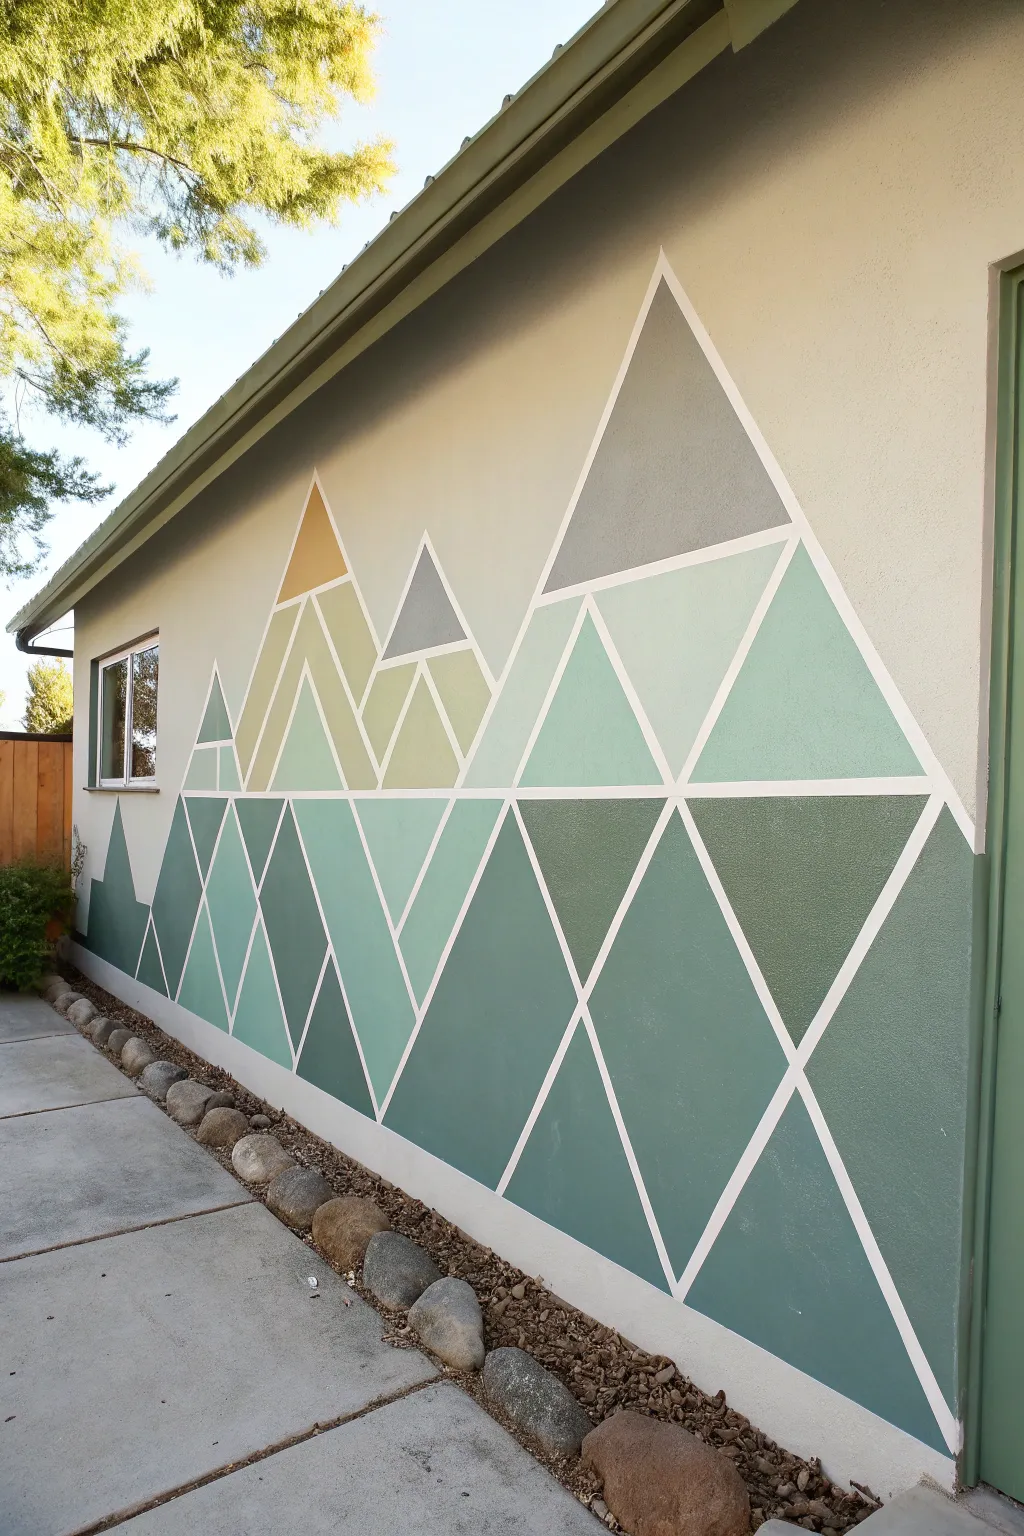

Transform a plain exterior wall into a stunning modern landscape with this crisp, geometric mountain mural. Using various shades of sage, forest green, and grey, this design creates depth and visual interest through simple triangular forms.
Step-by-Step Guide
Materials
- Exterior masonry primer
- Exterior latex paints (in 5-6 shades: dark green, medium sage, light sage, grey, yellow-gold, white)
- Painter’s tape (1-inch width, delicate surface or exterior strength depending on wall texture)
- Laser level or long straight edge
- Pencil
- Angle sash brushes (2-inch)
- Small roller kit with microfiber covers
- Paint tray and liners
- Damp rags for cleanup
Step 1: Setting the Scene
-
Clean the surface:
Before you begin, ensure your wall is completely free of dirt, cobwebs, and dust. A quick power wash or a scrubbing with soapy water and a stiff brush works well; let the wall dry completely for at least 24 hours. -
Prime the base:
If your wall is currently a dark or uneven color, roll on a coat of high-quality exterior masonry primer. If the existing wall color (cream/off-white) will serve as your ‘lines’ between shapes, ensure the base coat is fresh and clean. -
Plan the peaks:
Visualize the layout by marking the highest points of your three main mountain peaks with a pencil. The largest peak sits on the right, a medium one on the left, and smaller peaks nestle in the center.
Step 2: Taping the Geometry
-
Create the main outlines:
Using your painter’s tape, create the large triangular outlines for the main mountains first. Start from your peak mark and run a long, continuous strip of tape down to the base for each side of the triangle. -
Subdivide the shapes:
Now, break those large triangles into smaller geometric sections. Run tape lines horizontally or diagonally to create the ‘facets’ of the mountain. Aim for a mix of large diamonds and smaller triangles to create perspective. -
Add snow caps:
Tape off the very tips of the mountains to create separate small triangles for the ‘snow’ or sun-hit peaks. This detail adds a lovely focal point to the top of the design. -
Seal the tape edges:
I always take a moment here to press the tape edges down firmly with a credit card or putty knife. This prevents the paint from bleeding under the tape, especially on textured stucco walls. -
The base coat trick:
To ensure razor-sharp white lines, brush a light layer of your base wall color over the edges of the tape. This seals any gaps; if paint bleeds, it will just be the wall color, keeping your final lines crisp.
Bleed-Through Blues?
On heavy stucco, tape leaks happen. Don’t panic! Wait for the paint to dry fully, then use a tiny artist brush with the white base color to ‘erase’ the mistake manually.
Step 3: Applying Color
-
Map your colors:
Place a small dot of paint in each taped-off section to designate which color goes where. Use darker greens at the bottom for weight, lighter greens and teals in the middle, and greys or gold at the top. -
Paint the darks:
Start with your darkest forest green. Fill in the bottom-most triangles using a small roller for larger areas or a brush for corners. Apply two thin coats rather than one thick one for better durability. -
Work upwards:
Move to your medium sage and teal tones in the middle sections. Be careful not to paint over the tape into a neighboring section that requires a different color. -
Paint the peaks:
Apply the light grey to the large upper triangle shapes. For the special accent peaks, use your yellow-gold or a very light grey to simulate sunlight hitting the mountaintop. -
Second coat check:
Once the first layer is dry to the touch (usually 1 hour for exterior spills), apply a second coat to ensure the color is solid and opaque.
Color Consistency
Buy sample pots instead of gallons! You’ll need very little paint for the smaller triangles, and sample sizes are perfect for getting 5-6 different shades cheaply.
Step 4: The Reveal
-
Peel immediately:
Don’t wait for the paint to fully cure. Peel the tape off slowly at a 45-degree angle while the paint is still slightly tacky. This prevents the dried paint film from ripping. -
Touch ups:
Inspect your lines. If any paint bled through, use a small artist’s brush and your original base wall color to tidy up the edges.
Step back and admire how a simple weekend project completely redefined your outdoor space


Corner-to-Corner Triangles That Wrap the Room
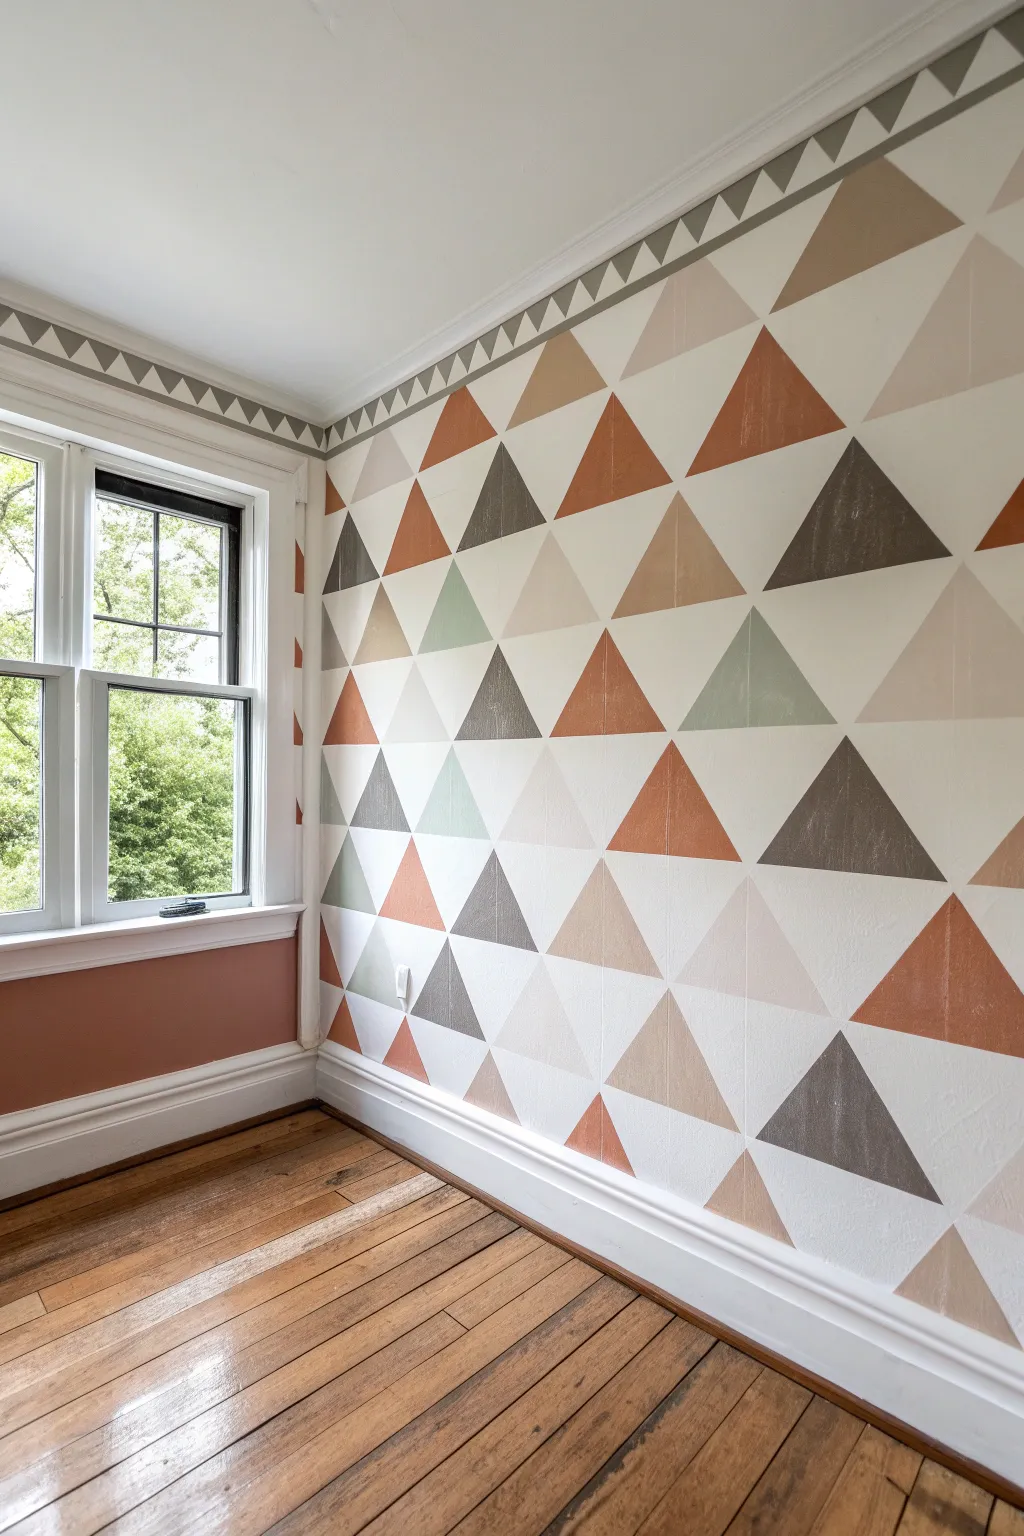
Transform a plain room corner into a cozy, modern focal point with this repeating triangle wall mural. By using a limited palette of earth tones like terracotta, sage, and grey, this geometric design creates a soothing rhythm that feels less like chaos and more like a structured quilt wrapping the space.
Detailed Instructions
Materials
- Interior latex paint (Eggshell finish)
- Base wall color (off-white or light cream)
- Accent colors (Terracotta, Sage Green, Warm Grey, Tan/Beige)
- Painter’s tape (1-inch width for main grid, thinner for border detail)
- Laser level or long spirit level
- Measuring tape
- Pencil
- Small foam roller (4-inch) and handle
- Angled sash brush (1.5 or 2-inch)
- Plastic drop cloths
- Paint tray and multiple liners
- Damp rag for mistakes
Step 1: Preparation & Grid Layout
-
Clear and clean:
Begin by removing any furniture near the corner and laying down your plastic drop cloths to protect the beautiful hardwood floors. Wipe down the walls with a damp cloth to remove dust, ensuring the tape will stick properly. -
Establish the base:
If your current wall color isn’t the desired background (in this case, a clean off-white), roll two coats of your base color over the entire area and let it cure for at least 24 hours. Fresh paint needs to be fully hardened before it can handle tape removal. -
Plan the grid height:
Measure the height of your wall from baseboard to molding. To get perfect triangles, you’ll want to create a grid of horizontal lines first. Determine how tall you want each row of triangles to be—around 10-12 inches works well for a standard room. -
Mark horizontal lines:
Using your pencil and measure, mark vertical intervals up the wall corner. Use a laser level to project a straight horizontal line across both walls at each interval, lightly tracing along the laser line with your pencil. -
Mark the triangle points:
On the bottom horizontal line, mark a point every 12 inches (or whatever width matches your height for an equilateral look). On the next line up, stagger the marks so they sit exactly in the middle of the marks below. Repeat this staggered pattern all the way up. -
Connect the dots with tape:
This is where the magic happens. Connect your diagonal dots with painter’s tape. You are taping *outside* the triangles you plan to paint first. I find it helpful to place a small piece of tape inside the triangles that need to stay white so I don’t get confused.
Tape Sealing Trick
For razor-sharp lines on textured walls, run a damp cloth over the tape edge to activate the adhesive fully before sealing it with your base coat paint.
Step 2: Painting the Main Pattern
-
Seal the tape edges:
To get those crisp lines, take a small amount of your *base* wall color and brush it lightly over the edge of the tape where you will be painting. This seals the tape so any bleed-through matches the white background, keeping your colored lines sharp. -
Plan your color distribution:
Look at your grid and decide where each color goes. The goal is random dispersal—try not to let two triangles of the same color touch. You might want to sketch this on a piece of paper first or mark the tape with a tiny dot of the intended color. -
Apply the first color batch:
Starting with your lightest color (the tan/beige), use the small foam roller to fill in the designated triangles. Use a brush for the tight corners near the tape intersections. Do not remove the tape yet. -
Apply remaining accent colors:
Wash your roller or switch to a new liner, then move on to the terracotta, followed by the warm grey, and finally the sage green. Apply two light coats rather than one heavy one to avoid ridge buildup against the tape. -
Let the first pass dry:
Allow the paint to dry to the touch. Because the triangles share tape lines, you can’t paint adjacent triangles simultaneously. You are currently painting only the ‘pointing up’ (or every other) set of triangles. -
Removing the first tape grid:
Once the paint is dry, carefully peel off the tape at a 45-degree angle. You should see a pattern of colored triangles floating on a white background with gaps between them. -
Re-tape for the second pass:
Now you need to tape off the *already painted* triangles to fill in the white gaps (if you want a full coverage look as shown). Apply fresh tape directly over the dry edges of your painted triangles to frame the empty white spaces. -
Paint the remaining triangles:
Fill in these new spaces with your accent colors, following your distribution plan. Ensure you seal these tape edges again for the sharpest possible result.
Step 3: The Border Detail
-
Measure the top border:
The image features a charming mini-triangle border near the ceiling. Measure about 3-4 inches down from the crown molding and apply a horizontal strip of tape. -
Create the mini stencil feel:
Use thinner tape to create small zigzag patterns within that strip. Since this area is small, you can freehand the spacing or use a simple cardboard template cut into a small triangle to trace repeatedly. -
Paint the border:
Using a small artist’s brush or the very tip of your sash brush, fill in these small border triangles with the warm grey tone to frame the room. -
Final reveal:
Remove all remaining tape slowly. Check for any small bleeds and touch them up with a tiny artist brush and your base wall color.
Paint Bleeding Under Tape?
If paint seeps under, wait for it to fully dry. Then, use a straight edge or putty knife to gently scrape the excess, or touch up with the base wall color and a tiny brush.
Step back and admire how this structured yet playful pattern adds immediate architectural interest to your room
Off-Center Geometric Panel for Asymmetry
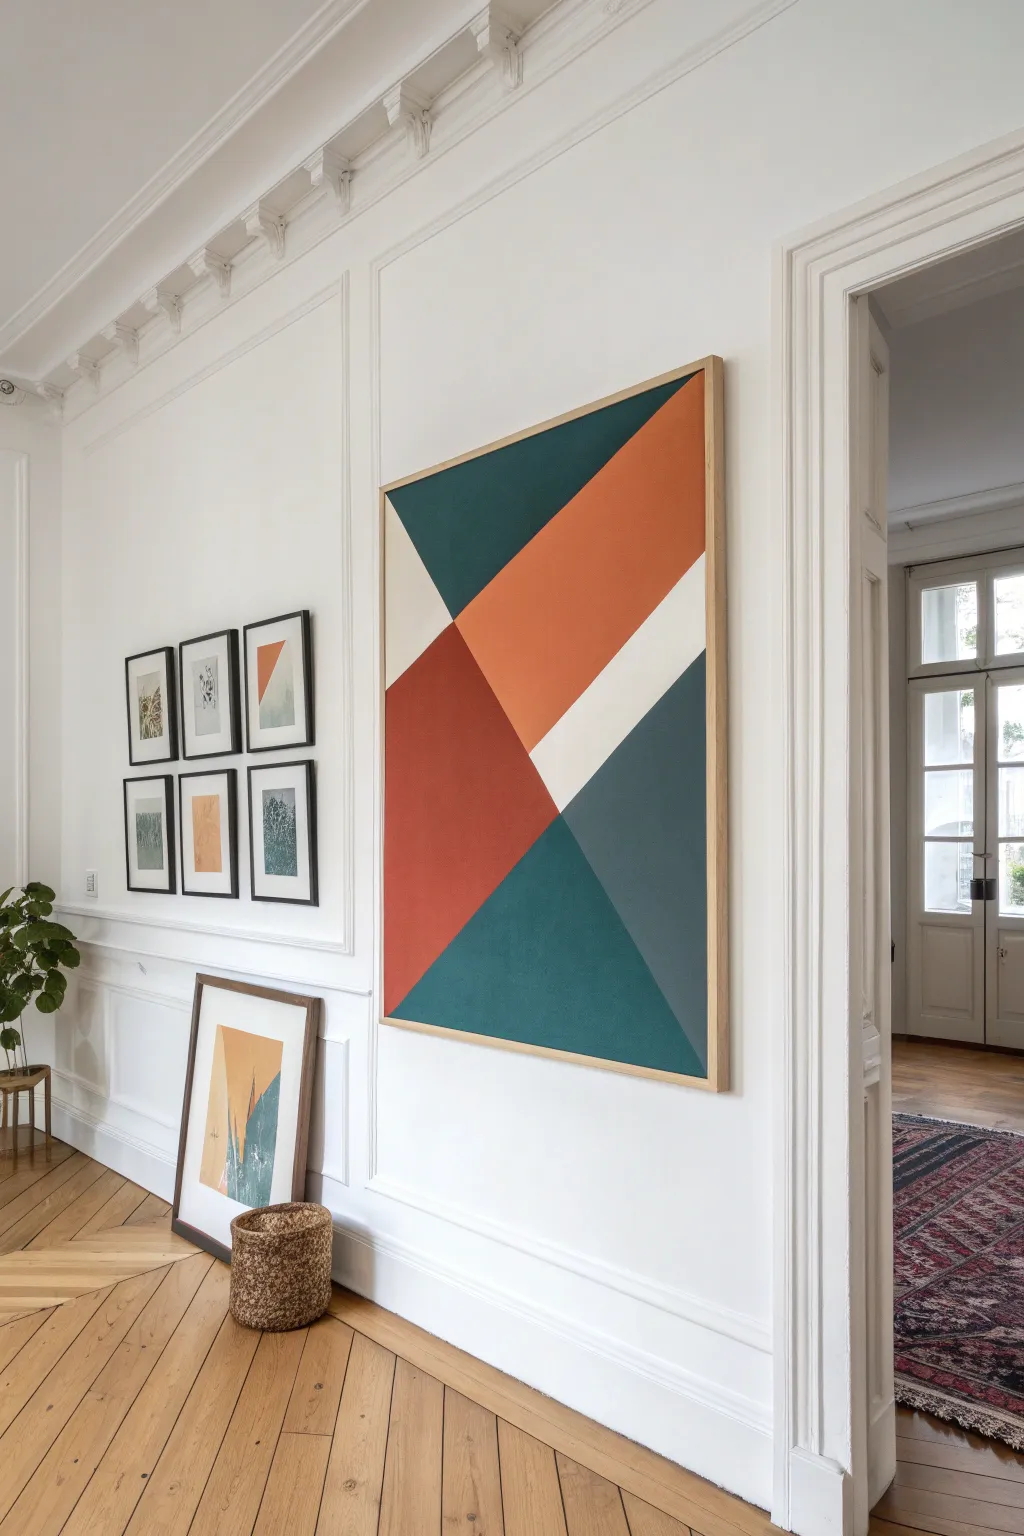
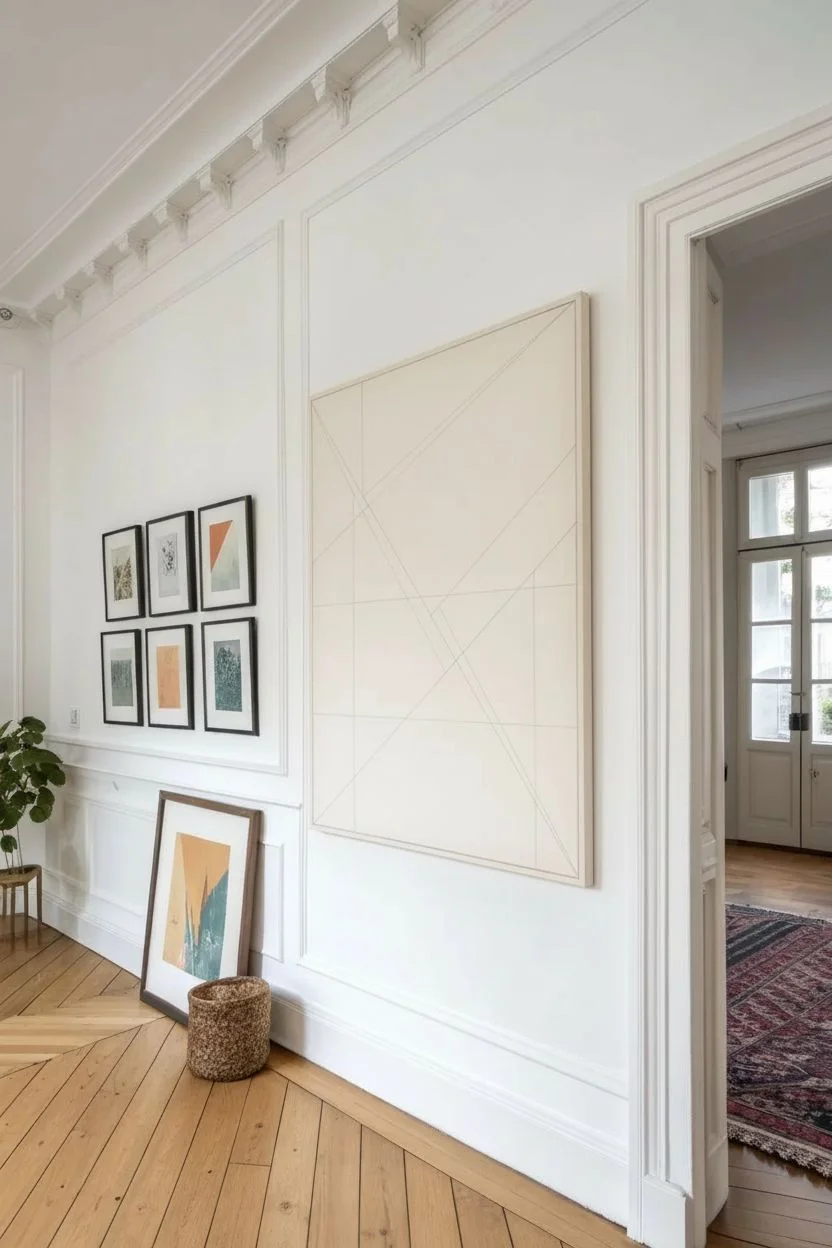
This striking, large-scale artwork brings a modern touch to any space with its bold diagonal lines and balanced palette of warm terracotta and cool teal. By framing a simple canvas with raw wood, you achieve a high-end gallery look that beautifully fills large wall panels.
How-To Guide
Materials
- Large stretched canvas (approx. 36×48 inches)
- Acrylic paints (Terracotta Orange, Emerald Green, Slate Blue, Cream/Off-White)
- Painter’s tape (high-quality, low-tack)
- Large flat paintbrushes (2-inch and 1-inch widths)
- Ruler or straight edge
- Pencil
- Bubble level or T-square
- Pine lattice strips (1×2 inch) for framing
- Wood glue
- Finishing nails
- Sandpaper (fine grit)
- Matte varnish (optional)
Step 1: Planning and Layout
-
Prepare the canvas:
Lay your plain white canvas on a flat, protected surface. Wipe it down slightly with a dry cloth to ensure no dust interferes with the tape adhesion. -
Mark the primary diagonal:
Using your straight edge and a pencil, lightly draw the main diagonal line that splits the canvas. In this design, it runs from the top-middle area down towards the bottom-right corner. -
Divide the space:
Sketch the intercepting lines. Create a large ‘V’ shape near the top left and intersect the main diagonal with perpendicular lines to form the distinctive triangles and quadrilaterals seen in the reference. -
Refine the geometry:
Check your pencil lines. The composition relies on sharp angles, so ensure your lines are perfectly straight. I like to step back at this point to make sure the balance feels right before committing to tape.
Step 2: Taping and Painting
-
Tape the first section:
Apply painter’s tape firmly along the pencil lines for your first color section—let’s start with the large terracotta orange shape in the center. -
Seal the edges:
Press the tape edge down firmly with your thumbnail or a credit card to prevent paint bleed. For extra crisp lines, paint a thin layer of the background white over the tape edge first to seal it. -
Apply the warm tone:
Paint the large central shape using the terracotta orange. Use long, smooth strokes with a large flat brush to minimize texture. Apply a second coat if needed for opacity. -
Remove tape while damp:
Carefully peel back the tape while the paint is still slightly tacky, not fully dry, to ensure the cleanest edge. -
Tape the adjacent sections:
Once the orange section is completely dry (wait at least an hour), tape off the neighboring sections: the deep emerald green triangle at the top and the slate blue section on the bottom right. -
Paint cool tones:
Fill in the emerald and slate sections. Be very careful along the lines where they meet the already painted orange section; exact tape placement is crucial here. -
Add the accent strip:
Tape off the narrow diagonal strip and paint it cream or off-white. This band creates crucial negative space that breaks up the heaviness of the darker colors. -
Final color block:
Finish with the large bottom triangle in teal or dark emerald. Ensure steady coverage, as dark colors can sometimes look streaky if applied too thinly. -
Touch ups:
Once all tape is removed and paint is dry, use a small detail brush to fix any tiny bleeds or uneven intersections.
Crisp Line Pro Tip
Always brush *away* from the tape edge rather than underneath it. This simple directional change drastically reduces the chance of paint seeping under the tape.
Step 3: Floating Frame Assembly
-
Measure frame pieces:
Measure the outer dimensions of your canvas. You want the wood strips to fit snugly against the canvas edge. -
Cut the wood:
Cut your pine strips to length. For a simple butt joint, two sides will run the full length of the canvas, and the top/bottom pieces will fit between them. -
Sand the timber:
Give the raw pine a quick sanding with fine-grit paper to remove any splinters and soften the sharp corners slightly. -
Attach the frame:
Apply a bead of wood glue to the side of the canvas. Press the wood strip against it, ensuring it is flush with the back of the canvas so it hangs flat. -
Secure with nails:
Drive a few small finishing nails through the wood strip and into the wooden stretcher bar of the canvas for a secure hold.
Texture Upgrade
Mix a small amount of modeling paste or baking soda into the acrylic paint before applying. This adds a tactile, plaster-like texture for a more organic feel.
Hang your new masterpiece in a prominent spot and enjoy the sophisticated architectural vibe it brings to the room
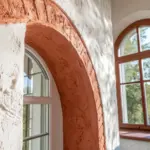
Overlapping Arches for Retro Geometry
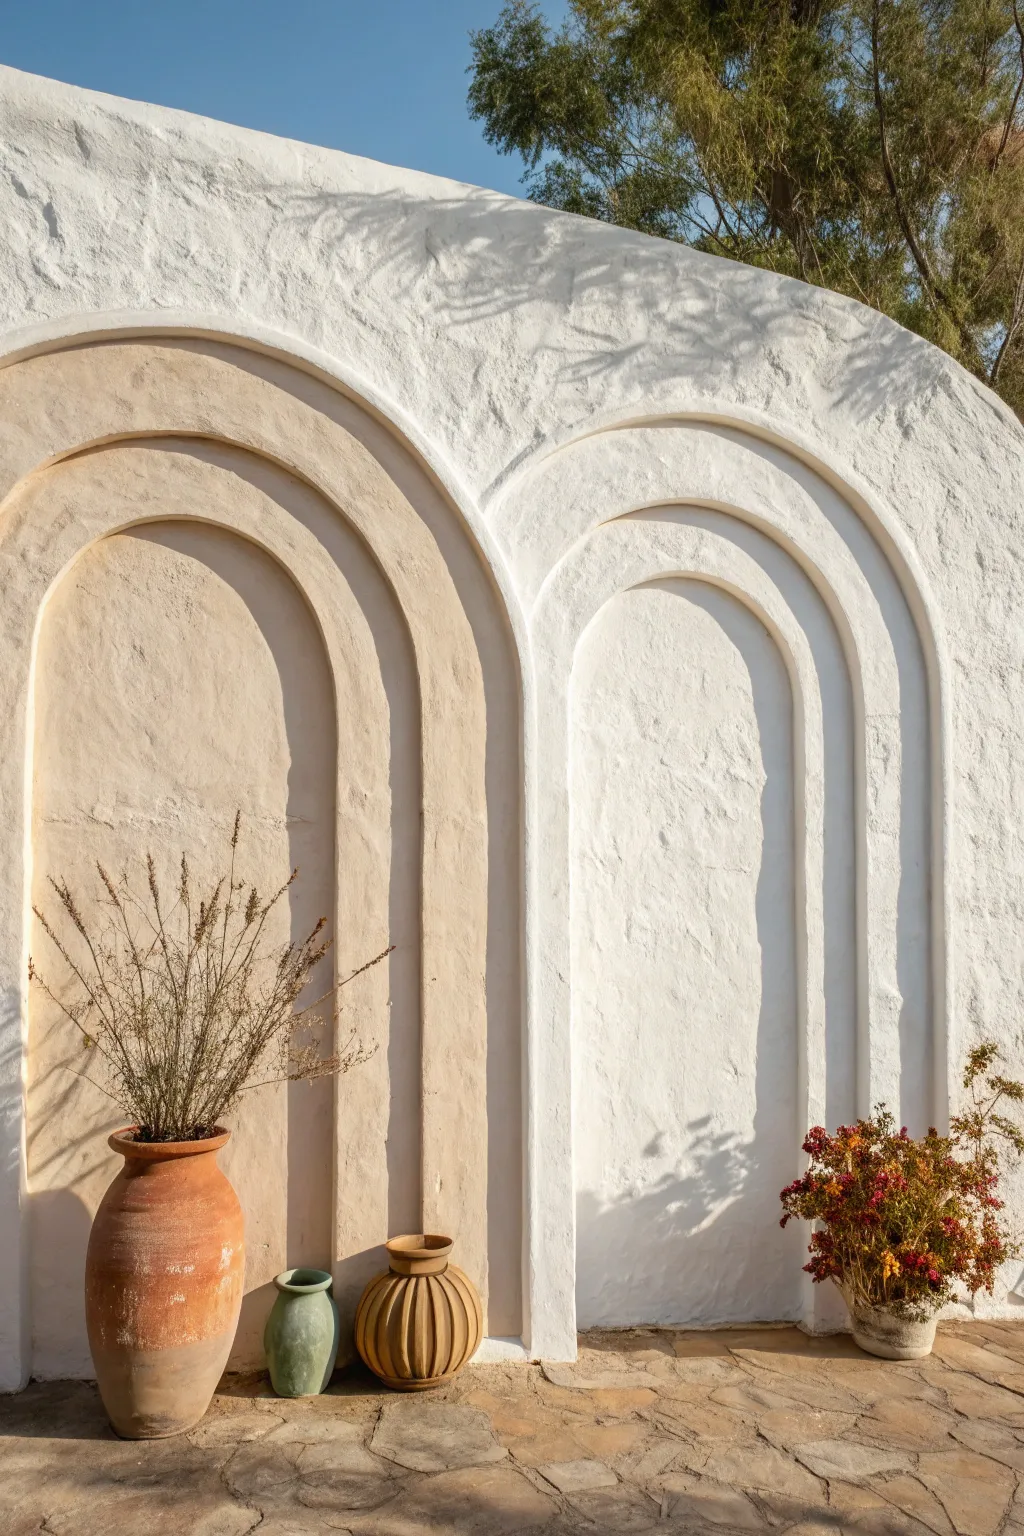

Bring the warmth of the Mediterranean to your space with this textured, faux-architectural wall feature. By layering concentric arches with textured plaster and varied paint tones, you’ll create a striking 3D illusion that adds instant character and depth to any plain wall.
Step-by-Step Tutorial
Materials
- Exterior or interior wall paint (White base, Warm Beige/Tan)
- Textured masonry paint or additive (sand/silica textured)
- Plaster or joint compound (optional for extra texture)
- Pencil and string (or a large compass tool)
- Painter’s tape (flexible curve tape recommended)
- Wide paintbrush (3-4 inch)
- Detail paintbrush (1-2 inch)
- Paint roller and tray
- Drop cloth
- Bubble level
- Measuring tape
Step 1: Planning and Mapping
-
Prepare the Canvas:
Begin by cleaning your wall surface thoroughly to remove dust and grease, ensuring the textured paint adheres properly. Lay down your drop cloth to protect the flooring, as textured paint can be messy. -
Determine Center Points:
Decide on the placement of your two main arch sets. Mark the center point for the base of each arch along the floor or trim line using a pencil. -
Draw the Vertical Guides:
Use a bubble level to draw faint vertical lines upward from your base marks. These will serve as the central axis for each arch set, ensuring your curves don’t lean to one side. -
Create a String Compass:
Tie a piece of string to a pencil. Hold the loose end of the string at your center point on the wall (or anchor it with a tack) to create a makeshift compass. -
Sketch the Nested Arches:
Starting with the largest outer arch, pull the string taut and draw a half-circle. Shorten the string by roughly 4-6 inches and draw the next inner arch. Repeat this process until you have 3-4 nested arches sketched out for both the left (beige) and right (white) designs.
Use the Sun
Check the room’s natural lighting before painting shadows. Paint your faux shadows on the side of the ridges opposite the actual window to make the illusion convincing.
Step 2: Creating Texture and Depth
-
Mix the Texture:
If you aren’t using pre-mixed masonry paint, mix your texturing additive into your white base paint now. You want a consistency thick enough to hold brushstrokes but fluid enough to spread. -
Paint the White Arch Base:
Using the wide brush, apply the textured white paint to the right-hand set of arches. Don’t worry about being perfectly neat at the lines yet; focus on building up a stucco-like surface. -
Build the Ridge Lines:
To create the 3D ‘lip’ effect, apply a thicker bead of plaster or heavy-body paint along the pencil lines of your right-hand arch. Use your finger or a small rounded tool to smooth this ridge so it looks like protruding molding. -
Texturize the Left Arches:
Repeat the texturing process for the left set of arches. Even though this side will be colored later, apply a white textured base coat first to ensure the finish matches the other side perfectly. -
Let it Cure:
Allow the textured base and ridges to dry completely. This is crucial—if the base is wet, your top colors will muddy the texture. An overnight dry is often best here.
Step 3: Adding Color and Dimension
-
Mix the Beige Tones:
Pour your warm beige paint into a tray. For a natural, weathered look, I like to have a small cup of slightly lighter beige and a cup of slightly darker brown nearby to blend on the wall. -
Paint the Left Arches:
Using a smaller brush, carefully paint the left set of arches with your main beige color. Work section by section—paint the outermost ring, then the next inner ring. -
Create Shadows:
While the beige paint is still wet, dip a small detail brush into your darker brown mix. lightly run this color along the *inner* edge of each arch ridge to simulate a shadow cast by the sun. -
Add Highlights:
Similarly, brush the lighter beige mix onto the *outer* face or top of the ridges. This high-contrast shading is the secret to making the flat wall look like it has deep architectural recesses. -
Refine the White Arches:
Return to the right-hand white arches. Use a fresh white coat to clean up any pencil marks. To embrace the visual style, use a very light gray to add subtle shadows inside the white ridges, just like you did with the beige side. -
Soften the Edges:
Inspect the transition zone where the left and right arch sets might meet or overlap. Use a dry brush to feather the texture slightly so the connection feels organic rather than rigid. -
Seal (Optional):
If this project is in a high-traffic area or outdoors, apply a clear matte sealer over the entire design to lock in the texture and protect the paint from scuffs.
Old World Patina
For an aged look, dab a slightly damp sea sponge over the finished beige paint. It lifts small spots of pigment, revealing the texture beneath for an antique finish.
Step back and admire how a simple paint technique has transformed a flat surface into a structural masterpiece
Thin-Line Geometric Web (Tape-Art Look)
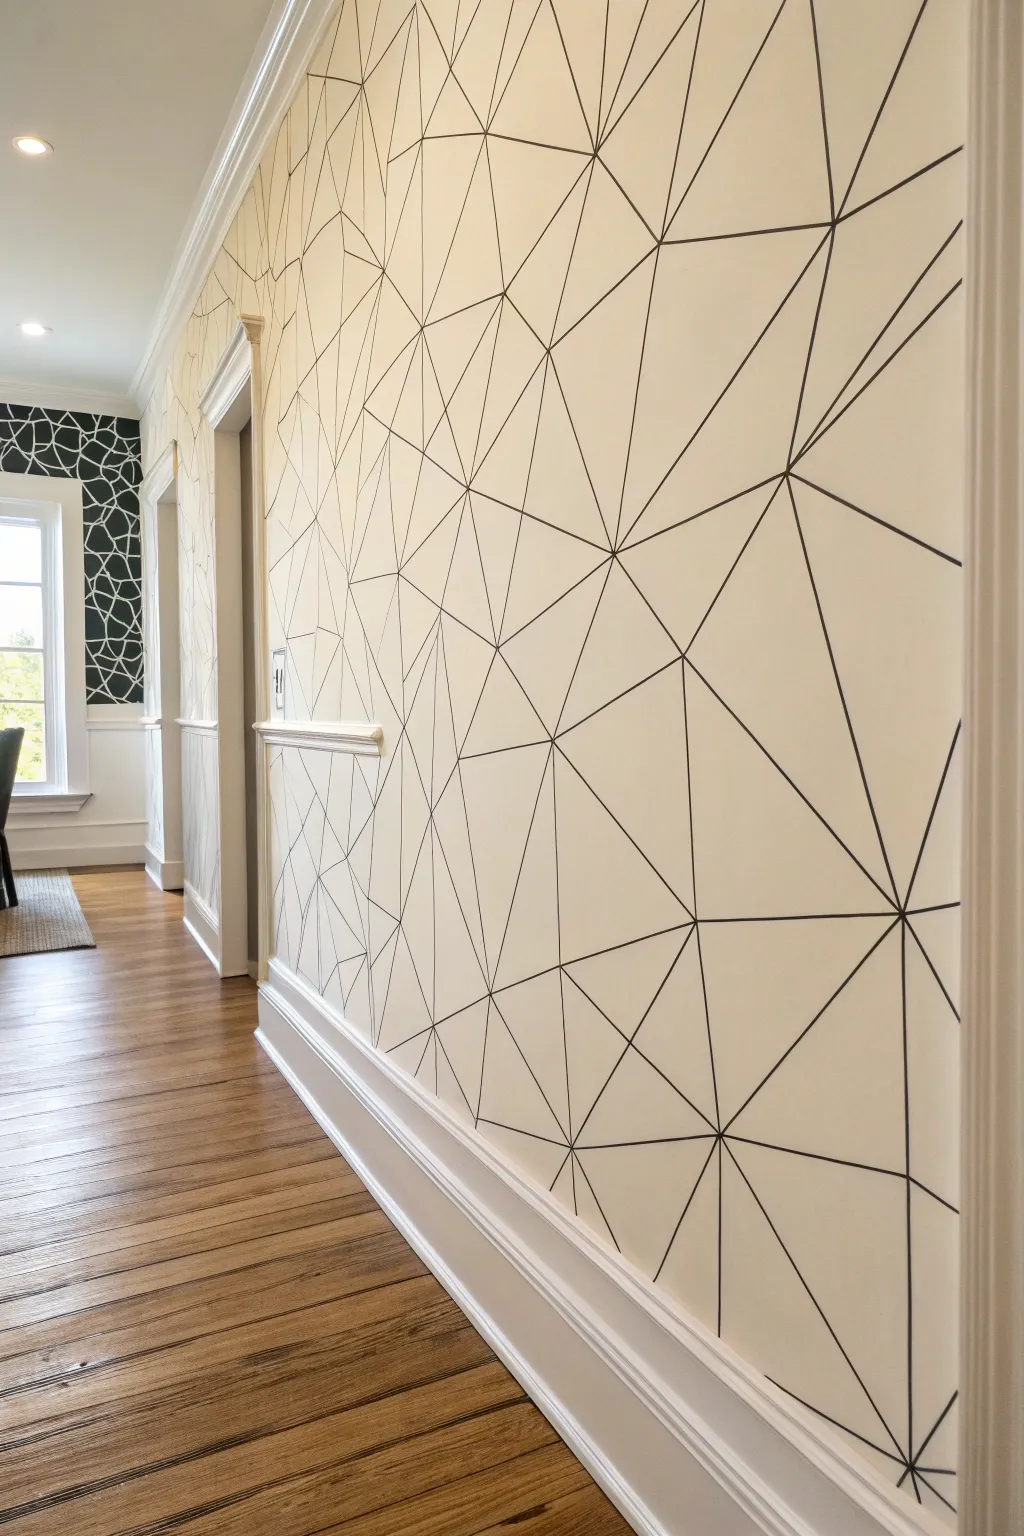
Transform a plain hallway or feature wall into a modern art piece with this striking, web-like design. By focusing on thin, crisp lines rather than filled shapes, you create an airy, architectural feel that adds depth without overwhelming the space.
Detailed Instructions
Materials
- Base coat paint (cream or off-white)
- Contrasting paint (charcoal or black)
- High-quality painter’s tape (0.25 inch or 6mm width)
- Standard width painter’s tape
- Small foam roller
- Paint tray
- Drop cloths
- Utility knife or scissors
- Damp cloth
- Matte clear sealant (optional)
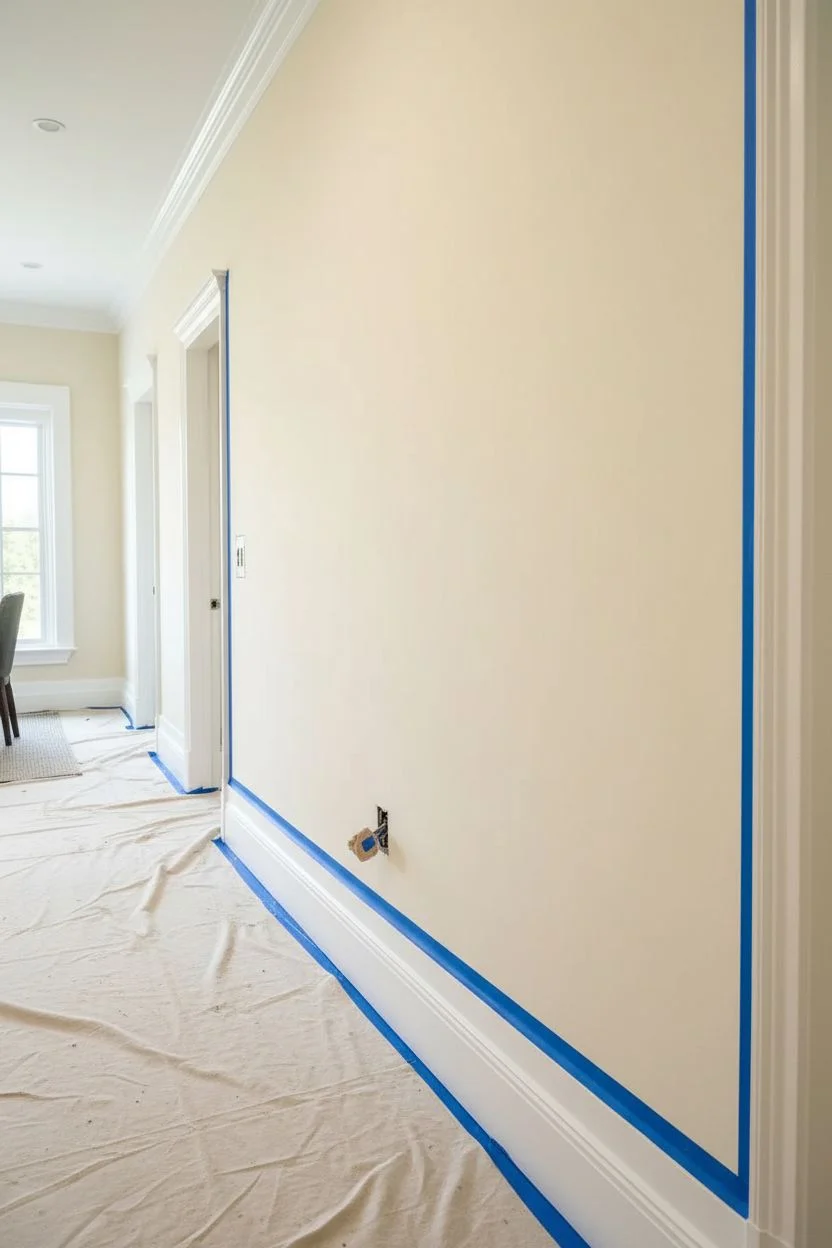
Step 1: Preparation and Base Layer
-
Clear and clean:
Remove all outlet covers, switch plates, and artwork from your chosen wall. Wipe the surface down with a damp cloth to remove dust, ensuring the tape will stick perfectly later. -
Protect the area:
Lay down drop cloths to protect your flooring. Use standard width painter’s tape to mask off your baseboards, crown molding, and the edges of adjoining walls. -
Apply the base color:
Roll on your chosen base color—a warm cream or soft off-white works best for this specific look. You’ll likely need two coats for opaque, even coverage. Let this cure for at least 24 hours so it doesn’t peel when you apply tape.
Smudge Alert
Paint markers can smear instantly if touched. Work from top-left to bottom-right (if right-handed) to keep your hand off wet lines.
Step 2: Designing the Web
-
Plan your focal points:
Visualize where your unexpected ‘nodes’ will be. Unlike regular patterns, this design relies on asymmetry. Pick a few spots where several lines will converge. -
Start with long lines:
Using thin artist’s tape (0.25 inch), lay down your longest lines first. Stretch them from ceiling to floor or corner to center. Keep the tape taut to ensure straight lines. -
Create the triangles:
Begin connecting your long lines with shorter diagonal strips. Avoid making perfect squares; aim for scalene triangles and irregular polygons to capture that ‘shattered glass’ effect. -
Check the density:
Step back frequently. If one area looks too empty, add a bisecting line. If an area looks too cluttered, you might want to leave it be—negative space is crucial here. -
Seal the edges:
Once your design is taped, run your finger firmly along every strip of tape. I like to paint a very thin layer of the *base* color over the tape edges first. This seals the tape and prevents the dark paint from bleeding under.
Metallic Twist
Swap the black paint pen for gold or copper metallic leafing pens. It creates a glamourous, inlaid metal look that catches the light.
Step 3: Painting the Lines
-
Switch strategy:
Here is the trick: You aren’t painting the lines directly; you are painting the *wall* again. You will be painting over the entire surface with the base color again? No, wait—this is the ‘reverse’ method for thick lines. For this *thin line* look shown in the image, we actually need to paint the *wall color* over the *line color*? No, looking closely at the image, the lines are dark on light. To get thin dark lines, you actually paint the *whole wall dark first*? That’s inefficient. -
Correction: The Paint Pen Method:
Actually, achieving lines this thin and consistent with tape and paint is incredibly difficult. The most faithful way to recreate the sharp look in the photo is using a high-quality, oil-based paint marker or a steady hand with a striping brush. Let’s pivot to the most DIY-friendly method for this specific result: The Paint Pen. -
Map with pencil:
Instead of tape, use a long straight edge (like a 4-foot level) and a light pencil. Draw your geometric web design lightly on the wall. -
Test your marker:
Use a chisel-tip black paint marker (acrylic or oil-based). Test it on a piece of cardboard to ensure the flow is consistent and the width matches your vision. -
Trace the verticals:
Using your straight edge as a guide, trace over your pencil lines with the paint marker. Start with the vertical-ish lines first. Wipe the edge of your ruler frequently to avoid smudging ink. -
Connect the diagonals:
Fill in the diagonal connecting lines. Move the ruler carefully; ensure the ink from the previous line is dry before placing the ruler over it. -
Freehand touch-ups:
Where lines meet at a ‘node’ or corner, careful freehand work is often cleaner than trying to jam a ruler into the intersection. Use the very tip of the marker to sharpen these points.
Step 4: Finishing Touches
-
Erase guidelines:
Once the paint marker lines have cured fully (check manufacturer instructions usually 1-2 hours), gently erase any visible pencil marks with a white vinyl eraser. -
Clean up baseboards:
Remove the masking tape from your trim. If any line work went onto the tape, use a small craft knife to score the edge before pulling to ensure a crisp break. -
Reinstall hardware:
Screw the outlet covers and switch plates back into place. If a line crosses a cover, you can continue the design onto the plastic plate for a seamless look.
Enjoy the sophisticated, architectural vibe your new wall brings to the room
Monochrome Geometry Using Multiple Tones

Transform a plain hallway into a sophisticated feature using a monochrome-inspired palette of earthy pinks, warm clays, and muted greens. This project combines precise geometric taping with a unique texturing technique to mimic the look of rough-hewn plaster or stucco.
How-To Guide
Materials
- Painter’s tape (high quality, medium width)
- Pencil
- Long level (4-foot) or laser level
- Chalk line (optional)
- White base paint (satin or eggshell)
- Texturing medium (sand additive or suede paint)
- Paint colors: Terracotta, Blush Pink, Cream, Beige, Sage Green
- Small roller covers (4-inch)
- Angled sash brush
- Drop cloths
- Paint trays
Step 1: Preparation and Base Coat
-
Prepare the surface:
Start by cleaning the wall thoroughly to remove dust and grease, which ensures tape adhesion is crisp. Lay down drop cloths to protect your floor, especially since we are working right up to the baseboards. -
Apply the base color:
Roll on two coats of your white base paint. This color will eventually become the ‘grout lines’ between your triangles, so ensure it is solid and opaque. Let this dry completely for at least 24 hours before taping.
Bleed-Through Blues?
If color bleeds under the tape, wait for it to fully dry. Then, use a small flat artist brush with the white base paint to carefully clean up the line. Don’t wipe wet paint!
Step 2: Mapping the Geometry
-
Determine the grid:
Decide on the height of your triangle rows. Measure the total wall height and divide it to get equal rows. Mark these horizontal intervals lightly with a pencil up the side of the wall. -
Mark horizontal lines:
Use your long level or a laser level to draw light horizontal pencil lines across the entire wall at your marked intervals. These serve as the top and bottom boundaries for your triangles. -
Mark vertical intervals:
Along the bottom horizontal line, mark points at equal distances (e.g., every 24 inches). On the next line up, stagger these marks so they sit exactly in the middle of the intervals below. -
Connect the dots:
Use a straightedge to connect your staggered marks diagonally, creating a series of zig-zag lines that form the triangles. Double-check that your lines look consistent before applying any tape.
Step 3: Taping the Pattern
-
Tape the ‘grout’ lines:
Apply painter’s tape directly over your pencil lines. The tape represents the white space that will separate the colors. Press the edges down firmly with a putty knife or credit card to prevent bleed. -
Seal the tape edges:
I always take a moment here to lightly brush a thin layer of the *base white paint* over the edges of the tape. This seals the tape and ensures that if any paint bleeds under, it’s white-on-white, keeping your final lines razor sharp.
Textured Roller Tip
For maximum texture, use a roller with a thicker nap (3/8″ or 1/2″). This holds more of the sand-paint mixture and deposits it unevenly, creating a better faux-stucco affect.
Step 4: Painting and Texturing
-
Mix the texture:
Pour your colored paints into separate trays. Mix a sand texturing additive into each color according to the package instructions to achieve that gritty, stucco-like finish visible in the photo. -
Plan your color distribution:
Mark each triangle with a small piece of painter’s tape or a sticky note indicating which color goes where. Aim for a random but balanced look, ensuring two identical colors never touch. -
Start with darker tones:
Begin painting the darkest triangles (the terracotta and deep clays) first. Use a small roller for the center of the shape and an angled brush for the corners near the tape. -
Apply the mid-tones:
Move on to your sage greens and beige tones. Because of the texture additive, you shouldn’t overwork the paint; roll it on thick enough to show the grain, rather than stretching it thin. -
Finish with light tones:
Paint the remaining triangles in your blush pinks and creams. Check for any holidays (missed spots) as the textured paint can sometimes leave small gaps. -
Apply a second coat:
Once the first coat is dry to the touch, apply a second coat to deepen the color and enhance the tactile, sandy texture. This builds up the dimension on the wall.
Step 5: The Reveal
-
Score the edges:
If the paint is very thick due to the texture, lightly score along the edge of the tape with a utility knife before pulling. -
Remove the tape:
Peel the tape off slowly at a 45-degree angle while the paint is still slightly tacky. This prevents the dried paint skin from ripping. Reveal your crisp white lines underneath. -
Touch up:
Use a small artist’s brush and your white base paint to fix any tiny bleeds or uneven spots on the grid lines.
Step back and admire how this structured, tactile design brings warmth and architectural interest to your space.
Negative-Space Lines for “Only the Outlines” Style
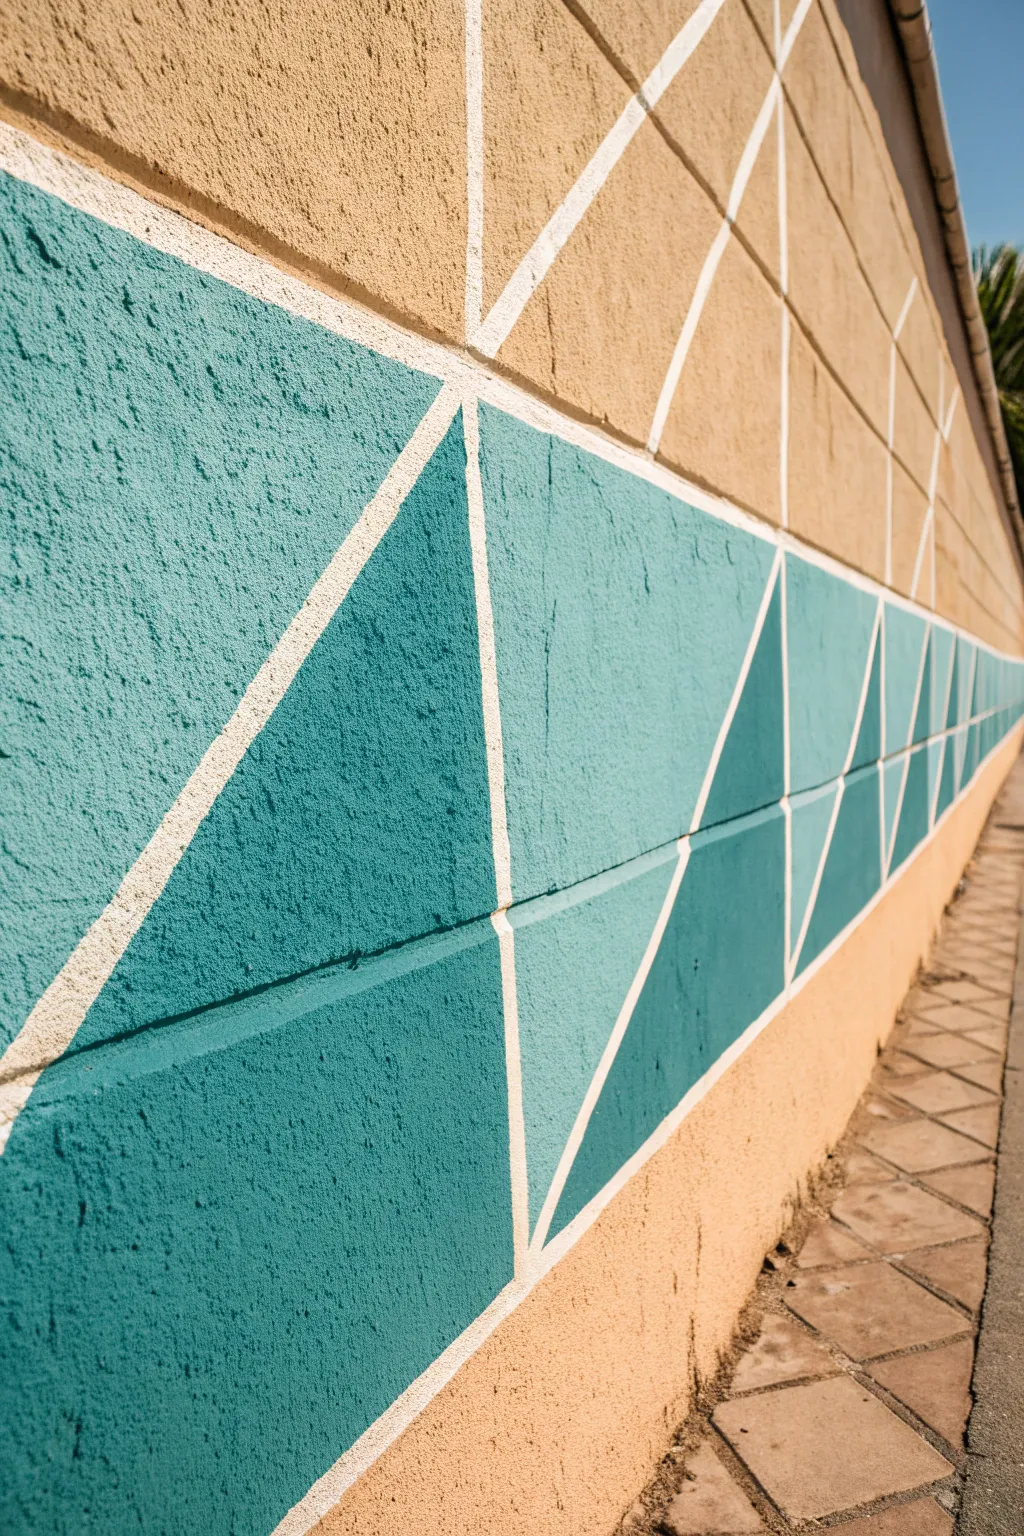
Achieve a striking geometric look without buying contrasting paint by letting your wall’s base color do the heavy lifting. This tutorial guides you through creating crisp, teal triangles defined by bold lines of negative space on a textured exterior or interior wall.
Detailed Instructions
Materials
- Exterior/Interior paint (Teal/Turquoise)
- Wide painter’s tape (0.75 to 1 inch width)
- Measuring tape
- Chalk line or straight edge
- Deep-pile paint roller (for textured walls)
- Angled sash brush
- Paint tray and liner
- Clean rags
- Ladder (if ensuring height coverage)
- Clear matte medium or base color paint (for sealing tape)
Step 1: Preparation and Planning
-
Assess the surface:
Begin by cleaning your wall thoroughly. Since this technique works beautifully on textured stucco or concrete, use a stiff brush to remove dust and cobwebs before wiping it down. -
Establish the base coat:
This style relies on the ‘lines’ being the original wall color. If your wall isn’t already the desired beige or sand tone shown in the image, apply a full base coat of quality exterior or interior latex paint and let it cure for at least 48 hours. -
Visualize the grid:
Decide on the height of your geometric band. Measure a horizontal line across the wall where the top of the teal shapes will end and snap a chalk line to keep it straight. -
Mark vertical intervals:
Along your horizontal guide, mark even intervals. For prominent triangles like this, spacing them about 24-36 inches apart works well. Repeat these marks along the bottom baseline, slightly offset if you want asymmetrical angles.
Bleeding Lines?
If paint seeps under the tape on rough stucco, don’t panic. Wait for it to dry, then firmly dab the original base color over the bleed with a small, stiff bristle brush to cover it.
Step 2: Taping the Geometry
-
Create the diagonals:
Connect your top and bottom marks with painter’s tape to form large triangles. Press the tape firmly into the texture of the wall. -
Add intersecting lines:
To mimic the complex look in the photo, run secondary tape lines that bisect the larger triangles or run parallel to existing lines. Don’t be afraid to cross pieces of tape; you will cut away the excess later. -
Trim the intersections:
Use a utility knife to carefully trim tape where lines intersect, ensuring sharp corners rather than messy overlaps. -
The sealing secret:
This is crucial for textured walls: Brush a thin layer of your *base* wall color (or a clear matte medium) over the edges of the tape. This seals the gaps in the texture and prevents the teal paint from bleeding under the tape.
Add Dimension
For a 3D effect, pick two shades of teal. Paint the left-leaning triangles the darker shade and right-leaning ones the lighter shade to mimic light and shadow.
Step 3: Applying Color
-
Cut in the edges:
Once the sealant is dry, use your angled sash brush to carefully paint the teal color along the edges of the tape and any intricate corners. -
Roll the main sections:
Load your deep-pile roller with teal paint. Roll vertically within the taped shapes, ensuring full coverage over the rough texture. I prefer to work in small sections to maintain a wet edge. -
Check for holidays:
Texture eats paint, so inspect the wall from different angles to spot any missed pinholes (holidays). Dab these with your brush rather than over-rolling. -
Apply a second coat:
Allow the first coat to dry according to the manufacturer’s instructions, then apply a second coat for a rich, opaque finish.
Step 4: The Reveal
-
Time the removal:
Don’t wait for the paint to fully cure. When the final coat is tacky but starting to set—usually about 30-60 minutes after painting—it’s time to remove the tape. -
Pull carefully:
Pull the tape slowly at a 45-degree angle away from the painted area. This helps shear the paint film cleanly. -
Touch up:
Inevitably, textured walls might have minor bleed. Use a small artist’s brush and your original base color to sharpen any lines that look fuzzy.
Step back and admire how simple masking tape transformed your plain wall into a structured masterpiece
Geometric Ceiling Band That Extends the Wall
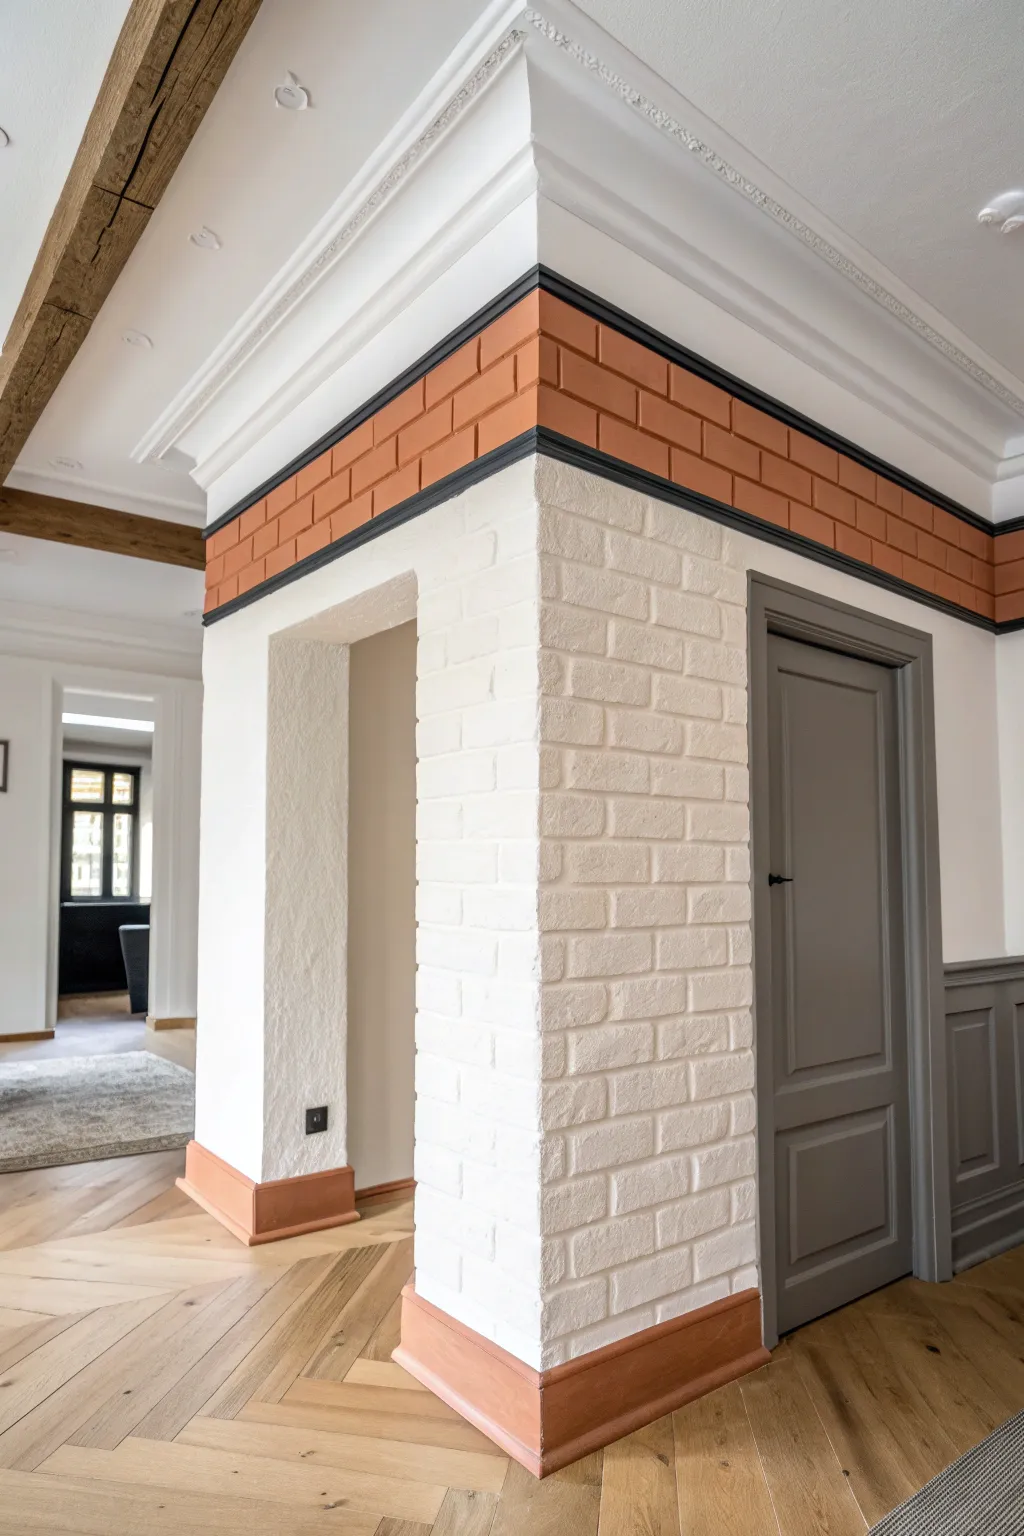
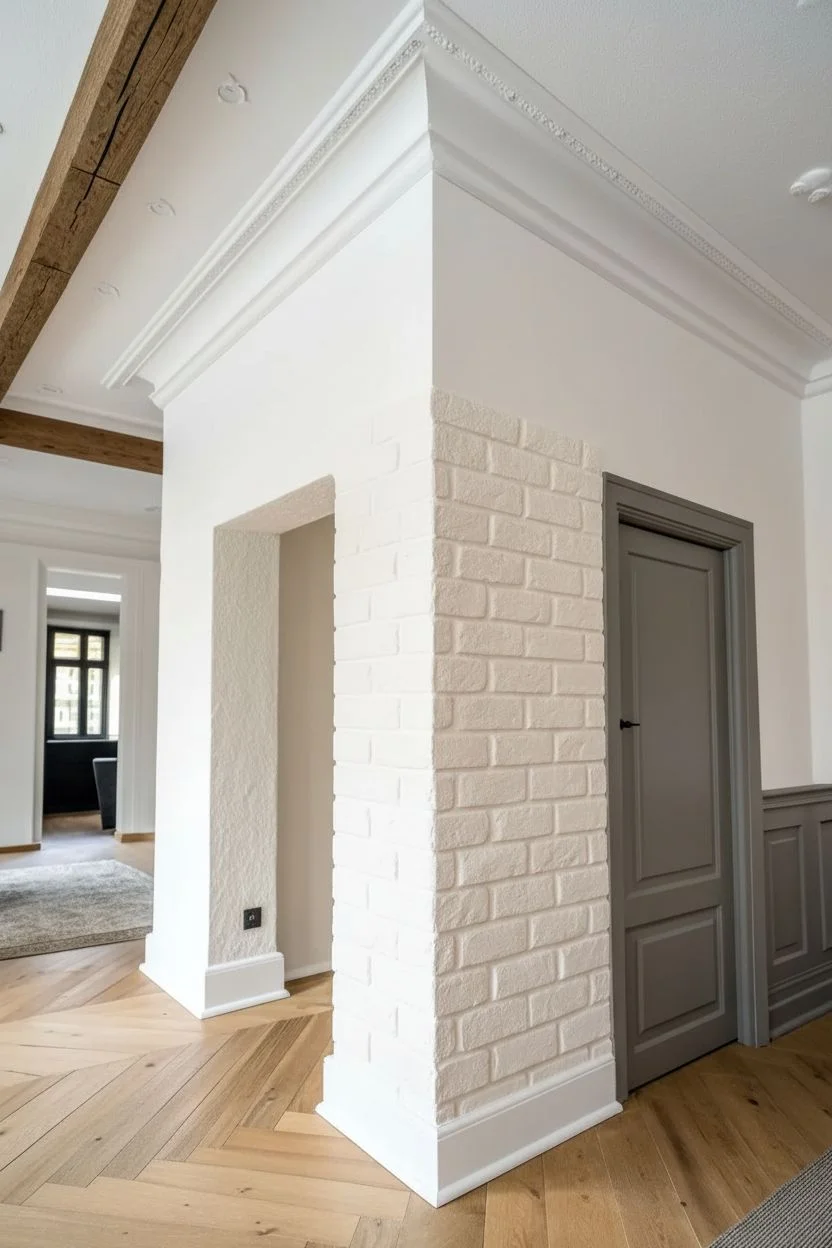
Elevate a standard corner column by combining texture and bold geometry for a high-end architectural look. This project features a textured white brick effect topped with a striking terracotta band and dark framing to visually anchor the ceiling line.
Step-by-Step Tutorial
Materials
- White brick wall texture panels (or thin brick veneer)
- Construction adhesive
- High-quality painter’s tape (multi-surface)
- Laser level (highly recommended)
- White emulsion paint (matte finish)
- Terracotta orange interior paint
- Charcoal grey or black interior paint
- Wooden baseboards
- Flat wood trim moulding (approx. 1 inch width)
- Paint brushes (angled sash brush and flat brush)
- Small foam roller
- Caulk and caulking gun
- Sandpaper (fine grit)
- Primer
Step 1: Creating the Textured Base
-
Prep the surface:
Begin by cleaning your corner walls thoroughly to remove dust and grease. Ensure the surface is dry and smooth; patch any major holes if necessary. -
Install brick texture:
Apply your lightweight brick veneer or texture panels to the main column area using construction adhesive. Ensure the ‘brick’ rows are level as you work your way up. -
Stop at the height mark:
Don’t install the texture all the way to the crown moulding. Stop approximately 12-16 inches below the ceiling moulding to leave smooth wall space for the painted band. -
Caulk the seams:
Once the adhesive sets, fill any gaps between panel seams or veneer pieces with paintable caulk to create a seamless, believable brick surface. -
Paint the brick white:
Apply a coat of primer followed by two coats of matte white paint to the textured area. Use a thick-nap roller or brush to get into all the crevices.
Step 2: Adding the Geometric Band
-
Mark the band boundaries:
Use a laser level to project a straight horizontal line right where the brick texture ends. Project a second line just underneath the crown moulding. -
Install the trim borders:
Cut your flat wood trim moulding to fit the width of the wall sections. Glue or nail these strips along your laser lines—one immediately above the brick texture, and one just below the crown moulding. -
Caulk trim edges:
Run a thin bead of caulk along the top and bottom of your new wood trim strips for a professional, gap-free finish. -
Prime the smooth band:
Prime the smooth drywall section between your two new wood trim strips, as well as the wood strips themselves. -
Paint the dark borders:
Using a small angled brush, carefully paint the wood trim strips in charcoal grey. I find it easier to do this first and touch up later if needed. -
Paint the terracotta field:
Fill in the smooth wall space between the dark trims with your terracotta paint. Apply two coats for rich, opaque coverage. -
Create the faux brick lines:
Once the terracotta paint is fully dry, use a ruler and a thin detail brush with the charcoal paint to draw the ‘mortar’ lines, mimicking the brick size below but on the smooth surface.
Wobbly Lines?
If you struggle painting straight faux-mortar lines freehand, use fine-line tape. Paint over the tape with the terracotta base color first to seal it, then apply the grey for crisp lines.
Step 3: Finishing Touches
-
Install baseboards:
Measure and cut your baseboards to wrap around the bottom of the column. -
Paint baseboards:
Paint the baseboards in the same terracotta shade as the upper band to create visual balance. -
Attach baseboards:
Fix the painted baseboards to the wall with adhesive or finishing nails. -
Paint the top rail:
If your design includes a picture rail like the photo, ensure the very top edge meets the white ceiling moulding cleanly. -
Final inspection:
Walk around the pillar and check for any paint bleeds or missed spots on the texture, touching up with a small artist’s brush.
Add Dimension
Make the smooth upper band look more like real masonry by mixing a handful of sand or texture additive into the terracotta paint before applying it to the wall.
Step back and admire how this structural illusion adds instant historic character to the room
Maximalist Shape Collage With Mixed Geometry
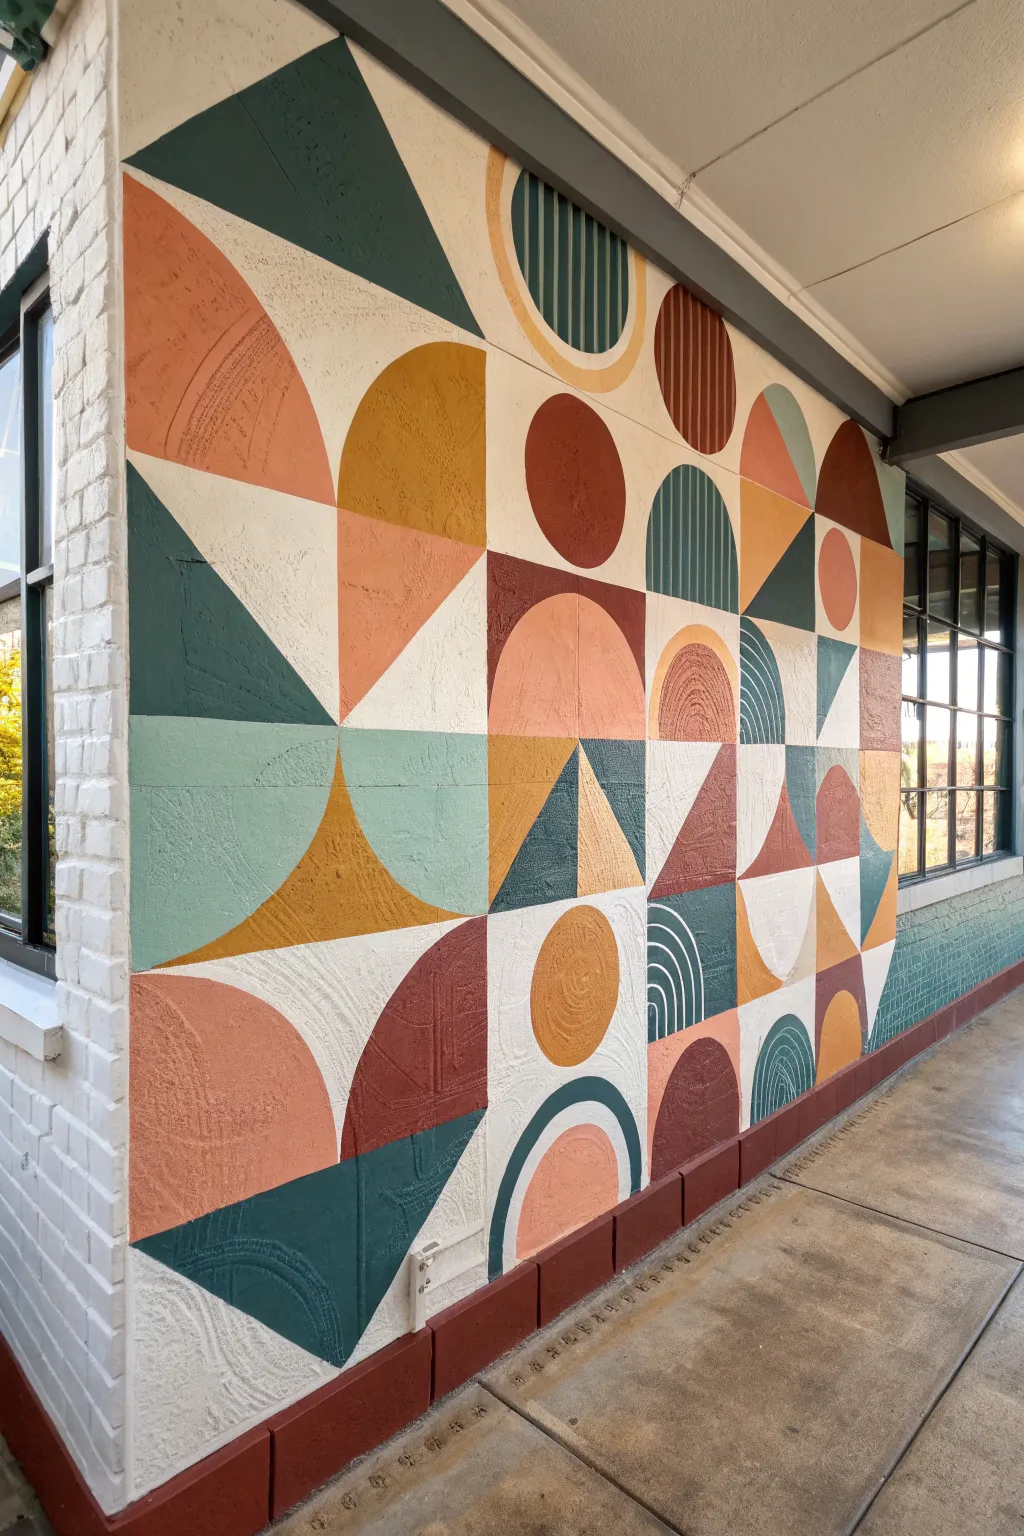
Transform a plain exterior or textured wall into a stunning focal point with this vibrant, maximalist shape collage. Combining earthy tones like terra cotta, sage, and mustard with bold geometric forms creates a sophisticated yet playful mural that feels modern and artistic.
How-To Guide
Materials
- Exterior masonry paint (terracotta, mustard yellow, sage green, teal, deep red, off-white)
- Painter’s tape (various widths for masking)
- Chalk line tool
- Large compass or string and pencil (for circles)
- Pencil and eraser
- Assorted paint brushes (angled sash brushes for edges, flat brushes for fill)
- Small foam rollers (4-inch size)
- Drop cloths
- Ladder or step stool
- Measuring tape
- Damp rag for cleanup
Step 1: Planning and Base Prep
-
Clean the surface:
Begin by thoroughly cleaning your wall surface. If you are painting on exterior brick or stucco like the reference, use a stiff bristle brush or a gentle power wash to remove dust and cobalt webs, as paint won’t adhere well to grit. -
Apply base coat:
Roll on a fresh coat of off-white or cream masonry paint across the entire area. This acts as your ‘mortar’ lines and background, ensuring the colors pop against a neutral canvas. Let this dry completely, preferably overnight. -
Create a grid:
Measure the total width and height of your wall space. Divide this area into a large grid of squares or rectangles using a pencil and a long straight edge or level. This underlying invisible structure keeps the maximalist design from looking chaotic. -
Sketch the layout:
Lightly sketch your design into the grid boxes using a pencil. Use a mix of quarter-circles, triangles, and arches. Don’t worry about being perfect yet; this is just a roadmap.
Clean Curve Trick
Make a cardboard template for repeated curves (like the small arches). Trace around it with a pencil instead of using string every time for consistent sizing.
Step 2: Drafting the Shapes
-
Draft straight lines:
For all the triangular and rectangular shapes, use a level or a chalk line to mark definitive, straight edges over your sketch marks. -
Draw perfect curves:
To create the circles and arches, tie a piece of string to your pencil. Hold the string endpoint at the center of where the circle would be, and swing the pencil like a compass to draw a clean arc. Alternatively, trace large circular objects like bucket lids for smaller curves. -
Mask the straight edges:
Apply painter’s tape along the pencil lines for all your straight-edged shapes (triangles and squares). Press the tape edges down firmly to prevent bleed, especially on textured surfaces.
Bleeding on Brick?
If paint bleeds deeply into mortar crevices, don’t wipe it creates a smudge. Let it dry fully, then paint over the mistake with your background color.
Step 3: Painting the Composition
-
seal the tape:
I always like to paint a thin layer of the *base* wall color over the edge of the painter’s tape first. This seals the tape, meaning any paint that bleeds under is invisible, leaving you with a crisp line later. -
Paint the first color group:
Start with your lightest color (e.g., the sage green or pale peach). Identify all shapes in your plan assigned to this color and fill them in using a small roller for larger areas and a brush for corners. -
Work by color batch:
Move on to your next hue, such as the mustard yellow. Painting all instances of one color at time speeds up the process and reduces brush washing. -
Freehand the curves:
For the circular shapes where tape is hard to use, use a high-quality angled sash brush. Load the brush moderately and carefully ‘cut in’ the curve, using your wrist to guide the brush in a smooth arc. -
Fill the curves:
Once the outline of the curve is established, fill in the rest of the shape with a flat brush or roller. -
Add striped details:
Some sections, like the semi-circles, feature vertical stripes. For these, wait until the base shape color is dry, then apply thin strips of tape and paint the contrasting darker color over them. -
Paint the dark accents:
Finally, apply your darkest heavy colors—the deep teals and burnt reds. These anchor the design. Apply two coats if necessary to get rich, opaque coverage.
Step 4: Finishing Touches
-
Remove tape carefully:
Pull the tape off while the paint is still slightly tacky, not bone dry. Pull it at a 45-degree angle away from the paint edge to ensure a sharp line. -
Touch up edges:
On textured walls like brick, some bleed is almost inevitable. Use a small detail brush and your off-white base color to clean up any fuzzy lines or spots where color seeped out. -
Let it cure:
Allow the full mural to cure for at least 24 hours before placing any furniture nearby or washing the area.
Step back and enjoy the dynamic energy this colorful geometric wall brings to your space
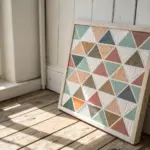
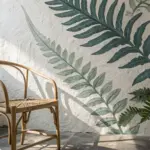


Have a question or want to share your own experience? I'd love to hear from you in the comments below!