If you can paint a simple draped shape and two little eyes, you can paint a ghost—and honestly, that’s the magic of it. Here are my favorite ghost painting ideas that feel cute, moody, and totally Pinterest-worthy without getting overly scary.
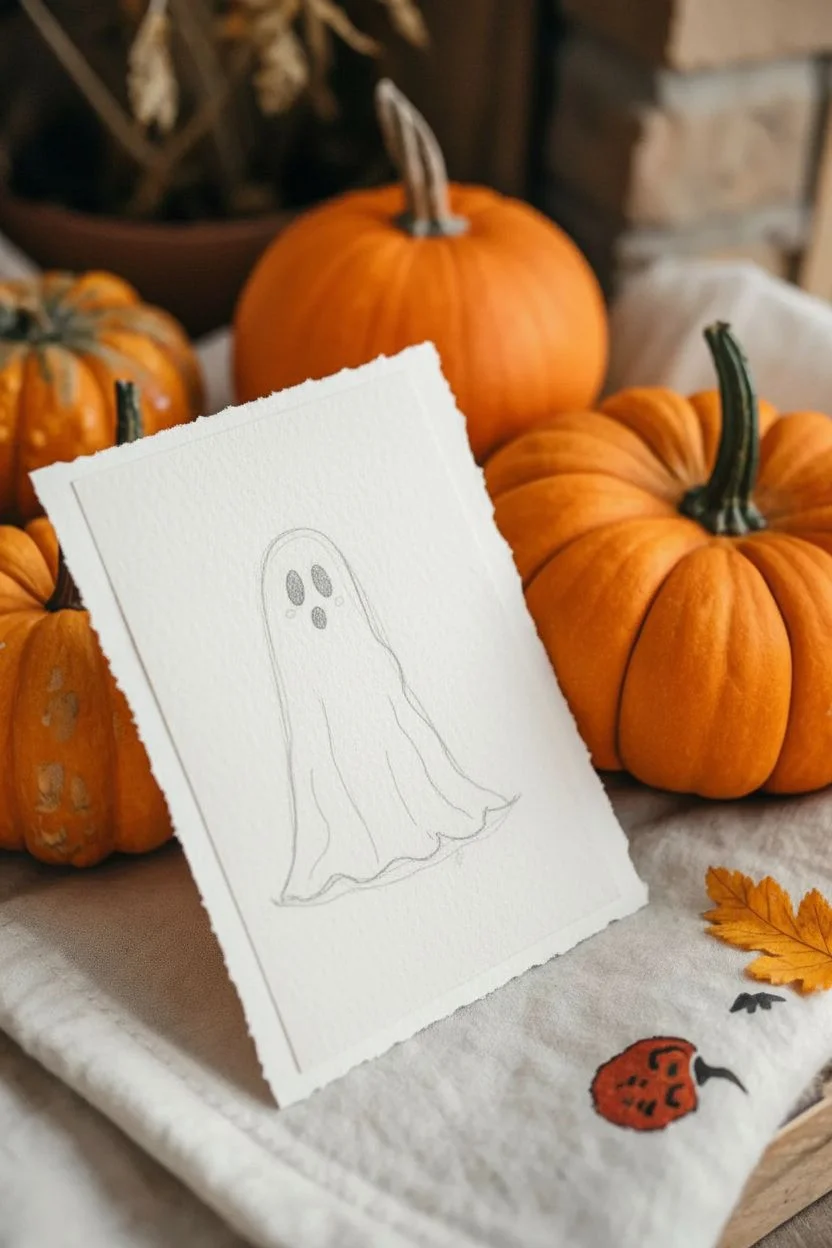
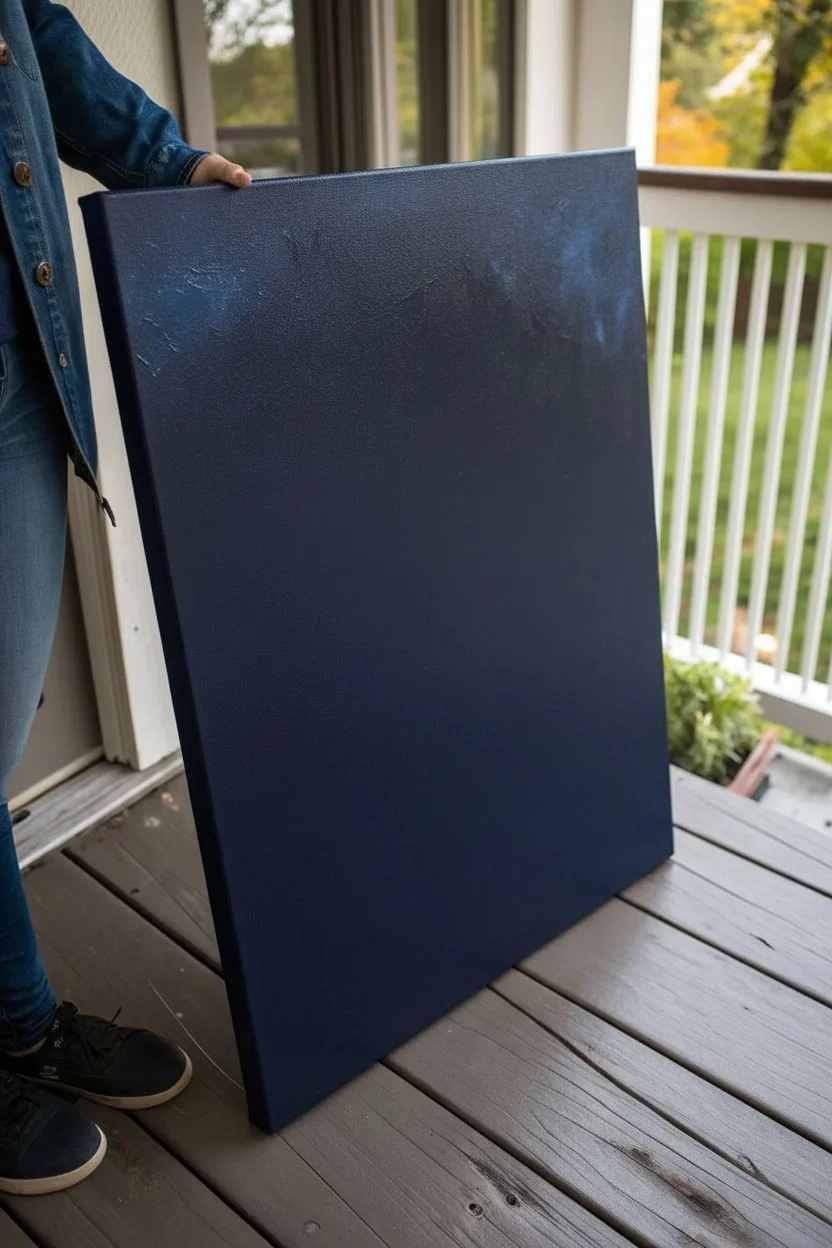
Classic Sheet Ghost Under a Full Moon
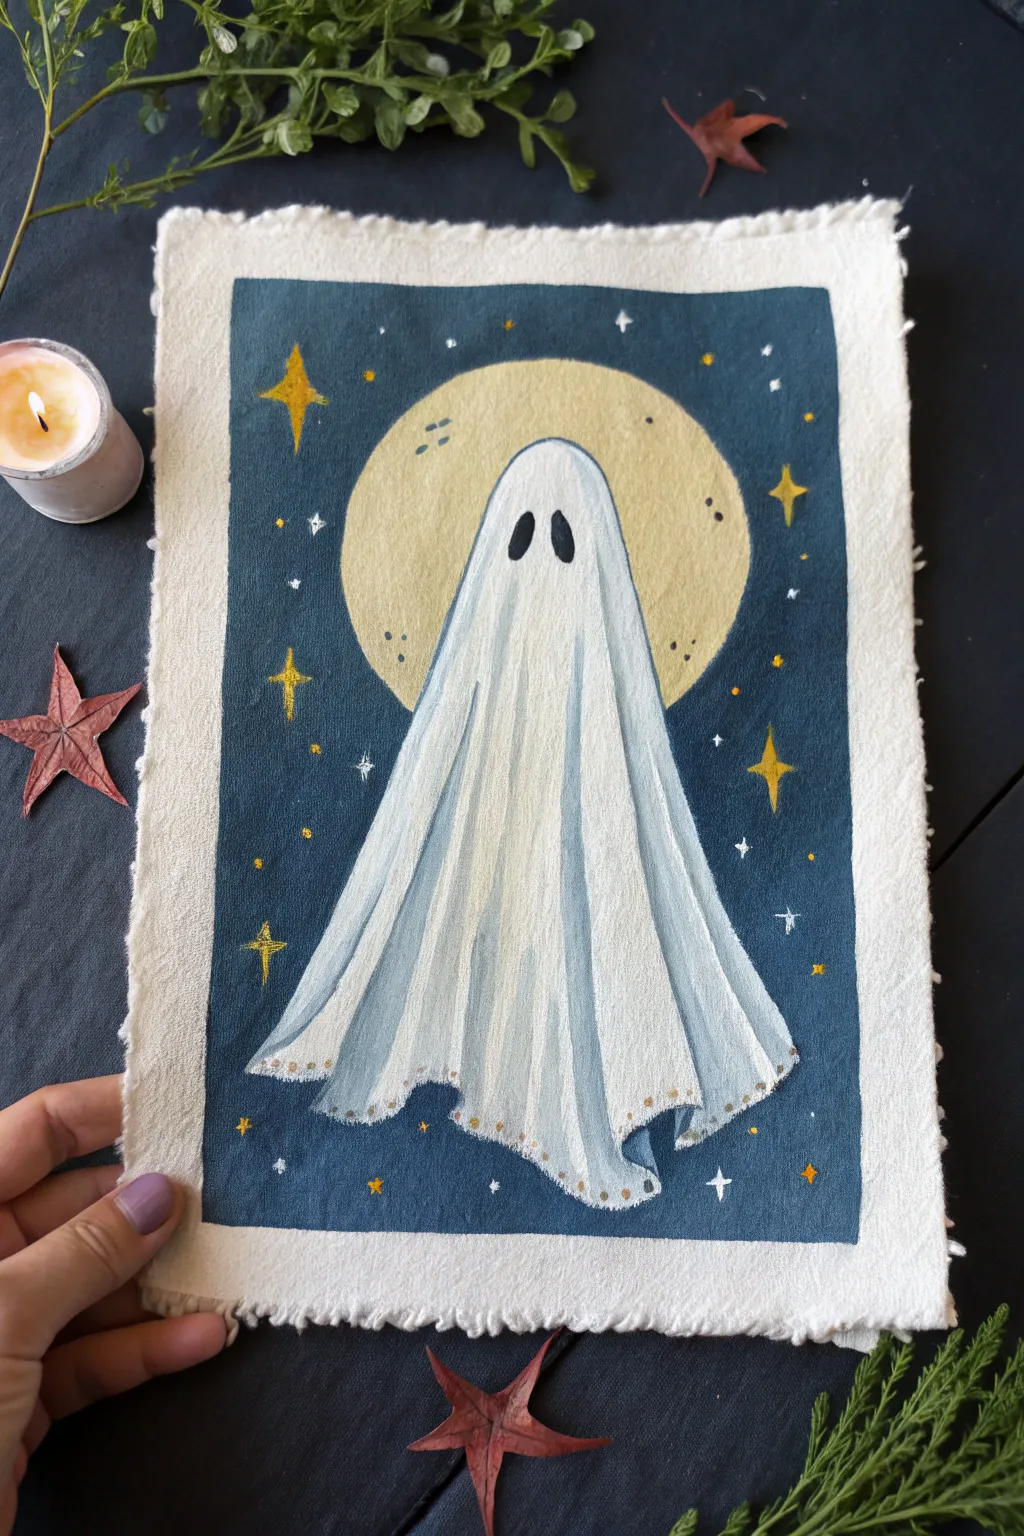
Capture the charm of Halloween with this classic sheet ghost floating serenely against a starry night sky. The contrast between the cool blue background and the warm, creamy moon creates a cozy atmosphere perfect for seasonal decor.
Step-by-Step Tutorial
Materials
- Heavyweight watercolor paper or canvas sheet (approx. 5×7 inches)
- Masking tape (for clean edges)
- Acrylic gouache or matte acrylic paints (Navy Blue, Cream/Pale Yellow, White, Grey, Gold, Black)
- Flat shader brush (size 6 or 8)
- Round detail brushes (size 0 and 2)
- Palette for mixing
- Water cup and paper towels
- Pencil and eraser
- Circle template or compass
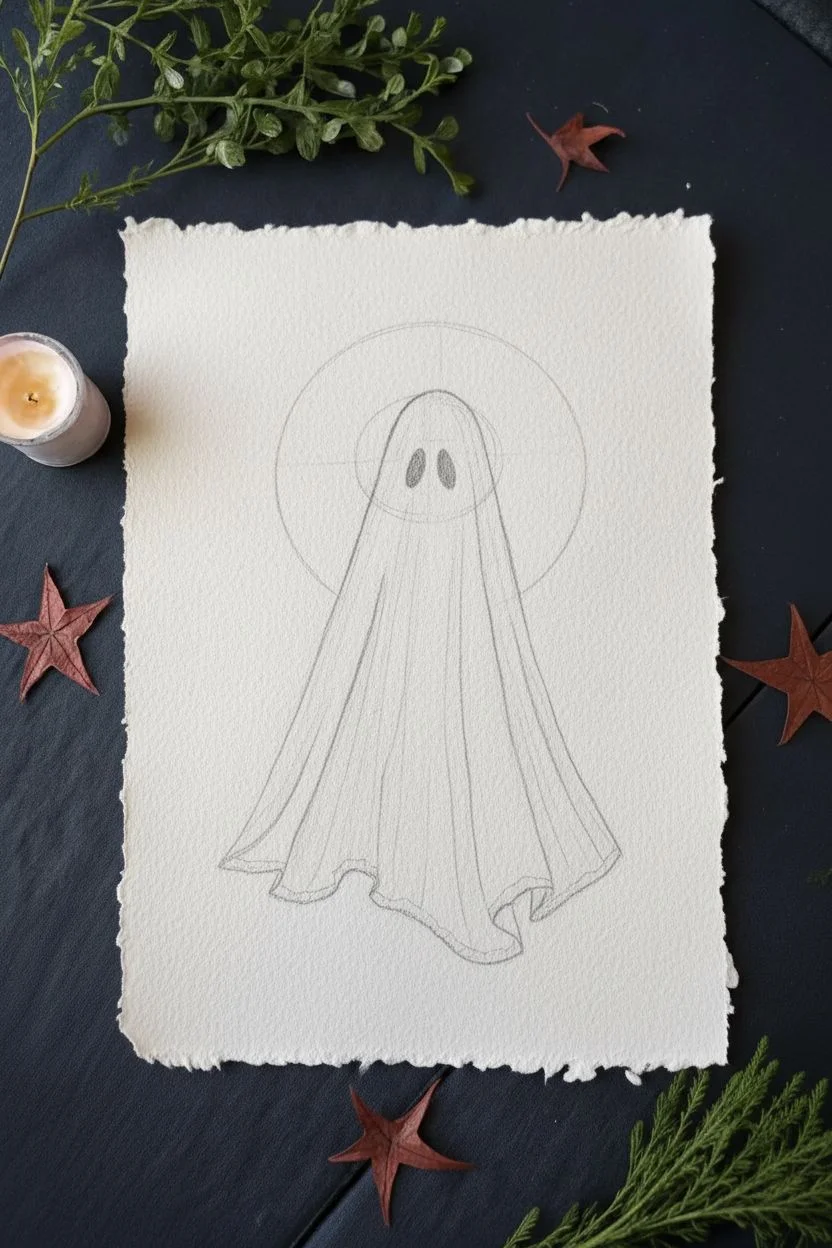
Step 1: Preparation and Sketching
-
Prepare the edges:
If you want the rough, deckled edge look shown in the photo, gently tear the edges of your heavy paper against a ruler. Alternatively, tape off a clean rectangle in the center of your paper using masking tape to create a crisp border. -
Draft the composition:
Lightly sketch a large circle in the upper center of your painting area using a compass or by tracing a circular object like a jar lid. This will be your full moon. -
Outline the ghost:
Sketch a tall, draped ghost shape starting from inside the moon and flowing downwards. Make the bottom hem wavy and uneven to mimic fabric folds, and add two vertical oval shapes for the eyes near the top.
Clean Lines
For the smoothest curve on the ghost’s head, turn the paper as you pull the brush rather than contorting your wrist.
Step 2: Painting the Background
-
Fill the night sky:
Mix a deep Navy Blue. Using your flat brush, carefully paint the entire background area around the moon and the ghost. Take your time edging around your pencil lines for a clean silhouette. -
Paint the moon:
Mix a Cream or Pale Yellow color. Fill in the moon circle completely. It’s okay if this layer looks a bit flat for now; we will add texture later. -
Add moon details:
Once the cream paint is dry, use a slightly darker beige or diluted ochre to add small dots and clusters of dashes on the moon’s surface to represent craters. Keep these subtle.
Chalky Paint?
If your white is streaky over the blue, don’t overwork it wet. Let it fully dry, then apply a fresh, opaque second coat on top.
Step 3: Bringing the Ghost to Life
-
Base coat the ghost:
Paint the entire ghost shape with pure White. Depending on the opacity of your paint, you may need a second coat to ensure the background blue doesn’t show through. -
Map out the folds:
Mix a very light Grey. Using a round brush, paint vertical lines following the flow of the ‘fabric’ from the top of the head down to the hem. These lines represent the valleys of the folds. -
Deepen the shadows:
Add a slightly darker grey to the deepest parts of the folds and under the hemline to create dimension. I find that blending the edge of the grey into the white while the paint is still slightly tacky creates a softer, more fabric-like transition. -
Paint the eyes:
Using your smallest detail brush and Black paint, fill in the two eye ovals. Make them slightly elongated to give the ghost a mournful but cute expression.
Step 4: Starry Details and Finishing Touches
-
Paint the large stars:
Using a small brush and Gold or Yellow Ochre paint, create several four-pointed stars scattered across the blue background. Vary their sizes for interest. -
Add tiny stars:
Dot tiny specks of White and Gold throughout the background to create distant stars. Grouping some closer together mimics constellations. -
Detail the hem:
Dip your smallest brush or a toothpick into Gold paint. Carefully add a row of tiny dots along the very bottom edge of the ghost’s sheet for a magical, shimmering trim. -
Final highlights:
Add tiny white highlights to the center of the largest gold stars to make them twinkle. If you taped your edges, wait until the painting is completely dry before gently peeling the tape away.
Now you have a charmingly spooky piece of art ready to display for the season


Ghosts in a Pumpkin Patch
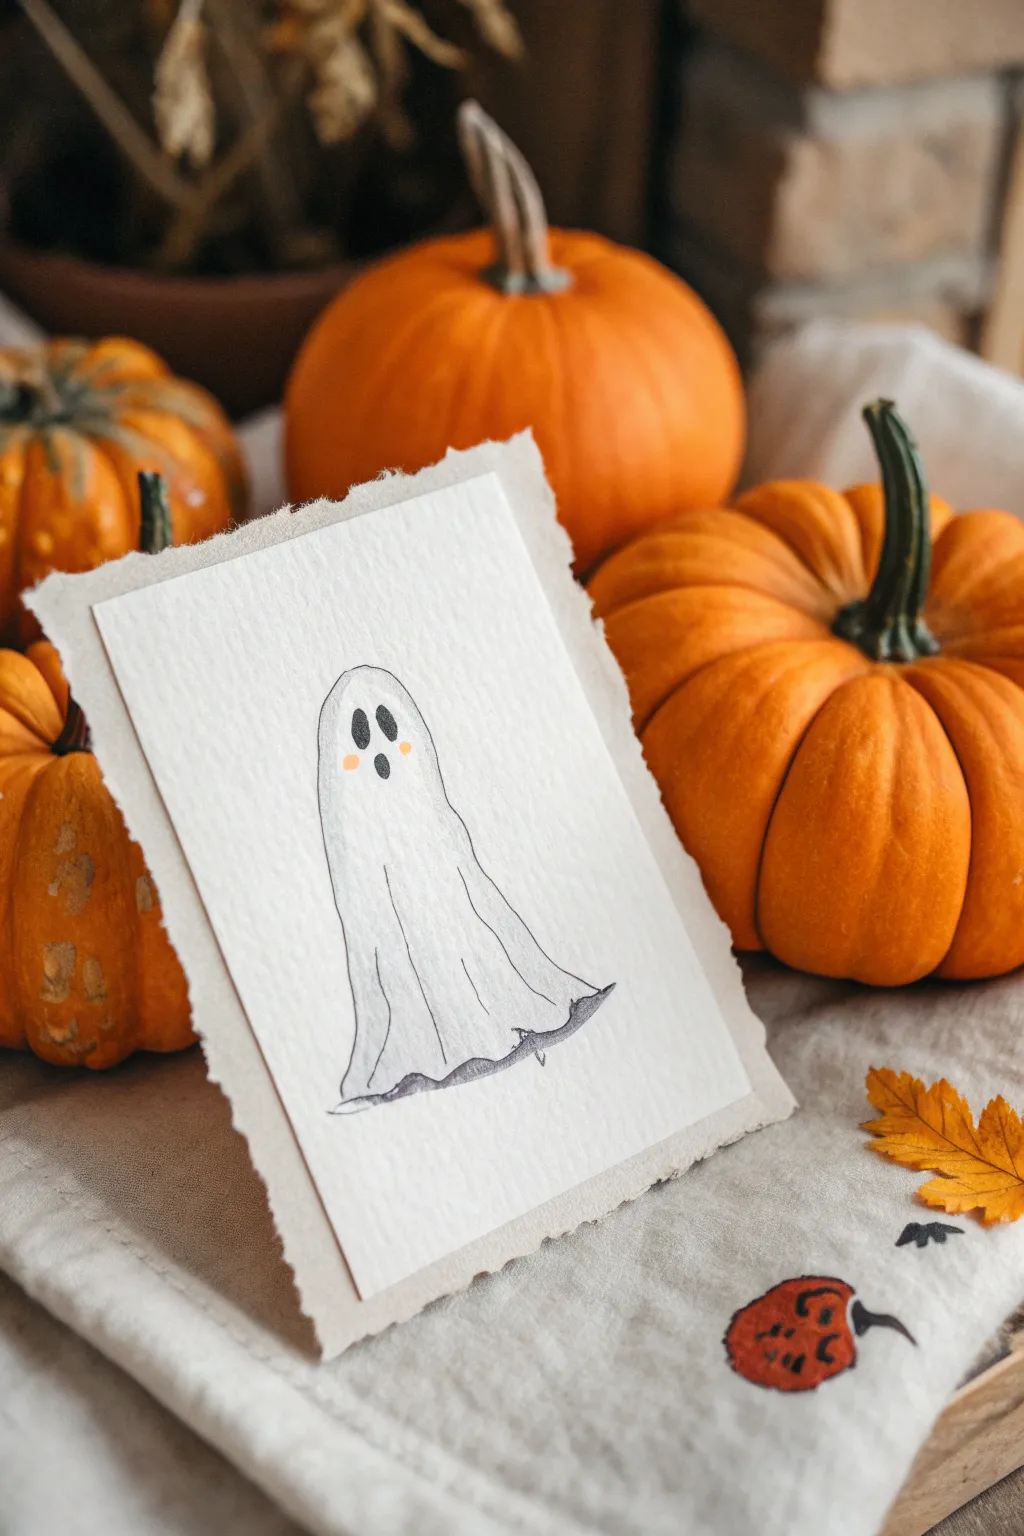
Capture the whimsy of the season with this minimalist watercolor illustration featuring a charming sheet ghost. The textured deckle-edge paper adds a rustic, vintage feel that perfectly complements autumn decor.
Step-by-Step
Materials
- Heavyweight cold press watercolor paper (deckle edge preferred)
- Small round watercolor brush (size 2 or 4)
- Black watercolor paint or ink
- Orange or peach watercolor paint (for blush)
- Grey watercolor paint (or highly diluted black)
- Pencil (H or HB)
- Kneaded eraser
- Clean water jar
- Paper towel
Step 1: Sketching the Shape
-
Outline the head:
Start by lightly sketching a tall, rounded arch shape in the center of your paper. Keep the top smooth and curved for the ghost’s head. -
Flow the drapery:
Extend the lines downward, letting them flare out slightly as if fabric is draping. Introduce gentle wobbles to the lines to suggest folds in a sheet. -
Define the bottom hem:
Connect the bottom of the shape with a wavy, irregular line. Create small peaks and valleys to mimic how cloth naturally rumples when hitting the floor. -
Add facial features:
Draw two tall, narrow ovals for the eyes about a third of the way down the head. Add a smaller, rounder oval between and slightly below them for the surprised mouth.
Muddy Shadows?
If your grey shadows look dirty, add a tiny drop of blue to your black mix. Cool shadows look cleaner on white subjects than warm, brownish greys.
Step 2: Painting the Features
-
Fill the eyes:
Using your small round brush and saturated black paint, carefully fill in the eye ovals. Aim for a solid, opaque black. -
Paint the mouth:
Fill in the mouth oval with the same black paint. Leave a tiny sliver of white paper unpainted if you want a highlight, or keep it solid for a classic look. -
Apply the blush:
Mix a watery, pale orange or peach tone. Dab two small circles gently onto the cheeks, just below and outside the eyes. -
Soften the edges:
If the blush looks too harsh, quickly dab it with a clean, damp brush or a corner of a paper towel to blend it into the white paper.
Paper Prep Tip
For that authentic jagged edge, paint a line of water where you want to tear the paper. Let it sit for a minute to soften fibers, then tear slowly.
Step 3: Creating Texture and Form
-
Mix a shadow wash:
Prepare a very dilute grey wash. It should be barely visible—mostly water with just a hint of pigment. -
Outline the silhouette:
With a steady hand, trace over your initial pencil outline using the grey wash. Let the line vary slightly in thickness to keep it organic. -
Add vertical folds:
Paint thin, vertical lines running from the ‘shoulders’ down toward the hem. These don’t need to be straight; let them curve to show the movement of the fabric. -
Deepen the crevices:
Go back while the paint is still slightly damp and add a slightly darker grey into the deepest folds for contrast. -
Ground the ghost:
Paint a darker, more concentrated grey strip along the very bottom edge of the hem. This creates a shadow where the sheet touches the ground.
Step 4: Finishing Touches
-
Check opacity:
Once the eyes are dry, see if they need a second coat of black to be truly dark and striking against the white sheet. -
Refine the lines:
Use a fine liner brush or a very sharp black pencil to lightly redefine any fold lines that got lost in the painting process. -
Clean up:
Wait until the painting is completely bone-dry. Gently erase any visible pencil sketch lines with the kneaded eraser so only the paint remains. -
Deckle the edges:
If you didn’t start with deckle paper, you can carefully tear the edges of your paper against a ruler to create that rough, handmade border seen in the example.
Prop your little ghost against a pumpkin or place it in a small frame to bring a gentle spooky spirit to your home


Friendly Ghost in a Haunted House Doorway
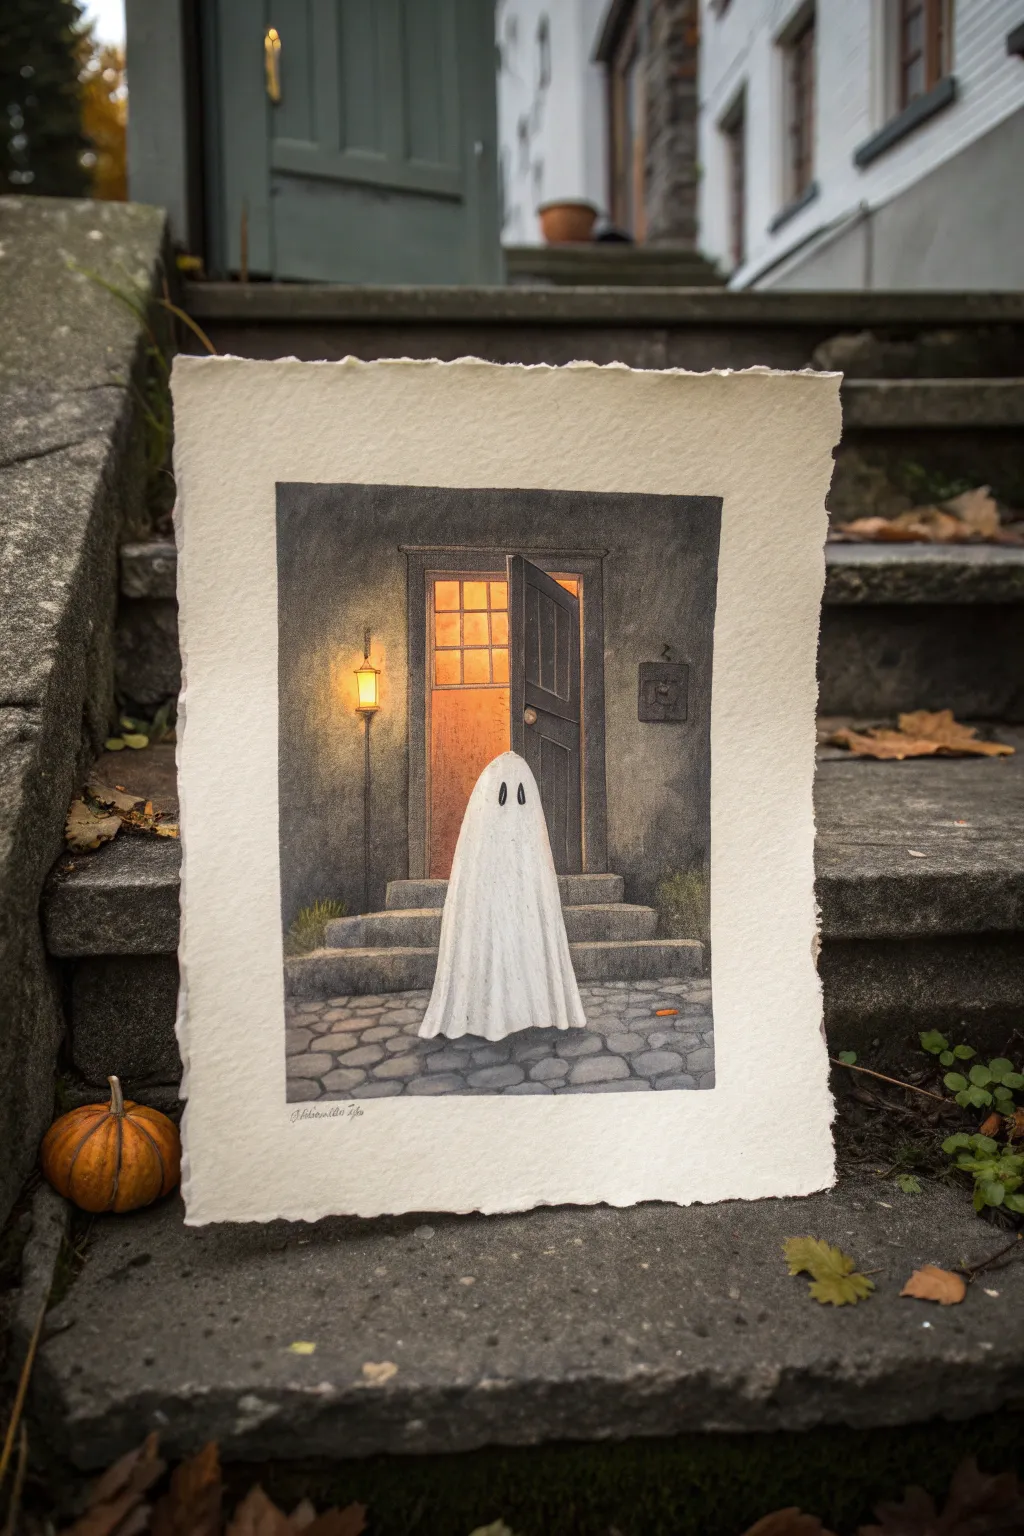
Capture the cozy side of spookiness with this charming painting of a friendly ghost waiting by a warm, lit doorway. Using layers of watercolor and gouache on textured paper creating a nostalgic, storybook atmosphere perfect for the autumn season.
Step-by-Step Tutorial
Materials
- Heavyweight watercolor paper (300gsm, cold press)
- Watercolor paints (Payne’s Grey, Burnt Sienna, Yellow Ochre, Cadmium Orange, Lamp Black)
- White gouache
- Pencil (HB or H)
- Kneaded eraser
- Round brushes (sizes 2, 6, and 8)
- Flat brush (1/2 inch)
- Mixing palette
- Masking fluid (optional)
- Two jars of water
- Paper towels
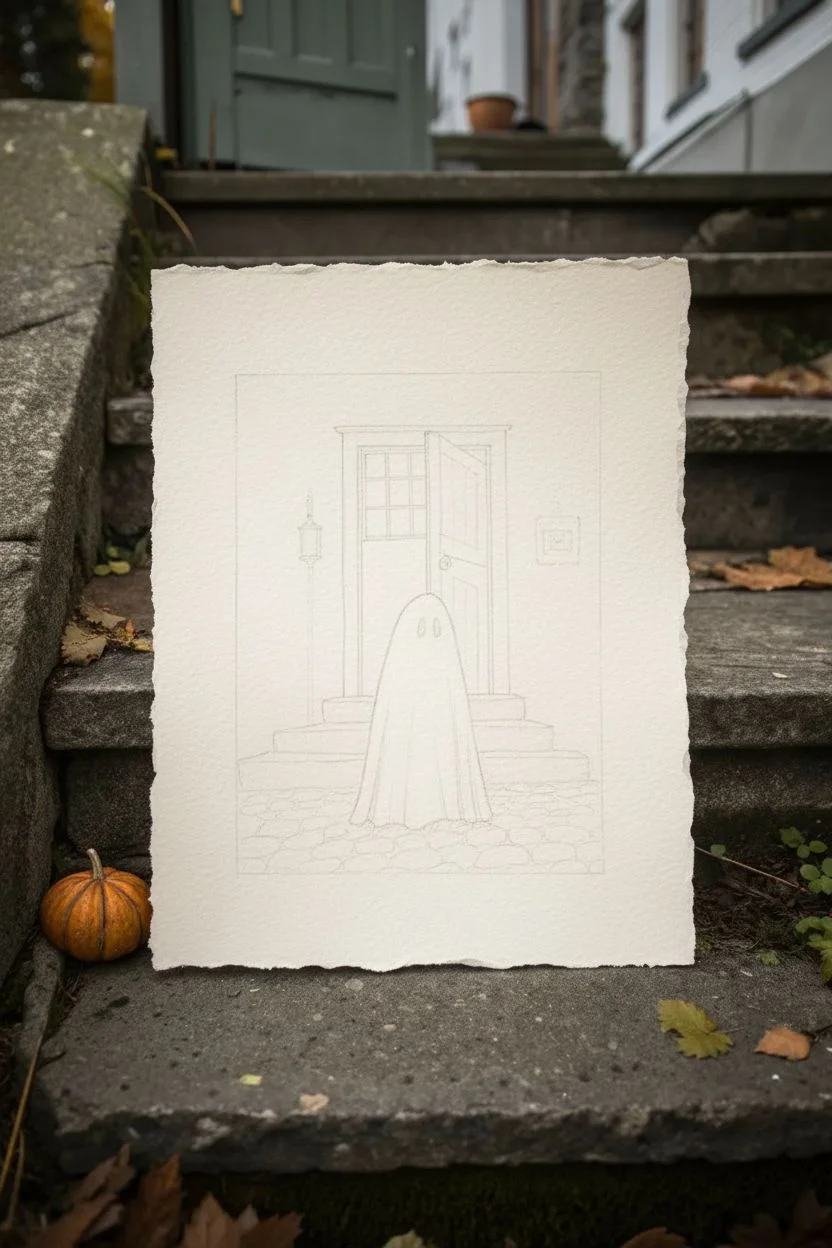
Step 1: Sketching and Preparation
-
Create the Deckled Edge:
Start by tearing the edges of your paper against a ruler to create that rough, vintage deckled look shown in the photo, or use paper that already has this texture. -
Draft the Doorway:
Use a ruler to lightly sketch the vertical lines of the doorframe and the open door itself. Keep your pencil pressure very light so the graphite won’t show through the transparent paint later. -
Position the Ghost:
Sketch a simple rounded dome shape for the ghost’s head in the lower center, draping the fabric lines down to the ground. Add slight waviness to the bottom hem to suggest fabric folds. -
Map the Surroundings:
Draw the horizontal lines for the stone steps leading up to the door and faint indications of the cobblestones in the foreground. Mark the position of the lantern on the left wall.
Gouache for Opacity
If your spooky sheet accidentally gets dirty with wall paint, use pure white gouache to reclaim the bright white shape of the ghost over the mistake.
Step 2: The Warm Glow
-
Paint the Light Source:
Mix a bright, watery Yellow Ochre. Paint the interior rectangle of the open doorway, letting it serve as the brightest point. While wet, drop in hints of Cadmium Orange near the bottom to intensify the warmth. -
Lantern Glow:
Apply the same yellow mix to the small lantern glass on the left wall. Let these yellow areas dry completely before moving on to prevent muddying the dark colors next. -
Door Details:
Once the yellow is dry, use a fine brush and a mix of Burnt Sienna and a touch of grey to paint the grid lines (muntins) of the door window over the yellow glow.
Step 3: Building the Shadows
-
Base Gray Wash:
Mix a large amount of Payne’s Grey with plenty of water. Apply a wash over the exterior walls, carefully painting *around* the ghost shape, the lantern, and the door frame. -
Darkening the Door:
Paint the actual wooden door (the part swung open) with a darker, more concentrated mix of Payne’s Grey and Lamp Black. Leave the edge highlighting the thickness of the door slightly lighter. -
Step Definition:
Paint the front faces of the stone steps with a mid-tone grey, leaving the tops of the steps lighter to show perspective. Add a little texture by dabbing with a paper towel while damp. -
Cobblestone Texture:
For the ground, paint individual irregular rounded shapes using varied shades of grey. Leave thin gaps of unpainted paper or lighter wash between them to represent the grout lines.
Trouble with Bleeding?
If the warm door light bleeds into the grey walls, your yellow layer wasn’t dry enough. Use a hair dryer on the low setting to ensure bone-dry layers.
Step 4: The Ghost and Finishing Touches
-
Shadowing the Sheet:
The ghost is mostly the white of the paper, but it needs volume. Mix a very watery, pale grey-purple. Paint vertical stripes following the folds of the fabric, focusing on the sides and deep creases. -
Face Details:
Using a size 2 brush and opaque Lamp Black, carefully paint two vertical ovals for the eyes. Position them high on the head to give that classic cute ghost expression. -
Adding Opaque Highlights:
I particularly enjoy this step: use white gouache to add crisp highlights to the top of the lantern and the edges of the steps where the light from the door would hit. -
Wall Texture:
Splatter tiny specks of dark grey paint onto the wall areas (cover the ghost with a scrap of paper first) to mimic the look of aged stone or stucco. -
Final Contrast:
Deepen the shadows right underneath the ghost’s hem using the darkest grey mix to anchor the figure to the ground so it doesn’t look like it’s floating too high.
Frame this little spirit in a rustic wood frame or gift it to a friend who loves the gentler side of Halloween


Misty Graveyard Ghost Silhouette
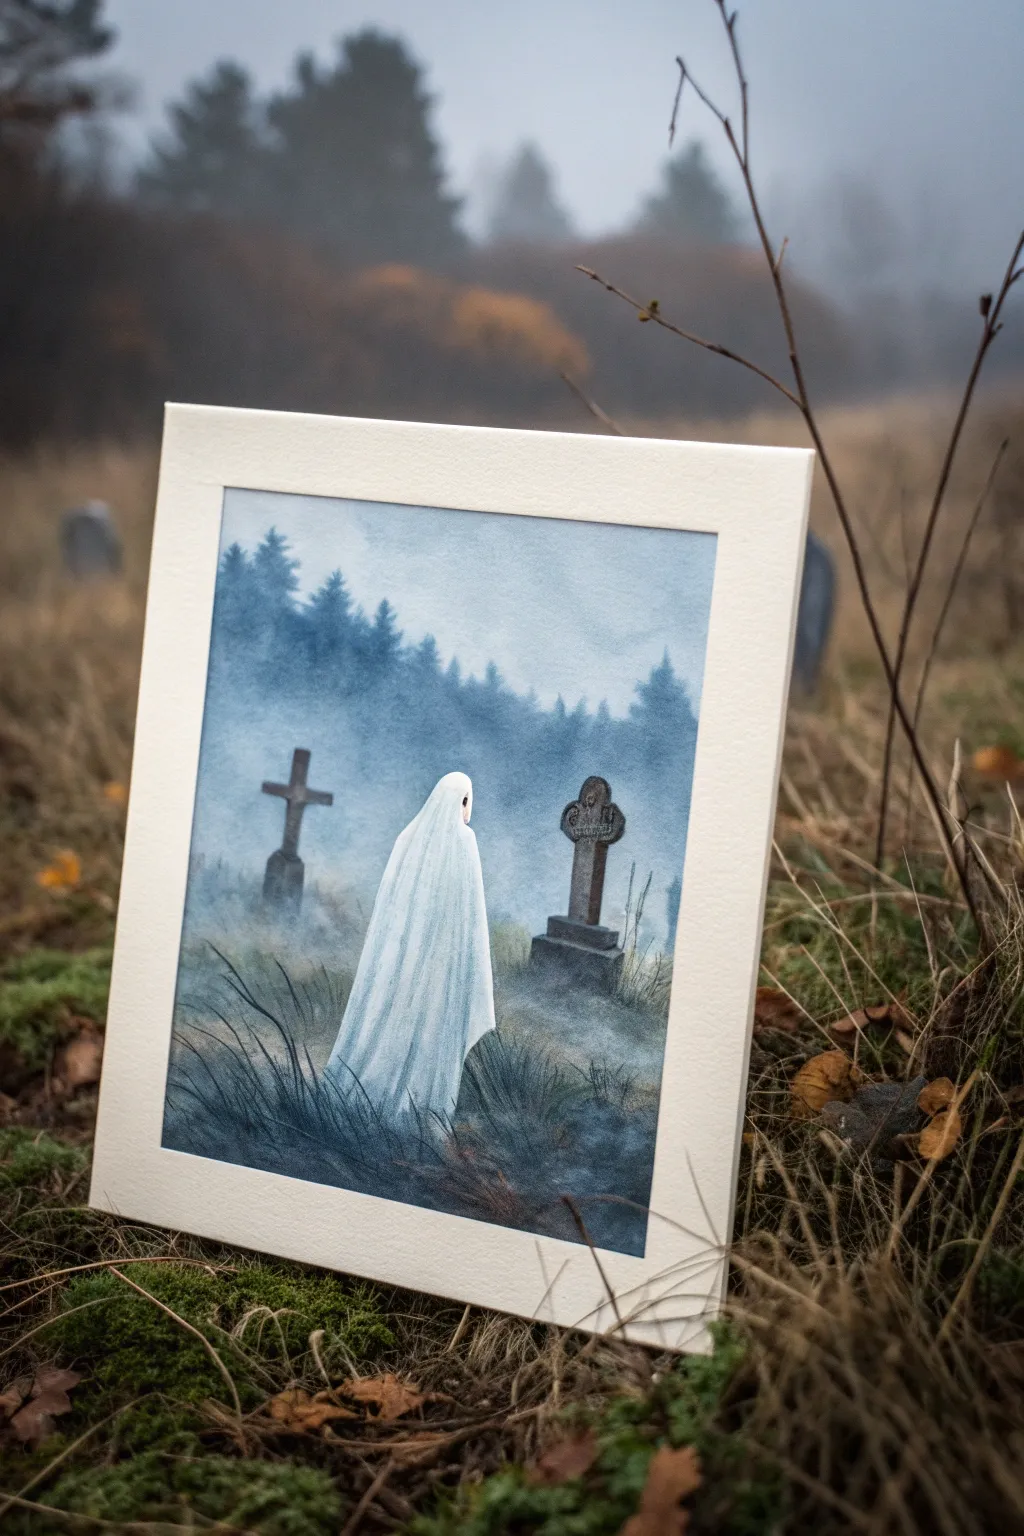
Capture the eerie solitude of a forgotten graveyard with this moody watercolor piece. Through careful layering and wet-on-wet techniques, you will create a ghostly figure that seems to drift through a thick, atmospheric fog.
Detailed Instructions
Materials
- Cold press watercolor paper (300 gsm)
- Watercolor paints (Indigo, Payne’s Grey, Burnt Umber, Lamp Black)
- White Gouache or opaque white watercolor
- Flat wash brush (large)
- Round brushes (sizes 4, 8, and a fine liner)
- Masking fluid (optional)
- Painter’s tape or washi tape
- Mixing palette
- Two jars of water
- Paper towels
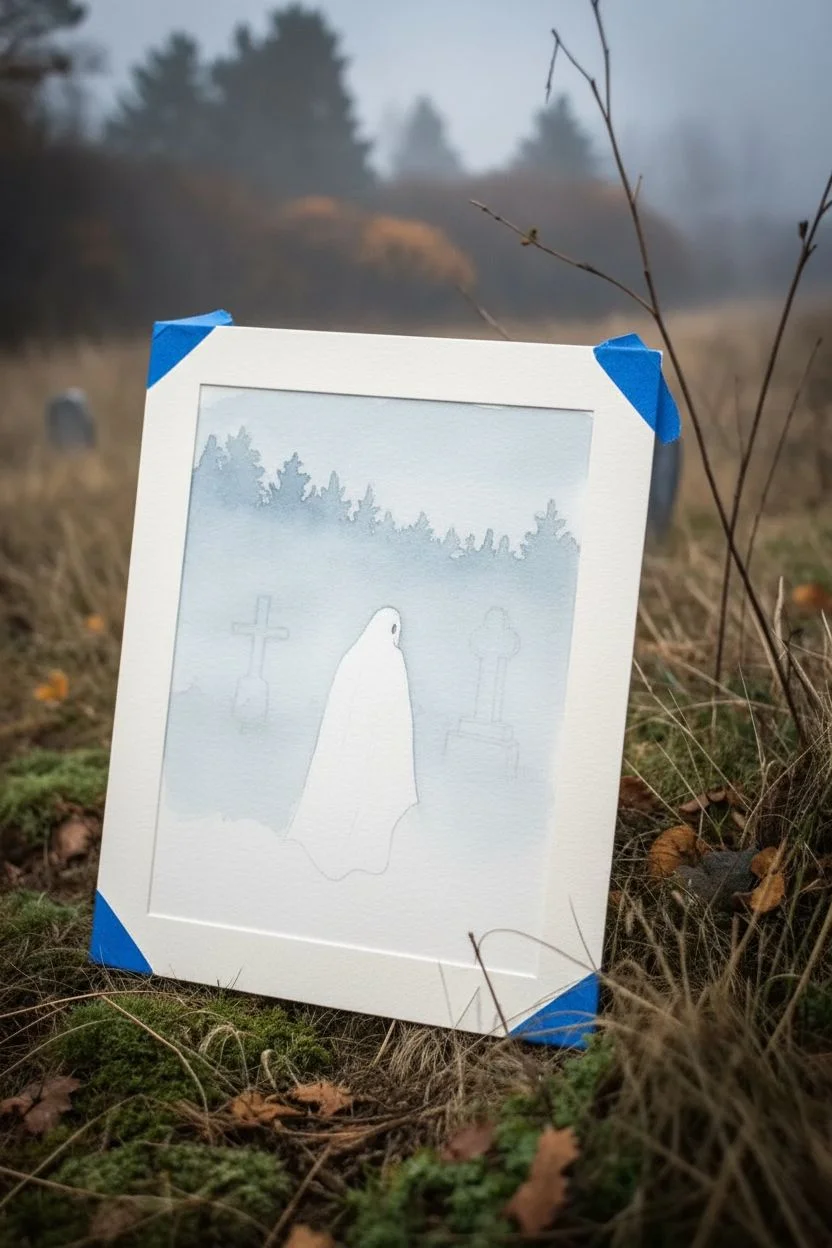
Step 1: Setting the Scene
-
Secure the paper:
Tape down all four edges of your watercolor paper to a board or table to prevent buckling and create a crisp clean border. -
Initial sketch:
Lightly sketch the horizon line about one-third up from the bottom. Outline the main headstones and the draped shape of the ghost in the center. Keep pencil lines faint so they disappear under the paint. -
Mask the ghost (optional):
If you struggle with painting around negative space, apply masking fluid to the ghost shape to keep it pure white. Alternatively, plan to paint carefully around it. -
Wet-on-wet sky:
Using your large flat brush, wet the entire paper surface except for the ghost figure. You want an even sheen, not puddles. -
Atmospheric wash:
Load your brush with a diluted mix of Indigo and a touch of Payne’s Grey. Start at the top and wash downwards, letting the color fade and become paler as it approaches the horizon line to simulate fog.
Mastering the Mist
To get that perfect foggy look, lift pigment off the paper with a thirsty brush or paper towel while the background wash is still damp. It creates soft, lighter patches.
Step 2: Layering the Background
-
Distant trees:
While the background is still slightly damp (but not soaking), use a size 8 round brush to dab in the shapes of distant pine trees along the horizon. Use a soft grey-blue mix. The damp paper will fuzz the edges, making them look misty. -
Darkening the forest:
Allow the first tree layer to dry completely. Then, mix a stronger, darker concentration of Indigo and Burnt Umber. Paint a second layer of clearer, sharper trees in front of the blurry ones to create depth. -
Ground wash:
Paint the ground area below the horizon using a mix of Burnt Umber and Payne’s Grey. Use horizontal strokes, keeping the area near the ghost’s feet slightly darker to ground the figure. -
Softening transitions:
While the ground paint is wet, lift a little pigment with a clean, damp brush right behind where the headstones will be, creating a subtle misty glow.
Step 3: Foreground Details
-
Painting headstones:
Using a smaller round brush and a dark grey mix (Payne’s Grey + Black), paint the silhouetted crosses and headstones. Ensure the edges are sharp against the misty background. -
Adding texture to stone:
While the headstones are drying, tap a tiny bit of water or darker pigment onto them to create a weathered stone texture. -
Grass blades:
Switch to your fine liner brush. With a black-green mix, flick quick, upward strokes in the foreground to create tall, sparse grass. Focus these around the base of the ghost and headstones. -
Removing the mask:
If you used masking fluid on the ghost, wait until everything is bone dry, then gently rub it off with your finger or a rubber cement pickup.
Stuck Paint Tape?
If your tape tears the paper when removing it, heat it gently with a hairdryer first. This softens the adhesive and allows it to peel away cleanly without damage.
Step 4: The Ghostly Figure
-
Defining the folds:
The ghost is mostly the white of the paper, but it needs form. Mix a very watery, pale blue-grey wash. Paint thin lines to suggest deep folds in the fabric, mostly vertical strokes. -
Shadowing the figure:
I like to add slightly darker shadows on the right side of the figure and under the implied arms to give the sheet volume and weight. -
The eyes:
Using pure black paint and a steady hand (or a fine black pen), add two small, oval shapes for the eyes. This instantly brings the character to life. -
Final highlights:
Using opaque white gouache, add tiny highlights to the tips of the grass or edges of the headstones if they got too dark, enhancing the misty atmosphere.
Once dry, frame your spooky masterpiece in a simple white mat to let the dark atmosphere truly pop
BRUSH GUIDE
The Right Brush for Every Stroke
From clean lines to bold texture — master brush choice, stroke control, and essential techniques.
Explore the Full Guide
Ghost and Black Cat Sidekick
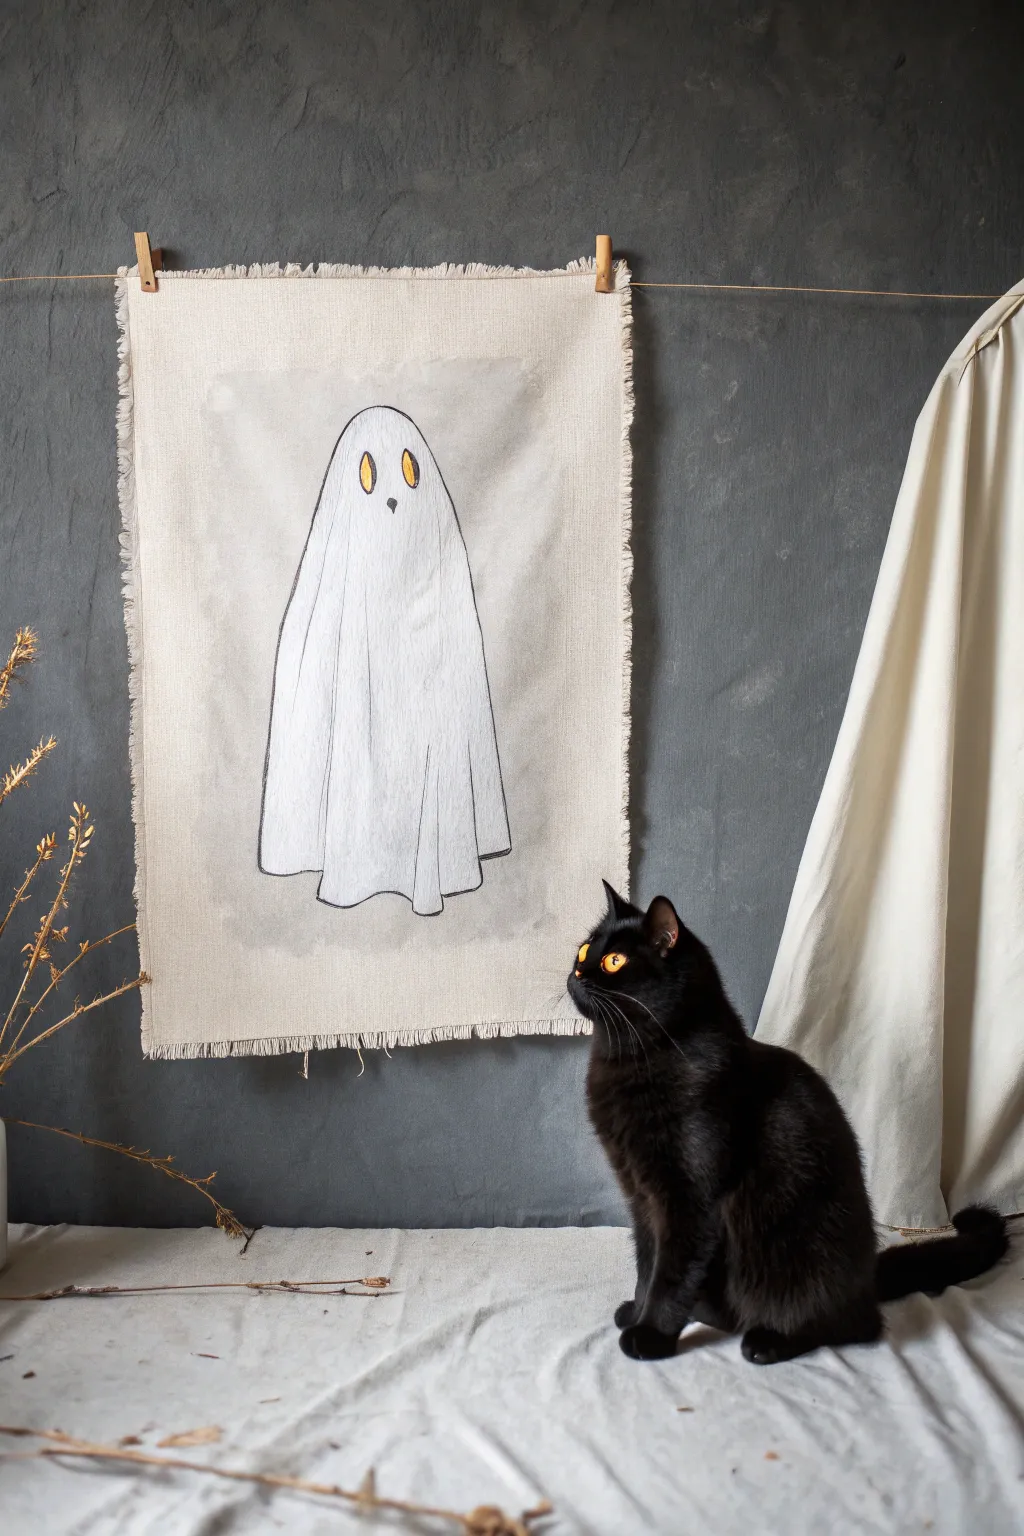
Capture the eerie charm of Halloween with this minimalist ghost drawing on suspended fabric. By combining raw, textured linen with simple charcoal or graphite art, you can create a hauntingly beautiful piece that floats effortlessly on your wall.
Step-by-Step
Materials
- Unbleached linen or cotton canvas fabric (approx. 12×18 inches)
- Charcoal pencils or soft graphite pencils (6B or 8B)
- White pastel pencil or white charcoal (optional for highlights)
- Workable fixative spray
- Jute twine or rustic string
- Two small wooden clothespins
- Scissors
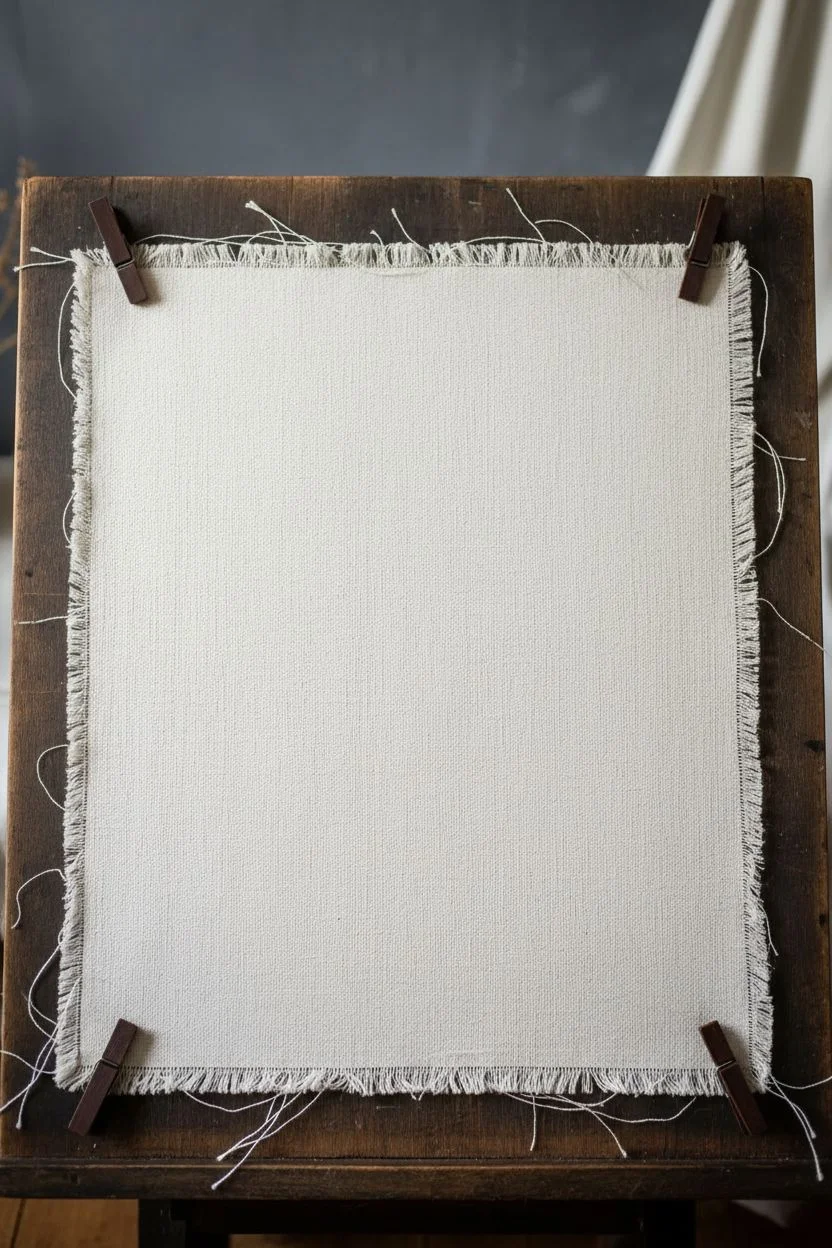
Step 1: Preparing the Canvas
-
Cut the fabric:
Cut your linen or canvas into a rectangle measuring approximately 12 by 18 inches. Don’t worry about perfect straight lines; a little variance adds to the rustic feel. -
Fray the edges:
Gently pull loose threads along all four sides of the fabric. I like to pull until I have a fringe about a quarter-inch long to give it that aged, tattered look. -
Secure the surface:
Tape the corners of your fabric onto a hard, flat surface or drawing board. This prevents the fabric from shifting while you sketch.
Fabric Texture Tip
Work *with* the grain. If the charcoal skips too much, press harder but move slower. The skips are actually desirable and add to the ghostly, ethereal aesthetic.
Step 2: Drafting the Ghost
-
Outline the shape:
Using a light touch with your charcoal or pencil, sketch a tall, rounded arch shape in the center of the fabric. Leave plenty of negative space around the edges. -
Refine the silhouette:
Bring the lines down from the arch to create the body. Widen the shape slightly towards the bottom to suggest draped fabric. -
Create the hem:
At the bottom, draw a wavy, uneven line to connect the two sides. Add small upward curves within this line to create the illusion of folds in the sheet.
Level It Up
Stain the linen with weak cold tea or coffee before drawing for an antique, yellowed parchment look that enhances the spooky vibe.
Step 3: Adding Detail and Depth
-
Darken the outline:
Go over your initial sketch with firmer pressure. The rough texture of the linen will catch the charcoal, creating a naturally broken, vintage line quality. -
Add vertical folds:
Draw faint, vertical lines starting from the top of the head and flowing down towards the hem. These don’t need to be solid; sketchy, broken strokes work best here. -
Draw the eyes:
Near the top of the head, draw two tall ovals for eyes. Place them close together but slightly angled away from each other for a melancholic expression. -
Color the eyes:
Fill in the ovals with a contrasting color like yellow or orange pastel, or keep them dark and hollow with heavy charcoal. Add a tiny black dot in the center for the pupil. -
Add a mouth:
Just below and between the eyes, add a small, inverted teardrop shape or a simple dot for the mouth. -
Shade the figure:
Lightly shade the sides of the ghost and the deep folds at the bottom hem. Smudge the charcoal slightly with your finger or a blending stump to soften the shadows.
Step 4: Finishing Touches
-
Highlight (optional):
If you are using toned fabric, use a white charcoal or pastel pencil to add highlights to the center of the ghost’s forehead and the tops of the folds. -
Add a background wash:
To make the ghost pop, lightly shade the area immediately surrounding the ghost outline with a very faint layer of grey pastel or dirty charcoal smudges, creating a subtle halo effect. -
Set the drawing:
take the artwork outside and spray it with a workable fixative. This is crucial for fabric drawings to prevent the charcoal from smearing or dusting off over time. -
Dry completely:
Let the fixative dry for at least 15 minutes before handling the fabric again.
Step 5: Hanging the Artwork
-
Measure the twine:
Cut a length of jute twine slightly longer than the width of your desired display area. -
Mount the string:
Secure the twine horizontally on your wall using nails, tacks, or tape, ensuring it is taut. -
Clip the art:
Use the two small wooden clothespins to clip the top corners of your frayed fabric directly onto the twine.
Step back and enjoy the simple, moody atmosphere your new ghost brings to the room
Ghosts Floating Through an Autumn Forest
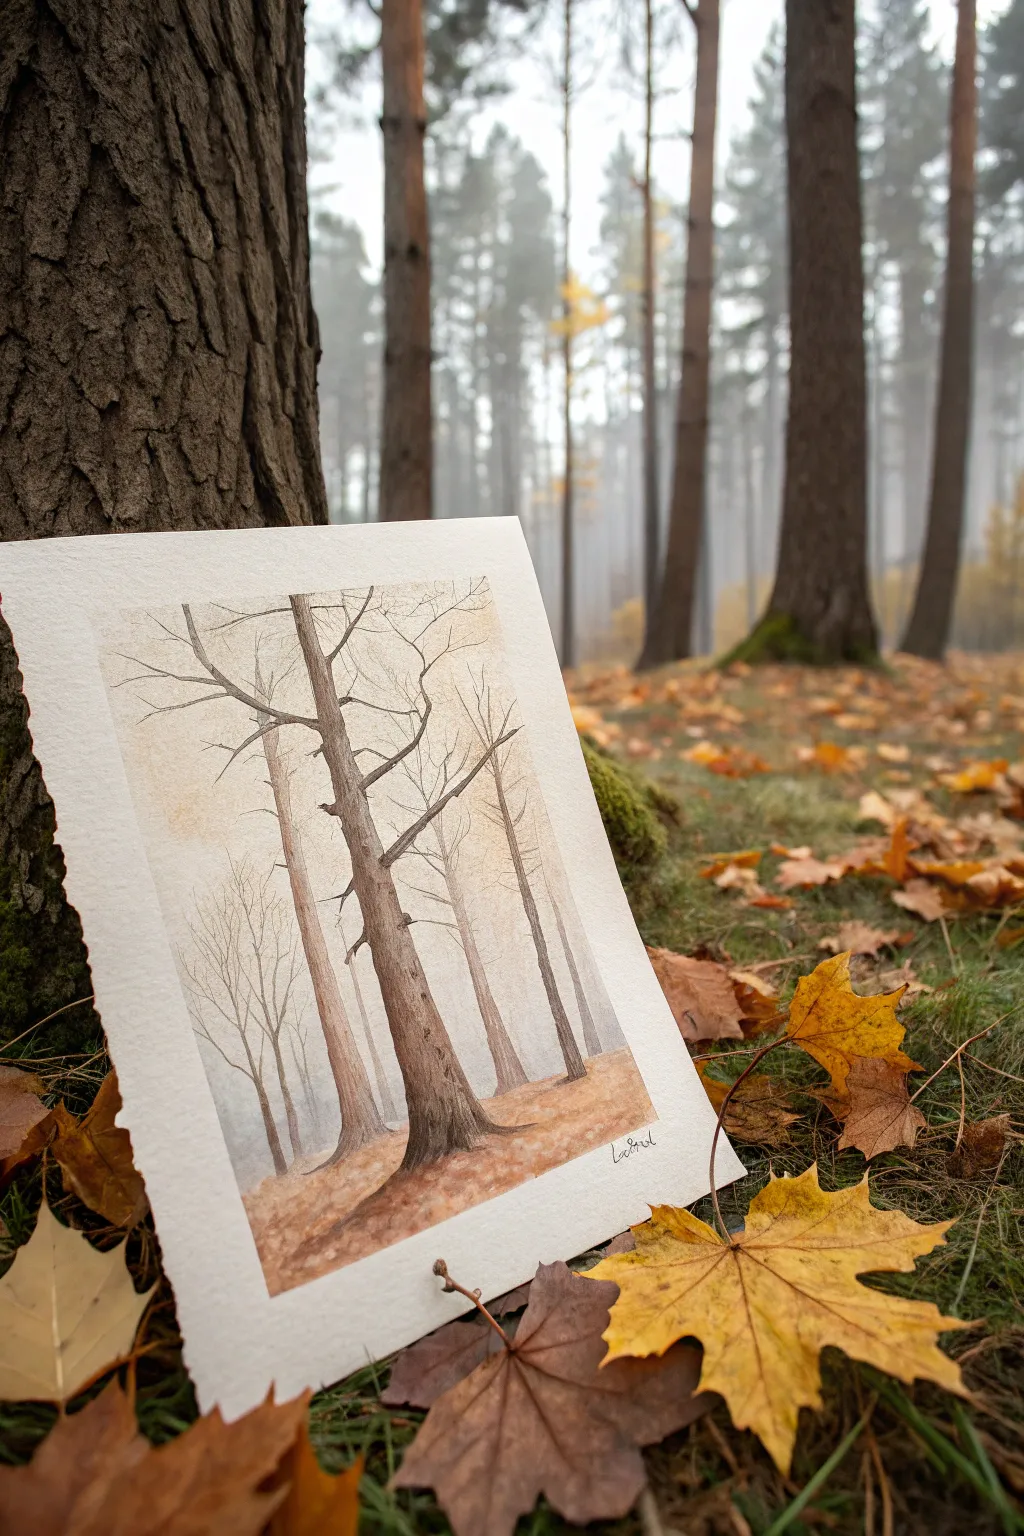
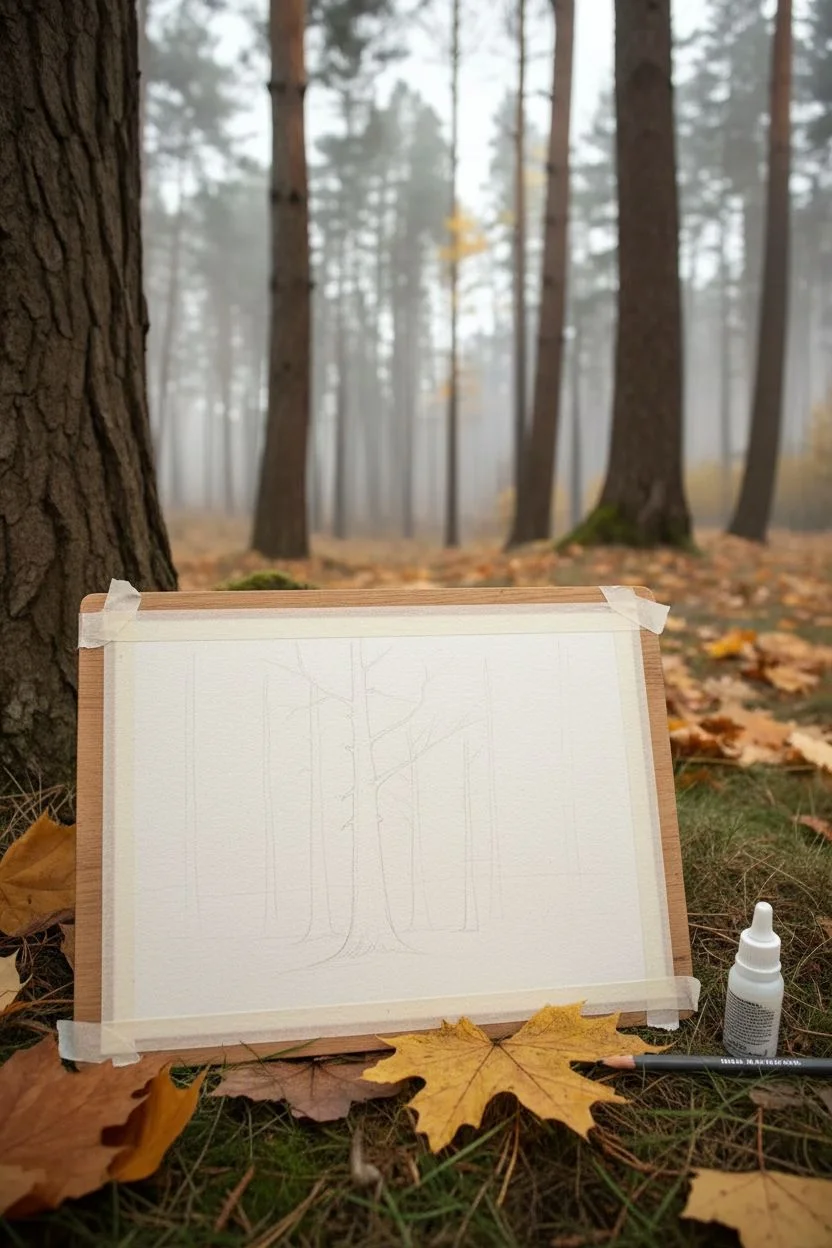
Capture the eerie stillness of late autumn with this delicate watercolor study of bare trees in the fog. While the prompt mentions ghosts, this foundational landscape creates the perfect haunting atmosphere before you add your spectral figures.
Step-by-Step Guide
Materials
- Cold press watercolor paper (300 gsm)
- Watercolor paints (Burnt Umber, Sepia, Yellow Ochre, Payne’s Grey, Titanium White)
- Masking fluid (optional)
- Round brushes (sizes 2, 6, and 10)
- Rigger or liner brush for fine branches
- Paper towels
- Water jars
- Artist tape and drawing board
Step 1: Setting the Scene
-
Paper Preparation:
Begin by taping your watercolor paper securely to a board. This prevents buckling when we apply the wet washes later. -
Light Sketching:
Using a hard pencil (like an H or 2H), very lightly sketch the positions of the main tree trunks. Keep the lines faint so they won’t show through the misty layers. -
Masking (Optional):
If you want crisp white highlights on the bark, use a fine applicator to apply thin lines of masking fluid on the sun-facing sides of the planned trees.
Muddy colors?
If your mist looks brown instead of gray, clean your water jar. Dirty water tints yellow washes quickly. Let layers dry fully before glazing.
Step 2: Atmospheric Background
-
Wet-on-Wet Sky:
Wet the entire upper two-thirds of the paper with clean water. The sheen should be glossy but not forming puddles. -
Initial Mist Layer:
Dilute a mix of Yellow Ochre and a tiny touch of Payne’s Grey to create a warm, foggy gray. Washes this loosely over the wet paper, letting it fade into white near the bottom. -
Distant Trees:
While the paper is still damp, use a dilute mix of Payne’s Grey and Sepia to paint faint, vertical lines for distant trees. Because the paper is wet, these lines will blur, creating that crucial depth. -
Drying Time:
Allow this initial layer to dry completely. If the paper feels cold to the touch, it is still wet.
Step 3: Forest Floor and Main Trees
-
Ground Layer:
Mix Burnt Umber with some Yellow Ochre. Paint the forest floor using horizontal strokes, letting the color be deeper in the foreground and fading as it goes back. -
Main Trunks:
Using your size 6 brush and a mix of Sepia and Burnt Umber, paint the primary tree trunks. Start from the base and pull upward, lifting pressure as the trunk narrows. -
Adding Texture:
While the trunk paint is semi-dry, drop in concentrated Sepia on the shadowed side of the trees to give them roundness and bark texture. -
Mid-Ground Trees:
Paint the trees slightly further back using a more watered-down version of your trunk color. This value change pushes them into the distance.
Level Up: Ghostly additions
Once dry, use white gouache to paint translucent figures floating between the trees. Blur their edges with water for a spectral effect.
Step 4: Fine Details
-
Branching Out:
Switch to your rigger or liner brush. With a thin, inky consistency of paint, add the intricate network of branches. Use a shaky hand to make them look organic and knobby. -
Creating Depth:
I like to ensure some branches cross over others; add darker paint where branches connect to the trunk to simulate shadows. -
Removing Masking:
If you used masking fluid, gently rub it away with your finger or a rubber pick-up tool once the painting is bone dry. -
Softening Edges:
If any background trees look too sharp, take a clean, slightly damp brush and gently scrub the edge to blur it back into the mist. -
Final Glaze:
To enhance the fog, you can apply a very thin, watery glaze of Titanium White or diluted white gouache over the lowest part of the forest floor.
This serene backdrop is now ready for you to add your haunting apparitions or leave as a peaceful nature study

PENCIL GUIDE
Understanding Pencil Grades from H to B
From first sketch to finished drawing — learn pencil grades, line control, and shading techniques.
Explore the Full Guide
Thrift-Style Landscape With a Hidden Ghost

Transform an ordinary thrift store landscape into a spooky yet sophisticated piece of decor by hiding a tiny ghost in plain sight. This project plays on the “ghost painting” trend by keeping the apparition subtle, rewarding those who look closely at the peaceful scenery.
Detailed Instructions
Materials
- Thrifted landscape print or painting (preferably under glass)
- Acrylic paints (white, grey, and colors matching the landscape)
- Fine detail brushes (sizes 0, 1, and small filbert)
- Palette for mixing
- Water cup and paper towels
- Matte spray varnish (optional, for finish matching)
- Painter’s tape (if painting on the glass)
Step 1: Preparation and Planning
-
Scout the Perfect Location:
Examine your found landscape closely. Look for a natural hiding spot where a ghost might peek out—behind the main tree, cresting a hill, or standing quietly in the tall grass near the foreground path. -
Clean the Surface:
If you’re painting directly on the art, wipe it gently with a dry microfiber cloth to remove dust. If you plan to paint on the glass for a removable effect, clean the glass thoroughly with window cleaner and let it dry completely. -
Select Your Palette:
Mix a “ghost white” that isn’t stark white. I like to dull down titanium white with a tiny touch of raw umber or grey so the figure sits naturally in the vintage atmosphere rather than glowing like a cartoon.
Too Bright?
If your ghost looks like a sticker, mix a ‘glaze’ of water and a tiny dot of brown paint. Wash this over the dried ghost to instantly age it and push it back into the scene.
Step 2: Painting the Apparition
-
Draft the Shape:
Using a very dilute wash of your off-white paint and a size 1 brush, lightly sketch the outline of your ghost. Keep the classic bedsheet shape soft and flowing, perhaps trailing off into the grass or pathway. -
Apply the Base Layer:
Fill in the ghost shape with a thin layer of your off-white mixture. Keep this first layer semi-transparent; you want some of the background landscape tones to influence the ghost’s opacity. -
Build Opaque Highlights:
Once the base is tacky, add a second layer of slightly brighter white to the center of the ghost and the top of the ‘head’. Leave the edges softer and more transparent to create an ethereal, hazy effect. -
Add Shadow and Depth:
Mix a light grey or blueish-grey wash. Paint tiny shadows into the folds of the sheet to give the ghost volume. If the painting has a specific light source (like the sun coming from the right), ensure your shadows match that direction. -
Ground the Figure:
This is crucial for realism: mix a color that matches the surrounding grass or dirt path. Gently dab this color over the very bottom edge of the ghost so it looks like it’s standing *in* the grass, not floating awkwardly on top of it. -
Create the Face:
Using your smallest size 0 brush and dark grey or black paint, add two simple dots for eyes. Keep them small; large eyes will make it look cartoony, while tiny eyes maintain the vintage aesthetic.
Step 3: Finishing Touches
-
Blend the Edges:
With a clean, slightly damp brush, gently feather the outer edges of the ghost into the background. This softens the transition and makes the figure look like part of the original atmosphere. -
Adjust Texture:
If the original painting has a lot of texture (like brushstrokes or canvas weave), try to mimic this by dabbing your paint rather than using smooth strokes. -
Dry and Assess:
Step back about five feet. The ghost should be visible but not immediately obvious. If it stands out too much, apply a very thin wash of yellow ochre or brown water over the ghost to destroy the brightness and ‘age’ it. -
Seal the Work:
If you painted directly on the artwork, you can lightly mist the area with a matte varnish once fully dry to match the sheen of the rest of the painting. -
Reassemble:
Place the artwork back into its frame if you removed it, ensuring the glass is clean on both sides before closing up the back.
Removable Option
Nervous about ruining a vintage find? Paint the ghost on the outside of the glass instead of the canvas. It creates a cool 3D shadow effect and scrapes off easily later.
Now you have a charmingly haunted piece of art that blends perfectly with cottage-style decor
Ghost Family Hanging Out Together
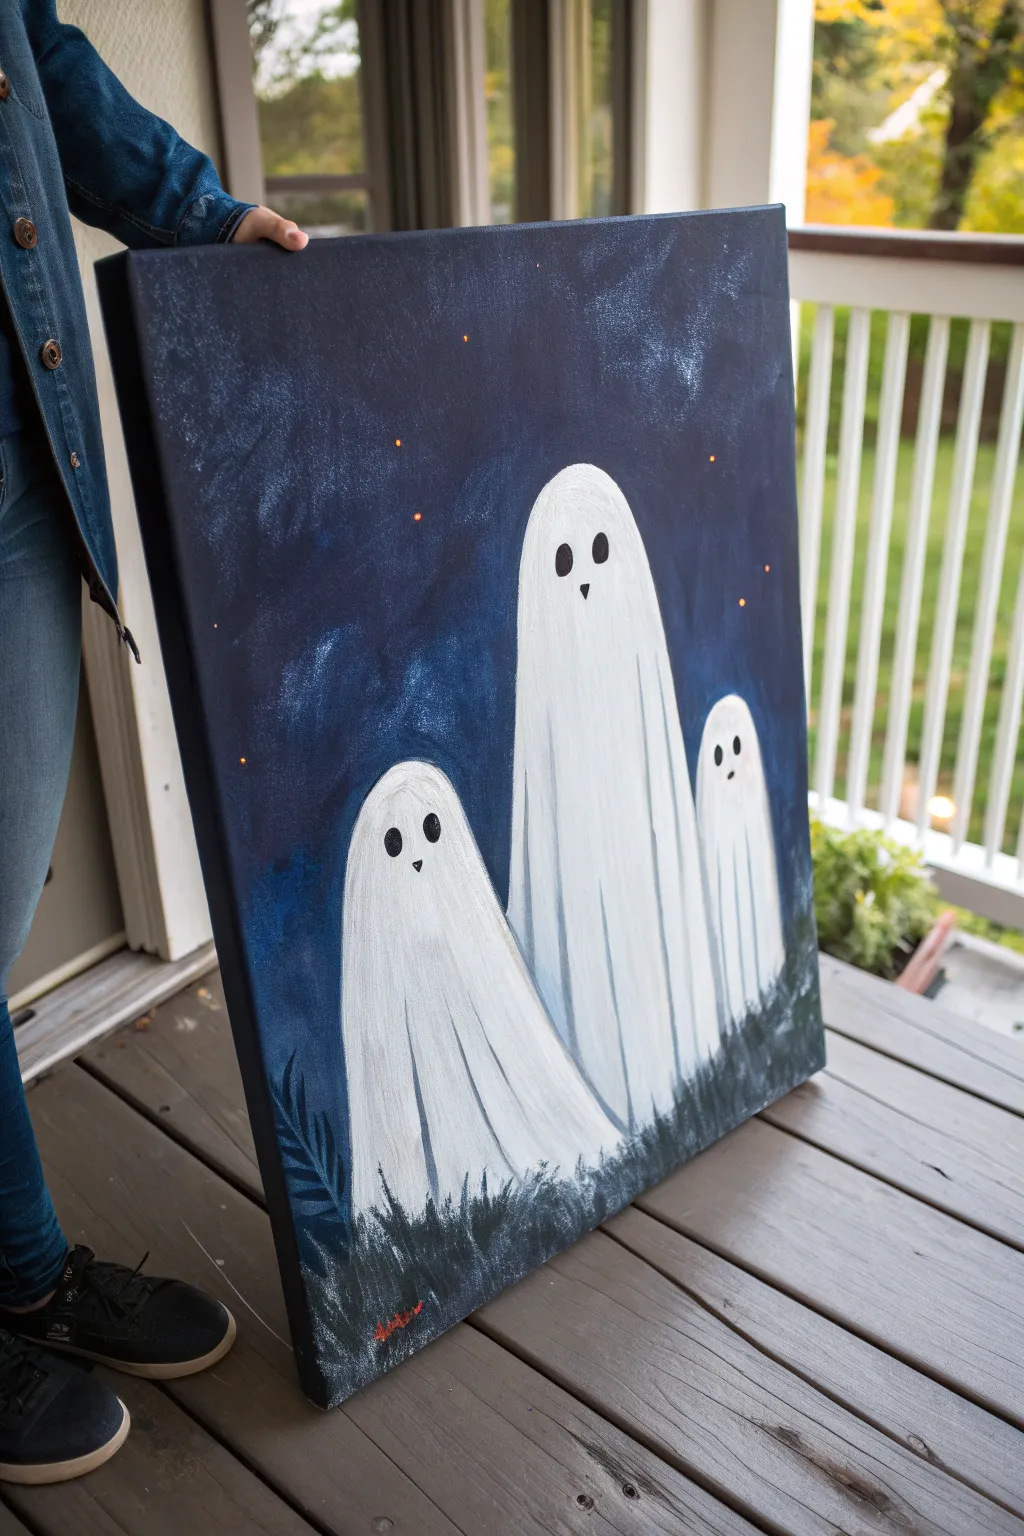
Capture a whimsical family of specters under a midnight sky with this charming acrylic painting. The deep indigo background makes the crisp white ghosts pop, creating a scene that feels both spooky and sweet.
Step-by-Step Tutorial
Materials
- Large stretched canvas (approx. 24×30 inches)
- Acrylic paints: Navy Blue, Black, White, Orange/Gold
- Large flat brush (for background)
- Medium filbert brush or round brush
- Small detail brush
- Palette
- Water cup and paper towels
- Chalk or pencil (for sketching)
Step 1: Setting the Scene
-
Mix the night sky color:
Begin by creating a deep, moody blue for your background. Mix a generous amount of Navy Blue with a touch of Black to deepen it without making it pitch dark. You want a rich midnight tone. -
Apply the base coat:
Using your large flat brush, cover the entire canvas with your dark blue mixture. Use broad, sweeping strokes. Don’t worry about perfect uniformity; a little texture adds to the atmospheric night effect. -
Add subtle texture:
While the blue is still slightly wet, I like to take a nearly dry brush with a tiny bit of lighter blue or white and scumble it gently in the upper corners to create a hazy, starry atmosphere. -
Let it dry completey:
Allow the background to dry fully to the touch. This ensures your white ghosts will stay bright and won’t mix with the blue underneath.
Opacity Pro Tip
Painting white over dark blue is tricky! Let each white layer dry completely before adding the next. Prevents dragging and keeps the white crisp.
Step 2: Forming the Family
-
Sketch the outlines:
Using a piece of chalk or a light pencil, lightly sketch three ghost shapes. Vary their heights—one tall protector in the middle, and two smaller ones on the sides. -
Shape the heads:
Give each ghost a rounded, dome-like head. The lines should flow down smoothly, getting slightly wider towards the bottom like draped fabric. -
Fill in the base white:
Load your medium brush with Titanium White. Fill in the shapes you just sketched. You will likely need two or three coats to get a solid, opaque white against that dark background. -
Create folds and shadows:
Mix a very light grey (mostly white with a tiny dot of black). Paint vertical streaks starting from the mid-body down to the bottom to suggest folds in the sheets. -
Blend the fabric:
While the grey streaks are wet, blend the edges gently into the white so the folds look soft and natural rather than like hard stripes.
Level Up: Glow Effect
Mix a glazing medium with a tiny drop of neon blue or purple. Glaze vaguely around the ghosts’ outlines to make them look like they are faintly glowing.
Step 3: Atmosphere & Details
-
Paint the faces:
Using your smallest detail brush and pure Black paint, add the eyes. They are simple ovals or circles. Place them slightly high on the head for a cute look. -
Add the tiny mouths:
Paint a very small triangle or dot for the mouth just below the eyes to give them surprised or curious expressions. -
Ground the ghosts:
Mix a dark grey-blue color. Using short, upward flicking strokes at the bottom of the canvas, paint grass blades overlapping the bottom hem of the ghosts. This grounds them in the scene. -
Add fern details:
On the left side, paint a simple fern shape using a lighter blue-grey tone to add visual interest to the foreground. -
Scatter the fireflies:
Dip the tip of your detail brush handle (or a toothpick) into Orange or Gold paint. Dot tiny specks around the ghosts’ heads to look like distant fireflies or embers. -
Highlight the stars:
Using your scruffy brush, gently tap faint white stardust in the upper sky area to enhance the magical night feeling. -
Final touches:
Check for any patchy areas in the white ghosts and add a final layer of bright white to the centers of the fabric folds if needed to make them truly glow.
Now you have your own adorably spooky family to watch over your home during the Halloween season


Ghost With a Floral Crown
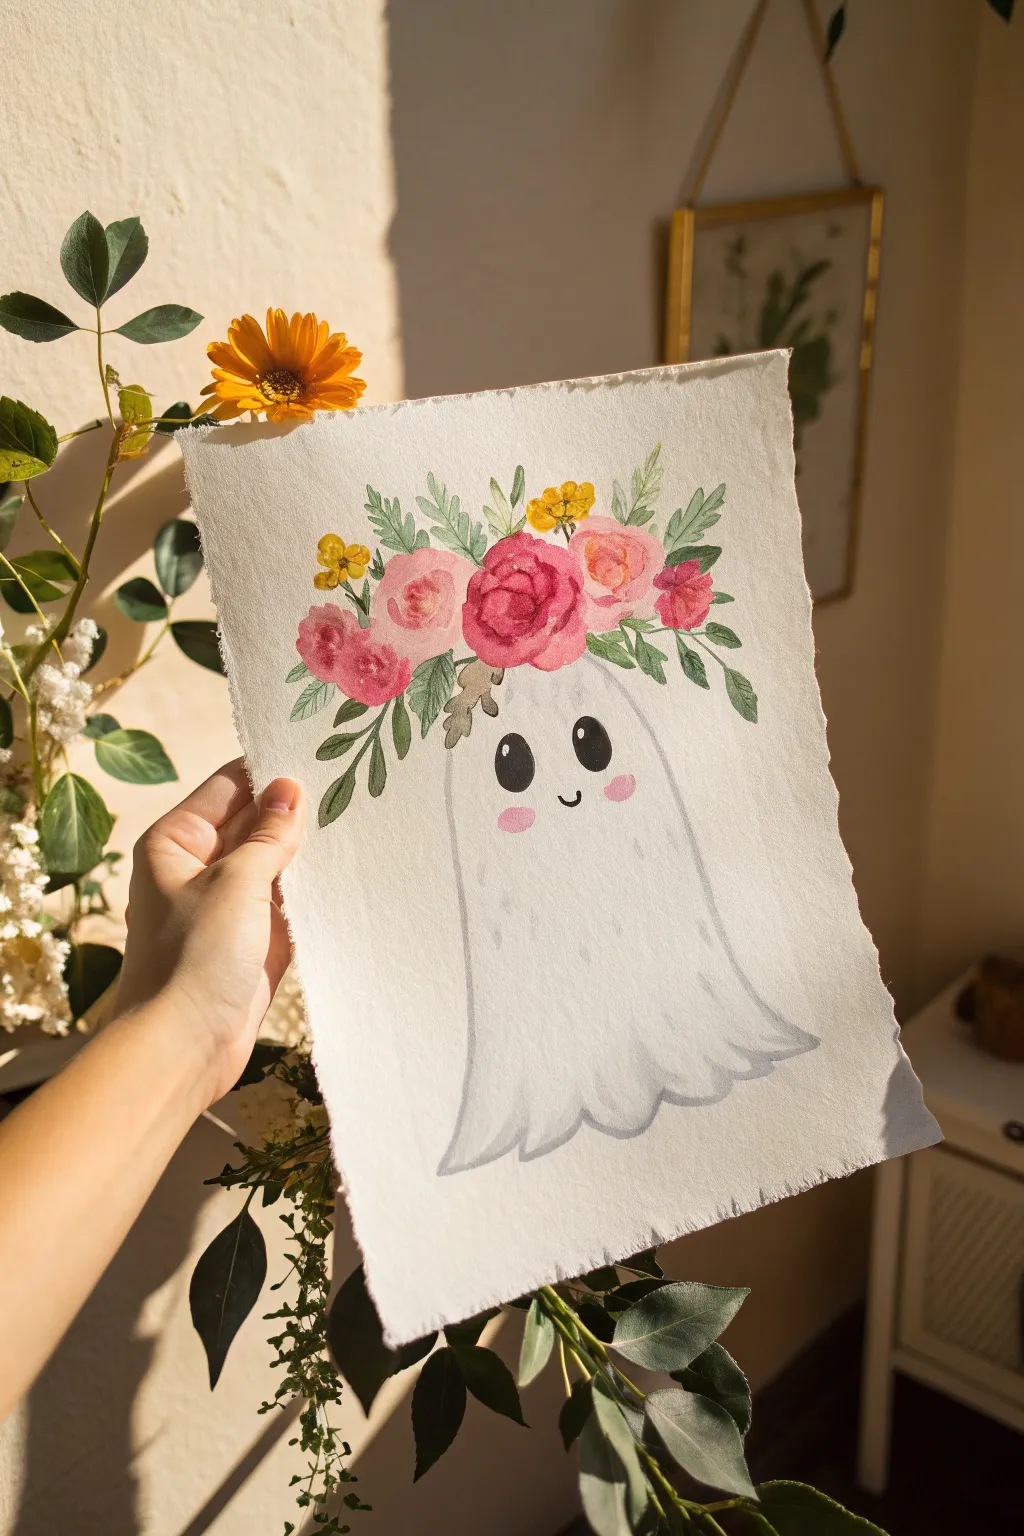
This charming watercolor project combines spooky and sweet, featuring a friendly ghost wearing a vibrant crown of pink and yellow blooms. The soft watercolor textures and rough-edged paper give it a delightful, handmade vintage feel perfect for seasonal decor.
Step-by-Step Guide
Materials
- Cold press watercolor paper (rough edge/deckled edge preferred)
- Watercolor paints (pinks, reds, sage greens, dark greens, yellow, black)
- Round watercolor brushes (size 2, 4, and 6)
- Pencil and kneaded eraser
- Jar of water
- Paper towels
- Palette for mixing
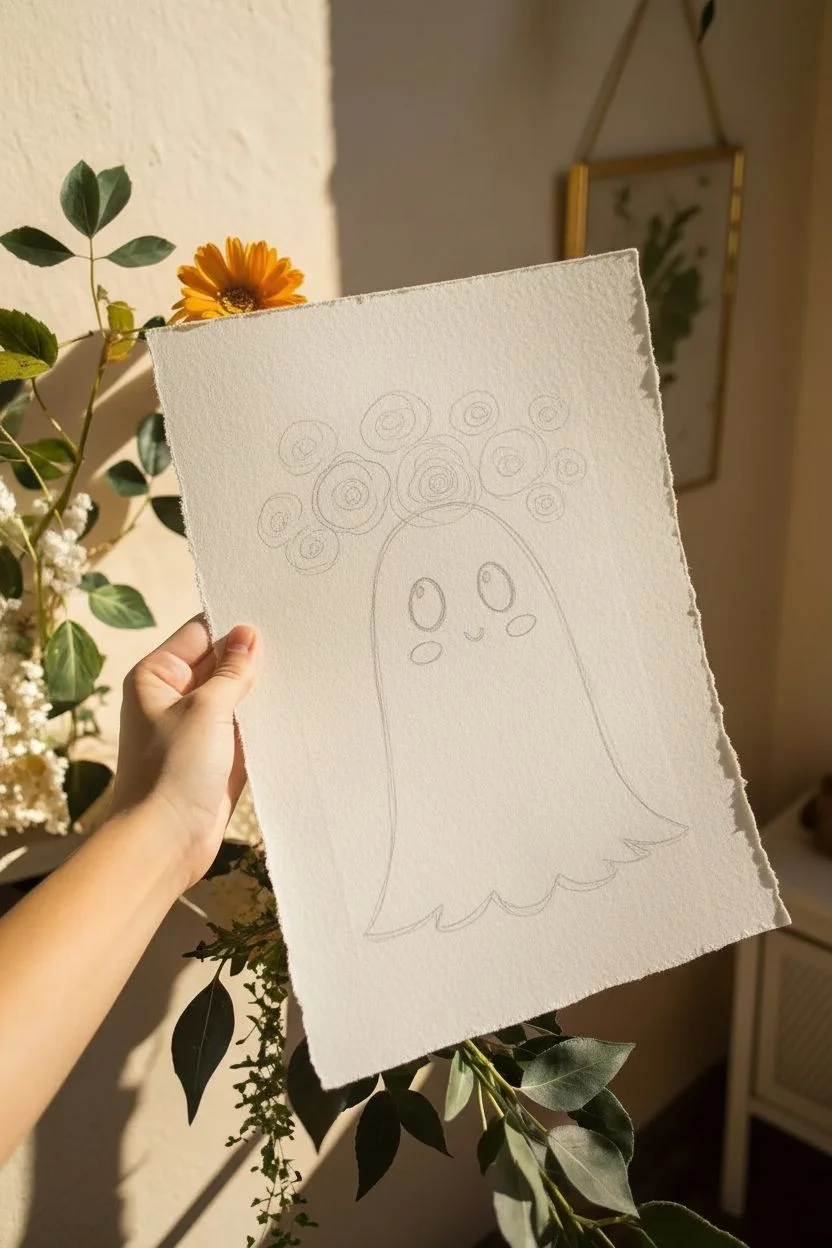
Step 1: Sketching the Outline
-
Draw the ghost shape:
Begin by lightly sketching a simple bell-like shape for the ghost’s body using your pencil. Keep the top rounded for the head and let the sides flow down, widening slightly towards the bottom. -
Add the wavy hem:
Connect the bottom edges with a soft, wavy line to create the draping sheet effect. The waves should be irregular to look more natural and flowy. -
Map out the face:
Sketch two oval shapes for the eyes near the upper middle of the body. Add a small ‘u’ shape for a smile right between them. Don’t worry about filling them in yet. -
Plan the floral crown:
Lightly sketch circles across the top of the ghost’s head where your main flowers will sit. Drawing these loosely now helps ensure the crown looks balanced before you commit to paint.
Muddy colors?
If your pink flowers are bleeding into the green leaves and looking brown, wait for the flower layer to be completely dry to the touch before painting any touching leaves.
Step 2: Painting the Flowers
-
Start the main roses:
Using a size 4 brush, load up a soft pink and paint the base of the left-most flowers. Use a wet-on-dry technique, making small ‘c’ shaped strokes that curve around a center point to mimic rose petals. -
Paint the focal flower:
Mix a deeper, more saturated pink-red for the large center rose. Paint this one slightly larger than the others, keeping your strokes loose and leaving tiny slivers of white paper showing to create separation between petals. -
Add yellow accents:
Clean your brush and pick up a warm yellow ochre. Paint small clusters of simple three-petal flowers or rounded blobs tucked between the pink roses for contrast. -
Detail the leaves:
Switch to a sage green. Using the tip of your brush, paint small, leafy sprigs extending outward from the flowers. Vary the green shades by adding a touch of brown or blue to some leaves for depth. -
Refine the foliage:
While the green is still slightly damp on your palette, paint a few darker, sharper leaves overlapping the lighter ones to give the crown fullness.
Add metallic magic
Once dry, use metallic gold watercolor or a gold paint pen to add tiny stamens to the flower centers or outline a few select leaves for a magical shimmer.
Step 3: Painting the Ghost
-
Outline the body:
Create a very watery, pale grey wash. Using your largest brush, carefully paint along the pencil outline of the ghost’s body. You want this line to be confident but faint. -
Create the shadows:
While the outline is wet, drag some of that pale grey wash inward at the bottom hem folds. This suggests the fabric’s weight without coloring the whole ghost grey. -
Add subtle texture:
With a mostly dry brush and very faint grey paint, add a few vertical dashed lines on the ghost’s body to suggest folds in the sheet. -
Paint the eyes:
Once the paper is totally dry, use a size 2 brush and concentrated black paint to fill in the oval eyes. Leave a tiny white dot unpainted in the upper corner of each eye for a sparkle highlight. -
Add the smile:
Carefully paint the small smile line with the very tip of your fine brush using black. -
Blush the cheeks:
Dilute a small amount of pink paint with plenty of water. Paint two soft oval cheeks just below the eyes. If the edges look too hard, dab them gently with a clean, damp brush to soften.
Allow your spooky new friend to dry completely before displaying it in a simple frame
Minimalist One-Brushstroke Ghosts
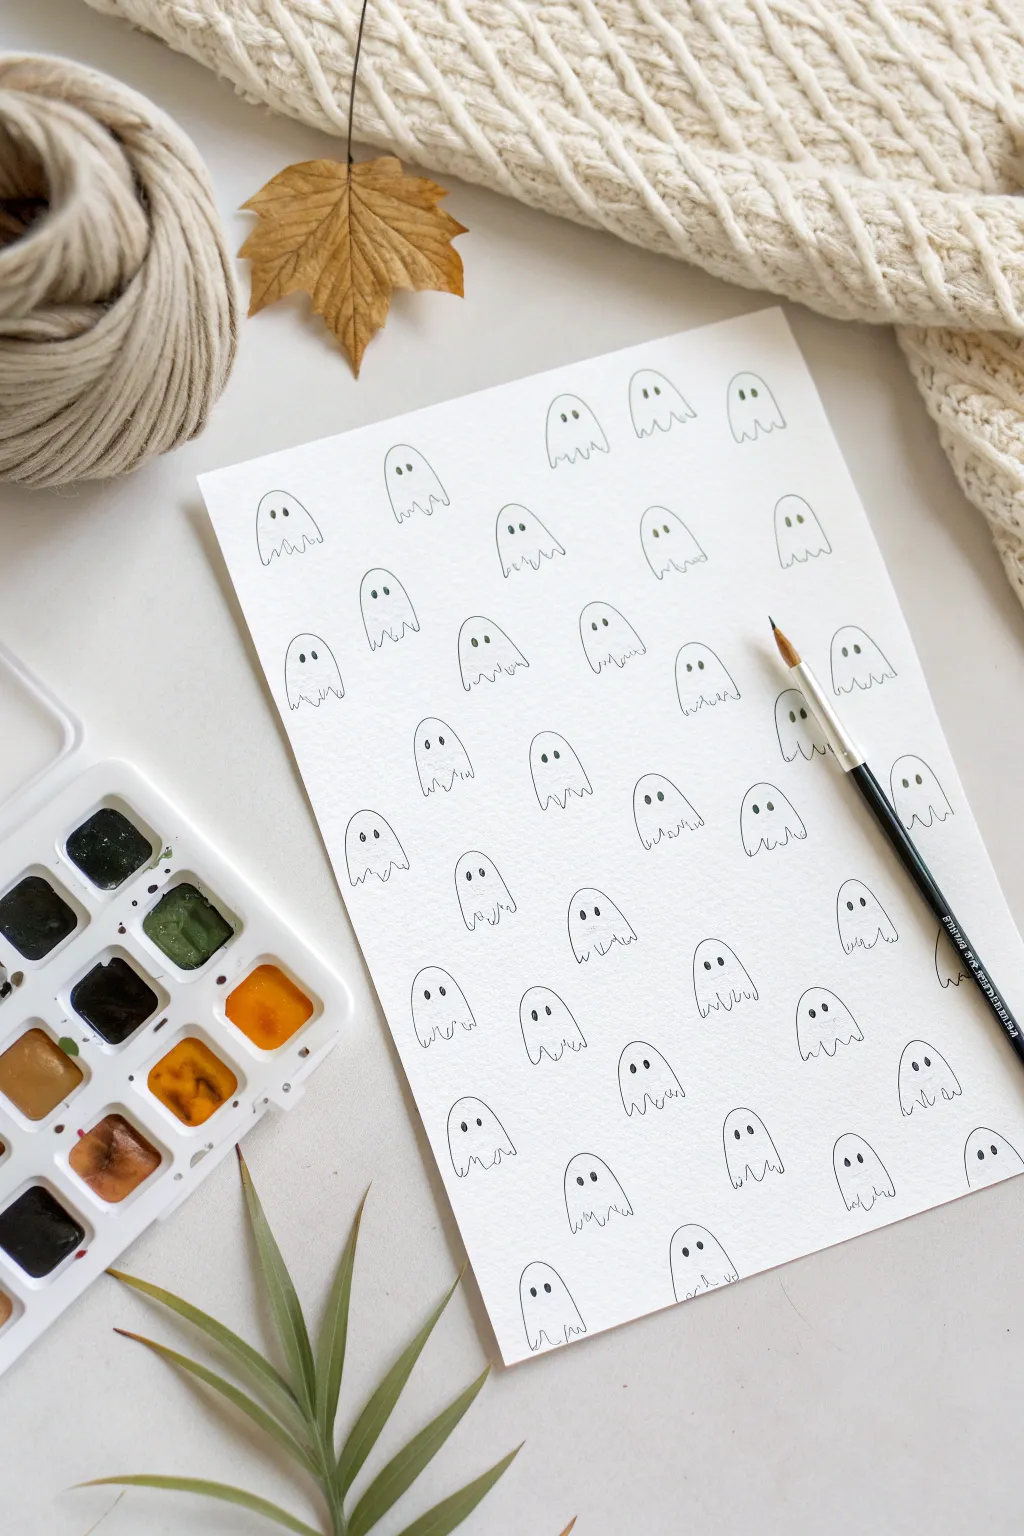
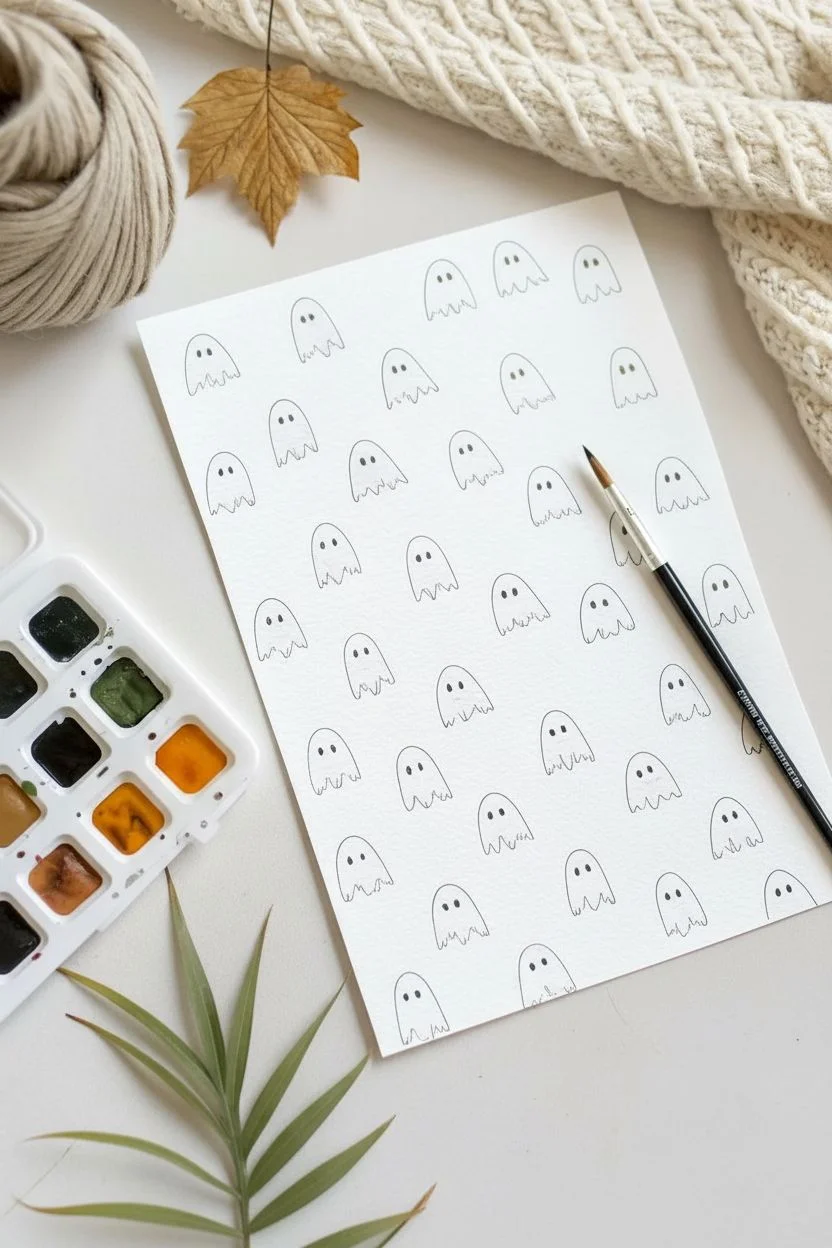
Create a charmingly simple piece of seasonal art with this minimalist ghost pattern. Using delicate linework and negative space, you’ll fill a page with tiny, expressive spirits that are perfect for framing or scanning for digital paper.
Step-by-Step Tutorial
Materials
- Cold press watercolor paper
- Fine liner brush (size 0 or 00)
- Black watercolor paint or black india ink
- Water cup
- Watercolor palette
- Paper towel
- Pencil (optional for grid lines)
Step 1: Preparation
-
Set up your workspace:
Clear a flat surface and tape down your watercolor paper if it tends to buckle, though for these light washes it isn’t strictly necessary. -
Prepare your medium:
Mix a small amount of black watercolor with water in your palette until you have a smooth, ink-like consistency. Alternatively, pour a few drops of India ink into a well. -
Test your brush:
Dip your fine liner brush into the black paint. Test the flow on a scrap piece of paper to ensure you can make thin, controlled lines without blobs. -
Plan the layout:
Visualize a loose grid on your paper. If you struggle with spacing, lightly sketch a very faint grid with a pencil to guide where each ghost will float.
Brush Control Tip
Hold the brush perpendicular to the paper, not at an angle. This gives you the finest line width and prevents the metal ferrule from accidentally dragging ink.
Step 2: Painting the Ghost Outlines
-
Start the first row:
Begin at the top left corner. Paint a simple arch shape, like an upside-down ‘U’, to form the head of your first ghost. -
Add the wavy bottom:
From the right side of the arch, continue the line downward and create a scalloped or wavy line that connects back to the left side of the arch. This is the ghostly ‘tail’. -
Maintain variety:
Move to the right to paint the next ghost. I like to make this one slightly taller or shorter than the first to keep the pattern organic and handcrafted. -
Vary the waves:
For some ghosts, make the bottom waves sharp and zigzaggy; for others, keep them soft and rolling. This subtle variation adds character. -
Continue the row:
Work your way across the paper, leaving relatively even spacing between each figure until the first row is complete. -
Start the second row:
Begin the second row below the first. You can align them in a grid or stagger them in a brick-lay pattern for a more dynamic look. -
Fill the page:
Repeat this process down the entire sheet of paper. Don’t worry if your hand wobbles slightly; imperfections make these little doodles sweeter.
Fixing Smudges
If you smudge a wet line, turn it into a shadow or a new ghost shape. Don’t try to wipe it while wet, or you’ll ruin the paper texture.
Step 3: Adding Details
-
Let the outlines dry:
Give the outlines a few minutes to dry completely. Since the lines are thin, this shouldn’t take long. -
Load brush for details:
Refresh your brush with a slightly more concentrated black mixture for the eyes, ensuring they stand out boldly. -
Paint the eyes:
Add two small, oval dots near the top of the first ghost’s head. -
Experiment with expression:
Place the eyes close together for a cute look, or wider apart for a goofy expression. You can even make one eye larger than the other. -
Finish the faces:
Work through every ghost on the page, giving each one its own set of eyes. -
Final check:
Scan the page for any spots that look too empty. You can add partial ghosts creeping in from the edges of the paper to make the pattern feel continuous.
Once dry, this adorable pattern makes for excellent handmade wrapping paper or a festive background for Halloween cards
Bold Pop Background With a Cute Ghost
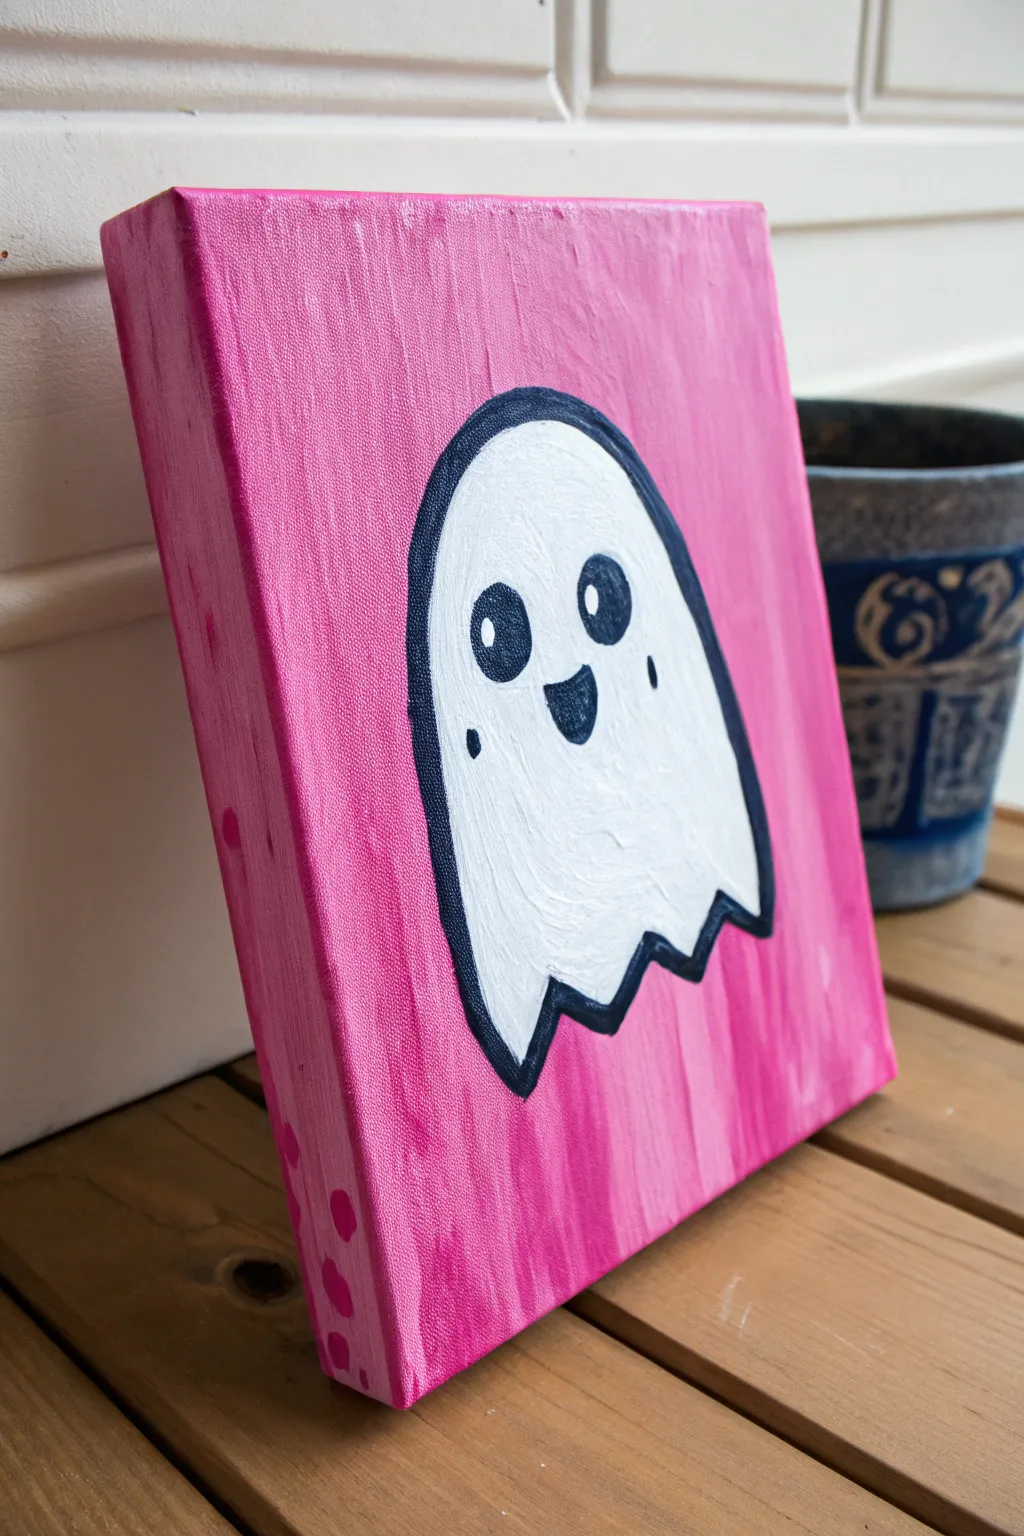
Brighten up your Halloween decor with this vibrant, pop-art inspired ghost painting featuring a bold hot pink background. The visible brushstrokes and thick black outlines give this cute specter a modern, illustrative feel that pops right off the canvas.
Step-by-Step
Materials
- Small stretched canvas (e.g., 8×10 or 5×7 inches)
- Hot pink acrylic paint
- Titanium white acrylic paint
- Black acrylic paint
- Medium flat paintbrush (for background)
- Small round paintbrush (for details)
- Fine liner brush (for outlining)
- Pencil
- Palette or paper plate
- Cup of water
- Paper towels
Step 1: Background Basework
-
Prepare the pinks:
Squeeze a generous amount of hot pink acrylic paint onto your palette. To create depth, mix a very small dot of white into a portion of the pink to make a slightly lighter shade, keeping the original hot pink pure for the main coat. -
Apply the first layer:
Using your medium flat brush, paint the entire front surface of the canvas with the unmixed hot pink. Use long, vertical strokes that run from top to bottom. -
Paint the edges:
Don’t forget the sides! Continue the pink paint around all four edges of the stretched canvas. painting the sides gives the piece a finished, professional look even without a frame. -
Add texture:
While the first layer is still slightly tacky but not wet, streak in some of your lighter pink mix or add a second coat of hot pink using quick, vertical motions. The goal is to leave visible brush texture rather than a perfectly smooth finish. -
Let it dry:
Allow the background to dry completely. This is crucial because painting white over wet pink will turn your ghost into a light pink blob. A hairdryer on a cool setting can speed this up.
Step 2: Shaping the Specter
-
Sketch the outline:
Lightly sketch a simple arch shape in the center of the canvas using a pencil. Make the top round and domed, and the bottom uneven with jagged ‘wavy’ points for the tail. -
Fill the base coat:
Using a clean flat brush, fill in the ghost shape with titanium white paint. Don’t worry about perfect opacity yet; the pink will likely show through the first coat. -
Apply a second white coat:
Once the first white layer is dry to the touch, apply a second coat. I find that painting in a curved direction that mimics the ghost’s round head helps create a nicer volume. -
Check for opacity:
If the pink background is still visible, apply a third coat of white. You want a solid, opaque white shape before moving on to details.
Clean Lines Hack
Thin your black paint slightly with a drop of water for the outlining step. Ink-like consistency flows smoother off the brush, creating crisper lines without dragging.
Step 3: Bold Details
-
Outline the body:
Switch to your fine liner brush and load it with black acrylic paint. Carefully paint a thick, consistent outline around the entire white ghost shape. If your hand is shaky, try resting your pinky finger on a dry part of the canvas for balance. -
Draw the eyes:
Paint two large black ovals for eyes in the upper third of the ghost’s body. Make them slightly tall and tilted inward just a hair to add a cute expression. -
Add the mouth:
Between and slightly below the eyes, paint a small semi-circle or ‘U’ shape for a smiling mouth. -
Add eye sparkles:
Dip the non-brush end (the handle tip) of a small paintbrush into white paint. Dot a small white highlight into the upper right corner of each black eye oval. This ‘catchlight’ brings the character to life immediately. -
Paint cheek accents:
Using the tip of your small round brush and black paint, add two small, short vertical dashes underneath the eyes to suggest blushing cheeks or dimples. -
Refine the edges:
Go back over your main black outline if needed to smooth out any bumps or ensure the line thickness is uniform all the way around. -
Final touches:
Inspect the pink background near the outline. If you accidentally got white or black paint on the background, touch it up with a small dab of pink paint.
Glow Up
Mix glow-in-the-dark medium into your final layer of white paint. In the daylight it looks normal, but at night your ghost will actually glow green.
Allow your painting to dry fully before displaying this cheery haunt on a shelf or desk
Transparent Watercolor Ghost With Salt Texture
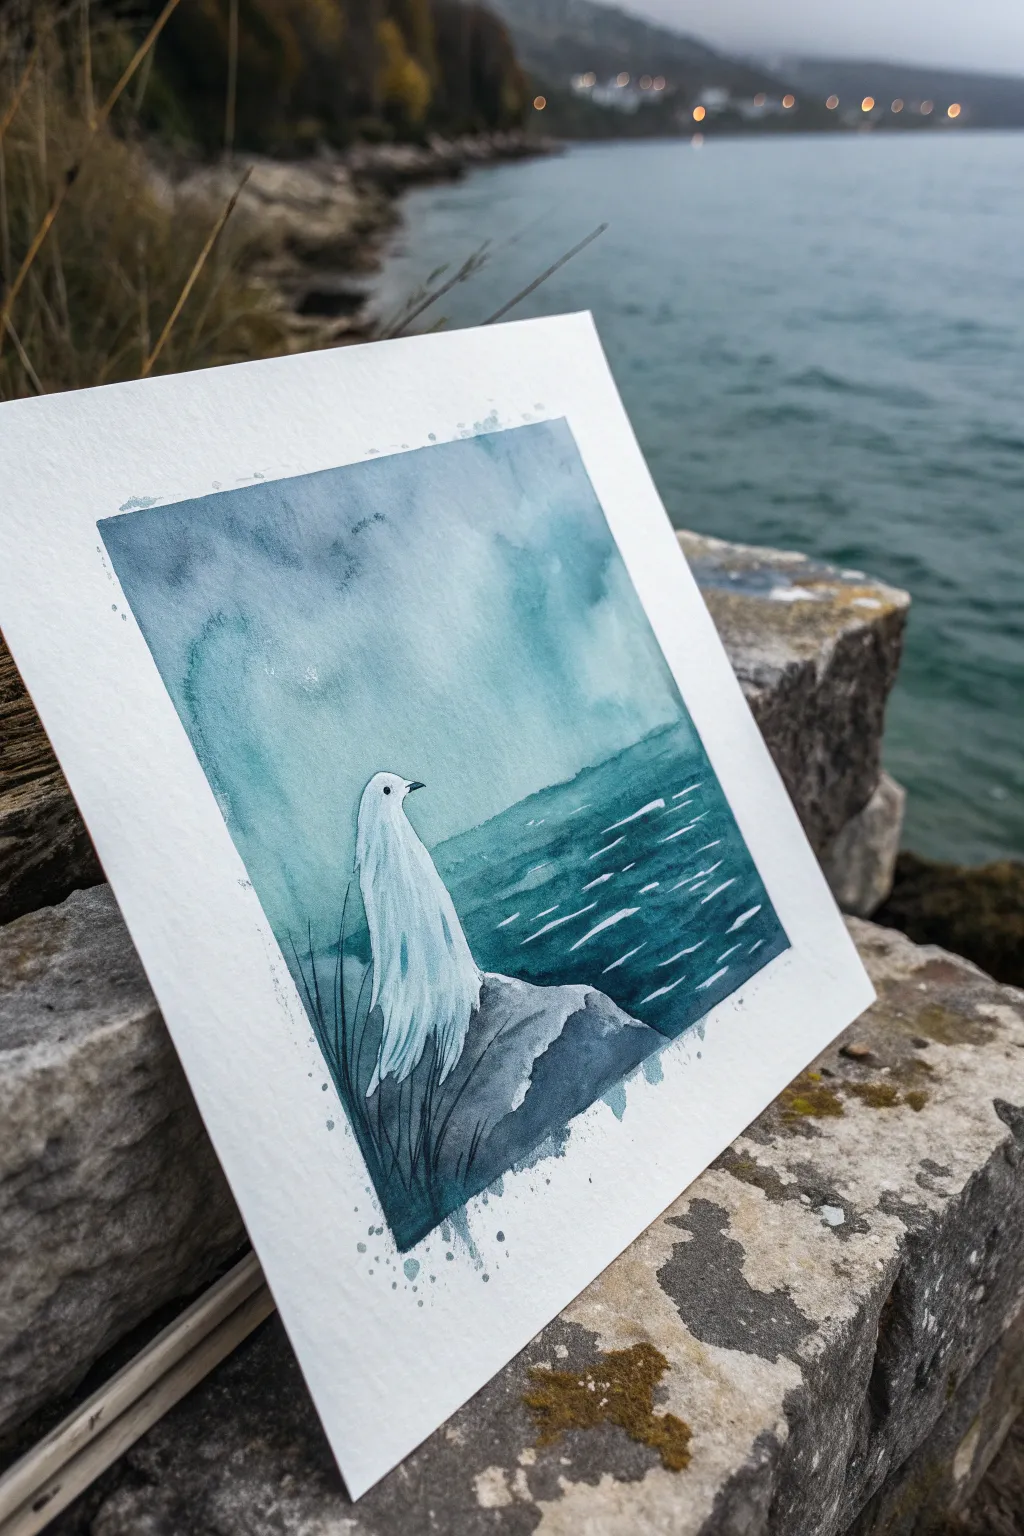
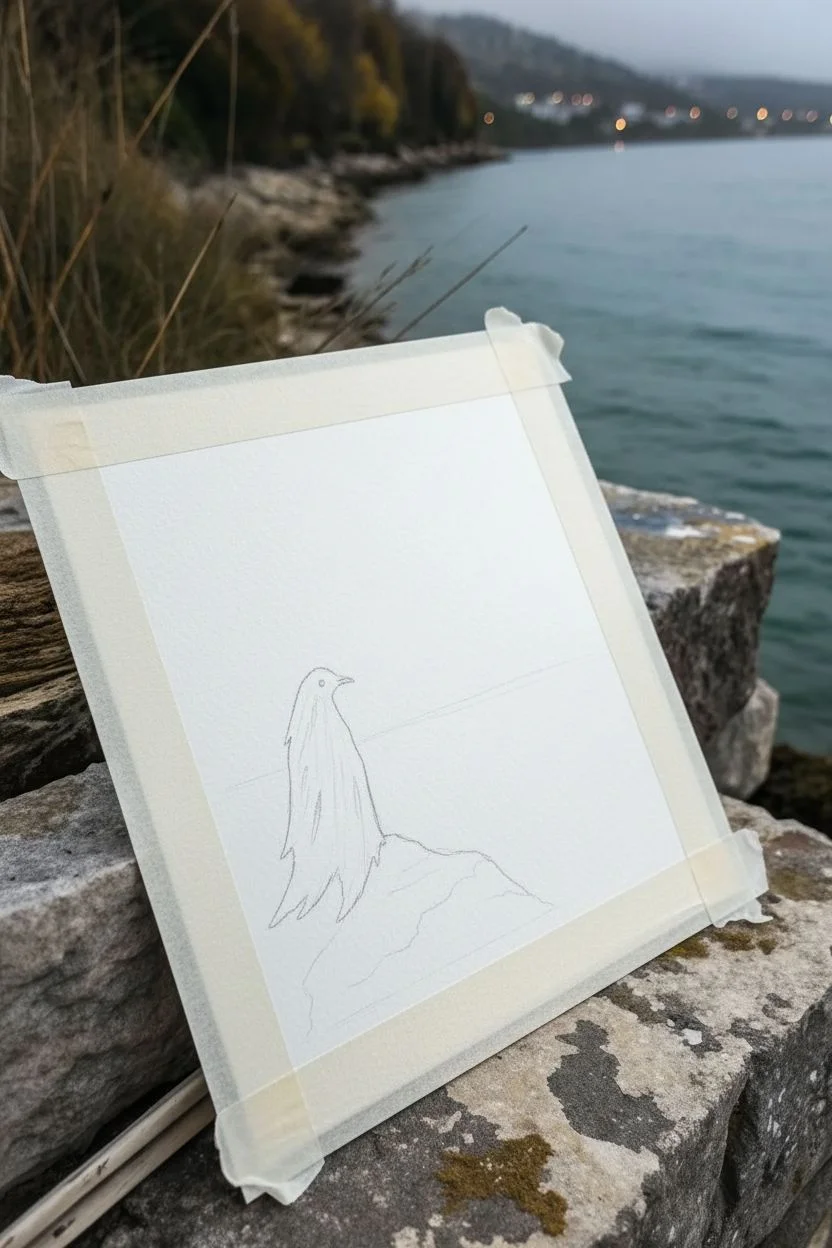
Capture the moody essence of a misty coastline with this evocative watercolor painting featuring a lonely ghost gazing out to sea. The piece uses wet-on-wet techniques and deep teal tones to create a hauntingly beautiful atmosphere.
Detailed Instructions
Materials
- Cold press watercolor paper (300 gsm or heavier)
- Watercolor paints (Indigo, Payne’s Grey, Prussian Blue, Teal, White Gouache)
- Masking fluid (optional)
- Round brushes (size 4 and 8)
- Painter’s tape or masking tape
- Drawing board or hard surface
- Paper towels
- Two jars of water
- Table salt (for texture)
Step 1: Preparation & Drawing
-
Prepare your paper:
Tape down all four sides of your watercolor paper to a board. This creates the crisp white border seen in the example and prevents buckling. -
Sketch the silhouette:
Lightly sketch the outline of the ghost figure standing on a rock. Focus on the draped folds of the sheet that taper down like feathers or fabric. Keep the horizon line relatively low, about one-third up from the bottom. -
Mask the ghost (optional):
If you struggle to paint around white spaces, apply masking fluid carefully to the ghost figure. Let it dry completely. Alternatively, you can just paint carefully around the outline.
Step 2: The Moody Sky
-
Wet the sky area:
Using clean water and your larger brush, wet the entire sky area above the horizon line. Avoid the ghost figure if you haven’t used masking fluid. -
Drop in color:
While the paper is wet, drop in a mix of Teal and Prussian Blue. Start darker at the top left corner and let it fade slightly as it moves towards the right, creating a sense of drifting mist. -
Create cloud textures:
While still damp, touch in slightly more concentrated Payne’s Grey or Indigo into the wet areas to suggest stormy clouds. Tilt your board slightly to encourage organic blending. -
Add texture:
Sprinkle a pinch of table salt into the wet sky wash while it’s still glistening. This will draw out pigment and create the starry, speckled texture visible near the top edge.
Prevent Blooms
Work patiently! If you paint next to a section that is still wet, the colors will bleed into each other. Use a hairdryer on low heat to ensure dryness between phases.
Step 3: The Dark Ocean
-
Define the horizon:
Allow the sky to dry until the shine disappears. Mix a dark, saturated color using Indigo and Teal. Paint a crisp, straight line across the horizon. -
Build the water depth:
Paint the ocean area with horizontal strokes. Use a darker value near the horizon and transition to a slightly lighter teal as you move closer to the foreground rocks. -
Lift out waves:
While the ocean wash is damp but not soaking, use a clean, thirsty brush (damp but pigment-free) to lift out small horizontal lines. I find this creates the perfect soft whitecaps on distant waves.
Glowing Effect
For a supernatural glow, gently lift a halo of color around the ghost’s head with a damp brush after the background is dry, softening the hard edge.
Step 4: The Ghost Figure
-
Remove masking:
Once the background is bone dry, gently rub off the masking fluid if you used it. You should have a stark white silhouette. -
Define the form:
Mix a very watery, pale grey (heavily diluted Payne’s Grey). Paint subtle vertical shadows on the ghost’s ‘sheet’ to suggest folds and drapery, leaving mostly clean white paper for the highlights. -
Add the eye:
With a fine detail brush and thick black paint (or barely diluted Indigo), paint a small, simple dot for the eye and a tiny geometric beak-like shape to give the ghost its bird-like character.
Step 5: Foreground & Details
-
Paint the rock:
Mix a dark grey using Indigo and a touch of brown or purple to dirty it up. Paint the rock shape beneath the ghost, keeping edges somewhat jagged to look like stone. -
Add grass details:
Using the tip of your smallest brush and dark Indigo paint, flick upward from the base of the ghost and rock to create thin, wispy blades of grass or reeds. -
Enhance the waves:
Use Titanium White gouache or opaque white watercolor to add crisp, thin highlights to the crests of the waves in the dark water. This adds contrast and movement. -
Create splashes:
Load a brush with watery teal or grey paint and tap it against another brush handle to splatter tiny droplets around the edges of the painting, breaking the border slightly for an artistic finish. -
Final reveal:
Wait for everything to be completely dry. Carefully peel away the painter’s tape at a 45-degree angle to reveal your crisp, clean borders.
Now enjoy the quiet haunting beauty of your coastal watercolor creation


Have a question or want to share your own experience? I'd love to hear from you in the comments below!