Ghost rocks are my favorite kind of spooky-cute project because a simple stone shape already feels like a tiny floating spirit. Here are a bunch of ghost rock painting ideas you can try, from classic little sheet-ghosts to more playful, story-filled designs.
Classic White Sheet Ghost Face
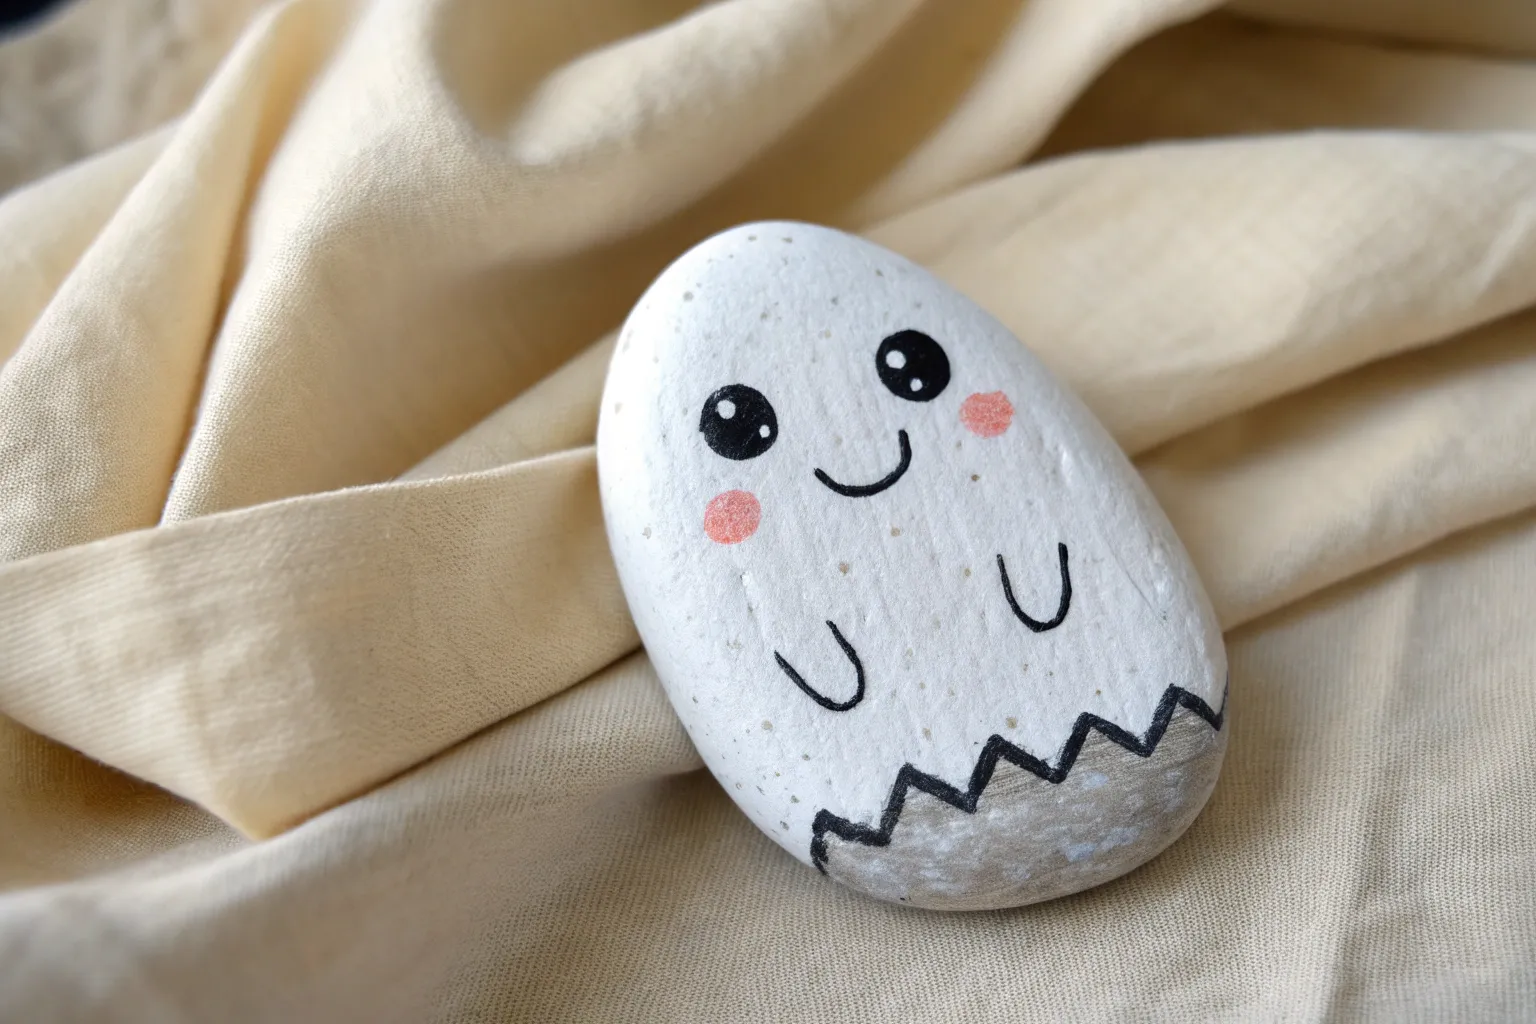
Embrace the minimalism of this project, featuring a smooth, matte white base and an impossibly adorable facial expression. This classic ghost design relies on clean lines and perfect placement to create a rock friend that feels both classic and cartoonish.
Step-by-Step
Materials
- Smooth river rock (oval or egg-shaped)
- White acrylic paint (matte finish)
- Black acrylic paint or black paint pen (fine tip)
- Wide flat paintbrush
- Small round paintbrush or dotting tool
- Matte spray sealant (optional)
- Clean water cup
- Paper towels
Step 1: Creating the Base
-
Stone selection:
Start by finding a stone that mimics the shape of a sitting ghost or an egg. A smooth surface is crucial here, as bumps will distort the clean white finish you’re aiming for. -
Clean the canvas:
Wash your rock thoroughly with warm soapy water and scrub away any dirt or grit. Let it dry completely before opening any paint bottles. -
First coat of white:
Using your wide flat brush, apply a generous layer of white acrylic paint. Paint in long, consistent strokes to minimize texture and brush marks. -
Drying time:
Allow this first layer to dry completely. If the rock’s natural color is still showing through, don’t worry—most rocks need at least two or three coats. -
Building opacity:
Apply a second coat of white paint. I like to paint this layer in a perpendicular direction to the first coat (cross-hatching) to help fill in any ridges and ensure solid coverage. -
Final smooth coat:
If needed, apply a third coat. The goal is a seamless, bright white surface that looks almost like a ceramic egg. Let this cure fully for at least an hour to prevent cracking.
Step 2: Designing the Expression
-
Planning the placement:
Visualize where the face should sit. For the cutest effect, place the eyes slightly higher than the center line of the rock, keeping them spaced somewhat wide apart. -
Drafting lightly:
If you are nervous about freehanding, use a very light pencil sketch to mark two large ovals for eyes and a tiny curve for the mouth. -
Painting the eye outlines:
Using a small round brush and black paint, or a black paint pen, carefully trace the outline of your eye ovals. They should be tall ovals, leaning slightly away from each other at the top. -
Filling the eyes:
Fill in the black ovals completely. If using a brush, load it well so the black is opaque and rich, not streaky. -
Adding the catchlights:
This is the most critical step for cuteness. Dip the handle end of a paintbrush into white paint and gently stamp a small white dot in the upper right corner of each black eye. -
Letting the eyes set:
Allow the black paint and white dots to dry for a few minutes so you don’t accidentally smudge them while working on the mouth. -
Drawing the smile:
Create the mouth using a very fine detail brush or the finest tip of your paint pen. Draw a tiny, shallow ‘u’ shape right between the eyes, placed slightly lower than the bottom of the ovals. -
Refining edges:
Check your edges. If the black paint bled slightly into the white, you can touch it up with a tiny bit of white paint once the black is fully dry. -
Sealing the ghost:
Once your artwork is 100% dry (give it a few hours), take it outside and spray a light mist of matte sealant over the top to protect the paint from chipping.
Streaky White Paint?
If your white base looks streaky, stop brushing! Let it dry fully, then sponge on the next layer instead of brushing for a smoother, texture-free finish.
Instant Personality
Changing the size and position of the white eye dots (catchlights) drastically changes the look. Placing them closer to the center makes the ghost look shy.
You now have a charming little pocket companion that captures the friendly spirit of Halloween without any of the fright


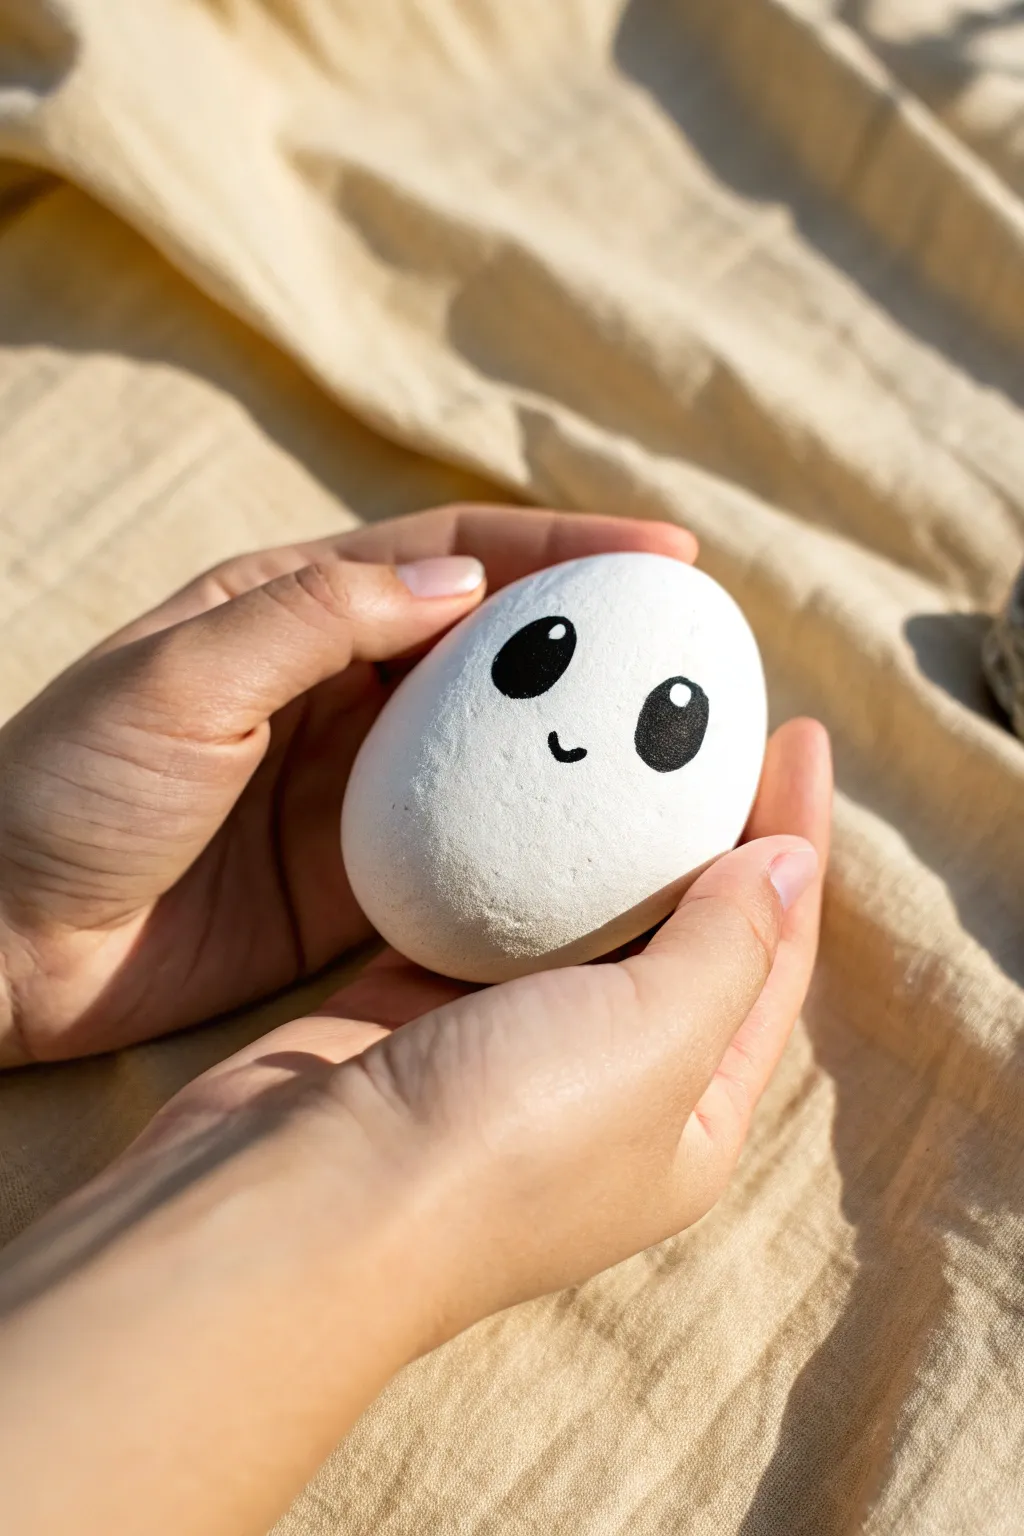
Cute Blushing Ghost With Big Eyes
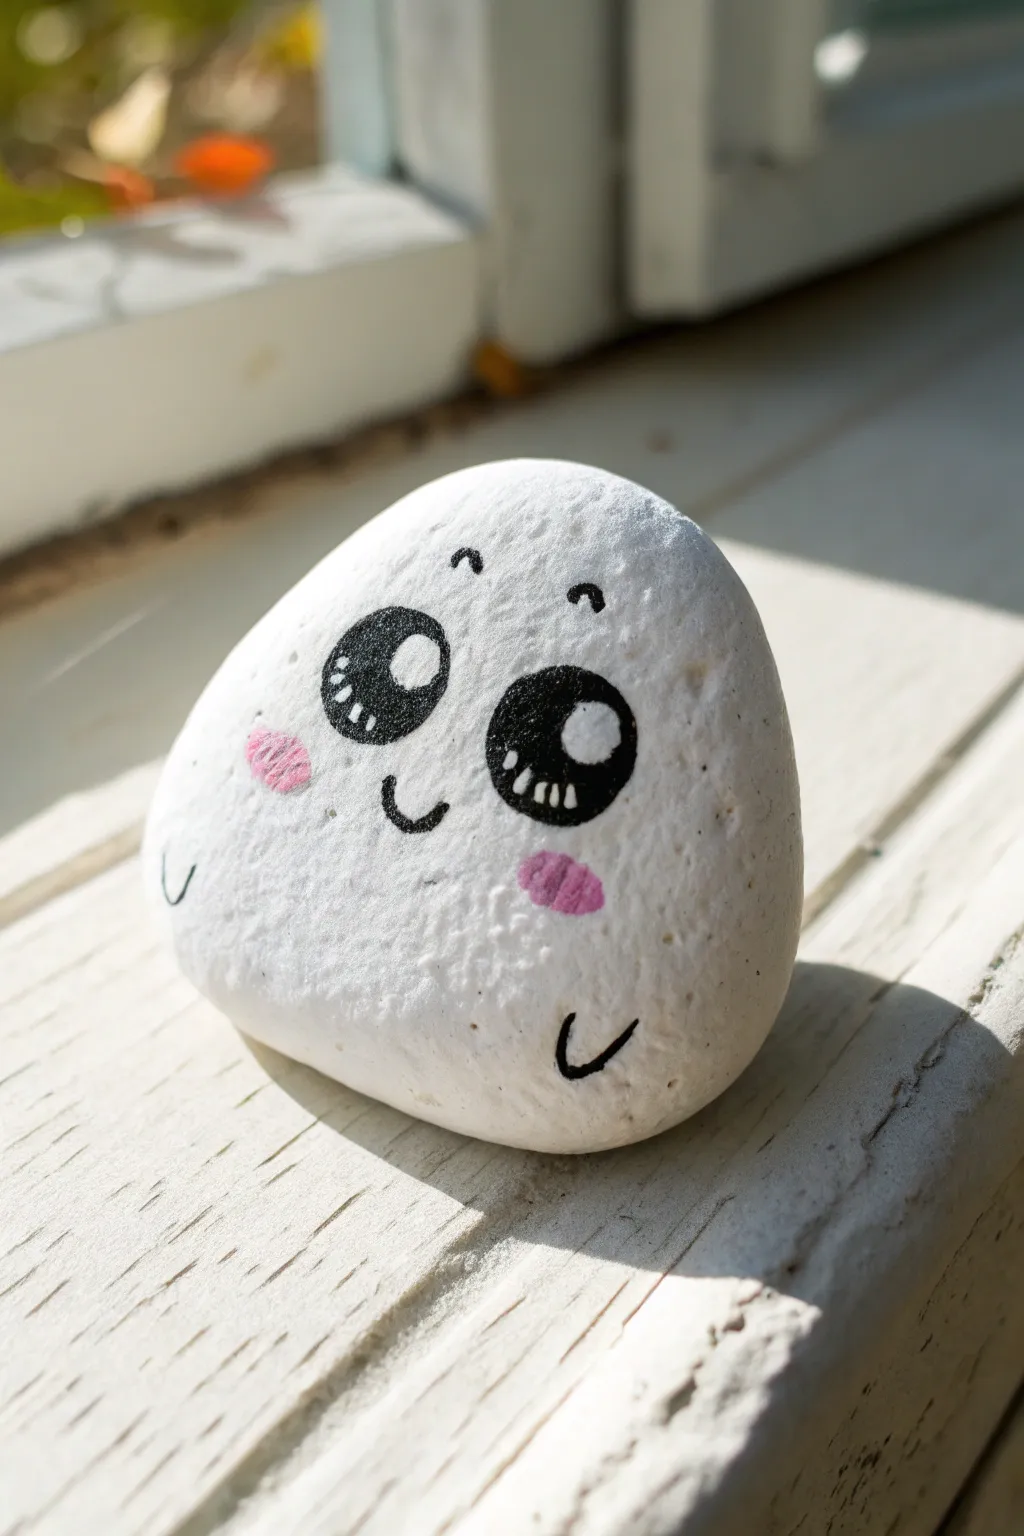
Transform a simple stone into a charming little friend with just a few strokes of paint. This project features a smooth white ghost with oversized, sparkling eyes and rosy cheeks that is sure to bring a smile to anyone’s face.
Detailed Instructions
Materials
- Smooth, rounded river rock
- White acrylic paint (high opacity)
- Black fine-point paint pen or black acrylic paint
- Pink acrylic paint or pink paint pen
- Flat paintbrush
- Detail brush (size 0 or 00)
- Spray sealer or varnish
Step 1: Preparing the Canvas
-
Rock selection:
Begin by finding a rock that has a generally rounded or slightly triangular shape. A rock with a smooth surface is ideal for getting clean lines, but a little texture adds character. -
Cleaning:
Wash the rock thoroughly with warm soapy water to remove any dirt or oils. Scrub it gently, rinse well, and allow it to dry completely before you start painting. -
Base coat application:
Using a flat paintbrush, apply a layer of white acrylic paint over the top surface. You don’t need to paint the very bottom if it will be sitting flat. -
Building opacity:
Let the first layer dry. If the rock’s natural color shows through, apply a second or even third coat until you have a solid, opaque white finish. -
Surface check:
Ensure the white paint is fully dry and smooth to the touch. This provides the perfect foundation for the delicate facial features coming next.
Fixing Smudges
If you accidentally smudge the black paint onto the white, wait for it to dry fully. Then, paint over the error with your opaque white base coat like an eraser.
Step 2: Drawing the Features
-
Eye placement:
Visualize where the face will go. The eyes should sit slightly lower than the center line to give it that cute, chibi look. You can lightly sketch with a pencil first if you’re nervous. -
Outlining the eyes:
Using a black paint pen or a fine detail brush with black paint, draw two large, slightly oval circles. Space them apart enough to fit a small smile between them. -
Filling the eyes:
Fill in the circles with solid black. If using a paint pen, employ light, circular strokes to avoid scratching the white base coat underneath. -
Adding expression:
Above each eye, draw a tiny, curved eyebrow. They should be short and arc slightly distinctively to give a gentle, happy expression. -
The smile:
Draw a small, U-shaped mouth right between the eyes, positioned slightly lower than the bottom edge of the eye circles. Keep the line thin and delicate. -
Little arms:
Near the bottom edge of the rock on the left and right sides, draw two small ‘U’ shapes. These act as tiny ghost nubs or hands.
Glow Up Idea
Swap the standard white base paint for glow-in-the-dark acrylic paint. Your cute ghost will look normal by day but softly illuminate your garden at night
Step 3: Adding Details
-
Eye highlights:
Once the black ink is completely dry, take your finest brush or a white gel pen. Add a large white circle in the upper right of each pupil. -
Secondary glimmer:
Add smaller white tick marks or dots along the bottom left curve of the iris. This creates depth and makes the eyes look glassy and wet. -
Rosy cheeks:
Dip a small brush into pink paint (or use a pink marker). Dab a small oval blush mark just beneath the outer corner of each eye. -
Texture details:
If you want a softer look on the cheeks, you can lightly dab the wet pink paint with a fingertip to diffuse the edges slightly, though solid ovals work just as well. -
Drying time:
Allow all the facial features to dry completely. Black paint pens can smudge easily if you rush to the sealing step too soon. -
Sealing the ghost:
Finish by applying a clear spray sealer or brush-on varnish. This protects the paint from chipping and gives the ghost a polished sheen.
Place your little ghost on a window sill or hide it in the garden to surprise a friend


Spooky Hollow-Eyed Wailer Ghost
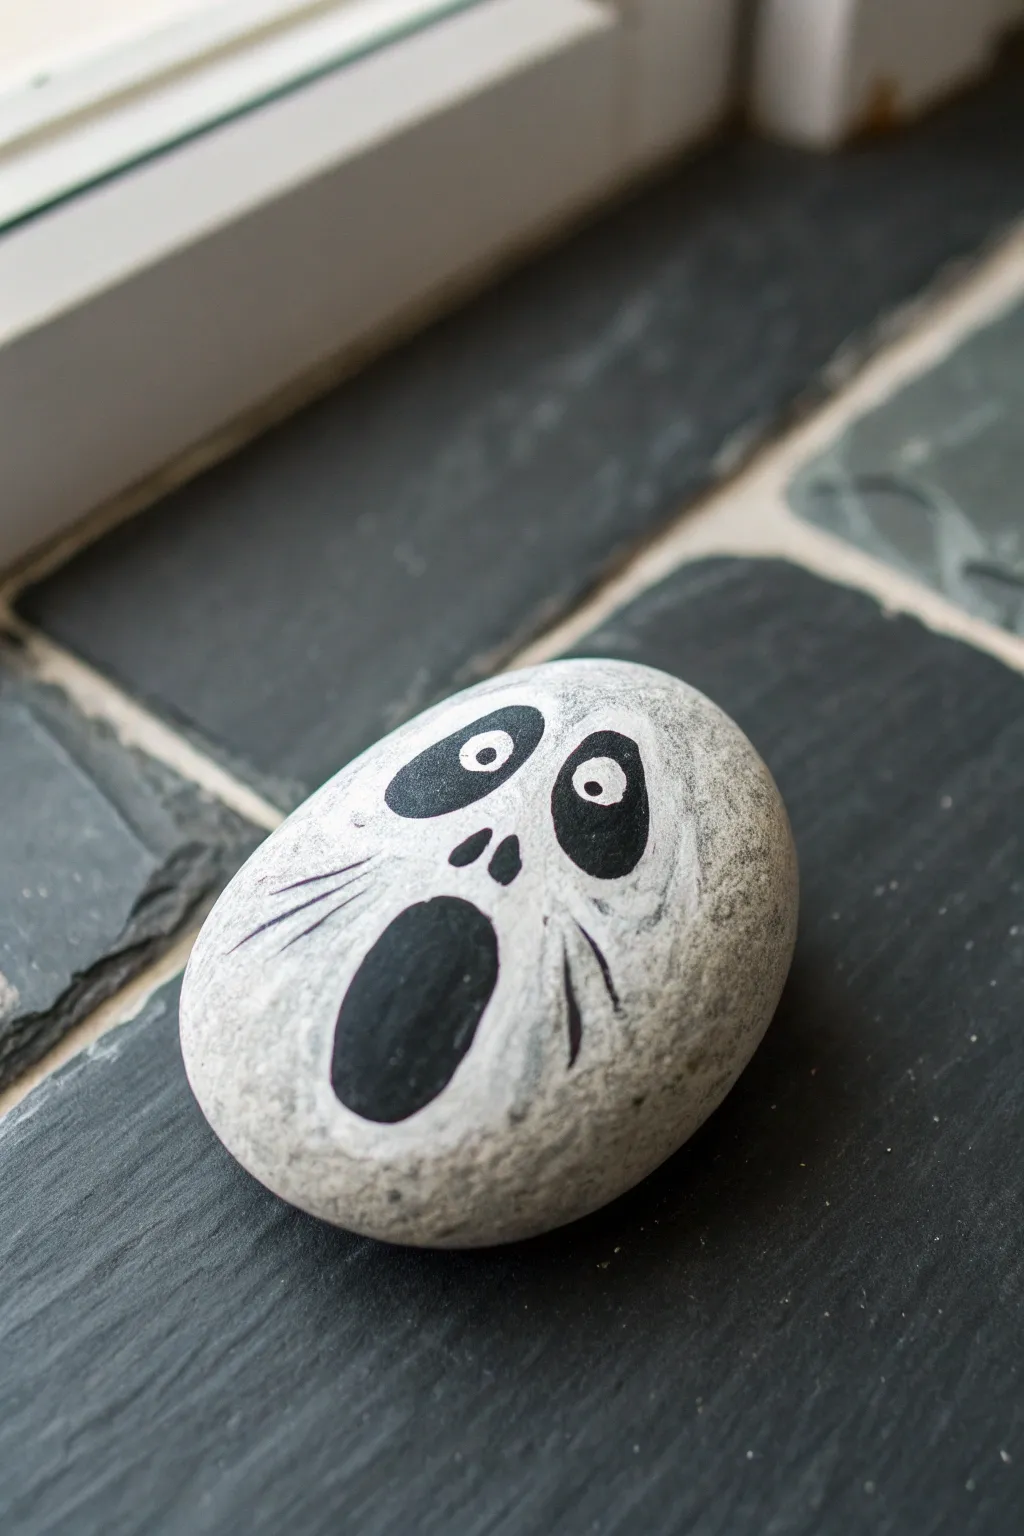
This eerie little rock ghost captures that classic, wide-mouthed wail perfectly, blending the natural stone texture with ghostly white paint. It features large, dark hollow eyes with tiny pinprick pupils and a screaming mouth that looks genuinely spooked.
Step-by-Step Tutorial
Materials
- Smooth oval river rock (grey or dark grey works best)
- White acrylic paint
- Black acrylic paint
- Small flat paintbrush
- Fine detail paintbrush (size 0 or 00)
- Cup of water
- Paper towels
- Clear spray sealant (optional)
Step 1: Base Ghost Shape
-
Clean your canvas:
Before starting, ensure your rock is clean and dry. Wash it with a little soap and water to remove any dirt or dust that might prevent the paint from sticking. -
Load the brush:
Take your small flat brush and load it with a small amount of white acrylic paint. You don’t want a heavy glob; a thinner layer works better for the ghostly effect. -
Dry brush the outline:
Create an oval shape in the center of the rock using a dry-brushing technique. Gently drag the brush so the texture of the rock shows through the white paint, making it look transparent and misty. -
Build the opacity:
Add a second, slightly more opaque layer of white just in the very center where the face will go. Keep the edges ragged and faded into the natural grey of the stone. -
Let it set:
Allow the white paint to dry completely. Since the layers are thin, this should only take a few minutes.
Ghostly Fade Trick
Use a sponge or your finger to dab the edges of the white wet paint. This blurs the line between paint and stone for a true apparition effect.
Step 2: Painting the Face
-
Map out the eyes:
Switch to your fine detail brush and load it with black paint. Paint two large, tall ovals near the top of the white area for the eye sockets. Slant them slightly inward to create a worried expression. -
Create the screaming mouth:
Paint a large, elongated oval shape below the eyes for the open mouth. This should be the biggest feature on the face, really emphasizing that wailing look. -
Add nose holes:
Between the eyes and mouth, dab two small, teardrop-shaped nostrils using just the tip of your detail brush. -
Fill them in:
Go back over the eyes, mouth, and nose with a second coat of black if the first layer looks streaky or grey. You want deep, void-like black here. -
Paint the pupils:
Once the black paint is dry, act carefully with a clean brush or a dotting tool. Place a small white dot in the center of each black eye socket. Making one pupil slightly larger gives it a frantic look. -
Add worry lines:
Using the very tip of your detail brush and black paint, draw three thin, curved whisker-like lines radiating out from the cheek area on the left side. -
Mirror the lines:
Repeat the process on the right cheek, adding two or three thin curved lines sweeping downwards to enhance the screaming motion. -
Detail the forehead:
Add a tiny, faint curved line or two above the eyes to suggest furrowed brows.
Glow Up
Mix glow-in-the-dark medium into your white paint for the body. By day it’s a painted rock, but at night a glowing spirit appears.
Step 3: Finishing Touches
-
Blend the edges:
Inspect the painted white edges of your ghost. If any line looks too sharp, use a barely damp brush to smudge the white paint outward, softening the transition into the rock. -
Check for contrast:
If the white paint around the eyes isn’t bright enough against the black sockets, carefully touch up the white surrounding areas to make the eyes pop. -
Let it cure:
Allow the entire rock to dry for at least an hour to ensure all layers are set. -
Seal the deal:
To protect your ghostly friend from the elements, spray a light coat of clear sealant over the rock, preferably a matte finish to keep the natural stone look.
Now you have a wonderfully worried little spirit ready to haunt your garden path or windowsill


Trick-or-Treat Pail Ghost
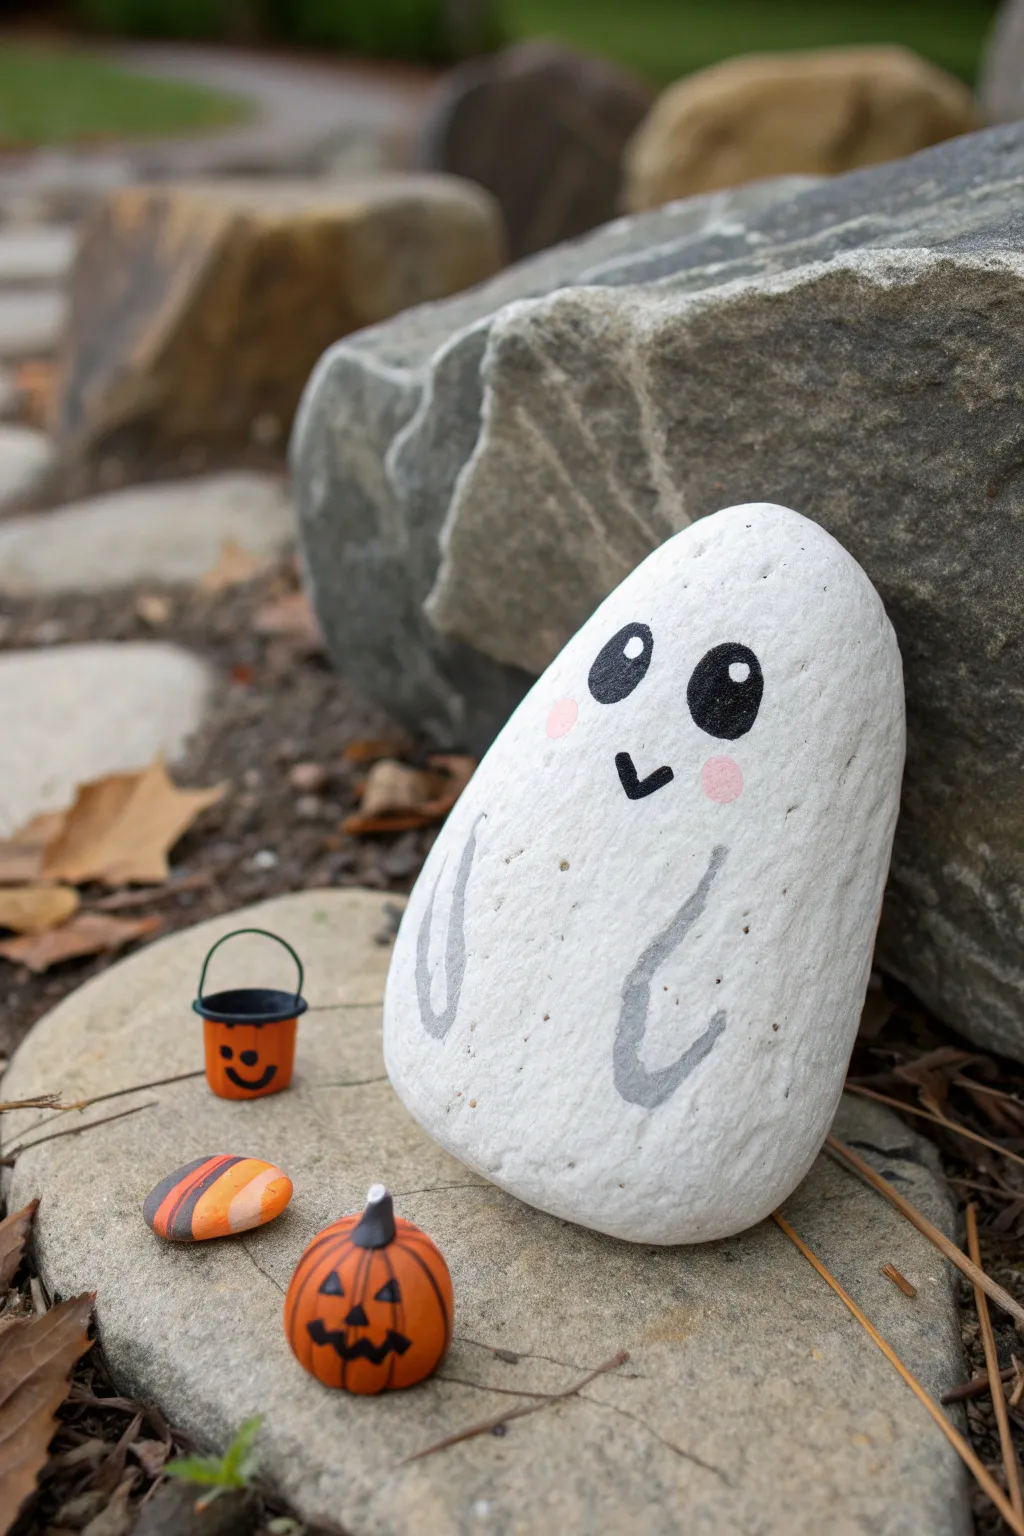
This adorable little ghost brings a festive spirit to your garden with its happy expression and tiny trick-or-treat pail. It’s a simple yet charming rock painting idea that uses soft grays and classic Halloween oranges to create a playful scene.
Step-by-Step Guide
Materials
- Smooth, oval-shaped river rock (freestanding)
- White acrylic paint (or gesso)
- Black acrylic paint or paint pen
- Light gray acrylic paint
- Pink acrylic paint
- Orange acrylic paint
- Small round paintbrushes (sizes 0 and 2)
- Fine liner brush
- Sealer (spray or brush-on)
- Small pebble (for the pumpkin)
- Tiny flat stone (for the candy)
- Small piece of wire or stiff string (for the pail handle)
Step 1: Base Coating
-
Clean the rock:
Start with a clean slate by washing your rock with warm, soapy water. Scrub away any dirt or grit to ensure a smooth painting surface and let it dry completely. -
Apply the first white coat:
Paint the entire front surface of the rock with white acrylic paint. Don’t worry if it looks streaky at first; building up layers is key for a solid ghost look. -
Let it dry:
Allow the first coat to dry for about 10-15 minutes. It should be dry to the touch before you add more paint. -
Add secondary coats:
Apply 2-3 additional coats of white paint, letting each layer dry in between. You want a bright, opaque finish so the rock’s natural color doesn’t peek through.
Step 2: Painting the Face
-
Outline the eyes:
Using a small brush or a black paint pen, draw two medium-sized ovals near the top third of the rock. Angle them slightly inward to create a cute, friendly expression. -
Fill in the eyes:
Carefully fill the oval shapes with black paint. Take your time here to keep the edges smooth. -
Add eye highlights:
Dip the non-brush end of a paintbrush into white paint and dot it onto the top right corner of each black eye. This ‘sparkle’ brings the ghost to life. -
Paint the mouth:
Draw a small ‘V’ shape between and slightly below the eyes using black paint. Thickening the lines just a tiny bit makes the smile more prominent. -
Blush the cheeks:
Dip a finger or a dry brush into a tiny amount of pink paint. Dab it gently on the rock surface just below the outer edges of the eyes to create soft, rosy cheeks.
Uneven Coverage?
If the white paint looks patchy, apply thin layers rather than one thick glob. Let each layer dry fully to prevent lifting the previous coat.
Step 3: Adding Details
-
Outline the arms:
Mix a very light gray or use a gray marker. I like to sketch two curved lines on the lower half of the ghost to represent arms hugging the body. -
Shadow the arms:
Go over your sketch with a slightly darker gray paint to give the arms definition, making it look like the sheet is folded. -
Texture the body:
For a stony, weathered look, you can lightly flick a toothbrush dipped in diluted black or gray paint near the bottom, creating tiny speckles.
Glow in the Dark
Add a top coat of glow-in-the-dark medium over the white body paint. Your ghost will charge in the sun and spookily impress neighbors at night.
Step 4: Creating the Accessories
-
Paint the candy stone:
Take your tiny flat stone and paint stripes of orange, yellow, and white to resemble a piece of candy corn or a wrapped sweet. -
Create the pumpkin pail:
Find a very small, round pebble. Paint it entirely orange. Once dry, use a fine liner brush to add black triangles for eyes and a jagged mouth. -
Attach the pail handle:
Bend a small piece of wire into a ‘U’ shape and glue it to the sides of your mini pumpkin pail using strong craft glue. -
Make the mini pumpkin:
If you have another small round pebble, paint it orange with vertical darker orange stripes. Add a tiny black stem on top. -
Seal everything:
Once all paint is fully dry on both the main ghost rock and the accessories, apply a clear weather-resistant sealer to protect your work from the elements. -
Arrange the scene:
Place your ghost rock in the garden and set the tiny accessories in front of it to complete the trick-or-treat vignette.
Now you have a charming little spectral friend ready to greet visitors on your porch or garden path
BRUSH GUIDE
The Right Brush for Every Stroke
From clean lines to bold texture — master brush choice, stroke control, and essential techniques.
Explore the Full Guide
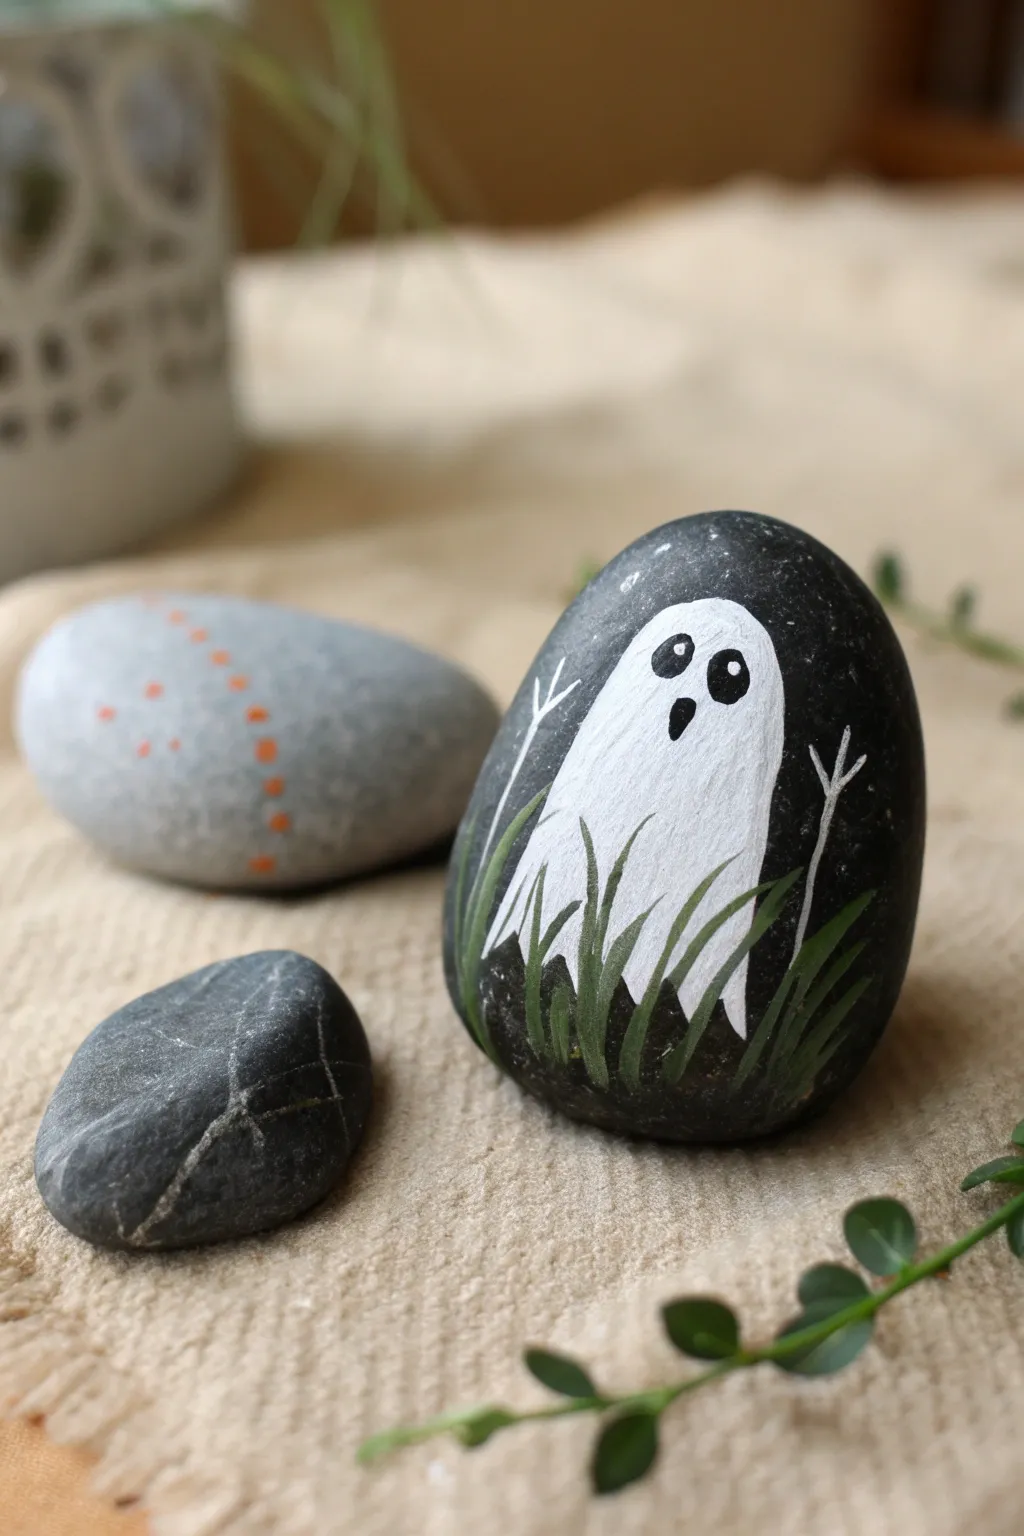
Pumpkin-Hugging Ghost
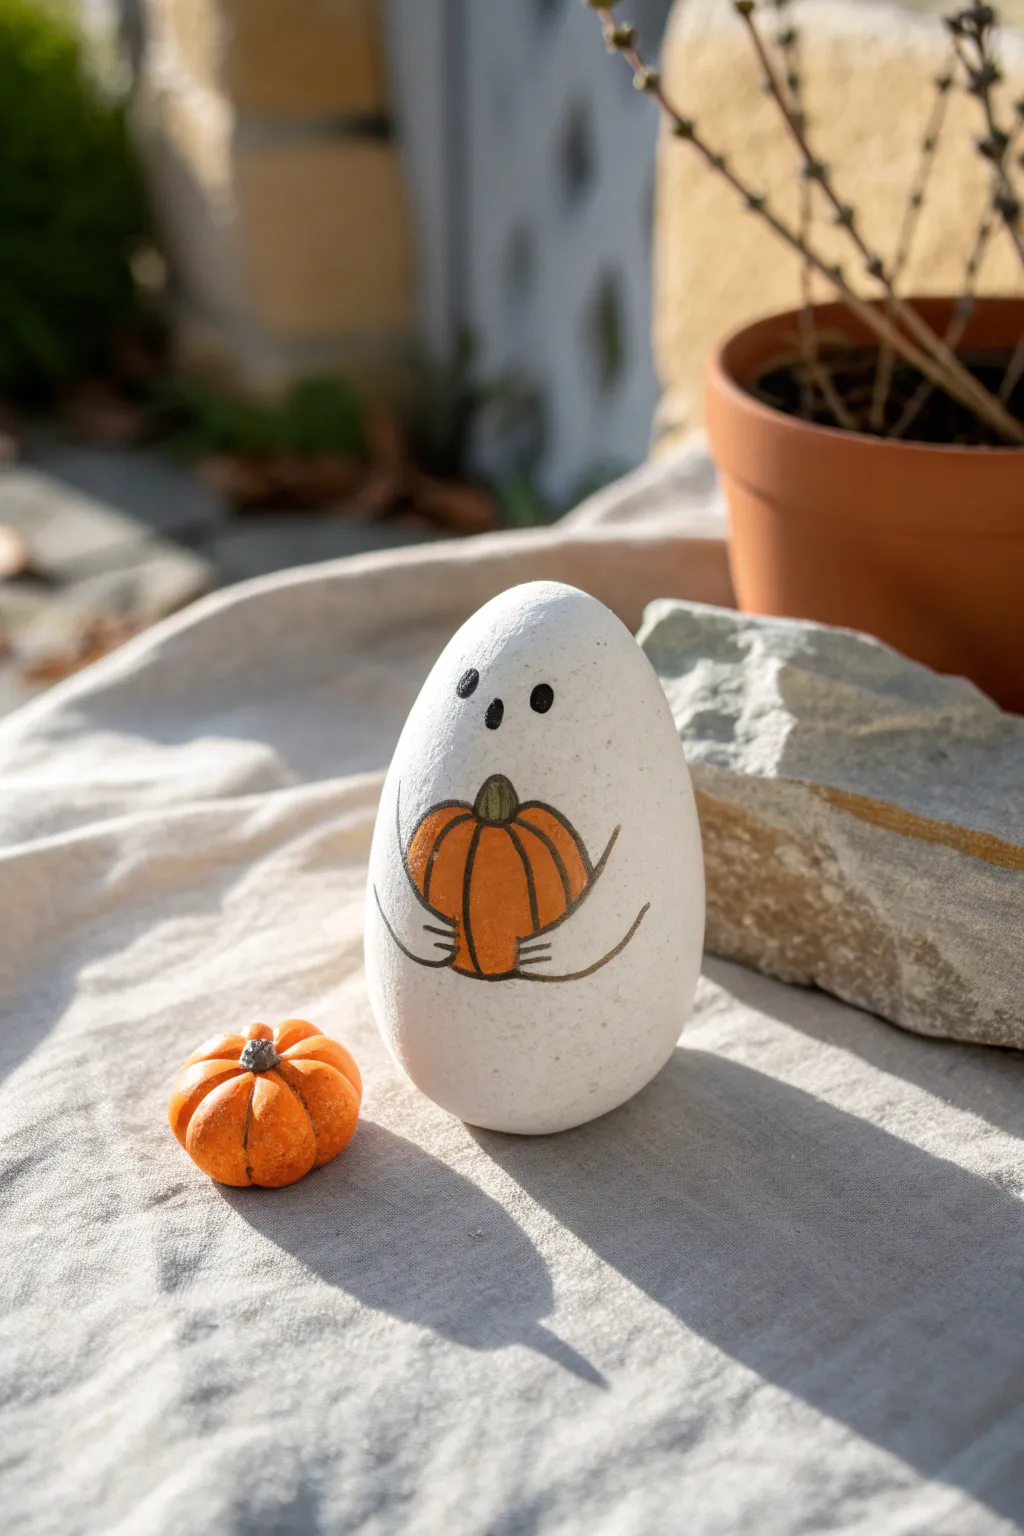
Capture the spirit of autumn with this darling ghost rock that radiates coziness rather than spookiness. The simple, rounded shape of the stone perfectly complements the ghost’s soft features as it sweetly clutches its miniature pumpkin prize.
Detailed Instructions
Materials
- Smooth, egg-shaped river rock (approximately 3-4 inches tall)
- White acrylic craft paint (matte finish)
- Orange acrylic paint
- Dark green or olive green acrylic paint
- Black acrylic paint or fine-point black paint pen
- Pencil for sketching
- Medium flat paintbrush
- Small round paintbrush
- Matte spray sealant or brush-on varnish
Step 1: Preparing the Canvas
-
Clean the Stone:
Begin by washing your rock with warm, soapy water to remove any dirt or oils. Use a scrub brush if needed to get into the pores. Pat it completely dry with a towel and let it sit for a bit to ensure no moisture is trapped inside. -
Prime with White:
Dispense a generous amount of matte white acrylic paint. Using a medium flat brush, coat the entire surface of the rock. You will likely need 2-3 coats to get a solid, opaque coverage where the underlying stone color doesn’t show through. -
Check Coverage:
Between coats, hold the rock up to the light to check for thin spots. Allow each layer to dry completely—usually about 15-20 minutes—before applying the next to prevent lifting the previous paint.
Fixing Sketches
If your pencil sketch leaves visible graphite smudges on the white paint, use a clean, white eraser gently. Or, simply paint a thin layer of white over the error before re-sketching.
Step 2: Drafting the Design
-
Sketch the Basic Shape:
Once your white base is bone dry, use a pencil to lightly sketch the ghost’s features. Start by drawing a rounded pumpkin shape in the lower center of the rock. -
Add Arms:
Draw two simple curves emerging from the sides of the ghost’s body, wrapping around to ‘hold’ the pumpkin. The hands should look like simple rounded nubbins resting on the pumpkin’s surface. -
Draft the Stem:
Add a small, slightly curved rectangle or trapezoid at the top of the pumpkin for the stem. -
Position the Face:
Lightly mark three small dots for the face—two for the eyes and one slightly lower for the mouth. Keep them somewhat close together to achieve that cute, expressive look.
Paint Pen Precision
For the crispest black outlines, especially on the pumpkin ribs, use an extra-fine acrylic paint pen (0.7mm) instead of a brush. It offers much steadier control for beginners.
Step 3: Painting the Pumpkin
-
Base Color Application:
Load a small round brush with bright orange paint. Carefully fill in the pumpkin shape you sketched, working slowly around the edges where the ghost’s hands rest. -
Adding Depth:
While the orange is still slightly wet, you can add a tiny touch of a darker orange or rust color to the sides to create subtle dimension, though a flat color works perfectly for this simple style too. -
Paint the Stem:
Rinse your brush thoroughly and pick up the olive green paint. Carefully fill in the small stem area at the top of the pumpkin. -
Dry Time:
Let the pumpkin section dry completely. I like to give this step a little extra time because we will be outlining it next, and wet paint will ruin your lines.
Step 4: Detailing and Outlining
-
Outline the Pumpkin:
Using a very fine liner brush with black paint, or a black paint pen for better control, trace the outer edge of the pumpkin. -
Delineate the Ribs:
Draw curved vertical lines down the face of the pumpkin to create the ridges. Start at the base of the stem and curve outward, then back in toward the bottom center. -
Define the Arms:
Trace the pencil lines for the ghost’s arms. Ensure the line continues from the side of the body and creates the distinct separation between the white arm and the white body. -
Paint the Face:
Using the tip of a small round brush or a paint pen, fill in the eyes and mouth with solid black. These should be imperfect, slightly oval dots rather than perfect circles to maintain the hand-painted charm.
Step 5: Finishing Touches
-
Clean Up Lines:
If any black lines went astray or look shaky, wait for them to dry and use a small bit of white paint to touch up the edges and crisp everything up. -
Final Seal:
Once the entire rock is completely dry (give it at least an hour), apply a matte spray sealer or brush-on varnish. This protects your hard work from chipping and gives the ghost a unified finish.
Place your adorable ghost in a potted plant or on a windowsill to enjoy a subtle touch of autumn magic all season long
Tiny Ghost Family Set
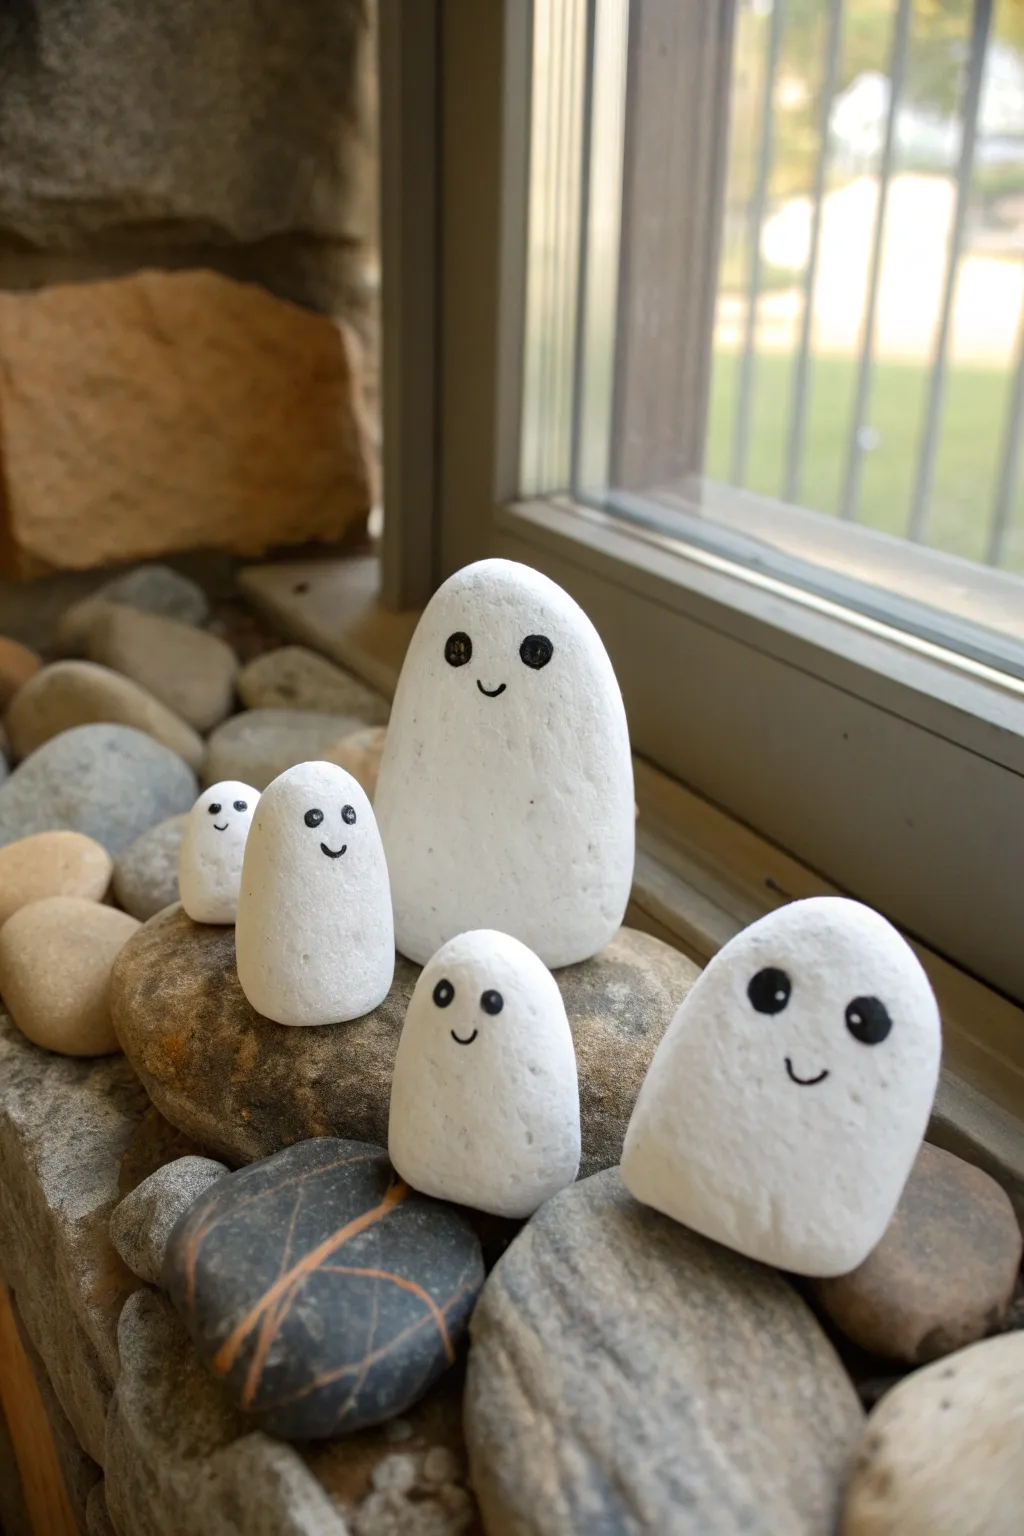
Transform ordinary river rocks into an adorable gathering of friendly phantoms with just a little paint and patience. This minimalist project creates a charming set of white ghost stones that look perfect perched on a windowsill or tucked into a garden display.
Step-by-Step Guide
Materials
- 5 rounded, smooth river rocks of varying sizes
- White acrylic paint (high coverage)
- Black acrylic paint or a black paint pen (fine tip)
- Flat paintbrush (medium size)
- Small round paintbrush (optional, for details)
- Matte finish sealant spray
- Soap and water for cleaning
- Paper towels
- Palette or paper plate
Step 1: Preparation & Base Coat
-
Select your stones:
Hunt for five smooth stones with a naturally rounded, slightly elongated shape. Look for sizes that vary so you can create a ‘family’ effect with parents and children, ranging from small pebbles to a larger central stone. -
Clean surface:
Wash your selected rocks thoroughly with warm soapy water to remove any dirt, moss, or grit. This step is crucial because debris will prevent the paint from sticking properly. -
Dry completely:
Pat the stones down with a paper towel and let them air dry completely. If the stone is porous, wait an extra 15 minutes to ensure no moisture is trapped inside. -
First coat of white:
Squeeze a generous amount of white acrylic paint onto your palette. Using a flat paintbrush, apply the first layer of white paint over the entire visible surface of the rock. -
Let it dry:
Allow this first coat to dry for about 20-30 minutes. The rock’s natural color will likely show through at this stage, but don’t worry about full coverage yet. -
Apply second coat:
Paint a second layer of white acrylic. Use smooth strokes in the same direction to minimize brush marks. If you are using dark rocks, I sometimes find a third coat is necessary for that solid, ghostly white look. -
Check coverage:
Inspect the rocks to ensure the color is solid and opaque. The texture should look matte and chalky, like a real sheet. Let them dry fully before touching the faces.
Stone Selection Tip
Choose stones that stand up on their own without wobbling. If a perfect ghost candidate wobbles, glue a small flat washer to the bottom for stability.
Step 2: Face Details & Finishing
-
Plan the expressions:
Decide on the personality for each rock. In the reference image, the ghosts have simple, wide-set eyes and tiny smiles. You can lightly sketch the placement with a pencil if you feel nervous about free-handing. -
Paint the eyes:
Using a fine-tip black paint pen (or a very small round brush dipped in black acrylic), draw two solid black circles for the eyes. Position them slightly higher than the center of the rock to give them a cute, ‘looking up’ appearance. -
Add the shine:
For the larger ghosts, leave a tiny unpainted white speck in the black eye circles, or go back later with a pin-point dot of white paint. This adds life and sparkle to their expression. -
Draw the smiles:
Carefully draw a small, simple ‘u’ shape between and slightly below the eyes. Keep the line thin and delicate. Varied smile widths give each ghost a unique character. -
Adjust the smallest members:
For the tiniest pebble ghosts, simplify the face further if needed. Two dots and a tiny dash are enough to convey a happy expression on a very small surface. -
Dry the details:
Let the black paint dry completely. Paint pens usually dry fast, but liquid acrylic needs about 15 minutes to ensure you don’t smear the face when sealing. -
Seal the artwork:
Take the rocks to a well-ventilated area. Spray a light, even coat of matte finish sealant over the rocks. This protects the paint from chipping and gives them a finished, professional look without making them too glossy. -
Arrange the family:
Once the sealant is dry to the touch, you can arrange your tiny ghost family on a shelf, windowsill, or even hide them in a planter for a spooky surprise.
Glow Up
Swap the standard white acrylic for glow-in-the-dark paint. Apply 3-4 coats so your ghost family actually glows when the lights go out.
Enjoy finding the perfect spot to display your new clan of happy haunting stones around your home

PENCIL GUIDE
Understanding Pencil Grades from H to B
From first sketch to finished drawing — learn pencil grades, line control, and shading techniques.
Explore the Full Guide
Ghost Party With Balloons

This adorable painted rock features a friendly little ghost ready for a celebration with two floating balloons. The minimal design sits striking against the natural dark grey stone, making it a perfect quick craft for Halloween decor or a sweet pocket gift.
Detailed Instructions
Materials
- Smooth, dark grey river rock (oval shape)
- White acrylic paint or paint pen (Posca PC-3M or similar)
- Black fine-liner paint pen or permanent marker
- Peach or metallic rose gold acrylic paint/pen
- Light pink paint pen (fine tip)
- Matte spray sealant or brush-on varnish
- Small round paintbrush (optional, if not using pens)
Step 1: Planning and Base Coats
-
Clean your canvas:
Start with a clean slate by scrubbing your rock with soap and water to remove any dirt or oils. Let it dry completely in the sun or use a hairdryer to speed things up. -
Sketch the outline:
Using a very light pencil touch, draw a simple ghost shape—essentially a rounded arch with an uneven, ‘wobbly’ bottom edge. Position it slightly to the right to leave room for the balloons. -
Add the balloons:
Draw two overlapping ovals to the left of the ghost’s head. One should be slightly higher than the other to create depth in the composition. -
Fill the white ghost:
Use your white paint pen or a small brush to fill in the ghost’s body. If the stone is dark, this first layer might look streaky, but don’t worry about full coverage yet. -
Paint the first balloon:
Fill the top balloon purely with white paint. Aim for smooth, even strokes to keep the texture flat. -
Paint the second balloon:
Fill the lower balloon with your peach or metallic rose gold paint. This adds a lovely pop of warmth to the monochromatic palette. -
Second coat:
Once the first layer is dry to the touch, apply a second coat of white to the ghost and the top balloon. This ensures the white pops brightly against the dark grey stone.
Uneven Coverage?
If the white paint looks transparent after drying, don’t apply thick blobs. Instead, apply 3-4 very thin layers, letting each dry fully in between.
Step 2: Details and Outline
-
Outline the ghost:
Take your black fine-liner pen. Carefully trace the outer edge of the ghost. Keep your hand steady, but remember that a slightly organic line adds character. -
Outline the balloons:
Trace the edges of the balloons with the black liner. Where the balloons overlap, only outline the visible parts to maintain the illusion of one being behind the other. -
Draw the strings:
Sketch two thin black lines coming down from the balloons toward the ghost’s ‘hand’. Add a tiny zig-zag or wobbly line for the loose end of the string hanging down. -
Add the arms:
Draw two small, rounded nubby shapes for arms. One should be reaching out to hold the balloon strings, and the other can hang loosely at the side. -
Color the arms:
Fill these arm outlines with white paint. Since they are small, a paint pen is definitely easier here than a brush. -
Connect the strings:
Extend the black string lines so they look like they are tucked into the ghost’s hand.
Step 3: Face and Finishing Touches
-
Create the face:
Using the black fine-liner, make two small dots for eyes. Place them fairly wide apart for maximum cuteness. -
Draw the mouth:
Between the eyes, draw a tiny, shallow ‘u’ shape for a smile. Keep it petite and centered. -
Add blush cheeks:
Take your light pink fine-tip pen and dab two small ovals directly under the eyes. I find this simple step instantly gives the character so much personality. -
Seal the artwork:
Allow the paint to cure for at least an hour. Finish with a matte spray sealant to protect the design without making the natural stone too shiny.
Make It Sparkle
Add a coat of clear shimmer paint or glitter glue over just the balloons to make them look festive and distinct from the ghost’s matte body.
Your charming little party ghost is now ready to haunt your desk or garden with festive cheer
Peekaboo Ghost Behind a Tombstone
Transform an ordinary dark river rock into a charmingly eerie decoration with this simple ghost design. The contrast of the bright white spirit against the natural dark stone creates a striking pop that’s perfect for Halloween decor.
Step-by-Step Tutorial
Materials
- Smooth, dark gray or black river rock (flat bottom preferred)
- White acrylic paint (high opacity)
- Black acrylic paint
- Green acrylic paint (muted/olive tone)
- Small flat brush
- Fine detail liner brush (size 0 or 00)
- Pencil or white chalk pencil
- Matte or satin sealant spray
Step 1: Preparing the Canvas
-
Select your stone:
Choose a rock that stands upright easily or lies flat with a nice, smooth face. Dark gray or black stones work best here because they provide a natural night-sky background without needing a base coat. -
Clean and dry:
Wash the rock thoroughly with warm soapy water to remove any dirt or oils. Let it dry completely; painting on a damp rock can cause moisture to get trapped and the paint to peel later. -
Draft the outline:
Using a white chalk pencil or a regular graphite pencil, very lightly sketch the ghost shape. Aim for a gumdrop or inverted ‘U’ shape, slightly off-center, with a ragged bottom edge where the ‘sheet’ ends.
Uneven Coverage?
If the white paint looks patchy, let it dry fully before adding another layer. Painting over semi-dry acrylic pulls up the layer beneath it, creating lumps.
Step 2: Painting the Ghost
-
Base layer:
Load your small flat brush with white acrylic paint. Fill in the main body of the ghost. Don’t worry if it looks streaky at first; thin layers are better than thick globs. -
Opacity boost:
Let the first coat dry for about 10-15 minutes. Apply a second coats of white until the stone’s dark color no longer shows through. I usually find two or three coats gives that solid, spectral glow. -
ragged edges:
At the bottom of the ghost, use the tip of your brush to drag the paint downward in uneven, jagged points. This creates the tattered sheet effect. -
Ghostly arms:
Switch to your fine liner brush. Paint thin, white lines extending outward and upward from the sides of the ghost to represent stick-figure arms or small floating branches. -
Tiny fingers:
Add small V-shapes or forks at the end of these white lines to serve as little ghostly fingers or twigs.
Layering Pro Tip
Paint the grass blades in two slightly different green shades. Put the darker blades in the back and lighter ones in front for instant 3D depth.
Step 3: Adding Details & Foreground
-
Draft the face:
Once the white paint is bone-dry, mix a tiny drop of water into your black paint to help it flow smoothly. -
Paint the eyes:
Using the detail brush, paint two oval shapes for eyes near the top of the ghost. Make the one on the right slightly larger for a quirky expression. -
Add the mouth:
Paint a small, vertical oval between and slightly below the eyes for the surprised mouth. -
Sparkle of life:
Dip the very tip of a clean brush handle or a toothpick into white paint. Add a tiny dot inside each black eye oval to bring the character to life. -
Mix your greens:
Prepare an olive green shade. If you only have bright green, mix in a tiny touch of black or brown to mute it so it looks like night-time grass. -
Paint the background grass:
With the liner brush, paint thin, sweeping blades of grass starting from the bottom of the rock and curving upward. Some blades should go *behind* the ghost to create depth. -
Paint the foreground grass:
Paint more grass blades that cross *over* the bottom edge of the white ghost. This is crucial—it anchors the ghost in the scene rather than just having it float on top.
Step 4: Finishing Touches
-
Check for gaps:
Look closely at where the grass meets the bottom of the rock. add a few extra short strokes to ensure the base looks full and grassy. -
Final dry time:
Allow the entire rock to dry for at least an hour, or overnight if possible, to ensure the thickest parts of the paint are set. -
Seal the deal:
Spray the rock with a matte or satin sealant. This protects your artwork from scratches and weather if you plan to hide it outside.
Now you have a delightfully spooky companion to sit on your desk or hide in the garden


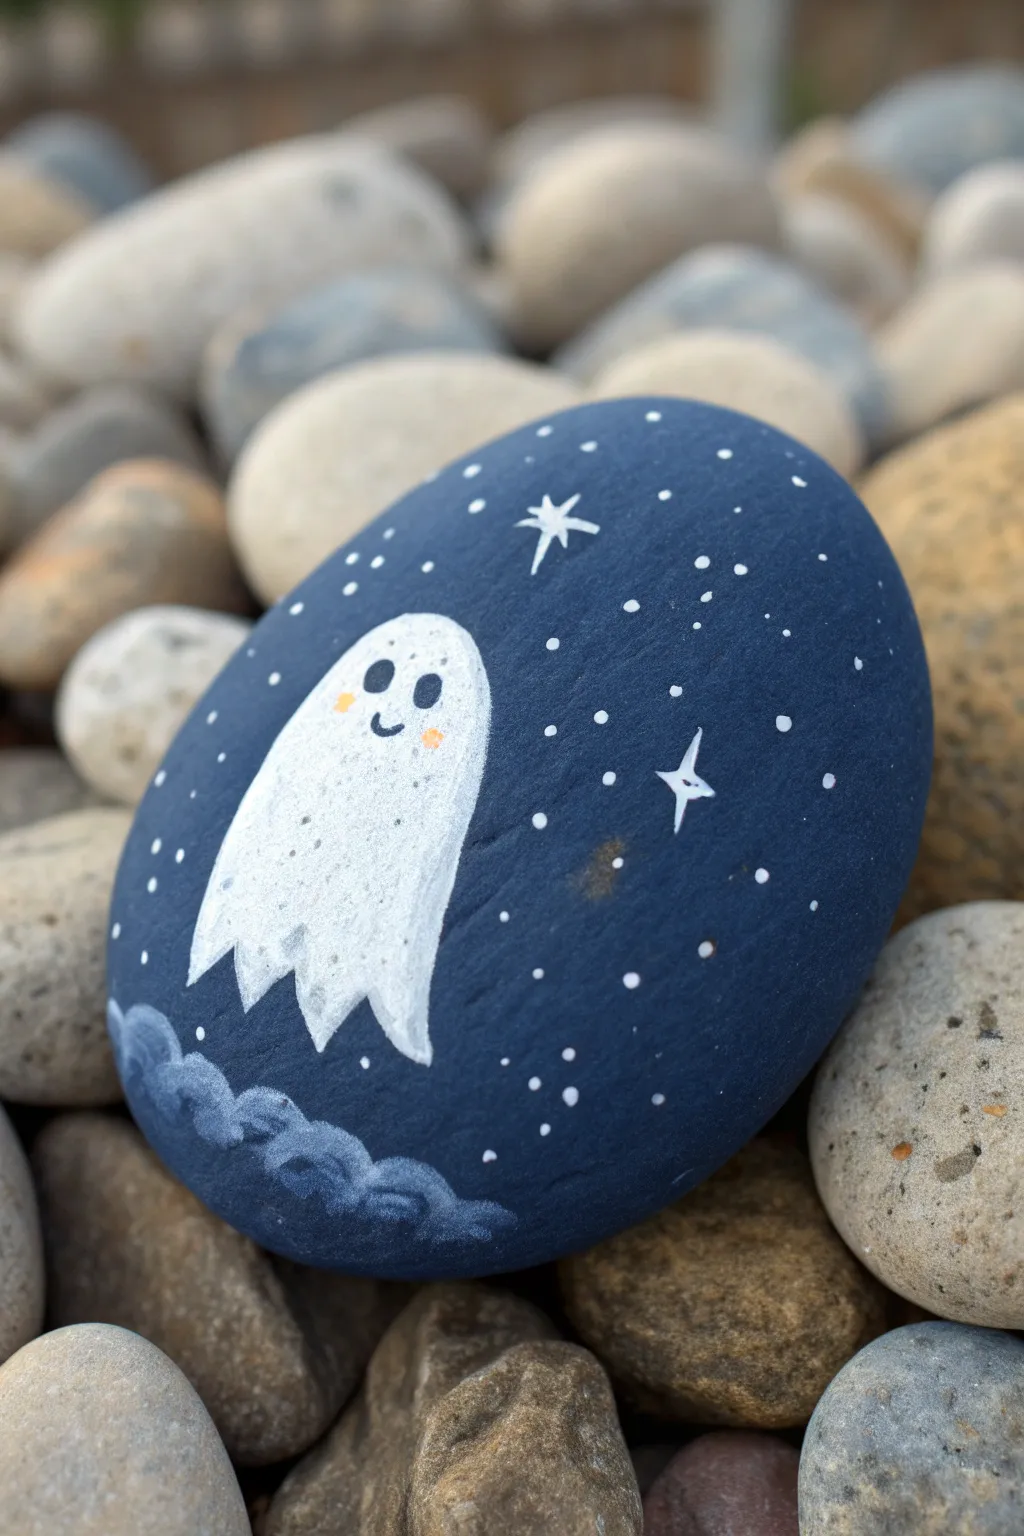
Floating Ghost in a Misty Night Scene
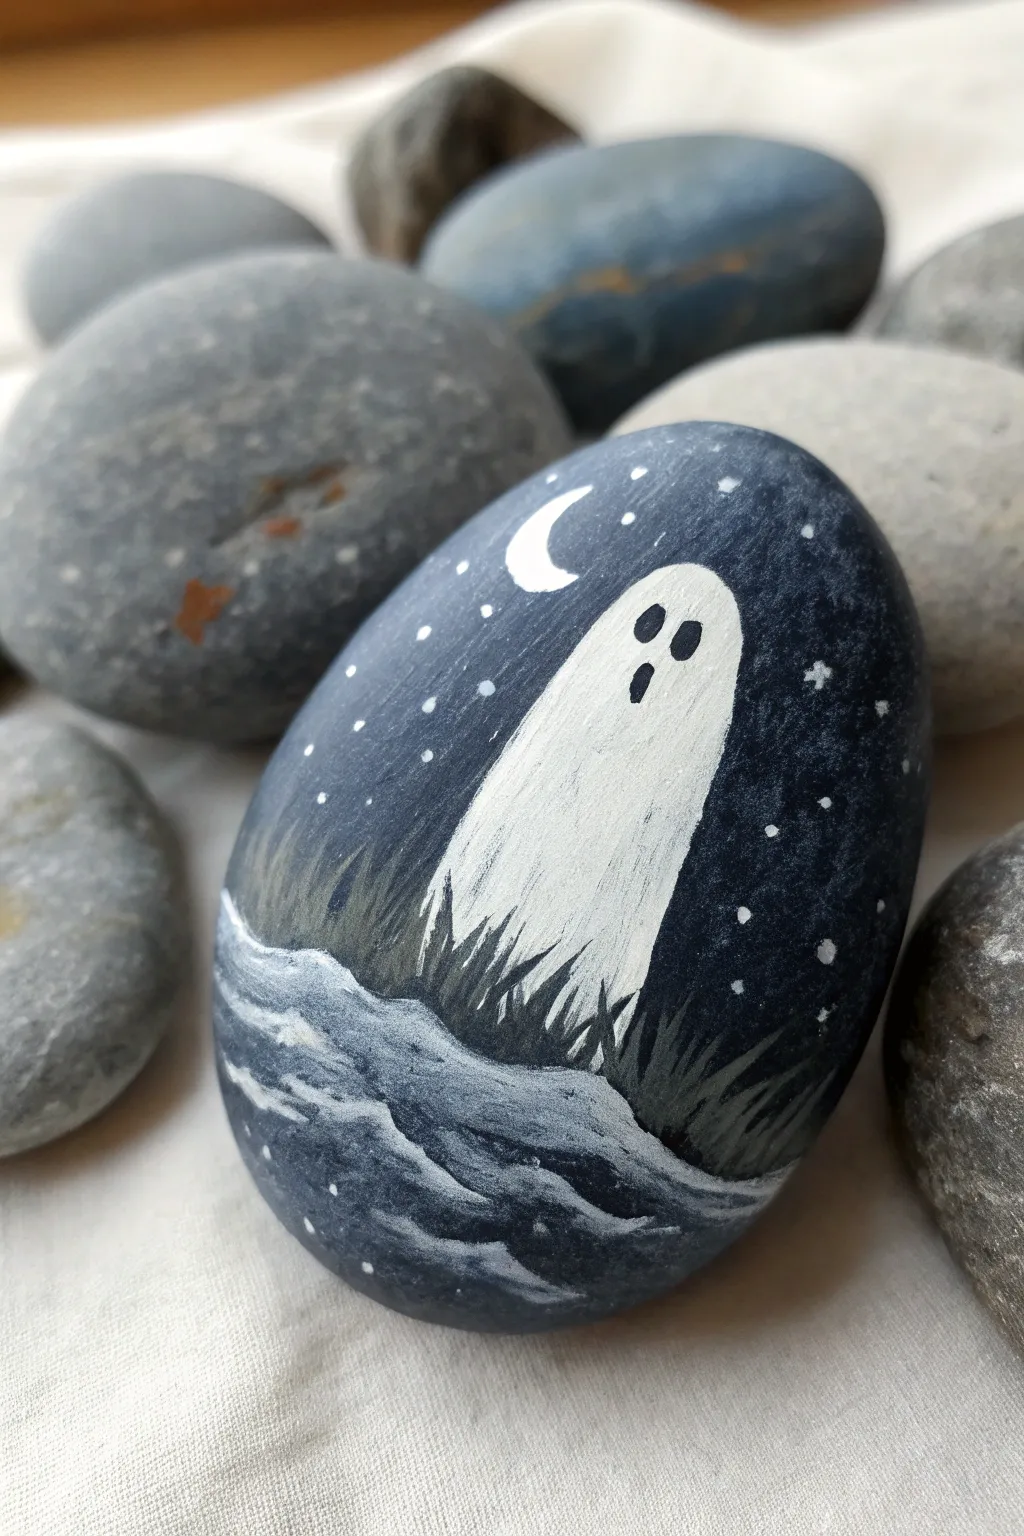
Capture the eerie beauty of a floating spirit with this moody, atmospheric rock painting tutorial. You’ll layer deep midnight blues and stark whites to create a stunning contrast that looks beautifully dimensional on a smooth stone.
Step-by-Step
Materials
- Smooth oval river rock (clean and dry)
- Acrylic paints: Midnight Blue, Black, Titanium White, Grey
- Paintbrushes: Medium flat brush, small detail round brush (size 0 or 00)
- Dotting tool or toothpick
- Palette or paper plate for mixing
- Water cup and paper towels
- Spray varnish or Mod Podge (gloss or matte)
Step 1: Setting the Scene
-
Prime the surface:
Begin by painting the entire top surface of your rock with a solid coat of Midnight Blue. If your rock is very porous, a second coat might be necessary to get full, opaque coverage. -
Create the vignette:
I like to deepen the edges to create focus, so while the blue is still slightly wet, blend a tiny amount of black paint around the outer perimeter of the rock, fading it inward. -
Establish the background:
Let the base layer dry completely before moving forward. This is crucial to prevent your white paint from turning muddy blue later. -
Sketch the outline:
Using a very thinned-down white paint or a chalk pencil, lightly sketch the tall, draped oval shape of the ghost in the center. Don’t worry about perfection; it should look organic.
Step 2: The Ghost and Sky
-
Base coat the ghost:
Fill in the ghost shape with Titanium White. The first layer will likely look streaky against the dark background, which is normal. -
Build opacity:
Apply a second and perhaps third coat of white to the ghost, letting it dry between layers, until you have a bright, solid figure. -
Add the stars:
Using a dotting tool or a toothpick dipped in white, dot tiny stars scattered across the dark blue sky. Vary the pressure to create different sizes. -
Paint the moon:
With your smallest detail brush, carefully paint a small crescent moon shape in the upper left section near the ghost’s head. -
Add distinctive stars:
Select two or three spots in the sky to paint tiny cross-shapes (‘plus signs’) for brighter twinkling stars.
Fixing Opacity
If your white paint looks translucent or streaky over the dark blue, don’t keep brushing wet paint. Let it fully dry, then apply another thin coat.
Step 3: Atmosphere and Details
-
Paint the face:
Using black paint and your smallest brush, add two ovals for eyes and a slightly larger oval for the mouth. Keep them clustered somewhat high on the ‘head’ area. -
Create the water base:
Mix a dark grey-blue color. Paint wavy, undulating lines at the very bottom of the rock to establish the water or misty ground beneath the ghost. -
Highlight the water:
Take pure white on a small brush and add jagged, horizontal highlight lines on the crests of the water waves to show movement and reflection. -
Add grass texture:
Mix a dark charcoal grey. Using the very tip of your detail brush, flick short, quick upward strokes starting from the water line and overlapping the bottom of the ghost. -
Layer the grass:
Add a few more grass flicks in pure black among the grey ones to add depth and shadow to the foreground vegetation. -
Ghost texture:
Dry brush a tiny amount of grey vertically near the bottom hem of the ghost to make it look like the fabric is fading into the darkness. -
Final touches:
Check your white areas. If the moon or stars need a brightness boost, tap a tiny bit more white paint onto them. -
Seal the artwork:
Once strictly dry (wait at least an hour), seek your rock with a spray varnish to protect the paint against chipping and make the colors pop.
Dry Brushing Trick
For the wispy bottom of the ghost, wipe most paint off your brush on a paper towel before painting. This creates a transparent, ghostly fade effect.
Place this spooky stone on a shelf to add a touch of spectral magic to your room
Ghost With Spiderweb Background
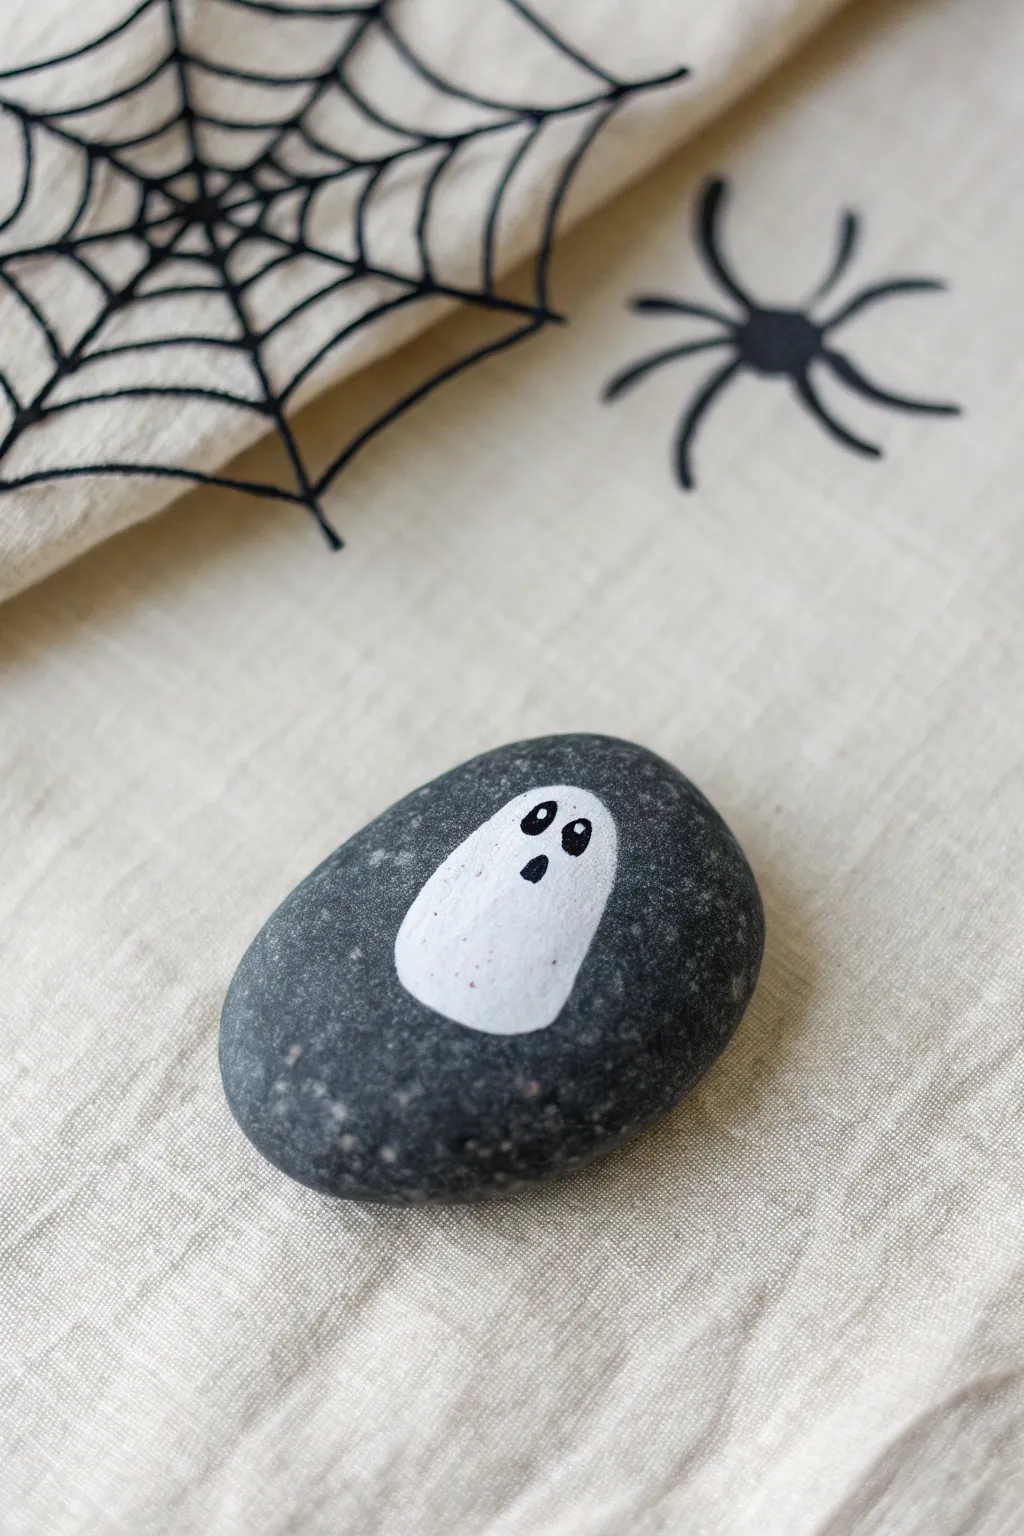
Embrace simplicity this Halloween with a beautifully understated ghost painted on a natural river rock. This project uses the stone’s dark, organic texture as a backdrop for a stark white, cartoonish spirit.
Step-by-Step Guide
Materials
- Smooth river rock (dark grey or black)
- White acrylic paint (high opacity)
- Black acrylic paint or fine-point paint pen
- Small round paintbrush
- Detail brush or dotting tool
- Matte or satin sealant spray (optional)
- Water cup and paper towels
Step 1: Preparation
-
Clean the Canvas:
Begin by thoroughly washing your dark river rock with warm soapy water to remove any dirt or oils. -
Dry Completely:
Let the stone dry completely in the sun or use a hairdryer to speed up the process; paint won’t stick well to damp stone.
Uneven Coverage?
If the white paint looks streaky, don’t just load more paint on. Let it dry fully, then lightly sand the painted area with fine-grit sandpaper before the next coat.
Step 2: Painting the Ghost
-
Outline the Shape:
Using your small round brush and white acrylic paint, gently outline a small, rounded oval shape in the center of the rock. -
Refine the Bottom:
Flatten the bottom of the oval slightly so the ghost doesn’t look like a perfect egg, giving it a soft, floating appearance. -
First Fill:
Fill in the outline with white paint. Don’t worry if it looks streaky at first; most acrylics need layers. -
Let it Set:
Allow this first layer to dry to the touch. I usually wait about 10 minutes to ensure I don’t lift the wet paint with my next stroke. -
Second Layer:
Apply a second coat of white paint over the ghost shape to make it bright and opaque against the dark background. -
Check Coverage:
If shadow from the dark rock still shows through, apply a third thin coat for a solid, crisp white finish. -
Total Drying Time:
Let the white ghost shape dry completely before moving on to the facial features to prevent bleeding.
Step 3: Adding Details
-
The Eyes:
Dip a detail brush or a dotting tool into black paint. Place two small, vertical oval shapes near the top of the ghost for eyes. -
The Mouth:
Paint a slightly smaller, rounder dot centered below the eyes to create a surprised ‘O’ mouth. -
Eye Highlights:
Once the black eyes are dry, take a very fine tip or a toothpick with a tiny amount of white paint. -
Adding Sparkle:
Place a microscopic white dot in the upper corner of each black eye to bring the expression to life. -
Clean Up:
If any white paint smudged onto the dark rock, use a damp Q-tip to wipe it away immediately or paint over it with a color matching the stone.
Glow Up
Swap the standard white acrylic for glow-in-the-dark paint. Apply it as a final topcoat over the white base so your creepy rock ghost illuminates at night.
Step 4: Finishing Touches
-
Final Inspection:
Look over your ghost for any stray marks and ensure the black paint is fully opaque. -
Sealing:
To protect your art, spray a light coat of matte or satin sealant over the entire rock in a well-ventilated area. -
Cure Time:
Let the rock cure for 24 hours before placing it outside or handling it excessively.
Now you have a charmingly spooky stone perfect for hiding in the garden or decorating your desk
Ghost and Black Cat Buddy Rock
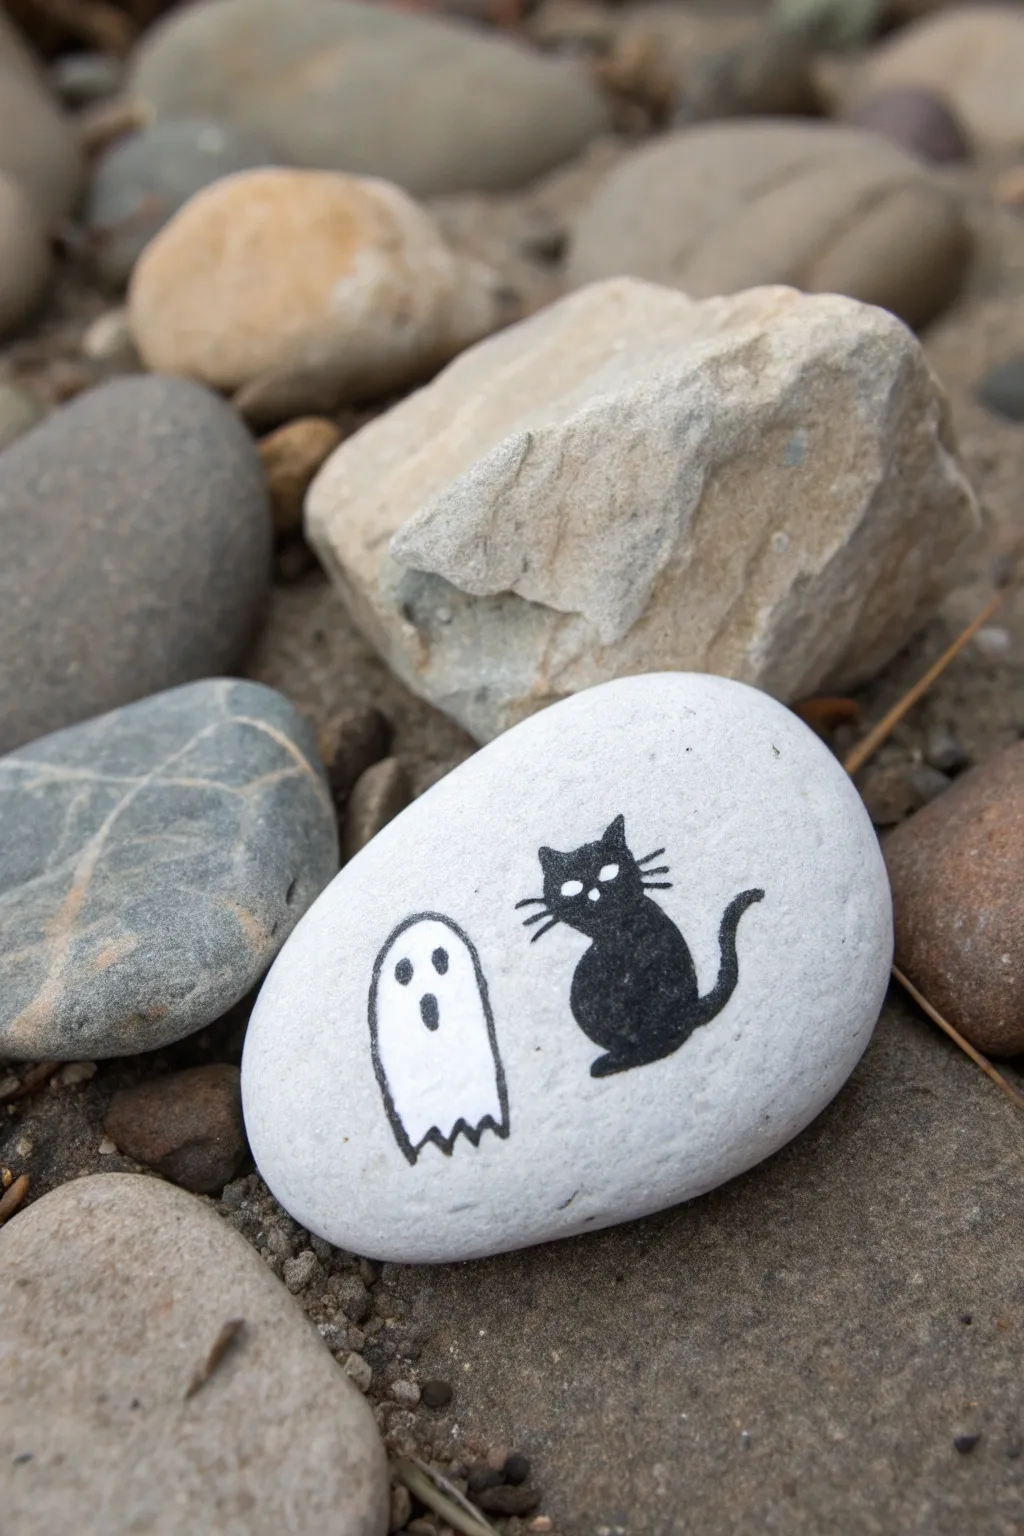
Celebrate Halloween with a minimalist design that pairs a classic sheet ghost with a curious black cat. This clean, high-contrast rock painting is perfect for beginners looking to create a cute, unified little scene on a single stone.
How-To Guide
Materials
- Smooth, flat river rock (palm-sized)
- White acrylic paint (matte finish)
- Black acrylic paint or black paint pen (extra fine tip)
- Standard pencil and eraser
- Medium flat paintbrush
- Fine detail paintbrush (size 0 or 00)
- Clear spray sealant (matte or satin)
- Water cup and paper towels
Step 1: Base Coat
-
Clean and Dry:
Begin by scrubbing your rock with warm, soapy water to remove any dirt or oils that might prevent the paint from sticking. Let it dry completely in the sun or use a hairdryer to speed things up. -
Apply First White Layer:
Using your medium flat brush, paint the entire top surface of the rock with white acrylic paint. Don’t worry if it looks streaky; coverage is more important than perfection right now. -
Dry and Repeat:
Allow the first coat to dry fully. Apply a second, and possibly third, coat of white until the rock’s natural color is completely hidden and you have a solid, opaque canvas. -
Check Smoothness:
Ensure the white paint is perfectly smooth and dry before moving on. I like to run my finger lightly over the surface to make sure there are no tacky spots.
Step 2: Drawing the Outlines
-
Sketch the Cat:
Lightly sketch the cat’s silhouette on the right side of the rock using a pencil. Start with a round shape for the haunches and top it with a smaller circle for the head, including two pointed ears. -
Add the Tail:
Draw a curved line extending from the bottom right of the cat’s body, flicking upward to create a sleek tail shape. -
Sketch the Ghost:
On the left side, draw a simple inverted U-shape for the ghost’s body. The top should be rounded. -
Detail the Hem:
At the bottom of the ghost shape, sketch a jagged line connecting the two sides to create the classic tattered sheet look. -
Ghost Face Placement:
Mark three small oval spots on the ghost for the eyes and mouth. The mouth should be slightly larger and lower than the eyes to create a surprised expression.
Clean Lines Tip
For the crispest lines on the ghost and cat whiskers, use an ultra-fine tip acrylic paint marker (0.7mm) instead of a brush. It offers much better control.
Step 3: Painting the Details
-
Outline the Ghost:
Using a very fine brush dipped in black paint (or a black paint pen), carefully trace over your pencil lines for the ghost’s body. -
Fill the Ghost Face:
Fill in the two eyes and the open mouth of the ghost with solid black. Keep the shapes rounded for a friendly rather than scary look. -
Fill the Cat Body:
Using the black paint, fill in the entire silhouette of the cat you sketched earlier. Paint carefully around the edges to keep them crisp. -
Add Whiskers:
Once the cat’s head is filled, use your finest brush or pen to flick three thin lines outward from each cheek for whiskers. -
Create Cat Eyes:
Let the black paint on the cat dry completely. Then, using a tiny dotting tool or the tip of a toothpick, add two small white dots for the eyes. -
Refine Edges:
Step back and look at your lines. If any edges look shaky, verify the paint is dry and touch them up with the appropriate color.
Glow Up
Paint the ghost with glow-in-the-dark acrylic paint instead of leaving it plain white. During the day it looks normal, but it will haunt your garden at night.
Step 4: Finishing Up
-
Erase Stray Marks:
If any pencil lines are still visible outside your paint, gently erase them with a clean eraser. -
Seal the Rock:
Spray the dried rock with a light coat of clear sealant. This protects the white background from scuffs and keeps the black details sharp.
Enjoy displaying your spooky duo on a porch step or hidden in a flower pot for a fun surprise
Glow-Style Ghost on Starry Sky
Transform an ordinary stone into a whimsical night scene featuring a cheerful ghost drifting through the cosmos. The deep midnight blue background makes the white ghost and bright stars pop, creating a magical glow effect that stands out beautifully.
Step-by-Step Guide
Materials
- Smooth, oval-shaped river rock
- Acrylic paint: dark navy blue (or midnight blue), titanium white, light grey
- Fine detail paintbrushes (size 0 and 00)
- Medium flat brush (for base coat)
- Dotting tool or a toothpick
- Paint markers (optional): black and light pink/coral
- Matte or satin sealant spray
- Cup of water and paper towels
Step 1: Setting the Scene
-
Clean Your Canvas:
Begin by thoroughly washing your rock with soap and water to remove any dirt or oils. Let it dry completely in the sun or use a hairdryer to speed things up. -
Apply the Base Coat:
Using your medium flat brush, paint the entire rock surface with a dark midnight blue. This deep color mimics the night sky and serves as the perfect backdrop. -
Second Layer:
Once the first coat is dry, apply a second layer of blue to ensure full, opaque coverage. If you can still see the stone’s texture or color underneath, a third thin coat might be necessary.
Step 2: Painting the Ghost
-
Outline the Shape:
Mix a tiny drop of water into your titanium white paint to improve flow. Using a fine brush, lightly outline a simple arch shape in the center-left of the rock. -
Add the Tail:
Extend the bottom of the arch into a jagged, playful edge to create the ghost’s tail. I like to make three or four little points to give it a floating appearance. -
Fill in the Body:
Fill the spectral shape with white paint. Don’t worry if it looks slightly streaky at first; ghosts are ethereal, after all. Let this layer dry completely. -
Build Opacity:
Apply a second coat of white over the ghost shape. To get that soft texture seen in the photo, you can gently stipple (tap) the paint on rather than stroking it flat. -
Create Texture:
While the white is drying, mix a very faint grey wash. Lightly dab minute specks of this grey onto the white body to give it a speckled, stone-like texture rather than a flat cartoon look.
Uneven White Paint?
If your white paint looks streaky over the dark blue, don’t keep brushing wet paint. Let it dry fully, then apply another thin coat. Thin layers build opacity better than thick globs.
Step 3: Faces & Clouds
-
Paint the Clouds:
At the bottom left, paint small, rolling cloud shapes using a mix of light blue-grey. Keep them low so they look like drifting mist beneath the ghost. -
Define Cloud Edges:
Highlight the tops of the cloud bumps with pure white or very light grey to give them dimension and volume against the dark background. -
Facial Features:
Using a very fine brush or a black paint pen, draw two oval eyes and a small, curved smile near the top of the ghost. Keep the features close together for a cute expression. -
Add Blush:
Dip a toothpick or small dotting tool into light pink or coral paint. Gently dab two small cheeks just under the eyes.
Mastering Tiny Stars
For the tiniest, sharpest stars, dip the tip of a sewing needle or a toothpick into white paint. Just barely touch the rock surface to leave a perfect micro-dot.
Step 4: The Starry Sky
-
Dot the Stars:
Load a fine brush or needle tool with white paint. Create random tiny dots all over the blue background, varying the pressure to make different sized stars. -
Draw Starbursts:
Choose two or three spots to feature larger stars. Paint a simple four-pointed star shape (a cross with tapered ends) or a five-pointed star to add variety. -
Final White Highlights:
Add a tiny white spec inside the black eyes of the ghost to bring the character to life. -
Seal the Artwork:
Once the paint is fully cured (usually after 24 hours), spray the rock with a matte or satin sealant. This protects your painting from chipping and UV damage.
Now you have a charming little pocket-sized ghost to decorate your garden or desk
Ghost With Swirly Transparent Edges
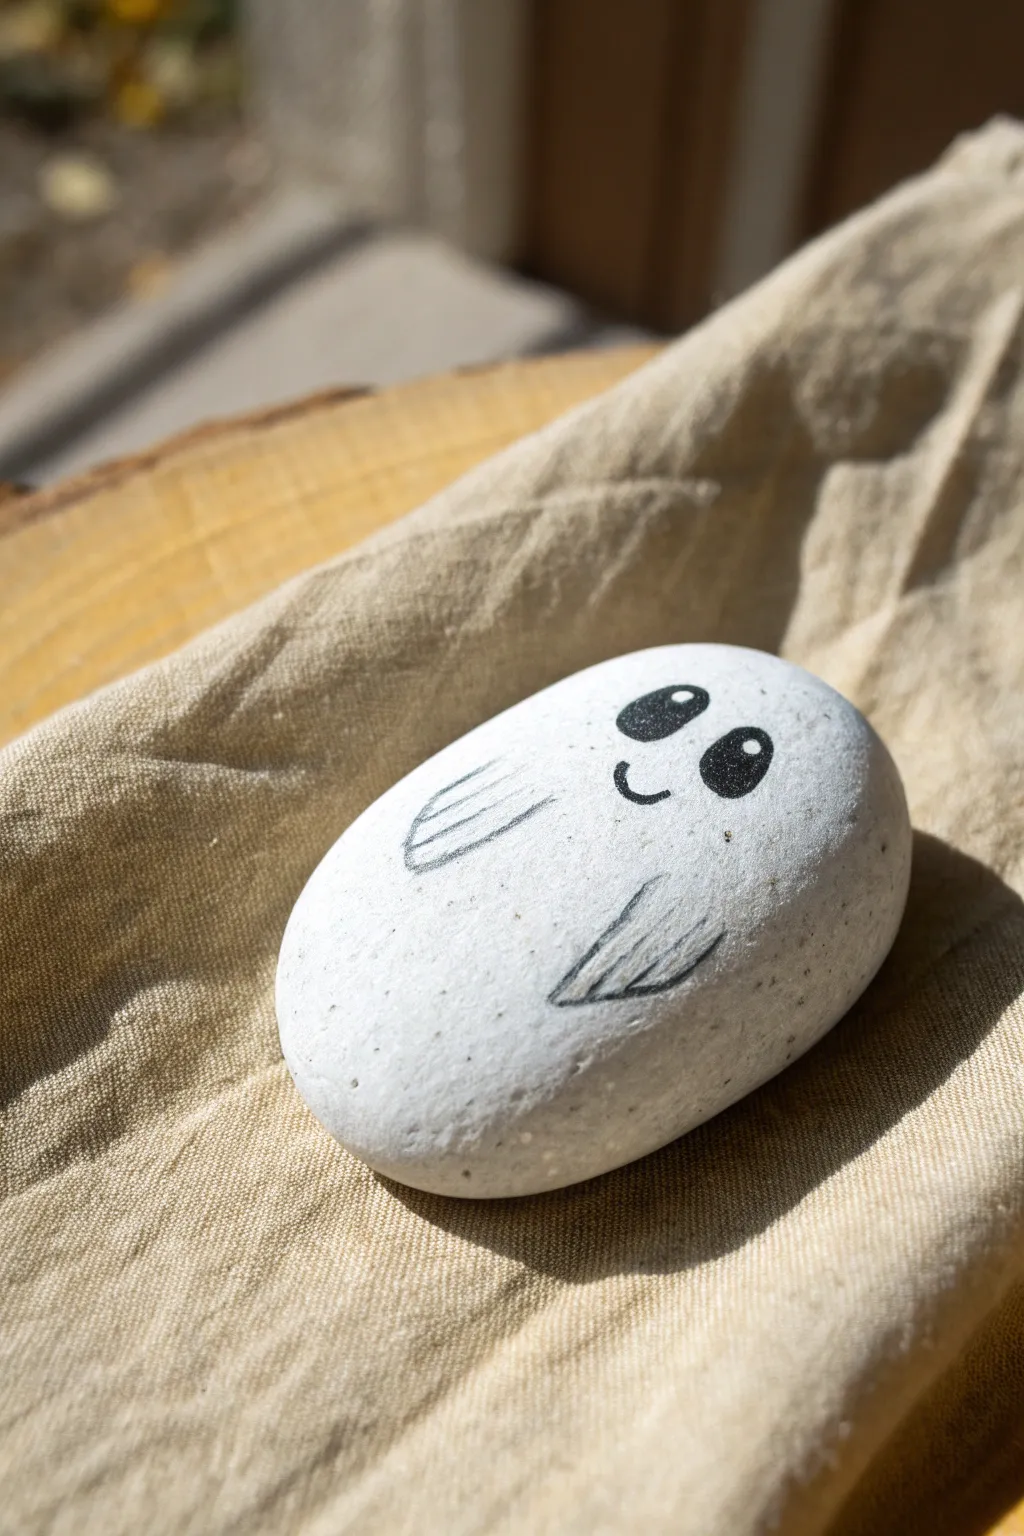
Embrace simplicity with this adorable ghost rock that captures the charm of a quick sketch. With its bright white base and pencil-style shading on the arms, this project creates a sweet, friendly spirit perfect for pockets or desktops.
Step-by-Step Tutorial
Materials
- Smooth, oval-shaped river rock
- White acrylic paint (matte finish preferred)
- Wide flat paintbrush
- Black acrylic paint or fine-tip paint pen
- Graphite pencil or fine-tip black ink pen (for details)
- Matte spray sealer or varnish
Step 1: Preparing the Base
-
Clean the surface:
Begin by washing your stone thoroughly with warm soapy water to remove any dirt or oils. Use a stiff brush if necessary to get into the pores. -
Dry completely:
Allow the rock to air dry completely or speed up the process with a hair dryer. Trapped moisture can ruin your paint layers later. -
Base coat application:
Using a wide flat brush, apply a generous coat of white acrylic paint. Smooth out your brushstrokes so they run in one direction. -
Layering:
Let the first coat dry fully. Apply a second or third coat until the natural color of the stone is completely hidden and the white looks solid and opaque.
Ink Smearing?
If using a pen for the arms, ink can smear under varnish. Let it dry overnight, or seal initially with a light layer of hairspray before the final varnish step.
Step 2: Designing the Face
-
Position the eyes:
Visualize the face near the top third of the stone. I find it helpful to lightly mark the eye placement with a very soft pencil touch before committing to paint. -
Paint the eye shapes:
Using black acrylic paint and a small detail brush, or a black paint pen, draw two tilted ovals. They should lean slightly inward toward each other for a cute expression. -
Fill the eyes:
Carefully fill in the ovals with solid black. Ensure the edges are crisp and smooth. -
Add the smile:
Right between and slightly below the eyes, paint a small, simple U-shape for the smile. Keep the line thin and delicate. -
Create the highlights:
Dip the non-brush end of a paintbrush or a toothpick into white paint. Dot a single reflection highlight into the upper right corner of each black eye oval to bring the character to life.
Step 3: Adding the Sketchy Arms
-
Choose your tool:
For the arms, you want a sketched, translucent look. A fine-tip black ink pen or even a sharpened graphite pencil works best here to create texture. -
Outline the left arm:
Draw a rounded fin-like shape on the left side of the body. Don’t make the outline too thick; keep it light and wispy. -
Shade the left arm:
Fill the arm shape with quick, diagonal hatching lines. These lines shouldn’t be solid black; let the white background show through to mimic a transparent, ghostly effect. -
Outline the right arm:
Repeat the process on the right side, drawing a similar fin shape angling downward. -
Shade the right arm:
Fill this arm with similar hatching lines. Try to keep the angle of your shading consistent with the first arm for a cohesive look.
Make It Sparkle
Mix a tiny pinch of white or iridescent glitter into your final coat of sealer to give the ghost a magical, shimmering ectoplasm effect under light.
Step 4: Finishing Touches
-
Check the contrast:
Step back and look at your ghost. If the arms look too faint, go over the hatching lines one more time to darken them slightly without losing the sketched texture. -
Let it cure:
Allow all ink and paint to dry for at least an hour. Ink can smudge easily if sealed while fresh. -
Seal the rock:
Spray the entire rock with a matte sealer. Use light, sweeping mists rather than one heavy coat to prevent the ink from running.
Now you have a charming little pocket ghost ready to haunt your desk with cuteness
Haunted Diorama Set of Ghost Rocks
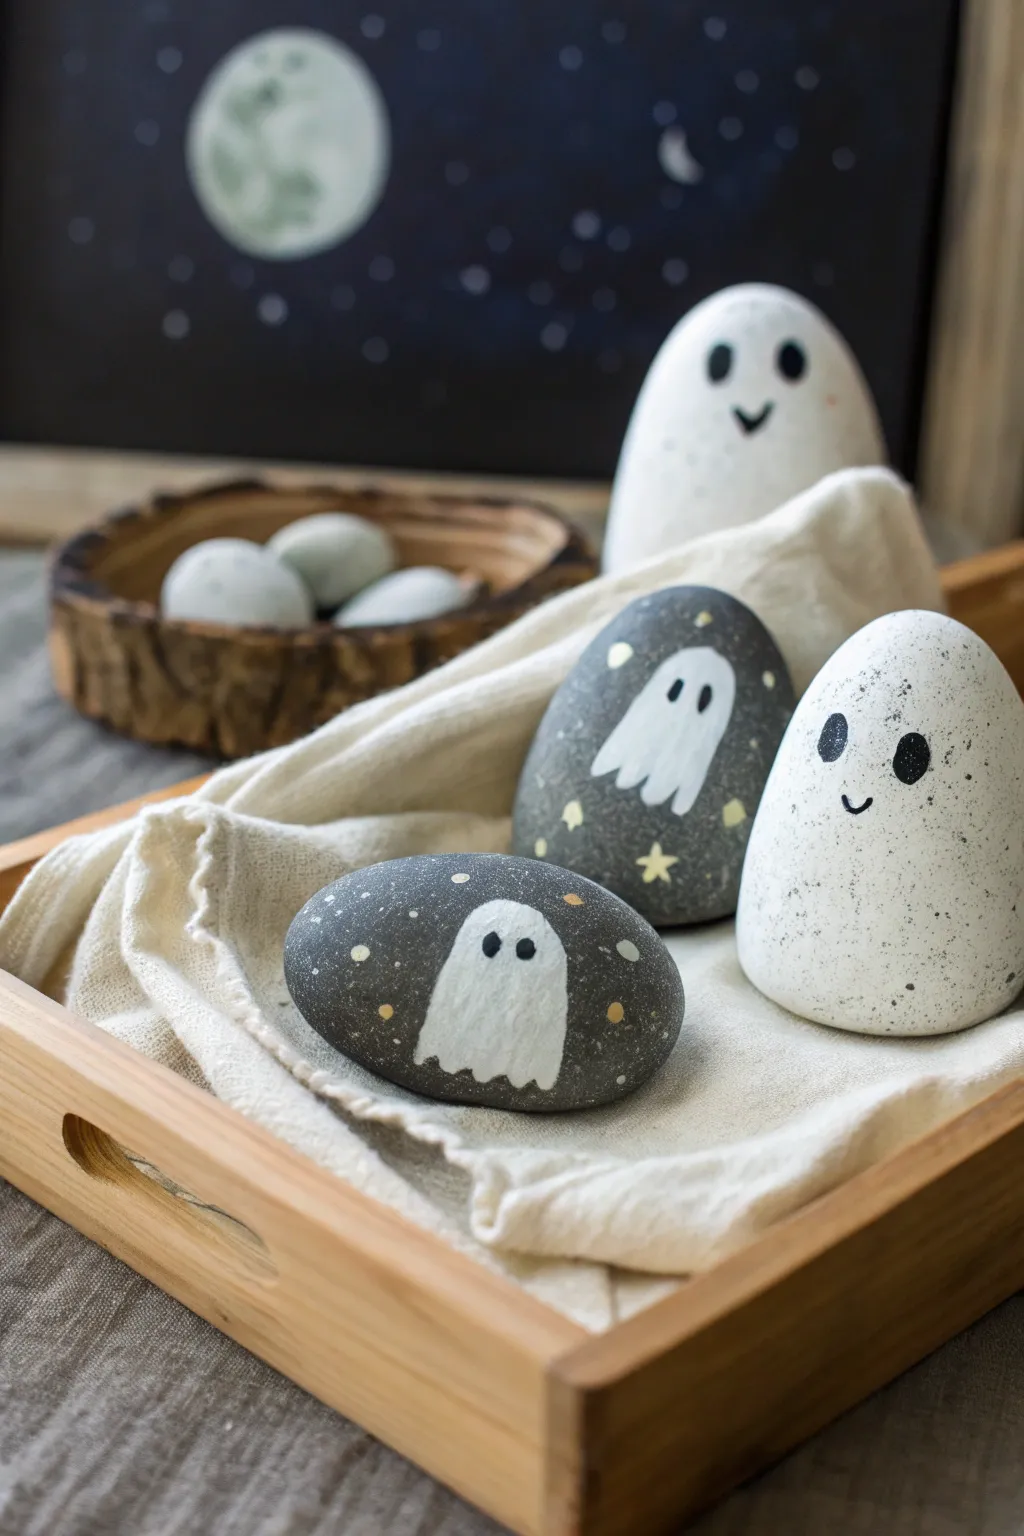
Create a charming, spooky scene using smooth river stones transformed into adorable spectral figures. This intermediate-level project combines simple character design with a night-sky aesthetic for a decorative Halloween display.
How-To Guide
Materials
- Smooth river stones (various sizes, round and oval)
- Acrylic paints (black, white, yellow, grey)
- Fine detail paintbrushes (size 0 and 00)
- Medium flat paintbrush
- Paint markers (black and white, fine point)
- Clear matte acrylic sealer
- Light wooden tray
- Cream or beige gauze fabric
- Small wooden bowl (optional prop)
- Pencil for sketching
Step 1: Preparing the Canvas
-
Select the stones:
Choose your rocks carefully. You will need at least two oval, upright-standing rocks to serve as the ‘ghosts’ and two flatter, darker rocks to serve as the ‘night sky’ backgrounds. Wash them with soapy water and let them dry completely. -
Base coat – White Ghosts:
For the upright standing rocks, apply a base coat of white acrylic paint. You will likely face streaks with the first coat, so plan on applying 2-3 thin layers, allowing 15 minutes of drying time between each to ensure opacity. -
Base coat – Night Sky:
Paint the two flatter rocks with a dark grey or soft black acrylic paint. I personally prefer a dark charcoal grey rather than pure black to give it a softer, stone-like texture. Let this base dry fully. -
Speckling effect:
To give the white ghosts a natural, speckled stone look, dilute a tiny drop of black paint with water. Dip an old toothbrush or stiff brush into the mix and flick the bristles to spray fine mist-like dots over the dried white rocks.
Pro Tip: Texture Trick
For the speckling step, practice flicking the paint onto a paper towel first. The first flick is often too heavy and can ruin your smooth base coat with large blobs.
Step 2: Painting the Night Sky Ghosts
-
Outline the silhouettes:
On your dark grey rocks, use a pencil to lightly sketch a simple ghost shape in the center. The shape should look like a draped sheet with a slightly wavy bottom edge. -
Fill in the bodies:
Using a small flat brush and white paint, fill in the ghost silhouettes. Like the standing rocks, these will need multiple coats to stand out brightly against the dark background. -
Add facial features:
Once the white silhouettes are bone-dry, use the non-bristle end of a small paintbrush dipped in black paint to dot two eyes onto the ghost faces. -
Painting the stars:
Switch to a very fine detail brush (size 00) and yellow or gold paint. Add tiny star shapes and simple dots around the white ghost figures on the dark background. -
Varying the stars:
Mix a little white into your yellow paint to create a paler shade. Add a few more tiny dots among the yellow stars to create depth and a twinkling effect.
Troubleshooting: Streaky White
If your white paint looks streaky on the dark rocks, don’t keep brushing wet paint. Let it dry completely, then apply another thin coat. Patience creates opacity.
Step 3: Detailing the Standing Ghosts
-
Drafting faces:
Take your fully dried, speckled white rocks. Decide on the ‘front’ of the rock and lightly sketch large, oval eye sockets and a small mouth. -
Painting the eyes:
Use deep black paint or a black paint marker to fill in the large oval eyes. Make them slightly tilted towards each other to create a friendly, curious expression. -
Adding the mouths:
Paint a small, simple ‘v’ or ‘u’ shape between and slightly below the eyes for the mouth. Keep the lines thin for a cute, minimalist look. -
Sealing the work:
Once all paint is completely cured (wait at least an hour), spray or brush on a clear matte acrylic sealer. This protects the paint from chipping and gives a unified finish.
Step 4: Assembling the Diorama
-
Prepare the tray:
Take your light wooden tray and drape the cream gauze fabric inside. Bunch it up intentionally to create folds and ‘hills’ for the rocks to nestle into. -
Position the standing ghosts:
Place the large white ghost rocks towards the back or corners of the tray. If they wobble, use a small dab of mounting putty underneath or tuck fabric around the base to stabilize them. -
Place the night sky rocks:
Lay the darker, flat rocks in the foreground, nestled into the fabric folds so they are tilting slightly upward for better visibility. -
Add background elements:
If you have a chalkboard or a dark piece of cardstock, draw a simple moon and white dots to mimic the night sky and place this behind the tray as a backdrop.
Arrange your finished spooky stones on a mantelpiece or entry table to greet guests with a friendly haunting


Have a question or want to share your own experience? I'd love to hear from you in the comments below!