If you’re in the mood to paint something instantly recognizable (and ridiculously fun), a giraffe is such a satisfying subject. That long-neck silhouette plus all those spot patterns gives you endless ways to go realistic, loose, or totally whimsical.
Full-Body Giraffe in the Savanna
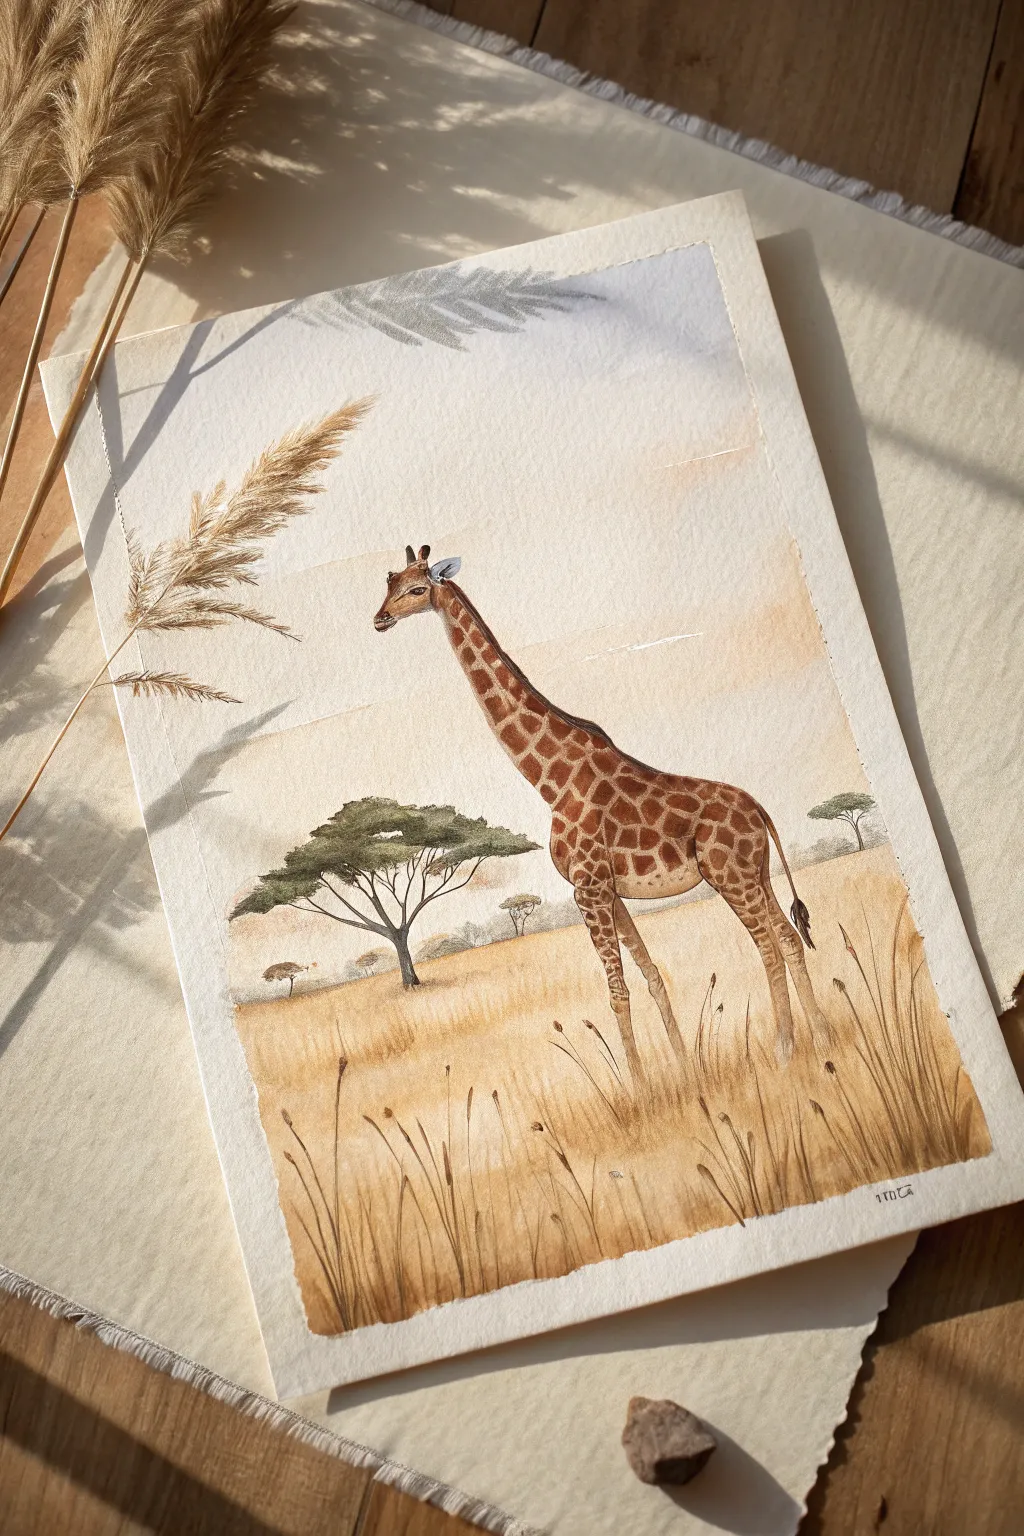
Capture the serene majesty of the African savanna with this warm-toned watercolor painting. This project features a full-body giraffe standing tall against a hazy, sun-drenched horizon, surrounded by gentle grasses and iconic acacia trees.
Step-by-Step Guide
Materials
- Cold press watercolor paper (A4 or slightly smaller)
- Watercolor paints (Yellow Ochre, Burnt Sienna, Burnt Umber, Sepia, Sap Green, Payne’s Grey)
- Masking tape
- Pencil (HB) and kneadable eraser
- Round brushes (sizes 2, 6, and 10)
- Rigger or liner brush for fine grass details
- Two jars of water
- Paper towels
Step 1: Preparation and Sketching
-
Secure the paper:
Begin by taping down all four edges of your watercolor paper to a board or table. This creates a clean white border when finished and prevents the paper from buckling during wet washes. -
Draft the horizon:
Lightly sketch a horizontal line about one-third of the way up the page to establish your ground level. Add a faint suggestion of distant hills or tree lines just above it. -
Sketch the giraffe:
Drawing the giraffe can be tricky, so start with simple shapes: an oval body, a long neck extending upward, and long, slender legs. Position the giraffe slightly off-center to the right. Refine the outline, adding the ossicones (horns) and ears. -
Outline the environment:
Sketch the iconic flat-topped acacia tree on the left side, balancing the composition. Add faint vertical strokes in the foreground to indicate where the tall grasses will be.
Uneven Watermarks?
If you get ‘cauliflowers’ or blooms in the sky, don’t panic. Gently lift the pigment with a damp brush or embrace the texture—it often looks like natural clouds.
Step 2: Painting the Background
-
Apply the sky wash:
Wet the sky area with clean water, careful not to paint inside the giraffe shape. Drop in a very dilute mix of Yellow Ochre near the horizon, fading into a pale greyish-blue towards the top. Let colors bleed softly. -
Create the distant haze:
While the sky is still damp near the horizon, introduce a soft, misty line of distant trees using a watery mix of Payne’s Grey and Burnt Umber. Keep edges soft to push them into the background. -
Paint the savanna ground:
For the ground, use a wash of Yellow Ochre and Burnt Sienna. I like to keep the foreground slightly darker and warmer to create depth. Paint right over the leg area for now if your pencil lines are visible, but try to preserve the main body white. -
Let it dry completely:
Wait until the paper is bone dry before proceeding. If the paper is cool to the touch, it’s still damp.
Make It Glow
For a ‘golden hour’ feel, glaze a very thin wash of transluscent orange/gold over the entire finished painting (except the sky) to warm up the lighting.
Step 3: The Giraffe and Trees
-
Base layer for the giraffe:
Paint the entire giraffe with a light, warm wash of Yellow Ochre mixed with a touch of Burnt Sienna. This serves as the underpainting for the light spaces between spots. -
Adding the spots:
Once the underlayer is dry, mix a rich Burnt Sienna and Burnt Umber. Using your size 2 brush, carefully paint the mosaic of geometric spots. Note that the spots get smaller and closer together as you move up the neck. -
Detailing the face:
Switch to your smallest brush for the face. Use Sepia for the dark eyes and nostrils. Keep the muzzle lighter than the rest of the head to show dimension. -
Painting the legs and tail:
Fade the spots as you move down the legs. The lower legs should act as a gradient from the spot color to a lighter, creamy beige. Add the dark tuft of the tail with quick, downward strokes. -
The Acacia tree:
Paint the trunk and branches of the tree using a dark Sepia or Burnt Umber mixture. Use jagged, angular strokes for the branches. Dapple in a muted Sap Green mixed with grey for the canopy foliage.
Step 4: Foreground and Details
-
Building the grassy foreground:
Using a rigger or a fine brush, flick upward strokes in the foreground using various shades of gold, brown, and ochre. Vary the pressure to create thick and thin blades. -
Adding foreground depth:
Mix a darker brown (Burnt Umber) and add a few prominent, taller stalks in the immediate foreground. Add small seed heads or wheat-like details to the tips of a few grasses. -
Grounding the giraffe:
Add a few horizontal strokes of dry-brush texture under the giraffe’s hooves to ground it, preventing it from looking like it’s floating. -
Shadows and highlights:
Assess the painting. If the giraffe looks too flat, add a subtle glaze of diluted purple or grey along the shadowed side of the neck and belly. -
The Reveal:
Once absolutely everything is dry, carefully peel away the masking tape at a 45-degree angle to reveal your crisp white border.
Now you have a warm, peaceful savanna scene that perfectly captures the gentle nature of the giraffe.


Silhouette Giraffe at Sunset
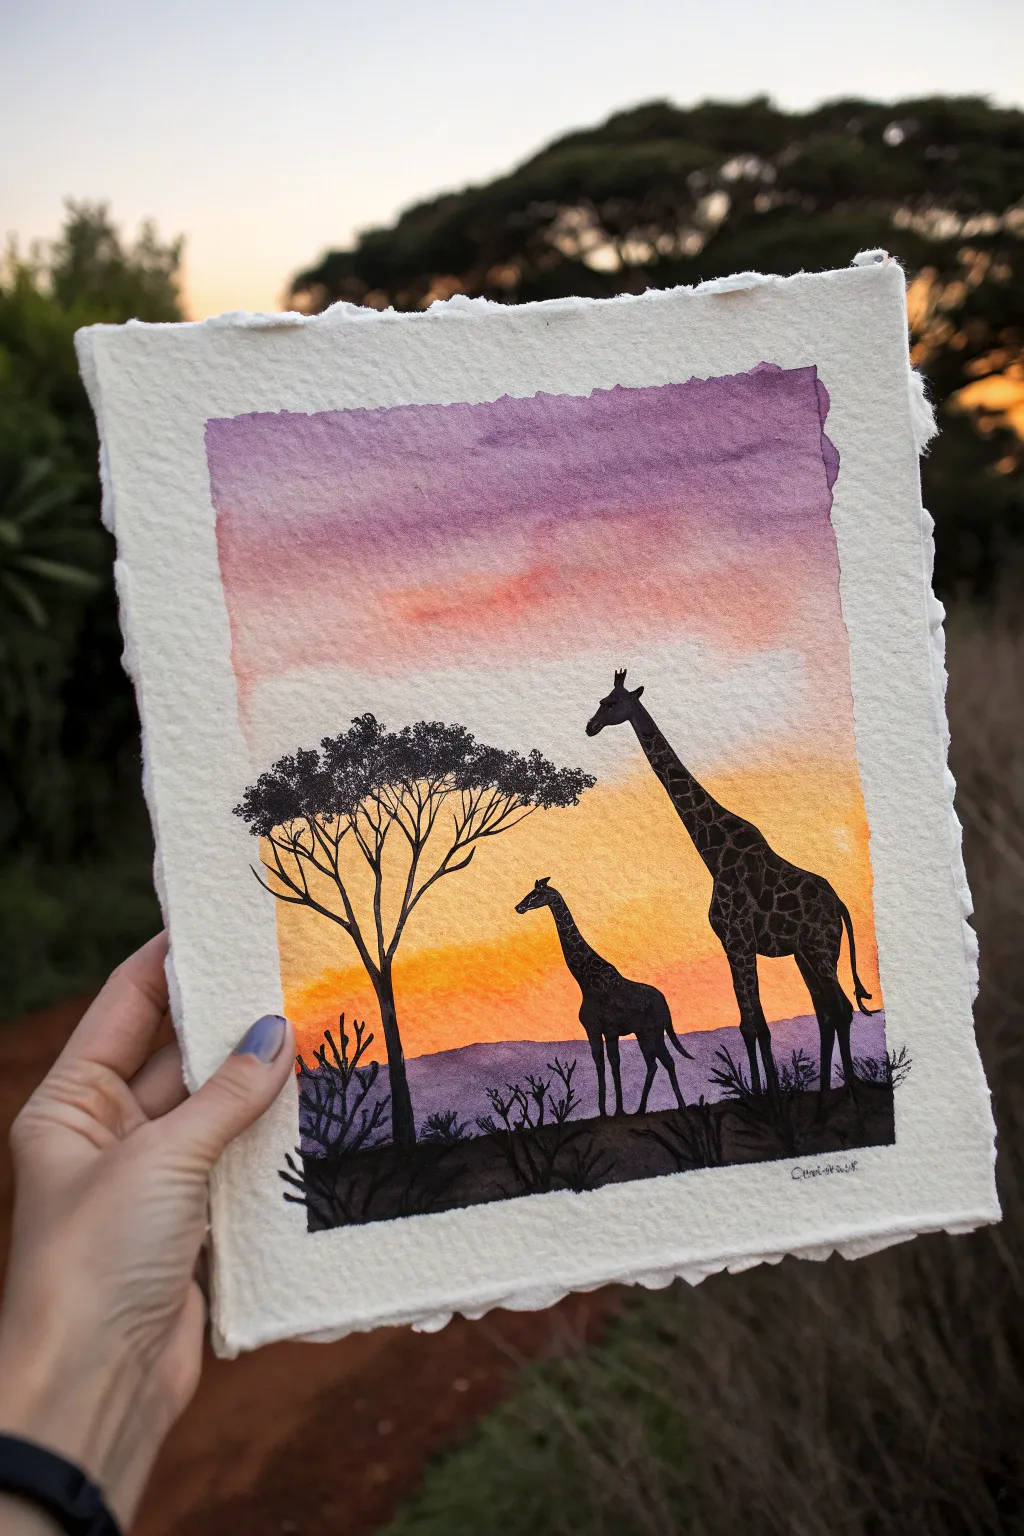
Capture the serene beauty of the savanna with this striking watercolor painting featuring two giraffe silhouettes against a vibrant sunset sky. The stark contrast between the colorful wash and the deep black ink creates a dramatic and professional-looking piece.
Step-by-Step
Materials
- Cold press watercolor paper (deckled edge preferred for look)
- Masking tape
- Watercolor paints (Violet, Alizarin Crimson, Orange, Cadmium Yellow)
- Black waterproof ink or black gouache
- Fine liner pigment pens (sizes 01 and 05)
- Large flat wash brush
- Round brushes (size 4 or 6)
- Small detail brush (size 0 or 00)
- Palette for mixing
- Clean water and paper towels
Step 1: Creating the Sky Wash
-
Prepare the paper:
Begin by taping down your watercolor paper to a board if it isn’t a block. If you are using deckled edge paper like the example, tape just inside the rough edge to keep the center flat while painting. -
Pre-wet the surface:
Using your large flat brush, apply a generous layer of clean water over the entire area where the sky will be painted. The paper should be glistening but not forming puddles. -
Apply the top violet layer:
Load your brush with a diluted violet or purple mix. Apply this to the top third of the paper, using horizontal strokes. Let the water carry the pigment slightly downward for a soft edge. -
Introduce the pinks:
While the paper is still wet, mix Alizarin Crimson with a touch of orange to create a warm pink. Apply this directly below the purple, allowing the colors to bleed together naturally where they meet. -
Blend into orange:
Rinse your brush and pick up pure orange. Paint the middle section of the sky, blending it softly into the pink area above. -
Finish with yellow:
Complete the gradient by painting Cadmium Yellow at the bottom third, bringing it all the way down to where your horizon line will be. The yellow should be brightest near the bottom. -
Add subtle clouds:
While the wash is still damp, you can drop in tiny hints of slightly darker orange or pink horizontally to suggest drifting clouds, but keep this subtle. -
Dry thoroughly:
This is crucial: allow the background wash to dry completely. The paper must be bone dry before you add any black silhouette details, or the ink will bleed.
Step 2: Painting the Silhouettes
-
Sketch the outlines:
Lightly sketch the horizon line (some distant hills) and the outlines of the two giraffes and the acacia tree using a very hard pencil (H or 2H) so the lines remain faint. -
Paint the distant hills:
Mix a diluted watery purple-grey using your previous sky colors and a tiny touch of black. Paint the low-lying hills in the distance. This should be transparent enough to look far away. -
Block in the giraffes:
Using your size 4 round brush and black gouache or waterproof ink, carefully fill in the bodies of the giraffes. Start with the larger adult, creating a smooth, solid black shape. -
Refine the shapes:
Switch to your smaller detail brush to sharpen the ossicones (horns), ears, and tails. Ensure the edges are crisp against the colorful background. -
Add the giraffe pattern:
I like to leave tiny, hair-thin lines of negative space (the background color showing through) on the giraffe’s neck and body to suggest their famous reticulated pattern, rather than painting them solid black. -
Paint the acacia tree:
Using the fine liner pen or the smallest brush with black ink, draw the trunk and branches of the tree on the left. The branches should twist and fan out into a flat-topped umbrella shape. -
Stipple the leaves:
Use the tip of your brush to tap small dots (stippling) along the top of the branches to simulate the dense, flat canopy of the acacia tree. -
Create the foreground:
Paint the immediate foreground with solid black ink. Use upward flickering strokes to create the look of tall grasses and scraggly bushes at the bottom edge. -
Final touches:
Review your silhouettes. If the black looks patchy after drying, apply a second coat to ensure the shadows are deep and opaque.
Clean Edges Pro-Tip
To get the crisp, rough border shown in the photo, don’t paint all the way to the paper’s edge. Leave about half an inch of natural paper unpainted to frame the scene.
Level Up: White Gel Pen
Use a white gel pen to add tiny highlights to the tops of the giraffes or the edges of the acacia leaves. It simulates the last rays of sunlight hitting them.
Once the ink is fully dry, step back and admire the warmth of your handmade safari sunset


Mother and Calf Nuzzle Scene
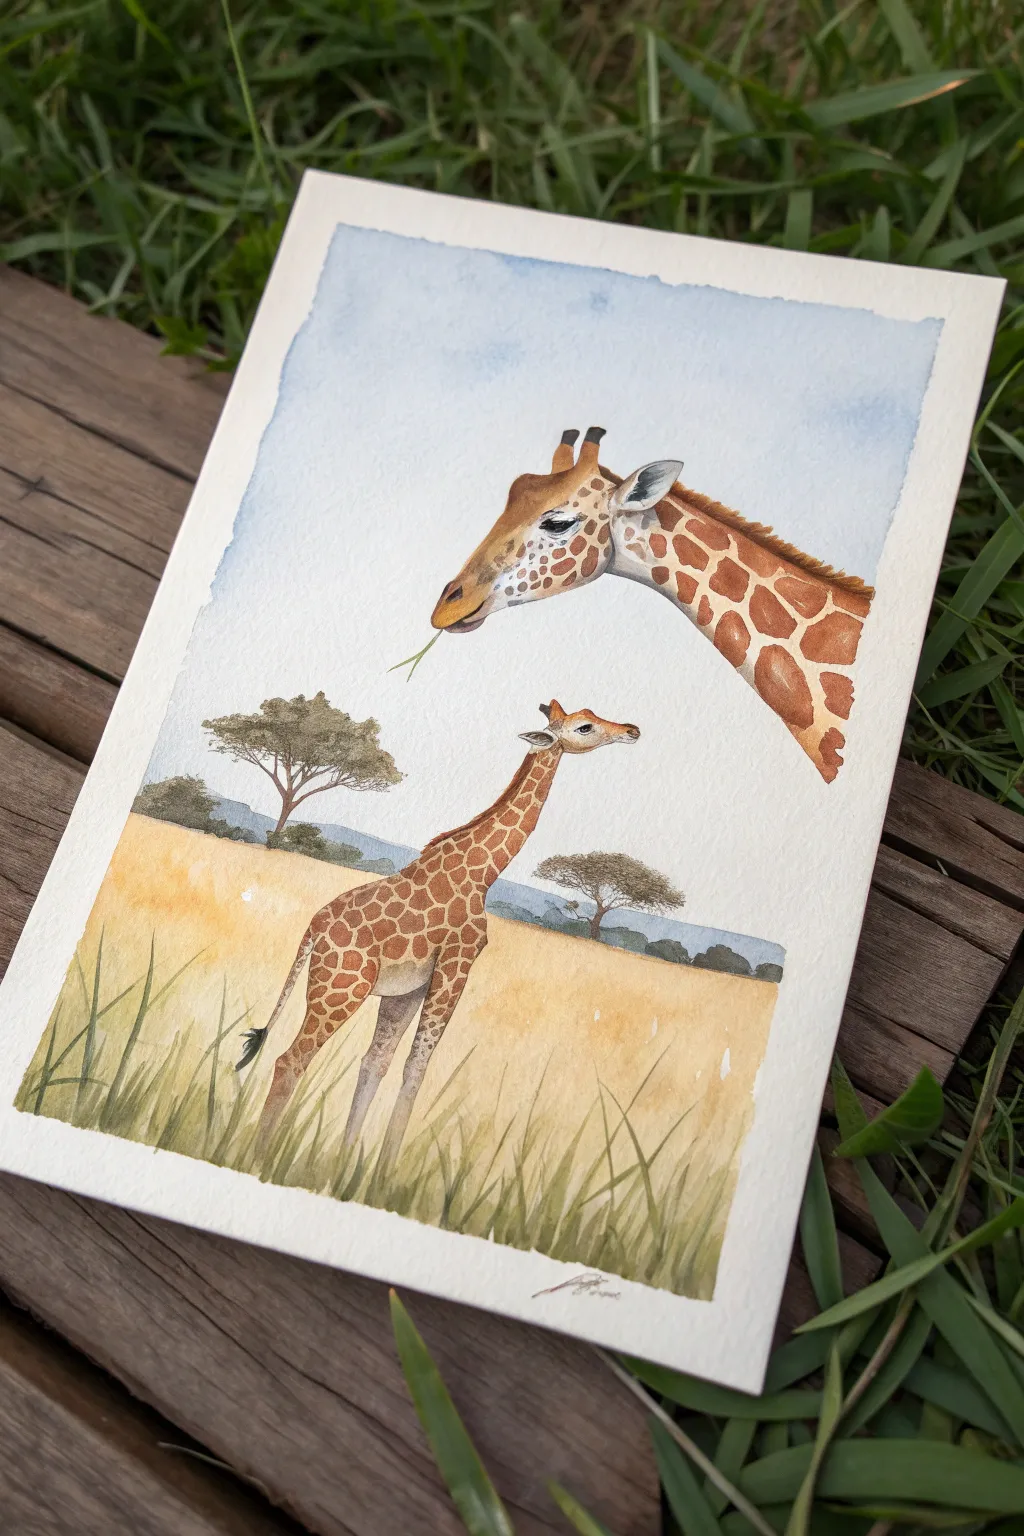
Capture the gentle spirit of the African plains with this layered watercolor scene featuring a curious calf and watchful mother. The composition uniquely combines a close-up portrait with a landscape view, all rendered in soft, earthy tones.
Step-by-Step Guide
Materials
- Cold press watercolor paper (300 gsm)
- Round watercolor brushes (sizes 2, 6, and 10)
- Watercolor paints (Yellow Ochre, Burnt Sienna, Burnt Umber, Ultramarine Blue, Sap Green)
- Drawing pencil (HB or 2H)
- Kneaded eraser
- Clean water jar
- Paper towels
- Masking tape
Step 1: Sketching and Sky
-
Prepare the paper:
Tape down all four edges of your watercolor paper to a board. This prevents buckling and creates that crisp white border seen in the final piece. -
Sketch the giraffes:
Lightly sketch the large giraffe head entering from the top right corner. Then, draw the full-body calf standing in the lower third. Keep your pencil pressure very light so graphite doesn’t smudge into the paint later. -
Add landscape lines:
Draw a faint horizon line behind the calf. Sketch the rough outlines of the acacia trees—one to the left of the calf and a smaller one to its right. -
Paint the sky wash:
Wet the sky area with clean water using the size 10 brush, carefully painting around the giraffe shapes. While wet, drop in a very diluted mix of Ultramarine Blue, letting it fade out near the horizon for an atmospheric look.
Muddy colors?
If your brown spots begin bleeding into the yellow undercoat, the first layer wasn’t dry enough. Let it dry completely, then try glazing again with a drier brush
Step 2: The Golden Grasslands
-
Base layer for the grass:
Mix a watery wash of Yellow Ochre. Apply this across the entire bottom section, creating the sun-baked field. Let it be uneven; some white gaps add texture. -
Adding depth to the field:
While the ochre is still slightly damp, drop in touches of Burnt Sienna near the bottom foreground to suggest shadow and density in the grass. -
Distant mountains:
Once the sky is completely dry, mix a cool, pale gray-blue using Ultramarine and a touch of Burnt Umber. Paint the distant hills along the horizon line, softening the bottom edge with a damp brush. -
Painting the trees:
Use a mix of Burnt Umber and Sap Green for the acacia trees. Use the size 2 brush for the delicate trunks and a stippling motion with the size 6 brush for the foliage.
Add some texture
Sprinkle a tiny pinch of salt onto the wet landscape wash near the bottom. When it dries and you brush the salt away, it creates a unique, sandy earth texture
Step 3: Bringing the Giraffes to Life
-
Underpainting the giraffes:
Paint the base skin tone of both giraffes with a pale, watery wash of Yellow Ochre mixed with a tiny bit of Burnt Sienna. Let this dry completely. -
Detailing the calf’s spots:
With a size 2 brush and a creamy mix of Burnt Sienna, carefully paint the geometric spots on the calf. Notice how they are larger on the body and get smaller up the neck. -
Painting the mother’s pattern:
Switch to the large head portrait. Use a darker mix of Burnt Sienna and Burnt Umber for her distinctive reticulated pattern. Leave thin lines of the pale underlayer showing between the shapes. -
Face details:
Use your smallest brush to define the eyes and nostrils with a dark brown-black mix. Paint the ossicones (horns) dark at the tips, fading into the head color. -
Adding the manes:
Using short, directional strokes, paint the bristly mane down the back of the mother’s neck and the calf’s neck using a rich Burnt Umber. -
Shadows and form:
Mix a diluted purple-grey. I find this works perfectly to glaze a subtle shadow along the underside of the mother’s jaw and the belly of the calf to give them roundness.
Step 4: Final Flourishes
-
Foreground grass blades:
Load a size 6 brush with a mix of Sap Green and Yellow Ochre. Use quick, upward flicking motions to create tall grass blades in the immediate foreground, overlapping the bottom of the calf slightly. -
The green snack:
Paint a thin sprig of green leaves hanging from the mother giraffe’s mouth using the size 2 brush, adding a playful story element. -
Final assessment:
Step back and check your values. If the mountains look too bold, lift some color with a damp paper towel. If the eyes need more life, add a tiny dot of white gouache for a highlight. -
Reveal:
Wait until the painting relies absolutely bone dry before slowly peeling off the masking tape at a 45-degree angle.
Enjoy the peaceful atmosphere of your new savannah scene as you frame it


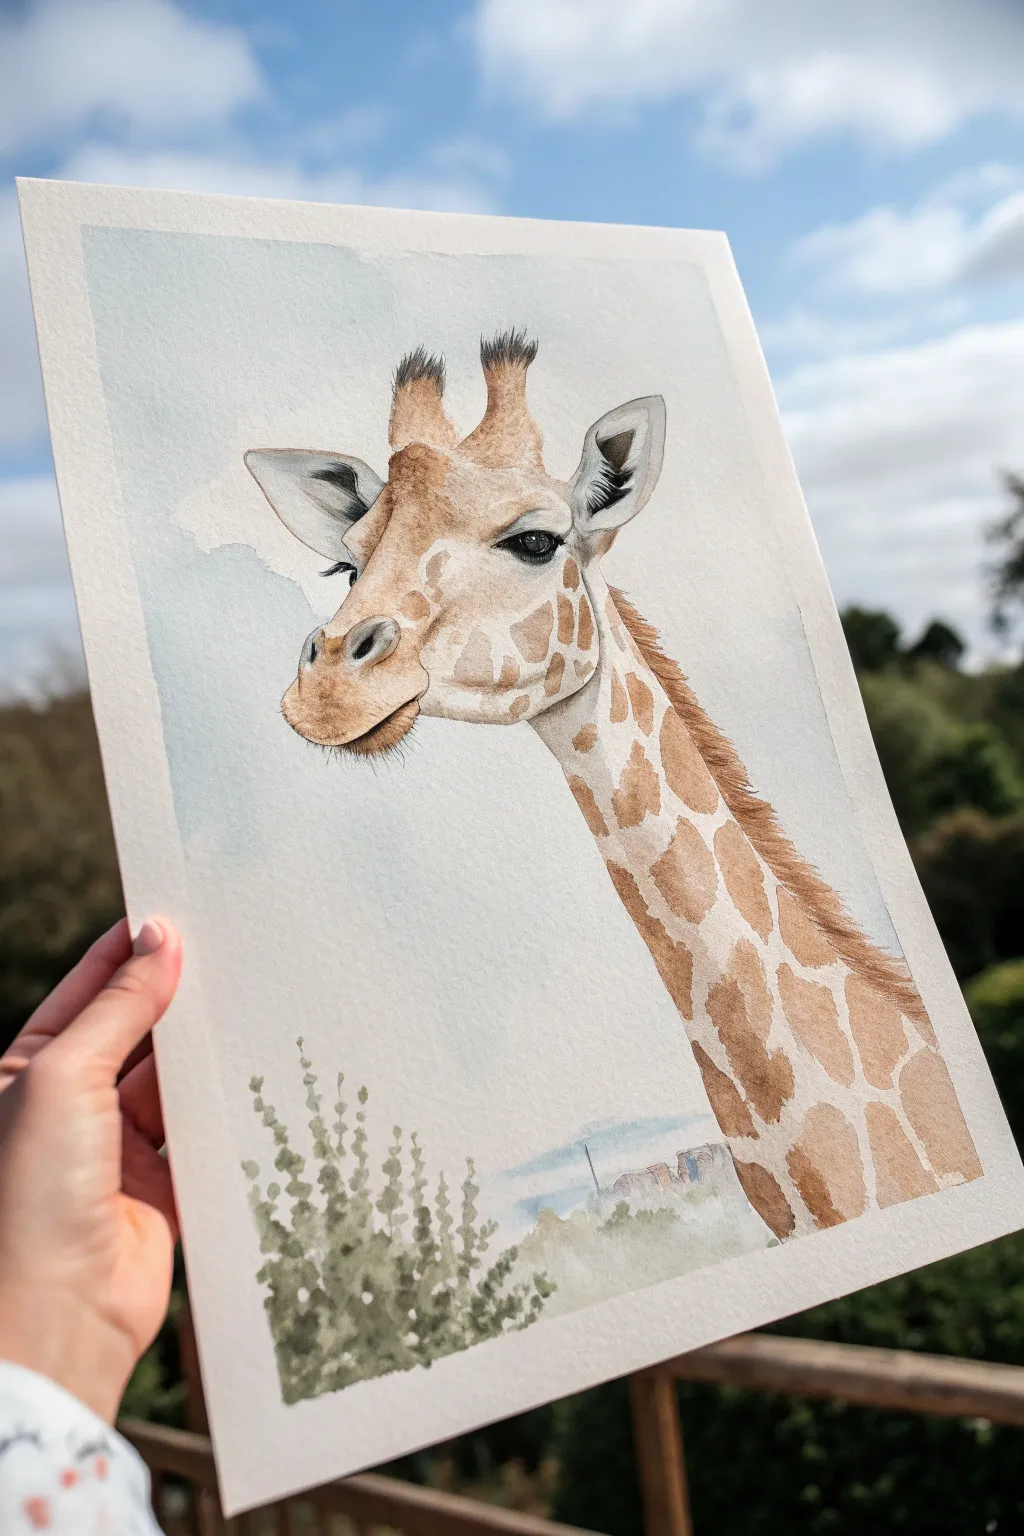
Whimsical Big-Eyed Giraffe Close-Up
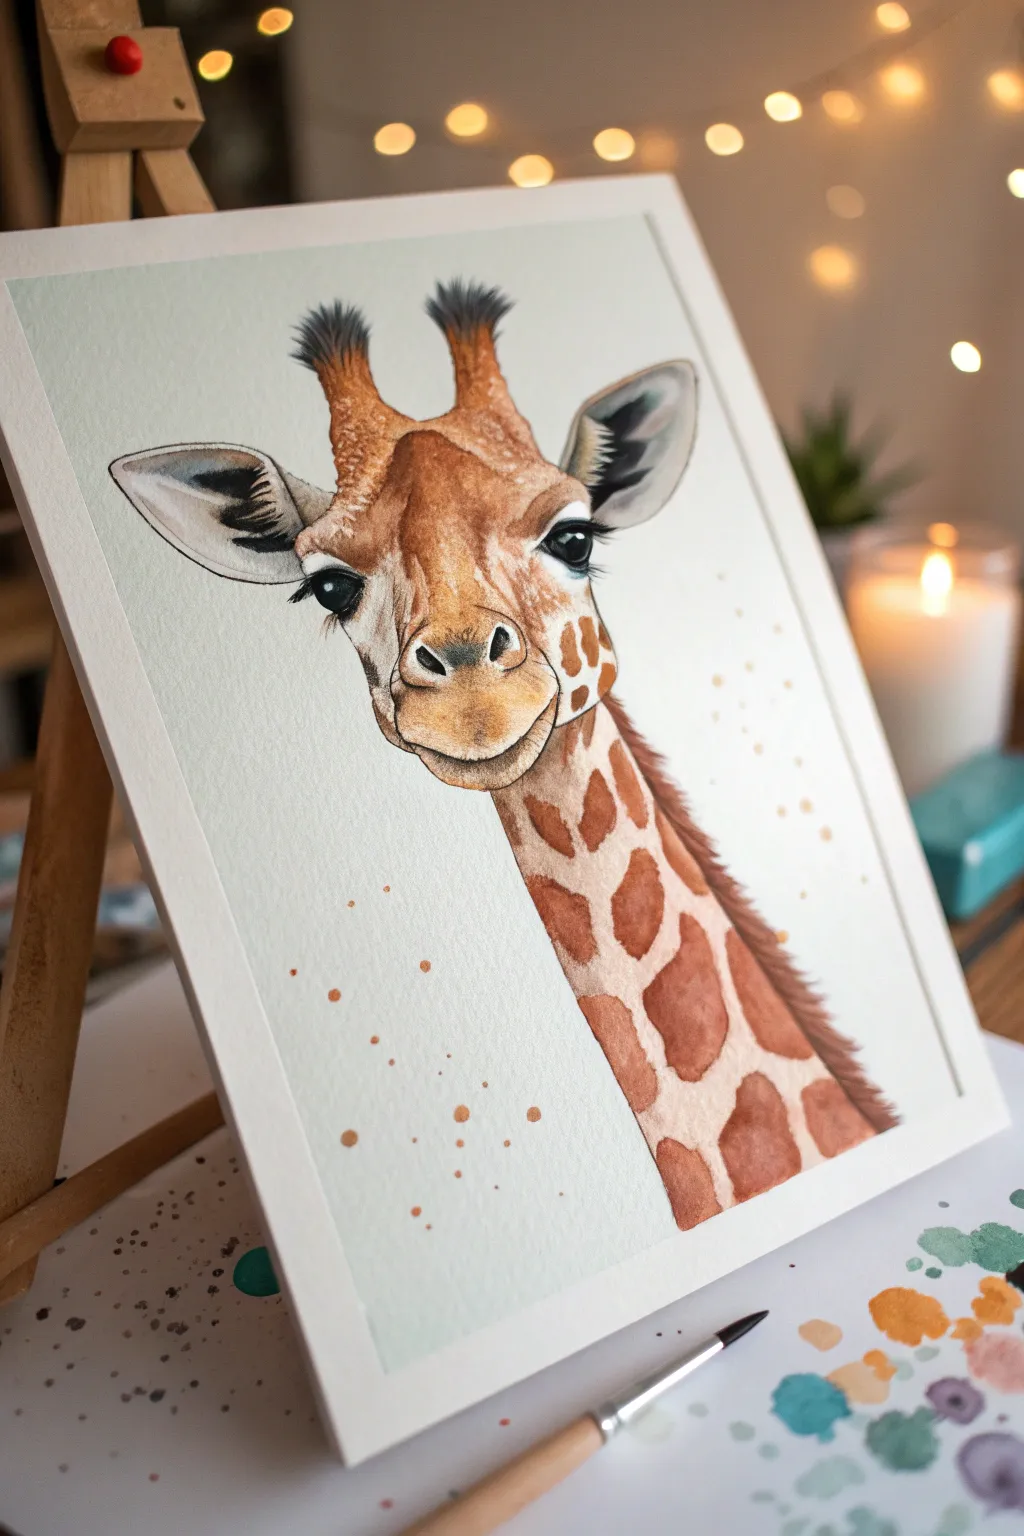
Capture the sweetness of a young giraffe with this detailed watercolor tutorial, focusing on gentle eyes and soft textures. This project balances precise wet-on-dry details with loose, watery washes to create a heartwarming animal portrait perfect for a nursery or art studio.
How-To Guide
Materials
- Cold press watercolor paper (300 gsm)
- Watercolor paints (Burnt Sienna, Yellow Ochre, Burnt Umber, Lamp Black, Payne’s Grey)
- Round brushes (sizes 2, 6, and 10)
- Fine liner brush (size 0 or 00)
- Pencil (HB) and kneaded eraser
- Masking fluid (optional)
- Two jars of water
- Paper towels
- Palette for mixing
Step 1: Sketch and Base Layer
-
Light Outline:
Begin by sketching the giraffe’s head shape lightly with an HB pencil. Focus on the distinct ossicones (horns), the large ears, and the gentle curve of the neck. Keep your lines faint so they don’t show through the transparent watercolor layers later. -
Mapping the Spots:
Lightly draw the irregular shapes of the spots running down the neck. Notice how they fit together like a puzzle with thin channels of white space between them. Don’t make them perfect circles; organic, jagged edges look more realistic. -
Initial Face Wash:
Mix a very dilute wash of Yellow Ochre and a touch of Burnt Sienna. Using a size 10 brush, apply this pale, warm tone across the entire face, avoiding the eyes and the very tip of the muzzle. Let this layer dry completely. -
Defining the Eyes:
While the face dries, switch to a small size 2 brush. load it with a rich mix of Lamp Black and Burnt Umber. Carefully paint the irises, leaving a small, crisp white circle in each eye for the highlight. This sparkle brings the giraffe to life immediately.
Muddy colors?
If your browns look dull or grey, let the paper dry completely between layers. Wet paint moving into wet paint on previous layers often causes ‘mud.’ Patience is key for vibrancy.
Step 2: Building Form and Color
-
Deepening the Face:
Once the initial wash is bone dry, mix a slightly stronger Burnt Sienna. Paint the darker areas of the face: the bridge of the nose, the forehead, and the base of the ossicones. Use a damp, clean brush to soften the edges of this paint, blending it into the lighter base layer. -
Painting the Spots:
For the characteristic pattern, mix a warm, reddish-brown using Burnt Sienna and Burnt Umber. Fill in the mapped-out spots on the neck. Vary the water-to-paint ratio slightly for each spot so they aren’t all a uniform flat color—some natural variation adds depth. -
Detailing the Ears:
The inside of the ears needs a shadowed look. Mix Payne’s Grey with a little brown to create a cool shadow tone. Paint the inner ear, leaving the fuzzy outer rim light. While the paint is still wet, you can drop in a tiny bit of darker grey near the base for depth. -
The Muzzle Texture:
The muzzle area is often lighter and textured. Use a very pale, watery brown-grey mix. Apply it around the nose area, then stipple (tap) with a mostly dry brush to suggest a velvety texture. -
Ossicone Details:
Paint the tops of the ossicones with dark brown or black, simulating the tufts of hair. Use short, upward flicks of your brush to mimic the hair texture rather than painting a solid shape.
Step 3: Fine Details and Mane
-
Adding the Mane:
Using a size 6 brush, paint the mane running down the back of the neck. Use a mix of Burnt Umber and Sienna. Apply the paint in short, diagonal strokes that follow the direction of hair growth, creating a jagged, hairy edge rather than a straight line. -
Eyelashes:
Switch to your finest liner brush or a size 0. Load it with creamy black paint. With a steady hand, paint long, sweeping eyelashes curving outward from the outer corners of the eyes. These should be thick at the base and taper to nothing. -
Refining Eye Contours:
Add a thin, dark line around the rim of the eyes to define the eyelids. Add a very faint shadow underneath the upper lid to make the eye look spherical. -
Nostrils:
Paint the nostrils using a dark, cool brown. They should be darkest at the center and fade out softly at the edges. Make sure they are symmetrical. -
Spot Shadows:
To make the spots look like they are sitting on the skin, you can glaze a very watery cool brown over the lower edge of a few spots, though this is optional. It adds a subtle 3D effect. -
Final Texture Touches:
I like to take a dry brush with a tiny amount of dark brown paint and drag it very lightly over the bridge of the nose or forehead. This ‘dry brushing’ technique catches the tooth of the paper and looks like short fur.
Highlight Hack
If you accidentally painted over the eye highlight, use a white gel pen or a dot of white gouache at the very end to restore that crucial sparkle.
Step 4: Atmospheric Finish
-
Splatter Effect:
Cover the main face area with a clean paper towel to protect it. Load a brush with watery brown or gold paint and tap the handle against your finger to flick tiny droplets onto the background area for a whimsical, loose feel. -
Background Specs:
If you want more controlled ‘dust motes’ or accents, use the tip of your brush to manually place small dots of gold or brown around the neck area, varying their size.
Step back and admire the soft, soulful expression you’ve created.
BRUSH GUIDE
The Right Brush for Every Stroke
From clean lines to bold texture — master brush choice, stroke control, and essential techniques.
Explore the Full Guide
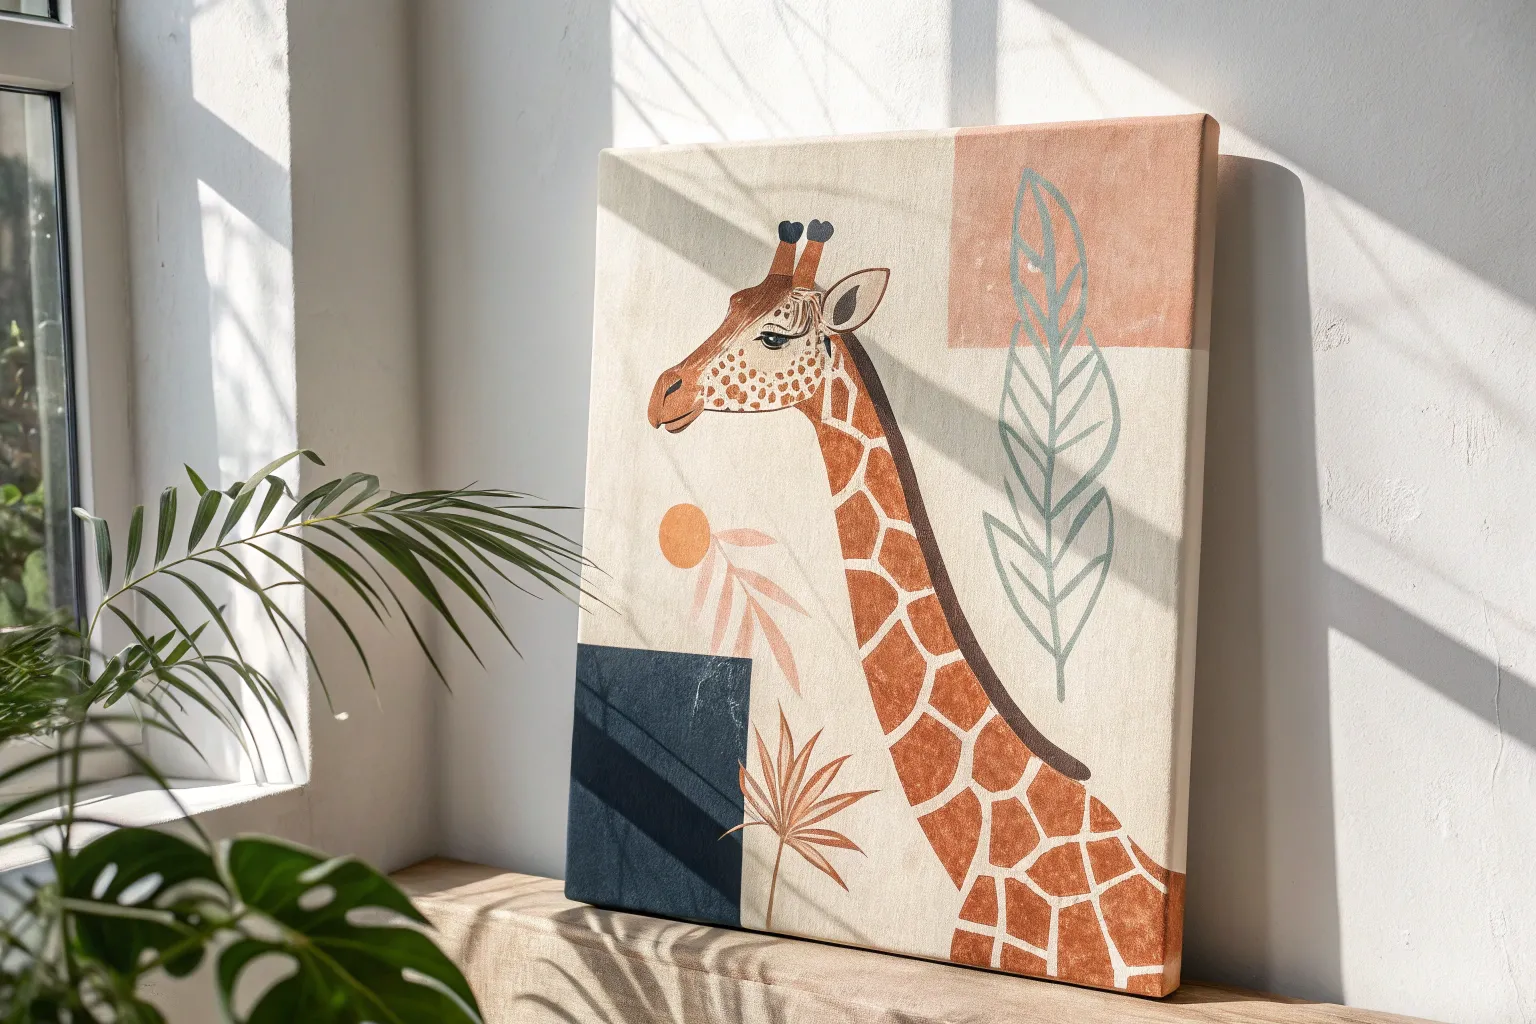
Easy Long-Neck Composition
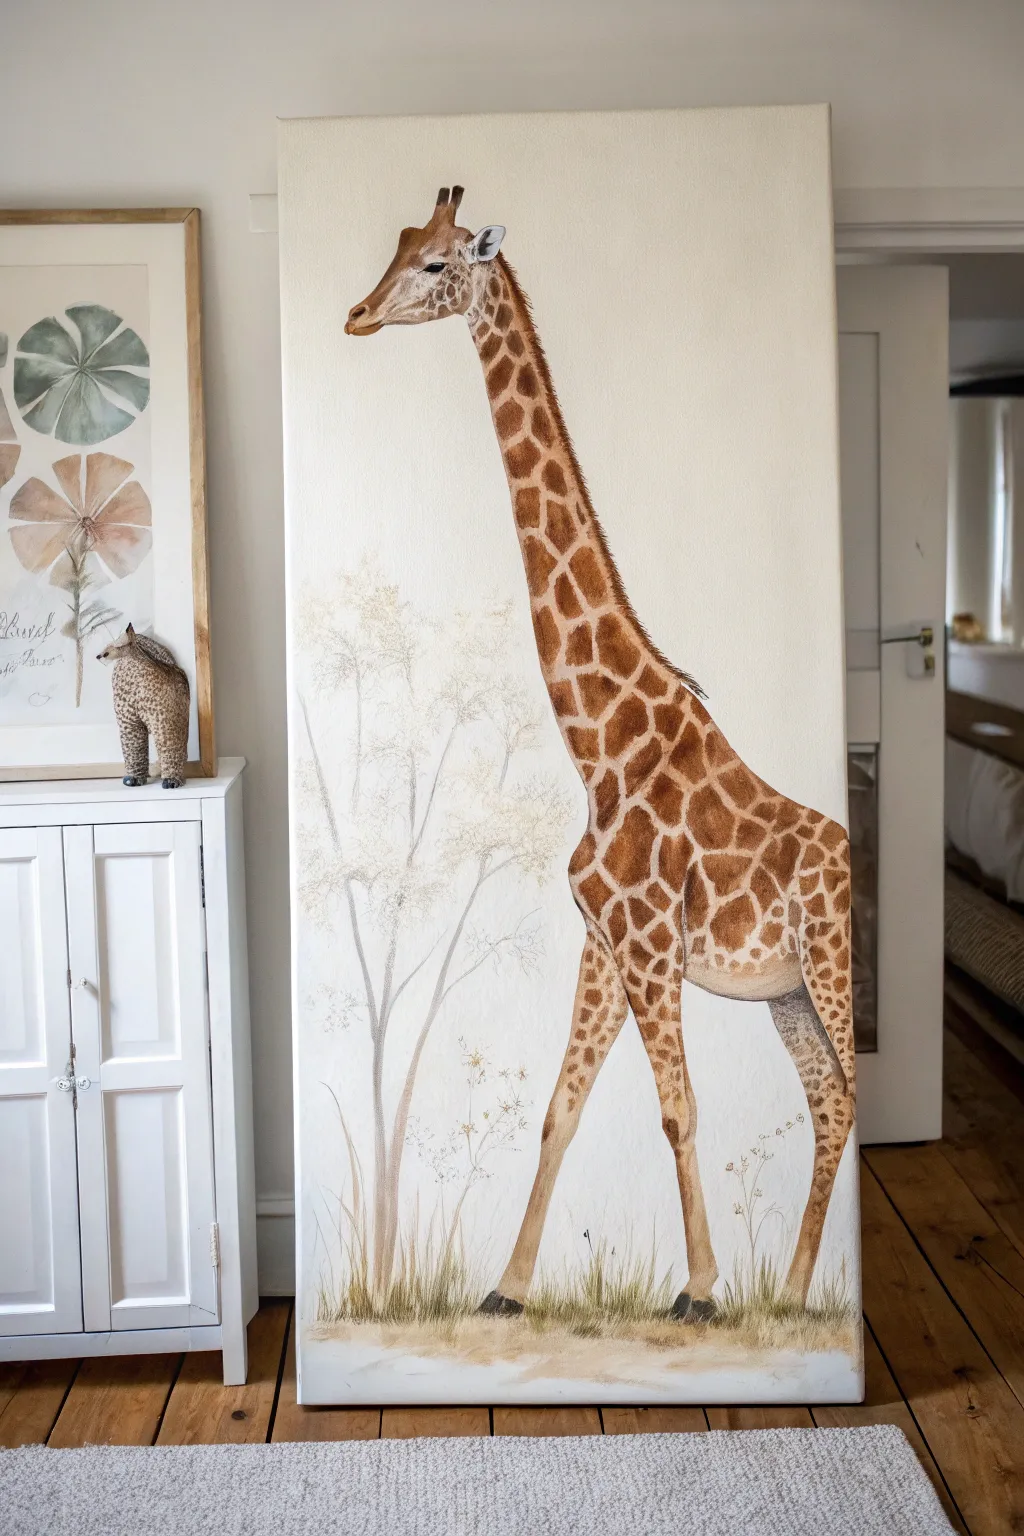
Capture the elegance of the savanna’s tallest resident on a uniquely proportioned canvas that emphasizes its height. This project uses soft washes and careful layering to create a realistic, textured coat pattern against a serene, minimalist background.
Step-by-Step
Materials
- Tall, narrow canvas (e.g., 12×24 or custom stretched)
- Acrylic paints (Burnt Sienna, Raw Umber, Yellow Ochre, Titanium White, Leaf Green)
- Matte medium or glazing liquid
- Pencil (HB) and eraser
- Large flat brush (1-inch)
- Medium filbert brush
- Small round detail brush (size 1 or 2)
- Palette and water cup
- Paper towels
Step 1: Sketching the Giant
-
Prepare the composition:
Since this is a tall, narrow format, visualize the giraffe’s neck taking up the central vertical space. Lightly mark the top of the head and the bottom of the hooves to ensure the full figure fits. -
Block in shapes:
Start with a simple oval for the body and a smaller modified triangle for the head near the top right. Connect them with a long, tapering neck that curves slightly for a natural look. -
Refine the anatomy:
Sketch the legs, paying attention to the knobby knees and the sloping back. The front legs should appear slightly longer and more robust than the hind legs. -
Outline the pattern:
Before painting, lightly map out the mosaic of spots. Make them larger and more irregular on the body, becoming smaller and tighter as they move up the neck towards the head.
Pro Tip: Softening Edges
For a dreamy look, while the spot paint is wet, gently blur the edges with a clean, damp brush. This mimics the soft texture of fur rather than hard, graphic shapes.
Step 2: Layering the Background
-
Mix a warm white:
Combine a large amount of Titanium White with a tiny touch of Yellow Ochre to create a warm, creamy off-white. This prevents the background from looking too stark. -
Apply the base coat:
Using the large flat brush, paint the entire background around your sketch. Don’t worry if you paint slightly over the pencil lines; acrylics are forgiving. -
Create the ghostly trees:
Mix a very watery wash of Raw Umber and White. Use a small round brush to paint faint, spindly tree trunks and branches in the lower left quadrant. Keep this extremely subtle so it looks distant. -
Dab in foliage:
With the same pale wash, gently steep or dab the brush to suggest clusters of leaves on the faint trees. Let this background layer dry completely.
Troubleshooting: Muddy Colors?
If your spots look muddy or flat, let them dry fully. Then, apply a bright glaze of pure burnt sienna over them to restore variety and warmth without losing the darks.
Step 3: Painting the Giraffe
-
Base coat the animal:
Mix Yellow Ochre with White to make a light tan color. Fill in the entire shape of the giraffe. This creates the ‘grout’ color between the spots. -
Paint the spots:
Mix Burnt Sienna with a touch of Raw Umber for a rich, reddish-brown. Using the filbert brush, standard filling in the spot shapes you sketched earlier. -
Vary the spot tones:
To add realism, lighten your brown mix slightly for spots on the sunlit side (the left) and darken it with more Umber for spots on the shadowed side (the right belly and legs). -
Detail the face:
Switch to your smallest brush. Paint the ossicones (horns) and ears. Use dark Umber for the eye and nostril, adding a tiny white highlight to the eye to bring it to life. -
Add a mane:
Using the small brush and dark brown paint, create short, flicking strokes all the way down the back of the neck to simulate the stiff mane hair. -
Create shadows:
Glaze a thin, watery layer of Raw Umber along the underside of the belly and huge neck muscles to give the animal three-dimensional form.
Step 4: Final Touches
-
Establish the ground:
Mix Yellow Ochre, White, and a tiny bit of Green. Paint upwards flicking strokes at the bottom of the canvas to create tall, dry grasses covering the hooves. -
Deepen the grass shadows:
Add a little brown to your green mix and add darker grass clump near the base of the hooves to anchor the giraffe to the ground. -
Add wildflowers (optional):
If you like, use the tip of your smallest brush to add tiny dots of white or yellow among the grass for subtle floral details. -
Final assessment:
Step back and check your values. If the background trees look too heavy, glaze over them with a thin layer of the background cream color to push them further back.
Hang your tall masterpiece in a narrow wall space to maximize the dramatic effect of the composition.
Watercolor Splash Spots
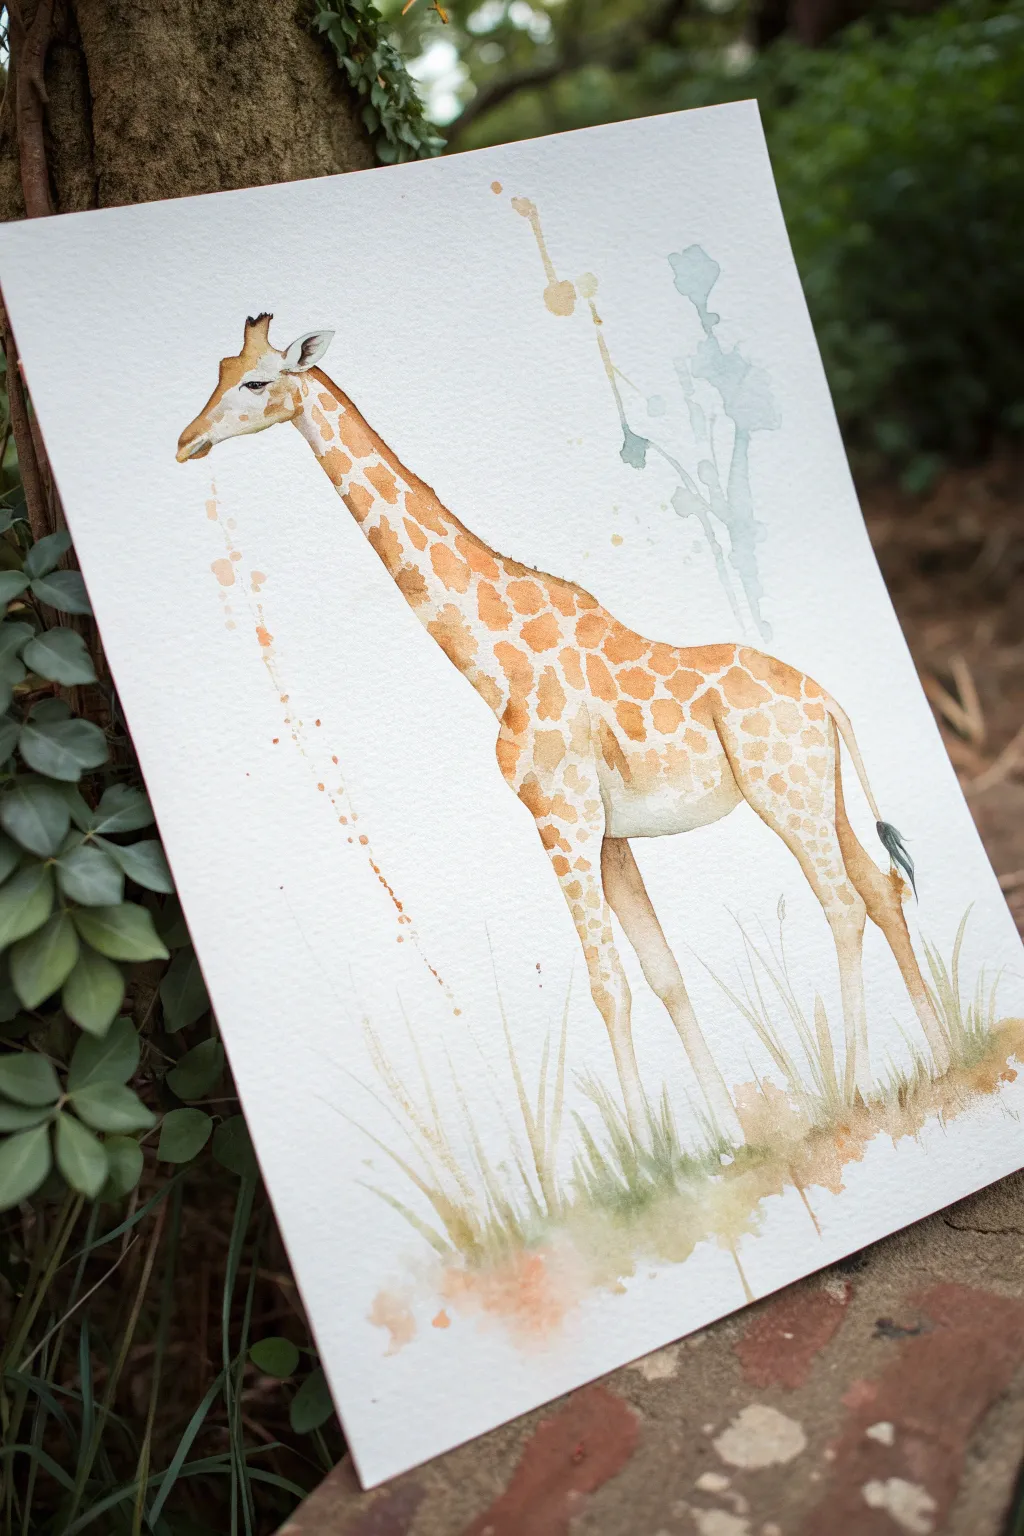
Capture the graceful elegance of a giraffe with this delicate watercolor tutorial that balances detailed spots with loose, artistic splashes. The soft warm tones and airy composition make this piece perfect for a nursery or a nature lover’s gallery wall.
Detailed Instructions
Materials
- Cold press watercolor paper (300 gsm)
- Watercolor paints (Yellow Ochre, Burnt Sienna, Raw Umber, Sap Green, Payne’s Grey)
- Round brushes (sizing approx. #2, #6, and #10)
- Pencil (HB or H for light lines)
- Kneadable eraser
- Palette for mixing
- Two jars of water
- Paper towels
Step 1: Sketching and Initial Wash
-
Light preliminary sketch:
Begin by lightly sketching the outline of the giraffe with an HB pencil. Focus on the long, sloping neck angle and the triangular shape of the head. Don’t press too hard, as you want the graphite to disappear under the paint later. -
Refining the anatomy:
Add the details for the legs, distinguishing the knobby knees and hooves. Sketch the ossicones (horns) and ears. Indicate the faint hairline of the mane running down the back of the neck. -
Mapping the spots:
Draw faint, irregular shapes for the iconic giraffe pattern. These should be larger on the body and gradually get smaller and closer together as they move up the neck towards the head. -
Base layer wash:
Mix a very watery, pale Yellow Ochre. Using your #10 brush, apply a light wash over the entire giraffe body, carefully avoiding the white underbelly area. Keep this layer wet and loose. -
Softening edges:
Before the yellow wash dries, dip a clean, damp brush along the bottom edge of the belly to soften the line into the white paper, creating a rounded, 3D effect.
Wet-on-Wet Magic
To get soft, fuzzy edges on the background ‘sky’ shapes, wet the paper with clean water first, then drop in your pale blue pigment and let it spread naturally.
Step 2: Painting the Spots and Details
-
Mixing the spot color:
Create a warm brown mix using Burnt Sienna with a touch of Yellow Ochre. You want a distinct color, but not too dark yet. -
Filling the pattern:
Using a #6 brush, fill in the sketched spots on the dry yellow base. Variate the saturation—add a little more water to some spots and more pigment to others for a natural, non-uniform look. -
Adding gradients to spots:
While the spots are still damp, touch the lower edge of larger body spots with a slightly darker Raw Umber mix. This adds subtle dimension and volume to the giraffe’s form. -
Facial details:
Switch to your #2 detail brush. Paint the eye carefully with a dark mix of Burnt Sienna and Payne’s Grey, leaving a tiny speck of white paper for a highlight. Add soft shading around the muzzle and ossicones. -
Defining the mane:
With the tip of the #2 brush and a rich brown mix, paint short, directional strokes along the back of the neck to suggest the bristly mane texture. -
Leg shadows and hooves:
Glaze a light cool brown (Raw Umber + tiny bit of Payne’s Grey) on the legs that are furthest away to push them into the background. Paint the hooves dark grey or black.
Step 3: Atmosphere and Splatter
-
Abstract grass base:
Mix a watery Sap Green with a touch of brown. Using upward flickering strokes with a #6 brush, create loose grass blades at the giraffe’s feet. Let them fade out naturally at the bottom. -
Adding earthy texture:
Drop some Burnt Sienna into the wet grass area near the hooves to ground the animal. Allow the colors to bleed together freely. -
Creating the splash effect:
Load a #6 brush with watery brown paint. Hold it over the paper near the giraffe’s chest and tap the handle against another brush to create controlled splatters that mimic dust or debris. -
Atmospheric blue accents:
Mix a very pale, watery blue-grey. Paint loose, amorphous shapes in the background behind the neck to suggest distant foliage or sky, letting the edges bloom and soften. -
Connecting splash lines:
Use a very fine rigger brush or the tip of your #2 brush to drag a few thin lines out from your splatters, connecting them vertically to suggest movement or tall dry grass. -
Final assessment:
Step back and check the contrast. If the painting looks too pale, add a second glaze of brown over the darkest shadow areas on the underbelly and neck spots once completely dry.
Go Metallic
Once the painting is dry, trace just a few of the central spots or the eye highlight with gold watercolor paint for a subtle, shimmering accent.
Allow your beautiful artwork to dry flat completely before framing it to admire those lovely textures.

PENCIL GUIDE
Understanding Pencil Grades from H to B
From first sketch to finished drawing — learn pencil grades, line control, and shading techniques.
Explore the Full Guide
Wet-on-Wet Watercolor Giraffe
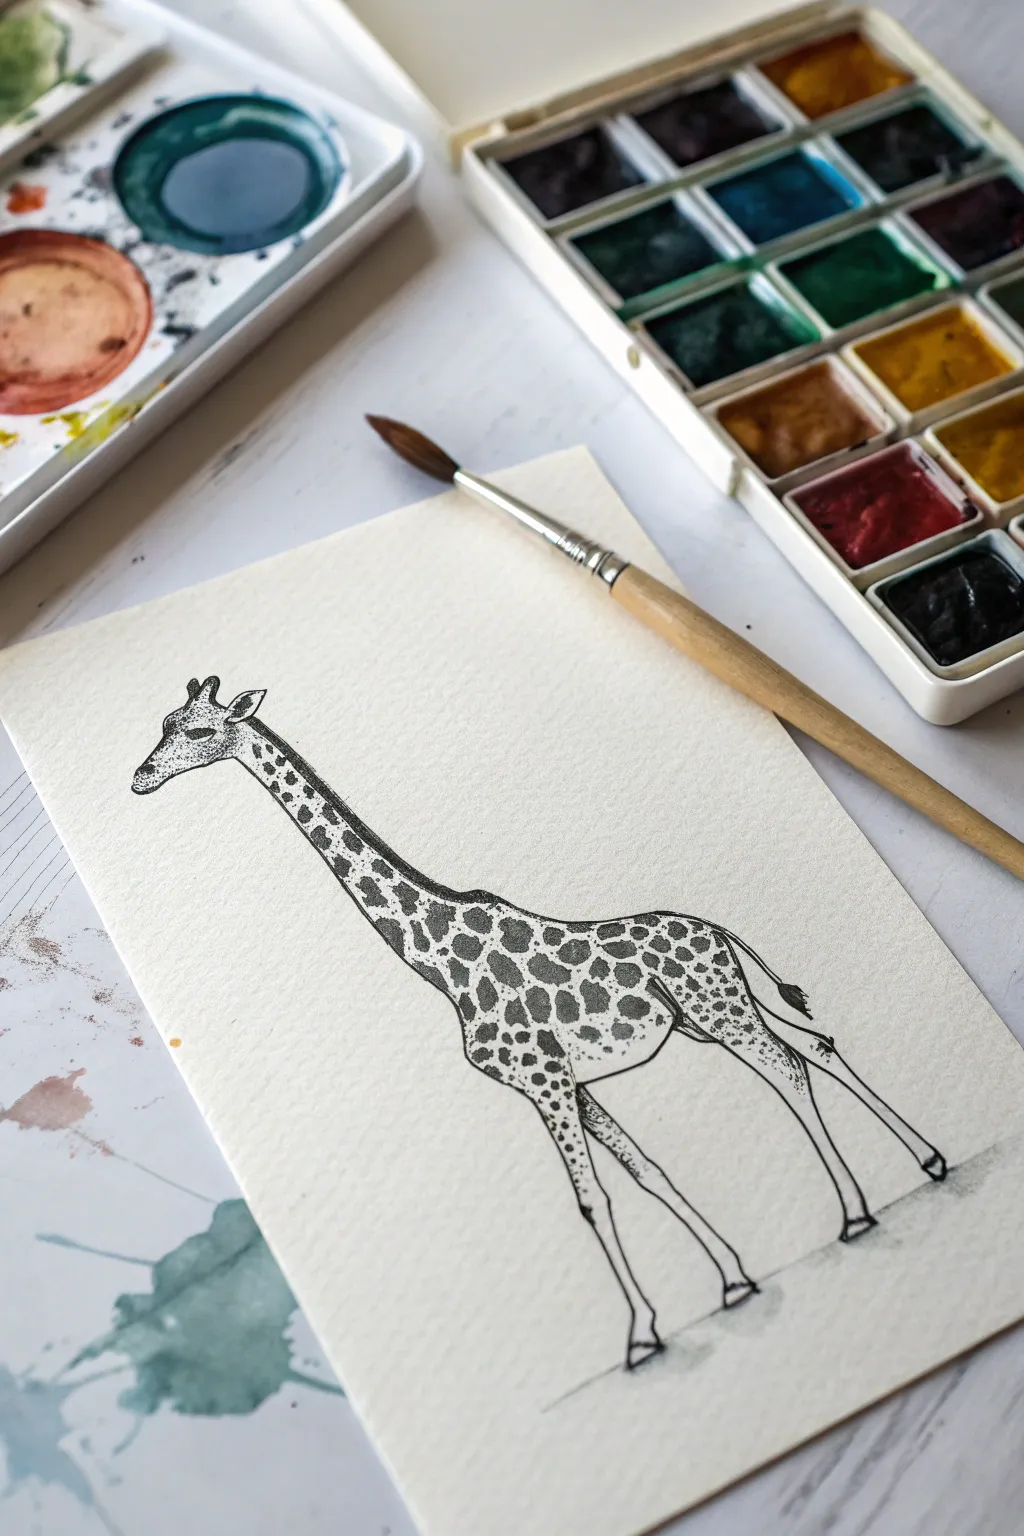
This elegant project combines the precision of ink illustration with the subtle texture of watercolor paper to bring a giraffe to life. The stark contrast between the crisp black lines and the warm, creamy paper creates a timeless, minimalist piece of art perfect for a nursery or study.
Step-by-Step Guide
Materials
- Cold-pressed watercolor paper (300gsm)
- Fine liner pens (sizes 0.1, 0.3, and 0.5)
- Pencil (HB or 2H)
- Kneaded eraser
- Watercolor paints (Payne’s Gray or a diluted Black)
- Round watercolor brush (size 4 or 6)
- Jar of water
Step 1: Sketching the Framework
-
Establish the height:
Begin lightly with your HB pencil. Draw a gentle diagonal line to establish the angle of the giraffe’s neck, ensuring you leave room for the head at the top left and the legs at the bottom right. -
Shape the body:
Sketch an oval shape for the main torso. Attached to this, draw the long, tapering cylinder of the neck. Don’t worry about perfect anatomy yet; just get the main masses down. -
Leg placement:
Map out the legs using straight lines first to get the angles right. The front legs should appear slightly longer, and the back legs should have the characteristic ‘hock’ joint bending backward. -
Detailing the head:
Refine the head shape. It should look somewhat like a elongated triangle. Add two small ossicones (the horn-like bumps) on top and outline the ears just below them. -
Refining the contour:
Go over your sketch with slightly more confidence, smoothing out the connections between the neck and back. Erase any distracting guide lines so you have a clean outline to work with.
Ink Advice
Ensure your fine liner is ‘waterproof’ or ‘archival’ before painting. If not, paint the grey spots first, let dry, and then ink over them.
Step 2: Inking the Outline
-
Start the ink work:
Using your 0.3 fine liner, carefully trace the outer contour of the giraffe. Use short, deliberate strokes rather than one continuous shaky line to give it a slightly organic feel. -
Facial features:
Switch to a 0.1 pen for the delicate facial features. Draw the eye with a heavy lid, the nostril, and the mouth line. Leave a tiny white highlight in the eye for life. -
Adding the tail:
Draw the thin tail extending from the rear, ending it with a tuft of hair. Use quick flicking motions with the pen to simulate the texture of the hair at the tip. -
Dry and erase:
Wait at least five minutes to ensure the ink is completely set. Then, gently use the kneaded eraser to lift all remaining pencil marks, leaving just the clean black ink.
Step 3: Creating the Spots
-
Mapping pattern areas:
Visualize the pattern flow. The spots are largest on the body and get smaller and more tightly packed as they move up the neck. -
Drawing body spots:
With the 0.5 pen, draw irregular polygon shapes on the main body. They shouldn’t be perfect circles or squares; think of them like cracked paving stones. -
Neck pattern:
Move up the neck, drawing smaller, more rectangular spots. Leave consistent channels of whitespace between them to represent the ‘grout’ lines of the coat. -
Leg details:
Fade the spots out as you go down the legs. The spots should become tiny speckles or dots near the knees and disappear almost entirely on the lower legs.
Make It Pop
Instead of grey paint, fill the spots with a warm, diluted jagged ochre or burnt sienna watercolor for a splash of realistic color.
Step 4: Texture and Wash
-
Stippling texture:
For a textured look, I like to use the 0.1 pen to add tiny dots (stippling) inside the darker spots, especially near the bottom edges of each spot to suggest volume. -
Prepare the grey wash:
Mix a very watery puddle of Payne’s Gray or Black watercolor. You want a ‘dirty water’ consistency—very transparent and pale. -
Filling the spots:
Using the round brush, carefully paint inside the inked spots. Don’t worry if you go slightly outside the lines or if the saturation varies; this blotchiness adds character. -
Adding shadow:
While the paint is still slightly damp, drop a tiny bit more pigment into the bottom-right corners of the larger body spots to create a 3D shading effect. -
Grounding the figure:
Use a very dry brush with a hint of grey paint to swipe a quick, horizontal shadow under the hooves, anchoring the animal to the ground.
Once the paint is fully dry, you will have a sophisticated illustration ready to be framed
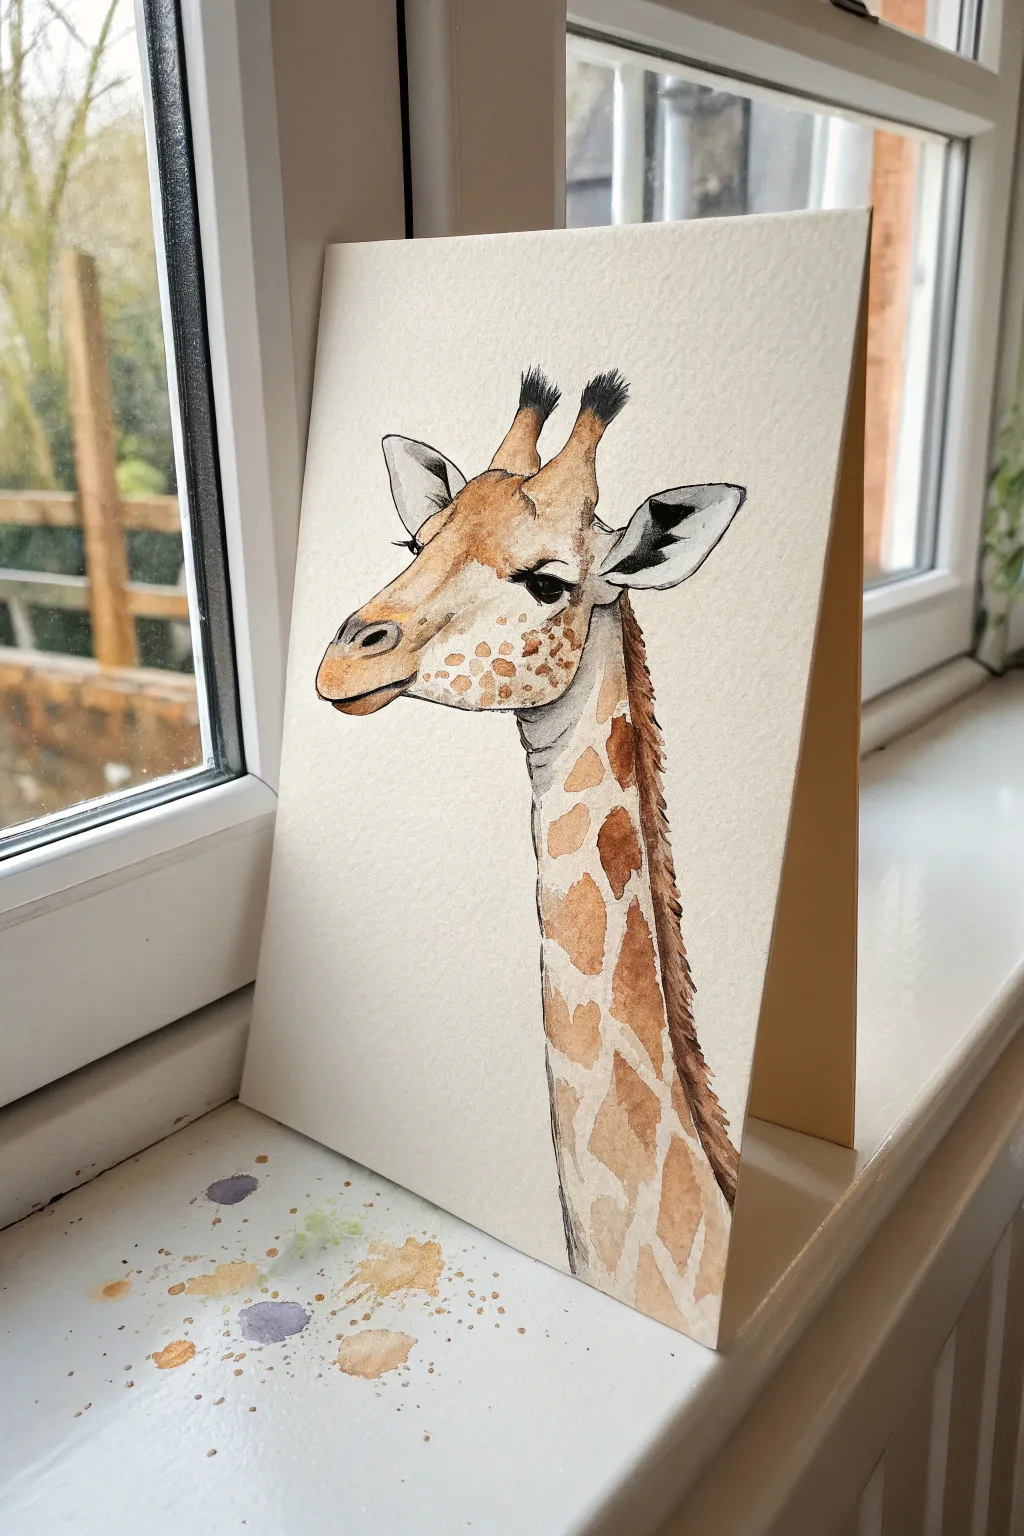
Soft Pastel Giraffe in Warm Neutrals
Capture the serene expression of a giraffe using soft watercolor washes and warm, neutral tones. This project emphasizes delicate layering to build the characteristic ossicones and patterned neck against a subtle sky background.
Step-by-Step Guide
Materials
- Cold press watercolor paper (300 gsm)
- Watercolor paints (Yellow Ochre, Burnt Sienna, Burnt Umber, Sepia, Ultramarine Blue, Payne’s Grey)
- Round watercolor brushes (Size 8 for washes, Size 4 and 2 for details)
- Sketching pencil (HB) and kneaded eraser
- Masking fluid (optional)
- Two jars of water
- Paper towels
Step 1: Drawing and Background
-
Initial Sketch:
Lightly sketch the giraffe’s outline using an HB pencil. Focus on the triangular shape of the head, the placement of the ossicones (horns), and the long elegant neck. Keep the lines faint so they don’t show through the paint. -
Refine Features:
Detail the eyes, nostrils, and the geometric pattern of the spots running down the neck. Pay close attention to the ears; the inner ear needs specific shapes for depth later. -
Sky Wash:
Wet the sky area around the giraffe with clean water. Drop in a very dilute mix of Ultramarine Blue and a touch of Payne’s Grey. Let the pigment bloom naturally, leaving some white paper showing for cloud-like effects. -
Lower Foliage Base:
While the bottom of the paper is dry, lightly stipple a mix of muted greens (sap green with a touch of brown) to suggest bush shapes in the bottom left corner. Keep this abstract and loose.
Muddy colors?
If your brown spots look muddy, you might be overworking wet layers. Wait for the first layer of ochre to be bone dry before painting the darker spots on top.
Step 2: Base Layers
-
First Skin Tone:
Mix a watery wash of Yellow Ochre with a tiny hint of Burnt Sienna. Apply this pale warm tone over the giraffes face and neck, carefully avoiding the white of the eyes and the lightest highlights on the nose. -
Spot Foundation:
While the neck base is dry, mix a slightly stronger Burnt Sienna. Paint the shapes of the spots. Don’t make them solid blocks of color; let some water vary the intensity within each spot for a natural look. -
Ossicone Warmth:
Apply the Burnt Sienna mix to the ossicones, making the tips darker and the base blended into the head color. -
Ear Shadowing:
Use a dilute greyish-brown to paint the inner shadows of the ears, leaving the hairy edges light.
Add Softness
To replicate the gentle look of the image, take a clean, damp brush and soften the hard edges of the spots on the neck while the paint is still slightly moist.
Step 3: Building Depth and Texture
-
Deepening the Spots:
Once the first layer of spots is dry, glaze a darker Burnt Umber over parts of them, particularly on the right side of the neck to suggest shadow and form. -
Facial Contours:
Model the face by adding a tan mix (Yellow Ochre and Sepia) under the cheekbone, around the eye socket, and under the jawline to give the head three-dimensional volume. -
Snout Details:
Paint the nostrils with a dark Sepia, keeping the edges soft. Add a little texture to the snout with small, stippled dots of Burnt Sienna. -
The Mane:
Using your size 4 brush, create the mane. Use short, directional strokes with Burnt Sienna and Burnt Umber to mimic coarse hair sticking up along the back of the neck.
Step 4: Final Details
-
The Eye:
Paint the eye using a thick mixture of Sepia or Black. Leave a tiny speck of white paper for the catchlight to bring the animal to life. Add distinct eyelashes with a fine liner brush. -
Ear Tufts:
Use a small brush with dark grey to flick in the dark tufts of hair at the tips of the inner ears. -
Refining Edges:
Go back over the jawline and chin with fine, short strokes to suggest fur texture rather than a solid line. -
Foliage Foreground:
Strengthen the green bush in the foreground with darker, more defined stippling to ground the composition. -
Horizon Line:
If desired, paint a very faint, distant horizon line in blue-grey to intimate a landscape far behind the subject.
Enjoy the calm presence your watercolor giraffe brings to the room


Pencil Sketch With Detailed Spots
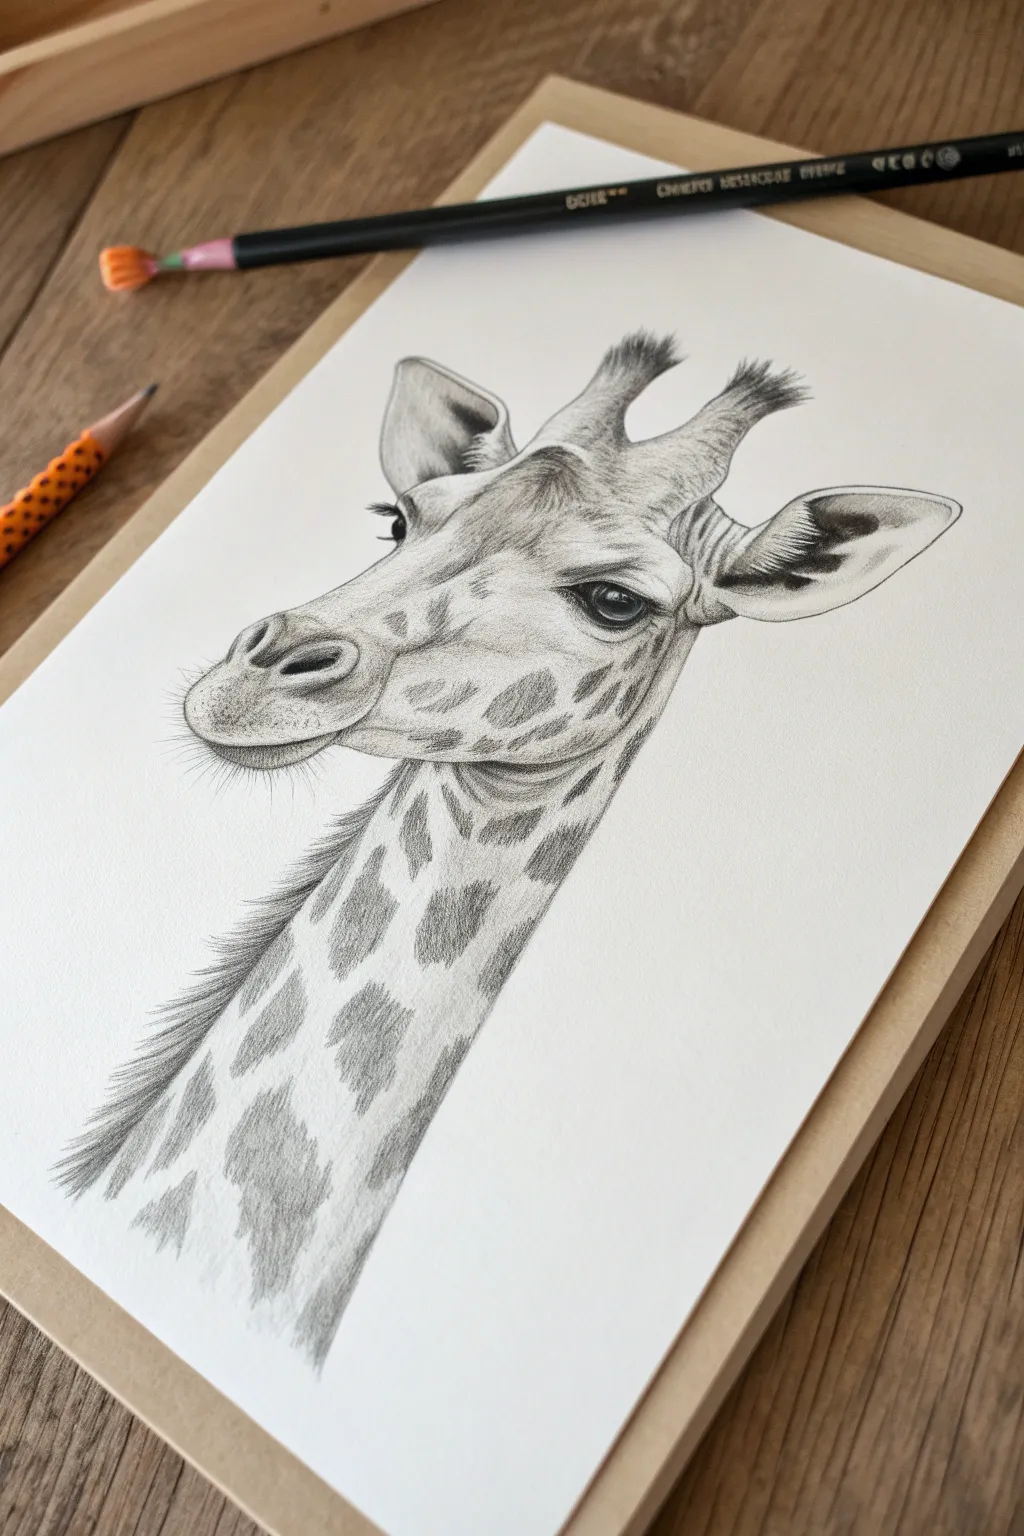
Capture the gentle grace of a giraffe with this highly detailed pencil sketch that focuses on realistic texture balance. You’ll layer graphite to build up dimension around the ossicones and spots, resulting in a soft yet striking monochromatic portrait.
Step-by-Step
Materials
- High-quality drawing paper (smooth or vellum finish)
- Graphite pencils (HB, 2B, 4B, 6B)
- Mechanical pencil (0.5mm HB for fine details)
- Kneaded eraser
- Blending stump or tortillon
- Fine-tip eraser (or eraser pencil)
- Drafting masking tape
Step 1: Structural Outline
-
Map the basic shapes:
Start with a light HB pencil to lay down the foundational geometry. Use an oval for the head and a long, tapering rectangle for the neck. Draw a line down the center of the face to help with symmetry. -
Refine the silhouette:
Connect your shapes to form the giraffe’s profile. Sketch the two ossicones (horns) at the top, ensuring they curve slightly inward. Add the large, teardrop-shaped ears just below the horns. -
Place facial features:
Position the large eyes wide on the sides of the head. Sketch the snout, nostrils, and mouth line. Lightly map out the irregular shapes of the spots running down the neck and across the cheeks.
Fur Texture Tip
Don’t shade the spots solidly. Use tiny, circular scumbing motions with your pencil to create a feeling of dense, short hair texture within the dark areas.
Step 2: Shading and Form
-
Establish the eyes:
Using a 4B pencil, darken the pupils and iris, leaving a tiny white circle for the catchlight to bring the giraffe to life. Shade the eyelids heavily to create depth. -
Define the snout:
Work on the nose specifically, shading the insides of the nostrils with a 6B pencil for deep blacks. Stipple small dots around the muzzle to suggest the coarse texture of the whiskers. -
Contour the face:
Switch to a 2B pencil to shade the dips and curves of the facial structure. Shade under the eyes and along the jawline. Use a blending stump to smooth these shadows for a soft skin look. -
Render the ossicones:
Draw the tufts of hair at the very tips of the horns using quick, short strokes. Shade the cylindrical base of the horns to make them look rounded and solid.
Step 3: Detailed Texture Work
-
Fill the spots:
Begin filling in the geometric spots on the neck. I prefer to use a scribbling motion rather than solid shading here; this mimics the look of fur texture within the darker patches. -
Create fur direction:
Between the spots, use your mechanical pencil to draw very fine lines depicting the lighter fur. Ensure the stroke direction flows down the neck, following the animal’s muscle structure. -
Darken the mane:
Along the back of the neck, draw the mane. Use long, firm strokes with a 4B pencil, flicking outward to create wispy, realistic hair ends that stand distinct from each other. -
Add ear details:
Darken the inner ear recesses significantly. Use your fine-tip eraser to pull out thin white lines against the dark shading to represent the fluffy inner ear hairs catching the light. -
Refine spot edges:
Go back over the edges of your neck spots. Make them slightly irregular and soft—giraffe spots aren’t perfect shapes, they look more organic with fuzzy borders.
Background Idea
For a ‘scientific illustration’ vibe, lightly sketch a faint map of the African savanna or some acacia leaves behind the head using a hard H pencil.
Step 4: Final Polish
-
Deepen contrast:
Take your 6B pencil and revisit the darkest areas: under the chin, the pupils, and the deepest folds of the ear. High contrast is what makes the drawing pop off the page. -
Add whiskers:
With a very sharp mechanical pencil or a hard H pencil, create the long, delicate whiskers extending from the muzzle. These should be confident, sweeping lines. -
Final clean up:
Use your kneaded eraser to tap away any smudges on the white background space to ensure a crisp presentation.
Now step back and admire the soulful expression you have captured in your giraffe portrait
Ink Outline With Watercolor Fill
Capture the gentle spirit of a giraffe with this classic combination of crisp ink lines and soft watercolor washes. This project creates a stunning folded greeting card that balances illustrative detail with artistic looseness.
Step-by-Step Tutorial
Materials
- Heavyweight watercolor paper (300gsm cold press recommended)
- Fine liner pens (sizes 005, 01, and 05, waterproof pigment ink)
- Watercolor paints (Yellow Ochre, Burnt Sienna, Burnt Umber, a touch of Lamp Black)
- Round watercolor brushes (size 4 and 8)
- Pencil (HB or H) and kneadable eraser
- Bone folder (for creasing the card)
- Clean water and paper towels
Step 1: Preparation and Sketching
-
Preparing the Card Base:
Begin by cutting your watercolor paper to twice the desired width of your finished card. Score the center line gently with a bone folder and fold it crisp to create a sturdy standing base. -
Blocking the Shape:
Using a hard pencil like an H or HB, very lightly sketch the basic shapes. Draw an oval for the head and a long, tapering rectangle for the neck. Keep your lines faint so they won’t show later. -
Refining the Features:
Add the specific details: sketch the ossicones (the horn-like bumps), the large ears, and the muzzle. Pay close attention to the heavy eyelids and long lashes that give giraffes their distinct expression. -
Mapping the Pattern:
Lightly outline where the spots will go. The spots on the neck should be larger and somewhat geometric, fitting together like a puzzle, while the spots on the face fade into smaller freckles.
Step 2: Inking the Outline
-
Main Contours:
Switch to your waterproof 01 fine liner. Carefully trace the main outline of the giraffe. Use broken, slightly jagged lines along the back of the neck to suggest the mane texture. -
Facial Details:
Use a finer 005 pen for the delicate facial features. Draw the long eyelashes with quick, outward flicks and define the nostrils and mouth with controlled curves. -
Darkest Areas:
Fill in the pupils of the eyes completely black, leaving a tiny white circle for the catchlight to bring the giraffe to life. Also darken the inside depths of the ears. -
Adding Texture:
Add gentle hatching lines under the jaw and inside the ears to suggest shadow. Don’t outline every single spot on the neck; leaving some open creates a softer, more painterly look. -
Clean Up:
Once you are certain the ink is completely dry—I usually give it at least 15 minutes to be safe—gently erase all your pencil guides with a kneadable eraser.
Ink Smearing?
If your ink bleeds when painting, your pen isn’t waterproof. Test pens on a scrap first! If you lack waterproof pens, paint the watercolor first, let it dry fully, then add ink.
Step 3: Watercolor Application
-
Base Wash:
Mix a very watery wash of Yellow Ochre. Paint the entire giraffe shape, avoiding the eyes and the darkest inner ear parts. Keep this layer pale and transparent. -
Painting the Spots:
While the base is dry, mix Burnt Sienna with a touch of Burnt Umber. Paint the patches on the neck, letting the color pool slightly in some areas for natural variation. -
Softening Edges:
For the spots on the face, use a damp brush to soften the edges of the paint, creating a freckled appearance rather than hard geometric shapes. -
Deepening Shadows:
Mix a darker brown using Burnt Umber and a tiny touch of black or blue. Apply this to the mane, the tips of the ossicones, and the shadow side of the neck to create volume. -
Final Contrast:
Add a second layer of the dark brown to the very darkest points, such as the nostrils and the deepest folds of the ear, to make the illustration pop. -
Spatter Effect (Optional):
To mimic the artistic look in the reference, load your brush with watery paint and tap it against your finger to create splatters at the base of the card.
Pro Tip: Lost & Found Lines
Don’t connect every ink line. Breaking the line on the sun-lit side of the neck makes the drawing feel lighter and more dimensional.
Allow your card to dry flat completely before writing your message inside
Geometric Spot Mosaic Giraffe
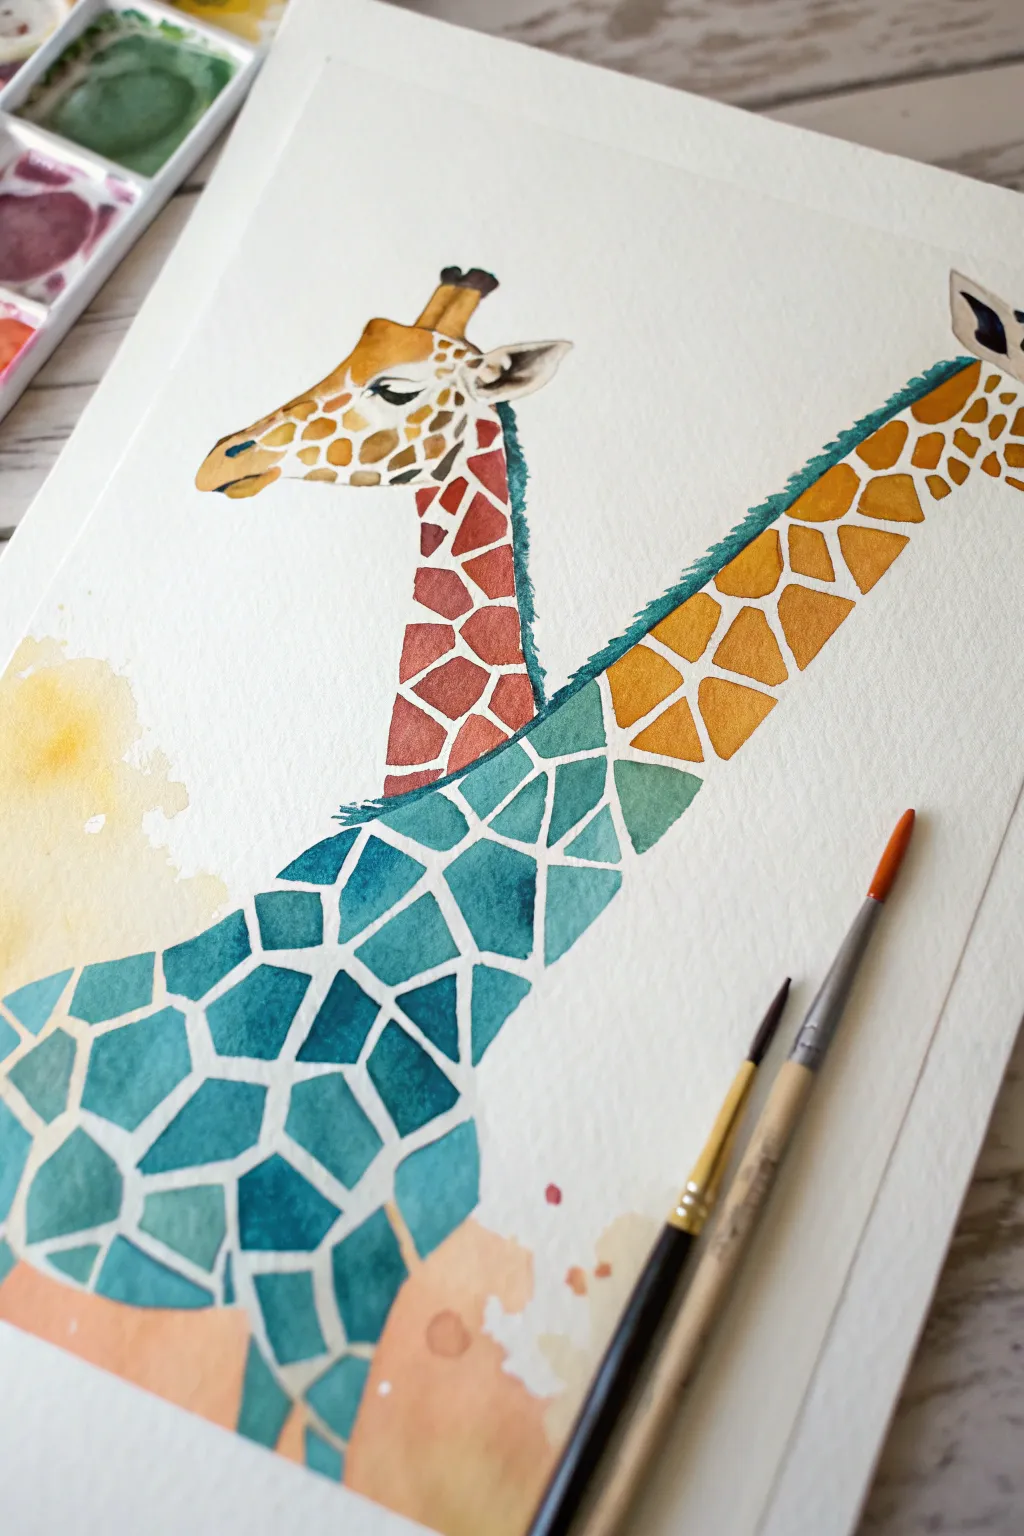
Reimagine the classic giraffe with this vibrant watercolor project that blends realism with abstract geometric design. By swapping traditional random spots for bold blue, teal, and orange mosaic tiles separated by crisp white lines, you’ll create a striking, modern wildlife portrait.
Detailed Instructions
Materials
- Cold press watercolor paper (140lb/300gsm)
- Watercolor paints (teal, turquoise, burnt sienna, yellow ochre, Payne’s gray, burnt umber)
- Round watercolor brushes (size 4 and 8)
- Small detail brush (size 0 or 1)
- Pencil (HB or H)
- Masking fluid (optional but helpful)
- Eraser
- Clean water
Step 1: Sketching the Mosaic Structure
-
Outline the giraffes:
Begin by lightly sketching the outlines of two giraffes. Place the larger giraffe in the foreground, swooping across the bottom left. Position the second giraffe’s neck and head rising behind it in the center. Keep your pencil lines very faint so they don’t show through the final paint. -
Sketch the face details:
For the giraffe heads, sketch the eyes, ossicones (horns), ears, and snouts with a bit more detail. These areas will be painted more realistically than the bodies. -
Map the geometric grid:
Instead of drawing round organic spots, draw a network of geometric shapes—triangles, trapezoids, and polygons—filling the necks and bodies. Leave narrow, consistent gaps between each shape to serve as the white ‘grout’ lines.
Clean Lines Pro Tip
Painting around white space is tricky! Use sketching gum (masking fluid) to draw the grid lines before painting. Rub it off at the end for perfectly crisp white boundaries.
Step 2: Painting the Foreground Giraffe
-
Mix your cool palette:
Prepare a range of cool tones for the front giraffe. Mix a deep teal using Phthalo Blue and Viridian, a lighter turquoise, and a darker Payne’s gray-blue for shadow areas. -
Fill the first few tiles:
Start at the base of the neck. load your size 4 brush with the deep teal. Carefully fill in a geometric shape, ensuring the paint doesn’t touch the pencil boundary lines. The white paper gap is crucial. -
Vary the hues:
As you move painting shape by shape, alternate between your blue, teal, and green mixtures. Wet a tile with clean water first, then drop in two slightly different colors to let them bleed together for a soft, mottled look within the hard geometric edge. -
Create volume with value:
To make the neck look round, use darker, more saturated teals on the left side (the shadowed edge) and lighter, more watered-down washes for the shapes in the center and right. -
Add mane texture:
Along the back of the neck, paint the mane using short, bristly strokes in a deep blue-green. Unlike the smooth geometric body, let the edge of the mane be slightly jagged and organic.
Level Up: Metallic Grout
Instead of leaving the lines white, fill the gaps between spots with gold metallic watercolor or a gold paint pen after the painting dries for a luxurious cloisonné effect.
Step 3: Painting the Background Giraffe
-
Mix warm earth tones:
For the second giraffe, mix warm colors: Burnt Sienna, Yellow Ochre, and a touch of Burnt Umber. You want a gradient from golden yellow to deep rust red. -
Paint the geometric spots:
Using the same technique as before, fill the geometric shapes on the second giraffe’s neck. Use the lighter yellow-ochre mixes near the top and transition to deeper reddish-browns as you move down the neck to create depth. -
Connect the mane:
Paint a teal mane on this orange giraffe as well. This color choice visually ties the two animals together. Use the tip of your brush to flick small lines outward, suggesting hair texture.
Step 4: Refining Heads and Details
-
Paint the faces nicely:
Switch to a smaller brush for the faces. Use wet-on-dry technique here for control. Paint the ossicones and snouts with yellowish-browns, blending gently. -
Define the eyes:
The eyes bring the painting to life. Use a very dark brown or black mixture. Leave a tiny speck of white paper unpainted in each eye for the highlight, or add it later with white gouache. -
Add facial markings:
For the face pattern, transition from the sharp geometric shapes of the neck to softer, more organic spots on the cheeks. Soften the edges with a clean, damp brush.
Step 5: Final Touches and Atmosphere
-
Add a soft background wash:
To place the giraffes in an environment without distracting detail, wet a patch of paper in the bottom left corner. Drop in some very watery yellow and pale orange paint, letting it bloom softly behind the blue giraffe. -
Clean up edges:
Once everything is completely bone dry, erase any visible pencil lines in the white gaps. If any paint crossed a line where it shouldn’t have, you can gently lift it with a damp brush or touch it up with opaque white paint.
Step back and admire how the crisp geometry interacts with the fluid watercolor to give these gentle giants a sophisticated new look
Negative Space Giraffe Shape
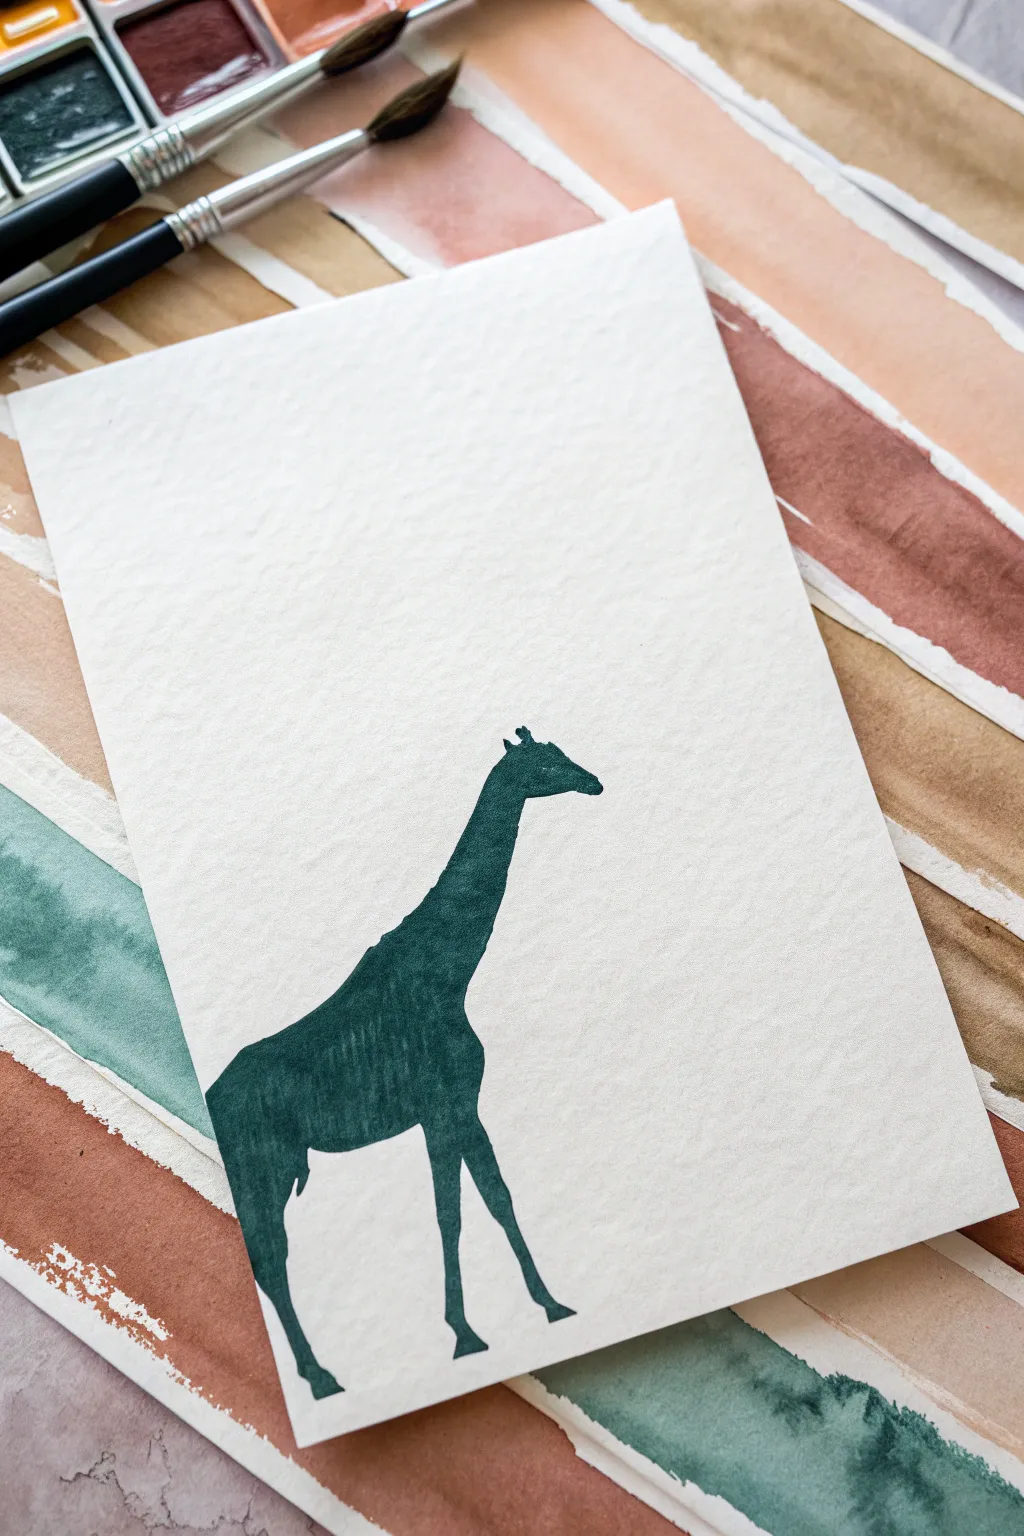
This minimalist art project uses clean lines and saturated color to create a striking giraffe profile. The contrast of deep, forest green watercolor against textured white paper makes for a modern and sophisticated piece.
How-To Guide
Materials
- Cold press watercolor paper (300 gsm)
- Deep forest green watercolor paint
- Small round synthetic brush (size 2 or 4)
- Fine liner brush (size 0 or 00)
- Pencil (HB or very light lead)
- Kneaded eraser
- Jar of clean water
- Paper towels
- Reference image of a giraffe profile
Step 1: Preparation and Sketching
-
Paper Selection:
Begin by selecting a high-quality cold-press watercolor paper. The textured surface is visible in the final piece and adds essential character to the simple silhouette. -
Cutting to Size:
Cut your paper to your desired dimensions. A standard 5×7 inch or A5 size works beautifully for this scale of subject matter. -
Finding a Reference:
Locate a side-profile photo of a giraffe. Focus specifically on the outline shape—the slope of the back, the ossicones (horns), and the long neck—rather than internal details. -
Light Outline:
Using an HB pencil, very lightly sketch the outline of the giraffe onto your paper. Keep your touch incredibly delicate, as heavy graphite lines will show through the translucent watercolor later. -
Refining the Shape:
Check your proportions. Ensure the neck tapers correctly as it rises and that the legs have the distinct knobby knees characteristic of giraffes. Use a kneaded eraser to lift any excess graphite until only a faint ghost of a line remains.
Uneven Color?
If you see ‘cauliflower’ or ‘bloom’ textures in the dried paint, it means too much water was added unevenly. Let it dry fully, then apply a second layer with a thicker, creamier paint mix to cover it.
Step 2: Painting the Silhouette
-
Mixing the Color:
Prepare your paint. You want a high pigment-to-water ratio to achieve that deep, opaque forest green seen in the example. Test the opacity on a scrap piece of paper first. -
Starting the Outline:
Load your small round brush (size 2 or 4). Carefully paint along the inner edge of your pencil line, creating a clean, crisp boundary. I find it helpful to rotate the paper to keep my hand comfortable while tracing curves. -
Filling the Body:
While the outline is still wet, quickly fill in the larger main body area. Work efficiently to ensure the wet edge from your outline blends seamlessly into the fill, avoiding hard drying lines. -
Neck and Head:
Move upwards to the neck. Switch to a slightly smaller brush if needed to control the narrowing shape. -
Detailing the Legs:
Use your fine liner brush for the legs. These features are delicate; use the very tip of the brush to capture the thinness of the lower legs and the hooves. -
Head and Ossicones:
Switch to your smallest detail brush (size 0 or 00) for the head. Carefully paint the snout and the small ossicones on top of the head. These tiny bumps give the giraffe its recognizable character, so take your time. -
Refining Edges:
Look over the silhouette for any jagged edges or uneven spots. While the paint is still damp, you can gently smooth out the perimeter with a slightly damp, clean brush. -
Drying:
Allow the first layer to dry completely. If the green looks uneven or lighter than you’d like, you can apply a second layer once the first is bone dry.
Step 3: Finishing Touches
-
The Second Coat:
To achieve the solid, dark look in the photo, apply a second coat of paint over the dried silhouette. This eliminates brushstrokes and deepens the value. -
Final Cleanup:
Once the painting is absolutely dry (give it at least an hour), use your kneaded eraser to dab away any visible pencil marks around the exterior of the silhouette. -
Flattening:
If the paper has buckled slightly from the water, place the dry artwork under a heavy book overnight to flatten it out perfectly for display.
Try Masking Fluid
For sharper edges, apply masking fluid to the negative space around your sketch before painting. Peel it off after the paint dries for a perfectly crisp white background.
Now you have a striking piece of minimalist wildlife art ready to frame
Giraffe Spots as Fingerprints
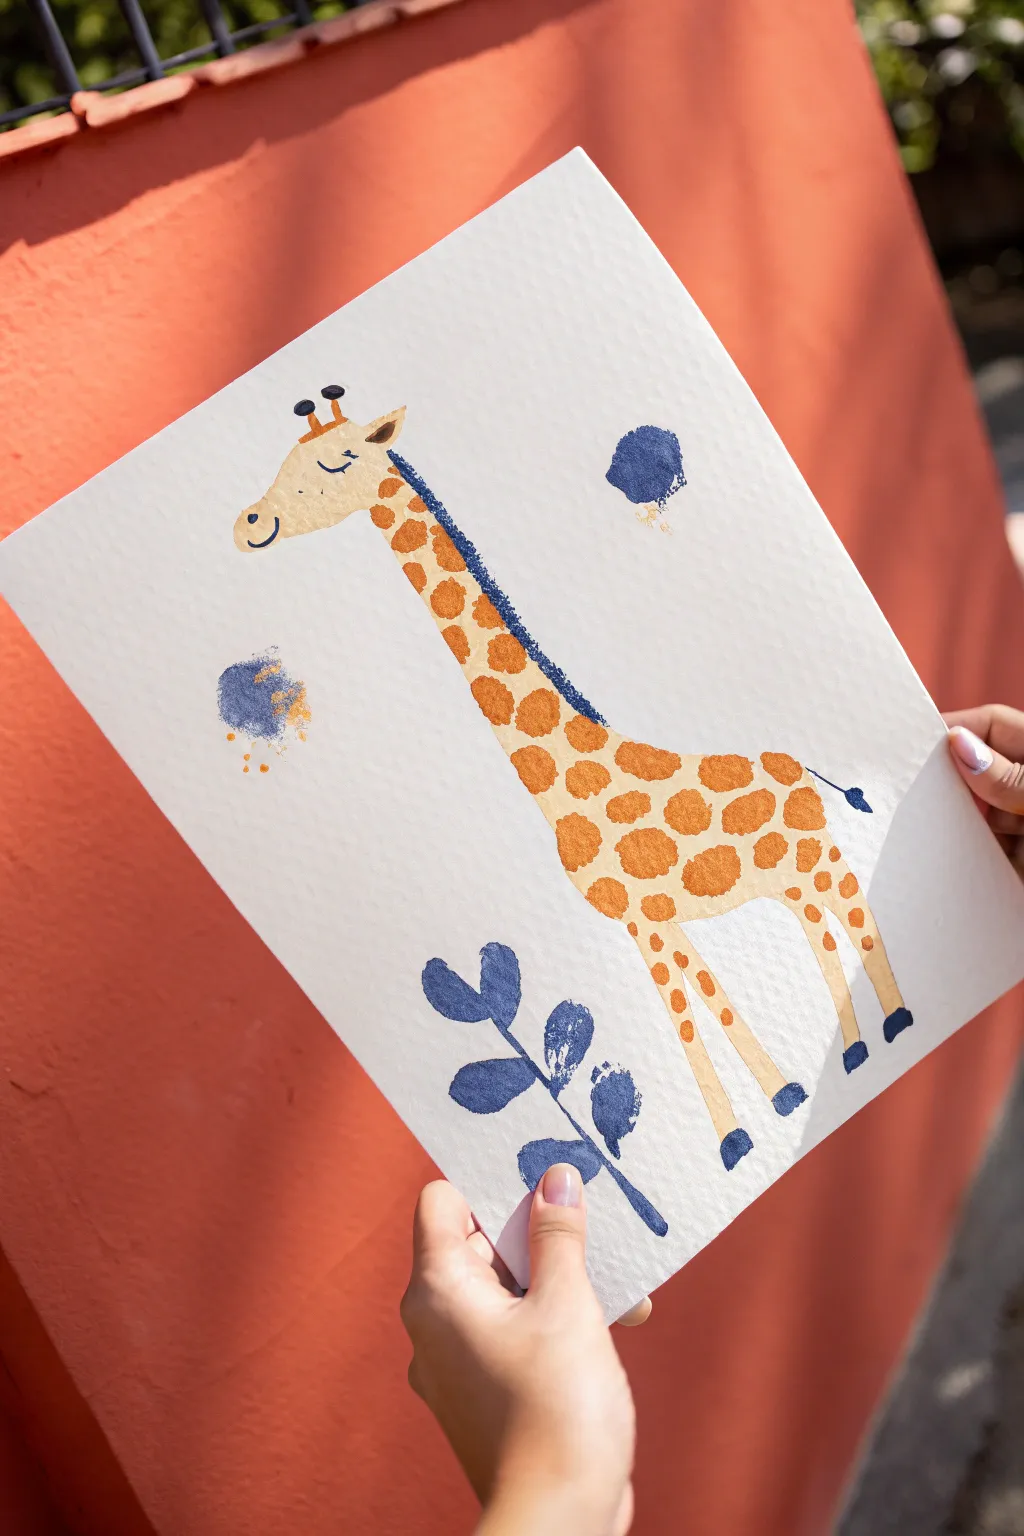
This charming project combines simple drawing with the tactile fun of fingerprint art to create a happy giraffe bursting with personality. The texture of heavy watercolor paper adds a sophisticated feel to the playful, spotted design.
Step-by-Step Tutorial
Materials
- Heavyweight cold-press watercolor paper
- Orange washable paint or acrylic paint
- Yellow ochre or light brown paint
- Navy blue paint
- Fine liner brush (size 0 or 1)
- Small flat brush (size 4 or 6)
- Black fine-tip marker or micron pen
- Palette or paper plate
Step 1: Sketching the Outline
-
Paper placement:
Position your cold-press watercolor paper vertically to accommodate the giraffe’s long neck. -
Head shape:
Near the top left quadrant, lightly sketch a rounded, elongated oval for the giraffe’s head using a pencil. -
Drawing the neck:
Draw two long, gently sloping lines extending downward from the head towards the bottom right to form the neck. -
Body curve:
Curve the bottom line out slightly to suggest the giraffe’s back and rear, keeping the shapes simple and stylised. -
Adding legs:
Sketch four simple, straight legs extending from the body, tapering slightly at the bottom for the hooves.
Clean Prints Only
Keep a damp cloth nearby to wipe your finger between colors. If the paint gets too tacky on your skin, the spots won’t transfer crisply.
Step 2: Painting the Base Layer
-
Mixing the body color:
Mix a pale, creamy yellow using yellow ochre and plenty of white to get a soft base tone. -
Filling the shape:
Use your flat brush to gently fill in the entire giraffe silhouette with this pale yellow wash. -
Drying time:
Allow this base layer to dry completely; if the paper feels cool to the touch, give it a few more minutes.
Make It 3D
Glue a small piece of dark blue yarn over the painted mane line, or use real dried leaves glued at the bottom instead of painting them.
Step 3: The Fingerprint Spots
-
Preparing the spot color:
Squeeze a dime-sized amount of bright orange paint onto your palette. -
Testing the print:
Dip your index finger into the orange paint and tap it once on a scrap paper to remove excess globbiness. -
Stamping the neck:
Press your finger firmly along the painted neck to create the distinct orange spots. -
Body spots:
Continue stamping spots across the body, rotating your finger slightly to vary the oval angles. -
Leg detail:
Use your pinky finger for smaller spots as you move down towards the upper legs. -
Abstract accents:
Stamp two smudgy circles of blue and a touch of orange floating freely in the background for artistic flair.
Step 4: Detailed Features
-
Painting the mane:
Load your liner brush with navy blue paint and dab a textured line down the back of the neck for the mane. -
Adding foliage:
Using the same navy blue, paint a simple stem with broad, leaf-like shapes at the bottom right corner. -
Hooves and tail:
Paint the four hooves navy blue, and add a tiny tuft of blue at the end of a thin tail line. -
Facial details:
Once the yellow face is dry, use a black marker or fine brush to draw a curved smiley mouth and a closed, sleeping eye. -
Ears and ossicones:
Paint two small orange triangles for ears and two short lines with knobs for the ossicones (horns) on top of the head. -
Final touches:
I like to add tiny dots of gold or yellow near the floating blue circles to tie the colors together.
Now you have a whimsical piece of art that literally has your personal touch all over it
Night Sky Giraffe With Starry Spots
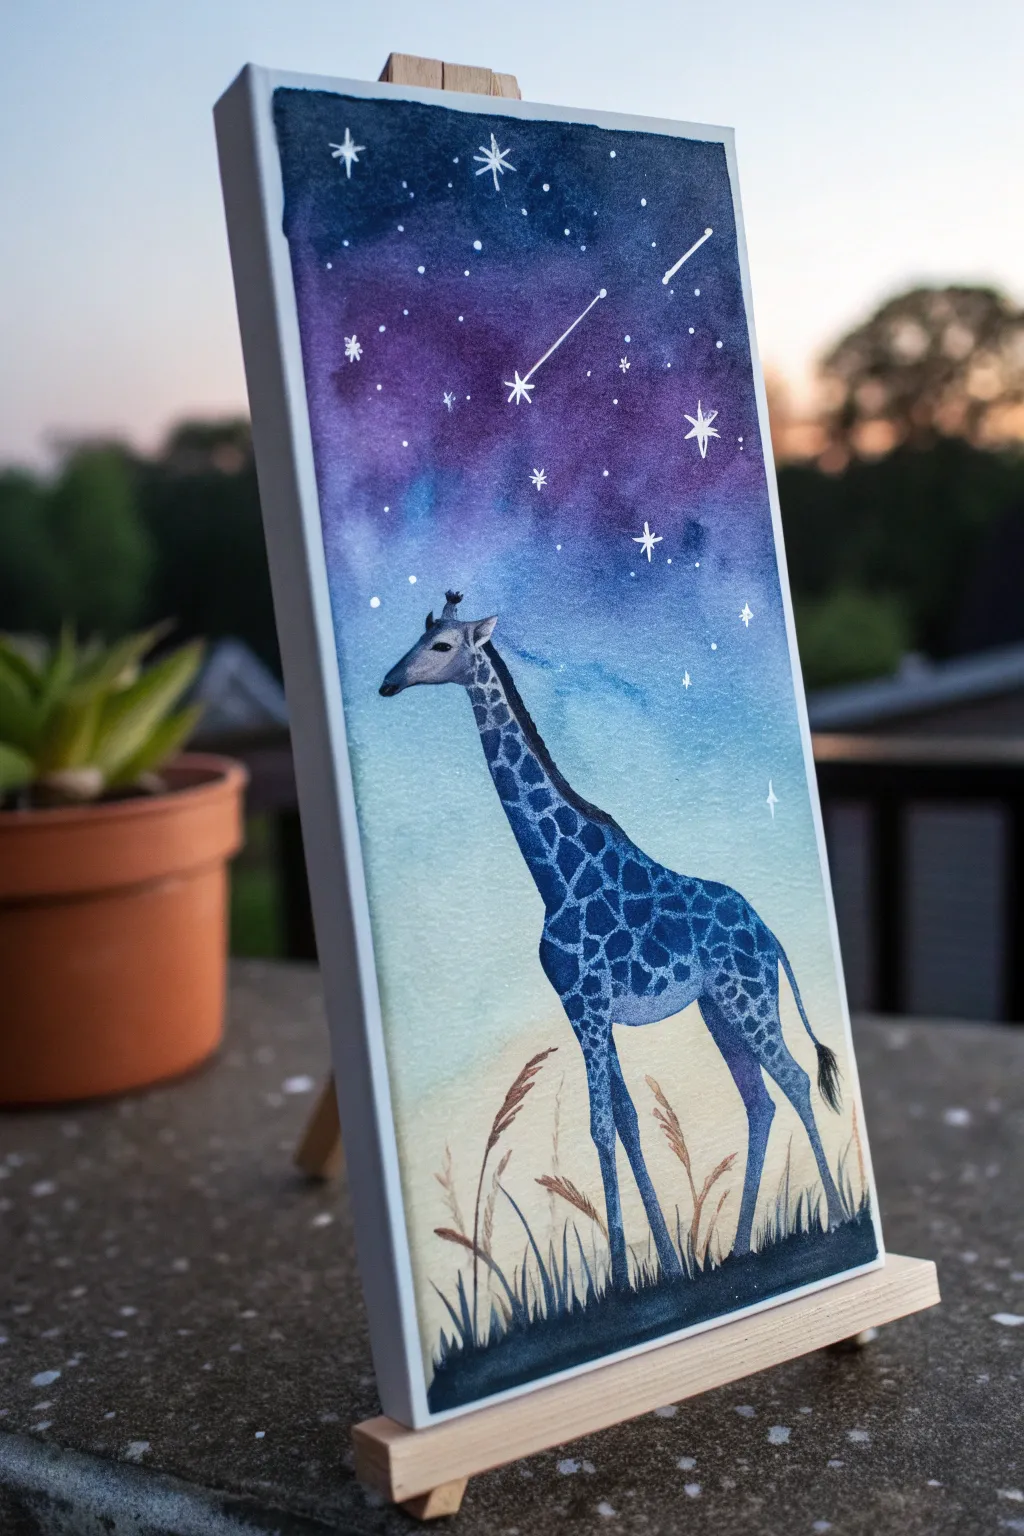
This whimsical watercolor-style painting captures a giraffe blending into the magic of the cosmos, with a coat that mirrors the night sky. The gradient washes and starry details create a dreamy, vertical composition perfect for a tall canvas or paper.
Detailed Instructions
Materials
- Tall rectangular canvas board or watercolor paper block (approx. 6×12 inches)
- Watercolor paints or fluid acrylics
- Colors: Indigo, violet/purple, cerulean blue, cyan, sap green, black, ochre/yellow wash
- Gouache or white acrylic ink for stars
- Range of brushes: Large wash brush, medium round brush, fine liner brush
- Pencil for sketching
- Masking fluid (optional)
- Mixing palette and water jars
- Mini wooden easel for display
Step 1: Setting the Scene
-
Lightly sketch the outline:
Begin with a very faint pencil sketch of the giraffe’s profile. Position the body low on the canvas so the long neck stretches upward, leaving ample room for the sky above. Lightly mark the horizon line near the bottom. -
Prepare the sky gradient:
Mix a deep indigo, a vibrant violet, and a lighter cyan blue on your palette. You want these colors wet and ready for a wet-on-wet blend. -
Paint the upper sky:
Wet the top portion of the canvas (or paper) with clean water. Apply the deep indigo at the very top, letting it bleed downwards. -
Transition the sky colors:
While the indigo is still damp, introduce the violet shade below it. Blend them gently where they meet to create a soft, hazy transition. -
Lower sky wash:
Continue moving down the canvas with the cyan blue, fading it out to almost clear water just before you reach the giraffe’s head. This creates a glow effect around the subject. -
Paint the horizon:
At the very bottom, paint a loose wash of ochre mixed with a tiny bit of green to suggest a grassy plain. Let this fade upward into the blue sky. Allow the entire background to dry completely before proceeding.
Don’t Rush the Blur
To get that smooth galaxy blur in the sky, ensure your paper is consistently damp. If edges start drying hard, soften them immediately with a clean, wet brush.
Step 2: Bringing the Giraffe to Life
-
Base coat for the giraffe:
Paint the entire body of the giraffe with a very pale, watery blue wash. This acts as the highlight color for the skin between the spots. -
Plan the spots:
Once the base is dry, look at your reference. The spots are not random; they follow the contours of the neck and body. Sketch them lightly if needed. -
Paint the darker spots:
Using a medium round brush, fill in the spots with a mix of indigo and cerulean blue. Vary the saturation—some spots should be darker (like the night sky) and some slightly lighter. -
Create texture within spots:
While the spot paint is still wet, you can drop in tiny hints of violet or darker blue to give them depth and a galaxy-like appearance. -
Detail the face:
Switch to a smaller brush for the face. Use a darker grey-blue for the snout and ear details, keeping the eye dark with a small white highlight reserved. -
Add the mane:
Paint the mane along the back of the neck using short, consistent strokes with a dark blue-black mix. -
Define the tail:
Add the tail tuft with the same dark mix, using quick flicking motions to simulate hair texture.
Make It Personal
Instead of random stars, paint a real constellation that has meaning to you, like your zodiac sign, hidden in the night sky above the giraffe.
Step 3: Celestial Details and Foreground
-
Paint foreground grass:
Using a dark blue-black mix, paint silhouette grasses at the very bottom. Use quick upward flicks with a liner brush to create thin, tapering blades that overlap the giraffe’s legs slightly. -
Add taller stalks:
Mix a brownish-ochre shade and paint a few taller, wheat-like stalks rising from the grass, adding variety to the silhouette. -
Create the legs gradient:
Ensure the giraffe’s legs darken as they reach the ground, blending into the dark grass to ground the figure in the scene. -
Add the constellations:
Using white gouache or acrylic ink and a fine liner brush, paint the larger stars and connecting lines in the purple area of the sky. -
Sprinkle the stardust:
Load a stiff brush or toothbrush with watered-down white paint. Flix the bristles to splatter tiny stars across the textured sky and lightly over the giraffe’s dark spots. -
Final highlights:
Add specific bright white stars with 4-point flares for emphasis, and add a tiny rim light along the back of the giraffe’s neck to separate it from the background.
Place your finished piece on the mini easel and enjoy your own slice of the painted cosmos
Surreal Giraffe With Impossible Neck Loops
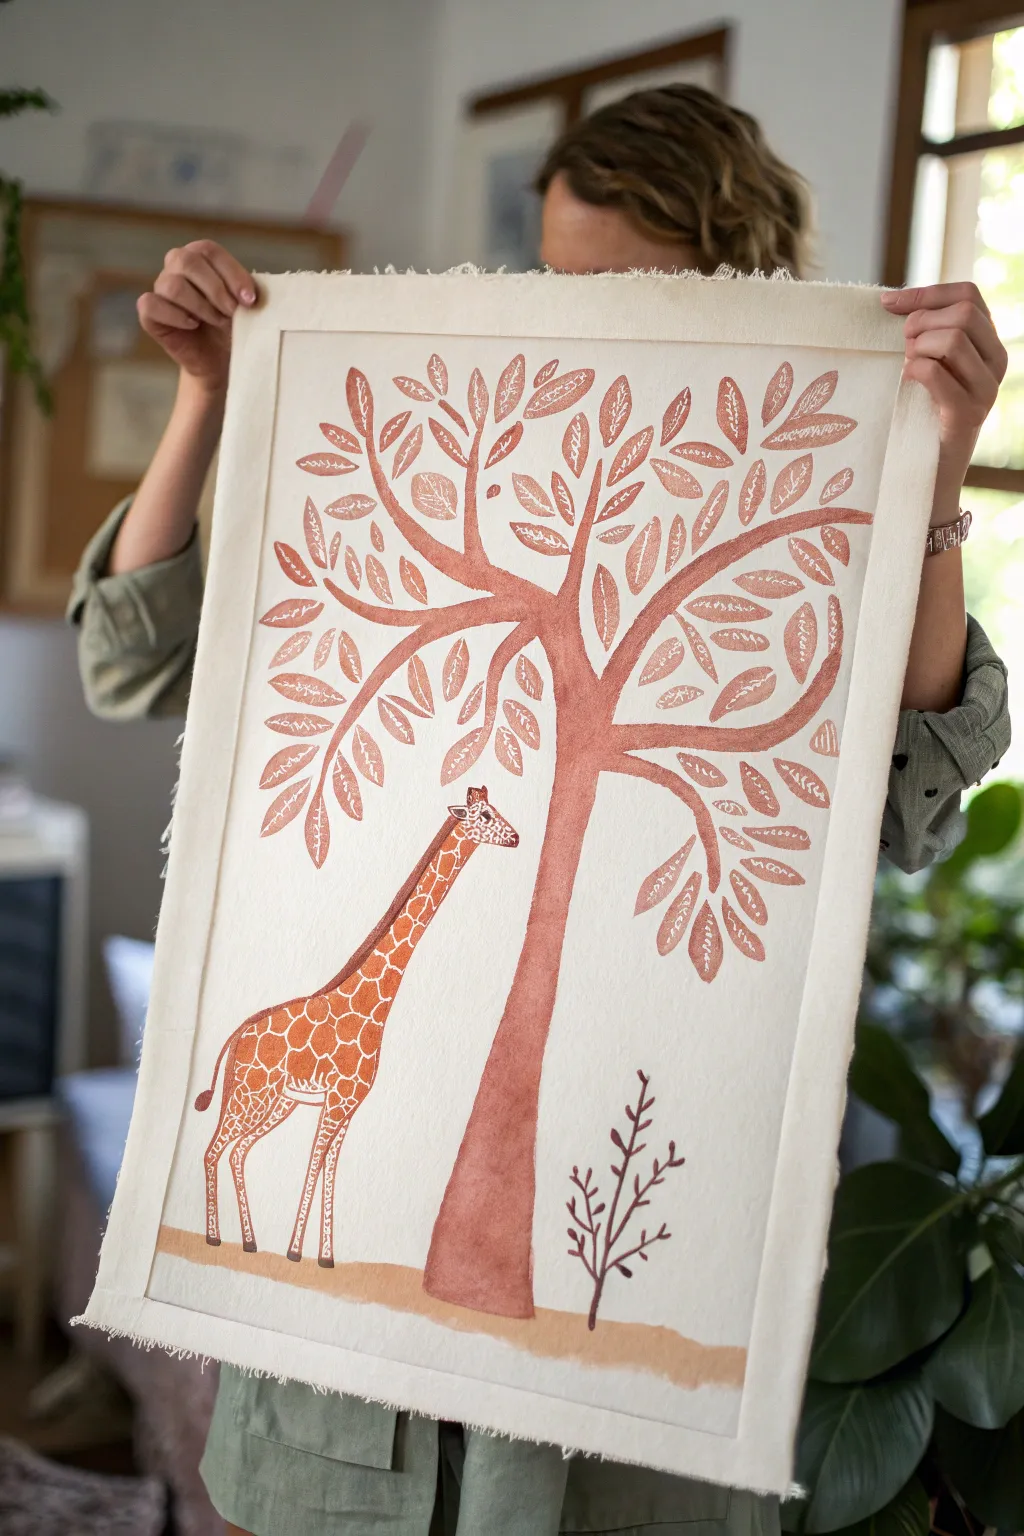
Create a warm, earthy wall hanging featuring a stylized giraffe under a sprawling tree using fabric painting or block printing techniques. The rustic edges of the canvas and the monochrome reddish-brown palette give this piece a timeless, handcrafted charm perfect for a nursery or living space.
How-To Guide
Materials
- Unprimed cotton canvas or linen fabric (approx. 18×24 inches)
- Fabric paint or block printing ink (terracotta or reddish-brown)
- Soft lino block or carving rubber (for stamping)
- Lino carving tools
- Fine detail paintbrush
- Flat shader paintbrush (medium size)
- Pencil for sketching
- Masking tape
- Palette or plate for mixing paint
- Piece of cardboard or heavy paper (for leaf stencil optionally)
Step 1: Preparation & Sketching
-
Prepare the canvas:
Cut your canvas or linen to the desired size, leaving an extra inch around the border. Gently fray the edges by pulling horizontal and vertical threads until you have a nice, rugged fringe about half an inch deep. -
Map out the composition:
Lightly sketch the horizon line near the bottom third of the fabric. Draw a large central tree trunk that splits into two main branches, creating a canopy shape. Place the giraffe to the left of the trunk, ensuring its head reaches just under the lower branches. -
Draft the details:
refine the sketch of the giraffe, marking the ossicones (horns) and the general shape of the body. Sketch the placement of the large, oval-shaped leaves radiating from the branches.
Fixing Blotches
If you drop paint or smudge a line, don’t scrub! Let it dry, then dab a tiny bit of white opaque fabric paint over the mistake to mask it.
Step 2: Painting the Tree & Ground
-
Mix your color:
Prepare your terracotta or reddish-brown fabric paint. If it’s too thick, dilute it slightly with water or fabric medium to achieve a consistency that will soak into the fabric without bleeding. -
Paint the ground:
Using a flat brush, paint a simple, horizontal strip across the bottom for the ground. Don’t worry about making it perfectly straight; a slightly organic, uneven line adds character. -
Fill the trunk:
Using the same color, fill in the tree trunk. Keep your brushstrokes vertical to mimic the texture of bark. I like to taper the trunk slightly as it moves upward. -
Create the leaves:
You can either freehand paint the leaves or create a simple stencil or stamp. For the look in the photo, carve a simple oval leaf shape into a small piece of lino or cut a sponge. Stamp or paint the leaves along the branches, leaving small gaps to vein the leaves if painting by hand. -
Add leaf veining:
If you painted solid leaves, use a very fine brush dipped in water (or a white fabric paint pen) to lift or add the central vein and side veins while the paint is still damp, or scratch them out for a negative space effect.
Step 3: Creating the Giraffe
-
Outline the giraffe:
Switch to a fine detail brush. Carefully outline the giraffe’s body, neck, and legs using the terracotta paint. -
Paint the lattice pattern:
Instead of round spots, this giraffe features a geometric, net-like pattern. Paint a grid of irregular polygons (mostly pentagons and hexagons) all over the body and neck, leaving thin lines of unpainted fabric between them to serve as the ‘grout’ lines. -
Detail the head:
Fill in the face shape, leaving a small negative space for the eye. Use the very tip of your brush to define the ears and ossicones. -
Refine the legs:
Paint the legs carefully. The pattern should get smaller and more compressed as you move down the legs. Add small hooves at the bottom where they meet the ground line.
Texture Trick
To mimic the stamped look without carving lino, paint your leaves on bubble wrap or a textured sponge and press them onto the canvas.
Step 4: Final Touches
-
Add the small plant:
To the right of the tree, paint a small, delicate sprig or shrub. Use a single central stem with small V-shaped leaves coming off it, mimicking the style of the main tree but smaller. -
Assessment:
Step back and look at the overall balance. If the tree canopy looks sparse, add a few more leaves to fill the gaps. Ensure the paint density is consistent across the artwork. -
Set the paint:
Allow the painting to dry completely, preferably overnight. Once dry, follow the manufacturer’s instructions for your fabric paint, which usually involves heat-setting with an iron on the reverse side.
Hang your finished canvas using poster rails or simply pin the corners for a relaxed, bohemian look


Have a question or want to share your own experience? I'd love to hear from you in the comments below!