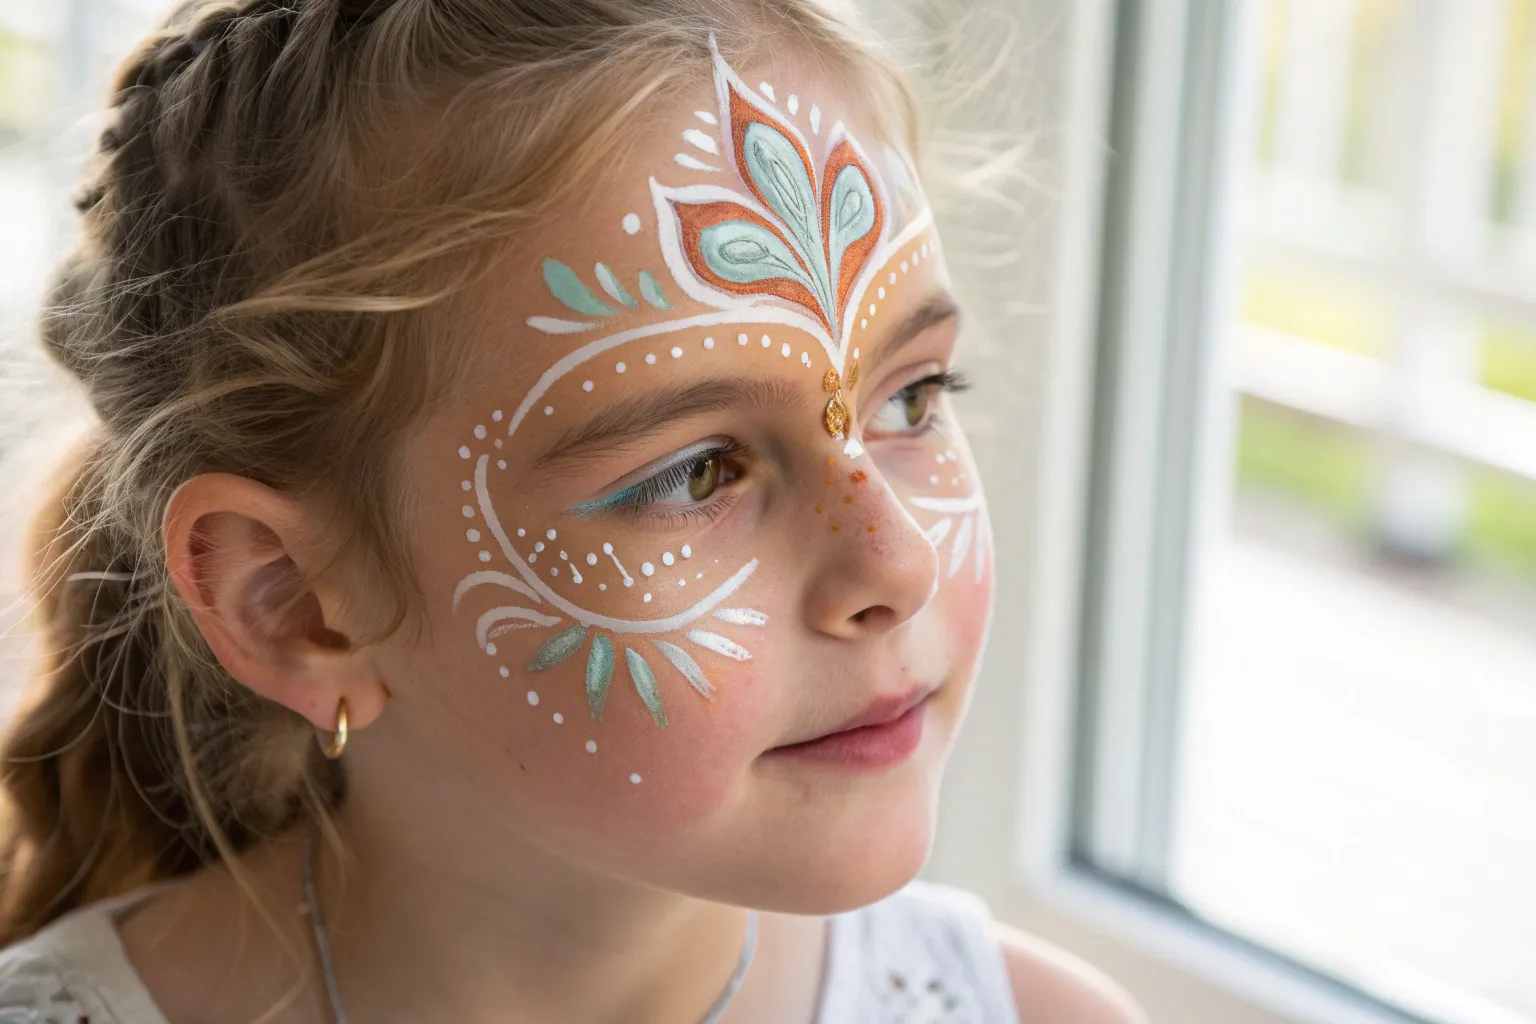
When I’m painting faces in my studio, I always try to give girls options that feel both playful and pretty, from quick cheek designs to full-on transformations. Here are my go-to girl face paint looks—starting with the classics everyone asks for, then drifting into more creative, artsy twists.
Butterfly Wing Eye Mask
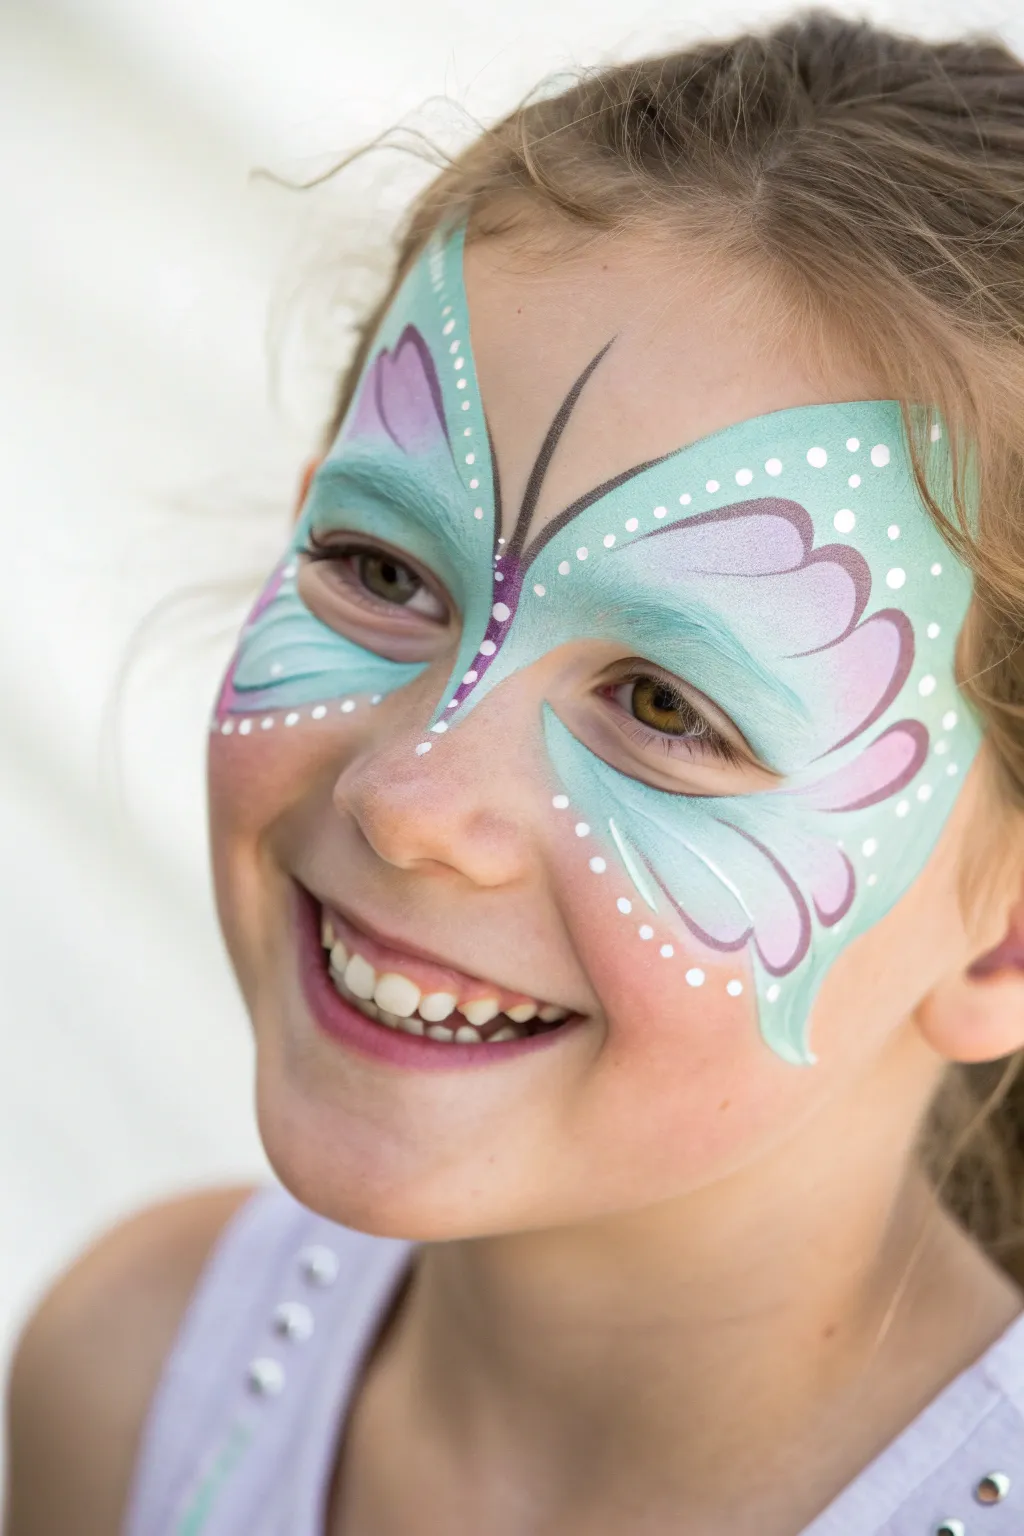
This enchanting design transforms the eyes into delicate butterfly wings using a blend of soft teal and purple hues. With sparkling white accents and sweeping lines, it creates a magical look perfect for parties or festivals.
Step-by-Step
Materials
- Face paint cake: bright teal or aqua
- Face paint cake: light purple or lavender
- Face paint cake: white
- Face paint cake: black
- High-density face painting sponge (cut in half)
- Round brush: size 2 or 3 (for outlines)
- Round brush: size 1 (for fine dots)
- Water spray bottle
- Water cup for rinsing
Step 1: Base Shape & Color
-
Load the sponge:
Start by misting your teal face paint cake with water until it’s creamy. Rub the rounded corner of your sponge into the paint to get a solid, even load. -
Create the right wing base:
On the girl’s left eye (your right), press the sponge gently over the eyelid and extend it outward towards the temple. Sweep it up vertically onto the forehead and down onto the upper cheekbone to create a wing shape. -
Define the wing edge:
While the sponge is still loaded, refine the outer edge of the wing so it has a soft, curved point that aims toward the hairline. -
Repeat on the other side:
Reload your sponge with teal and repeat the process on the other eye, trying to keep the symmetry balanced. It helps to stand back for a second to check if the wings are roughly equal in height. -
Add purple accents:
Load a clean corner of your sponge (or a smaller finger dauber) with lavender paint. Gently dab this color onto the inner top section of the wing on the forehead and the lower section on the cheek to create a soft, two-tone gradient.
Sponge Savvy
For the smoothest base, squeeze excess water out of your sponge before loading paint. Just the tip should be wet; too much water makes the design drip and become transparent.
Step 2: Inner Details & Structure
-
Outline the scallops:
Switch to your medium round brush (size 2-3) loaded with a slightly darker purple or a mix of purple and teal. Paint scalloped ‘U’ shapes inside the teal area to simulate the veins of the butterfly wing. -
Blend the scallops:
Before the outlines dry completely, use a slightly damp, clean brush to gently pull the color inward, softening the lines so they look like shadows rather than harsh strokes. -
Paint the central body:
Using a thin brush and black paint, draw a very thin, delicate antenna starting from the center of the forehead, just between the eyebrows. I like to curve it slightly outward for elegance. -
Create the nose bridge detail:
Continue with the black paint (or dark purple) to create the butterfly’s body down the bridge of the nose. Use small, teardrop-shaped strokes distinct from the wings.
Step 3: Highlights & Finishing Touches
-
Load white paint:
Thoroughly rinse your small round brush (size 1) and load it with creamy white paint. The consistency should be like melted ice cream to ensure opaque dots. -
Dot the upper wing:
Add a series of white dots along the upper outer curve of the teal wing on the forehead. Vary the pressure to make some dots larger and some smaller. -
Dot the lower wing:
Mirror this dotting pattern along the bottom curve of the wing on the cheekbone. -
Highlight the body:
Add tiny white dots down the dark center body line on the nose bridge. This contrast makes the center pop. -
Add inner sparkles:
Place a few random, tiny white dots or ‘starbursts’ inside the teal area near the eye corner to add sparkle and dimensional interest. -
Final symmetry check:
Step back one last time to ensure both sides have an equal amount of white highlights. Add a few extra dots if one side feels too heavy.
Glitter Glam
Before the teal paint fully dries, lightly poof some cosmetic-grade iridescent glitter over the eyelids. It catches the light beautifully when the child blinks.
Now you have a stunning, symmetrical butterfly design that is ready for any magical adventure


Mermaid Scales and Sea Swirls
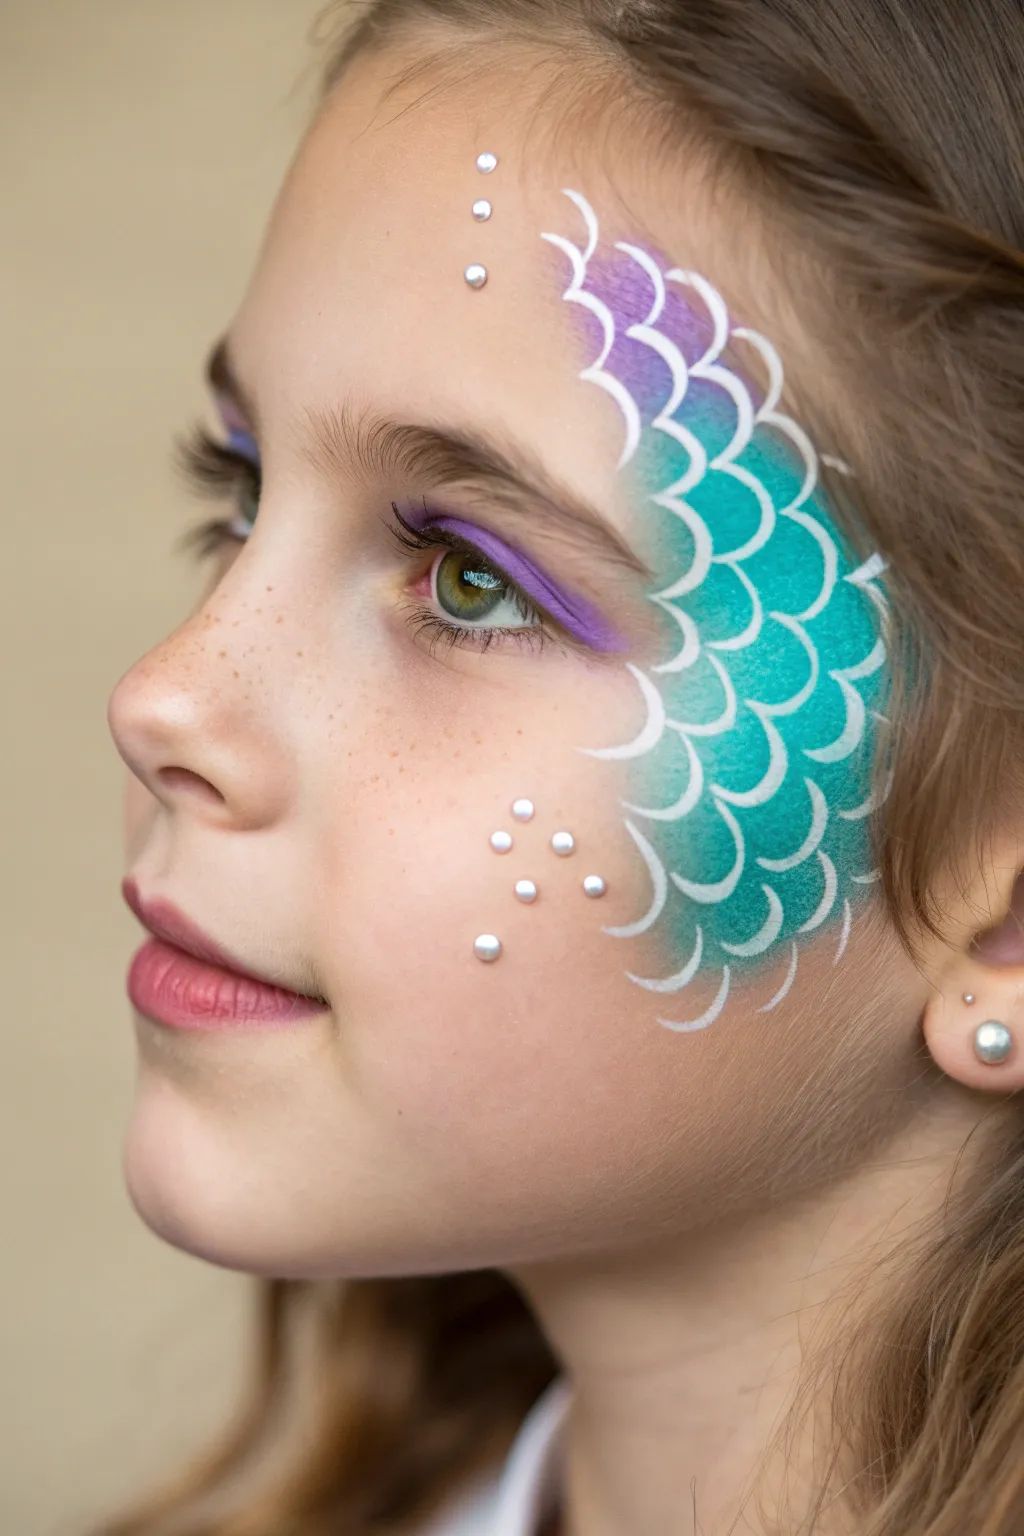
Transform an ordinary afternoon into an aquatic adventure with this mesmerizing mermaid face paint design. Focused on one side of the face, this look combines vibrant teal and violet gradients with delicate white linework to create the illusion of iridescent scales.
Step-by-Step Tutorial
Materials
- High-density face paint sponge (teardrop or half-moon shape)
- Split cake face paint (containing violet, blue, and teal)
- White face paint (wax-based works best for linework)
- Round brush (size 2 or 3)
- Flat brush (small, for eyeshadow application)
- Purple eyeshadow
- Self-adhesive pearl gems (varying sizes)
- Setting spray (optional)
- Small cup of water
- Cotton swabs for cleanup
Step 1: Creating the Scale Base
-
Load the sponge:
Begin by dampening your face paint sponge slightly. Rub it back and forth over your split cake palette to pick up all the colors—violet, blue, and teal—ensuring the paint is creamy but not dripping. -
Position the gradient:
Align the sponge so the darker violet color is towards the top and the lighter teal is towards the bottom. This creates a natural gradient that mimics light hitting water. -
Stipple the background:
Gently press the sponge onto the temple area, starting just above the eyebrow tail and curving down towards the top of the cheekbone. -
Build the shape:
Continue dabbing the sponge to create a curved, kidney-bean-like shape that hugs the eye socket. I prefer to tap lightly at the edges to soften the color transition into the skin. -
Check for coverage:
Ensure the color is opaque and vibrant. If it looks patchy, let the first layer dry for a few seconds before adding a second light layer of stippling.
Step 2: Defining the Eyes
-
Select the eyeshadow:
While the base paint sets, take a small flat brush and load it with a vibrant purple eyeshadow that complements the violet in your face paint. -
Apply the wing:
Draw a sweeping line across the upper eyelid, extending outward into a soft wing. The powder texture contrasts nicely with the creamy face paint. -
Highlight the lower lash line:
Use the edge of the brush to gently smudge a small amount of the same purple along the outer third of the lower lash line for definition.
Fixing Smudged Lines
If your white lines accidentally connect or smudge, wait for them to dry completely. Then, use a slightly damp Q-tip to erase the mistake without ruining the teal base underneath.
Step 3: Painting the Scale Detail
-
Prepare the round brush:
Dip your round size 3 brush into water and swirl it into your white face paint until it reaches an inky, fluid consistency. -
Start the top row:
Beginning at the highest point of your color base on the forehead, paint small “U” shapes. These are your first scales. -
Connect the pattern:
Work your way down, painting overlapping “U” shapes. Each new row should start from the middle of the scale above it, creating a fish-scale brick pattern. -
Vary the line weight:
When painting the curves, press down slightly at the bottom of the “U” and lift up as you reach the tips to create lines that are thicker in the middle and tapered at the ends. -
Follow the contour:
As you move down the cheek, angle your scales slightly to follow the curve of the girl’s face. This naturally enhances the 3D effect. -
Fade the edges:
On the outermost scales (where the color fades into skin), paint incomplete or lighter curves to make the design look like it’s merging with the face.
Pro Tip: Highlight Placement
Add tiny white dots or ‘starbursts’ at the intersections of a few scales. This mimics light glinting off wet fish scales and adds extra dimension to the design.
Step 4: Adding the Final Sparkle
-
Clean and dry spot:
Identify a few spots on the forehead above the design and on the cheek below the eye where you want to place gems. -
Place forehead gems:
Apply three small pearl gems in a vertical line on the forehead, spacing them about half an inch apart. -
Cluster cheek gems:
Place a loose cluster of 4-5 pearl gems just below the outer corner of the eye, near the cheekbone, mimicking bubbles rising. -
Finish with earrings:
If the child has pierced ears, adding a matching pearl stud earring ties the whole pearlescent theme together wonderfully.
Step back and admire how the light catches the intricate scales on your beautiful mermaid creation


Cat Nose and Soft Whiskers
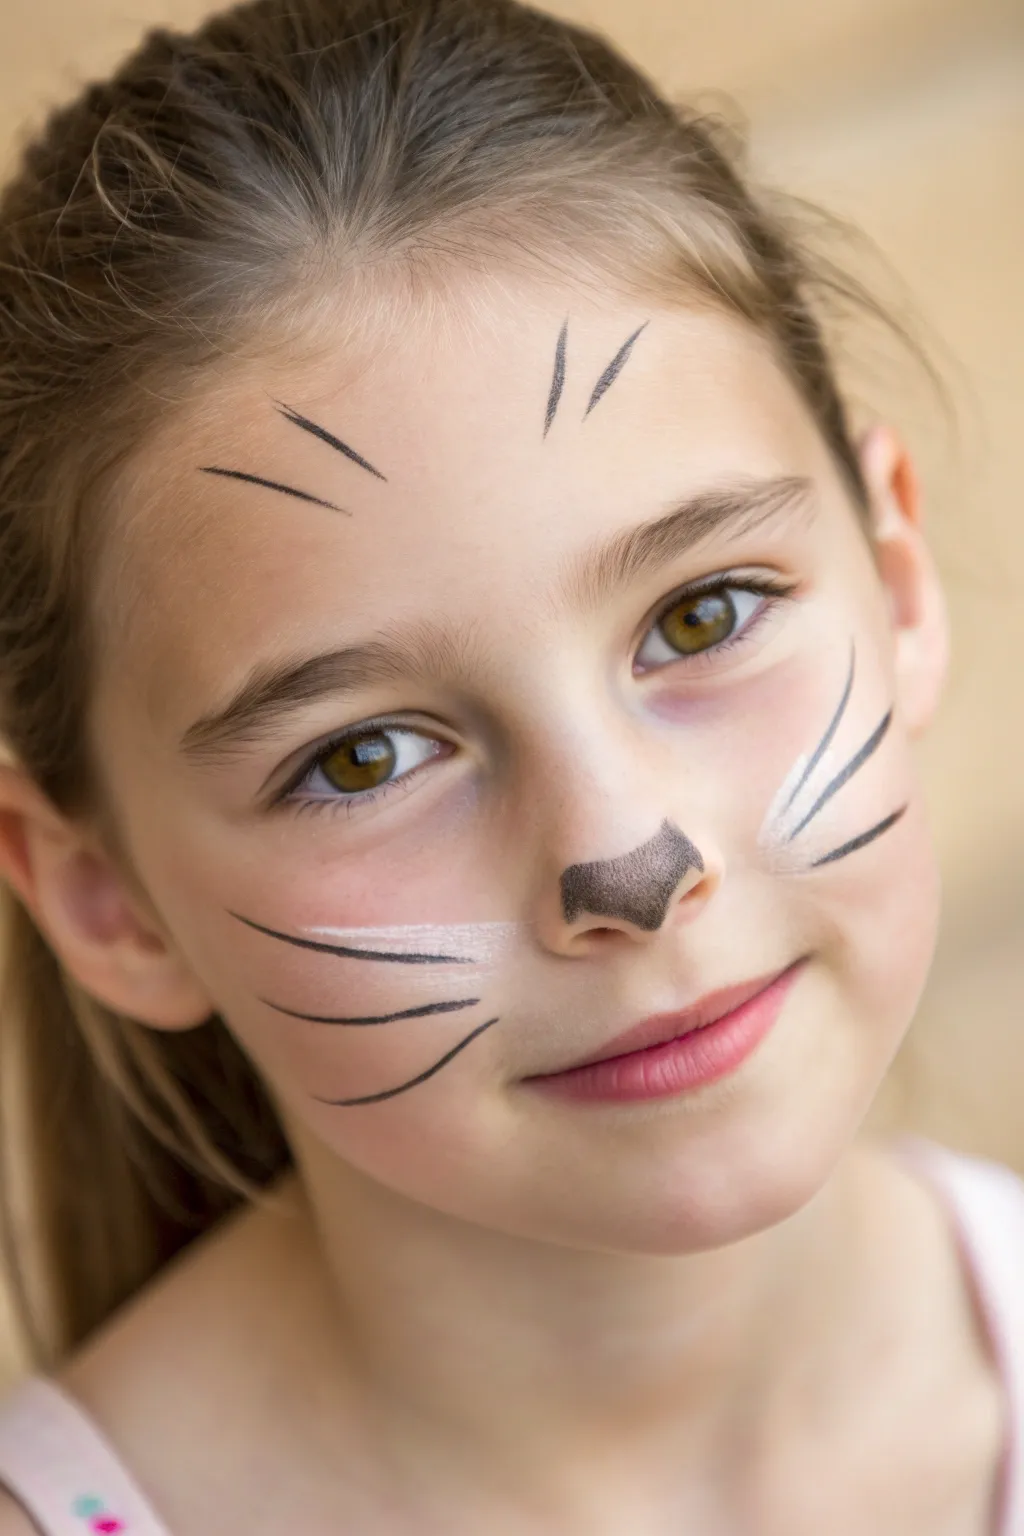
This charming design captures the essence of a playful kitten with minimal effort and maximum cuteness. Featuring a soft black nose and delicate, sweeping whiskers, it’s a perfect quick transformation for imaginative play.
Detailed Instructions
Materials
- White face paint
- Black face paint
- Round brush (size 2 or 3)
- Small round brush (size 1)
- Clean water cup
- Paper towels or sponge
Step 1: The Kitty Nose
-
Load the Brush:
Begin by dampening your size 2 or 3 round brush and loading it with black face paint until you have a creamy, ink-like consistency. -
Outline the Shape:
On the tip of the nose, carefully outline a rounded, inverted triangle shape. Follow the natural curve of the nostrils for the bottom edge. -
Fill in the Color:
Gently fill in the outlined nose shape with black paint. Use light strokes to ensure solid coverage without lifting the paint underneath. -
Soften the Edges:
While the paint is still slightly damp, you can gently dab the edges with a clean, slightly damp sponge or finger to soften the look if it appears too harsh.
Step 2: Soft White Accents
-
Clean Your Brush:
Thoroughly rinse your brush to remove all black pigment, or switch to a fresh brush to keep the white pure. -
Prepare White Paint:
Load a round brush with white face paint. You want this mixture to be slightly more transparent than the black for a softer effect. -
Cheek Bases:
On the apple of one cheek, paint two or three quick, light feathering strokes moving outward from the nose area. This creates a fluffy base for the whiskers. -
Repeat on Other Side:
Mirror these white strokes on the other cheek. Aim for symmetry, but don’t worry about being perfectly identical. -
Add Nose Highlight:
Wait for the black nose paint to dry completely, then add a tiny dot or thin line of white near the top center to make the nose look shiny and wet.
Purr-fect Points
To get super sharp whisker ends, lift your brush off the skin while you are still moving your hand. This ‘flick’ motion creates naturally tapered tips.
Step 3: Whiskers and Brows
-
Switch to Detail Brush:
Change to your smallest round brush (size 1) and load it with black paint. To get sharp lines, roll the bristles into a fine point on your palette. -
Draw Lower Whiskers:
Starting near the nose (over your white patches), pull the brush outward across the cheek. Press down at the start and lift up quickly at the end to taper the line to a fine point. -
Middle Whiskers:
Paint a second whisker just above the first, following a similar outward curve but angling slightly higher. -
Upper Whiskers:
Add a third whisker above the second one. Keep your wrist loose to create a dynamic, curved sweep rather than a stiff straight line. -
Mirror the Whiskers:
Repeat the three-whisker pattern on the opposite cheek, trying to match the angle and length of the first side. -
Forehead Details:
Move to the forehead. Use the fine tip of your brush to paint two short, curved lines on the left side, flicking upward and outward like eyebrows. -
Final Symmetry:
Paint two matching curved lines on the right side of the forehead to complete the feline expression.
Corrections
If a whisker line ends up too thick or wobbly, use a wet cotton swab or a clean, damp brush like an eraser to tidy up the edges before the paint sets.
Now your little kitten is ready to prowl and play with their adorable new look


Puppy Face With Rosy Cheeks
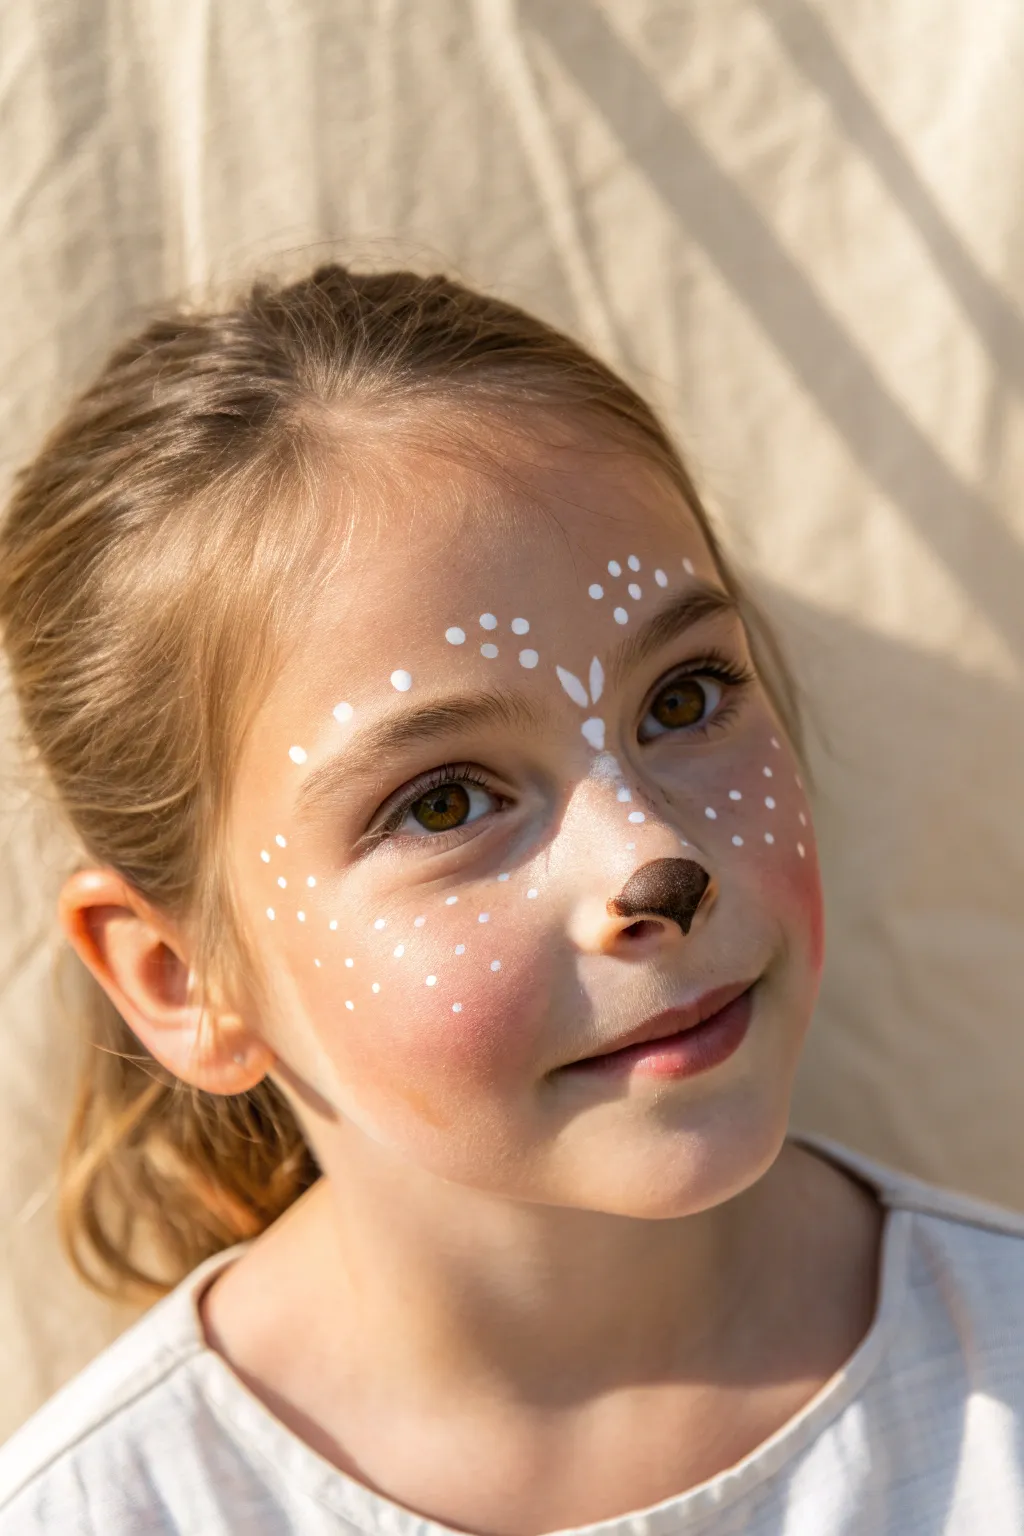
Transform your little one into an adorable pup with this sweet and simple face paint design. Featuring soft rosy cheeks, delicate white freckles, and a cute button nose, this look is perfect for playtime or parties.
Step-by-Step Guide
Materials
- White face paint
- Dark brown face paint
- Pink blush or face paint
- Small round brush (size 2 or 3)
- Medium round brush
- Makeup sponge or blush brush
- Water container
- Paper towels
Step 1: Rosy Base
-
Prepare the face:
Start with clean, dry skin. Gently wipe the face with a damp cloth if necessary to remove any oils or food residue. -
Apply the blush:
Using a makeup sponge or a fluffy blush brush, pick up a generous amount of pink face paint or powder blush. Lightly tap off the excess. -
Create the cheeks:
Dab the pink color onto the apples of the cheeks. Blend it outwards slightly towards the hairline to create a soft, diffused look rather than harsh circles. -
Add warmth to the nose:
Lightly dust a tiny amount of the remaining pink over the bridge of the nose to connect the two cheek areas subtly.
Step 2: The Button Nose
-
Load the brush:
Dip your medium round brush into water and swirl it into the dark brown face paint until you have a creamy consistency. -
Outline the nose:
Draw a curved line across the bottom of the nose tip. Then, create a rounded top edge specific to just the tip of the nose, resembling a soft triangle or button shape. -
Fill it in:
Fill in the shape completely with the dark brown paint. Ensure the edges are smooth and clean. -
Check symmetry:
Take a quick step back to make sure the nose shape looks centered and balanced on the face.
Dot Technique
Vary the pressure on your brush to create different sized dots. Press harder for large dots and use just the very tip for tiny, delicate freckles on the cheeks.
Step 3: Freckles and Details
-
Prepare white paint:
Clean your small round brush thoroughly. Load it with white face paint, aiming for an ink-like consistency that flows easily. -
Paint the center highlight:
Directly between the eyebrows, paint a small ‘V’ shape or two small tapered teardrops pointing upwards to mimic a little tuft of fur. -
Start the freckles:
Begin adding white dots on the forehead. Start with larger dots near the center and make them gradually smaller as you move outward toward the temples. -
Cheek details:
Add a cluster of tiny white dots over the pink areas on the cheeks. Keep these quite small and delicate to look like magical freckles. -
Bridge of nose:
Place a few small white dots across the bridge of the nose, connecting the forehead design to the cheek area. -
Refine the brow:
Add a few more scattered dots above the eyebrows to fill out the upper face area without overcrowding it. -
Nose highlight:
I like to add a tiny, curved white line on the upper edge of the brown nose to make it look wet and shiny.
Smudged Paint?
If a dot smudges or runs, wait specifically for it to dry completely. Then, use a slightly damp Q-tip to gently lift the mistake without ruining the base layer.
Step 4: Finishing Touches
-
Review the design:
Look over the face for any spots that need a touch-up or any dots that need to be rounded out. -
Set the look:
Allow the paint to dry completely for a minute or two before letting the child run off to play.
Now you have a picture-perfect puppy face ready for a day of fun
BRUSH GUIDE
The Right Brush for Every Stroke
From clean lines to bold texture — master brush choice, stroke control, and essential techniques.
Explore the Full Guide
Rainbow and Cloud Cheek Design
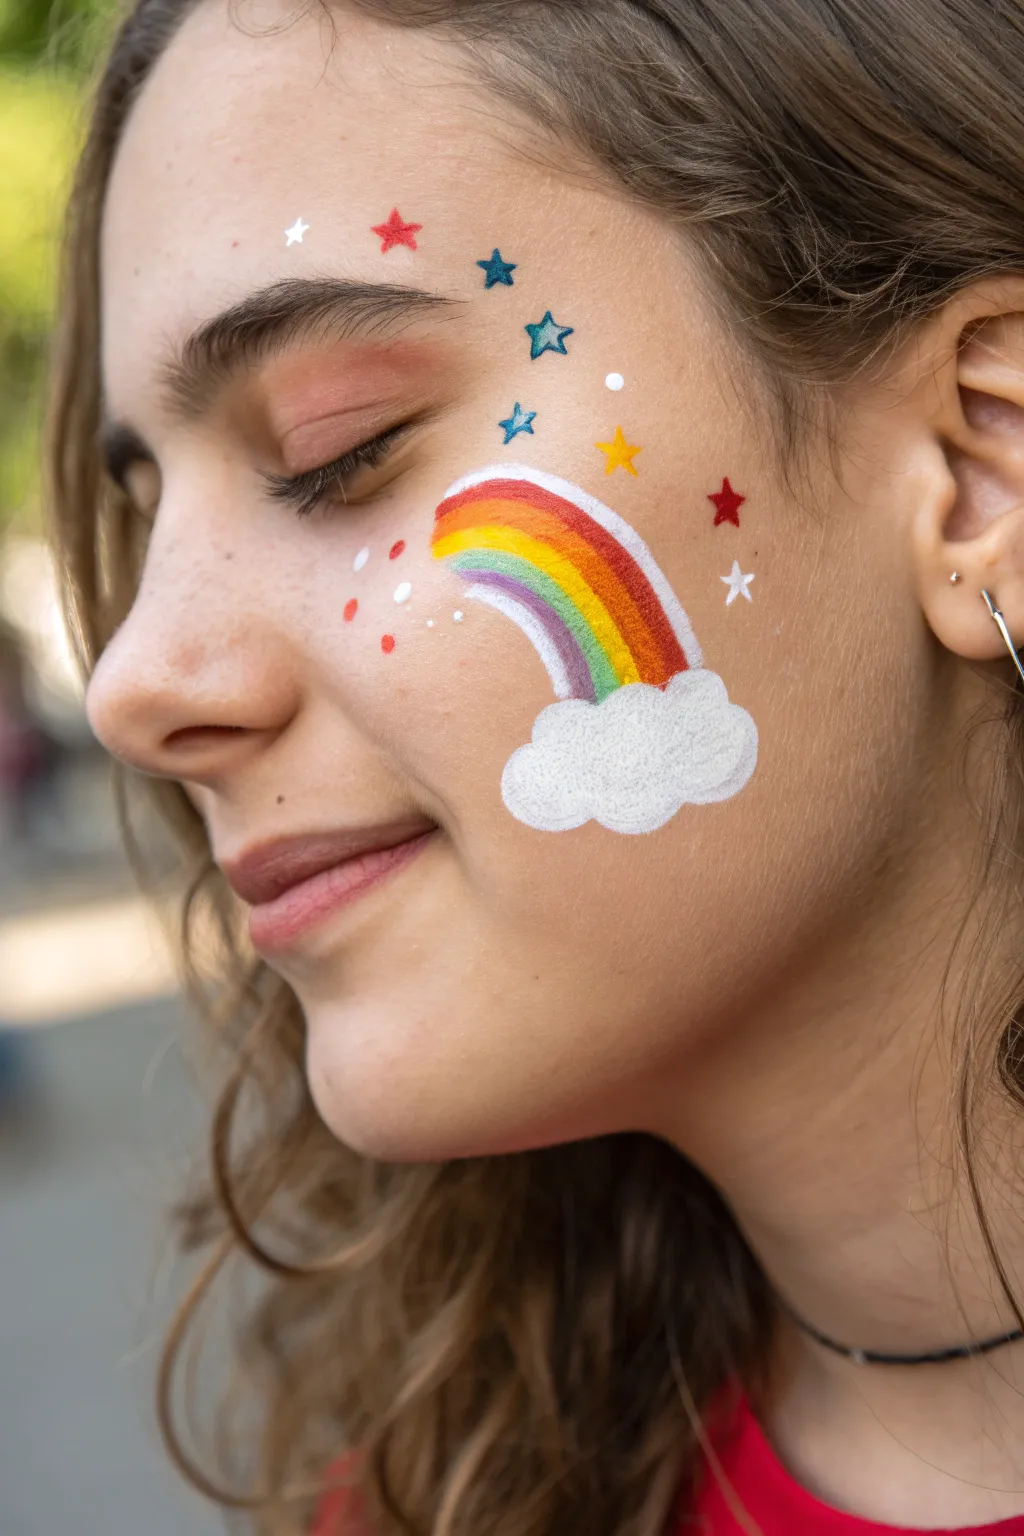
This whimsical face paint design features a classic arching rainbow ending in a fluffy white cloud, surrounded by a scattering of colorful stars. It is perfect for festivals or parties, offering a bright and cheerful look that sits beautifully on the cheekbone.
Step-by-Step
Materials
- White face paint (high density)
- Red face paint
- Orange face paint
- Yellow face paint
- Green face paint
- Blue face paint
- Purple face paint
- Flat brush (small, approx. 1/4 inch)
- Round brush (size 2 or 3 for stars)
- Fine liner brush (size 0 or 00 for details)
- Small cup of water
- Paper towels or sponge
Step 1: Painting the Rainbow Arch
-
Map the cloud:
Visualize where the cloud will sit on the lower cheek. You don’t need to paint it yet, but knowing its location helps you aim the rainbow correctly. -
Start with purple:
Load a small flat brush or a round brush with purple face paint. Create the innermost arch of the rainbow, starting near the eye corner and curving down towards the jawline. -
Add the blue stripe:
Clean your brush thoroughly. Load it with blue paint and carefully follow the purple line, keeping the spacing tight so the colors touch but don’t mix muddily. -
Paint the green band:
Continue building the arch outward with a stripe of bright green paint. -
Apply the yellow:
Add the yellow stripe next. Since yellow is a lighter pigment, make sure your brush is very clean to keep the color vibrant. -
Layer the orange:
Follow the curve with a band of orange paint. Try to keep the width of this stripe consistent with the others. -
Finish with red:
Complete the rainbow with the outermost red arch. This should be the longest curve, framing the entire design.
Clean Lines?
If your rainbow stripes are wobbly, don’t wipe them off. Wait for them to dry, then use a clean, slightly damp flat brush to gently tidy up the edges.
Step 2: Creating the Cloud
-
Outline the cloud shape:
Using a round brush loaded with white face paint, outline a fluffy, bumpy cloud shape at the bottom of your rainbow. Ensure the rainbow ends disappear into this shape. -
Fill with white:
Fill in the entire cloud area with white paint. Use dabbing motions rather than long strokes to create a slightly textured, fluffy appearance. -
Add a crisp edge:
Once the base white is slightly tacky, go over the very top edge of the cloud one more time with a fully loaded brush to make it pop against the skin.
Step 3: Stars and Sparkles
-
Paint the red star:
Above the eyebrow, use a small round brush and red paint to create a five-pointed star. Start with an upside-down ‘V’ and cross the arms to form the shape. -
Add blue stars:
Paint a small blue star near the temple area and another simpler star shape slightly lower down. -
Create the yellow star:
Add a bright yellow star near the outer corner of the eye area, close to the rainbow. -
Include a red accent star:
Place a small red star further back towards the hairline to balance the composition. -
Paint tiny white stars:
Switch to your fine liner brush with white paint. Add tiny five-pointed stars scattered in the empty spaces, particularly on the forehead and cheek. -
Dot the details:
Using the tip of the brush or the handle end dipped in paint, add small white dots around the cloud and rainbow for a magical effect. -
Add red accent dots:
Finish by adding a few tiny red dots near the white ones under the eye to tie the color scheme together.
Instant Rainbow
To save time, use a ‘split cake’ or ‘rainbow cake’ face paint with a wide flat brush or sponge. You can apply all the rainbow colors in a single swipe.
Now you have a cheerful sky scene that adds a pop of color to any day
Sparkle Swirls Around the Eyes
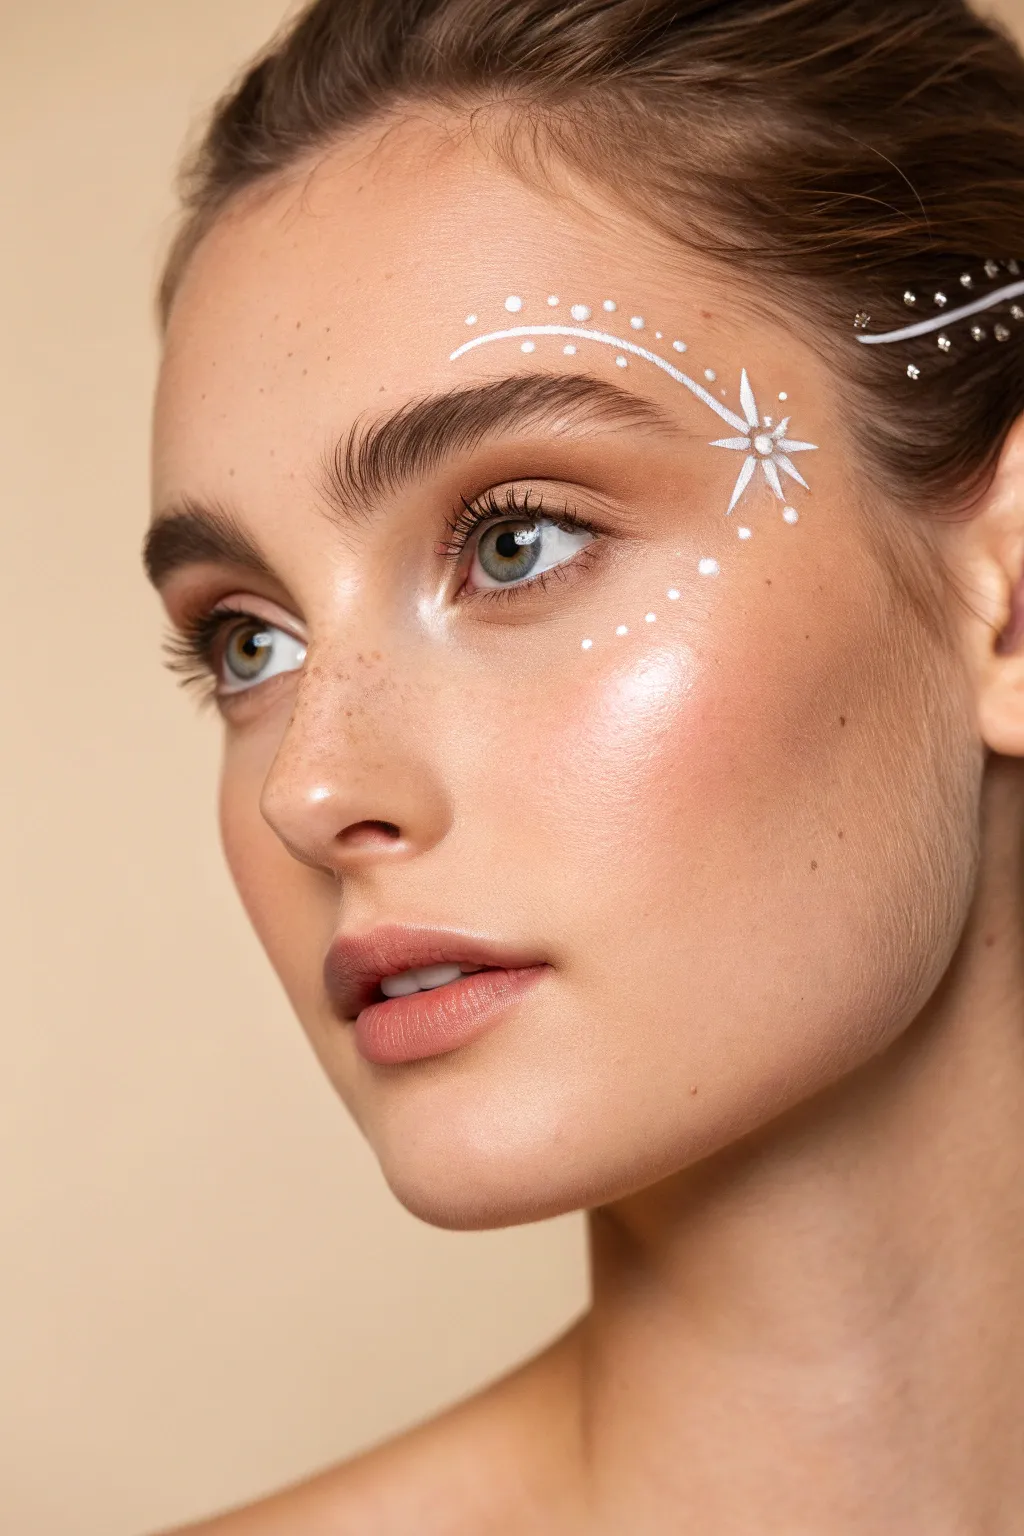
Capture the ethereal beauty of the night sky with this delicate white shooting star design. Perfect for festivals or holiday parties, this look combines precise linework with soft, glowing skin for a magical finish.
Step-by-Step
Materials
- White liquid eyeliner or water-activated face paint (white)
- Fine detail brush (size 0 or 00)
- Small dotting tool or toothpick
- Adhesive face gems or rhinestones (clear/crystal)
- Eyelash glue (clear drying)
- Champagne or pearl powder highlighter
- Setting spray
- Cotton swabs needed for cleanup
Step 1: Base Prep
-
Prepare the Canvas:
Begin with a clean, moisturized face. Apply a light coverage foundation or tinted moisturizer to even out the skin tone while keeping freckles visible if desired. -
Add the Glow:
Using a fan brush or fluffy highlighter brush, sweep a generous amount of champagne or pearl highlighter across the high points of the cheekbones. You want a ‘wet look’ sheen where the design will sit. -
Groom the Brows:
Brush eyebrows upward with a clear brow gel to create a fluffy, feathered look that frames the eye area nicely without being too heavy.
Clean Lines Hack
If your hand shakes or a line gets too thick, wait for the paint to fully dry. Then, use a cotton swab dipped in micellar water to gently erase or sharpen the edges without smudging.
Step 2: Painting the Star
-
Load Your Brush:
Activate your white face paint with water until it reaches a creamy, ink-like consistency, or shake your white liquid liner well. Coat your fine detail brush evenly. -
Map the Star Center:
Locate the spot right at the temple, slightly above the outer corner of the eyebrow. Place a small dot here to serve as the anchor for your star. -
Draw the Vertical Rays:
Carefully draw a vertical line through your anchor dot. Make the top segment slightly shorter and the bottom segment quite long and tapered, extending down towards the cheek. -
Add Horizontal Rays:
Cross the vertical line with a horizontal one. These should be shorter than the vertical lines to create a traditional starburst shape. -
Fill the Points:
Draw four tiny, diagonal points between your main cross lines to complete an eight-pointed star shape. Keep your hand steady and use just the very tip of the brush. -
Add the Center Gem:
Apply a tiny dot of lash glue to the very center of your painted star. Wait a few seconds for it to get tacky, then press a small white pearl or crystal rhinestone into place.
Add Dimension
Layer a tiny amount of iridescent glitter gel over only the center star once the white paint is dry. It catches the light beautifully without overwhelming the delicate white linework.
Step 3: Creating the Swirls
-
Draw the Main Arch:
Starting from the top point of your star, draw a smooth, curved line arching over the eyebrow towards the forehead center. Let the line taper off naturally as you lift the brush. -
Dotting the Arch:
Using a dotting tool or the back of your brush dipped in paint, place a series of dots just above the arched line you just drew. I like to graduate the sizes, making them smaller as they move away from the star. -
Cheekbone Constellation:
Create a second curve of dots starting from the bottom of the star and swooping down under the eye area. Space these dots out slightly more to mimic scattered stars. -
Inner Details:
Add three to four tiny dots inside the main arch curve, right near the star’s center, to add density to the design.
Step 4: Hair Embellishment
-
Paint Hair Streaks:
For the hair detail, take a slightly larger brush with the white paint. Select a thin strand of hair near the temple and paint a white streak, or gently apply the paint directly onto sleeked-back hair. -
Secure Hair Gems:
Using a strong hold hair gel or lash glue, attach several small rhinestones along the white painted hair streak or along the hairline above the ear. -
Final Set:
Close your eyes and mist the entire face with a setting spray to lock the makeup in place and prevent the white lines from cracking or flaking.
Now you are ready to shine with a look that is literally written in the stars

PENCIL GUIDE
Understanding Pencil Grades from H to B
From first sketch to finished drawing — learn pencil grades, line control, and shading techniques.
Explore the Full Guide
Ice Princess Snowflakes
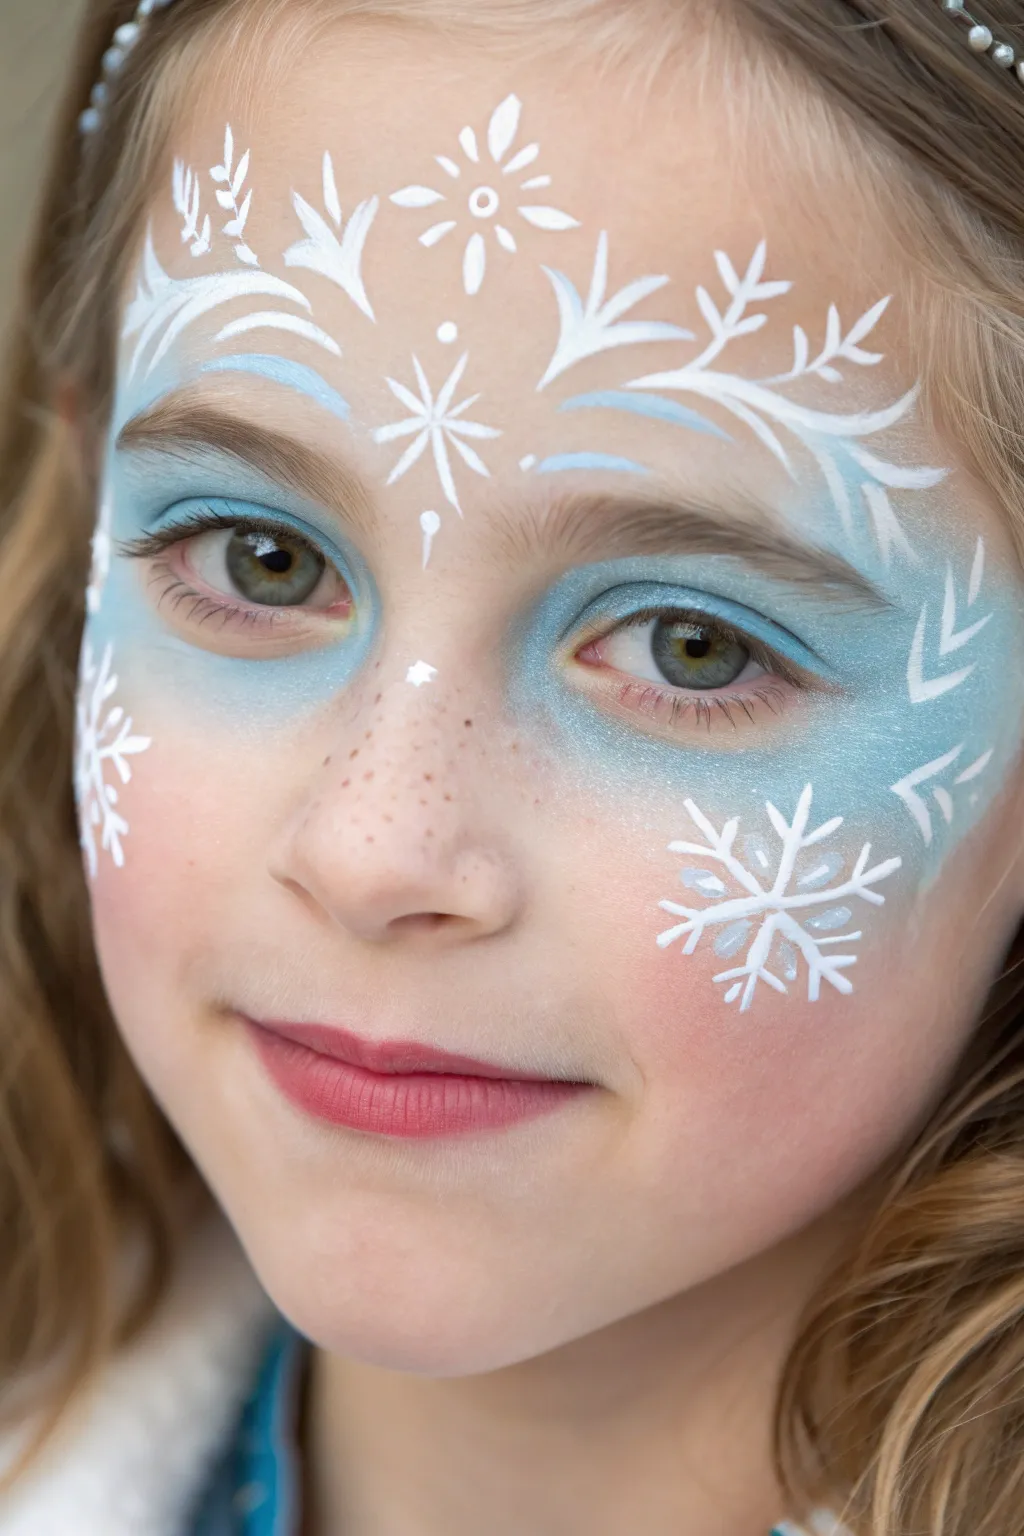
Transform little faces into winter wonderland royalty with this delicate snowflake design. Featuring icy blue gradients and striking white details, this look captures the magic of a snowy day in a style fit for an ice queen.
How-To Guide
Materials
- High-density face paint sponge
- Light blue shimmer face paint
- Teal or aqua face paint
- Professional white face paint (high opacity)
- Round brush (size #3 or #4)
- Fine liner brush (size #1)
- Cosmetic grade glitter (iridescent or silver)
- Water spritzer bottle
- Water cup
- Cotton swabs for cleanup
Step 1: Setting the Frozen Foundation
-
Sponge prep:
Begin by dampening your high-density sponge with a light spritz of water, ensuring it’s moist but not dripping. -
Load the base color:
Load the sponge generously with a shimmery light blue face paint, rubbing in a circular motion to build up a creamy consistency. -
Upper eye application:
Gently pat the paint over the eyelids and extend it upwards onto the forehead, creating a soft, curved shape above the eyebrows. -
Temple extension:
Carry the blue pigment out towards the temples, fading the edge slightly so it doesn’t look like a harsh block of color. -
Under-eye shimmer:
Using the same sponge, dab a lighter layer underneath the eyes and across the top of the cheekbones to connect with the temple area. -
Deepening the hue:
Take a slightly darker teal or aqua shade on the edge of your sponge and press it lightly onto the outer corners of the eyelids to add depth and dimension.
Step 2: Designing the Icy Crown
-
Centerpiece structure:
Switch to your #3 or #4 round brush loaded with strong white paint. Start in the center of the forehead and paint a small teardrop shape pointing down. -
Forehead flourishes:
From that center point, paint two symmetrical S-curved lines sweeping upwards and outwards toward the hairline, pressing down for thickness and lifting for a fine trailing point. -
Adding organic vines:
Add smaller, branching fern-like strokes coming off your main curves, mimicking frost spreading across a windowpane. -
The center snowflake:
Directly in the middle of the forehead, paint a simple six-point starburst snowflake using quick, straight strokes. -
Adding dots:
Place tiny white dots at the tips of your snowflake and along the curved vines to soften the design and add whimsy.
Stay Sharp
Keep your white paint consistency like melted ice cream. If it’s too watery, it will drip into the blue; too dry, and your lines won’t be crisp.
Step 3: Cheek Details & Highlights
-
Cheek snowflake anchor:
On the left cheekbone (or right, depending on preference), paint a large, prominent snowflake. Start with a vertical line intersected by an X. -
Detailed tines:
Using your fine liner brush, add tiny ‘V’ shapes to the ends of each snowflake arm to make it look crystallized. -
Side accents:
On the temples near the outer eye corners, paint smaller partial snowflakes or simple geometric ‘V’ shapes that flow towards the hairline. -
Nose highlight:
Place a small triangular cluster of three white dots on the bridge of the nose for a subtle highlight. -
Freckle frost:
I like to flick a very dry brush with diluted brown paint lightly over the nose and cheeks to create faux freckles, which grounds the magical look. -
Eye definition:
Use a liner brush with dark teal to trace a very thin line along the upper lash line, giving the eyes a pop without heavy makeup. -
Glitter dusting:
While the paint is still slightly tacky, dab your finger into iridescent glitter and press it onto the center of the forehead snowflake and the high points of the cheeks. -
Final touches:
Step back and check for symmetry, adding an extra white dot or vine curl wherever the design feels empty.
Stick-on Sparkle
For maximum princess effect, use skin-safe glue to adhere a large rhinestone gem right in the center of the forehead snowflake.
Finish with a touch of pink lip gloss or balm and she is ready to rule the winter kingdom
Ladybug Mask With Dainty Dots
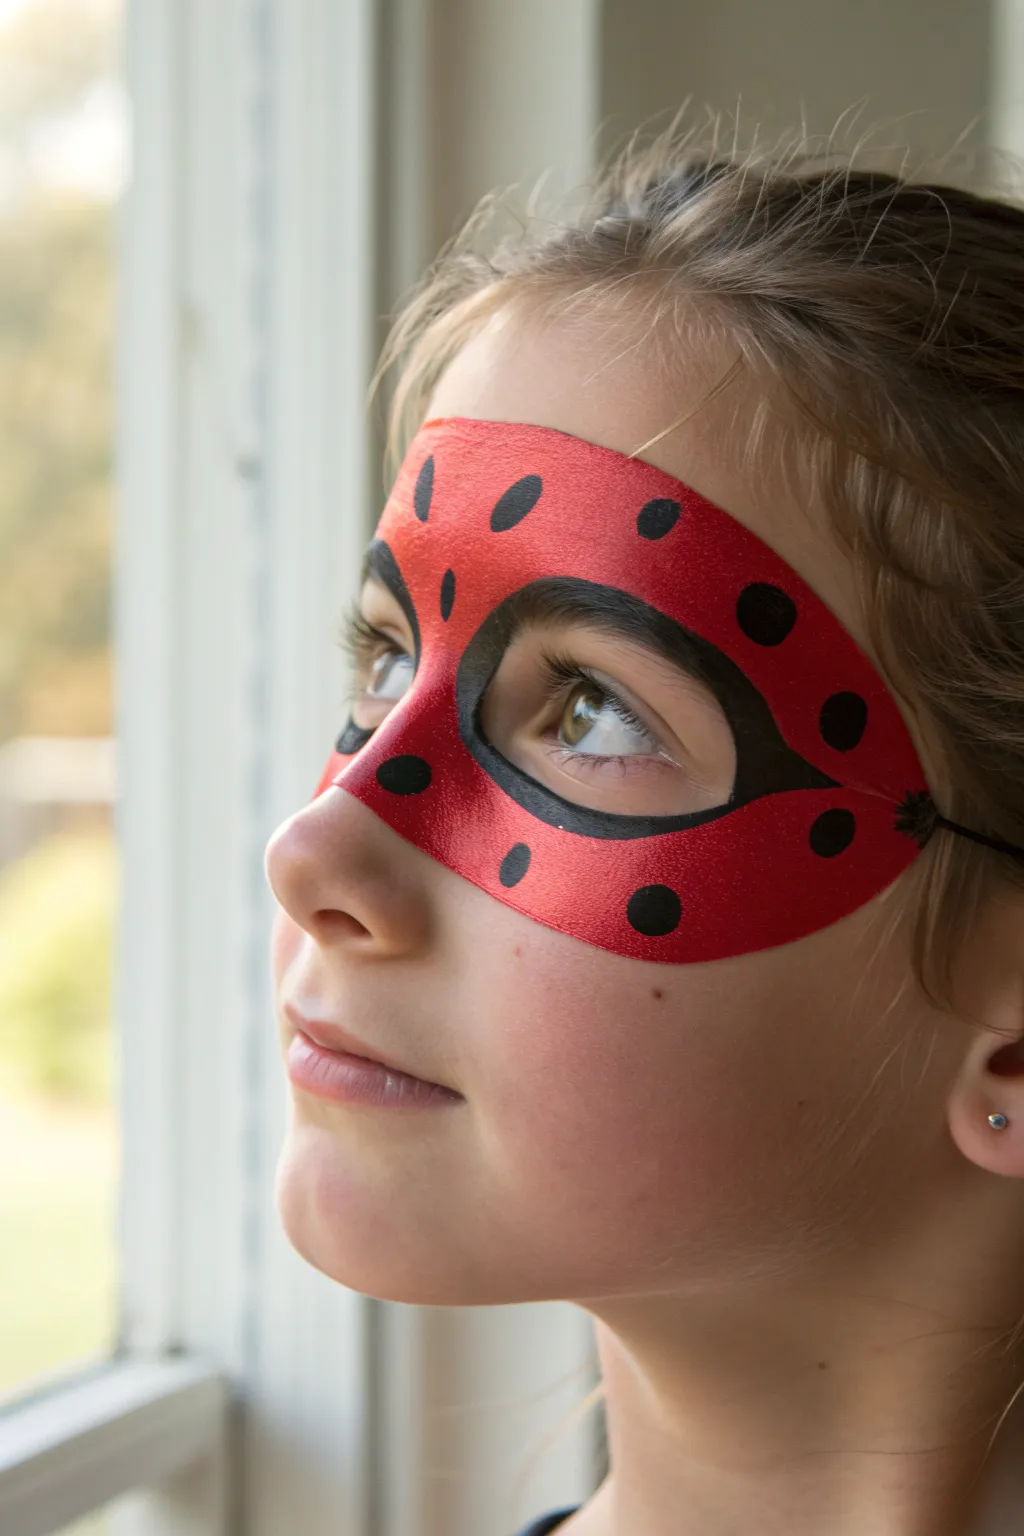
Transform momentarily into a garden superhero with this vibrant and classic ladybug mask design. The look features a bold, bright red base with crisp black spotting that contours the face beautifully for a playful and heroic effect.
Step-by-Step Tutorial
Materials
- High-quality red face paint (water-based or cream)
- Black face paint (strong pigment)
- Medium flat brush (approx. 1/2 inch) or filbert brush
- Small round brush (size 2 or 3) for detailing
- Water cup
- Paper towels or sponge for cleanup
- Spray mist bottle (optional, for activating paint)
Step 1: Setting the Foundation
-
Clean canvas:
Begin with a clean, dry face to ensure the paint adheres properly and doesn’t mix with natural oils. -
Outline the mask shape:
Load your medium brush with red paint. Start at the bridge of the nose and draw a gentle curve upwards over one eyebrow, aiming for the temple. -
Mirror the curve:
Repeat this same sweeping motion on the other side, ensuring the top of the mask is symmetrical across the forehead. -
Define the bottom edge:
From the temple, sweep the brush down under the eye, following the natural curve of the cheekbone, and bring it back up to meet at the nose bridge. -
Fill the base:
Once your outline is satisfying, use the flat brush to fill in the entire mask shape with the red paint. Use smooth, horizontal strokes for even coverage. -
Check opacity:
If the red looks streaky, wait about 30 seconds for the first layer to dry and apply a second coat for a truly vibrant, superhero red.
Step 2: Adding the Spots and Details
-
Switch to black:
Rinse your brushes well or grab a fresh small round brush and load it with creamy black paint. -
Outline the eyes:
Carefully draw an outline around the eyes inside the red mask. I find it helpful to have the model look up while I do the lower lash line to prevent blinking smudges. -
Thicken the eye shape:
Go over the eye outline again, making the line slightly thicker to create a dramatic, cat-eye shape that tapers at the corners. -
Start the center spots:
Place a prominent black dot right in the center of the forehead area of the mask. -
Add cheek spots:
Paint a medium-sized circle on the lower ‘wing’ of the mask on each cheekbone area. -
Fill in the pattern:
Add smaller dots scattered around the remaining red space. Try to keep them somewhat symmetrical from left to right, but they don’t have to be perfect. -
Refine the circles:
Go back over your black dots to make sure they are fully opaque and round. A simple ‘press and twist’ motion with a round brush creates great circles.
Fixing Smudges
If black paint bleeds into the red, let it dry completely. Then, use a damp Q-tip to ‘erase’ the mistake before re-applying the red base over that spot.
Step 3: Finishing Touches
-
Define the nose:
If the bridge of the nose faded during filling, re-establish a sharp line or a small ‘v’ shape at the bottom center of the mask. -
Connect the mask (Optional):
For a ‘tied-on’ look, you can paint a thin black line extending from the outer temples toward the hairline, simulating a string. -
Cleanup edges:
Use a slightly damp Q-tip or wipe to clean up any red paint that may have strayed outside your intended mask shape for a crisp finish. -
Final inspection:
Take a step back and look for any spots that need a touch-up of red or black, ensuring the contrast is sharp.
Add Some Sparkle
While the black spots are still slightly wet, tap a tiny bit of cosmetic glitter onto them. It adds a magical shimmer without changing the design.
Now you have a bold, heroic look ready for a costume party or an afternoon of imaginative play


Bumblebee Cheeks With Tiny Daisies
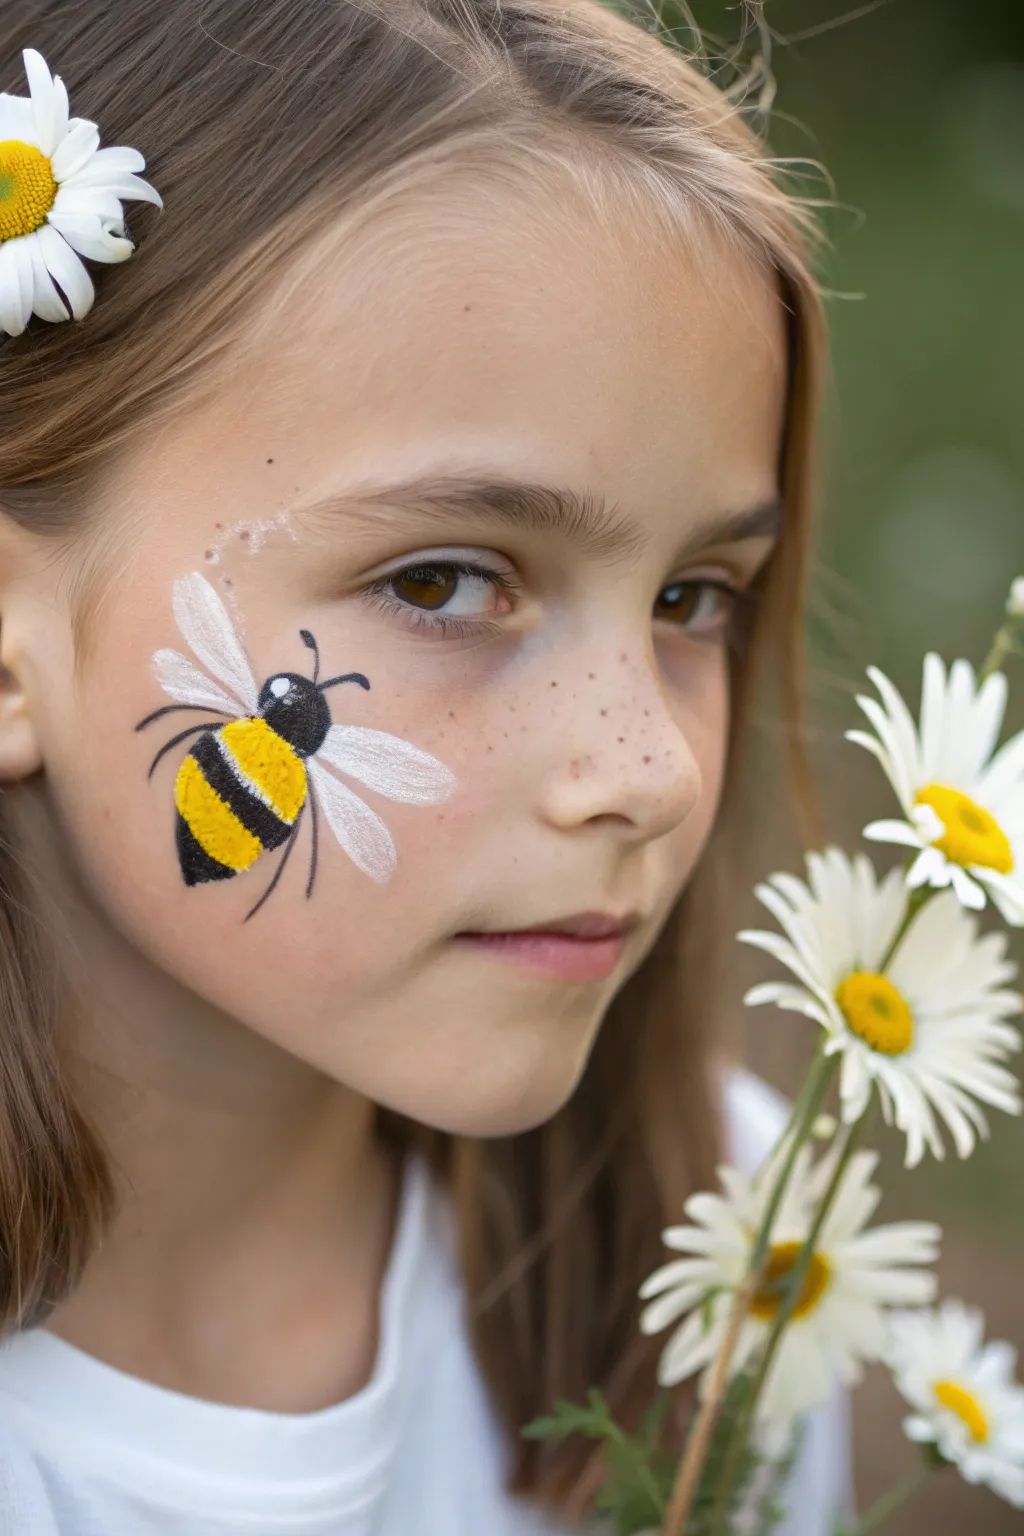
Capture the sweetness of a summer garden with this adorable face painting design featuring a fuzzy bumblebee and delicate floral accents. This look pairs perfectly with real or silk flowers for a whimsical, nature-inspired costume or photo shoot.
How-To Guide
Materials
- High-quality face paint (Yellow, Black, White)
- Round brush (size 4 or similar)
- Fine liner brush (size 1)
- Filbert brush or petal brush (optional)
- Clean water cup
- Spray bottle with water
- Face painting sponge (optional)
- Daisy hair clip or real flower
Step 1: Planning and Base
-
Prep the Canvas:
Start with a clean, dry face. Ensure the child is comfortable and sitting still. If you are adding the real daisy to the hair later, you can position it now to see where the bee should ‘fly’ towards, or just visualize the placement on the ample part of the cheek. -
Outline the Bee Body:
Using your yellow face paint and a moistened round brush, paint an oval shape on the apple of the cheek. It should be tilted diagonally, as if the bee is buzzing upwards toward the ear or eye.
Smudged Stripes?
If black bleeds into yellow, wait for it to fully dry. Then, re-apply thick yellow over the smudge to clean it up like correction fluid.
Step 2: Painting the Bee
-
Fill the Body:
Fill in the yellow oval completely. I like to dab the paint slightly rather than smooth it perfectly to give it a tiny bit of texture, but a smooth coat works great too. Let this yellow layer dry for a moment so the black stripes don’t bleed into it. -
Paint the Head:
Load your round brush with black paint. At the top-right end of the yellow oval, paint a smaller black circle for the bee’s head, connecting it seamlessly to the body. -
Add the Stripes:
Using the black paint, carefully paint two or three curved stripes across the yellow body. Make sure they curve with the shape of the oval to make the bee look round and plump. -
Fill the Stinger:
At the bottom end of the yellow oval, add a tiny black triangle or point to create the stinger area. -
Create Texture:
With a fine liner brush and black paint, add tiny, quick flicking motions along the edges of the black stripes and the body. This ‘fur’ effect makes the bumblebee look fuzzy and realistic.
Step 3: Adding Wings and Details
-
Paint the Top Wings:
Clean your brush thoroughly and load it with white paint. Paint two teardrop shapes extending from the upper back of the bee. The paint should be slightly translucent to mimic delicate insect wings. -
Paint the Bottom Wings:
Add two smaller teardrop shapes below the first set of wings. If your white paint is too opaque, you can water it down slightly for this step. -
Highlight the Eyes:
Using the back of a brush handle or a very fine tip with white paint, add a small dot on the black head to create a glint in the bee’s eye. This brings the character to life immediately. -
Wing Veins:
Wait for the white wings to dry completely. Then, take your finest liner brush with a very watery grey or watered-down black and paint incredibly thin lines inside the wings for veins. -
Legs and Antennae:
Reload the fine liner with black paint. Carefully draw two thin antennae protruding from the head. Add delicate, thin legs hanging down from the body—usually three visible on the side facing the viewer.
Level Up: Glitter Wings
Before the white wing paint dries, tap a small amount of iridescent cosmetic glitter onto them. It makes the wings sparkle in the sunlight.
Step 4: Finishing Touches
-
Movement Lines:
To give the illusion of flight, you can add a tiny dotted white line trailing behind the stinger. -
Add Pixie Dust:
Using the white paint, add a few tiny white dots or ‘freckles’ around the bee’s flight path or across the nose bridge for a magical, dusted look. -
Style the Hair:
Clip a large white daisy into the hair on the same side as the painting, positioned relatively close to the bee so it looks like the bee is approaching the flower. -
Coordinate Accessories:
Have the child hold a small bouquet of daisies to complete the thematic look shown in the inspiration photo.
Now you have a buzzing little garden friend ready for a sunny afternoon adventure
Fox Face With Floral Accents
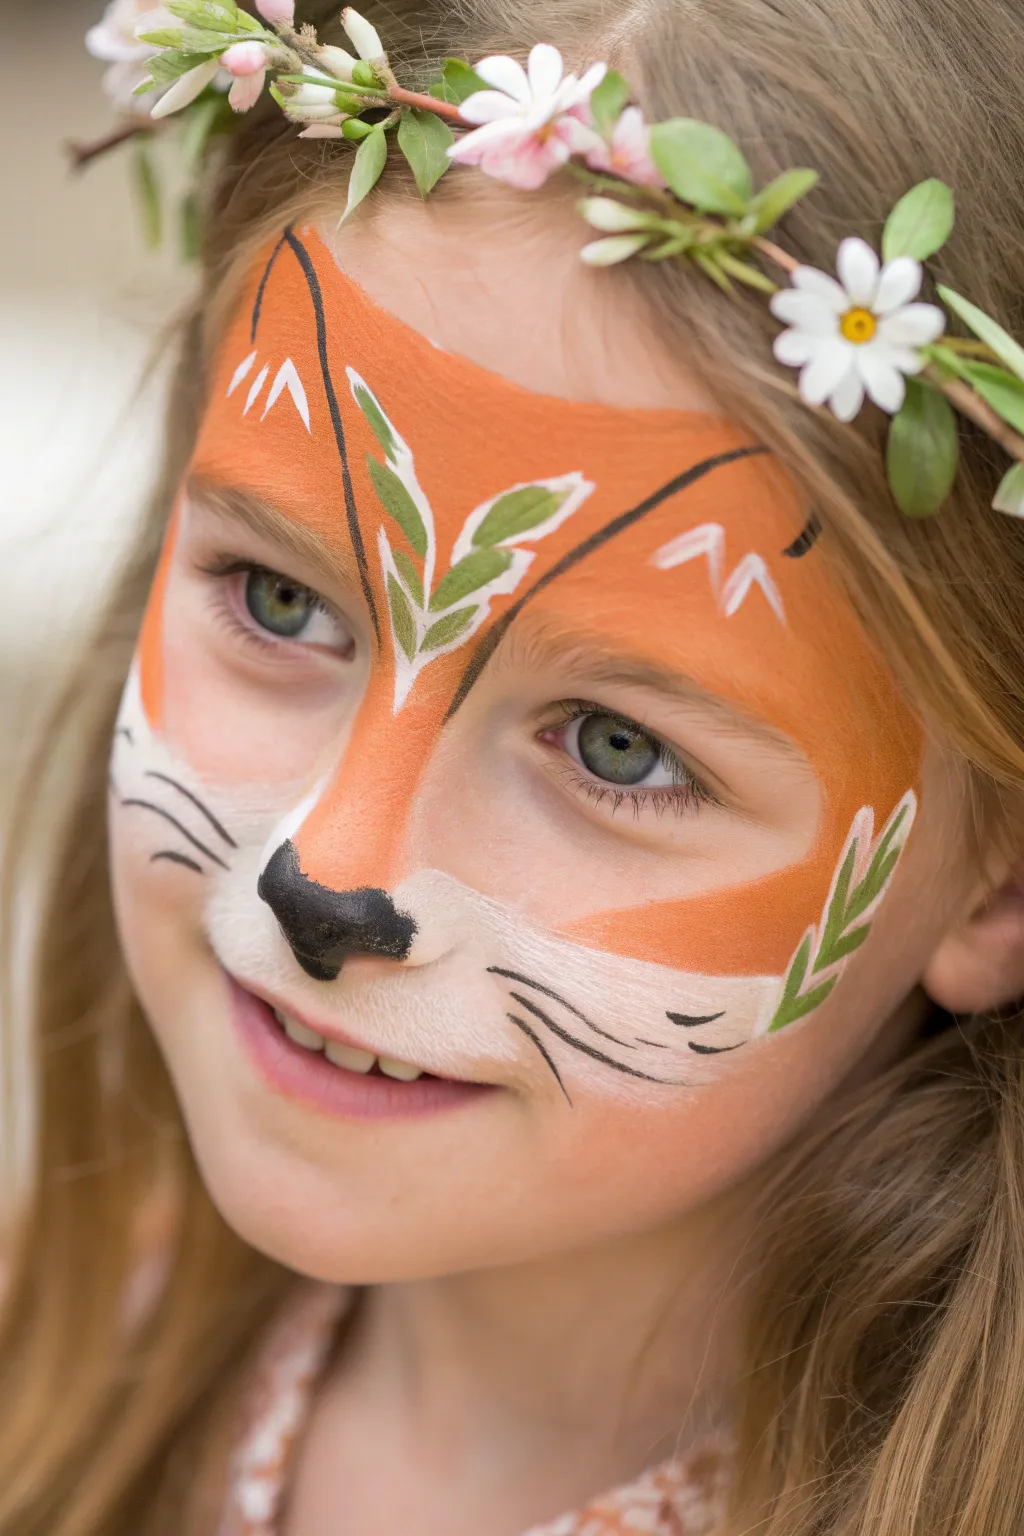
Transform little faces into adorable forest creatures with this sweet and nature-inspired fox design. The look combines classic animal features with delicate leafy details for a unique, enchanting twist perfect for spring festivals or garden parties.
Step-by-Step Guide
Materials
- Face paint (orange, white, black, light green, dark green)
- High-density face painting sponge (petal shaped or round)
- Round brush (size 2 or 3)
- Small flat brush or filbert brush
- Fine liner brush (size 0 or 1)
- Water container
- Spray bottle for wetting paints
Step 1: The Orange Base
-
Sponge Preparation:
Begin by dampening your sponge with a spray bottle, ensuring it’s moist but not dripping. Load it generously with a bright, warm orange face paint. -
Forehead Shape:
Press the sponge onto the center of the forehead to create the main fox shape. You want to cover the area between the eyebrows and fan out towards the temples, creating a rough ‘V’ or mask shape. -
Cheek Extensions:
Continue sponging the orange down onto the tops of the cheekbones, keeping the edges soft. Stop just before you reach the nose area, leaving the space around the mouth and nose clean. -
Ears Illusion:
Use the edge of your sponge or a flat brush to extend the orange paint slightly upwards at the temples to suggest the base of ears, though the main focus will be the central mask.
Step 2: Adding the Muzzle
-
White Loading:
Rinse your sponge or grab a fresh one. Load it with creamy white paint. I prefer a slightly thicker consistency here for better opacity over lips. -
Upper Lip Area:
Dab the white sponge over the entire upper lip area, creating a mustache shape that extends out to the cheeks. -
Cheek Blending:
Carefully blend the top edge of the white section where it meets the orange on the cheeks. You can use a clean, slightly damp finger or the clean side of a sponge to soften this transition. -
Nose Highlight:
Add a very small dab of white on the bridge of the nose, right between the eyes, to add dimension to the snout.
Sponge Softness
For the softest blend between the orange and white fur, tap the sponge lightly over the border while the paint is still barely wet. Don’t rub!
Step 3: Defining Features
-
Black Nose:
Using a round brush (size 3) loaded with black paint, color in the tip of the nose. Create a rounded triangular shape, extending it slightly onto the nostrils. -
Outline the Snout:
Switch to a fine liner brush. With a very light hand, draw thin, sweeping lines extending from the side of the nose outward to define the muzzle shape. -
Main Whiskers:
On the white muzzle area, paint three distinct whisker lines on each side. Start thick near the nose and flick your wrist to taper them into thin points. -
Detail Lines:
Add a few tiny black dots or short dashes near the whisker base for texture. -
Eye Definition:
Using the thin liner brush again, draw two sweeping black lines starting from the inner corner of the eyebrows and moving diagonally up and out. This creates that sloped ‘fox eye’ look without heavy eyeliner.
Sparkle & Shine
Add cosmetic-grade gold glitter to the orange sections while the paint is wet to give the fox a magical, sun-kissed shimmering effect.
Step 4: Floral flourishes
-
Forehead Leaves:
With a round brush and light green paint, create a leaf sprig in the center of the forehead. Press the belly of the brush down and lift to create teardrop leaf shapes. -
Cheek Decor:
Mirror the forehead design by adding a similar leafy vine on one or both cheeks, curving slightly to frame the face. -
Adding Contrast:
Once the green is dry to the touch, use a fine brush with white paint to add a central vein line or outline to the leaves. This makes them pop against the orange background. -
White Tufts:
Add small, quick strokes of white paint inside the orange ears (at the temples) and on the forehead to mimic fur texture. -
Final Touches:
If desired, paint tiny white ‘V’ shapes or rice grains on the forehead to suggest additional fur patterns or highlights.
Pop on a flower crown and this little woodland fox is ready to explore.
Glam Leopard Spots
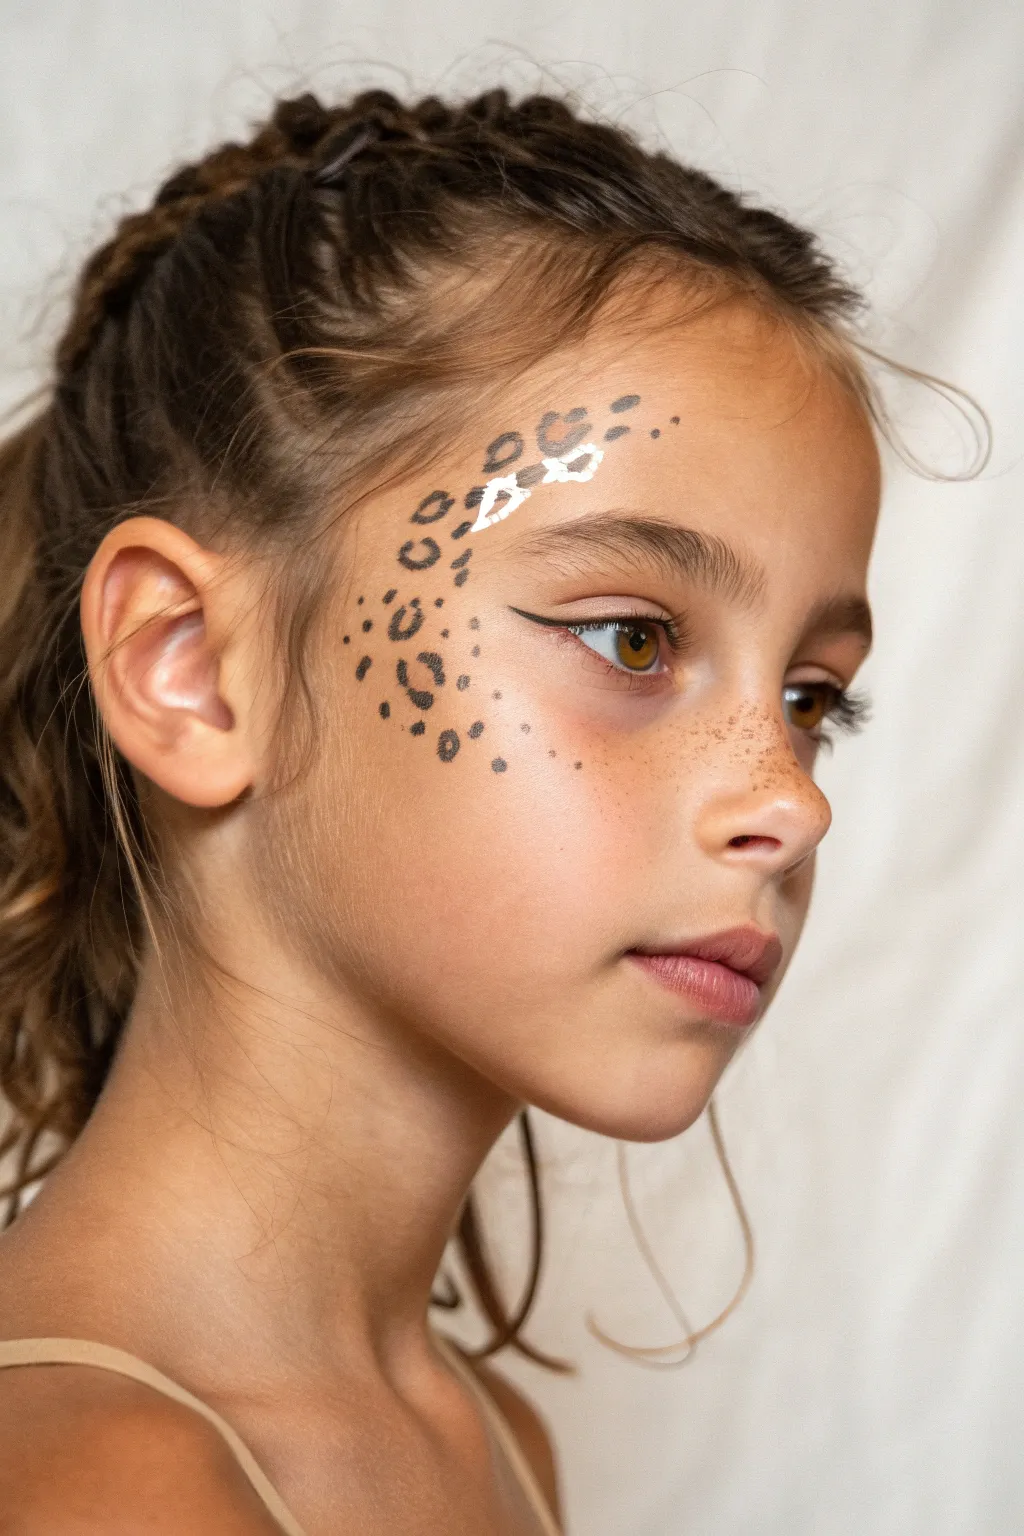
Transform a simple makeup look into something wild yet elegant with these delicate leopard spots. This design focuses on the temple and cheekbone, blending metallic accents with crisp black linework for a sophisticated finish perfect for older kids or festive parties.
How-To Guide
Materials
- Black liquid eyeliner (fine felt tip)
- Gold or bronze face paint (or metallic liquid liner)
- Small round brush (size 1 or 2)
- Black pencil eyeliner
- Setting spray (optional)
- Micellar water and cotton swabs (for cleanups)
Step 1: Base & Gold Accents
-
Prep the canvas:
Begin with clean, dry skin. If the child has any natural oils on their face, a quick wipe with a toner can help the makeup adhere better and last longer. -
Map the area:
Visualize a C-shape curve starting from above the eyebrow, curving down around the temple, and ending high on the cheekbone. This is where your design will live. -
Create metallic centers:
Using your small round brush and gold face paint (or a metallic liner), dab small, irregular blobs along this imaginary curve. -
Vary the sizes:
Make sure these gold spots aren’t uniform circles. Press the brush down explicitly to create organic, bean-like shapes. Some should be larger near the eyebrow tail and get smaller as they descend onto the cheek. -
Let it set:
Allow the metallic paint or liner to dry completely for a minute. You don’t want the next layer to smear into the gold.
Steady Hand Trick
Rest your pinky finger on the child’s cheek or chin while drawing. This anchors your hand and gives you much better control for painting those tiny, detailed brackets.
Step 2: Defining the Spots
-
Start the outlines:
Take your black liquid eyeliner. The fine tip is crucial here for crisp edges. Begin outlining your larger gold spots. -
The bracket technique:
Don’t circle the gold completely. Instead, draw two or three broken brackets around the metallic center. Think of drawing parenthesis that don’t quite touch. -
Vary line thickness:
As you draw the brackets, press slightly harder at the curves and lighter at the ends to give the spots a dynamic, hand-painted feel. -
Add open spots:
Move to the spaces between your gold-filled spots. Draw small, open C-shapes or U-shapes in black directly on the skin without any gold center. -
Create solid specks:
Scatter tiny sold black dots and irregularly shaped specks amongst the larger spots to fill in gaps. This mimics the natural irregularity of animal print. -
Fade the edges:
As you move further away from the main cluster (towards the hairline or lower cheek), make the spots smaller and more sparse to create a fading gradient effect.
Step 3: Finishing Touches
-
The winged liner:
To complement the fierce theme, add a sharp winged eyeliner to the upper lash line. Start thin at the inner corner and thicken as you flick it out towards the temple. -
Define the flick:
Ensure the wing points in the same general direction as the flow of your leopard spots for visual harmony. -
Enhance freckles:
If the model has natural freckles, leave them be. If not, I sometimes like to add a few tiny, faint brown faux freckles across the nose bridge to tie the earthy tones together. -
Check symmetry:
Step back and look at the overall density. If there are any bald patches in your C-curve, add a tiny black dot to balance it out. -
Set the look:
A light mist of setting spray will keep those crisp lines from smudging during play or parties.
Glitter Upgrade
While the gold paint is still slightly tacky, tap a tiny bit of cosmetic-grade biodegradable glitter onto the center spots for a sparkling 3D effect.
Now you have a fierce, fashionable look that is ready for the spotlight
Heart Cheek Tattoo With Filigree
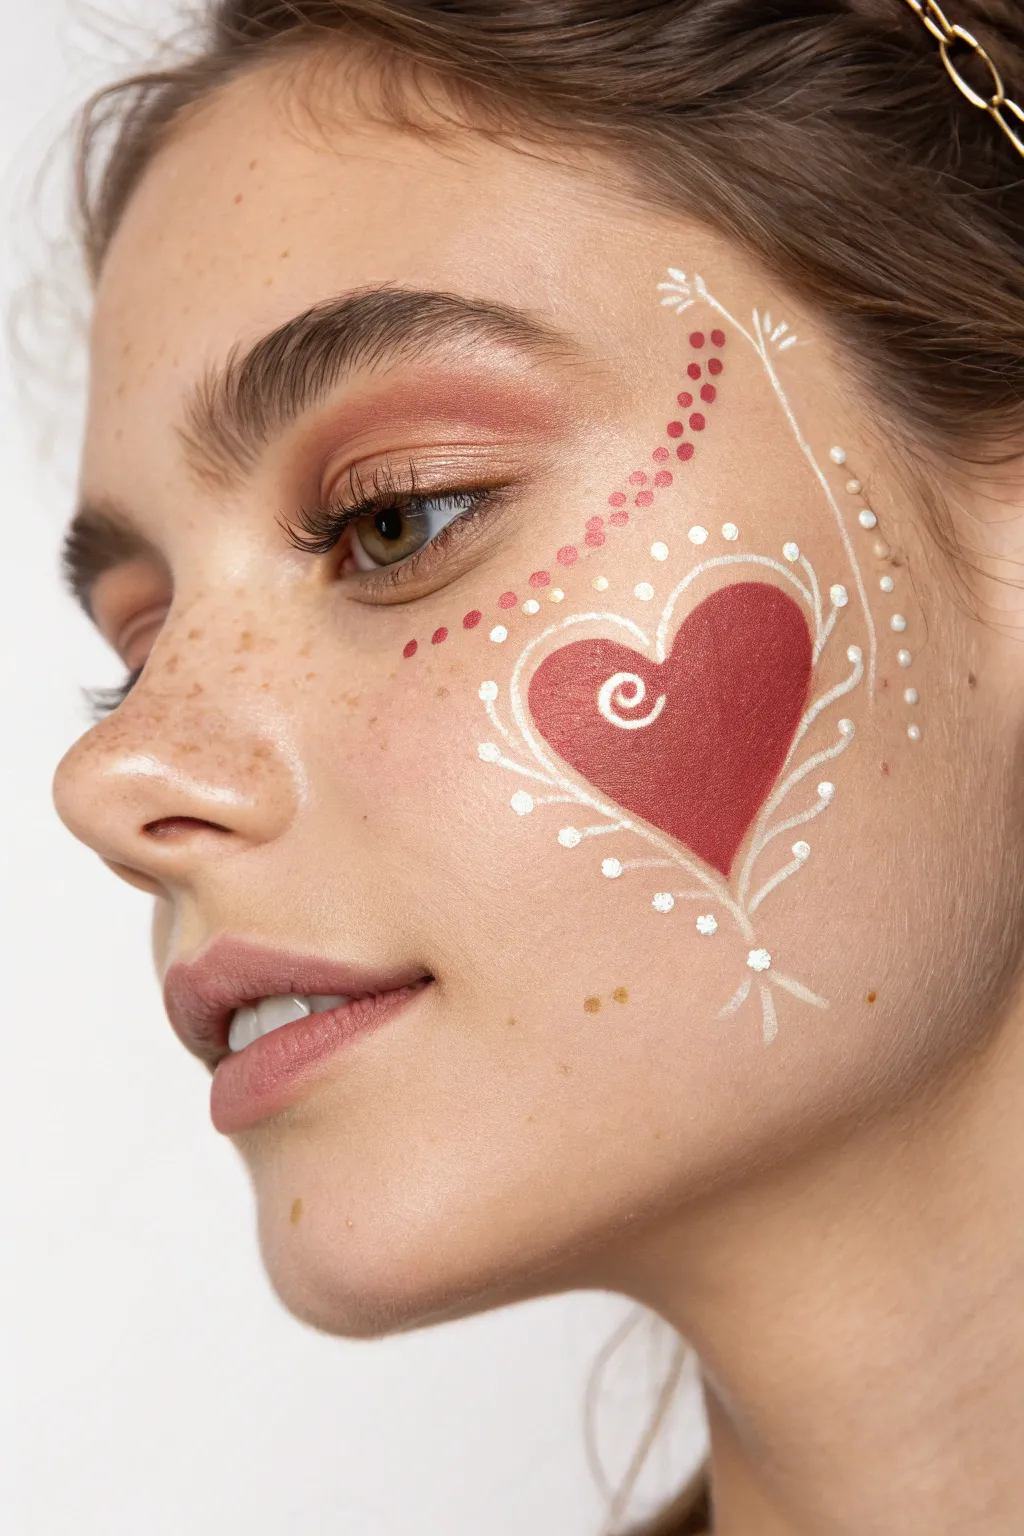
Embrace a touch of romance with this delicate and lovely face paint design. Featuring a classic red heart surrounded by lacy white filigree and dotted accents, this look offers a sweet, embellished style perfect for Valentine’s designs or fairytale characters.
Step-by-Step Tutorial
Materials
- Red face paint (high pigment, cream or water-activated)
- White face paint (strong opacity for linework)
- Coral or light pink eyeshadow (for base blending)
- Flat shader brush (small to medium)
- Round liner brush (size 1 or 0 for fine details)
- Small fluffy blending brush
- Setting spray (optional)
- Makeup sponge
Step 1: Base and Heart Placement
-
Prep the canvas:
Begin with clean, moisturized skin. Apply a light base of foundation or BB cream if desired to even out the skin tone, but keep natural freckles visible if possible for a fresh look. -
Create a soft shadow:
Using a small fluffy blending brush, pick up a small amount of coral or warm light pink eyeshadow. Sweep this gently over the cheekbone and eyelid area to create a warm, unified background for your design. -
Outline the heart:
Load a small flat shader brush or a medium round brush with red face paint. Carefully sketch the outline of a tilted heart on the apple of the cheek. The heart should lean slightly towards the ear. -
Fill in the heart:
Once you are happy with the shape, fill the interior of the heart completely with the red paint. Ensure the coverage is opaque and smooth. -
Add the inner highlight:
Clean your fine liner brush thoroughly and load it with crisp white face paint. Paint a small, tight spiral or swirl near the upper left lobe of the heart to act as a stylized reflection.
Fixing Smudges
If the red and white mix and turn pink, let it dry completely. Then, repaint over the mistake with the correct color. Don’t blend while wet.
Step 2: The Filigree Framework
-
Start the lower filigree:
Using the same fine liner brush and white paint, find the bottom point of the heart. Draw two curved lines extending downwards and crossing over each other, resembling the stems of a bouquet. -
Draw the side curves:
From that bottom intersection, draw two long, sweeping curves that hug the sides of the heart. These should reach up past the mid-point of the heart, framing it nicely. -
Add teardrop leaves:
Along these sweeping white curves, paint small teardrop shapes or tiny dashes that look like leaves. Angle them outwards away from the heart. -
Create the upper frame:
Above the heart, draw disconnected curved lines that mimic the shape of the heart’s top lobes, creating a ‘halo’ effect with the white paint. -
Connect the top stems:
Extend a thin white line from the outer corner of the eye area, traveling diagonally upward toward the temple. Add small leaf-like dashes to this stem as well.
Add Dimension
Use a darker red or burgundy paint on the lower right edge of the heart to create a subtle shadow, making the heart look 3D and rounded.
Step 3: Dotted Details and Accents
-
Dot the frame:
Reload your white paint. Place distinct white dots in the negative spaces between the heart and the white filigree lines you just painted. -
Add tiny sparkles:
At the very ends of the bottom crossed stems, paint tiny three-pronged star shapes or small floral bursts to cap off the lines elegantly. -
Create the red dot trail:
I prefer to switch back to a clean small brush with red paint here. Starting near the temple and curving down toward the heart, paint a series of red dots. -
Graduate the dot sizes:
Make the red dots largest at the top (near the hairline) and gradually smaller as they get closer to the heart, creating a fading trail effect. -
Add outer white dots:
To balance the design, add a trail of tiny white dots running parallel to the upper white stem line near the temple. -
Final touches:
Inspect your work. If the red heart needs more vibrancy after drying, add a second thin coat, being careful not to disturb the white swirl.
You now have a wonderfully romantic face paint look ready for any special occasion
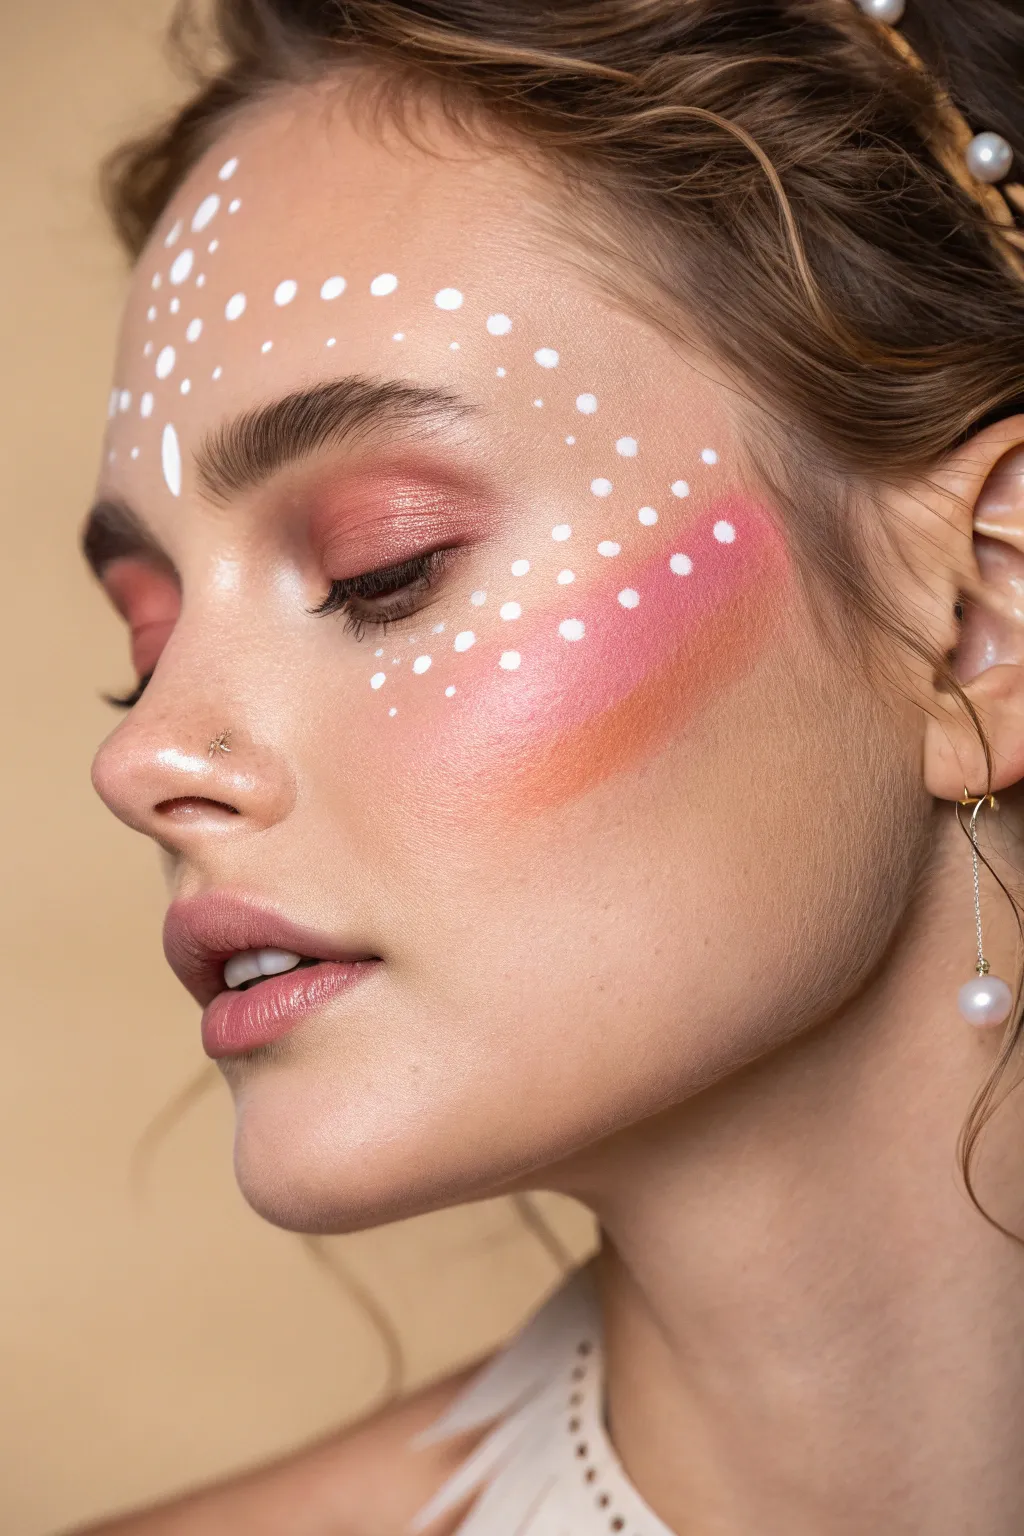
Sunset Ombré Eye Mask
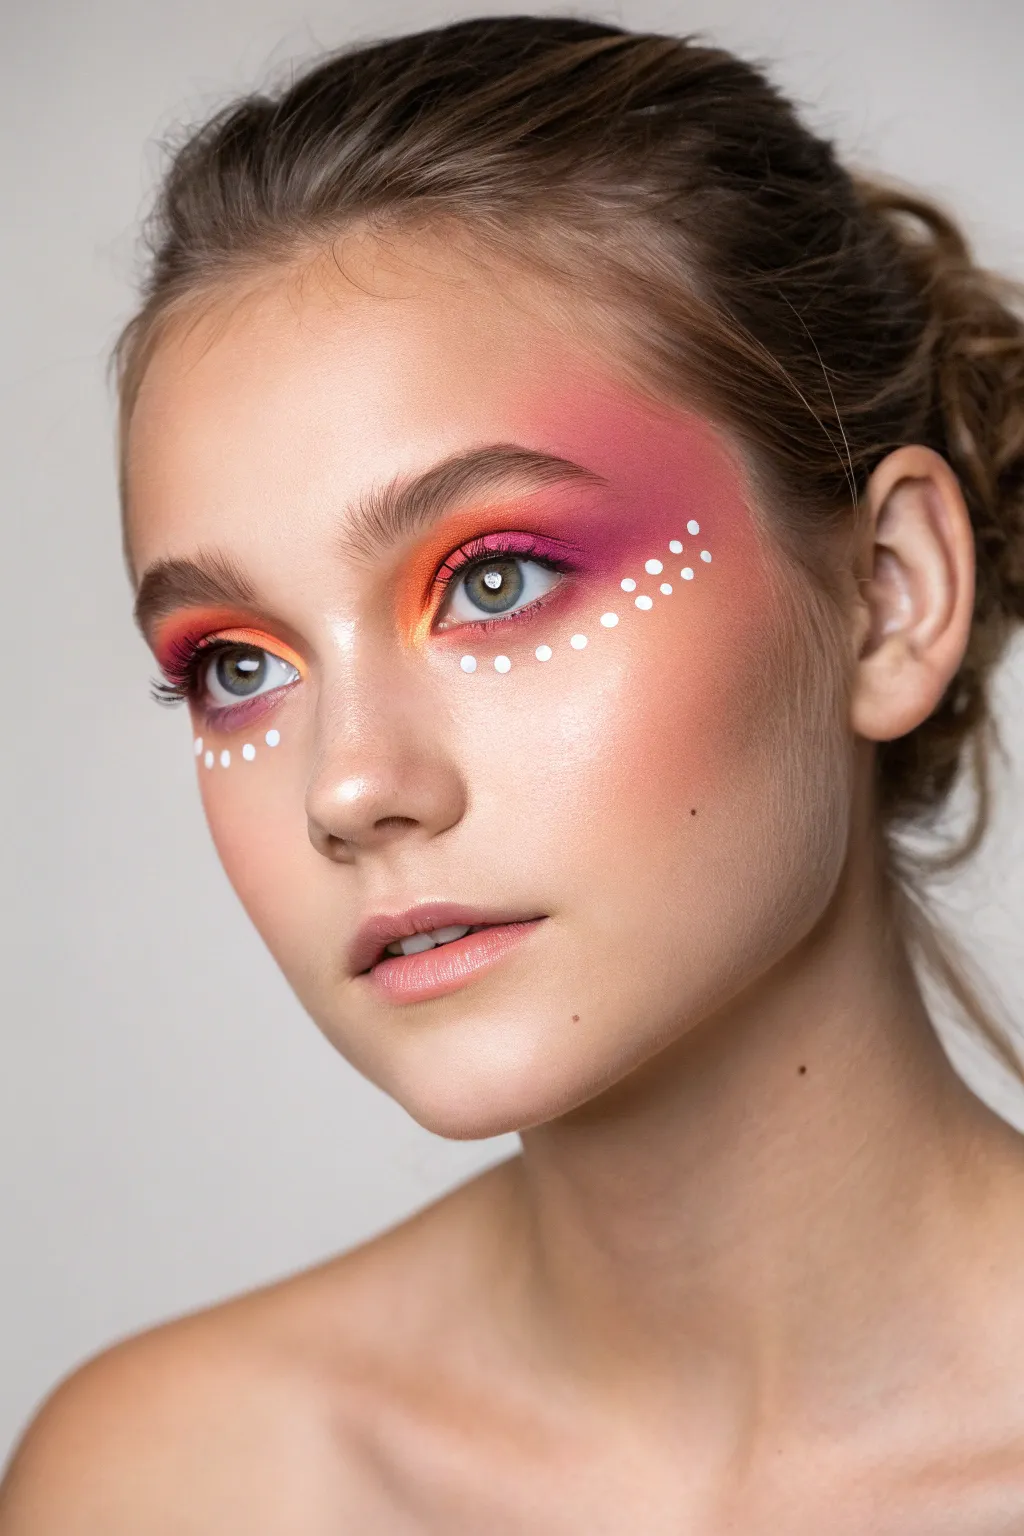
Capture the magic of twilight with this vibrant eye look that blends fiery orange into deep magenta, wrapping across the temples like a glowing mask. Accented with delicate white dots, this design mimics the softness of a setting sun against a twilight sky.
Step-by-Step
Materials
- Eyeshadow primer or white cream base
- Highly pigmented orange eyeshadow (matte)
- Bright magenta or deep pink eyeshadow (matte and satin)
- Yellow-gold shimmer eyeshadow (for inner corner)
- White liquid eyeliner or creative face paint with a fine brush
- Fluffy blending brush
- Small pencil brush or detail shader
- Mascara
- Setting spray
- Foundation and concealer (for base)
Step 1: Base and Transition
-
Prime the canvas:
Start with a clean, moisturized face. Apply your regular foundation and concealer. Crucially, apply an eyeshadow primer or a thin layer of white cream base all over the eyelid, extending well past the outer corner towards the temple. This white base makes the sunset colors pop vividly. -
Lay down the orange:
Dip a fluffy blending brush into your bright orange matte eyeshadow. Pack this color primarily onto the inner half of the eyelid, sweeping it up into the crease and slightly above the brow bone. -
Extend the gradient:
Using the same orange shade, softly blend the color underneath the lower lash line, focusing on the inner two-thirds. Verify that the edges are diffused and soft like a cloud, not harsh lines.
Muddy Colors?
If the orange and pink look brown where they meet, you over-blended. Pack the colors side-by-side first, then gently wiggle the brush only on the border between them to mix.
Step 2: Creating the Sunset Gradient
-
Introduce magenta:
Switch to a clean blending brush. Pick up the deep magenta or hot pink eyeshadow. Apply this to the outer third of the eyelid, blending it inwards to meet the orange. The overlap area will naturally create a lovely coral hue. -
Wrap the temple:
This is the signature ‘mask’ shape. Boldly sweep the magenta pigment from the outer corner of the eye, up over the cheekbone, and towards the hairline at the temple. It should look like a soft wash of watercolor blush. -
Deepen the crease:
Take a smaller pencil brush with a tiny bit of dark plum or intense purple shadow. Work this strictly into the outer ‘V’ of the eye crease to add dimension, but keep it minimal so the look stays bright. -
Mirror the lower lash line:
Mirror the upper lid by applying the magenta to the outer third of the lower lash line, blending it seamlessly into the orange section you applied earlier. -
Buff and perfect:
Take a clean fluffy brush with no product on it. Gently buff the edges where the pink meets your skin tone at the temple and cheekbone to ensure a seamless, airbrushed fade. I find this step is what separates a novice look from a professional one.
Starry Night Twist
Swap the white dots for tiny adhesive rhinestones or gold leaf flakes along the gradient curve. This adds a festival-ready texture that catches the light beautifully.
Step 3: Details and Finishing Touches
-
Brighten the inner corner:
Using a small detail brush, press a pop of yellow-gold shimmer right into the tear duct area. This brings light to the eyes and mimics the sun itself. -
Map the dotwork:
Plan the path for your white dots. They will follow the curve of the eyeshadow ‘mask’—starting under the inner eye, swooping down slightly over the cheek, and curving up towards the temple. -
Apply the dots:
Using white liquid liner or white face paint on a fine detail brush, create the dots. Start with smaller dots near the nose. -
Graduate the size:
As you move outwards along the cheekbone towards the temple, make the dots slightly larger. A dotting tool or the back end of a small brush handle works perfectly for maintaining consistent circles. -
Add mascara:
Curl your lashes and apply a generous coat of mascara to top and bottom lashes to frame the colorful work. -
Brow grooming:
Brush your eyebrows upward with a clear brow gel. Since the eye makeup is so bold, keep the brows natural and feathery rather than heavily filled. -
Set the look:
Close your eyes and mist the face with a setting spray to lock the pigments in place and remove any powdery finish.
Enjoy wearing this glowing, ethereal look that brings the warmth of golden hour to any time of day
Pastel Galaxy With Starbursts
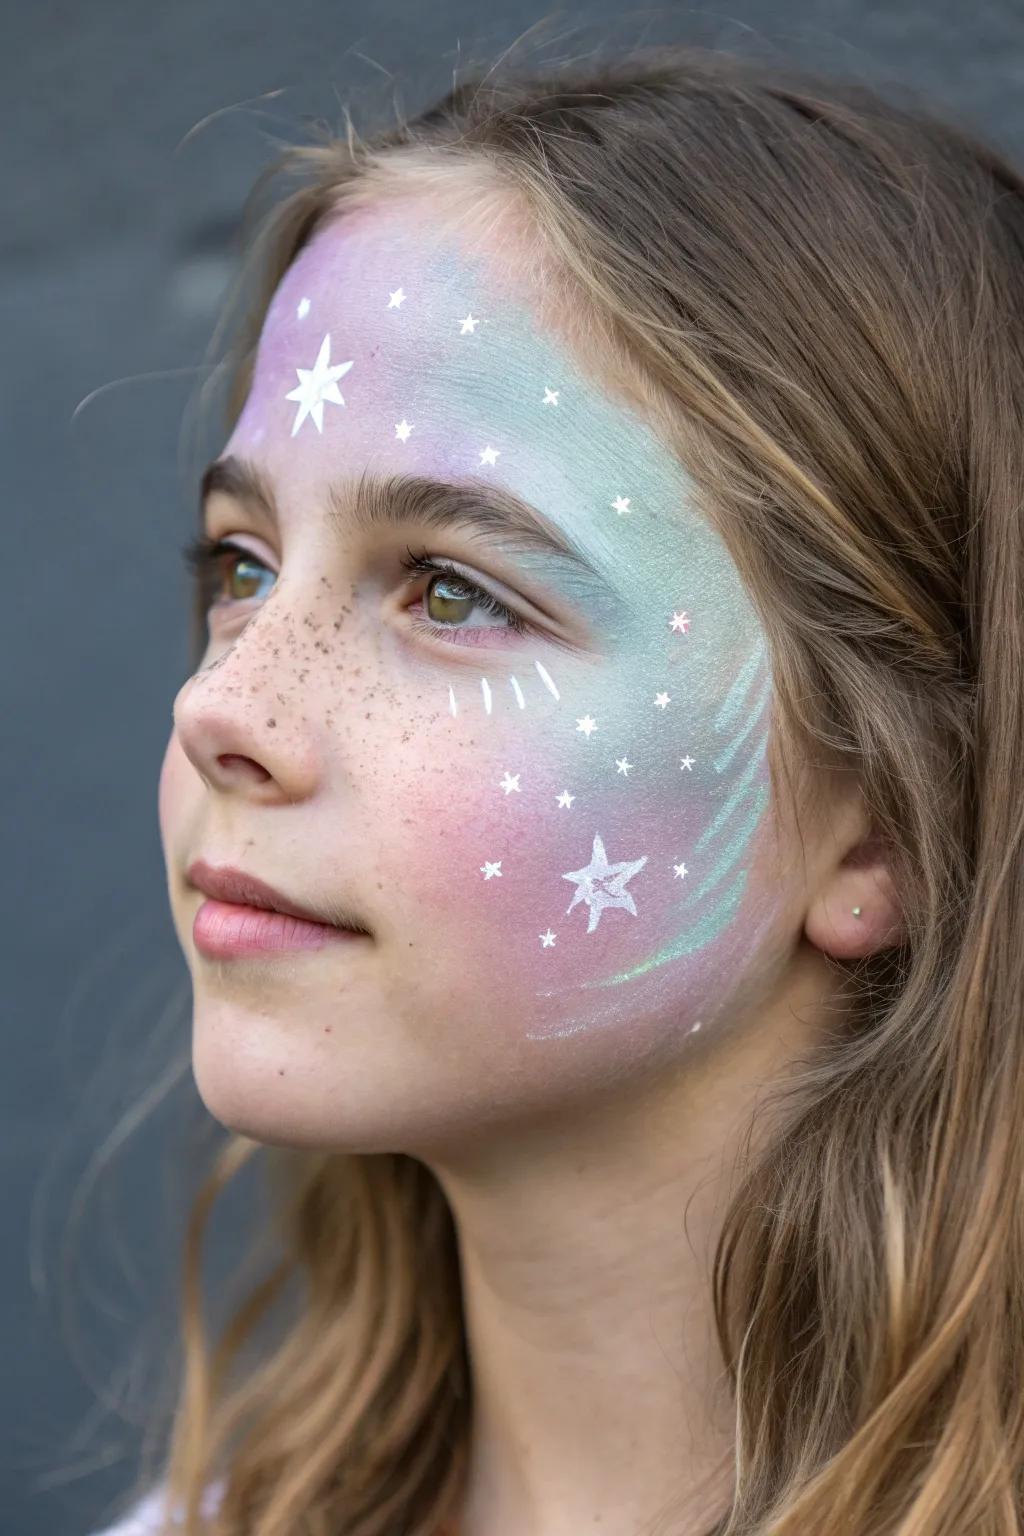
Transform a face into a dreamy skyscape with this soft, celestial design. Featuring a gentle blend of mint, lilac, and rose hues topped with sparkling white stars, this look is perfect for anyone wanting a touch of magic without heavy theatrical makeup.
How-To Guide
Materials
- High-quality face paint (pastel pink, pastel purple/lilac, mint green/teal)
- White face paint or liquid white liner
- High-density face painting sponge (petal-shaped or half-moon)
- Round brush (size 2 or 3)
- Fine liner brush (size 0 or 1)
- Optional: Cosmetic glitter (iridescent)
- Water cup and paper towels
Step 1: Creating the Galaxy Base
-
Load the sponge:
Begin by dampening your sponge slightly and loading the rounded edge with the pastel purple and mint green paints. Place the colors next to each other on the sponge to encourage a natural gradient when applied. -
Apply the forehead sweep:
Starting just above the eyebrow on one side, press and sweep the sponge upward toward the hairline in a curved motion. Let the purple fade out near the top and the green sit closer to the brow. -
Blend the cheek area:
Reload your sponge with a mix of mint green and pastel pink. Sponge this down the temple and onto the apple of the cheek in a wide, C-shape curve. -
Soften edges:
Use the clean, un-inked side of your sponge to gently pat the edges of the paint. This feathers the color into the natural skin tone so there are no harsh lines. -
Intensify the color:
Go back over the center of your design with a second layer of paint to build opacity, leaving the edges sheer and misty. I like to keep the colors slightly separate to avoid creating a muddy brown tone.
Step 2: Adding Celestial Details
-
Prep the white paint:
Mix your white face paint with water until it reaches an inky, fluid consistency. It should flow easily off a brush but be opaque. -
Paint the main star:
Using your size 2 round brush, paint a prominent five-pointed star on the forehead within the purple section. Start with a simple cross, then add the diagonal points. -
Add the cheek star:
Paint a second, slightly smaller five-pointed star lower down on the cheek, amidst the pink and green blend. Keep the lines crisp and sharp. -
Create distant stars:
With the tip of your fine liner brush or the very end of your round brush, dot tiny four-pointed stars and simple cross-shapes scattered randomly across the painted area. -
Add stardust dots:
Place single white dots of varying sizes throughout the galaxy cloud. Cluster a few together for a constellation effect. -
Draw accent lines:
Under the outer corner of the eye, paint three or four short, vertical teardrop shapes or dashes in white. These should follow the natural curve of the cheekbone. -
Add sweeping motion:
Using a very dry brush with a small amount of white paint, add faint, sweeping curved lines on the outer cheek to mimic the tail of a shooting star or movement in the galaxy.
Sponge Technique
Don’t wipe or drag the sponge too hard. Use a firm ‘stippling’ or dabbing motion to deposit color evenly without streaking.
Step 3: Final Touches
-
Highlight the eyes:
If desired, add a tiny dot of white paint to the inner corner of the eye to brighten the look. -
Glitter application:
While the paint is still slightly tacky, gently tap a small amount of iridescent cosmetic glitter over the stars to make them shimmer. -
Clean up:
Use a damp cotton swab to clean up any paint that may have strayed too close to the eye or lash line.
Level Up: Cosmic Glow
Use a UV-reactive neon pink or green for the gradient base. Under blacklight, the galaxy mask will glow vividly for parties.
With these simple steps, you have created a stunning, celestial art piece that feels light and magical
Watercolor Drip Cheek Art
Transform a standard makeup look into a piece of wearable art with this dreamy, celestial-inspired design. Utilizing soft watercolor-like blending and precise white pointillism, this style creates a romantic and mystical effect perfect for festivals or photoshoots.
Detailed Instructions
Materials
- Matte foundation or tinted moisturizer
- Concealer
- Translucent setting powder
- Pink powder blush (cool tone)
- Peach or terracotta powder blush (warm tone)
- Fluffy blush brush
- Angled contour brush
- White liquid eyeliner or white face paint
- Dotting tool or fine-tip brush
- Rose-colored eyeshadow
- Clear brow gel
- Mascara
- Soft rose lipstick or tinted balm
- Setting spray
Step 1: Base and Brows
-
Prep the canvas:
Start with a clean, moisturized face. Apply a light layer of matte foundation or tinted moisturizer to even out the skin tone without masking natural texture. Conceal any blemishes or dark circles as needed. -
Set the base:
Lightly dust the T-zone with translucent powder. Keep the cheeks slightly tacky or dewy, as this helps the heavy blush application adhere better later on. -
Sculpt the brows:
Brush your eyebrow hairs upward using a clear brow gel. Use the flat side of the spoolie to press the hairs against the skin for that feathery, laminated look.
Uneven Dots?
Don’t stress about perfect symmetry. If a dot is too large or shaped oddly, wait for it to dry completely, then gently scratch the excess away with a clean spoolie or dry Q-tip.
Step 2: The Watercolor Flush
-
Apply the pink base:
Take a fluffy blush brush and load it with a cool-toned pink blush. Sweep this liberally across the apple of the cheek, blending it unusually high—right up to the lower lash line and onto the temple. -
Create the gradient:
Switch to a peach or terracotta blush using an angled brush. Apply this shade just below the pink on the cheekbone, blending downwards towards the hollow of the cheek to create a warm ‘watercolor’ transition. -
Intensify the draping:
Go back in with the pink blush and connect the color from the temple onto the outer corner of the eyelid. This ‘draping’ technique connects the eye makeup to the cheek color seamlessly. -
Soft eye shading:
Apply a soft rose eyeshadow over the entire lid, blending it into the blush you pulled up from the temples. I like to keep the center of the lid slightly lighter to open up the eye. -
Define the crease:
Deepen the outer corner and crease slightly with a touch of the terracotta blush shade to add dimension without harsh lines.
Get Glowing
Mix a liquid highlighter into your white face paint before dotting. This adds a subtle pearlescent shimmer to the design that catches the light beautifully.
Step 3: Celestial Pointillism
-
Map the forehead arch:
Using white liquid eyeliner or face paint on a dotting tool, begin placing dots above the eyebrow. Create a loose arch shape that follows the brow bone, varying the spacing slightly. -
Vary dot sizes:
To make the pattern look organic, alternate between tiny specks and slightly larger, more deliberate dots. Create a cluster of dots in the center of the forehead above the brows. -
Cheekbone constellation:
Follow the high point of your cheekbone with a line of white dots. Start near the hairline and curve down towards the apple of the cheek, layering them over the pink blush. -
Bridge detailing:
Place a few small, vertical dots right between the eyebrows to connect the forehead design to the nose bridge visually. -
Temple accents:
Add a scattering of dots at the temples, letting them fade out into the hairline. This creates a star-shower effect that frames the eyes beautifully. -
Create the nose bridge focal point:
Paint a larger, elongated teardrop or diamond shape right in the center of the forehead pattern (the ‘third eye’ area) and a similar accent on the bridge of the nose if desired.
Step 4: Finishing Touches
-
Lashes:
Apply a coat of mascara to the top lashes only. Keep the bottom lashes bare to maintain the fresh, ethereal vibe. -
Soft lips:
Pat a rose-colored lipstick onto your lips with your finger. Blotting it creates a soft, diffused edge rather than a sharp line, matching the dreamy blush texture. -
Lock it in:
Mist the entire face with a setting spray. This will help melt the powders into the skin and ensure your white dots don’t crack or flake off during the day.
Step back and admire your celestial creation, ready to capture magic in every photo
Kaleidoscope Geometric Mask
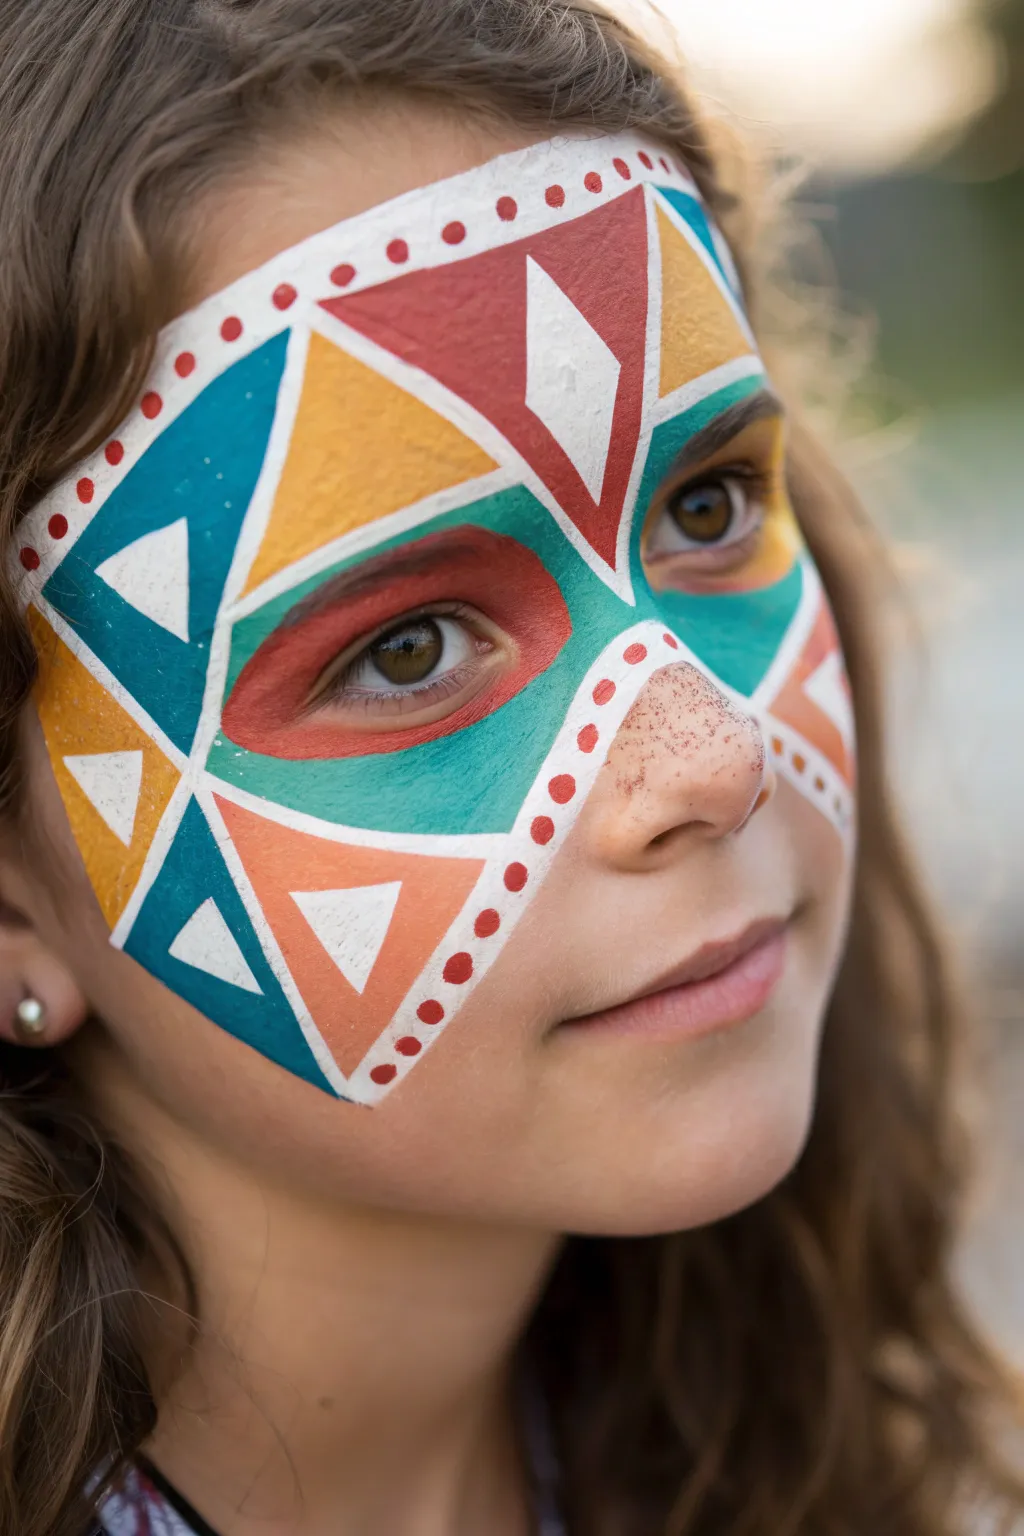
Transform a face into a canvas of vibrant geometric precision with this striking tribal-inspired mask. The design relies on bold symmetrical triangles and intricate white detailing to create a look that feels both ancient and modern.
Step-by-Step Tutorial
Materials
- Water-activated face paints: Teal, Deep Red/Maroon, Golden Yellow, Bright Orange, White
- Flat brush (medium size, around #6 or #8)
- Small round brush (size #2 or #3 for details)
- Fine liner brush (size #0 or #1 for dots)
- Face painting sponge (optional, for base)
- Cup of water
- Spray bottle
- Biodegradable glitter (optional)
Step 1: Establishing the Color Blocks
-
Map the center:
Start by identifying the center vertical line of the face. Using a flat brush loaded with deep red paint, create a large diamond shape right in the middle of the forehead, extending down to the bridge of the nose. -
Create the eye mask:
Switch to your teal paint. Above the eyes, paint triangular sections that flank the central red diamond. Extend this teal color underneath the eyes as well, creating a mask-like shape that covers the cheekbones. -
Add warmth:
Create an bold red outline around the eyes themselves, filling the eyelid space and extending slightly below the lower lash line. This creates a striking contrast against the teal. -
Fill the forehead triangles:
On the forehead, paint large golden yellow triangles on either side of the central red diamond. Ensure the lines are clean and straight. -
Extend to the cheeks:
On the outer cheeks, beneath the teal section, paint a downward-pointing triangle on each side using bright orange paint. Wait a moment for these block colors to dry completely before starting the white work. -
Outer details:
Add a final teal triangle or trapezoid shape on the very outer edge of the cheeks/jawline to frame the design.
Step 2: Geometric White Linework
-
Define the grid:
Using a round brush and creamy white paint, carefully outline every single colored shape you painted. These white lines should act like grout in a mosaic, separating the colors cleanly. -
Central diamond detail:
Inside the large red diamond on the forehead, paint a smaller white diamond in the center. -
Forehead accents:
Within the teal forehead sections, paint a white triangle pointing inwards. Repeat this inside the yellow triangles as well, creating a ‘shape within a shape’ effect. -
Cheek accents:
Add white triangles inside the orange cheek sections. Keeping the brush perpendicular to the skin helps get the sharpest corners. -
Nose bridge:
Paint the bridge of the nose white, connecting the design elements from the forehead down toward the tip of the nose.
Clean Lines Hack
For super sharp geometric edges, drag your flat brush vertically to create the line, rather than painting horizontally like you’re coloring in a book.
Step 3: Dotwork and Finishing Touches
-
Prep the dotting tool:
Load a fine liner brush or the back end of a small brush with a thick consistency of red paint. -
Line the perimeter:
Add a series of red dots along the upper white border of the forehead design. Space them evenly for a professional look. -
Accent the nose:
Switch to red dots along the white lines framing the nose bridge area and the upper cheekbones. -
Lower details:
Continue the red dot pattern along the white lines bordering the orange cheek triangles. -
Freckle dust:
Load a toothbrush or stiff brush with a watered-down brown or dark red paint. Use your thumb to flick a light spray of ‘freckles’ over the nose and upper cheeks for texture. -
Glitter touch:
If desired, dab a tiny bit of aloe gel or skin-safe adhesive on the central white diamond and press on some biodegradable glitter.
Smudged White Lines?
If your white lines turn pink or blue, your base layer wasn’t dry enough. Stop, let it dry fully, then re-apply the white over the top gently.
Now you have a bold, symmetric masterpiece ready for any festival or celebration


Have a question or want to share your own experience? I'd love to hear from you in the comments below!