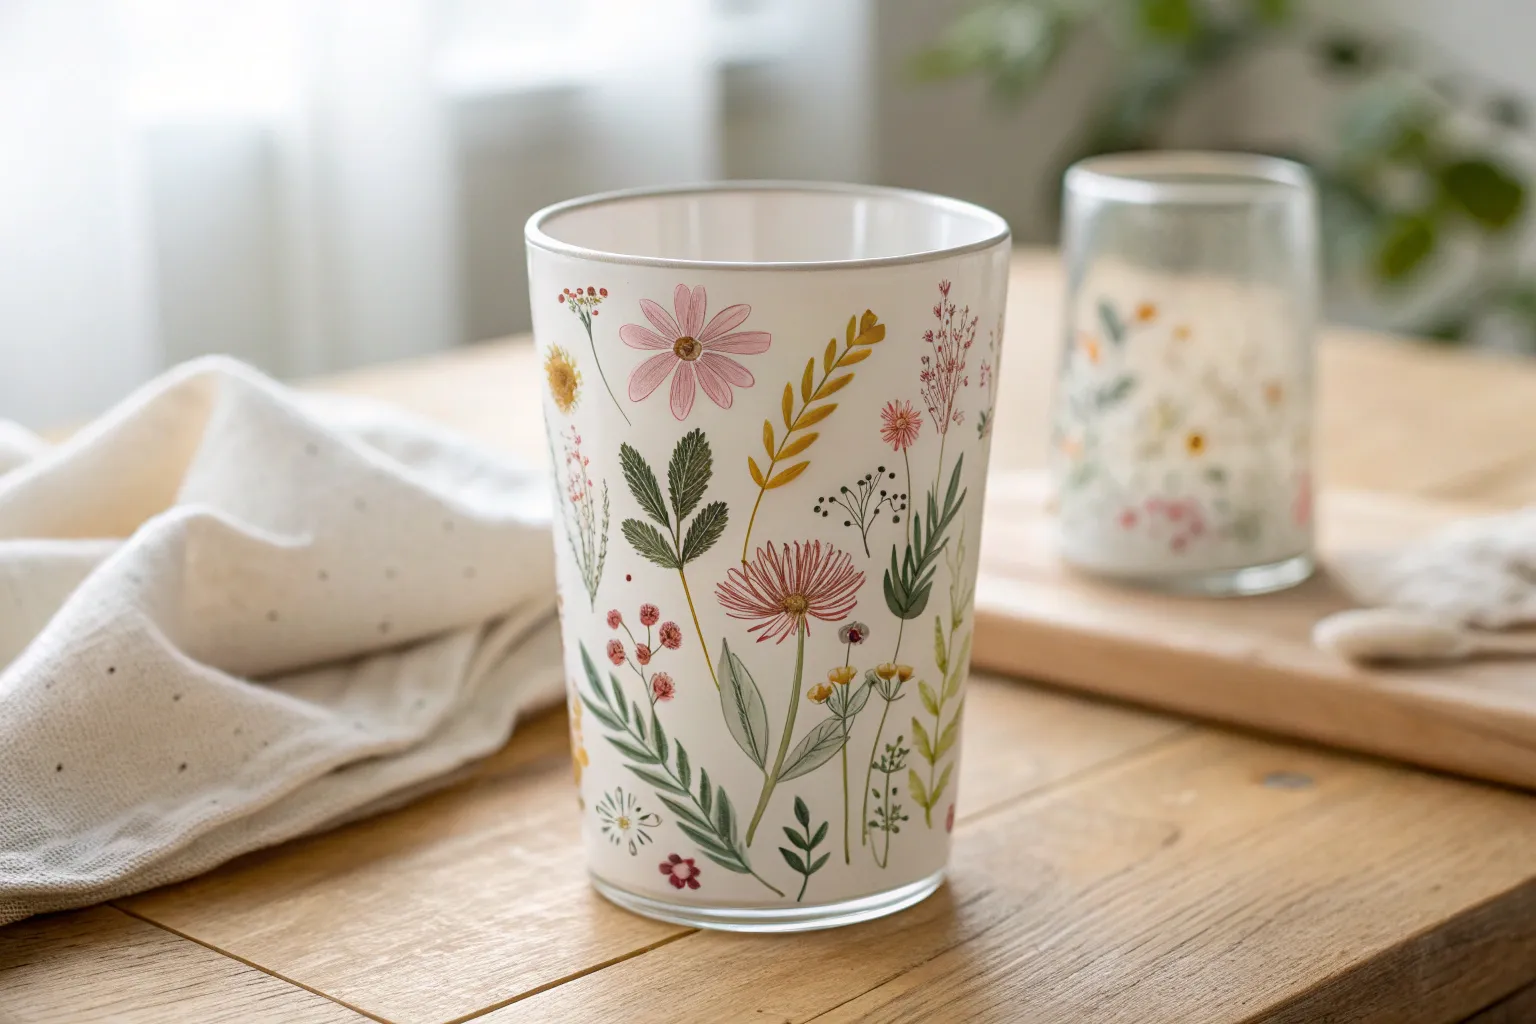
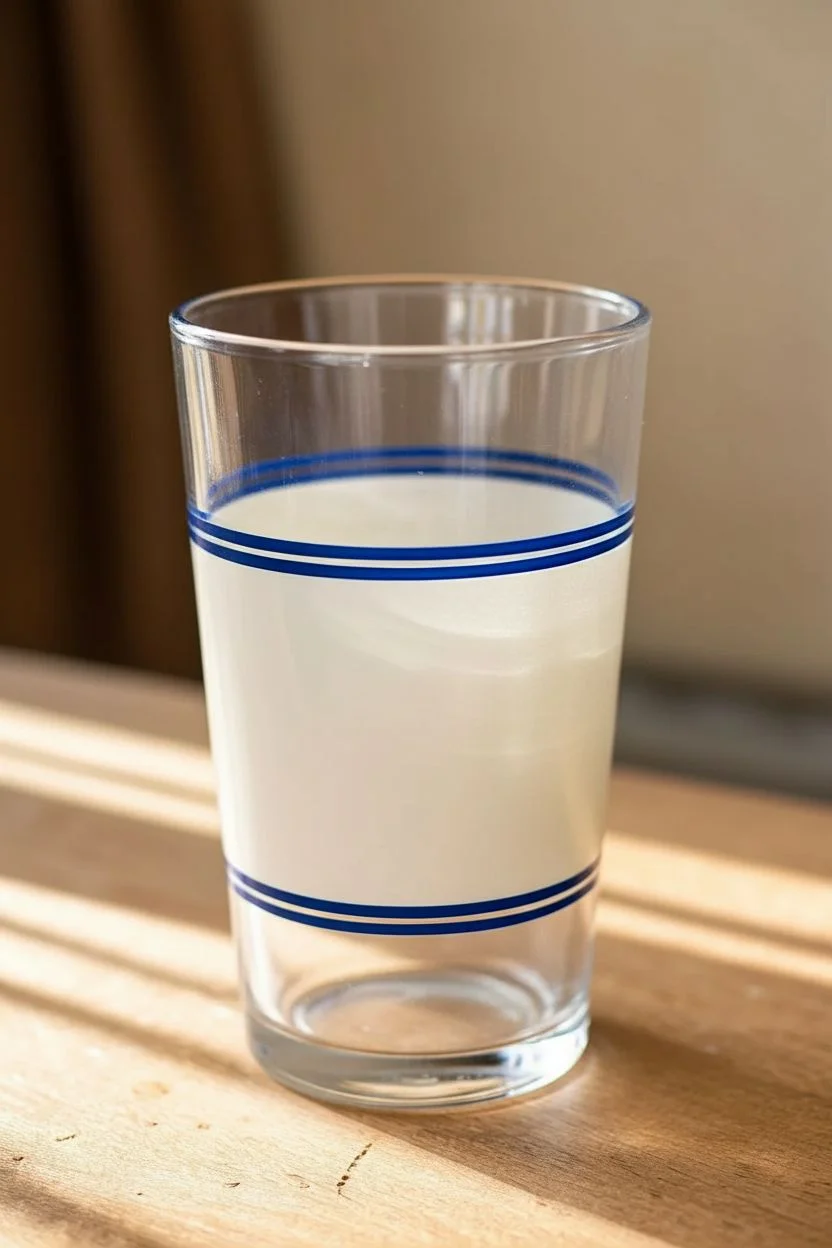
Painting on a glass cup is one of my favorite quick projects because you get instant sparkle and that satisfying “I made this” vibe every time you pour a drink. I’m sharing a mix of classic, beginner-friendly glass painting looks and a few artsy twists for when you want your cups to feel extra special.
Wildflower Wraparound Border
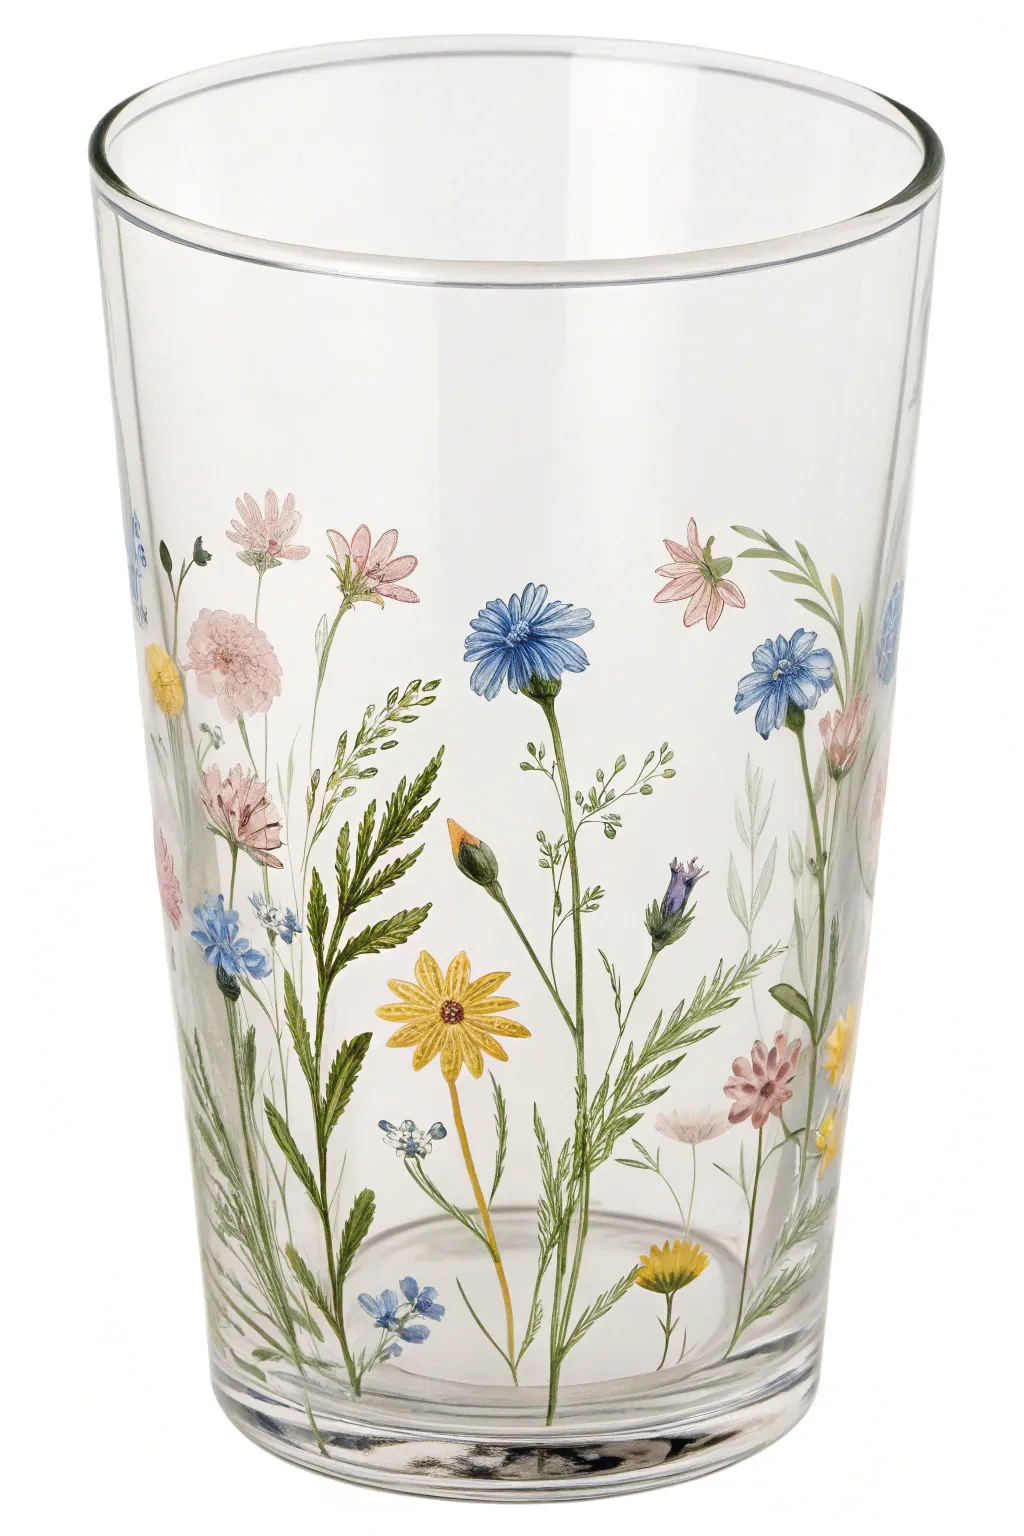
Transform a plain drinking glass into a delicate summer garden with this intricate wildflower painting project. The result is a translucent, airy design featuring cornflowers, daisies, and swaying grasses that looks beautiful from every angle.
Step-by-Step Guide
Materials
- Clear glass tumbler or highball glass
- Rubbing alcohol and paper towels
- Enamel glass paints (blue, yellow, pink, white, sage green, dark green, violet)
- Fine detail brushes (size 00 or 000 liner brush)
- Small round brush (size 1)
- Palette or small plate
- Cotton swabs
- Oven for baking (optional, depending on paint brand)
Step 1: Preparation & Planning
-
Clean the surface:
Before making a single mark, wipe the entire exterior of the glass with rubbing alcohol on a paper towel. This removes oils and fingerprints that prevent paint adhesion. -
Map the stems:
Mix a very thinned-out pale green shade. lightly sketch the main vertical lines for your stems all around the glass. Vary heights to create a natural, unforced rhythm, leaving plenty of negative space between them.
Unsteady Hand?
If you struggle with fine lines, rest your pinky finger against the glass surface for leverage. You can also sketch the layout first with a dry-erase marker, which wipes off easily.
Step 2: Painting the Flowers
-
Start with the cornflowers:
Using a bright cornflower blue and your smallest liner brush, create the ragged petals of the blue flowers. Use quick, outward flicks from a central point to mimic their textured edges. -
Add dimension to blue blooms:
While the blue is still slightly tacky, dab a tiny dot of darker blue mixed with violet at the very center of the flower for depth. -
Paint the yellow daisies:
Switch to a golden yellow color. Paint thin, elongated oval petals radiating from a center point. I like to keep these petals slightly separated rather than overlapping to maintain that airy glass-paint look. -
Detail the daisy centers:
Once the yellow petals are dry, use a brownish-orange hue to stipple small dots in the center. This creates the textured ‘eye’ of the flower. -
Create pink cosmos:
Mix a soft pink with a touch of white for opacity. Paint broad, slightly ruffled petals for the pink flowers, ensuring they look open and cup-shaped. -
Add the buds:
Look for empty spaces near the top of your stems. Paint small, tight teardrop shapes in yellow, blue, or pink to represent closed flower buds.
Step 3: Foliage & Details
-
Thicken the stems:
Go back over your initial sketch lines with a mix of sage and dark green. Use a steady hand to connect the stems to your blooming flower heads. -
Add leafy texture:
Along the lower grassy stems, paint feathery, fern-like leaves using short, diagonal strokes. This adds weight to the bottom of the design. -
Paint broad leaves:
For the larger green foliage, use a size 1 brush to press and lift, creating tapered leaf shapes that mimic the fern or yarrow leaves seen in the design. -
Insert filler flowers:
Mix a pale blue-white. Add tiny clusters of forget-me-nots or baby’s breath lower down on the glass to fill gaps without cluttering the design. -
Highlight the foliage:
Mix a very light lime green. Carefully add thin highlight lines on one side of the thicker stems and leaves to simulate sunlight hitting the meadow. -
Clean up edges:
If any paint has strayed, dampen a cotton swab with rubbing alcohol or water (depending on your paint type) and gently wipe away mistakes while the paint is fresh. -
Final cure:
Allow the glass to air dry for at least 24 hours. Follow the manufacturer’s instructions for your specific paint, which usually involves baking the glass in a non-preheated oven to make it dishwasher safe.
Transparency Tip
For a watercolor effect, mix a drop of clear extender medium or water into your paint. This makes the petals translucent, letting the light shine through the glass.
Enjoy sipping your favorite beverage from your personal garden meadow all year round


Classic Polka Dot Confetti
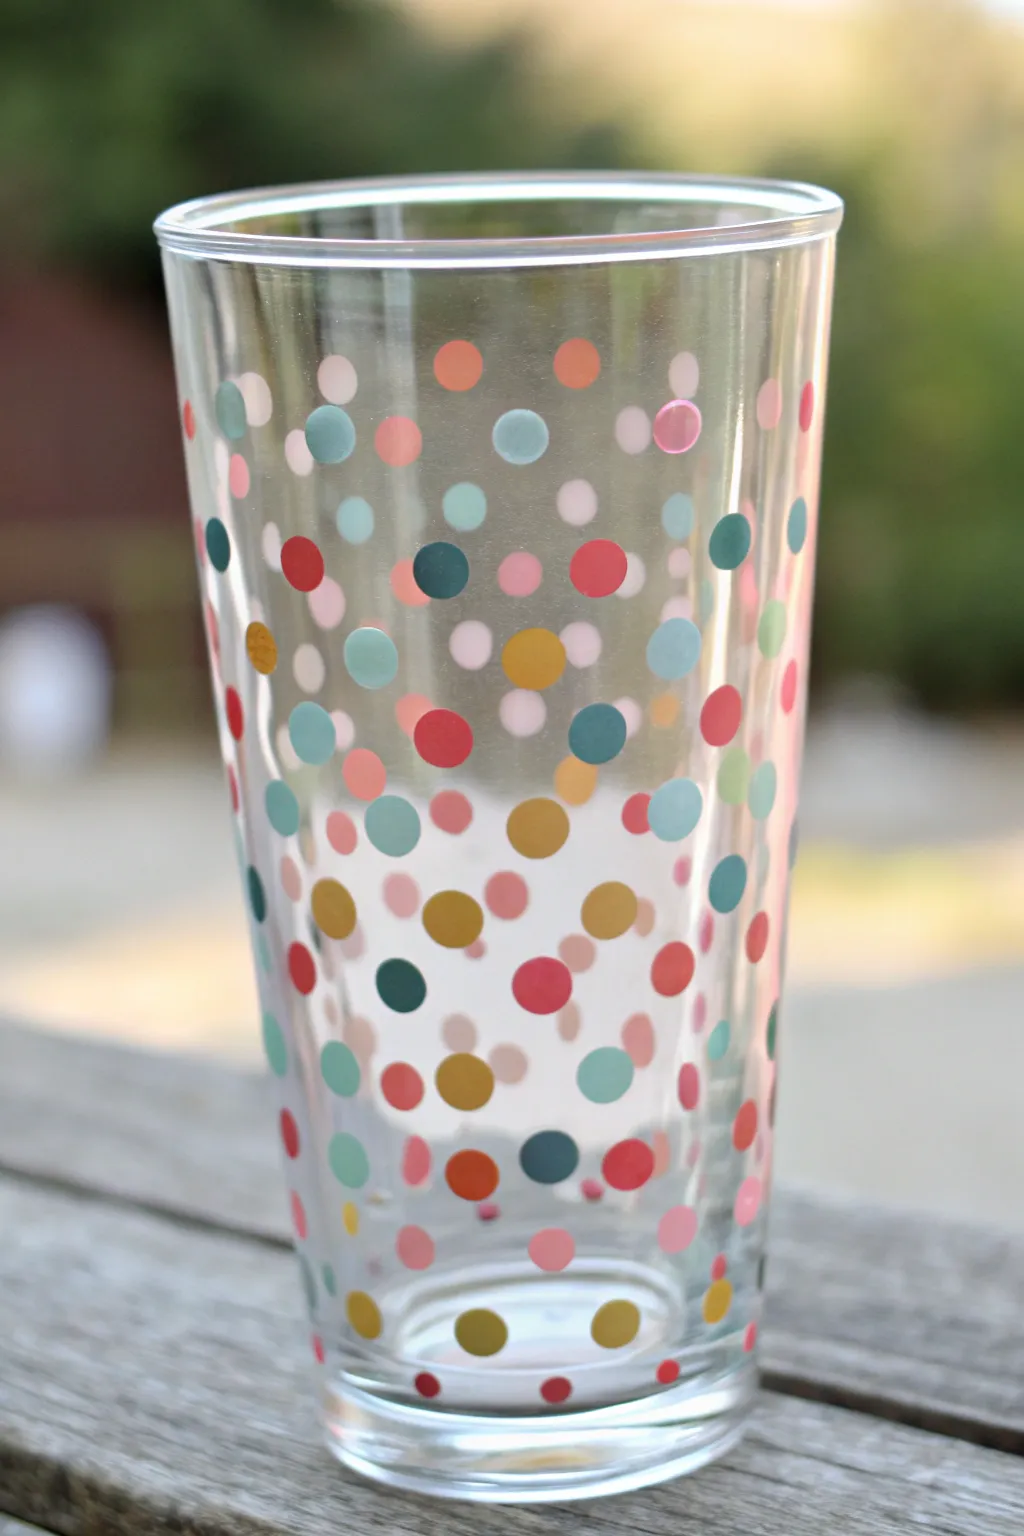

Bring a festive touch to your kitchen cabinet with this cheerful confetti-style glass. By layering different sizes and shades of dots, you create a playful depth that mimics falling confetti trapped in time.
Step-by-Step Tutorial
Materials
- Plain clear glass tumbler or pint glass
- Rubbing alcohol
- Cotton pads or lint-free cloth
- Multi-surface acrylic enamel craft paints (pink, red, coral, teal, navy, mustard yellow)
- Foam pouncers or spouncers (various small sizes)
- Paper plate or palette
- Cotton swabs (Q-tips)
- Oven (for curing)
Step 1: Preparation
-
Clean surface:
Begin by thoroughly washing your glass with warm soapy water to remove any factory residue. -
Degrease glass:
Once dry, wipe the entire exterior surface with rubbing alcohol on a cotton pad. This step is crucial because even natural oils from your fingers can prevent the paint from adhering properly. -
Prepare palette:
Squeeze a dime-sized amount of each paint color onto your paper plate. Keep the colors well-separated so your sponges don’t muddy them.
Confetti Layering Pro-Tip
To get a true ‘scattered’ effect, intentionally overlap a few dots. Let the bottom dot dry fully first, then stamp a second color partially over it for depth.
Step 2: Applying the Dots
-
Start with lightest color:
Dip a medium-sized foam pouncer into your lightest color first, such as the pale pink or light teal. -
Offload paint:
Tap the pouncer lightly on a clean part of the palette to remove excess paint. Too much paint causes slippery dots and drips; you want an even, thin coating on the sponge. -
Stamp first layer:
Press the pouncer straight down onto the glass and lift straight up. Scatter these dots randomly around the glass, leaving plenty of empty space for other colors. -
Switch colors:
Move on to your next color, perhaps the mustard yellow. Use a fresh pouncer or cleaner end of a spouncer to keep colors bright. -
Vary sizes:
Applying different sizes is key to the confetti look. Use a smaller pouncer for darker colors like navy or deep red to create visual interest. -
Middle section focus:
Concentrate slightly more dots around the middle and lower portion of the glass, letting them thin out slightly near the very top rim where your mouth touches. -
Add detail dots:
For the tiniest accents, dip the non-cotton end of a paint brush or a stylus tool into paint and dot it into the small gaps between larger circles. -
Check transparency:
Some dots might look a bit translucent. If you want solid coverage, let the first coat dry to the touch (usually 15-20 minutes) and carefully stamp the exact same color over the existing dot.
Drip Disaster?
If paint bleeds under the sponge, let it dry completely. Then, scratch the excess off with a toothpick to reshape the circle perfectly.
Step 3: Finishing Touches
-
Clean up edges:
If any dots have smeared edges or aren’t perfectly round, use a damp cotton swab to gently wipe away the mistake before the paint fully sets. -
Air drying:
Allow the painted glass to sit undisturbed for at least 1 hour to ensure the surface is dry to the touch, though I prefer letting it sit for 24 hours before baking to be safe. -
Oven loading:
Place your glass into a cold oven. Do not preheat the oven first, as thermal shock can break the glass. -
Curing process:
Set the oven temperature to 350°F (175°C). Once the oven reaches temperature, set a timer for 30 minutes. -
Cool down:
Turn the oven off after 30 minutes, but leave the glass inside. Open the door slightly and let the glass cool down completely along with the oven before removing it.
Now you have a durable, custom piece of drinkware ready for your next celebration


Citrus and Berry Fruit Doodles
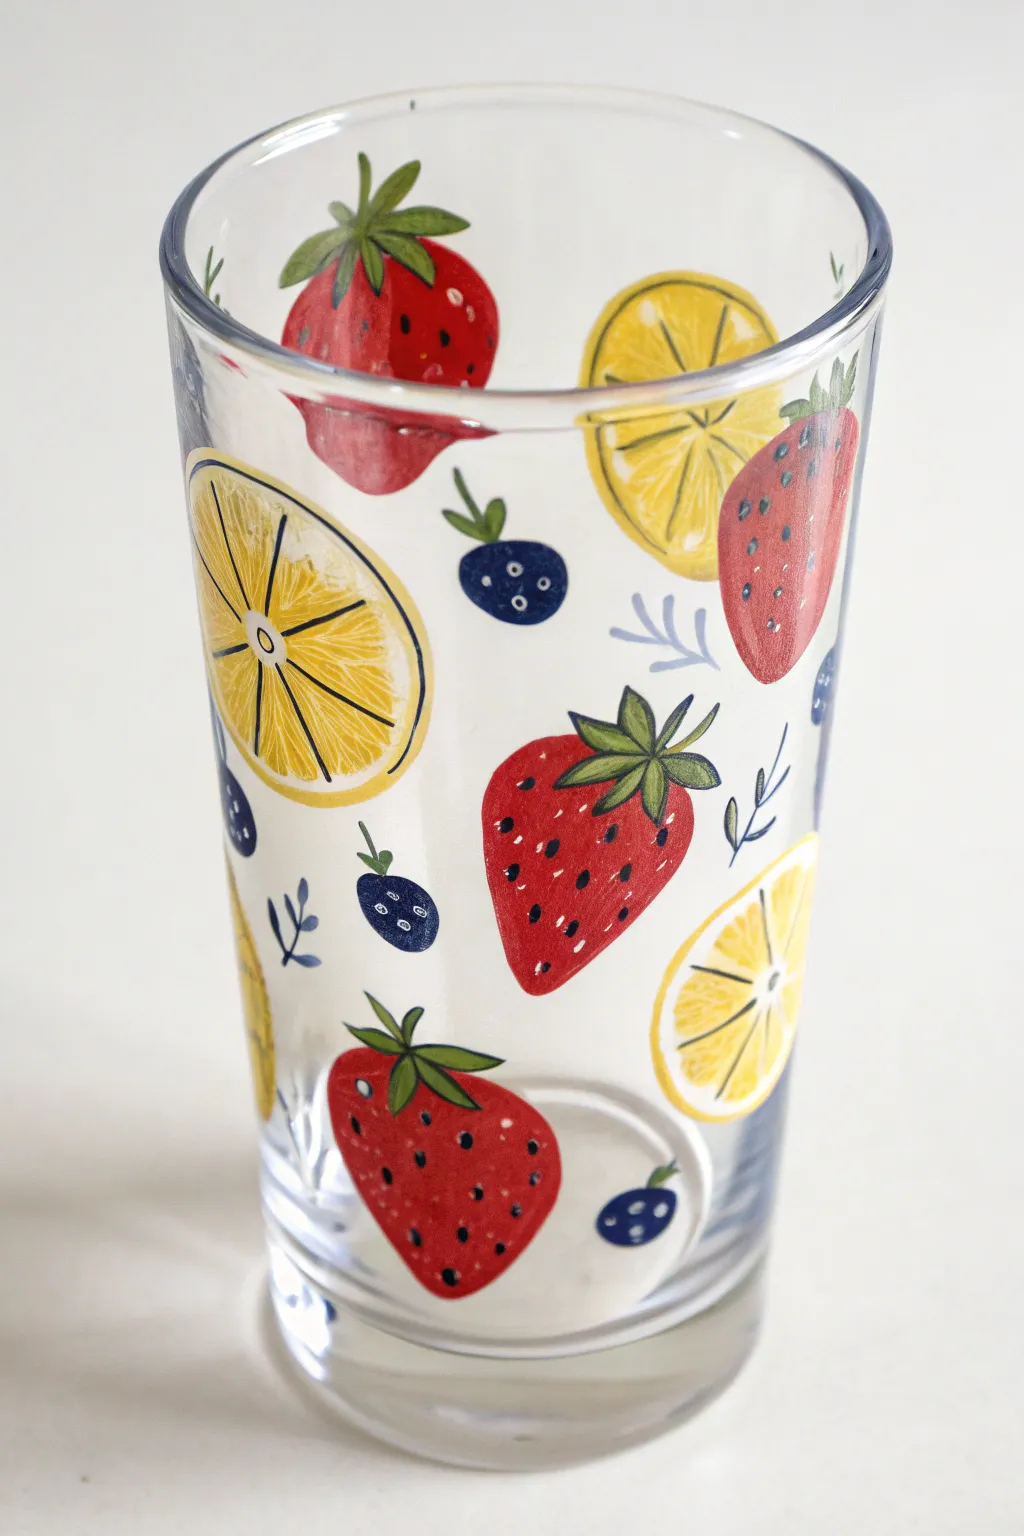
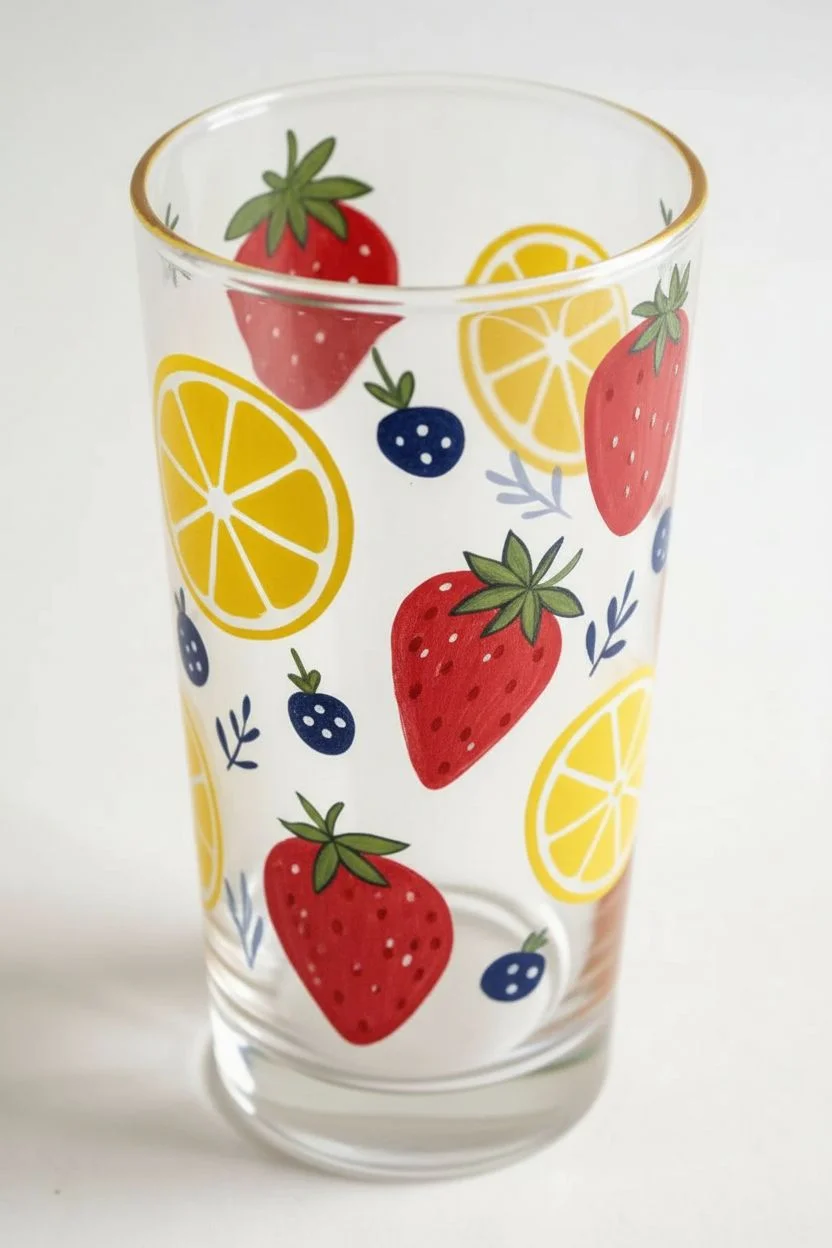
Transform a plain drinking vessel into a refreshing piece of functional art with this vibrant pattern of lemon slices, strawberries, and blueberries. The transparent nature of the glass allows the light to shine through the fruit motifs, giving them a juicy, translucent appeal that is perfect for summer drinks.
Step-by-Step
Materials
- Clear glass tumbler or highball glass
- Rubbing alcohol and cotton pads
- Glass paints (Enamel or Multi-surface acrylics)
- Colors: Bright Yellow, Red, Dark Blue, Green, White, Black
- Small round brushes (size 0 and 2)
- Fine liner brush (size 00) or extra-fine Posca paint pen (Black/White)
- Palette or small plate for mixing
- Oven (for curing, if required by paint type)
Step 1: Preparation and Planning
-
Clean the surface:
Before laying down any color, wipe the entire exterior of the glass with rubbing alcohol on a cotton pad. This removes invisible oils and fingerprints that could prevent the paint from adhering properly. -
Plan your spacing:
Visualize where your main fruits will go. You want a random scatter pattern, so mentally mark spots for the large items (lemon slices and strawberries) first to ensure they are evenly distributed around the circumference.
Opacity Hack
Glass is slick! If your yellow or red looks too transparent, dab the first layer with a sponge instead of a brush for better grip, then brush the second layer on smooth.
Step 2: Painting the Fruit Base Layers
-
Paint the lemon rounds:
Using a size 2 round brush and bright yellow paint, create circles for the lemon slices. Don’t worry about the internal segments yet; just paint a solid yellow circle. -
Add lemon wedges:
For variety, paint a few semi-circles in yellow to represent half-slices of lemon peeking in from the edges. -
Shape the strawberries:
Switch to red paint. In the empty spaces between lemons, paint rounded, inverted triangle shapes for the strawberries. Make sure the top edges are slightly curved to accommodate the leaves later. -
Add blueberry spots:
Using a dark blue mix (add a tiny touch of black if your blue is too bright), paint small, slightly oval circles in the smaller gaps. These are your blueberries. -
Paint the leaves:
With green paint and a smaller brush, add the leafy calyxes to the tops of the strawberries. Some strawberries should have leaves pointing up, others splayed out. -
Add tiny sprigs:
Using a watered-down blue or grey-blue, paint very delicate, tiny leaf sprigs floating in the background filler space. This adds depth without cluttering the design. -
Let the base dry:
Allow these base shapes to dry completely. If the paint looks streaky, apply a second coat for opacity, though a little transparency on glass can be nice.
Fixing Smudges
Made a mistake? Don’t wipe it while wet, creating a smear. Wait for the spot to dry completely, then gently scrape it off cleanly with a craft knife or razor blade.
Step 3: Adding Details and Definition
-
Detail the lemons:
Once the yellow is dry, use a fine liner brush with a darker yellow or light brown outline to draw the rind circle and the internal radiating lines for the segments. -
Highlight the lemon segments:
Add tiny dashes of white inside the yellow segments to give the look of juicy pulp texture. -
Detail the strawberries:
Using a fine liner or a toothpick, add tiny black or dark brown specks for the seeds on the red strawberries. -
Highlight the strawberries:
Add a tiny stroke of white or light pink on the side of each strawberry to indicate a shine or reflection. -
Finish the blueberries:
Paint a small, uneven white or light blue circle on the top of each dark blue berry to mimic the ‘crown’ where the stem attaches, plus two tiny dots for depth. -
Outline the sprigs:
Go back to your filler sprigs and sharpen their edges if needed, ensuring they look delicate compared to the bold fruit. -
Final leaf details:
Add a thin vein line down the center of the strawberry leaves using a darker green or black fine liner brush.
Step 4: Curing
-
Air dry:
Let the project sit undisturbed for at least 24 hours (or whatever your specific paint brand recommends) to let the paint harden. -
Bake to set:
If using enamel paints that require heat setting, place the glass in a cool oven, heat to 350°F (176°C), bake for 30 minutes, and then turn the oven off, letting the glass cool down completely inside the oven.
Once the curing process is complete, your glass is ready to add a splash of color to your kitchen cabinet


Leafy Botanical Silhouettes

Bring the serene beauty of a forest floor to your morning coffee with this delicate botanical glass painting project. By layering different styles of greenery in deep forest tones, you’ll create an elegant, nature-inspired vessel that looks hand-pressed.
Detailed Instructions
Materials
- Clear glass mug (smooth surface)
- Rubbing alcohol and cotton pads
- Peel-off glass paint or enamel glass paint (Forest Green, Moss Green)
- Fine liner brush (size 0 or 00)
- Detail brush (size 1)
- Palette or small dish
- Paper towels
- Reference images of ferns and leaves
- Oven (optional, if using heat-set paints)
Step 1: Preparation & Planning
-
Clean the Surface:
Begin by thoroughly wiping down the exterior of your glass mug with rubbing alcohol on a cotton pad. This removes any oils or fingerprints that could prevent the paint from adhering properly. -
Dry Completely:
Allow the alcohol to air dry completely for a minute or two. Avoid touching the painting area with your bare hands, as natural oils can transfer back onto the glass. -
Plan Your Layout:
Visualize where you want your stems to go. Aim for vertical orientation, spacing the main stems about an inch apart around the circumference of the mug to avoid a cluttered look.
Use a Template
Print a leaf pattern, cut it to size, and tape it to the *inside* of the glass. You can now trace the design directly onto the outside surface for perfect shapes.
Step 2: Painting the Ferns
-
Load the Brush:
Squeeze a small amount of forest green glass paint onto your palette. Dip your fine liner brush into the paint and roll it slightly to create a sharp point, ensuring you don’t have a bead of paint hanging off the tip. -
Paint the Central Stems:
Starting from the bottom of the mug, paint a few thin, slightly curved lines extending upward to act as the stems for your ferns. Vary the heights slightly for a natural appearance. -
Create Pinnate leaves:
For the classic fern look (the plant on the left in the reference), start at the bottom of a stem. Using the very tip of your brush, flick small, curved strokes outward and upward from the stem. -
Taper the Foliage:
As you move up the stem, make your strokes progressively shorter. This creates the characteristic tapered triangle shape of a fern frond. -
Paint Rounded Leaves:
For the second type of plant (resembling the center specimen), switch to the detail brush. Paint small, teardrop, or oval shapes attached to thin stems by pressing down slightly to widen the stroke and lifting up to finish the leaf point. -
Add Serrated Details:
If painting broader leaves, use your finest brush to pull tiny imperfections or serrated edges out from the main leaf shape. This adds realism and keeps the design from looking too cartoonish. -
Vary the Greens:
I like to mix a tiny bit of yellow or white into my green for a few specific leaves to create depth, making some strands look like new growth catching the light.
Step 3: Finishing Touches
-
Add Delicate Fillers:
Look for gaps between your main plants. Using the absolute tip of your liner brush, stipple tiny dots or extremely faint branching lines to represent baby’s breath or mossy textures. -
Check Consistency:
Rotate the mug and check for any opaque blobs. The beauty of this design lies in its translucency, so use a clean, slightly damp brush to lift away excess paint if a leaf looks too heavy. -
Review the Rim:
Ensure no paint has been applied to the top 2 centimeters of the rim where your lips will touch. If you painted too high, clean it up with a damp cotton swab. -
Re-Clean Edges:
If you made any stray marks or smudges on the unpainted glass, carefully wipe them away with a Q-tip dipped in rubbing alcohol. -
Air Dry:
Let the mug sit undisturbed in a dust-free area for at least 24 hours. This initial cure is crucial before any baking. -
Heat Set (If Applicable):
If your chosen paint requires baking, place the mug in a cold oven. Set the temperature to the manufacturer’s recommendation (usually around 350°F), bake for 30 minutes, and let it cool completely inside the oven.
Fixing Smudges
Paint sliding? The glass is too slick or the paint is too thin. Let the first layer dry slightly to become tacky, or gently scratch off dried mistakes with a toothpick.
Now you have a stunning piece of custom glassware that captures the quiet elegance of the woods
BRUSH GUIDE
The Right Brush for Every Stroke
From clean lines to bold texture — master brush choice, stroke control, and essential techniques.
Explore the Full Guide
Minimal Line-Art Faces Around the Cup
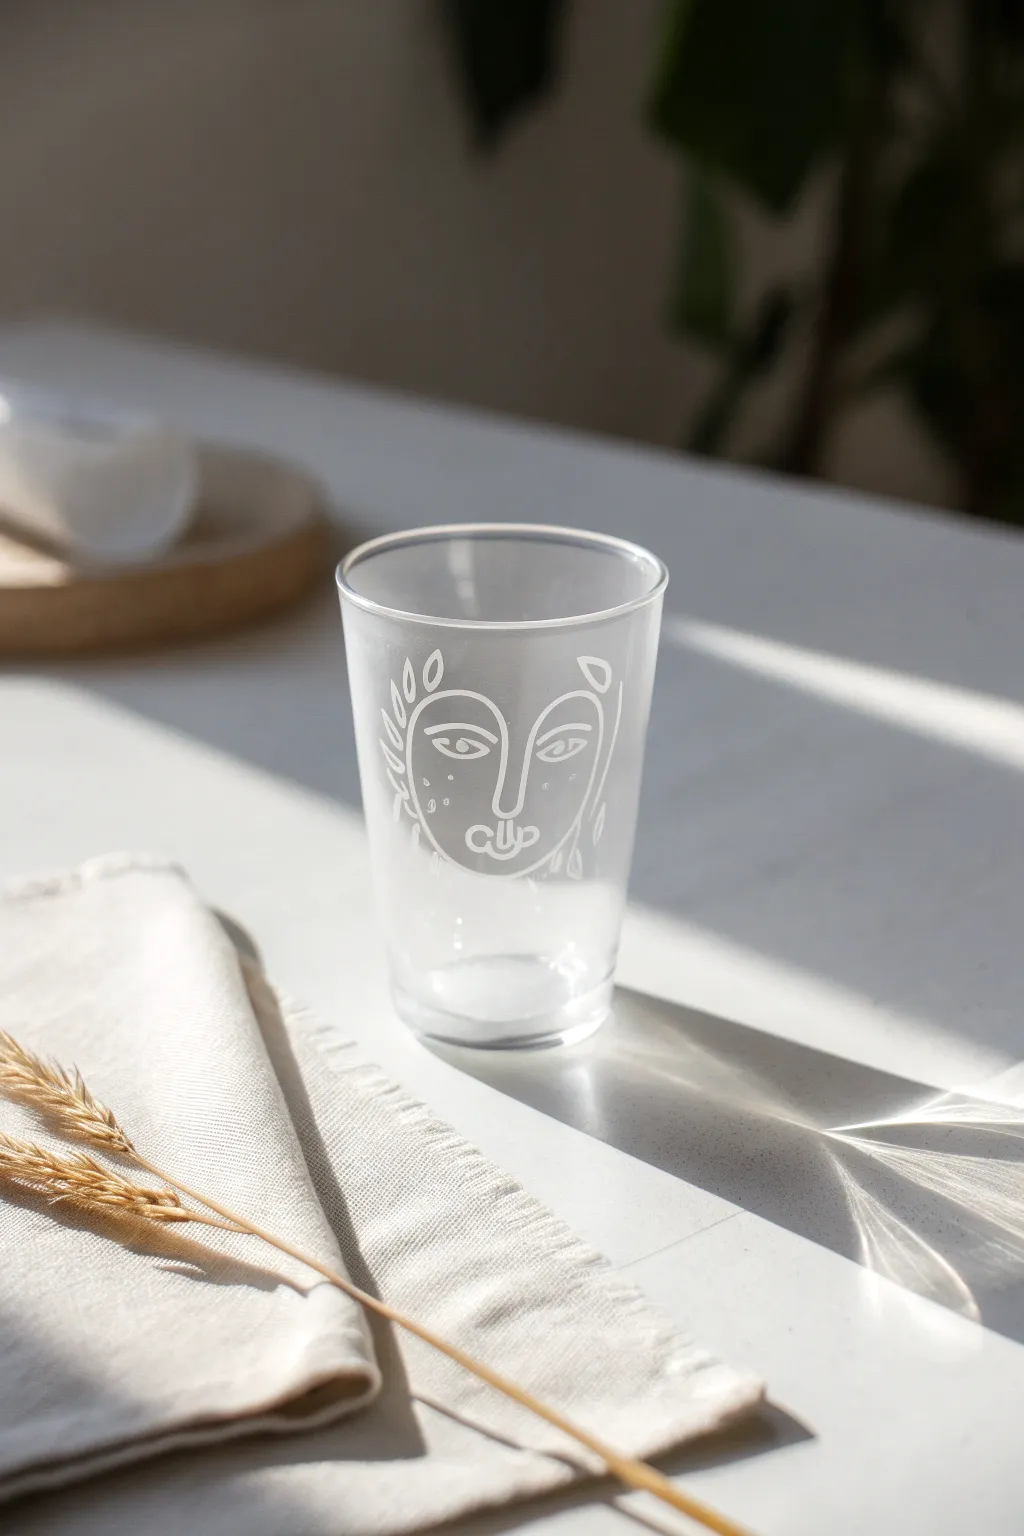
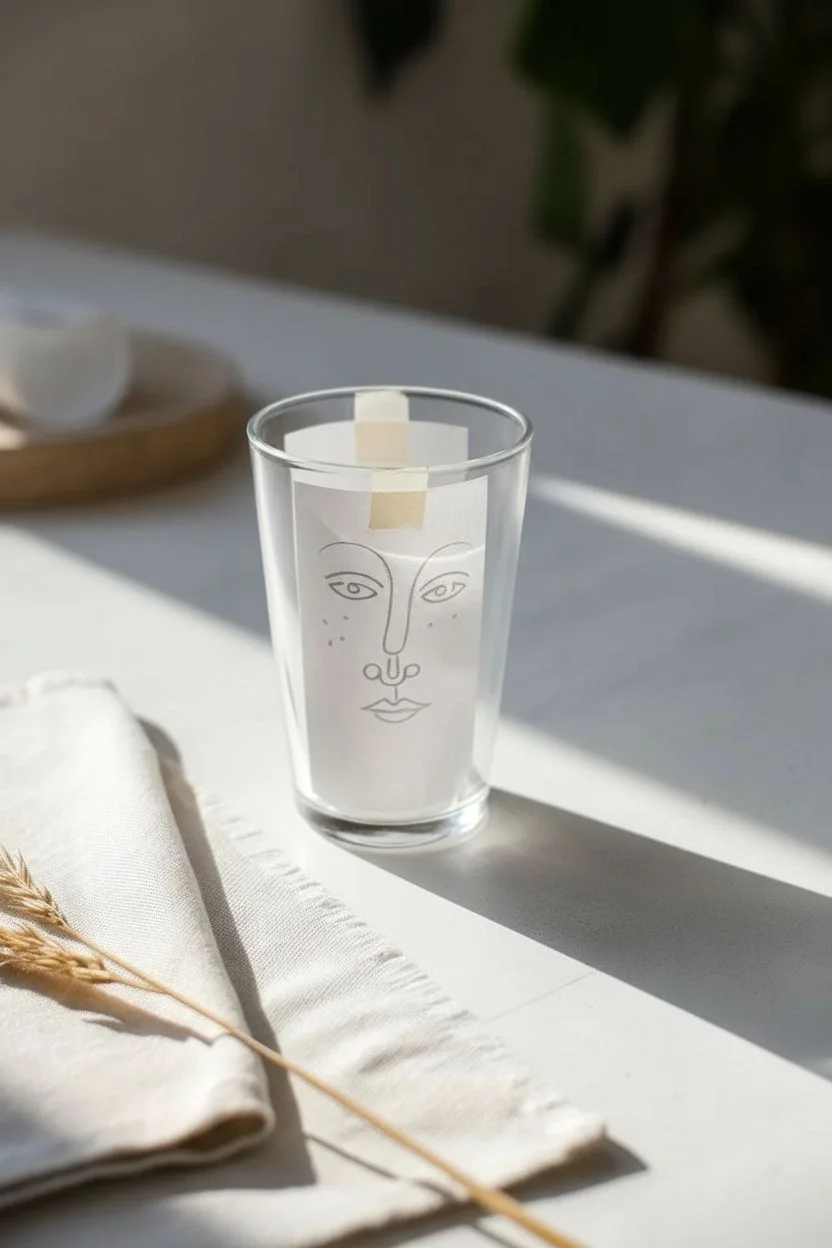
Embrace the beauty of simplicity with this elegant glass cup project that features a serene, continuous-line style face. The stark white ink against clear glass creates a modern aesthetic that looks professional but is surprisingly achievable for beginners.
Step-by-Step Guide
Materials
- Clear glass tumbler (straight-sided works best)
- Rubbing alcohol
- Cotton rounds or paper towel
- White oil-based paint marker (fine tip)
- Piece of paper and pencil (for sketching)
- Masking tape or painter’s tape
- Q-tips (cotton swabs)
- Scrap paper or ceramic tile (for priming the marker)
- Oven (for curing)
Step 1: Preparation & Planning
-
Clean surface:
Begin by thoroughly cleaning the exterior of your glass cup with warm, soapy water. Rinse and dry it completely with a lint-free cloth. -
Degrease glass:
Wipe the outer surface with rubbing alcohol on a cotton round. This removes invisible oils or fingerprints that prevent paint adhesion. -
Measure design area:
Wrap a piece of paper around your cup to determine the exact circumference and height available for your design. -
Trim template:
Cut the paper to match the size of the glass surface you want to cover. -
Practice sketch:
On your cut paper, sketch out your face design with a pencil. Aim for fluid, connective lines rather than separate shapes. -
Refine the face:
Draw the main features: almond-shaped eyes, a long continuous nose bridge connecting to the brow, and abstract organic shapes for the hair or ears. -
Check placement:
Tape your sketch inside the glass, facing outward. This serves as a perfect stencil guides to trace over.
Step 2: Painting the Design
-
Prime marker:
Shake your white oil-based paint marker vigorously. Press the nib down on scrap paper or a tile until the ink flows smoothly and evenly. -
Start with the nose:
Locate the central nose line on your internal guide. Carefully draw this vertical line first to anchor your design’s symmetry. -
Outline eyes:
Create the upper and lower curves of the eyes. Keep your hand steady and try to maintain consistent pressure for an even line width. -
Add pupils:
Draw the circles for the pupils. I usually like to stop here and check the glass against a dark background to ensure opacity. -
Draw facial contours:
Trace the outer curves defining the cheeks and forehead area that frame the central features. -
Add decorative details:
Draw the small ‘leaf’ shapes or abstract hair strands on the sides. These little flourishes add character to the minimalist look. -
Detailing work:
Add tiny dots or freckles on the cheeks if desired, just using the very tip of the marker. -
Clean edges:
If any lines look wobbly or smudged, dip a Q-tip in rubbing alcohol and carefully wipe away the wet paint to correct them. -
Remove template:
Once you are satisfied with the tracing, carefully peel the paper template out from inside the glass.
Uneven Ink Flow?
If the marker streaks, don’t press harder. Recap, shake well, and re-prime on paper. Apply a second coat only after the first is 100% dry.
Step 3: Finishing & Curing
-
Initial dry:
Let the glass sit untouched for at least 1 hour to allow the paint surface to set properly. -
Oven prep:
Place the glass into a cold oven. Do not preheat the oven, as sudden temperature changes can crack the glass. -
Bake design:
Turn the oven to 350°F (175°C) and bake for 30 minutes. The time starts once the oven reaches temperature. -
Cool down:
Turn the oven off and leave the glass inside until the oven is completely cool. This gradual cooling is crucial for durability.
Try Frosted Glass
For a luxe look, spray the glass with frosted glass spray before painting. The white lines on matte frost look incredibly high-end.
Now you have a chic, custom piece of glassware ready for your morning juice or iced coffee
Sweet Strawberry Vine Garland
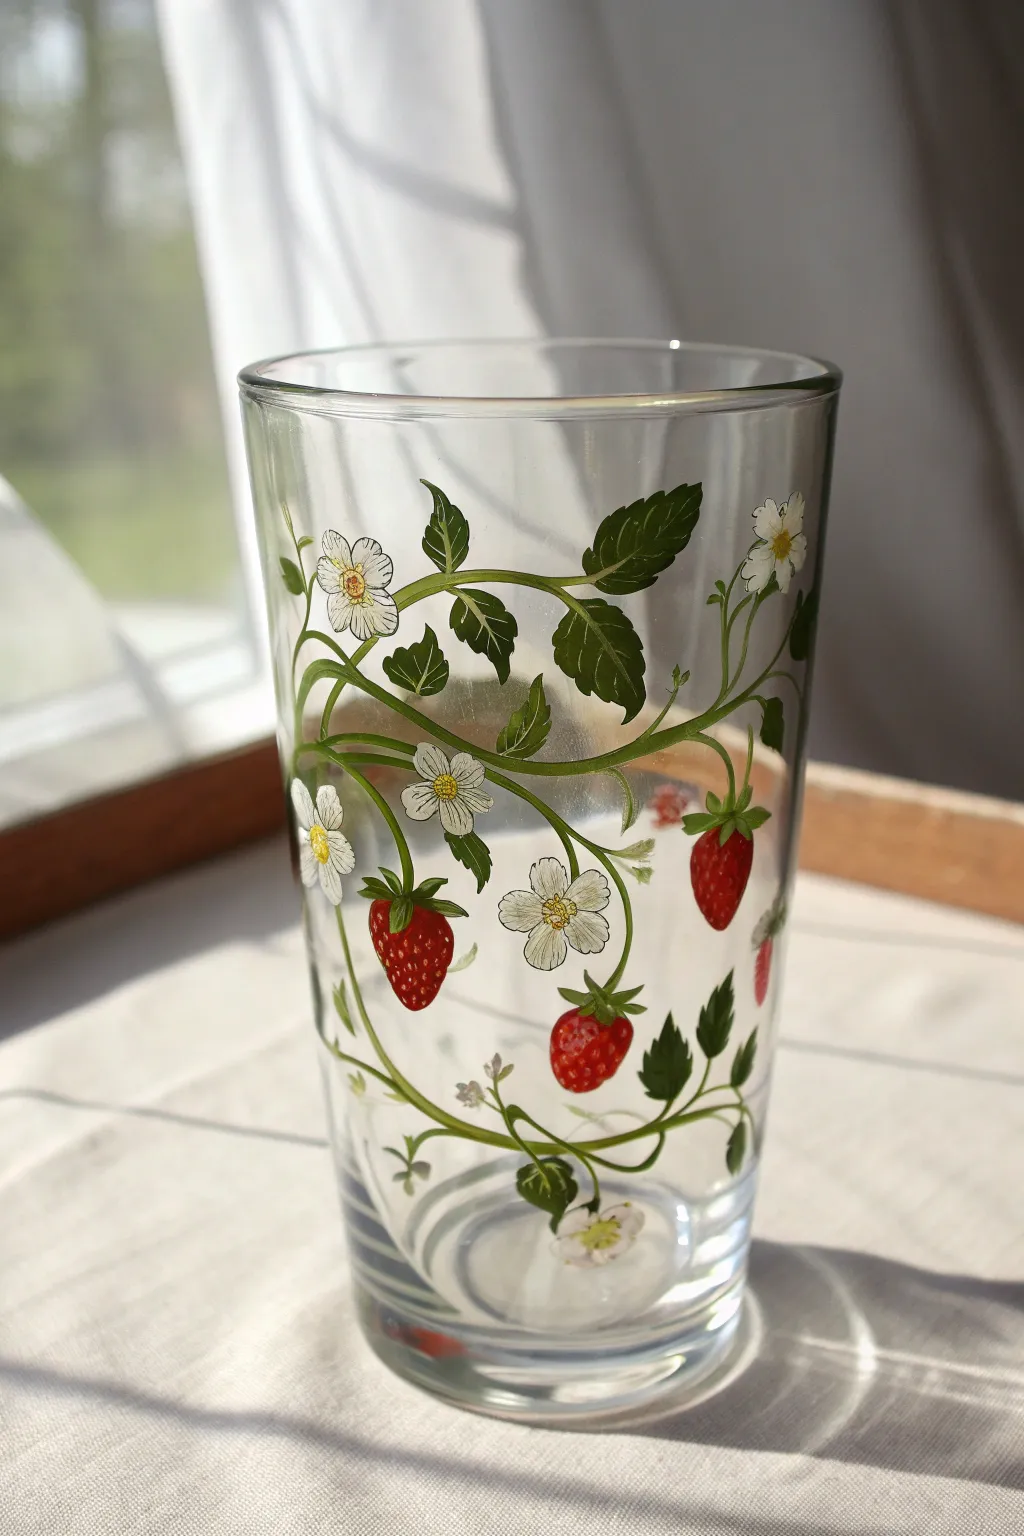
Transform plain glassware into a vintage-inspired treasure with this delicate motif of winding vines, lush leaves, and ripe berries. The translucent quality of glass paints gives the design a stained-glass effect that catches the light beautifully on a sunny windowsill.
Detailed Instructions
Materials
- Clear, thick-walled glass tumbler
- Rubbing alcohol and cotton pads
- Glass enamel paints (Gloss finish)
- Colors: Deep Hunter Green, Leaf Green, Bright Red, White, Golden Yellow
- Round synthetic brushes (sizes 0, 1, and 2)
- Fine liner brush (size 00 or 10/0)
- Paper palette or ceramic tile
- Paper towels
- Oven (for curing, if required by paint brand)
Step 1: Preparation & Mapping
-
Clean the surface:
Before putting brush to glass, it is crucial to remove any invisible oils or fingerprints. Wipe the entire exterior of the cup thoroughly with rubbing alcohol on a cotton pad and let it air dry completely. -
Plan the vine placement:
Visualize a loose ‘S’ curve or spiral that wraps around the glass. You aren’t painting this yet, just planning where the main flow will go so your design feels balanced from all angles.
Paint Slipping?
Does the paint slide off the glass immediately? Your brush might be too wet with water. Keep brushes relatively dry and use the paint’s natural thickness for better adherence.
Step 2: Painting the Greenery
-
Mix your greens:
On your palette, place a dollop of Deep Hunter Green and a smaller amount of Leaf Green. I like to keep them slightly separated so I can dip into both for natural color variation on the brush. -
Paint the main vines:
Using a size 1 round brush and the lighter Leaf Green, paint long, fluid sweeping lines that curl around the glass. Keep these lines relatively thin but confident. -
Add the leaves:
Switch to the darker Hunter Green. Along the vine, press your size 2 brush down and lift it as you pull away to create teardrop-shaped leaves. Group them in clusters of three for that classic strawberry plant look. -
Detail the leaf edges:
While the paint is wet or just tacky, use your fine liner brush to pull tiny serrated points out from the leaf edges. This mimics the jagged edge of real strawberry leaves. -
Add stems:
Connect your leaf clusters to the main vine using thin strokes of the lighter green mixture. Ensure the connections look organic and flowing.
Translucency Tip
For the strawberries, don’t aim for solid opacity. One coat allows light to pass through the red like real stained glass. Only add a second coat if you want a flat, graphic look.
Step 3: Flowers & Berries
-
Base coat the strawberries:
Using your Bright Red and a size 1 brush, paint teardrop shapes hanging from the vines. Paint these slightly smaller than you want the finished berry to be, as glass paint can spread slightly. -
Paint the blossoms:
With a clean size 1 brush and White paint, create five-petaled flowers scattered among the leaves. Start from the outside of the petal and pull your stroke toward the center, leaving a tiny empty space in the middle. -
Add berry caps:
Once the red paint is tacky, use your liner brush and Hunter Green to add the little leafy caps (sepals) at the top of each strawberry where it connects to the vine. -
Flower centers:
Dip the tip of a toothpick or the handle end of a small brush into Golden Yellow. Dot this firmly into the center of each white flower to create the pollen center. -
Highlight the leaves:
Mix a tiny bit of Yellow with Leaf Green. Using the liner brush, add very subtle veins to the larger dark leaves to give them dimension.
Step 4: Fine Details & Curing
-
Seed the strawberries:
Wait until the red paint is dry to the touch. Use your finest liner brush (00) and a mix of Yellow and White to tap tiny, delicate seeds onto the surface of the berries. -
Detail the flower centers:
Add tiny brown or dark orange specs around the yellow centers of the flowers to give them depth and realism. -
Clean up edges:
If any paint has strayed or a line looks wobbly, use a damp cotton swab or a toothpick to gently scrape or wipe away the mistake before curing. -
Initial dry time:
Allow the glass to sit undisturbed in a dust-free area for at least 24 hours. The paint needs to skin over completely before baking. -
Bake to set:
Place the glass in a cool oven. Set the temperature to 350°F (176°C) and bake for 30 minutes. Turn the oven off and let the glass cool completely inside the oven before removing preventing thermal shock.
Now you have a charming, customized tumbler perfect for serving summer lemonade

PENCIL GUIDE
Understanding Pencil Grades from H to B
From first sketch to finished drawing — learn pencil grades, line control, and shading techniques.
Explore the Full Guide
Mandala Dot-Art Band
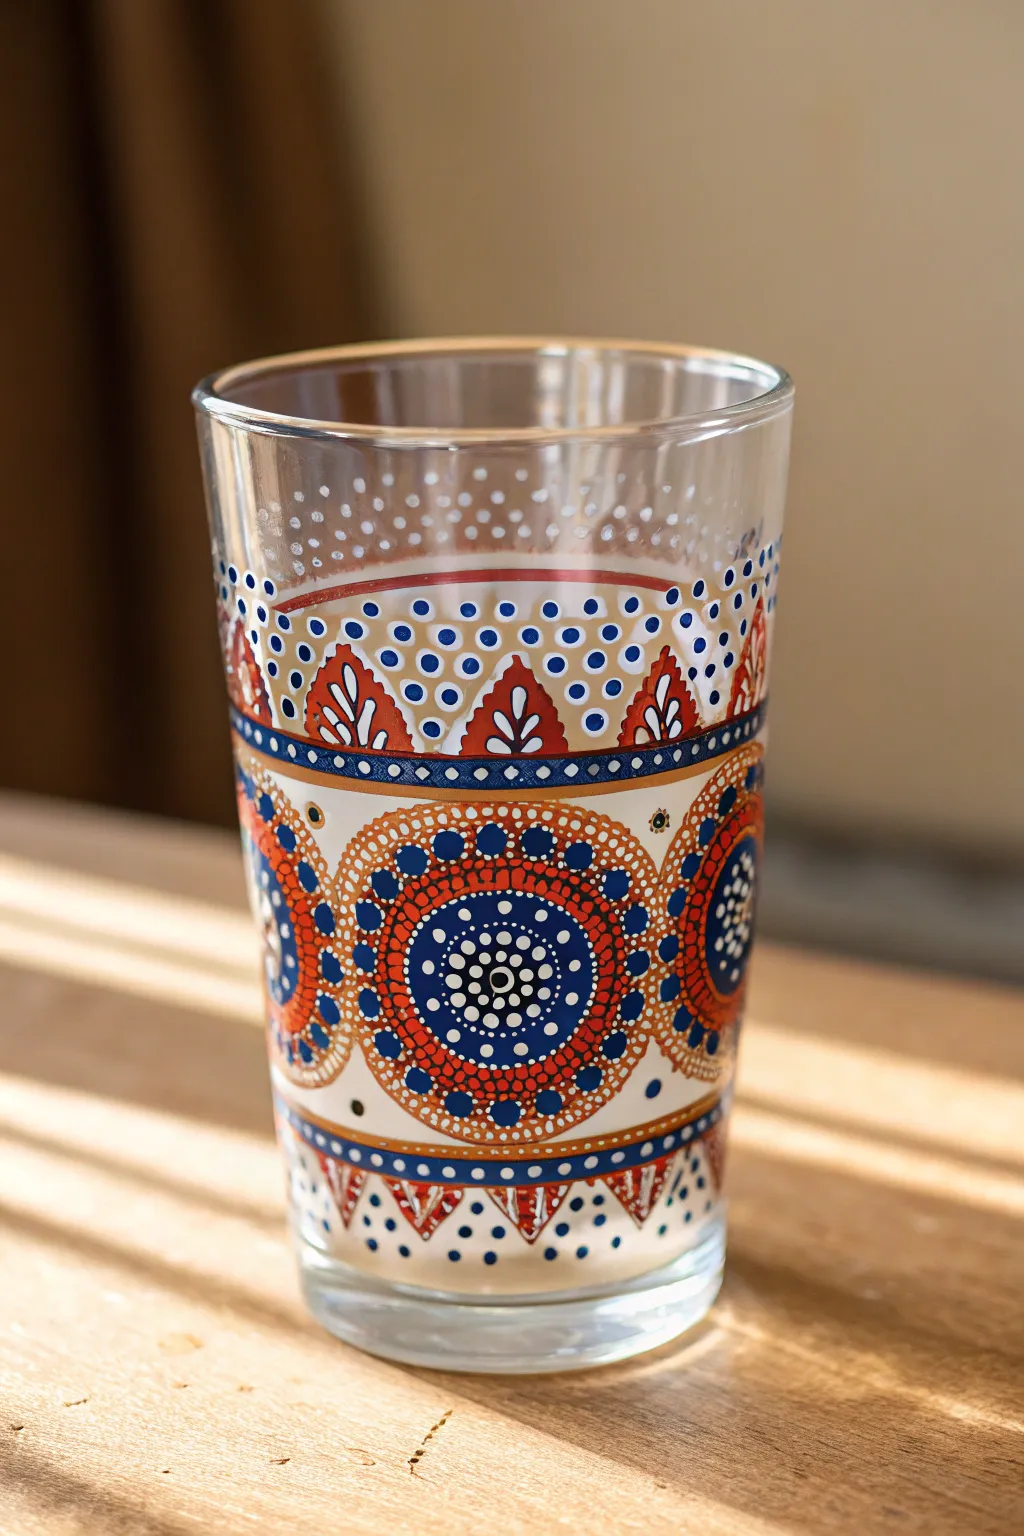
Transform a simple glass tumbler into a stunning piece of decor with this intricate mandala dot-art design. Featuring bold bands of terracotta red, deep royal blue, and crisp white dots, this project creates a mesmerizing, textured finish that catches the sunlight beautifully.
How-To Guide
Materials
- Clear glass tumbler (straight-sided works best)
- Rubbing alcohol and cotton pads
- Gloss enamel glass paints (terracotta red, royal blue, white, gold/ochre)
- Dotting tools (various sizes)
- Fine detail paintbrush (size 0 or 00)
- Masking tape or painter’s tape
- Cotton swabs (for cleanup)
- Oven (for curing, if paint requires)
Step 1: Preparation and Base Bands
-
Clean surface:
Begin by thoroughly wiping the outside of the glass with rubbing alcohol on a cotton pad. This removes oils and fingerprints, which is crucial for paint adhesion. -
Mark boundaries:
Apply two horizontal strips of masking tape around the glass to define the central band where the main mandalas will sit. This creates a clear zone to frame your artwork. -
Paint base layer:
Using a flat brush, paint the large area between your tape lines with a creamy off-white or very pale beige enamel. This provides an opaque background for the colorful dots to pop against. Let this layer dry completely. -
Add bordering lines:
Once the white band is dry, carefully remove the tape. Using your fine liner brush and royal blue paint, draw a continuous thin line along the top and bottom edge of the white band to create a crisp border.
Step 2: Creating the Central Mandalas
-
Establish centers:
Visualize the spacing for three or four large circular mandalas around the central band. Place a large black or dark blue dot in the very center of each imagined circle. -
First white ring:
Using a small dotting tool, encircle the center dot with tiny, tightly packed white dots. Keep your tool vertical to ensure perfectly round shapes. -
Blue expansion:
Moving outward, create the next ring using medium-sized royal blue dots. Try to place these in the gaps between the white dots of the previous row for a nested look. -
Terracotta layer:
Switch to your terracotta red paint. Create a wider ring of dots outside the blue ring. These should be slightly larger to build the mandala’s visual weight. -
Outer detail ring:
Complete the circular motif with a ring of gold or ochre dots. I like to add a tiny white micro-dot on top of each of these larger dots once they are tacky for extra dimension. -
Fill the gaps:
Between the large circular mandalas, fill the empty white space with small triads of blue or red dots to maintain the pattern’s density.
Fixing Smudges
If a dot smudges or runs, wait for it to dry slightly, then carefully scrape it off with a toothpick. Wiping wet paint often makes a bigger mess.
Step 3: Upper and Lower Decoration
-
Top arches:
Above the main band (on the clear glass), paint a row of small, repetitive arches using terracotta red. These should mimic leaf or petal shapes. -
Arch details:
Inside each red arch, use your fine brush to paint a white spine line and small white veins, giving them a stylized leaf appearance. -
Field of dots:
Above the red arches, create a scattered ‘snow’ effect. Start with larger blue dots near the arches and transition to tiny white dots as you move toward the rim of the glass. -
Lower triangles:
Below the main band, paint a series of downward-pointing triangles in terracotta red. Outline them with dots—alternating blue and white—to mirror the complexity of the central band. -
Bottom rim:
Finish the design near the base with one final solid blue line, accented underneath with evenly spaced white dots.
Add Luminosity
Mix a tiny amount of transparent gloss medium into your blue dots. This makes them look like little glass beads when the light shines through the cup.
Step 4: Finalizing
-
Dry check:
Inspect your work for any accidental smears. If you find one, use a damp cotton swab to gently lift the mistake before it cures fully. -
Curing:
Allow the glass to air dry for at least 24 hours. Depending on your paint brand, bake the glass in a non-preheated oven according to the manufacturer’s instructions to make it dishwasher safe.
Enjoy your beautiful new hand-painted glassware during your next sunny morning coffee
Geometric Color-Block Triangles
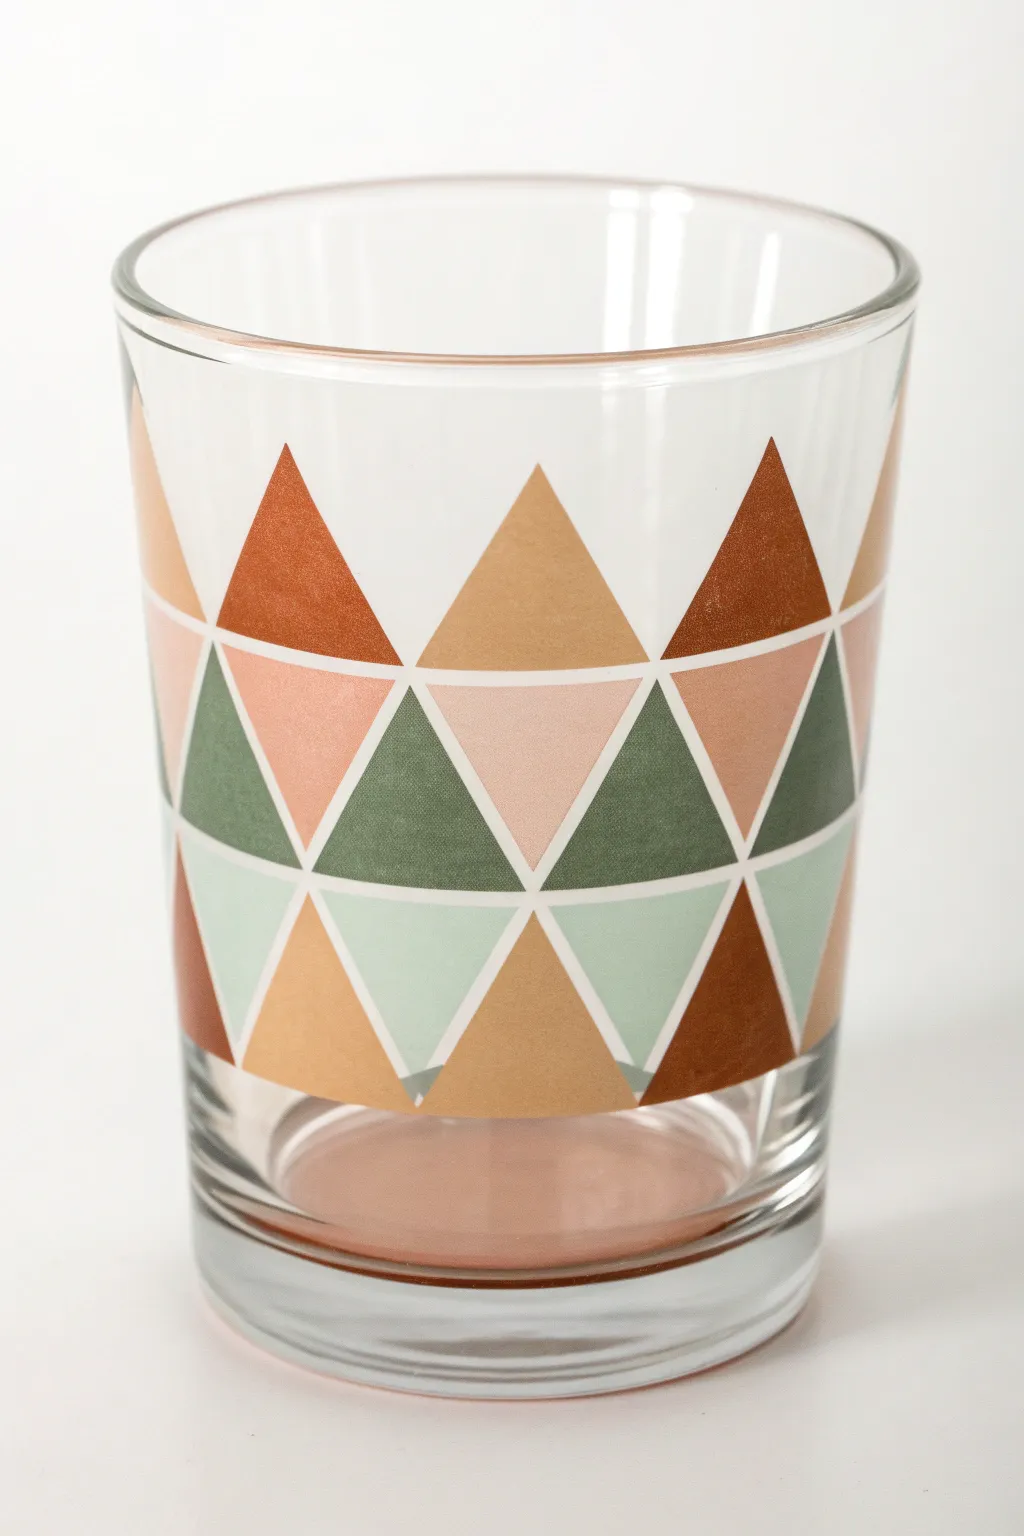
This project transforms a plain tumbler into a trendy piece of drinkware using a tessellated triangle design. By painting sharp, interlocking shapes in earthy tones like terracotta, sage, and sand, you create a sophisticated pattern that looks professionally printed.
Step-by-Step
Materials
- Plain clear glass tumbler (straight-sided works best)
- Rubbing alcohol and cotton pads
- Painter’s tape or masking tape (approx. 1/4 inch width is ideal, or cut standard tape)
- Enamel glass paints (Terracotta, Sage Green, Sand/Beige, Pale Pink)
- Flat shader brush (size 4 or 6)
- Detail brush (size 0 or 1)
- Palette or small plate
- Craft knife
- Ruler
- Oven (for curing)
Step 1: Preparation and Planning
-
Clean the surface:
Begin by thoroughly wiping down the exterior of your glass with rubbing alcohol on a cotton pad. This removes any oils or fingerprints that could prevent the paint from adhering properly. -
Measure the circumference:
Measure the circumference of your glass with a flexible measuring tape. Divide this number by how many triangles wide you want your pattern to be (e.g., 6 or 8) to determine the width of each triangle base. -
Mark vertical guides:
Using a washable marker or small pieces of tape, mark the top and bottom boundaries of your design area on the glass. The design shown sits centrally, leaving clear glass at the rim and base.
Step 2: Creating the Grid
-
Apply vertical tape strips:
If you are struggling with freehand spacing, place thin vertical strips of tape at the intervals you calculated earlier. These will act as guides for where your triangle points should land. -
Map out the zigzag:
The pattern is essentially rows of zigzags forming triangles. You can sketch these lightly on the glass directly with a marker if you feel confident, or cut your painter’s tape into thin strips to mask off the triangle shapes directly. -
Tape the first row:
Apply tape to define the first row of upward-pointing triangles. Focus on creating sharp points. Smooth the tape edges firmly with your fingernail to prevent paint bleed.
Tape Trick
Use 1/8 inch graphic art tape instead of cutting wide masking tape. It is flexible, easier to position for precise geometric angles, and leaves less residue on the glass.
Step 3: Painting the Base Layer
-
Mix your palette:
Squeeze out your enamel colors onto a palette. You’ll need four distinct shades: a dark rust, a sandy beige, a pale pink, and a sage green. -
Paint the bottom row:
Using the flat shader brush, fill in the masked triangles for the bottom row. Alternate colors randomly or follow a specific sequence. I usually do two thin coats rather than one thick one for better durability. -
Let it dry slightly:
Allow the paint to become tacky but not fully dry before carefully peeling off the tape. This ensures clean lines without pulling up the paint skin. -
Clean up edges:
If any paint bled under the tape, use a slightly damp craft knife or a toothpick to gently scrape away the excess while the paint is still soft.
Metallic Accent
For a glamorous twist, use a gold or copper relief paste liner to fill in the clear gaps between the triangles, giving the effect of stained glass leading.
Step 4: Building the Pattern
-
Tape the middle row:
Once the first row is dry to the touch (check bottle instructions, usually 1 hour), apply tape to define the inverted triangles that nest between the first row’s peaks. -
Leave a gap:
Crucial step: Leave a tiny hairline gap of clear glass between the new paint area and the existing dried triangles. This creates the white outline effect seen in the photo. -
Paint the inverted triangles:
Fill these new shapes with your contrasting colors. Try to place a dark green next to a light pink for visual interest. -
Remove tape and repeat:
Remove the tape while the paint is tacky. Allow this row to dry. Then, repeat the taping and painting process for the top row of upward-pointing triangles, again maintaining that thin clear gap.
Step 5: Finishing Touches
-
Inspect the spacing:
Look closely at the gaps between your triangles. If any gaps are too wide or uneven, you can use a fine liner brush with a tiny amount of paint to carefully extend a triangle’s edge. -
Clean the negative space:
Use a cotton bud dipped in alcohol to clean up any smudges on the clear glass areas above and below the pattern. -
Cure the paint:
Follow the manufacturer’s instructions to cure the glass. This typically involves letting the glass air dry for 21 days or baking it in a cool oven that is heated to 350°F (176°C) for 30 minutes.
Once baked and cooled, your custom geometric glass is ready for hand washing and your favorite iced beverage


Metallic Rim Accent and Starry Speckles
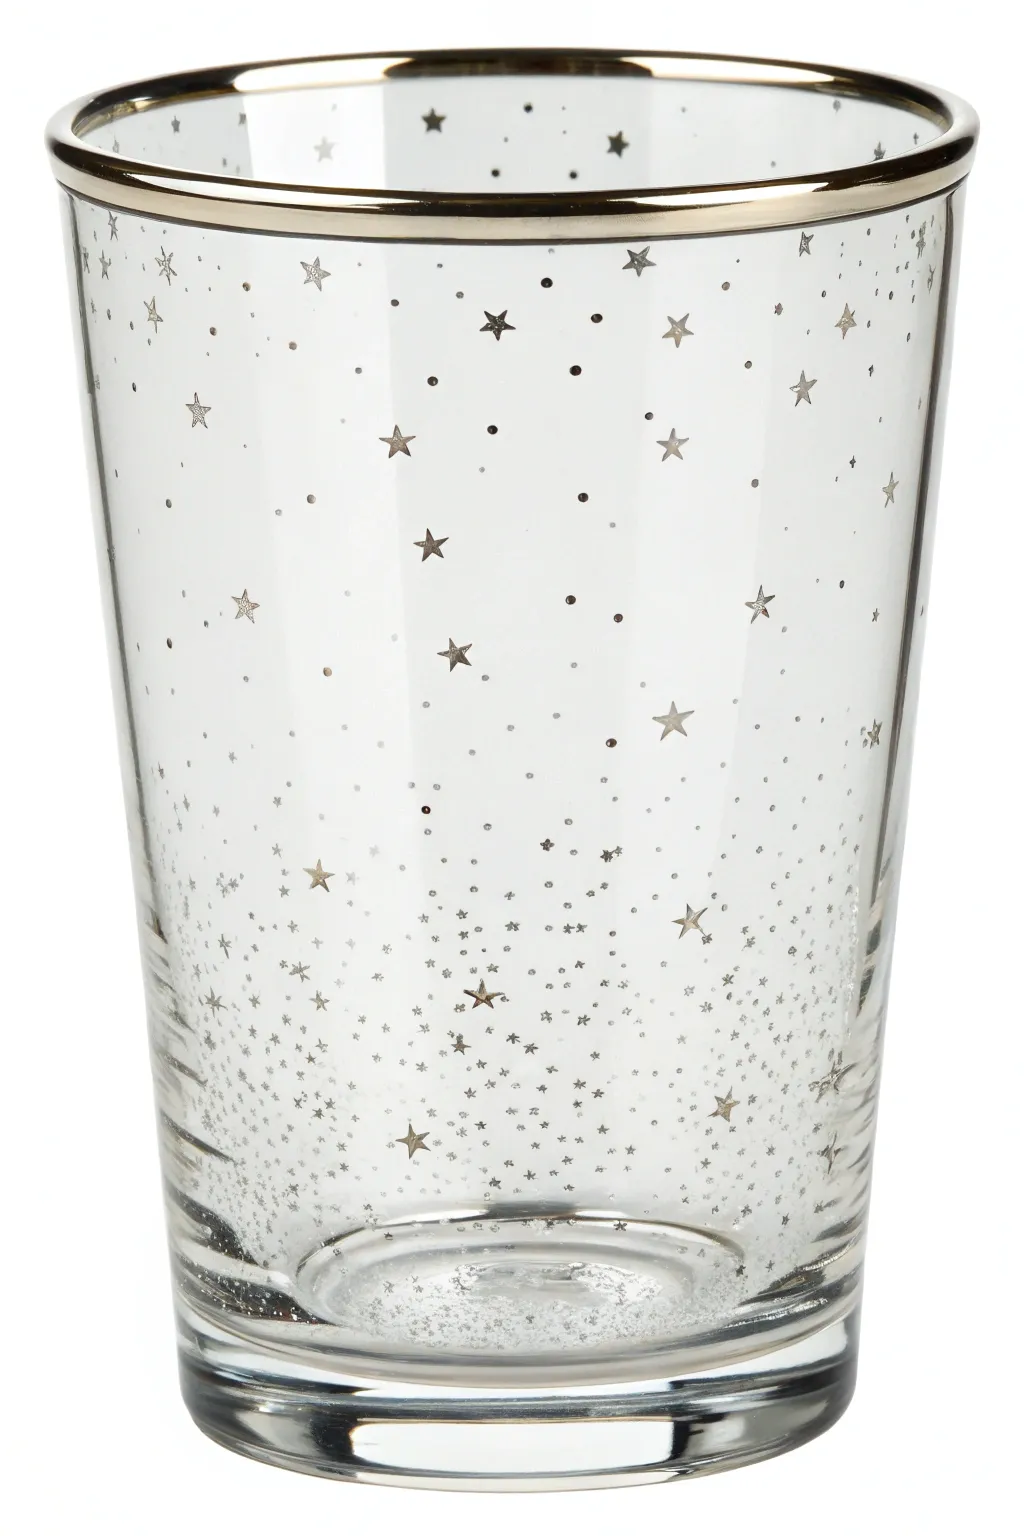
Transform plain glassware into an enchanting night sky with this elegant project featuring a luxe metallic rim and a cascade of shimmering stars. The design moves from sparse, delicate speckles at the top to a dense galaxy of stardust at the base, creating a sophisticated ombre effect.
Step-by-Step
Materials
- Clear glass tumbler (thoroughly cleaned)
- Pebeo Porcelaine 150 paint (Gold or Platinum)
- Small flat synthetic brush (size 4 or 6)
- Fine point synthetic liner brush (size 00 or 000)
- Dotting tool or toothpick
- Rubbing alcohol
- Lint-free cloth
- Painter’s tape or masking tape (optional but recommended)
- Palette or small dish
- Oven (for curing)
Step 1: Preparation & Rim Focus
-
Clean the surface:
Before catching any stardust, you need a pristine surface. Wipe the entire glass down with rubbing alcohol and a lint-free cloth to remove oils and fingerprints, which can prevent paint adhesion. -
Tape the rim line:
To ensure a crisp, professional top edge, wrap a piece of painter’s tape around the outside of the glass, about 1/4 inch below the rim. Press it down firmly to seal the edge. -
Load the flat brush:
Squeeze a small amount of metallic porcelain paint onto your palette. Load your flat brush evenly, ensuring the bristles are coated but not dripping. -
Paint the rim:
Carefully paint the exposed glass area above your tape line. Use long, smooth horizontal strokes to minimize brush marks. Don’t forget to paint the very top lip of the glass for a finished look. -
Remove tape:
Wait about 5-10 minutes for the paint to tack up slightly, then gently peel away the tape at a sharp angle. If any paint bleeds under, clean it instantly with a damp cotton swab.
Step 2: Creating the Starry Gradient
-
Start with large stars:
Using your fine liner brush, dip just the tip into the metallic paint. Begin painting five-pointed stars in the middle section of the glass. -
Distribute the main stars:
Scatter these larger stars randomly. Place them sparsely near the top third of the glass and slightly more frequently as you move down past the midline. -
Paint medium stars:
Clean your brush or pick up slightly less paint to create smaller stars. Fill in the gaps between the larger stars, focusing more on the lower half of the glass. -
Refine star shapes:
If your stars look blobby, use the very tip of the liner brush to pull the paint outward from the center to sharpen the points. I find steadying my pinky finger on the table helps with control. -
Begin the dotting process:
Switch to a dotting tool or the blunt end of a toothpick. Dip it into the paint and add tiny dots around the stars in the upper and middle sections. -
Increase dot density:
As you move toward the bottom quarter of the glass, start adding dots much closer together. You want to create a sense of accumulation near the base. -
Create the bottom galaxy:
At the very bottom inch of the glass, apply dots rapidly and densely. They can overlap slightly or vary in size to create a textured, ‘stardust’ appearance. -
Final dense touches:
Check the transition. If the jump from the sparse top to the dense bottom looks too abrupt, add medium-density dots in the middle zone to blend the gradient smoothly.
Starry Sharpness Pro-Tip
For sharper stars, don’t try to paint the whole shape at once. Paint a ‘V’ shape, then an inverted ‘V’ below it, and fill in the sides. It’s easier to control the points this way.
Step 3: Curing & Finishing
-
Dry time:
Allow the glass to dry for at least 24 hours. This is crucial—don’t rush this step or the paint may bubble during baking. -
Prepare for baking:
Place the glass into a cool oven. Do not preheat the oven, as the sudden temperature change can crack the glass. -
Bake the design:
Set the oven temperature to 300°F (150°C). Once the oven reaches temperature, bake for 35 minutes. -
Cool down:
Turn the oven off and open the door slightly, but leave the glass inside to cool down gradually with the oven.
Sticky Tape Trouble?
If paint peels up with your tape, you waited too long. Score the edge of the tape with a craft knife very lightly before peeling to separate the dried paint film from the tape.
Once baked, your celestial creation is top-rack dishwasher safe and ready for your favorite beverage
Coastal Blues With White Wave Tips
Capture the serene energy of the ocean with this layered glass painting project. By blending cool turquoise and indigo hues with a textured white foam, you can transform a simple tumbler into a piece of beachside art.
How-To Guide
Materials
- Clear high-ball glass tumbler
- Rubbing alcohol and paper towels
- Enamel glass paints (White, Turquoise, Phthalo Blue, Deep Navy)
- Glazing medium for glass paint
- Flat shader brushes (medium size)
- Small sea sponge or stippling brush
- Palette for mixing
- Oven (for curing, if required by paint brand)
Step 1: Preparation & Base Layers
-
Clean surface:
Begin by thoroughly wiping down the outside of your glass with rubbing alcohol. This removes oils and fingerprints that could prevent the paint from adhering properly. -
Mix the darkest tone:
On your palette, mix a dot of Deep Navy with a small amount of Turquoise. You want a rich, dark ocean floor color for the very bottom of the glass. -
Apply the base:
Using a flat shader brush, paint the bottom half-inch of the glass with your dark navy mix. Dab the brush slightly at the bottom edge to create texture reminiscent of pebbles or deep water. -
Transition to teal:
Without rinsing your brush thoroughly, dip into the pure Turquoise paint. Apply this directly above the navy layer, blending the two where they meet while the paint is still wet to create a soft gradient. -
Create transparency:
Mix a little glazing medium into your Turquoise paint for the middle section. This makes the paint semi-transparent, mimicking the look of water. Paint upward in horizontal, wavy strokes, letting the clear glass show through slightly.
Step 2: Creating the Waves
-
Add deep currents:
Load a clean brush with a touch of Phthalo Blue. Paint thin, undulating horizontal lines through the turquoise section to suggest deep currents and movement within the water. -
Soften the lines:
Before the Phthalo Blue lines dry, gently swipe a damp brush over them horizontally. This blurs the edges so they look like fluid water rather than harsh stripes. -
First white layer:
Mix a very watery wash of White paint. Using a thin brush, add faint, translucent white streaks periodically throughout the turquoise area to represents light refracting in the water. -
Establish the horizon line:
Decide where your waterline will be near the rim. Use a piece of painter’s tape if you need a guide, or paint freehand with Turquoise for a more organic, rolling wave look.
Fixing Streaks
If your blue gradient looks streaky rather than smooth, don’t overwork it. Let it dry, then apply a second thin layer of glazed paint to smooth out the transition.
Step 3: The White Foam & Finish
-
Paint the crest:
Using pure White enamel paint, fill in the space from your horizon line up to the rim of the glass. Apply this relatively thickly to ensure opacity. -
Texture the foam:
While the white rim paint is wet, take your small sea sponge or a stiff stippling brush and tap vertically along the bottom edge of the white section. Drag a little bit of white down into the blue to look like crashing foam. -
Add surface bubbles:
Dip the very tip of a brush handle or a toothpick into white paint. Dot small clusters of bubbles where the white foam meets the blue water. -
Dry completely:
Let the glass sit undisturbed for at least 1 hour until the paint is dry to the touch. -
Second coat (optional):
If your white foam area looks too streaky, apply a second coat of white, re-stippling the texture at the bottom edge. -
Clear coat sealing:
I prefer to brush a thin layer of clear gloss medium over the entire painted area once it’s dry. This unifies the sheen and adds extra durability. -
Cure the glass:
Follow the instructions on your specific paint bottle for curing. This usually involves baking the glass in a non-preheated oven for 30 minutes to make it dishwasher safe.
Add Sea Salt Texture
While the white foam paint is still wet, sprinkle a tiny pinch of coarse sea salt onto it. Once baked and washed, it leaves cool craters.
Now you have a stunning piece of custom glassware that brings the calm of the coast right to your table
Faux Stained-Glass Outlines With Translucent Fills
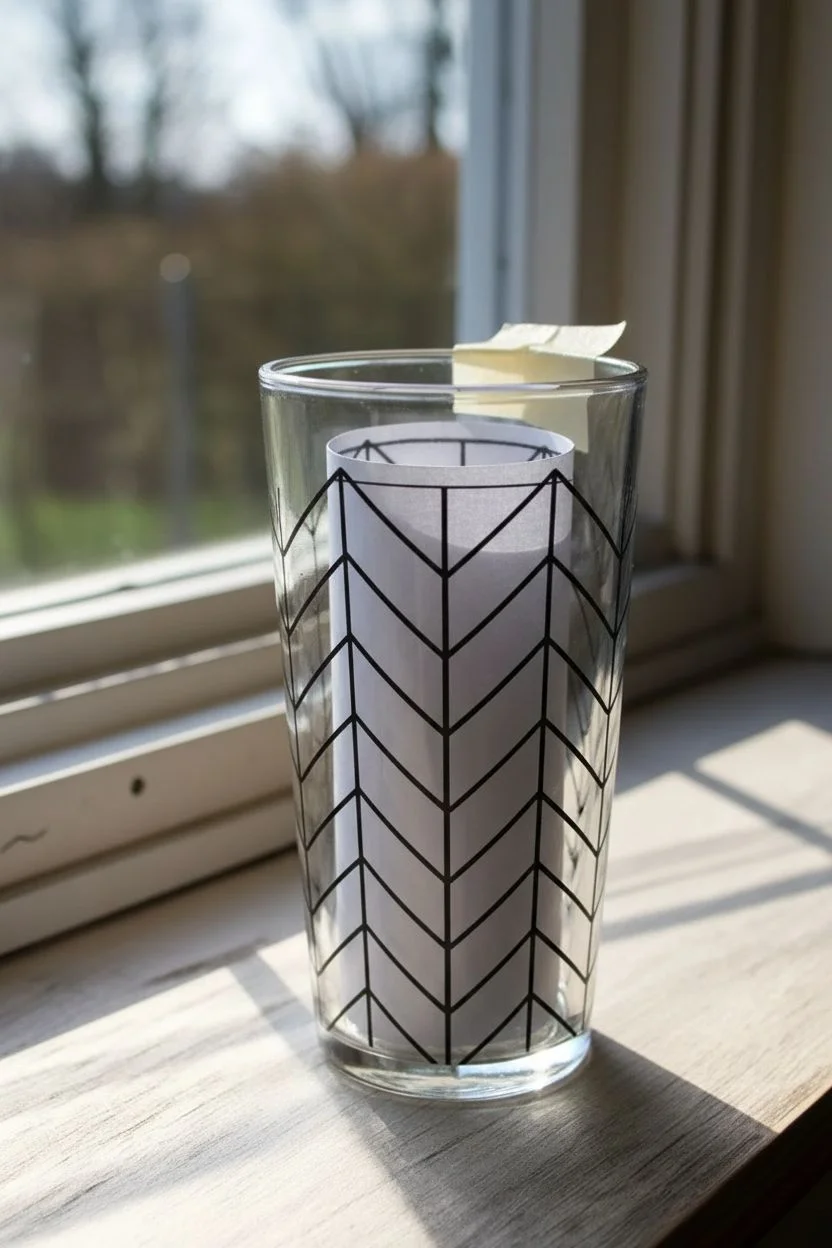
Transform a plain glass tumbler into a luminous work of art using simple outlining and filling techniques. This project captures the classic look of leaded stained glass with a modern geometric chevron pattern that glows beautifully in sunlight.
Detailed Instructions
Materials
- Tall, clear glass tumbler or cylindrical vase
- Rubbing alcohol and cotton pads
- Liquid leading or dimensional glass paint outline (Black)
- Translucent glass paints (Turquoise/Teal, White/Frost, Salmon/Coral, Amber/Gold)
- Small round paintbrush (size 0 or 1)
- Paper towels
- Printed chevron pattern template (sized to fit inside the glass)
- Masking tape or painter’s tape
- Cotton swabs (for clean-up)
Step 1: Preparation & Mapping
-
Clean the Surface:
Before you begin painting, thoroughly wipe down the exterior of your glass with rubbing alcohol and a cotton pad. This removes any oils or fingerprints that could prevent the paint from adhering properly. -
Prepare the Template:
Print or draw a geometric chevron pattern on a piece of paper. Ensure the pattern matches the circumference of your glass so the design meets neatly at the seam. -
Secure the Guide:
Roll the pattern into a tube shape and slide it inside the glass. Adjust it until the lines are straight and the pattern connects correctly, then tape it securely to the inside rim so it doesn’t shift while you work.
Pro Tip: Texture Trick
To mimic the ‘hammered’ texture of real stained glass, dab a crumpled piece of plastic wrap lightly onto the wet paint, then lift it straight up.
Step 2: Creating the Lead Lines
-
Test the Flow:
Squeeze a small amount of liquid leading onto a paper towel first to ensure there are no air bubbles and to get a feel for the flow rate. -
Tracing Vertical Lines:
Start by tracing the long vertical lines from the top rim down to the base. Hold the bottle nozzle slightly above the glass surface, allowing the line of paint to ‘drape’ onto the glass for a smoother finish. -
Tracing Angled Lines:
Once the verticals are done, connect them with the angled chevron lines. Work slowly, turning the glass as needed to keep your hand steady. -
Clean Up Edges:
If you make a mistake or a line gets wobbly, quickly wipe it away with a damp cotton swab before it sets. For dried mistakes, you can carefully scrape them off with a craft knife. -
Let the Outline Cure:
Allow the black outlines to dry completely according to the manufacturer’s instructions. This usually takes at least 6 to 8 hours, though I prefer leaving it overnight to be safe.
Step 3: Adding Translucent Color
-
Mixing Texture:
For that authentic textured glass look, you don’t want the paint to be perfectly smooth. You can achieve this by dabbing the paint rather than brushing it flat. -
Painting the Teal Sections:
Dip your small brush into the turquoise/teal glass paint. Fill in the designated chevron sections, pushing the paint right up against the black ‘lead’ lines to avoid gaps. -
Adding the Frosty White:
Clean your brush thoroughly and move on to the white or frosted sections. Apply this color a bit more thickly to increase opacity while still letting light filter through. -
Warm Tones:
Apply the salmon/coral and amber/gold paints to their respective geometric shapes. I like to alternate these warm tones to create a balanced contrast against the cool teal. -
Check for Pinholes:
Hold the glass up to a light source to check for any tiny holes where the paint didn’t cover. Dab a tiny bit of extra paint into these spots to seal the color. -
Drying Time:
Set the glass in a dust-free area to dry. Glass paints often require 24-48 hours to cure fully before they are safe to handle. -
Baking (Optional):
Check your paint brand’s instructions; some require baking in a home oven to make the design dishwasher safe. If so, place the cold glass in a cold oven, heat to the specified temp, and let it cool down inside the oven.
Level Up: Ombre Effect
Instead of solid colors, blend two shades within a single geometric shape while wet. Transition from teal to clear for a gradient effect.
Place your finished piece on a sunny windowsill and enjoy accurate color display
Reverse-Painted Florals on the Inside Wall
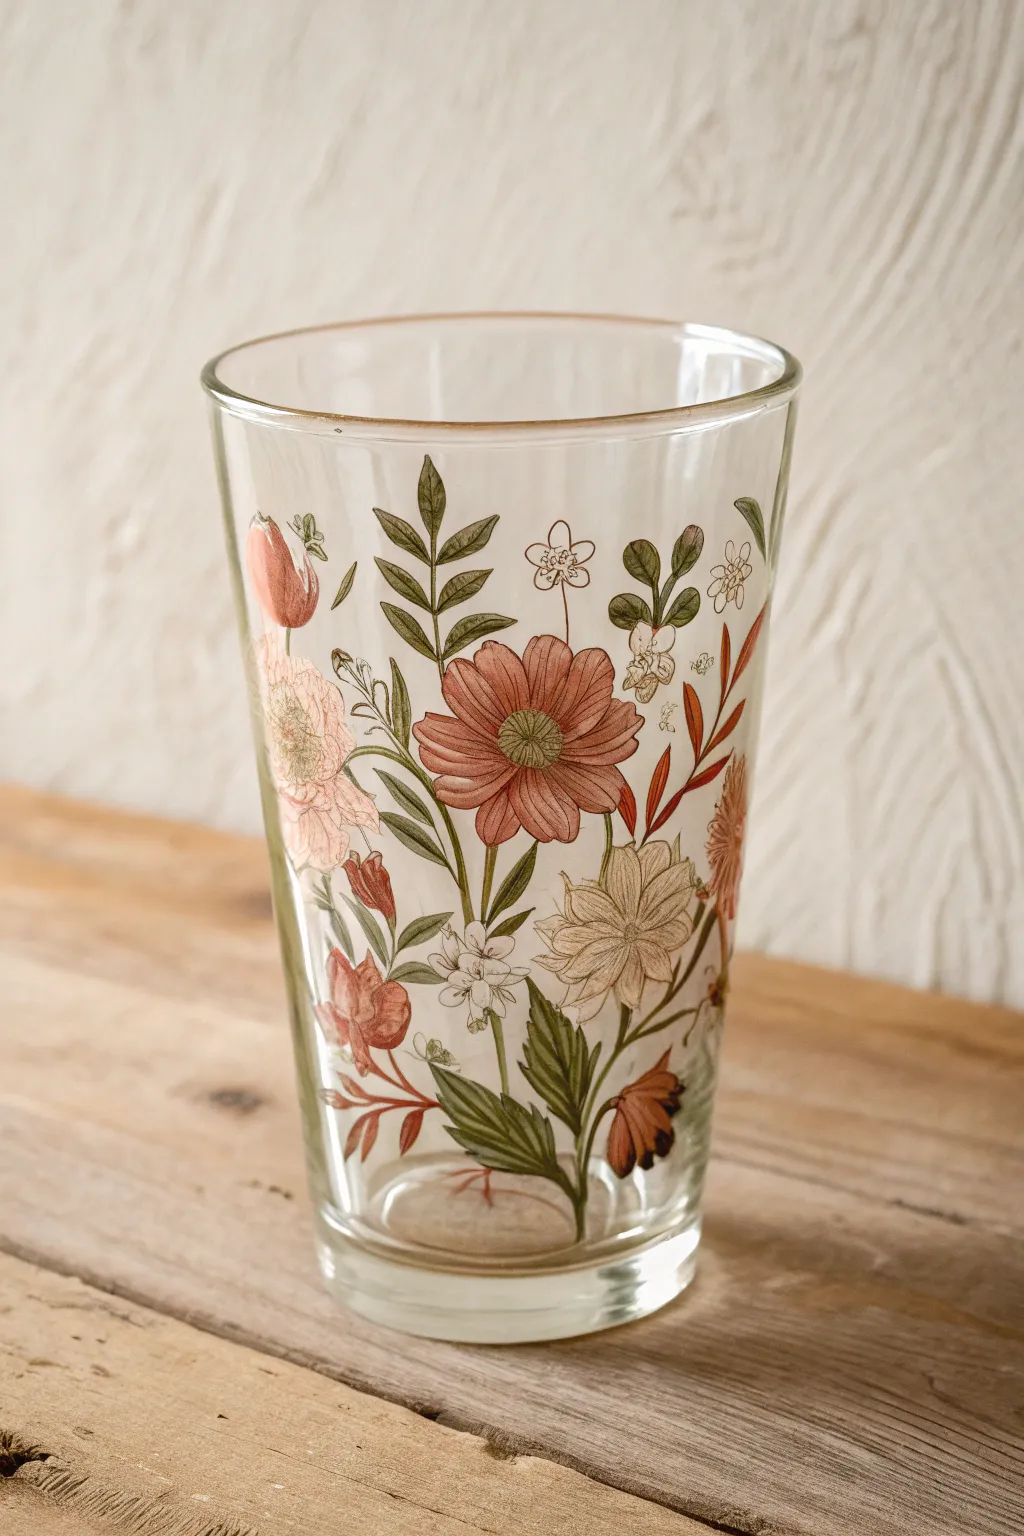
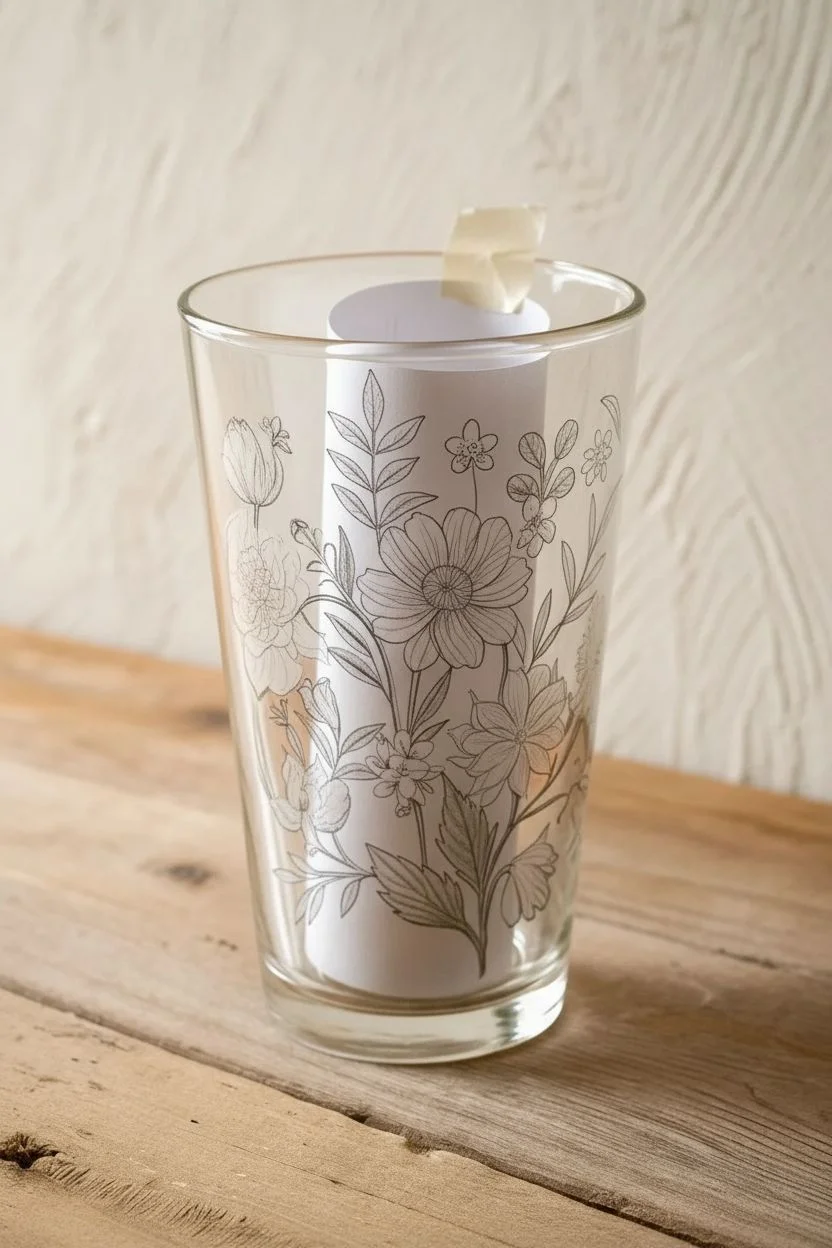
Transform a plain glass tumbler into a vintage-inspired piece of art with this clever reverse-painting technique. By painting on the inside surface, your delicate floral designs gain an extra layer of depth and protection behind the glass.
Step-by-Step Guide
Materials
- Clear glass tumbler or straight-sided vase
- Glass-safe enamel paints (muted terra cotta, sage green, cream, mustard yellow, brown)
- Fine liner brushes (size 00 or 0)
- Rubbing alcohol and paper towels
- Reference image of wildflowers
- Small palette or ceramic plate
- Painter’s tape (optional)
- Oven (for curing, if required by paint type)
Step 1: Preparation
-
Clean the Surface:
Before you begin, thoroughly wipe down the *inside* of the glass with rubbing alcohol. This removes any oils or fingerprints that could prevent the paint from adhering properly. -
Map the Design:
If you aren’t comfortable freehanding, sketch your floral design on a piece of paper that fits inside the cup. Roll it up, slide it inside with the drawing facing out, and tape it in place to use as a guide.
Smudged Lines?
If your fine lines smear when adding the fill color, your base layer wasn’t dry enough. Let outlines cure for at least an hour before filling.
Step 2: Painting the Foreground
-
Start with Details:
Because this is reverse painting, you must work backward: foreground details first, background layers last. Begin by painting the tiny yellow centers of the large flowers and the white stamen dots. -
Add Fine Veins:
Using your finest liner brush and a diluted brown or dark green connected to your leaf shapes, paint the delicate veins of the leaves. These need to be applied now so they appear ‘on top’ later. -
Outline Petals:
Carefully outline the petals of the main terra cotta flowers and the cream-colored blooms. Keep the lines incredibly thin to mimic a botanical illustration style. -
Let it Dry:
Allow these fine detail lines to dry completely to the touch. If you paint over them too soon, you’ll smear the crisp lines.
Step 3: Adding Color and Body
-
Fill the Blooms:
Once the outlines are dry, gently fill in the petals with your terra cotta and cream paints. Dab the paint on gently rather than brushing aggressively to avoid lifting the underlying lines. -
Paint the Leaves:
Fill in the leaf shapes with sage green. You can mix a tiny bit of brown into the green for the lower leaves to create color variation and depth. -
Create the Stems:
Connect your floating flowers and leaves with long, sweeping stem lines. Use a steady hand and pull the brush upward from the base of the glass. -
Layering Colors:
For the multi-tone effect seen in the reference, apply a second coat of color on the flower centers once the first layer is tacky. I like to add a slightly darker shade near the center of the petals for a shadow effect. -
Check Transparency:
Hold the glass up to a light source. If the paint looks too streaky or transparent, apply a second coat to the petals and leaves after the previous layer dries.
Gilded Edge
Add a thin rim of metallic gold glass paint to the very top edge of the cup to frame your botanical art and give it a high-end vintage look.
Step 4: Finishing Touches
-
Inspect from Outside:
Constantly check your progress from the outside of the glass. This is the true viewing side, so ensure your lines look clean and the colors are vibrant through the glass wall. -
Clean Edges:
If any paint went astray, wrap a slightly damp paper towel around a skewer or toothpick to clean up the edges while the paint is still workable. -
Remove Guide:
If you used a paper guide, carefully remove it now. Be cautious not to scratch your fresh paint. -
Cure the Paint:
Follow the manufacturer instructions for your specific glass paint. Most require air drying for 21 days or baking in a non-preheated oven to become dishwasher safe.
Now you have a stunning piece of functional art that brings a garden vibe to your table setting
Galaxy Night Sky With Tiny Constellations
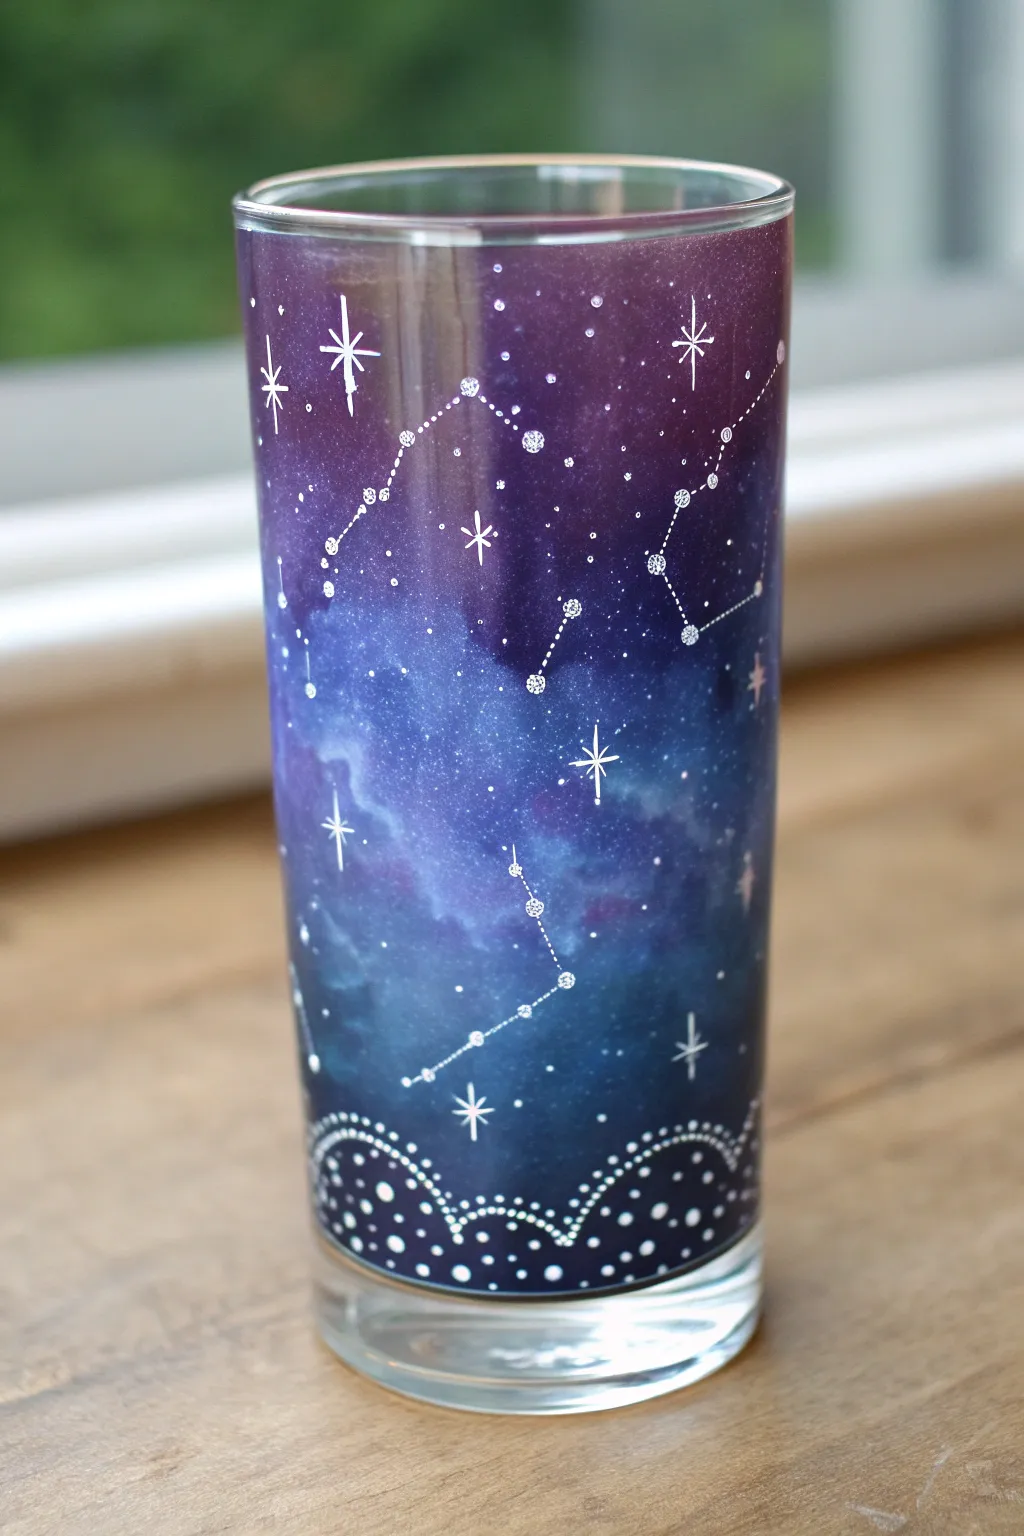
Transform plain glassware into a portal to the universe with this dreamy galaxy painting project. By layering translucent glass paints and adding delicate white details, you’ll create a functional piece of art that captures the magic of a starry night.
Step-by-Step
Materials
- Clear highball glass or tumbler
- Rubbing alcohol and cotton pads
- Glass paints (transparent/translucent types): Deep indigo, violet, ultramarine blue, teal
- Glass paint (opaque): White
- Makeup sponge wedges or sea sponge
- Fine detail paintbrush (size 0 or 00)
- Small dotting tool or toothpick
- Palette or small paper plate
- Cotton swabs (for cleanup)
- Oven (for curing, check paint instructions)
Step 1: Preparing the Canvas
-
Clean surface:
Begin by thoroughly cleaning the exterior of your glass with rubbing alcohol and a cotton pad. This removes any oils or fingerprints that might prevent the paint from adhering properly. -
Tape the rim:
Apply a strip of painter’s tape or wash tape around the top ½ inch of the glass rim. This ensures you have a clean, paint-free area for lips to touch while drinking.
Uneven Paint?
If sponge marks look too harsh, lightly dab over the wet paint with a clean, dry piece of sponge to soften the texture and blend the colors better.
Step 2: Creating the Galaxy Background
-
Sponge base colors:
Squeeze small amounts of your blue, teal, and violet glass paints onto your palette. Dab a makeup sponge into the darkest indigo or violet color first. -
Apply first layer:
Lightly dab the sponge onto the glass, starting near the top. Don’t try to cover the whole glass perfectly; a patchy texture is actually desirable for a nebula effect. -
Blend gradients:
While the first color is still tacky, pick up some ultramarine blue or teal on a clean part of the sponge. Dab this into the open spaces and slightly overlap with the darker color to create soft transitions. -
Intensify darkness:
I like to go back in with the darkest indigo around the very top and bottom edges to create a vignetted look, which makes the brighter galaxy center pop. -
Dry and repeat:
Let this first layer dry until it’s touch-dry (usually 15-20 minutes). If the glass looks too transparent, apply a second sponged layer to deepen the opacity while keeping the cloudy texture.
Step 3: Painting the Constellations
-
Load fine brush:
Once the background is fully dry, put a drop of opaque white glass paint on your palette. Dip your finest detail brush into the paint, ensuring it’s not overloaded. -
Mark main stars:
Visualize or look up simple constellation shapes like Cassiopeia or the Big Dipper. Gently dot the main ‘corner’ stars of these shapes onto the glass first using the brush tip. -
Connect with dots:
Instead of solid lines, connect your main star points with tiny, delicate dots. Use the very tip of your brush or a toothpick for this to keep the lines subtle and airy. -
Add cross stars:
Select a few random spots in the empty space to paint larger ‘twinkle’ stars. Paint a simple cross shape—a vertical line crossed by a shorter horizontal line—and add a tiny dot in the center.
Add Some sparkle
Before the background paint dries completely, sprinkle a tiny pinch of ultra-fine holographic glitter onto the wet paint for a genuine cosmic shimmer.
Step 4: Adding the Lower Details
-
Start the scallop:
Near the bottom of the painted area (about an inch up from the base), paint a scalloped or wavy line using small white dots. Imagine a series of small hills going around the circumference. -
Fill the bottom:
Underneath your scalloped line, fill the remaining dark space at the bottom of the glass with a density of random white dots. This grounds the design and looks like a horizon of distant lights. -
Sprinkle atmosphere:
Dip a stiff bristled brush or toothbrush into slightly watered-down white paint. Use your thumb to flick the bristles, spraying a very fine mist of white specs over the galaxy background to create distant stars.
Step 5: Finishing Touches
-
Review and refine:
Check your work against a light source. If any stars look too faint, carefully re-dot them with a fresh drop of white paint. -
Clean up:
Remove the tape from the rim immediately. If any paint seeped under, use a damp cotton swab to wipe it away for a crisp edge. -
Cure the paint:
Follow the specific instructions on your glass paint bottle. Most require air drying for 24 hours, followed by baking in a cool oven that heats up to 350°F (175°C) for 30 minutes to make it dishwasher safe.
Once baked and cooled, fill your new cosmic glass with a cold drink and enjoy the view of the stars
Layered Abstract Brush Dashes for a Modern Set
Transform plain glassware into a modern art set with these sweeping, layered abstract designs. The feathery brushstrokes and earthy color palette create a sophisticated look that feels custom-made for a stylish table setting.
Step-by-Step Guide
Materials
- Clear glass tumblers (straight-sided works best)
- Rubbing alcohol and cotton pads
- Enamel craft paint for glass (colors: terracotta, sage green, dark forest green, beige/peach)
- Flat shader paintbrushes (medium width, bristles somewhat stiff)
- Small round detail brush (optional for dots)
- Paper palette or plate
- Oven (for curing paint)
Step 1: Preparation
-
Clean the surface:
Before you begin, thoroughly clean the outside of your glasses with rubbing alcohol and a cotton pad. This removes any oils or fingerprints that could prevent the paint from adhering properly. -
Set up your palette:
Squeeze a dime-sized amount of each enamel paint color onto your palette. I find keeping them slightly separated helps prevent muddying the colors too early. -
Test your stroke:
Practice the brushstroke technique on a piece of paper or cardboard first. You want to place the brush down firmly and then flick it upward and outward quickly to create a feathered, uneven tail at the end of the stroke.
Paint Slipping?
If paint streaks or pools, you’ve overloaded the brush. Wipe excess paint off on a paper towel before applying. Multiple thin, dry layers adhere better than one thick blob.
Step 2: Painting the Base Layers
-
Start with the dominant color:
Load your flat brush with the terracotta paint. Apply 3-4 large angled strokes randomly around the glass, starting from the middle and flicking diagonally upward. -
Create variation:
Vary the length and start points of these first strokes. Some should start lower near the base, while others can float higher up, but keep the diagonal orientation consistent. -
Add the second tone:
Wipe your brush clean or grab a fresh one. Load it with the beige or peach color. Place strokes adjacent to or slightly overlapping the terracotta ones. -
Dry briefly:
Let this first wave of colors set for about 10-15 minutes. It doesn’t need to be fully cured, just tacky enough that the next layer won’t smear it.
Step 3: Layering Colors
-
Introduce the green:
Using the sage green, add strokes that cross over the previous colors slightly. The transparency of glass paint means layering creates beautiful depth. -
Add contrast:
Use the dark forest green for high-contrast accents. Keep these strokes a bit shorter and more deliberate to anchor the lighter colors. -
Fill the gaps:
Look at the composition from a distance. Add smaller filler strokes using whichever color feels underrepresented, turning the glass as you go. -
Maintain transparency:
Don’t cover the entire glass. Leaving negative space (clear glass) is crucial for this abstract modern look to feel airy and light.
Metallic Pop
Add a touch of glam by layering a final few strokes of gold or copper foil paint over the dried colors. The metallic shine contrasts beautifully with earthy matte tones.
Step 4: Details and Curing
-
Dry brushing texture:
For added texture, wipe most of the paint off your brush and lightly drag it over existing dried strokes. This ‘dry brush’ effect emphasizes the bristle marks. -
Add whimsical dots:
Dip the handle end of a small brush into the terracotta paint. Gently stamp a few small clusters of dots in the negative spaces between the sweeping strokes. -
Review and cleanup:
Check the rim of the glass. Ensure no paint is within an inch of where your lips will touch. Use a damp cotton bud to wipe any stray marks away. -
Air cure:
Follow the manufacturer’s instructions for drying time. Typically, you need to let the glasses air dry for at least 1 hour, or sometimes up to 24 hours, before baking. -
Bake to set:
Place the glasses in a cold oven. Set the temperature to 350°F (176°C) and bake for 30 minutes. The cold start is vital to prevent the glass from cracking. -
Cool down:
Turn the oven off after 30 minutes but leave the glasses inside until the oven is completely cool. This gradual cooling further protects the glass.
Enjoy your beautiful new custom glassware at your next dinner party or give them as a thoughtful handmade gift


Have a question or want to share your own experience? I'd love to hear from you in the comments below!