A glass door is basically a vertical lightbox, and paint is your way of turning that everyday surface into art. Here are my favorite glass door painting ideas—from classic stained-glass vibes to unexpected, artsy statements that still let the light do its thing.
Frosted Background With Painted Florals
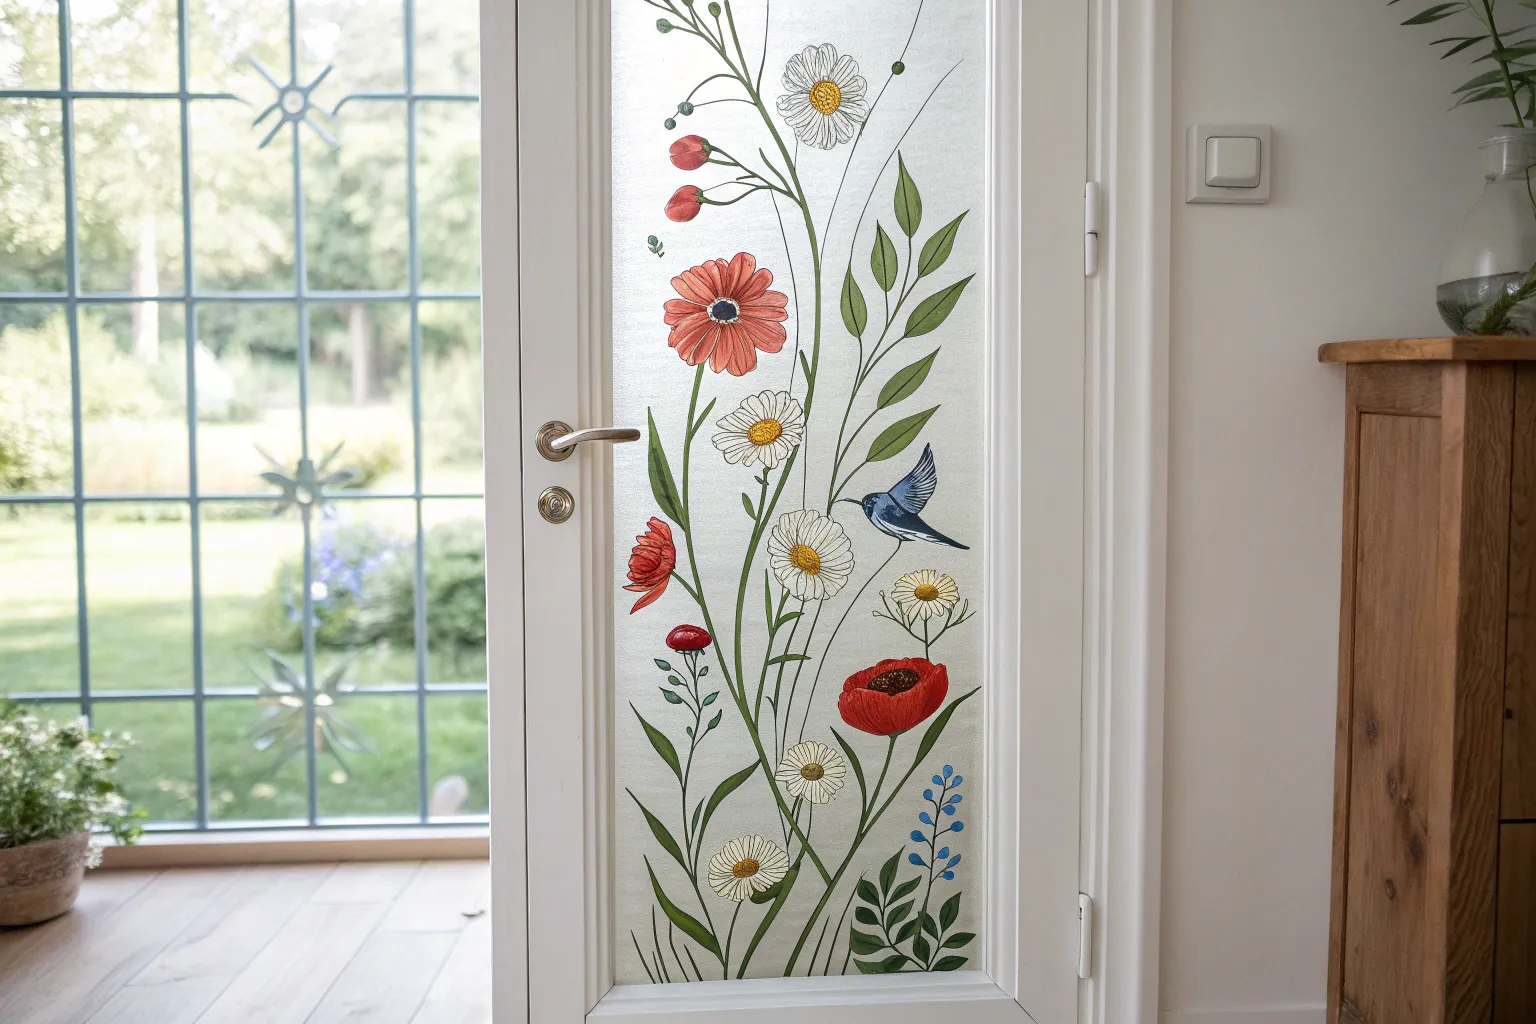
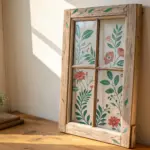
Transform standard interior glass doors into a whimsical garden entrance with this delicate technique that mimics etched glass. By combining a privacy-enhancing frosted film with custom botanical painting, you achieve a sophisticated, airy look that lets light filter through while showcasing vibrant wildflowers.
Step-by-Step Tutorial
Materials
- Adhesive frosted glass window film (cut to size)
- Painter’s tape
- Squeegee and craft knife
- Isopropanol (rubbing alcohol)
- Glass paints (transparent and opaque varieties)
- Fine liner brushes (size 0 and 00)
- Small round brushes (size 2 and 4)
- Palette for mixing
- Printed floral template (optional)
- Glass varnish or sealant (optional)
Step 1: Preparing the Canvas
-
Clean the surface:
Begin by thoroughly cleaning both sides of the glass panels with glass cleaner, followed by a wipe-down with isopropanol to remove any lingering grease or fingerprints. -
Measure and cut film:
Measure the glass dimensions precisely and cut your frosted window film, leaving a tiny 1-2mm gap around the edges to ensure it lays flat without bunching against the door frame. -
Apply the frost:
Apply the film to the *back* side of the glass (the side facing away from where you will paint). Use a spray bottle with water and a drop of dish soap to position it, then squeegee out all bubbles from the center outward. -
Dry time:
Allow the film typically 24 hours to fully adhere and cure; painting on the front side while the back is still shifting can ruin your perspective.
Paint Slipping?
If paint beads up on the glass, the surface is too sleek. Wipe it again with alcohol. If it persists, mix a tiny drop of glass medium or dish soap into your acrylics to break the surface tension.
Step 2: Planning the Design
-
Create a guide:
If you aren’t confident freehanding, tape a printed large-scale floral design or sketch to the *back* of the glass (over the frosted film). The light shining through will act as a lightbox, letting you trace the design on the front. -
Outline the stems:
Using a size 0 fine liner brush and a diluted mixture of olive green and brown glass paint, sketch the main climbing stems. Keep lines fluid and organic, varying the pressure to create thick and thin sections. -
Add delicate branches:
Branch off from your main stems with wispy, thinner lines that reach upward towards the top of the pane. I find that lifting the brush quickly at the end of a stroke creates a natural tapered look for twig ends.
Step 3: Painting the Florals
-
Base layers for blooms:
For the pink poppy-like flowers and dried seed heads, block in the general shapes using a watered-down wash of paint. Use pale pinks and siennas here to keep it translucent. -
Building opacity:
Once the base is tacky, come back with more opaque pigment on the petals. Use a size 2 round brush to dab darker pinks and reds into the centers of the flowers, blending outward. -
Leaf detailing:
Paint the leaves using two shades of green—a sage tone for the main body and a deeper forest green for veins and shadows. Keep distinct gaps between leaves to maintain the airy feeling of the composition. -
Adding texture:
For the fuzzy texture of the seed heads or dried florals, use a stippling motion (tiny dots) with a nearly dry brush in varying shades of brown and ochre. -
The tall grasses:
Intersperse long, singular blades of grass or wheat-like stalks in a very pale, translucent beige or grey. These should recede into the background visually.
Level Up: Depth Effect
Paint shadowier, paler stems on the REVERSE side (directly on the frosted film) and bright, detailed blooms on the front. This physical separation creates incredible 3D parallax depth.
Step 4: Finishing Touches
-
Review contrast:
Step back and look at the door from a distance. If the flowers look too washed out against the frost, add small, sharp dark accents to the stamens and stem junctions. -
Clean up edges:
If any paint strayed onto the wood frame, carefully scrape it away with a craft knife or wipe with alcohol before it fully curses. -
Remove the template:
Peel off the paper template from the back of the door to reveal the final effect of the painted front layer floating over the frosted background. -
Seal the work:
If your door is in a high-traffic area, apply a clear glass varnish over the painted elements only, feathering the edges so the varnish line disappears. -
Reinstall hardware:
If you removed handles for easier access, screw them back into place, ensuring you don’t scratch your fresh paint work.
Now you have a stunning botanical entryway that balances light and privacy perfectly


Tall Irises and Reeds for Elegant Privacy
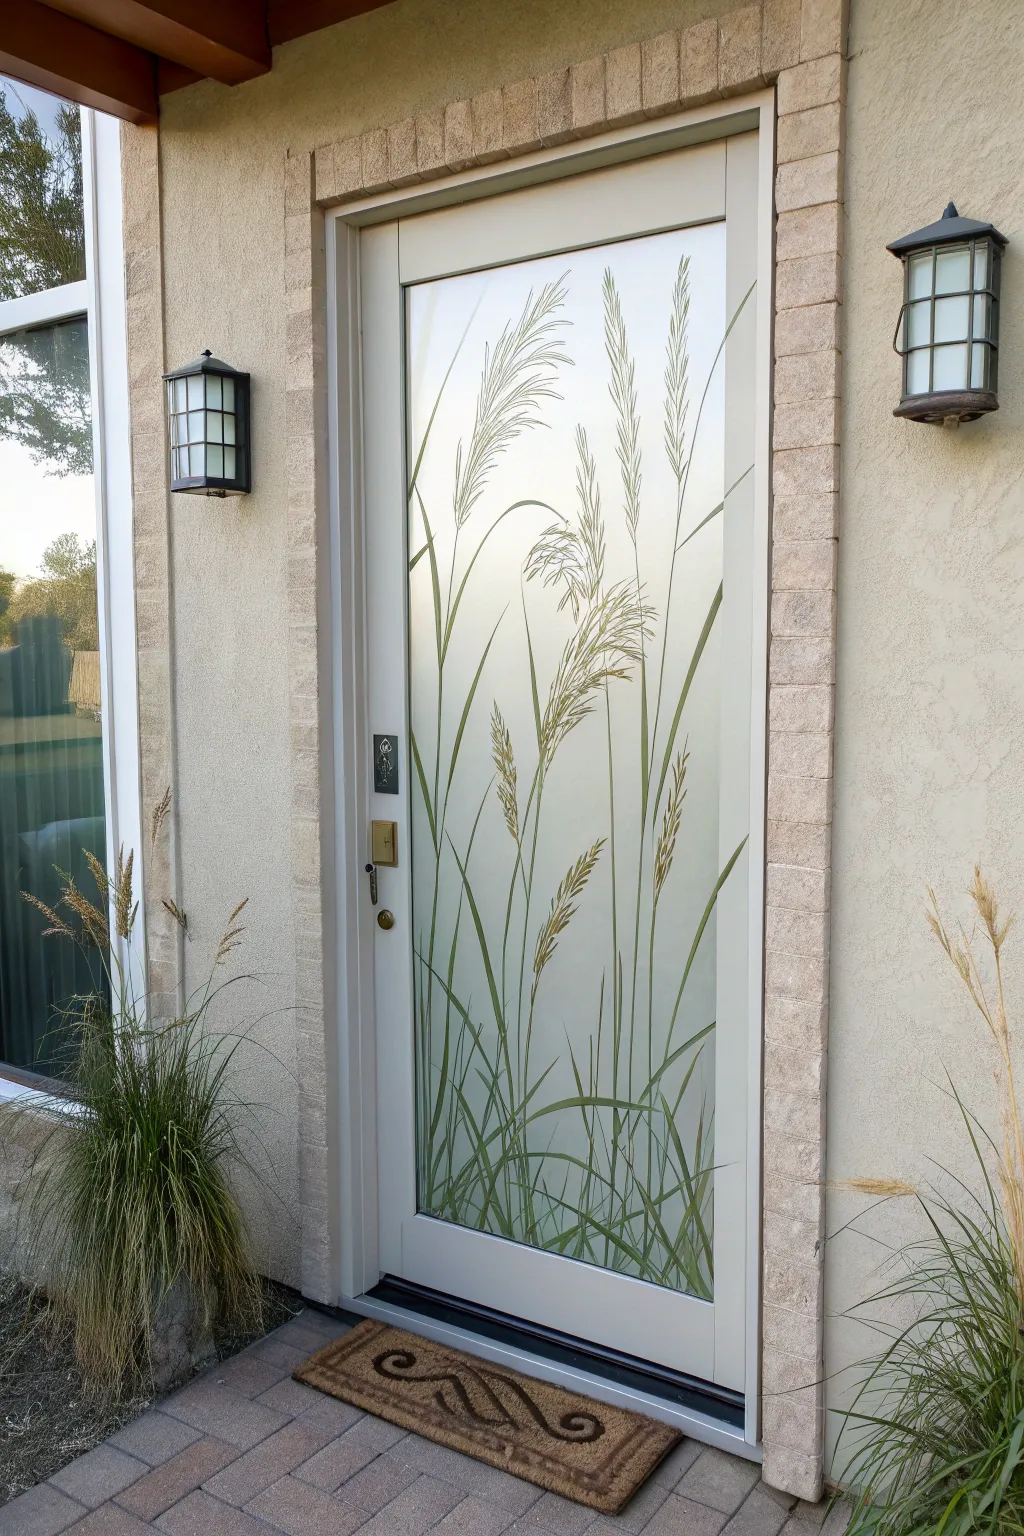
Transform a plain glass door into a stunning privacy feature with this botanical painting project. By combining frosted glass spray with detailed acrylic painting, you’ll create an elegant screen of tall grasses and reeds that lets light in while keeping prying eyes out.
How-To Guide
Materials
- Glass cleaner and microfiber cloth
- Painter’s tape
- Frosted glass spray paint
- Acrylic enamel paints (olive green, dark hunter green, burnt umber, tan/cream)
- Glass medium (if not using enamels)
- Assorted synthetic brushes (liner brush, small round brush, medium flat brush)
- Dry erase marker or chalk marker
- Paper towels
- Palette or paper plate
- Reference photo of tall grasses
Step 1: Preparation & Frosting
-
Clean the surface:
Begin by thoroughly cleaning the glass door with glass cleaner and a microfiber cloth. Any fingerprints, dust, or oil will prevent the paint and frosting from adhering properly. -
Protect the frame:
Apply painter’s tape carefully along the edges of the door frame and over any hardware like locks or handles. Press the tape down firmly to ensure sharp lines. -
Apply the frost base:
Shake your frosted glass spray paint vigorously. Holding the can about 12 inches away, apply a light, even coat over the entire glass pane using sweeping back-and-forth motions. -
Build opacity:
Let the first coat dry for about 15 minutes. Depending on how much privacy you want, apply a second or third thin coat. I prefer three light coats rather than one heavy one to avoid drips. -
Allow to cure:
Before painting your design, let the frosted layer dry completely, ideally for at least 24 hours, to ensure a stable canvas for your reeds.
Uneven Frosting?
If the frosted spray looks blotchy, it was likely applied too heavily. Let it dry, lightly sand the blotchy area with fine-grit sandpaper, and apply a final very mist-like coat to blend it.
Step 2: Drafting the Design
-
Sketch the layout:
Using a white dry erase marker or chalk marker, lightly sketch the main stems of your grass. Start from the bottom edge and draw sweeping, slightly curved lines upward to mimic natural growth. -
Create variation:
Vary the heights of your sketch lines. Some should reach nearly the top of the glass, while others should be shorter to fill the lower space, creating a natural, layered look. -
Mark seed heads:
Indicate where the fluffy seed heads will go at the tips of the taller stalks with simple oval or teardrop shapes.
Add Dimension
For a 3D effect, paint some reeds on the BACK of the glass (if accessible) and some on the front. This creates incredible depth when light shines through.
Step 3: Painting the Foliage
-
Mix your greens:
On your palette, prepare two shades of green: a dark hunter green for shadows and an olive green for the main stems. If using standard acrylics, mix them with glass medium now. -
Paint main stems:
I suggest using a medium liner brush or small round brush here. Load it with the olive green and trace your sketched lines, starting from the bottom and lifting pressure as you reach the top for a tapered tip. -
Add blades of grass:
Paint thinner, arching blades of grass branching off the main stems and filling the bottom area. Use the darker green sparingly on lower blades to create depth. -
Blend for realism:
While the paint is still slightly wet, streak in a little of the lighter green or even a touch of tan into the stems to simulate light hitting the grass. -
Anchor the bottom:
Ensure the bottom edge of the glass is dense with painted foliage. You want a ‘grounded’ look so the reeds don’t appear to be floating in mid-air.
Step 4: Detailing the Reeds
-
Base the seed heads:
Switch to your tan or cream paint. Using a small round brush, stipple or dab the paint onto the oval shapes you sketched for the seed heads. -
Add texture:
Mix a tiny amount of burnt umber with your tan. Use a very fine liner brush to paint tiny, hair-like strokes extending outward from the seed heads to give them a feathery, textured appearance. -
Connect the heads:
Check that all seed heads are firmly connected to a green stem. If there is a gap, extend the green stem carefully to meet the cream-colored head. -
Final touch-ups:
Step back and look at the whole door. Fill in any sparse areas with extra blades of grass using your lightest green to keep it airy. -
Clean and seal:
Once fully dry (usually 48-72 hours for glass paint), gently wipe away any visible sketch lines with a damp cotton swab. Remove the painter’s tape carefully.
Enjoy the serene, natural atmosphere your new custom privacy door brings to your entryway


Peacock Tail Statement Down the Panel
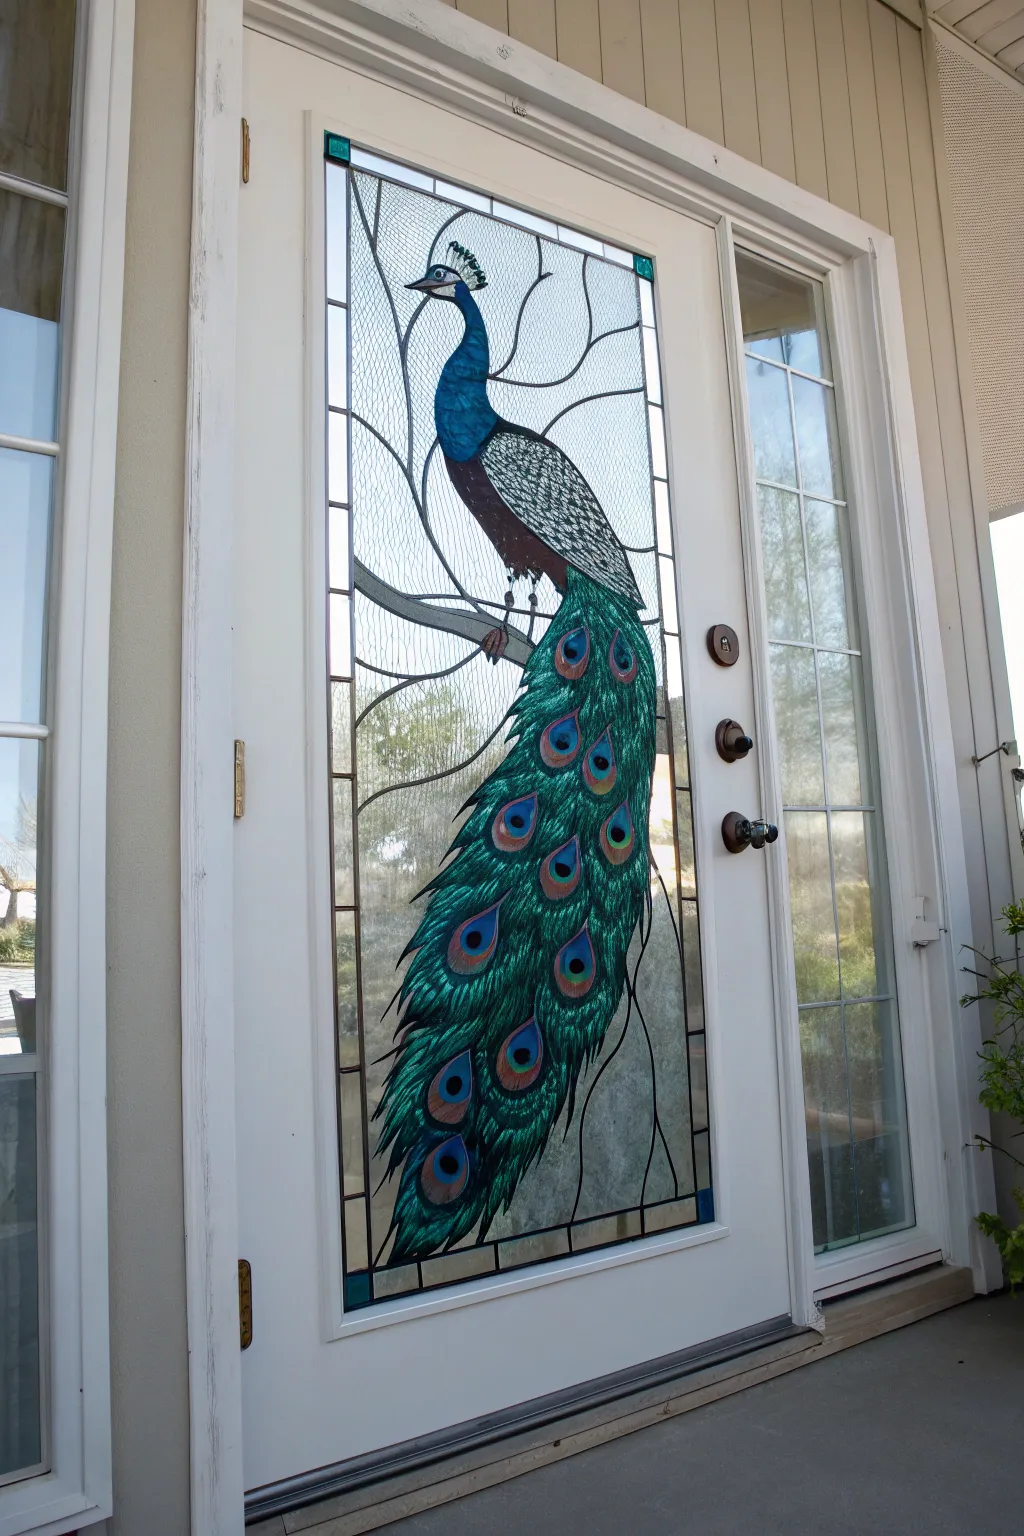
Transform a plain glass door panel into an Art Nouveau masterpiece with this faux stained glass project. The vibrant peacock design brings privacy and beauty to your entryway, mimicking the look of traditional leaded glass without the heavy price tag.
Detailed Instructions
Materials
- Adhesive lead strips (1/8 inch)
- Glass cleaner and lint-free cloth
- Gallery Glass or Pebeo Vitrail glass paints (Sapphire Blue, Emerald Green, Rich Brown, White, Gold, Turquoise)
- Clear simulated glass texture medium (optional)
- Fine-tip liner brush (size 0 or 00)
- Flat shader brush
- Bamboo skewers or toothpicks
- Printed peacock pattern (scaled to door size)
- Painter’s tape
- Rubbing alcohol
- Bone folder or specialized lead application tool
Step 1: Preparation and Leading
-
Clean the surface:
Begin by thoroughly cleaning the glass panel with glass cleaner, followed by a wipe-down with rubbing alcohol to remove any oily residues. This ensures your lead and paint adhere perfectly for years to come. -
Secure the pattern:
Tape your scaled printed pattern to the *outside* of the glass door. Since you will be working from the inside, ensure the pattern is facing the correct direction so the peacock looks right to visitors approaching your home. -
Map the main lines:
Starting with the long, vertical lines of the faux ‘panes’ surrounding the central design, apply the self-adhesive lead strips. Peel back a few inches of backing at a time, pressing firmly as you go. -
Outline the peacock:
Carefully trace the peacock’s silhouette with the lead strips. The neck involves gentle curves, so warm the lead strip slightly in your hands to make it more pliable before bending it into shape. -
Create the tail feathers:
For the intricate tail section, you don’t need to outline every single feather. Instead, create the general flowing shape of the tail mass, saving the individual feather details for the painting phase. -
Detail the background branches:
Add the organic lines for the tree branches behind the bird. Cut the lead strips at angles where they intersect with the main border lines ensuring tight, seamless joints. -
Burnish the lead:
Once all lead lines are placed, use a bone folder or the plastic tool included with your lead kit to rub firmly over every strip. This ‘burnishing’ seals the edges and prevents paint from seeping underneath.
Clean Lines
If you make a joint where two lead strips meet and it looks messy, add a tiny drop of liquid lead or black glass paint to the intersection to hide the gap.
Step 2: Painting the Peacock
-
Paint the neck and head:
Fill the neck area with Sapphire Blue glass paint. While it’s wet, drop in a tiny touch of Emerald Green near the edges and swirl gently with a toothpick to create an iridescent effect. -
detail the body scales:
For the peacock’s main body, use a mix of Rich Brown and White. Instead of flat color, apply small dots or dabs to mimic the texture of layered feathers or scales. -
Base coat the tail:
Apply a generous layer of Emerald Green to the entire tail area defined by your lead lines. Keep the door horizontal if possible; if painting vertically, apply thinner coats to prevent drips. -
Add the tail ‘eyes’:
While the green base is tacky but not dry, paint small oval shapes using Sapphire Blue for the centers of the tail feathers. Surround these blue centers with a ring of Turquoise and a hint of Gold. -
Texture the feathers:
Using a fine liner brush or a bamboo skewer, drag distinct lines through the green paint, radiating outward from the ‘eyes’ to simulate barbs of the feathers. -
Fill the background:
For the clear glass areas around the bird, apply a clear texture medium. Use a stippling motion with an old brush to create a frosted or ‘hammered’ glass look that obscures visibility but lets light in.
Step 3: Finishing Touches
-
Paint the crest:
Don’t forget the delicate crest on the head. Use the finest tip of your brush to add tiny vertical strokes of Turquoise tipped with black or dark blue. -
Check for pinholes:
Hold a sheet of white paper behind the glass (or wait for daytime light) to spot any tiny gaps where the paint didn’t meet the lead. Fill these pinholes with a toothpick dipped in the appropriate color. -
Cure the project:
Allow the door to cure undisturbed. While it may be touch-dry in 24 hours, glass craft paints often require up to a week to fully harden and bond to the surface.
Gemstone Accents
Glue small flat-backed glass cabochons or rhinestones into the center of the tail feather ‘eyes’ for extra dimension and sparkle when the sun hits.
Now you have a stunning entryway feature that welcomes guests with brilliant color and artisan flair


Simple Branch Line Art on Glass
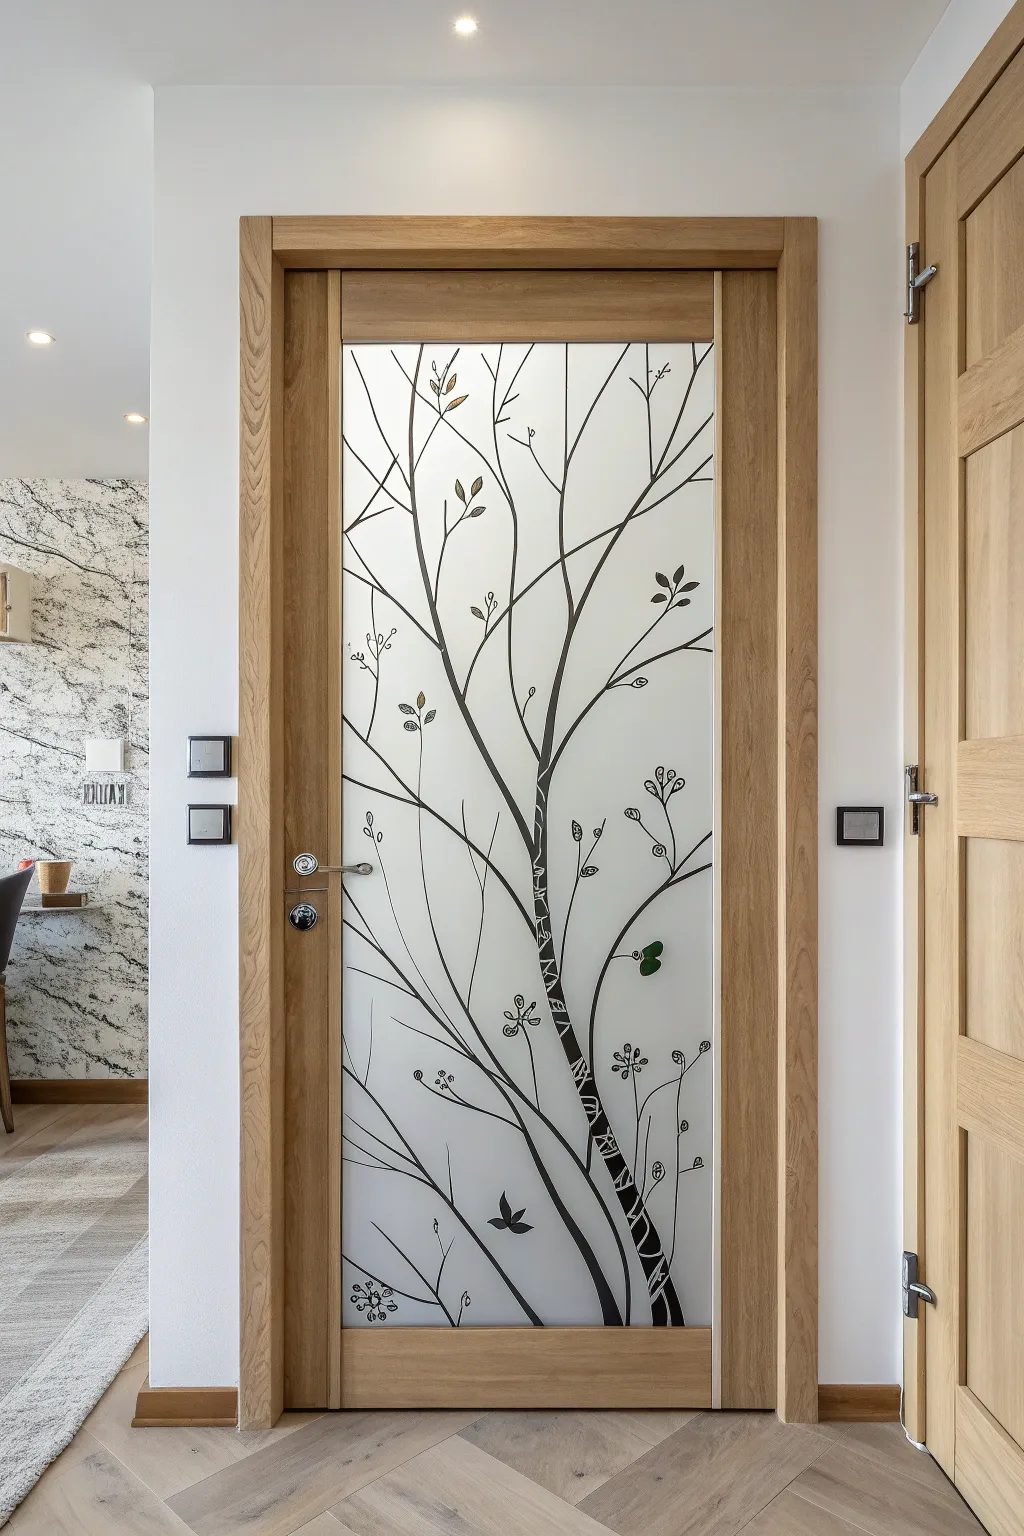
Transform a plain glass door into a striking botanical feature with this elegant branch design. Using black liner work on frosted glass creates a sophisticated, high-contrast look that mimics expensive etched or leaded glass while maintaining privacy.
Step-by-Step Guide
Materials
- Glass door (or large glass panel)
- Glass frosting spray or frosted window film (if glass is clear)
- Black glass contour paste or outliner paint (tube with a fine nozzle)
- Black glass paint (solvent-based preferred for durability)
- Fine synthetic detail brushes (size 0 and 1)
- Glass cleaner and lint-free cloth
- Printed branch template or reference photo
- Painter’s tape
- Rubbing alcohol
- Cotton swabs (for corrections)
- White china marker or dry-erase marker
Step 1: Preparing the Canvas
-
Clean the surface:
Thoroughly clean the glass door on both sides using glass cleaner. Follow up with rubbing alcohol to remove any residual oils or fingerprints, as these inhibit paint adhesion. -
Frost the glass (optional):
If your door is currently clear glass, apply a frosted window film or use glass frosting spray on one side to achieve the opaque background shown in the reference. Let this cure completely according to manufacturer instructions before painting. -
Plan the composition:
Tape your printed template to the *back* side of the glass if possible. Since this is a door, you might not be able to do this easily. Alternatively, lightly sketch the main trunk lines directly onto the working side using a white china marker or dry-erase marker.
Step 2: Creating the Main Structure
-
Outline the main trunk:
Starting from the bottom right corner, use your black glass contour paste to draw the thickest part of the tree trunk. Keep your hand steady and apply even pressure to the tube. -
Extend main branches:
Draw the primary branches extending upwards and towards the left. Use long, flowing motions rather than short choppy strokes to make the tree look organic. -
Add texture to the trunk:
As seen in the original design, the trunk isn’t solid black. Create the ‘birch-like’ texture by drawing irregular horizontal stripes and patches along the main trunk, leaving negative space between them. -
Refine the trunk edges:
Go back over the outer edges of the trunk with a slightly thicker line of contour paste to define the boundaries clearly against the frosted background.
Shaky Lines?
If your hand shakes while piping lines, rest your wrist on a bridge. Keep a steady stick or a ruler raised above the wet glass on two supports (like books) to stabilize your hand while drawing.
Step 3: Detailing and Foliage
-
Draw secondary branches:
Switch to your finest nozzle tip. Add thinner, spindly branches stemming from the main limbs, reaching toward the top and sides of the door frame. -
Create the leaves:
At the tips of the branches, draw small almond-shaped leaves. Some can be simple outlines, while others can be filled in later for heavy contrast. -
Mock up the floral elements:
Sketch the small clusters of berries or buds using your marker first if needed. These look like tiny circles at the end of thin stems. -
Paint the floral details:
Outline these small circular clusters with the contour paste for a delicate, jewelry-like effect. -
Add the bird accent:
Near the bottom of the design, draw a simple silhouette of a bird perched on or near a lower branch. This adds a charming narrative element to the composition. -
Clean up smudges:
If you make a mistake, quickly use a damp cotton swab to wipe away wet paint. For dried mistakes, gently scrape them off with a craft knife.
Pro Tip: Depth trick
Make line weights vary! Make base branches thick and topmost twigs hair-thin. This variance mimics nature and stops the design from looking like a flat sticker.
Step 4: Finishing Touches
-
Fill in solid areas:
Using a small brush and liquid black glass paint, carefully fill in the specific leaves and trunk patches you outlined earlier. I like to do this slowly to avoid air bubbles. -
Add subtle color (optional):
The reference shows a few leaves with a hint of gold or green. If desired, mix a tiny drop of metallic glass paint and fill in just 3-4 selected leaves for a pop of interest. -
Dry the artwork:
Let the door remain untouched for at least 24 hours. If your specific paint requires heat setting (and you can’t put a door in an oven), use a hair dryer on a low heat setting to speed up the curing process carefully. -
Final wipe down:
Once fully cured (check paint bottle for cure times, often up to 21 days for full hardness without baking), gently clean the surrounding glass to remove any marker lines or fingerprints.
Now you have a stunning, nature-inspired focal point that adds artistic flair to your room.
BRUSH GUIDE
The Right Brush for Every Stroke
From clean lines to bold texture — master brush choice, stroke control, and essential techniques.
Explore the Full Guide
Soft Ombre Fade for Light and Coverage
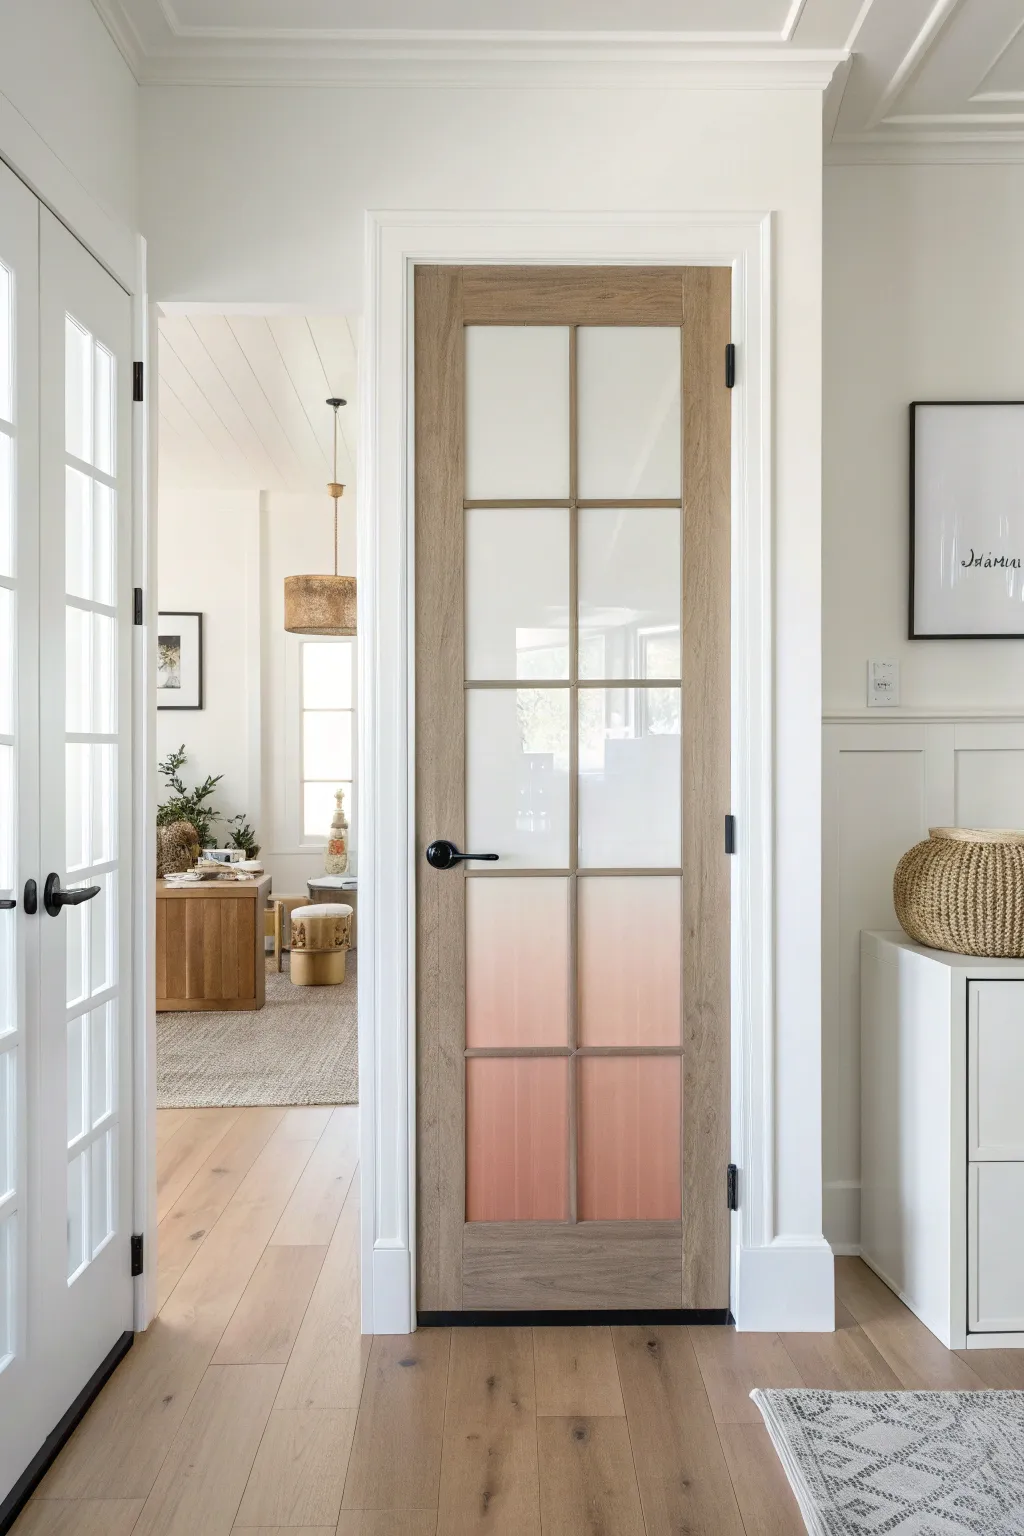
Transform a standard glass pane door into a privacy-enhancing statement piece with this delicate, sunset-inspired gradient. This soft ombre fade transitions from a warm, opaque blush at the bottom to perfect clarity at the top, allowing light to flow while screening the view.
Step-by-Step
Materials
- Frosted glass spray paint
- Blush pink or terracotta spray paint (matte finish)
- Painter’s tape
- Masking paper or plastic drop cloths
- Glass cleaner
- Lint-free cloth
- Razor blade scraper
- Respirator mask
Step 1: Preparation
-
Clean the Glass:
Thoroughly clean both sides of the glass panes, but pay special attention to the side you will be painting (usually the interior side). Use a razor blade to gently scrape off any stuck-on debris, then wipe down with glass cleaner and a lint-free cloth to ensure zero oils or dust remain. -
Mask the Wood:
Carefully apply painter’s tape to the wooden mullions (grids) surrounding each pane of glass. Take your time to press the tape edge firmly into the corners to prevent paint bleed. -
Protect Surrounding Areas:
Use masking paper and tape to cover the entire wooden door frame, the floor beneath the door, and the wall areas nearby. Spray paint travels, so generous masking is essential to avoid overspray on your floors.
Pro Tip: The Distance Trick
For the smoothest ombre fade, increase your spraying distance to 18 inches when doing the transition zone. The mist will land softer, avoiding harsh lines.
Step 2: Creating the Ombre Effect
-
First Frosted Layer:
Shake your frosted glass spray paint can vigorously for at least one minute. Apply a very light, even coat of frosted spray to the bottom two-thirds of the glass panes. Keep the can moving constantly to avoid drips. -
Adding Color Depth:
Once the frosted layer is tacky but not fully wet, take your blush or terracotta colored spray paint. Hold the can about 12 inches away and target only the bottom third of the door. Spray in short, horizontal bursts. -
Feathering the Gradient:
This is the crucial step for the fade. Aim your colored spray slightly upward from the bottom section, pulling the can farther away from the glass as you move up. You want a dusting of color to land on the middle section, creating a seamless transition. -
Check and Adjust:
I prefer to step back at this point to check the evenness across all panes. If one pane looks lighter, add a whisper-light dusting of color to match its neighbors. -
Second Frosted Coat:
Apply another light coat of the frosted glass spray over the colored sections and slightly higher up the pane. This softens the colored paint’s texture and blends the transition line where the color ends and the clear glass begins. -
Final Density Check:
Assess the opacity at the bottom. If you need more privacy, add one final, heavier coat of the colored spray effectively at the lowest level, fading it out quickly as you move up.
Troubleshooting: Blobby Spray?
If the nozzle spits or creates droplets, wipe the nozzle tip immediately. Always start your spray burst off the glass surface, then sweep onto the pane.
Step 3: Finishing Up
-
Remove Masking:
Do not wait for the paint to cure completely before removing tape. Peel the tape away slowly at a 45-degree angle while the paint is dry to the touch but still slightly flexible to prevent chipping the edge. -
Clean Edges:
If any paint seeped under the tape onto the wood, gently scrape it away with a fingernail or a plastic scraper. Avoid using solvents that might damage the wood finish. -
Cure Time:
Let the door remain open and untouched for at least 24 hours. The frosted finish needs time to harden completely before it can withstand cleaning or handling.
Enjoy the warm glow and privacy your new ombre glass brings to the space
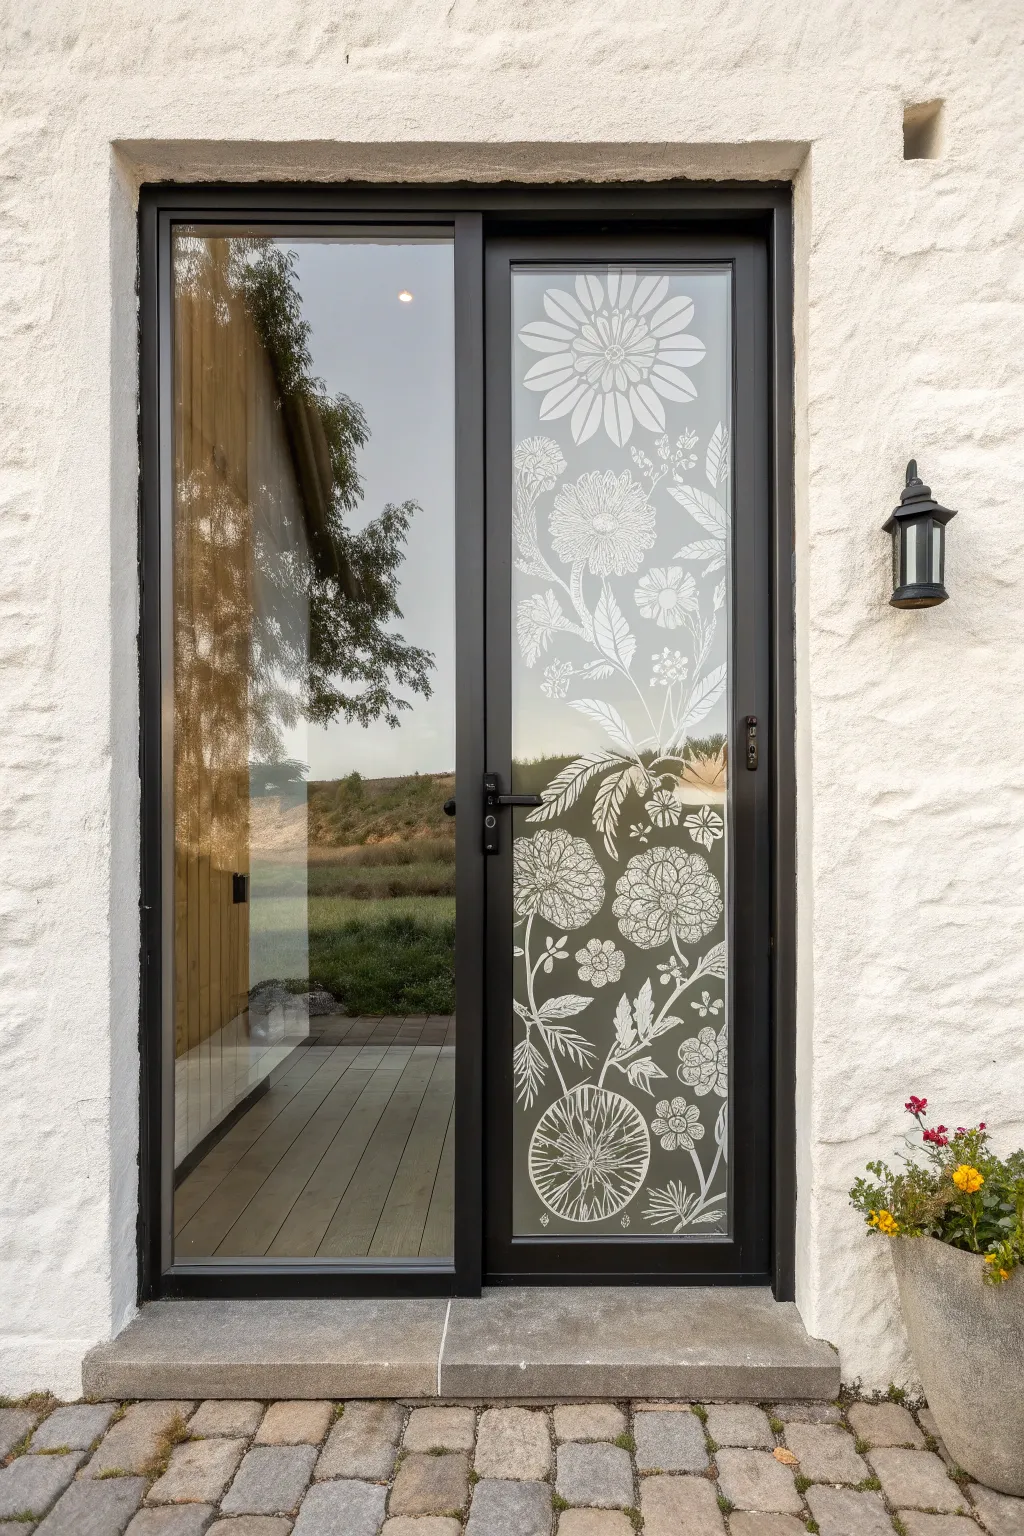
“Etched” Scrollwork Illusion in Paint
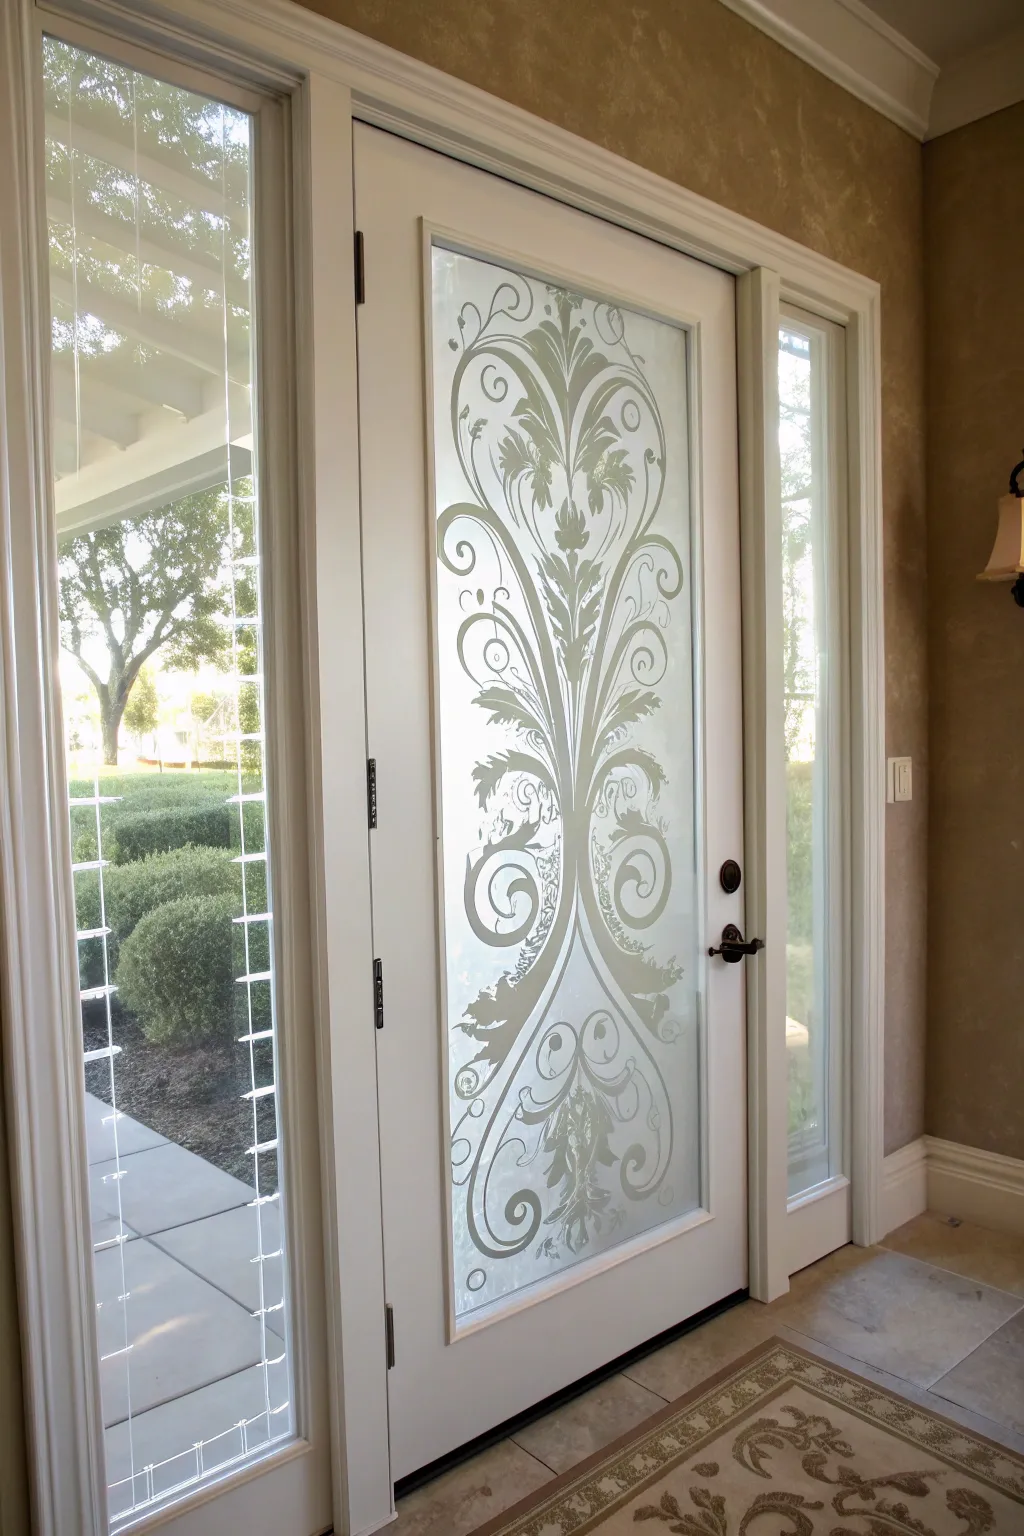
Transform a plain glass door into a masterpiece of Victorian elegance without the heavy price tag of real acid etching. By using specialized frosted glass spray paint and a custom stencil, you can achieve this sophisticated, semi-opaque scrollwork design that adds both privacy and curb appeal.
How-To Guide
Materials
- Frosted glass spray paint (e.g., Rust-Oleum or Krylon)
- Adhesive stencil vinyl or contact paper
- Cricut or Silhouette machine (or craft knife and cutting mat)
- Transfer tape
- Glass cleaner and lint-free cloth
- Painter’s tape
- Drop cloths or newspaper
- Scraper tool or credit card
- Masking paper
- Tweezers or weeding tool
Step 1: Preparation & Design
-
Measure the glass:
Start by meticulously measuring the glass pane on your door. Subtract about 1/8th of an inch from all sides to ensure your design fits perfectly without running into the caulking or trim. -
Choose your motif:
Select a tall, vertical scrollwork design. Vector graphic sites often have ‘acanthus scroll’ or ‘damask flourish’ patterns that mimic the Victorian style seen in the image. -
Prepare the stencil:
Scale your design in your cutting machine software to match your measurements. Since door glass is large, you might need to slice the design into two or three vertical sections to fit your vinyl width. -
Cut and weed:
Cut the design onto adhesive vinyl. Careful weeding is crucial here; remove the ‘positive’ space (the scroll shapes) if you want the design to typically be the frosted part, or remove the background if you want the glass clear and the background frosted. In the reference image, the background is frosted while the scrolls remain clear glass. -
Apply transfer tape:
Cover your weeded vinyl stencil with transfer tape. Squeegee it down firmly to ensure the vinyl lifts off the backing paper easily.
Step 2: Application
-
Clean the surface:
Thoroughly clean the inside of the door glass with glass cleaner and a lint-free cloth. Any dust or fingerprints will be permanently trapped under the frosting. -
Mask the perimeter:
Use painter’s tape to mask off the door frame immediately surrounding the glass. I like to double-check the corners to make sure no wood is exposed. -
Protect the area:
Tape masking paper or newspaper over the rest of the door and floor. Frosted glass spray produces a very fine dust that travels everywhere. -
Place the stencil:
Position your vinyl stencil on the glass. Use a few pieces of tape to hinge it at the top, ensuring it is perfectly centered and level. -
Adhere the vinyl:
Peel away the backing paper slowly while smoothing the vinyl onto the glass with a scraper tool. Work from the center outward to push out air bubbles. -
Remove transfer tape:
Slowly peel back the transfer tape at a sharp 45-degree angle. If the vinyl lifts, push it back down and rub the spot again. -
Seal edges:
Run your finger or a scraper over every edge of the vinyl design again. A tight seal is essential to prevent the spray paint from bleeding underneath.
Clean Lines Secret
Before spraying the frost, spray a very light coat of clear matte sealer over the stencil. This seals the edges so any bleed is clear, not white.
Step 3: Painting & Reveal
-
Shake the can:
Shake your can of frosted glass spray paint vigorously for at least one minute after the mixing ball starts rattling. -
First light coat:
Hold the can 10-12 inches away and apply a very light mist coat. Do not try to get full opacity yet; wet drips will ruin the effect. -
Layering:
Wait 10-15 minutes for the first coat to dry to a hazy finish. Apply 3-4 more light coats, crossing your spray pattern (horizontal then vertical) to ensure even coverage. -
Partial drying:
Allow the final coat to dry until it feels tacky but not fully cured—usually about 20-30 minutes depending on humidity. -
Remove the stencil:
Carefully peel off the vinyl stencil. Use tweezers to grab the corner of intricate scroll pieces. Pulling while the paint is slightly soft prevents the dry paint from cracking or peeling up with the vinyl. -
Clean up:
Remove the surrounding masking tape and paper. If a tiny bit of spray got under the stencil, use a damp toothpick to gently scrape it away before it fully hardens.
Privacy Upgrade
For more privacy, apply the stencil in reverse: leave the background large and frosted, and peel away only thin scroll lines to remain clear.
Step back and admire how the light filters softly through your elegant new entryway design

PENCIL GUIDE
Understanding Pencil Grades from H to B
From first sketch to finished drawing — learn pencil grades, line control, and shading techniques.
Explore the Full Guide
French Door Pane-by-Pane Mini Designs

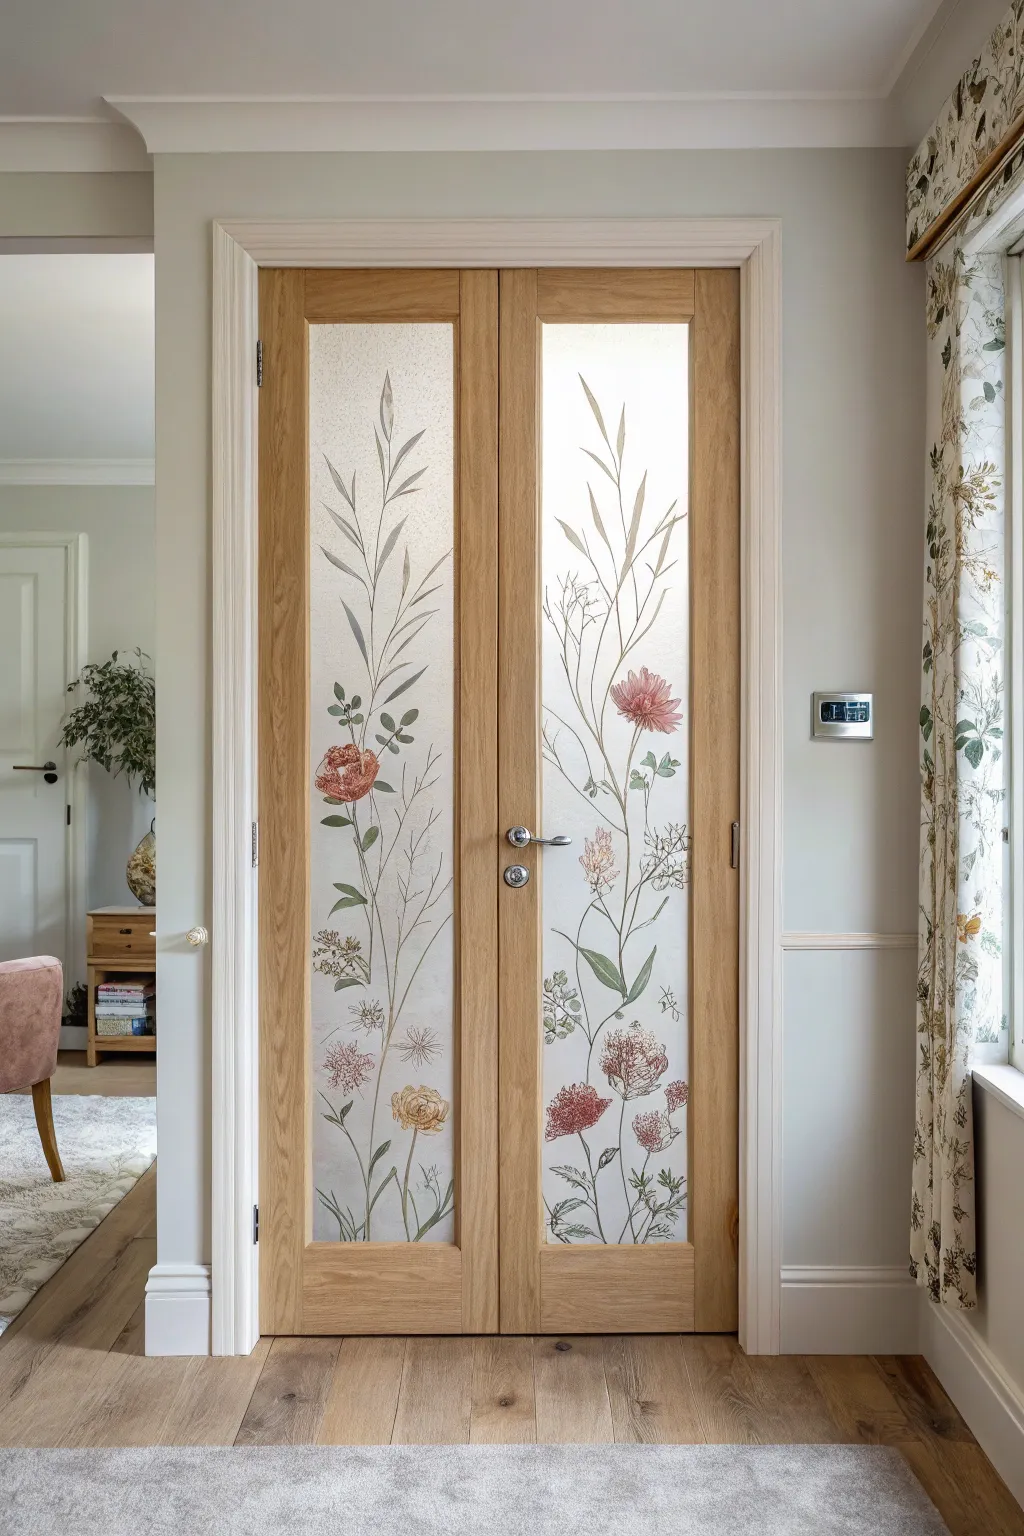
Transform standard glass panes into a whimsical garden view with these delicate, folk-art inspired floral motifs. This project uses glass paint to create a repeating yet organic pattern of ferns, sunburst flowers, and scattered leaves that adds privacy and vintage charm to any entryway.
Step-by-Step
Materials
- Glass surface primer (clear)
- Enamel glass paints (dark green, sage green, terracotta orange, deep blue)
- Fine liner brushes (size 0 and 00)
- Round synthetic brushes (size 2 and 4)
- Isopropyl alcohol and lint-free cloth
- Paper templates (grid paper is helpful)
- Painters tape
- Glass scraper or craft knife (for cleanup)
- White or cream opaque glass paint (for bottom panels)
Step 1: Design & Preparation
-
Clean the surface:
Begin by thoroughly cleaning every pane of glass with isopropyl alcohol and a lint-free cloth. Any oil or fingerprints will prevent the paint from bonding properly. -
Map out the pattern:
Measure individual panes and cut paper to size. Sketch your recurring motifs: a long fern frond, a spiky sunburst flower, small scattered leaves, and tiny stars. Arrange them loosely; the charm lies in the organic spacing. -
Secure templates:
Tape your sketched patterns to the *outside* of the door (the side you aren’t painting on) facing in so you can trace them through the glass. If tracing isn’t an option, keep a reference sketch taped nearby.
Step 2: Painting the Motifs
-
Start with structural greens:
Using a size 2 round brush and dark green enamel, paint the central stems for the ferns first. Use a light hand to keep the lines thin and fluid. -
Add the leaves:
Switch to a sage green for leaf variation. Using a ‘press and lift’ motion, dab small leaves along the stems you just painted. This creates a natural taper at the end of each leaf. -
Paint the sunburst flowers:
Load a round brush with terracotta orange paint. Start from a center point and flick outward in quick strokes to create the spiky petals of the main flowers. Vary the size so some look like full blooms and others like buds. -
Detail with blue:
Dip a fine liner brush into deep blue paint. Add tiny four-point stars and small dots in the empty spaces between the larger foliage. These small details tie the composition together. -
Let the first layer set:
Allow the paint to tack up for about 20-30 minutes. If the colors look too translucent, you may need a second coat, but often the semi-sheer look works well for this style.
Uneven Coverage?
If brushstrokes look streaky on glass, try pouncing (dabbing) paint with a small sponge applicator instead of brushing for a smoother, frosted texture.
Step 3: Bottom Panel & Finishing
-
Prepare the bottom panels:
The bottom panels in the image have an opaque background. Apply 2-3 coats of white or cream glass paint (or chalk paint for glass) to create a solid canvas, letting each coat dry fully. -
Paint the centerpiece:
On the dry white background, paint a larger, symmetrical version of your floral motif. Center a large orange flower and flank it with symmetrical green ferns rising from the bottom edge. -
Add framing details:
Use the dark green paint to create a thin border line just inside the edge of the bottom panel to frame your artwork. -
Clean up edges:
Once the paint is completely dry and hard to the touch, use a craft knife or glass scraper to gently remove any paint splatters or wobbly lines near the mullions. -
Cure the paint:
Follow your specific paint manufacturer’s curing instructions. This usually involves air curing for 21 days or baking the glass if the panes are removable (though air curing is safer for fixed doors).
Paint Viscosity
Glass paint can be slippery. I like to let a blob sit on the palette for 5 mins to thicken slightly before painting; it helps control drips on vertical surfaces.
Now enjoy the customized privacy and artistic touch your new painted doors bring to the room
Herb Silhouettes for a Pantry Glass Door
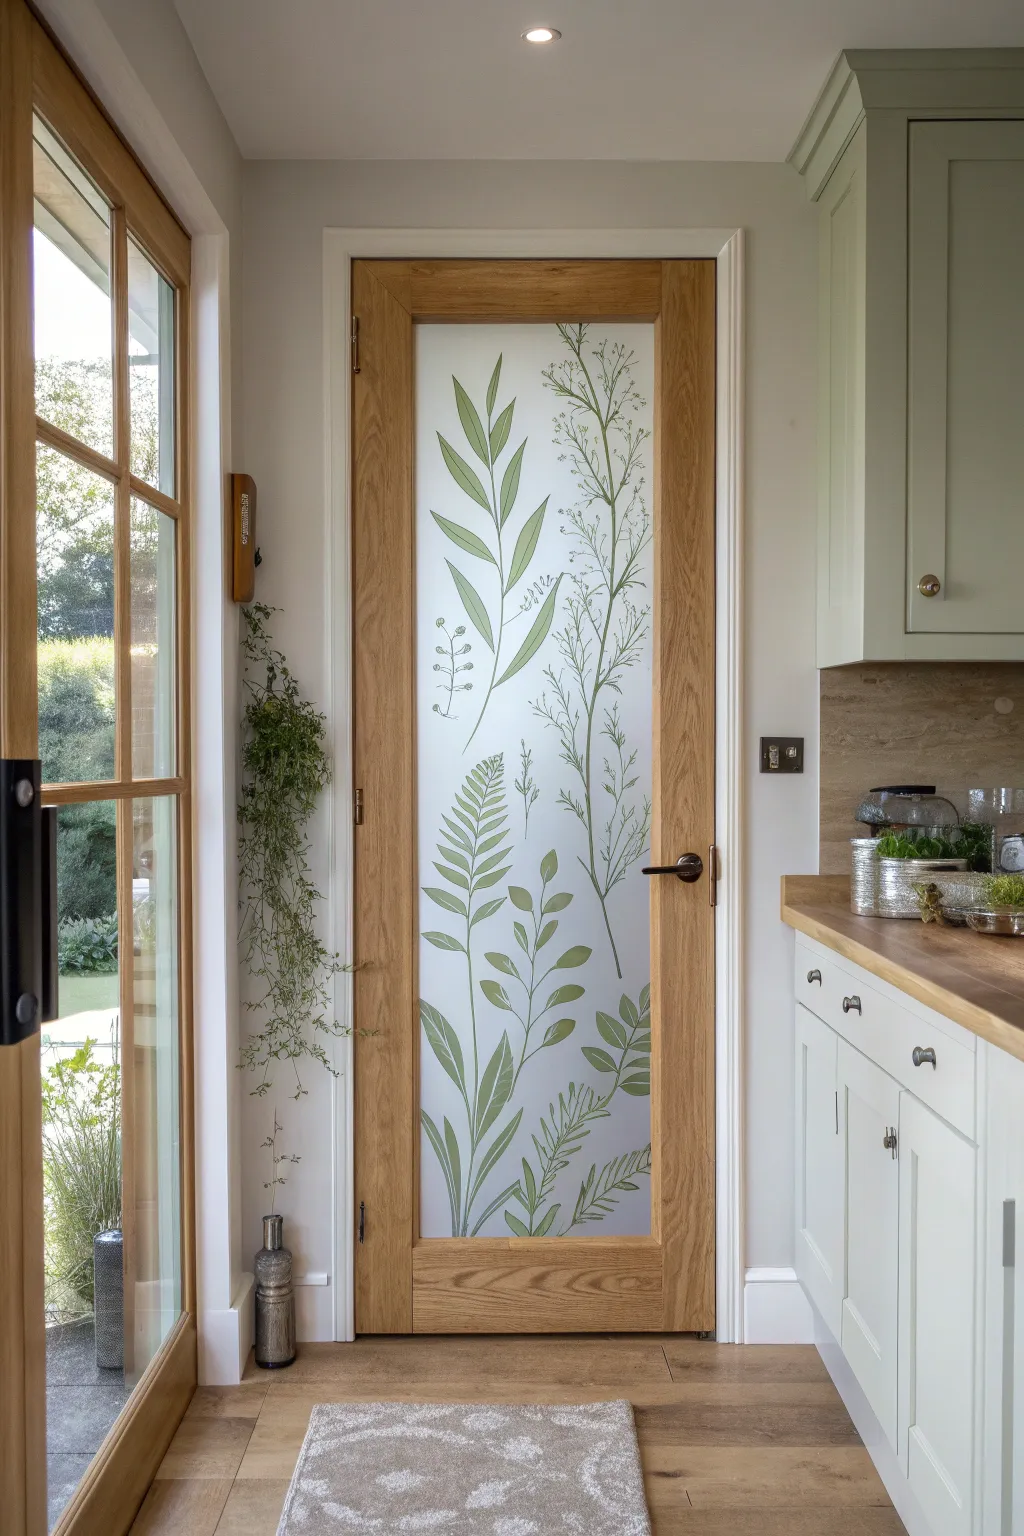
Transform a plain glass pantry door into a botanical feature piece using frosted window film and translucent glass paints. This project creates a soft, diffused look where leafy green silhouettes appear to float within the frosted glass, adding privacy and organic charm to your kitchen.
How-To Guide
Materials
- Clear glass door panel
- Frosted window film (adhesive or static cling)
- Pebeo Vitrea 160 glass paints (various shades of green: Olivine, Emerald, Sandalwood Green)
- Glass paint thinner or medium (optional, for transparency)
- Fine liner brush (size 0 or 1)
- Flat shader brushes (size 4 and 8)
- Rubbing alcohol and lint-free cloth
- Printed botanical templates or stencils
- Painter’s tape
- Squeegee and spray bottle with soapy water (film application)
- Utility knife
Step 1: Preparation and Planning
-
Clean the glass:
Before doing anything, thoroughly clean both sides of the glass door using rubbing alcohol and a lint-free cloth to remove any grease or fingerprints. This ensures the best adhesion for both the paint and the film. -
Select your botanicals:
Choose a variety of herb shapes—think tall dill, fern fronds, broad sage leaves, and delicate thyme stems. Print out reference images or sketches sized appropriately for your door panel. -
Create a guide:
I find it helpful to tape your paper templates onto the *back* side of the glass door. This allows you to see the design through the glass while you paint on the front, acting as a perfect tracing guide.
Step 2: Painting the Botanicals
-
Mix your greens:
On a palette, mix your glass paint colors. Aim for variety: mix a deep emerald for ferns, a lighter yellow-green for younger leaves, and perhaps a brownish-green for stems. Adding a drop of thinner can make the paint more translucent. -
Outline the stems:
Using your fine liner brush, carefully trace the main stems of your plants following the guide on the reverse side. Keep your hand steady but allow for natural, organic wobbles. -
Fill in broad leaves:
Switch to a flat shader brush for larger leaves. Apply the paint in long, sweeping strokes from the stem to the leaf tip. Don’t worry if the coverage isn’t perfectly solid; variations add texture. -
Detail the delicate plants:
For plants like dill or fennel, use the tip of your liner brush to stipple tiny dots or execute quick flicking motions to mimic feathery textures. -
Layering colors:
While the first layer is still slightly tacky, add subtle highlights with a lighter green or shadows with a darker shade to give the leaves dimension. -
Curing the paint:
Once your design is complete, remove the paper templates. Let the paint air dry for at least 24 hours. Depending on the specific paint brand, you may need to bake the glass section (if removable) or simply let it cure for several days to become scratch-resistant.
Paint Fixes
Made a mistake with a stroke? While the glass paint is wet, quickly wipe it away with a cotton swab dipped in rubbing alcohol. If dry, use a razor blade to gently scrape it off.
Step 3: Applying the Frosting
-
Measure the film:
Measure the glass panel dimensions accurately. Cut your frosted window film to size, leaving about an inch of excess on all sides for trimming later. -
Prepare the surface:
Since you painted on the front, you will apply the frosted film to the *back* side of the glass. Spray the back of the glass generously with a mixture of water and a few drops of dish soap. -
Apply the film:
Peel the backing off the top few inches of the film. Align it with the top edge of the glass panel on the back side. Slowly smooth it down, peeling off the rest of the backing as you go. -
Squeegee out bubbles:
Using a squeegee wrapped in a soft cloth (to prevent scratching), work from the center of the film outward to push out air bubbles and excess water. -
Trim the edges:
Use a sharp utility knife and a straight edge to trim the excess film right up to the frame for a seamless fit. -
Final inspection:
Wipe down the door and check for any remaining bubbles. The combination of the paint on the front and the film on the back creates a beautiful depth where the shadows of the paint fall onto the frost.
Add Depth
Paint some leaves on the BACK side of the glass before applying the film. This ‘sandwich’ technique creates a sense of depth, making some leaves look closer and others further away.
Now you have a stunning, vertically integrated garden that brings nature indoors without taking up any floor space


Flowing Abstract Waves That Catch Sunlight
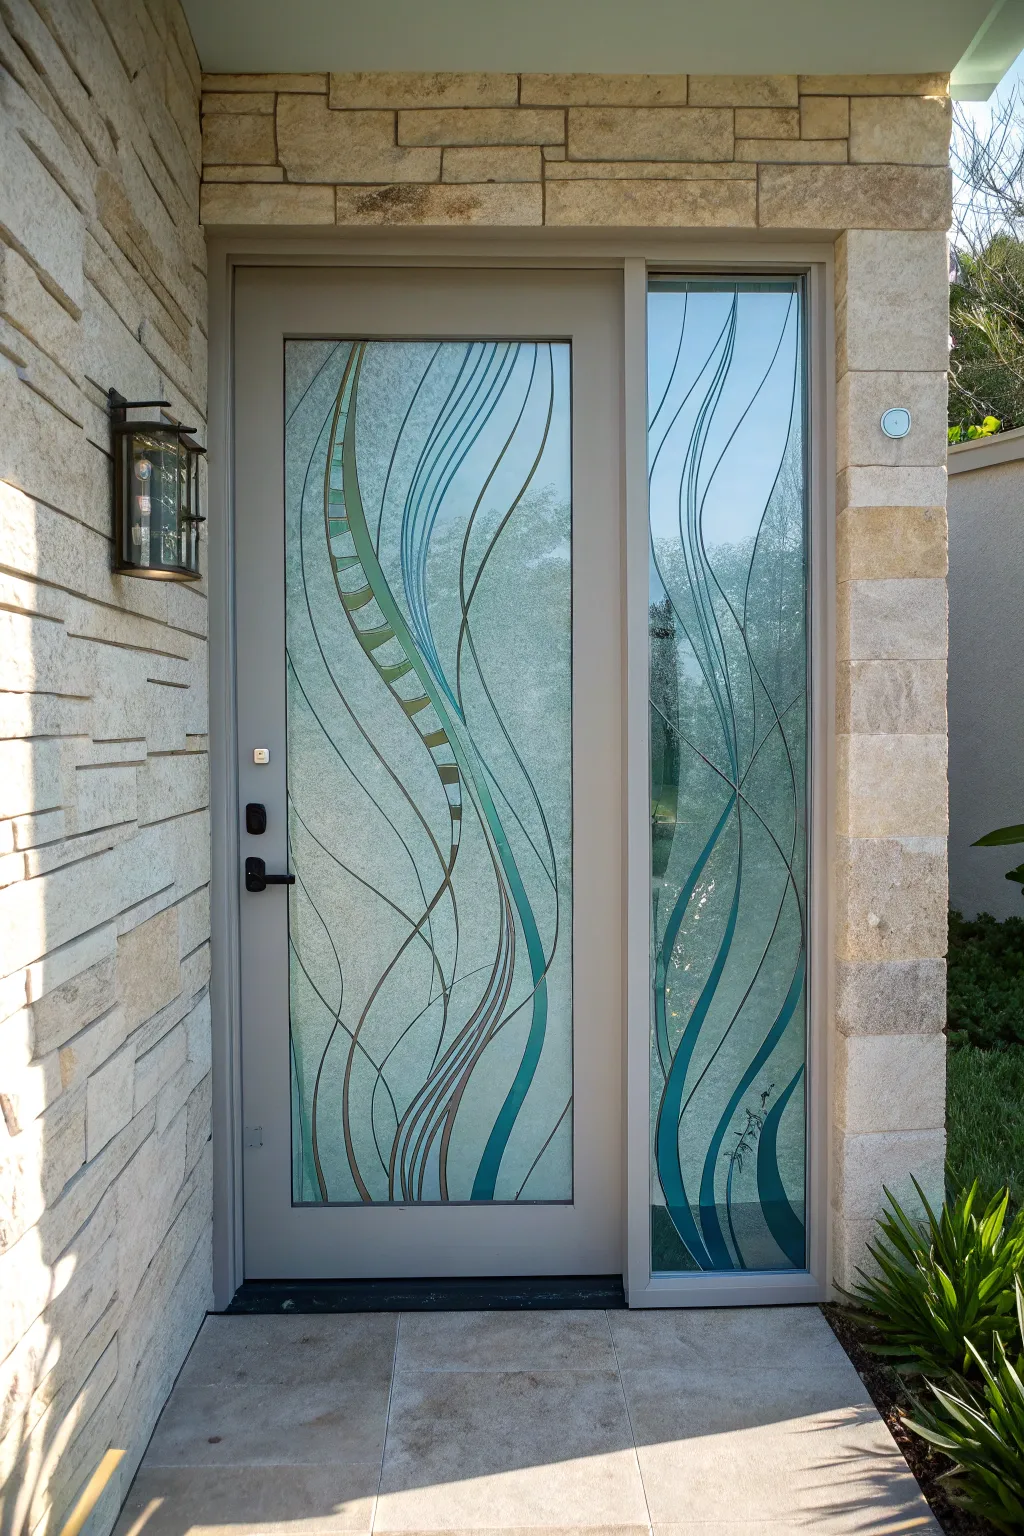
Transform a plain glass entryway into a stunning kinetic sculpture of light and color with this abstract wave design. The flowing organic lines in teal, aqua, and bronze create privacy while casting beautiful colored shadows in the sunlight.
Step-by-Step Tutorial
Materials
- Glass door (and sidelight)
- Glass cleaner and microfiber cloth
- Self-adhesive lead strip (3mm or 1/8 inch width)
- Bonig tool or smooth plastic burnisher
- Gallery Glass or similar glass stain paints (Teal, Aqua, Bronze, Clear Frost)
- Combed or textured window privacy film (optional alternative for background)
- Sharp craft knife
- Fine-tip black permanent marker
- Large sheets of tracing paper
- Masking tape
- Toothpicks or fine brush for bubble removal
Step 1: Design & Preparation
-
Measure and scale:
Begin by measuring the precise dimensions of your main glass panel and the sidelight. Scale your wave design on large paper to match these dimensions, ensuring the flow continuity across both panels. -
Draft the flow lines:
On your paper template, draw long, sweeping vertical S-curves that start from the bottom right and curve upward to the left. Vary the width between lines to create organic movement. -
Create the segmented spine:
For the focal point wave on the main door, sketch a ribbon-like structure that is segmented into blocks, similar to a ladder or spinal column, which will add structural contrast to the fluid lines. -
Clean surface:
Thoroughly clean the interior side of the glass door window with glass cleaner and a microfiber cloth to remove all dust, oils, and fingerprints. -
Position the pattern:
Tape your paper pattern securely to the *exterior* side of the glass so the design shows through clearly to the inside where you will be working.
Unwanted Drips?
If paint drips or runs under a lead line, wait for it to dry completely. Once rubbery, you can carefully slice the excess away with a craft knife and peel it off.
Step 2: Leading the Lines
-
Apply main flow lines:
Starting at the top, press the self-adhesive lead strip onto the glass, following the long swooping lines of your pattern. Work slowly, peeling the backing as you go. -
Navigate curves:
Gently bend the flexible lead strip as needed for tighter curves; avoid pulling too tight or the lead might lift. Cut the ends cleanly with a craft knife where the line meets the door frame. -
Outline the segmented wave:
Outline the wider, ribbon-like wave. Then, cut shorter pieces of lead strip to create the horizontal ‘rungs’ or segments within this main wave. -
Secure the lead:
Once all lines are placed, go over every inch of the lead strip with the boning tool or burnisher, pressing down firmly to ensure a watertight seal against the glass.
Add Jewel Accents
Embed small, clear glass gems or marbles into the wet paint within the segmented wave. This adds 3D texture and creates brilliant prisms when the sun hits.
Step 3: Painting & Texturing
-
Fill the flowing ribbons:
Apply the Gallery Glass paint directly from the nozzle into the spaces between the lead lines. Use Teal and Aqua colors for the thinner, fluid waves to mimic water. -
Paint the segmented spine:
For the segmented wave, alternate between a lighter green-gold and a bronze shade in the blocks. This creates a shimmering, mosaic effect. -
Spread the color:
Use a toothpick to gently push the paint all the way to the edges of the lead strips, ensuring there are no gaps where light can leak through uncolored. -
Apply the background texture:
For the large negative spaces, apply a generous layer of Crystal Clear or Frost tint. While wet, use a comb tool or stiff brush to drag vertical, wavy texture lines through it. -
Pop bubbles:
Inspect the wet paint closely for air bubbles. I find distinct bubbles distracting in the final piece, so pop them immediately with a sharp pin or toothpick. -
Initial dry time:
Allow the door to remain undisturbed for at least 8 hours until the paint is dry to the touch, keeping pets and dust away from the surface. -
Curing:
Let the project cure fully for 48 to 72 hours. During this time, the milky appearance of the wet paint will clarify into translucent, jewel-like colors.
Now you have a custom entryway that balances modern privacy with the beauty of stained glass art
Galaxy Night Sky on a Glass Door Panel
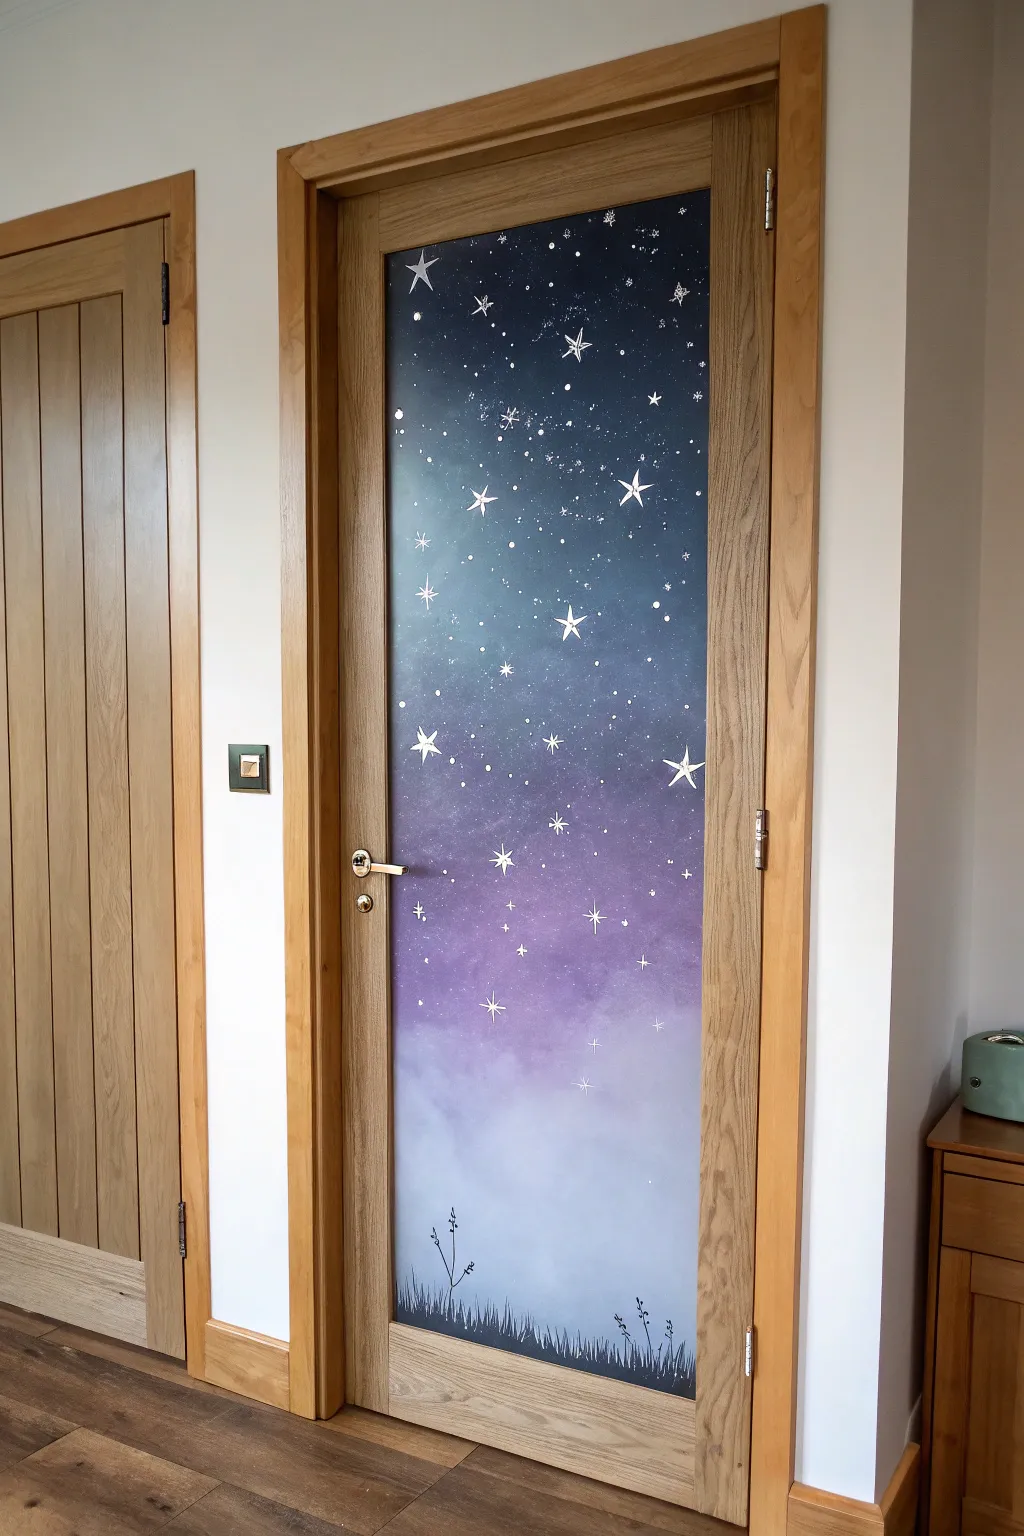
Transform an ordinary interior glass door into a magical portal with this ethereal night sky mural. Using a gradient blending technique, you’ll create a dreamy transition from deep space indigo to misty lavender, accented with crisp starlight and delicate botanical silhouettes.
Detailed Instructions
Materials
- Glass cleaner and lint-free cloth
- Painter’s tape
- Acrylic paints (dark navy/indigo, violet/purple, white, black)
- Glass medium or multi-surface acrylic medium
- Large flat sponge or sea sponge
- Medium flat synthetic brush
- Small round detail brush (size 0 or 1)
- Fine liner brush
- Disposable palette or paper plate
- Cup of water and paper towels
- Cardboard or drop cloth (for floor protection)
Step 1: Preparation & Base Gradient
-
Prepare the surface:
Clean the glass panel thoroughly on the side you intend to paint. If painting the inside face (recommended for protection), remember the image will be reversed from the outside. Use painter’s tape to mask off the wooden frame precisely to prevent stray marks. -
Mix your mediums:
Mix your acrylic paints with the glass medium according to the bottle’s instructions. This step is crucial for adhesion and durability, ensuring your hard work doesn’t peel off later. -
Apply the deep space layer:
Start at the very top of the glass using your sponge. Load it with the dark navy or indigo paint and dab it onto the glass. Work your way down about one-third of the panel, keeping the paint opaque and textured. -
Create the violet transition:
While the blue is still slightly tacky, load a clean part of your sponge with purple paint. Start dabbing just below the blue section, then work upward into the blue to blend the boundary. The goal is a soft, seamless transition where the colors meet. -
Blend the misty bottom:
Mix a light lavender shade by combining purple with a generous amount of white. Apply this to the bottom third of the door, sponge-blending it upward into the darker purple. -
Add the cloud layer:
For that ethereal bottom fog, take pure white on a slightly damp sponge and lightly stipple the lowest section, letting it fade out as it reaches the middle. I like to keep this layer a bit translucent to let light filter through. -
Dry completely:
Allow this base gradient layer to dry completely. Since glass is non-porous, this might take longer than painting on canvas—give it at least 2-3 hours.
Light It Up
For a magical nighttime effect, dry-brush a tiny amount of glow-in-the-dark acrylic over the white stars. They’ll charge during the day and softly shine at night.
Step 2: Celestial Details
-
Paint the major stars:
Using a small round brush and pure white paint, create the larger stars. Paint a small dot, then carefully pull four thin lines outward to create a pointed ‘cross’ shape. Place these randomly, focusing them more in the darker upper section. -
Add medium stars:
Dip the handle end of a paintbrush into white paint and dot it onto the glass to create perfectly round, medium-sized stars. -
Create distant stardust:
Load an old toothbrush or stiff bristle brush with watered-down white paint. Use your thumb to flick the bristles, spraying a fine mist of tiny white specks across the darker blue and purple areas. Practice on cardboard first to control the splatter. -
Enhance the glow:
For the largest stars, you can dry-brush a tiny halo of translucent white around their center to make them look like they are glowing.
Soft Diffusion
Work on the back side of the glass if possible. The glass thickness adds depth, making the stars look suspended in space rather than sitting on the surface.
Step 3: Grounding Details
-
Rough in the grass:
Switch to black paint mixed with glass medium. Using a medium flat brush, paint a solid, wavy line across the very bottom edge of the glass to establish the ground level. -
Paint individual blades:
Using your fine liner brush, pull upward distinct strokes from the black base to create blades of grass. Vary the heights and angles—nature isn’t uniform. -
Add botanical silhouettes:
Intersperse the grass with taller, delicate weed silhouettes. Paint thin stems with tiny clusters of leaves or seed heads at the top to mimic wild flora. -
Final cure:
Remove the painter’s tape carefully while the paint is dry but not fully cured to avoid peeling. Let the door cure for several days before cleaning or touching excessively.
Now you have a stunning piece of functional art that brings the cosmos right into your home
Reverse Painting on the Inside of the Glass
Transform a plain glass door into a stunning botanical focal point using the technique of reverse glass painting. This method protects your delicate white ink work from the elements while creating a crisp, frosted effect that looks professionally etched.
Step-by-Step
Materials
- Glass door (clean and dry)
- White oil-based paint marker (fine point)
- White oil-based paint marker (medium point)
- Large roll of tracing paper or butcher paper based on door size
- Pencil and eraser
- Painter’s tape or masking tape
- Glass cleaner and lint-free cloth
- Printed floral reference images (optional)
- Ruler or measuring tape
Step 1: Planning and Preparation
-
Measure the glass surface:
Start by measuring the exact dimensions of the glass pane you intend to paint. Cut your tracing paper or butcher paper to match these dimensions perfectly so you can visualize the full scale of your design. -
Draft the botanical layout:
Lay the paper on a flat surface. Using a pencil, sketch out your floral composition. Focus on creating a variety of flower shapes—some large blooms like zinnias or dahlias, and smaller filler flowers for balance. Don’t worry about perfection here; this is just your guide. -
Detail the foliage:
Add stems and leaves connecting your blooms. Mimic the natural flow of plants by having stems curve gently rather than sticking straight up. Leaves should vary in size to fill empty spaces without making the design look cluttered. -
Refine the line work:
Go over your pencil sketch to darken the lines you want to keep. Since this is reverse painting, any text or directional elements need to be drawn in reverse on this template if you want them legible from the outside, though for flowers, mirroring usually doesn’t matter. -
Clean the glass thoroughly:
Clean the inside surface of your glass door using glass cleaner and a lint-free cloth. Any dust, grease, or fingerprints will prevent the paint markers from adhering properly, so I like to do a second pass just to be sure.
Step 2: Transfer and Outline
-
Secure the template:
Tape your paper design to the *outside* of the glass door, facing inward. Ensure it is pulled tight and taped securely at all corners so the paper lies flat against the glass pane. -
Prime your markers:
Shake your white oil-based paint markers well to mix the pigment. Press the nib down on a scrap piece of cardboard until the white ink flows smoothly and consistently. -
Trace the main outlines:
Standing on the inside, begin tracing the major shapes of your flowers using the medium-point marker. Start from the top of the design and work your way down to avoid smudging wet ink with your hand. -
Add stem structure:
Continue using the medium marker to draw the main stems and larger leaf outlines. Keep your hand steady, but remember that organic lines in nature are rarely perfectly straight, so a little wavering adds character. -
Let the outline dry:
Allow the initial outlines to dry completely. Oil-based markers can take anywhere from 5 to 15 minutes to set depending on humidity.
Steady Hand Secret
Rest your painting hand on a ‘maulstick’ or a simple clean ruler held against the door frame. This keeps your hand off the glass prevents smudging wet ink.
Step 3: Detailed Shading and Texturing
-
Switch to the fine point:
For the intricate details inside the petals and leaves, switch to your fine-point marker. This contrast in line weight is essential for recreating the delicate, etched look seen in the photo. -
Texture the petals:
Fill in the flower petals with fine lines, stippling, or small geometric patterns. For the large sunflower-like blooms, draw lines radiating from the center outward to suggest texture and volume. -
Detail the leaves:
Draw the veins inside the leaves using thin, light strokes. You can vary the style—some leaves might have cross-hatching while others use simple parallel lines. -
Fill the centers:
Add density to the center of the flowers. Use tiny circles or dense dots to create a pollen-like texture that contrasts with the lighter petals. -
Review and refine:
Step back periodically to look at the overall balance. If certain areas look too sparse, add small buds, floating leaves, or extra tendrils to fill the gaps. -
Remove the template:
Once you are satisfied and the paint is fully dry, go outside and carefully remove the paper template. Wipe away any tape residue from the exterior glass. -
Final touch-ups:
inspect the design from both sides of the door. If the white looks translucent in some areas, carefully go over those lines again with your marker to make the white pop.
Level Up: Faux Etching
For a frosted glass look, use a semi-transparent white glass paint or translucent medium inside the petals instead of leaving them clear.
Now you have a custom, privacy-enhancing art piece that brightens your entryway with permanent blooms
Metallic Accents Over Translucent Color
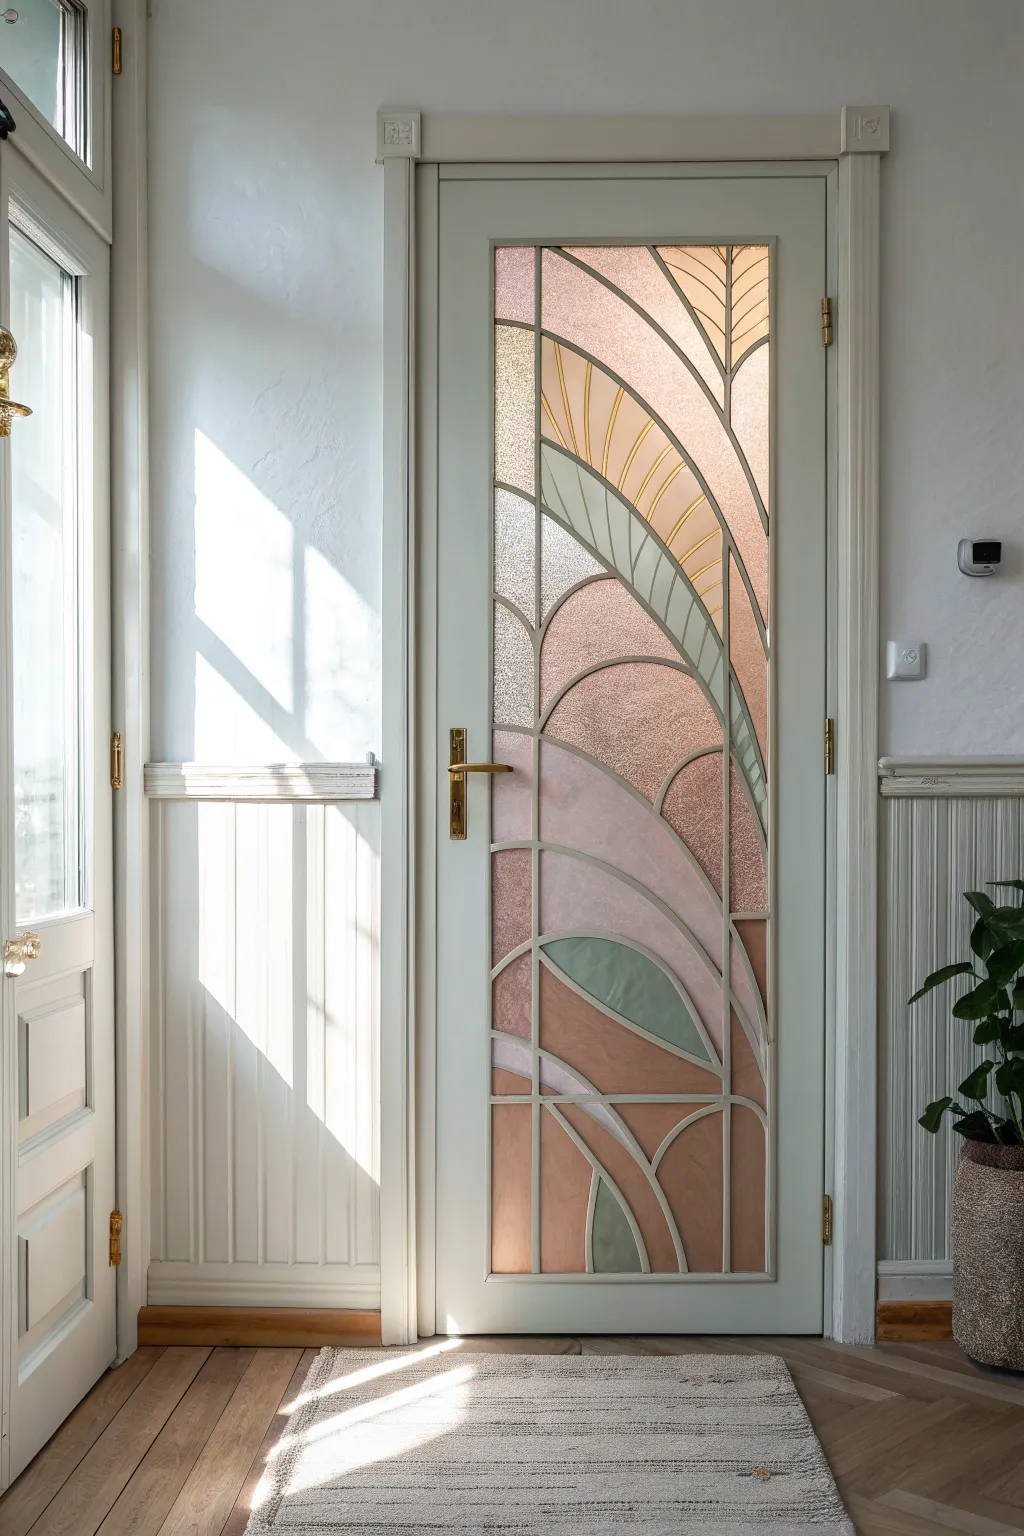
Transform a plain glass door into a stunning 1920s-inspired architectural feature using faux-stained glass techniques. This project recreates the look of leaded caming and textured glass using dimensional outliners and translucent glass paints in soft pastel hues.
How-To Guide
Materials
- Glass cleaner and lint-free cloth
- Rubbing alcohol
- Printed full-scale paper pattern (Art Deco fan design)
- Painter’s tape
- Liquid leading or relief outliner (Pewter or Antique Silver)
- Glass paints (Peach, Rose, Sage Green, Champagne)
- Crystal Clear or Frost glass painting medium
- Toothpicks
- Small round paintbrushes
Step 1: Design & Outline
-
Clean surface:
Thoroughly clean the glass pane with glass cleaner, then wipe it down with rubbing alcohol to remove any oily residue that might prevent adhesion. -
Secure pattern:
Tape your printed Art Deco template to the reverse side of the glass. If you can’t access the back, tape it to the front, trace the design on the back with a washable marker, and then remove the paper. -
Test the flow:
Squeeze a small amount of liquid leading onto a paper towel to remove any air bubbles and ensure a smooth, consistent line width before touching the glass. -
Outline the arches:
Begin tracing the main structural arches of the design with your relief outliner. Apply even pressure and keep the nozzle slightly elevated above the glass so the line ‘drapes’ onto the surface rather than being dragged. -
Add detail lines:
Fill in the smaller geometric shapes and ‘leaf’ veins. I prefer to work from the top left to the bottom right to avoid smudging my previous work with my hand. -
Connect the joints:
Ensure every intersection needs to be completely closed. Wet leading can be nudged gently with a toothpick to close gaps; this prevents the colored paint from leaking later. -
Let it cure:
Allow the outline to dry completely. This usually takes 8 to 24 hours depending on humidity; the lines should feel firm and not tacky.
Leak Patrol
If colored paint bleeds under a lead line, don’t wipe it! Let it dry completely, then carefully score the excess paint with a craft knife and peel it away like a sticker.
Step 2: Painting & Texturing
-
Mix custom shades:
To achieve the sophisticated look in the photo, mix a drop of clear medium into your pastel colors (peach and rose). This increases transparency and gives it that delicate, wash-like quality. -
Fill the sage leaves:
Squeeze the Sage Green paint generously into the leaf-shaped sections. Do not brush back and forth like wall paint; instead, ‘flood’ the area and use the tip of the bottle or a brush to push the paint to the edges. -
Create the peachy glow:
Fill the large central fan shapes with your Peach and Champagne mixtures. For visual interest, alternate slightly between lighter and darker washes in adjacent sections. -
Add texture instantly:
While the colored paint is still wet, gently tap the surface with a stiff brush or swirl a toothpick in small circles to create the pebbled, irregular texture seen in true stained glass. -
Applying the frost:
For the white/clear sections (the ‘background’ shapes), use the Crystal Clear or Frost medium. Apply it thickly to create a textured sunlight-catching surface that contrasts with the colored panels. -
Pop the bubbles:
Keep a close eye on the wet paint for the first few minutes. If you see tiny air bubbles rising, pop them immediately with a sharp pin or toothpick for a smooth finish. -
Inspect against light:
If possible, shine a light from behind the door to check for uneven coverage. Add more paint to any bald spots while the layer is still wet to avoid seam lines. -
Final cure:
Remove the paper pattern from the back. Allow the project to cure undisturbed for at least 48 to 72 hours before cleaning or touching the painted areas.
Pro Tip: Ombré Effect
To get the gradients on the large arches, drop clear medium at the top and colored paint at the bottom. Swirl them together in the middle with a toothpick for a seamless fade.
Now you have a timeless, light-filtering masterpiece that adds privacy and artistic flair to your entryway.


Have a question or want to share your own experience? I'd love to hear from you in the comments below!