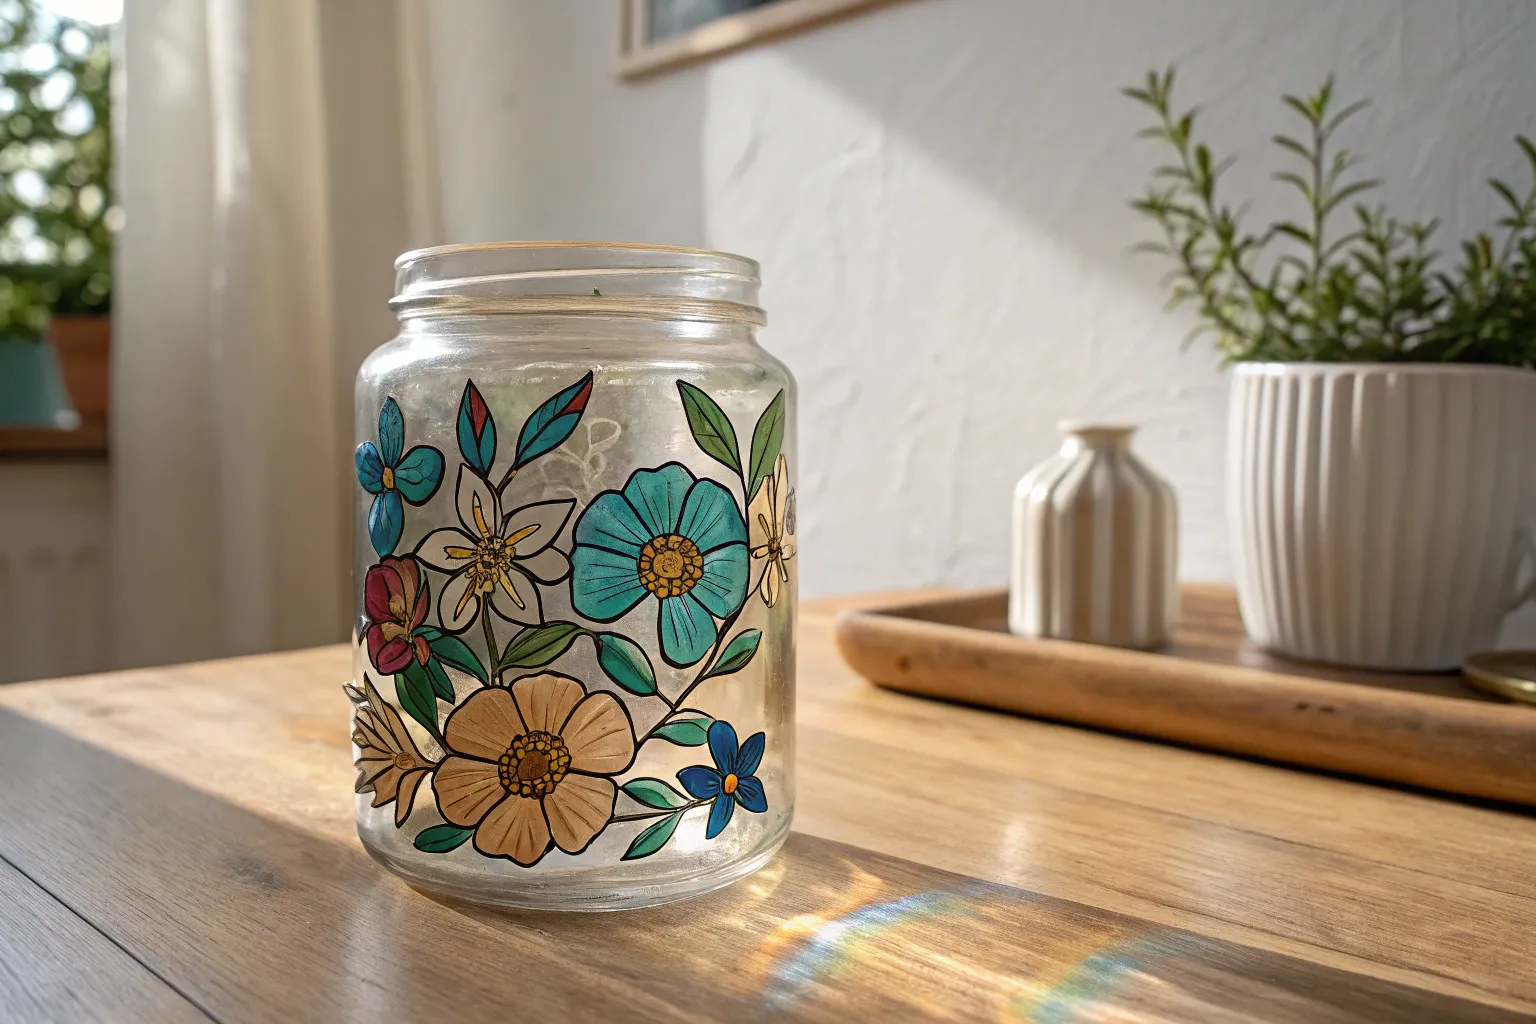
Glass painting is basically instant magic—one little swipe of translucent color and plain glass starts glowing like it has its own inner light. Here are my favorite glass painting ideas to try, starting with the classics and drifting into some fun, unexpected territory.
Faux Stained Glass Suncatcher Panels

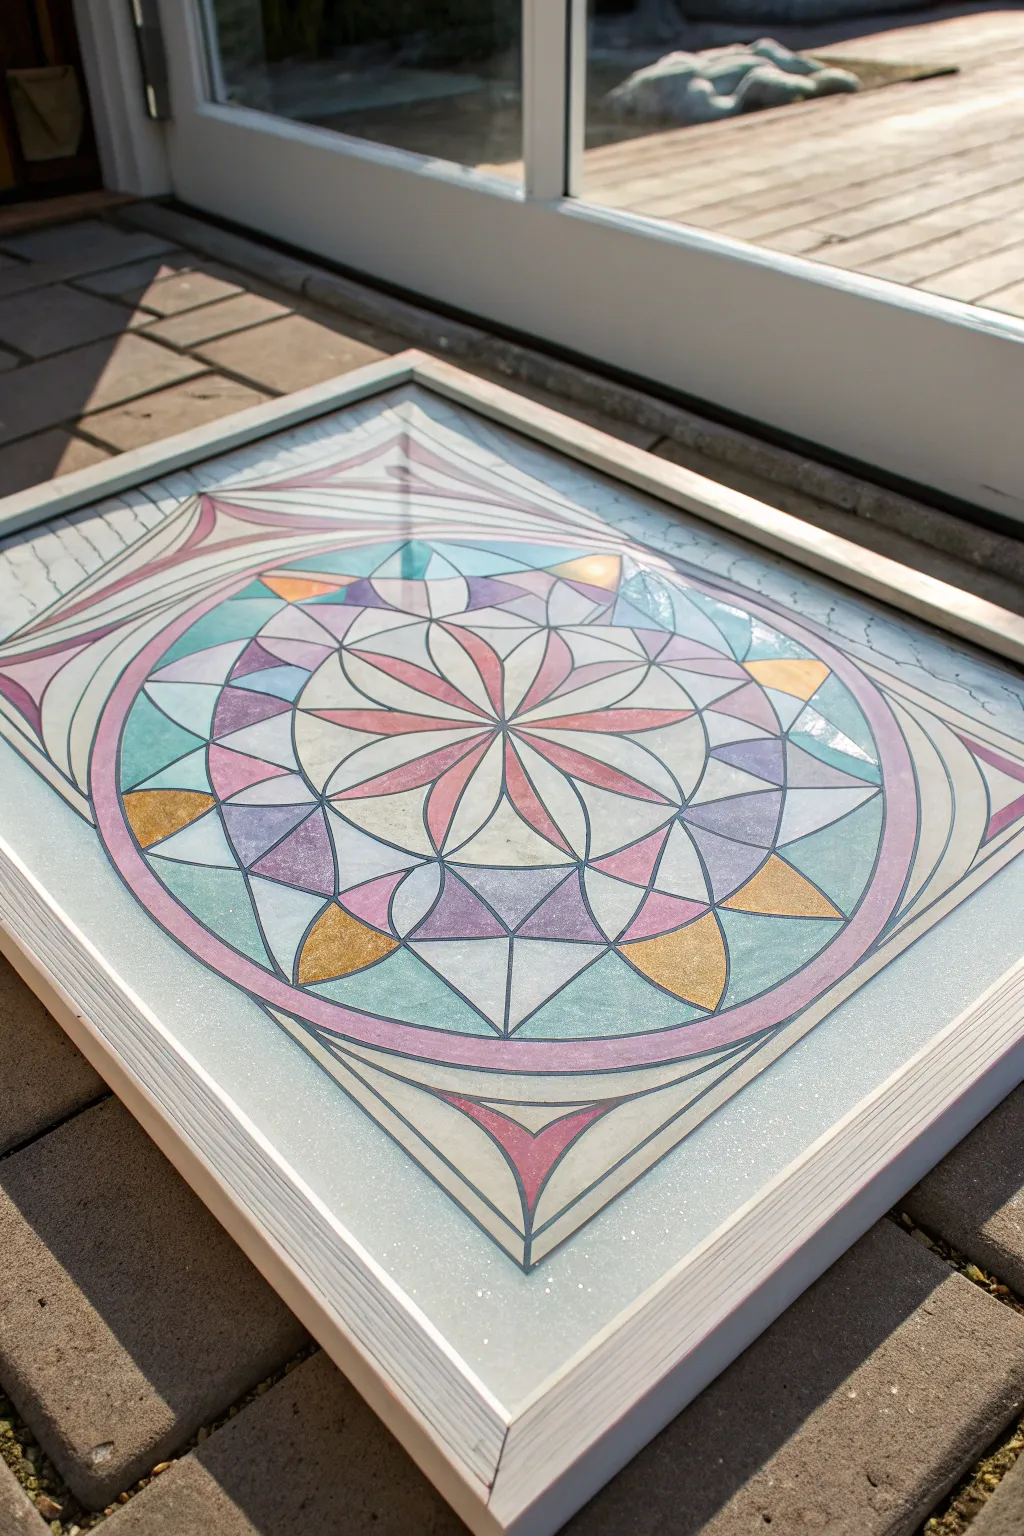
Capture the elegance of traditional leaded glass with this stunning geometric suncatcher panel. Using a simple picture frame and glass paints, you’ll create a sophisticated Arts and Crafts style piece that glows beautifully in natural light.
Step-by-Step Guide
Materials
- Rectangular picture frame with glass (approx. 8×12 inches)
- Black liquid leading or dimensional glass paint
- Gallery Glass or translucent glass paints (Ruby Red, Emerald Green, Crystal Clear)
- Amber/Gold glass paint (for center diamond)
- Craft knife
- Ruler and permanent marker
- Paper towels
- Toothpicks
- Thin decorative chain for hanging
- Screw eyes (small)
- Graph paper (for pattern making)
Step 1: Preparation & Design
-
Prepare the glass:
Remove the glass pane from your picture frame carefully. Clean both sides thoroughly with glass cleaner or rubbing alcohol to remove any oils or fingerprints, which can prevent the paint from adhering properly. -
Draft the pattern:
Using graph paper cut to the size of your glass, draw your geometric design. Create a central vertical rectangle flanked by two thinner columns. Add horizontal lines near the top and bottom to create header and footer blocks. -
Detailed drafting:
In the exact center of the main panel, draw a tall, slender diamond shape. Ensure all your lines are straight and symmetrical, as geometric patterns rely on precision for their professional look. -
Setup the workspace:
Tape your paper pattern flat onto your work surface. Place the clean glass pane directly on top of the pattern and secure it with painters tape so it doesn’t shift while you work.
Texturing Like a Pro
For that icy, crinkled texture seen in the photo, dab the wet clear paint repeatedly with a stiff bristle brush or a crumpled piece of plastic wrap, then lift straight up.
Step 2: Creating the Lead Lines
-
Outline the main structure:
Using the black liquid leading, trace the major vertical lines first. Hold the bottle tip slightly above the glass and let the line drape down for a smoother finish rather than dragging the tip directly on the surface. -
Add horizontal details:
Connect the vertical lines with your horizontal cross-sections at the top and bottom. I find it helpful to stop and start at each intersection to create a realistic ‘soldered’ joint look. -
Adding the diamond:
Carefully pipe the central diamond shape. Since this is a focal point, take your time to ensure the points are sharp and the lines are even. -
Let it cure:
Allow the leading lines to dry completely according to the manufacturer’s instructions, typically 8 to 24 hours. The lines should feel firm and rubbery before you proceed to painting.
Leading Lines Uneven?
If your black lines are wiggly or uneven, let them dry completely. Once dry, you can easily trim the edges with a craft knife or peel the entire bad line off and re-pipe it.
Step 3: Adding Color & Texture
-
Paint the red borders:
Fill the long outer vertical rectangles and the small horizontal rectangles at the top and bottom with the Ruby Red glass paint. Apply the paint generously to ensure rich color depth. -
Fill the green sections:
Apply the Emerald Green paint to the inner vertical columns flanking the central panel. Use a toothpick to gently push the paint into the corners of the leading lines for a seamless fill. -
Create the clear texture:
Fill the large central background area with Crystal Clear paint. To mimic the ‘textured glass’ look from the photo, swirl the wet paint gently with a toothpick in small circles or irregular patterns. -
Detail the diamond:
Fill the central diamond shape with the Amber or Gold paint. Keep this application smooth to contrast with the textured clear glass surroundings. -
Pop bubbles:
Scan the wet paint for any air bubbles. pop them immediately with a clean pin or toothpick to ensure the dried surface looks like genuine stained glass. -
Second coat (Optional):
If the colors look too transparent after drying initially, apply a second thin layer to the colored sections to increase opacity and vibrancy.
Step 4: Assembly
-
Dry completely:
Allow the entire piece to cure for at least 48 hours. The paint will clarify and harden as it sets. -
Reframe the glass:
Place the painted glass back into the frame. You may need to secure it with glazing points or a small bead of silicone if the original backing doesn’t fit over the textured paint. -
Attach hardware:
Screw two small eye hooks into the top edge of the wooden frame. Attach your decorative chain to these hooks. -
Hang and enjoy:
Suspend your finished panel in a sunny window where the light can filter through the texture and colors.
Enjoy the colorful glow your new masterpiece brings to your room


Simple Wildflower Jar Vases
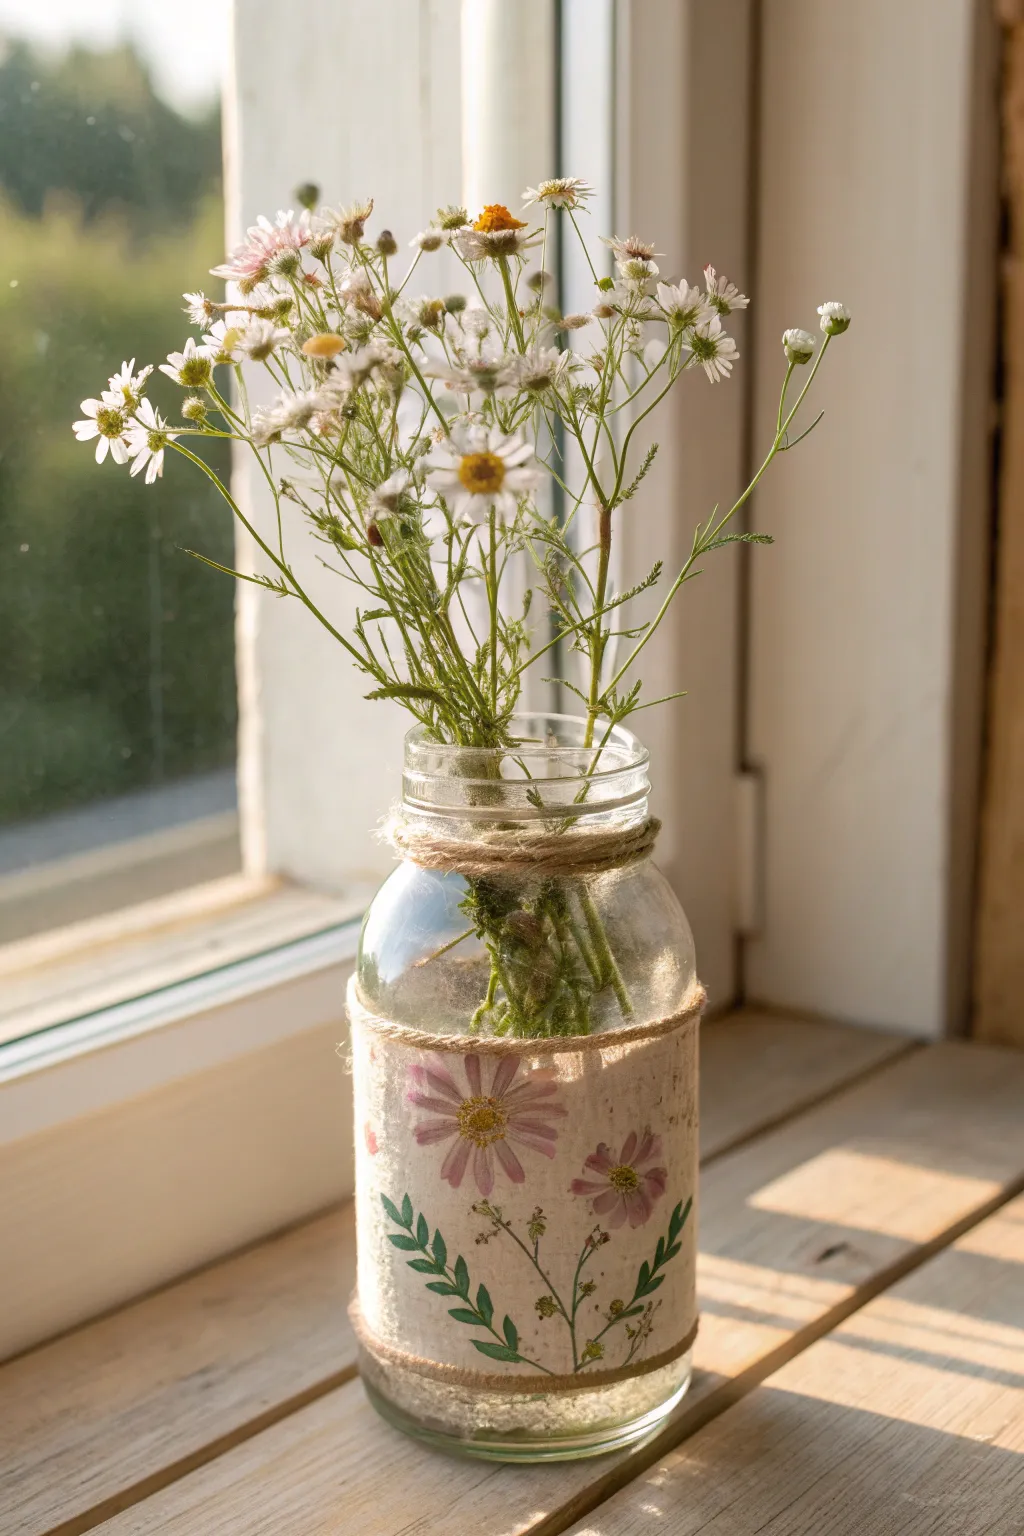
Bring the effortless charm of a meadow indoors with this rustic glass vase project. Combining glass painting techniques or decoupage on a fabric band creates a soft, textured look perfect for holding freshly picked stems.
Detailed Instructions
Materials
- Clean glass jar (mason jar or recycled pickle jar)
- Wide strip of natural linen, cotton fabric, or burlap ribbon
- Mod Podge or white craft glue
- Jute twine
- Acrylic craft paints (pink, mauve, yellow, green)
- Small flat paintbrush
- Fine detail paintbrush
- Scissors
- Foam sponge brush
- Hot glue gun and glue sticks
Step 1: Preparing the Base
-
Clean the jar:
Start by thoroughly washing your glass jar with warm soapy water to remove any labels or adhesive residue. Wipe it down with rubbing alcohol to ensure the surface is completely grease-free. -
Cut the fabric:
Measure the circumference of your jar and cut a wide strip of your chosen fabric. It should be long enough to wrap around the jar with a slight overlap and cover the middle two-thirds of the glass. -
Prime the fabric (optional):
If you are using a very porous fabric like burlap, I find it helpful to brush a thin layer of white acrylic paint or gesso over the area where you plan to paint the flowers. Let this dry completely to create a smoother painting surface. -
Attach the fabric:
Apply a layer of Mod Podge or craft glue directly to the glass where the band will sit. Press the fabric strip onto the glue, smoothing out any air bubbles or wrinkles as you go. Secure the seam at the back with an extra dab of glue.
Step 2: Painting the Wildflowers
-
Start the flower centers:
Using your small round brush and yellow acrylic paint, dab small, imperfect circles onto the fabric to serve as the centers for your daisies and coneflowers. -
Paint the petals:
Mix a soft pink or mauve color. Using a small flat brush, press down gently near the yellow center and pull outward to create simple, elongated petal strokes. Vary the pressure to give the petals a natural, tapered look. -
Add dimension:
While the petal paint is still slightly wet, add a tiny streak of white or a darker pink to a few petals. This simple step adds instant depth and makes the flowers look less flat. -
Paint the stems:
Switch to your fine detail brush and green paint. Draw thin, slightly curved lines extending downward from the flower heads. Don’t make them perfectly straight; natural stems have a bit of a wiggle. -
Create the leaves:
Along the stems, paint small, fern-like leaves. Use short, quick strokes that angle upward to mimic the feathery foliage of chamomile or cosmos. -
Add detail buds:
Paint tiny green dots at the ends of some smaller stems to represent potential buds that haven’t bloomed yet. -
Seal the design:
Once the paint is thoroughly dry (give it at least an hour), gently brush a coat of Mod Podge over the entire fabric band. This seals the paint and prevents the fabric edges from fraying too much.
Paint Bleeding?
If paint bleeds into the fabric weave, use less water on your brush. Try distinct, dry-brush strokes rather than washing techniques. A thicker acrylic paint works best on textiles.
Step 3: Finishing Touches
-
Wrap the top rim:
Take your jute twine and wrap it several times around the neck of the jar. You can do this right at the screw threads or slightly lower depending on the jar style. -
Secure the twine:
Use a small dot of hot glue to secure the end of the twine so it doesn’t unravel. You can tie a small bow if you like, or keep it minimal by tucking the end under. -
Add lower twine detail:
Repeat the wrapping process at the bottom edge of the fabric band. This frames your painted artwork and hides the raw edge of the material. -
Add upper twine detail:
Finally, wrap a few strands of twine around the top edge of the fabric band to create a symmetrical border.
Add Real Pressed Flowers
Instead of painting, use Mod Podge to adhere real pressed flowers onto the fabric band. Seal them with another topcoat for a botanical specimen look.
Place your jar in a sunny window and fill it with fresh daisies to complete the rustic cottage display


Daisy Drinkware Sets
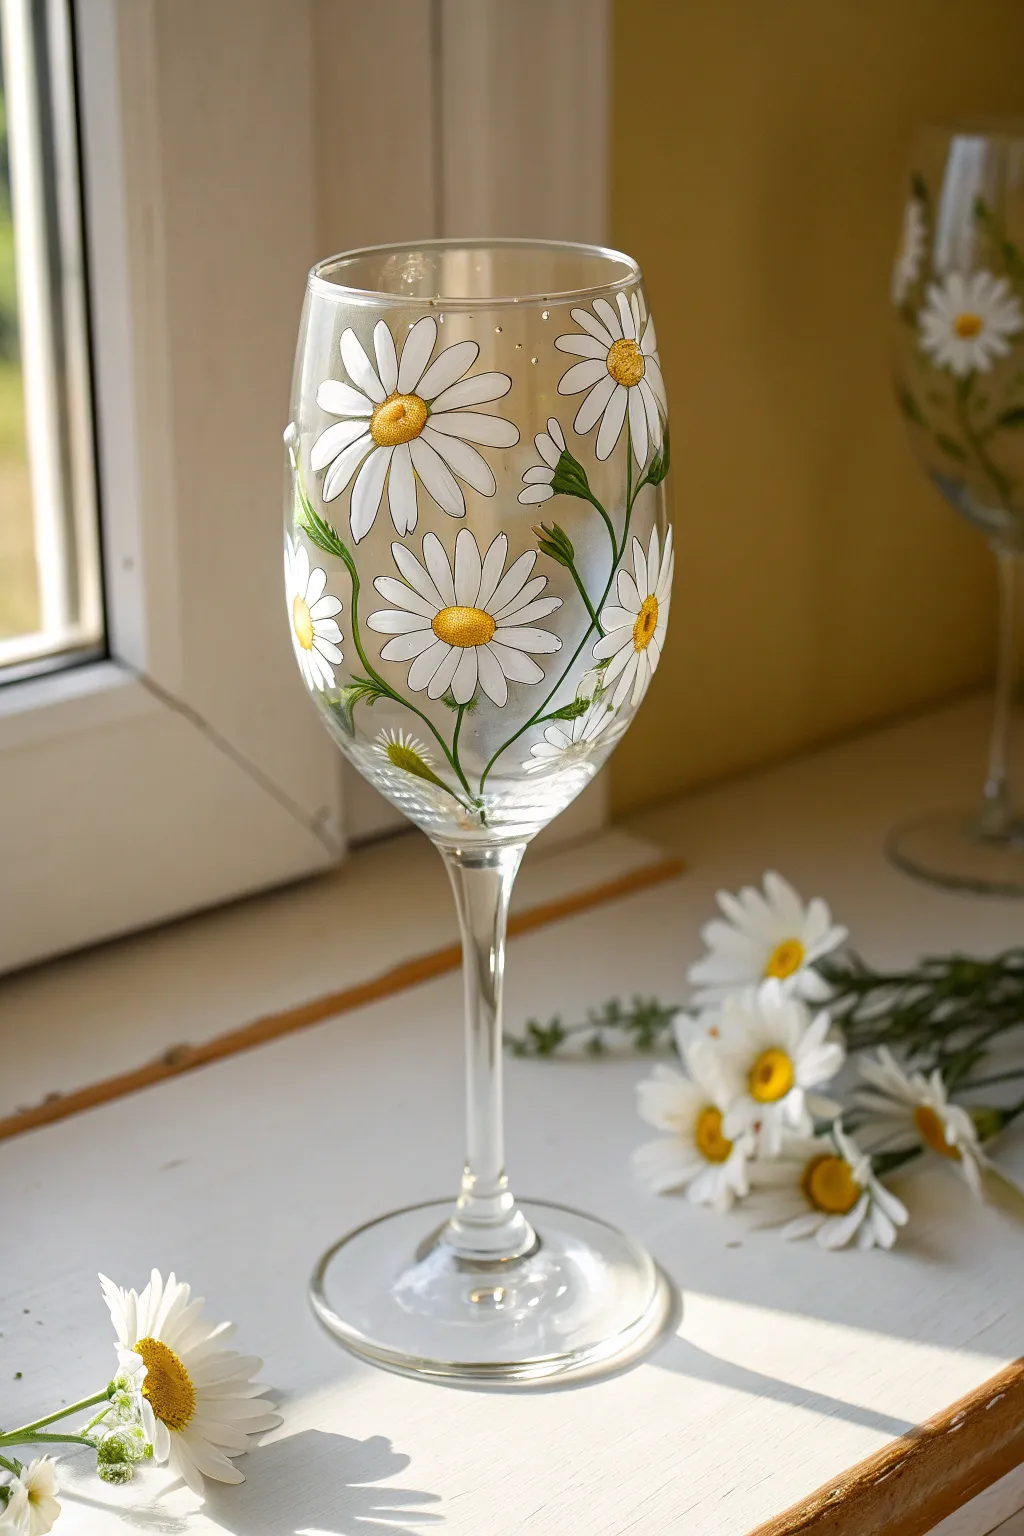
Transform plain glassware into a blooming garden with this cheerful daisy design. The translucent white petals and bright yellow centers create a sunny, welcoming feel perfect for summer sipping or thoughtful gifting.
How-To Guide
Materials
- Clear wine glass
- Rubbing alcohol
- Cotton pads or paper towels
- Enamel glass paint (Opaque White)
- Enamel glass paint (Sunshine Yellow or Golden Yellow)
- Enamel glass paint (Leaf Green and Dark Olive Green)
- Small round brushes (#2 and #0)
- Fine liner brush (#00 or #000)
- Palette or small plate
- Oven (for curing, optional depending on paint brand)
Step 1: Preparation
-
Clean the Surface:
Before you even touch a paintbrush, wipe down the entire outer surface of the wine glass with rubbing alcohol on a cotton pad. This removes oils and fingerprints that could prevent the paint from adhering properly. -
Map Your Layout:
Visualize where your main flower heads will go. You can lightly mark the center of each daisy with a tiny dot of a washable marker if you need a guide, spacing them irregularly around the bowl.
Clean Edges
Keep Q-tips and rubbing alcohol nearby while painting. If a petal goes wonky, you can wipe it away instantly and retry without ruining the whole design.
Step 2: Painting the Petals
-
Load the Brush:
Load a #2 round brush with opaque white enamel paint. You want a decent amount of paint, but not so much that it drips. -
First Petal Stroke:
Starting near the center mark of your first flower, press the brush down to create the wide part of the petal, then pull outward while lifting the brush to create a tapered tip. -
Complete the Circle:
Continue painting petals around the imaginary center point. Aim for 12-15 petals per flower. Don’t worry if they overlap slightly; it adds dimension. -
Vary the Sizes:
Paint 3-4 large, fully open daisies as your focal points on different sides of the glass. -
Add Side Views:
Near the rim or bottom, paint a few ‘half’ daisies or buds. For these, paint petals fanning out in a semi-circle or grouping them tightly pointing upwards. -
Second Coat (Optional):
If the white looks too streaky or transparent, let it dry for 20 minutes and apply a second coat to the petals for solid opacity.
Add a Bee
Paint a tiny bumblebee hovering near one of the flowers. Use a yellow oval, add black stripes with a liner brush, and dry-brush translucent white wings.
Step 3: Centers and Stems
-
Yellow Centers:
Using a smaller round brush, dab a generous circle of yellow paint into the center of each open flower. -
Texturing the Center:
While the yellow paint is wet, stipple it gently with the tip of the bristles or use a darker golden tone on the bottom edge to create a textured, pollen-like look. -
Green Stems:
Switch to your fine liner brush and load it with leaf green paint. Draw long, slender, curving lines extending from the flower heads down toward the stem of the glass. -
Connecting Buds:
For the closed buds, paint a small green calyx (cup) at the base of the white petals before drawing the stem downward. -
Adding Leaves:
Using the #0 round brush, add small, slender leaves along the stems. Use a simple ‘press and lift’ motion similar to the petals but thinner. -
Depth and Detail:
I find that mixing a tiny bit of dark olive green into your leaf color adds beautiful shadow depth near the base of the stems and under the flower heads. -
Fine Lines:
Use your finest liner brush to add tiny, wispy details or extra thin stems that weave behind the main flowers to fill any large gaps.
Step 4: Curing
-
Air Dry:
Allow the painted glass to sit undisturbed for at least 24 hours (or per manufacturer instructions) to let the surface skin over. -
Bake to Sets:
Place the glass in a cool oven. Set the temperature to 350°F (175°C) and bake for 30 minutes. Turn the oven off and let the glass cool completely inside before removing to prevent cracking.
Now you have a stunning piece of functional art ready to brighten up your next brunch table


Confetti Dots and Speckles
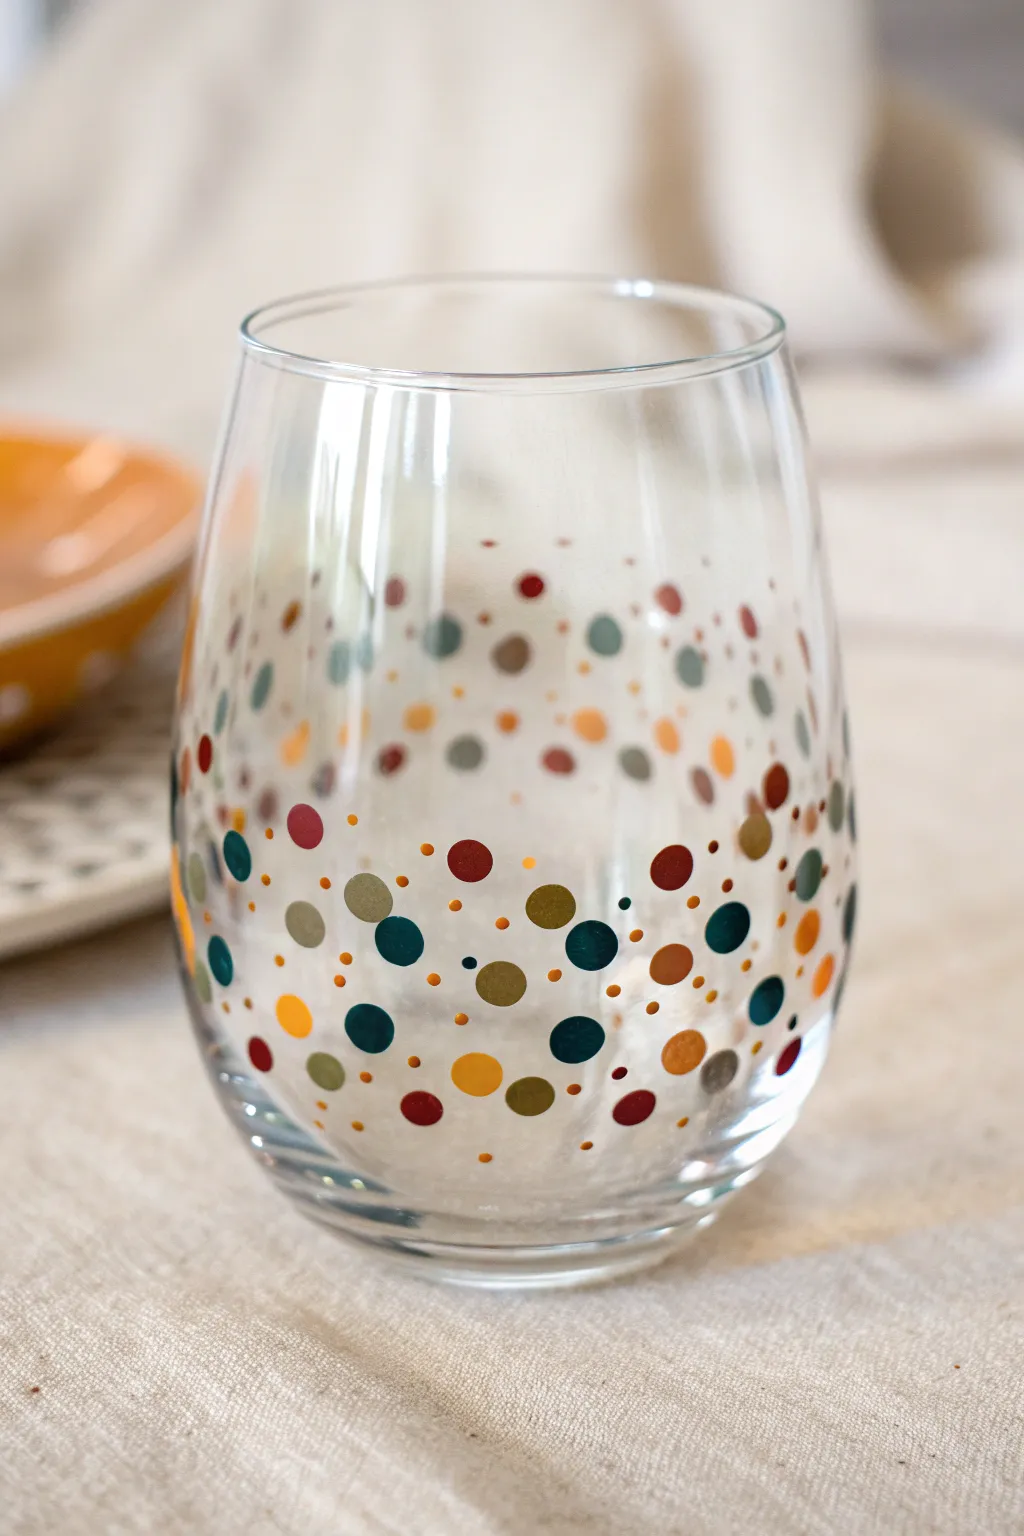
Transform a plain stemless wine glass into a festive piece of drinkware with this whimsical scattering of dots. Using a warm, autumnal palette of rich ochres, teals, and deep reds creates a sophisticated ‘confetti’ look that feels both playful and elegant.
Step-by-Step Guide
Materials
- Stemless wine glass (clear, thoroughly cleaned)
- Enamel glass paints (Deep Red, Burnt Orange, Ochre/Mustard, Dark Teal, Olive Green, Beige)
- Rubbing alcohol
- Cotton pads or lint-free cloth
- Foam pouncers (assorted small sizes)
- Cotton swabs (Q-tips)
- Toothpicks or a dotting tool
- Paper palette or foil plate
- Oven (for curing)
Step 1: Preparation
-
Clean the Surface:
Before painting, wipe down the entire outer surface of the glass with rubbing alcohol and a lint-free cloth. This removes oils and fingerprints that prevent paint adhesion. -
Secure Your Workspace:
Place the glass upside down on your work surface. This makes it easier to access the bottom curve where the design is densest, and prevents the glass from rolling. -
Palette Prep:
Dispense nickel-sized amounts of your enamel paint colors onto your palette. Ensure your colors complement each other; mixing a tiny bit of white into the teal or orange can create lovely variation.
Perfect Circles
For perfectly round dots, don’t press down hard. Touch the tool to the glass, twist slightly, and lift straight up to leave a clean deposit of paint.
Step 2: Creating the Large Dots
-
Start at the Base:
Load a small circular foam pouncer or the flat end of a brush handle with your darkest color (like the deep red or dark teal). Press it gently onto the lower third of the glass to create a perfect circle. -
Building Density:
continue applying these larger dots around the base. Aim for a random arrangement, but keep them relatively close together near the bottom curve. -
Switching Colors:
Wipe your tool or switch to a fresh one, then repeat the process with the ochre and burnt orange paints. Allow these large dots to dry for just a few minutes so they don’t smear while you work. -
Fading Upward:
Add a few large dots slightly higher up the glass, past the halfway point. Space them much further apart than the bottom details to begin the ‘falling confetti’ effect.
Paint Drips?
If your large dots start to drip or sag, your paint load is too heavy. Dab the tool on paper first, and keep the glass horizontal while drying.
Step 3: Adding Detail & Speckles
-
Medium Dots:
Use the back of a paintbrush or a cotton swab to add medium-sized dots in between the larger ones. I prefer using the lighter beige and olive tones here to add depth. -
Fill the Gaps:
Look for empty spaces near the bottom where the glass is still showing through clearly. Fill these voids with medium dots to create a rich, dense cluster at the base. -
The Tiny Speckles:
Dip a toothpick or a fine-point dotting tool into the burnt orange and mustard paints. -
Scattering the Tiny Dots:
Apply tiny speckles liberally throughout the design. These should be the most numerous element, surrounding the larger circles. -
Create the Gradient:
As you move upward, reduce the number of large and medium dots, but continue carrying the tiny toothpick speckles higher. -
Sparse Top Layer:
Near the rim (but leaving at least an inch clear for drinking), place only stray, single tiny dots. This emphasizes the visual of the confetti settling at the bottom.
Step 4: Finishing Touches
-
Review the Balance:
Turn the glass right-side up carefully to inspect the pattern. Add stray dots if any area looks too empty or unbalanced. -
Clean Up Edges:
If any dots are misshapen or smeared, use a damp cotton swab with a little rubbing alcohol to wipe them away instantly before they set. -
Initial Cure:
Let the glass air dry for at least 1 hour, or up to 24 hours depending on your specific paint brand’s instructions. -
Baking:
Place the glass in a *cold* oven. Set the temperature to 350°F (176°C) and bake for 30 minutes. The glass must heat up with the oven to prevent cracking. -
Cooling Down:
Turn the oven off after 30 minutes, but leave the glass inside until the oven is completely cool. This gradual temperature change is crucial for durability.
Once baked and cooled, your custom confetti glassware is ready for your next dinner party or quiet evening drink
BRUSH GUIDE
The Right Brush for Every Stroke
From clean lines to bold texture — master brush choice, stroke control, and essential techniques.
Explore the Full Guide
Citrus Slice Glass Painting
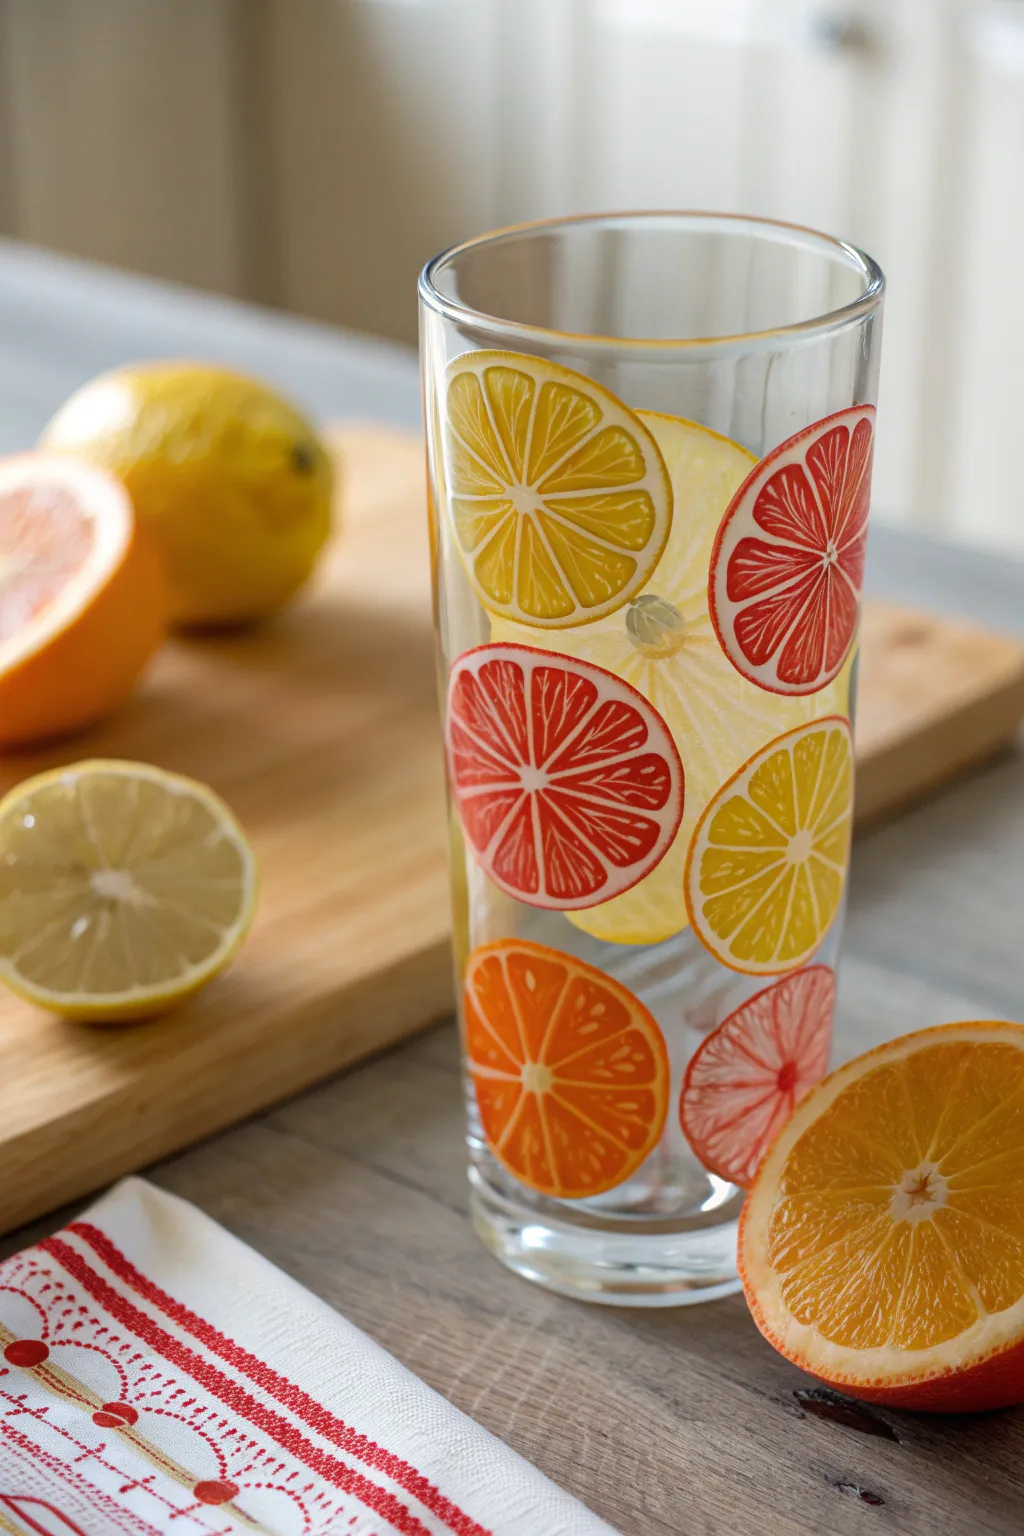
Transform a plain drinking vessel into a refreshing piece of art with these vibrant, translucent citrus slices. This project layers sunny yellows, ruby grapefruits, and juicy oranges for a look that feels just like summer.
Step-by-Step Tutorial
Materials
- Tall clear glass tumbler
- Rubbing alcohol and cotton pads
- Glass paints (Yellow, Orange, Red, White)
- Fine detail paintbrush (size 0 or 00)
- Small flat paintbrush (size 2 or 4)
- Paint palette or mixing surface
- Pencil and paper (for sketching)
- Tape (optional)
- Oven (for curing, if paint requires)
Step 1: Preparation & Planning
-
Clean the Surface:
Before putting brush to glass, wipe down the entire exterior surface with rubbing alcohol on a cotton pad. This removes any oils or fingerprints that could prevent the paint from adhering properly. -
Sketch the Layout:
On a piece of paper, sketch out circles of varying sizes to represent your citrus slices. I find it helpful to plan the layout on paper first to visualize where the overlapping fruits will sit. -
Create a Reference Insert:
Roll your paper sketch into a tube and insert it inside the glass. Tape it in place so the drawing presses against the glass walls. This will serve as your tracing guide while you paint.
Step 2: Painting the Fruit Bases
-
Mix Your Citron Yellow:
Start by pouring a small amount of yellow glass paint onto your palette. If the paint is very opaque, you might want to mix in a tiny drop of clear medium to keep that lovely translucent look. -
Paint the Lemon Outlines:
Using your fine detail brush, carefully trace the outer circles for the lemon slices directly onto the glass, following your paper guide. -
Fill the Lemon Segments:
Switch to the small flat brush. Paint the interior of the lemon circles, leaving a very thin clear gap between the outer rind and the inner fruit pulp. Don’t worry about segmentation lines just yet; fill the circle with a solid, even coat of yellow. -
Mix the Grapefruit Pink:
Clean your brush. Mix red with a little bit of orange or white to achieve a soft ruby red or pink grapefruit color. -
Paint Grapefruit Bases:
Repeat the outlining and filling process for your grapefruit slices. Be mindful of where slices overlap; paint the bottom layer first and let it dry slightly before adding an overlapping slice to avoid muddying the colors. -
Add the Orange Slices:
Using straight orange paint, create the final set of circular bases. Distribute these evenly around the glass to balance the colors. -
Dry the Base Layers:
Allow these base circles to dry until they are tacky or dry to the touch, usually about 20-30 minutes depending on your paint brand. This prevents the detail lines from bleeding into the base color.
Oops, Smudged Line?
Don’t panic! If wet, wipe immediately with a damp Q-tip. If dry, carefully scrape the unwanted paint away with a razor blade or craft knife edge.
Step 3: Adding Details & Segments
-
Prepare the Detail White:
Pour a small amount of white paint. You want this to be opaque enough to show up over the colors, so don’t dilute it. -
Paint the Rind:
With your finest detail brush, paint a thin white circle just inside the colored outer edge of each fruit slice. This distinguishes the peel from the fruit. -
Create the Spokes:
Paint a small white dot in the exact center of a slice. From this center point, paint thin, straight lines radiating outward toward the rind, like the spokes of a wheel. These are the segment dividers. -
Refine the Segments:
At the outer end of each spoke, gently curve the line to meet the inner white rind circle. This creates the rounded triangular shape of individual fruit segments. -
Add Pulp Texture:
For extra realism, add tiny, faint strokes or dots of a slightly darker shade (e.g., dark yellow on the lemon) inside the segments to mimic juicy pulp texture. -
Repeat for All Fruits:
Go through every slice—lemon, orange, and grapefruit—and add these white segment details. Steady hands are key here, so rest your pinky against the glass for stability. -
Clean Up Edges:
If any paint went astray, use a toothpick or a cotton swab dampened with alcohol to tidy up the edges while the paint is still workable.
Make It Sparkle
Mix a tiny amount of superfine iridescent glitter medium into your fruit pulp colors before painting for a ‘sugared rim’ cocktail effect on the fruit itself.
Step 4: Finishing Up
-
Remove the Guide:
Once the paint is dry to the touch, gently untape and remove the paper insert from inside the glass. -
Cure the Glass:
Follow the manufacturer’s instructions for your specific glass paint. This usually involves either air-drying for 21 days or baking the glass in a cool oven that heats up slowly to set the paint permanently.
Now you have a custom piece of glassware ready to brighten up your breakfast table
Trailing Flower Vine Borders
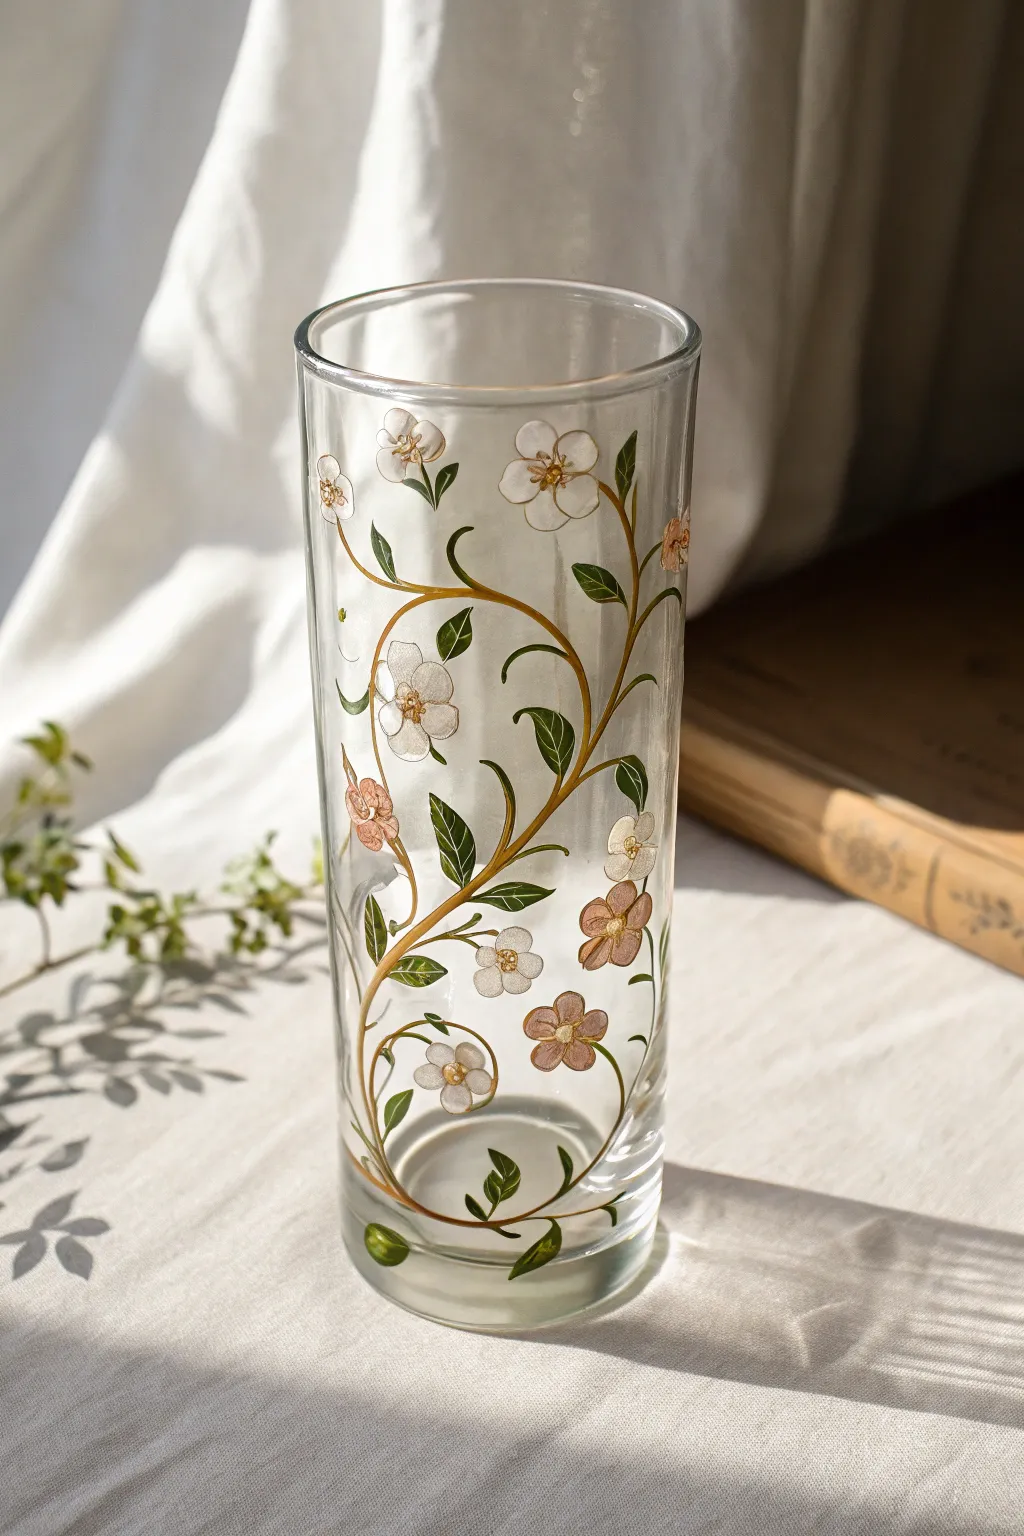
Transform a plain glass cylinder into a botanical masterpiece with this delicate trailing flower vine design. The interplay of golden-brown stems, fresh green leaves, and soft pearlescent blooms creates a vintage-inspired look that catches the light beautifully.
Step-by-Step
Materials
- Tall, cylindrical glass vase or tumbler (clean and dry)
- Rubbing alcohol and cotton pads
- Glass outliner paste (bronze or antique gold)
- Glass solvent-based paints (Forest Green, Pearl White, Soft Peach)
- Fine-point round brush (size 0 or 00)
- Paper palette or foil
- Cotton swabs (for clean-up)
- Oven (if using heat-set paints)
Step 1: Preparation & Stem Layout
-
Prep the Surface:
Before you begin, wipe the entire outer surface of the glass with rubbing alcohol on a cotton pad. This removes invisible oils and fingerprints which can prevent the paint from adhering properly. -
Practice the Flow:
On a piece of scrap paper, practice squeezing your outliner tube to create smooth, flowing S-curves. You want steady pressure to avoid blobs. -
Map the Main Vine:
Starting near the bottom, draw a long, meandering S-curve vine with the bronze outliner that travels up the glass. Let the lines cross over each other occasionally to create a natural, tangled look. -
Add Secondary Branches:
Branch off from the main stem with shorter, thinner curves. Aim for a mix of upward-reaching sprigs and side-trailing tendrils to fill the negative space without overcrowding it. -
Create Leaf Petioles:
Draw tiny stems extending from the vines where you plan to place your leaves and flowers later. Let the outliner dry completely (usually 1-2 hours) before moving to the next phase.
Step 2: Painting the Blooms
-
Outline the Flowers:
Using the same bronze outliner, draw simple four-petal flower shapes at the ends of your branch tips. Keep the petals rounded and slightly irregular for a wildflower aesthetic. -
Fill with Pearl White:
Once the flower outlines are touch-dry, dip your fine brush into the Pearl White paint. Fill in the petals of about two-thirds of the flowers, letting the paint pool slightly for a semi-opaque effect. -
Add Peach Accents:
For the remaining flowers, fill the petals with Soft Peach paint. I like to mix a tiny drop of the white into the peach to give it the same milky opacity as the other blooms. -
Create Depth:
While the paint is still wet, you can add a microscopic dot of darker color near the center of the petals to suggest depth, but keeping it solid is also lovely. -
Add Flower Centers:
After the petal paint settles, use the bronze outliner to place a cluster of 3-4 tiny dots in the center of each flower.
Shaky hands?
Rest your painting wrist on a sturdy object (like a thick book or block) placed next to the glass. This stabilizes your hand for smoother vine lines.
Step 3: Leaves & Finishing Touches
-
Paint Single Leaves:
Load your brush with Forest Green. Paint single, almond-shaped leaves attached to the vine stems. Use a ‘press and lift’ motion: press the brush down to widen the leaf base, then lift as you pull away to create a sharp point. -
Paint Leaf Clusters:
In open areas, paint pairs of leaves. Vary the sizes—some leaves should be tiny and new, while others are fully grown. -
Add Golden Veins:
Allow the green paint to dry fully. Then, using a very light touch with the bronze outliner, draw a simple central vein down the middle of the larger leaves. -
Inspect and Clean:
Check your work against the light. If you slipped anywhere, use a damp cotton swab or a toothpick to gently scrape away the mistake before curing. -
Cure the Piece:
Follow the manufacturer’s instructions for your specific paint. Most require air drying for 24 hours, followed by baking in a home oven for 30-40 minutes to make the design dishwasher safe.
Air bubbles in paint
I pop tiny bubbles immediately with a dry pin. Do this before the paint skins over to ensure a perfectly smooth finish.
Once baked and cooled, your custom glassware is ready to hold fresh blooms or refreshing drinks with elegant style

PENCIL GUIDE
Understanding Pencil Grades from H to B
From first sketch to finished drawing — learn pencil grades, line control, and shading techniques.
Explore the Full Guide
Butterflies on Candle Jars
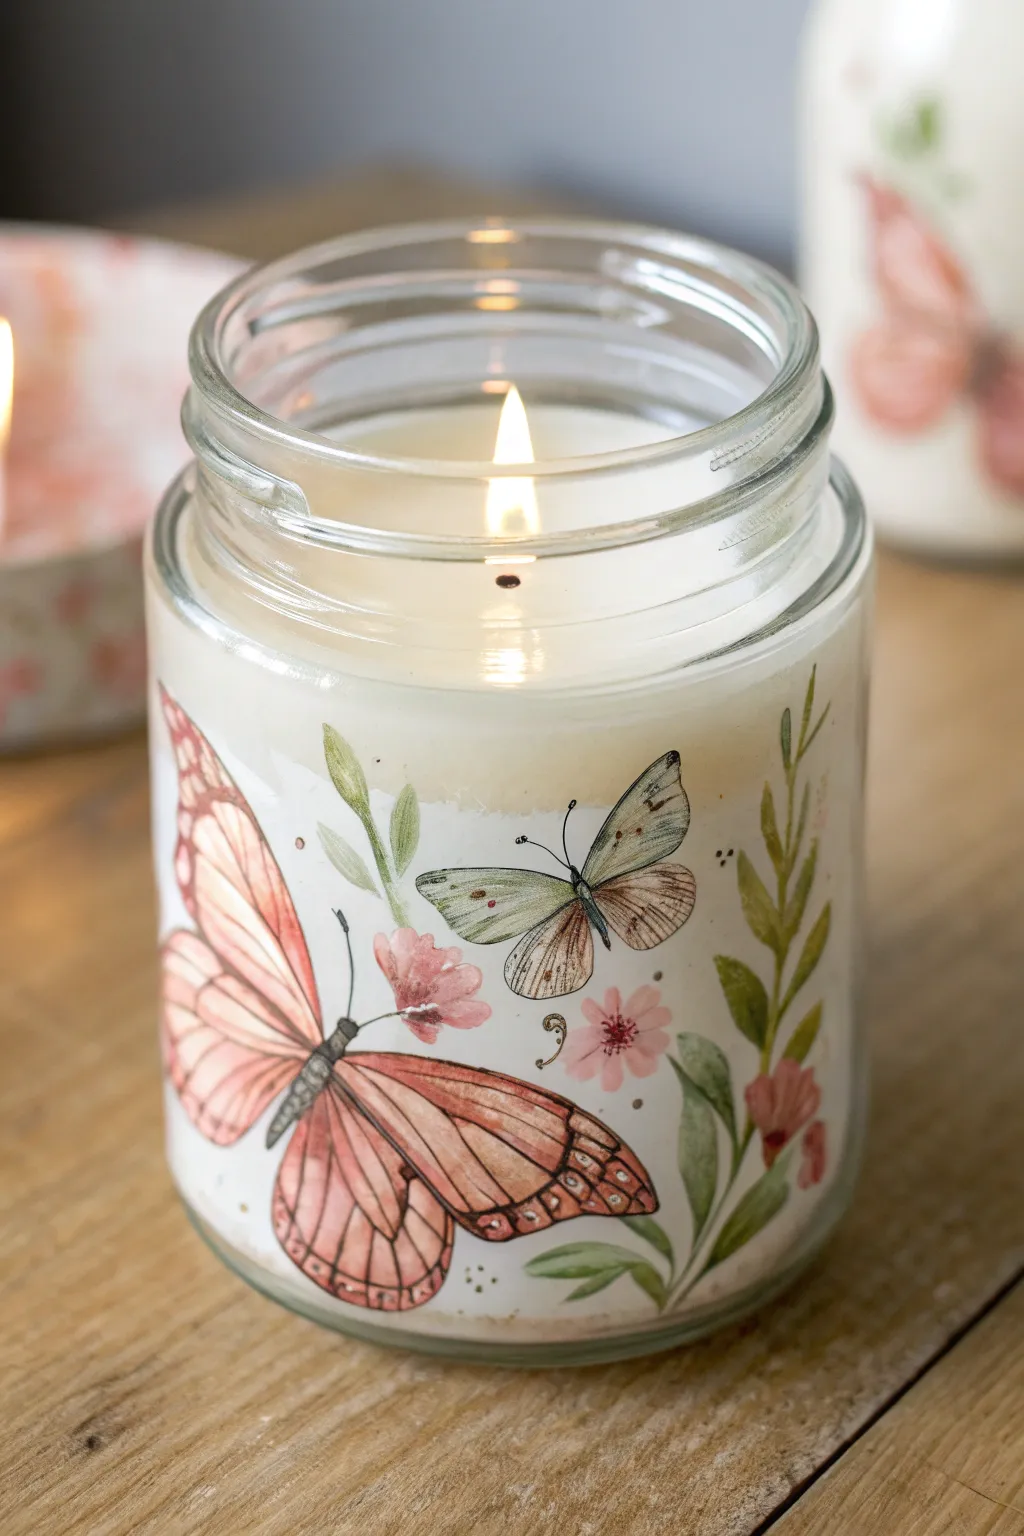
Transform a plain glass candle jar into a vintage-inspired piece of home decor featuring delicate butterflies and botanical sprigs. This project uses a clever decoupage technique on glass to achieve that lovely, hand-painted illustrative look without requiring advanced painting skills.
Step-by-Step Guide
Materials
- Clean glass candle jar (recycled or new)
- White tissue paper or rice paper
- Mod Podge (dishwasher safe or gloss formula)
- Soft flat paintbrush (synthetic bristles)
- Small detail scissors
- Printer (laser works best) or butterfly motif napkins
- Rubbing alcohol
- Cotton pads
- Acrylic sealer spray (optional)
- Sponges or daubers
Step 1: Preparation and Design
-
Clean surface:
Begin by removing any existing labels from your glass jar. Once the bulk is removed, wipe the entire outer surface with rubbing alcohol on a cotton pad to remove oils and adhesive residue, ensuring a pristine base for adhesion. -
Select motifs:
Choose your imagery. You can use thin paper napkins with butterfly prints or print your own vintage illustrations onto white tissue paper. If printing, tape a piece of tissue paper to a standard sheet of cardstock to feed it through your printer. -
Cut designs:
carefully cut out your butterflies, flowers, and leaf sprigs. You don’t need to cut exactly on the line; leaving a tiny border can sometimes help blend the image later, but for this specific look, try to trim fairly close to the edges of the wings and petals. -
Plan layout:
Before applying any glue, lay your cutouts on a table. Experiment with the arrangement—perhaps a large pink butterfly as the focal point, with smaller moths and floral stems curving upwards to frame it.
Wrinkled Wings?
If tissue paper wrinkles while gluing, don’t panic. Dip your finger in water and gently rub the wrinkle in a circular motion to smooth it out before the glue sets.
Step 2: Applying the Base
-
Initial glue layer:
Load your flat brush with a thin, even layer of Mod Podge. Paint a patch on the glass where your first large butterfly will go. Keep the glue layer smooth to avoid visible ridges. -
Placement:
Gently pick up your butterfly cutout and place it onto the wet glue. I find using tweezers helps here to avoid transferring oils from my fingers to the sticky surface. -
Smoothing:
Starting from the center of the butterfly, gently tap or brush outwards to flatten the paper. Be incredibly gentle with wet tissue paper as it tears easily. You want to push out distinct air bubbles without stretching the image.
Pro Tip: Vintage Tint
For an aged look, steep your tissue paper in strong tea and let it dry before printing or painting your design. It gives the background a warm, antique parchment glow.
Step 3: Creating the Composition
-
Adding botanicals:
Move on to your floral elements. Apply glue to the glass below and around the main butterfly, then press down your stems and leaves. Overlapping a leaf slightly over a wing can add depth, but generally, try to keep elements distinct. -
Smaller details:
Add the smaller moth or secondary butterfly. Position it somewhat higher or off-center to create visual balance. Ensure the antennae are glued down flat, as these tiny details tend to lift. -
Sealing the paper:
Once the paper is positioned and relatively dry to the touch (about 10-15 minutes), apply a top coat of Mod Podge directly over the artwork. Use long, sweeping strokes with a very soft brush to minimize texture lines. -
Creating the background:
To achieve the milky, semi-opaque look seen in the photo, sponge a very thin layer of white acrylic paint mixed with Mod Podge around the edges of your images, feathering it out into the clear glass. This helps hide the paper edges.
Step 4: Finishing Touches
-
Clean edges:
Check the rim and the very bottom of the jar. If any glue or paint has strayed where you don’t want it, scrape it off gently with a damp cloth or your fingernail while it is still somewhat pliable. -
Curing:
Allow the jar to dry completely. This usually takes at least 24 hours. Placing it in a warm, dry spot helps the decoupage medium harden properly. -
Final seal:
For extra durability, especially if you handle the candle often, you can spray a clear acrylic sealer over the entire outside of the jar. This protects against moisture and fingerprints. -
Insert candle:
If you decorated an empty jar, you can now pour your own wax or simply drop in a pillar candle or tea light to illuminate your work.
Light your candle and enjoy the warm glow illuminating your handcrafted butterfly garden.
Ocean Waves and Bubble Motifs
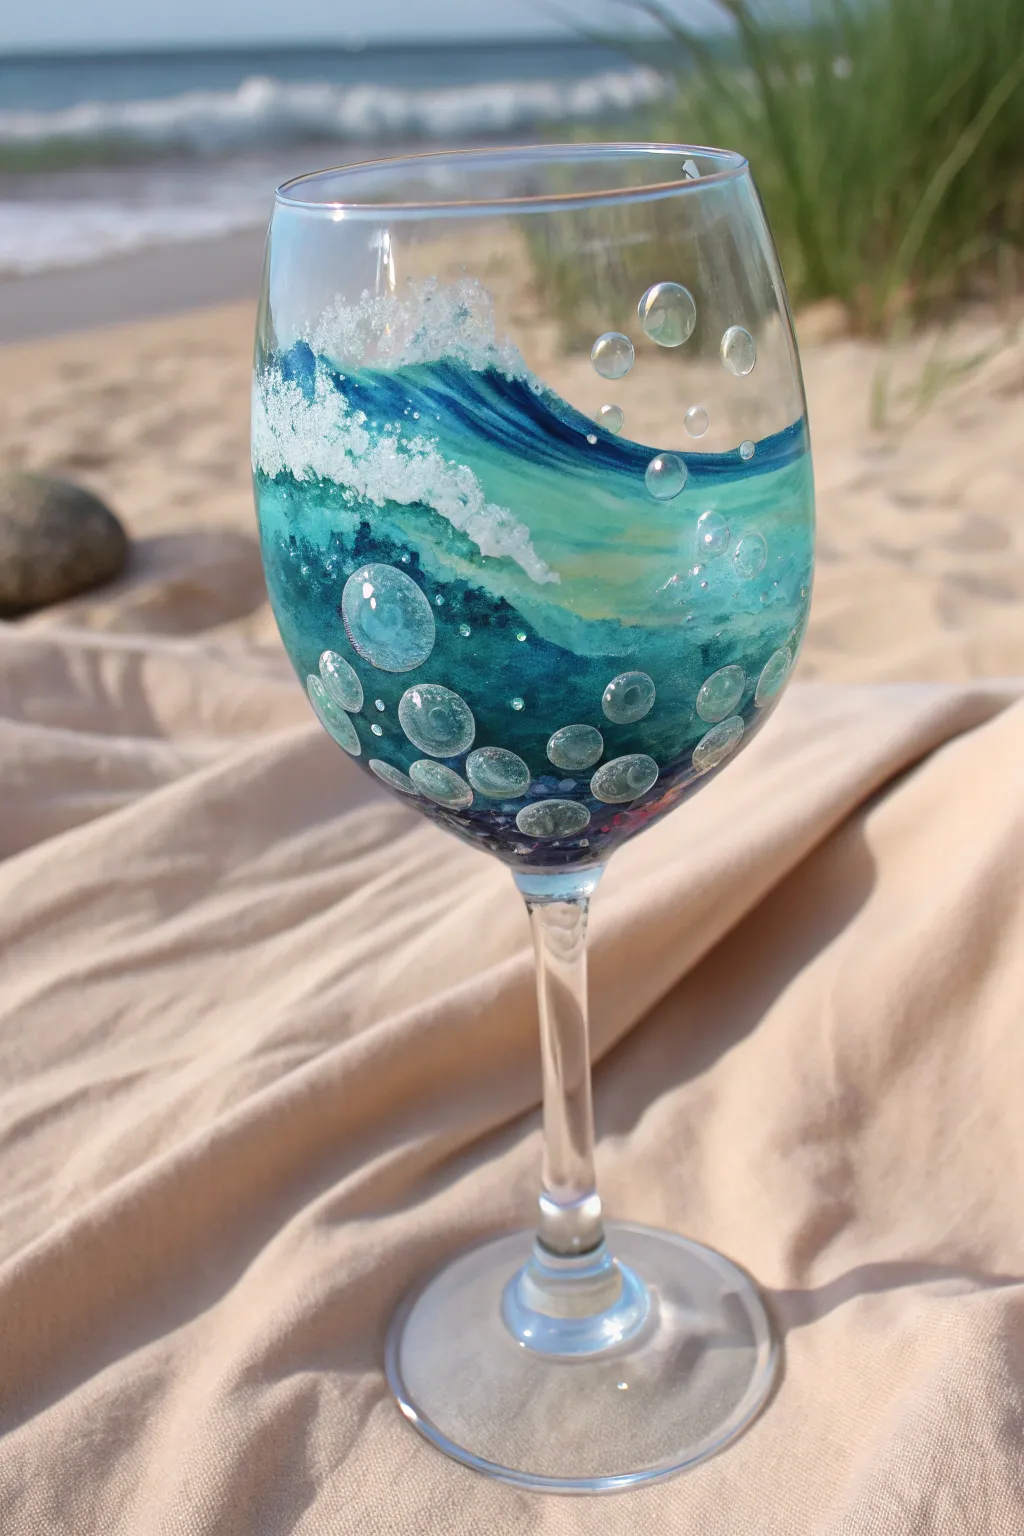
Capture the rhythm of the ocean with this stunning hand-painted wine glass featuring crashing waves and dimensional bubbles. The translucent teal and deep blue hues blend seamlessly to create an underwater effect that looks beautiful whether the glass is full or empty.
Detailed Instructions
Materials
- Large clear wine glass
- Rubbing alcohol and cotton pads
- Pebeo Vitrea 160 or similar glass paints (Turquoise, Deep Blue, Emerald Green, White)
- Gloss medium or clear dimensional glass paint
- Soft synthetic flat brushes (size 4 or 6)
- Fine liner brush (size 0 or 00)
- Small sea sponge or cosmetic wedge
- Palette for mixing bubbles
- Oven for curing (if using bake-on paints)
Step 1: Preparation & Base Wave
-
Clean the Surface:
Before painting, wipe the entire outer surface of the wine glass with rubbing alcohol on a cotton pad. This removes oils and fingerprints that could prevent the paint from adhering properly. -
Map the Wave Line:
Using your flat brush and a small amount of Turquoise paint, lightly sketch a flowing, diagonal line across the upper third of the glass. This will serve as the crest of your wave. -
Apply the Mid-Tone:
Start painting below your wave line with the Turquoise. Use horizontal, sweeping strokes to cover the middle section of the bowl, but leave the paint somewhat translucent rather than opaque. -
Deepen the Depths:
While the turquoise is still slightly wet, blend Deep Blue into the bottom third of the glass bowl. Brush upward into the turquoise to create a seamless gradient from dark ocean depths to lighter, clearer water.
Step 2: Creating Texture & Foam
-
Add Green Accents:
Mix a tiny drop of Emerald Green into your Turquoise. Apply this vibrant shade just under the wave crest to simulate the sun hitting the water through the lifting wave. -
Sponge the Foam:
Dip a small piece of sea sponge into White glass paint. Dab off the excess on a paper towel until it’s almost dry, then gently stipple it along the top edge of your wave line to create a frothy crashing effect. -
Extend the Spray:
Lightly drag the sponge downward in a few spots from the white crest into the blue water. This mimics the churn of the foam mixing into the wave below. -
Refine the Crest:
Using the liner brush and thick white paint, add solid, sharp highlights to the very top edge of the foam to make the wave look like it is breaking freshly.
Fixing drips
If paint drips down the curve, don’t wipe it yet. Wait for it to dry slightly until tacky, then carefully lift it off with a craft knife or razor blade for a clean removal.
Step 3: Painting the Bubbles
-
Outline Large Bubbles:
Once the base background is dry to the touch, mix a very pale blue-white. Use your liner brush to paint thin circles of varying sizes scattered across the dark blue bottom section. -
Add Dimension:
Fill the center of each bubble with clear medium or a very watered-down gloss varnish. This keeps the center transparent, allowing the dark blue background to show through like a real bubble. -
Highlight the Spheres:
On the upper left curve of each bubble, paint a tiny crescent of opaque white. I find this simple reflection instantly makes the circle look like a sphere. -
Add Lower Reflections:
Paint a softer, thinner crescent reflection on the bottom right of each bubble to complete the 3D effect. -
Create Tiny Carbonation:
Use the tip of your liner brush or a toothpick to dot tiny white specks around the larger bubbles and near the wave crest, suggesting fizz and movement. -
Add Surface Bubbles:
Paint a few sporadic bubbles floating above the wave line on the clear glass, using just the white outline and highlight technique so they look airy.
Add 3D texture
Mix clean fine sand or crushed clear glass beads into the white foam paint before applying. This adds a gritty, realistic texture to the breaking wave crest.
Step 4: Finishing Touches
-
Dry Check:
Hold the glass up to a light source to check for any translucent spots in the dark blue area that need a second coat for depth. -
Clean the Rim:
Use a damp cotton swab to ensure the top 2cm of the rim are completely free of paint for comfortable drinking. -
Cure the Paint:
Follow the manufacturer’s instructions for your specific paint. Most glass paints require air drying for 24 hours, followed by baking in a home oven to make the design dishwasher safe.
Now you have a beautiful piece of functional art that brings the calming vibes of the beach to your table setting


Fish Scales With Metallic Outlines
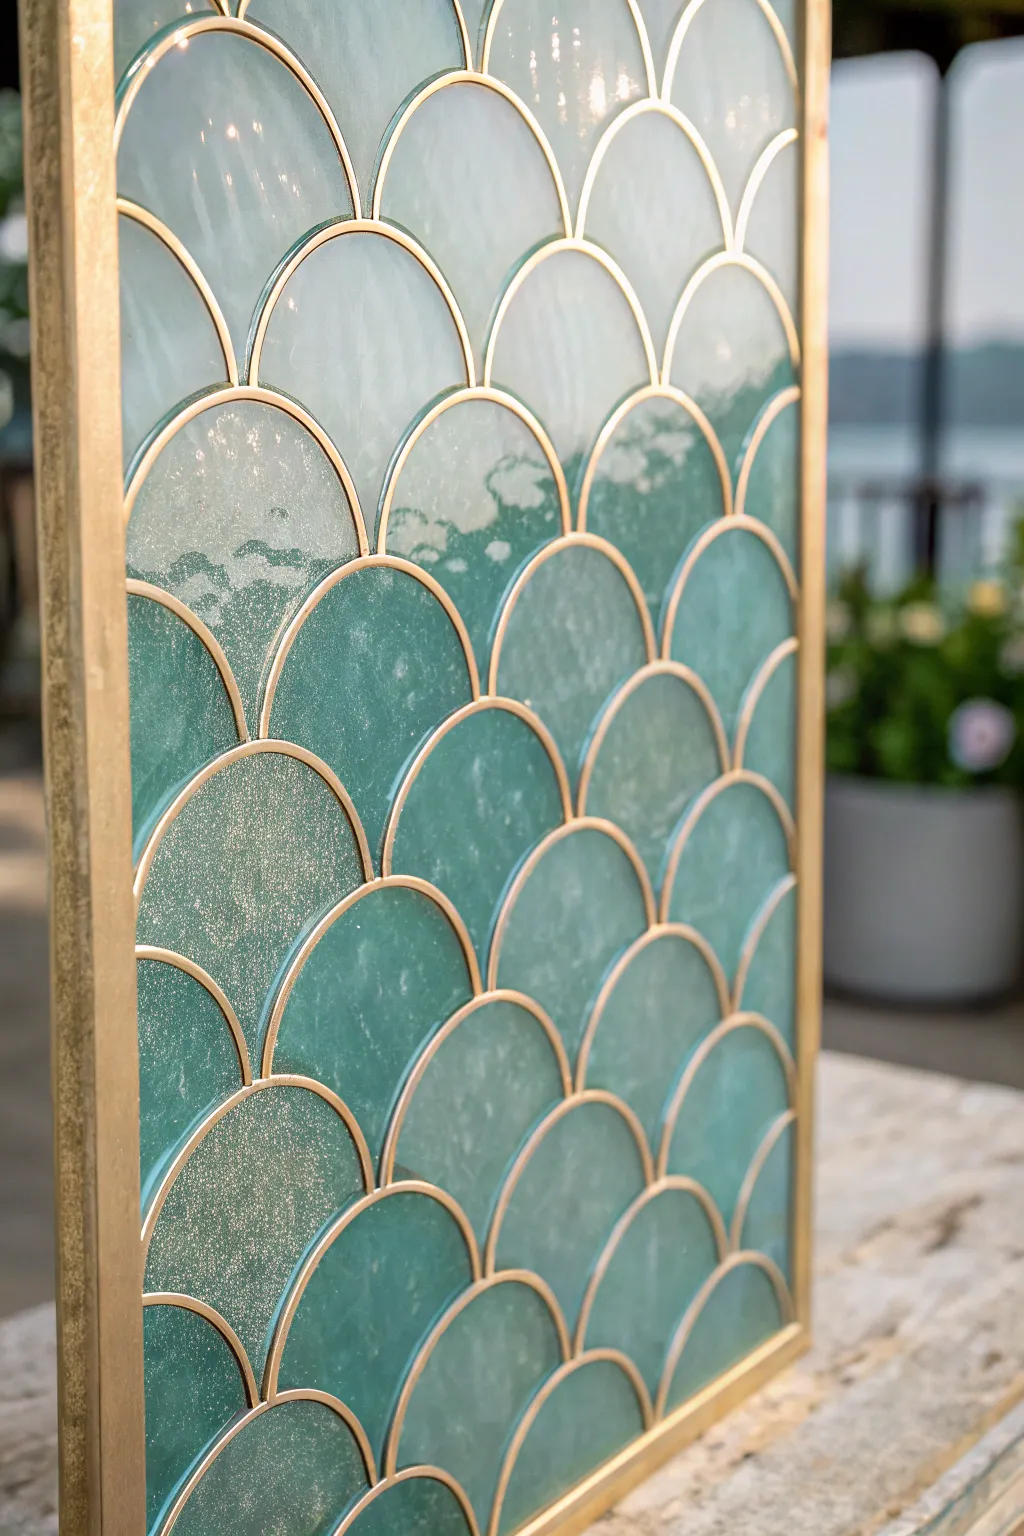
Capture the shimmering elegance of mermaid scales with this sophisticated glass painting project. By combining translucent teal glazes with raised metallic outlining, you’ll create a structured yet organic piece that glows beautifully when backlit.
How-To Guide
Materials
- Picture frame with glass insert (approx. 11×14 inches)
- Pebeo Cerne Relief outliner (Gold)
- Gallery Glass or Pebeo Vitrail glass paints (Turquoise, Emerald Green, White, Clear Medium)
- Rubbing alcohol
- Lint-free cloth
- Paper template of a scallop/fish scale pattern
- Painter’s tape
- Fine detail paintbrush
- Toothpicks
- Gold spray paint (for the frame)
Step 1: Golden Framework
-
Prep the frame:
Remove the glass and backing from your frame. Use gold spray paint to coat the frame itself so it matches your eventual metallic leading perfectly. Set this aside to dry. -
Clean the surface:
While the frame dries, thoroughly clean both sides of the glass pane with rubbing alcohol and a lint-free cloth. Any fingerprints or oil left on the glass will prevent the paint from adhering properly. -
Secure the template:
Select a fish scale or scallop pattern template that fits your glass size. Position it underneath the glass and secure it firmly with painter’s tape so it won’t shift while you work.
Leaking Lines?
If paint bleeds underneath your gold lines, wait for it to dry. Use a craft knife to slice the bleed, scrape away the excess, and touch up the gold line.
Step 2: Creating the Relief
-
Test flow:
Before touching the glass, squeeze a small amount of the gold Cerne Relief outliner onto a paper towel. You want to ensure the nozzle is clear and you have a feel for the pressure needed for a consistent line. -
Start outlining:
Begin piping the scallop shapes at the top left corner of the glass. Hold the tube like a pencil, keeping the tip slightly elevated above the glass surface to let the line fall naturally into place. -
Connect the scales:
Work row by row, ensuring every intersection point connects fully. Creating closed shapes is crucial—if there are gaps, the liquid glass paint you add later will leak into neighboring scales. -
Clean mistakes:
If you smudge a line, don’t panic. Let it dry for a few minutes until it is tacky, then gently lift it off with a craft knife or toothpick and redo that section. -
Dry deeply:
Allow the metallic outlines to cure completely. I prefer to leave this overnight, as the outliner needs to be hard enough to act as a dam for the paint.
Natural Variation
Don’t overmix your colors. Let the white and teal swirl slightly in the scales rather than blending fully for a realistic agate or sea-glass effect.
Step 3: Glass Glazing
-
Mix your palette:
Prepare three variations of your teal color. Mix pure Turquoise, a Turquoise/Green blend, and a lighter, milky version by adding a drop of White or Pearl medium to the Turquoise. -
Apply the first tone:
Load a fine brush or dropper with your darkest teal mixture. Fill random scales throughout the pattern, carefully nudging the paint right up to the gold barrier without going over it. -
Add variance:
Switch to your lighter, milky teal mixture. Fill adjacent scales, ensuring you don’t place too many identical shades next to each other to maintain visual interest. -
Create texture:
For a ‘frosted’ look on certain scales, dab the wet paint gently with a clean, dry stiff brush or a sponge. This breaks the surface tension and creates a textured, semi-opaque finish. -
Pop bubbles:
Check your work for tiny air bubbles, which are common with glass paint. Use a toothpick to pop them immediately before the paint begins to skin over. -
Add transparency:
Fills remaining empty scales with a mix heavily diluted with Clear Medium. This creates highly transparent sections that will let the most light through. -
Final cure:
Let the panel dry flat on a level surface for at least 24 to 48 hours in a dust-free area. Reassemble the glass into your gold frame once fully cured.
Place your finished piece near a window or light source to see the stunning depth of the colors come to life
Peacock Feather Feature Piece
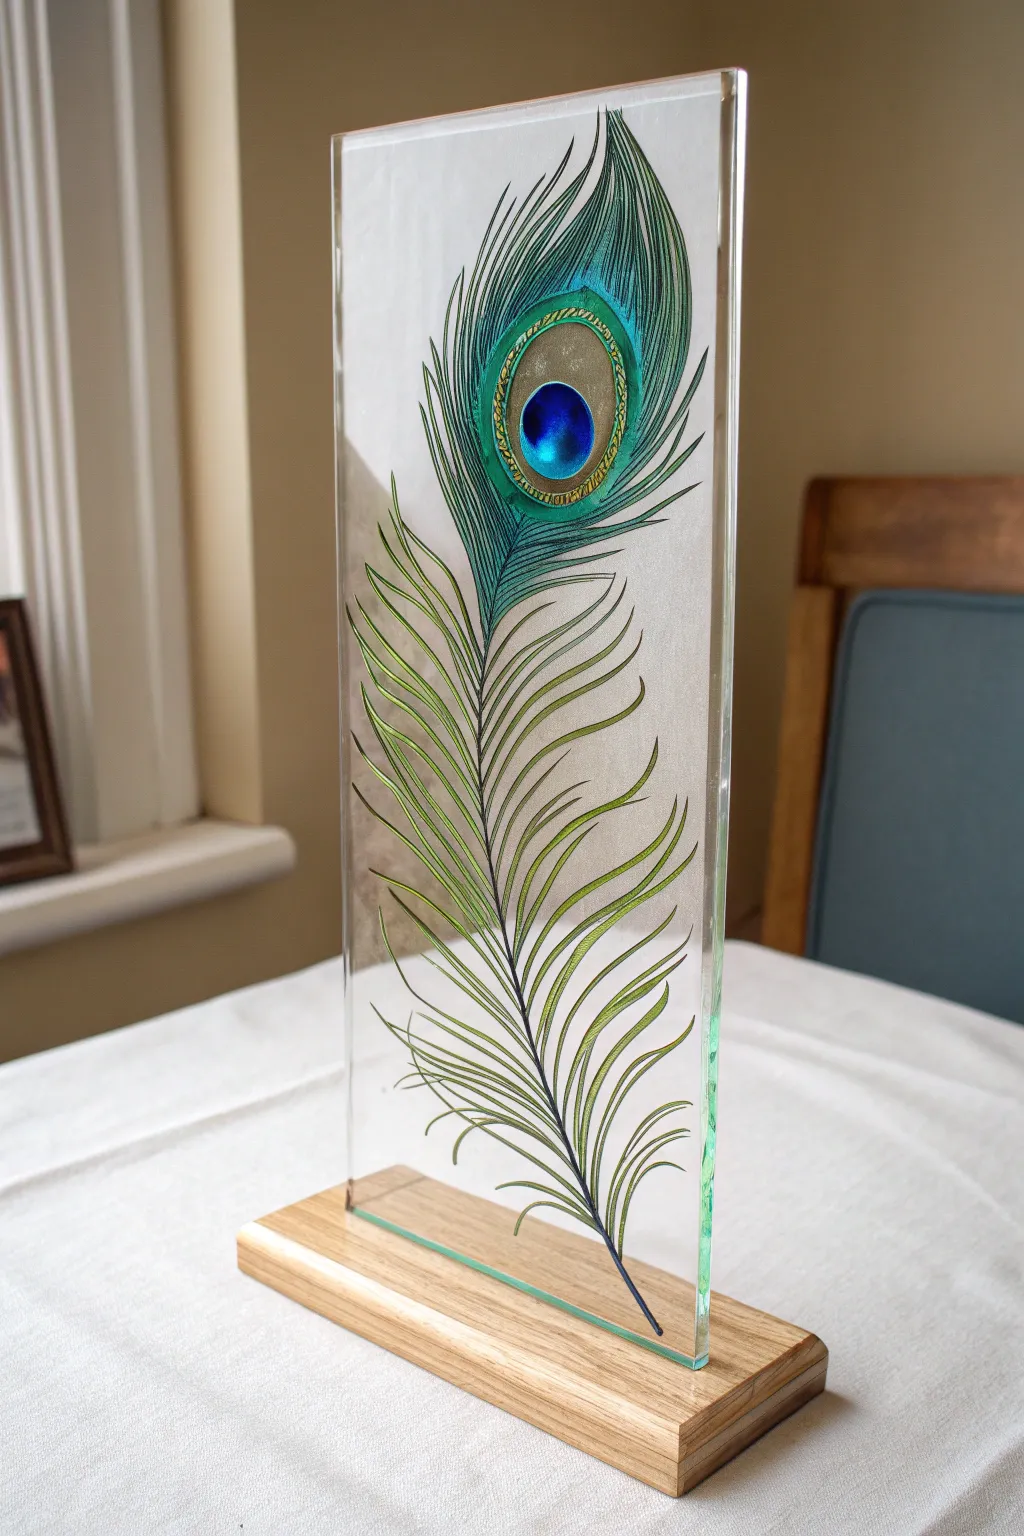
Capture the iridescent beauty of a peacock feather with this elegant glass standing display. The mix of sharp outlines and translucent jewel-toned fills creates a stunning play of light that mimics the natural luster of the feathers.
Detailed Instructions
Materials
- Rectangular clear glass pane (approx. 5×12 inches)
- Wooden display base (grooved to fit glass thickness)
- Glass outliner paste (black or dark pewter)
- Solvent-based or water-based glass paints (Emerald Green, Turquoise, Royal Blue, Gold, Chartreuse)
- Fine detail paintbrush (size 0 or 00)
- Rubbing alcohol and paper towels
- Printed peacock feather template
- Masking tape
- Toothpicks or cotton swabs
- Small mixing palette
Step 1: Preparation & Outlining
-
Clean surface:
Begin by thoroughly cleaning your glass pane with rubbing alcohol to remove any fingerprints or oils. This ensures the outliner and paint adhere properly without peeling later. -
Secure template:
Place your printed peacock feather pattern underneath the glass. Center it vertically, leaving a bit of clear space at the bottom where the glass will slot into the wooden base. Secure the design and glass together with masking tape. -
Trace the spine:
Using the black glass outliner, start by drawing the central spine (rachis) of the feather. Apply steady, even pressure to the tube to keep the line thickness consistent. -
Drawing the eye:
Move to the top and carefully outline the iconic ‘eye’ shape. Create two ovals: the inner deep blue circle and the surrounding gold ring. Keep your hand steady and rest your wrist on a book if needed for stability. -
Outline the barbs:
Work your way down the feather, outlining the wispy barbs that branch off the spine. Use quick, confident strokes and lift the nozzle at the end of each stroke to create a tapered, fine point. -
Upper detail:
Don’t forget the dense collection of short flues surrounding the eye of the feather. These lines should be very fine and closely spaced. -
Dry the outline:
Allow the outliner to dry completely according to the manufacturer’s instructions. I usually let this sit for at least an hour to ensure the barriers are hard enough to contain the liquid paint.
Fixing Air Bubbles
Tiny bubbles can ruin the smooth look of the paint. Pop them immediately while wet using a sharp pin, or lightly blow on the surface to release trapped air.
Step 2: Painting & Finishing
-
Paint the eye center:
Dip your fine brush into the Royal Blue glass paint. Drop the paint into the center oval of the eye, nudging it gently to the edges of the outline. Let the paint naturally level itself for a smooth finish. -
Add the gold ring:
Fill the ring surrounding the blue center with metallic Gold glass paint. If the gold feels too opaque, you can dilute it slightly with the appropriate thinner to let more light pass through. -
Create the halo:
For the large teal section surrounding the eye, mix a little Emerald Green with Turquoise. carefully flood this area, ensuring no gaps remain against the black outline. -
Painting the barbs:
For the individual wispy strands, you’ll need a steady hand. Load your brush lightly with Chartreuse or a light yellow-green. Paint the interior of the longer barbs. -
Gradient effect:
While the green is still wet on the barbs, add a tiny touch of darker green near the spine and blend it outward. This gives the feather depth and dimension rather than a flat color. -
Touch up lines:
If you accidentally paint over the black outline, wipe it instantly with a clean toothpick or wait for it to dry and re-apply a thin layer of outliner on top. -
Top section gradients:
For the dense top section of the feather, use short strokes of the Emerald Green, blending into the transparency of the glass at the very tips. -
Dry completely:
Place the glass in a dust-free area to cure. This often takes 24 hours depending on the paint brand. Do not touch the surface while it feels tacky. -
Clean edges:
Once fully cured, gently clean any smudges from the unpainted glass areas using a cotton swab dipped in alcohol. -
Display:
Insert the painted glass panel into the groove of your wooden base. Ensure it fits snugly so it stands upright securely.
Add Real Sparkle
While the blue paint in the ‘eye’ is wet, sprinkle a tiny pinch of extra-fine iridescent glitter into the center. It catches the sun beautifully.
Place your finished piece near a window to let the sunlight illuminate the vibrant colors
Geometric Mandala Window Art
Bring the serene beauty of stained glass into your home with this intricate mandala project. Using specialized glass paints and outliners, you’ll create a sun-catching masterpiece featuring soothing pastels and metallic accents that glow in natural light.
How-To Guide
Materials
- Picture frame with glass insert (approx. 16×20 inches recommended)
- Glass outliner paste (silver or lead color)
- Glass paints (solvent or water-based): light pink, magenta, purple, teal, sky blue, gold
- Printed mandala pattern (sized to fit your frame)
- Masking tape
- Rubbing alcohol
- Cotton pads or lint-free cloth
- Small round paintbrush (size 0 or 2)
- Toothpicks
- Paper towels
Step 1: Preparation & Outlining
-
Disassemble and Clean:
Remove the glass pane from your picture frame carefully. Clean both sides thoroughly using rubbing alcohol and a lint-free cloth to remove any fingerprints, grease, or dust, which can prevent the paint from adhering properly. -
Secure the Pattern:
Place your printed mandala pattern on a flat work surface. Lay the clean glass directly over the pattern and secure the edges with masking tape to ensure the paper doesn’t shift while you work. -
Test the Outliner:
Squeeze a small amount of glass outliner onto a scrap piece of paper or paper towel. Practice creating steady lines and check for air bubbles before moving to your actual glass piece. -
Trace Main Lines:
Begin tracing the design with the metallic outliner paste. Hold the tube like a pen but lift the tip slightly off the glass, letting the line fall into place rather than dragging it. I find it easiest to start from the center and work outward to avoid smudging wet lines with my hand. -
Complete the Grid:
Continue tracing all the geometric lines, ensuring each intersection connects fully. Any gaps in the lines will cause the liquid paint to bleed into neighboring sections later. -
Correct Mistakes:
If you make a wobbly line, don’t panic. Let it dry slightly, then use a toothpick or a craft knife to lift the mistake off the glass cleanly before redoing the line. -
Let it Cure:
Allow the outline to dry completely. This usually takes between 2 to 24 hours depending on the brand, so check the manufacturer’s instructions.
Step 2: Painting & Filling
-
Prepare the Paints:
Shake or stir your glass paints gently to mix the pigment without creating bubbles. If you are mixing custom shades, do this on a palette beforehand. -
Fill Central Petals:
Start with the central flower motif. Load a small brush with pink paint and drop the color into the center of a petal shape. Use the brush tip to gently push the paint toward the outlines without painting over them. -
Add Metallic Accents:
Identify the triangular sections intended for gold. Using a clean brush, apply the gold glass paint. These metallic paints are often more opaque, so ensure you apply an even layer to avoid streaks. -
Create Gradients:
For the larger curved sections, you can create subtle gradients. Apply teal on one end and light blue on the other, then gently swirl them together where they meet using a clean toothpick or brush tip. -
Color the Outer Rings:
Work your way to the outer rings using alternating colors like purple and light blue. Apply the paint generously enough so it self-levels but not so much that it spills over the relief lines. -
Pop Air Bubbles:
Keep a sharp toothpick handy as you paint. If you spot tiny bubbles in the wet paint, pop them immediately or drag them to the edge to ensure a smooth, glass-like finish. -
Corner Details:
Fill the corner decorative elements with the lighter pastel pink and white or clear medium to keep the design feeling airy and open. -
Final Drying Phase:
Once all sections are filled, leave the glass flat in a dust-free area to dry. Glass paints often take 24 to 48 hours to cure fully and harden.
Bleeding Lines?
If paint leaks under a dried outline, wait for it to dry completely. Then, use a craft knife to gently scrape away the excess paint without scratching the glass underneath.
Step 3: Assembly
-
Clean Backside:
Once the paint is rock hard, flip the glass over and give the unpainted side a quick wipe with glass cleaner to remove any residue from the template tape. -
Reframe:
Place the glass back into the frame. Since this is a transparent piece intended for a window, do not put the cardboard backing back in; secure the glass using just the frame clips or a small bead of clear silicone if untempered.
Frosted Effect
For a textured look, dab a sponge with ‘frosting medium’ on the unpainted back side of the glass. This adds privacy while still letting the colored light shine through.
Place your framed mandala on a sunny windowsill or hang it against the glass to enjoy the colorful light display all day long
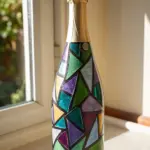
Color-Blocked Modern Bottles
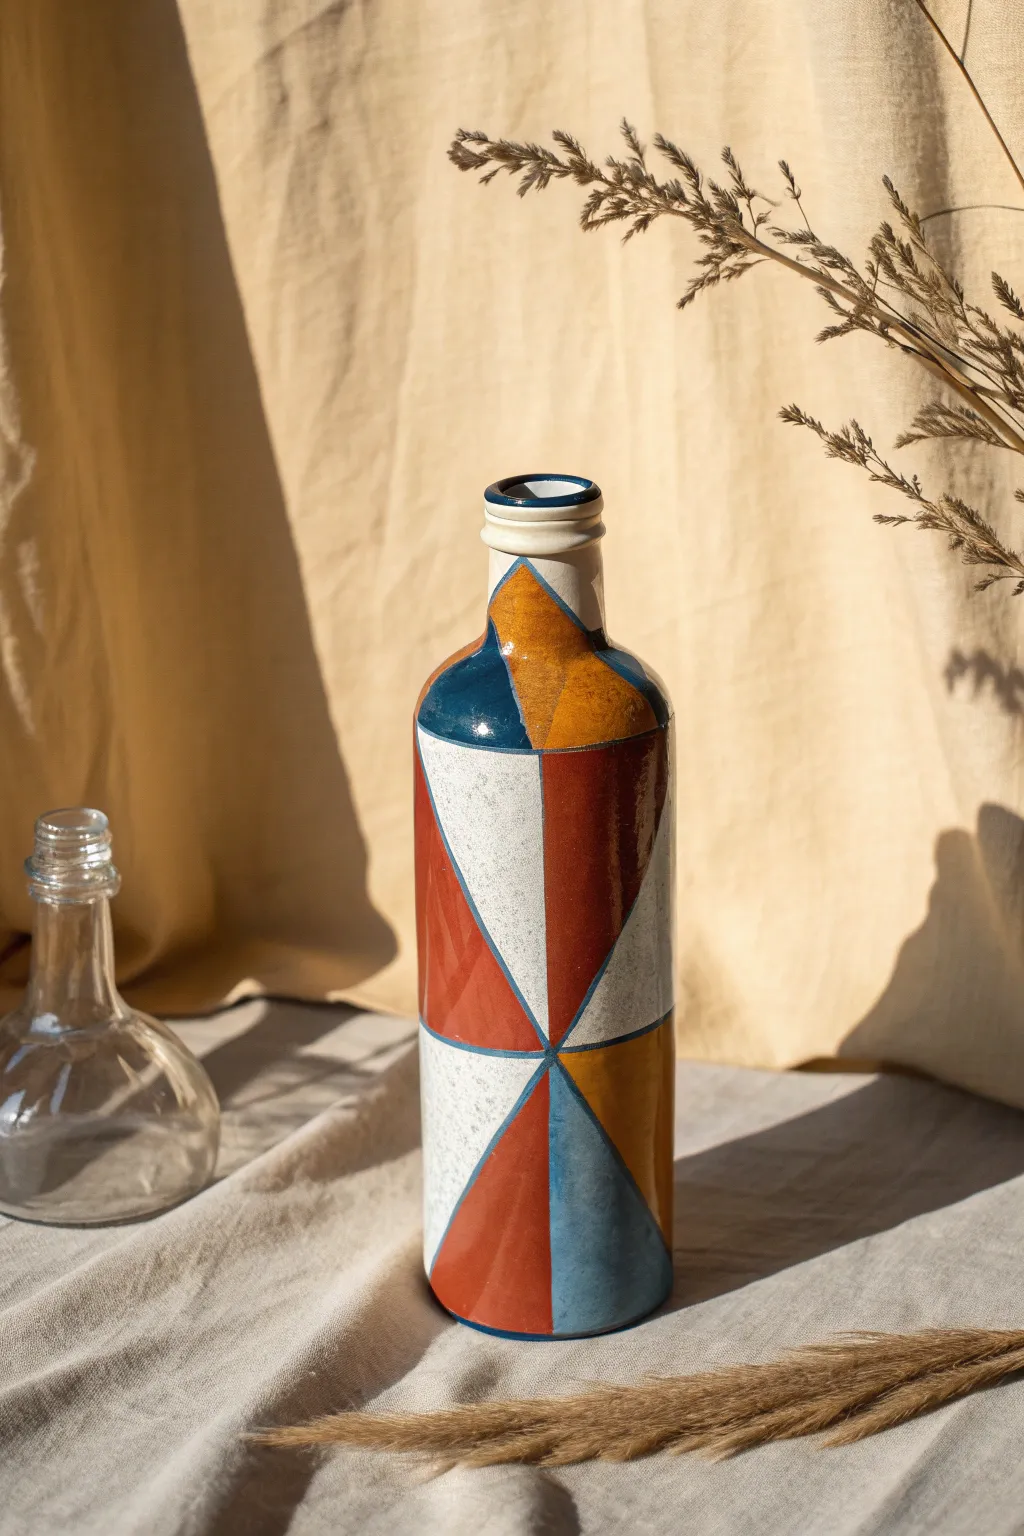
Transform a simple glass bottle into a striking piece of modern decor with this geometric color-blocked design. Using warm terracotta, deep blue, mustard, and crisp white, you’ll create a sophisticated pattern that looks like high-end ceramic glaze.
Step-by-Step Guide
Materials
- Clean glass bottle (wine or spirit bottle shape)
- Rubbing alcohol
- Cotton pads
- Peel-off liquid masking tape or fine-line tape (1-2mm width)
- Multi-surface acrylic paints or glass paints (Terracotta, Mustard Yellow, Deep Navy, Light Blue, White)
- Flat shader brushes (small and medium sizes)
- Small round detail brush
- Palette for mixing
- Spray sealant (gloss or matte finish)
- Craft knife
Step 1: Preparation & Mapping
-
Clean surface:
Thoroughly wash your glass bottle with warm soapy water to remove any labels and adhesive residue. Dry completely. -
Degrease glass:
Wipe the entire exterior surface with rubbing alcohol on a cotton pad. This step is crucial for paint adhesion, so don’t skip it. -
Plan the grid:
Visualize the bottle divided into vertical sections. For this specific look, imagine a central point on the bottle’s tall face where all the triangles meet, like a pinwheel. -
Apply masking lines:
Use your fine-line tape or liquid masking fluid to draw the geometric boundaries. Start by creating a large ‘X’ shape that spans the main body of the bottle, centered vertically. -
Divide the spaces:
Add vertical and horizontal lines intersecting the center of your ‘X’ to create smaller triangular sections. Extend these lines up toward the neck and down to the base to create the exploded geometric effect. -
Handle the neck:
Wrap a line of tape around the base of the neck where it meets the shoulder. Create a few random angular shapes on the upper neck to continue the fragmented style. -
Seal the tape:
Press down firmly on all tape edges with your fingernail or a craft stick to prevent paint bleed-under. If using liquid mask, let it dry completely until it’s transparent.
Tape Removal Trick
Pull the tape away at a 45-degree angle while the paint is still slightly wet. If paint dries fully over the tape, it might peel off in chunks.
Step 2: Painting the Blocks
-
Start with white:
Select two large triangular sections opposite each other to be white. Sponge or brush on a thin layer of white glass paint. This often needs the most coats for opacity. -
Apply the rusted red:
Fill in the large vertical rectangular sections or tall triangles with your terracotta or rust red shade. Use smooth, vertical strokes to mimic a ceramic glaze finish. -
Add deep blue accents:
Paint the smaller geometric shards, particularly near the shoulder and base, with the deep navy blue. This dark color grounds the design. -
Paint mustard tones:
Fill remaining triangular gaps with the mustard yellow paint. The warmth of this color balances the cool blues and crisp white. -
Dry and repeat:
Allow the first layer to dry for about 20-30 minutes. You will likely need 2-3 coats for solid, opaque coverage, especially on the lighter colors. -
Detail the rim:
Paint the very top lip of the bottle with the deep navy blue to give it a finished, professional ceramic look. -
Create texture (Optional):
For the speckled look seen in the white sections, dip a stiff bristle brush or toothbrush into slightly watered-down gray or blue paint and gently flick speckles onto the dried white areas.
Ceramic Look
Mix baking soda into your acrylic paint before applying. This creates a grainy, matte texture that perfectly mimics terra cotta pottery.
Step 3: Finishing Touches
-
Remove masking:
Carefully peel away the tape or rub off the liquid mask while the final coat of paint is tacky, not bone dry. This helps keep the edges crisp. -
Clean up lines:
If any paint bled under the tape, use a craft knife or a toothpick dipped in water (if acrylic) to gently scrape away the excess for a sharp line. -
Fill the gaps:
The negative space left by the tape creates the ‘grout’ lines. Leave them clear for a glass effect, or paint these thin lines silver or gold with a fine liner brush for definition. -
Cure or seal:
Follow your specific paint instructions for curing. Many glass paints require baking in a home oven (usually 350°F for 30 mins) to become permanent and dishwasher safe.
Place your new vase near a sunny window where the light can catch the colors and unpainted lines
Frosted Look With Painted Details
Transform a plain glass vessel into an ethereal piece of decor that captures the beauty of winter frost meeting spring growth. This project combines a specialized frosted texture medium with delicate botanical painting for a sophisticated, icy finish.
Step-by-Step
Materials
- Clear glass bottle with a narrow neck
- Rubbing alcohol and cotton pads
- Frost effect spray paint or frost glass medium
- Sea sponge (natural texture)
- Fine liner brush (size 0 or 00)
- Small flat brush or filbert brush (size 2 or 4)
- Acrylic enamel paints (Sage Green, Olive Green, White, Brown)
- Palette or small plate
- Paper towels
- Sealant spray (matte finish)
Step 1: Preparation & Frosting
-
Clean the surface:
Before you begin, thoroughly clean your glass bottle with rubbing alcohol and a cotton pad. This removes invisible oils and fingerprints which are the main enemy of paint adhesion. -
De-lint the glass:
Wait until the alcohol has completely evaporated. Check the glass in good light to ensure no lint or dust particles remain, as these will get trapped under the frost layer. -
Prepare the frost medium:
You can use a frost effect spray for a very even coat, but to achieve the sugary, textured look in the photo, I prefer dabbing on liquid frost medium. Shake the bottle well before opening. -
Apply the first frost layer:
Dip a dampened sea sponge into the frost medium. Dab off the excess on a paper towel until the sponge is almost dry—this is crucial to avoid drips. -
Texture the glass:
Lightly pounce the sponge all over the bottle’s exterior. Focus on creating an organic, uneven texture rather than perfectly smooth coverage. Let this layer dry for about 15-20 minutes. -
Build opacity:
Apply a second layer of frost medium using the same dabbing technique. The goal is a semi-opaque finish where light can still pass through, but the glass isn’t clear.
Step 2: Painting the Botanicals
-
Mix the stem color:
On your palette, mix a small amount of Brown with a touch of Olive Green to create a woody, natural stem color. It should be thin enough to flow off a liner brush easily. -
Draft the main stems:
Using your fine liner brush, paint long, slender, curving lines rising from the bottom third of the bottle. Let them cross slightly for a natural arrangement. -
Add delicate branches:
From your main lines, pull out smaller, shorter twigs. Keep your hand loose and lift the brush at the end of the stroke to taper the lines to a fine point. -
Mix the large leaf color:
Blend White with a tiny drop of Sage Green. You want a very pale, almost translucent green that barely contrasts against the frost. -
Paint the pale leaves:
Using the flat or filbert brush, press down and lift up to create the larger, ghostly leaves attached to the central stem. One stroke is best to keep it sheer. -
Add darker foliage:
Switch to your Olive Green paint. With your small brush, paint the second variety of leaves near the bottom—these should be more defined and opaque than the pale ones. -
Detail the veins:
Once the green leaves are dry to the touch, use your liner brush and the thinned white or pale green mix to carefully draw fine vein lines inside the darker leaves. -
Create the buds:
Dip the very tip of your liner brush or a toothpick into brown paint. Dot tiny clusters at the ends of your thinnest twigs to simulate dried winter berries or buds. -
Refine with highlights:
Add extremely subtle white highlights to the tips of the buds and stems to give them dimension and make them pop against the frosted background.
Sponge Technique
Use a natural sea sponge rather than a synthetic kitchen sponge. The irregular holes create that authentic ‘ice crystal’ texture shown in the image.
Step 3: Finishing Touches
-
Cure the paint:
Allow the painted design to dry completely. Depending on your paint type, this usually takes at least 24 hours. Some enamels require oven baking, so check your bottle instructions. -
Seal the work:
To protect the delicate frost texture and your painting from scratches, spray the entire bottle with a clear, matte sealant in a well-ventilated area.
Level Up: Inner Glow
For a magical winter look, place a string of warm white micro-LED fairy lights inside the finished bottle to make the frost texture sparkle from within.
Place your new frosted vase near a window where the sunlight can filter through the chilly texture and illuminate your painted garden
Marbled Swirl Dip Effects on Vases
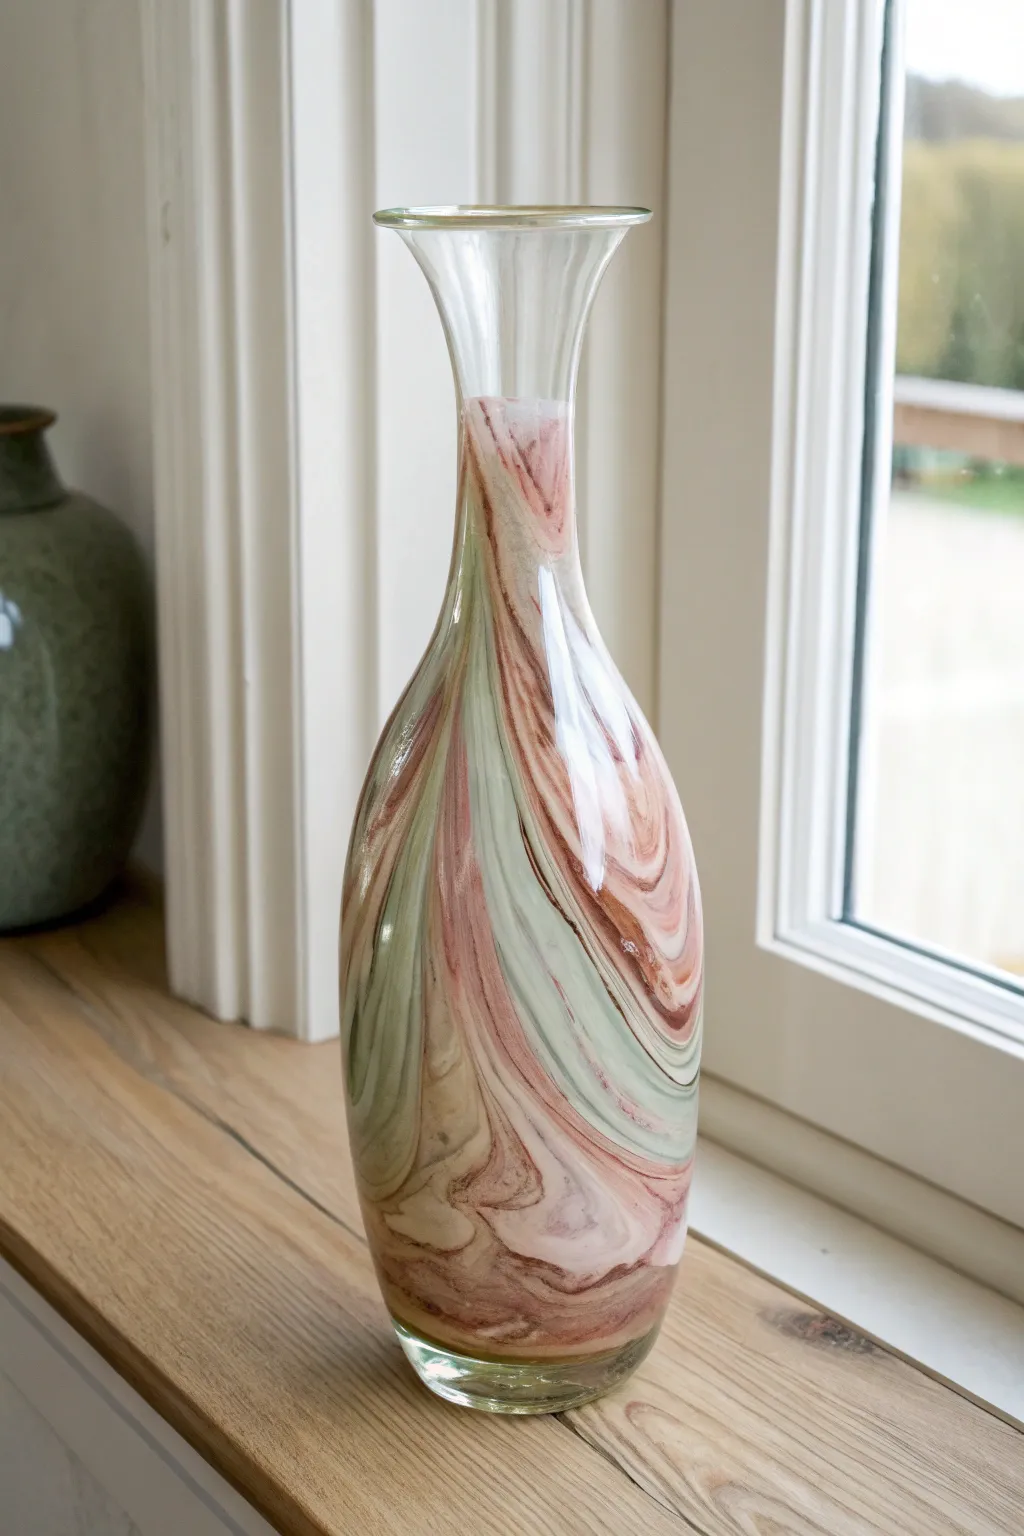
Transform a simple glass vessel into a high-end decor piece featuring swirls of sage green, terracotta, and cream. Using a dip-dye marbling technique, you can capture organic movement and unique patterns that look professionally blown.
Step-by-Step
Materials
- Tall clear glass vase with a narrow neck
- Large plastic bucket or bin (deep enough to submerge the vase)
- Enamel or multi-surface acrylic paints (Sage Green, Terracotta/Rose, Cream/White)
- Water (room temperature)
- Wooden skewer or toothpick
- Painter’s tape
- Paper towels
- Drop cloth or newspapers
- Clear acrylic sealer spray (gloss finish)
Step 1: Preparation
-
Clean the glass:
Wash your vase thoroughly with warm soapy water to remove any grease or manufacturing residue. Dry it completely with a lint-free cloth. -
Wipe with alcohol:
For extra adhesion, wipe the exterior surface down with rubbing alcohol and let it air dry for a moment. -
Mask the neck:
Looking at our inspiration piece, the marbling stops before the very top. Apply painter’s tape around the neck of the vase where the clear glass begins, creating a crisp line where you want the paint to stop. -
Prepare the workspace:
Lay down your drop cloth or newspapers. This process can get messy, so protect your surfaces well. -
Fill the dipping container:
Fill your large bucket with room temperature water. Ensure there is enough depth to dip the vase up to the tape line, but leave several inches at the top of the bucket to prevent displacement overflow.
Step 2: Creating the Marble Effect
-
Add the first color:
Gently drip your Cream or White paint onto the surface of the water. Avoid pouring heavily; let the drops spread out naturally on the surface tension. -
Layer the green:
Add drops of Sage Green paint into the center of the cream circles and sporadically around the edges. I find that alternating drop placement creates more interesting negative space. -
Add the accent color:
Finish by adding drops of Terracotta/Rose paint. This color is strong, so use slightly less of it than the base cream color to keep the earthy balance visible. -
Swirl the pattern:
Take your wooden skewer and very gently drag it through the paint on the water’s surface. Create figure-eights or simple lines to marble the colors together. Don’t overmix, or the colors will turn muddy. -
The dip method:
Hold the vase by the very top rim (above the tape). Slowly and steadily lower the vase vertically into the water. The paint film will adhere to the glass as it breaks the surface tension. -
Rotate while dipping:
As you lower the vase, rotate it slowly. This ensures the swirling pattern wraps seamlessly around the curves of the glass rather than just streaking vertically. -
Clear surface and remove:
Before pulling the vase out, blow on the water’s surface to push excess paint away from the area where you will withdraw the vase. This prevents double-dipping the pattern. -
Withdraw the vase:
Lift the vase straight up out of the clear spot in the water. Hold it steady over the bucket for a moment to let excess water drip off.
Temperature Matters
Use room temperature water. If the water is too cold, the paint creates a thick skin instantly; if too hot, it sinks. Ideally, test a scrap jar first.
Step 3: Finishing Touches
-
Initial dry:
Set the vase upside down on a paper towel or elevated drying rack. Let it sit for about 30 minutes until the paint is tacky but set. -
Remove the tape:
Carefully peel away the painter’s tape while the paint is still slightly soft. If you wait until it’s fully hard, you risk peeling up chunks of the dried marble design. -
Clean up edges:
If any paint seeped under the tape or splashed onto the clear neck, use a cotton swab dipped in rubbing alcohol or acetone to gently wipe it away for a perfect edge. -
Correct imperfections:
Check the bottom of the vase. If there are heavy drips of paint that ruin the stability, smooth them out or gently wipe them away before they harden completely. -
Full cure:
Allow the vase to dry completely for at least 24 hours. The thickest swirls of paint need time to harden fully. -
Seal the design:
To protect your artwork from scratches, take the vase outside and apply a light, even coat of clear gloss acrylic sealer spray over the painted portion.
Gilded Veins
Add a touch of metallic gold or copper paint to your water swirl. It creates stunning metallic veins that catch the light perfectly alongside the earthy tones.
Place your newly marbled vase on a sunny windowsill where the light can illuminate your unique pattern
Bottle Lights With Ink-Like Color Layers
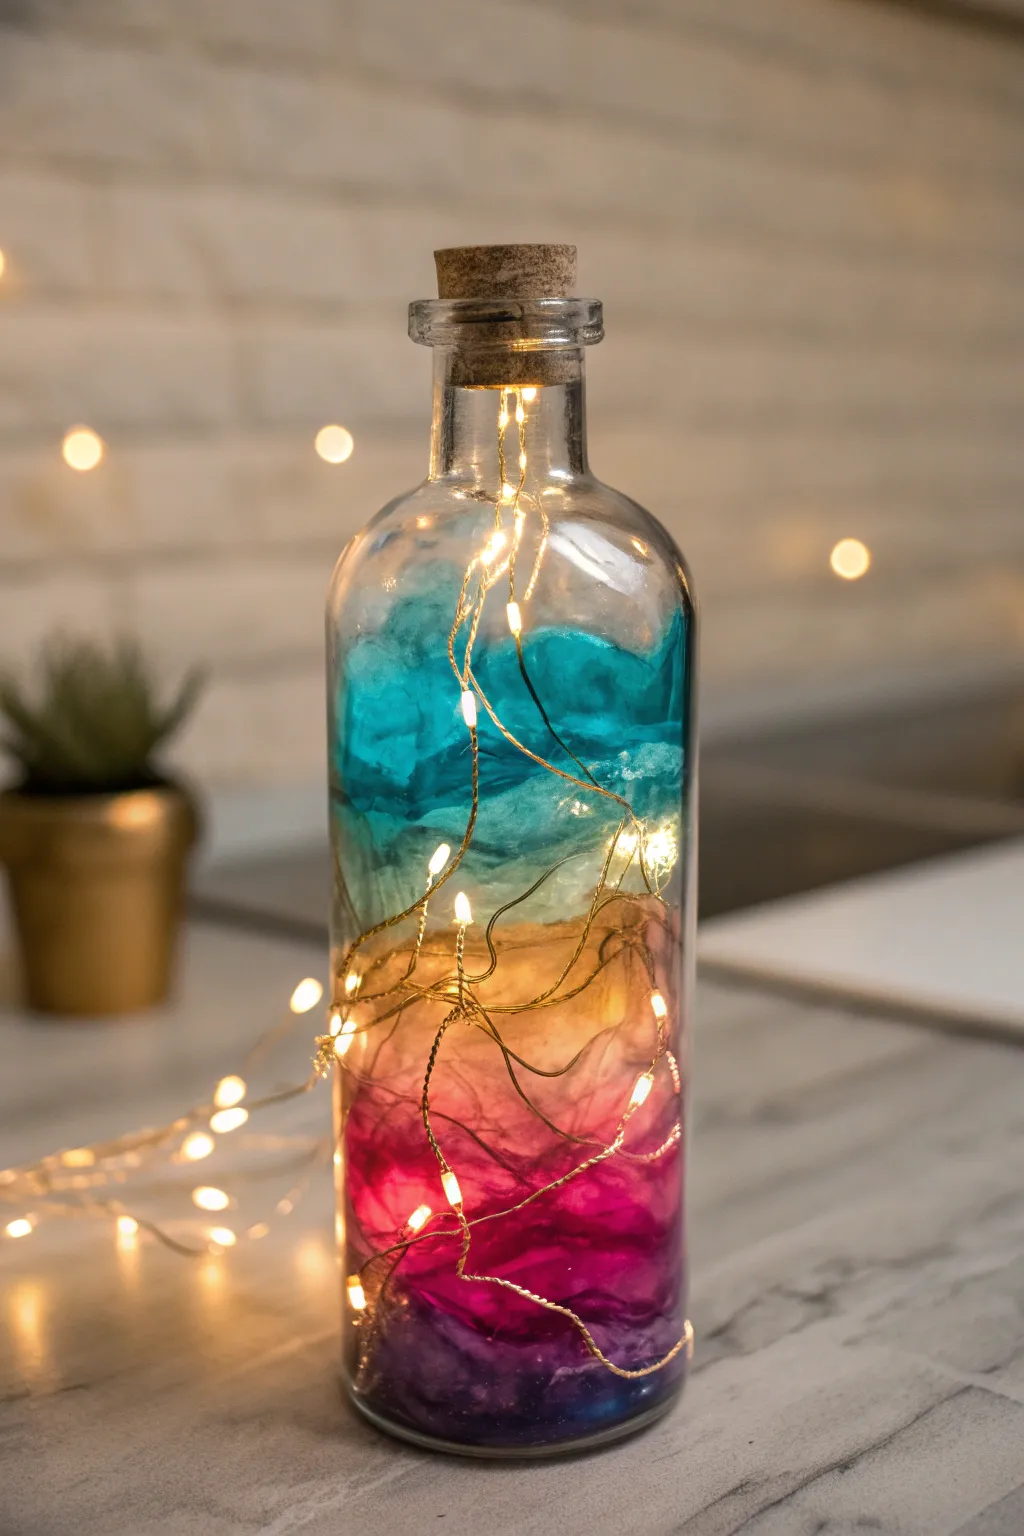
Transform a plain glass vessel into a glowing nebula of color with this simple layering technique. Using cotton batting and liquid watercolors, you can create an ethereal, ink-like gradient that looks beautiful both lit and unlit.
Detailed Instructions
Materials
- Clear glass bottle with cork stopper
- Cotton batting or cotton balls
- Liquid watercolor paints (Blue, Yellow, Magenta/Pink, Purple)
- Water in a spray bottle
- Long skewers or chopsticks
- Cup of water for rinsing
- Fairy lights (battery operated with cork pack preferred)
- Glitter (optional for extra sparkle)
Step 1: Preparation & First Layer
-
Clean the vessel:
Begin by thoroughly cleaning your glass bottle inside and out to remove any dust or fingerprints. Let it dry completely. -
Prepare the base:
Take a handful of cotton batting and gently tease it apart to make it fluffy. Push this layer into the bottom of the bottle using a skewer until you have about two inches of fluff. -
Mix the first color:
In a small cup, dilute your purple watercolor with a tiny bit of water if it’s very concentrated. Pour a small amount directly onto the cotton at the bottom. -
Saturate carefully:
Use your spray bottle to mist water onto the cotton until the purple dye spreads and the cotton is damp but not swimming in liquid. Use the skewer to press the cotton down so the color absorbs evenly. -
Add some sparkle:
If you want a galaxy effect, sprinkle a generous pinch of fine glitter down the neck of the bottle so it lands on the wet purple layer.
Don’t Over-Soak
Add water gradually. If the cotton is swimming in liquid, the colors will turn into a brown muddiness at the bottom. The cotton should be damp, not dripping wet.
Step 2: Building the Gradient
-
Add the second layer:
Insert another fluffy handful of cotton batting on top of the purple layer. Use your skewer to arrange it, ensuring it covers the previous layer completely without packing it too tight. -
Apply the next tone:
Pour a small amount of magenta or pink liquid watercolor onto this new cotton layer. Try to direct the liquid towards the sides of the glass so the color is visible from the outside. -
Blend the transition:
Spray water gently to help the magenta seek into the cotton. I find that slightly tilting the bottle helps the colors merge softly where the purple and pink layers meet. -
Create the golden center:
Add your third layer of cotton batting. Pour yellow liquid watercolor onto this section. Be cautious here—yellow can turn muddy if it mixes too much with purple, so keep this layer distinct. -
Top with blue:
Finish with a final layer of cotton near the neck of the bottle. Saturate this with blue or teal watercolor, creating a cool-toned cap to your gradient. -
Final adjustments:
Use your skewer to poke down the sides if you see any large air gaps against the glass. The wet cotton should press firmly against the bottle walls for the best color payoff.
Galaxy Stars
Use a stiff brush to flick white acrylic paint inside the bottle BEFORE adding cotton. These tiny specks will look like distant stars against the colored clouds.
Step 3: Lighting & Finish
-
Insert the lights:
Unravel your fairy light string. Using the skewer as a guide, gently push the end of the wire down through the center of the cotton layers. -
Distribute the glow:
Feed the rest of the wire into the bottle, using the chopstick to push the LEDs to different depths so they aren’t all clumped at the top. -
Conceal the wire:
Try to tuck the stiff wire visually behind the colored cotton puffs where possible, so the light seems to emanate from the clouds themselves. -
Seal it up:
Clean the rim of the bottle if any dye splashed during the process. Place the cork mechanism into the top. -
Dry time:
Let the bottle sit with the cork off for a few hours if it feels overly wet, allowing some moisture to evaporate before sealing it permanently.
Switch on the fairy lights in a dim room to see your personal nebula come to life with a soft, magical glow


Have a question or want to share your own experience? I'd love to hear from you in the comments below!