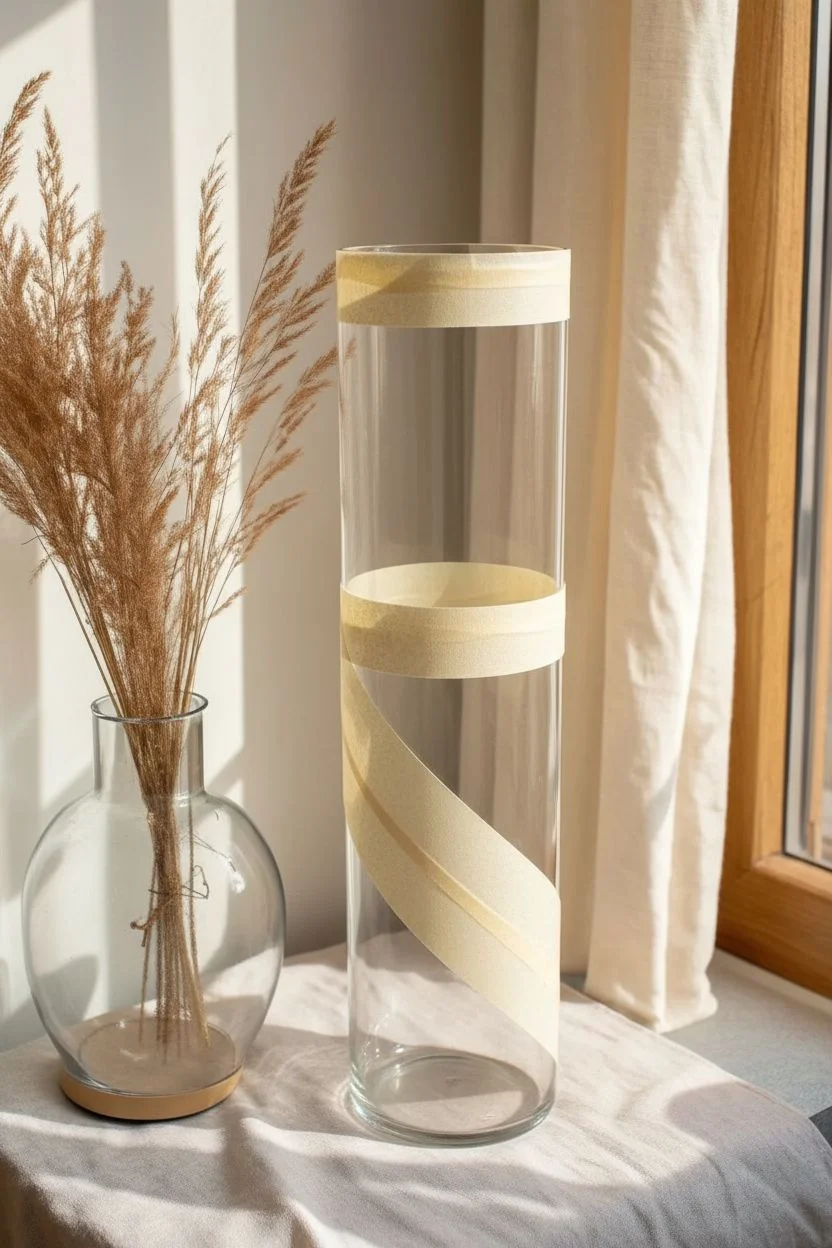
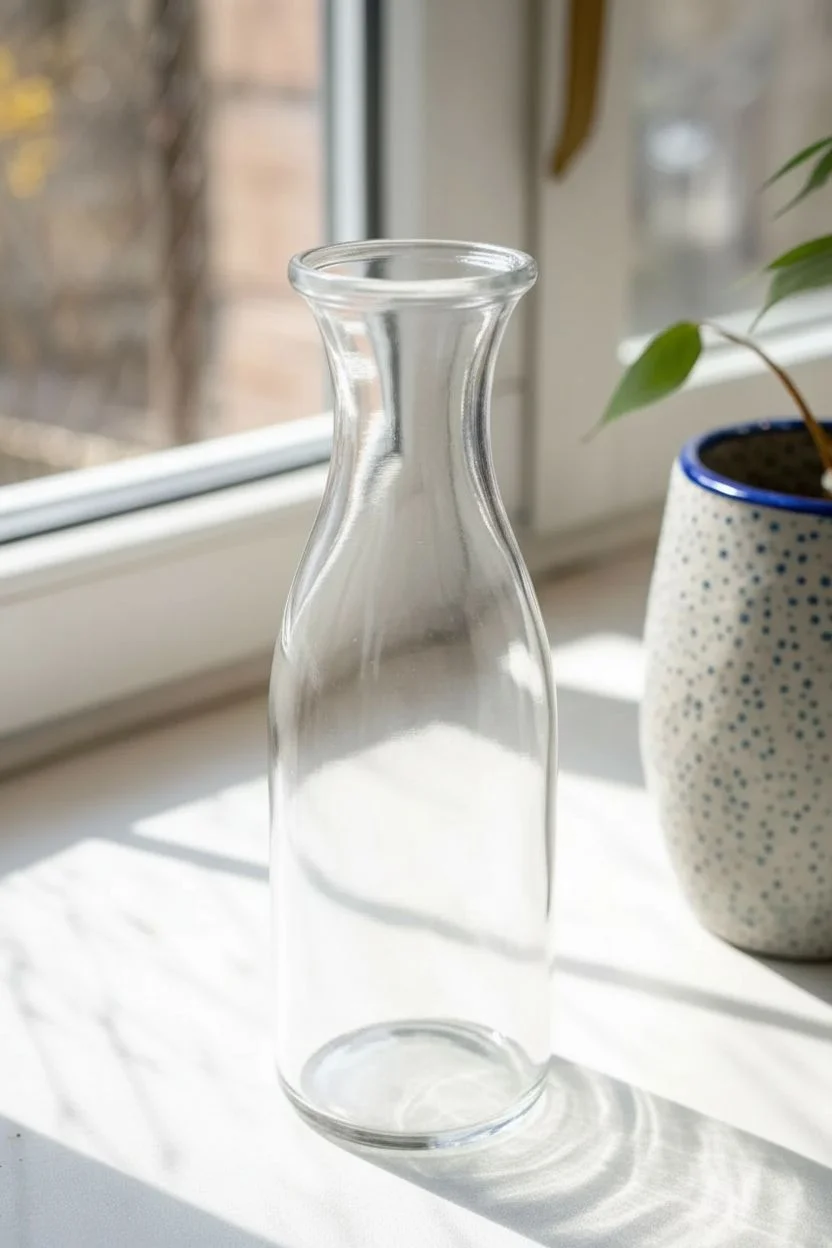
A plain glass vase is basically a blank canvas that catches light in the prettiest way once you add color. Here are my favorite glass vase painting ideas—starting with the easy classics and drifting into the artsy, unexpected ones that always get the most saves.
Two-Tone Diagonal Color Split
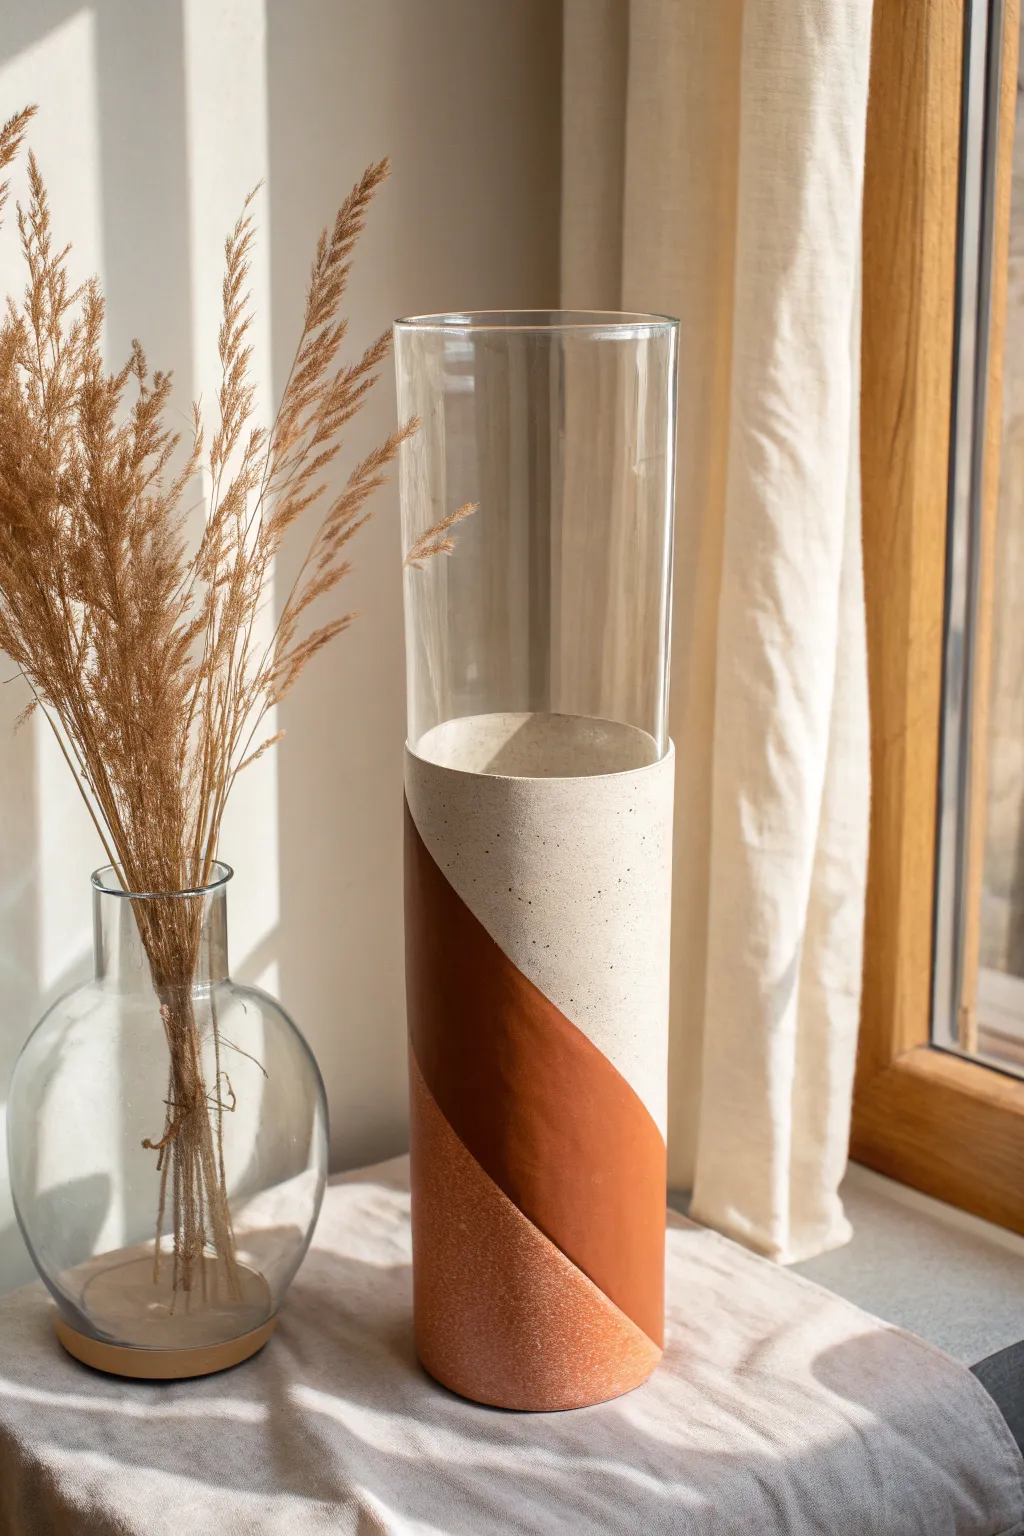
Transform a plain cylindrical glass vase into a piece of modern art with this geometric painting project. Using earthy clay tones and crisp diagonal lines, you’ll create a sophisticated vessel that looks like high-end ceramic.
Step-by-Step Guide
Materials
- Tall clear cylindrical glass vase
- Rubbing alcohol
- Cotton pads or paper towels
- Masking tape or painter’s tape (high quality)
- Acrylic paint (Matte Beige/Cream, Terracotta, Burnt Sienna)
- Baking soda (to create texture)
- Small mixing cups
- Flat paintbrush (medium width)
- Foam sponge brush
- Sealer spray (matte finish)
Step 1: Preparation and Taping
-
Clean the surface:
Begin by thoroughly cleaning the exterior of your glass vase with rubbing alcohol on a cotton pad. This removes oils and dust that prevent paint adhesion. -
Plan your lines:
Visualize where you want your diagonal sections to fall. The design features a large central diagonal band flanked by contrasting sections. -
Tape the first line:
Apply your first strip of painter’s tape diagonally across the vase. Press down firmly along the edge to ensure no paint will bleed under. -
Tape the top boundary:
Apply a strip of tape horizontally around the vase where the painted section will end and the clear glass begins.
Crisp Line Secret
Before applying your colored paint, brush a thin layer of clear matte medium over the tape edge to seal it perfectly.
Step 2: Mixing the Textured Paint
-
Mix the cream color:
In a small cup, pour out your matte beige or cream acrylic paint. -
Add texture:
Stir in roughly one teaspoon of baking soda for every two tablespoons of paint. The consistency should be fluffy but spreadable, like mousse. -
Mix the terracotta:
Repeat the process in a second cup with your burnt sienna or terracotta paint, aiming for that same fluffy texture. -
Create a transition shade:
For the bottom section, I like to mix a little of the dark terracotta with a lighter orange or beige to create that speckled, lighter clay look seen at the base.
Step 3: Painting the Sections
-
Paint the top section:
Using a foam brush or flat brush, dab the cream texture paint onto the top section of the design. -
Build opaque layers:
Don’t try to get full coverage in one go. Let the first thin coat set for 10 minutes, then apply a second, thicker coat. -
Paint the middle band:
Apply the dark terracotta mixture to the middle diagonal section. Use a pouncing motion (dabbing up and down) to enhance the gritty texture. -
Paint the base:
Apply your lighter, speckled clay mixture to the very bottom section, ensuring it wraps under the curve of the vase slightly. -
Create speckles:
To mimic the stone look in the image, you can flick a tiny amount of watered-down brown paint onto the wet cream section using an old toothbrush. -
Wait for semi-dryness:
Let the paint dry until it feels tacky but not fully hardened, usually about 30-45 minutes.
Faux Ceramic Look
Mix varying amounts of baking soda into each color section. Subtle differences in graininess make the faux-ceramic effect more realistic.
Step 4: Finishing Touches
-
Remove tape carefully:
Slowly peel back the tape at a 45-degree angle. Pulling while the paint is slightly tacky helps prevent the dry paint from chipping off with the tape. -
Clean up edges:
If any paint bled through, use a damp Q-tip or a toothpick to gently scrape away the excess for a crisp line. -
Full cure time:
Allow the vase to sit undisturbed for 24 hours to let the baking soda paint mixture harden completely. -
Seal the work:
Spray a light coat of matte sealer over the painted area to protect the texture and prevent flaking over time.
Place your dried arrangements inside and enjoy the modern warmth this piece brings to your space


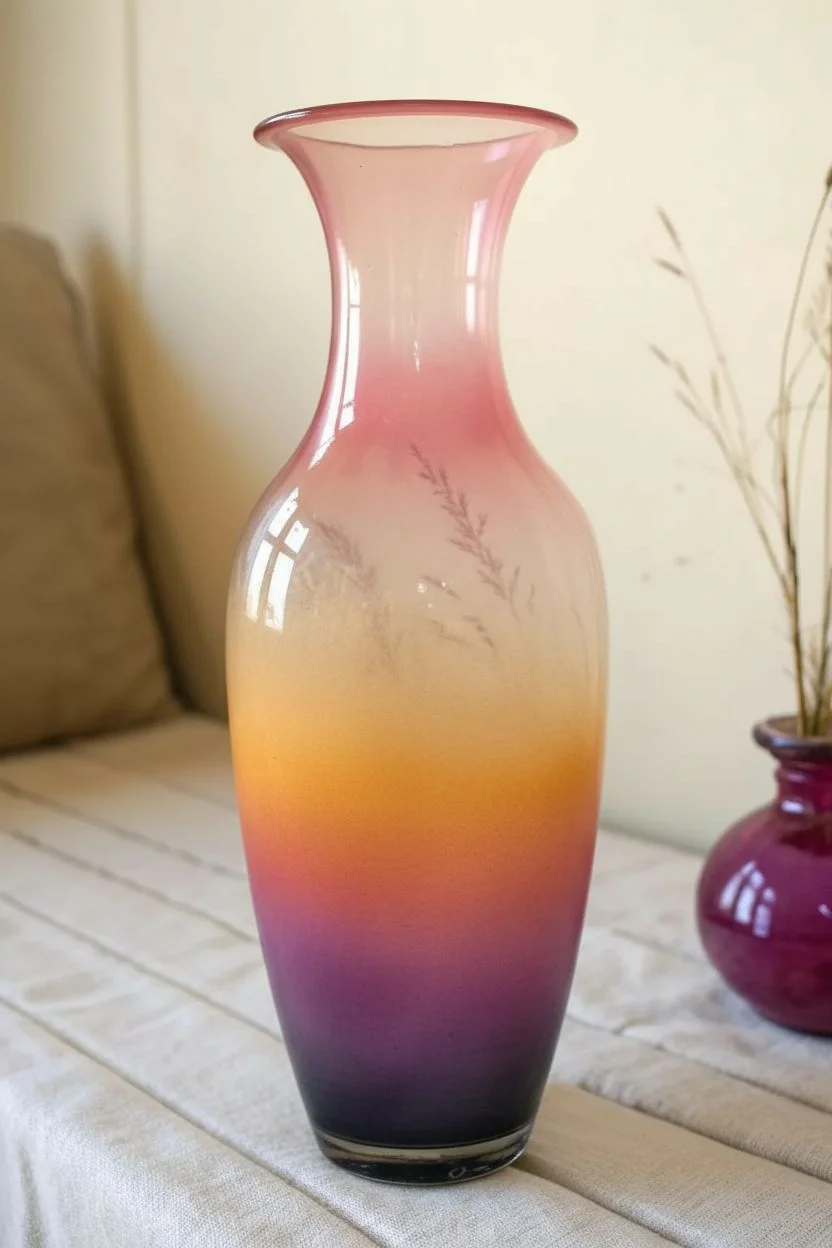
Simple Ombre Fade From Rim to Base
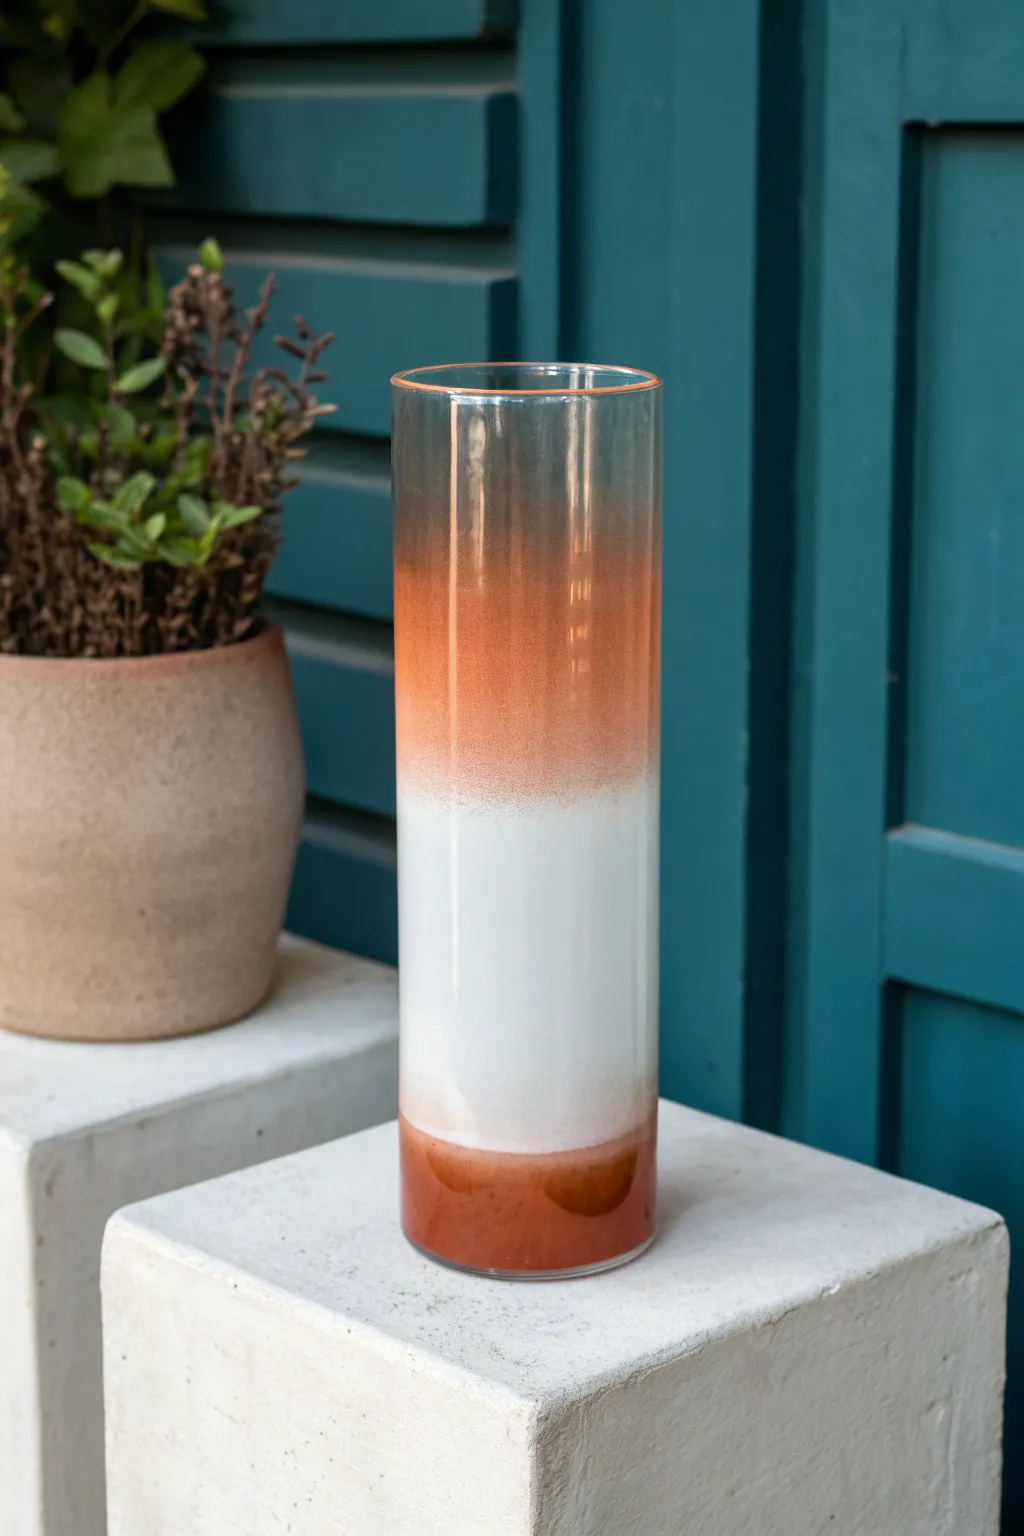
Transform a plain cylindrical vase into a modern art piece with distinct color blocking and a soft ombre fade. This project mimics the look of layered sediment or a sunset horizon using earthy terracotta, crisp white, and a translucent orange gradient.
How-To Guide
Materials
- Tall cylindrical glass vase (clear)
- Rubbing alcohol
- Lint-free cloth
- Painter’s tape or masking tape
- Spray paint: Matte Terracotta / Burnt Orange (opaque)
- Spray paint: Matte White (opaque)
- Spray paint: Translucent or ‘Sea Glass’ Orange/Amber
- Spray sealant (optional, matte finish)
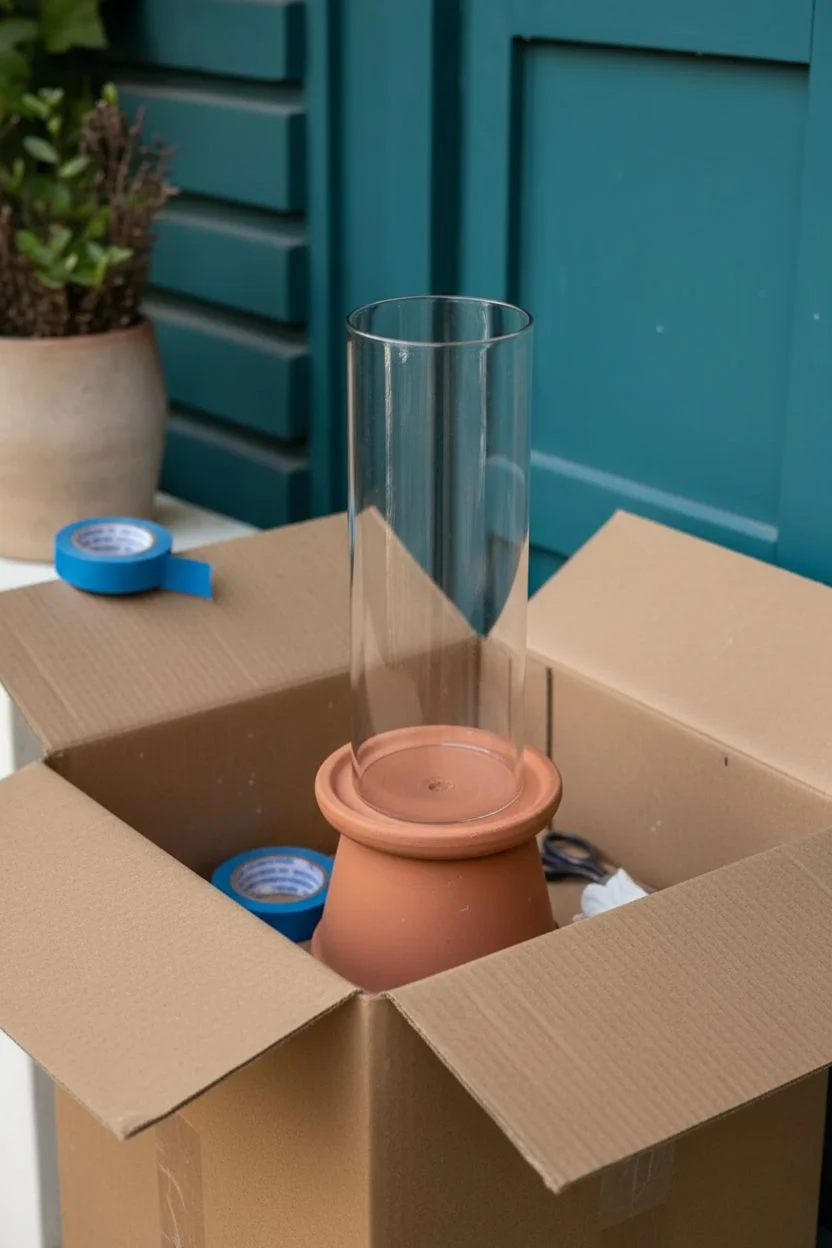
- Cardboard box (for spraying)
- Paper towels
Step 1: Preparation
-
Clean the Glass:
Before you begin, thoroughly wipe down the entire exterior of the glass vase with rubbing alcohol and a lint-free cloth. This removes oily fingerprints that could prevent the paint from adhering properly. -
Set Up Your Workspace:
Place your vase upside down on a paint-safe stand (like an old jar or can) inside a cardboard box. This position is crucial because it protects the interior from getting sprayed, keeping the inside food-safe if you want to use it for fresh flowers.
Drip Disaster?
If you sprayed too heavily and see a drip forming, don’t wipe it! Wait for it to dry completely, sand it down gently with fine-grit sandpaper, and respray that specific area lightly.
Step 2: Creating the Base Layer
-
Mask the Middle:
Determine how tall you want your bottom terracotta section to be—roughly 1-2 inches looks balanced. Apply a strip of painter’s tape horizontally around the vase just above this line to protect the rest of the glass for now. -
Spray the Base:
Using the terracotta or burnt orange opaque spray paint, spray the exposed bottom section (which is currently facing ‘up’ if your vase is inverted). Apply light, sweeping coats. -
Build Opacity:
Let the first coat dry for about 15 minutes. Apply a second coat to ensure the color is solid and completely opaque. I usually check for any translucent spots by holding a piece of white paper behind the glass. -
Remove Tape:
Carefully peel off the painter’s tape while the paint is slightly tacky but not wet. This prevents the tape from pulling off dried chips of paint. Let the base cure fully for at least an hour.
Pro Tip: Softening Lines
To get that super soft ombre transition instead of a hard stripe, hold the spray can 12 inches away and use short, quick bursts rather than a continuous stream while blending layers.
Step 3: The White Band
-
Mask the Base:
Once the terracotta paint is fully dry, cover it completely with paper and tape to protect it from overspray. Secure the tape precisely along the existing paint line. -
Mask the Top:
Decide where the white section should end and the orange fade should begin. Place a piece of tape or paper around the top section of the vase, leaving a generous middle band exposed for the white paint. -
Apply White Paint:
Spray the exposed middle section with matte white paint. Keep your hand moving steadily to avoid drips, which show up easily on vertical glass surfaces. -
Create the Soft Edge:
For the top edge of the white section (where it meets the future orange fade), you don’t want a hard line. Instead of taping this line off sharply, simply stop spraying gradually to create a ‘mist’ of white that fades out upward. -
Dry and Protect:
Allow the white layer to dry completely. Once dry, cover the solid white area with paper, leaving the ‘misted’ top edge and the bare glass above it exposed.
Step 4: The Sunset Fade
-
Prepare Translucent Paint:
Switch to your translucent orange or amber spray paint. This type of paint is designed to let light through, unlike the solid opaque colors used below. -
Start from the Rim:
Focus your spray nozzle at the very top rim (still the bottom, since the vase is inverted). Spray the heaviest concentration of color here. -
Mist Downward:
As you move the can down toward the white section, pull your hand further away from the vase. You want a very light dusting of orange to overlap the white mist you created earlier. -
Blend the Transition:
The goal is a seamless transition. The translucent orange speckles should mix visually with the white fade, creating a soft, peach-like blur where the two colors meet. -
Check Density:
Hold the vase up to a light source carefully. Ensure the top is vibrant and transparent, fading gently into the opaque white. Add tiny bursts of spray if the orange looks too pale.
Step 5: Finishing Touches
-
Remove All Masking:
Once the final top coat is dry to the touch (about 30-45 minutes), very gently remove all remaining tape and paper covering the white and terracotta sections. -
Clean Up:
If any paint bled under the tape lines, use a cotton swab dipped in nail polish remover or acetone to carefully tidy up the edges. -
Seal (Optional):
To protect the paint from scratching, lightly mist the entire painted exterior with a matte clear coat. This unifies the sheen of the different paint types. -
Final Cure:
Let the vase sit undisturbed for 24 hours before handling significantly or placing it near other objects.
Place your vase where natural light can shine through the top rim to highlight that beautiful color fade


Frosted Sea Glass Effect
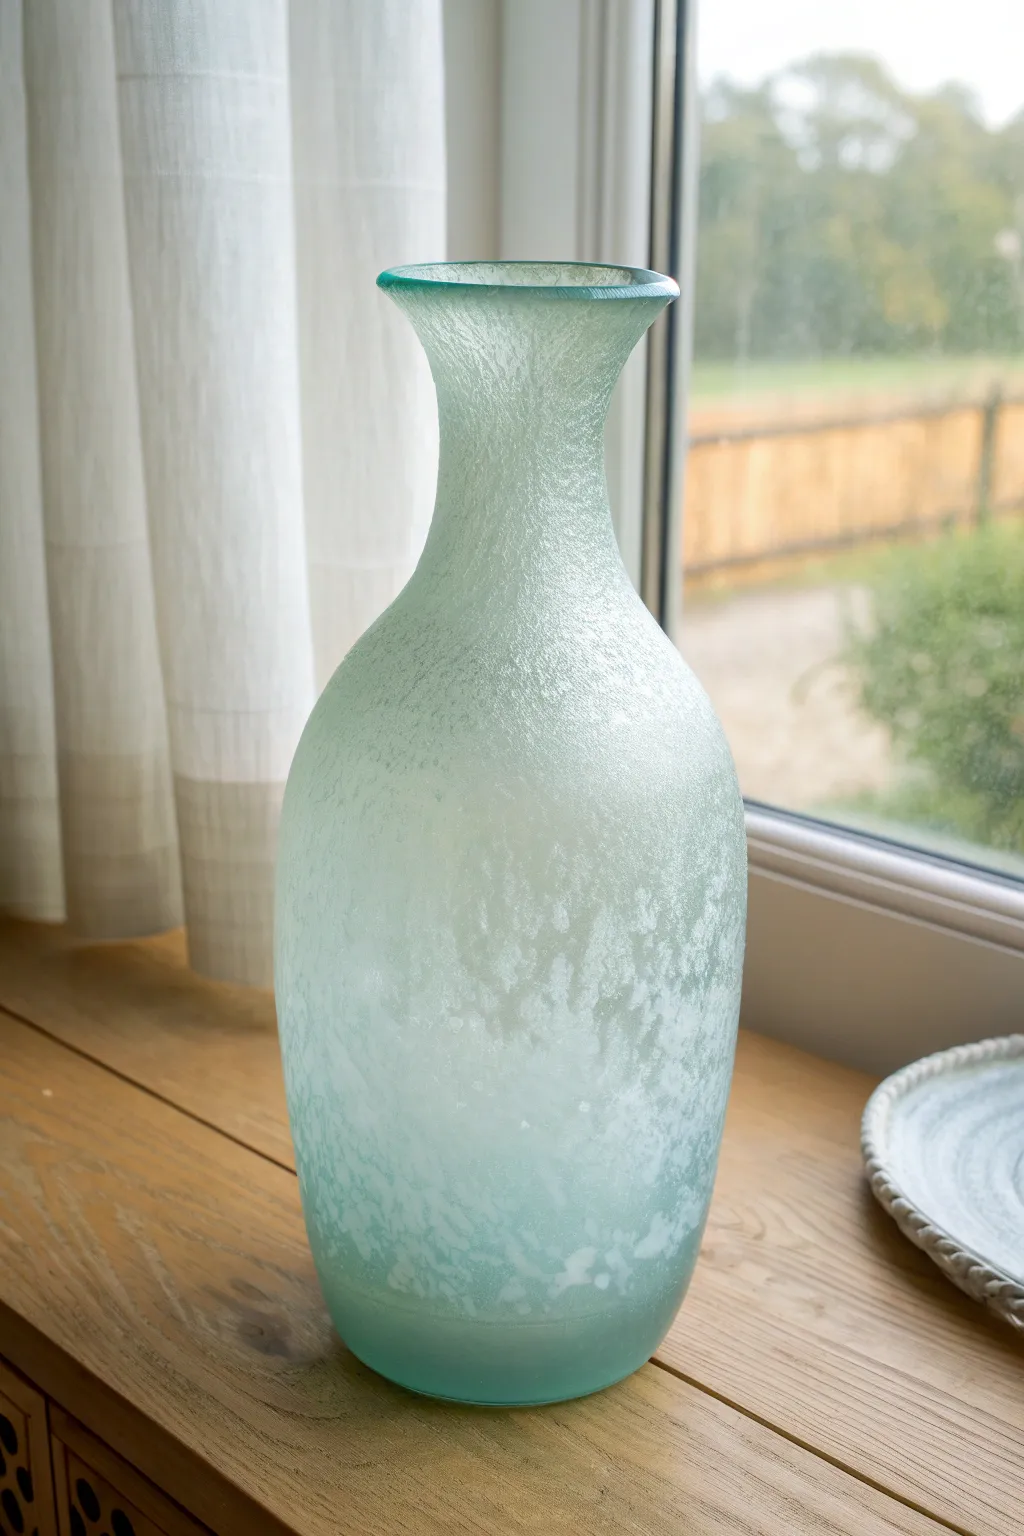
Transform a plain glass vessel into a washed-up treasure that looks like it has tumbled in the ocean for decades. This technique achieves that sought-after cloudy, matte finish with a beautiful ombré effect in soothing aqua tones.
Step-by-Step Guide
Materials
- Clear glass vase (curvy shapes work best)
- Rubbing alcohol
- Cotton pads or paper towels
- Sea glass spray paint (aqua or turquoise)
- White or frosted glass spray paint
- Painter’s tape (optional)
- Drop cloth or cardboard
- Fine grit sandpaper (220-400 grit)
- Clean, lint-free cloth
Step 1: Preparation
-
Clean surface:
Begin by thoroughly cleaning your glass vase with soapy water to remove any stickers or residue. Dry it completely with a lint-free cloth. -
Degrease glass:
Wipe the entire exterior surface with rubbing alcohol on a cotton pad. This removes invisible oils from your fingers that could repel the spray paint. -
Protect workspace:
Set up your workspace in a well-ventilated area, preferably outdoors or in a garage. Lay down a drop cloth or cardboard to catch overspray. -
Mask opening:
If you want the inside of the rim to remain clear glass, carefully apply painter’s tape to the interior edge of the vase’s mouth.
Paint Dripping?
If you see drips forming, you are spraying too close or too heavy. Let the drip dry completely, sand it smooth with fine sandpaper, and then apply a light mist coat to cover the patch.
Step 2: Creating the Base Frost
-
First light coat:
Hold your aqua sea glass spray paint can about 10-12 inches away from the vase. Apply a very light, misty coat. Do not try to get full coverage yet; you want it to look translucent. -
Rotate and repeat:
Rotate the vase slowly to ensure even coverage around the circumference. Keep your hand moving constantly to prevent drips. -
Short dry time:
Let this first layer dry for about 15 minutes. It should feel dry to the touch but still look slightly transparent. -
Second coat:
Apply a second light coat of the aqua spray paint, focusing slightly more intensity near the top and bottom curves to start building depth.
Step 3: Building the Weathered Look
-
Introduce white frost:
To get that cloudy, aged look found in the reference image, take your white or frosted glass spray paint. Adding a burst of white creates variation in the opacity. -
Spot spraying:
Spray the white paint sporadically around the center of the vase, holding the can slightly further back (14-16 inches) to let the particles settle gently. -
Blending layers:
Immediately follow the white burst with a very dusting of the aqua paint again to blend the white into the blue, softening any harsh transitions. -
Full dry:
Allow the vase to dry completely for at least an hour. The finish must be hard before the next texturing step.
Ombré Effect
For extra depth, spray the bottom third with a slightly darker teal paint before doing the full aqua coat. This mimics the thickness of real glass bottles.
Step 4: Texturing and Finishing
-
Initial distressing:
Once fully dry, take a piece of fine-grit sandpaper (around 220 grit). Very gently buff the surface of the vase. -
Creating the matte finish:
Rub in small circular motions. This knocks back any glossiness from the spray paint and enhances the powdery, salt-blasted sea glass texture. -
Highlighting imperfections:
Sand a little harder on raised areas or the rim to mimic natural wear patterns where sea glass would rub against rocks. -
Wipe down:
Use a dry cloth to wipe away the paint dust generated by sanding. Avoid using water at this stage as the paint is still curing. -
Final inspection:
Check your vase in natural light. If it looks too transparent in spots, you can add one final very quick mist of aqua spray, let dry, and lightly re-sand. -
Curing time:
Let the vase cure undisturbed for 24 hours before filling it with water or flowers to ensure the finish is durable.
This soothing, frosted masterpiece will bring a breath of fresh ocean air to your windowsill


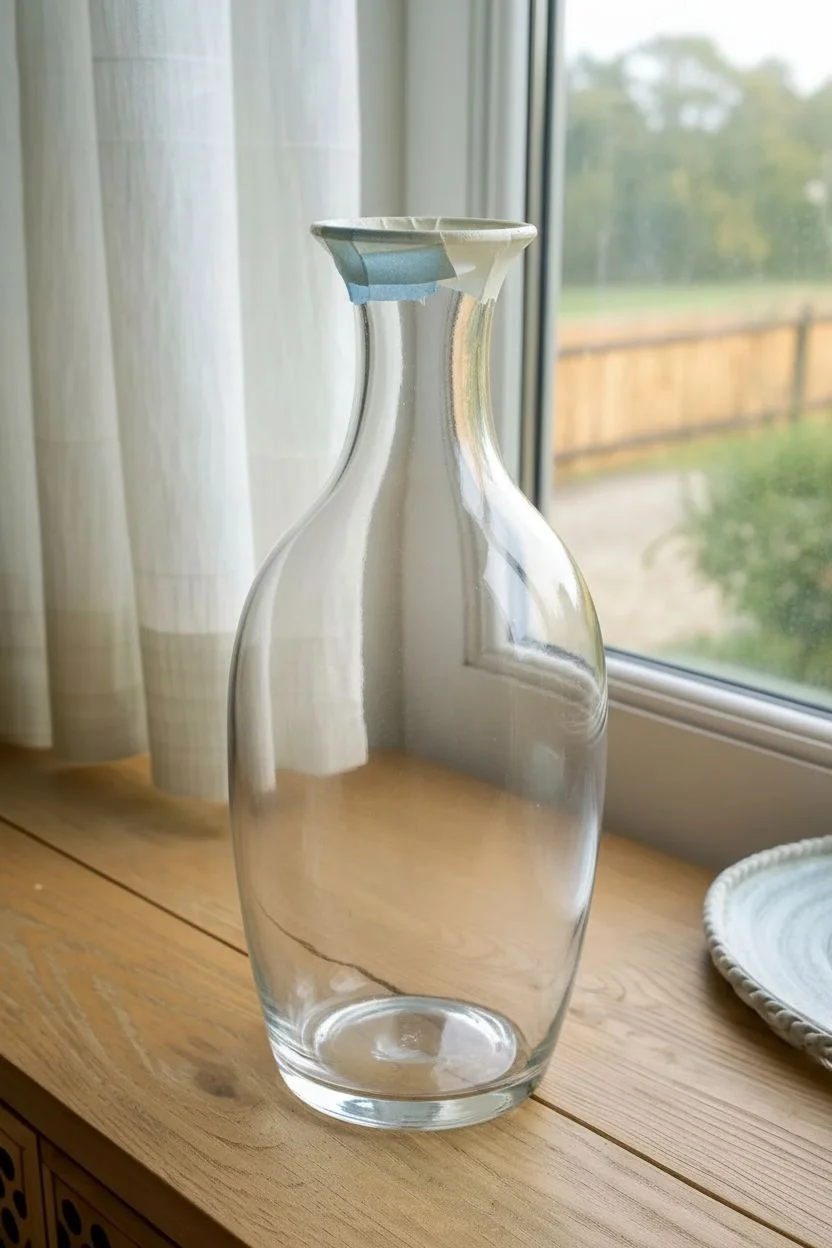
Crisp Stenciled Pattern Bands
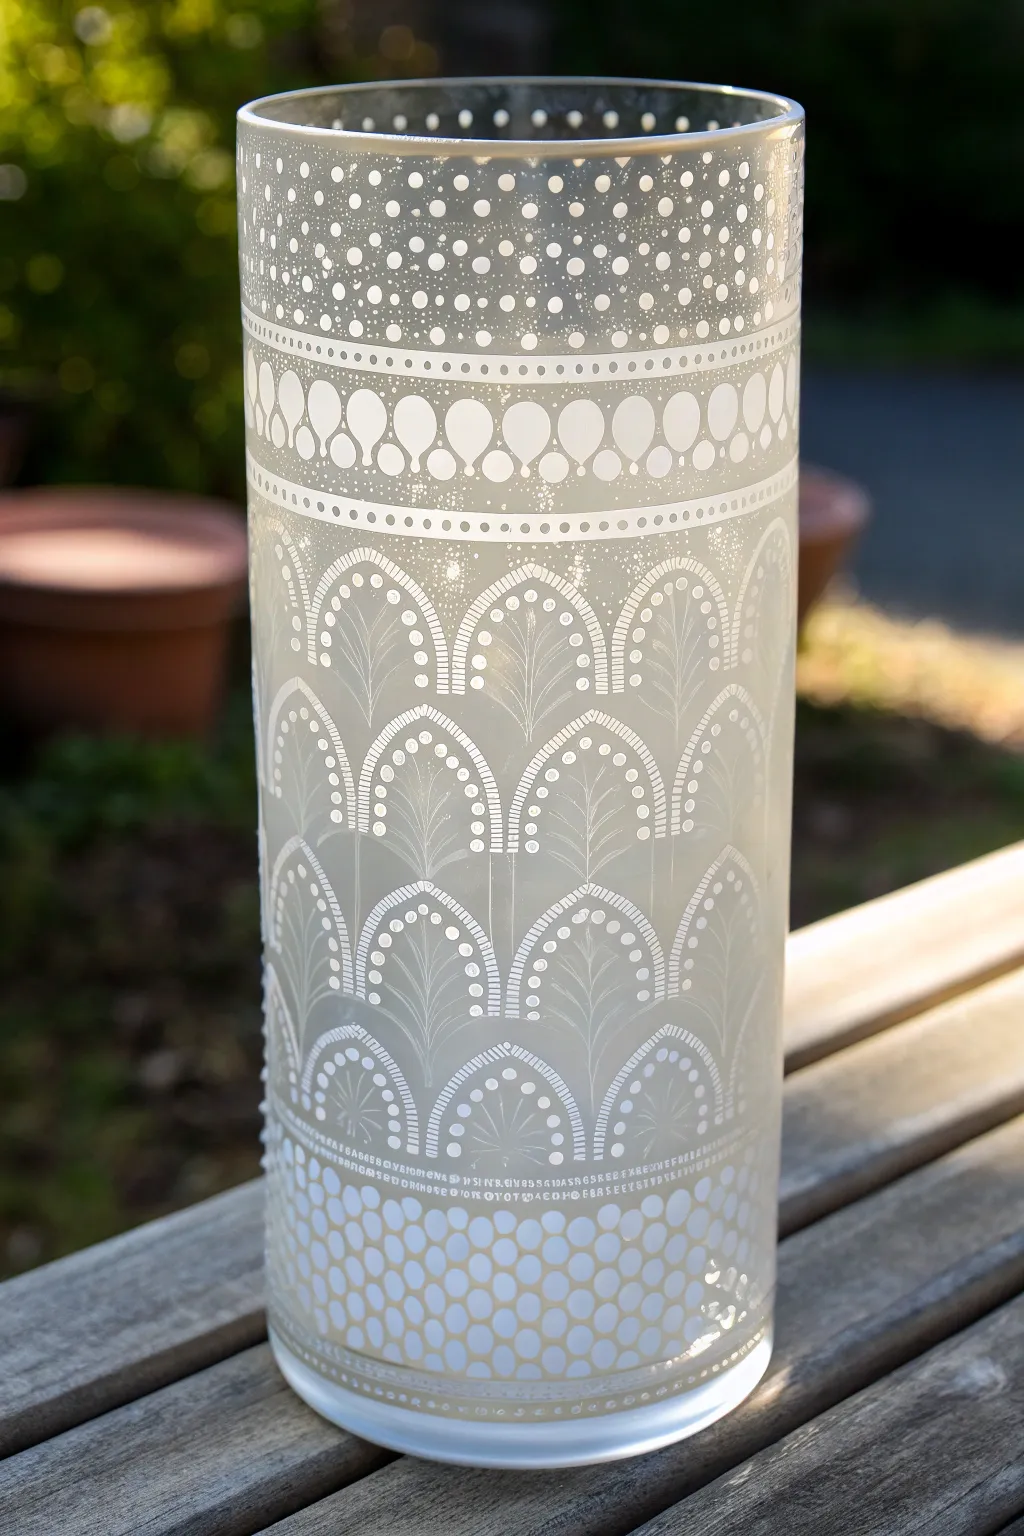
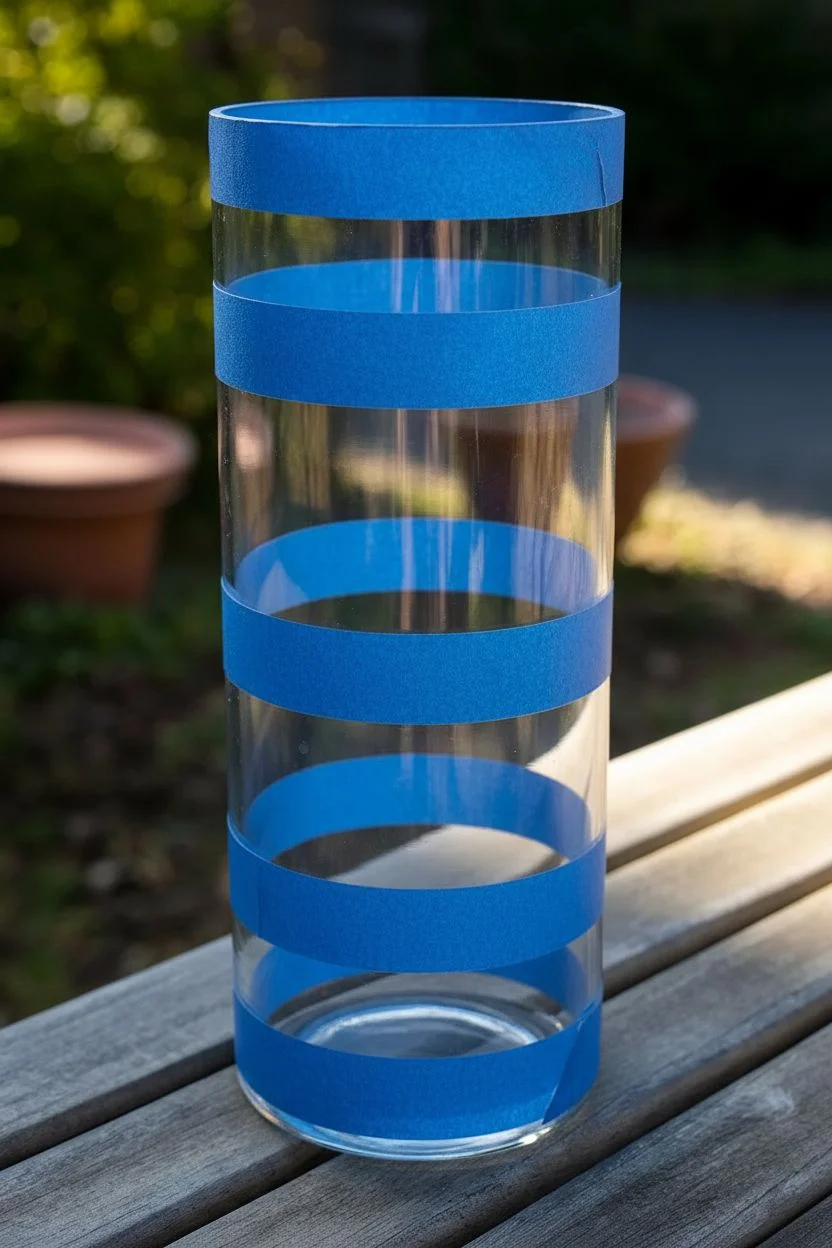
Transform a plain glass cylinder into a wintery, bohemian masterpiece using frosted glass paint and precise stencil work. This project layers intricate bands of geometric and organic patterns to create a look that mimics delicate lace or etched glass.
Step-by-Step Tutorial
Materials
- Tall cylindrical glass vase (clear)
- Frosted glass paint (white or frost effect)
- High-density foam pouncers or cosmetic sponges
- Adhesive stencils (lace, scallop, and geometric dot patterns)
- Painter’s tape or low-tack masking tape
- Rubbing alcohol and paper towels
- Small detail paintbrush (liner size)
- Paper plate or palette
- Q-tips (for cleanup)
Step 1: Preparation & Planning
-
Clean surface:
Begin by thoroughly cleaning your glass vase with rubbing alcohol and a paper towel. This removes any oily fingerprints or dust that could prevent the stencil adhesive and paint from gripping the glass surface securely. -
Map your bands:
Look at your vase and visualize where each pattern band will sit. You can use small pieces of painter’s tape to mark the horizontal guides for the top, middle, and bottom sections to ensure your distinct pattern layers remain level.
Clean lines only
If paint bleeds under the stencil, don’t panic. Wait for it to dry completely, then use a craft knife or a wooden toothpick to gently scratch off the excess for a perfect edge.
Step 2: Stenciling the Middle Arches
-
Apply the arch stencil:
Select a stencil featuring repeating outlined arches or scallops with internal leaf motifs. Wrap this stencil around the middle section of the vase, ensuring the seam aligns at the back. Press down firmly on all the intricate cutouts to prevent paint bleed. -
Load the pouncer:
Squeeze a small dollar-sized amount of frosted glass paint onto your palette. Dab your foam pouncer into the paint, then tap it repeatedly on a clean part of the palette to offload almost all the excess paint. Ideally, the sponge should feel almost dry to the touch. -
Pounce the first layer:
Using a straight up-and-down motion, lightly tap the sponge over the stencil design. Do not drag or brush. Apply a very thin, translucent layer first; it’s better to build opacity slowly than to risk a gloppy mess. -
Build opacity:
Let the first light coat dry for about 5-10 minutes. Repeat the pouncing process one or two more times until you achieve a solid, crisp white look against the clear glass. -
Remove stencil:
While the final coat is still slightly tacky (but not wet), carefully peel back the stencil. Pulling it away at a sharp angle usually gives the cleanest edge.
Step 3: Creating the Upper & Lower Bands
-
Stencil the teardrops:
Position a stencil featuring a row of teardrop or oval shapes just above your middle arch section. Repeat the dry-sponge pouncing method to fill these shapes with the frosted white paint. -
Add the honeycomb base:
For the bottom-most band, apply a hexagon or honeycomb grid stencil. This adds a sturdy visual weight to the bottom of the vase. Apply the paint slightly heavier here for a more opaque, grounded look. -
Create the starry top:
The top band features a dense collection of dots. If you don’t have a specific stencil for this, you can create it manually. Dip the handle end of a paintbrush into the paint and dot it onto the glass, clustering them densely near the rim and spacing them out as you move down.
Make it glow
Place a battery-operated LED pillar candle inside the finished vase. The light will shine through the unpainted negative space, making the patterns glow brilliantly.
Step 4: Detailing & Finishing
-
Connect the layers:
Use your fine liner brush to paint thin horizontal lines separating the different distinct bands of pattern. These ‘belts’ make the design look cohesive and intentional rather than floating randomly. -
Fix imperfections:
Inspect your work for any smudges or bleed-under. Before the paint cures fully, use a damp Q-tip or a toothpick to gently scrape away any unwanted paint marks. -
Cure the paint:
Follow the specific instructions on your glass paint bottle. Many air-dry within 21 days for durability, but some brands allow you to bake the glass in a home oven to speed up the curing process and make it dishwasher safe.
Now you have a stunning custom vase ready to hold your favorite blooms or stand alone as a piece of art
BRUSH GUIDE
The Right Brush for Every Stroke
From clean lines to bold texture — master brush choice, stroke control, and essential techniques.
Explore the Full Guide
Polka Dots and Confetti Speckles
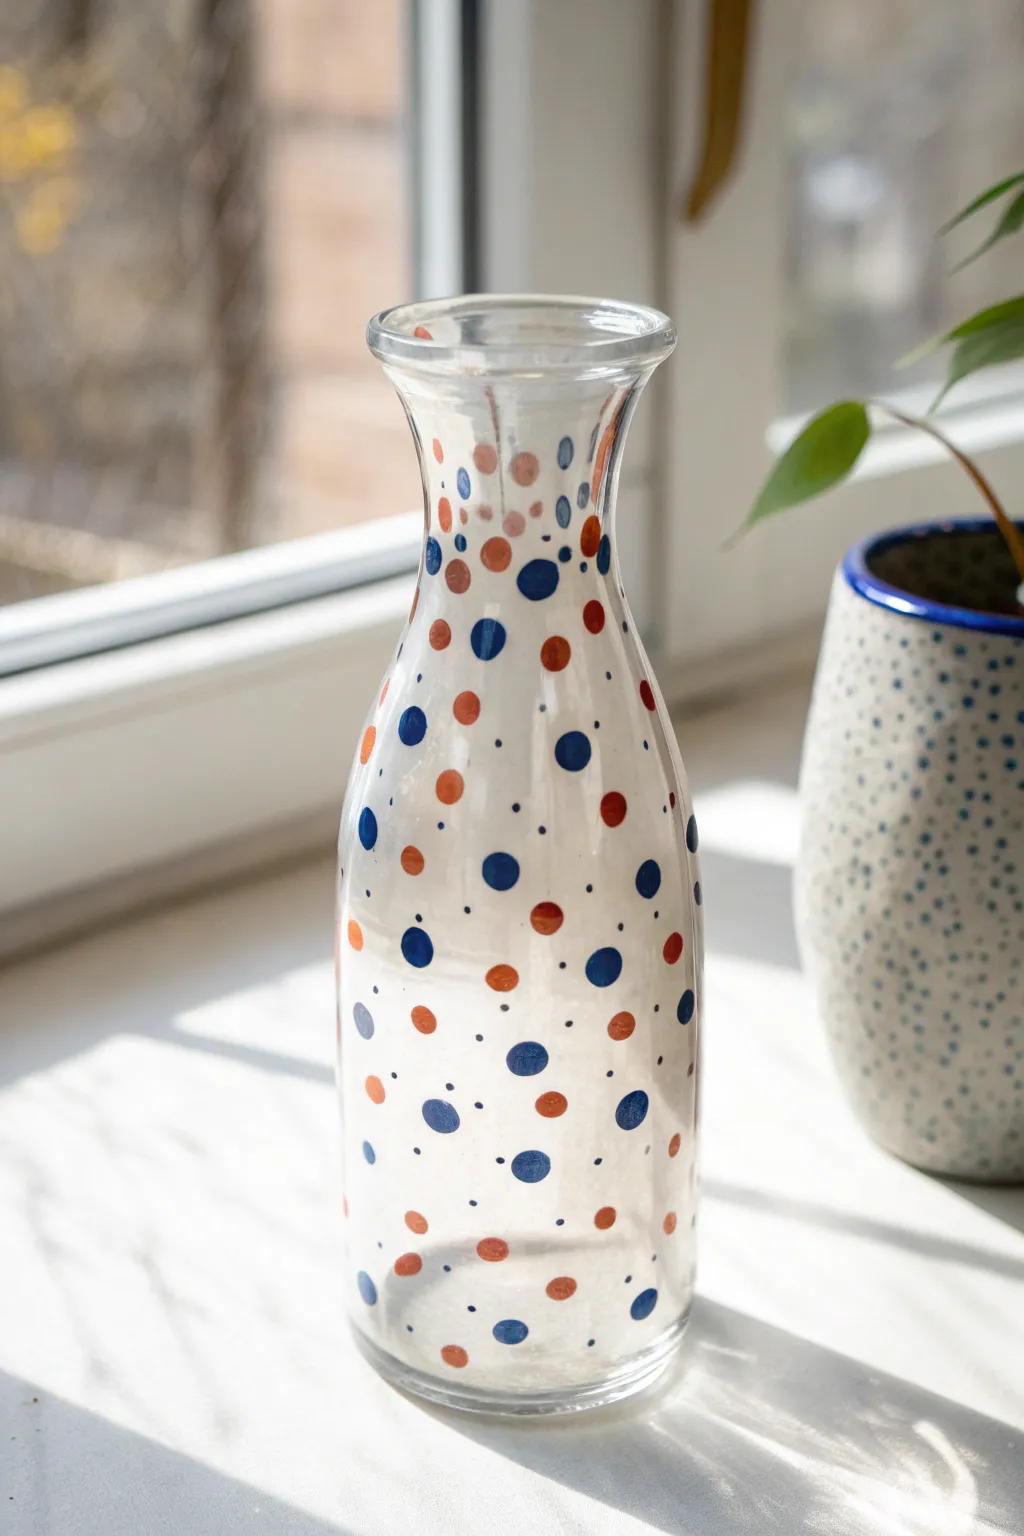
Transform a simple clear glass carafe into a playful piece of decor with nothing but a few dabs of paint. This polka dot and confetti speckle design uses varying sizes of blue and rust-orange dots to create a lively, free-floating effect that feels both modern and handmade.
How-To Guide
Materials
- Clear glass vase or carafe (clean and dry)
- Rubbing alcohol and cotton pads
- Glass paint or multi-surface acrylic enamel (Navy Blue)
- Glass paint or multi-surface acrylic enamel (Rust/Terracotta)
- Round foam pouncer (small size, approx. 1/4 inch)
- Detail paintbrush (size 0 or fine tip)
- Ball stylus tool or toothpick
- Paper plate or palette
- Paper towels
Step 1: Preparation
-
Clean the Glass:
Before thinking about paint, wash your glass vase thoroughly with warm soapy water to remove any sticker residue or dust. -
Degrease the Surface:
Wipe down the entire exterior surface with rubbing alcohol on a cotton pad. This is crucial as oils from your fingers can prevent the paint from adhering properly. -
Prepare the Palette:
Squeeze a small amount of your Navy Blue and Rust/Terracotta paints onto your palette. Keep the puddles separate to avoid accidental mixing.
Perfect Circles
Use the flat end of a drill bit or the eraser end of a pencil as a stamp. It creates perfectly round, opaque dots much easier than a brush.
Step 2: Creating the Large Dots
-
Load the Pouncer:
Dip your small foam pouncer or the round end of a large paintbrush handle into the Navy Blue paint. Tap it lightly on a clean part of the palette to ensure the paint isn’t dripping. -
Apply First Blue Dots:
Press the tool firmly against the glass to create your largest dots. Scatter them randomly around the vase, leaving plenty of empty space between them. -
Switch to Rust:
Clean your tool or switch to a fresh one, then load it with the Rust color paint. -
Add Rust Polka Dots:
Apply the large rust-colored dots in the empty spaces. Try not to place them too close to the blue ones just yet; aim for an evenly distributed ‘scattered’ look. -
Check Coverage:
If your dots look a little translucent, let them dry for about 20 minutes and then carefully apply a second dab of paint directly over the first to make the color opaque.
Drips & Slips
If paint runs, don’t wipe immediately! Let it dry slightly until tacky, then lift it cleanly with a toothpick to avoid a smeared mess.
Step 3: Adding the Confetti Speckles
-
Switch Tools:
Now, pick up your fine detail brush or a ball stylus tool. We are moving on to the medium-sized elements. -
Paint Medium Blue Dots:
Dip the brush into the blue paint and create medium-sized dots. Place these in the gaps between the larger polka dots. -
Paint Medium Rust Dots:
Repeat this process with the Rust paint. Vary the spacing—some can be close to the blue dots, others floating independently. -
Create the Micro-Speckles:
For the tiniest ‘confetti’ look, I find a toothpick or the very tip of a small brush works best. -
Apply Blue Speckles:
Dip the toothpick into blue paint and gently dot the glass to create tiny specks. These fill in the visual ‘noise’ of the pattern. -
Apply Rust Speckles:
Finish the painting phase by adding tiny rust-colored specks. Step back occasionally to ensure the density of the pattern looks balanced from top to bottom. -
Clean Up Edges:
If any dots look smeared or uneven, use a damp cotton swab to wipe them away while wet, or gently scrape them off with a craft knife once dry.
Step 4: Curing and Finishing
-
Air Dry:
Allow the vase to sit undisturbed for at least 1 hour until the paint is dry to the touch. -
Cure the Paint:
Follow the specific instructions on your paint bottle. Most glass paints require either 21 days of air curing or baking in a home oven to become dishwasher safe. -
Baking Method (Optional):
If baking, place the cold vase in a cold oven. Set to 350°F (175°C) and bake for 30 minutes. Turn the oven off and let the glass cool completely inside before removing.
Now you have a charming, speckled vase ready to brighten up your windowsill with freshly cut stems
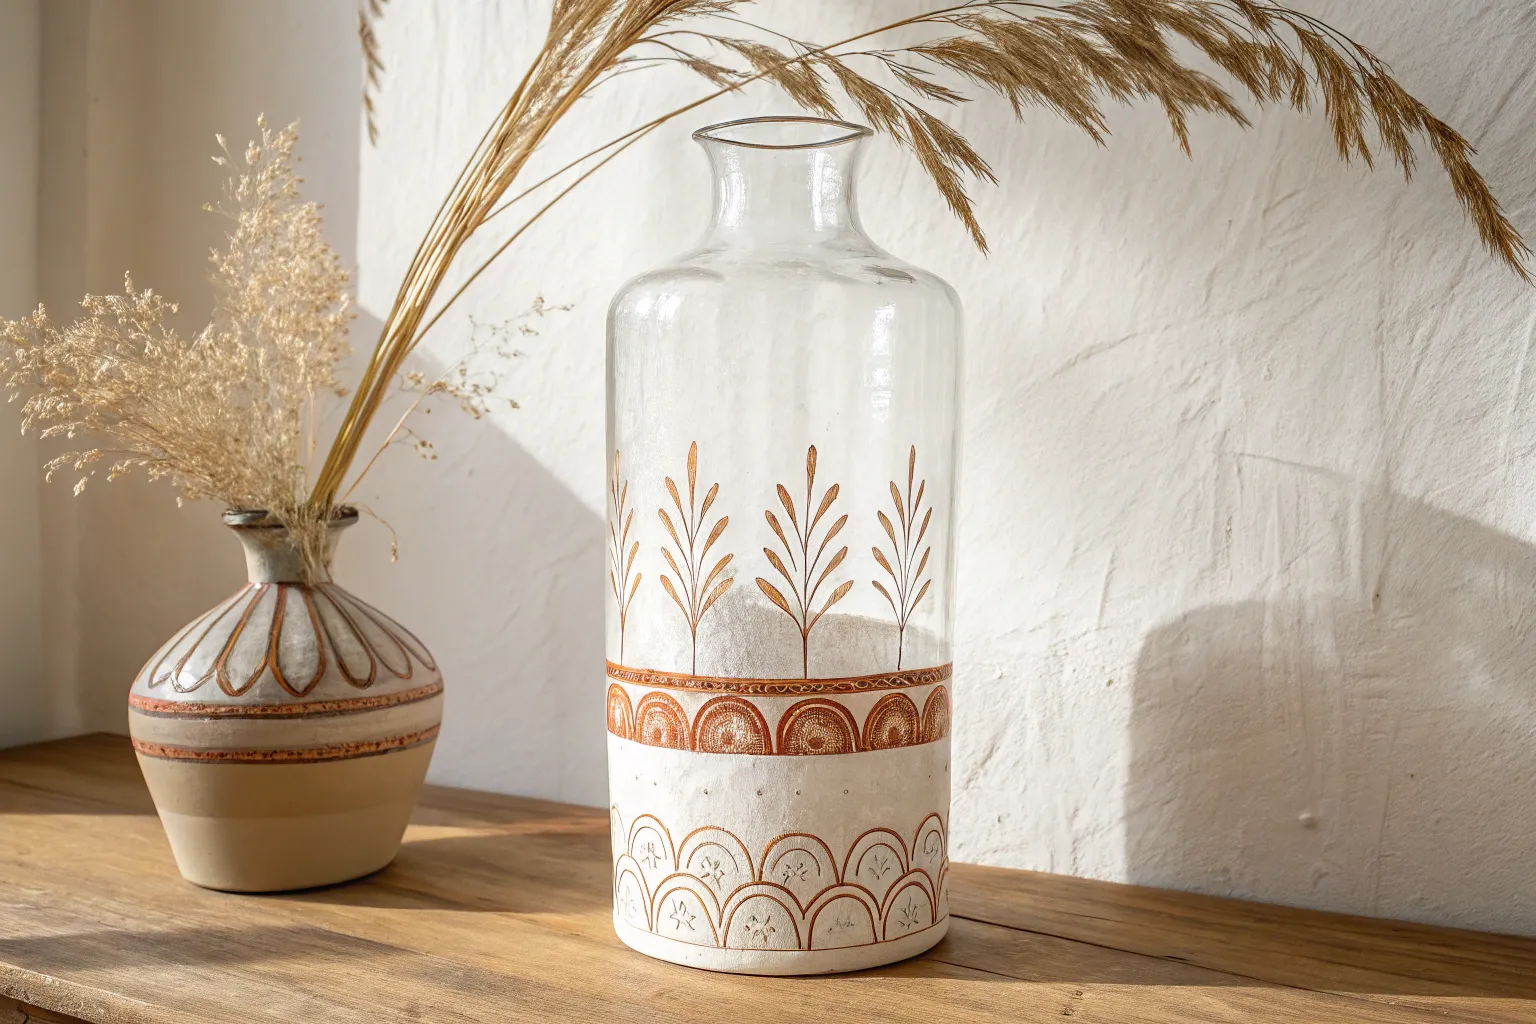
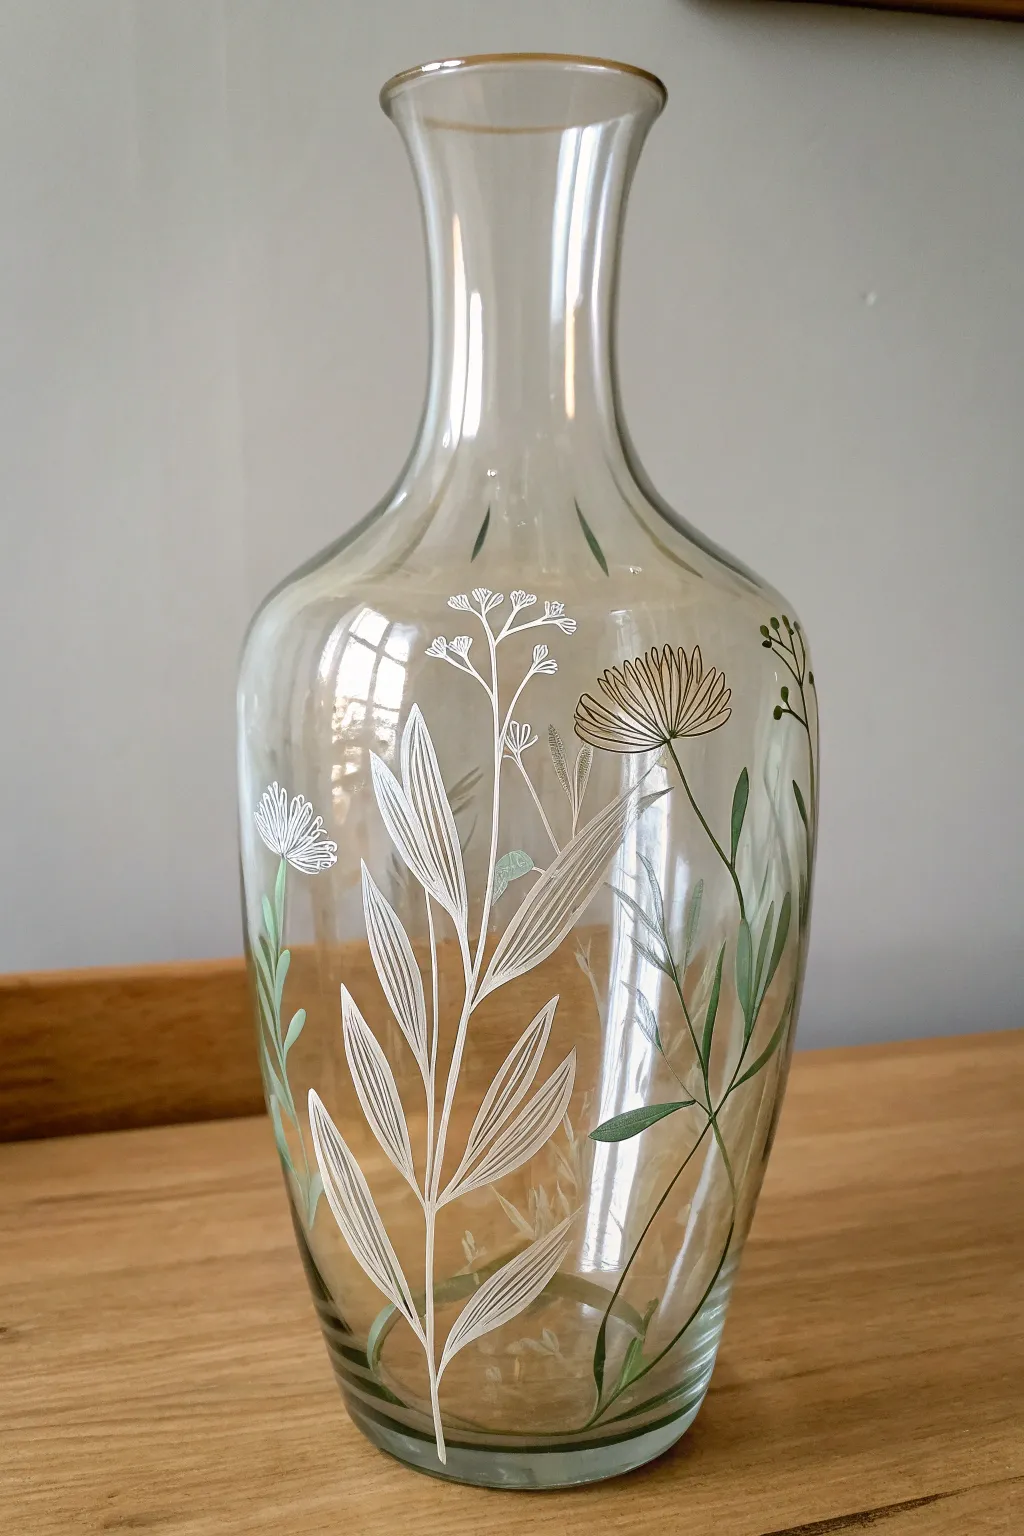
Botanical Line Art Wrapped Around the Vase
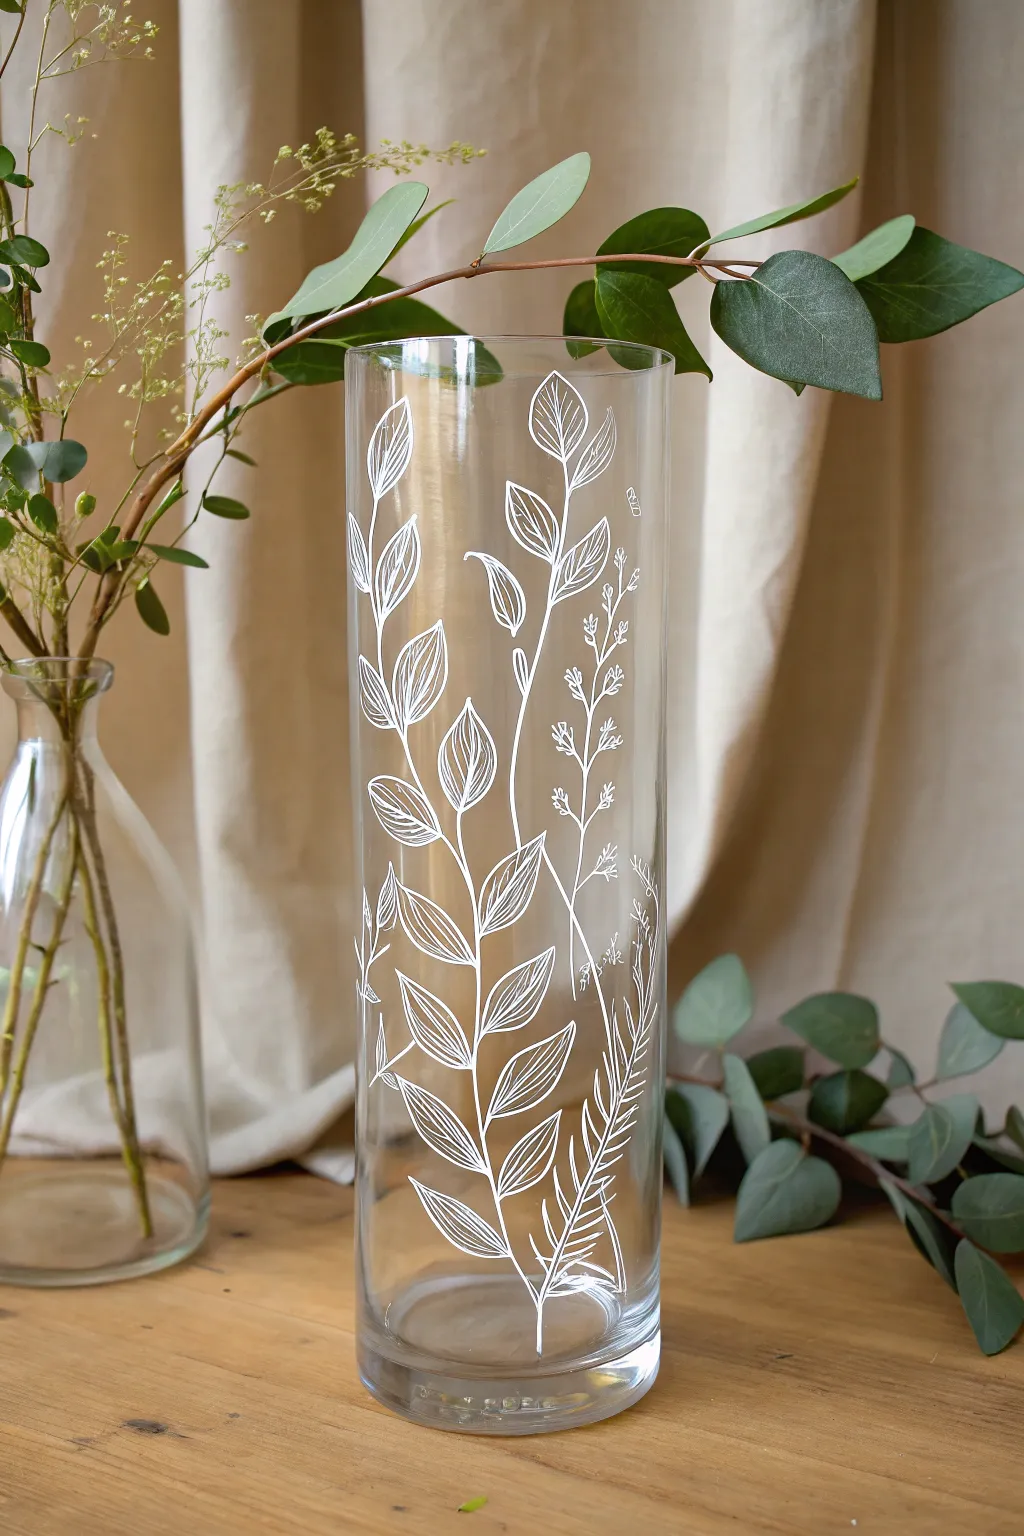
Transform a plain cylinder vase into a sophisticated centerpiece featuring delicate white foliage that appears to wrap organically around the glass. This minimalist botanical design brings a light, airy feel to any room while showcasing the beauty of simple line work.
Detailed Instructions
Materials
- Tall clear cylindrical glass vase
- Oil-based white paint marker (fine tip)
- Rubbing alcohol
- Cotton pads or paper towel
- Scrap paper
- Pencil
- Masking tape or painter’s tape
- Cotton swabs (for corrections)
Step 1: Preparation and Planning
-
Clean the surface:
Begin by thoroughly wiping down the entire exterior of the glass vase with rubbing alcohol and a cotton pad. This removes invisible oils and fingerprints that could prevent the paint from adhering properly. -
Measure the circumference:
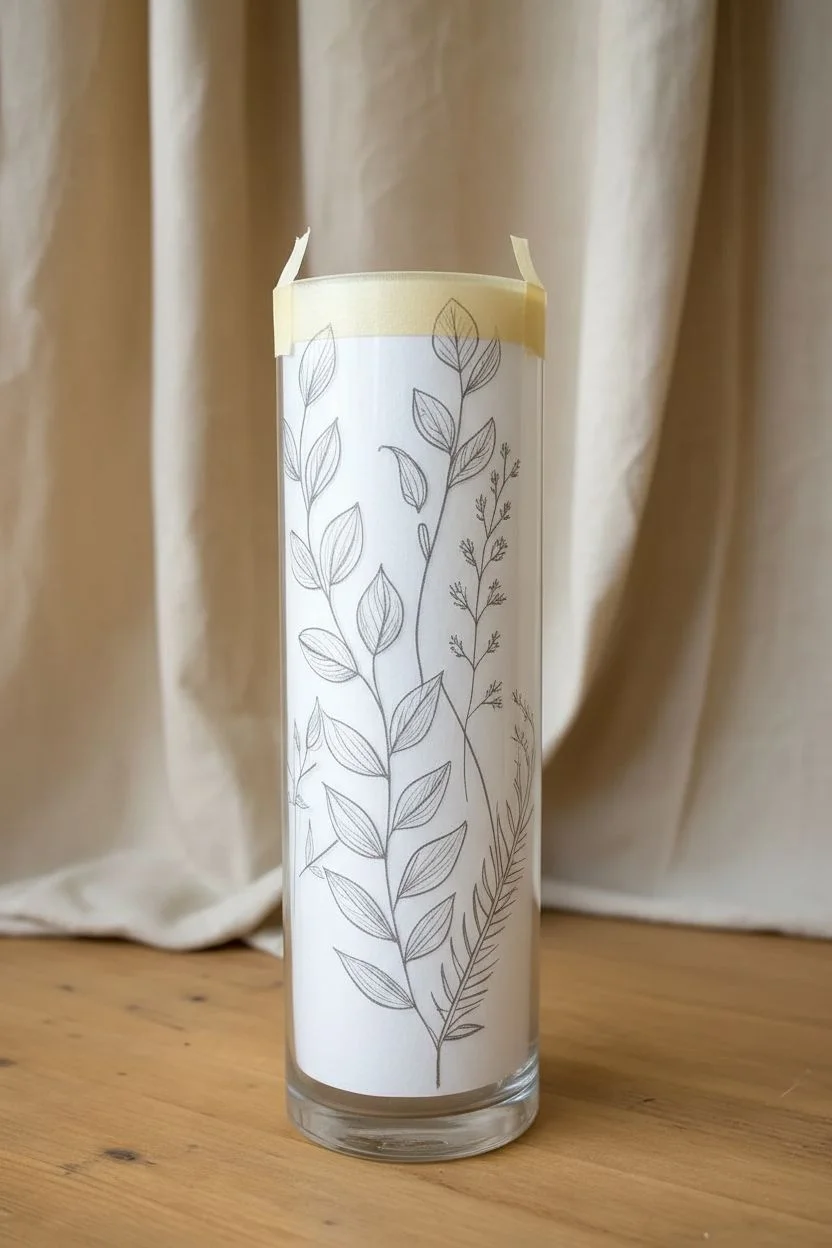
Wrap a piece of scrap paper around the vase to measure its circumference and height, then cut the paper to match these dimensions exactly. -
Draft the design:
Lay the cut paper flat on a table. Using a pencil, sketch out your botanical pattern. Focus on creating sweeping, upward-growing stems that will look natural when wrapped around the form. -
Refine the foliage:
Draw variety into your leaves; sketch some as simple ovals, others with central veins, and include delicate, thin sprigs to fill negative spaces, just like in the example image. -
Secure the template:
Once satisfied with the sketch, place the paper inside the vase with the drawing facing outward. Tape it securely in place so the lines are visible through the glass.
Pro Tip: Steady Hands
Rest your painting hand on a folded towel or a small stack of books. This raises your wrist to the right height and stabilizes your hand for smoother, less shaky lines.
Step 2: Painting the Design
-
Prime the marker:
Shake your white oil-based paint marker vigorously. Press the tip down on a separate piece of scrap paper until the ink flows smoothly and consistently. -
Trace the main stems:
Start by tracing the long, central stems of your design directly onto the glass. Use a steady hand and pull the pen towards you for smoother lines. -
Outline the leaves:
Work your way up the stems, drawing the outer contours of the larger leaves. Rotate the vase carefully as you work to avoid smudging wet ink. -
Add leaf details:
Go back into the larger leaf outlines and add the internal details, such as the central veins and diagonal texture lines shown in the inspiration piece. -
Correct mistakes:
If a line goes astray or looks scribbly, quickly dampen a cotton swab with a little rubbing alcohol and wipe it away before the paint sets fully.
Step 3: Detailing and Finishing
-
Draw filler sprigs:
Add the finer floral elements, like the tiny branched sprigs and smaller buds. Use a lighter touch here to make the lines thinner than the main leaves. -
Check for gaps:
Take a step back and look at the vase from a distance. If any areas feel too empty, freehand a few extra small leaves or stems to balance the composition. -
Remove the template:
Carefully peel away the tape and slide the paper sketch out of the vase. This reveals the clean white lines against the clear glass. -
Cure the paint:
Allow the vase to air dry for at least 24 hours. For extra durability, follow the baking instructions on your specific paint marker brand (usually placing in a cool oven, heating to 350°F/176°C for 30 minutes).
Level Up: Frosted Texture
Before drawing, spray the bottom third of the vase with frosted glass spray paint. Draw your white botanicals over the fade for a dreamy, wintery transition effect.
Now you have a stunning custom vase ready to display your favorite fresh stems or dried greenery

PENCIL GUIDE
Understanding Pencil Grades from H to B
From first sketch to finished drawing — learn pencil grades, line control, and shading techniques.
Explore the Full Guide
Bold Sunflower Statement Vase
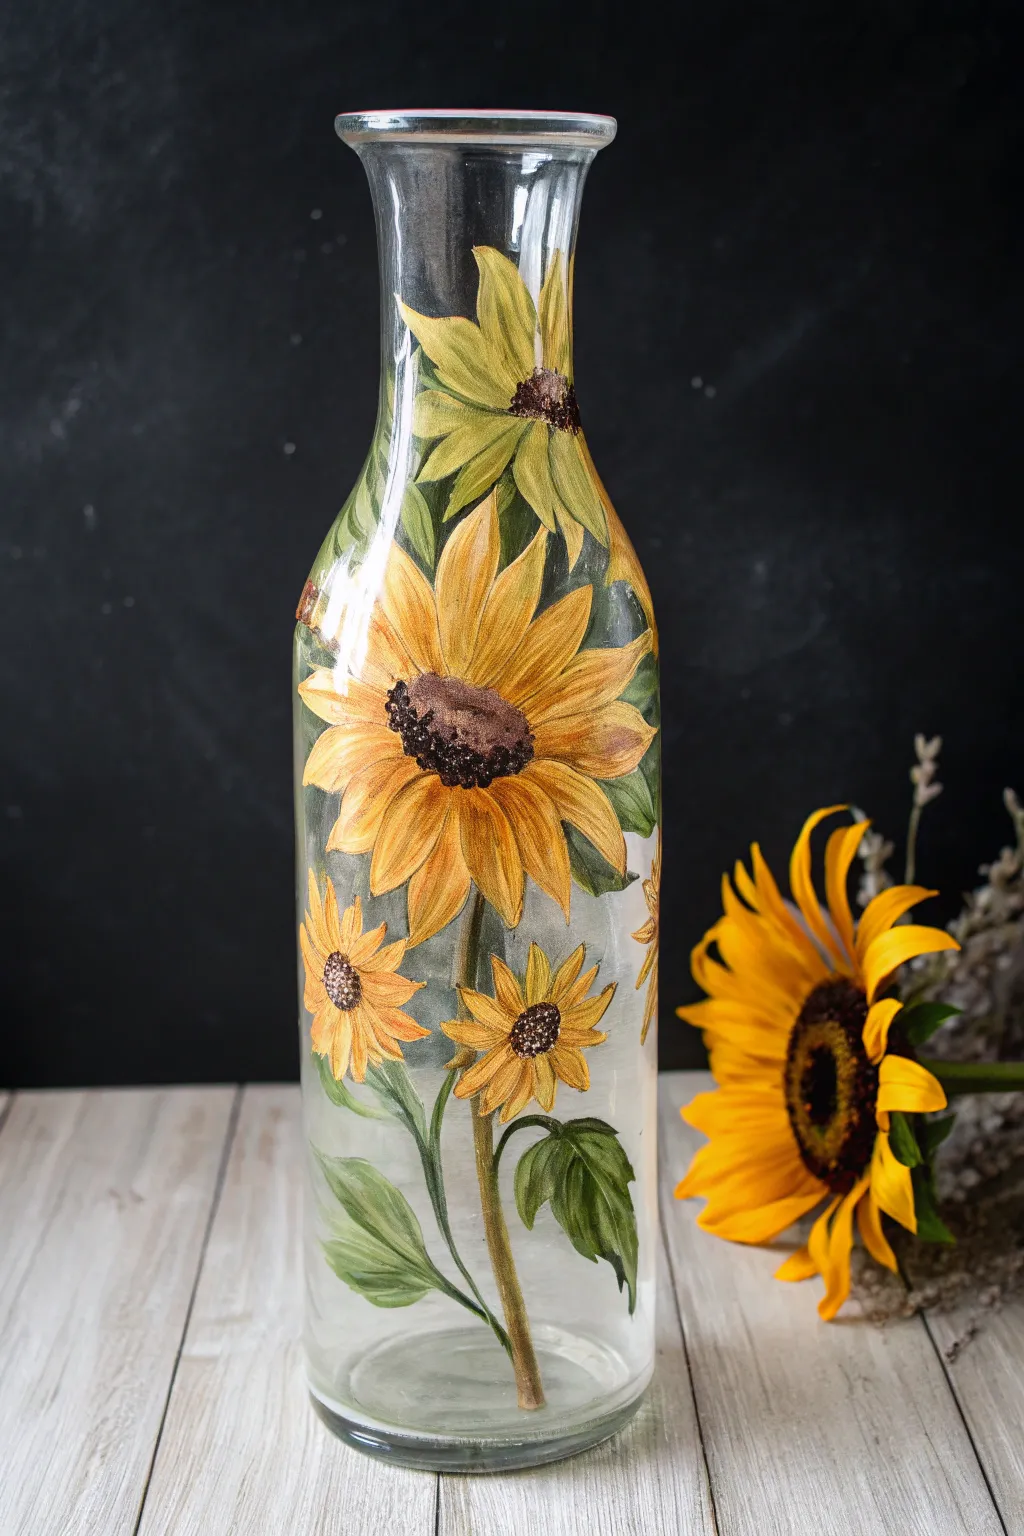
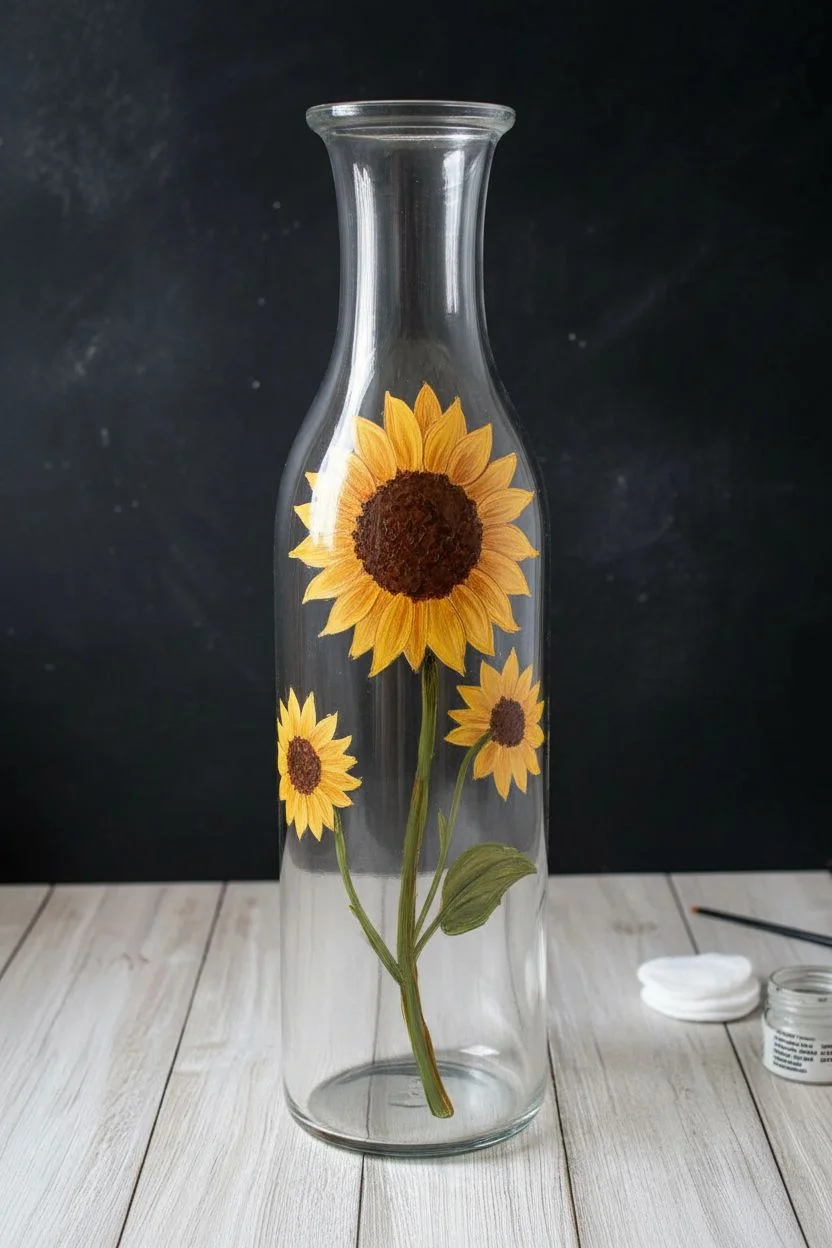
Transform a plain glass carafe into a stunning decor piece featuring vibrant, hand-painted sunflowers that seem to grow right up the vessel. This project captures the rustic charm of late summer with rich yellows and natural greens, creating a translucent stained-glass effect that glows beautifully in the light.
Step-by-Step
Materials
- Tall, clear glass carafe or narrow-neck vase
- Rubbing alcohol and cotton pads
- Glass paints or multi-surface acrylic enamels (Yellow Ochre, Cadmium Yellow, Burnt Umber, Sap Green, White)
- Round synthetic brushes (sizes #2, #4, and #6)
- Fine liner brush (size #0 or #00)
- Small sea sponge or foam pouncer
- Palette or paper plate
- Paper towels
- Oven (optional, for curing)
Step 1: Preparation and Base Layout
-
Clean surface:
Before putting brush to glass, wipe the entire exterior of the vase with rubbing alcohol on a cotton pad. This removes invisible oils and fingerprints that could prevent the paint from adhering properly. -
Outline the stems:
Mix a small amount of Sap Green with a touch of Burnt Umber to create an earthy stem color. Using your #4 round brush, paint a slightly curved central stem rising from the bottom third of the vase. Add a few branching stems for the smaller flowers. -
Block in flower centers:
Visualize where your main blooms will sit—one large one in the center, smaller ones below, and one near the neck. Dip your pouncer or sponge into Burnt Umber and gently dab oval shapes onto the glass to create the textured centers of the sunflowers.
Step 2: Painting the Petals
-
First petal layer:
Load your #6 brush with a mix of Yellow Ochre and a tiny bit of White for opacity. Starting from the center of the main flower, pull strokes outward to form the first layer of back petals. Keep tips somewhat pointed. -
Shape the upper blossom:
Repeat this process for the flower near the neck of the vase. The petals here can be slightly longer and more swept back, as if the flower is reaching upward along the curve of the glass. -
Paint lower blooms:
Switch to a #4 brush for the smaller sunflowers near the base. These petals should be shorter and spikier. Don’t worry about perfect coverage yet; layering adds depth. -
Add brightness:
Once the ochre layer is touch-dry (about 15-20 minutes), mix Cadmium Yellow with White. Paint a second layer of petals on top of the first, slightly offset, to create the bright, sunlit foreground leaves. -
Define individual petals:
I find it helpful to use the liner brush with pure White to add very thin highlight streaks along the center or edge of the top petals. This separates them visually from the darker background petals.
Slippery Paint?
If paint slides around and leaves streaks, you might be overloading the brush. Let the first layer dry completely, then apply a second coat rather than trying to fix it while wet.
Step 3: Creating Texture and Leaves
-
Texturize the centers:
Return to the brown centers. Take the liner brush and stipple (dot) dark brown and black dots around the outer edge of the center ovals. Add a few lighter brown or tan dots in the very middle to simulate seeds. -
Paint the leaves:
Using the #6 brush and Sap Green, paint broad, tear-drop shaped leaves attaching to the stems. Press down firmly at the base of the leaf and lift as you pull away to create a tapered point. -
Highlight the greenery:
While the green paint is still wet, pick up a tiny bit of Yellow or White on the dirty brush and blend it into the upper curves of the leaves. This creates a natural shine and dimension. -
Connect the elements:
Use the liner brush and thin green paint to ensure all flowers and leaves are physically connected to the main stems. Add tiny sepals (little green leaves) right under the flower heads where they meet the stem.
Bee-utiful Addition
Add a tiny bumblebee resting on one of the petals. Use a liner brush to paint a small yellow and black oval with delicate grey wings for a charming, lively detail.
Step 4: Final Touches and Curing
-
Refine edges:
Inspect your work against a light source. If any petals look too transparent, gently dab more yellow paint onto them. Clean up any stray smudges on the clear glass with a damp cotton swab/Q-tip. -
Curing instructions:
Allow the vase to air dry for at least 24 hours. For durability, check your paint manufacturer’s instructions; many glass paints can be baked in a cool oven (usually 350°F for 30 mins) to make the design dishwasher safe.
Place your finished vase near a window to let the sunlight illuminate your handmade garden
Bee and Blossom Garden Scene
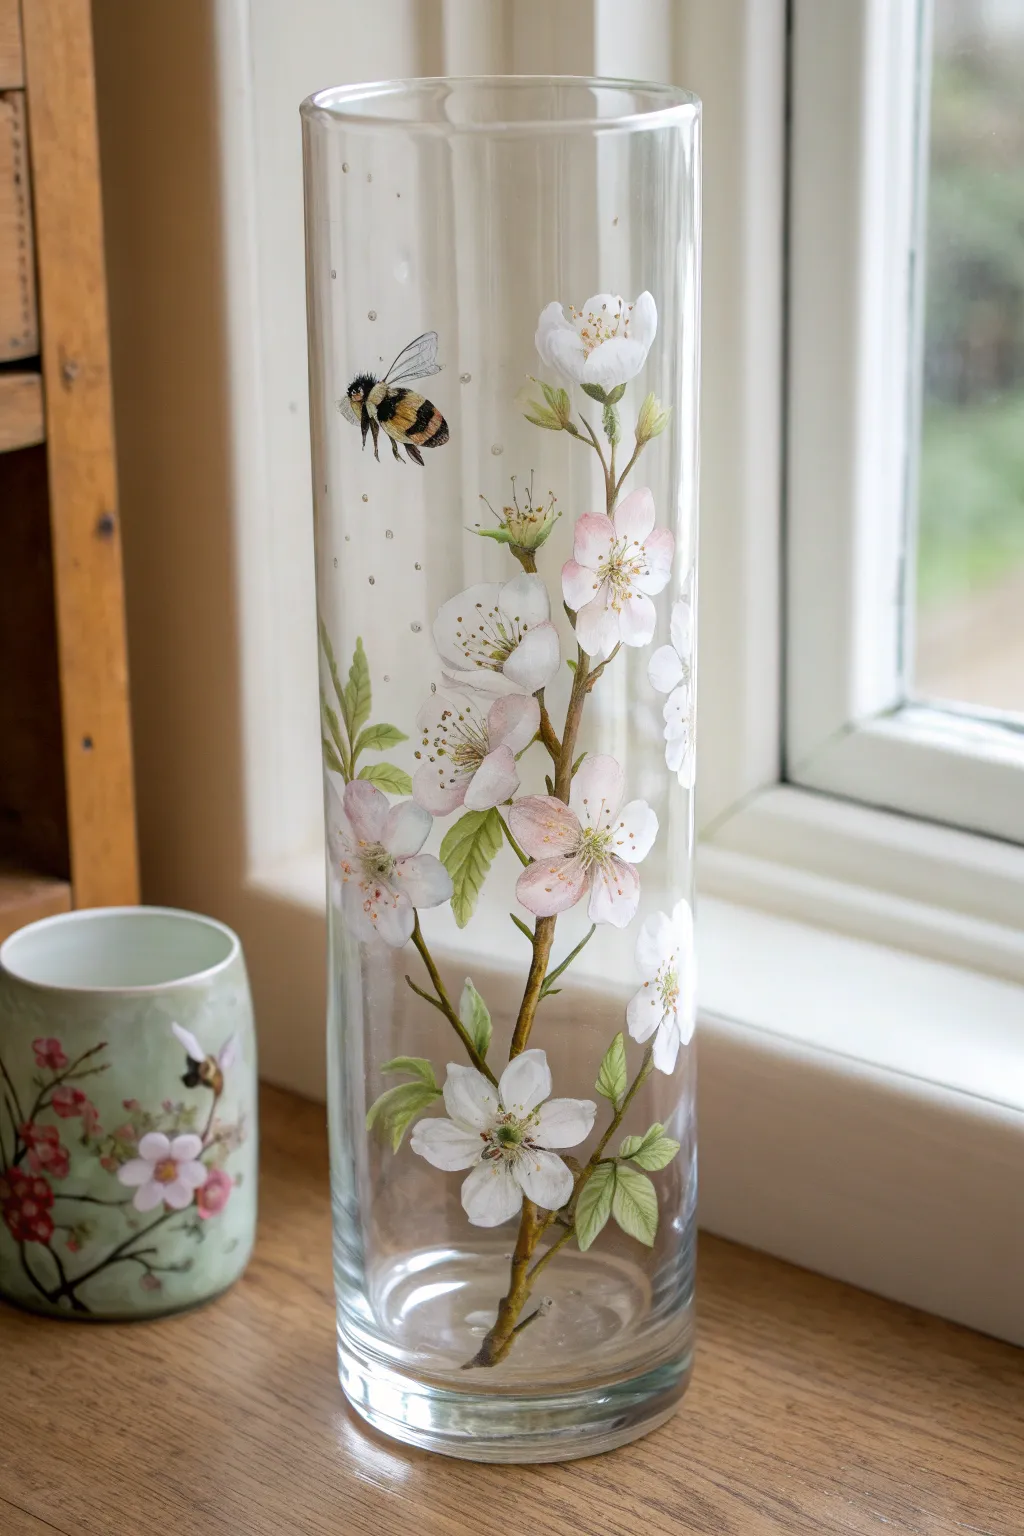
Transform a plain glass cylinder into a piece of spring-inspired art with these delicate blossoms and a fuzzy bumblebee. This project uses translucent layers and fine detail work to create a garden scene that looks as though it’s growing right inside the glass.
Detailed Instructions
Materials
- Tall cylindrical glass vase (clear)
- Rubbing alcohol
- Enamel glass paints (White, Leaf Green, Olive Green, Pale Pink, Yellow Ochre, Black, Golden Yellow)
- Synthetic paintbrushes (Fine liner 00, pointed round size 2, small flat shader)
- Paint palette or ceramic tile
- Paper towels
- Cotton swabs (for mistakes)
- Oven (for curing, if using bake-to-set paints)
Step 1: Preparation and Branch Structure
-
Clean the surface:
Before making a single mark, wipe the entire exterior of the glass vase with paper towels soaked in rubbing alcohol. This removes finger oils and ensures the paint adheres permanently. -
Plan the composition:
Visualize a vertical branch climbing up the vase. You want it slightly off-center for a natural look. If you aren’t confident freehanding, you can tape a sketch inside the glass to use as a guide. -
Mix the branch color:
On your palette, mix a touch of Black into the Olive Green and Yellow Ochre to create a brownish-green ‘wood’ tone. It shouldn’t be too dark; keep it natural. -
Paint the main stem:
Using the pointed round brush, paint the central stem starting from the bottom. Use uneven pressure—press down for thickness and lift up for thinner sections—to create knobbly, realistic branch textures. -
Add side shoots:
Branch off smaller shoots from the main stem. Keep these quite thin and delicate, angling them upwards as if reaching for the sun.
Step 2: Painting the Blossoms
-
Base coat the petals:
Load your round brush with White enamel. Press the brush gently onto the glass to create tear-drop shapes for petals. Arrange them in groups of five for open flowers, and singular ovals for buds. -
Create variation:
While the white is still slightly wet, pick up a tiny amount of Pale Pink on the same brush. Blend it into the center or edges of some flowers to give them depth and a soft blush. -
Paint the closed buds:
For the unopened buds near the top, make tight, rounded strokes using a mix of White and heavier Pink. Add small green sepals (the leafy base) underneath them using your liner brush and Leaf Green. -
Detail the flower centers:
Once the white base petals are dry to the touch, use the liner brush to add a small starburst of Yellow Ochre or Green in the middle of the open blooms. -
Add the stamens:
With your finest liner brush and Golden Yellow paint, create tiny dots hovering above the center on delicate, almost invisible stalks. This detail really brings the flowers to life.
Layering Pro Tip
Paint the background leaves first, then the branches, and finally the foreground flowers. This overlap creates a convincing 3D depth on the flat glass surface.
Step 3: Leaves and The Bee
-
Paint the leaves:
Using a mixture of Leaf Green and Olive Green, paint leaves emerging from the branch nodes. Use a ‘press and lift’ motion: touch the tip, press down to widen the leaf, and lift while dragging to create a sharp point. -
Vein details:
I like to wait for the green leaves to tack up slightly, then use a clean, dry liner brush to gently scratch through the wet paint, revealing the clear glass underneath to act as the leaf veins. -
Start the bee body:
Position your bee near the top third of the vase. Paint a small, fuzzy oval using Golden Yellow. Let this dry completely before moving to the next step so the colors don’t muddy. -
Add bee stripes and features:
Paint thick black stripes over the yellow oval using the liner brush. Stipple the edges slightly to mimic fur texture. Add a small black head and delicate legs hanging down. -
The bee wings:
Mix a tiny drop of White with a lot of glazing medium (or clear extender) to make it very transparent. Paint two translucent wings extending from the bee’s back. Outline them with the faintest grey line. -
Add pollen dust:
Dip the back end of a brush into diluted grey or white paint and dot tiny specks around the bee and flowers to simulate floating pollen or dust motes.
Level Up: Frosted Glass
Sponge a translucent frost medium onto the bottom third of the vase before painting the stems to give the illusion of early morning mist in the garden.
Step 4: Finishing and Curing
-
Review and refine:
Check your work against a light source. If the petals look too thin, add a second coat of white to the tips for opacity. -
Dry thoroughly:
Let the vase sit in a dust-free area for at least 24 hours (or as per your paint manufacturer’s instructions) to ensure the surface is non-tacky. -
Bake to cure:
Place the vase in a cool oven. Set the temperature to 350°F (175°C) and bake for 30 minutes. Turn the oven off and let the vase cool down inside completely so the glass doesn’t crack from thermal shock.
Now you have a stunning, hand-painted centerpiece that captures the eternal freshness of spring


Sunset Gradient With a Silhouette Design
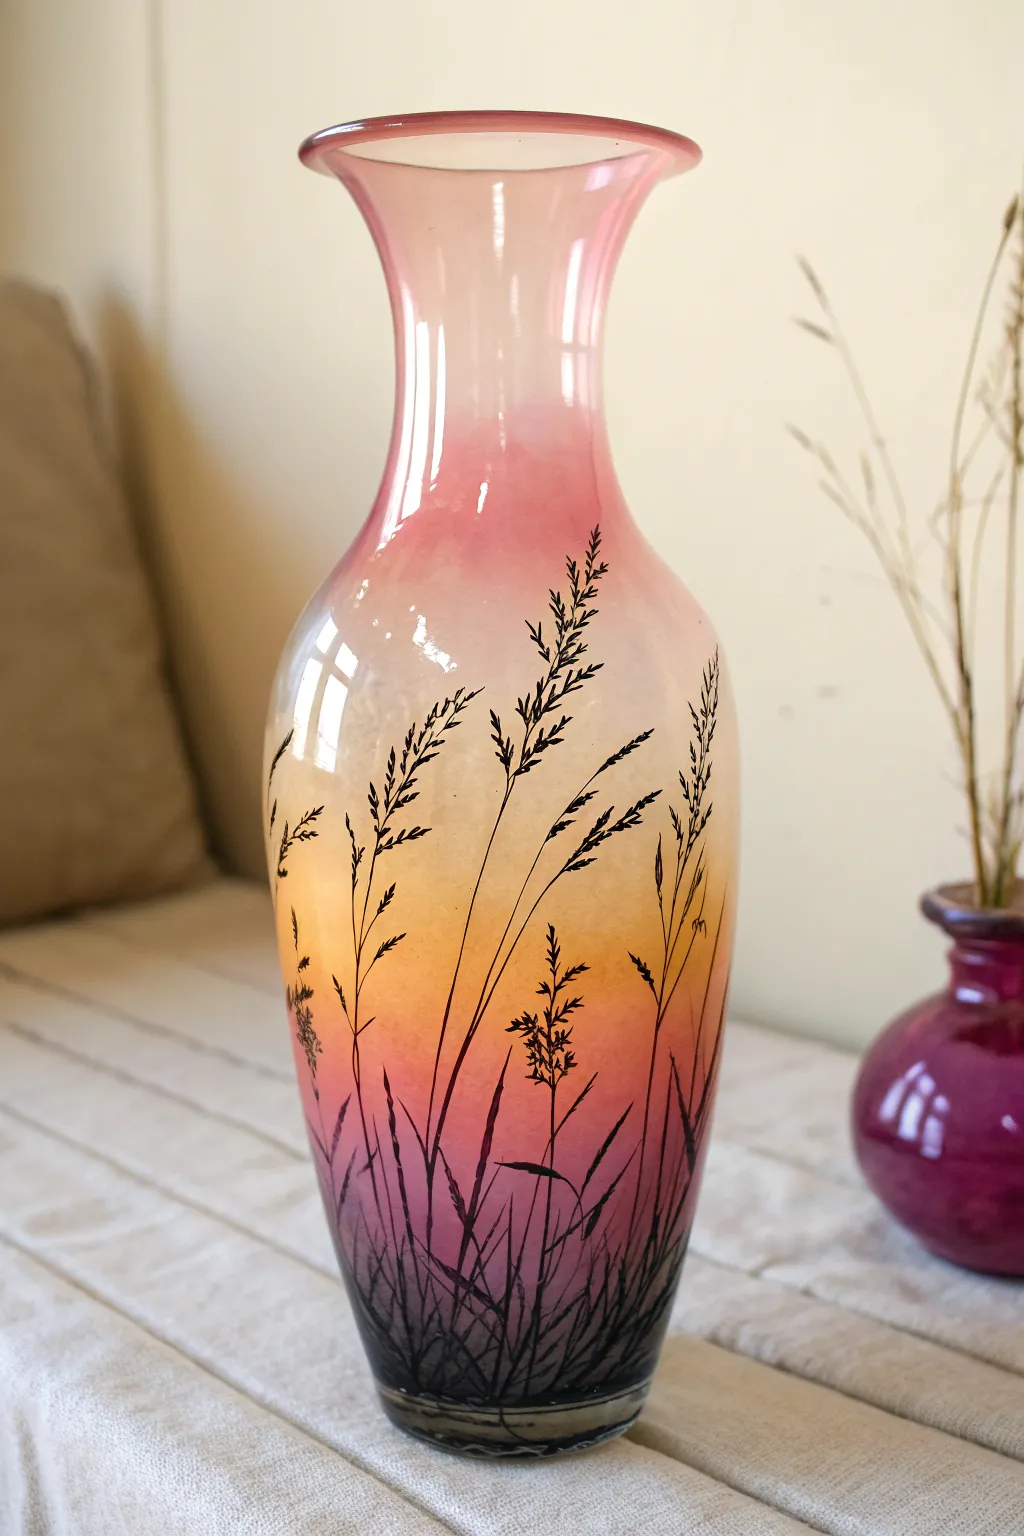
Capture the fleeting beauty of dusk with this stunning glass painting project. Using translucent glass paints to create a soft sunset gradient and stark black liners for the grass silhouettes, you can transform a plain vase into a piece of glowing art.
Step-by-Step Tutorial
Materials
- Tall clear glass vase
- Rubbing alcohol and cotton pads
- Glass paints (Pink/Rose, Orange/Yellow Ochre, Deep Purple/Violet)
- Black glass liner or oil-based paint marker (fine tip)
- Soft cosmetic sponges or dabbers
- Palette or paper plate
- Cotton swabs for cleanup
- Oven (for curing, if paint requires)
Step 1: Preparing the Canvas
-
Clean the glass:
Before engaging with any paint, the surface must be pristine. Wipe the entire exterior of the vase with rubbing alcohol on a cotton pad to remove oils and fingerprints, ensuring the paint adheres properly. -
Plan your zones:
Visualize the vase in thirds. The top neck area will be your soft pink, the middle bulge will transition to a warm orange-yellow, and the base will ground the piece in deep purple and black.
Step 2: Creating the Sunset Gradient
-
Start at the top:
Squeeze a small amount of pink glass paint onto your palette. Load your sponge lightly—you want a frosted look, not a thick coat. Dab the paint onto the neck of the vase, fading it out as you move downward. -
Add the golden hour:
Clean your sponge or grab a fresh one. Pick up the orange or yellow ochre paint. Start dabbing in the middle section of the vase, slightly overlapping the bottom edge of the pink to create a peach transition color. -
Blend the transition:
While the paints are still tacky, lightly dab over the line where pink meets orange to soften the gradient. I find using a barely damp sponge helps blur hard lines without removing the pigment. -
Apply the base:
Load a sponge with deep purple paint. Apply this to the bottom third of the vase. Work the color upwards into the orange section to create a dusky, transitional hue. -
Darken the bottom edge:
To add visual weight, dab a tiny amount of black or very dark purple right at the very bottom rim of the vase, blending it up slightly into the purple layer. -
Let it cure:
Allow the sponge painting to dry completely according to the manufacturer’s instructions. This usually takes at least one hour, but overnight is safer so you don’t smudge the base while drawing.
Pro Tip: Frosted Effect
To get that matte, hazy look shown in the photo, look for ‘frost’ or ‘opaque’ medium to mix with your glossy glass paints before sponging.
Step 3: painting the Silhouettes
-
Anchor the grass:
Using your black relief liner or paint marker, start at the very bottom of the vase. Draw short, curved strokes clustering together to create the dense tufts of grass at the root level. -
Draw the main stems:
Extend several long, thin lines upward from the grass base. Vary their heights and curvature; natural grass rarely stands perfectly straight. Let some reach all the way up into the pink section. -
Add seed heads:
On the taller stalks, draw small ‘V’ shapes or tiny dashes alternating up the sides of the stem to mimic wheat or seed heads. Keep these delicate and finer than the main stem. -
Fill in the mid-ground:
Add medium-height stalks that stop in the orange zone. These can be slightly thicker or leafier to add depth to your field. -
Layer the details:
Go back to the bottom purple area and add more density with crisscrossing short lines. This obscures the bottom glass and makes the tall stalks look rooted. -
Refine the tips:
Check the very tops of your tallest grasses. Taper the lines off gently so they end in sharp points rather than blunt blobs. -
Clean up mistakes:
If a line goes rogue, quickly use a damp cotton swab to wipe it away before it sets. Precision is key for the silhouette effect.
Troubleshooting: Stubborn Bubbles
If sponging creates tiny air bubbles, let the paint sit for 30 seconds, then lightly tap over them with a dry, clean sponge to pop them.
Step 4: Finishing Touches
-
Inspect the gradient:
Hold the vase up to a light source. If the background looks too patchy, you can carefully sponge a second, very thin layer of color behind the dried black lines, though leaving it semi-transparent is lovely. -
Bake or seal:
Depending on your specific paint brand, place the vase in a cold oven and heat it to the specified temperature (often 325°F/160°C) for 30-40 minutes to make it dishwasher safe, or apply a clear sealant spray.
Place your finished vase near a window where the sunlight can illuminate those warm gradient colors
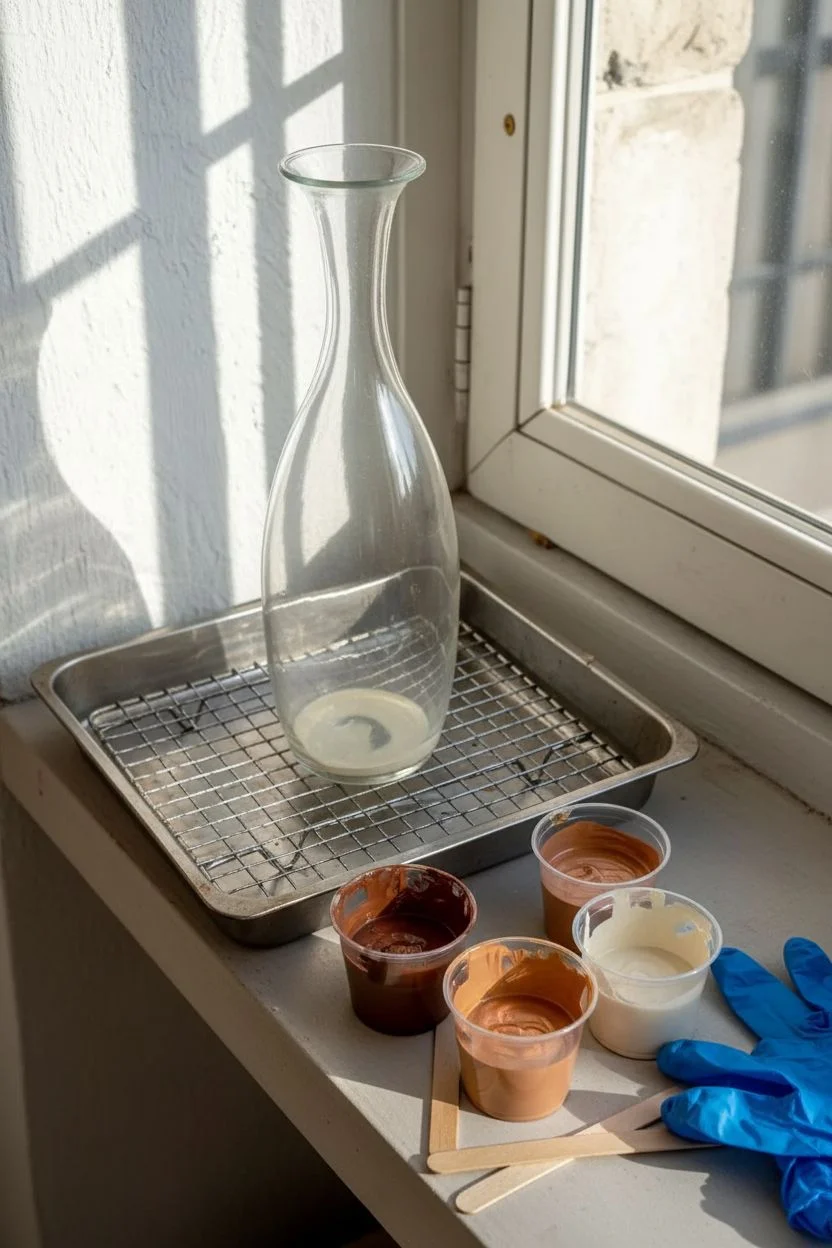
Marbled Swirls for a Stone-Like Finish
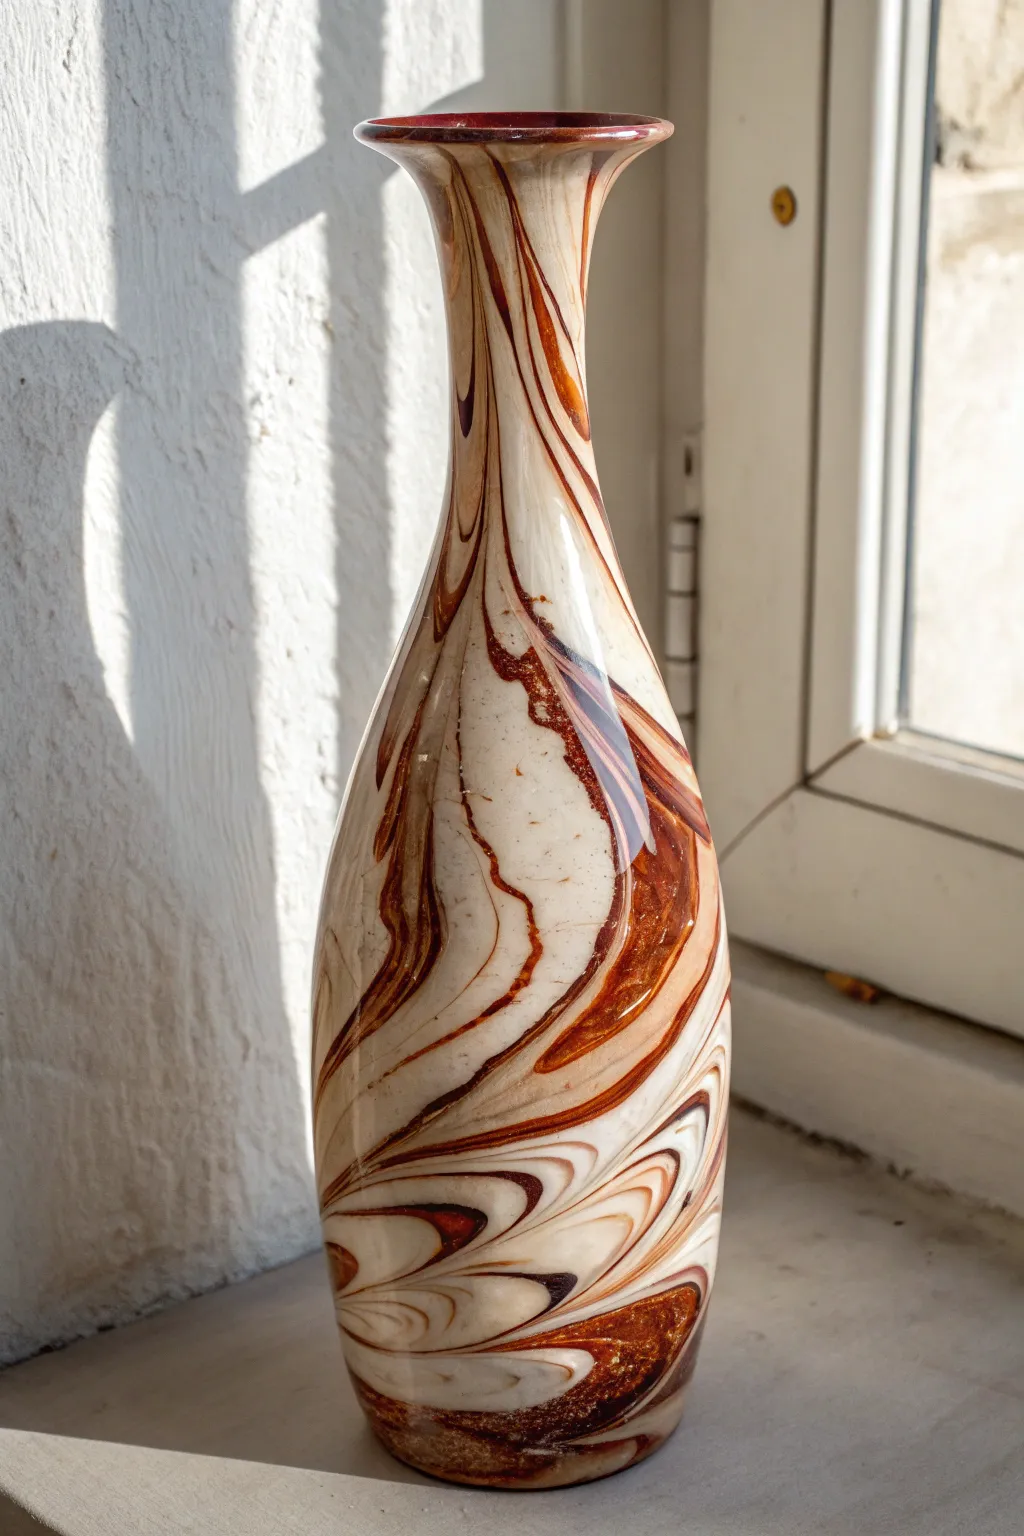
Transform a plain glass vase into a sophisticated centerpiece that mimics the organic beauty of polished agate or marble. This technique swirls rich browns, creams, and metallic copper to create rolling bands of color that look incredibly high-end.
Step-by-Step Guide
Materials
- Tall, narrow-neck glass vase (cleaned and dried)
- Acrylic pouring medium (or Floetrol)
- Acrylic paints: Chocolate Brown, Cream/Off-White, Metallic Copper, Tan/Latte
- Rubbing alcohol
- Small plastic cups (one for each color)
- Popsicle sticks for stirring
- Disposable baking tray or large cardboard box
- Wire cooling rack or four spare cups (to elevate vase)
- Gloves
- Clear acrylic sealer spray (gloss finish)
Step 1: Preparation and Mixing
-
Clean surface:
Begin by wiping the exterior of your glass vase down thoroughly with rubbing alcohol. This removes unseen oils or dust that might repel the paint. -
Set up a drip station:
Place your wire cooling rack inside a disposable baking tray. Alternatively, set up four small upturned cups in a square formation inside a box. You need the vase to be stable and elevated so paint can flow off the bottom freely. -
Prepare the paints:
In separate cups, mix each acrylic paint color (brown, cream, copper, tan) with your pouring medium. A standard ratio is 1 part paint to 1 part medium, but check your specific medium’s bottle. -
Check consistency:
Stir until the mixtures are smooth. The consistency should be like warm honey—fluid enough to pour but thick enough to coat the glass without instantly running off.
Paint sliding off too fast?
Your mixture is likely too thin. Add a pea-sized amount of heavy body acrylic paint to thicken it up, or let the mixed cups sit for 15 minutes before pouring to thicken slightly.
Step 2: Creating the Dirty Pour
-
Layer the colors:
Take a fresh, empty cup. This will be your ‘dirty pour’ cup. Pour a small amount of the cream color into the bottom. -
Build the layers:
Gently pour the chocolate brown on top of the cream, followed by the metallic copper, and then the tan. Do not stir. -
Repeat layering:
Continue layering the colors in this sequence until the cup is about three-quarters full. I like to vary the amount of paint in each layer slightly to create organic, uneven stripes. -
Add variance:
For the specific look in the photo, ensure you have plenty of cream and brown layers, using the copper as a thinner accent layer between them.
Step 3: Pouring and Swirling
-
Position the vase:
Place the vase upside down on your elevation stand. Ensure it is perfectly level so the drips are even. -
The initial pour:
Start pouring your layered paint cup directly onto the center of the vase’s base (which is currently facing up). Pour slowly and steadily. -
Controlled movement:
As the paint flows down the sides, move your pouring hand in a very slight circular motion. This encourages the straight layers to twist into the marbled swirls seen in the image. -
Covering the neck:
Watch as the paint travels down the narrow neck. If you miss a spot, you can touch up by dripping a tiny bit of extra paint near the top edge, but try to let gravity do the work for the smoothest finish. -
Manage the drips:
Let the paint drip off the rim (which is currently at the bottom) for at least 20-30 minutes. You want the excess to flow completely off. -
Clean the rim:
While the paint is still wet, gently run a popsicle stick around the very edge of the rim to remove ‘drip icicles’ that have formed.
Pro Tip: Cell creation
Add 2 drops of silicone treadmill oil to the copper paint cup before layering. This creates tiny ‘cells’ or bubbles in the metallic streaks for an even more detailed stone texture.
Step 4: Finishing
-
Dry time:
Leave the vase undisturbed to dry for at least 24 to 48 hours. Acrylic pours require significant drying time to cure fully. -
Seal the art:
Once fully dry to the touch, take the vase outside and spray 2-3 thin coats of clear acrylic gloss sealer. This protects the paint and gives it that polished stone shine.
Once it’s dry, flip it over and you have a stunning faux-stone vase ready for dry flowers
Drip-and-Pour Vertical Paint Streams
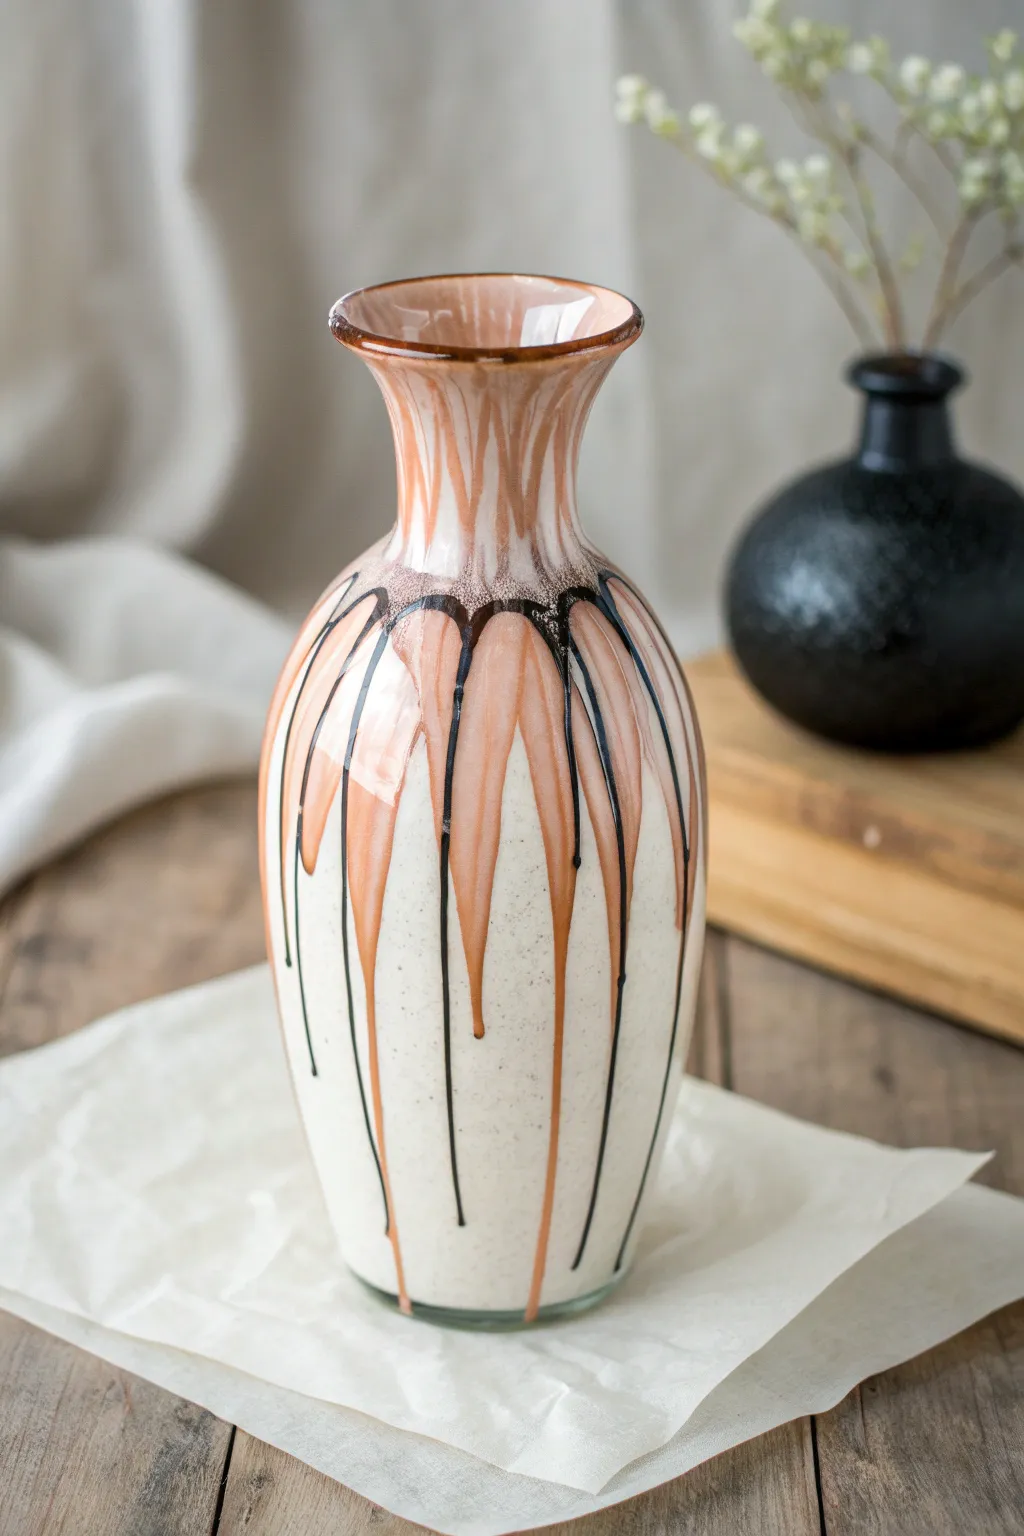
Transform a plain glass vessel into a high-end decor piece featuring a striking duel-tone drip effect. This technique combines a textured cream base with elegant ribbons of coral and black glaze that cascade naturally down the sides.
Detailed Instructions
Materials
- Tall clear glass vase (narrow neck preferred)
- Rubbing alcohol and cotton pads
- Cream or off-white acrylic spray paint (matte finish)
- Granite or textured spray finish (optional, for speckling)
- High-gloss pourable acrylic paint (Coral/Salmon)
- Glazing medium or pouring medium
- Black glass liner paint (tube with precision tip) or dimensional fabric paint
- Painter’s tape
- Disposable cups and mixing sticks
- Protective drop cloth or parchment paper
Step 1: Base Preparation
-
Clean the Surface:
Begin by thoroughly wiping down your entire glass vase with rubbing alcohol on a cotton pad to remove any oils or fingerprints, ensuring the paint adheres perfectly. -
Protect the Interior:
Stuff the opening of the vase with a paper towel or use a small strip of painter’s tape inside the rim to prevent spray paint from fogging up the inside. -
Apply the Base Coat:
In a well-ventilated area, hold the can 12 inches away and apply a light, even coat of matte cream spray paint. -
Build Opacity:
Let the first coat dry for about 15 minutes, then apply a second and possibly third coat until the glass is completely opaque and the color is solid. -
Add Subtle Texture:
If you want that speckled stoneware look shown in the image, hold a can of granite-effect spray paint further back (about 18 inches) and do a very quick, light misting over the cream base. -
Complete Drying:
Allow the base coats to cure completely for at least 24 hours before moving on to the liquid paints to prevent any lifting or cracking.
Drip Control
If a drip is moving too fast or getting too long, quickly turn the vase upside down for 30 seconds. This reverses gravity and slows the flow without smudging the paint.
Step 2: Creating the Coral Drips
-
Mix the Glaze:
In a disposable cup, mix your coral acrylic paint with a pouring medium at a 2:1 ratio. You want a consistency like warm honey—fluid enough to run, but thick enough to hold its shape. -
Load a Brush:
Dip a medium-sized round brush heavily into your coral mixture so it is dripping wet. -
Apply the Neck Ring:
Paint a generous, thick band around the shoulder of the vase, just where the neck widens into the body. -
Encourage the Drips:
Press the loaded brush against the bottom edge of that fresh band and let gravity pull the excess paint down. I find tilting the vase slightly helps guide the path. -
Define the Scallops:
Add more paint to the shoulder ring, purposefully creating ‘heavy spots’ at even intervals that will naturally flow down into those tapered, triangular drip shapes. -
Paint the Neck:
While the drips are moving, use the remaining paint on your brush to streak upward from the shoulder ring to the rim, creating vertical striated lines on the neck. -
Initial Set:
Let the coral paint sit for about an hour until the surface has skinned over and isn’t tacky to the touch.
Metallic Finish
Swap the black liner paint for liquid gold leaf or metallic silver liner. The metallic shine against the matte cream base adds an incredibly luxurious, modern feel.
Step 3: The Dark Accents
-
Prepare Black Liner:
Use a tube of black glass paint with a fine-tip applicator nozzle. If you don’t have one, fill a precision squeeze bottle with slightly thinned black acrylic. -
Outline the Drips:
Starting at the shoulder, carefully trace the curve between two coral drips, following the negative space downward. -
Extend the Lines:
Ideally, you want these black lines to extend slightly lower than the coral sections. Squeeze gently to let a long, thin bead of black paint travel down the cream surface. -
Finish the Shoulder:
Connect the tops of these black drip lines with small arches right at the shoulder line, emphasizing the separation between the coral sections. -
Rim Detail:
For a polished finish, carefully run a bead of the coral paint (or a metallic bronze for contrast) along the very top rim of the vase. -
Final Cure:
Place the vase in a dust-free area and let it dry undisturbed for 48 hours to ensure the thick drips harden completely.
Now you have a stunning, gallery-worthy vase ready to hold your favorite dried botanicals
Terrazzo Speckle Chips on a Glass Vase

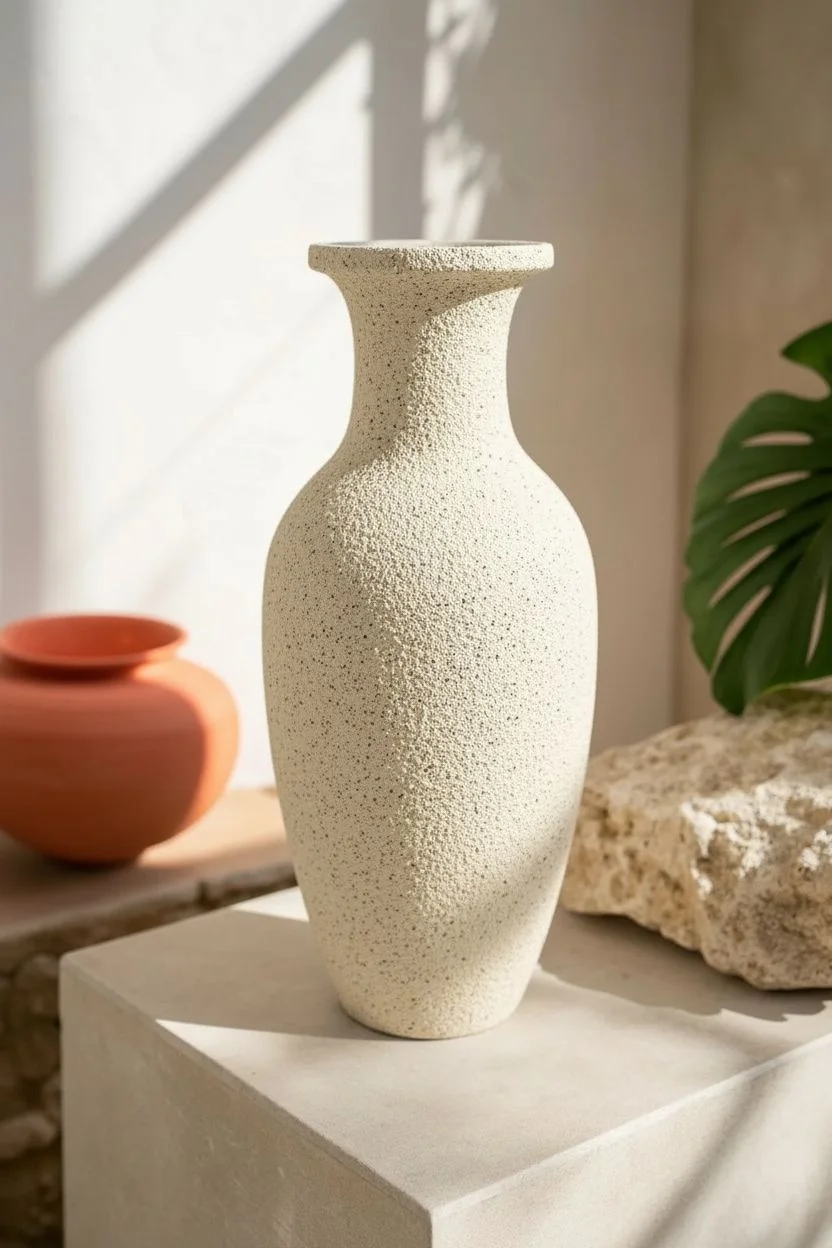
Transform a plain glass vessel into high-end decor with this remarkably realistic terrazzo effect. By layering textured base coats with freehand painted “chips,” you’ll achieve an organic, speckled porcelain look that mimics real stone composite.
Step-by-Step Guide
Materials
- Glass vase (curved silhouette preferable)
- Rubbing alcohol and cotton pads
- Baking soda or plaster powder (for texture)
- Acrylic paint (Cream or Warm White for base)
- Acrylic paints (Burnt Orange, Teal, Navy Blue, Mustard Yellow, Black)
- Small flat brush
- Fine detail brush
- Medium foam brush or wide flat brush
- Paper palette or plate
- Matte clear sealant spray
Step 1: Prepping the Canvas
-
Clean the surface:
Wipe down your entire vase with rubbing alcohol to remove dust and finger oils, ensuring the paint adheres properly. -
Mix the textured base:
Squeeze a generous amount of cream or warm white acrylic paint onto your palette. Slowly mix in baking soda (about a 1:1 ratio) until you have a thick, fluffy consistency like frosting. This creates the faux stone texture. -
Apply the first coat:
Using a foam brush or wide flat brush, apply the sandy mixture all over the vase. Use dabbing motions rather than long strokes to build up a stippled, stone-like surface. -
Let it cure:
Allow this first layer to dry completely. Because of the baking soda, it might take a bit longer than usual—about an hour. -
Add a second textured layer:
Apply a second coat of your textured cream mixture to ensure full opacity so no glass shows through. Let this dry fully before moving to the fun part. -
Create the speckle mix:
While the base dries, prepare a watered-down black or dark grey acrylic paint. You want it fluid enough to splatter. -
Splatter the base (optional):
Dip an old toothbrush or stiff brush into the watery black paint and run your thumb across the bristles to flick tiny micro-speckles onto the vase. This adds depth behind the larger chips.
Natural Shaping
Avoid perfect circles or squares. Real terrazzo chips are broken stone, so wiggle your brush slightly as you paint to create jagged, organic edges.
Step 2: Painting the Terrazzo Chips
-
Plan your palette:
Pour dime-sized puddles of your accent colors: burnt orange, teal, navy, and mustard yellow. I find keeping the tones muted helps the stone look feel authentic. -
Paint the large shapes first:
Using a small flat brush, paint irregular geometric shapes with your largest accent color (perhaps the teal). Think triangles with rounded corners or jagged pebbles. Space them out generously. -
Rotate and evaluate:
Constantly turn the vase as you work to ensure the distribution isn’t too clustered in one spot. -
Add secondary colors:
Switch to your medium brush for the burnt orange and mustard chips. Try to vary the sizes—some should be chunky, others mere slivers. -
Layering the dark accents:
Use the navy blue or black for smaller, sharper shards. These act as high-contrast anchors for the pattern. -
Fill the gaps:
Look for empty “white space” areas. Use a detail brush to add tiny dots or crumbs of color to balance the composition. -
Vary orientation:
Make sure your shapes constitute a mix of vertical, horizontal, and diagonal orientations so the pattern flows organically rather than looking like stripes.
Step 3: Finishing Touches
-
Check density:
Step back about three feet to look at the vase. Add a few more tiny specs if any area feels too bald. -
Dry efficiently:
Allow all the colorful chips to dry. Since baking soda paint is absorbent, the top colors usually dry quite fast. -
Seal the deal:
Take the vase to a well-ventilated area and apply a coat of matte clear spray sealant. This protects the textured paint from chipping and locks in the earthy finish.
Level Up: Metallic Pop
Mix a tiny amount of gold leaf adhesive or metallic gold paint into your palette and add a few rare, shimmering “chips” for a luxe, modern twist.
Now you have a stunning, stone-effect vessel that looks incredibly heavy and expensive, despite being painted glass
Faux Terracotta Texture With a Gritty Mix
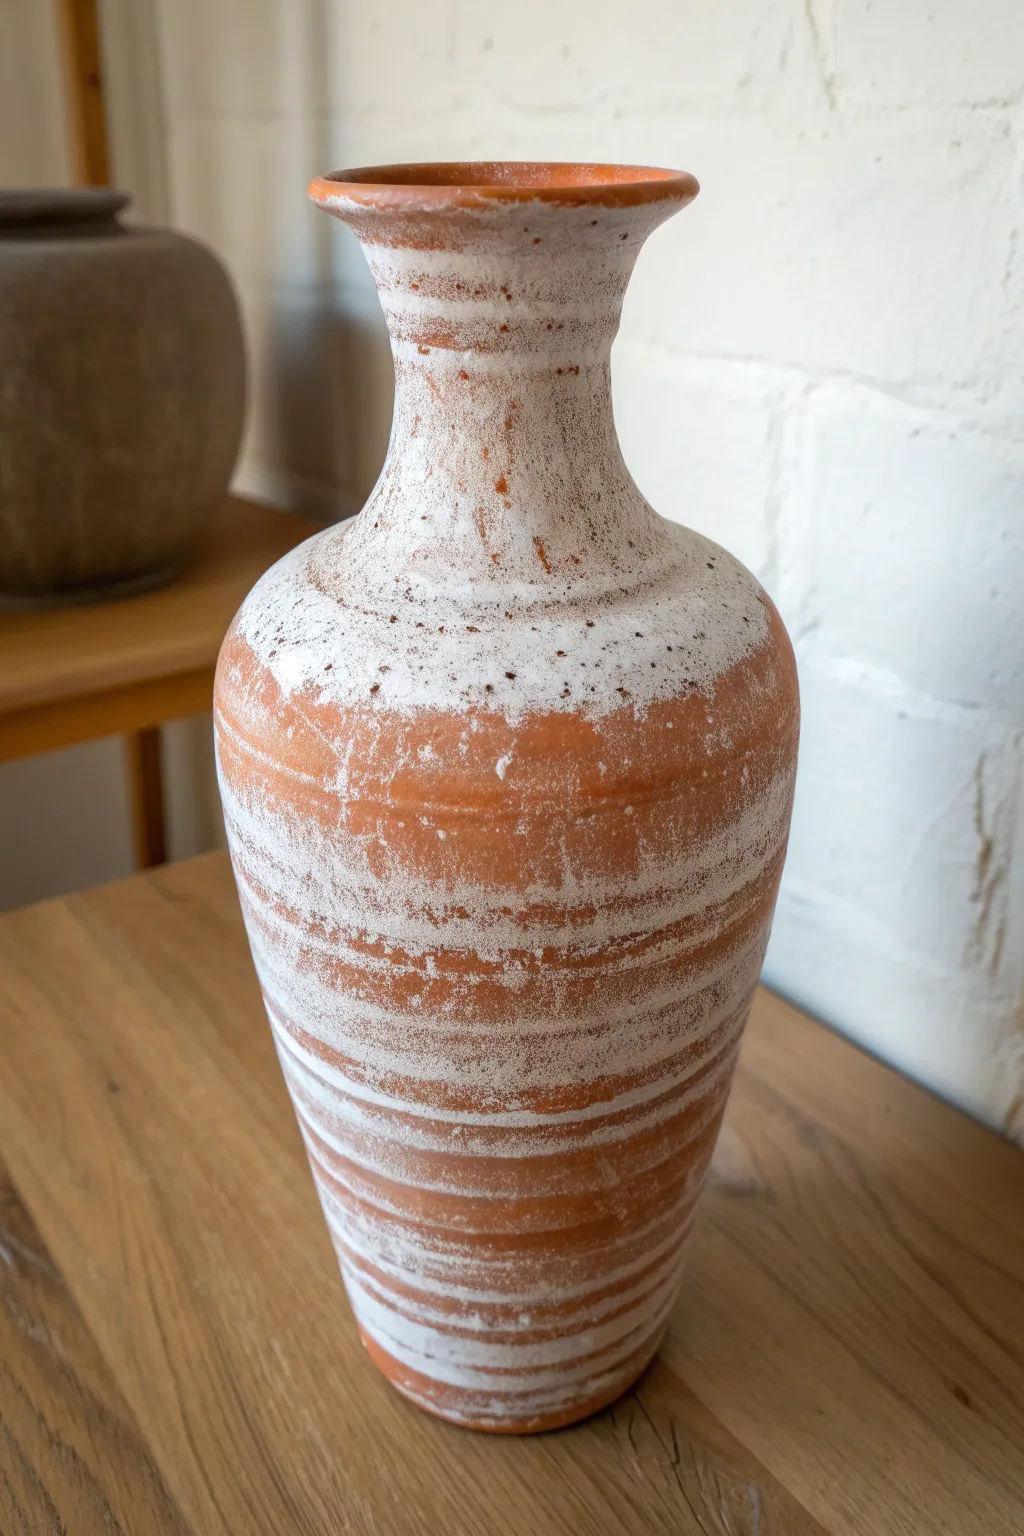
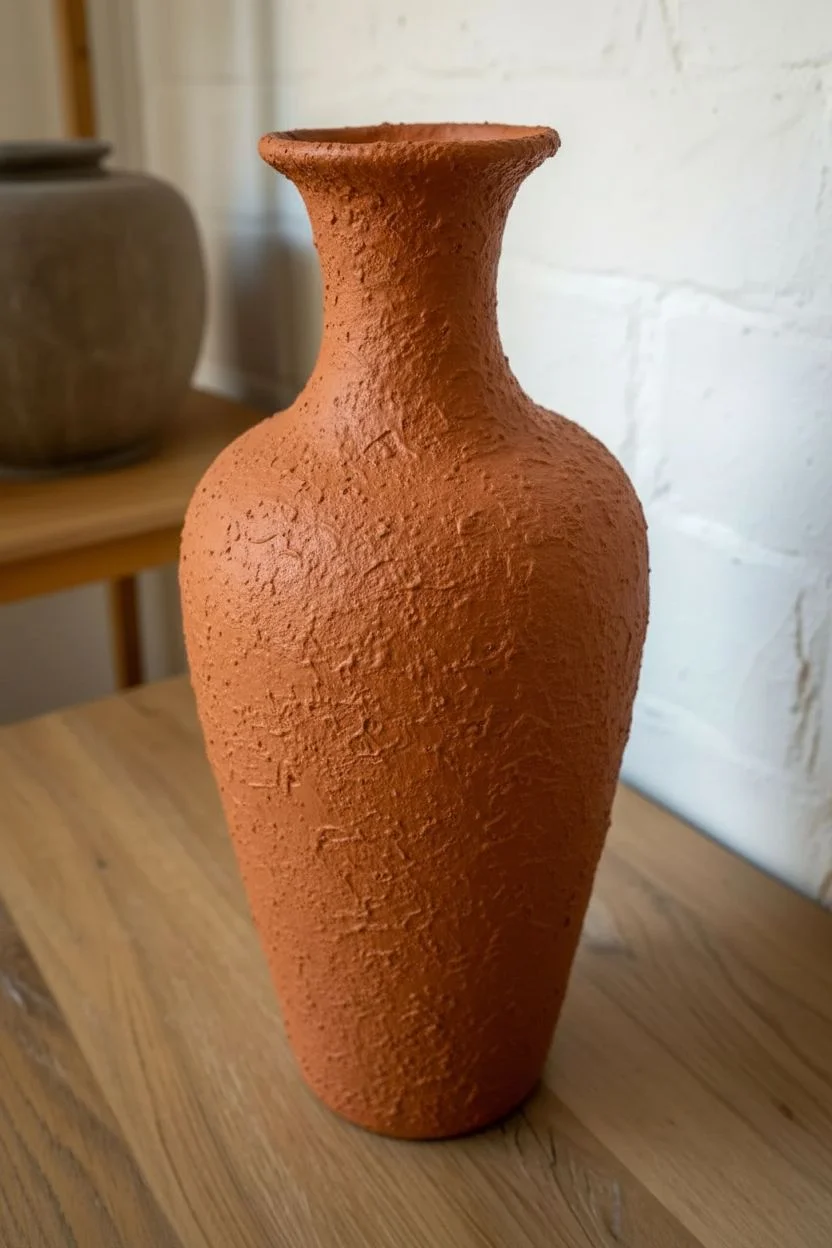
Transform a plain glass vessel into a piece of old-world pottery with this surprisingly simple technique. By mixing paint with baking powder, you can achieve a wonderfully chalky, aged terracotta finish that looks like it was pulled from an ancient kiln.
Step-by-Step Tutorial
Materials
- Glass vase (clean and dry)
- Terracotta or burnt orange acrylic paint
- Off-white or cream chalk paint
- Baking powder (not baking soda)
- Medium flat paintbrush
- Small round bristle brush or stencil brush
- Paper plate or mixing palette
- Sponge or paper towel
- Newspaper or drop cloth
Step 1: Creating the Terracotta Base
-
Prep your workspace:
Lay down your newspaper or drop cloth on a flat surface to protect it from any spills or powder dust. Ensure your glass vase is completely clean of any oils or price tag residue. -
Mix the texture paint:
Pour a generous amount of your terracotta-colored acrylic paint onto your palette. Gradually mix in baking powder—start with a ratio of 1 part powder to 4 parts paint. -
Check consistency:
Stir the mixture until it reaches a fluffy, mousse-like consistency. It should hold peaks slightly but still be spreadable. Add a pinch more powder if it feels too runny. -
First coat application:
Using the flat paintbrush, apply a thick, uneven coat of the texture mixture all over the glass vase. Don’t worry about brush strokes; texture is the goal here. -
Dabbing for effect:
While the paint is still wet, dab the surface lightly with your brush tip or a sponge to break up uniform lines and create a pitted, clay-like surface. -
Let it dry completely:
Check the drying time; baking powder paint dries fast but needs to be bone dry before the next step. Wait at least 30-45 minutes or use a hair dryer on a cool setting to speed it along. -
Second coat (optional):
If you can still see glass showing through, apply a second coat of your terracotta mixture. This adds even more depth and grit to the final piece. -
Final base dry:
Ensure the base layers are completely hardened. The surface should feel rough and chalky to the touch.
Step 2: Adding the Distressed White Finish
-
Prepare the whitewash:
Take your off-white or cream chalk paint. You want this to be separate from the baking powder mix. Pour a small amount onto a clean area of your palette. -
Dry brush technique:
Dip your round bristle brush into the white paint, then wipe almost all of it off onto a paper towel. The brush should be nearly dry. -
Highlighting the texture:
Gently whisk the dry brush over the raised areas of the vase. Focus on the neck and the widest part of the body where ‘wear’ would naturally occur. -
Creating the stripes:
For the striped effect seen in the photo, load your brush slightly more. Holding the brush steady against the vase, slowly rotate the vase to create horizontal bands. -
Feathering the edges:
Use a erratic, up-and-down motion to feather the white bands into the orange base. You want the white to look like salt deposits or mineral buildup, not painted stripes. -
Intensifying the neck:
Dab a heavier concentration of white paint around the neck and rim of the vase. I like to stipple this area to simulate years of handling. -
Adding specific speckles:
Dip an old toothbrush or stiff brush into the wet terracotta paint (without powder this time) and flick tiny speckles over the white areas if you lost too much distinct orange color. -
Distressing back:
If any white patch looks too solid, take a slightly damp paper towel or fine-grit sandpaper and gently rub it back to reveal the terracotta texture underneath. -
Final assessment:
Step back and look at your vase. Add tiny dry-brushed highlights to any dark spots that need lifting. -
Seal (optional):
Since this is a decorative finish, sealing isn’t strictly necessary, but a light mist of matte spray sealer will help keep the baking powder texture from shedding over time.
Don’t Overmix!
Mix the baking powder and paint right before you use it. If it sits too long, the reaction stops and you lose that fluffy, clay-like volume essential for the texture.
Add Some Earth
For an even grittier, excavated look, sprinkle a tiny pinch of actual garden dirt or fine sand onto the wet paint in random patches before it dries completely.
Now you have a stunning, weathered vessel that brings a touch of Mediterranean warmth to your shelf
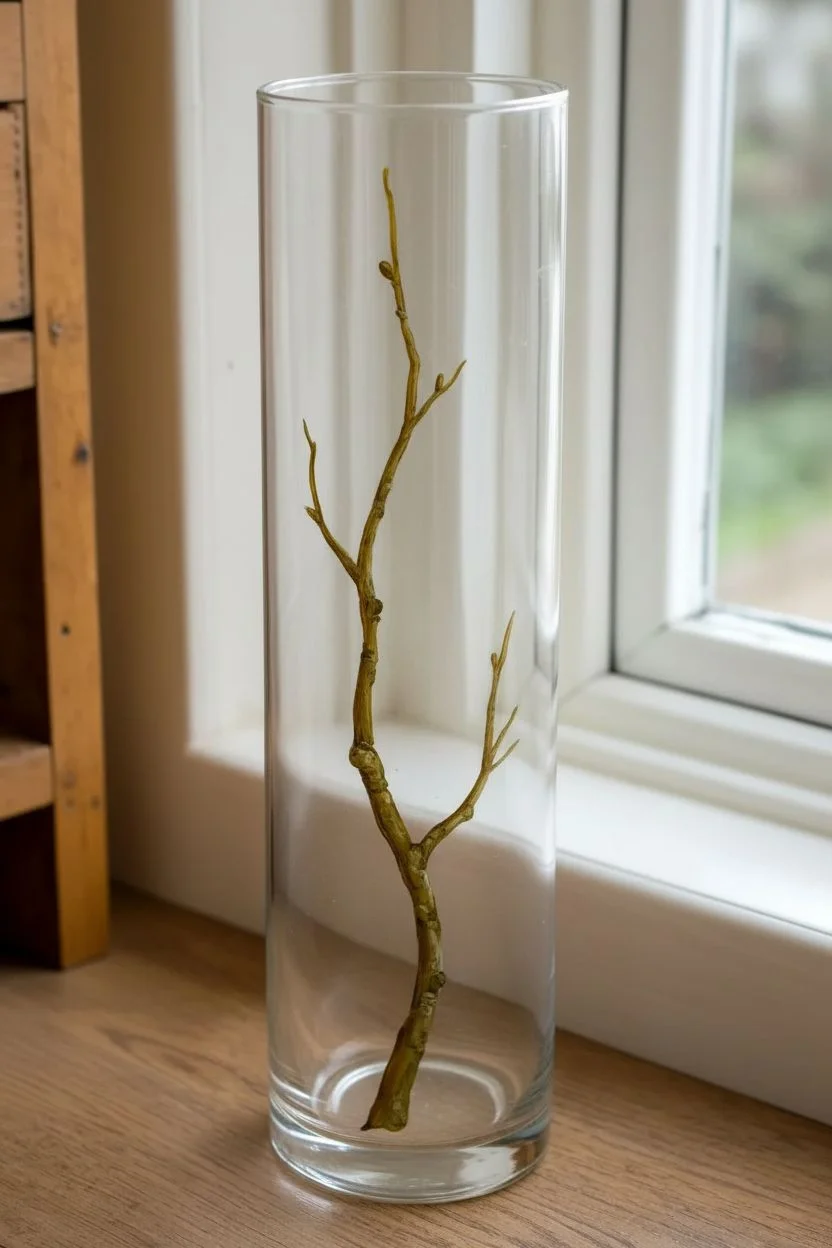
Reverse Painting Inside the Glass Vase

Transform a simple glass vessel into a botanical masterpiece with delicate white and green line work. This project uses fine lines and translucent layers to create an airy, ethereal floral design that looks elegant on any tabletop.
Step-by-Step
Materials
- Tall, clear glass vase (narrow neck preferred)
- Rubbing alcohol and cotton pads
- Paper towels
- White multi-surface acrylic paint or glass enamel
- Sage green multi-surface acrylic paint or glass enamel
- Olive green multi-surface acrylic paint or glass enamel
- Fine liner brush (size 0 or 00)
- Small round brush (size 2)
- Palette or small plate
- Water cup
Step 1: Preparation and Planning
-
Clean surface:
Begin by thoroughly cleaning the vase with soap and warm water to remove store dust. Dry it completely with a lint-free cloth. -
Degrease glass:
Wipe the entire exterior surface down with rubbing alcohol on a cotton pad. This step is crucial because oils from your fingers will prevent the paint from adhering properly. -
Study the stems:
Before painting, visualize where your longest stems will go. Notice how the main central white stem curves gently upward to follow the vase’s shape. You want the stems to feel kinetic, not rigid.
Paint sliding off?
Glass is slippery! If lines separate or bead up, let the first coat dry for 10 mins, then apply a second layer. Don’t add water to the paint.
Step 2: Painting the Foliage
-
Mix leaf white:
Place a small amount of white enamel or multi-surface acrylic on your palette. Add a tiny drop of water if the paint feels too thick—you want an ink-like consistency that flows smoothly from a liner brush. -
Paint main stem:
Starting near the bottom center, use your liner brush to pull a long, slightly curved line upward, stopping about two-thirds up the vase. This is the anchor for your large white fern-like leaf. -
Add large leaves:
From that central stem, paint long, almond-shaped outlines for the leaves. Keep the lines thin. Inside these almond shapes, add fine striations or veins running lengthwise for that detailed botanical look. -
Create secondary stems:
Switch to a sage green color. Paint thinner, wandering stems off to the sheer sides of the vase, letting them curve naturally as if blown by a gentle breeze. -
Detail green leaves:
On the green stems, add small, simple leaves. For variety, make some leaves solid (filled in) and others just outlined. This contrast creates visual depth.
Level Up: Frosted Look
Before painting lines, sponge a light layer of frost medium inside the vase. This gives a misty background that makes white lines pop.
Step 3: Adding Floral Accents
-
Outline focal flower:
Choose a spot slightly off-center for the ‘dandelion’ style flower. Using a mix of olive green and a touch of brown (or just dark olive), paint a small circle for the base. -
Draw petals:
Pull thin, straight lines radiating outward from that base to create the bloom. Keep the strokes quick and light to mimic delicate petals. -
Paint delicate filler:
Back with your white paint and the finest brush, create small clusters of ‘baby’s breath’ style flowers near the top. These are just tiny stems branching out with dot-like tips. -
Add white accents:
Look for empty spaces that feel unbalanced. Add a small white bloom on the left, using a half-circle shape with radiating lines, similar to a thistle. -
Intertwine elements:
carefully paint a few grass-like blades in green that cross *behind* or *in front of* your white leaves. This layering effect makes the design look three-dimensional. -
Clean up edges:
If you made any mistakes or lines became too thick, use a wet cotton swab or a toothpick to gently scrape away excess paint before it fully cures.
Step 4: Finishing Touches
-
Rim detail:
Dip your round brush into a metallic gold or bronze paint (optional) or use the olive green. Carefully paint a thin band around the very top rim of the vase to frame the artwork. -
Review density:
Step back and look at the vase from a distance. I often find I need to add just a few more tiny white dots or fern tips near the bottom to ground the design. -
Remove oils again:
Once the paint is dry to the touch, very carefully wipe away any fingerprints from the unpainted glass areas using a clean cloth. -
Cure the paint:
Follow the manufacturer’s instructions for your specific paint. Most glass enamels require either 21 days of air drying or baking in a cool oven that is heated to 350°F (176°C) for 30 minutes.
Once baked and cured, your custom vase is ready to hold fresh blooms or stand alone as a piece of art
Stained-Glass-Inspired Outlined Panels on a Vase
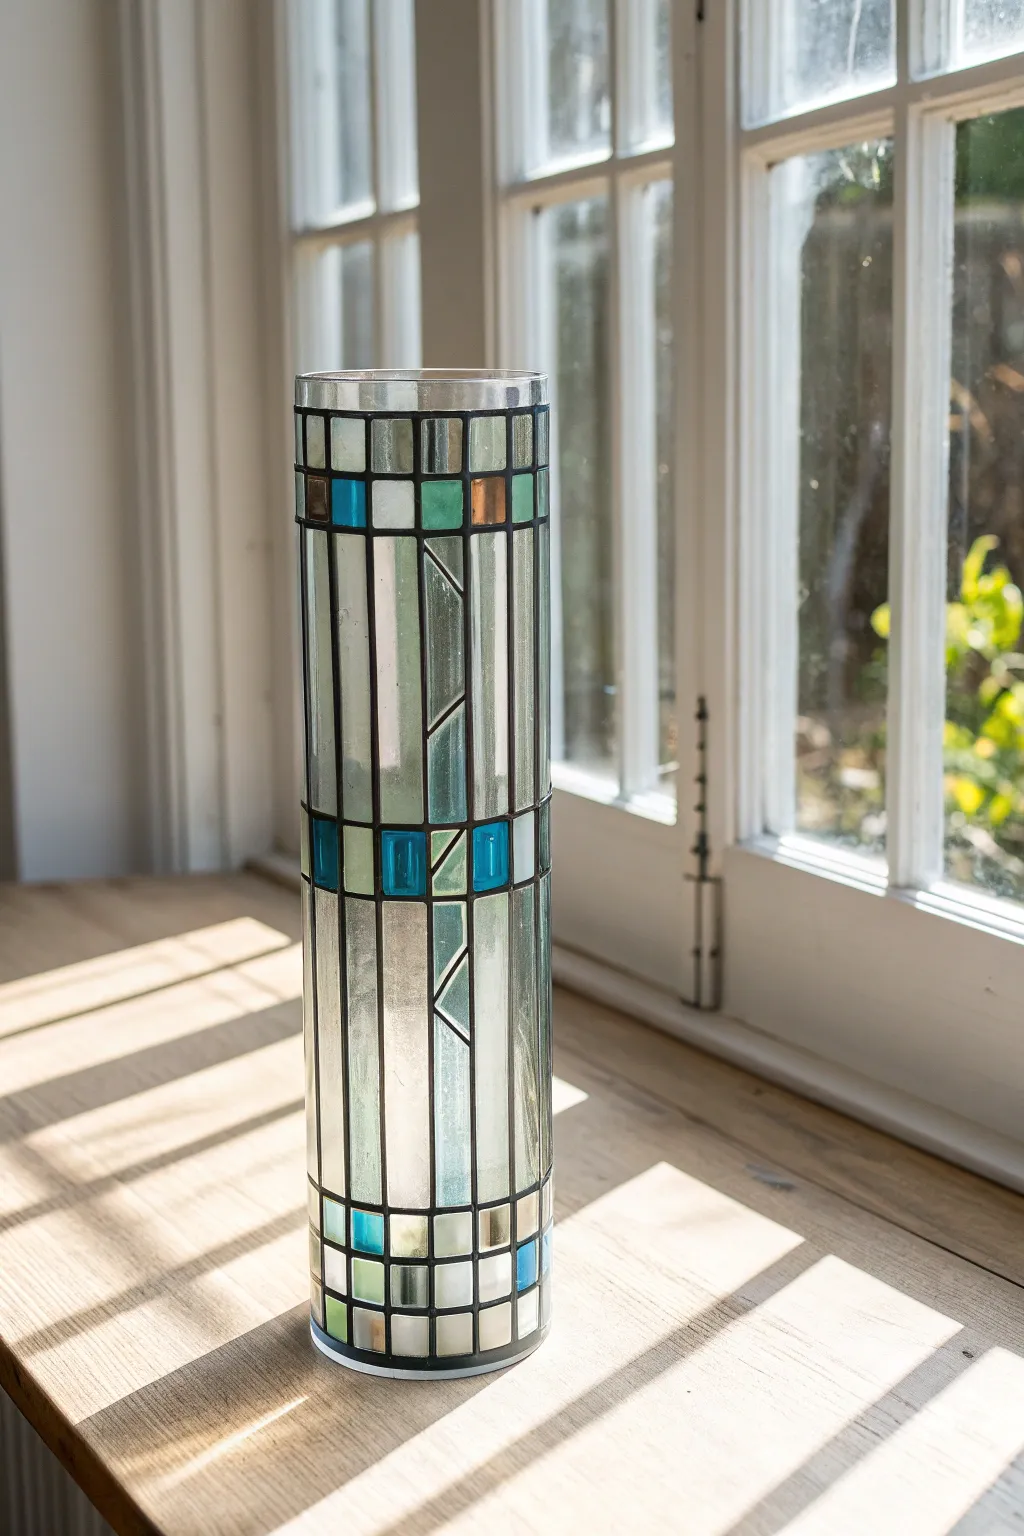
Transform a plain glass cylinder into an architectural masterpiece with this faux stained glass technique. By combining precise leading lines with translucent glass paints, you’ll recreate the elegant, geometric look of Prairie School design right on your tabletop.
Step-by-Step Guide
Materials
- Tall, cylindrical glass vase
- Adhesive lead strip (1/8 inch or 3mm width)
- Rubbing alcohol and lint-free cloth
- Glass gallery paints (Translucent Turquoise, Emerald Green, Amber, Frosted White/Clear)
- Liquid leading (Black or Pewter)
- Fine liner paintbrush
- Ruler or measuring tape
- Dry erase marker
- Grid paper
- Bone folder or plastic smoothing tool
- Cotton swabs
Step 1: Planning the Grid
-
Clean surface:
Begin by thoroughly cleaning the vase with rubbing alcohol and a lint-free cloth to remove any oils or fingerprints, which ensures good adhesion for the lead tape. -
Measure circumference:
Measure the circumference of your vase and divide it by an even number (like 4 or 6) to determine how many vertical panels you will create. -
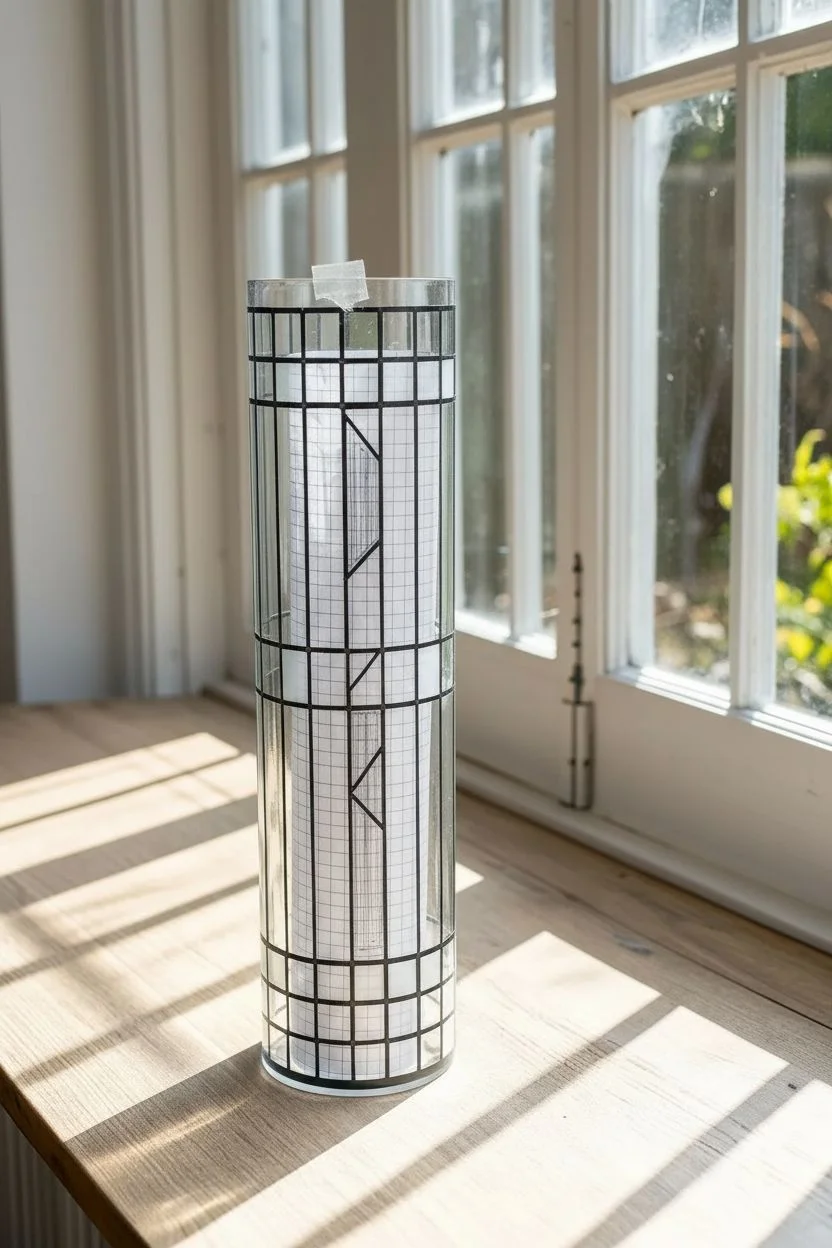
Draft pattern:
Sketch your design on grid paper first. The design in the image uses strong vertical lines intersected by small geometric squares and rectangles near the top, middle, and bottom. -
Insert guide:
Roll up your paper pattern and insert it inside the vase facing outward. Secure it with a piece of tape so the grid shows through the glass clearly.
Clean Lines Pro Tip
If paint accidentally gets on top of the lead lines, wait for it to dry completely. You can then easily scrape it off the metal strip with a fingernail or a wooden toothpick.
Step 2: Applying the Lead Lines
-
Vertical primary lines:
Start with the long, continuous vertical lines. Peel the backing off the adhesive lead strip and slowly apply it down the length of the vase, following your paper guide. -
Burnish the lead:
I like to use a bone folder or the back of a plastic spoon to firm press the lead strip down immediately after placing it, ensuring a tight seal against the glass. -
Create horizontal breaks:
Cut smaller pieces of lead strip for the horizontal cross-sections that create the squares and rectangles. Butt the ends of these strips tightly against the vertical lines to prevent gaps. -
Add diagonal accents:
Apply the diagonal lead lines within the larger vertical panels. These angled pieces are characteristic of the Prairie style and add dynamic movement to the design. -
Seal intersections:
Where the lead strips meet, apply a tiny dot of liquid leading. This seals the joint and makes the framework look like soldered metal rather than tape. -
Double check seals:
Run your finger over all lead lines once more. Any gaps between the lead and glass will allow paint to seep under, so a firm seal is crucial.
Make It Illuminate
Place a battery-operated LED pillar candle or fairy lights inside the finished vase. The light will shine through the frosted and colored sections, casting colorful geometric shadows.
Step 3: Painting the Glass
-
Prepare the palette:
Squeeze a small amount of your glass paints (Turquoise, Green, Amber, White) onto a palette or piece of foil. Keep cotton swabs nearby for quick cleanups. -
Fill small squares:
Using a fine brush, load the Turquoise and Green paints and carefully fill in the small square sections at the top and middle bands. Apply the paint generously so it self-levels. -
Add amber accents:
Paint the occasional small rectangular accents with the Amber color. Use this color sparingly to create high-contrast focal points. -
Paint frosted panels:
Fill the long vertical sections and larger geometric shapes with the Frosted White or Clear texture medium. This mimics the look of textured privacy glass. -
Pop bubbles:
Check wet paint for air bubbles. Gently pop them with a pin or the tip of a dry brush before the paint begins to skin over. -
Dry horizontally:
To prevent drips on the vertical surfaces, lay the vase on its side, propped up by towels. Paint one ‘face’ of the vase at a time, letting it dry to the touch before rotating to the next section. -
Final cure:
Once all sides are painted and dry to the touch, allow the project to cure fully according to the paint manufacturer’s instructions, which may take several days.
Now you have a stunning, architectural piece of decor that captures the light beautifully


Have a question or want to share your own experience? I'd love to hear from you in the comments below!