Glass windows aren’t just “openings” in a wall—they’re a chance to choreograph light, frame a view, and turn everyday rooms into little art moments. Here are glass window design ideas I’d personally sketch out in my studio when I want a space to feel brighter, calmer, and more you.
Picture Windows That Frame the View
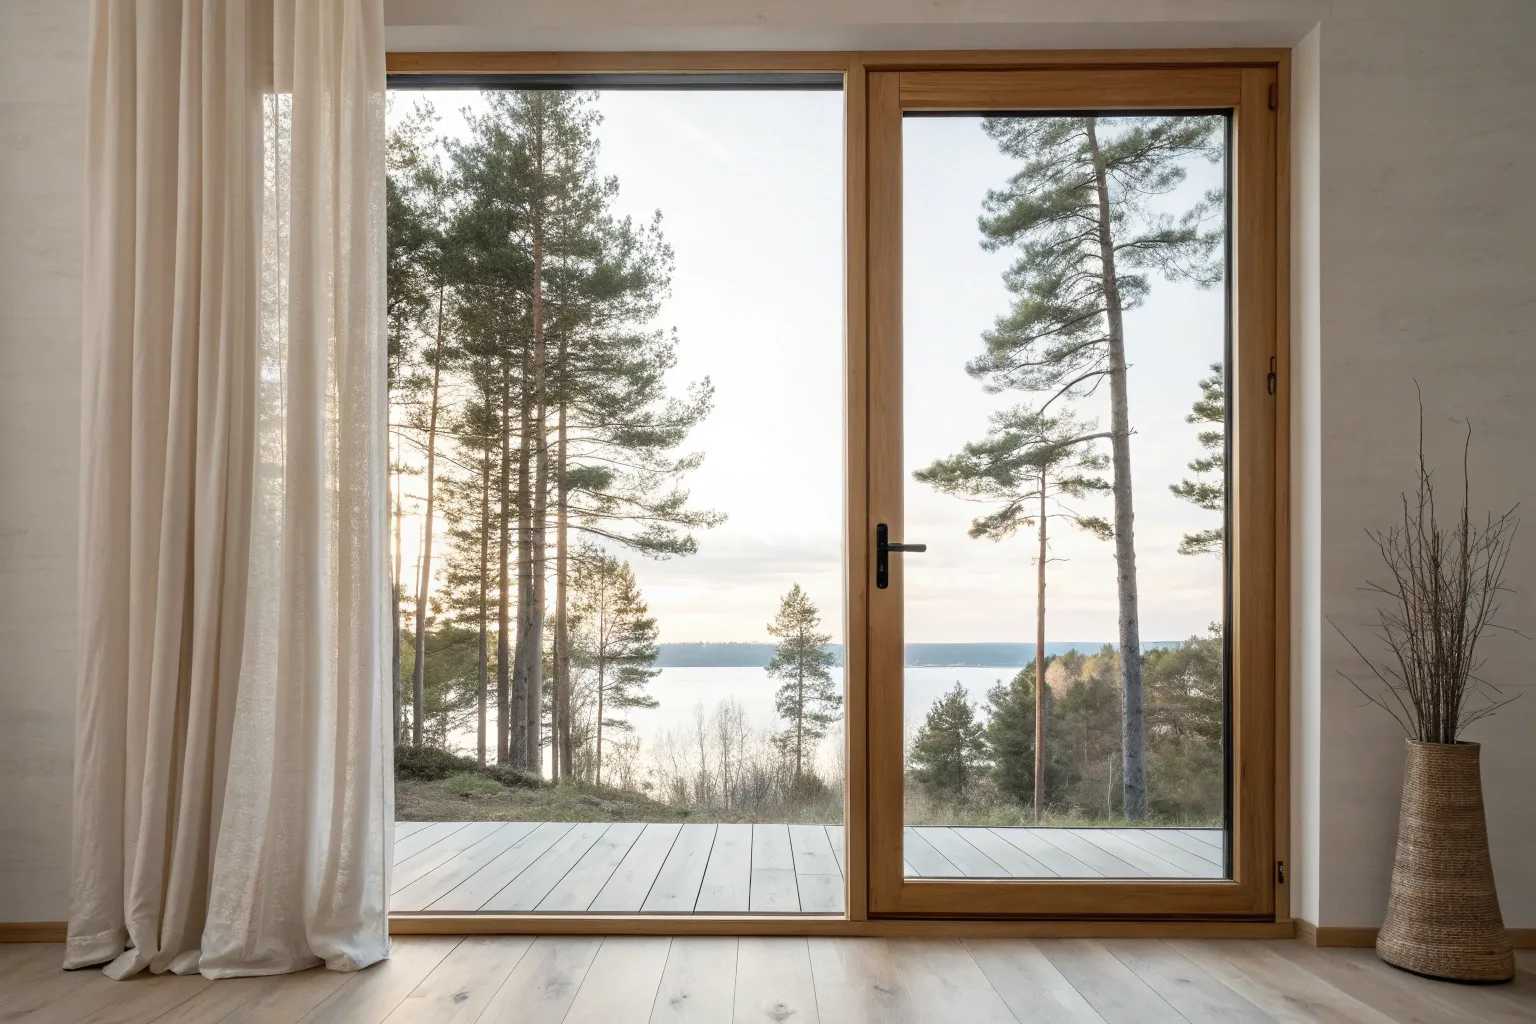
Transform a standard window into a framed piece of living art that draws the eye to the outdoors. This project focuses on installing clean, wooden interior casing and a deep sill to creating a sleek, gallery-like surround for your view.
Step-by-Step Guide
Materials
- 1×6 or 1×8 clear pine or oak boards (for sill and jamb extensions)
- 1×4 flat stock trim (for casing)
- Table saw or circular saw with guide
- Miter saw
- Jigsaw (for notching)
- Wood glue
- Brad nailer with 18-gauge nails
- Wood filler
- Sandpaper (120 and 220 grit)
- Clear polyurethane or matte varnish
- Paintable latex caulk
- Tape measure
- Carpenter’s square
- Paint (white interior semi-gloss)
Step 1: Preparation and Jamb Extension
-
Measure the depth:
Begin by measuring the distance from the face of the existing window frame to the face of your drywall. This depth will determine the width of your jamb extensions and sill. Measure in at least three places (top, middle, bottom) to account for uneven walls. -
Rip the extension boards:
Using a table saw, rip your 1×6 or 1×8 lumber to match the exact depth measurement you just took. I usually cut these just a hair (1/16 inch) wider than the wall depth to ensure the casing seats perfectly flush later. -
Cut the head and side pieces:
Measure the height and width of the window opening. Cut the top head jamb and the two side jambs to length using your miter saw. The top piece should span the full width, resting on top of the side pieces. -
Dry fit the box:
Assemble the three pieces (top and sides) inside the window opening to test the fit. Use shims behind the boards to square everything up if the rough opening is slightly out of plum. -
Install the side and head jambs:
Apply construction adhesive or wood glue to the back of the boards, then slide them into place. Secure them by nailing through the board and shims into the rough framing using 2-inch finish nails.
Closing the Gaps
If your wall is uneven and leaves gaps behind the casing, don’t force the wood. Use a scribe tool to trace the wall contour onto the trim, then plane the back edge for a custom fit.
Step 2: Crafting the Deep Sill
-
Establish the sill overhang:
Decide how far you want the sill to protrude into the room. For this look, an inch beyond the wall face is standard. Measure the total width of the window opening plus the width of your future side casings. -
Cut the sill board:
Cut your sill board to the full length (opening width + casing width + desired overhang on each side). This creates the ‘ears’ of the sill. -
Notch the sill:
Use a jigsaw to cut out the back corners of the sill board so it slides into the window opening but leaves the ‘ears’ extending past the drywall on the left and right. Test fit frequently. -
Secure the sill:
Apply wood glue to the bottom framing and slide the notches sill into place. Nail straight down through the board into the framing, keeping nails near the back where they are less visible.
Add a Radiant Touch
Before installing the sill, route a channel underneath the overhang and install an LED strip light. This creates a soft, ambient glow that highlights the wood grain at night.
Step 3: Applying the Outer Casing
-
Measure for side casings:
Measure from the top of the stool (sill) to the top edge of the head jamb. Cut two pieces of 1×4 flat stock to this exact length. -
Install side trim:
Place the side casings vertically against the wall, resting them on the sill ears. Leave a 1/8 to 1/4-inch ‘reveal’ (setback) from the inside edge of the jamb extension. Nail into the wall studs and the jamb edge. -
Install the head casing:
Measure the distance between the outside edges of your two vertical side casings. Cut a piece of flat stock to this length to create the top header. Install it directly above the side pieces, aligning the edges perfectly for a simple butt joint.
Step 4: Finishing Touches
-
Fill and sand:
Fill all nail holes with wood filler matched to your wood species. Once dry, sand the filler flush and give all wood surfaces a pass with 220-grit sandpaper to smooth out the grain. -
Caulk the gaps:
Run a thin bead of paintable latex caulk where the outer casing meets the drywall and where the wood joints meet, except for the sill-to-sash connection. -
Clear coat the wood:
To achieve the warm, natural look in the photo, apply a clear matte polyurethane to the sill and interior jambs. Brush with the grain and let it dry completely between coats. -
Paint the sash (optional):
If your actual window sash (the moving part) isn’t already white, mask off the glass carefully and paint the sash with a white semi-gloss to create that crisp contrast against the wooden frame.
Now, pull up a chair and enjoy the scenery framed by your clean, modern craftsmanship


Classic Multi-Pane Grid Windows
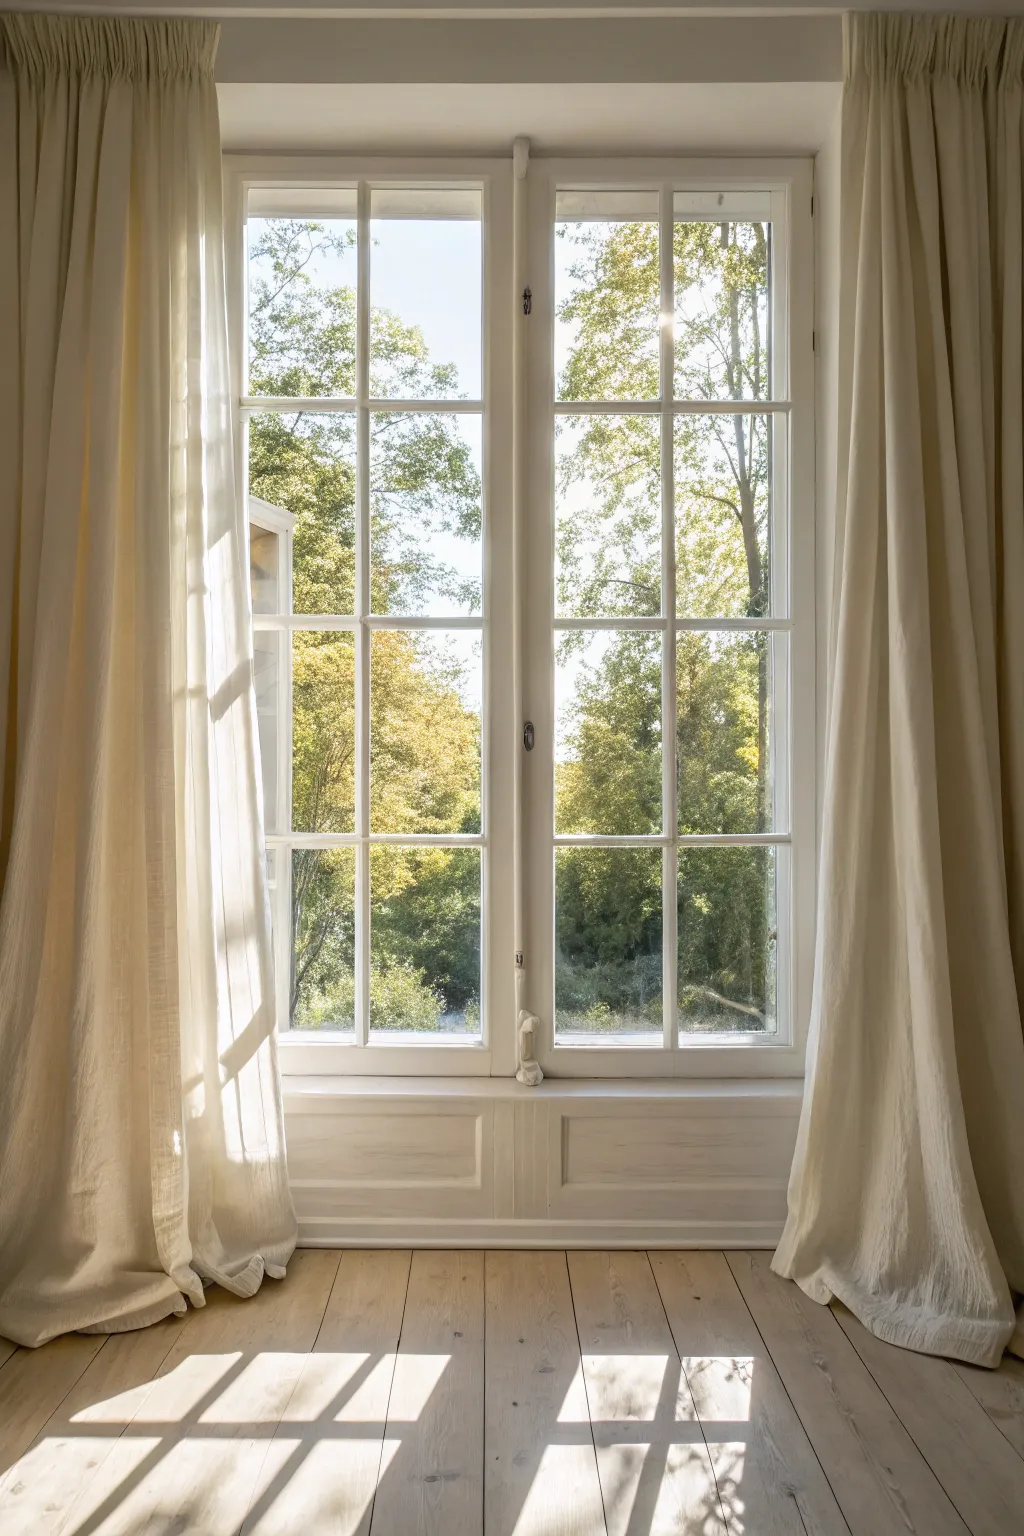
Capture the serene beauty of a French-style window overlooking a lush garden with this detailed illustration tutorial. You will learn to render soft, flowing fabric textures and the interplay of light and shadow on architectural elements.
How-To Guide
Materials
- Heavyweight mixed-media paper or illustration board
- Graphite pencils (HB, 2B, 4B)
- Fine liner pens (0.1, 0.3, 0.5mm in black and sepia)
- Watercolor paints (Sap Green, Hooker’s Green, Burnt Sienna, Yellow Ochre, Paynes Grey, White Gouache)
- Ruler and T-square
- Soft synthetic round brushes (sizes 2, 6, and 10)
- Masking fluid
- Kneaded eraser
Step 1: Drafting the Architecture
-
Establish the horizon and perspective:
Begin by lightly drawing a horizon line roughly one-third up the page. Use a T-square to ensure your vertical lines are perfectly straight, marking out the large rectangular frame of the double window. -
Grid the window panes:
Divide each of the two main window sashes into a 2×4 grid. Measure carefully so the muntins (the grid bars) are evenly spaced. Keep your pencil pressure light, using an HB pencil, so these lines don’t become permanent grooves. -
Outline the moldings and panels:
Below the window sill, sketch the recessed wooden panels of the wall. Add depth by drawing double lines for the molding edges. Sketch the floorboards receding towards the window to establish depth. -
Curtain framework:
Lightly sketch the general shapes of the curtains on either side. Focus on the vertical flow; draw long, sweeping curves that puddle slightly at the floor to suggest weight and fabric length.
Step 2: Inking and Masking
-
Ink the window structure:
Use a 0.3mm fine liner to ink the window frame and sash bars. Use a ruler for the straight architectural lines but allow the lines for the curtains to remain freehand and softer. -
Masking light highlights:
Apply masking fluid to the brightest areas where the sunlight hits the floorboards and the edges of the curtains. This preserves the white of the paper for that blindingly bright natural light effect later. -
Erase pencil guides:
Once the ink is fully dry, gently roll a kneaded eraser over the entire drawing to lift the graphite, leaving only your clean ink lines.
Sunlight Tip
Soften the edges of your floor shadows with a clean, damp brush immediately after painting them to mimic diffused daylight.
Step 3: Painting the Landscape
-
Wet-on-wet background:
dampen the paper inside the window panes with clean water. Drop in a very dilute wash of sky blue at the top, fading into nothingness as you move down. -
Distant foliage base:
Mix Sap Green with a touch of Yellow Ochre. While the paper is still slightly damp, dab in the general shapes of the trees. Keep this layer loose and unfocused to suggest they are outside the glass. -
adding defining shadows:
Mix Hooker’s Green with a tiny bit of Paynes Grey. With a size 6 brush, dab in the darker areas of the trees to suggest depth and form, leaving lighter gaps for the sun-drenched leaves.
Level Up: Sheerness
To make curtains look sheer, paint the landscape detail slightly visibly *through* the fabric where it overlaps the window.
Step 4: Rendering the Interior
-
Washing the curtains:
Mix a very watery wash of Yellow Ochre and a dot of Burnt Sienna to create a warm cream tone. Apply this to the curtains, following the vertical folds. -
Deepening fabric folds:
While the first wash is damp but not wet, add a slightly darker mix of the cream tone into the recesses of the folds. I like to let this bleed slightly to keep the fabric looking soft. -
Painting the floorboards:
Use a dilute wash of Burnt Sienna for the wooden floor. Paint individual planks, leaving small gaps of white paper between them to represent the seams. -
Architectural shadows:
Mix a cool grey wash (Paynes Grey + water). Apply this to the interior window frames and the paneling below the sill. Focus on the side facing away from the light source to give the wood dimension.
Step 5: Lighting and Details
-
Remove masking fluid:
Gently rub away the masking fluid to reveal the crisp white paper underneath. -
Cast shadows:
Observe where the light falls on the floor. Paint the diagonal shadows of the window grid onto the floorboards using a transparent grey glaze. Ensure these align with the direction of the light from the window. -
Curtain highlights:
Use white gouache on a dry brush to gently drag over the raised areas of the curtain folds facing the window. This enhances the backlit texture of the fabric. -
Final touches:
Use a 0.1mm sepia pen to re-emphasize any lost details in the wood grain or the curtain headers. Add a final touch of bright green to the leaves closest to the window panes.
Step back and enjoy the peaceful, sun-drenched atmosphere you have captured in your architectural study


Sliding Glass Doors for Indoor-Outdoor Flow
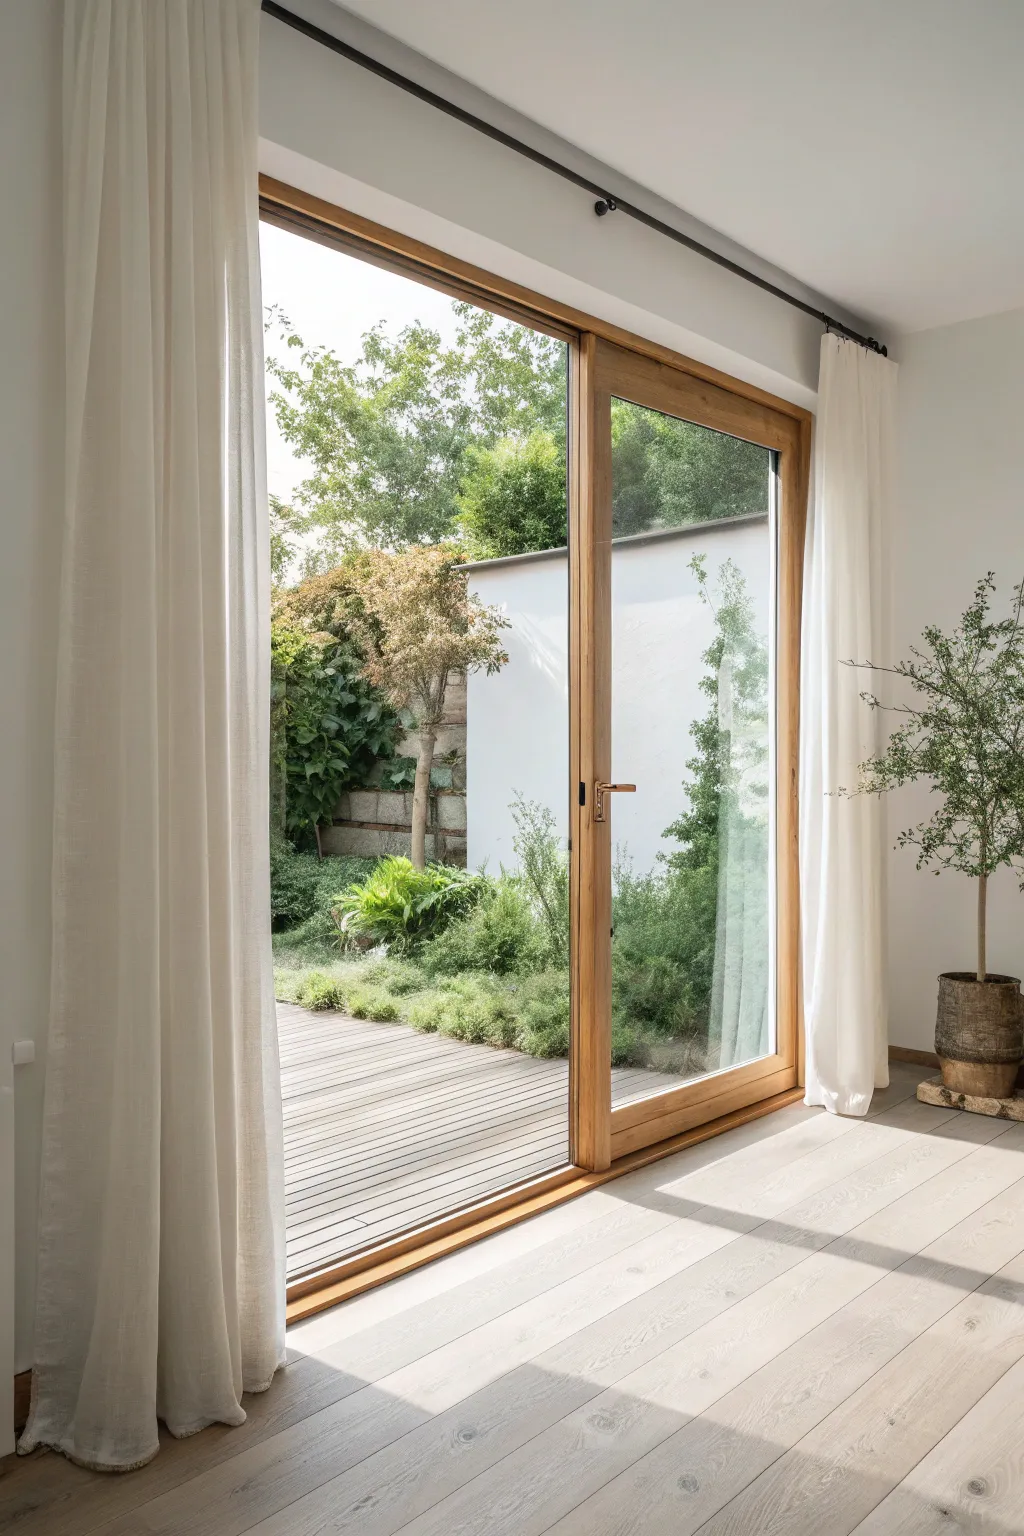
Capture the serene transition between an interior living space and an outdoor garden with this watercolor and ink illustration. This project focuses on mastering perspective, rendering soft natural light on wood textures, and creating depth through layers of transparency.
Detailed Instructions
Materials
- Cold press watercolor paper (300 gsm)
- Pencil (HB for sketching)
- Waterproof fine liner pens (0.1mm, 0.3mm, and 0.5mm, Sepia or Black)
- Watercolor paints (Burnt Sienna, Yellow Ochre, Sap Green, Hooker’s Green, Paynes Grey, Ultramarine Blue, White Gouache)
- Round watercolor brushes (Size 4, 8, and 12)
- Masking fluid
- Ruler
- Paper towels
- Water cups
Step 1: Sketching the Framework
-
Establish the horizon:
Begin by lightly drawing a horizon line about one-third of the way up the paper. This will align the outdoor deck with the indoor floor. -
Draft the perspective lines:
Using your ruler, mark a vanishing point on the horizon line towards the left side. Draw the diagonal lines for the floorboards and the top edge of the curtain rod radiating from this point to create accurate perspective. -
Outline the door frame:
Sketch the large vertical rectangle for the sliding door frame. Add the internal division for the sliding panel, ensuring the vertical lines are perfectly straight and parallel to the paper’s edge. -
Add soft details:
Lightly sketch the curtains on either side, using wavy, organic lines to suggest fabric folds. Rough in the shape of the indoor potted tree on the right and the garden foliage outside.
Step 2: Inking and Masking
-
Preserve highlights:
Apply masking fluid to the brightest areas: the thin glint on the curtain rod, the highlight on the door handle, and the sun-drenched edge of the wooden deck outside. -
Ink the structure:
Once dry, use the 0.3mm pen to ink the wooden door frame and curtain rod. I recommend using a ruler here for crisp architectural lines. -
Ink organic elements:
Switch to a 0.1mm pen for the tree leaves and garden plants. Use short, erratic scribbles for the outdoor bushes to create texture, and more deliberate, leafy shapes for the indoor olive tree. -
Erase pencil guides:
Wait for the ink to dry completely, then gently erase all visible pencil lines to keep the watercolor washes clean.
Muddy Colors?
If your greens look dull, stop mixing brown into them. Instead, darken green by adding red (its complement) or use blue for cool shadows to keep foliage vibrant.
Step 3: Applying the Washes
-
Paint the sky and walls:
Mix a very dilute wash of Paynes Grey and water. Apply this to the interior walls, keeping it extremely faint to represent white walls in shadow. Leave the outdoor sky area white or use a tiny touch of faint blue. -
Wash the wooden floor:
Mix Yellow Ochre with a tiny bit of Burnt Sienna and plenty of water. Paint the indoor floor planks with a large brush, following the direction of the wood grain. Keep the wash light to mimic bleached oak. -
Outdoor greenery base:
Apply a wet-on-wet wash of Sap Green and Yellow Ochre to the garden area. Let the colors bleed together to create a soft, out-of-focus background effect for the distant plants. -
Curtain shadows:
Use a diluted mix of Ultramarine Blue and a touch of Burnt Sienna to create a neutral grey. Paint the vertical shadow folds in the white curtains, softening the edges with a clean, damp brush.
Pro Tip: Atmospheric Depth
Make outdoor elements slightly paler and less detailed than indoor items. This ‘atmospheric perspective’ trick helps the garden look like it’s truly behind the glass.
Step 4: Building Depth and Texture
-
Detail the door frame:
Mix a stronger concentration of Burnt Sienna and Yellow Ochre. Paint the wooden door frame, lifting out pigment in the center of the beams to suggest roundness and light hitting the wood. -
Define the deck:
Paint the outdoor deck using a cooler grey-brown mix. Use the tip of a smaller brush to paint the gaps between the slats, emphasizing the linear perspective. -
Deepen the garden:
Once the initial green wash is dry, use Hooker’s Green mixed with a little Paynes Grey to dab in darker foliage shadows behind the lighter bushes. This negative painting technique makes the foreground plants pop. -
Indoor tree details:
Paint the planter basket with textured strokes of raw umber. Use various shades of green to fill in the leaves of the indoor tree, keeping the strokes loose and playful. -
Cast shadows:
Add the distinct cast shadow on the floor from the door frame using a transparent wash of cool grey. Ensure lines align with your light source angles.
Step 5: Finishing Touches
-
Remove masking:
Gently rub away the masking fluid to reveal the crisp white paper underneath. -
Glass reflections:
Mix a very watery pale blue-grey. Paint quick, diagonal streaks across the glass area to suggest reflection, being careful not to obscure the garden view too much. -
Final highlights:
Use a small brush with white gouache to add sharp highlights to the metal door handle, curtain rod rings, and a few bright leaves on the indoor tree to bring them forward.
Step back and admire how you’ve captured a light-filled architectural moment on paper


Bay Windows With a Window Seat Nook
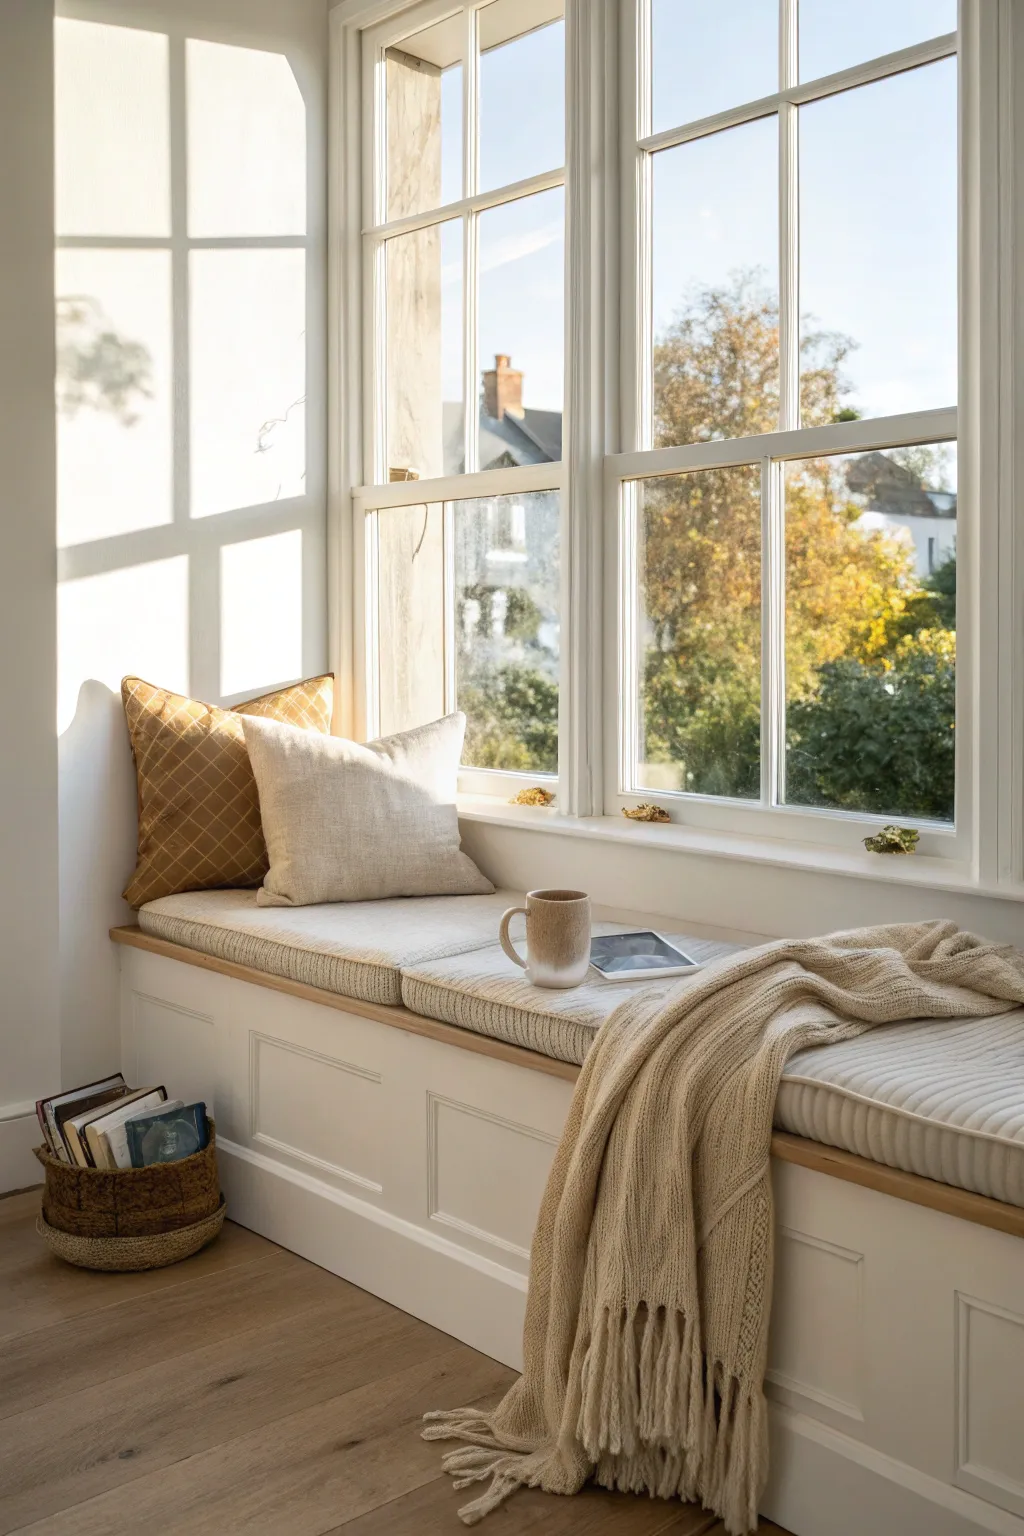
Transform an ordinary bay window into a serene reading retreat with this custom built-in bench project. Featuring deep drawers for storage and a plush upholstered cushion, this nook perfectly balances classic architectural details with modern comfort.
Detailed Instructions
Materials
- 3/4-inch birch plywood (for carcass)
- pre-primed MDF boards (for facing)
- 2×4 lumber (for base frame)
- Wood glue
- Pocket hole screws
- Cabinet grade trim paint (creamy white)
- High-density foam (3-4 inches thick)
- Batting
- Upholstery fabric (neutral linen blend)
- Drawer glides and pulls (optional)
- Wood filler
- Sandpaper (120 and 220 grit)
- Solid wood top (oak or maple)
Step 1: Building the Base Structure
-
Measure and clear the space:
Begin by taking precise measurements of your bay window alcove, accounting for angles and any unevenness in the walls. Remove existing baseboards to ensure the new unit sits flush against the wall. -
Construct the support frame:
Build a simple platform base using 2×4 lumber. This creates a sturdy foundation and elevates the cabinet box off the floor slightly, allowing for a toe kick or flush baseboard installation later. -
Cut the carcass panels:
Cut your 3/4-inch plywood into the main box components—sides, bottom, and back supports—according to your measurements. I like to double-check my saw blade squareness before these cuts to ensure tight joints. -
Assemble the cabinet boxes:
Using pocket hole screws and wood glue, assemble the plywood pieces into cabinet boxes. If your bay is angled, you may need to build three separate small boxes that connect together to follow the window’s shape. -
Install the boxes:
Place your assembled boxes onto the 2×4 base. Shim them until they are perfectly level and screw them securely into the wall studs and the base frame.
Step 2: Adding the Face Frame & Trim
-
Attach the face frame:
Cut strips of poplar or MDF to create the face frame that covers the raw plywood edges. Attach these using glue and brad nails for a clean, professional look. -
Create the panel molding detail:
To achieve the classic look in the photo, cut thinner molding strips to create rectangular boxes on the front face of the bench. Secure these with adhesive and micro-pins. -
Fill and sand:
Fill all nail holes and joints with wood filler. Once dry, sand everything smooth, starting with 120 grit and finishing with 220 grit for a seamless surface. -
Install the solid wood top:
Cut your solid wood top to fit the bay shape, leaving a slight overhang at the front (about 1 inch). Scribble the back edge if your walls are uneven for a perfect fit, then secure it from underneath through the cabinet supports.
Uneven Walls?
Walls are rarely perfectly square. Use a scribing tool to trace the wall’s contour onto your countertop wood, then cut along that line for a gap-free fit against the plaster.
Step 3: Painting and Finishing
-
Prime the woodwork:
Apply a high-quality primer to the base and face frame. This step is crucial for hiding grain variation and ensuring the topcoat adheres well. -
Apply topcoat paint:
Paint the base in a creamy white satin or semi-gloss finish. Use a sprayer or a high-density foam roller to avoid brush marks. Apply 2-3 coats, sanding lightly between each layer. -
Seal the wooden bench top:
If you are leaving the wood top visible under usage, seal it with a clear matte polyurethane to protect it from moisture and wear while keeping the natural tone visible.
Pro Tip: Foam Cutting
Don’t use scissors for thick foam! An electric kitchen carving knife slices through high-density upholstery foam like butter, leaving clean, vertical edges.
Step 4: Creating the Cushion
-
Cut the foam:
Using an electric carving knife, cut your high-density foam to match the shape of the bench top exactly. -
Wrap with batting:
Wrap the foam in Dacron batting using spray adhesive. This softens the sharp edges of the foam and gives the final cushion a plump, high-end appearance. -
Sew the box cushion cover:
Sew a simple box cushion cover with your chosen linen fabric. Install a long zipper along the back edge so the cover can be easily removed for washing. -
Style the nook:
Place the cushion on the bench. Add a few throw pillows in contrasting textures and a cozy knit blanket to complete the inviting look as seen in the inspiration image.
Now you have a stunning, permanent piece of furniture that invites relaxation and adds value to your home
BRUSH GUIDE
The Right Brush for Every Stroke
From clean lines to bold texture — master brush choice, stroke control, and essential techniques.
Explore the Full Guide
Corner Glass Windows for Wraparound Light
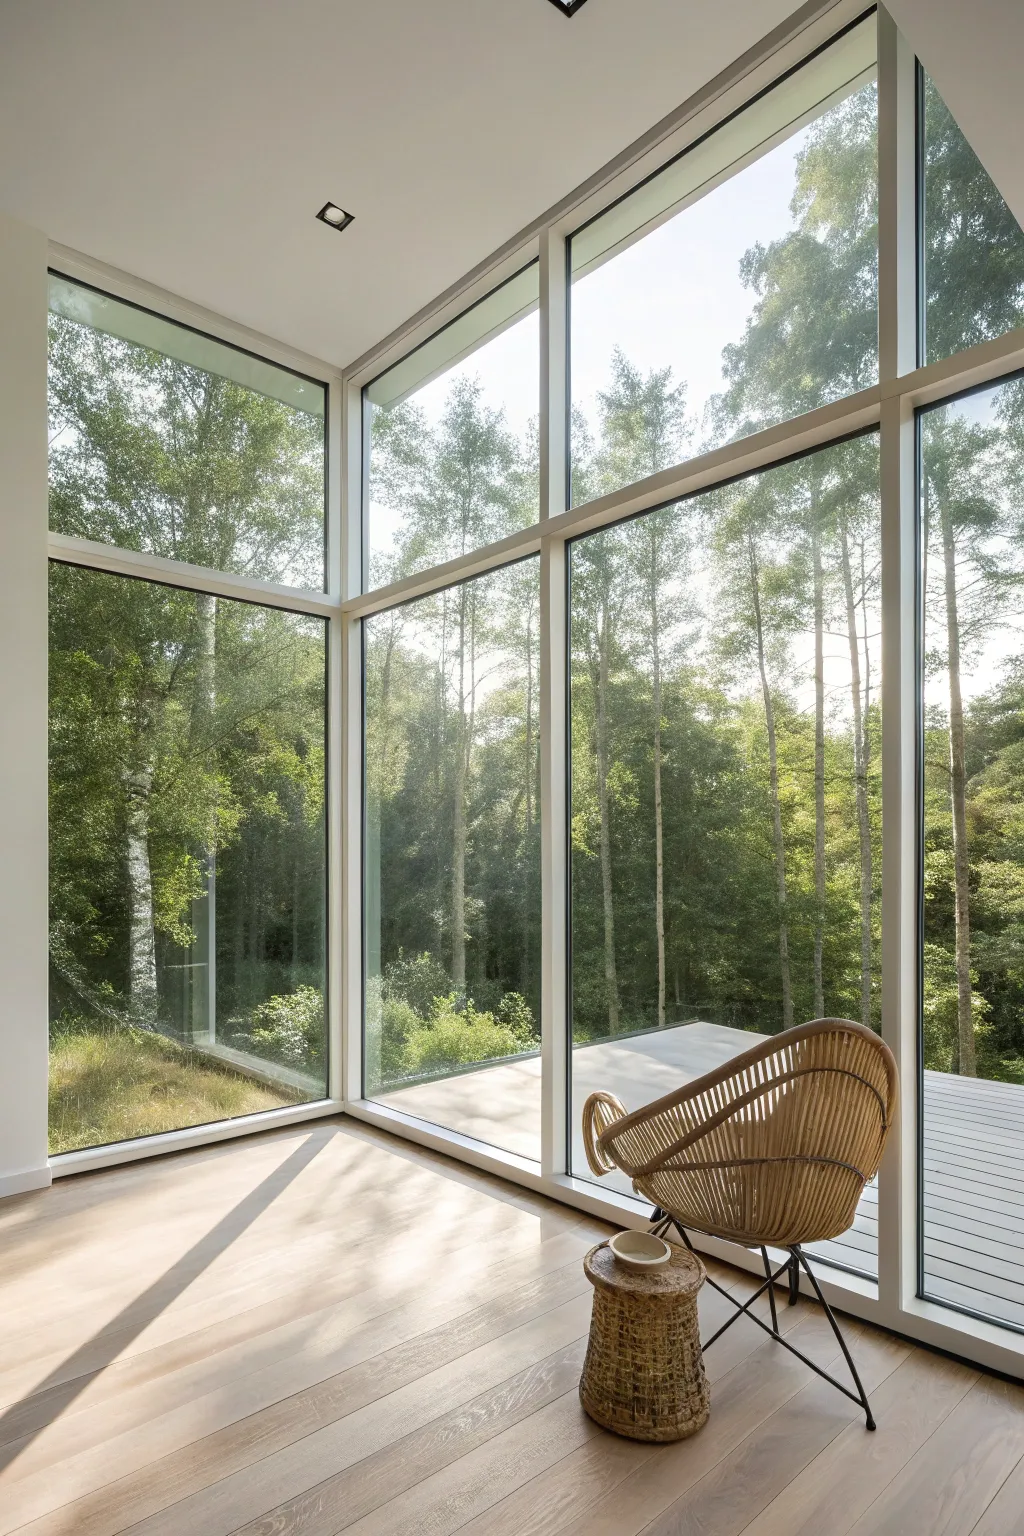
Capture the serene beauty of a modern interior bathed in natural light with this acrylic painting tutorial. By focusing on the interplay between the crisp geometric lines of the windows and the soft, organic forms of the forest outside, you’ll recreate a space that feels open and breathable.
How-To Guide
Materials
- Canvas or primed panel (16×20 inches or larger recommended)
- Acrylic paints (Titanium White, Burnt Umber, Yellow Ochre, Sap Green, Phthalo Green, Lamp Black, Ultramarine Blue, Raw Sienna)
- Set of brushes: 1-inch flat brush, ½-inch flat brush, small angled brush, fine liner brush
- Ruler or T-square
- Painter’s tape or artist tape
- Palette knife for mixing
- Water cups and paper towels
- Pencil (HB or lighter)
Step 1: Drafting the Perspective
-
Establish the Horizon:
Begin by lightly sketching your horizon line about one-third up from the bottom of the canvas. This will guide the outdoor deck line and the distant tree bases. -
Map the Corner:
Using your ruler, draw the vertical line that represents the corner of the room where the windows meet. Position this slightly off-center to the left to match the composition. -
Grid the Windows:
Draw the grid of the window frames. Note that the horizontal mullions (the bars between panes) should align across both walls. Be precise with your ruler here; these lines anchor the whole image. -
Add Furniture Outlines:
Sketch the basic oval shape for the rattan chair seat and the simple cylinder for the side table in the foreground. Keep these lines loose; we will refine the complex textures later.
Tape for Sharpness
Use artist tape over the dry window frame lines before painting the trees. Peel it off later to reveal perfectly crisp white mullions without needing a steady hand.
Step 2: Blocking in the Base Colors
-
Underpaint the Floor:
Mix Titanium White with a touch of Raw Sienna and a tiny bit of Burnt Umber. Use the large flat brush to sweep in the floor area with long, horizontal strokes. I find working back-to-front helps establish depth early on. -
Create the Sky Gradient:
For the sky visible through the upper windows, mix a very pale blue-white. Paint the top section of the window panes, fading it into white as you move down towards the tree line. -
Base the Trees:
Mix Sap Green with a little Burnt Umber for a deep forest green. Block in the general shapes of the trees outside. Don’t worry about individual leaves yet; just focus on the mass of foliage. -
Paint the Window Frames:
Using a smaller flat brush, fill in the window frames with pure Titanium White. Apply two coats if necessary to ensure they look opaque and structural against the background.
Atmospheric Depth
Mix a tiny bit of the sky color into your green for the furthest trees. This desaturation creates atmospheric perspective, making the forest look deeper.
Step 3: Developing the View
-
Refine the Tree Trunks:
Mix a light gray-brown using White and Burnt Umber. With your liner brush, paint the vertical trunks of the birch or aspen trees. Vary the thickness and ensure some trunks disappear behind foliage. -
Stipple the Foliage:
Load a worn or rough brush with various shades of green—mix Phthalo Green with Yellow Ochre for lighter leaves. Dab and stipple over the dark base green to create the illusion of thousands of leaves. -
Suggest the Deck:
Outside the window, paint the deck slats using a light gray mix. Use a ruler to keep the lines parallel to the window frame, following the perspective toward the vanishing point. -
Enhance the Light:
Add patches of very bright, almost white-green to where the sun hits the trees directly. This high contrast mimics the overexposed effect of looking out a bright window.
Step 4: Interior Details & Texture
-
Shadows on the Floor:
Mix a transparent glaze of Burnt Umber and water (or glazing medium). Paint the long, diagonal shadows cast by the window frames across the floor. These should line up with the direction of the light source. -
Texture the Chair:
Using the liner brush and a mix of Yellow Ochre and Burnt Umber, paint the individual rattan strands of the chair. Curve your strokes to follow the bowl shape of the seat. -
Weave the Table:
For the side table, use short, cross-hatching strokes with varied browns to replicate the woven texture. Add a highlight on the top left rim where the light hits. -
Detail the Chair Legs:
With Lamp Black and your finest brush, carefully draw the thin metal legs of the chair. Use a steady hand or brace your wrist against a mahlstick (or dry part of the canvas). -
Final Adjustments:
Check your white window frames again. Clean up any edges where the green foliage paint might have strayed. Crisp edges are key to the ‘glass’ look. -
Add Reflections (Optional):
For extra realism, create subtle vertical streaks of white glaze on the window panes themselves to suggest reflections on the glass surface.
Step back and admire how your precise lines and organic textures combine to open up the room to the forest air
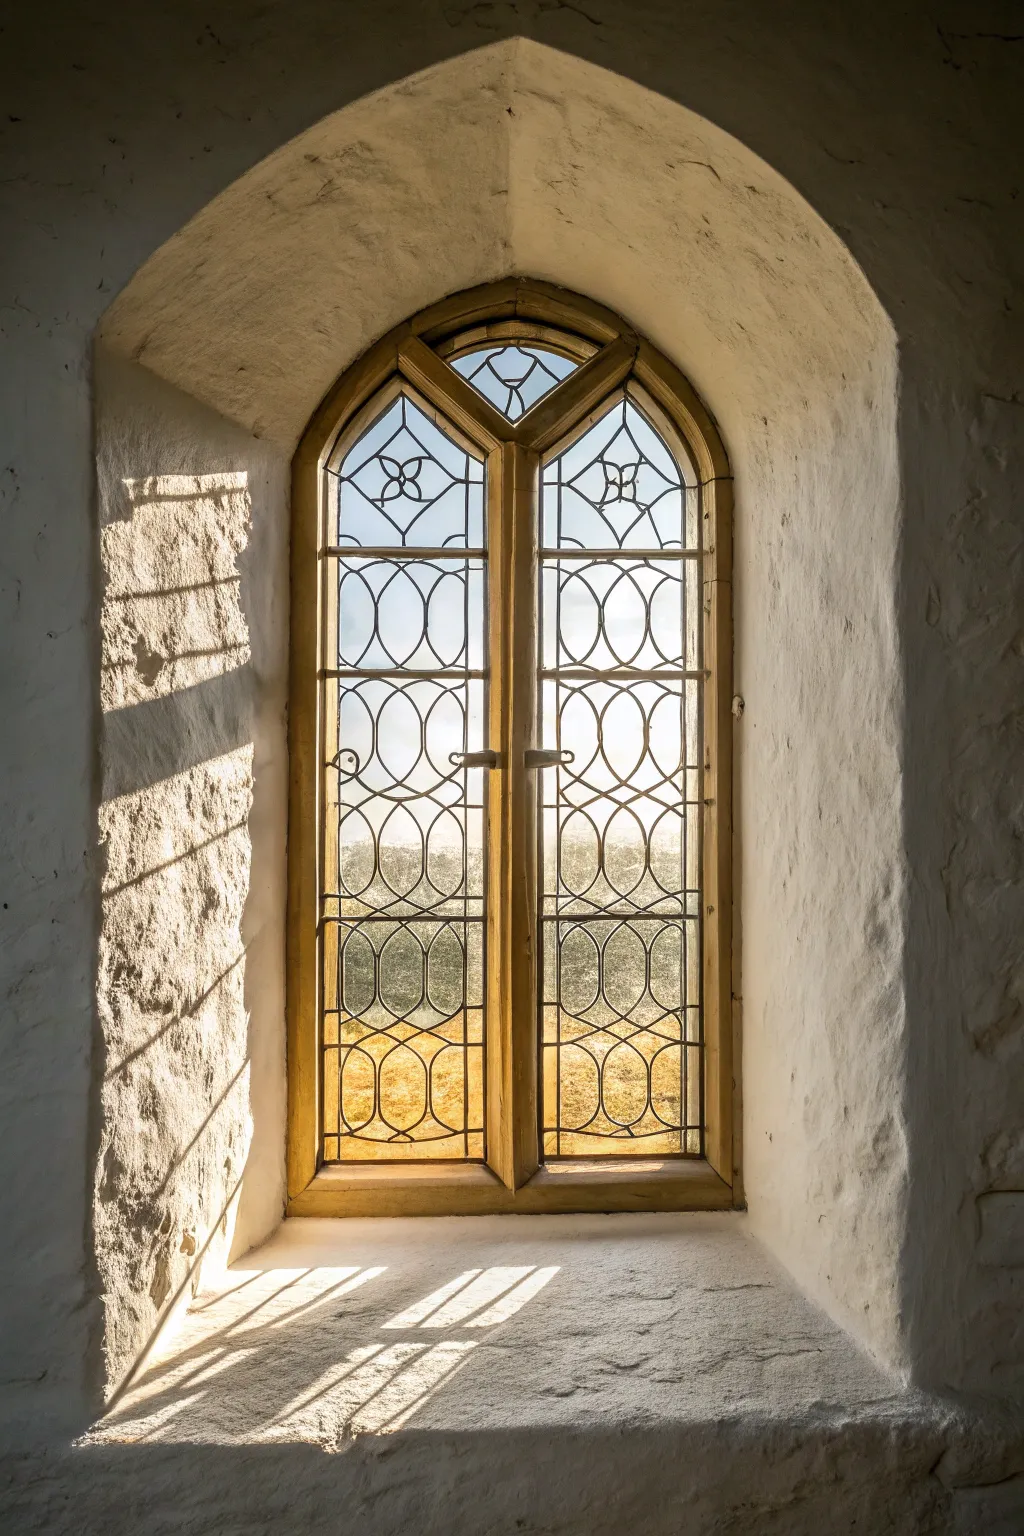
Arched Glass Windows for Soft Drama
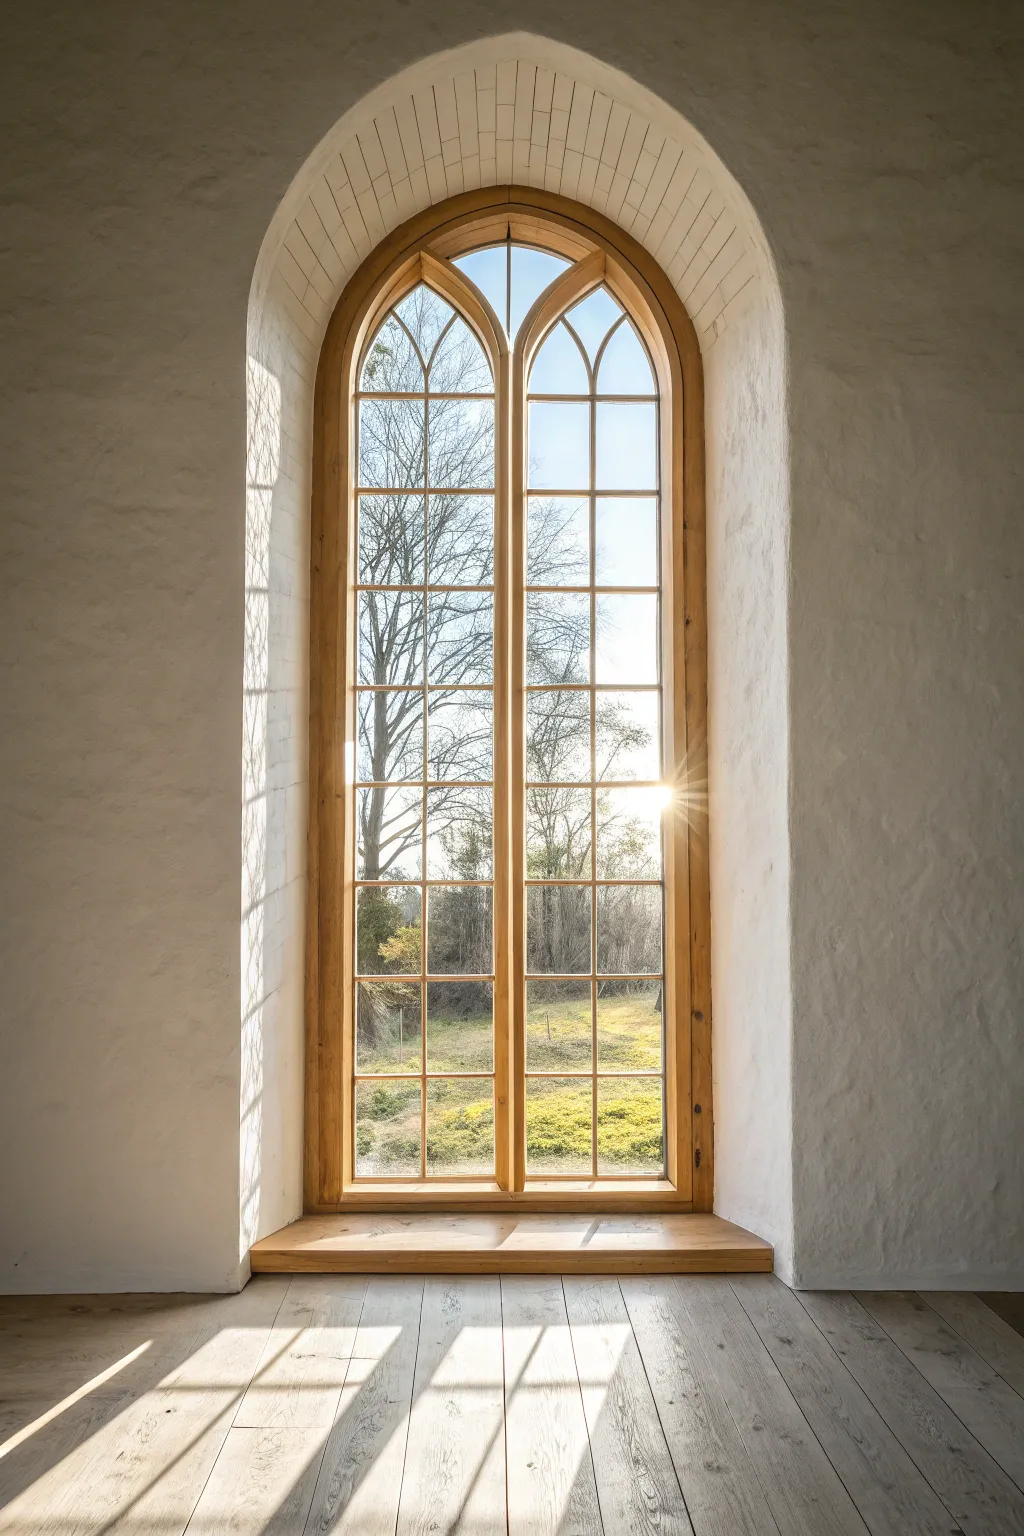
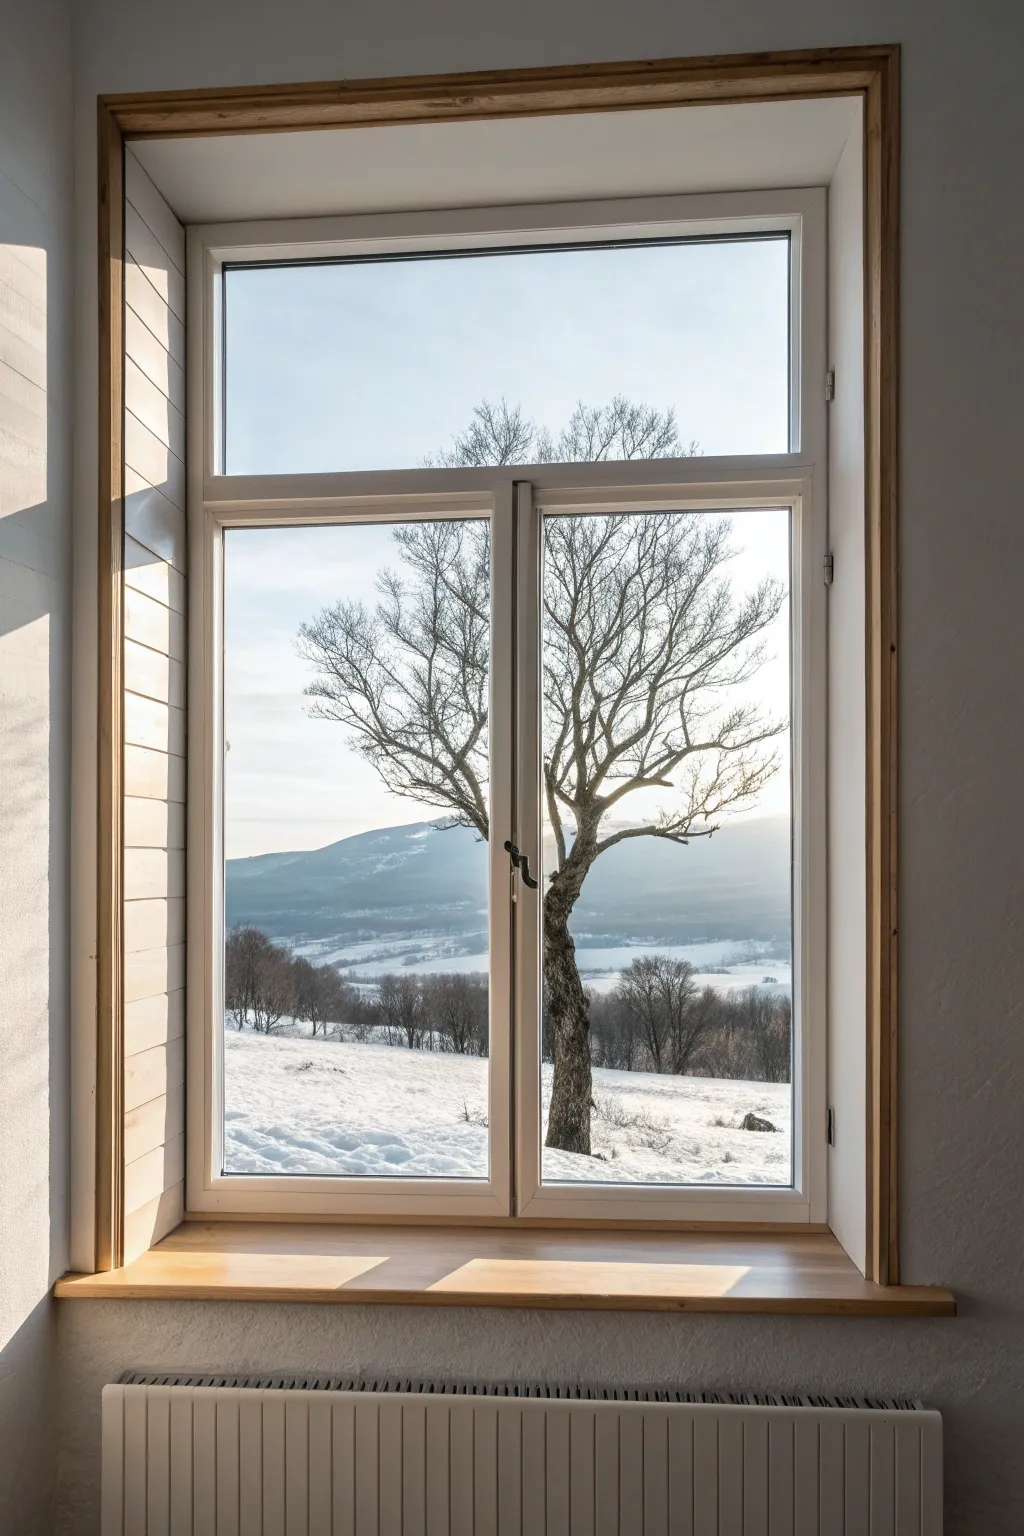
Capture the serene beauty of light pouring through a classic arched window in this detailed architectural painting. You will learn to render realistic textures like rustic wood and plaster while mastering the interplay of sunlight and shadow.
Step-by-Step Tutorial
Materials
- Heavyweight watercolor paper or mixed media board (approx. 11×14 inches)
- Pencil (HB) and eraser
- Ruler and T-square
- Acrylic gouache or matte acrylic paints (White, Raw Umber, Yellow Ochre, Burnt Sienna, Payne’s Gray, Sap Green, Ultramarine Blue)
- Flat shader brushes (sizes 6 and 10)
- Round detail brushes (sizes 0 and 2)
- Masking tape (low tack)
- Palette and water container
- Paper towels
Step 1: Sketching the Framework
-
Establish the Perspective:
Begin by lightly drawing the vertical lines of the wall edges and the floorboards. The perspective is frontal, so keep your vertical lines perfectly straight and parallel. -
Draw the Arch Outline:
Measure and mark the center of your paper. Sketch the tall, vertical sides of the window, then carefully freehand the curved arch at the top to connect them, ensuring symmetry. -
Detail the Mullions:
Use your ruler to draw the internal grid of the window. There is a central vertical divider and several horizontal bars. Don’t forget the smaller, pointed arches within the main arch at the top.
Uneven Arches?
If your arch looks lopsided, draw a box first, then trace a round object like a plate or bowl to get the curve perfectly symmetrical before connecting the sides.
Step 2: Painting the Exterior View
-
Sky and Atmosphere:
Mix a very pale wash of Ultramarine Blue and White. Paint the sky in the uppermost window panes, keeping it light and airy to suggest a bright day. -
Suggesting Trees:
Using a thin mix of Payne’s Gray and a touch of Sap Green, paint the delicate, bare branches of the trees. Keep these strokes loose and organic; they act as a silhouette against the light. -
Painting the Grass:
Mix Sap Green with Yellow Ochre and White. Block in the grassy area seen through the lower panes, dabbing the brush to create texture rather than flat color.
Add Dust Motes
Splatter tiny specs of white gouache in the sunbeam path to simulate dust dancing in the light, adding incredible atmosphere to the scene.
Step 3: Rendering the Architecture
-
Base Coat for the Wall:
Mix a large amount of Titanium White with a tiny dot of Raw Umber to create an off-white plaster color. Paint the entire wall area surrounding the window, applying it slightly unevenly to mimic texture. -
Shadowing the Plaster:
While the white is dry, mix a dilute grey-beige wash. Paint the curved shadow inside the window reveal (the thickness of the wall) to give the arch 3D depth. -
Painting the Wooden Frame:
Mix Yellow Ochre and Burnt Sienna. Paint the window frame, mullions, and the deep sill. I like to let this dry briefly before adding a second coat for opacity. -
Adding Wood Grain:
With a fine round brush and a darker brown mix (add Raw Umber), paint thin, broken lines along the frame to suggest wood grain. -
Highlighting the Frame:
Mix a pale cream color. Add crisp highlights to the edges of the wooden bars where the sunlight would hit them, specifically on the right side of the verticals.
Step 4: The Light and Floor
-
Flooring Base:
Paint the floorboards using a desaturated beige-grey mix. Follow the pencil lines you drew earlier, leaving tiny gaps between boards to define them. -
Casting the Shadow:
Mix a transparent glaze of Payne’s Gray and water. Paint the diagonal shadows cast by the window muntins onto the floorboards. Keep the edges relatively sharp. -
The Sun Flare:
For the bright burst of sun on the right side of the frame, use pure Titanium White. Dry brush a starburst shape emanating from the edge of the window frame. -
Illuminating the Floor:
Paint patches of bright, warm white on the floor where the sun hits directly. These shapes should correspond to the clear window panes. -
Final Adjustments:
Step back and check your contrast. Deepen the darkest corners of the window frame and brighten the plaster texture near the light source if needed.
Frame this piece with a wide white mat to emphasize the airy, spacious feeling of your architectural study

PENCIL GUIDE
Understanding Pencil Grades from H to B
From first sketch to finished drawing — learn pencil grades, line control, and shading techniques.
Explore the Full Guide
Geometric-Shaped Glass Windows
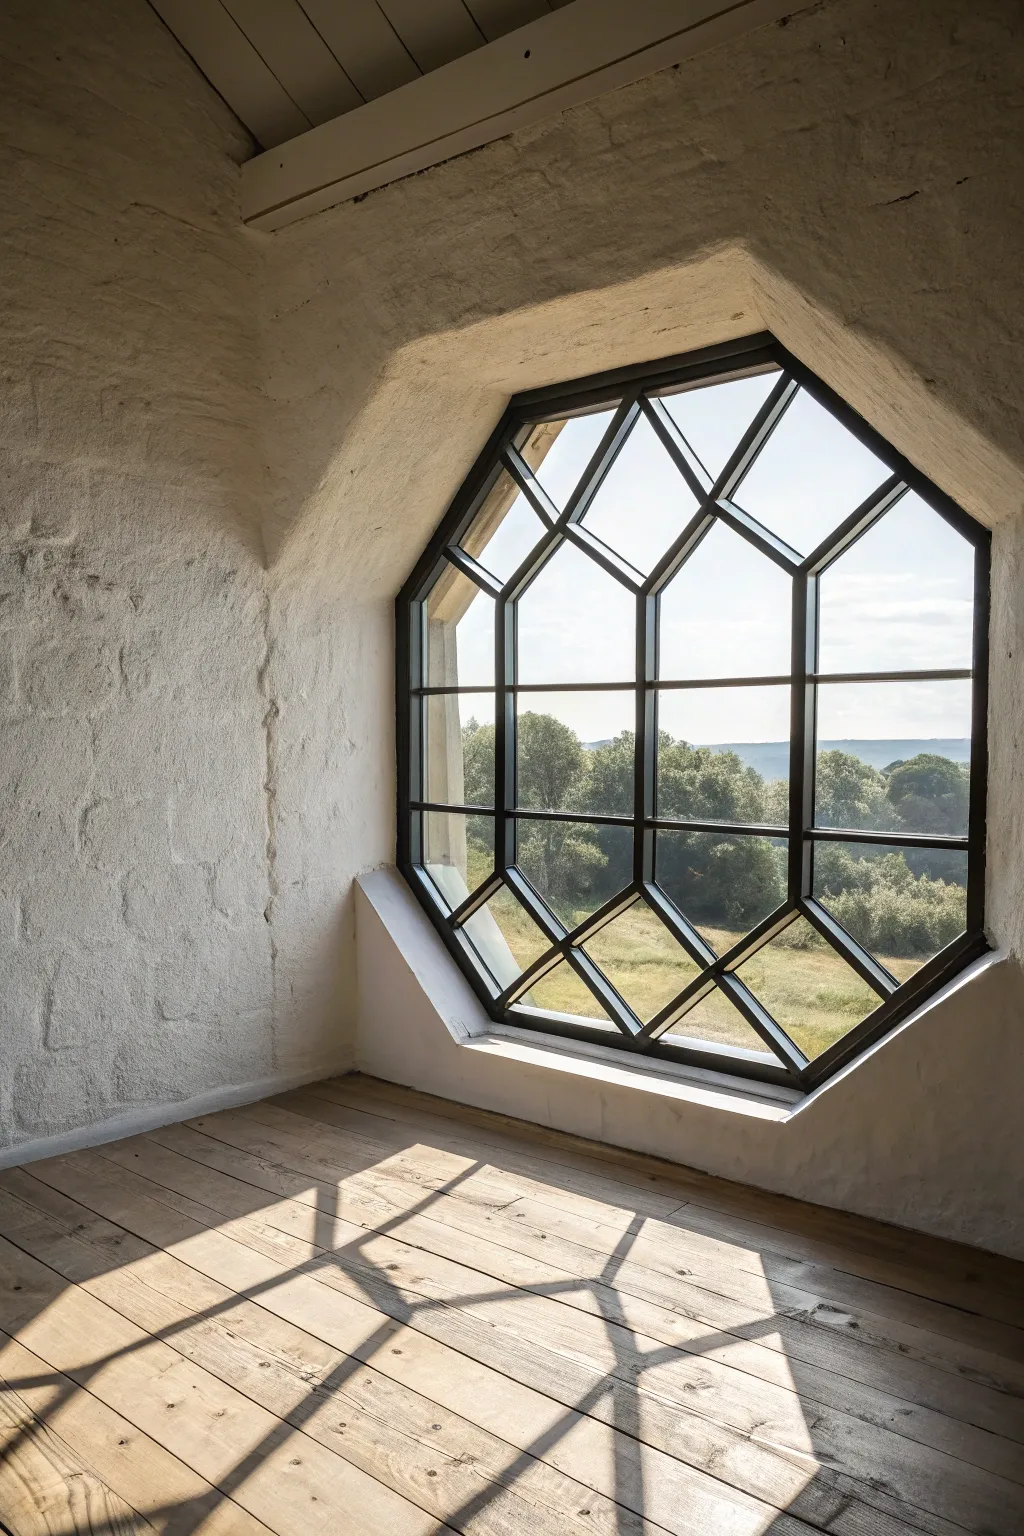
Capture the serene beauty of a geometric window casting intricate shadows in this architectural painting. You’ll work with light and perspective to render the textures of rough plaster walls and aged wood flooring bathed in natural light.
Step-by-Step Guide
Materials
- Canvas or heavy watercolor paper (16×20 inches)
- Acrylic paints (Titanium White, Burnt Umber, Yellow Ochre, Paynes Grey, Sap Green, Phthalo Blue)
- Set of brushes: 1 inch flat, medium filbert, fine liner
- Ruler and T-square
- Pencil (HB or 2H)
- Masking tape
- Mixing palette
- Water cups
Step 1: Drafting the Geometry
-
Establish the Horizon:
Begin by lightly drawing a horizon line about one-third up from the bottom of your canvas; this will serve as the anchor for the outdoor landscape. -
Map the Window Shape:
Using your ruler, draw a large octagon shape centered on the right side of the canvas. This is the main frame. Then, draw the surrounding archway shape, paying attention to the deep angles where the wall recedes. -
Grid the Panes:
Sketch the internal grid of the window. Start with the central square, then connect the diagonal lines to the octagon’s corners. Reference the photo closely to get the perspective of the frame thickness right. -
Outline Shadow Lines:
Lightly trace the shapes of the cast shadows on the floor. These geometric shapes will be elongated and distorted versions of the window panes.
Step 2: Painting the Landscape View
-
Sky Gradient:
Mix Titanium White with a tiny dot of Phthalo Blue. Paint the sky area within the window panes, blending to a lighter, almost white blue near the horizon line. -
Distant Trees:
Mix Sap Green with a little White and a touch of Grey for atmospheric perspective. Dab in the tree line using an old, scruffy brush to create leafy texture, keeping the edges soft. -
Foreground Fields:
Paint the fields visible through the lower panes using varied tones of Yellow Ochre and Sap Green. Keep these strokes horizontal and loose.
Straight Lines Only
If your hand shakes while painting the frame, use masking tape or hold your breath while pulling the brush for cleaner lines.
Step 3: Rendering the Architectural Interior
-
Base Wall Color:
Mix a large amount of Titanium White with a speck of Yellow Ochre and a tiny bit of Grey. Cover the wall areas, using a dry brush technique in some spots to suggest the rough plaster texture. -
Deepening Shadows:
To create the recession of the window nook, mix a darker version of your wall color using more Grey. Paint the inside edges of the window reveal to show depth. -
Texturing the Plaster:
Once the base is dry, use a nearly dry brush with pure White to lightly skim over the wall surface, highlighting the ‘bumps’ of the plaster. -
Painting the Floor Base:
Mix Burnt Umber with White and Yellow Ochre to create a warm wood tone. Paint the entire floor area, brushing horizontally to mimic floorboards. -
Defining Floorboards:
Use a fine liner brush with thinned Burnt Umber to draw the seams between the floorboards. Vary the pressure so lines aren’t perfectly uniform.
Dust Particles
Splatter tiny, faint droplets of watery white paint in the sunbeams to mimic dust motes dancing in the light.
Step 4: Window Frame and Light
-
Dark Iron Frame:
Mix Paynes Grey with a touch of Burnt Umber for a near-black hue. Carefully paint the window frame structure using a flat brush for straight edges. -
Highlighting the Metal:
Add thin lines of light grey along the top and right edges of the window frame bars to imply they are 3D objects catching the light. -
Painting Cast Shadows:
This is crucial. Mix a transparent wash of Burnt Umber and Grey. Glaze over the floor area where you sketched the shadows earlier. The wood grain should still be visible underneath. -
Bright Sunlight Patches:
I like to enhance the contrast here by painting the sunlit parts of the floor (the non-shadow areas) with a lighter, warmer mix of Unbleached Titanium and White.
Step back and admire how the interplay of light and shadow brings a quiet warmth to your architectural study
Frosted Glass for Privacy and Glow
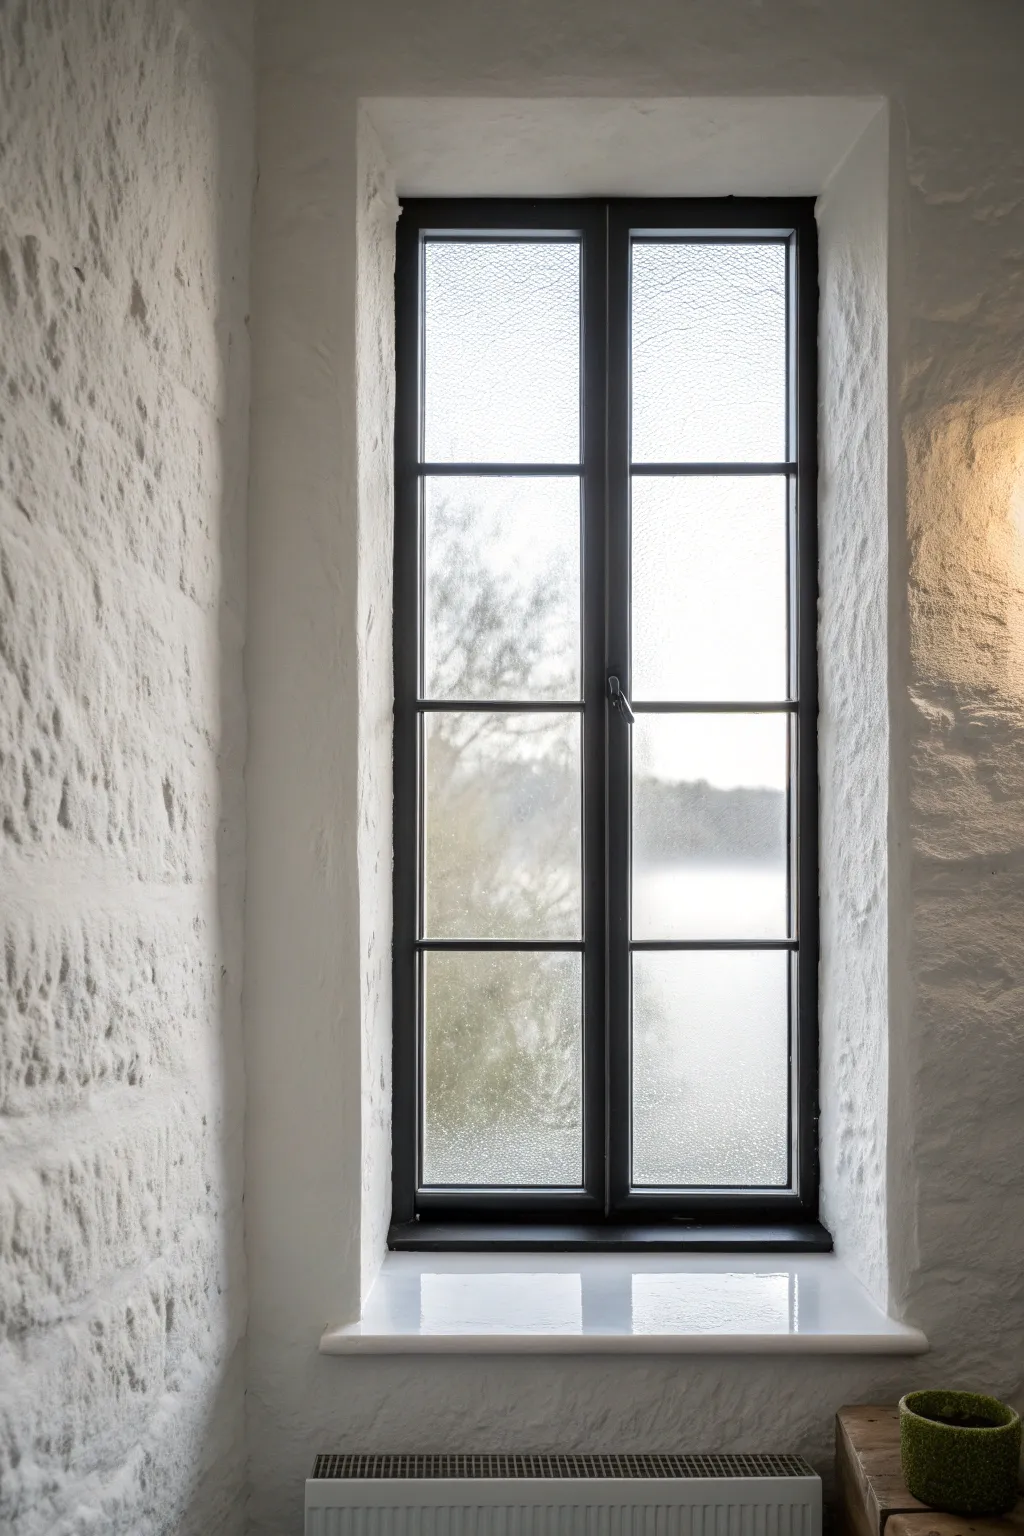
Transform ordinary clear glass into a sophisticated privacy feature that diffuses light beautifully. This project replicates the look of textured, obscure glass often found in older cottages or modern bathroom designs, giving your space a soft, glowing ambiance.
Step-by-Step
Materials
- Frosted glass window film (static cling or adhesive)
- Glass cleaner
- Lint-free cloth or microfiber towel
- Measuring tape
- Straight edge ruler
- Utility knife or precision cutting tool
- Squeegee (often included with film)
- Spray bottle with water and a few drops of dish soap
- Hairdryer (optional, for adhesive films)
- Scissors
Step 1: Preparation & Cleaning
-
Assess the surface:
Begin by inspecting your window panes. If there is old paint or stubborn grime on the glass, use a razor scraper to carefully remove it without scratching the surface. -
Deep clean:
Spray the glass generously with glass cleaner. Wipe it down thoroughly with a lint-free cloth to ensure no dust, pet hair, or grease remains, as these will create bubbles under the film. -
Dry the edges:
Pay special attention to the corners and the very edge where the glass meets the frame. Use a dry corner of your cloth to wick away any remaining moisture or dirt trapped there.
Step 2: Measuring & Cutting
-
Measure the panes:
Measure the varying dimensions of each individual window pane. Even windows that look identical can vary by small fractions, so measure every single pane individually. -
Mark the film:
Unroll your frosted film on a clean, flat surface. Mark your measurements on the backing paper, adding an extra inch to both the height and width for safety. -
Cut the rough size:
Using scissors, cut out the rough shapes based on your measurements. Don’t worry about being perfect yet; the excess will be trimmed away later for a precise fit. -
Organize your pieces:
If you are doing multiple panes, I find it helpful to lightly number the back of each piece with a pencil so you know exactly which pane it belongs to.
Use a Hard Card
Wrap a credit card in a thin microfiber cloth to push out bubbles near the edges without scratching the film.
Step 3: Application
-
Create the slip solution:
Fill a spray bottle with water and add just two to three drops of liquid dish soap. Shake gently to mix. -
Wet the glass:
Spray the first window pane generously with your soapy water solution. You want the glass to be visibly wet, as this allows you to slide the film into position. -
Peel the backing:
Peel the protective backing off the film. A helpful trick is to use two pieces of tape on a corner—one on the front, one on the back—and pull them apart to separate the layers. -
Spray the film:
Lightly mist the adhesive or static side of the film with your soapy solution. This prevents it from grabbing the glass instantly and reduces static electricity. -
Position the film:
Place the film onto the wet glass. Because both surfaces are wet, you should be able to slide it around until it is centered, with excess film overlapping the frame on all sides.
Creative Cutouts
Before applying, cut small geometric shapes or a thin border line out of the film to create a peekaboo clear glass design.
Step 4: Refining & Finishing
-
Squeegee the center:
Spray the outside of the film lightly to help the squeegee glide. Starting from the center, squeegee straight out toward the edges to push out water and air bubbles. -
Work toward corners:
Continue squeegeeing in an overlapping pattern, moving from the middle out to the corners. Apply firm, consistent pressure. -
Trim the excess:
Use your straight edge ruler to press the film tight into the corner where the glass meets the frame. Run your sharp utility knife along the ruler to trim the excess film away cleanly. -
Remove perimeter bubbles:
After trimming, you might see small water pockets appear at the edges. Describe a final pass with the squeegee or a hard card wrapped in a soft cloth to press the edges down firmly. -
Dry the frame:
Use a towel to soak up the excess water that has been squeezed out onto the window sill and frame. -
Repeat process:
Move on to the next pane, repeating the cleaning, wetting, and application steps until the entire window unit is frosted.
Now you have a beautifully obscured window that maintains brightness while offering complete privacy


Textured Glass That Makes Light Ripple
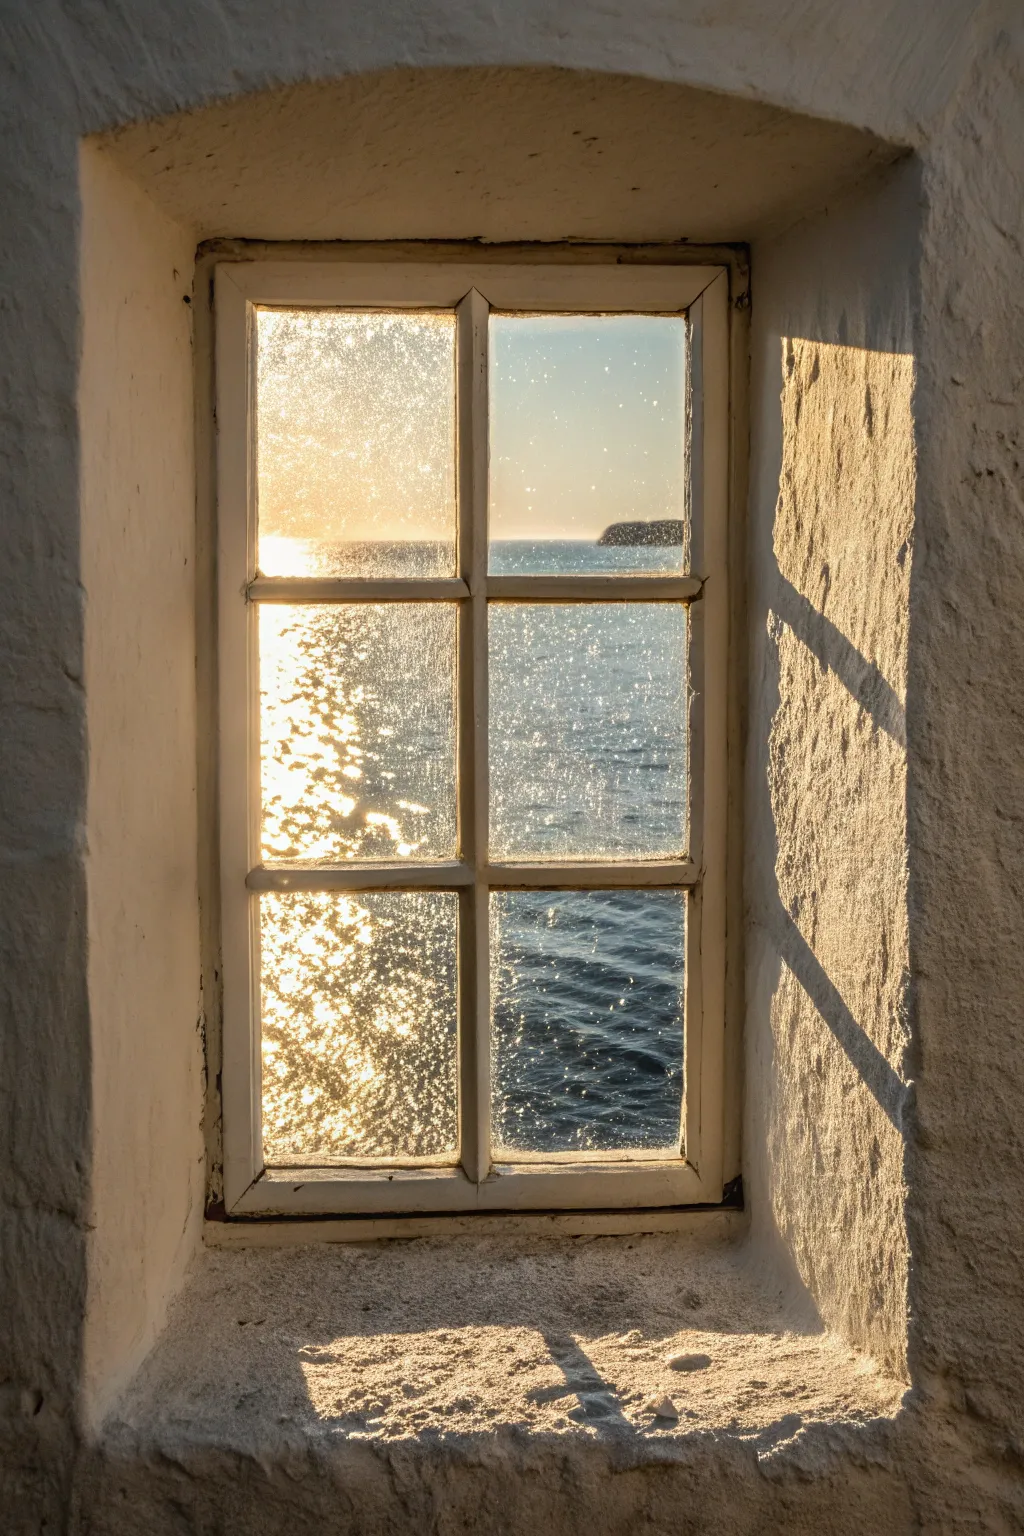
Capture the magic of looking through an old cottage window at a shimmering ocean with this acrylic painting tutorial. You’ll layer warm light and cool water tones, using clever texture techniques to mimic the ripple of aged glass.
How-To Guide
Materials
- Canvas board or stretched canvas (11×14 or similar)
- Acrylic paints: Titanium White, Phthalo Blue, Ultramarine Blue, Yellow Ochre, Burnt Umber, Cadmium Yellow Light
- Assorted brushes: 1-inch flat, medium filbert, shimmering fan brush (optional), fine liner
- Texture paste or heavy body clear acrylic gel
- Palette knife
- Masking tape (low tack)
- Glazing medium
- Sea sponge or crumpled paper towel
Step 1: Setting the Scene
-
Sketch the framework:
Begin by lightly sketching the deep window recess and the six-pane window frame. Keep the perspective slightly angled to match the viewer’s position, ensuring the sill feels deep and substantial. -
Block in the walls:
Mix Titanium White with a tiny touch of Burnt Umber and Yellow Ochre to create a warm, off-white stone color. Apply this to the wall sections surrounding the window, using a scumbling motion to suggest a rough, plastered surface. -
Deepen the shadows:
While the wall paint is still tacky, mix a slightly darker grey-brown using Burnt Umber and White. Paint the left side of the recess and the top arch to create depth, blending the edges softly where the shadow meets the light.
Too Opaque?
If your glass texture looks like white paint rather than transparent grime, add more glazing liquid to your mix. It should dry mostly clear, leaving only texture behind.
Step 2: Painting the Seascape
-
Tape the panes:
Once the surrounding walls are dry, carefully use masking tape to block out the window frame bars (mullions and transoms). This protects the wood areas while you paint the sea behind them. -
Paint the sky:
Mix White with a whisper of Phthalo Blue and Cadmium Yellow Light. Paint the top two panes with a gradient, keeping it lighter and warmer near the horizon line to suggest the sun’s glow. -
Establish the horizon:
Locate your horizon line about one-third of the way up the middle panes. Paint a distant, dark island shape on the right side using a mix of Ultramarine Blue and Burnt Umber. -
Base layer of the sea:
Fill the sea area with a mid-tone mix of Phthalo Blue, Ultramarine, and a touch of White. Don’t worry about details yet; just get a solid, cool blue base down. -
Add sunlight reflection:
Mix a bright, warm white using Titanium White and a dot of Cadmium Yellow. Stipple this vertically down the left side of the window panes, creating a blinding path of sunlight on the water.
Golden Hour Glow
Glaze a very thin layer of transparent orange or gold over the entire sunlit section of the water once dry. This unifies the highlights and adds warmth.
Step 3: Creating the Glass Texture
-
Apply texture medium:
This is the secret sauce. Mix a small amount of glazing medium with heavy body clear gel or a tiny bit of White. Using a sea sponge or stiff brush, dab this mixture over the sunlit parts of the water. -
Stipple for ripples:
While the gel is wet, stipple it aggressively to create tiny peaks and ridges. This physical texture will catch the light later, mimicking the uneven surface of old, hand-blown glass or salt spray. -
Enhance the sparkle:
Once the texture layer is dry, dry-brush pure Titanium White over the raised ridges of your texture. This makes the ‘glass’ look like it’s scattering the sunlight. -
Add glass imperfections:
Dilute a bit of grey-blue paint with plenty of water. Randomly glaze a few spots on the darker water areas to suggest dirt, salt residue, or imperfections in the glass pane itself.
Step 4: Framing and Shadows
-
Reveal the frame:
Gently peel away the masking tape to reveal the crisp white canvas below. I always find this moment incredibly satisfying. -
Paint the window frame:
Fill in the frame bars with a creamy off-white. Add a thin line of shadow on the right side of each vertical bar and the bottom of horizontal bars to give them 3D form. -
Cast the frame shadows:
Using a transparent glaze of Burnt Umber and Grey, paint the diagonal shadows cast by the window frame onto the right-hand wall recess. Keep the edges of these shadows slightly soft. -
Highlight the sill:
Mix a bright, warm white and dry-brush the bottom window sill where the sun hits it directly. This connects the light source from the water to the interior room. -
Final texture check:
Use a palette knife to add thick, impasto strokes of your wall color to the surrounding masonry, emphasizing the rough, rustic feel of the cottage walls.
Step back and enjoy the peaceful view you’ve created, where the light will always be perfect
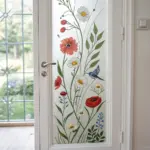
Leaded Glass Lines for Vintage Charm
Transform a plain sheet of glass or an existing window into a stunning architectural feature reminiscent of medieval craftsmanship. This project uses self-adhesive lead strips and glass paint to recreate the look of vintage leaded windows, complete with intricate geometric traceries and a warm, aged feel.
Detailed Instructions
Materials
- Clear glass pane or acrylic sheet (cut to size)
- Self-adhesive lead strip (3mm or 6mm width, depending on desired thickness)
- Lead strip finishing tool (bone folder or plastic burnisher)
- Glass cleaner and lint-free cloth
- Paper for template
- Pencil and ruler
- Compass or circular object (for tracing curves)
- Craft knife or precision blade
- Cutting mat
- Glass paint (optional: clear texture medium or slight amber tint)
- Masking tape
Step 1: Planning and Preparation
-
Measure the space:
Begin by carefully measuring the dimensions of your glass pane. You need exact width and height to ensure your geometric pattern remains symmetrical. -
Draft the template:
On a large sheet of paper, draw the outline of your window frame, including the arched top. Use a ruler to divide the space into a vertical grid, creating two main columns. -
Draw the geometric lattice:
Using a compass, sketch the intersecting circle motif within the grid. Aim for a ‘vesica piscis’ shape where the circles overlap rather than just touching. Add the floral ‘clover’ designs in the upper arch section to mimic the tracery seen in Gothic windows. -
Secure the template:
Clean your glass thoroughly with glass cleaner to remove any oils. Place the paper template flat on your work surface and secure the glass directly on top of it with masking tape so it doesn’t shift.
Step 2: Applying the Vertical Lines
-
Apply the central mullion:
Start with the thickest vertical line down the center. If your lead strip is thin, you might want to run two strips side-by-side to create the look of the heavy central wooden mullion shown in the reference. -
Add side borders:
Run strips of lead tape along the extreme left and right vertical edges of the glass to frame the design. -
Create horizontal divisions:
Place the straight horizontal lead lines that separate the main geometric sections. Cut the lead strip slightly longer than needed, press it down firmly following your template, and trim the excess carefully with a craft knife at the edges.
Sticky Situation
If a lead line goes crooked, don’t peel it straight up, which stretches it. Gently warm it with a hair dryer and slide a craft knife under to lift it slowly.
Step 3: Creating the Curves
-
Warm the lead:
For the circular patterns, the lead needs to be pliable. I find that warming the strip slightly in my hands before peeling the backing makes it much easier to curve without kinking. -
Trace the first oval:
Peel back a small section of the backing tape. Anchor the start of the strip on a vertical line, then slowly guide it along the curve of your template, pressing down as you go. Work slowly to avoid sharp bends. -
Close the shape:
Continue forming the oval shape until it reconnects with the vertical line. Cut the strip cleanly with your craft knife where it meets the existing lead line for a seamless butt joint. -
Complete the lattice:
Repeat this process for all the intersecting ovals in the central panels. Ensure the points where lines cross or meet look intentional and neat. -
Detail the arch:
For the top section, use smaller pieces of lead to form the floral/clover shapes. These tighter curves require patience; use your fingernail or the finishing tool to nudge the lead into tight corners.
Ancient Patina
Mix a tiny drop of brown glass paint into clear texture medium. Apply unevenly near the corners of the panes to simulate centuries of grime buildup.
Step 4: Finishing Touches
-
Burnish the joints:
Once all lead is applied, use the boning tool (provided with most lead kits) to rub down the entire length of every strip. Pay special attention to the intersections (joints); rubbing them firmly merges the overlapping lead slightly for a soldered look. -
Weather the lead (optional):
If using a bright sliver lead, apply a patina fluid to darken it to a gunmetal gray immediately. If your lead is already antique-finish, you can skip this. -
Apply texture medium:
To mimic the distortion of old glass, dab a clear glass texture medium or a very pale amber glass paint into the negative spaces. Use a stippling motion with a stiff brush to create an uneven, rippled surface. -
Double-sided application:
For the most realistic effect, flip the glass over (once dry) and repeat the lead application on the reverse side, using the front lead lines as your guide. This hides the adhesive backing from view. -
Install the pane:
Set your finished faux-leaded glass into your wooden window frame or display area.
Enjoy the timeless elegance created by shadow and light playing through your new geometric masterpiece
Stained Glass Panels as a Focal Point
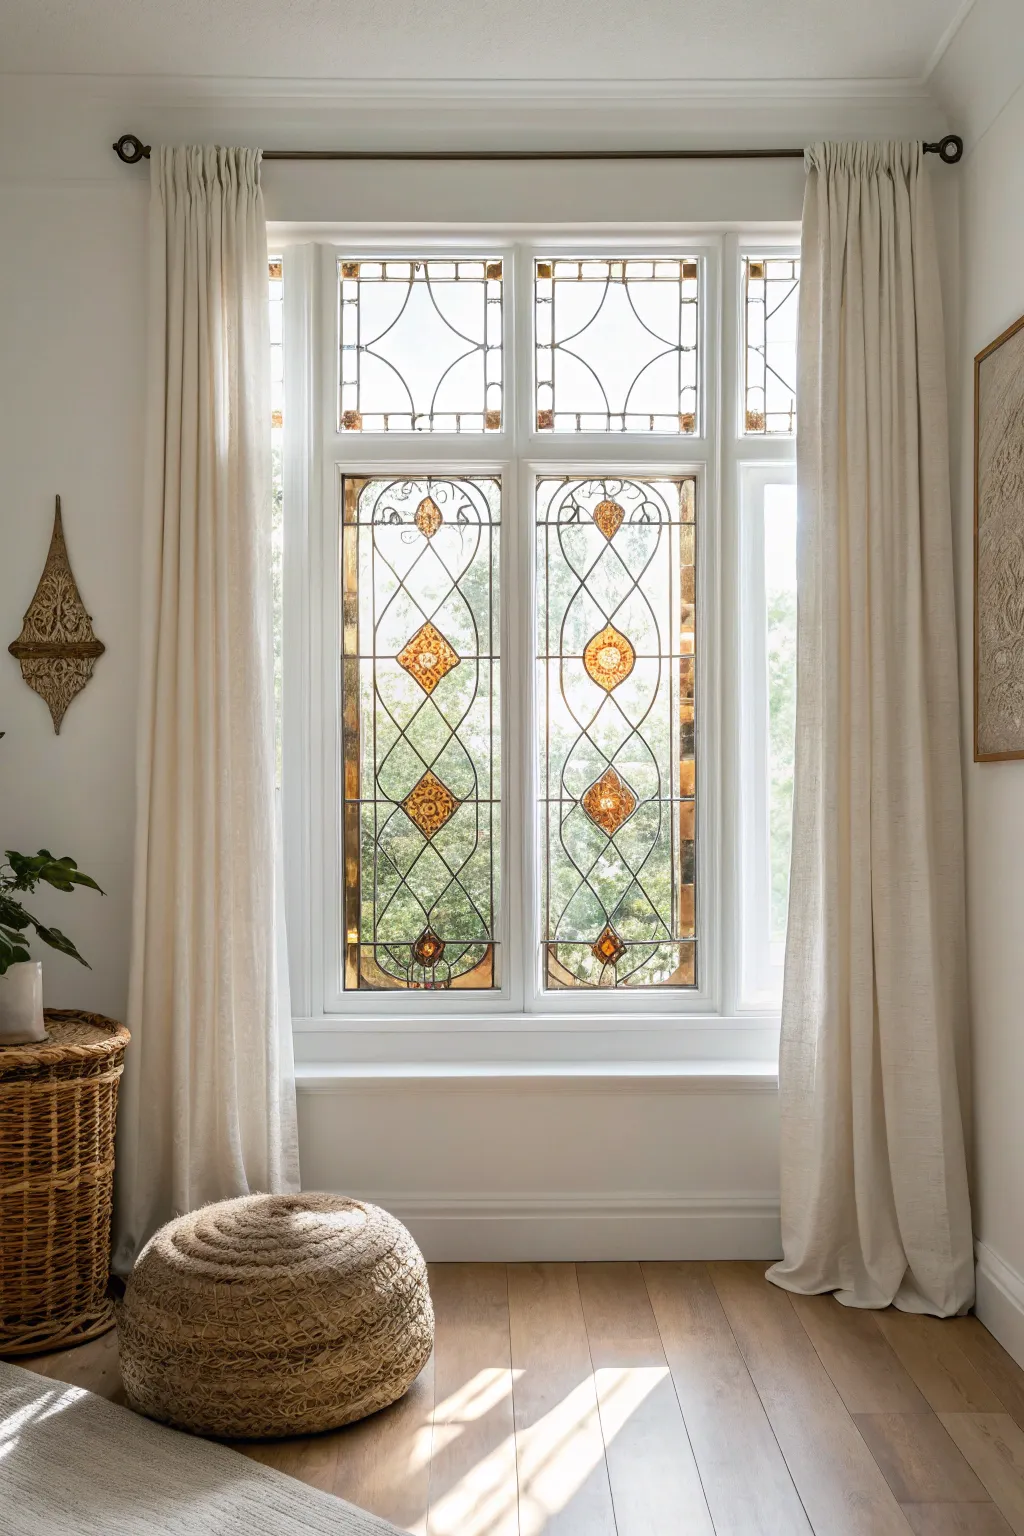
Transform a standard window into a glowing masterpiece with this elegant faux stained glass project that mimics the look of traditional lead caming and amber glass bevels. The warm golden tones and classic diamond geometry create a stunning focal point without the need for soldering or glass cutting.
Step-by-Step Tutorial
Materials
- Clear glass panel (cut to window size) or existing window
- Adhesive lead strip (3mm and 6mm widths)
- Faux stained glass paint (Amber/Golden Yellow)
- Glass gallery bevels (diamond and tear-drop shapes)
- UV adhesive or strong clear glass glue
- Bon tool (bone folder or plastic burnisher)
- Glass cleaner and lint-free cloth
- Paper, pencil, and ruler
- Masking tape
- Craft knife
- Fine-point permanent marker
- Rubber gloves
Step 1: Planning and Preparation
-
Clean surface thoroughly:
Begin by cleaning your glass surface meticulously with glass cleaner and a lint-free cloth. Any dust or grease left behind will prevent the adhesive lead and bevels from sticking properly, so wipe it down until it squeaks. -
Draft the pattern:
Measure your window pane exact dimensions. On a large sheet of paper, draw a 1:1 scale template of the design. Start with a central vertical line, then sketch the diamond focal points and the curving “ribbon” lines that intertwine around them. -
Position the template:
Tape your paper template securely to the *back* or outside of the glass. Verify that it is perfectly centered and level, as this will be your only guide for placing the lead lines and bevels.
Step 2: Applying Bevels and Base Lead
-
Layout the glass bevels:
Before gluing, dry-fit your glass bevels onto the front of the window surface to ensure they match the template perfectly. Use small diamond shapes for the centers and teardrop shapes if your design calls for them near edges. -
Adhere the bevels:
Apply a small drop of UV adhesive to the back of a bevel. Place it carefully over the corresponding shape on your template. Use a UV light source to cure the glue instantly (or follow manufacturer instructions for standard glass glue). -
Start the vertical lines:
Unroll your 6mm adhesive lead strip. Remove the backing paper and apply the main structural lines first—typically the straight vertical borders and horizontal divisions shown in the upper transom sections. -
Burnish the lead:
After placing each strip, firmly rub over it with the bon tool. This ensures a strong bond and removes any air bubbles trapped beneath the adhesive.
Lead Line Smoother
Warm the lead strip slightly in your hands before applying curved lines. The warmth makes the metal more pliable and prevents it from kinking or lifting on tight turns.
Step 3: Creating the Lattice Work
-
Form the curves:
For the elegant curved lines weaving around the diamonds, use the thinner 3mm lead strip. Because lead is soft, you can gently bend it as you lay it down to follow the swooping lines of your template. -
Connect to bevels:
Run the lead strips right up to the edge of your glued bevels. Cut the lead cleanly with a craft knife where it meets the glass jewel so it looks like the bevel is held in place by the metal. -
Cross the joints:
Where lines intersect, overlap one strip over the other, then press down firmly with the bon tool to flatten the junction. This mimics the soldered joints of real stained glass. -
Trimming edges:
Use your craft knife to slice off any excess lead at the very edge of the window frame for a tidy finish that looks built-in.
Bubbles in Paint?
If tiny bubbles appear in your amber glass paint after application, gently pop them with a clean sewing pin or pass a lighter quickly over the surface before it dries.
Step 4: Adding Color and Finish
-
Prepare the paint:
Stir your amber or golden yellow faux glass paint gently to avoid creating bubbles. The texture should be smooth and fluid. -
Fill the accent areas:
Using a dropper or a small round brush, flood the areas inside the diamond shapes (around the bevels) or the decorative side borders with the amber paint. I find it helps to push the paint right up to the lead edge to create a meniscus. -
Let it cure:
Allow the paint to dry completely flat for at least 24 hours. Keep dust away from the wet surface during this crucial time. -
Apply patina (optional):
If your self-adhesive lead looks too shiny and new, lightly dab a darkening solution or black shoe polish over the lead strips to give them an aged, oxidized pewter look. Wipe away excess immediately. -
Clean up:
Once everything is fully cured, remove the paper template from the back of the glass. Gently polish the clear glass sections with a microfiber cloth to remove fingerprints.
Enjoy the way the sunlight casts warm, golden patterns across your floor through your new masterpiece.
Half-Window Stained Inserts for Subtle Color
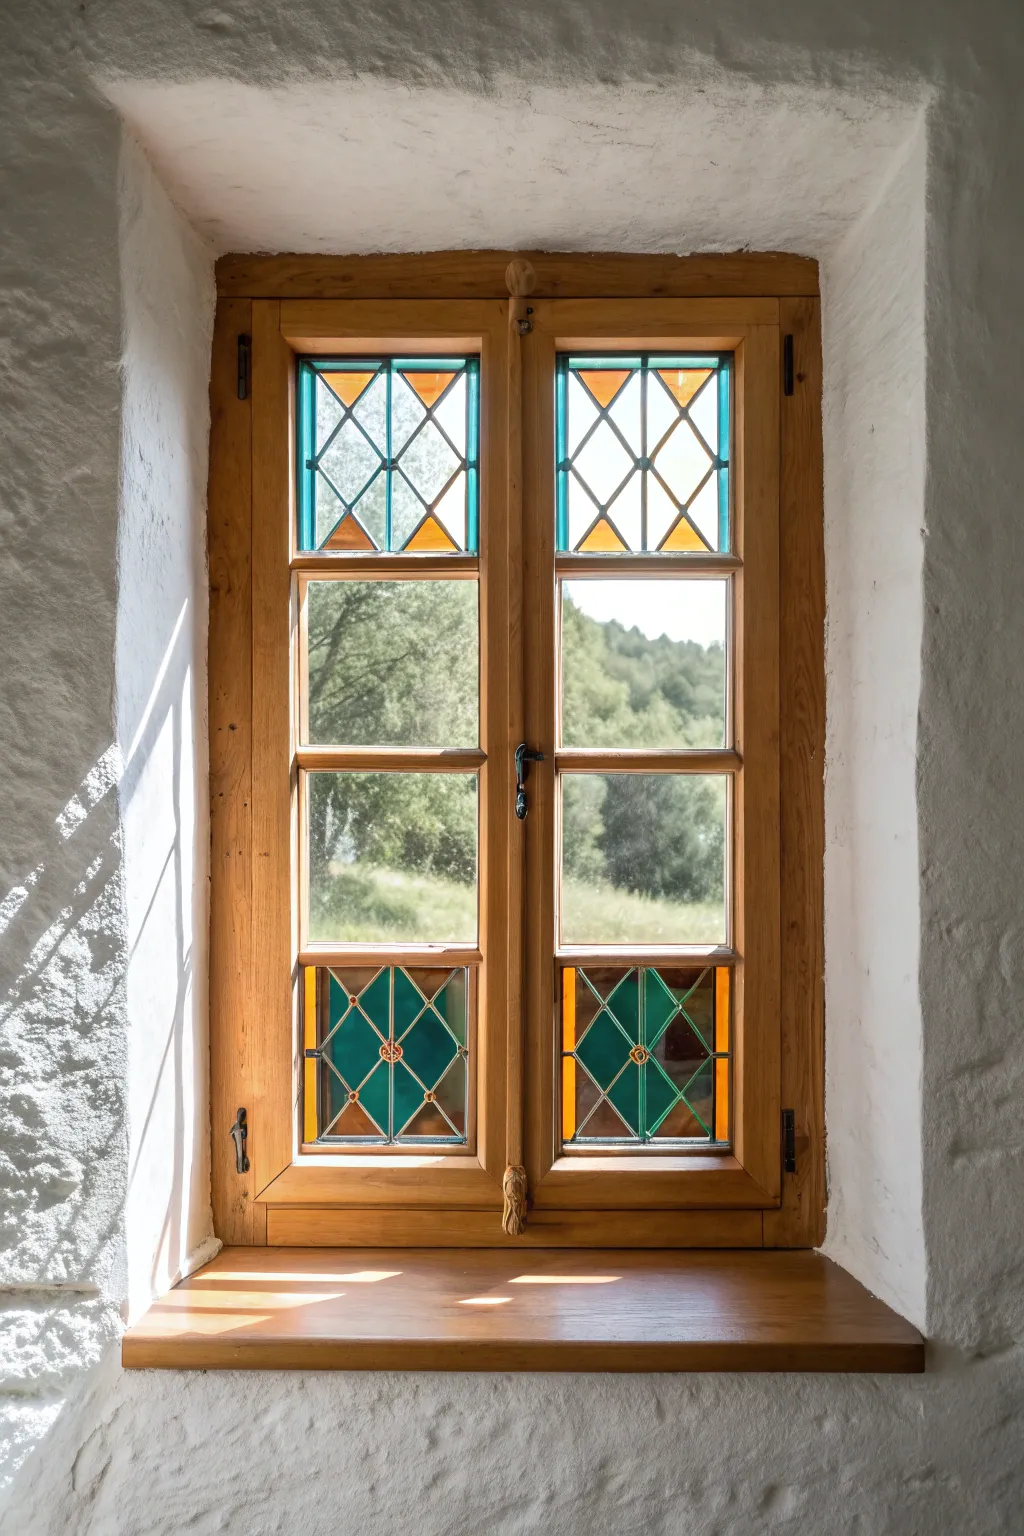
Transform existing window panes with these custom geometric inserts, featuring vibrant amber and teal accents within a classic leaded diamond pattern. This project adds a touch of historical charm and beautiful light diffusion without sacrificing the view through the center of your window.
Step-by-Step Guide
Materials
- Clear textured art glass (e.g., glue chip or hammered)
- Colored stained glass sheets (teal/aqua and amber/orange)
- Lead came (H-profile for construction, U-profile for edges)
- Glass cutter and running pliers
- Measuring tape and T-square
- Pattern paper and permanent marker
- Horseshoe nails and assembly board
- Flux and brush
- Soldering iron and 60/40 solder
- Glazing putty or cement
- Whiting powder and scrub brush
Step 1: Planning and Cutting
-
Measure the opening:
Begin by carefully measuring the interior rebate of your wooden window frame where the glass will sit. Subtract approximately 1/8 inch from both height and width to allow clearance for installation and expansion. -
Draft the design:
Draw your pattern to scale on heavy paper. Create a grid of diamonds, ensuring the points align perfectly. Mark which sections will be colored (the triangles at the top/bottom and the central diamonds) and which will be clear. -
Trace and score:
Lay your glass sheets over the pattern. I like to use a light table for this, but a bright surface works too. Trace the shapes onto the glass surface using a permanent marker, accounting for the width of the lead came between pieces. -
Cut the glass:
Score the glass along your lines using the glass cutter. Apply steady, moderate pressure—you want a consistent scratching sound. Use running pliers to snap the glass cleanly along the score lines. -
Refine the edges:
Check the fit of your cut pieces against the paper pattern. If any pieces are slightly too large or have sharp burrs, use a glass grinder or a grozing plier to smooth and fine-tune the edges.
Step 2: Assembly and Soldering
-
Prepare the assembly board:
Secure your paper pattern to a flat wooden board. Nail two wooden strips along one corner of the pattern (forming an L-shape) to create a rigid jig to build against. -
Frame the corner:
Cut two lengths of U-channel lead came for the exterior edges and place them against your wooden jig. This forms the starting boundary for your panel. -
Weave the first pieces:
Insert the first corner piece of glass into the channel. Cut a piece of H-channel lead came to fit the exposed edge of the glass. Tap it gently into place until the glass sits snugly within the channel. -
Continue the pattern:
Work diagonally outward from the corner. Place the next glass pieces, separating them with H-channel lead. Use horseshoe nails tapped into the board to hold everything tight as you work, preventing pieces from shifting. -
Finalize the border:
Once all interior glass and lead pieces are assembled, finish the remaining two outer edges with U-channel lead came. Ensure the overall dimensions match your initial measurements. -
Solder the joints:
Apply flux to every joint where lead came pieces meet. Heat your soldering iron and apply a small bead of 60/40 solder to each intersection, creating a neat, flat pool that bridges the lead. -
Flip and repeat:
Carefully turn the panel over. Apply flux and solder all the joints on the reverse side to ensure structural stability.
Loose Glass Rattle
If glass rattles after soldering but before cementing, gently crimp the lead edges down onto the glass with a fid or lathekin tool to tighten the fit.
Step 3: Finishing and Installation
-
Cement the panel:
Force stained glass cement or glazing putty under the lead flanges on both sides of the panel. This weather-proofs the piece and stops the glass from rattling. -
Clean with whiting:
Sprinkle whiting powder over the cemented panel. Use a stiff natural bristle brush to scrub the lead and glass. The powder absorbs excess oil from the putty and polishes the lead to a dark, clean finish. -
Allow to cure:
Let the panel sit for roughly 48 hours so the cement can harden slightly before handling. -
Install in frame:
Place the finished leaded panel into the wooden window rebate. Secure it using glazing points or small wooden stops, then seal the edges with window caulk or putty.
Add Antique Patina
Apply a black or copper patina solution to the solder lines after cleaning to instantly age the metal for a classic, time-worn aesthetic.
Enjoy the colorful play of light that your new handmade window inserts bring to the room
Hanging Glass Suncatchers in Clusters
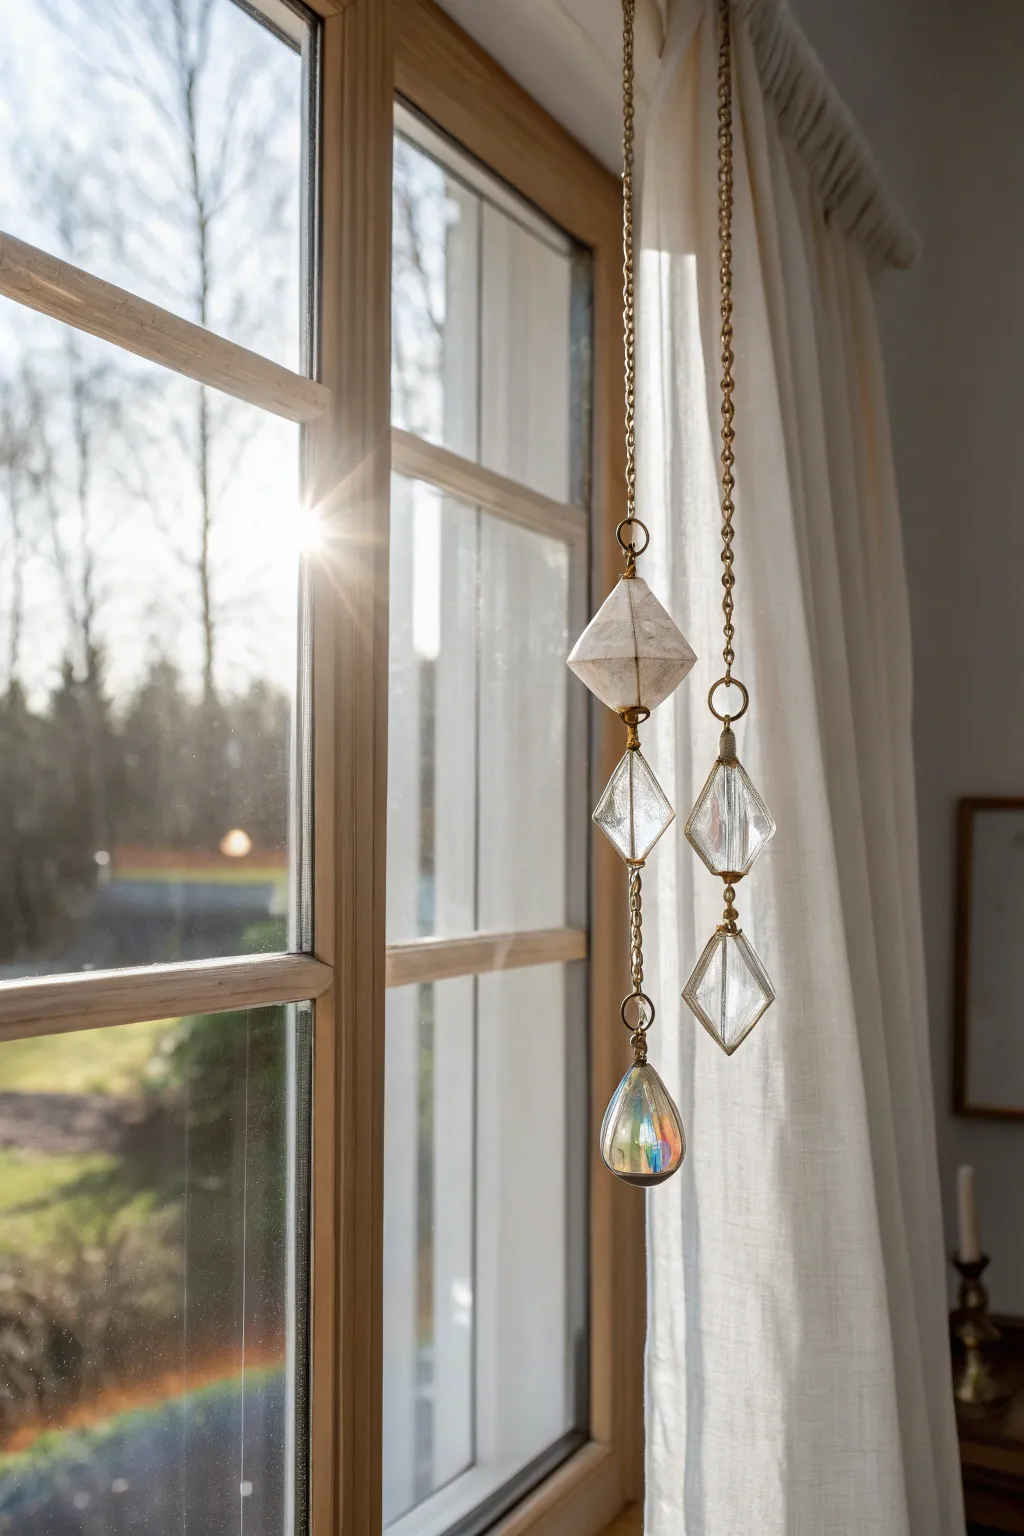
Capture the afternoon sun with these elegant, tiered hanging prisms that scatter rainbows across your room. By combining geometric glass shapes with gold chain links, you can create a sophisticated window accessory that feels both vintage and modern.
Step-by-Step Tutorial
Materials
- Various clear glass prism pendants (diamond, teardrop, and faceted geometric shapes)
- Gold finish jewelry chain (medium link size)
- Gold jump rings (6mm and 8mm)
- Jewelry pliers (flat nose and round nose)
- Wire cutters
- Gold screw-eye hooks or cup hooks for mounting
- Measuring tape
- Soft cloth for polishing
Step 1: Planning the Layout
-
Assess your materials:
Lay out all your glass prisms on a soft cloth to protect them from scratching. Group them by shape to decide which ones will act as top anchors and which will be the heavy bottom weights. -
Design the tiers:
Arrange the prisms on your work surface in vertical lines to simulate how they will hang. Aim for varied lengths; for instance, one strand with three elements and another with two, just like in the photo. -
Determine spacing:
Decide how much chain you want between each crystal. A gap of about 1-2 inches usually looks balanced, preventing the glass pieces from clinking together constantly.
Pro Tip: Rainbow Optimization
Hang these in an East or West-facing window. The lower angle of the sun during morning or evening hits the prisms horizontally, creating the most brilliant wall rainbows.
Step 2: Assembling the Chains
-
Cut the top chains:
Using your wire cutters, snip two lengths of gold chain for the main suspension. Make one slightly shorter than the other to create a staggered height effect when hung. -
Cut connecting segments:
Cut smaller segments of chain that will connect the top prism to the middle or bottom ones. These should be cut according to the spacing you decided on during the planning phase. -
Open jump rings:
Using the flat nose and round nose pliers, gently twist open several jump rings. Remember to twist the ends away from each other laterally rather than pulling them apart, which weakens the metal.
Troubleshooting: Spinning
If a prism keeps twisting to face the wall, use a second pair of pliers to gently twist the chain link 90 degrees, forcing the flat side of the glass to face the room.
Step 3: Connecting the Prisms
-
Prepare the top anchoring prism:
Attach a jump ring to the top loop of your first geometric prism. Thread the long suspension chain through this ring before closing it securely. -
Add the first extension:
If your prism has a bottom loop, attach a new jump ring there. If the prism is solid, you may need to loop a chain around a groove or use a wire-wrapped bail, though most suncatcher prisms come pre-drilled. -
Link the connecting chain:
Attach one of your short chain segments to the bottom of the first prism using the jump ring you just added. -
Attach the second tier:
Connect the next glass shape—perhaps a flat diamond shape—to the bottom of that short chain segment using another jump ring. -
Repeat for length:
Continue this process for the longer strand. For the final tier, I usually select the heaviest, zestiest prism, like a faceted teardrop, to act as a gravity anchor. -
Secure the bottom drop:
Attach the final teardrop prism to the very end of the chain assembly. Ensure this jump ring is extra thick or secure, as this piece takes the most movement.
Step 4: Final Installation
-
Check connections:
Hold the completed chains up by the top link. Inspect every jump ring to ensure they are fully closed and the gaps are tight so the chain won’t slip out. -
Prepare the window frame:
Locate a spot on your wooden window frame that receives direct sunlight. Mark two spots for your hooks, spacing them close enough that the chains interact visually but don’t tangle. -
Install hooks:
Screw the gold cup hooks into the top inside frame of the window. You may need to drill a tiny pilot hole if the wood is particularly hard. -
Hang the strands:
Loop the top link of your main chains onto the hooks. Step back to ensure the heights are staggered nicely. -
Clean the glass:
Using a microfiber cloth, wipe away any fingerprints from the assembly process. This ensures maximum clarity and rainbow refraction.
Enjoy the dancing light patterns as the sun moves across your newly decorated window
Glass Room Dividers That Keep Light Moving
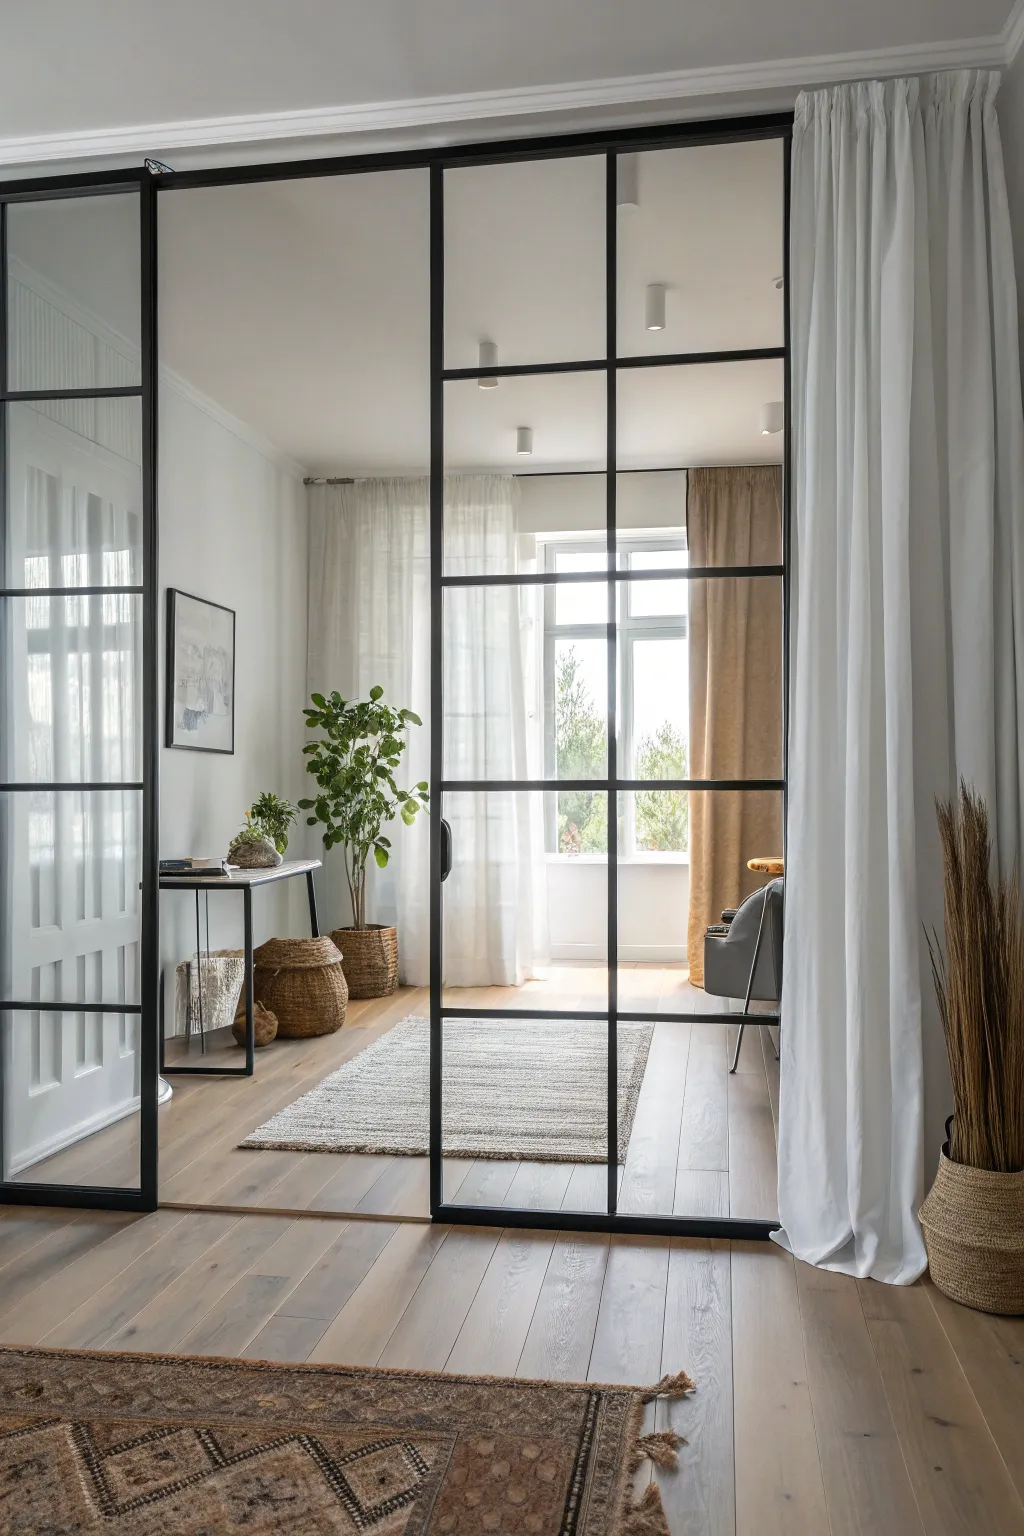
Transform an open floor plan into distinct zones without blocking sunlight using this sleek, industrial-style room divider. By building a custom wooden frame and painting it to mimic black steel, you achieve that coveted loft aesthetic at a fraction of the cost.
How-To Guide
Materials
- 2×2 inch pine lumber (for the main frame)
- 1×2 inch pine trim (for the grid)
- Plexiglass or acrylic sheets (0.25 inch thick)
- Black semigloss interior paint
- Wood filler
- Construction adhesive
- Screws (2.5 inch)
- Sliding door track hardware kit
- Sandpaper (120 and 220 grit)
- Black silicone caulk
- Circular saw or Miter saw
- Drill with driver bits
- Level and measuring tape
Step 1: Framing the Structure
-
Measure the aperture:
Measure the total width and height of the opening where your divider will go. Subtract the height needed for your specific sliding track hardware from the total vertical measurement. -
Cut the perimeter lumber:
Cut your 2×2 lumber to create the outer rectangle of your frame. You will need two vertical stiles and two horizontal rails. -
Assemble the outer frame:
Lay the pieces on a flat floor. Pre-drill holes to prevent splitting, then secure the corners using 2.5-inch screws and a dab of construction adhesive for extra rigidity. -
Plan the grid layout:
Decide on your windowpane pattern. In the reference image, the sliding door uses a 2-wide by 4-high grid. Mark these intervals evenly on your outer frame. -
Cut vertical dividers:
Cut a central 2×2 vertical post to run down the middle of the frame, creating the two main vertical columns. Secure this with pocket holes or angled screws.
Step 2: Creating the Grid
-
Cut horizontal muntins:
Using the lighter 1×2 trim, cut short horizontal pieces to fit snugly between the outer frame and the center post. These create the ‘panes’ of your window. -
Install the muntins:
Secure these horizontal pieces at your marked intervals. I find using a Kreg jig for pocket holes on the back side hides the joinery best, or you can toe-nail them carefully. -
Sand the assembly:
Once the skeleton is built, sand the entire wood structure with 120-grit sandpaper to remove rough edges, followed by 220-grit for a smooth finish. -
Fill gaps and holes:
Apply wood filler to all screw holes and visible joints. Let it dry completely, then sand it flush so the frame looks like a single continuous piece. -
Paint the frame:
Apply two coats of black semigloss paint. The semigloss finish mimics the sheen of powder-coated steel perfectly. Ensure you paint the inside edges where the glass will sit.
Fixing Wobbly frames
Does the door feel flimsy? Add metal L-brackets to the corners on the back side or hidden edge. It reinforces the joinery significantly without ruining the sleek look.
Step 3: Glazing and Installation
-
Measure for glazing:
Measure the exact dimensions of each individual grid opening. Subtract 1/8 inch from your measurements to allow for slight expansion. -
Cut the plexiglass:
Cut your acrylic sheets to size. Scoring them multiple times with a utility knife and snapping them over a straight edge works well, or use a fine-tooth saw blade. -
Install stop molding (Back):
Nail small strips of quarter-round or thin trim recess-mounted on the *back* side of each opening to create a ‘shelf’ for the glass to rest against. -
Insert the panels:
Place the cut acrylic sheets into each opening from the front, resting them against your back-stop molding. -
Secure front molding:
Install a second set of thin trim strips on the *front* side of the glass to sandwich it in place. Paint these black before installing to save time on touch-ups. -
Seal the edges:
Run a very thin bead of black silicone caulk along the edges where the trim meets the ‘glass’ to prevent rattling and create a watertight-looking seal. -
Mount the track:
Install the sliding door track header to your ceiling or wall according to the manufacturer’s instructions, ensuring it is perfectly level. -
Hang the door:
Attach the roller hardware to the top of your finished wood frame and carefully lift the door onto the track. -
Finishing touches:
Attach a matte black handle to the side of the frame and add a floor guide at the bottom to keep the door swinging smoothly.
Frosted Privacy Upgrade
Want light but more privacy? Spray a matte frosting film onto the acrylic panels before installing them. It diffuses the view while still keeping the room bright.
Enjoy the airy, modern separation your new custom room divider brings to your space
Stairwell Glass That Wraps the Vertical Space
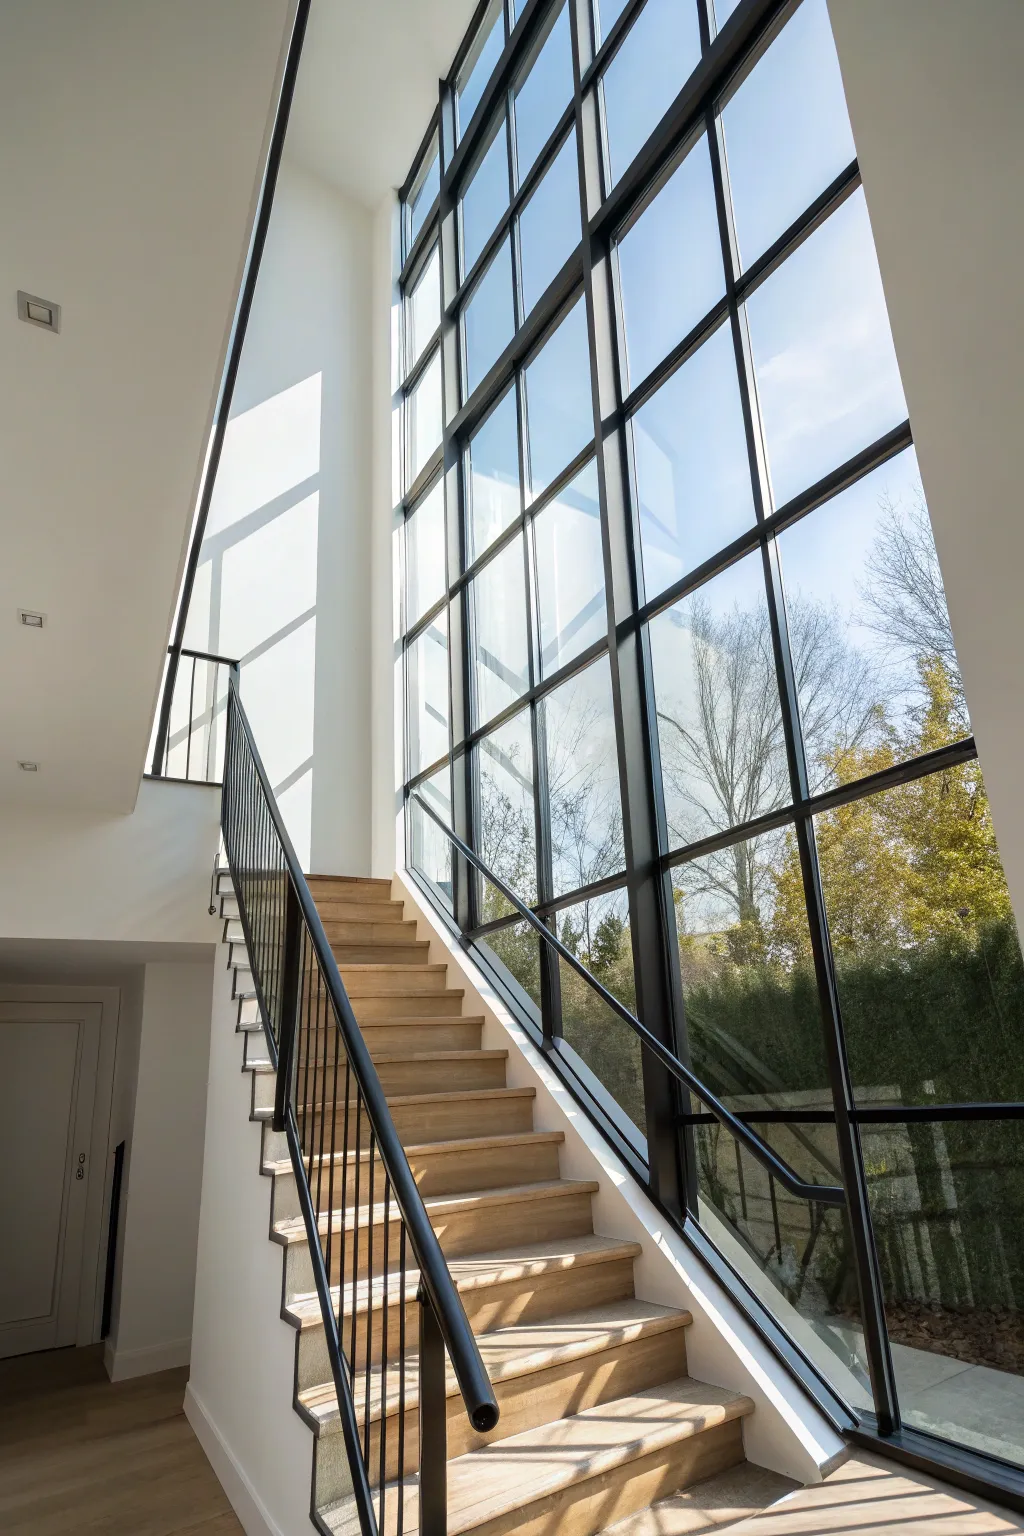
Capture the airy brilliance of a modern glass stairwell with this architectural illustration tutorial. You’ll master perspective drawing and learn how to render light passing through expansive window panes using watercolor and fineliners.
Step-by-Step
Materials
- Hot press watercolor paper (A3 size recommended)
- HB and H mechanical pencils (0.3mm and 0.5mm)
- Architectural scale ruler or long straightedge
- Waterproof technical fineliners (0.05, 0.1, 0.3, 0.5mm in black)
- Watercolor paints (Payne’s Grey, Cobalt Blue, Burnt Umber, Yellow Ochre, Titanium White opacity)
- Round watercolor brushes (Size 2, 6, and a flat wash brush)
- Masking tape
- Kneaded eraser
Step 1: Planning Perspectives
-
Establish the horizon:
Tape your paper to a board. Start by lightly drawing a horizon line roughly in the bottom third of the paper. This view looks upwards, so your vanishing points will be quite dynamic. -
Draft the vertical grid:
Using your scale ruler, draw the dominant vertical lines of the window frame first. These should fan out slightly towards the top to mimic the camera’s perspective distortion (3-point perspective). -
Add horizontal mullions:
Sketch the horizontal bars of the window grid. Notice how the spacing appears to compress as you look higher up the wall due to foreshortening. -
Outline the stairs:
Draw the zig-zag profile of the staircase on the left. Use the H pencil here for precise, faint lines. Ensure the treads flatten out visually as they ascend. -
Detail the railing:
Sketch the sleek black railing. Maintain a consistent gap between the vertical balusters, following the rhythm of the stairs.
Step 2: Inking the Structure
-
Line the window frame:
Switch to a 0.5mm fineliner for the main vertical window frames. Use a ruler to keep these lines perfectly straight and authoritative. -
Refine the mullions:
Use a 0.3mm pen for the horizontal window bars. I like to stop the line just short of the intersection sometimes to let the drawing ‘breathe’ a little. -
Ink the staircase:
Use the 0.3mm pen for the wooden treads. Break the lines slightly to suggest the texture of wood rather than solid plastic. -
Detail the balustrade:
Carefully ink the vertical railing bars with a 0.1mm pen. These need to be delicate to not overpower the scene. Fill in the handrail solid black with the 0.5mm pen. -
Clean up:
Once the ink is completely dry (give it a good ten minutes), gently erase all pencil guidelines with the kneaded eraser.
Wobbly Lines?
If your long ruler lines smear or wobble, try turning the ruler upside down so the beveled edge faces the paper. This prevents ink from bleeding under the ruler’s edge.
Step 3: Watercolor Washes
-
Sky gradient:
Mix a very watery Cobalt Blue. While the paper is dry, paint the sky visible through the windows, starting stronger at the top right and fading to almost clear water near the bottom left. -
Suggesting foliage:
While the sky wash is still damp in the lower right corner, drop in touches of Yellow Ochre and mixed Green (Cobalt + Ochre) to suggest the trees outside without detailing every leaf. -
Shadows on walls:
Mix a diluted Payne’s Grey. Paint the interior walls, leaving the areas struck by direct sunlight perfectly white (the paper itself). Soften the edges of these shadows with a damp brush. -
Wood tones:
Mix Burnt Umber with plenty of water. Paint the stair treads, layering a slightly darker mix near the back of each step (the riser) to create depth. -
Window frame depth:
Now use a concentrated Payne’s Grey to paint the thickness of the black window frames. This gives the grid 3D volume rather than looking like a flat sticker. -
Sunlight beams:
If you want to emphasize the light rays hitting the floor or wall, you can gently lift pigment with a clean, wet brush or use a very faint wash of white gouache mixed with water.
Pro Tip: Atmospheric Depth
Make the trees and sky outside the window slightly paler and less detailed than the interior staircase. This ‘atmospheric perspective’ emphasizes that the glass is separating inside from outside.
Now step back and admire how you’ve captured the feeling of space and light in your illustration


Have a question or want to share your own experience? I'd love to hear from you in the comments below!