If you love art that feels a little magical, glow in the dark painting is one of the easiest ways to get that big “wow” payoff without needing fancy skills. I’m sharing my favorite easy glow in the dark painting ideas that look great in normal light and absolutely transform when the lights go off.
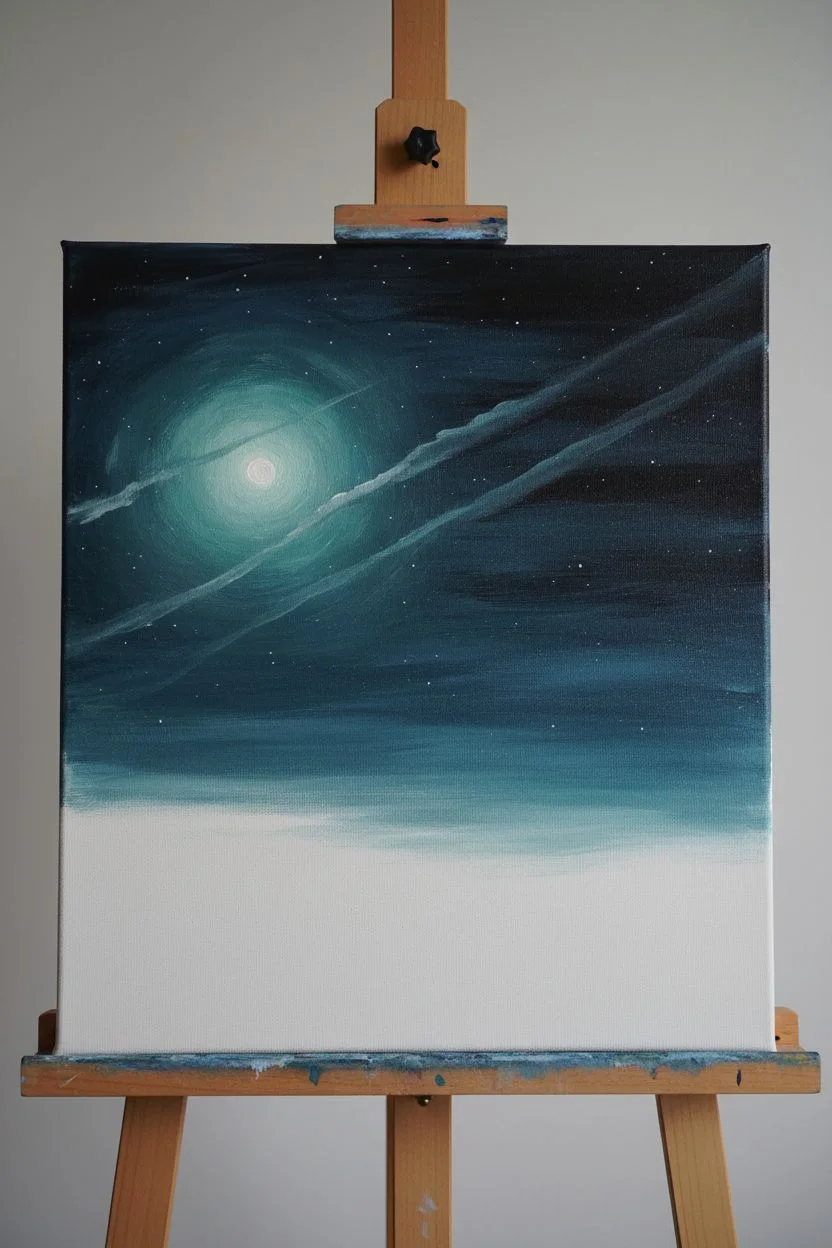
My Easy Glow-in-the-Dark Galaxy on a Black Canvas
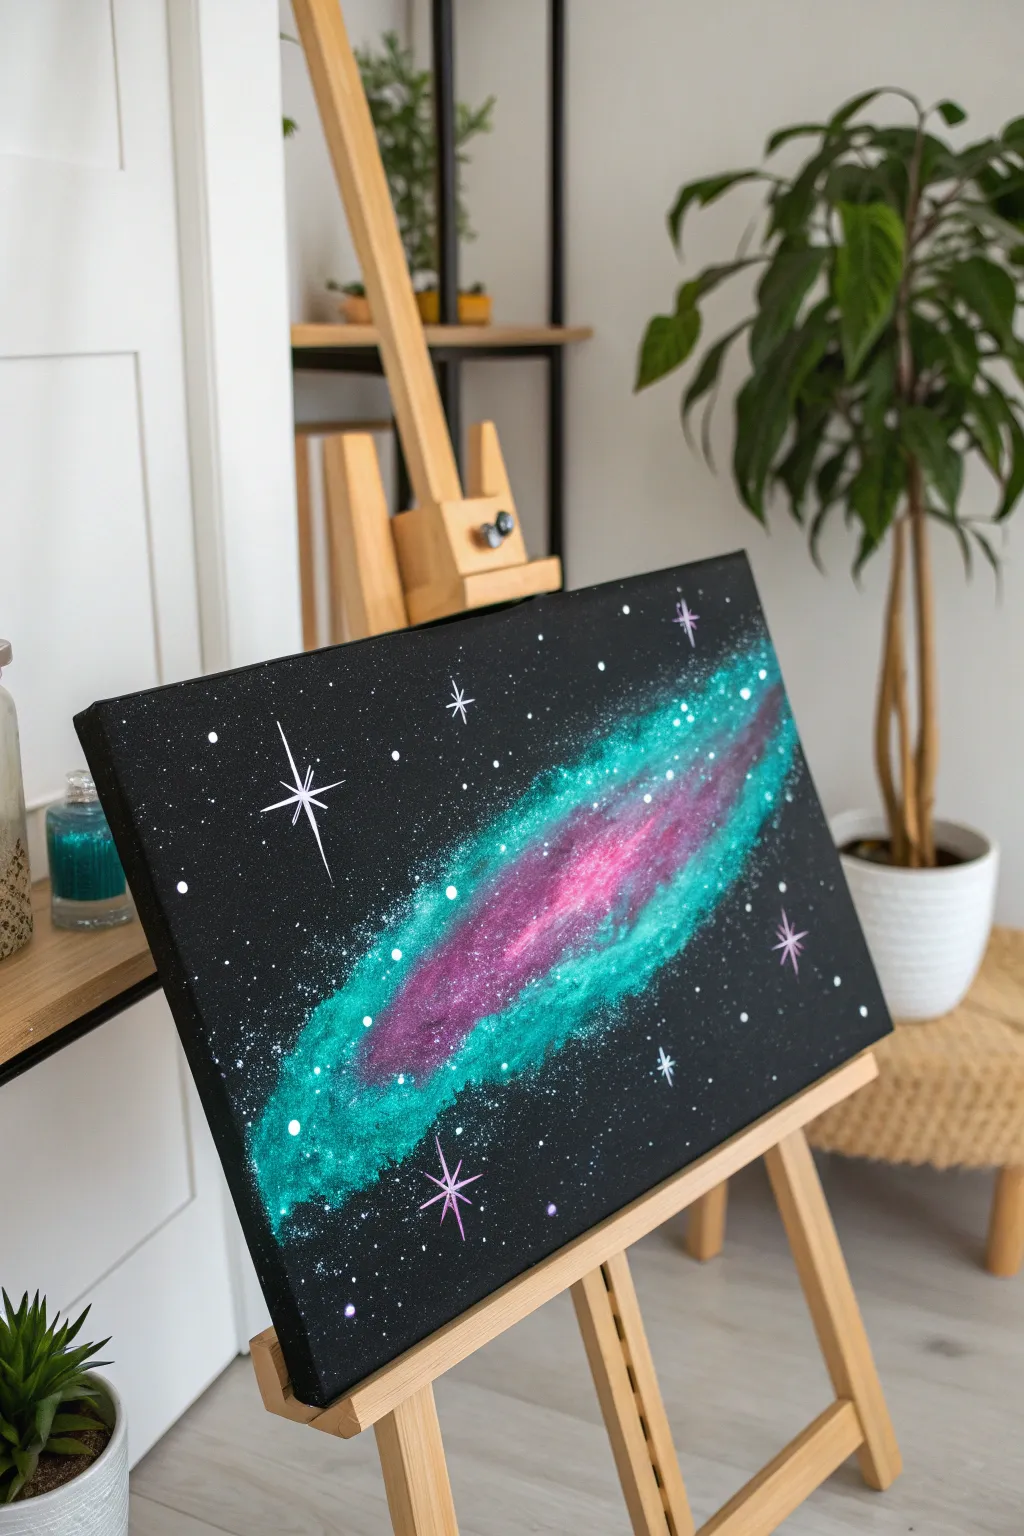
This striking galaxy painting uses a deep black background to make neon and glow-in-the-dark colors truly pop. The swirling nebula effect looks complicated, but it’s achieved with simple sponging techniques that beginners will love.
How-To Guide
Materials
- Black stretched canvas (11×14 or similar)
- Acrylic paints: Metallic teal, neon purple, neon pink, titanium white
- Glow-in-the-dark acrylic medium or paint (neutral/clear drying)
- Kitchen sponge or natural sea sponge
- Small round detail brush (size 1 or 2)
- Medium flat brush
- Old toothbrush
- Palette or paper plate
- Water cup
- Paper towels
Step 1: Setting the Stage
-
Prepare the canvas:
If your canvas isn’t pre-primed black, paint the entire surface with black acrylic paint. Use a flat brush and ensure full coverage, painting the edges too for a finished look. -
Let it dry completely:
Wait until the black base is bone dry to the touch. This usually takes about 20-30 minutes, but you can speed it up with a hairdryer. -
Prepare your sponge:
Take a kitchen sponge and tear off a small chunk, roughly the size of a golf ball. The rough, torn edge creates a much more natural texture than a cut edge.
Glow Like a Pro
Glow paint is often transparent. To make it shine brighter, paint a layer of white underneath the glow areas first, or mix it directly with light-colored paint.
Step 2: Creating the Galaxy
-
Load the teal:
Squeeze some metallic teal paint onto your palette. Dip your sponge piece into the paint, then dab the excess off onto a paper towel until the texture looks dry and misty. -
Sponge the outer shape:
Gently dab the sponge diagonally across the canvas. Create an elongated oval shape that tapers at the ends. Keep the pressure light to maintain a cloudy, airy feel. -
Add density:
Go back over the center line of your teal shape, dabbing a bit more paint to make the middle section brighter and more opaque than the wispy edges. -
Introduce the pink:
Using a clean piece of sponge (or the other side of the first one), pick up your neon pink mixed with a tiny bit of purple. Blot off the excess. -
Blend the core:
Dab this pinkish-purple mix right down the center of the teal nebula. Overlap the colors slightly so they blend visually, but don’t overwork it or it might turn muddy. -
Highlight the center:
Mix a tiny drop of white into your neon pink to brighten it. Sponge this lighter color into the very heart of the galaxy stripe to simulate intense light.
Step 3: Adding the Glow & Stars
-
Apply the glow medium:
Once the colorful paint is dry, sponge a layer of clear glow-in-the-dark paint directly over the teal and pink areas. I like to let this dry and add a second coat for maximum brightness. -
Mix paint for stars:
Dilute a small amount of titanium white paint with water until it has the consistency of ink or heavy cream. -
Create the starfield:
Dip an old toothbrush into the thinned white paint. Hold it over the canvas and run your thumb across the bristles to flick tiny speckles across the black background. -
Add major stars:
Switch to your small detail brush. Paint 5-7 distinct brilliant stars using pure white paint. Place them randomly in the black space around the galaxy. -
Draw the star flares:
For the largest stars, paint a cross shape—a long vertical line intersected by a shorter horizontal line. Use a very light touch to keep the lines thin. -
Add diagonal flares:
paint a much smaller ‘X’ shape in the center of the previous cross to give the star an 8-point glint. Keep these diagonal lines very short. -
Final glow touches:
Use the detail brush to carefully dab a dot of glow paint onto the center of your largest painted stars so they shine when the lights go out.
Oops, Splatter Mess?
If you flick a star splatter that is too big or in the wrong spot, quickly wipe it away with a damp Q-tip while the paint is still wet to erase it without ruining the black base.
Charge up your canvas under a bright light and watch your personal galaxy come to life in the dark


Easy Firefly Meadow With Glowing Dots
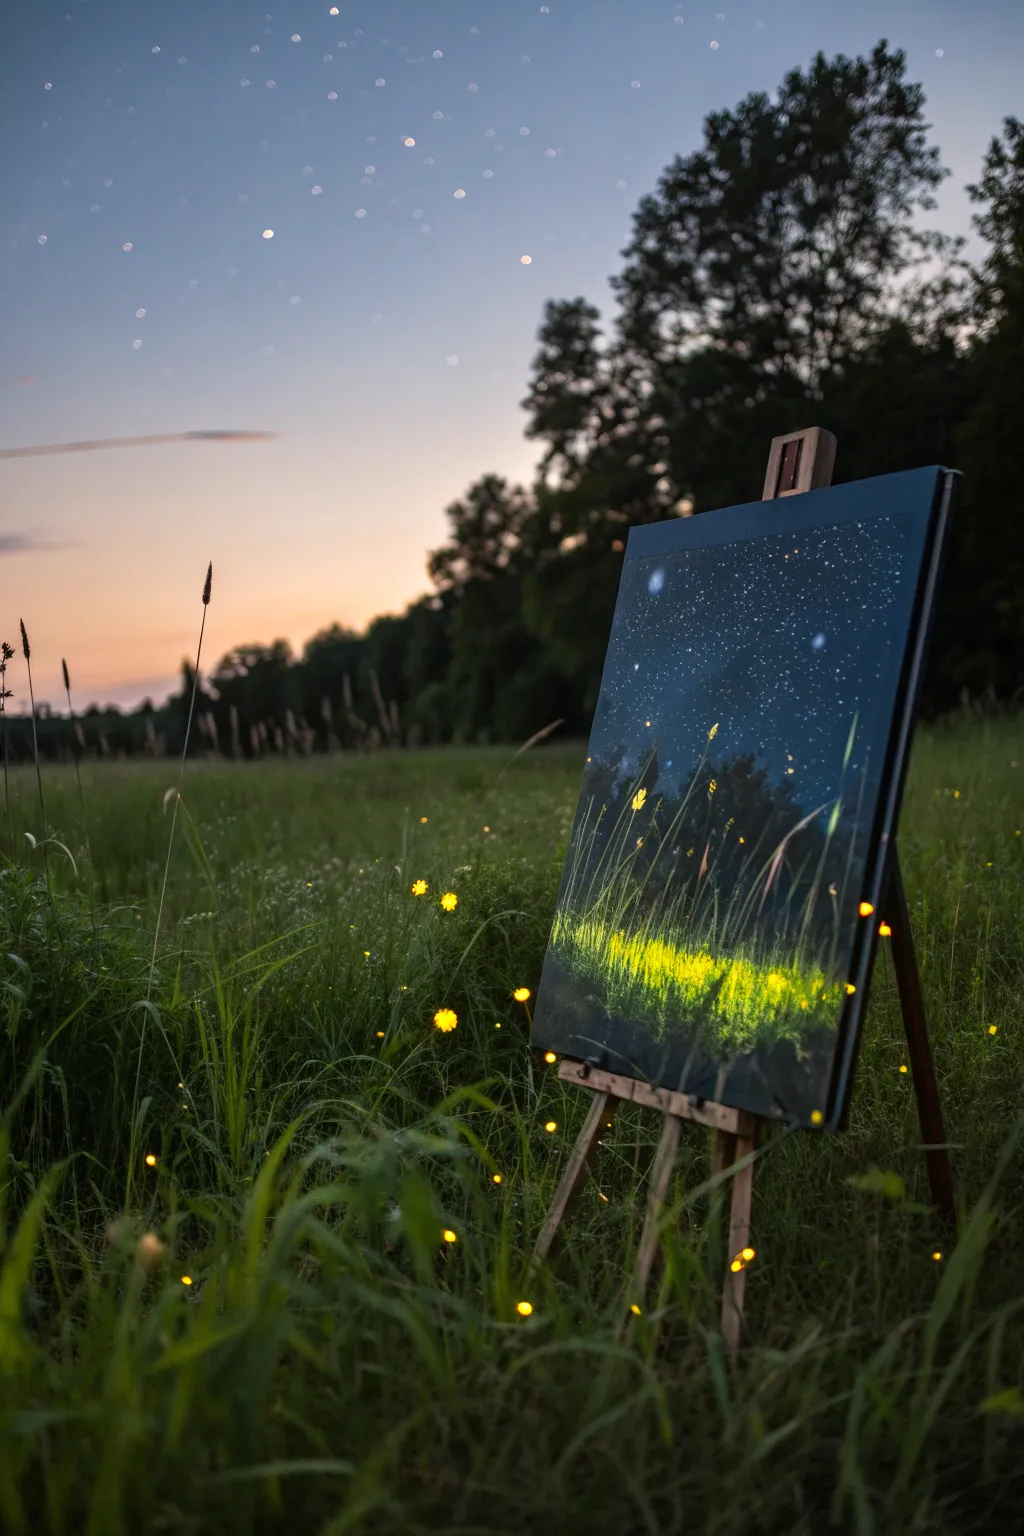
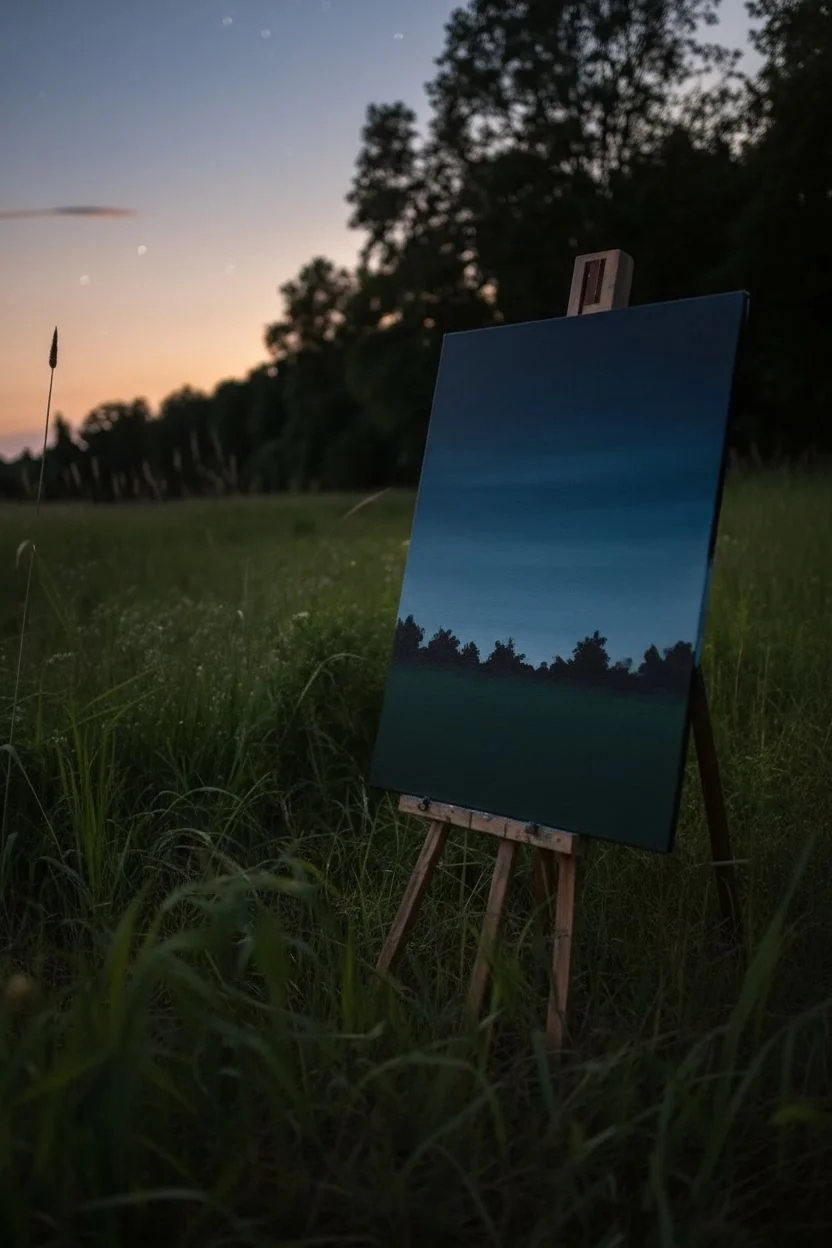
Capture the magic of a summer evening with this enchanting canvas that comes alive when the lights go out. Using simple layering techniques and glow-in-the-dark acrylics, you’ll create a dreamy field where fireflies dance among the tall grasses.
How-To Guide
Materials
- Stretched canvas (16×20 inches recommended)
- Acrylic paints: Phthalo Blue, Mars Black, Titanium White, Sap Green, Deep Yellow
- Glow-in-the-dark acrylic paint (Yellow or Green tint)
- Flat wash brush (1 inch)
- Medium round brush (size 6)
- Small liner or detail brush (size 0 or 1)
- Fan brush (optional)
- Palette and water cup
- Old toothbrush (for spatter effect)
Step 1: Setting the Scene
-
Prepare the Gradient Sky:
Begin by squeezing Phthalo Blue and a small dot of Mars Black onto your palette. At the very top of your canvas, use your large flat brush to paint a deep, dark blue strip. -
Blend Downward:
Gradually mix in tiny amounts of Titanium White as you work your way down the canvas. Keep your horizontal strokes long and smooth to create a seamless transition from the deep midnight sky at the top to a lighter, hazy twilight blue near the horizon line. -
Establish the Horizon:
Roughly 1/3 of the way up from the bottom, stop blending the sky. Let this layer dry completely; acrylics usually need about 15-20 minutes, or you can speed it up with a hair dryer. -
Paint the Treeline:
Mix Mars Black with a touch of Phthalo Blue to create a cool shadow color. Using your medium round brush, tap in a silhouette of trees and bushes along the horizon. Don’t worry about detail—just create organic, bumpy shapes to suggest distant foliage.
Glow Troubles?
If the glow paint isn’t bright enough, ensure you have a light-colored base coat (white or pale yellow) underneath it. Glow mediums are transparent and disappear on dark backgrounds.
Step 2: Creating the Meadow
-
Block in the Dark Grass:
For the bottom third of the canvas, paint a solid base of Mars Black mixed with a little Sap Green. This dark underlayer is crucial because it makes the glow effects pop later. -
Add Tall Grass Blades:
Switch to your liner brush or the edge of a fan brush. Mix Sap Green with a drop of water to improve flow. Flick the brush upward from the bottom of the canvas to create thin, swaying blades of grass reaching up toward the sky. -
Suggest Depth:
Add a few lighter grass blades by mixing a tiny bit of Deep Yellow into your green. Place these sparingly in the foreground to create a sense of dimension.
Step 3: Adding the Glow
-
Paint a Starry Sky:
Water down a small amount of Titanium White paint until it’s inky. Load an old toothbrush, aim it at the sky portion of your canvas, and gently run your thumb over the bristles to flick tiny white specks across the blue gradient. -
Add Larger Stars:
use the tip of your smallest brush to manually dot in a few slightly larger, brighter stars to break up the pattern. -
Create Firefly Base Layers:
Using your Deep Yellow paint, dot small circles throughout the dark grass area. Vary the sizes—some tiny dots in the distance, and slightly larger fuzzy circles in the foreground. -
Soften the Glow:
While the yellow is still slightly wet, I like to gently dry-brush the edges of the larger dots to make them look fuzzy and glowing, rather than perfect hard circles. -
Apply the First Glow Layer:
Once the yellow dots are fully dry, apply a generous dollop of glow-in-the-dark medium directly over each yellow firefly. Let it dry clear. -
Intensify the Effect:
For the brightest shine, apply a second or third coat of the glow medium over the fireflies. You can also add tiny dots of glow paint to the brilliant stars in the sky. -
Final Touches:
Step back and assess your composition. If the grass looks too flat, flick a few more dark grass blades *over* some of the fireflies to make them look like they are floating deep inside the meadow.
Starry Depth
Make the sky 3D by adding a ‘halo’ to the moon or largest stars. thinly glaze a translucent ring of white around the object, then top with a thick dot of glow paint.
Charge your painting under a bright lamp for a minute, then switch off the lights to see your meadow wake up


Hummingbird Outline With Glow Trail Wing Lines
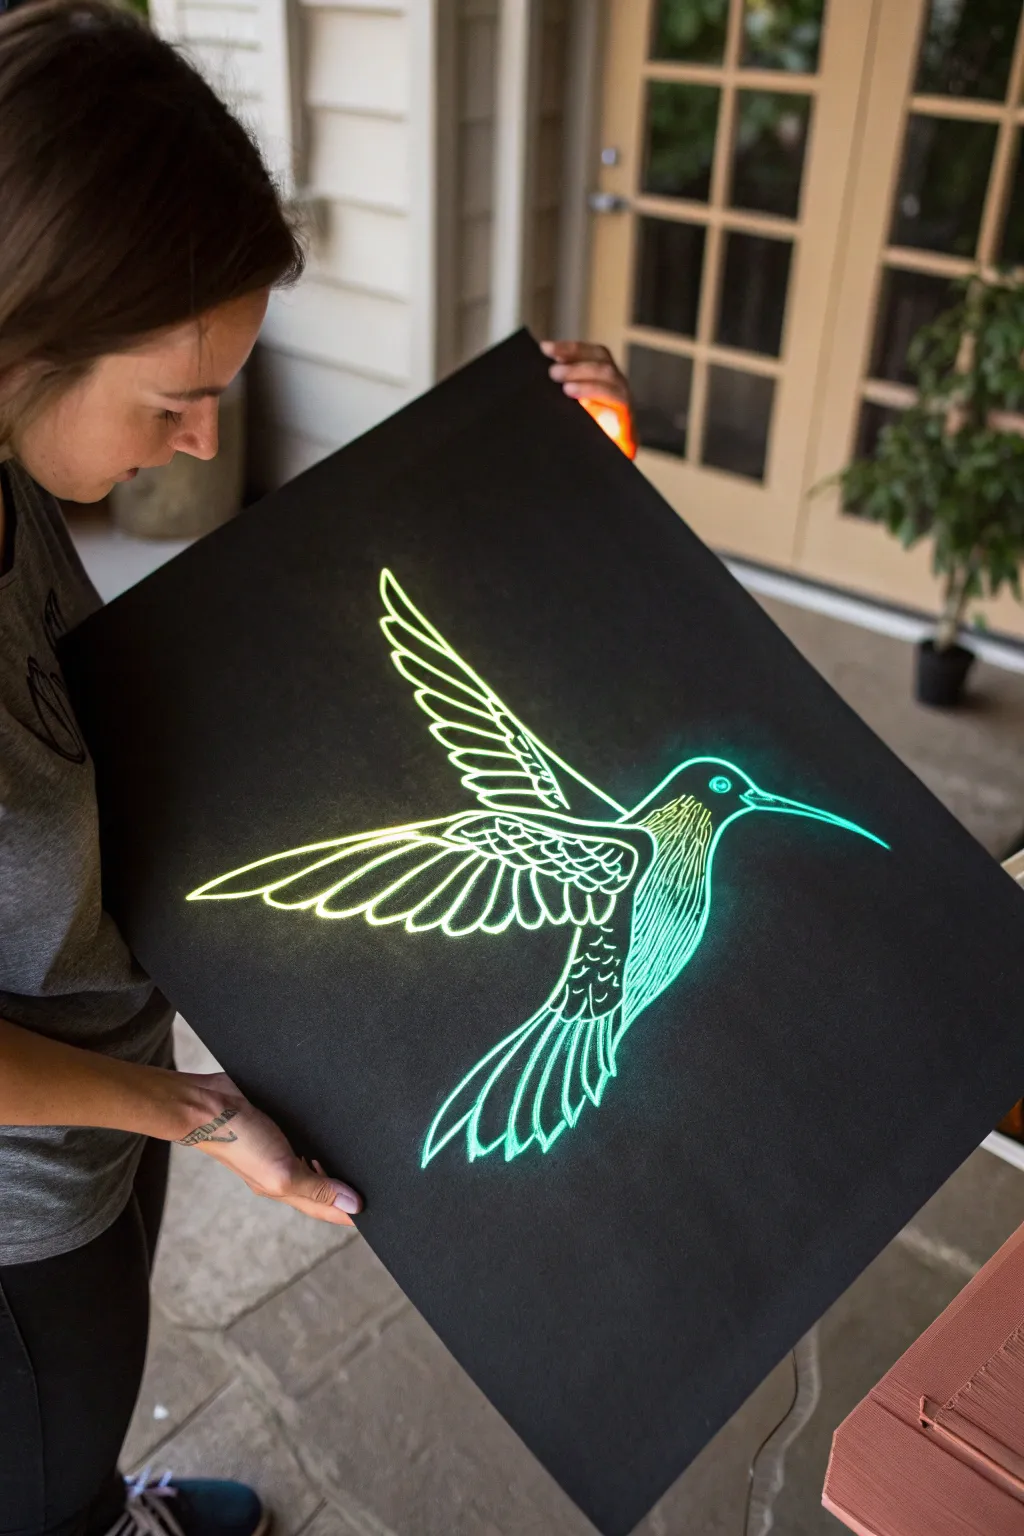
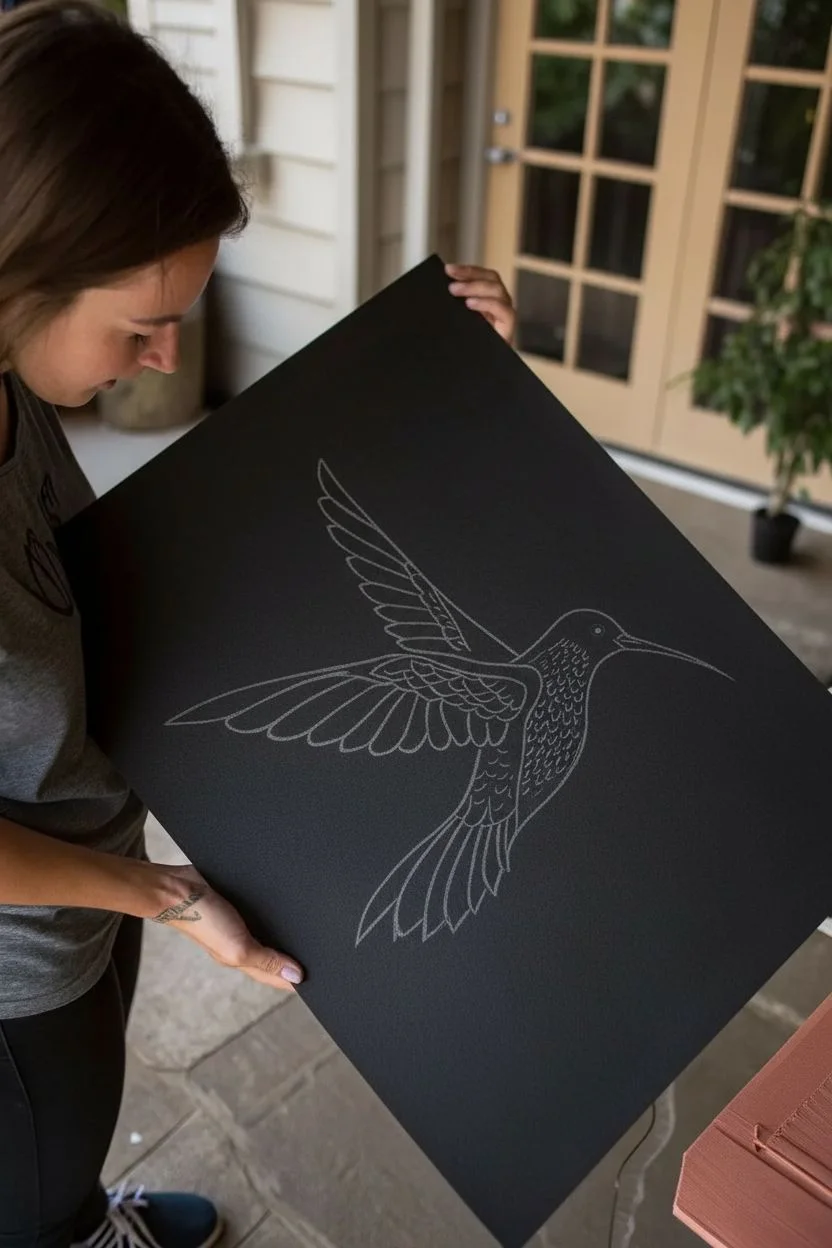
Capture the ethereal beauty of a hummingbird in mid-flight using luminescent paints on a stark black background. This project transforms simple linework into a glowing masterpiece that shifts from electric yellow to cool cyan, perfect for lighting up dark spaces.
Step-by-Step Tutorial
Materials
- Large black foam core board or black canvas (approx. 24×36 inches)
- White colored pencil or chalk (for sketching)
- Glow-in-the-dark acrylic paints (Neon Yellow, Neon Green, Cyan/Blue)
- White acrylic primer or fabric paint (optional base layer)
- Fine liner paintbrush (size 0 or 1)
- Round paintbrush (size 2)
- Palette for mixing gradients
- Pencil and eraser
- Reference image of a hummingbird
Step 1: Drafting the Design
-
Prepare your surface:
Lay your black foam core board or canvas on a flat, well-lit surface. Ensure it is free of dust or lint, as specks will show up under the paint. -
Sketch the basic shapes:
Using a white colored pencil or chalk, lightly map out the hummingbird’s body shape. Start with an oval for the torso, a small circle for the head, and long triangles for the wings. -
Refine the outline:
Connect your shapes to create the smooth contour of the bird. Extend the beak into a long, slender point and fan out the tail feathers. -
Detail the feathers:
Sketch the internal details of the wings. Instead of drawing every individual feather, focus on the major flight feathers and the layered shape of the wing structure. -
Add texture lines:
Draw light, curved hatching lines on the bird’s belly and throat area to simulate the texture of small feathers without filling the space completely.
Step 2: Painting the Glow
-
Lay the foundation:
For maximum brightness, I like to paint the entire design with a thin layer of white acrylic primer first. This makes the neon colors pop against the black background. -
Prepare the palette:
Squeeze out your neon yellow, green, and cyan paints. Create a transition shade by mixing a little green into the yellow, and a little blue into the green. -
Start with the wingtips:
Load a fine liner brush with neon yellow. Paint the upper edges of the wings, keeping the lines crisp and confident. -
Transition the color:
As you move down the wing towards the bird’s body, dip into your yellow-green mix. Blend this slightly with the wet yellow on the board for a smooth gradient. -
Paint the body details:
Switch to the purer green shade. Carefully trace the hatched lines on the chest and the scalloped feathers on the back. -
Illuminate the head:
Use a teal or blue-green mix for the head and eye. Leave a tiny black dot in the center of the eye to give it life and focus. -
Define the beak:
Using your cyan paint, draw the beak in a single, steady stroke. It should taper to a fine point at the end. -
Finish the tail:
Complete the gradient by painting the tail feathers in the coolest blue tone. Use sweeping strokes that lift at the end to mimicking the flare of the tail. -
Second coat application:
Let the first layer dry completely (usually 15-20 minutes). Carefully go over your lines a second time to build up the opacity and glow potency. -
Clean up edges:
If any paint strayed outside your lines, use a small brush with black acrylic paint to cover the mistake and sharpen the edges. -
Charge the glow:
Once fully dry, place your artwork under a bright light or UV lamp for a few minutes to test the luminescence.
Boost the Brightness
Apply a thin layer of clear glow medium over your colored lines as a final topcoat. It dries transparent but adds extra phosphorescence for a longer-lasting charge.
Level Up: Cosmic Background
Before painting the bird, splatter tiny specks of white or diluted silver paint across the black board to create a starry galaxy effect behind your subject.
Hang your artwork in a dim hallway to enjoy a ghostly, beautiful flight every time the lights go down


Ocean Waves With Glow-in-the-Dark Sea Foam Highlights
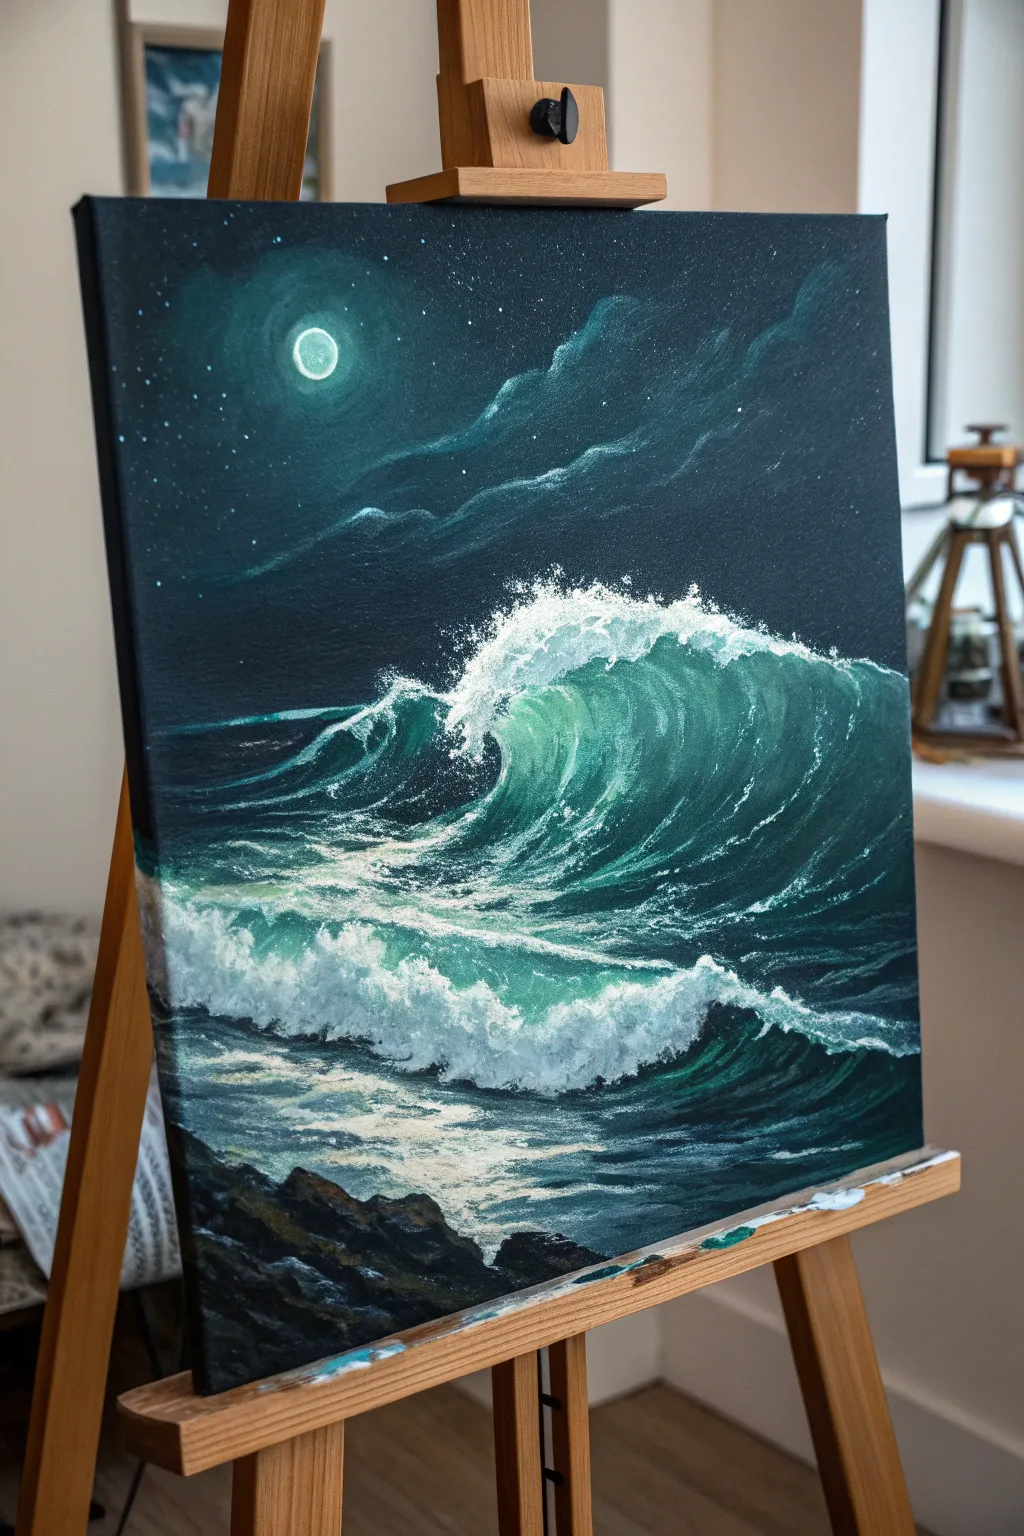
Capture the magic of a crashing ocean wave under moonlight with this dramatic acrylic painting that hides a luminous secret. By layering phosphorescent details over sea foam, your seascape transforms into a glowing masterpiece when the lights go down.
How-To Guide
Materials
- Canvas (16×20 inches recommended)
- Heavy body acrylic paints (Phthalo Blue, Phthalo Green, Prussian Blue, Titanium White, Mars Black)
- Glow-in-the-dark acrylic medium or paint (neutral/white tone)
- Large flat brush (1 inch)
- Medium filbert brush
- Small round detail brush
- Fan brush (optional)
- Palette knife
- Water cup and paper towels
- Easel
Step 1: Setting the Night Sky
-
Prime the background:
Begin by covering the entire top two-thirds of the canvas with a dark, moody blend. Mix Prussian Blue with a touch of Mars Black to create a deep midnight blue. Apply this using horizontal strokes with your large flat brush. -
Create the atmospheric glow:
While the background is still slightly wet, mix a small amount of Phthalo Green and Titanium White into your dark blue. Blend this lighter teal gently in the upper left quadrant where the moon will sit, softening the edges into the darkness to create a hazy halo effect. -
Paint the moon:
Using a small round brush and pure Titanium White, paint a small circle in the center of your glow halo. Keep it bright and distinct against the dark sky. -
Add wispy clouds:
Mix a diluted teal-grey using Phthalo Green, White, and a tiny dot of Black. Use a dry filbert brush to scumble in faint, diagonal cloud streaks stretching from the moon toward the right side. Keep these thin and transparent for an ethereal look. -
Sprinkle the stars:
Dilute a bit of Titanium White with water until it’s inky. Load an old brush or toothbrush and flick the bristles to spray tiny stars across the upper sky. Focus more stars away from the bright moon.
Wave Shape Correction
If your wave looks flat, darken the area immediately under the white foam crest with deep blue. This high contrast makes the white pop forward.
Step 2: Building the Great Wave
-
Block in the water shape:
Switch to Phthalo Green and Phthalo Blue. Paint the basic shape of the large wave cresting in the center. Use darker blue at the base of the wave and transition to pure Phthalo Green near the top where the light hits. -
Painting the translucent eye:
The curve of the wave needs to look like light is shining through it. Mix Phthalo Green with a little Titanium White and glazing medium if you have it. Paint the inner curve of the wave, blending it smoothly into the darker water below. -
Defining the crash:
Load your filbert brush with heavy Titanium White. Dab it vigorously along the top ridge of the wave to create the main crash. Don’t smooth this out; the texture is crucial for realistic foam. -
Adding sea spray:
Take a dry fan brush or an old bristle brush with a tiny amount of white paint. Tap and drag lightly upwards from the crashing lip to create the mist and spray flying off the wave. -
Veining the water:
Using a fine liner brush and thinned white paint, create the webbing of foam that stretches across the face of the wave. These lines should follow the curve of the water, wrapping around the wave’s form.
Step 3: Foreground and Final Details
-
Create the rolling surf:
Below the main wave, paint turbulent, churning water using a mix of teal and white. Use horizontal, choppy strokes to show the movement of the foamy water rushing toward the viewer. -
Anchor with rocks:
In the bottom left corner, paint jagged rock formations using Mars Black mixed with a little Prussian Blue. Use a palette knife or flat brush to give them sharp, hard edges. -
Highlight the rocks:
Add dimension to the rocks by lightly brushing grey-blue highlights on the top edges where moonlight would hit them. -
Apply the magic glow:
Once the painting is completely dry, shake your glow-in-the-dark medium well. Using a clean detail brush, paint directly over the whitest parts of your sea foam, the moon, and the star specks. -
Layering for brightness:
Glow paint is often transparent. For a stronger effect, let the first coat dry and apply a second or third layer specifically on the brightest crest of the wave and the moon’s center.
Glow Intensity Tip
Charge your painting with a UV flashlight or strong LED lamp before viewing in the dark. Sun exposure works best for the brightest, longest-lasting glow.
Now turn off the lights and watch your ocean come alive with a mesmerizing bioluminescent shimmer.
BRUSH GUIDE
The Right Brush for Every Stroke
From clean lines to bold texture — master brush choice, stroke control, and essential techniques.
Explore the Full Guide
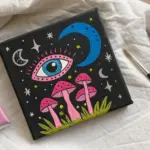
Hidden Constellations Painted in Clear Glow Over the Sky
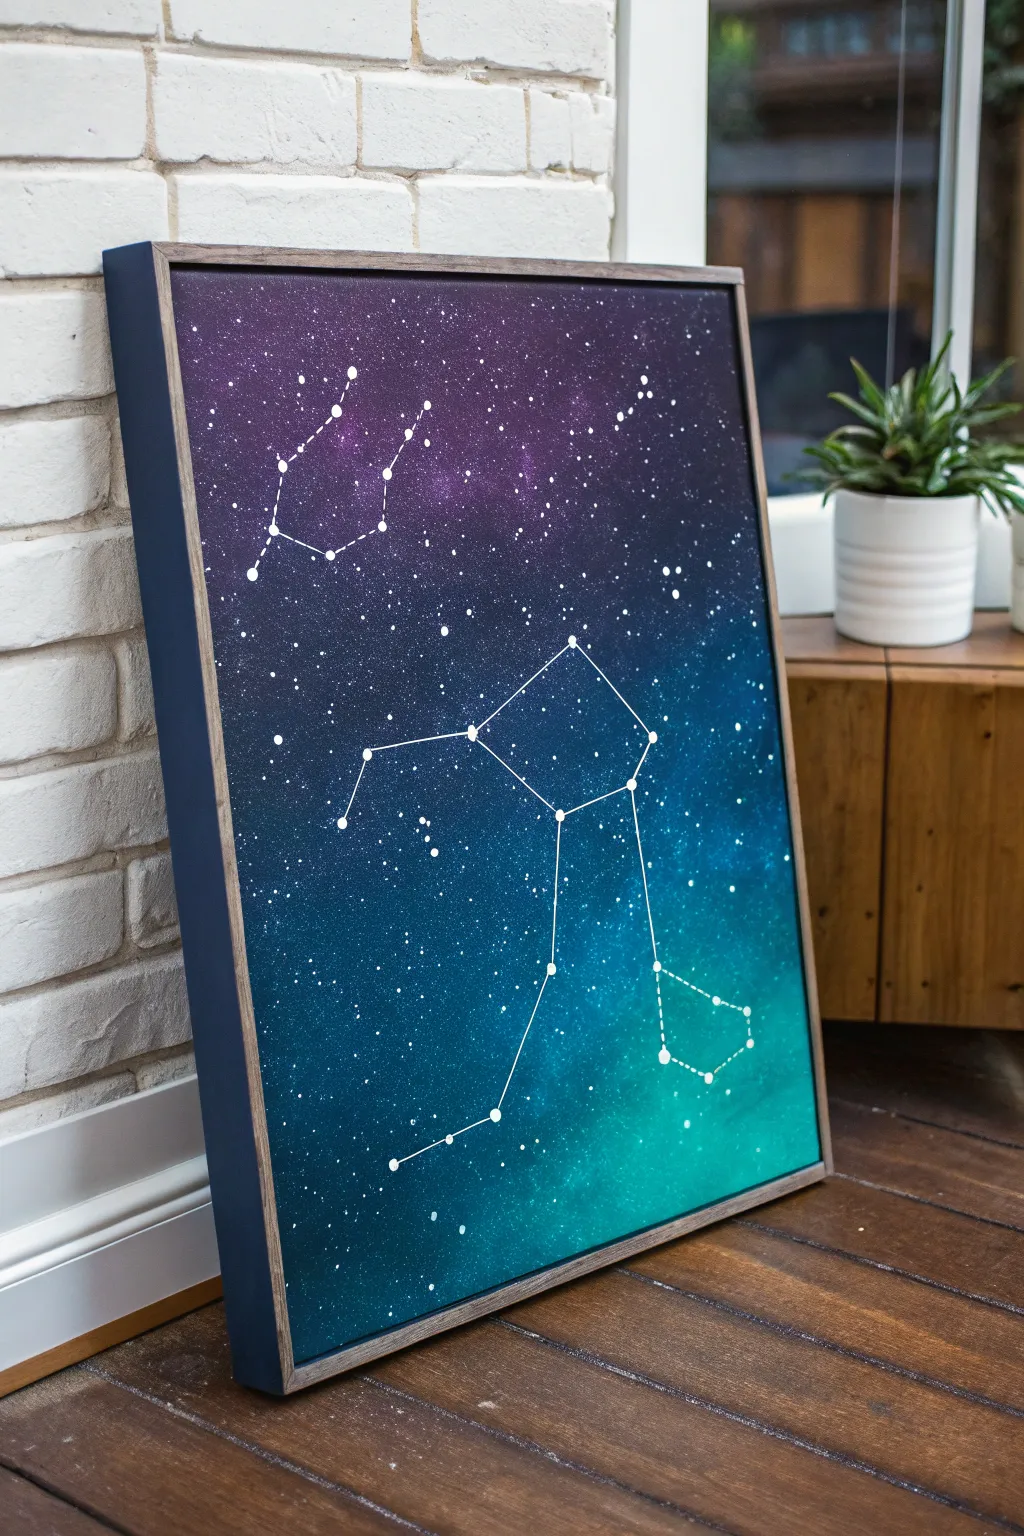
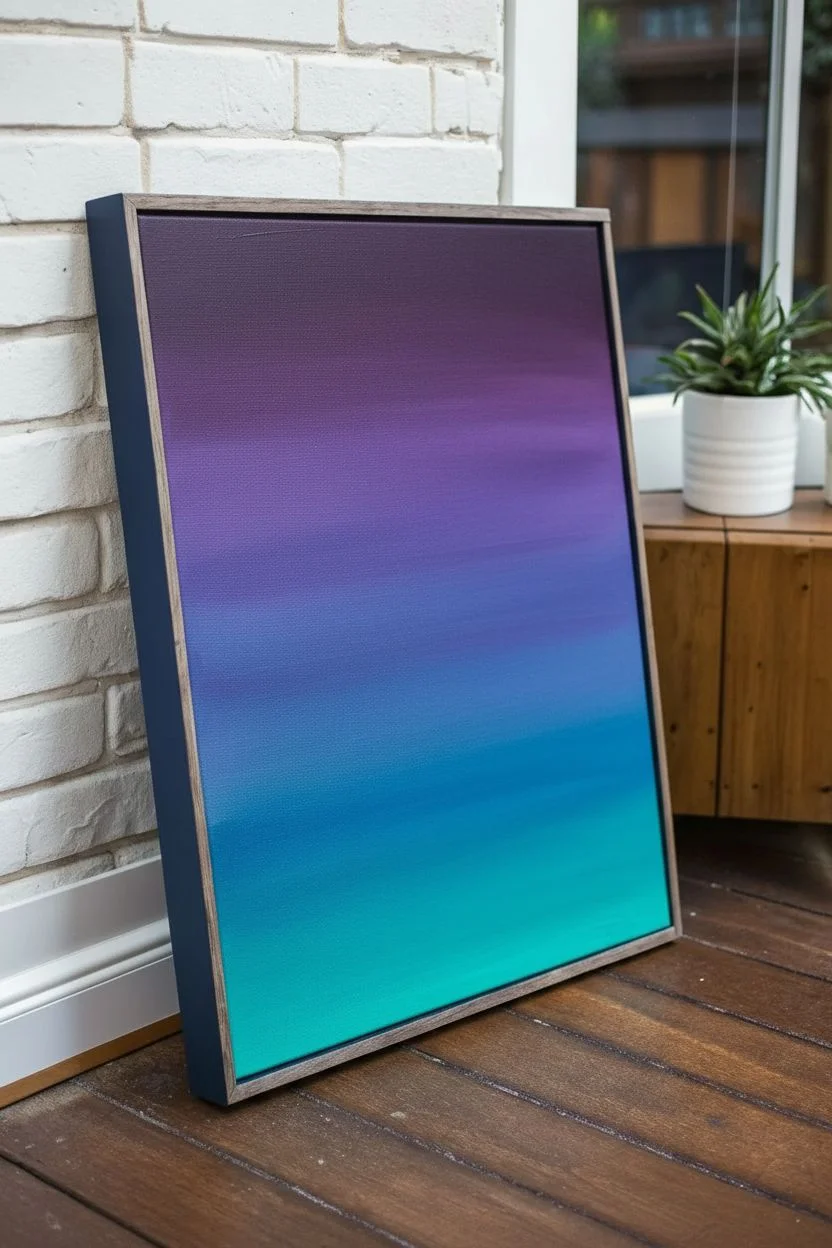
Bring the wonder of the night sky indoors with this stunning gradient galaxy painting. Featuring crisp constellation lines over a dreamy purple-to-teal ombre background, this piece is perfect for adding a touch of cosmic magic to any room.
Step-by-Step Guide
Materials
- Stretched canvas or canvas board (16×20 or similar size)
- Acrylic paints (Dark Purple, Violet, Phthalo Blue, Teal/Turquoise, White)
- Wide flat brush (2-inch)
- Medium round brush
- Fine detail liner brush (0 or 00 size)
- Clear glow-in-the-dark acrylic paint or medium
- Old toothbrush
- Ruler
- White paint pen (fine point)
- Palette or paper plate
- Cup of water and paper towels
- Floating wood frame (optional, for finishing)
Step 1: Creating the Galaxy Gradient
-
Prepare your palette:
Squeeze out generous amounts of your main background colors: Dark Purple, Violet, Phthalo Blue, and Teal. Keep White separate for later mixing. -
Start at the top:
Using your wide flat brush, apply the Dark Purple paint in horizontal strokes across the top quarter of the canvas. Ensure thick, even coverage. -
Blend the transition:
While the paint is still wet, pick up the Violet shade. Paint the next section down, overlapping slightly with the Dark Purple. Clean your brush slightly, then brush back and forth over the seam to create a smooth ombre blend. -
Move to blue:
Continue painting downwards with Phthalo Blue. I find that adding a tiny touch of white to this layer helps the blue pop against the darker purple above it. -
Finish with teal:
Paint the bottom section with your bright Teal color. Blend it upwards into the blue section just like before. Let the entire background dry completely before moving on.
Step 2: Adding the Stars
-
Prepare splattering paint:
Mix a small amount of white acrylic paint with water until it reaches an inky, fluid consistency. It should drip easily from a brush. -
Splatter large stars:
Dip a medium round brush into the thinned paint. Hold it over the canvas and tap the handle against a second brush or your finger to shake droplets onto the canvas. -
Create distant shimmer:
Dip an old toothbrush into the white paint mixture. Run your thumb across the bristles to create a fine mist of tiny stars. Focus this mist in the center transition area to simulate the Milky Way. -
Add focal stars:
Using your fine detail brush, manually paint a few larger, distinct dots randomly scatter across the sky to represent brighter planets or stars. -
Dry thoroughly:
Allow the star layer to dry completely. This is crucial so you don’t smudge the stars while drawing the constellations.
Uneven Gradients?
If your color blending looks choppy, wait for it to dry, then apply a second coat. Use a slightly damp clean brush to feather the edges where colors meet.
Step 3: Mapping the Constellations
-
Plan your layout:
Decide which constellations you want to feature. The example uses Hercules and Corona Borealis, but you can choose your zodiac sign or favorites. Lightly mark the key star points with a pencil or chalk. -
Paint constellation nodes:
Using the white paint pen or fine brush, paint solid white dots over your marked points. make these slightly larger than your background stars. -
Connect the dots:
Use a ruler and the white paint pen to draw straight, clean lines connecting the star nodes. Don’t worry if the lines intersect existing background stars. -
Add the glow:
For the hidden magic, shake your clear glow-in-the-dark medium well. Using a clean detail brush, carefully trace over the white constellation lines and nodes. -
Layer the glow:
Glow paint is often translucent. I like to let the first coat dry and apply a second or third coat to ensure a bright luminosity when the lights go out.
Level Up: 3D Stars
Add self-adhesive rhinestones or tiny nail art crystals to the main constellation points for a sparkle that catches the light during the day.
Once dry, frame your cosmic masterpiece and turn off the lights to see your secret sky reveal itself
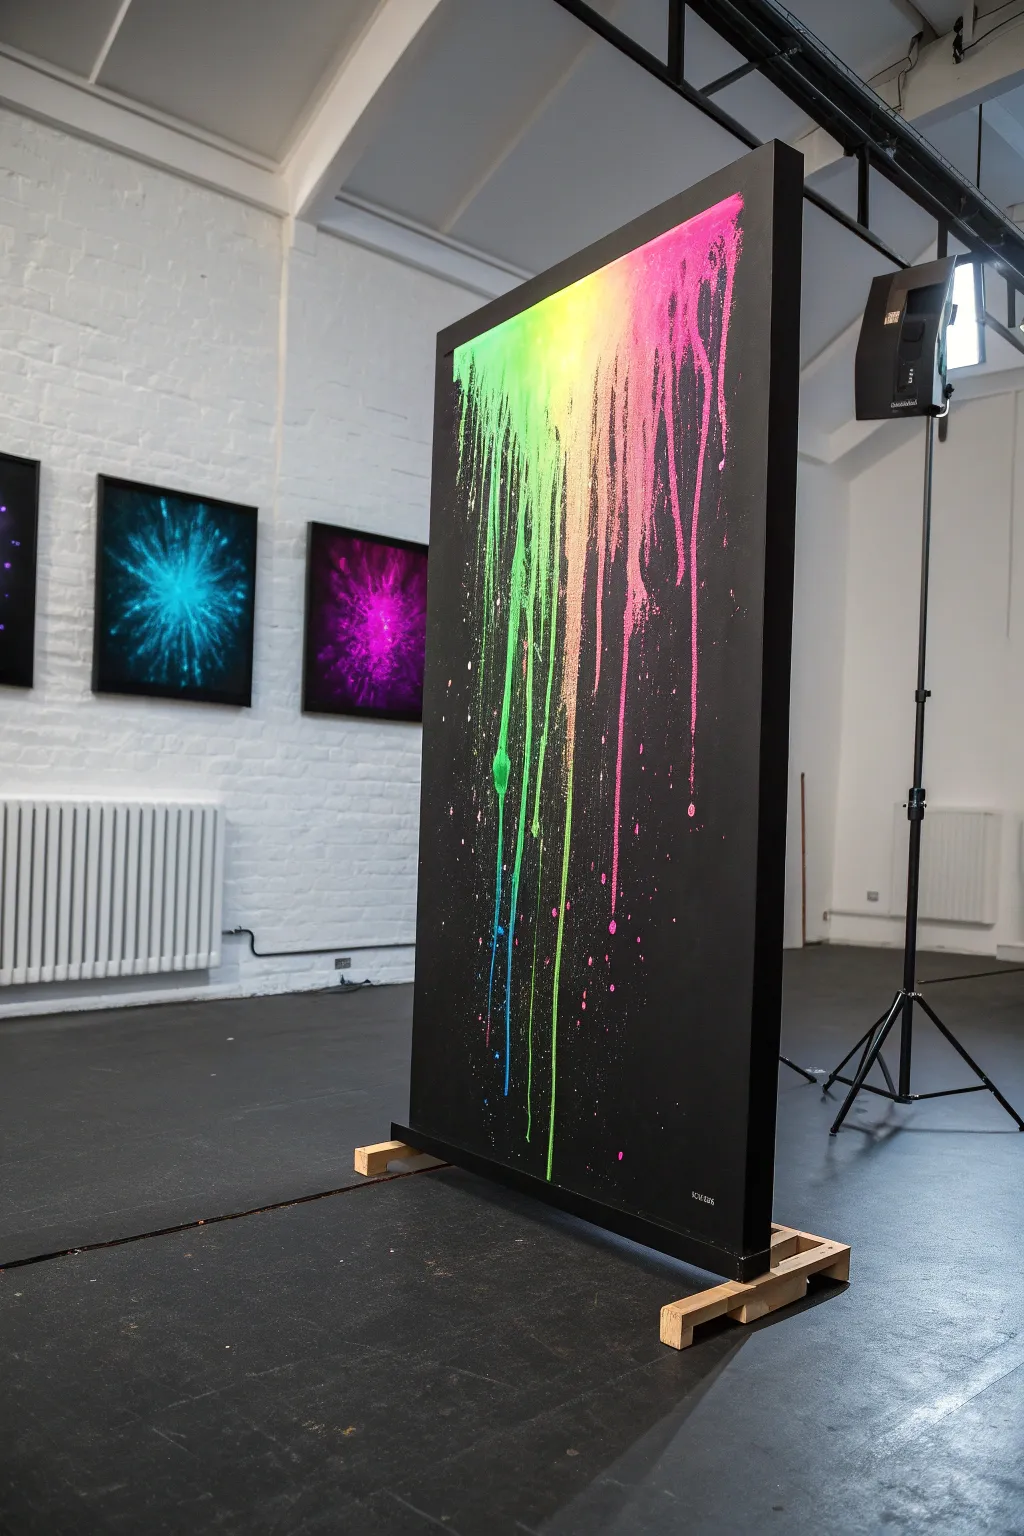
Abstract Drip-and-Splatter With Neon Glow Layers

Transform a simple black canvas into a vibrant cascade of glowing color with this bold drip-art technique. By layering neon acrylics from the top edge, you’ll create a striking, gravity-defying waterfall effect that looks electric even in daylight.
Step-by-Step Tutorial
Materials
- Large stretched canvas painting panel (black primed, or white primed + black acrylic paint)
- Black acrylic paint (matte or satin finish)
- High-flow acrylic paints or textile paints (Neon Green, Neon Yellow, Neon Pink, Cyan)
- Glow-in-the-dark medium or additive (optional)
- Squeeze bottles or pipettes
- Water spray bottle (mister)
- Drop cloths or plastic sheeting (essential for floor protection)
- Easel or wall mount setup
- Masking tape
- Wide flat brush or paint roller
Step 1: Preparation & Base Coat
-
Prepare your workspace:
This project gets messy, so lay down extensive drop cloths or plastic sheeting on the floor. Verify that your canvas is positioned vertically and securely on an easel or temporary stand. -
Prime the canvas black:
If your canvas isn’t already black, cover the entire surface with a solid coat of black acrylic paint using a wide brush or foam roller. -
Ensure opacity:
Let the first coat dry completely. If you can still see the white weaving of the canvas, apply a second coat for a deep, opaque background which will make the neon pop. -
Mix the glowing paints:
Prepare your neon colors in separate cups. If you want a true glow-in-the-dark effect, mix a generous amount of glow medium into your neon acrylics now. For a purely daylight-fluorescent look, standard high-flow acrylics work perfectly. -
Adjust paint consistency:
The paint needs to flow easily but not be watery. Aim for the consistency of heavy cream. If using tube acrylics, thin them with a flow medium or a little water. -
Load the applicators:
Transfer your thinned paint mixtures into squeeze bottles or large syringes without needles. This gives you control over where the drips begin.
Step 2: Creating the Drips
-
Tape the top edge (optional):
If you want a clean border at the very top, run a strip of painter’s tape along the upper edge of the canvas face. -
Start the green section:
Begin on the left side of the top edge. Squeeze a generous amount of neon green paint directly against the top rim of the canvas, letting gravity pull it down. -
Encourage the flow:
If the drips are moving too slowly, give the top area a very light mist of water from your spray bottle. Don’t overdo it, or the pigment will wash out. -
Transition to yellow:
Moving towards the center, begin applying the neon yellow. Slightly overlap it with the green section while it’s still wet to create a beautiful lime gradient where they meet. -
Add the pink section:
Continue to the right side with your neon pink paint. Apply heavy beads of paint at the top so thick rivulets run almost to the bottom of the canvas. -
Layering for depth:
Once the first set of drips has slowed, go back and add second layers of specific colors on top of the existing path to create density and brightness. -
Create the splatter effect:
Dip a stiff brush or toothbrush into your diluted paint. Use your thumb to flick bristles and spray fine speckles of neon paint around the main drip lines, simulating energy and movement. -
Introduce contrast drips:
I like to add a tiny amount of cyan or blue as a thin, rogue drip cutting through the green or pink sections for visual interest. -
Control the lengths:
Not every drip needs to hit the bottom. You can stop a drip by dabbing it gently with a dry cloth or letting the paint amount naturally run out mid-canvas. -
Let it cure flat (optional):
If the paint is pooling too much at the bottom, you can lay the canvas flat once the drips have reached your desired length to freeze them in place. -
Final drying:
Allow the painting to dry undisturbed for at least 24 hours. The thick ridges of paint at the top will take the longest to cure.
Glow Pro Tip
For maximum luminosity, paint a thin line of white primer exactly where you plan to pour your drips first, then pour the neon over it. Neon colors appear much brighter over white than direct black.
Level Up: UV Lighting
Install a small blacklight LED strip on the ceiling above the painting. This will permanently charge the glow paint and keep the colors vibrating with intense light whenever the room is dim.
Hang your masterpiece in a spot where it can catch the light and watch your space transform into a modern art gallery


Have a question or want to share your own experience? I'd love to hear from you in the comments below!