There’s something kind of magical about a smooth gradient—it instantly adds mood, light, and depth, even if the subject is super simple. Here are my favorite gradient painting ideas you can try when you want satisfying color blending without overcomplicating the sketch.
Classic Sunset Sky With Silhouette
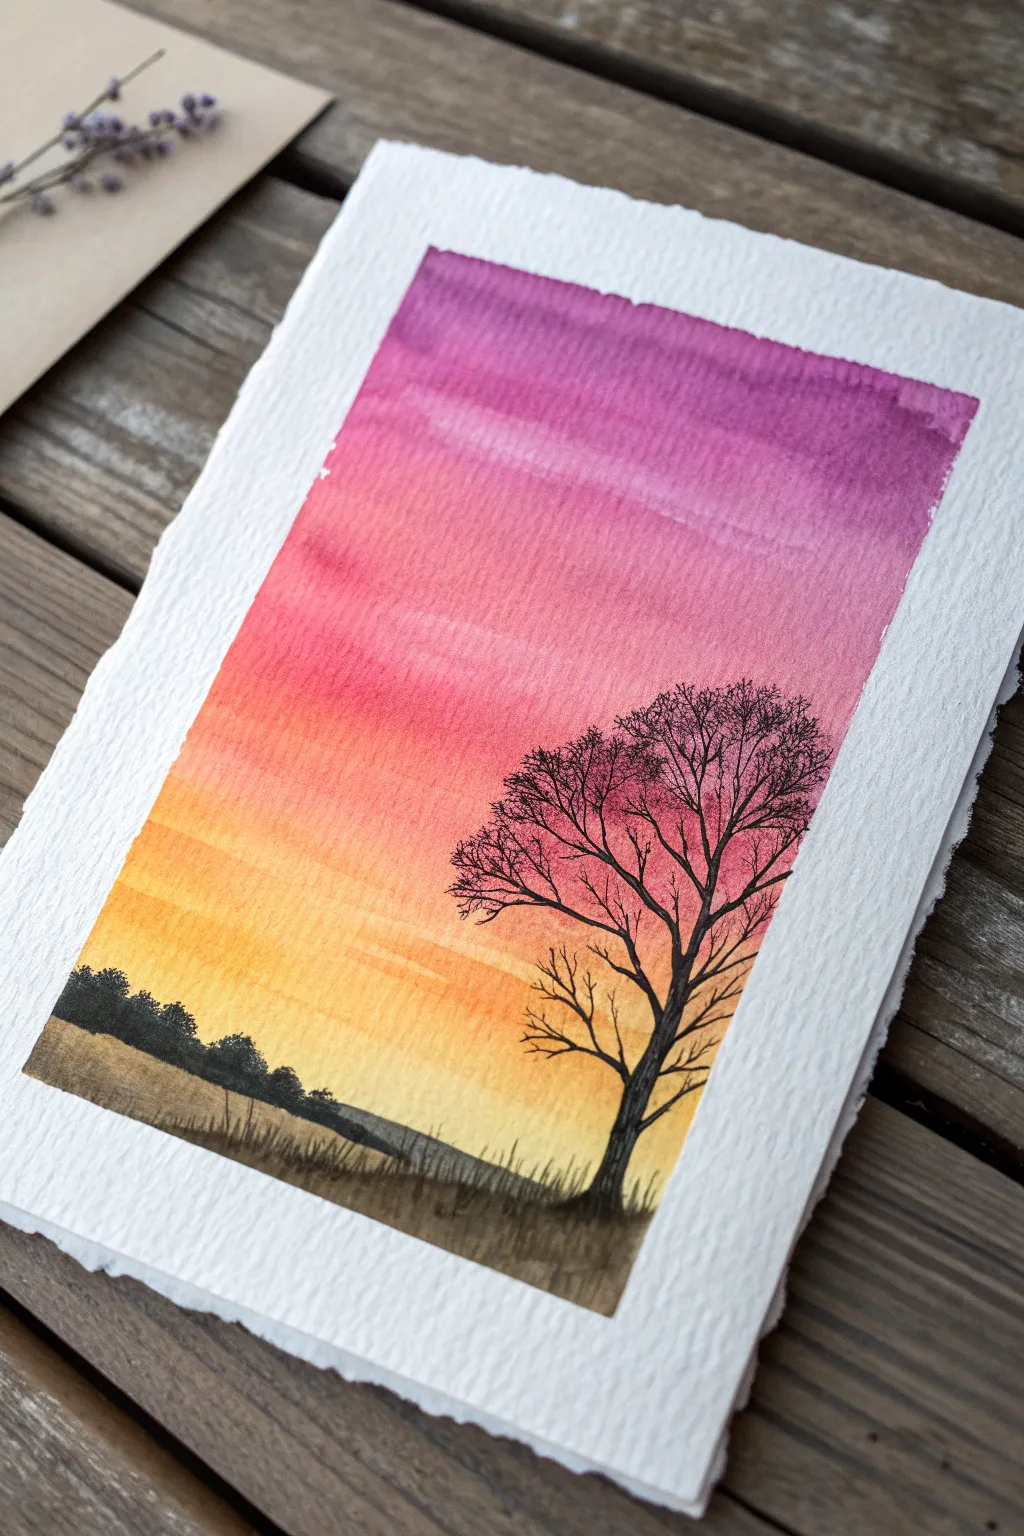
Capture the serene beauty of twilight with this striking watercolor gradient project. By blending vibrant sunset hues behind a stark, detailed silhouette, you’ll create a dramatic contrast that feels both peaceful and bold.
Step-by-Step
Materials
- Cold press watercolor paper (deckled edge preferred for the rustic look)
- Watercolor paints: Violet/Purple, Magenta, Orange, Warm Yellow, Black (or Sepia)
- Flat wash brush (3/4 or 1 inch)
- Small round detail brush (size 0 or 1)
- Pencil (HB or H)
- Masking tape (optional, to secure paper)
- Jar of clean water
- Paper towels
Step 1: Setting the Sky
-
Prepare your paper:
Start by taping down your cold press watercolor paper to a board if you want to prevent warping, or simply have your sheet ready. The deckled edge shown in the reference adds a lovely framed quality, so try to preserve it if your paper has one. -
Pre-wet the sky area:
Using a clean flat brush, apply a very light, even glaze of clean water across the entire area where the sky will be. You want the paper damp and glistening, but not soaking wet with puddles. -
Begin with yellow:
Load your flat brush with a warm yellow. Start painting horizontally near the bottom third of the paper, sweeping back and forth to create a solid base of light. -
Introduce the orange:
Without cleaning the brush completely, pick up some orange paint. Blend this directly into the wet yellow edge, moving upwards. The wet-on-wet technique will naturally soften the transition line. -
Shift to pink tones:
Clean your brush slightly, then load it with magenta or a deep pink. Continue working up the paper, overlapping the orange section slightly to create a reddish-coral mid-tone before the pure pink emerges. -
Add the twilight purple:
For the very top of the sky, mix a rich violet. Apply this to the top edge of the paper and bring it down to meet the pink. Allow the colors to bleed into each other naturally; gravity can help here if you tilt your board slightly. -
Let it dry completely:
This is crucial. The paper must be bone dry before you add the silhouette, or the black ink will bleed into the sky like a spiderweb. Use a hairdryer on a low setting if you are impatient.
Clean Edges Pro Tip
To get that crisp, white border around the deckled edge, leave a margin of unpainted paper. If you’re nervous about painting too far, use masking fluid to block out the edges and rub it off when dry.
Step 2: Creating the Landscape
-
Sketch the horizon:
Lightly sketch a low, uneven horizon line with a pencil. Mark a spot on the right side where your main tree trunk will anchor. -
Paint the distant ground:
Mix a watery grey-brown or sepia wash. Paint the bottom strip of land below your yellow sky. This should be lighter and less opaque than the trees to simulate atmospheric perspective. -
Add the middle ground bushes:
Using a smaller brush and a darker, thicker mix of black and brown, dab in the shapes of low bushes or a distant tree line along the left side of the horizon. Keep the edges slightly rough to mimic foliage. -
Outline the main tree:
Switch to your smallest detail brush (size 0 or 1). Load it with concentrated black watercolor or even varied black ink for opacity. Paint the main trunk on the right, making it thicker at the base and tapering as it rises.
Level Up: Birds
Add liveliness to the empty sky area on the left by painting two or three tiny ‘V’ shapes with your smallest brush to represent distant birds returning to roost for the evening.
Step 3: Detailing the Silhouette
-
Branching out:
Start extending major branches from the trunk. I like to twist the brush slightly as I pull away to create the natural, knobby look of organic wood, rather than perfect straight lines. -
Create fine twigs:
From the main branches, pull out very fine, wispy lines to represent the smaller twigs. Use the very tip of your brush and use quick, confident flicks. The more intricate this network, the more realistic the silhouette will look against the gradient. -
Anchor the tree:
Return to the base of the trunk. Add small, vertical flicking strokes upwards from the ground to simulate wild grass growing around the root of the tree. -
Darken the foreground:
While the grass area is still workable, drop in a bit more pure black at the very bottom right corner to give the painting visual weight and depth. -
Final assessment:
Step back and look at your branch structure. If a spot looks too empty, add a few more hair-thin twigs. Let the black paint dry thoroughly before touching or moving the paper.
Once dry, this serene landscape is ready to be framed or gifted as a peaceful reminder of nature’s beauty


Ocean Gradient From Shore to Deep Water
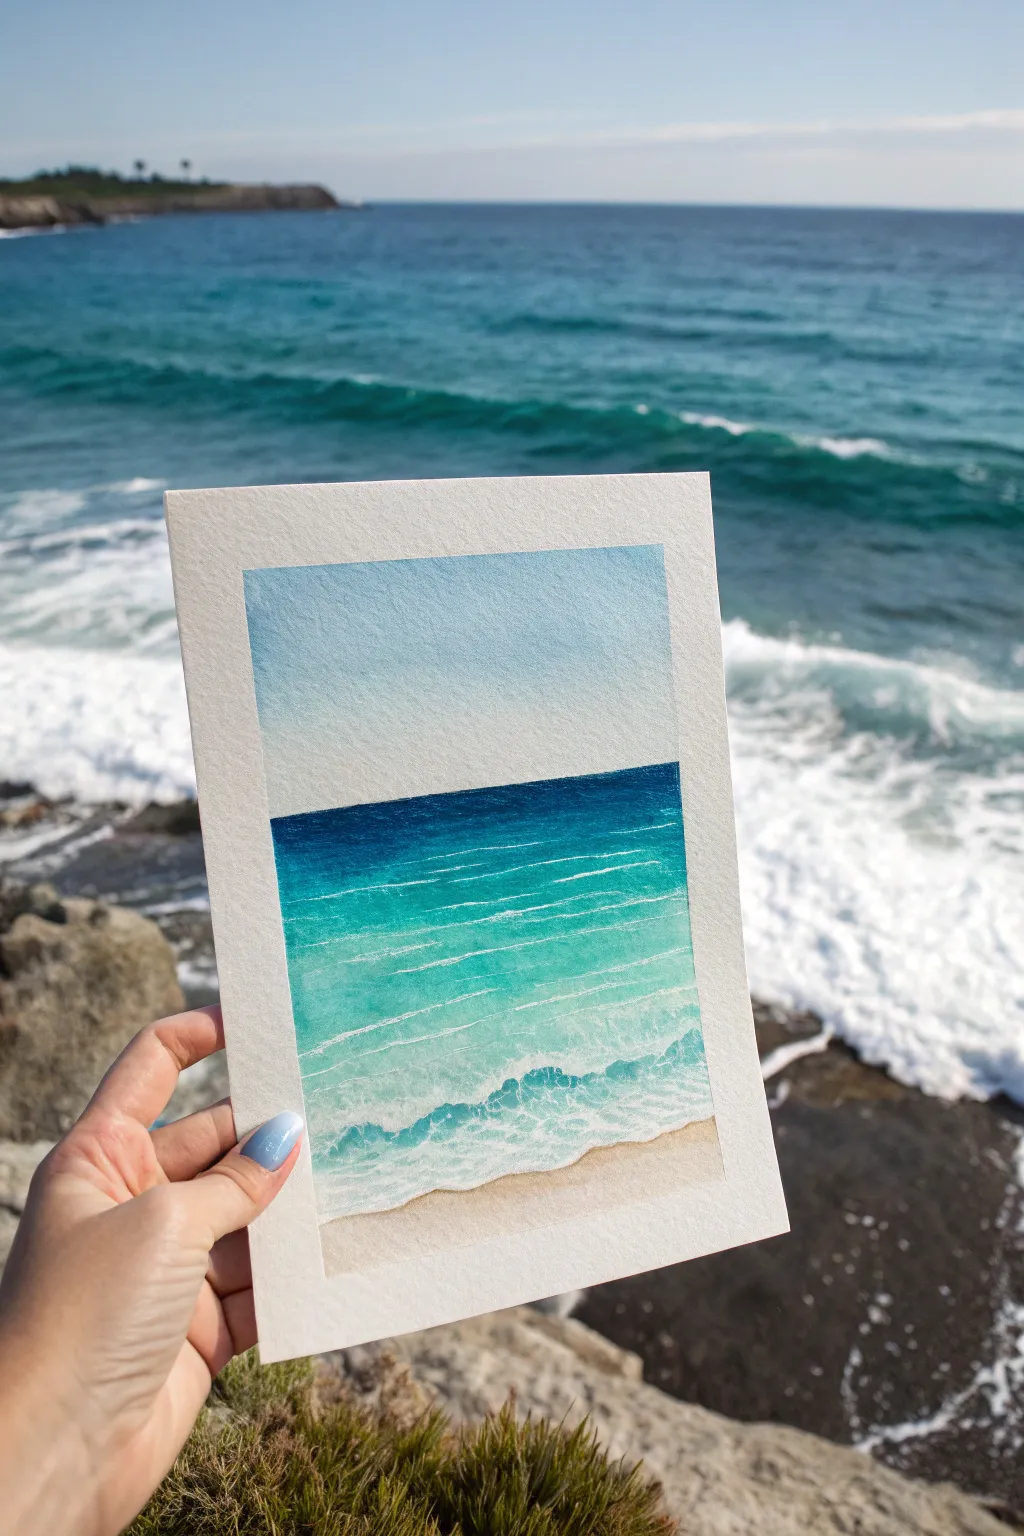
Capture the serene transition of the ocean’s depths with this vibrant watercolor gradient study. This project focuses on mastering the wet-on-wet technique to blend sandy beiges into striking teals and deep indigo waters.
Step-by-Step
Materials
- Cold press watercolor paper (300 gsm)
- Masking tape (painters tape)
- Watercolor paints (Indigo, Phthalo Blue, Turquoise, Cerulean Blue, Burnt Sienna or Yellow Ochre)
- Flat wash brush (3/4 inch)
- Round detail brush (size 2 or 4)
- White gouache or white gel pen
- Jar of clean water
- Paper towels
- Mixing palette
Step 1: Preparation and Sky
-
Tape the Edges:
Secure your watercolor paper to a sturdy board using masking tape on all four sides. Press the edges down firmly to ensure a crisp, clean border reveal later. -
Define the Horizon:
Lightly sketch a straight horizontal line about two-thirds of the way down the page to separate the sky from the ocean. -
Wet the Sky Area:
Using your flat brush and clean water, apply a thin, even layer of moisture to the sky section above the horizon line. -
Paint the Sky Gradient:
Mix a very dilute wash of Cerulean Blue. Apply it starting from the top, fading smoothly into nearly clear water as you reach the horizon line for an atmospheric effect. -
Dry Completely:
Wait for the sky section to be bone dry. If the paper is cool to the touch, it still holds moisture.
Uneven Gradients?
If you see harsh lines forming between colors, your paper dried too fast. Briefly re-wet the area with a damp brush to reactivate the paint and smooth the transition.
Step 2: The Ocean Gradient
-
Mix Your Ocean Palette:
Prepare three distinct pools of color on your palette: a deep Indigo/Phthalo mix for the horizon, a bright Turquoise for the middle, and a very pale teal for the shallows. -
Start the Deep Water:
On dry paper, carefully paint a sharp line of the deep Indigo mix right against the horizon line. Pull this color down about an inch. -
Blend Mid-Tones:
While the indigo is still wet, rinse your brush swiftly, pick up the Turquoise, and blend it into the bottom edge of the indigo band. -
Transition to Shallows:
Continue painting downward, adding more water to your brush to dilute the color into a pale teal as you approach the bottom third of the water section. -
Paint the Sand:
Mix a light wash of Burnt Sienna or Yellow Ochre. Paint the bottom strip of the paper for the sand, allowing it to slightly touch the pale water edge for a soft blend. -
Wait for Drying:
Allow the entire ocean gradient layer to dry completely. This is crucial before adding texture.
Step 3: Adding Details and Foam
-
Deepen the Horizon:
To create depth, add a second glaze of your darkest Indigo only at the very top edge of the water line. -
Prepare White Gouache:
Squeeze out a small amount of white gouache. It should be thick and creamy, not too watery, to ensure it stands out against the blue. -
Create Distant Ripples:
Using your fine round brush, paint very thin, broken horizontal white lines in the teal section to suggest distant waves catching the light. -
Form the Crashing Wave:
Paint a more jagged, thicker white line where the deep water meets the shallow section. Use a stippling motion to mimic churning foam. -
Detail the Shoreline:
Add a soft, uneven line of white wash where the water meets the sand to represent sea foam washing up on the beach. -
Refine Highlights:
I like to add a few tiny dots of pure white gouache near the main wave crests to look like splashing droplets. -
The Reveal:
Once absolutely everything is dry, slowly peel off the masking tape at a 45-degree angle to reveal your crisp white borders.
Sparkle & Shine
For a magical touch, mix a tiny pinch of clear iridescent medium or glitter into your white gouache for the sea foam to make the water look sun-kissed.
Enjoy the calming view of your personal ocean slice on your wall or desk


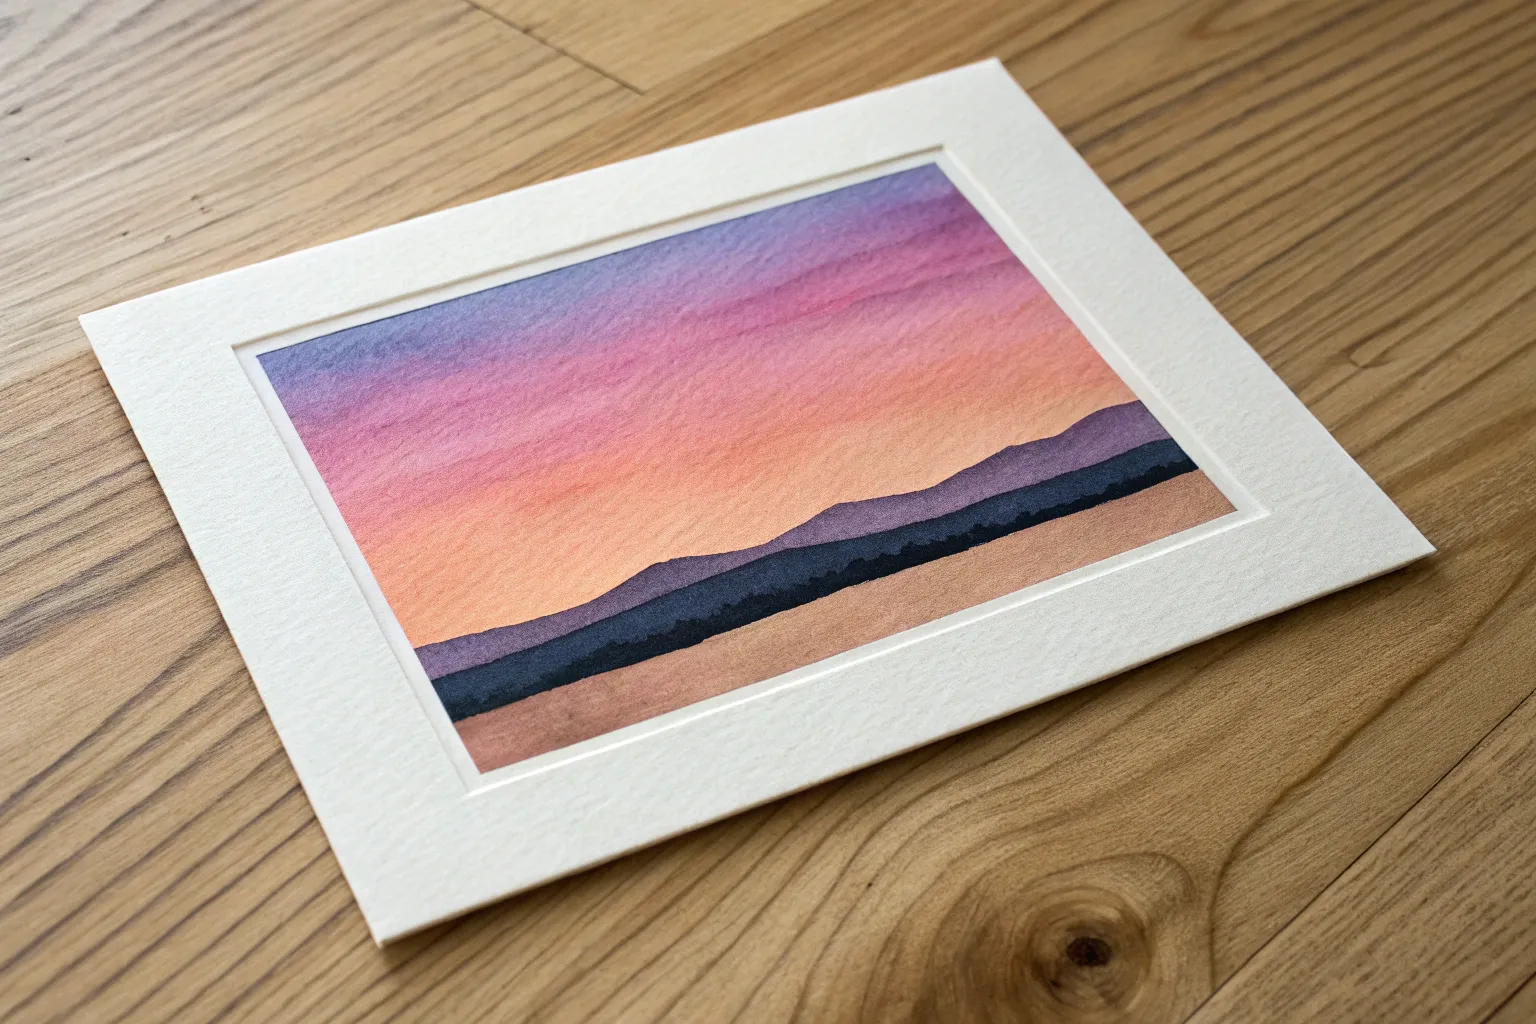
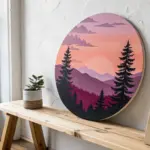
Mountain Range Against a Gradient Sky
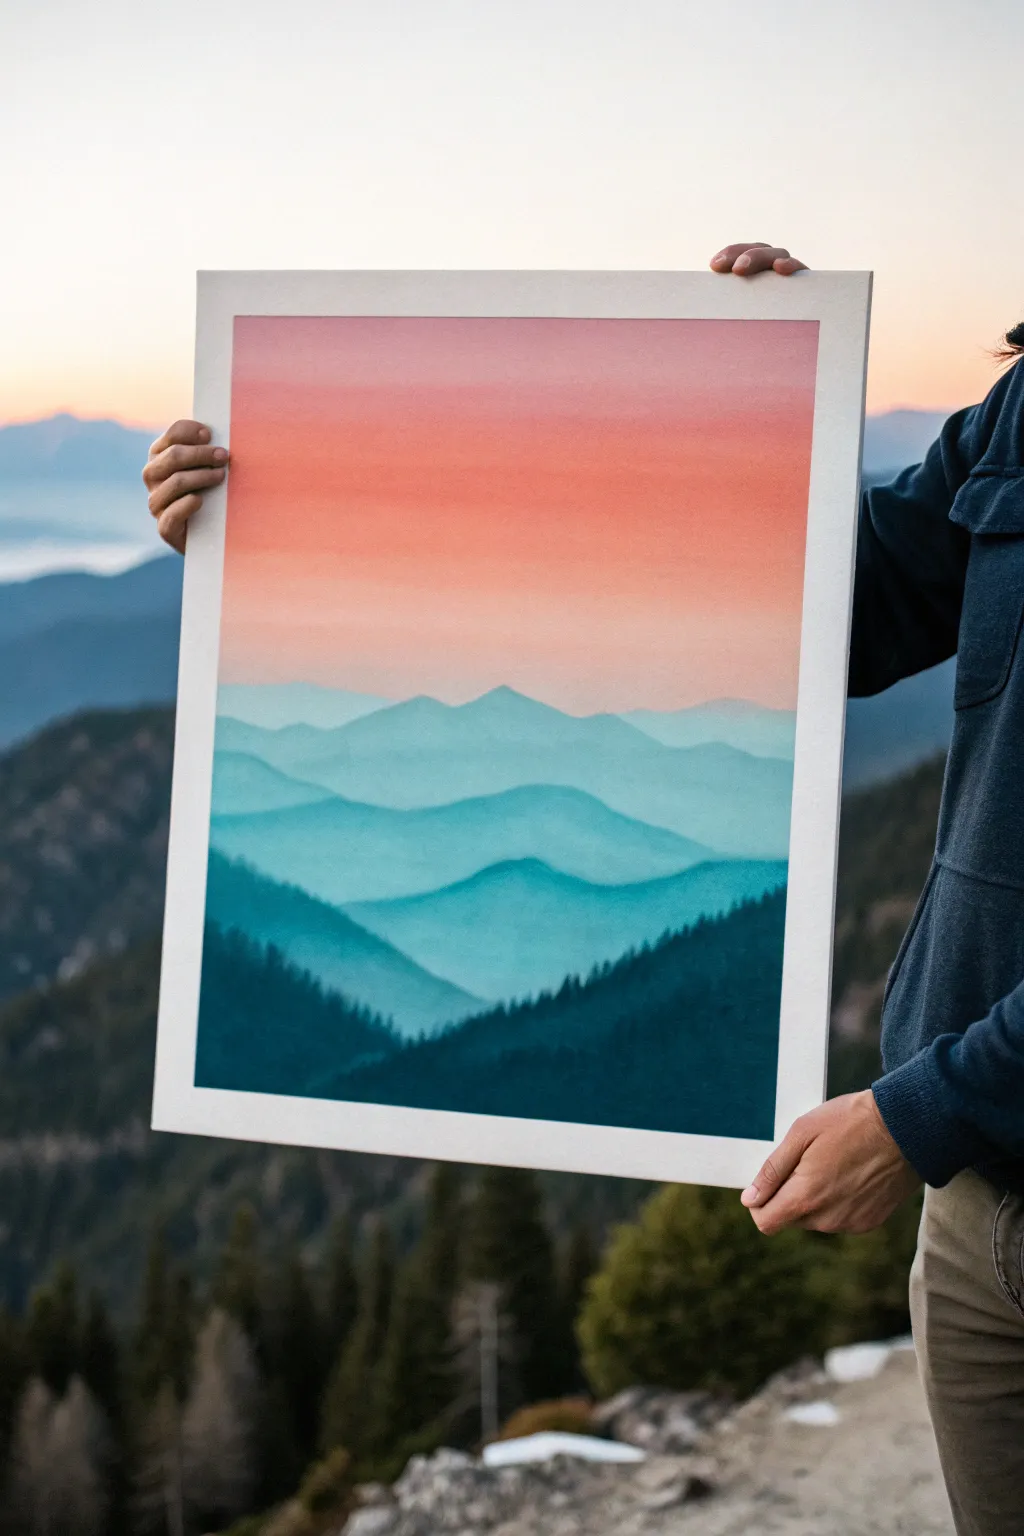
Capture the serene beauty of twilight with this stunning layered landscape painting. By combining a seamless sky gradient with successively darkening mountain ranges, you’ll create a breathtaking sense of depth and atmospheric perspective.
Step-by-Step Guide
Materials
- Large canvas or heavy watercolor paper
- Acrylic paints (Titanium White, magenta, orange, Phthalo Blue, Hooker’s Green, black)
- Large flat wash brush (2-inch)
- Medium filbert brush
- Small round brush for details
- Palette or mixing plate
- Cup of water
- Paper towels
- Masking tape (optional for clean edges)
Step 1: The Sky Gradient
-
Prepare the canvas:
Start with a blank white canvas. If you want a crisp white border like in the reference photo, carefully apply masking tape around the edges of your painting surface before you begin. -
Mix the sky colors:
Prepare three piles of paint for your sky: a soft pinkish-magenta, a warm orange, and a very pale, almost white blue. Add plenty of white to all colors to keep them pastel and soft. -
Apply the top band:
Using your large flat brush, paint a wide band of the pink mixture across the very top of the canvas. Use horizontal strokes for a smooth finish. -
Blend in the middle band:
Without cleaning the brush entirely, pick up the orange mixture. Apply this directly below the pink, overlapping slightly. Quickly brush back and forth over the seam where they meet to blur the line. -
Finish the bottom sky:
Rinse your brush and pick up the pale blue-white mixture. Paint the lower section of the sky, blending it upwards into the orange. The goal is a seamless transition from cool blue to warm orange to soft pink. -
Let it cure:
Allow the sky gradient to dry completely before moving on. I prefer to wait at least 20 minutes here, as wet paint will muddy the crisp mountain edges we need next.
Step 2: Layering the Mountains
-
Mix the first mountain color:
Create the color for the farthest mountains. Mix a small amount of Phthalo Blue with a lot of Titanium White. It should be just slightly darker than the bottom of your sky. -
Paint the distant range:
Using a filbert brush, paint a wavy, organic line across the canvas, roughly 1/3 down from the top. Fill in everything below this line with that light blue mixture. -
Dry the first layer:
Let this layer dry to the touch. This drying step is crucial so the next layer doesn’t blend into this one. -
Create the mid-ground color:
Add a tiny drop more blue and a speck of green to your previous mixture. The goal is a slightly darker, more turquoise shade. -
Paint the second range:
Paint a new mountain line slightly lower than the first one. Vary the peaks and valleys so they don’t mirror the previous layer perfectly. -
Progressively darken:
Repeat this process two more times. For each new layer, move lower on the canvas and mix slightly less white and slightly more blue/green into your paint. Each range should be distinct against the lighter one behind it.
Gradient Not Blending?
If acrylics are drying too fast to blend smooth transitions, mix a retarder medium into your paints. It slows down drying time significantly.
Step 3: The Foreground
-
Mix the darkest shade:
For the closest mountain range, mix a deep teal. Combine Phthalo Blue, Hooker’s Green, and a touch of black. This should be significantly darker than previous layers. -
Paint the final silhouette:
Paint the large, sloping shapes of the foreground hills at the bottom of the canvas. Fill in solid to the bottom edge. -
Add texture:
While the paint is still wet, or using a dry brush technique, switch to a small round brush. Tap tiny, vertical strokes along the top ridge of this dark foreground layer to suggest pine trees. -
Refine the tree line:
Continue these tiny vertical dabs down into the dark mass slightly to create the texture of a dense forest. Keep the tops uneven for a natural look. -
Reveal the border:
Once the entire painting is completely dry, very slowly peel away the masking tape at a 45-degree angle to reveal your crisp white frame.
Add Some Magic
Before removing the tape, splatter tiny specks of watered-down white paint across the dark foreground for a subtle firefly effect.
Step back and admire how simple layers creates such a deep, immersive world on your canvas


Pine Forest Silhouette on Dusk Gradient
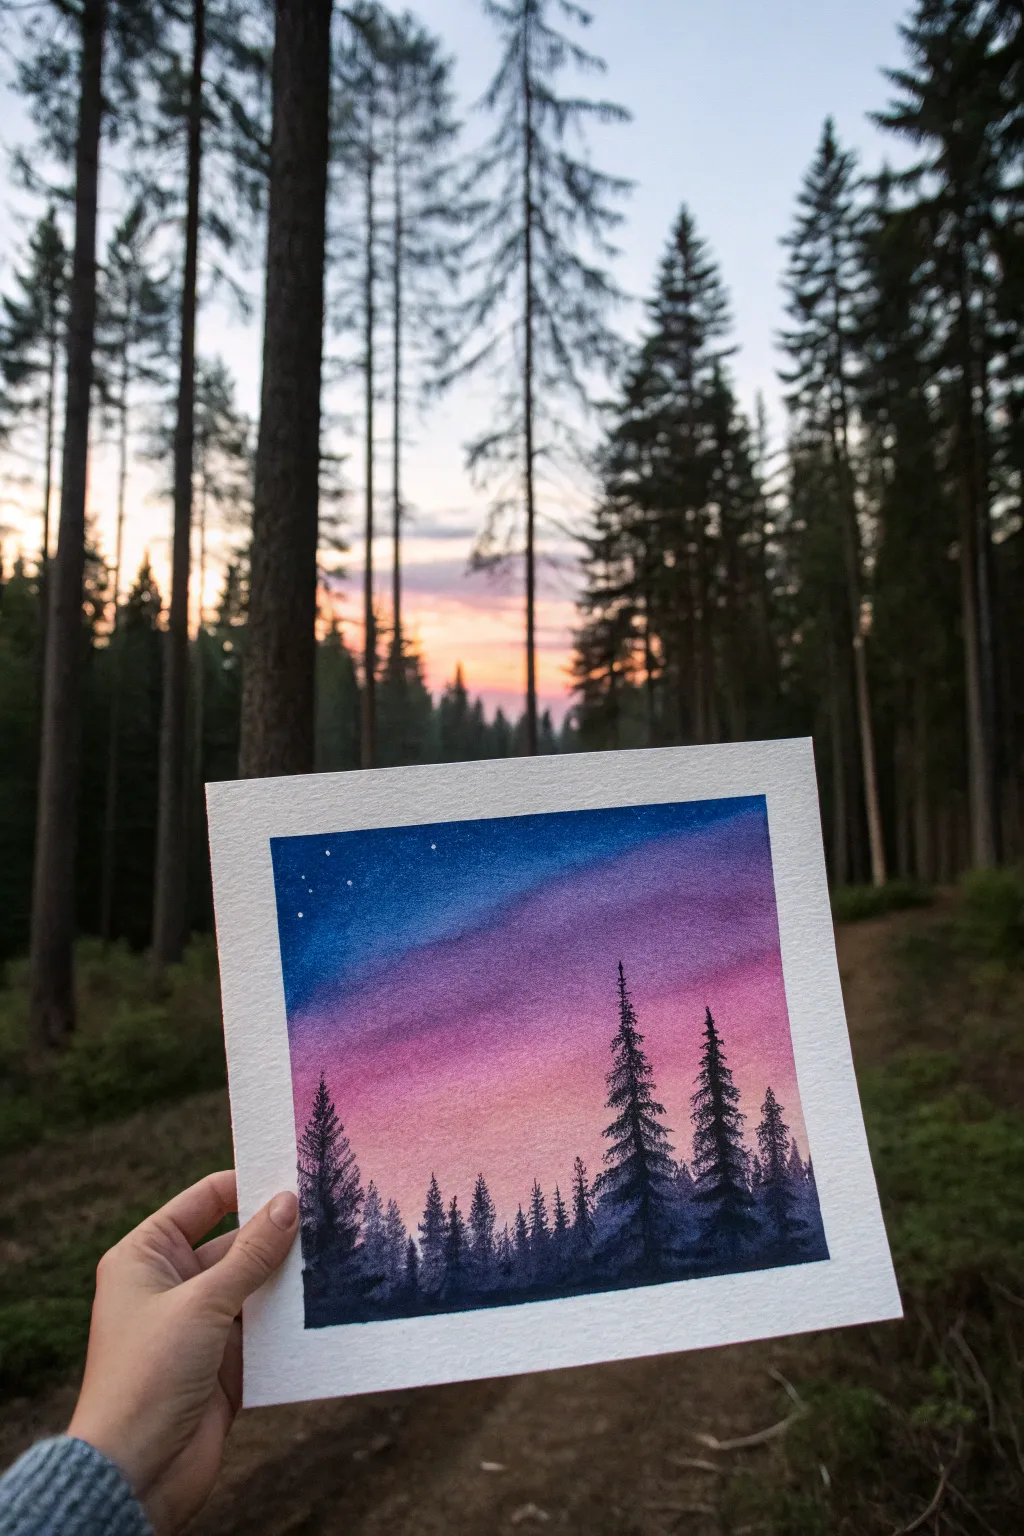
Capture the serene transition from sunset to night with this vibrant watercolor project. You will blend deep blues into soft pinks to create a dreamy dusk sky before layering striking black pine trees in the foreground.
Step-by-Step Tutorial
Materials
- Cold press watercolor paper (140lb/300gsm)
- Masking tape
- Watercolor paints (Indigo, Ultramarine Blue, Purple/Violet, Quinacridone Rose or Magenta, Peach/Orange)
- Flat wash brush (3/4 inch or 1 inch)
- Round brush (size 6 or 8 for mixing)
- Small liner brush or rigger brush (size 0 or 1)
- Two jars of water (one for clean, one for dirty)
- Paper towels
- White gel pen or opaque white gouache
Step 1: Preparation & Sky Gradient
-
Taping the Edges:
Secure your watercolor paper to a board or table using masking tape on all four sides. Press the edges down firmly to ensure a crisp white border later and to prevent the paper from buckling when wet. -
Pre-wetting the Paper:
Using your large flat wash brush and clean water, apply an even coat of water across the entire paper surface. The paper should be glisten with a sheen but not have puddles sitting on top. -
Mixing the Sky Colors:
While the paper soaks, quickly prepare your palette. You will need a deep indigo blue, a vibrant violet, a reddish-pink (like rose), and a soft peach or orange tone. -
Applying the Deep Blue:
Start at the very top of the paper with your Indigo paint. Use the flat brush to paint a horizontal strip across the top, letting the wet-on-wet technique soften the edges naturally. -
Blending in Violet:
Clean your brush slightly and pick up the violet paint. Apply this directly below the indigo stripe, slightly overlapping the two colors so they bleed together seamlessly. -
Adding the Pink Layer:
Rinse your brush again and load it with the rose or magenta color. Paint the next horizontal section, blending upwards into the violet. You want to see a gradual shift from cool to warm tones. -
Finishing with Peach:
For the horizon area just above where your trees will go, apply the peach or light orange mix. Blend this into the pink layer above it, keeping this lowest section light and airy. -
Smoothing the Gradient:
If you notice harsh lines, clean and dry your flat brush slightly, then gently sweep it horizontally across the transition zones to help the colors meld. Be careful not to overwork it, or the colors might turn muddy. -
Complete Drying:
This is crucial: allow the sky layer to dry completely. The paper must be bone-dry and room temperature to the touch before moving to the next phase, otherwise, the tree silhouettes will bleed.
Step 2: Painting the Forest Silhouette
-
Mixing the Silhouette Color:
Create a very dark, saturated mix for the trees. I prefer mixing indigo with a bit of black or burnt umber to get a natural deep shadow color, rather than using straight black from a tube. -
Drafting the Tree Line:
Using a medium round brush, paint an uneven, undulating line across the bottom inch of the paper to represent the distant ground and undergrowth. Fill this bottom strip in completely. -
Starting the Main Trees:
Switch to your smaller round brush or liner brush. Paint a few thin vertical lines extending upward from your ground layer to serve as the trunks for your tallest trees. Vary the heights to create interest. -
Adding Pine Branches:
Starting from the top of a trunk, use the tip of your small brush to tap in short, downward-sloping strokes. Keep the top very narrow and gradually widen your strokes as you move down the tree to create a cone shape. -
Creating Texture:
Don’t make the branches too symmetrical. Use a stippling motion—tapping the brush tip rapidly—to mimic the texture of pine needles and overlapping branches. -
Filling the Mid-ground:
Add smaller, shorter trees between the tall ones using the same tapping technique. These represent trees further back in the distance. -
Refining the Edges:
Go back over your main trees and add a few stray branches sticking out slightly further than the main shape to make them look organic and wild. -
Adding Stars:
Once the trees are dry, take a white gel pen or a tiny dot of white gouache. add a few tiny dots in the upper indigo section of the sky to represent the first stars of the evening. -
Structuring the Constellation:
Group a few stars together or form a recognizable constellation like the Big Dipper to add a specific focal point to the sky. -
The Reveal:
Carefully peel away the masking tape at a 45-degree angle away from the painting to reveal your clean, crisp white border.
Tape Removal Trick
If your masking tape feels too sticky, stick it to your clothes (pants or shirt) once before applying it to the paper. This reduces tackiness and prevents tearing.
Starry Splatter
Instead of drawing stars, load a stiff toothbrush with white gouache and flick the bristles for a realistic galaxy spray effect across the blue section.
Step back and admire your beautiful miniature landscape, capturing the quiet magic of the forest at dusk
BRUSH GUIDE
The Right Brush for Every Stroke
From clean lines to bold texture — master brush choice, stroke control, and essential techniques.
Explore the Full Guide
Palm Tree Silhouette on Tropical Gradient
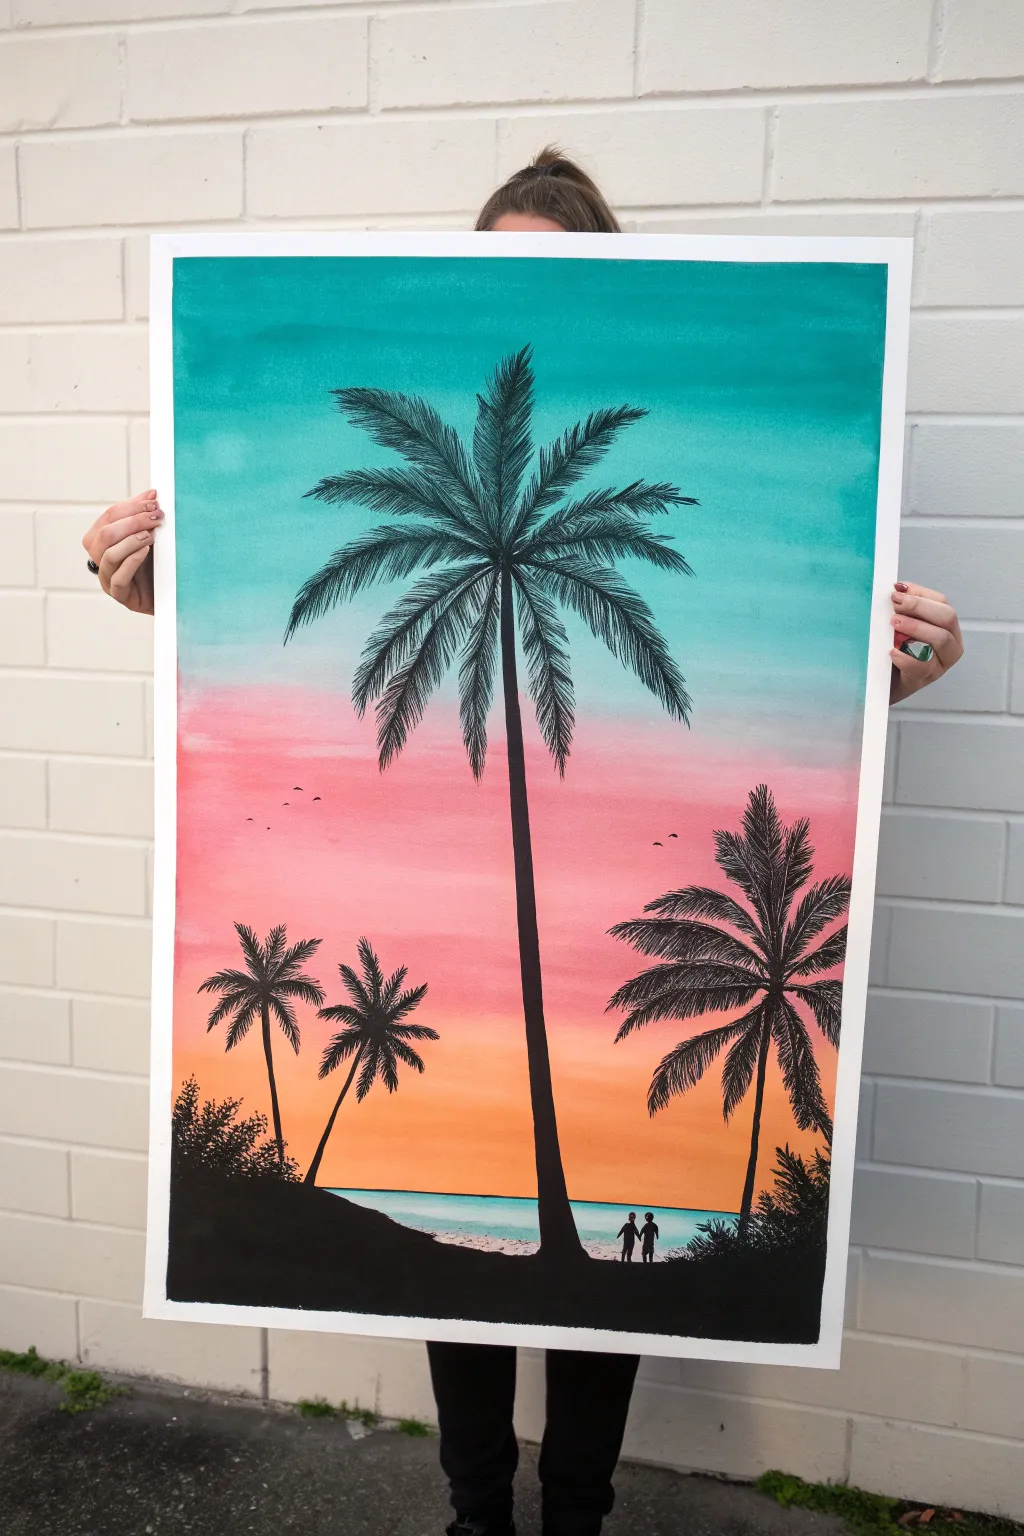
Capture the magic of a beach sunset with this vibrant gradient painting. You’ll layer rich turquoise, pink, and orange hues to create a stunning backdrop for striking black palm tree silhouettes.
How-To Guide
Materials
- Large heavy-weight watercolor paper or mixed media paper
- Acrylic paints (Turquoise, Teal, Hot Pink, Salmon, Orange, Yellow, Black, White)
- Wide flat brush (for the background)
- Medium round brush
- Fine liner brush (for details)
- Paper towels
- Jar of water
- Painter’s tape or masking tape
- Palette or paper plate
Step 1: Preparing the Gradient Sky
-
Secure the paper:
Before you begin, tape down your paper to a flat surface or drawing board using painter’s tape. This prevents the paper from buckling when wet and creates a clean, professional white border around the edge. -
Mix your teal:
Load your palette with a generous amount of turquoise and teal paint. Using your wide flat brush, apply this color to the top third of the paper using horizontal strokes. -
Add the middle pinks:
Clean your brush thoroughly. Mix hot pink with a touch of white to make it opaque. Apply this below the teal section. While the paint is still wet, gently blend the boundary where the pink meets the teal to create a soft transition. -
Paint the horizon:
For the bottom third of the sky, mix orange with a little yellow for a warm glow. Paint this section, blending it upwards into the pink layer. The goal is a seamless fade from cool top tones to a warm bottom. -
Create the water:
Leave a small gap for the horizon line if you wish, or paint right over it. Below the orange sky, paint a thin horizontal strip of light turquoise mixed with white to represent the ocean water. Keep the horizon line perfectly straight. -
Let it dry completely:
This is crucial. The background must be 100% dry before adding silhouettes, or the black paint will bleed into the sky. You can use a hairdryer on a low setting to speed this up.
Step 2: Painting the Landscape & Silhouettes
-
Outline the land mass:
Switch to your medium round brush and black acrylic paint. Paint a sloping hill starting from the bottom left corner, curving gently downwards towards the center right. Fill this area fast with solid black. -
Position the main palm tree:
Using a thinner brush, paint a long, slightly curved vertical line roughly in the center of the composition. Make the trunk wider at the base and taper it as it reaches the teal sky area. -
Draft the fronds:
At the top of the trunk, paint 5-7 curved lines radiating outward like a firework. These are the spines of your palm leaves. -
Flesh out the leaves:
Using a fine liner brush, flick quick, short strokes outward from each spine line. These strokes should face downwards to mimic the heavy, hanging nature of palm leaves. -
Add secondary trees:
Paint a large palm tree on the right side and two smaller leaning palms on the left side. Vary their heights so the composition feels natural and balanced. -
Texture the foreground:
Use the tip of your round brush to dab small, irregular shapes along the top edge of the black land mass. This stippling technique creates the look of distant bushes and coastal shrubbery. -
Add figure details:
If you want to include the tiny people, switch to your finest liner brush. Paint two very small stick-figure shapes holding hands on the beach line. Keep them simple—just silhouettes. -
Paint distant birds:
In the pink section of the sky, add a few tiny ‘v’ or ‘m’ shapes to represent birds flying in the distance. Vary their sizes to show depth. -
Final touches:
Once the water strip is dry, you can add a tiny amount of white paint on a dry brush and lightly drag it along the shore edge to create the look of sea foam. -
Reveal the border:
Once strictly dry, slowly peel away the painter’s tape at a 45-degree angle to reveal your crisp white edges.
Gradient Not Smooth?
If your colors aren’t blending well, keep your brush slightly damp (not soaking). Work quickly while the acrylics are wet to smudge the line between colors.
Make It Pop
Add a few streaks of metallic gold paint into the water area or the lower orange sky for a sparkling sunset effect that catches the light.
Hang your tropical masterpiece in a sunny spot to enjoy those vacation vibes all year round
Clouds Painted Over a Smooth Gradient
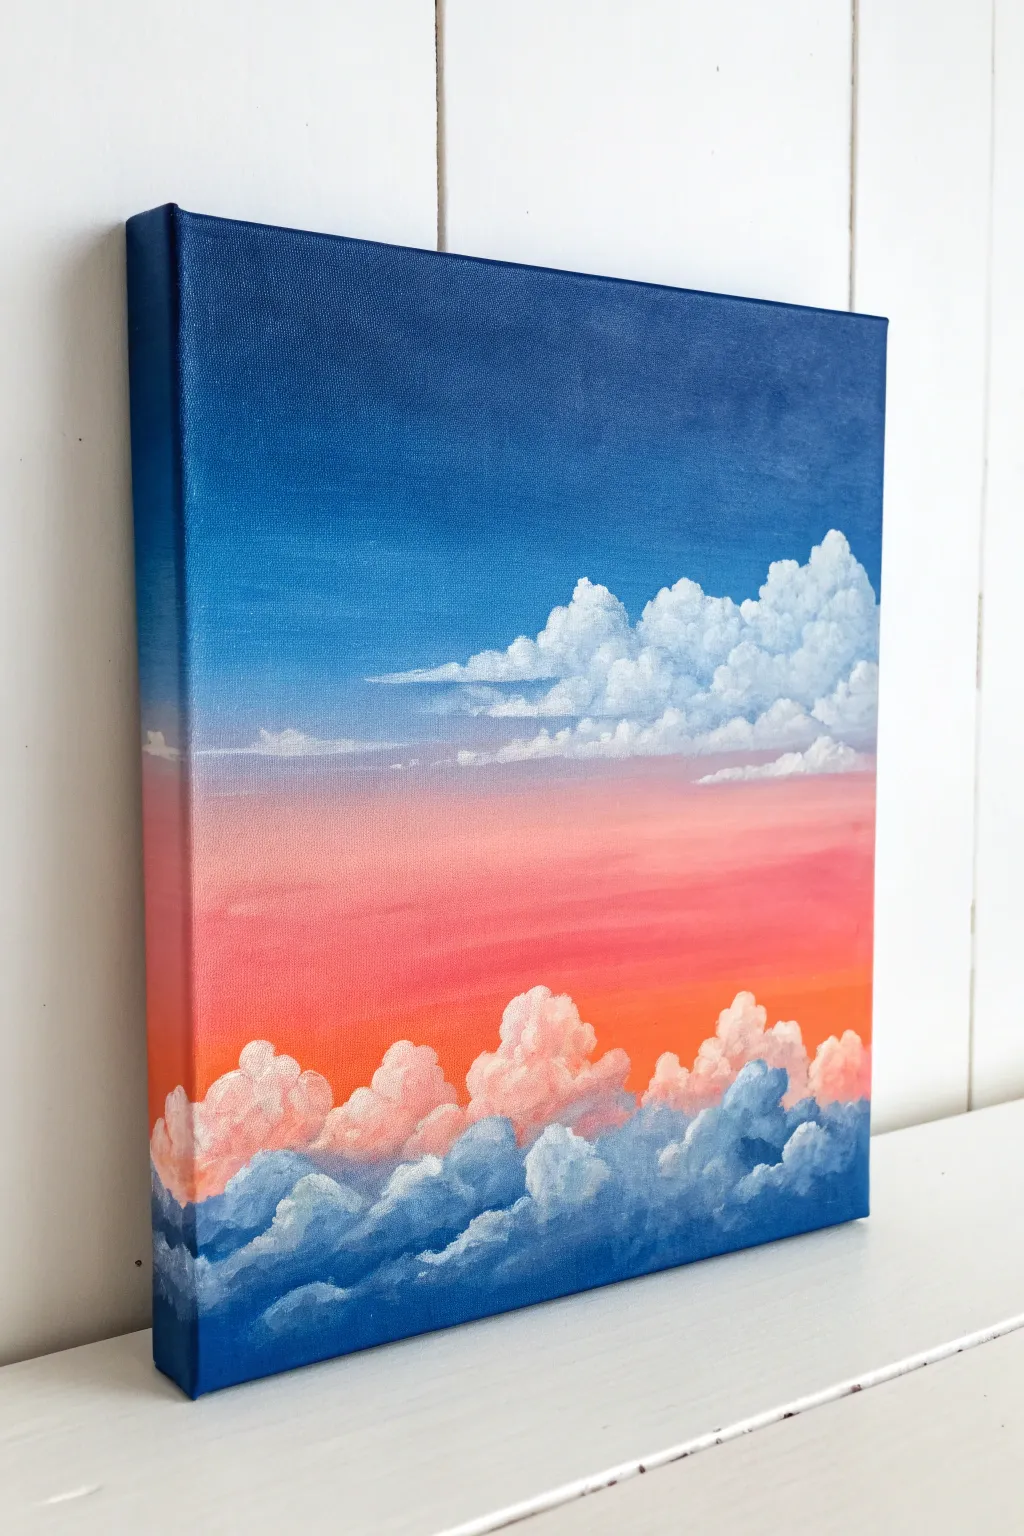
Capture the serene beauty of twilight with this acrylic painting that features a vibrant gradient sky and billowy, three-dimensional clouds. By layering soft blends with crisp highlights, you’ll create a stunning piece of art where glowing peach clouds seem to float above a deep blue shadowed base.
Step-by-Step
Materials
- Square canvas (stretched)
- Acrylic paints (Phthalo Blue, Titanium White, Magenta or Quinacridone Red, Cadmium Orange)
- Large flat brush or foam brush (for the gradient)
- Medium filbert brush (rounded tip)
- Small round detail brush
- Clean water for rinsing
- Palette or mixing plate
- Paper towels
Step 1: Painting the Gradient Sky
-
Mix your top blue:
Start by mixing a generous amount of Phthalo Blue with just a touch of white to create a rich, deep blue. It shouldn’t be navy, but a strong, clear daylight blue. -
Apply the top layer:
Using your large flat brush, apply this blue mix to the top third of the canvas. Don’t forget to paint the top and upper side edges of the canvas for a professional finish. -
Create the transition blue:
While the paint is wet, add more white to your blue mix on the palette. Blend this lighter blue directly onto the canvas below the dark blue, working your way down to just above the midline. -
Mix the sunset peach:
Clean your brush thoroughly. On your palette, mix Magenta, a tiny bit of Cadmium Orange, and plenty of Titanium White to create a soft, glowing peach-pink. -
Paint the horizon line:
Apply this peach color starting from the bottom third and working upwards. Let it meet the light blue section. -
Blend the transition:
Where the light blue meets the peach, refine the blend. You might need a clean, slightly damp brush to gently feather these colors together so there is no hard line, creating a purplish transition zone. -
Intensify the horizon:
Add a bit more orange and magenta to your mix to make a more vibrant sunset band right where the main cloud bank will sit roughly a quarter way up from the bottom. Let the entire background dry completely.
Muddy Gradient?
If blending blue and orange turns brown, let the blue dry completely first. Then apply a thin glaze of white over the transition area before painting the orange layer on top.
Step 2: Adding the Clouds
-
Block in the lower cloud shadows:
Mix a dark, stormy blue using Phthalo Blue and a tiny touch of Magenta. Using a filbert brush, tap in the shape of the bottom cloud bank. These are the heavy, shadowed undersides of the clouds. -
Extend the shapes:
Continue blocking in these dark shapes all the way to the bottom edge of the canvas. Ensure you paint the sides of the canvas to match the cloud forms. -
Mix the mid-tone pink:
Create a warm, pinkish cloud color using White and Magenta. Using a clean filbert brush, start tapping this color on top of your dark blue cloud base. -
Form the cloud tops:
Use a rounded, circular scrubbing motion to create the puffy tops of the lower clouds. Leave the dark blue showing underneath your pink puffs to act as a deep shadow. -
Add high-altitude wisps:
For the upper sky, mix Titanium White with a tiny speck of blue (almost pure white). Use a drier brush to lightly scumble wispy, horizontal clouds in the blue section of the sky. -
Detail the upper right cloud:
Paint a larger, cumulus formation in the mid-right section using pure white. Keep the edges fluffy and irregular. -
Highlight the sunset clouds:
I like to go back to the bottom pink clouds now that they are tacky. Add highlights of pure Titanium White mixed with a tiny drop of orange to the very tops of the pink puffs. -
Refine the shadows:
If the transition between the pink tops and blue bottoms looks too harsh, create a mid-tone purple-blue and glaze it between the two areas to soften the shift. -
Final brights:
Use your smallest brush to add the brightest white highlights to the absolute top curves of the clouds where the sun would hit them most direct.
Level Up: Birds
Wait for the sky to fully cure, then paint tiny, V-shaped silhouettes of birds in the distance using black paint. Place them near the transition of the pink and blue sky.
Step back and admire your peaceful sunset scene, with its perfect balance of vibrant color and moody shadow.

PENCIL GUIDE
Understanding Pencil Grades from H to B
From first sketch to finished drawing — learn pencil grades, line control, and shading techniques.
Explore the Full Guide
Galaxy Gradient With Star Scatter
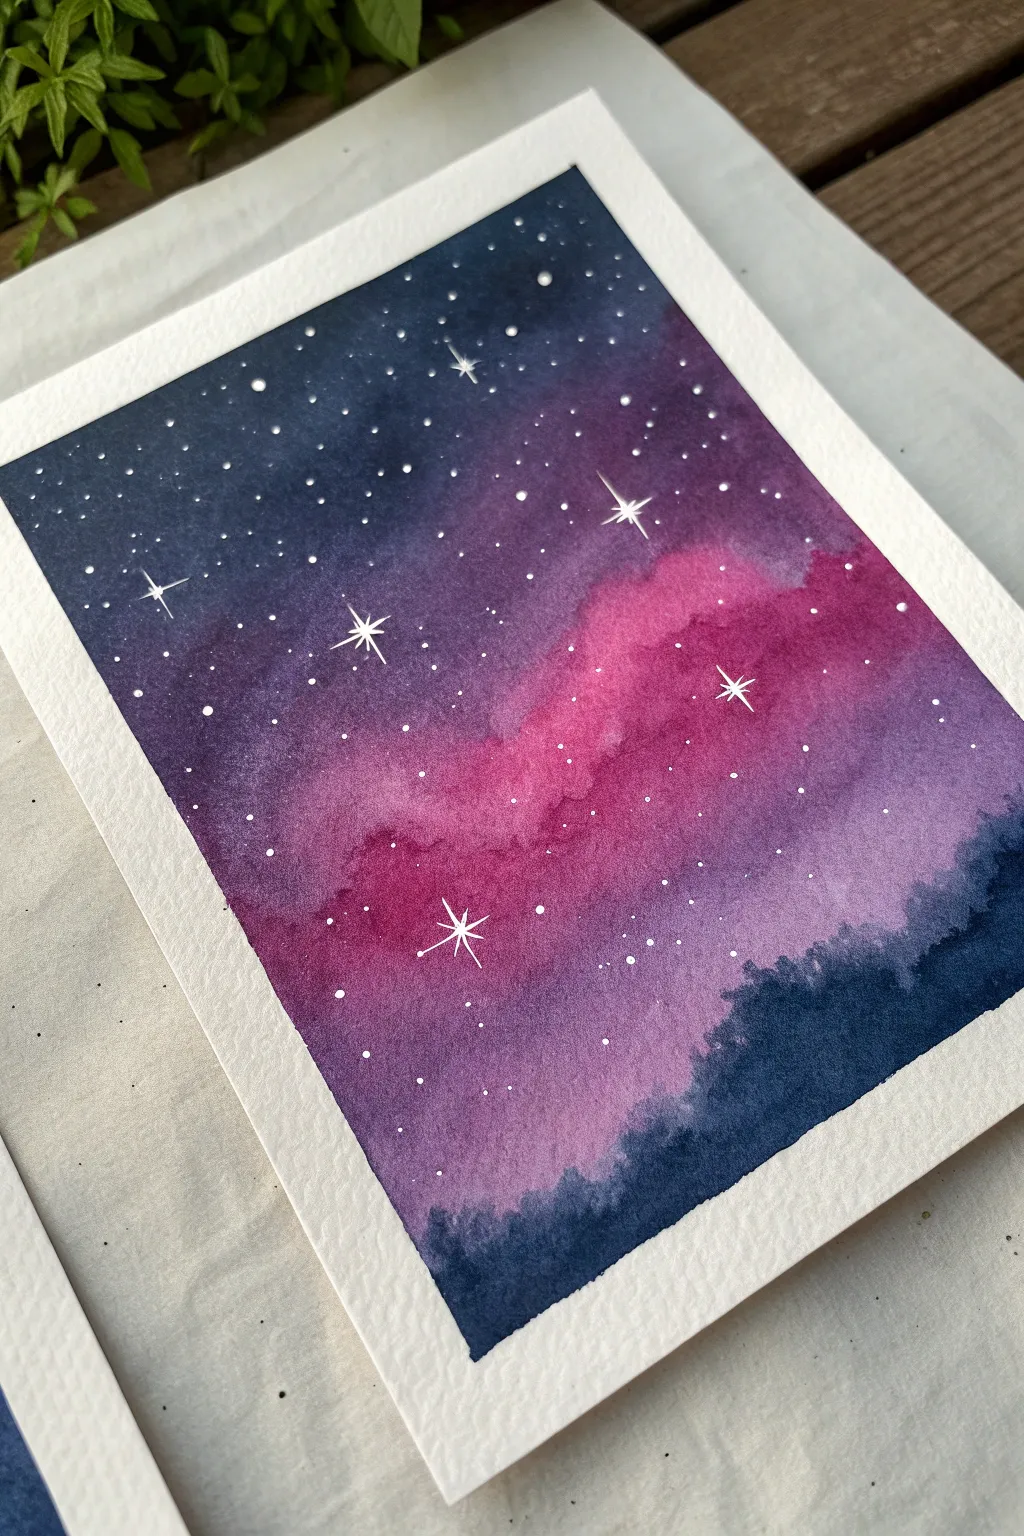
Capture the magic of deep space with this moody, vibrant galaxy painting. By blending rich indigos with vibrant magenta, you’ll create a cosmic backdrop that perfectly sets off a sprinkling of bright white stars.
How-To Guide
Materials
- Cold press watercolor paper (300gsm/140lb)
- Painter’s tape or masking tape
- Watercolor paints (Indigo, Payne’s Gray, Magenta/Alizarin Crimson, Violet)
- White gouache or white gel pen
- Large round brush (size 10 or 12)
- Small liner brush (size 0 or 00)
- Clean water jar
- Paper towels
- Mixing palette
Step 1: Setting the Sky Base
-
Tape the edges:
Begin by taping down all four edges of your watercolor paper to a rigid board. Press the tape down firmly to ensure crisp, clean borders later. -
Prepare your colors:
Pre-mix puddles of your paint on the palette. You’ll need a saturated Indigo or Navy, a deep Violet, and a bright Magenta. Having these ready prevents color drying while you work. -
Wet the paper:
Using your large round brush, apply a layer of clean water across the entire paper surface. Ideally, the paper should be glistening but not holding swimming pools of water. -
Paint the top darks:
Start at the top left corner with your Indigo or Payne’s Gray. Drop the color onto the wet paper, letting it flow naturally. Bring this dark tone down about one-third of the page, keeping the edges soft. -
Add the berry tones:
While the paper is still wet, introduce the Magenta or pink hue in the center area. Dab it in broadly, allowing it to touch and slightly bleed into the dark indigo at the top. -
Blend the transition:
Where the indigo and magenta meet, drop in a little Violet to smooth the gradient. This creates a natural transition rather than a harsh line. -
Create the horizon:
Load your brush with the darkest Indigo fluid again. Paint the bottom third of the paper, shaping an uneven, cloud-like edge where it meets the pink section. -
Soften edges:
Rinse your brush and dab it on a paper towel so it’s damp but clean. Gently run it along the edges where the pink middle meets the dark bottom to create a misty, cloud-like softness. -
Deepen the contrast:
While everything is still damp, drop more concentrated Indigo into the very top corners and the bottom edge. This ensures the galaxy has depth when it dries. -
Let it dry completely:
This is crucial—allow the painting to dry fully until the paper is flat and room temperature to the touch. You can use a heat tool to speed this up.
Control the Bleed
If your colors are spreading too fast and turning muddy, your paper is likely too wet. Wait 60 seconds for the sheen to dull slightly before adding the next color.
Step 2: Adding the Stars
-
Prepare the white medium:
Squeeze out a pea-sized amount of white gouache. Dilute it slightly with water until it has the consistency of heavy cream. -
Flick the stars:
Load a wet brush with the white mixture. Hold it over the painting and tap the handle against another brush or your finger to spray fine speckles across the dark areas. -
Paint large stars:
Switch to your fine liner brush or a white gel pen. Select 5 or 6 spots to place larger, deliberate ‘hero’ stars. -
Draw the starbursts:
For these larger stars, carefully draw a vertical line intersecting a horizontal line. Add smaller diagonal lines in the center to create a glimmering cross shape. -
Add medium dots:
Using the tip of the liner brush or gel pen, manually dot in a few medium-sized stars around the starbursts to bridge the gap between the tiny splatter and the large focal points. -
Final assessment:
Step back and look at the balance. If a dark corner looks too empty, add a small cluster of dots there. -
The reveal:
Once the white paint is totally dry, slowly peel away the painter’s tape at a 45-degree angle to reveal those crisp white borders.
Add Dimension
Before the paint dries, sprinkle a tiny pinch of table salt onto the wet indigo areas. Brush it off when dry for a stunning, textured nebula effect.
Enjoy the deep contrast of your new cosmic landscape
Layered Hills in Stepped Gradients
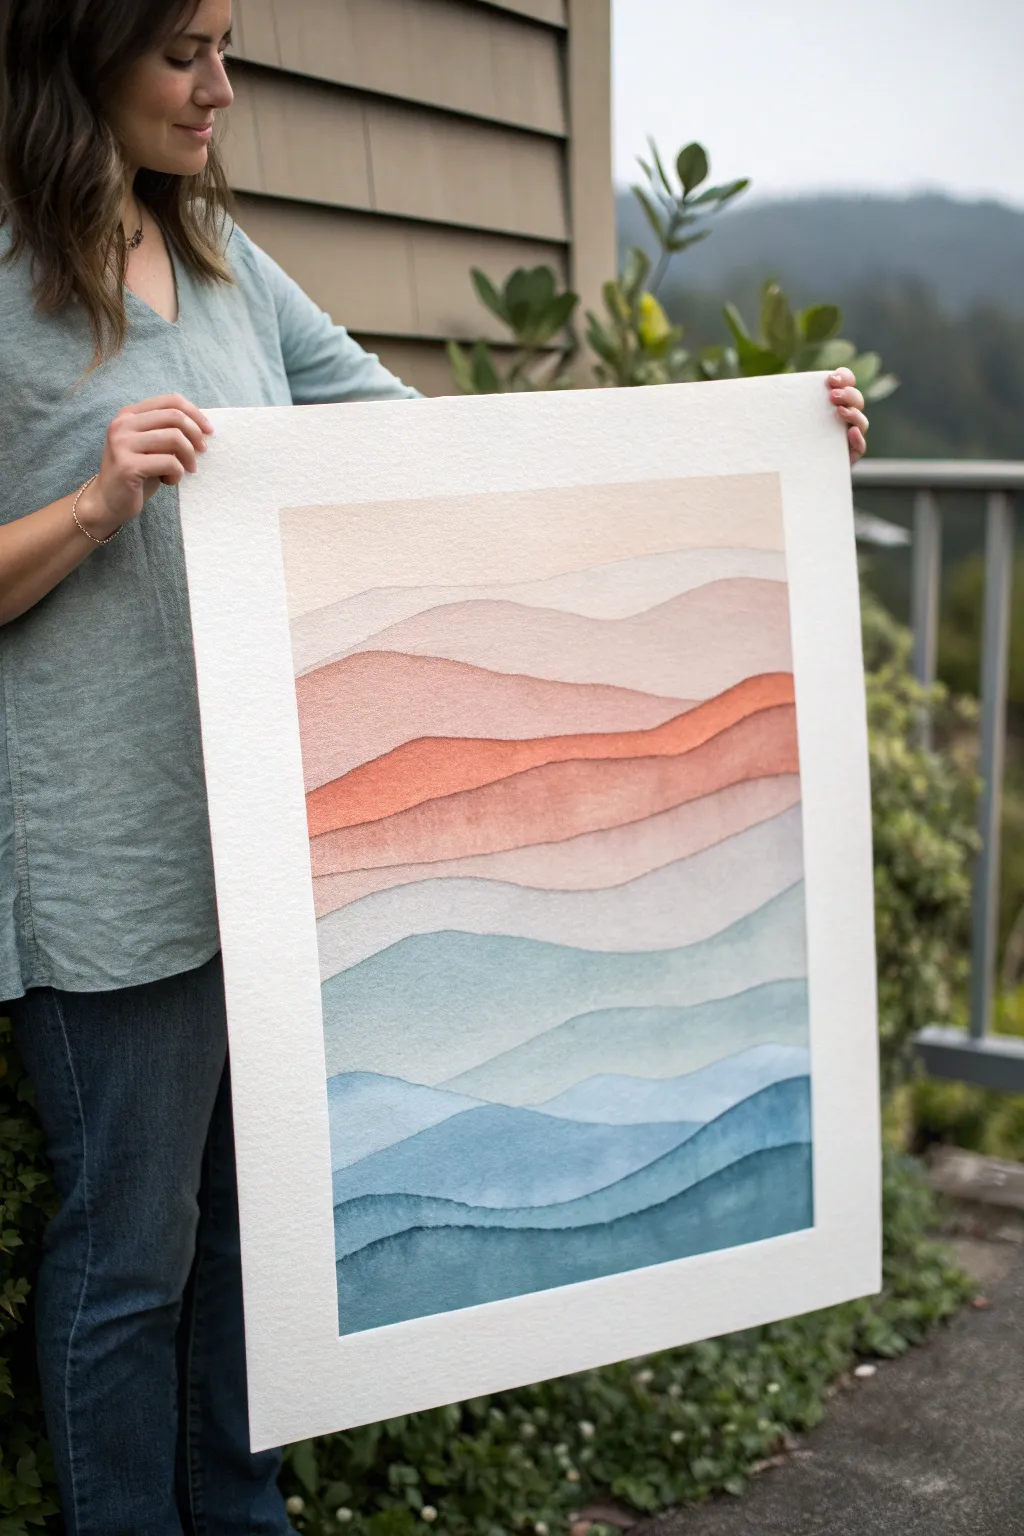
Capture the serenity of rolling hills with this soft, layered watercolor study. By carefully building up gradients from cool ocean blues to warm sunset peaches, you create a sense of depth and atmospheric perspective that feels both modern and timeless.
Step-by-Step Tutorial
Materials
- Large sheet of cold press watercolor paper (minimum 140lb)
- Artist quality watercolor paints (Indigo, Prussian Blue, Burnt Sienna, Alizarin Crimson, Yellow Ochre)
- Large round brush (size 12 or 14)
- Flat wash brush (1 inch)
- Two jars of water (one for clean, one for dirty)
- Masking tape or painter’s tape
- Pencil (HB or lighter)
- Paper towels
- Drawing board or hard surface
Step 1: Preparation and Sketching
-
Secure the paper:
Tape your large watercolor paper down to your drawing board on all four sides. Ensure the tape is pressed firmly to prevent paper buckling and to create a crisp white border around the edge. -
Draft the hill lines:
Using a very light hand, sketch the wavy contour lines of your hills. Start from the bottom and work your way up. -
Vary the line weight:
Make sure your lines are organic and irregular. Some sections should be steeper, others flatter, to mimic natural terrain. Leave a generous amount of white space at the very top for the sky.
Step 2: Painting the Cool Tones
-
Mix the darkest blue:
In your palette, mix a saturated, deep blue using Indigo and a touch of Prussian Blue. This will be for the very bottom layer. -
Apply the first wash:
Load your round brush and paint the bottom-most shape. Ensure the top edge of this shape follows your pencil line precisely, but keep the paint consistent and flat. -
Softening the blend:
As you move to the second layer up, add a significant amount of water to your blue mix to lighten the value. Paint the next hill shape, slightly overlapping the bottom one if dry, or letting them touch if you want a softer bleed. -
Transitioning to teal:
For the third and fourth layers, introduce a tiny bit of cooler green or turquoise to your blue mix. Continue to dilute the pigment with water so each ascending layer becomes lighter and more transparent. -
Dry completely:
This is crucial: Let the cool bottom section dry entirely before moving upward. If the paper is cold to the touch, it is still wet.
Clean Water Is Key
Since this relies on transparency, dirty water will muddy your colors. Change your rinse water immediately when switching from the blue section to the pink section.
Step 3: Transitioning to Warmth
-
Bridge the gap:
Create a neutral transition graphics by mixing a very slate-like grey-blue. Paint the middle layer that separates the obvious blues from the coming warm tones. -
Mix the sunset strip:
Mix a vibrant coral-orange using Alizarin Crimson and Yellow Ochre. This should be fairly saturated, acting as a focal point or ‘stripe’ of intensity in the middle of the composition. -
Paint the horizon line:
Apply this warm coral strip carefully. I like to let the brush skip slightly on the paper texture here to keep it feeling organic. -
Fade upward:
Rinse your brush. For the layers above the coral strip, use a very watery wash of Burnt Sienna or a pale peach. These layers should be extremely faint.
Add Metallic Details
Once dry, trace the very top edge of the dark blue or coral layers with a fine gold paint pen or metallic watercolor for a touch of shimmer.
Step 4: Finishing Touches
-
The final sky fade:
For the very top shape, use almost clear water with just a ghost of warm pigment. Let it fade seamlessly into the white of the paper at the top. -
Review edges:
Look for any ‘hard edges’ that formed where you didn’t want them. You can gently scrub them with a damp, clean brush to soften, although keeping the hard contour lines is part of this specific style. -
Remove the tape:
Once the painting is 100% dry, peel the tape away slowly at a 45-degree angle to reveal your clean, crisp borders.
Now you have a serene, layered abstract landscape ready to be framed and hung


Monochrome Gradient in One Color Family
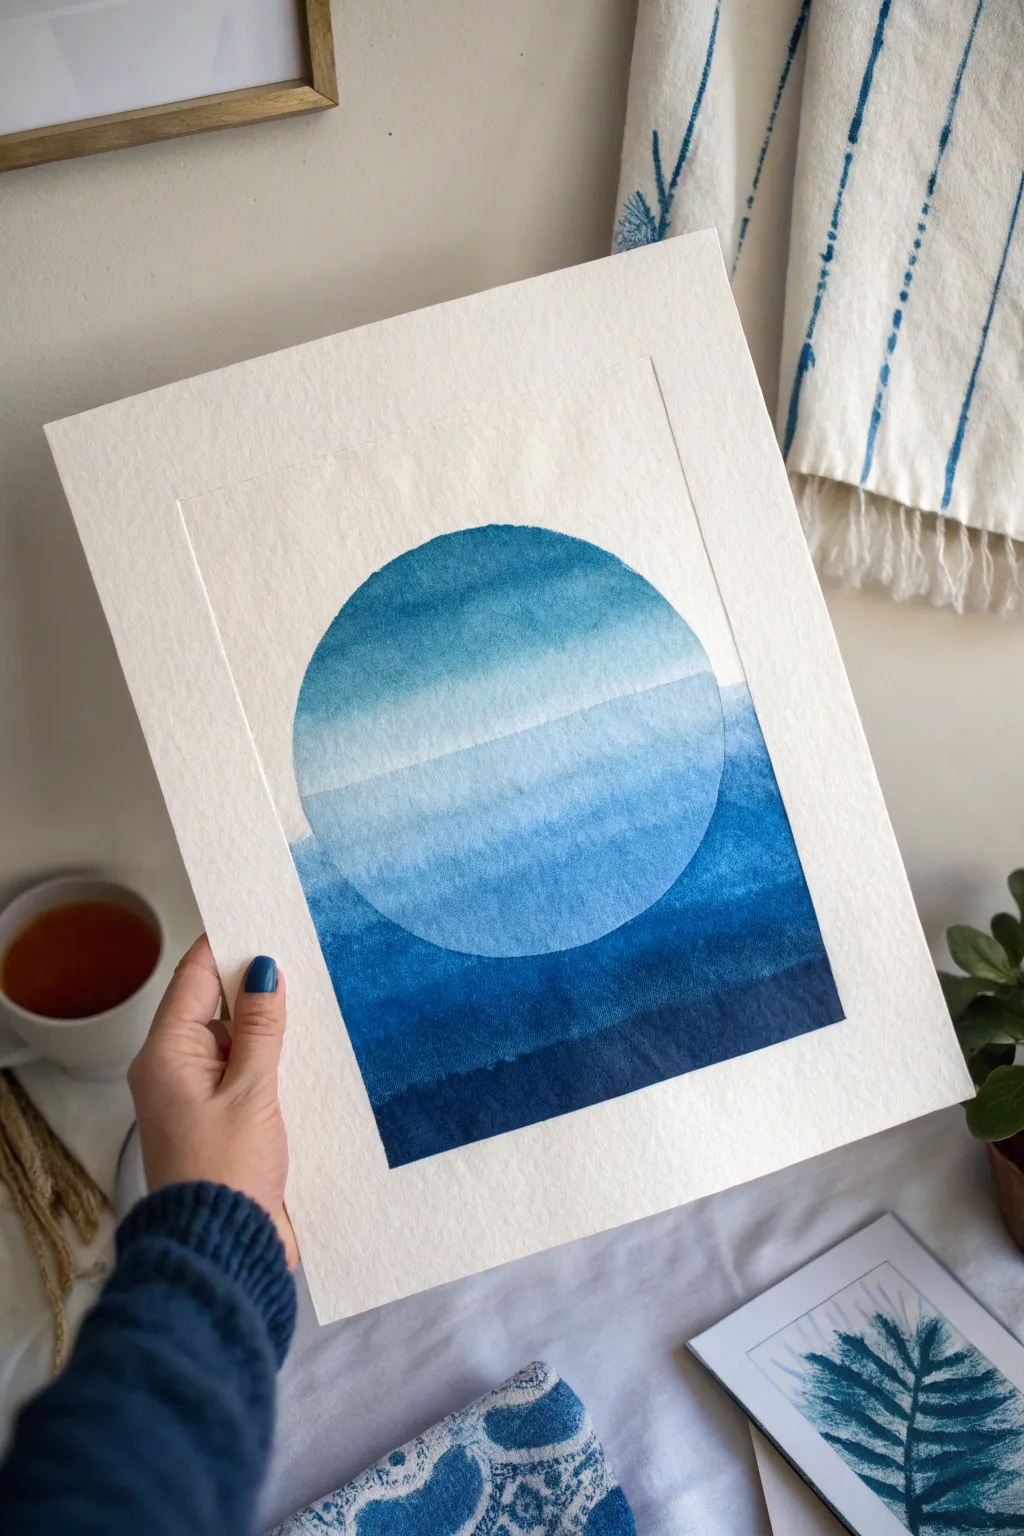
Capture the serene beauty of a moonlit sky using just one color family in this striking watercolor project. By layering a circular gradient over a rectangular wash, you will create a sense of depth and luminosity that feels both modern and timeless.
How-To Guide
Materials
- Cold press watercolor paper (minimum 140lb)
- Pencil and eraser
- Large circular object or compass
- Ruler
- Masking fluid (drawing gum) or masking tape
- Watercolor paints (phthalo blue, indigo, and prussian blue)
- Large flat wash brush
- Medium round brush
- Two jars of water
- Paper towels
- Palette for mixing
Step 1: Planning and Masking
-
Define the boundaries:
Start by using a ruler to lightly draw a large rectangle in the center of your watercolor paper. This will be the outer boundary of your painting. -
Draw the circle:
Place your large circular object or compass in the center of the rectangle and lightly trace a circle. Press very gently with your pencil so the graphite doesn’t show through the final paint. -
Mask the circle:
This is crucial for preserving the lighter tones. Carefully apply masking fluid over the entire interior of the circle. Create a smooth, even layer and ensure the edges are crisp. -
Wait for drying:
Allow the masking fluid to dry completely. It should feel rubbery and not tacky to the touch. Patience here prevents tearing the paper later. -
Tape the edges:
Use artist’s tape or masking tape to tape off the four outer edges of your rectangle border. Press the edges of the tape down firmly to prevent paint bleeding.
Clean Bevels
Peel your tape away at a 45-degree angle away from the painting. If the paper starts to lift, use a hair dryer to warm the tape adhesive slightly.
Step 2: Painting the Background
-
Prepare the deep blues:
Mix a large puddle of your darkest blue—an indigo or Prussian blue works well here. You want a high pigment-to-water ratio for that deep, bottom-of-the-ocean look. -
Start the background gradient:
Using your flat wash brush, load up the dark blue paint. Start painting from the very bottom of the taped rectangle, using horizontal strokes. -
Transition upwards:
As you move up the paper, dip your brush into clean water to slightly dilute the pigment. Continue painting right over the dried masking fluid that covers the circle. -
Fade to light:
Continue adding water and reducing pigment as you reach the top of the rectangle. The color should transition from a deep navy at the bottom to a very pale, watery blue at the top. -
Dry completely:
Let this background layer dry thoroughly. The paper must be bone dry before you attempt to remove the mask.
Salt Texture
While the background paint is still wet, sprinkle a pinch of coarse sea salt into the dark blue area. It creates blooming, star-like textures as it dries.
Step 3: Revealing and Painting the Circle
-
Remove the mask:
Gently rub the masking fluid with your clean finger or a rubber cement pickup tool to peel it away, revealing the pristine white paper circle underneath. -
Inverse the gradient:
For the circle, we will flip the gradient direction. We want the top of the circle to be the darkest point to contrast with the light background. -
Paint the top of the circle:
Load your round brush with a medium-strength cyan or phthalocyanine blue. Carefully paint the top arc of the circle, keeping the edge neat. -
Create distinct bands:
Instead of a smooth seamless wash, try painting in horizontal bands. Paint a strip of color, then dilute your mix slightly for the next strip down. -
Soften the edges:
As you paint each band moving downward, run a damp brush along the edge where the new band meets the previous one to encourage a slight bleed. -
Fade to the bottom:
Continue painting bands down the circle, getting lighter and lighter. The bottom of the circle should be the palest blue, contrasting against the dark background you painted earlier. -
Final touches:
Once the circle is dry, carefully peel away the border tape to reveal your crisp, white edges.
Now you have a stunning, atmospheric piece of art ready to frame or gift
Desert Heat Haze Gradient Sky
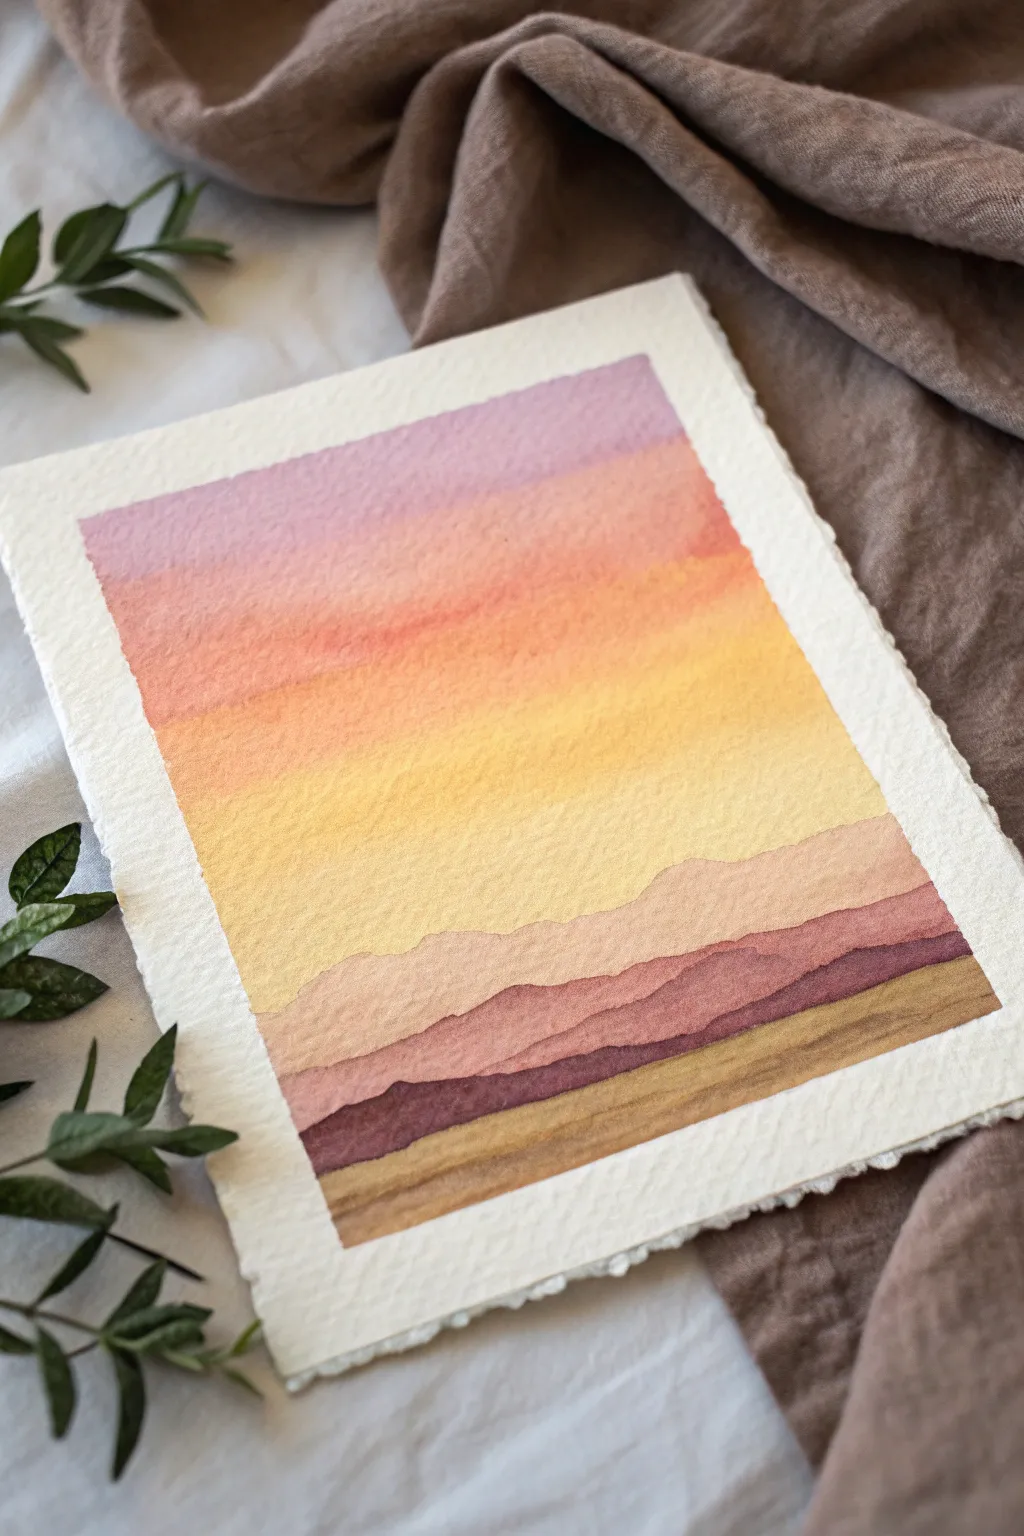
Capture the serene warmth of a fading day with this layered watercolor landscape. This project focuses on building a seamless, glowing gradient sky that transitions gently into rolling, hazy mountain silhouettes.
Step-by-Step
Materials
- Cold press watercolor paper (deckle edge optional)
- Watercolor paints (Lavender, Coral/Orange, Warm Yellow, Burnt Sienna, Deep Purple/Alizarin Crimson)
- Flat wash brush (3/4 inch or 1 inch)
- Round brush (size 6 or 8)
- Masking tape or gummed tape
- Jar of clean water
- Paper towels
- Palette for mixing
Step 1: Painting the Gradient Sky
-
Prepare your paper:
Begin by taping down your paper to a board if you aren’t using a block. This prevents warping. If you have paper with deckle edges like mine, you might gently tape just the very corners or let it float if it’s heavy enough (300gsm+). -
Mix your sky colors:
On your palette, prepare three distinct puddles of watery paint: a soft lavender for the top, a warm coral or salmon pink for the middle, and a bright warm yellow for the horizon. -
Clean water wash:
Using your flat wash brush, apply a layer of clean water across the top two-thirds of the paper. This ‘wet-on-wet’ technique is crucial for a smooth blend. -
Apply the lavender:
Load your brush with the lavender mix and paint a horizontal strip across the very top wet area. -
Transition to coral:
While the lavender is still wet, rinse your brush slightly and pick up the coral color. Apply this right below the lavender, allowing the edges to touch and bleed into each other naturally. -
Finish with yellow:
Rinse again and load up with the warm yellow. Paint the rest of the sky area, blending it upwards into the coral. Bring the yellow wash down past where you want your highest mountain to start. -
Let it dry completely:
This is the most important step. The paper must be bone dry before you start the mountains, or the sharp edges will bleed into the sky. Use a hairdryer on low heat if you’re impatient.
Step 2: Layering the Mountains
-
Mix the first mountain color:
Create a very diluted, pale mixture. I usually mix a bit of the lavender with a touch of burnt sienna to get a dusty, hazy mauve color. -
Paint the furthest range:
Using your round brush, paint a jagged, organic line across the paper to represent the furthest mountain peaks. Fill in everything below this line with the pale wash. -
Dry the first layer:
Wait for this first mountain layer to dry completely. The transparency of watercolors relies on dry layers. -
darkening the mix:
Add a bit more pigment to your previous mountain mix—maybe a touch more purple or crimson—to make it slightly darker and more intense. -
Paint the middle range:
Paint a second mountain range slightly lower than the first one. Vary the height of the peaks so they don’t look too uniform. Fill the shape in downwards. -
Dry and deepen:
Once dry, darken your mix again. Add deep purple or even a tiny dot of blue to cool it down. Paint the third, lower range of mountains, which should be darker than the previous two. -
Create the foreground:
For the bottom-most layer, closest to the viewer, mix a stronger, earthier color. Use Burnt Sienna mixed with a little deep purple. Paint the final ground layer at the bottom. -
Add texture (optional):
While the final foreground layer is drying but still damp, you can streak in a slightly darker brown horizontally to suggest ground texture or shadows.
Fixing “Cauliflowers”
If water blossoms appear in your sky, don’t fuss with them while wet. Wait until dry, then gently scrub the edge with a damp stiff brush to soften it.
Sun & Stars
Once fully dry, flick white gouache for stars, or lift a circle of paint out of the wet sky with a tissue to create a soft, glowing sun.
Frame your piece with plenty of white space to let those delicate edges breathe
Negative-Space Silhouette Cut Out of a Gradient
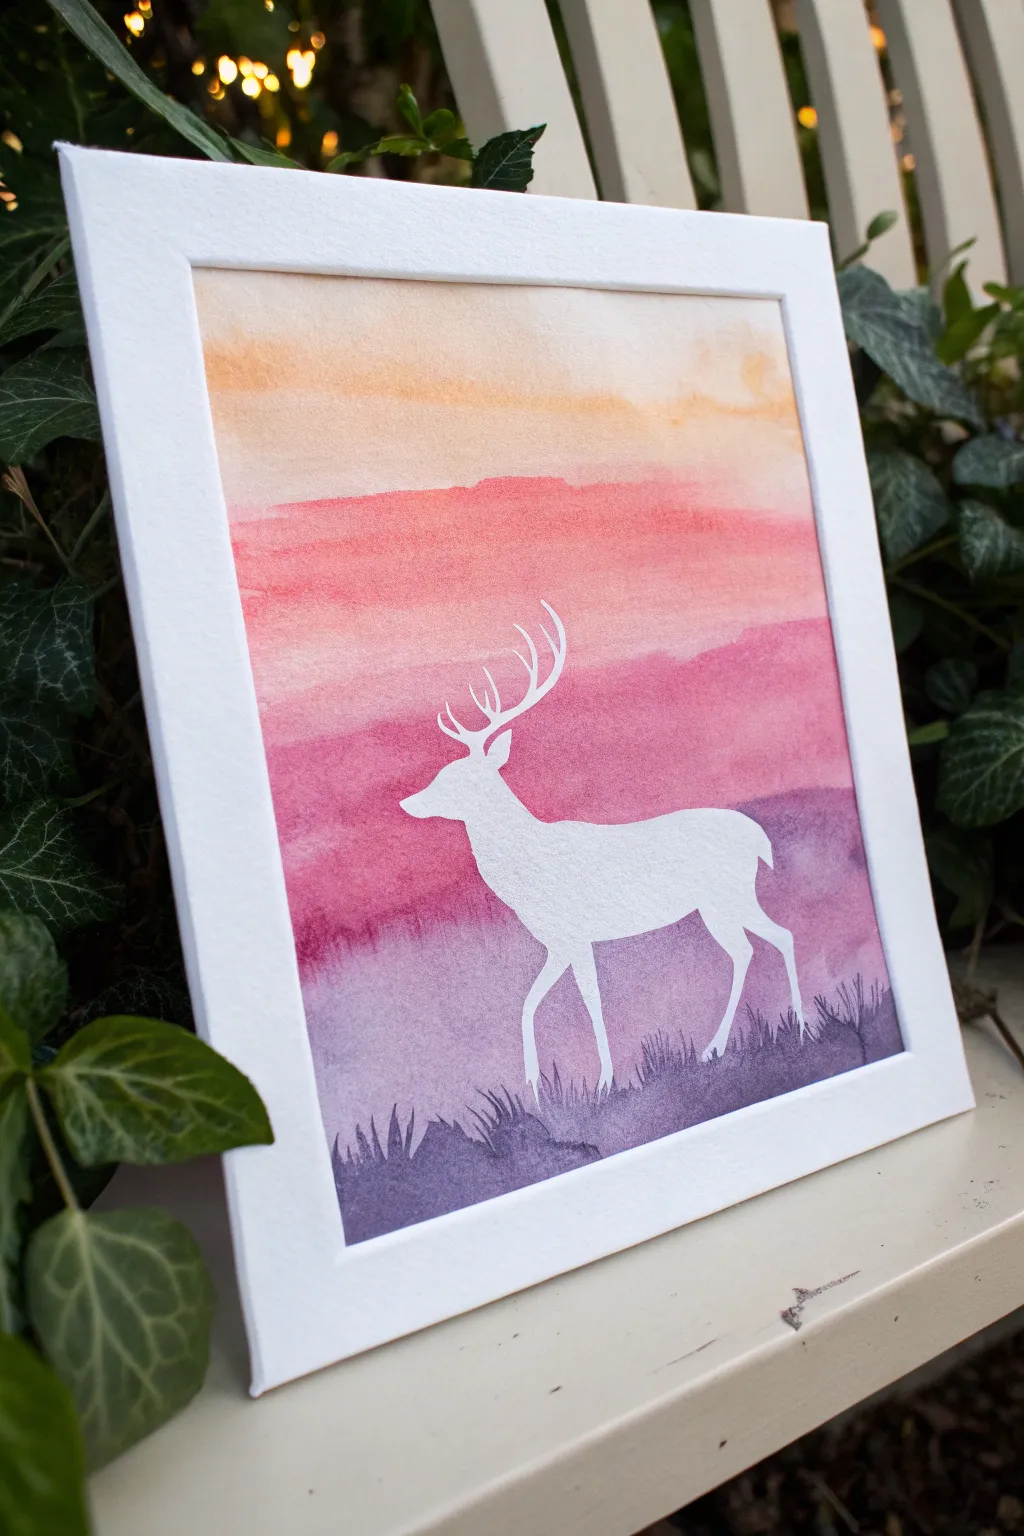
Capture the serene beauty of twilight with this striking negative space watercolor project. By masking off a simple deer shape, you’ll create a crisp, bright white focal point that stands out beautifully against a blended, multicolored sunset gradient.
Step-by-Step Tutorial
Materials
- Watercolor paper (cold press, heavy weight)
- Watercolor paints (Yellow ochre, cad orange, alizarin crimson, violet)
- Masking fluid (drawing gum) or masking tape/stencil vinyl
- Old paintbrush or silicone applicator (for masking fluid)
- Large flat wash brush
- Medium round brush
- Jar of clean water
- Paper towels
- Pencil and eraser
- Rubber cement pick-up (optional, for removing mask)
- White mat or frame
Step 1: Preparation and Masking
-
Sketch the outline:
Begin by lightly sketching the outline acting as your focal point on the watercolor paper. Draw a deer profile in the center, focusing on the antlers and the stance of the legs. Keep the pencil lines faint so they are easily erased later. -
Refine the shape:
Double-check your proportions. The beauty of a silhouette lies in the recognizable contour, so make sure the antlers look organic and the legs are positioned naturally. -
Apply masking fluid:
Using an old brush or a silicone tool, carefully fill in the entire deer shape with masking fluid. Be generous enough to cover the paper fully but avoid thick globs that take forever to dry. -
Protect the borders:
If you want a crisp white border around the painting itself (like a built-in mat), apply masking tape around the four edges of your paper. Press the edges of the tape down firmly to prevent paint seepage. -
Full dry time:
Let the masking fluid dry completely. It should feel hard and tacky to the touch, with no wet spots. If you paint too soon, you risk ruining the brush and the paper surface.
Save Your Brushes
Never use your good watercolor brushes for masking fluid! The fluid dries into rubber that ruins bristles instantly. Coat the bristles in dish soap before dipping to make cleaning easier.
Step 2: Painting the Gradient
-
Wet the paper:
Using your large flat brush and clean water, apply a gentle wash over the entire paper surface, going right over the dried masking fluid. This wet-on-wet technique helps the colors blend seamlessly. -
Start with the sky:
Load your brush with a diluted yellow ochre or pale orange. Paint a horizontal strip across the very top of the paper, letting the color diffuse downwards into the wet paper. -
Transition to warmth:
While the first strip is still wet, pick up a richer orange or coral shade. Apply this below the yellow, slightly overlapping the two zones so they bleed together softly. -
Deepen the colors:
Move to a reddish-pink or alizarin crimson for the middle section behind the deer’s rack. Stroke horizontally, allowing the water on the paper to do the heavy lifting of blending the transition. -
Add the purple tones:
As you move down past the deer’s body, switch to purple or violet. Paint this band stronger and less diluted than the top colors to create visual weight at the bottom. -
Ground the scene:
For the very bottom strip (the ground), mix a deep violet with a touch of blue or black. Paint horizontal strokes to imply a grassy field, making it the darkest part of the gradient. -
Suggest grassy texture:
While the bottom purple layer is damp but not soaking, use a smaller round brush to flick upward strokes along the bottom edge. This creates the illusion of tall grass shadows.
Step 3: Reveal and Refine
-
Let it dry completely:
Patience is key here. Before removing anything, the paper must be bone dry. If it feels cool to the touch, it’s still dragging moisture. -
Remove the mask:
Gently rub the masking fluid with your finger or a rubber cement pick-up tool. I usually start at the legs and peel upwards carefully to avoid tearing the paper. -
Clean up lines:
Once the mask is gone, erase any visible pencil marks. If any paint bled under the mask slightly, you can gently scrape it away with a craft knife or cover it with a tiny dab of white gouache. -
Final touches:
Peel off the border tape at a 45-degree angle away from the painting. Place your finished piece in a white mat frame to accentuate the clean, crisp silhouette.
Starry Night Option
Before removing the deer mask, load a toothbrush with white gouache and flick tiny specks over the top purple/blue section. This creates a magical starry sky effect behind the silhouette.
Now step back and admire how that stark white shape transforms a simple background wash into a moody, atmospheric scene


Have a question or want to share your own experience? I'd love to hear from you in the comments below!