If you’re craving that fresh, nature-soaked vibe, green rock painting is one of the easiest ways to get it on your table fast. I love how one color family can shift from soft and leafy to bold and graphic, depending on the details you add.
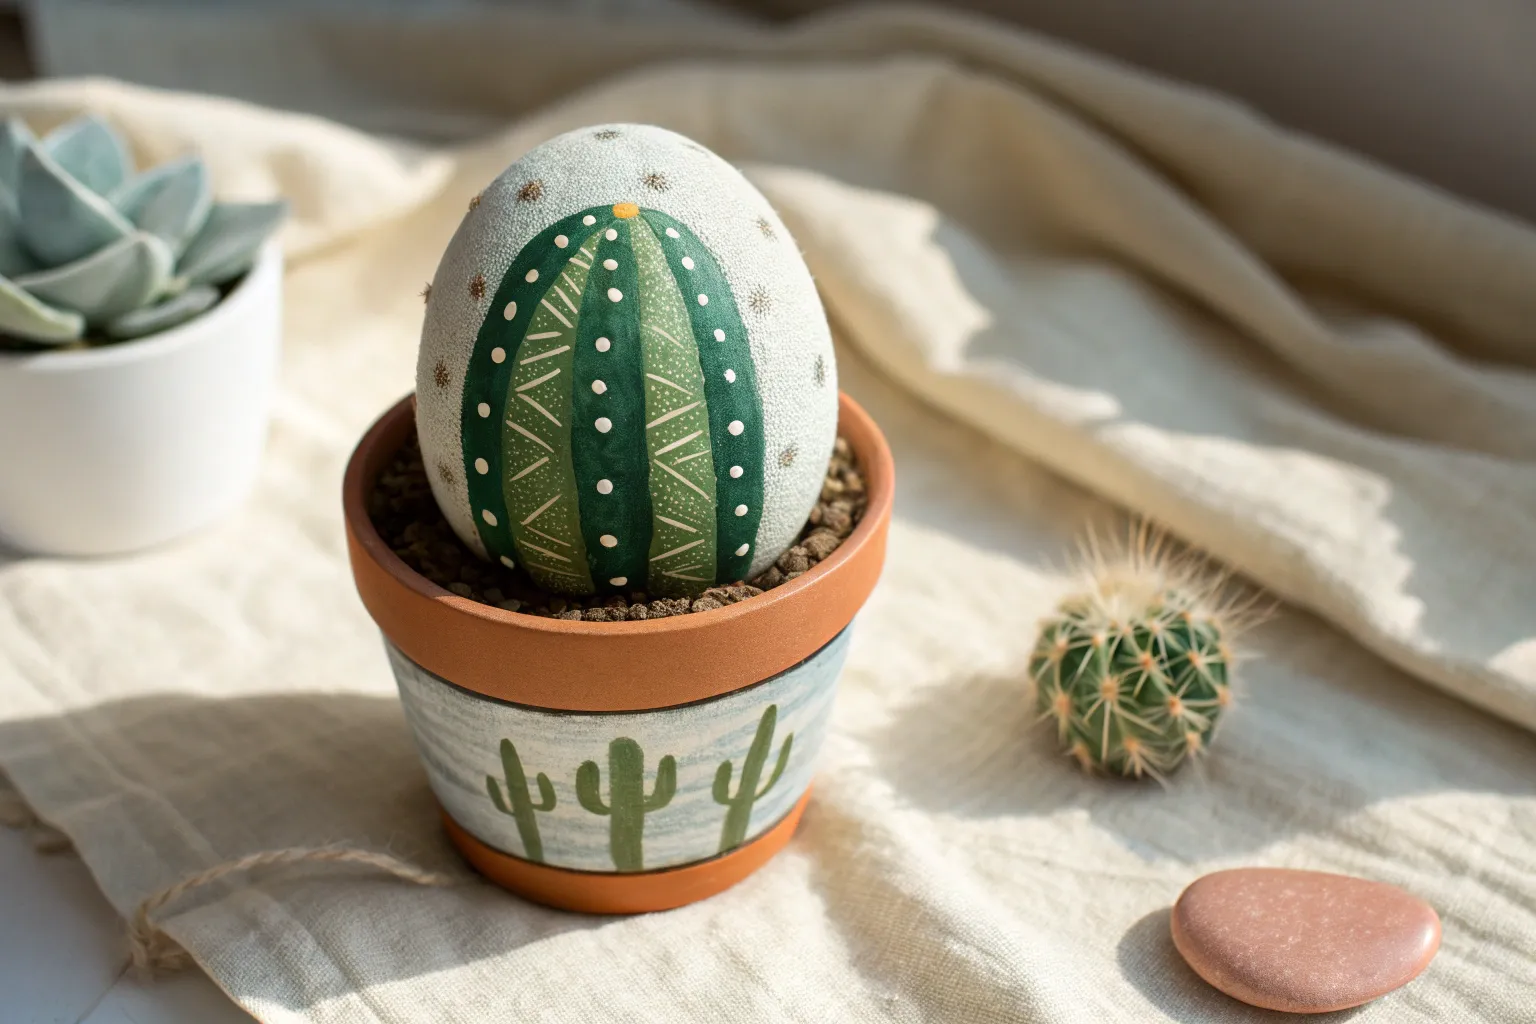
Classic Cactus Rocks
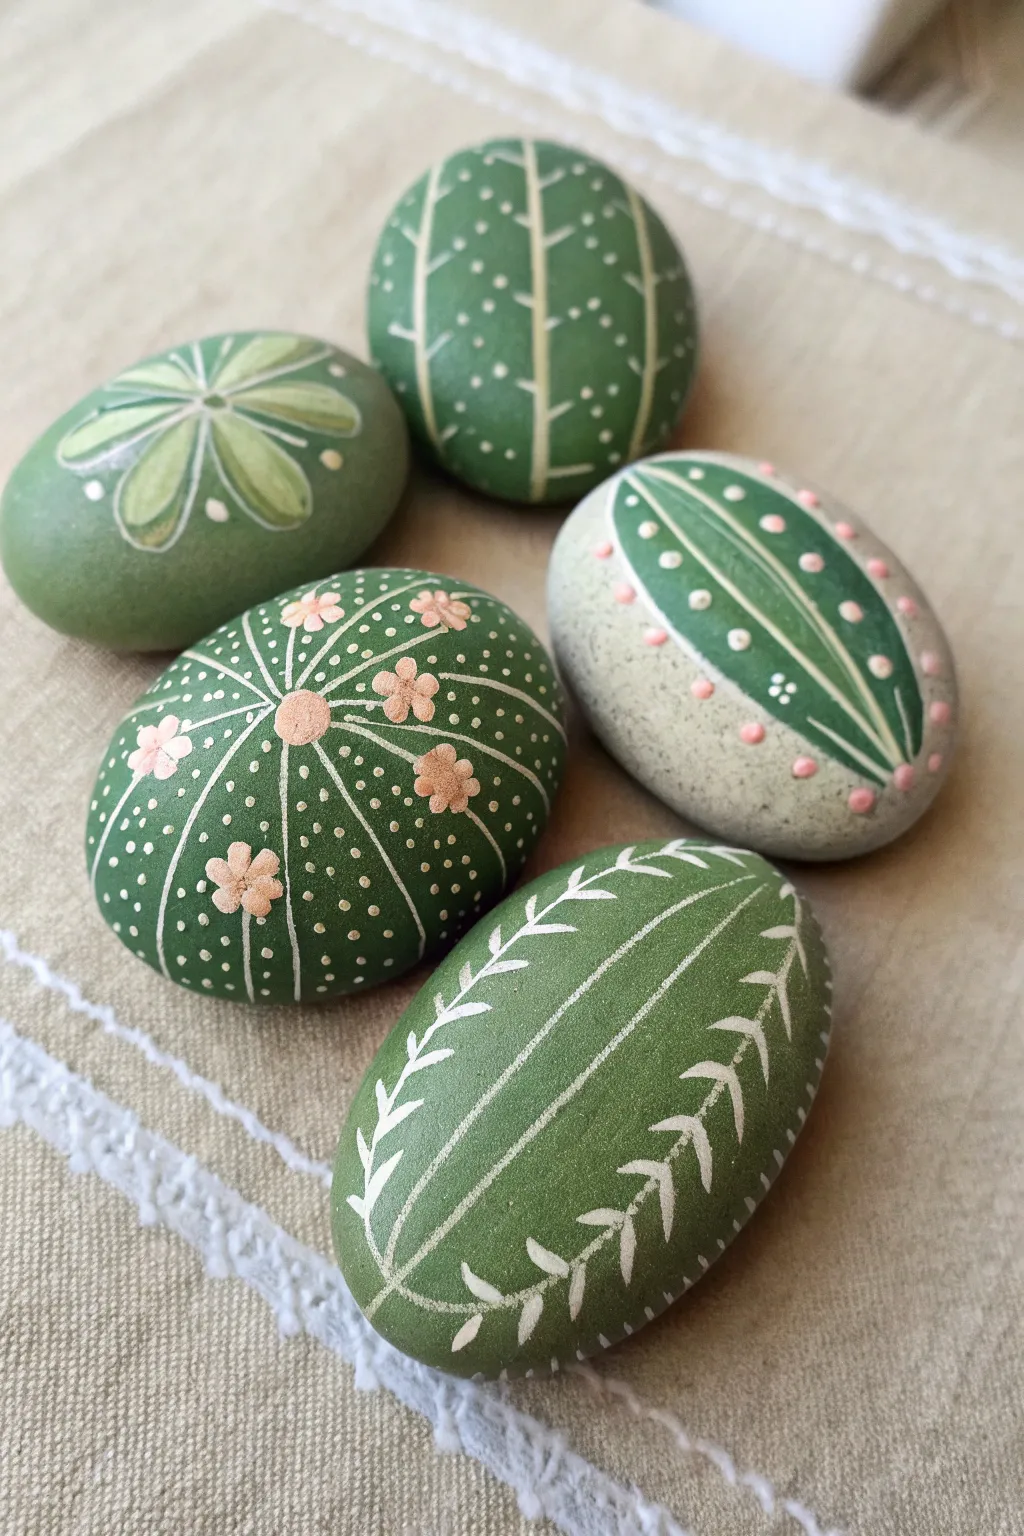
Transform smooth river rocks into an everlasting succulent garden that requires absolutely no watering. These adorable faux-cacti feature distinct needle patterns and tiny blooms painted on deep green backgrounds, creating a charming textural illusion.
Step-by-Step
Materials
- Smooth oval river stones (assorted sizes)
- Acrylic paint (Deep forest green, lighter olive green, white, pale pink)
- Flat shader brush (size 6 or 8)
- Fine liner brush (size 0 or 00)
- Dotting tools (various sizes)
- Acrylic matte varnish or sealer
- Palette or paper plate
- Water cup and paper towels
Step 1: Base Coating
-
Clean the canvas:
Begin by scrubbing your stones with warm soapy water to remove any dirt or oils. Let them dry completely before painting to ensure the acrylics adhere properly. -
Mix your greens:
Prepare a deep forest green for the main base color. For variety, you can leave one stone its natural grey color or mix a lighter, sage green for a different cactus species. -
Apply the first coat:
Using a flat shader brush, paint the entire top surface of four of the stones with your deep green paint. Leave one stone unpainted if you want to replicate the light grey cactus shown in the image. -
Paint the second coat:
Once the first layer is dry to the touch, apply a second coat of green to ensure solid, opaque coverage. I generally find two coats give the richest color. -
Create the grey cactus base:
For the light grey stone, paint a large oval shape in the center using green paint, leaving a wide border of natural stone visible. This creates the body of that specific cactus variety.
Shaky Hands?
If your lines are wobbling, rest your pinky finger on the dry part of the stone to stabilize your hand while painting fine details.
Step 2: Designing the Cacti Patterns
-
The Ribbed Cactus (Bottom Right):
On one green stone, use your fine liner brush and white paint to draw thin, vertical curved lines running from the top to the bottom to create ribs. -
Adding ribbed details:
Along these white lines, paint small ‘V’ shapes or angled dashes pointing downwards to simulate spines. -
The Starburst Cactus (Top Left):
On another green stone, mix a lighter lime green. Paint 6-8 teardrop petals radiating from a central point near the top of the stone. -
Outlining the starburst:
Use your fine liner brush with white paint (thinned slightly with water) to outline each lime green petal and draw a center line through each one. -
The Grid Cactus (Top Center):
Take a third green stone. Paint vertical lines with a light beige or off-white color. Add short horizontal dashes across these lines to create a ladder-like grid effect. -
Adding texture dots:
Use a small dotting tool to place tiny white dots randomly in the spaces between your grid lines to mimic texture. -
The Prickly Pear Style (Center):
On the largest round stone, use a liner brush to draw thin white lines radiating from a central point, like wheel spokes. -
Detailing the Prickly Pear:
Along these spoke lines, use a very fine touch to add tiny white dots. Fill the spaces between the lines with scattered tiny dots as well.
Step 3: Floral Accents & Finishing Touches
-
Mixing blossom pink:
Mix white with a tiny drop of red to create a soft, pale pink for the flowers. -
Painting main blooms:
On the ‘Prickly Pear’ stone, paint small five-petal flowers using the pink paint. Place a larger flower in the center where the lines meet, and smaller ones scattered around. -
Adding buds to the grey cactus:
Return to the light grey stone. Use a dotting tool dipped in pink to add dots along the outer edge of the green painted oval. -
Refining the grey cactus:
Paint white spines radiating inward from the green edge of the oval, pointing toward the center. -
Flower centers:
Add a tiny dot of darker pink or orange in the center of your main flower blooms for depth. -
Final cure:
Allow all paint layers to dry completely, ideally overnight, to prevent smudging during the sealing process. -
Sealing the work:
Apply a coat of matte spray varnish or brush-on sealer to protect your painting and give the stones a finished, professional look without too much shine.
Pro Tip: Translucency
Water down your lighter green paint slightly when painting ‘petals’ on top of the dark base. This creates a realistic, semi-transparent succulent look.
Arrange your finished stones together in a shallow tray or pot for a delightful zero-maintenance garden display


Monstera Leaf Rock
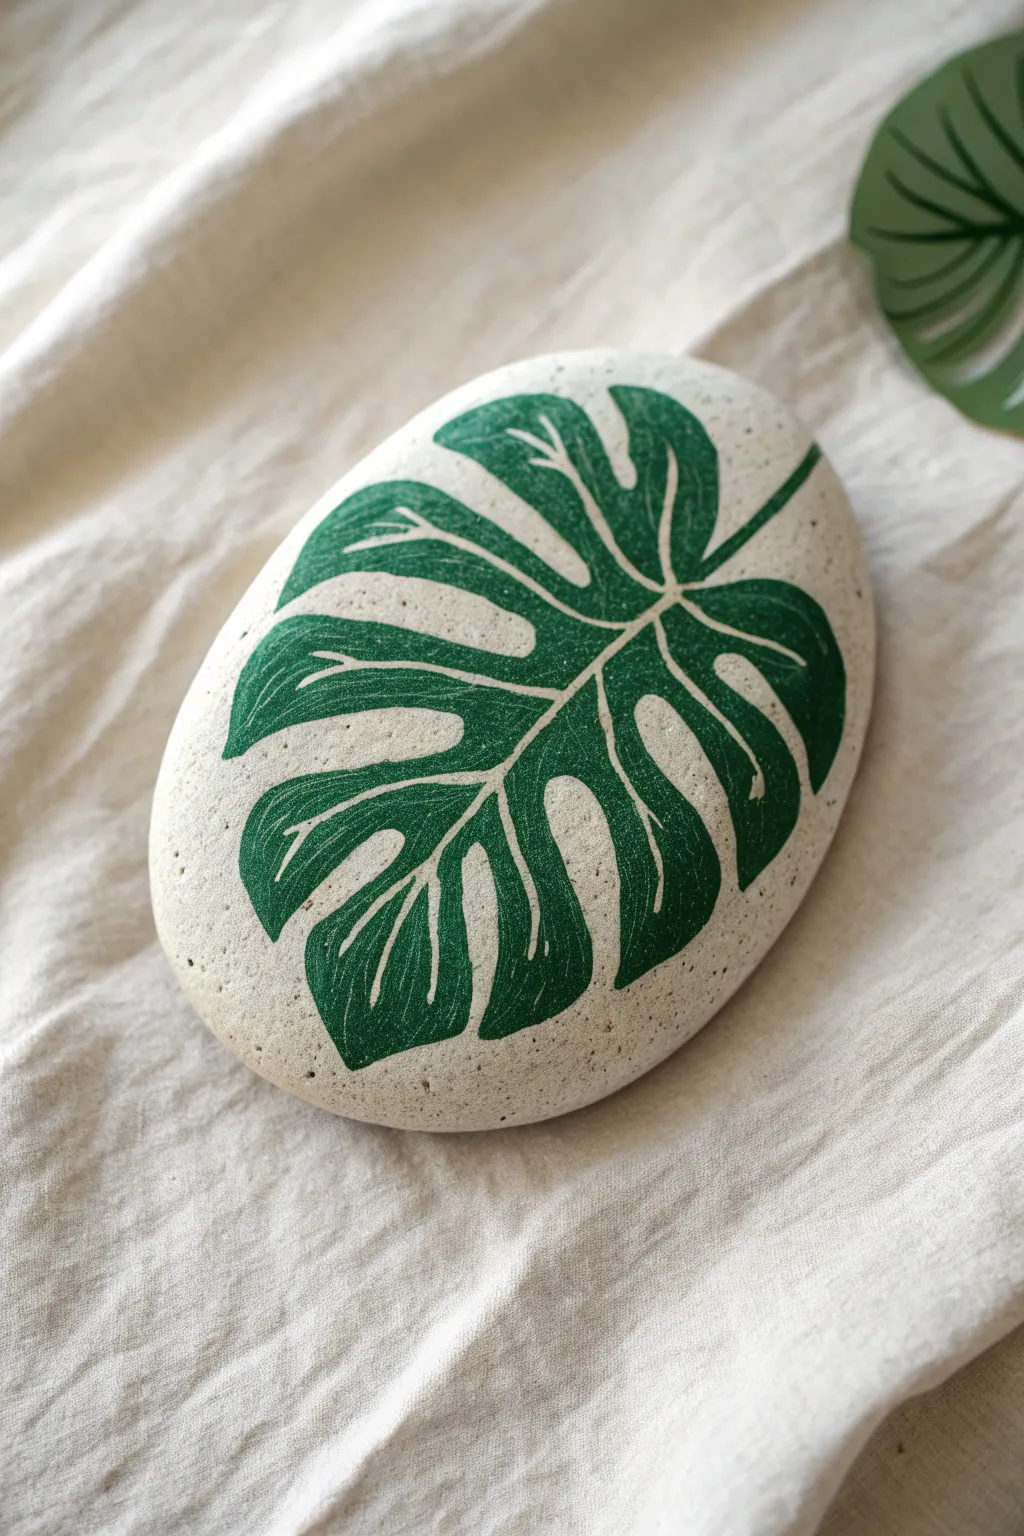
Bring a touch of the rainforest to your rock collection with this striking Monstera leaf design. By letting the rock’s natural cream color serve as a backdrop, you can create a bold, modern botanical piece that pops with deep jungle green.
Detailed Instructions
Materials
- Smooth, oval-shaped river rock (light beige or cream)
- Acrylic paint (deep forest green)
- Pencil for sketching
- Fine liner brush (size 0 or 00 for details)
- Small round brush (size 2 or 3 for filling)
- Matte or sealant or varnish
- Water cup and palette
- Paper towels
Step 1: Preparation and Sketching
-
Clean surface:
Begin by washing your stone with warm soapy water to remove any dust or oils. Let it dry completely before starting. -
Analyze the shape:
Position your rock so the widest part is somewhat horizontal or diagonal, depending on how you want the leaf to sit. I usually envision the leaf stem starting at one of the narrow ends. -
Draw the central vein:
With a pencil, lightly sketch a curved line running from one end of the rock to the other. This main midrib will anchor your entire leaf structure. -
Outline the leaf shape:
Sketch a large heart shape around the central vein, filling almost the entire surface of the rock but leaving a small border near the edges. -
Add fenestrations:
Now, draw the characteristic ‘slots’ or cutouts. Sketch inward curves from the leaf’s outer edge toward the center vein, creating finger-like sections. -
Detail the holes:
Add a few isolated oval holes near the center vein on the wider sections of the leaf for that realistic Swiss-cheese plant look. -
Finalize sketch:
Refine your penciled lines until you are happy with the symmetry and spacing. Lighten the lines with an eraser if they are too dark.
Clean Lines Hack
Work steadily from the center outward. Use your pinky finger as a pivot point resting on a dry part of the rock to stabilize your hand for shaky lines.
Step 2: Painting the Foliage
-
Mix your green:
Prepare your green acrylic paint. You want a dark, solid forest green. If your paint is too translucent, mix in a tiny touch of black or dark blue to deepen it. -
Outline a section:
Using your fine liner brush and the green paint, carefully trace the pencil outline of one of the top leaf sections. -
Fill the section:
Switch to your size 2 round brush to fill in that outlined section with solid green. Keep the paint application smooth to avoid heavy brush ridges. -
Preserve the veins:
This is crucial: instead of painting over the veins, paint *around* them. Leave a very thin line of the bare rock showing to represent the heavy veins. -
Continue section by section:
Work your way down the leaf, outlining and filling each segment. Remember to leave those thin negative-space lines for the side veins branching off the center. -
Refine the edges:
Go back over the outer edges of the leaf with the liner brush to ensure the curves are crisp and sharp. -
Check opacity:
Let the first coat dry completely. If the rock color shows through the green too much, apply a second thin coat for solid coverage.
Step 3: Finishing Touches
-
Stylize the veins:
If your negative-space veins look messy, you can carefully clean them up with a tiny bit of cream paint that matches your rock, or scratch away excess green paint gently with a toothpick while it’s semi-dry. -
Add stem detail:
Extend a thin green line off the bottom of the leaf to create the stem, curving it naturally off the side of the stone. -
Dry time:
Allow the rock to dry for several hours. The thickest parts of the paint must be fully hardened. -
Seal the work:
Apply a coat of matte spray varnish. A matte finish mimics the natural waxy texture of a real Monstera leaf better than a gloss finish.
Jungle Vibes
For a variegated Monstera look, mix a lighter lime green and dab it onto a few sections while the dark green is wet to create a marbled effect.
Place your finished rock near your houseplants for a cute, low-maintenance botanical accent.


Eucalyptus Sprig Pattern
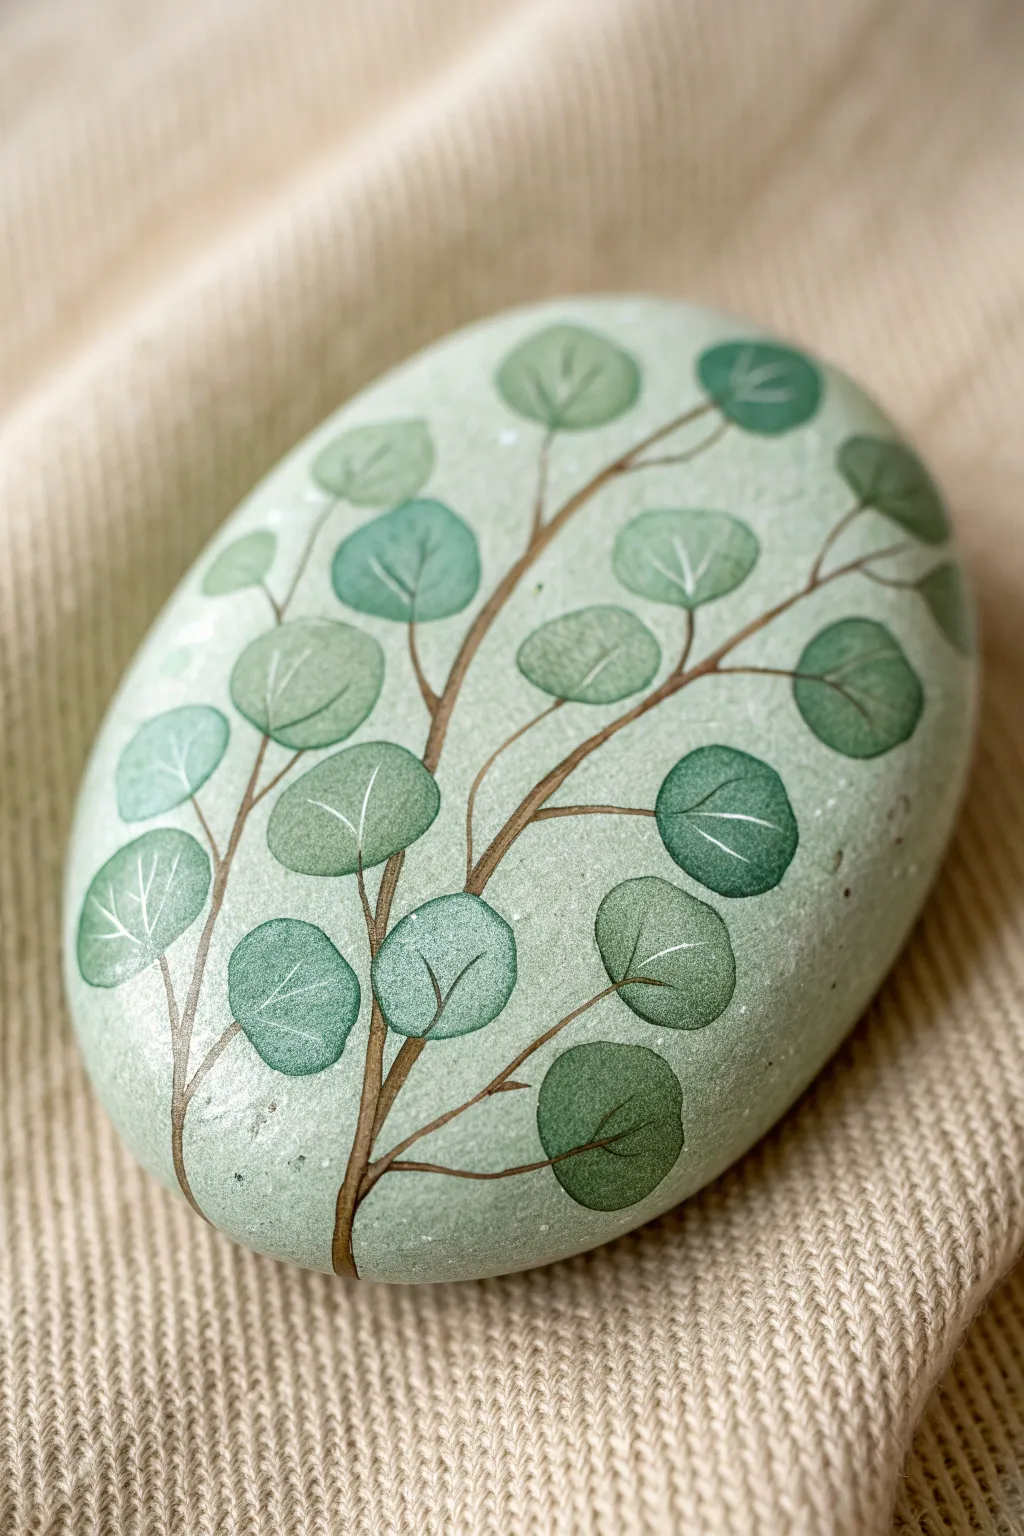
Bring a touch of nature indoors with this calming painted rock project featuring delicate eucalyptus sprigs. The soft green background combined with detailed botanical illustrations creates a sophisticated piece of decor perfect for a desk or shelf.
How-To Guide
Materials
- Smooth, oval river rock (about palm-sized)
- Pencil
- Acrylic paints (Sage Green, Dark Forest Green, Brown, White, Black)
- Flat brush (small/medium)
- Fine liner brush (size 00 or 000)
- Acrylic sealer (matte or satin finish)
- Palette or small dish for mixing
- Water cup and paper towel
Step 1: Base Preparation
-
Clean the surface:
Begin by thoroughly washing your stone with warm soapy water to remove any dirt or oils that might prevent the paint from sticking. Let it dry completely in the sun. -
Apply the base coat:
Mix a soft sage green acrylic paint with a tiny drop of white to get a pale, creamy pastel green. Using a flat brush, paint the entire top surface of the rock. -
Check for coverage:
Once the first layer is dry, assess the opacity. I usually find that a second or even third thin coat is necessary to get that smooth, solid finish where the dark rock doesn’t show through.
Brush Control Secret
For the finest lines on the veins, don’t hold the brush tight. Hold it perpendicular to the rock and use only the very tip of the bristles.
Step 2: Creating the Stems
-
Sketch the layout:
Lightly sketch the main stem structure with a pencil. Draw a central curved line branching out towards the edges, ensuring the composition flows naturally across the oval shape. -
Mix the stem color:
On your palette, mix brown paint with a tiny bit of black to create a deep, earthy twig color. Thin the paint slightly with water until it has an inky consistency. -
Paint the main branch:
Using your fine liner brush, trace over your pencil line for the main stem. Keep the pressure light so the line remains thin and delicate, thickening slightly at the base. -
Add secondary branches:
Paint smaller, thinner branches shooting off the main stem. These should be very fine, as they will hold the individual leaves later.
Shaky Hands?
If your lines are wobbling, rest your pinky finger on a dry part of the rock to stabilize your hand while painting the detailed stems.
Step 3: Painting the Foliage
-
Prepare leaf colors:
Create three shades of green on your palette: a pale mint (lighter than the base), a medium sage, and a darker dusty green. This variety will add depth to the foliage. -
Paint the first leaves:
Start with the medium sage tone. Paint round, coin-shaped leaves attached to the branch tips. Don’t worry about perfect circles; slight irregularities look more organic. -
Add color variation:
While the first leaves are drying, paint other leaves using the paler mint and darker dusty green shades. Distribute these randomly so no single color dominates one area. -
Layering density:
If you want a fuller look, add a few leaves that appear to be behind the stems or slightly overlapping others, ensuring the paint is dry before overlapping to avoid muddiness.
Step 4: Adding Details & Finishing
-
Mix the vein color:
Clean your fine liner brush thoroughly. Put a small amount of pure white acrylic paint on your palette and thin it down just enough to flow smoothly. -
Draw the central veins:
carefully paint a thin, curved line down the center of each leaf. The line doesn’t need to touch the edges perfectly; a floating line often looks more artistic. -
Add lateral veins:
From the central white vein, paint tiny V-shaped lines branching outward. Keep these strokes extremely light and whisper-thin. -
Highlight the stems:
Take a slightly lighter brown (mix your stem color with a dot of white) and add very subtle highlights to the side of the thicker main branch to give it dimension. -
Erase pencil marks:
Inspect the rock for any visible pencil lines from your initial sketch. If the paint is fully cured, you can gently erase these with a soft eraser. -
Wait for curing:
Allow the rock to sit for several hours, or preferably overnight, to ensure every layer of paint is completely dry and hardened. -
Seal the artwork:
Apply a coat of matte or satin acrylic sealer. This protects the delicate line work from scratches and gives the stone a professional, finished look.
Once sealed, this peaceful stone is ready to serve as a paperweight or a thoughtful handmade gift


Shamrock Luck Stones
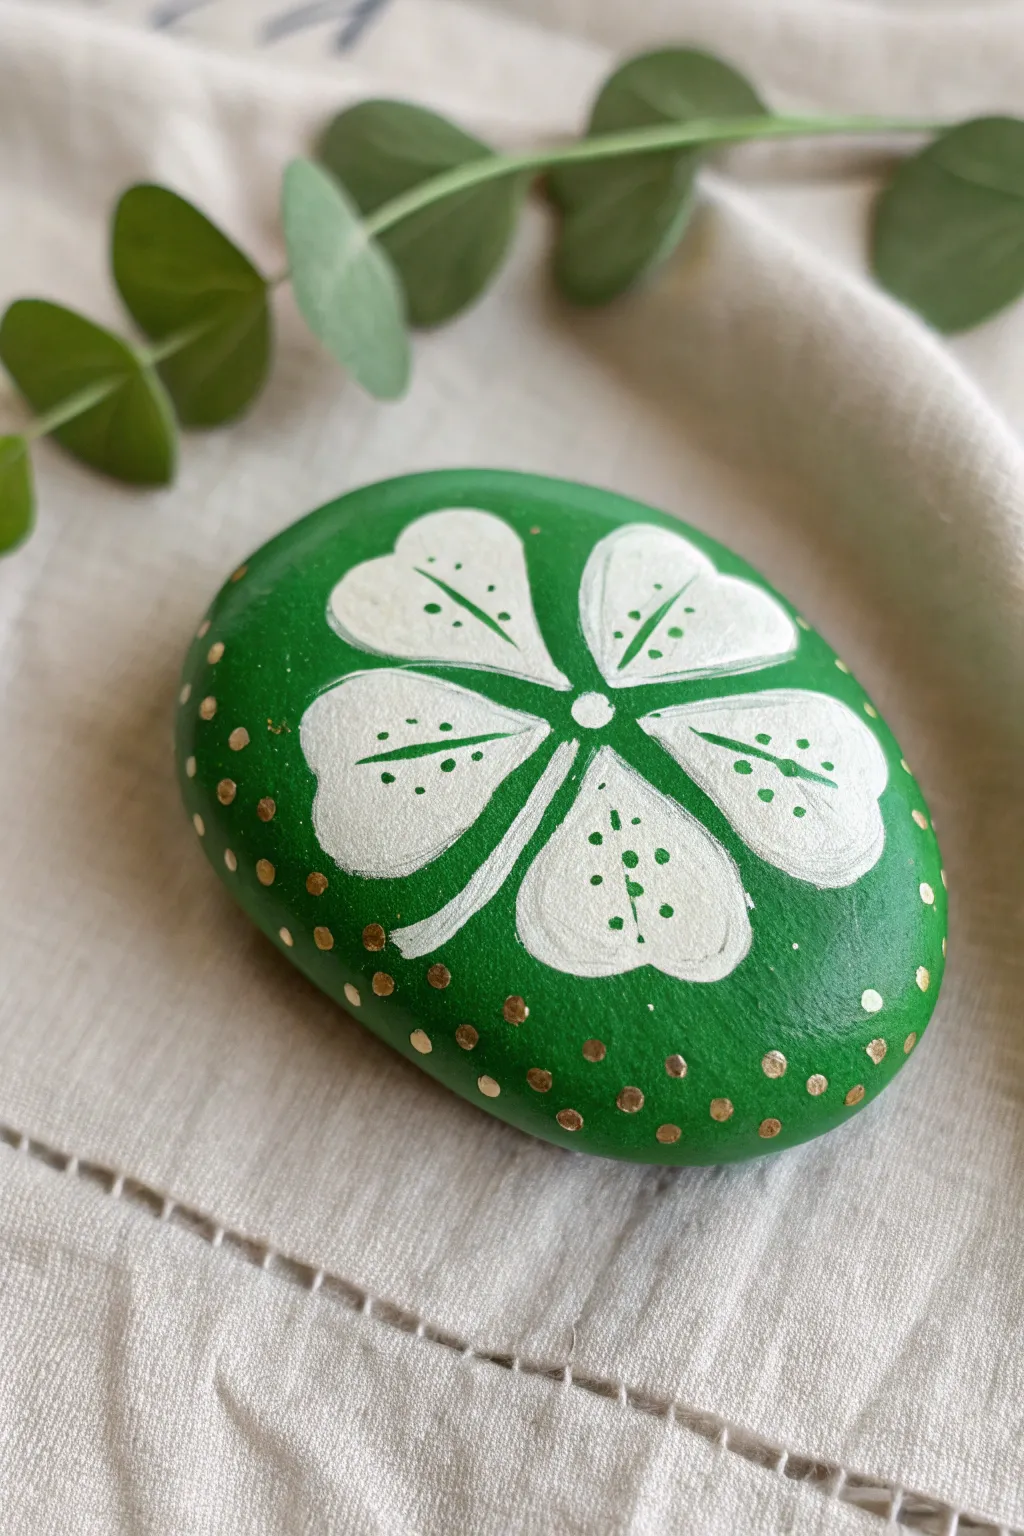
Capture the luck of the Irish with this stunningly simple painted rock design. The vibrant green base makes the crisp white shamrock pop, while delicate gold accents add a touch of elegance to the finished piece.
Step-by-Step Guide
Materials
- Smooth, oval river rock
- Gesso or white primer (optional)
- Acrylic paint: Emerald Green, Titanium White
- Gold metallic paint or paint pen
- Fine liner brush (size 0 or 00)
- Small flat brush
- Dotting tool or toothpick
- Pencil and eraser
- Gloss varnish or sealant
Step 1: Base Preparation
-
Clean the surface:
Begin by scrubbing your rock with warm soapy water to remove any dirt or oils. Rinse it thoroughly and let it dry completely before you start painting. -
Prime the stone:
If your rock is dark, you might want to apply a thin layer of white gesso first. This helps the green paint appear more vibrant, though it’s not strictly necessary on lighter stones. -
Apply the green base:
Use a flat brush to coat the entire top surface of the rock with emerald green acrylic paint. Paint cleanly around the sides, leaving the very bottom natural if you wish. -
Second coat:
Once the first layer is dry to the touch, apply a second coat of green to ensure full, opaque coverage. I usually wait about 15 minutes between coats to prevent lifting the previous layer.
Step 2: Designing the Shamrock
-
Sketch the outline:
Using a pencil, lightly sketch a four-leaf clover shape in the center of the rock. Draw four heart shapes that meet in the middle at a central point. -
Paint the petals white:
With a small round brush or liner brush, fill in the four heart shapes with titanium white paint. Be careful to stay inside your sketched lines. -
Refine the edges:
Go over the edges of the white petals to make them crisp and smooth. You want a distinct separation between the white clover and the green background. -
Add a second white layer:
White paint can be translucent, so apply a second layer once the first is dry. This ensures the bright white really stands out against the dark green. -
Create the stem:
Paint a thin, curved white line extending from the bottom center of the clover downwards to create the stem. Taper it slightly at the end. -
Add the center dot:
Place a small white dot right in the center where all four leaves meet. This connects the design elements cleanly.
Fixing Wobbly Lines
If your white edges aren’t smooth, wait for them to dry fully. Then, use the green background color to essentially ‘erase’ and reshape the white petals from the outside in.
Step 3: Detailing & Accents
-
Paint the leaf veins:
Dip your finest liner brush into the green background paint. Carefully draw a thin line down the center of each white petal, stopping before you reach the outer edge. -
Add inner dots:
Using the tip of your brush or a toothpick, add tiny green dots inside the white petals. Place them creatively around the central vein lines for texture. -
Create the gold border:
Dip a larger dotting tool (or the back end of a paintbrush) into gold metallic paint. Press it gently around the outer perimeter of the rock to create a ring of dots. -
Vary dot placement:
For a more organic look, I like to stagger the gold dots slightly rather than making a perfect line, giving it a whimsical border effect. -
Let it cure:
Allow the entire rock to dry completely, ideally for several hours or overnight, to ensure the thick dots of paint are hard all the way through. -
Seal the artwork:
Finish by applying a clear gloss varnish over the entire painted surface. This protects the paint from chipping and makes the gold accent shine brilliantly.
Pro Tip: Dotting Consistency
Make sure to reload your dotting tool with fresh gold paint after every single dot. This ensures each one stays round, plump, and exactly the same size around the border.
Now you have a charming lucky charm to keep on your desk or gift to a friend who needs a little boost
BRUSH GUIDE
The Right Brush for Every Stroke
From clean lines to bold texture — master brush choice, stroke control, and essential techniques.
Explore the Full Guide
Rainbow and Pot of Gold Rock
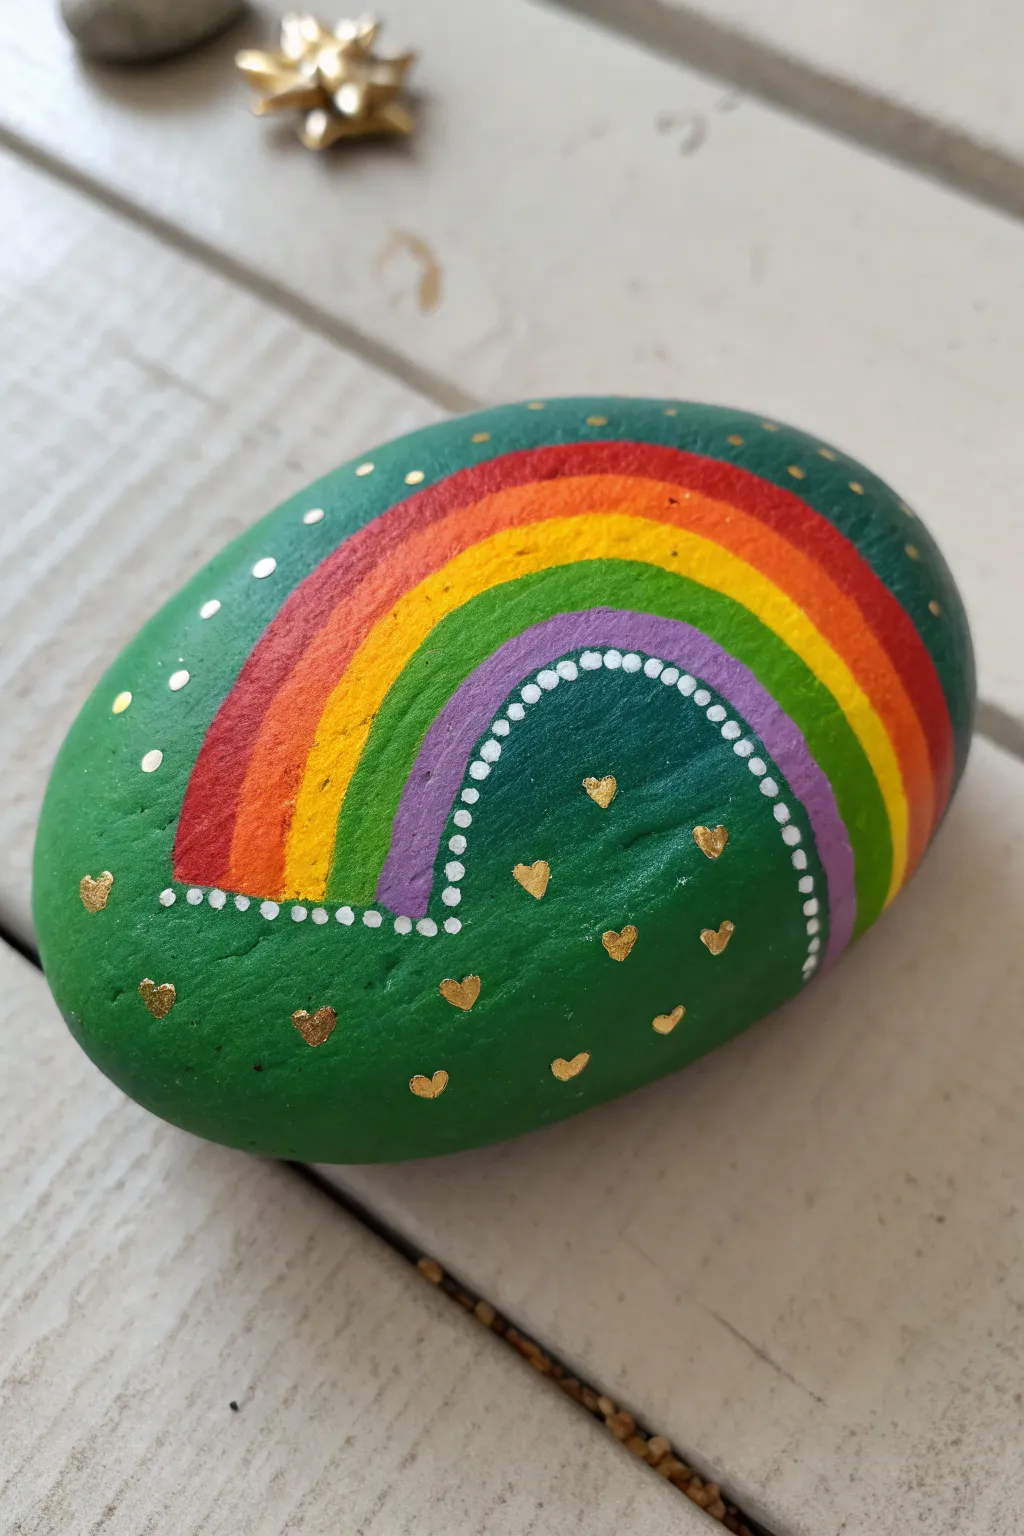
Brighten up your garden or windowsill with this vibrant green stone featuring a cheerful rainbow arch. Hand-painted gold hearts and delicate white details give this charming rock a magical, high-quality finish that really shines in the sun.
Step-by-Step
Materials
- Smooth, oval river rock (palm-sized)
- Acrylic paints: Dark Green, Red, Orange, Yellow, Purple
- Gold metallic acrylic paint or paint pen
- White acrylic paint or fine tip paint pen
- Flat paintbrush (medium)
- Fine detail paintbrush (0 or 00 size)
- Dotting tool or toothpick
- Spray sealer or varnish (gloss finish recommended)
Step 1: Base Coating
-
Clean the canvas:
Begin by washing your stone with warm soapy water to remove any dirt or oils. Let it dry completely in the sun or use a hairdryer to speed things up. -
Green foundation:
Using your medium flat brush, apply a coat of dark green acrylic paint over the entire top surface of the stone. Depending on the opacity of your paint, you may need a second coat once the first is dry to ensure solid coverage. -
Dry time:
Wait until the green base layer is completely dry to the touch before moving on to the rainbow. This prevents the colors from muddying.
Step 2: Painting the Rainbow
-
Outer red arch:
Start with the red paint. Paint a wide, curved band that arches across the upper middle of the stone. Leave plenty of green space visible around the edges. -
Orange layer:
Directly underneath the red band, paint an orange stripe of equal width. Try to touch the edge of the red paint so there are no gaps. -
Yellow brightness:
Follow the orange curve with a bright yellow stripe. If your yellow is transparent, you might need to dab it on a bit thicker for vibrancy. -
Skip to purple:
Interestingly, this design skips straight to the cool tones. Paint a purple stripe underneath the yellow one. Note that this specific design leaves a large green space in the center rather than painting blue or indigo. -
Refining edges:
Go back over any rainbow stripes that look uneven or transparent with a second layer of paint for a bold, opaque look.
Uneven Arches?
If your rainbow stripes are wobbly, don’t worry. Let them dry, then use a tiny bit of the base green paint to ‘cut in’ and clean up the edges for sharper lines.
Step 3: Golden Details & Accents
-
Inner dot border:
Dip a small dotting tool or the back of a paintbrush into white paint. Create a line of uniform dots tracing the inner curve of the purple band. -
Connect the dots:
Carefully connect these dots with a very fine white line on the outside edge, leaving the dotted appearance clear but creating a defined border. -
Gold heart placement:
Using metallic gold paint and a fine detail brush, paint small hearts scattered in the empty green space directly under the rainbow arch. -
More hearts:
Add a few more gold hearts floating in the green space near the bottom of the rock and along the sides for balance. -
Outer sparkle:
Use the tip of a toothpick or smallest dotting tool to add tiny gold specks around the outer top edge of the rainbow, simulating magical dust. -
Bottom border:
Complete the detailing by dotting a white line straight across the bottom of the purple arch legs to “ground” the rainbow.
Add a Pot of Gold
Make it festive by painting a small black cauldron at one end of the rainbow, filled with gold glitter glue dots for a textured treasure effect.
Step 4: Finishing Touches
-
Final drying:
Allow the entire rock to sit undisturbed for at least an hour. The metallic paint sometimes takes slightly longer to cure than standard acrylics. -
Seal for protection:
Once fully dry, spray the rock with a clear gloss sealer. This protects the paint from weather and makes the gold hearts shimmer beautifully.
Place your finished stone near a sunny window and watch the gold accents catch the light
Cute Avocado Character Rock
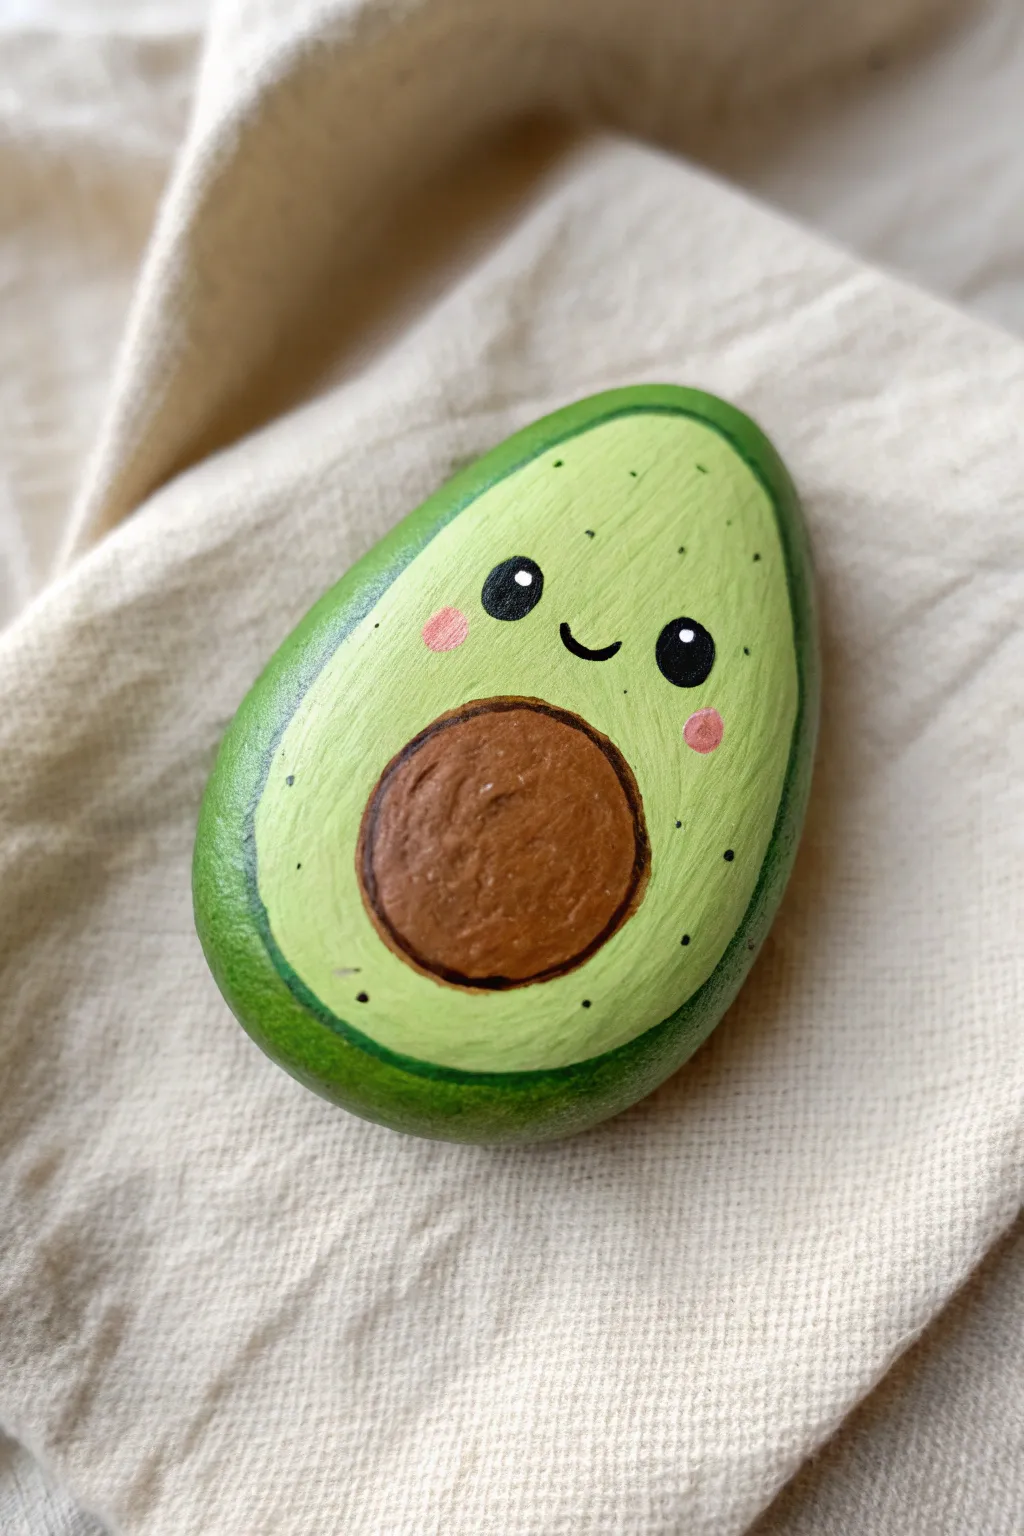
Transform a simple stone into the friendliest fruit in the kitchen with this adorable kawaii avocado design. This project uses multiple shades of green to capture the distinct look of an avocado half, complete perfectly round pit and rosy cheeks.
Detailed Instructions
Materials
- Smooth, oval-shaped river rock (palm-sized)
- Acrylic paints: Dark forest green, light lime green, creamy off-white, chocolate brown, light cocoa brown, black, and pink
- Paintbrushes: Medium flat brush, small round brush, and fine liner brush
- Pencil for sketching
- Spray sealant (gloss or matte)
- Palette for mixing
Step 1: Base Coat & Outline
-
Clean surface:
Begin with a clean, dry rock. Wash off any dirt or dust with soap and water to ensure your paint adheres smoothly, and let it dry completely. -
Sketch the avocado shape:
Using a pencil, lightly draw a teardrop shape that follows the natural contours of your rock. This will be the outer edge of the avocado flesh. -
Mark the pit:
In the wider, bottom section of your teardrop, sketch a large circle for the avocado seed. It should take up a good portion of the bottom half to look cute and cartoonish.
Step 2: Painting the Greens
-
Mix the flesh color:
Mix your light lime green with a generous amount of creamy off-white. You want a very pale, pastel green for the main edible part of the avocado. -
Paint the inner flesh:
Fill in the teardrop shape you sketched, painting around the circle reserved for the pit. Use your medium flat brush for smooth coverage. -
Apply a second coat:
Pale greens can be semi-transparent, so let the first layer dry and apply a second coat if the rock’s natural color is showing through. -
Paint the outer skin:
Using the dark forest green, paint the remaining area of the rock outside the teardrop shape. Bring the color slightly over the edge of the light green to create a crisp border. -
Add the rim detail:
If you look closely at a real avocado, there’s often a transition layer. Take a small round brush and paint a thin line of pure lime green (unmixed) right between the dark skin and light flesh to add depth. -
Add texture spots:
With the tip of a fine brush, add tiny, scattered dots of the dark forest green onto the light green flesh near the edges. This mimics the little specks often seen in real avocados.
Smooth Rock Tip
If you can’t find a perfectly smooth rock, paint a layer of white gesso first and sand it lightly once dry to create a glass-like surface.
Step 3: The Pit & Face
-
Base coat the pit:
Fill in the circle for the seed using chocolate brown acrylic paint. Ensure the edges are nice and round. -
Add dimension to the seed:
Mix a little white into your brown or use a light cocoa shade. Paint a smaller, slightly off-center circle inside the dark brown pit to create a rounded highlight effect. -
Outline the seed:
Using a fine liner brush and dark brown or black paint, carefully outline the pit to make it pop against the light green background. -
Draw the eyes:
Once the green paint is fully dry, use black paint and a detail brush (or a paint pen) to draw two small oval eyes in the upper half of the avocado seed area. -
Add eye sparkles:
Dip the back end of a paintbrush into white paint and dot it into the top corner of each black eye. This ‘catchlight’ brings the character to life. -
Paint the smile:
With your finest liner brush and black paint, draw a tiny, curved U-shape right between the eyes for a happy little smile. -
Rosy cheeks:
Dip a small round brush into pink paint and dab it gently below the eyes to create soft, blushing cheeks.
Make it a Set!
Paint a second matching rock that looks like the ’empty’ side of the avocado (just the indentation without the seed) for a cute friendship gift.
Step 4: Finishing Up
-
Final check:
Look over your rock for any smudges or areas that need a touch-up. Clean up the separation lines between the skin and flesh if needed. -
Seal the artwork:
Once absolutely dry (I like to wait overnight to be safe), spray the rock with a clear acrylic sealer. This protects your handiwork from chipping and makes the colors vibrant.
Your adorable avocado rock is now ready to serve as a paperweight or a fun garden decoration

PENCIL GUIDE
Understanding Pencil Grades from H to B
From first sketch to finished drawing — learn pencil grades, line control, and shading techniques.
Explore the Full Guide
Green Frog Garden Friend

Turn a smooth garden stone into an adorable, wide-eyed amphibian with this charming painting project. The bright green body and cheerful smile make this little frog a perfect, low-maintenance garden companion.
Step-by-Step
Materials
- Smooth, round river rock (palm-sized)
- Acrylic paints: Bright green, dark green, white, black, pink
- Paintbrushes: Medium flat brush, small round brush, fine liner brush
- Pencil for sketching
- Acrylic sealer (spray or brush-on)
- Palette or paper plate
- Water cup and paper towels
Step 1: Preparation & Base Coat
-
Clean Your Stone:
Before starting, scrub your rock thoroughly with soap and water to remove any dirt or oils. Let it dry completely so the paint adheres properly. -
Sketch the Outline:
Using a pencil, lightly sketch a large oval shape for the frog’s body on the top of the rock. Leave the bottom third of the rock unpainted or marked for a creamy white belly area. -
Paint the Body:
Fill in the large oval shape with bright green acrylic paint. You may need two coats to get a solid, opaque color, allowing the first coat to dry before adding the second. -
Paint the Belly:
For the bottom section under the frog, paint a curved area with a mix of white and a tiny dot of brown or beige to create a natural stone color, or just leave the natural rock showing if it’s light enough.
Step 2: Adding the Face
-
Paint the Eye Whites:
Using a small round brush and white paint, create two large circles near the top center of the green body. These should be touching or slightly overlapping. -
Add Pupils:
Once the white is dry, paint large black circles inside the white ones. Make them look slightly toward the upper left or right to give him a curious expression. -
Highlight the Eyes:
Dip the handle of your paintbrush into white paint and add a small dot to the upper right corner of each black pupil. This ‘catchlight’ brings the frog to life instantly. -
Draft the Smile:
With a very fine liner brush and black paint, draw a wide, sweeping U-shape for the mouth. Add small tick marks at the ends of the smile for cheeks.
Paint Too Thin?
If your green paint looks streaky, don’t keep brushing wet paint. Let it dry fully, then sponge on a second coat for better coverage.
Step 3: Creating Texture & Details
-
Add Green Spots:
Mix a darker shade of green and use a round brush to dab spots of varying sizes around the outer edges of the frog’s body. I like to concentrate them near the sides and top. -
Add Tiny Speckles:
Using the tip of your smallest brush or a toothpick, add tiny black dots across the nose area to simulate texture. -
Paint the Legs:
On the sides of the body where the green meets the belly area, paint simplified back legs. Use a darker green for the folded leg shape and add three little toes at the bottom. -
Outline the Legs:
Use your fine liner brush and black paint to outline the legs and toes so they stand out against the body. -
Outline the Eyes:
carefully outline the white part of the eyes with a thin black line to define them clearly.
Make Him Shine
Use a high-gloss varnish specifically for the eyes to make them look wet and realistic, while using a matte sealer for the rest of the body.
Step 4: Finishing Touches
-
Paint the Front Feet:
Draw two small lines coming down from the center of the body for front arms, ending in little three-toed hands resting on the belly. -
Add the Flower:
Paint a tiny five-petal flower in pink near the bottom of the rock, sitting near the frog’s feet. Add a yellow or black dot in the center. -
Final Clean Up:
Check your lines. If any black outlines are shaky, you can touch them up with the base colors once dry. -
Allow to Cure:
Let the rock dry for at least 24 hours to ensure all layers are set. -
Seal the Deal:
Apply a clear acrylic sealer to protect your frog from the weather if he’s going to live outside.
Place your new friendly frog near a plant pot or front step to greet visitors
Turtle Shell Mandala in Greens
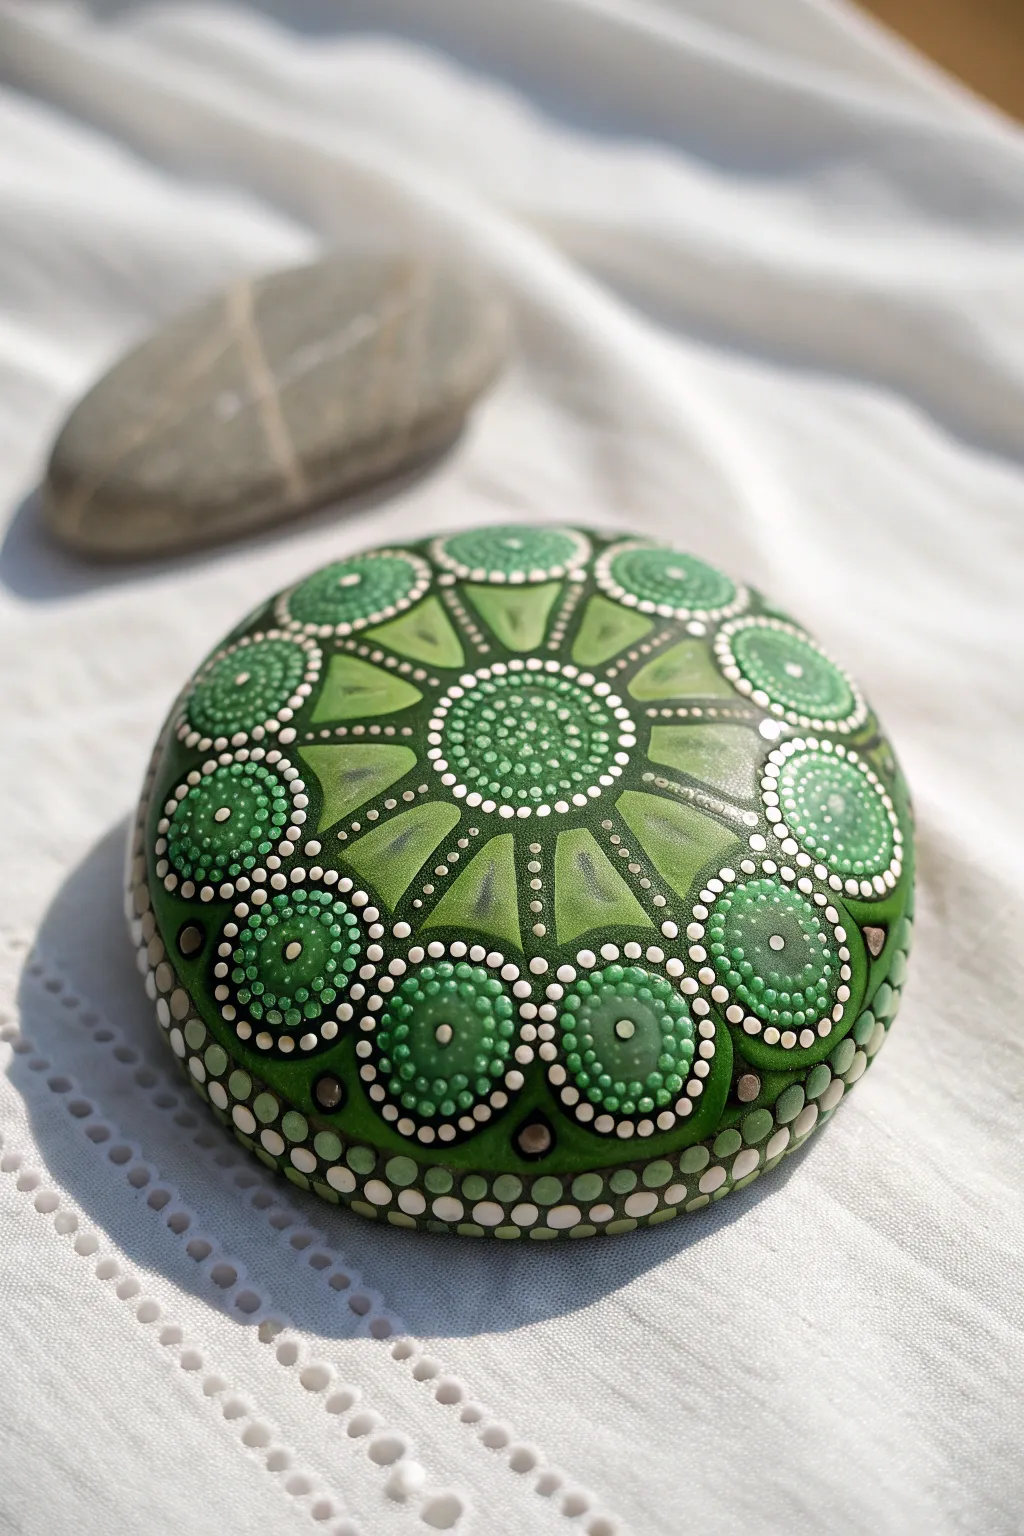
Transform a simple round stone into a mesmerizing turtle shell mandala using layers of soothing greens. This project combines geometric precision with the relaxing rhythm of dot art, resulting in a piece that feels both organic and structured.
Step-by-Step Tutorial
Materials
- Smooth, round river stone (palm-sized)
- Acrylic paints: Dark forest green, lime green, kelly green, white, metallic gunmetal grey
- Dotting tools (various sizes, from fine stylus to large ball tools)
- Small flat synthetic brush
- Compass or circle stencil (optional)
- White charcoal pencil or chalk pencil
- Gloss varnish or resin for finishing
Step 1: Base and Structure
-
Prepare the Canvas:
Begin by washing your stone thoroughly with soap and water to remove any oils. Once dry, paint the entire top surface with a solid coat of dark forest green. You may need two coats for full opacity, allowing the first to completely dry before applying the second. -
Mark the Grid:
Find the center of your stone. Using your white charcoal pencil, lightly draw a small central circle about the size of a quarter. Draw a larger outer ring about an inch from the edge. Then, divide the stone into 8 equal pie-slice sections radiating from the center. -
Block the Segments:
Within the large ring of ‘pie slices,’ use your flat brush and a lighter, muted lime green to paint thick, tapering shapes. These should look like trapezoids or fan blades, wider at the outer edge and narrowing toward the center circle. Leave a thin gap of the dark base color showing between each segment.
Uneven Dots?
If your paint peaks or forms ‘Hershey kisses,’ your paint is too thick. Add a single drop of flow medium or water to smooth it out for perfect domes.
Step 2: Central Mandala
-
Center Dot Cluster:
Mix a mid-tone kelly green. Using a large dotting tool, place a central cluster of dots inside the very middle circle. Fill the gaps between these larger green dots with tiny white micro-dots using your smallest stylus. -
Inner Ring Definition:
Outline the central circle (where the fan blades start) with a ring of medium-sized white dots. Try to space them evenly so they look like a string of pearls. -
Decorating the Blades:
Inside each of the 8 lime green ‘fan blade’ shapes you painted earlier, add a small, elongated triangle or teardrop shape using a slightly darker green mix. This creates depth and makes the segments look 3D. -
Dividing Lines:
Along the dark green lines separating the fan blades, dot a straight line of graduating white dots. Start with larger dots near the center and taper to tiny dots as you move outward.
Level Up: Swooshes
Instead of just dots, try dragging a tool through wet dots on the outer rim to create ‘swoosh’ or comma shapes for a more dynamic sense of movement.
Step 3: Outer Rim Details
-
Large Outer Circles:
At the outer edge of each fan blade section, paint a large circle using the dark forest green base color. These circles should touch each other, forming a scallop pattern around the stone’s shoulder. -
Inner Circle Filling:
Inside each of these dark outer circles, create a concentric ring of medium white dots. I find it helps to place the top, bottom, left, and right dots first to ensure even spacing. -
Green Gradients:
Fill the center of these outer rings with a graduating spiral or cluster of green dots. Start with a dark green in the center and work outward with lighter lime green dots to create a glowing effect. -
The Center Point:
Place a single, crisp white dot in the exact center of each outer circle assembly to act as a focal point. -
Connecting Dots:
Where the large outer circles meet, place a small metallic gunmetal grey dot in the V-shape gap. This adds a subtle industrial contrast to the organic greens.
Step 4: Finishing Touches
-
The Skirt:
Moving down the side of the rock (below the main design), add a row of large white dots that align with the center of each main geometric section above. -
Second Row Skirt:
Beneath the large white dots, add a final row of smaller, alternating dots in a soft sage green to blend the design into the bare rock bottom. -
Clean Up:
Wait until the paint is bone dry. Then, take a damp cotton swab or cloth and gently wipe away any visible white charcoal guidelines. -
Seal:
Finish with a coat of high-gloss varnish or a layer of art resin. This will make the green tones pop and protect your intricate dot work from chipping.
Now you have a stunning, symmetrical piece of art that radiates calm energy from your garden or desk


Mossy Texture Illusion Rock
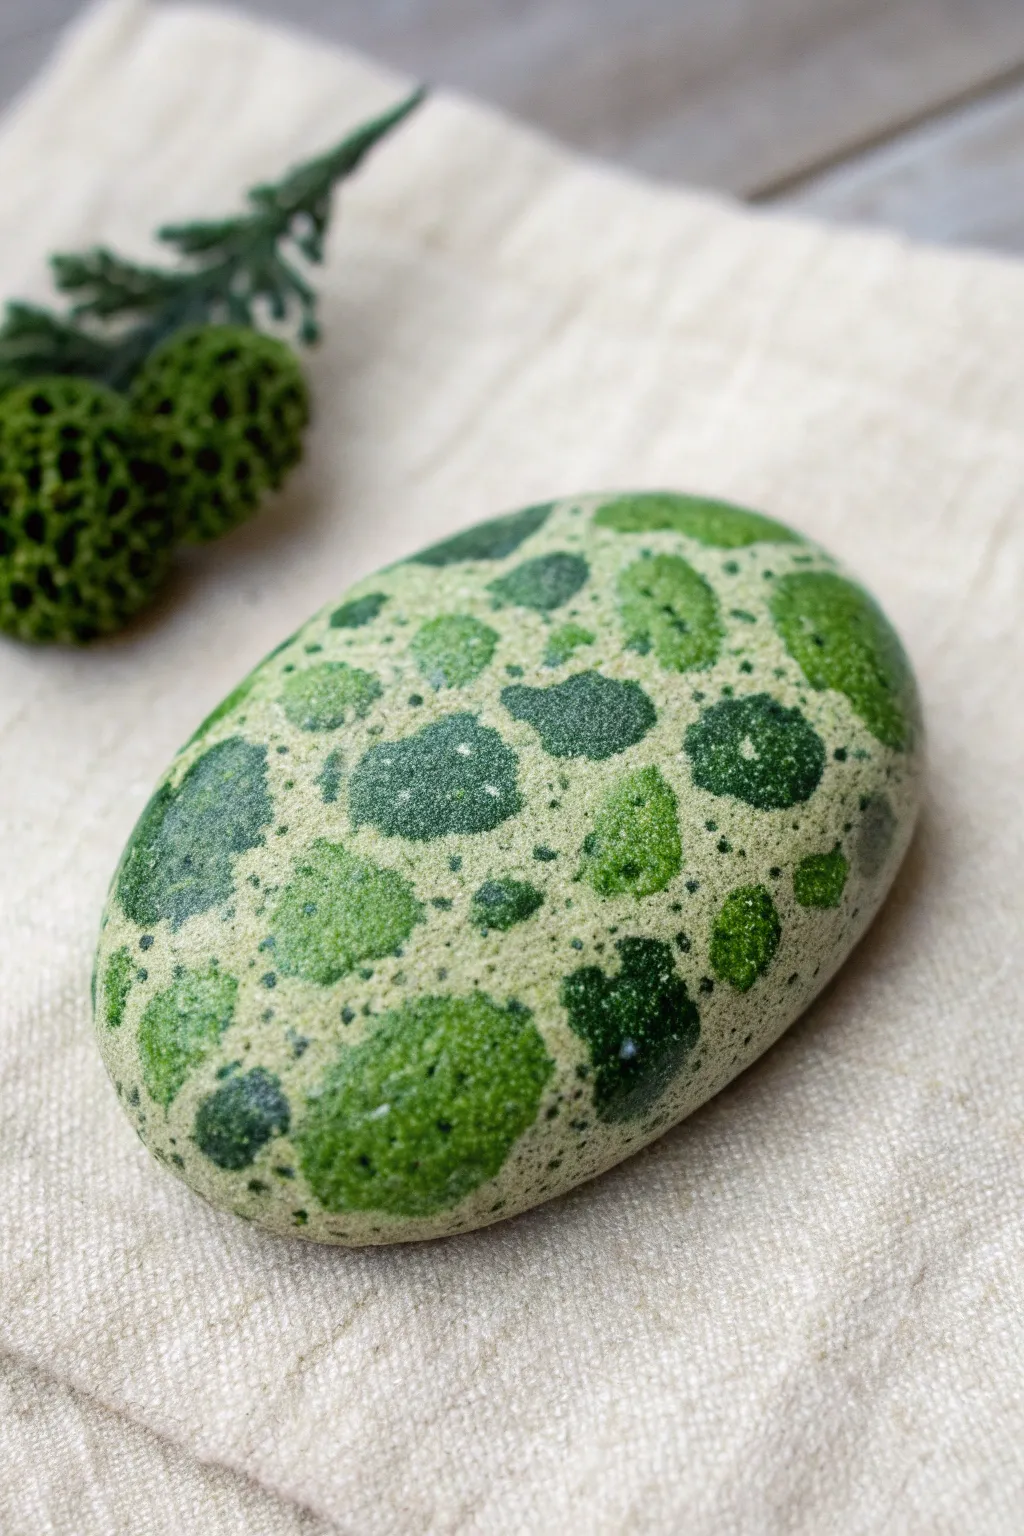
Transform a smooth river rock into a piece of nature with this realistic moss and lichen effect. By layering various shades of green over a sandy base, you’ll create a textured organic look that brings a touch of the forest indoors.
Step-by-Step Guide
Materials
- Smooth, oval river rock (cleaned and dried)
- Acrylic paint: Sandy beige or light cream
- Acrylic paint: Dark forest green
- Acrylic paint: Medium olive green
- Acrylic paint: Lime or chartreuse green
- Small natural sea sponge or synthetic texture sponge
- Stiff bristle stencil brush or old toothbrush
- Small detail brush
- Matte finish acrylic sealer or varnish
- Paper plate or palette
- Water cup and paper towels
Step 1: Preparation and Base Coat
-
Clean the Surface:
Begin by scrubbing your rock with soapy water and drying it completely to ensure the paint adheres properly. -
Mix the Base Color:
Pour out a dollop of sandy beige paint. If it’s too dark, mix in a tiny bit of white to create a light, limestone-like hue. -
Apply the Foundation:
Coat the entire top surface of the rock with the beige mixture. You want full, opaque coverage, so apply a second coat if the rock’s natural color shows through. -
Create Texture:
Before the second coat dries completely, dab the surface lightly with a dry sponge to remove brush strokes and give it a slightly stony, pitted texture. -
Dry Completely:
Set the rock aside until the base layer is bone dry to the touch.
Too Blotchy?
If your sponge marks look too heavy or like distinct stamps, dab over them immediately with a clean, slightly damp sponge to lift pigment and soften the edges into the base.
Step 2: Layering the Moss
-
Prepare the Dark Green:
Dispense a small amount of dark forest green paint onto your palette. This will form the core of your moss patches. -
Sponge the Dark Patches:
Dip a small piece of sponge into the dark green, blot off almost all the excess paint on a paper towel, and lightly dab irregular, organic shapes onto the rock. -
Soften the Edges:
While dabbing, focus the pigment density in the center of the blobs and tap very lightly around the edges to create a fading effect. -
Establish Variety:
Make some patches large and others tiny—nature is rarely uniform. -
Introduce Olive Tones:
Switch to your medium olive green paint. Using a clean section of the sponge, dab this color over parts of the dark green patches, allowing the darker color to peek through underneath. -
Extend the Lichen:
Use the olive green to foster new, smaller colonies on the beige background, separate from the dark green clusters. -
Add Highlights:
Load a stencil brush or stiff brush with the lime or chartreuse green. Remove almost all paint (dry brush technique) and stipple this bright color onto the highest points of your moss patches.
Step 3: Fine Details and Finishing
-
Speckle Effect:
For that gritty, realistic look, water down a tiny bit of dark green paint. Dip an old toothbrush or stiff brush into it and flick the bristles with your thumb to spray tiny speckles across the whole rock. -
Refine with Dots:
Using a small detail brush, add tiny, deliberate dots of the lightest green around the edges of the larger patches to simulate spore growth. -
Check for Balance:
Step back and look at your rock. If any area looks too empty, sponge on a faint whisper of olive green to balance the composition. -
Final Drying:
Allow all paint layers to dry completely, ideally for several hours, to prevent smearing during the sealing process. -
Seal the Surface:
Apply a coat of matte varnish or sealer. A matte finish is crucial here, as a glossy finish will ruin the illusion of dry stone and moss.
Add 3D Texture
Mix a small pinch of baking soda or fine sand into your green moss paint before sponging it on. This creates actual physical bumps for a hyper-realistic touch.
Place your finished stone in a plant pot or garden bed for a delightful hidden surprise
Green Crystal and Gemstone Rock
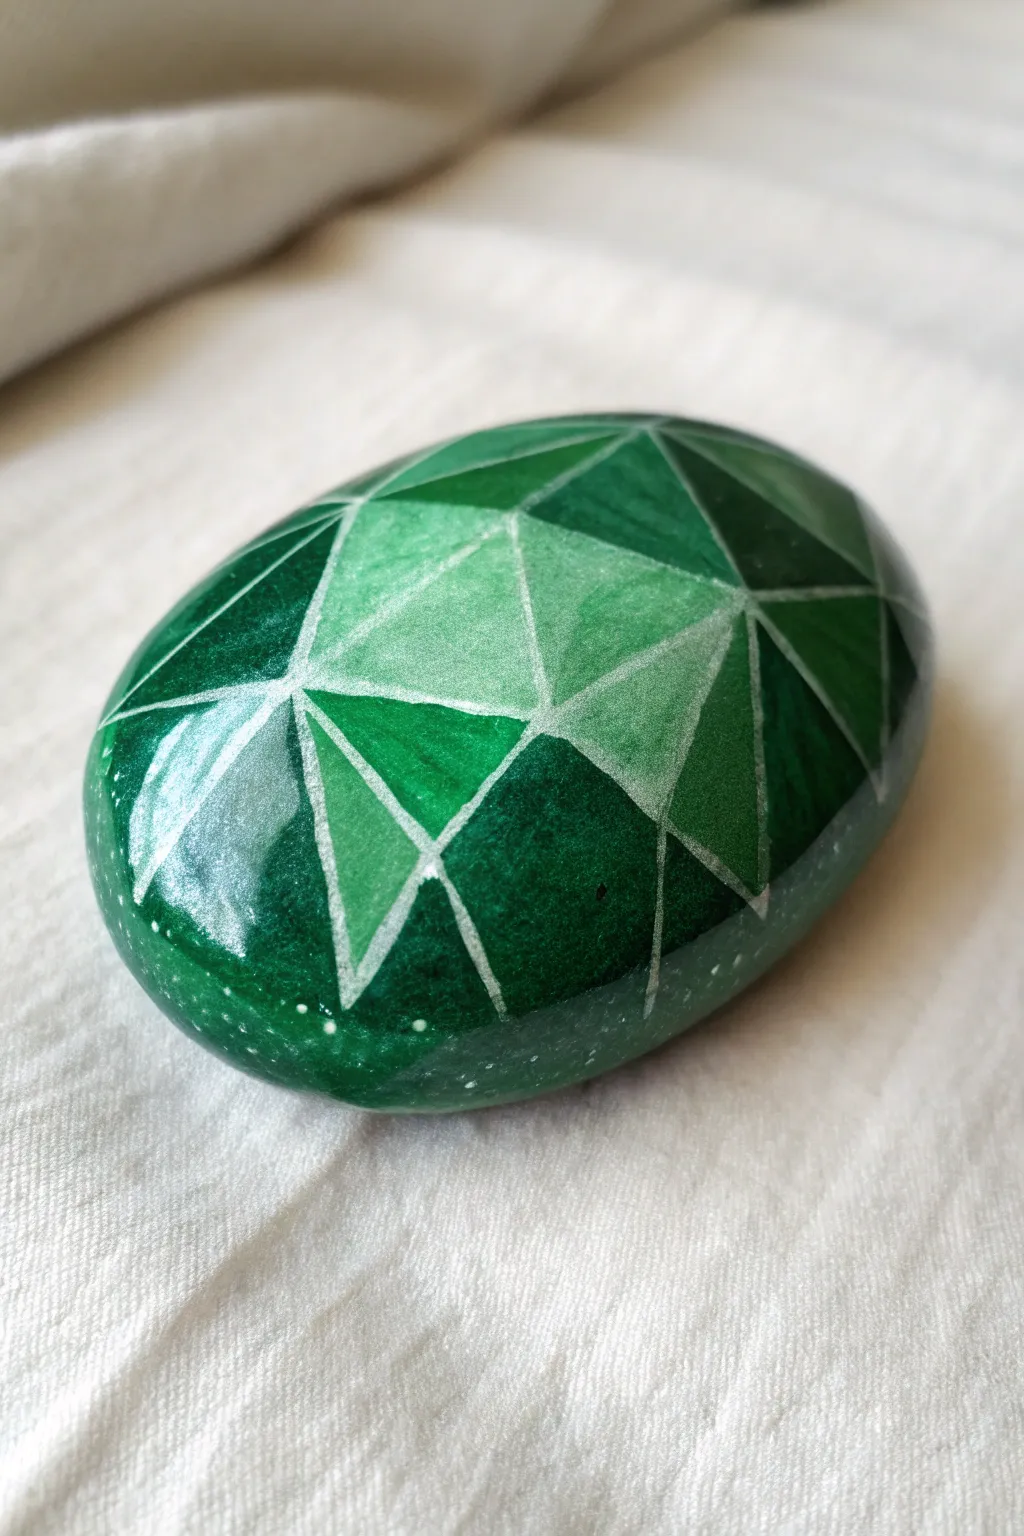
Transform an ordinary smooth stone into a dazzling, multi-faceted emerald that catches the light beautifully. This project uses geometric lines and varying shades of green to create a convincing 3D gemstone illusion.
Step-by-Step
Materials
- Smooth, oval river rock (polished preferred)
- Acrylic paints (Dark hunter green, kelly green, white, black)
- Fine-point white paint pen (0.7mm or similar)
- Flat shader brushes (small and medium)
- Fine liner brush
- Pencil and eraser
- Glossy clear coat sealant (spray or brush-on)
- Mixing palette
- Water cup and paper towels
Step 1: Preparation and Sketching
-
Clean surface:
Begin by washing your rock thoroughly with soap and water to remove any dirt or oils, then let it dry completely. -
Base coat:
Paint the entire top surface of the rock with a solid layer of your mid-tone kelly green. Let this dry. Apply a second coat if the rock’s natural color is still showing through. -
Draft the grid:
Using a pencil, lightly draw a geometric pattern on the dried green surface. Start by connecting triangles and diamond shapes. Imagine the facets of a cut gem; the lines don’t need to be perfectly symmetrical, but they should intersect cleanly.
Clean Lines Hack
If you have trouble painting straight edges for the facets, use small strips of washi tape to mask off individual triangles while you paint them.
Step 2: Painting the Facets
-
Mix your palette:
Prepare four distinct shades of green on your palette: one very dark (almost black-green), a standard dark green, your base mid-tone green, and a very light mint green (white mixed with a touch of green). -
Identify light source:
Decide where the ‘light’ is hitting your gem. Typically, the facets near the top center will be lighter, while the edges will be darker. -
Paint highlights:
Using a small flat brush, fill in the central triangular facets with your lightest mint green mixture. Stay carefully within your pencil lines. -
Apply mid-tones:
Move outward from the center, painting the next ring of facets with your standard mid-tone green. It’s okay if this matches your base coat, but freshly painting it adds texture. -
Add shadows:
Paint the facets closer to the edges of the rock with the dark green shade. -
Deepen the edges:
For the outermost triangles touching the sides of the rock, use your darkest, nearly black-green shade to create depth and roundness. -
Blend transitions:
I find it helpful to look at the rock from a distance here. If two adjacent facets look too similar, slightly lighten or darken one of them to ensure contrast between shapes. -
Let it cure:
Allow all the paint sections to dry completely. This is crucial before the next step to prevent smudging.
Step 3: Detailing and Finishing
-
Outline the facets:
Take your fine-point white paint pen and carefully trace over the lines where your color blocks meet. Keep the pressure light to maintain a thin, crisp line. -
Connect the corners:
Ensure distinct points where the lines intersect. The white lines act as the ‘edges’ of the cut crystal. -
Add sparkle:
Use a white paint pen or a tiny brush with pure white paint to add small dots or ‘star’ bursts on the lightest facets to mimic light reflection. -
Texture details:
If you want a more organic look, you can lightly speckle the darker areas with faint white dots to simulate imperfections inside the crystal. -
Seal the deal:
Once the paint pen is 100% dry, apply a high-gloss sealant. This is the magic step that makes the rock look like a polished gemstone. -
Second coat:
For extra shine and durability, apply a second coat of glossy varnish after the first one has tacked up.
Make it Sparkle
Mix a tiny amount of iridescent mixing medium or fine green glitter into your mid-tone paint layer for a subtle shimmer that only shows in sunlight.
Now you have a stunning faux emerald that looks ready to be set in a giant crown
Green Night Sky With Firefly Glow

Capture the magic of a summer evening with this luminous painted rock design that mimics fireflies dancing in the dark. By blending deep greens with bright yellows and crisp white dots, you’ll create a glowing effect that brings a touch of whimsy to any garden bed.
Step-by-Step
Materials
- Smooth, oval river rock (about palm-sized)
- Acrylic paint: dark forest green, metallic leaf green, light yellow, white, lime green
- Dotting tools (various sizes) or ends of paintbrushes/toothpicks
- Small flat paintbrush
- Sponge dabber or small makeup sponge
- Clear acrylic sealer (spray or brush-on)
- Palette or paper plate
- Water cup and paper towels
Step 1: Preparing the Base
-
Clean the Stone:
Begin by washing your rock with soapy water and scrubbing away any dirt. Let it dry completely in the sun or use a hairdryer to speed things up. -
Base Coat:
Using your flat brush, paint the entire top surface of the rock with the dark forest green acrylic paint. You may need two coats to get a solid, opaque coverage. Allow full drying time between coats. -
Create the Glow:
Squeeze a small amount of metallic or lighter leaf green paint onto your palette. Using a sponge dabber, lightly tap this color onto the left side of the rock to create a soft, gradient highlight. Feather the edges so it fades naturally into the dark background.
Oops, Smudged Dot?
Don’t panic! Let the smudge dry completely, then paint over it with your dark green base color. It works like an eraser before you re-dot.
Step 2: Dotting the Fireflies
-
Large Glowing Orbs:
Dip your largest dotting tool into the light yellow paint. Place three to four large, randomly spaced dots across the lower and right sections of the rock. These will be your main ‘fireflies’. -
Adding Green Accents:
Clean your tool and switch to lime green paint. Add one or two medium-sized dots in the upper right quadrant to balance the composition. -
Creating the Paths:
Load a medium-small dotting tool with white paint. Starting from the top, create a curved line of dots that sweeps down across the rock, mimicking the flight path of a firefly. -
Varying Dot Sizes:
As you continue the white dotted lines, try ‘walking the dots’: dip your tool once in paint and press it down multiple times in a row. The dots will naturally get smaller, creating a trailing effect. -
Circling the Glow:
Using a very small dotting tool or a toothpick, place tiny dots of metallic green or yellow around the large yellow orbs you painted earlier. This halo effect enhances the illusion of glowing light. -
Adding Floating Particles:
Fill in some of the empty negative space with scattered, single white dots of varying sizes. I like to imagine these are distant stars or smaller fireflies in the background. -
Layering for Brightness:
Once the large yellow dots are dry, adding a second layer of yellow paint can make the color pop against the dark green base.
Glow-in-the-Dark Magic
For a real night-time surprise, mix glow-in-the-dark pigment medium with your yellow and white paints for the final top layer of dots.
Step 3: Finishing Touches
-
Check Contrast:
Step back and look at your rock. If the ‘glow’ section looks too subtle, you can carefully dry-brush a tiny bit more metallic green over the dried dots in that area for a unified shimmer. -
Final Dry:
Let the rock sit undisturbed for at least an hour—or overnight if you used thick globs of paint—to ensure the dotted layers are fully cured. -
Sealing the Artwork:
Apply a coat of clear acrylic sealer. A spray sealer is best for dotted art to prevent smearing the raised texture. Apply in light, even mists.
Place your finished rock in a flower pot or by your front door to enjoy a little phantom light even during the day


Have a question or want to share your own experience? I'd love to hear from you in the comments below!