
When you want your drawing to look “right” without feeling overwhelmed, the grid drawing method is like having training wheels for your eyes. These easy grid drawing ideas keep things simple and satisfying, so you can focus on one little square at a time and actually enjoy the process.
Realistic Eye Practice One Square at a Time
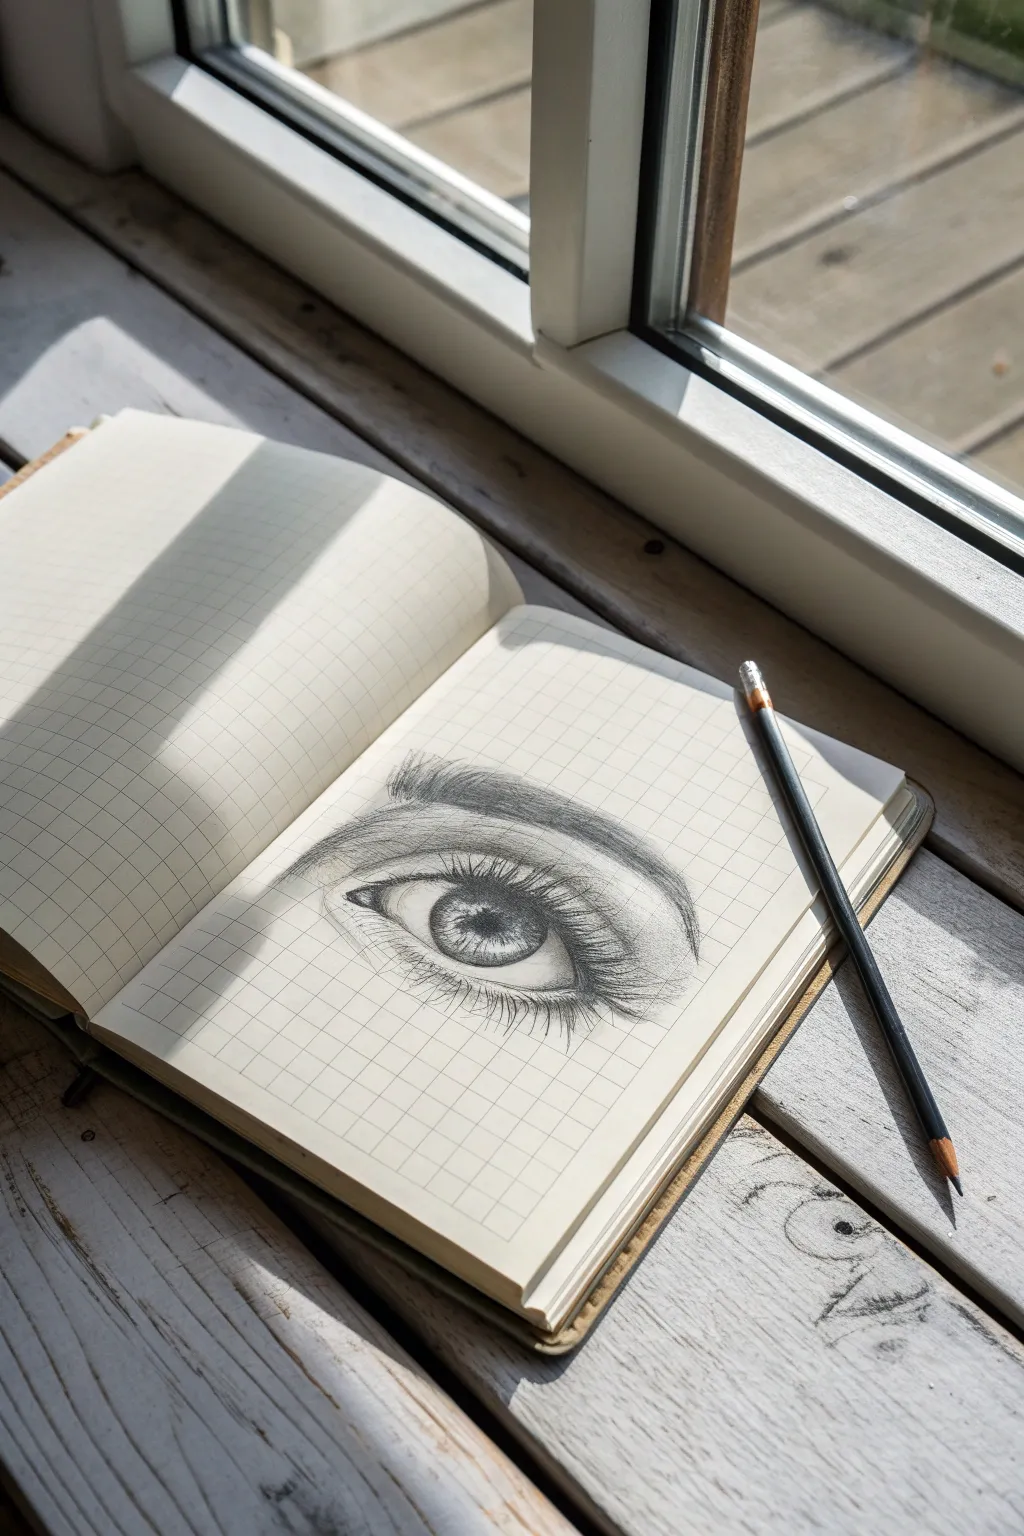
Mastering the complexities of the human eye becomes manageable when broken down into simple squares. Using a pre-gridded notebook, this tutorial guides you through creating a realistic, soulful eye with depth and sparkling highlights.
Detailed Instructions
Materials
- Grid paper sketchbook (or plain paper ruled with a 1cm grid)
- H pencil (for light outlines)
- 2B pencil (for general shading)
- 4B or 6B pencil (for darkest pupils and lashes)
- Blending stump or cotton swab
- Kneaded eraser
- Precision eraser (for highlights)
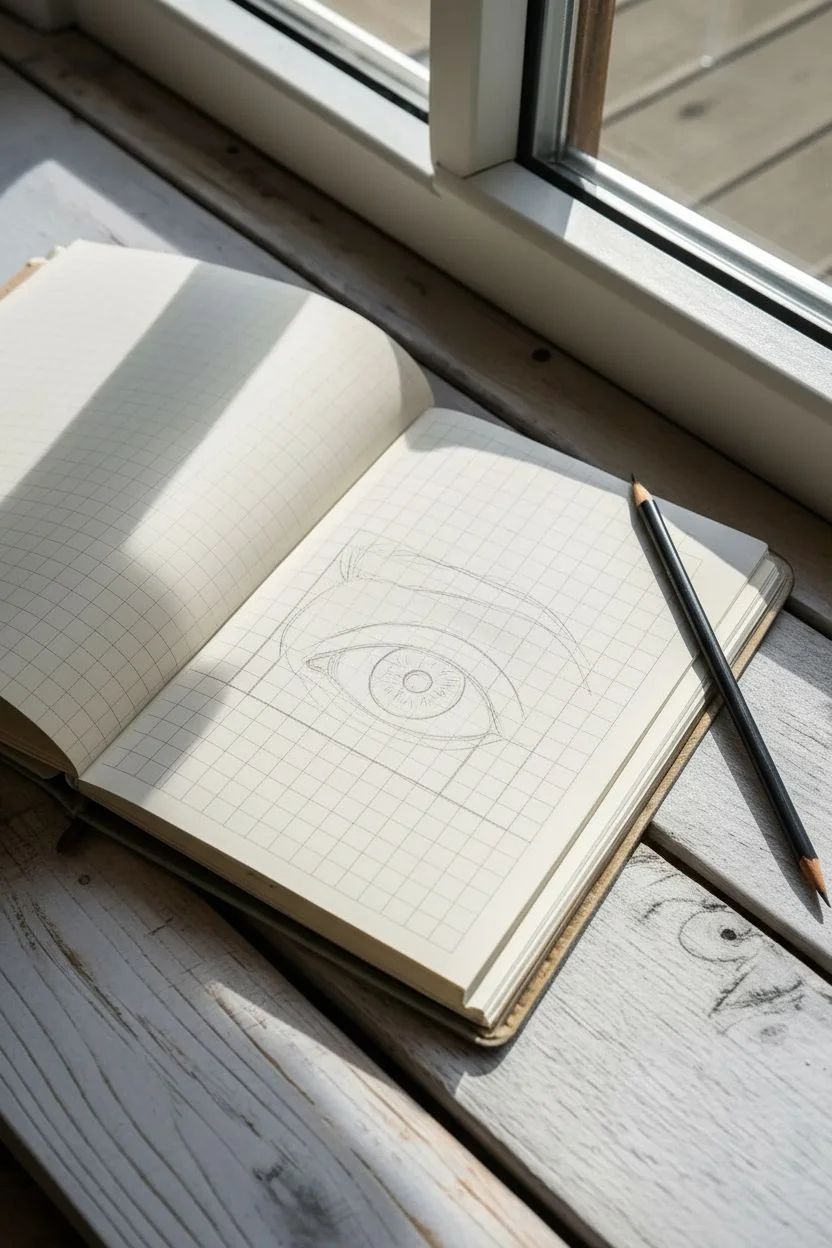
Step 1: Planning and Outlining
-
Establish the grid:
If your notebook isn’t already gridded, draw a light 4×4 grid. Locate the center intersection; this will be the anchor point for the pupil. -
Map the tear duct:
Start the inner corner (tear duct) in the lower left quadrant. Sketch a small, curved ‘V’ shape that dips slightly below the quadrant’s horizontal midline. -
Draw the upper lid arch:
Sweep a large curve from the tear duct, rising high into the upper two quadrants and extending almost to the right edge. The highest point of the arch should align slightly right of center. -
Define the lower lid:
Connect the outer corner back to the tear duct with a gentler, shallower curve. Keep this line lighter, as the lower lid is less defined than the upper. -
Place the iris and pupil:
Draw the large circle of the iris. Note that the top part is usually cut off by the upper eyelid. Roughly center the smaller pupil circle inside it. -
Mark the highlight:
Before shading anything, draw a small, irregular rectangle or trapezoid overlapping the pupil and iris. This is your reflection—keep it pure white. -
Indicate the crease:
Draw a parallel line above the upper eyelid to indicate the skin crease. It should follow the same curve but fade out as it reaches the outer edges.
Step 2: Shading and Depth
-
Darken the pupil:
Switch to your 4B or 6B pencil. Fill in the pupil with solid, dark pressure, being extremely careful not to smudge into the reserved highlight area. -
Spoke the iris:
Using a 2B pencil, draw spoke-like lines radiating from the pupil outward. Leave some areas lighter to mimic the fibrous texture of the iris muscle. -
Shadow the upper eyeball:
The eyelid casts a shadow on the eye. Gently shade the top curve of the eyeball (sclera) and the top of the iris, blending it downwards to create volume. -
Contour the tear duct:
Add soft shading inside the tear duct area. It should be pink and fleshy, so keep the tones mid-range, not stark black. Leave a tiny dot of white for moisture. -
Shade the skin folds:
Add graphite to the crease above the eye. Darken the deepest part of the fold and fade it out upwards towards the brow bone.
Smudge Alert
Graphite smearing on the grid? Place a clean sheet of paper under your drawing hand. This acts as a shield, protecting your crisp grid lines and delicate shading while you work.
Step 3: Detailing and Lashes
-
Draft the eyelash curve:
Don’t draw straight sticks. Practice a ‘flick’ motion on a scrap paper. Eyelashes grow from the rim of the lid, grouping together slightly. -
Apply upper lashes:
Using the 4B pencil, flick long, curved lashes from the upper rim. They should swoop down slightly before curling up. Make them thicker at the timeline and tapered at the tips. -
Reflect the lashes:
Draw tiny, warped reflections of the lashes in the highlight of the eye if you want extra realism. This is a detail I love adding for that ‘glossy’ look. -
Add lower lashes:
Draw the lower lashes shorter and more sparse than the top ones. Ensure they originate from the outer rim of the lower lid, not the inside waterline. -
Sketch the eyebrow:
Above the crease, lay down a base tone for the brow. Over this, draw short, directional hair strokes using the sharp edge of your pencil. -
Final contrast check:
Deepen the darkest areas (pupil, lash line, crease) one last time. Use your precision eraser to pick out texture in the lower lid and brighten the whites of the eye.
Level Up: Wet Look
Use a white gel pen to add tiny, sharp dots of moisture along the bottom waterline and the tear duct. This high-contrast pop makes the eye look incredibly wet and alive.
Step back and admire the soulful gaze you’ve created from simple grid squares.


Lips With Simple Shading Blocks


Master the art of drawing expressive lips using a simple grid method for perfect proportions. This sketch focuses on capturing volume through hatched shading lines, creating a realistic, dimensional look on grid paper.
Step-by-Step
Materials
- Spiral-bound sketchbook with grid paper (or loose graph paper)
- Mechanical pencil or fine-point graphite pencil (HB or B)
- Ruler or straight edge
- Fine liner pen (0.3mm or 0.5mm, black)
- Eraser
Step 1: Setting Up the Grid
-
Define the drawing area:
Start by counting out a square area on your grid paper. Based on the reference, mark out a box that is roughly 8 squares wide by 6 squares tall to house the main lip shape. -
Mark the center lines:
Lightly trace the vertical center line of your chosen box. This symmetry line is crucial for keeping the cupid’s bow and the bottom lip aligned. -
Establish the corners:
Count 4 squares out from the center line to the left and right. Mark these points to define the outer corners of the mouth.
Curve Your Hatching
Don’t draw straight lines for shading. Curve your hatch marks to follow the roundness of the lips. This ‘contour hatching’ creates instant 3D volume.
Step 2: Outlining the Shape
-
Sketch the Cupid’s Bow:
Starting at the top center, draw the ‘V’ shape of the cupid’s bow. The peaks should sit just inside the center two grid squares. -
Connect the upper lip:
Draw a sweeping curve from the top of the cupid’s bow down to the corner marks you made earlier. Keep the line slightly convex to give the upper lip fullness. -
Draw the mouth opening:
Draw the line where the lips meet. This isn’t a straight line; dip it down slightly in the center and curve it up towards the corners. -
Outline the bottom lip:
Sketch a deep, wide curve for the bottom lip. It should be fuller than the top lip, extending down about 2-3 grid squares from the mouth opening. -
Refine the corners:
Connect the upper and lower lip lines at the corners with sharp, precise points.
Step 3: Shading and Texture
-
Map out the highlights:
Before you start hatching, lightly outline where the light hits the lips. You’ll want an oval-shaped highlight in the center of the bottom lip and smaller ones on the upper peaks. -
Start vertical hatching:
Begin adding texture lines. On the bottom lip, draw curved lines that follow the contour of the lip, moving from the bottom edge upward toward the center. -
Shade the upper lip:
For the top lip, hatch downward from the top edge and upward from the mouth opening, leaving the center slightly lighter to show roundness. -
Deepen the shadows:
Go back over the corners of the mouth and the line where the lips meet with heavier strokes. I find that deepening these areas really makes the drawing pop off the page. -
Add cross-hatching:
In the darkest areas (corners and bottom edge), add diagonal lines crossing your original marks to create deeper values. -
Clean up:
Erase any stray construction lines or grid marks that interfere with your drawing, though leaving the grid visible is part of the aesthetic here. -
Final inking (optional):
If you want a bolder look, trace over your main contour lines with a fine liner pen, keeping the hatching lines delicate.
Lips Looking Flat?
If the lips look flat, you likely shaded the center too darkly. Erase the middle of the bottom lip to create a strong highlight, mimicking glossy reflection.
Now you have a structured yet expressive sketch to add to your grid drawing portfolio


Cute Cat Face Using a 6×6 Grid
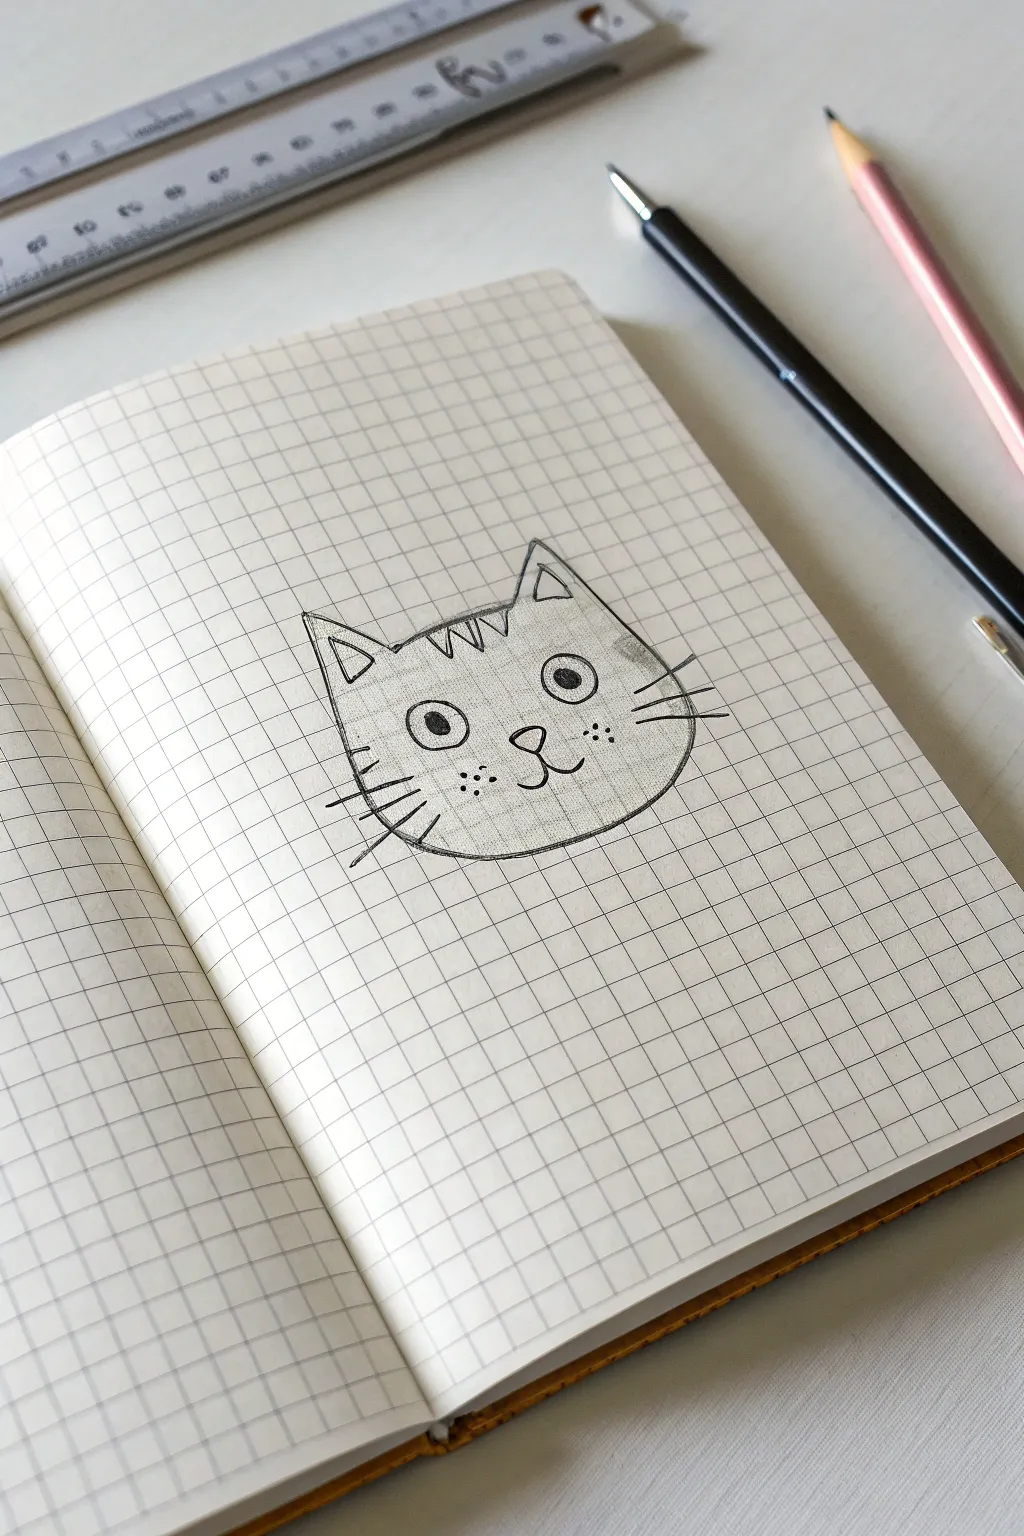
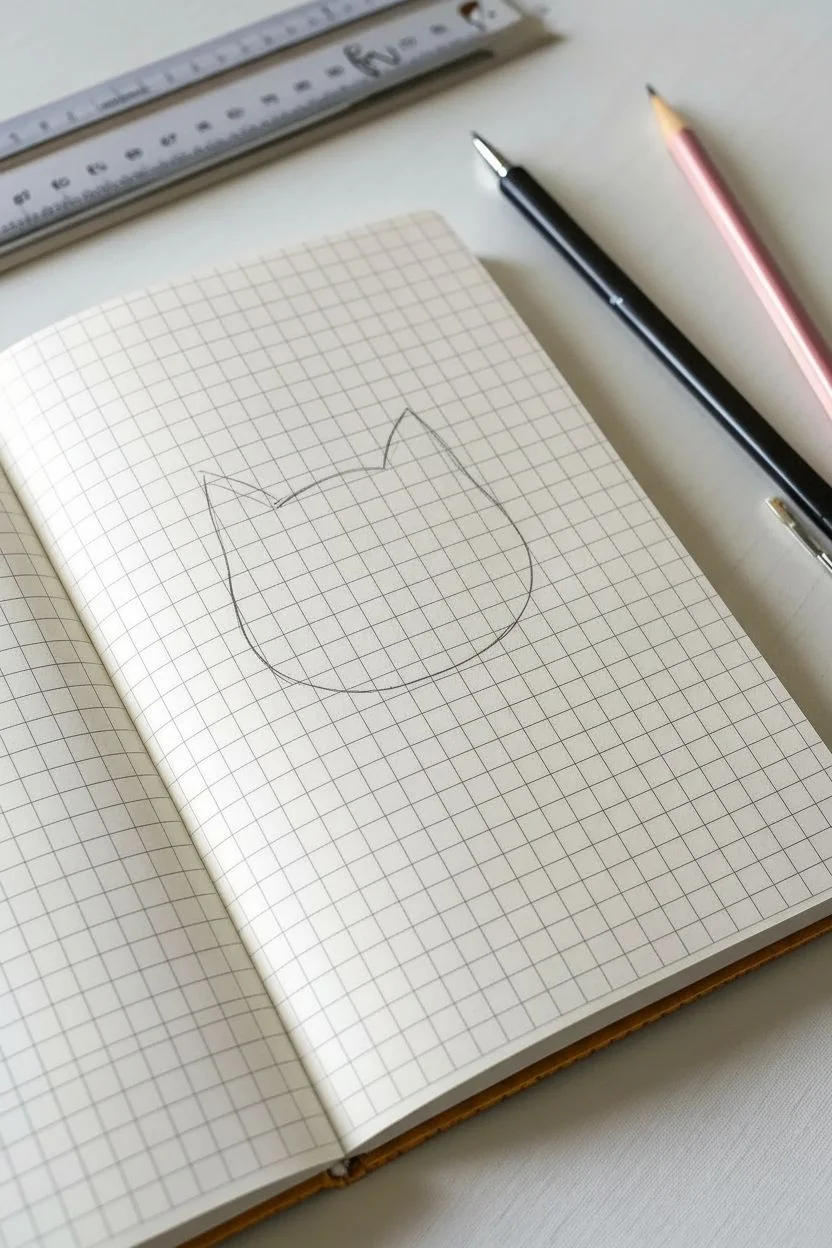
This simple yet charming project uses basic grid paper to guide you in sketching a perfectly balanced, cartoon-style cat face. The grid lines act as helpful scaffolding, making it easy to place symmetric features like ears and eyes without needing complex measuring tools.
Detailed Instructions
Materials
- Grid paper notebook (A5 or similar size)
- Mechanical pencil (0.5mm or 0.7mm)
- Black fine-liner pen (optional, for final lines)
- Eraser
- Ruler (optional, for straight edges)
Step 1: Setting the Framework
-
Identify your grid area:
Locate a clear section of your grid paper. For this cat, visualize a central working area that is roughly 6 squares wide and 5 squares high to contain the main head shape. -
Start the head outline:
Beginning near the bottom left of your envisioned 6×6 space, sketch a curved line upward. This will form the left cheek and side of the face. -
Mirror the right side:
Draw the corresponding curve on the right side. Check the grid squares to ensure it mirrors the left side’s width and height. -
Connect the chin:
Join the bottom of these two curves with a slightly flatter, gentle curve to create the cat’s chin. -
Draw the forehead line:
Sketch a horizontal line connecting the top points of your side curves, but leave gaps near the corners where the ears will go.
Uneven Eyes?
If your circles look wonky, trace a small button or coin that fits within the grid square to get perfect round shapes.
Step 2: Adding Key Features
-
Position the ears:
At the top corners of the head, draw two triangles pointing upward. Their bases should sit on the forehead line you just imagined. -
Detail the inner ears:
Inside each large ear triangle, draw a smaller, similar triangle to create depth. -
Add forehead stripes:
Between the ears, draw a few zig-zag ‘M’ shapes or small hanging triangles to represent the tabby stripes on the forehead. -
Place the eyes:
Count about two grid squares down from the top of the head. Draw two circles spaced about two grid squares apart for the eyes. -
Fill the pupils:
Draw a smaller solid black circle inside each eye. Placing them slightly cross-eyed or looking in one direction adds character. -
Draw the nose:
Below the eyes, centrally located, draw a small inverted triangle with rounded corners for the nose.
Personality Pop
Change the expression by altering the eyebrows or mouth shape—a tiny ‘o’ mouth makes a surprised cat, while slanted brows look angry.
Step 3: Bringing it to Life
-
Create the mouth:
From the bottom tip of the nose, draw a small vertical line down, then curve it outward to the left and right like an anchor shape to form the mouth smile. -
Add whisker points:
On the cheeks, adding a cluster of three or four dots on each side creates the suggestion of whisker pads. -
Sketch the whiskers:
Draw three long, straight lines extending outward from each cheek area. I find quick, confident strokes work best to keep lines straight. -
Refine outline:
Go over your main outline lines again with a slightly heavier hand or a fine-liner pen to make the cat pop against the grid background. -
Add shading (optional):
Lightly shade in the inner ears or add a small smudge of graphite on the cheek for a bit of blush effect.
You now have a delightful grid-based doodle ready to peek out from your notebook pages


Easy Dog Profile With Clear Landmarks
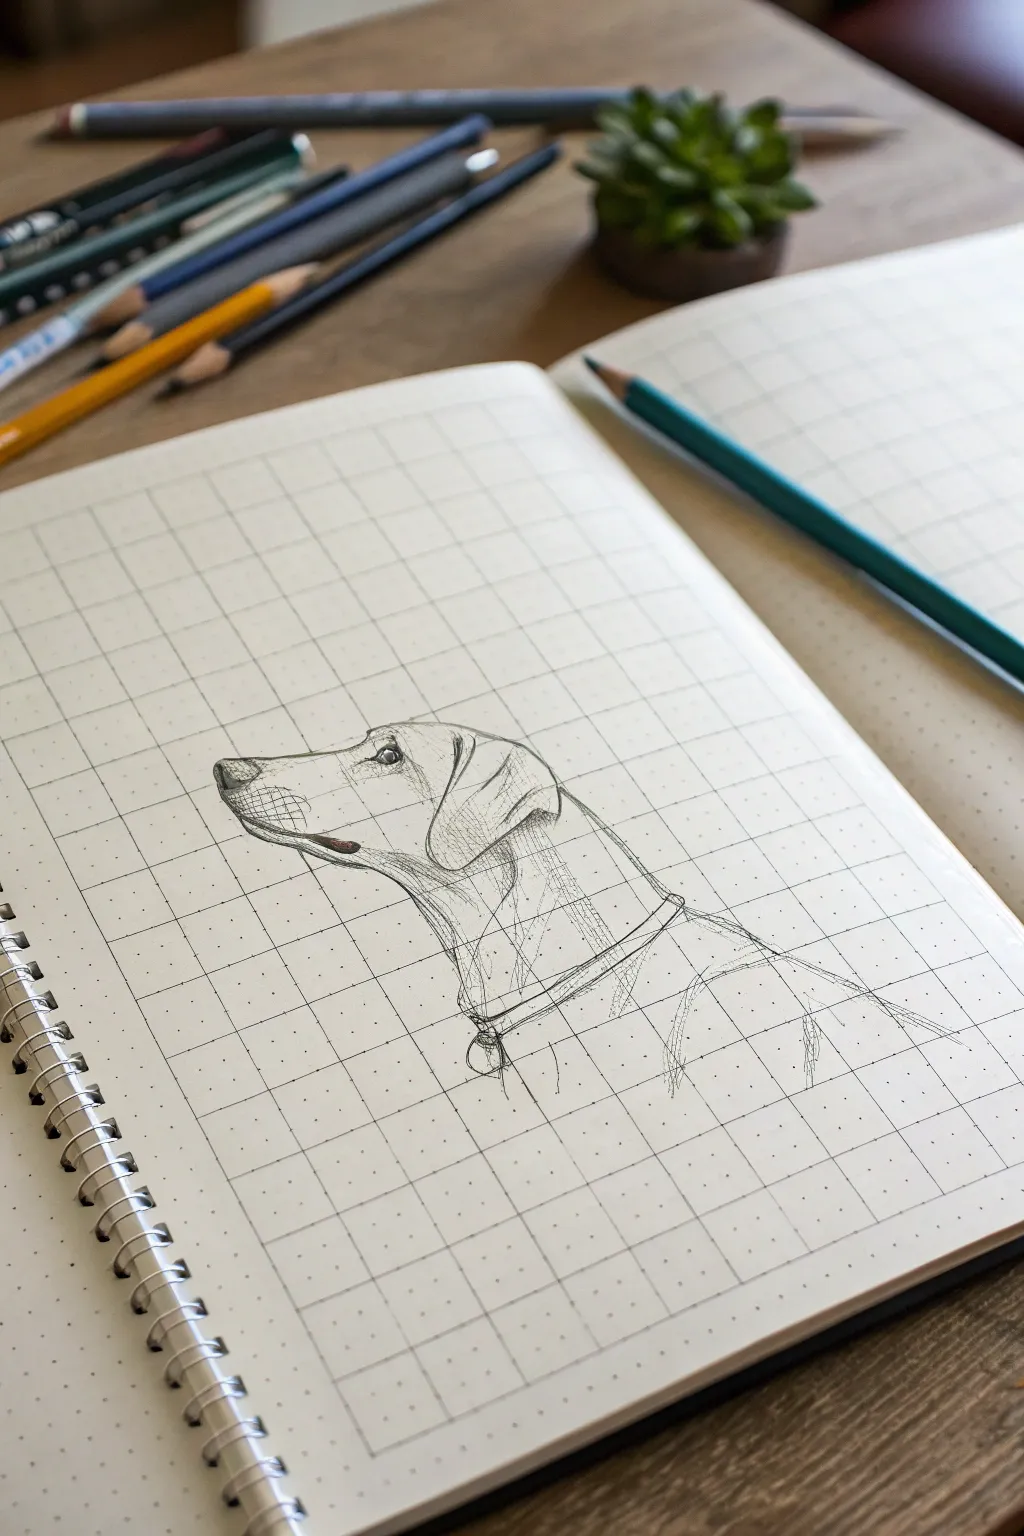
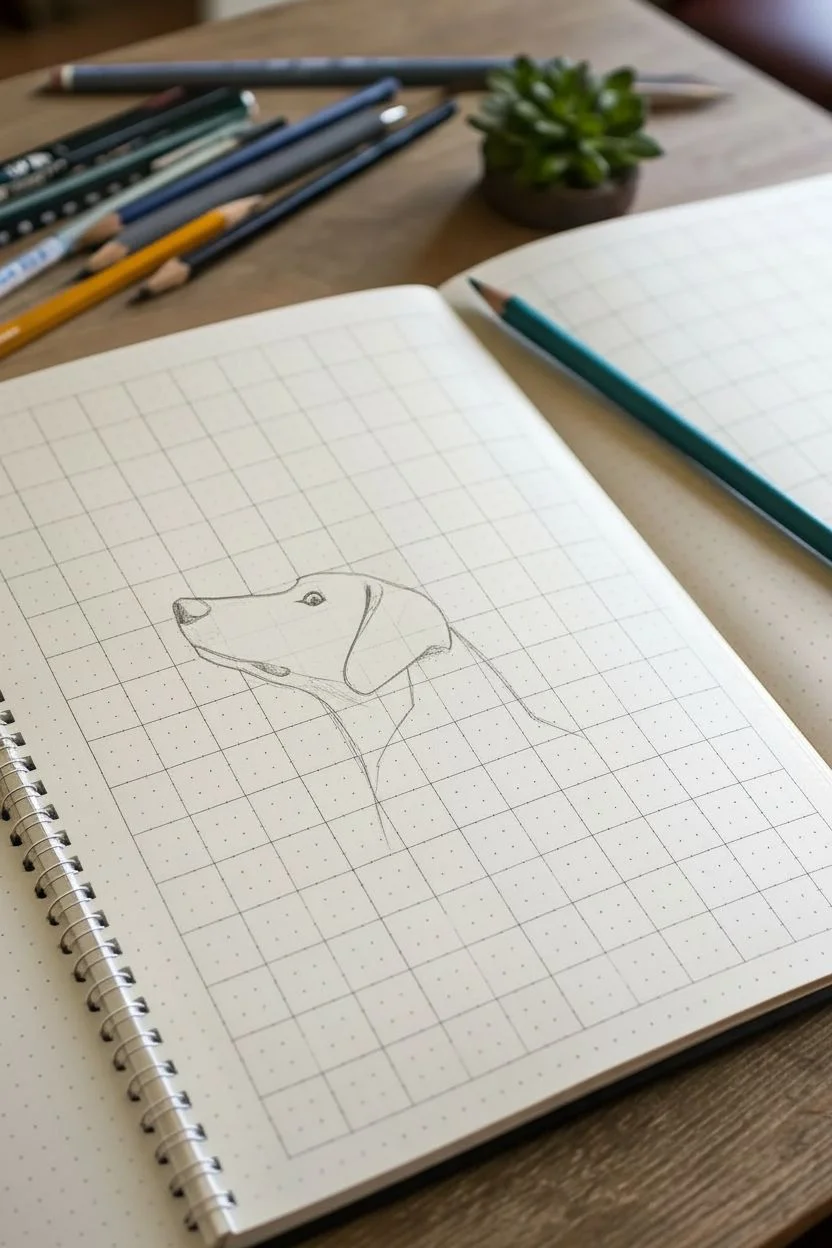
Capture the loyal expression of man’s best friend with this structured approach to drawing a dog profile. Using the helpful guidance of a dot grid notebook, you’ll learn to break down the canine anatomy into simple, manageable shapes.
Step-by-Step
Materials
- Dot grid notebook or grid paper
- HB graphite pencil for sketching
- 2B or 4B pencil for shading
- Fine-point eraser
- Pencil sharpener
- Reference photo of a dog profile (optional)
Step 1: Establishing the Basic Landmarks
-
Set your boundaries:
Begin by counting out a working area on your grid. For this profile, you’ll need roughly 10-12 grid squares wide and about 8-10 squares high. Lightly mark the corners so you know where you are heading. -
Draw the muzzle line:
Start the snout by drawing a mostly horizontal line about 3 grid units long. Angle it very slightly upwards towards the right side. This sets the primary direction of the dog’s face. -
Define the forehead slope:
From the right end of your muzzle line, draw a gentle diagonal line moving up and to the right, crossing about 2 grid squares. This forms the ‘stop’ where the nose meets the forehead. -
Mark the eye placement:
Locate the intersection where the muzzle meets the forehead. Go back about one grid unit horizontally and slightly down. Make a small, almond-shaped mark here for the eye. -
Draft the ear shape:
Starting just behind the eye and slightly higher on the forehead, sketch a large, drooping triangle shape for the ear. It should hang down roughly 3 to 4 grid units, curving gently at the bottom tip.
Step 2: Refining the Form
-
Detail the nose:
Return to the tip of the muzzle. Draw a small, rounded triangular shape for the nose leather. Add a small curve underneath for the nostril. -
Draw the mouth and jaw:
From underneath the nose, draw a long, sweeping curve backward for the mouth line. It should run parallel to the top of the muzzle and end align with the front of the eye. -
Shape the lower jaw:
Sketch the chin starting just below the mouth line, creating a curve that sweeps back towards the neck. Keep this line softer than the top of the muzzle. -
Connect the neck:
Draw the back of the neck starting from behind the ear, sloping downwards. Draw the front of the neck starting from the jaw, curving gently outward to suggest the dog’s chest. -
Add the collar:
Draw two parallel curved lines across the lower neck area to represent a collar. Add a small circle or oval hanging from the bottom line for the tag.
Grid Counting Trick
Don’t guess distances! Count exact grid squares between the nose tip and ear base to keep proportions perfect every time.
Step 3: Adding Texture and Shading
-
Hatch the nose area:
Using light, diagonal strokes, shade the top of the muzzle and the nose itself. This specific cross-hatching technique helps distinguish the darker nose texture from the fur. -
Darken the eye:
Fill in the pupil of the eye, leaving a tiny white speck for the highlight. This immediately brings life to the drawing. -
Shade the ear:
Add vertical shading lines to the ear flap. Use slightly more pressure at the top where the ear folds over to show depth and shadow. -
Suggest neck muscles:
Draw faint, loose lines running down the neck to suggest the direction of the fur and underlying muscles. I find that keeping these lines broken rather than continuous looks more natural. -
Define the collar shadow:
Add a little shading right underneath the collar. This casts a shadow on the dog’s neck and makes the collar appear to sit on top of the fur rather than being flat against it. -
Final contour check:
Go over your main outline with a slightly sharper or darker pencil (like a 2B) to make the profile pop against the grid background.
Muzzle Too Pointy?
If the snout looks too sharp, round off the nose tip and soften the chin curve. Dogs rarely have perfect angles.
You have captured a wonderful canine likeness using simple geometry
BRUSH GUIDE
The Right Brush for Every Stroke
From clean lines to bold texture — master brush choice, stroke control, and essential techniques.
Explore the Full Guide
Stylized Portrait With Glasses in a Grid
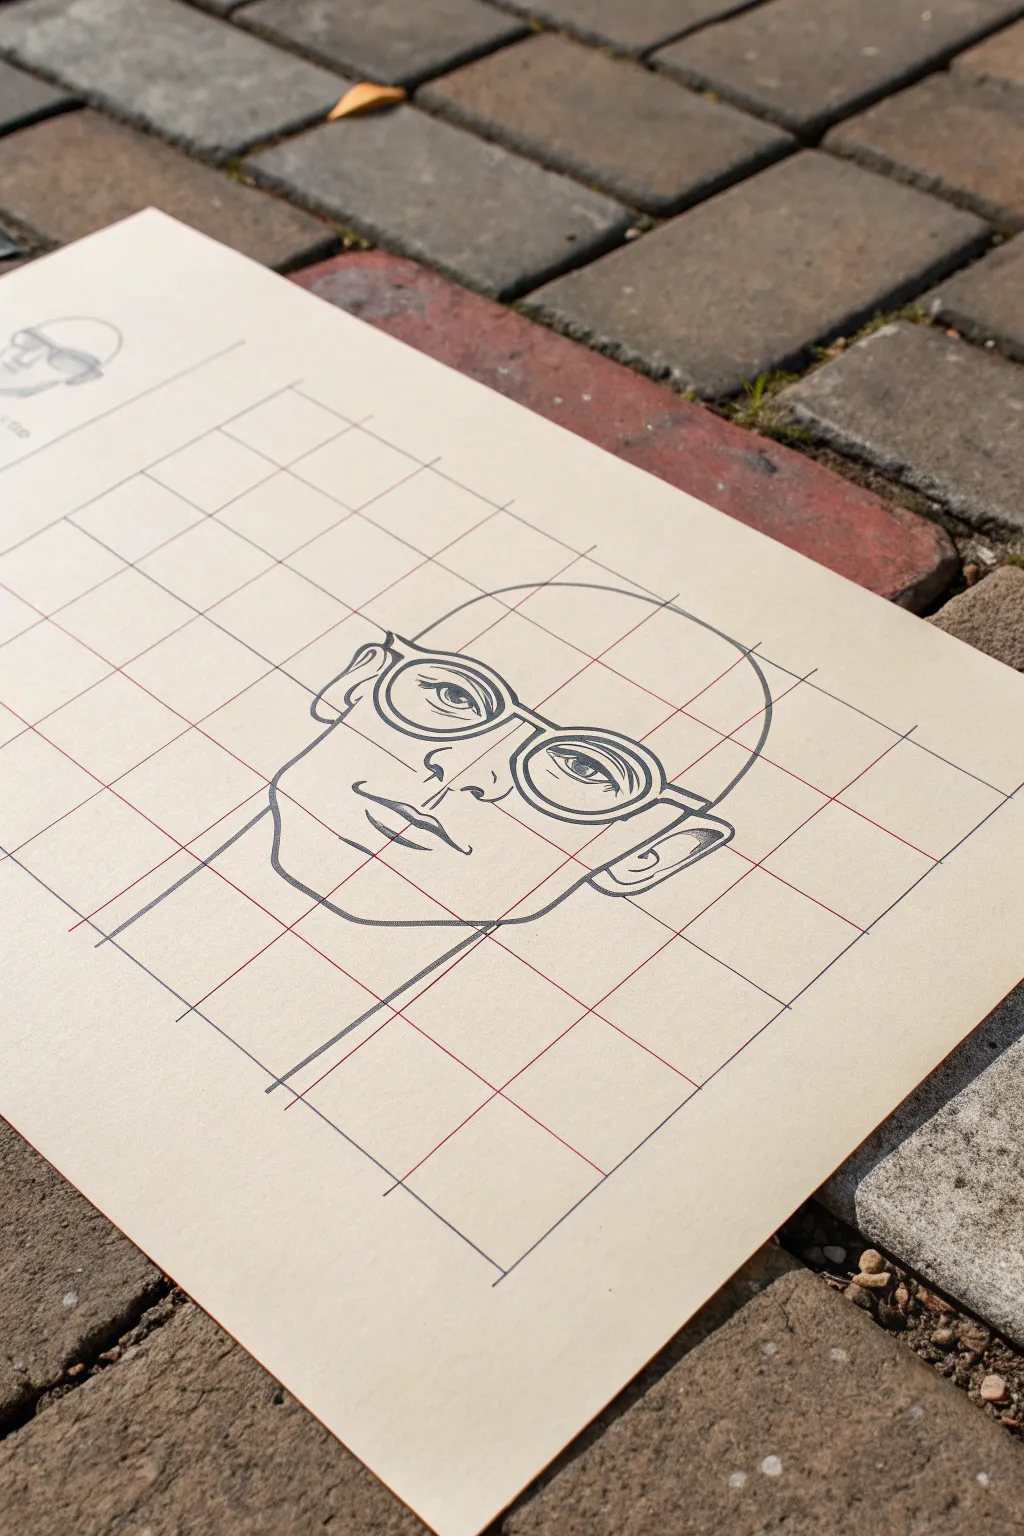
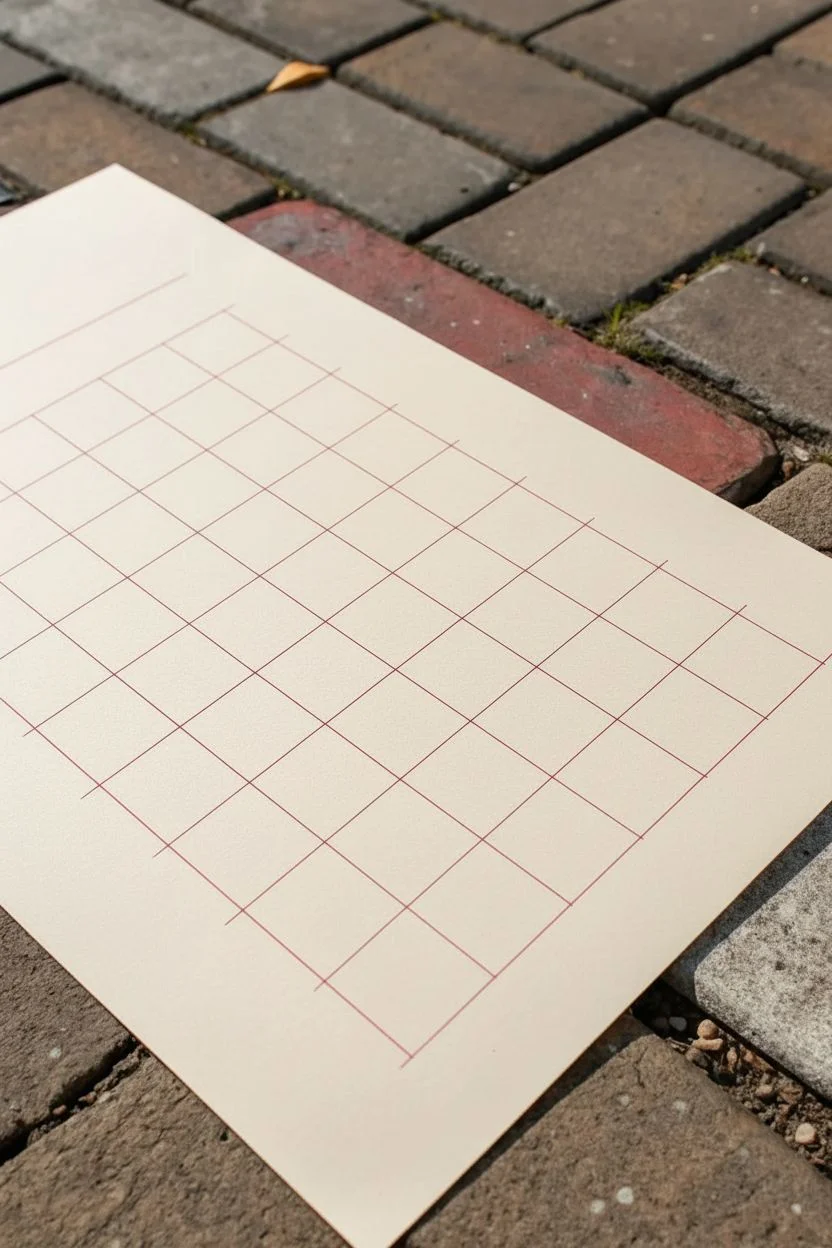
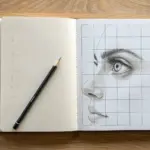
Master the art of proportion with this stylized portrait exercise, featuring a calm, bald figure wearing round spectacles. Using a grid overlay as your guide, you will learn to break down complex facial features into manageable geometric shapes for a clean, professional illustration.
Step-by-Step Guide
Materials
- Cream or off-white drawing paper (smooth bristol or cardstock)
- Red fine-liner pen or red pencil
- Ruler
- HB graphite pencil (sharpened)
- Black drawing pen (0.3mm or 0.5mm)
- Kneaded eraser
Step 1: Setting the Foundation
-
Prepare your paper:
Start with a clean sheet of cream-colored paper. Orient it vertically to allow enough space for the head and neck structure. -
Mark the grid boundaries:
Using your ruler and red pen, draw a large rectangle that will contain your portrait. Aim for roughly 6 inches by 8 inches, or adjust proportionally for your paper size. -
Create the vertical columns:
Measure equal increments across the top and bottom of your rectangle. Connect these points with vertical red lines to create 5 equal columns. -
Create the horizontal rows:
Measure the same increments along the sides. Connect these points horizontally to create 6 equal rows. You should now have a perfect grid of squares. -
Double-check your squares:
Verify that your grid lines are straight and parallel. This structure is the most critical part of the drawing, so take a moment to ensure accuracy.
Clean Lines Tip
When inking the long curves of the head, lock your wrist and move your entire arm from the elbow. This produces smoother, less shaky lines.
Step 2: Constructing the Face
-
Outline the head shape:
Switch to your HB pencil. In the central upper squares, lightly sketch the dome of the head. Notice how the curve interacts with the grid lines—observe exactly where the line crosses each red square edge. -
Draft the jawline:
Moving downward, sketch the angular jaw. The chin should rest in the lower-middle section, with the jawline cutting diagonally across the corner squares. -
Place the glasses:
Locate the horizontal center line of the face. Draw two large circles for the glasses frames, using the grid intersections to ensure they are level and symmetrical. -
Add the nose bridge:
Connect the glasses with a simple bridge. Sketch the nose below this, using a hook shape for the tip and small curves for the nostrils. -
Position the mouth:
Draw the mouth roughly halfway between the nose and chin. Keep the upper lip thin and the lower lip slightly fuller, curving gently. -
Sketch the ears:
Draw the ears on the sides of the head. I find it helpful to align the top of the ear with the top of the glasses frame to keep proportions realistic.
Step 3: Inking and Refining
-
ink the main outlines:
Take your black drawing pen and carefully go over your pencil lines. Use a confident, steady hand for the main contour of the face and head. -
Define the eyes:
Inside the glasses frames, draw the eyes. Add details like the eyelids and pupils. Notice the slight shading lines under the upper lids to give them depth. -
Thicken the frames:
Go over the glasses frames again to thicken the line weight. This makes them stand out as a distinct object on the face. -
Add facial details:
Ink the nose, mouth, and ears. Add small accent lines, like the curve of the nostril or the crease of the earlobe, to add character. -
Draw the neck:
Extend two lines downward from the jaw for the neck. Keep these simple and clean, anchoring the head to the bottom of the grid. -
Erase pencil guides:
Once the ink is completely dry, gently run your kneaded eraser over the entire drawing to remove the graphite sketches. Leave the red grid visible as part of the aesthetic.
Level Up: Color Pop
Use a light watercolor wash or marker to color just the lenses of the glasses a faint blue or teal. It adds a modern, graphic design focal point.
You now have a striking, geometrically balanced portrait study ready for display
Upside-Down Grid Copy for Extra Accuracy
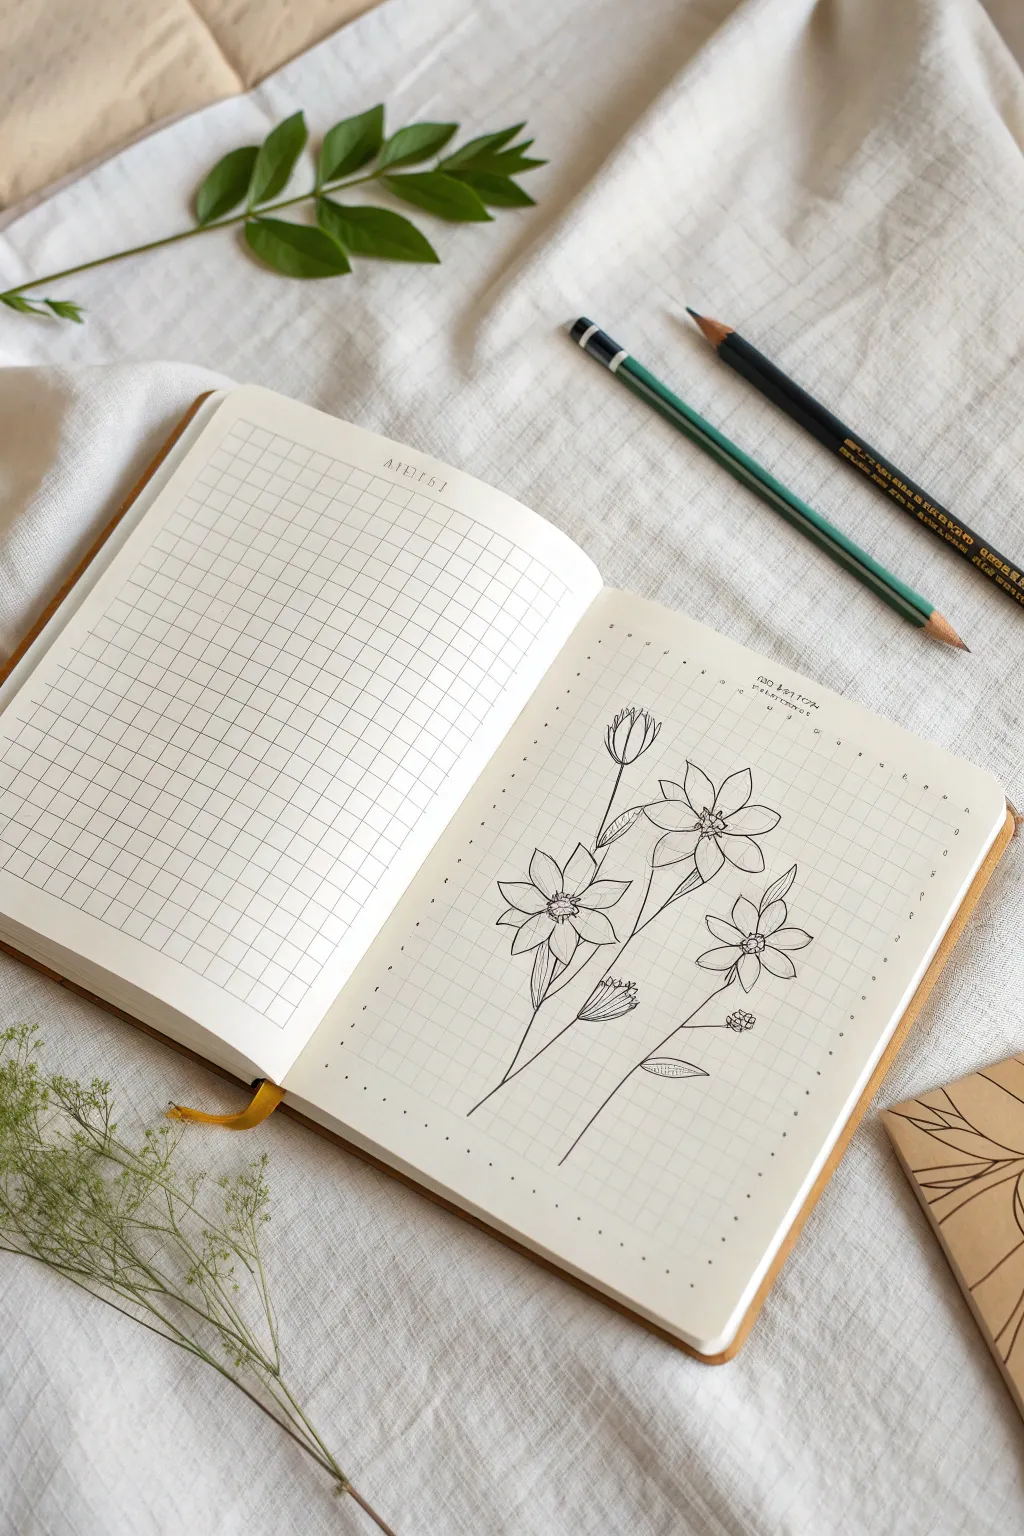
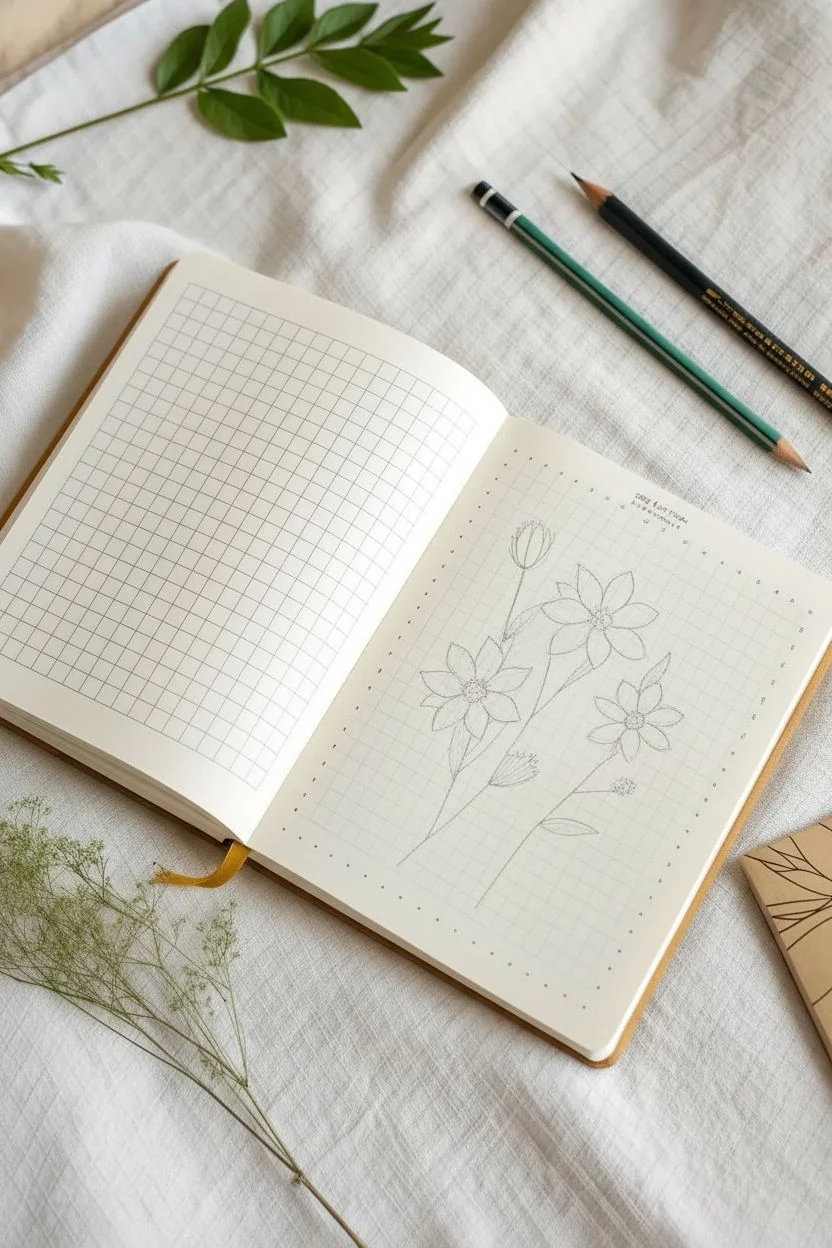
This project transforms a simple grid notebook into a canvas for a delicate floral illustration, using the grid lines as a built-in guide for proportions and placement. The result is a clean, minimalist black ink drawing that looks professional yet is surprisingly approachable for beginners.
Step-by-Step Tutorial
Materials
- Grid notebook or bullet journal (A5 size recommended)
- Fine liner pen (0.3mm or 0.5mm, black)
- Pencil (HB or 2B)
- Eraser
- Ruler (optional, for checking angles)
Step 1: Preparation and Initial Layout
-
Select your workspace:
Begin by opening your grid notebook to a fresh spread. Ensure the paper lies as flat as possible; you might need to gently press the spine to keep the pages from curving while you draw. -
Establish the composition:
Decide on the placement of your three main flowers. Unlike a freehand sketch, count the grid squares to determine roughly where the center of each flower head should sit. Visualizing a triangle between these three points helps create a balanced composition. -
Lightly sketch the stems:
Using your pencil with very light pressure, draw the main stem lines. Start from the bottom third of the page and sweep upward. Use the grid intersections to guide the angle of the stems; for example, for every 3 squares up, go 1 square right. -
Block in flower shapes:
At the top of your stems, sketch rough circles or ovals to represent the overall size of the flower heads. These don’t need to be detailed yet, just placeholders to ensure the flowers don’t overlap awkwardly or run off the page.
Smudge Alert
If you are left-handed, place a scrap piece of paper under your hand while inking. This acts as a shield, preventing the side of your palm from dragging wet ink across the page.
Step 2: Pensioning the Main Flowers
-
Draft the center petals:
Focus on the largest lower-left flower first. Draw a small, textured center circle. From there, sketch the petals closest to the viewer, noting how they extend across specific grid boxes. -
Add petal details:
Fill in the remaining petals for the first flower. Notice that some petals have a slight fold or crease down the center; lightly pencil these lines in now to guide your ink later. -
Sketch the upper bloom:
Move to the highest flower on the right. This one is facing slightly more upward. Sketch the petals radiating from the center, using the horizontal grid lines to keep the petal lengths relatively consistent. -
Draw the side flower:
Sketch the third flower on the middle right. This one is slightly smaller. Ensure the petals have pointed tips for that star-like appearance seen in the reference. -
Include buds and leaves:
Add the smaller details: a closed bud near the top center and a small leaf branching off the lower stem. Use the grid to check that the leaf is symmetrical on both sides of its center vein.
Grid Counting Trick
Treat the grid like coordinates. Instead of guessing petal length, count: ‘This petal starts at X and ends two squares right, one square up.’ This guarantees near-perfect proportions.
Step 3: Inking and Refining
-
Begin inking outlines:
Switch to your fine liner pen. I find it safest to start inked lines from the top left (if you’re right-handed) to avoid smudging, though starting with the central flower is also fine. Trace your pencil lines confidently. -
Refine the petals:
As you ink the petals, don’t make the lines perfectly straight. Add slight wobbles or curves to mimic natural organic shapes. The grid helps maintain the size, but the ink line gives it life. -
Detail the flower centers:
For the centers of the flowers, use small stippling dots or tiny loops instead of a solid circle. This texture adds depth and makes the drawing feel more botanical and less cartoonish. -
Ink the stems:
Draw the stems with single, steady strokes. If your hand is shaky, you can breathe out as you draw the long line. Ensure the stems connect logically to the flower heads. -
Add internal shading:
Using very light, quick strokes, add hatching lines at the base of the petals where they meet the center. This suggests a bit of shadow and dimension without needing heavy shading. -
Ink the leaves and veins:
Outline the leaves and carefully draw the center vein. Add small diagonal lines for the leaf texture, keeping them sparse to maintain the drawing’s clean aesthetic.
Step 4: Final Touches
-
Dry completely:
Wait at least 5 to 10 minutes for the ink to dry thoroughly. Grid paper can sometimes be less absorbent than sketch paper, meaning ink sits on the surface longer. -
Erase pencil marks:
Gently erase all underlying pencil sketches. Hold the paper taut with one hand and rub carefully to avoid crinkling the page. -
Evaluate the grid integration:
Step back and look at how the drawing sits on the grid. If any areas feel too empty, you can add tiny stippling dots around the flowers to subtly integrate the background.
Flip the page upright and admire how the rigid structure of the graph paper beautifully contrasts with your organic floral lines


Have a question or want to share your own experience? I'd love to hear from you in the comments below!