If you love art that’s part drawing, part puzzle, grid pixel art is going to feel like pure comfort. I’m sharing a bunch of grid pixel art ideas you can copy square-by-square on graph paper, bead grids, or any square tile layout.
Classic 8-Bit Heart Icon on a Visible Grid
Capture the nostalgia of early gaming with this iconic pixel art heart. Drawn simply on grid paper, this project creates a bold, graphic symbol using just two colors and the paper’s natural guidelines for perfectly crisp edges.
Step-by-Step Tutorial
Materials
- White grid paper (standard 5mm or 0.25 inch squares)
- Black fine-tip or felt-tip marker
- Red felt-tip marker or colored pencil
- Pencil (optional, for drafting)
- Eraser
- Ruler (optional, but helpful for outlines)
Step 1: Drafting the Outline
-
Locate center:
Begin by finding a central spot on your grid paper sheet. You will need a canvas area that is roughly 11 squares wide and 10 squares tall for the heart itself. -
Mark the top arches:
Start by lightly marking the top sections with your pencil or just counting. You need two horizontal bars of 2 squares each. Leave a gap of 1 square between them. -
Add corner pixels:
Move diagonally down and out from those top bars. Mark a single square on the left and right outer edges to start forming the curve of the heart’s humps. -
Draw the side vertical bars:
Below those corner pixels, mark a vertical line of 2 squares down on both the far left and far right sides. This establishes the widest part of the heart. -
Start the lower taper:
From the bottom of your vertical side bars, move diagonally inward one square. Mark a single square on each side. -
Continue the diagonal:
Move diagonally inward again. This time, mark a set of 2 vertical squares on each side moving toward the center point. -
Form the tip:
Finally, connect the shape at the bottom with a single central square. This creates the classic pointed tip of the pixel heart.
Step 2: Inking the Borders
-
Trace the perimeter:
Switch to your black fine-tip marker. Carefully outline the exterior boundary of all the squares you just mapped out. -
Fill the black pixels:
Now, fill in the squares that make up the outline completely with black ink. I usually trace the individual square first before coloring it in to keep the edges sharp. -
Double-check the shape:
Ensure the outline is continuous. You should have a distinct black border that is one ‘pixel’ (grid square) thick all the way around the empty center. -
Add inner shine detail (optional):
The reference image shows a solid heart, but if you want that classic ‘shiny’ look, mark off a small 2×1 rectangle or a single square in the upper left of the red area to leave white.
Bleeding Lines?
If your markers bleed through grid paper, place a scrap sheet underneath. For cleaner edges, outline each pixel square before filling the center.
Step 3: Coloring the Core
-
Fill the top left section:
Grab your red marker. Start coloring the squares inside the top left arch, staying neatly within the grid lines. -
Fill the top right section:
Repeat the coloring for the top right arch section. Using small circular motions with your marker can help prevent streaking on the paper. -
Complete the center:
Methodically fill in the remaining central body of the heart. Be careful near the black outline so the colors don’t bleed into each other. -
Final inspection:
Look for any white gaps in your red coloring or uneven edges on the black outline. Touch them up gently for a perfectly solid pixel look. -
Clean up:
If you used any pencil guide marks that are still visible outside the borders, erase them gently once the ink is totally dry to avoid smudging.
Level Up: 3D Shadow
Add a drop shadow by coloring a single grey pixel line along the entire right and bottom edge of your heart to make it pop off the page.
Now you have a charming piece of retro art ready to be framed or used as a handmade card


Simple Smiley Face Emote With Bold Pixel Outline
Bring a touch of digital retro charm to the real world with this hand-drawn pixel art project. Using simple grid paper and bold markers, you’ll create a classic smiley face with a chunky outline that pops right off the page.
Step-by-Step
Materials
- Large sheet of white paper (A3 or similar size)
- Ruler or straight edge
- Pencil
- Black permanent marker (broad tip)
- Yellow permanent marker or paint pen (broad tip)
- Eraser
Step 1: Setting up the Grid
-
Prepare your canvas:
Lay your large sheet of white paper on a flat, clean surface. I find it helpful to tape the corners down lightly so the paper doesn’t shift while measuring. -
Measure the grid spacing:
Using your ruler and pencil, make small tick marks along the top and left edges of the paper. Space these marks exactly 2 centimeters apart (or 1 inch if you want larger pixels) to create a consistent square size. -
Draw vertical lines:
Align your ruler with the top tick marks and draw straight vertical lines all the way down the page. Keep your pressure light so the pencil lines can be faint. -
Draw horizontal lines:
Repeat the process horizontally, connecting your side tick marks to create a full grid of squares across the entire sheet. -
Locate the center:
Find the approximate center of your grid. This will help ensure your smiley face is centered on the page and doesn’t run off the edges.
Step 2: Drafting the Outline
-
Mark the top curve:
Starting near the top center, lightly mark the squares with an ‘X’ that will form the top curve of the circle. This usually involves a flat row of 6-8 pixels on top. -
Step down the sides:
map out the ‘staircase’ steps down the left and right sides. Typically, you’ll drop down one square and move out one square to create the rounded effect. -
Define the bottom curve:
Mirror the top curve at the bottom of the circle shape. Step the pixels inward until you have a flat row at the bottom that matches the top width. -
Check the symmetry:
Before coloring, step back and look at your marked ‘X’ squares to ensure the circle looks symmetrical on both sides.
Grid Consistency
Use graph paper first to sketch your design before scaling it up. This acts as a map so you don’t lose count of pixels on the big sheet.
Step 3: Adding Features and Color
-
Outline the eyes:
Count about 3-4 rows down from the top inside edge. Mark out two rectangles for eyes. In this design, the eyes are roughly 2×3 pixels, slanted slightly or offset depending on the expression you want. -
Sketch the smile:
Mark the squares for the mouth. Start with the corners of the mouth about 3 rows underneath the eyes, then step down and inward to connect them in a broad ‘U’ shape. -
Fill the black pixels:
Use your broad-tipped black marker to color in the outline, the eyes, and the smile mouth line. Coloring in small circular motions helps get full coverage without streaking. -
Start the yellow fill:
Switch to your yellow marker. begin filling in the empty squares inside your black outline. I prefer to outline the inside of each square first before filling the center to stay neat. -
Complete the coloring:
Continue filling strictly within the grid lines until the entire face is a vibrant yellow. -
Cleanup:
Once the ink is completely dry, take your eraser and gently remove any visible pencil grid lines that extend outside the smiley face for a cleaner look. -
Final touches:
If you notice any white gaps between your colored squares, gently touch them up with the appropriate marker to make the image solid and cohesive.
Bleeding Lines
If your black marker bleeds into the squares meant for yellow, let it dry fully. Use white correction fluid to fix the edge before applying yellow.
Your bold, pixelated smiley is now ready to brighten up any space you choose to display it


Cute Mushroom Sprite With a Limited Color Palette
Bring a touch of retro gaming nostalgia to your sketchbook with this classic pixel art mushroom. Using a simple grid and just a few colors, this project is perfect for beginners looking to practice precise coloring and sprite design.
Step-by-Step
Materials
- Spiral-bound grid notebook (A4 or A5)
- Black fineliner or gel pen (0.5mm or 0.7mm)
- Red felt-tip marker or colored pencil
- Beige/tan felt-tip marker or colored pencil
- Pencil (optional, for drafting)
- Ruler (optional)
Step 1: Drafting the Outline
-
Locate the starting point:
Choose a clear area on your grid paper. Leave enough white space around the edges so the sprite feels centered. It helps to lightly mark the bottom center square with a pencil first. -
Draw the mushroom stem base:
Start with the bottom row of the stem. Fill in 4 squares horizontally with your black pen to create the flat base. -
Build the stem sides:
Move up one row and color the squares immediately to the left and right of your base row. Then, move up another row and do the same, creating a widening effect. -
Outline the cap bottom:
For the bottom rim of the mushroom cap, extend the line outwards. Color one square diagonally up-left from the stem, then draw a horizontal line of 8 squares across the top of the stem, and one final square diagonally down-right. -
Form the cap sides:
From the edges of the rim you just drew, move up and color two vertical squares on each side to start gaining height. -
Curve the cap top:
Create the rounded top by stepping inward. Color one square diagonally inward on each side. Then, connect these points with a horizontal row of 6 solid black squares at the very top. -
Define the spots:
Inside the cap area, outline the white spots. I find it easiest to draw the black borders of the spots now so I don’t accidentally color over them later. There should be a large central spot and two partial spots on the sides.
Bleeding Lines?
If your markers bleed through the paper, place a scrap sheet underneath your current page. Switching to colored pencils for the fill is a safer bet for thin paper.
Step 2: Coloring the Sprite
-
Fill the red cap:
Take your red marker. Carefully fill in the grid squares surrounding the white spots inside the cap outline. Use gentle strokes to keep the ink even and avoid bleeding outside the lines. -
Preserve the highlights:
Leave the designated ‘spot’ areas completely white. This contrast creates the classic mushroom look. -
Color the face/stem:
Switch to your beige or tan marker. Fill in the entire stem area below the cap rim, except for two specific squares that will act as eyes. -
Detail the eyes:
Locate the eye positions within the tan area. Use your black pen to fill in two vertical rectangles (2 squares high each) as the eyes. -
Add separation lines:
Draw faint black lines on the grid separating the white gum of the mushroom from the red cap if your initial outline needs reinforcement. -
Clean up edges:
Go back over your outer black perimeter one last time. Thickening the outer border slightly can make the sprite pop off the page more effectively.
Level Up: Shading
Add depth by using a darker red on the bottom right of the cap and a darker beige on the bottom right of the stem to simulate simple shadow effects.
Now you have an iconic gaming power-up ready to energize your sketchbook layout

Kawaii Cat Head With Big Eyes on a Countable Grid
Capture current cozy vibes with this adorable pixel art cat head drawn on grid paper. Featuring oversized eyes and sweet pink cheeks, this design is perfect for beginners looking to practice counting squares and clean coloring techniques.
Step-by-Step Tutorial
Materials
- Grid paper notebook (5mm squares recommmended)
- Black fine liner or felt-tip pen
- Pink or peach colored pencil/marker
- Light beige or cream colored pencil/marker
Step 1: Drafting the Outline
-
Establish the base width:
Start near the bottom of your page. Count out 7 grid squares horizontally and mark them lightly. This will be the flat base of the cat’s chin. -
Build the right cheek:
From the right end of your base, move up diagonally one square to the right and mark 2 squares. Move up-right again for 1 square. Then, move up-right again for 2 vertical squares. -
Create the left cheek:
Repeat the previous step on the left side: go up-left for 2 squares, up-left for 1 square, then up-left for 2 vertical squares to mirror the other side. -
Outline the ears:
For the left ear, move up vertically 4 squares. Then create the tip by moving diagonally inward. Do the same for the right ear, ensuring they look symmetrical. -
Connect the forehead:
Draw a horizontal line connecting the inner base of the ears. This line should be about 10-12 squares long, dipping slightly if you want a more organic look, though a straight line works perfectly for pixel art.
Step 2: Adding Facial Features
-
Position the left eye:
Locate a spot about 3 squares in from the left outline and 3 squares up from the chin. Mark a 5×4 rectangular area for the eye. -
Define the eye highlights:
Inside that left eye rectangle, mark two white squares to serve as reflections—one in the top-left corner and a smaller one near the bottom-right. These will stay uncolored. -
Draw the right eye:
Leave a gap of about 4-5 squares for the nose area. Draw the second eye mirror-image to the first, keeping the same 5×4 dimensions and highlight placements. -
Place the nose and mouth:
In the center gap between the eyes, draw a small ‘T’ shape or a simple dot for the nose. Extent small lines downward and outward to create the signature ‘w’ cat mouth. -
Mark the cheeks and ears:
Outline small rectangular patches under the eyes for blush marks. Also, outline the inner triangle shapes inside the ears.
Bleeding Lines?
If using markers on thin paper, ink can bleed into neighbor squares. To fix this, color just inside the lines rather than touching the grid borders directly.
Step 3: Inking and Coloring
-
Fill the black outlines:
Take your black pen and meticulously fill in all the outline squares you marked in the first phase. I find it helpful to outline the square first, then fill the center to stay neat. -
Darken the eyes:
Fill in the eye rectangles with black ink, being extremely careful not to color over the white highlight squares you reserved earlier. -
Add pink details:
With your pink marker or pencil, fill in the cheek rectangles, the geometric nose shape, and the inner ear triangles. -
Apply base color:
Using the light beige or cream pencil, gently shade in the entire face. Use even, diagonal strokes to minimize streak marks. -
Final check:
Compare your drawing to the grid to ensure no squares were missed. If your black ink looks patchy, carefully go over it one more time for a solid, opaque look.
Make It a Sticker
Once colored, cover the drawing with clear packing tape, cut it out leaving a small white border, and use double-sided tape on the back.
Enjoy your charming new pixel art creation
BRUSH GUIDE
The Right Brush for Every Stroke
From clean lines to bold texture — master brush choice, stroke control, and essential techniques.
Explore the Full Guide
Chibi Bunny Character With Simple Shading Blocks
Hop into relaxation with this adorable pixel-art style bunny sketch on grid paper. This charming character combines simple geometric filling with a unique, scribbly outline technique that gives it a hand-drawn, fuzzy texture.
How-To Guide
Materials
- Grid notebook or graph paper (5mm squares ideal)
- Black fine-liner pen (0.3mm or 0.5mm)
- Black gel pen or slightly thicker marker (optional for bolding)
- Beige or light tan colored pencil/highlighter
- Pink or salmon colored pencil/highlighter
- Pencil for initial sketching
- Eraser
Step 1: Drafting the Basic Shape
-
Establish the Head:
Begin by counting out a rectangle for the head. Outline a space that is roughly 10 squares wide and 7 squares tall in light pencil. -
Shape the Head:
Round off the corners of your rectangle. For the cheeks, extend the width by one square on the bottom two rows to give it that chubby chibi look. -
Add the Ears:
Starting from the top of the head, draw two long oval shapes. Each ear should be about 3-4 squares wide at the base and approximately 8-9 squares tall, tilting slightly outward. -
Outline the Body:
Below the head, sketch a smaller, rounded body. It should be narrower than the head, roughly 6-7 squares wide and 5 squares tall. -
Draft Arms and Legs:
Add small, stubby arms on either side of the body and two rounded feet at the bottom. Keep these within the grid lines to maintain the pixel aesthetic.
Step 2: Adding Scale and Color
-
Color the Face Base:
Using your beige or tan marker/pencil, fill in the entire head shape, being careful to stay within your penciled boundaries. -
Fill the Body:
Continue with the beige color to fill in the body, arms, legs, and the outer edges of the ears. -
Add Pink Accents:
Switch to your pink color. Fill in the inner sections of the tall ears, leaving a beige border around them. -
Rosy Cheeks:
Add small horizontal pink rectangles on the cheeks, just below where the eyes will go. -
Heart Detail:
Place a small pink heart or square right in the center of the chest for a cute belly detail.
Ink Smearing?
If your markers smear the black ink, color the shapes first and add the black outlines last. This keeps colors crisp and ink dark.
Step 3: Inking the Details
-
Draw the Eyes:
With your black pen, draw two large, vertical rectangular eyes. I usually make these 2 squares tall and 1 square wide. -
Add Eye Shine:
Leave a small white square or circle in the top corner of each eye purely uncolored for a highlight, then fill the rest of the eye black. -
Nose and Mouth:
Between the eyes, draw a tiny ‘Y’ or ‘W’ shape for the nose and mouth. Make sure it connects to create that classic bunny snout. -
Create the Fuzzy Outline:
Instead of tracing straight lines, use your fine-liner to create small, distinct loops or squiggles along the entire pencil perimeter. -
Looping Technique:
Keep your loops small and tight, mimicking the texture of fur. Go all the way around the ears, head, and body. -
Inner Ear Texture:
Add a dividing line between the pink inner ear and beige outer ear using the same loopy, broken line style. -
Define the Limbs:
Use the squiggly line to separate the arms from the body, defining the shape clearly. -
Add Belly Definition:
Draw a faint, loopy circle on the stomach around the pink heart to define a belly patch. -
Cleanup:
Wait for the ink to dry completely, then gently erase any visible pencil sketch lines underneath your artwork.
Level Up: Accessories
Give your bunny personality by drawing a pixel-style carrot in its hand or adding a tiny bow tie near the neck.
Now you have a charming, fuzzy friend sketched right into your notebook, ready to brighten your notes
Frog in a Witch Hat for a Seasonal Grid Template
Get into the spooky spirit with this adorable pixel art frog donning a classic witch hat. Using a simple grid template, you’ll create a charming character perfect for Halloween cards or notebook doodles.
Step-by-Step Guide
Materials
- Grid paper (1cm or 0.5cm squares recommended)
- Black fine-liner or gel pen (for outlines)
- Green marker or colored pencil (frog skin)
- Purple marker or colored pencil (hat)
- Orange marker or colored pencil (hat band and details)
- Pencil and eraser (for sketching)
Step 1: Setting the Stage
-
Prepare your grid:
Start with a clean sheet of grid paper. You will need a working area of approximately 12 squares wide by 18 squares tall. Lightly mark the boundaries with a pencil if it helps you stay centered. -
Outline the hat base:
Begin near the top-middle of your area. Count 10 squares horizontally for the brim of the hat. Outline the bottom edge of these squares in black. -
Draw the hat brim:
Complete the brim by drawing the sides and top edge. The brim is two squares high on the ends, but dips in the middle. Focus on creating that jagged, pixelated look by stepping the lines up and down.
Pixel Perfection
Count squares twice before inking! When coloring, use small circular motions with markers to avoid streaks and keep the color saturation even within each square.
Step 2: Building the Hat
-
Start the cone:
Move to the top of the brim. Outline a base for the cone that is about 6 squares wide. Step inward by one square on each side as you move up to create a tapering effect. -
Add the hat tip:
Continue tapering the hat upward until it comes to a point, roughly 5-6 squares high from the brim. Add a little ‘step’ to the left side to make the hat look slightly crumpled or crooked at the top. -
Define the band:
Draw a horizontal stripe across the base of the hat cone which will later be colored orange. This band should be 1-2 squares tall depending on your preference. -
Color the hat:
Fill in the main body of the hat with your purple marker. Use the orange marker for the band, and carefully color the underside of the brim in a darker purple or black if you want extra depth.
Smudge Alert
If your black outline smears when coloring, switch the order: color the internal blocks first, let them dry completely, and add the black outlines as the very final step.
Step 3: Drawing the Frog
-
Outline the head:
Directly under the hat brim, outline a wide, rectangular shape for the frog’s head. It should be slightly wider than the hat’s cone but narrower than the brim. -
Create the eyes:
Inside the head area, outline two large squares for eyes. Leave a small white square inside each pupil for a highlight, then fill the pupils with black ink. -
Draw the mouth:
Below the eyes, draw a long horizontal line for the mouth. Outline a thin rectangle below this line to serve as the lower lip or chin area. -
Sketch the body:
Extend the outline down to create a stout, blocky body. The body should be roughly the same width as the head, flaring out slightly at the bottom for the legs. -
Shape the legs:
On drawing the bottom corners, create ‘steps’ looking like crouching legs. The feet should extend outward by one or two squares on each side.
Step 4: Coloring and Details
-
Color the skin:
Take your green marker and fill in the frog’s face and body. Be careful not to color over the eyes or the mouth details. -
Add orange accents:
Use your orange marker to color the frog’s lips (or stomach band) and the tips of the feet. This ties the color palette together with the hat band. -
Refine outlines:
Go over all your outer border lines with the black fine-liner again to make them bold. A thicker outline makes the pixel art pop against the grid. -
Grid lines:
Since you are working on grid paper, you can optionally trace the internal grid lines within your colored sections lightly with a thin pen to emphasize the ‘pixel’ aesthetic.
Your spooky little frog is now ready to hop onto a greeting card or decorate your journal

PENCIL GUIDE
Understanding Pencil Grades from H to B
From first sketch to finished drawing — learn pencil grades, line control, and shading techniques.
Explore the Full Guide
Ghost and Jack-o’-Lantern Pair as Easy Grid Pixel Art
Transform a simple page of graph paper into a festive Halloween scene with these retro-style pixel art characters. This layout features a playful ghost floating at the top and a pair of smiling pumpkins anchoring the bottom corner.
Step-by-Step
Materials
- Grid paper notebook or loose graph paper
- Black fine-tip pen or marker (0.5mm or similar)
- Orange marker or colored canci
- Grey marker or colored pencil
- Ruler (optional, if you want perfectly straight lines)
Step 1: Drawing the Ghost
-
Outline the top curve:
Start near the top right corner of your page. Find a starting square and draw a horizontal line spanning 6 grid squares. From the ends of that line, draw vertical lines going down 2 squares on each side. -
Shape the head:
To round off the ‘head’, draw single diagonal steps inward at the top corners if you want a softer look, but for this strict boxy style, simply connect your horizontal and vertical lines at sharp 90-degree angles. -
Extend the body:
Continue the vertical lines down on both sides for another 4 squares, creating a tall rectangle shape that is open at the bottom. -
Create the jagged bottom:
To make the classic ghostly hem, draw a zigzag pattern connecting the bottom endpoints. Unlike a perfect zigzag, make these irregular: go up one diagonal square, down one, up again, and repeat until the sides connect. -
Add facial features:
For the eyes, fill in two single squares with black ink, leaving two empty squares between them. Below the eyes, draw a small ‘V’ shape composed of two diagonal lines for a simple smile.
Bleed-Through Blues?
If using heavy markers, place a scrap piece of paper behind your grid page. This catches excess ink and protects the sheets underneath from bleed-through dots.
Step 2: Creating the First Pumpkin
-
Outline the pumpkin shape:
Move to the bottom right corner of the page. Draw a box outline that is approximately 8 squares wide and 6 squares tall. This forms the main body of the pumpkin. -
Refine the corners:
To make it look more organic, indent the corners. Instead of a sharp corner, step in one square diagonally at all four corners, giving it a slightly rounded, pixelated appearance. -
Draw the stem:
On the top center of your pumpkin shape, outline a small rectangle that is 2 squares wide and 2 squares tall. -
Fill the smile:
Using your black pen, fill in the mouth. Create a jagged grin by coloring a connected line of squares that steps up and down, approximately 5 squares wide. -
Add the nose and eyes:
For the nose, fill in a single square right above the center of the mouth. For eyes, draw small triangles (or fill 2-square blocks) diagonally above the nose. -
Color the pumpkin:
Use an orange marker to fill in the entire body of the pumpkin, being careful to work around the black features you just drew. I find that coloring in small circular motions helps avoid streaking. -
Color the stem:
Finish this pumpkin by coloring the stem rectangle with a grey marker.
Step 3: Adding the Second Pumpkin
-
Position the second gourd:
Leave a gap of about 2 to 3 grid squares to the right of your first pumpkin to start the second one. -
Replicate the outline:
Repeat the same outline process: 8 squares wide, 6 squares tall, with indented corners to match the style of the first pumpkin. -
Vary the face:
To give them personality, change the face slightly. Try making the eyes square blocks instead of triangles, or shift the mouth shape so the tooth gap is on the opposite side. -
Final coloring:
Fill the second pumpkin with the same orange marker and color its stem grey to complete the pair.
Glow in the Dark
Trace over the ghost’s outline with a glow-in-the-dark gel pen or puffy paint. When you turn off the lights, your little phantom will actually glow.
Enjoy filling up the rest of the page with notes or more spooky pixel friends
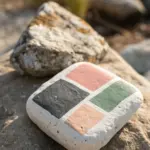
Pixel Eye With Rainbow Tears as a Grid Mosaic Design
Transform simple square tiles into a striking piece of functional art with this pixelated eye design. The vivid rainbow tears spilling from the black-and-white eye create a bold, modern look perfect for a coaster or wall hanging.
Detailed Instructions
Materials
- Square wooden coaster base (approx. 4×4 inches)
- Small white ceramic mosaic tiles (10mm or similar)
- Black mosaic tiles
- Beige or skin-tone mosaic tiles
- Rainbow color mosaic tiles (Red, Orange, Yellow, Green, Blue, Indigo)
- Strong craft glue or mosaic adhesive
- Tweezers
- Grout (optional, white works best)
- Varnish or sealant (if not using grout)
Step 1: Planning and Base Layer
-
Prepare your grid:
Before gluing anything, determine the grid size of your base. The project shown uses a grid of 11 tiles wide by 11 tiles high. Lightly mark this grid on your wooden base with a pencil if it helps you visualize the spacing. -
Dry fit the design:
It is crucial to lay out your tiles on a flat surface next to your base before gluing. This ‘dry run’ ensures you have enough tiles of each color and allows you to catch any spacing errors early. -
Start the layout from the bottom:
Begin your dry layout with the bottom row. Place four white tiles on the left and four white tiles on the right. In the center three columns, place the bottom-most tiles of the rainbow tears (Indigo, Blue, and Black outline).
Uneven Grid?
If your tiles don’t fit the base perfectly, center the design first. Paint the exposed edges of the wooden base white or black so the border looks intentional rather than like a mistake.
Step 2: Building the Rainbow Tears
-
Construct the color columns:
Work your way up the grid. The central feature creates stripes of color. From left to right within the tear zone, the columns are: Black (outline), Blue, Green, Yellow, Orange, Red. -
Check the stair-step effect:
Notice that the rainbow tears aren’t a perfect rectangle. The colors start lower on the left (blue) and step slightly higher as you move right toward the red. Replicate this staggered height to give the flow a dynamic feel. -
Fill the background:
As you build the colorful center, surround the columns with your white background tiles to keep the grid aligned. This helps maintain the structure as you move upward toward the eye.
Step 3: Crafting the Pixel Eye
-
Form the lower eyelid:
Once you reach the middle section, switch to black tiles to create the heavy under-eye line. This creates the ‘cup’ causing the tears to spill over. Expand this black line horizontally to wider than the rainbow section. -
Create the iris and pupil:
In the center of the eye area, place a 2×2 block of black tiles for the pupil. Surround this with the beige or skin-tone tiles to form the iris, making sure to leave one white tile in the pupil for a ‘shine’ reflection. -
Add the upper eyelid and lashes:
Place a row of black tiles above the iris for the upper lid. Extend single black tiles upward at angles to represent the long, pixelated eyelashes jutting into the white space above. -
Complete the white background:
Fill in the remaining empty spaces at the top corners and between the eyelashes with white tiles to complete the square format. Ensure every spot in the 11×11 grid is filled.
Make it Pop
Use mirrored or glitter tiles for the ‘tears’ section to make them shimmer. You can also swap the white background for matte black to make the neon colors vibrate more intensely.
Step 4: Adhering and Finishing
-
Begin gluing:
Now that your design is fully laid out, transfer the tiles to the wooden base one by one. I prefer starting from a bottom corner and working in rows. -
Apply adhesive:
Dab a small amount of strong craft glue onto the back of each tile. Press it firmly onto the wooden base. Tweezers are incredibly helpful here for keeping your fingers clean and placing tiles precisely. -
Maintain tight spacing:
Try to keep the gap between tiles as minimal and consistent as possible. This ‘tight butt joint’ style mimics digital pixels better than wide grout lines. -
Let it cure:
Allow the glue to dry completely according to the manufacturer’s instructions. Do not disturb the tiles while they are setting. -
Seal the surface:
If you are using this as a drink coaster, applying a thin layer of clear sealant or varnish over the top will protect the wood from moisture and keep the tiles easy to wipe clean.
Now you have a stunning piece of pixel art that adds a splash of retro color to any table surface


Have a question or want to share your own experience? I'd love to hear from you in the comments below!