If your workout space feels a little “meh,” a fresh coat of paint can turn it into a high-energy gym that pushes you to show up. These gym painting ideas are all about motivation, focus, and that satisfying “this space is mine” feeling—whether you’re painting one wall or going full mural mode.
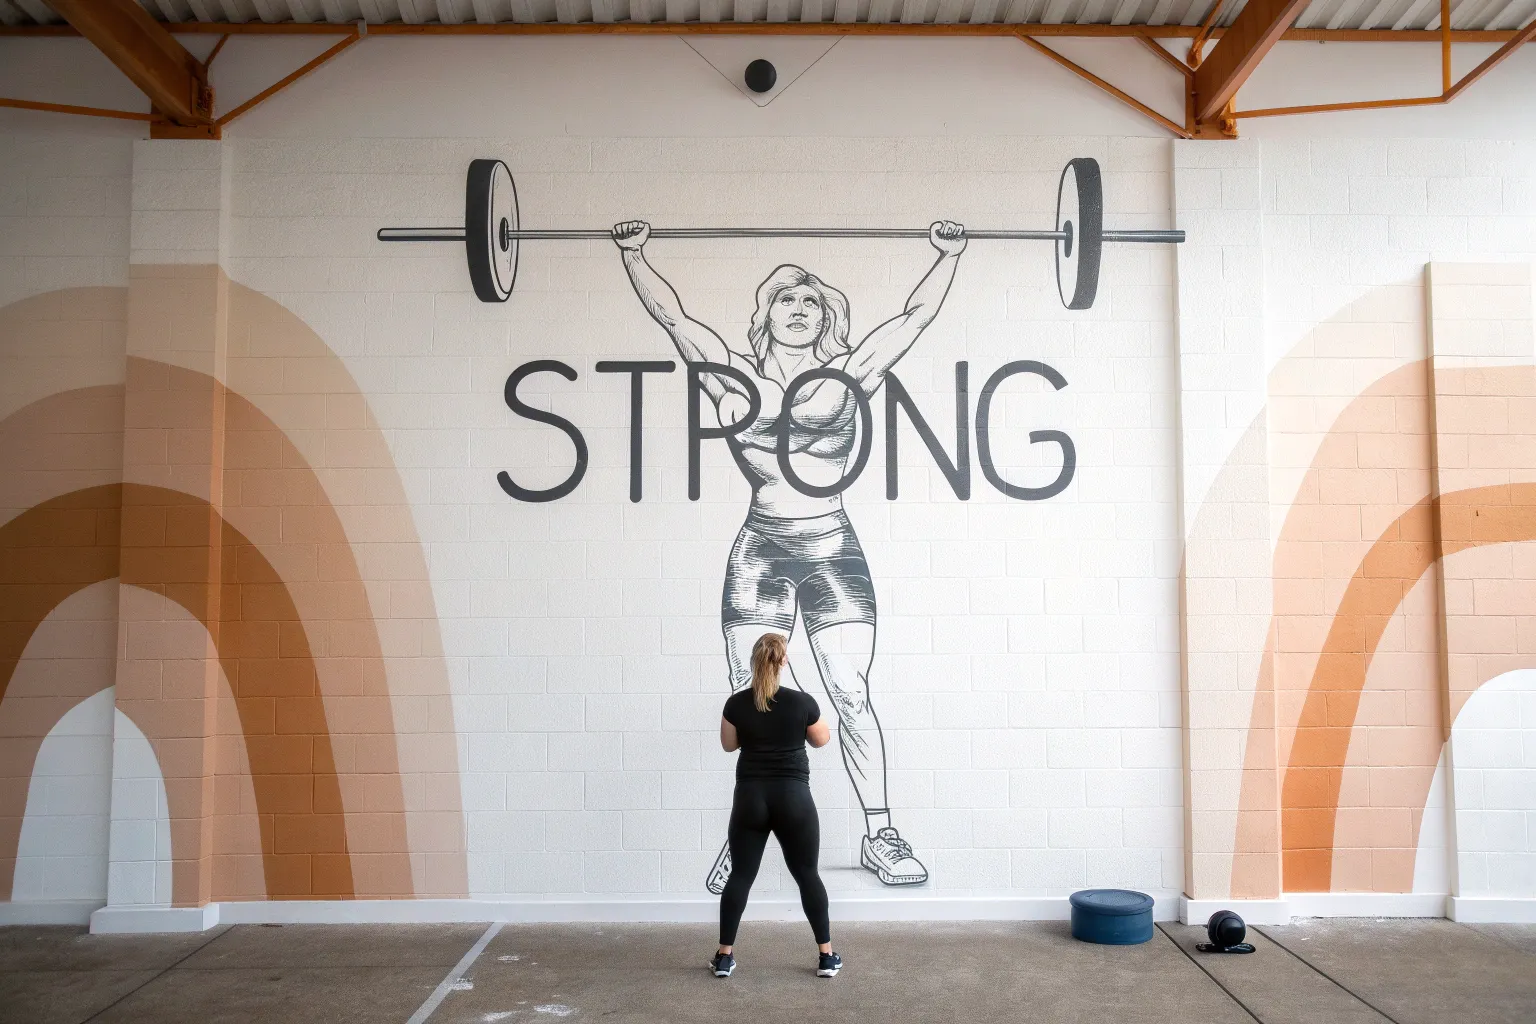
Bold Motivational Quote Wall
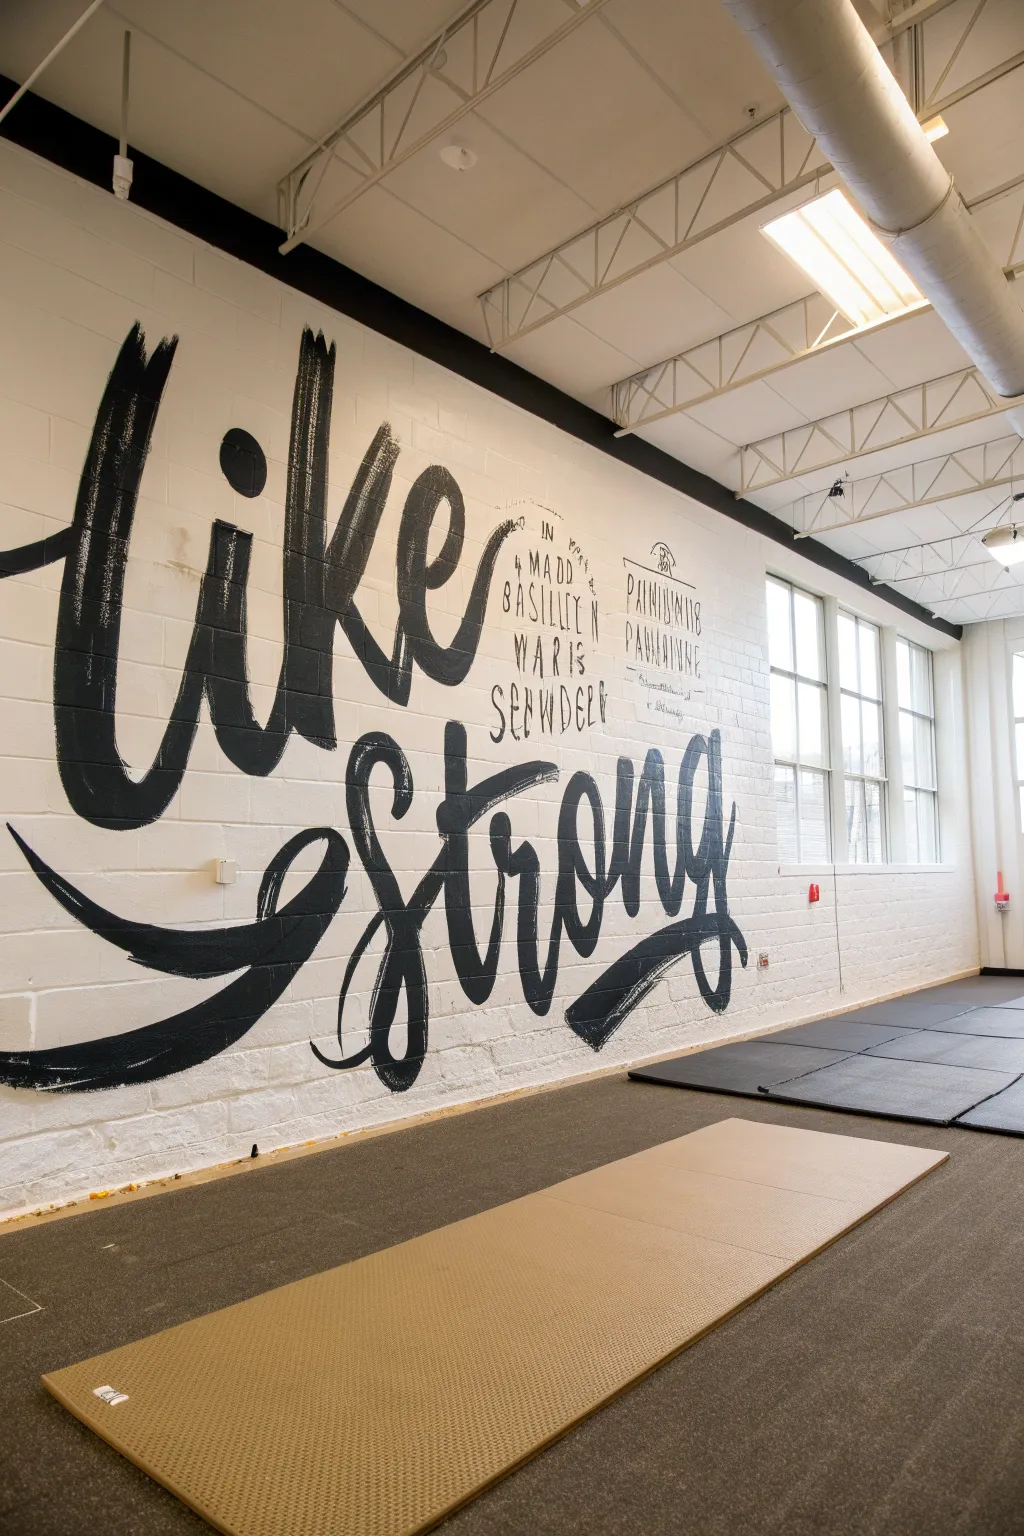
Transform a plain gym wall with this massive, high-impact typographic mural that mimics the energetic sweep of a giant calligraphy brush. This design relies on bold contrast and varied line weights to create a raw, motivational backdrop perfect for workout spaces.
How-To Guide
Materials
- High-coverage black acrylic latex paint (interior semi-gloss or satin)
- White interior wall paint (for base coat)
- Wide flat synthetic brushes (3-inch and 4-inch angled)
- Small round detail brush (size 4 or 6)
- Chalk or projector (for layout)
- Painter’s tape
- Drop cloths
- Paint tray and liner
- Ladder or step stool
- Bubble level
Step 1: Surface Preparation
-
Clean and clear:
Begin by removing any fixtures or outlet covers on the wall and wiping down the brick surface to remove dust or grime, as textured surfaces hold onto dirt easily. -
Prime the canvas:
Apply a fresh coat of bright white interior paint to the entire wall. This high-contrast background is essential for making the black lettering pop. -
Let it cure:
Allow the white base coat to dry completely for at least 24 hours to ensure your mural paint adheres properly without peeling up the layer beneath.
Bleeding Lines?
On rough brick, paint can seep into crevices. Keep a wet rag handy to immediately wipe drips, and use a small brush to sharpen edges with white paint later
Step 2: Design and Layout
-
Choose your phrase:
Select a short, punchy phrase like ‘Like Strong’ or ‘Live Strong’. Because of the large scale, fewer words often have more impact. -
Project or grid:
Using a digital projector is the easiest method here; project your chosen script font onto the wall to get the sizing just right. -
Trace lightly:
Trace the outline of your letters lightly using white chalk or a very light pencil. Chalk is forgiving on brick and can be wiped away later. -
Add secondary text:
If you are including the smaller, blockrier text seen on the right side, mark horizontal guidelines with a level to keep these lines perfectly straight. -
Mock up the flourishes:
Pay special attention to the large swoops and tails of the letters, outlining exactly where the ‘dry brush’ effects will fade out.
Pro Tip: Dry Brushing
To get that authentic faded tail on the letters, wipe most of the paint off your brush onto cardboard before dragging it swiftly across the final inches of the stroke
Step 3: Painting the Bold Script
-
Load the wide brush:
Dip your 4-inch angled brush into the black paint. You want it fully loaded but not dripping. -
Fill the thickest strokes:
Start with the main vertical downstrokes of the letters. Apply firm pressure to fill the textured brick grooves thoroughly. -
Create the brush texture:
For the feathery ends of the strokes (like at the top of the ‘l’ or ‘k’), use less paint on the brush and drag it quickly upwards to simulate a calligraphy pen running out of ink. -
Define the curves:
Switch to a 3-inch brush for the curved connecting lines. Rotate your wrist as you paint to maintain a fluid, natural curve rather than a stiff geometric line. -
Master the brick texture:
The mortar joints will be tricky. I find it helps to dab the tip of the brush into deep mortar lines to ensure there are no white gaps break up the solid black forms. -
Refine edges:
Step back frequently to view the mural from a distance. If edges look too jagged due to the brick, smooth them out slightly, but keep the loose, hand-painted aesthetic.
Step 4: Detailing and Finishing
-
Paint secondary text:
Use your smaller flat brush or the round brush to paint the smaller block text on the right side. These lines should be thinner and more uniform than the giant script. -
Add scratchy details:
To mimic the imperfect, artistic look in the reference, go back with a nearly dry brush and add a few scratchy marks near the stroke endings. -
Clean up splatters:
Inspect the white negative space for any accidental black drips. Touch these up with a small brush and your remaining white wall paint. -
Erase guidelines:
Once the paint is fully dry to the touch, gently wipe away any visible chalk lines with a damp microfiber cloth.
Step back and admire how this powerful graphic statement energizes the entire room


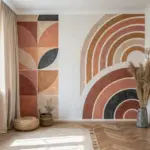
High-Energy Color Block Accent Wall
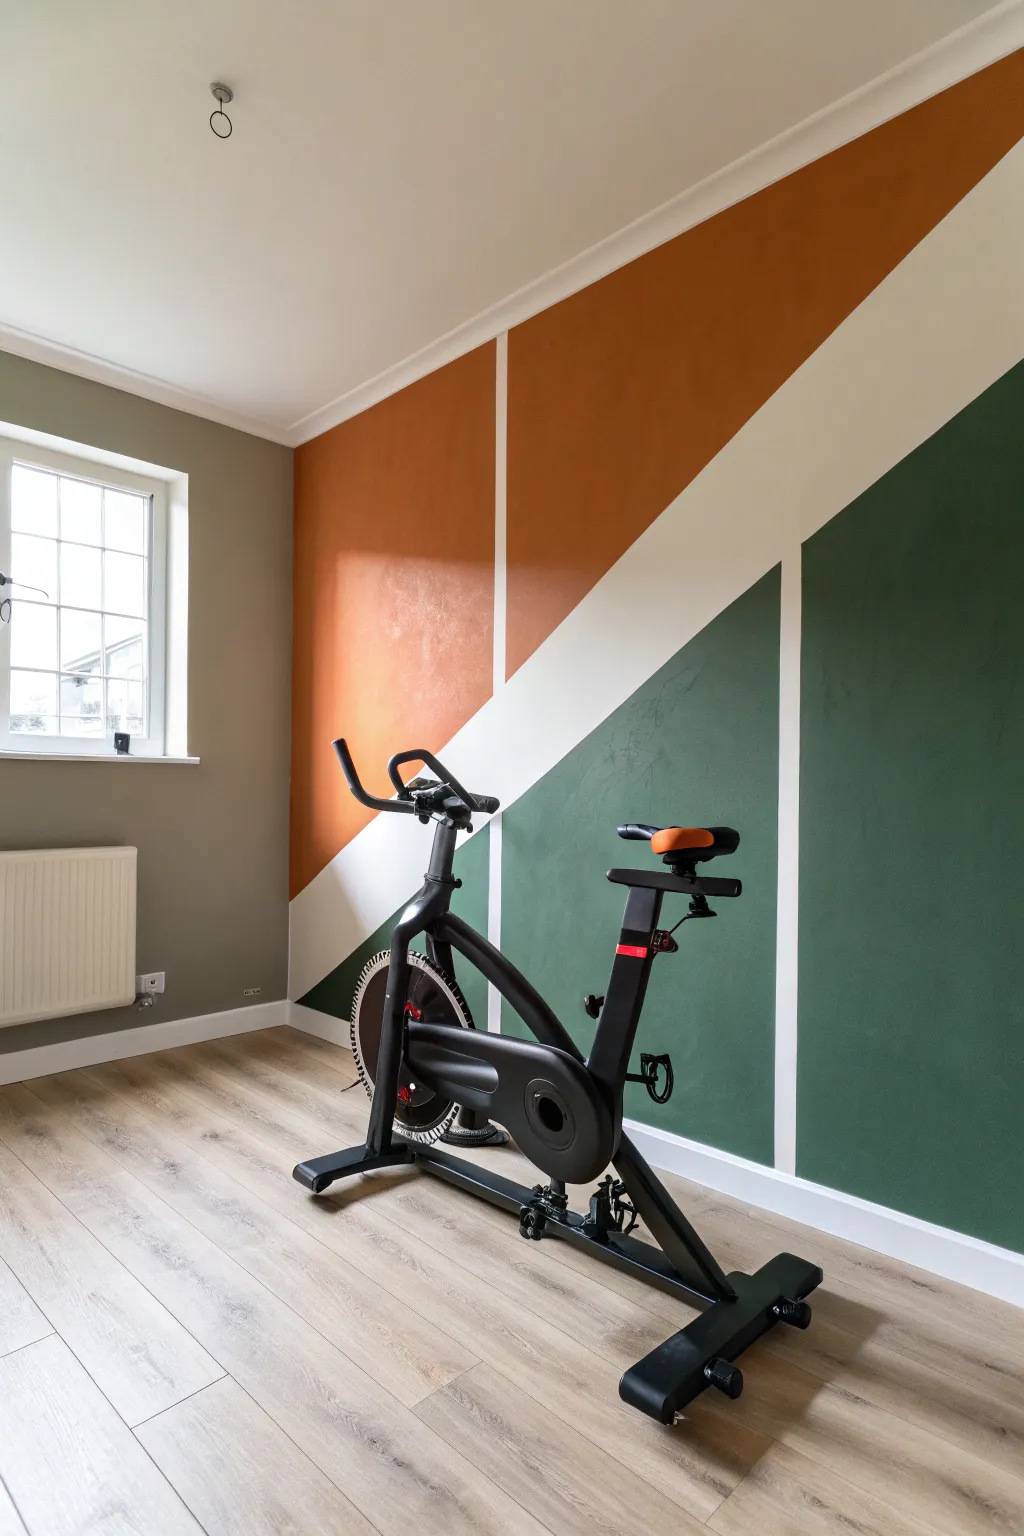
Transform a boring spare room into an energizing workout space with this bold geometric mural. Featuring large angular blocks of burnt orange and forest green cut through with crisp white lines, this design adds dynamic movement without overwhelming the room.
Step-by-Step Guide
Materials
- Interior latex paint (Eggshell finish)
- Colors: Deep Burnt Orange, Forest Green, Neutral Sage (for adjacent walls), White (for lines)
- High-quality painter’s tape (1.5 inch or 2 inch width)
- Laser level or long straight edge
- Pencil
- Drop cloths
- Paint rollers (9-inch for large areas)
- Angled sash brush (2-inch)
- Small foam roller
- Paint tray and liners
- Damp rag
Step 1: Preparation & Base Coat
-
Clear and Prep:
Remove all furniture and gym equipment from the room to give yourself plenty of space. Lay down drop cloths to protect your flooring, ensuring they are taped down at the edges so they don’t slide while you work. -
Clean the Surface:
Wipe down the wall you intend to paint with a damp rag and mild soap solution. Removing dust and oils is crucial for ensuring your painter’s tape sticks firmly later on. -
Apply the Base Color:
Since the separating lines in this design are white, paint the entire accent wall with your chosen white paint first. Two coats are usually best to ensure solid coverage where the lines will eventually be revealed. -
Full Dry Time:
Allow the white base coat to dry completely. I strongly recommend waiting at least 24 to 48 hours before applying tape; if the paint is even slightly tacky, the tape will pull it right off.
Step 2: Mapping the Geometry
-
visualize the Layout:
Look at the reference image. The design relies on two major diagonal lines moving upward from left to right, creating three main zones. -
Mark the Main Diagonals:
Using a pencil and a long straight edge (or a laser level for guidance), lightly mark your first diagonal line starting from the bottom left corner rising to the upper center. Mark a second parallel line starting from the center left rising to the top right. -
Add Vertical Intersections:
Draw the vertical line that splits the top orange section. In the image, this line drops down from the ceiling and stops when it intersects the diagonal. Repeat this for the vertical line splitting the bottom green section. -
Apply the Tape:
Apply your painter’s tape directly over your pencil marks. Remember, the area *under* the tape will remain white, so place the tape exactly where you want those thick white dividing lines to be. -
Seal the Edges:
Run your finger or a plastic putty knife firmly along the edges of the tape to secure it. This prevents paint from bleeding under.
Bleed-Through Blues?
If paint seeps under the tape, don’t panic. Let it dry completely. Then, place a fresh piece of tape over the colored part and touch up the line with your white base paint for a crisp fix.
Step 3: Painting the Color Blocks
-
The ‘Sealant’ Trick:
To get perfectly crisp lines, lightly brush a small amount of the *white* base paint over the edges of the tape. This seals any tiny gaps; if paint bleeds, it will be white-on-white and invisible. -
Cut In the Orange:
Start with the top sections. Use your angled brush to cut in the Burnt Orange paint along the ceiling line, the corner, and the tape edges of the upper geometric blocks. -
Roll the Orange:
Use a roller to fill in the rest of the orange sections. Aim for smooth, even overlapping strokes. -
Cut In the Green:
Move to the lower right sections. Cut in the Forest Green paint along the baseboard, the right corner, and the tape boundaries. -
Roll the Green:
Fill in the large green areas with your roller. Be careful not to splatter green paint into the wet orange areas. -
Second Coats:
Once the first coat is dry to the touch (usually 2-4 hours), apply a second coat to both colors to ensure rich opacity and no streaking.
Texture Play
Add depth by using a high-gloss finish for the white lines and a matte finish for the colored blocks. This subtle contrast makes the geometry pop even more under gym lighting.
Step 4: The Reveal
-
Remove Tape:
The most satisfying part! While the paint is still slightly damp (not wet, but not fully cured), slowly peel off the tape. Pull it away from the paint edge at a 45-degree angle. -
Touch Ups:
Inspect your lines. If any paint bled through, wait for it to dry completely, then use a tiny artist’s brush and your base white paint to correct the imperfection. -
Reassemble:
Once the wall is fully cured (give it a day or two), move your exercise bike or weights back into position.
Step back and admire purely energetic design that is ready to fuel your next workout.


Geometric Energy Lines and Chevrons
Transform a standard cinder block gym wall into a dynamic focal point with this large-scale geometric chevron design. The alternating peaks of rusty orange, slate blue, navy, gold, and white create a sense of movement and energy perfect for an athletic space.
Step-by-Step Tutorial
Materials
- Interior semi-gloss latex paint (White, Navy Blue, Slate Blue, Rust Orange, Tan/Gold, Black)
- Painter’s tape (2-inch and 1-inch widths)
- Laser level or chalk line
- Measuring tape
- Pencil
- Extension pole for paint rollers
- 9-inch roller covers (3/8 or 1/2 inch nap for textured block)
- Roller frame and tray
- 2-inch angled sash brush (for cutting in)
- Drop cloths
- Ladder or scaffolding
- Cleaning supplies (TSP or degreaser)
Step 1: Preparation and Base Coat
-
Clean the surface:
Start by thoroughly cleaning the cinder block wall with TSP or a heavy-duty degreaser to remove gym dust and grime, ensuring the tape adheres properly. -
Protect the area:
Lay down drop cloths along the base of the wall and tape off the trim or floor edge to catch any drips. -
Apply the black base:
Since the background and lowest sections are dark, roll the entire wall with your black or darkest navy base color first. This acts as your ‘mortar’ line color if you aren’t taping specifically for grout lines, though in this design, we are painting over the grout. -
Let it cure:
Allow this base coat to dry completely, ideally for 24 hours, so your tape doesn’t pull it up later.
Bleed-Through Blues?
Cinder blocks are porous. If paint bleeds under tape, don’t wipe it! Let it dry, re-tape the line slightly, and touch up with the original base color.
Step 2: Mapping the Chevrons
-
Find your center:
Measure the total width of your wall and mark the exact center point at the bottom; this will be the anchor for your central peak. -
Mark the peaks:
Decide on the width of your chevrons (the ones in the photo look to be about 4-5 feet wide at the base). Mark the bottom points and top peaks along the wall using a pencil. -
Shoot the lines:
Using a laser level or a chalk line, connect your bottom marks to your top peak marks to create the initial large triangle guides. -
Tape the master lines:
Apply wide painter’s tape along these guide lines. Remember to place the tape on the *outside* of the shape you intend to paint if you are sizing strictly, or consistently on one side.
Step 3: Creating the Stripes
-
Measure stripe thickness:
Determine the thickness of each colored stripe. In this design, the white and colored bands look uniform. Mark these measurements vertically along your main diagonal tape lines. -
Tape the internal angles:
Connect your measurement marks with tape, creating parallel V-shapes nested inside each other. Thoroughly burnish the edges of the tape by rubbing them firmly to prevent bleed-under on the textured block. -
Seal the tape:
I always like to brush a light layer of the *base color* (black) over the tape edges first. This seals the tape so any paint that bleeds underneath matches the background.
Pro Tip: The Nap Factor
For deep grout lines, use a thick 3/4-inch nap roller. It holds more paint and reaches into crevices without forcing you to mash the roller against the wall.
Step 4: Painting the Colors
-
Paint the white bands:
Start with the high-contrast white stripes. Use a roller for the main areas and a brush to push paint into the grout lines and uneven block texture. -
Apply the warm tones:
Move on to the rust orange and tan/gold sections. You may need two coats to get full opacity over the dark base, especially with these earth tones. -
Apply the cool tones:
Paint the slate blue and navy sections. Be careful not to cross into neighboring color zones. -
Detail the triangles:
Don’t forget the small, solid triangles at the very bottom center of the ‘W’ shapes; paint these in the designated accent color (like the small orange triangle at the base). -
Execute the second coat:
Once the first coat is dry to the touch, apply a second coat to all colors to ensure vivid, solid coverage.
Step 5: Finishing Up
-
Remove tape:
Pull the tape while the final coat is still slightly tacky. Pull slowly at a 45-degree angle to ensure a crisp line. -
Touch up:
Use a small artist’s brush to fix any spots where the texture of the cinder block caused the paint to skip or bleed.
Step back and admire the energetic rhythm your new wall brings to the room


Athlete Action Pose Wall Mural
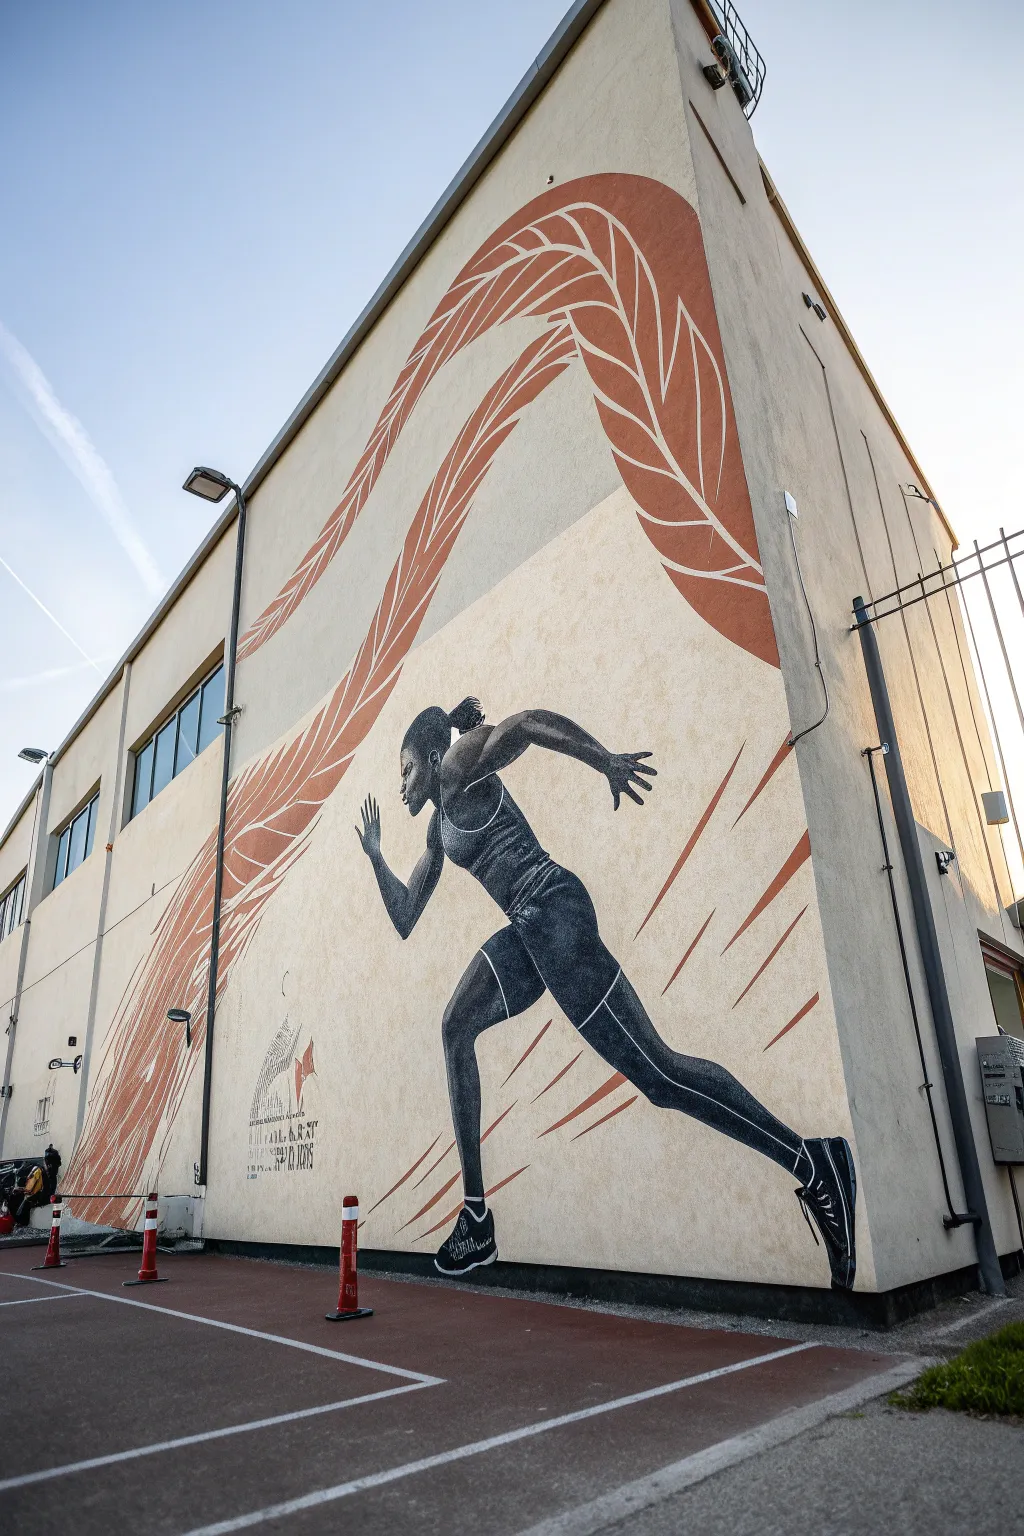
Transform a plain gym exterior or large interior wall into a source of motivation with this striking athlete mural. By combining a monochromatic figure with abstract, flowing copper leaf designs, you’ll create a piece that feels both powerful and elegantly artistic.
Step-by-Step
Materials
- Exterior masonry primer (white or off-white)
- Black acrylic latex exterior paint
- Terracotta or copper-colored exterior paint
- Projector (essential for scale)
- Scaffolding or sturdy ladder
- Chalk or charcoal stick
- Assorted paintbrushes (large rollers, medium sash, fine detail)
- Painter’s tape
- Drop cloths
- Clear exterior sealant (matte or satin)
Step 1: Preparation and Projection
-
Surface Prep:
Begin by thoroughly cleaning the wall surface to remove dust and grime. If the existing stucco or concrete is rough, use a stiff brush to dislodge loose debris. -
Base Coat:
Apply a fresh coat of off-white masonry primer or paint across the entire working area. This ensures your colors pop and provides a clean slate for the projection. -
Setting Up:
Wait until dusk or set up in a dimly lit gym. Position your projector so the image of the runner fills the desired space. I find it helpful to stand back frequently to ensure the angle isn’t distorting the figure’s proportions. -
Tracing:
Using a piece of chalk or charcoal, trace the outline of the runner and the large swooping leaf patterns. Don’t worry about shading yet; just capture the major shapes, the separation of limbs, and the clothing lines.
Grid Method Alternative
No projector? Draw a grid over your reference photo and a matching scaled-up grid on the wall using chalk lines to transfer the image accurate square by square.
Step 2: Painting the Athlete
-
Blocking in Black:
Load a medium-sized brush with black exterior paint. Start by filling in the darkest darkest areas of the figure—the spandex shorts, tank top, and shadowed skin areas. -
Defining Muscles:
For the grey mid-tones on the skin, mix a small amount of your white base paint with the black. Apply this to the arms and legs to create muscle definition. -
Texture Technique:
Use a dry-brushing technique where the light hits the muscles (shoulders, thighs). Wipe most of the paint off your brush and lightly drag it over the textured wall to create a stippled, highlight effect that mimics skin texture. -
Clothing Details:
Use a fine liner brush to add white outlines or ‘seams’ to the athletic wear. This separation is crucial so the black clothing doesn’t merge indistinguishably with the dark skin tones. -
Feet and Shoes:
Paint the sneakers carefully, ensuring the soles are distinct. The back foot should look like it’s kicking up, while the front foot plants firmly—get these angles right to sell the motion.
Step 3: The Abstract Elements
-
Leaf Pattern Outline:
Moving to the background, use your terracotta or copper paint to outline the large, swooping leaf shapes that curve behind and above the runner. -
Filling the Negative Space:
Instead of painting the leaves solid, paint the negative space *between* the veins. This leaves the white wall color to act as the vein structure, creating a modern, graphic look. -
Speed Lines:
Add sharp, angular shards of the terracotta color near the runner’s legs. These ‘speed lines’ should point in the direction of the run to emphasize forward momentum. -
Clean Up:
Once the main colors are dry, take a small brush with your wall base color and touch up any edges where the black or copper might have bled outside the lines.
Uneven Texture Issues
If painting on rough stucco, dab the brush (stippling) rather than stroking. This pushes paint into the deep pores for solid coverage without gaps.
Step 4: Finishing Touches
-
Highlight Check:
Step back about twenty feet. If the figure looks too flat, go back in with a very light grey blend and strengthen the highlights on the shoulder blade, cheekbone, and calf muscle. -
Sealing:
After allowing the mural to cure for at least 24 hours (or per paint manufacturer instructions), apply a clear exterior sealant to protect against weather and UV fading.
Step back and admire the energy this powerful figure brings to the entire building
BRUSH GUIDE
The Right Brush for Every Stroke
From clean lines to bold texture — master brush choice, stroke control, and essential techniques.
Explore the Full Guide
Racing Stripe Wall for Cardio Energy
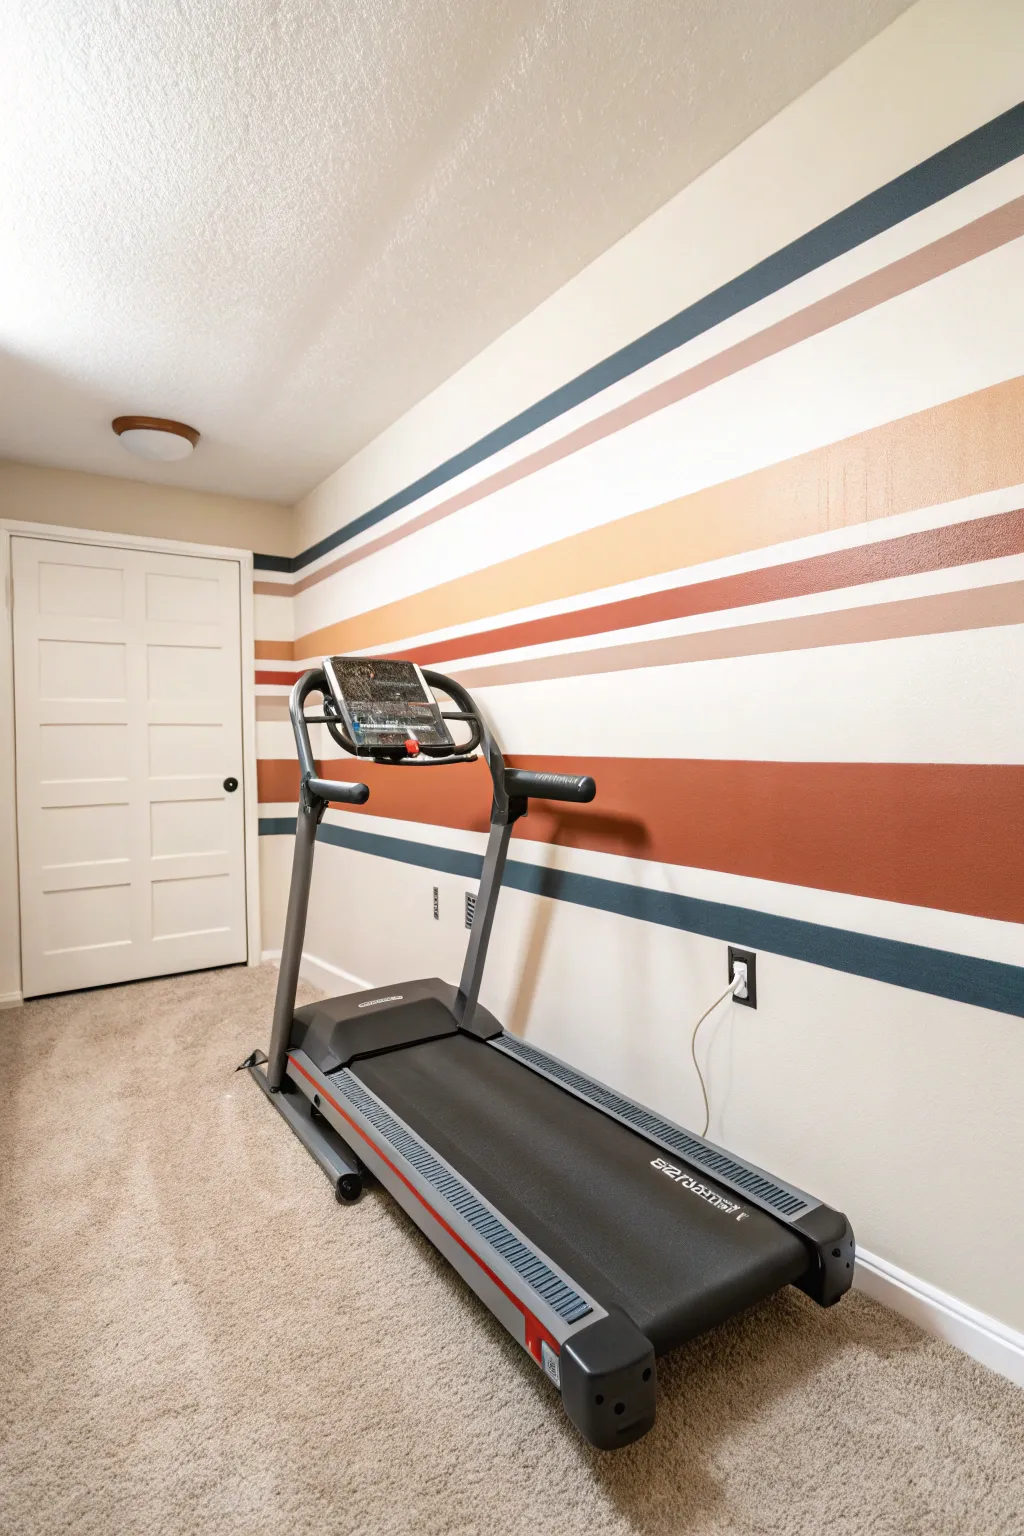
Inject dynamic energy into your home gym with this retro-inspired racing stripe wall, featuring horizontal bands of warm earth tones and cool slate blue. This design plays with varying stripe widths to create visual movement that guides the eye and motivates your workout.
How-To Guide
Materials
- Latex interior wall paint (White base color)
- Latex interior wall paint (Slate Blue)
- Latex interior wall paint (Dusty Pink)
- Latex interior wall paint (Butterscotch/Peach)
- Latex interior wall paint (Terracotta/Rust)
- Latex interior wall paint (Deep Maroon/Brown)
- Painter’s tape (multi-surface, 1.5 inch or wider)
- Laser level (highly recommended)
- Pencil
- Tape measure
- Mini paint rollers (4-inch) with foam or low-nap covers
- Roller handle
- Paint tray and liners
- Drop cloths
- Spackle (for touch-ups)
- Angle sash brush (2-inch)
Step 1: Preparation and Base Coat
-
Clear and clean:
Remove all outlet covers, switch plates, and move your gym equipment away from the wall to give yourself ample working space. -
Patch and prime:
Check for any nail holes or dents. Fill them with spackle, sand smooth once dry, and spot prime to ensure an even finish. -
Apply base color:
Roll two coats of your white base color over the entire wall. This step is crucial because the white stripes you see in the final design are actually just the base wall color showing through. -
Let it cure:
Allow the base coat to cure for at least 24 to 48 hours. This extra patience prevents the painter’s tape from peeling up your fresh white paint later.
Bleeding Lines?
If you missed the sealing step and have fuzzy edges, don’t panic. Wait for the paint to harden fully, scrape the bumps gently with a razor, and touch up with a tiny artist brush.
Step 2: Mapping the Stripes
-
Plan your pattern:
Sketch your design on paper first. The key to this look is asymmetry; note that the stripes get generally thinner toward the top. -
Set the laser level:
Set up your laser level on a tripod or stable surface. Starting from the bottom, measure and aim the laser line where your first stripe transition will be. -
Tape the first line:
Apply a strip of painter’s tape along the laser line. Remember to place the tape on the side of the line that will *remain white* so you are masking off the negative space. -
Measure the gaps:
Continue moving up the wall. Use a tape measure to mark the specific heights for your slate blue, pink, peach, terracotta, and maroon bands, adjusting your laser level for each new horizontal line. -
Seal the tape edges:
Once all horizontal lines are taped, press down firmly on the tape edges. I like to run a credit card or putty knife over the tape to ensure a tight seal. -
The bleed-prevention trick:
Lightly brush a very thin layer of your *white base paint* over the edge of the tape where the colored stripes will go. This seals the tape edge so any paint that bleeds underneath is white, making the line crisp.
Pro Tip: Measuring Math
Plan your wide stripes around your electrical outlets. Adjust the stripe height slightly so your outlets land entirely inside one color band, saving you from painting the plastic plates.
Step 3: Painting the Stripes
-
Start with the darkest tones:
Begin painting the lowest colored stripe, which is the thick maroon/brown band near the bottom half. Use a mini roller for the best control. -
Apply the warm mid-tones:
Move up to the terracotta stripe. Use an angled sash brush to carefully cut in near corners or door frames before rolling the main section. -
Paint the thin stripes:
Paint the peach and dusty pink stripes. Since these are thinner, you may need to use a brush for the entire width if your roller is too wide, or turn the roller vertically if suitable. -
Finish with the accent color:
Apply the slate blue paint to the top stripe and the lower accent stripe. Be mindful of not dripping onto the lower sections you’ve already finished. -
Second coats:
Let the first coat dry partially (check can instructions), then apply a second coat to all colored stripes to ensure rich, opaque coverage.
Step 4: The Reveal
-
Time the removal:
Remove the painter’s tape while the final coat of paint is still slightly tacky—usually about an hour after painting. This prevents the dried paint ‘skin’ from ripping. -
Pull carefully:
Pull the tape slowly at a 45-degree angle away from the painted edge for the sharpest possible line. -
Touch up:
If any paint bled through, wait for it to fully dry. Then, use a small artist’s brush and your base white paint to carefully correct the line. -
Reinstall hardware:
Once the wall is completely dry, screw your outlet covers back in and return your treadmill or equipment to its spot.
Now you have a vibrant, professionally painted accent wall that sets the pace for your daily run
Concrete-Look Texture for a Garage Gym
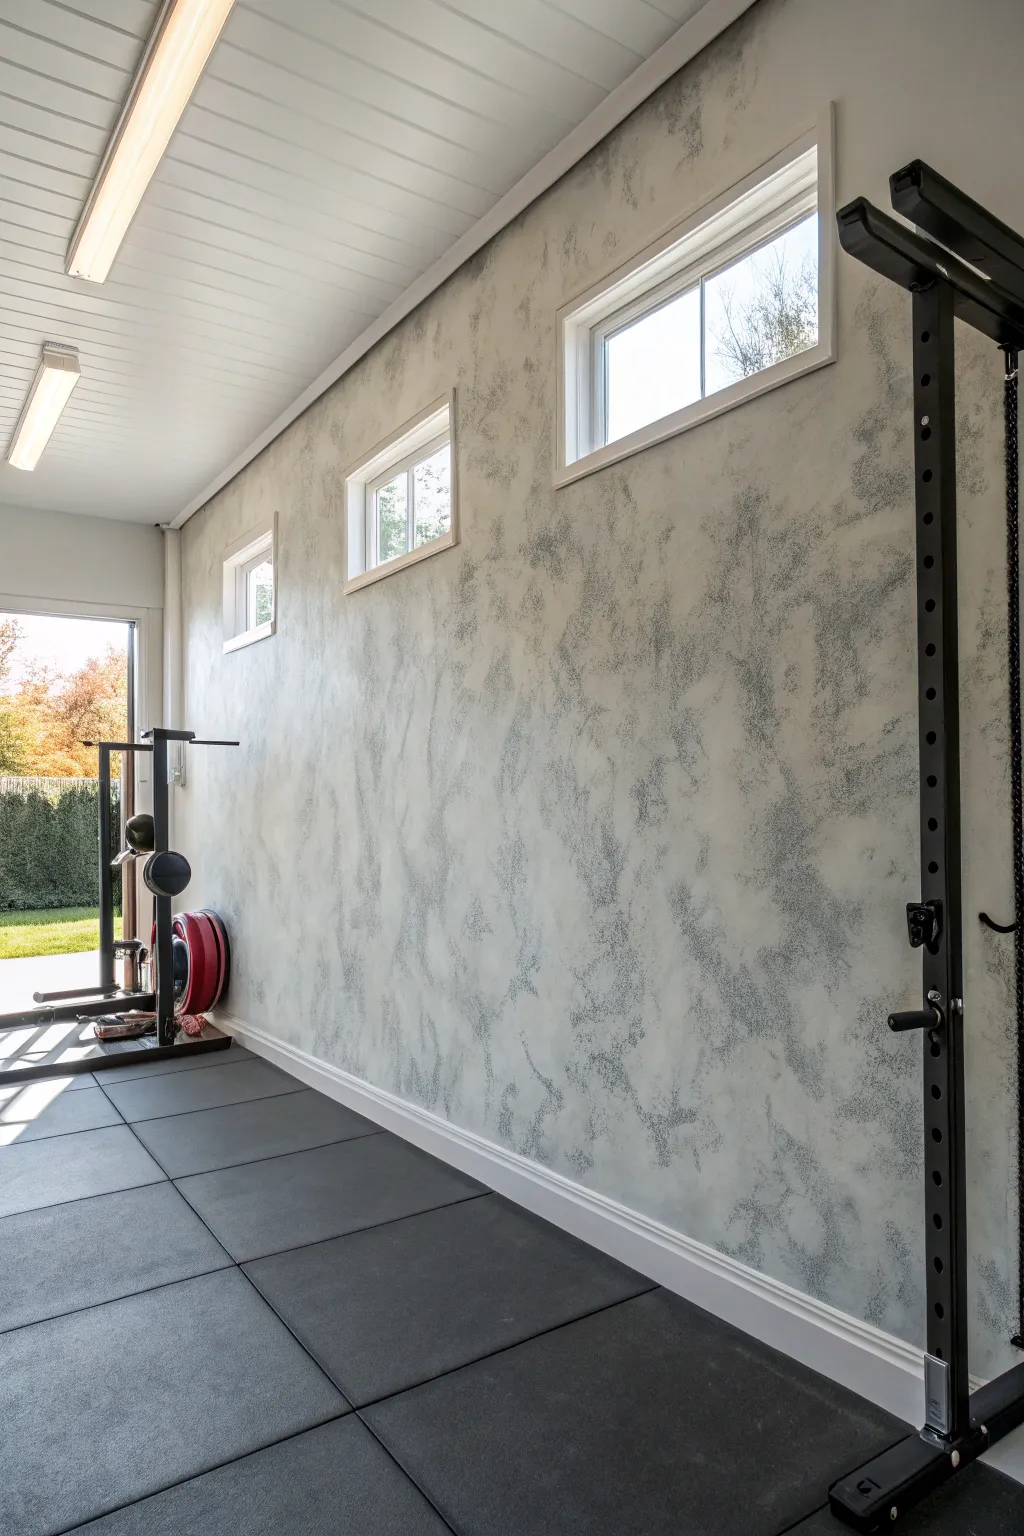
Transform a plain garage or home gym wall into a high-end industrial feature with this faux concrete technique. By layering soft greys and using a sponging method, you achieve a cloudy, textured depth that hides imperfections and adds serious character to your workout space.
Step-by-Step Tutorial
Materials
- High-quality white primer (if starting on bare drywall)
- Base coat paint: Pale cool grey (eggshell or satin finish)
- Top coat paint: Charcoal or slate grey (matte or flat finish)
- Glaze medium
- Large sea sponge (natural texture)
- Small synthetic sponge
- Painter’s tape
- Drop cloths
- Paint roller and tray
- Clean, lint-free rags
- Cardboard scrap (for testing)
Step 1: Preparation and Base Layer
-
Protect the perimeter:
Begin by taping off all baseboards, window trim, and ceiling edges with high-quality painter’s tape. Lay down drop cloths to protect the gym flooring, especially if you have rubber mats like the ones shown. -
Prime the surface:
If your walls are new drywall or have a dark existing color, roll on a coat of white primer. Let this dry completely according to the can’s instructions. -
Apply the base color:
Roll on your pale cool grey base coat. This lighter color will peek through the texture, creating the ‘highlight’ areas of the concrete look. -
Check for coverage:
Once dry, assess if a second coat of the pale grey is needed. You want a solid, opaque background before starting the texture work. Let the base cure for at least 4 hours.
Step 2: Creating the Glaze Mixture
-
Mix the glaze:
In a bucket or tray, mix one part of your darker charcoal paint with four parts glaze medium. This translucency is key; raw paint will be too heavy and opaque. -
Test the ratio:
Dab a bit of your mixture onto a scrap piece of cardboard. I usually test it here first to ensure it’s sheer enough that I can still see the cardboard texture underneath. -
Prepare the sponge:
Soak your large sea sponge in water until it’s fully expanded, then wring it out completely so it is barely damp. This prevents the glaze from drying too quickly in the sponge.
Too Blotchy?
If your sponge marks look like distinct blobs rather than cloudy texture, your glaze is too thick. Add more glaze medium to the mix and dab the wall with a damp rag to blend the harsh edges.
Step 3: Applying the Concrete Texture
-
Load the sponge:
Dip the face of the sea sponge into your glaze mixture, creating a thin, uneven coating. Blot excess glaze onto the tray’s ribbed section or a paper towel. -
Start sponging:
Beginning in a top corner, press the sponge against the wall. Use a random, twisting motion of your wrist each time you lift and press. Do not stamp in a grid pattern. -
Vary the pressure:
Apply lighter pressure in some areas and firmer pressure in others. This creates the natural, organic variance found in real poured concrete. -
Work in sections:
Focus on a 3×3 foot section at a time. This allows you to work with the ‘wet edge’ of the glaze so you don’t get hard lines where sections meet. -
Soften the look:
While the glaze is still wet, take a clean, slightly damp lint-free rag and gently dab at areas that look too heavy or blob-like. -
Address the corners:
Switch to the smaller synthetic sponge to get the texture all the way into tight corners and around window frames where the large sponge won’t fit. -
Step back and assess:
Every 15 minutes, walk back to the other side of the room. Look for repetitive patterns or empty bald spots and fill them in lightly. -
Layering for depth:
Once the first pass is dry to the touch, you can go back over sparse areas with a very dry sponge and just a hint of glaze to build up darker ‘shadow’ pockets.
Add Industrial Grime
For a grittier warehouse vibe, mix a tiny amount of metallic silver or bronze into a separate glaze batch and sponge it sparingly over the final dark grey layer.
Step 4: Finishing Touches
-
Remove tape carefully:
Score the edge of the painter’s tape with a utility knife before pulling it off. This prevents the textured paint film from peeling away with the tape. -
Clean up edges:
If any glaze bled under the tape, use a small artist’s brush and your trim color to touch up the baseboards or ceiling line for a crisp finish. -
Optional protection:
For a high-traffic gym where weights might scuff the walls, consider rolling on a clear matte polyurethane topcoat after the texture has cured for 24 hours.
Now you have a rugged, durable wall finish that sets the perfect tone for serious training sessions

PENCIL GUIDE
Understanding Pencil Grades from H to B
From first sketch to finished drawing — learn pencil grades, line control, and shading techniques.
Explore the Full Guide
Warm-Up Gradient Wall
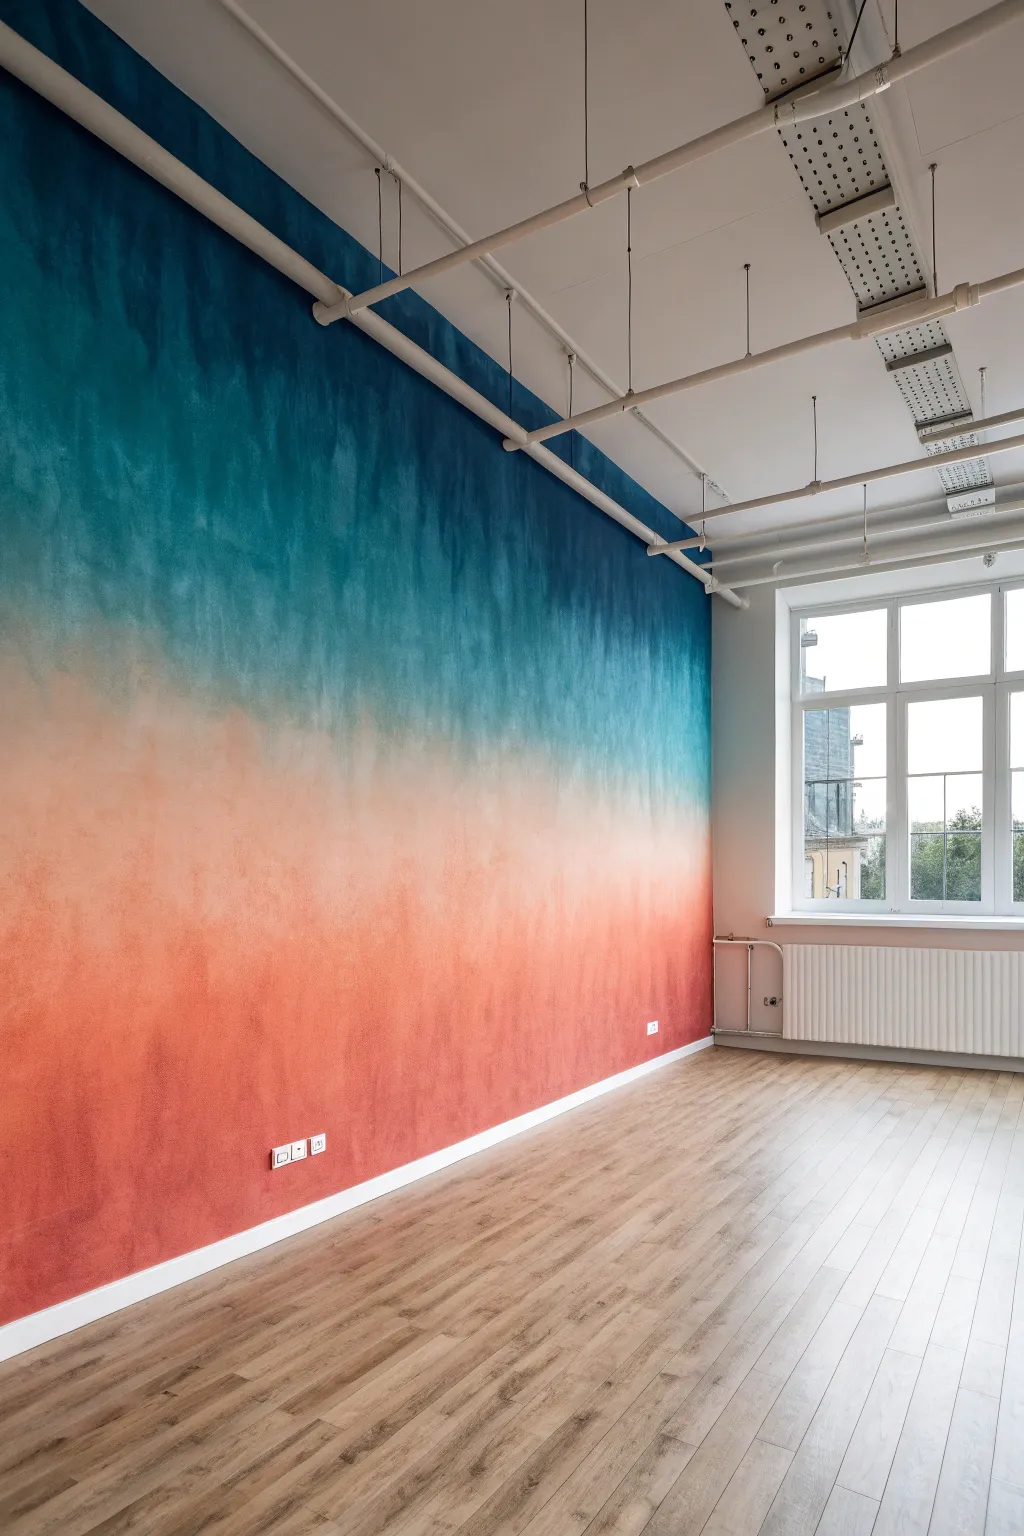
Transform a plain gym wall into a motivating sunrise with this bold teal-to-coral gradient. This technique, often called ombré color washing, uses blending to create a soft, seamless transition that energizes the space without feeling overwhelming.
How-To Guide
Materials
- High-quality interior latex paint: Deep Teal
- High-quality interior latex paint: Coral/Salmon
- High-quality interior latex paint: White (for mixing)
- Painter’s tape
- Drop cloths
- 2 Large paint rollers and trays
- 3-4 Wide bristle brushes (4-inch size is ideal)
- Mixing buckets or cups
- Spray bottle with water
- Clean rags
- Ladder
Step 1: Preparation and Base Layout
-
Protect the space:
Clear the area of any gym equipment and lay down drop cloths to protect the flooring. Use painter’s tape to mask off the baseboards, window frames, and the ceiling line. Since you’ll be blending right up to the edges, perfect taping is crucial for that crisp, professional look. -
Plan your gradient:
Visually divide your wall into three horizontal sections. The top third will be your Deep Teal, the bottom third will be the Coral, and the middle third will be where the magic happens—the mixing zone. You can lightly mark these zones with pencil if it helps you visualize. -
Apply the top color:
Pour your Deep Teal paint into a roller tray. Using a roller, apply a thick, even coat to the top third of the wall. Work your way down slightly past your imaginary one-third line. Don’t worry about a straight edge at the bottom; an uneven, feathery edge is actually better for blending later. -
Apply the bottom color:
Switch to a fresh roller and tray for the Coral paint. Apply this color to the bottom third of the wall, rolling upwards until you are about a foot or two away from the teal section. Just like the top, keep the upper edge of this section uneven and organic.
Keep It Wet
If the paint is drying too fast, mix a latex glaze extender into your paint buckets. It slows drying time significantly, giving you much more freedom to blend without panic.
Step 2: Creating the Mid-Tone Blend
-
Mix the transition color:
In a separate bucket, mix equal parts of your Deep Teal and Coral paint. If the resulting color looks too muddy, you can add a splash of white to brighten it, or simply use the two pure colors side-by-side on the wall. For this specific look, however, having a pre-mixed middle tone helps bridge the gap. -
Apply the transition strip:
Use a brush or a smaller roller to fill in the empty middle gap with your transition mixture or by dragging the teal down and coral up until they meet. You want the paint to be wet for the next steps, so work in 3-4 foot wide vertical sections rather than trying to do the whole wall length at once.
Starry Night Effect
After the gradient dries, flick a stiff toothbrush dipped in diluted white paint across the upper teal section to create subtle stars, turning your sunrise into a twilight transition.
Step 3: The Wet Blending Technique
-
Mist the wall:
This is the most critical trick: take your spray bottle and lightly mist the area where the colors meet. The water keeps the latex paint open (wet) longer, allowing pigments to move and mix directly on the wall surface. -
Initial cross-hatching:
Take a large, dry 4-inch bristle brush. Start at the boundary between the Teal and the transition area. Use rapid, X-shaped strokes (cross-hatching) to pull the dark teal down into the lighter areas. I prefer to work quickly here to establish the blur before the paint gets tacky. -
Clean and switch:
Wipe your brush on a rag or grab a clean dry brush. Now do the same X-shaped blending motion where the Coral meets the transition area, pulling the lighter peach color upwards. The goal is to eliminate any hard horizontal lines. -
Soften the texture:
Once the X-strokes have mixed the colors, use a clean, dry brush to lightly drag horizontally across the blend. This sweeping motion smooths out the brush marks and creates that hazy, atmospheric look seen in the photo. -
Step back and assess:
Walk to the other side of the room. Up close, it might look messy, but from a distance, you’ll spot areas that look too ‘stripey.’ If you see a hard line, mist it lightly again and work it with the brush. -
Vertical texturing:
In the image, there is a subtle vertical texture to the paint application. To achieve this, once your horizontal blend is good, do very light vertical brush strokes through the gradient zone while the paint is just starting to set. This creates a falling rain effect.
Step 4: Refining and Sealing
-
Repeat for the full wall:
Continue this process—rolling base blocks, misting, and cross-hatch blending—in vertical sections across the entire length of the wall. Keep a ‘wet edge’ where you move to new sections so you don’t get vertical seams. -
Touch up the extremes:
Once the blend is done, check the very top (ceiling line) and very bottom (baseboard). Ensure the solid Teal and solid Coral are opaque and rich. If the blending thinned them out too much, carefully cut in a second coat at the very edges. -
Remove tape:
While the paint is still slightly damp (not soaking wet, but not fully cured), carefully peel away your painter’s tape at a 45-degree angle. This prevents dried paint from peeling off with the tape. -
Final drying time:
Allow the wall to cure for at least 24 hours before moving any gym equipment back. The thicker blended areas may take longer to dry than a standard coat of paint.
Step back and enjoy the vibrant energy this custom gradient brings to your workout sessions
Floor Zone Markings and Training Lanes
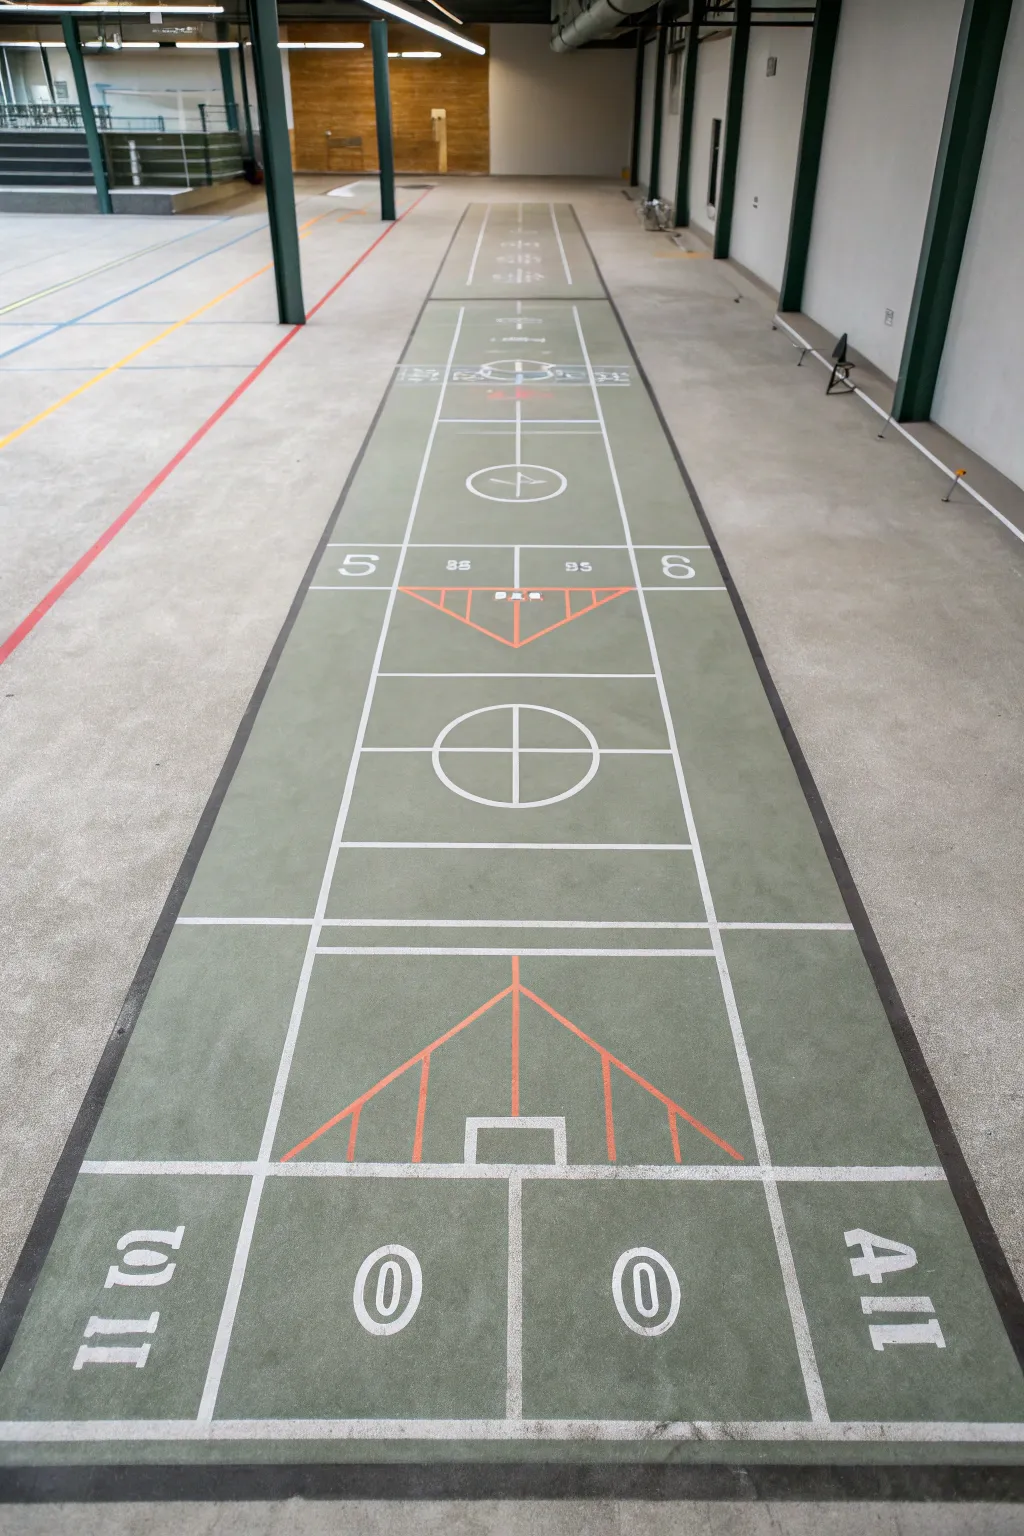
Transform a plain concrete gym floor into a functional, professional-grade shuffleboard court that doubles as an agility training zone. This project uses precise masking and durable epoxy paints to create a crisp, high-contrast design that stands up to heavy foot traffic.
Step-by-Step Guide
Materials
- Concrete floor cleaner/degreaser
- Concrete etching solution
- Painter’s tape (2-inch and 1-inch widths)
- Fine-line tape (1/4 inch or similar for details)
- Chalk line reel
- Measuring tape and straight edge
- Epoxy floor coating (Green base color)
- Epoxy line paint (White)
- Epoxy line paint (Orange/Red)
- Paint rollers (short nap) and extension pole
- Detail brushes
- Stencil kit (Numbers 0, 5, 8, 10) or cardstock to make custom stencils
- Clear epoxy topcoat (optional for extra durability)
Step 1: Prep and Base Coat
-
Clean the surface:
Start by thoroughly sweeping and vacuuming the concrete area. Use a heavy-duty degreaser to remove any oils or residues that might prevent the paint from bonding. -
Etch new concrete:
If the concrete is relatively smooth or unpainted, use an etching solution. This opens the pores of the concrete, ensuring the epoxy grips tightly. -
Mark the perimeter:
Snap a chalk line to define the long rectangular boundary of your court. Standard shuffleboard courts are typically 6 feet wide by 52 feet long, but adjust to fit your available gym space. -
Tape the outer edge:
Apply wide painter’s tape along the outside of your chalk lines. Press down firmly on the tape edge to prevent bleed-under. -
Apply the green base:
Roll on the green epoxy base coat within the taped area. Use smooth, even strokes. I like to apply two thin coats rather than one thick one for better durability, waiting for the first to dry to the touch before adding the second. -
Remove tape and cure:
Peel up the perimeter tape while the second coat is still slightly tacky to get a clean edge. Let this base layer cure for at least 24 hours before walking on it.
Step 2: Marking Lines and Zones
-
Measure the zones:
Once cured, use a measuring tape to find the center line and mark the scoring zones. You’ll need horizontal dividers for the ’10’, ‘8’, ‘5’, and ’10-off’ sections at both ends of the court. -
Snap center and zone lines:
Snap a chalk line down the exact center of the green rectangle. Then, snap horizontal lines to divide the scoring sections according to standard shuffleboard dimensions. -
Tape white lines:
Using masking tape, tape off the distinct white border around the green rectangle and the interior zone dividers. For the thin interior lines, precise spacing is key, so double-check your measurements. -
Create the triangle guides:
Use fine-line tape to mask out the large triangle shape within the scoring zone. This triangle typically points toward the center of the court.
Clean Line Technique
Before painting your white or orange lines, seal the tape edge with a tiny amount of the green base color. This fills any gaps and ensures the next color line is razor sharp.
Step 3: Detailing and Numbers
-
Paint structural lines:
Apply the white epoxy paint to creaete the border and the horizontal zone dividers. Use a small roller or a stiff brush for these narrower sections. -
Add the orange details:
Paint the thin orange/red lines that form the internal structure of the scoring triangle and the vertical dividers. A small detail brush gives you the most control here. -
Position number stencils:
Place your number stencils in their respective zones. The ’10’ goes at the tip of the triangle closest to the player, followed by ‘8’, ‘7’, and so on, moving outward. -
Stipple the numbers:
Using white paint and a stencil brush (or a sponge), lightly stipple the paint over the stencils. Use very little paint to prevent it from bleeding under the stencil edges. -
Paint the center circles:
If your design includes a dead-zone circle in the middle of the court, use a compass or a string tied to a pencil to trace it, then mask and paint it white. -
Remove mapping tape:
Carefully peel away all remaining masking tape. Pull the tape at a 45-degree angle away from the wet paint to ensure crisp, sharp lines. -
Apply clear coat:
For a gym floor that will see sneakers and equipment, seal your design with a clear urethane or epoxy topcoat. This protects the markings from scuffs and makes cleaning much easier.
Agility Ladder Mod
Extend the project by painting a matching agility ladder alongside the shuffleboard court using the same colors for a cohesive functional fitness zone.
Allow the floor to cure fully for 72 hours before opening the area for the first game or training session


Have a question or want to share your own experience? I'd love to hear from you in the comments below!