
Halloween gives us the perfect excuse to trade our canvases for skin and explore the art of transformation with boldness and creativity. Whether you are looking for a hauntingly beautiful aesthetic or a terrifying illusion, these painting techniques will elevate your costume to a gallery-worthy masterpiece.
The Elegant Sugar Skull Calavera
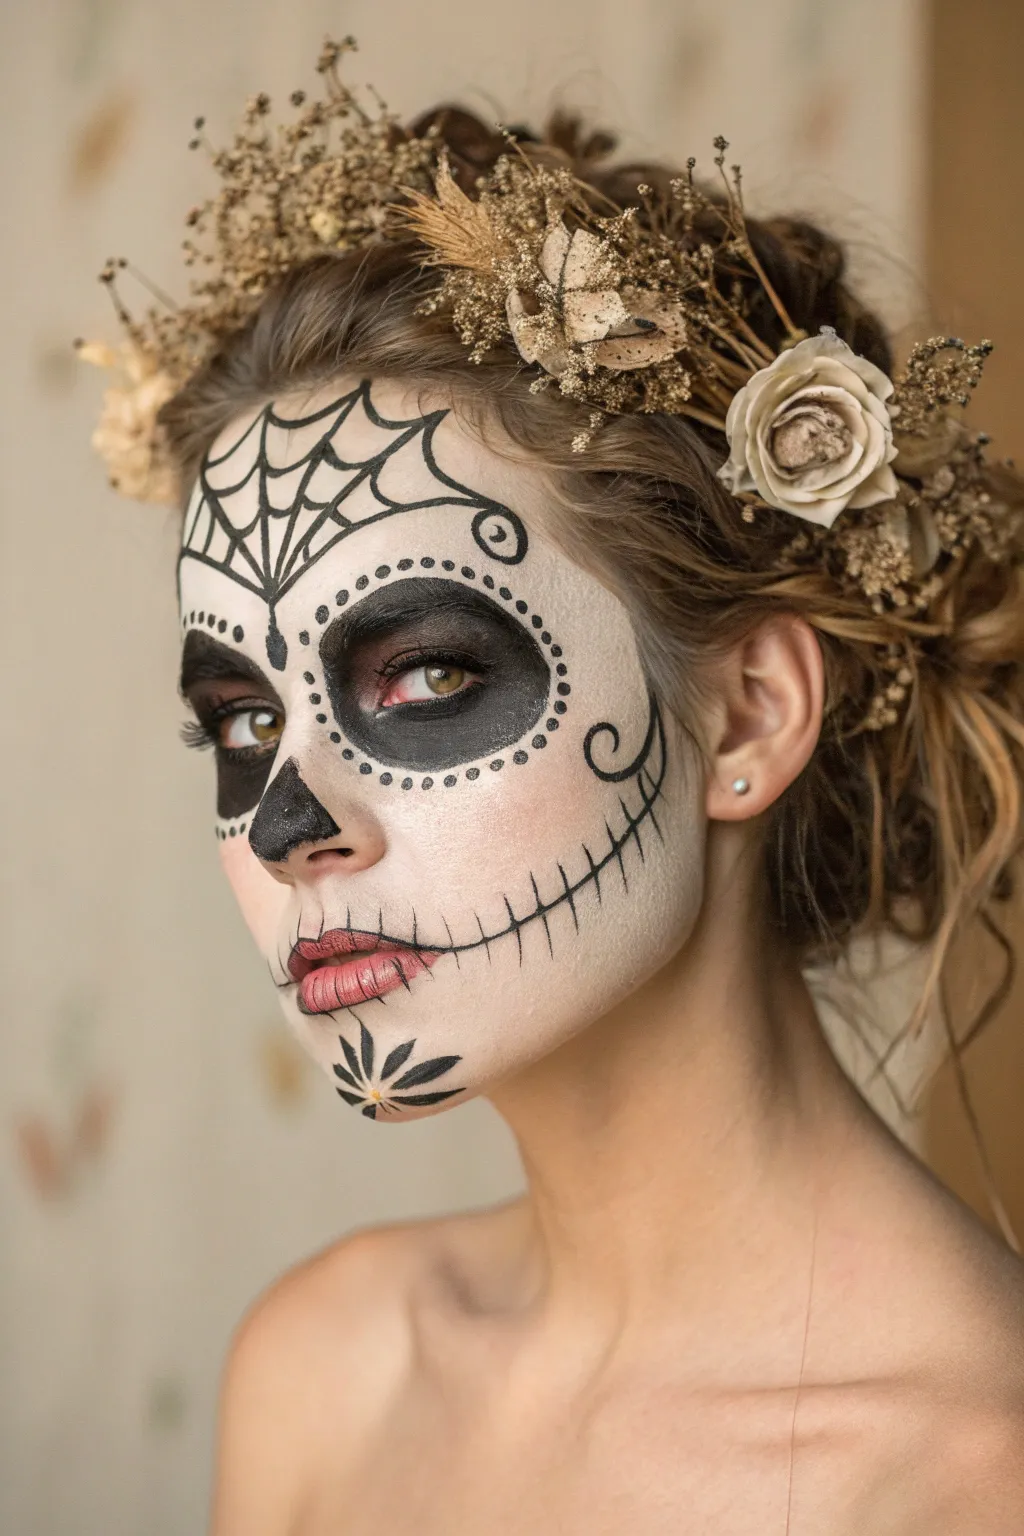
This hauntingly beautiful look combines traditional Dia de los Muertos elements with an earthy, bohemian twist suited for a sophisticated costume. By blending stark linework with soft, dried floral accessories, you achieve a style that is both spooky and ethereal.
How-To Guide
Materials
- White cream foundation or face paint
- Translucent setting powder
- Black water-activated face paint (or gel liner)
- Berry-colored lip stain
- Makeup sponges
- Fine detail brushes (sizes 0 and 2)
- Dried flowers (beige roses, baby’s breath)
- Bobby pins
Step 1: Creating the Canvas
-
Prep and prime:
Start with a clean, moisturized face to ensure the paint doesn’t cling to dry patches. Apply a thin layer of primer. -
Apply the base:
Using a slightly damp makeup sponge, stipple white cream makeup all over your face. Don’t make it opaque white; aim for a pale, porcelain wash that allows a hint of skin texture to show through. -
Set the foundation:
Immediately press a generous amount of translucent setting powder over the white base using a fluffier brush or puff. This step is crucial to prevent the black lines from smudging later.
Pro Tip: Steady Hands
Rest your pinky finger against your cheek while drawing the fine spiderweb and teeth lines. This anchors your hand and prevents shaking for crisp, sharp details.
Step 2: Darkening the Features
-
Outline the sockets:
With a flat brush and black paint, draw large circles around your eyes. These should encompass your eyebrows and extend down to the top of your cheekbones. -
Fill in the eyes:
Fill these circles completely with black paint. I find that patting the color on creates a more solid, matte finish than swiping. -
Paint the nose:
Draw an upside-down heart or spade shape on the tip of your nose in black, extending slightly up the bridge, and fill it in. -
Add the decorative border:
Using the handle end of a small brush or a dotting tool, dip it in black paint and stamp a ring of evenly spaced dots around the outside perimeter of your black eye sockets.
Level Up: Texture
For a 3D effect, use eyelash glue to attach tiny flat-back rhinestones or pearls to the center of the forehead web and the middle of the chin flower.
Step 3: Fine Linework
-
Draw the web structure:
In the center of your forehead, use your finest liner brush to draw a vertical line, then draw two diagonal lines radiating outward on each side to create the spokes of a spiderweb. -
Connect the web:
Connect these spokes with inverted scallops (curved lines) to complete the web design. -
Add cheek flourishes:
On the outer cheekbones, paint a delicate swirl or coil shape that curves inward toward the nose. -
Create the chin detail:
Paint a stylized flower or agave plant on the chin using five tear-drop shapes that fan out from a central point.
Step 4: The Stitched Smile
-
Stain the lips:
Dab a berry-colored lip stain onto your lips. You want a blotted, matte look rather than a glossy finish. -
Extend the smile:
Draw a thin black line from the corners of your mouth extending horizontally toward your jawline. -
Stitch it up:
Paint short, vertical hatch marks across your lips and the extended lines to create the classic skeletal teeth effect.
Step 5: Floral Crowning
-
Prepare the hair:
Loosely pull your hair back into a low, messy bun or textured updo, allowing wisps to frame the face. -
Place focal flowers:
Secure large dried roses or beige flowers near the temple using bobby pins. -
Add filler textures:
Tuck sprigs of dried baby’s breath, wheat, or dried herbs around the larger flowers to create a rustic, halo-like crown.
Mist with a setting spray to lock in your artwork and enjoy your hauntingly elegant creation.


3D Spider Web Eye Accents
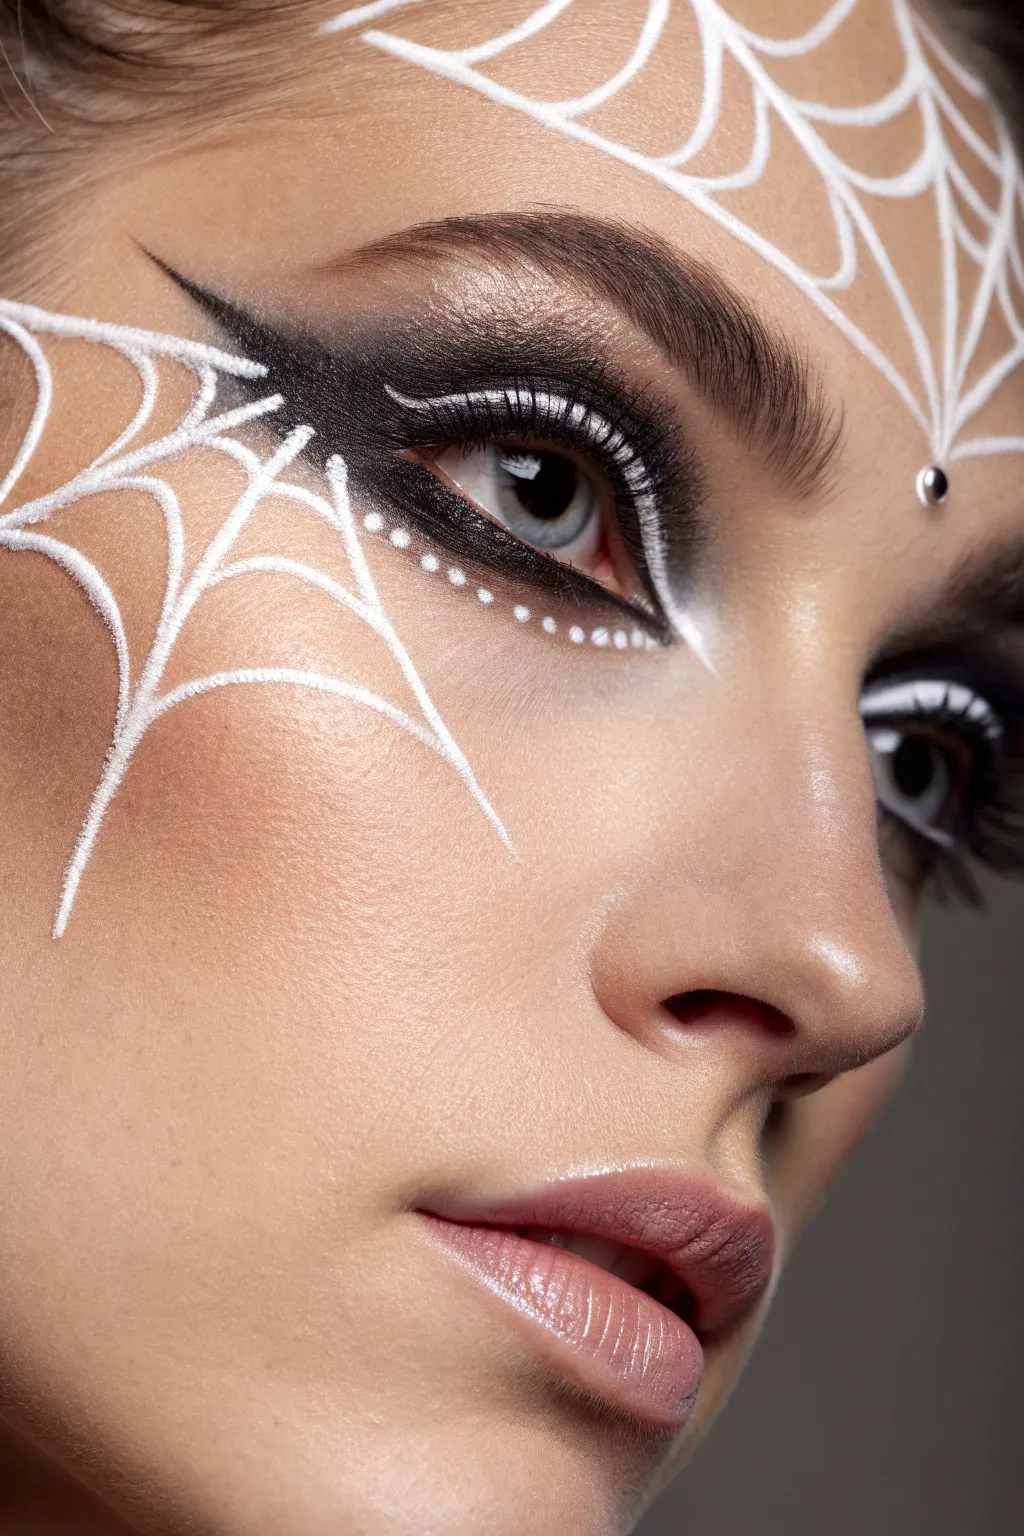
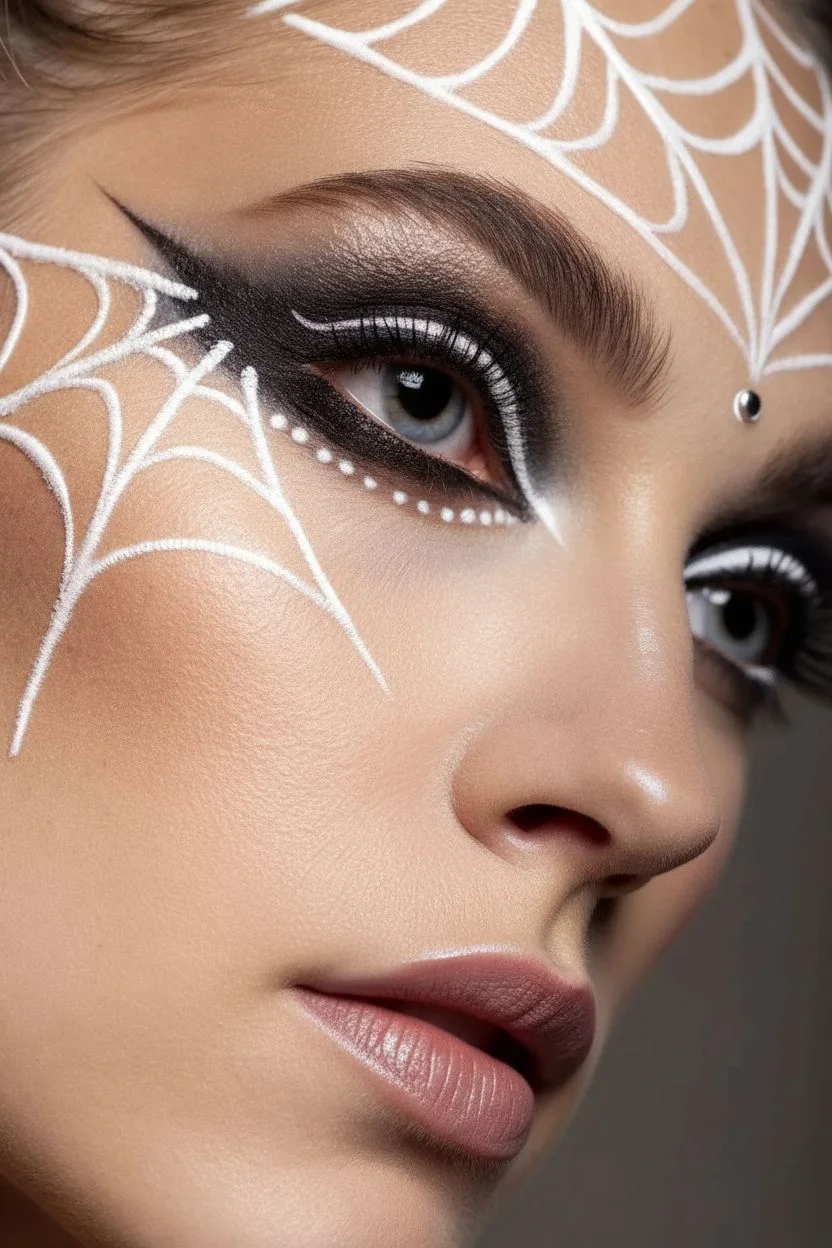
Elevate spooky makeup into high fashion with this striking graphic look that pairs a smoked-out cat eye with crisp, high-contrast spiderweb detailing. The dimensional white lines against the skin create a stunning 3D effect that feels both elegant and edgy.
Detailed Instructions
Materials
- Matte foundation and concealer
- Translucent setting powder
- Black gel eyeliner
- Black matte eyeshadow
- Highly pigmented white liquid eyeliner
- Fine detail liner brush (000 size)
- Small blending brush
- Angled eyeliner brush
- White kohl pencil
- Single silver rhinestone
- Lash glue
- Adhesive tape (optional)
Step 1: The Graphic Eye Base
-
Create a sharp guide:
Apply a small piece of adhesive tape angling from the outer corner of your eye toward the end of your eyebrow to ensure a razor-sharp wing. -
Draft the shape:
Using an angled brush and black gel liner, draw a thick wing along the tape edge, extending it inward across the entire lid. -
Soften the edges:
Before the gel sets, take a small blending brush and smudge the upper edge of the black liner into the crease to create a gradient smoke effect. -
Set with shadow:
Pack black matte eyeshadow over the gel liner to lock it in place and intensify the darkness, ensuring no skin shows through. -
Sharpen the inner corner:
Remove the tape and carefully extend the black liner into the inner corner of the eye, creating a small, pointed beak shape. -
Add contrast:
Run a white kohl pencil along your lower waterline to open up the eye and create a stark contrast against the black wing. -
Define the crease:
Using your white liquid liner, carefully paint highly detailed, thin strokes just above the black crease shadow to mimic spider leg textures or web strands. -
Lash application:
Apply two coats of black mascara and adhere false lashes if desired for extra drama.
Clean Lines Pro-Tip
Wipe your detail brush on a damp cloth every few strokes. Dried liner on the bristles causes clumps, but a clean brush ensures crisp, fluid lines.
Step 2: Weaving the Web
-
Mark the center:
Identify the convergence point for your forehead web, centered just above the bridge of the nose. -
Draw radiating spokes:
Using a fine detail brush and white liquid liner, paint long, thin lines radiating upward and outward from that center point onto the forehead. -
Connect with scallops:
Connect the spokes with curved, scalloped lines that drape downward like fabric, creating the classic web structure. -
Repeat on the cheek:
Move to the cheekbone area and paint three to four long ‘spokes’ extending downward from the outer corner of the eye. -
Thicken slightly:
Go over your main structural lines a second time to build up the product texture, which gives that slight 3D appearance in photos. -
Connect the cheek web:
Draw the scalloped connecting lines between the cheek spokes, keeping the curves consistent with the forehead design. -
Steady your hand:
I usually rest my pinky finger on my chin while painting the cheek web to keep my hand completely stable for these fine lines.
Level Up: 3D Shadow
Mix a tiny drop of grey eyeshadow with mixing medium and paint very thin shadow lines directly under the white webs to create a realistic raised effect.
Step 3: Luminous Details
-
Create the dotted accent:
Dip the handle end of a small brush into the white liner and stamp a row of dots following the lower curve of your black winged liner. -
Gradient dot sizing:
Start with larger dots near the outer corner and gradually use less pressure to make them smaller as you move inward. -
Jewel placement:
Apply a tiny dot of lash glue to the back of your silver rhinestone. -
Affix the gem:
Place the rhinestone firmly at the very bottom center of the forehead web design to anchor the look. -
Finish with lips:
Apply a soft mauve or dusty rose lipstick to balance the heavy eye makeup without competing for attention.
Mist with a setting spray to lock in your design and enjoy your hauntingly beautiful creation.


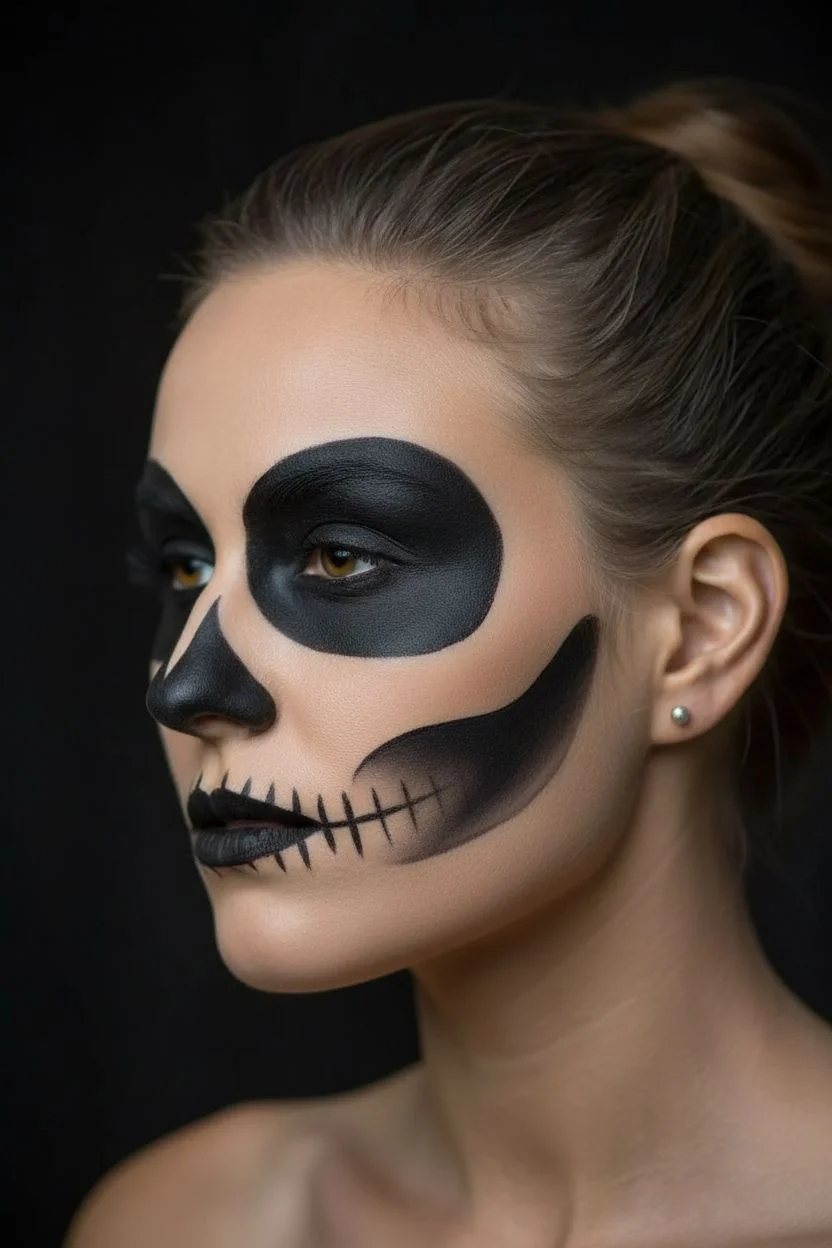
The Skeletal Jack-O’-Lantern
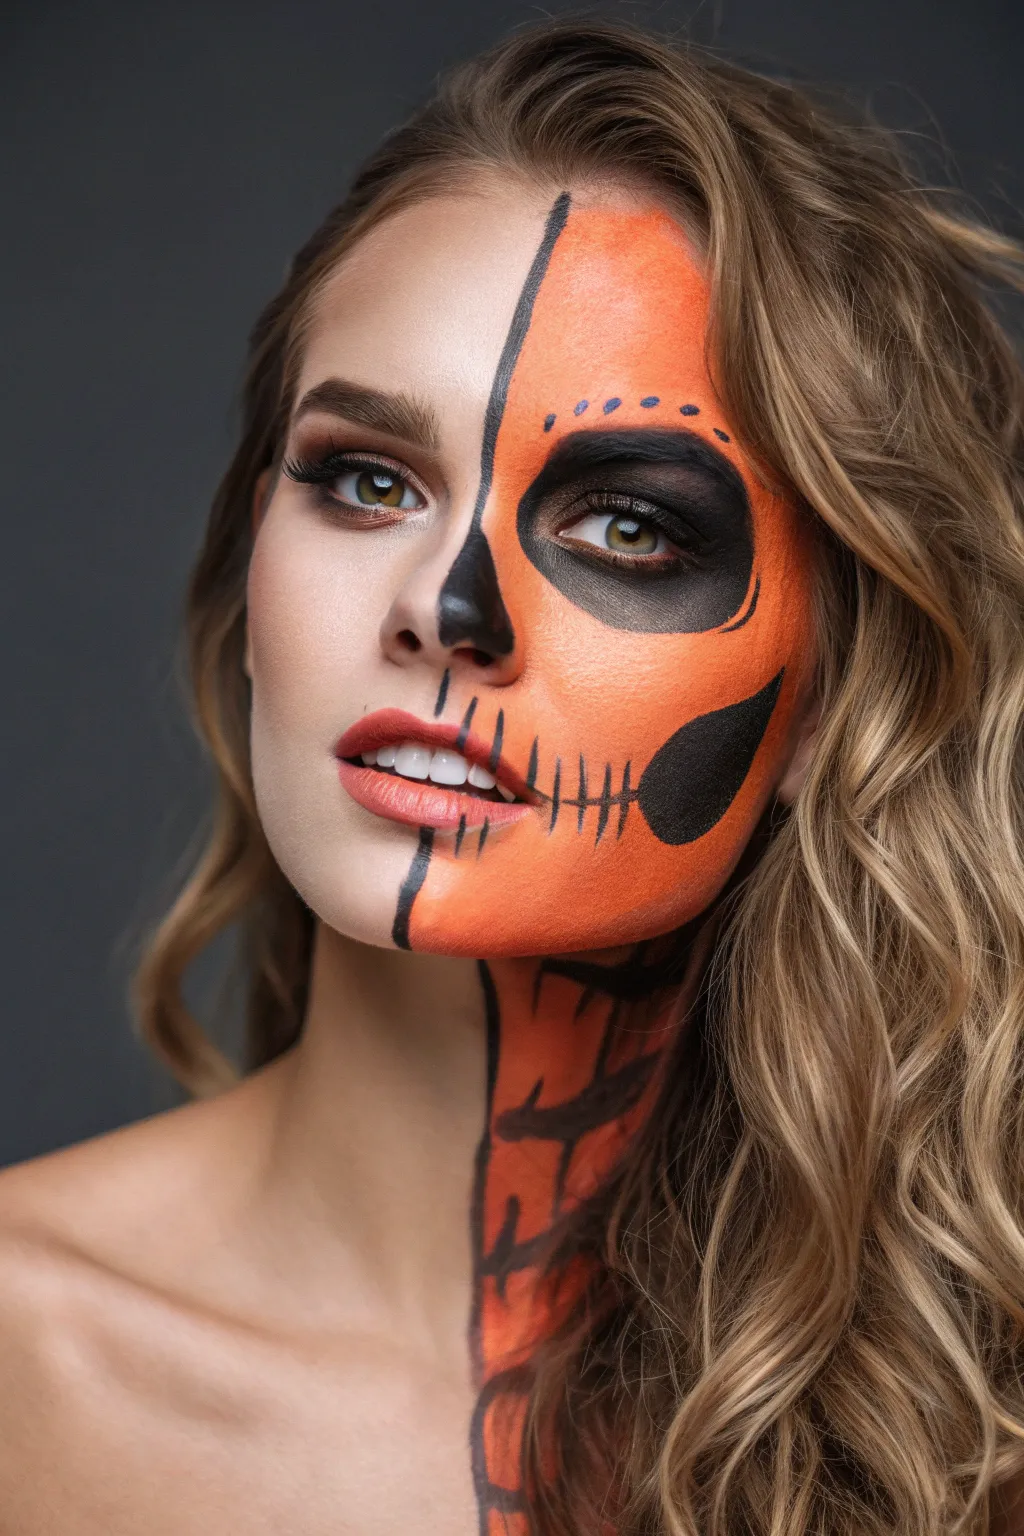
Merge glam beauty with spooky Halloween vibes in this striking split-face design. By keeping one side polished and transforming the other into a skeletal Jack-O’-Lantern, you create a captivating duality that looks professional yet is surprisingly achievable.
Step-by-Step
Materials
- High-coverage liquid foundation
- Orange face paint (water-activated or cream)
- Black face paint or gel liner
- Matte black eyeshadow
- Bronze or brown eyeshadow palette
- Flat foundation brush
- Fine detail brush
- Makeup sponge
- Setting spray
- Translucent powder
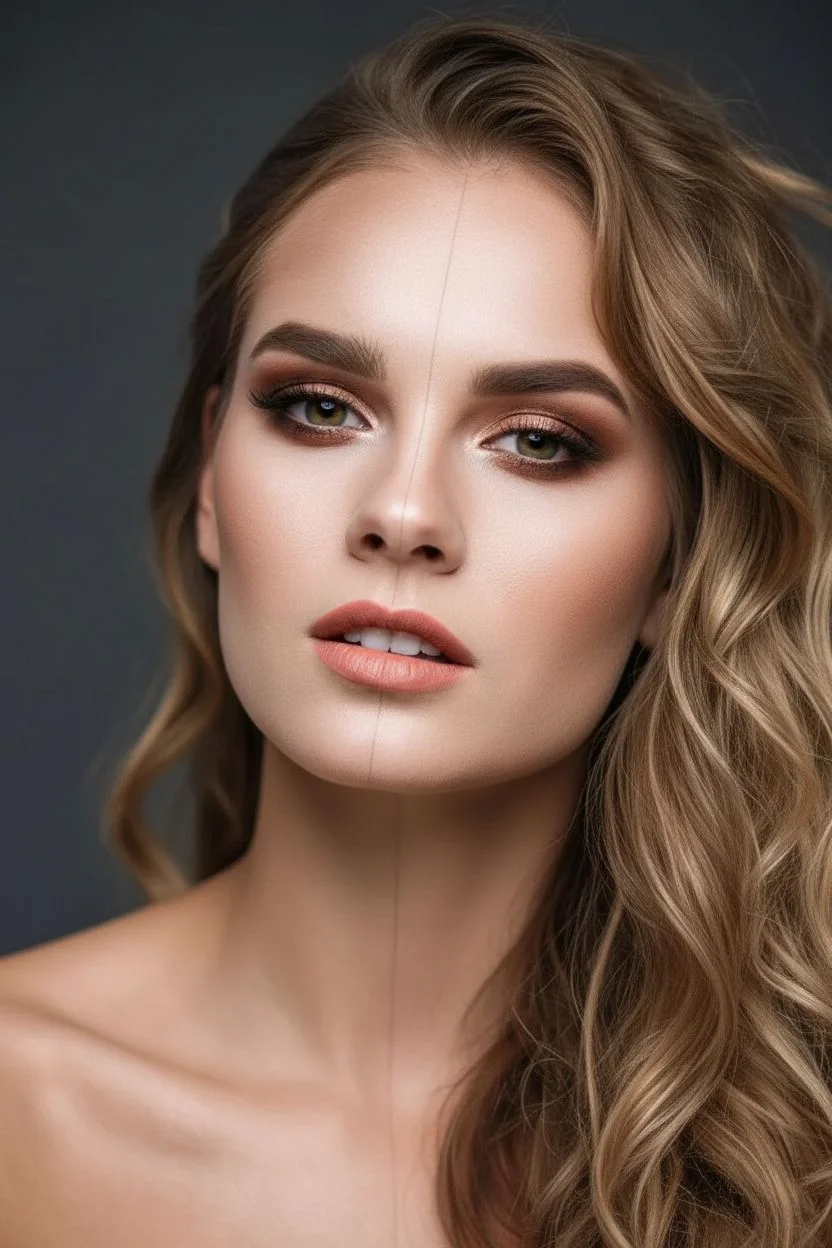
Step 1: The Glamour Half
-
Establish the divide:
Using a light eyeliner pencil or the handle of a brush, trace a faint vertical guide line straight down the center of your forehead, nose, lips, and chin to separate the two halves. -
Apply natural base:
On the left side of your face (the ‘beauty’ side), apply your regular foundation and concealer, blending right up to your guide line without crossing it. -
Define the brows:
Fill in the eyebrow on the natural side with your preferred brow product, keeping the arch sharp and defined to contrast with the skull side later. -
Create a smoky eye:
Apply a warm brown eyeshadow to the crease and lid of the natural eye, blending outwards. Add a coat of mascara to the lashes; false lashes are optional but add drama. -
Paint the lips:
Apply a peachy-nude or soft coral lipstick to the natural side of the mouth only, keeping a clean edge at the center mark.
Set It and Forget It
To make the black areas intensely dark and smudge-proof, press matte black eyeshadow on top of the black paint while it is still slightly tacky.
Step 2: The Pumpkin Base
-
Lay down the orange:
Using a slightly damp makeup sponge, dab orange face paint onto the entire right side of the face. Press the color into the skin rather than dragging it to ensure an opaque, streak-free finish. -
Extend to the neck:
Continue sponging the orange paint down the right side of your neck and décolletage, fading it slightly as you reach the collarbone area. -
Set the color:
Dust a light layer of translucent powder or orange eyeshadow over the paint. I find this vital for preventing the cream paint from creasing in smile lines. -
Draw the border:
Load a fine liner brush with black face paint. carefully draw a crisp, solid vertical line down the center of the face, separating the natural skin from the orange base.
Step 3: Skeletal Features
-
Outline the eye socket:
With a medium round brush and black paint, draw a large distinct circle around the right eye. Keep the shape rounded at the bottom but slightly squared off near the eyebrow. -
Fill the void:
Fill in the entire eye socket area with black paint. For extra depth, blend matte black eyeshadow around the edges of the socket to soften the transition slightly. -
Create the nose cavity:
Paint a black teardrop shape on the right side of the nose essentially creating half a skull nose. The straight edge should hug the center line you drew earlier. -
Sculpt the cheek:
Locate the hollow of your cheekbone and paint a large, sideways teardrop shape (pointing towards the ear) in black to mimic a skeletal hollow. -
Draft the mouth stitch:
Using a fine liner brush, extend a thin horizontal black line from the corner of your mouth out toward the jawline.
Level Up The Look
Pop a bright yellow or white contact lens into the eye on the painted side for a piercing, supernatural gaze that contrasts with the beauty side.
Step 4: Details & Neck
-
Stitch the lips:
Paint short, vertical hatch lines across the extended mouth line and over the orange portion of your lips to create the skeletal teeth effect. -
Decorate the forehead:
Dip the back of a thin brush into black or deep purple paint to stamp a row of small dots above the blackened eye socket, following the curve of the brow bone. -
Border the eye:
Use a black liquid eyeliner to trace the waterline and upper lash line of the painted eye to ensure no skin color peeks through the black socket. -
Outline the vertebrae:
On the orange neck area, paint a thick black vertical line to represent the spine, then add horizontal curved lines branching off to suggest vertebrae bones. -
Final seal:
Mist the entire look with a strong hold setting spray to lock the face paint and beauty makeup together for the whole night.
Enjoy flaunting this sophisticated yet spooky look that perfectly captures the spirit of the season


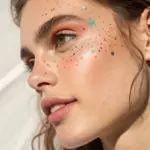
Celestial Moon Witch Aesthetic
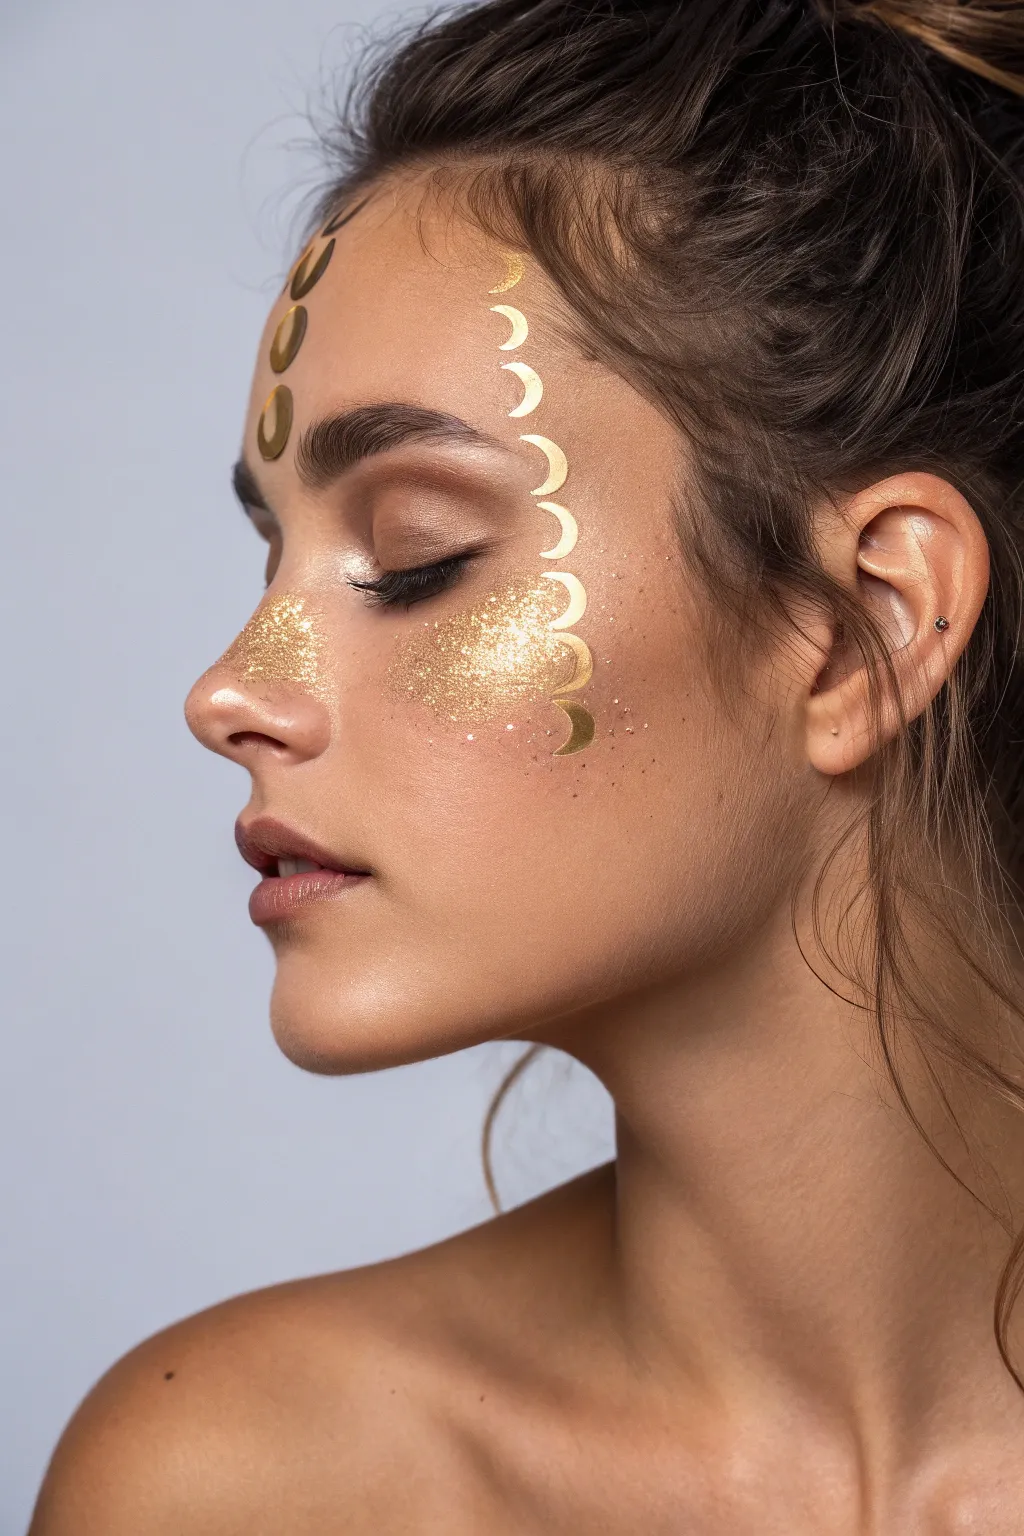
Capture the magic of the night sky with this radiant, golden celestial look. This style combines dazzling glitter freckles with metallic moon phases for a witchy aesthetic that feels both glamorous and mystical.
How-To Guide
Materials
- Dewy finish foundation or tinted moisturizer
- Clear brow gel
- Neutral warmth eyeshadow palette (browns/bronzes)
- Gold metallic temporary tattoos (crescent moons)
- Cosmetic grade gold glitter (chunky and fine mix)
- Glitter primer or clear lash glue
- Small flat brush
- Setting spray
- Cotton pads and scissors
- Black mascara
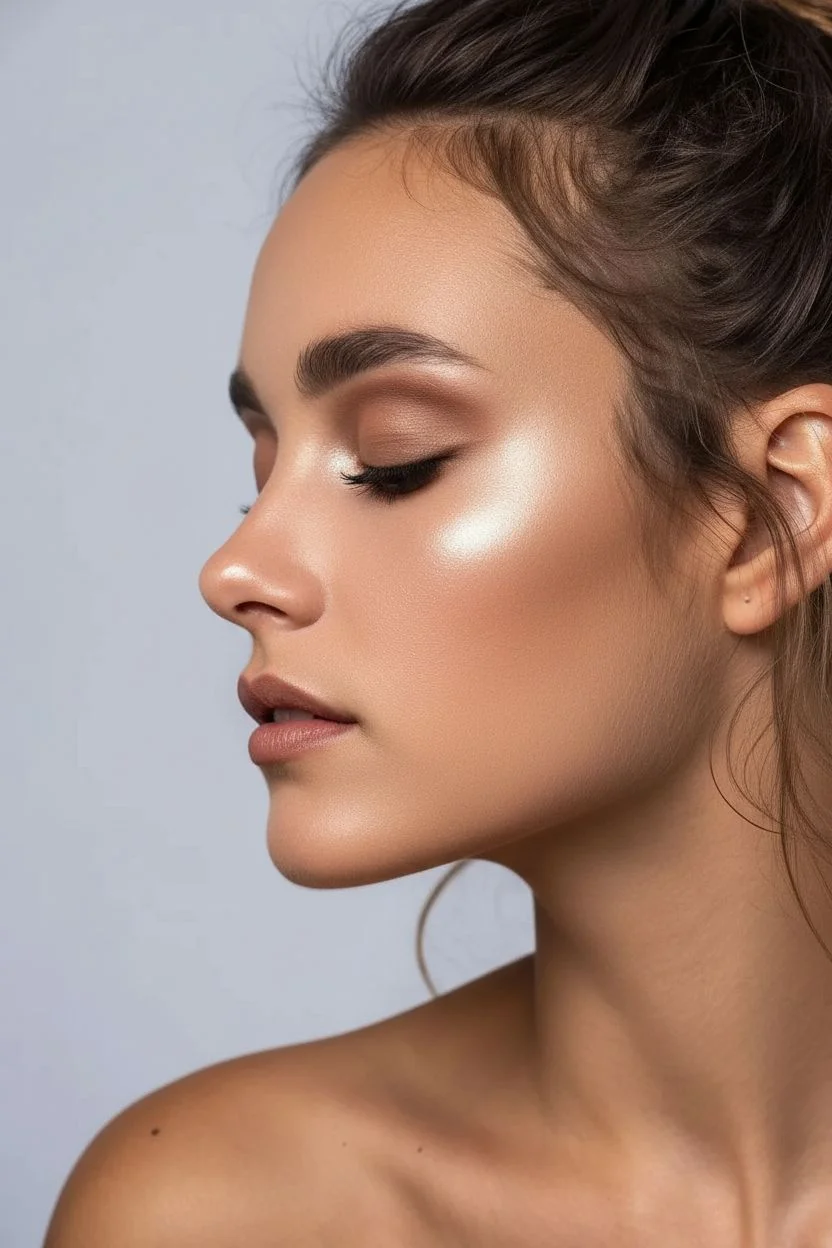
Step 1: Base and Definition
-
Prep the canvas:
Start with a clean, moisturized face and apply a light layer of dewy foundation. You want the skin to look fresh and natural rather than matte or heavy. -
Groom the brows:
Brush your eyebrows upward using a clear brow gel to create a feathery, full shape that frames the celestial elements. -
Shadow the lids:
Sweep a soft, warm brown shadow into the crease of your eyelid to add subtle depth without overpowering the gold details. -
Add lashes:
Apply a coat of black mascara to your top lashes to define the eyes.
Step 2: Golden Moons
-
Prepare the tattoos:
Take your sheet of gold metallic moon temporary tattoos and carefully cut out the individual crescent shapes you plan to use so they are ready to grab. -
Plan the alignment:
Visualize the placement: you want two vertical moons above your left eyebrow, and a cascading ‘C’ curve of moons flowing from your temple down to your cheekbone. -
Degrease the skin:
Dab a little rubbing alcohol or toner on a cotton pad and gently wipe the specific spots where the tattoos will go. Removing natural oils ensures they stick perfectly flat. -
Position the forehead moons:
Peel the clear plastic off the first tattoo and place it adhesive-side down above the arch of your brow. -
Adhere the foil:
Press a damp sponge or cloth against the backing paper for about 30 seconds until the paper slides off easily, revealing the gold design. -
Repeat vertically:
Apply the second moon directly above the first one, maintaining a straight vertical line. -
Create the cascade:
Apply the remaining moons along the temple and cheekbone, slightly curving the line inward to hug the eye area. -
Smooth it out:
Gently tap the applied tattoos with a damp finger to ensure all edges are flush with the skin.
Placement Pro Tip
Keep the moon tattoos close to the hairline at the temple and curve them inward toward the apple of the cheek. This follows your natural bone structure and lifts the face visually.
Step 3: Stardust Freckles
-
Prime for glitter:
Tap a thin layer of glitter primer or clear lash glue along the tops of your cheekbones and across the bridge of your nose. -
Apply the base shimmer:
I like to dip a small flat brush into fine gold glitter first and pat it over the primer to create a solid base of sparkle. -
Add texture:
While the primer is still tacky, pick up chunky gold glitter pieces and press them randomly over the fine glitter, focusing the density under the center of the eye. -
Scatter the edges:
Use a clean, fluffy brush to lightly sweep away any loose glitter at the edges, creating a faded, scattered effect rather than a harsh line. -
Bridge the nose:
Ensure the glitter travels across the bridge of the nose to connect both sides of the face, mimicking a band of sun-kissed freckles. -
Seal the look:
Close your eyes and mist your face generously with a setting spray to lock the glitter and tattoos in place for the night.
Level Up: Starry Night
Make the look even more magical by using a white liquid eyeliner to draw tiny dots and four-pointed stars sporadically around the gold moons and glitter patches.
Step out and glow knowing your celestial golden energy is sure to turn heads
BRUSH GUIDE
The Right Brush for Every Stroke
From clean lines to bold texture — master brush choice, stroke control, and essential techniques.
Explore the Full Guide
Rustic Scarecrow with Fabric Texture
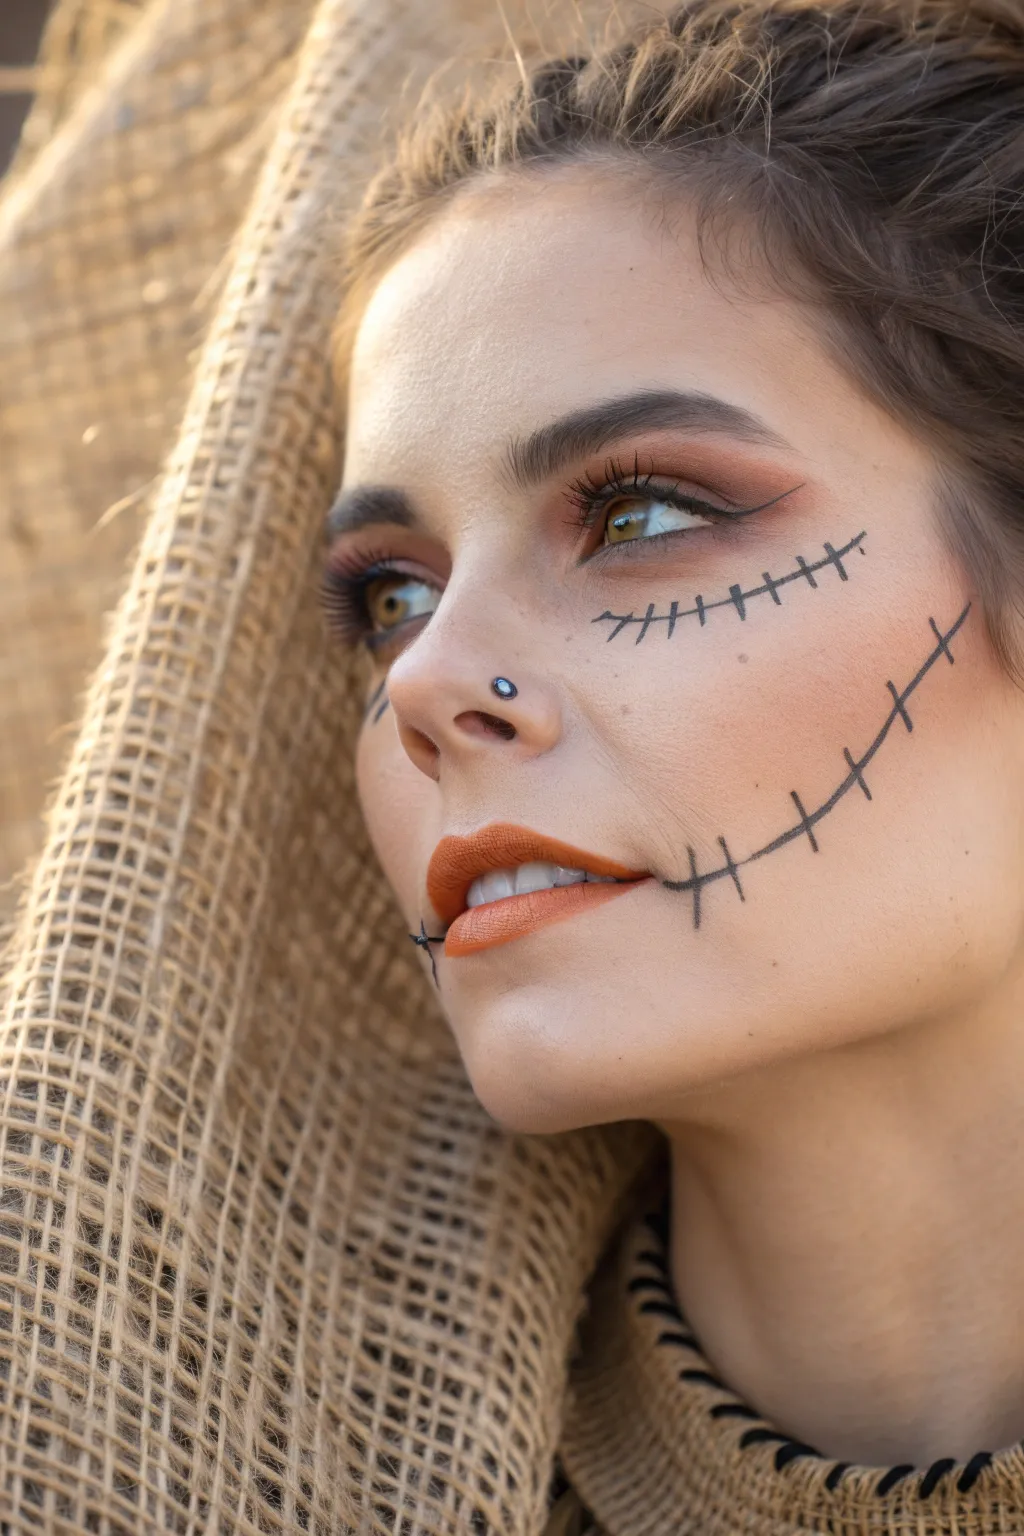
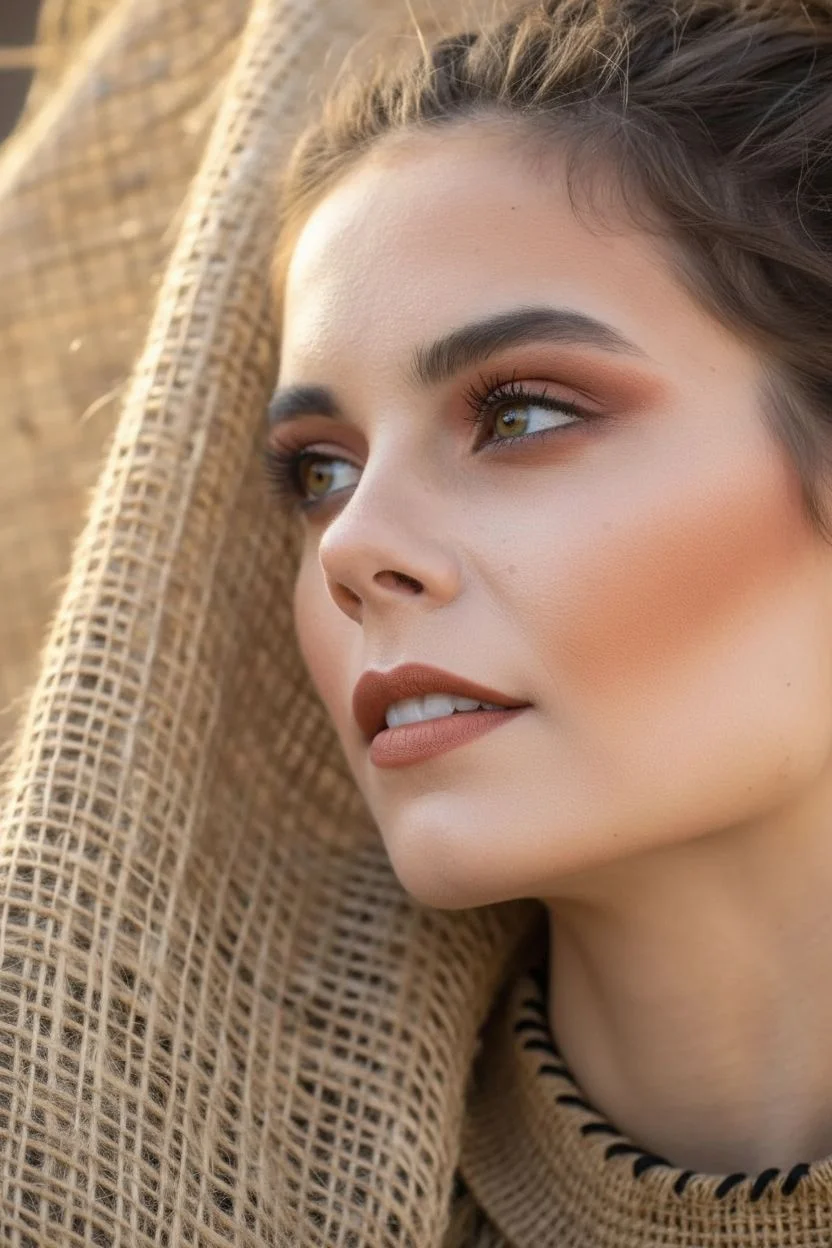
Merge the spooky spirit of Halloween with high-fashion autumn aesthetics in this polished scarecrow look. By combining warm terracotta tones with precise graphical stitching, you create a costume that is both rustic and radiant.
Step-by-Step
Materials
- Matte finish foundation
- Translucent setting powder
- Warm bronzer (terracotta or orange-toned)
- Eyeshadow palette (burnt orange, copper, dark brown)
- Black liquid eyeliner (pen type preferred)
- Matte liquid lipstick (pumpkin or brick orange)
- Fluffy blending brush
- Angled eyeliner brush
- False eyelashes (wispy style)
- Mascara
Step 1: Flawless Warm Base
-
Prep and prime:
Start with a clean, moisturized face and apply a matte primer to ensure your detailed linework stays put later. -
Apply foundation:
Buff a medium-to-full coverage matte foundation into the skin for a uniform canvas. -
Conceal and brighten:
Apply a lighter concealer under the eyes and on the center of the forehead to bring dimension to the face. -
Set the base:
Dust translucent powder over the entire face, focusing on the cheeks where you will be drawing stitches. -
Warm the complexion:
Using a large fluffy brush, apply a warm toned bronzer generously to the hollows of your cheeks. -
Contour the perimeter:
Sweep the same bronzer across your temples and jawline to mimic the sun-baked look of a scarecrow in a field.
Step 2: Autumnal Eyes
-
Define the crease:
Blend a soft matte orange or light brown eyeshadow into the crease of your eyelid using windshield wiper motions. -
Pack the lid:
Press a deeper burnt orange or copper shadow onto the mobile lid for a saturated pop of color. -
Smoke the lower lash line:
I like to take a small pencil brush and smudge the copper shadow along the lower lash line to soften the look. -
Create the wing:
Use your black liquid liner to draw a thin, sharp cat-eye wing extending outward from the upper lash line. -
Lash application:
Apply black mascara to your natural lashes and adhere a pair of wispy false lashes for added drama. -
Groom the brows:
Brush your eyebrows upward with a tinted gel for a fluffy, natural texture that complements the rustic theme.
Clean Lines
If your liquid liner bleeds, the skin might be too oily. Dab the area with a tissue and re-powder before drawing the stitches again for crisp, sharp lines.
Step 3: Stitches and Smiles
-
Apply lip color:
Carefully apply the matte pumpkin-orange liquid lipstick, ensuring crisp edges. -
Draw the mouth extensions:
Using the fine tip of your liquid eyeliner, draw a thin black line starting from the corner of your mouth extending outward toward your ear. -
Create the mouth stitches:
Draw short, vertical hash marks across the extended line you just created on the cheeks. Vary the angles slightly to make it look like rough thread. -
Add corner details:
Add a tiny ‘x’ or slightly overlapping lines at the very corners of the lips to simulate where the mouth is ‘sewn’ shut. -
Under-eye detail:
On one side only, draw a curved horizontal line about an inch below the eye, following the orbital bone shape. -
Stitch the eye:
Cross the under-eye line with vertical hatch marks, similar to the mouth technique, but keep them slightly smaller and more delicate. -
Final setting:
Mist the entire face with a setting spray to lock the design in place for the night.
Fabric Texture
To mimic burlap, hold a piece of fishnet stocking against your forehead and lightly dab brown eyeshadow over it to create a cross-hatch fabric pattern on the skin.
Pair this striking makeup with a burlap collar or neutral sweater and you are ready to charm the pumpkin patch
Shimmering Mermaid Scales

Transform yourself into an ethereal sea siren with this luminous, high-fashion face paint look. Using a clever texturing technique and iridescent pigments, you will create a seamless transition from human skin to shimmering aquatic scales.
Detailed Instructions
Materials
- Fishnet wig cap or fishnet stockings (for the scale stencil)
- Teal and aquamarine water-activated face paint
- Metallic turquoise eyeshadow
- Makeup sponges
- Variety of eyeshadow brushes
- High-shine liquid highlighter
- False eyelashes
- Nude-pink cream lipstick
- Setting spray
Step 1: Setting the Canvas
-
Prep and prime:
Start with a clean, moisturized face. Apply a luminous primer to ensure your skin glows from within. -
Apply foundation:
Buff a medium-coverage foundation all over your face using a beauty sponge or brush. Keep the coverage natural but flawless. -
Soft contour:
Sweep a cool-toned bronzer under your cheekbones to sculpt the face, providing a shadow for the scales to sit above.
Blurred scales?
If paint bleeds under the net, your sponge was too wet. Let it dry, clean the edges with a Q-tip dipped in makeup remover, apply concealer, and re-stamp with a dryer sponge.
Step 2: Creating the Scales
-
The fishnet trick:
Take a fishnet wig cap (or a stocking leg) and pull it over your head so the netting sits taut against your forehead and temple. The tighter the net, the cleaner your scale definition will be. -
Load the sponge:
Activate your teal face paint with a little water. Rub a makeup sponge into the paint until it is coated but not dripping wet. A paste-like consistency is key here. -
Stipple the pattern:
Gently pat the sponge over the fishnet mesh on one side of your forehead, temple, and upper cheekbone. Do not swipe, or you will smear the pattern under the net. -
Add dimension:
While the stencil is still in place, I like to tap a metallic turquoise eyeshadow over the damp paint to set it and add instant shimmer. -
The reveal:
Carefully lift the netting straight up and away from your skin to reveal the scale pattern. Let this dry completely. -
Fade out the edges:
Dip a fine-point brush into your teal paint and add individual loose dots at the edges of the scale clusters to make the transition look organic and magical.
Make it 3D
Use eyelash glue to adhere small flat-back rhinestones or pearls to the center of random scales or the outer edges for added texture and fantasy sparkle.
Step 3: Ocean Eyes
-
Deepen the crease:
Blend a matte cool-toned brown or dark grey shadow into your eyelid crease to create depth. -
Teal lid application:
Pack a highly pigmented metallic teal eyeshadow all over the mobile lid using a flat shader brush. -
Inner corner glow:
Highlight the inner corner of the eye with a bright, icy mint or silver shimmer shade to open up the gaze. -
Liner and lashes:
Line the upper lash line with black eyeliner, smudge it slightly for a smoky effect, and apply a coat of mascara. -
False eyelashes:
Apply a pair of wispy false lashes. Look for a pair that flares out at the ends to elongate the eye shape.
Step 4: Finishing Touches
-
Intense highlight:
Apply a liquid or cream highlighter generously to the tops of your cheekbones, right below the scales, for a ‘wet’ skin look. -
Lip color:
Outline your lips with a nude-pink liner, then fill them in with a satin-finish lipstick in a matching soft rose shade. -
Lock it in:
Mist your face generously with a setting spray to keep the scales and shimmer in place all night.
Step back and admire your shimmering transformation into a mystical creature of the deep

PENCIL GUIDE
Understanding Pencil Grades from H to B
From first sketch to finished drawing — learn pencil grades, line control, and shading techniques.
Explore the Full Guide
Vintage It Clown Harlequin
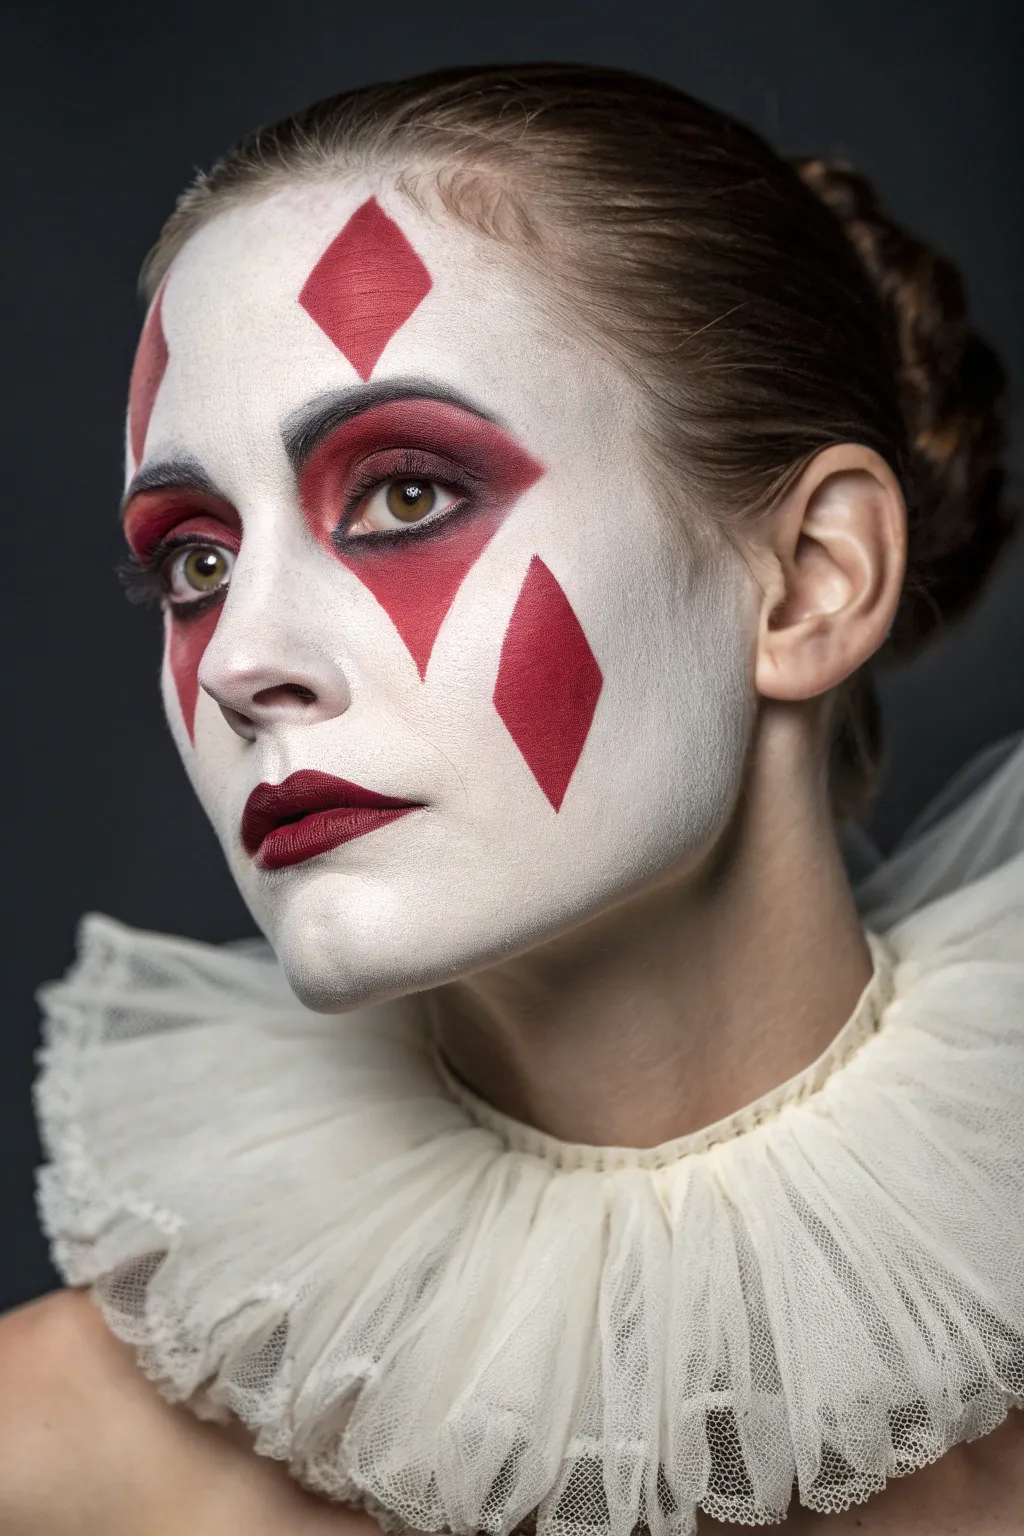
Merge the eerie allure of a classic court jester with high-fashion elegance in this striking makeup look. The high-contrast palette of stark white, deep black, and blood red creates a sophisticated Halloween style.
Step-by-Step
Materials
- Opaque white cream face paint
- Translucent setting powder
- Red face paint (water-activated preferred)
- Deep red and black eyeshadows
- Black eyeliner pencil
- Burgundy matte lipstick
- Makeup sponges
- Angled flat brush
- Fluffy blending brush
- Fine detail brush
Step 1: The Porcelain Base
-
Prep the skin:
Start with a clean, moisturized face and apply a gripping primer to ensure the heavy stage makeup lasts all night. -
Apply white base:
Load a damp makeup sponge with opaque white cream makeup. -
Stipple for coverage:
Press the sponge into the skin using a stippling motion rather than dragging, which builds solid, streak-free opacity. -
Blend downward:
Fade the white paint down past the jawline onto the neck so there is no harsh line visible above the collar. -
Set the base:
I like to use a powder puff to firmly press translucent setting powder over the entire face, locking the white in place.
Pink Haze Control
If red pigment dust falls onto your white cheeks, do not wipe it! Sweep it away quickly with a large fan brush, or dab a dot of white paint over it.
Step 2: Smoky Dramatic Eyes
-
Apply red base:
Using a flat shader brush, pat red eyeshadow or face paint across the entire eyelid, extending up to the brow bone. -
Define the crease:
Take a fluffy brush with black eyeshadow and sweep it into the crease and outer corner of the eye. -
Create the gradient:
Blend the black shadow inward, merging it with the red to create a deep, smoky transition. -
Lower lash line:
Smudge the red shadow heavily beneath the lower lashes, blending it out for a soft, diffused look. -
Add definition:
Tightline the upper and lower waterlines with black eyeliner to intensify the gaze.
Level Up: Texture
For an antique doll feel, lightly dust grey eyeshadow under the cheekbones and along the temples to create hollowed, moody contours on the white base.
Step 3: Geometric Details
-
Map the shapes:
Using a pale pencil or a very light touch, faintly outline a diamond shape in the center of the forehead and one on each cheek. -
Paint the red diamonds:
Fill in your outlines with red face paint, using a flat angled brush to keep the edges razor-sharp. -
Set the paint:
Pat a little matching red eyeshadow over the wet paint to set it and intensify the color saturation. -
Clean up:
If any red migrates outside the lines, use a small brush with white paint to carve out the shape and correct mistakes.
Step 4: Lips and Finishing
-
Outline lips:
Line the lips with a dark burgundy or deep red lip liner, accentuating the cupid’s bow for a classic shape. -
Fill and matte:
Apply a matte burgundy lipstick to fill the lips completely. -
Add the ruff:
Fasten a tulle ruff or collar around your neck to frame the face paint and complete the vintage aesthetic.
Step back and admire your hauntingly beautiful transformation into a classic harlequin
Comic Book Pop Art Heroine
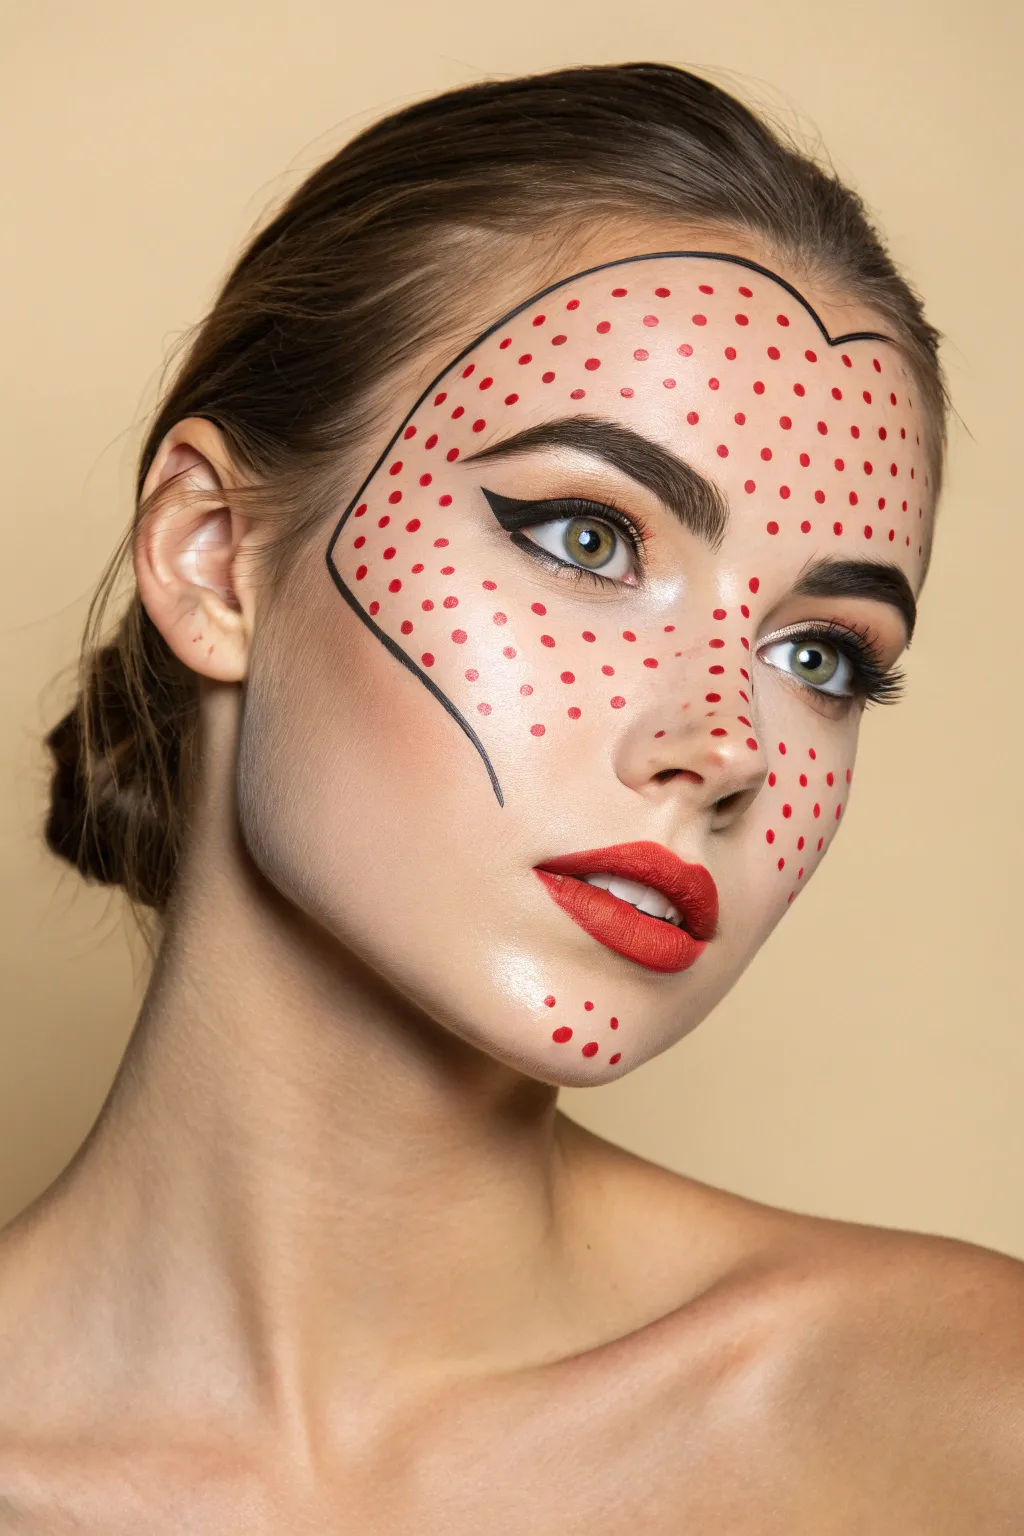
Transform yourself into a walking work of art with this Roy Lichtenstein-inspired makeup look. By combining precise graphic lines with classic Ben-Day dots, you can create a striking 2D illustration effect that pops beautifully against a flawless base foundation.
How-To Guide
Materials
- Full-coverage foundation and concealer
- Translucent setting powder
- Dark brown or black eyebrow pomade/pencil
- Matte brown eyeshadow
- Black liquid or gel eyeliner (pen is easiest)
- White or nude eyeliner pencil
- Red water-activated face paint (or highly pigmented red lipstick)
- Small round brush or Q-tips
- Matte red lipstick and matching liner
- Mascara
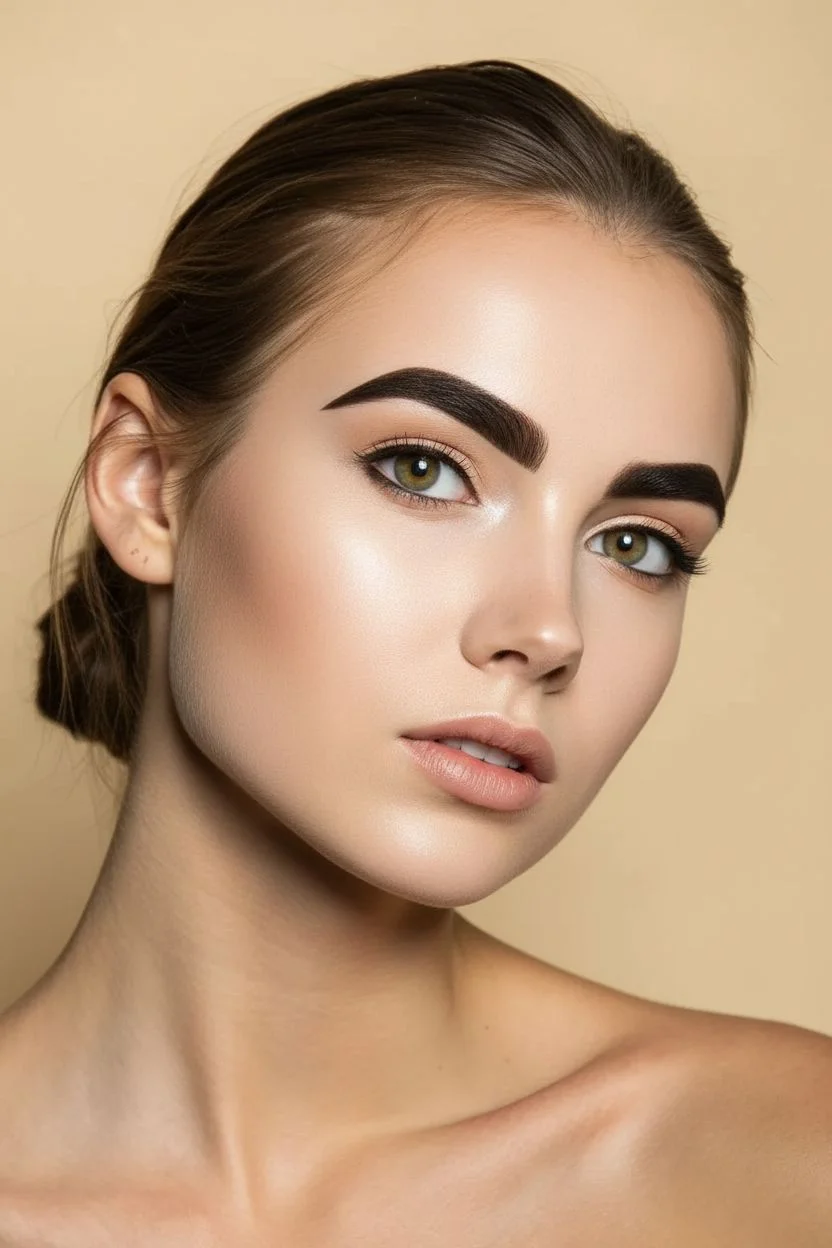
Step 1: Flawless Base & Brows
-
Prime and perfect:
Begin with a clean, moisturized face and apply a smoothing primer to ensure your canvas is ready for detailed work. -
Apply foundation:
Use a full-coverage foundation to even out your skin tone completely, blending it down your neck for a seamless look. -
Conceal and brighten:
Apply concealer under the eyes and on any blemishes, then buff it out so the skin looks airbrushed. -
Set the base:
Dust translucent powder over your entire face to lock the foundation in place and create a matte surface, which helps the face paint adhere better. -
Sculpt the brows:
Using a dark brow pomade or pencil, fill in your eyebrows heavily to create a sharp, defined, and slightly exaggerated arch typical of comic book characters.
Smudge Control
If a red dot accidentally smears, don’t wipe it! Let it dry completely, then gently flake it off with a clean spoolie brush and dab concealer over the spot before re-dotting.
Step 2: Graphic Eyes
-
Define the crease:
Sweep a matte soft brown eyeshadow into the crease of your eyelid to add subtle depth without overpowering the graphic lines. -
Draft the wing:
Take your black liquid liner and draw a dramatic cat-eye wing, starting thin at the inner corner and thickening as you move outward. -
Sharpen the tail:
Ensure the tail of your eyeliner is incredibly sharp and points toward the end of your eyebrow. -
Brighten the waterline:
Run a white or nude eyeliner pencil along your lower waterline to make your eyes appear larger and more doll-like. -
Clean up:
If I make a smudge, I dip a small angled brush in concealer to carve out the eyeliner wing for a razor-sharp edge. -
Add lashes:
Apply two generous coats of mascara to both top and bottom lashes to frame the eyes.
Step 3: The Comic Contour
-
Map the graphic line:
Visualize a line running from the top center of your forehead, tracing along the hairline, down the temple, and curbing inward across the cheekbone. -
Draw the outline:
Using your black liquid liner, carefully draw this continuous black line to frame the right side of your face (or left, if you prefer), effectively sectioning off the area for the dots. -
Refine the thickness:
Go over the black line a second time to ensure it is opaque and has a consistent thickness, mimicking a marker stroke. -
Highlight the skin:
Apply a touch of powder highlighter on the high points of your cheekbones and the tip of your nose before starting the dots.
Stamping Pro Tip
To get perfectly uniform circles every time, use the clean eraser end of a standard pencil as your stamp. Dip it into the paint, blot once on a paper towel, then press onto the skin.
Step 4: Ben-Day Dots & Lips
-
Prepare the red paint:
Activate your red face paint with a little water until it reaches a creamy consistency, or scoop a bit of red lipstick onto a palette. -
Stamp the dots:
Dip the smooth, round end of a makeup brush handle or a Q-tip into the red paint to use as a stamp. -
Apply forehead dots:
Press red dots onto the forehead inside the black outlined area, keeping the spacing uniform and grid-like. -
Dot the cheeks and nose:
Continue the dot pattern down across the eye area, over the nose bridge, and onto the cheek, maintaining steady spacing. -
Add chin accents:
Place three distinct red dots in a small triangle formation on the side of the chin to balance the look. -
Line the lips:
Outline your lips carefully with a red lip liner, correcting any asymmetry. -
Fill with color:
Fill in the lips completely with a matte bright red lipstick for a bold, saturated pout.
Mist your face with a setting spray to lock in your comic book creation for the whole night


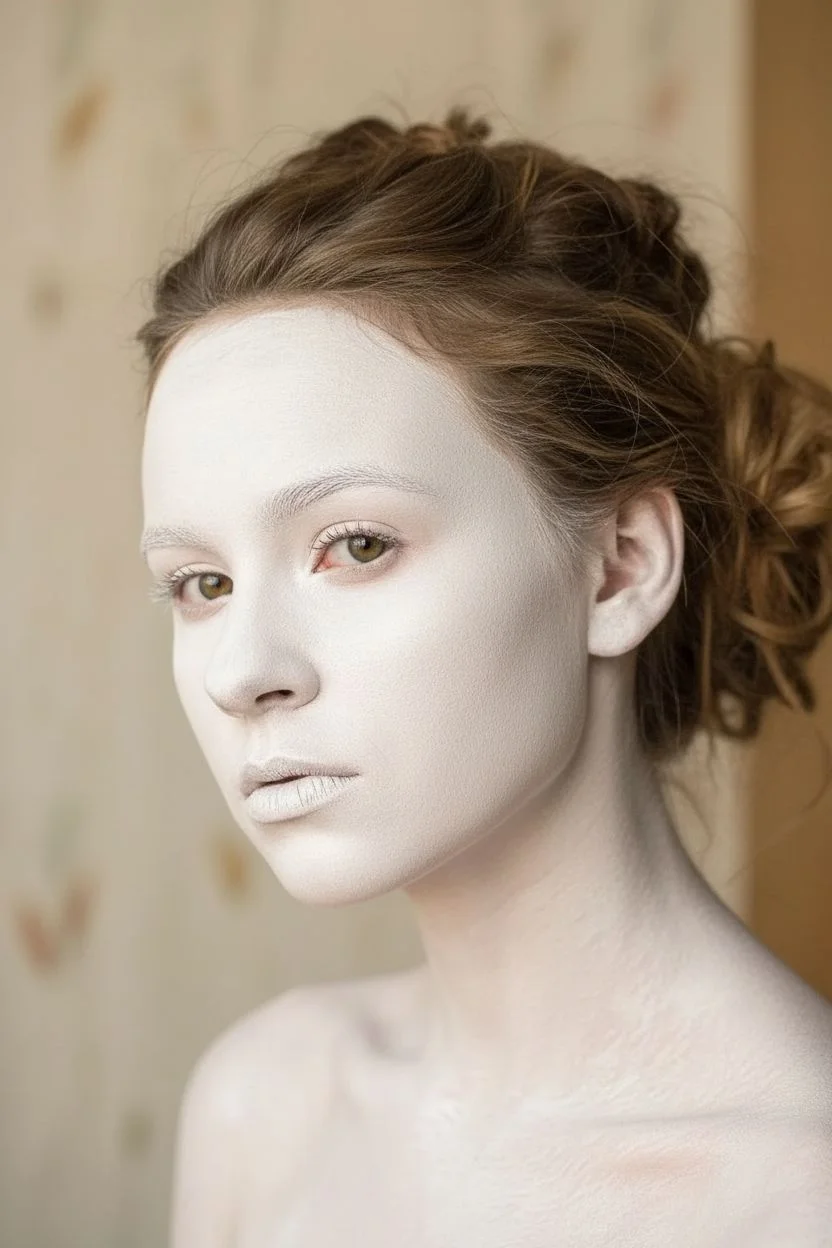
Broken Porcelain Doll Illusion
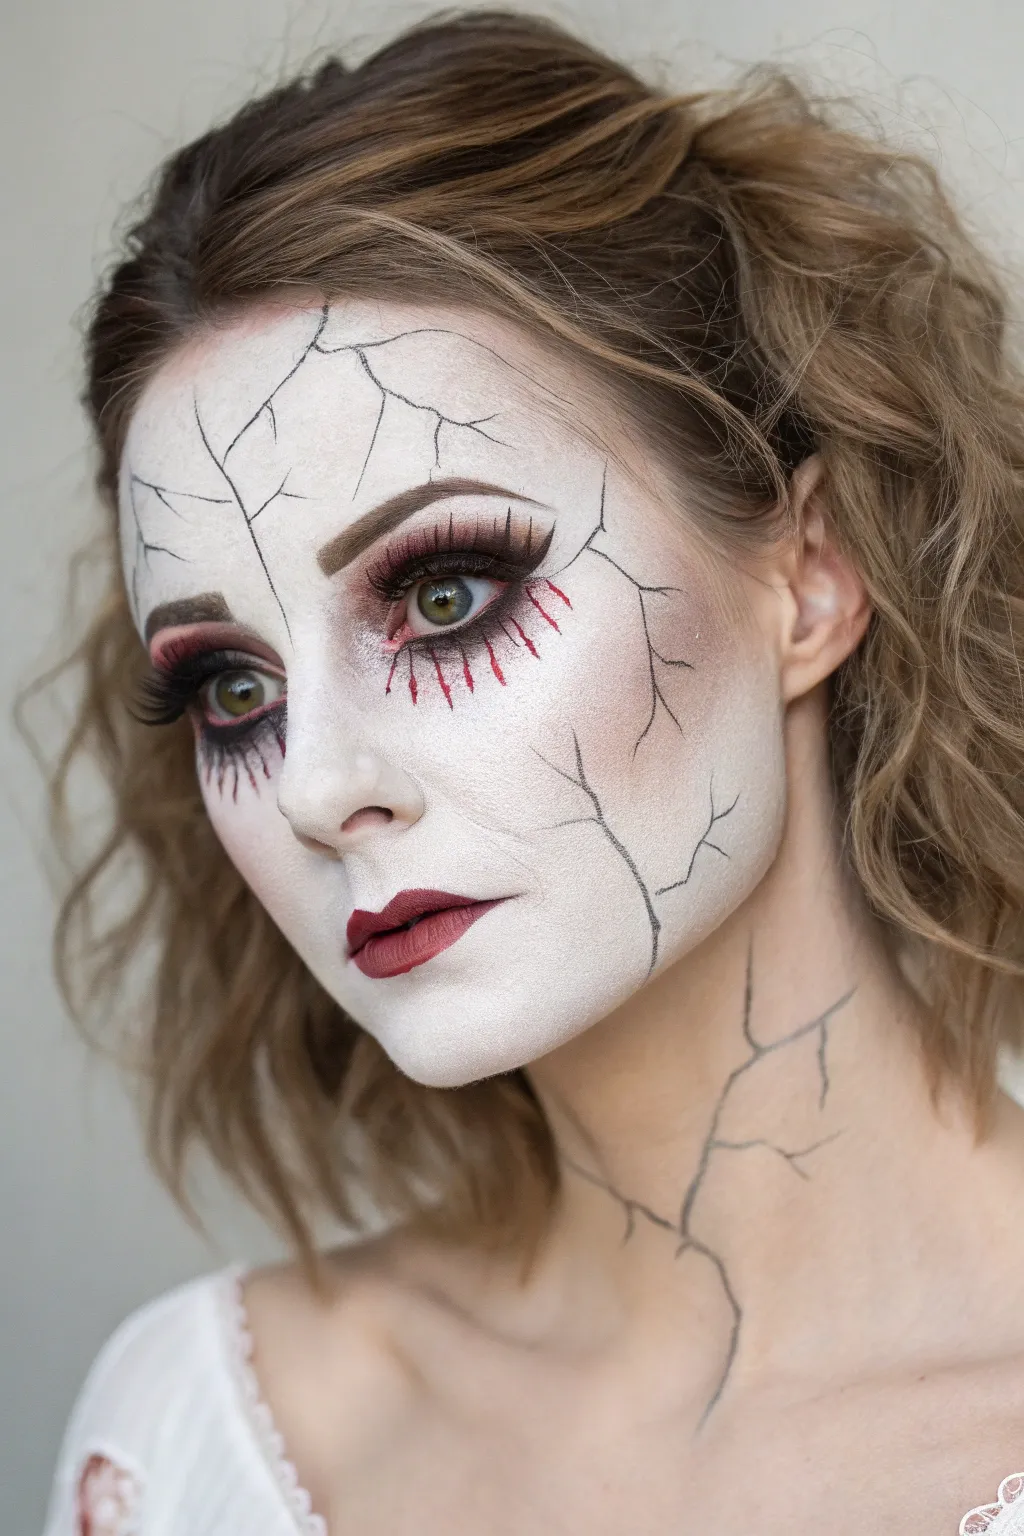
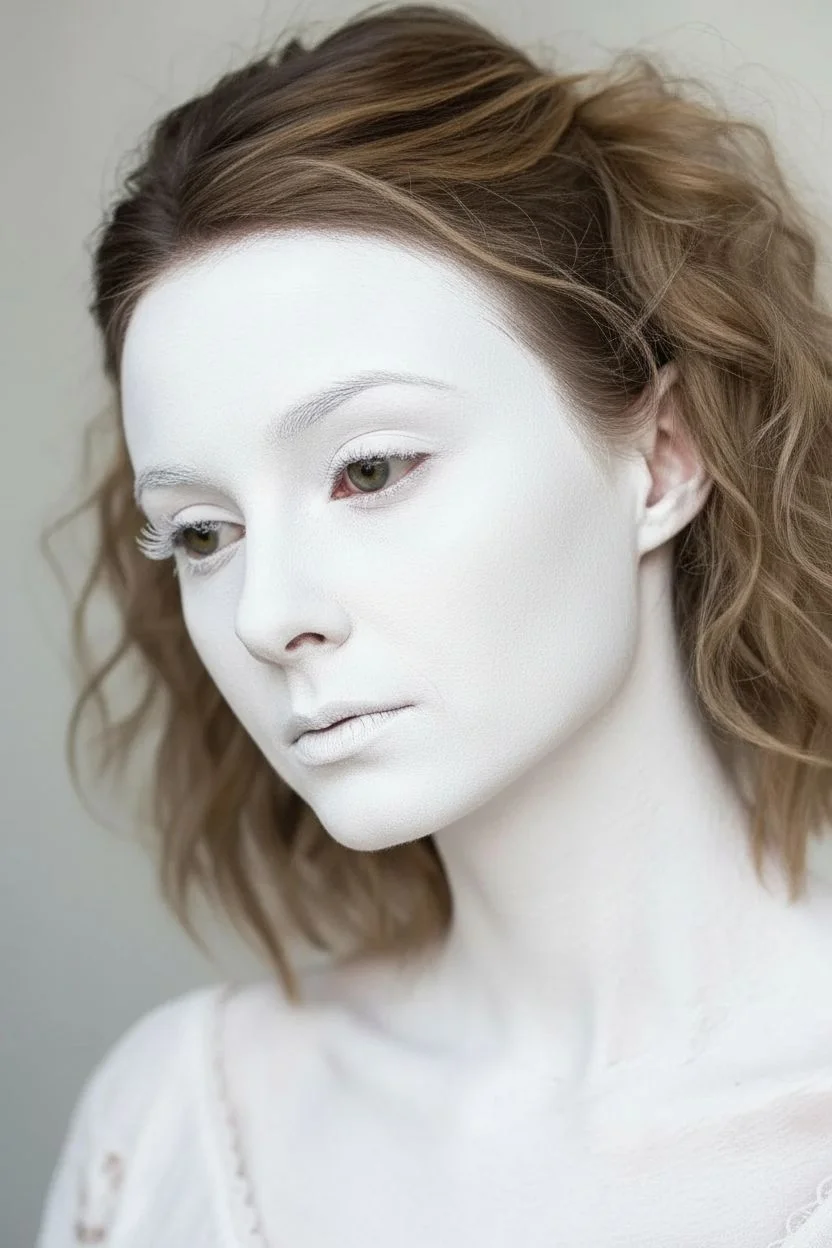
Transform yourself into a hauntingly beautiful antique piece with this broken porcelain makeup look. By combining a flawless pale base with dramatic, jagged crack lines, you will create a fragile and eerie effect that is perfect for Halloween.
Step-by-Step Guide
Materials
- White cream face paint or full-coverage very pale foundation
- Translucent or white setting powder
- Makeup sponge
- Burgundy or deep red eyeshadow
- Black eyeshadow
- Black liquid eyeliner (fine tip)
- Red liquid eyeliner or face paint
- Deep red matte lipstick
- Cool-toned contour powder (grey or taupe)
- False eyelashes and lash glue
- Small detail brushes
- Fluffy blending brush
Step 1: The Porcelain Canvas
-
Prime and prep:
Start with a clean, moisturized face and apply a primer to ensure the heavy makeup sits smoothly without sinking into pores. -
Apply the base:
Using a damp makeup sponge, stipple the white face paint or foundation all over your face, ears, and down your neck and chest. Aim for complete opaque coverage. -
Set the surface:
Generously press white setting powder over the entire base using a puff or large brush to create that matte, dry porcelain texture and prevent creasing.
Unsteady Hand Tip
Don’t worry if your hand shakes while drawing the cracks—it actually helps! Nervous, twitchy lines look more like shattered ceramic than perfectly straight smooth lines.
Step 2: Haunted Gaze
-
Define the brows:
Fill in your eyebrows using a dark brown or black pomade, creating a sharp, well-defined arch that stands out against the pale skin. -
Apply red shadow:
Sweep burgundy eyeshadow heavily into the crease and outer corners of your eyelids, blending it upward toward the brow bone. -
Smoke the under-eyes:
Take the same burgundy shadow and buff it generously along the lower lash line, creating a bruised, tired appearance. -
Deepen with black:
Apply black eyeshadow into the very outer V of the upper eyelid and slightly along the lower lash line to add dimension and drama. -
Paint vertical drips:
Using a fine detail brush and red liquid liner/paint, carefully draw vertical lines extending downward from your lower lash line to mimic raw, exaggerated doll lashes. -
Line the upper lid:
Draw a thick black line across your upper lashes with liquid eyeliner, finishing with a sharp wing at the outer corner. -
Add lashes:
Apply a pair of dramatic false eyelashes to the upper lash line to open up the eyes.
Step 3: Sculpting the Features
-
Hollow the cheeks:
Use a cool-toned contour powder to carve out your cheekbones and temples. I prefer keeping the contour sharp rather than over-blended to maintain a rigid doll-like structure. -
Paint the lips:
Fill in your lips with a deep red matte lipstick, accentuating the cupid’s bow for a classic doll shape.
Level Up: 3D Depth
To make the cracks look truly deep, use a tiny brush to apply a thin highlight of pure white paint along just one side of every black crack line you drew.
Step 4: The Fracture Details
-
Map the main cracks:
Using a liquid eyeliner with a very fine tip, draw jagged lines starting from the hairline on your forehead and the side of the face. -
Branch out:
Add smaller, thinner lines branching off the main cracks, similar to how a tree branch splits or lightning strikes. -
Extend to the body:
Continue drawing cracks down your neck and onto your chest, ensuring the lines connect logically with the cracks on your lower jaw. -
Vary line thickness:
Go back over certain sections of the cracks to thicken them, making the ‘break’ look deeper in some spots and hairline-thin in others.
Now you are ready to haunt the night with your elegantly broken façade
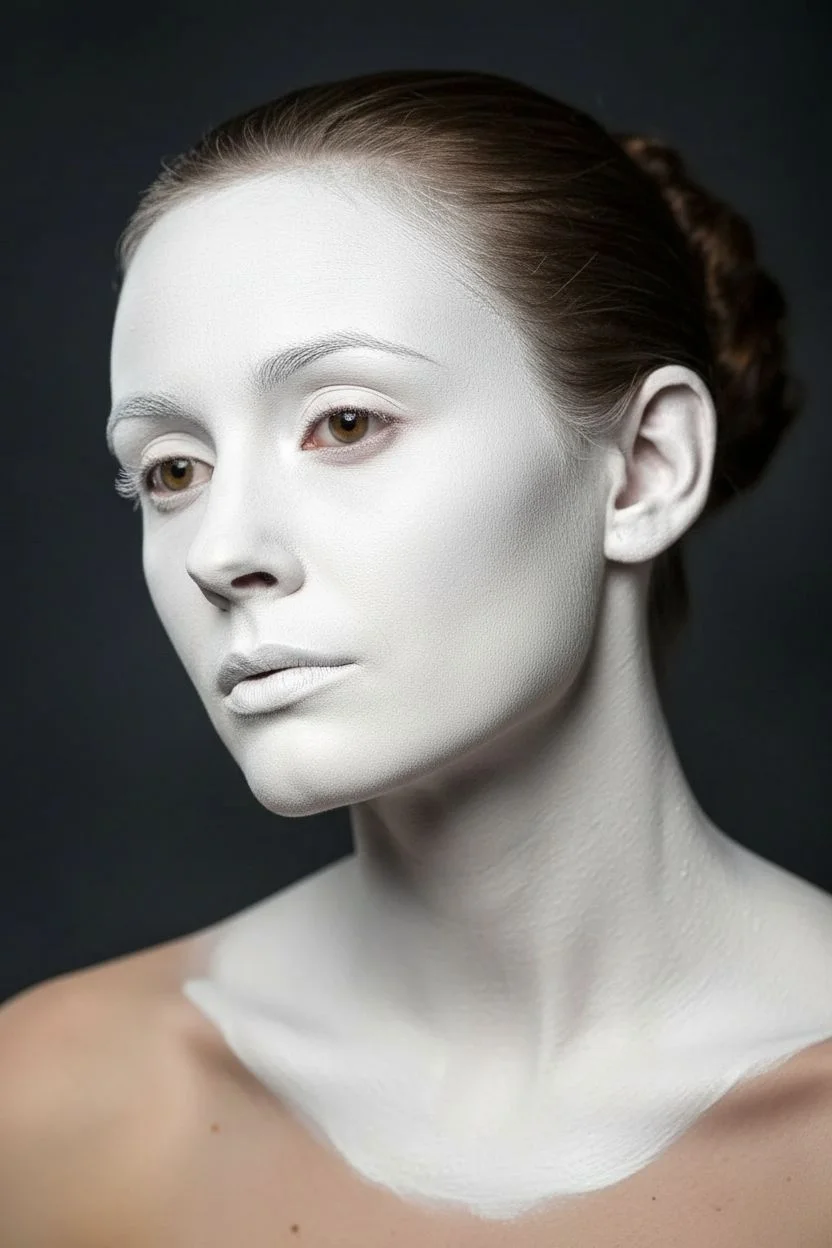
Anatomical Skull Shading
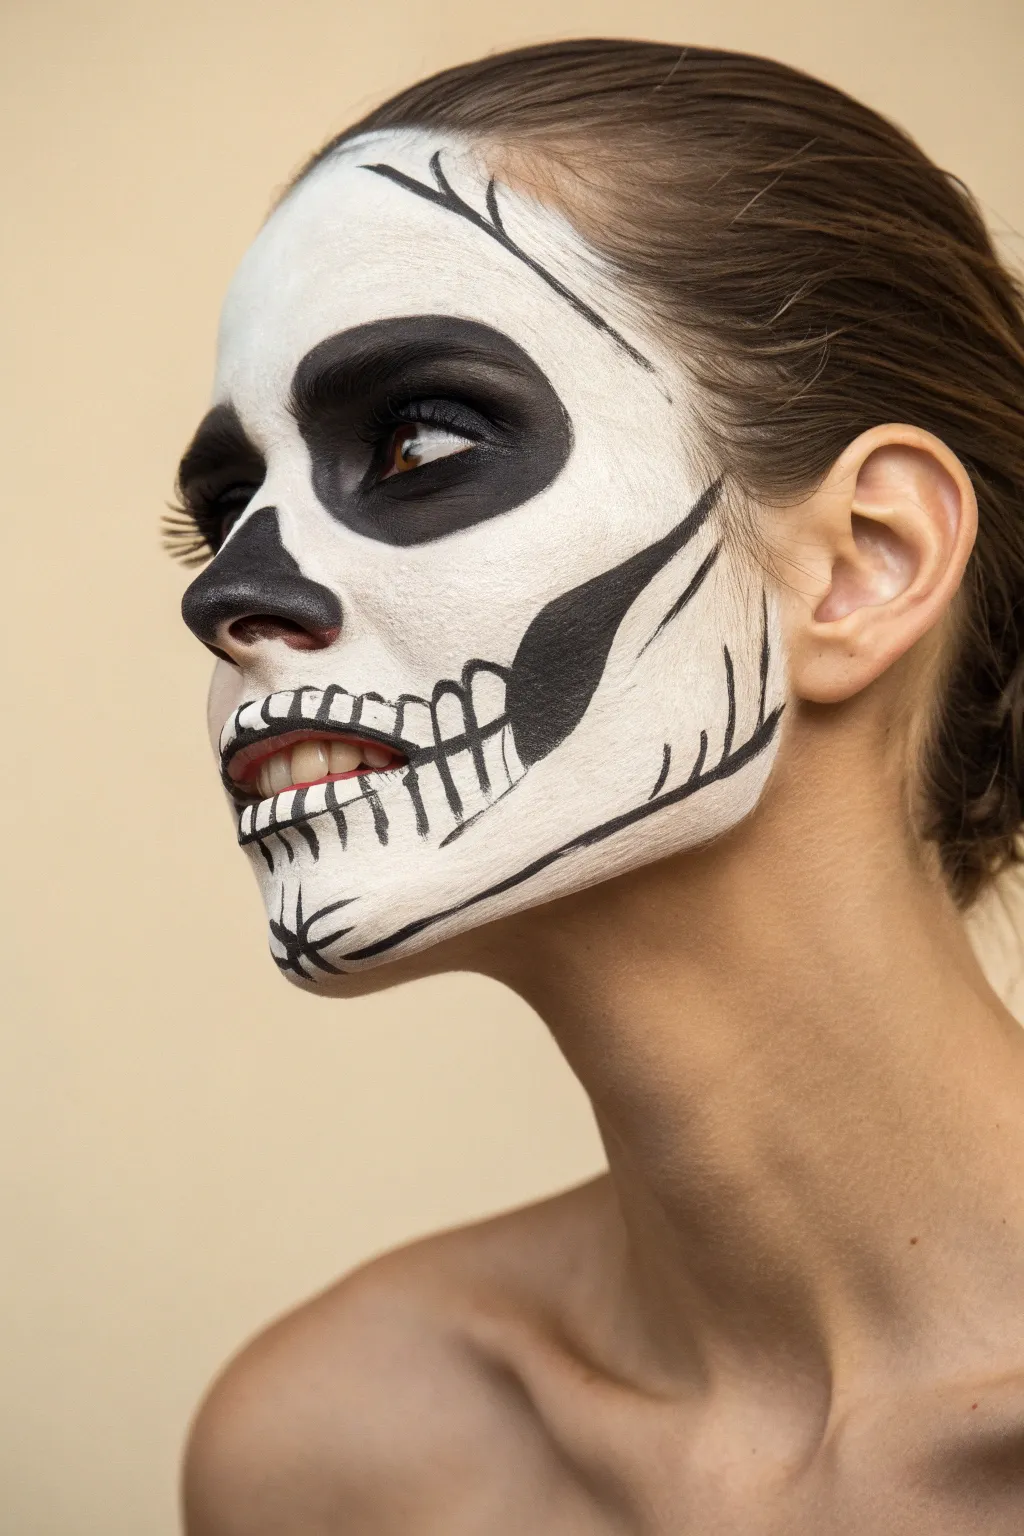
Master the art of high-contrast anatomical makeup with this striking skull design. By combining stark white, solid black voids, and graphic lining, you will create a hauntingly realistic bone structure that captivates from every angle.
Detailed Instructions
Materials
- High-pigment white water-activated face paint
- Black water-activated face paint
- Dense makeup sponge
- Flat foundation brush
- Fine liner brush (size 0 or 1)
- Small angled brush
- Black eyeshadow
- Translucent setting powder
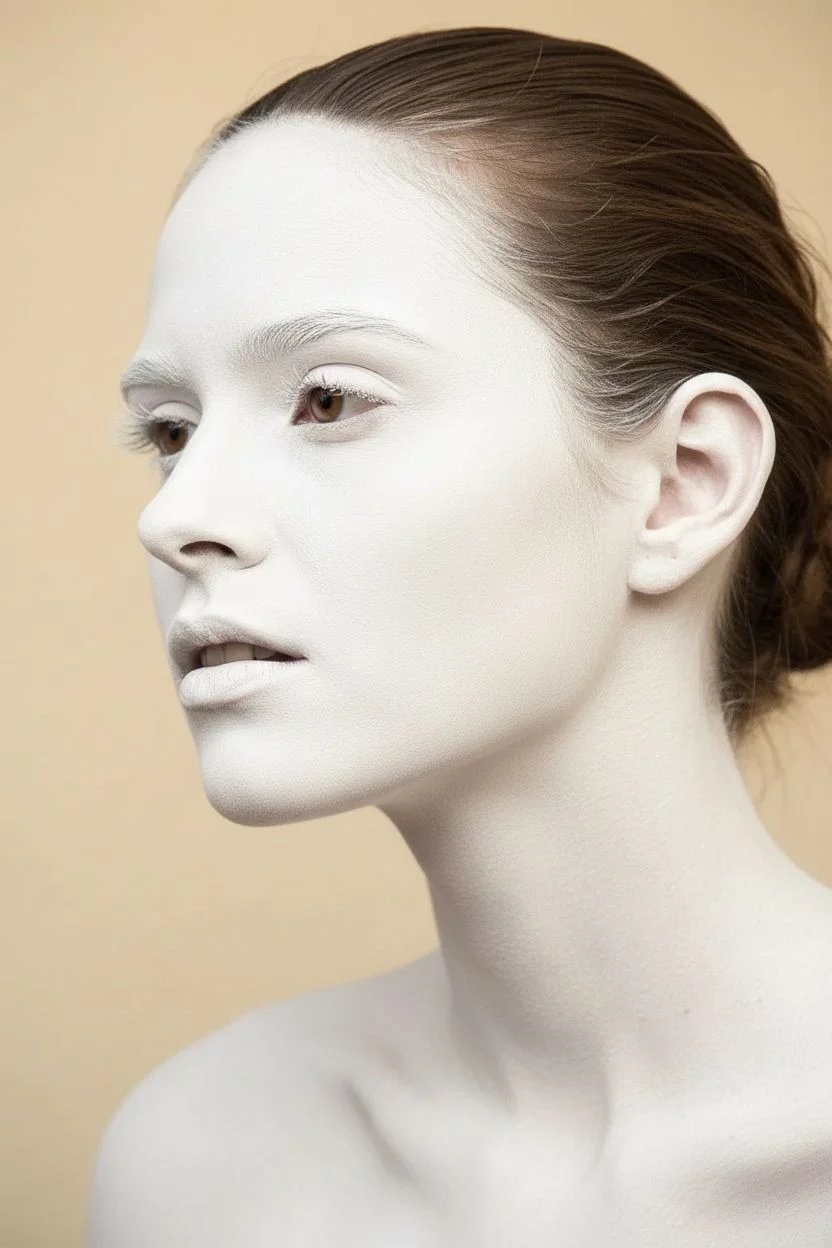
Step 1: The Porcelain Base
-
Prep and Prime:
Start with a clean, dry face. Tie your hair back tightly to keep it away from the paint. If you have very dark eyebrows, you may want to flatten them with a glue stick, though simply painting over them works for this graphic style. -
Apply White Base:
Dampen your makeup sponge and load it generously with white face paint. Stipple the paint over your entire face, ears, and down the neck using a pressing motion rather than swiping to ensure opacity. -
Refine Coverage:
Use a flat foundation brush to go over areas around the nose and eyes where the sponge might have missed, ensuring an even, solid white canvas. -
Set the Base:
Before moving to black, lightly pat translucent setting powder over the white paint. This prevents the colors from mixing and creating grey sludge later.
Step 2: Hollows and Voids
-
Outline Eye Sockets:
Using the angled brush and black paint, draw large circles around your eyes. Follow your natural orbital bone, but extend slightly above the brow and below the under-eye area for a larger, skeletal look. -
Fill the Eyes:
Fill in the circles completely with solid black paint. Keep your eyes closed while painting the lids to ensure no skin shows through when you blink. -
Sculpt the Nose:
With a fine liner brush, paint an ‘M’ shape or two distinct teardrop shapes on the tip of your nose to mimic the nasal cavity. Fill this in with solid black.
Patchy White Base?
If the white looks streaky, wait for it to dry fully, then pat a second layer on with a sponge. Do not drag the sponge, as this lifts the layer underneath.
Step 3: The Zygomatic Arch
-
Map the Cheekbone:
Suck in your cheeks to find the natural hollow. Using the angled brush, draw a sharp line starting from the ear, sweeping down towards the corner of the mouth, but stopping halfway across the cheek. -
Thicken the Shadow:
Thicken the back part of this line near the ear to create a deep triangular hollow. This mimics the space under the zygomatic arch. -
Create the Hook:
At the end of the cheek line closest to the mouth, curve the paint upwards slightly into a hook shape to define the bone structure. -
Define the Jaw:
Paint a sharp line along your actual jawbone, starting from the ear and fading out as you reach the chin. Add a secondary line branching upward slightly to separate the jaw from the upper skull.
Level Up: Decay
Dilute a tiny bit of black paint with extra water to create a grey wash. Glaze this lightly over the ‘teeth’ to make them look aged and less perfectly white.
Step 4: Teeth and Details
-
Sketch Vertical Lines:
Using your fine liner brush, paint thin vertical lines across your lips. Extend these lines upward onto the upper lip and downward onto the chin to elongate the teeth. -
Create Tooth Shapes:
Connect the tops and bottoms of the vertical lines with small arches. This turns the simple lines into individual tooth shapes. -
Add Roots:
I like to flick the brush lightly upward from the top of the teeth to simulate long roots disappearing into the gum line. -
Horizontal Gum Line:
Draw a horizontal line connecting the tops of the teeth roots across the cheek, extending back toward the black cheek hollow. -
Detail the Jaw:
Add hatch marks or vertical lines on the jaw area (below the cheek hollow) to suggest ligaments or muscle attachments.
Step 5: Refinement and texture
-
Forehead Cracks:
With the finest point of your liner brush, draw squiggly, branching lines on the forehead and temples to look like cranial fissures. -
Chin Details:
Add a small starburst or spider-web shape on the chin to balance the design. -
Shadow Depth:
Use a dry fluffy brush and a little black eyeshadow to gently smudge the edges of the cheek hollows and eye sockets for a softer, 3D gradient. -
Final Set:
Mist the entire face with a setting spray to lock the design in place for the night.
Step back and admire your skeletal transformation, ready to haunt the night with elegant precision.
Unzipped Zipper Face Gore
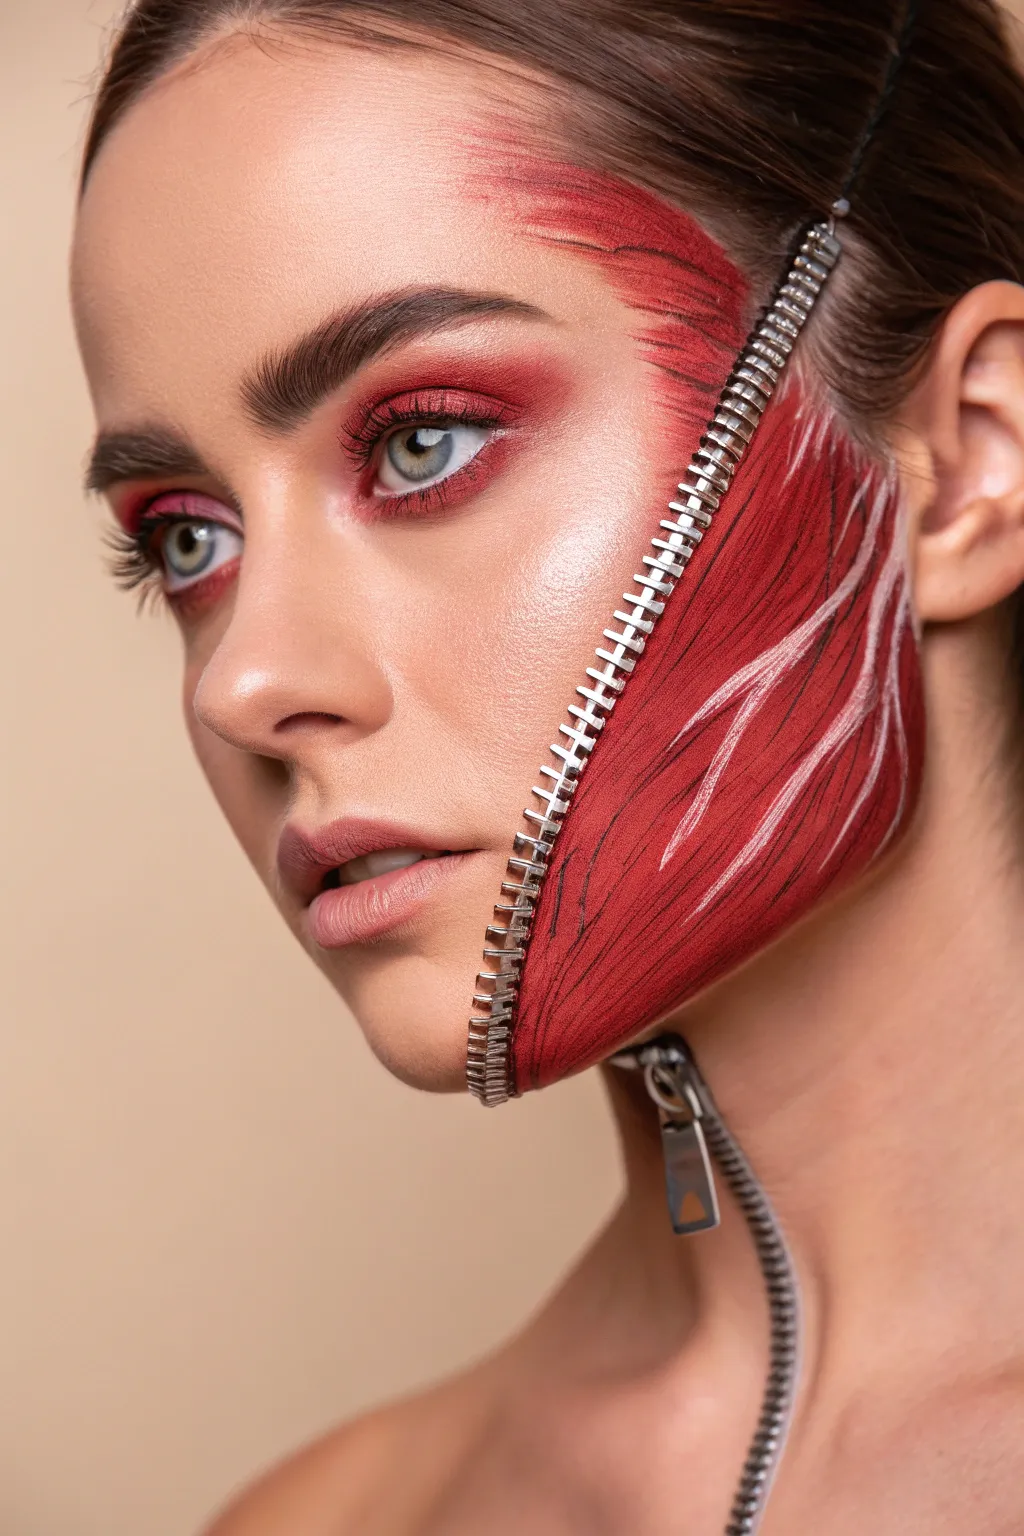
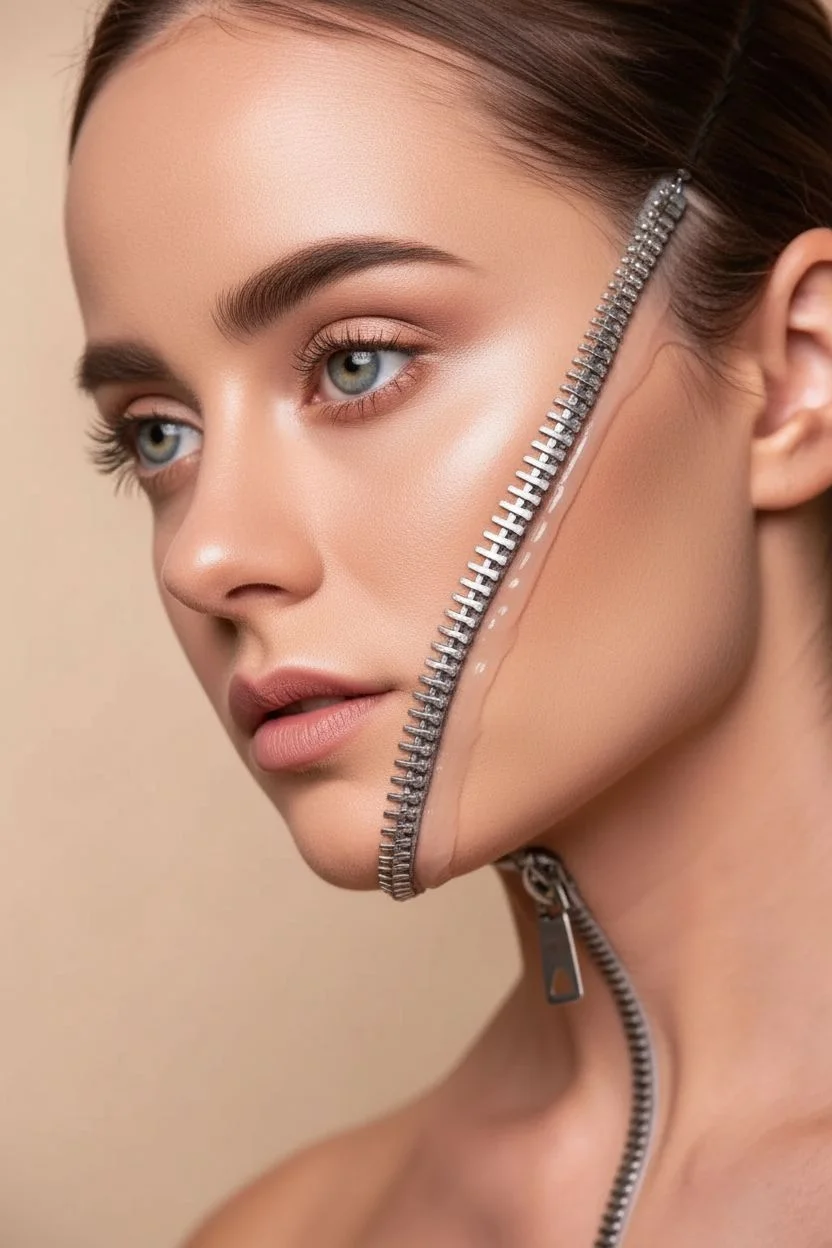
This striking look blends high-fashion glamour with anatomical horror, creating the illusion that your skin is unzipping to reveal the raw muscle underneath. It relies on precise shading and line work to achieve that realistic, fibrous texture.
Step-by-Step Guide
Materials
- 22-inch metal zipper (gold or silver teeth)
- Spirit gum or liquid latex
- Red, white, and black face paints
- Fine liner brushes
- Flat shader brush
- Red-toned eyeshadow palette
- Foundation and concealer
- Scissors
Step 1: Zipper Application
-
Measure and trim:
Hold the closed zipper against your face to determine the placement, running from the forehead, diagonally across the eye, and down the neck. -
Cut the tape:
Trim the fabric tape on the sides of the zipper close to the teeth to minimize the amount of bulk you need to hide later. -
Apply adhesive:
Paint a strip of spirit gum or liquid latex along the mapped-out path on your skin where the zipper teeth will sit. -
Secure the zipper:
Press the unzipped zipper onto the adhesive, ensuring the bottom joins in a ‘V’ shape at the neck and the top flares open on the forehead. -
Smooth the edges:
Apply a thin layer of liquid latex over the remaining fabric edges of the zipper to blend them seamlessly into your skin texture.
Sticky Situation?
If the zipper ends start lifting due to facial movement, dab a tiny amount of eyelash glue under the lifting spot and hold firmly for 30 seconds.
Step 2: Painting the Anatomy
-
Base coat:
Using a flat shader brush, fill the entire exposed skin area inside the zipper with a vibrant, matte red face paint. -
Create depth:
Mix a small amount of black into your red paint to create a burgundy shade, applying this along the inner edges of the zipper teeth to simulate shadows. -
Sketch muscle fibers:
Switch to a fine liner brush and the burgundy mix to draw thin, vertical lines following the natural curve of your jaw and cheek muscle. -
Highlighting detail:
Dip a clean liner brush into white face paint to create the distinct fibrous striations seen in the reference image. -
Refine the lines:
I like to use very light pressure here to feather the white lines over the red base, making them look like tight sinew rather than solid stripes. -
Add dimension:
Go back in with diluted black paint to deepen the darkest crevices between the muscle groups for extra contrast.
Level Up
For a grotesque 3D texture, mix small bits of pulled cotton ball with liquid latex and apply it inside the ‘muscle’ area before painting the red base.
Step 3: Glamour & Blending
-
Foundation application:
Apply your regular foundation to the ‘skin’ side of the face, carefully stippling over the latex-covered zipper tape to hide the seam. -
Set the fabric:
If the fabric tape is still visible, pat a powder foundation over the area to obscure the texture difference. -
Matching eye makeup:
On the ‘skin’ side eye, apply a smoky look using red and cranberry eyeshadows to visually tie the glam side to the gore side. -
Define the brows:
Fill in the eyebrow on the glam side sharply, while leaving the gore side brow covered by the red muscle paint. -
Attach the pull:
Use a dot of strong spirit gum to adhere the zipper slider (the pull tab) at the very bottom of the zipper on your neck. -
Add shadows:
Brush a little dark brown eyeshadow on your skin right next to the outer zipper teeth to make the zipper look embedded rather than just sitting on top. -
Final touches:
Check for any gaps in the red paint near the teeth and fill them in for a solid, opaque finish.
You are now ready to unzip your true form and turn heads with this beautifully terrifying illusion
Galaxy Nebula and Stars
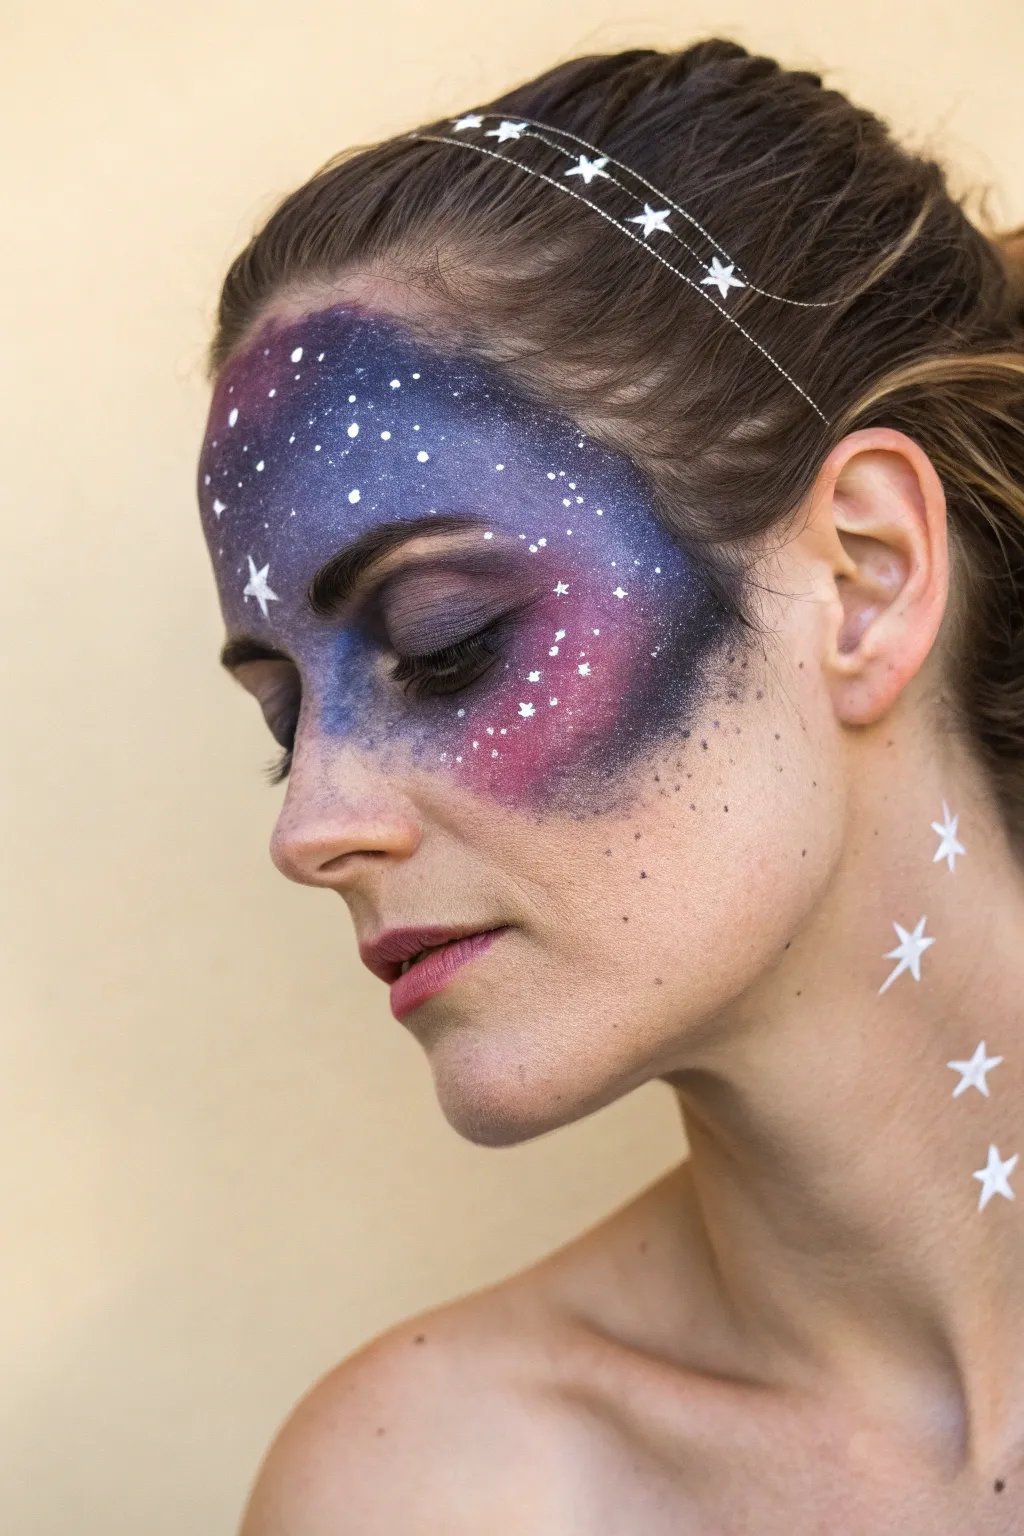
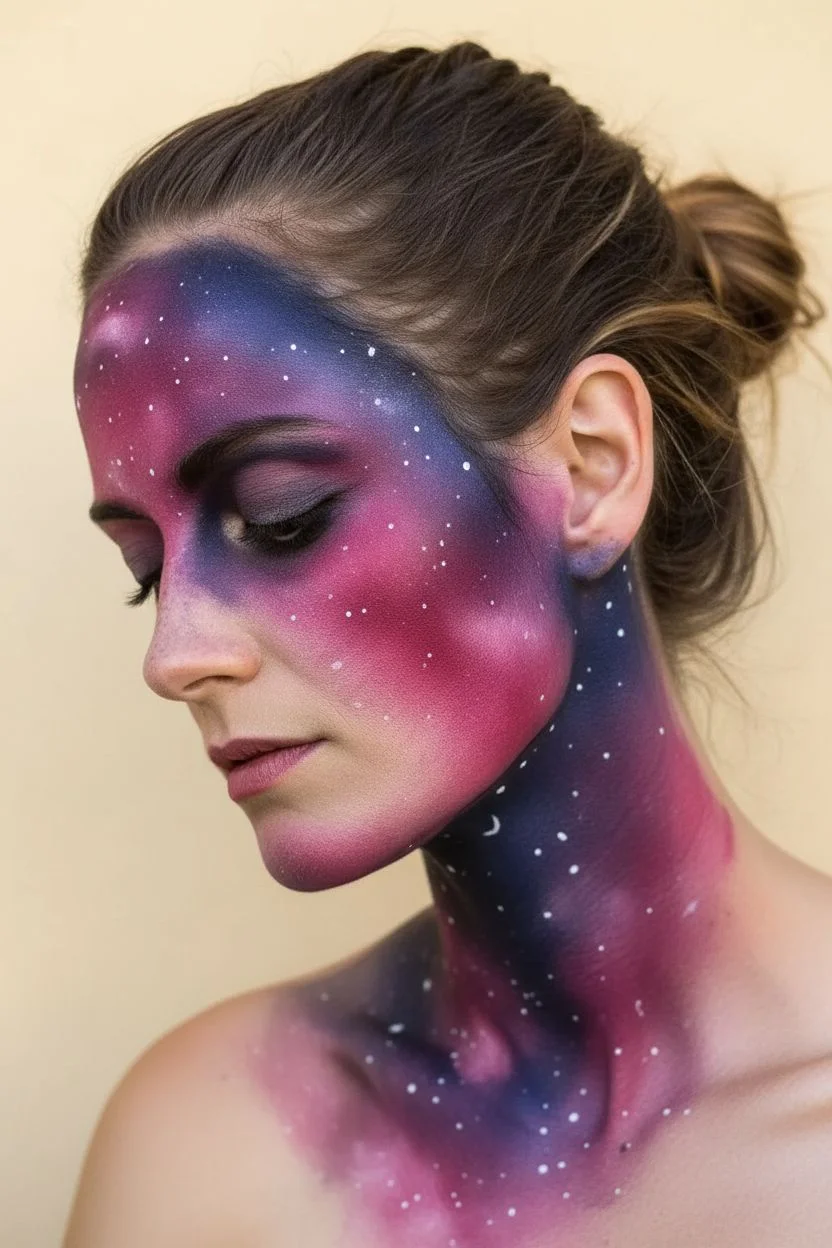
Transform your profile into a captivating window to the cosmos with this dreamy galaxy design. This look combines soft, blended nebulous clouds with crisp constellations, trailing elegantly down the neck for a complete celestial effect.
How-To Guide
Materials
- Water-activated face paints (Magenta, Violet, Deep Navy, White)
- High-density makeup sponges (cut into wedges)
- Fine liner brush (size 0 or 1)
- Small round brush (size 3)
- A clean toothbrush or stiff bristle brush
- Silver star wire headband
- Makeup setting spray
- Black mascara
Step 1: Building the Nebula
-
Prepare the canvas:
Start with a clean, dry face. Tie your hair back to keep the forehead and temple area completely clear for painting. -
Apply the pink base:
Load a damp sponge wedge with magenta or bright pink paint. Stipple this color lightly onto the top of the cheekbone and the center of the temple. -
Add violet tones:
Using a fresh side of the sponge, pick up the violet paint. Tap this color around the edges of the pink, blending softly where they meet to create a transition. -
Deepen with navy:
Load a sponge with deep navy blue. Dab this concentrated color along the hairline and the outer corners of the design to create the illusion of deep space. -
Contour the eye:
Gently press the dark violet or navy sponge over the entire eyelid and into the eye socket. This integrates the eye into the galaxy rather than leaving it bare. -
Extend to the nose:
Lightly tap the sponge across the bridge of the nose. I find that fading the color out here makes the mask look more organic and less like a rigid shape. -
Blend the edges:
Take a clean, slightly damp sponge with no paint on it. softly dab the outer perimeter of your painted area to feather the colors into your natural skin tone.
Muddy Colors?
If colors turn grey while blending, stop! Let the first layer dry completely before adding the next color on top. Always use a clean section of the sponge for new hues.
Step 2: Creating the Stars
-
Mix the star paint:
Mix a small amount of white face paint with water until it reaches an inky, fluid consistency. It needs to be thin enough to splatter but opaque enough to show up. -
Create the star field:
Dip a stiff brush or toothbrush into the thin white paint. Hold it about six inches from your face and flick the bristles to spray fine specks across the nebula. -
Paint prominent stars:
Switch to your fine liner brush with creamy white paint. Draw a few four-pointed cross stars on the forehead and cheekbone to act as focal points. -
Add bright centers:
Place a tiny, solid dot of white paint in the absolute center of your drawn cross-stars to make them look like they are glowing.
Step 3: The Constellation Trail
-
Map the neck trail:
Visualize a curved line trailing from behind your ear down towards your collarbone. This is where your larger stars will sit. -
Outline the neck stars:
Using the fine liner brush, carefully draw the outlines of five-pointed stars along this path. Vary the sizes, keeping the largest ones near the neck and smaller ones lower down. -
Fill the stars:
Use the small round brush to fill in your star outlines with solid white paint. You may need a second coat to ensure they are fully opaque. -
Sharpen the points:
Once the fill is dry, use your liner brush to touch up the tips of the stars so they look crisp and sharp. -
Define the lashes:
Apply a coat of black mascara to your upper and lower lashes. This adds definition to the eye area without overpowering the galaxy colors. -
Place the crown:
Position the silver wire headband so the stars sit flat against your hair, framing the top of the painted area. -
Set the look:
Close your eyes and mist the entire design with a setting spray to prevent the water-based paint from smudging throughout the night.
Pro Tip: Splatter Control
For the starry mist, use an old toothbrush loaded with watery white paint. Run your thumb over the bristles to create a fine spray much faster and more naturally than a brush.
Now you are ready to light up the night with your own personal galaxy!
Abstract Neon Line Work
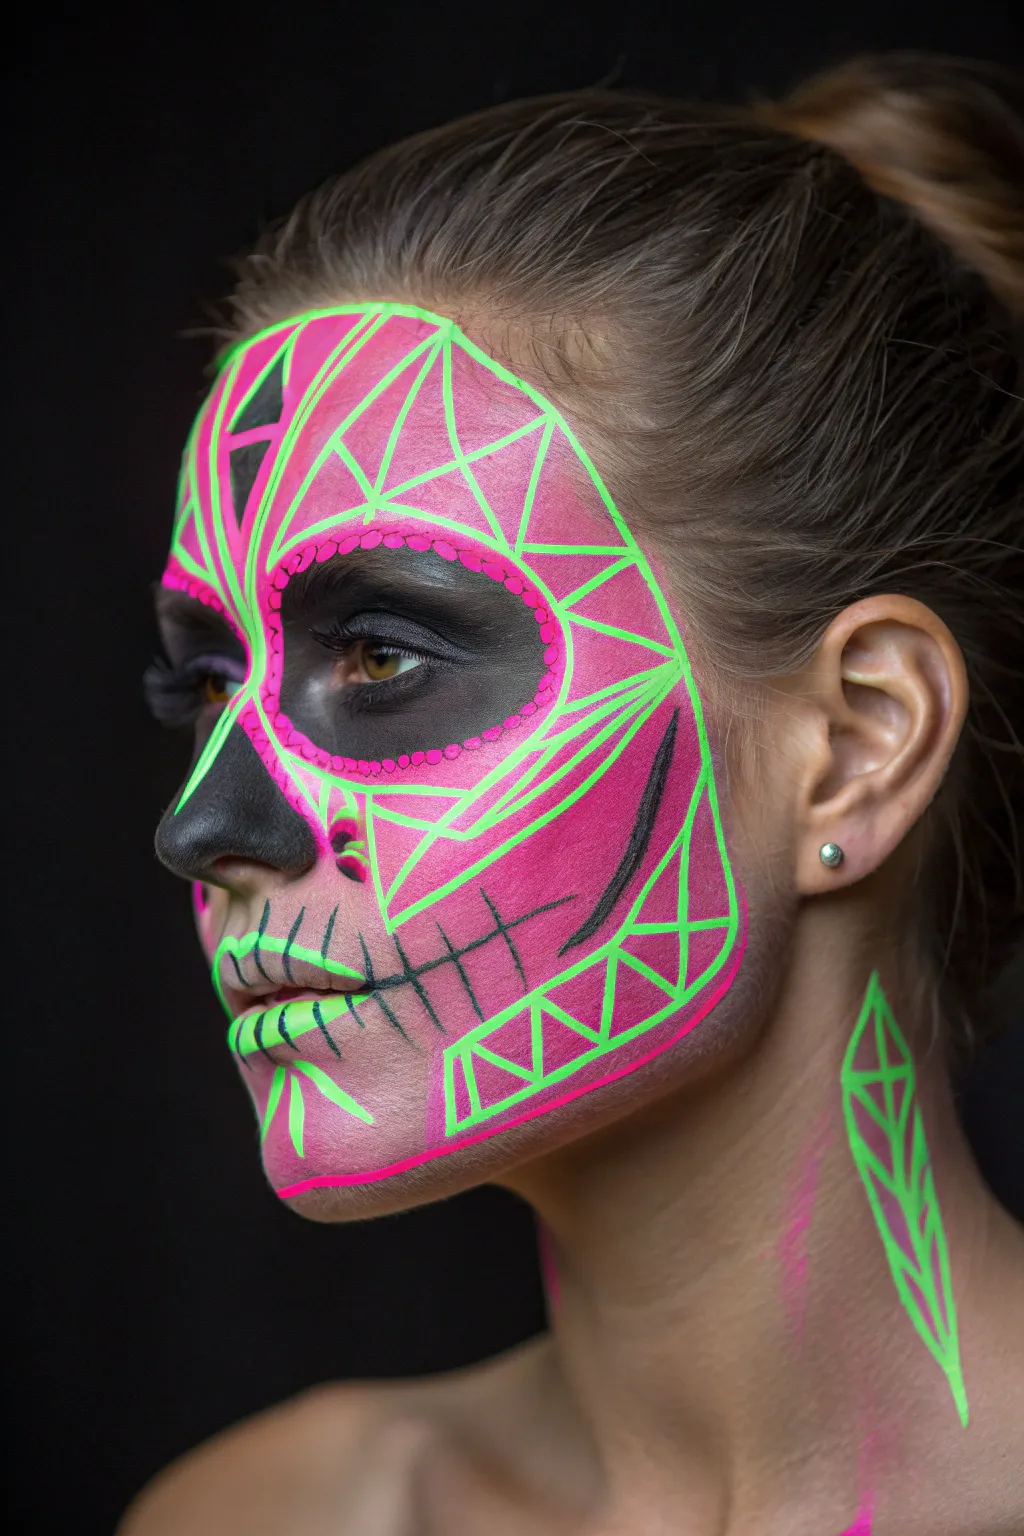
Fuse traditional Dia de los Muertos imagery with a Cyberpunk edge in this striking design. By combining stark black shading with vibrant neon pink blocks and precise green netting, you create a glowing, structural abstract look.
Step-by-Step Tutorial
Materials
- Water-activated face paint (Black, Neon Pink, Neon Green)
- Small round brush (size 1 or 2)
- Medium flat brush
- High-density makeup sponge
- Cup of water
- Paper towels
- Setting spray (optional)
Step 1: The Dark Foundation
-
Prepare the canvas:
Start with clean, dry skin to ensure the clean lines adhere properly without slipping. -
Darken the eye:
Using a sponge or a medium brush loaded with black paint, cover the entire eye socket area, extending up to the eyebrow and down to the dark circles area to create a hollow skull socket. -
Define the nose:
Paint the tip of the nose black in a spade or teardrop shape, featuring a small split at the top center for a skeletal look. -
Carve the cheek:
Paint a sharp, curved black line starting from the ear and sweeping underneath the cheekbone to create a hollowed-out contour.
Step 2: Vibrant Blocking
-
Load the pink:
Clean your brush or switch to a fresh flat brush. Load it with neon pink paint until you have a creamy consistency. -
Forehead geometry:
Paint a large, angular section on the forehead. I prefer to keep the edges slightly geometric rather than perfectly round to match the theme. -
Cheek and jaw fill:
Fill the space above the black cheek contour and the entire chin area with the same solid neon pink. -
Dry time:
Allow the pink layer to dry completely for a minute. This is crucial so your next green lines sit on top without blending into a muddy brown.
Clean Lines Hack
Issues with messy lines? Ensure your brush is perpendicular to the skin while drawing. Dragging the brush side leads to thick, sloppy edges.
Step 3: The Neon Grid
-
Outline the shapes:
Using a fine number 1 liner brush and neon green paint, outline the outer edges of all your pink shapes. -
Create the web:
On the forehead pink patch, paint intersecting straight lines to create a triangular, low-poly mesh pattern. -
Detail the eye:
Carefully dab small green dots around the perimeter of the black eye socket where it meets the pink paint. -
Cheek triangulation:
Continue the geometric web pattern on the pink cheek area, drawing lines that radiate outward toward the ear. -
Jawline grid:
Add a row of triangles or zig-zags along the jawline pink section to balance the forehead design.
Level Up: UV Glow
For a true showstopper at dark parties, use specific UV-reactive bright paints. They will vividly fluoresce under blacklights.
Step 4: Skeletal Details
-
Sketch the smile:
Switch back to your liner brush and black paint. Draw thin lines extending horizontally from the corners of your mouth. -
Stitch it up:
Paint vertical tick marks across the lips and the extended mouth lines to create the classic sutures. -
Lip highlights:
Add tiny strokes of neon green on the lips between the black stitches for extra dimension. -
Neck accent:
Paint a geometric diamond or feather shape on the neck using neon green outlines to extend the art beyond the face. -
Set the look:
Mist lightly with a setting spray to lock the intricate lines in place for the night.
Step back and admire your electrifying, modern take on a classic Halloween tradition


Have a question or want to share your own experience? I'd love to hear from you in the comments below!