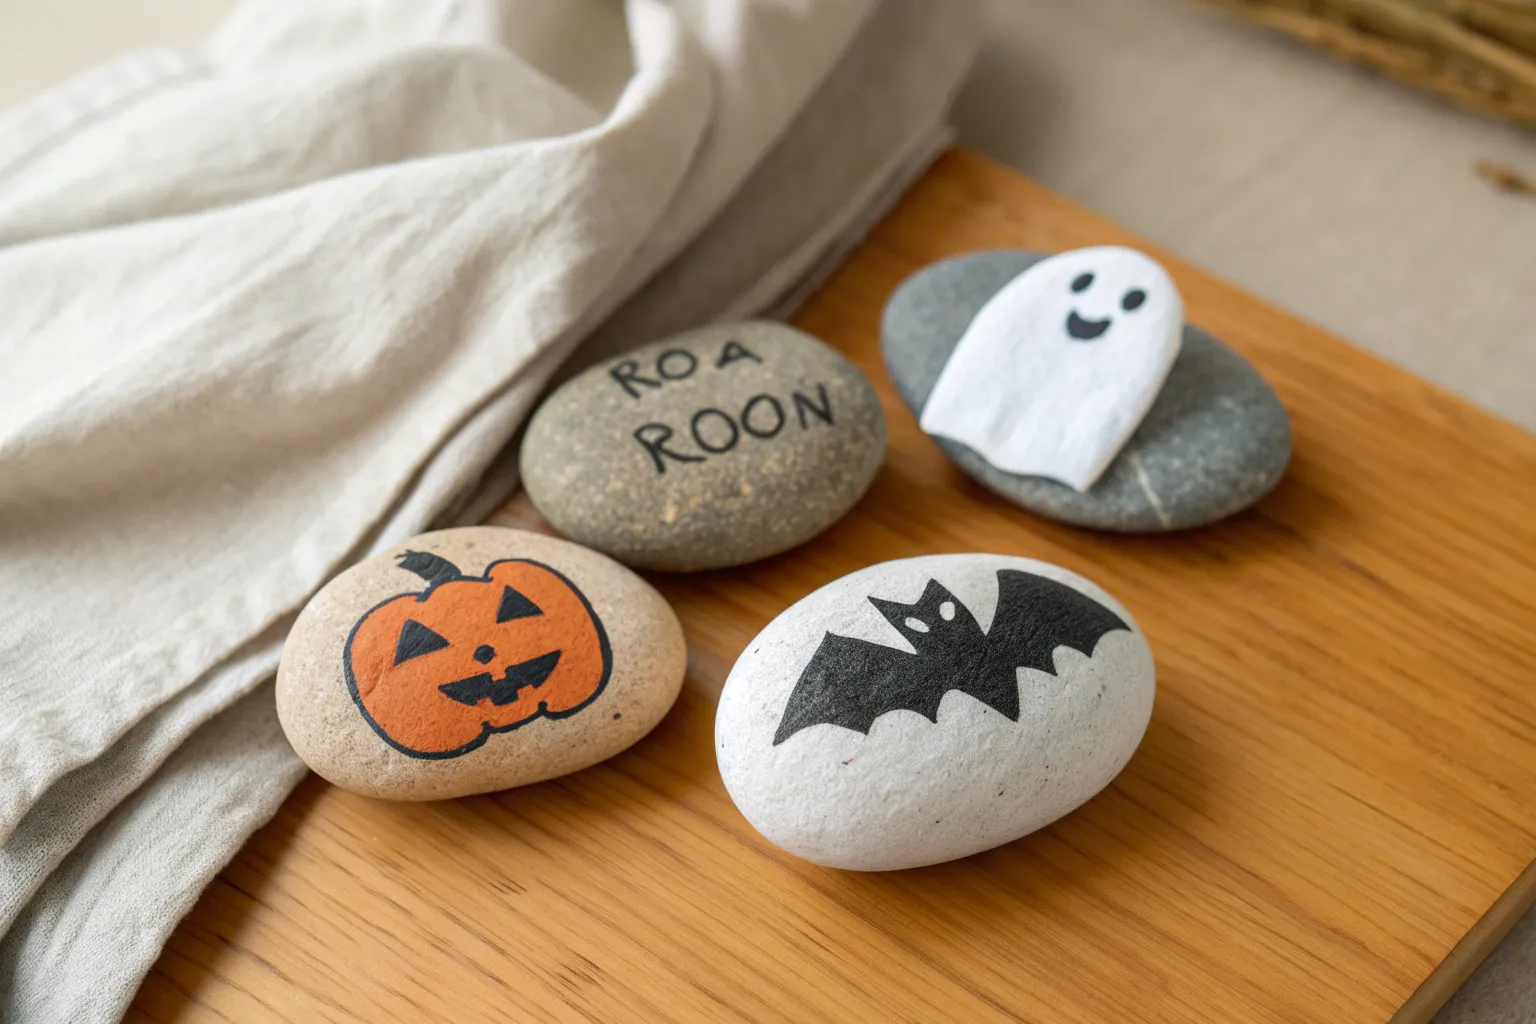
Halloween is the perfect excuse to turn a handful of ordinary stones into tiny spooky treasures. I love how halloween painted rocks can be as cute or as creepy as you want—and they’re quick enough to make a whole set in one sitting.
Sweet Little Ghost Rocks
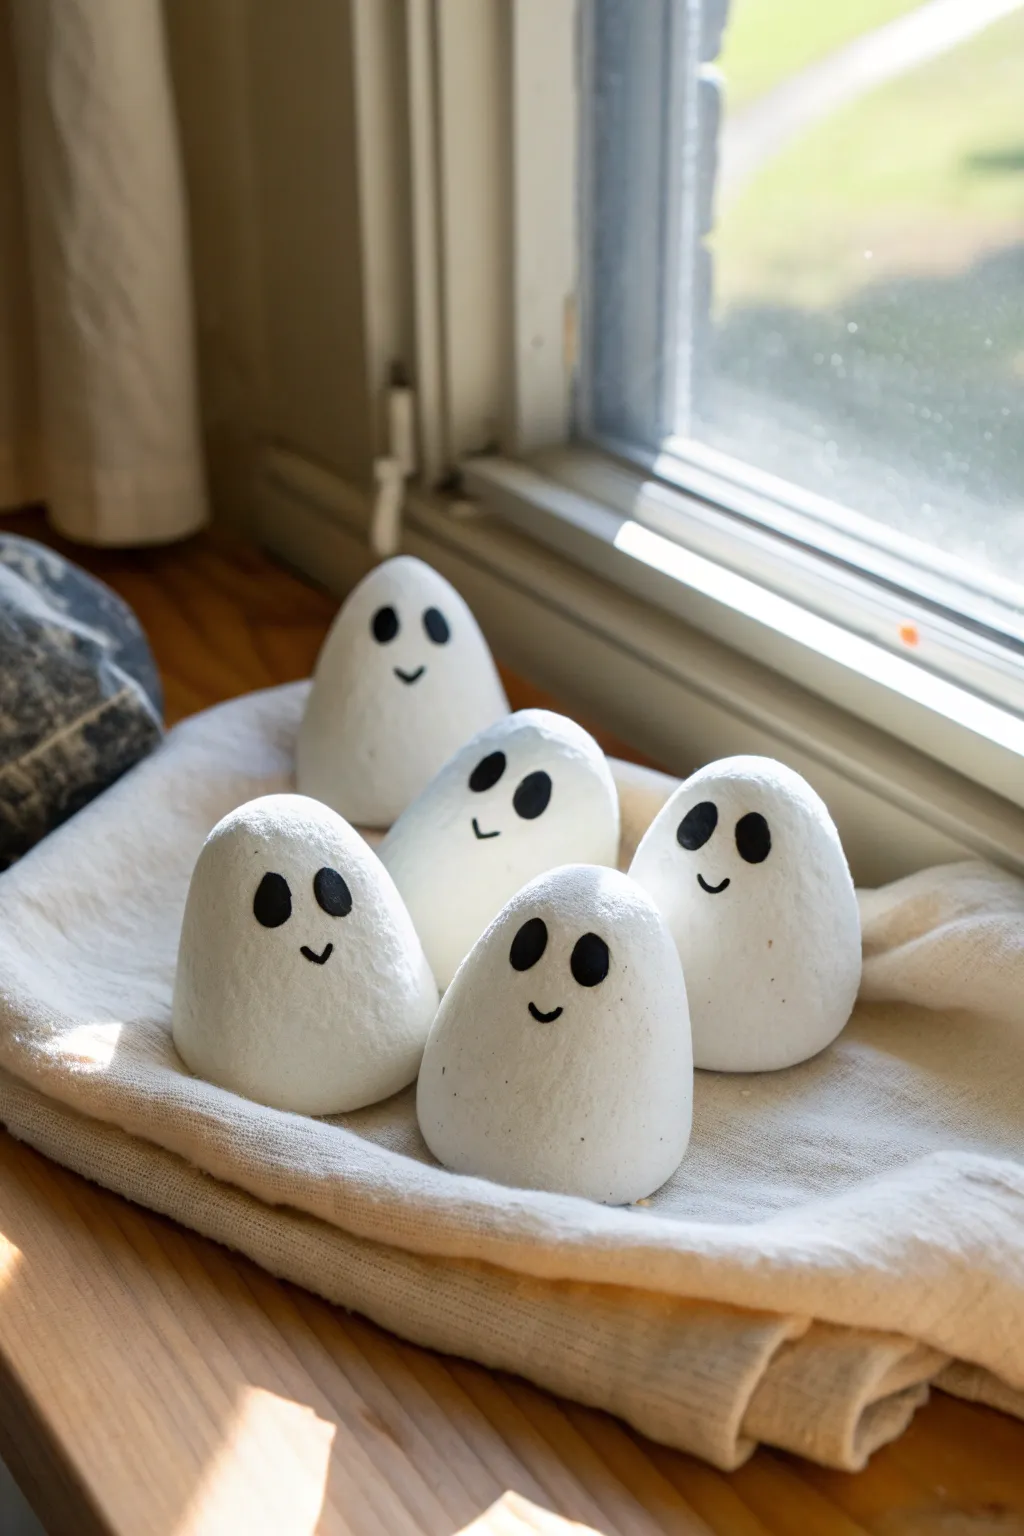
These delightfully minimalist ghost stones bring a friendly spirit to your windowsill or garden path without any spooky fright. Their smooth, egg-like shape and simple expressions make for a charmingly understated Halloween decoration that takes just moments to design once the paint is dry.
Step-by-Step
Materials
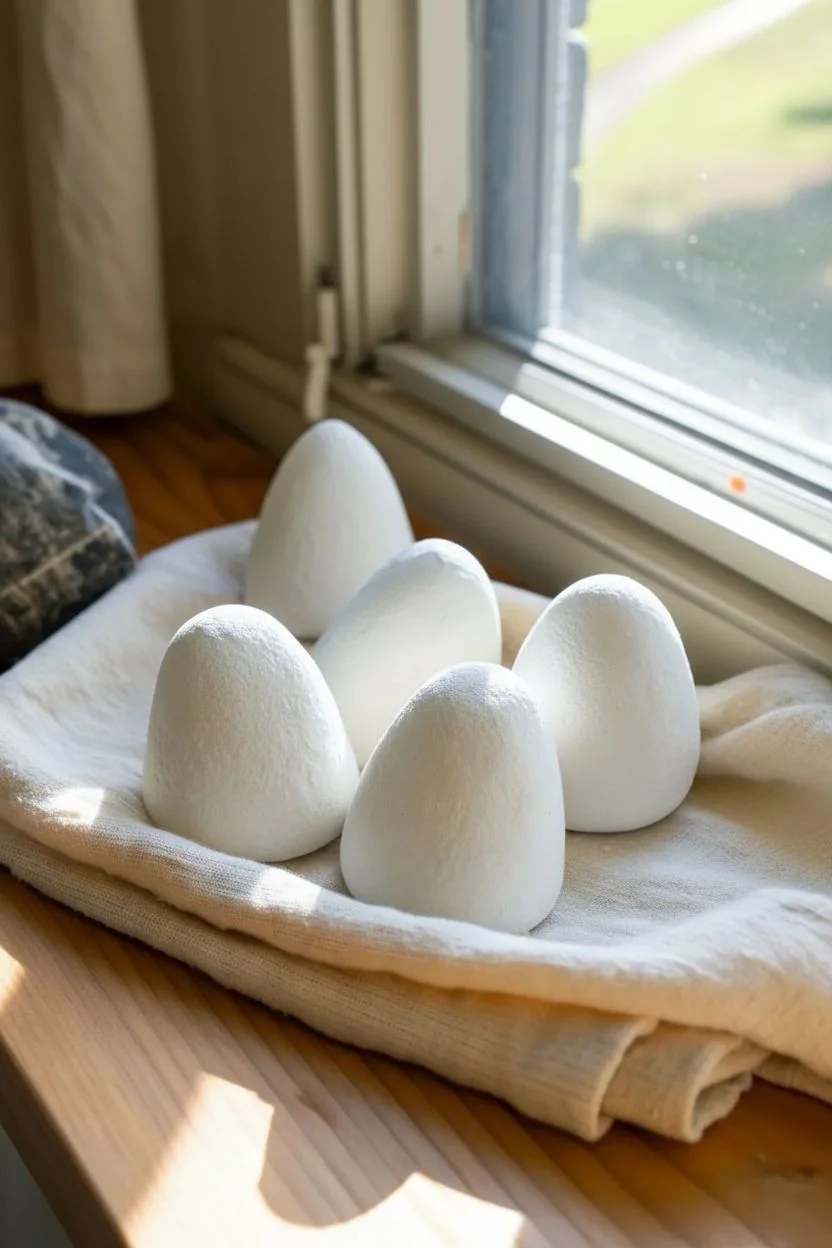
- Smooth, egg-shaped river rocks (roughly 2-3 inches tall)
- White acrylic craft paint (matte finish)
- Black acrylic craft paint or a black paint pen
- Wide flat paintbrush
- Small round detail brush (if not using a paint pen)
- Spray sealant (matte or satin)
- Soap and water for cleaning
- Palette or paper plate
Step 1: Preparing the Base
-
Select your stones:
Hunt for rocks that have a natural, upright stability. Try to find river stones that are slightly tapered at the top and wider at the bottom, mimicking a classic egg or ghost silhouette. -
Clean the surfaces:
Wash your chosen rocks thoroughly with soap and warm water to remove any dirt, grit, or oily residue that might prevent the paint from adhering properly. -
Dry completely:
Set the rocks out in a sunny spot or dry them with a towel. Ensure they are bone dry before you open any paint bottles, as moisture can cause bubbling later. -
Apply the first coat:
Using a wide flat brush, paint the entire surface of the rock with matte white acrylic paint. Don’t worry if the grey stone shows through slightly; this is just the primer layer. -
Let it cure:
Allow the first coat to dry for at least 15 to 20 minutes. The surface should feel chalky and dry to the touch. -
Add a second coat:
Apply a second layer of white paint to achieve a solid, opaque finish. If your paint is thin, I sometimes find a third coat helps create that perfect porcelain-like look.
Paint Pen Tip
For the smoothest black eyes, store your paint pen tip-down for 10 minutes before starting. This ensures a rich, opaque flow immediately without streaking.
Step 2: Adding the Expressions
-
Observe the orientation:
Stand your dried white rock up on a flat surface to see exactly where the ‘face’ should sit. You want the eyes to be positioned comfortably on the upper third of the stone. -
Draft the eyes:
Creating oval shapes for the eyes adds a touch of innocence. Use a pencil to faintly sketch two tall ovals, tilting them slightly inward toward each other for a friendly look. -
Paint the left eye:
Using a black paint pen or a very fine detail brush dipped in black acrylic, fill in the left oval. Work slowly from the center outward to keep the edges crisp. -
Paint the right eye:
Fill in the second eye, trying to match the size of the first. If they aren’t perfectly symmetrical, don’t panic—slight variations give each ghost unique character. -
Add the smile:
Place a small, simple u-shaped curve between and slightly below the eyes. Keep the mouth tiny and subtle to maintain the cute, minimalist aesthetic shown in the photo. -
Review the details:
Check for any stray white spots inside your black eyes and touch them up carefully. Ensure the black paint is solid and opaque.
Step 3: Finishing Touches
-
Allow thorough drying:
Let the black facial features dry completely. Since the black paint is applied over the white, smearing it now would be difficult to fix. -
Prepare for sealing:
Take your finished ghosts to a well-ventilated area, preferably outdoors, for the sealing process. -
Apply sealant:
Spray a light, even coat of matte or satin sealant over the rocks. This protects the white paint from chipping and keeps the ghosts looking fresh year after year. -
Final cure:
Let the sealant cure according to the can’s instructions, usually about 24 hours, before placing your new friends on display.
Fixing Mistakes
If you mess up the mouth or eyes, wait for the black paint to dry completely, then paint over it with two coats of white. Once dry, try painting the face again.
Set your group of ghosts on a sunny windowsill or nestle them into a potted plant for a subtle spooky greeting


Black Cat Silhouette Rocks
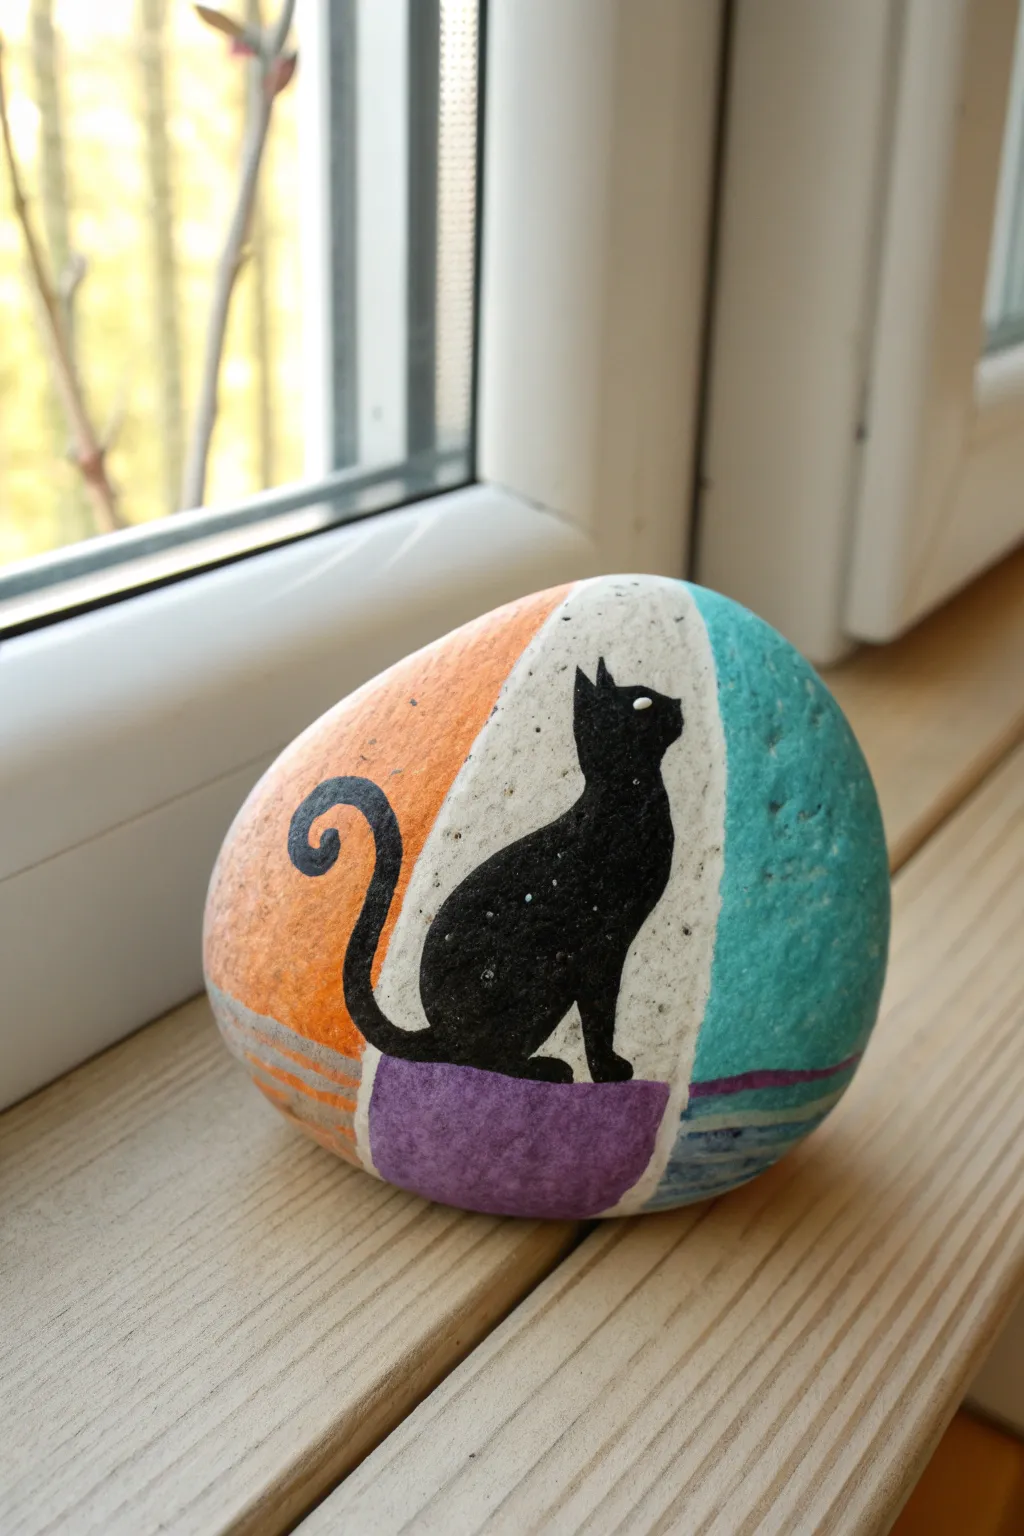
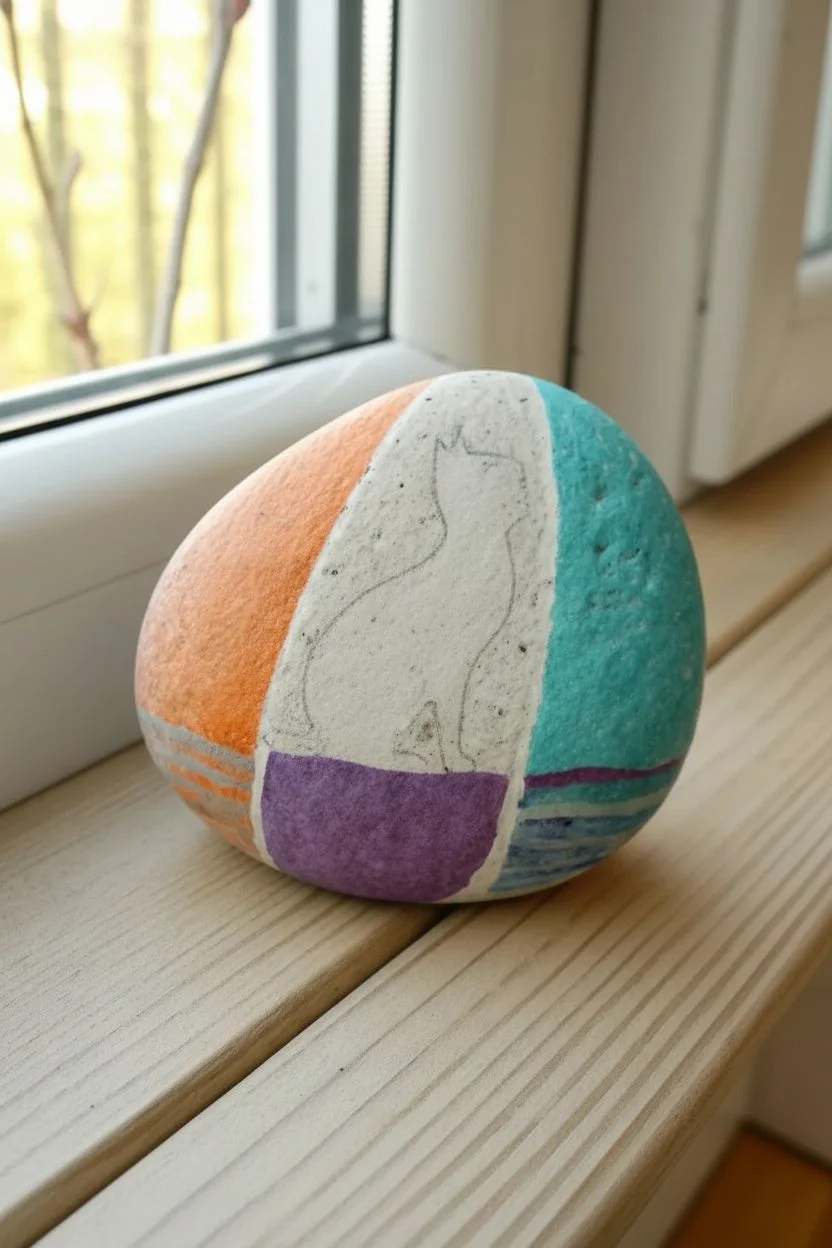
This striking design avoids the traditional spooky look by placing a sleek black cat silhouette against a backdrop of bold, colorful blocks. The clean lines of the orange, teal, and purple sections give it a crisp, modern art feel perfect for Halloween decor.
Step-by-Step Tutorial
Materials
- Smooth, rounded rock (roughly palm-sized)
- Acrylic paints (black, white, bright orange, teal/aqua, purple)
- Flat paintbrushes (medium for blocks, small for details)
- Fine liner brush or black paint marker
- Pencil for sketching
- Painter’s tape (optional, for straight lines)
- Spray gloss varnish
Step 1: Setting the Background
-
Clean the canvas:
Before you begin, scrub your rock with soap and water to remove any dirt or oils, then let it dry completely to ensure the paint adheres. -
Base coat:
If your rock is dark, you might want to prime the painting area with a layer of white acrylic first. This helps the orange and teal colors pop. -
Sketch the zones:
Using a pencil, lightly draw two vertical lines to divide the rock face into three vertical sections. The middle section should be slightly wider to accommodate the cat. -
Establish the horizon:
Draw a horizontal line across the bottom third of the rock to crate a “floor” for the design.
Wobbly Lines?
If painting straight vertical lines is difficult on the curved surface, use thin strips of masking tape or painter’s tape to block off the sections before painting.
Step 2: Blocking the Colors
-
Paint the center:
Fill the large central panel with white paint. Use a flat brush to keep the edges crisp. -
Add the orange:
Paint the left vertical panel with bright orange paint. You may need two coats for solid opacity. -
Add the teal:
Paint the right vertical panel with the teal or aqua color. Be careful where it meets the white section. -
Create the floor:
In the central bottom section (under the white), paint a purple rectangle. -
Add stripe details:
Under the orange and teal sections, paint small horizontal stripes. Use a lighter, watered-down version of orange on the left and teal or purple on the right to create a textured look.
Glow Up
Use glow-in-the-dark acrylic paint for the cat’s eye or the white background panel. It will look like a normal colorful rock by day and a spooky silhouette by night.
Step 3: Painting the Silhouette
-
Outline the cat:
Once the background blocks are completely dry, lightly sketch the cat’s outline in the white center panel using a pencil. Position the body so the paws rest on the purple block. -
Draw the tail:
Extend the tail out from the body, swirling it into the orange section on the left. The curve adds nice movement to the rigid background. -
Fill in the black:
Using black acrylic paint and a fine brush, carefully fill in the cat’s body. Start from the center and work outward to the edges for better control. -
Refine the edges:
Switch to your finest liner brush to sharpen the ears and the tip of the tail. I find using a black paint pen here makes the clean lines much easier to manage. -
Add the eye:
Dip the non-brush end of a paintbrush into white paint and dot it onto the cat’s face to create a single, staring eye. -
Texture (Optional):
If you want a distressed look, you can lightly speckle the white background with tiny black dots or faint gray smudges.
Step 4: Finishing Up
-
Dry thoroughly:
Allow the entire rock to dry for several hours. The thick black paint needs time to set fully. -
Seal:
Apply a spray gloss varnish to seal the design. This protects the paint from chipping and gives the colors a polished, ceramic-like shine.
Place your finished geometric kitty on a windowsill or shelf to add a subtle touch of Halloween flair


Spiderwebs and Tiny Spiders
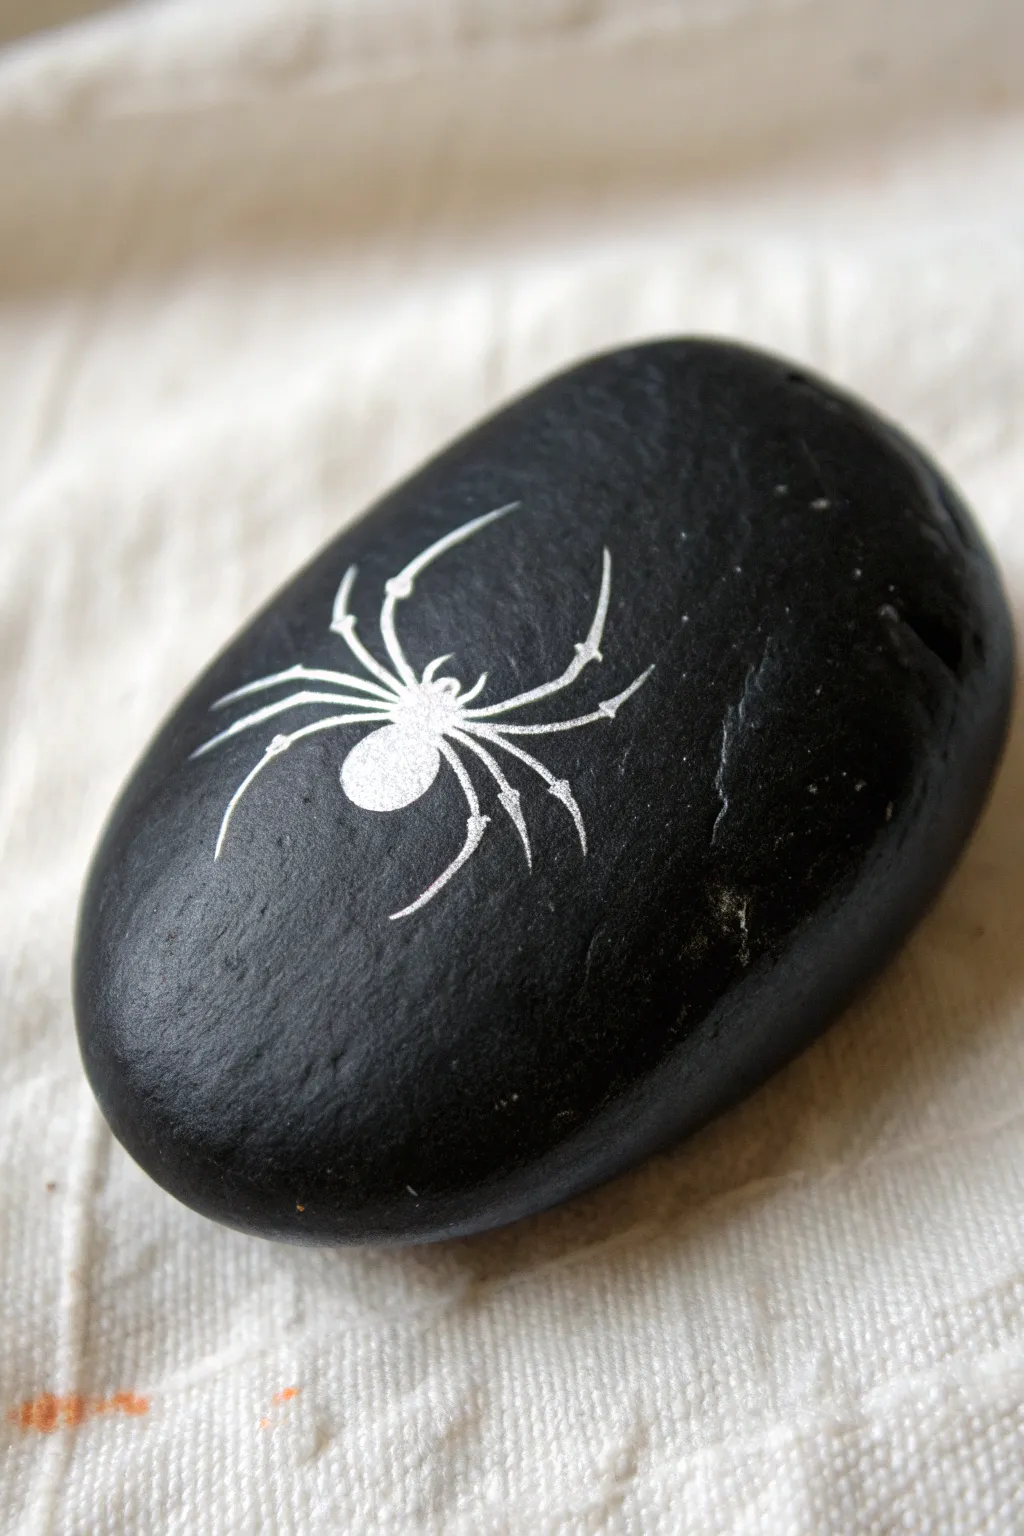
This project creates a striking contrast between a deep, matte black background and a delicate, metallic silver spider. It’s a sophisticated take on Halloween decor that looks almost like an engraved amulet.
Step-by-Step Tutorial
Materials
- Smooth river rock (oval or round)
- Black acrylic paint (matte finish preferred)
- Metallic silver paint pen (extra fine tip, 0.7mm or smaller)
- Flat paintbrush
- Pencil (HB or standard)
- Spray sealer (matte or satin)
- Water cup and paper towel
Step 1: Preparing the Canvas
-
Clean the Stone:
Begin by washing your stone thoroughly with soap and warm water to remove any dirt or oils. Dry it completely with a towel. -
Base Coat Application:
Using your flat paintbrush, apply a layer of black acrylic paint to the top surface of the rock. Smooth out your brushstrokes so there are no ridges. -
Second Layer:
Once the first coat is dry to the touch, apply a second coat of black to ensure full, opaque coverage. Let this dry completely before moving on. -
Check the Finish:
Inspect the surface. If you see any brush bristles or lumps, gently sand them away and touch up the paint. A smooth surface is crucial for the fine lines coming next.
Uneven Ink Flow?
If the silver pen skips, don’t press harder on the rock. Instead, re-prime the tip on scrap paper to get the flow heavy again, then lightly resume drawing.
Step 2: Drafting the Arachnid
-
Locate the Center:
Visualize where the spider will sit. Slightly off-center creates a more natural look. -
Sketch the Abdomen:
Very lightly sketch a small oval for the spider’s main body (abdomen) using your pencil. Keep the lines faint so they don’t groove the paint. -
Sketch the Cephalothorax:
Draw a smaller, somewhat rounded shape attached to the top of the abdomen for the head/chest area. -
Map the Legs:
Lightly mark eight guide lines coming from the smaller body section—four on the left, four on the right. Curve the front legs forward and the back legs backward.
Pro Tip: Scary Shadows
For a 3D effect, mix a tiny drop of water with black paint to make a wash. Paint a faint shadow under one side of the legs to make the spider look lifted.
Step 3: Painting the Details
-
Prime the Pen:
Shake your metallic silver paint pen well and press the tip on a scrap piece of paper until the ink flows smoothly. -
Fill the Body:
Carefully fill in the two body shapes with silver. Use a stippling (dotting) motion if you want a slight texture, or smooth strokes for a solid shine. -
Draw the Front Legs:
Start with the front pair of legs. Draw a curved line extending upward and outward, tapering off at the finer tip. Add small joints where the leg bends. -
Add Middle Legs:
Draw the second and third pairs of legs. These are usually shorter and hug the body closer. I find it helpful to rotate the rock so my hand doesn’t smudge wet ink. -
Draw Rear Legs:
Extend the final pair of legs backward, following the curve of the abdomen. Give them a sharp, elegant curve at the end. -
Refine the Joints:
Go back over the leg intersections (the ‘knees’) and add tiny spurs or slight thickening to make the anatomy look more realistic. -
Add Highlights:
Add a tiny extra dot of silver to the center of the abdomen to simulate a reflection or rounded quality.
Step 4: Finishing Touches
-
Wait for Ink Drying:
Metallic pens can take longer to dry than standard markers. Give it at least 20 minutes to set completely. -
Erase Guidelines:
If any pencil marks are still visible, very gently erase them. Be extremely careful not to rub off the black base paint. -
Seal the Rock:
Take the rock to a ventilated area and apply a light coat of spray sealer. This protects the silver from tarnishing and keeps the black paint from chipping.
Place this eerie artifact in a dark corner or on a bookshelf for a subtle spooky surprise


Simple Bat Rocks on Night Skies
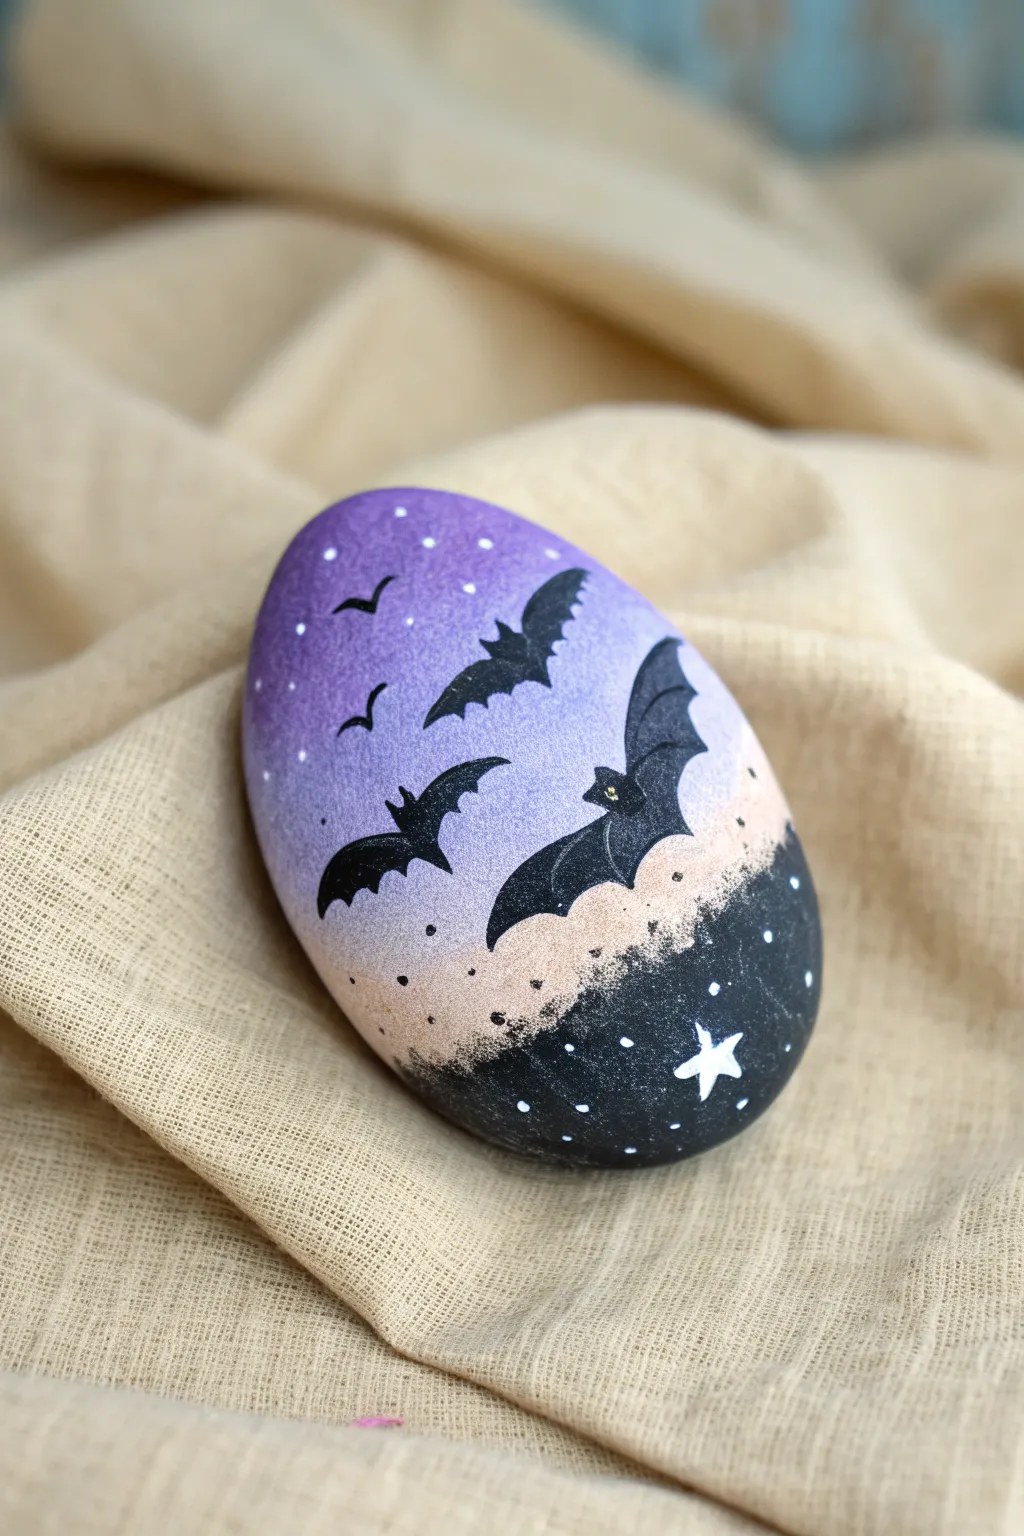
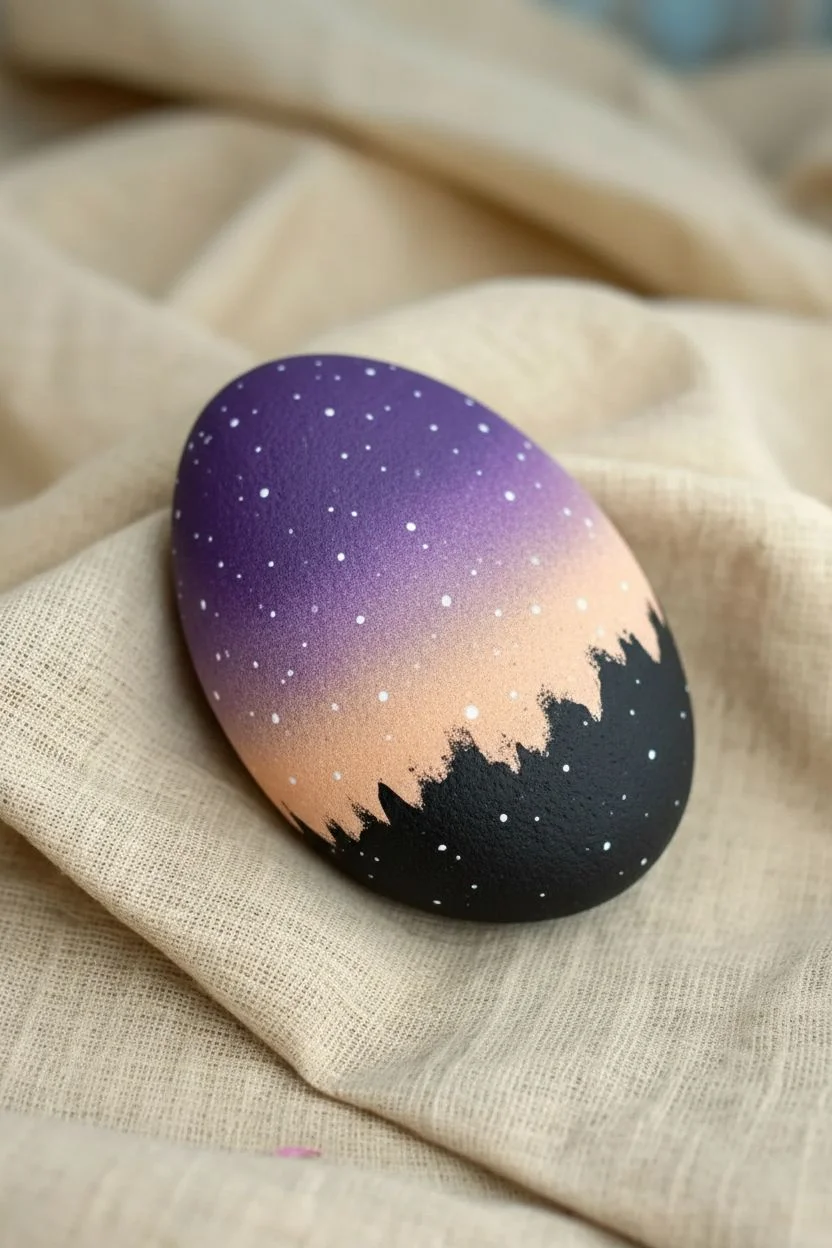
Capture the eerie beauty of Halloween night with this striking gradient rock painting. Featuring silhouetted bats flying across a purple twilight sky that fades into deep black, this design is both atmospheric and surprisingly simple to achieve.
Detailed Instructions
Materials
- Smooth, oval river rock (clean and dry)
- Acrylic paints: white, violet/purple, peach/tan, and black
- Small flat brush (for gradients)
- Fine liner brush or ultra-fine paint pen (black and white)
- Sponge dabber (optional for blending)
- Acrylic sealer (matte or gloss)
- Cup of water and paper towels
Step 1: Creating the Twilight Gradient
-
Base coat preparation:
Start by ensuring your rock is completely clean. Apply a solid coat of white acrylic paint over the entire surface to prime it; this will make your gradient colors pop much more vibrantly later. -
Apply the purple:
Using a flat brush, paint the top third of the rock with a rich violet or purple hue. Don’t worry about a perfect bottom edge just yet. -
Add the middle tone:
Below the purple, apply a band of light peach, tan, or very pale orange paint. This mimics the last light of the sunset. -
Create the transition:
While the paint is still slightly wet, use a clean, dry brush or a sponge dabber to gently blend the line where the purple meets the peach. Use a stippling motion to create a soft, scattered fade rather than a hard line. -
Paint the night bottom:
Paint the bottom third of the rock with solid black. Create a jagged, uneven horizon line where it meets the peach section, suggesting a distant, rough landscape. -
Blend the darkness:
Using a dry brush technique or your sponge, dab along the black horizon line to feather it slightly up into the peach area. You want it to look like darkness creeping up, similar to the texture shown in the photo. -
Add star speckles:
Dip a toothbrush or stiff brush into watered-down white paint. Use your thumb to flick a very fine mist of ‘stars’ over the purple and black sections, keeping the center peach area mostly clear.
Problem Solver
Gradient looking muddy? You probably over-blended. Let it dry completely, then repaint the distinct bands of color and try blending just the seam again with less pressure.
Step 2: Painting the Silhouette Details
-
Draft the big bat:
Once the background is 100% dry, take your fine liner brush with black paint. Outline the largest bat on the right side, starting with the body and then creating the scalloped wing shapes. -
Fill the silhouette:
Fill in the large bat completely with solid black paint. Make the wing tips sharp and pointed for a dramatic effect. -
Add distant bats:
Paint two smaller bats in the middle ground—one slightly to the left of the center and one higher up near the top. These should be simpler shapes, just curved lines meeting at a point for the body. -
Paint tiny birds:
Add two very small, simple ‘M’ shapes on the far left side to represent birds or bats flying in the far distance. -
Detail the main star:
Using a fine liner brush and white paint, draw a distinct five-pointed star in the lower right black section. -
Highlight the eyes:
Add two microscopic dots of gold or yellow paint to the large bat’s face for glowing eyes. Alternatively, use a toothpick to apply these tiny dots. -
Final drying and seal:
Let the entire rock dry properly, ideally overnight. Finish by applying a layer of clear acrylic sealer to protect your painting from chipping and moisture.
Level Up
Add glow-in-the-dark paint over the white star and the tiny bat eyes. When the lights go out, your creepy night scene will still be watching you.
Display this moody little masterpiece on your porch or hide it in the garden for a spooky surprise
BRUSH GUIDE
The Right Brush for Every Stroke
From clean lines to bold texture — master brush choice, stroke control, and essential techniques.
Explore the Full Guide
Mummy Wrap Bandage Texture
Transform a smooth garden stone into a classic Halloween character using little more than some tape and paint. This clever technique creates a realistic bandaged texture that looks much more complex than it actually is.
How-To Guide
Materials
- Smooth, oval-shaped river rock
- Adhesive bandage tape or masking tape (off-white/cream color)
- White acrylic paint or paint pen
- Black acrylic paint or broad tip marker
- Clear sealant spray (optional)
- Scissors
Step 1: Preparing the Base
-
Clean the stone:
Begin by washing your rock thoroughly with warm soapy water to remove any dirt or oils. -
Dry completely:
Allow the stone to dry completely before you start; moisture can prevent the tape from sticking properly. -
Inspect the surface:
Check your rock for a distinct ‘face’ side. It’s easier if you pick a side that is relatively flat or broadly curved.
Peeling tape?
If the tape ends won’t stay down on the back of the rock, add a small dab of hot glue or superglue under the loose strip for a permanent hold.
Step 2: Creating the Mummy Wraps
-
Cut the tape strips:
Cut or tear your bandage tape or masking tape into thin strips. If you are using standard width tape, I find it helps to cut the strips longitudinally to make them narrower, about 1/4 to 1/2 inch wide. -
First winding:
Start applying the tape strips across the rock at diagonal angles. Wrap them all the way around to the back. -
Vary the angles:
Don’t place the strips perfectly parallel. Cross them over each other in random directions to mimic hastily wrapped mummy bandages. -
Leave a gap:
Be sure to leave a clear, unwrapped oval space near the top third of the rock. This bare stone area will serve as the canvas for the eyes. -
Build layers:
Continue adding strips until most of the rock is covered, except for your designated eye area. The tape overlaps create great depth and shadows naturally. -
Secure the ends:
Press down firmly on all tape ends, especially on the back of the rock, to ensure they don’t peel up later.
Step 3: Bringing It to Life
-
Outline the eyes:
In the exposed stone gap, use your white acrylic paint or a paint pen to draw two large, connected oval shapes. -
Fill the whites:
Fill in these oval shapes with solid white paint. Depending on your paint’s opacity, you might need a second coat once the first one is dry for a bright finish. -
Add pupils:
Once the white base is completely dry, use a black marker or black paint to add two large pupils. -
Positioning the gaze:
Place the pupils slightly off-center or looking in different directions to give your mummy a goofy, confused, or spooky expression. -
Outline for definition:
Carefully trace the outer edge of the white eyes with the black marker to make them pop against the grey stone background. -
Optional texture:
If you used masking tape and want a starker look, you can lightly dry-brush a tiny bit of white paint over the tape edges to highlight the texture. -
Seal the deal:
If you plan to keep this outside, apply a matte spray sealant over the painted area and tape to protect it from moisture.
Make it antique
Lightly brush a diluted brown or tan paint wash over the white tape strips to make the mummy bandages look ancient, dirty, and weathered.
Your spooky little stone mummy is now ready to guard your garden or doorstep
Frankenstein Monster Faces
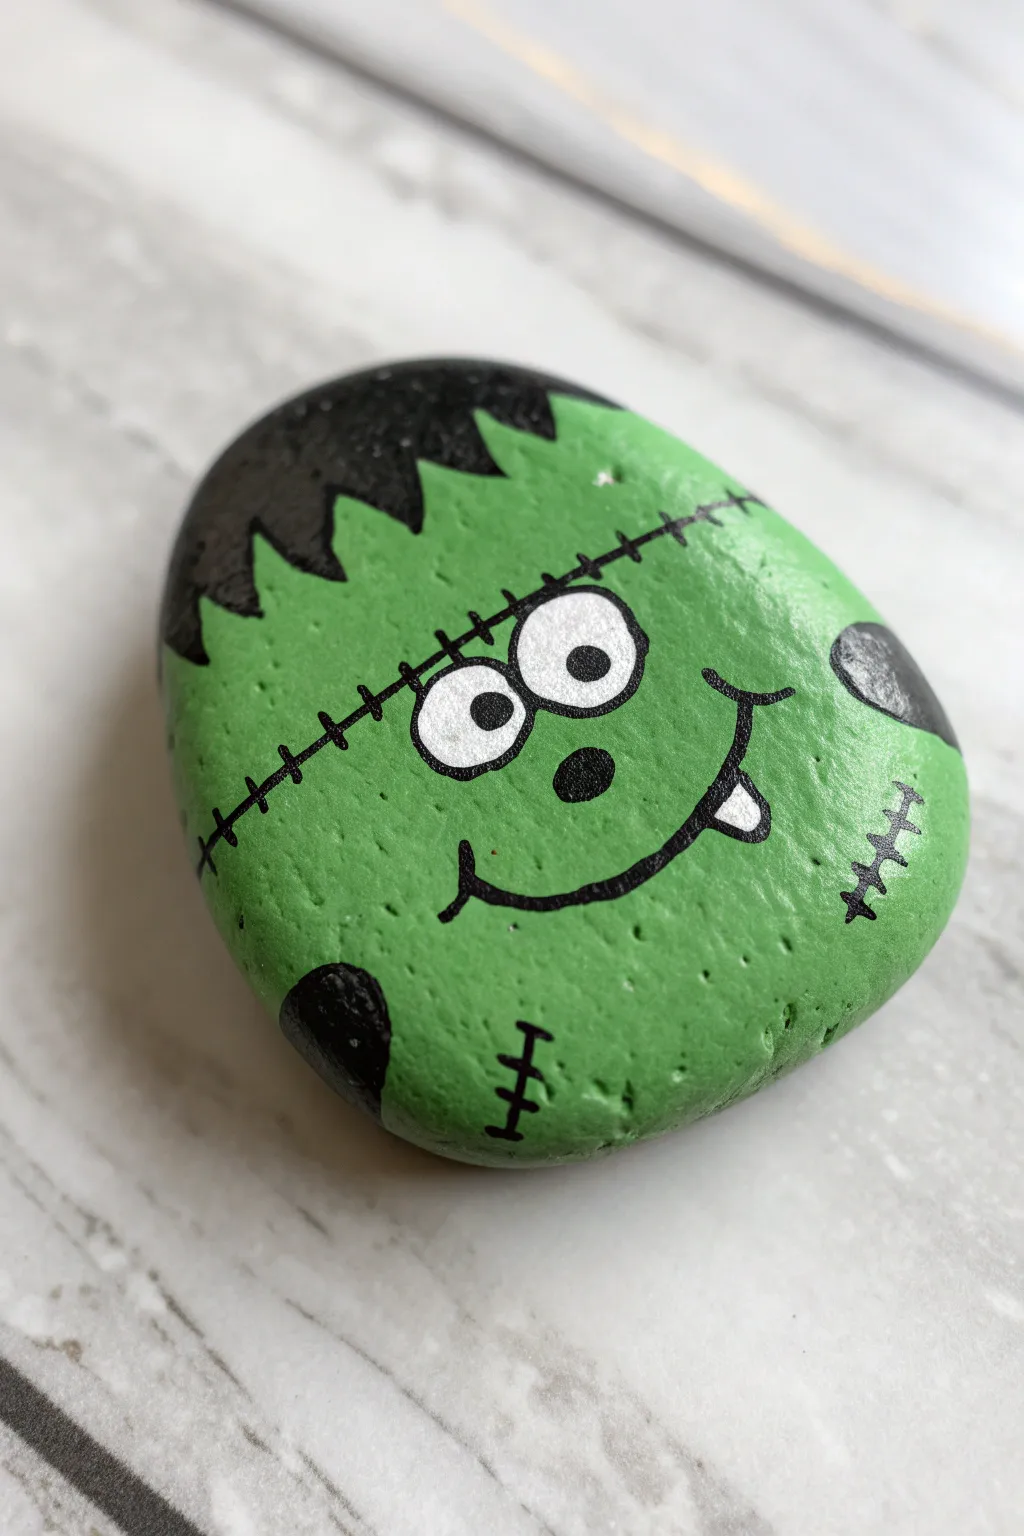

Transform an ordinary garden stone into a classic Halloween character with this charmingly spooky Frankenstein’s monster design. With his goofy grin, single tooth, and signature stitches, this painted rock is more silly than scary, making it perfect for little trick-or-treaters.
Step-by-Step
Materials
- Smooth, round river rock (palm-sized)
- Acrylic craft paint: bright green, black, and white
- Paintbrushes: medium flat brush and fine detail liner brush
- Pencil (optional)
- Black paint pen/marker (fine tip)
- Clear sealant spray or varnish (gloss or matte)
Step 1: Painting the Base
-
Clean Your Canvas:
Begin by washing your rock with warm, soapy water to remove any dirt or grit. Let it dry completely before starting; a damp rock can cause acrylic paint to peel later. -
Green Base Coat:
Using a medium flat brush, paint the entire top surface of the rock with bright green acrylic paint. You want a solid, opaque look. -
Apply Second Coat:
Once the first layer is dry to the touch, apply a second coat of green. This ensures the natural color of the stone doesn’t show through, giving you that vibrant monster skin tone. Let this dry thoroughly.
Step 2: Adding the Hair
-
Outline the Hairline:
Switch to your black paint and a smaller brush. Paint a jagged, zig-zag line across the top quarter of the rock to create Frankenstein’s iconic hairline. -
Fill in the Hair:
Fill the space above the zig-zag line with solid black paint, covering the curved top edge of the rock. Make the points of the hair sharp for that classic cartoon look.
Pro Tip: Crispy Lines
If you struggle with brush control for thin lines like the scars or smile, use a black acrylic paint marker or even a permanent Sharpie instead of a brush.
Step 3: Painting Facial Features
-
Sketch the Face:
If you’re nervous about freehanding, use a pencil to lightly sketch two circles for eyes (make one slightly larger than the other for a goofy expression) and a curved mouth. -
Paint the Eyeballs:
Using a small round brush or the end of a paintbrush handle dip-dotted, paint two white circles for the eyes. They should be touching or slightly overlapping in the center of the forehead area. -
Add a Tooth:
Paint a small, white rectangular tooth protruding downwards from the right side of where your mouth line will be. Let the white paint dry completely before moving to black outlines. -
Outline the Eyes:
Once the white is dry, use your black paint pen or a very fine liner brush to carefully outline the white eye circles. -
Add Pupils:
Place a black dot inside each white eye circle. I like to make them slightly mismatched in size or position to enhance the silly expression. -
Paint the Nose:
Add a small black oval or circle right below the eyes for the nose.
Level Up: Glow in the Dark
Mix a tiny bit of glow-in-the-dark medium into your white paint for the eyes and tooth. When the lights go out, his goofy face will shine in the night!
Step 4: Stitching and Details
-
Draw the Mouth:
Draw a curved black smile line, ensuring it connects with the white tooth you painted earlier. Add small ‘cheek’ creases at the ends of the smile. -
Create the Main Scar:
Draw a long, slightly curved horizontal line across the forehead, just below the hairline. -
Stitch it Up:
Add short, vertical hash marks along the forehead line to turn it into a stitched scar. -
Add Minor Scars:
Draw one or two smaller scars on the cheeks or chin using the same technique—a short line crossed with tiny hatches. -
Bolts on the Neck:
Paint two black semi-circles on the extreme left and right edges or bottom of the rock to represent the bolts in his neck. -
Seal the Deal:
Allow all paint to cure for at least 24 hours. Finish by spraying the rock with a clear acrylic sealer to protect your artwork from the weather if it’s living outside.
Place your little monster on the front porch to greet visitors with a friendly grin

PENCIL GUIDE
Understanding Pencil Grades from H to B
From first sketch to finished drawing — learn pencil grades, line control, and shading techniques.
Explore the Full Guide
Witch Hat and Broom Icons
Summon a spooky atmosphere with this set of three smooth stones featuring classic Halloween icons. These crisp black-and-orange illustrations create a minimalist yet festive look that is perfect for a mantle or tabletop display.
Detailed Instructions
Materials
- 3 smooth, oval river rocks (light grey or white)
- Black fine-point paint pen (or permanent marker)
- Orange paint pen or acrylic paint with fine brush
- Pencil for sketching
- Eraser
- Clear matte sealant spray (optional)
- Small decorative twig broom (for styling, optional)
Step 1: Preparation & Planning
-
Select your stones:
Choose three stones with a relatively flat surface. A lighter background color like white, cream, or light grey works best here so the black ink stands out sharply without needing a base coat. -
Clean surface:
Scrub the rocks with warm soapy water and let them dry completely. Any dust or grit will clog your paint pens. -
Sketch the broom-hat:
On the first stone, lightly sketch a classic witch hat shape. Draw a wide brim at the bottom and a crumpled cone shape pointing slightly to the left. Add a band across the middle.
Step 2: Drawing the Broom-Hat Stone
-
Outline the hat:
Using your fine-point black paint pen, trace over your pencil lines carefully. Keep the lines consistent in thickness. -
Fill the hat:
Color in the entire hat with black ink, leaving the hat band empty for now. You might need two layers to get solid coverage. -
Add detail:
Once the black ink is dry, use white or a scratching technique to add tiny speckles or stars within the black hat for texture, if desired. -
Color the band:
Fill the empty hat band with orange paint. Add a tiny black circle or square in the center to represent a buckle.
Ink Flow Secret
Store paint pens horizontally when not in use. If the ink feels dry while drawing, press the tip on a scrap paper a few times to get it flowing again.
Step 3: Creating the Pumpkin-Hat Scene
-
Draft the scene:
On the second stone, sketch a similar witch hat, but this time place it hovering above two pumpkins. Add a small crescent moon to the left and a star to the right. -
Inking the hat:
ink the hat just like the first one, filling it with black but leaving a decorative band. In the reference image, this band has vertical stripes. -
Pumpkin outlines:
Draw the pumpkins using loose, sketch-like lines rather than a solid coloring. Emphasize the curved ridges of the pumpkin skin. -
Add nature touches:
Draw thin, wiry stems coming out of the pumpkins. I like to add little starburst shapes at the ends of the stems for a whimsical touch. -
Color accents:
Using the orange pen, fill in the hat band stripes and add tiny dots of orange to the starbursts on the pumpkin stems.
Smudging Lines?
Paint pens can smear if you touch them too soon. Work from left to right (if right-handed) and let the black outlines dry fully before adding orange.
Step 4: Painting the Starlight Stone
-
Map the stars:
On the third stone, draw one large five-pointed star in the center. Surround it with 4-5 smaller stars of varying sizes. -
Outline in black:
Trace all the stars with your black fine-point pen. For the smaller stars, you can cross the lines slightly to give them a twinkling look. -
Fill the center:
Color the large central star with your orange paint or pen. Leave the smaller surrounding stars as simple black outlines. -
Add sparkle:
Draw tiny dots or smaller cross-shapes in the empty spaces to make the stone look like a night sky.
Step 5: Finishing Touches
-
Cleanup:
Once the ink is 100% dry, gently erase any visible pencil sketch lines that weren’t covered by paint. -
Seal:
Spray the stones with a clear matte sealant. This protects the paint from chipping and keeps the marker from fading over time.
Arrange your charming new rock collection alongside a small broom or dried flowers for the ultimate festive vignette
Bubbling Cauldron Rocks
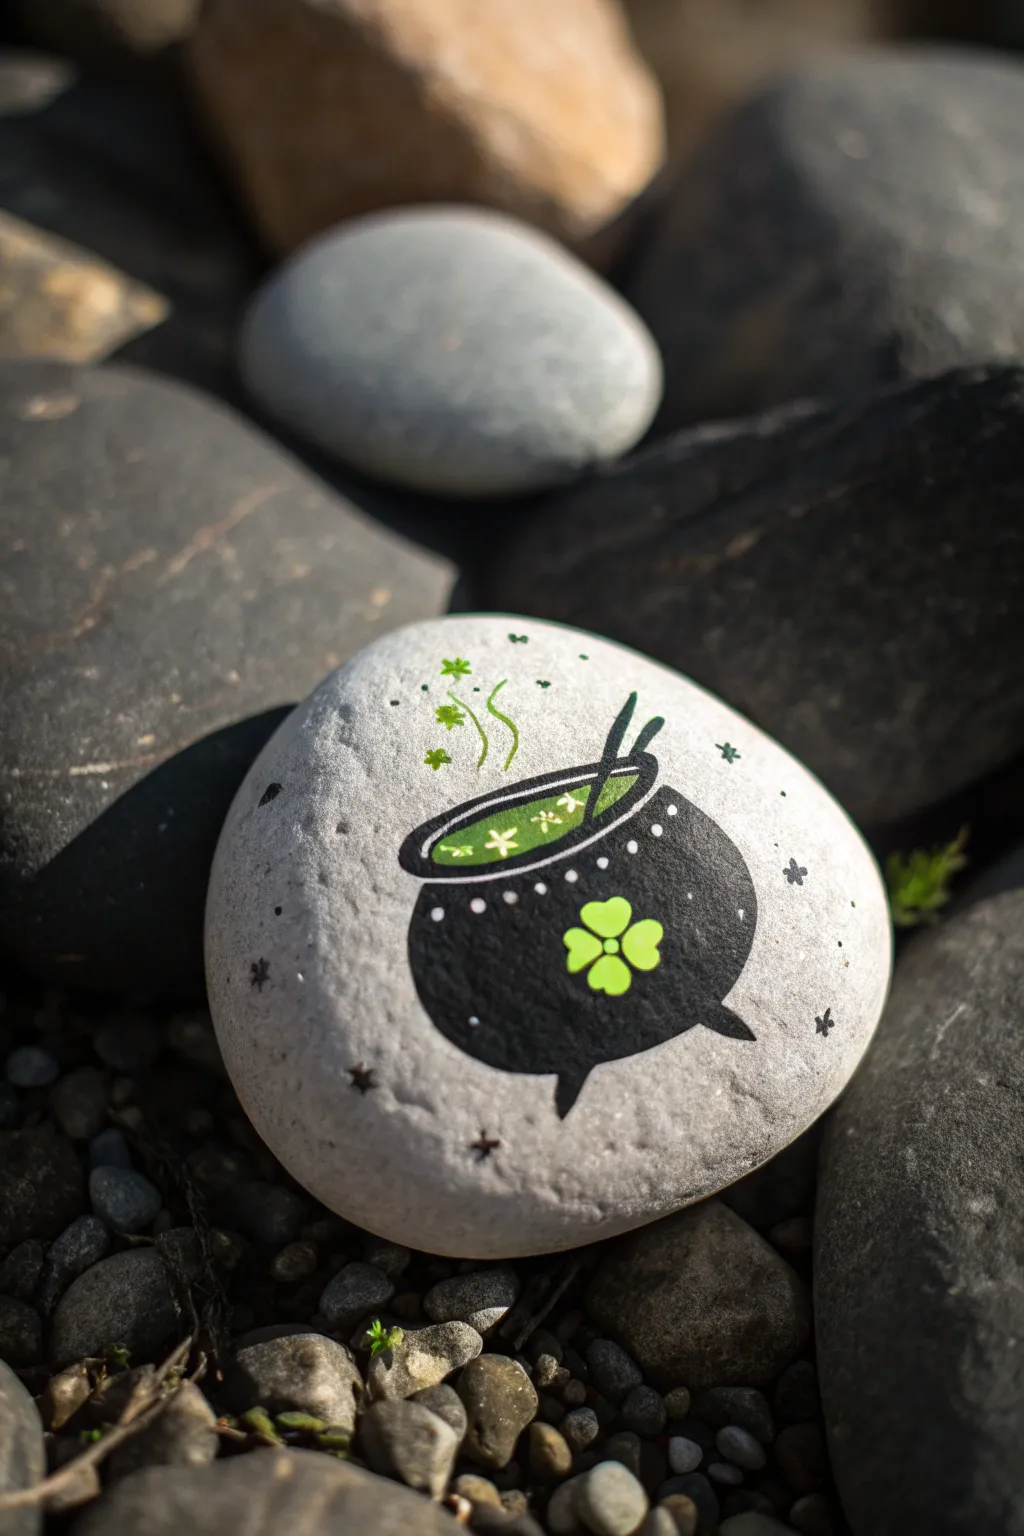
Combine Halloween spookiness with a touch of good fortune using this charming cauldron rock design. The crisp black pot against a white background features bubbling green brew and a shamrock accent for a unique holiday twist.
Step-by-Step
Materials
- Smooth, round river rock (approx. 3-4 inches wide)
- White acrylic paint (matte finish)
- Black acrylic paint or fine-tip paint pen
- Lime green acrylic paint
- Darker green acrylic paint
- Thin paintbrush (liner brush)
- Doting tool or toothpick
- Clear spray sealant (matte or satin)
- Pencil with a good eraser
Step 1: Preparing the Canvas
-
Clean the stone:
Begin by washing your rock with warm soapy water to remove any dirt or oils that might prevent paint adhesion. Let it dry completely. -
Base coat application:
Paint the entire surface of the rock with matte white acrylic paint. You will likely need 2-3 coats for full opacity, allowing each layer to dry fully before adding the next. -
Texture check:
Ensure the white paint is smooth. If you have brush strokes, a very light sanding with fine-grit sandpaper can help create a perfect surface for detailed drawing.
Step 2: Drawing the Cauldron
-
Sketch the outline:
Using a pencil, lightly sketch a rounded bowl shape for the cauldron slightly below the center of the rock. -
Add the rim:
Draw an oval shape across the top opening of the bowl to create the rim of the pot. -
Draw the legs:
Add three small triangular legs at the bottom of the pot—two on the sides and one angled slightly in the center to give it a 3D perspective. -
Fill the black shape:
Use black acrylic paint and a small brush (or a black paint pen for easier control) to fill in the main body of the cauldron, carefully going around the oval rim. -
Define the rim:
Outline the oval rim in black, but leave the inside empty for now—this is where your potion will go. Keep the line thickness consistent. -
Add the stirrer:
Draw two diagonal parallel lines sticking out of the pot to represent a spoon or ladle handle.
Clean Lines Pro-Tip
For the crispest black cauldron edges, use a Posca extra-fine paint marker instead of a brush. It gives you pen-like control over the curves.
Step 3: Brewing the Magic
-
Paint the potion:
Fill the inside of the oval rim with a vibrant lime green paint to represent the bubbling brew. -
Add the clover:
In the center of the black cauldron body, carefully paint a four-leaf clover using the same lime green. I find using a small dotting tool to make four connecting dots first helps get the shape right. -
Detail the rim:
Once the green potion is dry, add a thin highlight line of lighter green or white just inside the rim’s edge to simulate liquid reflection. -
Add potion sparkles:
Use a fine brush or toothpick to add tiny white asterisks (*) floating in the green soup.
Level Up: Glow Time
Swap the standard lime green paint for glow-in-the-dark acrylic. Your potion and clover will eerily illuminate when the lights go out!
Step 4: Final Touches
-
Embellish the pot:
Using white paint and a very fine tool, add a row of tiny dots along the upper edge of the black cauldron body for decoration. -
Create steam:
Paint delicate, wavy green lines rising from the potion to look like magical steam. Add small green clover shapes or asterisks floating upward in the steam. -
Atmospheric stars:
Fill the surrounding white space with small black stars and dots. Vary their sizes to create a whimsical atmosphere. -
Clean up outlines:
If any white paint overlapped the black cauldron, touch up the black edges now to make the silhouette crisp. -
Seal the artwork:
Allow the rock to cure for at least 24 hours. Finish by applying a clear spray sealant in light bursts to protect your design from weather and chipping.
Place this lucky little cauldron on your porch or hide it in the garden for a neighbor to find


Haunted House Windows Glow
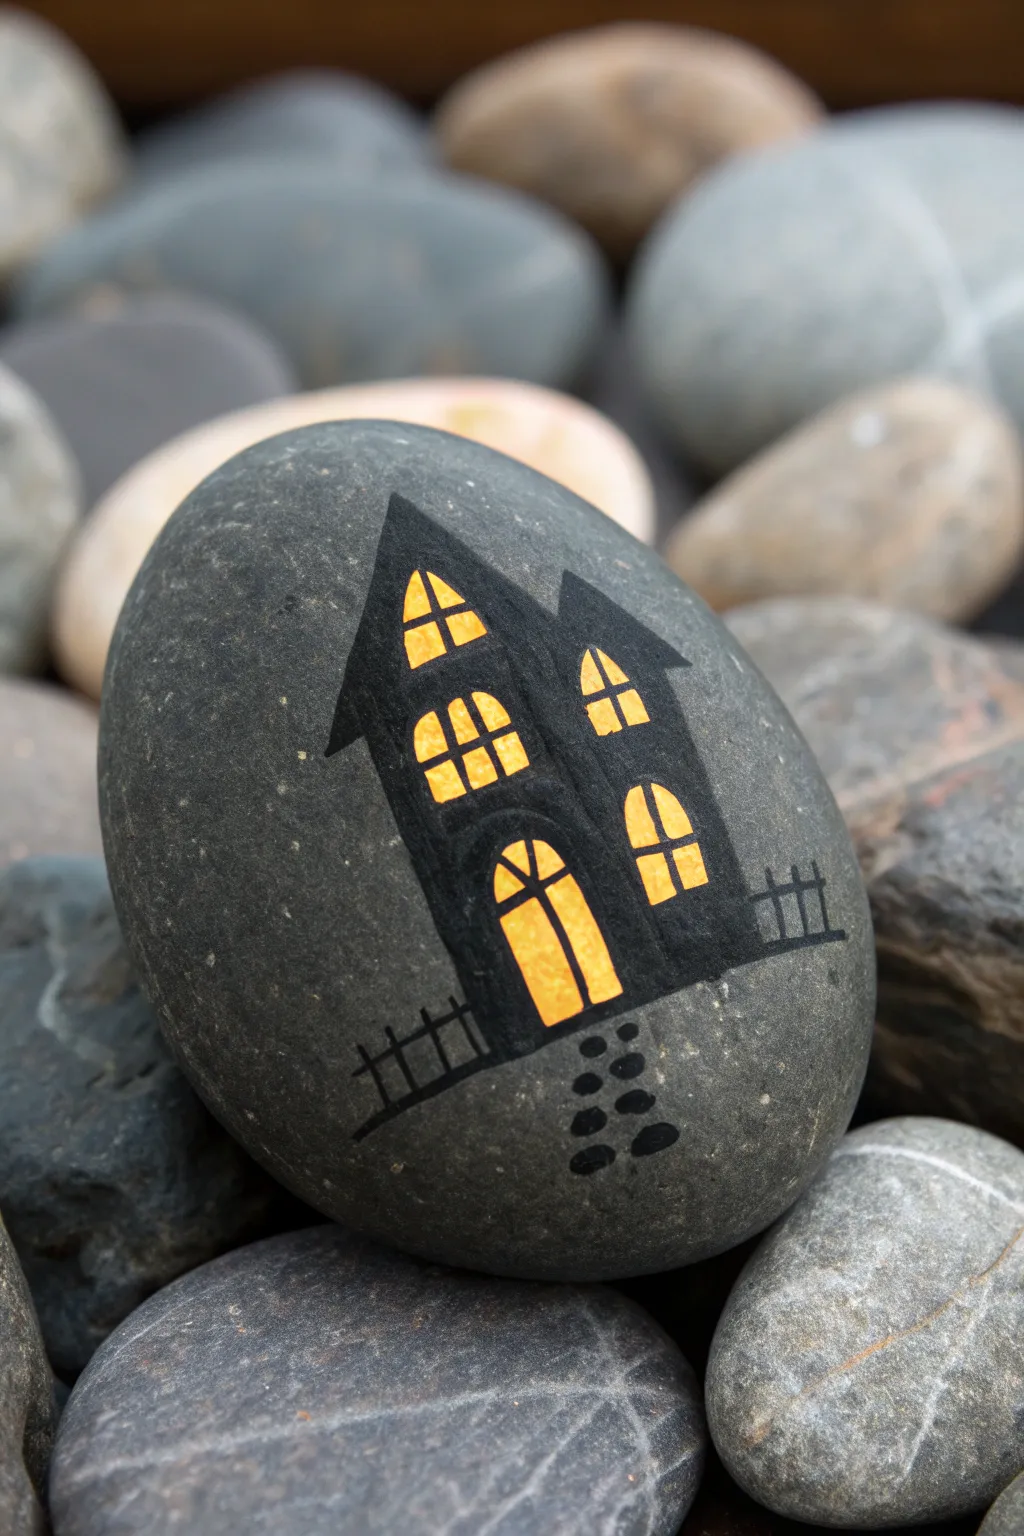
Transform a simple dark stone into a spooky scene where the lights are always on. The contrast between the matte black silhouette and the vibrant yellow windows creates a convincing illusion of inner warmth against a cold night.
Step-by-Step
Materials
- Smooth, dark grey river rock (flat and oval shape works best)
- Black acrylic paint or fine-point black paint pen
- Yellow acrylic paint (bright, warm yellow)
- Orange acrylic paint (for shading)
- Small flat brush
- Fine detail liner brush (size 0 or 00)
- Pencil (optional for sketching)
- Matte finish sealer spray
Step 1: Planning the Structure
-
Select your canvas:
Choose a rock that is naturally dark grey or black. If you can’t find one, you can paint a lighter rock with a dark grey base coat, but the natural stone texture shown in the image looks best. -
Visualize the layout:
Look at the shape of your rock. You want the house to sit slightly below the center line to leave room for the tall roof peaks. The total height of the house should take up about two-thirds of the rock’s vertical space. -
Sketch the outline:
Using a pencil, lightly sketch the main body of the house. Draw a tall, narrow rectangle for the main section on the left, and a shorter, slightly wider section attached on the right side. -
Add the roof peaks:
Sketch two sharp triangles on top of your rectangles. The left roof should be taller and steeper than the right one to create that classic crooked haunted house silhouette.
Paint Pen Bleeding?
If using a paint pen over the texture of a rock causes the ink to bleed into the stone’s pores, apply a layer of clear matte medium first to seal the surface before drawing.
Step 2: Painting the Light
-
Map out the windows:
Before painting any black, outline where your windows and door will go with your pencil. You need two arched windows on the top left, two on the right, and a large arched double door at the bottom center of the main structure. -
Fill the light sources:
Dip your small brush into bright yellow acrylic paint. Fill in the window and door shapes completely. Don’t worry about perfect edges right now; the black paint will cover any messiness later. -
Add warmth:
While the yellow is still slightly wet, I like to touch a tiny bit of orange paint to the very bottom corners of the door and windows. Blend it upward lightly to create a glowing gradient effect. -
Let it dry completely:
This is crucial. The yellow paint must be 100% dry before you add the black, or the colors will muddy together and lose their glow.
Boost the Glow
To make the windows really pop, paint a layer of white underneath the yellow. This white base coat prevents the dark rock from dulling the brightness of the yellow paint.
Step 3: Creating the Silhouette
-
Outline the house:
Using black acrylic paint and a fine brush (or a black paint pen), carefully outline the exterior shape of the house, going around the dried yellow windows. -
Fill the walls:
Fill in the rest of the house structure with solid black. Paint right up to the edges of your yellow shapes, refining their curves to make them look like sharp arches. -
Add window panes:
Switch to your finest liner brush or a very fine-point paint pen. Draw a vertical line and a horizontal line through each window to create the panes. For the door, draw a single vertical line down the center and curved lines for the frame. -
Create the roof eaves:
Extend the black paint slightly past the walls at the bottom corners of the roof triangles to create overhanging eaves. This adds dimension to the silhouette.
Step 4: Final Spooky Details
-
Paint the fence:
On the left and right sides of the house, paint a simple horizontal line extending outward. Add small vertical dashes crossing it to create a rickety fence. -
Lay the stone path:
Below the main door, paint small, irregular black ovals in a cluster that widens as it moves away from the house. This creates a stepping stone path leading to the entrance. -
Tidy up nuances:
Check your black opacity. If the stone color is showing through the house silhouette, apply a second thin coat of black for a solid, opaque look. -
Seal the artwork:
Once everything is completely dry (give it at least an hour), spray the rock with a matte finish sealer to protect the paint without adding unnatural shine.
Place this eerie little cottage on your porch or hide it in the garden for a subtle Halloween surprise
Full Moon and Spindly Trees
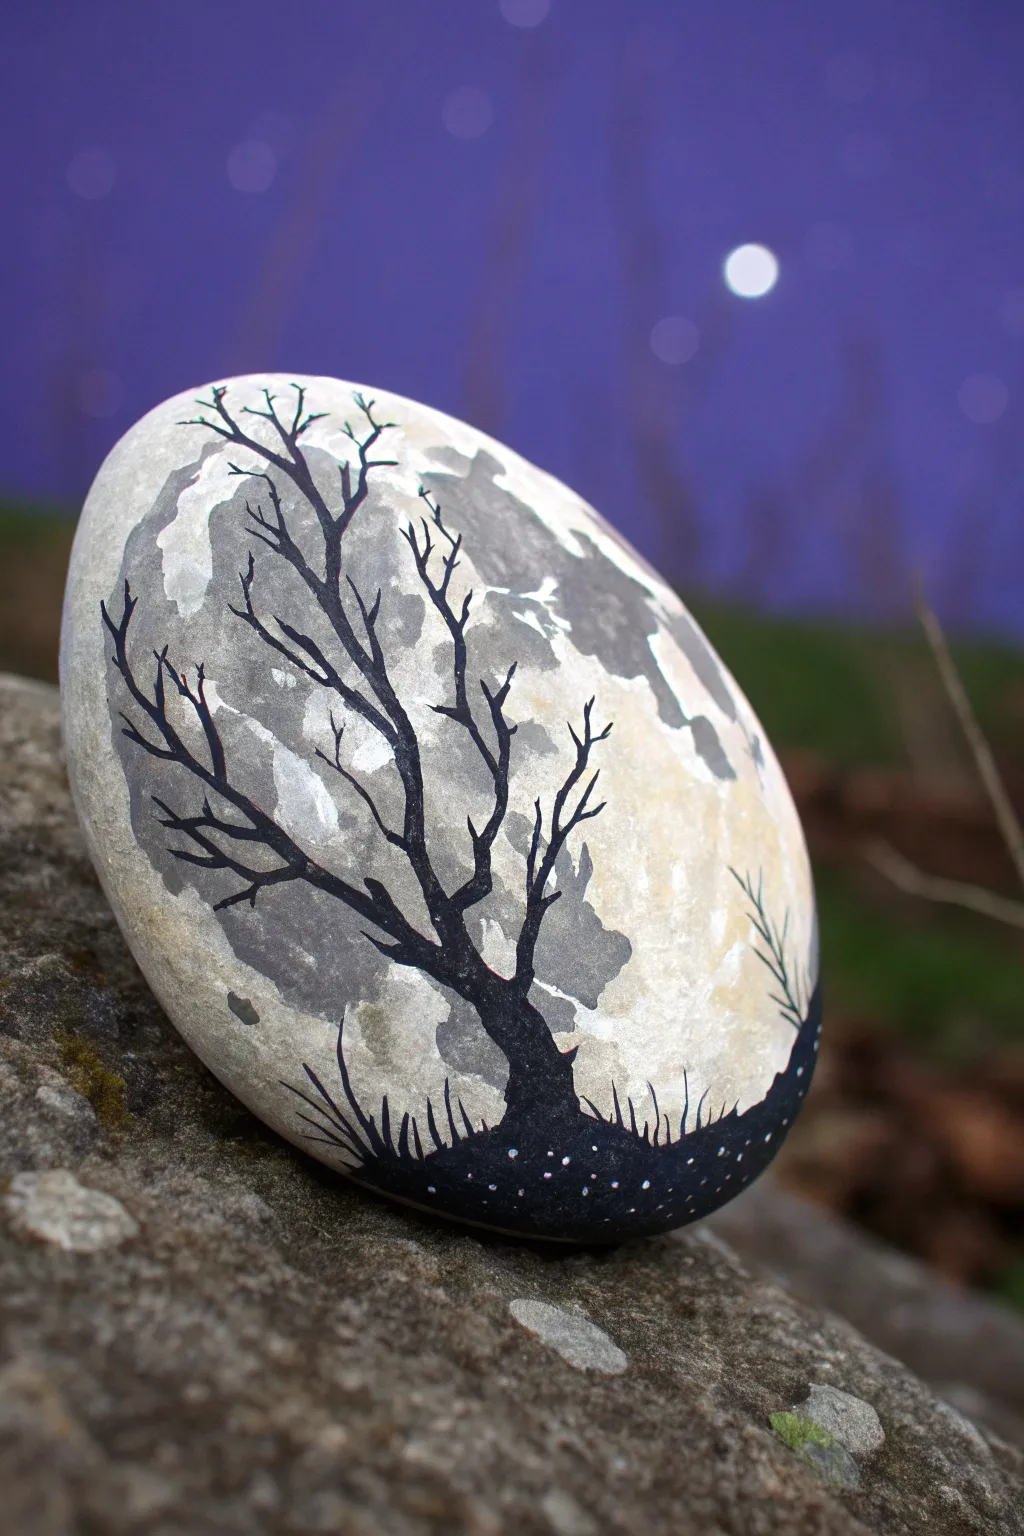
Capture the eerie beauty of a Halloween night with this striking rock painting. By using the natural shape of the stone as your moon, you’ll create spooky contrast with a stark black tree silhouette.
Detailed Instructions
Materials
- Smooth, round or oval rock
- White acrylic paint
- Light grey acrylic paint
- Black acrylic paint or black fine-point paint pen
- Small flat brush
- Detail liner brush (size 0 or 00)
- Small piece of sponge (optional)
- Clear sealant (spray or brush-on)
- Palette or paper plate
Step 1: Painting the Moon
-
Prime the Surface:
Start by washing and thoroughly drying your rock to remove any dirt or oils. Paint the entire top surface with a coat of white acrylic paint. Depending on your paint’s opacity, you might need a second coat to get a solid, bright base. -
Create Texture:
While the white base is dry, mix a very small amount of black into your white paint to create a pale grey. You want this to be subtle. -
Dab the Craters:
Using a small sponge or a dry, stiff brush, lightly dab the pale grey onto the white surface. Focus on creating random, cloud-like patches rather than perfect circles to mimic the moon’s maria and craters. -
Softening the Edges:
If the grey patches look too harsh, take a clean, slightly damp brush and gently feather the edges while the paint is still wet to blend them into the white background. -
Add Depth:
Mix a slightly darker shade of grey and add tiny, concentrated dabs inside the larger grey areas. This adds dimension to the lunar surface. Let the rock dry completely before moving on.
Smudged the white?
If you accidentally get black paint on the moon, wait for it to dry fully. Then, dab a thick opaque layer of white paint over the mistake to act as ‘correction fluid’ before blending it back in.
Step 2: The Silhouette
-
Ground the Scene:
Using black acrylic paint and a small flat brush, paint a curved hill at the very bottom of the rock. This anchors your tree and gives the scene perspective. -
Start the Trunk:
Switch to your liner brush or a black paint pen. Draw a line extending upward from the hill, making it thicker at the base and tapering slightly as it goes up. I find it helpful to twist the brush slightly to create a gnarled, uneven texture. -
Branching Out:
From the main trunk, pull out two or three main branches. Keep them jagged and crooked rather than smooth and straight to enhance the spooky vibe. -
Add Fine Twigs:
Using the very tip of your brush or pen, add smaller twigs growing off the main branches. Let these lines be very thin and chaotic, crossing over each other occasionally. -
Fill the Gaps:
Continue adding tiny twig details until the tree looks sufficiently dense and eerie. The tips of the branches should fade into very fine points. -
Grass Details:
Go back to the black hill at the bottom. Use quick, short upward flicks with your liner brush to create uneven blades of grass silhouettes along the horizon line. -
Tiny Stars:
Dip the back end of a small paintbrush or use a toothpick in white paint. Add just a few tiny white dots scattered within the black hill area to represent fireflies or distant ground reflections.
Go Glow-in-the-Dark
Mix a little glow-in-the-dark medium into your white base coat. When the lights go out, your moon will actually glow green behind the black tree silhouette.
Step 3: Finishing Touches
-
Dry Time:
Allow the black paint to dry completely. This is crucial because black smears very easily on a white background. -
Protect Your Work:
Apply a coat of clear sealant. A spray sealant is often safer for the first coat to avoid dragging the black ink, but a brush-on varnish works if you are very gentle.
Place this eerie moon rock on your porch step to greet trick-or-treaters with a touch of handmade magic
Glow-Look Ghosts on Black Backgrounds
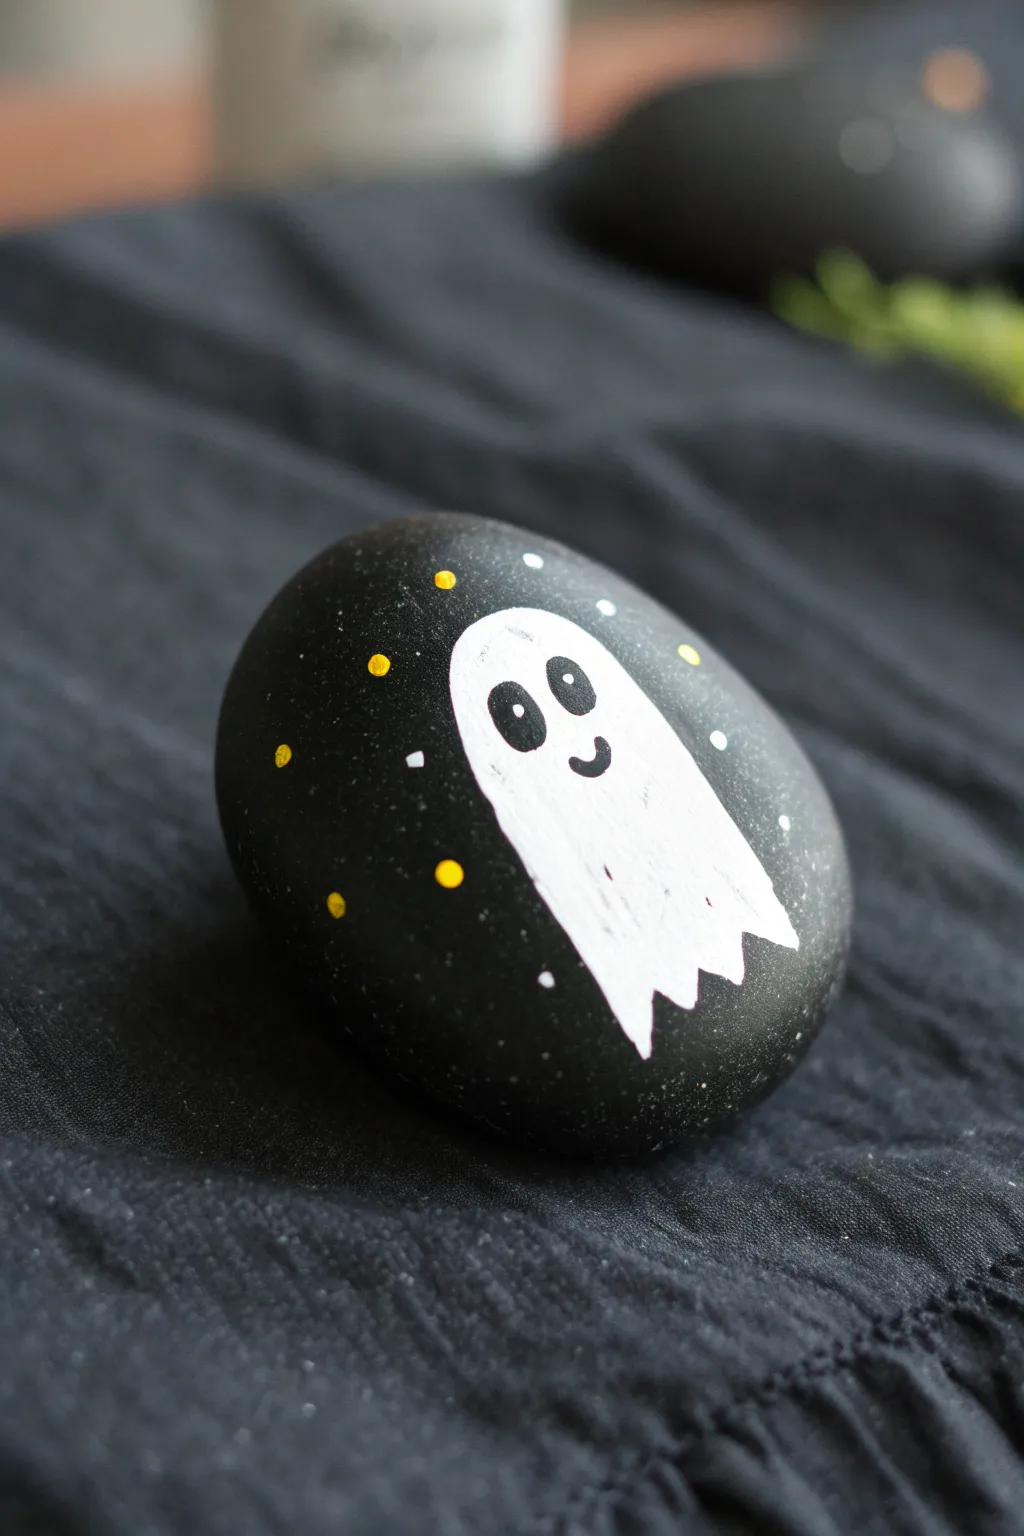
Transform an ordinary stone into a piece of the night sky with this charming ghost design. The stark black background makes the friendly white spirit and scattered stars pop, creating a glow-like effect perfect for Halloween decor.
How-To Guide
Materials
- Smooth river rock (pebble size or slightly larger)
- Matte black acrylic paint
- Titanium white acrylic paint
- Bright yellow acrylic paint
- Flat paintbrush (medium size for base coating)
- Round paintbrush (small or fine tip for details)
- Dotting tool or a toothpick
- Spray sealant (matte or satin finish)
- Water cup and paper towels
Step 1: Preparing the Night Sky
-
Clean surface:
Begin by washing your rock with warm soapy water to remove any dirt or oils. Let it dry completely before beginning, as moisture can prevent the paint from adhering properly. -
Base coat application:
Using your medium flat brush, apply a layer of matte black acrylic paint over the entire top surface of the rock. Don’t worry about the bottom yet. -
Optional second coat:
Once the first layer is dry to the touch, assess the coverage. If you can still see the stone’s texture or color through the black, apply a second coat for a truly opaque, deep background. -
Full drying time:
Allow the black base to dry thoroughly. This is crucial because any wet black paint will mix with your white ghost later, turning him gray instead of bright white.
Step 2: Painting the Ghost
-
Outline the shape:
With a small round brush and white paint, gently sketch the outline of the ghost. Start with a rounded dome shape for the head near the top center of the rock. -
Elongate the body:
Pull the white lines down from the head, curving slightly to the right to create a flowing, floating movement. -
Create the hem:
At the bottom of the shape, paint a jagged, zigzag line to form the ghostly tail. Connect this back up to the side lines. -
Fill in the white:
Fill the entire ghost outline with white paint. Don’t stress if it looks a bit streaky on the first pass; white often needs layering over black. -
Layering for opacity:
Let the first white layer dry, then apply a second layer. I find this second coat is what really makes the ghost look solid and bright against the dark stone.
Smoother Coverage
If your white paint feels too thick or chalky, mix in a tiny drop of water. This helps it flow off the brush smoothly for crisp outlines.
Step 3: Adding Personality & Stars
-
Facial features:
Once the white paint is fully dry, dip a fine-tip brush or a dotting tool into black paint. Create two vertical ovals for the eyes, placing them slightly high on the head. -
A friendly smile:
Using the very tip of your smallest brush, paint a tiny, u-shaped smile just below and between the eyes. Keep it simple for a cute expression. -
Highlights in eyes:
If you want extra cuteness, add a microscopic dot of white inside the black eyes using a toothpick, though the original rock keeps them solid black for a classic look. -
Adding yellow stars:
Dip a dotting tool or the non-brush end of a paintbrush into bright yellow paint. Tap small dots randomly around the ghost on the black background. -
Adding distant stars:
Clean your tool and switch to white paint. Add smaller white dots interspersed among the yellow ones to create depth and a twinkling effect. -
Final dry:
Let all the details dry completely for at least an hour to ensure nothing smears during the sealing process. -
Seal the artwork:
Take the rock outside and apply a light coat of spray sealant. This protects your hard work from chipping and gives the rock a finished, professional look.
Glow Up
Use glow-in-the-dark acrylic paint for the white ghost body. By day it looks normal, but at night your garden will have a real spectral visitor.
Now you have a pint-sized phantom ready to haunt your garden or windowsill
Halloween Story Stone Sets

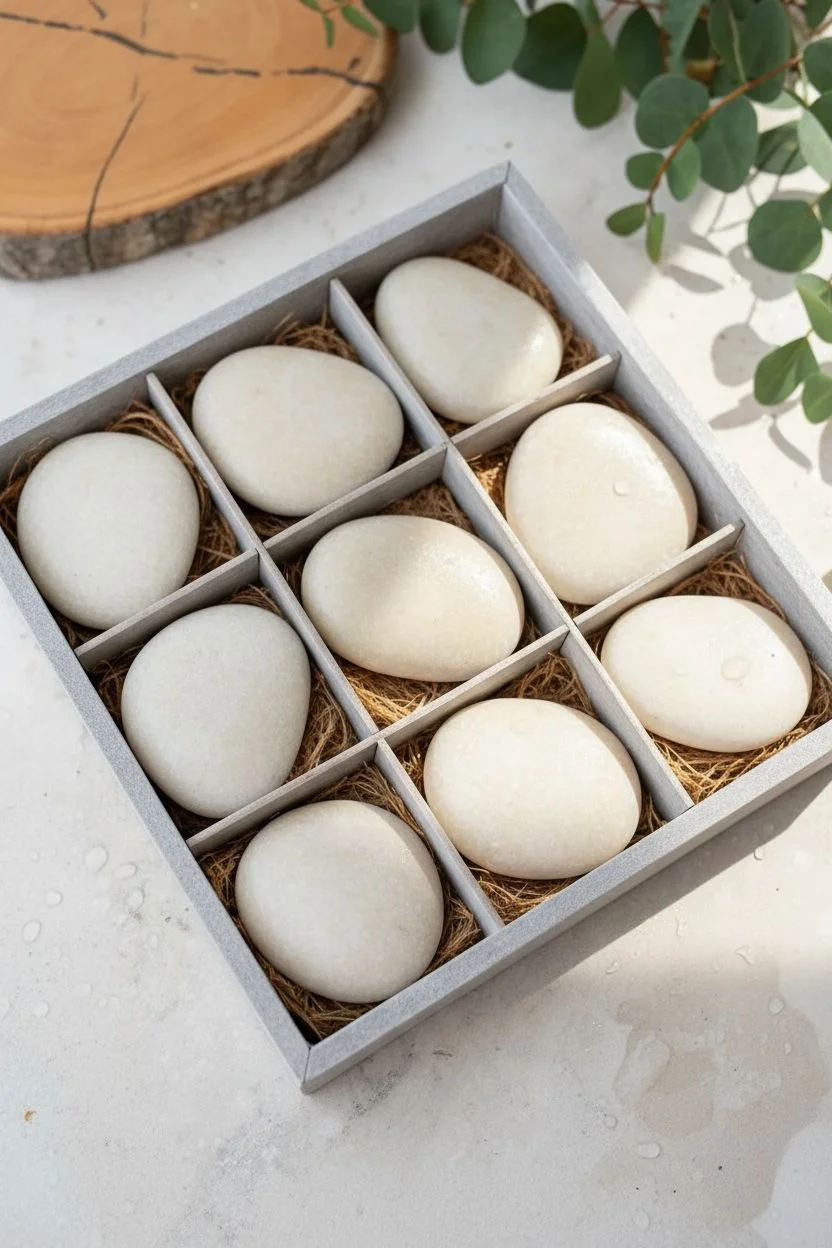
Create an interactive Halloween storytelling set with these charmingly simple painted rocks housed in a rustic wooden display. The clean, minimalist designs—featuring classic icons like ghosts, pumpkins, and black cats—make for a delightful seasonal decoration or a fun family activity.
Detailed Instructions
Materials
- 9 smooth river rocks (roughly 2-3 inches in diameter, light color preferred)
- Wooden display box with 9 compartments
- Acrylic paints (White, Black, Orange)
- Fine detail paintbrush (size 0 or 00)
- Small flat paintbrush (size 4 or 6)
- Pencil with eraser
- Dried moss or brown shredded paper filler
- Matte or satin clear sealant spray or varnish
- Palette or small dish for mixing
Step 1: Stone Preparation
-
Select and Clean:
Choose nine stones that fit comfortably within your wooden box’s compartments. Wash them thoroughly with warm soapy water to remove any dirt or oils, then let them dry completely in the sun. -
Base Coat (Optional):
If your stones are dark or uneven in color, paint a layer of white acrylic over the top surface to create a blank canvas. If using naturally light stones like the ones pictured, you can skip this step for a more organic look.
Fixing Mistakes
Mess up an outline? Don’t panic. Wait for the acrylic to dry completely, then gently scrape the error off with a craft knife or paint over it with the stone’s base color.
Step 2: Painting the Icons
-
Drafting Designs:
Lightly sketch your nine designs onto the stones with a pencil. Plan for variety: three jack-o’-lanterns, two ghosts (one white, one black), a bat, a black cat face, a full black cat, and a spiderweb. -
The Friendly Ghosts:
For the white ghost, paint a simple rounded shape with wavy bottom edges. Let it dry, then outline it with a very fine black line. Add simple oval eyes and a mouth. For the black ghost, simply paint a silhouette shape in black and add two small white dots for eyes once the black is dry. -
Jack-o’-Lantern Base:
Paint round or slightly oval pumpkin shapes using bright orange acrylic. You may need two coats to get vivid coverage. Allow the orange paint to dry completely before adding features. -
Pumpkin Faces:
Using your finest brush and black paint, add the jack-o’-lantern faces. Vary the expressions: try triangular eyes with a toothy grin for one, and rounded eyes with a simple smile for another. -
Black Cat Face:
Paint a black silhouette of a cat’s head with pointed ears. Once dry, use a toothpick or fine brush to add white slit eyes. Add whiskers using thin black lines extending from the cheeks. -
Full Black Cat:
On a new stone, paint a seated cat silhouette. Start with a teardrop shape for the body and a circle for the head, then add a curving tail and triangular ears. Keep the edges crisp. -
The Bat:
Draw a small circle for the head and add jagged, expansive wings on either side. Fill the shape in with solid black paint. -
Spiderweb Design:
Cover the entire top surface of one stone with white paint if it isn’t naturally very light. Once dry, paint a central point, then draw straight lines radiating outward like spokes of a wheel. Connect these spokes with small, curved horizontal lines to form the web.
Step 3: Finishing Touches
-
Clean Up Lines:
inspect your stones for any smudges or shaky lines. You can gently scrape away small acrylic mistakes with a toothpick while the paint is semi-dry, or paint over them with the background color. -
Sealing:
Once all paint is perfectly dry (wait at least overnight), apply a coat of matte or satin varnish. This protects the paint from chipping during handling. -
Assembly:
Place a small amount of dried moss or shredded brown paper into each compartment of the wooden box to act as a nest. -
Display:
Settle one finished stone into each compartment, arranging them so the colors are balanced—try not to put all the orange pumpkins right next to each other.
Smoother Lines
If your black outlines look chunky, thin your black acrylic paint slightly with a drop of water. Ink-consistency paint flows much better from a fine liner brush.
Now you have a timeless collection of spooky stones ready for storytelling or display on your coffee table


Have a question or want to share your own experience? I'd love to hear from you in the comments below!