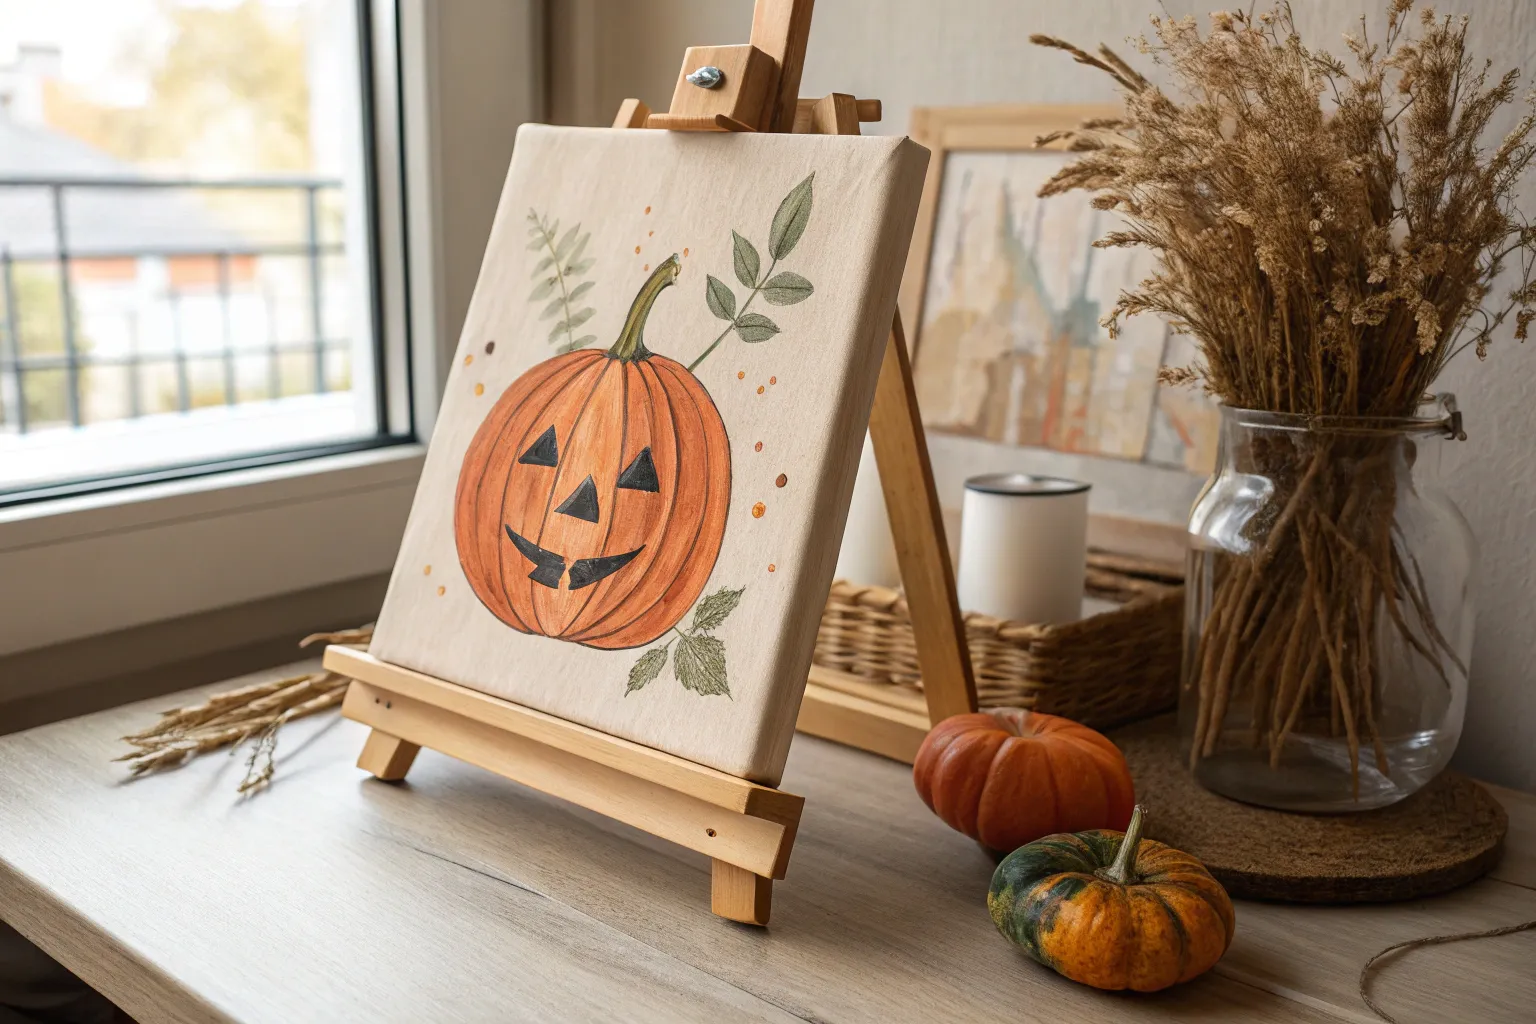
Halloween is basically permission to paint bold colors, dramatic shadows, and all the classic spooky shapes without overthinking it. I pulled together my favorite Halloween painting ideas that look striking on Pinterest but still feel totally doable on a cozy, low-pressure art night.
Cute Ghosts Floating in Moonlight
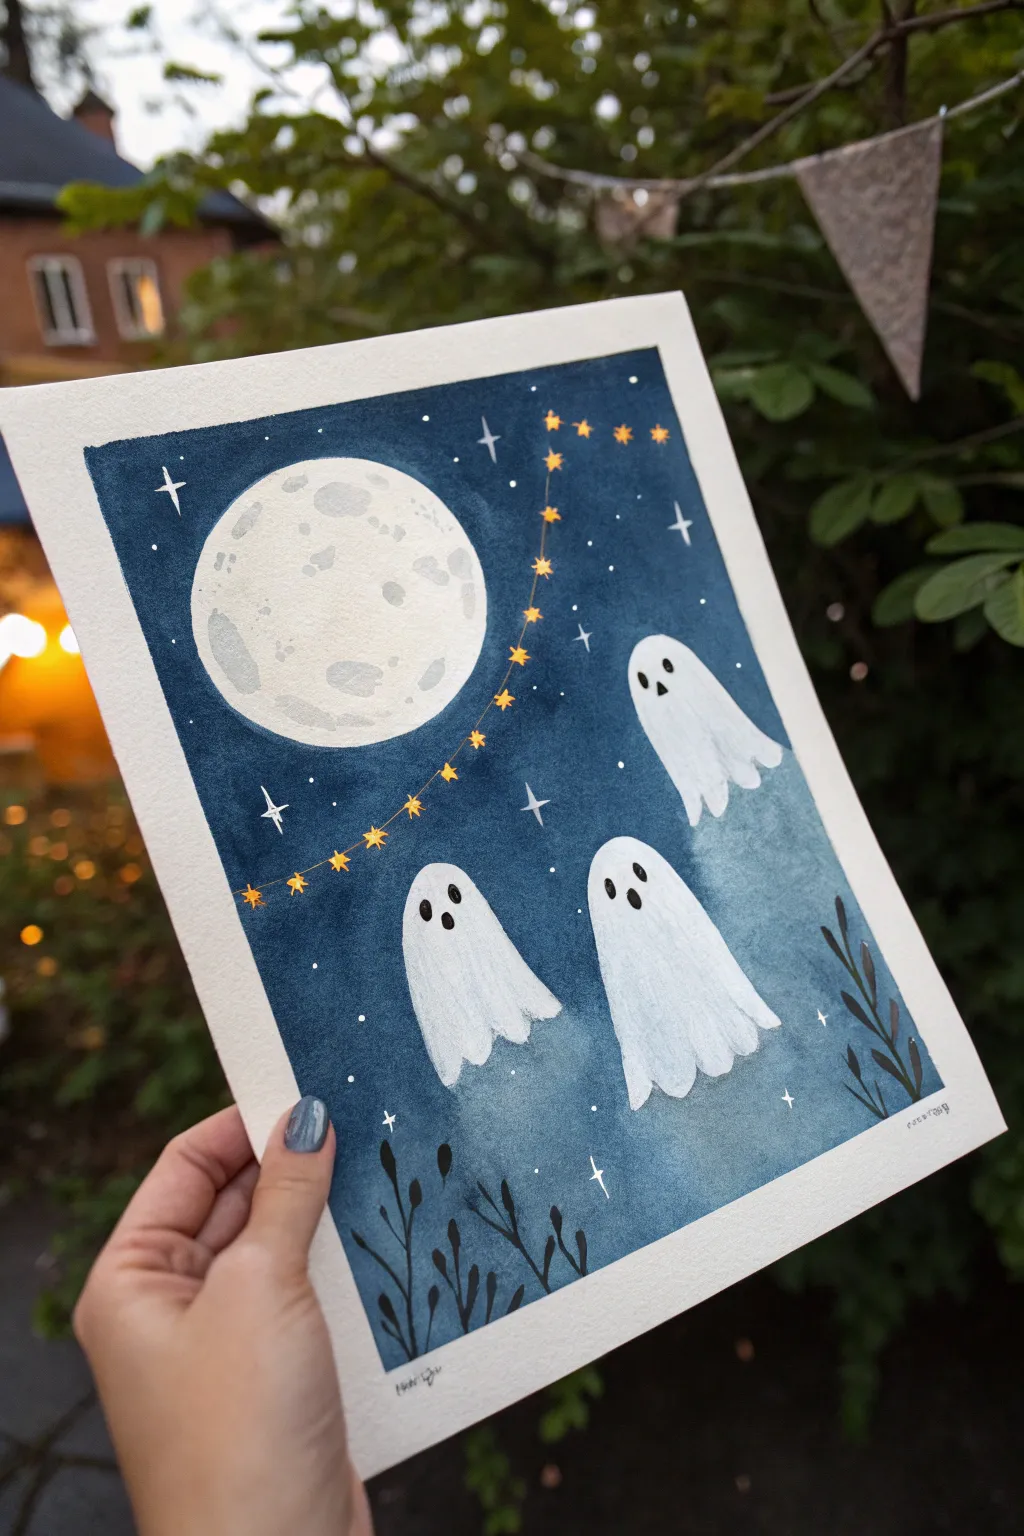
Capture the whimsical side of Halloween with this charming watercolor illustration features three friendly ghosts drifting under a bright full moon. The deep indigo sky contrasts beautifully with the bright white spirits and golden celestial details, creating a piece that feels magical rather than spooky.
Step-by-Step Guide
Materials
- Cold press watercolor paper (A4 or slightly smaller)
- Watercolor paints (Indigo, Payne’s Grey, Black)
- White gouache or white acrylic ink
- Gold metallic watercolor or gold gel pen
- Masking tape or painter’s tape
- Pencil and eraser
- Round watercolor brushes (sizes 2, 6, and 10)
- Fine liner brush or white gel pen
- Salt (optional for texture)
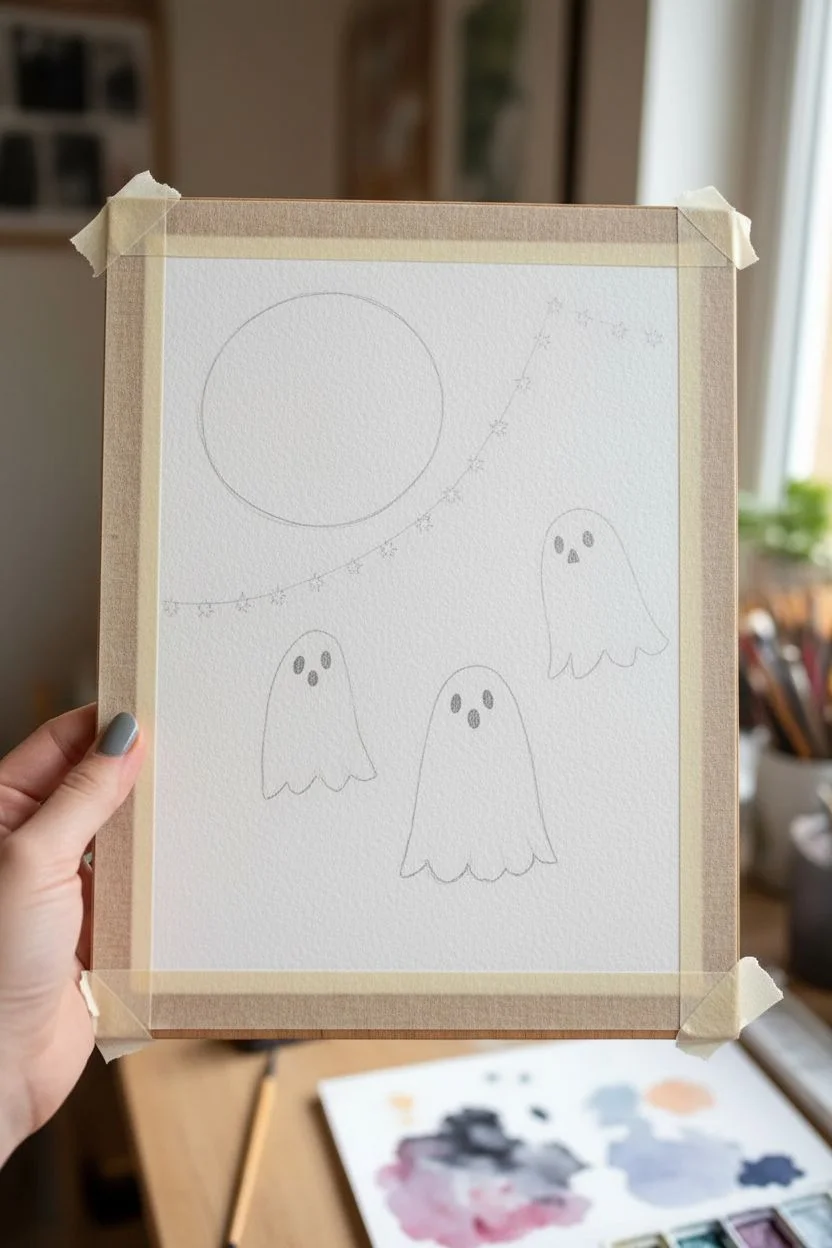
Step 1: Preparation and Sketching
-
Secure the paper:
Begin by taping down all four edges of your watercolor paper to a board or table. This creates that crisp white border you see in the photo and prevents the paper from buckling when wet. -
Draft the layout:
Lightly sketch a large circle in the upper left quadrant for the moon. Use a compass or trace a cup rim to get it perfectly round. -
Shape the ghosts:
Draw three simple, bell-shaped ghost outlines. Place one higher on the right side and two lower down in the center, staggering their heights for visual interest. Keep the bottom edges wavy like drapery. -
Add floating strands:
Sketch a gentle, curved line connecting from the top center towards the moon to guide where your gold stars will hang later.
Clean Edges Pro Tip
To prevent paint from bleeding under your tape, run a bone folder or the back of a spoon firmly along the tape edge before you start painting to seal it tight.
Step 2: Painting the Elements
-
Paint the moon base:
Mix a very watery pale grey wash. Fill in the moon circle, leaving some irregular patches of white paper dry to represent craters. Let the grey bleed softly into the wet areas. -
Detail the moon:
While the moon is still slightly damp but not soaking, drop in slightly darker grey spots to add crater depth. Let this dry completely before moving on. -
Block in the ghosts:
Paint the ghosts with clean water first, then drop in a very faint grey shadow just at the bottom edges and folds of the fabric to give them dimension. Keep the tops bright white. -
Fill the sky background:
Prepare a large amount of a deep blue-black mix (Indigo mixed with Payne’s Grey works perfectly). Carefully paint around the moon and the ghosts. -
Create the gradient:
As you move down the paper, lighten the wash slightly with water so the bottom third is a softer, hazy blue rather than solid black. This creates a misty effect around the ghosts’ tails. -
Soften the edges:
While the blue background is still wet, use a clean, damp brush to gently feather out the bottom edges of the ghosts so they seem to fade into the mist.
Level Up: glow effect
Before painting the dark sky, put a ring of clean water around the moon and ghosts. When you add the blue, it will bleed softly away, creating a glowing aura.
Step 3: Details and Embellishments
-
Add ghost faces:
Once the paper is bone dry, use thick black watercolor or ink to paint small oval eyes and mouths on the ghosts giving them surprised or curious expressions. -
Paint the star garland:
Using gold metallic paint or a gold gel pen, draw small five-pointed stars along the curved line you sketched earlier. Draw a thin line connecting them. -
Add celestial sparkles:
Dip a fine brush into white gouache. Paint crisp four-pointed stars and tiny dots scattered throughout the dark blue sky area. -
Create foliage silhouettes:
Mix a concentrated black paint. Using your smallest brush, paint organic, leafy stems rising from the bottom corners of the painting. -
Final highlights:
Add tiny white highlights inside the black eyes of the ghosts to make them look alive and cute. -
The reveal:
Wait until the painting feels cool to the touch (indicating it is totally dry), then slowly peel away the masking tape at a 45-degree angle to reveal the clean border.
Frame this delightful trio to bring a touch of handcrafted magic to your holiday decor


Black Cat Silhouette on a Full Moon
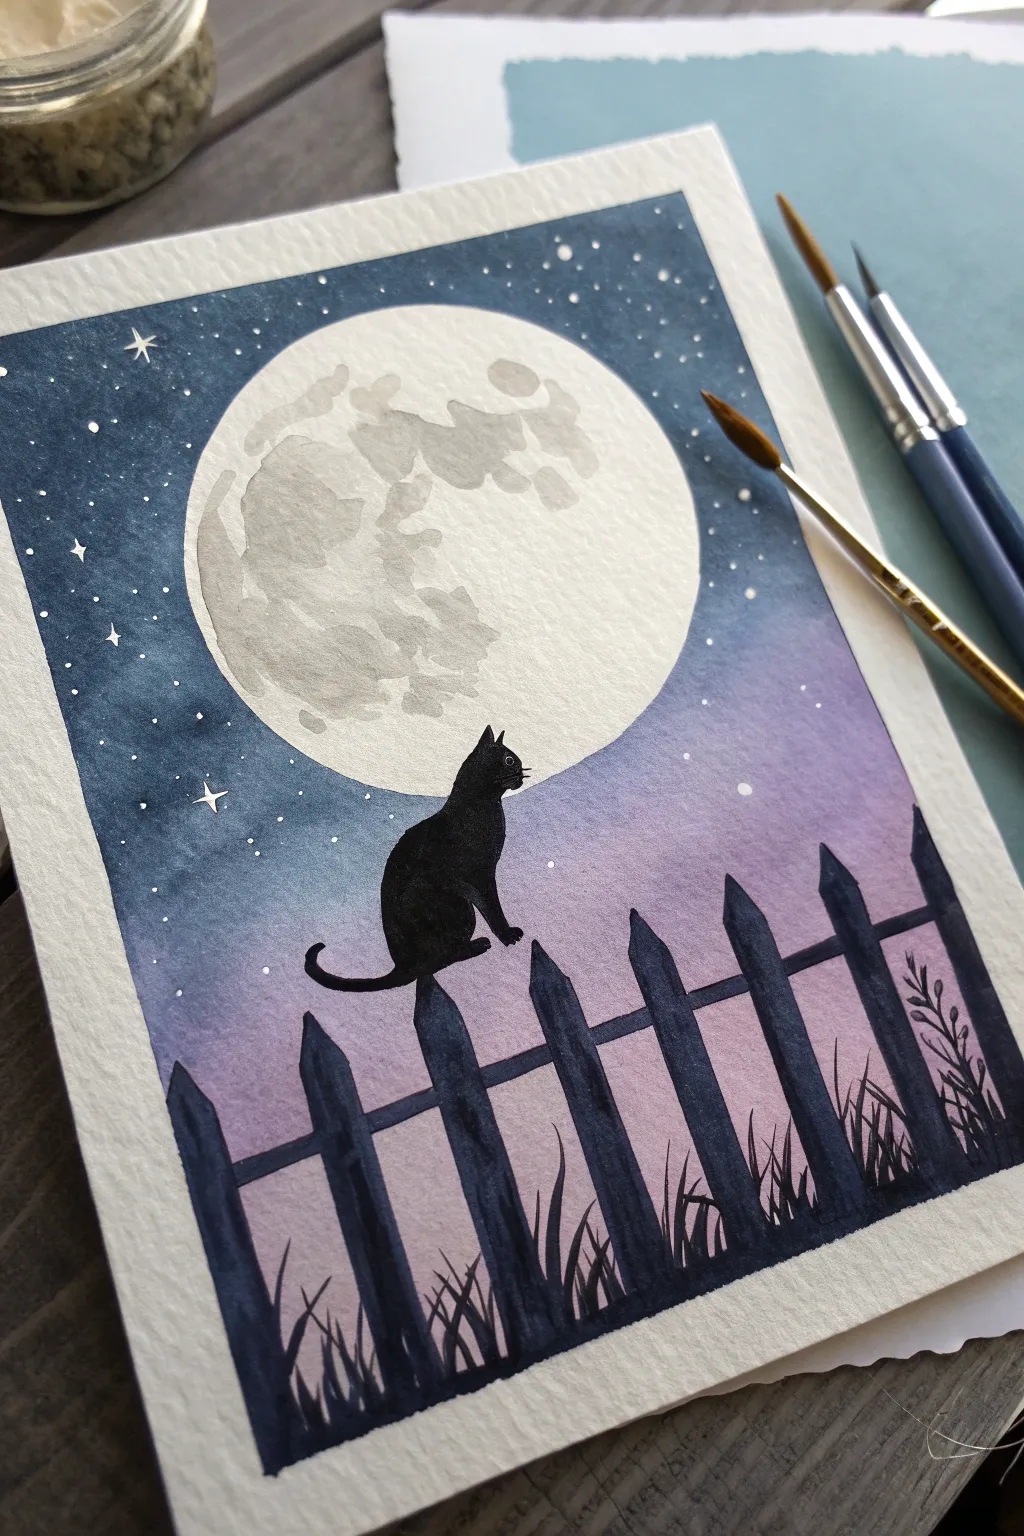
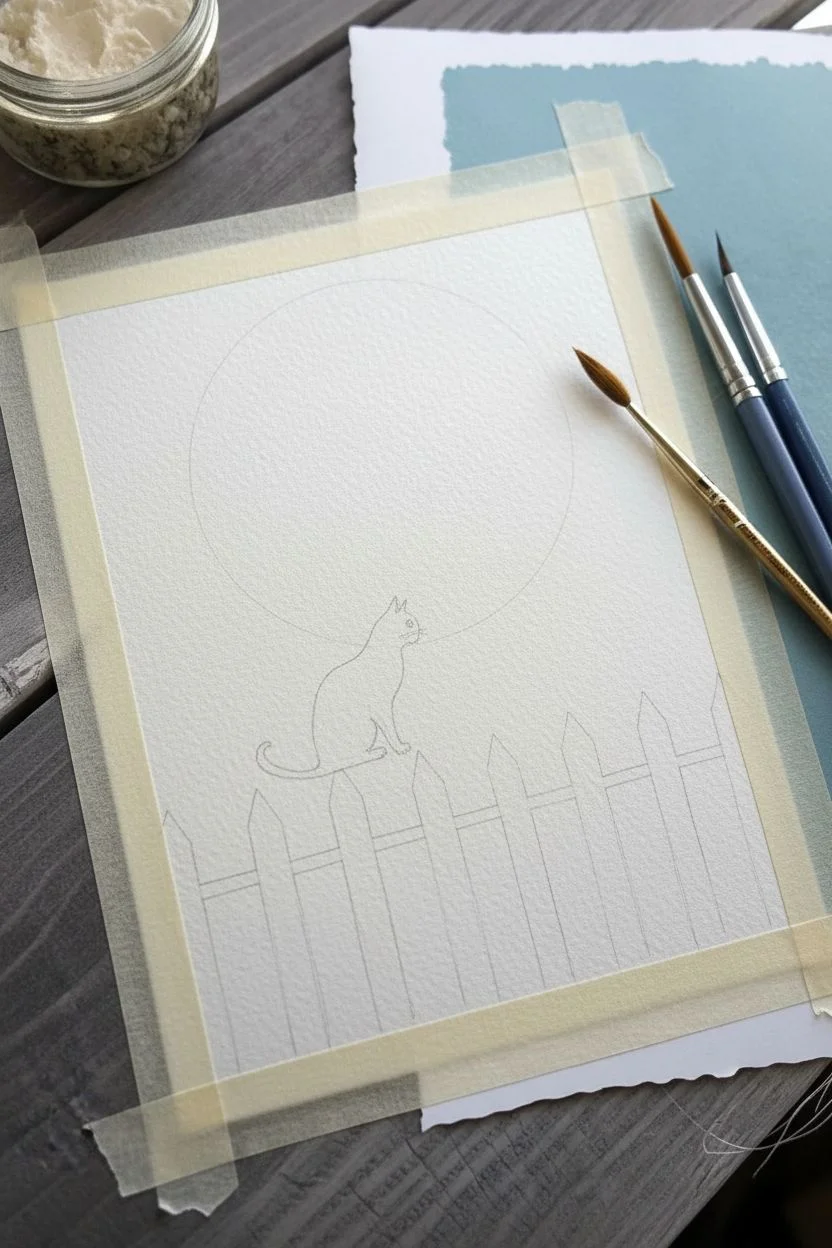
Capture the mystic charm of a Halloween night with this enchanting watercolor project. You’ll create a glowing full moon, a starry indigo sky, and a bold silhouette of a watchful cat perched on a fence.
Step-by-Step
Materials
- Cold press watercolor paper (approx. 5×7 inches)
- Watercolor paints (Indigo, Purple/Violet, Black, Grey)
- Round brushes (sizes 6, 2, and 0 for details)
- Masking fluid or white gouache/white gel pen
- Jar or compass (to trace a circle)
- Pencil and eraser
- Painter’s tape
- Two jars of water
- Paper towels
Step 1: Preparation and Sketching
-
Tape the edges:
Begin by securing your watercolor paper to a board or table using painter’s tape. Press the edges down firmly to create a crisp white border and prevent the paper from buckling when wet. -
Outline the moon:
Place a jar or lid in the upper center of your paper and lightly trace a circle with a pencil. This will preserve the white space for your bright full moon. -
Sketch the foreground:
Lightly sketch the picket fence along the bottom third of the paper. Add the silhouette of the cat sitting on one of the fence posts, ensuring its tail hangs naturally.
Step 2: Painting the Sky and Moon
-
Mask the stars (optional):
If you are using making fluid, dot tiny specks in the sky area around the moon. Let this dry completely before painting over it. Alternatively, skip this step and use white gouache later. -
Wet the sky area:
Using clean water and your larger brush, wet the entire sky area around the moon circle, being careful not to get water inside the moon circle itself. -
Apply the deepest blue:
Start at the top corners with a concentrated indigo or dark navy blue. Let the color flow into the wet paper, keeping the pigment darkest at the top edges. -
Blend into purple:
As you move down towards the fence line, introduce a soft violet or purple hue. Blend this upward into the blue to create a magical night gradient. -
Create a halo effect:
When painting near the moon’s edge, use very water-diluted paint or clean water to ensure the sky is lightest right next to the moon, making it appear to glow. -
Paint the moon’s craters:
Once the sky is dry, mix a very watery grey. Dab faint, organic shapes inside the moon circle to suggest craters and texture, leaving plenty of white paper showing for brightness.
Clean Lines
For the sharpest moon edge, paint the sky carefully around your pencil line. If you slip inside, simply dab it immediately with a clean tissue.
Step 3: Creating the Silhouettes
-
Base layer for the fence:
Mix a dark grey or black watercolor. Paint the wooden fence posts and rails using the flat edge of a brush for straight lines. It doesn’t need to be solid black yet; some variation adds wood texture. -
Paint the cat:
Using a smaller round brush (size 2), carefully fill in the cat shape with concentrated black paint. Ensure the edges are crisp, especially the ears and tail. -
Darken the fence:
Go back over the fence posts with a second layer of black to match the intensity of the cat. Leave the very tops slightly lighter if you want to suggest moonlight hitting them. -
Add grassy details:
With your smallest brush or the tip of the size 2 brush, flick upward strokes at the base of the fence to create wild, overgrown grass blades in silhouette. -
Add side foliage:
On the far right side, paint a few delicate leaf shapes or weeds poking up, adding variety to the silhouette layer.
Spooky Glow
Mix a tiny amount of yellow ochre into your moon grey. While wet, drop in a speck of salt to create unique, crater-like textures as it dries.
Step 4: Final Details
-
Add the stars:
If you used masking fluid, rub it off now to reveal white stars. If not, use a white gel pen or a detail brush with opaque white gouache to dot stars throughout the blue sky. -
Create starbursts:
Select a few of your white stars and carefully draw a tiny cross or four-pointed shape over them to create twinkling starbursts. -
Highlight the whiskers:
Using an extremely fine liner brush or a white gel pen, draw delicate whiskers on the cat’s face. This tiny detail really brings the character to life. -
Remove the tape:
Wait until the painting is 100% bone dry. Peel the painter’s tape away slowly at a 45-degree angle to reveal your crisp, clean borders.
Now you have a serene yet spooky piece of art perfect for the Halloween season


Bat Swarm Across a Twilight Sky

Capture the eerie beauty of dusk with this vibrant gradient painting featuring a swarm of bats taking flight. The blend of warm oranges into deep midnight blue creates a striking backdrop for the crisp black silhouettes.
How-To Guide
Materials
- Stretched box canvas (approx. 8×10 or 11×14 inches)
- Acrylic paints: Orange, yellow, dark blue, black, and white
- Wide flat brush (for background blending)
- Small round brush (for details)
- Fine liner brush (for sharp edges)
- Cup of water
- Palette or paper plate
- Pencil (optional)
- Hairdryer (optional, to speed up drying)
Step 1: Creating the Twilight Gradient
-
Prime the warm tones:
Start by squeezing out generous amounts of yellow and orange paint. Using your wide flat brush, paint the bottom third of the canvas with horizontal strokes, blending the yellow near the bottom into a rich orange as you move up. -
Introduce the night sky:
Clean your brush thoroughly. At the very top of the canvas, apply dark blue paint. If you want it really murky, mix a tiny dot of black into the blue. -
Blend the transition:
This is the crucial moment. While the orange and blue bands are still wet, mix the two colors slightly in the middle section of the canvas. Use long, smooth horizontal strokes to feather the blue down into the orange, creating a muddy but natural twilight transition. -
Check the sides:
Don’t forget the edges! Wrap your color gradient around the sides of the canvas, or alternatively, paint all four sides solid black now to frame the image immediately. -
Drying time:
Let this background layer dry completely. I like to use a hairdryer on a cool setting here to speed things up, as the background must be bone-dry before adding silhouettes.
Muddy colors?
If blending orange and blue creates an ugly brown, let the orange dry first. Then, glaze the blue over the top lightly, or use a strip of red or purple between them as a buffer color.
Step 2: Painting the Silhouettes
-
Establishing the ground:
Load your medium brush with pure black acrylic. Paint a jagged, uneven strip along the very bottom edge of the canvas face to represent the ground. -
Adding grass texture:
Switch to a smaller brush. Use quick, upward flicking motions to pull paint up from the ground line, creating the look of wild, unkempt grass and weeds. -
Drafting the bats (optional):
If you’re nervous about freehanding, use a pencil to lightly sketch the positions and basic shapes of your bats. Vary their sizes to create depth. -
Painting large bats:
Using black paint, fill in the largest bats first. Focus on the distinct ‘M’ shape of the wings. The wings should have sharp points and curved scallops along the bottom edge. -
Adding medium bats:
Scatter medium-sized bats throughout the middle section of the sky. Tilt them at different angles so they don’t look like lined-up soldiers; some should be diving, others climbing. -
Filling with small bats:
paint the smallest bats in the distance using just the tip of your smallest brush. These can be simple ‘V’ or ‘M’ shapes without too much detail. -
Refining edges:
Go back over your bat silhouettes with a fine liner brush to sharpen the wing tips and ears. Crisp edges make the silhouette effect convincing.
Glow in the dark
Mix glow-in-the-dark medium into your white paint for the stars and the bat eyes (if you add them). When the lights go out, your spooky scene will come alive
Step 3: Starry Details
-
Dotting the stars:
Dip the handle end of a small paintbrush or a toothpick into white paint. Gently dot stars into the dark blue section of the sky. -
Painting twinkle stars:
Select a few larger white dots and use your finest liner brush to pull four tiny lines outward from the center (up, down, left, right) to create a twinkling cross shape. -
Side details:
This specific style uses the painted sides as part of the composition. If you painted the sides black earlier, add a series of white dots running vertically down the side edge for a decorative finish. -
Final touches:
Check for any transparency in your black silhouettes. If the sunset shows through the bats, apply a second coat of black paint to make them solid and opaque.
Hang your spooky masterpiece near a light source to let those white stars really pop against the dark sky


Haunted House With Lit Windows
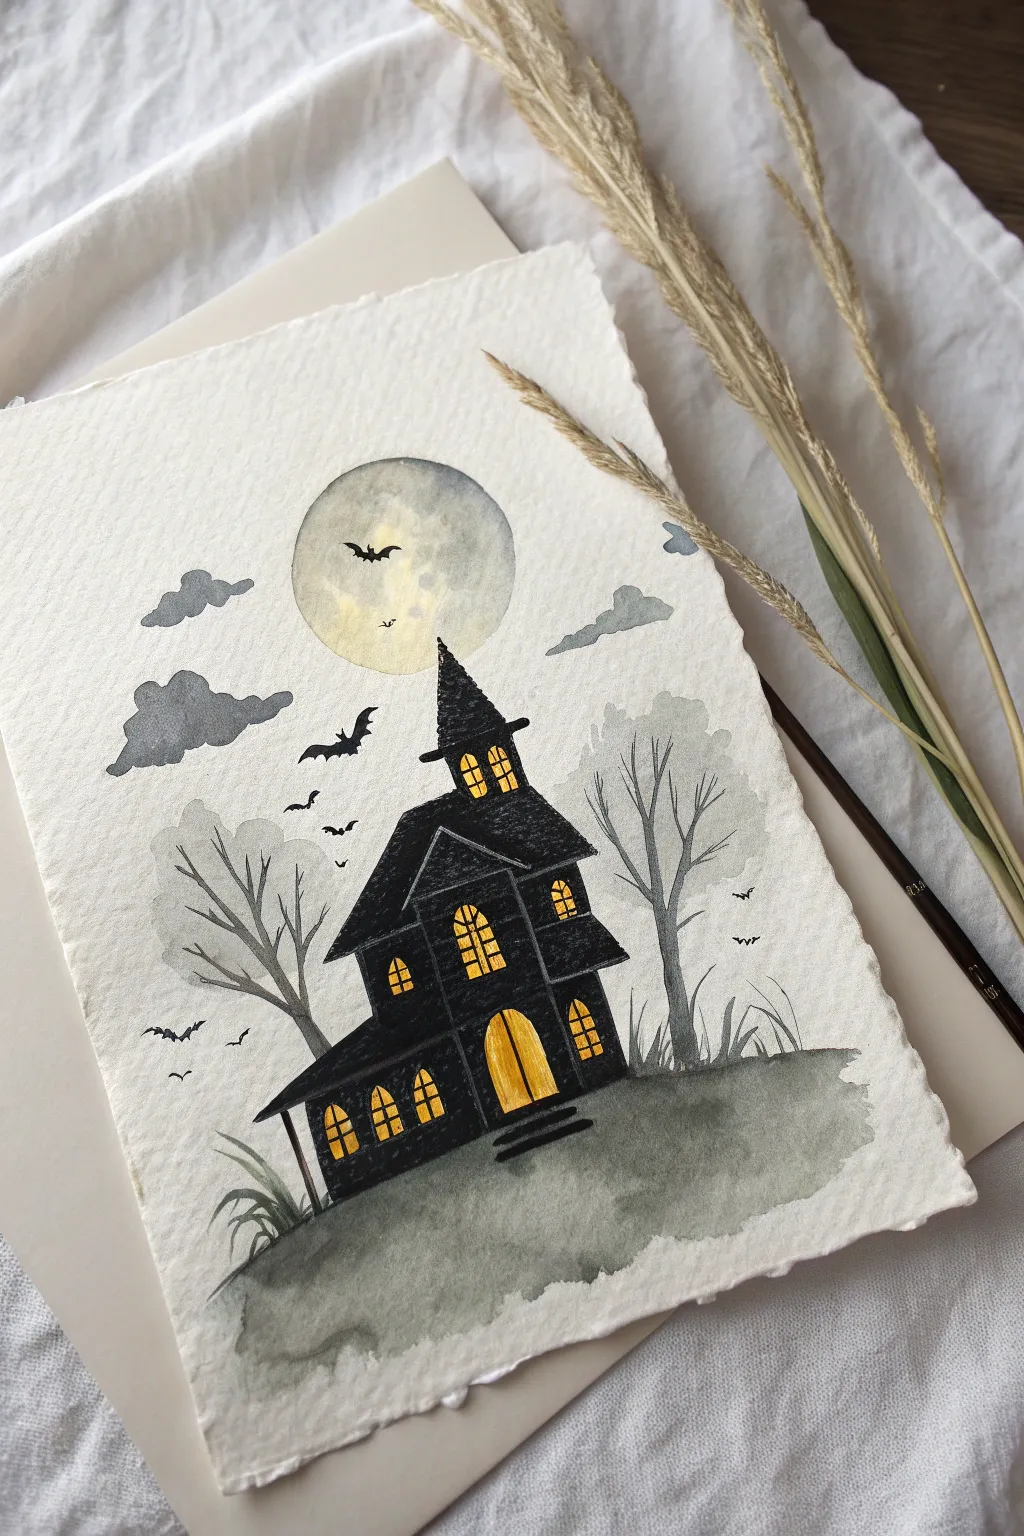
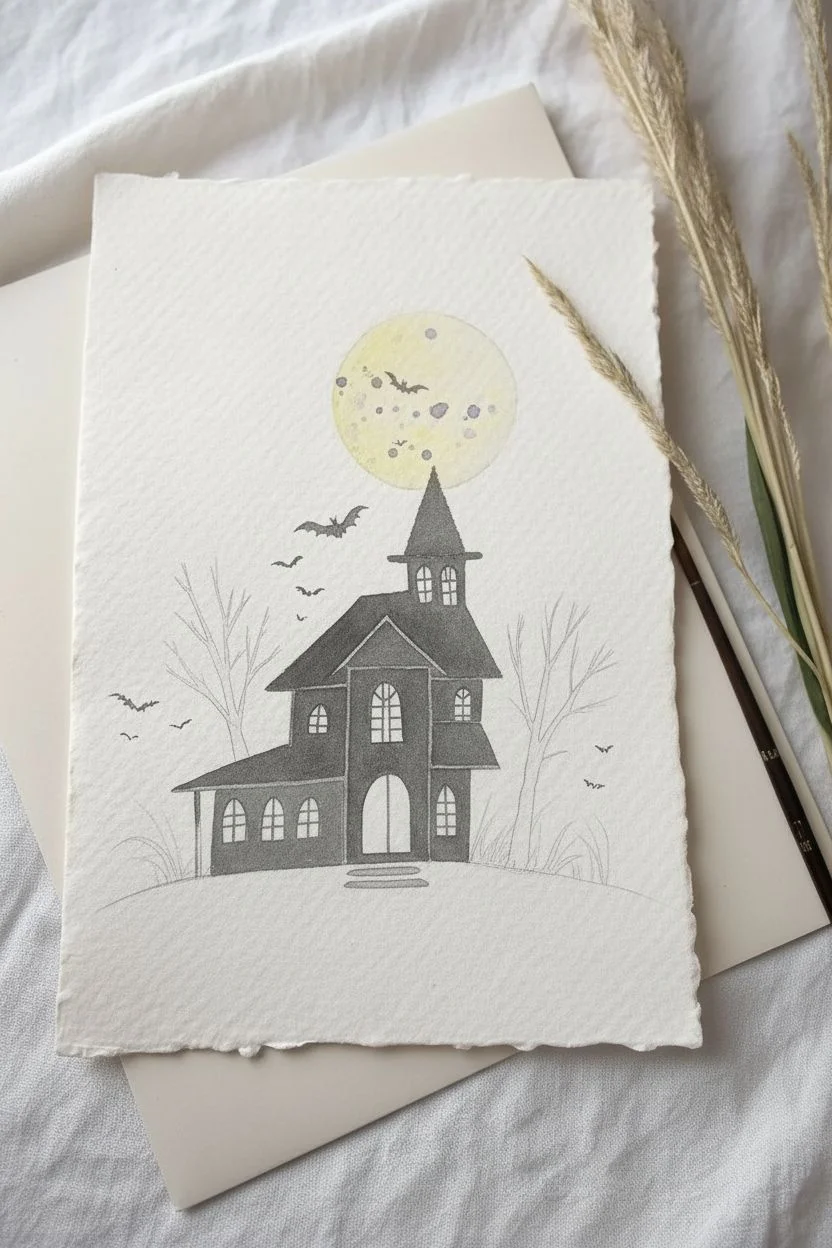
Capture the spooky charm of Halloween with this illustrative watercolor painting featuring a dark, crooked house against a glowing moon. The contrast between the deep indigo-black silhouette and the warm yellow windows creates an inviting yet eerie atmosphere perfect for the season.
Step-by-Step Guide
Materials
- Cold press watercolor paper (with deckled edges if possible)
- Watercolor paints (Payne’s Gray, Lamp Black, Yellow Ochre, Cadmium Yellow, Burnt Umber)
- Round watercolor brushes (size 2, 6, and 8)
- Pencil and eraser
- Jars of water & paper towels
- White gouache or gel pen (optional, for stars)
- Masking tape
Step 1: Planning and The Moon
-
Sketch the layout:
Begin by lightly sketching the outline of your haunted house in the center. Give it a crooked, tall roof and plenty of arched windows. Add a large circle behind the roof peak for the moon. -
Map the landscape:
Sketch a simple curved hill for the house to sit on, and draw outlining shapes for the bare, spooky trees on either side. -
Paint the moon base:
Wet the circle area for the moon with clean water. Drop in a very dilute wash of Cadmium Yellow mixed with a touch of Yellow Ochre. Keep it pale. -
Add moon texture:
While the moon is still damp, dab in tiny spots of watered-down Payne’s Gray or a soft purple to create craters and texture. Let the pigment bloom naturally.
Crisp Window Panes
Work carefully around the yellow windows. If you struggle with steady lines, paint the yellow rectangles slightly larger than needed, then cut back into them with the black house paint to shape them.
Step 2: The House & Windows
-
Glow the windows:
Using a strong mix of Cadmium Yellow and Yellow Ochre, carefully paint the window shapes and the arched door. We want these to shine brightly against the dark house later. -
Outline the building:
Once the windows are completely dry, use a size 2 brush and thick black paint (Lamp Black) to outline the roof, chimney, and walls. Be mindful not to paint over your yellow windows. -
Fill the silhouette:
Switch to a size 6 brush to fill in the rest of the house with black. You can mix a tiny bit of blue into the black to give it a cool, night-time feel. -
Add window mullions:
After the house structure is dry to the touch, use your finest brush tip to draw thin black grid lines (mullions) over the dry yellow windows. -
Paint the roof details:
Use a slightly lighter concentration of black or dark gray to add subtle texture lines on the roof shingles and under the eaves for dimension.
Step 3: Atmosphere & Landscape
-
Paint the ground:
Mix a watery gray using Payne’s Gray and plenty of water. Paint the hill under the house using loose, horizontal strokes, letting the edges stay ragged and uneven. -
Add ghostly trees:
Using a mix of gray and brown, paint the bare trees on the sides. Start with the trunk and flick the brush upward to create thin, wispy branches. -
Deepen the foreground shadows:
While the ground wash is still damp, drop slightly darker gray pigment right at the base of the house and trees to anchor them to the earth. -
Create floating clouds:
Paint irregular cloud shapes in the sky using a medium gray. Keep the edges relatively soft, and perhaps let them overlap the moon slightly for spookiness.
Muddy Ground?
If your ground wash looks too muddy or uniform, drop clear water onto the damp gray paint. It will push the pigment away, creating ‘cauliflower’ blooms that look like spooky fog.
Step 4: Final Spooky Details
-
Add flying bats:
Using your smallest brush and opaque black paint, add several silhouettes of bats flying around the moon and chimney. Vary their sizes to show depth. -
Refine the grass:
With a dry brush technique or very little water, flick upward strokes of dark gray/black at the base of the hill to simulate tall, dead grass. -
Final touches:
Check your contrast. If the roof needs to be darker to pop against the moon, add a second layer of black now. -
Dry and display:
Allow the entire piece to dry completely before erasing any visible pencil marks, specifically around the moon’s edge.
Frame this delightful piece in a black frame or propped on a mantel to greet your Halloween guests
BRUSH GUIDE
The Right Brush for Every Stroke
From clean lines to bold texture — master brush choice, stroke control, and essential techniques.
Explore the Full Guide
Witch Hat and Broom Silhouette Scene
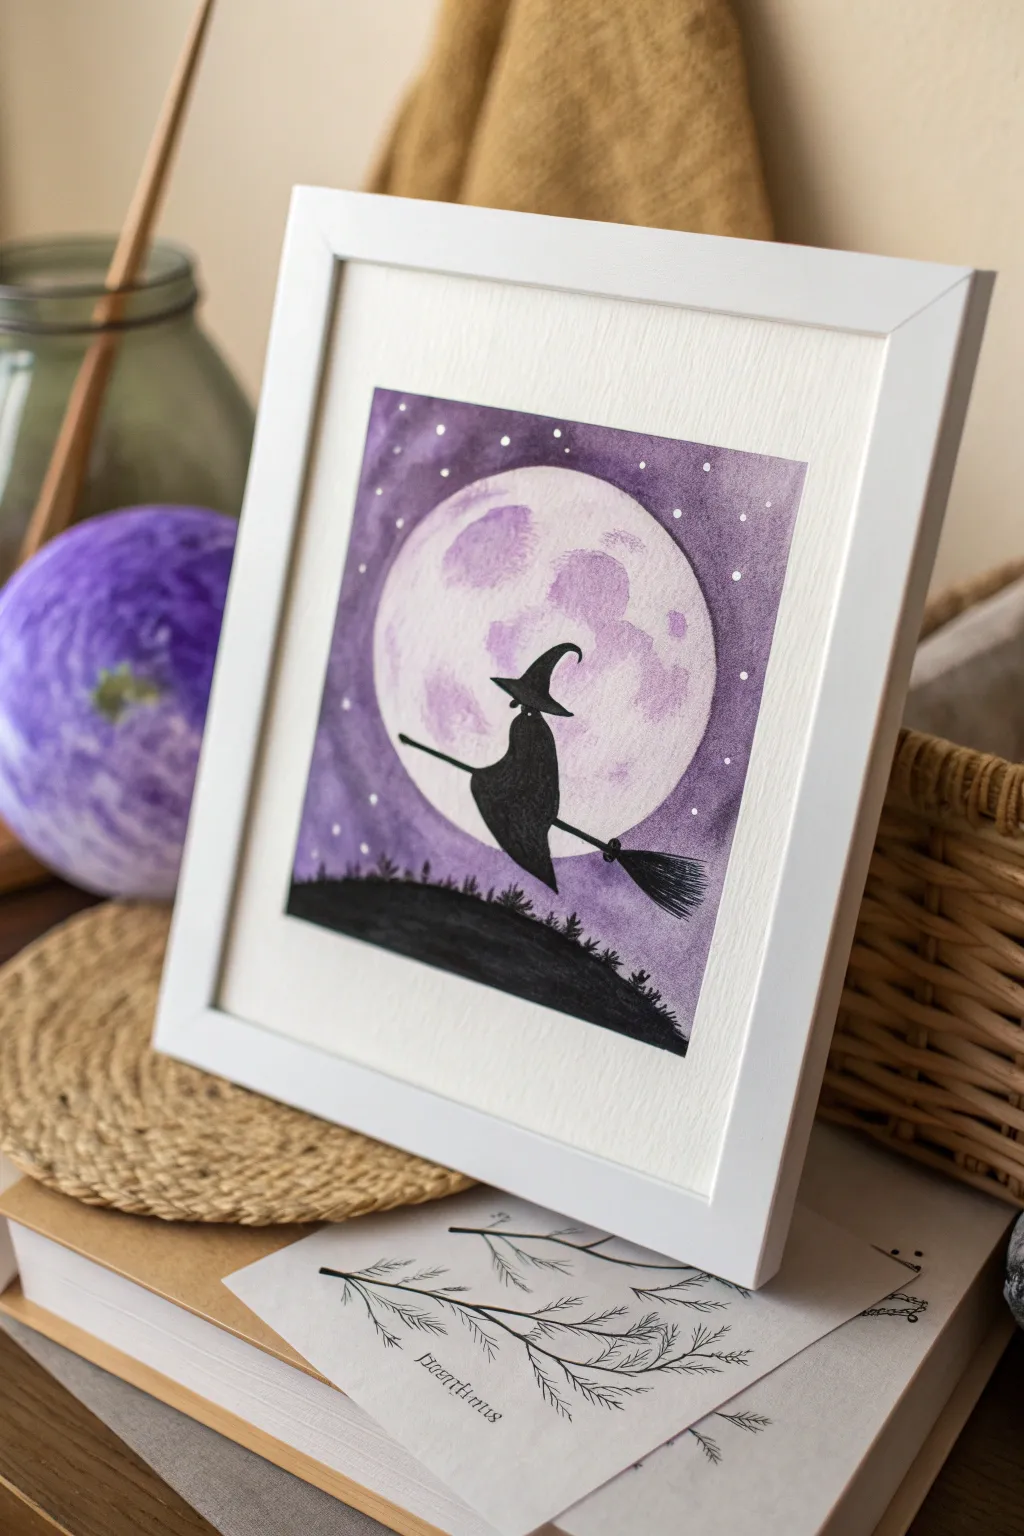
Capture the magic of Halloween night with this dreamy watercolor painting featuring a witch soaring past a textured purple moon. The stark contrast of the black silhouette against the soft, misty background creates a striking piece of seasonal art.
How-To Guide
Materials
- Cold press watercolor paper (cut to 8×8 or similar square)
- Watercolor paints (shades of purple, violet, indigo, and white gouache)
- Black waterproof ink or black acrylic paint
- Round watercolor brushes (size 6 or 8 for washes, size 0 or 1 for details)
- Masking fluid (drawing gum) or simple circle template
- Pencil and eraser
- Jars of clean water
- Paper towels
- Salt (table salt works well)
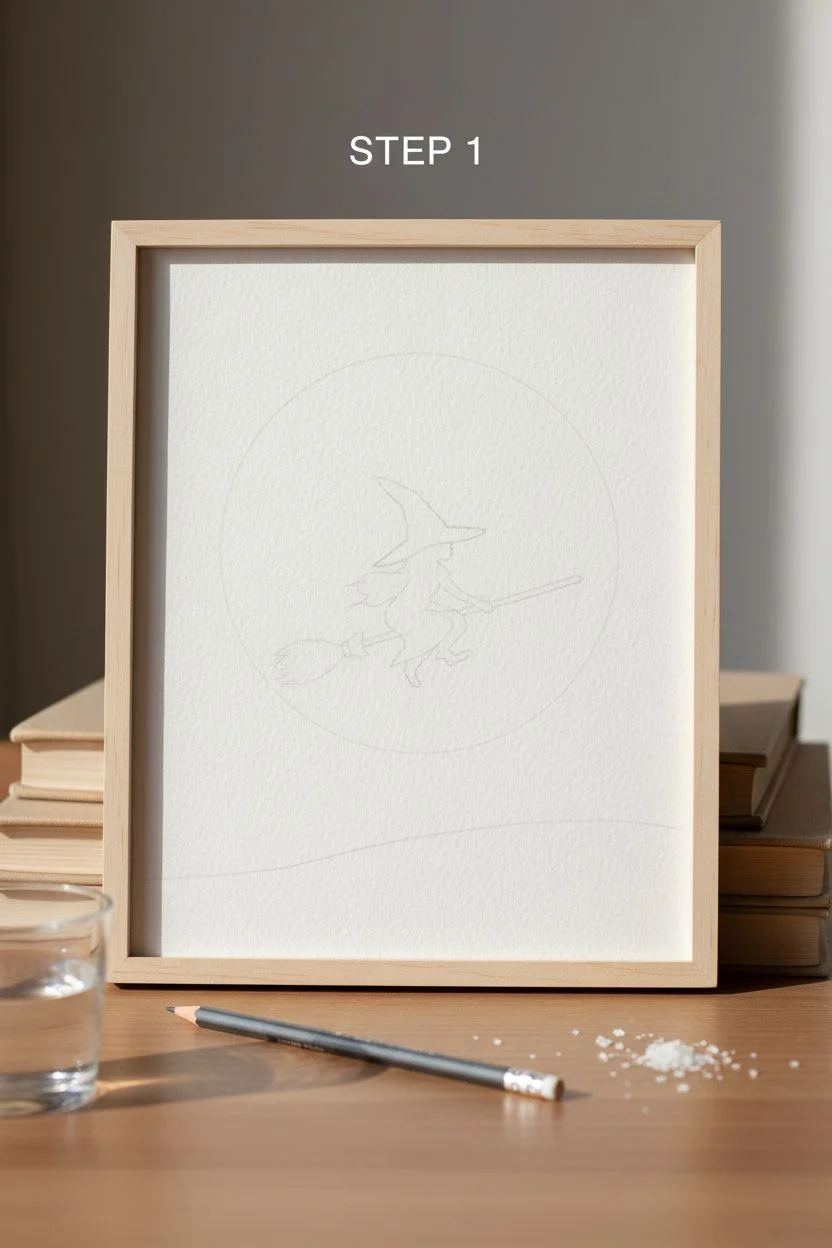
Step 1: Planning and Sketching
-
Trace the moon:
Begin by lightly tracing a large circle in the upper center of your paper using a bowl or a compass. This will act as the focal point for your moon. -
Sketch the silhouette:
Very faintly sketch the outline of the witch, her hat, and the broomstick directly over the moon area. Keep the lines minimal, as they will be filled in later. -
Define the ground:
Draw a gently curved line near the bottom of the paper to represent the grassy hill. The witch should be hovering well above this line.
Moon Magic
Don’t overwork the moon texture. Let the watercolor bloom naturally wet-in-wet. The imperfections make it look more like a real lunar surface.
Step 2: Painting the Sky and Moon
-
Wet the moon area:
Using clean water, wet the inside of your moon circle. You want the paper glistening but not forming puddles. -
Start the moon texture:
Drop in very diluted pale purple or lavender paint into the wet circle. I like to dab darker spots of violet while it’s still wet to create craters and moon texture. -
Wait for the moon to dry:
Let the moon layer dry completely. If you paint the sky too soon, the colors will bleed into your crisp moon circle. -
Prepare the night sky:
Mix a deep, rich purple wash. Wet the area outside the moon circle with clean water, avoiding the moon itself. -
Paint the background:
Apply your dark purple mixture to the wet sky area. Deepen the corners with a touch of indigo to create a vignette effect. -
Add starry texture:
While the sky is still slightly damp, sprinkle a tiny pinch of salt in the corners to create starburst textures. Alternatively, splatter clean water with a toothbrush for lighter spots. -
Dry completely:
Allow the entire background to dry thoroughly. If you used salt, gently brush it off once the paper is bone dry. -
Paint the stars:
Using a tiny brush or a toothpick, dot small points of white gouache or opaque white ink into the purple sky for bright stars.
Step 3: Adding the Silhouette
-
Fill in the hill:
Switch to your black ink or black acrylic paint. Fill in the bottom hill area completely solid black. -
Add grassy details:
Use your smallest brush to flick tiny, upward strokes along the top edge of the hill to simulate blades of grass and small plants. -
Outline the witch:
Carefully outline the witch’s shape with your fine liner brush and black paint. Pay attention to the sharp point of the hat and the curve of the cape. -
Paint the broom:
Draw a straight black line for the broom handle, extending it past the witch’s body on both sides. -
Texture the broom bristles:
Use quick, feathery strokes at the tail end of the broom handle to create the look of straw bristles. -
Fill the silhouette:
Fill in the rest of the witch’s body with solid black. Ensure the paint is opaque enough that the moon’s texture doesn’t show through. -
Final touches:
Check for any uneven edges on your silhouette and smooth them out. Let the finished piece dry completely before framing.
Sparkle finish
Once dry, add a tiny touch of silver glitter glue or metallic silver paint to the stars or the broom’s trail for a magical, shimmering effect.
Place your dried artwork in a simple white frame to let the deep purple hues really pop
Twisted Bare Tree Against a Giant Moon
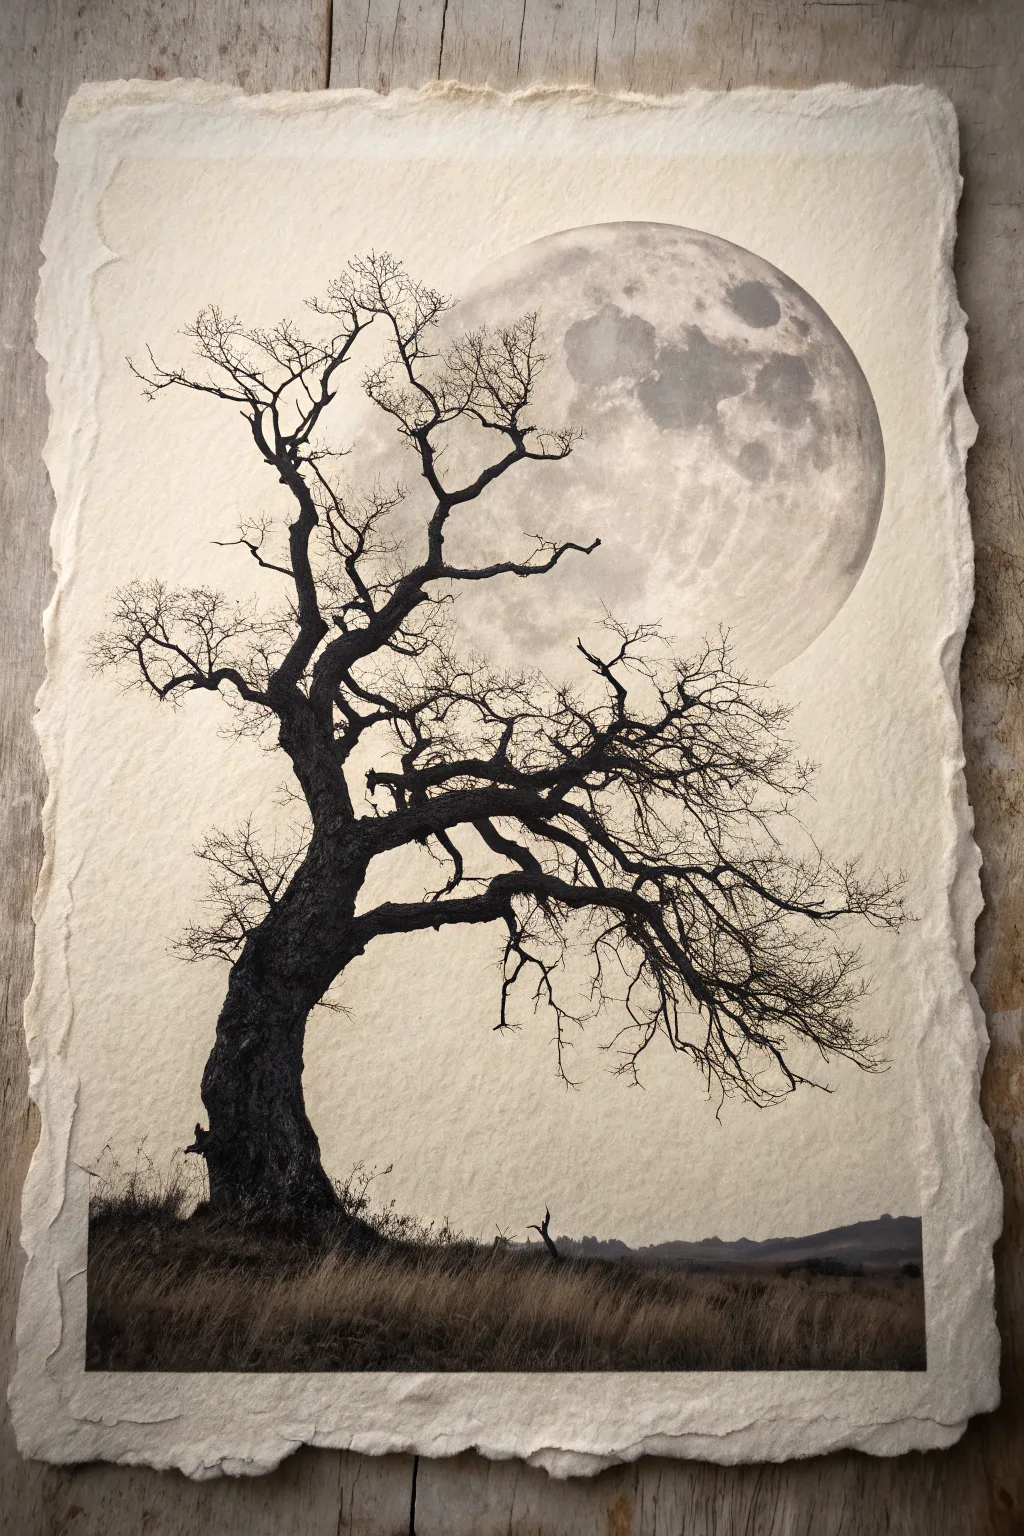
Capture the eerie stillness of Halloween with this stark silhouette painting on textured paper. The contrast between the gnarled, twisted branches and the ghostly oversized moon creates a hauntingly beautiful focal point fit for any seasonal display.
Step-by-Step Guide
Materials
- Heavyweight textured paper (deckle-edged or watercolor paper)
- Black acrylic paint or India ink
- Titanium white acrylic paint
- Raw umber or sepia acrylic paint (for tinting)
- Small flat brush (size 4)
- Fine liner brush (size 0 or 00)
- Large round sponge or stencil brush
- Circle template (plate or compass)
- Paper towels
- Optional: Antique finish spray or tea bags for staining
Step 1: Preparing the Canvas
-
Age the paper:
If your paper is bright white, give it that vintage, parchment look first. Brew strong black tea, let it cool, and lightly brush it over your paper. Allow it to dry completely before painting. -
Create the rough edges:
To mimic the handmade feel of the reference, manually tear the edges of your paper. Wet the edges slightly with a brush or sponge, wait a moment, then gently pull the paper apart to create a soft, deckled border.
Ink Confidence
For the finest twigs, India ink flows much better than acrylics. It creates razor-sharp lines without the paint dragging or skipping.
Step 2: Painting the Moon
-
Outline the orb:
Place a plate or use a compass to faintyl trace a large circle in the upper right quadrant of the paper. It should dominate the sky. -
Mix the moon color:
Mix titanium white with just the tiniest drop of raw umber or black to create a very pale, dusty grey-white. You want it ghostly, not bright. -
Sponge the base:
Using a slightly damp sponge, dab the moon color inside your circle. Don’t aim for solid coverage; a mottled texture looks more like a cratered surface. -
Add craters and depth:
While the base is still tacky, mix a slightly darker grey. Use the corner of your sponge or a scrunched-up paper towel to dab irregular, cloud-like shapes across the moon, focusing on the center and lower right. -
Soften the edges:
I like to take a clean, dry brush and very gently sweep over the moon’s paint while it’s drying to blur the crater edges so they aren’t too sharp.
Fixing Blotches
Spilled a drop of black in the sky? Turn it into a distant bird silhouette or a falling leaf. In a spooky scene, imperfections add character.
Step 3: Drafting the Tree
-
Establish the trunk:
Load a flat brush with pure black paint. Start at the bottom left, painting a thick, leaning trunk that curves toward the center. Ensure the base looks rooted and heavy. -
Create the main splits:
About a third of the way up the paper, split the trunk into two or three major heavy branches. Let them twist and zig-zag awkwardly rather than curving smoothly. -
Sketch the canopy shape:
Switch to a smaller round brush. Extend these main branches upwards and outwards, crossing in front of the moon. The dark black against the pale moon offers the best contrast.
Step 4: Detailing the Silhouette
-
Add gnarled texture:
On the thickest parts of the trunk, dab your brush slightly to create rough, bark-like protrusions. Perfect straight lines will ruin the spooky effect. -
Paint secondary branches:
Draw medium-sized limbs growing from your main structure. Make them angular—think ‘elbows’ and ‘nees’—to give the tree a tortured, old appearance. -
Work the fine twigs:
Using your finest liner brush with slightly watered-down ink or paint, add thousands of tiny twigs at the ends of the branches. A shaky hand actually helps here to make them look organic. -
Cross the moon:
Ensure several fine branches reach directly across the face of the moon. This layering creates depth and ties the two elements together.
Step 5: Ground and Final Touches
-
Anchor the tree:
At the base of the trunk, paint a low, sloping hill. Use quick, upward flicking strokes to simulate tall, dead grass silhouetted against the sky. -
Add distant hills:
Mix a dark grey (black with a little white/water) and paint a very faint, low horizon line in the background on the right side to add vastness to the landscape. -
Review contrast:
Step back. if the moon looks too bright against the paper, you can apply a very thin wash of watered-down umber over the whole sky area (avoiding the tree) to push it back.
Now you have a haunting scene that captures the silent chill of an October night

PENCIL GUIDE
Understanding Pencil Grades from H to B
From first sketch to finished drawing — learn pencil grades, line control, and shading techniques.
Explore the Full Guide
Spiderweb Corner With a Tiny Spider
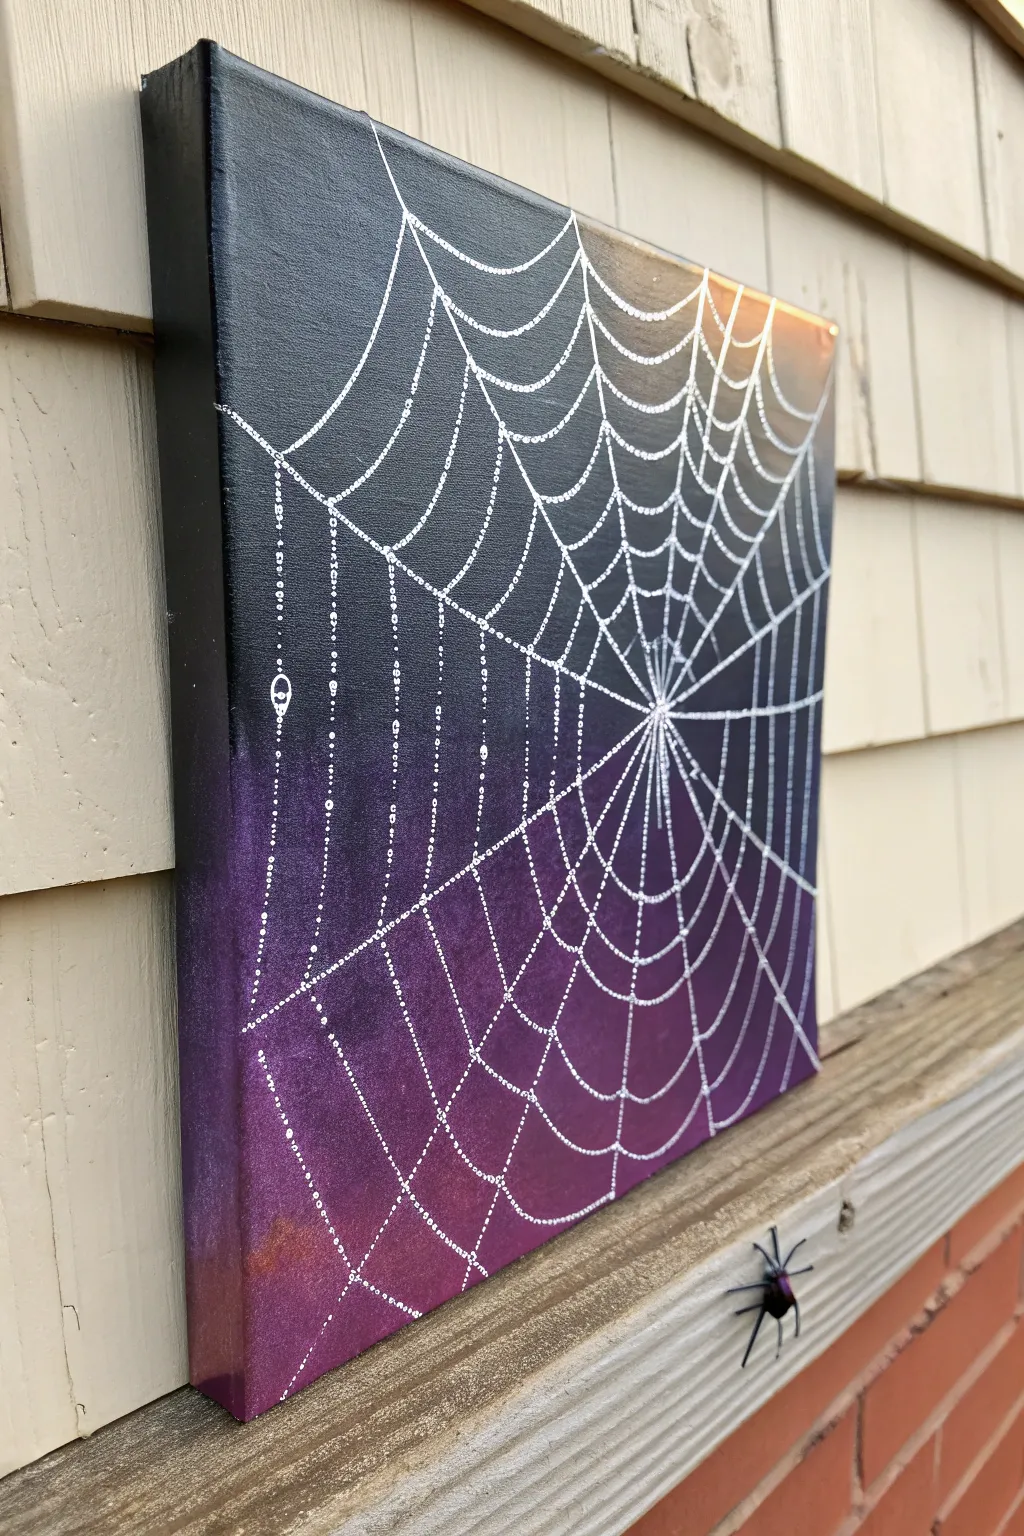
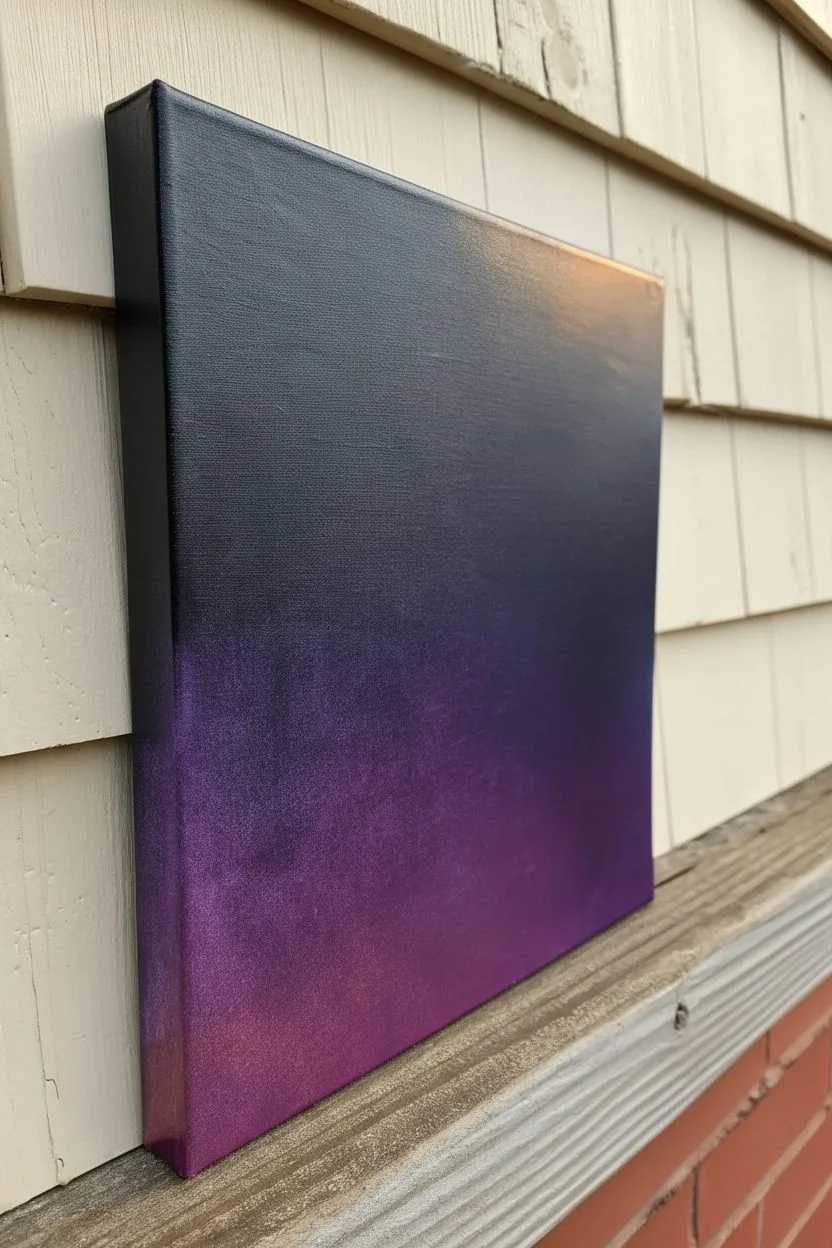
Create a spooky yet elegant piece of Halloween decor with this striking spiderweb painting. Featuring a smooth ombre background fading from midnight black to violet, the intricate web design pops with delicate, dot-work detailing.
Step-by-Step Tutorial
Materials
- Square stretched canvas (e.g., 10×10 or 12×12 inch)
- Black acrylic paint
- Deep violet or purple acrylic paint
- White liquid acrylic paint or white paint pen
- Wide flat brush (for background)
- Fine tip paint brush (size 0 or 00) or dotting tool
- Ruler (optional)
- Chalk or pencil (for sketching)
- Small plastic spider (optional, for 3D effect)
- Glue (if attaching a 3D spider)
Step 1: Creating the Ombre Background
-
Prepare your paints:
Squeeze out a generous amount of black and deep violet acrylic paint onto your palette. You want enough to cover the entire canvas without having to stop and mix more. -
Paint the top section:
Using a wide flat brush, paint the top third of the canvas in solid black. Don’t forget to paint the top and side edges of the canvas for a finished look. -
Apply the bottom color:
Clean your brush quickly or switch to a fresh one, and paint the bottom third of the canvas in your deep violet hue. Ensure the bottom edge is fully covered. -
Blend the middle:
While both paints are still wet, work on the middle section. Mix a little black into your violet on the palette to create a transition shade. Apply this to the center. -
Smooth the gradient:
Use horizontal brush strokes to blend the black downwards into the middle section and the violet upwards. Keep brushing back and forth until you have a seamless transition from dark to light. -
Let it dry completely:
Allow the background to dry fully before moving on. This is crucial because painting white over wet dark paint will result in a muddy gray mess.
Dew Drop Pro Tip
For extra sparkle, add a tiny dot of silver glitter glue on top of random white dots. It catches the light perfectly and mimics morning dew on the web.
Step 2: Drafting the Web Structure
-
Determine the center point:
Decide where the center of your web will be. In the example, the center is off-screen to the right. Mark a faint point on the right edge of your canvas with chalk. -
Sketch the anchor lines:
Lightly sketch straight lines radiating out from your center point across the canvas. Think of these as the spokes of a wheel. They should spread wider as they reach the left side. -
Curve the connecting threads:
Sketch the scalloped lines that connect the straight spokes. These lines should dip inwards towards the center, creating that classic U-shape between each spoke.
Step 3: Painting the Dot-Work Web
-
Choose your tool:
For the crisp, dotted look seen in the photo, a fine tip paint pen is easiest. If you prefer a brush, use a size 00 liner brush with thinned white paint. -
Start the main lines:
Begin tracing your sketched ‘spokes’ first. Instead of a solid line, create the line using a series of tiny, closely spaced dots. This gives the web a shimmering, dew-drop texture. -
Add the cross threads:
Work your way from the center outwards, tracing the scalloped connecting lines with the same dotted technique. -
Vary dot density:
I find that spacing the dots slightly further apart on the longer, outer curves helps the web look more delicate and stretched. -
Clean up sketch lines:
Once the white paint is completely dry, gently wipe away any visible chalk marks with a damp cloth or a clean eraser. -
Optional embellishment:
If you want to mimic the image exactly, you can glue a small plastic spider to the frame or the canvas itself to add a creepy-crawly 3D element.
Wobbly Lines?
Don’t stress if your web lines aren’t perfectly symmetrical. Real spiderwebs are organic and often have irregularities, which adds to the spooky realism.
Hang your new masterpiece in a corner to give your guests a frightfully fun surprise
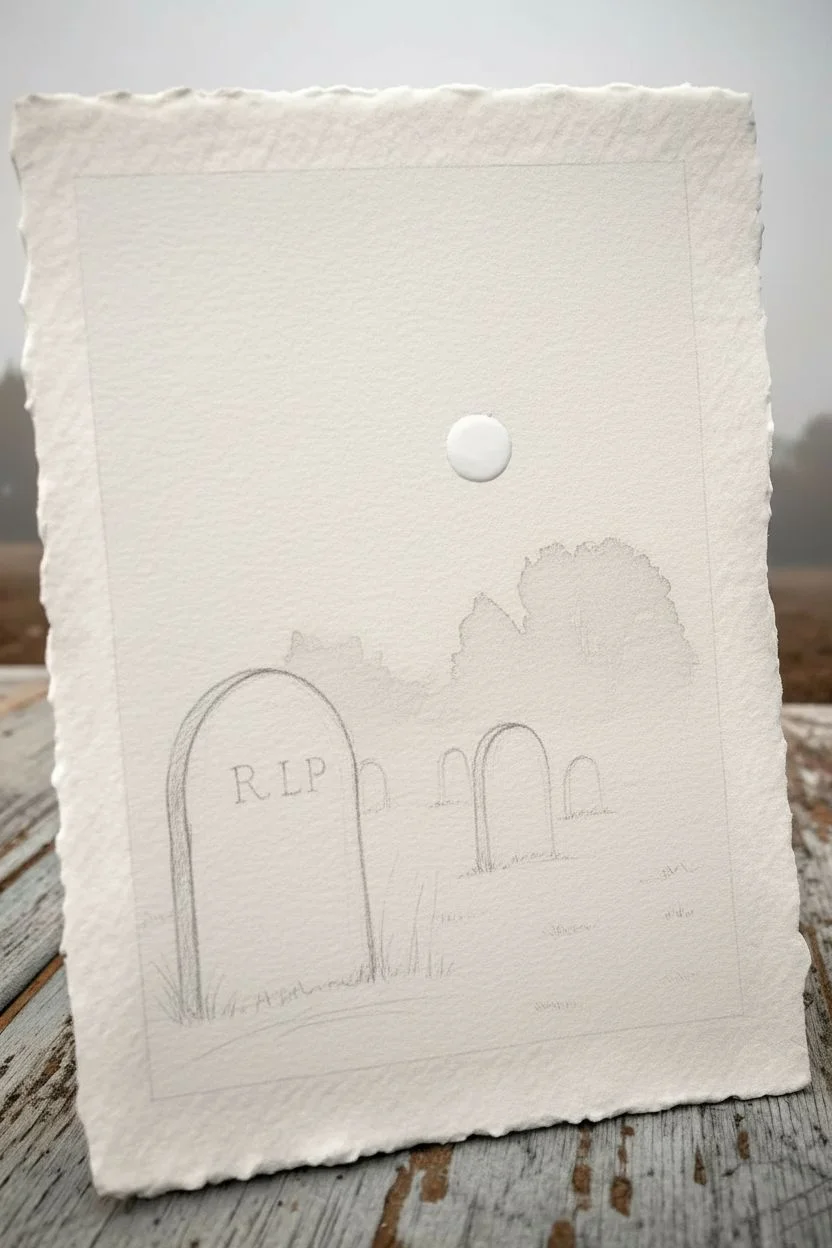
Foggy Graveyard With Simple Tombstones
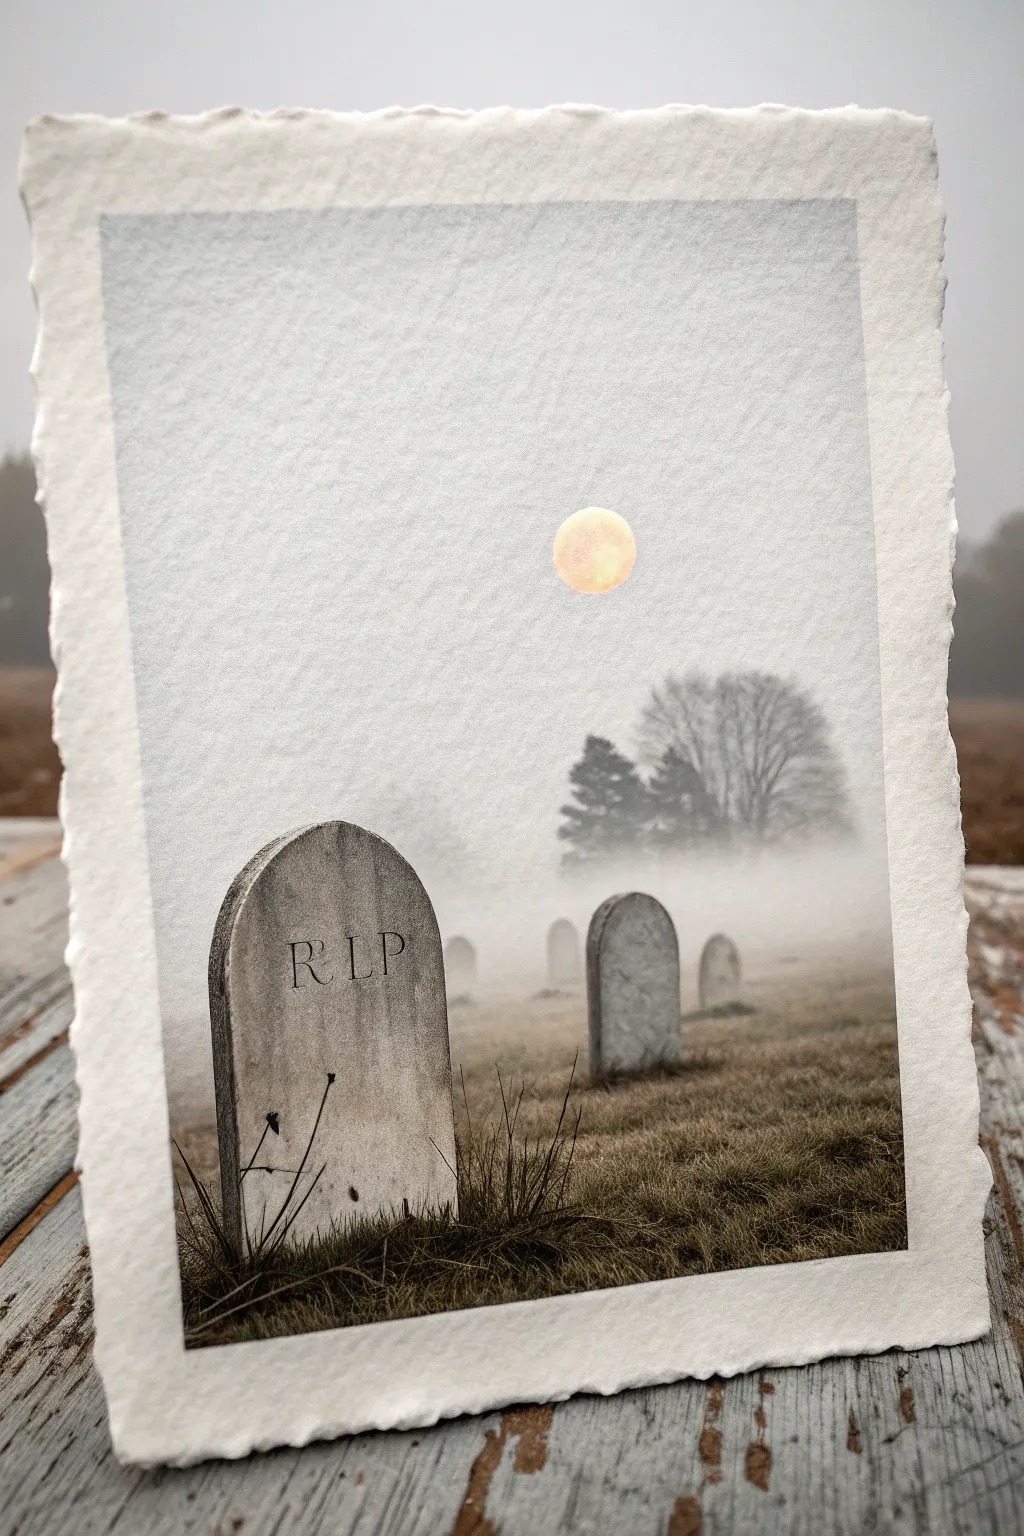
Capture the quiet eeriness of a moonlit cemetery with this soft, atmospheric watercolor painting. The design relies on varying opacities to create depth, making the foreground tombstone pop against a hazy, mysterious backdrop.
Step-by-Step
Materials
- Heavyweight watercolor paper (shabby edges optional for effect)
- Watercolor paints (Payne’s Grey, Lamp Black, Burnt Umber, Yellow Ochre, White Gouache)
- Small round brush (size 2 or 4)
- Medium flat brush
- Pencil (HB)
- Masking fluid
- Two jars of water
- Paper towels
Step 1: Setting the Scene
-
Sketch basic shapes:
Lightly sketch the outlines of the tombstones. Place the largest, curved stone in the immediate foreground on the left. Add a second stone slightly behind it to the right, and faint suggestions of distant stones further back. -
Mask the moon:
Near the center of the sky, paint a small, perfect circle with masking fluid. This will preserve the white of the paper for your glowing moon later. -
Wet-on-wet sky wash:
Brush clean water over the entire sky area, avoiding the tombstones. While wet, drop in a very dilute wash of Payne’s Grey. Let the color flow naturally, keeping it lighter near the horizon line to suggest rising fog. -
Add distant trees:
While the sky is still damp (but not soaking), mix a faint grey-brown. Gently dab in the shapes of distant trees on the right side. The wet paper will blur the edges, creating that crucial foggy focus effect.
Step 2: Building the Graveyard
-
Paint the background grass:
Mix Burnt Umber with a touch of Payne’s Grey. Using diverse horizontal strokes, paint the ground area. Keep this wash thin and washed out near the horizon, growing slightly darker as you move closer to the bottom. -
Define distant markers:
Using a diluted grey wash, fill in the tombstones that are furthest away. They should be just slightly darker than the fog to maintain atmospheric perspective. -
Mid-ground stones:
Paint the second-closest stone (the one behind the main subject) with a slightly more saturated grey mixture. Add subtle vertical streaks while wet to mimic aged stone texture. -
Reveal the moon:
Once the sky is completely bone-dry, gently rub off the masking fluid to reveal the white circle. -
Moon glow:
Mix a very watery Yellow Ochre. Carefully glaze over the white moon circle, letting a tiny bit of color bleed just outside the edges to create a gentle halo effect.
Muddy colors?
If your grey fog looks muddy, you’re likely overworking the paper while it’s wet. Lay down your wash once and let it settle without going back in with the brush.
Step 3: The Main Tombstone
-
Base coat:
Mix a creamy, opaque grey using Payne’s Grey and a little White Gouache. Paint the large foreground tombstone, ensuring distinct, crisp edges. -
Weathering effects:
While the base coat is damp, drop in darker blackish-grey spots near the bottom and sides to simulate moss and centuries of grime. -
Adding the inscription:
Switch to your smallest detail brush. Using a thick, dark mixture of Lamp Black and Burnt Umber, carefully paint the letters ‘R I P’ centered on the upper half of the tone. -
Stone texture:
Mix a translucent wash of Burnt Umber. Glaze specific areas of the stone’s face to create vertical water stains or discoloration. -
Shadow details:
Add a crisp, dark shadow line on the right edge and top curve of the stone to give it three-dimensional form.
Level Up: Aged Paper
Before painting, soak your paper in strong tea or coffee and let it dry completely. This creates a parchment-like base color that adds instant antiquity to the scene.
Step 4: Foreground Details
-
Foreground grass:
Load your brush with a darker, thicker mixture of Burnt Umber and Black. Paint short, upward flicking strokes at the base of the main tombstone to create wild, overgrown grass. -
Dead weeds:
Using the very tip of your brush, draw thin, jagged lines extending up past the stone’s base to represent dead stalks or dried flowers. -
Deepen shadows:
Glaze a final dark shadow under the base of the stones to ground them firmly in the earth. -
Mist layering:
If I feel the background is too sharp, I like to take a clean, damp brush and gently soften the horizon line one last time to enhance the foggy mood. -
Rough edges:
For the authentic look shown in the photo, tear the edges of your heavy paper against a ruler to create a deckled, antique edge.
Display your finished piece against a dark background to really make that foggy atmosphere stand out


Friendly Monster Portraits in Bright Color Blocks
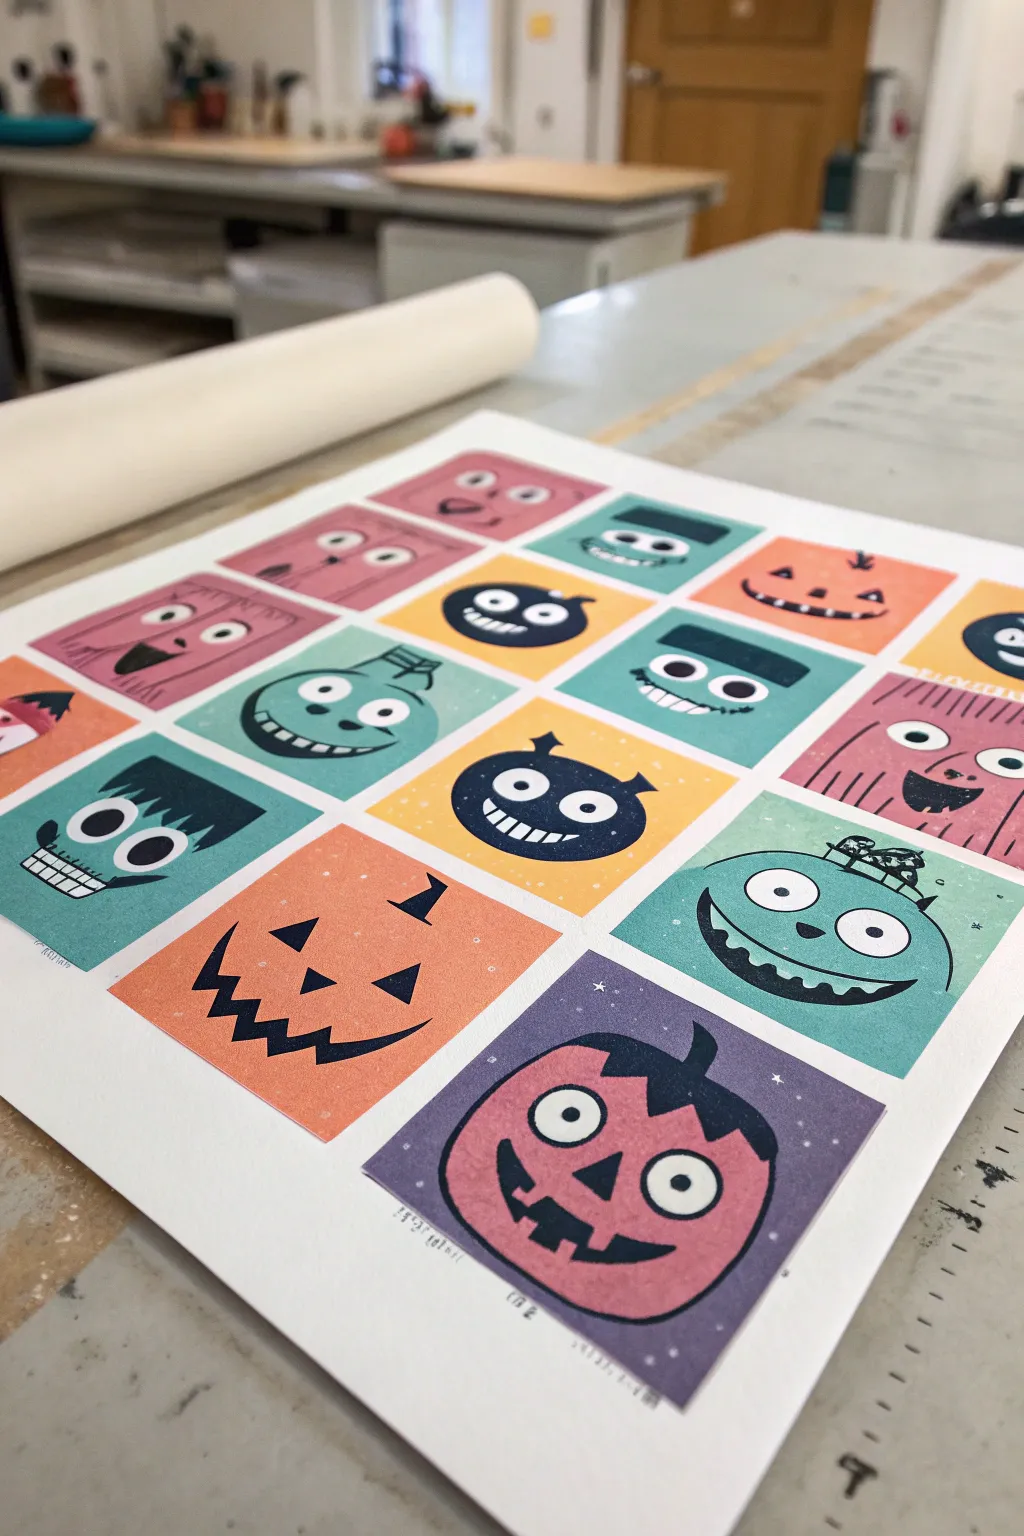
Create a modern, graphic art print featuring a grid of friendly monster and pumpkin faces set against vibrant color blocks. This project mimics the look of screen printing or Risograph art with its flat colors and bold, simple lines.
Detailed Instructions
Materials
- High-quality white printmaking paper or Bristol board (A3 or A4)
- Acrylic paints (pastel pink, teal, violet, orange, yellow, black)
- Wide flat paintbrush (approx. 1 inch)
- Fine detail round brush
- Ruler
- Painter’s tape or masking tape (low tack)
- Pencil and eraser
- Palette for mixing
- White gel pen (optional for touch-ups)
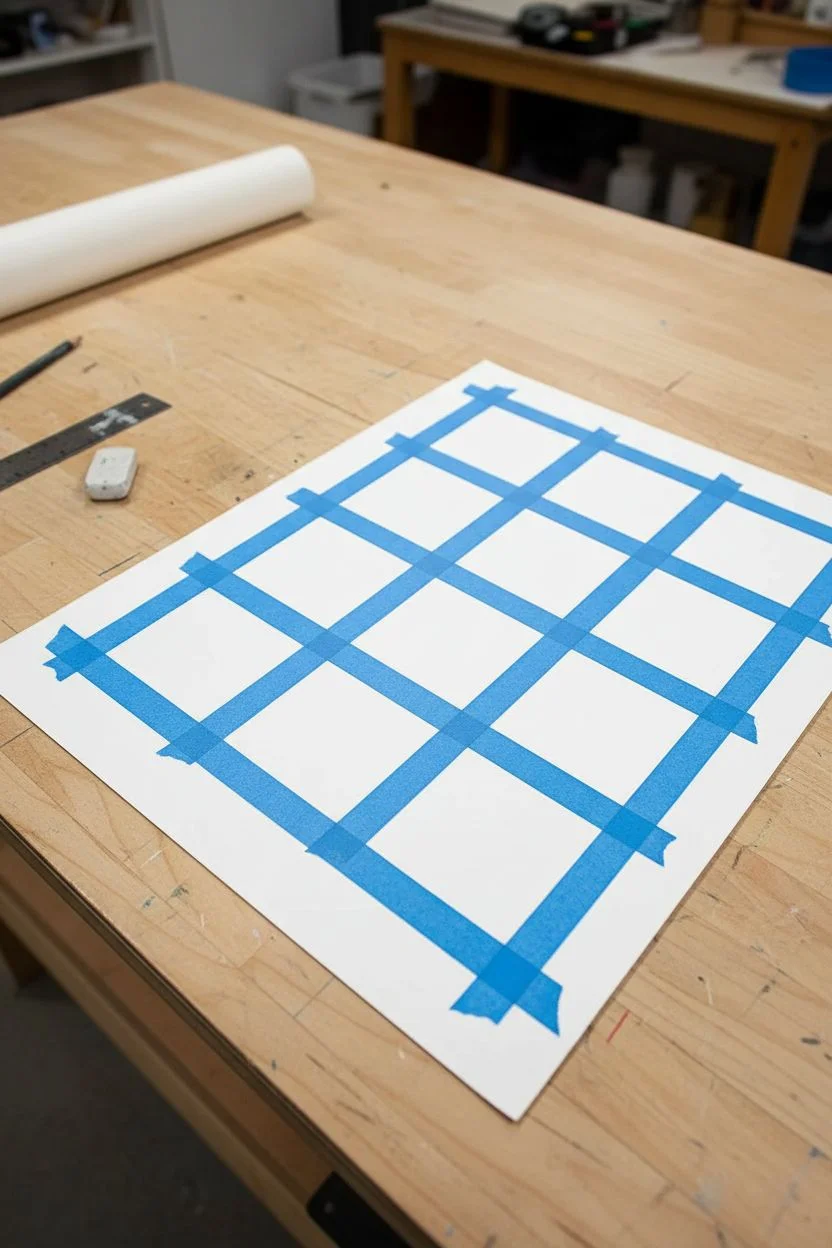
Step 1: Grid Preparation
-
Measure your margins:
Start with a clean sheet of heavy white paper. Use a ruler to measure an even border around the entire page, leaving plenty of white space to frame the artwork. -
Draft the grid:
Lightly draw a grid of squares inside your borders. Aim for a 4×4 or 3×4 layout depending on your paper size. Ensure there is a small, consistent gap of about 3-5mm between each square. -
Mask the squares:
Apply low-tack painter’s tape along the grid lines. This is crucial for achieving those crisp, sharp edges characteristic of the color-block style. Press the tape edges down firmly to prevent paint bleed.
Bleeding Edges?
If paint seeped under the tape, use a white gel pen or a small amount of white acrylic paint to cover the bleed. It acts like correction fluid and tidies up the grid lines instantly.
Step 2: Color Blocking
-
Plan your palette:
Select 4-5 core colors: a dusty pink, muted teal, vibrant orange, violet, and a sunny yellow. I like to test these on a scrap piece of paper first to ensure they harmonize well together. -
Paint the first set:
Using your flat wide brush, paint a selection of squares with your first color (e.g., pink). Scatter them randomly across the grid rather than grouping them to create balance. -
Apply remaining colors:
Clean your brush thoroughly and repeat the process with the teal, orange, violet, and yellow until every square is filled. Apply the paint in thin, even layers to keep the texture flat. -
Let it dry completely:
Wait until the paint is bone dry. If you peel the tape too early, you risk smudging the wet edges or tearing the paper. -
Remove the tape:
Carefully peel away the masking tape at a 45-degree angle. You should now have a clean grid of colorful squares ready for the faces.
Go Digital
Scan your finished painting at a high resolution. You can then digitally alter the colors to create different versions of your monster grid for holiday cards or invitations.
Step 3: Designing the Faces
-
Sketch the characters:
Lightly sketch a different face onto each colored square using a pencil. Keep the shapes simple: circles for eyes, crescents for mouths, and triangles for noses. -
Mix variety:
Alternate between classic jack-o’-lantern faces, Frankenstein-inspired flat heads, and round, friendly one-eyed monsters. -
Outline the features:
Load your fine detail brush with black acrylic paint. Carefully outline the eyes, mouths, and head shapes you sketched. -
Fill the black areas:
Fill in the pupils, mouths, and hair. For larger black areas, you might want to switch to a slightly larger round brush for better coverage. -
Add white details:
Once the black paint is dry, paint the whites of the eyes. This high contrast brings the characters to life immediately. -
Refine the edges:
Go back in with your fine brush to sharpen any wobbly lines. Small details like jagged teeth or stitches add a lot of personality. -
Add subtle texture (optional):
To mimic the print effect in the photo, you can lightly dab a dry brush with a tiny amount of white or a lighter shade of the background color onto the cheeks or foreheads for a speckled look. -
Final clean up:
Erase any visible pencil marks gently once all paint is completely cured. Use a white gel pen to clean up any tiny mistakes in the white margins.
Hang your finished grid on the wall for a playful, graphic touch to your seasonal decor that feels professional and fun
Big-Eyed Mummy Texture Practice
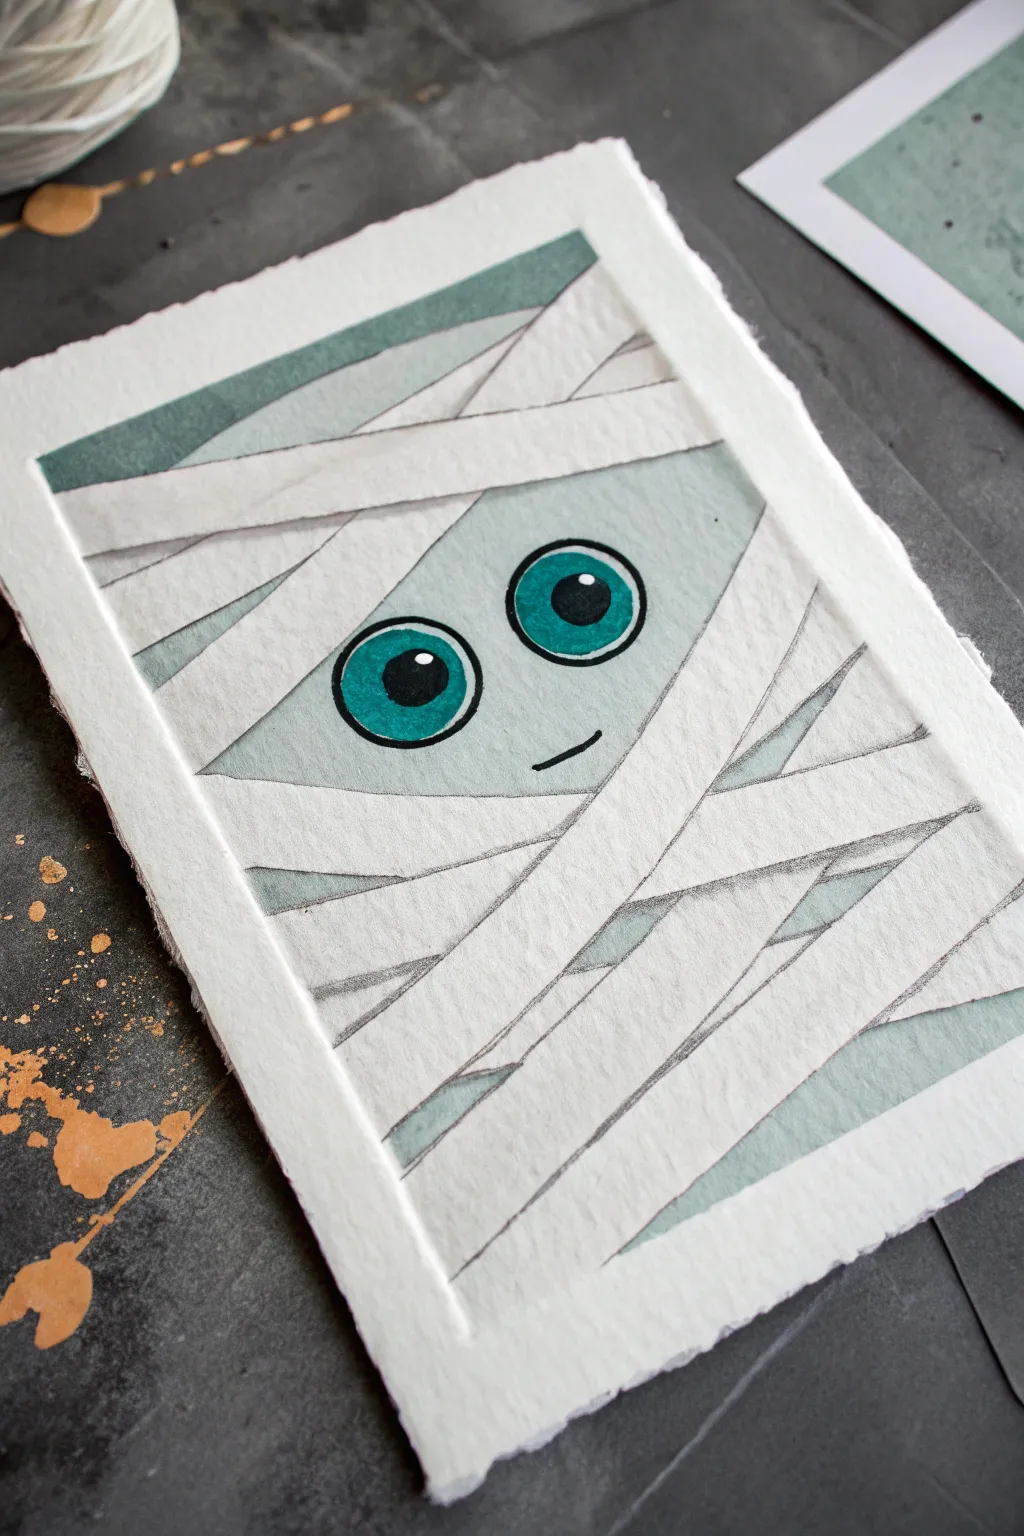
This charming project features a mummy peeking through layers of textured bandages with wide, shimmering teal eyes. It is a fantastic exercise for practicing shading and depth on high-quality deckled-edge paper.
Step-by-Step Tutorial
Materials
- Heavyweight watercolor paper with deckled edges
- Pencil and eraser
- Masking tape or artist’s tape
- Teal or turquoise watercolor paint
- Grey watercolor paint (or diluted black ink)
- Black fine-liner pen or black watercolor with a fine brush
- White gel pen (optional)
- Small round brushes (size 2 and 4)
- Ruler (optional)
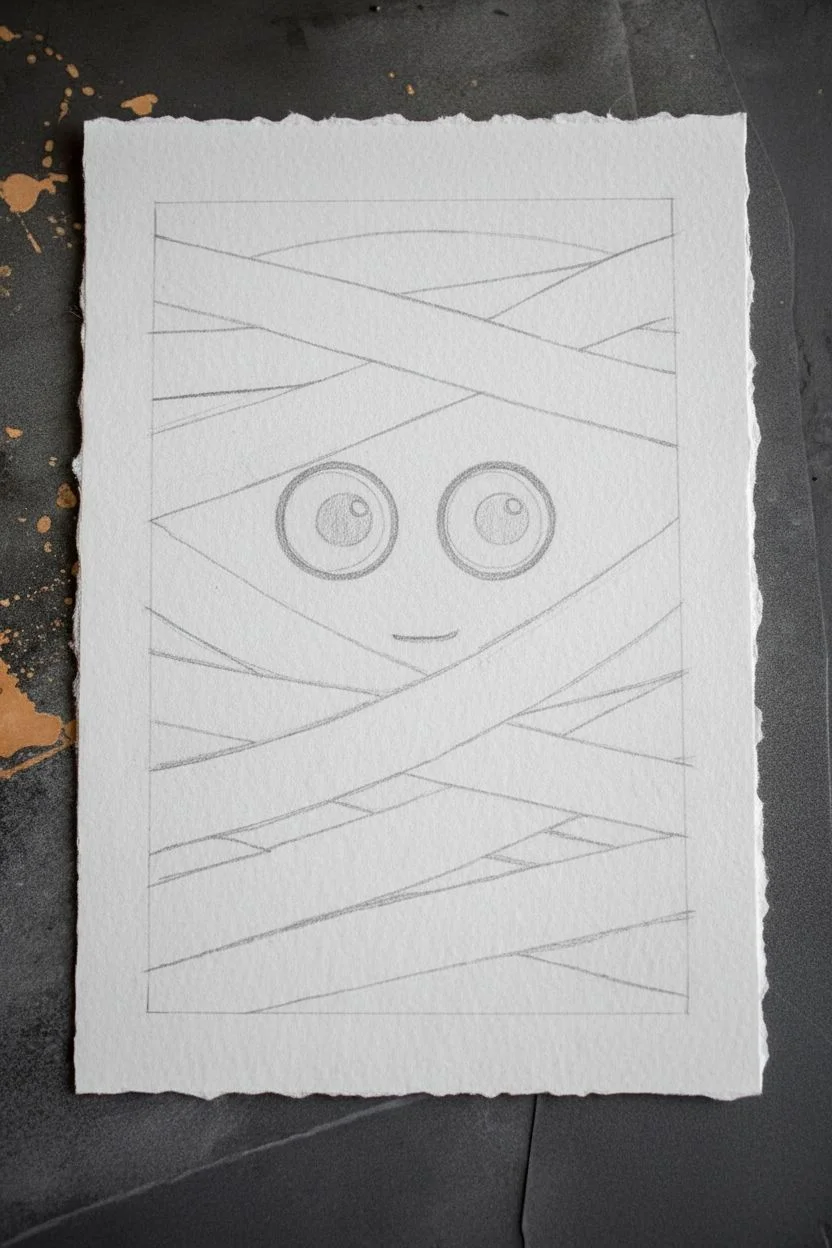
Step 1: Planning and Sketching
-
Define the Frame:
Begin by lightly marking a rectangular border inside the deckled edge of your paper using a pencil. Leave about a half-inch margin of white space all around to act as a natural frame for your mummy. -
Sketch the Eyes:
In the upper-middle section of your rectangle, draw two large circles for the eyes. They should be close together but not touching. Inside each, draw a smaller circle for the pupil. -
Add the Glint:
Within the pupil circles, draw a tiny circle near the top right of each pupil to represent the reflection of light. This is crucial for that cute, lively look. -
Map the Bandages:
Lightly sketch diagonal lines crisscrossing the rectangle. Allow some strips to overlap others. Make sure to leave a clear, uncrossed area around the eyes so the face remains visible. -
Add the Mouth:
Just below the gap between the eyes, draw a small, simple curved line for a shy smile.
Step 2: Painting the Face
-
Base Tone:
Using a very diluted grey wash, paint the background area behind the bandages—essentially the mummy’s skin. Keep this layer pale and even. -
Paint the Irises:
Mix a vibrant teal or turquoise color. Carefully paint the outer ring of the eyes (the iris), leaving the pupil and the tiny white reflection circle blank for now. -
Fill the Pupils:
Once the teal is dry, fill in the center pupil circles with solid black ink or paint. Be extremely careful to leave that tiny reflection dot pure white. -
Outline the Features:
Use a fine liner or a very thin brush with black paint to outline the eyes and the mouth. Add a slightly thicker line around the outer edge of the eyes to make them pop.
Shadow Precision
Always cast your shadows in the same direction. If a bandage crosses over another, the shadow falls on the bottom strip, hugging the edge where they meet.
Step 3: Creating Texture
-
Shade the Bandages:
The bandages themselves stay white (the color of the paper), but they need shadows to show depth. Mix a light, watery grey. -
Layering Shadows:
Paint thin grey strips along the edges where one bandage overlaps another. The shadow should be on the bandage that is underneath, right next to the edge of the top bandage. -
Defining Edges:
Outline the edges of each bandage strip lightly with a pencil or very faint grey paint to distinguish them from each other. -
Outer Background:
If you want the mummy to stand out more, you can paint the very small gaps between bandages with a slightly darker grey-teal mix, suggesting the hollow interior. -
Adding Texture:
To give the old cloth look, use a nearly dry brush with faint grey paint to add subtle, scratchy texture lines running parallel along the length of a few bandages.
Spooky Glow
Mix a tiny bit of phosphorescent (glow-in-the-dark) medium into your teal eye paint. When the lights go out, those big eyes will stare back!
Step 4: Finishing Touches
-
Clean the Borders:
If your paint went over your initial pencil border, you can gently tidy it up with white gouache or simply embrace the handmade charm. -
Erase Sketches:
Once the painting is completely bone-dry, gently erase any visible pencil sketch lines, especially around the white bandage areas. -
Highlight Check:
If you accidentally painted over the eye highlights, use a white gel pen to add that sparkle back in. It brings the character to life instantly.
Display your adorable mummy in a float frame to show off those beautiful deckled edges
Pumpkin Patch at Dusk With Layered Shapes
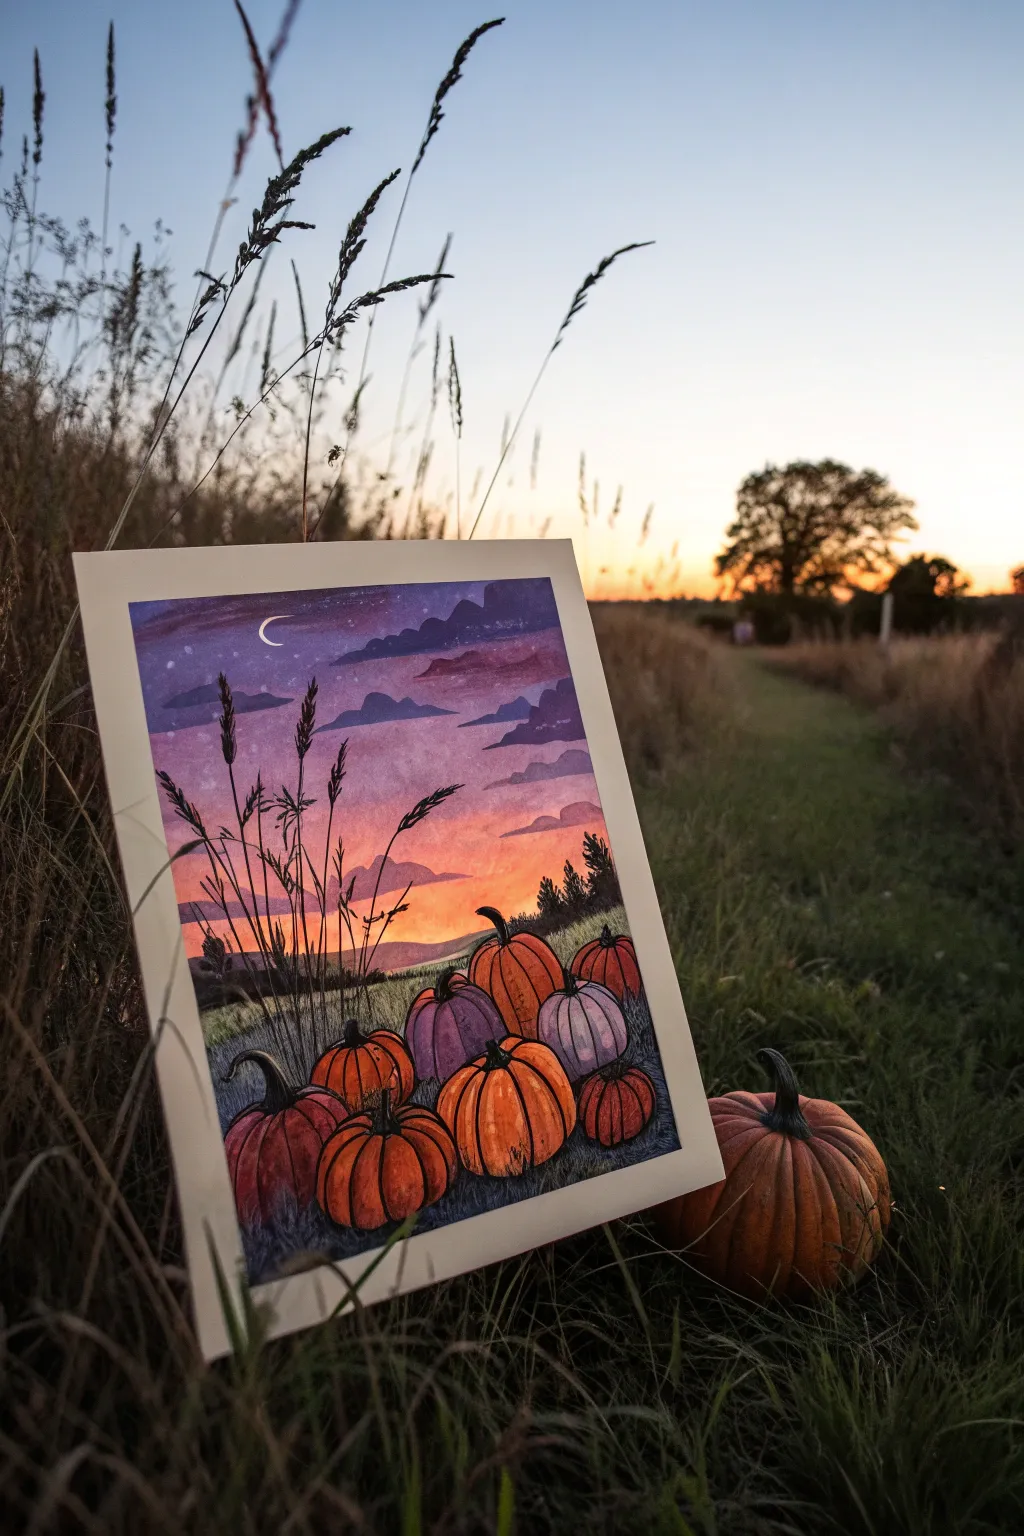
Capture the magic of an autumn evening with this vibrant watercolor and ink illustration. This project combines a glowing, gradient sunset sky with bold silhouettes and a charming cluster of pumpkins in the foreground.
Step-by-Step
Materials
- Watercolor paper (cold press, 140lb/300gsm)
- Watercolor paints (purple, indigo, magenta, orange, yellow, green, brown)
- White opacity medium (white gouache or white gel pen)
- Black fine liner pens (waterproof, various sizes like 0.1 and 0.5)
- Masking tape
- Pencil and eraser
- Round watercolor brushes (sizes 4, 8, and a large wash brush)
- Palette for mixing
- Paper towels and water cup
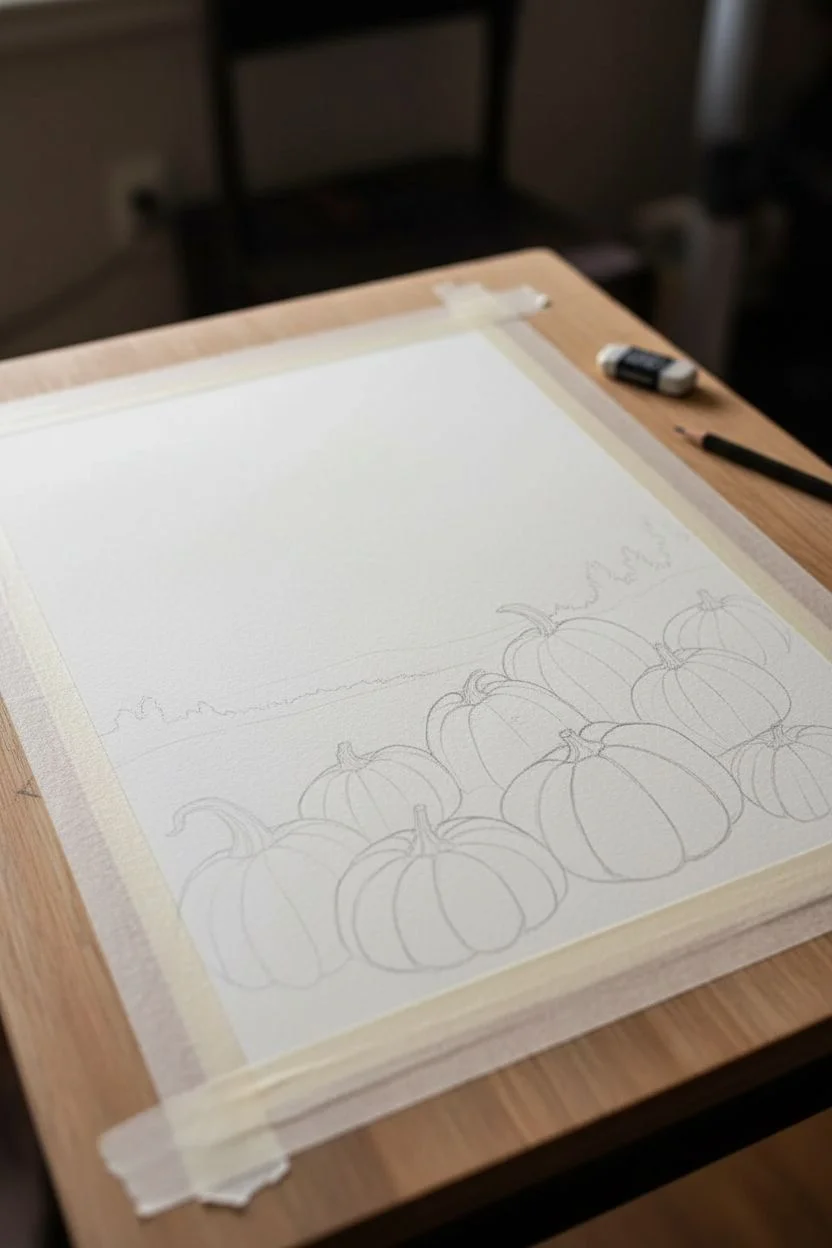
Step 1: Preparation and Sketching
-
Secure the paper:
Begin by taping down all four edges of your watercolor paper to a board using masking tape. This creates a clean white border and prevents the paper from buckling under heavy washes. -
Rough layout:
Lightly sketch the horizon line about one-third of the way up the page. It doesn’t need to be perfectly straight; a slight roll suggests hills. -
Sketch the pumpkins:
Draw a cluster of pumpkins in the bottom foreground. Vary their sizes and shapes—some tall, some squat. Overlap them slightly to create depth, ensuring the ones in front partially cover the ones behind.
Muddy colors?
If your sky gradient turns brown between the purple and yellow, let the yellow layer dry first before carefully glazing the purple over the top, or use a clean intermediary strip of pink.
Step 2: Painting the Sky Gradient
-
Wet the sky area:
Use your large wash brush to apply clean water to the entire sky area, stopping just at the horizon line. This wet-on-wet technique allows colors to blend seamlessly. -
Apply the sunset glow:
Load your brush with bright yellow and paint a strip just above the horizon. While it’s wet, blend orange into the top edge of the yellow, moving upwards. -
Deepen the sky:
As you move higher, mix magenta or pink into the orange. Finally, transition into deep purple and indigo at the very top of the paper for the night sky. -
Let it bloom:
Allow the colors to bleed into each other naturally. If the paper starts to dry, stop tinkering to avoid back-runs. Let this layer dry completely.
Step 3: Layering Hills and Clouds
-
Paint distant hills:
Once the sky is dry, mix a diluted purple-grey color. Paint a low, rolling hill shape right at the horizon line. Keep the edges soft or layered to suggest distance. -
Add stylized clouds:
Using a smaller round brush and a more saturated purple mixture, paint horizontal cloud shapes across the sky. Let the bottom edges of the clouds remain somewhat flat while making the tops fluffy or jagged.
Add some sparkle
Mix a tiny amount of metallic gold watercolor into your yellow horizon paint or use a gold pen to outline the moon for a magical, shimmering effect.
Step 4: Painting the Pumpkins and Ground
-
Base layer for pumpkins:
Paint the pumpkins using various shades of orange. For variety, paint one or two in a muted purple or grey tone. Keep the paint fairly translucent initially. -
Adding pumpkin dimension:
While slightly damp or after drying, add darker vertical curved strokes to each pumpkin to suggest ribs and roundness. Leave the tops slightly lighter to show reflected light. -
Stems and ground:
Paint the stems with a dark brown-green. Fill in the ground around the pumpkins with a mix of dark green and indigo to suggest grass in shadow.
Step 5: Inking and Final Details
-
Outline the pumpkins:
Once the paint is bone dry, use a waterproof fine liner to outline the pumpkins. Add sketchy, curved lines inside the shapes to emphasize their ribbed texture. -
Create grass silhouettes:
Using black ink or very dark paint, draw tall, thin grass blades rising from behind the pumpkins. Vary their heights, making some reach up into the sky area. -
Draw seed heads:
At the tips of the tallest grass blades, add small textured shapes to look like wheat or wild oat seed heads. These silhouettes look striking against the colorful sunset. -
Add twinkling stars:
Dip a small brush or toothpick into white gouache or use a white gel pen. Dot small stars into the purple area of the sky. Paint a thin crescent moon for a whimsical touch. -
Reveal the border:
Carefully peel away the masking tape at a 45-degree angle to reveal your crisp white edges.
Now you have a cozy autumn scene that perfectly captures the feeling of a crisp evening walk.
Abstract Halloween Color Field With Hidden Symbols
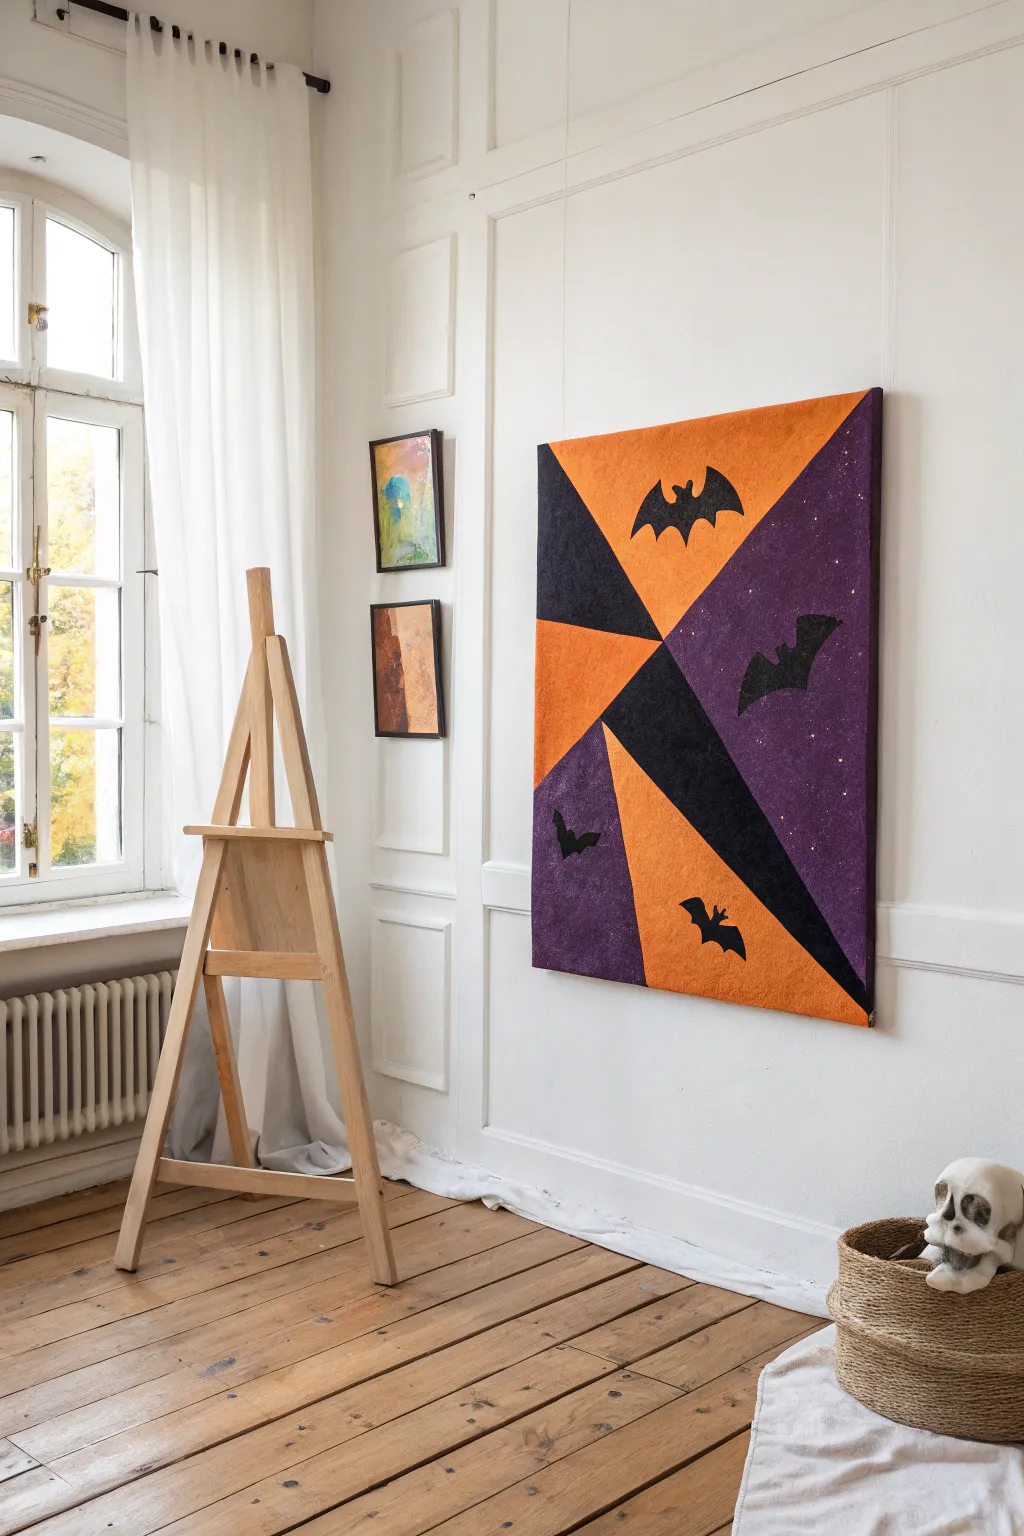
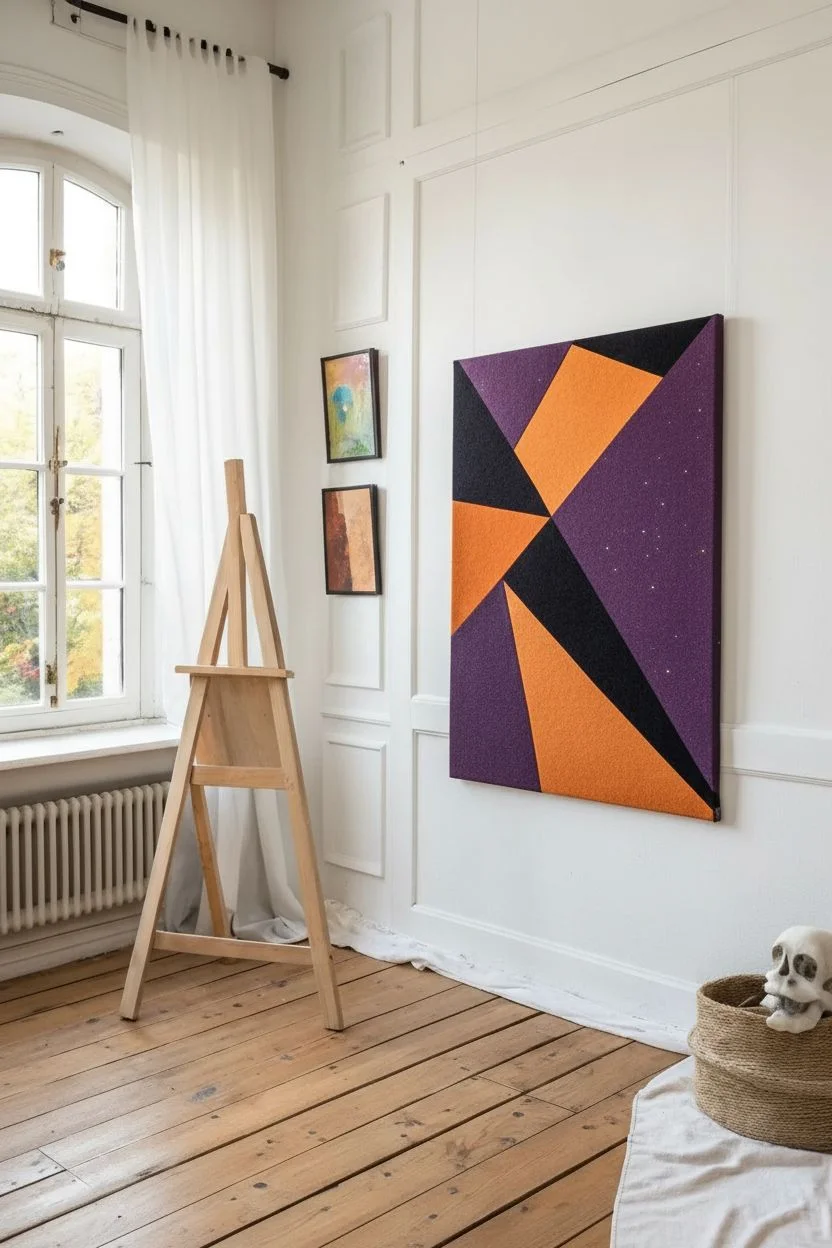
This striking wall art combines sharp geometric abstraction with classic Halloween motifs for a sophisticated spooky look. Using geometric color blocking in deep purple, vibrant orange, and black, you’ll create a modern backdrop for subtle, wandering bat silhouettes.
Step-by-Step Tutorial
Materials
- Large rectangular canvas or wooden panel (approx. 24×36 inches)
- Felt fabric sheets (orange, deep purple, black)
- Spray adhesive
- Fabric scissors or rotary cutter
- Straight edge ruler
- Chalk or fabric pencil
- Cardstock or stiff paper (for stencils)
- Pencil
- Craft knife
- Gold glitter spray or loose gold glitter (optional)
- Frame hanging hardware
Step 1: Planning and Cutting the Geometry
-
Map out the design:
Begin by sketching your geometric layout on a piece of paper. The design relies on large, intersecting triangles that create a fractured, shard-like effect. Aim for a balance between the purple, orange, and black sections. -
Transfer measurements:
Lay your canvas or board flat on a work surface. Using a straight edge and a pencil, lightly draw the final triangle layout directly onto the surface. This will serve as your ‘paint-by-numbers’ guide for the felt. -
Cut the first shape:
Start with the largest section, likely a purple or orange area. Measure the dimensions on your canvas, then mark these measurements onto your corresponding felt color using chalk or a fabric pencil. -
Slice the felt:
Cut your felt shape carefully. I find a rotary cutter and a metal ruler give the cleanest, sharpest lines for geometric work, but sharp fabric scissors work too. -
Dry fit the piece:
Place the cut felt piece onto the canvas to ensure it fits perfectly within your pencil lines. Trim any overhang if necessary before gluing. -
Adhere the base layer:
Apply spray adhesive to the back of the felt piece. Wait a few seconds for it to become tacky, then press it firmly onto the canvas, smoothing from the center outwards to release air bubbles.
Adhesion Issues
If the felt peels up at the corners, use a stronger tacky glue or a hot glue gun set to ‘low’ for spot repairs. Heavy books work great as weights while drying.
Step 2: Completing the Background
-
Continue the puzzle:
Proceed with the remaining geometric shapes. Measure, cut, and adhere the orange and black felt sections one by one. Butt the edges of the felt tightly against each other to minimize gaps. -
Handle intersections:
For the sharpest points where multiple colors meet, you might need to slightly overlap the felt and trim through both layers with a craft knife (a technique called double-cutting) or just cut very precisely beforehand. -
Secure the edges:
Pay special attention to the outer edges of the canvas. Ensure the felt is glued securely right to the rim. If your felt is large enough, you can wrap it around the sides of the canvas for a gallery-wrapped look. -
Add subtle sparkle:
Once the puzzle is complete, mist the purple sections very lightly with gold glitter spray. You want a faint starry night effect, not a heavy coat.
Glow Highlighting
For extra dimension, use a dry brush with a tiny amount of white or grey acrylic paint to highlight the top edges of the bat wings, mimicking moonlight.
Step 3: Adding the Bats
-
Create bat stencils:
Draw three or four bat silhouettes varying in size and wing position on cardstock. Cut these out to use as your templates. -
Trace onto black felt:
Place your templates on the remaining black felt scraps. Trace the shapes using white chalk so the lines are visible. -
Cut out the bats:
Using small, sharp embroidery scissors, cut out the detailed bat shapes. Take your time around the wing scallops to keep them distinct. -
Plan the flight path:
Arrange the felt bats on top of your geometric background without glue first. Try placing them where they cross over color boundaries to integrate the layers visually. -
Attach the bats:
Apply a dab of fabric glue or spray adhesive to the back of each bat and press them into place. Press down firmly for 30 seconds to ensure the felt fibers lock together. -
Final smooth:
Run your hand over the entire piece to check for any lifting edges. Add tiny dots of glue where needed, especially on corner points.
Hang your textured masterpiece and enjoy the modern Halloween vibes it brings to the room
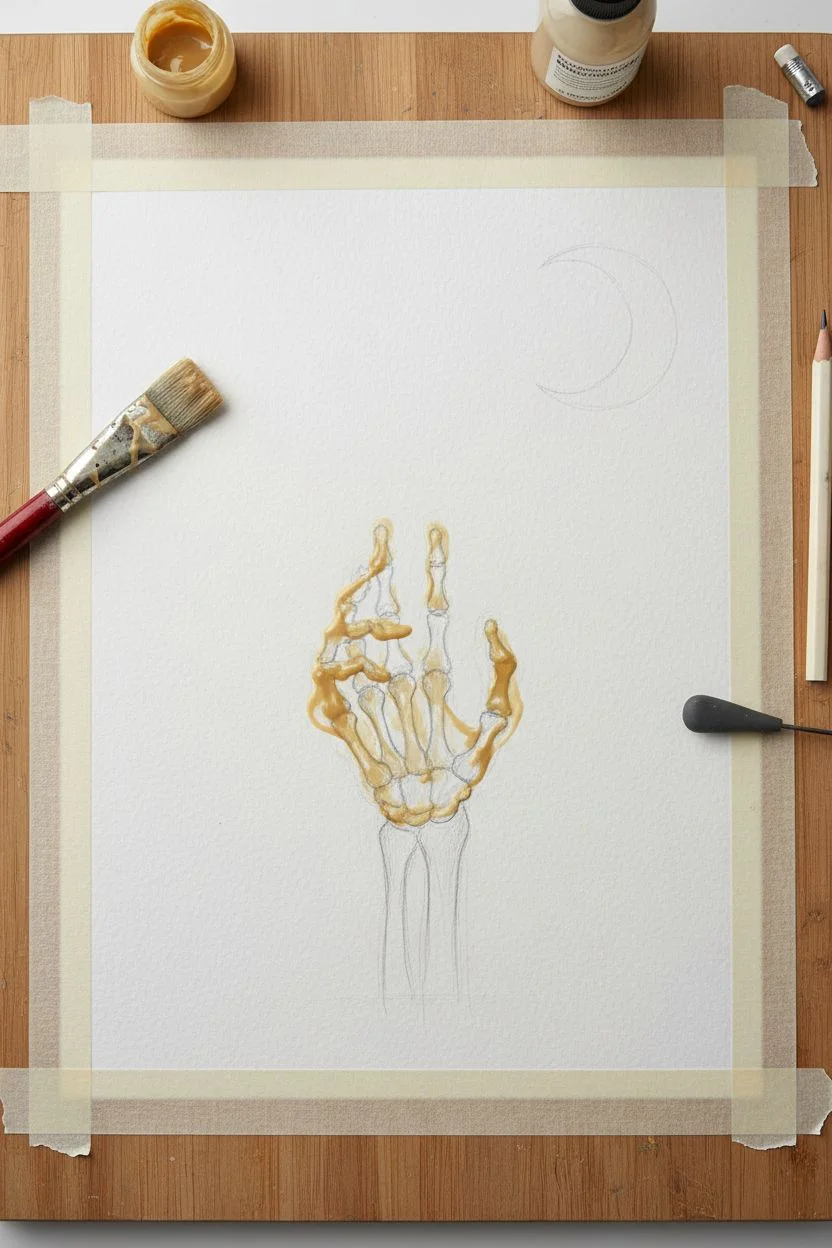
Negative Space Bone Hand on a Gradient Sky
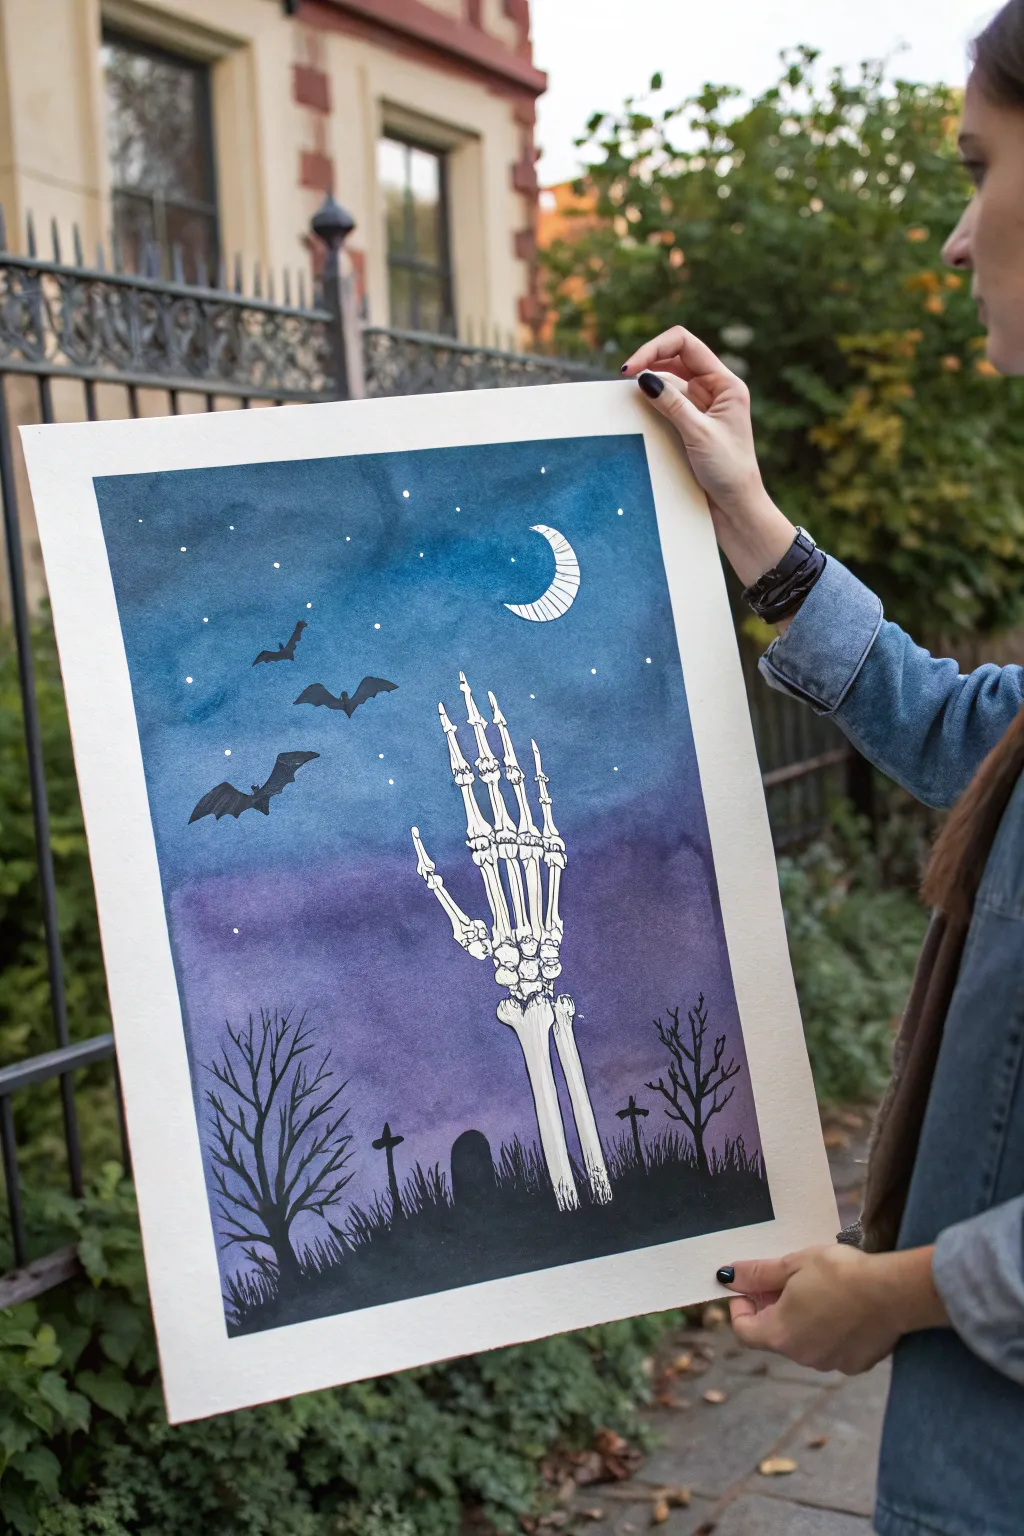
Capture the eerie beauty of Halloween with this striking silhouette painting. Featuring a seamless watercolor gradient and a stark white skeletal hand, this piece plays with negative space and contrast to create a hauntingly beautiful scene.
Step-by-Step
Materials
- High-quality watercolor paper (cold press, 300gsm)
- Watercolor paints (Indigo, Prussian Blue, Violet/Purple)
- Artist’s masking fluid or liquid frisket
- Old paintbrush or rubber styling tool (for masking fluid)
- Black acrylic paint or black gouache
- White gel pen (optional)
- Large flat wash brush
- Fine detail brush (round size 0 or 1)
- Pencil and eraser
- Painter’s tape
- Small cup of water and paper towels
Step 1: Preparation & Masking
-
Secure the Paper:
Begin by taping down all four edges of your watercolor paper to a board or hard surface using painter’s tape. This prevents buckling when the paper gets wet and creates a crisp white border. -
Sketch the Bones:
Lightly sketch the skeletal hand and arm bones reaching upward from the bottom center. Focus on the main shapes: the radius and ulna (arm bones), the carpals (wrist), and the segmented phalanges (fingers). Keep the lines very faint. -
Add the Moon:
Sketch a crescent moon shape in the upper right quadrant of the sky. -
Apply Masking Fluid:
Using an old brush or a rubber tipped tool, carefully fill in the entire skeleton sketch and the moon shape with masking fluid. Be precise with your edges, as this will define the final shape. -
Let it Dry:
Allow the masking fluid to dry completely. It should feel rubbery and not tacky to the touch. Do not rush this step, or you risk smearing the mask into the paper grain.
Sticky Situation?
If masking fluid tears your paper upon removal, it might be too soft. Next time, use a harder paper or ensure the fluid is 100% dry before peeling.
Step 2: Painting the Sky Gradient
-
Wet the Surface:
With your large flat brush, apply a clean coat of water across the entire paper (over the dried masking fluid too). This ‘wet-on-wet’ technique ensures a smooth blend. -
Start with Dark Blue:
Load your brush with a deep Indigo or Prussian Blue. Start painting from the very top edge, applying the pigment heavily. -
Transition to Purple:
As you move down the page, mix in your violet or purple watercolor. Blend it into the wet blue edge so there are no harsh lines, creating a twilight effect. -
Fade to Light:
Continue painting downwards until you reach the bottom third of the paper. Let the purple fade slightly lighter near the horizon line where the ground will be. -
Complete Drying Phase:
Set the painting aside to dry fully. The paper must be bone dry before the next steps to prevent the black ink from bleeding.
Step 3: Silhouettes & Details
-
Remove the Masking:
Once dry, gently rub your finger or a rubber cement pickup eraser over the masking fluid to peel it away, revealing the stark white paper underneath for the hand and moon. -
Detail the Bones:
Using a fine liner pen or a very small brush with diluted black paint, add delicate outlines and cracks to the skeleton bones to give them dimension. -
Add Moon Texture:
Draw faint horizontal lines across the crescent moon to give it a stylized, illustrative texture. -
Paint the Ground:
Switch to opaque black acrylic or gouache. Paint a solid black, uneven horizon line at the bottom, covering the base of the arm bones so they appear to rise from the earth. -
Add Grass Blades:
Use a detail brush to flick small, upward strokes along the horizon line to simulate tall, wild grass. -
Draw Tombstones:
Paint small black silhouettes of tombstones and crosses emerging from the grass on either side of the arm. -
Create Spooky Trees:
paint leafless, gnarly trees on the far left and right sides. Keep the branches jagged and thin. -
Flying Bats:
Paint three or four bat silhouettes in the sky above the hand, varying their sizes to create a sense of depth. -
Starry Night:
Finish by adding tiny white stars in the blue section of the sky using a white gel pen or small dots of white gouache.
Glow Up
Mix a tiny bit of glow-in-the-dark acrylic medium with white paint for the stars and moon to make your artwork come alive when the lights go out.
Peel off your border tape slowly to reveal your haunting masterpiece ready for display


Have a question or want to share your own experience? I'd love to hear from you in the comments below!