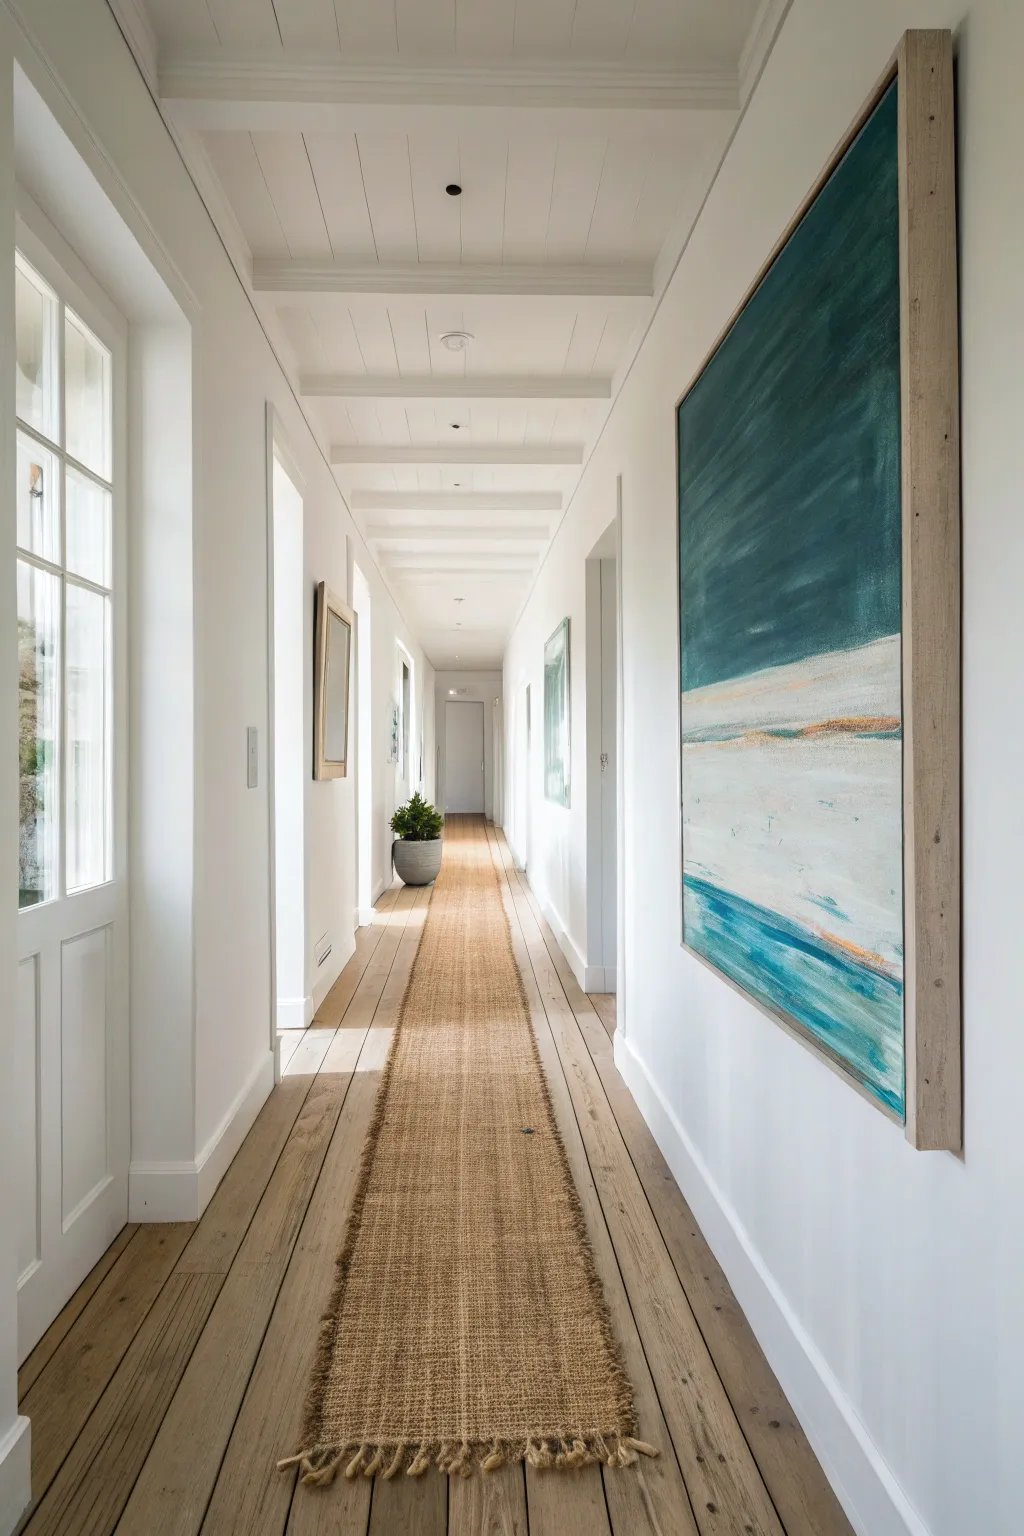
My favorite thing about hallway decor is that a few artful choices can turn a skinny pass-through into a mini gallery you get to walk through every day. Let’s play with light, color, and smart-scale details so your hallway feels intentional instead of forgotten.
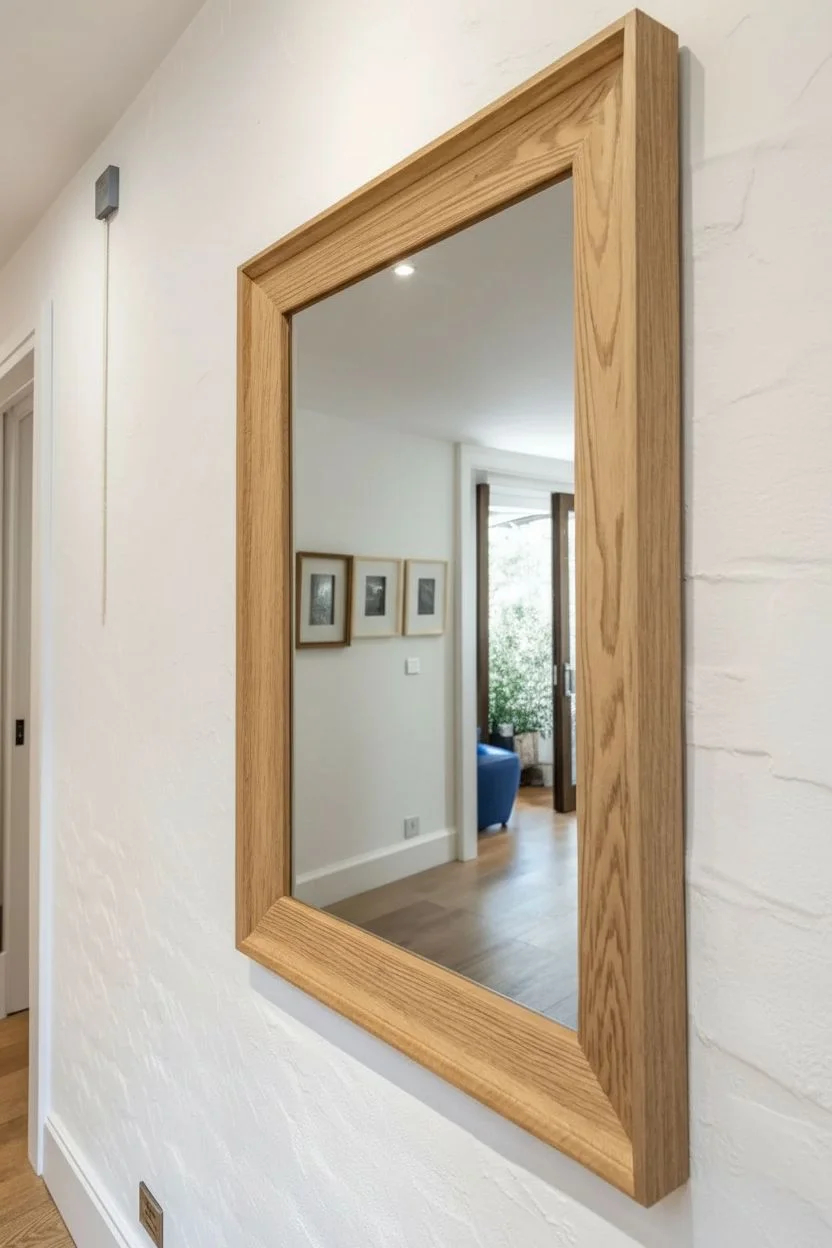
Go Big With a Statement Mirror
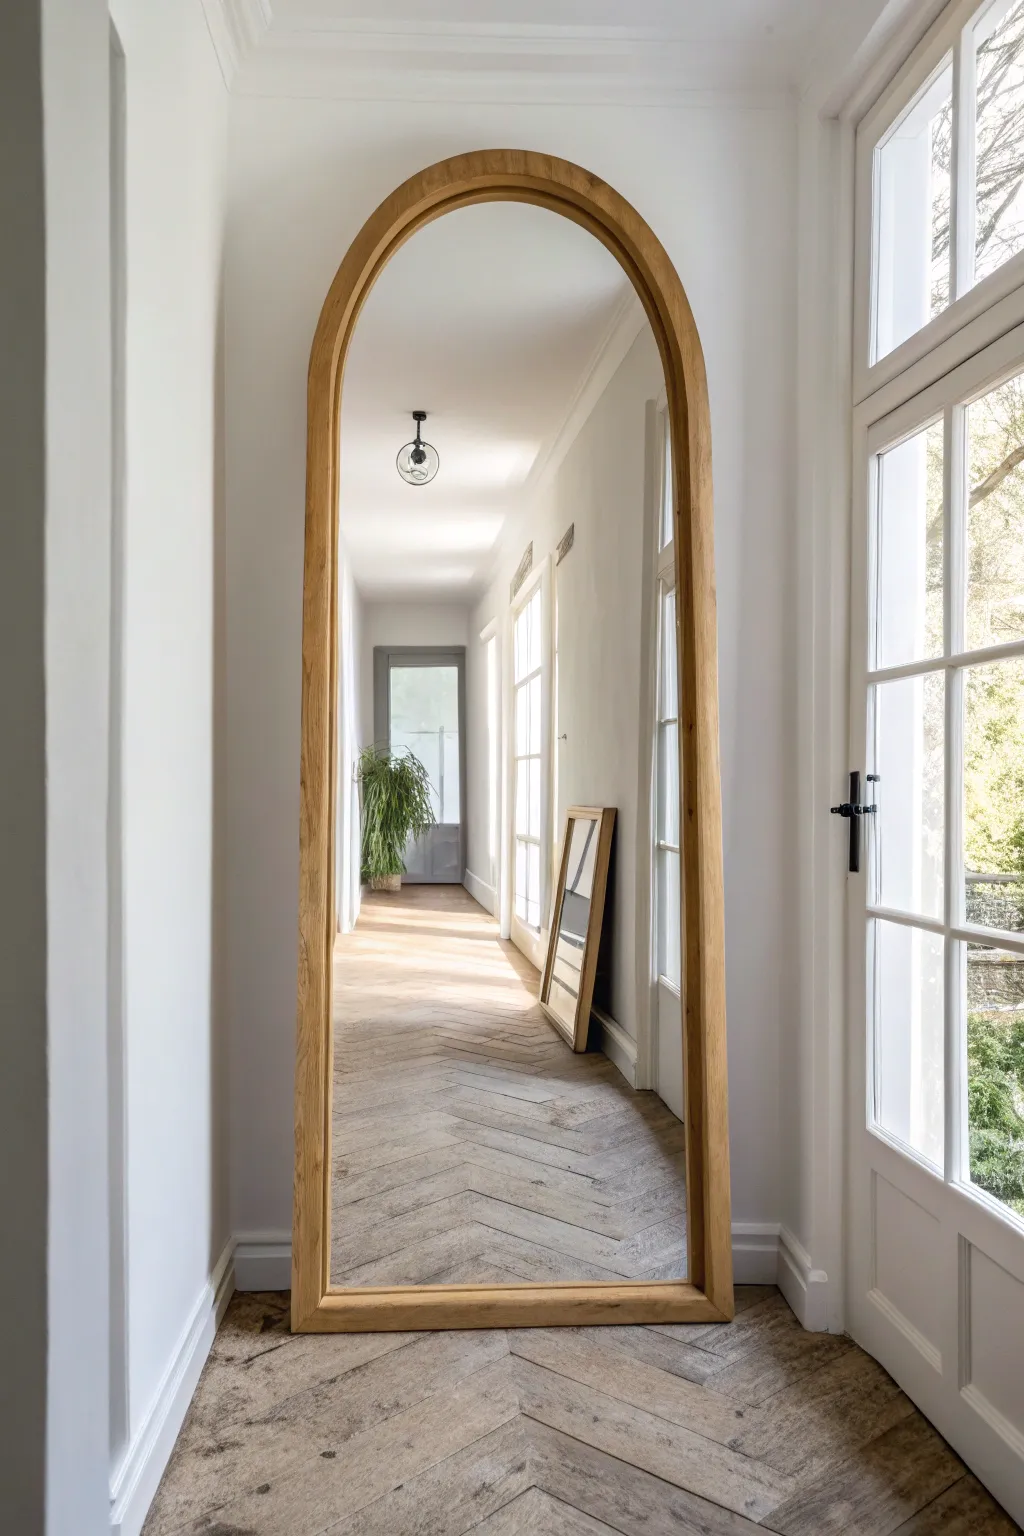
Transform your hallway with this striking, grand-scale arched mirror that creates an instant sense of depth and architectural elegance. This project involves crafting a custom wooden frame to encase a large mirror sheet, resulting in a high-end designer look without the luxury price tag.
Step-by-Step Tutorial
Materials
- Large rectangular mirror sheet (approx. 70″ x 40″, or custom size)
- Hardwood boards (white oak or ash) for framing, 1×4 inch
- Plywood sheet (3/4 inch thick) for backing
- Wood glue
- Biscuits or dowels for joinery
- Jigsaw
- Router with flush trim bit
- Orbital sander with various grits (80, 120, 220)
- Mirror adhesive (mastic)
- Clamps (large bar clamps and strap clamps)
- Clear matte polyurethane or wood wax
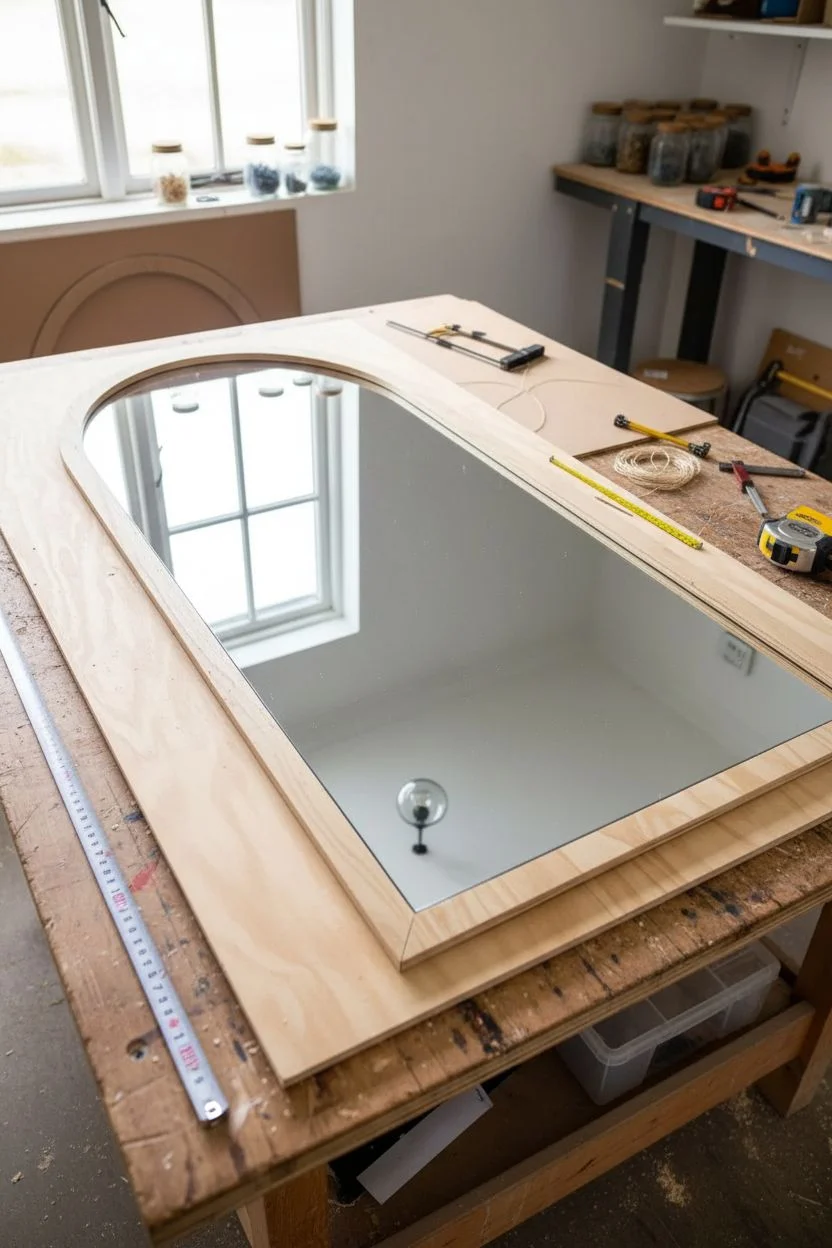
Step 1: Planning and Template Creation
-
Determine dimensions:
Measure your available hallway space. For a true statement piece like the one shown, aim for a height of at least 6 feet and a width proportional to your wall mostly likely around 3-4 feet. -
Purchase the glass:
Source a large rectangular mirror sheet from a local glass supplier. It’s often cheaper to buy a rectangular sheet and frame the arch over it, rather than cutting the glass itself into an arch. -
Draft the arch:
On a large sheet of cardboard or directly on your backing plywood, draw the arch shape. Use a string pinned to the center point to swing a pencil and create a perfect semi-circle for the top.
Uneven Seams?
If your arch segments have gaps at the joints, create a paste using wood glue and sanding dust from your specific wood. Pack it into the gaps, let dry, and sand smooth to hide imperfections.
Step 2: Building the Backing and Frame
-
Cut the backing:
Transfer your arch shape onto the 3/4-inch plywood. Use a jigsaw to cut out this solid backing shape. This will support the entire structure. -
Layout the frame segments:
Since you can’t cut a huge curve from a single board, you will segment the arch. Lay your 1×4 hardwood boards over the plywood arch template to determine the angles for your miter cuts. -
Cut frame segments:
Cut the straight vertical side pieces first. Then, cut trapezoidal segments for the arch top. Ensure the grain direction flows somewhat naturally around the curve. -
Join the frame:
Connect your wooden segments using wood glue and biscuits (or dowels) for strength. Clamp tightly on a flat surface and let the glue cure for at least 24 hours. -
Rough cut the curve:
Once the glue is dry, place the rough frame onto your plywood backing. Trace the plywood’s specific arch shape onto your glued-up frame wood. -
Scroll the shape:
Use a jigsaw to cut the arch shape out of your glued frame, staying just slightly outside your pencil line (about 1/16th inch) to leave room for finishing.
Step 3: Refining and Finishing
-
Flush trim:
Clamp the frame directly to the plywood backing (which is already the perfect shape). Use a router with a flush-trim bit to trace the plywood edge, making the hardwood frame identical to the backing curve. -
Add the rabbet (optional):
If you want the glass to sit flush, route a rabbet (a recessed groove) on the back inside edge of the frame. Alternatively, simply plan to adhere the frame onto the front face of the backing, sandwiching the mirror. -
Sanding sequence:
Sand the entire wooden frame, starting with 80 grit to even out joints, moving to 120, and finishing with 220 for a smooth touch. -
Seal the wood:
Apply a clear matte polyurethane or a wood wax to protect the lumber while keeping that natural, raw oak look visible in the photo.
Level Up: Beveled Edge
For a softer, more modern transition, use a round-over bit on your router along the inner and outer edges of the frame before finishing to softening the sharp 90-degree corners.
Step 4: Assembly
-
Mount the mirror:
Lay the plywood backing flat. Apply generous mounds of heavy-duty mirror mastic (adhesive). Place the mirror glass onto the plywood carefully. -
Attach the frame:
Apply wood glue to the exposed plywood border (or the rabbet edge if you routed one). Place your finished wooden frame over the glass/plywood assembly. -
Clamp and cure:
Use heavy weights or clamps to hold the frame down firmly against the backing while the glue sets. I typically leave this undisturbed for a full day to ensure safety. -
Clean up:
Once fully cured, carefully clean the mirror glass to remove any dust or squeeze-out. Stand the mirror upright and secure it to the wall with an anti-tip kit.
Enjoy the dramatic spaciousness this architectural piece adds to your home


Build a Gallery Wall With Cohesive Frames
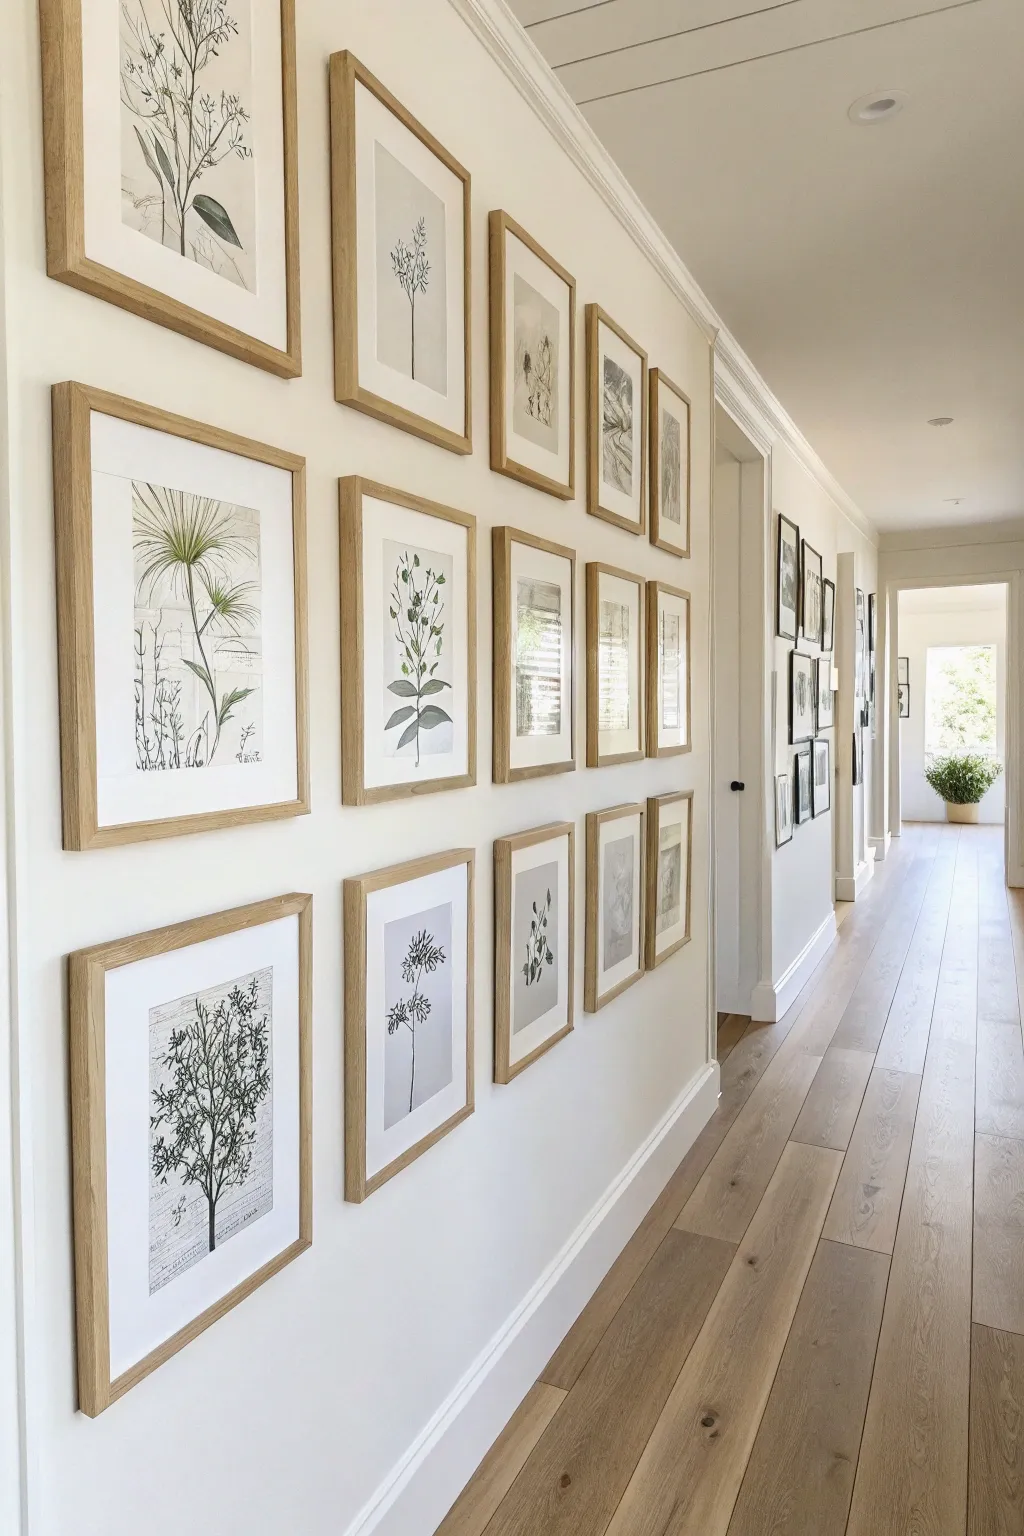
Transform a blank hallway into a sophisticated corridor of nature with this structured gallery wall project. By using identical light wood frames and a cohesive set of botanical prints, you can create a calming, museum-quality display that feels both modern and timeless.
Step-by-Step
Materials
- 12-15 matching light wood frames (frames shown appear to be oak, roughly 16×20 inches)
- White or cream mat boards to fit frames
- Set of botanical art prints (vintage style sketches or black and white plant illustrations)
- Measuring tape
- Painters tape
- Level (24-inch or longer is best)
- Pencil
- Hammer
- Picture hanging hooks or nails
- Kraft paper or newspaper (for templates)
- Scissors
Step 1: Planning the Layout
-
Measure your wall space:
Start by measuring the total length and height of the hallway wall space you intend to fill. This project features a grid layout, which requires precise spacing, so knowing your boundaries is crucial. -
Create frame templates:
Trace one of your frames onto kraft paper or newspaper and cut it out. Repeat this until you have a paper template for every frame you plan to hang. This low-tech step is a lifesaver for visualizing the final grid without putting a single hole in the wall. -
Determine spacing:
Decide on the gap between frames. In the image, the frames are spaced tightly, likely 2-3 inches apart. Uniform spacing is the secret ingredient to that clean, professional look. -
Test the arrangement:
Using painter’s tape, stick your paper templates to the wall. I like to start with the center column and work my way out to ensure the grid is centered on the wall. Adjust until the height feels right—try to keep the center of the grid at eye level, approximately 57 to 60 inches from the floor.
Step 2: Preparing the Artwork
-
Select your prints:
Gather your botanical prints. The example uses black and white line drawings of plants. Ensure they are all oriented vertically (portrait mode) to match the frames. -
Clean the glass:
Before assembly, clean both sides of the frame glass with glass cleaner and a microfiber cloth. Dust trapped inside is frustratingly visible later. -
Mount the artwork:
Place your print behind the mat board. Use a small piece of acid-free artist tape on the back of the print to secure it to the mat, ensuring it doesn’t slip down over time. -
Assemble the frames:
Place the matted print into the frame, add the backing board, and secure the clips. Repeat this process for all frames in your set.
Crooked Grid?
If frames keep shifting, place a small ball of museum putty (or blue tak) behind the bottom corners of each frame. This anchors them to the wall so your grid stays perfectly aligned.
Step 3: Installation
-
Mark anchor points:
With your paper templates still on the wall, measure the distance from the top of the frame to the hanging hardware on the back. Transfer this measurement to your paper templates on the wall and mark exactly where the nail needs to go. -
Install the first nail:
Hammer your nail or hanging hook right through the paper template at your marked spot. Start with the bottom-left or top-left frame to establish your anchor point. -
Remove the template:
Gently tear away the paper template from behind the nail. -
Hang and level:
Hang your first frame. Place your level on top of the frame to ensure it is perfectly straight. This first frame sets the standard for the entire grid. -
Install the remaining hardware:
Proceed to install the remaining nails, checking alignment frequently. I often recommend using a laser level if you have one to project a straight horizontal line across the wall for each row. -
Secure the frames:
Hang the rest of the frames. Use small adhesive rubber bumpers on the bottom corners of each frame; this keeps them straight and allows air circulation to prevent dust buildup on the wall. -
Final adjustment:
Step back and view the gallery wall from the end of the hallway. Make tiny adjustments to tilt frames until the grid lines look crisp and parallel.
Visual Balance
Mix up your botanical prints so you don’t have two ‘heavy’ or dark images right next to each other. Spread out the denser illustrations to keep the grid looking balanced.
Now you have a stunning, cohesive focal point that brings effortless elegance to your hallway walk.


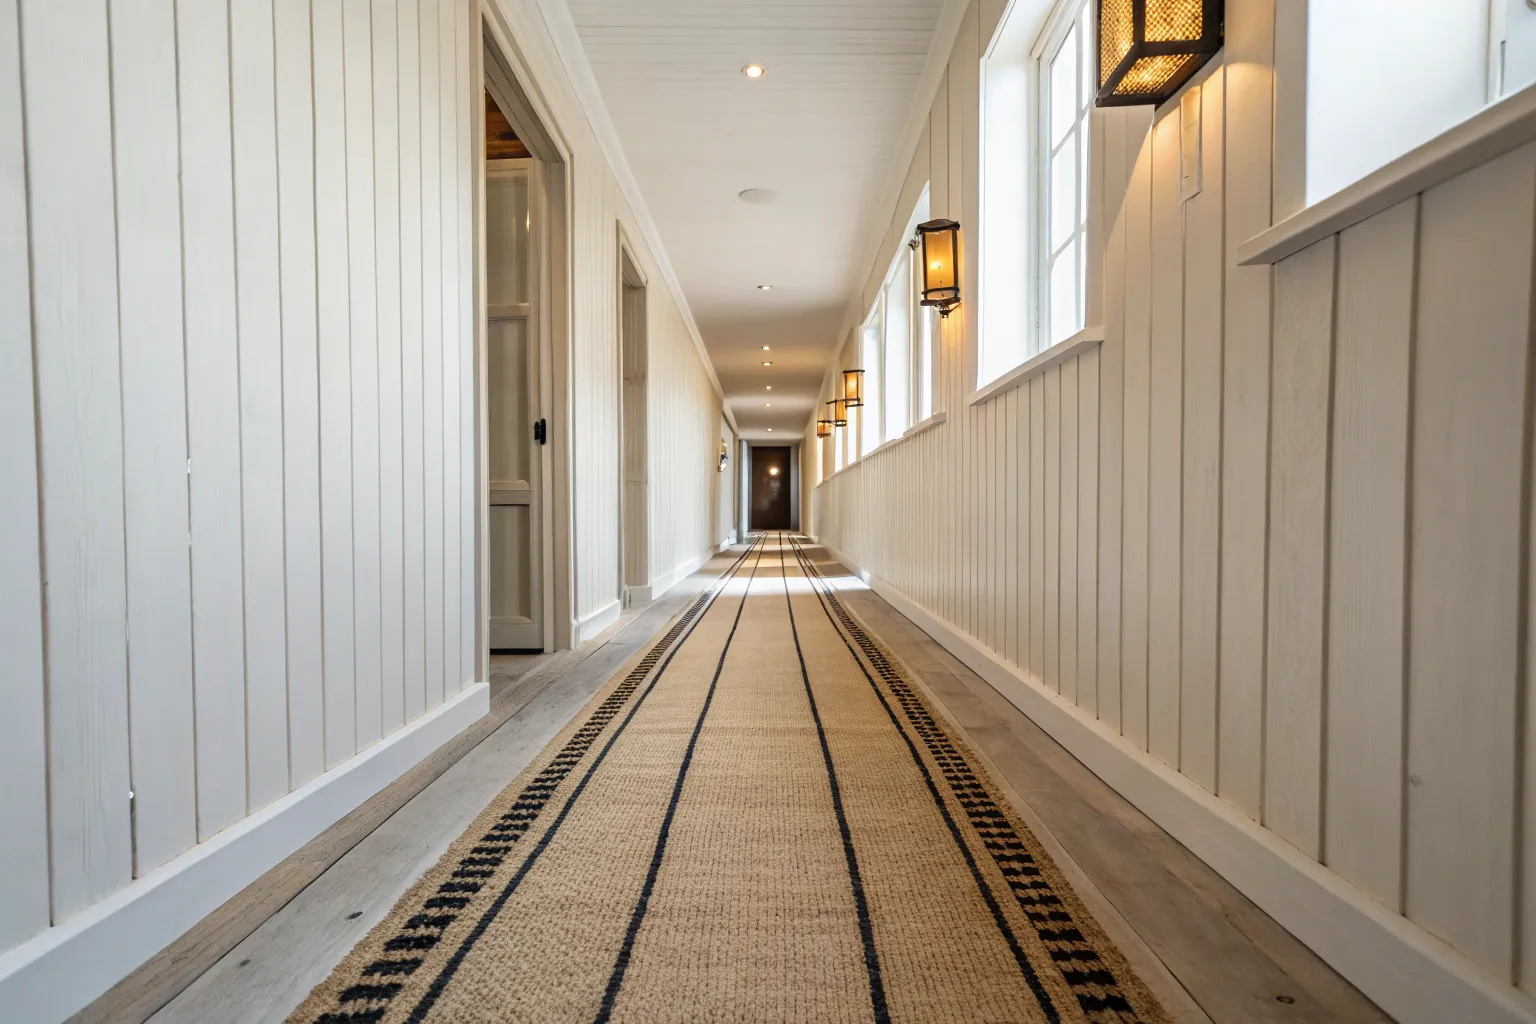
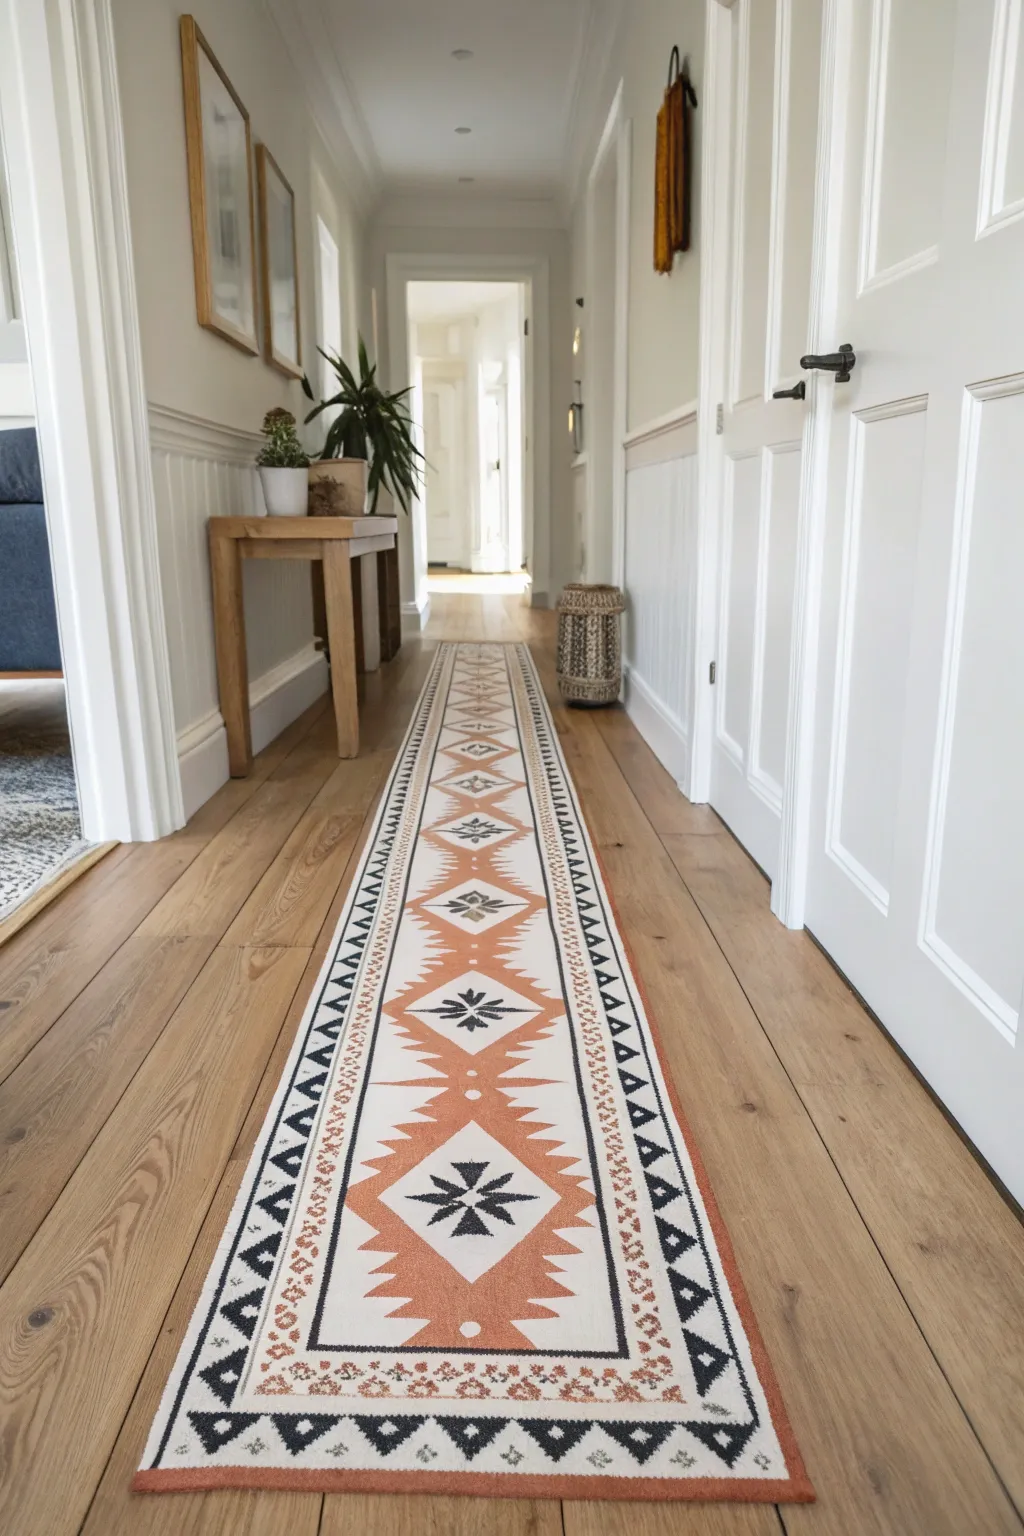
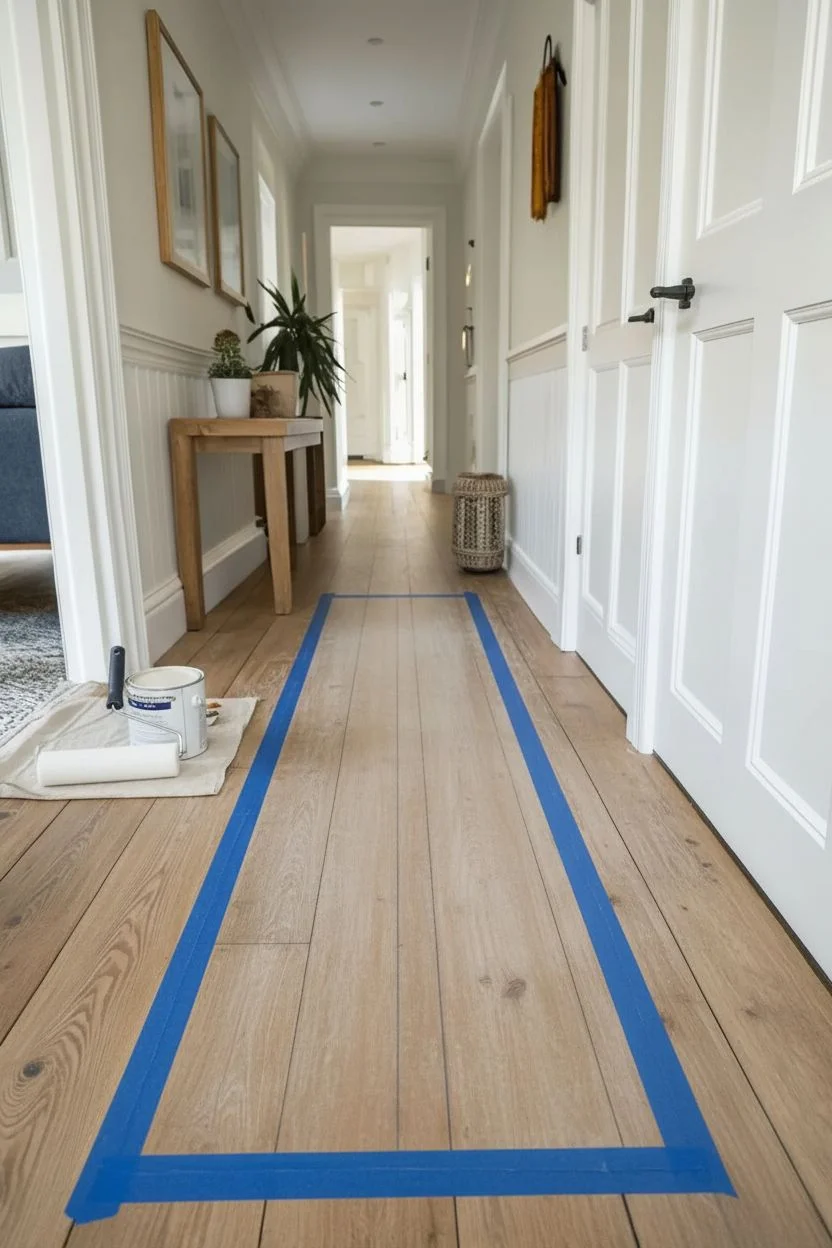
Lay Down a Runner Rug to Define the Walkway
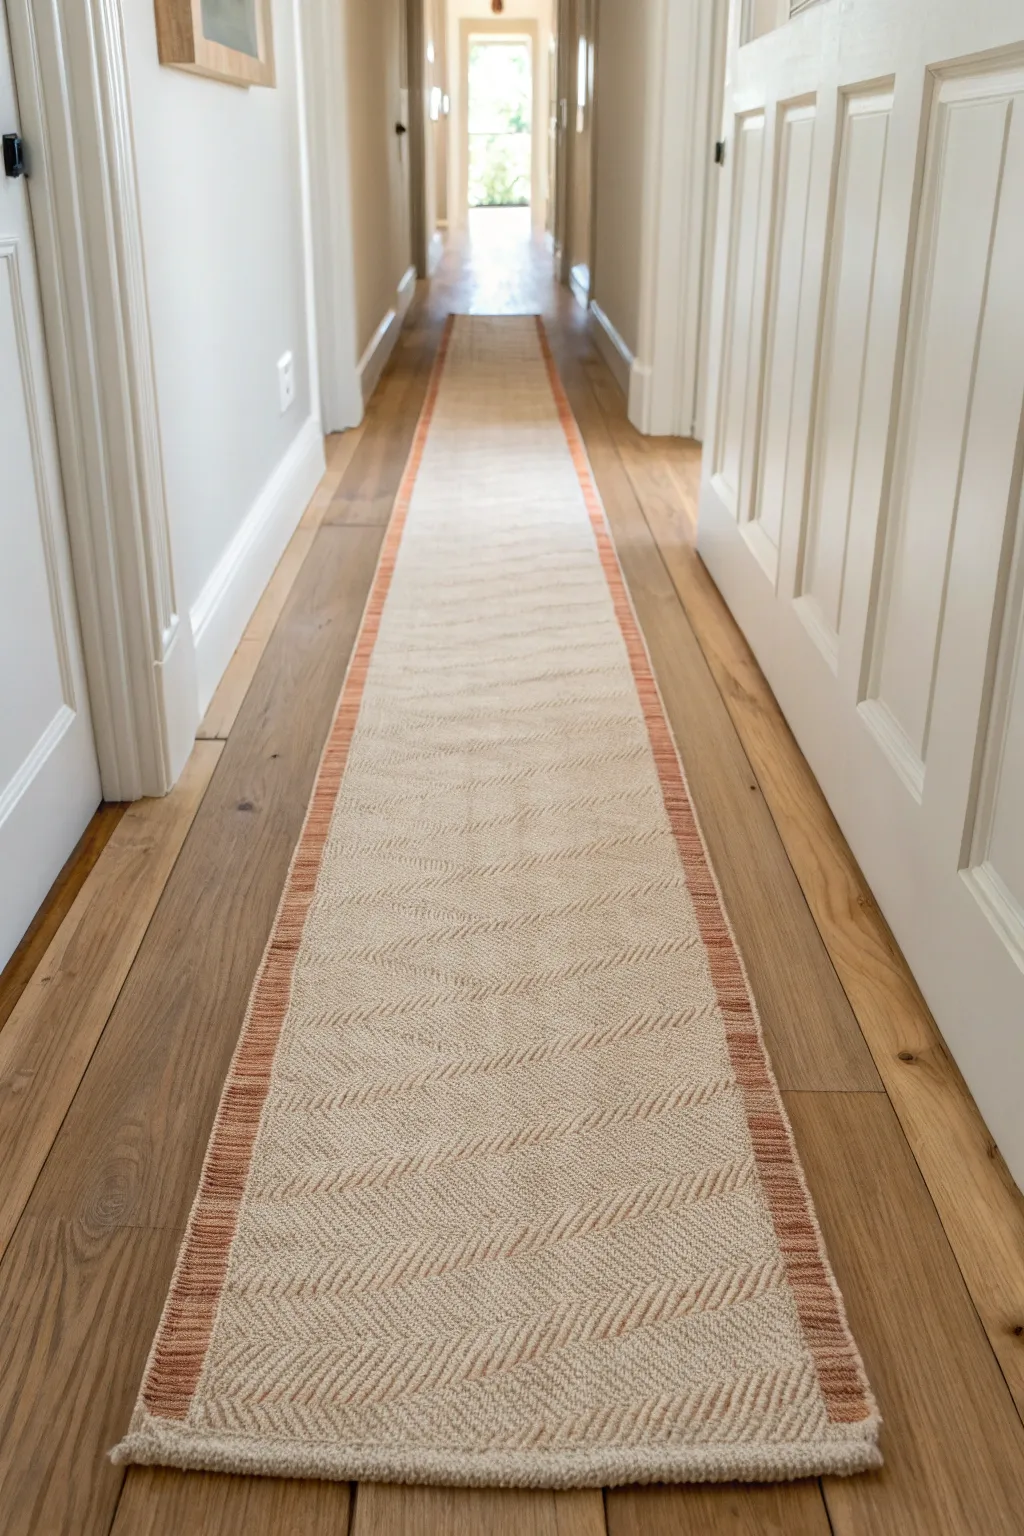
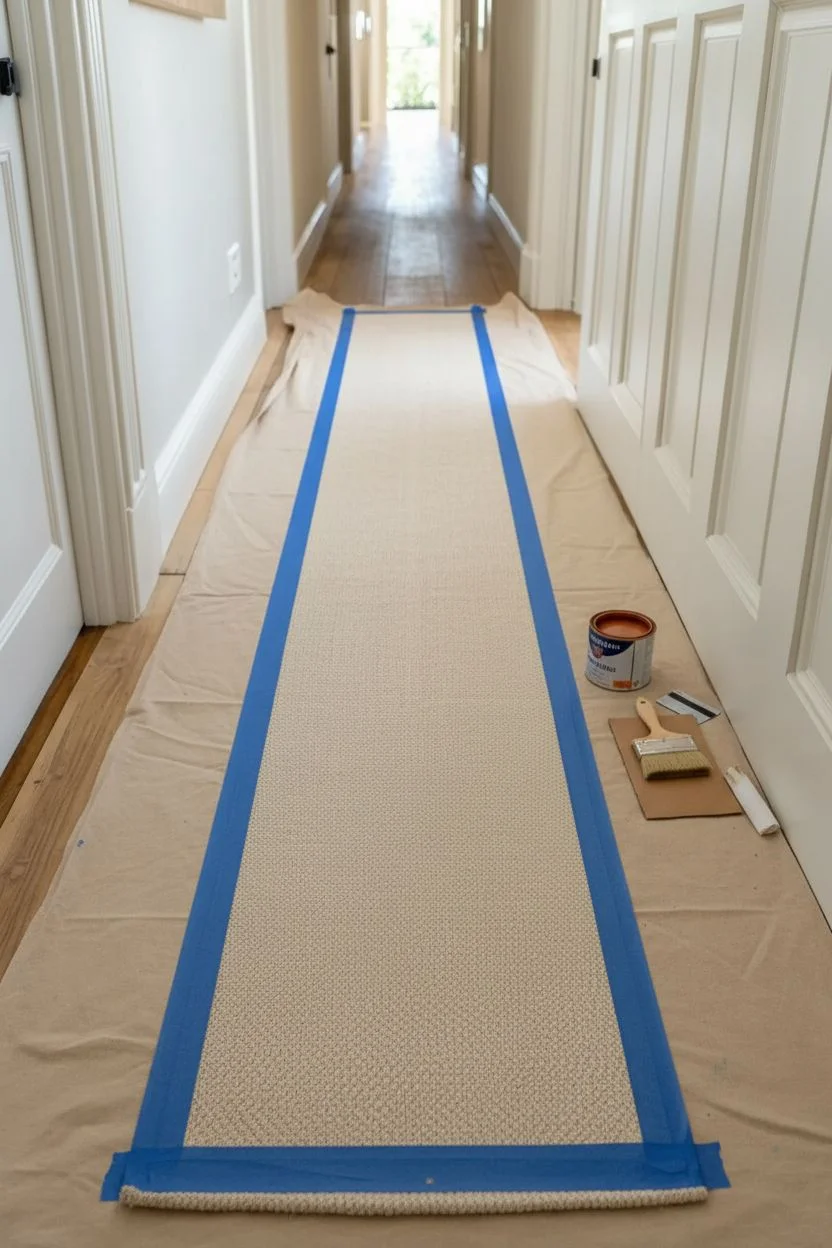
Transform a plain, inexpensive runner into a custom design piece that anchors your hallway perfectly. This project uses fabric paint and simple masking techniques to add a warm, terracotta border and subtle diagonal texture to a standard flat-weave rug.
Detailed Instructions
Materials
- Long, neutral flat-weave runner rug (sisal, jute, or cotton blend)
- Fabric paint or soft body acrylics (Terracotta/Rust color)
- Textile medium (if using acrylics)
- Fabric paint (Cream/Beige slightly darker than rug)
- Wide painter’s tape (2-inch width)
- Narrow painter’s tape (1-inch width)
- Stiff-bristled stencil brush
- Small foam roller
- Measuring tape
- Drop cloth or cardboard
- Iron and pressing cloth (for heat setting)
Step 1: Preparation and Border Design
-
Clean the surface:
Lay your runner flat on a clean, protected surface like a drop cloth. Vacuum it thoroughly to remove any loose fibers or dust that might interfere with paint adhesion. -
Mark the outer edge:
Decide on the width of your colored border—about 2 inches works well for most standard runners. Measure 2 inches in from the long edge and place a strip of wide painter’s tape running the full length of the rug. -
Secure the tape:
Press the tape down firmly. I like to run the edge of a credit card or a spoon along the tape seam to ensure a tight seal, which prevents paint from bleeding under. -
Repeat on the other side:
Perform the same measuring and taping process on the opposite long side of the rug, creating two parallel channels for your border color. -
Prepare the paint:
Mix your terracotta or rust-colored paint. If you are using standard acrylics rather than specific fabric paint, mix in textile medium according to the bottle’s ratio to keep the painted area soft and flexible.
Seal the Bleed
Before applying the rust paint, brush a thin layer of the *base* rug color (or clear matte medium) along the tape edge. This fills gaps so the colored paint won’t bleed under.
Step 2: Painting the Custom Border
-
Apply the first coat:
Using a stiff stencil brush, begin stippling the paint onto the exposed 2-inch border area. Use an up-and-down pouncing motion rather than brushing side-to-side to work the pigment deep into the woven fibers. -
Work in sections:
Move down the length of the rug in manageable 2-foot sections. Ensure the coverage is even, but don’t supersaturate the rug to the point where paint soaks through to the floor. -
Detail the edges:
Pay special attention to the very edge of the rug binding. You may need to use a smaller brush to carefully cover the serged edge without painting the sides of the rug. -
Let it dry:
Allow the first coat to dry to the touch, which usually takes about an hour depending on humidity. -
Apply a second coat:
If the rug’s original color is showing through significantly, apply a second coat of the rust color to achieve a rich, opaque finish. -
Remove tape carefully:
While the second coat is still slightly tacky (but not wet), slowly peel back the painter’s tape at a 45-degree angle to reveal a crisp, clean line.
Step 3: Adding the Herringbone Texture
-
Plan the diagonal pattern:
To mimic the subtle woven herringbone look in the center, you will use a dry-brush technique. Use the narrow painter’s tape to create a series of diagonal lines across the center beige section. -
Create the chevron:
Tape diagonals slanting right for one row, and slanting left for the next, or keep it simple with a single diagonal direction for a twill look. Space them about 1 inch apart. -
Dry brush the texture:
Dip your stencil brush into the cream/beige paint (just a shade darker than the rug) and wipe almost all of it off on a paper towel. The brush should be nearly dry. -
Add subtle definition:
Lightly sweep the dry brush over the exposed areas between the diagonal tape. You aren’t painting solid lines; you are just catching the high points of the weave to create visual texture. -
Remove diagonal tape:
Peel off the interior tape strips immediately. This effect should be very subtle, looking more like a shadow or a weave change than a painted stripe.
Paint Looking splotchy?
Natural fiber rugs absorb paint unevenly. Dilute your first coat slightly with water (10%) to help it penetrate the fibers, then do a full-strength top coat for even color.
Step 4: Finishing Touches
-
Cure the paint:
Allow the entire rug to dry completely for at least 24 to 48 hours before walking on it. -
Heat set the design:
To make the paint permanent and durable against foot traffic, place a pressing cloth over the painted areas and iron on a medium-high setting (no steam) for a few minutes per section. -
Place the rug pad:
Lay down a high-quality non-slip rug pad in your hallway before positioning your new custom runner on top.
Enjoy the custom look of your new hallway runner as it guides guests through your home with style


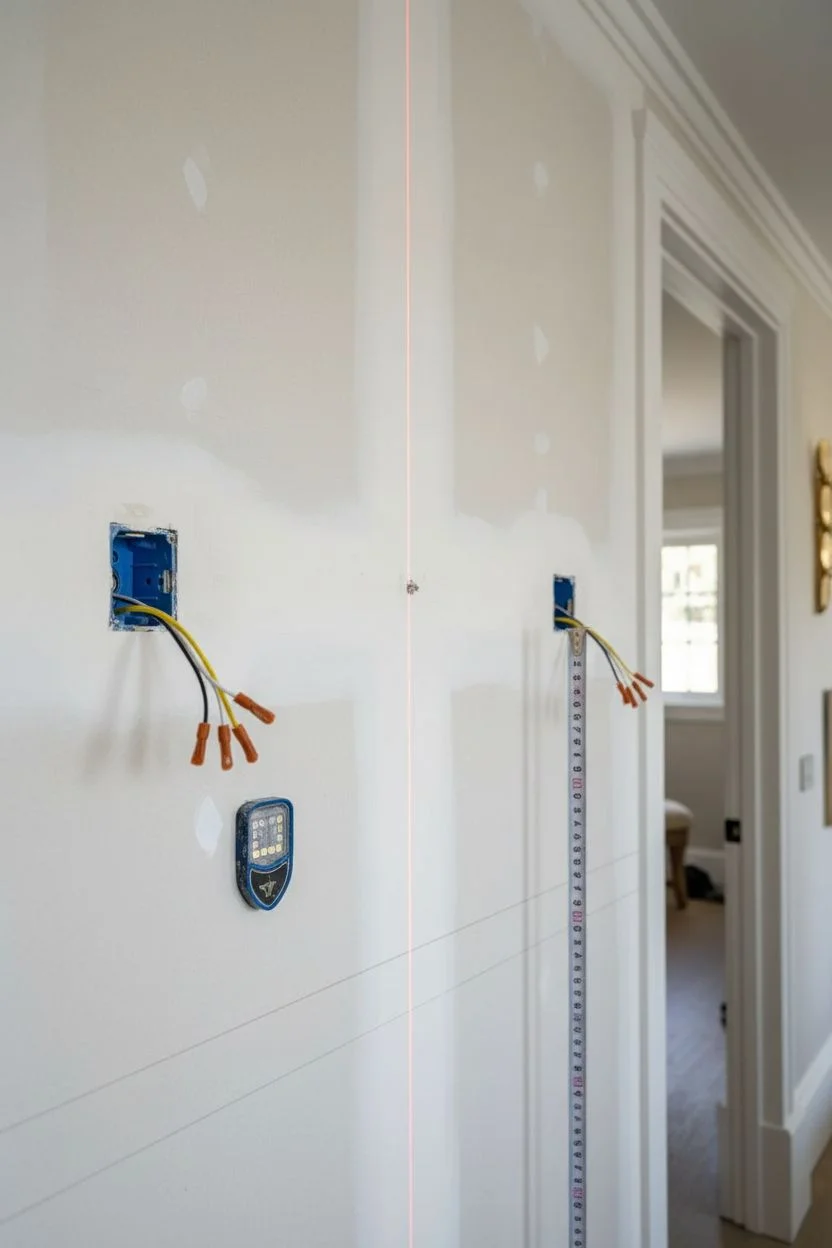
Add Wall Sconces for a Soft, Flattering Glow
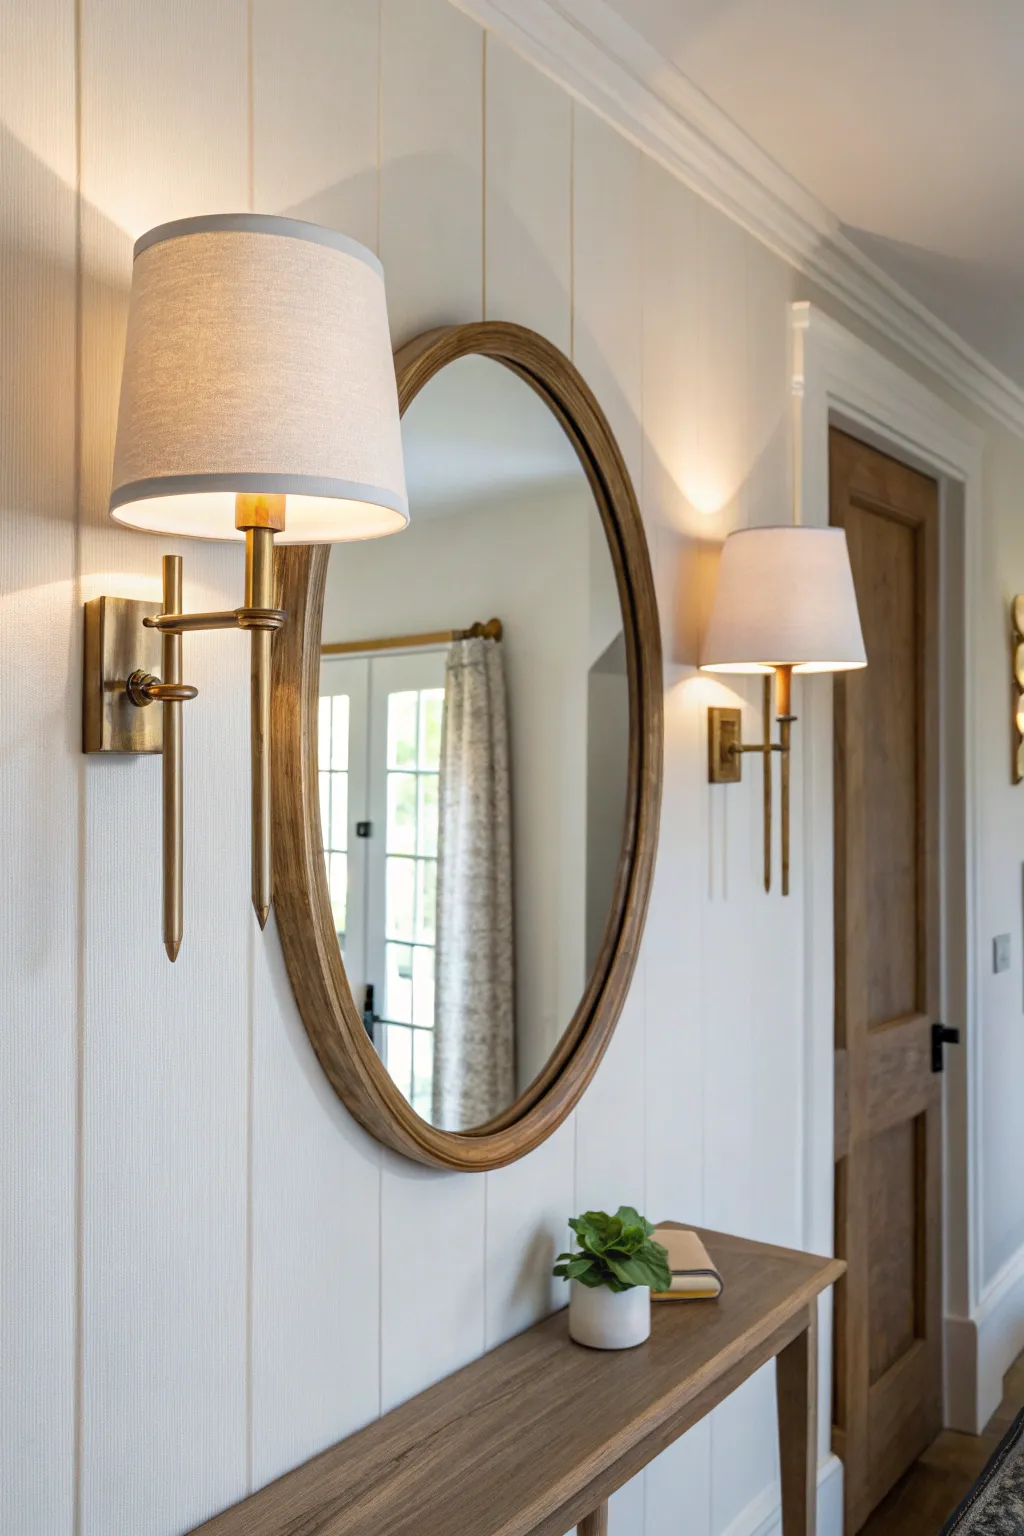
Transform a plain hallway into an inviting passage with the timeless elegance of wall sconces and classic paneling. This project combines vertical shiplap texture with warm, ambient lighting to create a sophisticated focal point that feels both modern and traditional.
Step-by-Step
Materials
- Two brass swing-arm wall sconces (hardwired or plug-in)
- Round wood-framed mirror (approx. 30-36 inches)
- Vertical shiplap paneling boards (MDF or wood)
- Construction adhesive
- Brad nailer and 1.5-inch brad nails
- Jigsaw or hole saw
- Level and measuring tape
- Stud finder
- Electrical tester and wire strippers (if hardwiring)
- Spackle or wood filler
- Sandpaper (fine grit)
- Primer and interior paint (creamy white)
- Paint rollers and angled sash brush
- Narrow console table
- Small potted plant and decorative books
Step 1: Wall Prep and Wiring
-
Plan your placement:
Decide on the perfect height for your mirror and sconces. Generally, the center of the mirror should be at eye level (about 60 inches from the floor), and the sconces should flank it, roughly centered vertically with the mirror or slightly above the centerline. -
Locate electrical needs:
If you are hardwiring, use a stud finder to locate studs and plan where your electrical boxes will go. Ensure power is turned off at the breaker before doing any electrical work. -
Install junction boxes:
Cut holes in the drywall for your electrical boxes using a drywall saw. Run the necessary Romex cabling to these points. If you aren’t comfortable with electrical work, this is the time to call an electrician.
Light Level Trick
Put your sconces on a dimmer switch. It allows you to shift from bright, functional light to a soft, moody glow instantly.
Step 2: Installing the Shiplap
-
Establish a level line:
Before attaching boards, use a long level to mark a vertical reference line. Walls in older homes are rarely perfectly straight, so rely on your level rather than the corners. -
Cut boards to length:
Measure the height of your wall from baseboard to ceiling (or crown molding). Cut your vertical shiplap boards to fit these dimensions. -
Apply adhesive:
Squeeze a zig-zag pattern of construction adhesive onto the back of your first board. -
Nail the first board:
Align the board with your level line and tack it into place using a brad nailer. Aim for the studs where possible, or nail at opposing angles into the drywall to secure it while the glue sets. -
Continue the pattern:
Slot the next board into the groove of the first. I like to use a nickel as a spacer if the boards don’t have built-in self-spacing tabs, just to ensure consistent shadow lines. -
Cut around electrical boxes:
When you reach your sconce locations, carefully measure and mark the box position on the shiplap board. Use a jigsaw to cut out the opening before installing that specific board.
No-Wire Option
Can’t do electrical? Use ‘puck lights’ with a remote control. Glue the puck into the sconce shade so you don’t need to hardwire anything.
Step 3: Finishing and Painting
-
Fill the holes:
Once all boards are installed, fill all nail holes with lightweight spackle or wood filler. Let it dry completely. -
Sand smooth:
Lightly sand the filled areas flush with the surface of the boards. Wipe away any dust with a tack cloth or damp rag. -
Prime the surface:
Apply a coat of high-quality primer. Ensure you get into the grooves between the boards; a brush works best for the seams while a roller handles the faces. -
Apply topcoat:
Paint the wall with two coats of a creamy white interior paint. A satin or eggshell finish reflects the light beautifully without being too glossy.
Step 4: Final Assembly
-
Mount the mirror:
Install heavy-duty wall anchors or find a stud to hang your round mirror centered between the two electrical boxes. -
Wire the sconces:
Connect the fixture wires to the house wires (black to black, white to white, ground to ground). Secure them with wire nuts and tuck them neatly into the box. -
Attach fixtures:
Secure the sconce mounting plates to the boxes and attach the fixtures. Ensure the arms are vertical using a small torpedo level. -
Add the shades:
Place your fabric shades onto the sconces. The soft texture of the shade contrasts wonderfully with the metal finish. -
Style the console:
Place a narrow wooden console table beneath the mirror. It grounds the arrangement. -
Accessorize:
Add a small green plant and a stack of neutral books to the table. This simple styling keeps the focus on the beautiful lighting and texture.
Enjoy the warm and welcoming atmosphere your new hallway lighting creates every time you walk by
BRUSH GUIDE
The Right Brush for Every Stroke
From clean lines to bold texture — master brush choice, stroke control, and essential techniques.
Explore the Full Guide
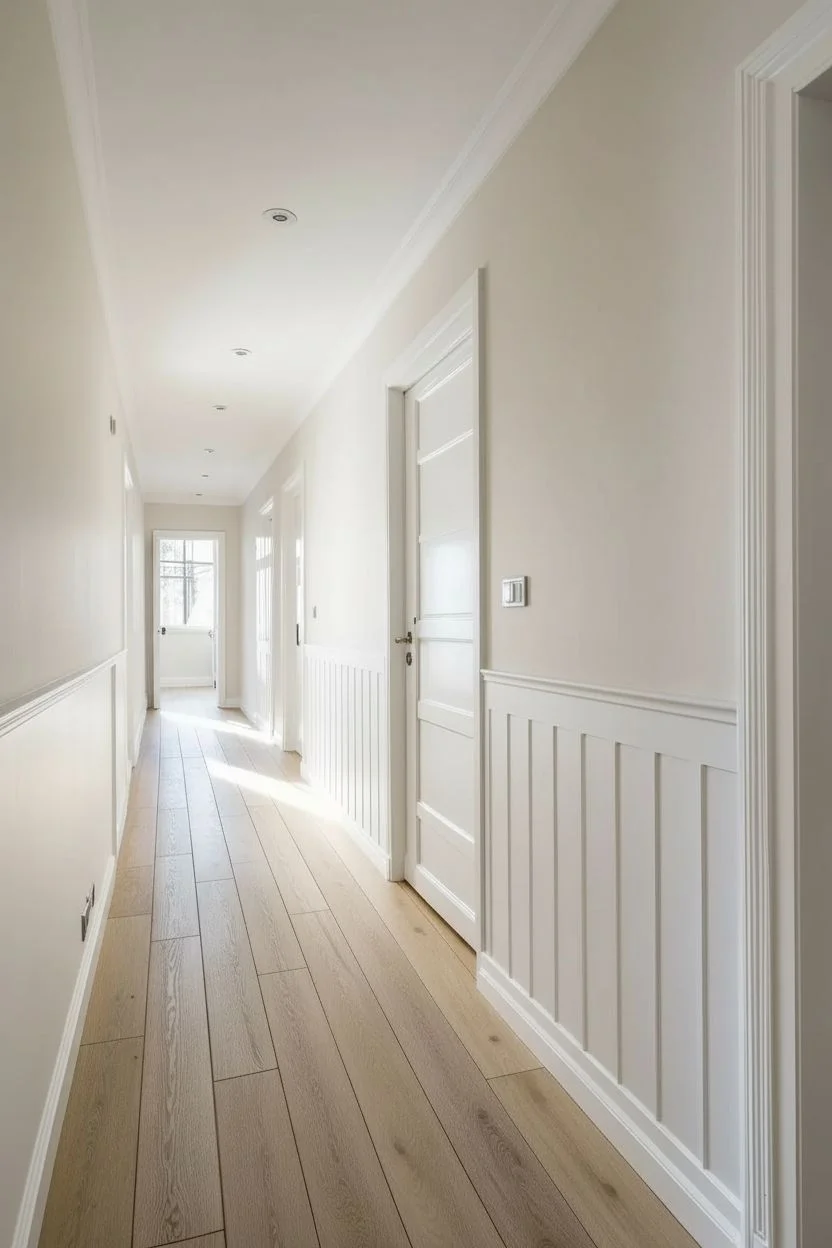
Try Two-Tone Walls With Wainscoting or a Painted Dado Line
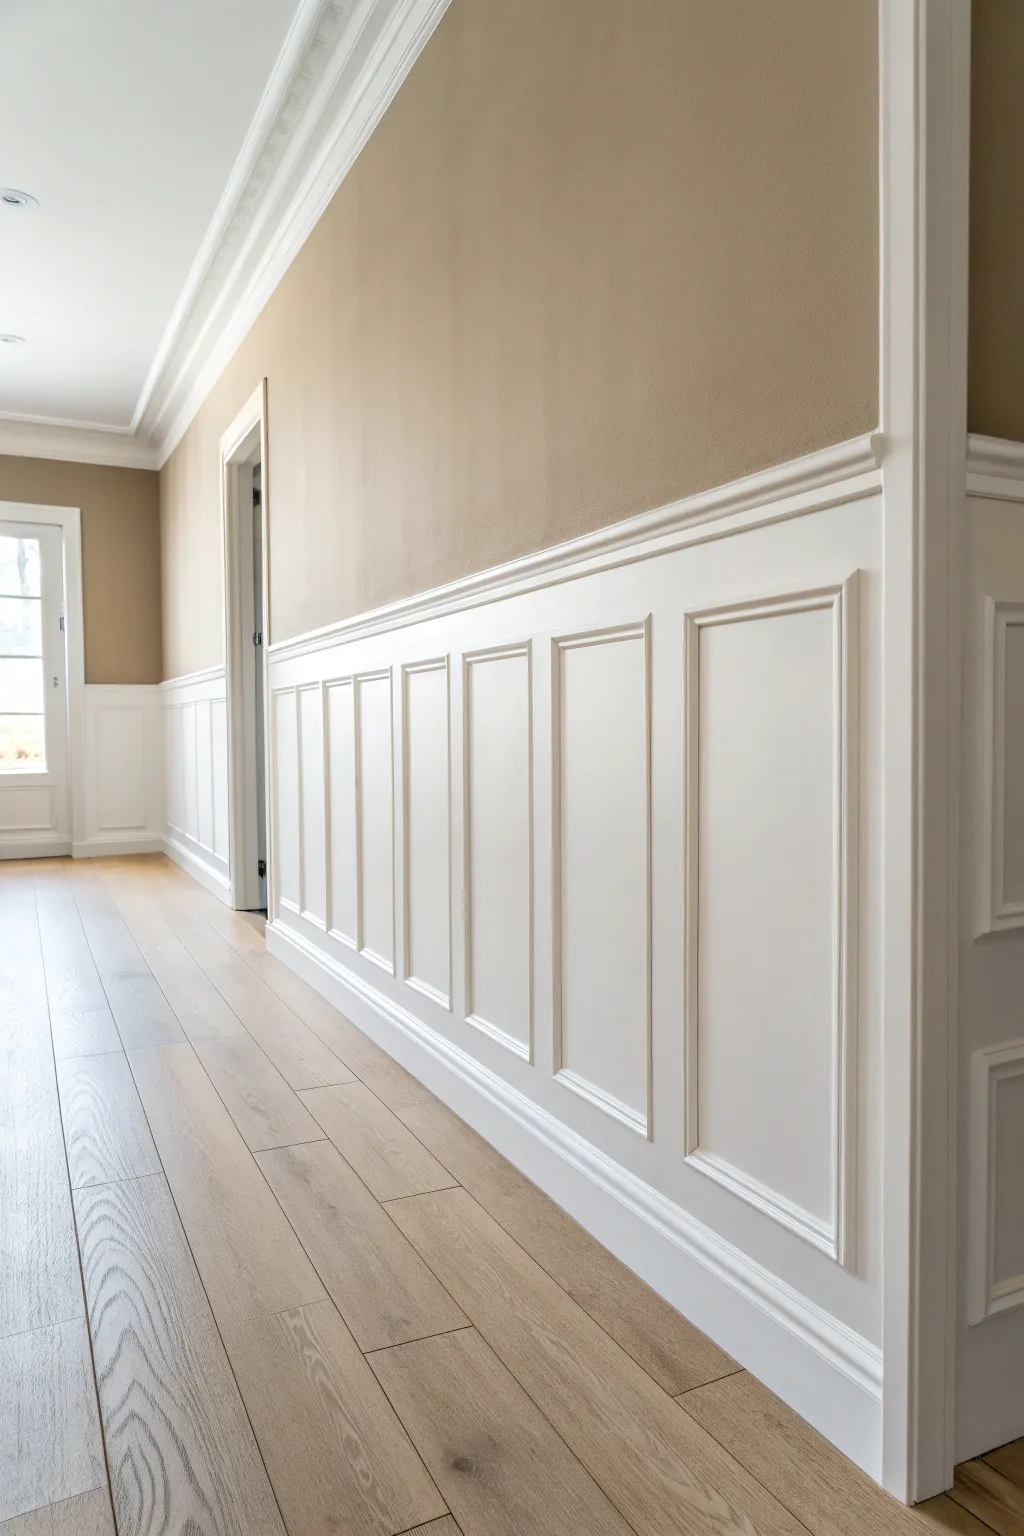

Elevate a plain hallway into a sophisticated corridor with this classic raised panel wainscoting project. By combining crisp white architectural details with a warm beige upper wall, you’ll create depth and character that feels both traditional and fresh.
Detailed Instructions
Materials
- Interior latex paint (Beige/Tan for upper walls)
- Interior semi-gloss enamel (White for wainscoting)
- MDF or plywood sheets (1/4 inch thick) for panels
- 1×4 pine or MDF boards (for stiles and rails)
- Baseboard molding
- Chair rail molding
- Base cap molding (for inside panel trim)
- Construction adhesive
- Finishing nails and nail gun
- Wood filler and caulk
- Sandpaper 220-grit
- Paint rollers, brushes, and painter’s tape
- Level and stud finder
Step 1: Preparation and Planning
-
Measure and calculate:
Begin by measuring the total length of your hallway walls. Decide on the height of your wainscoting—typically 32 to 36 inches high, or roughly one-third of the wall height. Sketch your layout on paper to determine the spacing of the vertical stiles so the boxes appear uniform. -
Prep the walls:
Remove existing baseboards carefully if you plan to reuse them, though new, taller baseboards often look best with this style. Patch any major holes and sand the lower wall smooth, as the wall itself will serve as the flat background for the panel frames. -
Paint the upper wall:
Before installing any wood, painting the upper portion of the wall is much easier. Apply two coats of your chosen warm beige or tan latex paint, extending slightly below your planned chair rail line to ensure full coverage.
Uneven Wall Woes
Walls are rarely perfectly flat. If gaps appear behind your boards, don’t force the wood back. Use shims to keep the wood straight, then cover the gaps with caulk.
Step 2: Installing the Framework
-
Mark the layout:
Using your level and a pencil, draw a horizontal line at the top height of your wainscoting. Then, mark the vertical positions of your stiles (the upright boards) based on your sketch calculations to ensure even spacing. -
Install the top rail and baseboard:
Apply construction adhesive to the back of your 1×4 top rail and nail it into the studs along your horizontal level line. Install the bottom baseboard directly to the floor. This creates the upper and lower boundaries of your wainscoting. -
Attach the vertical stiles:
Cut your 1×4 vertical boards to fit snugly between the top rail and the baseboard. Apply adhesive to the back of each piece, position them over your pencil marks, and secure them with finishing nails. -
Add the chair rail:
Install the decorative chair rail molding directly on top of the upper 1×4 rail. miter the corners at 45 degree angles where walls meet for a seamless transition.
Luxurious Upgrade
For deeper shadows and a grander look, add a second layer of slightly smaller panel molding inside the first one to create a ‘double raised’ panel effect.
Step 3: Adding Detail and Finish
-
Create the inner panels:
To achieve the raised panel look shown in the image, you need to frame the inside of each rectangular ‘box’ created by your stiles and rails. Measure the inside dimensions of each rectangle precisely. -
Cut the moulding trim:
Using a miter saw, cut lengths of base cap molding or small panel molding to frame the inside of each box. Each piece needs a 45-degree miter cut at the ends to form picture-frame corners. -
Install the panel molding:
Fit the molding pieces inside the squares. I find it helpful to dry-fit all four sides of a box first to ensure tight corners before nailing them in place with short brad nails. -
Fill the gaps:
This is the most crucial step for a professional finish. Use wood filler for all nail holes and a paintable latex caulk for every seam where wood meets wood or wood meets wall. -
Sand for smoothness:
Once the filler is completely dry, sand the filled areas and any rough wood joints with 220-grit sandpaper until they feel perfectly flush to the touch. -
Clean the surface:
Wipe down the entire lower wall with a tack cloth or slightly damp rag to remove all sanding dust. Dust residue can ruin your paint finish, so be thorough here. -
Prime the wood:
Apply a high-quality primer to all the new wood elements. If you are using raw wood, a stain-blocking primer is best to prevent knots from bleeding through later. -
Apply the first coat:
Using a semi-gloss white enamel, paint the wainscoting. Use a high-quality angled sash brush for the intricate molding profiles and corners first. -
Roll the flat surfaces:
While the brushed edges are wet, use a small foam roller or smooth-nap roller for the flat stiles, rails, and center panels to minimize brush marks. -
Final coat:
Allow the first coat to dry according to the manufacturer’s instructions, then apply a second coat for a durable, washable finish. -
Touch up:
Remove any painter’s tape carefully. If any white paint got onto your beige upper wall, use a small artist’s brush to touch up the line for a crisp separation.
Enjoy the sophisticated architectural depth your new hallway now displays every time you walk through
Use a Picture Ledge for Rotating Art Drops
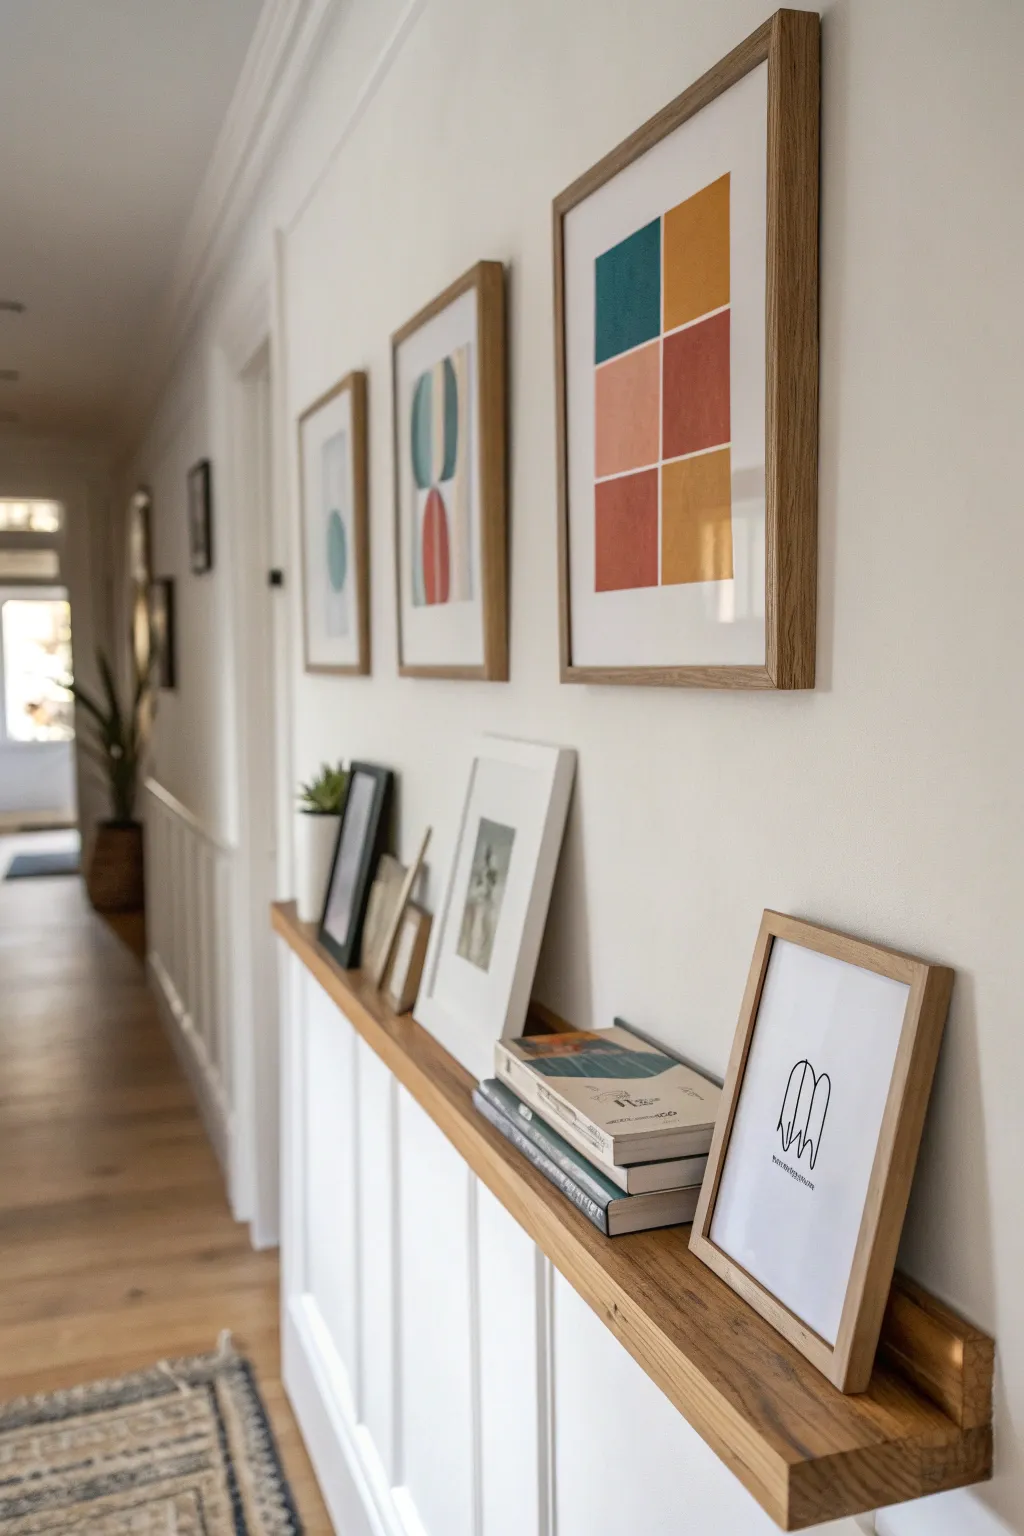
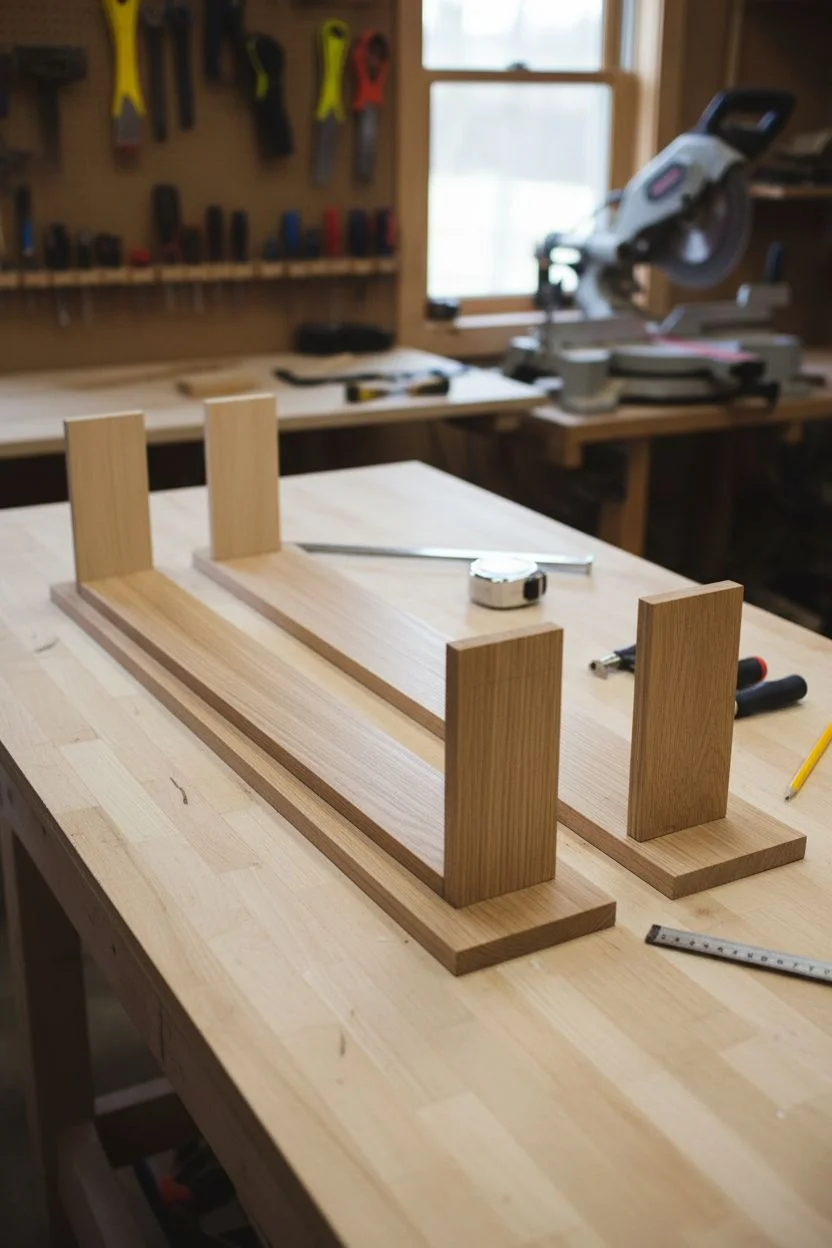
Transform a boring hallway wall into a gallery-worthy display with this sleek, custom-built picture ledge. Made from solid oak to match your existing trim, this ledge sits perfectly atop wainscoting to showcase rotating art prints and books without putting extra holes in the wall.
How-To Guide
Materials
- 1×4 solid oak board (length of your hallway section)
- 1×2 solid oak board (same length, for the front lip)
- 1×2 pine or poplar board (same length, for the back cleat/mounting strip)
- Wood glue
- 2-inch wood screws
- Finish nails or brad nailer
- Wood filler (oak tint)
- Sandpaper (120, 220, and 300 grit)
- Stain (optional, to match floors)
- Polyurethane or wood oil/wax finish
- Drill with countersink bit
- Stud finder
- Level
- Clamps
Step 1: Preparation and Cutting
-
Measure the space:
Measure the exact length of the hallway wall section where you want the ledge to sit. If you are revitalizing existing wainscoting like in the photo, measure the top rail’s length precisely. -
Select your lumber:
Choose straight, knot-free oak boards. You want the grain to look clean and modern. I personally look for boards with similar grain patterns so the joinery looks seamless. -
Cut to length:
Using a miter saw, cut your main 1×4 shelf, the 1×2 front lip, and the 1×2 back mounting strip to your measured length. -
Dry fit the pieces:
Arrange the pieces together on a flat surface to check for any bowing. The 1×4 is the bottom, the pine 1×2 goes against the wall (on top of the 1×4), and the oak 1×2 goes on the front face.
Step 2: Assembling the Ledge
-
Attach the back strip:
Apply a bead of wood glue along the back edge of the top face of your 1×4 oak board. Place the pine 1×2 strip here (this part will be hidden by art, so using cheaper wood is fine). -
Secure the back strip:
Clamp the strip in place. Flip the assembly over and drive 2-inch screws up through the bottom of the 1×4 into the pine strip. Predrill to avoid splitting the oak. -
Attach the front lip:
Apply glue to the front edge of the 1×4. Position your 1×2 oak board so it sits flush against the front face, creating a small lip that sticks up to hold the pictures. -
Nail the front lip:
Use finish nails or a brad nailer to secure the front lip. Shoot nails through the face of the 1×2 into the edge of the 1×4. Space them about every 8-10 inches. -
Fill the nail holes:
Take a tiny amount of oak-tinted wood filler and press it into the nail holes on the front lip. Let it dry completely.
Uneven Walls?
If your wall bows and creates a gap behind the ledge, don’t force the wood back. Instead, use thin shims behind the mounting strip at stud locations, then caulk the top seam for a seamless look.
Step 3: Finishing the Wood
-
Sanding phase one:
Start with 120-grit sandpaper to smooth out the joints where the boards meet. You want the transition from the shelf to the lip to feel like one solid piece. -
Sanding phase two:
Move to 220-grit paper for the entire surface. Pay special attention to the front face and top edge, as this is what’s most visible. -
Clean the dust:
Wipe the entire shelf down with a tack cloth or a rag slightly dampened with mineral spirits to remove all sawdust. -
Apply finish or stain:
If you want to change the color, apply your stain now. If you love the natural oak look shown in the photo, skip straight to a clear sealant. A matte polyurethane or hard wax oil works beautifully here. -
Final polish:
Once the first coat of finish is dry, give it a very light hand-sand with 300-grit paper to knock down any raised grain, then apply a second thin coat for durability.
Pro Tip: Height Check
Before mounting, place your tallest intended artwork on the ledge and have someone hold it up. Ensure it doesn’t clip the ceiling or look crowded against door frames.
Step 4: Installation
-
Locate wall studs:
Use a stud finder to mark the stud locations on your wall. Transfer these measurements to the back mounting strip of your ledge. -
Pre-drill mounting holes:
Drill pilot holes through the back pine strip at your marked locations. Using a countersink bit allows the screw heads to sink flush into the wood so they don’t scratch your artwork. -
Level and mount:
Place the ledge on top of your wainscoting cap (or hold it at your desired height). Place a long level on top. Drive 2.5 or 3-inch screws through your pre-drilled holes directly into the wall studs. -
Style your ledge:
Arrange your framed prints, leaning them casually against the wall. Mix in a small stack of books horizontally to break up the lines.
This simple addition creates a dynamic focal point that lets you swap out your gallery whenever the mood strikes

PENCIL GUIDE
Understanding Pencil Grades from H to B
From first sketch to finished drawing — learn pencil grades, line control, and shading techniques.
Explore the Full Guide
Anchor the End of the Hall With a Focal Point Artwork
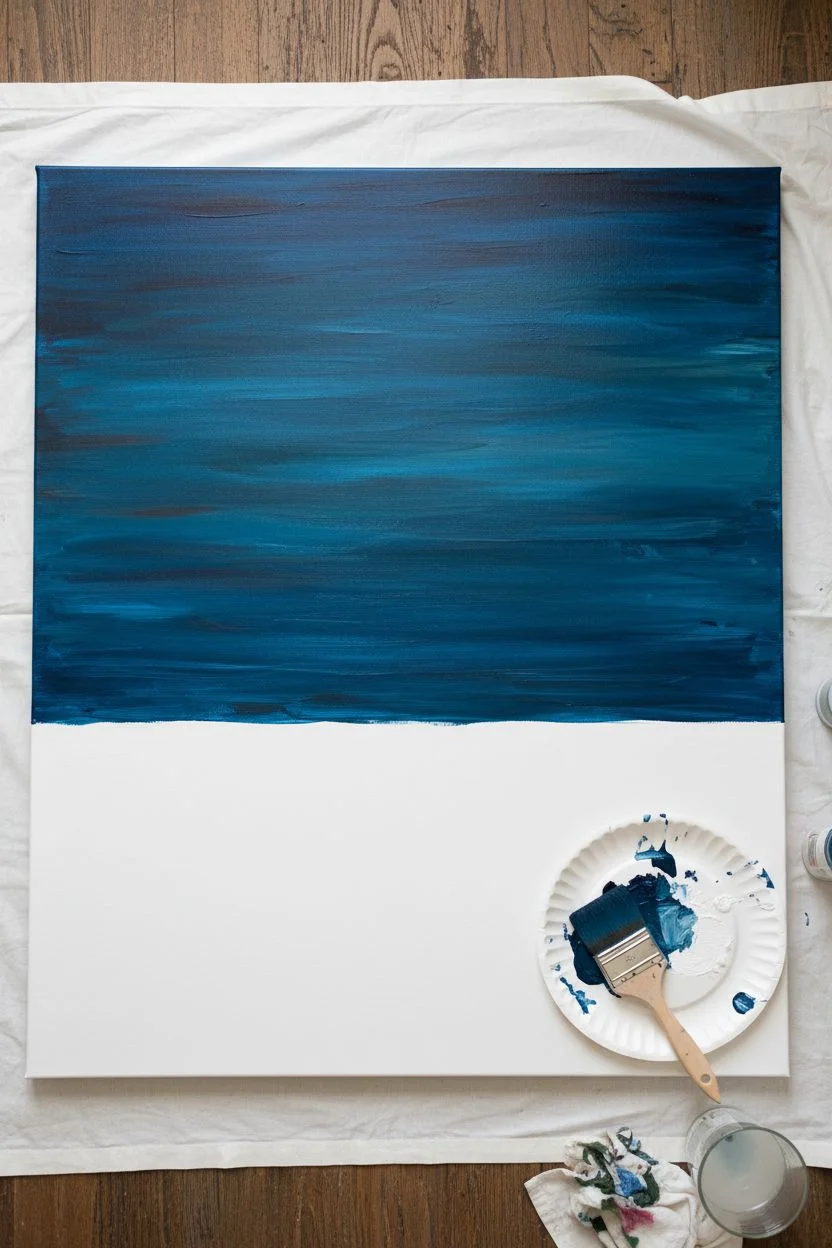
Bring the calming influence of the ocean into your hallway with this large-scale abstract seascape painting. This beginner-friendly project uses broad strokes and layered acrylics to create a textured, modern coastal vibe that elongates your space.
Step-by-Step Guide
Materials
- Large rectangular stretched canvas (e.g., 36” x 48”)
- Acrylic paints: Phthalo Blue, Teal, Titanium White, Raw Sienna, Gold Metallic vivid, Burnt Umber
- Large flat paintbrush (2-3 inch width)
- Medium round brush
- Palette knife or old credit card
- Fine grit sandpaper
- White Gesso (optional, for priming)
- Mixing palette or paper plates
- Water cup and rags
- Drop cloth
- Painter’s tape
- Matte or Satin varnish spray
Step 1: Preparation and Background
-
Prime the Surface:
Lay your drop cloth down and set up your canvas. If your canvas isn’t pre-primed, apply a coat of white gesso with your large flat brush to ensure a smooth painting surface. Let it dry completely. -
Establish the Horizon:
Visualize your composition. You want three main zones: a large sky/sea block at the top, a sandy middle band, and a water foreground. Place a strip of painter’s tape horizontally across the canvas roughly two-thirds of the way down to mark your horizon line. -
Mix the Deep Ocean Hue:
In your palette, mix Phthalo Blue with a touch of Teal and a tiny dot of Burnt Umber to deepen it. You want a rich, moody peacock blue color. -
Paint the Upper Section:
Using the large flat brush, apply the deep blue mixture to the top section of the canvas. Use long, horizontal strokes, but don’t worry about being perfect; visible brush texture adds character. -
Create Texture:
While the blue paint is still tacky, drag a dry brush or a clean palette knife horizontally through parts of the paint to create subtle streaks and variations in the water’s depth. -
Remove the Tape:
Carefully peel off the painter’s tape while the paint is still slightly wet to reveal a crisp line, then let the top section dry fully.
Step 2: The Sandy Shoreline
-
Mix the Sand Tones:
Combine Titanium White with a small amount of Raw Sienna. You aim for a very pale, warm beige—almost an off-white. -
Paint the Middle Band:
Apply this pale beige mixture directly below your blue section. This band should be thick, representing the beach and the crashing whitewater. -
Add Metallic Warmth:
Take your Gold Metallic paint and mix it with a little Raw Sienna. Use a smaller brush to add a thin, broken line right where the deep blue meets the white sand. -
Blend the Transition:
I like to use a slightly damp brush to feather the gold and beige together, creating a soft, organic transition that mimics sunlight hitting the sand.
Pro Tip: Dry Brushing
For that wind-swept look, wipe most of the paint off your brush on a paper towel before applying the white foam layers. This leaves faint, scratchy marks that look like sea spray.
Step 3: The Foreground Water
-
Mix Turquoise Tones:
Mix a fresh batch of Teal with plenty of Titanium White to create a vibrant, light turquoise color. -
Apply the Bottom Layers:
Paint the bottom section of the canvas with this turquoise mix. Leave some irregular white spaces exposed near the middle ‘sand’ band to suggest foam. -
Strengthen the Contrast:
Dip your brush into the original deep blue mix (from step 3) and add horizontal streaks into the wet turquoise at the very bottom edge to ground the artwork. -
Add Whitewash Highlights:
Load your palette knife with pure Titanium White. Gently scrape it horizontally over the turquoise section to create the look of sea foam and movement.
Level Up: Texture Medium
Mix a modeling paste or sand texture medium into your white paint for the middle section. This physically raises the surface, making the ‘beach’ feel real to the touch.
Step 4: Finishing Touches
-
Distress for Texture:
Once the entire painting is bone dry—usually after 24 hours—take fine grit sandpaper and very lightly scuff areas where the color bands meet. This softens the look and adds a weathered coastal feel. -
Seal the Artwork:
In a well-ventilated area, spray the entire canvas with a matte or satin varnish to protect the paint from dust and prevent fading. -
Frame the Piece:
To match the inspiration image, build or buy a simple floating frame using light natural wood strips. Attach the strips to the sides of the canvas using small nails or wood glue.
Now hang your masterpiece at the end of the hall and enjoy the view
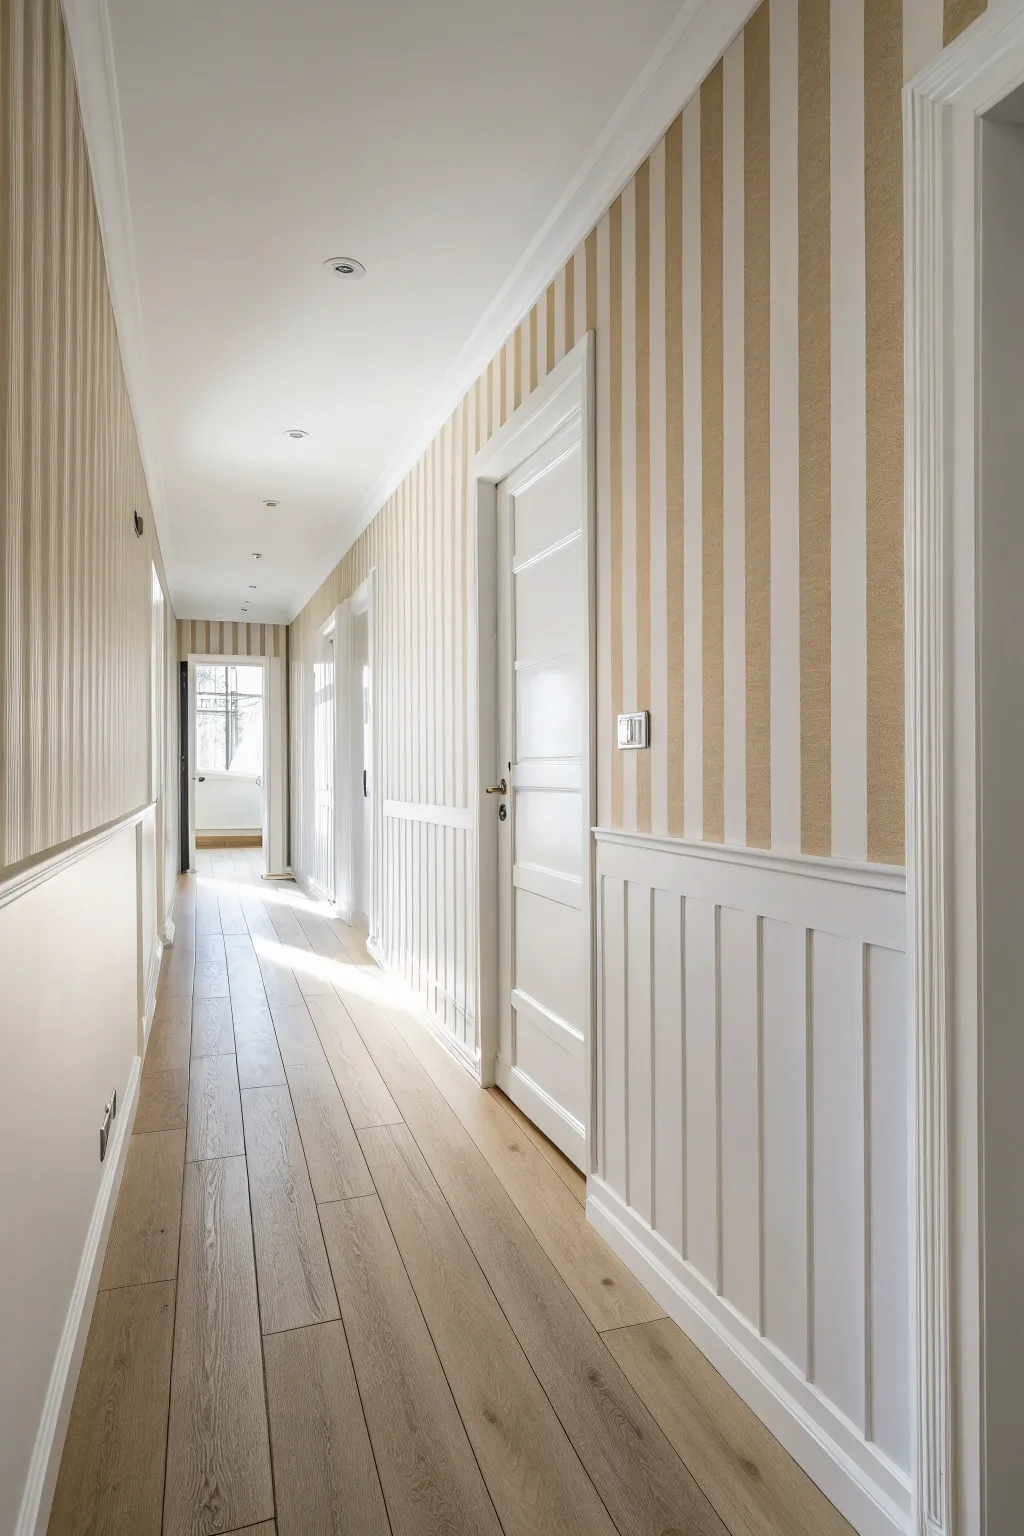
Use a Subtle Patterned Wall to Add Depth Without Chaos
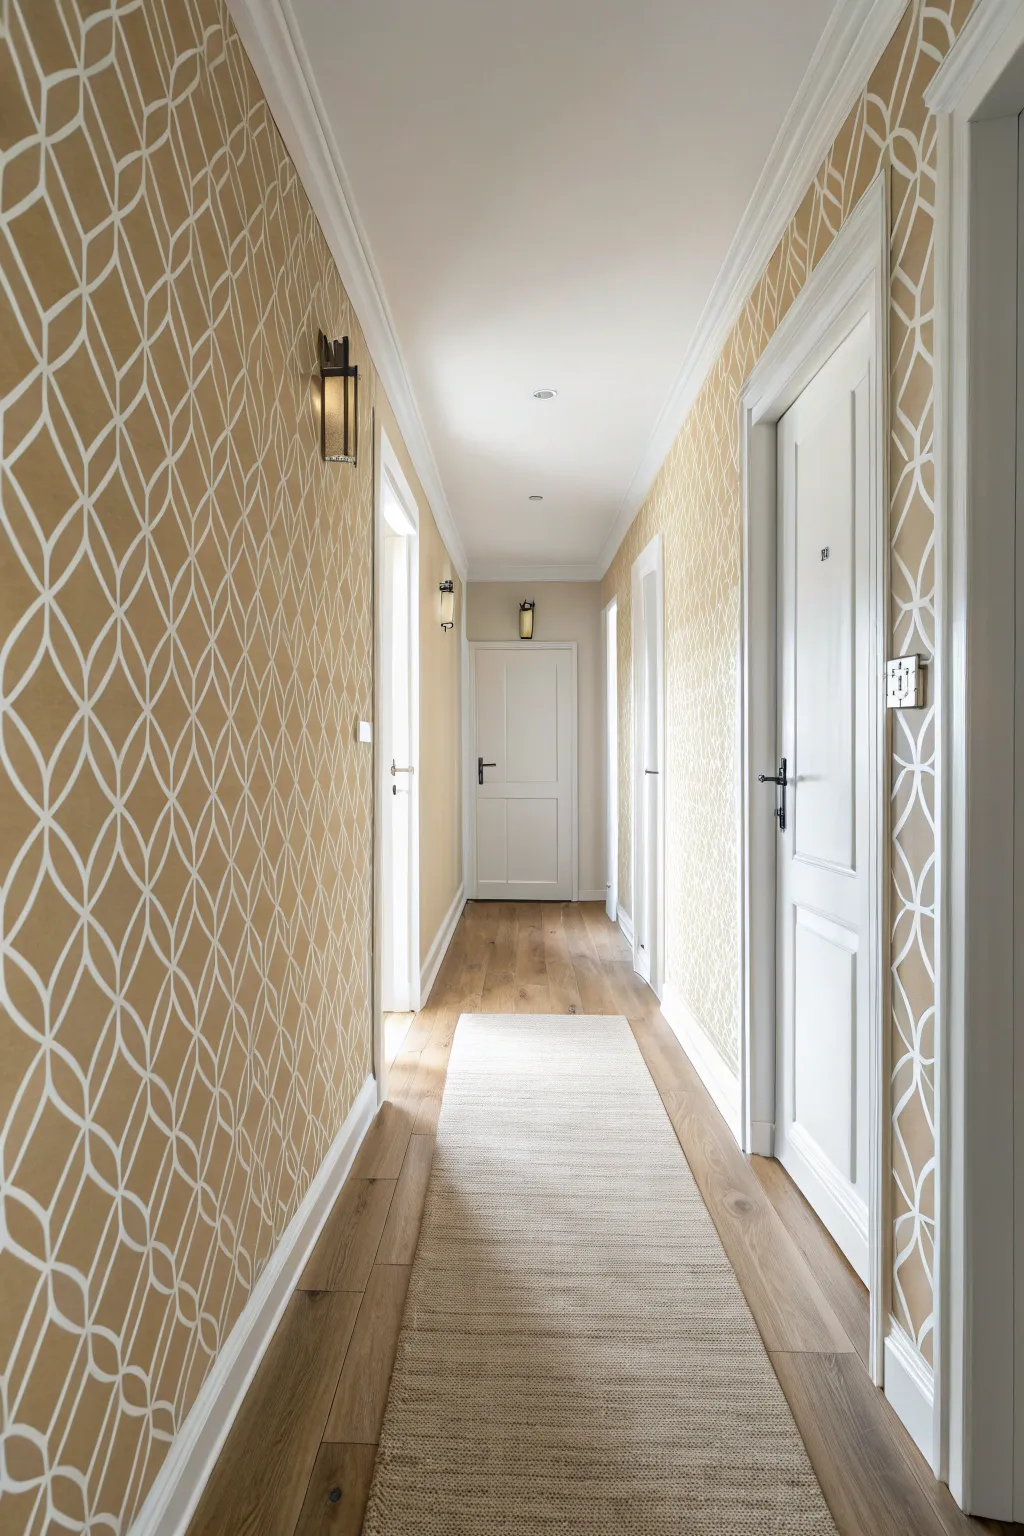
Elevate a narrow hallway with this sophisticated project that centers on applying a stunning geometric wallpaper in a warm beige and white palette. The result is an inviting, elongated space that balances intricate detailing with airy brightness.
Detailed Instructions
Materials
- Geometric lattice wallpaper (beige/gold background with white lines)
- Wallpaper paste (pre-mixed, clear)
- Smoothing brush and seam roller
- Sharp utility knife with extra snap-off blades
- Measuring tape and pencil
- Plumb line or laser level
- Spackle and putty knife
- Sandpaper (120 grit)
- Primer (wallpaper specific)
- White semi-gloss trim paint
- Painter’s tape
- Drop cloths
- Measuring bucket and sponge
- Metal straight edge
Step 1: Preparation & Priming
-
Clear and clean:
Remove all wall switch plates, outlet covers, and existing light fixtures (safety first: turn off the breaker). Wash the walls with a mild degreaser to remove any oils or dust. -
Patch imperfections:
Inspect the walls for any nail holes or dents. Fill these with spackle, let dry completely, and sand smooth so the wall surface is perfectly flat—imperfections will telegraph through wallpaper. -
Prime the walls:
Apply a coat of wallpaper-specific primer (sometimes called ‘sizing’). This crucial step ensures the paste adheres properly and makes it easier to slide the paper into position during hanging. -
Prep the trim:
While the wall primer dries, inspect your door frames and baseboards. If they need a refresh, tape off the floor and apply a fresh coat of semi-gloss white paint to frame your future wallpaper crisply.
Bubbles Won’t Budge?
If a small air bubble remains after drying, prick it with a needle and inject a tiny amount of wallpaper adhesive with a glue syringe, then smooth flat.
Step 2: Hanging the Wallpaper
-
Establish a plumb line:
Pick a starting point, usually an inconspicuous corner or behind a door. Use your laser level or drop a plumb line to draw a perfectly vertical guideline on the wall. -
Measure and cut:
Measure the height of the wall and add 4-6 inches for trimming excess at the top and bottom. Cut your first strip. -
Pattern matching:
Before cutting the second strip, line it up next to the first on the floor to match the geometric lattice pattern perfectly. This often requires shifting the roll up or down, creating some waste. -
Paste the paper:
Lay the strip face down on a clean table. Apply the paste evenly with a roller, ensuring you cover the edges thoroughly. Use the ‘booking’ technique by folding the pasted sides onto themselves and letting it rest for 5-10 minutes. -
Hang the first strip:
Unfold the top half of the booked strip and align it with your pencil plumb line on the wall. Leave about 2-3 inches of overhang at the ceiling line. -
Smooth it out:
Using a smoothing brush, work from the center of the paper outwards to push out air bubbles and ensure firm contact with the wall. -
Trim the excess:
Once the strip is smoothed, use your metal straight edge and a very sharp utility knife to trim the excess paper at the ceiling and baseboard. Change blades frequently to avoid tearing wet paper.
Step 3: Continuing the Pattern
-
Butt the seams:
Hang the next strip by positioning it directly next to the first. Gently slide it until the pattern matches precisely. Do not overlap the edges; simply butt them together tightly. -
Seal the seams:
After smoothing the second strip, run a seam roller gently over the joint to ensure the edges don’t lift later on. Wipe away any squeezed-out glue immediately with a damp sponge. -
Navigate corners:
When you reach a corner, measure from the last strip to the corner and add 1/2 inch. Cut the strip to this width. Paste and hang it, wrapping that extra 1/2 inch onto the adjacent wall. -
Overlap the next wall:
Hang the remaining piece of that strip on the new wall, overlapping the 1/2 inch wrap. This ensures a gap-free corner even if walls aren’t perfectly square. -
Cut around obstacles:
For switches and outlets, hang the paper right over the box. Feel for the corners, cut a small ‘X’ with your knife, and carefully trim away the excess paper so the plate covers the edges.
Pattern Drift Pro-Tip
Every 3-4 strips, re-check your vertical line with a level. Patterns can slowly drift off-plumb, and catching it early lets you nudge the paper back.
Step 4: Finishing Touches
-
Reinstall fixtures:
Once the paper is fully dry (usually 24 hours), reinstall your switch covers and wall sconces. The dark hardware creates a beautiful contrast against the beige paper. -
Lay the runner:
Roll out a textured, neutral runner rug down the center of the hallway. I like to leave equal visible flooring on both sides to guide the eye toward the end of the hall.
Step back and admire how the rhythmic pattern draws the eye through your beautifully refreshed hallway.


Carry a Frame Style From the Hall Into the Next Room
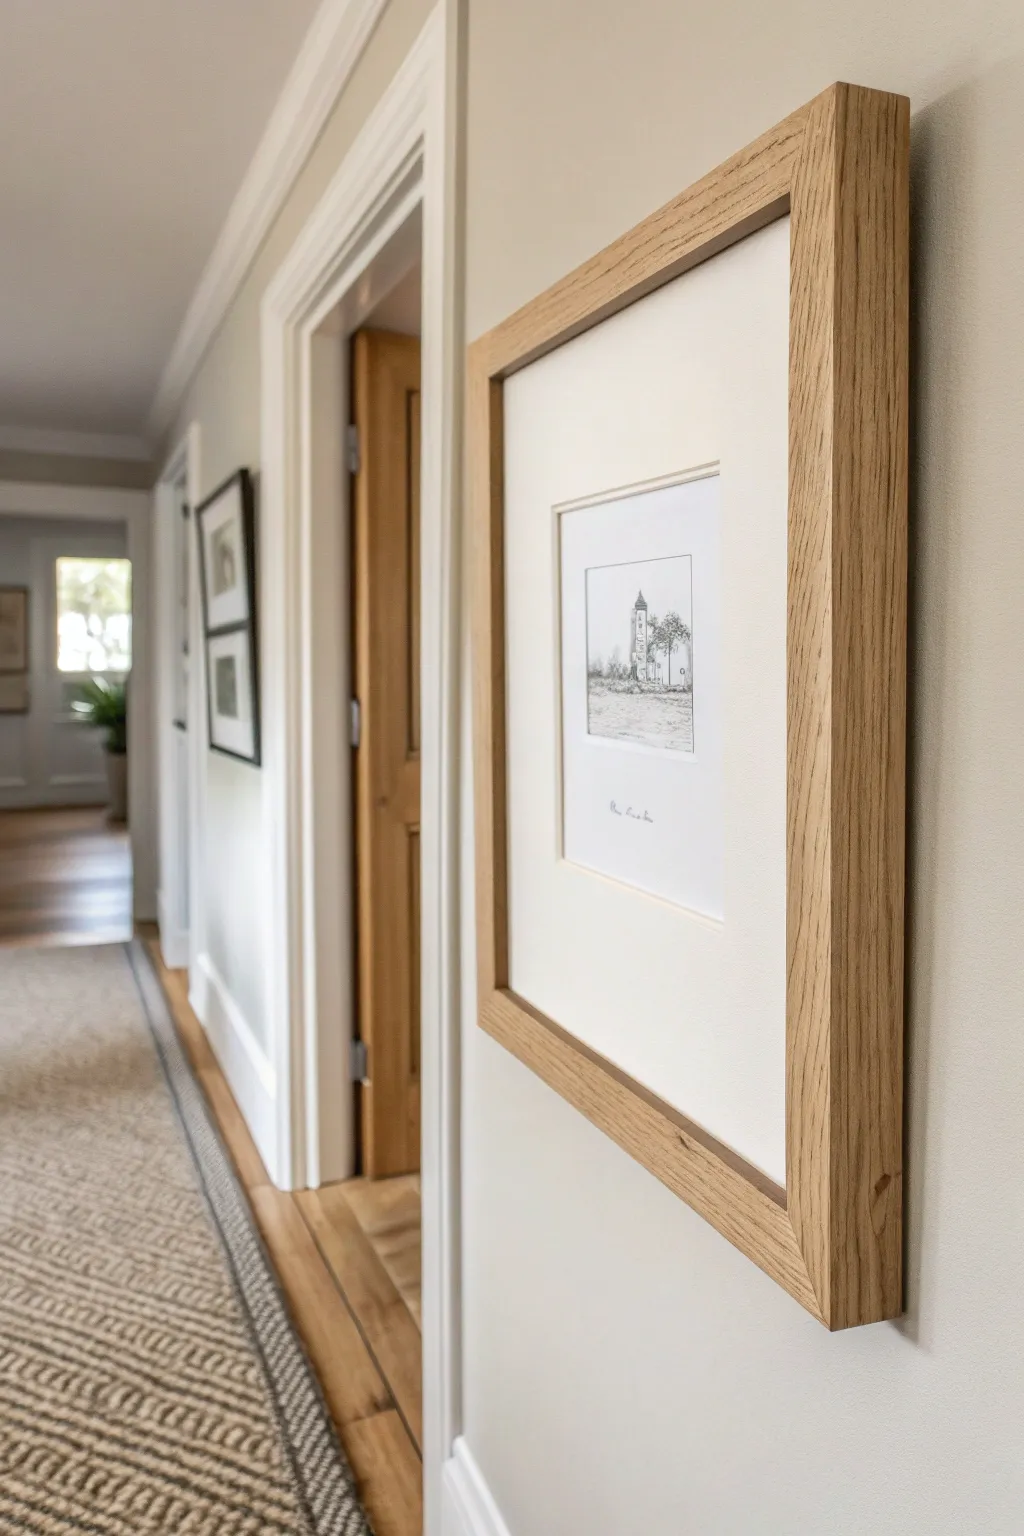
Create a gallery-worthy piece by combining a delicate architectural pen sketch with a dramatic, deep-set matting technique. This project emphasizes negative space and natural wood textures to achieve a sophisticated, airy look perfect for transitional hallways.
Step-by-Step
Materials
- Hot press watercolor paper or smooth Bristol board (small sheet)
- Fine liner pens (sizes 0.05, 0.1, and 0.3)
- Graphite pencil (HB or 2H)
- Kneaded eraser
- Ruler
- Reference photo of a tower or lighthouse
- Light cream or off-white mat board (thick 4-ply or 8-ply)
- Foam core board (for depth)
- Acid-free mounting tape
- X-Acto knife with fresh blades
- Metal straight edge
- Natural oak frame (deep profile)
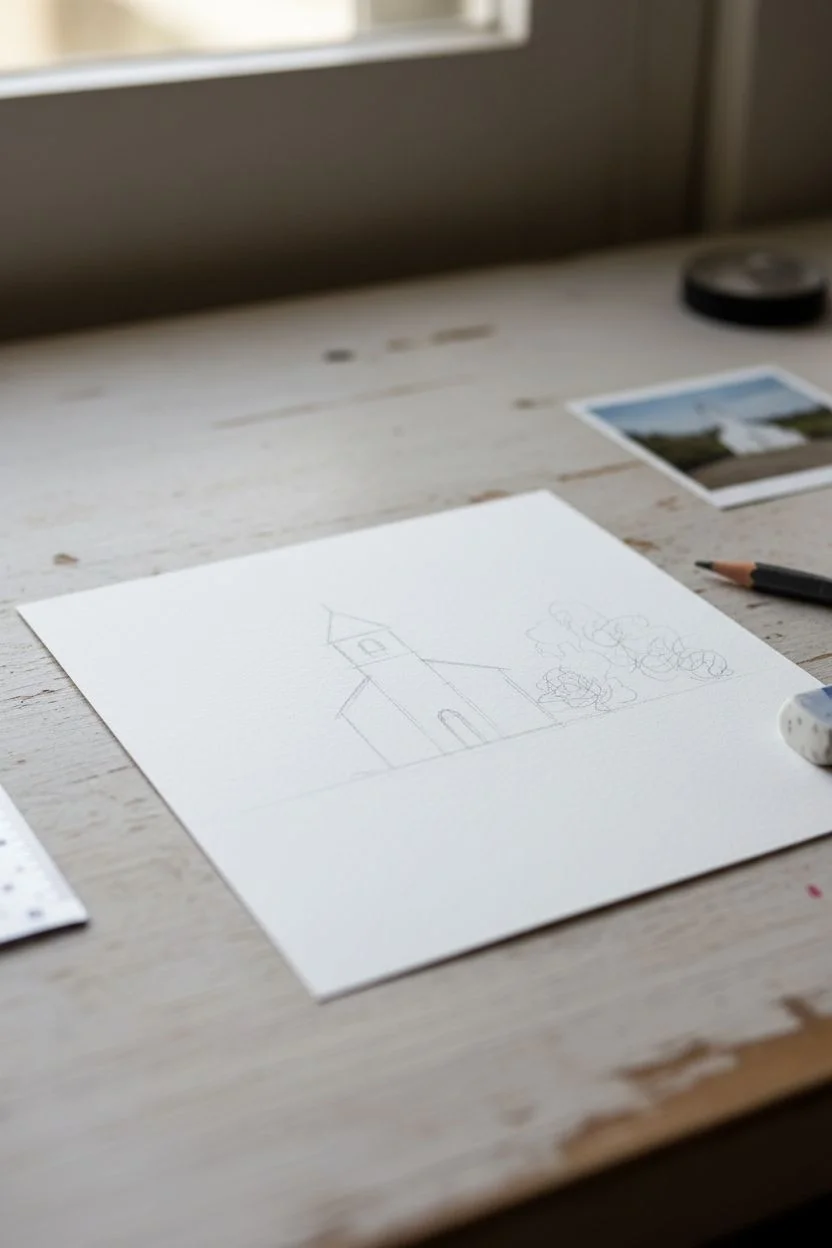
Step 1: Planning and Sketching
-
Select your subject:
Choose a reference photo of an architectural element, like a church tower, lighthouse, or gazebo. The subject should be vertical and simple enough to be represented with minimal lines. -
Prepare the paper:
Cut your drawing paper to a small square size, roughly 5×5 inches. The small scale is crucial for the intimate feel of the final piece. -
Draft the horizon:
Lightly draw a horizon line with your pencil about one-third up from the bottom of your square. This grounds your building. -
Outline the structure:
Using the HB pencil, lightly sketch the basic geometric shapes of your building. Focus on the main vertical lines of the tower and the triangular shape of the roof. -
Add landscape elements:
Sketch in loose, organic shapes for trees or bushes to the right of the building to balance the composition. keep these very faint.
Uneven Ink Flow?
If your fine liner skips, don’t force it. Scribble on scrap paper to restart flow. Keep the pen vertical for consistent lines, especially on textured paper.
Step 2: Inking the Drawing
-
Establish main lines:
Switch to your 0.1 fine liner pen. Trace over your main vertical structural lines. Use a broken line technique—lifting the pen occasionally—to give it an aged, sketchy quality rather than a rigid architectural blueprint look. -
Detail the architecture:
Use the 0.05 pen for finer details like windows, brick textures, or roof tiles. I find that suggesting texture with just a few dots or dashes is more effective than drawing every single brick. -
Render the foliage:
For the trees, use a scribbling motion with the 0.1 pen. Keep the foliage loose and airy, concentrating darker ink near the bottom of the tree canopy for shadow. -
Ground the image:
Use the 0.3 pen to add stronger stippling or hatching right at the base of the building and trees. This dark anchor helps the drawing pop off the white page. -
Erase pencil guides:
Wait at least 15 minutes for the ink to fully cure. Gently roll a kneaded eraser over the drawing to lift all graphite lines without smudging the ink. -
Sign the work:
Add a small, illegible or stylized signature in pencil or faint ink about an inch below the main drawing to mimic the aesthetic of a vintage etching.
Step 3: Creating the Deep Mat Mount
-
Measure the frame:
Determine the interior dimensions of your oak frame. Cut a piece of backing board (foam core) to exactly this size. -
Cut the main mat:
Cut your light cream mat board to the frame’s dimensions. In the exact center, cut a window opening that is slightly larger than your drawing paper—leave about 1/4 inch of reveal around the drawing. -
Create the inner mount:
Cut a smaller piece of mat board or heavy paper that is slightly larger than the window opening but smaller than the frame. This will act as the platform for your drawing. -
Attach the drawing:
Using acid-free tape, center and secure your drawing onto this inner mounting piece. -
Add depth spacers:
Cut thin strips of foam core. Adhere these strips to the back of the main mat board, framing the window opening but staying hidden from view. This creates the ‘shadow box’ effect. -
Assemble the stack:
Place your drawing mount onto the backing board. Place the main window mat over it, resting on the foam spacers. The drawing should look recessed, sitting deeper than the surface mat. -
Final framing:
Clean the frame glass thoroughly. Place the glass, then your spacer/mat assembly, and finally the backing into the frame. Secure with framing points or glazier’s points.
Vintage Wash Effect
Brush a very dilute layer of coffee or tea over the drawing paper before sketching. Let it dry flat for an antique, parchment-like background tone.
Hang your new artwork in a well-lit spot to let the shadow lines of the deep matting add extra dimension
Paint a Mini Mural in a Hallway Niche or Panel
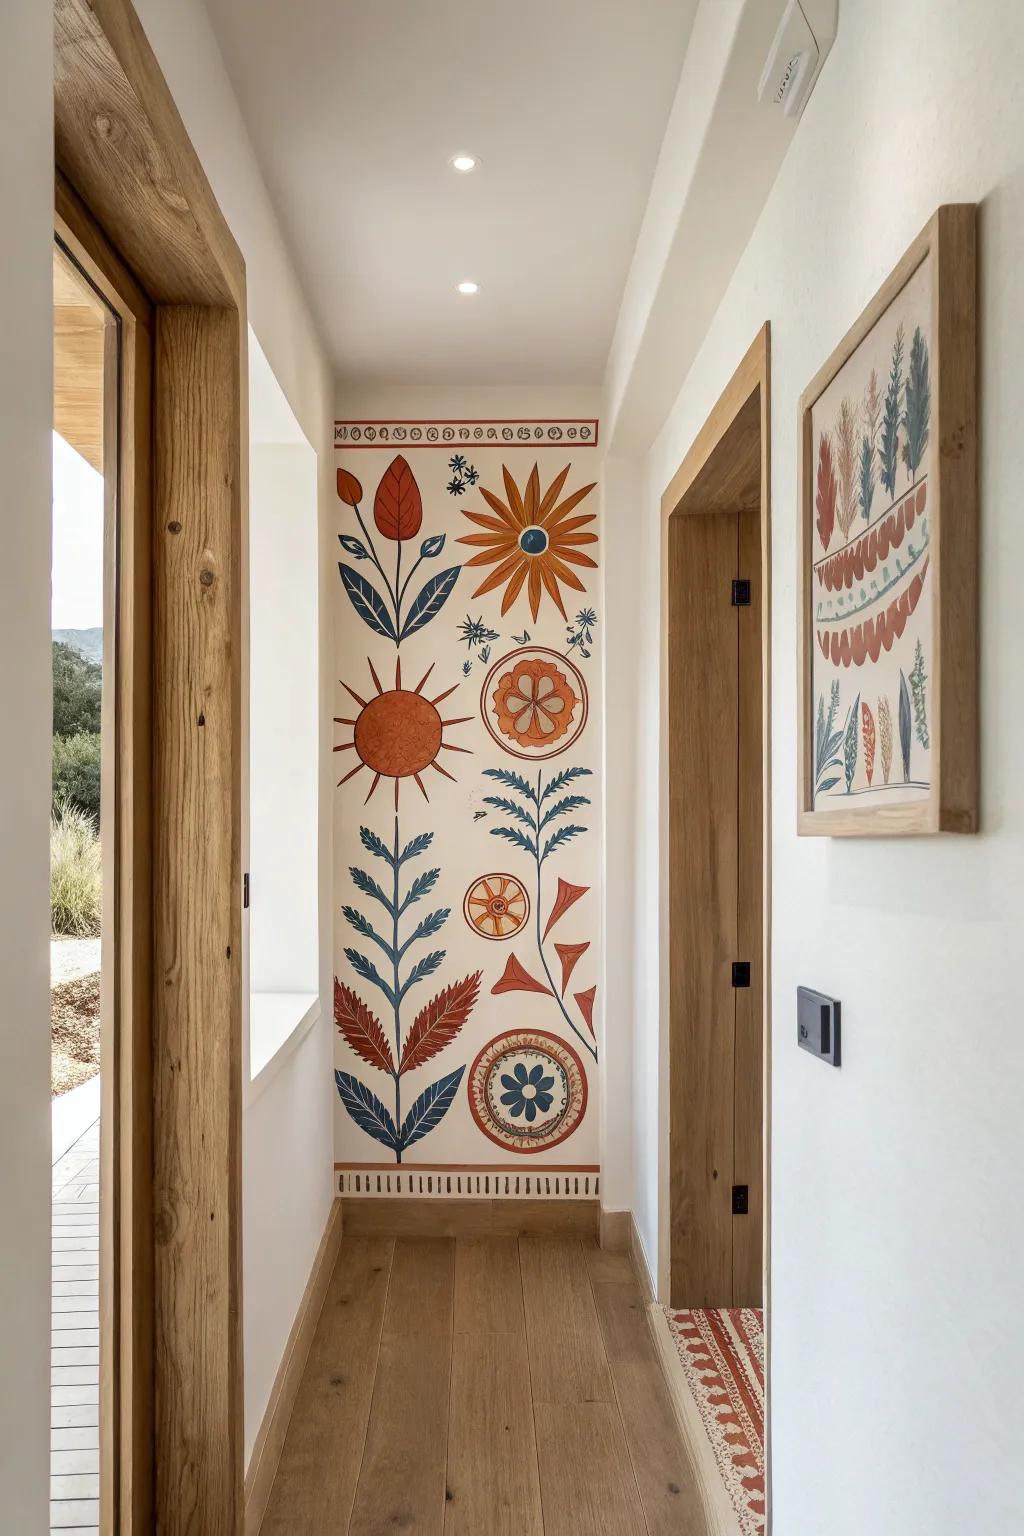
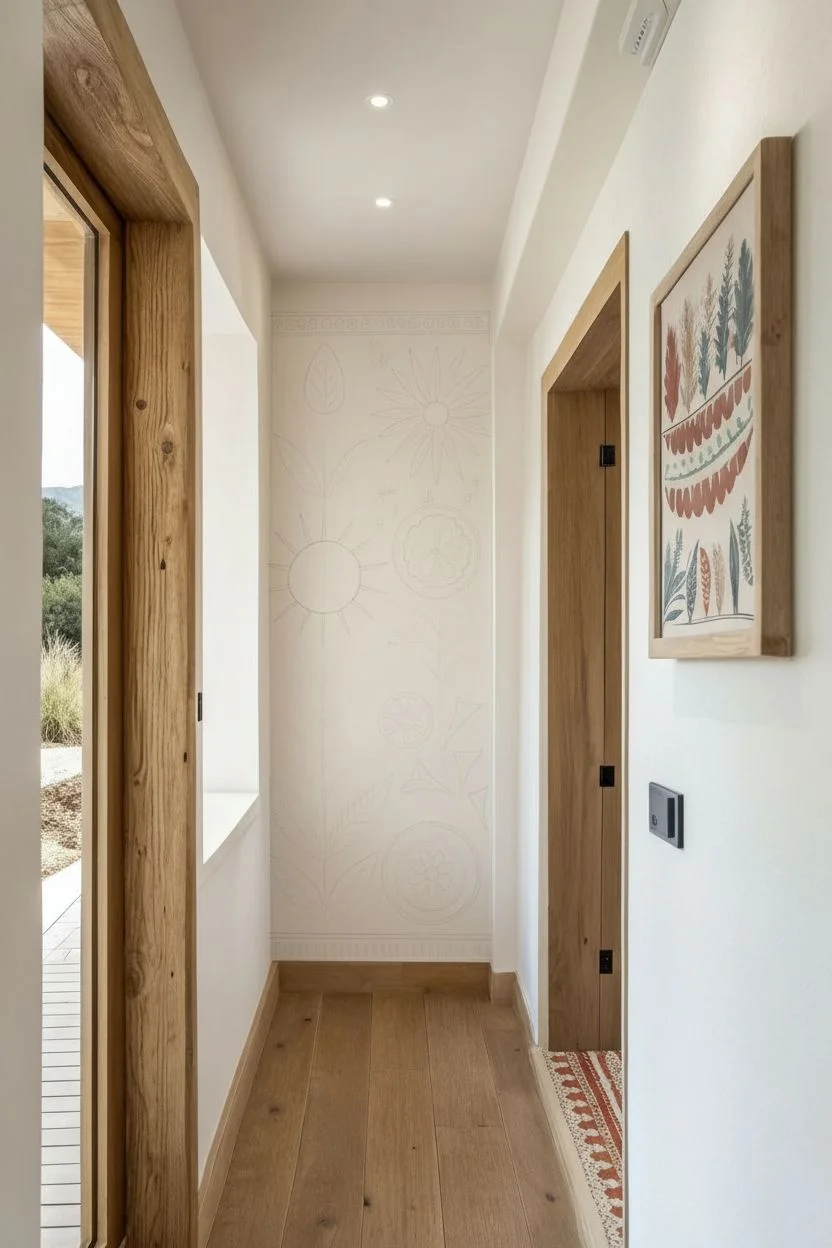
Transform a narrow hallway wall or niche into a charming focal point with this folk art-inspired mural. Using a warm, earthy palette of terracottas, ochres, and deep blues, this design features stylized suns and botanical motifs that feel both modern and timeless.
Step-by-Step Guide
Materials
- Interior latex paint (White or Cream base coat)
- Acrylic craft paints or sample pots (Terracotta, Burnt Orange, Mustard Yellow, Deep Navy, Sage Green)
- Pencil and eraser
- Painter’s tape
- Assorted paintbrushes (1-inch flat brush, round brushes sizes 4 and 8, fine liner brush)
- Level or laser level
- Ruler or yardstick
- Paper plate or palette
- Small cup of water
- Paper towels
Step 1: Preparation & Base Layout
-
Prepare the surface:
Clean the wall thoroughly with a damp cloth to remove any dust or oils. If the wall isn’t already white or cream, apply two coats of your base interior latex paint and allow it to dry completely, preferably overnight. -
Define the borders:
Using a level and ruler, lightly mark horizontal lines at the very top and bottom of your painting area to create the decorative borders. These should be about 2-3 inches wide. Create a secondary, thinner border line just inside those marks. -
Sketch the main motifs:
Lightly sketch the large design elements in pencil first. Start with the large sunburst shapes and circular medallions to establish balance. I find it helpful to place the largest items first—like the central orange flower and the lower blue medallion—before filling in the surrounding leaves. -
Add vertical stems:
Draw the vertical stems for the climbing plants. Keep the lines slightly organic rather than perfectly straight to maintain that hand-painted folk aesthetic. -
Detail the borders:
Sketch the repeating geometric patterns in the top and bottom borders. The top features small circles and swirls, while the bottom uses simple vertical tick marks.
Wobbly Lines?
If you’re struggling to paint straight stems or border lines freehand, use painter’s tape to mask off the lines, or use a paint pen for more control than a brush.
Step 2: Painting the Warm Tones
-
Paint the terra cotta elements:
Load a medium round brush with terracotta paint. Fill in the large sun shape on the left and the petals of the top-left tulip motif. Apply two thin coats rather than one thick one for smoother coverage. -
Add orange details:
Switch to a burnt orange or rust color. Paint the large starburst flower at the top right and the central medallion’s outer ring. Use a steady hand to keep the edges crisp. -
Fill in yellow accents:
Use your mustard yellow paint for the centers of the flowers and the smaller geometric details within the medallions. A smaller round brush (size 4) works best here. -
Create the two-tone leaves:
For the leaves that transition from red to blue, paint the bottom half or inner section with your rust/red shade first. Let this dry completely before attempting to add the blue sections near them.
Add Texture
Mix a small amount of baking soda into your acrylic craft paint for the flower petals. This creates a slightly raised, matte texture closer to real plaster frescoes.
Step 3: Painting the Cool Tones & Details
-
Paint the navy leaves:
Using deep navy blue, fill in the large leaves at the bottom and the smaller leaf accents throughout the design. The contrast of the dark blue against the white wall is crucial for this look. -
Define the stems:
Use a liner brush or a small round brush to trace over your pencil lines for the stems. You can use navy blue for a bold look or mix a dark green for a softer effect. -
Paint the border details:
Carefully paint the geometric patterns in the top and bottom borders using the rust and navy paints. The repeating vertical lines at the bottom can be done quickly with a small flat brush turned on its side. -
Add fine details:
Once the main shapes are dry, use your finest brush to add the tiny decorative dots, starbursts, and internal line work on the flowers and suns. -
Clean up edges:
Inspect your work for any stray pencil marks. Gently erase them, or if paint went outside the lines, use a small brush with your wall’s base color to touch up the edges.
Step back and enjoy the bespoke, artisanal character your new mural brings to the hallway.
Use Painted Stripes to Stretch or Widen the Space
This classic hallway transformation combines the elongating power of vertical stripes with the architectural charm of beadboard wainscoting. The alternating gold and cream tones draw the eye upward, while the crisp white woodwork grounds the space, creating an airy and sophisticated corridor.
Detailed Instructions
Materials
- Gold/beige striped wallpaper (pre-pasted or unpasted)
- Wallpaper paste (if needed) and primer
- Beadboard paneling sheets or individual tongue-and-groove planks
- Top cap molding (chair rail style)
- Baseboard molding
- White satin or semi-gloss interior paint
- Construction adhesive (Liquid Nails)
- Finishing nails or brad nailer
- Wood filler and caulk
- Wallpaper smoothing tool
- Utility knife with fresh blades
- Level and plumb bob
- Tape measure
- Paint roller and brushes
Step 1: Preparation & Wainscoting Installation
-
Measure and clear the space:
Begin by removing any existing baseboards, outlet covers, and light switch plates. Measure the total length of your hallway walls to calculate how much beadboard and molding you will need. -
Establish the height:
Decide on the height of your wainscoting; in this project, it sits at approximately one-third of the wall height. Mark a level horizontal line around the room at this height to guide your installation. -
Cut panels to size:
Using a circular saw or table saw, cut your beadboard sheets or planks to the determined height. Ensure your cuts are clean and straight for a professional finish. -
Locate wall studs:
Use a stud finder to mark the location of the studs along the wall. This is crucial for securely fastening the panels and molding later. -
Apply adhesive:
Apply a zigzag pattern of construction adhesive to the back of your first beadboard panel. I like to be generous here to prevent any rattling later on. -
Install the beadboard:
Press the panel against the wall, aligning the top edge with your level line. Secure it using a brad nailer, shooting nails into the studs and along the bottom edge where the baseboard will cover them. -
Continue panel installation:
Proceed down the hallway, butting the panels tightly against each other. If using sheets, ensure the grooves line up seamlessly to hide the joints. -
Add the molding:
Install the top cap molding (chair rail) over the top edge of the beadboard to create a finished look. Then, install the new taller baseboards along the floor. -
Fill and sand:
Fill all nail holes with wood filler and caulk the seams where the molding meets the wall and the beadboard. Once dry, sand the filler smooth. -
Paint the woodwork:
Apply two coats of bright white semi-gloss paint to the wainscoting, moldings, door frames, and doors to create that crisp, unified look seen in the photo.
Secret for Straight Stripes
Walls are rarely perfectly square. Never rely on the corner to start your first strip. Always use a spirit level or laser level to draw a true vertical ‘plumb line’ for your first piece.
Step 2: Wallpaper Application
-
Prime the upper walls:
Apply a coat of wallpaper primer (also known as sizing) to the wall area above the wainscoting. This helps the paper stick better and makes removal easier in the future. -
Set a plumb line:
Measure the width of your first wallpaper strip. Subtract half an inch, measure that distance from a corner, and use a level or plumb bob to draw a perfectly vertical line. -
Cut the first strip:
Measure the height from the top of the wainscoting to the ceiling. Cut your first strip of wallpaper, adding 2-3 inches of excess to both the top and bottom. -
Apply paste or activate adhesive:
If using unpasted paper, roll an even layer of paste onto the back. For pre-pasted, soak it in water according to the manufacturer’s instructions. Book the paper (fold it upon itself) for a few minutes to let it relax. -
Hang the first strip:
Align the edge of the paper with your drawn plumb line. Smooth the paper onto the wall using a smoothing tool, working from the center outward to push out air bubbles. -
Trim the excess:
Use a sharp utility knife and a straight edge to trim the excess paper at the ceiling line and along the top of the chair rail molding. -
Match the pattern:
Cut the next strip, ensuring the stripes align perfectly with the previous strip. A slight mismatch is very noticeable with stripes, so take your time here. -
Continue hanging:
Repeat the process down the hallway. Butt the seams tightly together without overlapping them. Use a seam roller gently to ensure edges are flat. -
Cut around obstacles:
When you encounter door frames or light switches, carefully cut the paper to fit. Make relief cuts at corners to allow the paper to lie flat before trimming. -
Wipe down:
Immediately wipe away any excess paste from the surface of the wallpaper and the woodwork using a clean, damp sponge to prevent staining.
Trouble with Seams?
If seams are lifting, apply a tiny amount of seam adhesive under the edge with a small artist’s brush. If they are shrinking and showing gaps, paint the wall color behind where seams will fall beforehand.
Step back and admire how the vertical lines and bright woodwork have instantly expanded the feel of your hallway
Treat the Ceiling as the Fifth Wall
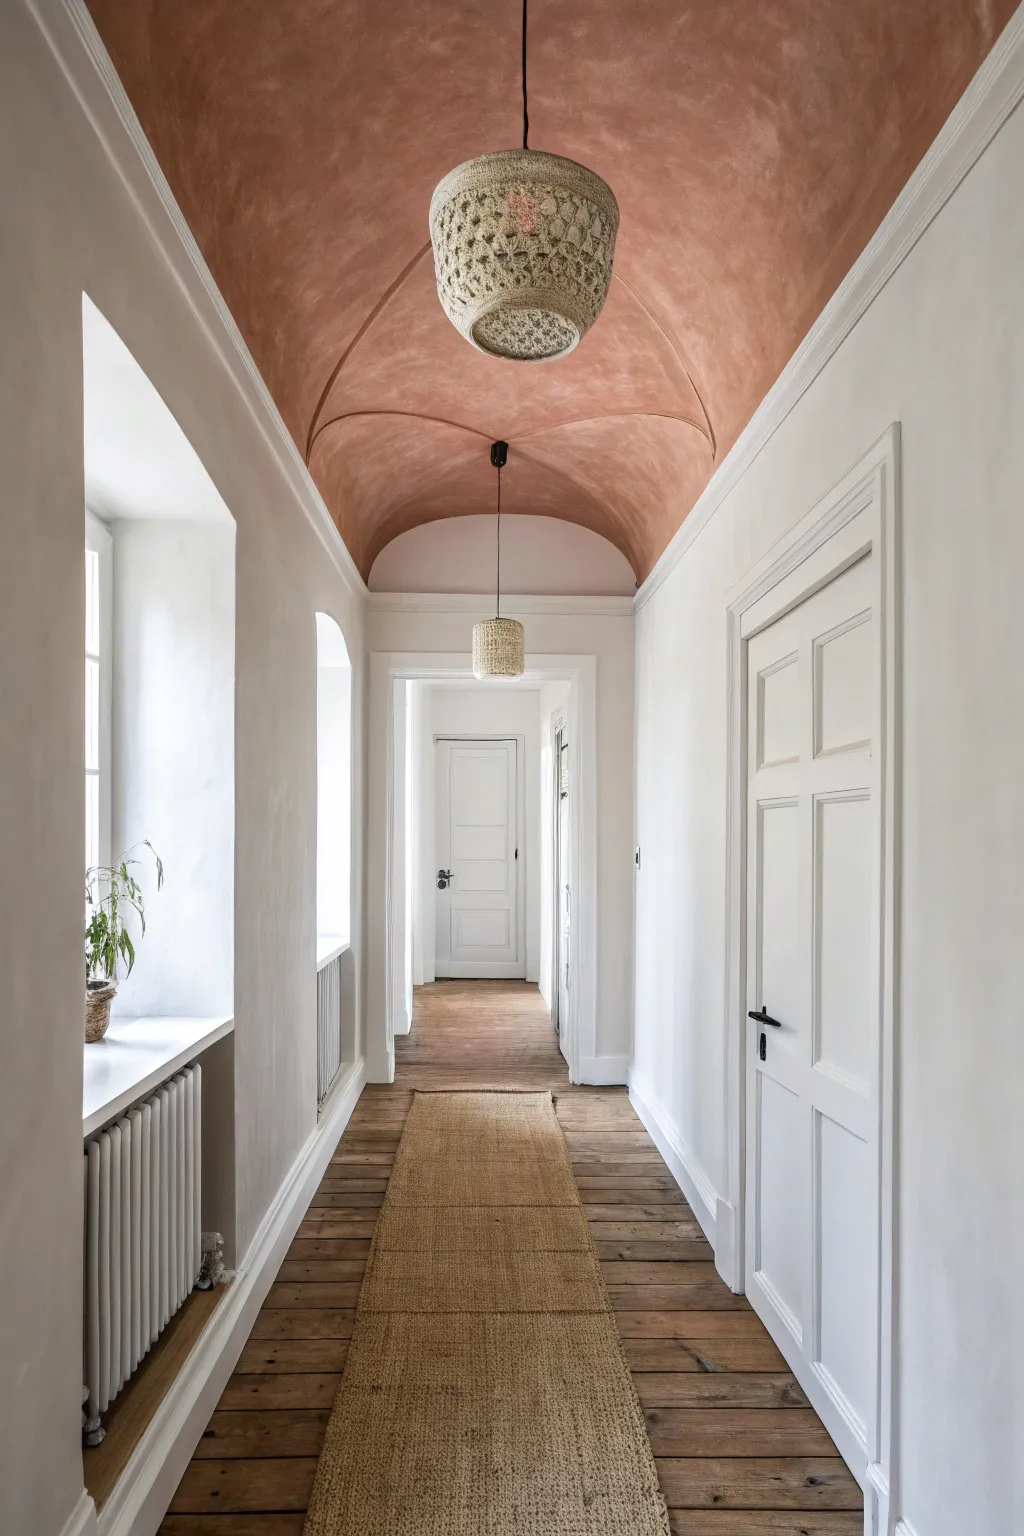
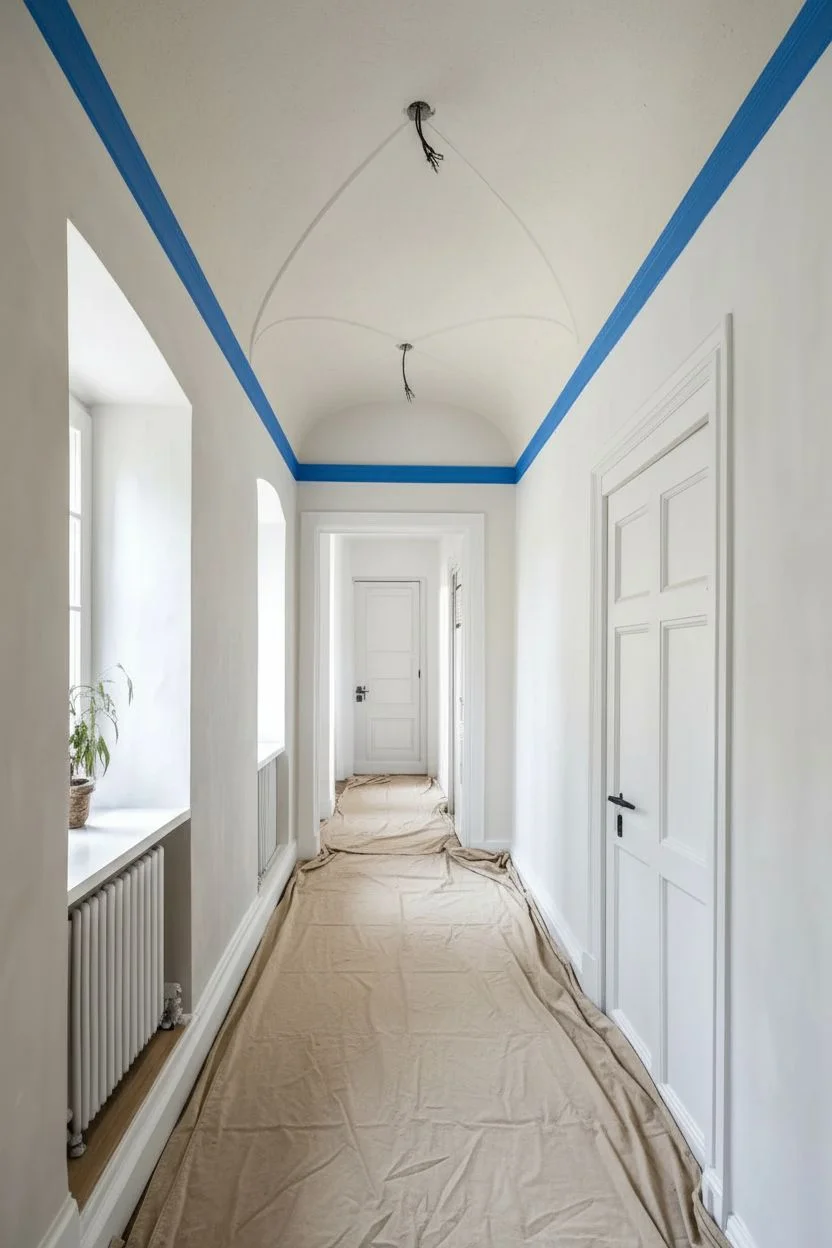
Transform a plain hallway ceiling into a stunning focal point using the power of lime wash paint. This project recreates the soft, velvety texture and warm terra-cotta earthy tones seen in arched European interiors, bringing instant character to any corridor.
Step-by-Step Tutorial
Materials
- High-quality lime wash paint (terra-cotta or dusty peach shade)
- Block brush (large, masonry-style)
- Painters tape (delicate surface)
- Drop cloths
- Primer (specifically for lime wash)
- Ladder
- Stir stick
- Mixing bucket
- Extension pole (optional but helpful)
- Damp rags
Step 1: Preparation
-
Clear the space:
Remove all lighting fixtures from the ceiling to ensure you can paint cleanly around the electrical boxes. It’s much easier than cutting in around a pendant later. -
Protect the perimeter:
Apply delicate surface painter’s tape along the top of the wall where it meets the ceiling or crown molding. Press the tape edge firmly to prevent bleed-through. -
Cover the floors:
Lay down drop cloths extensively. Lime wash is water-thin and tends to splatter more than traditional latex paint. -
Prime the surface:
Apply a coat of specific mineral primer designed for lime wash. This is crucial because lime wash needs a bonding agent to adhere properly to standard drywall or previously painted latex surfaces.
Step 2: First Coat Application
-
Mix the wash:
Thoroughly stir your lime wash paint. The pigments naturally settle at the bottom, so give it a vigorous mix until the consistency is uniform. -
Cut in the edges:
Using the block brush, start by painting a 3-inch border around the perimeter of the ceiling. Don’t worry about clean lines; irregular strokes are better here. -
Begin the cross-hatch:
Working in small 2×2 foot sections, apply the paint using random, X-shaped brush strokes. This multi-directional technique creates that signature cloudy movement. -
Maintain a wet edge:
Move quickly across the ceiling to keep a wet edge. If the paint dries mid-section, you might get harsh lap marks. -
Avoid symmetry:
Resist the urge to paint in straight lines. The goal is organized chaos in your brushwork to mimic old-world plaster.
Patchy Problems?
If you see harsh lap lines where sections joined, re-wet the area slightly with a spray mister and lightly brush over it with diluted wash to blend the dried edges.
Step 3: Building Depth
-
Allow to dry:
Let the first coat dry completely. It will likely look transparent and much darker when wet, lightening significantly as it dries. -
Apply the second coat:
Start your second layer using the same X-stroke technique. I find that loosely following the previous patterns builds the best texture. -
Feather out heavy spots:
Watch for pooling paint in the corners or around the archway details. Feather these out immediately with a dry brush tip. -
Check for coverage:
Step down from the ladder occasionally to view the ceiling from different angles, ensuring you haven’t missed spots in the texture. -
Optional third coat:
If you want a deeper, more saturated color, apply a third coat. More layers equal more cloudy depth and visual movement.
Architectural Illusion
To mimic the vaulted look even on a flat ceiling, paint the top 4 inches of the wall the same color as the ceiling, creating a ‘lid’ effect that softens the corner angles.
Step 4: Finishing Touches
-
Remove tape carefully:
Pull the painter’s tape while the final coat is still slightly tacky to ensure a crisp line against the white walls. -
Clean up splatters:
Use a damp rag to wipe any lime wash drips from the walls immediately; once it cures, it calcifies and becomes difficult to scrub off. -
Reinstall lighting:
Once fully cured (usually 24 hours), reinstall your pendant lights or fixtures. -
Final inspection:
Assess the ceiling in natural light. The finish should look matte, velvety, and naturally mottled.
Now your hallway has a warm, inviting canopy that draws the eye upward and adds incredible depth to the space
Hang a Textile Wall Piece to Warm Up Echoey Halls
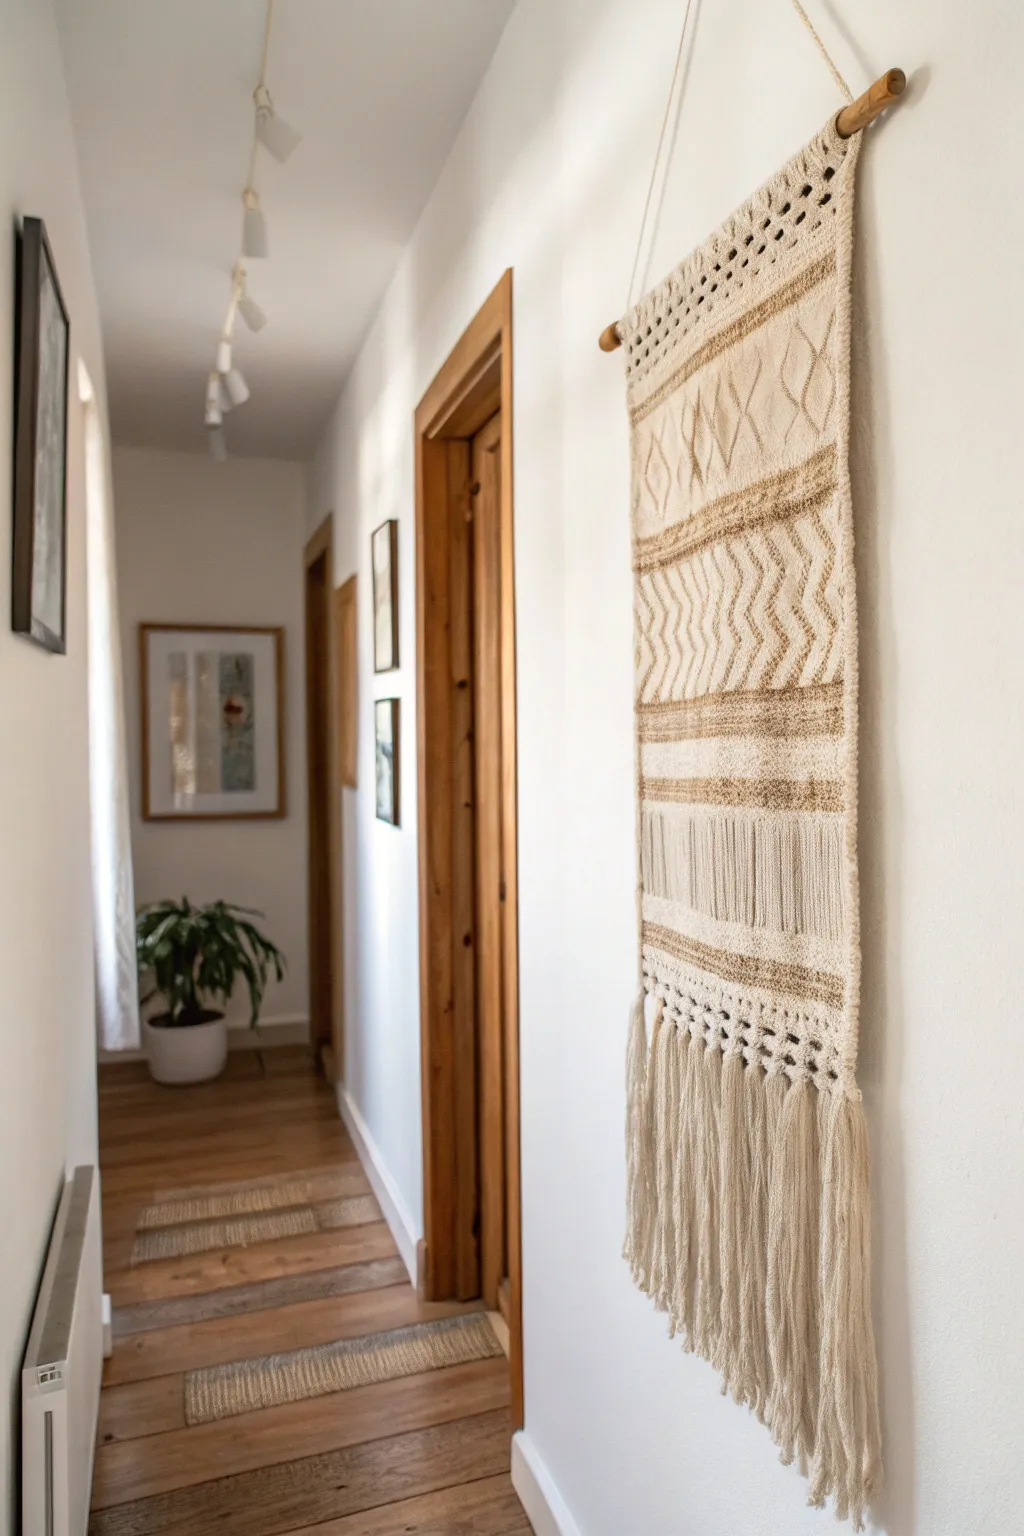
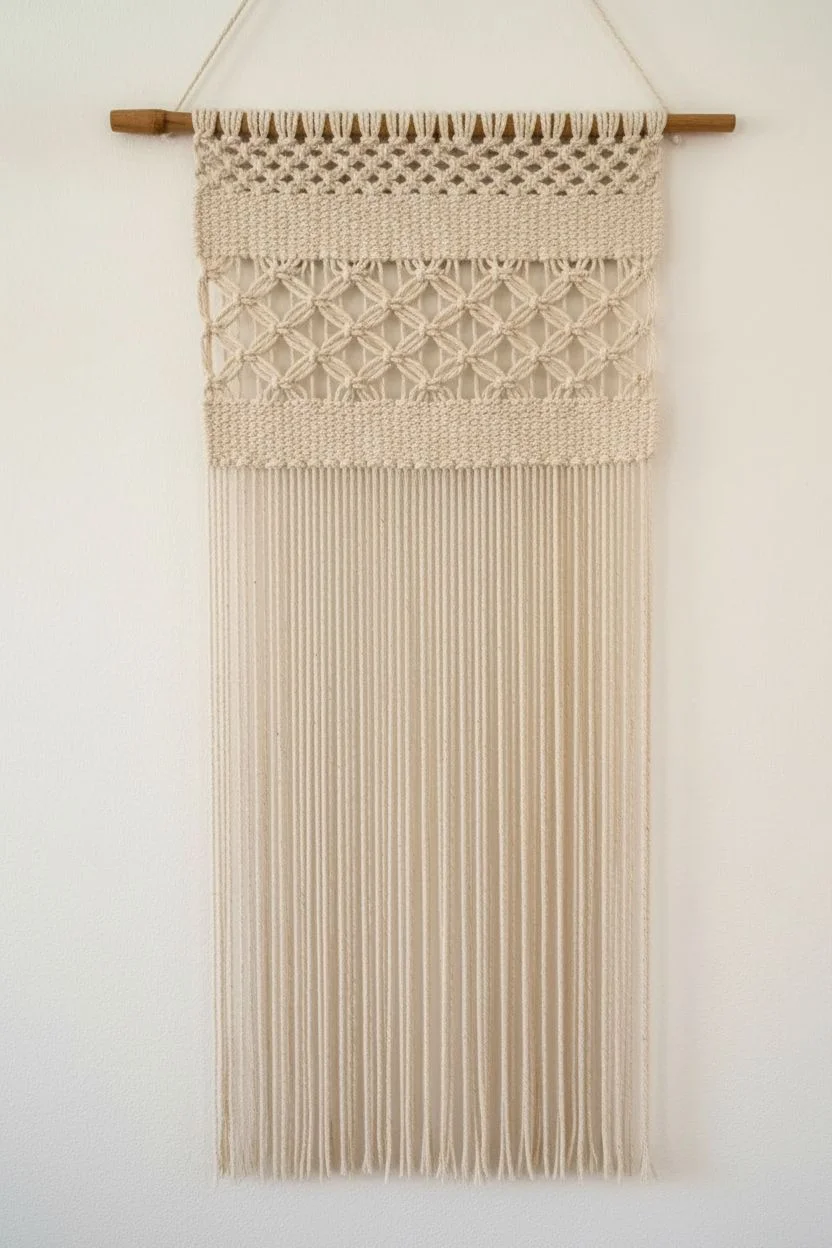
This textured wall hanging combines macramé knots and weaving techniques to bring warmth and softness to stark hallway walls. Using neutral tones of cream and beige with varying yarn weights creates a sophisticated, organic look that naturally absorbs sound.
How-To Guide
Materials
- Dowel rod (approx. 18-24 inches)
- Cotton macramé cord (3-4mm, natural/cream)
- Bulky beige textural yarn (bouclé or roving)
- Medium weight worsted yarn (tan/light brown)
- Tapestry needle (large eye)
- Scissors
- Measuring tape
- Combs (fine-tooth for fringe)
- Warp string (strong cotton twine)
Step 1: Setting the Foundation
-
Prepare the Warp:
Cut lengths of your warp string approximately double the desired final length of your tapestry plus 12 inches. Fold each in half and attach them to your dowel rod using a Lark’s Head knot. Aim for about 40-50 warp ends across the dowel. -
Secure the Top:
To create a stable starting point, weave a few rows of plain weave (over-under pattern) right against the dowel using your standard cream macramé cord. This locks the spacing of your warp threads. -
Create Open Work:
Switch to a technique that creates gaps. Group your warp threads in sets of four. Cross the inner two threads over the outer two to form diamond shapes, or use simple overhand knots every few inches to create that airy, lattice-like texture seen at the top.
Hourglass Warning
If the sides of your weaving start pulling inward (hourglassing), your weft tension is too tight. Ease up on the pull and arc the yarn like a rainbow before beating it down.
Step 2: Weaving the Textures
-
First Solid Band:
Below the open section, return to a plain weave. Use the natural macramé cord to weave a solid block of about 2 inches. Pack the weft down firmly with your fingers or a weaving comb. -
Add Contrast Color:
Thread your tapestry needle with the worsted tan yarn. Weave a thin stripe (about 4 rows) using the soumak technique—wrapping the yarn around each warp thread—to create a raised, braided effect. -
Weave the Chevron:
Using the same cream cord, start a twill weave pattern. Instead of going over-1, under-1, go over-2, under-2, shifting the pattern over by one warp thread on each subsequent row to create diagonal lines. -
Reverse the Diagonal:
Once you have woven about an inch of diagonal lines, reverse the direction of your shift. This will turn your diagonals into a zig-zag or chevron pattern. Continue this for a 4-5 inch section. -
Second Contrast Stripe:
Define the bottom of the chevron section by adding another thin band of tan yarn. I prefer using a double strand here to make the color pop slightly more against the cream background. -
Create the Fluffy Center:
Switch to your bulky beige bouclé or roving yarn. Weave a section of plain weave, but leave the weft loose. Gently pull up small loops between warp threads to create a bumpy, highly textured surface. -
Locking the Texture:
Immediately follow the bulky yarn with two rows of plain weave using the thinner warp string or fine cotton to lock those bulky rows in place so they don’t slide down.
Texture Pro Tip
Mix different yarn weights (thick vs thin) within the same color family to create visual depth without needing bold colors. It keeps the piece looking sophisticated.
Step 3: Adding the Vertical Details
-
Soumak Texture Band:
Below the fluffy section, create a wide band of soumak weaving using the cream cord. Wrap the weft cord over two warp threads and back under one, repeating across the row. This mimics a knit look. -
Vertical Rya Loops:
For the section with vertical lines, cut several 6-inch pieces of cord. Lay them vertically over the warp threads and secure them with a horizontal row of plain weave every inch to hold them flat against the tapestry. -
Securing the Bottom:
Finish the main body of the tapestry with a solid 1-inch block of tight plain weave using the cream cord. This is crucial for structural integrity before adding the final fringe. -
Finishing Stitch Is Key:
To prevent unraveling, tie off pairs of warp threads with simple overhand knots across the entire bottom width just below your last woven row.
Step 4: Fringe and Hanging
-
Adding Volume:
Cut long lengths of macramé cord (approx. 24 inches). Fold them in half and attach them to the bottom row of the tapestry—between your warp knots—using Lark’s Head knots to create a thick, luscious fringe. -
Trim to Shape:
Hang the piece on a wall or door to see clearly. Use sharp scissors to trim the bottom fringe evenly. You can cut straight across or in a gentle V-shape depending on your preference. -
Comb Out:
Use a fine-tooth comb or pet brush to vigorously brush out the fringe cords. This separates the individual fibers and creates the soft, crimped look shown in the image. -
Final Trim:
After combing, the ends will be uneven again. Do one final precision trim to get that perfect, clean edge. -
Attach the Hanger:
Cut a piece of sturdy cord for the hanger. Tie it securely to both exposed ends of the dowel rod using a double knot or winding technique.
Step back and admire how this handmade piece softens the acoustics and the aesthetic of your hallway
Create a Mirror-and-Art Pairing for Double Impact
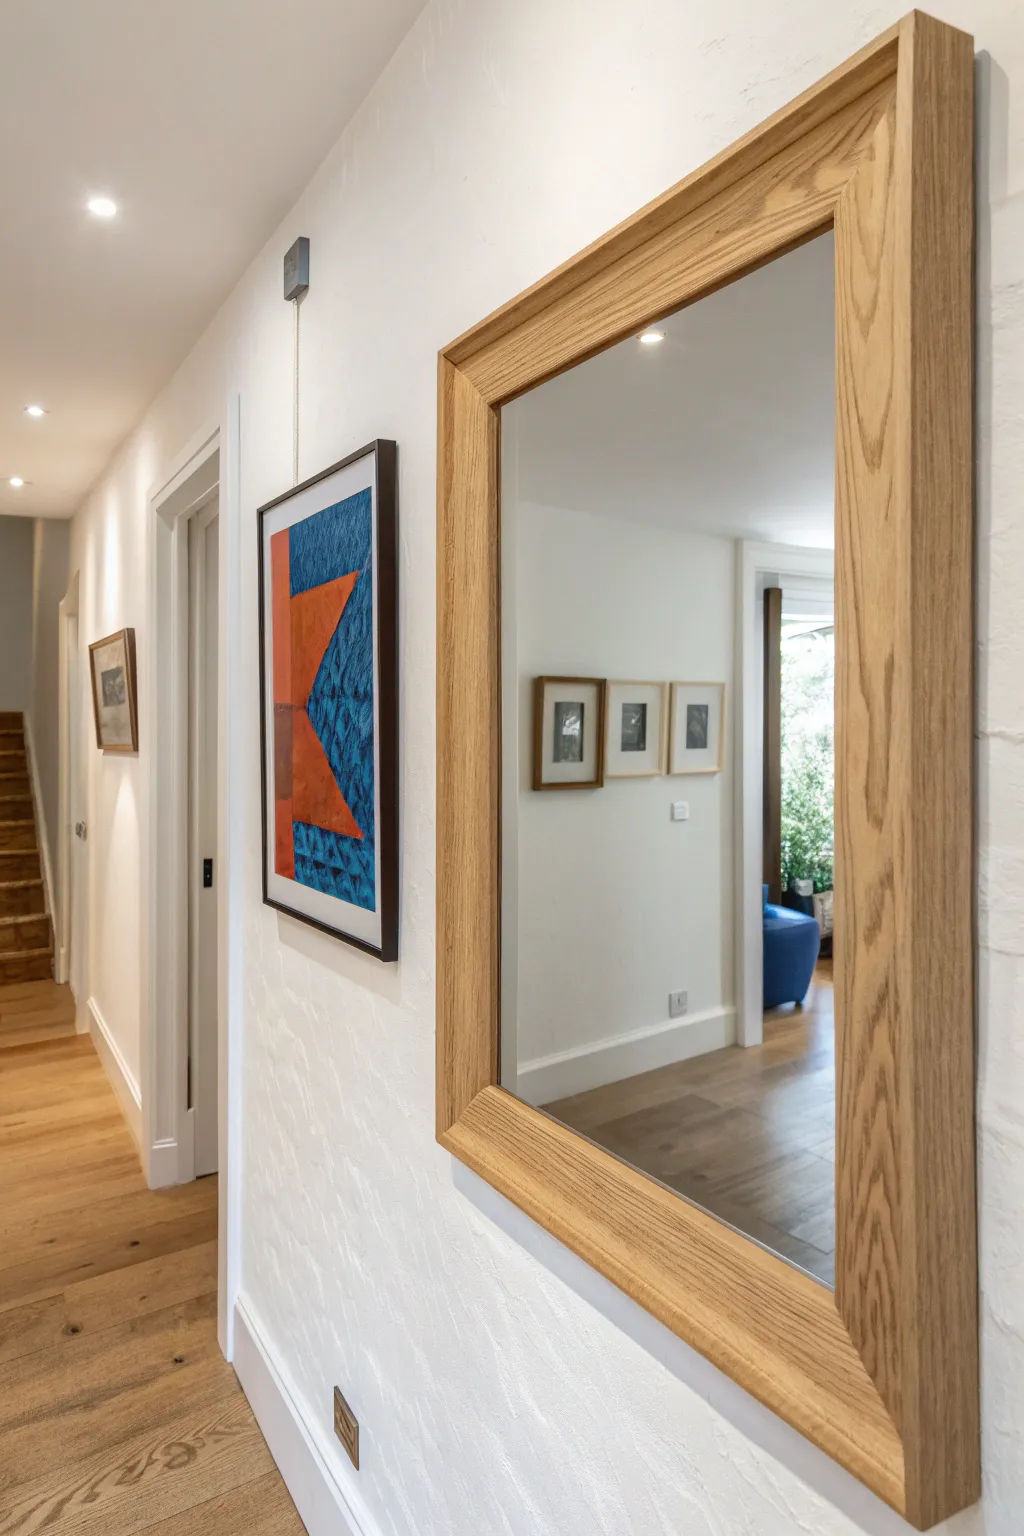
Elevate a simple hallway by crafting a cohesive display featuring a custom-framed large mirror and a vibrant, geometric abstract painting. This project combines basic woodworking for the frame with acrylic painting techniques to create a sophisticated, gallery-like atmosphere.
Step-by-Step Guide
Materials
- Large frameless mirror glass (approx. 24×36 inches)
- 1×3 inch red oak lumber (enough for frame perimeter)
- Wood glue
- Biscuits or pocket hole screws
- Sandpaper (120, 220 grit)
- Clear matte polyurethane finish
- Standard canvas or heavy watercolor paper (approx. 16×20 inches)
- Arylic paints (Ultramarine Blue, Phthalo Blue, Cadmium Orange, Burnt Sienna, White)
- Black picture frame (thin profile)
- Heavyweight gallery wire and hanging hook (top-rail style optional)
- Painters tape
- Sponge brush and flat synthetic brushes
- Palette knife
- Z-clips or heavy-duty mirror mastic
Step 1: Building the Oak Mirror Frame
-
Measure and cut:
Begin by measuring your mirror glass precisely. Cut your red oak boards to length, creating mitered 45-degree cuts at the corners for a classic join. Ensure the inner dimension of the frame is slightly smaller than the mirror glass to hold it securely if using a rabbet, or exactly the size of the glass if surface mounting. -
Join the corners:
Apply wood glue to the mitered distinct faces. Join the corners using biscuit joints for invisible strength, or use pocket hole screws on the back side where they won’t be seen. -
Clamp and dry:
Use strap clamps or corner clamps to hold the frame perfectly square while the glue cures. Wipe away any squeeze-out immediately with a damp rag to prevent staining issues later. -
Route the rabbet (optional):
If you want the glass inset, use a router with a rabbeting bit on the back inside edge of the frame. This creates a recessed lip for the mirror to sit in. -
Sand the wood:
Once the glue is fully separate and dry, sand the entire frame. Start with 120 grit to level the joints, then move to 220 grit for a silky smooth finish. -
Apply the finish:
Using a lint-free cloth or nice brush, apply a coat of clear matte polyurethane. This protects the wood while keeping that natural, light Scandinavian look tailored to the hallway. -
Secure the mirror:
Place the mirror glass into the rabbet or onto the back. Secure it using glazier points or mirror mastic, ensuring it is firmly attached to the wood structure.
Step 2: Painting the Abstract Geometry
-
Draft the design:
On your canvas or paper, lightly use a pencil to draw a large vertical rectangle divided into geometric sections. Create two prominent orange triangles facing left, contrasting against a blue background. -
Tape off the orange sections:
Use painter’s tape to mask off the areas that will be blue. This ensures crisp, hard edges for your focal orange shapes. -
Mix and apply orange:
Mix Cadmium Orange with a touch of Burnt Sienna to tone it down slightly. Apply this to the triangle shapes using a palette knife or flat brush to create distinct texture. -
Add texture to orange:
While the paint is wet, scratch subtle lines or variations into the paint to give it a worn, vintage feel. -
Paint the background:
Once the orange is dry and tape is removed, mask the orange shapes. Mix Ultramarine and Phthalo Blue with a little black or white to create a deep, complex blue. Paint the background, using short, cross-hatch strokes to mimic a woven texture. -
Add detail strokes:
I like to take a smaller brush with a darker shade of blue and add small, repetitive triangular marks over the blue field to create visual vibration and depth. -
Frame and hang:
Once artwork comprises fully dry paint, mount it in the thin black contour frame. Install a gallery rail system or standard hook on the wall, and hang the artwork next to the mirror so the reflection captures the space.
Beveled Beauty
Use a router with a 45-degree chamfer bit on the outer and inner edges of the oak frame. This simple step catches the light and adds a professional, high-end furniture look.
Gallery Rail Trick
To exactly match the sleek hanging mechanism seen in the photo, install a hanging system rail at the very top of your wall and use clear nylon cables to suspend the art at eye level.
Step back and admire how the mirrored reflection amplifies the vibrant colors of your new handmade art pairing
Paint or Stencil a Faux Runner Path on the Floor
Transform a plain hallway floor into a stunning focal point with this painted runner illusion that mimics the texture and warmth of a woven textile. Using geometric stencils and a warm, earthy color palette, you can achieve a custom look that never needs vacuuming and stays perfectly in place.
How-To Guide
Materials
- High-quality floor stencils (central diamond pattern and border strips)
- Painter’s tape (2-inch wide)
- Chalk line or laser level
- Pencil and eraser
- Sanding block (180-grit)
- Primer (bonding primer for glossy floors)
- Porch and Floor Enamel Paint (White/Cream based)
- Acrylic craft paints (Terracotta/Rust, Charcoal/Black)
- Stencil brushes (various sizes)
- High-density foam rollers (4-inch)
- Small artist brushes for touch-ups
- Matte or satin clear coat sealer (polyurethane designed for floors)
- Paper towels
- Measuring tape
Step 1: Preparation and Mapping
-
Clean the surface:
Begin by thoroughly cleaning your hallway floor to remove any dust, wax, or oils. Follow up with a light sanding using a 180-grit block to scuff the surface slightly; this helps the paint adhere better to the existing finish. -
Measure the center:
Find the exact center point of your hallway width at both ends. Snap a chalk line or use a laser level to mark this central axis, which is crucial for keeping your design symmetrical. -
Map out the runner width:
Decide on the width of your faux runner. Measure outward from your center line to mark the left and right boundaries, allowing for a few inches of bare wood on either side to mimic a real rug. -
Tape the perimeter:
Apply wide painter’s tape along the outside of your measured boundary lines. Press the edges down firmly with a credit card to prevent paint seepage underneath. -
Apply the base coat:
Using a high-density foam roller, apply a base coat of creamy white floor enamel within the taped area. I prefer to apply two thin, even coats rather than one thick one, letting the first dry completely before adding the second.
Step 2: Stenciling the Pattern
-
Position the central stencil:
Start stenciling from the center of the hallway and work your way out. Align your primary geometric diamond stencil with your marked center line. -
Secure the stencil:
Use small pieces of painter’s tape or spray adhesive to hold the stencil flat against the floor. Movement is the enemy of crisp lines here. -
Apply the rust color:
Load a stencil brush with the terracotta/rust paint, then offload most of it onto a paper towel until the brush feels almost dry. Stipple paint onto the large diamond sections using an up-and-down motion. -
Details in charcoal:
Switch to a smaller brush and the charcoal/black paint for the starburst details inside the diamonds and the small triangles. Be careful not to cross-contaminate colors in tight spaces. -
Repeat the central pattern:
Carefully lift the stencil and realign it with the registration marks of the previous section. Continue this process down the entire length of the hallway. -
Stencil the inner border:
Once the center is dry, lay down your border stencil for the delicate floral/geometric strip. Use the rust color here, keeping the application light to mimic a faded textile look. -
Add the outer triangle border:
Position the final border stencil consisting of repeating black triangles along the very edge of your white base. Apply the black paint firmly to create a bold frame for the composition. -
Connect the edges:
Where stencil repeats meet, you might have small gaps. Use a fine artist brush to bridge these connections carefully so the pattern looks continuous.
Dry Brush Technique
Always offload your brush onto paper towels first! A ‘dry brush’ prevents bleeding under the stencil and creates a woven texture effect.
Step 3: Finishing Touches
-
Remove the tape:
While the final paint is still slightly tacky (not fully cured), slowly peel back the perimeter painter’s tape at a 45-degree angle to reveal a crisp edge. -
Touch up imperfections:
Inspect the lines for any bleed-through. You can clean these up using a small brush dipped in the original floor color or by carefully scraping away excess with a craft knife. -
Apply protection:
Once the design has cured for at least 24 hours, apply a coat of clear floor sealer. Using a matte finish will keep it looking like fabric rather than a shiny sticker. -
Second seal coat:
Apply a second and final coat of sealer to ensure durability against foot traffic, allowing ample drying time before walking on your new masterpiece.
Fixing Paint Bleed
If paint seeps under the tape, wait for it to dry fully, then gently scrape it off with a razor blade or cover it with the base floor color.
Step back and admire how this painted illusion adds instant character and permanent style to your corridor


Have a question or want to share your own experience? I'd love to hear from you in the comments below!