If you love color that looks sliced in with a blade, hard-edge painting is your playground. Here are some go-to (and a few surprise) ideas for building bold geometric compositions with super-clean crisp edges and smooth flat color fields.
Concentric Squares Tunnel Effect
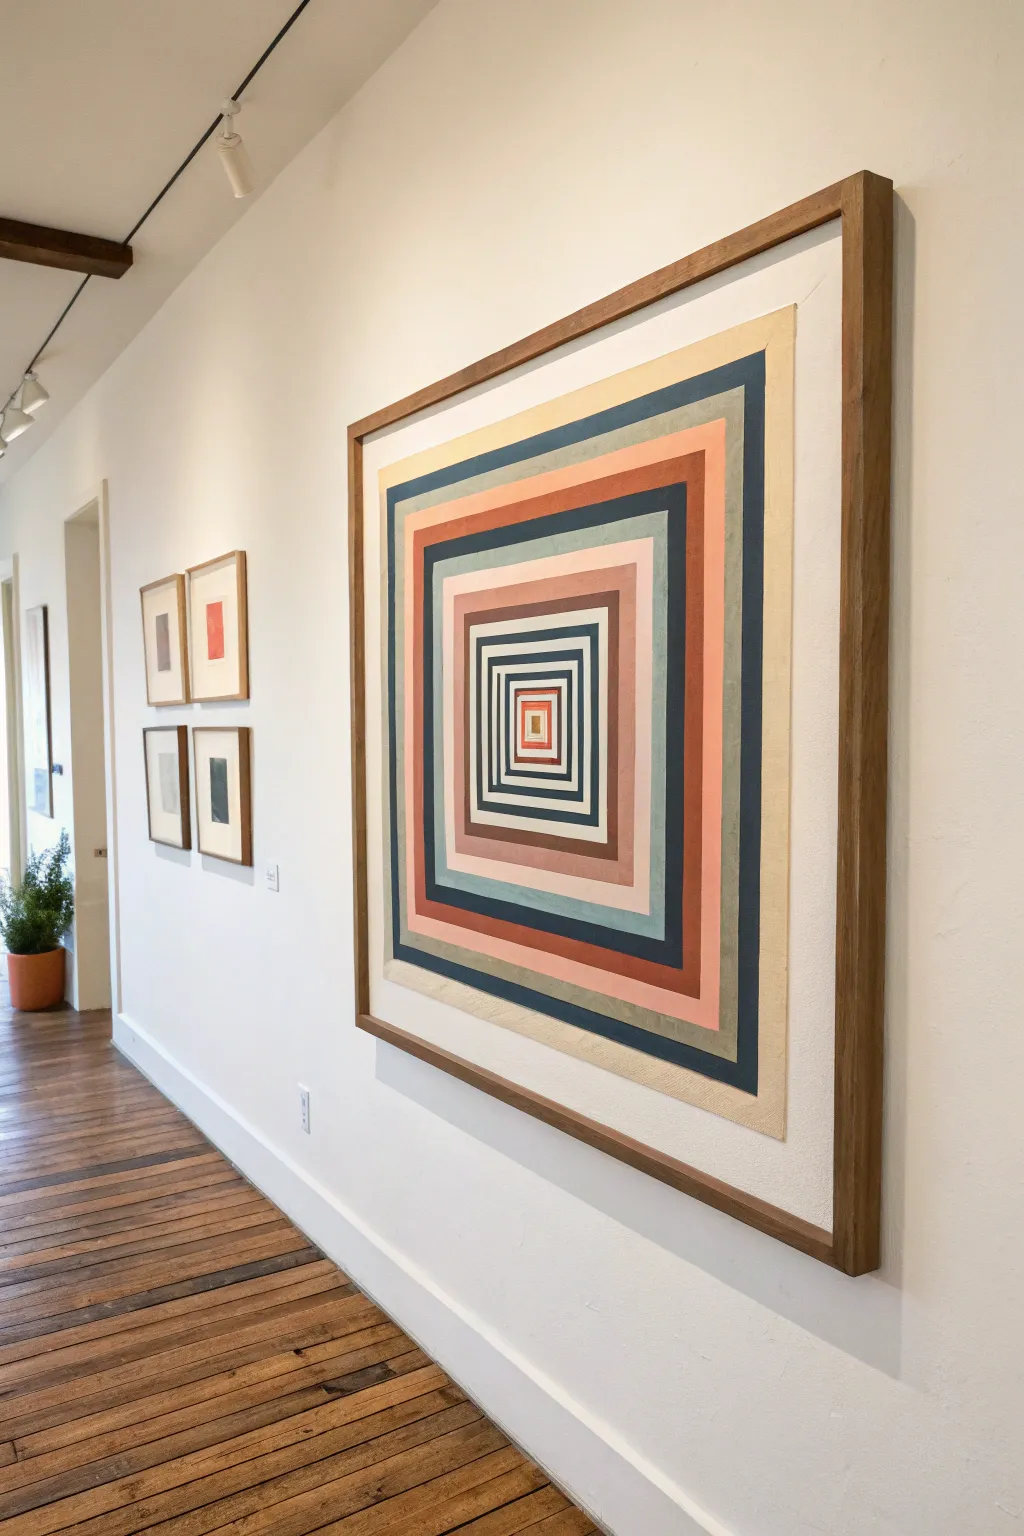
Master the art of illusion with this mesmerizing hard-edge painting that uses concentric squares to create a deep, tunnel-like perspective. By carefully alternating warm and cool muted tones, you will build a sophisticated geometric piece that draws the viewer’s eye straight to the center.
Step-by-Step
Materials
- Large square canvas or heavy-duty watercolor paper (approx. 30×30 inches)
- Acrylic paints (muted palette: cream/off-white, navy blue, sage green, terracotta, soft pink, deep brown)
- Painter’s tape (various widths: 1 inch, 1/2 inch, and 1/4 inch high-quality artist tape)
- Ruler or T-square
- Gesso (if using raw canvas)
- Pencil and eraser
- Flat synthetic brushes (1-inch and small detail brushes)
- Matte medium or clear acrylic sealer
- Palette for mixing custom colors
- Oak frame (optional for finishing)
Step 1: Preparation and Mapping
-
Prepare surface:
Begin by priming your canvas or heavy paper with two coats of gesso if it isn’t pre-primed. Sand lightly between coats for a smooth surface, which is crucial for crisp lines. -
Find the center:
Measure your support carefully to find the exact center point. Mark this tiny dot lightly with a pencil; everything will radiate from here. -
Draw the grid lines:
Using a ruler and pencil, lightly draw an ‘X’ from corner to corner through the center point. These diagonal guidelines will help you keep the corners of your squares perfectly aligned as you work inward. -
Map the squares:
Starting from the outside edge and measuring inward along your diagonal lines, mark the corners for your concentric squares. The bands in this piece vary slightly in width, so vary your measurements between 1.5 inches to 0.5 inches as you get closer to the center. -
Connect the dots:
Use your ruler to connect the marked points, drawing the full square outlines. Keep the pencil pressure very light so the graphite won’t smudge into your paint later.
Bleeding Lines?
If paint bleeds under the tape, wait for it to dry fully. Then, place a piece of tape precisely over the mistake and repaint the edge with the correct background color to ‘erase’ the error.
Step 2: Taping and Sealing
-
Apply first round of tape:
You cannot paint adjacent squares simultaneously, so tape off every *other* band. Place the tape on the side of the line that will *not* be painted in this round. -
Burnish edges:
Press the tape edges down firmly with a bone folder or your fingernail to ensure strong adhesion to the canvas texture. -
Seal the tape:
This is the secret to perfect lines: brush a thin layer of matte medium (or the base background color) over the edge of the tape. This fills any tiny gaps so the colored paint won’t bleed underneath. -
Allow to dry:
Wait for the sealer to dry completely clear before applying any color.
Step 3: Painting the Layers
-
Mix your palette:
Prepare your muted tones. You’ll need a large amount of the outer cream color, and smaller amounts of navy, sage, terracotta, and brown. Premixing prevents color shifting between sessions. -
Paint the first set:
Apply paint to the exposed bands. Use smooth, consistent strokes with a flat brush. Apply two thin coats rather than one thick one for opaque, even coverage. -
Remove tape:
Peel the tape off slowly at a 45-degree angle while the paint is still slightly tacky, not fully cured. This helps prevent the paint film from ripping. -
Let it cure:
Allow these first bands to dry fully—I usually wait at least a few hours—before taping over them for the next set. -
Tape remaining sections:
Apply tape over the dry painted dry areas to expose the remaining white bands. Remember to seal these tape edges with matte medium just like before. -
Paint second set:
Fill in the remaining bands with your alternating colors. Pay close attention to the center ‘tunnel’ effect, placing darker values like navy and deep brown near distinct light bands to create depth. -
Paint the center:
The very center square is tiny. Use your smallest flat brush here, and a steady hand. You might find it easier to freehand this last square if taping feels too clumsy.
Level Up: Texture
Mix a fine sand medium or modeling paste into your acrylics before painting the bands. This adds a tactile, architectural quality to the work that catches light beautifully.
Step 4: Finishing Touches
-
Touch ups:
Once all tape is removed, inspect your lines. Use a small detail brush and the appropriate paint color to carefully fix any small bleeds or jagged edges. -
Erase guidelines:
Gently erase any visible pencil marks from your initial diagonal guidelines, particularly in the lighter colored bands. -
Varnish:
Apply a final coat of spray varnish (matte or satin) to unify the sheen of the different paint colors and protect the surface.
Hang your new geometric masterpiece in a well-lit hallway to let the tunnel illusion expand your space
Bold Chevron Zigzags
This bold canvas project captures a nostalgic vibe with its clean, hard-edge zigzags and warm, earthy color palette. The repeating V-shapes create dynamic movement, making it a perfect geometric accent for modern or mid-century interiors.
Step-by-Step Tutorial
Materials
- Square stretched canvas (approx. 12×12 or 16×16 inches)
- Acrylic paints: Cream/Off-White, Burnt Orange, Mustard Yellow, Teal, Dark Teal/Green
- Painter’s tape (frog tape or high-quality masking tape, 1-inch width)
- Ruler or framing square
- Pencil
- Flat synthetic brushes (various sizes)
- Matte medium or white craft paint (for sealing tape)
- Palette or paper plate
- Gesso (optional, for priming)
Step 1: Preparation & Base Coat
-
Prime the Surface:
Ensure your stretched canvas is clean and taut. If it’s raw, apply a coat of gesso to smoothen the texture slightly, which helps achieve crisper lines. If pre-primed, you can skip this step. -
Apply the Base Color:
Paint the entire canvas with your Cream or Off-White sliding color. This will serve as the dividing lines between your colored zigzags. -
Cover the Edges:
Don’t forget to extend this base color painting over the sides of the canvas. Since this is a gallery-wrapped style, the pattern needs to look continuous. -
Allow to Cure:
Let this base coat dry completely. I prefer to wait overnight if possible, as applying tape to semi-dry paint will peel it right off.
Step 2: Drafting the Pattern
-
Mark Vertical Guides:
using your ruler, lightly mark even intervals across the top and bottom edges of the canvas. For example, mark every 3 inches across the top and bottom. -
Create the Grid:
Connect these marks lightly with a pencil to create vertical columns. This ensures your peaks and valleys stay aligned vertically. -
Establish Horizontal Levels:
Decide on the height of your zigzags. Mark horizontal points along the vertical lines where the ‘points’ of the chevron will hit. -
Draw the Zigzags:
Connect your points diagonally to form the continuous zigzag lines. Don’t worry about the width of the stripes yet; just draw the single skeletal line for the pattern.
Seal with Medium
Applying matte medium over the tape edge before painting creates an invisible barrier. It ensures razor-sharp lines without affecting the color underneath.
Step 3: Taping for Crisp Lines
-
Tape Phase One:
Apply your painter’s tape along the pencil lines. Crucially, you must decide which stripes you are painting first. You can’t paint adjacent stripes at the same time. -
Choose ‘Open’ Stripes:
Place the tape so that it masks the ‘cream’ areas and leaves the areas destined for color exposed. Group your colors—maybe tackle the Burnt Orange and Dark Teal sections first. -
Seal the Edges:
This is the secret sauce: paint a very thin layer of your base color (Cream) or clear matte medium directly over the edge of the tape. This fills any microscopic gaps and prevents the colored paint from bleeding under. -
Let Sealant Dry:
Wait 10-15 minutes for that sealing layer to act as a barrier.
Paint Peeling Off?
If base paint peels up with the tape, your base coat wasn’t dry enough or the tape is too sticky. Try sticking the tape to your clothes first to reduce tackiness.
Step 4: Painting & Finishing
-
Apply First Colors:
Fill in the exposed chevron stripes with your chosen colors (e.g., Burnt Orange and Dark Teal). Use a flat brush and paint away from the tape edge to further minimize bleeding. -
Opacity Check:
Apply a second coat if the color looks streaky. Lighter colors like Mustard Yellow often need two or three coats for full coverage. -
Partial Reveal:
Carefully peel off the tape while the paint is still slightly tacky (not wet, but not fully cured). Pull the tape away at a 45-degree angle. -
Dry and Repeat:
Allow these stripes to dry fully. Once dry, re-tape the canvas to expose the remaining unpainted stripes (the Mustard Yellow and Teal sections). Cover the stripes you just painted with tape to protect them. -
Paint Second Batch:
Repeat the sealing and painting process for the remaining colored stripes. -
Final Removal:
Remove all remaining tape to reveal the full pattern. -
Touch Up:
Use a small angled brush and your Cream paint to fix any tiny bleeds or uneven intersections by hand.
Hang your stunning chevron artwork and enjoy the retro energy it brings to the room.


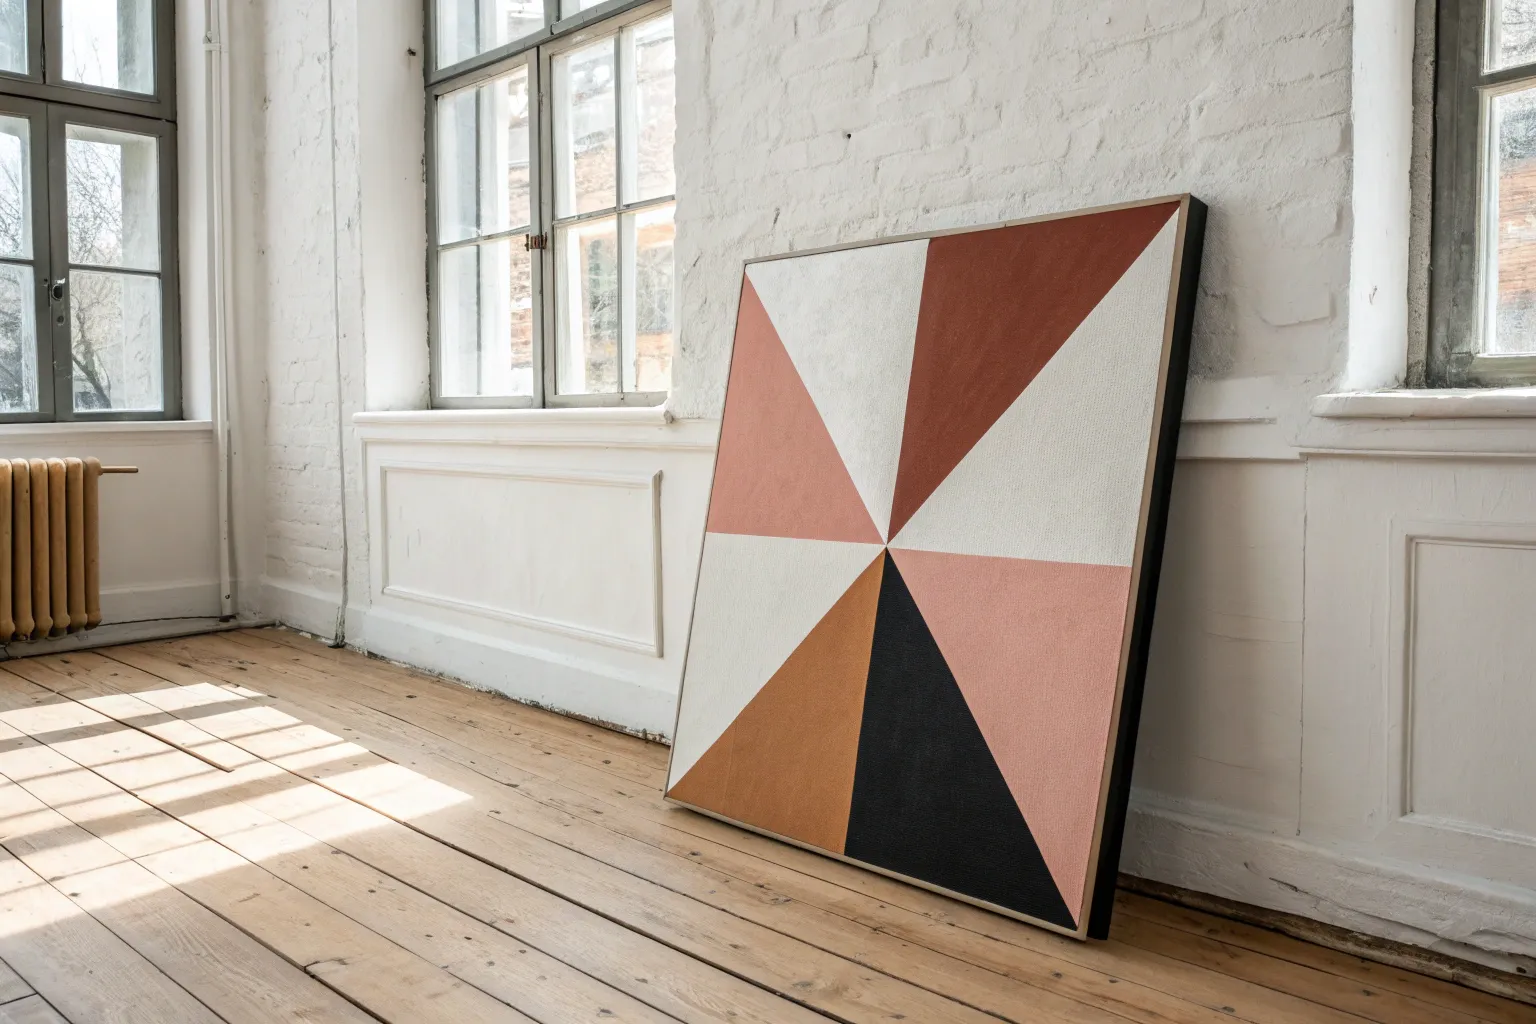
Diamond Orientation for Extra Punch
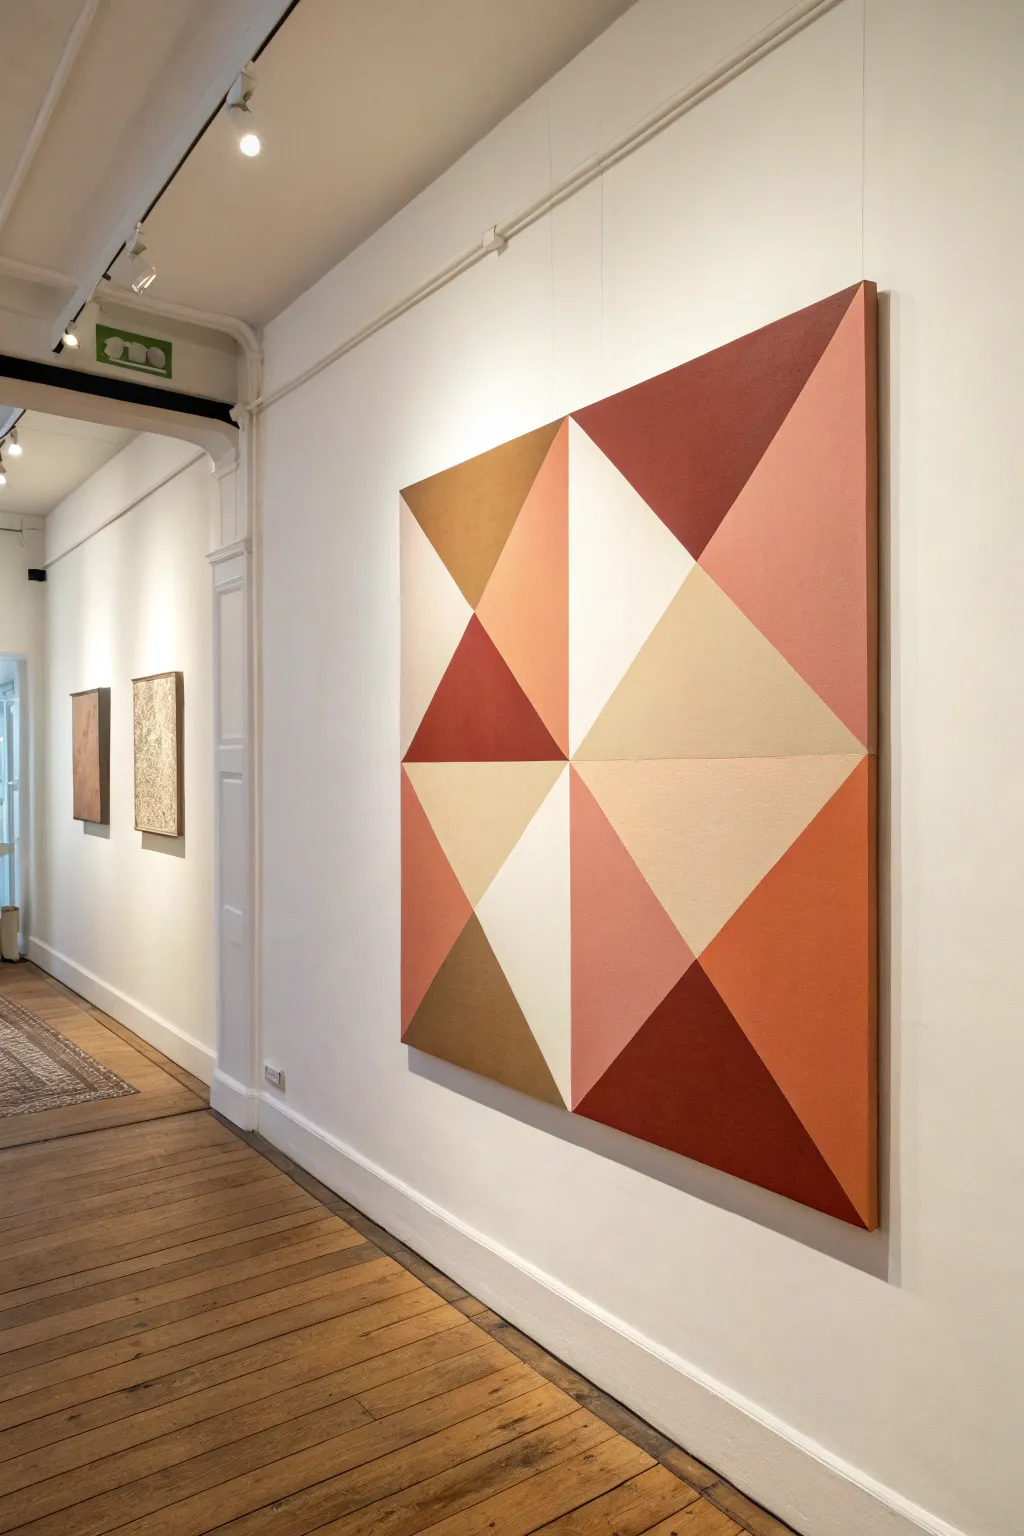
Embrace the precision of hard-edge painting with this large-scale geometric canvas featuring a striking puzzle of triangles. The warm, earthy palette of terracottas, creams, and ochres creates a sophisticated focal point that feels both modern and mid-century.
Detailed Instructions
Materials
- Large square canvas (approx. 36×36 or 48×48 inches)
- Acrylic paints (Titanium White, Burnt Sienna, Yellow Ochre, Raw Umber, Red Oxide)
- High-quality painter’s tape (frog tape or similar sharp-line tape)
- T-square or long ruler
- Graphite pencil
- Synthetic flat brushes (various widths)
- Matte medium (optional but recommended)
Step 1: Planning and Mapping
-
Prime your canvas:
Even if your canvas is pre-primed, apply two coats of white gesso to ensure a perfectly smooth surface. Sand lightly between coats with fine-grit sandpaper to remove the canvas tooth, which is crucial for sharp lines. -
Find the center:
Using your T-square, mark the exact center point of the canvas. This design relies on symmetry, so accuracy here is vital for the final effect. -
Draw the grid:
Lightly sketch a 2×2 grid by drawing a vertical line and a horizontal line through the center point, dividing the canvas into four equal quadrants. -
Sketch the triangles:
Within each quadrant, draw diagonal lines to create the master ‘X’ shape. Then, subdivide these larger triangles further to match the reference image. The pattern essentially consists of 16 smaller right-angle triangles arranged to form larger diamonds and squares. -
Color map your design:
Mark each section lightly with a letter or code corresponding to your planned colors (e.g., ‘W’ for white, ‘R’ for red-brown). This prevents confusion once painting begins.
Step 2: Taping and Sealing
-
Isolate the first set:
Apply painter’s tape along the outlines of your first set of non-touching triangles. You cannot paint adjacent shapes simultaneously, so you must work in alternating batches. -
Burnish the tape:
Press the edges of the tape down firmly with a credit card or bone folder to prevent paint from sneaking underneath. -
Seal the edges:
I always brush a thin layer of matte medium or the base coat color over the tape edge. This seals the tape; if any bleed occurs, it will be clear or white, keeping your color line crisp.
Bleed-Through Fix
If paint bleeds under the tape, wait for it to dry. Re-tape along the correct line, then paint over the bleed with the ORIGINAL background color to cover the mistake perfectly.
Step 3: Painting the Colors
-
Mix your palette:
Prepare your colors: a bright white, a soft beige, a deep rust red, a muted terracotta, and a brownish-gold ochre. Keep enough of each mixed in airtight containers for touch-ups later. -
Apply the first color group:
Fill in the taped-off triangles with their designated hues. Use flat brushes and stroke away from the tape edge inward to minimize ridges. -
Build opacity:
Let the first coat dry completely, then apply a second or third coat until the color is solid and opaque with no brushstrokes visible. -
Remove tape (the satisfying part):
While the final coat is still slightly tacky (not fully cured), carefully peel the tape away at a severe 45-degree angle. This prevents the paint from chipping. -
Wait for full dryness:
Allow these painted sections to dry completely—ideally several hours—before taping over them for the next batch.
Texture Play
Mix a fine sand medium into just the terracotta and ochre paints. This adds tangible grit against the smooth white and beige sections for subtle tactile contrast.
Step 4: Completing the Pattern
-
Tape the remaining shapes:
Apply tape over the dried paint edges to define the boundaries of the remaining empty triangles. Be gentle to avoid pulling up the fresh paint. -
Seal again:
Repeat the sealing step with matte medium to ensure the new colors don’t bleed onto the finished ones. -
Paint the second batch:
Fill in the remaining triangles with your terracotta, ochre, and beige tones, applying multiple thin coats for smoothness. -
Final reveal:
Remove all remaining tape carefully. Check for any tiny imperfections where lines meet. -
Touch up:
Use a small liner brush and your mixed paints to sharpen any intersections or fix minor bleeds by hand. -
Varnish:
Finish with a spray varnish (matte or satin) to unify the sheen of all colors and protect the surface.
Now step back and admire how a simple grid and careful taping transformed into a bold architectural statement for your wall


Have a question or want to share your own experience? I'd love to hear from you in the comments below!